
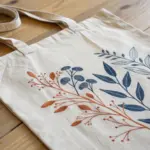
Denim is basically the perfect wearable canvas—tough, textured, and totally forgiving when you’re experimenting. Here are my favorite denim painting ideas that look amazing on jeans and jackets, with placement that actually works on real seams, pockets, and panels.
Classic Floral Back Pockets
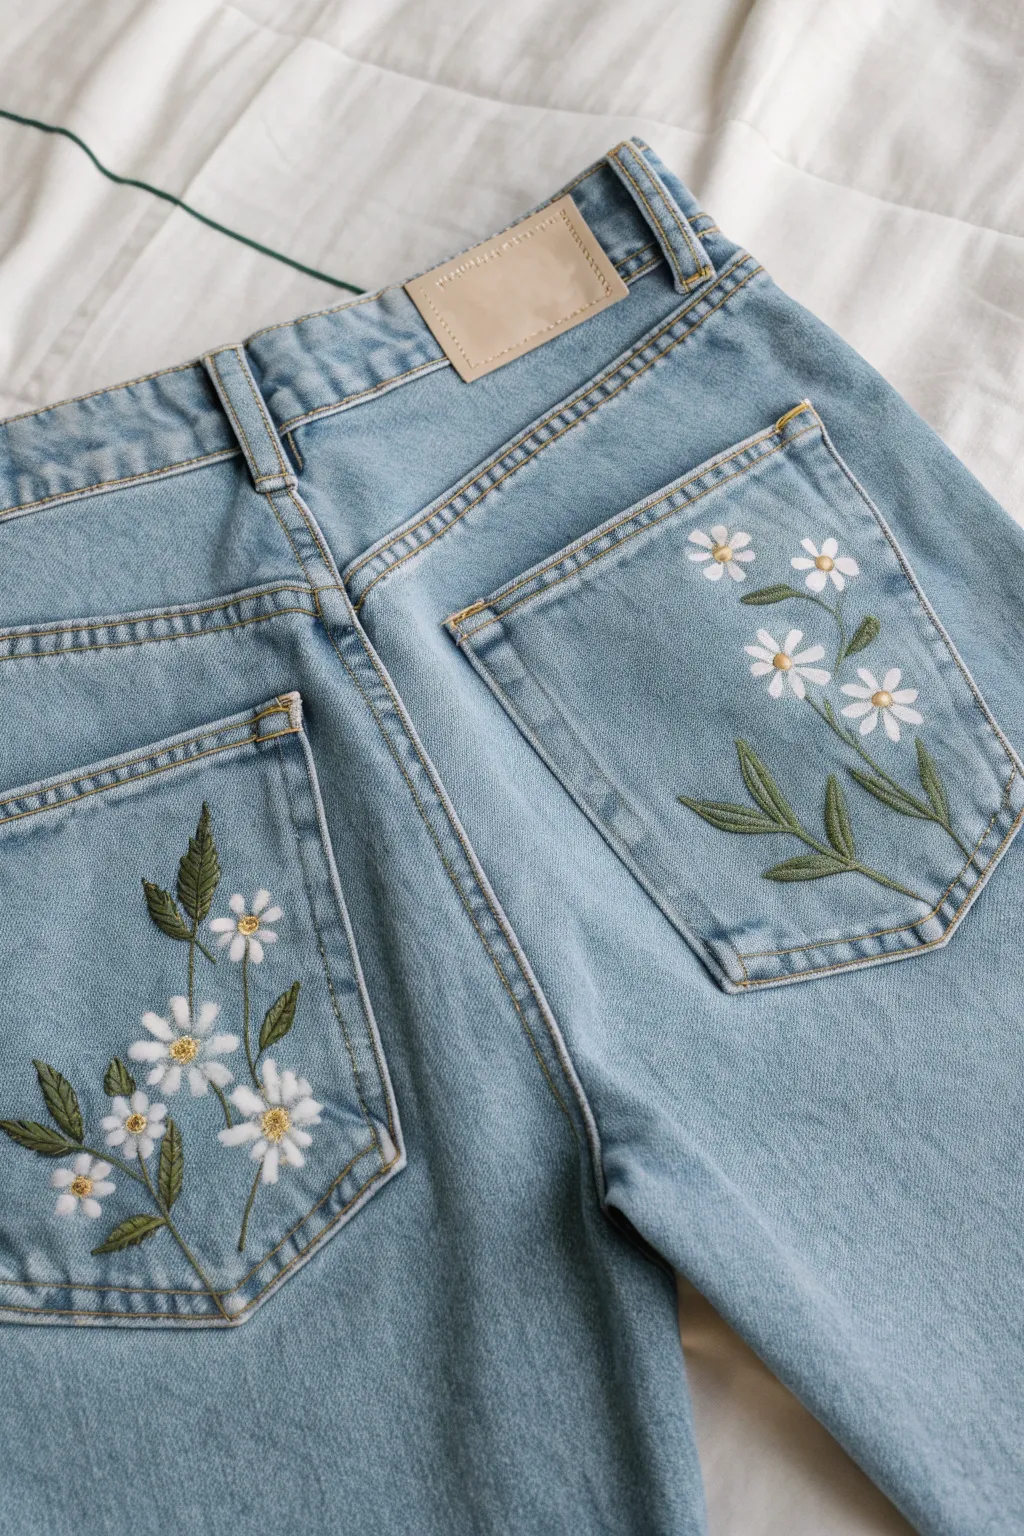
Transform a plain pair of light-wash jeans into a cottagecore dream with these delicate, hand-painted daisy clusters. The design mimics the look of vintage embroidery but uses fabric paint for a durable, washable finish that adds a touch of garden charm to your back pockets.
Step-by-Step Guide
Materials
- Light wash denim jeans
- White fabric paint
- Olive green fabric paint
- Forest green fabric paint (for shading)
- Golden yellow fabric paint
- Metallic gold fabric paint (optional)
- Small flat brush (size 2 or 4)
- Fine liner brush (size 00 or 0)
- Fabric painting medium (if using acrylics)
- Cardboard scraps
- Iron and parchment paper
Step 1: Preparation & Planning
-
Prep the pockets:
Begin by sliding small pieces of cardboard inside each back pocket. This is crucial to prevent the paint from seeping through the denim and sticking the pocket shut. -
Sketch the layout:
Using a heat-erasable fabric pen or white chalk, lightly sketch the flowing vines. On the left pocket, draw the stems curving upward from the bottom outer corner. on the right pocket, have the vines cascading down from the upper inner corner. -
Map the blooms:
Mark small circles where each daisy head will sit to ensure a balanced composition before you start painting.
Step 2: Painting the Foliage
-
Base coat the leaves:
Mix a muted olive green shade. Using your small flat brush, paint the basic leaf shapes along your sketched vines. Use a press-and-lift motion: press down for the wide belly of the leaf and lift up to create a sharp point. -
Connect the stems:
Switch to your fine liner brush and the same olive green to connect the leaves with thin, delicate stems. Keep these lines fluid rather than rigid straight lines. -
Add depth to greenery:
While the olive paint is still slightly tacky or just dry, take a tiny amount of forest green. Paint a thin central vein down the middle of each leaf. -
Highlight the edges:
I like to add a tiny touch of white to my olive mix and gently highlight just one edge of each leaf to make them look three-dimensional. -
Let the green cure:
Allow the foliage layer to dry completely for at least 15-20 minutes so your white flowers don’t pick up any green pigment.
Paint looks transparent?
Denim is thirsty! If your white looks gray, paint a base layer of white mixed with a little water first. Let dry, then apply your pure white topcoat for brightness.
Step 3: Creating the Daisies
-
Paint the first petal layer:
Load a clean small round brush with opaque white fabric paint. Paint the daisy petals using teardrop strokes, all pointing toward the open center found in your sketch. -
Build opacity:
Denim absorbs the first layer of paint quickly. Once the first coat is dry to the touch, apply a second coat of white to the petals to make them pop bright and bold. -
Vary the flower angles:
For flowers that look like they are facing sideways, shorten the petals on the back side and lengthen them on the front side. -
Dot the centers:
Mix golden yellow with a tiny dot of metallic gold. Use the handle end of your brush or a dotting tool to place a perfect round dot in the center of each daisy. -
Add center texture:
Once the yellow dot is dry, use your finest liner brush and a touch of brown or dark orange to add tiny stippled dots along the bottom edge of the yellow center for shadow.
Make it sparkle
Mix fabric medium with loose cosmetic glitter and brush a very thin layer over just the yellow centers. It catches the sunlight beautifully when you walk.
Step 4: Finishing Touches
-
Clean up lines:
Inspect your edges. If any petals look ragged, smooth them out with a final pass of white paint using your liner brush. -
Dry partially:
Let the paint sit for at least 24 hours to cure. Do not disturb the paint during this time. -
Heat set the design:
Once fully dry, place a piece of parchment paper over the painted pockets. Iron on a medium-high setting (no steam) for 3-5 minutes to permanently seal the paint into the fibers.
Now you have a custom piece of wearable art that looks freshly picked from a wildflower meadow

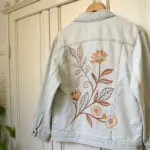
Big Back-Panel Bouquet on a Jacket
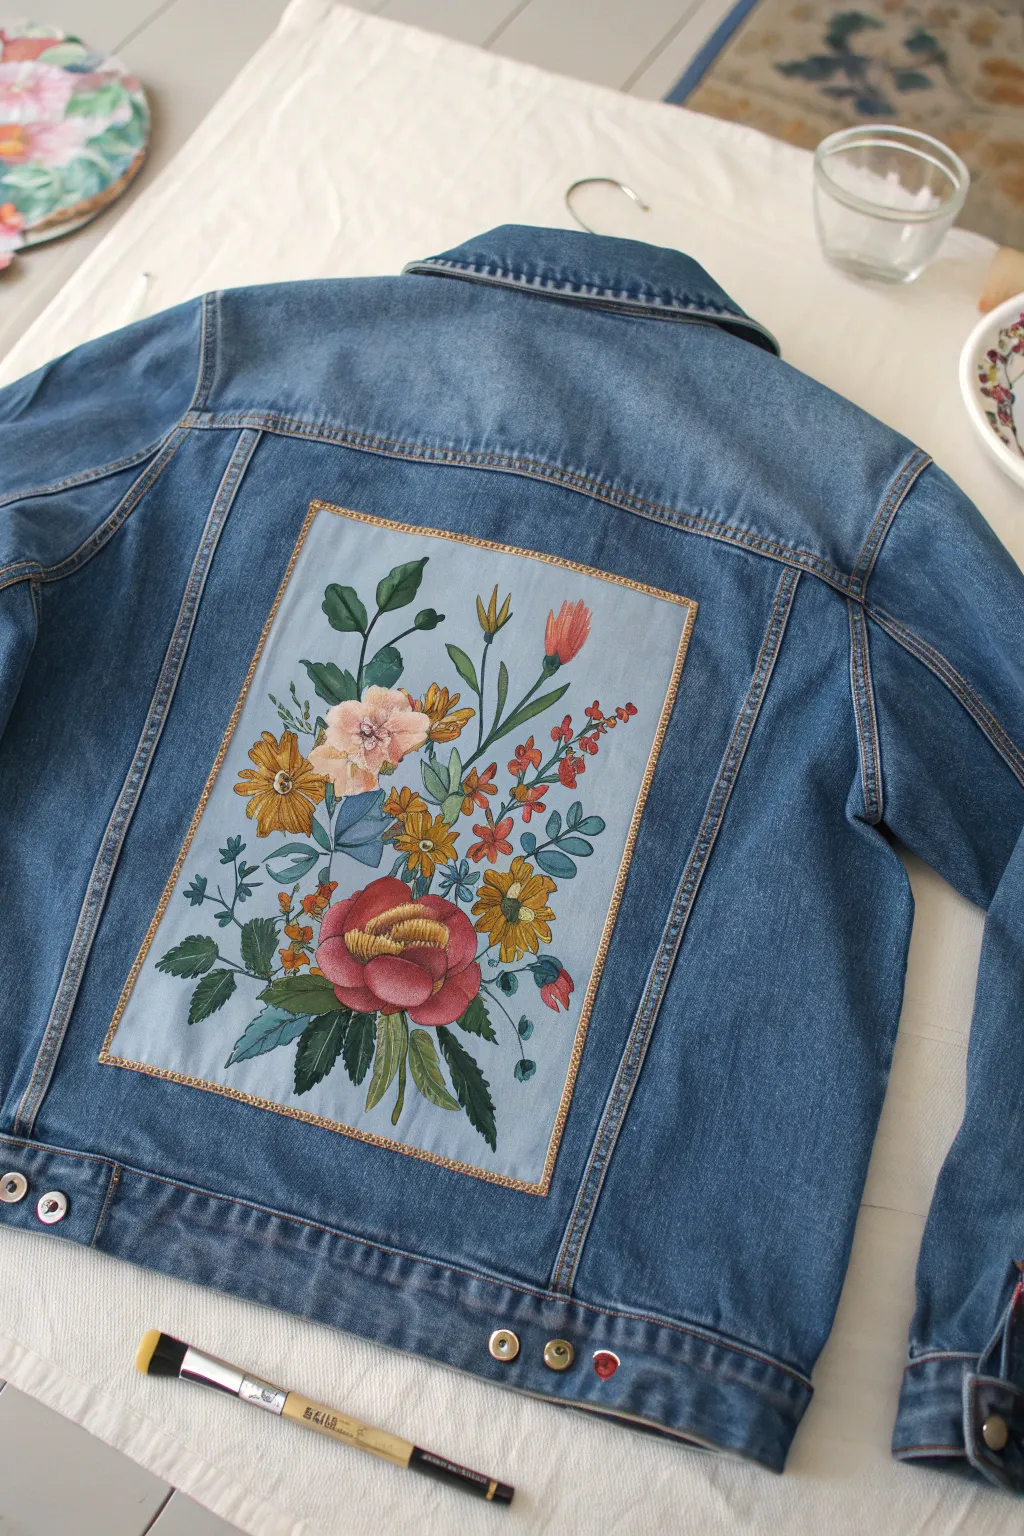
Transform a plain denim jacket into a wearable work of art with this detailed, vintage-inspired botanical bouquet. By creating a dedicated painting surface on the back panel, you achieve a canvas-like quality that makes the flowers pop against the rugged denim texture.
Step-by-Step Tutorial
Materials
- Denim jacket (clean and dry)
- White fabric paint or gesso (for priming)
- Light blue fabric paint (for background)
- Acrylic fabric paints (various floral colors: deep reds, yellows, greens, pinks)
- Fabric medium (if using regular acrylics)
- Gold fabric paint or dimensional paint liner
- Fine detail brushes (sizes 0, 1, and 2)
- Flat shader brush (size 6 or 8)
- Masking tape or painter’s tape
- Carbon paper and pencil (for transfer)
- Palette or paper plate
- Iron (for heat setting)
Step 1: Preparation & Priming
-
Define the Canvas:
Lay your jacket flat on a hard surface. Use masking tape to tape off a rectangular area on the central back panel, following the existing stitching lines of the jacket’s construction to keep it looking integrated. -
Apply the Base Coat:
Mix a small amount of white fabric paint with your chosen light blue shade to create an opaque, soft sky-blue base. Using a flat shader brush, paint the entire taped-off rectangle. This creates a smooth surface for the detailed flowers. -
Dry and Repeat:
Allow the first layer to dry completely. If the denim texture is still heavily visible or the blue is streaky, apply a second coat for full opacity. -
Smooth the Surface:
Once the base is fully dry, you can lightly sand any rough peaks of paint with very fine sandpaper if needed, though this is optional. Remove the masking tape carefully to reveal crisp edges.
Stiff Fabric Fix
If the painted rectangle feels too stiff or plastic-like, mix a fabric medium into your acrylics (50/50 ratio). This helps the paint flex with the denim rather than cracking.
Step 2: Sketching & Blocking
-
Draft the Design:
Sketch your bouquet design on paper first. Include a mix of large blooms (like the bottom peony), medium flowers, and wispy filler stems to create balance. -
Transfer the Outline:
Place a sheet of carbon paper over the painted blue rectangle, then place your sketch on top. Trace the design firmly with a pencil to transfer the floral outlines onto the jacket. -
Block in Main Shapes:
Start with the largest flowers. Mix a deep rose-red for the bottom peony and block in the general shape of the petals using a medium round brush. Don’t worry about shading yet. -
Add Secondary Blooms:
Paint the base colors for the yellow daisies and pink mid-sized flowers. Keep the paint relatively thin so it doesn’t crack, but opaque enough to cover the blue background.
Step 3: Detailing & Shading
-
Deepen the Reds:
Return to the large red peony. Mix a slightly darker burgundy and paint the shadows at the base of the petals to create depth and a cup-like shape. -
Highlight the Petals:
Mix a touch of white into your red paint. Use a small brush to add highlights to the top edges of the peony petals, giving them a curved, 3D appearance. -
Paint the Foliage:
Mix a dark forest green and a lighter sage green. Paint the leaves, using the dark green for the centers and veins, and the sage for the tips and edges. -
Add Small Florals:
Using your smallest detail brush, paint the tiny sprigs of orange-red buds and small blue filler flowers. These delicate elements add movement to the composition. -
Refine Flower Centers:
For the yellow flowers and the large peony, add detailed centers. Use tiny dots of ochre and brown to create the pollen texture in the middle of the blooms. -
Adding Stems:
Connect all your floating flowers with thin, graceful green lines. I find it helps to dilute the green paint slightly with water or flow medium to get long, smooth strokes for stems.
Pro Tip: Layering Depth
Paint the leaves generally darker where they tuck behind flowers. This small shadow trick instantly pushes the flowers forward visually, creating realistic depth.
Step 4: Finishing Touches
-
The Golden Frame:
Using gold fabric paint or a gold dimensional liner, carefully paint a thin border around the entire blue rectangle. This mimics the look of a framed vintage painting or embroidery. -
Final Inspection:
Step back and look for any areas that need a pop of white highlight or a deepened shadow. Touch up as necessary. -
Heat Setting:
Let the jacket dry for at least 24 hours. Place a pressing cloth or scrap fabric over the painted area and iron on a medium heat setting (no steam) for 3-5 minutes to permanently set the paint.
Wear your new custom jacket with pride knowing you have a one-of-a-kind vintage garden on your back


Vines Crawling Up the Side Seam
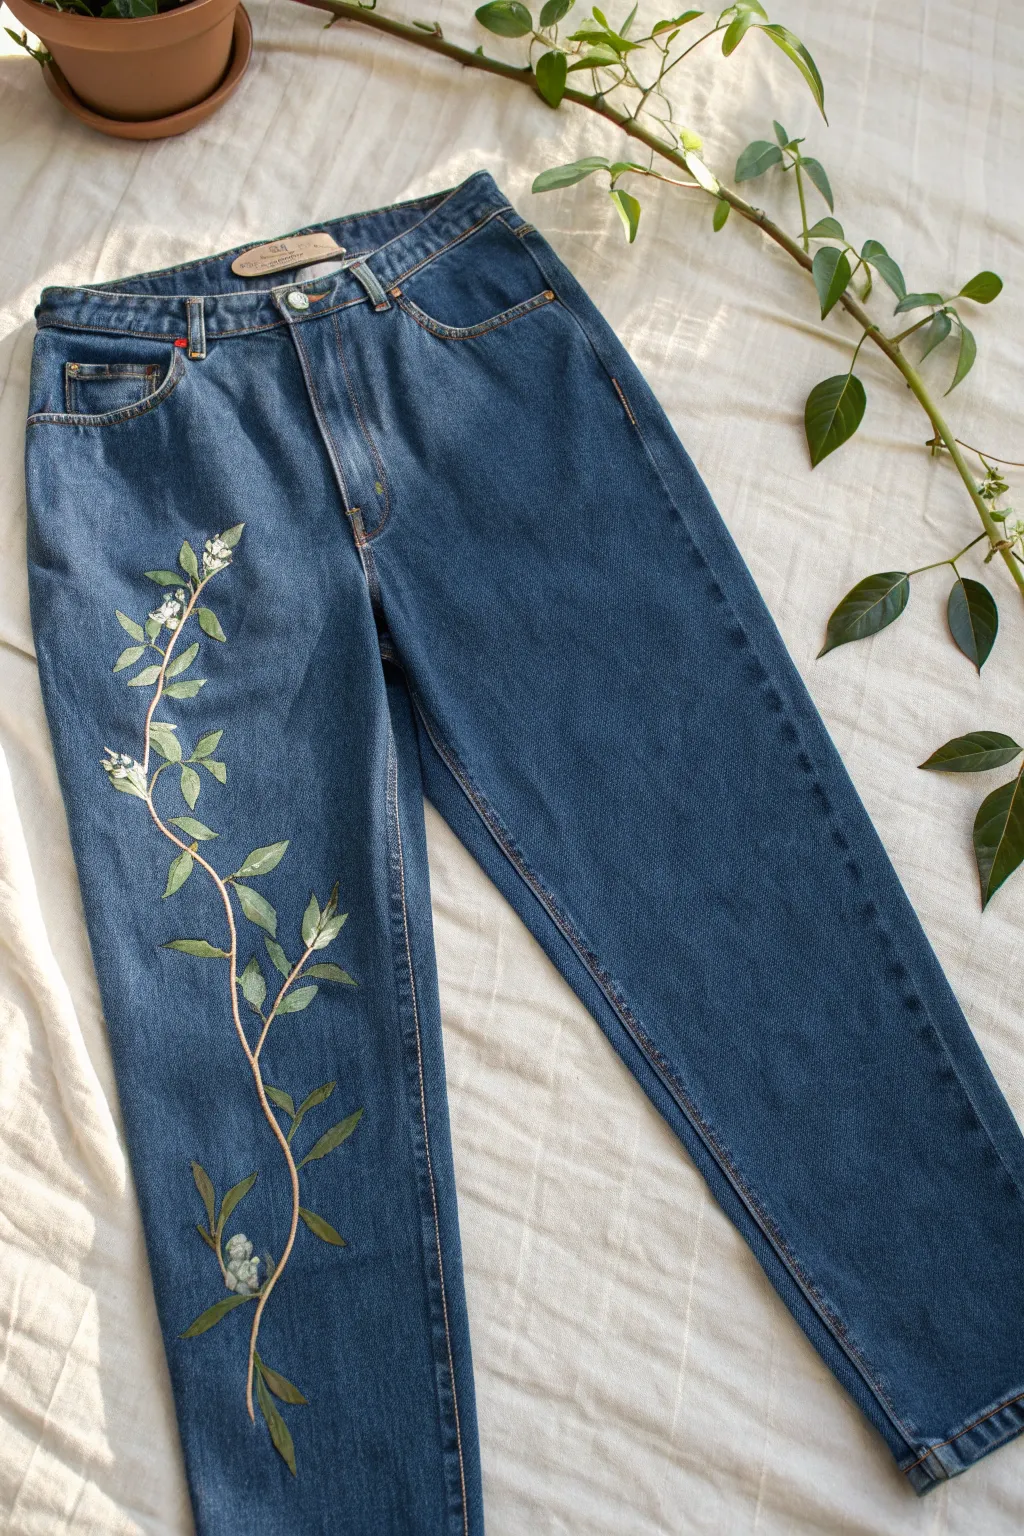
Transform a plain pair of jeans into a wearable garden with this elegant vine design that creeps naturally up the leg. The style balances delicate white buds with leaves ranging from deep forest green to soft sage, creating a beautiful organic flow.
How-To Guide
Materials
- Pair of blue denim jeans (washed and dried)
- Fabric medium
- Acrylic paints (Titanium White, Burnt Umber, Sap Green, Hooker’s Green, Yellow Ochre)
- Set of detail brushes (liner brush, small round brush, small flat brush)
- White chalk or fabric pencil
- Piece of cardboard or stiff cardstock
- Palette or paper plate
- Water cup and paper towels
- Iron (for heat setting)
Step 1: Preparation & Sketching
-
Prepare the surface:
Before starting, slip a piece of cardboard inside the leg of the jeans where you plan to paint. This prevents paint from bleeding through to the back side of the leg and gives you a firm surface to work on. -
Mix the sketching color:
If you are confident, you can sketch lightly with white chalk. However, mixed paint often guides you better. Mix a tiny drop of white paint with water to create a very faint, milky wash. -
Map the vine shape:
Using a thin liner brush and your watery mix or chalk, draw a long, meandering S-curve starting near the ankle and winding up toward the pocket area. Keep the line organic and uneven rather than perfectly straight. -
Add branch offshoots:
Sketch smaller offshoots branching from the main stem. Alternate sides as you move up the vine to maintain balance, leaving space for the leaves you will add later.
Stiff Paint Fix
If your painted leaves feel too stiff or crunchy after drying, you likely didn’t use enough fabric medium. For future coats, increase the medium ratio to keep the denim flexible.
Step 2: Painting the Stem
-
Mix the base brown:
Combine Burnt Umber with fabric medium (usually a 2:1 ratio of paint to medium, but check your bottle). Add a touch of white to lighten it slightly so it shows up against the dark denim. -
Paint the main stem:
Using a liner brush, paint over your sketch line. Vimy the pressure on your brush—push down for thicker sections and lift up for thinner, wispy ends—to make the wood look natural. -
Add highlights:
While the brown is still slightly tacky or just dry, mix a lighter tan color using White and Yellow Ochre. Carefully drag thin lines along the top or one side of the stem to suggest light hitting the bark.
Level Up: 3D Texture
Use ‘Puff Paint’ or dimensional fabric paint for the white flower buds. After heat setting, the buds will puff up slightly, adding a tactile, realistic texture to the vine.
Step 3: Layering the Leaves
-
Create a green palette:
Prepare three shades of green on your palette mixed with fabric medium: a dark shadow green (Hooker’s Green), a mid-tone green (Sap Green), and a light highlight green (Sap Green + White + Yellow Ochre). -
Block in the leaf shapes:
Start with your mid-tone green. Using a small round brush, paint simple almond shapes attached to your stem branches. Don’t worry about perfect opacity yet; the first layer acts as a primer. -
Add shadows:
Once the base layer is dry to the touch, take your dark green and paint the bottom half of each leaf or the side closest to the stem. This adds depth instantly. -
Highlight the tips:
Use the lightest green mix on the tips and upper edges of the leaves. I find that blending this slightly into the mid-tone while the paint is wet creates a lovely soft gradient. -
Detail the veins:
Switch back to your liner brush with the lightest green or a pale yellow-white mix. Paint a very fine line down the center of larger leaves to suggest the central vein.
Step 4: Buds & Finishing Touches
-
Paint the bud base:
At the tips of the vines, paint small oval shapes using a mix of Green and White. These are the sepals that hold the flower bud. -
Add the white petals:
Using pure Titanium White mixed with medium, dab small dots or teardrop shapes emerging from the green base ovals. Keep them small and clustered to look like unbloomed flowers. -
Refine edges:
Step back and look at the whole design. If any edges look messy, use a clean brush with a tiny bit of water to smooth them out, or sharpen points on leaves with your liner brush. -
Let it cure:
Allow the paint to dry completely for at least 24 hours. Don’t rush this step, as fabric paint needs time to bond with the fibers. -
Heat set the design:
Turn the jeans inside out (or place a cloth over the painted side). Iron the area on a medium-high setting (no steam) for 3-5 minutes to permanently set the paint.
You now have a custom piece of wearable art that celebrates nature

Pocket-Peeking Wildflowers
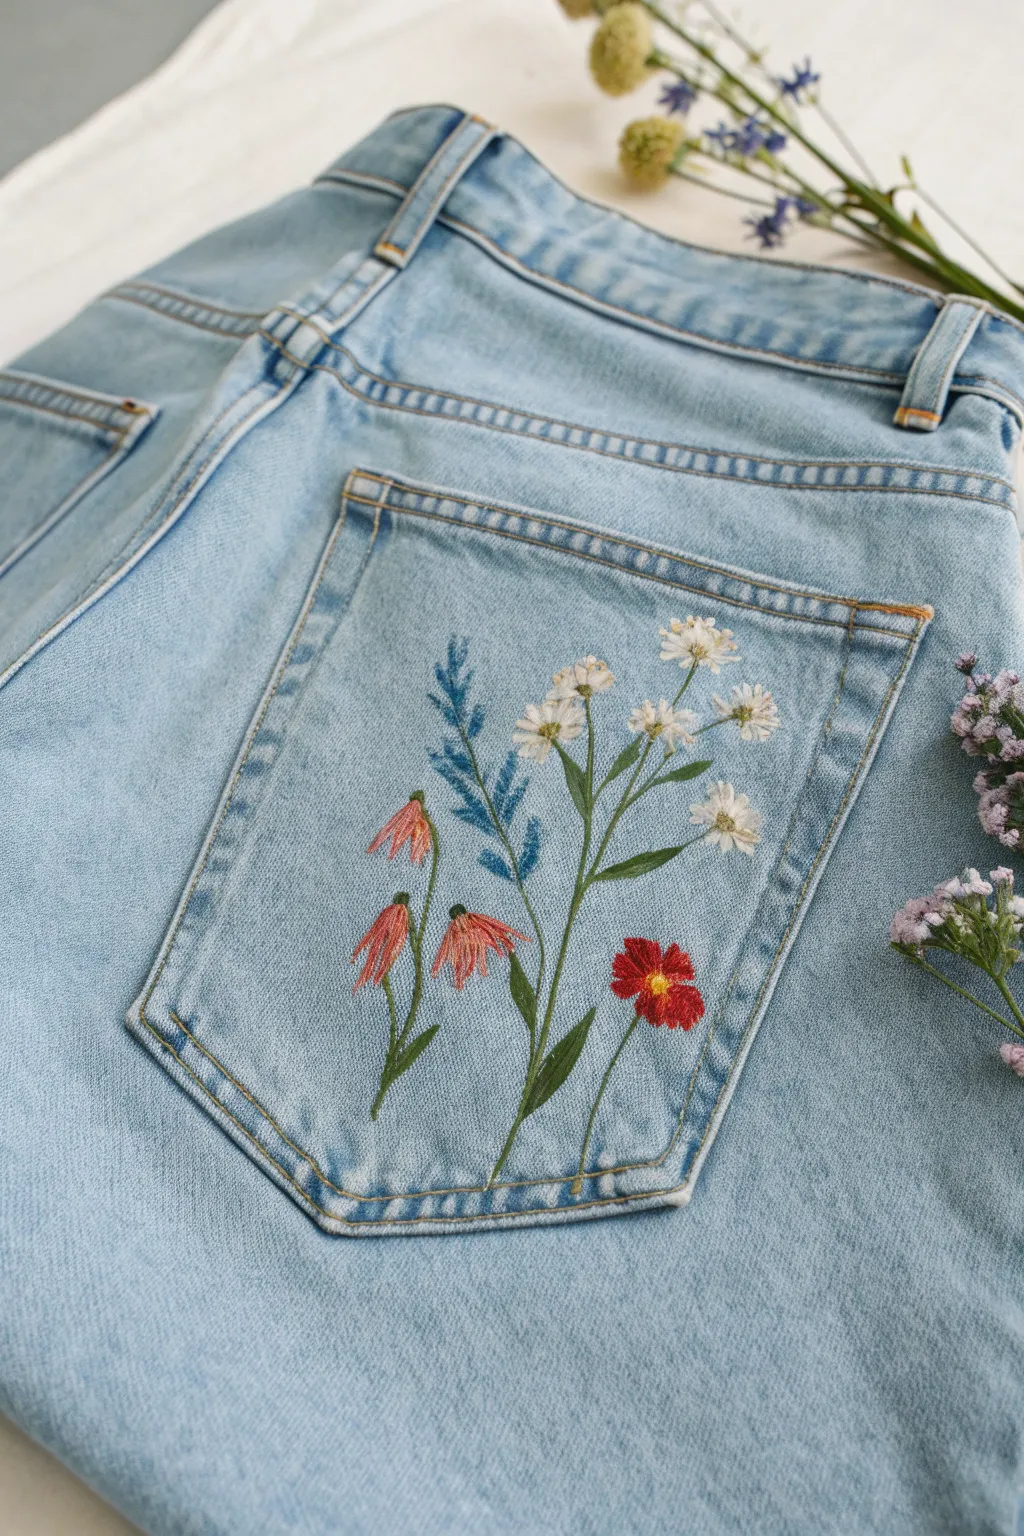
Transform a plain pair of light-wash jeans into a wearable garden with this delicate floral pocket design. Using fabric paints to mimic the texture of embroidery, you’ll create a bouquet of daisies, cone flowers, and greenery that looks like it’s sprouting right from the seams.
Step-by-Step
Materials
- Light wash denim jeans (clean and dry)
- Fabric medium (if using acrylics) or fabric paints
- Acrylic paints: White, Sage Green, Forest Green, Burnt Orange, Red, Yellow Ochre, Cornflower Blue
- Fine detail brushes (size 0 and 00 round)
- Small flat brush (size 2)
- Cardboard insert for the pocket
- White chalk pencil or disappearing fabric marker
- Palette or small dish for mixing
- Iron and cloth (for heat setting)
Step 1: Preparation & Sketching
-
Prepare the pocket:
Before starting, slip a piece of cardboard inside the back pocket. This is crucial to prevent paint from bleeding through to the denim underneath and creates a firm, flat surface for your brush. -
Map the stems:
Using your white chalk pencil, lightly sketch three main curved lines originating from the bottom center of the pocket. These will be your anchor stems. Add two shorter, branching lines on the left for the drooping flowers. -
Mark flower placement:
Draw small circles at the tops of your stems to mark where the main blooms will sit. Mark a cluster of small dots on the upper right stem for the daisies, and sweeping, cone-like shapes on the lower left stems.
Textural Trick
To mimic the look of actual embroidery thread, use slightly thicker paint application for the petals, letting the brush strokes be visible and raised.
Step 2: painting the Greenery
-
Mix your greens:
On your palette, mix two shades of green. Create a sage green by mixing Forest Green with a touch of White and Yellow. Keep some pure Forest Green separate for shadows. -
Paint main stems:
Using a size 0 brush and the sage green mix, paint over your sketched stem lines. Keep the pressure light to achieve thin, delicate lines that mimic thread. -
Add leaf foundations:
Along the main central stem, paint small, elongated almond shapes for leaves. Use short, flicking strokes to keep them tapered. -
Create the blue sprig:
For the fern-like plant situated in the background (center-left), mix Cornflower Blue with a drop of Forest Green. Paint a central vertical line, then add short, upward-angled dashes on either side to create a feathery texture.
Step 3: Adding the Blooms
-
Base coat the daisies:
Switching to White paint, create the small daisy petals on the upper right stem. Use the tip of your smallest brush to press and lift, creating tiny teardrop shapes radiating from a center point. -
Paint the cone flowers:
For the drooping flowers on the left, mix Red with a touch of Burnt Orange and White to get a soft coral-pink. Paint downward-facing, elongated petals. I like to leave small gaps between them so the denim shows through slightly, adding dimension. -
Add the red bloom:
Paint the single bold flower on the lower right using pure Red. Use jagged, short strokes for the petal edges to give it a poppy-like texture. -
Layer the leaves:
Go back to your green leaves with the darker Forest Green. Paint thin lines down the center of each leaf and along the bottom of the stems to add shadow and depth. -
Detail the blue sprig:
Add a second layer to the blue fern using a lighter mix (add more white to your blue-green). Placed just at the tips of the ‘leaves’, this highlights the texture.
Stiff Denim?
If the painted area feels too stiff after drying, scrunch the fabric gently in your hands to soften the fibers, or wash inside-out with fabric softener after curing.
Step 4: Fine Details & Finishing
-
Daisy centers:
Mix Yellow Ochre with a tiny dot of White. Carefully dot the centers of your white daisy clusters. Keep the dots irregular for a natural look. -
Cone flower centers:
At the top of the coral petals where they meet the stem, paint a small, darker cone shape using Burnt Orange mixed with a little brown or green. -
Poppy center:
Add a bright Yellow center to the red flower. Once dry, add a tiny dot of Burnt Orange in the very middle for contrast. -
Highlighting stems:
Mix a very pale green (almost white). Run an extremely thin line along the top edge of the thickest stems to mimic light hitting a round surface. -
Clean up edges:
If any chalk lines are still visible, gently brush them away with a damp Q-tip or a clean, stiff brush, careful not to smudge the wet paint. -
Heat set the design:
Allow the paint to cure for at least 24 hours. Place a thin cloth over the design and iron on medium heat (no steam) for 3-5 minutes to make it permanent and washable.
Enjoy wearing your new custom denim piece that brings a touch of spring to any outfit
BRUSH GUIDE
The Right Brush for Every Stroke
From clean lines to bold texture — master brush choice, stroke control, and essential techniques.
Explore the Full Guide
Butterfly Cluster on One Thigh
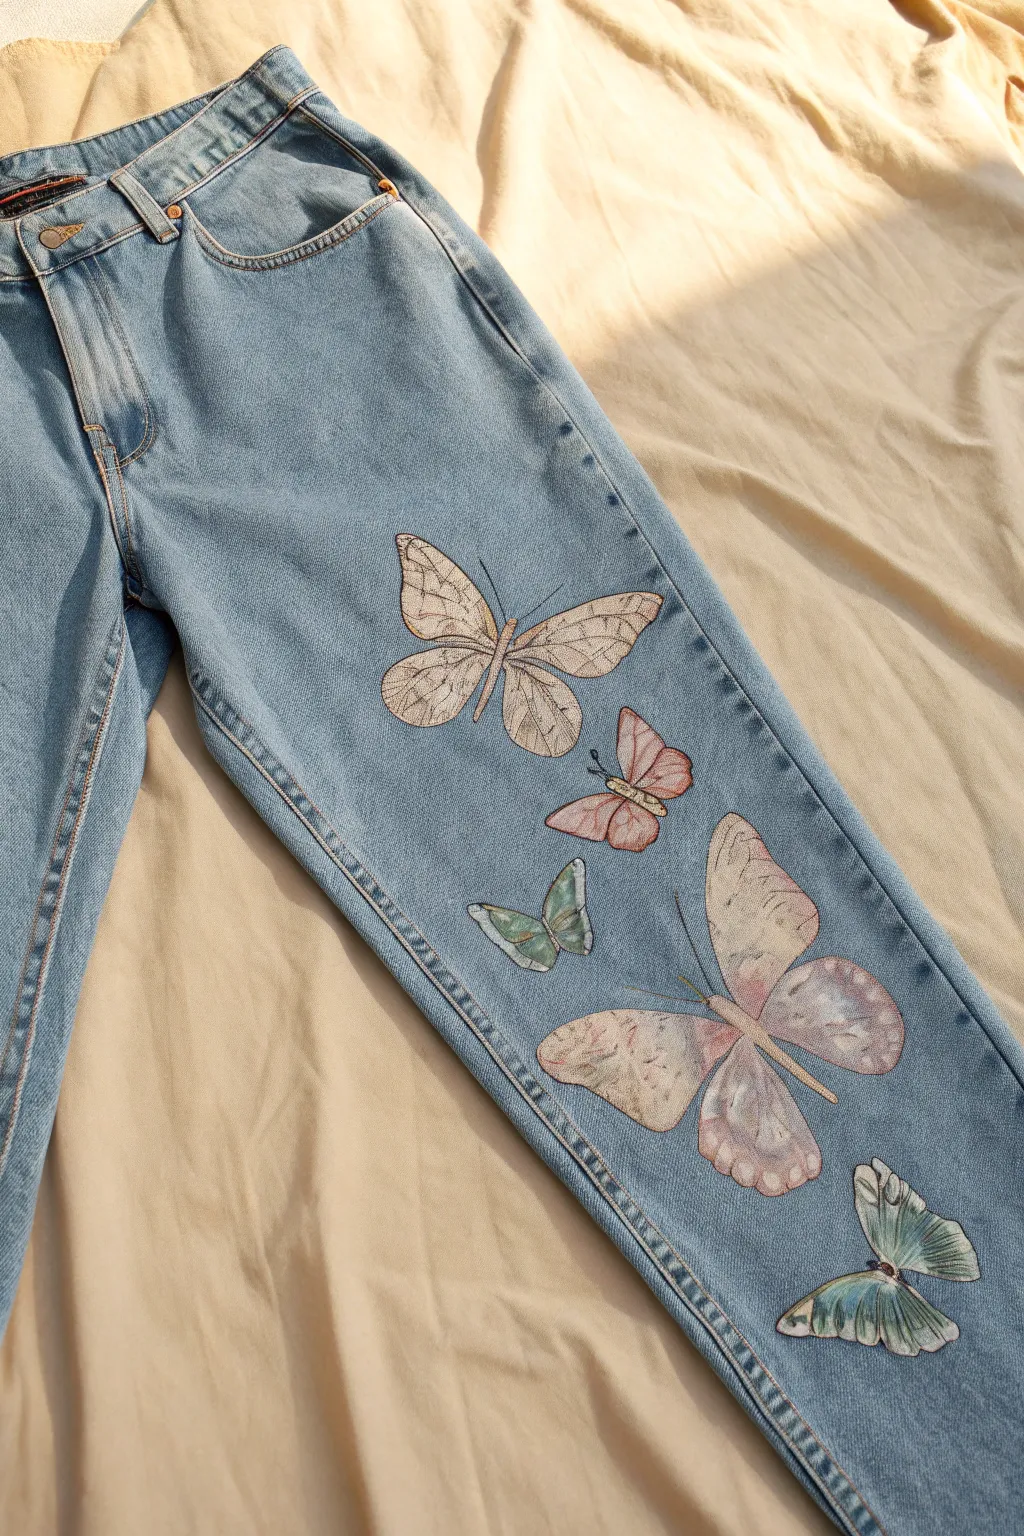
Transform a simple pair of denim into a wearable garden with this cascading arrangement of vintage-style butterflies. The result looks incredibly delicate, mimicking the soft, faded appearance of old scientific illustrations right on your jeans.
Step-by-Step Guide
Materials
- Light wash straight-leg jeans
- Fabric medium
- Acrylic craft paints (white, dusty pink, sage green, raw sienna, teal, charcoal grey)
- Fine liner brushes (size 00 or 000)
- Small flat shader brush (size 2 or 4)
- White tailor’s chalk or disappearing ink pen
- Mixing palette
- Cardboard insert for leg
- Iron for heat setting
Step 1: Preparation and Layout
-
Prep the surface:
Begin by washing and drying your jeans without fabric softener to remove any sizing chemicals. Slide a piece of stiff cardboard inside the leg you intend to paint; this provides a stable surface and prevents any paint from bleeding through to the back of the leg. -
Sketch the composition:
Using your tailor’s chalk or disappearing ink pen, lightly sketch five distinct butterfly shapes cascading down the thigh. Place the largest one at the top near the pocket, angled downward. -
Add variety:
Sketch the remaining four butterflies below the first, varying their angles and sizes. Include a mix of open-wing positions and slightly tilted perspectives to replicate the natural, fluttery look shown in the reference.
Step 2: Base Coating
-
Mix the white base:
Mix equal parts white acrylic paint and fabric medium. This mixture needs to be thin enough to soak into the denim fibers but opaque enough to cover the blue denim color. -
Apply the first layer:
Use your flat shader brush to fill in all the butterfly silhouettes with the white mixture. Don’t worry about details yet; just get a solid, opaque shape down. -
Build opacity:
Let the first layer dry completely (about 20-30 minutes). Apply a second coat of the white mixture to ensure the colored layers you add later will pop against the denim background.
Watercolor Effect
To get that vintage scientific illustration look, dilute your paints heavily with fabric medium rather than water. This prevents bleeding while keeping the color translucent.
Step 3: Adding Scale Color
-
create a wash:
For the largest top butterfly, mix a very watery wash of raw sienna and white. You want a vintage parchment look, not a solid brown. -
Glaze the wings:
Gently paint over the dry white base of the top butterfly. I like to keep the center of the wings slightly lighter to create a sense of dimension. -
Paint the pink butterfly:
For the small middle butterfly and the large lower one, mix dusty pink with a tiny drop of grey to desaturate it. Paint these wings, letting the paint fade out near the edges for a soft effect. -
Paint the green butterflies:
Mix sage green with a touch of teal for the two remaining butterflies (the small one and the bottom one). Apply this color, again keeping it somewhat translucent like a watercolor.
Moth Dust Shimmer
Mix a tiny amount of iridescent or pearl medium into your final glaze layer. It adds a subtle, realistic sheen that catches the light like real insect wings.
Step 4: Detailed Line Work
-
Mix the liner color:
Mix charcoal grey with a little fabric medium to create an inky consistency. Avoid using pure black, as it can look too harsh against the soft vintage colors. -
Outline the top wings:
Using your finest liner brush, carefully trace the outer edges of the top brown butterfly. Keep your hand steady but allow for slight unevenness to mimic natural textures. -
Draw the veins:
Paint the internal vein structures. Start from the body and pull the brush outward toward the wing tips, lifting pressure at the end of the stroke for a tapered line. -
Detail the pink variety:
Move to the pink butterflies. For these, use lighter, shorter strokes for the veins. Add a slightly darker pink shading near the body for depth before adding the grey vein lines. -
Detail the green variety:
On the green/teal butterflies, add darker teal accents near the wing tips before drawing your grey veins. This creates that specific detailed pattern seen on the bottom butterfly. -
Paint the bodies:
Fill in the slender bodies and heads of all the butterflies using a darker brown or grey mixture. Add two very fine, curved antennae to each head.
Step 5: Finishing Touches
-
Add white highlights:
Dip your fine brush into pure white paint. Add tiny dots along the outer edges of the wings and subtle streaks on the bodies to replicate light hitting the scales. -
Heat set the design:
Once the paint is fully cured (usually 24 hours), place a thin cloth over the design and iron on medium heat (no steam) for 3-5 minutes to permanently seal the artwork.
Give your new wearable art a full day to cure before wearing it out to showcase your handiwork
Simple Sunflower Knee Accent
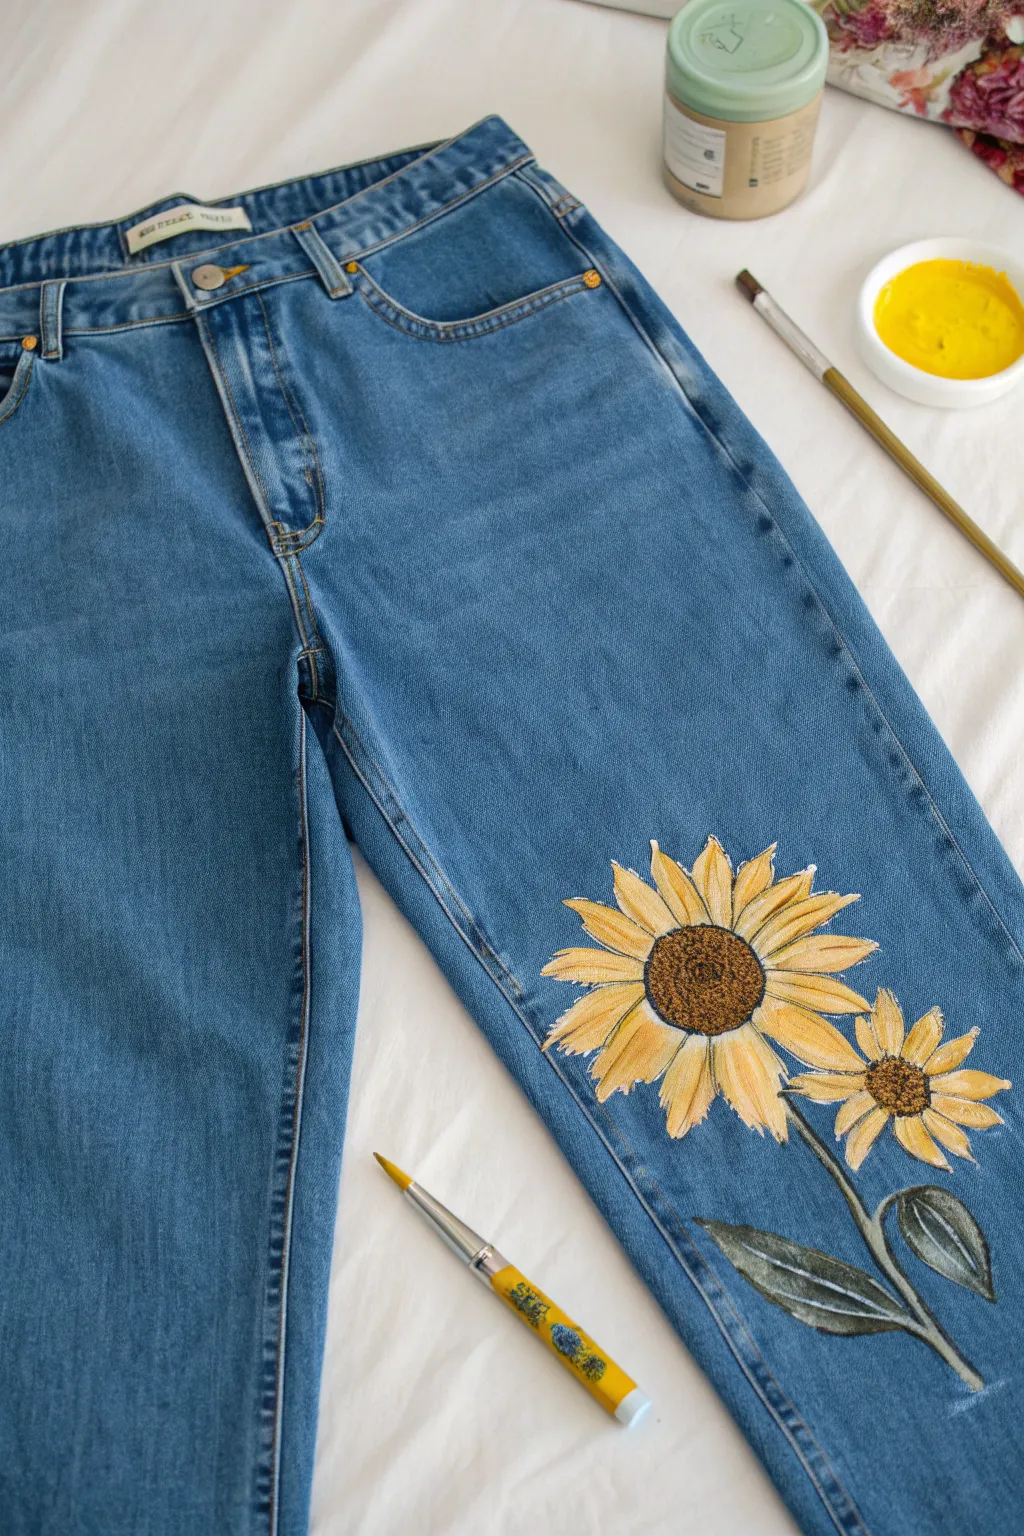
Transform a plain pair of jeans into a wearable garden with this bright and cheerful sunflower accent. The design features a large, dominant blossom paired with a smaller companion flower, featuring textured brown centers and vibrant yellow petals that pop against blue denim.
Step-by-Step
Materials
- Pair of blue denim jeans
- Fabric paint or textile medium mixed with acrylics (Yellow, White, Dark Brown, Tan/Ochre, Dark Green, Olive Green)
- White or light primer (gesso or white fabric paint)
- Flat paint brushes (sizes 4 and 8)
- Fine liner brush (size 0 or 1)
- Chalk or fabric pencil for sketching
- Cardboard insert
- Iron (for heat setting)
Step 1: Preparation and Base Layer
-
Protect the fabric:
Before starting, slide a piece of cardboard inside the jeans leg directly under the area you plan to paint. This prevents paint from bleeding through to the back of the leg. -
Position the design:
Decide on the placement for your flowers. The image shows them on the lower shin/calf area, but this design also works beautifully just above or beside the knee. -
Sketch the flower centers:
Using your chalk or fabric pencil, lightly draw a large oval for the main sunflower center and a smaller circle below and slightly to the right for the secondary flower. -
Map out the petals:
Sketch radiating petals around both centers. Keep the main sunflower’s petals long and slightly pointed, while the smaller flower’s petals can be shorter and more compact. -
Draw stem and leaves:
Add a curving line connecting the two flowers and extending downward for the stem. Draw two large, lance-shaped leaves near the base of the stem. -
Prime the petals:
Using a flat brush, paint the entire silhouette of the petals with white fabric paint or gesso. Denim absorbs color, so this white underlayer is crucial for making the yellow truly vibrant. -
Prime the leaves:
Apply the white base coat to the leaves and stem as well. Allow all the white primer to dry completely before moving to the next step.
Step 2: Adding Color and Dimension
-
Yellow base coat:
Once the white is dry, paint over the petal areas with a solid coat of bright yellow. You may need two coats for full opacity. -
Shading the petals:
While the yellow is still slightly tacky, mix a tiny bit of ochre or light brown with yellow. Paint thin streaks from the center of the flower moving outward into the petals to create depth. -
Highlighting petals:
Mix a little white into your yellow paint. Use a fine brush to add highlights to the tips and edges of the petals, giving them a sun-catch effect. -
Painting the centers:
Fill in the circular centers with dark brown paint. Don’t worry about texture yet; just get a solid base color down. -
Texturing the seeds:
Dip an old, stiff brush or a stippling sponge into lighter tan or ochre paint. Dab it repeatedly over the dark brown centers to simulate the texture of sunflower seeds. -
Painting the greenery:
Paint the stem and leaves with dark green. I like to use long, smooth strokes for the leaves to mimic their natural veins. -
Adding leaf details:
Mix a lighter olive green or add a touch of white to your green. Paint a central vein down each leaf and add subtle highlights to the leaf edges for a 3D look.
Textile Medium Secret
Don’t have fabric paint? Mix regular acrylic paint with textile medium in a 1:1 ratio. It keeps the paint flexible so it won’t crack when the denim moves.
Step 3: Finishing Touches
-
Refining outlines:
For a crisper look, you can use a very fine liner brush and thinned white paint to add tiny accents or separate overlapping petals, though this is optional. -
Final drying:
Allow the entire painting to dry for at least 24 hours. The paint needs to fully cure before being handled heavily. -
Heat setting:
To make the design permanent and washable, place a pressing cloth over the dry painting and iron on medium heat (no steam) for 3-5 minutes.
Fixing Opacity Issues
If your yellow looks dull or greenish against the blue denim, your white base layer was too thin. Let it dry, re-apply white to problem spots, then repaint yellow.
Enjoy wearing your custom floral denim on your next sunny outing

PENCIL GUIDE
Understanding Pencil Grades from H to B
From first sketch to finished drawing — learn pencil grades, line control, and shading techniques.
Explore the Full Guide
Ombre Wash Along the Hem
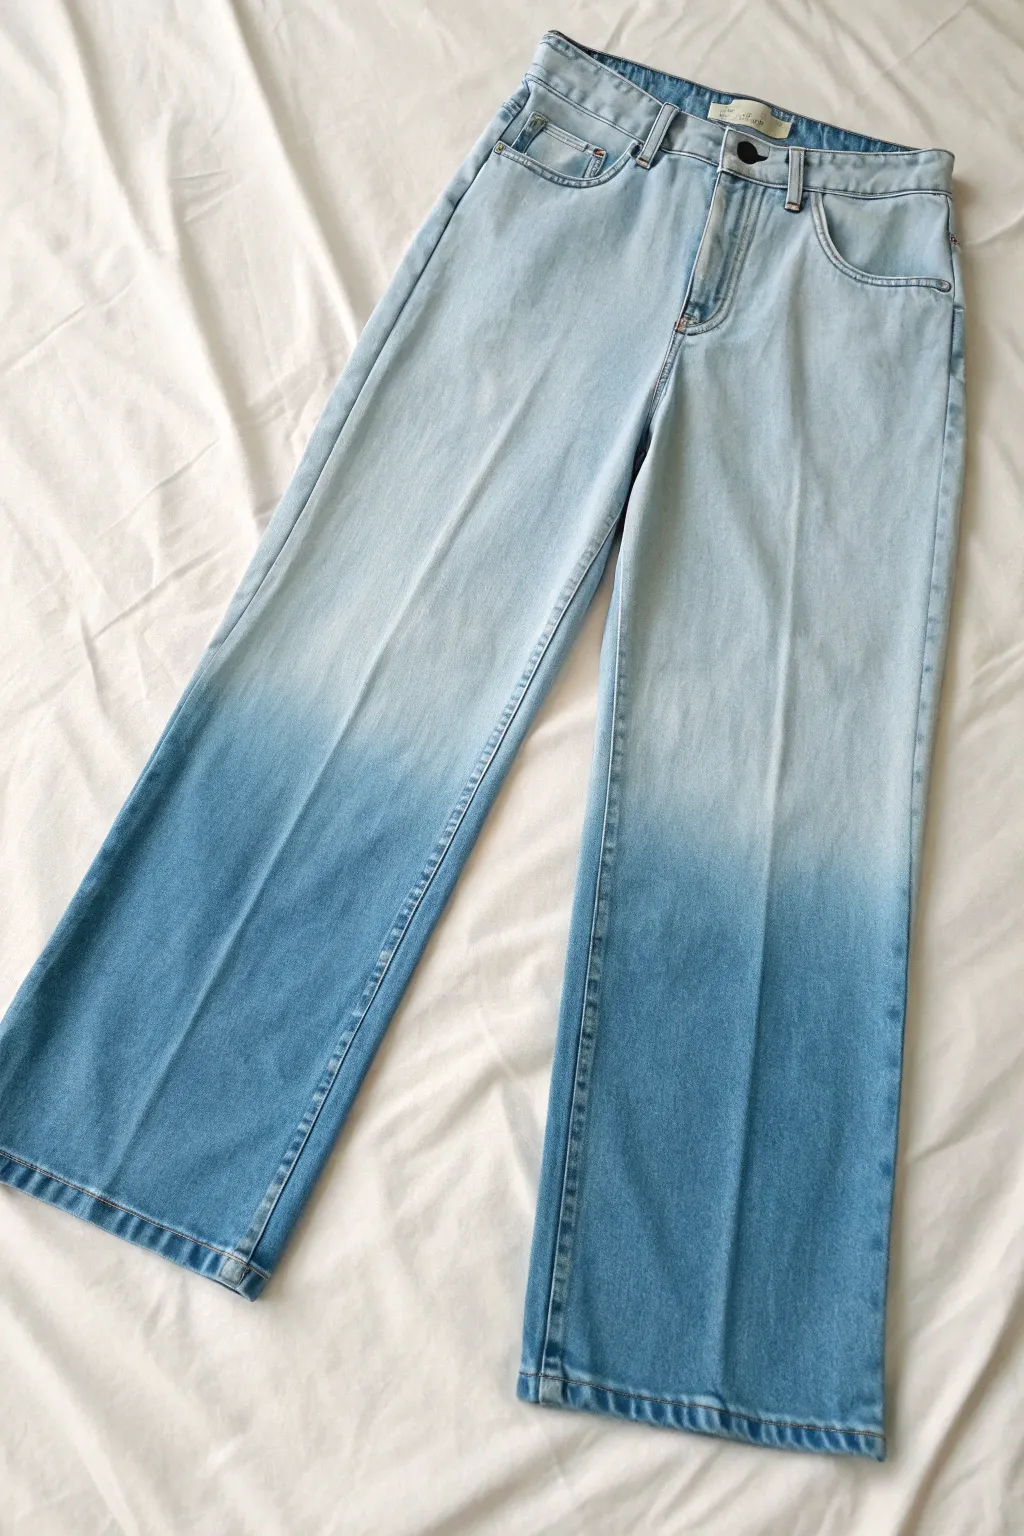
Transform a basic pair of light-wash jeans into a stunning gradient statement piece with this ombré dip-dye technique. The effect transitions seamlessly from a pale, icy blue at the waist to a saturated ocean blue at the hem, giving your denim a fresh, custom look.
Detailed Instructions
Materials
- Pair of light-wash or white denim jeans (100% cotton works best)
- Fabric dye (Indigo or Royal Blue liquid dye)
- Large plastic bin or stainless steel sink
- Rubber gloves
- Salt or dye fixative (check your dye instructions)
- Stirring spoon (stainless steel or disposable)
- Hanger with clips (skirt hanger)
- Plastic drop cloth or garbage bags
- Mild laundry detergent
Step 1: Preparation
-
Wash the jeans:
Start by washing your jeans without fabric softener to remove any sizing or finishes that might prevent the dye from absorbing evenly. Leave them damp, as wet fabric takes dye more smoothly. -
Set up your workspace:
Cover your floor or working area with plastic drop cloths to prevent accidental staining. Set up your large bin or prepare your sink. -
Prepare the dye bath:
Fill the bin with enough hot water (steaming hot is ideal) to submerge the jeans fully if needed, though we will be dipping. Put on your rubber gloves. -
Mix the dye:
Shake your liquid dye bottle thoroughly. Pour half of the bottle into the water. Add salt or fixative if your specific dye brand recommends it for cotton. -
Stir thoroughly:
Use your stirring stick to mix the dye solution until it is completely uniform. Ensure there are no clumps or unmixed streaks of dye.
Pro Tip: The Damp Cloth Trick
Keep a damp sponge or cloth nearby. If dye accidentally splashes onto the upper, light part of the jeans, wipe it away instantly to prevent spotting.
Step 2: The Dip Process
-
Clip the jeans:
Attach the waist of the damp jeans to the skirt hanger. This gives you a secure handle to hold onto while dipping and keeping your hands relatively clean. -
First dip: The full gradient:
Lower the jeans into the dye bath. Dip them up to the knee or wherever you want the fade to begin. Quickly pull them back out. This quick dunk establishes the lightest part of the gradient. -
Second dip: Building depth:
Lower the jeans again, but stop about two inches lower than your first dip line. Let them sit in the bath for roughly 3-5 minutes. -
Keep it moving:
While soaking, gently move the jeans up and down about an inch or two. This constant motion prevents a hard line from forming and ensures a soft, blurry transition. -
Third dip: Darkening the mid-leg:
Lift the jeans out slightly more, exposing another few inches of the leg. Lower the remaining bottom section back in and let it soak for about 10 minutes. -
Focus on the hem:
For the final and darkest stage, lift the jeans so only the bottom 6-8 inches (the calf and hem area) are submerged. Leave this section in the dye for 20-30 minutes. -
Check the color:
Remember that wet denim looks darker than dry denim. You want the hem to look almost navy blue in the wet state to achieve that rich medium blue once dry.
Step 3: Rinsing and Finishing
-
Initial rinse:
Remove the jeans from the dye bath. Holding them upside down (hems up) under a faucet, rinse with cold water. This direction prevents dark dye from running up into the light waist area. -
Continue rinsing:
Keep rinsing until the water runs completely clear. This can take some time, so be patient to avoid future bleeding. -
Wash separately:
Wash the jeans in the washing machine on a cold cycle with mild detergent. Do not add other clothes to this load. -
Air dry:
Hang the jeans to dry naturally. I always avoid the dryer for the first dry to prevent any potential heat-setting of uneven shrinkage. -
Final steam or iron:
Once dry, iron or steam the jeans to smooth out any wrinkles from the washing process, highlighting your new custom gradient.
Level Up: Bleach Start
For a higher contrast look, soak the top half of the jeans in a bleach solution first to make them nearly white before starting your blue dye process.
Now you have a beautifully graduated pair of jeans ready for any season
Polka Dots Made With Simple Stamps
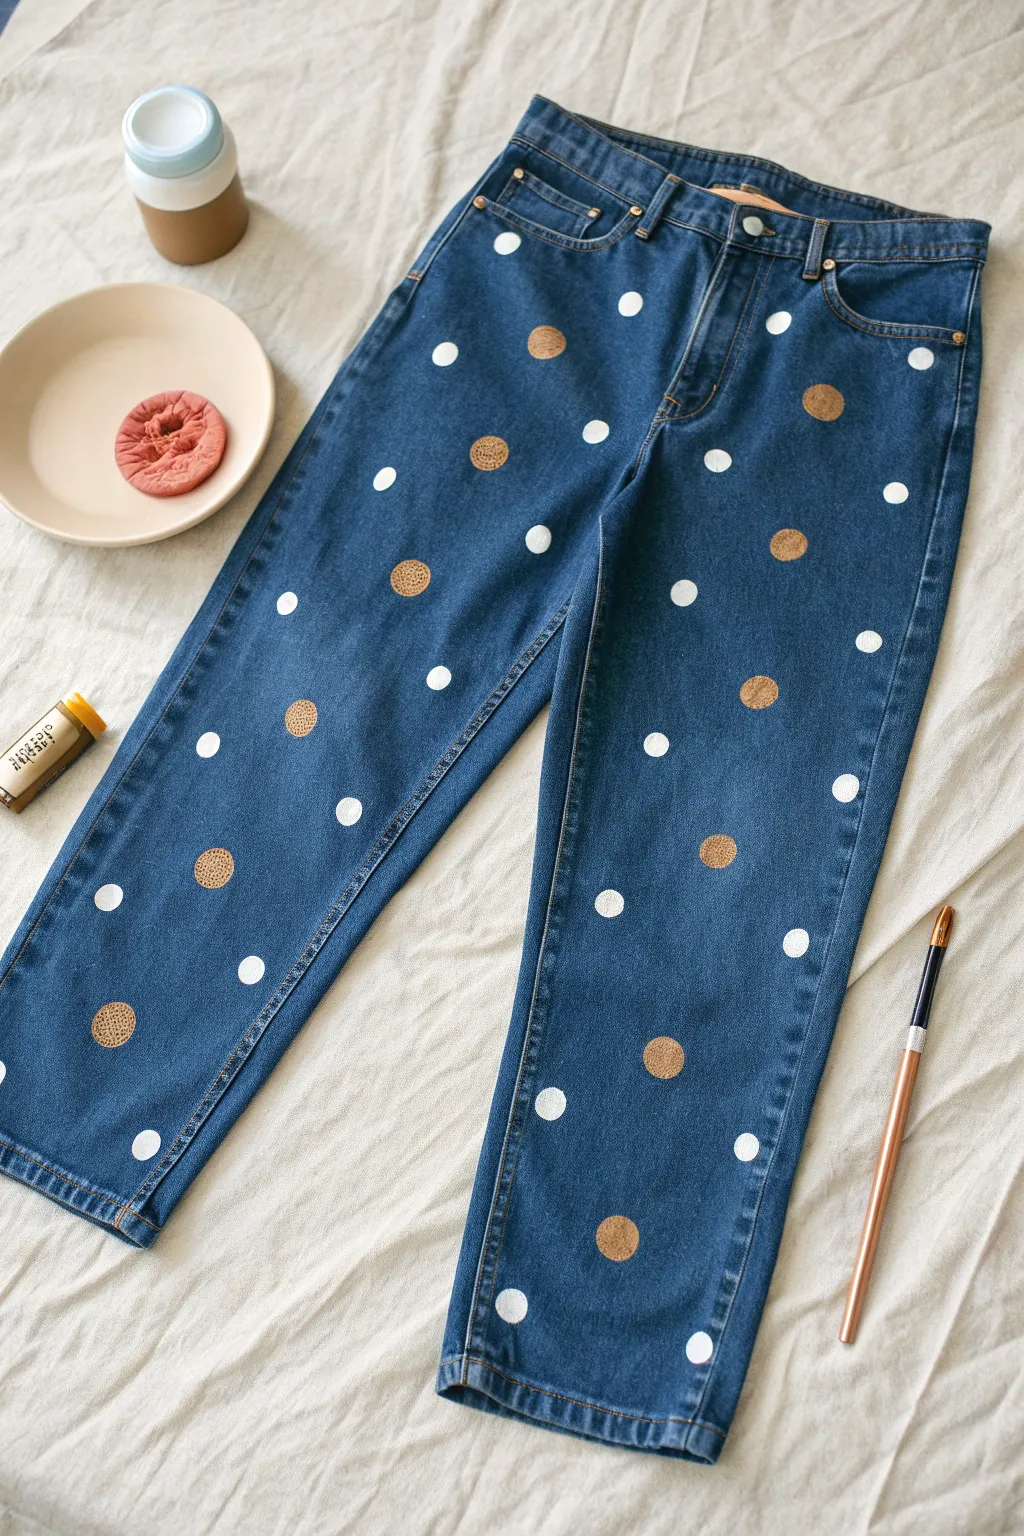
Transform a plain pair of denim into a playful statement piece with this easy stamping technique. By combining solid white circles with textured bronze accents, you’ll create a lively, mixed-media pattern that feels both handcrafted and chic.
Step-by-Step
Materials
- Pair of blue jeans (pre-washed)
- White fabric paint
- Metallic bronze or copper fabric paint
- Medium round sponge pouncer or foam dauber (approx. 1 inch)
- Recycled wine cork or champagne cork
- Round paintbrush (for touch-ups)
- Plastic palette or paper plates
- Cardboard or plastic bags (to insert inside pant legs)
- Iron and press cloth (for setting)
Step 1: Preparation
-
Prep the denim:
Begin with a clean, dry pair of jeans. It’s best to wash them without fabric softener beforehand, as this helps the paint adhere better to the fibers. -
Protect the fabric:
Slide pieces of cardboard or flat plastic bags inside each pant leg. This is crucial to prevent the paint from bleeding through to the backside of the jeans while you work. -
Set up your palette:
Squeeze a generous amount of white fabric paint onto your palette. On a separate section or a different plate, pour out some of the metallic bronze paint.
Uneven Circles?
If your cork stamped circles look messy or incomplete, try slightly rotating the cork as you lift it off the denim. This helps release the paint more evenly.
Step 2: Stamping the White Dots
-
Load the pouncer:
Take your round foam pouncer and dip it evenly into the white paint. Tap it lightly on a clean part of the palette to remove excess globs; you want a flat, even coat on the sponge. -
First impression:
Ideally, test your stamp on a scrap piece of denim or paper towel first to gauge how much pressure you need. -
Create the white pattern:
Press the foam pouncer firmly onto the jeans to create your first white dot. Lift straight up to keep the edges crisp. -
Space them out:
Continue stamping white dots across the front of the jeans. Aim for a random, scattered arrangement rather than perfect rows, leaving plenty of empty blue space for the second color. -
Touch up edges:
If any of your white circles look a bit uneven or patchy, use a small round paintbrush to carefully fill in the centers or smooth out the circumference. -
Let it set:
Allow the white dots to dry to the touch before moving on. This usually takes about 20-30 minutes, preventing accidental smudges while you add the next layer.
Step 3: Stamping the Bronze Pattern
-
Prepare the cork stamp:
For the textured dots, use the flat end of a wine cork. If the cork is stained or uneven, slice a thin layer off the end with a craft knife to create a fresh, flat surface. -
Create texture:
Dip the cork into the bronze paint. Unlike the smooth white dots, we want texture here, so don’t overload it, but ensure the surface is covered. -
Stamp the accents:
Press the cork onto the denim in the empty spaces between the white dots. Use a slightly lighter pressure here; the natural texture of the cork will leave a lovely, slightly pitted effect. -
Fill the gaps:
I like to step back occasionally to look at the overall balance. Add bronze dots wherever the pattern feels too sparse. -
Clean up details:
Check for any stray drips or smudges. You can often wipe away wet paint with a damp cotton swab, or cover mistakes later with a tiny dot of the opposite color.
Level Up: Glitter Pop
Before the bronze paint dries, sprinkle a tiny pinch of fine gold glitter over just the metallic dots for extra sparkle that catches the light.
Step 4: Finishing Touches
-
Dry partially:
Let the pants sit flat undisturbed for at least one hour until the surface of the paint feels dry. -
Remove barriers:
Reasonably gently, pull the cardboard or plastic out from inside the pant legs. Do this carefully so the fabric doesn’t fold on itself while still curing. -
Full cure:
Allow the jeans to dry completely specifically according to your paint bottle’s instructions—usually 24 hours. -
Heat set:
Once fully dry, turn the jeans inside out (or use a press cloth over the design) and iron on a cotton setting for several minutes to permanently set the design for washing.
Wear your new custom patterned jeans with a simple tee to let your artwork take center stage


Checkerboard Pocket Blocks
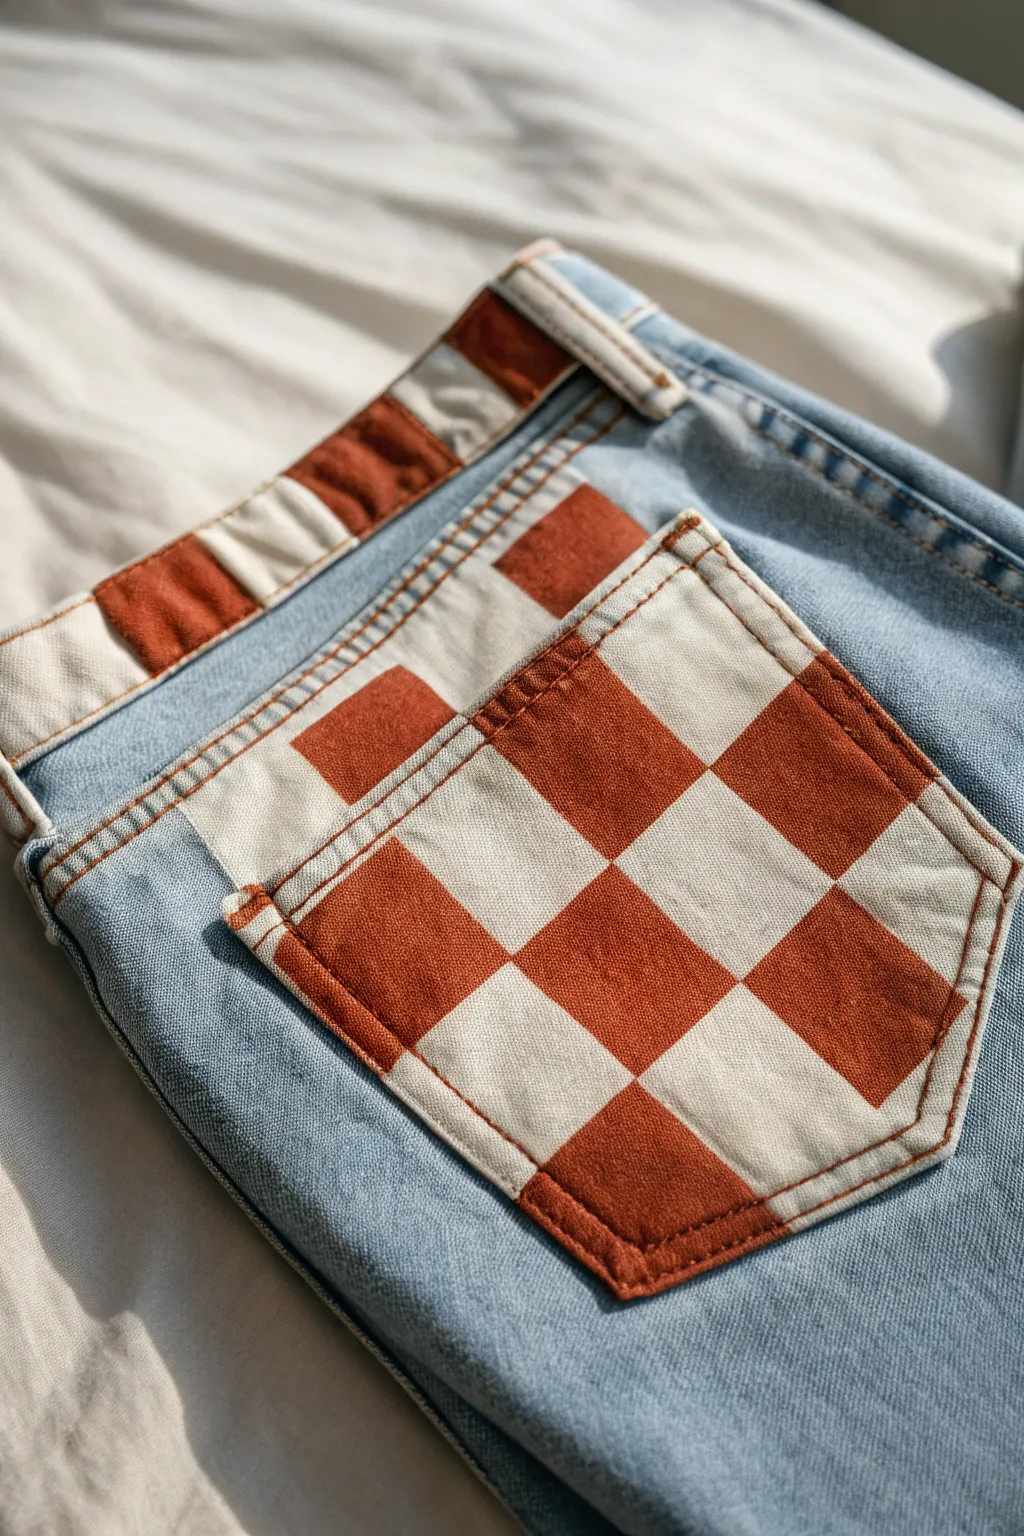
Transform a plain pair of light-wash jeans into a statement piece with this warm, vintage-inspired checkerboard design. By blocking out areas on the pocket and waistband, you create a structured yet hand-painted look that adds immediate character to your denim.
Detailed Instructions
Materials
- Light wash denim jeans
- Fabric paint (Burnt Orange/Terracotta)
- Fabric paint (Cream/Off-White)
- Textile medium (optional, to soften paint)
- Flat shader brush (approx. 1/2 inch)
- Fine detail brush
- Painter’s tape or masking tape (approx. 1 inch width)
- Ruler
- Fabric chalk or disappearing ink pen
- Cardboard insert
- Iron (for heat setting)
Step 1: Preparation & Mapping
-
Prepare the surface:
Begin by sliding a piece of cardboard inside the back pocket and another piece inside the waistband of the jeans. This crucial step prevents paint from bleeding through to the other side of the fabric. -
Clean the denim:
Use a lint roller over the pocket and waistband area to remove any dust or fibers that might interfere with your paint adhesion. -
Measure the grid:
Using a ruler and fabric chalk, measure the width of your pocket. Divide this number to create an even grid (usually 3 or 4 squares across works best for pockets). Mark small tick marks along the top and bottom edges. -
Draw the lines:
Connect your tick marks with the ruler to creating a grid of squares directly on the denim pocket. Do the same for the waistband section directly above the pocket, ensuring the vertical lines align with the pocket’s grid for visual continuity.
Clean Lines Hack
If you struggle with freehand straight lines, apply narrow masking tape over your grid lines. Paint the squares, let dry slightly, then peel the tape for sharp edges.
Step 2: Painting the Base Colors
-
Mix your medium:
If your fabric paint feels thick, mix it with a little textile medium on your palette. I find this helps the paint penetrate the denim fibers rather than just sitting on top, which prevents cracking later. -
Start with Cream:
Dip your flat shader brush into the cream paint. Select the squares that will be light-colored (creating a checkerboard pattern) and carefully fill them in. -
Edge control:
Use the edge of the flat brush to create crisp, straight lines along your chalk marks. Don’t worry if the chalk is slightly visible; the paint will cover it, or it will wash away later. -
Apply the second coat:
Allow the first layer of cream to dry for about 20 minutes. Apply a second coat to ensure the blue denim doesn’t show through too strongly, keeping the color solid. -
Paint the Terracotta:
Switch to a clean brush and your burnt orange paint. Fill in the alternating empty squares on the grid. -
Waistband details:
Repeat the painting process on the waistband area. Pay special attention to the belt loops—you can choose to paint over them or work around them, but painting under them adds a nice finished touch.
Step 3: Refining & Finishing
-
Touch up edges:
Once the main blocks are dry to the touch, use a fine detail brush to sharpen any corners where the orange and cream squares meet. -
Correct bleeding:
If any paint has bled outside the lines, you can use a clean, damp brush to gently scrub away the mistake while the paint is still semi-wet. -
Dry completely:
Let the jeans sit undisturbed for at least 24 hours. The paint needs to fully cure before the next step. -
Heat set the design:
Turn the jeans inside out (or place a pressing cloth over the painted area). Iron on a medium-high setting without steam for 3-5 minutes to permanently set the pigment into the fabric.
Stiff Fabric?
If the painted area feels too stiff after drying, tumble the jeans in the dryer on low heat with a couple of dryer balls to soften the fibers back up.
Enjoy styling your new custom denim with a cozy sweater or a vintage tee
Minimal Line Art on a Back Pocket
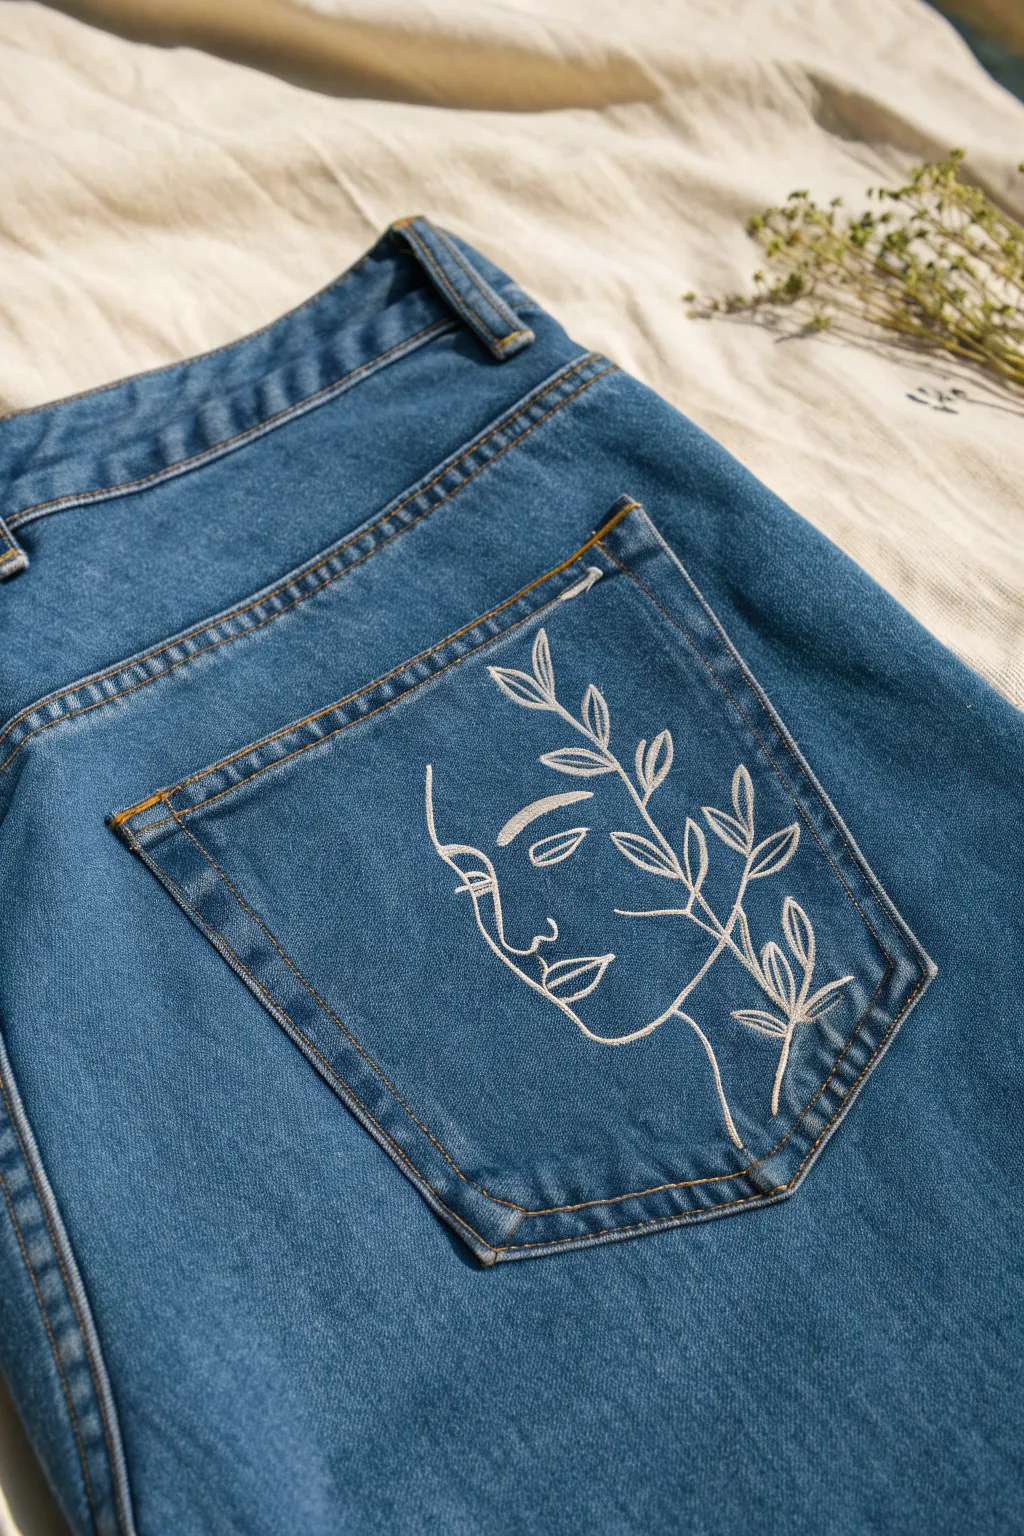
Transform a plain denim pocket into a piece of wearable art with this elegant minimalist design. The continuous line style creates a sophisticated profile intertwined with delicate leaves, standing out beautifully in crisp white against the denim blue.
How-To Guide
Materials
- Clean denim jeans (back pocket area)
- White fabric paint (high opacity)
- Fine liner brush (size 0 or 00)
- White tailor’s chalk or a disappearing fabric ink pen
- Small piece of cardboard (to fit inside the pocket)
- Painter’s tape or masking tape
- Paper palette or small dish
- Iron and pressing cloth (for heat setting)
Step 1: Preparation & Sketching
-
Prepare the surface:
Begin by sliding a piece of cardboard inside the back pocket you intend to paint. This is crucial as it creates a firm, flat surface for drawing and prevents paint from seeping through to the fabric underneath. -
Smooth the canvas:
Use your hands to smooth out any wrinkles on the pocket surface. If the denim is particularly crumpled, give it a quick press with an iron to ensure your lines will be straight and crisp. -
Outline the profile:
Using your tailor’s chalk or disappearing pen, start by lightly sketching the profile of the face on the left side of the pocket. Begin with the forehead curve, move down to the nose, and gently curve back for the lips and chin. -
Add facial details:
Sketch the closed eye with a simple curved line and a brow above it. Keep the lines fluid and loose; this style relies on abstraction rather than anatomical perfection. -
Draft the foliage:
Draw the main stem rising from the neck/cheek area, extending diagonally upwards towards the top right corner of the pocket. Add small, leaf-shaped loops branching off the main stem. -
Refine the composition:
Step back and look at your sketch. The design should fill the pocket nicely without feeling cramped. Adjust the leaves so they extend near the pocket edges but don’t cross into the stitching.
Fixing Shaky Lines
If a line gets too thick or wobby, wait for it to fully dry. Then, gently scrape the excess paint away with a toothpick or paint over the mistake with a blue that matches your denim.
Step 2: Painting the Design
-
Load your brush:
Squeeze a small amount of white fabric paint onto your palette. Dip your fine liner brush in, rolling it slightly to keep the tip sharp and pointed. You want the paint to be fluid but not runny. -
Test the flow:
I always like to test a line on a scrap piece of denim first. If the paint drags, mix in a tiny drop of water to improve the flow, but be careful not to dilute the opacity. -
Trace the profile:
Starting at the top of the forehead, carefully paint over your chalk lines with steady, even pressure. Go slowly around the curves of the nose and lips to maintain a consistent line width. -
Paint the eye:
Using the very tip of your brush, paint the delicate curve of the eye and the eyebrow. These lines should taper slightly at the ends for a refined look. -
Create the main stem:
Paint the long central stem line that connects the face to the leaves. Use a smooth, confident stroke to avoid a shaky appearance. -
Fill in the leaves:
Outline the leaf shapes. For this specific style, the leaves are outlined rather than filled in, maintaining that airy, sketch-like quality. -
Connect the elements:
Ensure the floral elements connect seamlessly to the facial profile line, creating the illusion that the plant is growing from the figure. -
Review and touch up:
inspect your work for any skipped spots where the denim texture shows through. Apply a second coat to any lines that look faint, but wait for the first layer to be touch-dry to avoid lifting the paint.
Step 3: Finishing Touches
-
Clean up sketch lines:
Allow the paint to dry completely (usually 24 hours). Once dry, gently brush away any remaining chalk marks or dab with a damp cloth if you used a water-soluble pen. -
Heat set the design:
To make the design permanent and washable, place a clean pressing cloth over the painted pocket. Iron on a medium-high heat (no steam) for 3-5 minutes, moving the iron constantly.
Add Subtle Dimension
Mix a tiny drop of silver fabric paint into your white. It won’t be overly glittery, but it adds a subtle sheen that catches the light beautifully when you move.
Now you have a custom pair of jeans with a boutique-style artistic touch that is ready to wear
Celestial Moons and Stars on a Jacket Yoke
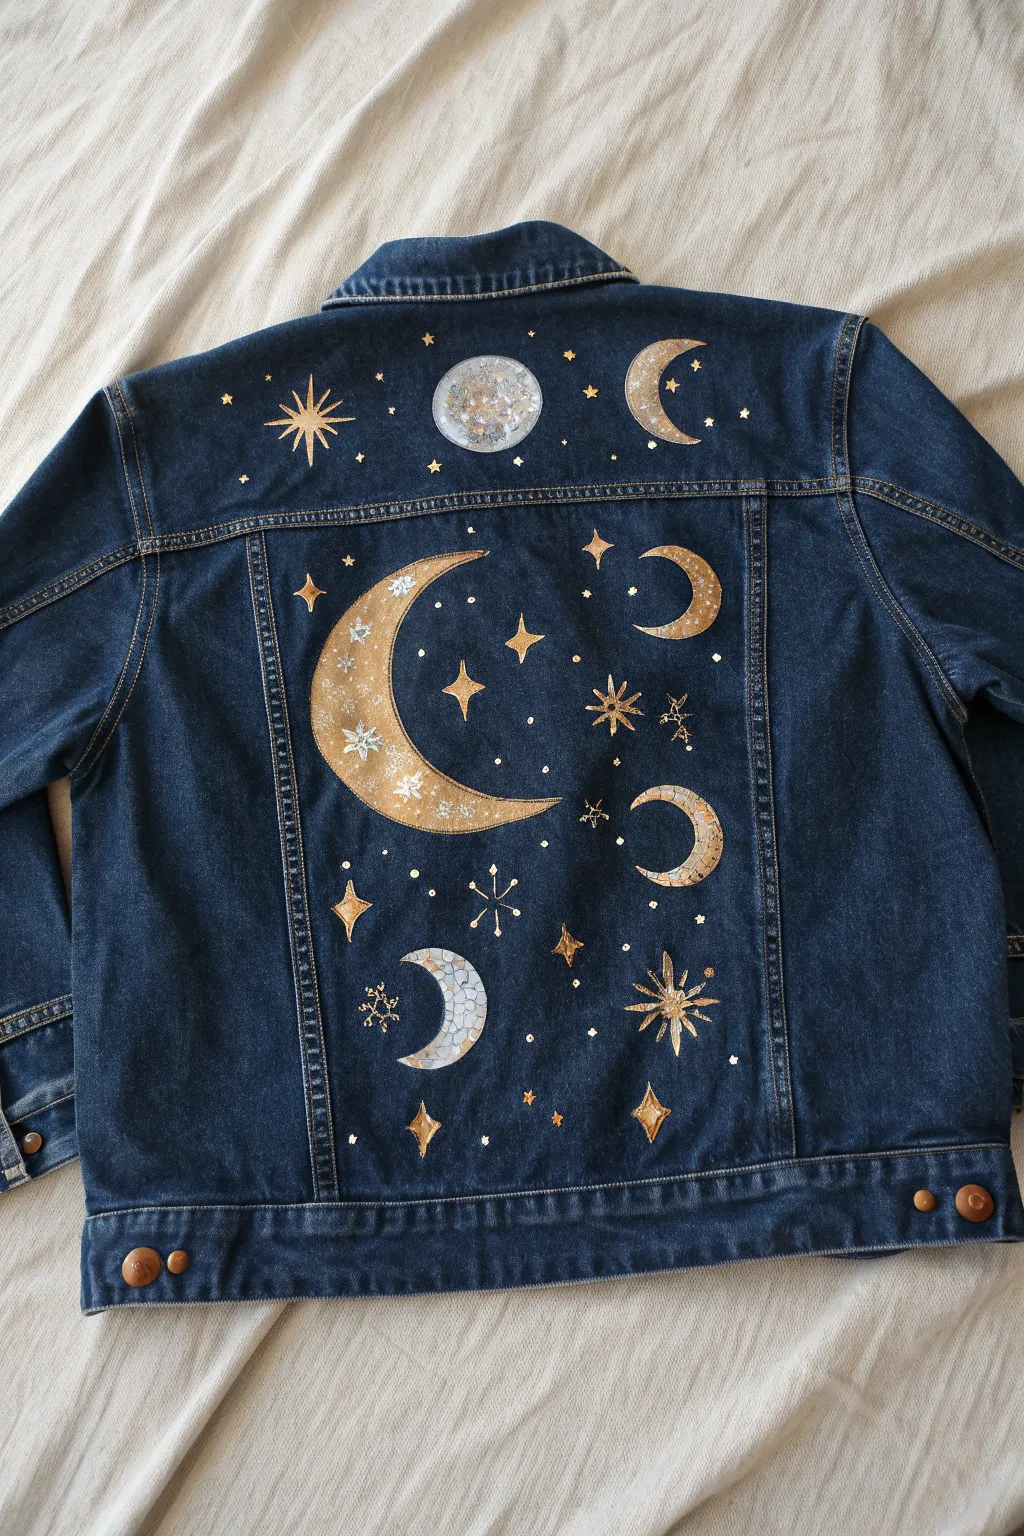
Transform a plain denim jacket into a starry night sky with this elegant celestial design featuring metallic moons, twinkling stars, and planetary orbs. The mix of gold and silver fabric paints against dark denim creates a stunning contrast that looks almost embroidered from a distance.
Step-by-Step Guide
Materials
- Dark wash denim jacket (pre-washed and dried)
- White or light grey chalk pencil (or transfer paper)
- Metallic fabric paint (Rich Gold)
- Metallic fabric paint (Silver or Pearl)
- White fabric paint (for mixing/highlights)
- Set of detail brushes (Liner brush, Round #2 and #4)
- Flat shader brush (small)
- Cardboard insert
- Iron and parchment paper (for heat setting)
Step 1: Preparation & Sketching
-
Prepare the workspace:
Slip a piece of sturdy cardboard inside the jacket, positioning it directly behind the back panel and yoke. This prevents paint from bleeding through to the front and keeps the fabric taut while you work. -
Plan the composition:
Using a chalk pencil, sketch the largest elements first. Draw the large crescent moon on the left side of the main back panel, pointing inward. Add the smaller crescent moons on the right side and the spherical moon/planet feature on the top yoke. -
Add celestial details:
Fill in the empty spaces with a variety of star shapes—classic four-point stars, tiny diamonds, and simple dots. Scatter them organically around the moons to mimic a galaxy.
Step 2: Painting the Moons
-
Base coat the gold:
Using a small flat shader brush, fill in the large crescent moon with your rich gold metallic paint. Applying a thin first layer is better than a thick one; you can build opacity later. -
Paint the silver elements:
Switch to your silver or pearl paint and fill in the circular moon on the top yoke. I prefer to dab the paint here rather than stroke it, creating a slight texture that mimics cratered surfaces. -
Create the smaller crescents:
Paint the smaller crescent moons on the right side. You can alternate between gold and silver, or mix a tiny bit of white into the silver to create a brighter, platinum tone for variety. -
Add texture and layering:
Once the base layers are dry, go back over the large gold moon. Mix a little silver with white and paint tiny snowflake-like starbursts directly on top of the gold for a magical, layered effect. -
Enhance the top planet:
On the top yoke’s silver moon, sponge or stipple a little gold paint near the center to give it dimension and an ethereal glow.
Metallic Opacity Tip
If the denim is very dark, metallic paint can look translucent. Paint a thin layer of white first as a primer, let it dry, then layer the gold or silver on top for maximum shine.
Step 3: Painting the Stars
-
Outline the major stars:
Use your finest liner brush loaded with gold paint to define the sharp points of the larger, four-pointed stars. Pull the brush outward from the center to get crisp, tapered tips. -
Fill the star centers:
Fill the centers of these larger stars. For the ‘burst’ style stars, paint many thin lines radiating from a central point, like a firework. -
Add diamond accents:
Locate your diamond-shaped sketches. Paint these in gold, ensuring the edges remain straight. Add a tiny dot of white in the very center of the largest diamonds to make them sparkle. -
Create background stars:
Dip the handle end of a paintbrush into silver or gold paint and dot it onto the fabric to create perfect, tiny circles. This fills the negative space with distant stars. -
Yoke details:
Don’t forget the top yoke section. Paint a prominent gold starburst to the left of the center moon and a silver crescent to the right to balance the design.
Level Up: Bejeweled Sky
After heat-setting, use fabric glue to attach tiny flat-back Swarovski crystals or rhinestones to the centers of the stars for a design that physically sparkles in the light.
Step 4: Finishing Touches
-
Clean up edges:
Inspect your lines. If the chalk is still visible or painted edges look fuzzy, use your smallest brush with fully opaque paint to sharpen the outlines. -
Remove chalk marks:
Allow the paint to dry completely (at least 24 hours is best). Gently brush away any remaining chalk lines with a clean, slightly damp cloth or a soft toothbrush. -
Heat set the design:
To make the denim washable, heat set your artwork. Place a piece of parchment paper over the painted area and iron on a medium heat setting (no steam) for several minutes, moving the iron constantly.
Wear your new galaxy jacket with pride knowing you have captured the night sky in wearable form
Clouds Along the Shoulder Line
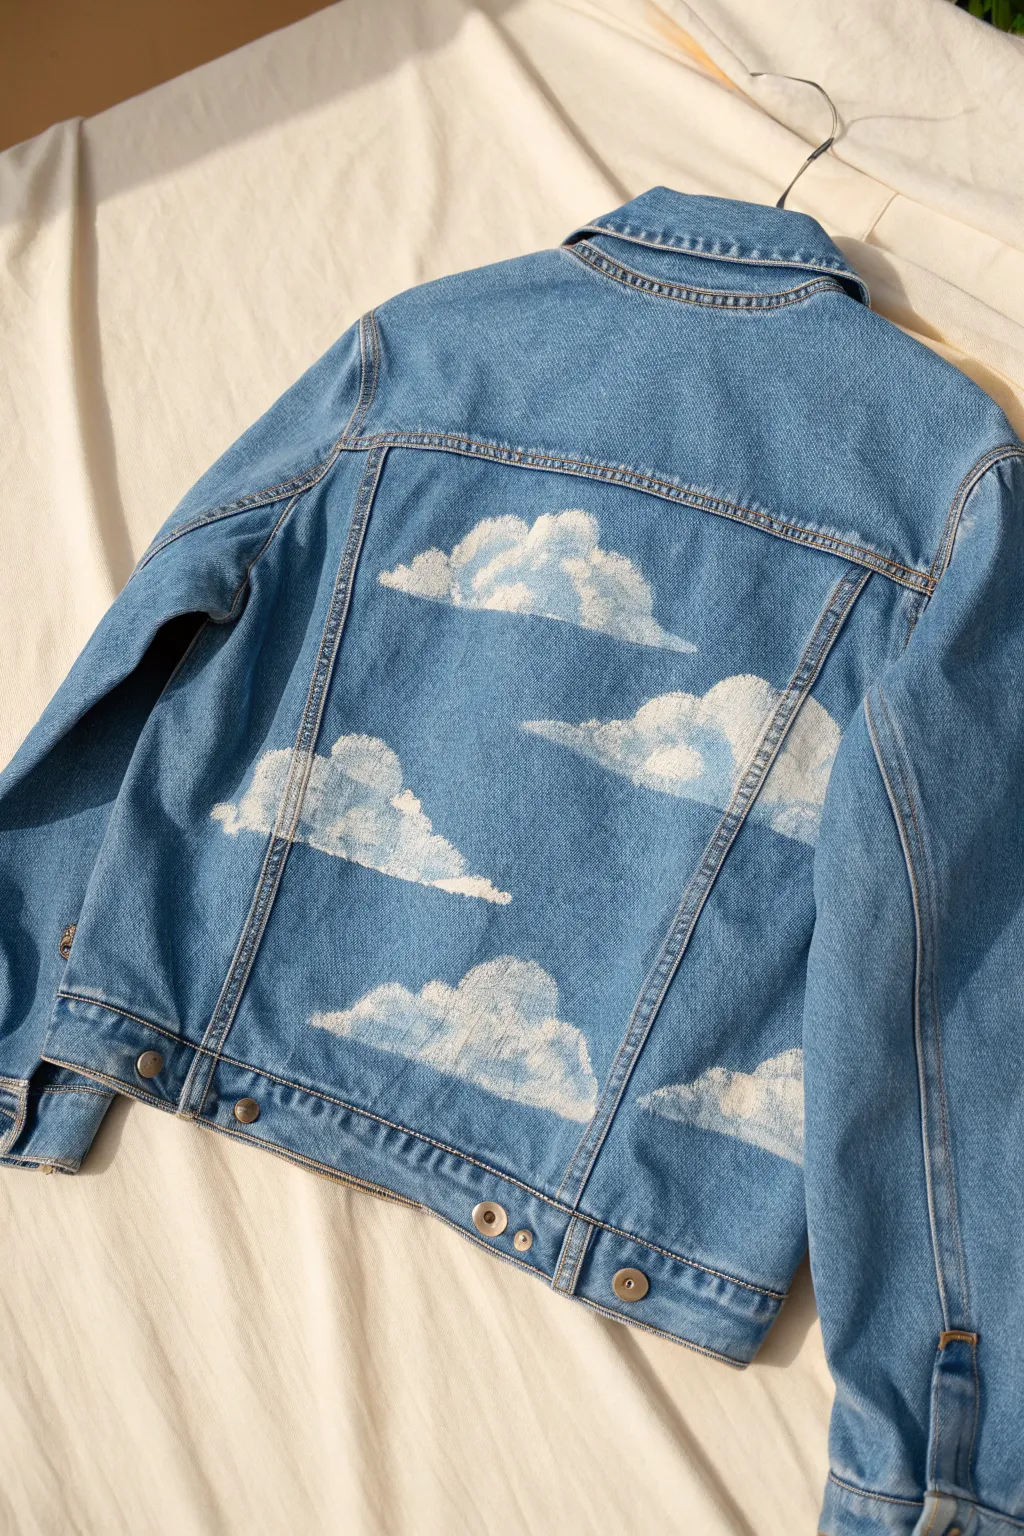
Transform a plain denim jacket into a dreamy piece of wearable art with these fluffy, hand-painted clouds. This project uses a simple layering technique to create depth and softness, turning the back panel of your jacket into a beautiful summer sky.
Step-by-Step
Materials
- Denim jacket (medium or light wash works best)
- White fabric paint (or acrylic paint mixed with textile medium)
- Grey fabric paint (optional, or mix black with white)
- Masking tape or painter’s tape
- Round paintbrushes (Size 6 and 10)
- Small flat brush regarding blending
- Sponge dabber (optional)
- Cardboard insert
- Palette or paper plate
- Iron for heat setting
Step 1: Preparation & Layout
-
Prep the fabric:
Begin by washing and drying your denim jacket without using fabric softener. This ensures the sizing is removed and the paint adheres properly to the fibers. -
Protect the layers:
Slide a thick piece of cardboard inside the jacket, positioning it directly behind the back panel where you plan to paint. This prevents any paint from bleeding through to the front. -
Map the sky:
Using masking tape, tape off the vertical seams and the horizontal seam of the upper yolk. This creates a clean ‘frame’ for your artwork, ensuring the clouds don’t look messy by crossing over thick stitching lines. -
Plan your placement:
With a piece of chalk or a very light pencil, sketch loose, organic outlines of where you want your clouds to sit. Aim for about five to six main cloud clusters, keeping them varied in size and spacing.
Diffuse the edges
For ultra-realistic fluffy edges, use a dry sponge to lightly tap the perimeter of your white paint. This achieves a misty, airbrushed effect without needing spray equipment.
Step 2: Painting the Base
-
Mix your base white:
Squeeze a generous amount of white fabric paint onto your palette. If you are using standard acrylics, mix 1 part textile medium to 2 parts acrylic paint thoroughly. -
Apply the first layer:
Using your larger round brush or a sponge dabber, fill in the cloud shapes with a thin, even layer of white. Don’t worry about perfect opacity yet; we just want to establish the shape. -
Build the brightness:
Once the first layer is touch-dry (usually about 15-20 minutes), apply a second coat of white, focusing mainly on the top edges of the clouds where the ‘sunlight’ would hit. -
Soften the edges:
While the white paint is still damp on the edges, use a clean, slightly dry brush to gently feather the paint outward. This creates that fluffy, airy look rather than a hard, sticker-like outline.
Step 3: Adding Depth & Dimension
-
Create a shadow tone:
Mix a very small dot of black or dark blue into your white paint to create a soft, light grey. You want a color only slightly darker than white, similar to a raincloud’s underbelly. -
Paint the underbellies:
Apply this light grey to the bottom curves of your cloud shapes. Use curved brushstrokes that mimic the billowing shape of a cumulus cloud. -
Blend the transition:
I like to take a slightly damp brush and gently drag the grey paint upward into the white areas. This wet-on-wet blending creates a seamless gradient from shadow to light. -
Add high-contrast highlights:
Dip a smaller round brush into pure, unmixed white paint. Dab this onto the very tops and roundest parts of the clouds to create ‘hot spots’ of brightness. -
Refine the texture:
Use a stippling motion (tapping the brush tip texturally) along distinct areas of the cloud to differentiate the puffy sections. This breaks up any large flat areas.
Paint cracking?
If your dried paint feels stiff or cracks, you likely applied layers that were too thick. Next time, mix in more fabric medium or water to keep the paint flexible with the denim.
Step 4: Finishing Touches
-
Clean the seams:
Carefully peel away your masking tape. If any paint bled under the tape near the seams, use a stiff brush dipped in water to scrub it away while fresh, or cover with a tiny dab of denim-colored paint later. -
Inspect the density:
Step back and look at the jacket from a distance. If the clouds look too sheer against the dark denim, add one final layer of white to the brightest centers only. -
Let it cure:
Allow the painted jacket to dry completely flat for at least 24 hours. Do not hang it up yet, as thick paint can sometimes droop while wet. -
Heat set the design:
Place a thin cotton cloth or piece of parchment paper over the dry painted area. Iron on a medium heat setting (no steam) for 3-5 minutes to permanently seal the paint into the fabric.
Now you have a custom piece of sky to wear on your shoulders wherever you go
Tiny Landscape Inside a Back Pocket
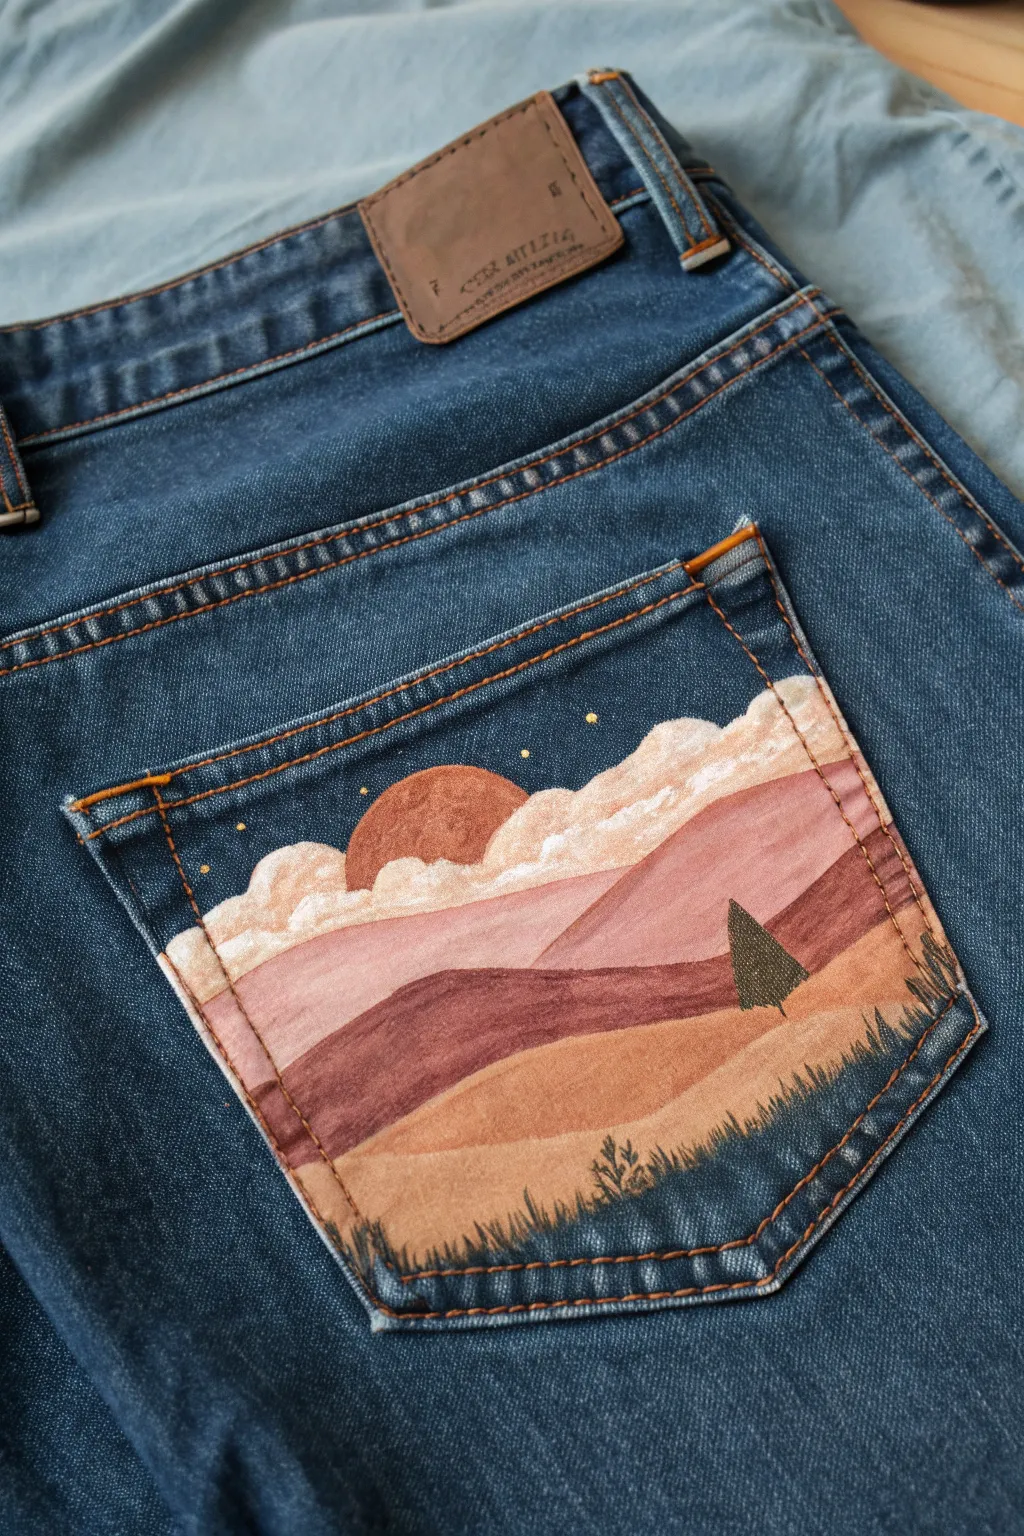
Transform a plain denim pocket into a window to a serene landscape with this warm-toned painting project. The design features rolling hills, a glowing orb, and fluffy clouds, bringing a soft, dreamy aesthetic to your favorite jeans.
Step-by-Step Guide
Materials
- Clean pair of blue jeans (back pocket area)
- White fabric paint or gesso (for priming)
- Fabric medium
- Acrylic paints: Burnt Sienna, Crimson, Ochre, Titanium White, Leaf Green, Black
- Small flat brush (size 4 or 6)
- Fine detail brush (size 0 or 00)
- Cardboard insert
- Masking tape (optional)
- Palette for mixing
- Heat source (iron or hair dryer)
Step 1: Preparation & Priming
-
Protect the layers:
Before you unscrew a single paint cap, slip a piece of stiff cardboard inside the back pocket. This is crucial to prevent paint from seeping through the denim and glueing your pocket shut. -
Define the boundaries:
If you want really crisp edges along the stitching, use masking tape to block off the seams surrounding the pocket panel. Alternatively, you can just paint carefully up to the stitching line for a more organic look. -
Prime the canvas:
Denim is dark and absorbent, so colors won’t pop without a base. Paint the entire rectangular area of the pocket (inside the stitching) with a layer of white fabric paint or gesso mixed with fabric medium. I like to apply two thin coats rather than one thick one to keep the fabric flexible. -
Let it cure:
Allow the white base layer to dry completely. It should feel dry to the touch before you start adding the landscape elements.
Step 2: Painting the Landscape
-
Paint the sky base:
Mix a very dark teal or navy blue using your black, blue, and a touch of green. Paint the top third of the pocket to create the night sky background. -
Create the sun shape:
Mix a warm terracotta color using the burnt sienna and a little white. Paint a half-circle shape just below the dark sky area, slightly off-center to the left, representing the setting sun or moon. -
Add the clouds:
Load a small flat brush with titanium white and a tiny drop of pink or light orange. Using a dabbing motion, create fluffy cloud shapes that overlap the bottom of the sun and drift across the middle section. Keep the top edges of the clouds rounded and soft. -
First hill layer:
Mix a dusty rose color. Paint the farthest range of hills right beneath your cloud line. Use wavy, organic strokes to imply distance. -
Second hill layer:
Deepen your rose mix with a bit of crimson or brown to make a burgundy shade. Paint the middle ground hills, letting them overlap the lighter hills behind them. -
Foreground terrain:
Mix yellow ochre with white and a touch of brown to create a sandy, wheat-colored tone. Paint the largest, bottom-most hill section, filling the space all the way down to the bottom stitching of the pocket.
Softer Clouds
While the white paint is still wet, blend in a tiny bit of the background sky color at the very bottom of the clouds. This creates a shadowy, voluminous 3D effect.
Step 3: Details & Finishing
-
Plant the tree:
Using your fine detail brush and a mix of dark green and black, paint a single, small triangular pine tree on the right side of the tan hill. Use tiny horizontal dashes to mimic branches. -
Add grass texture:
With the same dark green mixture, paint tiny, upward-flicking strokes along the very bottom edge of the pocket. These grassy blades help frame the scene and add depth to the foreground. -
Scatter the stars:
Dip the tip of your smallest brush (or a toothpick) into yellow or gold paint. Dot a few tiny stars into the dark sky area above the clouds. -
Dry thoroughly:
Let the painting sit undisturbed for at least 24 hours to ensure all layers are fully dry. -
Heat set the design:
To make your artwork permanent and washable, place a thin cloth over the dry painting and iron it on a medium heat setting (no steam) for 3-5 minutes. This seals the pigments into the fabric fibers.
Cracking Paint?
If your paint cracks after drying, you likely applied it too thickly. Use fabric medium to thin the acrylics—it increases flexibility so the paint moves with the denim.
Wear your new customized denim with pride, knowing you’re carrying a little piece of nature wherever you go
Ocean Waves Wrapping the Lower Leg
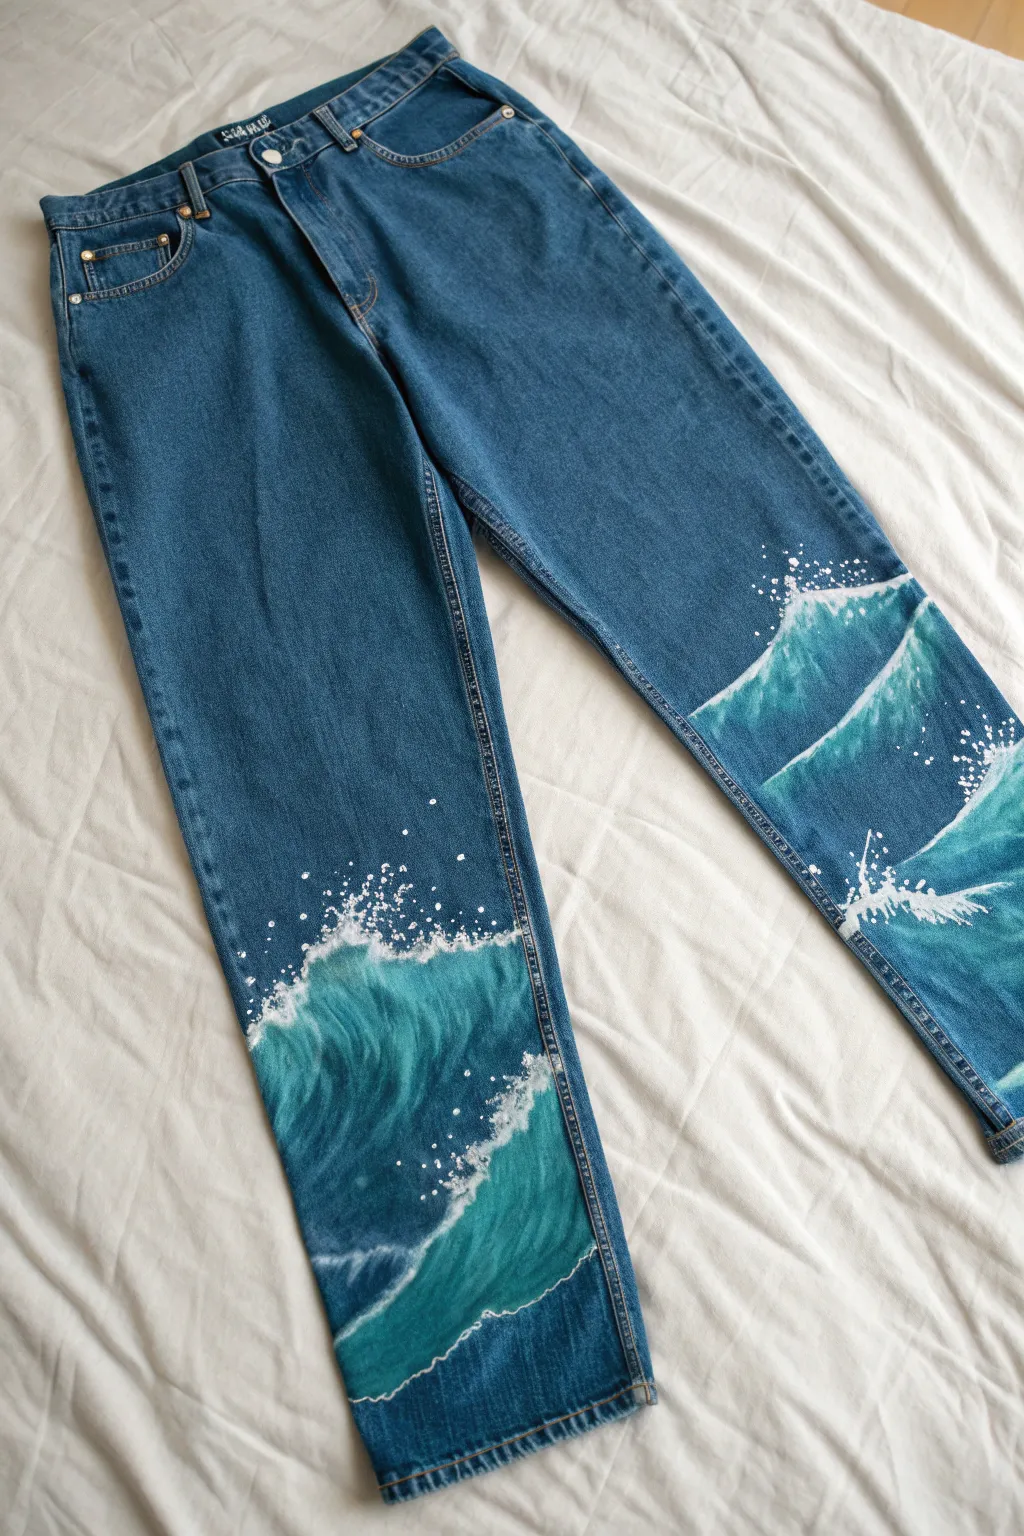
Transform a plain pair of straight-leg denim into a coastal masterpiece with these dynamic, splashing waves that wrap around the lower legs. Using a blend of deep teals and bright whites, this project captures the energy of the ocean right on your hemline.
How-To Guide
Materials
- Pair of medium-wash straight-leg jeans
- Fabric medium
- Acrylic paints (Phthalo Blue, Emerald Green, Titanium White, Black)
- White fabric paint (optional, for extra opacity)
- Flat shader brushes (sizes 8 and 12)
- Small round detail brush (size 0 or 1)
- Cardboard or plastic inserts
- Masking tape (optional)
- Palette or paper plate
- Water cup
Step 1: Preparation and Base Layer
-
Prepare the denim:
Begin by washing and drying your jeans without fabric softener to ensure the paint adheres properly. Slide a piece of cardboard or a plastic barrier inside both pant legs; this is crucial to prevent the paint from bleeding through to the back of the leg while you work. -
Mark the composition:
Lightly sketch the general shape of your waves with a piece of chalk or a white charcoal pencil. Focus on the lower shin area, creating diagonally rising shapes that mimic the surge of water. -
Mix your base color:
Mix equal parts Phthalo Blue and Emerald Green with fabric medium (usually a 1:1 ratio with paint, but check your bottle’s instructions). Add a tiny touch of black to deepen this shade for the darkest parts of the water. -
Apply the dark underpainting:
Using the size 12 flat brush, fill in the main body of the waves with your dark teal mixture. Don’t worry about being perfectly opaque yet; the denim texture showing through slightly actually adds depth. -
Create the gradient:
While the base is still slightly tacky, mix a lighter version of your teal by adding a little white. Apply this to the upper third of the wave shapes, blending downwards into the dark base to simulate light hitting the water’s curve.
Uneven Coverage?
Denim is thirsty! If your first layer looks patchy, don’t pile on thick paint. Let it dry completely, then apply a second thin coat. Two thin layers are flexible; one thick layer cracks.
Step 2: Adding Motion and Foam
-
Define the wave crests:
Mix a bright turquoise using more Emerald Green and White. Use the size 8 flat brush to paint sweeping strokes near the top edge of your wave forms, following the curve you established earlier. -
dry brushing texture:
Take a nearly dry brush with a small amount of the lighter turquoise and lightly drag it horizontally across the dark sections. This creates the illusion of surface ripples without covering your shadow work. -
Start the seafoam:
Switch to your Titanium White (mixed with fabric medium). Using the corner of a flat brush or a round brush, stipple—tap repeatedly—along the very top edge of the wave. This creates the fluffy, aerated look of breaking foam. -
Add falling water lines:
For the water cascading down the face of the wave, use your fine detail brush and watered-down white paint. Paint thin, squiggly lines dragging downward from the foam, fading them out as they reach the darker water below. -
Enhance the brightness:
Once the first layer of white is dry, go back over the thickest parts of the foam with pure white. I find that layering the white gives it a dimensional, impasto effect that looks great on denim.
Step 3: Splashes and Final Details
-
Create the spray:
Dip your smallest detail brush into thinned white paint. Dot tiny specks of paint hovering above the crashing wave crests to represent flying droplets of spray. -
Flick for randomness:
For a more natural spray effect, load a stiff brush with watered-down white paint and carefully flick the bristles with your finger to send a fine mist of droplets onto the denim above the waves. -
Refine the edges:
Check the bottom hem and side seams. Ensure your paint wraps cleanly around the edges if you want the design to look continuous, or use this time to clean up any rough borders. -
Heat set the design:
Allow the jeans to dry for at least 24 hours. Once fully dry, place a clean scrap of cotton cloth over the painted area and iron on a high, dry setting (no steam) for 3-5 minutes to permanently set the paint.
Level Up: Sparkle
Mix a tiny amount of iridescent mixing medium or fine silver glitter glue into your final white highlights. The waves will shimmer subtly when they catch the sunlight.
Now you have a piece of wearable art that captures the movement of the sea with every step you take
Abstract Brushstroke Color Blocks

Transform a standard pair of blue jeans into a wearable piece of abstract art with this bold color-blocking technique. By creating large geometric shapes in harmonious earth tones, you achieve a modern, patchwork aesthetic without sewing a single stitch.
Step-by-Step Tutorial
Materials
- A pair of straight-leg or relaxed-fit blue jeans
- Fabric paint (soft-body or textile medium mixed with acrylics)
- Painter’s tape or masking tape (various widths)
- Flat shader brushes (medium and large sizes)
- White fabric pencil or chalk
- Cardboard insert for legs
- Iron and pressing cloth
- Palette or paper plate
Step 1: Preparation & Planning
-
Prepare the canvas:
Start with clean, pre-washed jeans. Insert a piece of cardboard into each pant leg to prevent paint from bleeding through to the back side and to provide a firm surface for painting. -
Sketch the design:
Using a white fabric pencil or chalk, lightly map out your geometric zones directly onto the denim. Focus on creating large, angular shapes like trapezoids and triangles that span across the thigh and calf areas. -
Align with anatomy:
Try to align some of your lines with the natural structure of the jeans, such as parallel to the side seams or perpendicular to the hem, which makes the design look intentional and structured. -
Define the first edges:
Apply painter’s tape along the straight lines of your first chosen shape. Press the edges of the tape down firmly with your fingernail or a credit card to ensure a crisp seal against the fabric texture.
Step 2: Applying the Base Colors
-
Prime the cream sections:
For the lightest sections, like the cream patch on the upper thigh, paint a thin base layer of white fabric paint first. This neutralizes the blue denim so your top color will pop without requiring ten coats. -
Mix your palette:
Prepare your colors on a palette. Aim for an earthy, muted scheme: terra cotta, sage green, dusty pink, and tan. If using acrylics, mix them 1:1 with textile medium to keep the fabric soft. -
Paint the first block:
Load a large flat brush and fill in your first taped-off section. Use long, smooth strokes, brushing away from the tape edge inward to minimize paint seeping underneath. -
Let it tack:
Allow the first layer to dry until it feels tacky but not wet. If the denim blue is still showing through significantly, apply a second coat immediately. -
Remove tape carefully:
While the paint is still slightly damp (not fully dry), slowly peel back the painter’s tape at a sharp angle. This prevents the dried paint film from cracking or lifting at the edges.
Seal the Paint Line
Before painting your color, brush a tiny bit of clear fabric medium or the base paint color along the tape edge first. This seals any gaps so your clean lines stay razor sharp.
Step 3: Layering Adjacent Shapes
-
Wait for full dryness:
It is crucial to let your first shapes dry completely before taping over them. I usually wait at least an hour or use a hair dryer on a cool setting to speed this up. -
Tape overlapping zones:
Apply new tape for the adjacent color blocks. For areas where colors touch (like the pink meeting the terra cotta), place the tape precisely over the edge of the already-painted section to get a gapless seam. -
Painting the earth tones:
Fill in the terra cotta and sage green sections. These darker colors generally cover the denim better than the cream, but still aim for two thin, even coats rather than one thick, gloopy one. -
Handling texture:
Work the paint into the weave of the denim. You want the color to bond with the fibers, so use a firm hand with your brush to push the pigment into the grooves of the twill. -
Create the raw edge effect:
For the cream patch on the upper left thigh, use a smaller brush to create a slightly feathery, uneven top edge to mimic the look of a frayed fabric patch, rather than a taped hard line.
Stiff Painted Fabric?
If the painted areas feel too stiff after drying, tumble the jeans in the dryer on low heat with a couple of dryer balls. This breaks the stiffness and softens the fabric paint.
Step 4: Finishing Touches
-
Review and touch up:
Once all blocks are painted and tape is removed, scan the jeans for any uneven edges or spots where the denim shows through. Use a small detail brush to tidy up lines freehand if necessary. -
Dry completely:
Let the jeans sit undisturbed for at least 24 hours. The paint needs this time to cure fully before it interacts with heat or water. -
Heat set the design:
Turn the jeans inside out. Place a pressing cloth over the painted areas on the inside and iron on a cotton setting (no steam) for 3-5 minutes per section to heat-set the design permanently.
Enjoy styling your new statement denim with a simple white tee to let your artwork take center stage.
Paint Splatter Galaxy on Black Denim
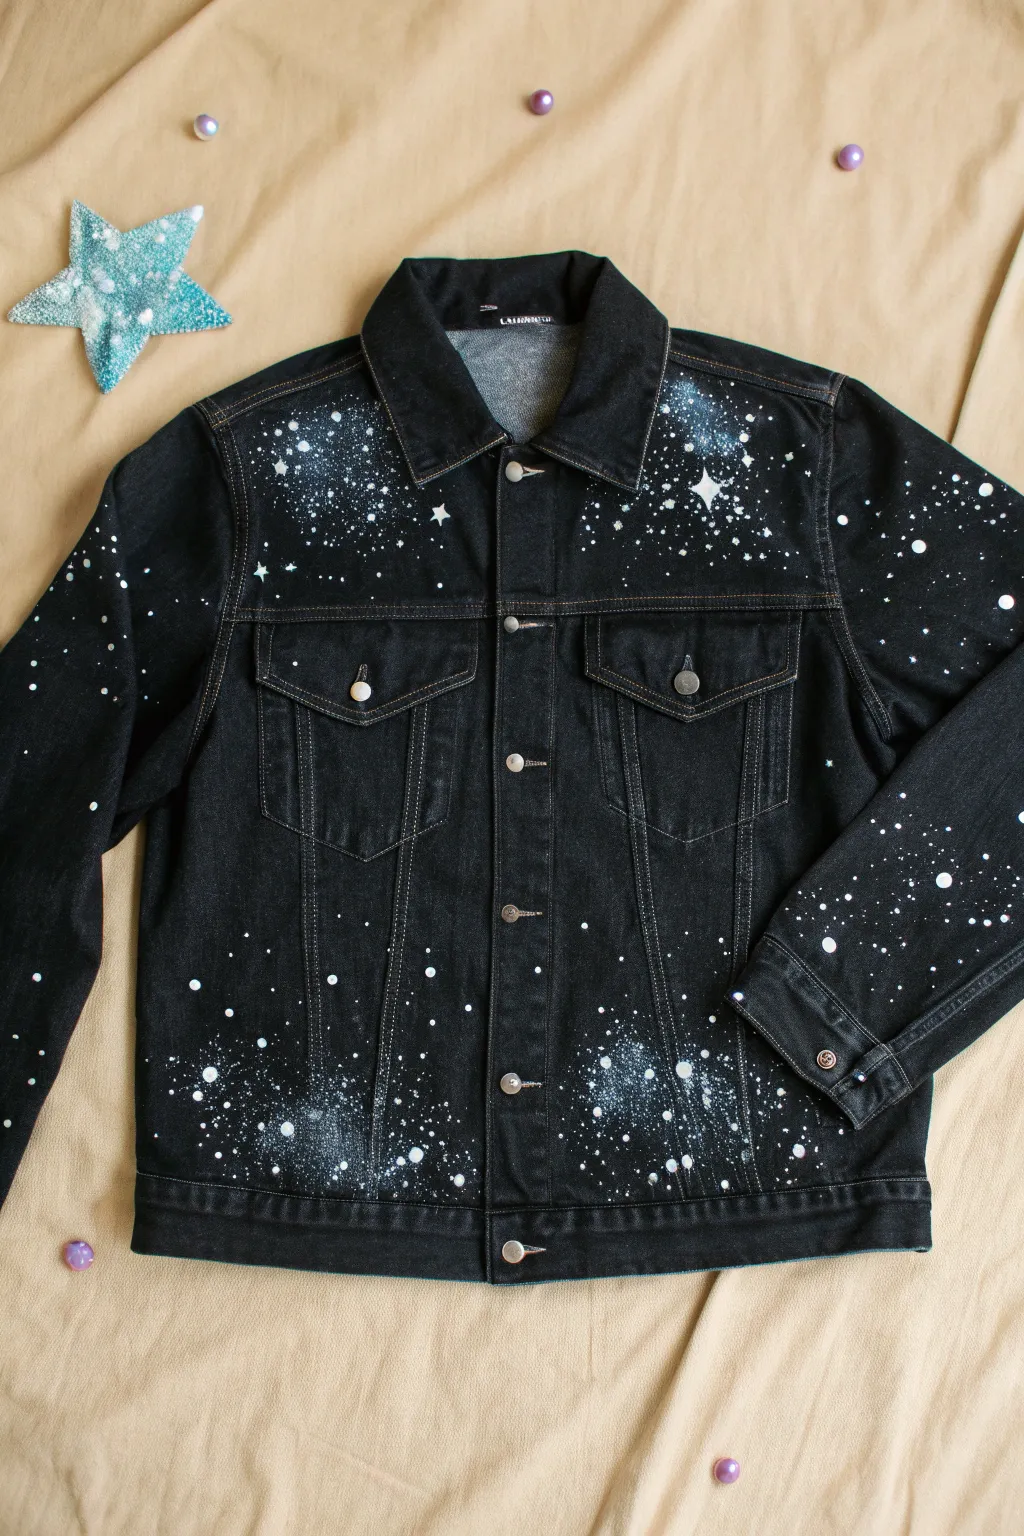
Transform a plain black denim jacket into a wearable piece of the night sky with this galaxy-inspired splatter technique. By layering misty nebulas with sharp constellations, you’ll create depth and movement that looks lightyears ahead of basic fabric painting.
Step-by-Step Guide
Materials
- Black denim jacket (washed and dried)
- White fabric paint (high opacity)
- Fabric painting medium (optional, for softer feel)
- Water container for thinning
- Old toothbrush
- Stiff bristle brush (small to medium)
- Fine detail brush (size 0 or 00)
- Cardboard or plastic bags (to protect work surface and inside jacket)
- Paper towels
- Palette or paper plate
Step 1: Preparation & Foundation
-
Protect your workspace:
Lay down a generous amount of newspaper or a drop cloth on your table. Fabric paint is permanent, and this splatter technique is notoriously messy, so you’ll want a wide safety zone. -
Prepare the jacket:
Button up the jacket fully. Slide a large piece of cardboard or a plastic bag inside the jacket body and sleeves. This prevents the paint from bleeding through to the back or the lining. -
Mix the nebula base:
Squeeze a dollop of white fabric paint onto your palette. Mix in a very small amount of water—just enough to make it the consistency of heavy cream. You don’t want it too watery, or it will soak in and disappear. -
Create the misty nebulas:
Dip your stiff bristle brush into the slightly thinned paint and dab most of it off onto a paper towel until the brush is almost dry. I find a circular scrubbing motion works best here. -
Build the hazy clusters:
Gently scrub the dry brush onto the shoulders and the lower hem area. Focus on creating cloudy, uneven patches rather than solid white spots. This creates the distant ‘glow’ of the galaxy.
Step 2: Splatter & Stars
-
Load the toothbrush:
Dip an old toothbrush into your white paint. It should be fully loaded but not dripping wet. Test the consistency on a scrap piece of cardboard first to ensure you get specks, not globs. -
Flick the spray:
Hold the toothbrush near the jacket areas where you painted the misty clouds. Run your thumb quickly across the bristles to flick a spray of fine dots onto the denim. Aim specifically for the upper yoke and shoulders. -
Vary the density:
Apply heavy splatters over the white misty areas to intensify them, and lighter, sparse splatters on the black negative space. This contrast creates crucial depth. -
Add larger stars:
Dip the handle end of a paintbrush into the white paint. Dot it onto the denim to create larger, distinct round stars scattered among the fine mist. -
Paint the four-point stars:
Switch to your fine detail brush. Select a few of the larger dots you just made and carefully pull the paint outward in four directions—up, down, left, and right—to create cross-shaped glimmer stars. -
Detail the sleeves:
Repeat the splatter process on the sleeves, concentrating the heaviest amount of ‘stars’ near the cuffs and fading them out as you move up toward the elbow. -
Review the composition:
Step back and look at the jacket as a whole. If an area looks too empty, add a few more toothbrush flicks. If an area looks too uniform, add a large hand-painted star to break it up.
Splatter Control
Is the toothbrush creating streaks instead of dots? The paint is too thick. Add water drop by drop until it flicks easily. If dots are huge blobs, the paint is too thin or the brush is overloaded.
Step 3: Finishing Touches
-
Let it dry completely:
Allow the jacket to sit undisturbed for at least 24 hours. The thicker dots of paint will take significantly longer to dry than the fine mist. -
Heat set the design:
Once fully dry, turn the jacket inside out (or place a pressing cloth over the design) and iron it on a medium heat setting without steam for 3-5 minutes to permanently set the paint.
Pro Tip: Depth Illusion
For a true 3D effect, mix a tiny drop of light blue or purple into your white paint for the first layer of ‘mist’ clouds, then use pure bright white only for the sharp stars on top.
Now you have a custom cosmic jacket ready for your next nighttime adventure


Have a question or want to share your own experience? I'd love to hear from you in the comments below!