When I pick up a 3D pen, I’m basically drawing in the air—and it never stops feeling like magic. Here are my favorite 3D pen ideas that look impressive fast, but still feel totally doable at your kitchen table or studio desk.
Trace-and-Peel Flat Shapes
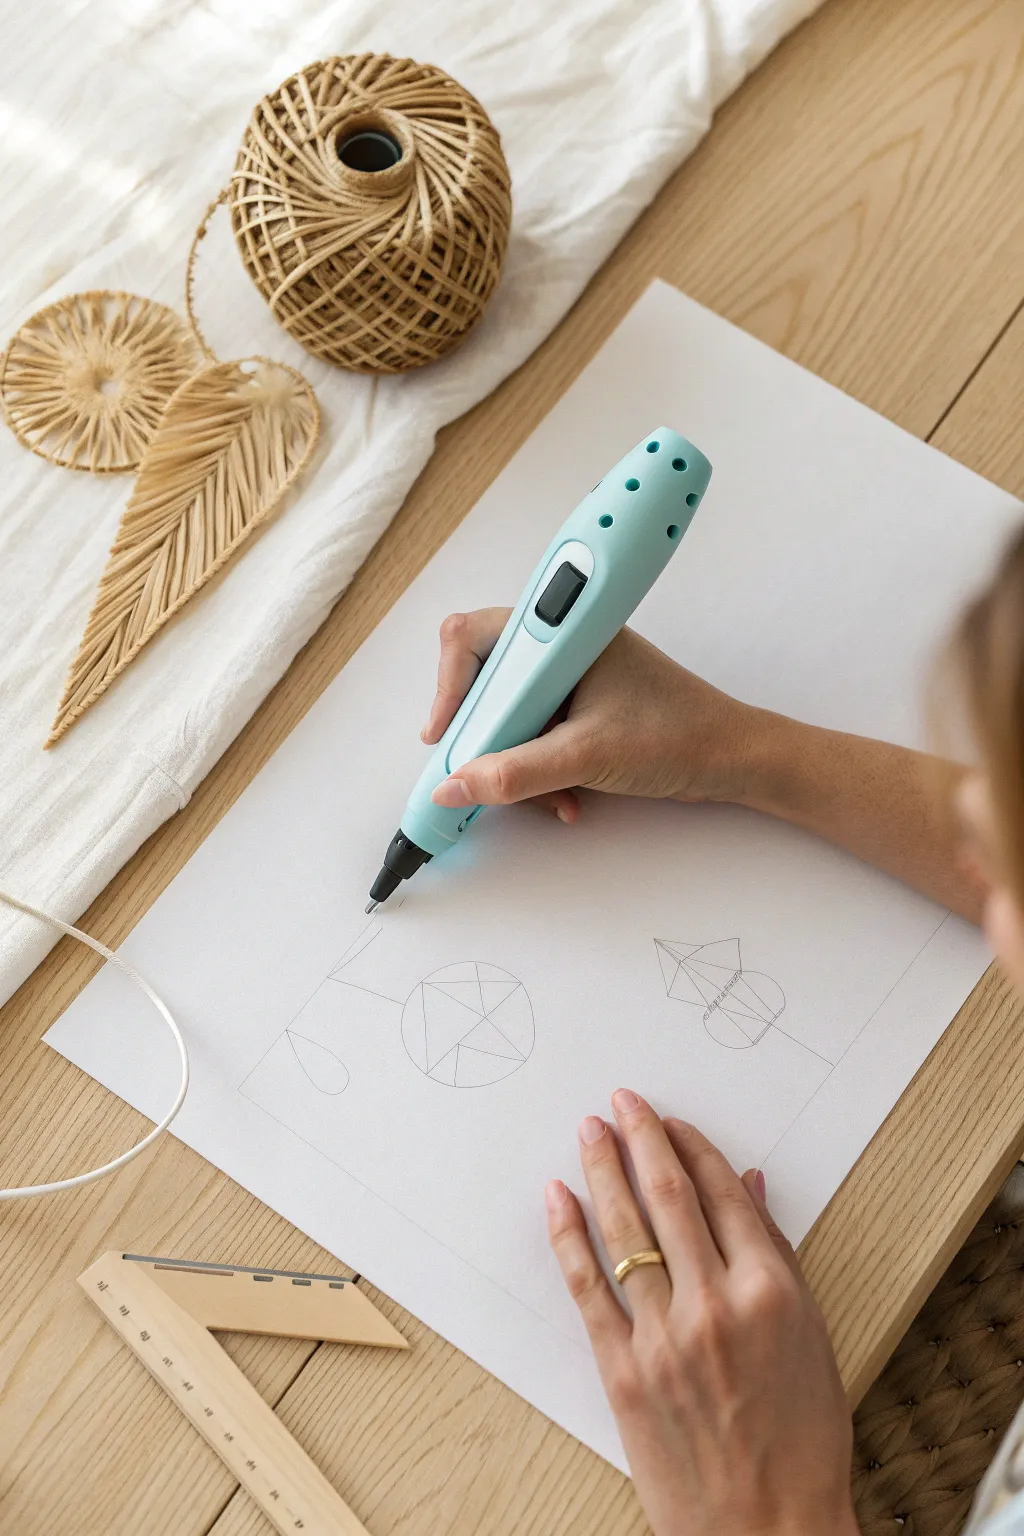
Master the fundamentals of 3D pen art by starting with flat, geometric designs traced directly on paper. This beginner-friendly project creates crisp, sturdy outlines that can be peeled up and used as decorative elements or assembled into larger structures.
Step-by-Step Guide
Materials
- 3D pen (light blue model shown, or similar)
- PLA or ABS filament in desired colors
- Clean white paper or cardstock
- Pencil for sketching
- Ruler or triangle tool
- Heat-resistant mat (optional, to protect table)
- Scissors (for trimming filament ends)
Step 1: Preparation & Sketching
-
Plug in and preheat:
Connect your 3D pen to a power source. Select the correct temperature setting for your filament (usually higher for ABS, lower for PLA) and allow it to reach operating temperature. -
Load the filament:
Insert your chosen filament strand into the loading port. Press the feed button until the melted plastic starts to extrude smoothly from the nozzle. -
Prepare the drawing surface:
Lay a sheet of clean white paper on a flat, hard surface. Ensure your workspace is well-lit and comfortable for drawing. -
Draft the guide shapes:
Using a pencil and ruler, lightly sketch your geometric designs. Start with simple shapes like a pentagon inside a circle, or a diamond lattice pattern. -
Refine the lines:
Go over your sketch with the pencil to ensure the lines are dark enough to see clearly through the plastic later, but not so dark they smudge messy graphite everywhere.
Step 2: Tracing the Design
-
Test the flow:
Before touching the paper, extrude a small amount of plastic onto a scrap area to ensure the flow is consistent and not sputtering. -
Anchor the start:
Place the nozzle tip gently against the paper at a corner of your design. Press the extrude button and let a small dot form to anchor the line. -
Draw the main outline:
Move the pen steadily along the pencil lines. Keep the nozzle close to the paper—almost touching it—to flatten the plastic slightly as it lays down. -
Maintain consistent speed:
Try to match your hand speed to the extrusion speed. If you move too fast, the line will thin and break; too slow, and it will blob. -
Connect the corners:
When reaching a corner, pause for a split second to let the plastic harden slightly before changing direction. This creates a sharp, crisp angle. -
Fill internal geometry:
Trace the interior lines, such as the star pattern inside the pentagon. Ensure these new lines physically fuse with the outer border for structural integrity.
Clean Corner Tip
Pause the extrusion for just a second at every vertex. This allows the corner to cool slightly, acting as a solid anchor point before you pull the pen in a new direction.
Step 3: Finishing Touches
-
Cool down:
Once the tracing is complete, allow the plastic to cool completely. This usually takes only a few seconds for PLA, but wait a minute to be safe. -
Peel the paper:
Gently bend the paper away from the plastic. If it sticks, you can dampen the back of the paper slightly with water to help release the fibers. -
Trim imperfections:
Use small scissors or wire cutters to snip off any stringy tails or sharp blobs where you started and stopped the flow. -
Flatten if needed:
If the shape curled slightly during cooling, you can press it under a heavy book for a few minutes to straighten it out.
Go 3D!
Create multiple traced shapes (like squares or triangles) and then use the 3D pen to ‘weld’ their edges together standing up. You can build cubes, pyramids, or hanging mobiles.
You now have a perfect geometric plastic piece ready to be hung or combined into a larger sculpture


Geometric Coasters
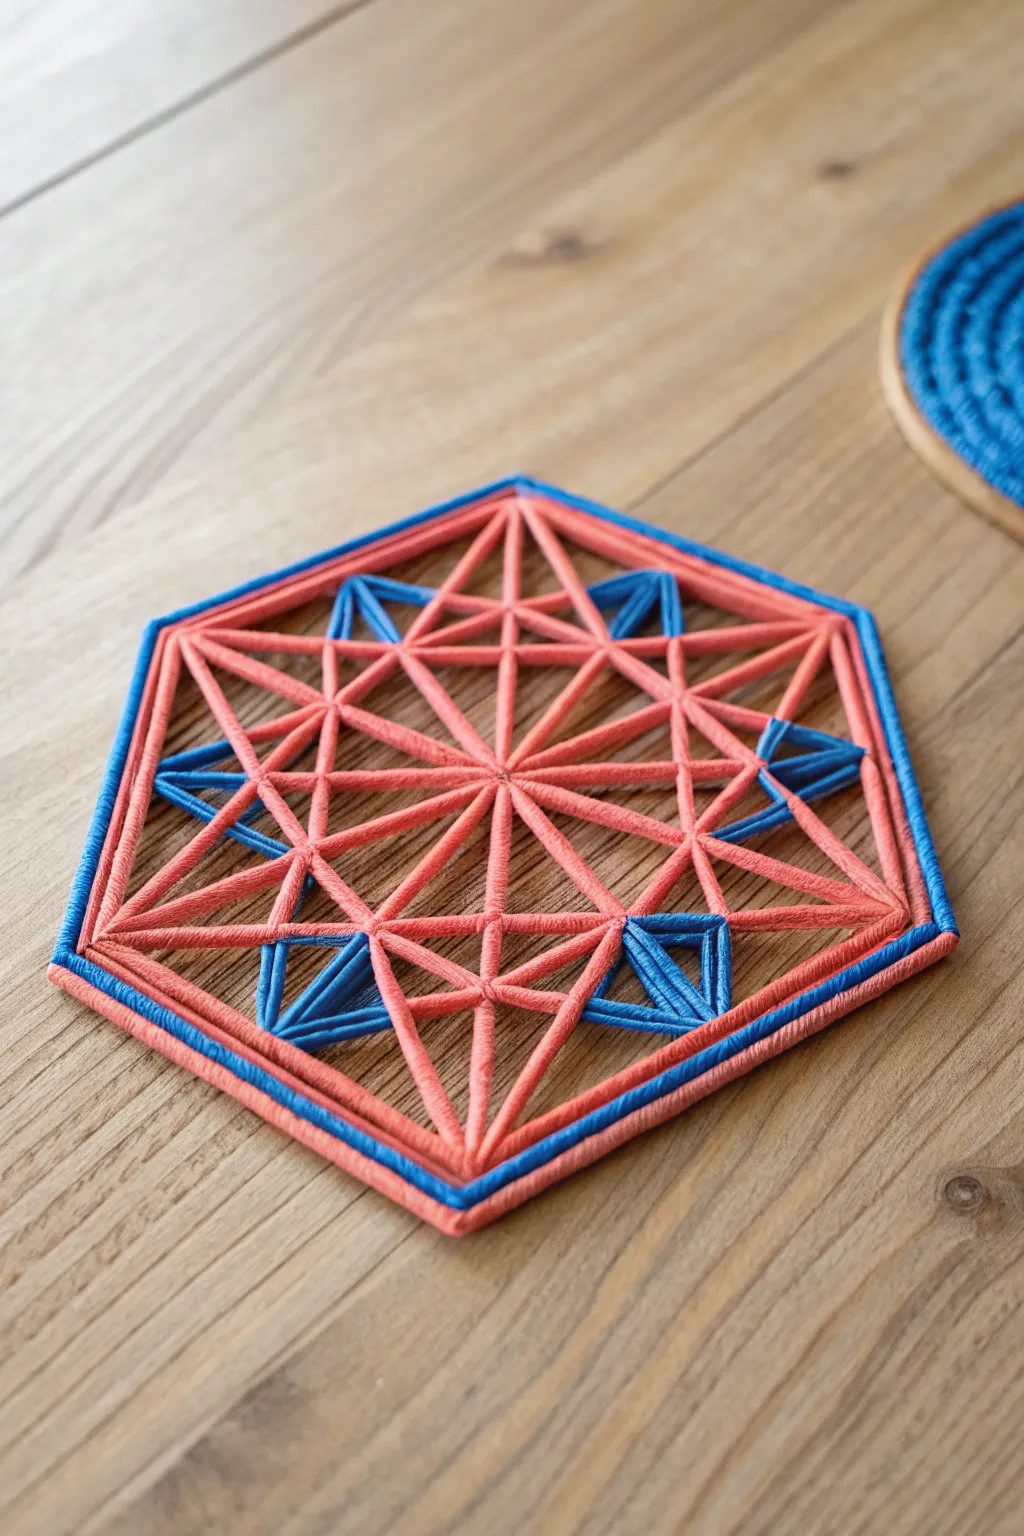
Master the art of structure with this intricate hexagonal coaster, featuring a stunning interplay of salmon pink and deep sky blue filaments. This geometric design combines rigid triangles and radiating lines to create a sturdy, functional, and visually mesmerizing piece for your coffee table.
Step-by-Step
Materials
- 3D Pen (compatible with PLA or ABS)
- PLA Filament: Salmon Pink (or Coral)
- PLA Filament: Deep Sky Blue
- Pencil and Ruler
- Paper (for drawing the template)
- Heat-resistant mat or glass surface (to work on)
- Clear Tape (to secure the template)
- Small scissors or flush cutters (for trimming)
Step 1: Drafting the Template
-
Draw the Outline:
Begin by drawing a perfect hexagon on your paper. A side length of about 2 to 2.5 inches works well for a standard coaster size. Use a ruler to ensure all six sides are equal. -
Find the Center:
Draw light lines connecting opposite corners of the hexagon to locate the exact center point where they intersect. -
Draw the Star Pattern:
Sketch a six-pointed star (hexagram) inside the main hexagon by drawing an inverted triangle and an upright triangle. Their points should touch the midpoints of the outer hexagon’s sides. -
Add Radiating Lines:
Connect the center point to each of the six outer corners of the hexagon, creating the wheel-spoke effect seen in the reference. -
Finalize Template Details:
Draw the smaller internal triangles within the star points where the blue accents will go. Place your template under your heat-resistant mat or glass, or tape it down and cover with a transparent work surface.
Stay Straight
For perfectly straight lines, use a metal ruler as a physical guide. Run the nozzle tip gently along the edge, but don’t hold it there too long or the plastic will stick to the metal.
Step 2: Tracing the Pink Structure
-
Warm Up and Prime:
Load your salmon pink filament and set your 3D pen to the appropriate temperature. Extrude a little scrap material to ensure the flow is smooth. -
Create the Outer Frame:
Trace the outer perimeter of the hexagon first. I like to go around twice to make this outer rim thick and durable. -
Draw the Inner Frame:
Just a few millimeters inside the outer rim, trace a second inner hexagon. This double-line border creates the channel for the blue accent later. -
Anchor the Center:
Place a solid dot of filament at the very center of the design to serve as an anchor point for all the connecting lines. -
Connect Spokes:
Draw straight lines from the center anchor to each of the six corners of the inner hexagon frame. -
Form the Star:
Trace the triangles that form the six-pointed star pattern. Move slowly to keep lines straight, lifting the pen slightly at the end of each segment to prevent dragging. -
Reinforce Intersections:
Go over the main structural lines (the spokes and the star) a second time to build height and strength.
Step 3: Adding the Blue Accents
-
Switch Filament:
Unload the pink filament and load the deep sky blue. Purge the pen until the color runs completely pure blue. -
Fill the Border:
Carefully fill the gap between the two outer pink hexagon lines with blue filament. This creates the distinct blue rim. -
Identify Accent Triangles:
Locate the small triangular gaps formed near the outer edges, between the star points. In the reference image, these are specific triangles, not all of them. -
Fill Accent Zones:
Fill these specific triangles with blue lines. You can use a back-and-forth hatching motion to create a solid fill, or draw concentric triangles inward for a cleaner look. -
Clean Up:
Once the blue areas are done, check for any stringy bits or ‘angel hair’ filament strands spanning across the gaps.
Warping Fix
If the coaster starts curling up as it cools, press it under a heavy book while it’s still slightly warm. Leave it there for 10 minutes to ensure it sets perfectly flat.
Step 4: Finishing Touches
-
Inspect and Strengthen:
Switch back to pink filament if you notice any weak connections in the main structure. Add small dabs of plastic to reinforced joints. -
Flatten the Surface:
If the top surface feels too rough or uneven (which can make cups wobble), you can carefully press the coaster (face down) onto a slightly warm surface to level it out, or use a flat ironing tool. -
Trim Edges:
Use your flush cutters to snip off any sharp points or stray blobs on the outer rim to ensure a clean geometric silhouette.
Now you have a striking geometric coaster ready to protect your surfaces.


Simple Wall Decal Silhouettes
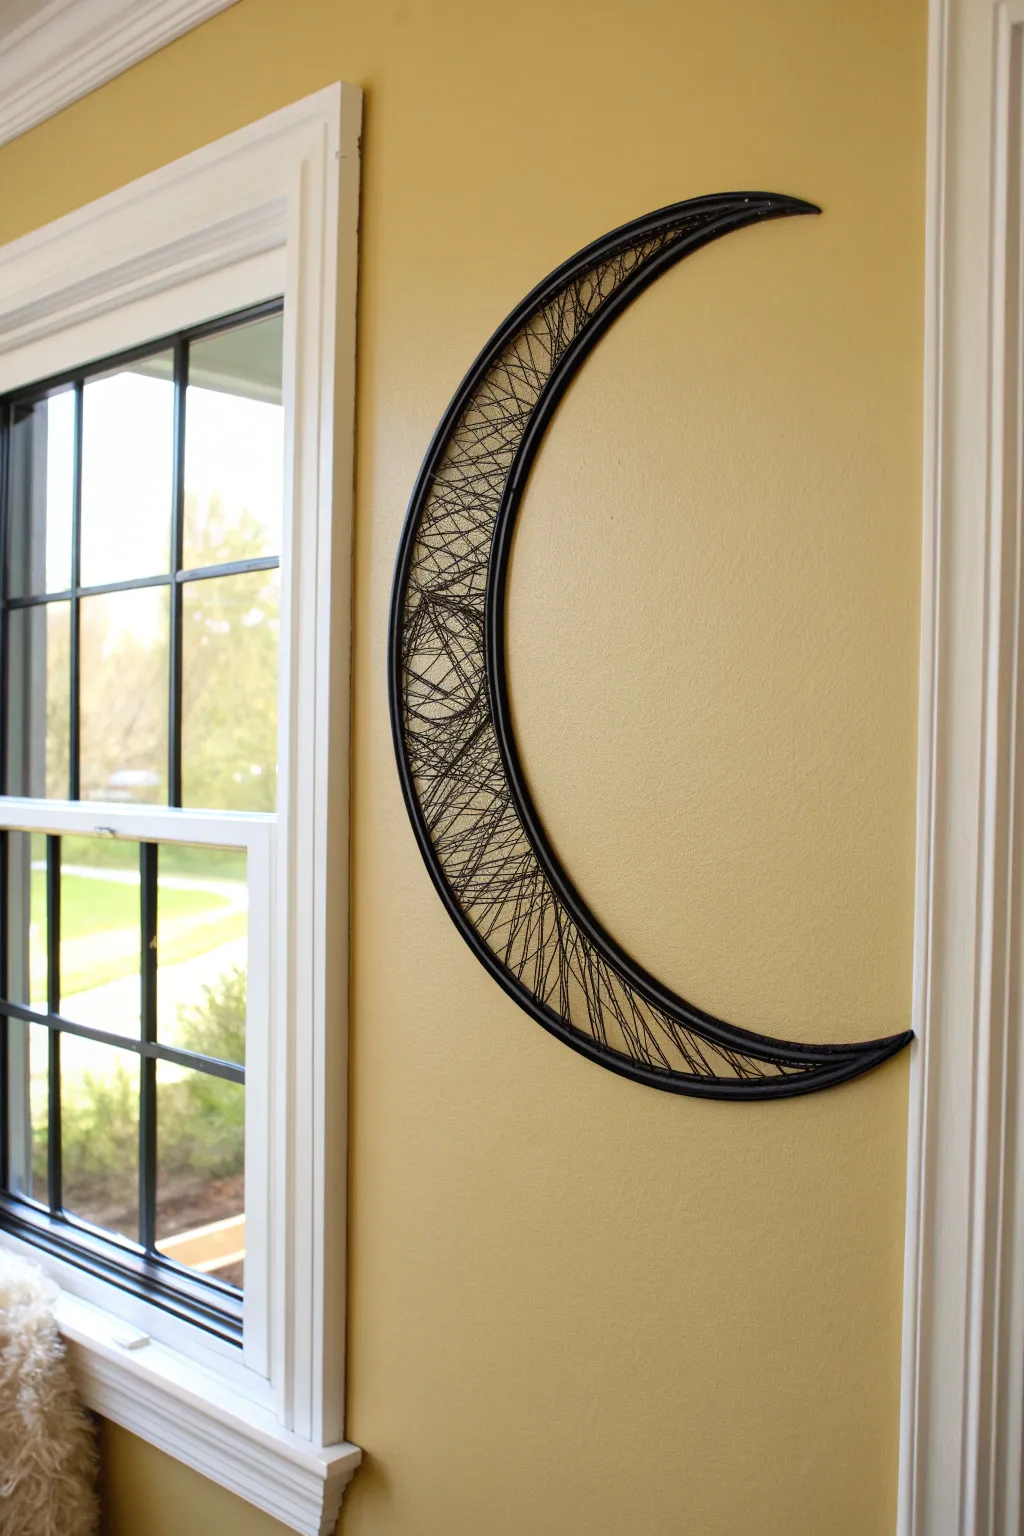
Create a striking piece of wall decor using just your 3D pen and a bit of patience. This intricate crescent moon mimics the look of modern string art but is entirely free-standing and lightweight, perfect for adding a celestial touch to any room.
Step-by-Step Guide
Materials
- 3D Pen
- Black PLA filament (or color of choice)
- Large sheet of paper or poster board
- Pencil
- Clear heavy-duty tape or painter’s tape
- Heat-resistant work surface (glass mat or silicone pad)
- Scissors
Step 1: Planning and Template Creation
-
Draft your shape:
Start by drawing a large crescent moon shape onto your poster board or paper. Ensure the curve is smooth and meets your size requirements for the wall space. -
Refine the outline:
Go over your pencil lines with a marker to make them distinct. The outer curve and inner curve should taper gracefully to sharp points at the top and bottom. -
Prepare the surface:
If you don’t have a large enough silicone mat, cover your paper template completely with clear heavy-duty packing tape. This creates a non-stick surface that the plastic will peel off of easily later. -
Secure the template:
Tape down the corners of your template to your work table so it doesn’t shift while you work.
Clean Lines
To prevent ‘spiderwebs’ (stringy wisps) when pulling the pen away, stop extruding and wait one second for the plastic to cool before jerking the pen tip upwards.
Step 2: Tracing the Frame
-
Heat up the pen:
Load your black PLA filament and set your specialized 3D pen to the appropriate temperature setting, usually around 190°C–210°C for PLA. -
Draw the outer perimeter:
Begin by tracing the very outer line of the crescent moon. Move slowly to ensure a thick, solid line. -
Thicken the frame:
Go over this outer line 3 or 4 more times. You want the border to be structurally sound, essentially creating a rigid plastic wire. -
Draw the inner perimeter:
Repeat the process for the inner curve of the moon. Trace the line, then reinforce it with multiple passes until it matches the thickness of the outer frame. -
Connect the tips:
Pay special attention to the top and bottom points where the two curves meet. Fill these points in solidly with plastic so they don’t snap off.
Step 3: Creating the Webbing
-
Begin the string effect:
Anchor your filament to the inner frame edge, then draw a straight line across to the outer frame. Hold the pen in place for a second to fuse the connection. -
Create zigzag patterns:
Continue moving back and forth between the two frames. Don’t make the lines perfectly parallel; angle them slightly to start building a chaotic web. -
Layer the lines:
Once you have a base layer of zigzags, go back over the area with lines crossing in the opposite direction. This overlapping creates tension and strength. -
Vary the density:
I prefer to make some areas dense with filament lines and leave other spots more open and airy. This random distribution looks more artistic and organic. -
Check connections:
As you work your way down the moon, gently press on the fresh filament strands to ensure they are truly bonding to the main frame and to each other. -
Fill the length:
Continue this cross-hatching technique until the entire interior of the crescent is filled with your plastic ‘string’ patterns.
Cosmic Glow Up
Switch to glow-in-the-dark filament for the inner webbing while keeping the frame black. During the day it looks standard, but at night it will glow softly.
Step 4: Finishing Touches
-
Reinforce weak spots:
Hold the artwork up to the light to spot any areas that look too thin or unconnected. Add a few more strands across these gaps for stability. -
Cool down:
Let the entire piece sit for at least 5-10 minutes to ensure the plastic is completely cool and rigid. -
Peel and clean:
Carefully peel the moon off your taped surface or silicone mat. Use scissors or wire cutters to snip off any tiny wisps of filament or sharp spurs on the edges. -
Mounting mechanism:
Flip the moon over. Use a small dab of hot filament to create a tiny loop on the back near the top center for hanging, or simply plan to use double-sided wall tape.
Hang your lunar creation near a window or light source to cast intricate shadows across your wall


Lightweight Statement Earrings
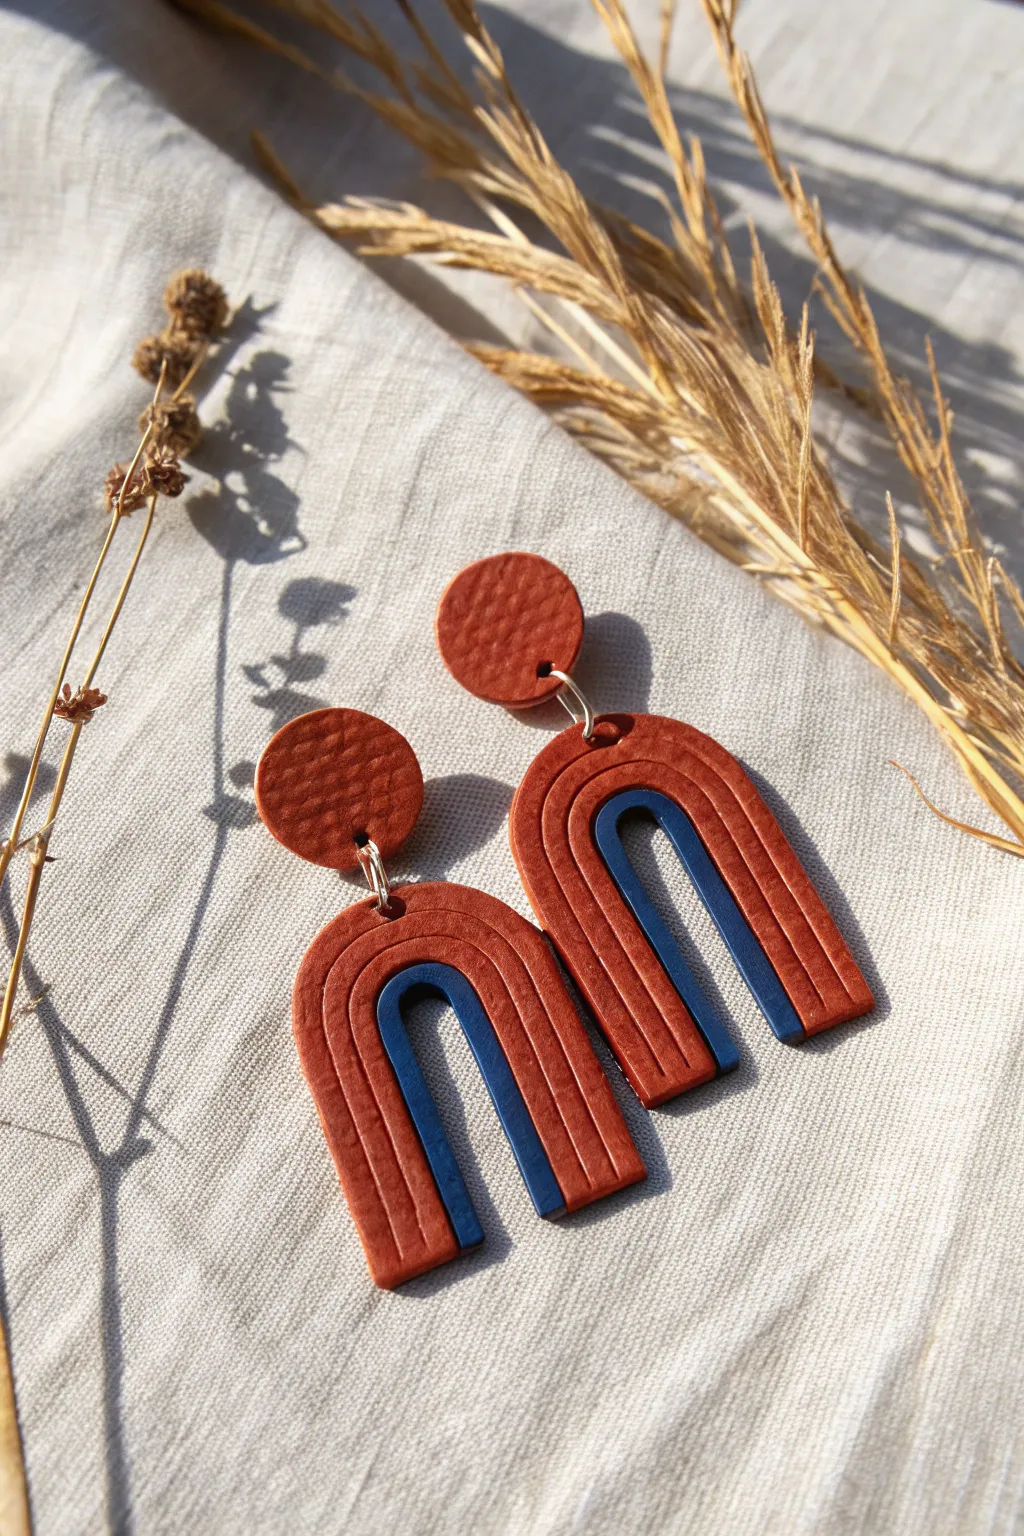
These stylish earrings mimic the trendy look of polymer clay but stand out with their featherlight weight thanks to absolute precision with a 3D pen. The design features a classic arch shape with a rich terracotta texture hugging a sleek navy core.
Detailed Instructions
Materials
- 3D Pen
- PLA Filament (Terracotta/Burnt Orange)
- PLA Filament (Navy Blue)
- Drawing mat or template (paper under glass)
- Sandpaper (fine grit)
- Earring posts and backs
- Jump rings (silver or gold)
- Jewelry pliers
- Small textured object (like a piece of leather or rough fabric) for stamping
- Heat tool or lighter (optional)
Step 1: Drafting the Design
-
Create a Template:
Sketch your design on a piece of paper first. Draw a large ‘U’ shape for the outer arch (about 1.5 inches tall) and a smaller nested ‘U’ shape inside it, leaving a small gap between them. -
Prepare the Surface:
Place your paper sketch under a clear drawing mat or a piece of glass. This ensures your hot filament won’t stick to the paper but you can still follow the lines. -
Add Stud Circles:
Above each arch drawing, sketch a simple circle (about 1 cm diameter) which will serve as the stud part of the earring.
Step 2: Creating the Navy Core
-
Outline the Inner Arch:
Load your navy blue filament. Trace the outline of the smaller, inner ‘U’ shape carefully. Go slowly to ensure clean lines. -
Fill the Navy Shape:
Fill in the navy outline using a tight back-and-forth motion. Aim for a solid, gap-free fill, but try to keep the layer relatively thin so the earrings remain lightweight. -
Smooth the Surface:
While the filament is still warm (or by briefly reheating with a heat tool), press down gently with a flat metal tool or spatula to flatten the top surface.
Tip: Texture Timing
Work in small sections for the texture step. PLA cools rapidly, so stamp the texture immediately after extrusion for the deepest impression.
Step 3: crafting the Terracotta Frame
-
Switch Filament:
Unload the navy and load the terracotta or burnt orange filament. Purge the pen on a scrap piece until the color runs purely orange. -
Outline the Outer Arch:
Trace the larger outer ‘U’ shape. It should fit snugly around the navy piece you just made, perhaps even touching it to fuse them, or you can join them later. -
Fill the Terracotta:
Fill the terracotta section generously. For this part, you want a slightly thicker layer than the navy core to create dimension. -
Create the Studs:
Move to the circle sketches above and fill them in completely with the terracotta filament. -
Add Texture:
Here is where the magic happens. Immediately after filling a small section of the terracotta (while it’s still hot and pliable), press your textured material (leather scrap or rough fabric) onto the filament. -
Detailing the Texture:
Repeat the texture stamping process until the entire terracotta surface has a matte, leathery finish rather than the shiny plastic look of standard PLA. -
Add Faux Grooves:
Take the hot nozzle and gently drag it vertically through the terracotta arch three or four times to create the decorative vertical lines seen in the design.
Level Up: Stone Effect
Use ‘speckled’ or ‘granite’ style filament instead of solid colors. It mimics real stone or pottery incredibly well for this specific design.
Step 4: Assembly and Finish
-
Cool and Peel:
Allow the plastic to cool completely. Gently peel the shapes off your drawing mat. -
Fusion Check:
If your navy and terracotta arches aren’t connected, use the 3D pen on the backside to add a tiny bridge of filament connecting them securely. -
Refine Edges:
Use fine-grit sandpaper to smooth any rough outer edges or stray strands of filament. -
Make Holes:
Using the hot tip of the pen (or a heated needle), carefully poke a hole at the top center of the main arch and the bottom center of the stud circle. -
Attach Hardware:
Use your pliers to open a jump ring and connect the stud circle to the main arch body. -
Secure Posts:
Flip the stud circles over. Add a small dollop of hot filament (or strong glue) to the back and press the metal earring post into it firmly.
Now you have a pair of custom, architectural earrings that look heavy but feel light as a feather to wear
BRUSH GUIDE
The Right Brush for Every Stroke
From clean lines to bold texture — master brush choice, stroke control, and essential techniques.
Explore the Full Guide
Headband or Hair Clip Toppers
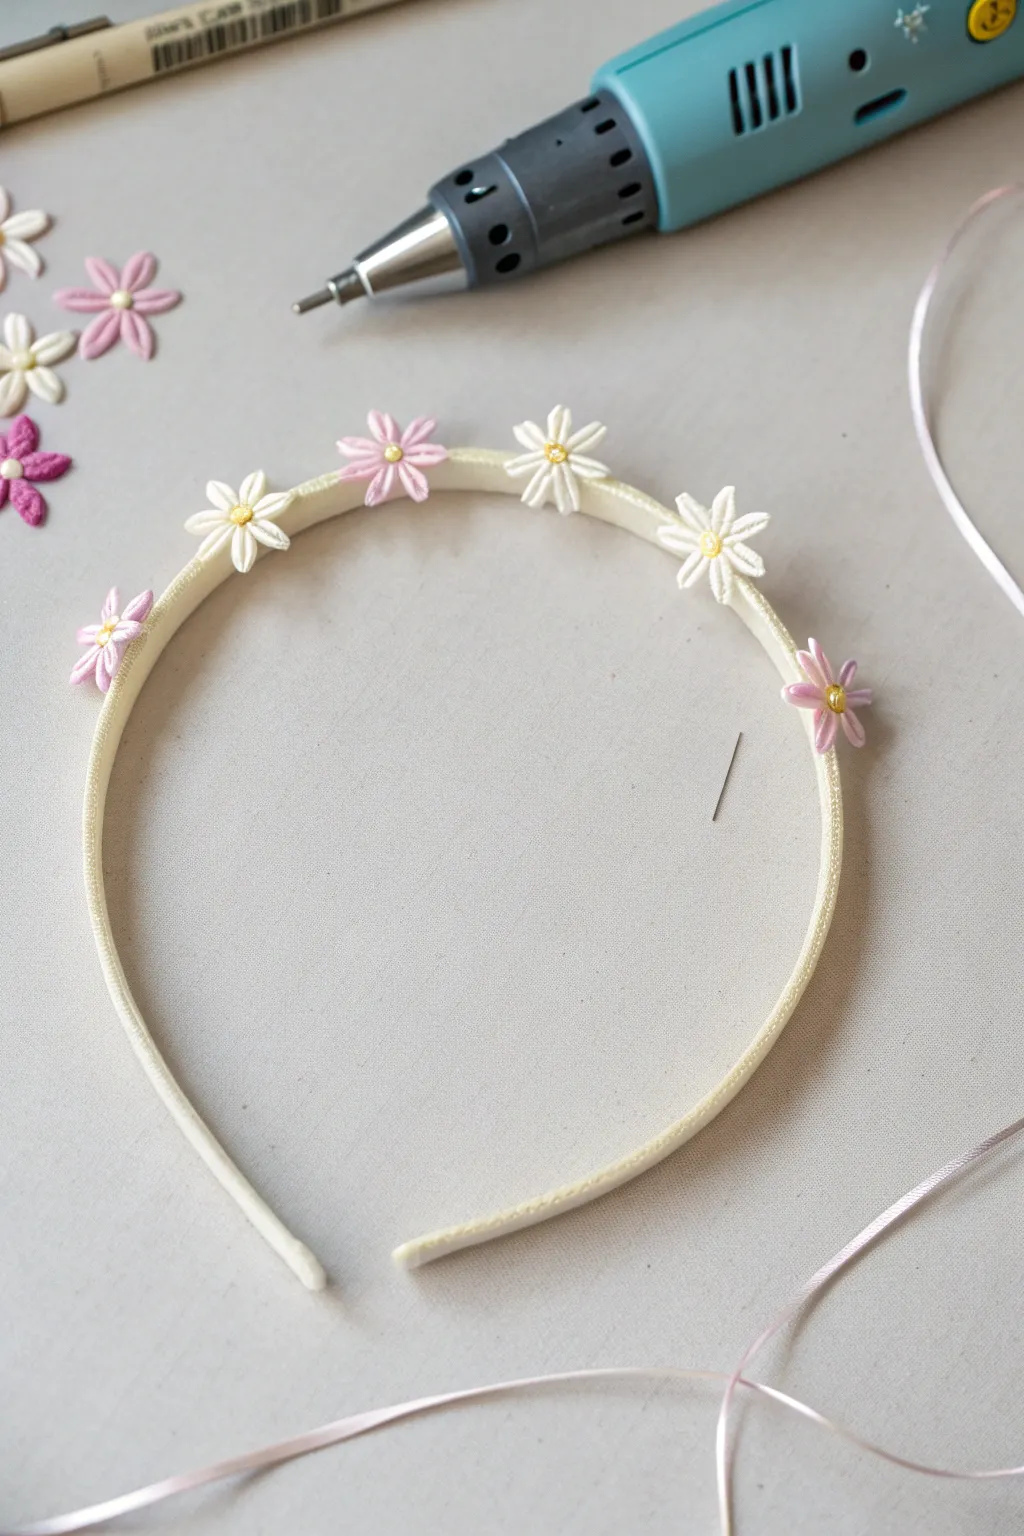
Transform a plain headband into a delicate, blooming accessory using just a few minutes of 3D pen work. These sweet, pastel daisies add a lovely handmade touch that looks surprisingly professional.
Step-by-Step Tutorial
Materials
- 3D pen
- PLA or ABS filament (white, light pink, dark pink/magenta, yellow)
- Plain plastic headband (white or light colored)
- Parchment paper or silicone work mat
- Paper and pencil (for sketching templates)
- Scissors
Step 1: Flower Petal Construction
-
Preparation:
Plug in your 3D pen and let it heat up. While you are waiting, lay down your parchment paper or silicone mat on a flat surface. -
Sketching a guide:
Draw three small flower templates on a piece of paper: one 5-petal flower about 1.5cm wide, and two 6-petal flowers of slightly different sizes. Place this paper under your mat or parchment paper to use as a tracing guide. -
Start with white filament:
Load the white filament first. We will make the central, main flowers with this color. -
Tracing the first white flower:
Carefully trace the outline of your 6-petal flower template. Keep the nozzle moving steadily to ensure smooth lines. -
Filling the petals:
Once the outline is done, fill in the center of each petal. Use a back-and-forth motion to create a solid, filled-in look rather than a messy scribble. -
Second white flower:
Repeat the process for a second white flower. Try to make the petals slightly elongated to mimic the daisy shape shown in the photo. -
Creating pink blooms:
Switch your filament to light pink. Create two or three flowers using the smaller 5-petal or 6-petal templates, filling them in just like before. -
Adding variety:
If you have a darker pink or magenta filament, create one small accent flower to add depth to your arrangement. -
Cooling:
Let all the flower shapes cool completely on the mat before peeling them off. They should pop off easily once rigid.
Sticky Situation?
If the flowers peel off the headband too easily, try roughing up the contact point on both the flower back and the band with sandpaper before gluing them again.
Step 2: Assembly and Details
-
Adding centers:
Switch your filament to yellow. Put a small dot of molten plastic right in the center of each flower. -
Refining the centers:
While the yellow dot is still warm, you can gently press it flat with a tool or the tip of the pen (carefully) for a button-like look, or leave it rounded for a natural feel. -
Prepping the headband:
Clean your plain headband to remove any oils. If the surface is very slick, I find scuffing it lightly with sandpaper helps the plastic adhere better. -
Planning the layout:
Arrange your loose plastic flowers on the table next to the headband to decide on the spacing. Alternate colors for the best visual balance: pink, white, pink, white, pink, white. -
Attaching the first flower:
Using the 3D pen as a glue gun, extrude a small bead of plastic onto the back of your center-most white flower. -
Press and hold:
Quickly press the flower onto the top center of the headband. Hold it firmly for 10-15 seconds until the plastic bonds and hardens. -
Working outwards:
Move down one side, attaching the next pink flower about an inch away from the center one. Repeat on the other side to keep things symmetrical. -
Continuing the pattern:
Continue gluing the remaining flowers down the sides of the headband, maintaining equal spacing. -
Reinforcing:
Flip the headband over. Add a tiny extra dab of filament at the contact points underneath the flowers to ensure they are secure against the band. -
Cleanup:
Inspect your work for any wispy plastic strings (often called ‘angel hair’). Snip these off with small scissors for a clean finish.
Add Some Dimension
Before the petals fully cool on the mat, gently bend them upward slightly. This gives the flowers a cupped, realistic 3D shape instead of looking completely flat.
Now you have a custom, durable floral crown ready to wear or gift to a friend
Pen Cup With Woven Lines
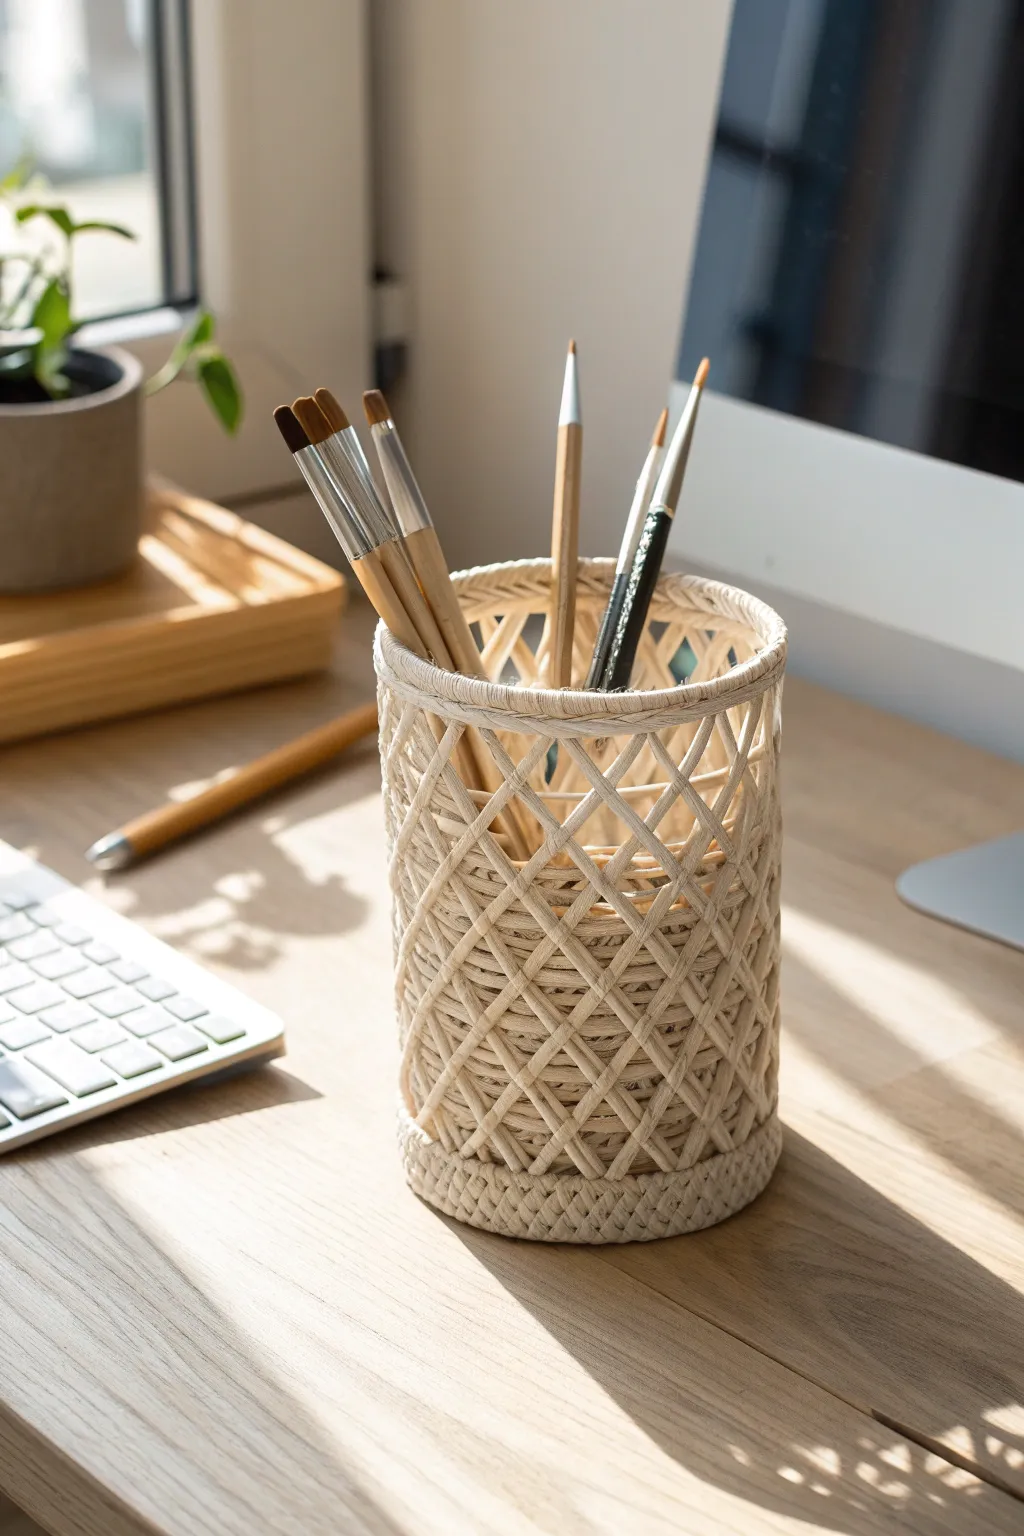
Achieve the rustic charm of woven rattan with the modern convenience of a 3D pen. This project creates a sturdy, open-weave cylindrical cup perfect for organizing your brushes and pencils while adding a touch of natural texture to your desk.
Step-by-Step Tutorial
Materials
- 3D pen
- Cream or beige PLA filament (matte finish preferred)
- Small cylindrical glass jar or sturdy cardboard tube (as a mold)
- Parchment paper or masking tape (to cover the mold)
- Scissors
Step 1: Preparing the Base Structure
-
Prepare the mold:
Find a cylindrical object like a glass jar or a sturdy cardboard tube to use as your form. Wrap it completely in parchment paper or cover it with a layer of masking tape so the hot plastic doesn’t stick permanently to the surface. -
Create the bottom ring:
Start at the very bottom edge of your mold. Extrude a thick, continuous line of filament around the circumference to form the base ring. Go over this circle 3–4 times to ensure it is robust. -
Build the top ring:
Decide on the height of your cup and repeat the previous step near the top of your mold. Create a solid ring of filament that will serve as the upper rim, reinforcing it with multiple layers just like the base. -
Connect with vertical ribs:
Draw straight vertical lines connecting the bottom ring to the top ring. Space these lines evenly around the cylinder, about 1 inch apart. These will act as the skeleton for your weaving pattern.
Natural Texture
Use a ‘wood’ filament (PLA with wood fibers) to get a texture that feels and smells like real wicker when extruded.
Step 2: Weaving the Lattice Pattern
-
Start the diagonal weave:
Pick a spot on the bottom ring. Draw a diagonal line upwards and to the right, crossing over your vertical ribs, until you hit the top ring. Anchor the filament there securely. -
Repeat diagonal lines:
Continue adding parallel diagonal lines around the entire cylinder. Try to keep the spacing consistent to mimic a real basket weave. It helps to rotate the mold slowly as you draw. -
Cross the diagonals:
Now, start from the bottom ring again, but draw diagonal lines going upwards and to the left. These new lines should crisscross your previous ones, creating diamond shapes in the gaps. -
Add horizontal texture:
To simulate the look of wrapped cord, draw horizontal lines that weave in and out of your diamond pattern. You don’t need to do this for every row, but adding a few horizontal accents in the middle section adds realism. -
Thicken the main lines:
Go back over your main diagonal structure lines one more time. This adds volume to the ‘strands’ and makes the plastic look more like thick rope or rattan.
Two-Tone Weave
Swap filament colors halfway. Use a darker brown for the diagonal cross-lines to create a high-contrast, deep basket effect.
Step 3: Refining the Details
-
Create the faux-woven base:
Return to the very bottom ring. Extrude short, slanted strokes all around the outside of the ring, layering them slightly overlapping each other. This mimics the tight braiding often seen at the bottom of wicker baskets. -
Repeat for the top rim:
Apply the same technique to the top rim. Short, diagonal hatching strokes applied thickly will give the rim a finished, rolled appearance. -
Fill the bottom:
Carefully lift your structure off the mold. Turn it upside down and fill in the bottom of the cylinder. You can use a simple cross-hatch pattern or a spiral starting from the center outward to create a solid floor for your pens. -
Clean up stray strands:
Inspect the cup for any wispy strings of filament, often called ‘stringing’. Snip these off with scissors or quickly melt them back into the main structure with the tip of the pen. -
Smooth the interior:
Check the inside of the cup for sharp points where lines connected. Briefly touch these spots with the hot nozzle to flatten them so they don’t scratch your pencils.
Place your new textured cup on your desk and enjoy the handmade warmth it brings to your workspace

PENCIL GUIDE
Understanding Pencil Grades from H to B
From first sketch to finished drawing — learn pencil grades, line control, and shading techniques.
Explore the Full Guide
Plant Pot Decorations
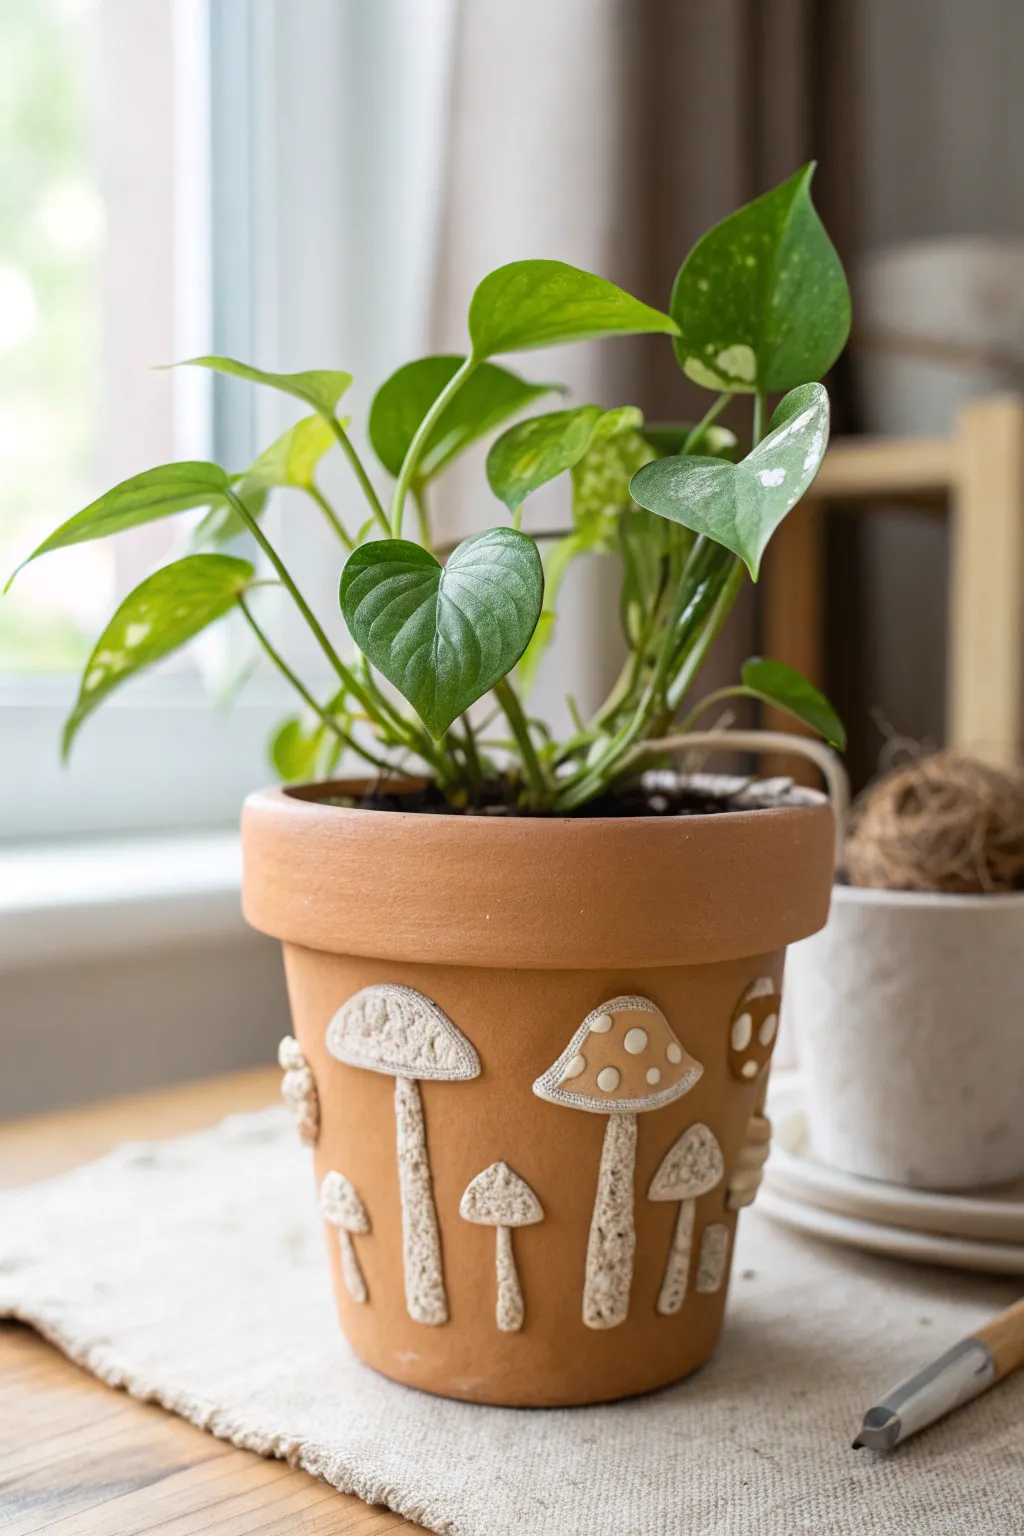
Transform a plain terra cotta pot into a woodland treasure with charming mushroom reliefs. This project uses 3D pen plastic to create textured, appliqué-style fungi that appear to be growing right out of the clay.
Step-by-Step
Materials
- Clean terra cotta pot
- 3D pen
- PLA filament (White, Cream, or Beige)
- Pencil (for sketching)
- Sand paper (fine grit)
- Heat emboss tool or hairdryer (optional)
- Clear matte sealant spray
Step 1: Preparation and Planning
-
Clean surface:
Ensure your terra cotta pot is completely clean and dry. Wipe it down with a damp cloth to remove any dust, as this can prevent the filament from adhering properly. -
Sketch the layout:
Lightly sketch your mushroom designs directly onto the pot using a pencil. Vary the sizes, placing large toadstools next to tiny sprouts for a natural look. -
Heat up:
Plug in your 3D pen and load your chosen filament color preferably a creamy white or beige to match the organic vibe. Set the heat to the appropriate setting for PLA.
Plastic Peeling Off?
If the PLA isn’t sticking to the clay, rough up the pot’s surface with sandpaper first. Alternatively, apply a tiny dot of superglue under any loose edges.
Step 2: Creating the Stems
-
Outline the stem:
Start with the stem of the largest mushroom. Draw the outline directly on the pot surface, following your pencil sketch. -
Fill the interior:
Fill in the stem outline using a back-and-forth motion. Keep the nozzle close to the surface to squash the plastic slightly for better adhesion. -
Add texture:
Go over the stem again, this time lifting the pen slightly as you extrude to create rough, bark-like vertical lines. This texture mimics a real mushroom stalk. -
Repeat for all stems:
Move around the pot, completing just the stems for all your sketched mushrooms. I find doing all stems first helps establish the scale before adding caps.
Step 3: Sculpting the Caps
-
Outline the cap shape:
Draw the outline of the mushroom cap above a finished stem. Make the shape slightly wider than the stem for that classic toadstool silhouette. -
Fill and build volume:
Fill the cap area completely. Once the base layer is done, add a second or third layer to the center of the cap to give it a rounded, 3D dome effect. -
Create the rim:
Extrude a slightly thicker line along the bottom edge of the cap where it meets the stem. This defines the separate parts of the fungus. -
Add spots (optional):
If you want the classic ‘Fly Agaric’ look, leave small circular negative spaces empty, or add small dots of filament on top of the finished cap for texture. -
Surface detailing:
For the smaller mushrooms shown in the image, use small circular motions to create a bumpy, porous texture on the cap surface instead of a smooth dome.
Glow Up
Swap standard white filament for Glow-in-the-Dark filament. Your mushroom forest will look normal by day but magically luminescent at night.
Step 4: Refining and Finishing
-
String removal:
Once all plastic has cooled and hardened, inspect the pot for wispy plastic strings. Snip these off with scissors or rub them away with your fingers. -
Smooth rough edges within design:
If any edges feel too sharp, lightly sand them with fine-grit sandpaper. Be careful not to scuff the terra cotta surrounding the design. -
Heat treatment:
Blast the design briefly with a heat emboss tool or a hair dryer on high. This melts the very top layer just enough to gloss over minor imperfections. -
Pressing down designs:
While the plastic is warm from the heat treatment, press down firmly on any edges that might be lifting to ensure a permanent bond with the clay. -
Seal the deal:
To protect your artwork from water when watering the plant, spray the entire pot exterior with a clear matte sealant.
Now you have a whimsical, textured planter that adds a touch of cottagecore charm to your indoor garden
Mini Trophy Shelf Decor
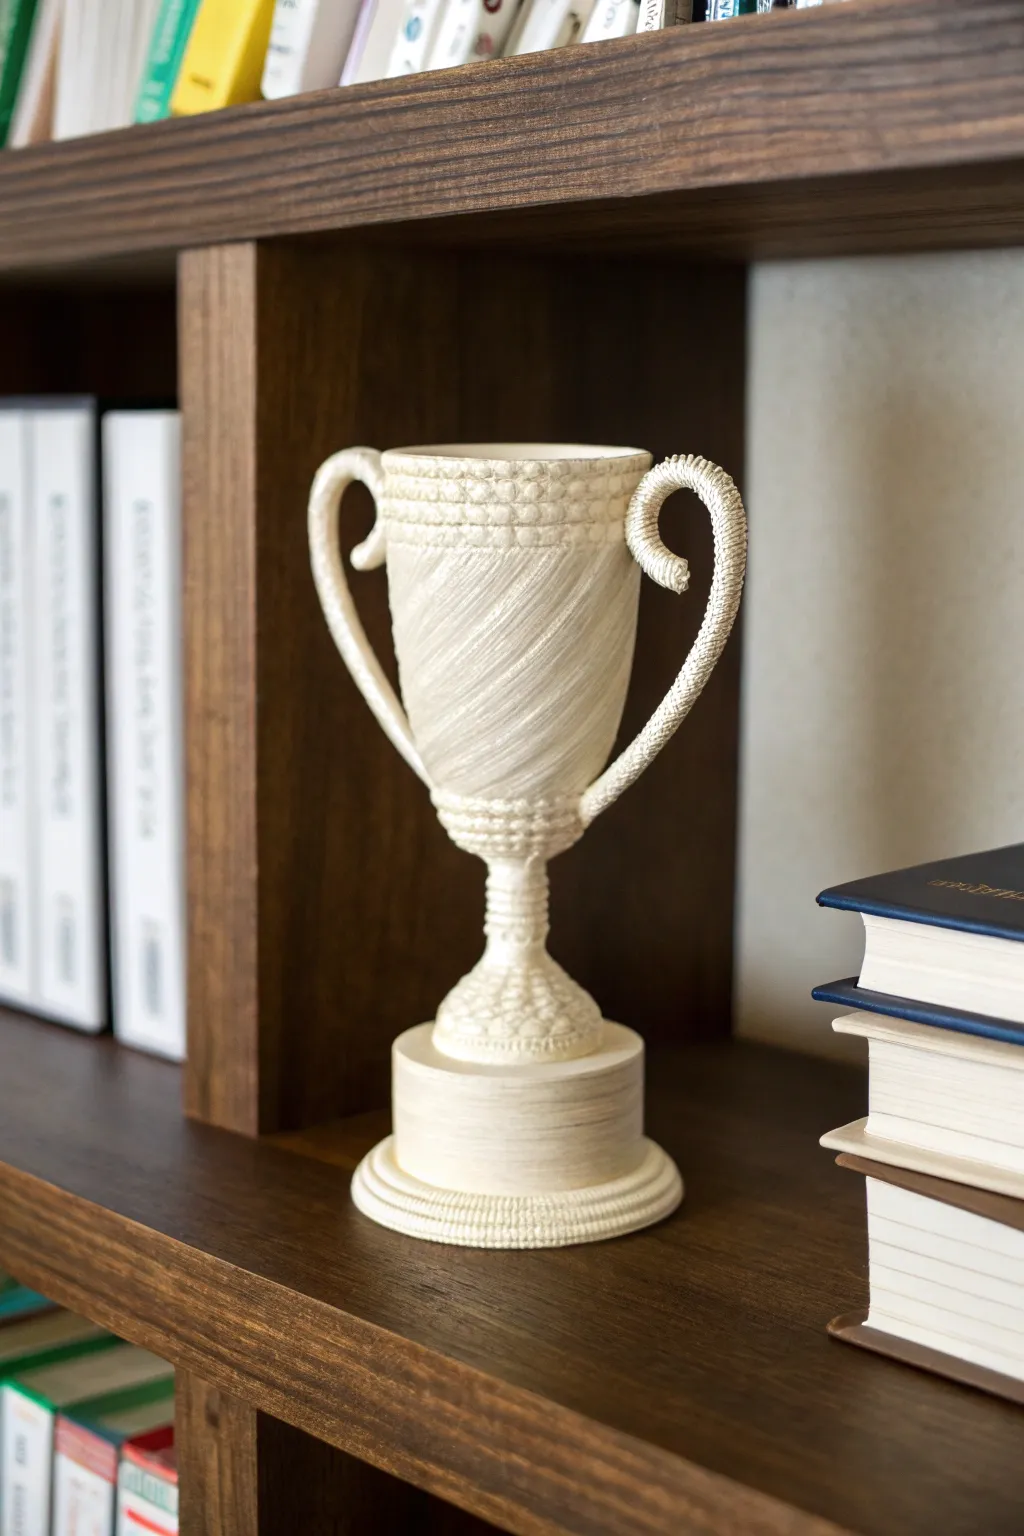
Celebrate small victories or just your love for crafting with this textured mini trophy, built entirely from coiled filament. Its classic urn shape and intricate woven appearance make it a sophisticated piece of shelf decor that looks far more expensive than plastic.
Step-by-Step Guide
Materials
- 3D pen (compatible with PLA or ABS)
- White or Cream PLA filament (lots of it)
- Heat-resistant crafting mat or glass surface
- Empty spice jar or pill bottle (for mandrels)
- Small plastic cup (for the bowl mold)
- Masking tape
- Sandpaper (optional for smoothing edges)
Step 1: Forming the Base
-
Create the bottom ring:
Start by drawing a circle on your mat, roughly 3-4 inches in diameter. Fill this circle in completely with a flat swirling pattern to create a solid disc for stability. -
Build the tiered steps:
Once the disc is solid, switch to building upwards. Create a vertical wall around the edge of the disc, about 5mm high. This is the wide foot of the trophy. -
Add texture to the foot:
Before moving up, apply a layer of vertical lines or small beads of filament around the exterior of this bottom ring to give it that ribbed, classical detail seen in the photo. -
Construct the main pedestal:
Draw a slightly smaller circle on top of your bottom tier. Build this up vertically for about an inch to create a cylindrical block. Keep your movements horizontal and steady to mimic a turned wood look. -
Cap the pedestal:
Close off the top of the cylinder with a flat layer of filament, ensuring it’s sturdy enough to hold the weight of the cup.
Step 2: The Cup & Stem
-
Shape the decorative stem:
On the center of your pedestal, build a small, bulbous shape. I find it easiest to make a small cone pointing up, then thicken the middle with extra loops of filament to create a rounded ‘knob’ profile. -
Texturizing the stem:
Go over the stem with small dots or ‘blobs’ of filament. This stippled texture hides print lines and mimics ornate stone carving. -
Prepare the cup mold:
Take your small plastic cup or a cone-shaped object and cover it in masking tape (sticky side out helps, or just standard tape). This prevents the hot plastic from fusing to the mold permanently. -
Draft the diagonal pattern:
Start drawing diagonal lines up the side of your mold. Instead of solid horizontal layers, use long, angled strokes that overlap slightly. This creates the unique ‘woven’ texture visible on the main body. -
Thicken the cup walls:
Go over your diagonal lines 2-3 times to ensure the cup is structural. Make sure the lines are tightly packed so there are no large gaps. -
Create the textured rim:
At the top of the cup, build a thick band of filament. Switch back to the ‘stippled’ or dot technique used on the stem to create a decorative, bumpy border about half an inch wide. -
Add a matching bottom band:
Repeat the stippling process at the very bottom of the cup, where it will eventually meet the stem. This ties the design together. -
Release and assemble:
Gently wiggle the filament cup off your mold. Use a generous amount of hot filament to weld the bottom of the cup to the top of your decorative stem.
Clean Lines
To get that consistent diagonal swathes on the cup, rotate your mold slowly with one hand while keeping your pen hand completely stationary.
Step 3: Handles & Final Details
-
Sketch the handles flat:
Draw two identical ‘S’ or ear shapes on your flat mat. Make them thick and robust. -
Add 3D volume:
Trace over your flat handle shapes repeatedly, adding layers to both the front and back until they are rounded and tubular, not flat. -
Texture the handles:
Run the pen along the length of the handles with a slow, shaky hand to create a rope-like or braided surface texture. -
Attach the handles:
Hold a handle against the side of the cup. Use the pen to ‘tack’ it in place with a dot of plastic, then reinforce the connection points at the rim and near the bottom of the cup heavily. -
Clean up:
Inspect the trophy for wispy plastic strings (stringing). Snip these off with scissors or quickly pass a heat gun over the surface to melt them away.
Go for Gold
While the creamy white looks like marble, a quick coat of metallic gold or bronze spray paint can instantly turn this into a realistic award.
Now you have a timeless decorative piece ready to display on your bookshelf.


Butterfly Wings You Can Bend Into 3D
Create a stunningly delicate work of art that captures the fragility of nature with the strength of PLA. This project combines precise wire-like structures with thin, semi-transparent filament fills to produce a pearlescent butterfly that can be gently shaped for a lifelike 3D effect.
Step-by-Step Tutorial
Materials
- 3D Pen with adjustable temperature settings
- Gold or Bronze PLA filament (for veins/outline)
- Clear, White, or Transparent Pearl PLA filament (for wings)
- Drawing mat or template printout of a butterfly
- Clear acetate sheet or glass surface (heat resistant)
- White or Pearl acrylic paint (optional, for body)
- Fine-grit sandpaper
Step 1: Drafting the Framework
-
Prepare your template:
Start by placing a clear acetate sheet or a heat-resistant glass pane directly over your printed butterfly template. Secure it with tape so it doesn’t shift while you work. -
Outline the upper wings:
Load your 3D pen with the gold or bronze filament. Set the speed to low for maximum control. Trace the outer perimeter of the upper left wing first, ensuring a continuous, unbroken line. -
Add structure to the upper wings:
Draw the interior veins connecting to the outer frame. These structural lines are crucial; thicker veins near the ‘body’ provide strength, while tapering them toward the edges adds realism. -
Complete the lower wing frames:
Repeat the outlining process for the lower wings. Pay attention to the scalloped bottom edges, adding small dots or tiny loops of filament at the points for extra decorative detail. -
Create the central body:
Draw a long, slender oval for the abdomen and thorax in the center. Build this up in rounds to give it 3D volume, rather than leaving it flat like the wings. Add two long, delicate antennae extending from the top.
Step 2: Filling the Gossamer Panels
-
Switch filaments:
Unload the metallic color and switch to your clear, white, or transparent pearl filament. You want a color that mimics a translucent membrane. -
Fill technique:
Instead of scribbling casually, work in slow, thin zig-zag motions between the gold veins. The goal is a single, thin layer that barely touches the gold borders to fuse with them. -
Avoid overfilling:
Be careful not to pile the filament too high. I prefer to move the pen quickly so the strand stretches thin, creating that lovely semi-transparent look rather than a solid plastic block. -
Detail the wing edges:
If your reference image has thicker white patches near the upper wing tips, go back over those specific sections with a second layer of white to increase opacity. -
Let it cool completely:
Before attempting to move anything, allow the plastic to cool fully. This ensures the thin membrane sections won’t warp when peeled.
Smoother Lines
To fix ‘hair’ or stringing, quickly wave a heat gun or lighter flame (very briefly!) over the finished piece. It melts the tiny wisps away instantly.
Step 3: Assembly & Shaping
-
Release the wings:
Gently flex the acetate sheet or slide a thin blade under the wings to pop them off the surface. They will be flat at this stage. -
Heat shaping:
If you want to add curve, briefly blast the wing with a hair dryer or heat gun on low. When the plastic softens slightly, gently bend the wings upward for a natural flight pose. -
Attach wings to body:
Use a dab of fresh melted filament from the pen (acting as hot glue) to fuse the four wing sections to the central body piece you created earlier. -
Reinforce the joints:
Add extra filament on the underside where the wings meet the body to ensure they don’t snap off during handling. -
Refine the body:
For a smoother look on the central body, you can lightly sand any rough start/stop points. -
Optional painting:
If the body looks too plastic, paint it with a thin coat of pearlescent white acrylic paint, blending it slightly onto the wing roots for a seamless transition.
Double-Layered Wings
Trap a layer of iridescent cellophane or organza fabric between your filament outlines for sparkly, truly transparent wings without using fill filament.
Now you have a shimmering, eternal butterfly ready to be mounted in a shadow box or displayed on a shelf
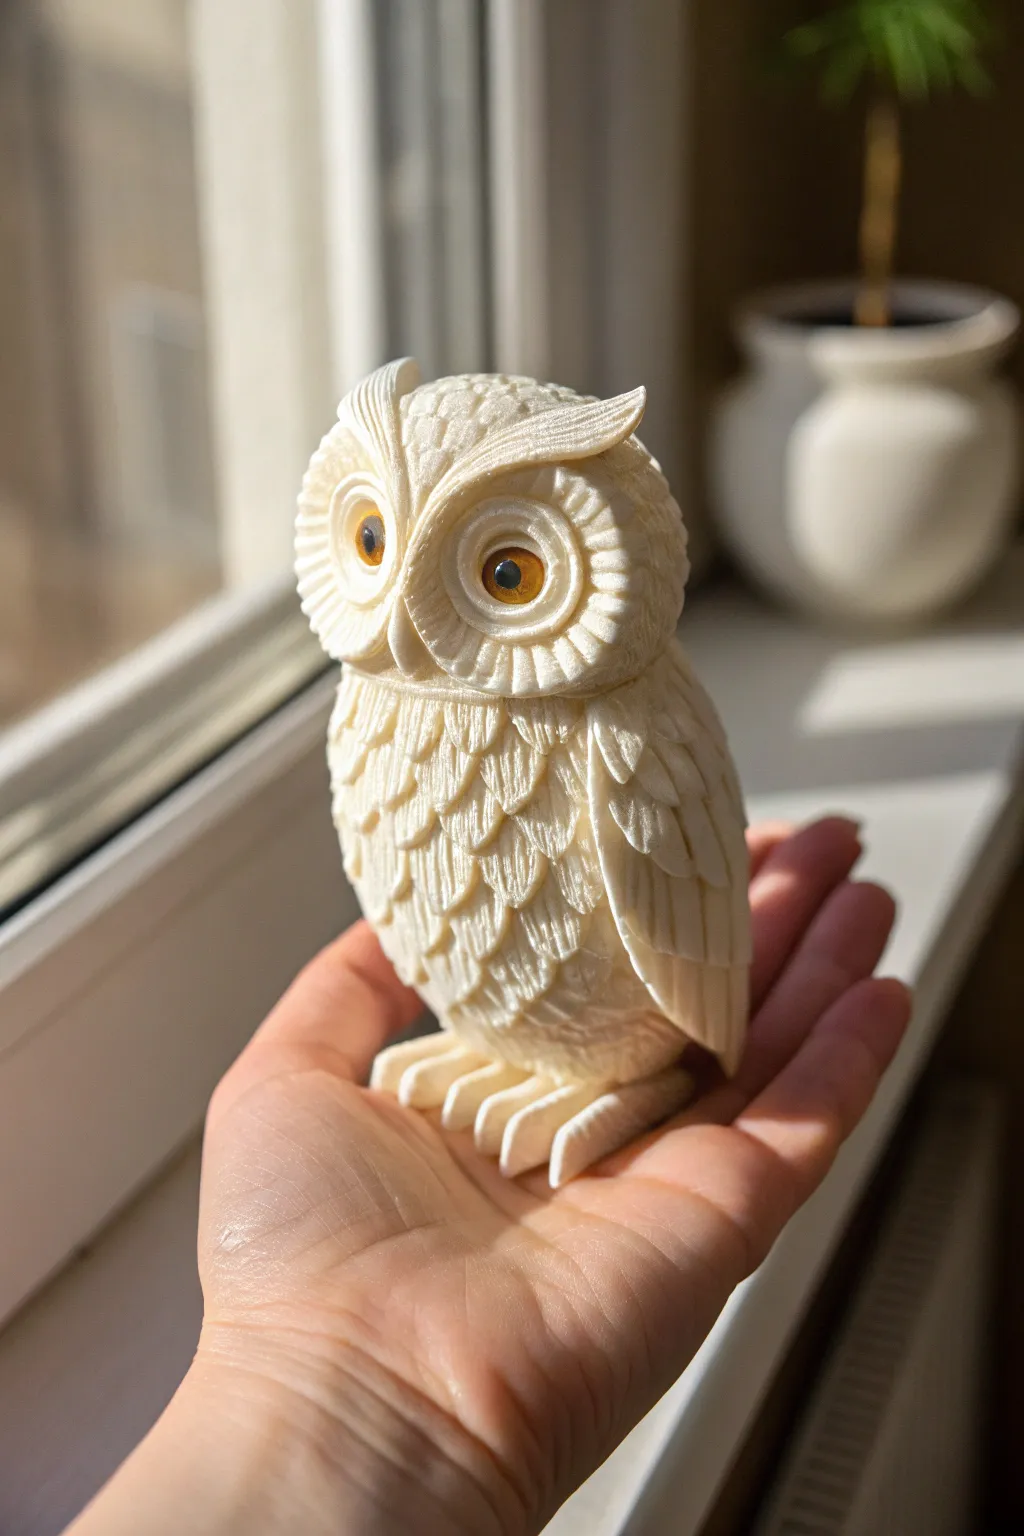
Cute Owl Figurine With Texture

Capture the beauty of intricate carving using just your 3D pen and some patient layering. This project results in a stunning, ivory-like owl figurine featuring detailed plumage and soulful, amber-colored eyes.
How-To Guide
Materials
- 3D Pen (capable of fine extrusion)
- Cream or Ivory PLA Filament
- Translucent Amber or Orange PLA Filament
- Black PLA Filament
- Egg-shaped styrofoam base or tightly crumpled aluminum foil armature
- Masking tape (if using foil)
- Small carving tool or heat-smoothing tool (optional)
- Fine-grit sandpaper
Step 1: Building the Core Structure
-
Prepare the armature:
Begin with an egg-shaped core. You can use a pre-made styrofoam egg or crumple aluminum foil into a tight oval shape, sized to fit comfortably in your palm. If using foil, wrap it completely in masking tape to create a surface the plastic will stick to. -
Define the head:
Using your ivory filament, draw a circle on the upper third of the egg to mark the face. Build up volume above this circle to create the rounded top of the head and two small, pointed tufts for the ears. -
Create the base coat:
Cover the entire armature with a thin, messy layer of ivory filament. This doesn’t need to be pretty; it just provides a solid plastic foundation for the detailed feathers we’ll add later.
Master the Texture
To get that carved look, pull the pen tip away quickly at the bottom of each feather stroke. This leaves a tapered point that mimics real plumage.
Step 2: Crafting the Face and Eyes
-
Form the eye sockets:
Build up distinct circular ridges for the eyes. These should be large and prominent. Leave a deep depression in the center of each circle. -
Insert the pupils:
Switch to black filament. Carefully extrude a small, shiny bead right in the center of each eye socket for the pupil. -
Add the iris color:
Using the translucent amber filament, fill the space around the black pupil. Move slowly to keep the plastic clear and gem-like. -
Sculpt the facial discs:
Switch back to ivory. Create the radiating feather pattern around the eyes by drawing short, straight lines outward from the eye rim to the edge of the face, resembling the spokes of a wheel. -
Add the beak:
Build a small, curved triangular beak between the lower edges of the eye discs. Keep it subtle and tucked in.
Step 3: Feathering the Body
-
Start the chest feathers:
Begin at the bottom of the neck area. Extrude a distinctive ‘U’ shape, then fill it in with vertical lines. This creates the look of individual feathers. -
Layering upwards:
Continue making rows of these ‘U’ shaped feathers, overlapping the row below slightly like roof shingles. Work your way down the chest and belly. -
Texture technique:
As you fill each feather, run the pen tip vertically through the warm plastic to carve subtle grooves, mimicking the barbs of a real feather. -
Create the wings:
On the sides of the body, build up longer, flatter shapes for the wings. These feathers should be longer than the chest feathers, sweeping downwards towards the tail. -
Define the wing primaries:
At the tips of the wings, extrude long, solid strips that layer over each other. I find it helps to let the plastic cool slightly before pressing it down to keep a sharp edge. -
Detail the head plumage:
Cover the top of the head and back of the neck with smaller, scale-like overlapping loops to transition smoothly into the body feathers.
Antiquing Effect
Apply a wash of diluted brown acrylic paint over the finished owl, then wipe it off immediately. The dark paint will stay in the grooves for depth.
Step 4: Feet and Finishing Touches
-
Construct the talons:
At the base of the owl, extrude four thick, forward-facing toes on each side. These should look like distinct segments. -
Refine the claws:
taper the ends of the toes into dull points. Add texture to the toes by drawing horizontal lines across them. -
Clean up strings:
Once the sculpture is fully cooled, inspect it for any wispy strings of plastic. Snip these off with small scissors or melt them away quickly with a heat tool. -
Optional sanding:
For an antique bone look, lightly sand the high points of the feathers with fine-grit sandpaper to smooth out the layer lines just a tiny bit.
Now you have a wise and durable little guardian to perch on your desk


Have a question or want to share your own experience? I'd love to hear from you in the comments below!