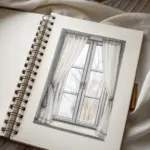
If you’re itching to dress up your glass for Independence Day, 4th of July window painting is one of my favorite ways to make a big, cheerful statement fast. I pulled together a mix of classic red, white, and blue designs and a few fresh twists you can totally pull off on a home window, glass door, or storefront.
Classic Stars-and-Stripes Flag Panel
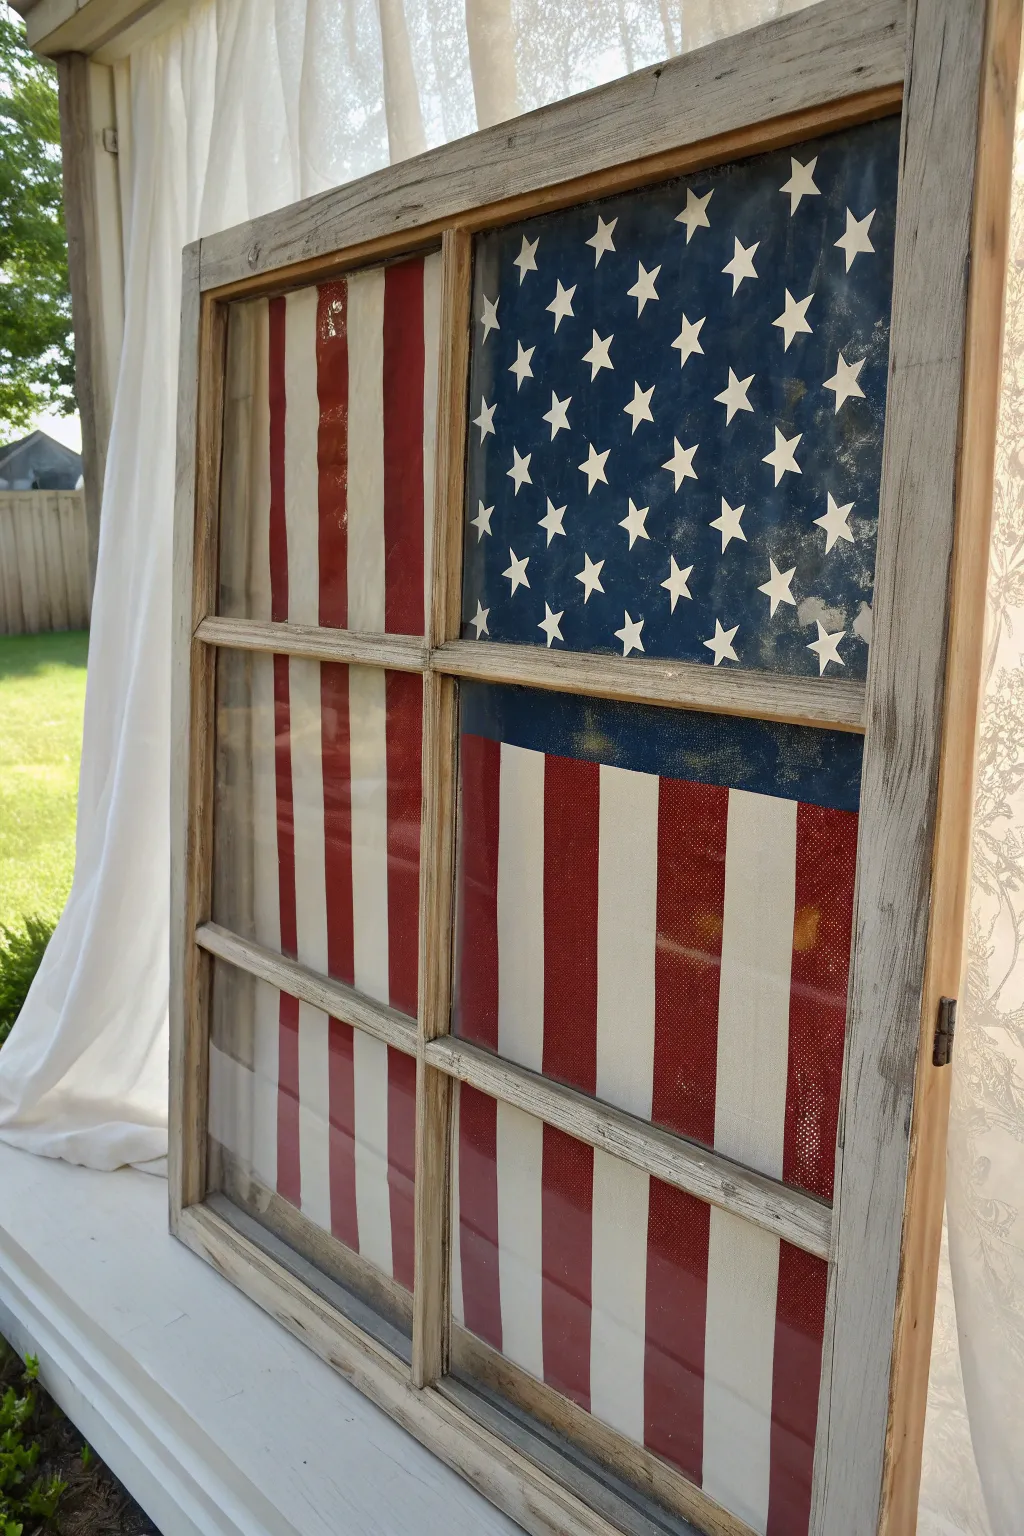
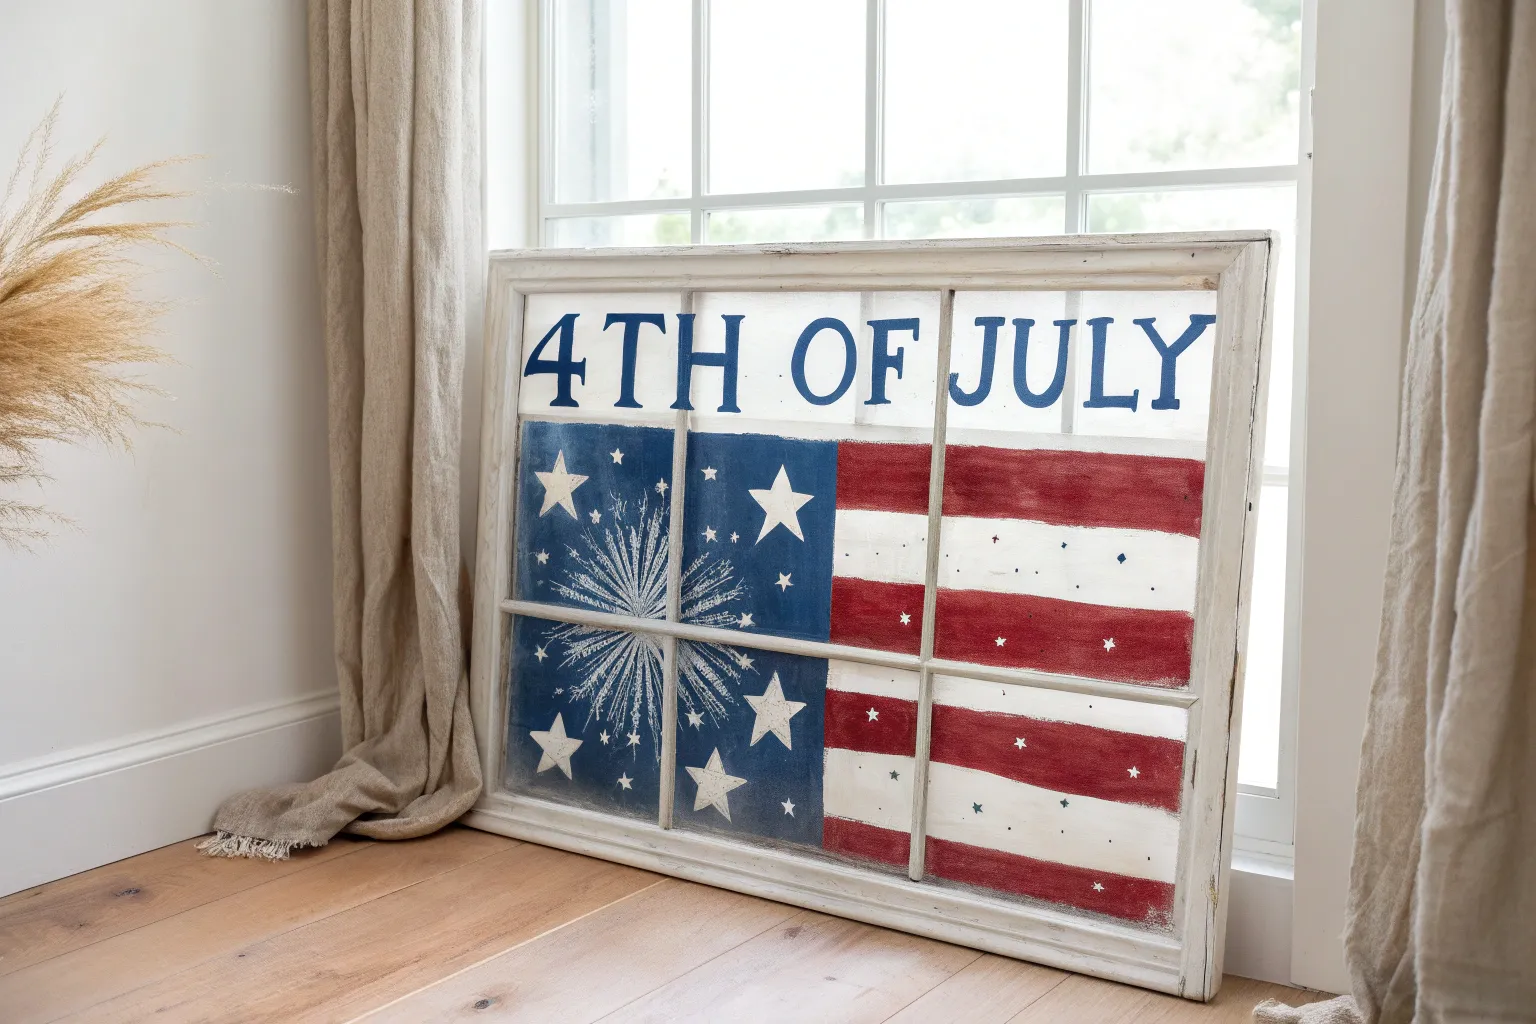
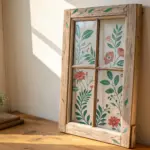
Transform a salvaged four-pane window into a striking piece of patriotic decor that evokes timeless Americana charm. This project uses the natural grid of the window frame to deconstruct the flag, creating a unique, segmented look that fits perfectly on a porch or mantel.
How-To Guide
Materials
- Vintage 4-pane wood window frame (cleaned)
- Glass cleaner and lint-free cloth
- Painter’s tape (1-inch width works best)
- Acrylic craft paint: Navy Blue, Deep Red, White
- Medium flat paintbrush (1-inch)
- Small round detail brush or star stencil
- Ruler or measuring tape
- Pencil
- Fine-grit sandpaper (optional)
- Clear spray sealer (optional)
Step 1: Cleaning & Prep
-
Assess the frame:
Begin by inspecting your vintage window. If the wood is too rough or splintered, give it a quick pass with fine-grit sandpaper, but leave some of the original patina for character. -
Clean the glass thoroughly:
Use glass cleaner and a lint-free cloth to remove decades of dust, grime, or old paint specks from both sides of the glass panes. A clean surface is crucial for paint adhesion. -
Mask the wood trim:
Apply painter’s tape along the inner wooden edges of each pane. This protects the vintage wood frame from accidental brushstrokes while you paint the glass.
Reverse Painting Tip
Paint on the REVERSE side of the glass! This keeps the front glossy and makes cleaning the window easier later. Remember to reverse your layout (blue goes top LEFT from the back).
Step 2: Developing the Design Layout
-
Assign the sections:
Visualize the flag layout: The top right pane will be the blue field (the union). The top left, bottom left, and bottom right panes will all be red and white stripes. -
Measure the stripes:
For the three striped panes, measure the width of the glass and divide by the number of vertical stripes you want (usually 5-7 looks balanced for this size). Mark these intervals lightly with a pencil at the top and bottom of the glass. -
Tape the stripe lines:
Run vertical strips of painter’s tape connecting your pencil marks. Remember, you will paint *between* the tape lines, so ensure the tape is pressed down firmly to prevent bleeding.
Make it Glow
Place battery-operated LED fairy lights behind the window or lean it against a lantern. The light will filter through the brushstrokes for a beautiful evening display.
Step 3: Painting the Stripes
-
Paint the red stripes:
Using your medium flat brush, apply the deep red acrylic paint to alternating sections in the top left, bottom left, and bottom right panes. Two thin coats are better than one thick coat to avoid globs. -
Let dry and remove tape:
Allow the red paint to dry completely. Carefully peel away the vertical tape strips to reveal clean edges and the unpainted glass in between. -
Fill the white stripes:
Now, paint the remaining clear glass sections with white acrylic paint. You can freehand this carefully or re-tape over the dry red stripes if you have a shaky hand. -
Check opacity:
Hold the window up to the light. If the brushstrokes look too streaky, apply a second coat of white to ensure a solid, vibrant look.
Step 4: Creating the Star Field
-
Base coat the union:
Move to the top right pane. Paint the entire glass surface with the Navy Blue acrylic paint. This usually takes 2-3 coats to become fully opaque against the light. -
Plan the star pattern:
Once the blue is fully dry, decide on your star layout. A staggered row pattern mimics the real flag perfectly. -
Paint the stars:
Dip a small detail brush into white paint. Start with the center of the star and pull paint outward to form the points. If you prefer precision, tap a sponge pouncer over a star stencil instead. -
Add variance:
I like to vary the opacity of the stars slightly—making some bright white and others a bit faded—to match the aged feel of the window frame.
Step 5: Finishing Touches
-
Clean up edges:
Remove the perimeter tape protecting the wood frame. If paint seeped under, gently scrape it away with a razor blade or fingernail. -
Distress lightly (optional):
For an extra rustic look, use a dry, stiff brush to scuff the paint surface slightly once dried, mimicking wear and tear. -
Seal the work:
To protect your artwork from humidity or scratches, spray a light coat of clear matte sealer over the painted glass areas.
Now you have a stunning piece of Americana art ready to display proudly on your porch or living room wall


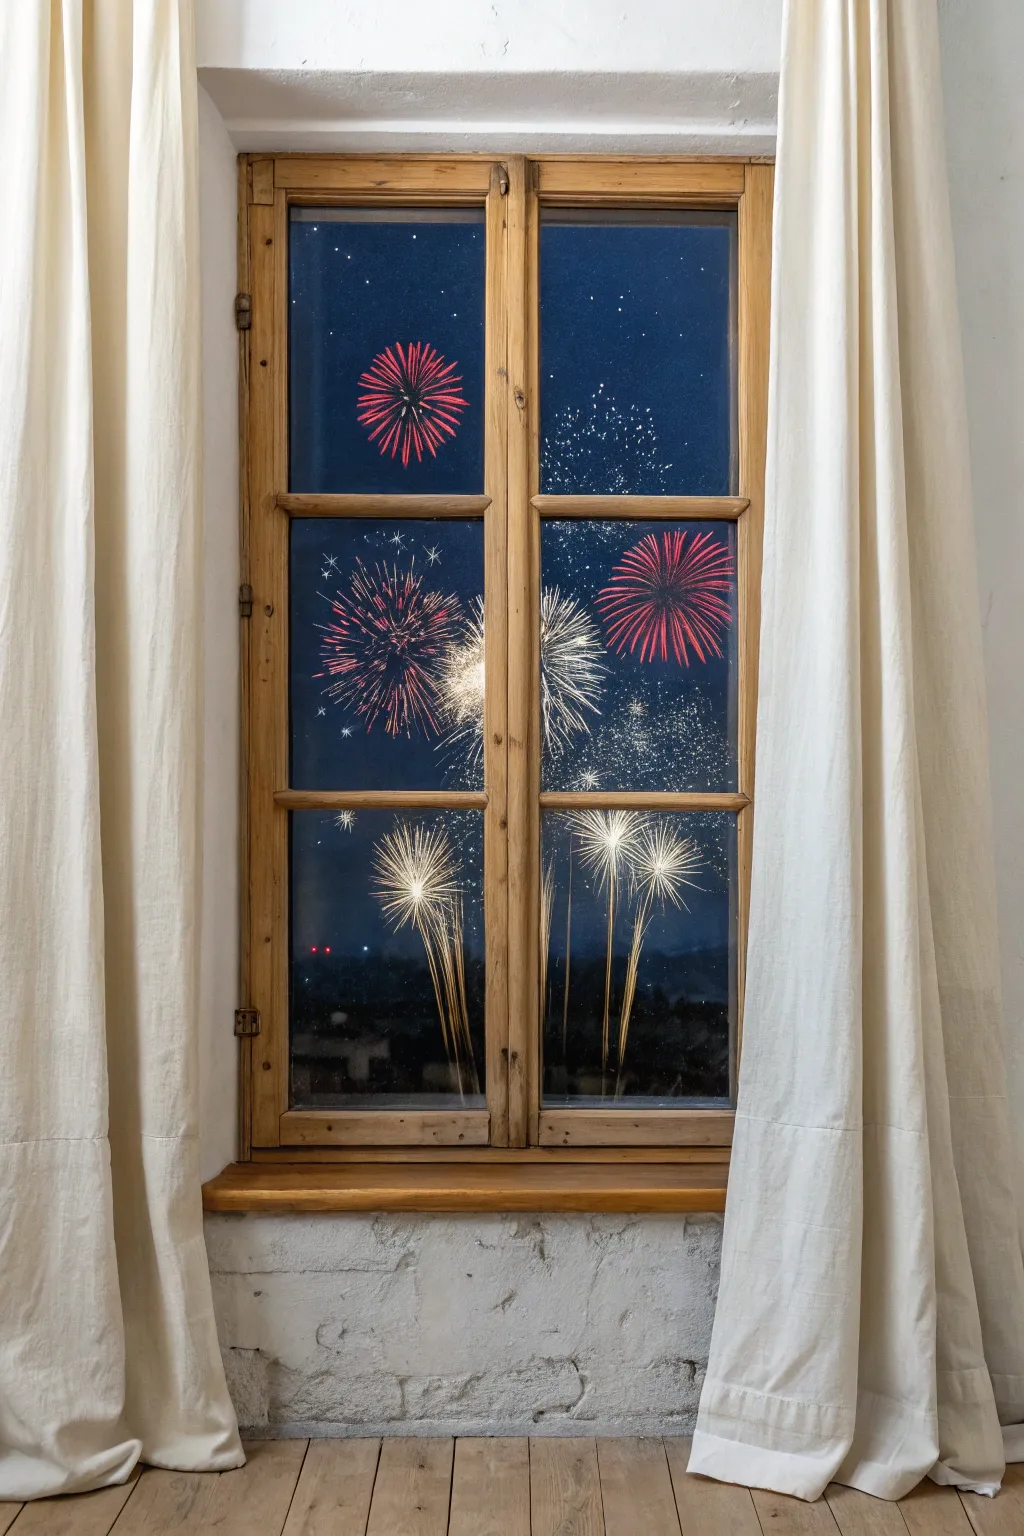
Firework Bursts Across the Top
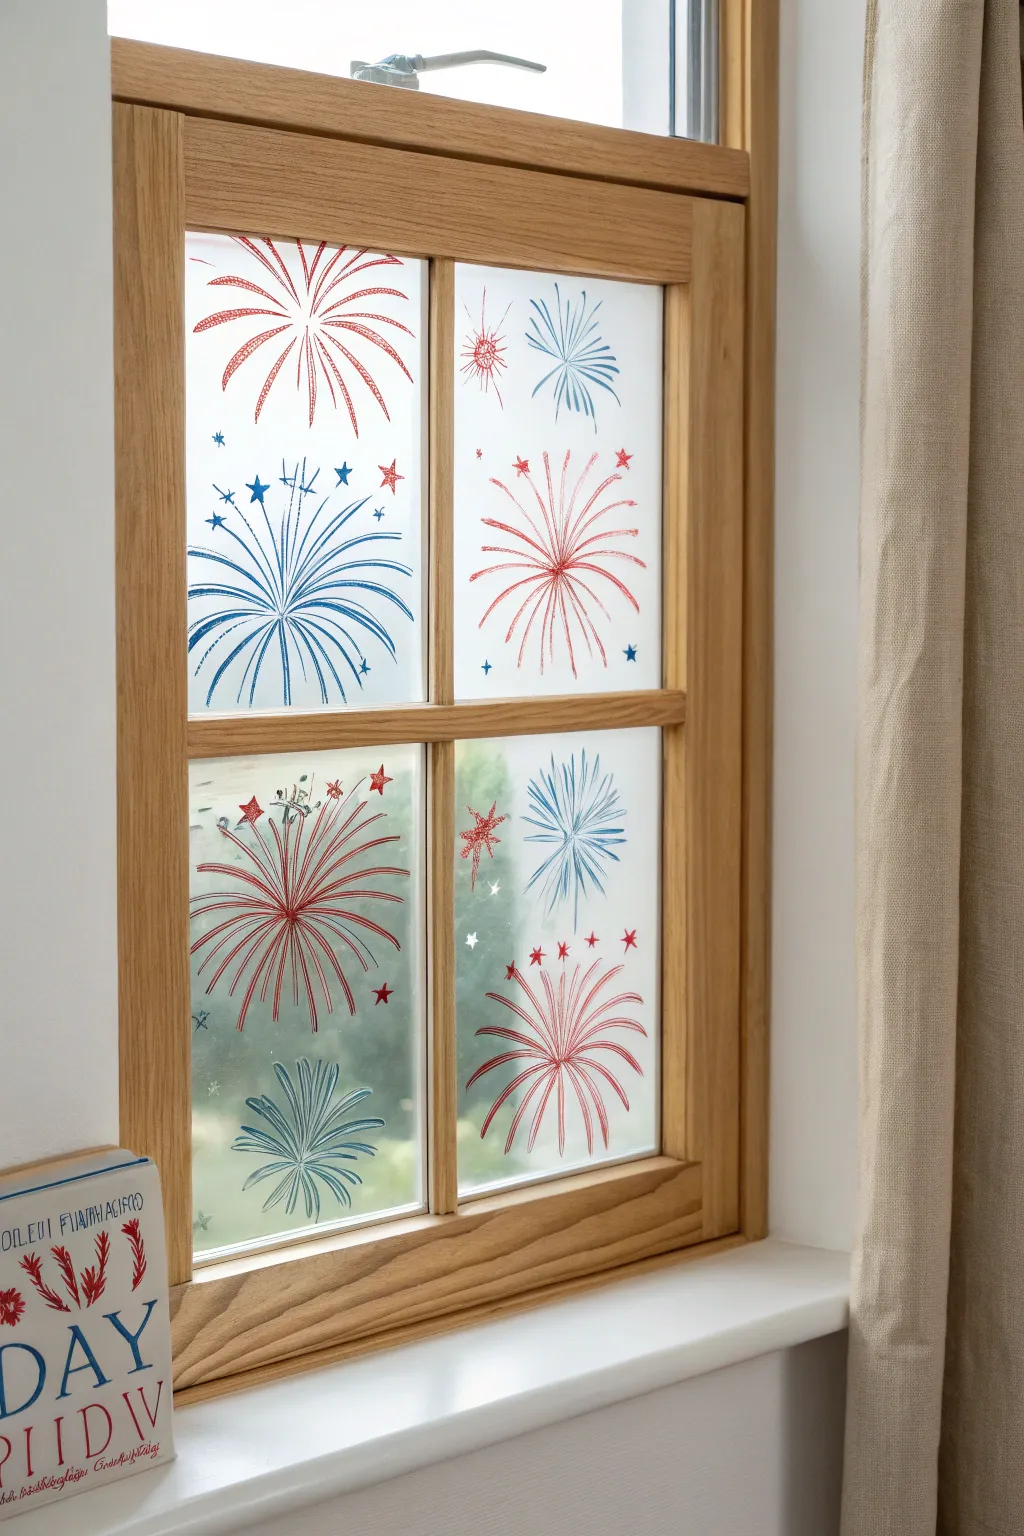
Transform your view into a permanent celebration with these festive red and blue firework bursts painted directly onto your window panes. This project uses translucent window paints or markers to create a stained-glass effect that glows beautifully when the sun shines through.
Step-by-Step Tutorial
Materials
- Glass-safe window paint markers (red and blue)
- White liquid chalk marker (optional for highlights)
- Glass cleaner
- Lint-free cloth or paper towels
- Paper for sketching
- Pencil
- Masking tape
- Cotton swabs (for cleanup)
Step 1: Preparation & Planning
-
Clean the Surface:
Start by thoroughly cleaning the inside of your window panes. Spray glass cleaner and wipe with a lint-free cloth to remove any dust, grease, or fingerprints, ensuring the paint adheres properly. -
Sketch Layouts:
Before touching the glass, grab a piece of paper and sketch out a few firework designs. Practice drawing curved lines radiating from a central point to mimic an exploding shell. -
Balance the scene:
Plan the placement of your fireworks. Notice how the original image alternates red and blue bursts across the four panes to create visual balance. Some bursts are large and central, while others are smaller accent pieces.
Oops! Smudged Line?
Don’t panic! Most window markers are water-based. Simply wait for the smudge to dry completely, then scrape it gently with a plastic card or fingernail before redrawing the line cleanly.
Step 2: Painting the Blue Bursts
-
Start the Center:
Choose a pane for your first large blue firework, like the bottom-left pane in the example. Using your blue window marker, draw a small central point or a tiny circle. -
Draw Radiating Lines:
From that center point, draw long, curved lines extending outward. Vary the length of these lines; some should be long and sweeping, while others are shorter to create depth. -
Add Decorative Tips:
On the ends of some lines, add small star shapes or dots. For the main blue burst, I like to add tiny stars floating near the tips of the longest lines to suggest flickering sparks. -
Create Smaller Bursts:
Move to the top right pane. Draw a smaller, more compact blue firework shape. Use quicker, straighter strokes here to make it look like a distinct type of explosion.
Step 3: Painting the Red Bursts
-
Main Red Explosion:
Switch to your red marker. In a clear pane (like the top right), draw a large, dominant red firework. Use the same technique of radiating lines, but perhaps curve them slightly more to differentiate from the blue ones. -
Layering Effects:
Review the bottom right pane. Create a large red burst near the bottom edge. If your markers are translucent, you can try crossing over existing lines slightly, though keeping them separate usually looks cleaner. -
Upper Corner Details:
Add a partial red burst in the very top left corner. Draw lines coming down from the top frame as if the center of the explosion is out of view. -
Interspersing Colors:
Look for empty negative space. Add small, floating red stars (five-pointed shapes) around the blue fireworks, and blue stars around the red ones to tie the color scheme together.
Add Some Sparkle
While the paint is still wet, lightly sprinkle ultra-fine translucent glitter onto the firework bursts. It will stick to the paint and catch the sunlight beautifully during the day.
Step 4: Finishing Touches
-
Review Distance:
Step back about five feet from the window. This helps you identify gaps or areas that feel too heavy on one side. -
Fill the Gaps:
If a pane looks empty, add a small ‘secondary’ firework. For example, add a small, spiky red starburst near a large blue one. -
Clean Up Edges:
If any lines went astray or look wobbly, dampen a cotton swab with a little glass cleaner or water (depending on your paint type) and carefully wipe away the mistake. -
Let it Set:
Allow the paint to fully dry according to the manufacturer’s instructions. Avoid touching the design or cleaning the window during this curing time.
Now you have a festive display that celebrates the holiday every time you look outside


Big Bold USA Lettering Filled With Patterns
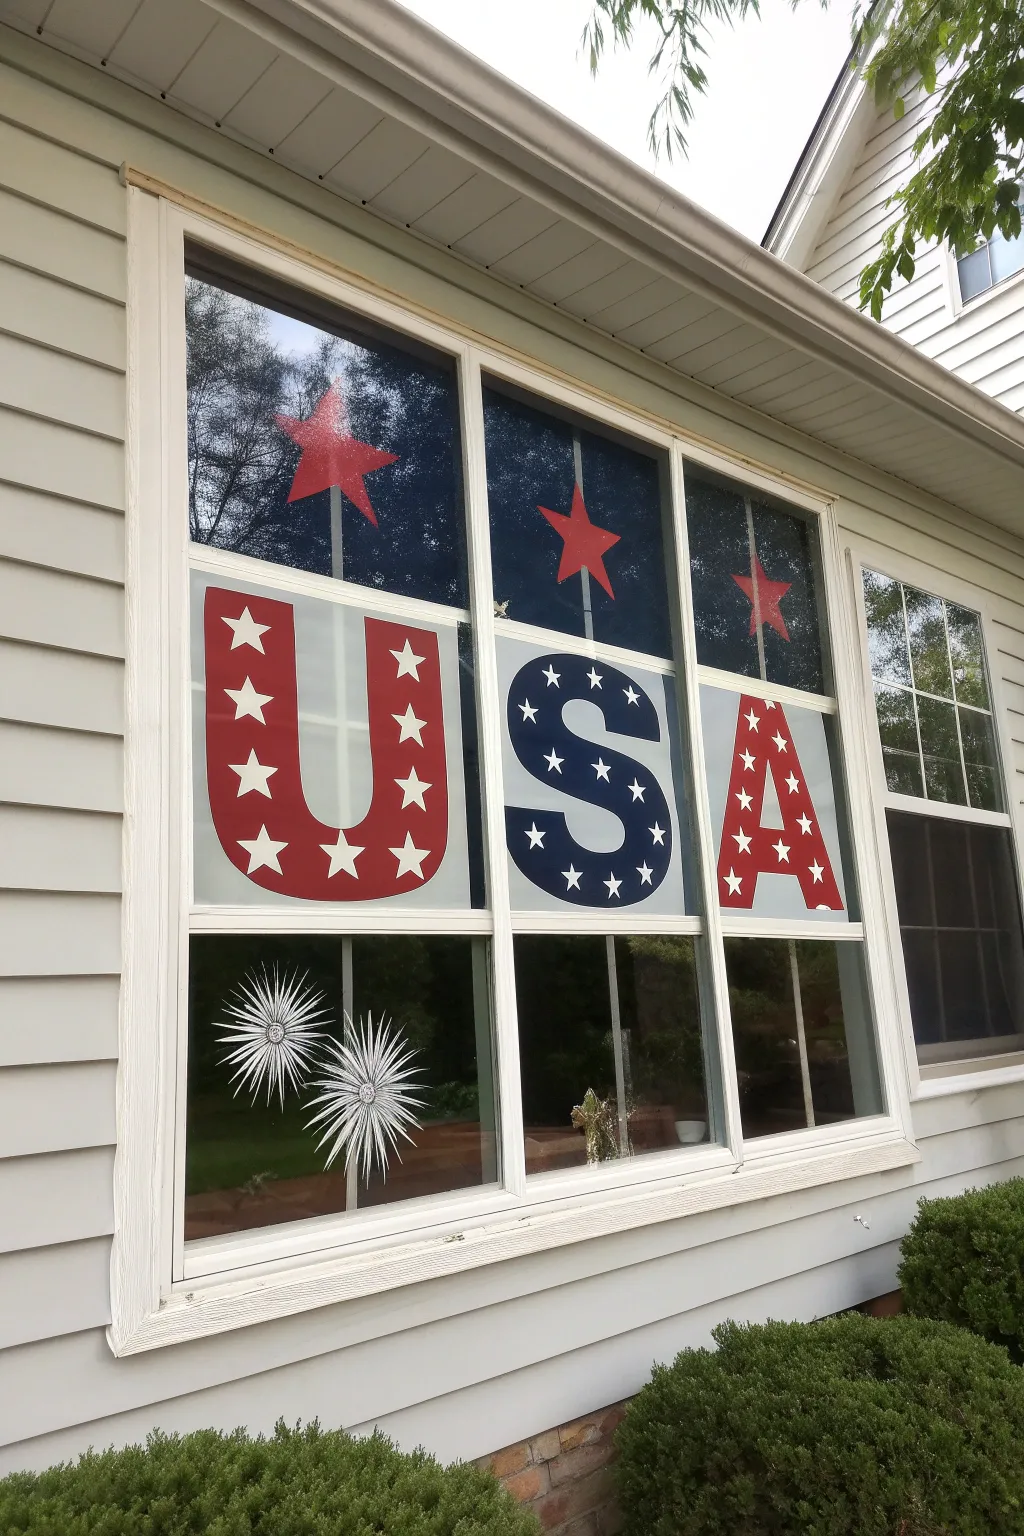
Transform your home’s exterior into a bold statement of patriotism with this large-scale window art project. The design uses separated window panes to frame giant “USA” lettering filled with stars, topped with floating red stars and grounded by white firework bursts.
Detailed Instructions
Materials
- Red acrylic craft paint or tempera paint
- Navy blue acrylic craft paint or tempera paint
- White acrylic craft paint or tempera paint
- Wide flat paintbrush (2-3 inch)
- Medium round paintbrush
- Small detail brush
- Painter’s tape or masking tape
- Chalk or dry erase marker (for sketching)
- Window cleaner and paper towels
- Ruler or straight edge
- Star stencil (optional)
Step 1: Preparation and Layout
-
Clean the surface:
Begin by thoroughly cleaning the outside of your window panes. Remove any dust, pollen, or water spots to ensure the paint adheres properly and looks crisp from the street. -
Plan the spacing:
Visualize the three vertical panes as individual frames. The first pane will hold the ‘U’, the middle the ‘S’, and the right pane the ‘A’. Mark the height of your letters lightly with a dry erase marker so they stay level across the window. -
Sketch the letters:
Using a dry erase marker or piece of chalk, lightly sketch the outlines of U, S, and A on the glass. Make them blocky and thick to allow room for the star patterns inside. -
Sketch the extras:
Above each letter, draw a simple five-point star centered in the upper pane section. At the bottom, sketch the radiating lines for your fireworks.
Paint Streaks?
If the sun is shining through and showing brush strokes, wait for the paint to fully cure, then dab a sponge brush gently over the area to add texture and opacity.
Step 2: Painting the Letters
-
Outline the ‘U’:
Load your medium brush with red paint. Carefully trace the outline of your ‘U’ sketch. I find it helps to tackle the outer edges first to define the shape. -
Fill the ‘U’:
Switch to your wide flat brush and fill in the body of the ‘U’ with red paint. Apply the paint thickly; you may need a second coat once the first is dry to make it opaque against the light. -
Paint the ‘S’:
Using navy blue paint, repeat the process for the ‘S’ in the center pane. Outline with the medium brush and fill with the wide brush, ensuring smooth curves. -
Paint the ‘A’:
Move to the third pane and paint the ‘A’ with red paint, matching the style and thickness of your ‘U’. Don’t forget the triangular hole in the top half of the letter. -
Add the top stars:
While the letters dry, paint the three floating stars in the upper section of the window using red paint. Keep the points sharp for a clean look.
Step 3: Adding Details
-
Create letter stars:
Once the base colors are completely dry to the touch, mix your white paint. Use a small detail brush or a stencil to paint white stars inside the letters. The red letters (‘U’, ‘A’) get white stars, and the blue letter (‘S’) gets white stars as well. -
Spacing the stars:
Try to space the stars evenly. A checkerboard pattern often works best to cover the surface without looking cluttered. -
Paint the fireworks:
For the bottom section, use white paint and a fine detail brush. Start from a central point and flick the brush outward to create thin, radiating lines like an exploding firework. -
Layer the bursts:
Paint a second, smaller burst directly over the center of the first one to add dimension. You can add a small dot in the very center as the nucleus. -
Clean up edges:
Inspect your work from a distance. If any edges look ragged, use a damp Q-tip or a razor blade (carefully) to scrape away excess paint and sharpen those lines.
Make It Glow
Sprinkle loose iridescent glitter onto the wet paint of the fireworks or stars. It will catch the sunlight during the day and streetlights at night.
Step back to the sidewalk and admire how your window display greets the neighborhood with festive spirit


Liberty Bell With Banner
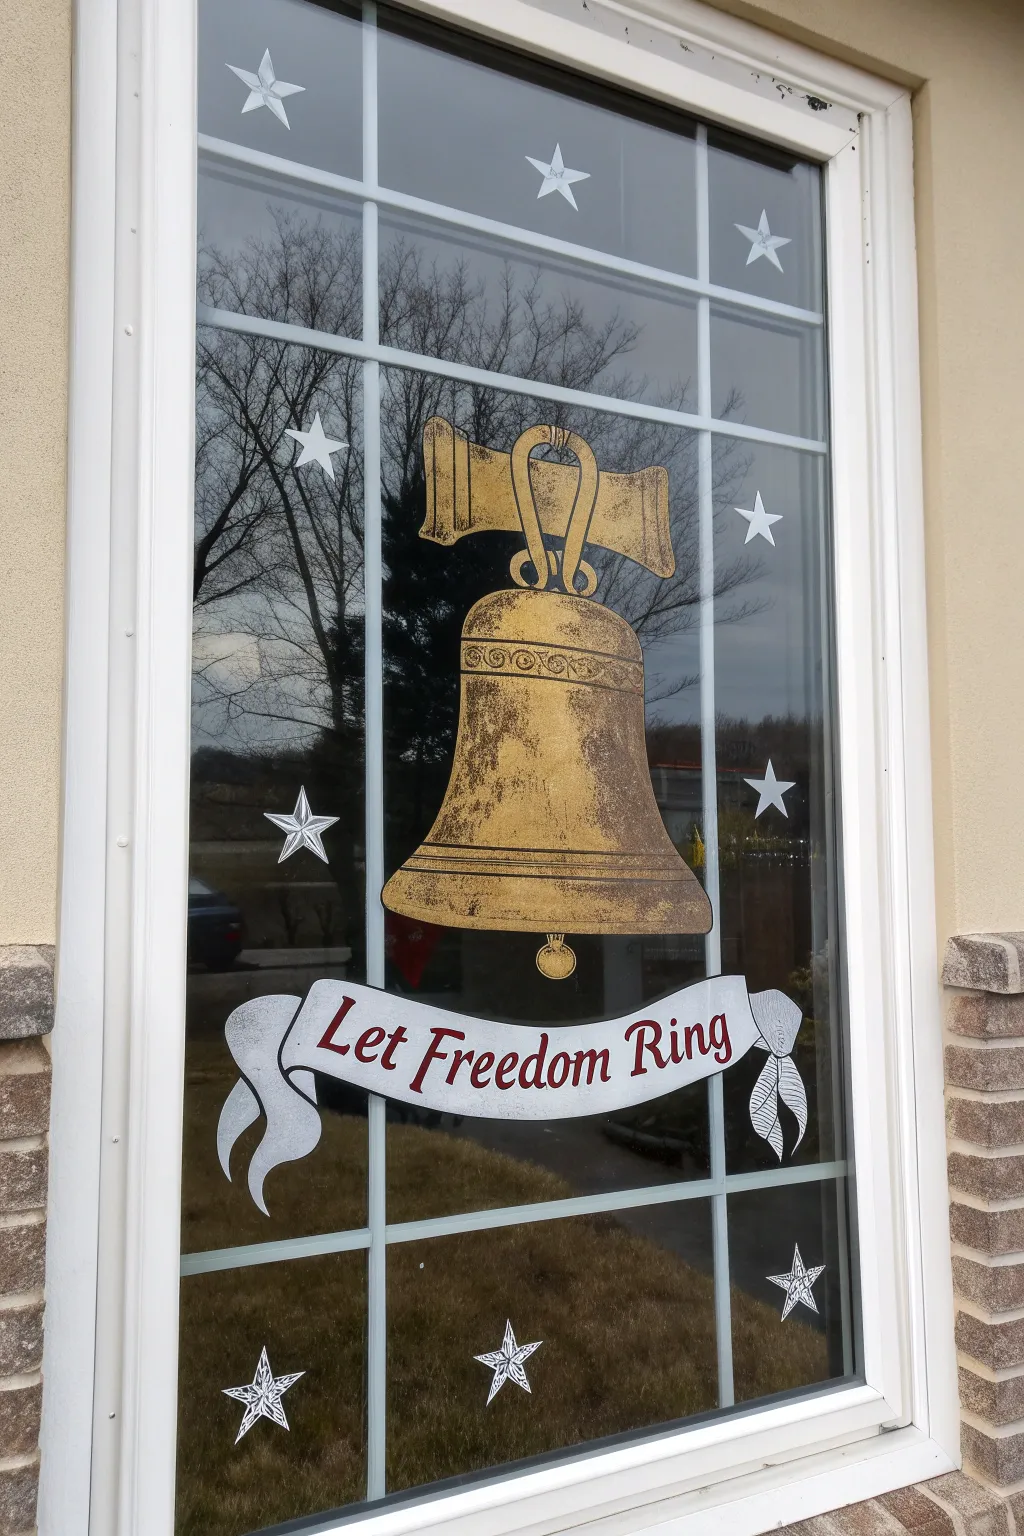
Bring a touch of historic Americana to your home with this stunning Liberty Bell window painting, featuring a realistic metallic finish and a classic patriotic banner. The golden hues and detailed scrollwork create a sophisticated display that shines beautifully both day and night.
Step-by-Step Guide
Materials
- Acrylic craft paints (Gold, Bronze/Dark Brown, White, Red, Black)
- Wide flat brush (1-2 inch)
- Small round brush for details
- Liner brush for lettering
- Window cleaner and paper towels
- Chalk marker or dry erase marker (white)
- Small sponge (optional for texture)
- Reference image of the Liberty Bell
Step 1: Preparation and Outline
-
Clean surface:
Start with a crystal-clean window. Use glass cleaner and paper towels to remove any dust or fingerprints, ensuring your paint adheres properly. -
Sketch the yoke:
Using your white chalk marker, begin sketching near the top of the window pane. Draw the wooden yoke (the top support beam) as a wide, slightly curved horizontal rectangle with flared ends. -
Draw the bell shape:
Below the yoke, sketch the main bell shape. Start with the rounded dome top, curve outwards gently for the body, and flare out significantly at the bottom rim. Don’t forget the vertical supports connecting the bell to the yoke. -
Outline the banner:
Beneath the bell, draw a flowing ribbon banner. Create a central waving section for the text and add curled tails on either side to give it dimension. -
Add stars:
Scatter five-pointed star outlines around the bell in the empty glass space—some near the top corners and some below the banner.
Paint Peeling Off?
If paints slide off the glass, your window might be too cold or damp. Ensure the glass is room temperature and completely dry. Mixing a bit of dish soap into acrylics can also improve adhesion on glass.
Step 2: Painting the Bell
-
Base coat the bell:
Mix a small amount of bronze or dark brown into your gold acrylic paint to create an antique brass color. Using a wide flat brush, fill in the entire bell shape and the yoke wood. The paint might look streaky at first; that’s okay. -
Sponge for texture:
While the base coat is tacky but not fully dry, I like to use a small sponge or a dry brush to dab pure gold paint onto the center of the bell. This creates a highlighted, metallic texture. -
Add shadow depth:
Use a darker brown or bronze mix to shade the edges of the bell and under the rim. Paint vertical streaks downwards to mimic the curvature and weathering of old metal. -
Detail the yoke:
On the wooden yoke at the top, use a liner brush with dark brown paint to add subtle wood grain lines. Outline the brackets holding the bell with black for contrast. -
Decorative banding:
Once the gold is dry, use a small round brush with dark brown or black paint to create the decorative band near the top of the bell. Paint a series of small swirls or loops within horizontal parallel lines. -
The clapper:
Paint the clapper (the ball that strikes the bell) hanging just below the bottom rim in gold, adding a small shadow on one side to make it look spherical. -
Final outlines:
Use a thin brush with black paint to outline the entire bell, yoke, and internal details. Keep the lines crisp to separate the gold from the glass background.
Level Up: Glitter Accents
While the gold paint on the bell is still wet, sprinkle a pinch of fine gold glitter onto the highlight areas. It will catch the sunlight beautifully and make the bell sparkle from the street.
Step 3: Banner and Finishing Touches
-
Fill the banner:
Paint the interior of your ribbon banner with white acrylic paint. You may need two coats to make it opaque against the light coming through the window. -
Shade the ribbon:
Mix a tiny drop of grey or use watered-down black to paint shadows where the ribbon folds or curls under itself. This adds a 3D effect. -
Lettering:
Using a liner brush and deep red paint, carefully write ‘Let Freedom Ring’ across the center of the banner. A classic serif font or calligraphy style works best here. -
Outline the banner:
Outline the white ribbon with black paint to match the bell’s style. -
Paint the stars:
Fill in your star sketches with white paint or leave them as simple white outlines for a lighter look. Adding inner detail lines can make them look faceted. -
Cleanup:
Once everything is fully dry, use a damp Q-tip or a razor scraper to gently remove any stray paint splatters or clean up wobbly edges.
Step back outside to admire how the sunlight illuminates your patriotic masterpiece for the whole neighborhood to enjoy
BRUSH GUIDE
The Right Brush for Every Stroke
From clean lines to bold texture — master brush choice, stroke control, and essential techniques.
Explore the Full Guide
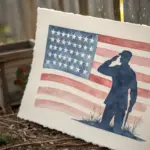
Statue of Liberty Silhouette at Sunset
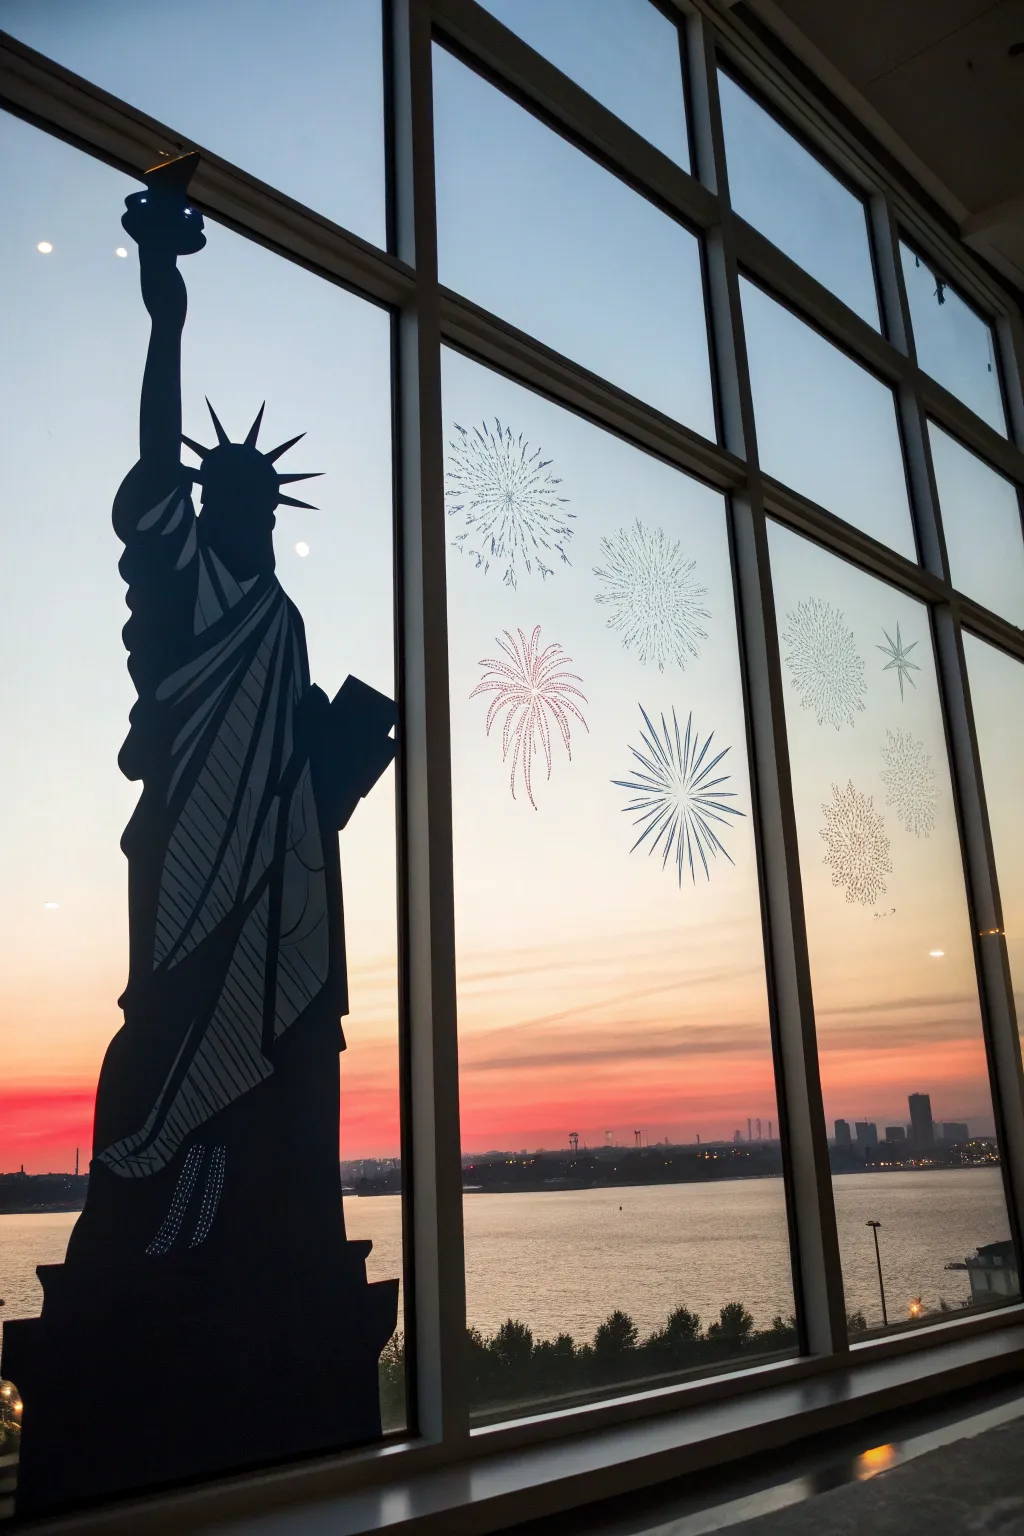
Capture the spirit of Independence Day with this dramatic window display that becomes magical when the sun goes down. Using the natural backdrop of the evening sky, this project combines a bold Statue of Liberty silhouette with delicate fireworks for a stunning panoramic effect.
Step-by-Step
Materials
- Large sheet of black poster board or cardstock
- White or metallic silver paint marker (fine point)
- Window markers or chalk markers (red, white, blue, silver)
- Painter’s tape or transparent tape
- Scissors and X-ACTO knife
- Pencil and eraser
- Yardstick or long ruler
- Reference image of Statue of Liberty
- Glass cleaner and paper towels
Step 1: Creating the Statue Silhouette
-
Measure your space:
Start by measuring the window pane where the statue will go. You want the figure to be imposing, filling about two-thirds of the height of a single pane. -
Draft the outline:
On your black poster board, use a pencil to lightly sketch the outline of Lady Liberty. Focus on the key recognizable elements: the spiked crown, the raised torch arm, and the draped folds of her robe. -
Refine the details:
Go back over your sketch to firm up the lines. Don’t worry about interior details yet; the most important part is getting a clean, recognizable exterior shape. -
Cut the silhouette:
Carefully cut out the entire shape using scissors for the large curves. For the intricate points of the crown or the tablet edges, switch to an X-ACTO knife for precision. -
Add drawn details:
Using the white or silver paint marker, draw the interior lines directly onto the black cardstock. Use diagonal hatching lines to suggest the folds of the robe and outline the arm and tablet to give the flat shape dimension. -
Mount the statue:
Clean the window glass thoroughly with glass cleaner. Once dry, use small loops of painter’s tape on the back of the cutout to secure it to the left side of the window pane. -
Secure the base:
Ensure the base of the statue sits flush against the bottom of the window frame or sash to make it look grounded.
Use a Stencil
Can’t freehand the statue? Use a projector to cast an image onto your poster board, or print a large template on multiple sheets of paper to trace.
Step 2: Painting the Fireworks
-
Plan your composition:
Look at the window panes to the right of the statue. Visualize where your fireworks will look best, aiming for a variety of heights to simulate a real show. -
Draw primary bursts:
With a fine-tip white chalk marker, draw the first ‘starburst’ shape. Start from a center point and flick your wrist outward to create thin, radiating lines. -
Add color variety:
Create the next firework using a red marker. Instead of straight lines, try drawing curved, falling lines to mimic a ‘weeping willow’ style firework. -
Mix shapes and sizes:
Draw smaller, tighter bursts in blue or silver. Vary the density of the lines—some can be sparse and starry, others dense and explosive. -
Layering effects:
I like to add little dots or dashes at the ends of the lines on larger fireworks to look like fading sparks. -
Create depth:
Draw a few smaller, simpler star shapes higher up in the corners to fill empty negative space without overcrowding the view. -
Final touches:
Step back and check the balance. If a firework looks too transparent against the bright sky, wait for the first layer of marker to dry and trace over it again to increase opacity.
Fixing Smudges
If you make a mistake with the chalk marker, wait for it to dry completely. It flakes off easily when dry; wet wiping often just smears the pigment around.
Enjoy the view as the setting sun naturally illuminates your patriotic display
Rocket and Firecracker Parade Border

Transform an ordinary window into a spectacular festive display with this layered painting technique that simulates a night sky viewing. By combining opaque flag banners with translucent fireworks, you’ll create depth and celebration just in time for Independence Day.
Step-by-Step Tutorial
Materials
- Glass cleaner and lint-free cloth
- painter’s tape (blue or green)
- White acrylic craft paint or window paint marker
- Red acrylic craft paint
- Navy blue acrylic craft paint
- Small fine-point paintbrush
- 1-inch flat paintbrush
- Paper plate or palette
- Ruler or straight edge
- Wide masking tape (optional for stripes)
- Blue construction paper or cardstock (for the sill runner)
- Scissors and adhesive tape
Step 1: Prepping the Canvas
-
Clean surface:
Begin by thoroughly cleaning the window glass inside and out. Any dust or fingerprints will make paint adhesion difficult, so ensure it is completely dry and streak-free before starting. -
Plan the layout:
Visualize your design: the top sash will feature the main fireworks display, while the bottom sash will house the flag banner along the lower panes, with some reflections above it.
Step 2: Painting the Flag Banner
-
Block out the blue field:
On the bottom row of window panes, designate the upper third section for the blue star field. Use your flat brush and navy blue paint to create a solid horizontal band across the top of these panes. Apply two coats if necessary for opacity. -
Paint the red stripes:
Below the blue field, paint vertical red stripes. Use a ruler to space them evenly or eyeball it for a rustic look. Leave clear glass between the red stripes—we will fill these with white later. -
Fill the white stripes:
Once the red paint is dry to the touch, use your flat brush to fill in the remaining vertical spaces with white paint. Be careful to keep lines crisp where they meet the red. -
Add the stars:
Dip a small fine-point brush into white paint. On the dry navy blue field, paint rows of small five-pointed stars. I find it easiest to paint a simple ‘A’ shape and cross it to form the star.
Star Shape Troubles
Struggling to paint perfect stars? Cut a small star shape out of a sponge or potato to make a custom stamp, or use a stencil for uniform results.
Step 3: Creating the Fireworks
-
Start the centers:
In the upper sash panes, choose spots for your firework bursts. Using a fine liner brush and white paint, create a small dot or cluster as the center point for each explosion. -
Draft the white bursts:
Paint long, curved lines radiating outward from your center points. Vary the pressure on your brush—press down at the start (center) and lift up as you flick outward to create tapering lines. -
Layer overlapping bursts:
Add visual depth by painting smaller, secondary bursts behind or beside the large ones. Some lines can be shorter to mimic sparks falling. -
Add red accents:
Rinse your brush and switch to red paint. Create distinct red fireworks interspersed among the white ones, or add small red tips to the ends of the white ‘sparks’ for a two-tone effect. -
Paint reflections:
On the top half of the bottom sash (above the flag banner), paint two large, slightly more transparent white fireworks. This connects the upper and lower designs seamlessly. -
Include tiny details:
Use the tip of your smallest brush to add tiny dots or ‘stars’ in the empty spaces around the fireworks to simulate a glittering night sky.
Weather Proofing
Work on the inside of the glass so rain won’t ruin your art. If painting outside, mix a drop of dish soap into acrylics for easier removal later.
Step 4: Finishing the Sill
-
Cut the paper runner:
Measure the width of your exterior window sill. Cut a strip of blue construction paper or cardstock to match this length, making it about 3-4 inches tall. -
Paint runner stars:
Using the same white paint and brush, paint a single row of uniform stars along the length of the blue paper strip. -
Attach the runner:
Once dry, affix this paper runner to the front face of the window sill using double-sided tape or rolled masking tape. This grounds the entire visual presentation. -
Clean up edges:
Inspect your work. If any paint smudged onto the window muntins (the wood dividers), use a damp Q-tip or a fingernail to gently scrape it away for a professional finish.
Step back to the street and admire how your window has become a patriotic centerpiece for the neighborhood

PENCIL GUIDE
Understanding Pencil Grades from H to B
From first sketch to finished drawing — learn pencil grades, line control, and shading techniques.
Explore the Full Guide
Vintage Parade Sign With 1776
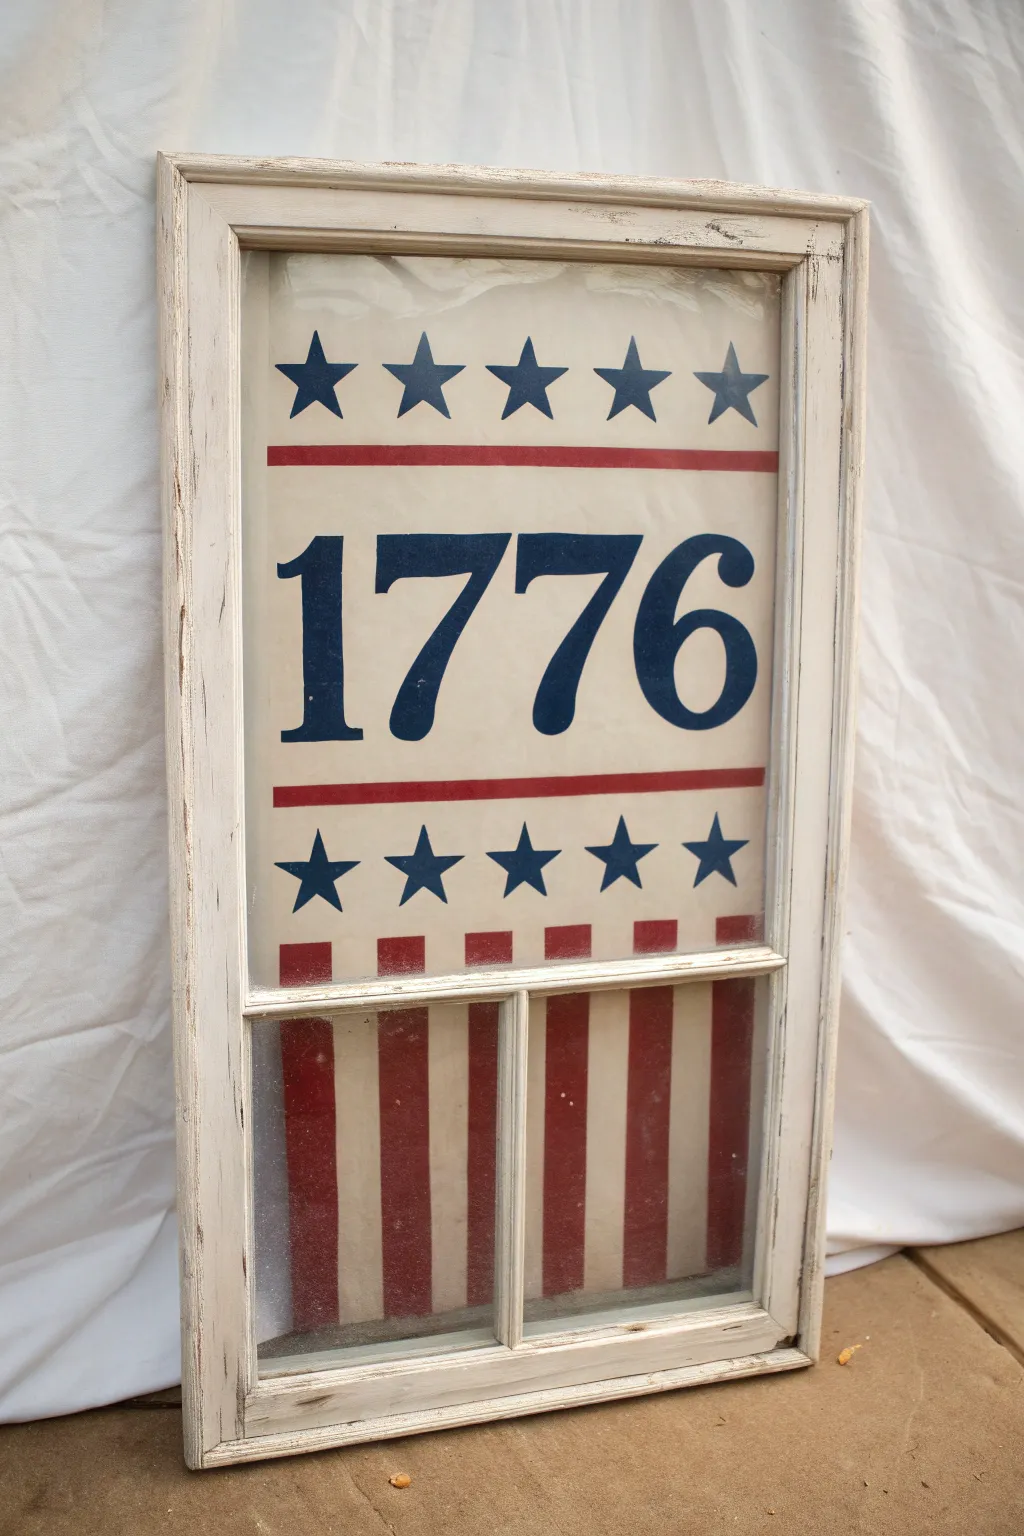
Transform an old, divided window pane into a stunning piece of patriotic decor that evokes timeless American history. This project combines reverse glass painting techniques with a distressed farmhouse frame for a look that feels authentically vintage.
Detailed Instructions
Materials
- Salvaged wood window pane (divided style)
- Glass cleaner and lint-free cloth
- Rubbing alcohol
- Painter’s tape (multi-surface)
- Contact paper or vinyl stencil material
- Acrylic craft paint: Navy Blue, Deep Red, Cream/Off-White
- Chalk paint: White (for the frame)
- Sandpaper (medium grit 120-150)
- Foam pouncer brushes
- Small flat artist brushes
- Computer and printer (for stencil reference)
- Craft knife or stencil cutter
Step 1: Preparation & Frame
-
Clean the surface:
Begin by thoroughly cleaning the entire window, paying special attention to the glass. Use rubbing alcohol as a final wipe-down to remove any grease or residue that might prevent paint adhesion. -
Paint the frame:
Apply a coat of white chalk paint to the wooden frame. You don’t need to be perfectly neat here; a little texture adds character. -
Distress the wood:
Once the frame is completely dry, take your sandpaper and gently rub along the edges and raised areas. Reveal the original wood underneath to create that aged, farmhouse aesthetic. -
Design your layout:
Using a computer, create your ‘1776’ text and star patterns sized to fit your specific window pane dimensions. Print these out to use as templates.
Step 2: The Upper Section
-
Create the stencil mask:
Cut your ‘1776’ numbers and two rows of five stars out of contact paper or vinyl. Place the negative space stencil (the outline) onto the upper glass pane. Ensure the edges are pressed down firmly to prevent bleeding. -
Paint the stars:
Load a foam pouncer with Navy Blue paint. Dab off the excess, then gently pounce over the star cutouts. Apply thin coats and let them dry between layers for solid coverage. -
Paint the numbers:
Using the same Navy Blue paint and pouncing technique, fill in the large ‘1776’ numbers. I find that pouncing straight up and down prevents paint from seeping under the stencil adhesive. -
Stripe the border:
Use painter’s tape to mark off two horizontal lines: one above the numbers and one below. Fill these stripes with Deep Red paint using a small flat brush. -
Remove stencils:
carefully peel away the vinyl stencils and painter’s tape while the paint is still slightly tacky to ensure crisp lines. -
Fill the background:
Once your blue and red designs are fully cured, paint the entire back surface of the upper pane with Cream/Off-White paint. You will need 2-3 coats to make it opaque so the design pops from the front.
Bleeding Lines?
If paint seeps under your stencil, wait for it to dry completely. Then, use a damp toothpick or the very tip of a craft knife to gently scrape the excess away for a sharp edge.
Step 3: The Lower Section
-
Tape the vertical stripes:
On the lower glass sections, use painter’s tape to create vertical columns. Measure carefully so your stripes are even. -
Paint the red stripes:
Fill in the exposed glass areas with Deep Red paint. Use a pouncer or a soft brush, applying enough coats to block out light. -
Remove tape:
Gently remove the tape to reveal clear glass stripes alternating with result red stripes. -
Paint the cream stripes:
Once the red paint is bone dry, paint the entire back of the lower section with the Cream/Off-White paint. This will fill in the clear glass stripes with cream while coating the back of the red stripes.
Reverse Order Pro-Tip
Remember, this is reverse glass painting. You must paint the foreground details (stars/letters) first. The background color (cream) always goes on last, covering everything from behind.
Step 4: Finishing Touches
-
Clean edges:
Use a craft knife or a razor blade to gently scrape away any paint depicting errant splatters on the front of the glass. -
Seal the back:
To protect your work from scratches, you can apply a clear acrylic sealer spray over the painted back side of the window. -
Final inspection:
Turn the window around and check your work. The design should look crisp and vibrant through the glass.
Display your new patriotic masterpiece on a mantel or porch to welcome guests with historic charm
Masked Negative-Space Stars
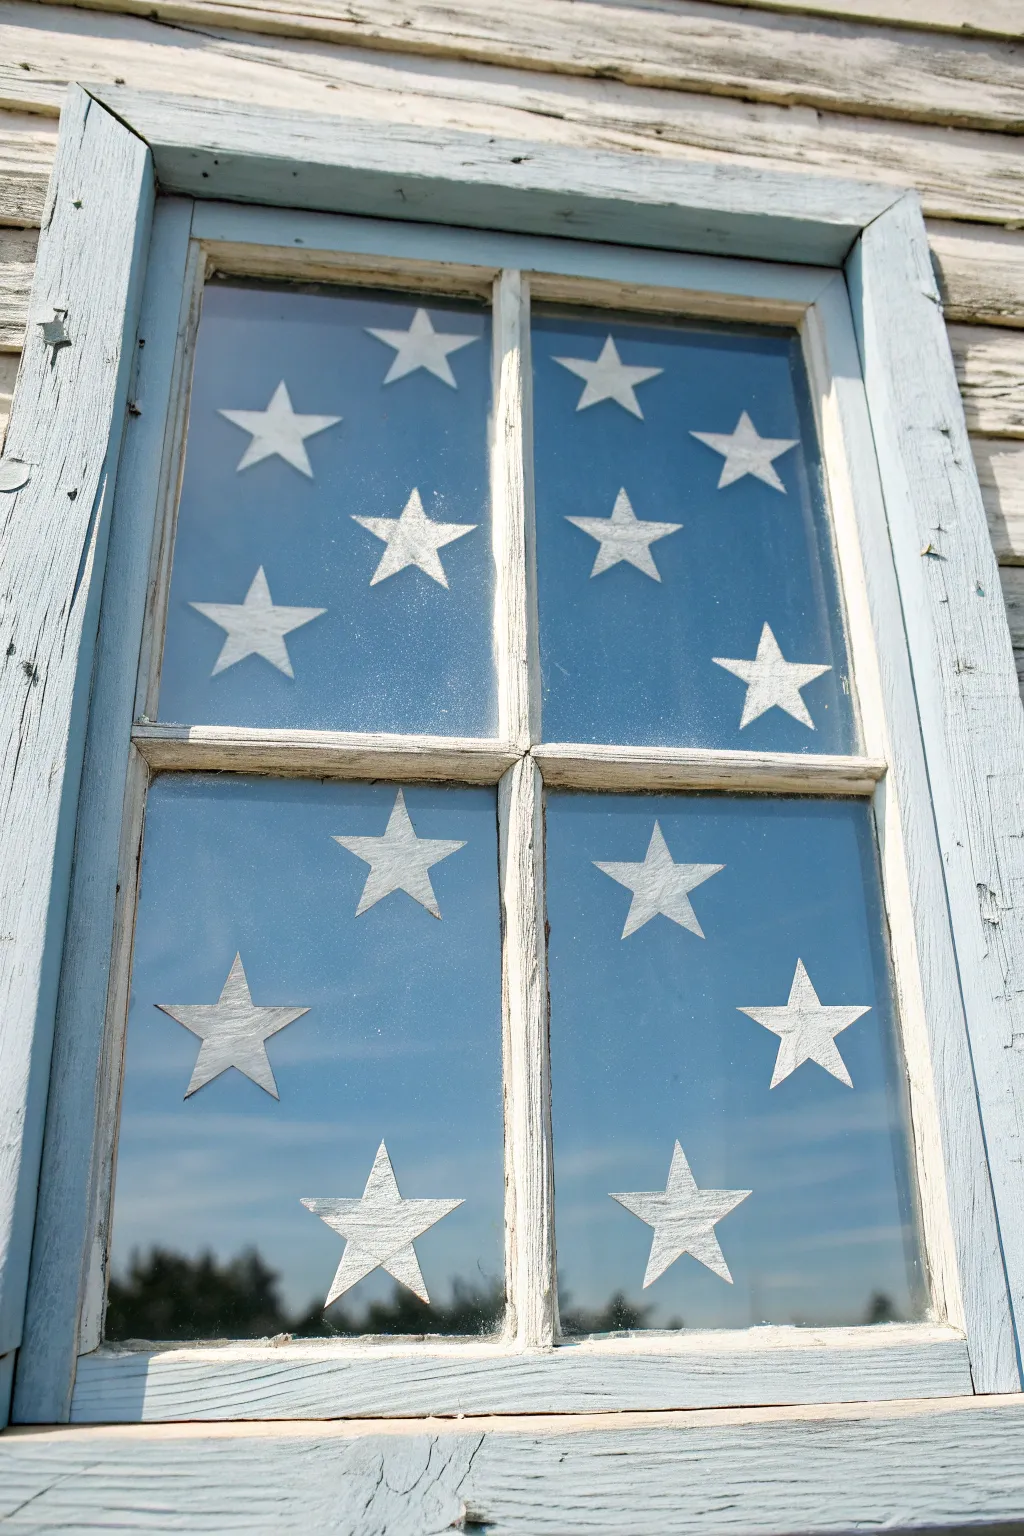
Bring a touch of rustic Americana to your home with this simple yet striking window art project. By stenciling crisp white stars onto glass, you create a beautiful contrast against the blue sky outside or a dark room inside, perfect for patriotic holidays.
Step-by-Step
Materials
- Glass window cleaner
- Lint-free cloth
- Star stencils (various sizes or uniform, based on preference)
- Painter’s tape or stencil spray adhesive
- White acrylic craft paint or tempera paint (washable)
- Stencil brush or high-density foam pouncer
- Small flat angled brush (for touch-ups)
- Paper plate or palette
- Ruler (optional, for spacing)
Step 1: Preparation & Layout
-
Clean the surface:
Begin by thoroughly cleaning the window pane inside and out. Any dust or grease on the glass will prevent the paint from adhering properly, so use a good glass cleaner and a lint-free cloth to ensure a spotless surface. -
Choose your star placement:
Decide on the arrangement of your stars. The reference image features a somewhat alternating grid pattern—three stars in one row, two in the next—which creates a nice visual balance without looking too rigid. -
Prep the stencils:
If you are using a plastic stencil sheet, secure it to the glass using painter’s tape. For even crisper lines, I prefer using a light mist of stencil spray adhesive on the back of the stencil to keep it flush against the glass. -
Measure for symmetry:
If you want a precise look, use a ruler to lightly mark small guide dots with a dry-erase marker (which wipes off easily later) to ensure your alternating rows are evenly spaced.
Sharper Lines Secret
Before applying white paint, dab a clear matte sealer over the stencil first. This seals the edge so any bleeding is invisible clear coat, keeping the white perfect.
Step 2: Applying the Design
-
Load the brush:
Squeeze a small amount of white paint onto your paper plate. Dip your stencil brush or foam pouncer into the paint. -
Offload excess paint:
Crucial step: stamp off most of the paint onto a clean part of the paper plate until the brush is almost dry. Too much paint will bleed under the stencil edges. -
Apply the first layer:
Using a straight up-and-down dabbing motion (stippling), apply the paint over the star stencil. Avoid brushing side-to-side, as this pushes paint under the plastic. -
Let it tack up:
Allow this first thin layer to dry for just a few minutes until it is tacky but not fully set. This creates a ‘tooth’ for the next layer to grab onto. -
Add opacity:
Repeat the stippling process with a second coat to build up a solid, bright white opacity that stands out against the glass. -
Remove the stencil:
Carefully peel the stencil away while the paint is still slightly wet. If you wait until it’s bone dry, the paint might peel up with the plastic.
Paint Peels with Stencil?
You likely waited too long or applied paint too thickly. Lift the stencil while the final coat is still wet, or score the edge with a craft knife before lifting.
Step 3: Refining & Finishing
-
Clean the stencil:
Wipe off your stencil immediately if you need to reuse it for the next star to prevent dried clumps from ruining the outline. -
Repeat the pattern:
Move to the next measured position and repeat the painting process until all panes are filled with your star configurations. -
Check for errors:
Inspect your stars for any paint bleed. If you see fuzzy edges, use a damp cotton swab or a precision craft knife to gently scrape away excess paint once it’s dry. -
Sharpen points:
Use a small, flat angled brush with a tiny bit of white paint to touch up any star points that didn’t get fully filled by the stippling brush. -
Weather the look (optional):
If you want the stars to match a rustic window frame, you can lightly sand the dried stars with fine-grit sandpaper for a distressed, vintage appearance. -
Final polish:
Give the glass surrounding the stars one last wipe to remove any fingerprints or smudge marks from your hands during the painting process.
Step back and enjoy the festive, patriotic charm your new window art brings to the neighborhood


Stained-Glass Style Star Mosaic
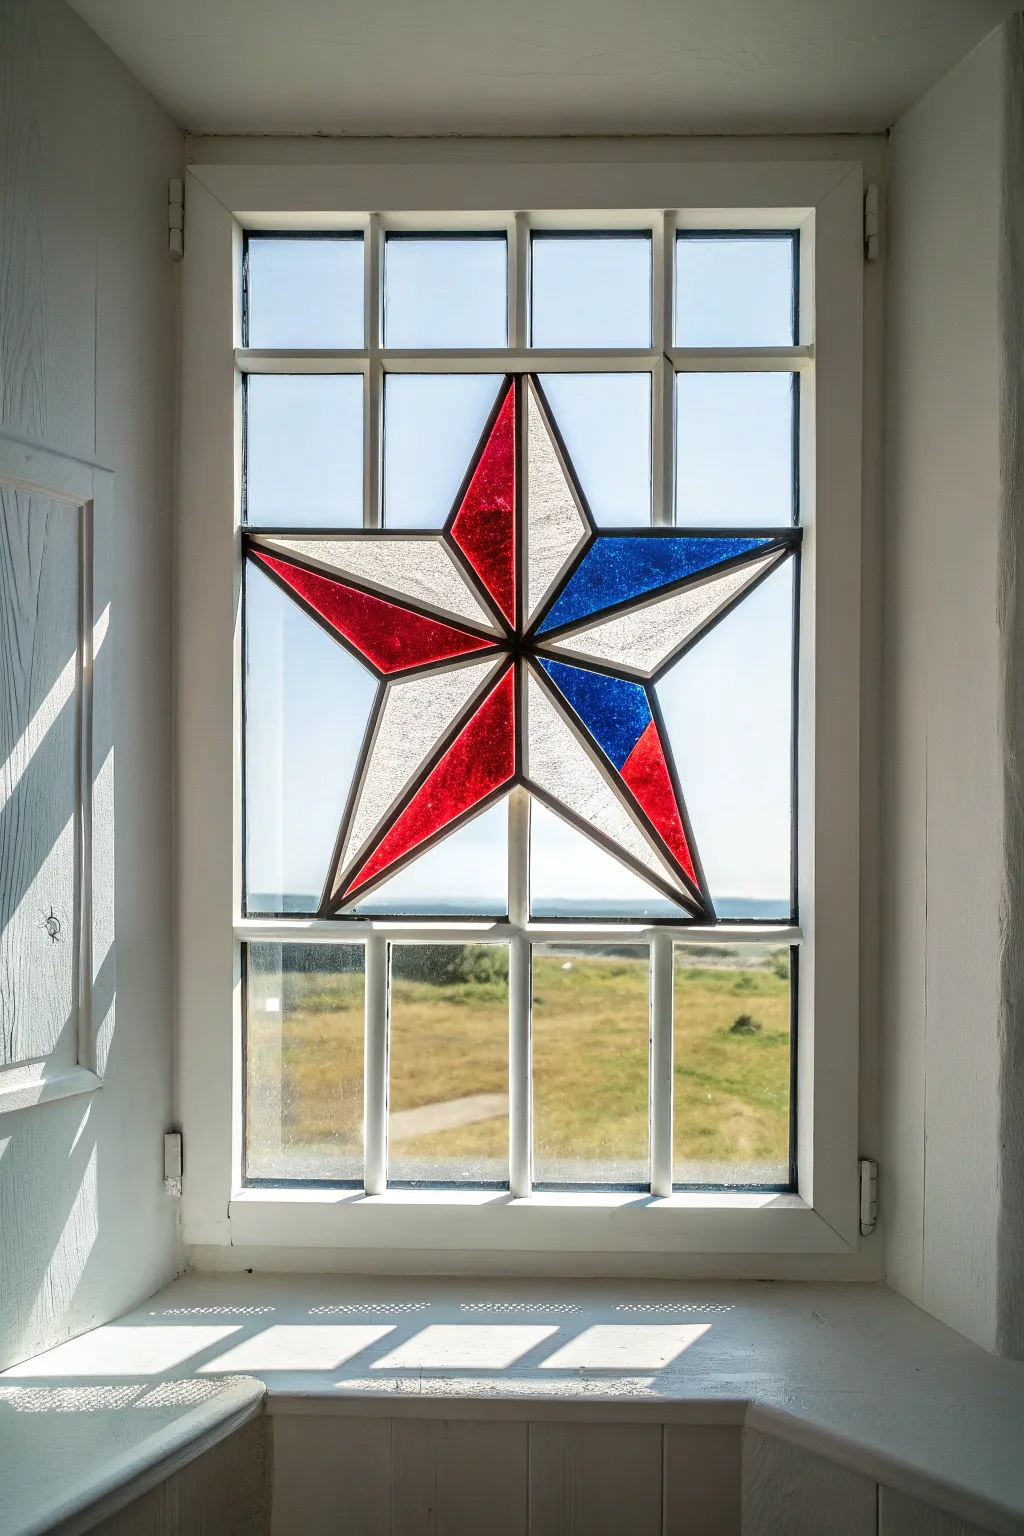
Transform an ordinary window pane into a stunning focal point with this faux stained-glass technique that captures the light dramatically. This geometric star design uses translucent glass paints and liquid leading to mimic the look of soldered artwork without the heavy tools.
Step-by-Step Tutorial
Materials
- Glass-safe window paint (ruby red, royal blue, clear or frosted white)
- Liquid leading (black or pewter)
- Printable star template (sized to your window pane)
- Clear plastic gallery glass sheet (optional, for removable option)
- Painter’s tape
- Rubbing alcohol
- Lint-free cloth
- Toothpicks or a scribe tool
- Fine-tipped paintbrush
Step 1: Preparation and Design
-
Clean the Surface:
Before applying any materials, thoroughly clean the window pane with rubbing alcohol and a lint-free cloth. Any dust or grease will prevent the leading and paint from adhering properly. -
Measure and Scale:
Measure the specific window pane where you want the star. You will need a five-pointed star pattern that fits centrally within the pane. -
Secure the Template:
Tape your printed star template to the *outside* of the window glass, facing inward. Ensure the pattern is centered perfectly in the pane. -
Understanding the Facets:
Mark your template to indicate color placement. Notice how each point of the star is bisected: the top point is split red/white, the right arm is blue/white, and the bottom legs alternate red and white.
Lead Line Mastery
Store your liquid leading bottle upside down for 30 minutes before starting. This prevents air pockets from sputtering out and breaking your smooth lines.
Step 2: Creating the Framework
-
Trace the Outline:
Using your bottle of liquid leading, carefully trace the main outer perimeter of the star directly onto the inside glass surface. Keep the nozzle about an inch above the glass for a smoother line flow. -
Add Inner Geometry:
Draw the internal lines that connect the inner corners of the star to the center point. Then, draw the bisecting lines from the outer points to the center. -
Connect to the Frame:
Observe how the star tips touch the window frame or muntins. Extend your lead lines slightly to ‘anchor’ the design visually to the edges. -
Fix Imperfections:
I like to keep a toothpick handy during this stage; if a line gets wobbly or bubbles, use the toothpick to nudge it back into shape or pop the bubble before it dries. -
Let it Cure:
Allow the lead lines to dry completely, usually for 8 to 12 hours. The lines must be firm before you start filling in the color.
Crystal Effect
Sprinkle fine clear glitter into the wet white/clear paint sections. When dry, this creates a ‘seeded glass’ texture that sparkles beautifully in sunlight.
Step 3: Painting the Glass
-
Start with the Top Point:
Begin filling the top point of the star. Squeeze ruby red paint into the left half of the top point, ensuring it touches the lead border completely. -
Apply the White Texture:
Fill the right half of the top point with the crystal clear or frosted white paint. This mimics the textured clear glass seen in real stained glass. -
Paint the Blue Section:
Move to the upper right arm of the star. Fill the top half of this arm with royal blue paint. Use a toothpick to swirl it into corners without overflowing the leading. -
Complete the Red Sections:
Fill the left half of the bottom-left leg and the right half of the top-left leg with red paint. Apply paint generously so it self-levels. -
Finish with White/Clear:
Fill the remaining segments with your clear or frosted paint. The variance in opacity helps catch the light differently than the colored sections. -
Pop Bubbles:
Scan the wet paint for tiny air bubbles. Tap the underside of the glass gently or use a needle to pop them to ensure a smooth, glass-like finish. -
Final Cure:
Let the paint dry undisturbed for at least 24 hours. It will transition from cloudy to translucent as it cures. -
Remove Template:
Once dry, carefully peel the paper template off the outside of the window to reveal your vibrant design.
Enjoy watching the summer sun cast colorful geometric shadows across your room with your new patriot masterpiece
Watercolor-Wash Fireworks Over a Cityline

Transform your view into a patriotic celebration with this dual-layered window display. By combining a crisp, silhouetted skyline decal with loose, watercolor-style painted fireworks directly on the glass, you create a scene that feels festive both day and night.
Detailed Instructions
Materials
- Matte black contact paper or removable vinyl
- Scissors or craft knife
- Cutting mat
- Pencil and ruler
- Transfer tape (optional)
- Acrylic craft paint (red, blue, gold/white)
- Dish soap
- Small round paintbrushes (various sizes)
- Painter’s tape
- Glass cleaner and microfiber cloth
Step 1: Prepping the Skyline
-
Measure the space:
Begin by measuring the width of the wall space or trim directly beneath your window sill. This is where your vinyl city silhouette will live, grounding the artwork above. -
Draft the design:
Unroll your black contact paper onto a flat surface, backing side up. Sketch a long rectangular base about 2-3 inches tall, spanning your measured width. -
Draw the buildings:
Above the base rectangle, pencil in a variety of building shapes. Mix tall skyscrapers with spires, shorter blocky buildings, and varied rooflines to mimic a real city skyline like New York or Chicago. -
Add iconic details:
Include recognisable landmarks if you wish, like the Empire State Building’s needle or the Freedom Tower’s slope, keeping lines clean and simple for easier cutting. -
Cut the silhouette:
Using sharp scissors for large sections and a craft knife for detailed spires, carefully cut out your skyline. Remember to keep the bottom edge perfectly straight. -
Apply the decal:
Clean the wall area below the window thoroughly. Peel back a few inches of the backing paper, align the bottom edge with your trim or floor moulding, and slowly smooth the vinyl onto the wall, working from one side to the other to avoid bubbles.
Step 2: Painting the Fireworks
-
Prepare the ‘window paint’:
In a palette, mix acrylic paint with a few drops of dish soap. This secret ingredient helps the paint stick to glass while making it significantly easier to scrape off later. -
Clean the glass:
Ensure the window pane is spotless using glass cleaner. Oils or fingerprints will cause the paint to bead up and ruin the effect. -
Plan the composition:
Visualize where your fireworks will explode. I like to stagger them at different heights, keeping the largest bursts near the top pane and smaller ones drifting lower. -
Paint the first burst:
Dip a round brush into red paint. Starting from a central point, flick the brush outward in curved strokes to create the ‘arms’ of the firework, leaving the center slightly open. -
Add dimension:
While the first strokes are wet, add a few shorter strokes in a lighter shade or thinned paint to simulate depth and movement. -
Create variety:
Switch to blue paint for the next firework. Try a different shape, perhaps one that looks like a palm tree with all sparks falling downward, rather than a radial burst. -
Incorporate gold accents:
Use a metallic gold or a muted white to paint smaller, star-like bursts. These act as filler and add a bit of sparkle to the composition. -
Paint the trails:
For some fireworks, paint a single, thin, wiggly line trailing downwards from the center of the burst to suggest the rocket’s path. -
Sprinkle stars:
Using the very tip of your smallest brush, dot tiny stars or diamond shapes in red and blue around the main fireworks to fill negative space. -
Let it cure:
Allow the paint to dry completely. It will look slightly more translucent once dry, giving it that lovely watercolor-wash appearance against the daylight.
Paint Beading Up?
If the paint separates on the glass, your mixture needs more soap. Add another drop of dish soap to the acrylics and stir well to break surface tension.
Pro Tip: Dry Brush Effect
Don’t overload your brush. A slightly ‘dry’ brush creates wispy, textured ends on the fireworks that look more realistic than solid, thick lines.
Enjoy your custom view that brings the excitement of Independence Day fireworks right into your living room
Hand-Lettered Holiday Message in Stars and Stripes
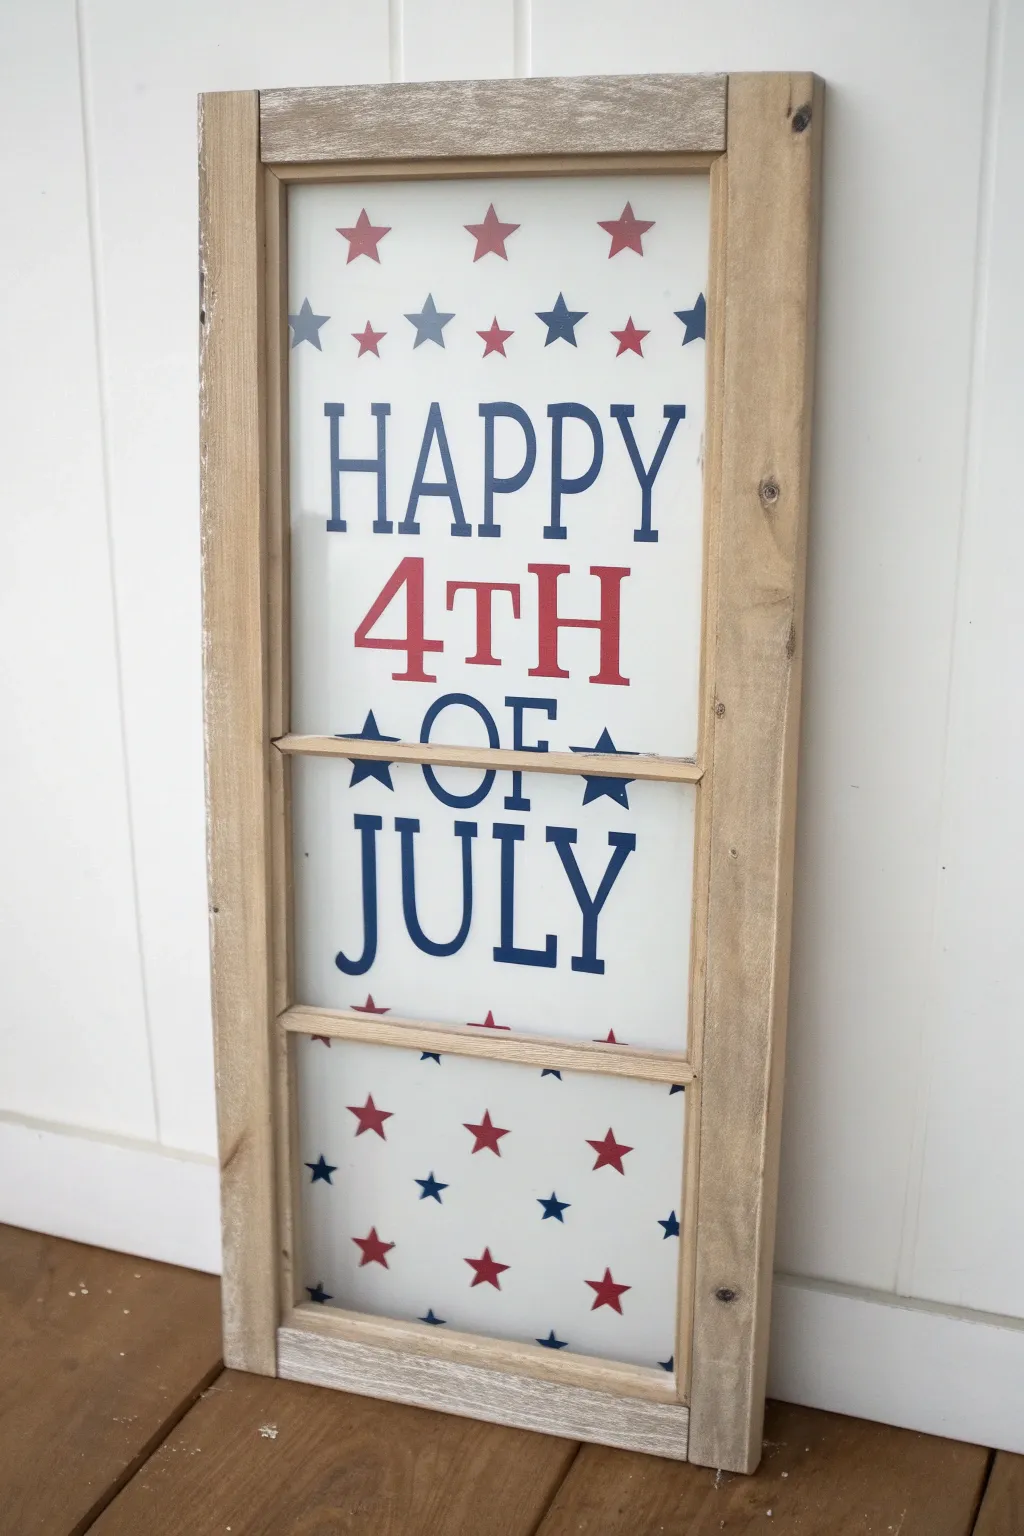
Transform an old farmhouse-style window frame into a patriotic statement piece with this charming project. The distressed wood combined with crisp stars and classic lettering creates a timeless decoration perfect for your porch or mantel this Fourth of July.
Step-by-Step
Materials
- Vertical wooden window frame (3 panes)
- Glass cleaner and lint-free cloth
- Rubbing alcohol
- Adhesive vinyl or contact paper (for stencils)
- Electronic cutting machine (e.g., Cricut or Silhouette) OR X-Acto knife
- Oracal 631 or 651 vinyl (any color for stencil)
- Transfer tape
- Acrylic craft paint: Navy Blue, Deep Red
- Foam pouncers or cosmetic sponges
- Painter’s tape
- Scraper tool or old credit card
- Sealant (optional, like Polycrylic if placing outdoors)
Step 1: Glass Preparation
-
Clean the surface:
Begin by thoroughly cleaning the glass on your window frame. Use a standard glass cleaner to remove dust and grime, then follow up with rubbing alcohol to remove any oily residues that might prevent the stencil from sticking. -
Tape the edges:
Apply painter’s tape to the inner edges of the wooden frame where it meets the glass. This protects your rustic wood finish from accidental paint smudges during the stenciling process.
Bleed-Proof Lines
Before applying your red or blue paint, dab a very thin layer of Mod Podge over the stencil edges. This seals the gap, ensuring perfectly crisp lines on the clear glass.
Step 2: Designing and Cutting Stencils
-
Measure your panes:
Measure the dimensions of each individual glass pane accurately. You will need to design three separate stencil sections to fit inside these specific areas. -
Create the top design:
For the top pane, design a repeating pattern of 5-point stars. Size them to create three distinct horizontal rows: a top row of red stars, a middle row of alternating blue and red, and a bottom row of alternating blue and red. -
Create the middle text design:
For the center pane, format the text ‘HAPPY 4TH OF JULY’. Use a tall, serif font (like Times New Roman or similar) for ‘HAPPY’ and ‘JULY’ in blue. Use a bold serif for ‘4TH’ in red. Add a decorative row of blue stars separating the date from ‘JULY’. -
Create the bottom design:
For the bottom pane, create another repeating star pattern. Plan for roughly four rows of alternating red and blue stars, spacing them slightly looser than the top pane for visual balance. -
Cut and weed:
Cut your designs out of adhesive vinyl using your cutting machine. Once cut, ‘weed’ the design by removing the creating the negative space where you want the paint to go (remove the letters and star shapes themselves, leaving the background vinyl).
Backlighting
For a magical evening look, tape battery-operated fairy lights to the back of the wood frame. The light will glow beautifully through the unpainted glass around your text.
Step 3: Applying the Stencils
-
Apply transfer tape:
Press transfer tape firmly over your weeded vinyl stencils using a scraper tool to ensure a strong bond. -
Position top stencil:
Carefully align the star stencil on the top pane of glass. Use a ruler to ensure the rows are level before pressing it down firmly. -
Position text stencil:
Center the ‘HAPPY 4TH OF JULY’ stencil on the middle pane. Check that the gap between ‘4TH’ and ‘JULY’ avoids the horizontal wooden divider so the text remains readable. -
Position bottom stencil:
Place the final star stencil on the bottom pane, mirroring the alignment style you used for the top. -
Burnish the vinyl:
Once positioned, burnish (rub firmly) the vinyl onto the glass. Peel back the transfer tape slowly. Go over the stencil edges one more time with your finger to seal them tight against the glass.
Step 4: Painting
-
Load the sponge:
Squeeze a small amount of Navy Blue and Deep Red acrylic paint onto a palette. Dip a foam pouncer into the blue paint and dab off the excess on a paper towel until the sponge is almost dry. -
Paint the blue elements:
Gently dab the blue paint over the ‘HAPPY’ and ‘JULY’ text areas, as well as the specific blue stars in your pattern. Use strict up-and-down motions to prevent paint from bleeding under the stencil. -
Paint the red elements:
Switch to a fresh sponge for the red paint. Stencil the ‘4TH’ text and the designated red stars. I find that doing two thin coats provides much better coverage than one thick, gloppy coat. -
Let it dry slightly:
Allow the paint to set for about 10-15 minutes. It should be dry to the touch but not fully cured.
Step 5: Finishing Touches
-
Remove stencils:
Carefully peel away the vinyl stencils at a sharp angle. If any paint lifts, press it back down immediately. Use a weeding tool or pin to lift the small centers of letters like ‘A’, ‘P’, and ‘O’. -
Clean up edges:
If you notice any small bleeds or rough edges, use a damp toothpick or a cotton swab dipped in rubbing alcohol to tidy up the lines while the paint is fresh. -
Distress (optional):
To match the rustic frame, you can very lightly create scratches in the dried paint with fine-grit sandpaper, though leaving it crisp offers a nice modern farmhouse contrast.
Place your finished window frame on a mantel or protected porch to celebrate the holiday with vintage flair
Trompe L’Oeil Night Sky “Open Window”
Transform your window panes into a permanent celebration with this clever trompe l’oeil effect that mimics a vibrant fireworks display against a deep summer night sky. Using removable glass paints, you can turn any view into a festive Fourth of July spectacle that glows beautifully when indoor lights hit the glass.
Step-by-Step Tutorial
Materials
- Glass cleaner and lint-free cloth
- Painter’s tape (low tack)
- Black acrylic craft paint or glass paint (opaque)
- Dark blue acrylic craft paint or glass paint
- Purple or indigo acrylic paint
- White acrylic paint
- Red and gold metallic acrylic paints
- Fine liner brush (size 0 or 00)
- Small flat shader brush
- Fan brush (optional)
- Sponge dabbers or sea sponge
- Ruler or straight edge
- Paper palette or plate
- Cup of water
Step 1: Preparation and Background
-
Clean the Surface:
Begin by thoroughly cleaning the window pane inside and out. Any dust or grease will prevent the paint from adhering properly, so give it a good wipe with glass cleaner and a lint-free cloth. -
Frame the Area:
Use painter’s tape to mask off the wooden mullions and sash bars surrounding the glass. This ensures crisp edges and protects the wood frame from stray brushstrokes. -
Mix the Night Sky Base:
On your palette, mix black with a generous amount of dark blue and a touch of purple. You want a deep, midnight navy color that isn’t completely flat black. -
Apply the Night Sky:
Using a sponge dabber or sea sponge, gently pat the dark mixture onto the glass. I find that dabbing creates a better texture than brushing, which can leave streaks on slick glass. Aim for opaque coverage, but leave the bottom 2 inches slightly lighter. -
Create the Horizon Line:
While the paint is still wet, mix a tiny bit of white into your dark blue to create a misty slate color. Blend this into the bottom 2 inches of the pane to suggest a distant horizon or city haze. -
Let it Cure:
Allow this base layer to dry completely. Since glass is non-porous, this might take 30-60 minutes depending on humidity. Don’t rush this, or the next layers will lift the base.
Step 2: Painting the Fireworks
-
Establish Centers:
Visualize where your fireworks will explode. Using a very small dot of white paint, mark the center point for about three to five major bursts across the different panes. -
Technique for Bursts:
Load a fine liner brush with red paint. Place the tip near a center white dot and flick swiftly outward, lifting pressure as you go to create a tapered line. Repeat this in a radial pattern. -
The Red Chrysanthemum:
For the large red firework in the upper left, paint curved lines radiating from the center. Make the inner lines shorter and the outer lines longer to create volume. -
Adding Golden Willows:
For the lower fireworks that look like weeping willows, use gold metallic paint. Start from the bottom center and pull long, slightly curved strokes upward and then letting them droop down, mimicking gravity. -
Layering the White Sparks:
Mix a watery white paint. Use the liner brush to add a ‘starburst’ explosion in the center pane. These lines should be very straight and fine, radiating sharply from a single point. -
Create Depth:
Once your main fireworks are dry, go back in with a lighter shade of each color (mix with a dot of white) and add smaller, shorter strokes near the centers of the explosions to make them look bright and hot. -
Stipple the Glitter Effect:
To create the fizzy, sparkling look of the background fireworks, use an old toothbrush or a stiff bristle brush. Dip it in white or silver paint and gently spatter or stipple tiny dots in clusters around the main bursts.
Paint Not Sticking?
If paint streaks or separates on the glass, your first layer is too thin. Let it dry, then sponge on a second coat. Adding a drop of dish soap to acrylics helps adhesion.
Step 3: Finishing Details
-
Paint the Stars:
Using the smallest liner brush or a toothpick, dot tiny white stars into the dark blue areas of the sky. Vary the sizes slightly for realism. -
Distant City Lights:
Along the very bottom horizon line you painted earlier, add a few infinitesimally small dots of red and yellow to suggest distant cars or buildings. -
Remove the Tape:
Carefully peel away the painter’s tape while the paint is fully dry. Pull the tape away from the paint at a 45-degree angle to ensure a clean line. -
Clean Up Edges:
If any paint bled under the tape, use a damp cotton swab or a razor blade to gently scrape it off the glass for a perfect framed look.
Add Real Sparkle
While the metallic firework paint is still wet, gently blow loose cosmetic glitter onto the streaks. This catches the room light and makes the fireworks shimmer.
Step back and enjoy your private light show that captures the magic of a summer celebration without the noise
Kid-Friendly Dot-Stamp Star Field
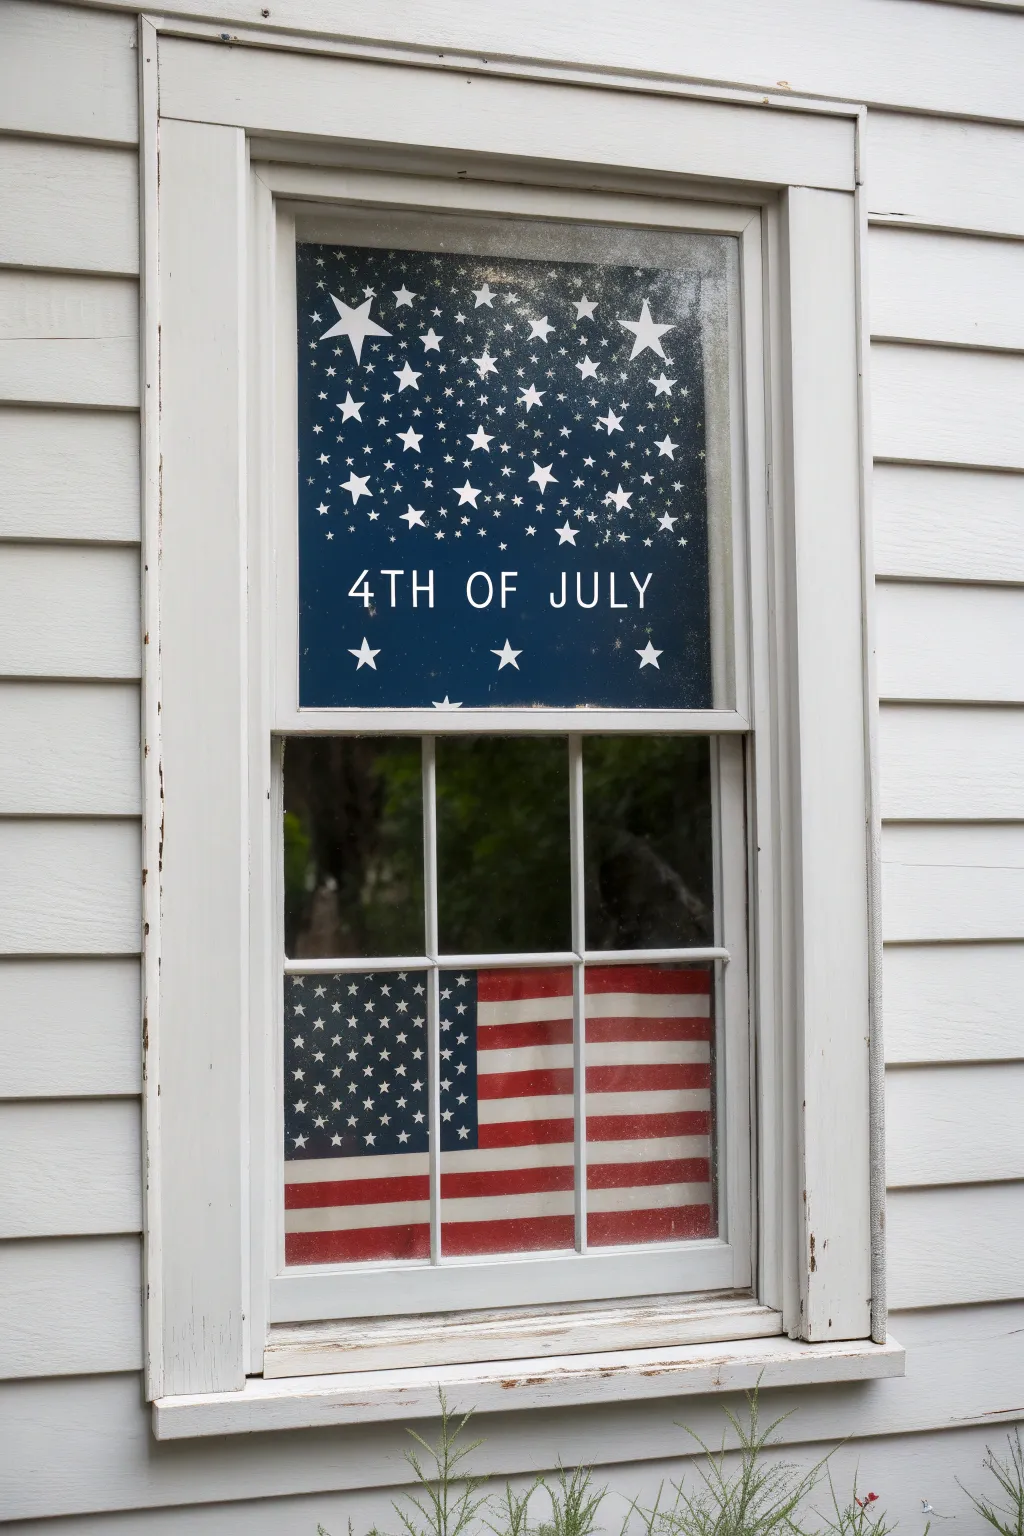
Transform a plain window into a patriotic display that mimics the night sky and the American flag. This two-part project uses washable window paints to create a dark blue starfield on the top sash and a classic flag design below, perfect for festive curb appeal.
Detailed Instructions
Materials
- Dark blue washable window paint (or tempera mixed with dish soap)
- White washable window paint
- Red washable window paint
- Painter’s tape (1-inch width)
- Large flat brush (2-inch or wide foam brush)
- Medium flat brush
- Small round detail brush
- Measuring tape or ruler
- Paper plates (for palettes)
- Glass cleaner and paper towels
- Star stencils (optional)
Step 1: Preparation and Background
-
Clean surface:
Begin by thoroughly cleaning the exterior of the window glass with glass cleaner and paper towels to ensure the paint adheres properly. -
Tape the edges:
Apply painter’s tape along the frames of both the top and bottom window sashes to protect the wood or vinyl from stray brush marks. -
Paint the top blue:
Using the large flat brush or foam brush, coat the entire glass surface of the top sash with dark blue window paint. -
Add a second coat:
Allow the first layer of blue to dry until it’s tacky but not wet. Apply a second coat to ensure an opaque, deep night-sky background. Let this dry completely before moving on.
Uneven Coverage?
If the blue paint looks streaky, dab it with a sponge instead of brushing. This stippling texture mimics a starry night better and hides brush strokes.
Step 2: Creating the Star Field
-
Paint large stars:
Dip a medium flat brush into white paint. Freehand three or four large, five-pointed stars scattered near the top corners of the blue field. -
Paint medium stars:
Switching to a slightly smaller brush if needed, add about a dozen medium-sized stars, distributing them randomly across the upper half of the pane. -
Create the milky way effect:
To create the density seen in the photo, use the tip of a small round brush to dot hundreds of tiny stars, clustering them tightly around the larger stars and letting them fade out as you move lower down the window. -
Add floating stars:
Paint three distinct, medium-sized stars along the very bottom edge of the top sash, spacing them evenly to anchor the design. -
Draft the text:
Once the blue background is fully dry, lightly sketch the words ‘4TH OF JULY’ in the center open space with a very thin brush or a chalk marker to get the spacing right. -
Paint the lettering:
Go over your guide lines with white paint and a small round brush. Use simple, clean block letters for legibility from the street.
Step 3: Painting the Flag
-
Tape the canton:
On the bottom sash, visualize the blue square (the canton). Use tape to block off a rectangular section in the upper left corner of the bottom pane. -
Tape the stripes:
Measure the remaining width and height. Use horizontal strips of painter’s tape to mark out where the white stripes will be, leaving the glass exposed for the red stripes. -
Paint red stripes:
Fill in the exposed horizontal glass strips with red paint. I find distinct, horizontal brush strokes look best here. -
Paint the blue canton:
Paint the blocked-off upper left rectangle with the same dark blue used for the top sash. You may need two coats for full coverage. -
Remove tape:
Carefully peel away the tape while the paint is still slightly damp to get crisp lines. The unpainted glass will serve as your ‘white’ stripes, utilizing the interior light or curtains. -
Paint canton stars:
Once the blue canton is dry, use a small brush or a star stamp to add rows of small white stars on top of the blue square. -
Add white stripes (optional):
If the clear glass doesn’t look white enough against your interior, paint the empty stripes with white window paint carefully between the red lines. -
Final touches:
Remove the perimeter tape from the window frame and touch up any smudges with a damp cloth or a razor blade scraper once dry.
Make It Glow
Mix a tiny bit of glow-in-the-dark acrylic pigment into your white paint for the stars. They will charge during the sunny July day and glow at night.
Step back to the sidewalk to admire your patriotic handiwork as it shines for the neighborhood
Glowy Highlight Details for Fireworks and Sparklers
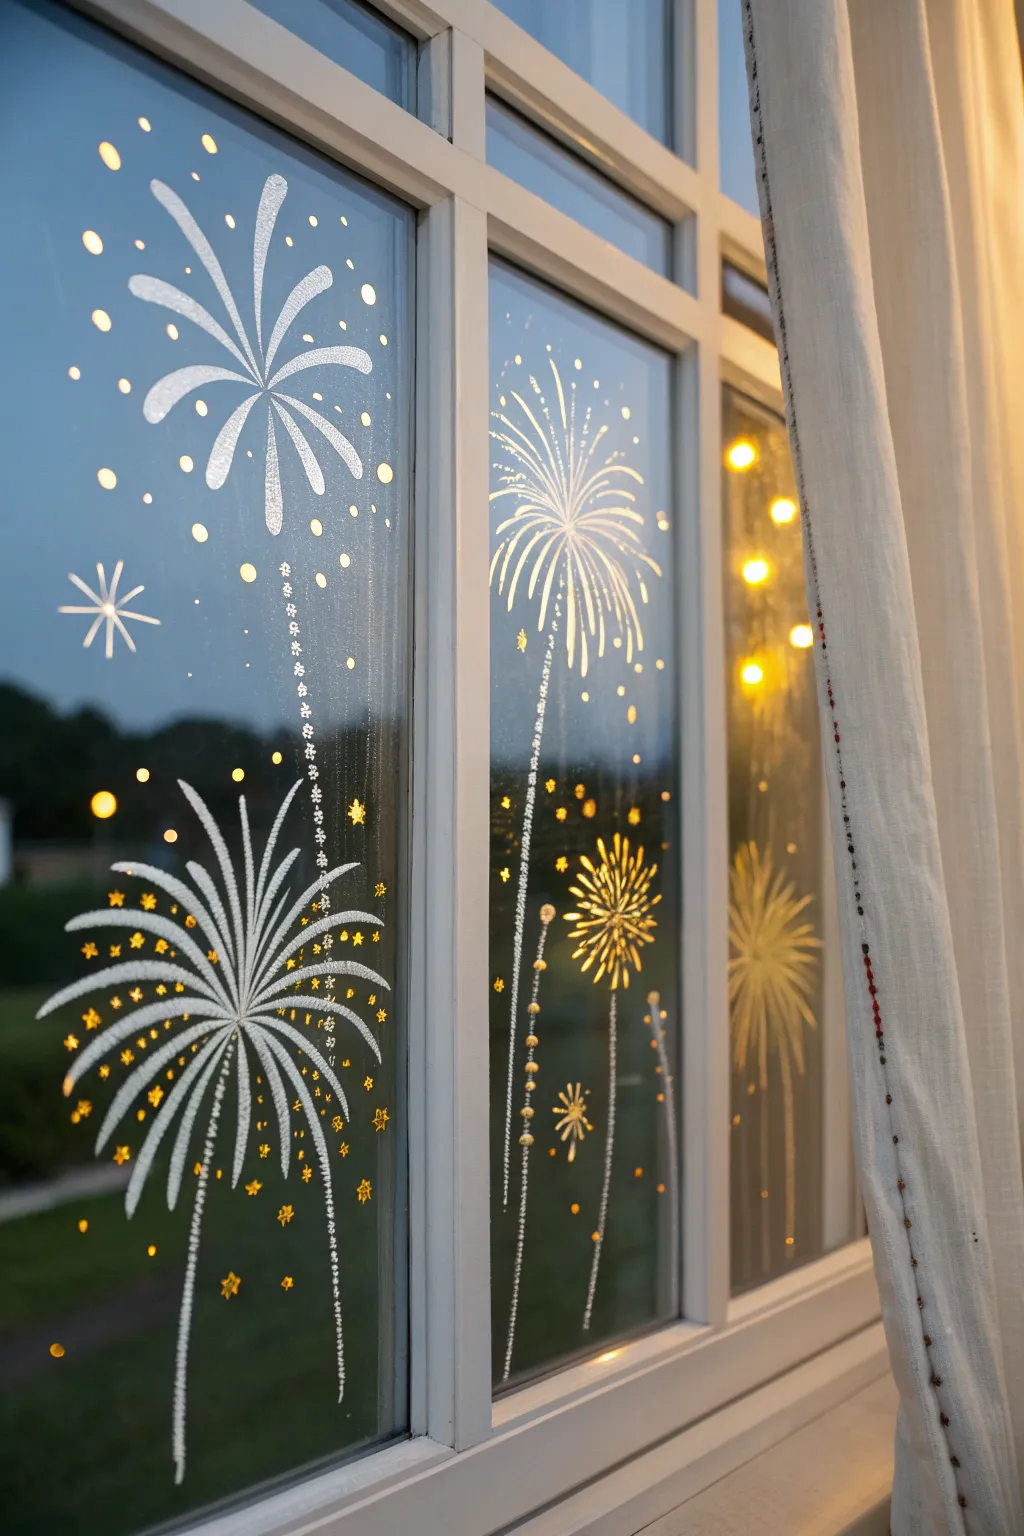
Transform your view into a permanent celebration with these elegant, hand-painted window fireworks. Using liquid chalk and metallic accents creates a stunning display that catches the light beautifully, perfect for adding festive cheer without the noise.
Step-by-Step Guide
Materials
- White liquid chalk marker (medium tip)
- White liquid chalk marker (fine tip)
- Gold metallic window marker or glass paint pen
- Silver metallic window marker or glass paint pen
- Glass cleaner
- Lint-free cloth or paper towels
- Scrap paper (for testing flow)
Step 1: Preparation and Main Bursts
-
Clean the surface:
Start by thoroughly cleaning the inside of your window glass. Any dust or fingerprints will prevent the markers from adhering smoothly, so give it a good wipe with glass cleaner and a lint-free cloth. -
Prime the markers:
Shake your white liquid chalk marker vigorously. Press the nib down on a piece of scrap paper repeatedly until the ink flows fully into the tip. Repeat this for your metallic markers as well. -
Draft the center points:
Visualize where you want your main fireworks to explode. I like to place them at varying heights—one high in the upper left, one lower in the middle pane, and a few scattered smaller ones. -
Create the first burst shape:
Using the medium-tip white marker, start from a central point and draw curved lines radiating outward. Make these lines thicker at the base and taper them off as they extend, resembling a ‘palm tree’ firework shape. -
Add a second style:
For the lower firework, draw straight lines radiating from a center point to create a starburst effect. Ensure the lines are varying lengths to give it a dynamic, exploding look. -
Layer the petals:
Go back to your first ‘palm’ firework and add a second layer of shorter curved lines in between the longer ones to make the explosion look dense and full.
Step 2: Creating Trails and Details
-
Draw the launch trails:
Switch to your fine-tip white marker. Starting from the bottom of the window frame, draw a long, slightly wavy vertical line leading up to the center of each explosion. -
Texturize the trails:
Instead of a solid line, try making one of the trails a series of small, closely spaced dots or dashes to mimic that sizzling rocket smoke effect. -
Add floating sparks:
Around the main bursts, dab random small dots of varying sizes using the white marker. These represent the embers drifting away from the main explosion. -
Incorporate star accents:
In the empty negative space between the large fireworks, draw simple eight-pointed stars or small asterisks to fill the sky without overcrowding the main subjects.
Double-Sided View
Remember that text will be backward from outside! Stick to abstract shapes like these fireworks so the design looks great from both the street and your living room.
Step 3: Adding the Metallic Glow
-
Highlight the core:
Take your gold metallic marker and trace over the very center point of your starburst firework. This adds a warm, glowing heart to the explosion. -
Add gold tips:
On the ‘palm’ style firework, gently dab a small gold dot at the very end of each white curved line. This subtle detail catches indoor light beautifully. -
Create a golden sparkler:
Draw a smaller, standalone firework near the bottom using only the gold marker. Make the lines short and spiky for a high-energy sparkler effect. -
Mix gold into the trails:
Return to your vertical launch trails. Dot the gold marker in between the white dots you created earlier to give the path a shimmering, two-tone appearance. -
Scatter tiny gold stars:
Draw tiny five-point stars (just the outline) using the gold pen scattered among the white drifting dots. Keep these very small for a delicate look. -
Final dry and polish:
Let the artwork dry completely (usually about 10-15 minutes). If you see any smudges or lines you don’t like, engage in a quick cleanup with a damp cotton swab once the surrounding area is dry.
Dripping Paint?
If your marker runs, you’re pressing too hard. Blot the tip on a paper towel to remove excess ink, let the window dry, and try again with lighter pressure.
Enjoy the cozy glow of your painted evening sky as the daylight fades


Have a question or want to share your own experience? I'd love to hear from you in the comments below!