I love how a simple acrylic heart can say a lot with just color, texture, and a few confident strokes. Here are my favorite acrylic heart painting ideas—starting with the classics you’ll want to try right away, then drifting into some fun, artsy experiments.
Classic Solid Acrylic Heart

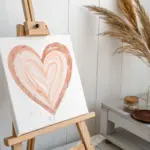
Simple yet striking, this classic red heart design captures the essence of affection with bold brushstrokes and subtle highlights. The visible texture of the paint on thick paper gives it a charming, handmade quality perfect for Valentine’s Day or anniversaries.
Step-by-Step Guide
Materials
- Heavyweight watercolor paper or cardstock (textured)
- Red acrylic paint (primary or cadmium red)
- White acrylic paint
- Medium round brush (size 6 or 8)
- Small round detail brush (size 2 or 3)
- Palette or paper plate
- Pencil
- Water cup and paper towels
Step 1: Preparation and Sketching
-
Preparing the paper:
Start by cutting your watercolor paper or cardstock to the desired size. A square format works particularly well for this centered heart composition. -
Finding the center:
Lightly mark the center of your paper with a pencil to ensure your heart is balanced within the frame. -
Sketching the outline:
Using a very light touch, draw the outline of a large heart. Don’t worry about perfect symmetry; a slightly organic shape adds to the hand-painted charm seen in the example.
Step 2: Painting the Base Layer
-
Loading the brush:
Squeeze a generous amount of red acrylic paint onto your palette. Load your medium round brush fully, but don’t add too much water; you want the paint to be opaque. -
Outlining the shape:
Carefully trace over your pencil sketch with the red paint to define the crisp edges of the heart. -
Filling the left side:
Start filling in the left lobe of the heart. Use curved strokes that follow the rounded contour of the shape to simulate volume. -
Filling the right side:
Repeat the process on the right lobe, pulling the paint down towards the bottom point. -
Creating texture:
As you fill the center, don’t smooth the paint out perfectly. Leave visible brushstrokes and slight ridges in the paint to mimic the texture shown in the original image. -
Refining the point:
Use the tip of your brush to sharpen the bottom point of the heart where the two sides meet.
Uneven Coverage?
If your red looks streaky or transparent, let it dry 100% before adding another layer. Painting over wet acrylic lifts the previous coat and causes patches.
Step 3: Layering and Highlights
-
Checking opacity:
Once the first layer is touch-dry, evaluate the coverage. If the paper shows through too much, apply a second coat of red, maintaining those directional brushstrokes. -
Mixing a highlight tone:
Mix a tiny dot of white into a small amount of red to create a soft pink, or simply use pure white thinned slightly with water for a starker contrast. -
Adding the main highlight:
Switch to your small detail brush. Paint a curved, comma-shaped highlight along the upper left curve of the heart. This creates the illusion of a shiny, rounded surface. -
Softening the highlight:
If the white line looks too harsh, quickly wipe your brush clean and damp, then gently feather the edges of the white paint into the wet red underneath. -
Secondary highlights:
Add a few smaller, fainter streaks of light reflection on the right lobe to balance the dimension. -
Correcting edges:
Look closely at the perimeter. If any edges look ragged, use the small brush with thick red paint to smooth them out. -
Final drying:
A thick application of acrylics can take a while to set, so let the artwork sit undisturbed until the paint is completely hard and dry to the touch.
Highlight Placement
Imagine a light source coming from the top left corner. Place your brightest white highlight on the upper left curve to make the heart look 3D and glossy.
Once dry, your heartfelt creation is ready to be gifted or framed as a lovely piece of wall art


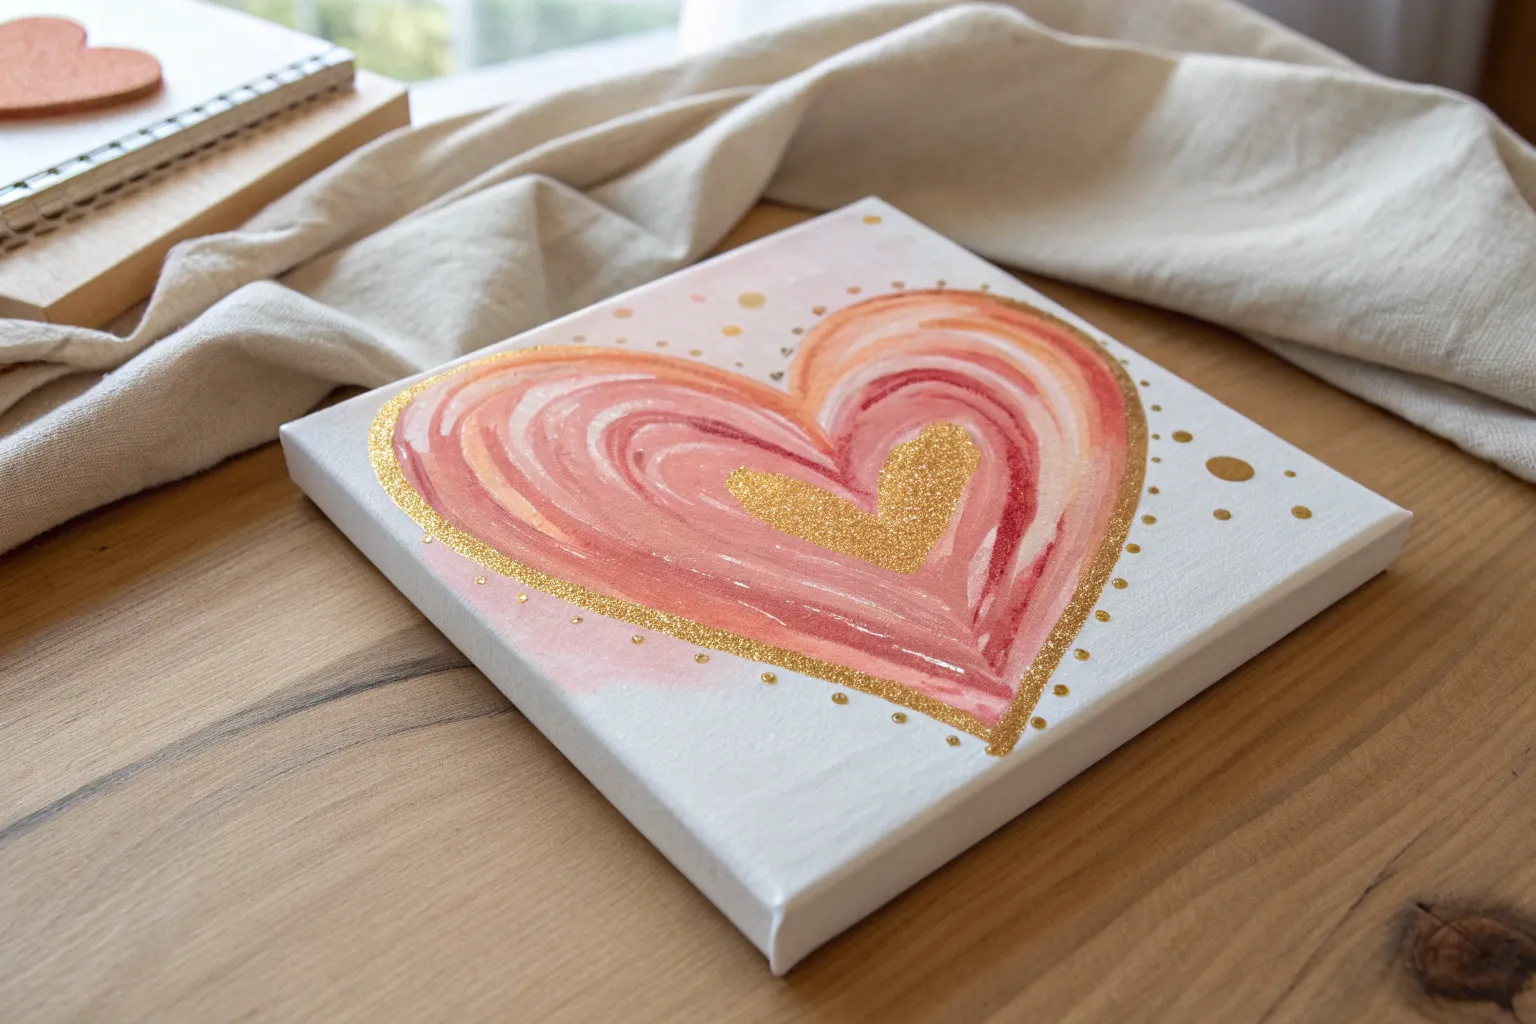
Soft Ombre Heart Blend
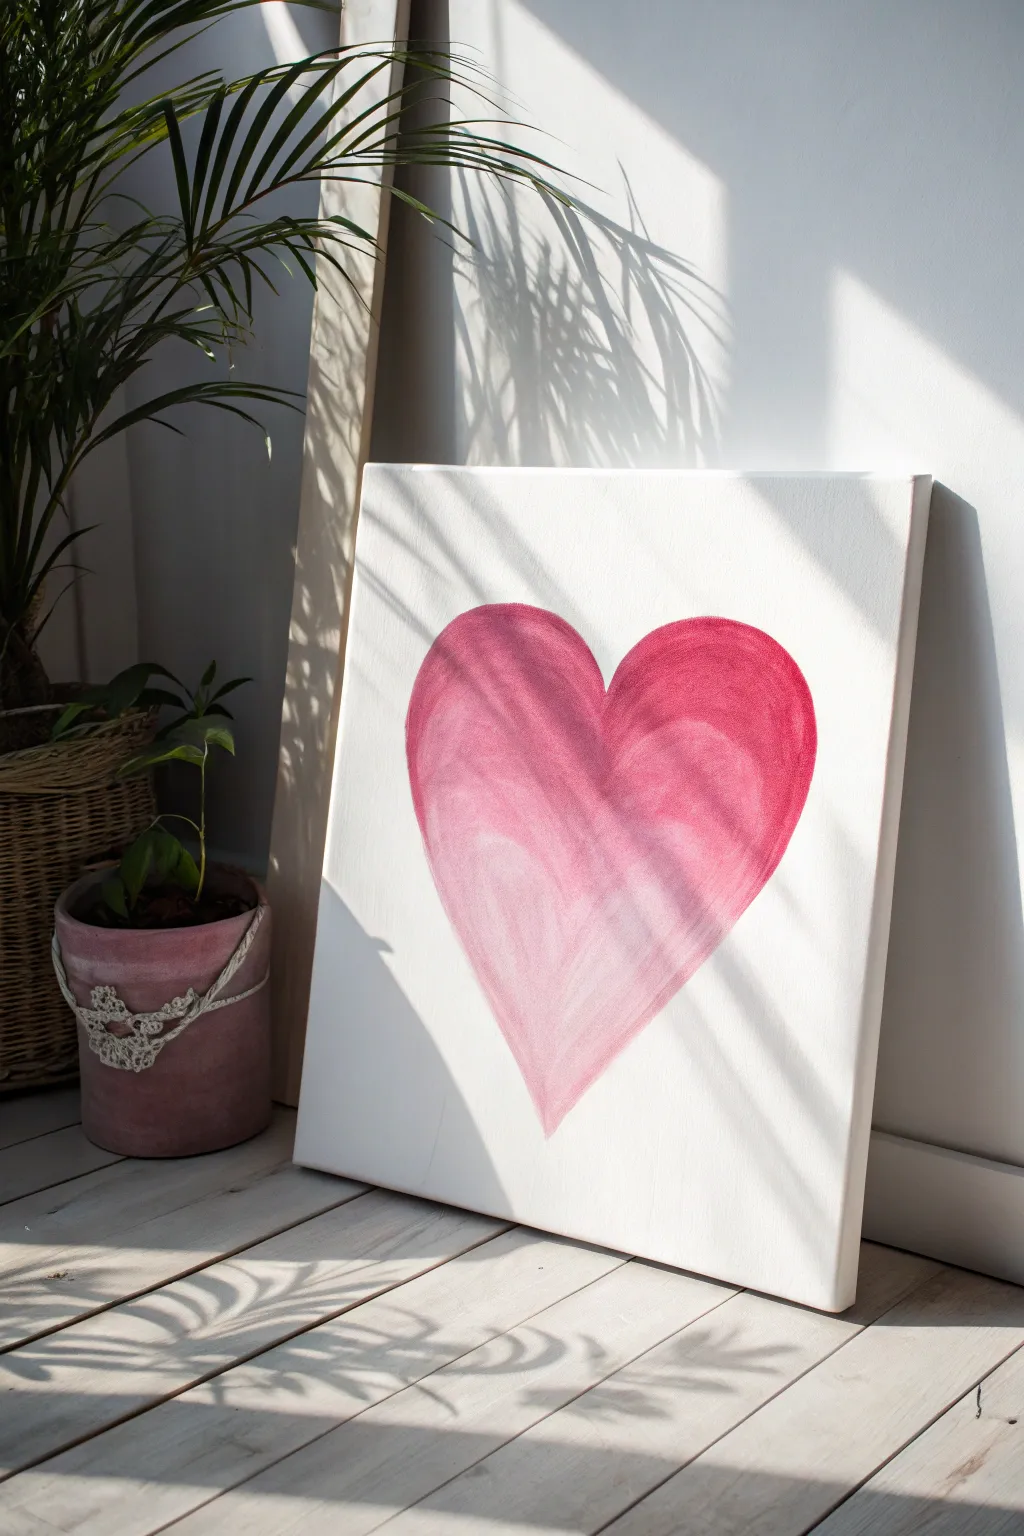
Create a dreamy, romantic focal point for any room with this soft acrylic painting technique that mimics the delicate flow of watercolors. By using watered-down acrylics, you’ll achieve a stunning ombre blend that transitions from deep raspberry to a whisper-soft blush.
Detailed Instructions
Materials
- Square pre-stretched canvas (e.g., 16×16 inches)
- Red acrylic paint (Crimson or Magenta)
- White acrylic paint (Titanium White)
- Large flat brush (1-inch width)
- Soft round synthetic brush (size 10 or 12)
- Palette or mixing plate
- Cup of clean water
- Pencil for sketching
- Paper towels
Step 1: Preparation and Sketching
-
Prepare your canvas:
Ensure your canvas is clean and free of dust. If you want a smoother surface, you can apply an extra coat of gesso and sand it lightly once dry, though standard canvas texture works beautifully for this rustic look. -
Mix your base color:
On your palette, place a dollop of red paint. Mix in a very small touch of white to soften the harshness of the raw pigment, creating a deep raspberry hue. This will be your darkest shade. -
Lightly sketch the outline:
Using a pencil, draw a large heart shape in the center of the canvas. Keep your lines incredibly faint so they won’t show through the translucent paint layers later. -
Create a wash consistency:
Add water to your raspberry mix until it reaches the consistency of heavy cream or ink. Acrylics dry fast, so having this fluid mix ready determines the flow of the painting.
Step 2: Painting the Ombre Effect
-
Start at the top:
Dip your large flat brush into the watered-down raspberry mix. Apply this darkest color to the very top curves of the heart, following the pencil line carefully. -
Pull the color down:
Without adding more paint, drag the brush downward about two inches. The color should naturally start to look streaky and semi-transparent due to the water content. -
Dilute for the mid-tone:
Dip your dirty brush into your water cup quickly, tap it once on a paper towel, and then go back to the canvas. Start blending just below your dark red area to create a lighter, pinker transition zone. -
Work quickly:
Acrylics set rapidly, so work one lobe of the heart at a time if you are struggling with drying times. Keep the brush wet to maintain that watercolor aesthetic. -
Fade to the bottom:
Rinse your brush almost completely. With a very wet, mostly clean brush, pull the paint down towards the bottom point of the heart. -
Refine the point:
Switch to your soft round brush for the bottom tip. Use the faintest wash of pink water here—it should be barely visible against the white canvas.
Use a Floating Medium
For a smoother blend without rapid drying, mix your paint with acrylic glazing liquid or retarder instead of just water. This keeps the paint workable longer.
Step 3: Layering and Detailing
-
Identify uneven areas:
Step back and look at the blend. If the top looks too patchy, wait for it to be touch-dry, then add a second thin glaze of the dark raspberry mix to the upper edges only. -
Add texture strokes:
I like to take a damp brush with a tiny bit of pigment and make long, vertical sweeping strokes through the body of the heart. This emphasizes the vertical texture seen in the reference image. -
Clean up edges:
If any paint bled outside your pencil line, use a small flat brush with pure white paint to ‘erase’ the mistake by painting over the background. -
Dry completely:
Let the painting sit for at least an hour. Because we used a lot of water, the canvas might need extra time to tighten back up.
Add Metallic Accents
Once the pink heart is totally dry, dry-brush a tiny amount of gold or metallic rose gold paint over the darkest areas for a subtle, shimmering highlight.
Your beautiful, soft-focus heart is now ready to add a touch of love to your wall decor


Abstract Layered Heart Strokes
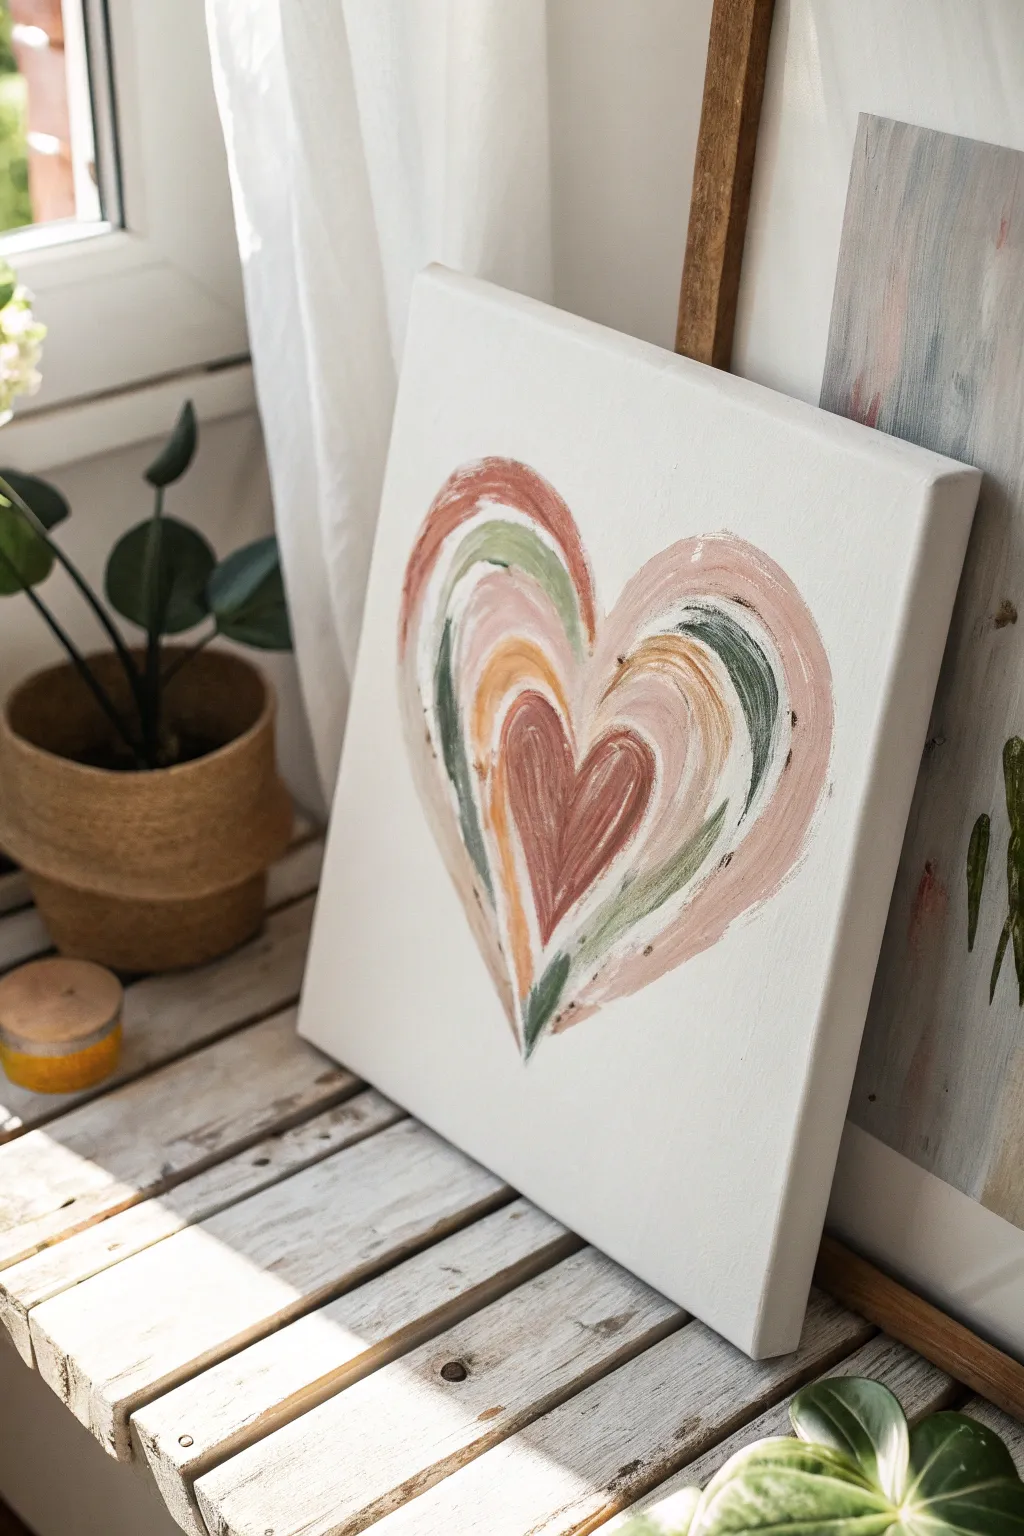
This project embraces the beauty of imperfection, using visible brushstrokes to build a layered, nested heart design. With its muted, earthy palette of terracotta, olive, and cream, this piece brings a warm, bohemian feel to any gallery wall.
Step-by-Step Tutorial
Materials
- Square stretched canvas (approx. 12×12 inches)
- Acrylic paints: Terracotta/Rust, Dusty Rose, Cream/Off-White, Olive Green, Mustard Yellow, Dark Brown
- Flat shader brushes (medium and large sizes)
- Small round brush (for details)
- Palette or paper plate
- Cup of water
- Paper towels
Step 1: Setting the Foundation
-
Prep your canvas:
Ensure your canvas is clean and taut. If you prefer a warmer background than the stark white canvas, you can apply a very thin, watered-down wash of cream paint over the entire surface. Let this base layer dry completely before moving on. -
Paint the center heart:
Begin right in the middle of your canvas. Load a medium flat brush with a mix of terracotta and a touch of brown. Paint a small, solid heart shape in the center. It doesn’t need to be perfectly symmetrical; a slightly elongated shape works well for this style. -
Add first highlights:
While the center heart is still tacky but not soaking wet, streak a little bit of dusty rose on the left side of the heart shape to add subtle dimension. -
Create the first contour:
Switch to a clean brush. Pick up your mustard yellow mixed with a generous amount of cream for a muted tone. Paint a loose stroke that hugs the left curve of your center heart, leaving a tiny gap of white space between the colors. -
Complete the first ring:
Continue that yellow-cream stroke down to the point of the heart. On the right side, add a similar stroke but perhaps break it up slightly, so it doesn’t look like a solid outline.
Step 2: Building the Layers
-
Add earthy tones:
Now, introduce the olive green. Paint a sweeping curve around the outside of your yellow layer. Focus on the texture here—let the bristles of the brush show at the start and end of the stroke to create that dry-brushed look. -
Layering the left side:
On the left side of the heart, add a thick stroke of cream paint outside the olive green. If it overlaps the green slightly, that’s perfect; mixing on the canvas adds to the organic feel. -
Introduce the dusty rose:
Load a larger flat brush with dusty rose paint. creating a broad arch over the top right curve of the heart. Bring this stroke down firmly to the bottom point. -
Balance with terracotta:
Mirror the large rose curve on the left side with a terracotta or rust-colored stroke. This should be one of your widest layers, giving the heart its substantial outer shape. -
Refine the bottom point:
All your layers converge at the bottom tip. Use a smaller brush with a dark green or brown to add a final, definitive V-shape at the very bottom, anchoring all the disparate colored strokes together.
Pro Tip: Dry Brushing
For that rustic texture, don’t reload your brush constantly. Let the paint run out as you finish a stroke to reveal the canvas weave underneath.
Step 3: Texture and Details
-
Dry brush technique:
Wipe most of the paint off a flat brush so it’s nearly dry. Dip just the tip into white or cream paint. Lightly drag this over the darker sections (like the terracotta and olive) to create a weathered, chalky texture. -
Add contrast strokes:
Look for areas where the colors blend too much. Add thin, decisive strokes of dark brown or deep green in the gaps between layers to separate the rings visually. -
Highlighting curves:
Take a small amount of pure white or very light cream. Add quick, curved highlights to the tops of the heart arches. I find this really helps the shape pop off the canvas. -
Distressing edges:
Using a slightly damp (but clean) brush, gently feather out the outer edges of the largest heart layer. You want the perimeter to look soft and painterly, not like a hard cutout. -
Final assessment:
Step back and look at the overall balance. If one side feels too heavy, add a thin, light-colored stroke to the opposite side to balance the visual weight.
Colors Turning Muddy?
If your layers are smudging into a brown mess, stop and let the current layer dry for 10 minutes. Wet-on-wet blending requires a light touch.
Allow your painting to dry completely before displaying it on a shelf or wall to add a touch of warmth to your room


Crisp Heart Stencil Silhouette
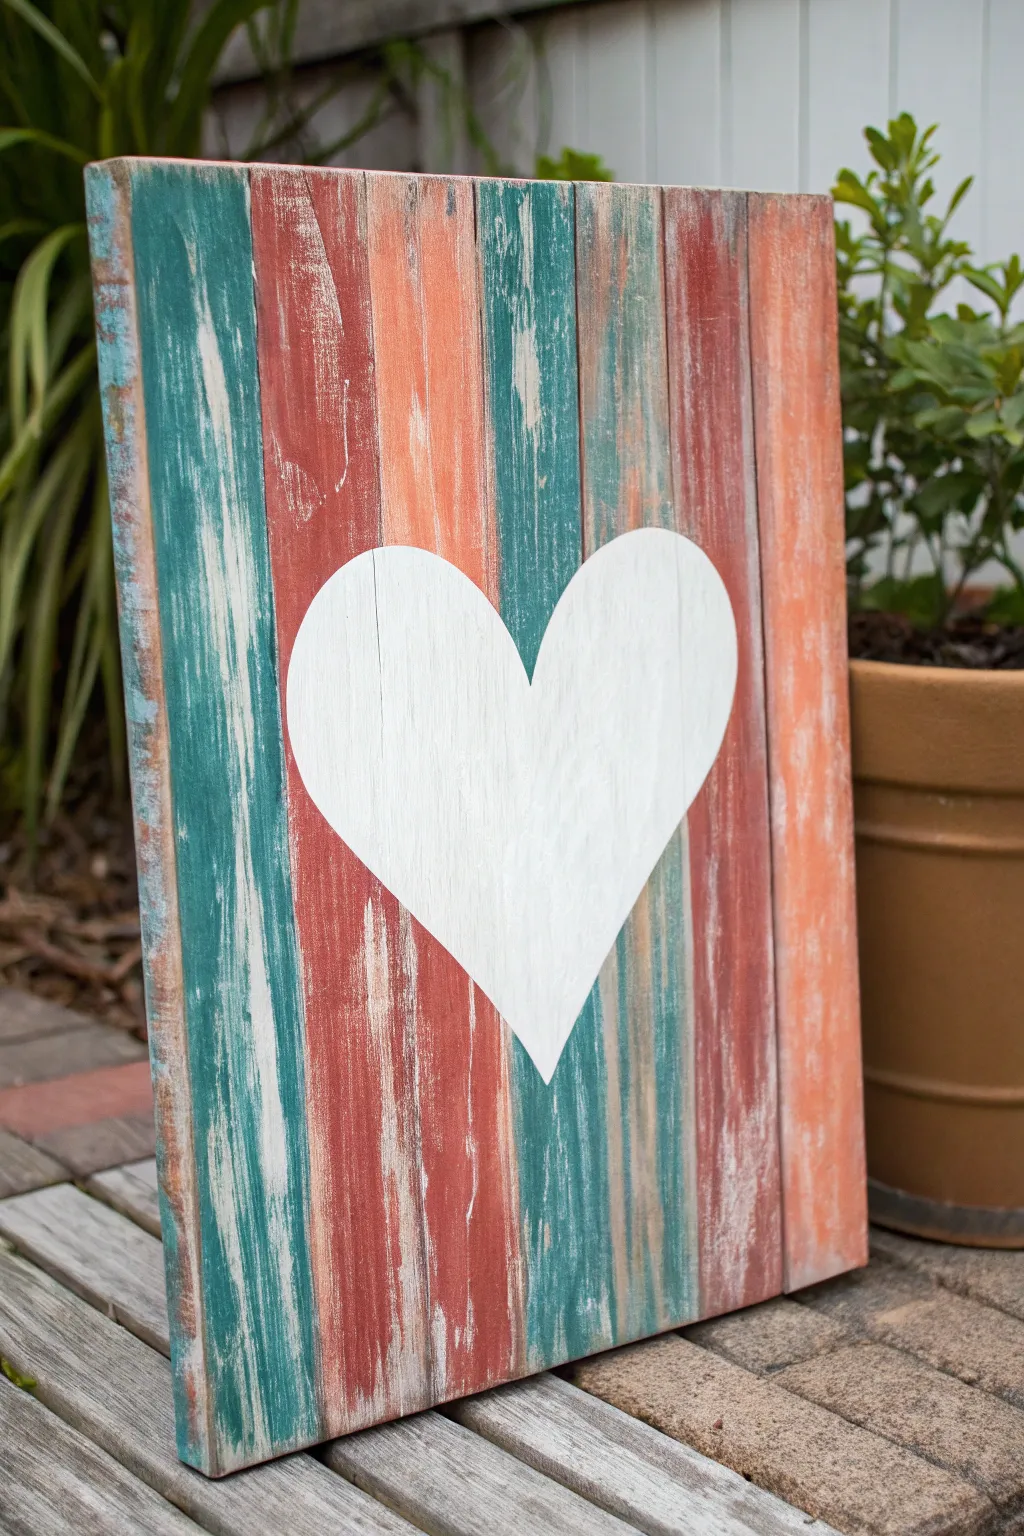
Achieve a charming rustic look with this distressed wood art piece that mimics the texture of aged barn board. By layering warm and cool acrylic tones under a crisp white heart silhouette, you create a striking focal point perfect for farmhouse decor or a heartfelt gift.
Step-by-Step Guide
Materials
- Wooden pallet sign or plank canvas (approx. 12×16 inches)
- Acrylic paints: Teal/Turquoise, Rust Red, Muted Orange, Cream, and White
- Medium flat paintbrush (1 inch)
- Small flat paintbrush
- Large heart stencil (mylar or vinyl) or contact paper
- Coarse grit sandpaper (60-80 grit)
- Fine grit sandpaper (120 grit)
- Candle wax or beeswax puck (for resist technique)
- Painter’s tape or stencil adhesive
- Paper towels or cotton rag
- Pencil
- Scissors (if cutting your own stencil)
Step 1: Prepping the Distressed Base
-
Base Coat Application:
Begin by painting the entire wooden sign with a layer of cream or off-white acrylic paint. This underlayer will peek through later to create depth. -
Dry the Base:
Allow the cream coat to dry completely. If you’re impatient like me, a hairdryer on a low setting speeds this up significantly. -
Apply Wax Resist:
Rub the candle wax or beeswax puck vigorously over random areas of the dried cream paint. Focus on edges and the ridges between the planks where natural wear would occur. -
Paint Vertical Stripes:
Using your 1-inch flat brush, paint vertical stripes along the planks. Alternate between teal, rust red, and muted orange. Don’t worry about perfect coverage; a slightly messy application looks more authentic. -
Blend the Transitions:
While the paint is still wet, lightly feather the edges where two colors meet to avoid harsh, straight lines. Let the colors overlap slightly. -
Full Drying Time:
Let this colorful layer dry thoroughly. It must be bone dry before the next step to prevent smearing. -
Distressing the Surface:
Take your coarse grit sandpaper and sand the entire surface firmly. The paint will easily lift off the areas where you applied the wax, revealing the cream layer underneath. -
Refine the Finish:
Switch to the fine grit sandpaper to smooth out the rough patches and soften the paint edges. Wipe away all dust with a damp paper towel.
Bleeding Lines?
If paint bleeds under the stencil, don’t panic. Wait for it to dry, then use a small stiff brush dipped in water to scrub the error, or sand it gently away.
Step 2: Creating the Crisp Silhouette
-
Position the Stencil:
Place your heart stencil in the center of the board. If you are using contact paper, draw a heart, cut it out, and firmly adhere the negative space (the outline) to the wood. -
Seal the Edges:
This is a crucial step: Paint a very thin layer of the *background* colors or a clear matte medium over the stencil edges first. This seals the gap and prevents the white paint from bleeding underneath. -
Let the Seal Dry:
Wait for that sealing layer to dry to the touch to ensure your barrier is solid. -
Paint the Heart:
Using the white acrylic paint and a small flat brush, fill in the heart shape. Use a stippling (dabbing) motion near the edges rather than brushing sideways to keep the line sharp. -
Second Coat:
Apply a second coat of white if the underlying stripes are still showing through too strongly. The heart should look solid and bright. -
Remove Stencil:
Carefully peel up the stencil or contact paper while the white paint is still slightly tacky. Pull at a sharp angle to shear the paint cleanly. -
Touch Ups:
If any paint managed to bleed through, use a small detail brush or a toothpick to gently scrape it away or paint over it with the matching background color. -
Final Light Sanding:
Once fully dry, give the white heart a very light scuff with fine sandpaper so it doesn’t look like a sticker sitting on top, but rather part of the painted wood.
Add Dimension
Mix a tiny drop of grey into your white paint and add a subtle shadow on one side of the heart. This makes the silhouette look like a cutout.
Hang your new rustic artwork in a spot that needs a pop of color and enjoy the warm, handmade vibe it brings to the room
BRUSH GUIDE
The Right Brush for Every Stroke
From clean lines to bold texture — master brush choice, stroke control, and essential techniques.
Explore the Full Guide
Negative Space Heart Pop
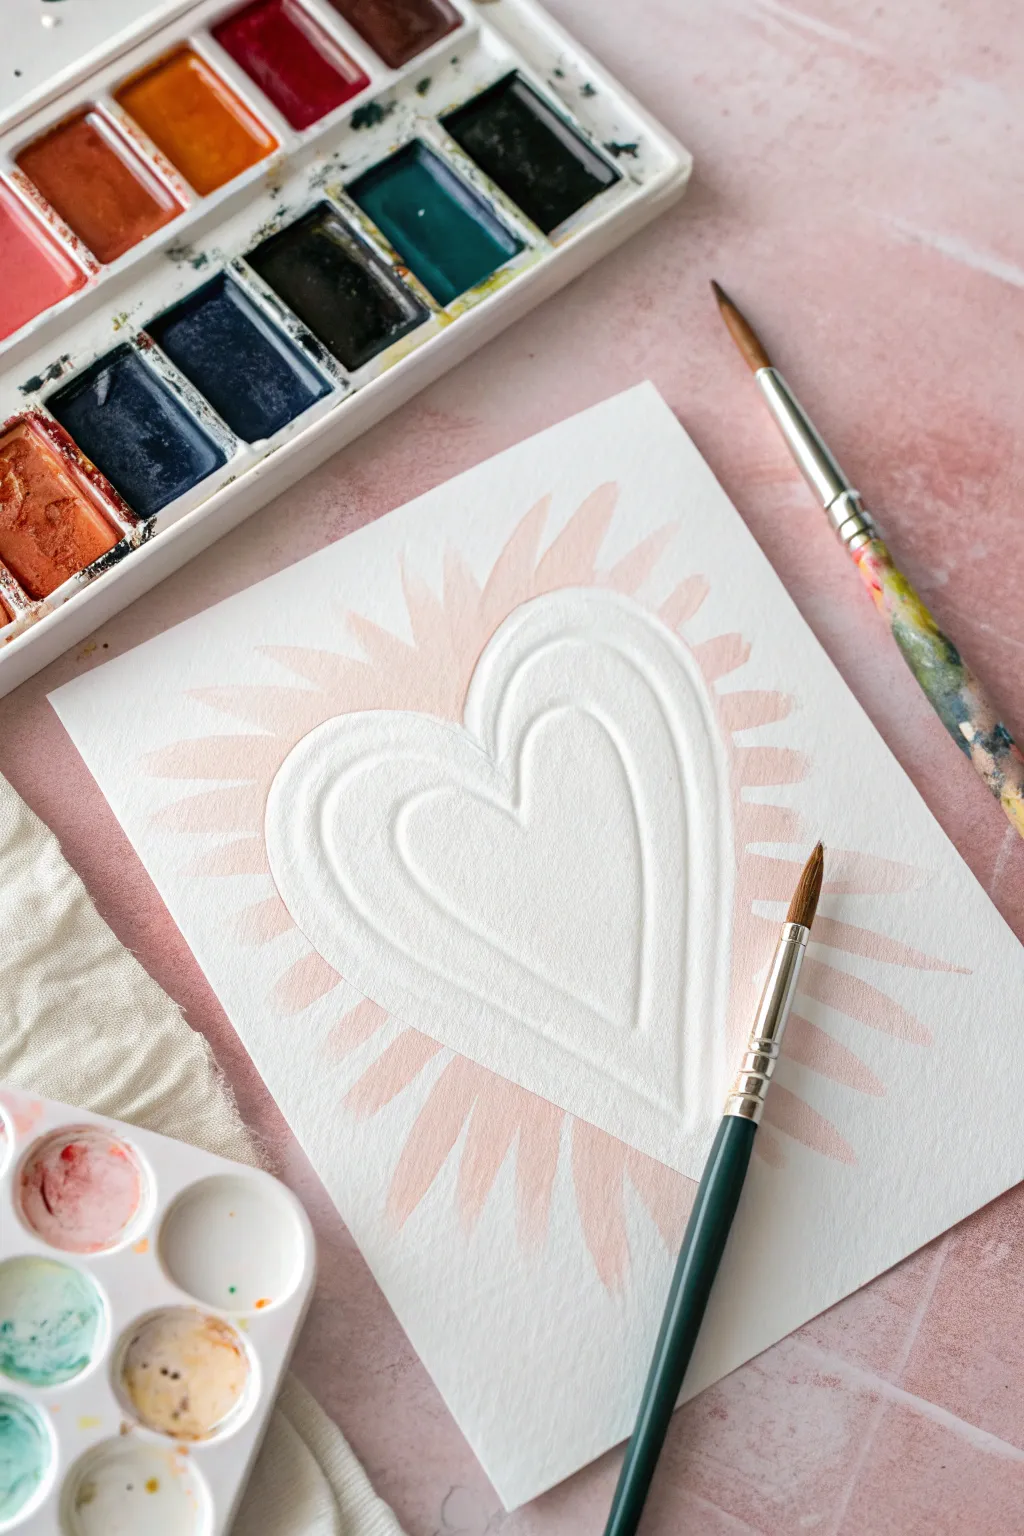
Embrace the beauty of simplicity with this gentle negative space painting where soft pink rays burst outward from a pristine white heart. While the effect looks intricate, it relies on masking techniques to keep the paper pure white, allowing the delicate watercolor wash to shine around it.
Step-by-Step
Materials
- Cold press watercolor paper
- Liquid masking fluid (drawing gum)
- Small round brush (size 2 or 4)
- Medium round brush (size 6 or 8)
- Watercolor paints (pale pink or coral tone)
- Dish soap (optional)
- Rubber cement pickup tool or clean finger
- Paper towel
- Water cups
Step 1: Preparation and Masking
-
Prepare your brush:
Before dipping into masking fluid, coat your small round brush with a tiny bit of dish soap. This creates a protective barrier that makes cleaning the sticky fluid off much easier later. -
Outline the outer heart:
Using the masking fluid, carefully draw a large heart shape in the center of your paper. Keep your lines smooth and confident. -
Create the inner heart:
Paint a second, smaller heart shape inside the first one. Leave a gap of white paper between the two outlines to create a concentric effect. -
Fill the center:
Draw the smallest heart in the very center. You can choose to outline it or fill it in slightly, depending on how thick you want the innermost lines to be. -
Let it cure completely:
Allow the masking fluid to dry fully. It will turn yellowish or transparent and feel hard to the touch. Do not rush this, or you will smear the fluid during painting.
Sticky Situation?
If masking fluid ruins your brushes, dedicate one specific, cheaper synthetic brush solely for masking fluid use. Never use your expensive natural hair brushes for this step.
Step 2: Painting the Rays
-
Mix a pale wash:
Dilute your pink or coral watercolor paint with plenty of water. You want a very translucent, soft tone rather than a heavy, opaque color. -
Start the sunburst:
Starting right at the edge of the dried masking fluid, paint a single “ray” extending outward. Use the tip of your medium brush and flick it gently away from the heart. -
Vary the lengths:
Continue painting rays all around the heart’s perimeter. I like to alternate between shorter and longer strokes to give the burst a more dynamic, natural energy. -
Work in sections:
Paint roughly a quarter of the way around the heart, then reload your brush. This ensures the color remains somewhat consistent but still has lovely watercolor variations. -
Mind the saturation:
The color should be strongest right next to the masked heart outline and fade slightly as it moves outward into the white paper. -
Complete the circle:
Finish painting the rays around the entire shape. Don’t worry if the strokes overlap slightly; this adds texture. -
Dry time:
Let the paint dry completely. The paper should feel room temperature to the touch, not cool.
Level Up
Once the mask is removed and dry, trace over the white negative space lines with a metallic gold pen or fine glitter glue for a sparkling, luxurious finish.
Step 3: The Reveal
-
Test the dryness:
Ensure absolutely no moisture remains, as removing gum from damp paper will tear the surface. -
Begin removal:
Gently rub the edge of the masking fluid with your clean finger or a rubber cement pickup tool to lift it. -
Peel carefully:
Slowly peel the masking fluid away, revealing the crisp white paper underneath. -
Clean up details:
brush away any little rubbery crumbs of masking fluid that might be clinging to the paper.
Step back and admire clean lines against the soft wash of color you have created
Q-Tip Dotted Heart Burst
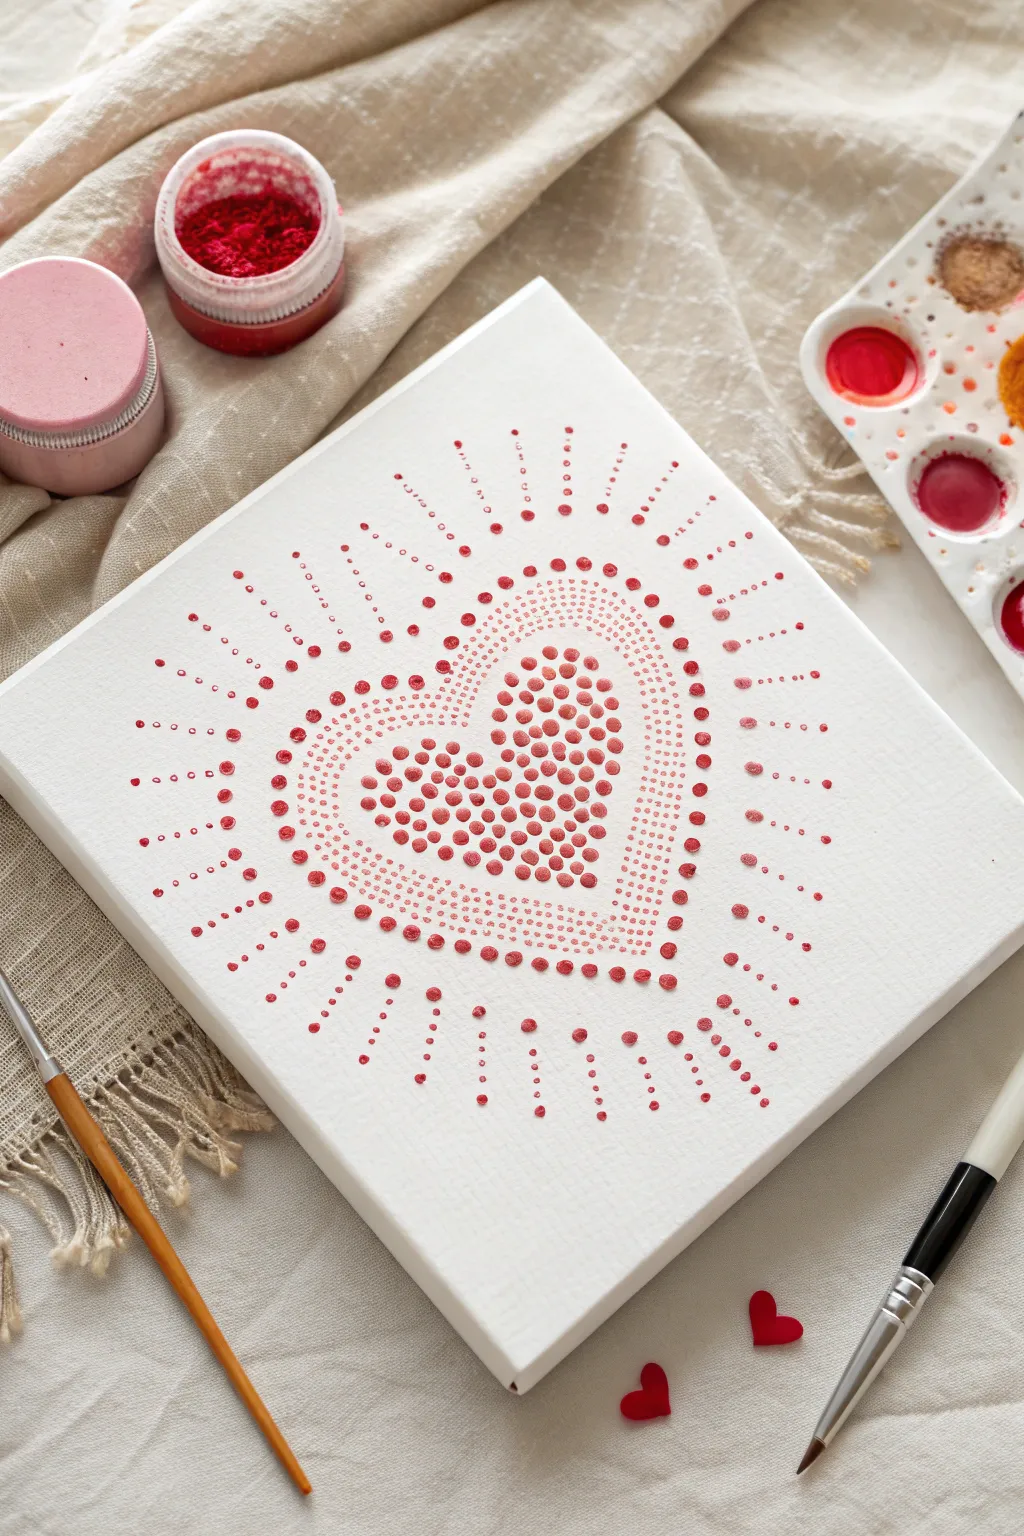
Express love with a modern twist using the simple yet stunning technique of pointillism. This project features a central heart composed of dense rose-colored dots that radiate outward in sun-like beams, creating a vibrant, glowing effect on canvas.
Step-by-Step Guide
Materials
- Small square stretched canvas (approx. 8×8 or 10×10 inches)
- Acrylic paints (Red, White, Rose Pink, and Deep Magenta)
- Q-tips (cotton swabs)
- Fine-point paintbrush (size 0 or 1)
- Pencil (H or HB for light lines)
- Small round palette or paper plate
- Paper towels
- Water cup
Step 1: Preparation & Sketching
-
Prepare your palette:
Squeeze out small amounts of red, deep magenta, and rose pink acrylic paint. Leave a larger space for white paint, as you will need it for mixing various tints. -
Sketch the central heart:
Lightly draw a heart shape in the very center of your canvas using a pencil. Keep the lines extremely faint so they won’t show through the paint later; you just need a guide. -
Mark the outer guideline:
Sketch a second, larger heart roughly an inch outside the first one. This will guide where your radiating burst lines begin. -
Draw the burst lines:
Use a ruler or just freehand faint straight lines radiating outward from the center heart toward the edges of the canvas, like rays of sunshine. Space them evenly around the heart shape.
Paint Consistency Matters
If your dots have peaks like little mountains, your paint is too thick. Mix in a drop of water or flow medium to get flat, smooth circles.
Step 2: The Central Heart
-
Mix your core color:
Create a soft medium-pink by mixing red with a generous amount of white. This will be the base color for the solid heart in the middle. -
Start dotting the center:
Dip the end of a Q-tip into the paint. Press it gently onto the canvas inside your smallest heart outline. Repeat to fill the shape with a cluster of dots. -
Vary the pressure:
For visuals that pop, use slightly different pressures. Pressing harder creates larger dots, while a light touch makes smaller ones. Fill the gaps with these smaller dots. -
Add dimension:
Mix a slightly darker shade of pink. Use a fine-point brush or a fresh Q-tip to add a few dots of this darker color near the bottom edges of the inner heart to suggest a slight shadow.
Try Metallic Accents
Replace the accent dots with metallic gold or copper paint. The shimmer adds an elegant, high-end feel perfect for gift-giving.
Step 3: Creating the Radiance
-
Outline the heart:
Using your darkest red or magenta, create a distinct ring of dots tracing the very edge of your central heart shape. I find a fine paintbrush works best here for precision control. -
Start the inner rays:
Begin placing dots along your radiating pencil lines. Start close to the central heart with larger dots using the Q-tip. -
Fade the size:
As you move outward along the radiated lines, make the dots progressively smaller. You can do this by switching from a Q-tip to the back end of a paintbrush handle, and then to the fine brush tip. -
Alternate the dot density:
For the lines directly at the top, bottom, and sides of the heart (the cardinal directions), extend the dots almost to the canvas edge. For the lines in between, stop them a bit shorter to create a dynamic oval burst shape. -
Create the second ring:
Looking at your larger pencil heart outline, add a ring of medium-sized dots that ‘interrupt’ the radiating lines. This creates a secondary halo effect around the center.
Step 4: Refining & Finishing
-
Fill the gaps:
Step back and look for uneven spaces in the burst pattern. Add tiny ‘micro-dots’ using a toothpick or very fine brush between the main rays to make the explosion of color feel denser near the center. -
Clean up edges:
If any pencil marks are still visible between the dried paint dots, gently erase them now. be sure the paint is totally dry first to avoid smearing. -
Soften the gradient:
If the transition from the center heart to the outer rays feels too stark, add a few intermediate pink dots around the perimeter of the central heart to blend the zones together. -
Add final highlights:
Mix a very pale pink, almost white. Add one tiny highlight dot on top of the largest dots in the very center heart to give them a 3D, spherical look.
Let your artwork dry completely on a flat surface before displaying your radiant creation

PENCIL GUIDE
Understanding Pencil Grades from H to B
From first sketch to finished drawing — learn pencil grades, line control, and shading techniques.
Explore the Full Guide
Swipe-Painted Card Drag Heart
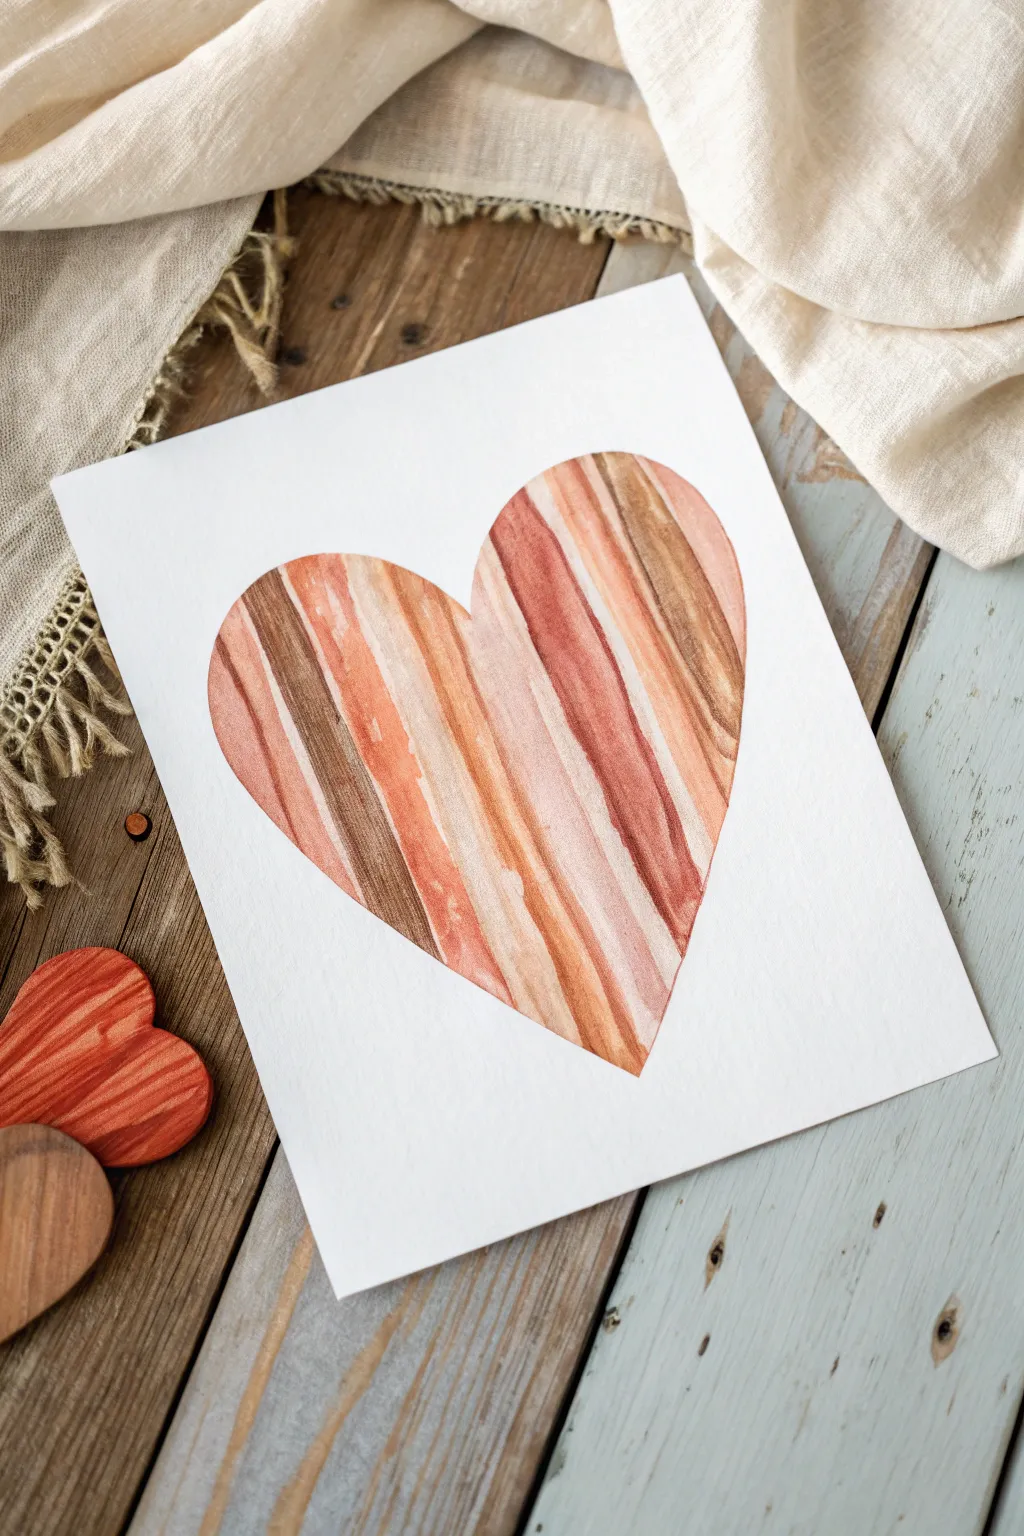
Create a stunning, textural heart design using a simple card-dragging technique that mimics the look of wood grain or strata. This project combines warm earth tones like terracotta, rust, and mocha for a sophisticated, modern piece of wall art.
Step-by-Step Tutorial
Materials
- Heavyweight mixed media paper or watercolor paper (approx. 9×12 inches)
- Acrylic paints (terracotta, burnt sienna, deep brown, peach, cream/off-white)
- Old plastic gift card, credit card, or squeegee tool
- Painter’s tape or masking tape (low-tack)
- Pencil
- Scissors
- Scrap paper or thick cardstock for the stencil
- Paper palette or disposal plate
Step 1: Preparation & Stenciling
-
Create the heart stencil:
Begin by folding a piece of scrap paper or thick cardstock in half. Draw a half-heart shape along the folded edge to ensure symmetry. Cut it out to reveal your full heart shape. -
Transfer the shape:
Place your heart cutout onto the center of your final artwork paper. Make sure it’s centered nicely, leaving varied negative space around the edges. -
Draw the outline:
Lightly trace around the heart using a pencil. Keep your lines very faint so they won’t show through lighter paint colors later. -
Mask the negative space:
This is a crucial reverse-masking step. Instead of masking the heart, we need to mask the *outside* of the heart. Cut strips of painter’s tape and carefully apply them along the pencil line to cover the white background paper, leaving *only* the heart shape exposed. -
Protect the edges:
Continue adding tape until the entire white background surrounding the heart is covered. If you have contact paper or masking film, you can cut a heart-shaped hole in a sheet of it and apply that instead for faster coverage.
Muddy Colors?
To avoid blending colors into gray mud, only swipe over the same area 1 or 2 times max. Wipe your plastic card clean after every single drag.
Step 2: Painting & Swiping
-
Prepare your palette:
Squeeze distinct dots of your acrylic paint colors onto the palette. You’ll need burnt sienna, deep brown, terracotta, peach, and cream. Don’t mix them completely; leave them separate. -
Apply paint dots:
Place small dots of paint directly onto the top edge of the masking tape, just above the heart shape. Alternate the colors (e.g., brown, peach, cream, rust) in a random pattern across the top width of the heart. -
Position the swipe tool:
Take your old plastic card or squeegee. Place the edge firmly into the paint dots at the very top, holding the card at a 45-degree angle. -
Perform the swipe:
In one smooth, confident motion, drag the card straight down across the heart shape. Apply consistent pressure to ensure the paint spreads evenly without scraping it all off. -
Clean and repeat:
Wipe your card clean immediately. If the first swipe didn’t cover everything or missed spots, add a tiny bit more paint to the top and swipe again. I find doing fewer swipes keeps the colors distinct rather than muddy. -
Touch up gaps:
If you missed the bottom point of the heart, you can pick up a little excess paint from the tape with your card and gently drag it downward into the tip. -
Check texture:
Look for beautiful streaks where colors meet. If the paint is too thick in areas, you can do a very gentle, dry swipe (no new paint) to flatten it, but act quickly before it dries. -
Let it set:
Allow the paint to dry until it is tacky but not completely rock hard. This usually takes about 10 to 15 minutes depending on the thickness of your acrylics.
Use Leftover Paint
Don’t wash the card yet! Press the paint-covered card onto a blank notecard to create abstract mini-prints before cleaning up.
Step 3: Reveal & Finish
-
Peel the tape:
Carefully peel back the painter’s tape. Pull the tape away from the heart shape at a sharp angle to get a crisp, clean line. -
Inspect edges:
Check the edges of your heart. If paint bled under the tape slightly, let it dry completely, then carefully touch it up with white paint or a white gel pen. -
Erase pencil lines:
Once the paint is 100% dry, gently erase any visible pencil marks that might be peeking out from the edge of the paint. -
Flatten the paper:
If plenty of paint made the paper buckle slightly, place the dry artwork under a heavy book overnight to flatten it out perfectly for framing.
This earthy, striped heart makes a lovely centerpiece for a gallery wall or a handmade card for someone special
Marbled Plastic Wrap Heart
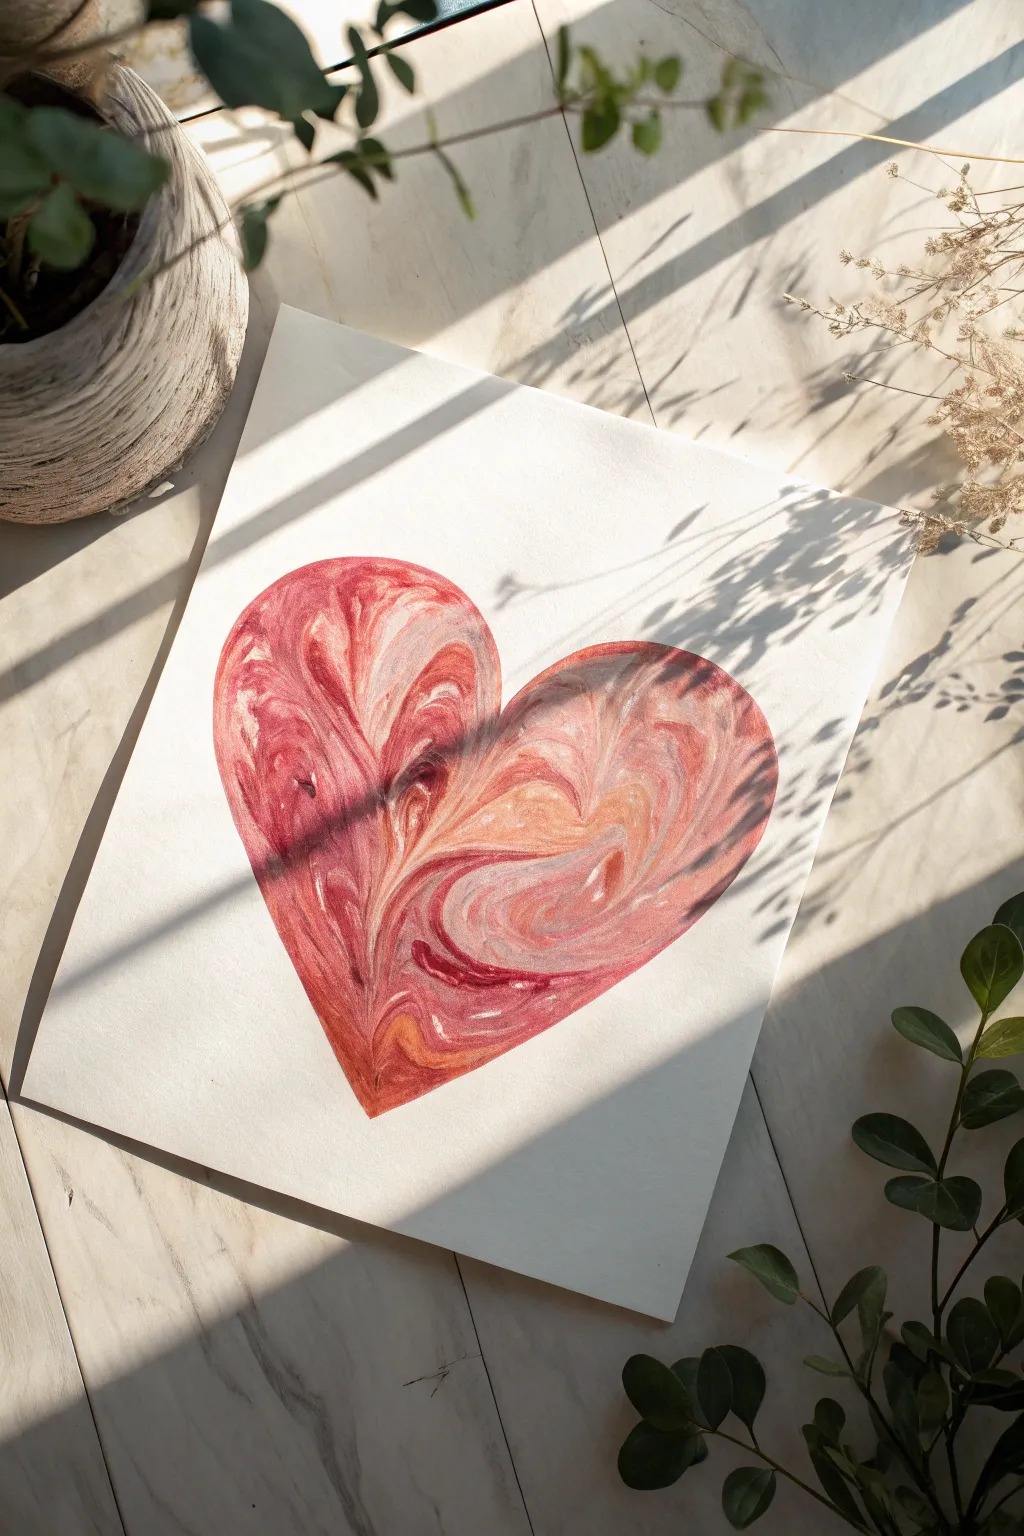
Create a mesmerizing, organic texture inside a crisp heart shape using nothing more than acrylic paint and household plastic cling wrap. This technique produces beautiful, unpredictable veins and swirls that resemble polished stone or marbled paper without the need for complex mediums.
Detailed Instructions
Materials
- Heavyweight watercolor paper or mixed media paper
- Acrylic paints (Red, white, pink, orange/peach)
- Pencil
- Plastic cling wrap (kitchen wrap)
- Scissors
- Paint palette or disposable plate
- Paper towels
- Painter’s tape or masking tape (optional for edges)
Step 1: Preparation
-
Prepare your surface:
Start with a clean sheet of heavyweight paper. Since this technique involves squishing paint, a thicker paper prevents warping. -
Visualizing the shape:
Using a pencil, lightly sketch a large heart shape in the center of your paper. Keep your lines faint so they won’t show through the lighter colors later. -
Ready your colors:
Squeeze out your acrylic paints onto your palette. You’ll want a generous amount of red, a medium pink, a soft peach or orange, and plenty of gleaming white.
Wrinkle Master
Don’t smooth the plastic wrap too much! The more wrinkles and bunches you leave in the plastic while it dries, the more intricate and vein-like the final texture will be.
Step 2: Applying the Paint
-
Filling the heart:
Squeeze or dab the paint directly onto the paper inside your pencil outline. Do not brush it out. -
Random placement:
Place large blobs of red in various spots, followed by medium dots of pink and peach next to them. -
Adding contrast:
Add smaller dots of white paint in the gaps between the colors and even on top of the red blobs. The white is crucial for creating the marbled veins. -
Checking volume:
Ensure you have a good amount of wet paint on the surface. It should be thick enough to move around but not so much that it floods the paper.
Muddy Colors?
If your colors turn brown or gray, you over-mixed them. Stop smooshing sooner next time. The goal is to squish them side-by-side, not blend them into one uniform color.
Step 3: The Smash Technique
-
Cut the plastic:
Cut a piece of plastic cling wrap that is slightly larger than your heart shape. -
Cover the paint:
Gently lay the plastic wrap directly on top of the wet paint blobs. Avoid pressing down hard just yet. -
Smashing and swirling:
Using your fingers, gently press and smoosh the paint underneath the plastic. Push different colors into each other to encourage mixing without turning it muddy. -
Refining the edges:
Carefully push the paint toward your pencil lines to fill the heart shape completely. I find using a fingernail or a q-tip on top of the plastic helps define the sharp points of the heart. -
Creating texture:
Once the shape is filled, scrunch the plastic slightly with your fingers to create wrinkles. These wrinkles in the plastic will dry into those beautiful vein-like patterns. -
Leave it be:
This is the hardest part: stop touching it. Leave the plastic wrap on the wet paint.
Step 4: The Reveal
-
Drying time:
Let the painting sit undisturbed until the paint is completely dry. This can take several hours or even overnight because the plastic slows down evaporation. -
Peeling back:
Once you are certain it’s dry, find a corner of the plastic wrap and slowly peel it away. -
Cleaning up:
If any paint seeped significantly outside your pencil lines, you can carefully touch it up with white paint or scrape it gently with an exacto knife. -
Reviewing the texture:
Admire the organic lines and color variations that formed where the plastic wrinkles sat. -
Erase guidelines:
gently erase any visible pencil marks around the perimeter of the heart to keep the edges looking crisp and professional.
Hang your unique marbled heart in a spot where the light can catch the subtle textures you created


Metallic Accents on a Heart
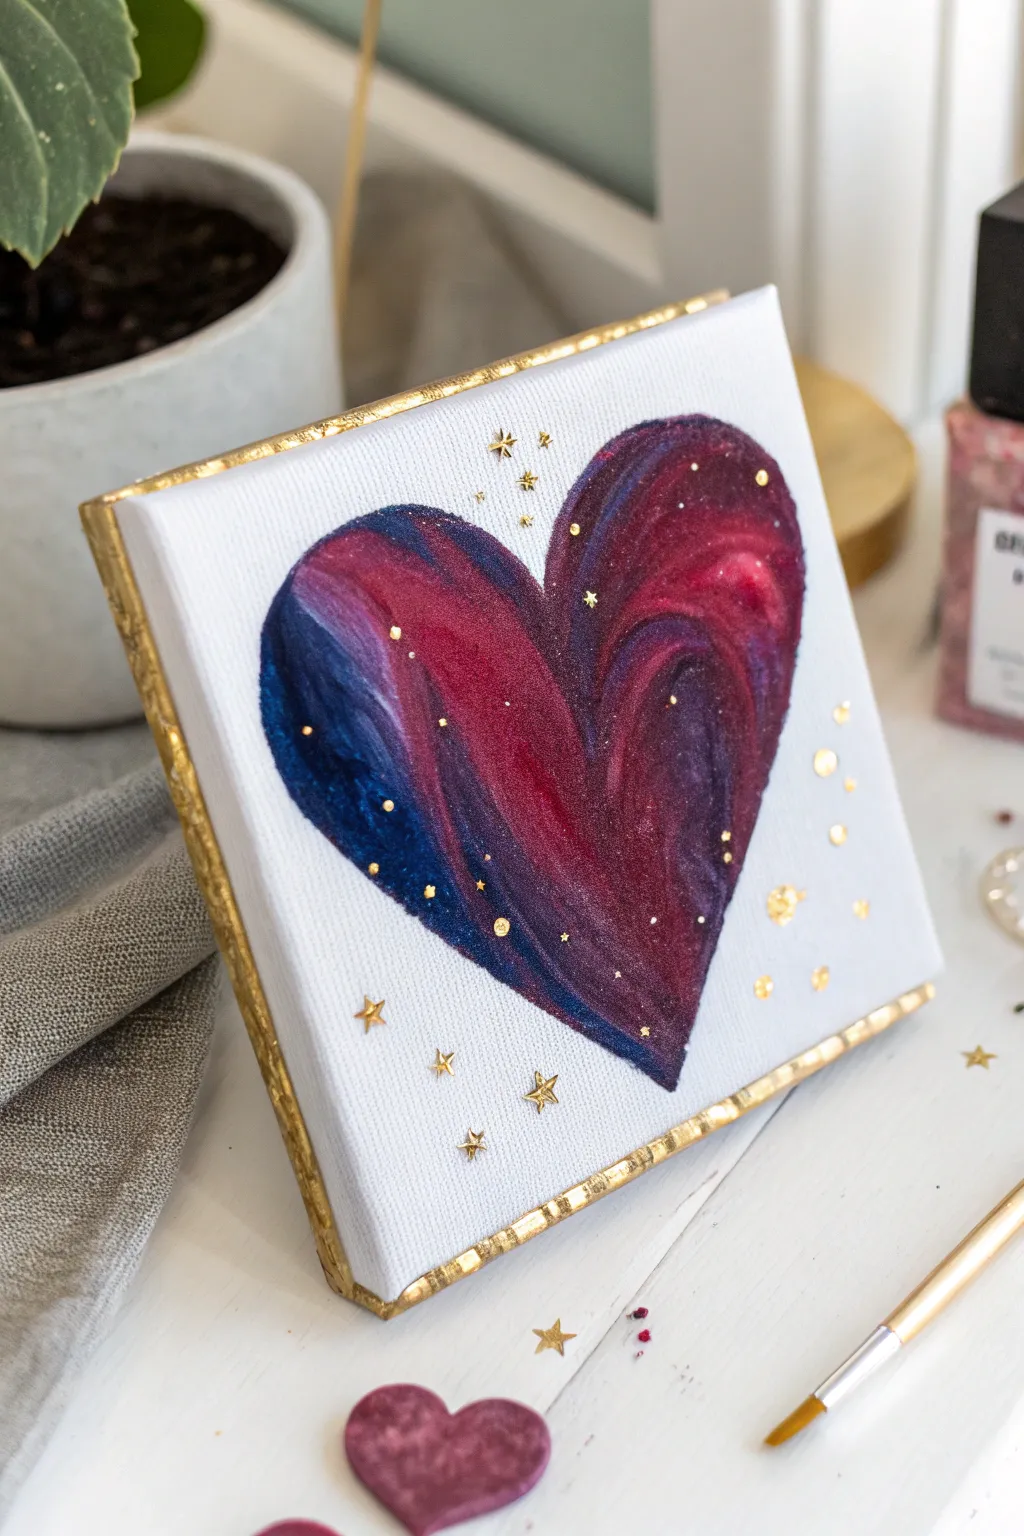
This petite canvas packs a punch with its rich, galaxy-inspired swirls of burgundy, violet, and deep blue, all framed by elegant gold edges. Embedded metallic stars and scattered gold flecks add a magical, celestial dimension to the traditional heart shape.
Step-by-Step Tutorial
Materials
- Small square canvas (e.g., 4×4 or 6×6 inch)
- Acrylic paints: Burgundy, violet, navy blue, and metallic shimmer medium
- Gold leaf paint or liquid gilding
- Small flat brush
- Fine detail brush
- Gold star confetti (tiny nail art stars work best)
- Pencil
- Palette knife or toothpick (for swirling)
- Gloss varnish or clear resin
Step 1: Preparation & Outline
-
Prime the surface:
Ensure your canvas is clean. If the weave is very rough, applying a coat of gesso first can help create a smoother surface for blending. -
Sketch the heart:
Using a pencil, lightly draw a large heart shape in the center of the canvas. Keep the lines faint so they won’t show through lighter areas of paint later. -
Prepare your palette:
Squeeze out generous dollops of burgundy, violet, and navy blue onto your palette. If your paints aren’t naturally metallic, mix a drop of iridescent medium into each color now.
Confetti Control
Use a wax pencil or a toothpick with a tiny bit of beeswax on the tip to pick up and place the tiny stars precisely without smudging wet paint.
Step 2: The Cosmic Heart
-
Apply base colors:
Start by laying down thick patches of paint inside the heart outline. Place the darker navy blue on one outer edge and the burgundy and violets towards the center and opposite side. -
Create the swirl:
This is the fun part. While the paint is still very wet, use your brush or a toothpick to gently drag the colors into each other. Don’t overmix; you want distinct streaks of color to remain visible. -
Follow the curve:
Direct your brushstrokes to follow the curve of the heart lobes. This enhances the sense of volume and makes the heart look puffy rather than flat. -
Refine the edges:
Use a clean, slightly damp brush to tidy up the outer edges of the heart, ensuring a crisp line against the white canvas background. -
Add floating stars:
While the paint is tacky (not fully wet, but not dry), carefully place tiny gold star confetti onto the surface. Press them gently so they adhere to the paint. -
Scatter gold flecks:
Dip the tip of a toothpick or a fine dotting tool into your gold paint and add tiny, random dots over the heart and vaguely into the surrounding white space for a magical dust effect. -
Let it cure:
Allow the heart to dry completely. Since the paint application was thick for swirling, this might take a few hours or overnight.
Step 3: The Golden Frame
-
Paint the canvas edge:
Using a flat brush and your liquid gilding or gold leaf paint, carefully paint the side edges of the canvas. -
Create the border lip:
Bring the gold paint slightly over the front edge of the canvas to create a framed look. I find resting my hand on the table helps keep this line steady. -
Add distressed texture:
Allow the brush to skip slightly or use a dry-brush technique on the very front lip to give the gold frame a vintage, hand-gilded appearance rather than a perfect factory line. -
Attach larger stars:
If you have slightly larger gold stars, glue a few onto the white canvas space surrounding the heart to balance the composition. -
Final varnish:
Once everything is absolutely dry, apply a coat of gloss varnish. This will make the deep colors pop and seal the metallic stars in place.
Muddy Colors?
If your swirls turn brown or grey, you are overworking the paint. Stop mixing immediately, wipe your tool, and apply fresh color on top only where needed.
Display your shimmering artwork on a mini easel or amongst candles for a warm, reflective glow
Floral Heart Wreath
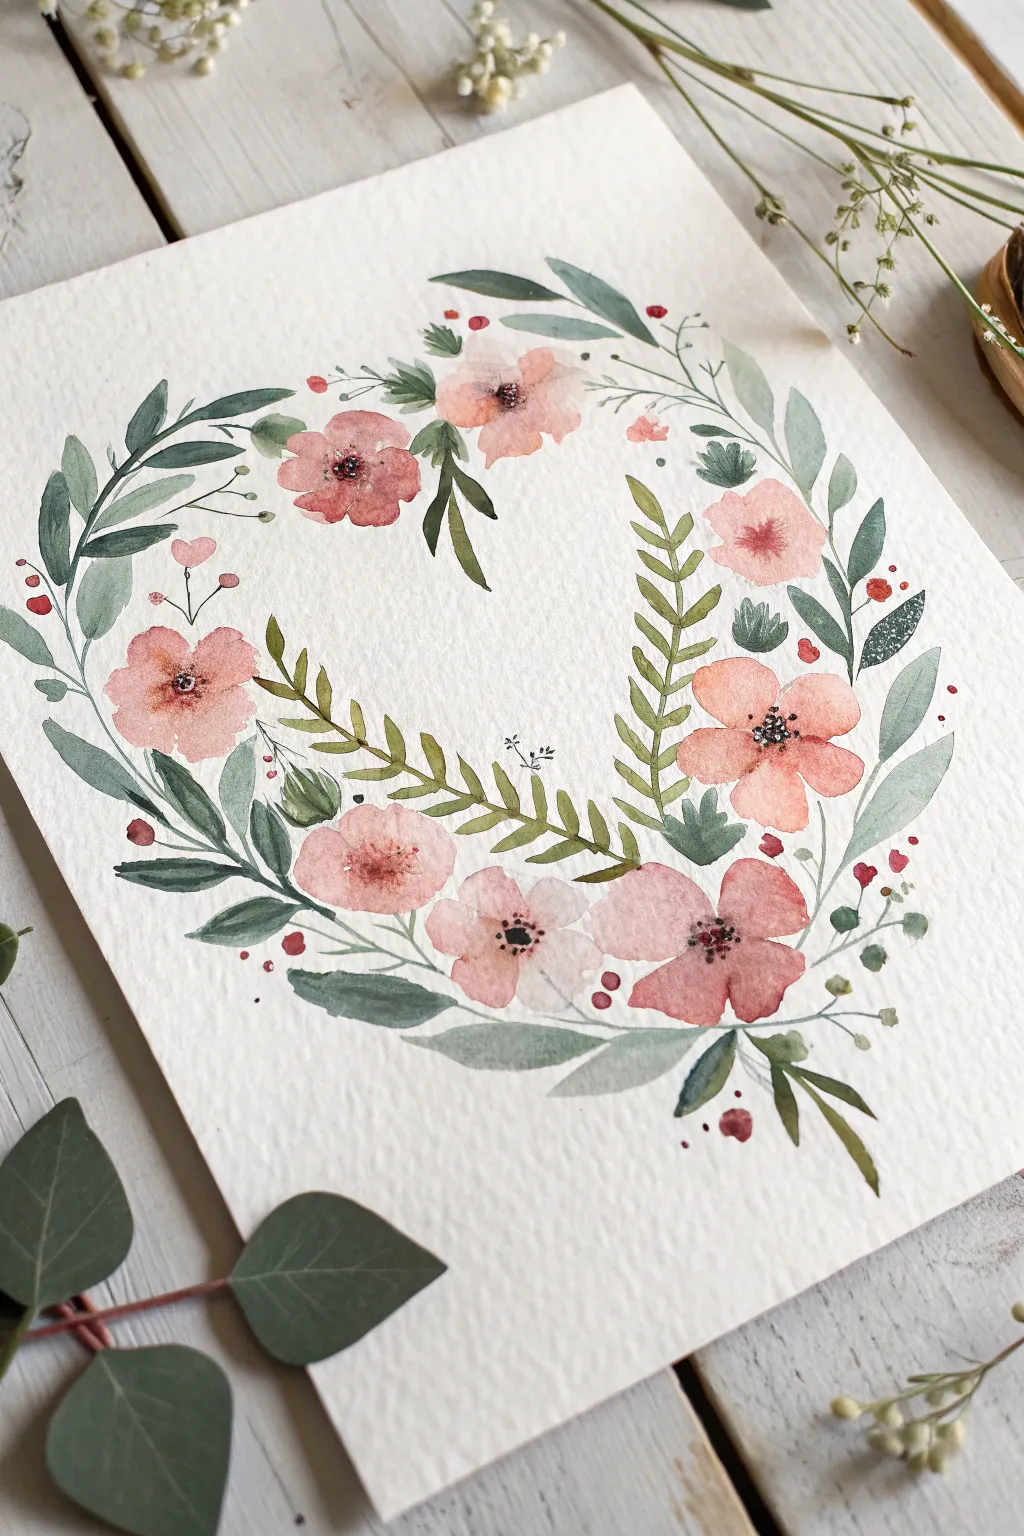
This tender heart-shaped wreath combines soft peach blossoms with varied sage and forest green foliage for a romantic, organic feel. The use of cold-press paper adds a lovely texture that enhances the soft, watery bleeds of the paint.
Step-by-Step Guide
Materials
- Cold-press watercolor paper (300 gsm recommended)
- Watercolor paints (Peach/Coral, Sap Green, Hooker’s Green, Burnt Umber, Alizarin Crimson)
- Round watercolor brushes (sizes 2, 4, and 6)
- Pencil (HB or 2H)
- Eraser
- Clean water jar
- Paper towels
- Palette for mixing
Step 1: Sketching the Shape
-
Lightly trace the heart:
Begin by very lightly drawing a large heart shape on your paper using an HB pencil. This line will serve as a guide for your wreath but attempt to keep it faint so it can be erased later or covered by paint. -
Mark flower placements:
Along the pencil line, lightly sketch small circles where you want your main blossoms to sit. Aim for an asymmetrical balance—place a cluster at the bottom point, one on the upper right curve, and a couple on the upper left curve.
Step 2: Painting the Blooms
-
Mix your petal color:
Create a watery mix of peach or coral paint. You want this to be quite transparent, so use plenty of water on your palette. -
Paint the first petals:
Starting with the bottom cluster, use your size 6 brush to paint loose, five-petal flower shapes. Keep the edges soft and don’t worry about perfect symmetry. -
Add detail while wet:
While the petals are still damp, touch the very center with a slightly more concentrated drop of reddish-pink to create a soft bleed. -
Complete the flower placement:
Move around the heart shape, painting the remaining flowers at your marked spots. Vary the sizes slightly—some large and open, others slightly turned or smaller. -
Create the flower centers:
Once the petals are nearly dry, use a size 2 brush with a dark brown or black mix to dot tiny stamens in the center of each bloom.
Too much water?
If a flower petal becomes a puddle, dry your clean brush on a paper towel and touch it to the puddle. The brush will act like a sponge and lift the excess water instantly.
Step 3: Adding Foliage
-
Mix green shades:
Prepare two shades of green: a lighter, yellowish ‘sap green’ and a cooler, darker ‘forest green’. Having variety adds depth to the wreath. -
Paint the main stems:
Using a size 4 brush, paint thin, curving stems that follow the heart’s pencil line, connecting the flowers. Leave some gaps; the line doesn’t need to be continuous. -
Add fern-like leaves:
On the right side of the heart, paint long, fern-like fronds using the lighter green. Press the brush down for the base of each leaflet and lift as you pull outward. -
Insert darker leaves:
Switch to your darker, cooler green mix. Paint broader, single leaves tucking behind the flowers, especially around the bottom point and upper left curve. -
Create wispy stems:
Use the tip of your size 2 brush to add very fine, delicate stems sticking out from the main wreath. Add tiny leaves to these for a wilder look. -
Add tiny accents:
Dip your small brush into red or deep pink and paint tiny berries or buds on the thin stems to bring some color balance to the green areas. -
Layering for depth:
If some areas look sparse, wait for the first layer to dry and paint a second layer of leaves overlapping the first. I find this creates a nice sense of fullness.
Loose & Lively
For more organic leaves, hold your brush higher up on the handle. This reduces control slightly, creating more natural, less stiff brushstrokes.
Step 4: Finishing Touches
-
Evaluate the shape:
Step back and look at your heart. If the shape feels lost, add small sprigs of leaves or tiny buds to fill out any dips or define the curves better. -
Erase pencil lines:
Ensure the painting is completely bone dry. Gently erase any visible pencil marks from your initial guide.
Frame this lovely piece in a simple wood frame to highlight its natural charm
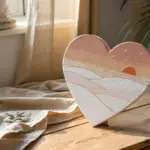
Heart Window Mini Landscape
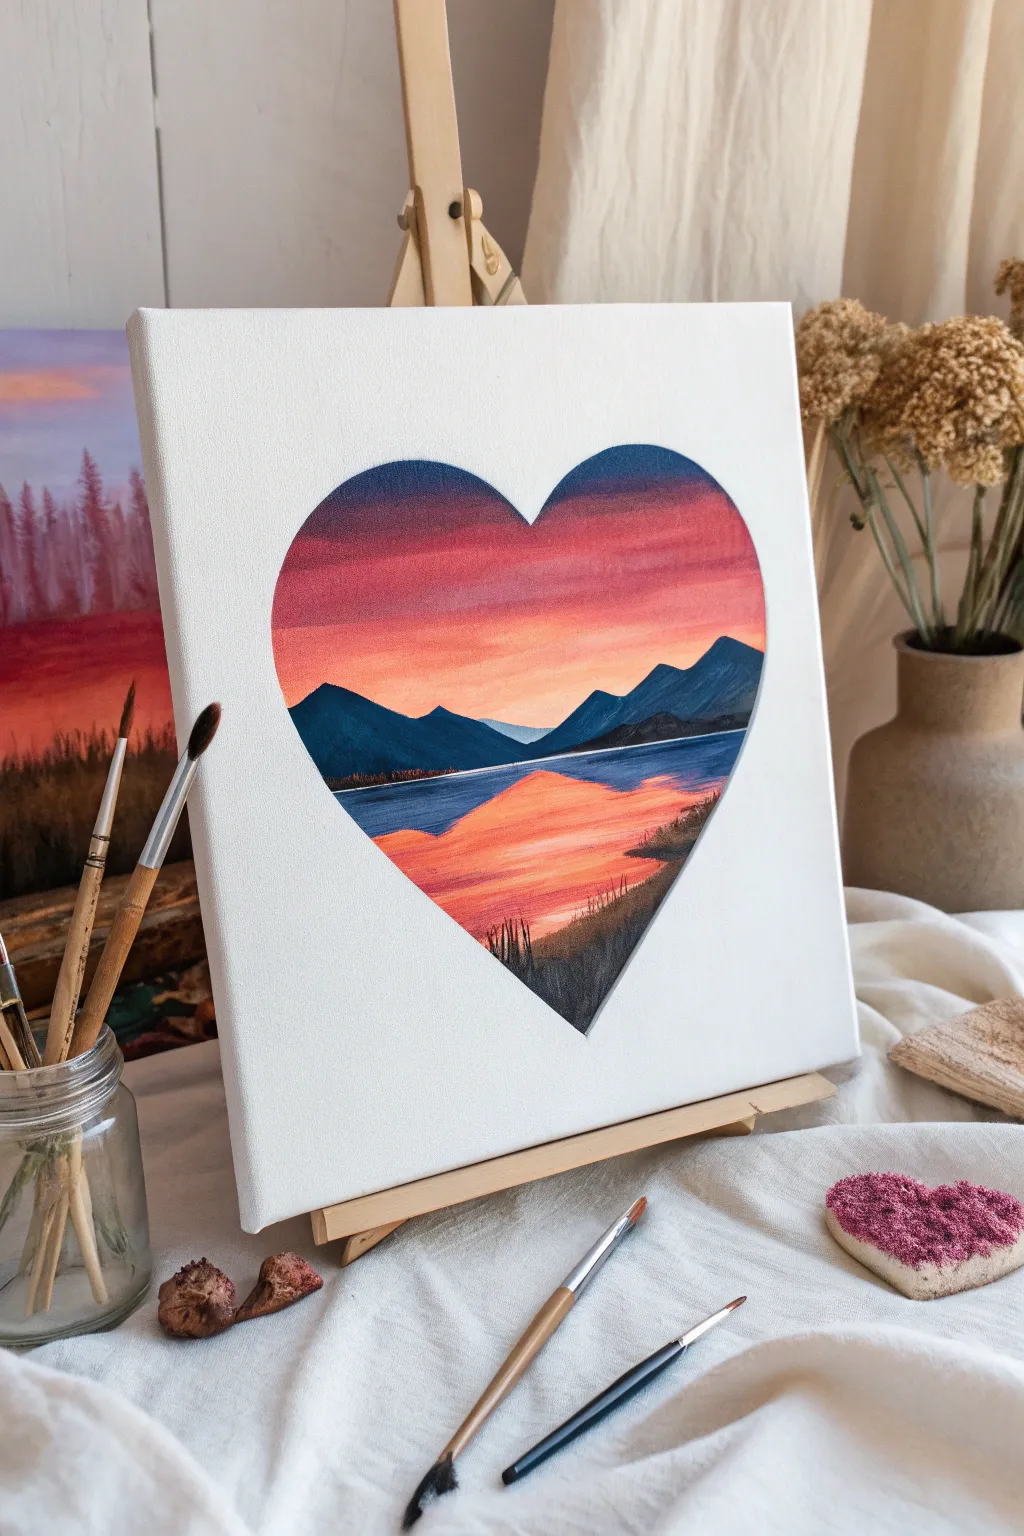
Capture the serenity of twilight within a striking heart-shaped silhouette. This project combines geometric precision with soft, blended gradients to create a romantic mountain vista that looks like you’re peeking through a window into another world.
Detailed Instructions
Materials
- Small square canvas (e.g., 6×6 or 8×8 inches)
- Contact paper or masking tape (wide)
- Scissors and a pencil
- Acrylic paints: Carbon Black, Titanium White, Prussian Blue, Phthalo Blue, Alizarin Crimson, Cadmium Orange, Cadmium Yellow
- Flat shader brushes (medium and small)
- Round liner brush (size 1 or 0)
- Palette knife (optional, for mixing)
- Water cup and paper towels
Step 1: Preparation & Masking
-
Create the stencil:
Cut a square of contact paper that matches the size of your canvas. Fold it gently in half (without creasing the backing too sharply) and draw a half-heart shape along the fold to ensure symmetry. -
Cut out the heart:
Carefully cut along your line. You are creating a negative stencil, so keep the outer ‘frame’ part intact. Discard the inner heart shape (or save it for another project). -
Apply the mask:
Peel the backing off the contact paper frame and center it on your white canvas. Press down firmly, especially along the inner edge of the heart cut-out, to prevent paint from seeping underneath.
Crisp Edge Secret
Before painting colors, seal the stencil edge with a clear matte medium or white paint. This blocks leaks so your final lines are razor sharp.
Step 2: Painting the Sky
-
Mix the top sky color:
Start by mixing Prussian Blue with a touch of Alizarin Crimson to get a deep, moody purple-blue. Apply this to the very top curve of the heart using a flat brush. -
Transition to red:
While the blue is still wet, mix Alizarin Crimson with a tiny bit of White. Blend this row just below the blue, using horizontal strokes to create a smooth gradient. -
Add the glowing horizon:
Mix Cadmium Orange, Cadmium Yellow, and Titanium White to create a bright, sunset peach color. Paint the lower third of the sky area, blending it upward into the crimson section for a seamless transition. -
Refine the blend:
Use a clean, slightly damp brush to lightly stroke back and forth horizontally over the areas where colors meet. This softens the lines and creates that misty evening look.
Level Up: Texture Pop
Use coarse modeling paste for the mountains before painting them. The 3D texture will catch the light and make the landscape jump off the canvas.
Step 3: Mountains & Lake
-
Block in the mountains:
Mix Prussian Blue with a little Black and a touch of the sky purple. Using a smaller flat brush, paint jagged mountain shapes across the horizon line. I like to make the mountains slightly darker on one side to suggest a light source. -
Create the waterline:
Using the sharp edge of your flat brush and a dark blue mix, draw a straight horizontal line at the base of the mountains to define the far shore of the lake. -
Paint the water reflection:
Mirror the sky colors in the water section. Start with the peach/orange mix right below the dark waterline, dragging the paint downwards with vertical strokes initially, then smoothing horizontally. -
Deepen the foreground water:
At the bottom point of the heart (the closest water), introduce the deeper purples and blues used at the top of the sky. Blend this gently into the orange reflection.
Step 4: Details & Reveal
-
Add shorelines:
Use a liner brush and black paint to add a thin, uneven shoreline on the right or left side, extending slightly into the water. -
Paint foreground grass:
Switching to your smallest liner brush, load it with black paint. Use quick, upward flicking motions to paint silhouettes of tall grass or reeds growing from the shoreline at the bottom. -
Add water ripples:
Mix a very light peach or white. Use the liner brush to add extremely thin, horizontal lines across the water to suggest gentle ripples disrupting the reflection. -
The Reveal:
Wait until the paint is completely dry to the touch. Start at one corner and slowly peel back the contact paper stencil. This is the most satisfying part, revealing those crisp, clean white edges. -
Touch-ups:
If any paint bled under the sticker, use a small flat brush with Titanium White paint to carefully clean up the edges and restore the perfect heart shape.
Step back and admire how a simple shape transforms a landscape into a token of affection
Galaxy Heart With Stars
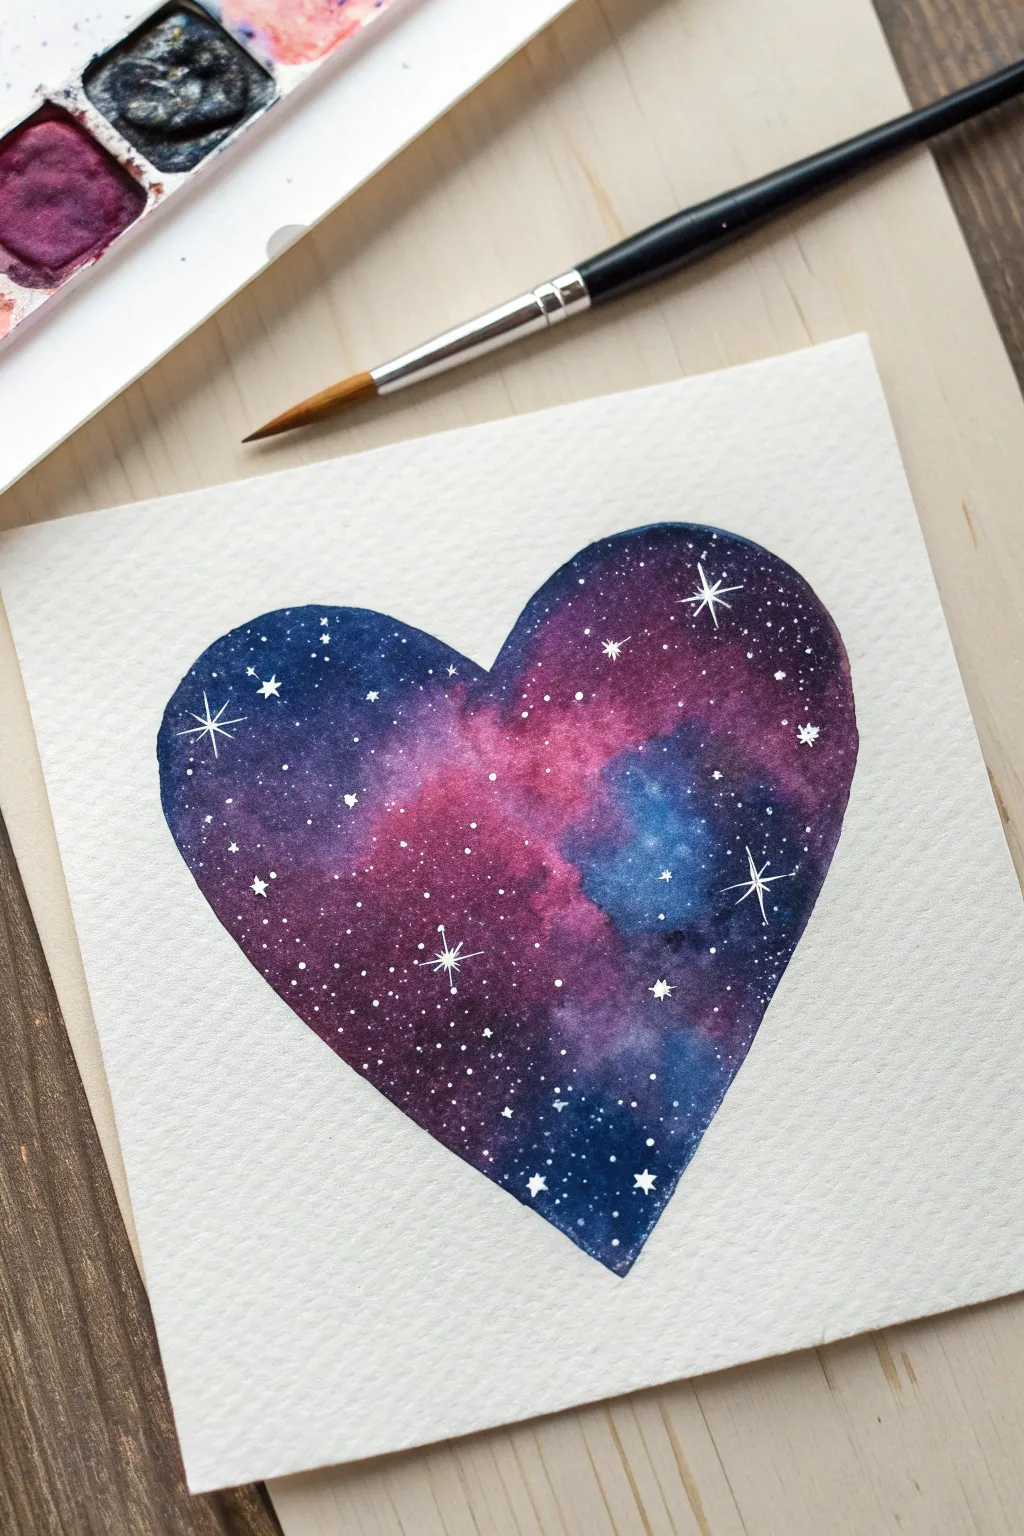
Capture the magic of deep space within a simple heart shape using this stunning watercolor technique. The blending of deep purples, blues, and bright pinks creates a nebulous effect that pops beautifully against crisp white paper.
How-To Guide
Materials
- Cold press watercolor paper (300 gsm recommended for heavy washes)
- Pencil (HB or lighter)
- Watercolor paints (Indigo, Payne’s Grey, Magenta/Pink, Cyan/Turquoise)
- Round watercolor brush (size 6 or 8)
- Small liner or detail brush
- White gouache or white gel pen
- Masking tape or painter’s tape
- Paper towels
- Two jars of water
Step 1: Preparation and Sketching
-
Secure the paper:
Tape down your watercolor paper to a board or table on all four sides. This prevents the paper from buckling when we add lots of water later. -
Outline the shape:
Lightly sketch a large heart in the center of your paper. Keep your pencil lines very faint so they don’t show through the final painting, or erase them slightly with a kneaded eraser until barey visible.
Bloom Control
For better ‘nebula’ clouds, don’t mix colors on the palette. Drop wet colors directly onto wet paper and let the water mix them for you.
Step 2: Creating the Nebula
-
Wet-on-wet start:
Using your larger round brush, apply clean water to the inside of the heart shape. You want the paper glistening but not forming puddles. Be careful to stay exactly inside your pencil lines. -
Drop in the pinks:
Load your brush with a vibrant magenta or pink. While the paper is still wet, drop this color into the center and upper-middle areas of the heart. Let the pigment bloom naturally. -
Add the blues:
Immediately pick up your cyan or turquoise. Drop this color next to the pink areas, allowing them to touch and merge slightly to create purple transitions. -
Deepen the edges:
While the heart is still wet, load your brush with a dark indigo or Payne’s grey. Carefully painting along the outer edges of the heart, moving inward. -
Blend the darkness:
Allow the dark outer color to bleed into the brighter center colors. If the paint isn’t moving enough, I like to gently tilt the board to encourage flow without overworking it with the brush. -
Intensify contrast:
While damp, drop concentrated dark pigment into the corners and curves to create depth, ensuring the ‘space’ looks vast and deep. -
Lift for highlights:
If painting gets too dark in the middle, use a clean, thirsty (slightly damp) brush to lift a little pigment out of the lighter nebula clouds. -
Let it dry completely:
This is crucial. Let the painting dry fully until the paper is flat and cool to the touch. Using a hair dryer on low heat can speed this up.
Muddy Centers?
If the center turns gray/brown, you likely overmixed the orange/pink and blue. Let them touch only at the edges next time.
Step 3: Stars and Details
-
Prepare the stars:
Dilute a small amount of white gouache with water until it has a milky consistency. Alternatively, prepare a high-opacity white gel pen. -
Spatter background stars:
Load a brush with the white mixture. Hold it over the heart and tap the handle against another brush to spray fine speckled stars across the galaxy. Cover the surrounding white paper with scrap paper if you want to keep it clean. -
Draw major stars:
Using your smallest detail brush or gel pen, manually dot a few larger, brighter stars in the dark areas for contrast. -
Add twinkle effects:
Select 3-5 of your larger dots and draw a simple cross or four-pointed star shape through them to create a twinkling effect. -
Final dry:
Allow the white details to dry completely before removing the tape. -
Clean up edges:
If any paint went outside the heart shape, you can carefully touch it up with white gouache or acrylic to keep the silhouette crisp.
Now you have a piece of the universe captured in a heart to frame or give to someone special
Geometric Color-Block Heart
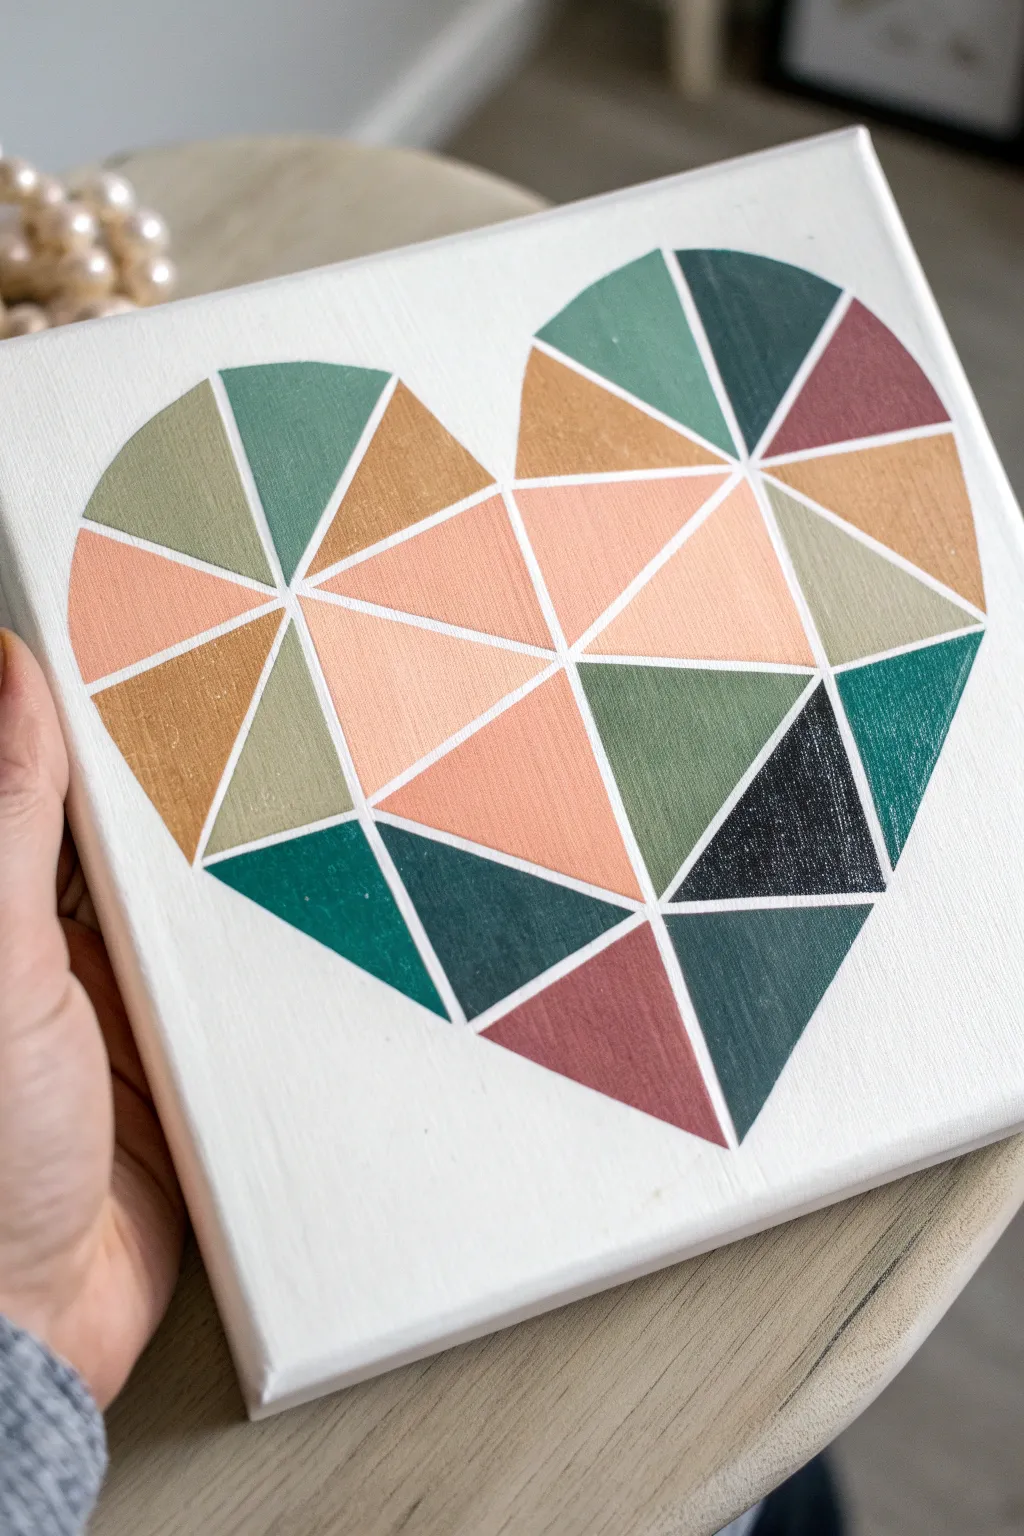
This chic wall art combines the warmth of earthy tones with the modern appeal of geometric design, creating a structured yet organic focal point. The clean white lines separating each colorful facet give the piece a sophisticated, stained-glass effect that looks great in any contemporary space.
Step-by-Step Tutorial
Materials
- Square stretched canvas (e.g., 8×8 or 10×10 inches)
- Acrylic paints (Recommended colors: Peach, Burnt Sienna, Sage Green, Forest Green, Mauve, Dark Teal, Mustard Yellow)
- Thin painter’s tape or graphic art tape (1/8 inch or 1/4 inch width)
- Flat shader brushes (sizes 4 and 6)
- Pencil and eraser
- Ruler
- Paper plate or palette
- Jar of water and paper towels
- Matte finish varnish (optional)
Step 1: Preparation and Mapping
-
Prime the Surface:
Since the white lines between shapes are an essential part of the design, ensure your canvas is a crisp, clean white. If the canvas looks dull, apply a preliminary coat of titanium white acrylic paint over the entire surface and let it dry completely. -
Outline the Heart Shape:
Using a pencil, lightly sketch a large, symmetrical heart in the center of the canvas. You can freehand this or create a paper template first to trace lightly onto the canvas to ensure symmetry. -
Create the Grid Work:
This is where the magic happens. Use your ruler to draw straight lines intersecting through the heart. Start with a few vertical and horizontal lines, then add diagonal lines to break the large shapes into smaller triangles and quadrilaterals. -
Balance the Shapes:
Step back and look at your pencil grid. The goal is to have a variety of geometric shapes within the heart boundary. If any section looks too large or empty, simply draw another diagonal line through it to break it up.
Clean Lines Secret
If you don’t have graphic tape, mask the lines with regular painter’s tape, then paint a layer of white over the tape edges BEFORE adding color. This seals the gap for perfect lines.
Step 2: Tape Application
-
Tape the Outer Boundary:
It’s time to tape. Carefully apply thin painter’s tape along the OUTSIDE of your heart outline. You’ll need to cut small pieces of tape to contour the curves at the top of the heart, overlapping them slightly to create a smooth edge. -
Tape Internal Lines:
Apply your thin graphic tape or cut slivers of painter’s tape over your pencil grid lines inside the heart. Press the tape down firmly. -
Seal the Edges:
To ensure super crisp lines later, run your fingernail or a plastic card firmly over all the tape edges. This prevents paint from bleeding underneath. -
Optional White Seal:
For extra crispness, I like to paint a very thin layer of white paint over the tape edges first. This seals any tiny gaps with white paint so the colored paint won’t seep through later.
Metallic Pop
Replace one of the earth tones (like the mustard yellow) with metallic gold or copper paint. It catches the light beautifuly and adds a chic, modern texture to the piece.
Step 3: Painting the Facets
-
Plan Your Palette:
Squeeze your paint colors onto the palette. This design works best with a mix of light (peach, sage) and dark (forest green, mauve) tones. Aim for about 6-8 distinct shades. -
Start with Lighter Colors:
Choose a light color like peach or sage green and select 3-4 non-adjacent shapes on your grid to fill in. Spreading the colors out creates that balanced ‘scattered’ look. -
Apply Mid-Tones:
Switch to your medium earthy tones like mustard yellow or burnt sienna. Paint another set of scattered shapes, being careful to stay within the taped boundaries. -
Add Darker Accents:
Now bring in the drama with your darkest colors—forest green and deep teal. Use these sparingly to anchor the design; placing a few dark triangles near the bottom point of the heart adds nice visual weight. -
Check for Coverage:
Let the first coat dry for about 10-15 minutes. Acrylics can be slightly transparent, so you will likely need a second coat on most colors to get that solid, opaque finish. -
Touch Up Edges:
As you apply the second coat, ensure the paint is pushed right up against the tape edges for sharp definition.
Step 4: The Reveal
-
Remove the Tape:
This is the most satisfying part. Once the paint is tacky but not fully hardened (usually 20-30 minutes after the last coat), gently peel off the tape. Pull slowly at a 45-degree angle away from the painted area. -
Clean Up:
If you notice any tiny bleeds where color slipped under the tape, wait for everything to dry completely, then use a tiny detail brush and white paint to tidy up the grid lines. -
Erase Visible Guides:
Gently erase any pencil marks that might still be visible in the white grid lines between the colored shapes. -
Final Varnish:
To protect your work and unify the sheen of the different paint colors, apply a coat of matte spray varnish over the entire canvas.
Hang your painting in a spot that needs a touch of warmth and structure and enjoy your handmade modern art piece
Mosaic Tile Heart Pattern
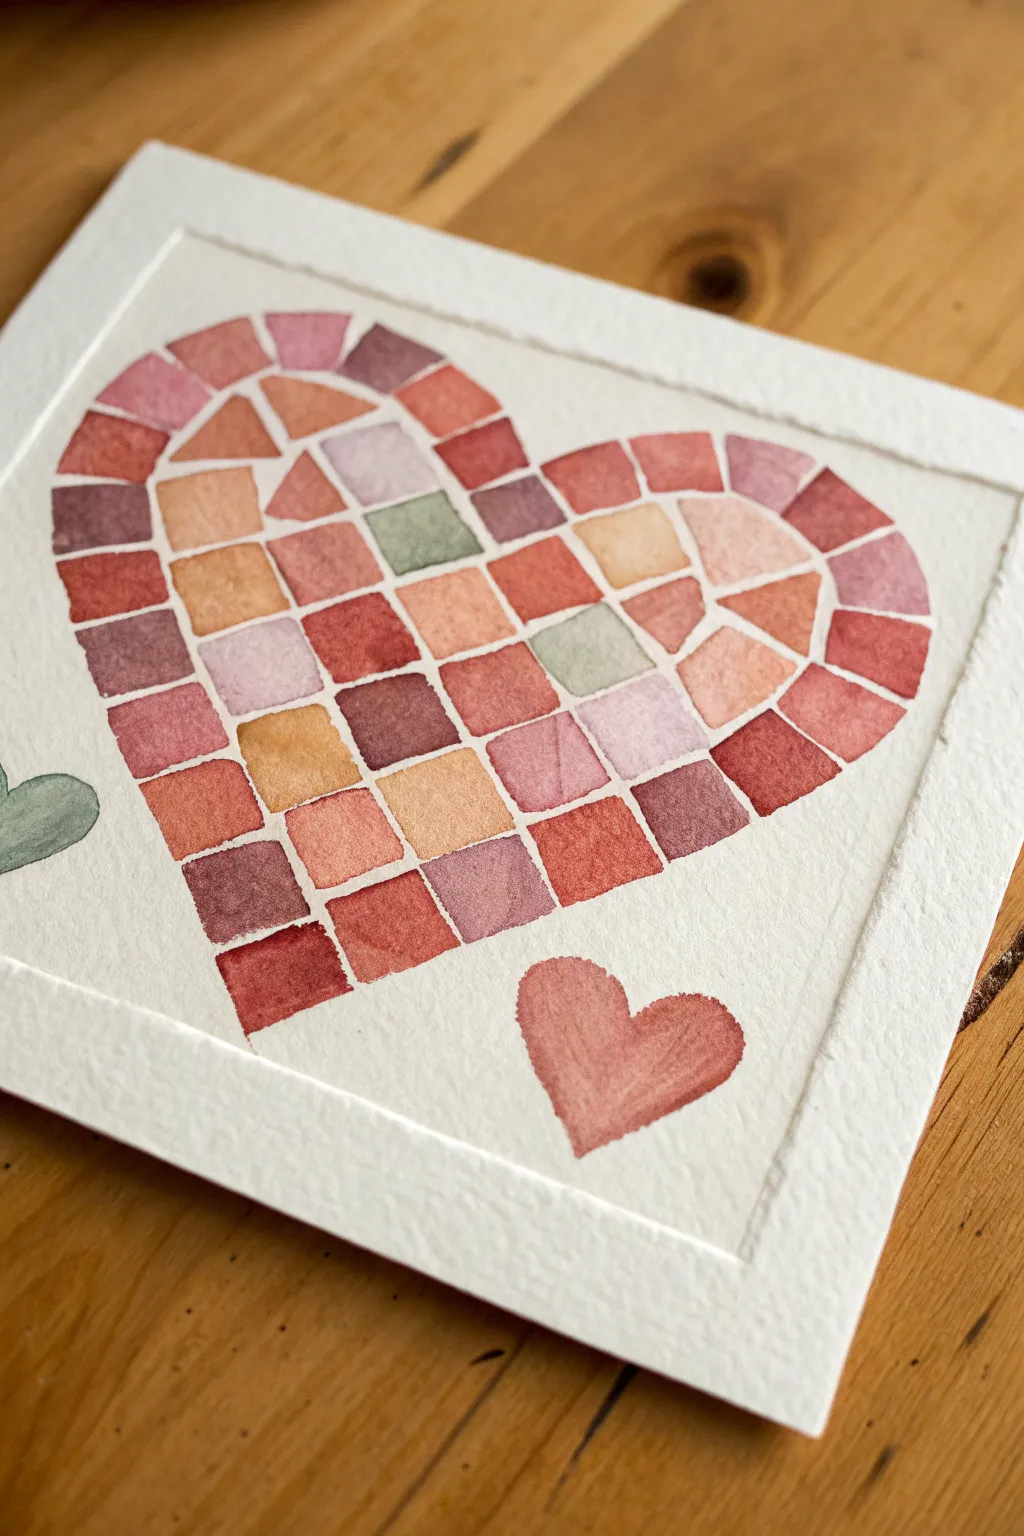
This charming project mimics the look of a stained glass or ceramic mosaic using translucent watercolor paints. By leaving thin lines of white paper between geometric shapes, you create a structured yet delicate heart design full of warmth and variety.
Step-by-Step Guide
Materials
- Cold press watercolor paper (square format)
- Watercolor paints (warm palette: reds, pinks, oranges, faint greens)
- Round watercolor brush (size 4 or 6)
- Pencil (HB or lighter)
- Eraser
- Paper towel
- Two cups of water
- Ruler
Step 1: Planning the Design
-
Outline the Heart Shape:
Begin by lightly sketching a large heart in the center of your paper. Keep your pencil pressure very light so the graphite doesn’t show through the transparent paint later. -
Add Secondary Elements:
Sketch a much smaller heart in the bottom right corner and a partial leaf shape entering from the left edge to balance the composition. -
Draft the Grid Lines:
Inside the large heart, lightly draw a grid pattern. The lines don’t need to be perfectly straight; a slight hand-drawn wobble adds organic charm. Focus on creating mostly square and rectangular shapes. -
Refine the Edges:
Modify the grid shapes near the curved edges of the heart into triangles or polygons so they fit neatly inside the outline. The goal is to make it look like cut tiles.
Step 2: Painting the Mosaic
-
Mix Your Palette:
Prepare several puddles of paint on your palette. You want a cohesive warm scheme: muted reds, terracotta, dusty pinks, and ochre. Include one or two grayish-green tones for contrast. -
Start the Outer Rim:
Begin painting the shapes along the outer edge of the heart first. Use a reddish-pink tone for these perimeter ’tiles’ to define the heart’s shape clearly. -
Mind the Spacing:
As you fill in the shapes, be crucial about leaving a thin, consistent gap of white paper between every single color patch. This negative space acts as the ‘grout’ for your mosaic. -
Vary the Colors:
Work your way inward, switching colors frequently. Try not to put the exact same shade right next to itself. Place a muted green square near the center to act as a focal point. -
Control Water Ratio:
Vary the amount of water with each shape. Some tiles should be sheer and watery, while others should be more saturated and opaque to create depth and texture. -
Create Soft Blooms:
On a few random tiles, while the paint is still wet, touch the tip of your brush (loaded with water or a slightly different color) to the center. This creates a lovely ‘bloom’ effect as it dries. -
Paint the Exterior Elements:
Fill in the small bottom-right heart with a solid, warm terracotta wash. Use a soft sage green for the partial leaf on the left. -
Let it Dry:
Wait for the paint to dry completely. Since the shapes are close together, wet paint might bridge the gaps if you aren’t careful, so patience is key here.
Grout Lines
If keeping white gaps is difficult, you can apply thin masking fluid lines over your pencil grid before painting. Peel it off at the end for crisp white lines.
Step 3: Finishing Touches
-
Evaluation:
Step back and look at the color balance. If a particular tile looks too pale, you can gently glaze a second layer of color over it once the first layer is bone dry. -
Erase Guidelines:
Once the paper is 100% dry to the touch (I suggest waiting an hour just to be safe), gently erase any visible pencil lines in the white ‘grout’ areas.
Metallic Accent
Once dry, use a fine-tip gold paint pen to trace over the white spacing lines. This turns the ‘grout’ into a shimmering outline.
Frame this piece in a simple wood frame to complement the warm, earthy tones of your mosaic heart

Have a question or want to share your own experience? I'd love to hear from you in the comments below!