Acrylic markers are basically paint with the control of a pen, and that combo opens up so many fun project options. If you’re craving bold color, clean lines, and satisfying layering without dragging out a whole paint setup, these ideas are for you.
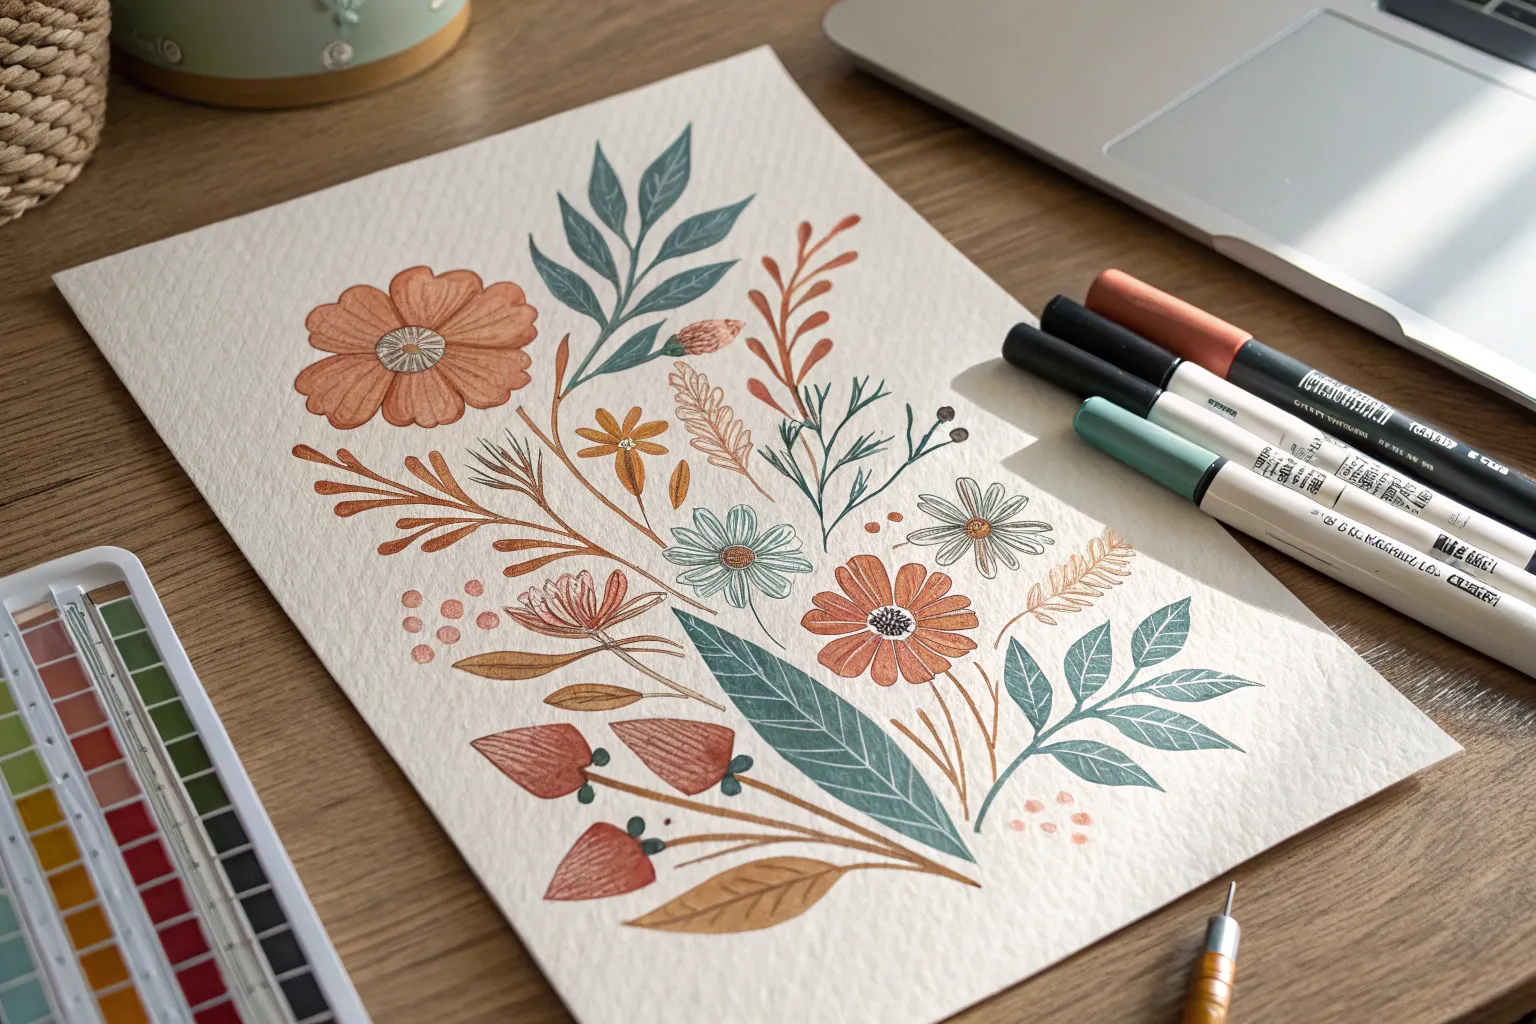
Vibrant Doodle Page of Mini Icons
Transform a blank page into a cheerful explosion of color with this vibrant doodle spread. Using acrylic markers, you’ll create a lively mix of rainbows, strawberries, and daisies that feels cohesive yet spontaneous.
How-To Guide
Materials
- Dotted or blank sketchbook suitable for markers
- Acrylic paint markers (medium tip: red, yellow, orange, pastel pink, mint or light blue, green, white)
- Black fineliner pen (0.3mm or 0.5mm)
- Pencil and eraser (optional for sketching)
Step 1: Planning the Layout
-
Start with key anchors:
Begin by mentally dividing your page. We want to place the largest elements first to anchor the composition. Visualize three distinct spots for the rainbows to ensure they aren’t clumped together. -
Pencil sketching (optional):
If you are nervous about committing ink directly to paper, lightly sketch the positions of the three rainbows and the large smiley face with a pencil. This acts as a safety net for spacing.
Step 2: Drawing the Focal Points
-
Rainbow arches:
Using your pastel pink, yellow, and blue makers, draw three rainbows. Vary them slightly—one large one on the left, a smaller one near the top right, and one at the bottom center. Let the colors dry for a moment between arches so they don’t bleed. -
Smiley centerpiece:
Draw a bold yellow circle in the middle-right area. This will become your smiley face icon later. -
Strawberry fields:
Scatter 4-5 strawberry shapes across the page using red. Make them roughly triangular with rounded corners. I like to rotate them in different directions to keep the energy dynamic.
Bleeding colors?
Acrylic markers can sometimes pill paper. If colors bleed or paper tears, let the first layer dry completely before adding layers, or switch to a higher GSM paper.
Step 3: Adding Secondary Elements
-
Bold daisies:
Switch to your white marker (or leave the paper blank if it’s white) and draw simple daisy shapes. Add a yellow center to each one. Place a large one near the center left and a few smaller ones near the edges. -
Hearts and stars:
Fill the medium-sized gaps with hearts in pink and red. Then, add yellow five-pointed stars. Don’t worry about them being perfect; the charm is in the doodle style. -
Tiny fillers:
Look for the smallest empty spaces and add tiny red hearts, small yellow dots, or miniature four-petal flowers. These ‘confetti’ elements tie the whole page together.
Add some sparkle
Use a glitter gel pen or a metallic gold marker to add tiny accents, like dots or borders, to the stars and hearts for an extra magical touch.
Step 4: Defining with Lines
-
Outline the rainbows:
Once the paint is completely dry, take your black fineliner. Outline the rainbow arches and draw fluffy white clouds at the base of each end. -
Detail the strawberries:
Outline your red strawberry shapes. Draw little green leafy tops (calyxes) on them. Use the white acrylic marker to add tiny seeds or dots on the red berry bodies for texture. -
Flower power:
Outline the daisy petals and their yellow centers. For variety, you can draw a ‘sunflower’ style outline on one of the yellow stars to make it a flower instead. -
Smiley face features:
Give your yellow circle a simple face. Two dots for eyes and a wide U-shape for a smile create that classic happy look. Add a double outline around the circle for emphasis. -
Final touches:
Go around the remaining hearts and stars with your black pen. Add a tiny handwritten quote in the center if you have a perfect spot, such as ‘Wies nas surtido’ or a favorite short phrase. -
Erase guidelines:
Once the black ink is fully set, gently erase any visible pencil marks to clean up the page.
Now you have a cheerful page of icons that can serve as a mood tracker or just a bright spot in your day


Bold Florals With Layered Petals and Leaves
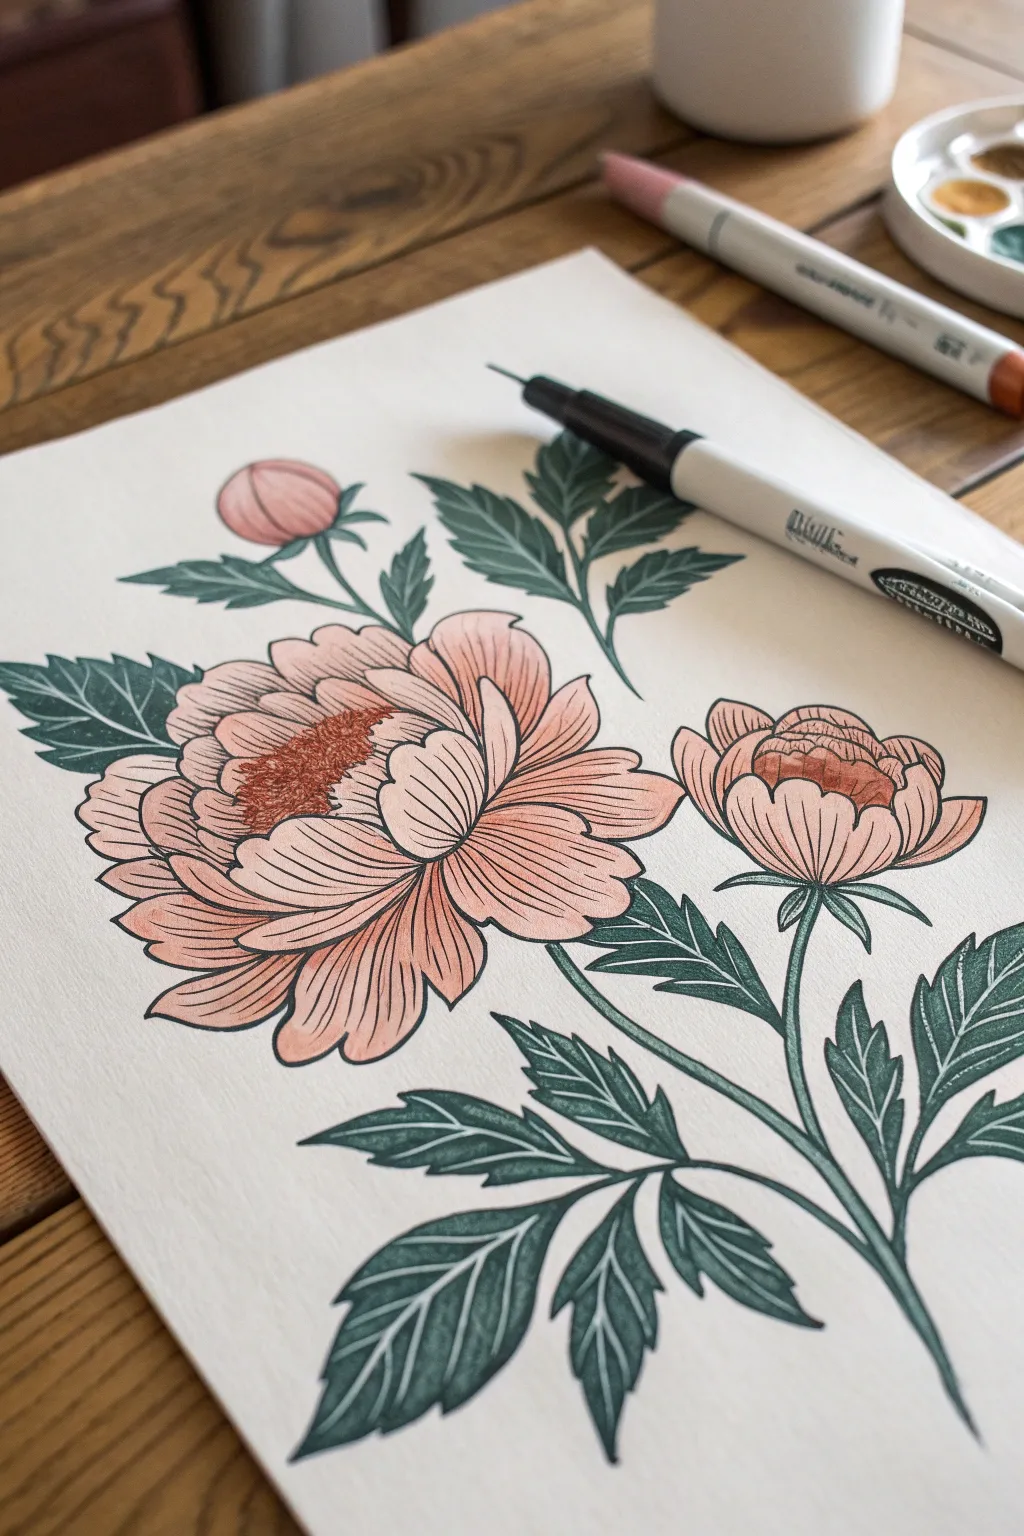
Capture the delicate beauty of blooming peonies using acrylic markers to achieve a stunning line and wash effect. This project combines crisp, bold outlines with soft, blended gradients for a look that feels both illustrative and effortlessly artistic.
Step-by-Step
Materials
- White mixed media paper or smooth bristol board (A4 size)
- Black fine-liner acrylic marker (0.5mm or 0.7mm)
- Thick black acrylic marker (1mm – 2mm) for stems
- Soft peach or salmon pink acrylic marker
- Deep reddish-brown acrylic marker
- Dark forest green acrylic marker
- Pencil (HB) and eraser for sketching
- Small paintbrush and water cup (optional for blending)
- Blending palette or plastic sheet
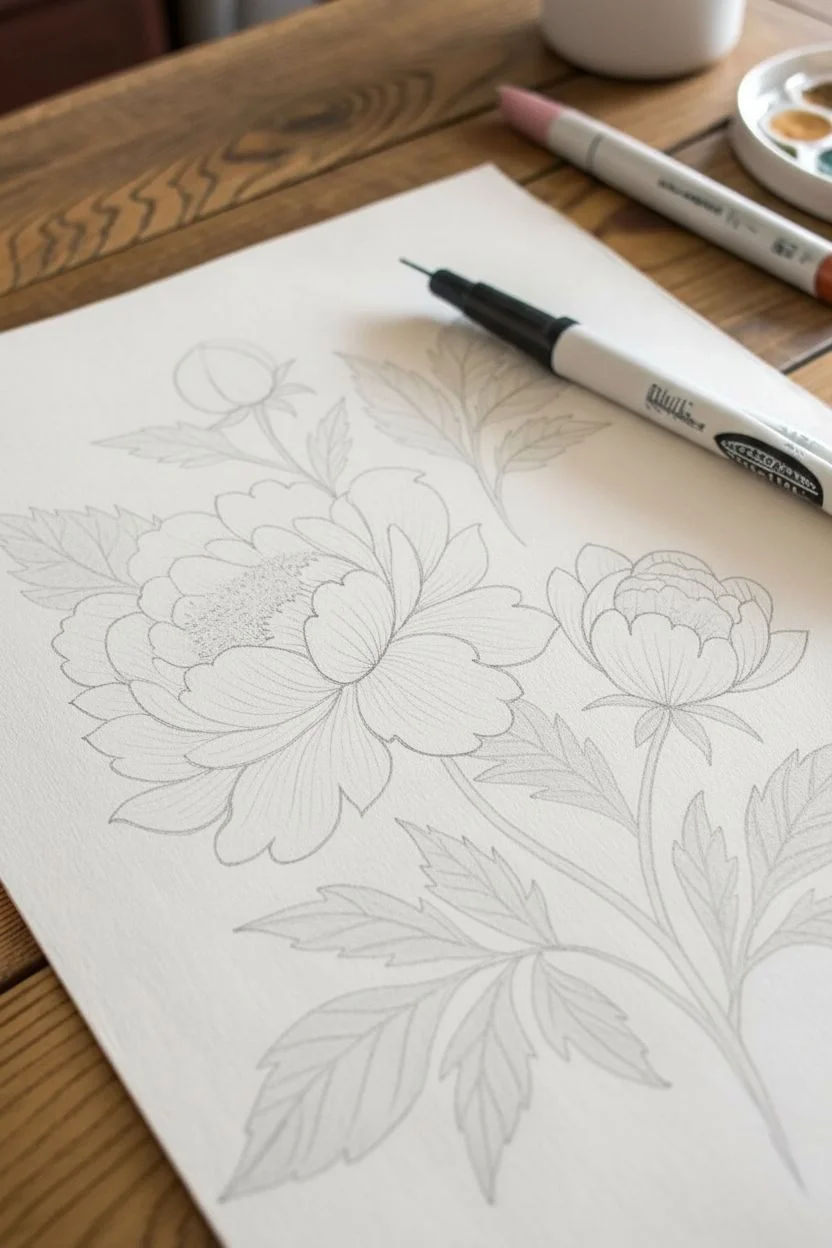
Step 1: Sketching the Composition
-
Map out the main shapes:
Start by lightly drawing three circles to position your flowers: a large central circle for the main bloom, a smaller circle on the right for the side bloom, and a tiny circle at the top left for the bud. -
Establish the stem structure:
Draw sweeping, curved lines connecting these circles. Bring them together towards the bottom right corner to create a unified stem system. -
Draft the petal layers:
For the main flower, sketch layers of scalloped shapes radiating from the center. Keep the outer petals large and open, and the inner ones tighter and smaller. -
Add leaf placements:
Sketch lance-shaped leaves branching off the main stems. Cluster some near the top bud and place larger ones near the base of the composition.
Gradient Secrets
To get that soft fade on the petals without water, scribble the marker primarily on the edge, then use your finger or a dry detailed brush to smudge it inward immediately.
Step 2: Inking the Outlines
-
Outline the central bloom:
Using your fine-liner black marker, trace over your pencil lines. Focus on creating clean, continuous curves for the petal edges. -
Define the inner details:
Add thin, curved lines inside the petals to suggest ripples and folds. These texture lines should follow the contour of each petal. -
Ink the smaller flowers:
Outline the right-side bloom and the top bud. Use the same confident strokes, making sure the sepals (the green base leaves) cup the flowers naturally. -
Draw the leaves:
Switch to your thicker black marker or use heavier pressure to outline the leaves. Add a central vein down the middle of each leaf. -
Thicken the stems:
Go over the main stems again to give them more visual weight compared to the delicate petals. This contrast anchors the drawing. -
Erase pencil guides:
Wait until the black ink is completely dry—acrylic markers can smear if rushed—then gently erase all underlying pencil sketch marks.
Step 3: Adding Color and Depth
-
Base layer for petals:
Take your peach/salmon pink marker. I like to color just the tips and outer edges of the petals first, leaving the centers white for now. -
Blend the pink gradient:
While the ink is still wet, quickly pull the color inward toward the base of the petal. You can use a damp brush or a colorless blender marker to fade the pink into the white of the paper. -
Deepen the flower center:
For the main bloom’s center, use the reddish-brown marker. Stipple (dot) the area to create a textured, pollen-like appearance. -
Add petal shadows:
Apply a second, light layer of peach ink near the base of the petals where they overlap. This enhances the 3D cupped effect. -
Color the leaves:
Fill in the leaves with the forest green marker. Use smooth strokes following the leaf direction. -
Create leaf highlights:
Before the green fully dries, you can lift a bit of color from the center of the leaf blades if your paper allows, or simply leave faint white streaks for a highlighted look. -
Detail the leaf veins:
Once the green is dry, use your fine black pen to add delicate vein lines branching from the central rib of each leaf. -
Final texture check:
Look at the reddish-brown centers of the flowers. Add a few tiny black dots over the color to increase contrast and definition. -
Refine the outlines:
If any color went over the lines, re-trace the black outline to clean up the edges and make the image pop.
Metallic Touch
Swap the reddish-brown center for a metallic gold acrylic marker. It adds a luxurious shine that catches the light beautifully against the matte leaves.
Step back and admire the elegant balance between your bold linework and soft floral colors


Simple Sunset Landscape in Color Blocks
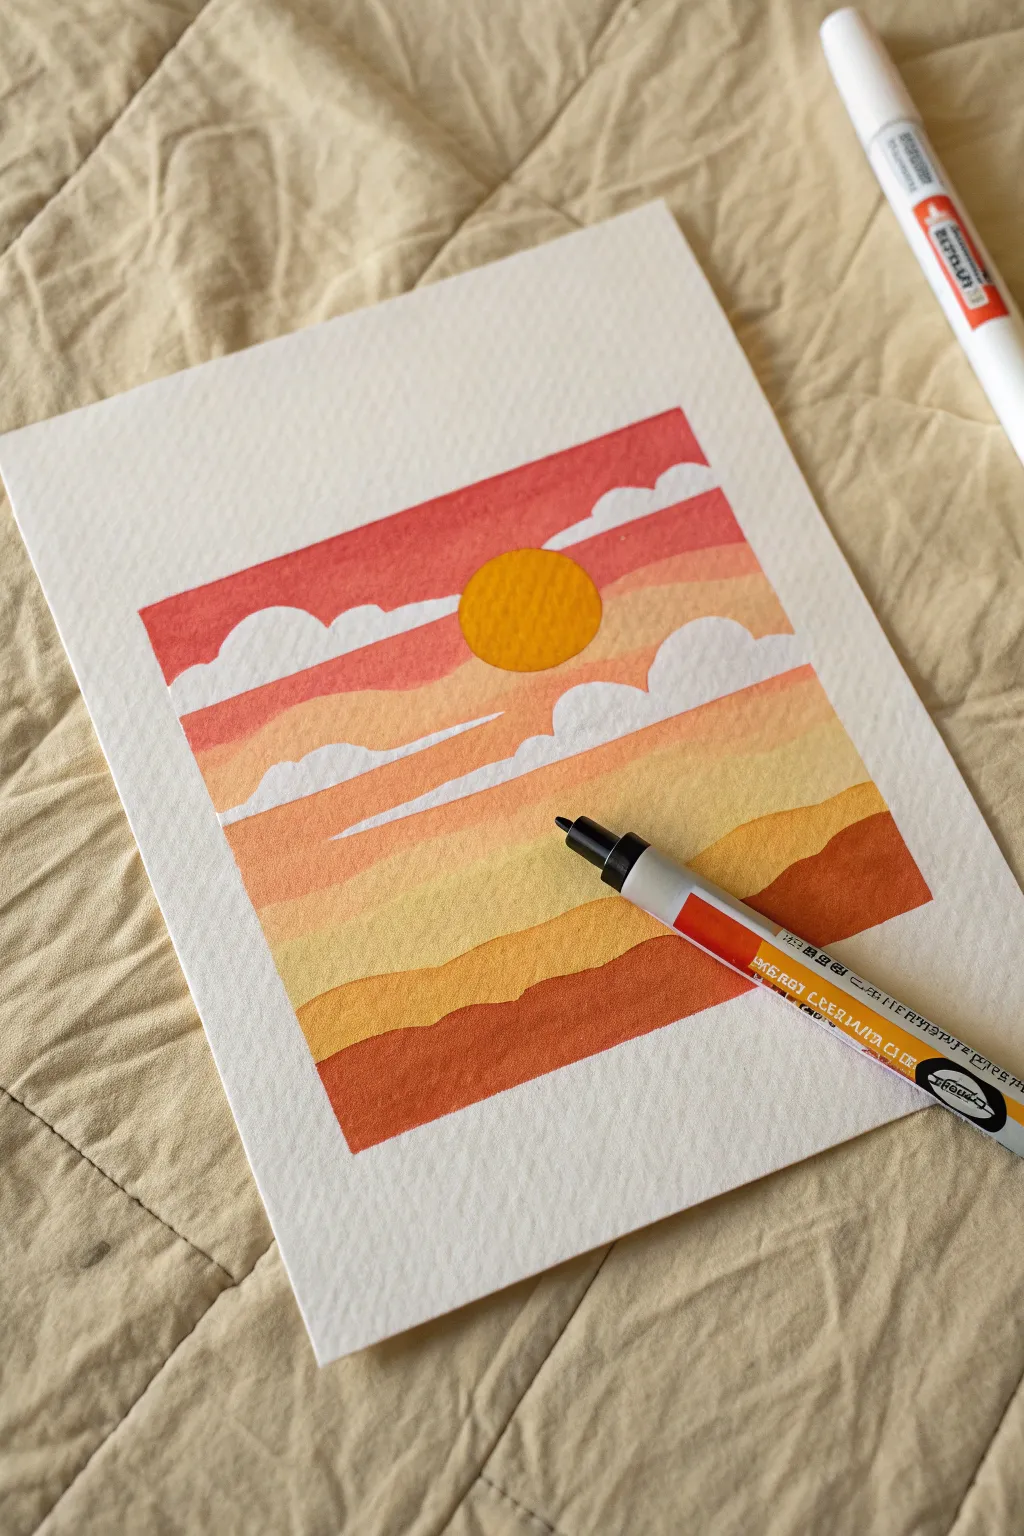
Capture the warmth of a setting sun with this vibrant, layered landscape created entirely with acrylic markers. Breaking a complex scene down into simple, wavy bands of color makes this project approachable and satisfyingly graphical.
Step-by-Step Tutorial
Materials
- Thick painting paper or mixed media pad (textured works well)
- Acrylic paint markers (red, coral, light orange, yellow, ochre, rust)
- Pencil
- Eraser
- Ruler or masking tape (optional for borders)
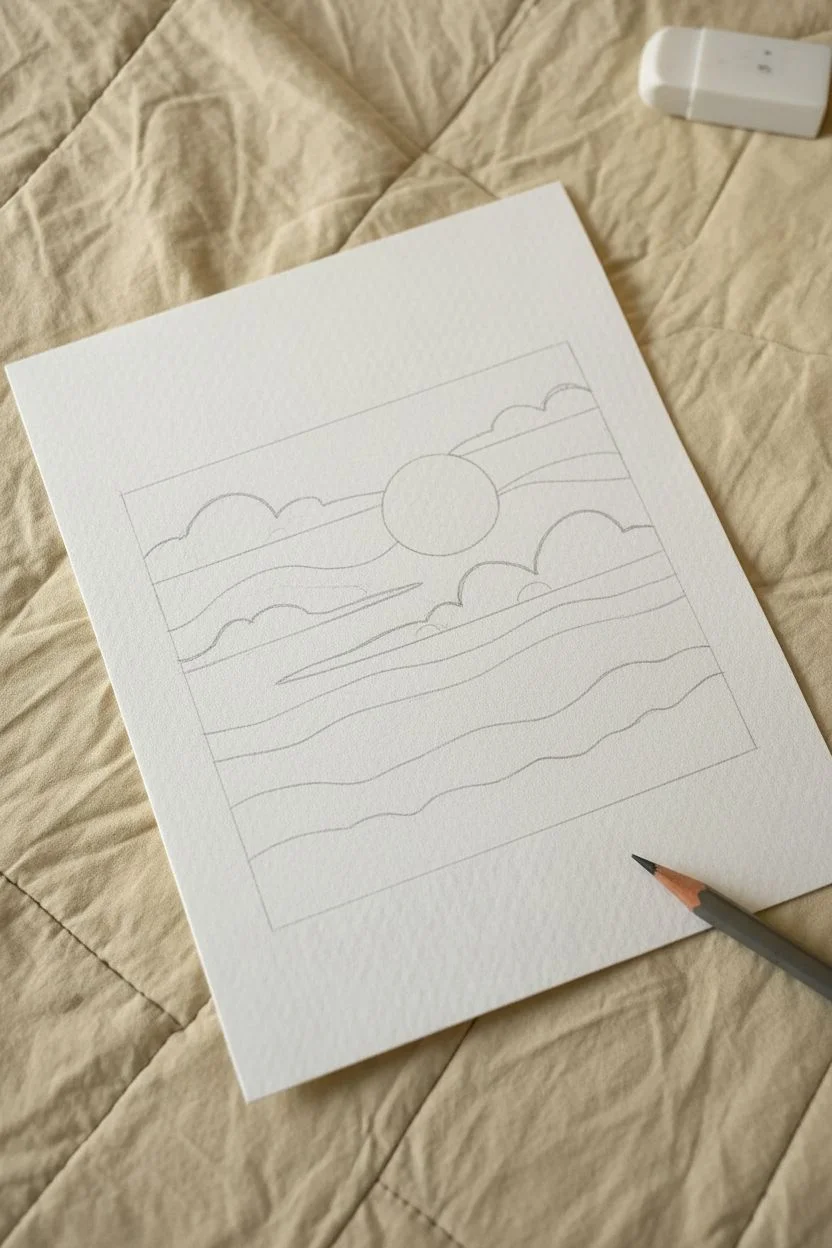
Step 1: Sketching the Layout
-
Define the frame:
Start by lightly drawing a square or rectangle in the center of your paper to define the boundaries of your artwork. You can use a ruler for precision or freehand it for a more organic feel. -
Place the sun:
Draw a small circle near the upper-middle section of your frame. This will be your sun and the focal point of the gradient. -
Sketch the clouds:
Lightly outline fluffy, bubbly cloud shapes. Place two large clusters on the left and right sides, slightly overlapping where the horizon line would be. -
Add landscape bands:
Draw wavy, horizontal lines across the entire rectangle. These lines should curve gently, mimicking rolling hills or layers of sky. Make sure the lines go behind your sun and cloud sketches.
Clean Edges Trick
Apply masking tape around your outer square border before painting. Peel it off when the ink is dry for a crisp, professional frame.
Step 2: Painting the Sky
-
Start with the top band:
Using a red marker, fill in the very top block of the sky. Outline the shape first, then fill the inside with smooth, consistent strokes. -
Work downwards:
Switch to a coral or dark pink marker for the next band down. Carefully color around the top edges of your white cloud shapes to keep them crisp. -
Define the sun:
Use a bright, warm yellow marker to fill in your sun circle. If your yellow is transparent, you might need a second coat after the first one dries to hide the pencil lines. -
Wait for drying:
Let the wet marker ink dry for a minute or two before painting adjacent sections to prevent the colors from bleeding into each other.
Step 3: Layering the Horizon
-
Add middle tones:
Below the clouds, transition to a light orange or peach tone. This section often represents the haze on the horizon. -
Preserve the white:
Remember to leave the cloud shapes completely unpainted. The white of the paper acts as the brightest highlight in this composition. -
Create the yellow glow:
As you move lower towards the foreground, use your lightest yellow marker for a wide band. I find this creates a nice sense of reflected light on the ground or water.
Patchy Color?
If you see streaks, let the first layer dry completely, then apply a second layer moving your strokes in the opposite direction (cross-hatching).
Step 4: Filling the Foreground
-
Darken the values:
Switch to a golden ochre or light brown for the next wavy band. This starts to build the heavy feeling of the earth at the bottom of the frame. -
Paint the final layer:
Use a rust red or deep orange for the very bottom shape. This anchors the image creates a nice visual balance with the red sky at the top. -
Refining edges:
Once dry, look for any uneven edges. You can carefully go back over the outlines with your markers to sharpen the contact points between colors. -
Erase guidelines:
Gently erase any visible pencil marks remaining inside the white clouds or around the border of the square.
Step back and enjoy the warming glow of your minimalist sunset landscape


Pattern Tiles: Geometric Repeat Designs
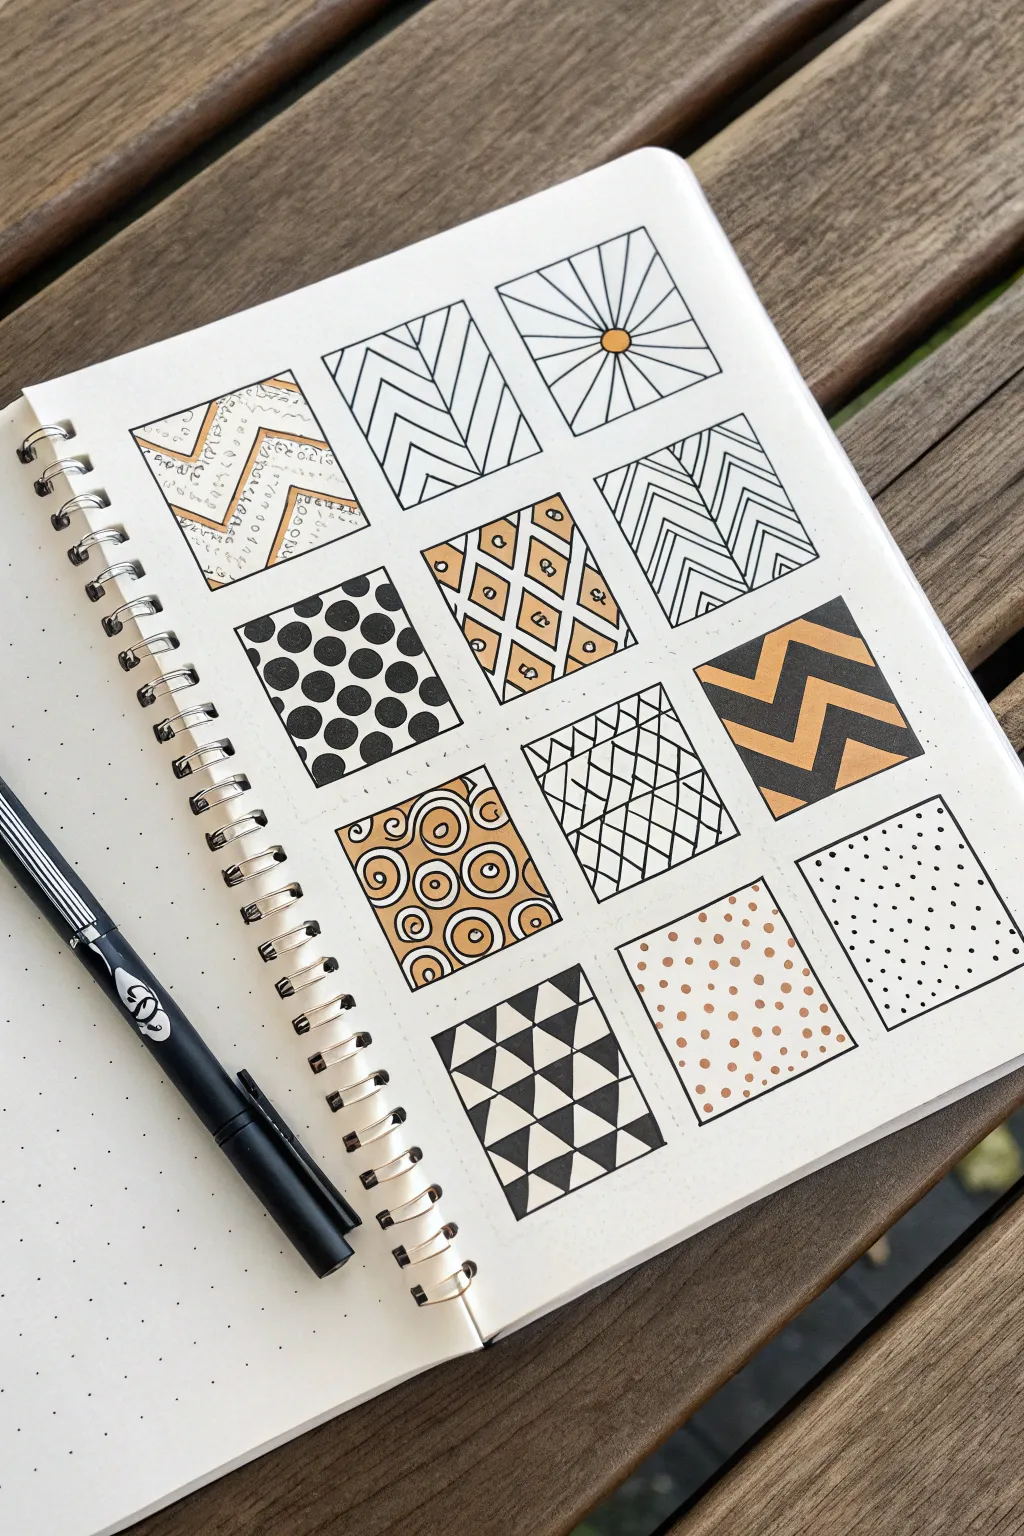
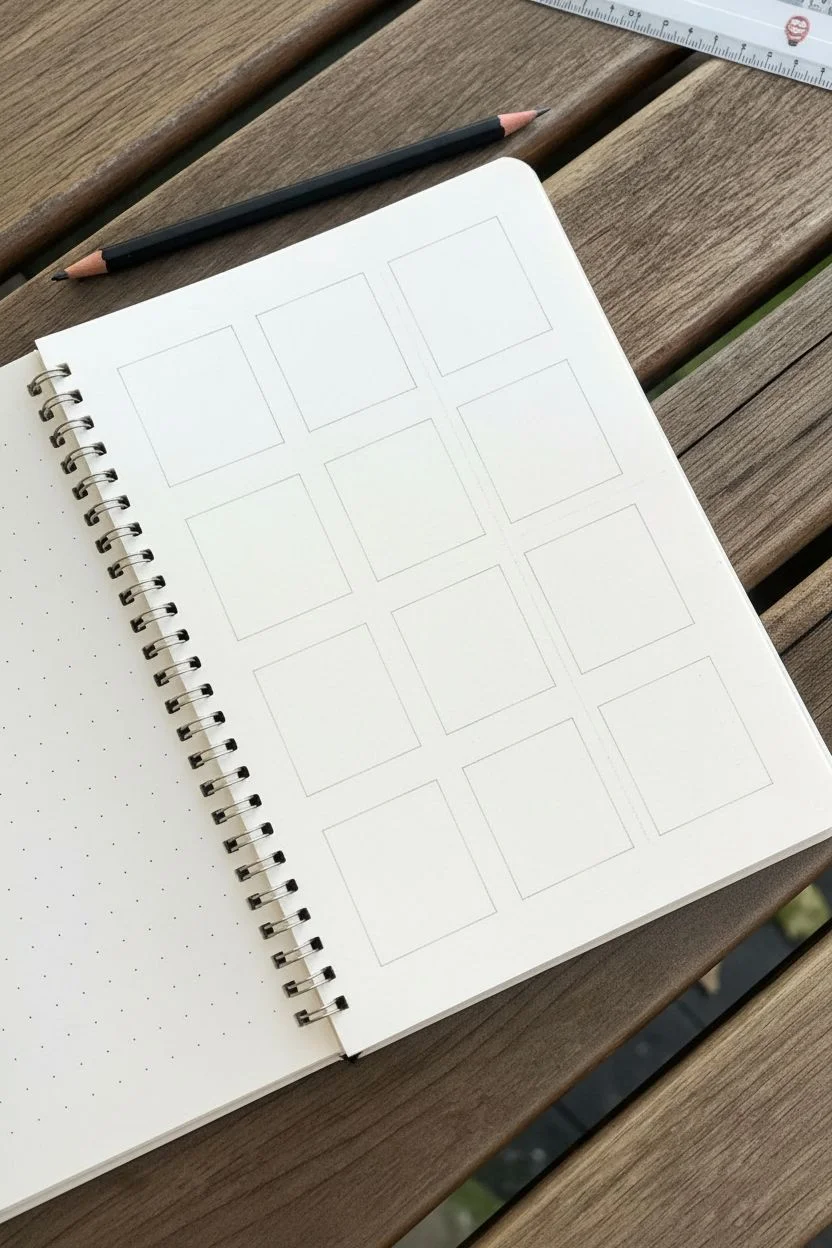
Transform a simple grid into a stunning showcase of geometric patterns using just black ink and a touch of warm gold. This project is perfect for practicing precision and exploring how basic shapes can repeat to create complex, modern designs.
Step-by-Step
Materials
- Dotted grid notebook or sketchbook
- Fine-point black liner pen (0.3mm or 0.5mm)
- Black brush pen or broad marker
- Gold or ochre acrylic paint marker
- Ruler
- Pencil (HB)
- Eraser
Step 1: Setting the Grid
-
Map out the squares:
Start by lightly drawing a 3×4 grid of squares using your pencil and ruler. Aim for squares that are about 1.5 to 2 inches (4-5 cm) on each side. -
Add spacing:
Leave a consistent gap between each square—about a quarter-inch works well—to let each pattern breathe.
Keep it clean
Place a scrap piece of paper under your hand while drawing. This prevents the oils from your skin from smudging the ink or marker while you work across the page.
Step 2: Row 1: Lines & Sunshine
-
Tile 1: Zigzag frame:
In the top-left square, draw a large zig-zag. Outline the zig-zag in black ink, then fill the interior with gold marker. Fill the background space with tiny, scattered scribbles or text-like marks. -
Tile 2: Herringbone:
Draw a vertical line down the center. Using your ruler, draw diagonal lines branching downward from the center to create a classic herringbone chevron pattern. -
Tile 3: Sunburst:
Place a small circle in the very center of the third square. Use your ruler to draw straight lines radiating outward from this circle to the edges of the box. Color the center dot gold.
Step 3: Row 2: Bold Geometry
-
Tile 4: Large Polka Dots:
Draw rows of large circles. Fill in the negative space (the area around the circles) with black ink, leaving the circles white for high contrast. -
Tile 5: Golden Diamonds:
Create a diamond grid by drawing diagonal lines in both directions. Color the inside of the diamonds gold, leaving a white border. Add a small black circle in the center of each gold diamond. -
Tile 6: Split Chevron:
Like the herringbone tile, draw a center vertical line. This time, draw the chevrons pointing upwards. Add smaller, inner chevrons inside the main lines to create a more intricate striped look.
Mix it up
Try swapping the color palette! A metallic silver marker with dark blue ink creates a beautiful ‘blueprint’ aesthetic, or use neon pink for a retro 80s vibe.
Step 4: Row 3: Contrast & Curves
-
Tile 7: Swirls:
Fill the square with tightly packed spiral shapes. Color the background gold, carefully working around your black ink swirls. -
Tile 8: Boxed Crosshatch:
Draw a grid of smaller squares (3×3 or 4×4) inside the tile. In every other square, draw a diagonal ‘X’. Keep the lines thin and precise. -
Tile 9: Bold Gold Zigzags:
Draw thick, bold zigzag lines horizontally across the square. Use your broad black marker to color alternating stripes black, and your gold marker for the others.
Step 5: Row 4: Simple Repetition
-
Tile 10: Triangles:
Draw a grid of triangles. Fill varying triangles with black ink to create a checkered flag effect, leaving alternating ones white. -
Tile 11: Confetti Dots:
Using your gold marker, simply dot the pen tip repeatedly to fill the square with evenly spaced, medium-sized gold polka dots. -
Tile 12: Micro Dots:
Repeat the previous step but with your fine black liner, creating a field of tiny, delicate specks. -
Final clean up:
Once all ink and maker is completely dry, gently erase your original pencil grid lines for a crisp finish.
Now you have a library of patterns ready to use in larger art pieces or bullet journal spreads

PENCIL GUIDE
Understanding Pencil Grades from H to B
From first sketch to finished drawing — learn pencil grades, line control, and shading techniques.
Explore the Full Guide
Layered Botanical Wreath on Toned Paper
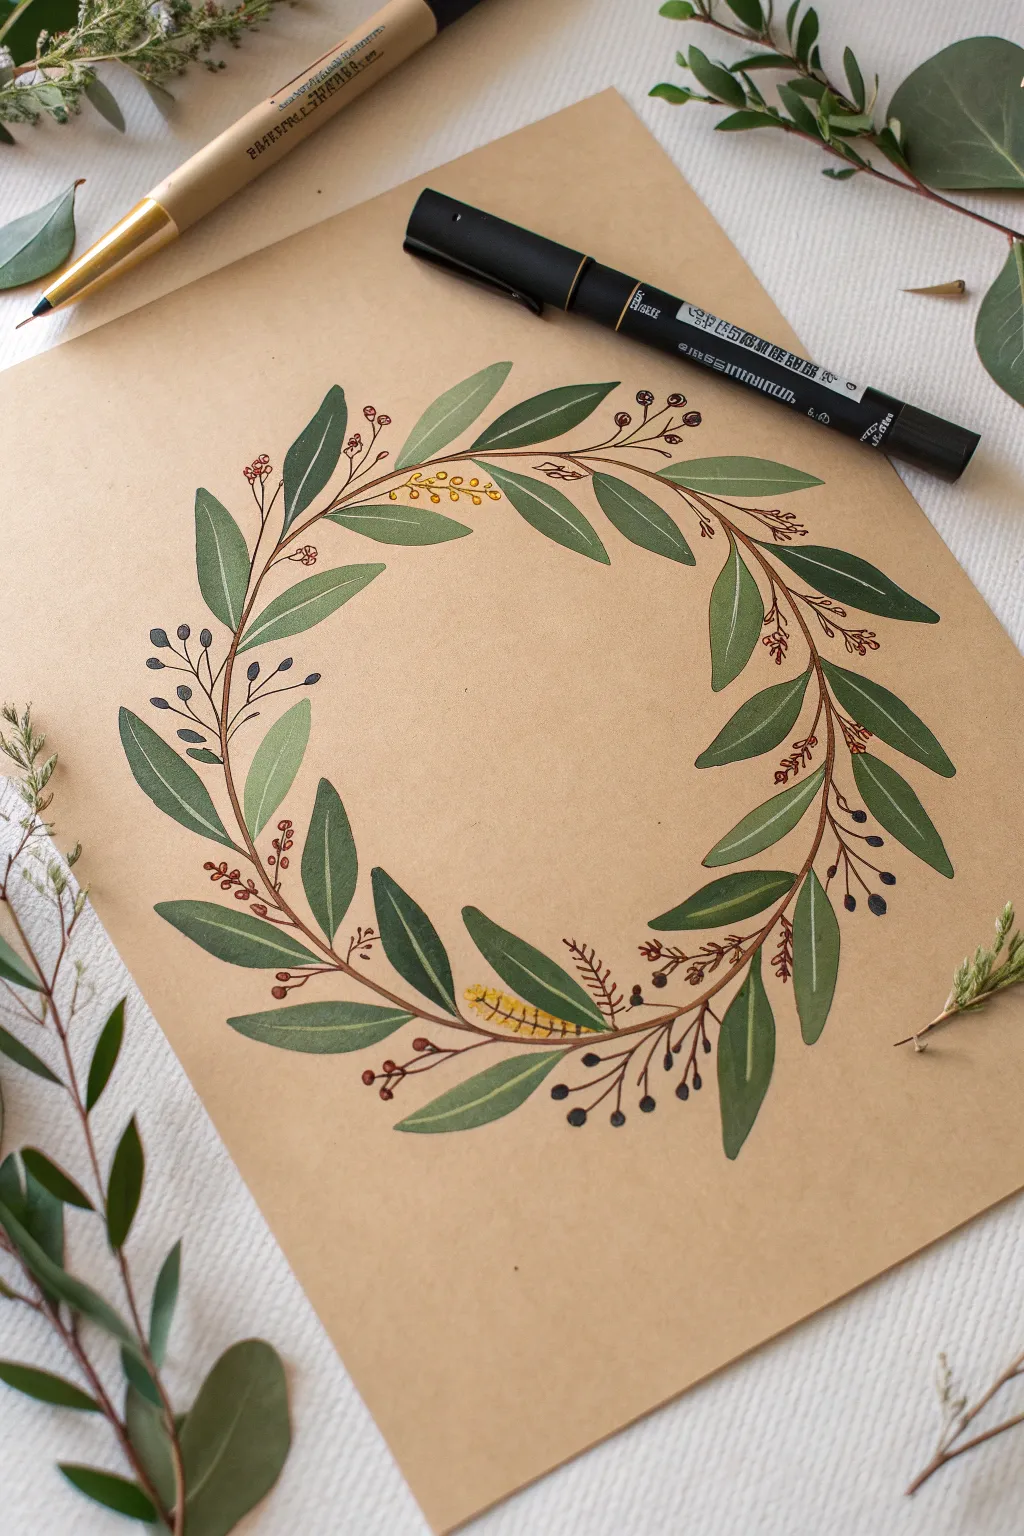
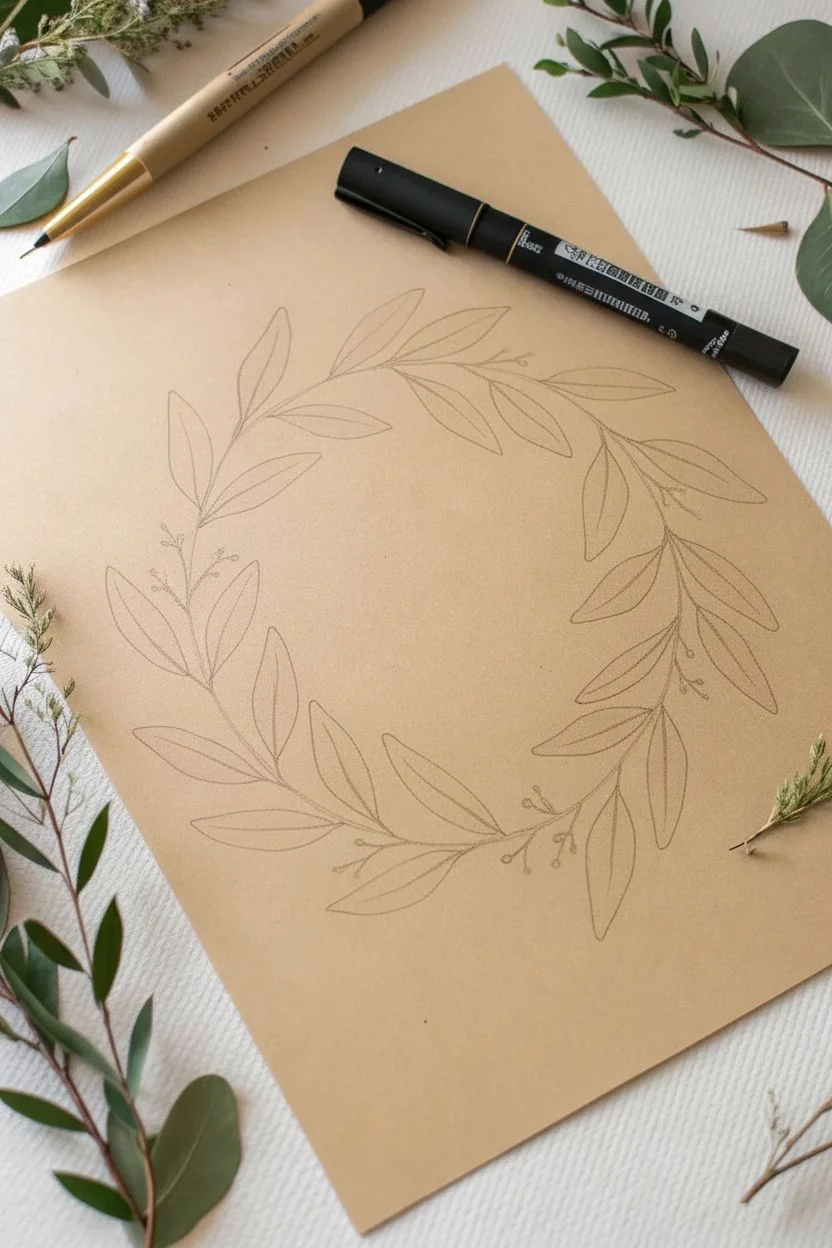
Using opaque acrylic markers on toned tan paper creates a wonderfully warm, organic look for this botanical wreath. The natural paper background makes the greens pop and gives the artwork a cozy, rustic feel perfect for framing or greeting cards.
Step-by-Step Guide
Materials
- Tan or kraft toned mixed media paper (smooth texture preferred)
- Acrylic markers in dark green (olive or forest)
- Acrylic markers in light green (sage or eucalyptus)
- Acrylic marker in brown (fine tip)
- Acrylic markers in accent colors (mustard yellow, deep red/burgundy, navy blue)
- Pencil and eraser
- Circular object or compass for tracing
Step 1: Base Structure
-
Establish the shape:
Begin by lightly tracing a circle onto your tan paper using a pencil. You can use a bowl, plate, or compass depending on the size you want. This guide line will help you keep the wreath balanced. -
Sketch the primary stems:
With your pencil, lightly sketch a meandering, wavy line that follows the circular guide. Don’t make it a perfect circle; let the vines overlap and weave in and out naturally to create a loose, organic foundation. -
Ink the main vine:
Take your fine-tip brown acrylic marker and trace over your pencil vine sketch. Use light pressure to keep the lines delicate. Add small offshoot branches every inch or so, varying their direction so some point inward and some outward.
Clean lines only
If the paper surface is rough, acrylic markers can splatter. Use smooth Bristol or mixed media paper to ensure crisp leaf edges and prevents the nibs from fraying.
Step 2: Adding Foliage
-
Paint the dark leaves first:
Using your dark forest green marker, draw elongated, pointed oval leaves scattered around the wreath. I like to place these somewhat randomly to form the ‘background’ layer of foliage. Fill them in solidly so no paper shows through. -
Add the lighter leaves:
Switch to your sage or light green marker. Draw similar leaf shapes, placing them in the empty spaces and occasionally overlapping the vine. The contrast between the two greens adds lovely depth. -
Create mid-tone leaves:
If you have a third green shade, add a few more leaves. If not, you can mix a little white into your dark green on a palette or simply layer the light green over a dried dark leaf for a new opaque shade. -
Draw the leaf veins:
Once the green leaves are fully dry, use your fine brown marker or a very fine darker green pen to draw a simple central vein line down the middle of each leaf. This simple detail instantly makes them look more realistic.
Metallic magic
Trace over just the veins of the leaves or the berries with a gold acrylic marker. It adds a subtle shimmer that looks incredible against the matte tan paper.
Step 3: Berries & Accents
-
Add mustard flourishes:
Find a few sparse areas on the vine and draw small clusters of tiny dots or elongated dashes using the mustard yellow marker. These mimic mimosa flowers or seeds. -
Draw red berry sprigs:
Using the deep red or burgundy marker, draw tiny clusters of three or four small circles attached to the vine with very fine stems. Scatter these sparingly for pops of warm color. -
Incorporate blue berries:
With a navy or dark blue marker, add small groups of round berries on straight stems, distinct from the red clusters. These blue accents cool down the warm palette nicely. -
Add delicate filler branches:
Use the brown marker again to draw very fine, fern-like or feathery sprigs tucking behind the main leaves. Keep these lines extremely thin to suggest texture without overwhelming the main leaves. -
Refine the connections:
Check where your leaves meet the main vine. If any look like they are floating, use the brown marker to draw tiny connecting stems to anchor them to the main branch.
Step 4: Finishing Touches
-
Clean up the sketch:
Wait until you are absolutely certain all ink is 100% dry. Then, gently erase any visible pencil marks from your initial circle guide. -
Highlighting (Optional):
For extra dimension, you can add a tiny dot of white or a lighter shade of the base color to the tops of the berries to simulate a shine.
Now you have a timeless botanical piece that brings a bit of nature’s calm to your space
Cute Food Illustration With Glossy Highlights
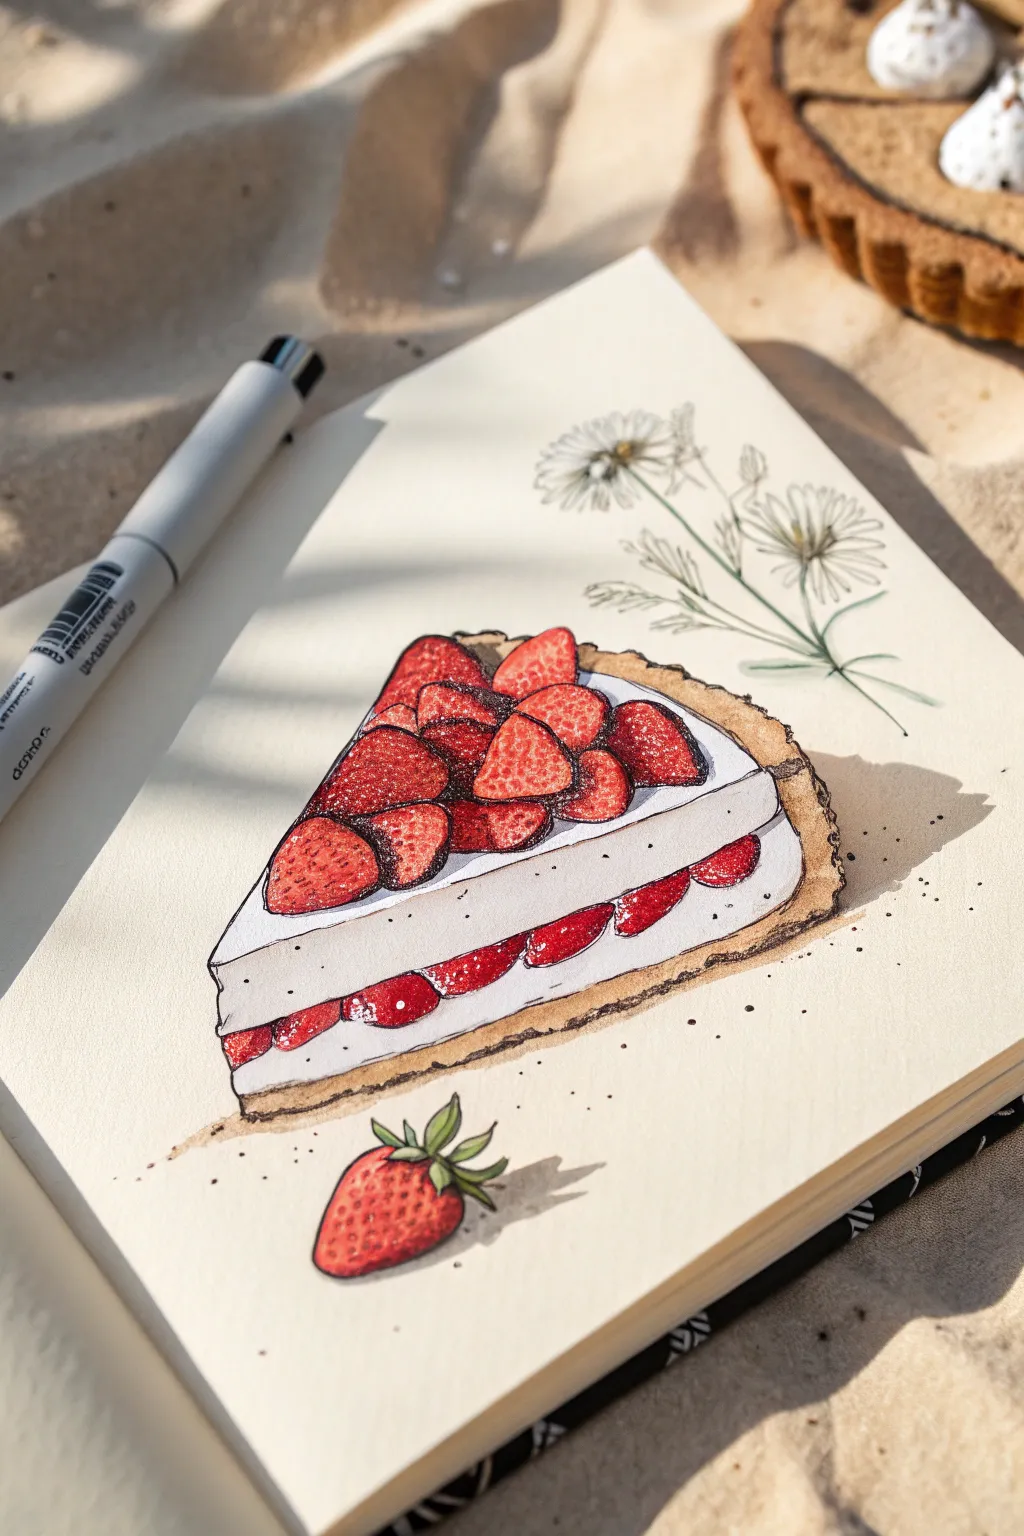
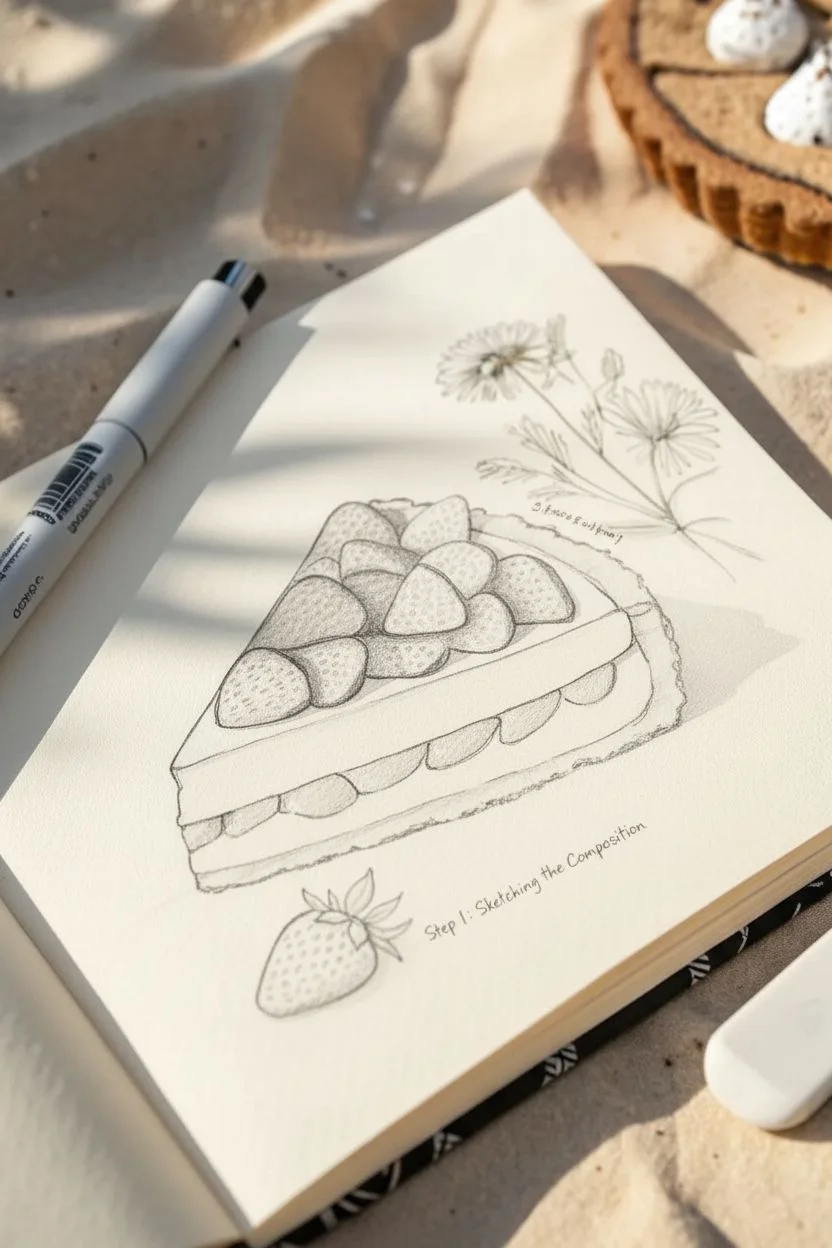
Capture the luscious texture of fresh fruit and smooth cream with this delightful food illustration. Using acrylic markers allows you to layer vibrant reds and creamy whites to achieve that mouth-watering, glossy finish on a classic strawberry tart.
Detailed Instructions
Materials
- Heavyweight sketchbook paper (mixed media or bristol)
- Pencil (HB or H)
- Eraser
- Fine liner pens (0.1mm and 0.3mm, black)
- Acrylic markers (Red, Dark Red, White, Cream/Beige, Light Brown, Dark Brown, Green, Light Gray)
- White gel pen (for fine highlights)
Step 1: Sketching the Composition
-
Outline the wedge:
Start by lightly sketching a triangular wedge shape for the cake slice. Give it dimension by drawing the top plane and the side plane to show the layers. -
Add strawberry details:
On the top surface, sketch rounded, irregular shapes to represent sliced strawberries packed closely together. Leave small gaps between them. -
Define the layers:
On the side of the wedge, draw horizontal lines to separate the components: the red fruit layer on top, a thick cream section, a thin layer of red jam or fruit pieces in the middle, another cream layer, and finally the crust at the bottom. -
Sketch the extras:
Draw a single whole strawberry lying near the bottom of the slice and sketch a few delicate daisy stems in the upper right background for balance.
Uneven Coverage?
If your cream layer looks streakey, let the first coat dry completely (5-10 mins) before applying a second layer. Acrylic markers are opaque and layer best when dry.
Step 2: Inking the Lines
-
Trace the outlines:
Using a 0.3mm fine liner, go over your pencil lines for the main tart slice. Use a slightly jagged, textured line for the crust to mimic its crumbly nature. -
Refine the background:
Switch to a thinner 0.1mm pen for the background flowers to keep them looking delicate and airy compared to the bold food subject. -
Erase guidelines:
Once the ink is completely dry, gently erase all visible pencil marks to leave a clean black-and-white framework.
Step 3: Coloring the Base Layers
-
Fill the strawberries:
Use a bright red acrylic marker to fill in all the strawberry shapes on top of the tart, the jam layer in the middle, and the whole berry at the bottom. -
Color the cream:
Apply a cream or very light beige marker to the thick filling layers. If you don’t have this exact shade, you can dilute a tiny bit of yellow-brown with white on a palette before applying. -
Paint the crust:
Use a light brown or biscuit-colored marker for the bottom crust. Extend the color slightly up the back edge of the tart to show the rim. -
Add green stems:
Carefully color the strawberry leaves (calyx) and the flower stems with a muted green marker.
Pro Tip: Seed Depth
Instead of just black dots for seeds, try a tiny dab of dark red/brown first, then a smaller black dot inside. It adds realistic depth to the berry texture.
Step 4: Shading and Texture
-
Deepen the reds:
Take a darker red marker to add shadows to the strawberries. Focus on the bottom edges of the sliced fruit and the side of the whole berry away from the light source. -
Shadow the cream:
Use a very light gray marker to add soft shadows on the cream layers, particularly right underneath the fruit pieces and at the back edge of the slice. -
Texture the crust:
Dot a darker brown marker along the crust to simulate a baked, porous texture. Don’t overdo it; just a few stippled dots will create the effect. -
Cast shadow:
Draw a soft gray shadow shape extending to the right of the tart slice and the single strawberry to ground the objects on the paper.
Step 5: Highlights and Details
-
Add seeds:
Use a fine black pen or a very dark brown marker to add tiny seed specks or pits onto the strawberries. -
Create the glossy look:
This is the most crucial step. Use a white acrylic marker or a white gel pen to add crisp highlights to the tops of the strawberries. Small dots and curved lines simulate wet, sugary glaze. -
Final touches:
Add a few tiny black dots scattered around the base of the tart on the paper to represent loose crumbs. I like to add a second layer of white to the brightest highlights to really make them pop.
Enjoy admiring your sweet creation, which looks good enough to eat.
BRUSH GUIDE
The Right Brush for Every Stroke
From clean lines to bold texture — master brush choice, stroke control, and essential techniques.
Explore the Full Guide
Mixed-Media Sketch: Acrylic Marker Over Pencil Shading
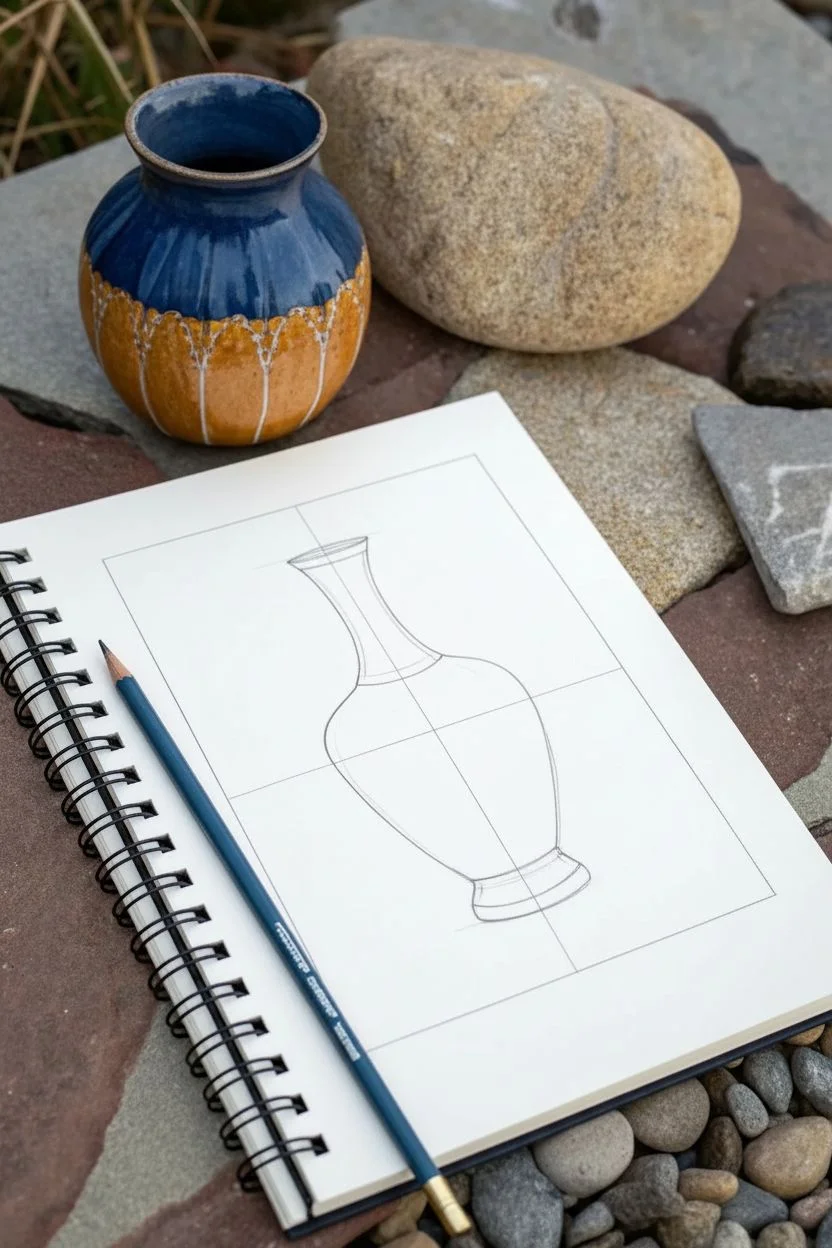
This mixed-media project combines the soft, textural depth of pencil shading with the crisp, vibrant lines of acrylic markers. By layering blue and gold marker details over a graphite sketch, you create a striking contrast that brings a decorative vase to life on the page.
Step-by-Step Guide
Materials
- Sketchbook (heavyweight paper recommended)
- Graphite pencils (HB, 2B, and 4B)
- Acrylic paint markers (fine tip: deep blue, metallic gold/copper)
- Ruler
- Eraser
- Blending stump (optional)
- Reference vase (or use imagination)
Step 1: Drafting the Vase Structure
-
Mark the center line:
Begin by lightly drawing a vertical line down the center of your page to ensure symmetry. This will serve as the spine for your vase. -
Define the proportions:
Sketch horizontal lines to mark the top rim, the narrowest part of the neck, the widest part of the body, and the base. -
Outline the silhouette:
Connect your horizontal marks with smooth, curving lines to form the outline of the vase. Aim for a long, slender neck that flows into a bulbous body. -
Draw the background box:
Use a ruler to draw a rectangular border around the vase. This frames the composition and contains the background elements.
Step 2: Adding Pencil Shading
-
Initial shading:
Using an HB pencil, lightly shade the entire body of the vase, leaving a vertical strip near the left side white to represent a highlight. -
Deepen the shadows:
Switch to a 2B pencil to darken the right side of the vase, creating a sense of volume. Use short, curved strokes that follow the form of the pottery. -
Sketch the background:
Behind the vase, sketch a horizon line. Above it, lightly shade a sky or distant hills; below, sketch a path or table surface using horizontal strokes. -
Add landscape details:
Use a 4B pencil to draw darker, textured scribbles along the horizon line to suggest distant trees or foliage. -
Define the ground:
Add cast shadows on the ground surface to the right of the vase to anchor it in the scene.
Smudge Alert
Graphite smudges easily under markers. Place a scrap piece of paper under your hand while drawing, and gently blow away eraser shavings rather than brushing them.
Step 3: Layering Acrylic Markers
-
Structure the design:
Using a fine-tip blue acrylic marker, draw vertical curved lines down the body of the vase, following its rounded contour. Space them evenly. -
Fill alternate sections:
With a metallic gold or copper marker, color in alternating vertical stripes. The marker ink will sit opaque on top of your pencil shading. -
Add decorative patterns:
Inside the blue stripes, use the gold marker (or a white gel pen if preferred) to add tiny dots or dashes for intricate detail. -
Detail the rim and base:
Outline the mouth of the vase and the foot with the blue marker, adding a stripe of gold for continuity. -
Enhance the neck:
Draw delicate horizontal rings or patterns around the long neck of the vase using both marker colors.
Level Up
Try using a white acrylic marker to add tiny, sharp highlights on the glossy parts of the vase right at the end for an extra 3D ceramic effect.
Step 4: Final Touches
-
Refine the outline:
Go back over the main silhouette of the vase with a darker pencil or the blue marker to make it pop against the background. -
Clean up borders:
Use a ruler and a fine liner or sharp pencil to re-trace the rectangular frame box, ensuring the edges are crisp. -
Add atmospheric color:
I like to add a very faint wash of yellow pencil or watercolor to the sky area to warm up the background without overpowering the vase. -
Sign your work:
Add your signature in the bottom corner of the framed area.
Now you have a sketchbook page that perfectly balances classical drawing techniques with modern color accents


Have a question or want to share your own experience? I'd love to hear from you in the comments below!