When you’re craving fresh acrylic painting motivation, the easiest win is choosing subjects that look bold and impressive without being fussy. Here are my go-to ideas I lean on in the studio when you want that “I actually made this!” feeling fast.
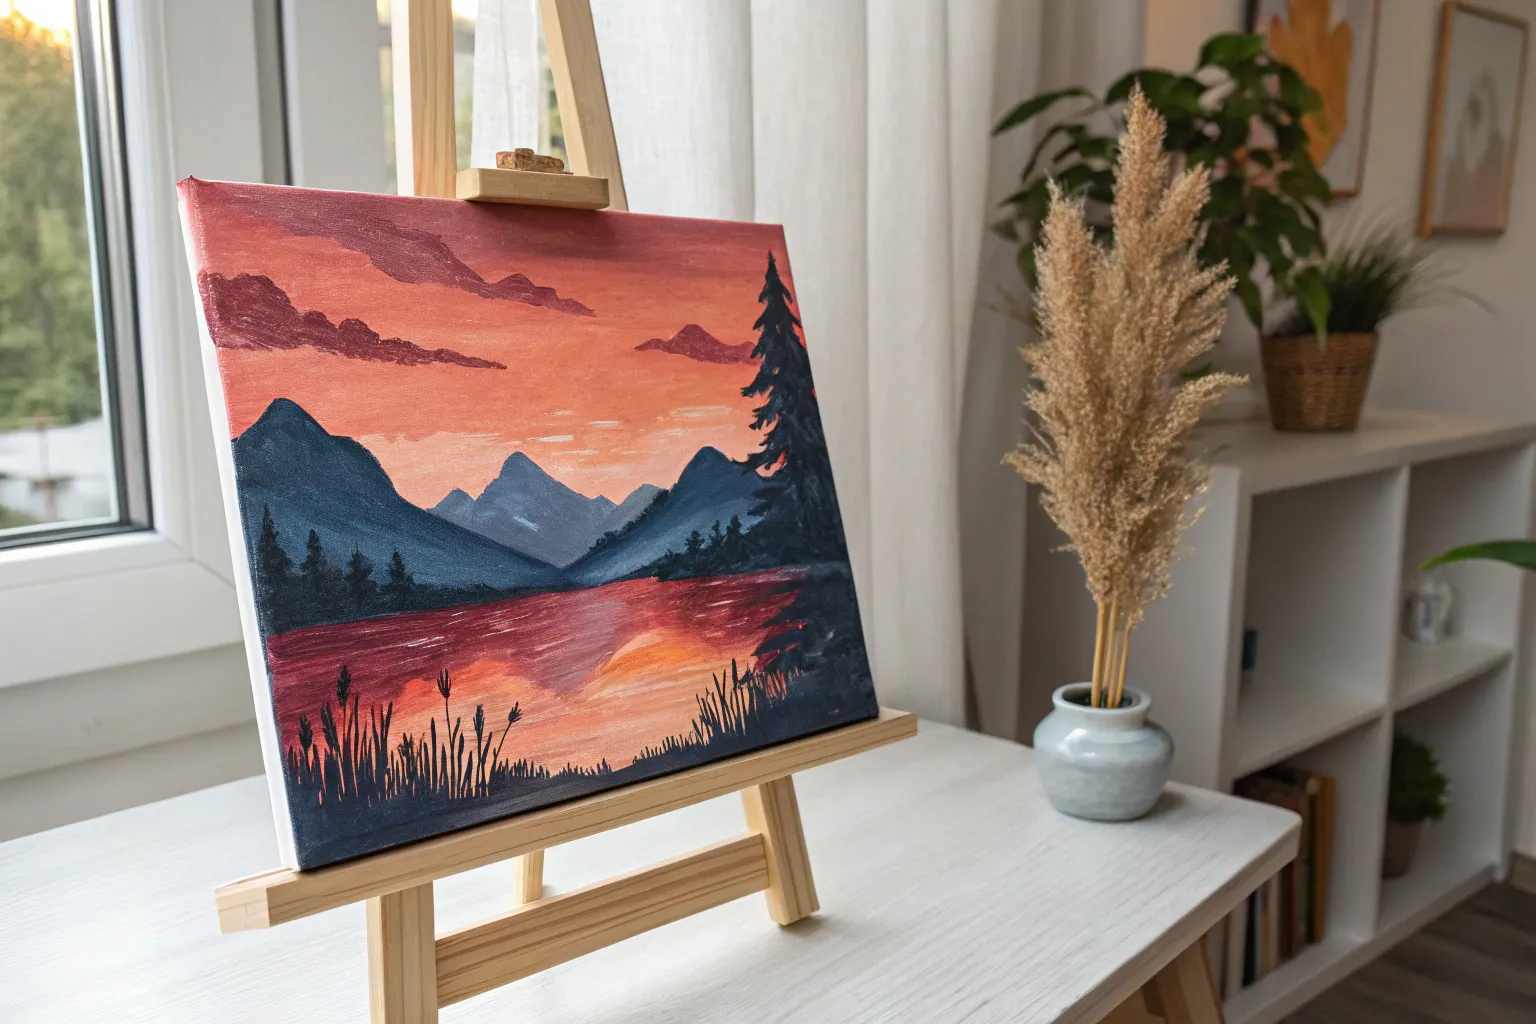
Sunset Gradient With a Silhouette Foreground
Capture the magic of twilight with this serene acrylic landscape featuring a seamlessly blended sunset sky. From deep violet to warm orange, the smooth gradient sets a dramatic backdrop for misty mountain ranges and crisp pine silhouettes.
Step-by-Step Guide
Materials
- Stretched canvas (square or rectangular)
- Acrylic paints: Purple, Magenta, Pink, Orange, Yellow, Titanium White, Black
- Large flat brush or wash brush (for the sky)
- Medium flat brush or angled shader (for mountains)
- Small round or liner brush (for trees)
- Palette or paper plate
- Water container and paper towels
- Pencil (optional for sketching)
Step 1: The Sunset Gradient Sky
-
Prepare the palette:
Squeeze out your sky colors in a line on your palette: Purple, Magenta, Pink, Orange, and Yellow. Having them ready before you start is crucial because acrylics dry fast, and speed is key for blending. -
Paint the top band:
Using a large flat brush, load up the purple paint. Apply a solid band of purple across the very top of your canvas, painting with long, horizontal strokes. Don’t clean the brush yet. -
Add the next color:
Pick up some magenta on your dirty purple brush. Paint directly below the purple strip, slightly overlapping the wet edge. The colors will start to mix on the canvas, creating a transition hue. -
Continue the gradient:
Wipe your brush on a paper towel if it’s too dark, then pick up the pink paint. Apply this below the magenta, again overlapping the wet edge above it to blend softening the lines between colors. -
Warm up the tones:
Rinse your brush thoroughly. Move to orange, painting the next band down. Work quickly back and forth horizontally to smooth out the transition from pink to orange. -
Finish the horizon:
Finally, apply yellow at the bottom of the sky area. Blend it upward into the orange. While the paint is still wet, you can take a clean, slightly damp brush and run it horizontally across the whole sky to smooth out any harsh brushstrokes. -
Add subtle clouds:
While the sky is drying, mix a tiny bit of white with yellow or pale orange. Using a smaller brush, streak in a few very thin, horizontal lines to suggest faint whispery clouds.
Blending Trouble?
If acrylics dry too fast to blend, spray a fine mist of water on the canvas or mix a ‘slow-drying medium’ into your paints.
Step 2: The Misty Mountains
-
Mix the furthest mountain color:
Once the sky is dry, mix a light lavender color using purple and a lot of white. You want this first mountain range to look distant and hazy. -
Paint the first range:
Paint a rolling hill shape across the glowing yellow horizon. Keep the top edge crisp, but you can water down the paint as you move downward to create a misty, faded look. -
Darken the next layer:
Add a little more purple to your mix to make a slightly darker shade. Paint another mountain range slightly lower than the first one. -
Add complexity:
Continue adding layers of mountains, making each new layer darker and more saturated purple than the one before it. I like to vary the shapes so the peaks don’t look repetitive. -
Paint the tree line slope:
For the closest mountain slope (before the black foreground), use a deep plum or dark purple. Create a diagonal slope that covers the bottom third of the canvas. -
Create texture:
On this closest purple slope, use a dry brush technique to dab tiny vertical strokes along the ridge, suggesting a dense forest of distant trees.
Starry Night Upgrade
Wait for everything to dry fully, then flick a stiff toothbrush loaded with watered-down white paint to create a starry twilight sky.
Step 3: The Silhouette Foreground
-
Block in the foreground:
Load a medium brush with pure black paint. Paint a solid undulating black hill at the very bottom of the canvas. This is the ground where your main trees will stand. -
Start the main pines:
Switch to a small round brush or a liner brush. Draw a few vertical lines extending up from the black hill. These will be the trunks of your foreground pine trees. Vary their heights for interest. -
Stipple the tree branches:
Starting at the top of a trunk, use the tip of your brush to tap small, horizontal dashes. Keep the top very narrow and pointed. -
Fill out the trees:
Work your way down the trunk, making the branches wider as you go. Use a zig-zag motion or varied tapping to mimic pine needles. Don’t make them perfect triangles; let them be a bit irregular. -
Add background trees:
Paint smaller, shorter black trees in the gaps between the large ones to create depth. This makes the forest look dense. -
Final touches:
Check the edges of your canvas. Painting the sides black creates a finished, framed look without needing an actual frame.
Let your masterpiece dry completely and admire how the bold silhouettes pop against that glowing gradient sky


Dreamy Pink Sky and Moon Study
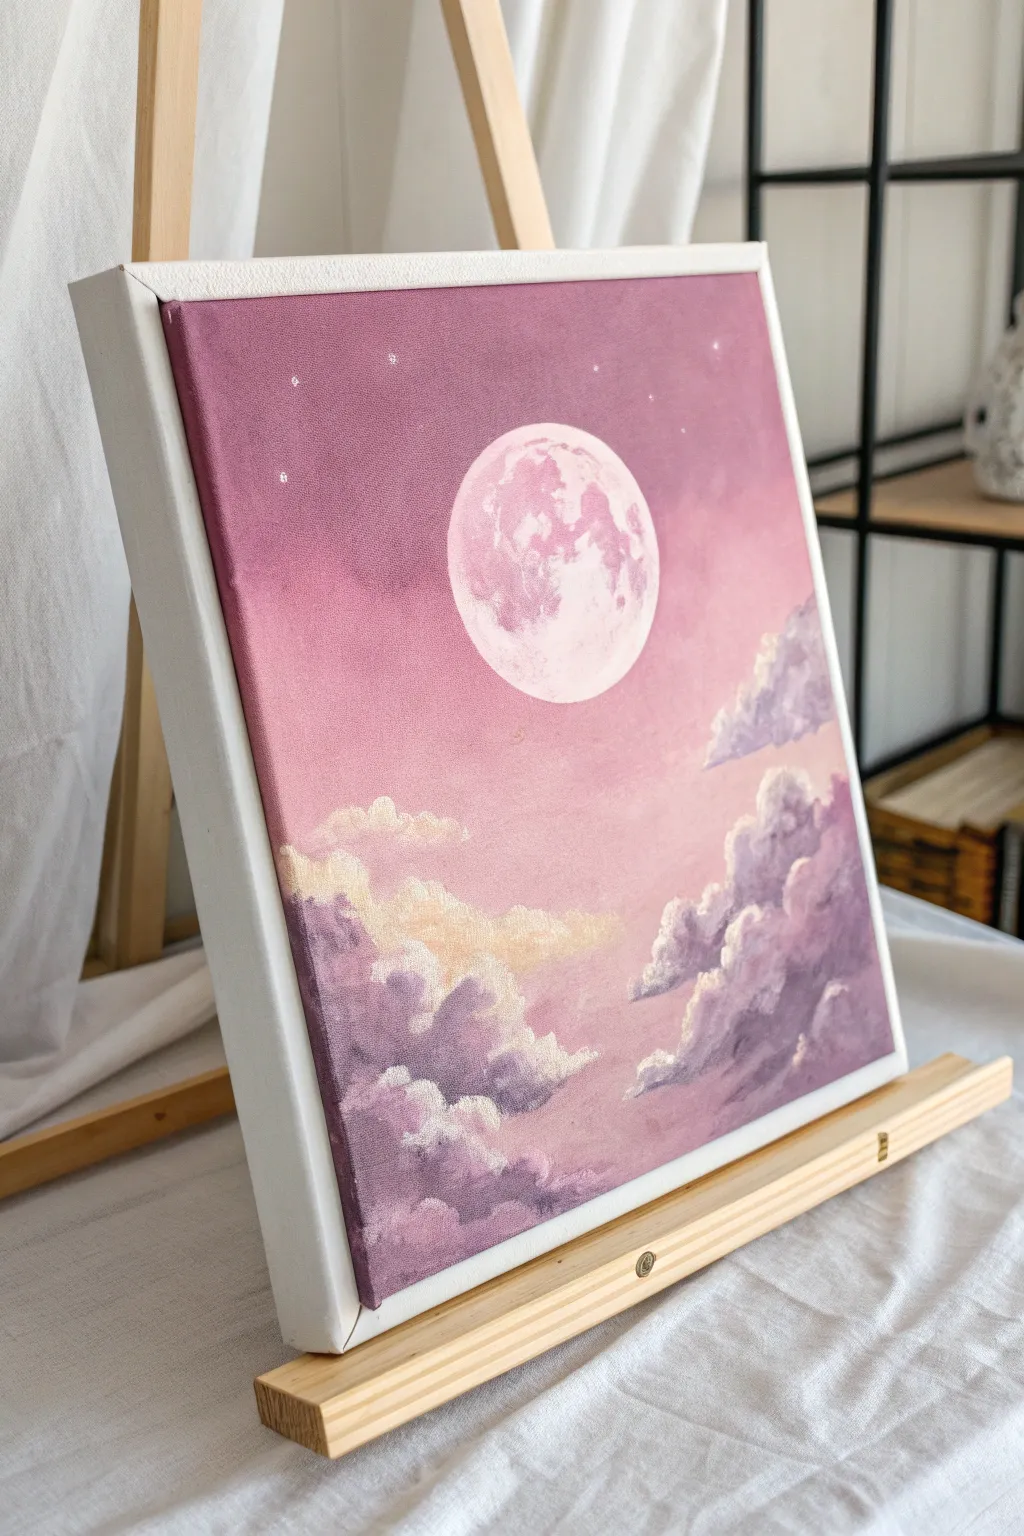
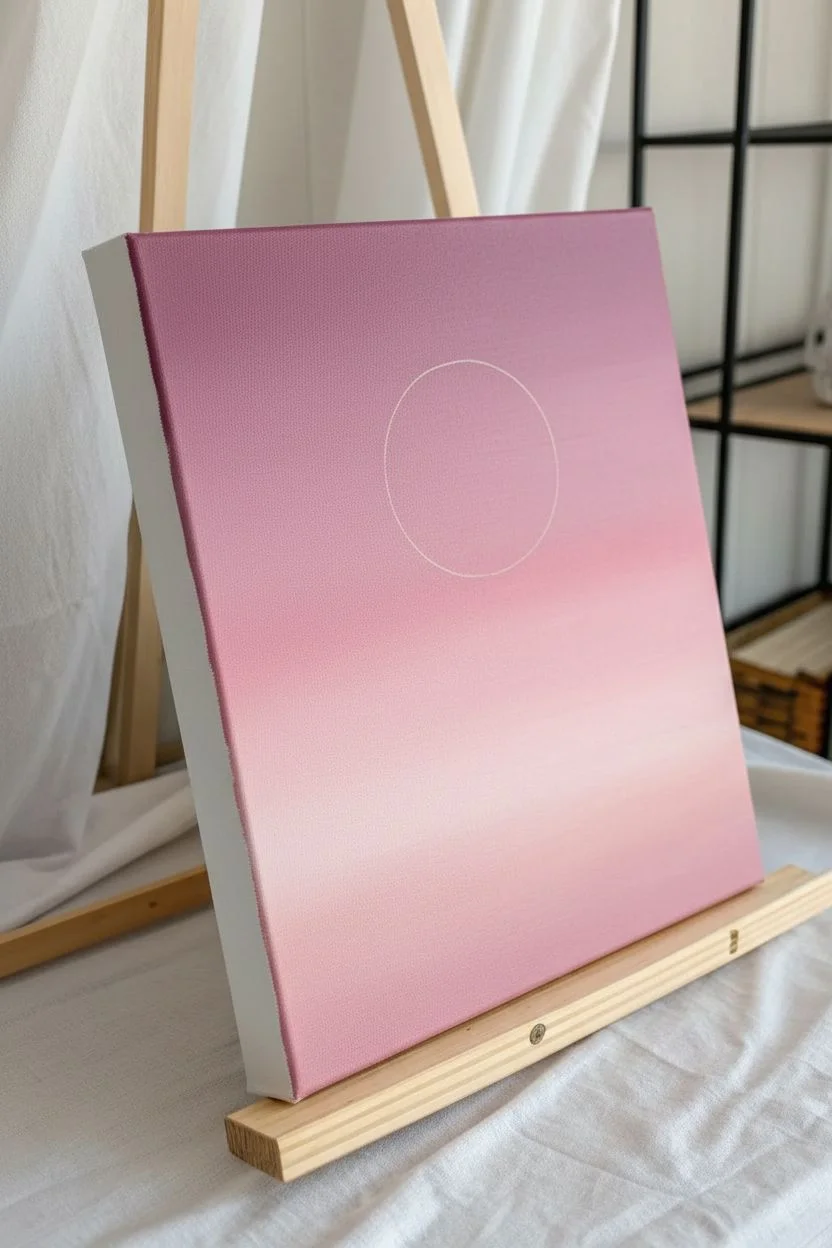
Capture the ethereal beauty of a dreamlike evening sky with this soft and romantic acrylic painting. Using a palette of dusky purples, marshmallows pinks, and warm creams, you’ll learn to blend a smooth gradient backdrop and layer fluffy, textured clouds beneath a glowing moon.
Step-by-Step Tutorial
Materials
- Square stretched canvas (e.g., 10×10 or 12×12 inches)
- Acrylic paints: Titanium White, Magenta or Quinacridone Pink, Dioxazine Purple, Ultramarine Blue, Yellow Ochre
- Large flat brush (1 inch)
- Medium filbert brush
- Small round detail brush
- Palette for mixing
- Cup of water and paper towels
- Compass or a round object (like a mug) for tracing
Step 1: Setting the Scene
-
Background Gradient Mix:
Begin by preparing your background colors. Mix a deep mauve using Magenta, a touch of Dioxazine Purple, and a tiny bit of White. For the lower sky, mix a lighter, pastel pink by adding more White to your Magenta. -
Applying the Sky:
Using your large flat brush, paint the top third of the canvas with the deep mauve mixture. While the paint is still wet, switch to your lighter pink mix and paint the middle section, blending upwards into the mauve where they meet to create a seamless transition. -
Fading to Horizon:
Continue painting downwards, adding even more White and a whisper of Yellow Ochre to your pink mix for the lowest part of the sky. This creates a warm, hazy horizon line tone just behind where the clouds will sit. -
Mapping the Moon:
Wait for the background to be completely dry to the touch. Place your round object or use a compass to lightly trace a circle in the upper center of the canvas with a pencil or very thinned white paint.
Smooth Blending Trick
If your acrylics are drying too fast while blending the sky gradient, mist the canvas lightly with water or add a slow-drying medium to your paint mix.
Step 2: Painting the Moon
-
Base White Layer:
Using a medium filbert brush, fill in the moon circle with pure Titanium White. You may need two coats to ensure it is fully opaque against the pink background. -
Mixing Moon Shadows:
Create a very pale lavender-grey by mixing a speck of Purple and Blue into a large amount of White. You want this color to be subtle, barely darker than the white base. -
Adding Craters and Texture:
With a small round brush, dab the lavender-grey mixture onto the moon to create the ‘seas’ or craters. Focus these irregular shapes mostly on the left side and top, keeping the edges soft and slightly blended rather than harsh lines. -
Highlighting:
Clean your brush and add fresh Titanium White highlights to the right side of the craters to give the moon dimension and a glowing effect.
Step 3: Creating the Cloudscape
-
Cloud Base Color:
Mix a medium purple tone using Dioxazine Purple, Magenta, and White. It should be darker than your sky background but lighter than the straight tube purple. -
Blocking in Shapes:
Use the filbert brush to block in the main cloud shapes at the bottom of the canvas and the smaller floating cluster on the right. use a dabbing motion to keep the edges fluffy and organic. -
Deepening Shadows:
Mix a darker purple-blue (Purple + Ultramarine Blue) and apply it to the bottom edges and undersides of your cloud masses. This grounds them and adds weight. -
Adding Warmth:
Mix a warm cream color using White and a tiny touch of Yellow Ochre. I like to apply this to the tops of the clouds where the moonlight would hit, focusing on the center-left cloud bank. -
Fluffing the Edges:
With a clean, dry brush, very lightly soften the transition between your shadow purple and the warm cream highlight. Don’t over-blend; you want visible texture. -
Brightest Highlights:
Load a small brush with pure Titanium White. Dab the very top edges of the highest clouds to make them pop against the pink sky. -
Building Layers:
Repeat the highlight process on the smaller floating clouds on the right, ensuring the tops are bright and the bottoms fade into the background pink.
Add a Glow
Once dry, dry-brush a very faint, transparent layer of zinc white or pale pink around the outside of the moon to create a glowing halo effect.
Step 4: Final Details
-
Adding Stars:
Using your smallest detail brush or a toothpick, dot tiny stars throughout the darker upper mauve section of the sky. Vary the pressure to create different sizes. -
Star Clusters:
Group a few stars closer together and add a tiny cross shape to the largest one to make it twinkle. -
Final Assessment:
Step back and check your moon contours. If the pink background overlap is messy, carefully touch up the pink edge with a small brush to make the moon perfectly round again.
Now step back and admire your serene moonlit creation, perfect for bringing a calm atmosphere to any room


Starry Night Galaxy With Paint-Splatter Stars
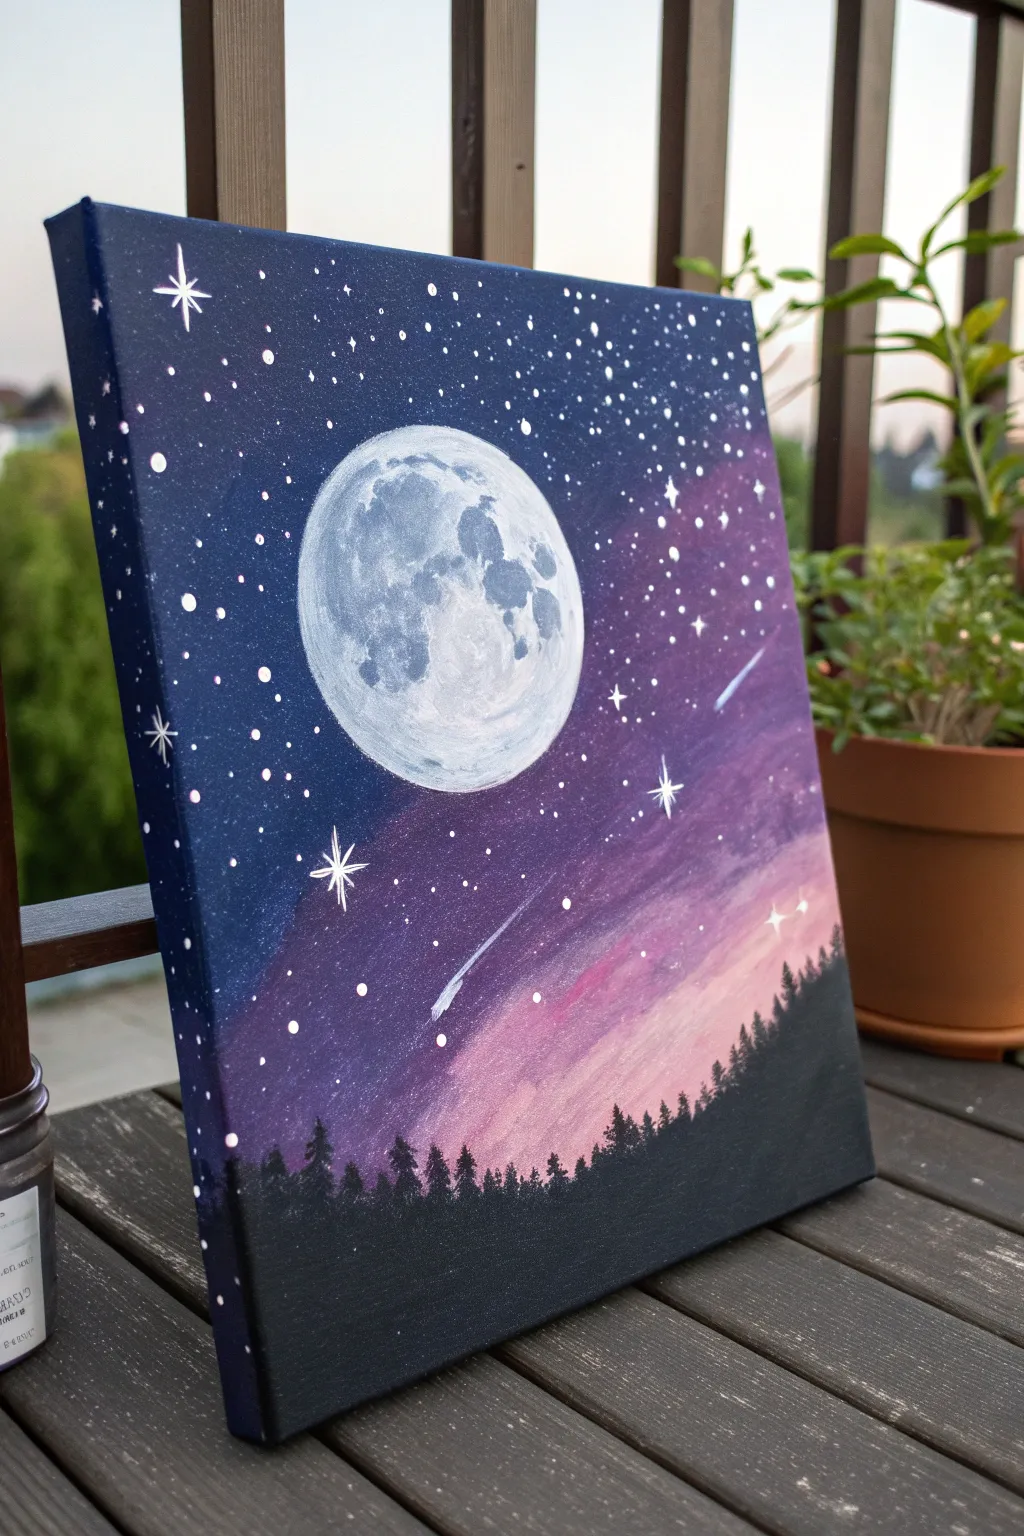
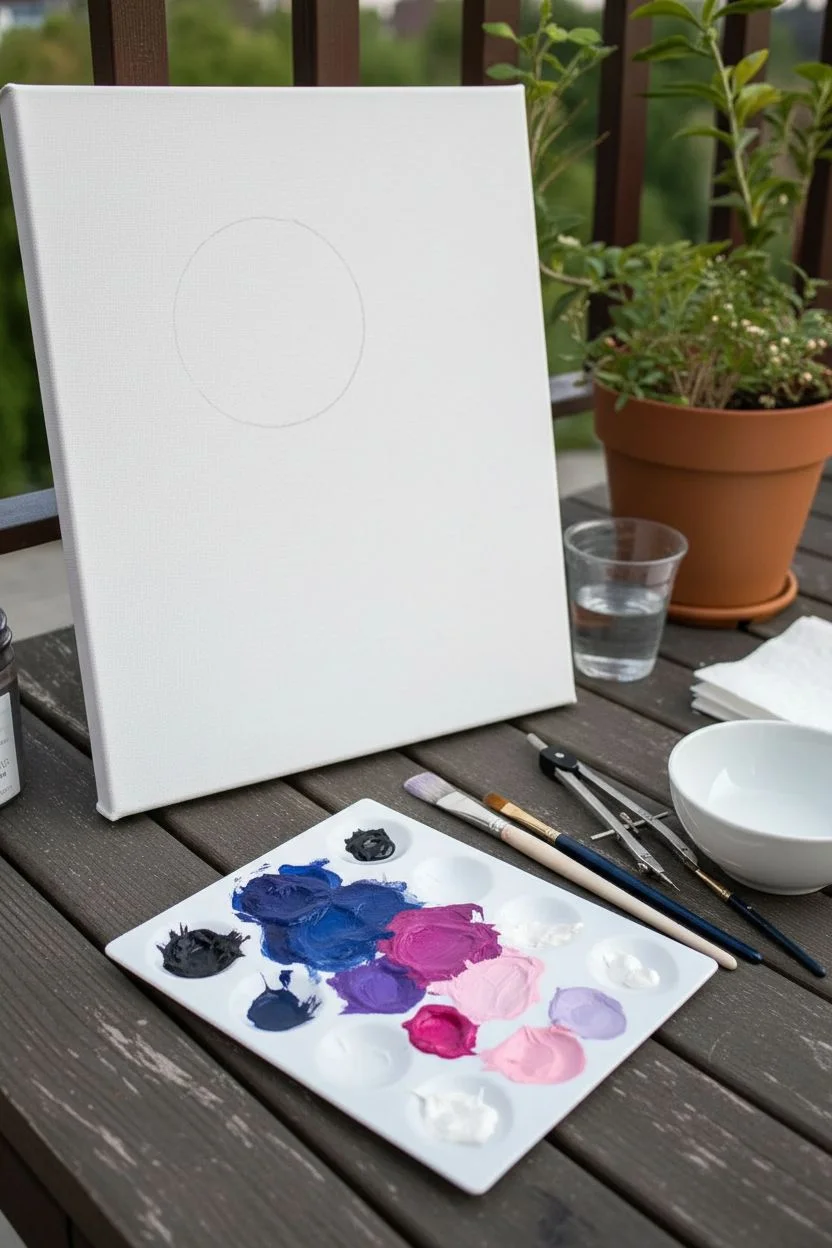
Capture the magic of a twilight sky with this dreamy acrylic painting, featuring a luminous moon set against a gradient of deep indigo, violet, and soft rose. The silhouetted pine forest grounds the celestial scene, making it a perfect project for learning blending and stippling techniques.
Step-by-Step
Materials
- Square stretched canvas (approx. 12×12 inches)
- Acrylic paints: Carbon Black, Titanium White, Prussian Blue (or Navy), Dioxazine Purple, Magenta, Light Pink
- Flat shader brushes (large and medium)
- Small round detail brush (size 0 or 1)
- Fan brush (optional, for blending)
- Old toothbrush (for stars)
- pencil
- Compass or a round object to trace (bowl or lid)
- Palette
- Cup of water and paper towels
Step 1: Setting the Scene
-
Map out the composition:
Begin with a clean canvas. Use a drawing compass or trace a round object (like a cereal bowl) to pencil in a large circle for the moon. Place it slightly off-center and in the upper half of the canvas. Keep your pencil lines light so they don’t show through later. -
Prepare the gradient colors:
Squeeze out your sky colors onto the palette: Prussian Blue, Dioxazine Purple, Magenta, and Light Pink. Keep Carbon Black and Titanium White separate for later steps.
Moon Texture Trick
Use a small piece of natural sea sponge or crumpled paper towel to dab grey paint onto the wet white moon. It creates instant, realistic crater textures effortlessly.
Step 2: Painting the Sky Gradient
-
Start with the darkest tones:
Using a large flat brush, paint the top left corner of the canvas with Prussian Blue mixed with a tiny drop of black. This creates the deepest part of the night sky. -
Transition to purple:
While the blue is still wet, mix in your Dioxazine Purple. Paint diagonally across the canvas, blending the purple into the blue edge. Work quickly to ensure a smooth transition. -
Add the vibrant mid-tones:
Clean your brush or grab a fresh one. Pick up the Magenta paint and continue the diagonal gradient towards the bottom right. Blend the edge where the purple meets the magenta, using back-and-forth strokes to soften the line. -
Create the horizon glow:
For the bottom right section (just above where the treeline will be), mix Light Pink with a touch of Titanium White. Blend this softly into the magenta layer above it. The goal is a seamless fade from dark night to soft twilight. -
Paint the edges:
Don’t forget to wrap your sky colors around the sides of the canvas. This gives the finished piece a professional, polished look without needing a frame. -
Let the sky dry:
Allow the background gradient to dry completely before moving on. This prevents the sharp details like stars and the moon from getting muddy.
Troubleshooting: Muddy Sky?
If your gradient colors start turning brown or muddy, stop blending! Let the layer dry completely, then glaze over it with a thin layer of the intended color to fix the transition.
Step 3: The Moon & Stars
-
Block in the moon:
Using a medium round brush and Titanium White, carefully fill in the circle you traced earlier. Create a solid white base. You might need two coats to fully cover the underlying sky colors. -
Add moon texture:
Mix a light grey using a tiny bit of black and plenty of white. With a small brush or even a dry scruffy brush, dab this grey onto the moon to create craters and ‘seas’. Keep the texture random and concentrate darker spots towards the left side for dimension. -
Highlight the moon:
Add pure white highlights to the right side of the craters to simulate sunlight hitting the surface. Soften any harsh edges with a clean, slightly damp brush. -
Create splatter stars:
Dilute a small amount of Titanium White paint with water until it’s the consistency of ink. Dip an old toothbrush into this mixture. Hold it over the canvas and flick the bristles with your thumb to spray tiny white specks across the darker parts of the sky. -
Paint larger stars:
Use your smallest round detail brush to add larger, specific stars. Dot them randomly, primarily in the dark blue and purple areas. -
Add glimmering stars:
Select a few of the larger dots and create ‘twinkles’. Paint a thin cross or an eight-pointed star shape over the dot. Adding a tiny comet or two with a trailing tail adds nice movement.
Step 4: The Forest Silhouette
-
Define the horizon:
Load a flat brush with pure Carbon Black. Paint a solid, slightly uneven strip across the very bottom of the canvas. This creates the ground for your forest. -
Paint the first trees:
Using a small round brush or a liner brush, paint vertical lines extending up from the black horizon. Vary the heights to make the forest look natural. -
Add pine branches:
Start at the top of a vertical line and use a stippling (dabbing) motion to create pine branches. Widen your strokes as you move down the tree trunk to form a triangular pine shape. -
Fill in the forest density:
Continue painting trees across the entire horizon. Overlap them slightly; some should be tall and distinct, while others can be shorter and blend into the mass of the forest. -
Final touches:
Check your edges and touch up any black paint on the sides of the canvas. Once everything is dry, you can sign your masterpiece in the corner.
Step back and admire your own slice of the galaxy on canvas.


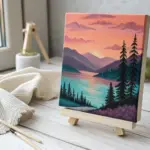
Calm Mountain Lake With Mirror Reflections
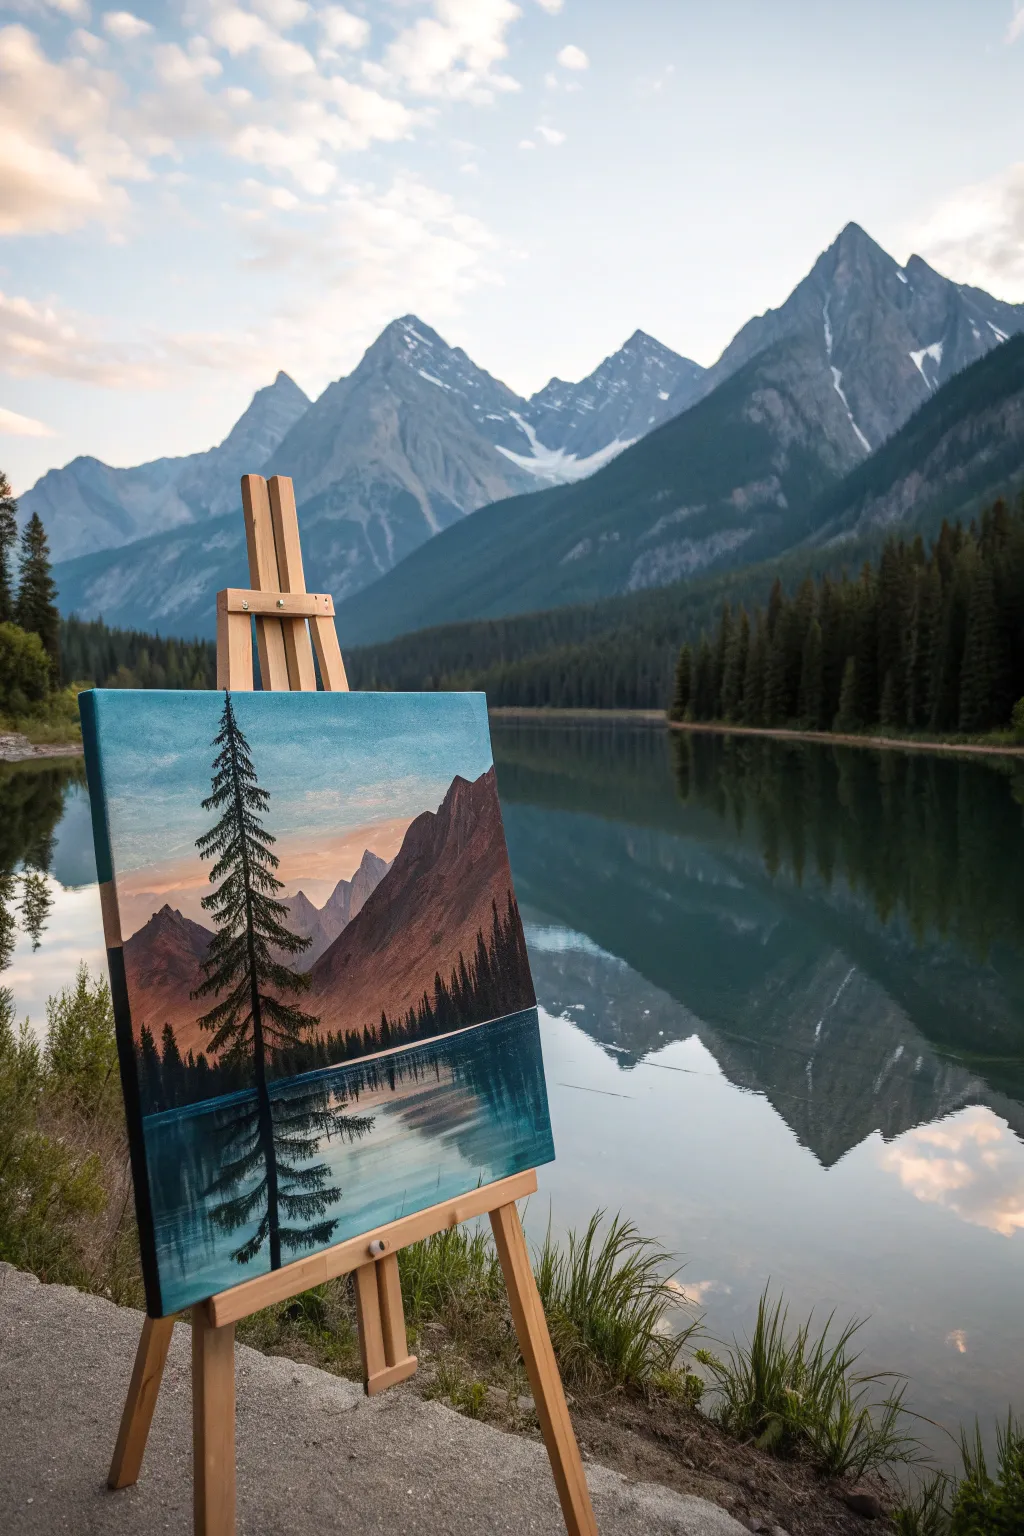
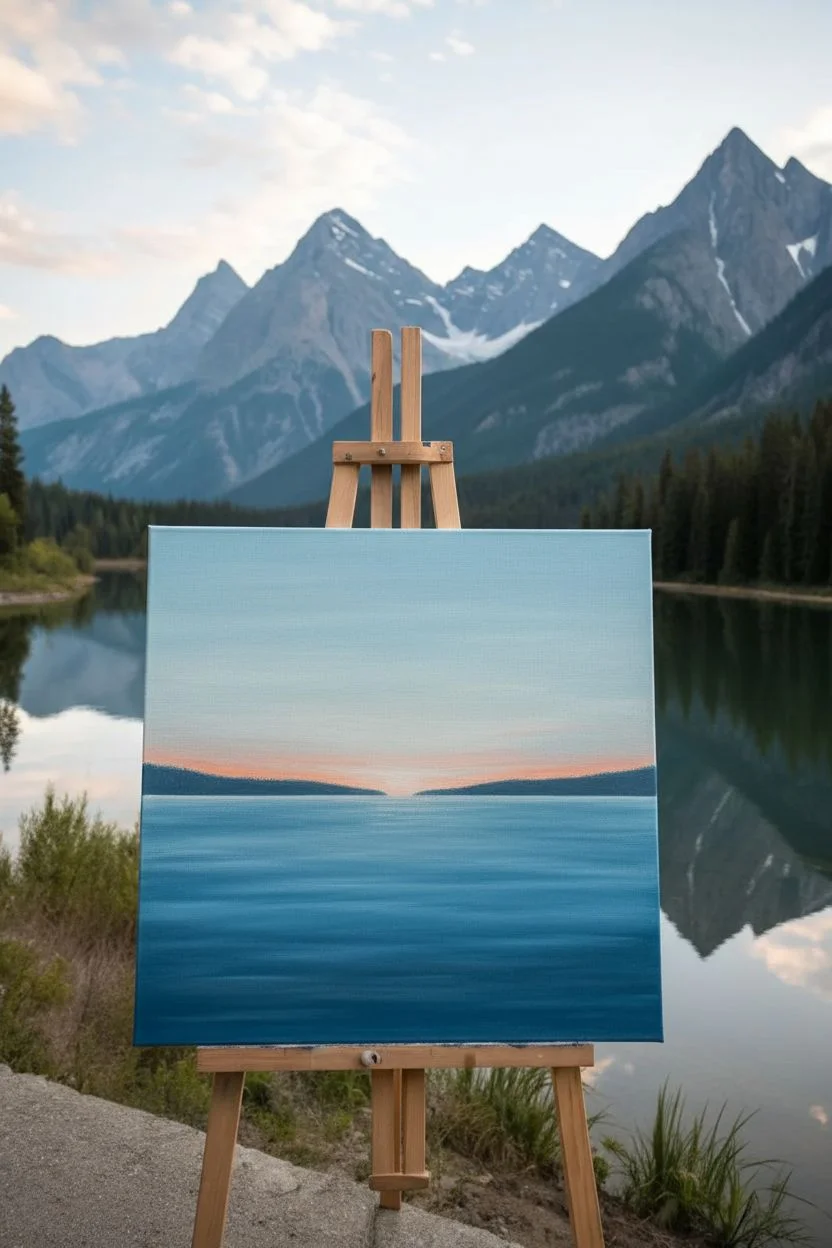
Capture the stillness of nature with this striking acrylic landscape featuring majestic peaks and their perfect reflection. By contrasting warm mountain hues against cool water tones and anchoring the scene with a bold foreground silhouette, you’ll create a piece full of depth and tranquility.
Step-by-Step Tutorial
Materials
- Square stretched canvas (e.g., 12×12 or 16×16 inches)
- Acrylic paints: Titanium White, Phthalo Blue, Burnt Sienna, Burnt Umber, Mars Black, Crimson Red, Yellow Ochre
- Flat brushes (large and medium)
- Round brushes (small and detail)
- Fan brush (optional, for trees)
- Palette knife
- Cup of water and paper towels
- Easel
Step 1: Setting the Scene
-
Prime the sky:
Begin by mixing Titanium White with a tiny touch of Phthalo Blue. Using a large flat brush, paint the upper third of the canvas using long horizontal strokes to create a pale, hazy sky. -
Add warmth to the horizon:
While the blue is still slightly wet, blend in a soft mix of Titanium White and a dot of Crimson Red or Orange near the horizon line. This creates that gentle sunset glow peeking through the valleys. -
Establish the water base:
For the lake, mix a deeper shade using Phthalo Blue and a touch of Burnt Umber to desaturate it. Paint the bottom half of the canvas with vertical strokes initially, then smooth them out horizontally to suggest a flat water surface. -
Define the horizon line:
Use a piece of masking tape or a steady hand with a ruler to lightly mark the horizon line where the water meets the land. Keep this line perfectly straight to ensure the reflection looks convincing.
Step 2: Sculpting the Mountains
-
Block in the mountain shapes:
Mix Burnt Sienna with a little Burnt Umber and White to create a reddish-brown earth tone. Using a medium flat brush, paint the large triangular shapes of the mountains on the right side, sweeping down towards the center. -
Add distant peaks:
For the mountains further back on the left, use a cooler, paler mix of grey-blue (White, Blue, and a touch of Black). This atmospheric perspective pushes them into the distance. -
Create texture and shadow:
Using a palette knife or a dry brush, drag a darker mix of Burnt Umber and Blue down the shadowed side of the mountain peaks. I like to keep the paint thick here to mimic the rugged rock face. -
Apply sunlit highlights:
On the opposite slopes facing the light source, scrape or brush on a lighter mix of Burnt Sienna and Yellow Ochre. Do not overblend; allow the rough texture of the canvas to help create the rocky effect.
Muddied colors?
If your reflections turn muddy, let the first layer of water paint dry completely before adding the reflection colors on top. A glazing medium helps keep layers distinct.
Step 3: Reflections and Details
-
Mirror the mountains:
In the water section, roughly paint the inverted shape of the mountains using the same colors but slightly darkened and muted with a little blue. The reflection should be slightly less detailed than the actual mountains. -
Blur the water:
With a clean, dry soft brush, gently sweep horizontally across the painted reflection while it is still tacky. This motion breaks up the hard edges and creates the illusion of a watery surface. -
Add the distant treeline:
Mix a dark green-black using Phthalo Blue and Yellow Ochre with a touch of Black. Use a small round brush to dab in a tiny, jagged treeline along the base of the mountains where they meet the water. -
Reflect the distant trees:
Pull small vertical strokes of this dark green mix downwards into the water directly below the treeline to create their shadow and reflection.
Go monochromatic
Try painting this entire scene using only shades of blue and white (monochromatic). It emphasizes value and gives the piece a frosty, winter morning vibe.
Step 4: The Foreground Silhouette
-
Paint the main trunk:
Load a liner brush or small round brush with Mars Black. Paint a confident vertical line on the left third of the canvas, extending from the bottom edge almost to the top, tapering slightly as it goes up. -
Add branches:
Starting from the top of the tree, use a small brush or the corner of a fan brush to tap in downward-sloping branches. Keep the branches shorter at the top and winder at the bottom. -
Texture the foliage:
Dab dense clusters of black needles onto the branches. Leave some gaps so the sky and mountains peek through; this prevents the tree from looking like a solid triangle. -
Create the tree reflection:
Mirror the tree shape in the water directly below the trunk. Use horizontal, zig-zag motions with a watered-down black paint to make this reflection look rippled and distorted by the water’s movement. -
Final water ripples:
Using a very thin brush and Titanium White mixed with a little water, paint ultra-thin horizontal lines across the water surface, cutting through the reflections to suggest surface tension and calm movement.
Step back and admire how the stillness of the water balances the rugged height of your mountains
BRUSH GUIDE
The Right Brush for Every Stroke
From clean lines to bold texture — master brush choice, stroke control, and essential techniques.
Explore the Full Guide
Easy Ocean Horizon With Big Cloud Shapes
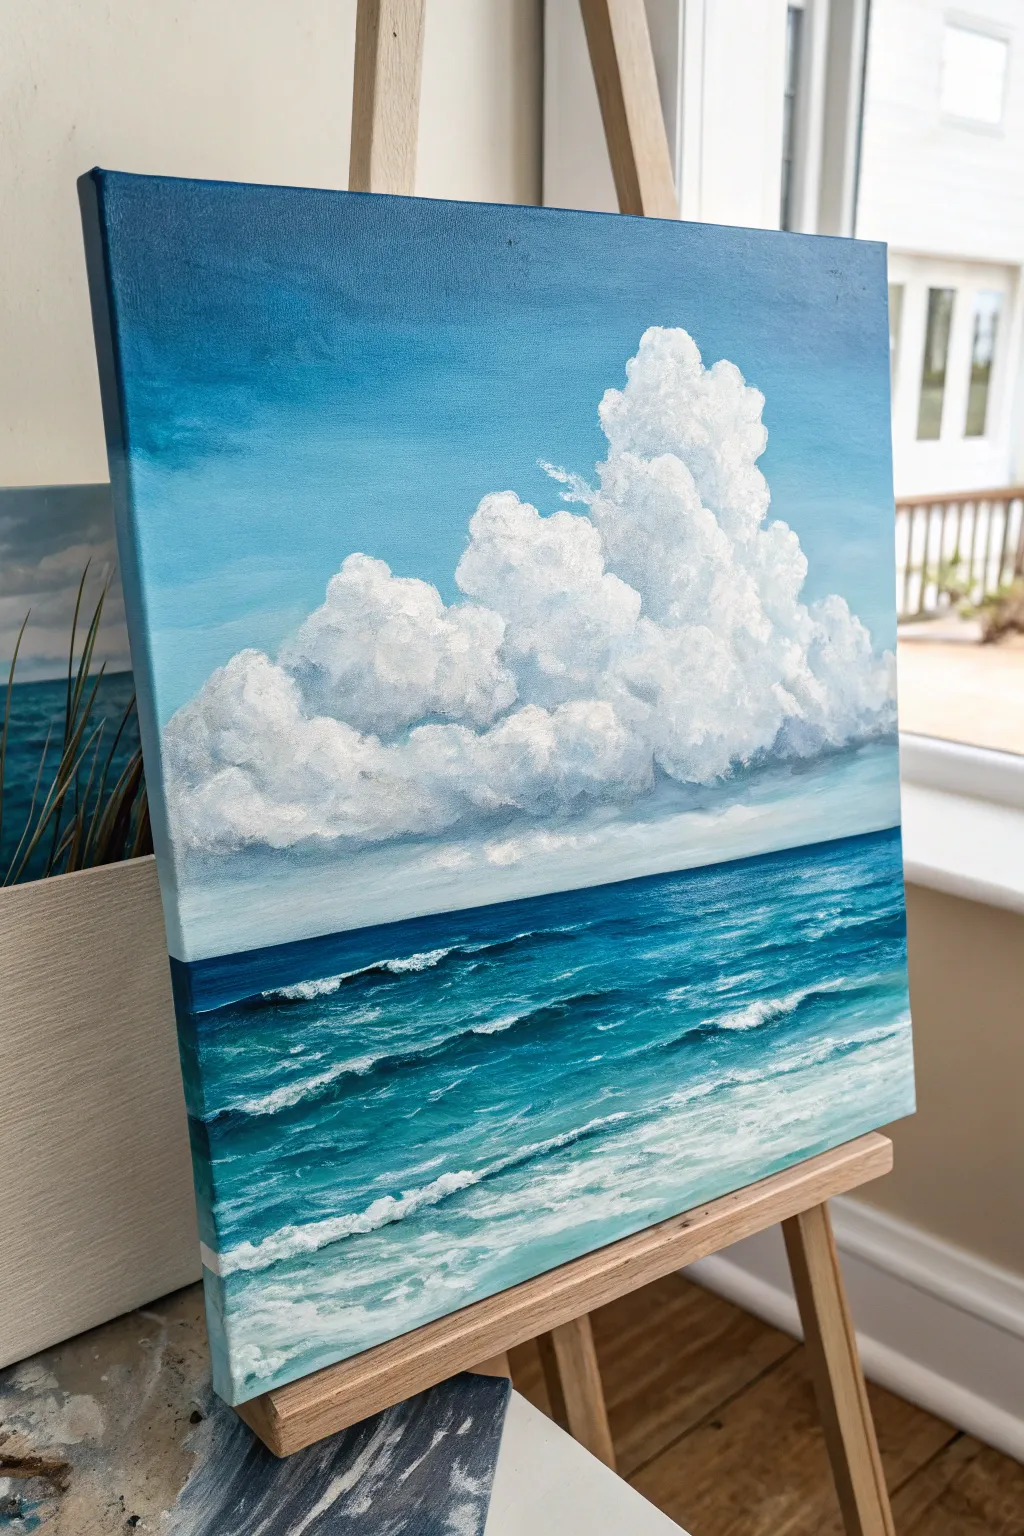
Capture the serenity of a perfect beach day with this tutorial that balances dramatic cloud structures against rhythmic ocean waves. You’ll layer soft blues for the sky and build up rich turquoise tones for the sea to create a striking sense of depth.
Step-by-Step
Materials
- Square canvas (12×12 or similar)
- Acrylic paints: Titanium White, Ultramarine Blue, Phthalo Blue, Teal/Turquoise, Burnt Umber or Paynes Grey
- Large flat brush (1 inch)
- Medium filbert brush
- Small round brush for details
- Palette knife (optional for texture)
- Water cup and paper towels
- Easing drying medium (optional)
Step 1: Setting the Atmosphere
-
Map the Horizon:
Begin by deciding where your horizon line will sit. For this composition, place a piece of painter’s tape or draw a faint pencil line about one-third of the way up from the bottom of the canvas. -
Mix the Deep Sky:
On your palette, mix a generous amount of Phthalo Blue with a touch of Ultramarine. Using your large flat brush, apply this dark blue to the very top edge of the canvas, painting with horizontal strokes. -
Create the Gradient:
Gradually add Titanium White to your blue mixture as you work your way down the canvas. By the time you reach the cloud area (the middle third), the color should be a soft, pale baby blue. -
Fade to Horizon:
Continue lightening the blue until it is nearly white at the horizon line. Blend the transition areas while the paint is still wet to ensure a smooth, seamless sky gradient.
Cloud Control
If your clouds look too flat, don’t just use white. Mix a tiny bit of purple into your grey shadow color. This complementary tone adds instant 3D volume against the blue sky.
Step 2: Sculpting the Clouds
-
Block in cloud shapes:
With a medium filbert brush, take pure Titanium White and roughly dab in the main silhouette of the large cloud tower. Let the edges be irregular and organic. -
Add Shadow Depth:
Mix a soft grey using White and a tiny speck of Paynes Grey or Burnt Umber (and perhaps a touch of the sky blue). Paint the underside of the cloud formation to give it weight and volume. -
Build the Puffs:
Clean your brush and load it with thick Titanium White. Use a circular scrolling motion to paint the rounded tops of the cumulus clouds. I like to keep the paint quite thick here for texture. -
Refine the Underside:
Softly blend the grey shadows into the white tops, keeping the transition fairly distinct to show rounded forms. Add a few trailing, wispy clouds near the horizon line.
Step 3: The Ocean Depths
-
Establish the Deep Sea:
Remove the tape (if used). Mix a dark, rich Teal using Phthalo Blue and a bit of Green (or premixed Teal) with a touch of dark blue. Paint a crisp, straight line right at the horizon. -
Transition the Water:
As you move down towards the foreground, begin adding white to your teal mixture. The water should transition from a deep navy-teal at the horizon to a brighter aquamarine in the middle. -
Foreground Translucency:
For the bottom third of the canvas, mix a very pale turquoise-white. Apply this loosely, allowing some of the underlying canvas texture to show through, mimicking shallow water.
Texture Trick
For realistic sea foam, dab the paint on with a specialized ‘stipple’ brush or even an old, scruffy brush you were planning to throw away. The messier bristles create perfect random bubbles.
Step 4: Waves and Foam
-
Mark the Wave Lines:
Using a small round brush and dark teal pant, paint thin, slightly wobbly horizontal lines where your wave crests will be. Space them closer together near the horizon and wider apart near the bottom. -
Create Shadow Curves:
Underneath each dark wave line, blend the color downwards slightly into the lighter water color. This creates the curved ‘face’ of the wave before it breaks. -
Top the Crests:
Load a small brush or the edge of a palette knife with pure Titanium White. Tap this along the top edge of your dark wave lines to create the breaking foam. -
Add Sea Foam Patterns:
In the shallow foreground water, use watered-down white paint to create web-like, diamond patterns. These represent the foam left behind as waves recede. -
Highlights and Sparkle:
Add final bright white highlights on the most prominent wave crests and a few touches on the brightest part of the cloud to make the scene pop.
Step back and admire the refreshing coastal atmosphere you have created on canvas
Loose Floral Bouquet in a Simple Vase
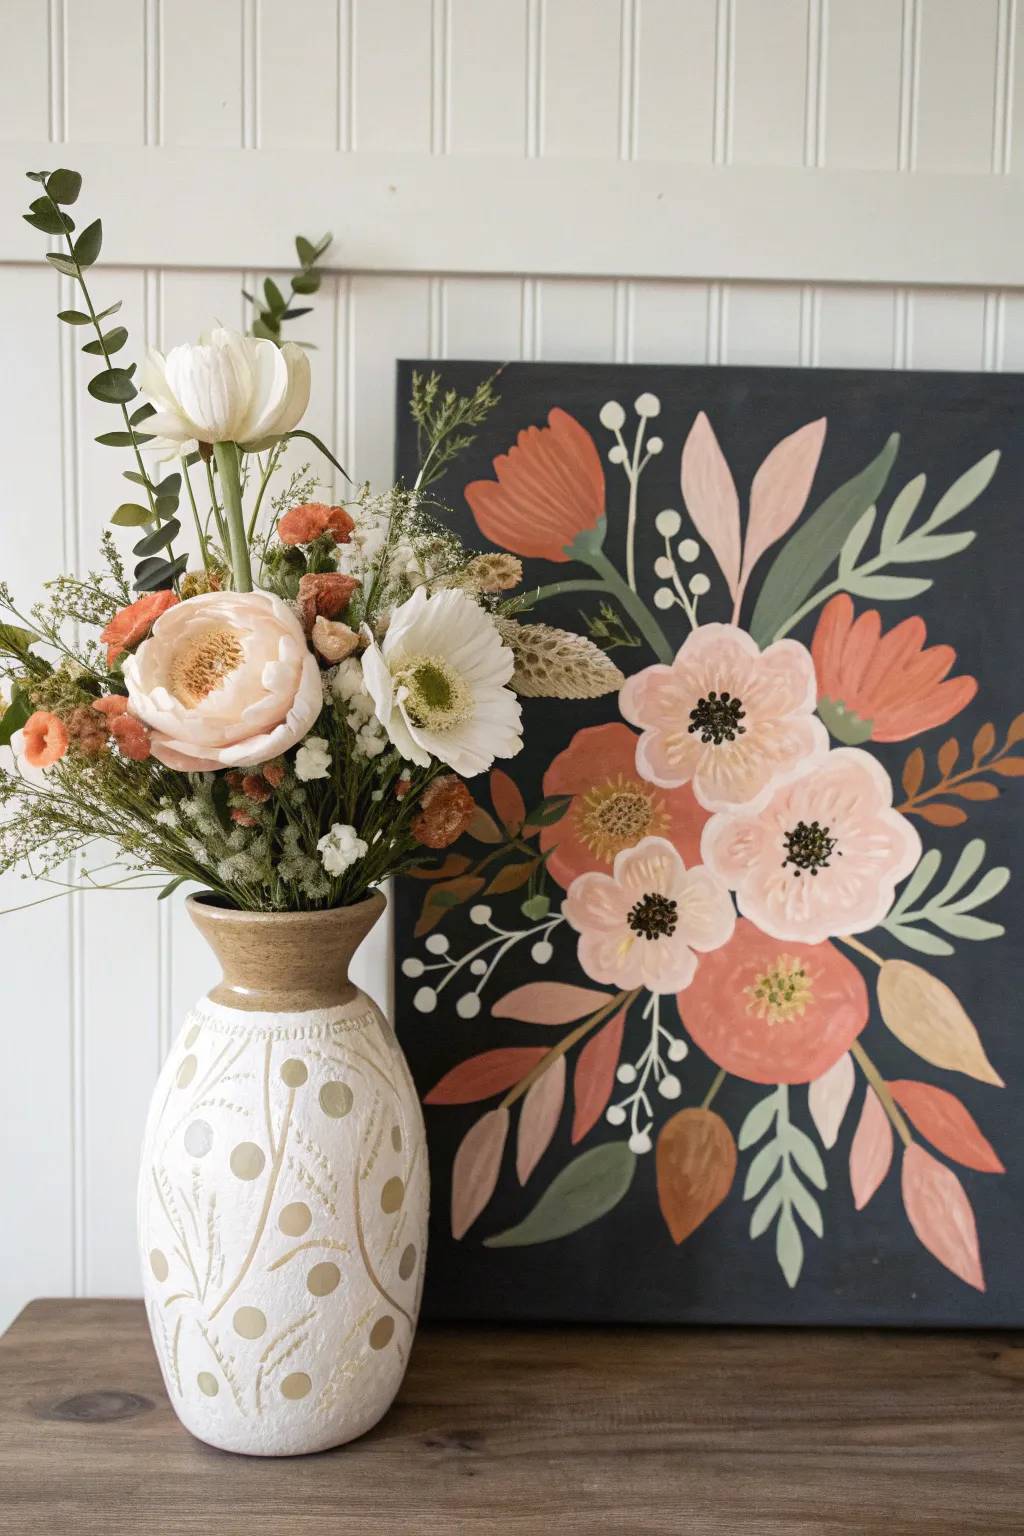
Embrace moody elegance with this striking acrylic floral painting set against a dramatic charcoal background. The composition balances loose, peachy-pink blooms with warm rust tones and stylized foliage for a piece that feels both vintage and fresh.
Step-by-Step Tutorial
Materials
- Square stretched canvas (12×12 or 16×16 inches)
- Acrylic paints: Carbon black, titanium white, burnt umber, yellow ochre, cadmium red
- Acrylic paints (greens): Sap green, olive green, or mixing blue/yellow
- Flat shader brushes (sizes 6 and 10)
- Round brushes (sizes 2 and 6)
- Small liner brush
- Palette for mixing
- Water cup and paper towels
- Chalk or pastel pencil (for sketching)
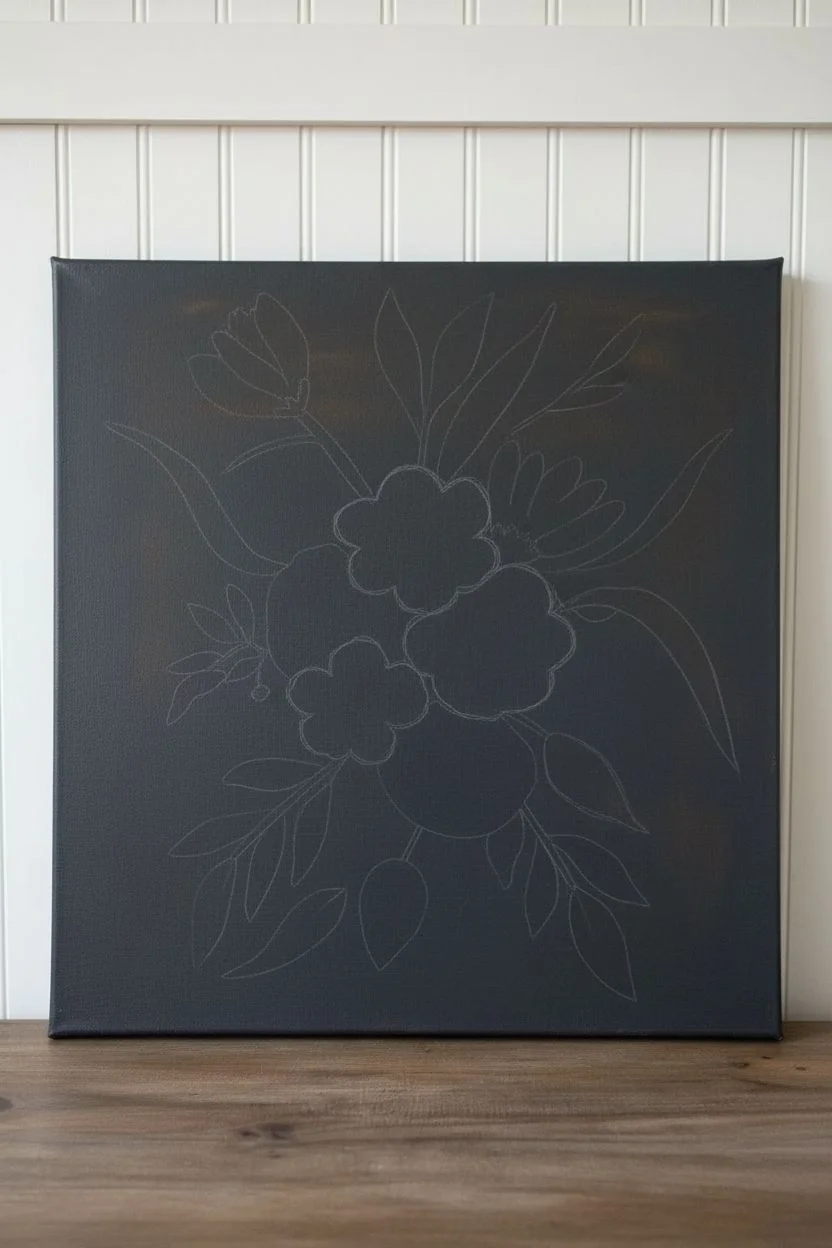
Step 1: Setting the Mood
-
Mix the background color:
Start by creating a soft, deep charcoal color. Mix carbon black with a touch of titanium white and a tiny bit of burnt umber to warm it up. Avoid using straight black, as it can look flat. -
Paint the base:
Cover your entire canvas with this charcoal mixture using a large flat brush. Ensure you paint the sides of the canvas as well for a polished gallery-wrap look. Let this layer dry completely before moving on. -
Plan the composition:
Using a piece of chalk or a light pastel pencil, very lightly sketch the rough placement of your main flowers. Focus on the three central blooms and the two large rust-colored tulip shapes at the top right and left.
Step 2: The Main Blooms
-
Mix the peach tones:
Create a palette of soft peach and pinks. Mix titanium white with a small amount of cadmium red and yellow ochre. You want three variations: a light blush, a medium peach, and a slightly darker coral. -
Block in the flower shapes:
Using a size 6 round brush, paint the base shapes of the three central open flowers. Don’t worry about petals yet; just paint rough, rounded shapes with scalloped edges in your medium peach tone. -
Add petal definition:
While the base is still slightly tacky or dry, use your lightest blush mix to paint distinct petal strokes on top. Start from the outer edge and pull the brush inward toward the center. -
Create the rust accents:
Mix cadmium red with burnt umber and a touch of yellow ochre to get a warm, earthy rust color. Use a flat brush to paint the tulip-like shapes on the sides and the larger buds. -
Layer the rust flowers:
Add a slightly lighter version of this rust color (add a tiny bit of white) to one side of these flowers to suggest a light source and add dimension.
Pro Tip: Loose Edges
Keep your wrist loose when painting petals. Don’t over-blend perfectly; seeing the brushstrokes adds to the charming, folk-art aesthetic.
Step 3: Foliage & Details
-
Mix sage greens:
For the leaves, you want a muted vibe. Mix sap green with white and a little burnt umber to desaturate it. Create a lighter ‘minty’ sage and a deeper olive tone. -
Paint large leaves:
Using the flat brush turned on its edge or a round brush, paint the long, sweeping leaves extending outward. Use the lighter sage for the upper leaves to contrast against the dark background. -
Add darker contrast leaves:
Tuck some darker olive leaves behind the main flower cluster. This helps push the light pink flowers forward visually. -
Paint warm foliage:
I like to echo the flower colors in the leaves. Use a watered-down version of your rust or a beige-pink mix to add the smaller sprigs and fern-like leaves on the sides. -
Detail the flower centers:
Once the flower petals are dry, use a small round brush with dark black-brown paint to dab dots in the center of the open blooms. -
Add white stamens:
Use your smallest liner brush or a toothpick dipped in white paint to add tiny dots on top of the black centers for texture. -
Painting filler elements:
Use a liner brush with a creamy white-yellow mix to paint delicate stems composed of small dots (berries) rising from behind the main bouquet. -
Final connections:
Use a liner brush with a medium green to paint thin stems connecting all your floating leaves and buds back toward the central cluster.
Level Up: Texture Pop
Mix a little modeling paste into your white paint for the center stamen dots. This creates actual physical texture that stands out beautifully.
Step back and admire how the dark background makes those soft pastels glow

PENCIL GUIDE
Understanding Pencil Grades from H to B
From first sketch to finished drawing — learn pencil grades, line control, and shading techniques.
Explore the Full Guide
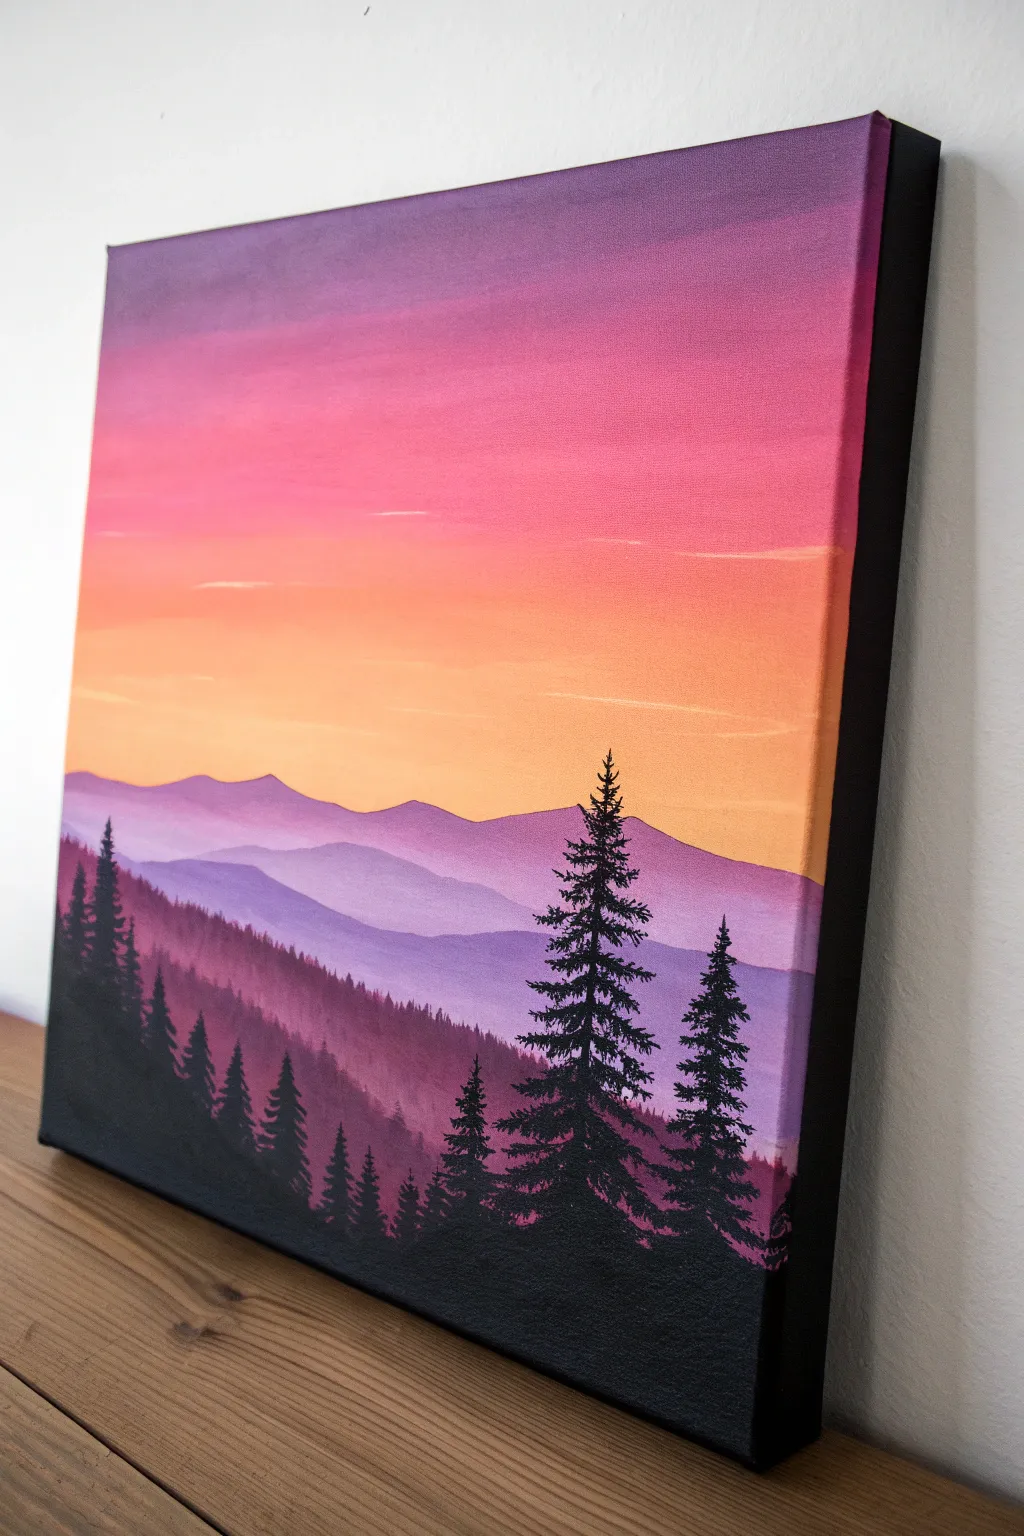
Colorful Birch Trees With High-Contrast Trunks

Capture the dramatic beauty of a sunset filtering through a birch grove with this high-contrast acrylic painting. The striking white bark pops against a gradient backdrop of deep teal, fiery red, and glowing orange, creating a mesmerizing play of cool and warm tones.
Step-by-Step
Materials
- Stretched canvas (rectangular format, e.g., 16×20 or 18×24)
- Acrylic paints: Teal/Phthalo Blue, Dioxazine Purple, Alizarin Crimson (or a deep red), Cadmium Orange, Cadmium Yellow, Titanium White, Carbon Black
- Large flat brush or wash brush (2-inch)
- Medium flat brush (1-inch)
- Small round brush (size 4 or 6)
- Detail liner brush (size 0 or 00)
- Palette knife (optional, for bark texture)
- Painter’s tape or masking tape
- Water cup and paper towels
Step 1: Painting the Sunset Gradient
-
Prepare the canvas:
Before you begin, decide where your horizon line will be. For this composition, keep the horizon quite low, leaving most of the canvas for the dramatic sky and tall trees. -
Start with the cool tones:
Using your large wash brush, apply a mix of Teal and a touch of Phthalo Blue to the very top right and left corners. While the paint is wet, blend downwards. -
Transition to purple:
Mix in Dioxazine Purple as you move down the canvas. Blend this into the blue while both sections are still wet to create a smooth, deep twilight transition in the upper third. -
Ignite the reds:
Clean your brush thoroughly. Below the purple, paint a bold band of Alizarin Crimson. Use horizontal strokes to blend the red upward into the purple, creating a seamless, dusky violet hue where they meet. -
Add the fiery glow:
Further down, introduce Cadmium Orange. Blend this into the bottom of the red section. The colors should look like a blazing fire. -
Finish the sky:
Near the bottom third of the canvas (but above the ground), paint with pure Cadmium Yellow, possibly mixed with a tiny bit of White for brightness. Blend this into the orange above it for a glowing sunset effect. -
Lay the groundwork:
Paint the very bottom strip of the canvas with a dark mix of Purple and Black to represent the shadowed forest floor. Let the entire background dry completely before proceeding.
Tape Bleeding?
If paint bled under your tape, don’t panic. Wait for it to dry, then use a small flat brush with the background color to carefully touch up the edge, straightening the line.
Step 2: Creating Depth with Background Trees
-
Mix a shadow color:
Create a watery mix of Alizarin Crimson and a tiny drop of Black. You want a semi-transparent color that is darker than the sky but not fully opaque. -
Paint faint silhouettes:
Using a small round brush, paint thin, vertical lines in the background between where your main trees will go. Add tiny, wispy branches. These should look like distant trees fading into the red mist. -
Add mid-ground shadows:
Paint slightly darker, thicker vertical lines closer to the bottom, suggesting a dense thicket behind the main birch trees. Let this layer dry.
Step 3: The Majestic Birch Trees
-
Tape the trunks:
To get crisp edges for your main trees, place strips of painter’s tape vertically. Angle them slightly to make them look natural, not perfectly straight pillars. Vary the widths—make the closest tree (left) the widest. -
Block in white:
Paint inside the taped areas with Titanium White. You may need two coats to fully cover the bright background colors. I find it helpful to let the first coat dry to the touch before adding the second. -
Remove the tape:
Carefully peel off the tape while the paint is still slightly tacky to reveal your stark white trunks. -
Add dimension:
Mix a light grey (White with a speck of Black). Paint a thin, transparent line down the right side of each trunk to act as a shadow, giving the trees a cylindrical shape.
Pro Tip: Card Trick
For realistic bark texture, dip the edge of an old credit card or stiff cardboard into black paint. Drag it horizontally across the white trunk for organic, random striations.
Step 4: Detailing the Bark and Branches
-
Create the heavy markings:
Using black paint and a small flat brush or the edge of a palette knife, create the signature birch markings. Scrape or brush horizontally across the trunk, curving the strokes slightly to follow the roundness of the tree. -
Detail the ‘eyes’:
Birch trees often have eye-shaped knots. Use your detail liner brush to paint small football shapes with black, focusing heavily on the main tree on the left. -
Paint the main branches:
With the liner brush and black paint thinned slightly with water (to an ink-like consistency), pull branches out from the trunks. Start thick near the trunk and release pressure to make them whisper-thin at the ends. -
Connect the canopy:
Add very fine twigs reaching up into the blue and teal sections of the sky. Let the branches overlap playfully. -
Ground the trees:
At the base of the trees, paint wispy grass blades using a small brush. Use deep greens and blacks for the shadows, and highlight a few blades with yellow where the sunset light hits them.
Step back and admire how the stark white trees command attention against that burning sky—a stunning piece ready for display.
Cherry Blossom Branches With Dabbed Petals
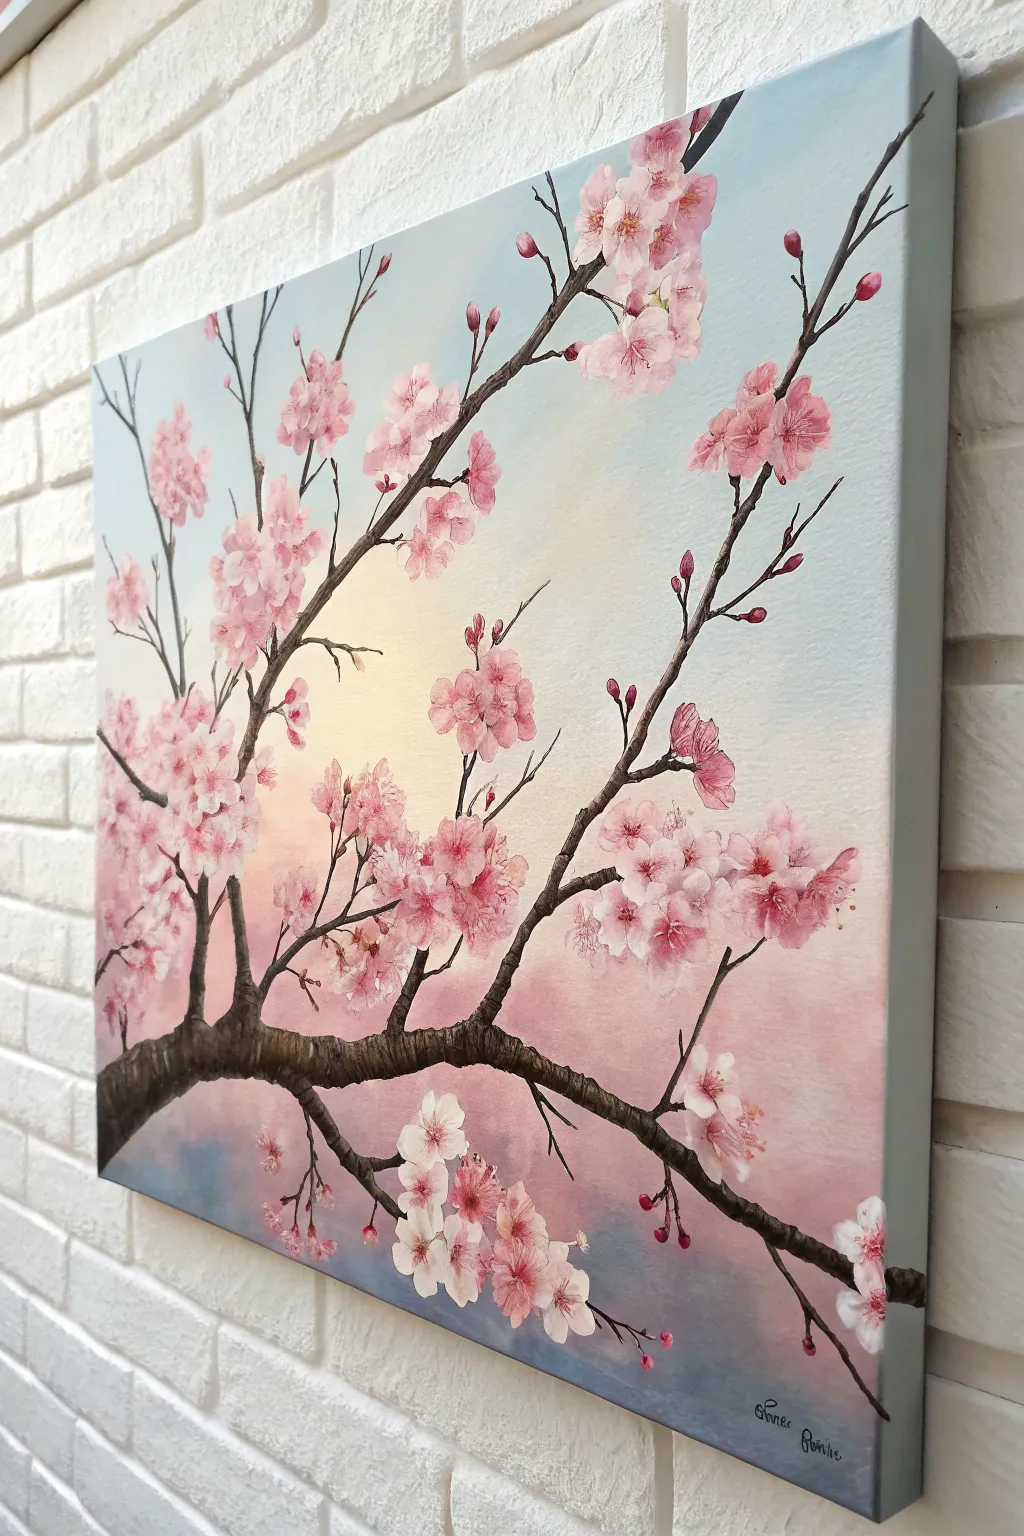
Capture the delicate beauty of spring with this stunning acrylic painting of cherry blossoms against a glowing sunset sky. The soft gradient background creates a luminous effect, perfectly highlighting the contrast of dark branches and tender pink petals.
How-To Guide
Materials
- Stretched canvas (11×14 or similar)
- Acrylic paints: Titanium White, Phthalo Blue (or Sky Blue), Cadmium Yellow Light, Alizarin Crimson, Burnt Umber, Mars Black
- Large flat brush (1-2 inch)
- Medium round brush (size 6 or 8)
- Small liner brush (size 0 or 00)
- Water cup and paper towels
- Palette or mixing plate
Step 1: Painting the Luminous Sky
-
Mix the sky colors:
Prepare three piles of paint on your palette: a pale light blue (White + tiny dot of Blue), a soft buttery yellow (White + small amount of Yellow), and a dusty pink (White + Crimson + tiny dot of Blue/Black to desaturate). -
Apply the yellow center:
Using your large flat brush, paint an organic, rounded area near the center-left of the canvas with the pale yellow mix. Use crisscross strokes to keep the edges soft. -
Blend in the blue:
While the yellow is still wet, clean your brush slightly and pick up the light blue. Paint the upper corners and top edge, blending downwards toward the yellow. Let the colors meet to create a soft greenish-white transition area. -
Add the pink horizon:
Apply the dusty pink mixture to the bottom third of the canvas. Blend upwards into the yellow center and sideways into the blue edges. The goal represents a dusk or dawn sky, so let the strokes be smooth and seamless. -
Deepen the corners:
For extra depth, mix a slightly darker blue-grey (Blue + touch of Black + White) and glaze the very bottom corners and top right corner. This vignette effect draws the eye to the bright center.
Natural Chaos
Don’t make your branches too straight! Cherry trees have ‘elbows.’ Twist your brush or slightly tremble your hand while painting branches to create organic, realistic knots.
Step 2: Creating the Branches
-
Sketch the layout:
Once the background is completely dry, lightly sketch the main branch structure with a pencil or thinned paint. Have the main thick branch enter from the bottom left and curve upwards toward the right. -
Base coat the branches:
Mix Burnt Umber with a touch of Black to create a deep, dark brown. Using a medium round brush, paint the main thick branch, pressing down firmly at the start and lifting pressure as the branch tapers. -
Add smaller twigs:
Switch to a smaller brush or use the tip of your round brush to pull thinner branches off the main trunk. Let these lines be slightly jagged and angular, mimicking the natural growth of cherry trees. -
Paint fine offshoots:
I like to use a liner brush with slightly watered-down dark paint to create the tiniest twigs reaching towards the corners. Ensure these lines are crisp and delicate. -
Highlight the bark:
Mix White with a little Burnt Umber to make a light tan. Gently dry-brush horizontal lines along the top curves of the thickest branches to suggest texture and light hitting the bark.
Texture Boost
Mix a small amount of modeling paste into your white and pink petal paint. This adds physical 3D texture to the flowers, making them pop off the canvas.
Step 3: The Blossoms
-
Prepare petal colors:
Create three shades of pink: a dark magenta (Crimson), a medium bubblegum pink (Crimson + White), and a very pale pink (mostly White + tiny Crimson). -
Block in flower shapes:
Identify clusters where you want flowers to sit. Using the medium round brush, dab 5-petal shapes using the medium pink color. Don’t worry about perfect details yet; just establish the silhouette. -
Add shadow depth:
While the base pink is tacky or dry, use the dark magenta to paint the center of the flowers and the areas where petals overlap. This gives the flower volume. -
Paint the bright petals:
Clean your brush and load it with the pale pink. Paint the outer edges of the petals, leaving the centers darker. For some flowers, use pure white on the very tips to make them look sunkissed. -
Create buds:
Paint small, teardrop shapes on the tips of thin twigs using the dark magenta color. Add a tiny highlight of pale pink on one side of each bud. -
Add falling petals:
Paint a few single, stray petals drifting in the air or landing on the lower branches to add movement to the scene.
Step 4: Final Details
-
Paint the stamens:
Using your finest liner brush and dark magenta or watered-down black, paint tiny lines radiating from the center of the open flowers. -
Dot the pollen:
Dip the tip of the liner brush or a toothpick into Cadmium Yellow. Place tiny dots at the end of the stamen lines you just painted. -
Define the sepals:
Where the flower meets the branch, paint a tiny green or dark brown cup (sepal) to anchor the blossom to the wood. -
Final highlights:
Take a step back. Add a final touch of pure white to the brightest part of the sky if it faded during drying, or add extra brightness to the petals closest to the light source.
Hang your masterpiece in a well-lit spot to let those gradient sky colors truly shine.


Birds on a Wire Minimal Silhouette Scene
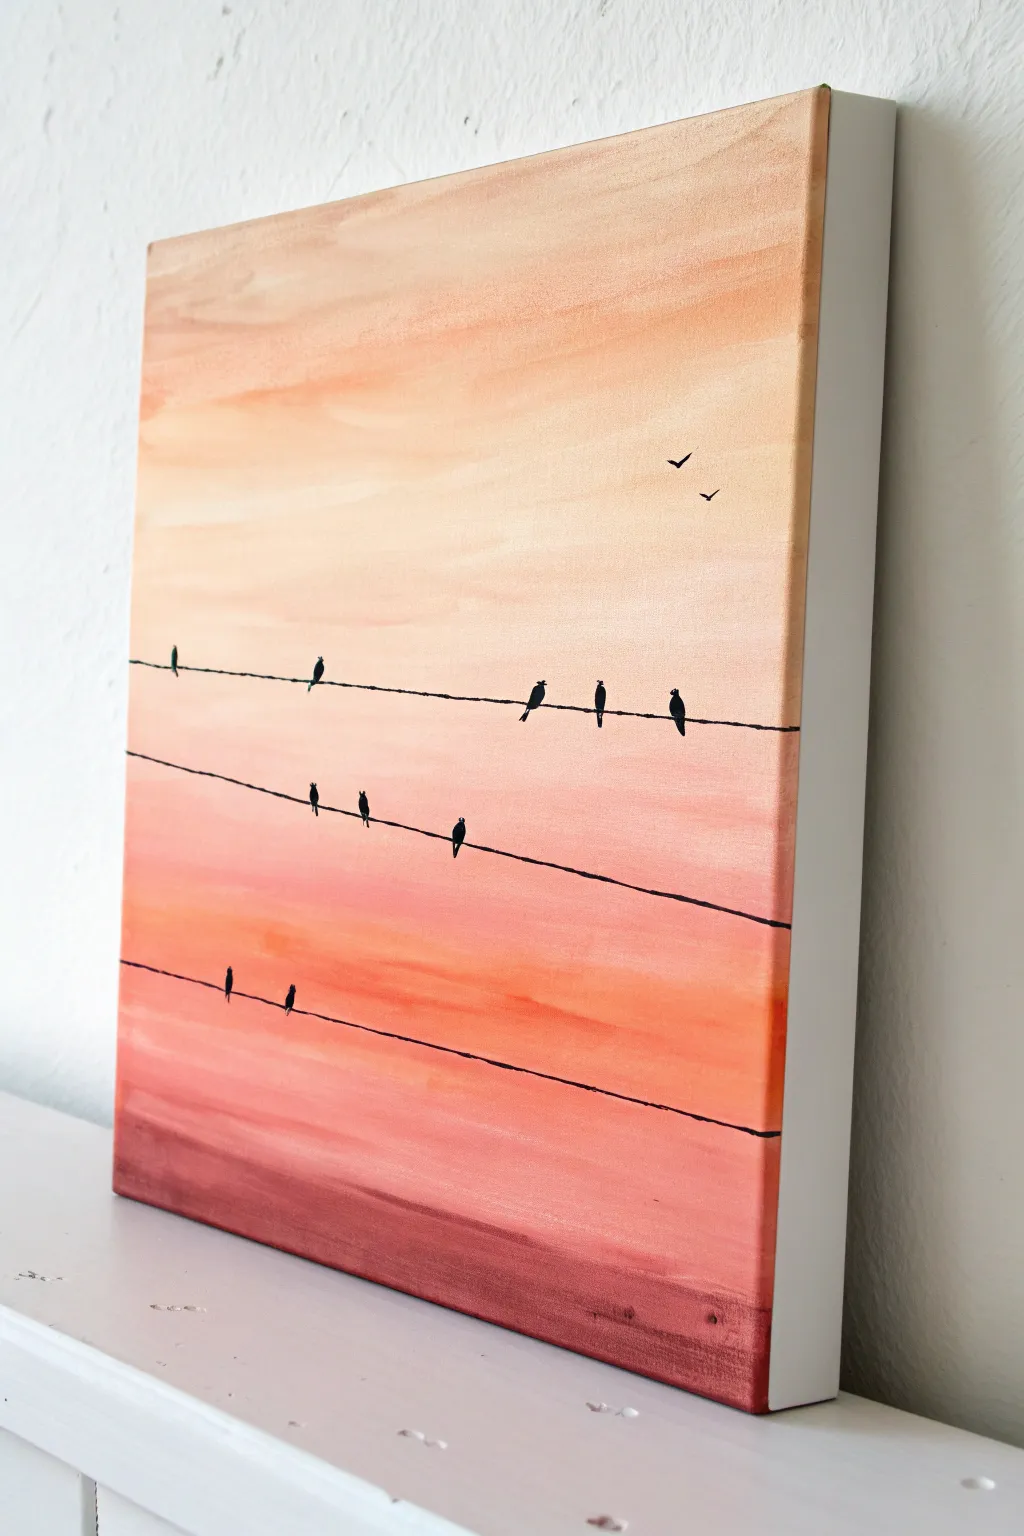
Capture the calm of dusk with this minimalist acrylic painting featuring silhouetted birds perched on wires against a soft, glowing gradient sky. The warm peach and coral tones blend seamlessly to create a peaceful atmosphere perfect for any modern space.
Detailed Instructions
Materials
- Stretched canvas (e.g., 11×14 or 16×20 inch)
- Acrylic paints: Titanium White, Peach (or Cadmium Orange mixed with White), Coral/Salmon, Burnt Sienna, and Mars Black
- Large flat brush or wash brush (1-2 inch) for the background
- Small round detail brush (size 0 or 1)
- Ruler or straight edge
- Palette
- Cup of water and paper towels
- Pencil (optional)
Step 1: Creating the Sunset Gradient
-
Prepare the palette:
Squeeze out generous amounts of your sky colors: White, Peach, Coral, and a touch of Burnt Sienna. Keep the Black separate for later. You want plenty of paint to ensure a smooth blend. -
Paint the top section:
Using your large flat brush, mix White with a small amount of Peach. Paint the top third of the canvas using long, horizontal strokes. Wrap the paint around the edges of the canvas for a professional finish. -
Introduce the mid-tones:
While the top layer is still wet, add more Peach and a tiny bit of Coral to your brush. Paint the middle section, overlapping slightly with the lighter top section to encourage blending. -
Blend the transition:
Clean your brush slightly (brush it on a dry towel, no water) and gently sweep back and forth over the line where the two colors meet until the transition looks soft. -
Deepen the horizon colors:
Mix a stronger Coral shade with a hint of Burnt Sienna for the lower third of the canvas. Apply this darker warm tone towards the bottom, getting progressively darker as you reach the bottom edge. -
Add texture clouds:
I like to create faint cloud streaks by taking a mostly dry brush with a lighter peach tone and swiftly dragging it horizontally across the wet sky layers. This adds subtle movement without distinct shapes. -
Ground the painting:
Paint the very bottom inch or two with a mix of Burnt Sienna and a tiny dot of Black to create a heavy base color, suggesting a distant landscape or ground in shadow. -
Let it dry completely:
Allow the background to dry fully. This is crucial because sharp lines painted over wet blending will bleed and look fuzzy.
Step 2: Painting the Wires
-
Plan the placement:
Visualize three slightly angled horizontal lines across the canvas. They shouldn’t be perfectly parallel; a slight sag or tilt makes them look more natural. -
Draft lightly:
You can use a ruler and a pencil to very lightly mark your wire lines, or trust your steady hand to freehand them. -
Mix the wire color:
Load your smallest round detail brush with slightly watered-down Mars Black paint. The ink-like consistency helps create long, smooth lines. -
Paint the wires:
Carefully drag your brush across the canvas to paint the three black utility lines. Try to use your whole arm movement rather than just your wrist to keep the line steady.
Smooth Blending Trick
Work quickly! Acrylic dries fast. Use a retarder medium to extend drying time, or keep a fine mist spray bottle handy to lightly mist the canvas as you blend gradients.
Step 3: Adding the Birds
-
Outline bird shapes:
Using the same small brush and pure black paint, start dabbing small oval shapes resting on the wires. Vary the spacing so they don’t look like soldiers in a row. -
Refine the silhouettes:
Add small circles on top of the ovals for heads. Give some birds tiny beaks pointing left or right, and slightly elongate the tails below the wire to mimic resting swallows or sparrows. -
Vary the poses:
Make some birds look slightly fatter (fluffed feathers) and others sleeker. Looking at the reference, group two close together on the top wire for visual interest. -
Paint the flying birds:
In the upper right corner, paint two very small ‘V’ shapes or checkmarks to represent distant birds in flight. Keep these marks delicate. -
Final inspection:
Step back from the canvas. If any wire lines look too thin or broken, carefully retrace them. Ensure the black paint is opaque and solid.
Personalize the Scene
Add personality to your silhouette line-up. Try painting a musical note pattern with the bird positions, or add a tiny black cat silhouette looking up from the bottom edge.
Hang your new peaceful evening scene in a spot where it can catch the light and warm up the room
Hot Air Balloons Floating Through Soft Clouds
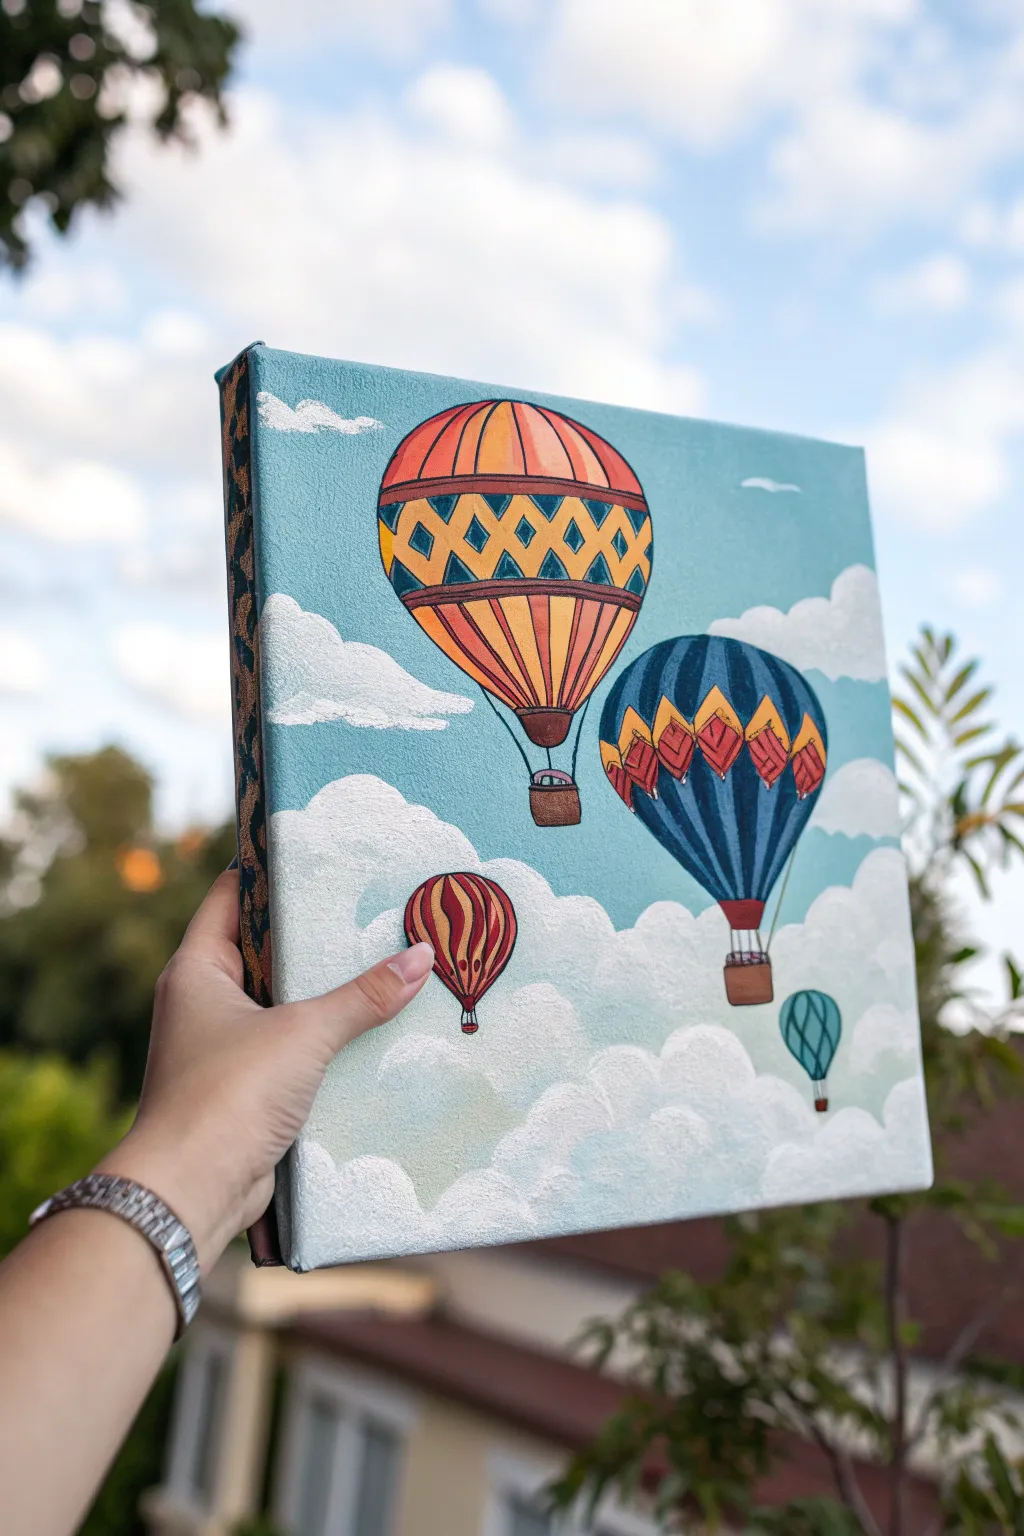
Capture the freedom of flight with this charming acrylic painting of colorful hot air balloons drifting through fluffy clouds. The soft blue backdrop and textured cloud details make this a dreamy addition to any space, perfect for nurseries or creative corners.
Step-by-Step Guide
Materials
- Square stretched canvas (approx. 10×10 or 12×12 inches)
- Acrylic paints: Titanium White, Sky Blue, Phthalo Blue, Cadmium Red, Cadmium Orange, Yellow Ochre, Burnt Sienna, Turquoise
- Flat brush (1 inch) for background
- Medium round brush (size 6 or 8)
- Small liner brush (size 0 or 1) for details
- Palette and water cup
- Pencil for sketching
- Paper plate or mixing tray
Step 1: Setting the Scene
-
Prime the sky:
Begin by covering the entire canvas surface with a solid coat of Sky Blue mixed with a tiny touch of Titanium White. Use your large flat brush for broad, smooth strokes. -
Add the edges:
Don’t forget the sides of the canvas. Extending the base blue color around the edges gives the finished piece a polished, professional look without needing a frame. -
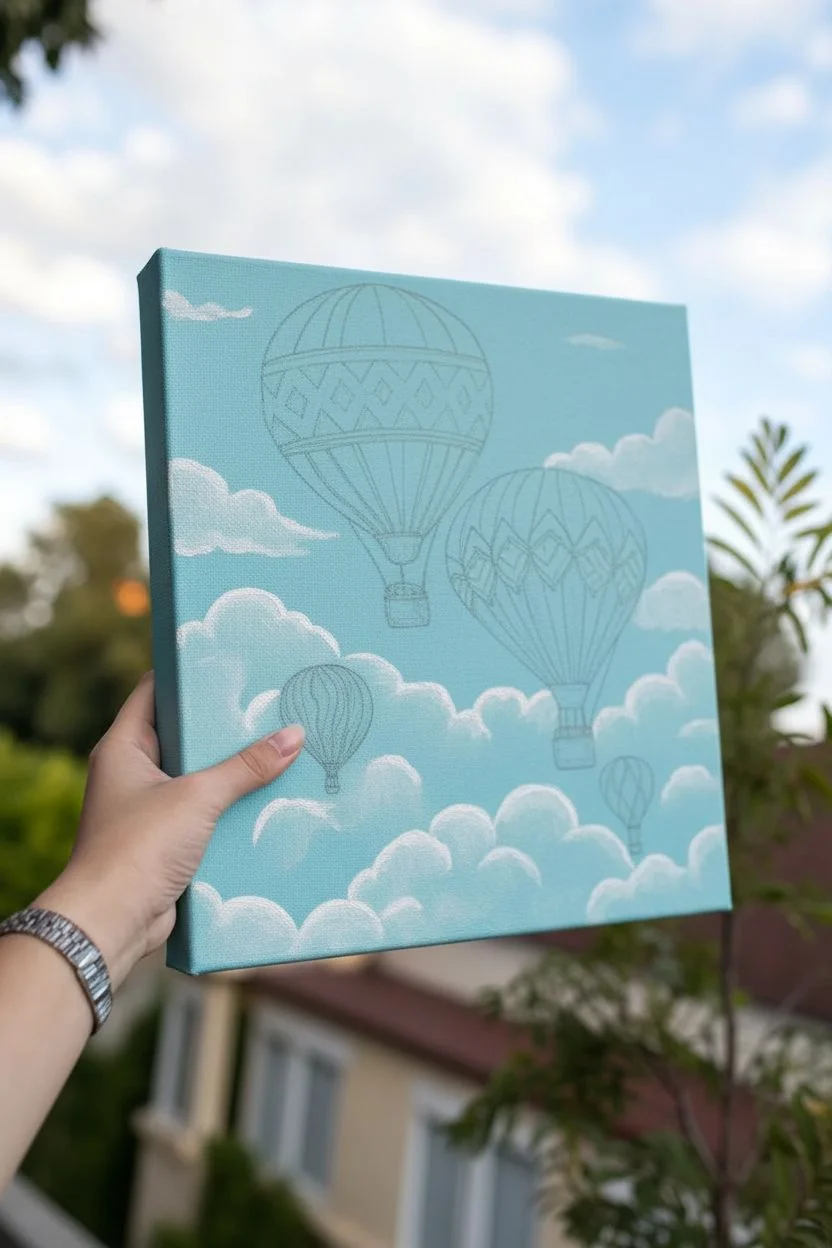
Sketch the layout:
Once the base coat is completely dry, lightly sketch the outlines of four hot air balloons using a pencil. Place the largest orange one near the top left, the medium blue one to the right, and the smaller ones floating below to create depth. -
Draft the clouds:
Lightly outline the fluffy cloud shapes. Keep the lines irregular and bubbly, focusing on a large bank of clouds at the bottom and a few drifting wisps near the larger balloons.
Fixing Shaky Lines
If your balloon ropes or patterns look wobly, wait for them to dry completely. Then use the background sky color to carefully ‘cut in’ and reshape the lines.
Step 2: Painting the Balloons
-
Base coat the large balloon:
Fill in the shape of the largest balloon with a mix of Cadmium Orange and Yellow Ochre. Apply two thin coats if needed for opacity. -
Base coat the blue balloon:
Paint the second-largest balloon using Phthalo Blue mixed with a drop of black or brown to deepen it slightly. This darker tone contrasts beautifully with the sky. -
Fill the smaller balloons:
Paint the small balloon on the left in Cadmium Red and the tiny distant one on the right in Turquoise. -
Detail the orange balloon:
Using your medium round brush and dark brown paint (Burnt Sienna mixed with a touch of blue), paint the basket and horizontal bands on the orange balloon. Add the zig-zag pattern in the middle band using a steady hand. -
Add yellow accents:
Fill the zig-zag diamonds with bright yellow. I like to let this dry briefly before outlining them again with the liner brush to crisp up the edges. -
Detail the blue balloon:
Paint a band of red diamonds or triangles across the upper section of the blue balloon. Use lighter blue streaks vertically to mimic the fabric folds. -
Define the ropes:
Switch to your smallest liner brush. With thinned black or dark brown paint, carefully draw the fine lines connecting the balloons to their baskets. -
Highlight the balloons:
Mix a pale version of each balloon’s main color and add a small curved highlight on the upper left side of each sphere to indicate a light source.
Add Sparkle
Mix a tiny bit of iridescent medium or glitter paint into the white highlights on the balloons. It gives a magical shimmer when the light hits the canvas.
Step 3: Fluffy Cloud Texture
-
Block in the clouds:
Load your medium brush with pure Titanium White. Stipple or dab the paint onto the cloud shapes you sketched earlier. Don’t smooth it out; you want texture. -
Build opaque layers:
Go over the main bodies of the clouds again with thick white paint to ensure the blue background doesn’t show through. Keep the edges soft and rounded. -
Add shadows:
Mix a tiny amount of grey or very light blue into your white. Dab this shadow color along the bottom edges of the cloud puffs to give them volume and 3D form. -
Highlight the tops:
Add a final layer of thick, pure white on the very tops of the clouds to make them pop against the sky. -
Tiny birds:
As a finishing touch, use your smallest brush to paint tiny white ‘v’ shapes in the distance to represent birds flying high above.
Step back and admire your airy creation as the balloons float peacefully across your canvas
Four Mini Canvases Showing the Same Scene in Different Seasons
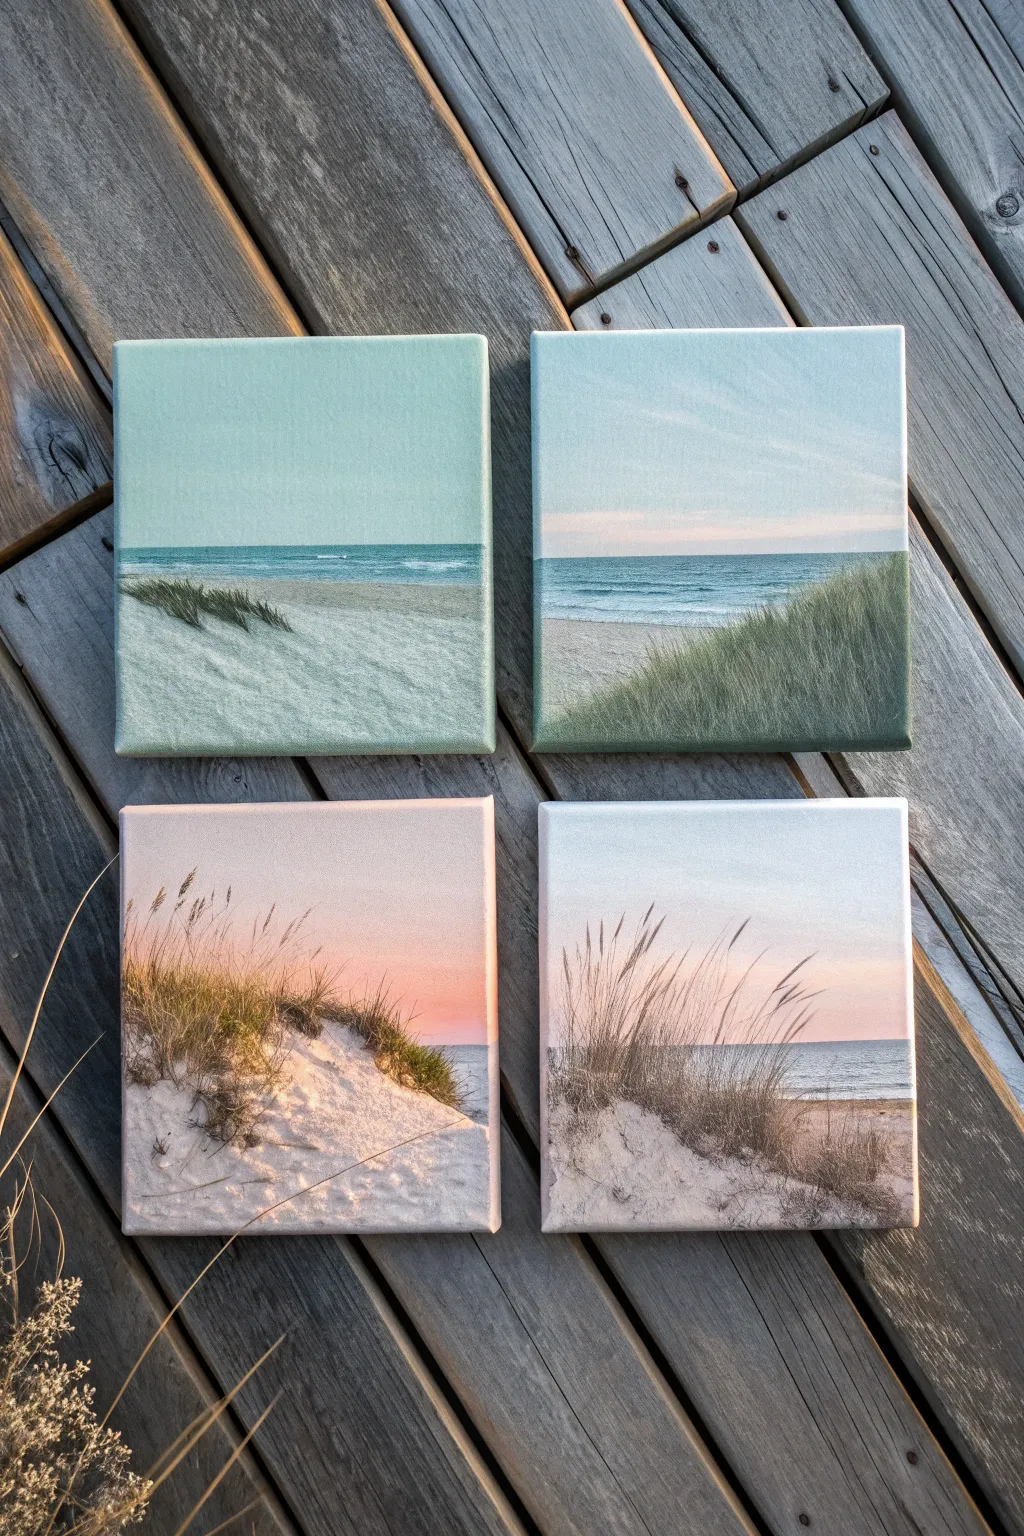
Capture the ever-changing beauty of the shoreline with this set of four mini canvases, each depicting the same tranquil dune scene through a different seasonal lens. From the cool turquoise of summer to the warm pink hues of sunset, this project teaches you how to maintain compositional consistency while playing with atmospheric color.
Detailed Instructions
Materials
- 4 small square stretched canvases (e.g., 6×6 or 8×8 inches)
- Acrylic paints: Titanium White, Phthalo Blue, Ultramarine Blue, Hooker’s Green, Burnt Sienna, Yellow Ochre, Cadmium Red, Alizarin Crimson
- Set of acrylic brushes: 3/4 inch flat wash, #6 filbert, #2 round, and a liner brush
- Palette or paper plate
- Water cup and paper towels
- Pencil and eraser
- Masking tape (optional for horizon lines)
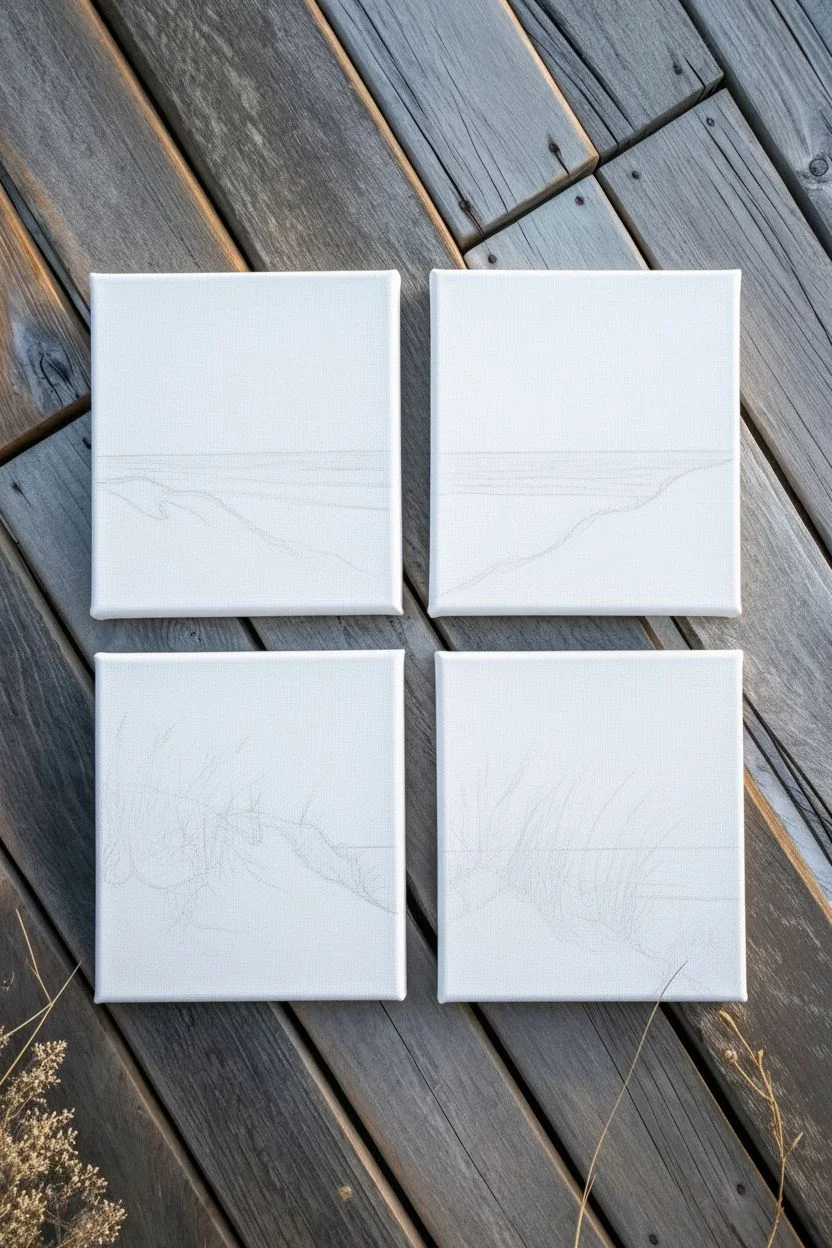
Step 1: Planning and Sketching
-
Standardizing the horizon:
To ensure the four canvases look like a cohesive set, measure the same horizon line on all four. Mark a light pencil line about midway up the canvas. -
Sketching the dunes:
Lightly sketch the swoop of the sand dune in the foreground. Since we want continuity, try to keep the general shape of the dune similar on all four canvases, starting low on the left and rising to the right, though you can vary the exact undulations slightly.
Step 2: Canvas 1: Cool Summer Morning
-
Painting the sky:
Mix a large amount of Titanium White with a tiny touch of Phthalo Blue. Paint the entire sky area with smooth horizontal strokes, keeping the color solid and crisp to mimic a clear, bright morning. -
Adding the ocean:
Using Phthalo Blue and a bit of Hooker’s Green mixed with white, create a vibrant teal for the water. Paint a darker thin line right at the horizon for depth, fading slightly lighter as you come forward. -
Laying the sand base:
Mix Titanium White with a speck of Burnt Sienna to create a very pale off-white sand color. Fill in the foreground dune area. -
Adding dune texture:
Using a dry flat brush, lightly scumble a slightly darker grey-beige (add a touch of blue to your sand mix) over the lower left corner to create shadows in the sand.
Uneven Horizon Lines?
If your ocean line is wobbly, place a piece of masking tape across the canvas where the sky meets the water. Paint the water, let it dry, then peel for a razor-sharp edge.
Step 3: Canvas 2: Mid-Day Lushness
-
Softening the sky:
For this panel, mix white with a touch of Ultramarine Blue for a softer sky. Near the horizon, blend in a very pale warm pink (White + tiny dot of Red) to suggest atmospheric haze. -
A deeper ocean:
Paint the water a slightly deeper blue than the first canvas. Add small horizontal streaks of white to suggest gentle breaking waves. -
Creating the grassy texture:
I like to use a filbert brush for the base of the grass. Mix Hooker’s Green with Yellow Ochre and tap in a dense area of greenery covering the right side of the dune. -
Refining grass blades:
Switch to your liner brush with a lighter green mix (add white/yellow). Flick upward strokes to create individual tall blades of dune grass catching the light.
Pro Tip: Atmospheric Perspective
Make your ocean color slightly lighter and greyer as it nears the horizon line. This subtle fade pushes the distance back, making your tiny canvas feel vast and deep.
Step 4: Canvases 3 & 4: Sunset and Golden Hour
-
Creating the gradient skies:
On the bottom two canvases, you’ll need a wet-on-wet technique. Paint the top of the sky pale blue-grey, blending downwards into a soft peach/pink (White + Alizarin Crimson + Yellow Ochre) near the horizon. -
Warm sand tones:
The sand shouldn’t be white here. Mix White, Burnt Sienna, and a touch of Cadmium Red to create a warm, pinkish-tan sand base that reflects the sunset sky. -
Painting dormant grass:
The grass in these ‘seasons’ is browner. Use your liner brush with a thin, inky mix of Burnt Sienna and Ultramarine Blue to flick in dry, dormant sea oats. -
Adding strong shadows:
Since the sun is setting, the shadows on the dunes will be dramatic. Mix a dark purple-grey and glaze it into the pockets of the sand where the grass clumps sit. -
Detailed foregrounds:
On the bottom left canvas, add some subtle dry-brush detailing in the immediate foreground to look like dried twigs or roots exposed by the wind.
Step 5: Final Unifying Touches
-
Checking the horizons:
Line up all four dried paintings side-by-side. If the water lines don’t match perfectly, carefully retouch them so the ocean feels like one continuous line. -
Bright highlights:
Use pure Titanium White on your smallest brush to add final sparklies on the water or tips of the grass blades on the sunniest canvases.
Display your finished quartet together on a wall or shelf to bring the soothing rhythm of the tides into your home
Bold Geometric Color Blocking With Clean Edges
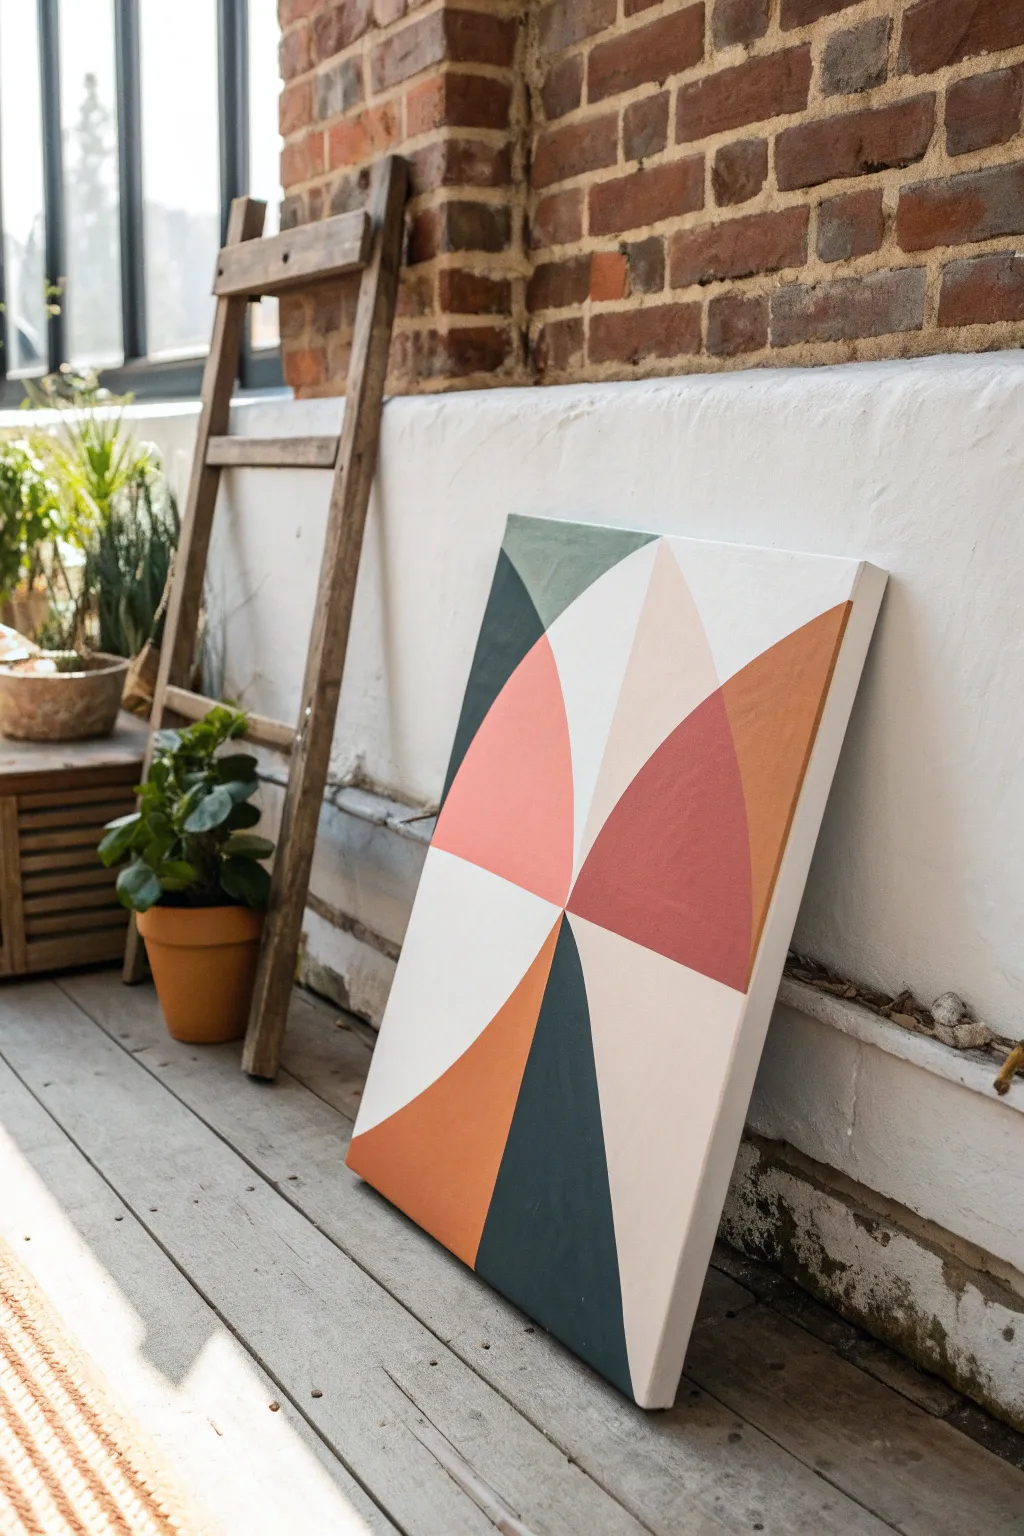

This modern abstract piece combines crisp lines and soft curves with an earthy, muted color palette. The striking interplay of terracotta, deep forest green, and blush tones creates a sophisticated focal point for any minimalist or bohemian space.
How-To Guide
Materials
- Rectangular stretched canvas (e.g., 18×24 inches or similar ratio)
- Acrylic paints: Titanium White, Burnt Sienna, Mars Black, Sap Green, Light Pink/Blush, Yellow Ochre
- Flat shader brushes (3/4 inch and 1/2 inch)
- Small round brush (size 2 or 4) for touch-ups
- Painters tape or masking tape (low tack)
- Pencil
- Ruler or straight edge
- Compass (or a string and pushpin method)
- Palette for mixing
- Jar of water
- Paper towels
Step 1: Planning and Sketching
-
Prepare the canvas:
Ensure your canvas is clean. If you want a smoother surface that minimizes canvas texture, you can apply a quick coat of gesso and sand it lightly once dry, though this is optional. -
Mark the center point:
Using your ruler, measure and mark the exact horizontal and vertical center of the canvas. Draw a very faint vertical line down the middle and a horizontal line across the center to create four precise quadrants. -
Draw the diagonal guides:
Connect the four corners of the canvas to the center point with your ruler. You should now have an ‘X’ crossing through your central ‘plus’ sign, dividing the canvas into eight triangular sections. -
Sketch the curves:
This design relies on curved borders within the triangular sections. Use a compass placed at the center point to draw a large circle that hits the midpoints of your quadrant lines. Alternatively, freehand smooth curves connecting the straight lines to create the ‘pie slice’ shapes seen in the reference. -
Refine the composition:
Look closely at the reference image. Note how some sections remain full triangles while others are rounded off. Erase any lines you don’t need so you have a clean ‘map’ of shapes to paint.
Seal Your Tape
Before painting color, brush a thin layer of your background color (or matte medium) over the tape edge. This seals gaps so the colored paint won’t bleed underneath.
Step 2: Mixing and Blocking Colors
-
Mix the terracotta:
Mix Burnt Sienna with a touch of Titanium White and a tiny dot of Yellow Ochre. You want a warm, earthy clay color. -
Mix the forest green:
Combine Sap Green with a small amount of Mars Black. If it looks too vibrant, dull it down with a microscopic amount of red or the Burnt Sienna you just used. -
Mix the blush and accent tones:
Create a soft blush pink by mixing Titanium White with a very small amount of Red or Deep Pink. Mix a separate darker rust orange by adding less white to your Burnt Sienna base. -
Tape the straight edges:
For the crispest lines, apply painter’s tape along the straight pencil lines of your first color sections. Press the edges of the tape down firmly with your fingernail to prevent bleed. -
Paint the first set of shapes:
Start by painting the sections that aren’t touching each other. Apply the dark forest green to the bottom-center triangle and the top-left curved section. Use smooth, even strokes. -
Apply the warm tones:
While the green dries, move to non-adjacent sections. Paint the large left-side curve with your pinky-terracotta mix, and the right-side curved triangle with the darker rust tone. -
Remove tape carefully:
Peel back the tape while the paint is still slightly tacky—this often helps prevent the dry paint film from ripping. Pull at a 45-degree angle away from the painted area.
Add Texture
For a trendier look, mix baking soda or modeling paste into your acrylics. It creates a plaster-like, gritty texture that adds depth to the simple geometric shapes.
Step 3: Finishing Touches
-
Handle the curved edges:
Since tape is hard to curve perfectly, use your flat brush to carefully cut in the curved edges freehand. Load the brush with paint and use the chisel edge to drag a smooth curve. -
Fill remaining sections:
Paint the remaining white/cream sections. Even if your canvas is white, painting these shapes with Titanium White mixed with a tiny drop of brown creates a richer, intentional ‘off-white’ look. -
Second coats:
Once the first layer is completely dry to the touch, assess the opacity. I usually find that the lighter blush and off-white sections need a second coat to look solid and professional. -
Touch up the lines:
Inspect where your colors meet. If there’s a gap or a shaky line, use your smallest round brush with a little water to tidy up the intersections. -
Paint the canvas sides:
Decide if you want to wrap the design around the edges or paint the sides a solid color. A solid white or black edge frame looks very crisp. -
Final varnish:
Allow the painting to cure for at least 24 hours. Protect your work with a coat of matte or satin varnish to unify the sheen of the different paint colors.
Hang your new geometric masterpiece in a spot with good light to show off those crisp lines and earthy hues
Textured Landscape Using Palette Knife Marks
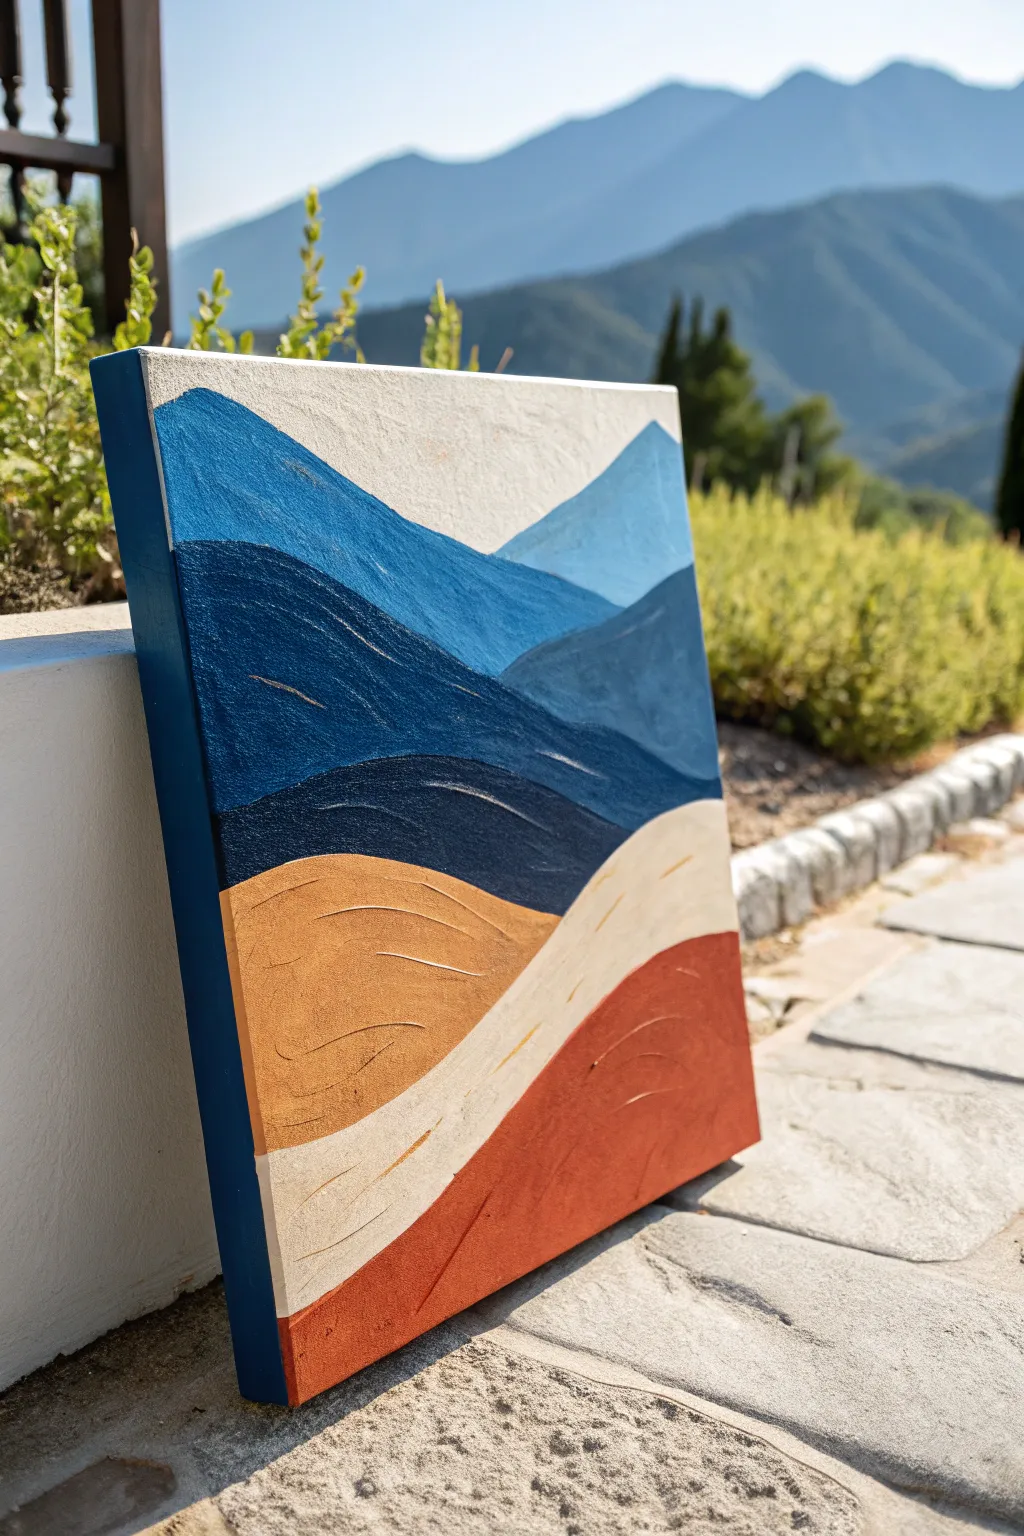
This project captures the essence of a mountain vista using bold, simplified shapes and heavy texture to create a sense of depth and movement. By layering distinctive bands of color with visible palette knife strokes, you’ll create a semi-abstract landscape that feels both modern and tactile.
Step-by-Step
Materials
- Square stretched canvas (approx. 12×12 or 16×16 inches)
- Heavy body acrylic paints (White, Phthalo Blue, Navy Blue, Burnt Sienna, Terra Cotta/Rust, Yellow Ochre)
- Modeling paste (optional, for extra texture)
- Palette knives (small and medium diamond shapes)
- Flat synthetic brush (1 inch)
- Pencil
- Painter’s tape or masking tape
- Mixing palette
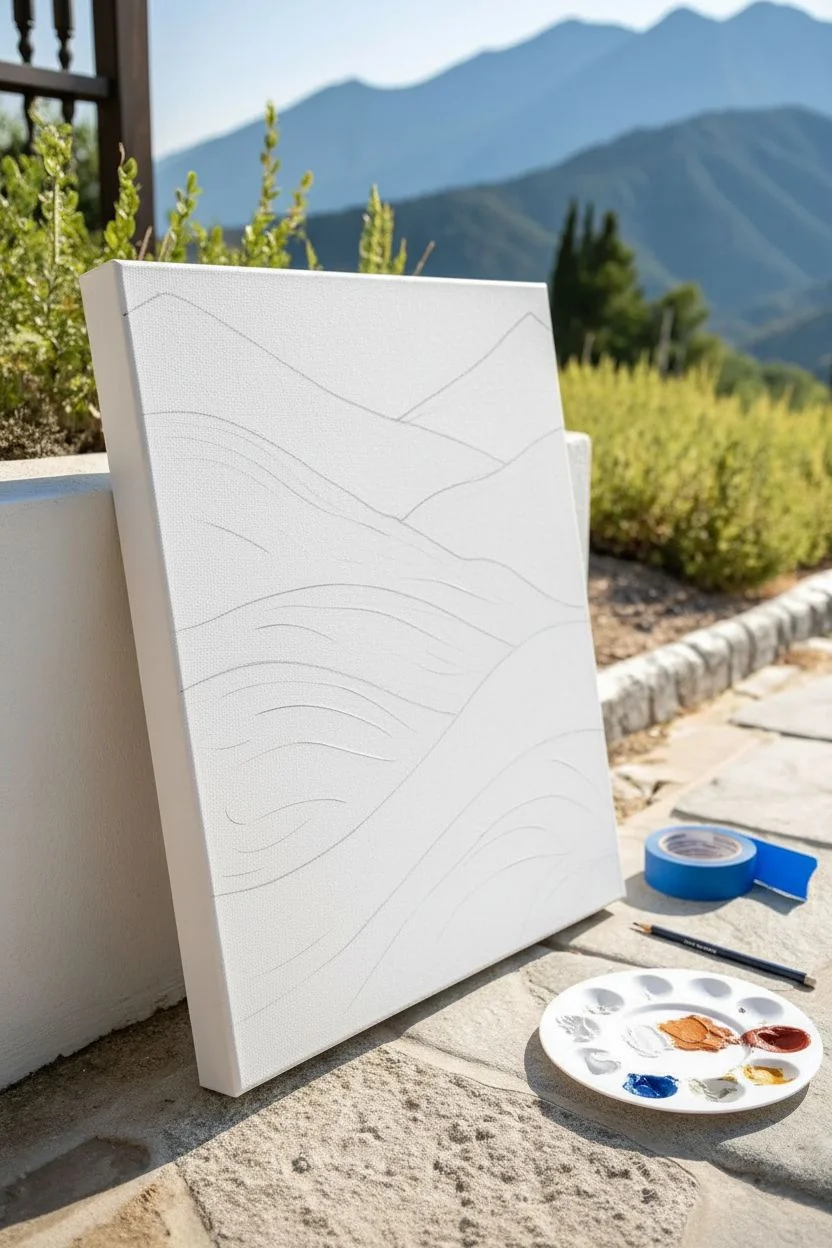
Step 1: Planning and Preparation
-
Analyze the Composition:
Begin by observing the flow of the landscape. Notice how the image is divided into distinct, wavy bands of color rather than realistic blending. It starts with sky at the top, moves through blue maintain peaks, transitions to navy foothills, and finishes with ochre and rust-colored foreground dunes. -
Sketch the Contours:
Lightly sketch the undulating lines of the mountains and hills onto your canvas with a pencil. Don’t worry about perfect realism; you want smooth, sweeping curves that overlap each other slightly to suggest distance. -
Prepare the Canvas Edges:
Apply painter’s tape to the back edges of your canvas if you want to keep the back clean, though for this gallery-wrapped style, painting the sides is an essential part of the finished look. -
Base Color Mixing:
Squeeze out your heavy body acrylics onto the palette. You will need to mix a few specific shades: a light sky blue (mostly white with a touch of blue), a medium denim blue, a deep navy, a warm ochre/sand color, and a reddish rust tone.
Sticky Situation?
If your paint is too thin and won’t hold the knife peaks, mix in a dollop of modeling paste or gel medium. This stiffens the acrylics instantly for better texture.
Step 2: Painting the Sky and Mountains
-
Paint the Sky Band:
Start at the very top. Mix a large amount of white with a tiny dot of blue. Using a clean palette knife or a flat brush, apply this pale mixture to the top section. If using a knife, spread it like frosting to create varied ridges. -
First Mountain Peak:
For the distant right peak, use a light steel-blue mix. Apply this shape so it overlaps slightly with the white sky while the paint is still wet, or wait for the sky to dry for sharper edges. -
The Main Blue Range:
Mix a vibrant medium blue. Using your palette knife, apply the paint thickly to the large mountain shape on the left. Pull the knife across the canvas horizontally to create directional texture that mimics the strata of rock. -
Adding Dark Depths:
Mix your deepest navy blue. Apply this to the band directly below the main blue mountains. This section acts as the shadow or the deepest valley. Press harder with the knife in some areas to let the texture of the canvas show through slightly if desired, or pile it on for high relief. -
Paint the Sides:
As you complete each color band, extend the paint around the sides of the canvas. This creates a professional, finished object that looks great from any angle without a frame.
Step 3: Foreground and Finishing Touches
-
The Ochre Dune:
Clean your palette knife thoroughly. Pick up the yellow ochre mixed with a little white to soften it. Apply this to the curved hill section below the navy line. -
Creating Movement:
While the ochre paint is wet, use the edge of your clean knife to gently score shallow, curved lines into the paint surface. These indentations add subtle detail that catches the light. -
The Sandy Path:
Below the ochre hill, paint a flowing band of creamy beige or off-white. This acts as a visual separator, breaking up the strong colors. I find using a smaller palette knife helps navigate these narrower curves. -
The Rust Foreground:
For the bottom-most section, use the terracotta or rust color. Apply this heavily, anchoring the bottom of the composition with this warm, visual weight. -
Refining Texture:
Look over the whole piece. If any areas look too flat, mix a bit more of that color (perhaps slightly lighter or darker) and dab it on top with the flat of the knife to build up the relief. -
Adding Highlights:
To enhance the sense of dimension, you can drag a very small amount of white paint barely grazing the tops of the texture ridges on the blue mountains. This is called ‘dry grazing’ and emphasizes the rough surface. -
Final Side Check:
Ensure all the color bands on the sides of the canvas line up perfectly with the front face of the painting. -
Drying Time:
Because the paint application is thick, allow the painting to dry flat for at least 24 to 48 hours. The outer skin will dry first, but the thickest ridges need time to cure underneath.
Metallic sheen
Mix a tiny drop of iridescent or metallic medium into the navy blue section. It will catch the light subtly in a dim room, making the ‘valley’ shimmer.
Once fully cured, your tactile landscape provides a stunning pop of color and modern design energy to any room.
Fluid Marble Background With Simple Line Art on Top
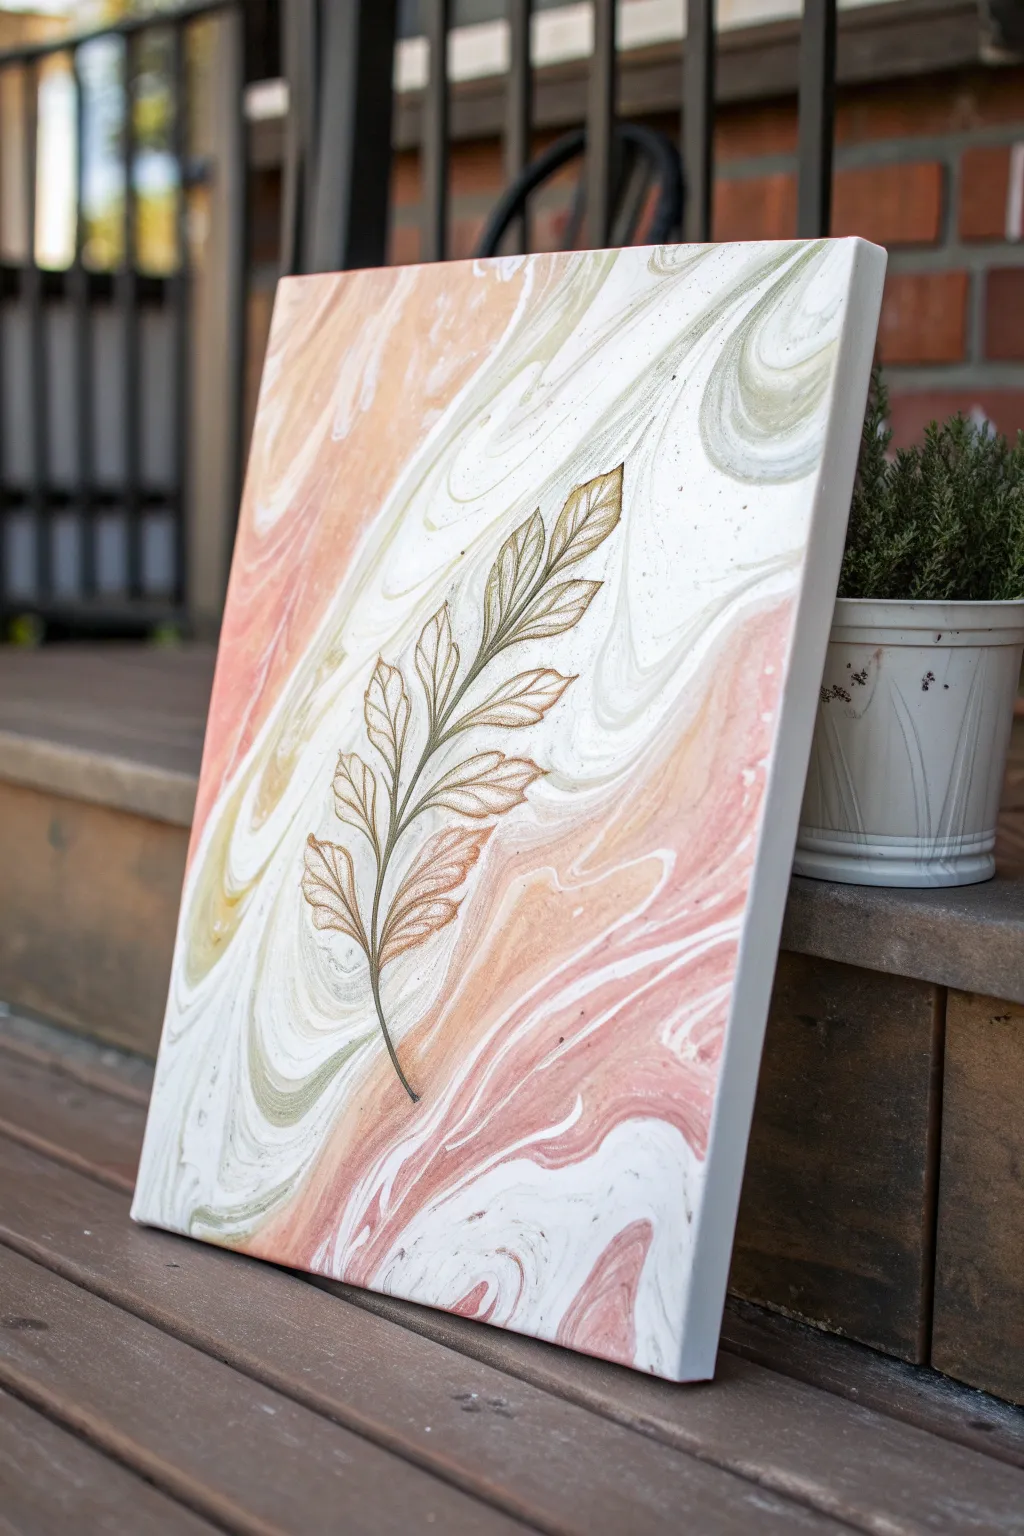
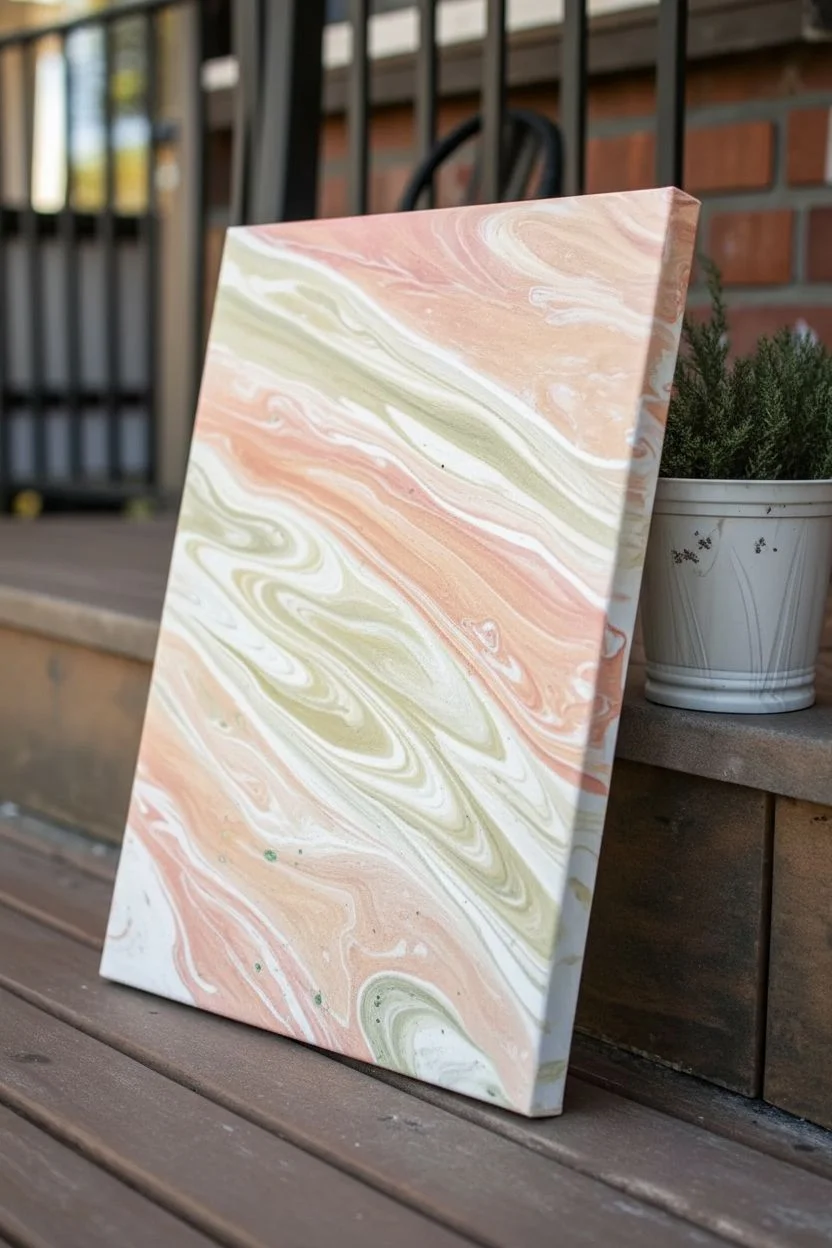
This elegant project combines the unpredictability of fluid art with the precision of line drawing. You’ll create a soft, swirling background in peach and sage tones before adding a delicate botanical illustration that seems to float on the surface.
Step-by-Step Tutorial
Materials
- Stretched canvas (11×14 or similar size)
- Acrylic paints (White, Peach/Coral, Sage Green, Beige)
- Pouring medium
- Silicone oil (optional, for cells)
- Plastic cups and stirring sticks
- Paint marker (Gold or Bronze, fine tip)
- Fine liner brush (optional)
- Varnish or clear coat
Step 1: Preparing the Pour
-
Mix your base colors:
Begin by setting up four separate cups. Pour a generous amount of white acrylic paint into one cup, and distribute your peach, sage green, and beige paints into the other three. The white will be your primary negative space color. -
Add pouring medium:
Add pouring medium to each cup. A standard ratio is 1 part paint to 2 parts pouring medium, but check your specific brand’s instructions. Stir each cup thoroughly until the consistency resembles warm honey. -
Check consistency:
Lift your stirring stick out of the cup. The paint should flow off in a smooth, continuous stream without breaking. If it’s too thick, add a few drops of water; if it’s too thin, add a touch more paint.
Clean Edges Trick
Before pouring, tape the back edges of your canvas with painter’s tape. Once the painting is dry, peel the tape off for perfectly clean back edges.
Step 2: Creating the Marble Background
-
Layer the dirty pour cup:
Take a clean, empty cup. Start by pouring a layer of white at the bottom. TILT the cup slightly and gently pour the sage green down the side, followed by the peach, then the beige. Repeat this layering process until the cup is nearly full. -
Pour onto canvas:
Starting at one corner of the canvas, slowly pour the contents of your dirty cup in a ribbon-like motion across to the opposite corner. I like to move diagonally to create a dynamic flow. -
Tilt and stretch:
Gently pick up the canvas and tilt it slowly. Let the paint stretch and flow to cover the corners and edges. The goal is to elongate those bands of color to mimic the striations found in marble. -
Refine the composition:
Continue tilting until you are happy with the movement of the swirls. If you have excess paint, let it drip off the edges to ensure a smooth, level surface. -
Let it cure completely:
This is crucial: place the canvas on a level surface raised by cups to dry. Fluid art takes much longer to dry than standard acrylics—allow at least 24 to 48 hours for it to fully cure before moving to the next phase.
Step 3: Adding the Line Art
-
Sketch the stem:
Once the background is rock hard, lightly sketch a curved central stem using a pencil. Follow the natural flow of the marble pattern; let the line glide along the swirls rather than fighting against them. -
Outline the leaves:
Using your gold or bronze paint marker, draw the central stem first. Then, add pairs of leaves branching outward. Keep the leaves simple and oval-shaped with pointed tips. -
Add interior details:
Draw a central vein down the middle of each leaf. From there, add small, delicate diagonal lines for the smaller veins. Don’t worry about perfect symmetry here; organic irregularities make it look more natural. -
Layer for opacity:
Metallic markers can sometimes be translucent. If the background colors show through too much, let the first layer of ink dry for a few minutes and retrace your lines for a bolder, more opaque finish. -
Seal the artwork:
Wait for the marker ink to dry completely (usually 1 hour). Apply a coat of gloss varnish or clear resin to deepen the background colors and protect the delicate line work.
Add Texture
Instead of a marker, use heavy body acrylic paint in a piping bag with a fine tip to create a raised, 3D texture for the leaf outlines.
Display your botanical marble piece in a spot with good natural light to catch the metallic shimmer


Have a question or want to share your own experience? I'd love to hear from you in the comments below!