If you’ve ever played with acrylic paint on wood, you know the grain can either fight you or become your favorite collaborator. These acrylic painting on wood ideas are the kind I keep coming back to—easy to start, super giftable, and honestly just really satisfying to make.
Mini Mountain Sunset on a Wood Round
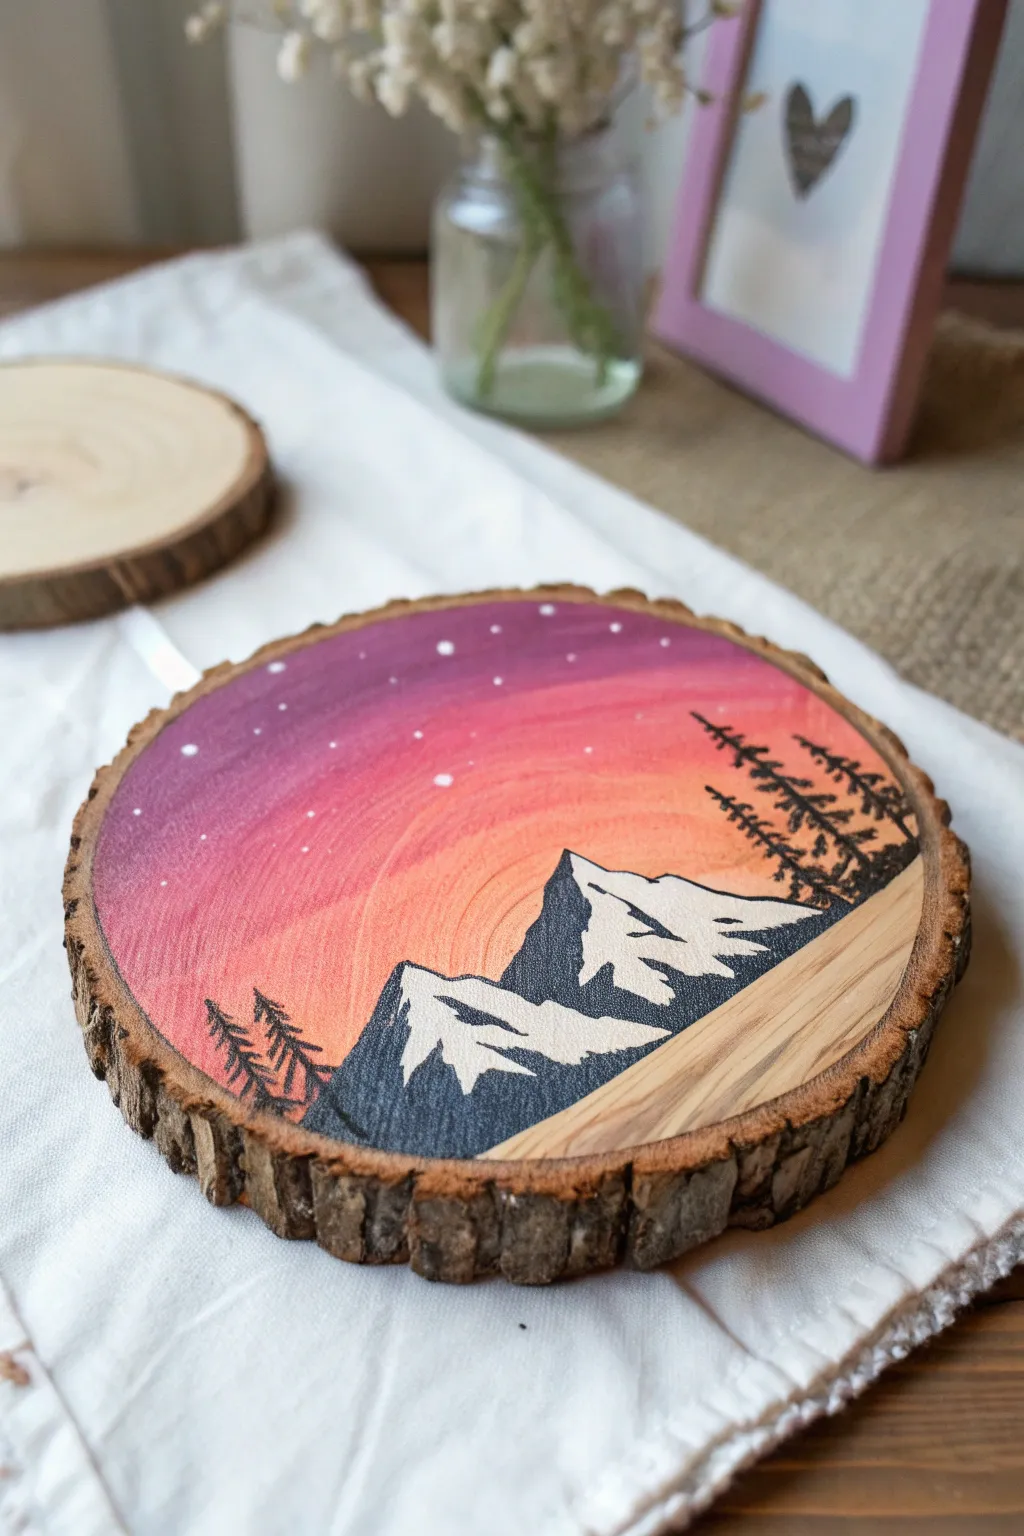
Capture the serene beauty of twilight in the wilderness with this vibrant wood slice painting. The natural grain of the wood complements a stunning gradient sky that fades from deep purple to soft orange, framing jagged snowy peaks.
Step-by-Step
Materials
- Wood slice (approx. 4-6 inches in diameter, with bark edge)
- Acrylic paints: Violet, magenta/fuschia, orange, white, black
- Flat shader brush (size 10-12)
- Small round detail brush (size 0 or 00)
- Painter’s tape or masking tape
- Water cup and paper towels
- Palette or mixing plate
- Matte or satin varnish (optional for sealing)
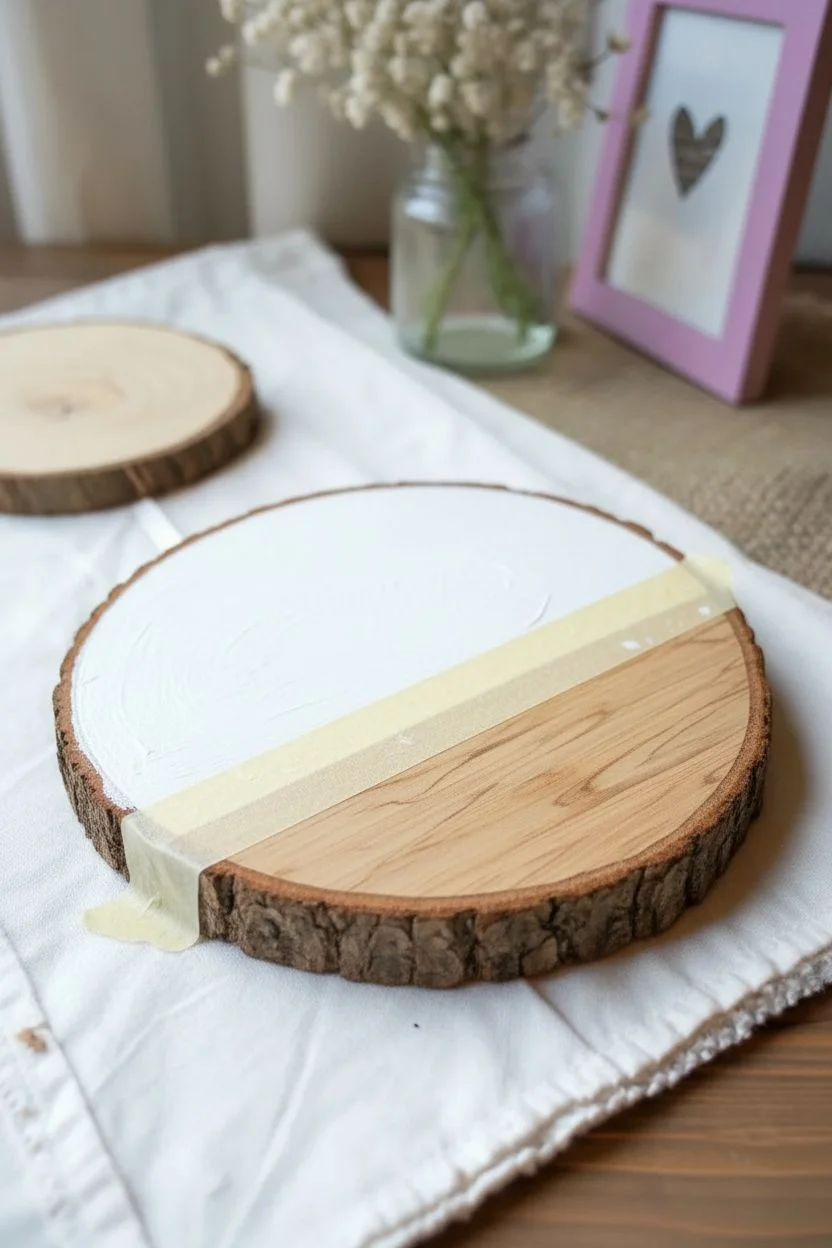
Step 1: Preparing and Blocking
-
Tape the horizon:
Begin by deciding where your ground line will be. Apply a strip of painter’s tape across the lower third of the wood slice at a slight diagonal angle. This will keep the wood grain area below crisp and unpainted. -
Seal the tape edge:
To ensure a super sharp line, press the tape down firmly. You can even apply a tiny amount of clear matte medium or white paint along the tape edge to prevent colored paint from bleeding underneath. -
Base coat the sky:
Using your flat shader brush, apply a coat of white acrylic paint to the entire area above the tape. This provides a bright base so your sunset colors pop against the wood grain.
Bleeding Lines?
If paint bled under your tape onto the raw wood, use a precision craft knife to gently scrape away the excess paint, or sand it lightly with fine-grit sandpaper.
Step 2: Painting the Sunset Gradient
-
Apply the top band:
Start at the very top arc of the wood slice with your violet or deep purple paint. Brush horizontally, covering about the top third of the sky area. -
Add the middle tones:
Without cleaning your brush thoroughly, pick up the magenta color. Paint directly below the purple, blending the two colors where they meet while the paint is still wet to create a smooth transition. -
Finish with the horizon:
Clean your brush and pick up the orange paint. Fill the bottom section just above the tape line. Blend it upward into the magenta, adding a tiny touch of white if needed to soften the glow near the horizon. -
Dry thoroughly:
Let the gradient dry completely. If the wood grain is still showing through too much for your liking, repeat the gradient steps for a second opaque layer.
Blending Like a Pro
Acrylics dry fast! Keep a misting spray bottle of water nearby to keep your paints slightly damp on the wood, making that purple-to-orange gradient much smoother.
Step 3: Adding the Mountains
-
Outline the peaks:
Using a small round brush and black paint, carefully outline triangular mountain shapes. Start the base of the mountains about half an inch above your tape line to leave room for the distant glow. -
Fill the mountains:
Fill in the mountain shapes with solid black. Extend the black paint all the way down to a conceptual line just above your tape, creating a solid silhouette against the colorful sky. -
Create snow caps:
Once the black is dry, take your smallest detail brush and white paint. Paint jagged shapes on the right highlighting side of each peak to represent snow. I find dragging the paint lightly creates a nice textured rock effect. -
Add shadow detail:
Mix a tiny dot of black into your white to make a light grey. Add very subtle strokes on the shadowed (left) side of the snow caps to give the mountains dimension.
Step 4: Final Details
-
Add the trees:
Using black paint and your finest brush or the very tip of a round brush, paint vertical lines on the far left and right edges. Tap the brush horizontally starting from the top of the line moving down, getting wider at the bottom, to create pine tree silhouettes. -
Paint the stars:
Dip the tip of a toothpick or the handle end of a small brush into white paint. Gently dot a few stars into the darker purple section of the sky. -
Remove the tape:
Ideally when the paint is dry to the touch but not fully cured, carefully peel back the painter’s tape to reveal the clean wood grain ground below. -
Seal the artwork:
Once the entire painting is completely dry (give it a few hours), apply a clear varnish over the painted area (or the whole slice) to protect the colors and prevent the wood from warping over time.
Display your rustic miniature landscape on a small easel or add a hook to the back for instant cabin-vibes decor


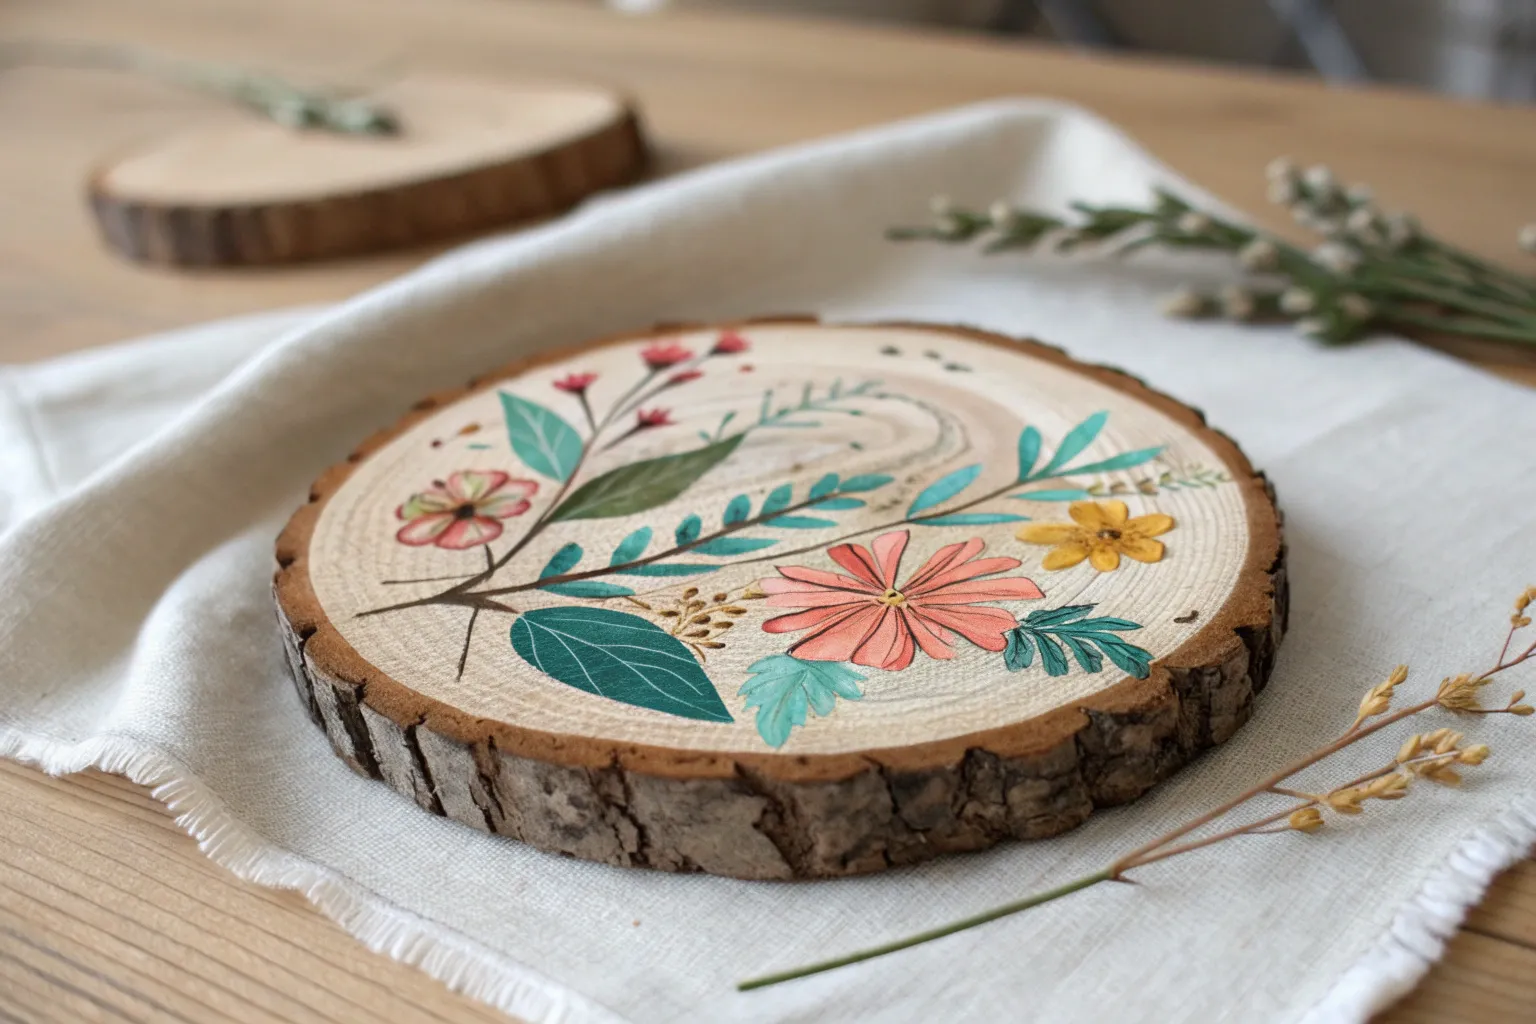
Wildflower Bouquet on Reclaimed Wood
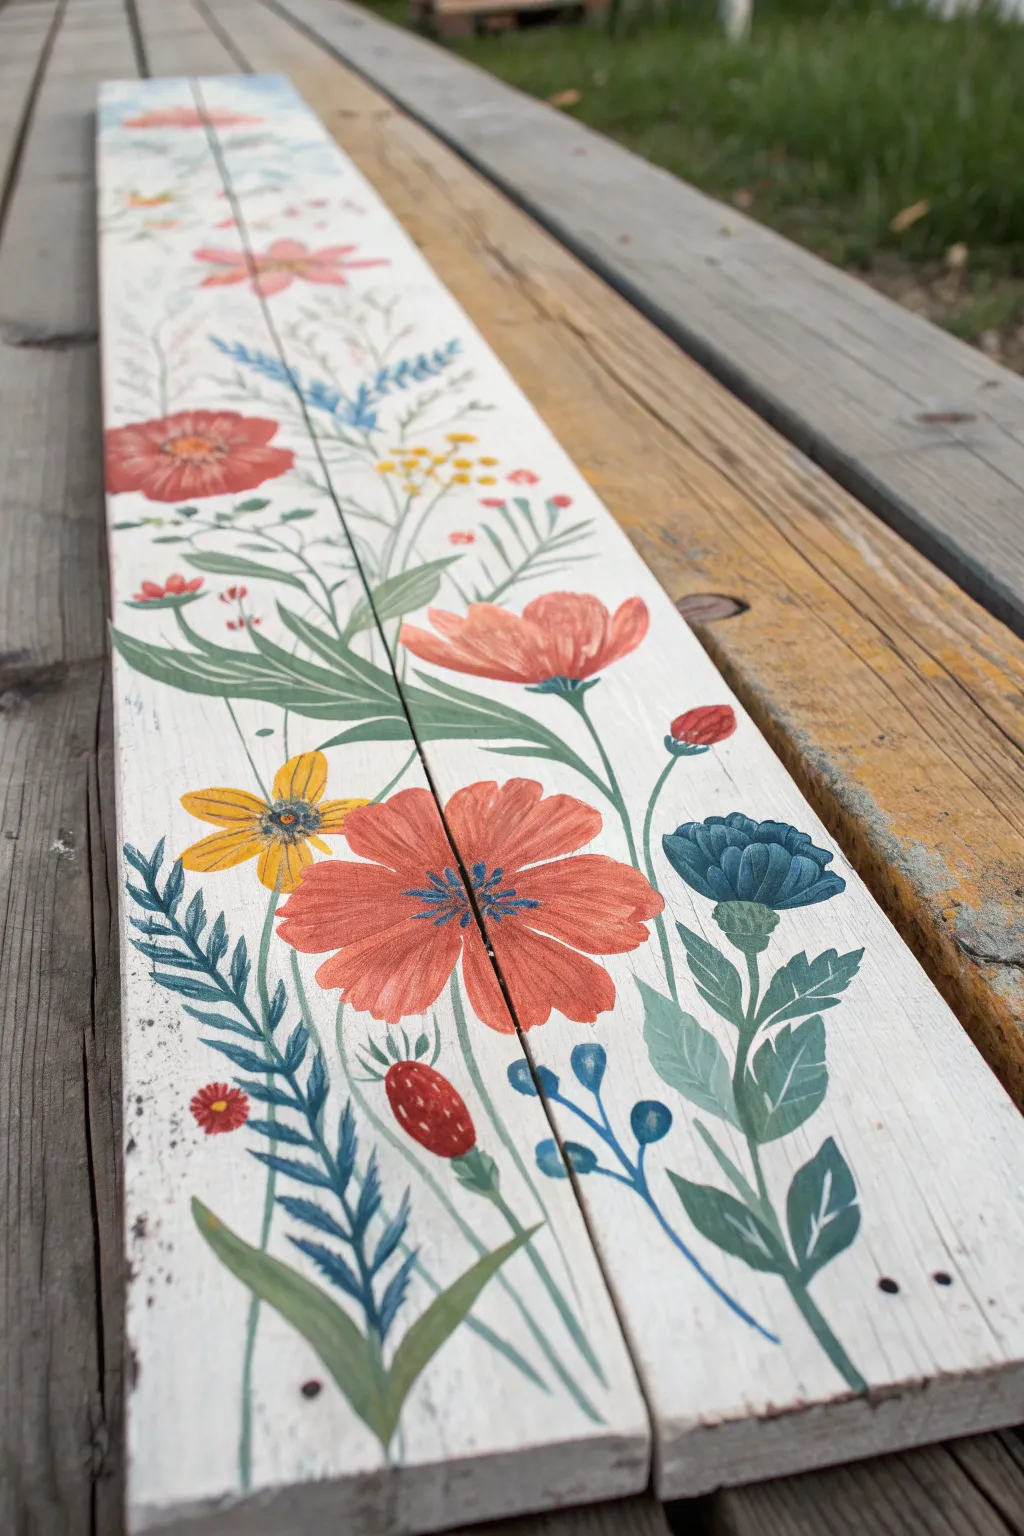
Transform rustic, weathered lumber into a blooming vertical garden with this delicate wildflower painting tutorial. The finished piece features a charming, folk-art style bouquet stretching across white-washed wood, perfect for bringing a touch of eternal spring to your porch or entryway.
How-To Guide
Materials
- Reclaimed wood plank (approx. 3-4 feet long, 6-8 inches wide)
- Sandpaper (100 and 220 grit)
- White acrylic paint or chalk paint (warm white)
- Acrylic craft paints (coral red, mustard yellow, sage green, forest green, deep blue, burnt sienna)
- Assorted brushes (1-inch flat brush, #4 round brush, #0 or #00 liner brush)
- Pencil
- Palette or paper plate
- Paper towels and water cup
- Matte clear sealant spray
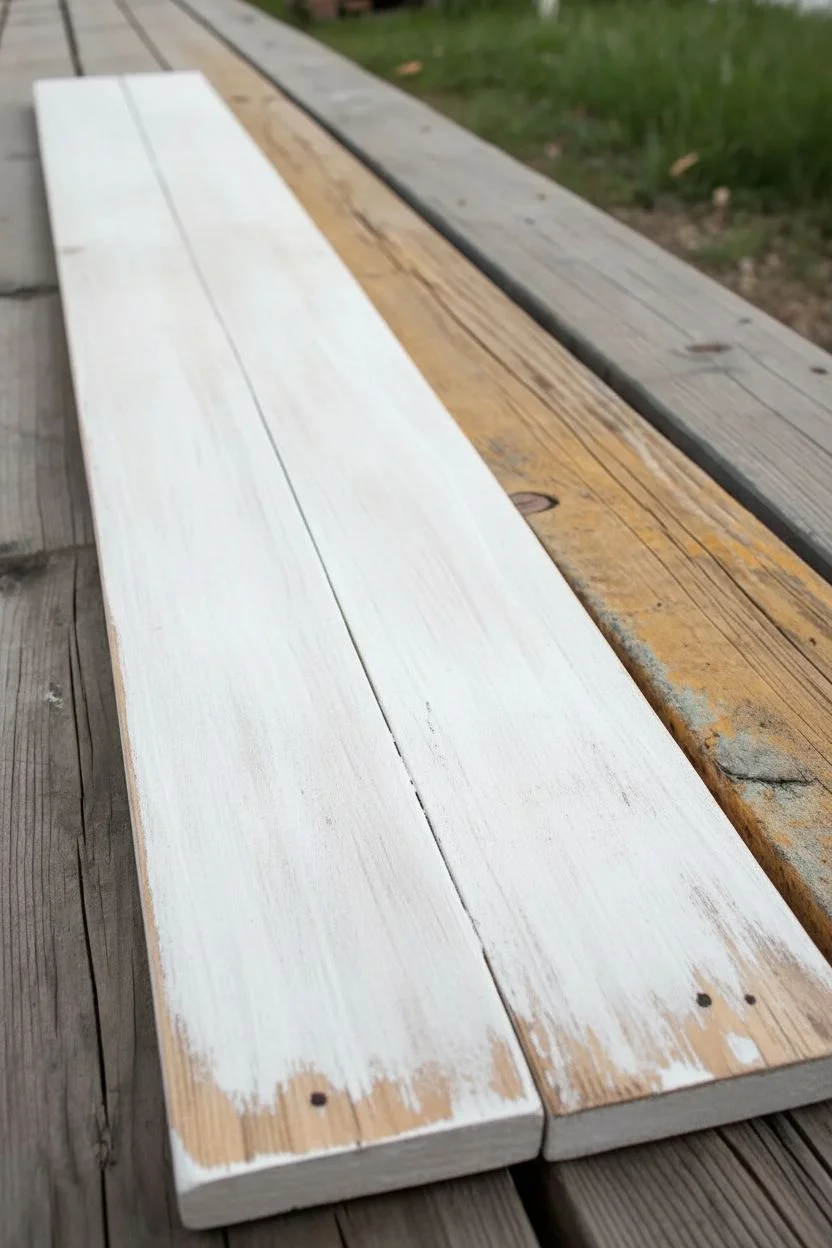
Step 1: Preparation & Base Coat
-
Clean the surface:
Begin by scrubbing your reclaimed wood with a stiff brush to remove loose dirt and moss. If the wood is damp, let it dry completely in the sun for several days before starting. -
Sand for texture:
Lightly sand the surface with 100-grit sandpaper to remove splinters, but don’t smooth it out completely. We want to keep that rustic character. Follow up quickly with 220-grit just to soften the painting area. -
Apply the wash:
Mix your white paint with a little water (about a 2:1 ratio) to create a wash. Apply this freely over the entire front face of the board. -
Distress the background:
Before the white wash fully cures, take a damp rag or a sanding block to the edges and raised grain areas. Wipe away some paint to let the natural wood color peek through, creating an aged look.
Step 2: Drafting the Design
-
Establish the stem flow:
Using a pencil, very lightly sketch long, sweeping S-curves starting from the bottom corners and reaching toward the top center. These will be your main stems. -
Mark flower placement:
Sketch circles and ovals where your main blooms will sit. Place the largest coral flower slightly below the center for visual weight, with smaller blooms floating higher up.
Flow & Movement
Avoid stiff stems by holding your brush loosely near the end of the handle. Let your wrist rotate naturally to create organic, winding curves that mimic real wildflowers.
Step 3: Painting the Foliage
-
Paint main stems:
Load a #4 round brush with thinned sage green. Paint the long stems using a confident, smooth stroke. I find that pulling the brush toward you helps keep lines steady over the rough wood grain. -
Add broad leaves:
Using the same sage green, press the belly of the brush down and lift as you pull away to create tapered, broad leaves near the base of the stems. -
Create fern details:
Switch to deep blue mixed with a touch of green. Using a liner brush, paint the fern-like fronds on the left side, using quick, short strokes for the individual needles. -
Layer darker leaves:
Add forest green leaves in the gaps. Varying your greens gives the bouquet depth and makes it look lush.
Paint Bleeding?
Reclaimed wood is thirsty and porous. If paint bleeds into the grain, switch to a heavier body acrylic and use less water on your brush. A clear sealer base coat also helps.
Step 4: Adding the Blooms
-
Base coat the main flowers:
Paint the large flower petals using coral red. Don’t worry about details yet; just fill in the basic shapes of the petals with solid color. -
Add the yellow accents:
Paint the small, daisy-like flower on the left with mustard yellow petals. Use the tip of your round brush to create teardrop shapes radiating from a center point. -
Paint the blue carnation:
Use your deep blue paint for the carnation-style flower on the right. Create layers of scalloped edges to mimic ruffled petals. -
Detail the strawberry:
Near the bottom center, paint a small, rounded triangular shape in deep red for the wild strawberry. Once dry, add tiny yellow dots for seeds. -
Layer highlights:
Mix a little white into your coral paint. Add thin streaks to the petals of the main flowers to suggest texture and light hitting the bloom. -
Paint the centers:
Add centers to your flowers using contrasting colors. Use dark blue for the coral flowers and burnt sienna for the yellow daisy.
Step 5: Refining Details
-
Add wispy extras:
Using your thinnest liner brush and watered-down paint, add tiny sprigs, buds, and extra stems filling the negative white space at the top. -
Define the stamens:
Paint delicate lines radiating from the flower centers using a dark color, tipping them with tiny dots of yellow or white pollen. -
Final weathering:
Once the painting is bone dry, lightly scuff a few painted areas with sandpaper if you want the flowers to look as weathered as the board. -
Seal the piece:
Spray the entire board with a clear matte sealant to protect your work from moisture and UV fading.
Hang your new floral masterpiece vertically and enjoy the blooming colors year-round


Cute Bee and Honeycomb on a Wood Slice

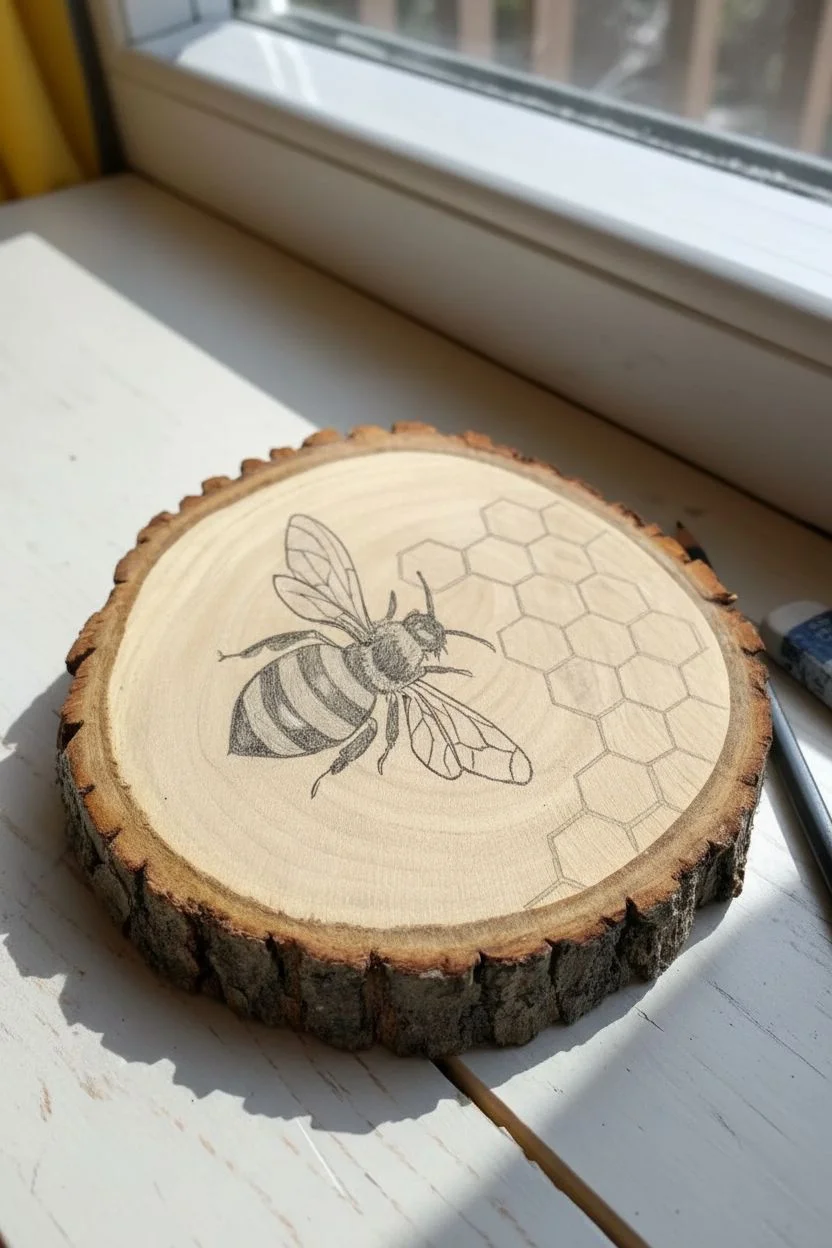
Bring the buzz of summer indoors with this charming wood slice art project, featuring a realistic honeybee resting beside a geometric honeycomb pattern. The natural wood grain provides a perfect rustic backdrop for the warm yellows and crisp black details.
Step-by-Step Tutorial
Materials
- Wood slice (approx. 4-5 inches diameter, with bark)
- Fine-grit sandpaper
- Pencil and eraser
- Black fine-point pigment liner or very fine detail brush
- Acrylic paints: Cadmium Yellow, Yellow Ochre, Titanium White, Black
- Small round paintbrushes (sizes 0 and 2)
- Small flat brush
- Water cup and palette
- Matte or satin clear sealant spray
Step 1: Preparation & Sketching
-
Prep the surface:
Ensure your wood slice is clean and dry. If the surface feels rough, gently sand the face with fine-grit sandpaper until it’s smooth to the touch, then wipe away all dust with a damp cloth. -
Map out the composition:
Using a pencil, lightly sketch the outline of the bee on the left side of the slice. Position the body diagonally, pointing toward the center. -
Draw the honeycomb grid:
On the right side, sketch a series of connecting hexagons. Don’t worry about making them mathematically perfect; organic variation adds character. Let the pattern trail off toward the bottom edge. -
Refine the bee details:
Add the internal details to your bee sketch, marking the stripes on the abdomen, the sections of the thorax, and the delicate vein patterns in the wings.
Smooth Surface Secret
Before painting, prime just the area where you will paint with a layer of clear matte medium or gesso. This stops the paint from bleeding into the wood grain.
Step 2: Painting the Honeycomb
-
Base layer for honey:
Mix a wash of Yellow Ochre with a tiny bit of water to make it semi-transparent. Paint the inside of random hexagons, leaving some empty to show the wood grain. -
Adding dimension:
Take un-thinned Yellow Ochre and paint a crescent shape along the bottom and right edges of each filled hexagon. This simple trick creates a shadow effect that simulates liquid depth. -
Highlighting the cells:
Mix a pale yellow using Titanium White and a dot of Cadmium Yellow. Add a small swoop or dot near the top left of the filled cells to simulate a glossy reflection. -
Outlining the comb:
Using a fine brush with thinned brown paint (mix black and ochre) or a brown liner pen, carefully trace the hexagon outlines. Keep the lines relatively thin but distinct.
Shaky Hands?
If painting fine details like wing veins is difficult, switch to a permanent pigment micron pen (size 01 or 03) after the acrylic base is fully dry.
Step 3: Painting the Bee
-
Underpainting the wings:
Apply a very thin, watery wash of Titanium White to the wing areas. You want them to look milky and translucent, not solid white. -
Blocking in the yellow:
Paint the yellow stripes on the bee’s abdomen using bright Cadmium Yellow. I like to let this dry briefly and add a second coat for vibrancy if the wood soaks up too much pigment. -
Adding the black body:
With your smallest brush and black acrylic, fill in the head, the thorax (fuzzy middle section), and the black stripes of the abdomen. Be careful not to paint over the legs or wings yet. -
Creating texture:
To make the thorax look fuzzy, stipple tiny dots of yellow ochre over the black base while it’s still slightly tacky, or wait until dry and dry-brush a little grey/blue highlight on top. -
Painting the legs and antennae:
Using a fine liner or a 00 brush with slightly watered-down black paint (ink consistency), draw the delicate legs and segmented antennae. -
Wing details:
With the same fine tool/brush, carefully trace the veins inside the wings. Keep your hand light; these lines should be hairline thin. -
Final highlights:
Add tiny dots of pure white to the bee’s eyes and the top of the thorax to bring the creature to life.
Step 4: Finishing Touches
-
Clean up sketch lines:
Once the paint is absolutely completely dry, gently erase any visible pencil marks remaining around the edges of your design. -
Protect your work:
Spray the entire face of the wood slice with a clear matte or satin sealant. This prevents the wood from drying out further and protects your delicate painting from scratches.
Display your new bee art on a shelf or attach a hanger to the back to create a rustic wall ornament


Simple Leaf Study That Follows the Wood Grain
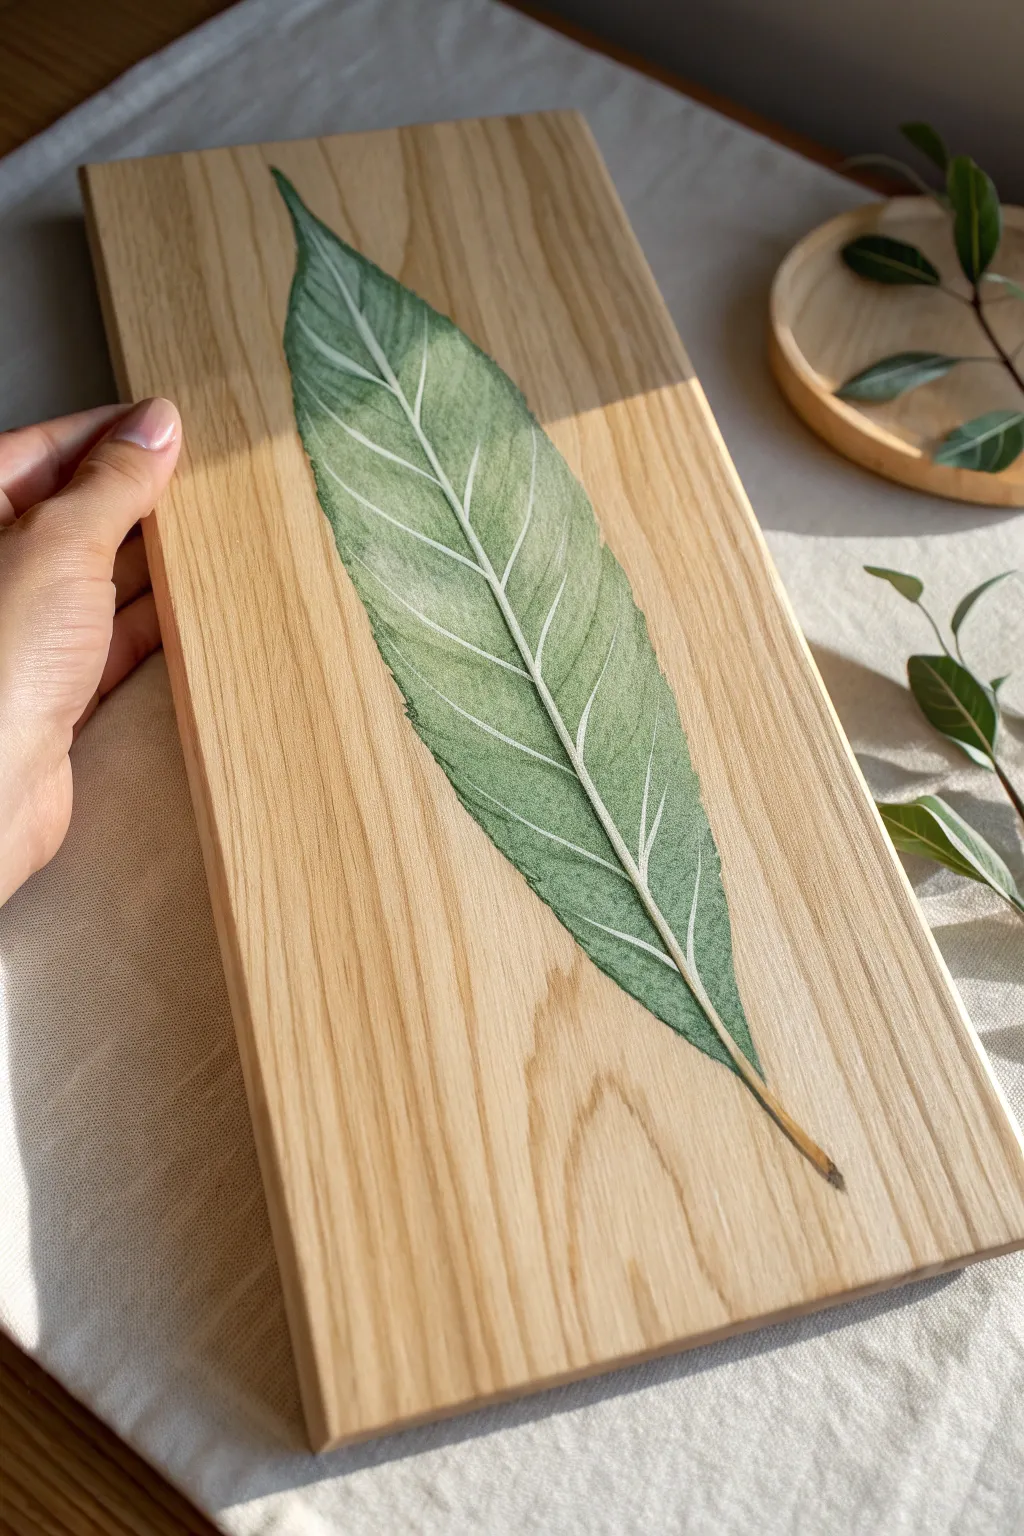
This project creates a serene piece of home decor by capturing the natural beauty of a single leaf painted directly onto raw wood. The translucent layers of acrylic paint allow the wood grain to subtly peek through, creating a harmonious blend between the subject and the canvas.
Step-by-Step
Materials
- Rectangular unfinished wood board (sanded smooth)
- Acrylic paints (Sap Green, Hooker’s Green, Titanium White, Burnt Umber, Yellow Ochre)
- Acrylic matte medium or glazing liquid
- Soft synthetic brushes (flat shader for blocking, fine liner for veins)
- Graphite pencil (HB or lighter)
- Eraser
- Palette
- Water container
- Paper towels
- Clear matte varnish (spray or brush-on)
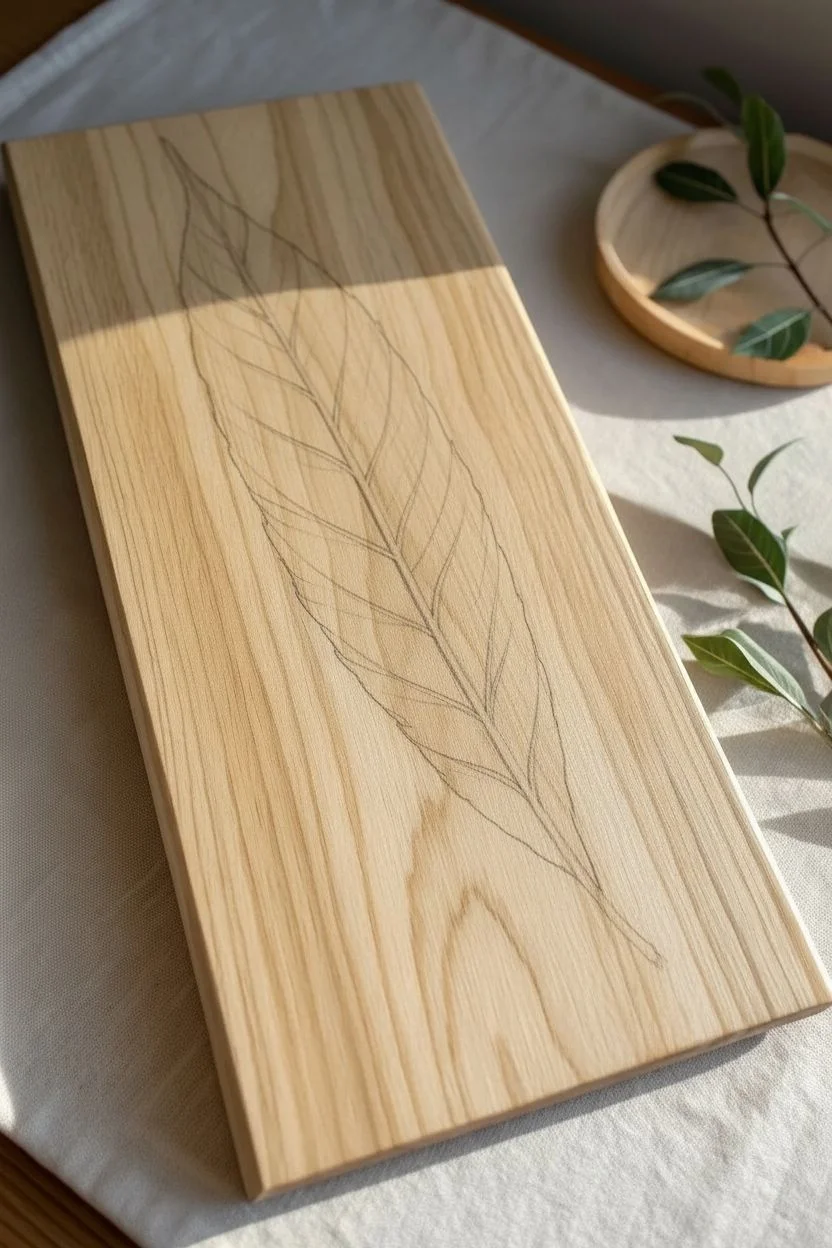
Step 1: Preparation and Sketching
-
Sand the Surface:
Begin by ensuring your wooden board is incredibly smooth. Sand with fine-grit sandpaper (220 or higher) in the direction of the grain to remove any splinters or rough patches that could snag your brush. -
Wipe Clean:
Remove all sanding dust with a microfiber cloth or a slightly damp paper towel. A clean surface is crucial for the paint to adhere properly without clumping. -
Plan the Composition:
Visualize the leaf placement. For a dynamic look, position the leaf diagonally across the board, starting from the top left corner and extending down towards the bottom right. -
Sketch the Outline:
Lightly sketch the leaf shape directly onto the wood using an HB pencil. Draw the central vein (midrib) first as a gentle curve, then add the outer edges. Keep the lines faint so they don’t show through the final paint. -
Map the Veins:
Sketch the main lateral veins branching out from the center line. You don’t need every tiny detail yet, just the primary structure to guide your painting.
Bleeding Lines?
If paint bleeds into the wood grain, use a clear acrylic medium to seal the sketch lines first. This creates a barrier so your colored paint stays crisp.
Step 2: Painting the Base and Midtones
-
Mix the Base Green:
On your palette, mix Sap Green with a touch of Yellow Ochre and a generous amount of matte medium. The medium creates transparency so the wood grain can influence the leaf texture. -
Apply the First Wash:
Using a flat shader brush, paint the entire leaf shape with this translucent green mixture. Avoid the central vein line if possible, leaving it the color of the wood for now. -
Let it Dry:
Allow this initial layer to dry completely. Acrylics on wood can soak in quickly, but you want the surface dry to the touch before adding more. -
Deepen the Shadows:
Mix Hooker’s Green with a tiny bit of Burnt Umber to create a darker, shadowy green. Apply this to the areas of the leaf that would naturally be shaded, such as near the center vein and the very edges. -
Feather the Edges:
While the shadow paint is still wet, use a clean, slightly damp brush to soften the edges where the dark green meets the lighter base color. This creates a natural gradient.
Add Dew Drops
For a fresh morning look, paint tiny highlights and drop shadows to create realistic 3D water droplets sitting on the leaf surface.
Step 3: Detailing and Refining
-
Paint the Veins:
Switch to your fine liner brush. Mix Titanium White with a very small amount of your base green to create a pale, milky green. Carefully paint the central midrib and the lateral veins. -
Refine Vein Thickness:
Ensure the veins are thicker at the base (near the stem) and taper off into hair-thin lines as they reach the leaf margins. -
Add Leaf Texture:
Using a dry-brush technique with your lighter green mix, gently scumble over the leaf surface between the veins. This mimics the microscopic texture of a real leaf surface. -
Highlight the Edges:
Add tiny touches of the pale vein color to the serrated edges of the leaf to make them pop against the wood background. -
Paint the Stem:
Mix Burnt Umber with a touch of Yellow Ochre. Paint the stem at the bottom of the leaf, blending it slightly into the base of the midrib for a seamless transition. -
Final Contrast Check:
Step back and assess your work. If the leaf looks too flat, glaze a very thin layer of dark green over the shadowed areas again to increase the contrast.
Step 4: Protection
-
Seal the Wood:
Once the painting is fully cured (give it at least 24 hours), apply a clear matte varnish over the entire board. This seals the wood and protects the paint from dust and UV light.
Hang this nature-inspired piece in an entryway or lean it on a shelf for a calming organic touch
BRUSH GUIDE
The Right Brush for Every Stroke
From clean lines to bold texture — master brush choice, stroke control, and essential techniques.
Explore the Full Guide
Mushroom Cottagecore Scene on a Wood Round
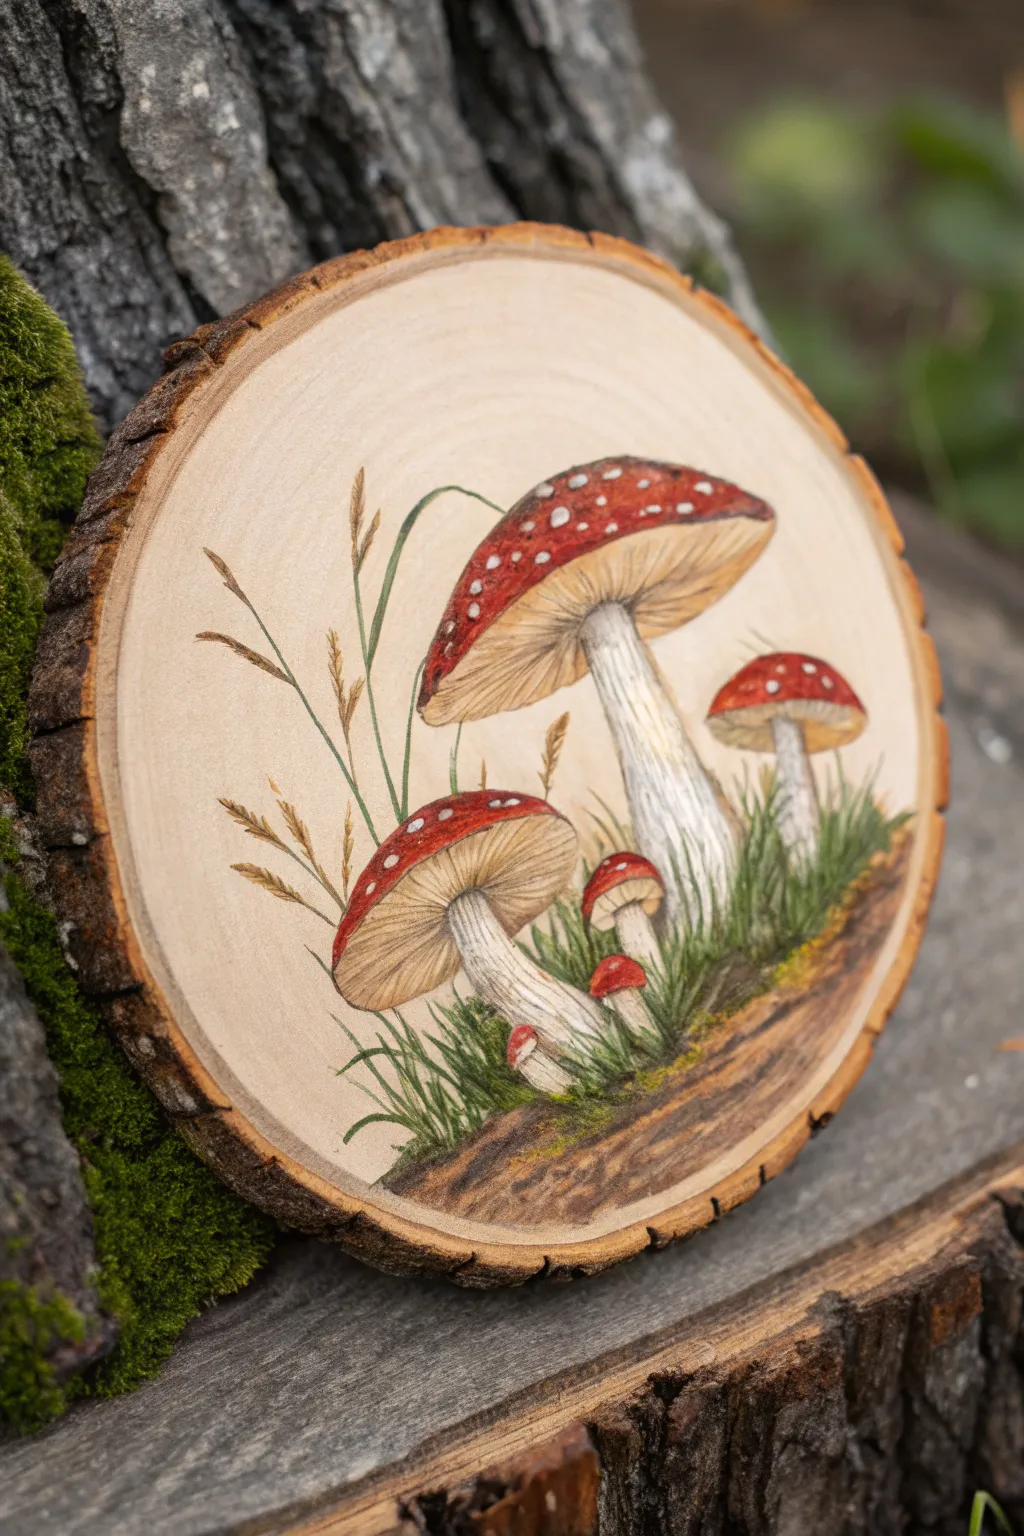
Capture the essence of the forest floor with this charming cottagecore project on a rustic wood round. The natural grain of the wood serves as the perfect backdrop for vibrant red fly agaric mushrooms nestled in detailed greenery.
Step-by-Step Tutorial
Materials
- Basswood or birch wood slice (approx. 6-8 inches)
- Sandpaper (medium and fine grit)
- Pencil and eraser
- Acrylic paints (primary red, deep red, titanium white, raw umber, yellow ochre, sap green, cadmium yellow)
- Fine detail brushes (sizes 0, 00, and 2)
- Small flat brush
- Brown micron pen or very fine liner brush
- Matte spray varnish
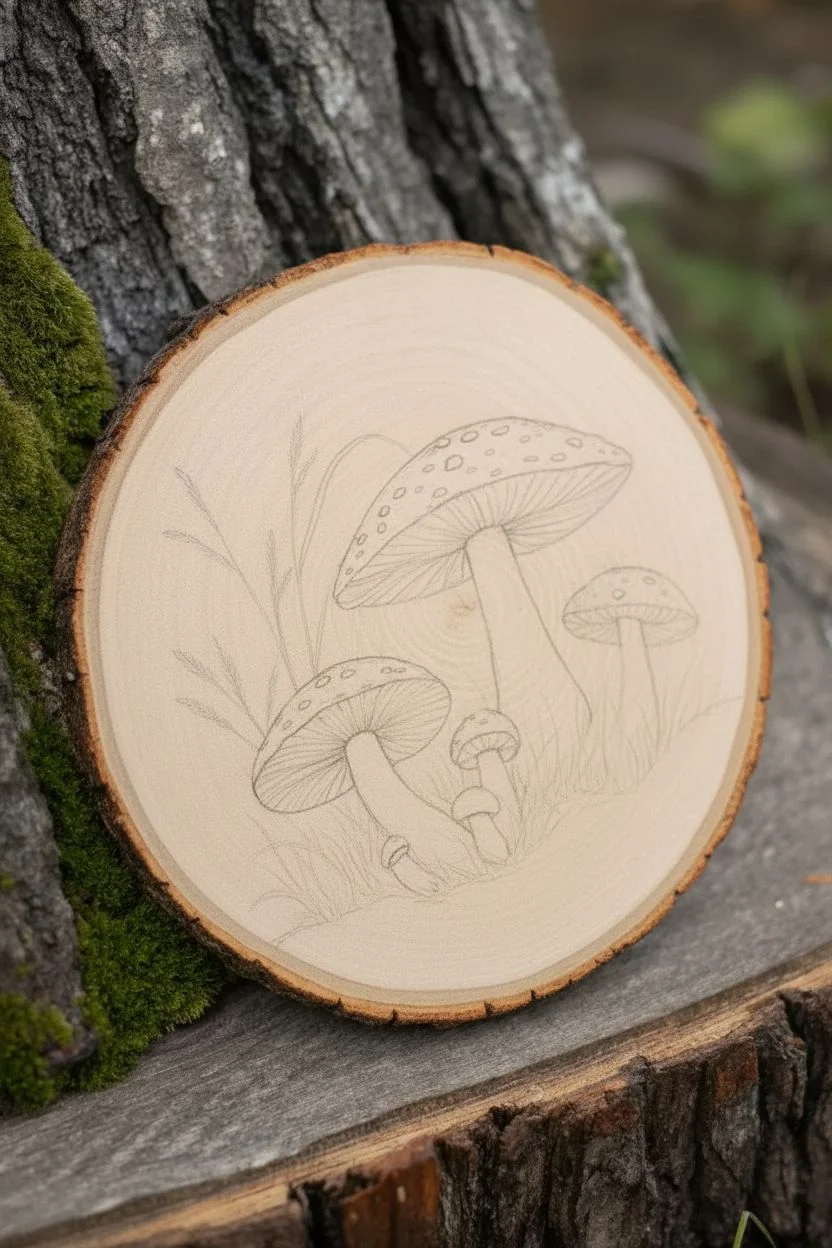
Step 1: Preparation & Sketching
-
Prep the surface:
Begin by sanding the face of your wood slice until it is extremely smooth to the touch. This is crucial for crisp paint lines; rough fibers will cause your paint to bleed. -
Sketch the composition:
Lightly draw your design directly onto the wood. Place a large mushroom off-center to the right, angling the cap slightly. Add a medium mushroom to the left and a smaller button mushroom tucked in behind. -
Add nature details:
Sketch in tall, thin grass blades clustering around the stems and draw a few taller, wheat-like stalks rising up the left side for balance.
Step 2: Painting the Mushrooms
-
Base coat the stems:
Mix titanium white with a tiny dot of raw umber to create a warm off-white. Paint the stems, stroking vertically to mimic the fibrous texture of a mushroom stalk. -
Paint the caps:
Fill in the mushroom caps with a primary red acrylic. Don’t worry about shading yet; just get a solid, opaque layer down. You may need two coats if the wood grain shows through. -
Shade the caps:
Take a deep red or mix a little brown into your red and carefully paint the bottom edge of the caps and any shadowed areas. Blend this upwards slightly while the paint is still tacky for a soft gradient. -
Paint the gills:
Using your off-white mixture darkened slightly with yellow ochre, paint the undersides of the caps. Use very fine lines radiating from the stem to the edge of the cap to resemble gills. -
Add the iconic spots:
Using a size 0 brush or a dotting tool, dab titanium white spots onto the red caps. Vary the sizes and spacing to make them look organic rather than uniform dots.
Bleeding Lines?
If paint bleeds into the wood grain, your mix is too watery. Use heavier body paint or seal the sketch area with clear matte medium before painting.
Step 3: Ground & Greenery
-
Create the soil bed:
Mix raw umber with a little water to create a semi-transparent wash. Paint the ‘ground’ area beneath the mushrooms, letting the wood grain show through slightly to act as texture. -
Paint the grass base:
Using sap green, paint short, upward strokes starting from the soil line. Keep these strokes loose and clustered around the base of the stems. -
Highlight the grass:
Mix some yellow into your green and add lighter grass blades on top of the dark green ones to create depth and volume in the foliage. -
Paint the wheat stalks:
Use yellow ochre mixed with a touch of white to paint the tall, thin stalks on the left. Paint small teardrop shapes near the top for the seed heads. -
Detail the stalks:
Add tiny brown accents to the bottom of the wheat seed heads to define them against the pale wood background.
Level Up: Pyrography
Before painting, use a wood burning tool to scorch the outlines of your design. Then, paint inside the burned lines for a stunning mixed-media texture effect.
Step 4: Final Details
-
Outline for definition:
I prefer to use a brown micron pen or incredibly thin liner brush with thinned brown paint to outline the stems, grass, and gills. Keep the line broken and delicate, not bold. -
Add stem texture:
Using a -
White highlights:
Add a few final tiny strokes of pure white to the highlight side of the stems and the very tips of the grass for a sun-kissed look. -
Seal the piece:
Once fully dry (give it at least an hour), spray the entire wood slice with a matte varnish to protect the paint and prevent the wood from warping over time.
Hang this lovely rustic artwork on your wall or prop it on a shelf to bring a touch of woodland magic indoors
Mandala Dot Art on Wood Slices
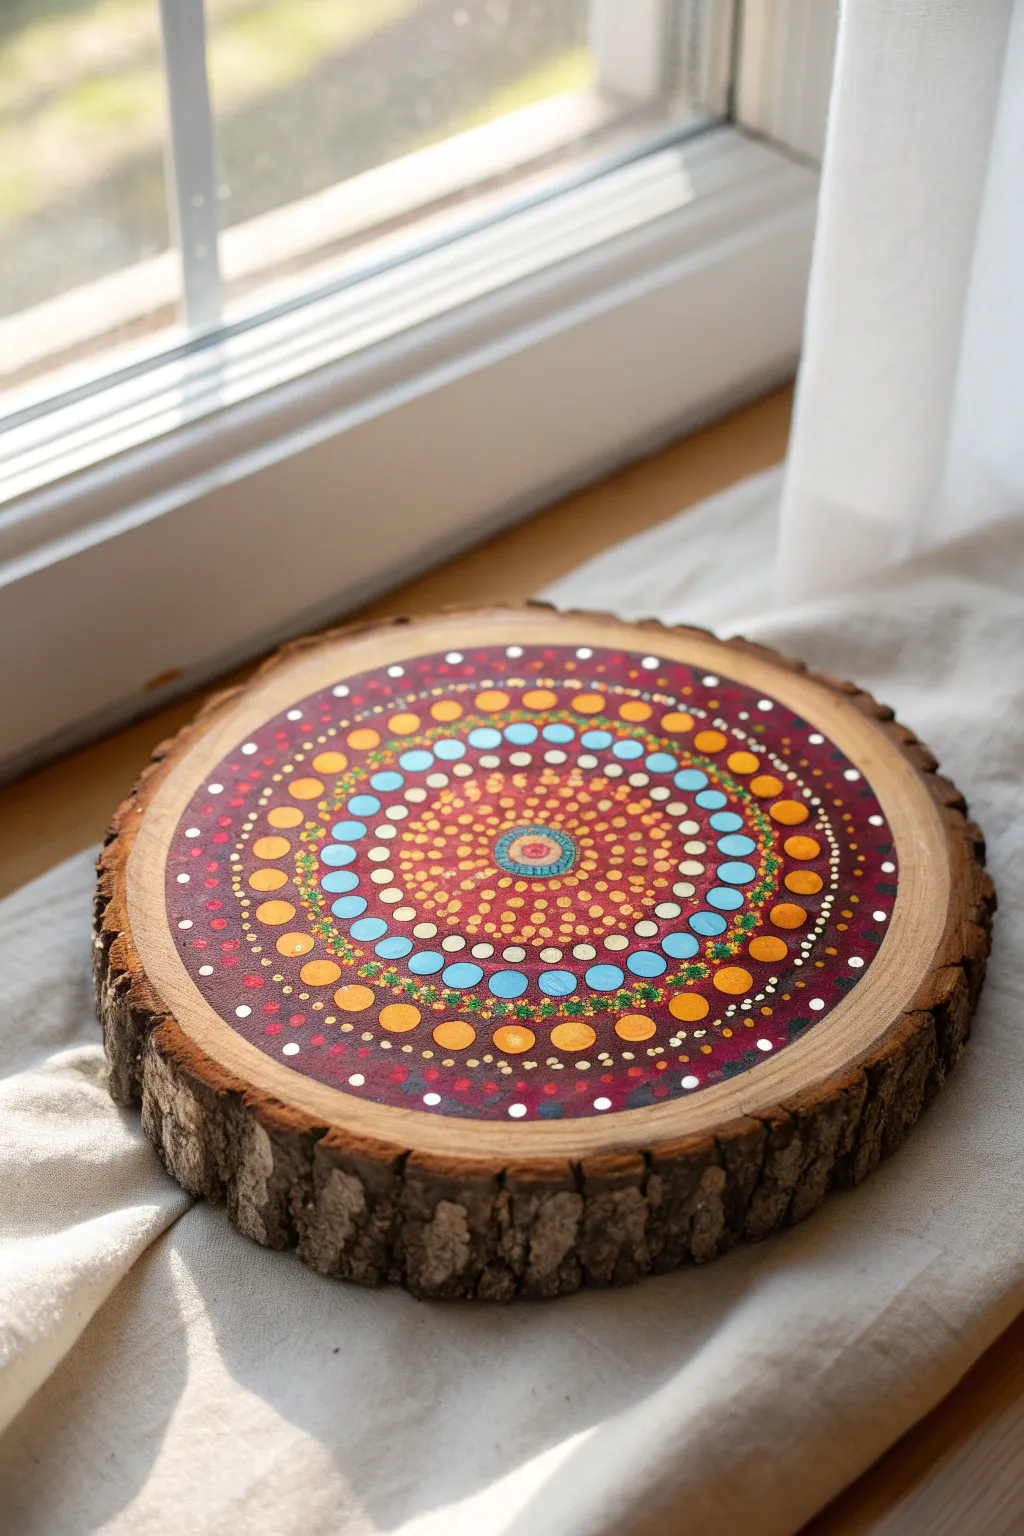
Transform a rustic slice of wood into a vibrant centerpiece with this radiant mandala design. Combining earthy reds and bright teals, the pattern radiates from the center like a warm sunburst, perfect for a windowsill accent or coaster.
Step-by-Step Tutorial
Materials
- Wood slice (approx. 8-10 inches diameter, roughly 1 inch thick) with bark intact
- Sandpaper (220 grit)
- Clear gesso or matte sealer
- Acrylic craft paints (Deep Burgundy, Burnt Orange, Bright Yellow-Orange, Teal/Native Turquoise, White, Gold)
- Set of dotting tools (various sizes)
- Compass and pencil (optional for guidelines)
- Small flat brush
- Spray or brush-on varnish (Gloss or Satin)
Step 1: Preparation
-
Prepare the surface:
Since wood slices can be rough, lightly sand the top face with 220 grit sandpaper to create a smooth surface for your dots. Wipe away all dust with a tack cloth or slightly damp rag. -
Seal the wood:
Apply a coat of clear gesso or a matte sealer over the top. This prevents the raw wood, especially the end grain, from soaking up your paint too quickly and keeps your dots plump. -
Create the background:
Using a small flat brush or sponge, paint a large circle in the center with your Deep Burgundy paint, leaving about an inch of natural wood visible around the rim. You may need two coats for full opacity.
Step 2: Painting the Core
-
Start the center:
Find the exact center of your burgundy circle. Place a medium-sized dot using a mix of Teal and a tiny bit of White to create a soft turquoise button. -
Add the first ring:
Using a small dotting tool, place tiny dots of Deep Burgundy directly on top of the center turquoise dot to create a textured, seeded look. -
Create the glow:
Switch to your metallic Gold or Bright Yellow-Orange. Make a tight ring of very small dots surrounding the central turquoise button. -
Build outward:
Create the next ring using slightly larger dots in Burnt Orange. Place these close together so they almost touch the previous gold ring. -
Expand the sunburst:
For the next few concentric circles, use tiny dots in bright yellow and gold. I find creating a ‘field’ of tiny dots rather than strict lines here creates that shimmering, stardust effect seen in the core.
Uneven Dots?
If your paint starts peaking (making Hershey kiss shapes), your paint is too thick. Mix in a drop of fluid medium or pouring medium to help the dots settle into perfect rounded domes
Step 3: The Teal Ring
-
Place anchor dots:
Switch to a medium-large dotting tool and your Teal paint. Place a ring of prominent dots about halfway out from the center. Try to space them evenly visually before committing if you aren’t using guidelines. -
Highlight the teal:
Once the teal dots are touch-dry, use a smaller tool to place a White dot in the center of each teal one. Then, place an even smaller Teal dot inside the white one for a ‘double-dip’ effect. -
Fill the gaps:
Between each large teal dot, place two vertically stacked smaller dots in Burnt Orange to connect the pattern.
Pattern Play
Instead of leaving the outer rim plain, try bringing the dot work slightly onto the bark for an organic transition, or paint the bark gold for a metallic, gilded edge
Step 4: Outer Detail
-
Create the large orange ring:
Moving outward again, use your largest dotting tool to create a bold ring of Burnt Orange dots. These should sit roughly 3/4 of the way to the edge of your burgundy background. -
Add separation:
Between the teal ring and this new orange ring, fill the negative space with medium-sized Gold dots to keep the mandala looking dense and rich. -
Walk the dots:
Around each large Burnt Orange dot, ‘walk the dots’ using tiny specks of Gold or Yellow. This means placing a series of diminishing dots that curve around the larger circle. -
Final border details:
Near the very edge of the burgundy paint, add widely spaced White dots as a final high-contrast border. Add tiny green or gold micro-dots scattered in remaining spaces for texture.
Step 5: Finishing
-
Dry completely:
Let the piece sit undisturbed for at least 24 hours. Because the paint is applied thickly in dots, the center may still be wet even if the surface feels dry. -
Apply varnish:
Once fully cured, apply a clear gloss or satin varnish. A spray varnish is safest as it won’t drag across the raised texture of the dots, sealing your artwork vividly.
Place your finished wood slice in a sunlit spot to watch the metallic paints catch the light

PENCIL GUIDE
Understanding Pencil Grades from H to B
From first sketch to finished drawing — learn pencil grades, line control, and shading techniques.
Explore the Full Guide
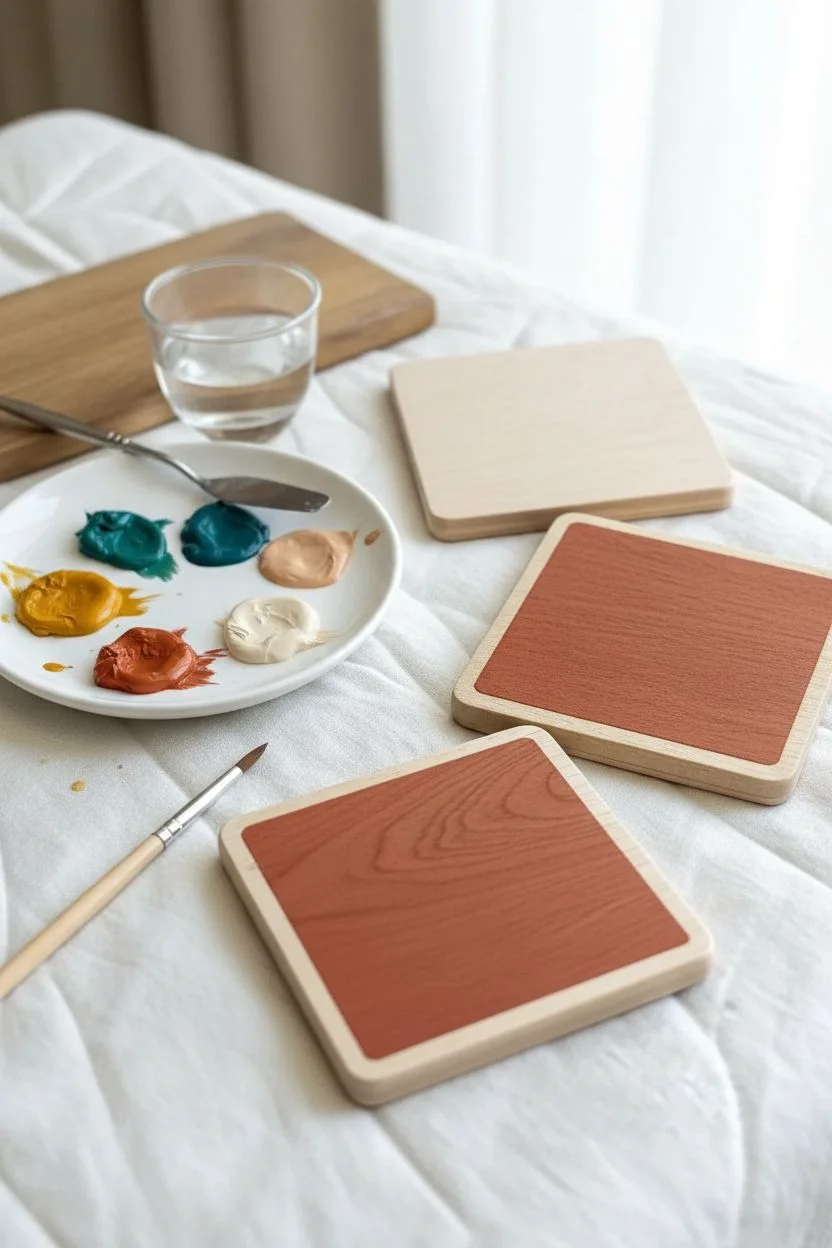
Painted Coaster Set on Wood Squares
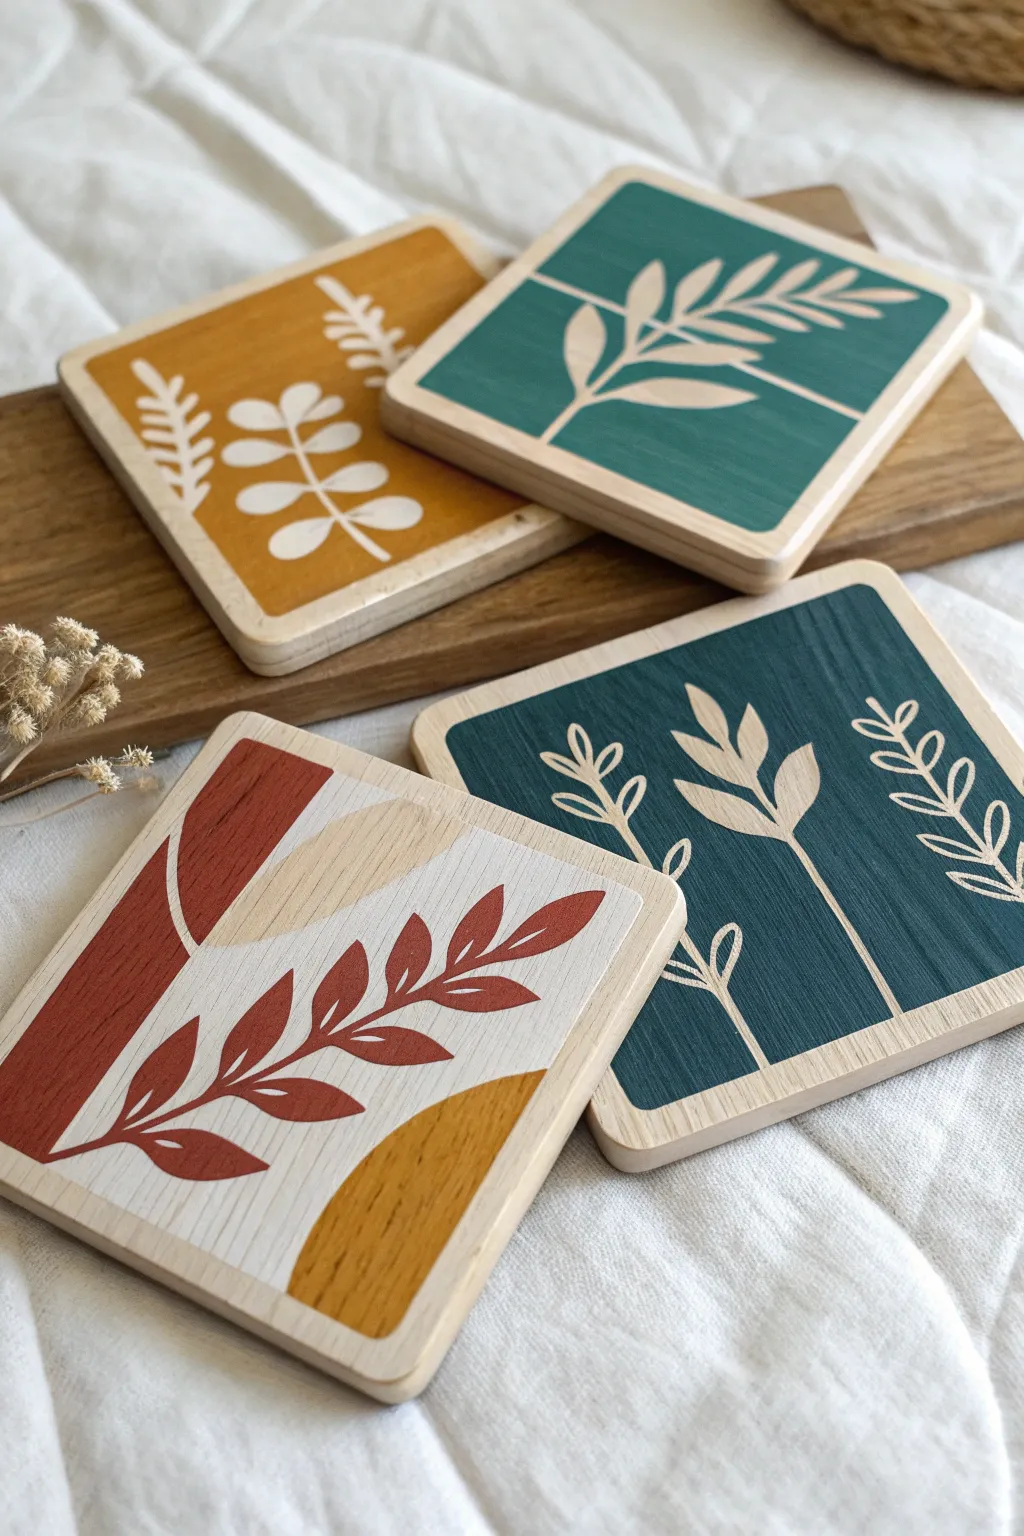
These charming coasters combine natural wood grain with modern, flat-color botanical designs to create a warm, earthy aesthetic. The set features a mix of abstract shapes and delicate leaf patterns in a palette of mustard, teal, and terracotta.
Step-by-Step Guide
Materials
- 4 unfinished square wooden coasters (approx. 4×4 inches) with rounded corners
- Acrylic paints (Mustard Yellow, Deep Teal, Terracotta/Burnt Orange, Warm Cream/Off-White)
- Small flat brush (size 6 or 8)
- Fine liner brush (size 0 or 00) for details
- Pencil and eraser
- Painter’s tape or stencil tape
- Fine-grit sandpaper (220-grit)
- Matte or satin clear sealant (spray or brush-on varnish)
- Palette or small plate
- Paper towels and water cup
Step 1: Preparation
-
Sand the Wood:
Begin by lightly sanding the surface and edges of each wooden coaster with fine-grit sandpaper. This removes any rough patches and helps the paint adhere smoothly. Wipe away all dust with a slightly damp cloth. -
Plan Your Palette:
Squeeze out your chosen colors—mustard yellow, teal, terracotta, and cream—onto your palette. If your acrylics are very thick, you can thin them slightly with a drop of water to help them flow better on the wood.
Clean Lines Hack
To prevent paint bleeding under your tape on rough wood, seal the tape edge with a tiny bit of matte medium or clear varnish before painting your color layer.
Step 2: Painting the Backgrounds
-
Mustard Coaster Base:
For the first coaster, paint the entire top surface with the mustard yellow paint. Leave a very small border (about 1/8 inch) of bare wood around the edge if you like that framed look, or paint right to the edge. Let it dry completely. -
Teal Coaster Base:
For the second coaster (top right), mask off a centered rectangle using painter’s tape to leave a clean wooden border. Paint the inside rectangle teal. Peel the tape gently while the paint is still slightly tacky to get crisp lines. -
Abstract Coaster Design:
For the third coaster (bottom left), lightly sketch your abstract shapes: a large terracotta quarter-circle, a cream shape, a mustard corner, and the main white background area. Paint these blocked shapes carefully using your flat brush. -
Deep Green Botanical Base:
For the final coaster (bottom right), paint a large teal or deep green square in the center, leaving a wide wood-grain border. You can use tape again here to ensure the square is perfectly straight.
Make It a Gift Set
Tie the stack of finished coasters with rustic twine and tuck in a dried sprig of lavender or eucalyptus for a beautifully presented handmade gift.
Step 3: Adding Botanical Details
-
Sketching Patterns:
Once all base coats are 100% dry, lightly sketch your leaf designs with a pencil. Don’t press too hard, or you’ll dent the wood. -
Painting the Mustard Leaves:
On the mustard coaster, use a liner brush and white or cream paint to create the vine pattern. Paint a central stem line first, then add oval-shaped leaves branching off horizontally. Keep the paint opacity high for a bold contrast. -
Negative Space Leaves:
For the top-right teal coaster, you ideally want the leaves to be the color of the bare wood. If you didn’t mask them out earlier (which is tricky), simply paint the leaf shape in a creamy beige that mimics the wood tone. Draw a horizontal line crossing the block and add a large, sweeping branch. -
Abstract Leaf Overlay:
Return to the multi-colored abstract coaster. Using a terracotta or deep rust color, paint a single, bold branch with pointed leaves diagonally across the cream section. I find it helps to rotate the coaster as you work to get the best angle for your hand. -
Fine Line Florals:
On the final dark teal coaster, use a very creamy, light beige paint. Paint three distinct vertical plant stems: two with small leaves on the sides and one central stem with larger leaves. Keep your liner brush perpendicular to the surface for the thinnest lines.
Step 4: Finishing Touches
-
Clean Up Edges:
Check the sides of your coasters. If any paint dripped over, sand it off gently or wipe it away if it’s still wet. -
Erase Guidelines:
Once the detailed lines are fully cured (give it at least an hour), gently erase any visible pencil marks. -
Seal the Wood:
Apply a thin coat of matte or satin varnish over the entire top surface. This step is crucial because condensation from drinks can ruin unsealed acrylics. Let the first coat dry, then apply a second coat for durability. -
Add Backing:
Stick small felt pads or a square of cork to the bottom of each coaster to prevent them from scratching your table.
Now you have a stylish set of custom coasters ready to protect your surfaces and spark conversation
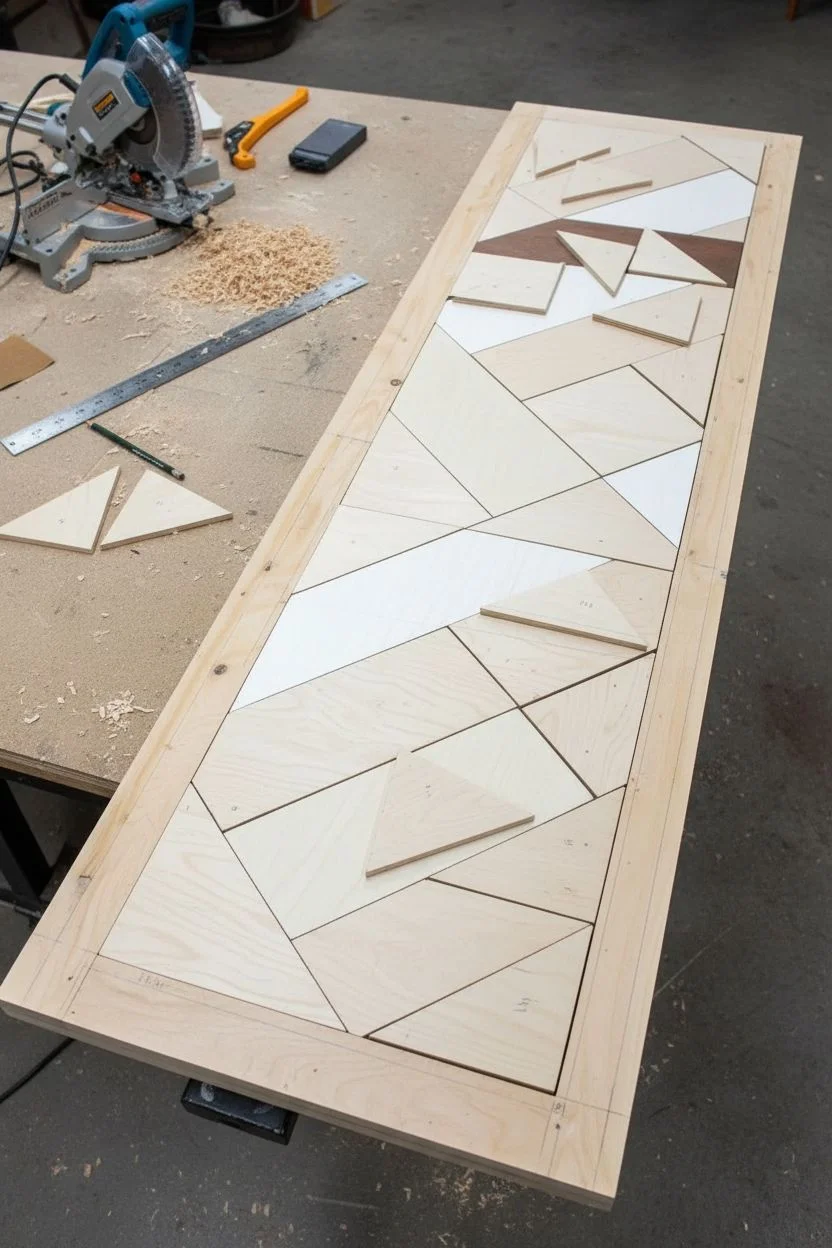
Geometric Abstract Over Natural Wood
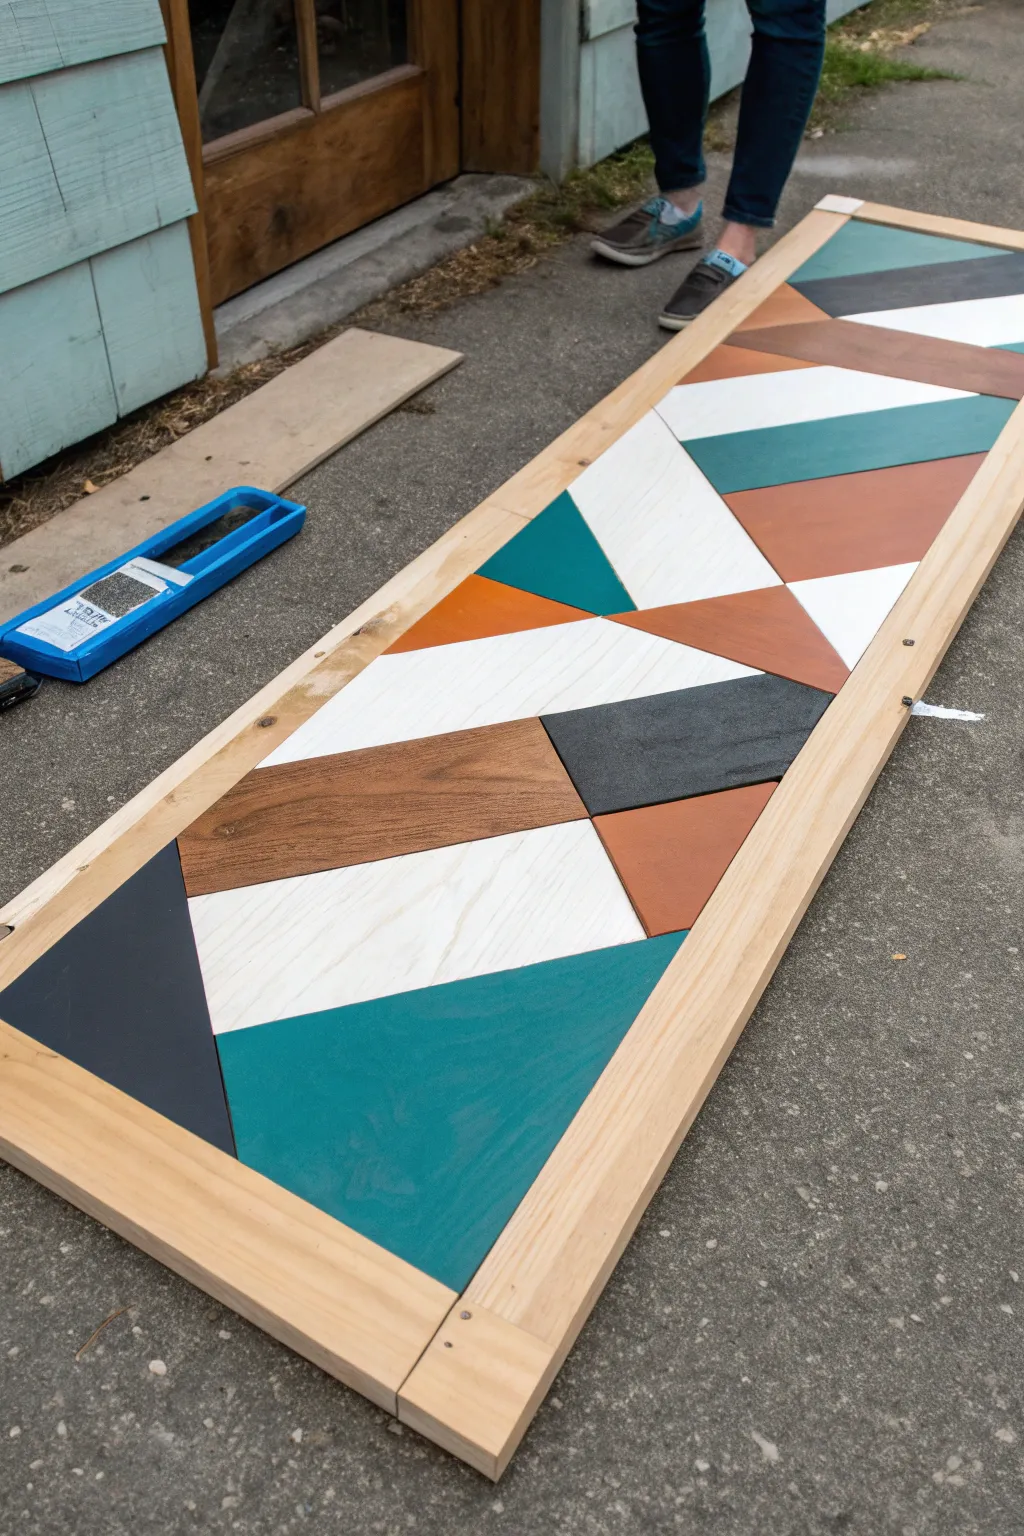
This striking wall art combines the warmth of natural wood grain with bold splashes of teal, white, and charcoal paint. The elongated design features interlocking geometric shapes that create a modern, dynamic flow perfect for a narrow wall space or hallway.
How-To Guide
Materials
- 1/2-inch plywood sheet (cut to 12″ x 48″ for base)
- 1/4-inch plywood or hardboard (for geometric pieces)
- 1×2 pine boards (for the frame)
- Acrylic craft paints (Teal, White, Charcoal, Burnt Orange)
- Wood stain (Walnut or Pecan)
- Wood glue
- Miter saw or jigsaw
- Sandpaper (120 and 220 grit)
- Painter’s tape
- Brad nailer or hammer and finishing nails
- Paintbrushes and foam brushes
- Pencil and ruler
- Clear matte polyurethane sealer
Step 1: Planning and Cutting
-
Prepare the base:
Cut your 1/2-inch plywood backer board to your desired dimensions. For the look in the photo, a long, narrow size like 12 inches by 48 inches works perfectly as a statement piece. -
Sketch the design:
Draw your geometric pattern directly onto the backer board using a pencil and a straight edge. Focus on creating large triangles and diagonal shapes that span the width of the board. -
Create templates:
If you are less confident with freehand cutting, trace your drawn shapes onto stiff cardboard or paper first to use as templates for cutting your wood pieces. -
Cut the shapes:
Using your 1/4-inch plywood, cut out the individual geometric shapes. A miter saw is great for the straight angles, but a jigsaw works well for odd shapes. Number the back of each piece and the corresponding spot on the base to keep track of the puzzle. -
Dry fit everything:
Lay all your cut pieces onto the backer board to ensure they fit snugly together. There might be small gaps, but that’s okay—it adds character. Sand any rough edges with 120-grit sandpaper now.
Grain Direction Magic
When cutting your pieces, vary the direction of the wood grain for the stained sections. This subtle detail catches the light differently and adds depth.
Step 2: Staining and Painting
-
Sort the pieces:
Separate your cut pieces into groups based on the color scheme: teal, white, charcoal, orange, and natural stain. I like to balance the colors so no two identical shades touch. -
Apply wood stain:
For the pieces designated as ‘natural wood,’ apply a coat of walnut or pecan stain using a rag. Wipe off excess stain promptly to let the grain show through clearly. -
Paint the solid colors:
Paint the remaining groups with their respective acrylic colors. Use smooth strokes with a foam brush to minimize brush marks. You may need two coats for the white and lighter colors to fully cover the wood grain. -
Distress (Optional):
Once the paint is fully dry, lightly sand the edges of the painted pieces with 220-grit sandpaper if you want a slightly rustic, worn look. Otherwise, keep them crisp for a modern finish. -
Seal the pieces:
Apply a thin layer of clear matte polyurethane to all pieces individually. Doing this before assembly prevents the sealer from pooling in the cracks later.
Step 3: Assembly and Framing
-
Glue the mosaic:
Apply a generous amount of wood glue to the back of each geometric piece and press it firmly onto the backer board in its assigned spot. Use weights or heavy books to hold them flat while the glue sets for at least an hour. -
Measure the frame:
Measure the total length and width of your assembled art piece. Cut your 1×2 pine boards to create a frame that fits snugly around the outside edges. -
Attach the frame:
Align the frame pieces flush with the front surface of the art. Secure them using wood glue and a brad nailer, shooting nails through the frame into the side of the plywood backer. -
Fill nail holes:
If visible, fill the small nail holes in the frame with wood filler that matches your pine. Once dry, sand the frame smooth. -
Final touch-ups:
Wipe down the entire piece with a tack cloth to remove dust. If the frame needs it, apply a coat of clear sealer or leave natural to match the light tones in the artwork.
Gaps happen!
If your pieces don’t fit perfectly flush, paint the plywood backer board a dark grey or black before gluing. This makes gaps look like intentional shadow lines.
Now you have a stunning, custom-built geometric art piece ready to hang.


Metallic Highlights on Matte Acrylic Backgrounds
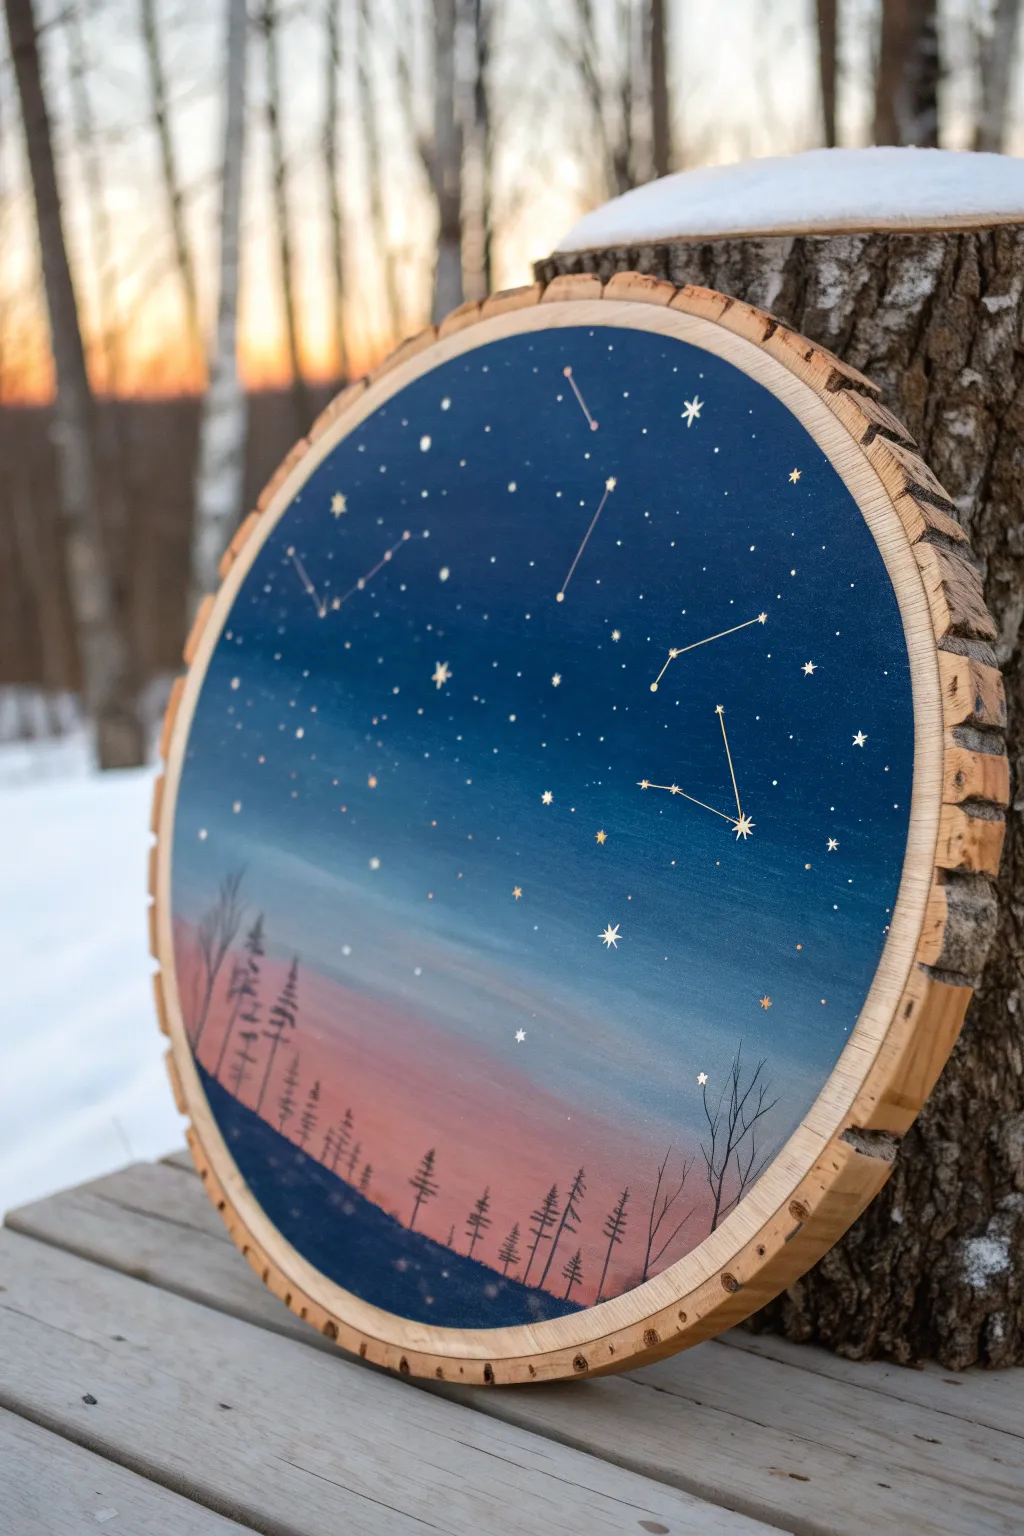
Capture the magic of a starry evening with this stunning wood slice painting that blends a rich acrylic gradient with delicate metallic accents. The natural bark edge frames a deep blue sky transitioning into a soft sunset, perfect for bringing a rustic yet elegant touch to your decor.
Step-by-Step
Materials
- Large round wood slice with bark edge (10-14 inches)
- Acrylic paints: Navy Blue, Phthalo Blue, Black, Titanium White, Magenta, Peach/Orange
- Gold metallic paint or gold leaf pen
- Gesso (clear or white)
- Flat shader brushes (large and medium)
- Fine liner brush (size 0 or 00)
- Old toothbrush (for spattering)
- Sandpaper (medium grit)
- Painters tape (optional)
- Matte spray varnish
Step 1: Preparing the Canvas
-
Sand the Surface:
Begin by sanding the face of your wood slice until it is perfectly smooth to the touch. This is crucial for achieving a clean gradient later. -
Clean and Seal:
Wipe away all sawdust with a damp cloth or tack cloth. Apply a layer of gesso to the surface to prime the wood, preventing the paint from soaking in too quickly, and let it dry completely. -
Protect the Bark:
If you’re worried about stray brushstrokes, apply painter’s tape carefully along the inner edge of the bark, though a steady hand works just as well.
Step 2: Painting the Sky Gradient
-
Mix the Midnight Blue:
Start at the very top of the wood slice. Mix a deep Navy Blue with a touch of Black to create a near-pitch dark zenith. -
Apply the Top Section:
Paint the top third of the circle with your dark mixture, using horizontal strokes that curve slightly with the shape of the wood. -
Transition to Blue:
While the paint is still wet, introduce Phthalo Blue or a standard dark blue just below the navy section. Blend the two colors where they meet using a clean, slightly damp brush to create a seamless transition. -
Create the Sunset Hues:
Towards the bottom third, start blending in Titanium White with a tiny dot of Blue to lighten the sky significantly. -
Add the Glow:
At the very bottom horizon line, mix Magenta and Peach/Orange with White. Paint this strip horizontally and blend it upwards into the light blue while everything is still wet for that soft, dusk effect. -
Dry Completely:
Allow the gradient background to dry fully before moving on to the details. A hairdryer on a cool setting can speed this up.
Clean Lines Pro-Tip
To get perfectly straight constellation connection lines without a ruler, dilute your gold paint with a drop of flow improver or water until it has the consistency of ink.
Step 3: Adding Stars and Constellations
-
Map the Constellations:
Using a reference photo of your favorite constellations (like Cassiopeia or the Big Dipper), lightly mark tiny dots with a pencil where the major stars will go. -
Paint Major Stars:
Dip a fine liner brush or the tip of a toothpick into Gold metallic paint. Carefully dot the main stars of your constellations. For variety, make some stars slightly larger than others. -
Connect the Lines:
With the finest liner brush you have (00 size works best), draw extremely thin gold lines connecting the constellation stars. Keep the paint fluid but not watery to ensure crisp lines. -
Create the Star Field:
For the distant background stars, dilute a small amount of White or light Gold paint with water. Dip an old toothbrush into the mixture and flick the bristles with your thumb to spray a fine mist of stars near the top, darker section of the sky. -
Detail Larger Stars:
Select a few larger gold stars and use your liner brush to draw tiny cross-shapes or sparkles over them to make them twinkle.
Level Up: 3D Bark
Enhance the rustic feel by lightly brushing a diluted white or grey wash over the exterior bark ridges. This ‘dry brushing’ makes the texture of the wood slice pop visually.
Step 4: Painting the Silhouettes
-
Create the Horizon:
Mix a dark Navy Blue with a little Black (strictly avoid pure black for a more natural look). Paint an uneven, sloping ground line at the very bottom, covering the lowest part of your sunset gradient. -
Paint First Trees:
Using the fine liner brush, paint vertical lines extending up from the horizon for the tree trunks. Vary the heights to make the landscape look natural. -
Add Pine Texture:
Stipple or dab the brush horizontally across the trunks, getting wider as you move down the tree, to create pine branches. Keep these silhouettes somewhat transparent and wispy near the tops. -
Foreground Detail:
I like to add a second layer of slightly darker trees in the immediate foreground once the first layer is dry to add depth to the forest.
Step 5: Finishing Touches
-
Check for gaps:
Review the edge where the paint meets the bark. Use a tiny brush to fill in any accidental unpainted spots without getting paint on the bark itself. -
Seal result:
Once absolutely dry (give it at least 24 hours), spray the entire piece with a matte varnish to protect the acrylics and keep the colors vibrant.
Hang this celestial masterpiece on your wall or prop it on a mantel to enjoy your own personal slice of the night sky
Paint Pens and Fine-Line Details on Painted Wood
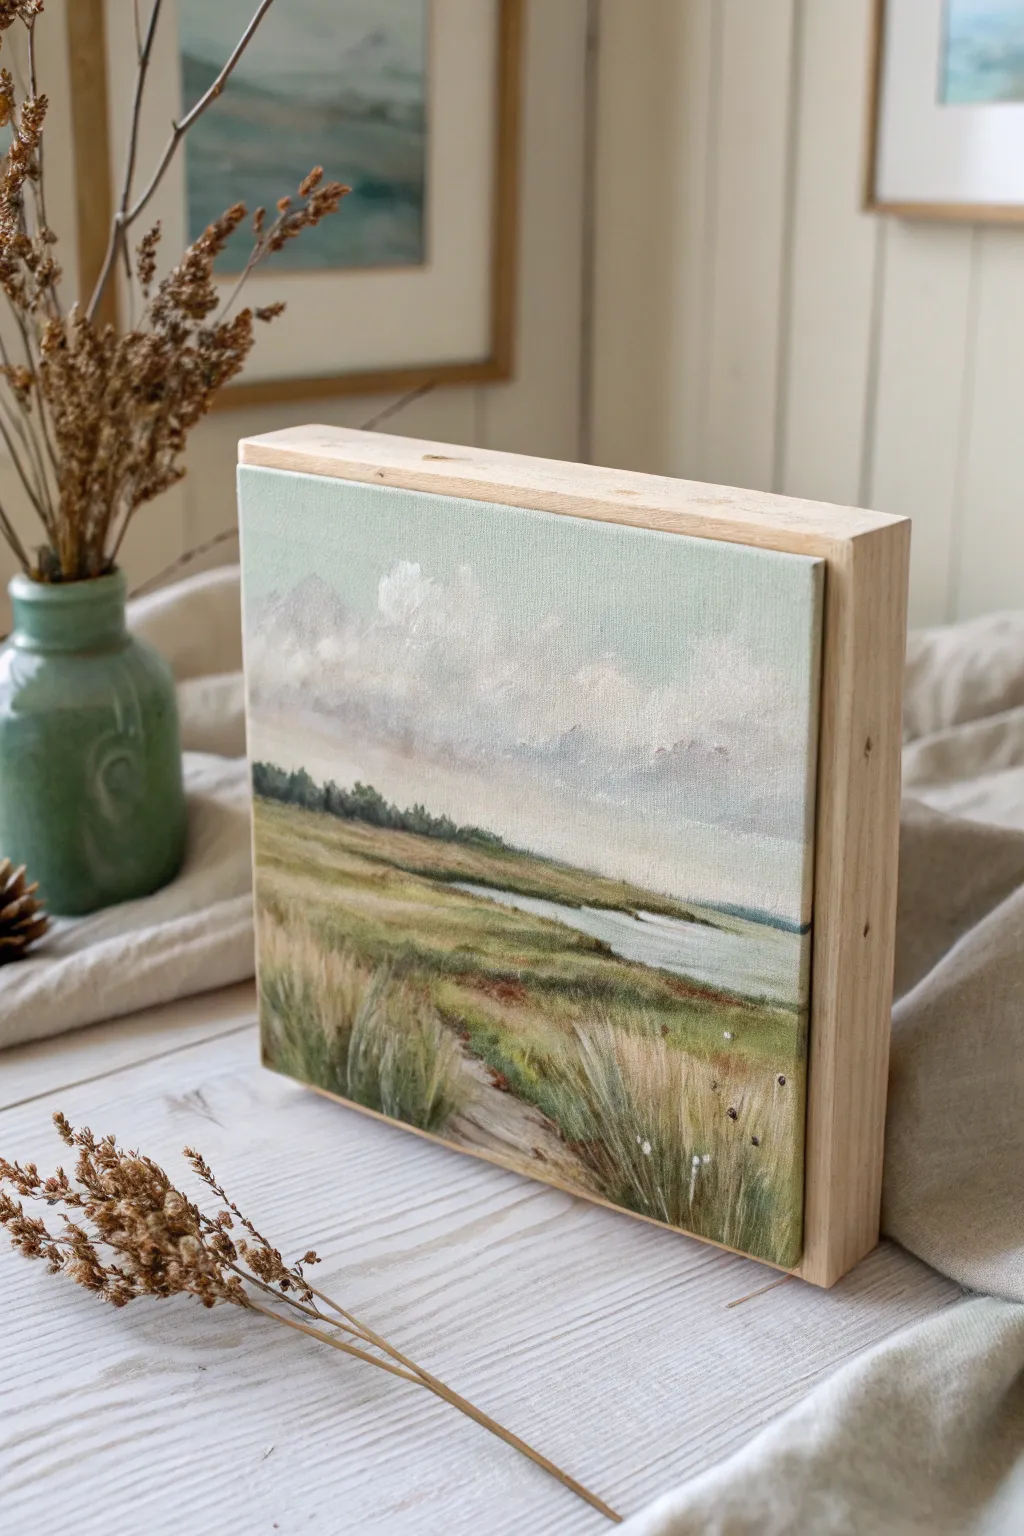
This serene landscape project combines the fluid blending of acrylics with the crisp precision of paint pens to capture a windswept coastal marsh. You will be painting on a deep-cradled wood panel, allowing the natural grain of the sides to frame your artwork beautifully without needing an external frame.
How-To Guide
Materials
- Deep-cradled birch or maple wood panel (approx. 6×6 or 8×8 inches)
- Matte acrylic paints (Titanium White, Unbleached Titanium, Ultramarine Blue, Hooker’s Green, Burnt Umber, Yellow Ochre)
- Acrylic paint pens (fine tip 0.7mm) in white, dark green, and light beige
- Gesso (clear or white, depending on preference)
- Wide flat brush (for sky)
- Small round brush (size 2 or 4)
- Small palette knife (optional for texture)
- Painter’s tape
- Water cup and paper towels
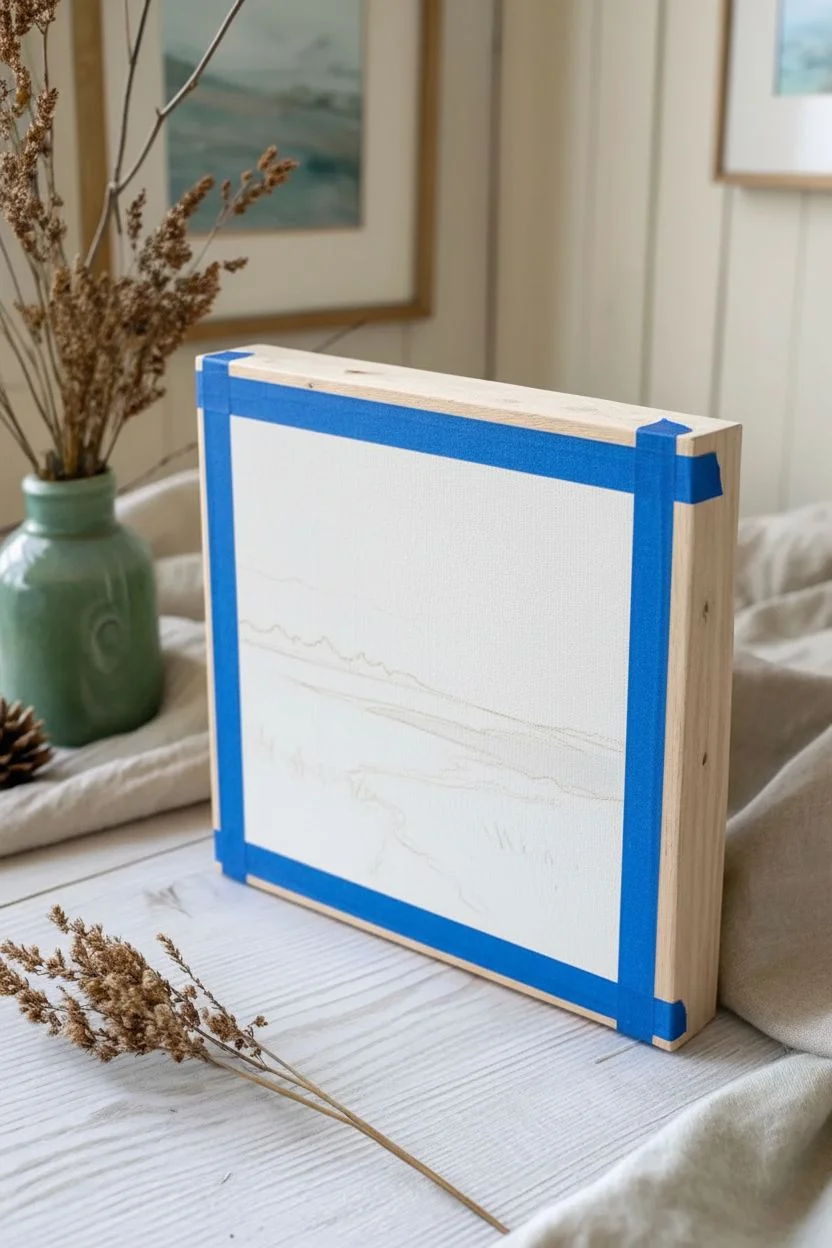
Step 1: Preparation and Base Layer
-
Protect the edges:
Since we want to keep the thick wooden sides natural and clean, carefully apply painter’s tape along the outer edges of the face of the panel. Press it down firmly to prevent paint from bleeding onto the sides. -
Prime the surface:
Apply a thin, even coat of gesso to the front painting surface. Wood is very absorbent, and this layer ensures your acrylics glide smoothly rather than sinking into the grain. Let this dry completely before moving on. -
Sketch the horizon:
Using a diluted wash of Burnt Umber or a pencil, lightly mark your horizon line about one-third of the way up from the bottom. Sketch the rough shapes of the water inlet and the distant tree line.
Keep It Fluid
Wood drags on the brush more than canvas. Keep a spray bottle of water nearby to lightly mist your palette, keeping the acrylics creamy and flowy.
Step 2: Creating the Atmospheric Sky
-
Mix sky colors:
On your palette, prepare a mix of Titanium White with a tiny touch of Hooker’s Green and Burnt Umber to create a muted, desaturated teal-grey. Also mix a pure cloudy white. -
Paint the gradient:
Start at the top of the panel with your darker grey-teal mix. As you work downward, blend in more white. Use horizontal strokes with a damp flat brush to keep the transition soft and airy. -
Add cloud forms:
While the sky layer is still slightly tacky, use a round brush loaded with Titanium White to scumble in soft cloud shapes. Keep the edges fuzzy to maintain that misty, distant look. -
Warm up the horizon:
Right near the horizon line, blend in a very faint wash of Unbleached Titanium or tiny bit of pink. This hints at sunlight breaking through the clouds in the distance.
Pen Won’t Write?
If your paint pen skips over the textured acrylic, the surface may be too rough. Lightly sand the dried paint with fine-grit sandpaper before drawing.
Step 3: Painting the Landscape
-
Block in the tree line:
Mix a dark, cool green using Hooker’s Green and a touch of Ultramarine Blue. Paint the distant tree line just below the sky, keeping the brushstrokes small and irregular to suggest foliage. -
Lay the grassy foundation:
For the main field, block in horizontal bands of color. Use Yellow Ochre mixed with Titanium White for the lighter patches, and Hooker’s Green mixed with Burnt Umber for the shadowed areas. -
Add the water inlet:
Paint the small stream or inlet using a very light grey-blue (a lighter version of your sky color). Ensure the water sits horizontally, mirroring the sky above. -
Build grass texture:
Once the underpainting is dry, use a small round brush to flick upward strokes of varying greens and tans. I prefer to vary the pressure here, starting firm at the bottom and lifting off quickly to create tapered grass blades.
Step 4: Detailing with Paint Pens
-
Define the foreground:
Take your dark green paint pen (ensure it’s shaken well) and draw crisp, individual stalks of grass in the immediate foreground corners. These lines should be clearer and sharper than the painted background. -
Add highlights:
Switch to your light beige or white paint pen. Add highlights to the tops of the grass clumps where the light would catch them. This creates immediate depth. -
Tiny details:
Use the fine tip of the pen to add tiny dots or seed heads at the tips of the tallest grass blades. These small graphic elements add a level of crispness that brushes sometimes struggle to achieve on wood. -
Remove tape:
Wait until absolutely everything is dry to the touch. Gently peel back the painter’s tape at a 45-degree angle to reveal the clean, sharp edge between your painting and the raw wood side.
Place your finished piece on a bookshelf or desk where the natural wood grain on the sides can add warmth to your decor


Have a question or want to share your own experience? I'd love to hear from you in the comments below!