Acrylic portraits are such a sweet spot: you get bold color, quick layering, and tons of room to play while still chasing a real likeness. Here are my favorite acrylic portrait ideas—starting with classic approaches and sliding into more experimental, artsy twists once you’re warmed up.
Classic Realistic Head-and-Shoulders Portrait
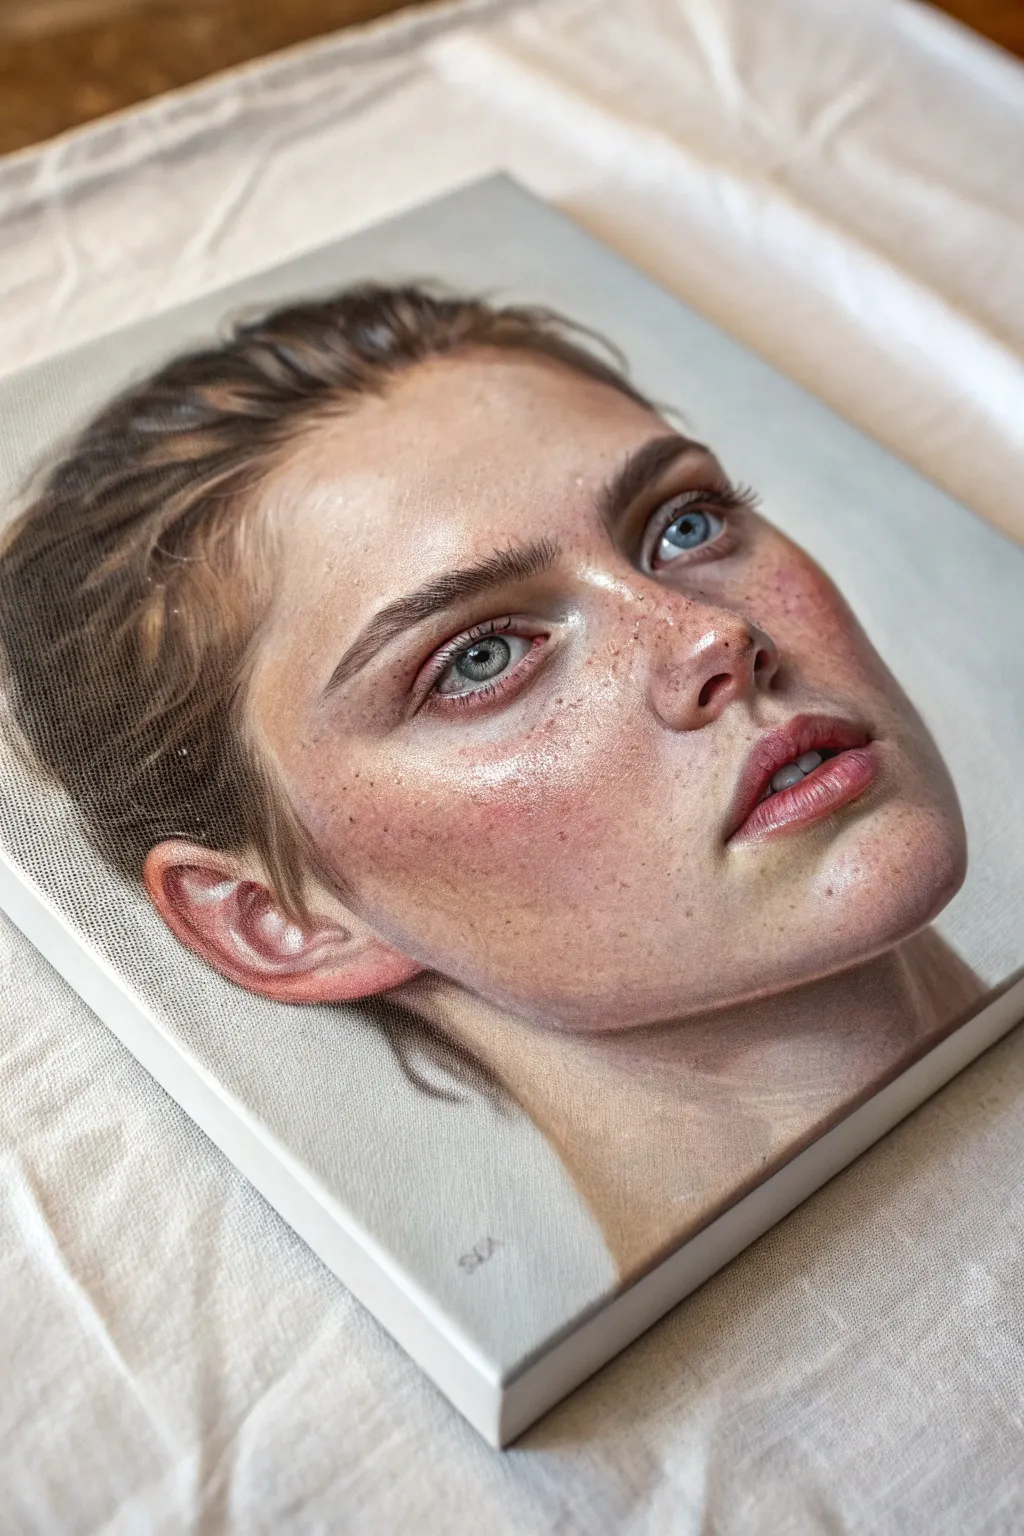
Capture the delicate luminosity of skin and the soft texture of fabric in this traditional head-and-shoulders portrait. This project focuses on building distinct layers of acrylics to achieve a glow often reserved for oils, resulting in a serene, museum-worthy piece.
How-To Guide
Materials
- High-quality cotton canvas or linen board (16×20 inches recommended)
- Heavy body acrylic paints (Titanium White, Burnt Umber, Yellow Ochre, Cadmium Red Medium, Ultramarine Blue, Alizarin Crimson)
- Slow-drying medium or retarder
- Synthetic filbert brushes (sizes 4, 8, 12)
- Small round detail brush (size 0 or 1)
- A fine mist water sprayer
- Stay-wet palette
- Charcoal or graphite pencil for sketching
Step 1: Preparation and Underpainting
-
Prime and tone:
Begin by toning your canvas with a wash of Yellow Ochre and a touch of Burnt Umber diluted with water. This warm ground will peek through later layers, giving the skin a natural glow. -
Map the anatomy:
Using a pencil or thinned Burnt Umber on a small round brush, sketch the outline of the subject. Focus carefully on the three-quarter profile angle of the nose and the alignment of the eyes. -
Establish values:
Create a monochromatic underpainting using just Burnt Umber and White. Block in the darkest shadows under the chin, behind the ear, and in the hair, leaving the highlighted areas of the forehead and cheeks the color of the toned canvas.
Step 2: Developing Skin Tones
-
Mix your base flesh palette:
Prepare a gradient of skin tones on your palette. Mix Titanium White with small amounts of Yellow Ochre and Cadmium Red. Create a shadow tone by adding a tiny touch of Ultramarine Blue to cool it down. -
Apply the mid-tones:
Using a size 8 filbert brush, paint the broad planes of the face—the cheeks, forehead, and chin—with your middle value mixture. Keep the paint somewhat thin to allow the underpainting to influence the color. -
Deepen the shadows:
Work into the shadow side of the face (the right side in this reference) and the neck area. Use your cooler, darker mixture here. Acrylics dry darker, so test a swatch first if you’re unsure. -
Refining the transition:
While the paint is still workable (use retarder here), use a clean, dry brush to gently feather the edges where the light meets the shadow. This softness is crucial for the realistic cheekbone structure. -
Add warmth to features:
Glaze a very thin layer of Alizarin Crimson and water over the lips, the tip of the nose, and the ear. This simulates blood flow under the skin.
Pro Tip: Soft Blending
Since acrylics dry fast, mix a glazing liquid into your paints instead of water. This increases translucency and extends open time, allowing for the soft, smoky blends seen on the cheek.
Step 3: Eyes and Hair
-
Construct the eyes:
Paint the whites of the eyes using a dull grey-blue, never pure white. Place the iris color, keeping the top half slightly darker where the lid casts a shadow. -
Add the spark:
With your smallest detail brush, place a single, crisp dot of pure Titanium White on the pupil to bring the subject to life. -
Block in hair masses:
Using a large filbert brush, lay down the general shape of the hair with a dark brown mix. Don’t paint individual strands yet; think of the hair as large sculpted shapes. -
Define hair volume:
Mix a lighter ochre-brown and add broad strokes to represent the waves catching the light. Follow the direction of the hair growth, specifically the sweep back from the forehead. -
Flyaway strands:
I usually switch to a rigger brush or fine round brush here to flick in a few loose hairs at the temples and the nape of the neck for realism.
Level Up: Color Harmony
Add a tiny amount of your background color into your skin shadow mix. This technique, called ‘reflecting,’ ties the subject to their environment and makes the portrait feel more 3D.
Step 4: Texture and Finishing
-
Painting the fabric:
Mix a soft off-white for the shirt. Paint the fabric using confident, directional strokes that mimic the folds. Keep the shadows in the fabric cool grey to contrast with the warm skin. -
Fabric details:
Use your detail brush to suggest the texture of the collar embroidery. You don’t need to paint every thread; small dabs of thicker white paint will suggest the tactile quality. -
Background atmosphere:
Paint the background with a neutral, soft beige-grey. Use a large brush and scumble the edges near the hair to keep the focus on the face. -
Final highlights:
Apply the highest highlights—often called ‘specular’ highlights—to the bridge of the nose, the forehead, and the highest point of the cheekbone using thick, opaque white.
Step back and admire how the layers of color interact to create a lifelike presence on your canvas


Limited Palette Skin Tones Study
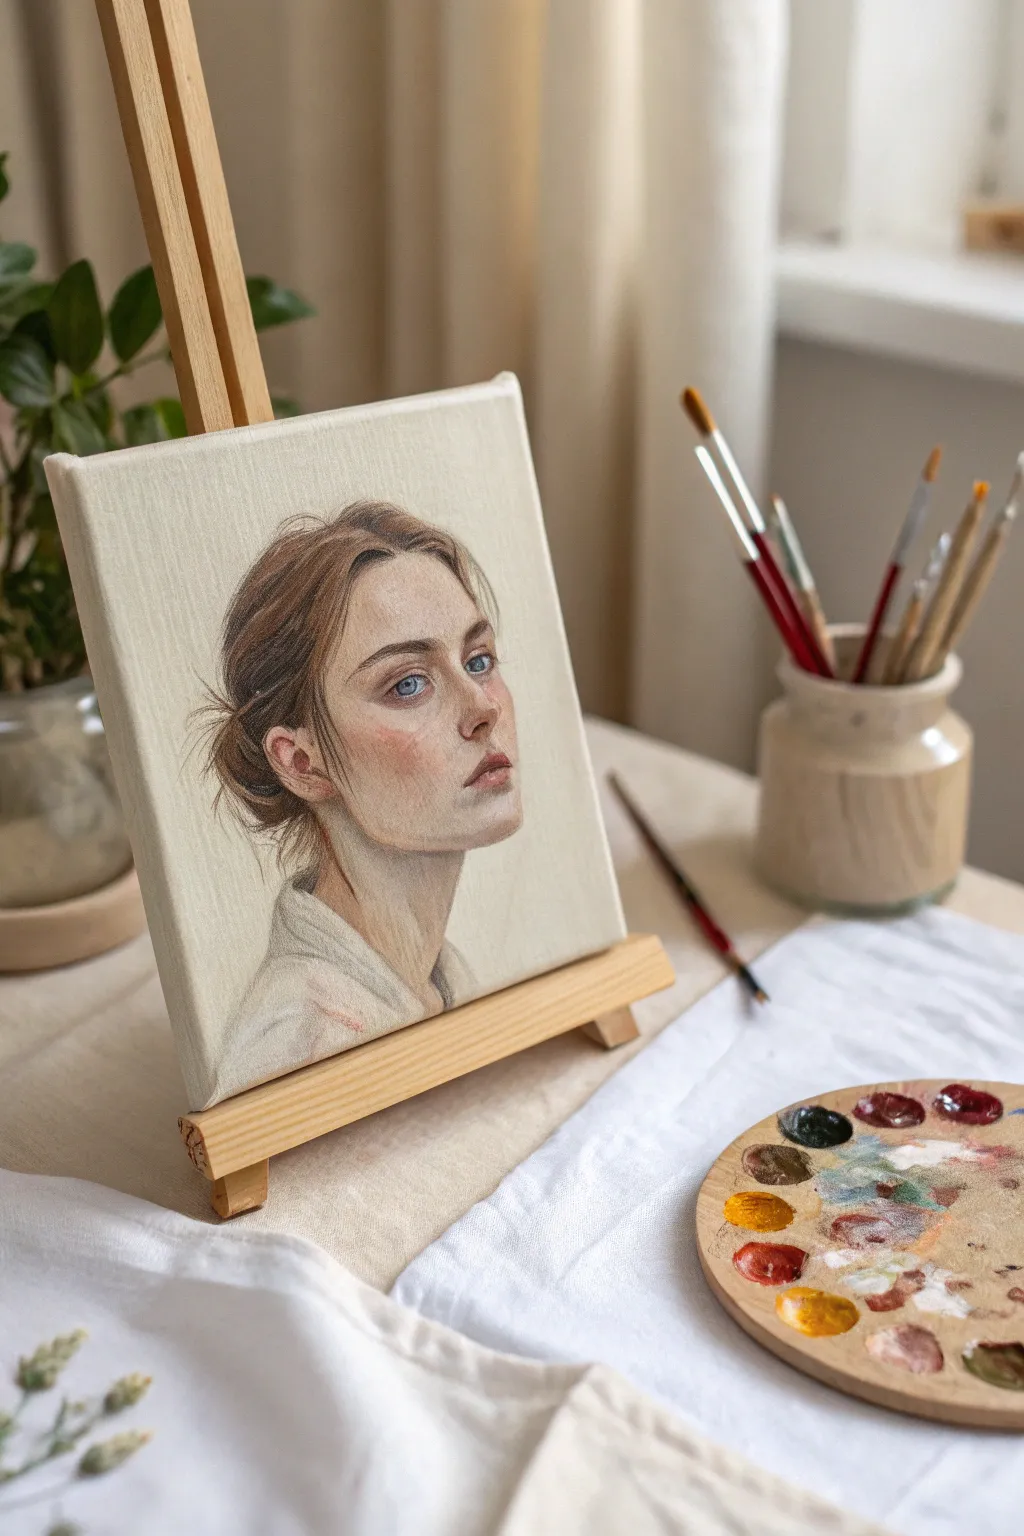
Capture the delicate nuance of skin tones with this soft, evocative portrait study that focuses on light and expression. By limiting your color palette, you’ll learn to mix sophisticated hues that give the subject a timeless, classical feel.
Step-by-Step
Materials
- Small square stretched canvas (approx. 8×8 or 10×10 inches)
- Acrylic paints: Titanium White, Yellow Ochre, Burnt Sienna, Alizarin Crimson, Burnt Umber, Ultramarine Blue
- Synthetic brushes: Filbert sizes 4 and 8, Round size 2, Liner brush size 0
- Stay-wet palette or disposable palette paper
- Water cup and paper towels
- Pencil (HB) for sketching
- Matte medium (optional, for glazing)
Step 1: Preparation and Initial Sketch
-
Prime the Surface:
Begin by applying a very thin wash of Yellow Ochre mixed with plenty of water or matte medium to your canvas. This tones the bright white down to a warm neutral base, which helps in judging skin values later. Let this dry completely. -
Map the Composition:
Using a diluted mixture of Burnt Sienna and a small round brush (or a light pencil), sketch the basic outline of the head. Focus on the tilt of the neck and the upward gaze. Keep your lines faint so they don’t show through the final layers. -
Define Features:
Lightly mark the placement of the eyes, bottom of the nose, and the line of the mouth. The subject has a long, elegant neck, so ensure you extend that line gracefully from the ear down to the shoulder.
Keep It Misty
To get that soft, dreamy look, mix a tiny bit of unbleached titanium or matte medium into your skin colors. It increases transparency for smoother blending without losing texture.
Step 2: Painting the Face and Skin Tones
-
Mix Your Base Tone:
Create a mid-tone flesh color using White, a touch of Yellow Ochre, and a tiny bit of Burnt Sienna. Paint this over the face area, avoiding the eyes and lips for now. It doesn’t need to be perfect; just get the general coverage. -
Establish Shadows:
Mix a shadow tone by adding Burnt Umber and a speck of Alizarin Crimson to your base skin mix. Apply this under the jawline, in the eye sockets, under the nose, and beneath the lower lip to start sculpting the form. -
Add Warmth to Cheeks:
While the paint is still workable, mix a rosy hue with White and Alizarin Crimson (toned down with a dot of Yellow Ochre). Glaze this gently onto the cheekbones, the tip of the nose, and the ear to give the skin a flushed, living quality. -
Refine the Eyes:
Using your size 2 round brush, block in the whites of the eyes with a dirty white (White + tiny dot of Blue/Brown). Then paint the irises using a mix of Ultramarine Blue and a touch of Burnt Umber for a muted, realistic blue-grey. -
Paint the Lips:
Use a mix of Alizarin Crimson and Burnt Sienna for the lips. Keep the upper lip slightly darker and cooler in tone than the lower lip. Soften the edges where the lips meet the skin so they don’t look pasted on. -
Highlights and Details:
Mix a highlight color using mostly Titanium White with the tiniest hint of Yellow Ochre. Apply this to the bridge of the nose, the forehead, the top of the cheekbones, and the chin. Don’t forget the tiny ‘catchlights’ in the eyes to bring them to life.
Step 3: Hair and Clothing
-
Block in Hair Mass:
For the brown hair, mix Burnt Umber with a touch of Ultramarine Blue to create a deep, dark base. Block in the main shape of the bun and the hair pulled back from the face. -
Add Hair Variety:
Once the dark base is dry, mix a lighter brown using Burnt Sienna and White. Dry-brush this over the crown of the head and the bun to suggest light catching the strands. -
Wispy Details:
Switch to your liner brush (size 0). Dilute your paint slightly with water to an inky consistency. Flick the brush gently to create loose, wispy strands escaping the bun at the nape of the neck and around the ears. This adds movement and realism. -
Rough in the Clothing:
The clothing is kept very loose to keep focus on the face. Use a large filbert brush with a mix of White and a tiny bit of Burnt Umber (a warm grey). Paint the collar and shoulder with broad, confident strokes. -
Clothing Shadows:
While the shirt paint is wet, add a slightly darker grey to the folds of the collar and where the fabric meets the neck. Keep edges soft.
Background Drama
Instead of the plain background, try a dark, moody grey-green or deep navy backdrop behind the head. This high contrast will make the pale skin tones glow intensely.
Step 4: Final Adjustments
-
Check Values:
Step back from your painting. If the shadows on the neck look too flat, deepen them with a glaze of Burnt Umber. If the highlights have faded as acrylics dry darker, re-apply the brightest spots on the nose and forehead. -
Softening Edges:
If any lines on the face look too harsh (like the side of the nose), use a clean, slightly damp brush to gently feather the edge of the paint, blending it into the surrounding skin tone. -
Final Ear Detail:
The ear often catches light—ensure the rim has a warm highlight, and the inner ear has a deep shadow to show depth. A touch of crimson on the earlobe suggests blood flow and is a lovely realistic detail.
Allow your painting to dry fully before varnishing to protect those delicate skin tones you’ve worked so hard on


Grayscale Underpainting With Color Layers
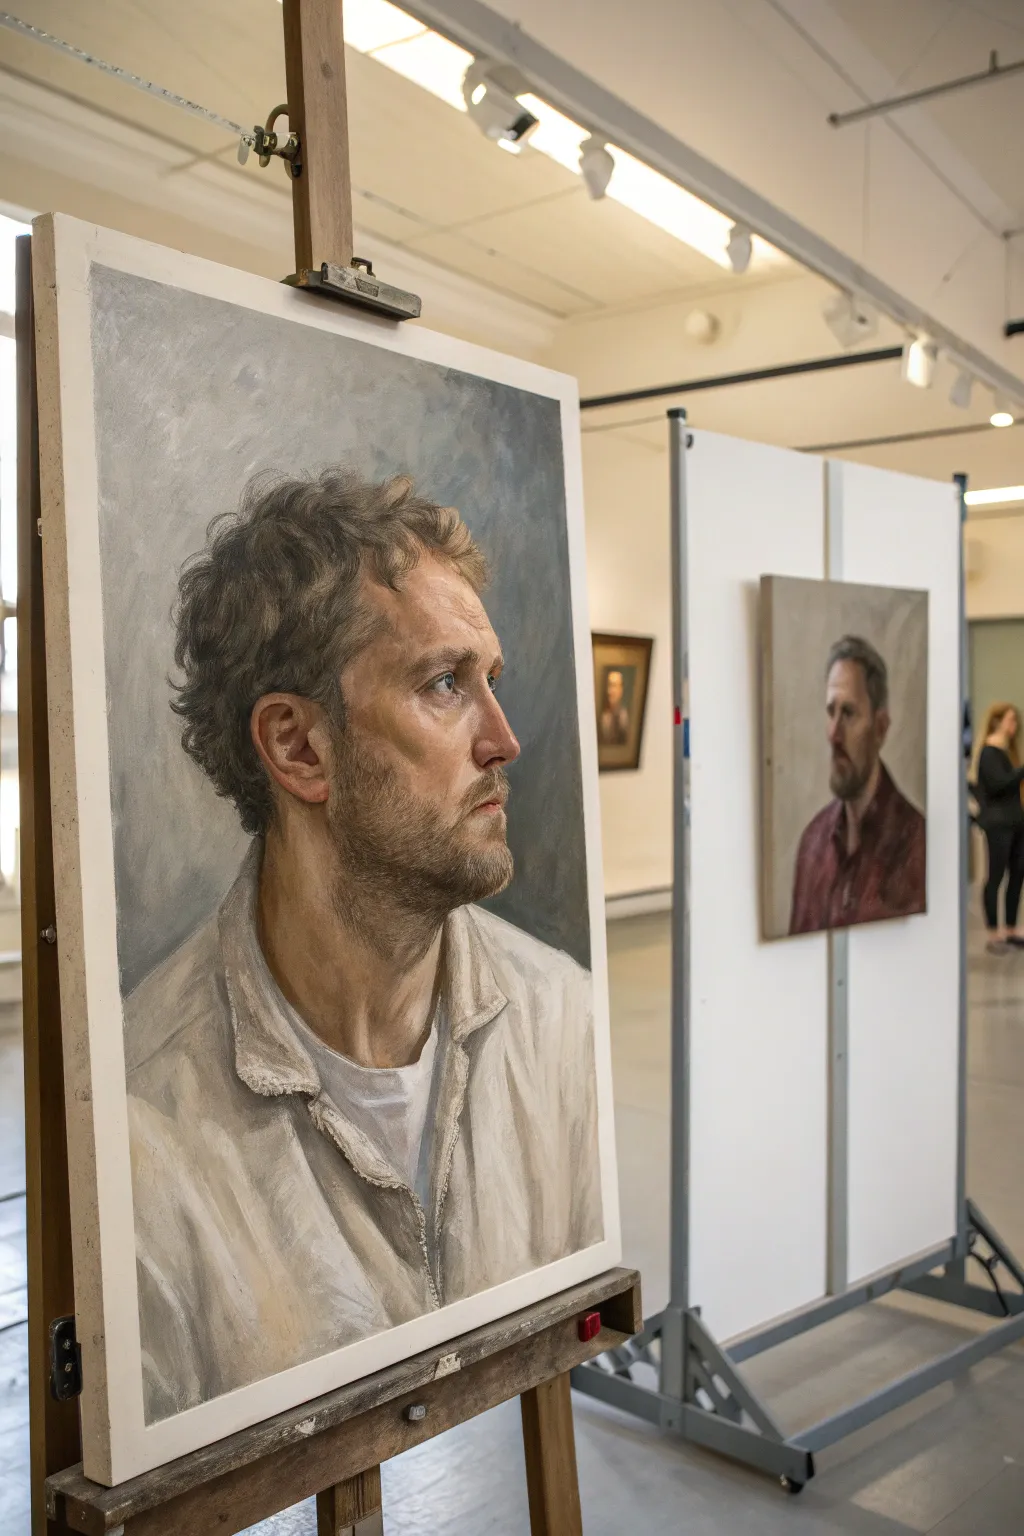
Capture the profound depth and realism of a classical portrait using a grisaille underpainting technique. By establishing your values in black and white first, you can focus purely on form before bringing the subject to life with subtle, transparent washes of acrylic color.
Step-by-Step Tutorial
Materials
- Primed canvas or wood panel (approx. 18×24 inches)
- Heavy body acrylic paints (Titanium White, Mars Black, Burnt Umber, Yellow Ochre, Alizarin Crimson, Ultramarine Blue, Cadmium Red)
- Acrylic glazing medium (gloss or satin)
- Assorted synthetic brushes (flats for blocking, rounds for details)
- Palette knife
- Water container and rags
- Stay-wet palette (optional but recommended)
Step 1: The Grisaille Underpainting
-
Map out the structure:
Begin with a diluted mix of neutral gray (Mars Black and Titanium White) and a small round brush. Sketch the basic contours of the head, focusing on the profile silhouette, the placement of the ear, and the neckline of the collar. Keep lines light and erasable if possible. -
Block in shadow shapes:
Switch to a larger flat brush. Mix a dark gray value and block in the major shadow areas: the back of the neck, underneath the chin, the eye socket, and the hair mass. Ignore details; squint at your reference to see just the big shapes. -
Establish mid-tones:
Create 2-3 distinct gray values on your palette, ranging from light to dark. Paint the mid-tones of the face, carefully modeling the cheeks, forehead, and nose bridge. The goal is to make the head look like a three-dimensional sculpture. -
Refine the features:
Using a smaller filbert or round brush, refine the smaller planes of the face. Pay close attention to the nose structure and the intricate folds of the ear. Ensure your values are accurate—if the grayscale looks flat, the final color will look flat. -
Add highlights and texture:
Use nearly pure Titanium White for the brightest points: the bridge of the nose, the top of the cheekbone, and the collar’s edge. At this stage, you can use a dry brush to suggest the texture of the hair and the stubble on the jawline. -
Create the background:
Paint the background using a clouded, atmospheric mix of grays. Use a scumbling technique (circular motions with a dry-ish brush) to create a soft, out-of-focus texture that contrasts with the sharpness of the profile. Let the entire underpainting dry completely—overnight is best.
Don’t Rush the Dry Time
If you glaze over wet paint, you’ll lift the layer underneath and create mud. Use a hair dryer on a cool setting between every single glaze layer to ensure crisp, clean transparency.
Step 2: Glazing Color Layers
-
Prepare the first glaze:
Mix a ‘flesh tone’ base using Burnt Umber, Yellow Ochre, and a massive amount of glazing medium. The paint should be transparent, like stained glass, not opaque. Test it on a scrap paper first to ensure the black and white drawing shows through clearly. -
Apply the general skin tone:
Brush this warm, transparent glaze over the entire face and neck area. Instantly, the gray underpainting will take on a sepia or warm neutral tone. Smooth out brushstrokes with a soft, clean brush to avoid streaks. -
Introduction of warm zones:
Mix a small amount of Alizarin Crimson or Cadmium Red with glaze. I like to target the areas where blood flow is higher: the ear, the nose tip, and the cheeks. Apply this selectively to bring life to the features. -
Cool zones and shadows:
Mix Ultramarine Blue with a touch of Burnt Umber and glaze. Apply this cooler tone to the shadow side of the jaw, the eye socket, and the stubble area (the ‘five o’clock shadow’ zone). This temperature shift creates realistic skin complexity. -
Define the hair:
Glaze the hair with a mix of Burnt Umber and Yellow Ochre. Since the underpainting already has the texture, this glaze just needs to tint it. You can add a second, darker glaze near the roots for depth. -
Work on the clothing:
Mix a very pale wash of Yellow Ochre and White (semi-opaque this time) to glaze over the jacket. Allow the gray underpainting to serve as the shadows in the folds, applying the new paint mostly to the highlighted ridges. -
Deepen the darkest accents:
Mix a dark, semi-transparent brown/black. Reinforce the darkest crevices—the pupil, the nostalgic, the deep inner ear shadows, and the separation between the lips. This restates contrast that might have been lost during glazing. -
Final highlights:
Re-establish the brightest highlights with opaque Titanium White mixed with the tiniest touch of Yellow Ochre. These scumbles sit on top of the glazes, bringing back the ‘punch’ of the light on the forehead, nose bridge, and collar. -
Unified background glaze:
Apply a final, very watery cool blue-gray glaze over the background to push it further back in space and unify the brushwork, ensuring the portrait remains the sharp focal point.
Pro Tip: Value Check
Take a photo of your underpainting with your phone and turn it to black & white. If the image looks blurry or flat, push your lights lighter and darks darker before adding any color.
Step back and admire how the layers of transparent color interact with your grayscale foundation to create a luminous, lifelike presence


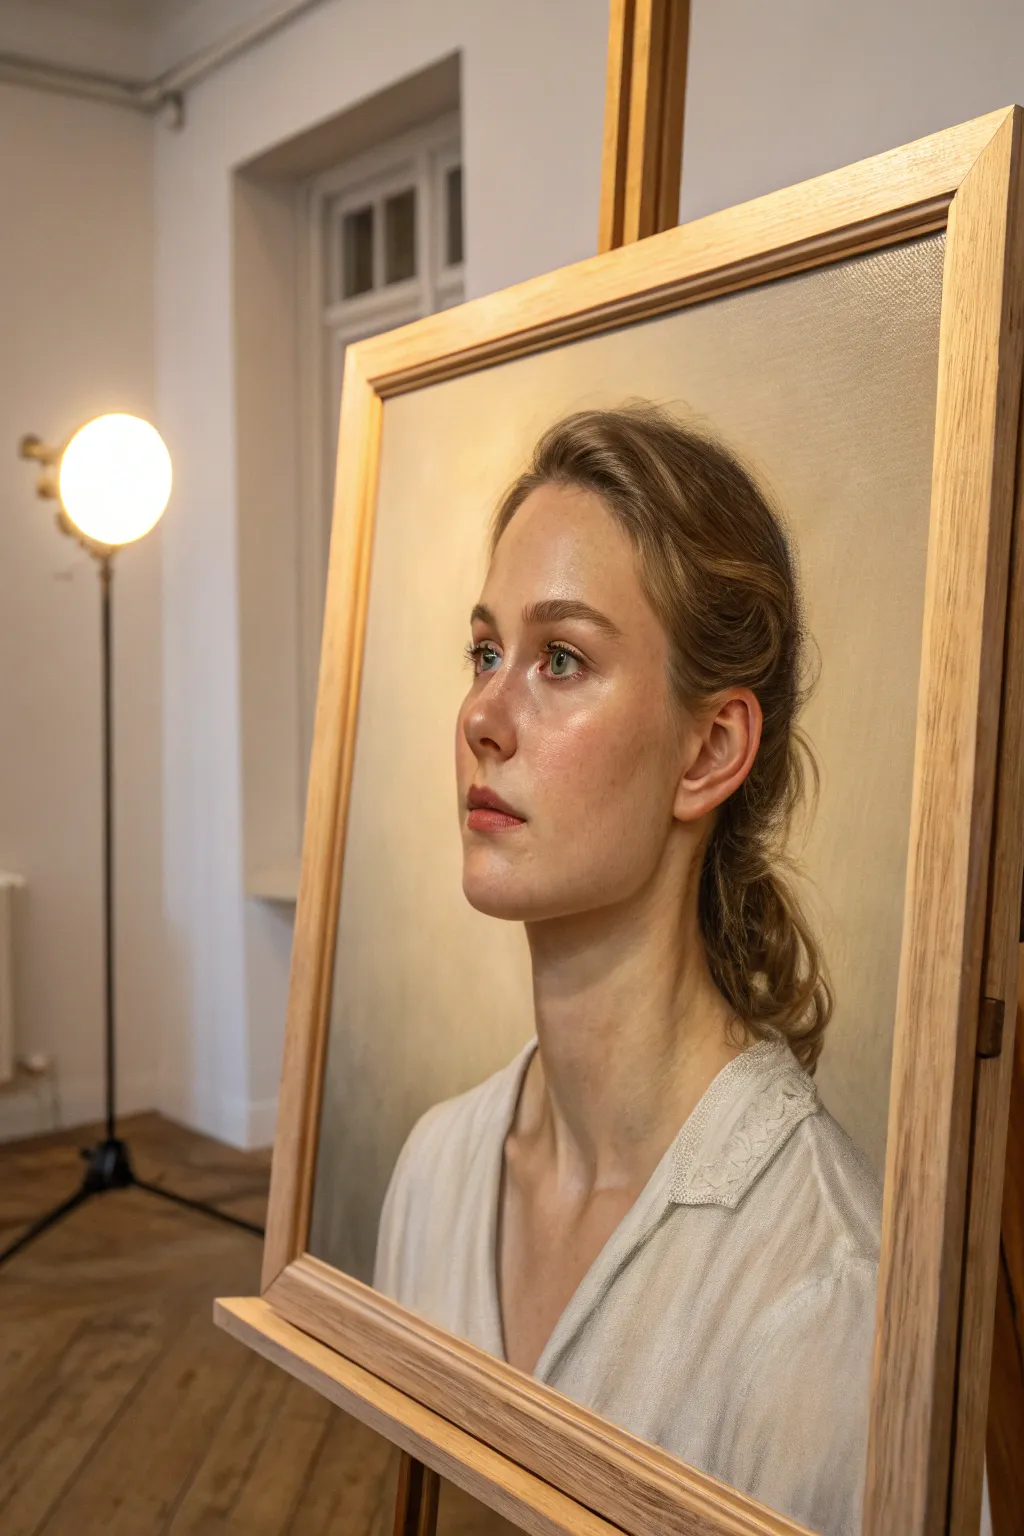
Warm Light, Cool Shadow Portrait
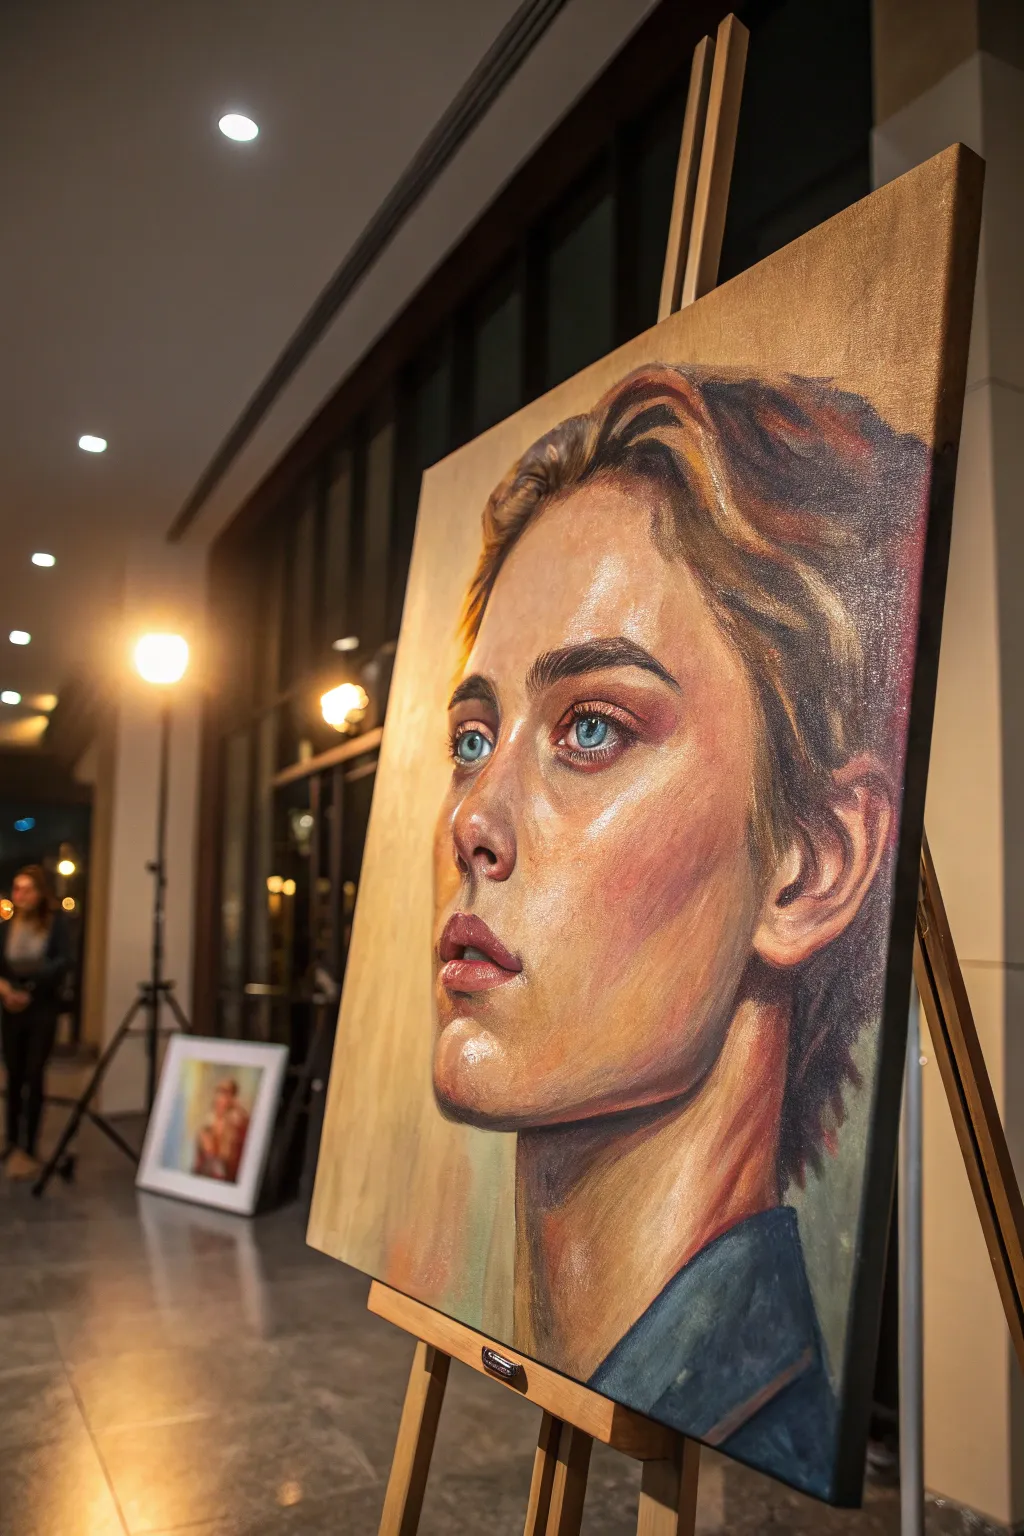
Capture the dramatic beauty of a sunset glow hitting a face with this acrylic portrait tutorial. You will learn to balance intense oranges and yellows against deep, cool shadows to create a vibrant, three-dimensional effect that radiates warmth.
Step-by-Step
Materials
- Stretched canvas (16×20 or 18×24 inches)
- Acrylic paints: Titanium White, Burnt Umber, Yellow Ochre, Cadmium Orange, Cadmium Red, Ultramarine Blue, Alizarin Crimson
- Flat and filbert synthetic brushes (sizes 4, 8, and 12)
- Small round detail brush (size 1)
- Palette knife for mixing
- Water container and paper towels
- Slow-drying medium or retarder (optional)
Step 1: Preparation and Underpainting
-
Tone the canvas:
Start by covering your white canvas with a thin wash of Yellow Ochre mixed with a lot of water. This eliminates the stark white background and provides a warm, unifying base tone that will peek through later layers. -
Sketch the contours:
Using a small round brush and thinned Burnt Umber paint, lightly sketch the outline of the head, neck, and shoulders. Focus on the main proportions: the tilt of the head, the placement of the eyes, and the jawline. -
Map the shadow shapes:
Identify where the darkest shadows fall—under the jaw, the back of the neck, and the eye sockets. Block these in roughly with a mix of Burnt Umber and Ultramarine Blue to establish your values early.
Pro Tip: Acrylic Glazing
To evoke glowing skin, wait for the base layers to dry, then apply a very thin, watery glaze of pure orange or red over the shadowy cheek areas. It adds incredible vibrancy without losing detail.
Step 2: Building the Skin Tones
-
Mix the mid-tones:
Create a general flesh tone using White, Yellow Ochre, and a touch of Red. Apply this to the cheek, forehead, and nose bridge, keeping the layer somewhat loose. -
Introduce the warm light:
This is the crucial step for the ‘glow’ effect. Mix Titanium White with Cadmium Orange and a tiny bit of Yellow. Apply this boldly to the areas hitting the light directly: the bridge of the nose, the forehead, and the cheekbone facing the light source. -
Develop cool shadows:
To contrast that warmth, mix Alizarin Crimson with a little Ultramarine Blue and White to create a cool, purplish shadow tone. Paint this into the side of the face turning away from the light, specifically the cheek hollows and the neck. -
Blend the transitions:
While the paint is still damp, use a clean, dry filbert brush to softly blend the edge where the warm light meets the cool shadow. Don’t over-blend; you want to maintain some painterly texture.
Troubleshooting: Chalky Skin?
If skin tones look chalky or pasty, you likely used too much white. Mix in a tiny amount of Cadmium Red or Orange to restore the blood-flow look and warmth to the flesh tones.
Step 3: Refining Features
-
Paint the eyes:
Use a small brush to paint the irises with a mix of Ultramarine Blue and a touch of white. Keep the upper part of the iris darker (under the lid shadow) and add a tiny speck of pure white for the catchlight to make them sparkle. -
Sculpt the nose:
Reinforce the highlight on the tip of the nose with your lightest warm mix. Add a touch of reddish-orange around the nostril to show the translucency of the skin. -
Define the lips:
Paint the lips using Alizarin Crimson and Burnt Umber. Keep the upper lip slightly darker. Add a crisp highlight to the bottom lip to simulate moisture.
Step 4: Hair and Clothing
-
Block in hair basic color:
Using a large flat brush, block in the hair mass with a dark mixture of Burnt Umber and Blue. Follow the direction of the hair growth with your brushstrokes. -
Add hair highlights:
Mix Yellow Ochre and White. Paint loose, flowing strokes where the light hits the waves of the hair, mostly on the top and front. Let the dark underpainting show through for depth. -
Paint the clothing:
Sketch in the collar and shoulders with a dark blue or grey tone (Ultramarine Blue + Burnt Umber + White). Keep this section loose and abstract so it doesn’t distract from the face.
Step 5: Final Touches
-
Intensify highlights:
Take a step back and look at your painting. Apply pure white (or white with a tiny dot of yellow) to the absolute brightest points: the corner of the eye, the glistening tip of the nose, and the highest point of the cheekbone. -
Deepen contrast:
If the shadows look washed out, glaze a thin layer of transparent Burnt Umber or Alizarin Crimson over the darkest areas to push them back. -
Add texture:
I like to use a palette knife or a coarse brush to drag a little bit of the background color over the edges of the hair, softening the silhouette and making the portrait feel integrated with the space. -
Background adjustments:
Refine the background with broad, vertical strokes of a neutral beige or soft grey, cutting into the hair shape slightly to correct any outline issues.
Step back and admire how the interplay of warm and cool colors brings a lifelike energy to your subject
BRUSH GUIDE
The Right Brush for Every Stroke
From clean lines to bold texture — master brush choice, stroke control, and essential techniques.
Explore the Full Guide
Alla Prima Expressive Brushstroke Portrait
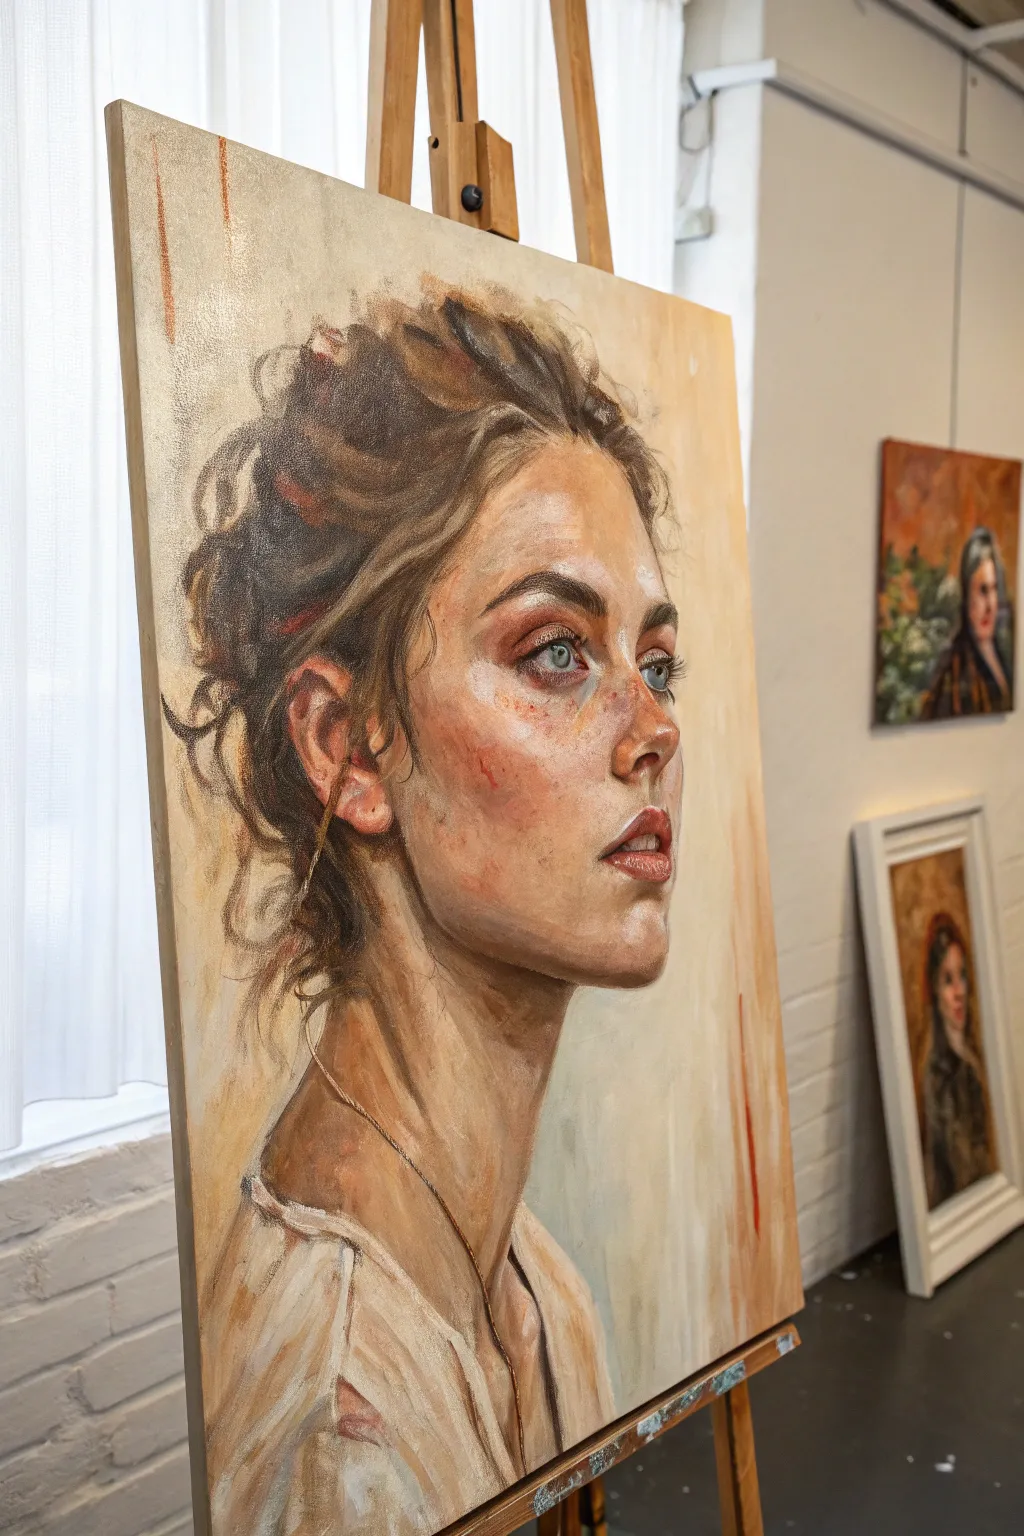
Capture the delicate intensity of a fleeting moment with this expressive acrylic portrait tutorial, focusing on loose brushwork and luminous skin tones. You will learn to build up layers from a warm underpainting to create a striking, emotive profile that feels both classical and contemporary.
Step-by-Step Tutorial
Materials
- Heavy body acrylic paints (Titanium White, Yellow Ochre, Burnt Sienna, Burnt Umber, Alizarin Crimson, Ultramarine Blue, Cadmium Red)
- Medium-tooth stretched canvas (approx. 18×24 inches)
- Synthetic bristle brushes: Large flat (1-inch), Filbert (sizes 4, 8, 12), Round (size 2)
- Palette knife for mixing
- Slow-drying medium or retarder
- Water container and rags
- Easle
- Charcoal or pastel pencil (canary yellow or light brown)
Step 1: Setting the Foundation
-
Tone the Canvas:
Begin by covering your entire canvas with a wash of Yellow Ochre mixed with a touch of Burnt Sienna and plenty of water. This warm, neutral ground will peek through later layers, giving the skin a glowing quality. -
Rough Sketch:
Once the wash is bone dry, use a pastel pencil or charcoal to sketch the large forms. Focus on the tilt of the head, the curve of the neck, and the placement of the ear. Don’t worry about eyelashes or nostrils yet; focus on the big shapes. -
Establish Shadow Shapes:
Mix a thin glaze of Burnt Umber and Alizarin Crimson. Using your large flat brush, block in the darkest areas: the deep crevices of the hair, the shadow under the jawline, and the recessed area of the eye socket.
Muddy Skin Tones?
If skin looks dull or grey, you likely over-blended complimentary colors while wet. Let the layer dry completely, then apply a fresh, clean stroke of color on top without disturbing the paint underneath.
Step 2: Blocking In Color
-
Mixing Skin Mid-Tones:
Prepare a base flesh tone using White, Yellow Ochre, and a tiny dot of Cadmium Red. Create three variations: one lighter, one redder (for cheeks/nose), and one cooler (mixed with a touch of blue for shadow edges). -
Apply Mid-Tones:
Using a size 12 filbert, paint the main planes of the face. Work confidently with large strokes, avoiding over-blending. Place the warmer pinks on the cheekbone and the cooler tones near the hairline and jaw. -
Defining the Hair Mass:
Mix Burnt Umber with Ultramarine Blue for a near-black. Roughly scumble this into the hair shape, leaving some of the warm background showing through to suggest light filtering through the strands. -
Adding the Garment:
For the shirt, mix White with a trace of Burnt Sienna and Umber. Use long, sweeping vertical strokes to suggest the fabric draping over the shoulder, keeping the paint application thin and sketchy to contrast with the face.
Use Larger Brushes
To maintain the ‘expressive’ look, use a brush one size larger than you think you need for as long as possible. This prevents you from getting bogged down in tiny details too early.
Step 3: Refining Features
-
Developing the Eye:
Switch to a smaller filbert brush. Paint the sclera (white of the eye) not with pure white, but with a light grey-blue. Add the iris using a mix of Ultramarine and Burnt Sienna, placing a sharp highlight near the top to verify the upward gaze. -
Nose and Mouth Structure:
Use the redder skin mix to define the tip of the nose and the lips. Keep the upper lip slightly darker than the bottom lip. I like to soften the edges of the lips into the surrounding skin so they don’t look pasted on. -
Refining the Ear:
The ear is complex, so simplify it into light and dark shapes. Use a crimson-heavy mix for the translucent areas where light hits the thinner cartilage, making it look warm and alive. -
Building Texture:
Mix your slow-drying medium into the flesh tones. Apply thicker, impasto strokes on the high points of the face: the forehead, the bridge of the nose, and the chin. This physical texture catches the light.
Step 4: expressive Details
-
Loose Hair Strands:
Using a round brush and thin, inky paint, flick out stray hairs escaping the bun. Let these dance over the background and across the forehead to create movement and spontaneity. -
Color Variation:
Glaze very thin washes of Alizarin Crimson over the cheek and nose to heighten the flushed look. Add a touch of cool blue-grey under the eye and neck to create color vibration. -
The Necklace Detail:
With your smallest round brush or a rigger, paint fine lines for the necklace chain. It doesn’t need to be a solid line; broken strokes look remarkably realistic from a distance. -
Background Integration:
Take some of your thick, creamy background color (White + Yellow Ochre) and cut back into the profile shape if you need to correct the silhouette. This negative painting technique sharpens the features. -
Final Highlights:
Add the brightest highlights last using pure Titanium White. Place small dots on the tip of the nose, the wetness in the eye, and the sheen of the lower lip.
Step back and admire how the loose strokes resolve into a breathing, lifelike portrait from a distance
Profile Portrait With Bold Edge Control
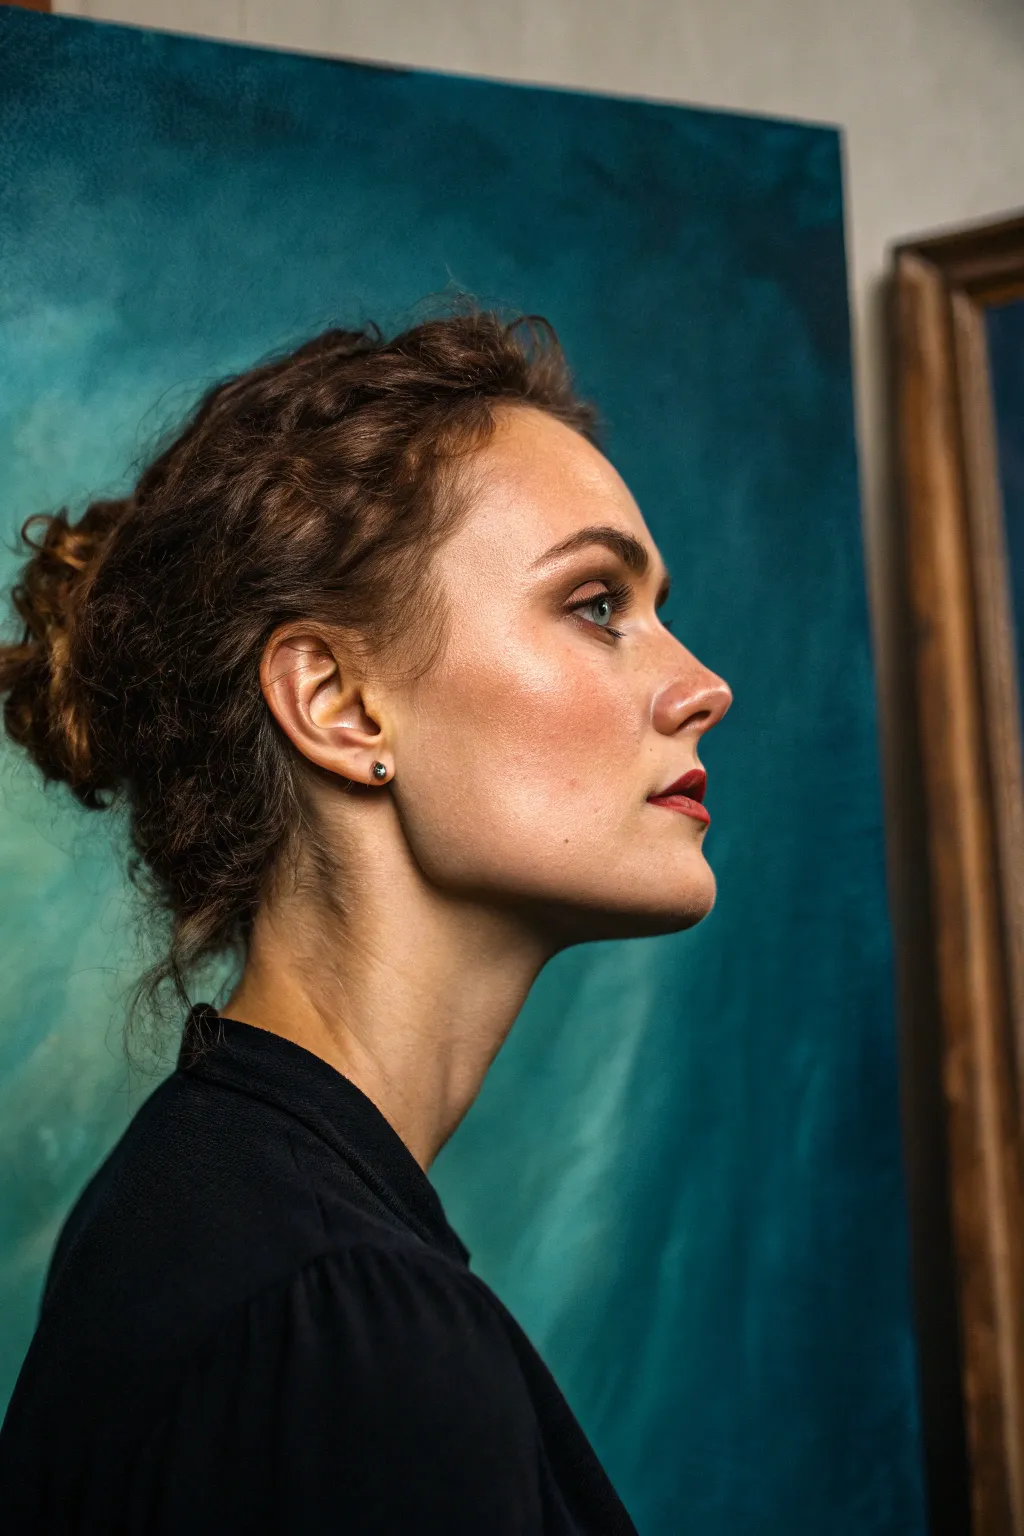
Capture the delicate strength of a side profile against a moody, textured backdrop in this acrylic study. By combining realistic skin tone rendering with an abstract, painterly background, you’ll create a striking contrast that emphasizes your subject’s features.
Detailed Instructions
Materials
- Stretched canvas or canvas board (16×20 inches recommended)
- Heavy body acrylic paints (Titanium White, Burnt Umber, Yellow Ochre, Cadmium Red Medium, Alizarin Crimson, Phthalo Green, Phthalo Blue, Mars Black)
- Set of synthetic brushes (filberts for blending, small rounds for details, large flat for background)
- Palette knife
- Slow-drying medium or retarder
- Water container and paper towels
- Graphite pencil (HB or B)
Step 1: Preparation & Drawing
-
Prime the surface:
Begin with a clean canvas. If you prefer a smoother texture for the face, apply an extra coat of gesso and sand it lightly once dry to minimize the canvas weave. -
Establish the composition:
Sketch the profile lightly with a graphite pencil. Focus on the negative space in front of the face to ensure she isn’t looking directly off the edge too abruptly. Allow ample room for the hair at the back. -
Refine the features:
Pay close attention to the angles of the nose, the specific curve of the lips, and the ear placement. Double-check your proportions now, as acrylics are opaque but fixing structural issues later is harder.
Step 2: The Abstract Backdrop
-
Mix background colors:
Create a gradient of teal tones. Mix Phthalo Green with Phthalo Blue, adding White to create varied values. Prepare a dark, shadowy teal and a lighter, misty turquoise. -
Apply the background base:
Using a large flat brush, block in the background color. I like to keep this loose, scumbling the paint so it feels atmospheric rather than flat. -
Add texture and variation:
While the background is still slightly wet, introduce subtle shifts in hue. Use a dry brush or even a palette knife to drag lighter teal vertically or diagonally, creating that cloudy, textured look seen behind the model. -
Cut the edge:
Carefully paint up to your pencil lines. This is the ‘Bold Edge Control’ phase—make the line between the profile and the background crisp to make the face pop.
Edge Control Secret
To get that razor-sharp profile edge, paint the background slightly *over* the pencil line first, let dry, then paint the face color up to it. It actually creates a cleaner visual crispness.
Step 3: Flesh Tones & Features
-
Base flesh tone mixing:
Mix a mid-tone skin color using Titanium White, Yellow Ochre, and a small touch of Cadmium Red. Add a tiny dot of Burnt Umber to desaturate it slightly so it looks natural, not orange. -
Block in the shadows:
Mix a darker shadow tone by adding Burnt Umber and a hint of Alizarin Crimson to your base mix. Apply this under the jawline, in the ear, the eye socket, and the side of the nose. -
Apply mid-tones:
Fill in the cheek, forehead, and neck with your base flesh tone. Use a filbert brush and a little slow-drying medium to blend the edges where the mid-tones meet the shadows. -
Highlight the high points:
Add more White and a touch of Yellow to your mix. Paint the highlights on the bridge of the nose, the brow bone, the top of the cheekbone, and the chin. These planes catch the most light. -
Refine the ear:
Ears can be complex. Treat the ear as a series of abstract shapes of light and shadow rather than thinking ‘ear.’ Use the shadow mix for the deep folds and bright highlights for the rim. -
Paint the eye:
Use a small round brush. The eye is in profile, so it appears triangular. Paint the iris with a mix of blue and green, and don’t forget the dark lash line and the small white reflection spot. -
Detail the lips:
Mix Alizarin Crimson with Cadmium Red and a little White. Paint the lips, keeping the upper lip slightly darker than the lower lip. Add a crisp highlight on the cupid’s bow.
Level Up: Color Harmony
Glaze a very thin, watery layer of the teal background color over the shadowed side of the face (the jaw/neck) to visually unify the subject with their environment.
Step 4: Hair & Clothing
-
Underpainting the hair:
Cover the hair area with a dark wash of Burnt Umber and Mars Black. This provides depth for the curls you will add later. -
Defining curls:
Once the dark layer is dry, mix Burnt Umber with Yellow Ochre and White. Using a small filbert or round brush, paint s-shaped strokes to suggest the wavy texture of the bun and pulled-back hair. -
Flyaway hairs:
Dilute your highlight hair color with water until it’s inky. Use a liner brush to flick rapid, thin strokes around the silhouette and nape of the neck for realistic flyaways. -
Block in the clothing:
Paint the shoulder and chest area with Mars Black. Keep this area fairly flat to not distract from the face, but add slight gray highlights to show the fold of the fabric. -
Final touches:
Check your edges. If you painted over the sharp profile line, cut back in with your background color. Add the small earring stud with a dot of gray and a specular white highlight.
Step back and admire how the crisp profile commands attention against the soft, moody background

PENCIL GUIDE
Understanding Pencil Grades from H to B
From first sketch to finished drawing — learn pencil grades, line control, and shading techniques.
Explore the Full Guide
Close-Up Eyes and Lips Mini Portraits
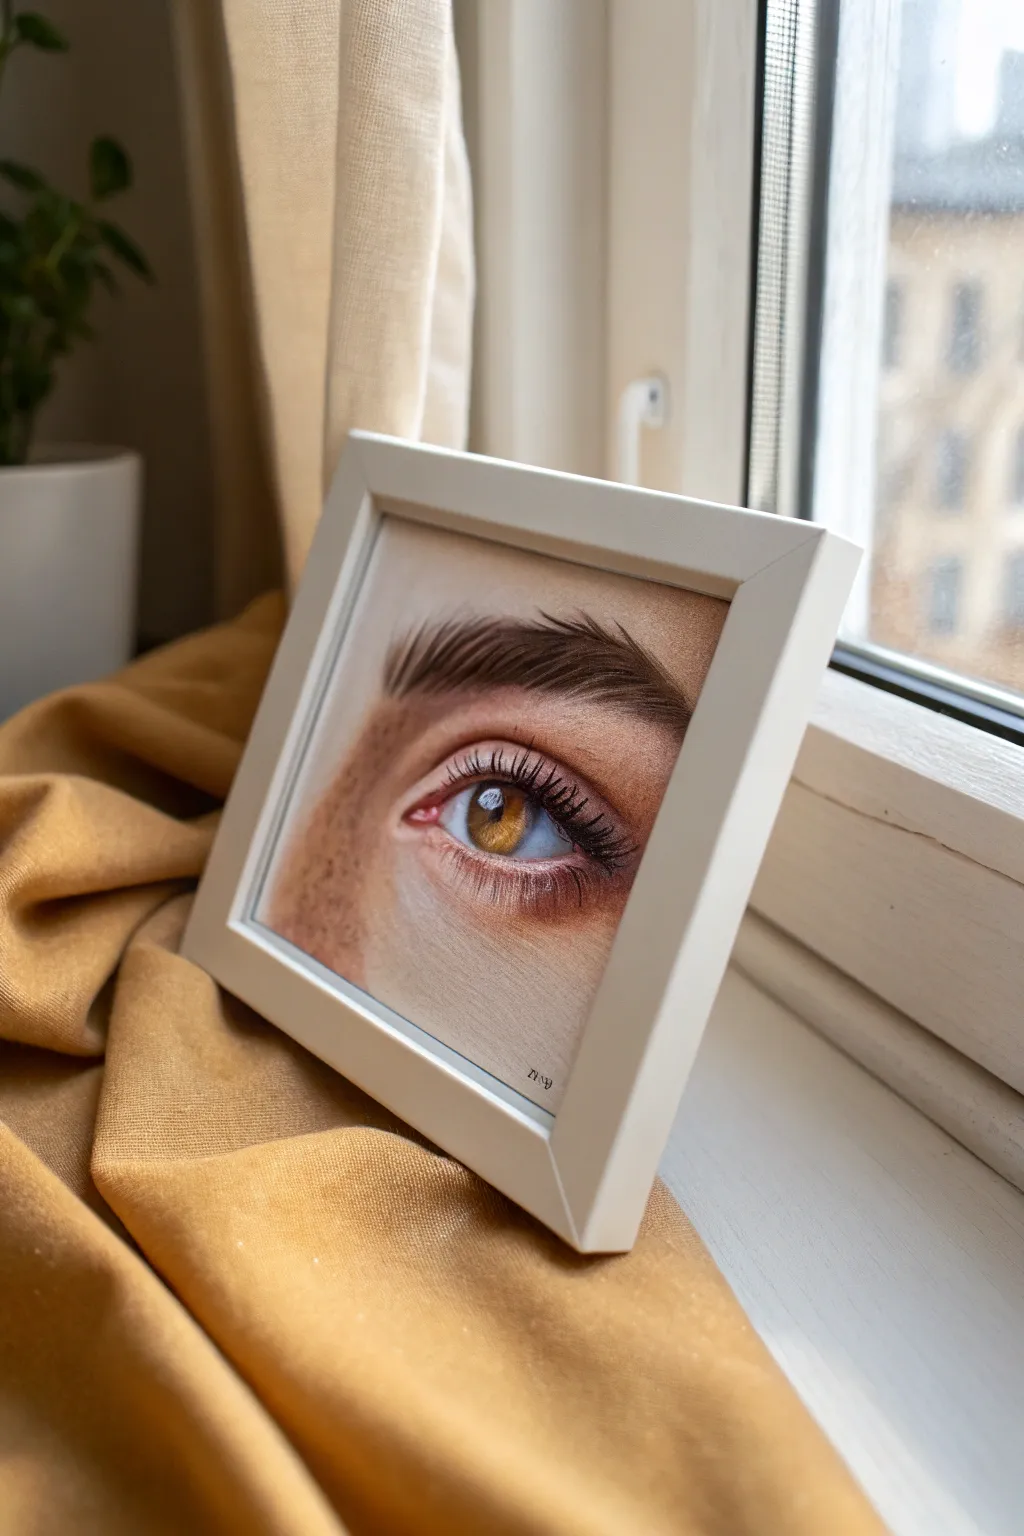
This captivating mini-portrait focuses entirely on the intricate details of a single eye, capturing the interplay of amber light within the iris and soft skin textures. It’s a perfect exercise in blending and precision on a small scale, resulting in a striking piece of realism.
Step-by-Step Guide
Materials
- Small square canvas board or heavy watercolor paper (e.g., 5×5 or 6×6 inches)
- Acrylic paints (Titanium White, Burnt Sienna, Yellow Ochre, Burnt Umber, Cadmium Red, Ultramarine Blue, Ivory Black)
- Fine detail brushes (sizes 0, 00, and 2 round)
- Small flat brush (size 4) for blocking in
- Mixing palette
- Water cup and paper towels
- Pencil (HB) for sketching
- Satin or matte varnish (optional)
Step 1: Sketching and Base Layers
-
Outline the structure:
Begin by lightly sketching the outline of the eye on your small canavas. Pay close attention to the shape of the tear duct and the curve of the eyelids, ensuring the iris is a perfect circle partially tucked under the upper lid. -
Mix skin tones:
Create a mid-tone skin color using White, Burnt Sienna, and a tiny touch of Yellow Ochre. Prepare a darker shadow shade by adding a bit of Burnt Umber to this mix. -
Block in the skin:
Using your flat brush, apply the mid-tone skin color around the eye area. While the paint is still wet, blend in the darker shadow shade into the crease above the eye and the hollow near the nose bridge. -
Paint the sclera:
Paint the ‘white’ of the eye. Avoid pure white; instead, mix a light grey-blue using White and a speck of Ultramarine Blue and Burnt Umber to give the eyeball roundness and depth.
Step 2: The Iris and Pupil
-
Base the iris:
Fill the entire iris circle with a dark mix of Burnt Umber and a little Black. This provides a deep background for the lighter details to sit on top of later. -
Add the pupil:
Paint a solid black circle in the center of the iris for the pupil. Ensure it is centered and crisp. -
Layer the amber tones:
Mix Yellow Ochre with a touch of Burnt Sienna. Using a size 0 brush, paint small streaks radiating outward from the pupil, varying the length to mimic the fibers of the iris. -
Apply highlights to the iris:
Mix a lighter golden shade by adding White to your ochre mix. Carefully dab this heavily on the lower left quadrant of the iris, where the light hits the eye, creating that glowing amber effect. -
Create the limbal ring:
Use a dark brown-black glaze (paint thinned with water) to darken the outer edge of the iris, softly blending it inward to frame the color.
Eye-Catching Glazing
To make the eye color glow, wait for the base layers to dry, then apply a transparent wash of bright yellow or orange over the iris. The color effectively pops.
Step 3: Refining Details and Textures
-
Deepen the creases:
Switch back to your skin shadow mix. Elaborate on the eyelid crease and the lower lash line shadow to deepen the socket. I find blending this out with a clean, slightly damp brush helps keep the transition soft. -
Add warmth:
Glaze a very thin layer of Burnt Sienna or diluted Cadmium Red near the tear duct and the corners of the eye to simulate the blood flow under the thin skin there. -
Create eyebrow texture:
Mix a dark brown shade. Using your 00 detail brush, paint the eyebrow hairs one by one. Follow the natural growth direction—upward at the inner corner, then arching over and down. -
Paint the eyelashes:
Using thin black paint, flick quick, curved strokes for the eyelashes. Remember that lashes clump together slightly and curve downwards before swooping up. Paint the reflection of the lashes faintly in the highlight of the eye. -
Freckles and imperfections:
Dilute some Burnt Sienna and lightly stipple faint freckles across the skin area, particularly on the left side, to add realism and texture to the complexion.
Shaky Lines?
If you struggle with fine eyelashes, thin your paint to an ink-like consistency with water or flow medium. This helps the paint glide off the brush smoothly without drag.
Step 4: Final Touches
-
The main reflection:
With pure Titanium White, paint the sharp window reflection on the iris. This should span across the pupil and iris and really brings the eye to life. -
Wetline highlights:
Add tiny dots of white along the lower waterline and inside the tear duct to make the eye look wet and glossy. -
Final adjustments:
Step back and check your contrast. If the skin looks too flat, glaze a little more shadow into the corners. Once fully dry, frame your piece in a simple white frame.
Place your finished miniature on a windowsill or desk to enjoy its intricate details every day
Older Face Portrait With Texture and Wrinkles
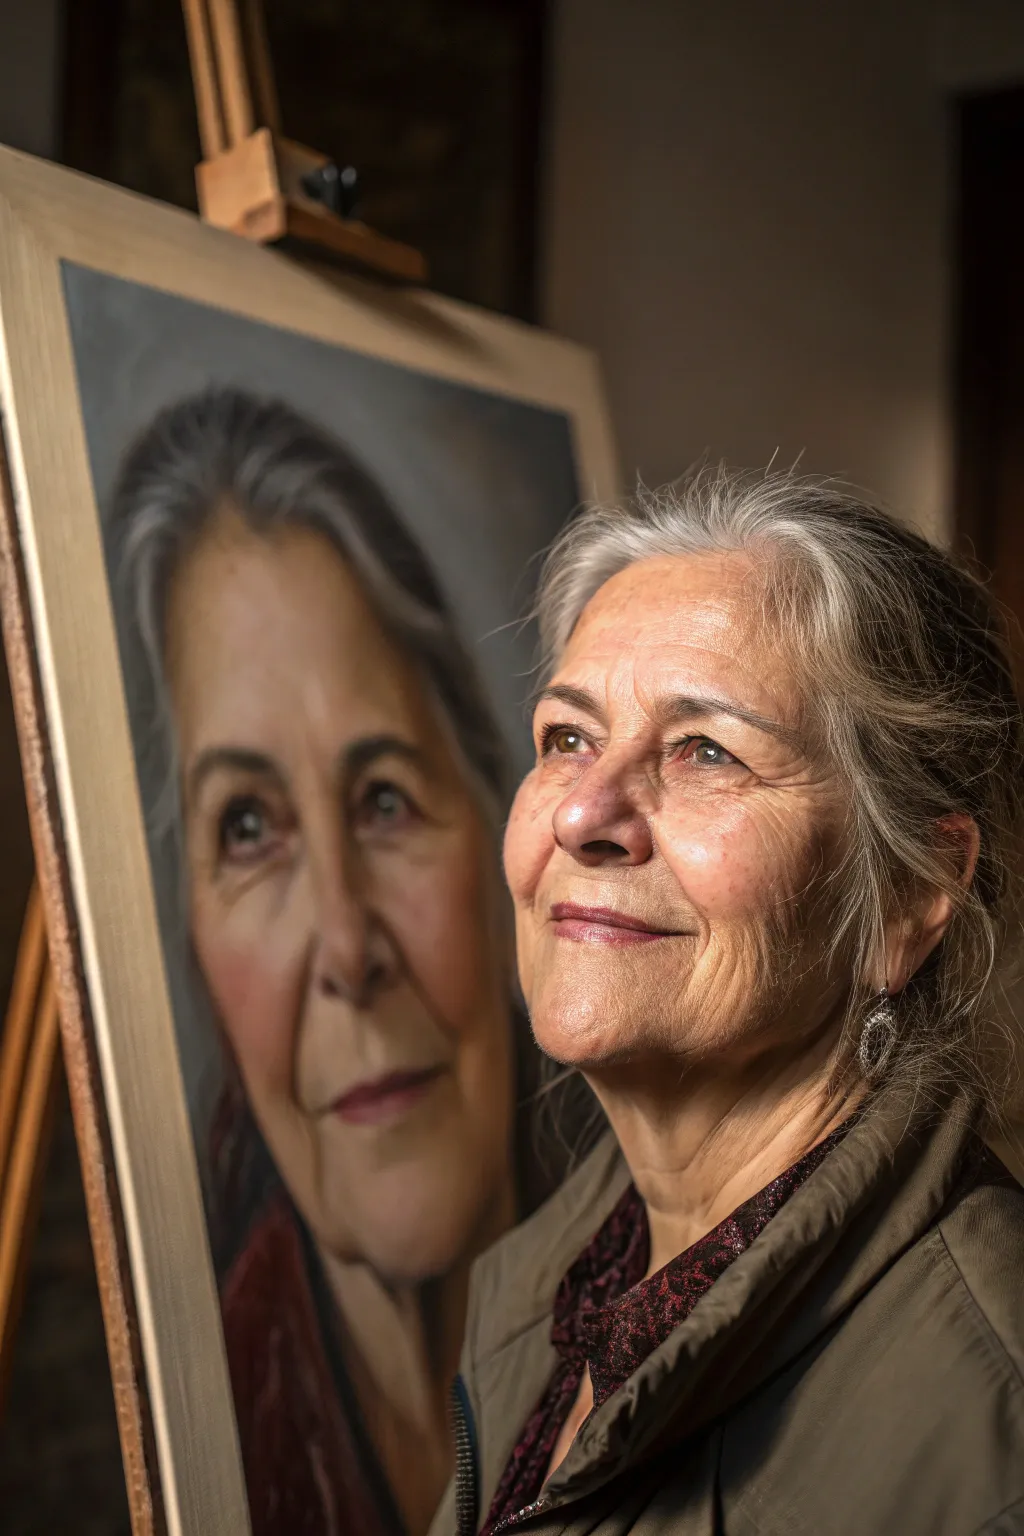
This project focuses on capturing the beauty and dignity of an aging face, emphasizing character lines and skin texture without over-exaggerating them. You’ll learn to layer acrylics to build up gentle transitions and create a lifelike, dimensional portrait full of personality.
Step-by-Step Tutorial
Materials
- High-quality acrylic paints (heavy body preferred)
- Stretched canvas (16×20 or larger suggested)
- Synthetic bristle brushes (filbert sizes 4, 8, 12; round sizes 0, 2)
- Slow-drying medium or retarder
- Stay-wet palette
- Reference photo of subject
- Pencil or charcoal for sketching
- Mixing palette knife
- Paper towels and water cup
Step 1: Preparation and Underpainting
-
Establish the sketch:
Begin by sketching the main contours of the face onto your canvas using a light pencil or vine charcoal. Pay special attention to the placement of the eyes, nose, and mouth, but don’t worry about drawing every wrinkle yet. -
Block in background values:
Mix a muted, neutral grey or blue-grey for the background. Apply this loosely around the head to establish the negative space, which helps you judge skin tones more accurately later. -
Create the tonal map:
Using a thin wash of Burnt Sienna or Raw Umber, paint the major shadow shapes of the face. This monochrome underpainting establishes the structure and volume before you introduce color. -
Identify key light sources:
Mark the highlight areas—usually the forehead, bridge of the nose, and cheekbones—with a wipe of a paper towel or a lighter value wash to map out your lighting scheme.
Step 2: Base Layers and Skin Tones
-
Mix your base flesh palette:
Prepare a range of skin tones on your palette. For older skin, I like to include unbleached titanium, yellow ochre, cadmium red light, and alizarin crimson, along with burnt umber and ultramarine blue for shadows. -
Apply the mid-tones:
Using a medium filbert brush, paint the general skin color across the face. Keep the paint somewhat fluid but opaque, covering the underpainting while respecting the shadow shapes you established. -
Deepen the shadows:
Mix a cool, dark shadow tone (burnt umber with a touch of blue) and paint the areas under the chin, the eye sockets, and the side of the nose. Avoid black, as it kills the vibrancy of skin. -
Add warmth to transitions:
Where the shadow meets the light (the terminator line), glaze a slightly warmer, reddish tone. This mimics subsurface scattering and makes the skin look alive rather than waxy.
Wrinkle Reality Check
Avoid using black or dark brown for wrinkles. Instead, use a slightly darker version of the nearby skin tone. This keeps the face looking soft and fleshy rather than cracked.
Step 3: Developing Features and Texture
-
Paint the eyes:
Use a small round brush to detail the eyes. Remember, the whites of the eyes are rarely pure white—use a light grey-blue. Add a crisp highlight to the pupil to bring the subject to life. -
Sculpt the nose and mouth:
Refine the shapes of the nose and lips. For older lips, the color is often less saturated; use muted pinks and browns. Soften the edges of the lips so they don’t look pasted on. -
Introduce the wrinkles:
This is crucial: don’t paint lines. Instead, paint the shadows created by the fold, then paint the highlight on the ridge of the fold. This push-and-pull creates the illusion of depth in wrinkles. -
Hair blocking:
Block in the main masses of hair using broad strokes. For grey hair, use a mix of ultramarine blue, burnt umber, and white. Don’t paint individual strands yet; focus on the overall shape and volume. -
Adding hair texture:
Once the hair mass is dry, use a rigger or liner brush to flick in lighter strands on top, following the direction of hair growth. Keep these strokes loose to look natural.
Add Subtle Age Spots
For hyper-realism, flick tiny, diluted specks of burnt sienna onto the skin areas using a toothbrush or stiff brush. Glaze over them slightly to make them sit ‘under’ the skin surface.
Step 4: Refining and Glazing
-
Reference the light source:
Look closely at your reference. Strengthen the brightest highlights on the forehead and nose using Titanium White with a tiny touch of yellow to prevent it from looking chalky. -
Softening texture:
Use a dry, soft brush to gently blend any harsh edges in the skin, particularly around the cheeks and jawline. Older skin has texture, but too much contrast can make it look like stone. -
Glazing color variations:
Mix a very transparent glaze of Alizarin Crimson or faint purple. Apply it thinly over areas where blood flow is higher, like cheeks, ears, or nose tip, to add realism and temperature variation. -
Refine the eyes again:
Check the catchlights in the eyes one last time. Ensure the eyelids have definition and slight shadows underneath the upper lid. -
Final touches:
Step back from the easel. Add any final adjustments to the background or clothing to ensure they recede properly and don’t compete with the face for attention.
Take your time studying the unique map of your subject’s face, treating every line as a story to be told.


Deep Dark Background Portrait for Drama
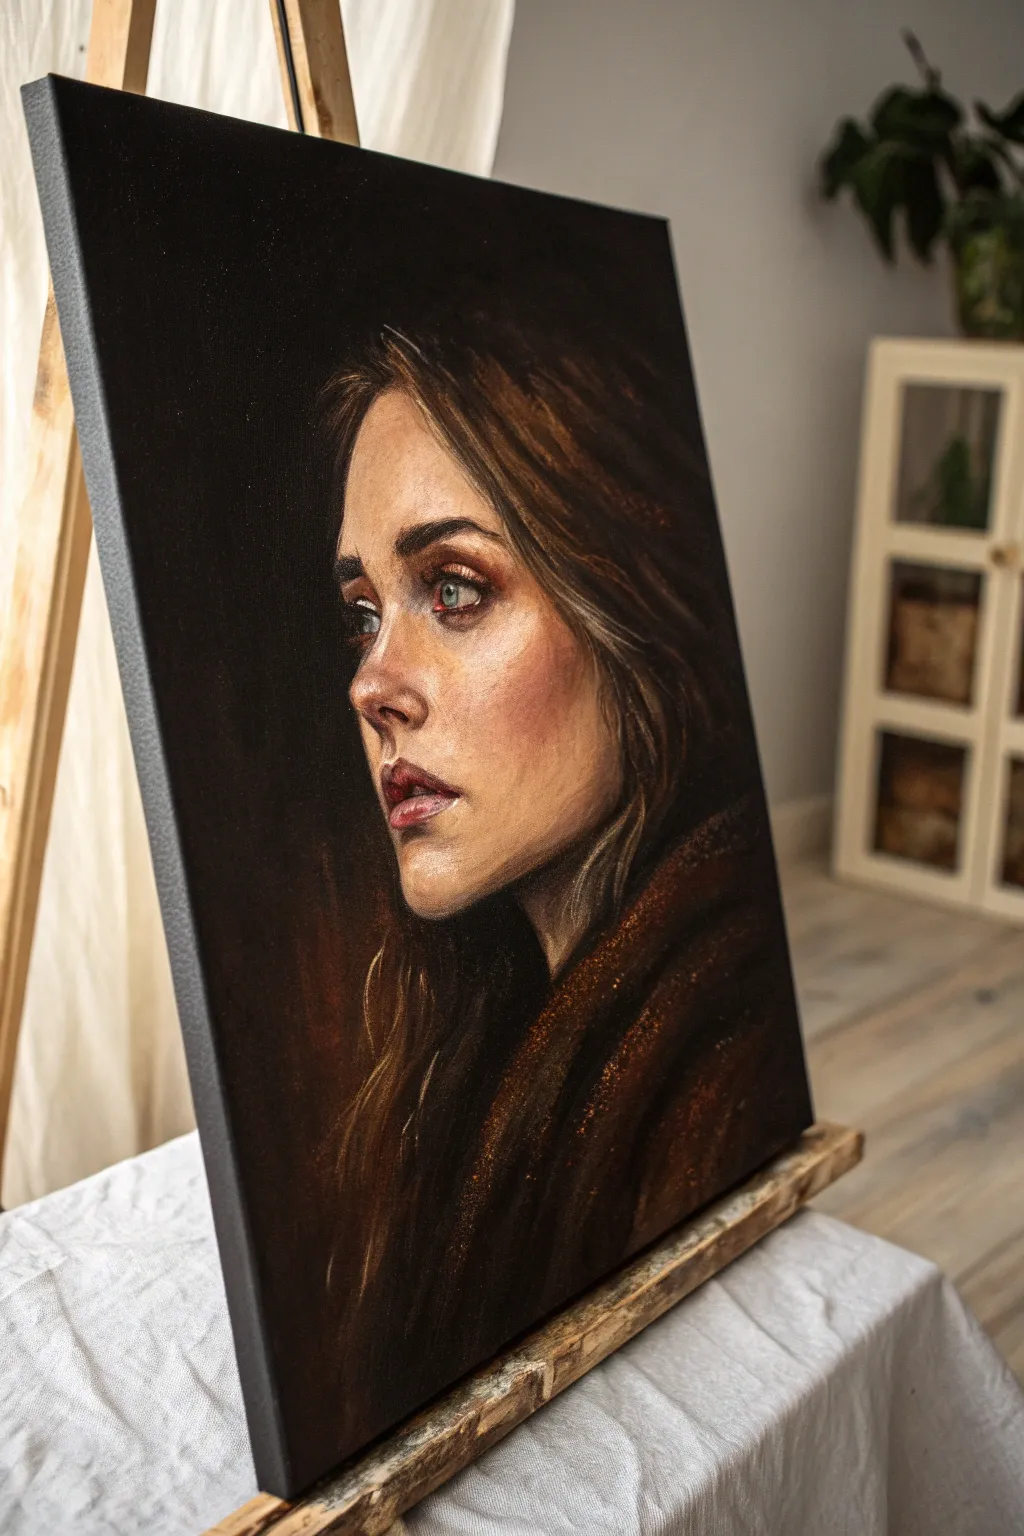
This project explores the power of negative space by emerging a luminous portrait from a deep, velvety darkness. By starting with a darkened surface and building up layers of highlight, you will capture a dramatic, moody atmosphere reminiscent of classical masters.
Step-by-Step Guide
Materials
- Deep edge stretched canvas (16×20 or 18×24 inches)
- Heavy body acrylic paints (Titanium White, Mars Black, Burnt Umber, Burnt Sienna, Yellow Ochre, Alizarin Crimson, Ultramarine Blue)
- Glazing medium
- Slow-drying medium (retarder)
- Assorted synthetic brushes (flats for blocking, rounds for details, and a soft blending mop)
- Palette knife
- Water container and rags
- Charcoal or chalk pencil for sketching
Step 1: Setting the Stage
-
Prepare the Dark Ground:
Begin by painting your entire canvas with two coats of Mars Black mixed with a tiny touch of Burnt Umber. This creates a richer, warmer dark than pure black. Don’t forget to paint the deep sides of the canvas for a gallery-wrapped finish. -
Sketch the Subject:
Once dry, use a white chalk pencil or light grey pastel to sketch the basic outlines of the face. Focus on the tilt of the head and the profile angle; keep your lines faint so they don’t show through the finished paint later. -
Map the Shadows:
Identify the darkest areas of the hair and the deep shadows under the heavy shawl. Reinforce these with a mix of Burnt Umber and Alizarin Crimson to differentiate them slightly from the black background.
Step 2: Blocking and Flesh Tones
-
Mix the Mid-Tones:
Create a base flesh tone using White, Yellow Ochre, and a touch of Burnt Sienna. Add a small drop of retarder to keep the paint workable longer. -
Apply the Base Layer:
Block in the main shapes of the face where the light hits—the forehead, nose bridge, cheekbone, and chin. Do not worry about smooth blending yet; just get the pigment onto the canvas. -
Introduce Warmth:
While the base is tacky, mix Burnt Sienna with a dot of Alizarin Crimson. Apply this to the cheek, the tip of the nose, and the eyelids to suggest blood flow beneath the skin. -
Establish the Eyes:
Paint the whites of the eyes (sclera) using a dull grey-white, not pure white, as they are in shadow. Add the iris using a mix of Ultramarine Blue and Yellow Ochre for that hazel-green look. -
Initial Hair Blocking:
Using a large flat brush, sweep in broad strokes of Burnt Umber and Yellow Ochre to suggest the flow of hair. Keep the edges where the hair meets the background very soft and lost in shadow.
Soft Edges are Key
For a dramatic look, lose the edges. Where the hair or shawl meets the black background, blur the paint so the figure seems to dissolve into the shadows rather than being a cutout.
Step 3: Refining and detailing
-
Refine the Features:
Switch to a smaller round brush. Carefully sculpt the nostrils and the lip line using a dark brown-red mix. Soften the edges with a clean, slightly damp brush to avoid harsh, cartoonish lines. -
Build the Highlights:
Mix Titanium White with a tiny bit of Yellow Ochre. Apply this to the highest points of the face: the tip of the nose, the cupid’s bow, and the brow bone. Use a dry brush technique to gently feather these highlights into the surrounding skin tones. -
Detail the Eyes:
Add a crisp, pure white reflection dot to the pupil to bring the eye to life. Deepen the upper lash line to ground the gaze. I find that getting this ‘spark’ right early on motivates me to finish the rest of the piece. -
Glaze the Shadows:
Mix a transparent glaze of Alizarin Crimson and glazing medium. Lightly wash this over the shadow side of the face (the transition zone near the ear and jawline) to deepen the form without losing the underlying drawing. -
Texture the Skin:
Stipple a little textural variation onto the cheeks and nose using a worn brush and slightly dry paint. This mimics natural skin texture better than perfectly smooth blending.
Add Texture
Mix a little coarse pumice gel into the paint for the shawl or hair shadows. This grit catches distinct highlights later, making the fabric look heavy and realistic.
Step 4: The Atmospheric Finish
-
Render the Shawl:
For the heavy garment, use Burnt Umber mixed with black. Use a palette knife or coarse brush to drag lighter brown (Burnt Sienna) across the surface, catching the texture of the canvas to simulate rough wool. -
Hair Highlights:
Using a liner brush, add individual strands of hair catching the light. Use a mix of Yellow Ochre and White. Only paint these strands where the light source hits, letting the rest fade into the darkness. -
Stray Hairs:
Paint a few very fine, loose ‘flyaway’ hairs backlit against the dark background. This creates realism and breaks up the solid silhouette. -
Check the Values:
Step back five feet. Look for areas that need more contrast. Step back in and punch up the brightest brights with pure white if needed, particularly on the wetness of the lower lip and eye tear duct. -
Final Glaze:
Once fully dry, you can apply a very thin, watery glaze of Burnt Umber over the hair and shawl to unify the colors and push them slightly back, making the face pop forward.
Step back and admire how the light seems to emanate from within the canvas, creating a timeless and soulful portrait.
Watered-Down Acrylic Wash Portrait
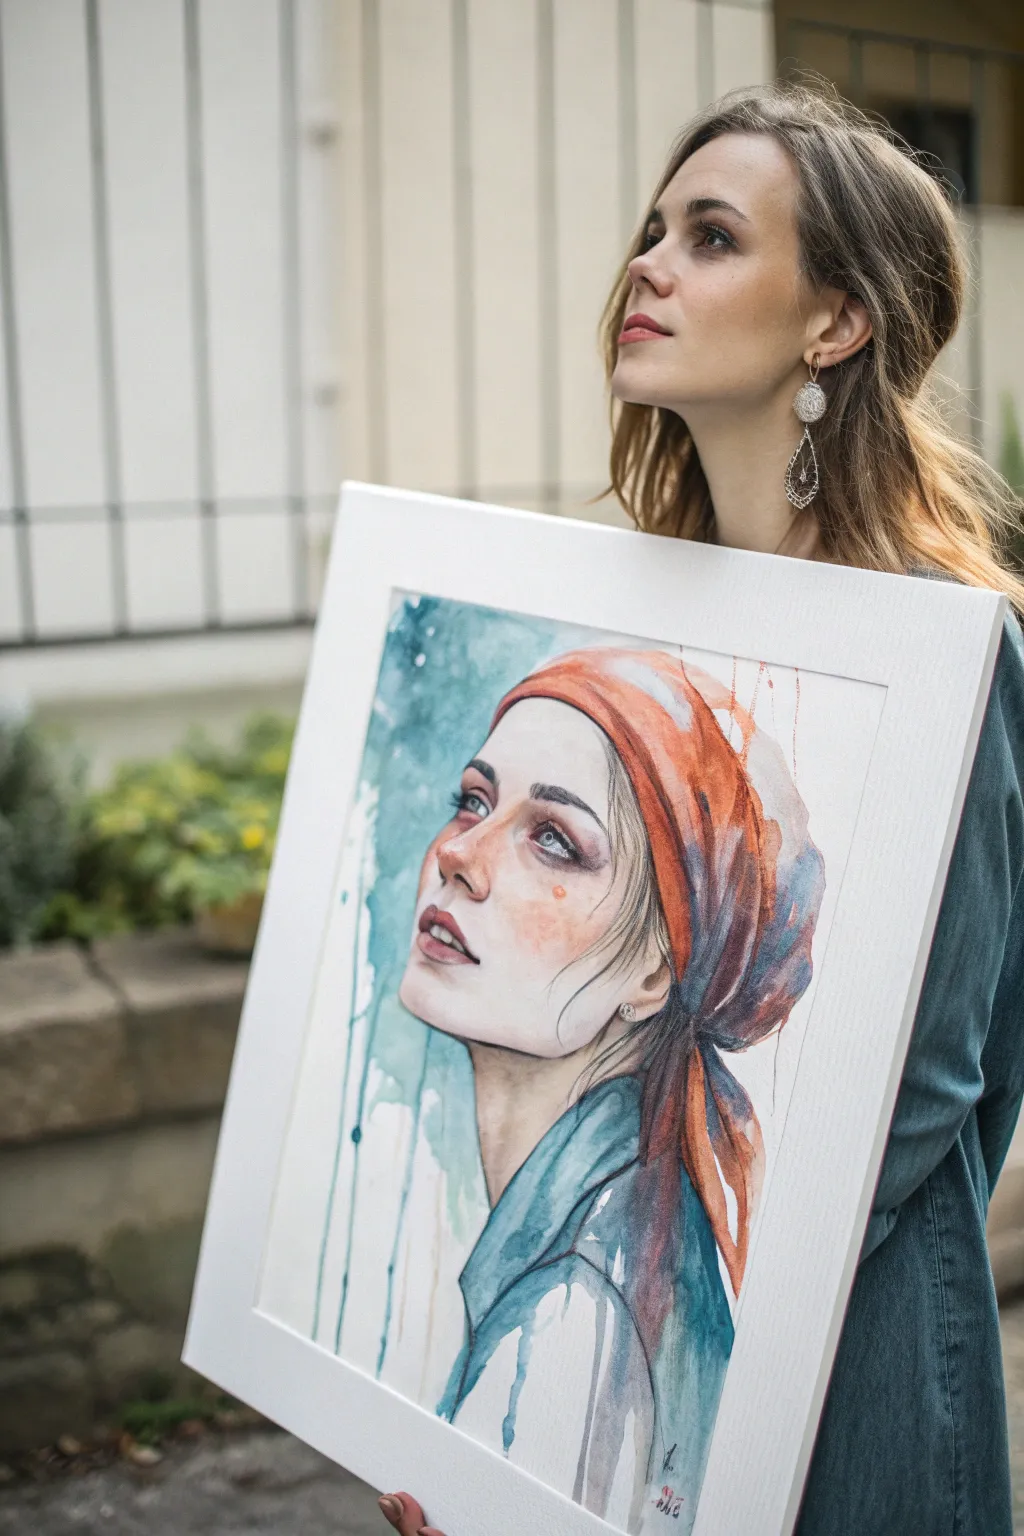
Capture the delicate translucency of watercolor with the permanence of acrylics in this striking portrait technique. By thinning your paints significantly, you will create a dreamy, drippy aesthetic that perfectly balances sketched lines with fluid, organic washes of teal and terracotta.
Step-by-Step Tutorial
Materials
- Heavyweight watercolor paper or mixed media board (approx. 18×24 inches)
- Acrylic paints (Phthalo Blue, Burnt Sienna, Yellow Ochre, Titanium White, Crimson, Black)
- Matte medium or glazing liquid
- Water containers (one for rinsing, one for clean dilution)
- Soft synthetic round brushes (sizes 4, 8, and 12)
- Fine liner brush or waterproof ink pen
- Graphite pencil (HB or 2B)
- Paper towels
- Large flat board for taping down paper
Step 1: Sketching and Preparation
-
Secure the surface:
Begin by taping your paper securely to a flat board on all four sides. Since we are using a lot of water, this prevents the paper from buckling as it saturates and dries. -
Draft the contours:
Lightly sketch the subject’s face using an HB pencil. Focus on the upward gaze, the tilt of the head, and the draping of the headscarf. Keep lines faint so they don’t dominate the final translucent layers. -
Define the features:
Refine the eyes, nose, and lips. Pay special attention to the iris placement to ensure the upward gaze looks natural and not strained.
Control the Bleed
If a wash starts spreading too far, use a clean, dry brush (a ‘thirsty brush’) to lift excess water right off the paper, acting like an eraser for wet paint.
Step 2: The First Washes
-
Create the watered-down mix:
Mix a small amount of acrylic paint with water and a drop of glazing liquid. You want a consistency similar to skim milk or watercolor tea. Start with a pale flesh tone using White, a touch of Yellow Ochre, and a tiny dot of Crimson. -
Initial skin tone application:
Apply this wash loosely over the face area, avoiding the highlight points on the nose and forehead. Let the water pool slightly in shadow areas like the eye sockets and under the chin. -
Introduce the background teal:
While the skin tone is tacky but not fully wet, mix Phthalo Blue with a touch of Titanium White and plenty of water. Apply this to the background, particularly on the left side, letting it touch the hair outline. -
Encourage drips:
Load your brush with the watery teal mix and press it against the paper near the bottom of the painting or the edges of the clothing. Tilt your board vertically to let gravity pull long, thin drips down the white space.
Mixed Media Accent
Once the acrylic is totally dry, trace over the main facial features with a charcoal pencil or waterproof ink pen for a gritty, illustrative finish.
Step 3: Building Layers and Vibrancy
-
Painting the headscarf:
Mix Burnt Sienna with a touch of Crimson to create a rich terracotta hue. Applying this as a semi-transparent wash allows the white of the paper to act as highlights on the fabric folds. -
Deepening facial shadows:
Once the first skin layer is dry, mix a slightly darker, more opaque flesh tone. Glaze this under the jawline, the side of the nose, and inside the ear to create dimension. -
Adding the blue clothing:
Use a stronger concentration of the teal mix for the subject’s shirt. Apply it quickly and loosely, allowing it to bleed into the background washes in some areas for that ‘lost edge’ look. -
Enhancing the eyes:
Switch to a size 4 round brush. Paint the irises carefully, keeping the upper portion darker underneath the eyelid. Add the whites of the eyes but keep them slightly muted with a grey-blue tint, not pure white. -
Blushing the cheeks:
Add a very diluted wash of Crimson and Burnt Sienna to the cheeks and the tip of the nose. This brings life and circulation to the portrait.
Step 4: Detailing and Defining
-
Linear definition:
Using a fine liner brush with slightly thinned black or dark grey paint, go back over key outlines. Emphasize the eyelashes, the curve of the lips, and the loose strands of hair escaping the scarf. -
Adding texture splashes:
Dip an old toothbrush or stiff brush into the teal and terracotta mixes. Flick the bristles to create subtle speckles around the headscarf and background, adding texture to the negative space. -
Darkest darks:
Mix a dark grey-brown for the deepest shadows in the hair folds and the corners of the mouth. Use this sparingly to anchor the ethereal washes without overpowering them. -
White highlights:
Use pure, undiluted Titanium White for the catchlights in the eyes and the tip of the nose to bring the focal point forward. -
Final drip check:
Assess the bottom edge. If you want more vertical movement, add a few drops of clean water to the bottom edge of the painted shirt area and let it run down, carrying a ghost of pigment with it.
Step back and admire how the fluid layers interact to capture a moment of quiet contemplation
Glazed Layers Portrait for Luminous Skin
This stunning portrait study focuses on achieving hyper-realistic skin texture and a deep, soulful gaze through the technique of glazing. By building up many thin, transparent layers of acrylics, you will create a luminous complexion that seems to glow from within the canvas.
Step-by-Step Guide
Materials
- Fine weave canvas or prepared panel (approx. 11×14 inches)
- Heavy body acrylic paints (Titanium White, Burnt Umber, Yellow Ochre, Cadmium Red, Alizarin Crimson, Ultramarine Blue)
- Acrylic glazing medium (satin or gloss)
- Retarder medium (to slow drying)
- Soft synthetic brushes (filberts #4-#8, rounds #0-#2)
- Mixing palette
- Water container
- Lint-free rags
Step 1: Drawing and Underpainting
-
Sketch the framework:
Begin with a precise pencil sketch on your canvas. Focus on the accurate placement of the facial features, paying close attention to the tilt of the head and the upward gaze of the eyes. Keep your lines light so they don’t show through later. -
Establish the grisaille:
Mix Burnt Umber with a little water or glazing medium to create a transparent wash. Block in the darkest shadows—the nostrils, inside the mouth, the pupils, and the deep shadow under the jawline—to establish your value map early. -
Define the mid-tones:
Using a slightly lighter wash of the brown, map out the softer shadows around the eye sockets, under the cheekbones, and the side of the nose. This monochromatic underpainting serves as a guide for your color layers.
Muddy colors?
If your skin tones look dirty, you likely mixed too many colors or didn’t let a layer dry fully. Let it dry completely, then apply a thin glaze of pure color (like orange or pink) to bring back vibrancy.
Step 2: Building the Base Skin Tones
-
Mix your base flesh tone:
Combine Titanium White, Yellow Ochre, and a tiny touch of Cadmium Red. The goal is a neutral, pale beige. Apply this opaque layer over the skin areas, avoiding the darkest shadows you established in the grisaille. -
Blend the edges:
While the base paint is still wet, use a clean, dry filbert brush to soften the edges where the light meets the shadow. Acrylics dry fast, so adding a drop of retarder here helps give you more working time. -
Add warmth to the shadows:
Mix Alizarin Crimson with Burnt Umber and plenty of glazing medium. Apply this transparent glaze into the shadowed areas of the neck, ear, and eye sockets to deepen them without losing the drawing underneath. -
Cool the receding areas:
Mix a very thin glaze of Ultramarine Blue and White. Apply this subtly to the temples and the jawline where it turns away from the light; cool colors help these areas visually recede.
Hyper-Real Texture
For ultimate realism, use a tiny ‘stippling’ sponge with semi-transparent glazing liquid to dab faint texture over the cheeks before the final highlight. This mimics pores perfectly.
Step 3: Glazing for Luminosity
-
Intensify the flush:
Create a glaze using Cadmium Red, a touch of Alizarin Crimson, and glazing medium. Gently brush this over the cheeks, the tip of the nose, and the earlobe to simulate blood flowing beneath the skin. -
Deepen the eyes:
Paint the irises using a mix of Ultramarine Blue and a touch of Umber for a grey-blue tone. Darken the rim of the iris and paint the pupil strictly black to create that piercing look. -
Define the lips:
Use your red glaze mixture but slightly more opaque this time. Paint the lips, keeping the edges soft. Add a darker line between the lips but soften it immediately so it doesn’t look like a cartoon outline. -
Layer the hair:
Start with a dark brown mix for the hair mass. Once dry, use a rigger or liner brush with lighter brown and ochre to flick in individual strands, following the direction of hair growth away from the hairline. -
Refine the eyebrows:
Using a small round brush and a semi-transparent dark brown, paint individual hairs for the eyebrows. Follow the natural arch and allow some skin to show through for realism.
Step 4: Refining Details and Texture
-
Create skin texture:
Mix a reddish-brown glaze. I like to spatter this very lightly using an old toothbrush or a stiff bristle brush to create natural freckles across the nose and cheeks. Dab any large droplets with a tissue immediately. -
Add high-key highlights:
Take pure Titanium White with just a hint of yellow. Place strict, unblended highlights on the tip of the nose, the highest point of the cheekbone, the wet line of the lower eyelid, and the cupid’s bow. -
Brighten the eyes:
Add the all-important catchlight (reflection) in the eyes. This should be a crisp white dot overlapping the pupil and iris, breathing life into the portrait. -
Enhance the skin glow:
Apply a very final, extremely thin glaze of Yellow Ochre over the lit side of the forehead and nose bridge to unify the highlights and give that golden, sun-kissed warmth. -
Background wash:
Paint the background with a soft, neutral grey or off-white. keep it simple and slightly blurred to ensure the focus remains entirely on the face.
Step back and admire the soulful depth you have created through patience and layers
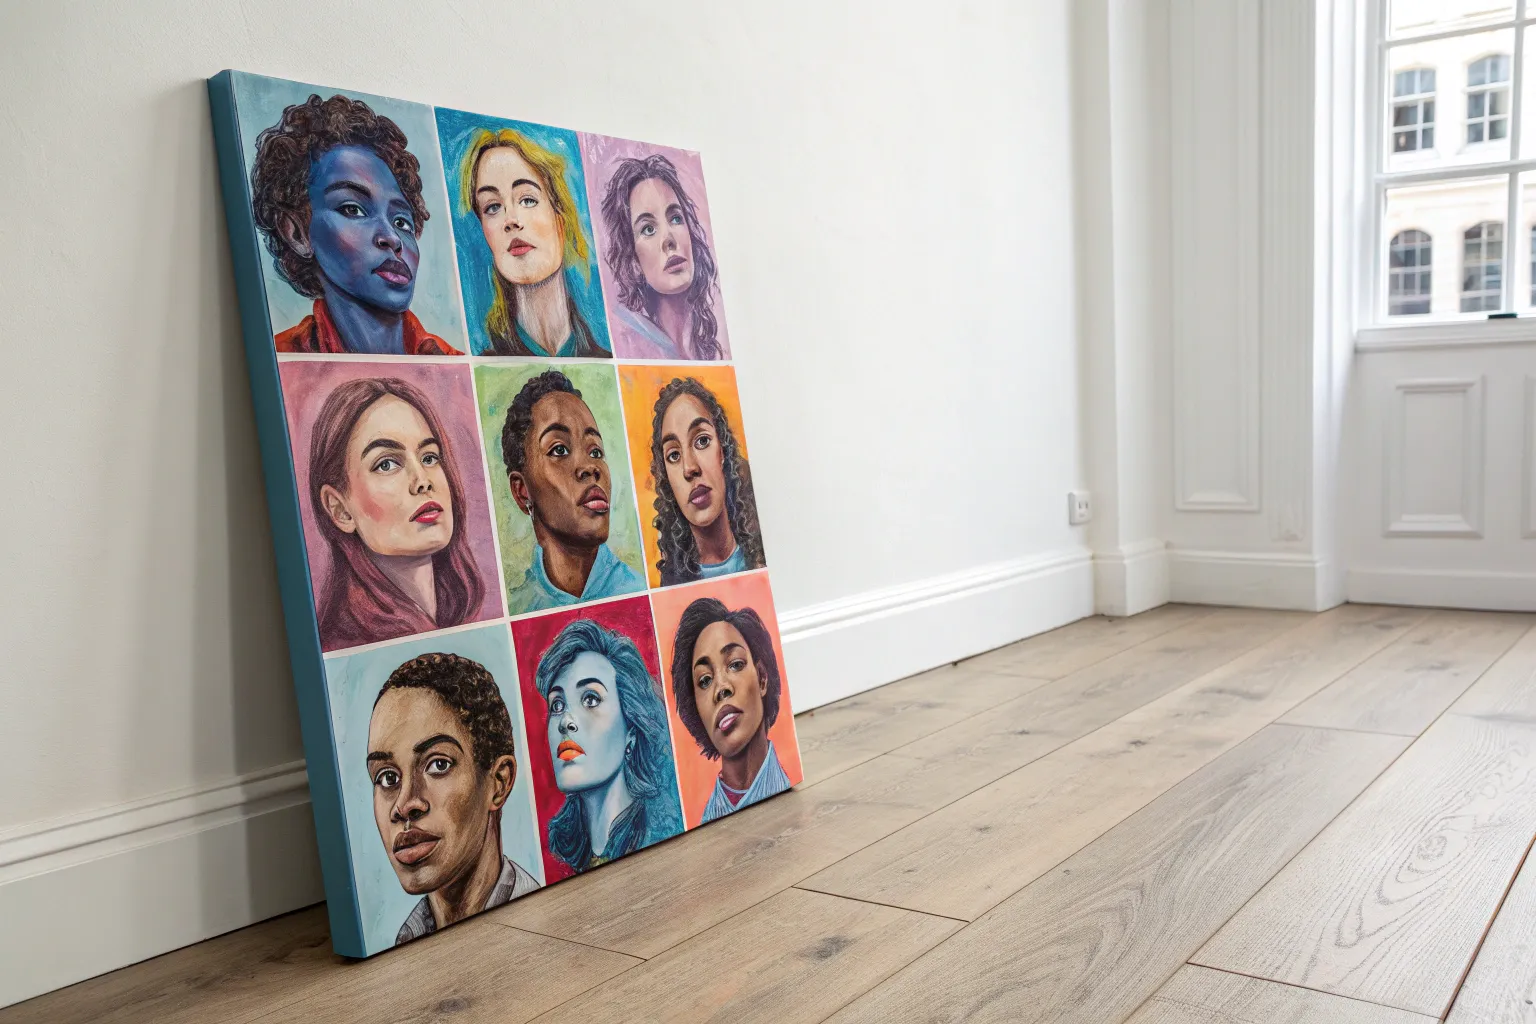
Technicolor Skin Portrait in Unnatural Hues
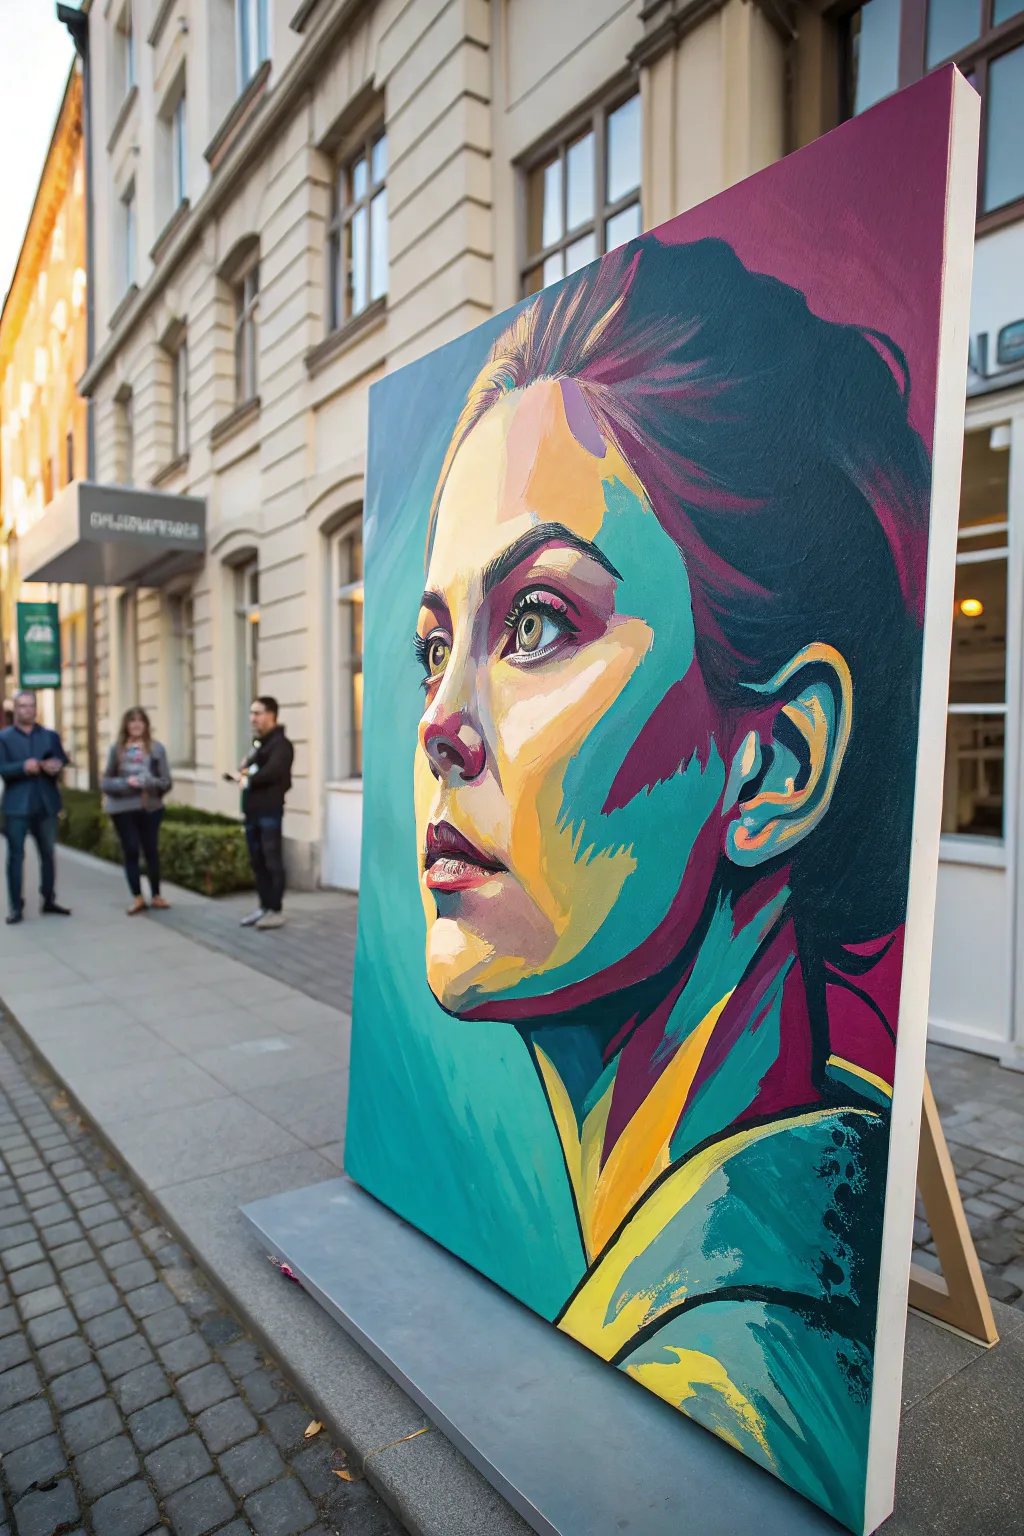
Step away from realism and embrace the vibrant world of unnatural hues with this bold acrylic portrait. By using unexpected colors like turquoise, magenta, and sunny yellow for skin tones, you’ll create a striking, pop-art inspired masterpiece that captures emotion through intensity rather than accuracy.
Detailed Instructions
Materials
- Large stretched canvas (24×36 inches or larger recommended)
- Heavy body acrylic paints (Titanium White, Mars Black, Phthalo Turquoise, Magenta, Cadmium Yellow Medium, Deep Violet)
- Set of synthetic flat brushes (sizes 1 inch, 1/2 inch, and #4 detail)
- Gesso (optional, for priming)
- Pencil or charcoal for sketching
- Palette knife for mixing large batches
- Large palette or paper plates
- Water container and rags
- Easle (sturdy floor easel recommended for this size)
Step 1: Preparation and Mapping
-
Prime the Surface:
Even if your canvas is pre-primed, adding a fresh coat of gesso creates a smoother texture for these bold color blocks. Let it dry completely before starting. -
Draft the Contours:
Using a pencil or vine charcoal, lightly sketch the subject’s face. Focus heavily on the ‘islands’ of light and shadow—draw shapes for where the highlights on the nose, cheekbones, and forehead will be. -
Define the Shadow Blocks:
Map out the deepest shadow areas under the chin, the side of the cheek, and the hair. Think of these not as gradients, but as distinct puzzle pieces.
Muddy Color Issues?
If colors look dull where they meet, let the first layer dry completely before painting the next color next to it. Wet-on-wet blending often creates brown mud.
Step 2: Blocking the Base Colors
-
Mix the Mid-Tone Turquoise:
Create a large batch of ‘shadow skin’ tone by mixing Phthalo Turquoise with a touch of White. You want a saturated teal color. Apply this to the shadowed side of the face, neck, and shoulder area. -
Apply Magenta Accents:
While the teal is drying, mix a deep Magenta. Paint the transition areas between the light and dark sides of the face, specifically along the jawline and the deep recesses of the ear. -
Establish the Highlights:
Mix Cadmium Yellow with Titanium White to create a pale, creamy yellow. Paint the illuminated areas: the bridge of the nose, the forehead, the upper cheekbone, and the chin. Don’t blend yet; keep the edges hard. -
Fill the Background:
Use a large flat brush to paint the background. A mix of Turquoise and White work well here, perhaps slightly lighter or cooler than the face shadow to separate the subject from the negative space.
Step 3: Refining Features and Details
-
Deepen the Hair:
Mix Mars Black with Deep Violet for a rich, dark purple tone. Using a 1-inch flat brush, block in the hair mass. Use confident, sweeping strokes to mimic the direction of hair growth. -
Sculpt the Nose and Lips:
Switch to a smaller brush. Use pure Magenta mixed with a tiny bit of red or orange for the lips and the shadow under the nose tip. Add a crisp highlight of nearly pure White on the lower lip. -
Paint the Eyes:
The eyes are the anchor. Outline the shape carefully with dark purple or black. Paint the iris a surprising color, like gold or light hazel, to pop against the blue skin tones. Add a sharp white reflection dot to bring them to life. -
Layering the Transitions:
Now, bridge the gaps between your yellow highlights and teal shadows. Create an intermediate tone—perhaps a muted orange or purple—and paint specifically where the planes of the face turn away from the light. -
Strengthen Contrast:
Go back over your darkest darks. The area behind the ear and the lower hairline needs to be very dark to push the brightly colored face forward.
Use a Posterize Effect
Struggling to see color ‘shapes’? Edit your reference photo on a phone app using the ‘posterize’ filter to break the image into simplified color blocks.
Step 4: Final Touches and Cleanup
-
Clean Up Edges:
Acrylics allow you to paint over mistakes. Use your background color to cut back into the profile if the shape got messy. Clean lines are crucial for this graphic style. -
Add Vivid Streaks:
I like to take a bit of pure Cyan or bright Yellow and add a few gestural strokes into the hair or clothing folds to suggest movement and reflected light. -
Detail the Ear:
The ear is a complex shape. Use your yellow highlight color to trace the helix and antihelix, leaving the deep canals dark teal or purple. -
Final White Highlights:
With your smallest brush, add the brightest highlights: the tip of the nose, the tear duct, and the highest point of the cheekbone. These should be pure Titanium White. -
Varnish:
Once completely dry (wait at least 24 hours), apply a satin or gloss varnish to unify the sheen of the different paint colors and protect that vibrant pigment.
Step back and admire how your bold color choices have come together to create a portrait full of energy and modern flair
Geometric Background Portrait With Clean Masked Lines
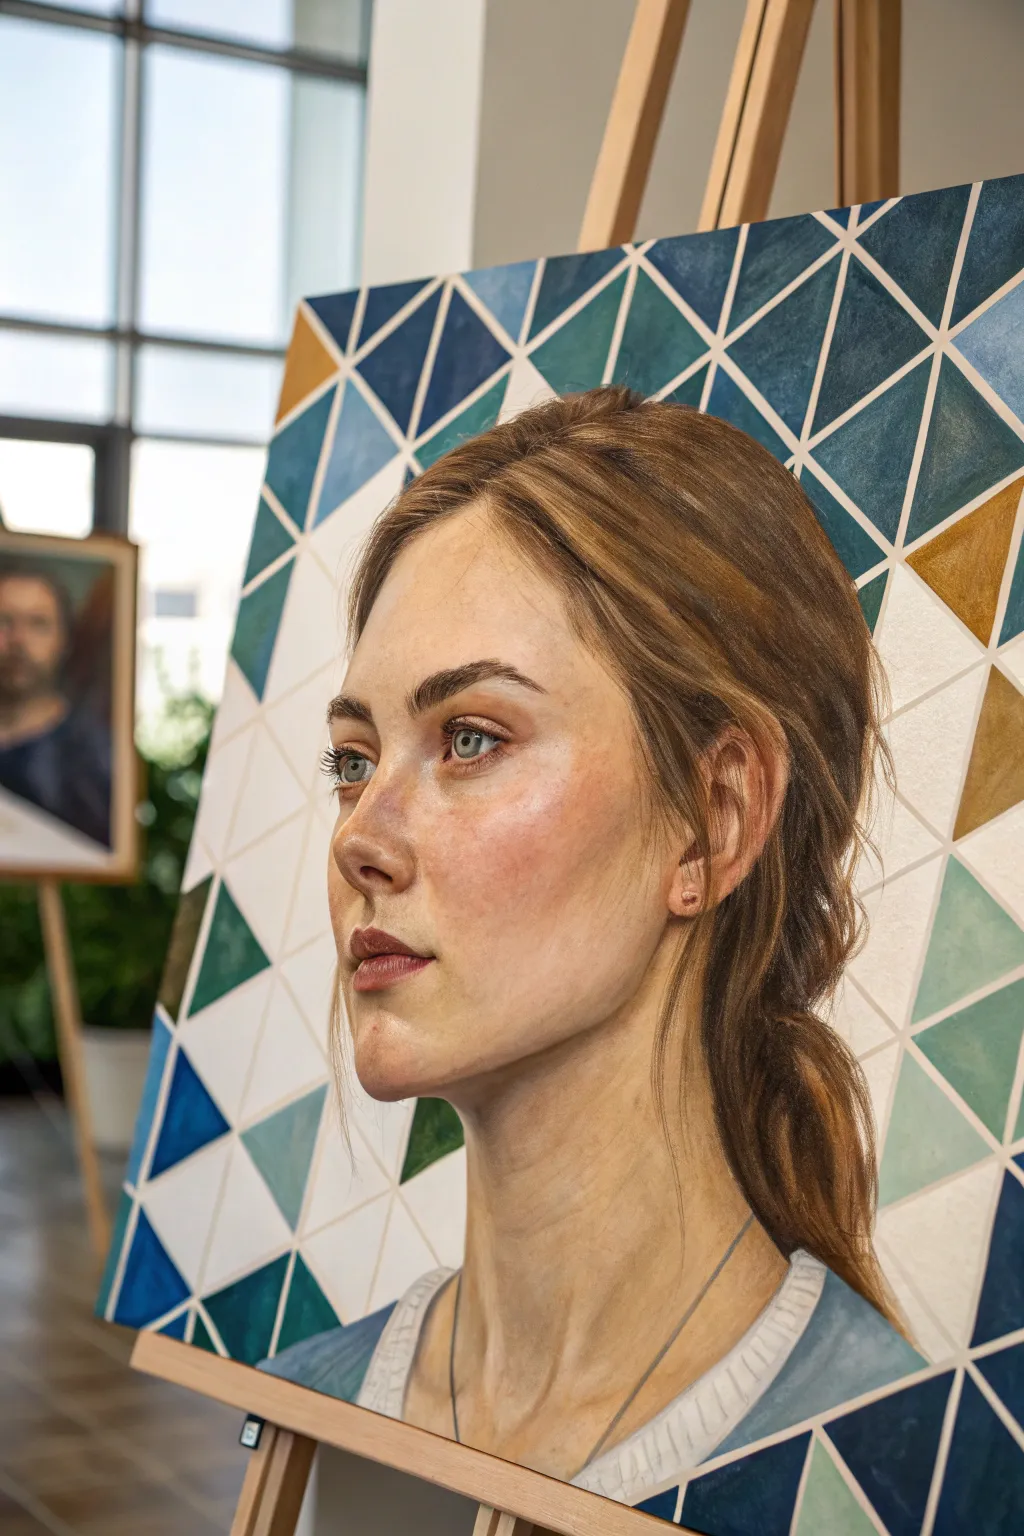
Marrying classical realism with contemporary design, this project features a delicate, realistic portrait set against a striking geometric mosaic. The crisp, masked lines of the background triangles create a beautiful contrast with the soft blending of the skin tones.
Step-by-Step Tutorial
Materials
- Stretched canvas (approx 16×20 inches recommended)
- Acrylic paints (Titanium White, Burnt Umber, Yellow Ochre, Cadmium Red, Ultramarine Blue, Phthalo Green, Turquoise)
- Artist tape or masking tape (1/4 inch width is ideal)
- Flat shader brushes (various sizes)
- Round detail brushes (sizes 0, 2, and 4)
- Filbert brush (for blending skin tones)
- Graphite pencil (HB or 2B)
- Ruler or straight edge
- Palette knife
- Slow-drying medium or retarder (optional)
Step 1: Planning and Sketching
-
Grid the background:
Begin by lightly drawing a grid of squares across your entire canvas using a ruler and pencil. Then, draw diagonal lines through the squares to form the triangular pattern seen in the reference, ensuring the lines interconnect seamlessly. -
Sketch the portrait:
Lightly sketch the subject’s profile over the geometric grid. Focus on accurate proportions for the eyes, nose, and jawline. Don’t worry about the grid lines showing through the face yet; you will paint over them. -
Masking tight:
Apply your artist tape over the grid lines *outside* of the portrait area. Press the edges down firmly with a palette knife or fingernail to prevent paint bleed. Leave the portrait area unmasked for now.
Bleeding Lines?
If paint bleeds under your tape, wait for it to dry completely. Then, use a small flat brush and white paint (or your background line color) to meticulously paint over and clean up the jagged edges.
Step 2: Painting the Geometric Background
-
Mix your palette:
Prepare three to four distinct colors for the triangles: a deep navy blue, a teal/turquoise, a muted gold (Yellow Ochre mixed with a touch of white), and a cream or off-white. Keep these separate on your palette. -
Block in color:
Paint the triangles within the taped sections. Distribute the colors randomly but aim for balance; avoid clustering too many dark blues or golds in one spot. Use a flat shader brush for crisp application. -
Second coat:
Acrylics can be translucent, especially yellows and whites. Apply a second coat to the triangles once the first is dry to ensure solid, opaque coverage. -
The reveal:
Wait until the paint is tacky but not fully cured before carefully peeling off the tape. This reveals the crisp white canvas lines (or whatever base color you started with) separates the shapes.
Make It Metallic
Replace the yellow ochre/gold paint in the geometric background with actual gold leaf or metallic acrylic paint. This adds a shifting shimmer that changes as you walk past the artwork.
Step 3: Creating the Portrait
-
Base flesh tones:
Mix a mid-tone flesh color using White, Yellow Ochre, and a tiny dot of Cadmium Red. Block in the main shape of the face, painting right over any grid lines that were inside the sketch area. -
Establish shadows:
Mix Burnt Umber into your flesh tone to create a shadow shade. Apply this to the hollows of the cheek, under the jawline, the eye socket, and the side of the nose. -
Blending the skin:
Using a filbert brush and perhaps a touch of slow-drying medium, blend the transition between the highlight and shadow areas. I find keeping the brush slightly damp helps creating that smooth, glowing skin texture. -
Adding the blush:
Glaze a thin layer of watered-down Cadmium Red or pink over the cheekbone and the tip of the nose to give the subject a healthy, natural flush. -
Painting the eyes:
Switch to your smallest round brush. Paint the iris with a mix of Blue and a touch of Umber. Add a sharp white highlight to the pupil to bring life to the gaze.
Step 4: Hair and Details
-
Hair base layer:
Paint the hair mass with a solid dark brown (Burnt Umber + Blue). Focus on the overall shape of the ponytail and how it frames the face. -
Adding highlights:
Mix a lighter caramel color (Umber + Ochre + White). Paint individual strands following the direction of hair growth, primarily on the crown and where the light hits the curve of the head. -
Refining the hairline:
Use a nearly dry brush to feather small ‘baby hairs’ along the forehead and temple so the hairline doesn’t look like a helmet. -
Clothing rough-in:
Paint the clothing loosely. In the example, a simple blue top complements the background. Keep the clothing strokes impressionistic to keep the focus on the face. -
Clean up edges:
Where the portrait meets the geometric background, use a small brush to touch up any lines. You want the portrait to feel like it is superimposed over the pattern. -
Final highlights:
Add final touches of pure white to the tip of the nose, the lips, and the earrings if you included them.
Step back and admire how the rigid geometry makes the organic softness of the portrait shine even brighter
Double-Exposure Style Portrait With Abstract Overlays
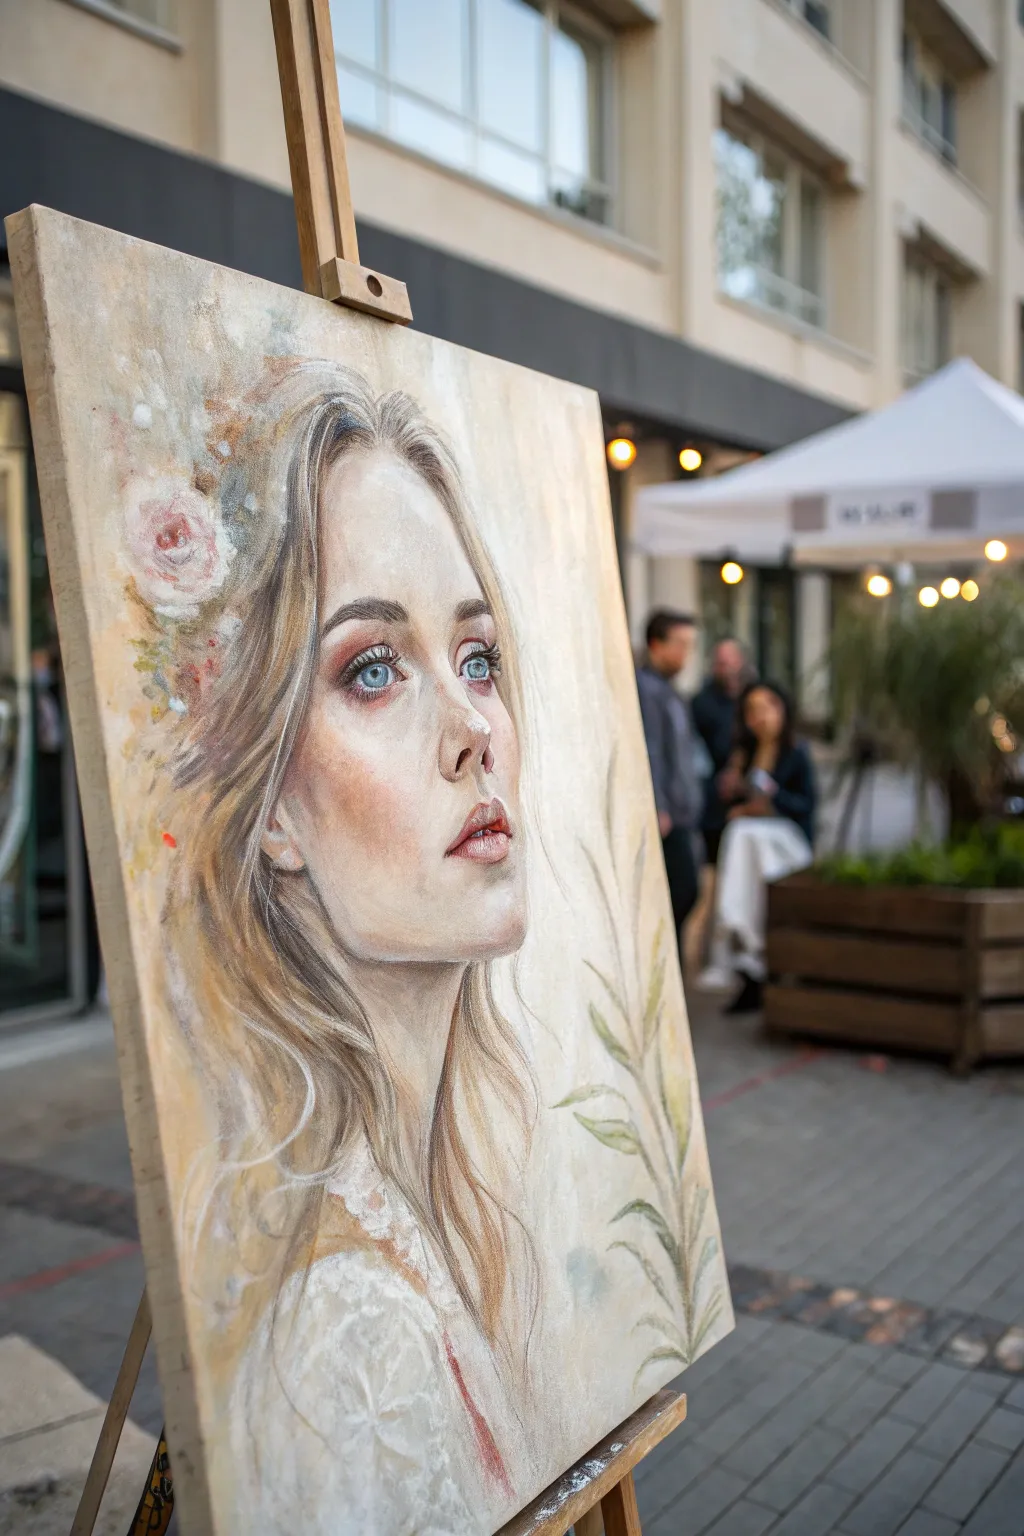
Capture the delicate beauty of a muse lost in thought with this soft, dreamlike acrylic portrait. This project combines realistic facial features with abstract, sketchy organic elements to create a harmonious double-exposure effect.
Step-by-Step Guide
Materials
- Stretched canvas (approx 16×20 or 18×24 inches)
- Acrylic paints (Titanium White, Burnt Umber, Yellow Ochre, Alizarin Crimson, Ultramarine Blue, Raw Sienna)
- Matte medium or glazing liquid
- Gesso (white)
- Assorted synthetic brushes (flats, filberts, and a fine liner)
- Palette knife
- Water container and paper towels
- Charcoal pencil or soft graphite for sketching
- Optional: Texture paste for floral elements
Step 1: Preparation and Sketching
-
Prime the Surface:
Begin by applying a coat of white gesso to your canvas. While it’s still wet, use a large brush to add chaotic, multidirectional strokes, creating a subtle texture that will catch the paint later. -
Establish the Base Tone:
Once the gesso is dry, mix a very watery wash of Raw Sienna and Titanium White. Apply this loosely over the entire canvas to kill the stark white, creating a warm, parchment-like background. -
Map the Composition:
With a charcoal pencil or diluted Burnt Umber paint, sketch the outline of the face. Focus on the tilt of the head and the upward gaze. Keep the lines for the hair very loose and flowing. -
Define Shadows:
Using a thin wash of Burnt Umber, block in the darkest areas: the nostrils, the line of the eyelashes, the corners of the mouth, and the deep shadows under the jawline. This establishes your value map early on.
Pro Tip: Soft Focus
To get that dreamy, out-of-focus look on the cheeks, use a clean, dry makeup sponge to dab the wet acrylic paint. It blends gradients smoother than a brush can.
Step 2: Painting the Portrait
-
Mixing Skin Tones:
Prepare a palette of skin tones. You’ll need a mid-tone (White + Yellow Ochre + touch of Crimson), a shadow tone (add Burnt Umber + tiny bit of Blue), and a highlight tone (mostly White + tiny bit of Yellow Ochre). -
Blocking in the Face:
Start applying the mid-tones to the cheeks and forehead. Use a filbert brush and keep your strokes soft. Don’t worry about perfect blending yet; just get the color down. -
Sculpting with Light:
Apply your highlight color to the bridge of the nose, the forehead, the chin, and the upper cheekbones. This pushes the features forward and gives the face dimension. -
Refining the Eyes:
Paint the irises with a mix of Ultramarine Blue and a touch of Grey. Keep the top of the iris darker where the lid casts a shadow. Use your fine liner brush to add the pupil and a crisp white reflection dot, which brings life to the subject. -
Adding Warmth:
Glaze a very thin layer of Alizarin Crimson over the cheeks, nose tip, and eyelids to simulate blood flow under the skin. It creates that flushed, realistic look. -
Painting the Mouth:
Use a mix of Crimson and White for the lips, keeping the edges soft. Add a darker line where the lips meet, slightly parted, and a bright highlight on the bottom lip to show moisture.
Step 3: Creating the Double-Exposure Effect
-
Fading the Edges:
Take your background color (the parchment off-white) and dry-brush it over the edges of the hair and neck. You want the portrait to look like it is emerging from or dissolving into the canvas, not pasted on top. -
Adding Floral Overlays:
On the left side of the head, sketch faint floral shapes. Using a dry brush with minimal paint (White + varying amounts of Crimson), scumble in the suggestion of roses. Keep them translucent so the hair texture shows through slightly. -
Developing the Hair:
Paint the hair using long, sweeping strokes of Raw Sienna and White. I like to focus only on main clumps of hair rather than individual strands. Let the hair fade into the floral abstract shapes on the left. -
Botanical Details:
On the bottom right, paint the stem and leaves using a muted green (Yellow Ochre + touch of Blue). Keep these flat and illustrative, almost like a sketch, contrasting with the realistic face.
Troubleshooting: Flat Face?
If the face looks too flat, you likely lack contrast. Don’t be afraid to darken the shadows under the jaw and in the nostrils. Deep darks make the lights pop.
Step 4: Final Touches
-
Enhancing Texture:
Use a palette knife to scrape a little bit of thick white paint over the floral area and the bottom of the dress. This adds a tactile, impasto quality that catches the light. -
The Drip Effect:
Dilute some red or ochre paint heavily with water. Allow a single drip to run down from the botanical elements or the dress area to emphasize the ‘unfinished’ artistic aesthetic. -
Final Highlights:
Return to the face one last times. Strengthen the brightest highlights on the nose tip and inner eye corners with pure Titanium White to verify the focal point. -
Unifying Glaze:
Once everything is completely dry, apply an extremely thin, watery wash of Yellow Ochre over selected parts of the flowers and hair to tie the colors together.
Step back and admire how the realistic gaze balances perfectly with the abstract surroundings.


Have a question or want to share your own experience? I'd love to hear from you in the comments below!