There’s something ridiculously satisfying about turning a plain pair of shoes into wearable art with acrylic paint. Here are my favorite acrylic shoe painting ideas, starting with the classic crowd-pleasers and building up to the artsy, head-turning stuff.
Classic Rainbow Stripes
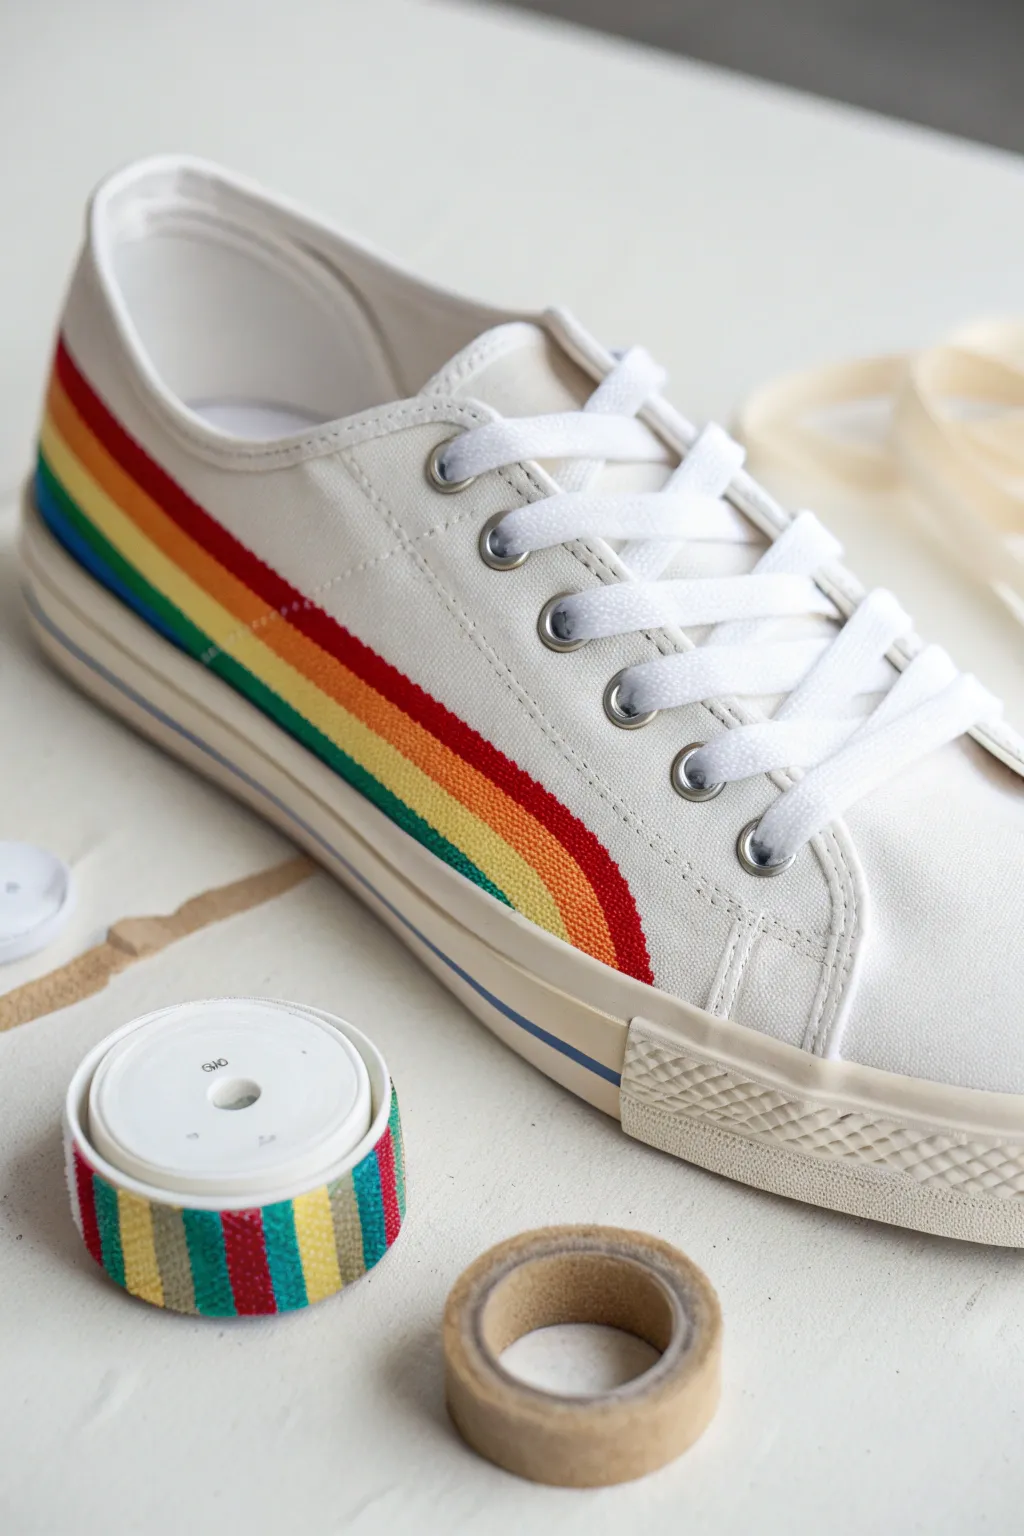
Give your plain white sneakers a vibrant personality boost with this clean, retro-inspired rainbow design. By layering acrylics in a precise, curved band, you’ll create a professional-looking custom shoe that mimics high-end collaborations.
Step-by-Step Guide
Materials
- White canvas sneakers (clean and dry)
- Acrylic leather or fabric paint (Red, Orange, Yellow, Green, Blue)
- Fabric medium (if using standard acrylics)
- Masking tape or painter’s tape
- Pencil
- Small flat brush (size 2 or 4)
- Fine liner brush (size 0 or 00)
- Hairdryer (optional)
- Acrylic finisher or sealant
- Small mixing palette
Step 1: Preparation & Mapping
-
Clean the Surface:
Before laying down any color, ensure the canvas is free of dust and dirt. Use a stiff brush or a damp cloth to wipe down the side area where you plan to paint. Let it dry completely. -
Remove Laces:
Take the laces out of the shoes to give yourself unobstructed access to the eyelet area and tongue, preventing accidental paint splatters. -
Define the Curve:
Using a pencil, lightly sketch the top and bottom boundaries of your rainbow stripe. Start from the back heel and curve gently downwards towards the midsole, ending just before the toe cap. This establishes the overall width of your design. -
Tape Off Boundaries:
Apply masking tape along the outside of your pencil lines to protect the rest of the white canvas. Press the edges of the tape down firmly with your thumbnail to prevent paint bleeding. -
Divide the Sections:
Within your taped area, use the pencil to visually divide the space into five equal strips. While you don’t need to draw heavy lines, faint guide marks will help you keep the colors proportional.
Step 2: Painting the Rainbow
-
Prepare the Paint:
Mix your acrylic paints with fabric medium according to the manufacturer’s ratio (usually 1:1). This ensures the paint flexes with the shoe and doesn’t crack as you walk. -
Start with Red:
I prefer to start at the top and work down to avoid dragging my hand through wet paint. Load your flat brush with red paint and carefully fill the top strip, hugging the upper tape line. -
Dry Layer One:
Allow the red strip to dry until it’s touch-safe. Using a hairdryer on a low, cool setting can speed this up significantly. -
Add the Orange:
Clean your brush thoroughly. Apply the orange stripe directly beneath the red. You want the edges to touch just enough to look seamless but not so much that they muddy together. -
Painting Yellow:
Continue with the yellow stripe. Since yellow can be translucent, apply a thin layer, let it dry, and then add a second coat for true opacity. -
Green and Blue:
Follow with the green strip, and finish with the blue stripe at the bottom, carefully painting along the lower tape line. -
Touch Up Edges:
Once the main blocks of color are dry, use a fine liner brush to neaten any gaps between the colors. A steady hand here makes the stripes look like a manufactured print.
Bleeding Lines?
If paint bleeds under the tape, wait for it to dry fully. Then, mix a tiny amount of white acrylic with fabric medium and carefully paint over the mistake to act as ‘correction fluid’.
Step 3: Finishing Touches
-
The Reveal:
Wait until the paint is fully dry, then slowly peel away the masking tape at a 45-degree angle. This is the most satisfying part, revealing those crisp, clean edges against the white canvas. -
Detail the Midsole:
For an extra pop, paint a very thin blue line horizontally along the rubber midsole using your fine liner brush. This echoes the rainbow theme subtly. -
Heat Set:
If your fabric medium requires heat setting, use a hairdryer on high heat or an iron on a low setting (with a cloth between the iron and shoe) for a few minutes. -
Seal the Work:
Apply a thin layer of acrylic finisher or water-resistant sealant over the painted rainbow to protect it from dirt and water. -
Re-lace:
Once everything is cured (usually 24 hours for full durability), lace your clean white laces back up.
Base Coat Pro-Tip
Paint a thin layer of white paint over the area *before* starting the colors. This primes the canvas, making the rainbow hues pop more vibrantly without needing five coats of each color.
Step out in style knowing your custom footwear is completely one of a kind


Playful Polka Dots
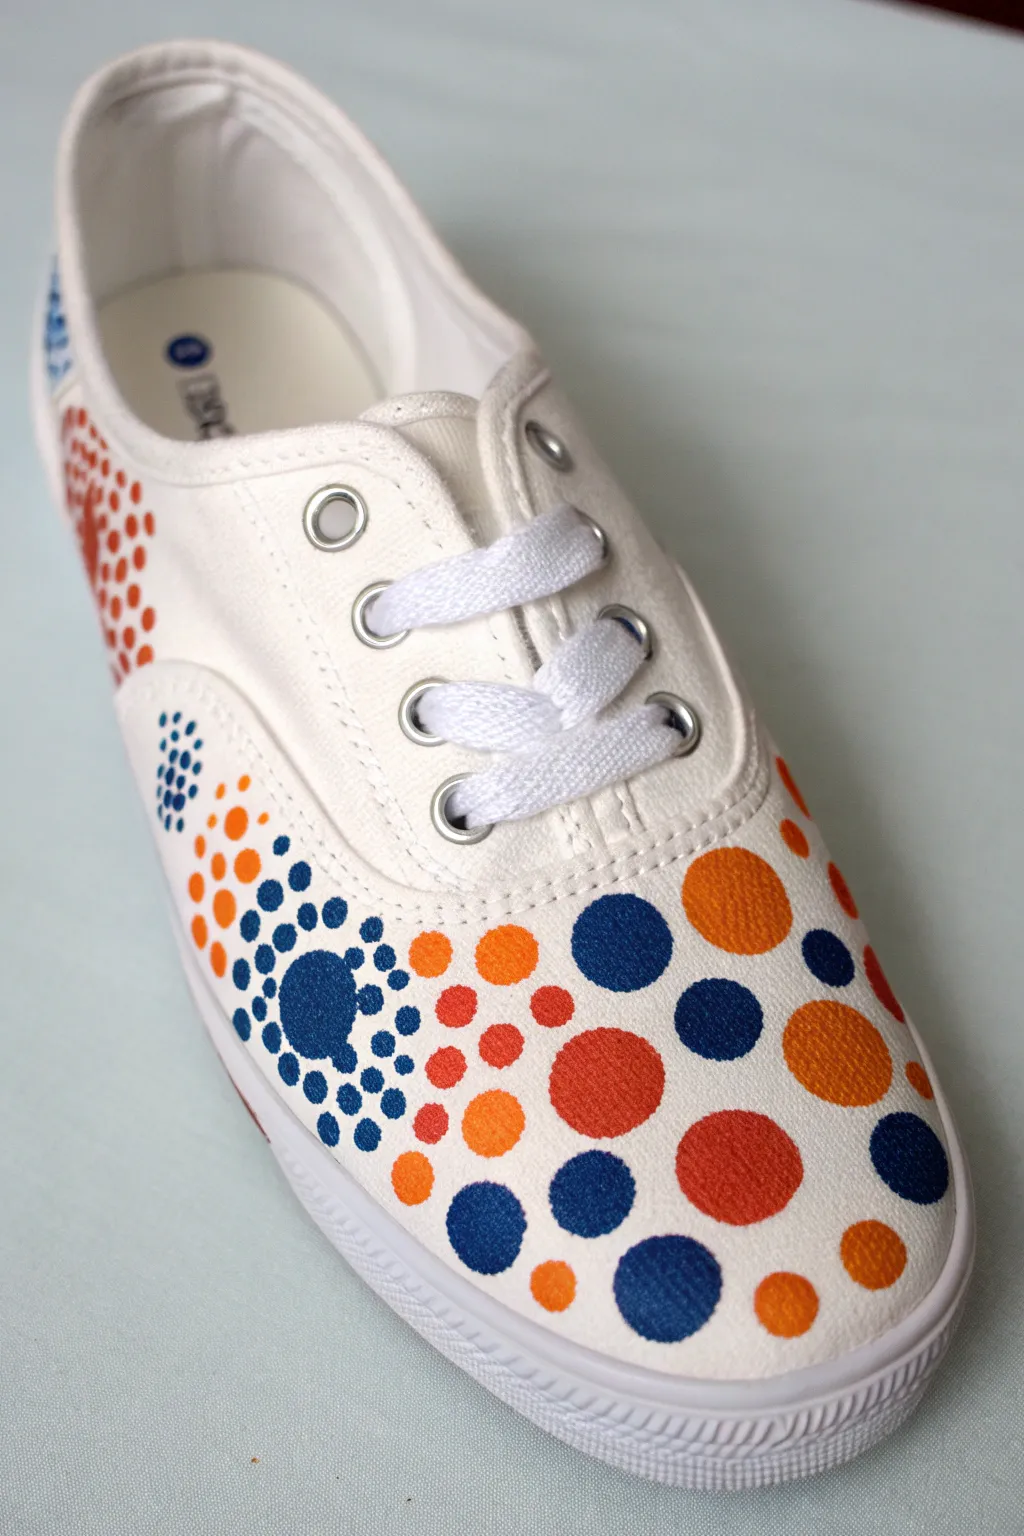
Transform plain white canvas shoes into a vibrant fashion statement with this playful polka dot design. Using simple tools and varied dot sizes, you’ll create a dynamic pattern that mimics effervescent bubbles or confetti.
Detailed Instructions
Materials
- White canvas sneakers
- Acrylic paints (Navy Blue, Royal Blue, Orange, Red-Orange)
- Textile medium (mixing medium for fabric)
- Foam pouncers (daubers) in varied sizes (large, medium)
- Cotton swabs (Q-tips)
- Small round paintbrush (size 0 or 1)
- Paint palette or paper plate
- Masking tape (optional)
- Water cup and paper towels
Step 1: Preparation
-
Prepare the canvas:
Remove the laces from your sneakers to ensure you have a clear, flat surface to work on. If the shoes are new, you might want to wipe them down with a slightly damp cloth to remove any factory sizing or dust, then let them dry completely. -
Stuff the shoes:
Stuff the inside of the shoes tightly with newspaper or old hand towels. This provides a firm surface to press against when you are stamping the dots, preventing the canvas from buckling under pressure. -
Mix your paints:
Mix your acrylic paints with the textile medium according to the bottle instructions (usually a 1:1 or 2:1 ratio). This step is crucial because it keeps the paint flexible so it won’t crack when you walk. Prepare distinct puddles of Navy Blue, Royal Blue, Bright Orange, and Red-Orange.
Step 2: Stamping Large Dots
-
Test your pouncers:
Before touching the shoe, practice stamping on a scrape piece of paper. Dip your largest foam pouncer into the orange paint, ensuring the entire circle face is covered but not dripping. -
Apply the anchor dots:
Start near the toe area. Press your large foam pouncer firmly onto the canvas to create a few large, statement dots in orange and red-orange. Don’t overcrowd them; leave plenty of white space between these main features. -
Add variety with blue:
Clean your pouncer or switch to a fresh one. Repeat the process with your navy blue paint, placing large dots sporadically around the orange ones. I like to let the colors touch or slightly overlap in just one or two spots for visual interest, but generally keep them separate. -
Create medium dots:
Switch to a medium-sized foam pouncer. Fill in some of the larger gaps on the toe box and sides with medium dots in all four of your colors. Aim for a random, scattered look rather than perfect rows.
Uneven Circles?
If a stamped dot looks patchy or faint, don’t stamp again directly over it as it might blur the edge. Instead, use a small detail brush to carefully fill in the missing paint inside the circle.
Step 3: Detailing the Side Burst
-
Start the mandala center:
Locate the side panel of the shoe (near where the arch of your foot would be). Use a medium or large blue pouncer to create a central ‘sun’ dot. -
Create the first ring:
Dip a cotton swab (Q-tip) into the navy blue paint. Carefully dot a ring of small circles immediately surrounding the central large dot. Keep the spacing tight and uniform. -
Expand the pattern:
Using the same cotton swab technique, create a second ring outside the first one using a lighter blue or Royal Blue. As you move outward, slightly increase the space between the dots to create an radiating effect. -
Add color accents:
Switch to a clean cotton swab and orange paint. Add a third, wider ring of small dots, or create small clusters of three dots floating near the blue burst to integrate the colors from the toe.
Level Up: Gradient Dots
Load your foam pouncer with two colors at once (e.g., orange on one side, red on the other) before stamping. This creates a cool ombré effect within a single dot.
Step 4: Finishing Touches
-
Fill empty spaces:
Scan the shoe for any areas that look too bare. Use the cotton swabs to add tiny ‘confetti’ dots in blue and orange to bridge gaps between the large stamped circles. -
Clean up edges:
If any paint accidentally got onto the rubber sole, wipe it away immediately with a damp paper towel or a cotton swab dipped in rubbing alcohol before it sets. -
Heat set the paint:
Allow the paint to air dry for at least 24 hours. To make the design truly permanent and weatherproof, blast the shoes with a hairdryer on high heat for a few minutes, or toss them in the dryer (inside a pillowcase) on high heat for 15 minutes. -
Re-lace and wear:
Once the shoes are fully cured and cooled, lace them back up. Your custom kicks are now ready for the street.
Now you have a pair of bubbly, custom sneakers that are sure to put a spring in your step


Mini Daisies on Dark Shoes
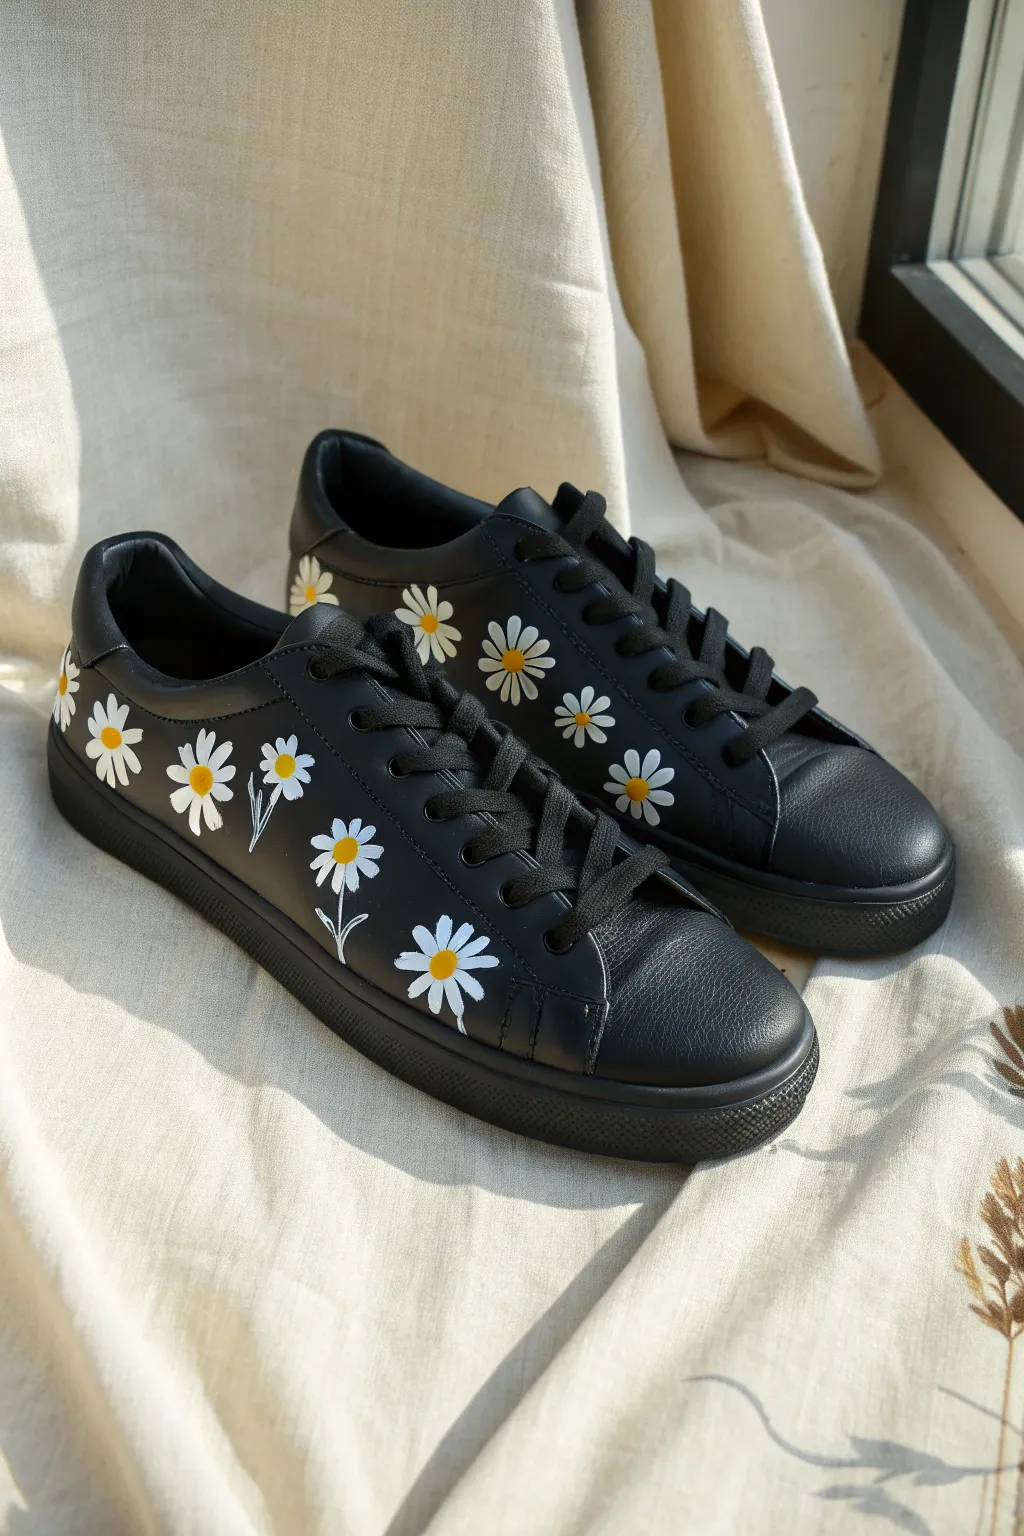
Transform a plain pair of black leather sneakers into a fresh spring statement with these charming mini daisies. The contrast of bright white petals against the dark background creates a look that is both graphic and whimsical.
How-To Guide
Materials
- Black leather or faux leather sneakers
- Leather preparer or acetone
- Cotton rounds or balls
- White acrylic leather paint (e.g., Angelus Flat White)
- Yellow acrylic leather paint
- Pale green acrylic leather paint (optional for stems)
- Small round detail brush (size 0 or 1)
- Fine liner brush (size 00 or 000)
- Dotting tool or toothpick
- Matte or satin acrylic finisher
- Masking tape
Step 1: Cleaning & Prep
-
Remove Laces:
Take the laces off the shoes completely. This gives you unhindered access to the side panels and prevents accidental paint splatter on the fabric laces. -
Deglaze the Surface:
Apply leather preparer or acetone to a cotton round. Rub the areas where you plan to paint firmly. You are removing the factory finish to ensure the paint adheres directly to the leather; the surface should feel slightly tacky or dull when you’re done. -
Tape Off Soles:
Use masking tape to carefully cover the rubber soles along the edge where they meet the leather. This protects the rubber from stray brushstrokes during the painting process.
Step 2: Painting the Petals
-
Base Layer Placement:
Dip your small round detail brush into the white paint. Start by visualizing where your first flower will go. -
Painting First Petals:
Press the brush down gently and pull outward to create a small teardrop shape used for the petal. Aim for 7 to 9 petals per flower, leaving a small empty circle in the very center. -
Building Opacity:
Once the first layer of white is dry to the touch (usually 10-15 minutes), apply a second coat. White paint on black leather is notoriously translucent, so I usually need three thin coats for solid coverage. -
Create a Scatter Pattern:
Move across the side of the shoe, painting flowers at random intervals. Place some near the heel, some midway, and some peeking up near the laces. Vary the rotation of the flowers so they don’t look like a uniform stamp pattern. -
Adding Stems (Optional):
Using your fine liner brush and pale green paint, draw very thin, delicate lines extending downward from a few of the lower flowers. Add tiny leaves if you like, but keep lines wispy.
Uneven Petals?
If your petals look messy, wait for the paint to dry completely. Use a toothpick to gently scratch away wobbly edges, or paint over mistakes with black to “erase” them.
Step 3: Centers & Finishing
-
Dot the Centers:
Dip a dotting tool or the back end of a paintbrush into the yellow paint. Place a perfect round dot in the center of each white flower. -
Second Yellow Coat:
Because yellow can be streaky, dab a second drop of paint over the centers once the first is dry to make the color pop against the dark background. -
Dry Time:
Let the shoes sit undisturbed for at least 24 hours. This allows the acrylic polymer to fully bond with the flexible leather surface. -
Apply Finisher:
Using a clean brush, apply a thin layer of matte or satin finisher over the painted areas. This seals the work against moisture and scuffs. -
Re-lace:
Once the sealer is fully dry, remove the masking tape from the soles and lace your sneakers back up.
Bee Creative
Add tiny bumblebees flying between the flowers! Use yellow ovals with black stripes and tiny white loops for wings to bring the garden scene to life.
Now you can step out in style with your custom floral footwear


Mandala Medallions on the Sides
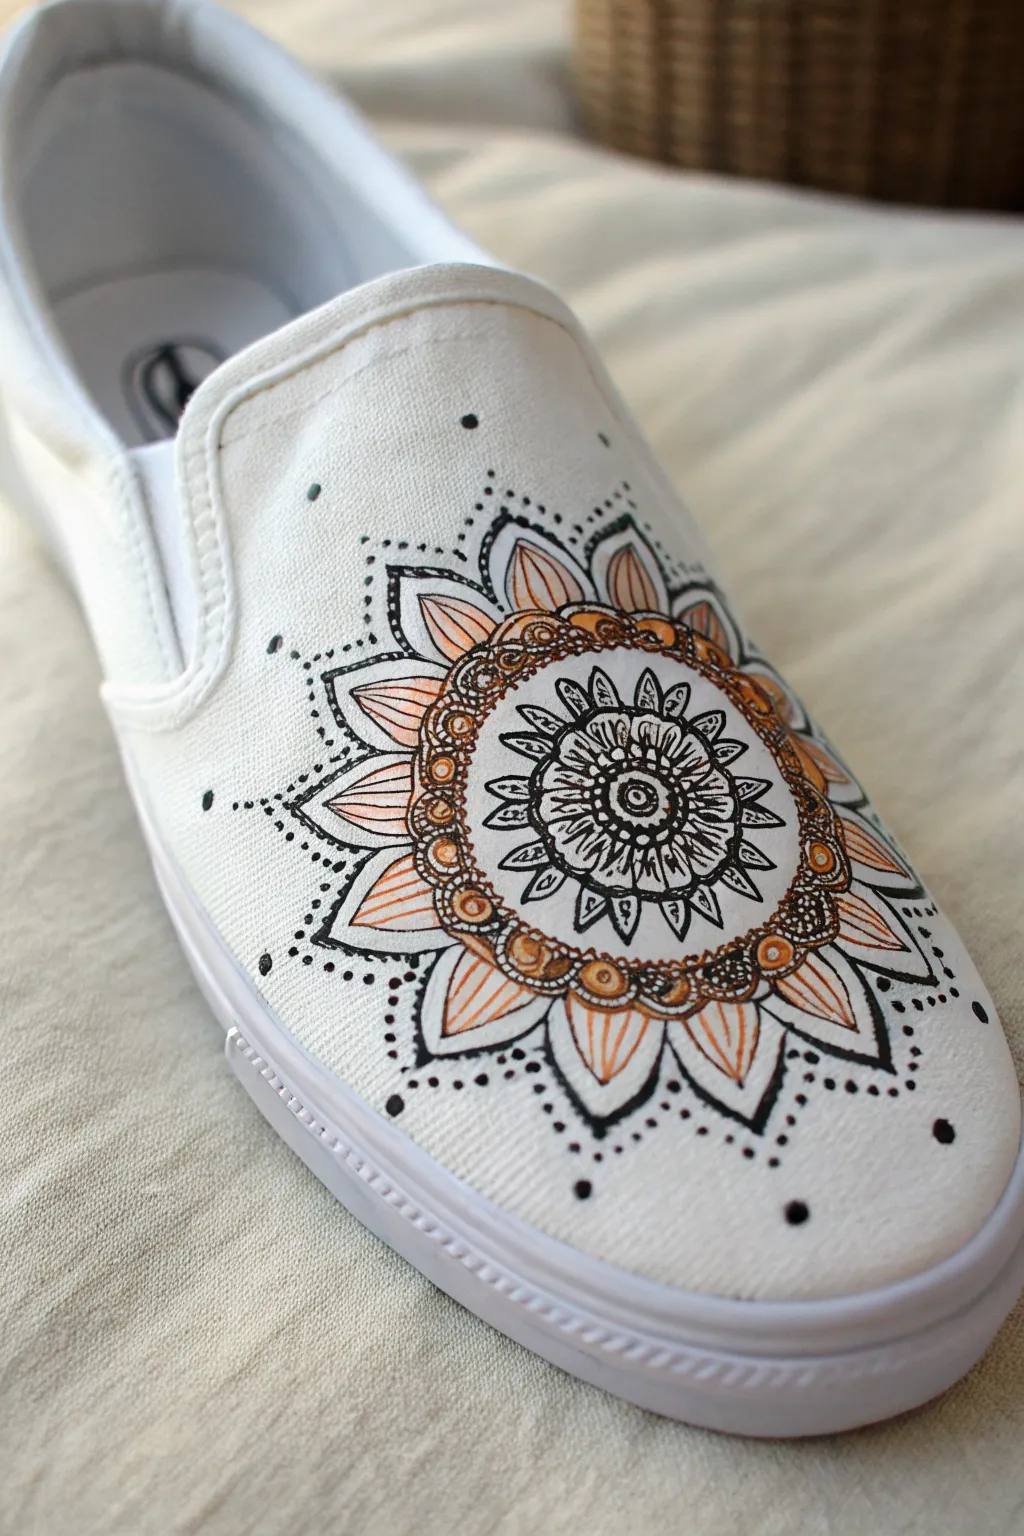
Transform a plain pair of white slip-on sneakers into a bohemian masterpiece with this intricate yet approachable mandala design. The combination of fine black linework and warm copper accents creates a striking focal point right on the vamp of the shoe.
Step-by-Step
Materials
- White canvas slip-on sneakers
- Fine-point fabric marker or waterproof ink pen (Micron 05 or similar)
- Acrylic paint (copper or metallic bronze)
- Thin round paintbrush (size 0 or 1)
- Pencil (HB or lighter)
- Eraser
- Circle template or compass (optional)
- Acrylic sealer spray (matte or satin finish)
Step 1: Drafting the Structure
-
Center Placement:
Start by finding the visual center of the shoe’s toe area (the vamp). Use a pencil to lightly mark a small dot here. This will anchor your entire mandala. -
Base Circles:
Lightly sketch three concentric circles radiating from your center dot. The first should be about the size of a dime, drawings the second about an inch wider, and the third extending nearly to the stitching boundary. -
Petal Guidelines:
Sketch light radial lines—like cutting a pizza—to divide your circles into even sections. This helps ensure your petals stay symmetrical as you work outward.
Step 2: Inking the Core
-
Central Eye:
Switch to your fine black pen. Draw a bold, filled-in circle over your center dot, leaving a tiny white speck in the middle for a highlight. -
Inner Ring:
Around the center dot, draw a small ring and fill it with tiny, delicate U-shapes or scallops. -
Primary Spikes:
Draw the first layer of pointed triangular petals around the core. Add a straight line down the center of each triangle to give them dimension. -
Detailed Leaves:
Create a second layer of slightly larger, leafy shapes. Fill the tips of these leaves with solid black ink to add contrast and weight to the design.
Ink Bleeding?
If the ink spreads into the canvas grain, your pen might be too wet. Switch to a finer nib or coat the area with clear acrylic medium first to seal the fibers.
Step 3: Adding Color and Texture
-
The Copper Ring:
Paint a thick band of copper acrylic paint around your current black linework. I like to use a size 0 brush here to keep the edges neat. -
Drying Time:
Let this copper paint dry completely to the touch before attempting to draw ink over it, or your pen tip might clog. -
Overlay Details:
Once the paint is dry, use your black pen to draw evenly spaced circles directly on top of the copper band. Repeat this pattern all the way around. -
Large Outer Petals:
Draw the largest set of petals extending outward from the copper ring. Make these broad and pointed, resembling sunflower petals. -
Shading with Ink:
Add shading lines (hatching) inside these large petals, starting from the base and flicking the pen outward. This creates a gradient effect without needing grey paint. -
Color Highlights:
Carefully paint a thin stroke of copper inside each large petal, following the curve of the leaf shape.
Glitter Upgrade
Mix fine copper glitter into your acrylic paint or apply a layer of glitter glue over the metallic sections for extra sparkle in the sunlight.
Step 4: Final Flourishes
-
Outer Stippling:
Using your pen, create a dotted halo around the entire mandala. Start with larger dots close to the petal tips and use smaller dots as you move outward. -
Accent Dots:
Add a few intentional, larger black dots scattered further out on the canvas, towards the side elastics and toe tip, to break up the negative space. -
Erase Sketches:
Wait at least 15 minutes to shape sure all ink is set, then gently erase any visible pencil guidelines. -
Sealing:
Protect your artwork by spraying the shoes with a thin coat of acrylic sealer. Apply two light coats rather than one heavy one to avoid drips.
Lace up your new custom kicks and enjoy walking in your own unique art
BRUSH GUIDE
The Right Brush for Every Stroke
From clean lines to bold texture — master brush choice, stroke control, and essential techniques.
Explore the Full Guide
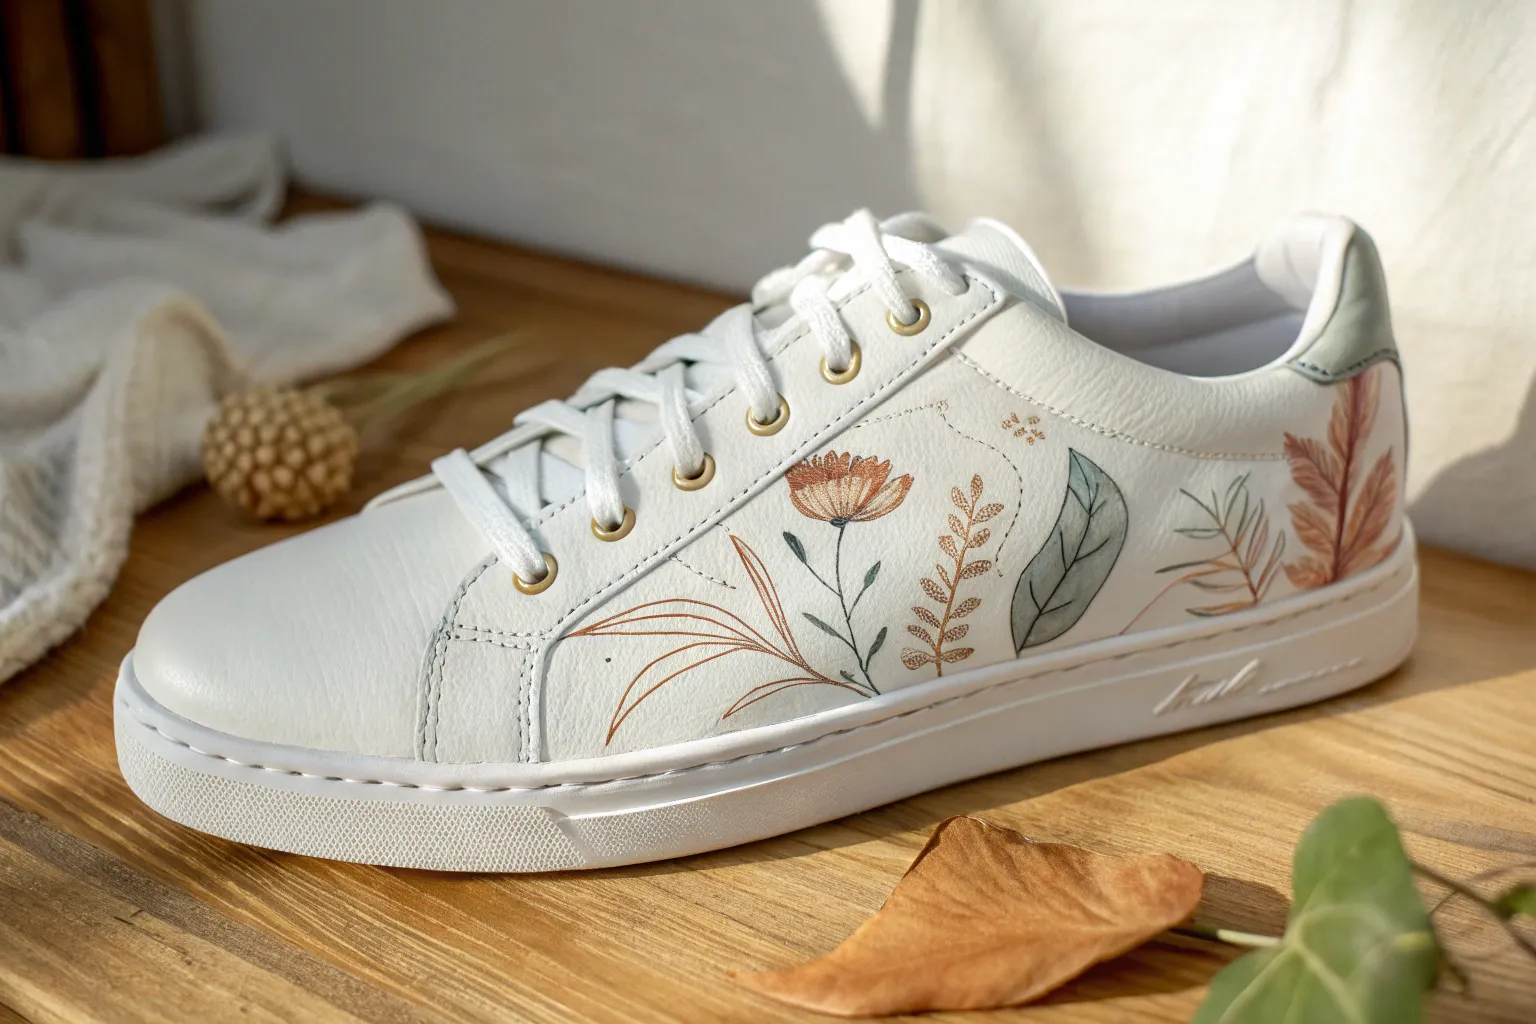
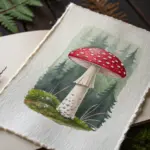
Botanical Mushrooms and Ferns

Transform a plain pair of white canvas sneakers into a woodland masterpiece with this delicate botanical design. Featuring classic red-capped mushrooms, earthy brown fungi, and feathery fern fronds, this project brings nature with you wherever you step.
Step-by-Step Guide
Materials
- White canvas sneakers
- Acrylic paints (Titanium White, Burnt Umber, Burnt Sienna, Yellow Ochre, Sap Green, Hookers Green, Cadmium Red)
- Textile medium (essential for durability)
- Fine detail brushes (sizes 0, 00, and 000)
- Pencil or air-erasable fabric pen
- Painter’s tape
- Palette or small dish
- Water cup and paper towels
- Acrylic matte sealer/varnish spray
Step 1: Preparation & Sketching
-
Prep the surface:
Remove the shoelaces completely to give yourself unobstructed access to the side panels. If the shoes are new, give them a quick wipe with a clean, damp cloth to remove any sizing or dust, and let them dry completely. -
Protect the sole:
Use painter’s tape to carefully mask off the rubber sole along the bottom edge of the canvas. Press the tape down firmly with your thumbnail to prevent paint from bleeding onto the white rubber. -
Mix your medium:
Before painting, mix your acrylic paints with textile medium according to the bottle instructions (usually a 1:1 or 2:1 ratio). This ensures the paint flexes with the fabric instead of cracking. -
Draft the composition:
Lightly sketch the design onto the canvas using a pencil. Start with two large fern fronds on the back heel area, angling them slightly. Then, place the mushroom caps along the bottom edge near the sole—one large red cap, a smaller red cap, and a brown rounded cap.
Step 2: Painting the Ferns
-
Establish the fern stems:
Using your size 00 brush and a mix of Sap Green and a tiny bit of Burnt Umber, paint the thin, central stems of the two fern fronds following your sketch lines. -
Paint the leaves:
Switch to pure Sap Green. Using short, controlled flicking motions, paint the individual tiny leaves extending from the stems. Start at the bottom of the stem where leaves are longest, and make them progressively shorter as you reach the tip. -
Add depth to the ferns:
Mix a darker green using Hookers Green and a touch of black or deep brown. Go back over the base of the fern leaves (closest to the stem) with tiny strokes to create shadow and dimension.
Paint Bleeding?
If paint bleeds into the canvas grain where you don’t want it, stop immediately. Let it dry, then paint over the mistake with Titanium White to ‘erase’ it before trying again.
Step 3: Painting the Mushrooms
-
Base coat the stems:
Mix Titanium White with a small amount of Burnt Umber to get a creamy beige. Paint the stems of all three mushrooms. Let the paint sink into the canvas weave; you might need two thin coats for opacity. -
Paint the red caps:
For the fly agaric (red) mushrooms, mix Cadmium Red with a drop of Burnt Sienna to tone it down slightly. Fill in the cap shapes carefully. I like to keep the paint slightly thin so the canvas texture still shows through a bit. -
Paint the brown cap:
For the round brown mushroom, use Burnt Umber mixed with Yellow Ochre for a warm, earthy tone. Paint the rounded cap shape completely. -
Add cap details:
Once the red caps are dry, use your smallest 000 brush and pure Titanium White to dot small specks onto the red surface. Vary the size of the dots for a natural look. -
Detail the brown cap:
On the brown mushroom, use a lighter tan color to add subtle vertical striations or texture lines to suggest the roundness of the cap. -
Shade the stems:
Using a watered-down brown wash, add shading to one side of the mushroom stems and right underneath the caps to create a cylindrical 3D effect.
Level Up: Texture
Make the white spots on the red mushrooms slightly raised by using ‘Puffy Paint’ or a 3D fabric paint directly from a squeeze bottle for tactile texture.
Step 4: Finishing Touches
-
Add delicate filler plants:
Using a very thin brown ink-like consistency, paint fine, wispy branches rising up between the mushrooms. Add tiny reddish-brown dots at the ends to represent berries or buds. -
Ground the scene:
Mix a few shades of green and use short, upward strokes along the very bottom edge of the canvas (near the tape) to create grass blades around the base of the mushrooms. -
Dry and seal:
Allow the shoes to dry for at least 24 hours. Once fully cured, spray them with a matte acrylic sealer to protect your artwork from dirt and water. -
Re-lace:
Remove the masking tape carefully and re-lace your sneakers.
Now you have a unique piece of wearable art that celebrates the quiet beauty of the forest floor
Seasonal Autumn Leaves Sweep
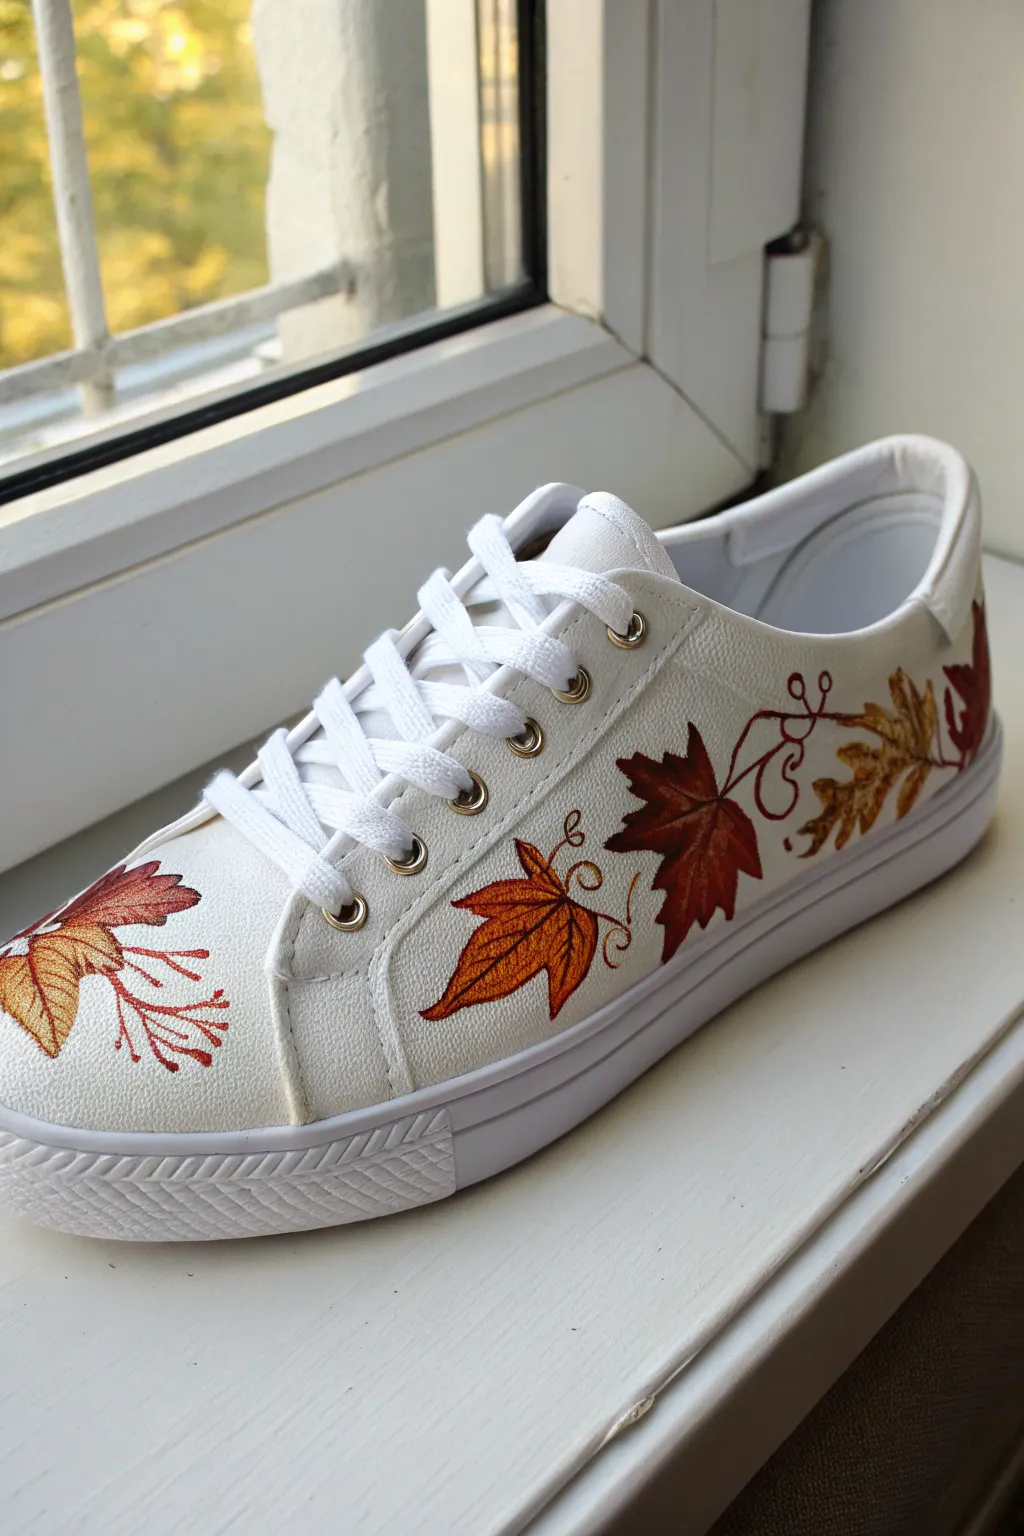
Embrace the crisp air and changing colors by transforming plain white sneakers into a stunning display of fall foliage. This design features detailed maple and oak leaves sweeping across the side and toe, rendered in warm acrylic hues of amber, rust, and burgundy.
How-To Guide
Materials
- White faux-leather or canvas sneakers
- Angelus leather paints (or high-quality acrylics mixed with fabric medium)
- Colors needed: Dark Brown, Burnt Orange, Golden Yellow, Deep Red, White, Tan
- Paintbrushes: Size 0 and 00 round liner brushes, Size 2 flat brush
- Leather preparer and degllazer (or rubbing alcohol)
- Cotton pads
- Pencil for sketching
- Finishing sealer (matte or satin finish)
- Painter’s tape
Step 1: Preparation & Sketching
-
Prep the surface:
Before painting anything, you must remove the factory finish. Apply leather preparer or rubbing alcohol to a cotton pad and scrub the areas you plan to paint—specifically the side panels and toe cap. This ensures the paint adheres permanently rather than cracking. -
Protect the sole:
Use painter’s tape to carefully mask off the rubber sole line. Press the tape firmly into the crease where the shoe meets the sole to prevent any stray paint drips from ruining the clean white edge. -
Plan the composition:
Sketch your design lightly directly onto the shoe using a pencil. For this ‘sweep’ effect, draw a large maple leaf near the heel, a smaller maple leaf transitioning toward the middle, and an oak leaf closer to the laces on the side. Add a couple of partial leaves on the toe cap. -
Add movement:
Draw thin, swirling lines connecting the leaves. These curly tendrils act as the ‘spine’ of the design, making the leaves look like they are blowing in the wind.
Paint Consistency
Leather paint should be the consistency of thin syrup. If it’s too thick, it leaves brush marks. If too thin, it runs. Thin slightly with water if needed for those fine lines.
Step 2: Base Colors
-
Mix your palette:
Squeeze out your Burnt Orange, Deep Red, Golden Yellow, and Tan paints. I like to keep a bit of Dark Brown nearby to darken colors instantly without needing black. -
Base coat the maple leaves:
Using a size 2 flat brush, fill in the large maple leaf shapes. Start with Deep Red for the large leaf near the heel. Apply the paint in thin, even layers. Don’t worry if it looks streaky on the first pass; thin layers prevent cracking. -
Paint the smaller leaves:
Fill in the smaller, central maple leaf with a mix of Burnt Orange and Golden Yellow. For the oak leaf near the laces, use a Tan or muted Golden Yellow base. Paint the toe cap leaves with contrasting fall tones like pure orange or yellow-brown. -
Let it dry completely:
Allow the first layer to dry for at least 15-20 minutes. If the white shoe material is still showing through, apply a second thin coat to all the leaves to build opacity.
Step 3: Detailing & Veins
-
Shading the leaves:
To create dimension, take a slightly darker version of your base color and paint the bottom edges of the leaves. For the yellow oak leaf, add some light brown shading near the center stem area. -
Mixing the vein color:
Combine Dark Brown with a tiny drop of Deep Red. You want a color that looks like dried bark—dark enough to stand out against the leaves but warmer than pure black. -
Painting the main stems:
Switch to your size 0 liner brush. With a steady hand, paint the central vein lines running through the middle of each leaf. -
Adding fine veins:
Using the 00 liner brush (the finest tip you have), paint delicate veins branching out from the central stem to the leaf tips. Keep your pressure extremely light so the lines taper off thinly at the ends. -
Creating the tendrils:
Now paint over those curly pencil lines you drew earlier with your reddish-brown mix. Paint loopy, ribbon-like spirals connecting the stems of the leaves together. These should look whimsical and decorative. -
Decorative dots:
At the ends of some of the thin branches—especially on the toe cap area—add tiny berries or buds using the tip of your brush in Deep Red.
Fixing Wobbly Lines
Shaky hand on the veins? Don’t stress. Wait for the mistake to dry, then paint over it with the base leaf color to ‘erase’ it, and try the line again.
Step 4: Finishing Touches
-
Clean up edges:
Check the perimeter of your leaves. If your brush slipped, use a tiny bit of white paint to carefully clean up the shoe background and sharpen the leaf points. -
Seal the artwork:
Once the paint is 100% dry (ideally let it sit specifically for 24 hours), apply a thin layer of leather sealer or acrylic finisher over the painted areas. This protects against water and scuffs. -
Remove tape:
Peel off the painter’s tape slowly to reveal your crisp, clean sole line.
Now you have a custom pair of kicks that perfectly captures the spirit of the season

PENCIL GUIDE
Understanding Pencil Grades from H to B
From first sketch to finished drawing — learn pencil grades, line control, and shading techniques.
Explore the Full Guide
Upcycled Cover-Up on Scuffed Shoes
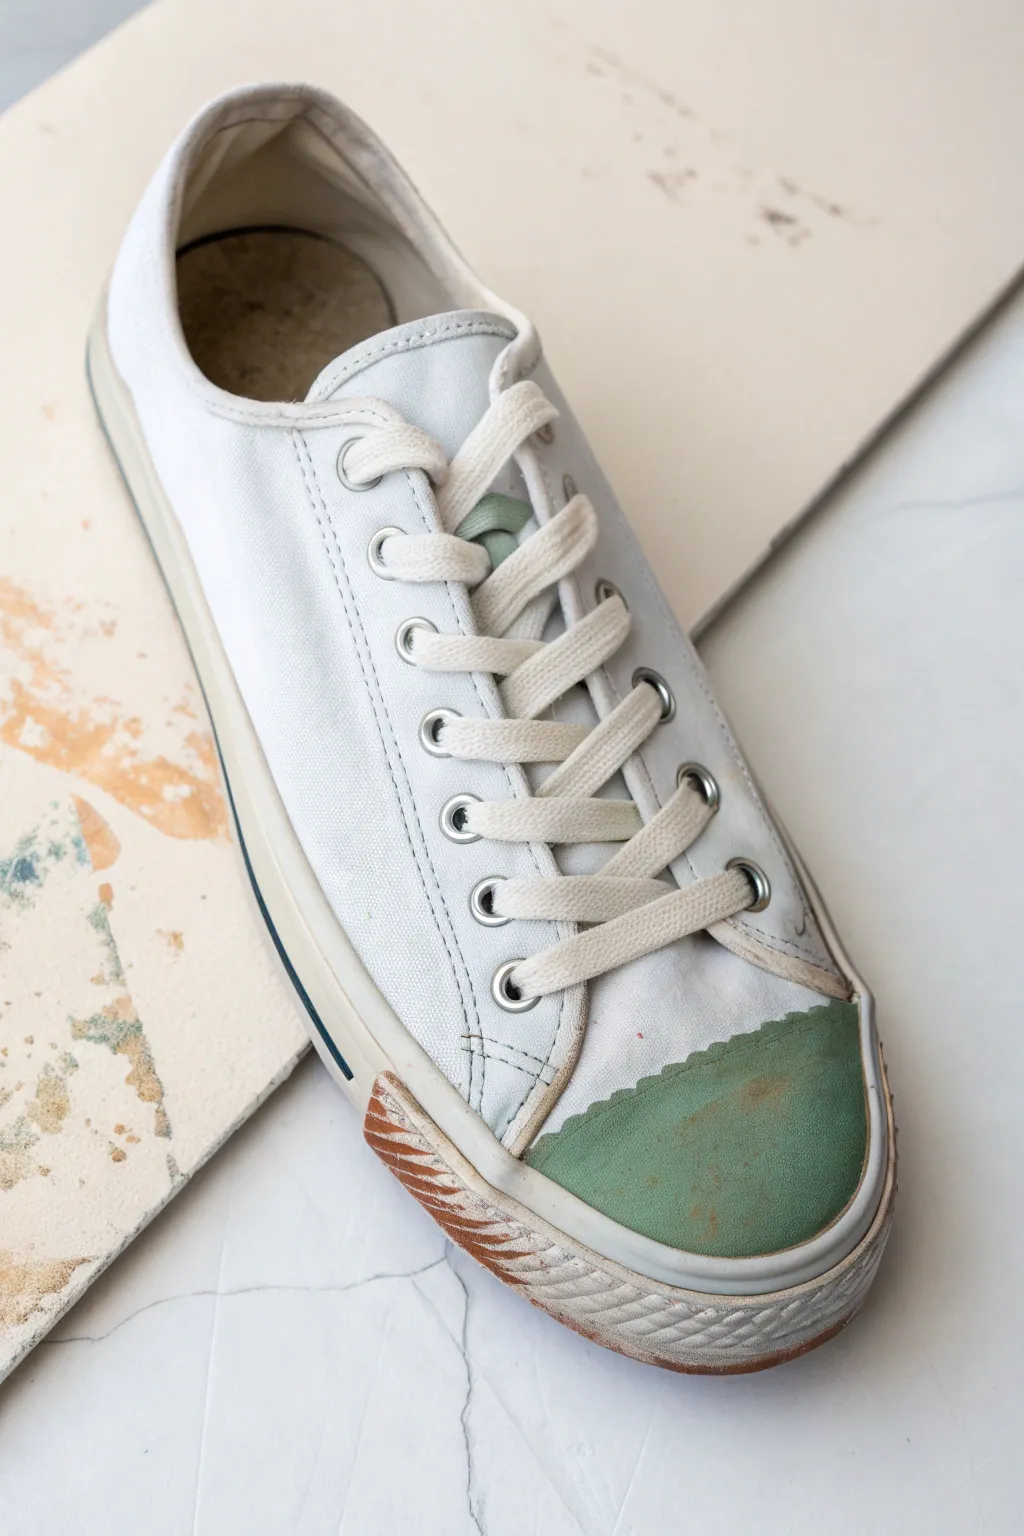
Give worn-out canvas sneakers a second life by turning their scuffs into a purposeful, vintage-inspired design feature. This project uses sage green acrylics and heavy texture paste to create a rugged, intentionally aged toe cap that hides imperfections beautifully.
Step-by-Step Guide
Materials
- Old white canvas sneakers
- Sage green acrylic paint
- Burnt sienna or reddish-brown acrylic paint
- Titanium white acrylic paint
- Fabric medium
- Masking tape
- Small flat brush
- Fine detail brush
- Texture paste or heavy body gel medium
- Stiff bristle brush (e.g., hog hair)
- Matte varnish or acrylic sealer
Step 1: Preparation & Cleaning
-
Clean the Surface:
Before painting, scrub the rubber toe cap and side foxing with a stiff brush and soapy water to remove loose dirt and oils. Let the shoe dry completely. -
Tape the Edges:
Apply masking tape neatly along the seam where the rubber toe cap meets the canvas upper. This ensures your green paint stays strictly on the rubber section and doesn’t bleed into the fabric.
Paint Peeling?
If paint peels off the rubber, sand the toe cap lightly with fine-grit sandpaper before repainting. This creates ‘teeth’ for the acrylic to grab onto.
Step 2: Painting the Tone
-
Mix the Base Color:
Combine sage green acrylic paint with a small amount of fabric medium. The medium helps the paint adhere better to the flexible rubber surface without cracking immediately. -
Apply the First Green Layer:
Using your small flat brush, paint the entire rubber toe cap with the sage green mixture. Don’t worry about perfect opacity yet; just get good coverage. -
Let it Dry:
Allow this base layer to dry for about 20-30 minutes. It should be dry to the touch before adding more. -
Build Opacity:
Apply a second coat of the sage green mix. If you want a more textured look like the reference connected to the suede-like appearance, dab the paint on rather than stroking it smooth. -
Add Subtle Variations:
While the second coat is still slightly tacky, mix a tiny drop of white into your green and dab it onto the center of the toe cap to create a slight highlight, mimicking faded suede.
Faux Suede Texture
Mix baking soda into your green paint. When it dries, it creates a gritty, velvety texture that looks incredibly like real suede.
Step 3: Distressing & Texture
-
Create the Mud Effect:
Mix burnt sienna paint with a little texture paste or heavy body gel. You want a thick, gritty consistency. -
Apply Side Details:
Locate the textured rubber patch on the side of the midsole (near the widest part of the foot). Use a stiff bristle brush to dry-brush this brown mixture onto the raised ridges. -
Scuff the Toe:
Dip a dry stiff brush into a very small amount of the brown paint (wipe most off on a paper towel). Lightly scuff the green toe cap to simulate wear and tear, focusing on the very front edge. -
Add Faux Dirt Stains:
Water down a tiny bit of brown paint until it’s like a wash. Randomly touch it to spots on the green toe to create organic-looking discoloration stains. -
Paint the Tongue Detail:
Using a small detail brush and your original sage green mix, carefully paint the small fabric loop on the tongue of the shoe to tie the color scheme together.
Step 4: Finishing Touches
-
Inspect the Sole:
Take a look at the white rubber sidewalls. If they are too pristine, use a dirty rag with a speck of brown paint to smudge them lightly for a cohesive aged look. -
Seal the Work:
Once all paint is 100% dry (I usually give it a few hours just to be safe), apply a coat of matte varnish over the painted rubber parts to protect your work from moisture. -
Remove Tape:
Carefully peel away the masking tape. If any green paint seeped under, clean it up quickly with a damp cotton swab or white acrylic.
Now you have a pair of custom kicks that embrace the beauty of imperfection


Have a question or want to share your own experience? I'd love to hear from you in the comments below!