Glass painting is one of my favorite ways to get that instantly dreamy, modern look because light + color does half the work for you. If you’re craving projects that feel clean, glowy, and seriously satisfying, these aesthetic glass painting ideas will keep your hands busy and your space looking gorgeous.
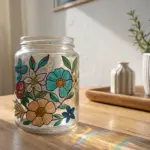
Faux Stained Glass Florals
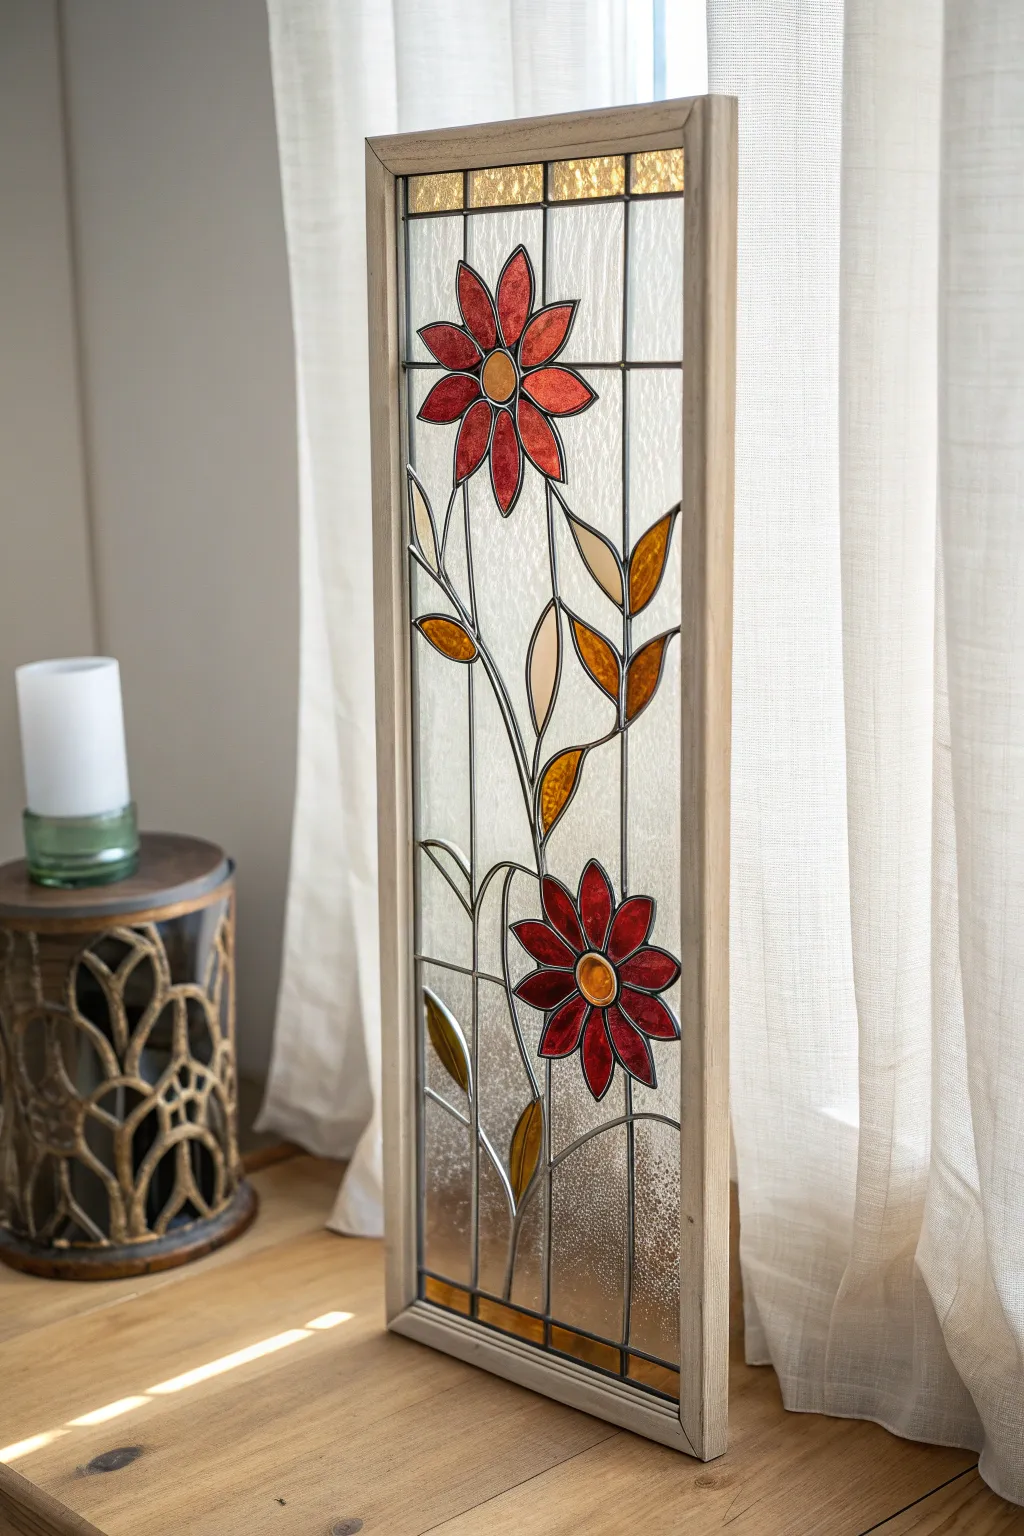
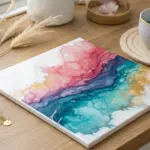
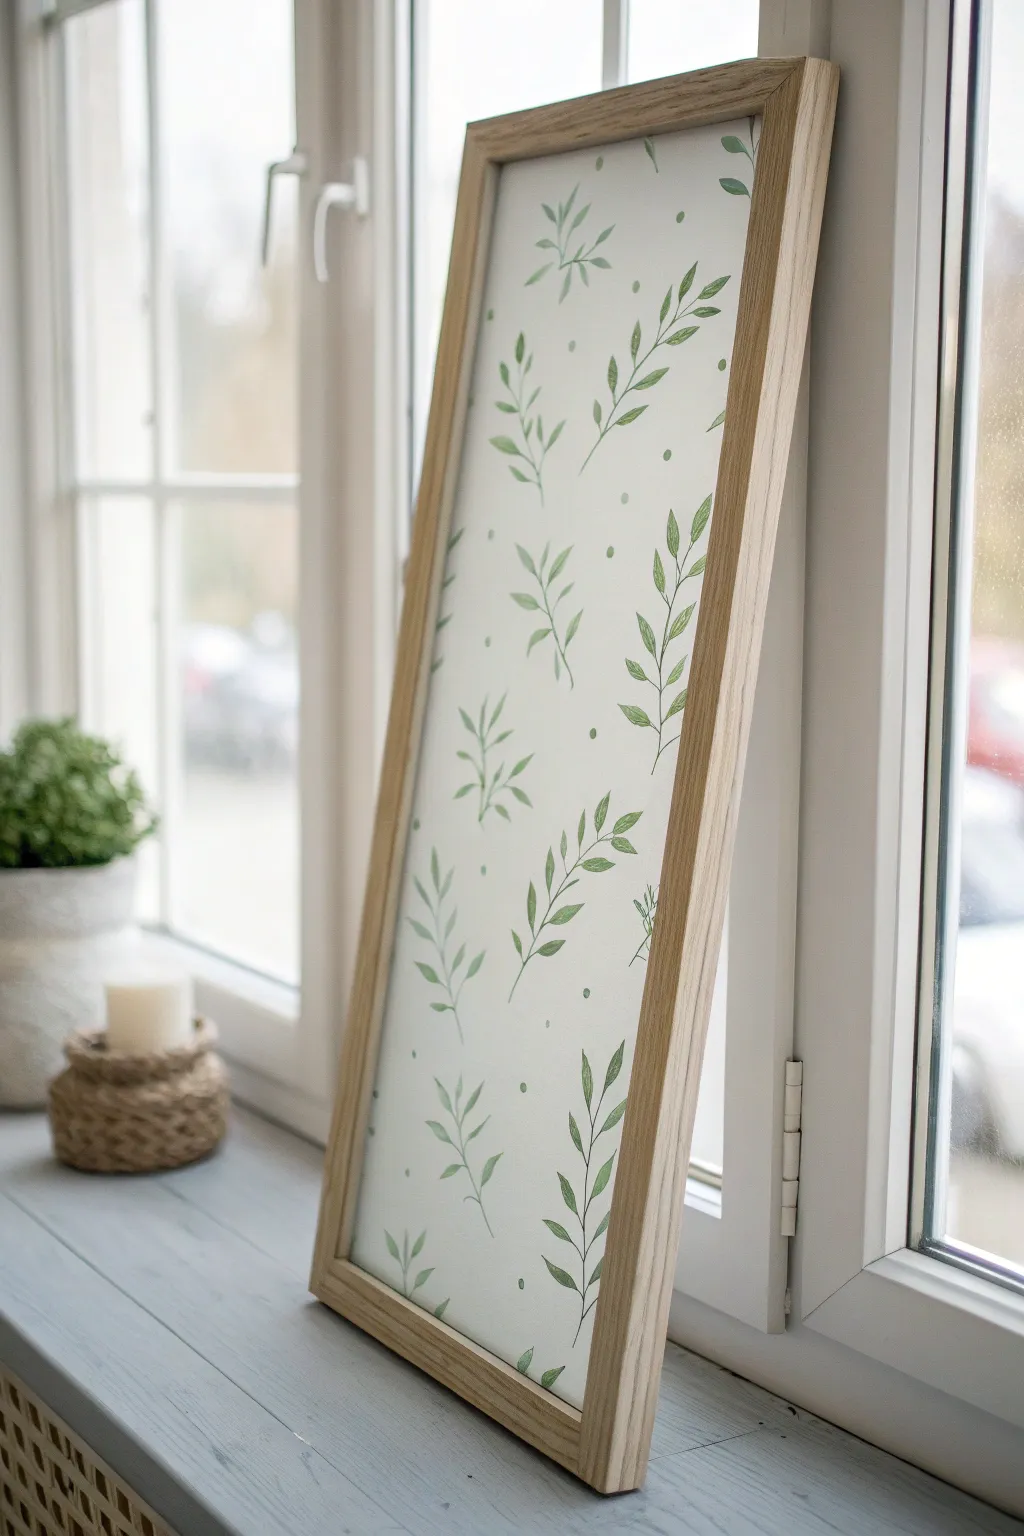
Capture the warmth of an English cottage garden with this elegant floral panel that mimics the look of authentic leaded glass. Using simple gallery glass paints and liquid leading, you can transform a plain picture frame into a stunning light-catching accent piece.
Step-by-Step
Materials
- Tall, narrow wooden picture frame (glass included, backing removed)
- Faux liquid leading (black or dark pewter)
- Gallery glass paints (Ruby Red, Amber/Gold, Clear/Crystal Clear)
- White paper (large enough to fit frame)
- Pencil and eraser
- Ruler
- Toothpick or skewer
- Masking tape
- Glass cleaner and lint-free cloth
Step 1: Design & Preparation
-
Prepare the canvas:
Disassemble your chosen picture frame. Remove the cardboard backing completely, as this piece is meant to be transparent. Clean the glass thoroughly on both sides with glass cleaner to remove any fingerprints or dust, ensuring a pristine surface for the paint to adhere to. -
Sketch the template:
Cut a piece of white paper to the exact size of your glass. Using your ruler, draw a border about 1 inch inside the paper edge to create your ‘frame within a frame.’ Then, sketch vertical lines to create three long rectangular panels, similar to the reference photo. Draw horizontal lines near the top and bottom to create the paneled grid structure. -
Add floral elements:
Sketch two main daisy-like flowers. Place one large flower in the upper left section and a second one in the lower right section to create balance. Give them rounded petals and circular centers. -
Draw foliage:
Connect the flowers with sweeping, curved stems that weave behind the grid lines. Add almond-shaped leaves branching off the stems, varying their angles to make the movement feel organic and natural. -
Secure the template:
Place your sketch on a flat work surface. Position the clean glass directly on top of the paper pattern. Use small pieces of masking tape at the corners to secure the glass to the paper so the pattern doesn’t shift while you work.
Step 2: Creating the Lead Lines
-
Outline the grid:
Shake your bottle of liquid leading gently to remove air bubbles. Holding the bottle like a pen but hovering slightly above the glass, trace the straight grid lines first. Let the liquid drape down onto the glass for a smoother line than if you dragged the tip directly on the surface. -
Trace organic shapes:
Carefully outline the flower petals, centers, stems, and leaves. When you reach an intersection with a grid line, stop and start your line cleanly so it looks like the flower is ‘in front’ or ‘behind’ the bar depending on your design preference. -
Clean up edges:
If you make a mistake or a line gets wobbly, don’t wipe it while wet. Wait for it to dry, then easily trim it away with a craft knife or razor blade. Allow all leading to dry for at least 8 hours or overnight until firm.
Lead Line Lift
Does your leading look flat? Let the first outlines dry completely, then go back and add a second layer of liquid leading directly on top to create a realistic raised, rounded profile.
Step 3: Painting & Texturing
-
Fill the petals:
Starting with the flower petals, squeeze Ruby Red gallery paint onto the glass. Fill the shape generously, pushing the paint right up against the lead lines to ensure there are no gaps where light could leak through. -
Add tonal variation:
While the petal paint is wet, I like to drop a tiny dot of a lighter red or orange near the tips and swirl it slightly with a toothpick. This creates a subtle gradient that mimics real stained glass variations. -
Color the leaves:
Use the Amber or Gold paint for the leaves and the flower centers. For the stems, you can use a diluted green or simply leave them as dark lead lines if they are thin enough. -
Pop bubbles instantly:
Keep your toothpick handy. As you pour paint, tiny air bubbles may appear. Pop them immediately before the paint begins to skin over for a smooth, professional finish. -
Create the textured background:
This step is crucial for the privacy-glass look. Apply Clear gallery paint to the empty background sections. Don’t smooth it out perfectly; instead, tap the wet paint repeatedly with the tip of the bottle or a stiff brush. -
Vary the background texture:
To mimic the patchwork of glass in the reference image, make the texture in the central panels different from the side panels. Use a circular swirling motion in the center and a vertical dabbing motion on the sides to catch the light differently. -
Final drying time:
Once all sections are filled, let the project dry flat in a dust-free area for 24 to 48 hours. The paints will look milky at first but will dry to a beautiful transparency. -
Frame and display:
Carefully place the glass back into the wooden frame. Secure it with the frame’s tabs or a bit of silicone glue if the backing clips no longer work without the cardboard. Place on a sunny windowsill to see the colors glow.
Cloudy Paint Fix
If paint looks milky after 48 hours, it’s likely applied too thick or the room is too humid. Move it to a warmer, drier spot and give it another day; it should eventually clear up.
Enjoy the interplay of light and color as the sun moves across your beautiful new faux stained glass artwork


Sunset Gradient With Silhouettes
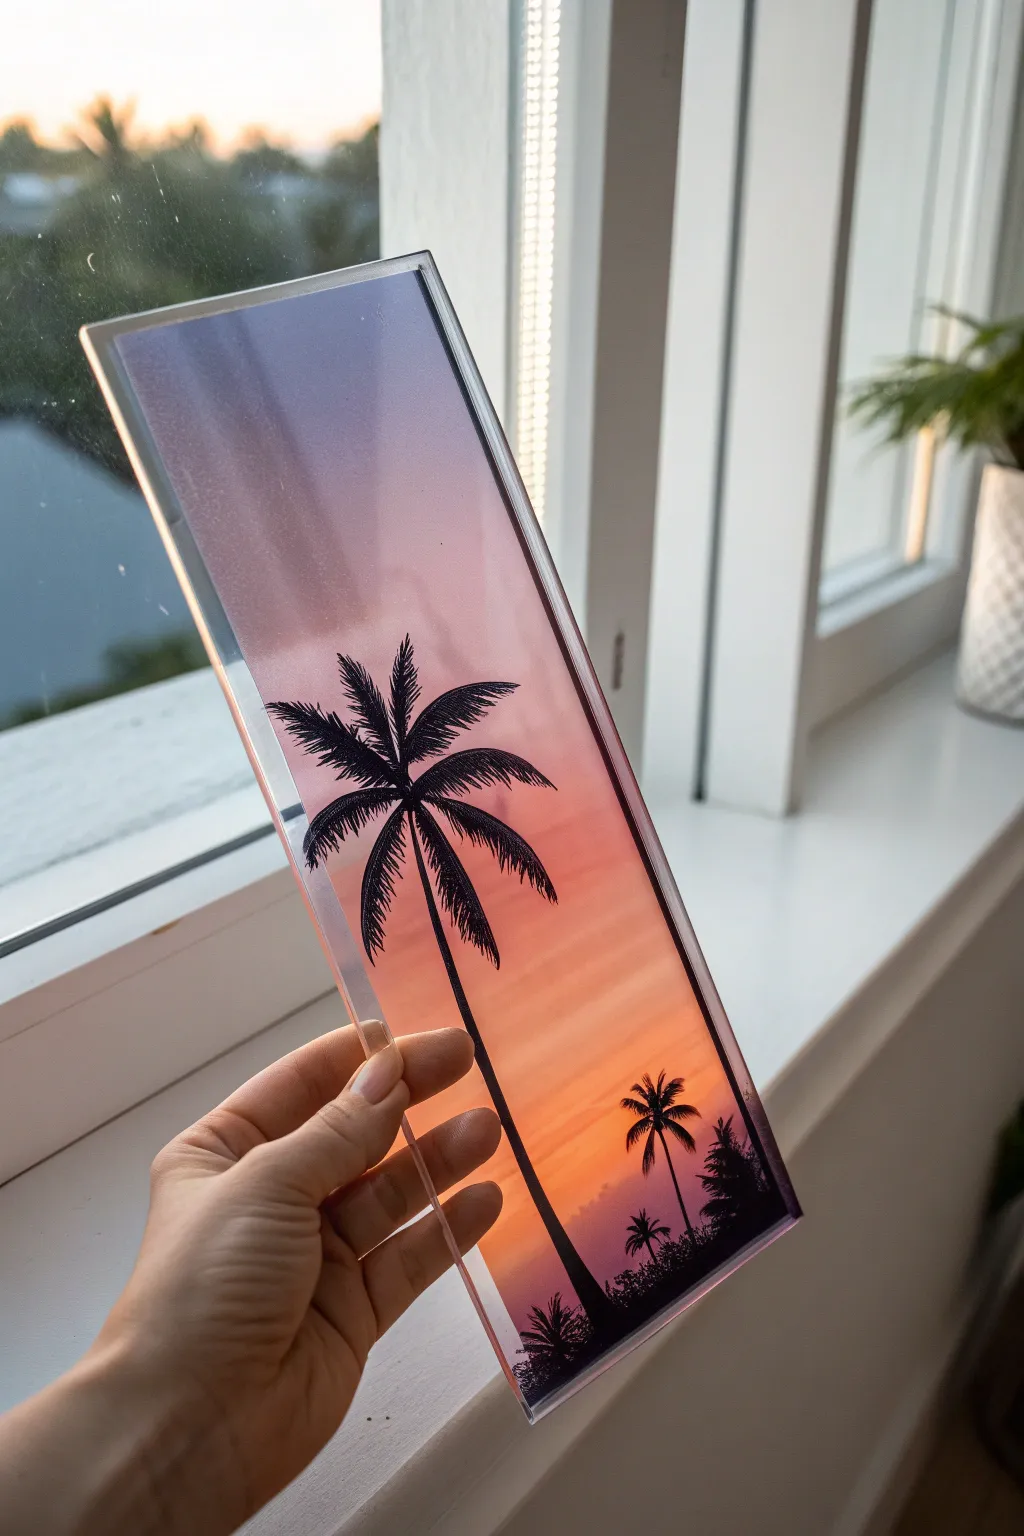
Capture the warmth of golden hour with this stunning sunset gradient painted directly onto a clear panel. By blending soft acrylics from purple to orange and layering stark black silhouettes on top, you’ll create a piece of art that glows beautifully when placed near a light source.
How-To Guide
Materials
- Rectangular clear acrylic sheet or glass pane (approx. 4×10 inches)
- Acrylic paints (Titanium White, Violet/Purple, Magenta, Orange, Black)
- Glazing medium or flow improver
- Flat shader brushes (medium and large)
- Fine liner detail brush (size 0 or 00)
- Sponge dabber or makeup sponge
- Palette paper or mixing plate
- Painter’s tape
- Glass cleaner and lint-free cloth
Step 1: Preparation & Gradient Base
-
Clean surface:
Begin by thoroughly cleaning your glass or acrylic panel with glass cleaner and a lint-free cloth. Any oils from your fingers will prevent the paint from adhering smoothly, so handle it by the edges from this point on. -
Tape edges:
Apply strips of painter’s tape along the very thin side edges of your panel. This keeps the sides clean and creates a crisp border if you decide to frame it later. -
Mix the colors:
Squeeze out your purple, magenta, orange, and white paints onto the palette. Mix a small amount of glazing medium into each color; this crucial step increases transparency and allows the colors to blend seamlessly on the slick surface. -
Apply the top purple:
Using a large flat brush or a makeup sponge, apply the violet paint to the top third of the glass. Use horizontal strokes to keep the application even, but don’t worry about full opacity yet. -
Blend the middle pink:
While the violet is still tacky, introduce the magenta below it. Use the sponge to gently dab the border between the purple and pink, blurring the line until the transition looks soft and foggy. -
Add the sunlight glow:
Paint the bottom third with your bright orange. I find that mixing a tiny dot of yellow or white into the center of the orange section creates a nice ‘sunny’ focal point. -
Smooth the gradient:
Use a clean, dry sponge or soft brush to lightly sweep over the entire wet surface from top to bottom. This knocks down brush strokes and creates that distinctive smooth, sunset-sky texture. -
Let it cure:
Allow this base gradient layer to dry completely. Acrylic on glass can take longer to cure than on canvas, so give it at least an hour or use a hair dryer on a cool setting.
Smoother Blending
If paint dries too fast while blending the sky, lightly mist the glass with water. This keeps acrylics workable longer for a perfect gradient.
Step 2: Painting the Silhouettes
-
Plan the trees:
Lightly sketch the position of your main palm tree trunks using a very pale pencil or a dry-erase marker on the *dry* paint. If you make a mistake, simply wipe it off with a damp cotton swab. -
Paint the main trunk:
Load your fine liner brush with pure black acrylic paint. Starting from the bottom, paint a long, slender line curving slightly upward to form the trunk of the large foreground palm tree. -
Add trunk thickness:
Go back over the bottom half of the trunk, slightly thickening it to give the tree weight and stability. The trunk should taper to a very fine point at the top. -
Create frond spines:
From the top of the trunk, paint 5-7 curved lines radiating outward like splashes of water. These are the central spines for your palm fronds. -
Add leaf details:
Using the very tip of your smallest brush, flick tiny, quick strokes downward from each spine. These strokes simulate the feathery leaves of the palm. -
Paint distant trees:
On the lower right side, add a smaller, thinner palm tree. Make this one less detailed and slightly shorter to create a sense of depth and perspective. -
Add the ground layer:
Stipple black paint along the very bottom edge of the glass to create a horizon line. Use an uneven, tapping motion to simulate bushes, grass, or distant island terrain. -
Integrate foliage:
Connect your large tree trunk to the ground layer by painting small grass blades or fern shapes at the base, ensuring the tree looks rooted rather than floating. -
Final touches:
Inspect your silhouettes against a light source. If any black areas look patchy or translucent, apply a second coat of black paint strictly to those shapes once the first layer is dry. -
Seal:
Once fully cured (wait 24 hours), spray a light coat of clear acrylic sealer over the painted side to protect your work from scratches.
Add Depth
Paint the sunset on the *back* of the glass and the black silhouettes on the *front*. This physical separation creates real 3D depth and shadows.
Place your finished piece on a windowsill to see the colors light up as the real sun goes down


Minimal Line Art Portrait
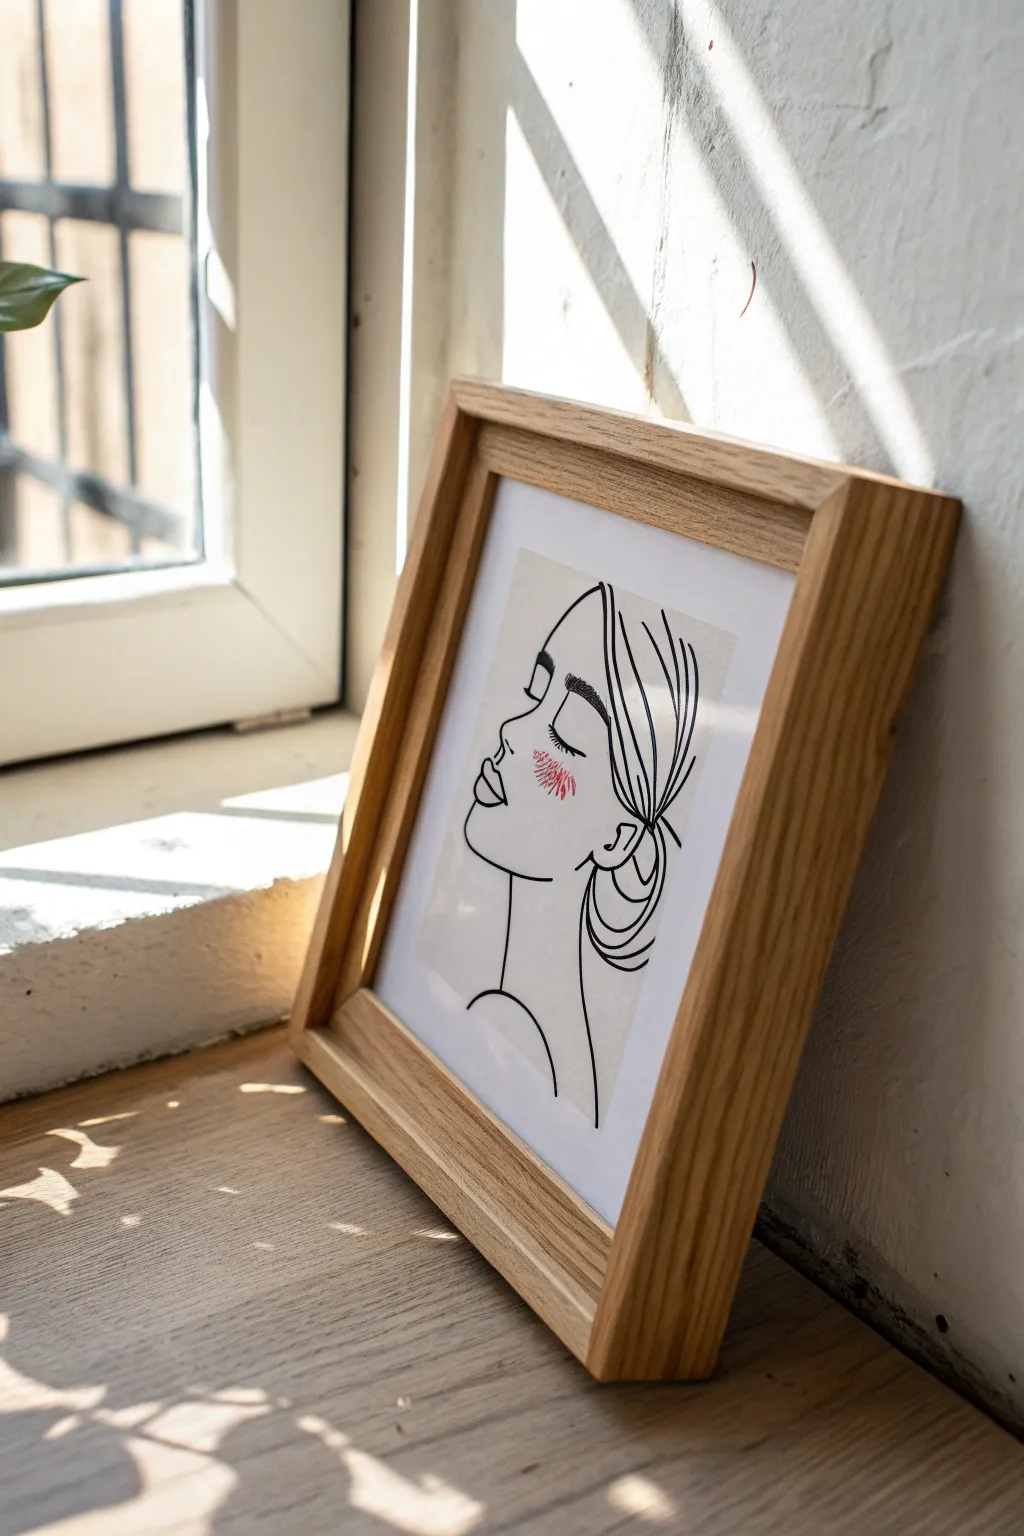
Capture serene beauty with this elegant line art portrait painted directly onto glass. The striking contrast of bold black strokes against a transparent floating background creates a modern, sophisticated piece perfect for sunny windowsills.
Step-by-Step Tutorial
Materials
- Floating glass frame (wood or gold finish)
- Black glass paint liner (or oil-based paint marker)
- Rubbing alcohol
- Cotton pads
- Printed line art template (profile view)
- Masking tape
- Red or pink acrylic paint (heavy body)
- Small stipple brush (or old toothbrush)
- Q-tips (for cleanup)
- Paper plate or palette
Step 1: Preparation & Tracing
-
Prepare your canvas:
Disassemble your floating frame carefully, removing the glass piece you intend to paint on. Clean both sides thoroughly with rubbing alcohol and a cotton pad to remove any fingerprints or oils that might repel the paint. -
Position the template:
Place your printed line art template on a flat surface. Lay the clean glass pane directly over it. Adjust the positioning until the portrait is centered exactly where you want it. -
Secure the layers:
Use small pieces of masking tape on the corners to secure the glass to the template and the table. This prevents any shifting while you trace, which is crucial for clean lines. -
Test your flow:
Before touching the glass, squeeze a small amount of your black glass paint liner onto a scrap paper to ensure the nozzle is clear and the flow is smooth.
Clear Flow
Keep a needle handy to unclog your liner tip instantly. If the paint bubbles, pop them gently with the needle tip before they dry.
Step 2: Creating the Lines
-
Start with facial features:
Begin tracing the most delicate areas first, like the closed eyelid, eyelashes, and the eyebrow. Keep your hand steady but fluid; dragging the liner tip slightly above the glass rather than scratching it against the surface helps flow. -
Outline the profile:
Move on to the main profile line—the forehead, nose, lips, and chin. Try to execute long curves in single, confident strokes rather than short, sketchy marks to maintain that sleek aesthetic. -
Add hair details:
Work on the messy bun and hair strands. Vary your pressure slightly here; thicker lines for the bun’s outline and thinner wisps for the loose strands add wonderful dimension. -
Draw the neck and shoulder:
Complete the linear structure by tracing the neck and the curve of the shoulder. Check your work against the light to ensure lines are opaque. -
Correct mistakes:
If a line goes astray, don’t panic. Use a damp Q-tip to wipe away wet paint instantly, or wait for it to fully dry and gently scrape it off with a craft knife. -
Let it cure:
Allow the black liner to dry completely according to the manufacturer’s instructions. I usually give it at least an hour to ensure I don’t smudge it during the next step.
Double Depth
Paint the black lines on the front of the glass and apply the red blush on the BACK side. This creates actual physical depth between the layers.
Step 3: Adding Texture & Assembly
-
Mix the blush tone:
Squeeze a tiny dot of red or pink acrylic paint onto your palette. If it’s too bright, mix in a speck of white or a warm beige to soften the color. -
Prepare the brush:
Take a rough stipple brush or an old, dry toothbrush and dip just the tips into the paint. Dab it repeatedly on a paper towel until almost no paint comes off—this is the dry-brush technique. -
Apply the blush:
Gently tap the brush onto the cheek area of the drawing. You want a distinct, textured look—like scratches or cross-hatching—rather than a solid blob of color. Build the intensity slowly. -
Dry the accent:
Let the red paint accent dry completely. Acrylics on glass can peel if handled too soon, so patience is key here. -
Clean the glass:
Once fully cured, hold the glass up to the light again. Use a clean cloth with a tiny bit of alcohol to carefully polish the unpainted areas, removing any dust or smudges. -
Reassemble the frame:
Place the painted glass back into the frame. If you are using a floating frame with two panes of glass, ensure the painted side is sandwiched safely inside to protect it from scratches. -
Final check:
Secure the frame backing or clips. Display your artwork near a light source to see the beautiful shadow play created by the floating lines.
Now you have a chic, modern art piece that plays with light and transparency


Wildflower Doodle Border
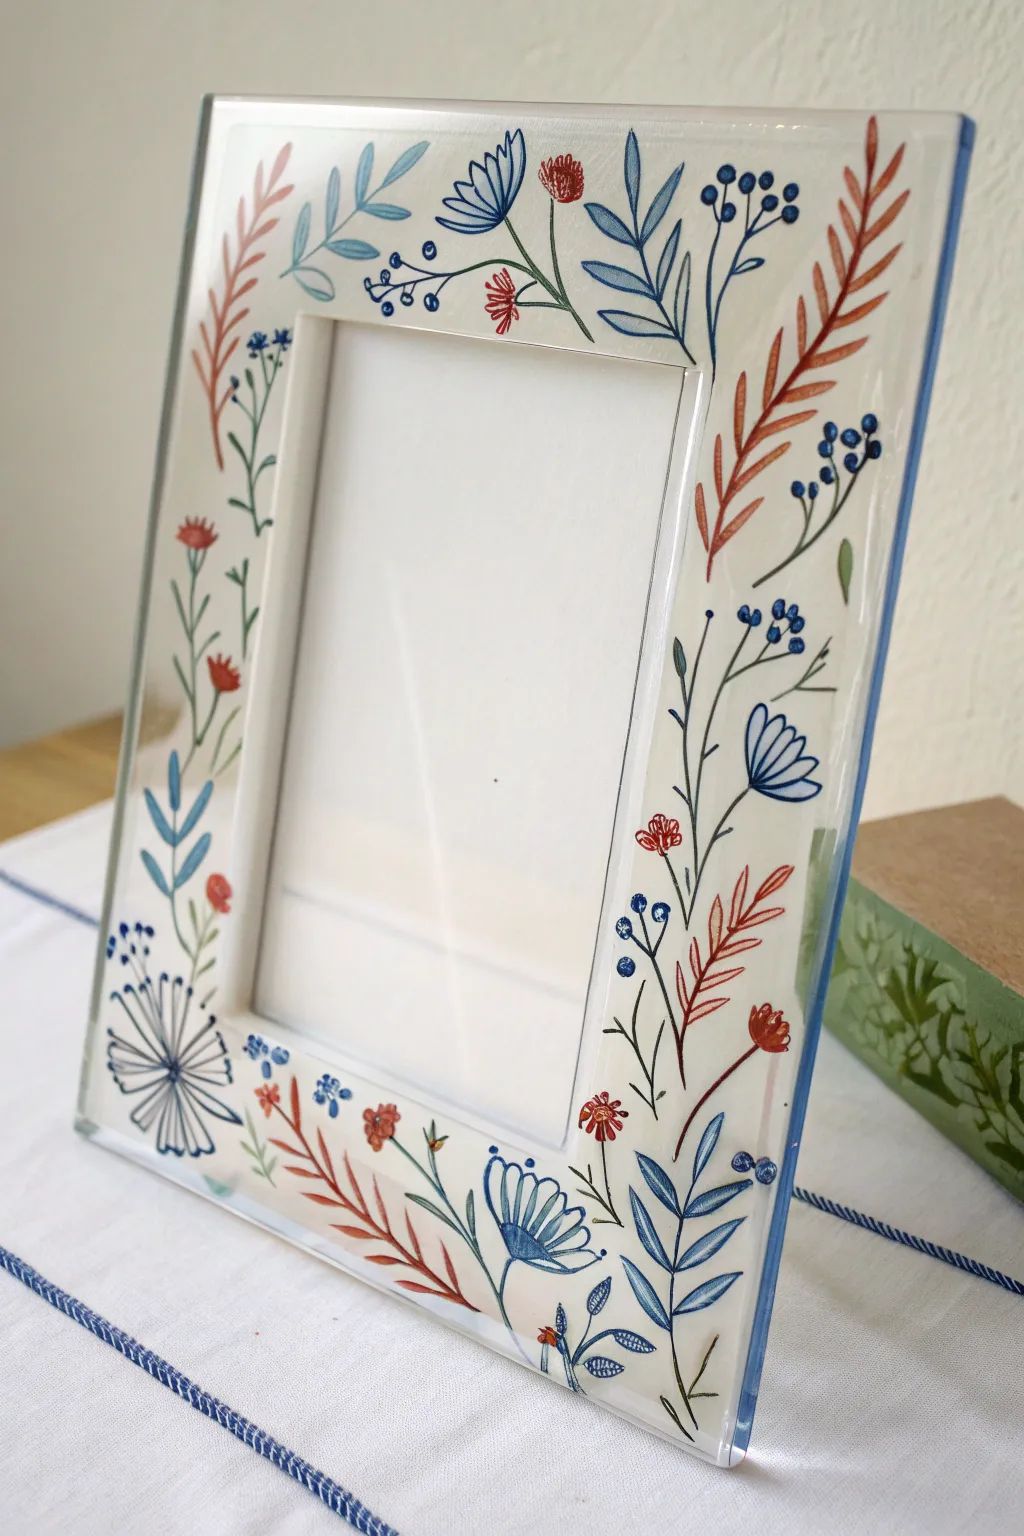
Transform a plain glass picture frame into a charming piece of decor with this delicate wildflower doodle design. Using a technique often called reverse glass painting, you’ll create crisp, botanical motifs that seem to float around your favorite photos.
Step-by-Step Guide
Materials
- Clear glass picture frame (flat surface preferred)
- Glass liner paint or fine-tip oil-based markers (dark blue or black)
- Glass paints or multi-surface acrylic enamels (opaque white, cornflower blue, rust orange, sage green)
- Small round synthetic brushes (sizes 0 and 2)
- Rubbing alcohol and paper towels
- Paper and pencil for sketching
- Tape
Step 1: Preparation & Design
-
Clean the surface:
Begin by removing the backing and any paper inserts from your frame. Wipe the entire glass surface, front and back, with rubbing alcohol to remove oils and fingerprints, which ensures the paint adheres properly. -
Create your template:
Trace the shape of your frame onto a piece of white paper. Inside this border, sketch out your wildflower design. Draw sprawling vines, small ferns, bell-shaped flowers, and tiny berries. Keep the design relatively loose and doodle-like rather than botanically perfect. -
Review the layout:
Check that your design flows nicely around the corners. It helps to vary the direction of the stems so they don’t all look uniform. Once you are happy with the sketch, cut the paper to size. -
Secure the template:
Tape your paper sketch securely to the *front* of the glass frame. Since we will be painting on the back (reverse painting) to protect the design, your template needs to be visible through the glass.
Fixing Smudges
If you make a mistake with the liner or paint, don’t panic. Use a cotton swab dipped in rubbing alcohol to quickly wipe away the error before it sets.
Step 2: Outlining the Botanicals
-
Flip and trace:
Turn the frame over so the back side is facing up. Using your fine-tip glass liner or oil-based marker, carefully trace the stems and leaf outlines from your template. -
Draw the main structures:
Focus on the long, sweeping lines of the stems first. I find it easier to pull the pen toward me for smoother curves. Don’t worry about filling in color yet; just get the skeleton of the plants down. -
Add floral details:
Outline the petals of the bell flowers and the small circular clusters of berries. Keep your lines thin and delicate to match the aesthetic of the original clear glass painting. -
Let the lines cure:
Allow your outline work to dry completely. If you are using a relief outliner paste, this might take an hour or two. If using a marker, give it at least 15-20 minutes so it doesn’t smudge during the painting phase.
Add Metallic Flair
Swap the white background layer for a metallic gold or silver paint. It creates a stunning, shimmering backdrop that elevates the simple floral doodles.
Step 3: Adding Color
-
Paint the leaves:
Dip your size 0 brush into the sage green paint. Carefully fill in the small leaves on the vines. You don’t need a heavy coat; a semi-translucent look adds to the watercolor effect. -
Add blue accents:
Using the cornflower blue, color in the larger, broad leaves and the bell-shaped flowers. For the tiny blue berries, just a small dot of paint from the tip of your brush is sufficient. -
Incorporate warm tones:
Switch to your rust orange paint. Fill in the fern-like fronds and the small accent flowers. This warm color contrasts beautifully with the cool blues and provides visual balance. -
Detail the flower, centers:
If your design includes open flower heads, you can add tiny dots of contrasting colors in the centers once the base petal color is dry. -
Dry between colors:
Let these colors dry to the touch. This prevents accidental blending if your hand brushes against a wet area while working on a different section.
Step 4: The Background Layer
-
Prepare the background paint:
This step is crucial for making the colors pop. Load a slightly larger brush (size 2) with opaque white glass paint. You want a consistency that covers well without being globby. -
Apply the white backing:
Paint a layer of white *over* the entire painted design area on the reverse side of the glass. Because you are looking through the front of the glass, this white layer will sit behind your flowers and make them opaque. -
Feather the edges:
When applying the white background, you can gently feather the inner edge where the clear glass meets the painted border, or create a sharp rectangular line for a crisp mat-like effect. -
Final drying:
Allow the project to cure fully according to your paint manufacturer’s instructions. Some glass paints require baking in a home oven for durability, while others just need 21 days of air curing. -
Reassemble:
Remove the paper template from the front, clean any smudges on the unpainted side, and reassemble your frame backing.
Place your favorite photo inside this custom frame to complete a truly personalized display piece
BRUSH GUIDE
The Right Brush for Every Stroke
From clean lines to bold texture — master brush choice, stroke control, and essential techniques.
Explore the Full Guide
Cute Fruit Drinking Glasses
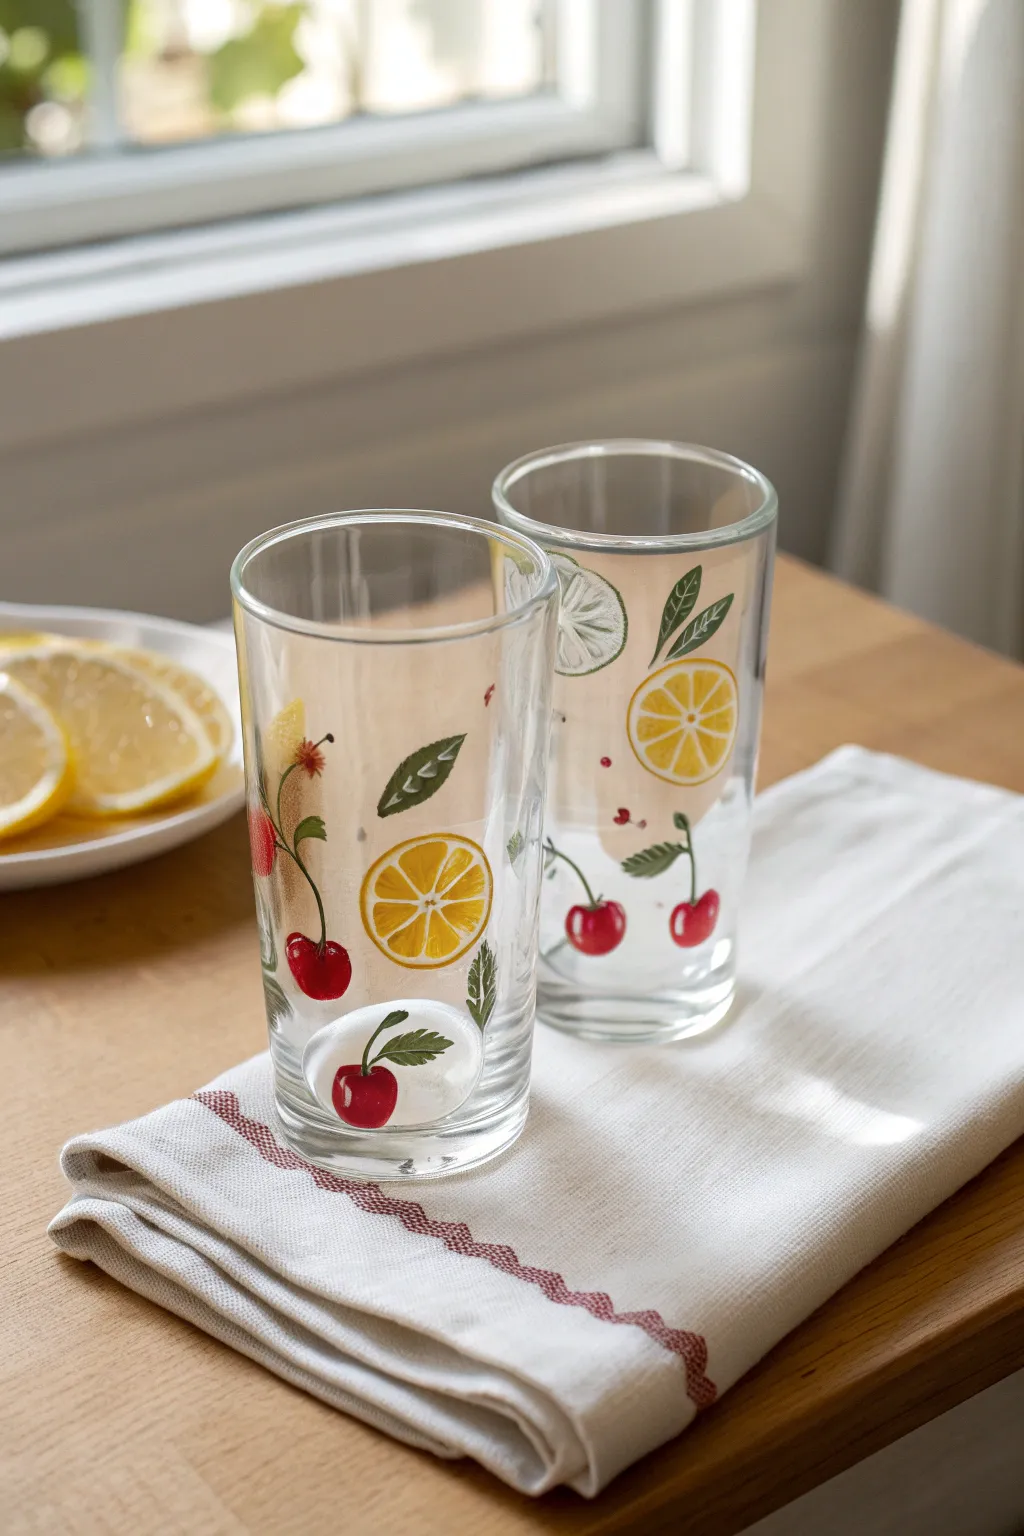
Transform ordinary glassware into charming summer staples with these hand-painted fruit illustrations. The playful combination of vibrant lemon wheels and classic red cherries adds a refreshing pop of color to any drink.
Step-by-Step Tutorial
Materials
- Two clear, straight-sided drinking glasses
- Rubbing alcohol and cotton pads
- Enamel glass paints (opaque white, sunshine yellow, bright red, deep green)
- Small round paintbrushes (sizes 0 and 2)
- Fine liner brush (size 00)
- Palette or small dish for mixing
- Paper towels
- Oven (for curing, if required by paint brand)
Step 1: Preparation & Base Designs
-
Clean the surface:
Thoroughly wipe down the exterior of your glasses with rubbing alcohol. This removes oils and fingerprints that prevent paint adhesion, ensuring your design lasts. -
Plan the layout:
Visualize where your fruit will sit. You want a scattered, organic look, so alternate between placing cherries and lemon slices at different heights around the glass. -
Paint the lemon bases:
Using a size 2 brush and yellow paint, create circular shapes for the lemons. Don’t fill them in solid yet; just establish the outer rim and the general segmented shape inside. -
Add the cherry shapes:
Switch to your red paint. Paint small, slightly flattened circles for the cherries. Group some in pairs and leave others solitary for visual variety. -
Let the base layer dry:
Allow these initial shapes to dry for about 15-20 minutes. Glass paint can be slippery, so letting the first layer tack up helps when adding details on top.
Step 2: Detailing the Lemons
-
Define the segments:
Mix a tiny bit of white with your yellow to create a lighter shade. Carefully paint the triangular fruit segments inside your yellow circles, leaving thin gaps for the pith. -
Paint the pith lines:
Using your fine liner brush and pure white paint, draw the thin lines separating the fruit segments and a thin ring just inside the yellow peel. -
Add shading depth:
On the bottom edge of the yellow peel, add a very subtle line of slightly darker yellow (or orange-yellow) to give the slice a bit of dimension. -
Create highlights:
I like to add tiny, transparent dashes of white over the juicy part of the lemon segments to make them look wet and fresh. -
Paint the background slices:
If you want the effect of a lime or unripe lemon, paint a circle using a very pale, diluted green or white wash for a translucent look, adding darker green peel details.
Fixing drips
If paint drips on the curved glass, don’t wipe it immediately. Wait for it to dry slightly, then use a craft knife to scrape the mistake off cleanly.
Step 3: Stems & Finishing Touches
-
Connect the stems:
Using the size 0 brush and deep green paint, draw thin, curved lines extending from the tops of your cherries. Join the paired cherries at a central point. -
Paint the leaves:
Add small, almond-shaped leaves attached to the stems. Press down slightly at the base of the leaf and lift up to create a pointed tip. -
Detail the leaf veins:
Once the green leaves are dry, use your finest liner brush and a lighter green or white to paint tiny central veins and chevron patterns on the leaves. -
Highlight the cherries:
Dip the tip of a toothpick or liner brush into white paint and add a small, curved reflection mark on the upper right side of each red cherry. This makes them pop. -
Clean up edges:
If any paint went astray, use a damp cotton swab or toothpick to gently scrape away mistakes before the paint fully cures. -
Cure the paint:
Follow the instructions on your specific paint bottle. Most glass paints require either air-drying for 21 days or baking in a cool oven that heats up to 350°F to become dishwasher safe.
Level Up: Texture
Mix a small amount of clear gloss medium into your fruit segments. This builds actual physical texture, making the lemons feel embossed and juicy.
Now enjoy sipping your favorite cold drinks from your new custom glassware
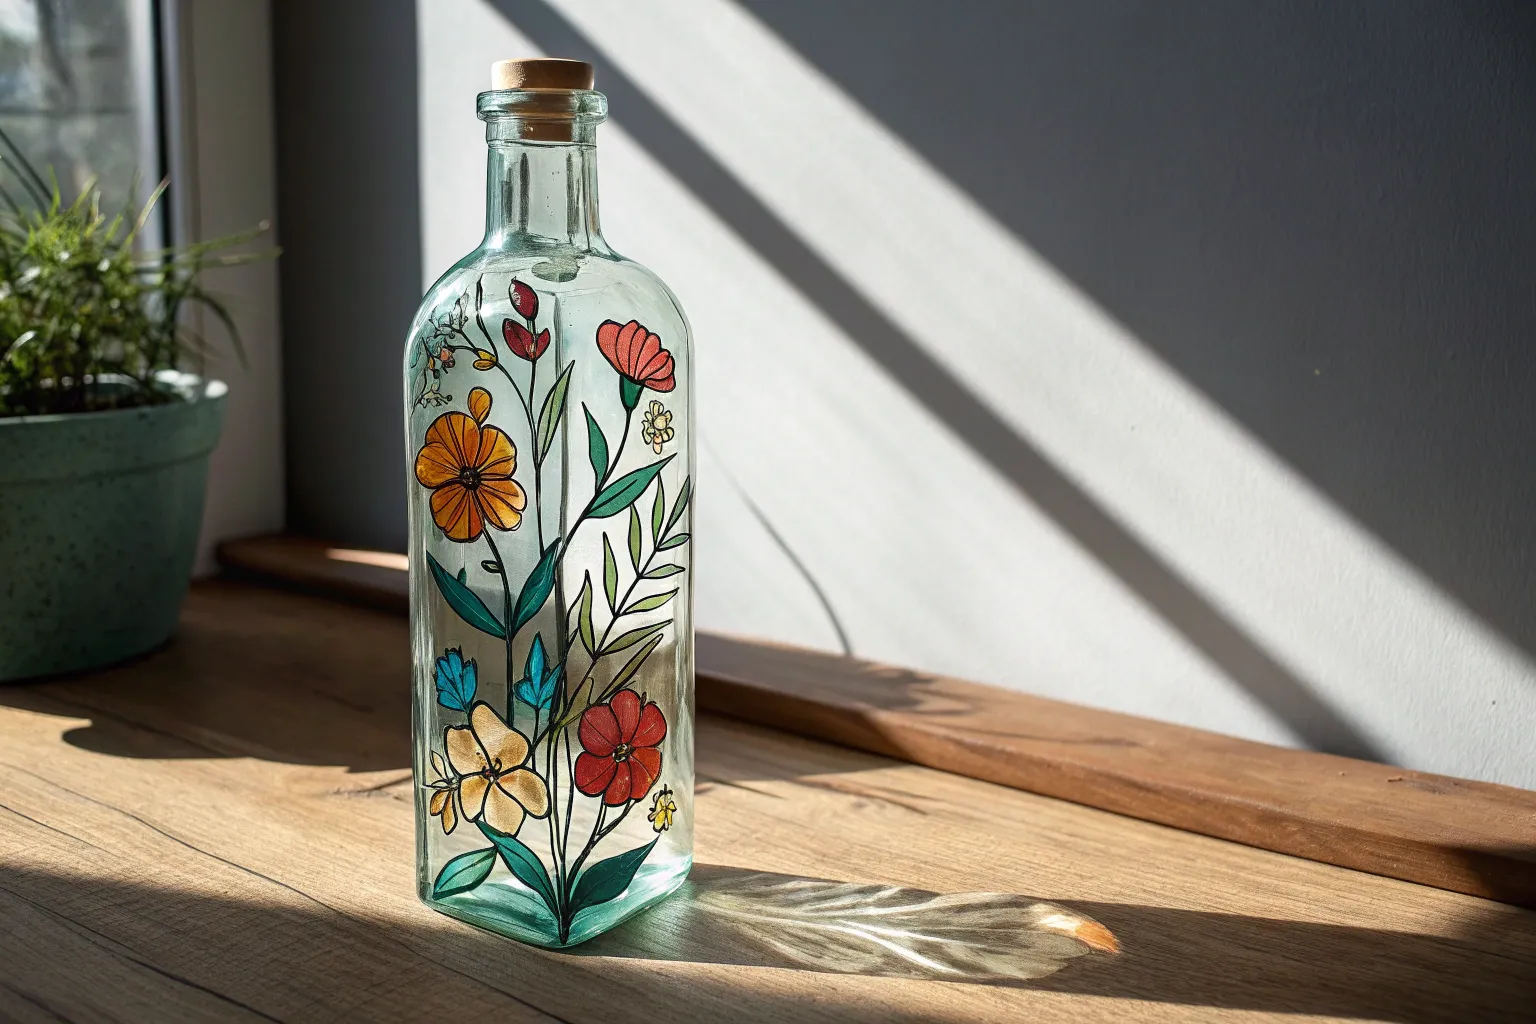
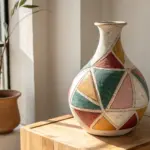
Color-Block Modern Vase
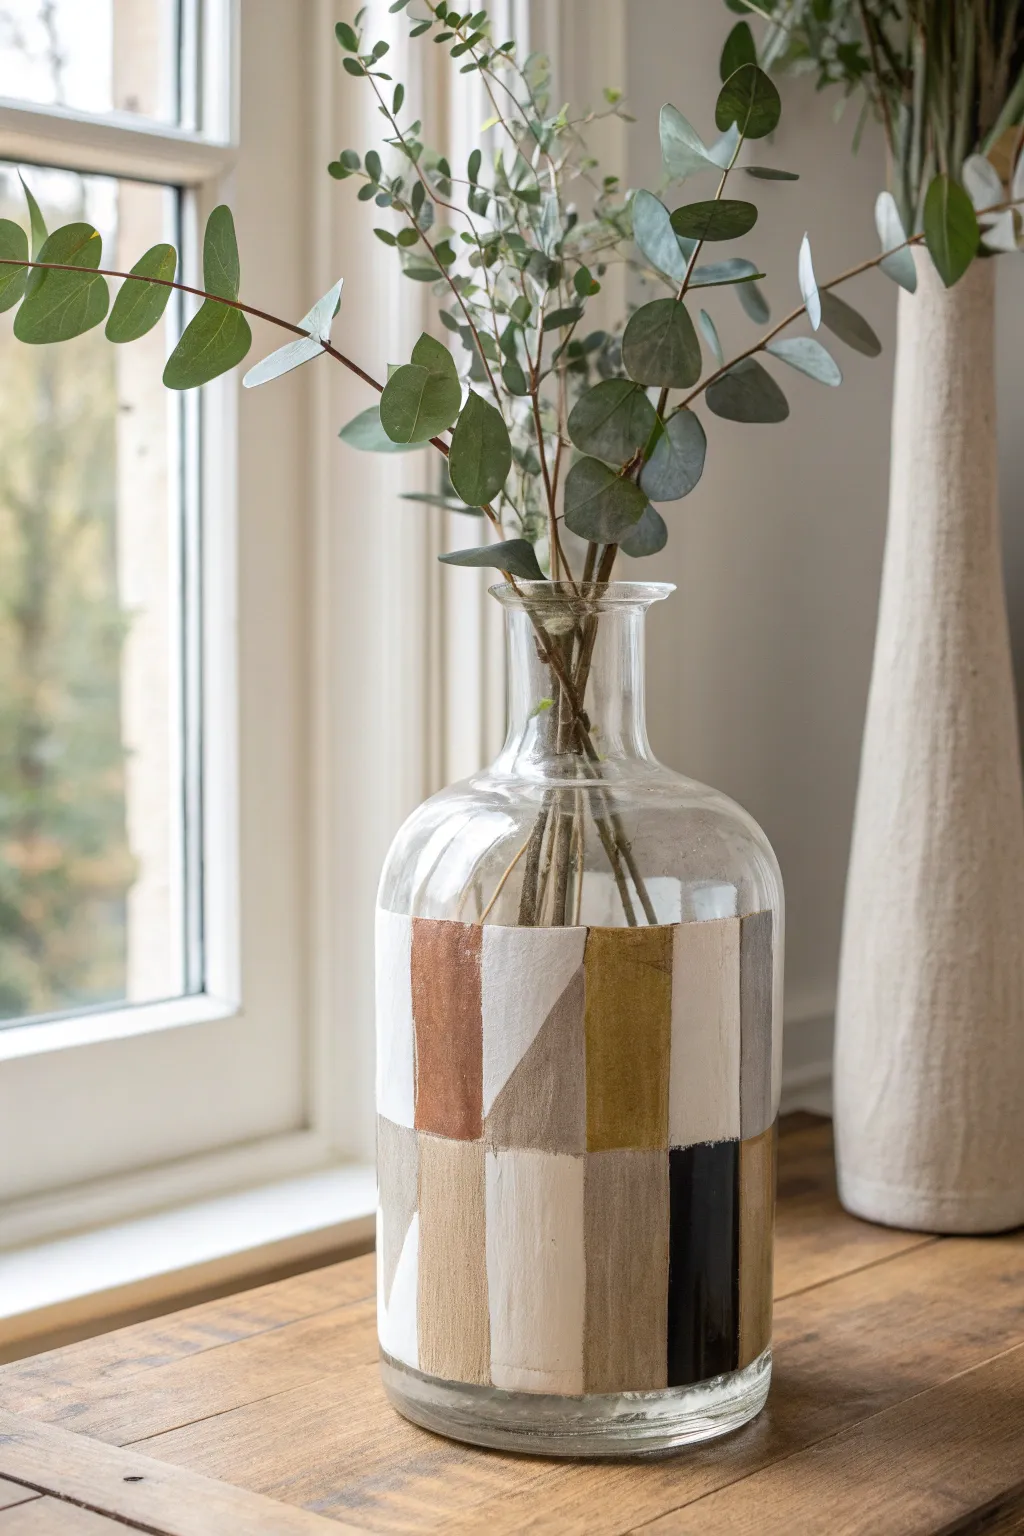
Transform a plain glass vessel into a striking piece of modern decor with this geometric painting project. Using earthy, muted tones in a color-block pattern creates a sophisticated, textured look that perfectly complements fresh greenery.
Detailed Instructions
Materials
- Clear glass bottle vase (medium to large)
- Rubbing alcohol
- Cotton pads or paper towel
- Multi-surface acrylic paints or glass paints (colors: rust, cream, mustard yellow, beige, black, taupe)
- Flat shader brushes (medium width, approx 1/2 inch)
- Painter’s tape or masking tape (optional but helpful for straight lines)
- Palette or paper plate
- Clear matte sealant spray (optional)
- Cup of water
- Rag or paper towel
Step 1: Cleaning & Preparation
-
Clean the surface:
Begin by thoroughly cleaning the exterior of your glass vase. Glass often carries oils from fingerprints that repel paint. -
Degrease with alcohol:
Soak a cotton pad with rubbing alcohol and wipe down the entire area where you intend to paint. Let it air dry completely for a few seconds. -
Map out the design:
Visualize where your color block section will sit. This design covers roughly the bottom two-thirds of the straight body of the bottle, leaving the neck and shoulder clear. -
Tape guides (optional):
If you struggle with freehand lines, apply a strip of painter’s tape horizontally around the top edge of your designated painting area to ensure a crisp upper border.
Clean Lines Pro-Tip
To get perfectly straight edges between color blocks without painter’s tape, a flat shader brush is essential. Press the bristles flat and pull downward in one confident stroke.
Step 2: Painting the Base Layer
-
Pour your palette:
Dispense quarter-sized amounts of your chosen earthy colors onto your palette: rust, cream, mustard, beige, and black. -
Paint the first rectangle:
Starting with the rust color, load your flat brush and paint a vertical rectangular shape. Keep your brush strokes vertical to maintain the texture seen in the reference. -
Add a contrasting shape:
Switch to a clean brush or wash yours thoroughly. Beside the rust, paint a larger block of cream or off-white. You can paint right up to the wet edge of the rust, or leave a hairline gap if you prefer. -
Create geometric variety:
Don’t just paint vertical stripes. For the next section, paint a triangle or a diagonal line with a taupe or grey tone to break up the vertical rhythm. -
Fill the mustard section:
Add a block of mustard yellow. Notice in the reference how the colors feel “stacked”—some shapes sit lower, others reach higher. I like to vary the heights slightly within the main band. -
Add the dark anchor:
Paint a narrow vertical strip of black or very dark brown. This high-contrast element grounds the lighter colors and adds modern definition. -
Continue around the bottle:
Keep working your way around the circumference, alternating colors so similar tones don’t touch. Aim for a mix of wide and narrow blocks.
Level Up: Baking
If using gloss enamels or specific glass paints, check the label for baking instructions. Baking the finished piece in a home oven can make the paint dishwasher safe.
Step 3: Layering & Texture
-
Let the first coat dry:
Allow the vase to sit for about 20-30 minutes until the paint is dry to the touch. The first coat on glass is often streaky; this is normal. -
Apply the second coat:
Go over each color block again with fresh paint. This builds opacity and creates that rich, matte texture. Use consistent vertical strokes. -
Refine the edges:
While applying the second coat, carefully tidy up the edges where colors meet. You want them to look deliberate and crisp. -
Add texture detail:
If the finish looks too smooth, you can stipple the wet paint slightly with the tip of a dry brush to give it an earthenware or ceramic feel. -
Check opacity:
Hold the vase up to a light source. If significant light shines through the painted areas, dab on a third coat in those specific spots.
Step 4: Finishing Touches
-
Remove tape:
If you used a guide tape for the top edge, peel it off carefully while the final coat is still slightly tacky to avoid pulling up dried paint chips. -
Clean up stray marks:
Use a toothpick or a damp q-tip to scrape away any accidental smudges on the unpainted glass section or the bottom rim. -
Seal (optional):
For extra durability, especially if you plan to gently wipe the vase later, apply a light mist of clear matte sealant over the painted area. -
Full cure time:
Let the vase cure for at least 24 hours before handling it extensively or adding water and flowers.
Place your favorite stems inside to see how the natural greens pop against your new geometric artwork

PENCIL GUIDE
Understanding Pencil Grades from H to B
From first sketch to finished drawing — learn pencil grades, line control, and shading techniques.
Explore the Full Guide
Soft Frosted Glass Panels
Transform a plain glass pane into a serene piece of décor featuring delicate leaf tendrils floating on a soft, milky white background. This project combines the elegance of reverse glass painting with a modern, frosted finish for a light and airy aesthetic.
Step-by-Step Tutorial
Materials
- Tall rectangular picture frame (wood or light oak finish)
- Glass cleaner and lint-free cloth
- Multi-surface acrylic paints (Sage Green, Olive Green, White)
- Frosted glass spray or white acrylic paint & sponge
- Fine liner brush (size 0 or 00)
- Small round brush (size 2)
- Palette for mixing
- Printed leaf pattern template (optional)
- Masking tape
Step 1: Preparation & Planning
-
Disassemble the frame:
Carefully remove the backing board and take out the glass pane from your wooden frame. Set the frame aside for now. -
Clean the surface:
Wipe down both sides of the glass thoroughly using glass cleaner and a lint-free cloth. Any oil or fingerprints will prevent the paint from adhering properly. -
Orientation check:
Decide which side will be the ‘front.’ You will be painting on the *back* side of the glass (reverse glass painting style) so the front remains smooth and glossy. -
Prepare your template:
If you aren’t confident freehanding, print a pattern of repeating leaf sprigs or draw one on paper. Tape this pattern to the *front* of the glass providing a guide to trace on the back.
Clean Lines Secret
If your leaf edges look messy from the back, don’t worry. Using a toothpick to gently scrape away excess paint while it’s semi-dry creates crisp, perfect points.
Step 2: Painting the Botanical Motif
-
Mix your greens:
On your palette, create two shades of green. Keep one purely olive and mix a second batch with a tiny drop of white for a softer sage tone. This variation adds depth to the leaves. -
paint the stems:
Using your fine liner brush and the darker olive mix, gently paint the thin, curving stems first. Use a light hand to keep the lines delicate rather than thick. -
Add the leaves:
Switch to the small round brush. Press the belly of the brush down and lift up quickly to create teardrop-shaped leaves along the stems. -
Vary the leaf angles:
Ensure the leaves point in slightly different directions and vary in size to mimic natural growth. I like to alternate between the sage and olive tones for visual interest. -
Add decorative dots:
Use the tip of your smallest brush or a toothpick to place tiny green dots randomly in the empty spaces between the branches, adding whimsical texture. -
Inspect your work:
Flip the glass over carefully to check your work from the front. Clean up any smudges with a damp cotton swab while the paint is still wet. -
Allow to cure:
Let the green paint dry completely. Since we are layering a background over it, the leaves must be fully hardened, or they will smear. Wait at least one hour.
Step 3: Creating the Frosted Effect
-
Choose your frosting method:
You can either use a frosted glass spray for a translucent look or sponge on white acrylic paint for a more opaque, creamy background. The example image suggests an opaque white backing. -
Apply the first background layer:
If using paint, dab a sponge into white acrylic and gently bounce it over the dried leaves on the *back* of the glass. Use an up-and-down motion, not wiping. -
Check for coverage:
Hold the glass up to the light. The first coat will look streaky. Let it dry until it’s no longer cool to the touch. -
Apply subsequent layers:
Repeat the sponge dabbing process two or three more times until you can no longer see through the glass, creating a solid white backing that makes the green leaves pop. -
Final drying time:
Allow the background paint to cure overnight to ensure it doesn’t scratch when reassembling.
Paint Lifting?
If the white background pulls up the green leaves, you are sponging too hard. Use a light dabbing motion and ensure the green layer has cured for at least 2 hours.
Step 4: Assembly
-
Clean the front:
Give the unpainted front side of the glass a final polish to remove any template tape residue or fingerprints. -
Reframe the art:
Place the glass back into the frame with the unpainted side facing out. Secure the backing board in place.
Place your new botanical artwork on a sunny windowsill where the light can enhance its delicate features
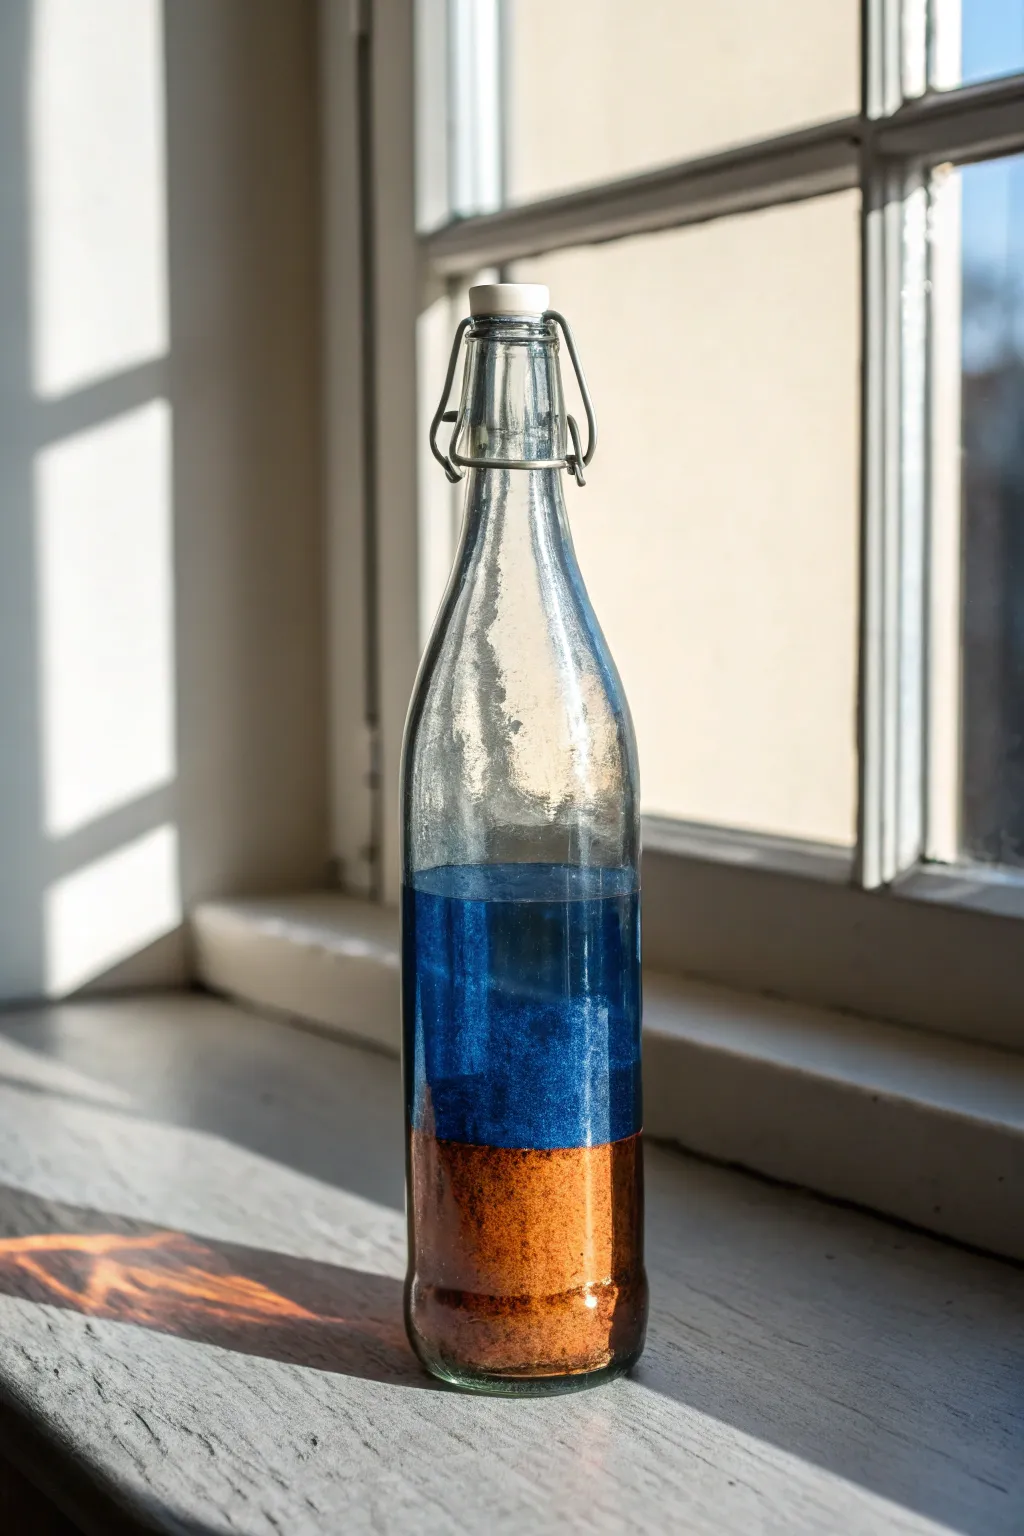
Pastel Milk-Glass Look
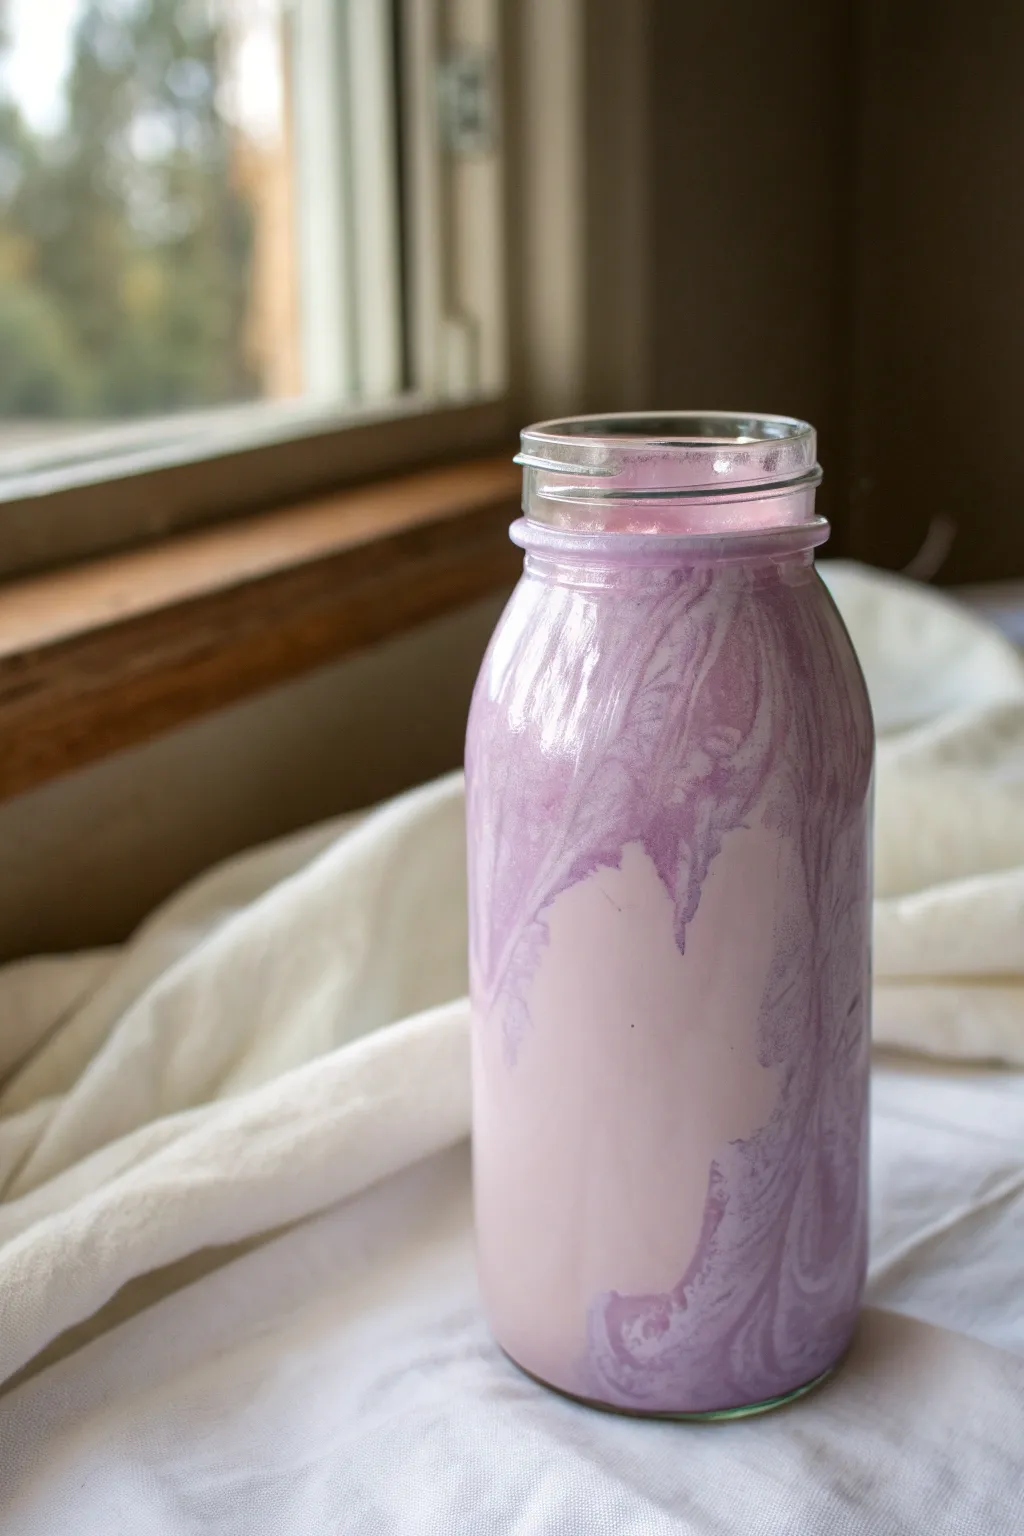
Transform a simple glass jar into a soft, dreamlike piece of decor with this internal marbling technique. The result resembles vintage milk glass with swirls of pastel lavender, perfect for holding dried flowers or standing alone as an accent piece.
How-To Guide
Materials
- Clean glass milk bottle or jar
- Rubbing alcohol
- Pastel pink acrylic paint
- Lavender or light purple acrylic paint
- Textile medium or marbling medium (optional, for flow)
- Small disposable cups
- Paper towels
- Water
Step 1: Preparation
-
Clean the Glass:
Wash your glass bottle thoroughly with warm, soapy water to remove any grease or sticker residue. Dry it completely. -
Sanitize the Surface:
Wipe the inside of the jar with rubbing alcohol on a paper towel. This step is crucial because it removes hidden oils that might prevent the paint from sticking to the smooth glass. -
Prepare Your Workspace:
Lay down some protective paper or an old cloth, as this pouring process can get a little messy once we start tipping the jar.
Paint sliding off?
If the paint streaks or slides off the glass too quickly, your mixture is too watery. Add more acrylic paint to thicken it up, wipe the jar, and try the pour again.
Step 2: Mixing the Paints
-
Dilute the Pink:
In a small cup, mix your pastel pink acrylic paint with a very small amount of water. You want a consistency similar to heavy cream—pourable but not watery. -
Dilute the Lavender:
Repeat the process with your lavender paint. If you have a textile or pouring medium, add a few drops here to help the paint slide more smoothly without cracking later. -
Create a Swirl Mix:
Pour the lavender paint into the cup with the pink paint, but do not stir them together. We want distinct ribbons of color, not a new blended shade.
Add some shimmer
Mix a small amount of pearlizing medium or fine mica powder into the lavender paint before pouring. It gives the dried jar a stunning iridescent milk-glass sheen.
Step 3: Pouring and Swirling
-
Initial Pour:
Carefully pour the two-tone paint mixture into the bottom of your glass bottle. You don’t need to fill the jar; just cover the bottom with a generous pool. -
Begin the Tilt:
Slowly tilt the bottle to one side, letting the paint creep up the glass wall. I like to rotate my wrist slowly to encourage the paint to travel in organic waves. -
Create the Peaks:
Tip the bottle upside down briefly over a waste cup to let excess paint run down towards the neck, creating those dramatic, dripping peaks seen in the reference photo. -
Control the flow:
Rotate the bottle as the paint flows downward to ensure the swirls wrap around the curves. Watch closely to capture that marbling effect where the purple cuts through the pink. -
Check Coverage:
If the paint isn’t covering enough area, you can add a little more paint directly onto the bare glass spots inside and tilt again to merge the sections. -
Drain Excess:
Once you are happy with the pattern, turn the bottle upside down and rest it on a few stacked paper towels or a drying rack. This allows extra paint to drip out so it doesn’t pool and crack at the bottom.
Step 4: Drying and Curing
-
Initial Drying:
Leave the bottle upside down for at least 30 to 45 minutes. Periodically move it to a clean spot on the paper towel so the rim doesn’t get stuck. -
Flip and Dry:
Turn the bottle right-side up. Wipe away any paint that may have collected on the very rim of the jar for a clean finish. -
Air Cure:
Let the jar sit in a dry, warm place for at least 24-48 hours. Acrylic inside glass takes longer to dry because air circulation is limited. -
Bake (Optional):
If you used glass-specific enamel paints, check the bottle instructions. You might be able to bake the piece in a low-heat oven to make the finish more durable.
Enjoy the soft, calming vibes your new pastel creation brings to your space.


Sea-Glass Bottle Makeover
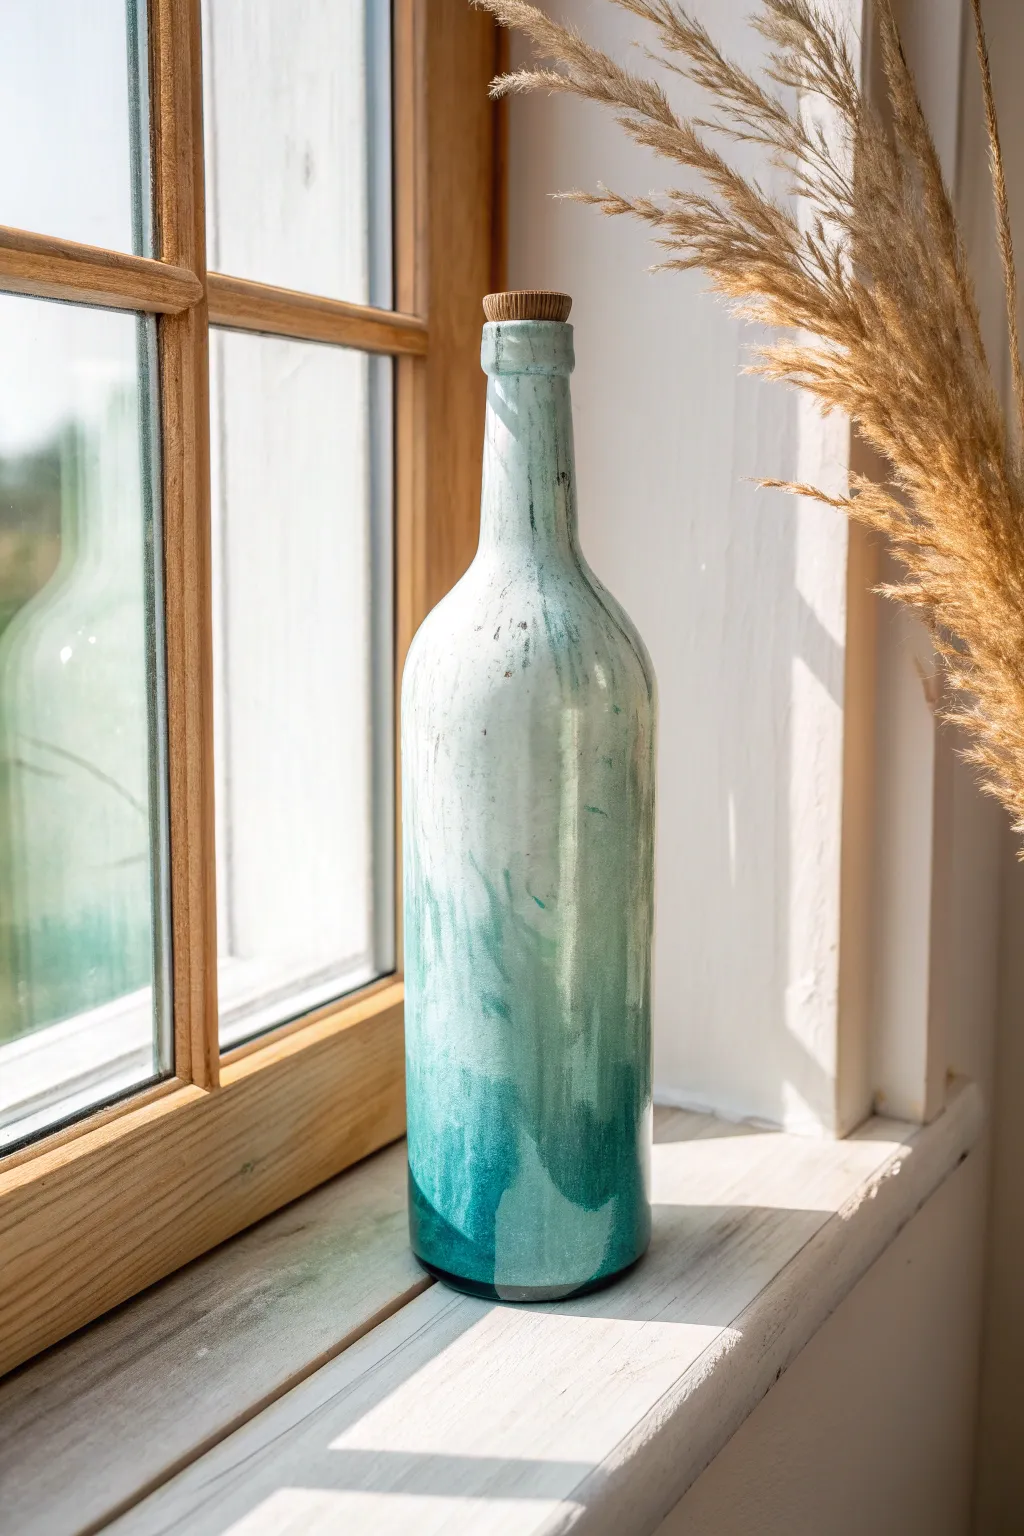
Transform a plain glass bottle into a sun-washed, coastal treasure with this easy makeover. The look mimics sea glass found on a beach, featuring a breezy gradient from deep ocean teal to a soft, frothy white.
Step-by-Step
Materials
- Empty wine or glass bottle (labels removed)
- Rubbing alcohol
- Cotton pads
- White acrylic paint or chalk paint
- Teal or turquoise acrylic paint
- Make-up sponge wedges
- Small sea sponge (optional for texture)
- Matte spray sealer or Mod Podge (matte)
- Small cup for mixing
- Paper plate or palette
- Cork stopper
Step 1: Preparation & Base Coat
-
Clean the surface:
Begin by thoroughly cleaning your glass bottle with warm soapy water to remove any label residue. Dry it completely. -
Degrease the glass:
Wipe the entire exterior with rubbing alcohol on a cotton pad. This removes oils and fingerprints, ensuring the paint adheres properly. -
Prime with white:
Pour a small amount of white chalk paint or acrylic paint onto your palette. Using a make-up sponge, dab a very thin, even layer of white over the entire bottle. -
Let the base dry:
Allow this first coat to dry completely. It doesn’t need to be fully opaque yet; it just gives the colored layers something to grab onto.
Paint sliding off?
Glass is slippery. If paint slides around instead of sticking, your coat is too thick. Let it dry completely, then apply multiple ultra-thin layers by dabbing, not brushing.
Step 2: Creating the Ombré Gradient
-
Prepare your palette:
Squeeze out a generous amount of teal paint and white paint on separate sides of your palette. In the middle, mix a little teal with a lot of white to create a soft pastel middle tone. -
Apply the darkest base:
Load a clean sponge with the pure teal paint. Start dabbing at the very bottom of the bottle, creating a solid band of color about 2-3 inches high. -
Work upwards:
Without cleaning the sponge, dip slightly into the middle pastel mix. Dab this directly above the teal section, overlapping the wet edges to start blending the transition. -
Transition to white:
As you move up past the middle of the bottle, switch to a fresh sponge loaded with mostly white paint. Dab this around the neck and shoulders. -
Blend the wet paint:
Go back to the transition zones while the paint is still tacky. I like to use a slightly damp, clean sponge to tap over the line where colors meet, softening the gradient. -
Add texture:
To achieve that weathered look, use a sea sponge or a crumpled piece of paper towel to lightly dab and lift tiny spots of wet paint, revealing hints of the base layer underneath.
Step 3: Refining the Weathered Look
-
Dry partially:
Let the bottle sit for about 10-15 minutes until it is dry to the touch but not fully cured. -
Add vertical streaks:
Take a nearly dry brush with a tiny bit of teal paint. Lightly drag it vertically from the dark base up into the white section to simulate water streaks. -
Highlight the neck:
Dab pure white paint heavily around the very lip and neck of the bottle to create a bright, bleached effect at the top. -
Create distressing:
Once fully dry, use a fine-grit sandpaper block to gently scuff random areas, especially raised seams or edges, to make it look worn by waves. -
Check for opacity:
Hold the bottle up to the light. If it’s too transparent, dab a second layer of your gradient colors in specific patchy areas to build depth.
Add a frosted effect
Mix baking soda into your white paint before applying the top layer. This adds a gritty, salty texture that looks incredibly realistic and feels just like real sea glass.
Step 4: Sealing & Finishing
-
Apply sealer:
To protect your paint and lock in the matte, sea-glass finish, spray the entirely dry bottle with a clear matte sealant. -
Insert the cork:
Finish the look by pressing a simple cork stopper into the neck. -
Style your bottle:
Place the bottle on a windowsill where the light can catch the texture, effectively mimicking the look of aged sea glass.
Enjoy the calming vibes your new coastal decor brings to the room
Vintage Mercury-Glass Speckle
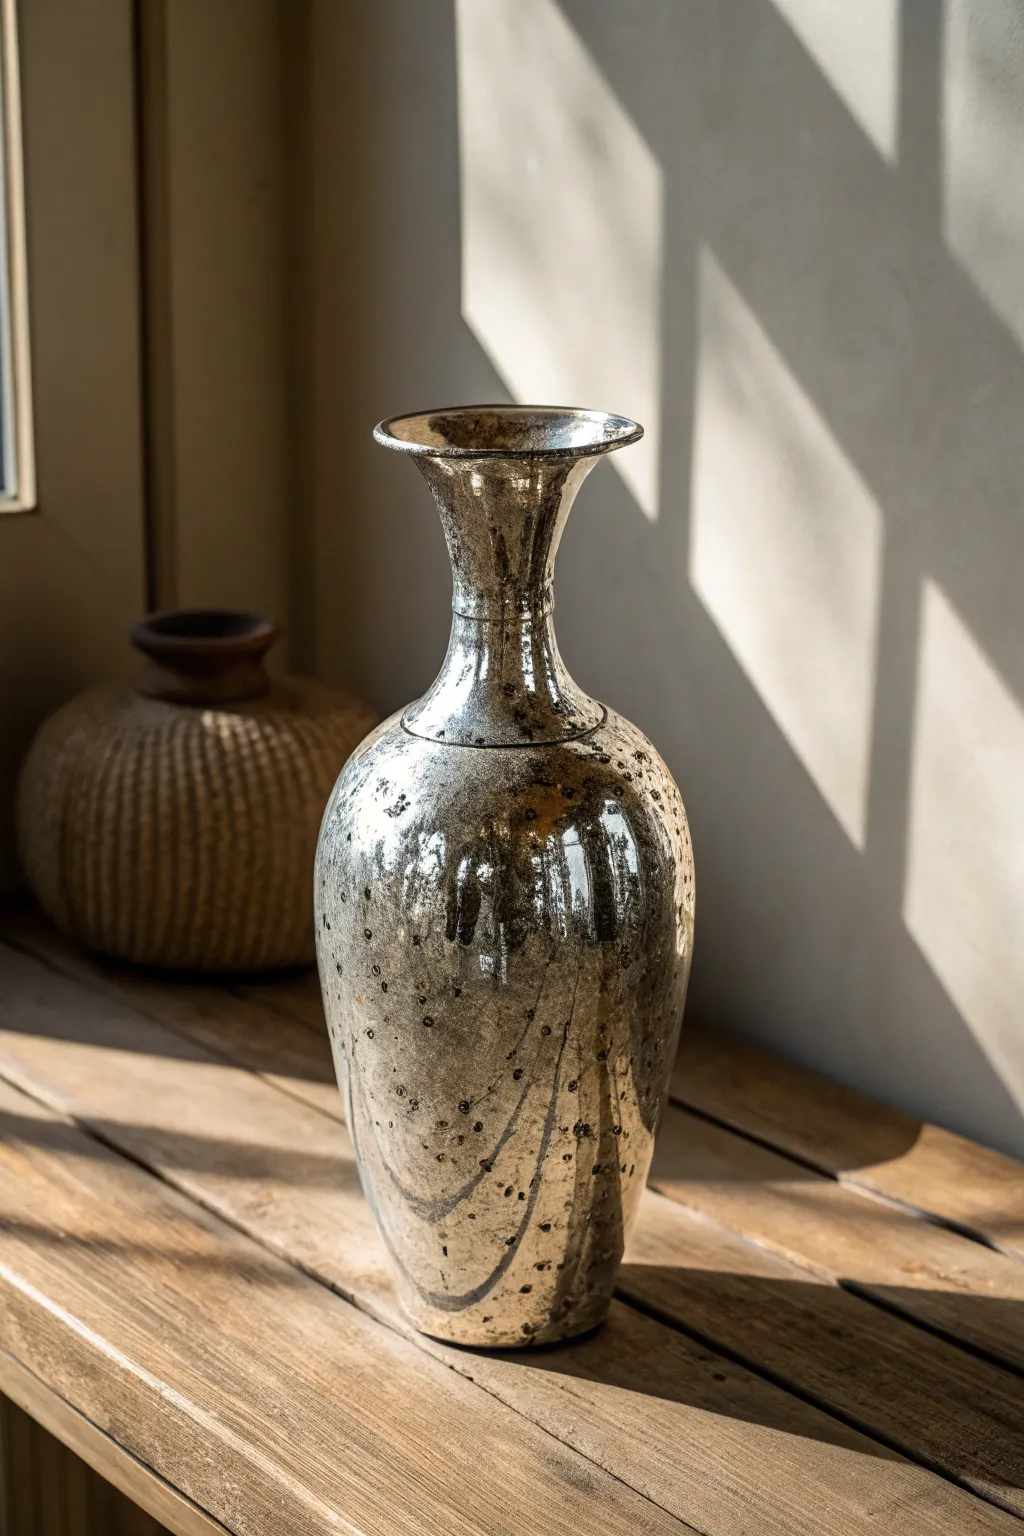
Transform plain glass into a stunning piece of vintage decor with this faux mercury glass technique. By layering specialized mirror effect spray paint with water and vinegar, you’ll achieve that coveted, mottled antique silver finish, complete with charming imperfections and dark, tarnished accents.
Detailed Instructions
Materials
- A tall, curvy clear glass vase (clean and dry)
- Krylon Looking Glass spray paint (or Rust-Oleum Mirror Effect)
- White vinegar and water solution (1:1 ratio)
- Empty spray bottle with a mist setting
- Paper towels or a soft lint-free cloth
- Matte black acrylic paint
- Fine liner brush
- Glossy black spray paint (optional, for interior sealing)
- Protective drop cloth or newspaper
- Masking tape
Step 1: Preparation & Base Texture
-
Clean surface:
Begin by thoroughly cleaning the outside of your glass vase with rubbing alcohol or glass cleaner to remove all oils and fingerprints, ensuring the paint adheres properly. -
Protect workspace:
Set up your workspace in a well-ventilated area, covering table surfaces with drop cloths or newspaper. -
Tape off rim:
Apply a strip of masking tape around the very top rim of the vase to keep the drinking edge clean and crisp. -
Mix vinegar solution:
In your spray bottle, mix equal parts white vinegar and water. The acidity of the vinegar is crucial for resisting the paint and creating the mottled effect. -
Mist the glass:
Lightly mist the exterior of the vase with the vinegar solution. You want small water beads to form on the surface, but try to avoid heavy drips.
Master the Mist
Adjust your spray nozzle to the finest mist possible. Large water droplets create big holes, while a fine mist creates that authentic, dusty antique speckle.
Step 2: Creating the Mercury Effect
-
First coat:
Shake your mirror effect spray can vigorously. Holding it about 8-10 inches away, spray a light, even coat over the water droplets on the vase. -
Wait and blot:
Allow the paint to sit for about 1-2 minutes. The paint will dry around the water droplets. -
Blot texture:
Gently blot—do not wipe—the wet spots with a crumpled paper towel. This lifts the water and some paint, creating the signature ‘worn’ holes in the silver finish. -
Second coat:
Once the first layer is touch-dry (usually 10-15 minutes), mist the vase again with your vinegar solution, perhaps focusing on different areas this time. -
Layering silver:
Spray a second light coat of the mirror paint over the new water droplets. -
Review coverage:
Repeat the blot and dry process. I find that doing 3-4 very light layers creates a much more authentic depth than just one heavy coat. -
Dry thoroughly:
Let the vase dry completely for at least an hour before handling it to add details.
Step 3: Adding Depth & Details
-
Inspect for translucency:
Hold your vase up to the light. If it’s too see-through for your taste, you can spray the *inside* of the vase with glossy black spray paint to make the silver pop and look more solid. -
Prepare acrylic paint:
Squeeze a small amount of matte black acrylic paint onto a palette or paper plate. Add a tiny drop of water to improve the flow for fluid lines. -
Paint tarnished areas:
Using a small brush, gently dab black paint into some of the larger ‘holes’ created by the vinegar resist to simulate deep tarnish/oxidation spots seen on antique silver. -
Draw swirled lines:
With your fine liner brush, paint thin, organic curved lines starting from the base and sweeping upward, mimicking the etched patterns seen in the reference photo. -
Add speckling:
Load your brush with watery black paint and gently flick the bristles near the vase (or tap the handle against another brush) to create tiny micro-speckles of black over the silver. -
Final drying:
Let all the acrylic surface details dry completely. -
Clear coat (optional):
If this vase will be handled frequently, seal the exterior with a crystal clear gloss spray protectant, though keeping it unsealed preserves the raw texture better.
Gilded Age Glamour
For a warmer, gold-toned antique look, experiment by misting a very light layer of gold metallic spray paint in between your silver layers.
Now you have a shimmering, time-worn centerpiece that captures the elegance of the past
Painted Pressed-Glass Highlights
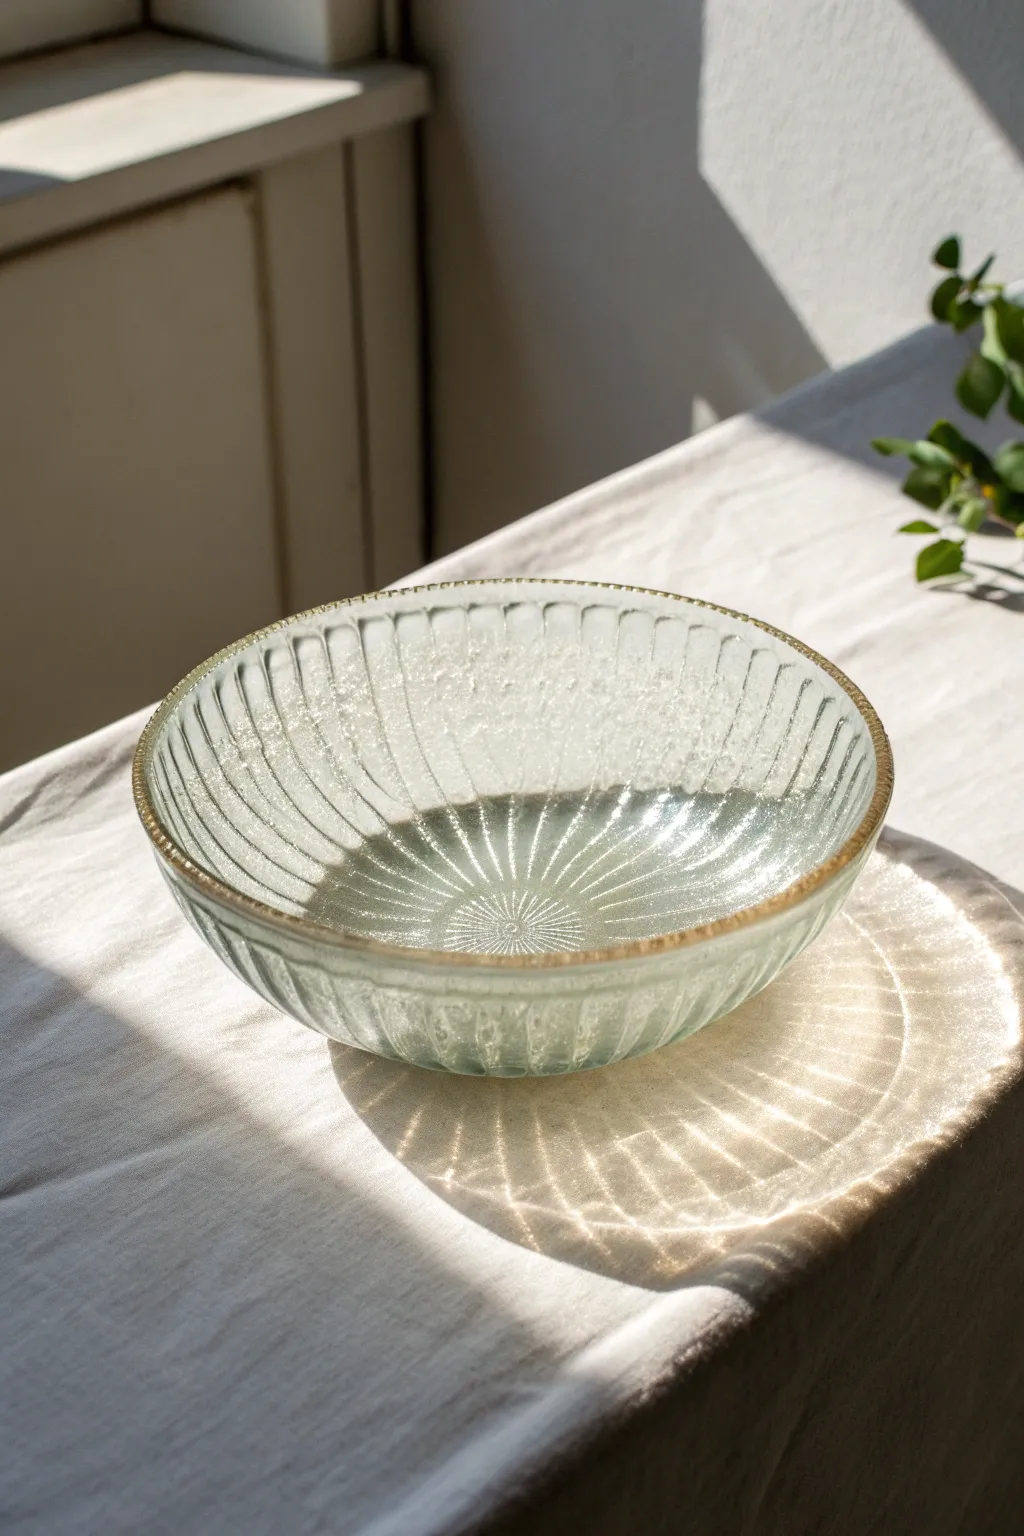
Elevate a simple pressed-glass bowl into a sophisticated centerpiece by accentuating its natural ridges with a delicate touch of gold. This project uses translucent glass paints to highlight the rim and fluting, catching the light beautifully for a vintage-inspired aesthetic.
Step-by-Step
Materials
- Clear pressed-glass bowl with fluted or ribbed exterior
- Rubbing alcohol
- Cotton pads or lint-free cloth
- Gold metallic glass paint (solvent-based or baking enamel)
- Fine detail paintbrush (size 0 or 00)
- Small flat shader brush
- Paper plate or palette
- Cotton swabs (for cleanup)
- Oven (if baking is required by paint manufacturer)
Step 1: Preparation & Cleaning
-
Wash the glass:
Start by thoroughly washing your glass bowl with warm soapy water to remove any factory dust, stickers, or oils. -
Degrease with alcohol:
Once dry, wipe the entire rim and the exterior surface where you plan to paint with rubbing alcohol using a lint-free cloth. This step is crucial for paint adhesion. -
Let it air dry:
Allow the alcohol to evaporate completely for a few minutes before you begin handling the glass again. Handle the bowl by the base to avoid adding new fingerprints to the rim.
Step 2: Gilding the Rim
-
Load the detail brush:
Shake your gold glass paint well. Squeeze a small amount onto your palette. Dip your fine detail brush into the gold, ensuring the bristles are coated but not dripping. -
Establish the top edge:
Hold the brush steady and apply a thin, even line of gold paint directly along the very top edge of the bowl’s rim. -
Work in sections:
Paint only a few inches at a time. I find it helpful to rotate the bowl slowly with my non-painting hand while keeping the brush hand stable. -
Clean edges immediately:
If your line wobbles or gets too thick, quickly use a damp cotton swab (dipped in water or alcohol, depending on your paint type) to neaten the edge while it’s still wet. -
Inspect the density:
Check the opacity of your gold line. If it looks streaky, let this first layer dry to the touch before deciding if a second coat is needed.
Use a Turntable
For steady lines, place the bowl on a heavy banding wheel or a lazy susan. Spin the object while holding your brush hand still to create a perfect rim.
Step 3: Adding Texture Highlights
-
Assess the fluting:
Look closely at the vertical ridges (fluting) on the outside of your bowl. You will be highlighting just the raised parts near the rim to create that sunkissed effect. -
Dry brush technique:
Switch to your small flat shader brush. Dip the very tip into the gold paint, then wipe almost all of it off onto a paper towel until the brush is nearly dry. -
Dust the ridges:
Gently drag the dry brush vertically down the top inch of the exterior ridges. You want a whisper of gold that fades out as it moves down the bowl, not a solid line. -
Feather the application:
Use a light, flicking motion to ensure the gold catches only the highest points of the texture, enhancing the pressed glass design without overwhelming it. -
Blend the transition:
Ensure the transition from the solid gold rim to the dry-brushed ridges is smooth. You may need to lightly tap the connection point with your detail brush to integrate them.
Fixing Smudges
If you smudge dried paint before baking, you can usually scrape it off gently with a craft knife or razor blade without scratching the glass.
Step 4: Curing the Paint
-
Initial dry time:
Allow the painted bowl to sit undisturbed for at least 1 hour, or until the paint is fully dry to the touch. -
Read paint instructions:
Check your specific paint bottle. Some enamels require 21 days of air curing, while others need to be baked in an oven to become dishwasher safe. -
Optional baking process:
If baking, place the bowl in a cold oven. Set the temperature to 350°F (or as directed). Once the oven reaches temperature, bake for 30 minutes. -
Cool down slowly:
Turn the oven off and leave the bowl inside to cool down completely with the oven door closed. This prevents the glass from cracking due to thermal shock.
Your finished bowl will now catch the sunlight beautifully, turning a plain utility item into a piece of art.
Two-Tone Inside-Outside Paint
Transform a plain glass swing-top bottle into a striking piece of decor with this unique two-tone technique. By layering textured metallic paints in distinct bands, you create a rustic yet modern aesthetic that catches the light beautifully.
How-To Guide
Materials
- Clear swing-top glass bottle (1 liter size)
- Rubbing alcohol
- Cotton pads or paper towels
- Painter’s tape (blue or green)
- Metallic copper acrylic paint
- Metallic dark blue or teal acrylic paint
- Texturing medium (or fine sand)
- Small mixing cups
- Stiff bristle paintbrush
- Sponge brush
- High-gloss varnish (optional)
Step 1: Preparation & Lower Band
-
Clean surface:
Begin by thoroughly cleaning the glass bottle. Wipe the entire exterior surface with rubbing alcohol on a cotton pad to remove any oils or fingerprints, which ensures the paint adheres properly. -
Masking the line:
Determine where you want your color shift to happen. Apply a strip of painter’s tape horizontally around the bottle, roughly one-third of the way up from the bottom. Press the edges down firmly to prevent bleed-under. -
Mix copper texture:
In a small cup, mix your metallic copper acrylic paint with a texturing medium. If you don’t have specialist medium, mixing in a pinch of fine sand or baking soda works surprisingly well to create that granular look. -
Apply copper base:
Using a sponge brush, dab the copper mixture onto the bottom section of the bottle. Use a stippling motion (up and down dabbing) rather than brushing strokes to build up the texture. -
Check opacity:
Let this first coat dry for about 20 minutes. If the glass is still showing through too clearly, apply a second stippled coat to deepen the copper tone. -
Remove lower tape:
While the second coat is still slightly tacky but drying, carefully peel away the painter’s tape. Pulling it off while the paint is slightly wet helps keep the edge crisp.
Tape Trick
To prevent paint bleeding, run a credit card firmly over the edge of the painter’s tape before painting to ensure a perfect seal.
Step 2: Upper Band Application
-
Dry thoroughly:
Wait at least an hour for the copper section to cure completely. You don’t want to damage your work when taping the next section. -
Mask the junction:
Apply a new line of painter’s tape directly over the very top edge of the dried copper paint. This protects the lower section while you work on the blue band. -
Create upper boundary:
Place a second strip of tape horizontally around the bottle, about 4-5 inches above your first tape line, defining the top edge of the blue section. -
Mix blue texture:
prepare your metallic dark blue paint. I like to add slightly less texture medium here than the bottom layer to create a subtle contrast in finish, but you can keep them consistent if you prefer. -
Stipple the blue:
Using a fresh sponge brush or stiff bristle brush, stipple the blue paint mixture into the space between your two tape lines. Ensure you get full coverage right up to the tape edges. -
Layering up:
Glass surfaces can be slippery, so apply thin layers. Let the first blue layer dry to the touch before adding a second to ensure a rich, deep color. -
Reveal the design:
Carefully remove both strips of tape. Peel slowly at a 45-degree angle to get the cleanest possible lines between the glass, the blue, and the copper. -
Refining edges:
Inspect your lines. If any paint bled under the tape, use a toothpick or a damp cotton swab to gently scrape or wipe away the excess while the paint is fresh.
Internal Variation
Instead of painting the outside, pour the paint inside and swirl it around for a smooth exterior finish that is easier to clean and handle.
Step 3: Finishing Touches
-
Creating the distressed look:
If you want the rustic look shown in the image, take a piece of fine-grit sandpaper once the paint is fully dry. Very lightly scuff random patches of the painted areas to reveal tiny hints of glass. -
Sealing the work:
Glass paint can be fragile. Apply a coat of high-gloss varnish over the painted sections to seal the texture and protect it from scratches. -
Final cure:
Let the bottle sit undisturbed for 24 to 48 hours. This allows the paint and varnish to bond fully to the non-porous glass surface. -
Reassemble:
If you removed the swing-top mechanism for easier painting, reattach it now to complete the look.
Place your bottle on a sunny windowsill to let the light play through the unpainted glass and the metallic textures
Mirror-Finish Frame Tray
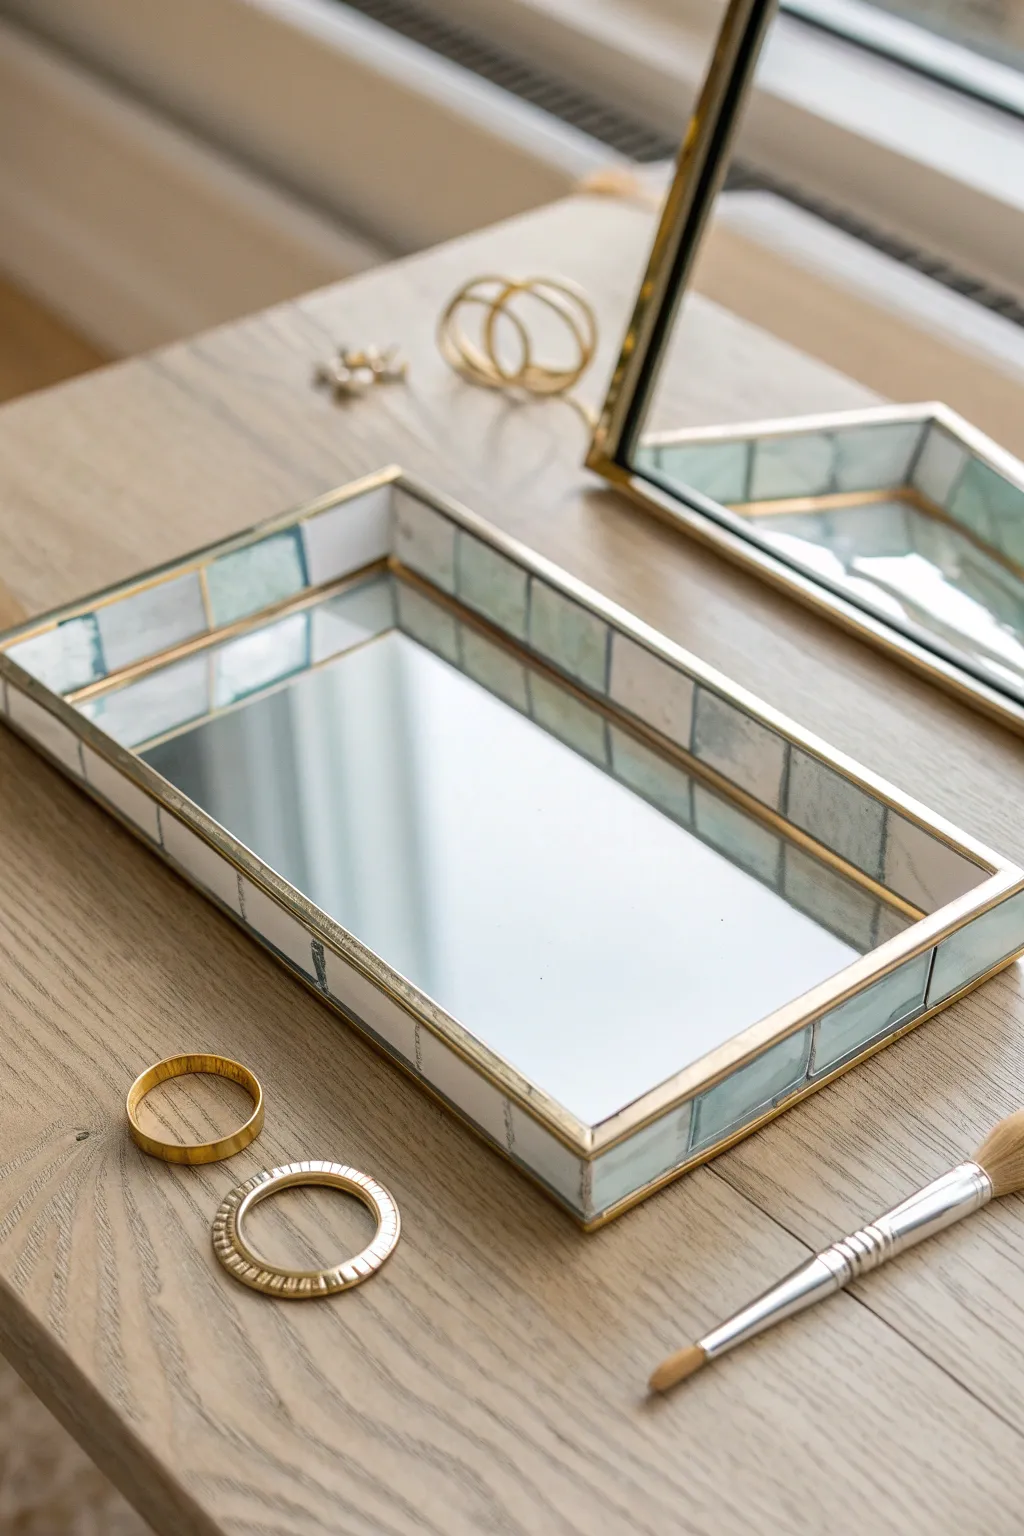
Transform a plain glass photo frame or shadow box into a stunning, vintage-inspired vanity tray. This project uses glass paints to mimic the look of mother-of-pearl or stained glass tiles, finished with elegant gold edging for a sophisticated touch.
Detailed Instructions
Materials
- Rectangular floating glass frame or shadow box (glass on both sides is ideal)
- Mirror effect spray paint (if not using a pre-mirrored base)
- Pebeo Vitrail or similar transparent glass paints (Turquoise, White, Clear Medium)
- Gold adhesive lead strip or liquid gold leading
- Gold gilding wax or gold leaf pen
- Self-adhesive copper foil tape (1/4 inch)
- Small flat synthetic brushes
- Ruler and permanent marker
- Rubbing alcohol
- E6000 or clear glass glue
- Cotton swabs
Step 1: Preparing the Base
-
Clean the surfaces:
Begin by thoroughly cleaning your glass frame or box with rubbing alcohol to remove any oils or fingerprints, ensuring the paint will adhere perfectly. -
Create the mirror base:
If your tray doesn’t already have a mirrored bottom, spray the *underside* of the bottom glass panel with mirror effect spray paint. Apply several thin coats until opaque, letting it dry completely between layers. -
Mark the grid:
On the outside vertical edges of the tray, use a ruler to measure equal rectangular sections. Mark these lightly with a marker to simulate the look of individual glass tiles. -
Apply the leading:
Cut strips of gold adhesive lead or copper foil tape. Stick them vertically over your marked lines to create the grid divisions between your ’tiles.’ Press them down firmly to prevent paint from seeping underneath.
Step 2: Creating the Faux Stone Effect
-
Mix your colors:
On a palette, mix a drop of turquoise glass paint with a generous amount of white. You want a very pale, milky teal color. Keep some pure white and clear medium nearby. -
Paint the first tile:
Dip your brush into the pale teal mix and flow it into one of the rectangular sections. Glass paint is self-leveling, so you don’t need to brush back and forth much; just drop it in and guide it to the edges. -
Add marbling details:
While the paint is still wet, dip a toothpick or fine brush into pure white paint and swirl it gently through the teal. This creates the organic, marble-like veins seen in the reference. -
Vary opacity:
For a natural stone look, make some tiles slightly more translucent by mixing in more clear medium, and others more opaque with extra white. Avoid making every tile identical. -
Continue around the perimeter:
Repeat this process for every ’tile’ section on the sides of the tray. Work on one side at a time and keep the surface flat while drying to prevent drips. -
Let it cure:
Allow the paint to dry completely. Glass paints often require 24 hours to fully cure and harden.
Fixing Bubbles
If you see tiny air bubbles in your wet glass paint, gently pop them immediately with a needle or breathe warm air onto the spot to release them.
Step 3: Gilding and Assembly
-
Clean up the edges:
Once dry, check for any paint that might have bled onto the gold tape dividers. Gently scrape it away with a craft knife if necessary. -
Apply gold foil tape:
Run a continuous strip of copper foil tape or gold adhesive lead along the very top rim of the tray walls to cap the glass edges. -
Finish the vertical corners:
Apply the gold tape to the four vertical corners of the box where the glass panels meet, creating a seamless metallic frame. -
Seal the bottom:
If you painted the underside of the base, protect the mirror finish by gluing a piece of felt or heavy cardstock to the bottom. -
Enhance with gilding wax:
I like to take a little gold gilding wax on my finger and rub it over the copper foil tape. This unifies the color and gives it a richer, more antique brass appearance. -
Final polish:
Gently buff the mirrored interior with a microfiber cloth to remove any dust from the assembly process.
Add Texture
Crumple a small piece of plastic wrap and dab it onto the wet paint to create a textured, crushed-glass effect instead of smooth marble.
Place your jewelry or cosmetics on the reflective surface and enjoy the vintage elegance of your handmade piece
Alcohol-Ink Light Bottle Glow
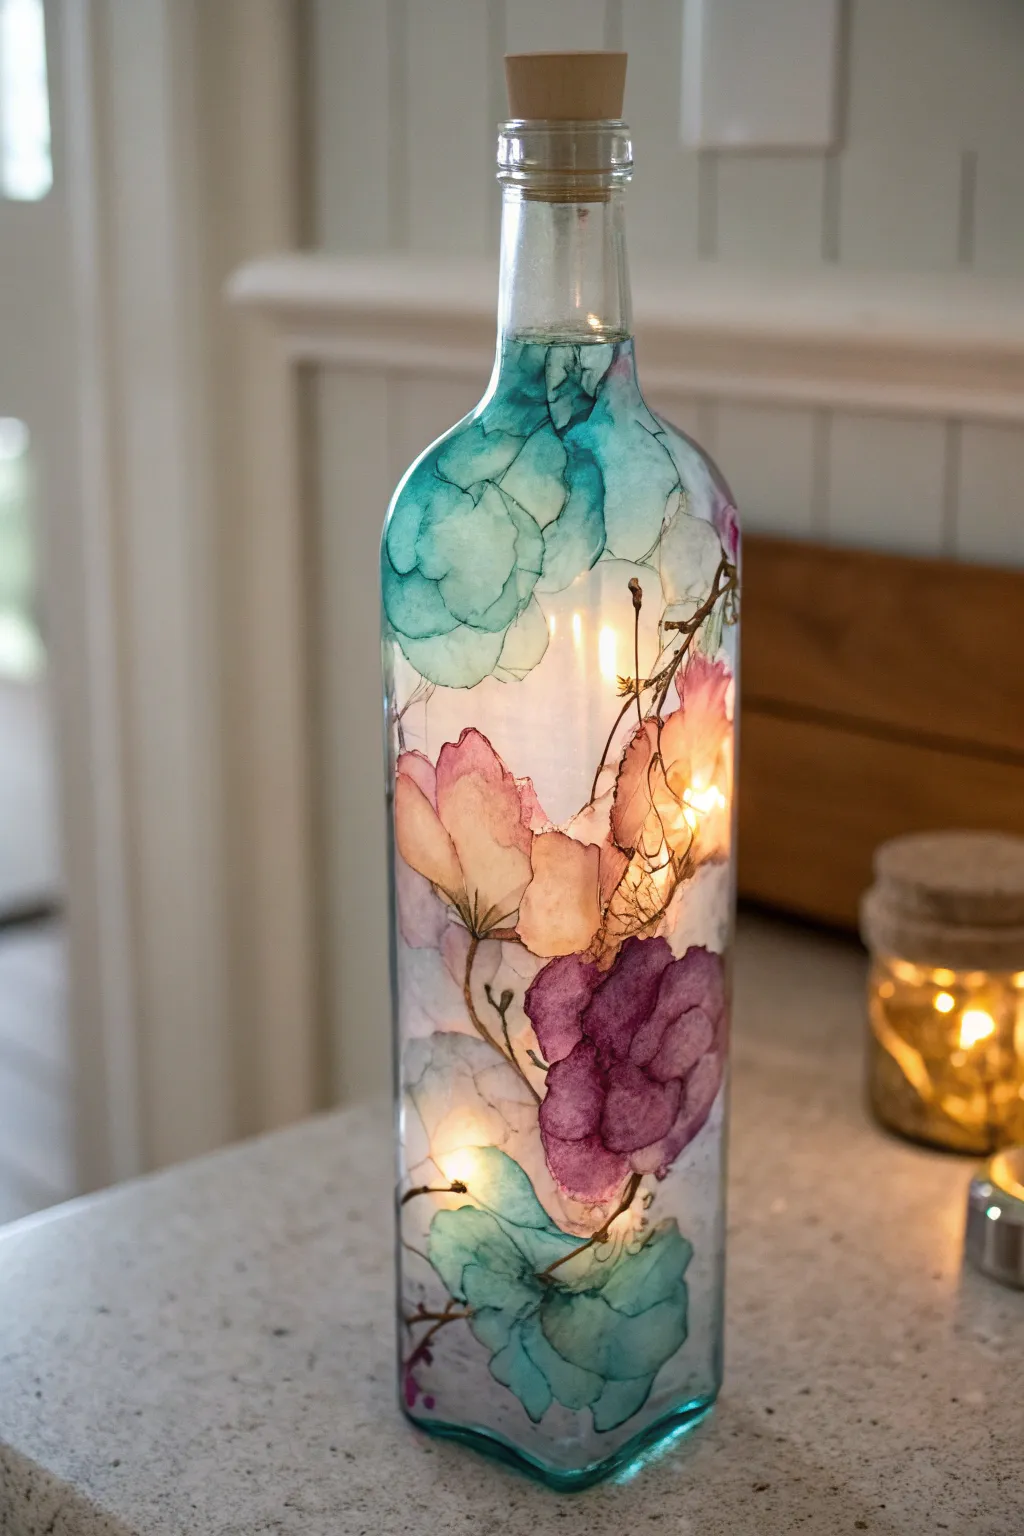
Transform a plain glass bottle into a glowing botanical masterpiece using the fluid, translucent beauty of alcohol inks. The resulting interplay between light and color creates a stained-glass effect that feels like captured watercolors floating on glass.
Step-by-Step Guide
Materials
- Clear glass bottle with cork stopper (wine or spirit bottle, label removed)
- Alcohol inks (Teal, Magenta/Plum, Amber/Yellow, Brown)
- Alcohol blending solution or Isopropyl alcohol (91% or higher)
- Small fine-point paintbrushes (synthetic hair works best)
- Micro-tip applicator bottles or fine-nib pens for details
- Compressed air can or a straw (for moving ink)
- LED fairy light string (battery or USB operated)
- Glass cleaner and lint-free cloth
- Disposable gloves
Step 1: Preparation & Base shapes
-
Clean the canvas:
Thoroughly clean your glass bottle with glass cleaner to remove all fingerprints, oils, and label residue. A pristine surface is crucial for the ink to adhere smoothly. -
Set up your workspace:
Alcohol inks are messy and stain easily. Cover your table with plastic or a non-porous mat and put on your disposable gloves before opening any bottles. -
Mix your base colors:
Pour a small amount of teal, magenta, and amber ink into a palette. If you want softer, more pastel hues like the reference image, dilute them slightly with blending solution right from the start. -
Lay down the teal blooms:
Start with the teal flowers near the top and bottom. Dab a drop of teal ink onto the glass, followed immediately by a drop of blending solution. Use your brush or a manual air blower to push the ink outward into rounded petal shapes. -
Create the central pink flowers:
Moving to the middle section, repeat the process with your pink or amber-toned ink. Create loose, organic shapes that mimic the profile of open tulip or poppy petals. -
Add the purple accents:
Introduce the deep purple or plum hues for the lower-middle flowers. Overlap the edges slightly with the pink areas; while wet, the colors will bleed into each other, creating beautiful gradients.
Air Control
Use a drinking straw to blow on wet ink. This targets the airflow better than blowing directly, giving you control over petal shapes and soft edges.
Step 2: Refining & Detailing
-
Sculpt layers with alcohol:
Once the base shapes are dry to the touch, dip a clean brush in pure rubbing alcohol. Gently touch the center of the petals to push the pigment to the edges, creating that distinct ‘outlined’ watercolor look found in the photo. -
Intensify the edges:
If I feel the definition is too soft, I carefully trace the very rim of the petals with undiluted ink using a very fine liner brush to make the flower shapes pop. -
Connect with vines:
Using a brown alcohol ink or a brown alcohol-based marker, draw delicate, spindly branches winding between the flowers. Keep the lines thin and varying in pressure to look natural. -
Add stamens and centers:
For the open flowers, add tiny dots or fine lines in the center using a contrasting dark color to mimic stamens. -
Dry completely:
Let the bottle sit undisturbed for at least 24 hours. Alcohol ink dries fast to the touch but needs time to fully cure on non-porous surfaces. -
Seal the artwork:
To protect your design from scratching or fading, spray the bottle with a clear, UV-resistant acrylic sealer. Apply 2-3 light coats rather than one heavy one to prevent the ink from reactivating and running.
Gilded Edges
Mix a tiny amount of metallic gold alcohol ink mixative into your branch lines or flower centers for a subtle shimmer that catches the LED light.
Step 3: Illumination
-
Prepare the lights:
Unwind your fairy lights and straighten out any kinks in the wire so they will fall naturally inside the bottle. -
Insert the glow:
Feed the light string into the bottle neck. Try to distribute the LED bulbs evenly so they backlight different flowers from top to bottom. -
Final assembly:
Tuck the battery pack switch into the neck or use a cork-style battery holder to seal the bottle top, completing the look.
Place your finished bottle on a mantle or bedside table to enjoy the warm, colorful ambiance it brings to the room
Celestial Moon Phase Panel
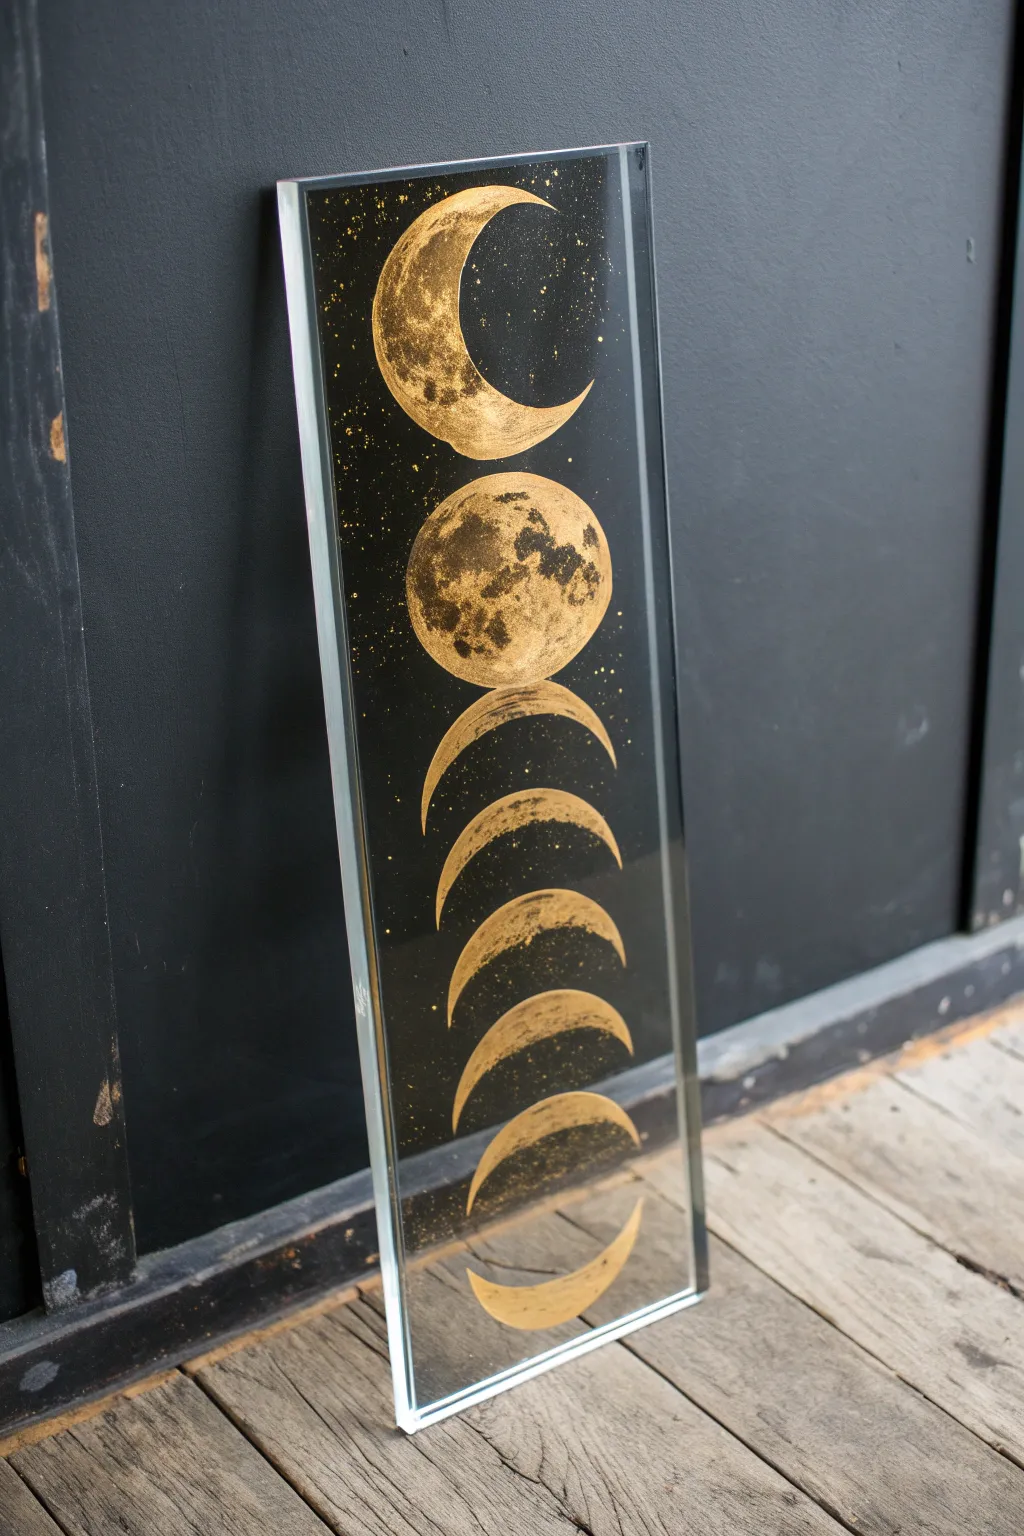
Capture the mystic cycle of the moon with this elegant glass panel, featuring textured gold phases against a starry, deep black backdrop. This sophisticated piece plays with translucency and reflection, making it a stunning addition to any modern or bohemian space.
Step-by-Step
Materials
- Rectangular glass pane (approx. 8×24 inches, polished edges recommended)
- Gold leaf sheets
- Gilding adhesive (sizing)
- Soft gilding brush and stiffer bristle brush
- Black acrylic paint or glass enamel
- Gold acrylic paint or metallic pigment powder
- Spray sealant (clear gloss)
- Small detail brushes
- Sponge dabber or sea sponge
- Rubbing alcohol and lint-free cloth
- Printed moon phase template (sized to fit glass)
Step 1: Preparation & Mapping
-
Clean the Surface:
Begin by thoroughly cleaning your glass pane with rubbing alcohol and a lint-free cloth. This removes fingerprints and oils that could prevent the paint and gold leaf from adhering properly. -
Set Up Guide:
Place your printed moon phase template underneath the glass. Secure it with painter’s tape to ensure the design doesn’t shift while you work. The template should show the vertical progression from crescent to full moon and back.
Crater Texture Tip
Use a wrinkled piece of plastic wrap dipped in paint to dab texture onto the moons. It creates organic, random patterns that look just like lunar geography.
Step 2: Creating the Moons
-
Apply Adhesive Sizing:
Using a soft brush, carefully apply the gilding adhesive over the moon shapes on your template. Apply the glue thinly and evenly, following the specific contours of each phase. -
Wait for Tackiness:
Allow the adhesive to sit until it becomes tacky. It should feel sticky to the touch but not wet or runny. This usually takes 15-30 minutes depending on the brand. -
Apply Gold Leaf:
Gently lay sheets of gold leaf over the tacky adhesive areas. Don’t worry about being too precise at the edges yet; just ensure the glue is fully covered. -
Burnish the Leaf:
Use a soft, dry brush to gently pat and smooth the gold leaf onto the glass. This ensures good contact and starts to reveal the texture. -
Remove Excess Gold:
Once the leaf is secure, take a slightly stiffer brush and sweep away the loose, unadhered gold flakes. You should be left with clean, gold silhouettes of the moon phases. -
Add Crater Texture:
To mimic the moon’s surface, take a small sponge or a stippling brush dipped in a tiny amount of black paint (or dark grey). Gently dab over parts of the gold leaf to create ‘craters’ and shadows. This breaks up the flat gold surface. -
Highlighting:
For added depth, you can repaint small highlights using metallic gold paint over the dark texture spots, creating a multi-layered, lunar landscape effect.
Streaky Black Paint?
If your black background looks streaky, switch to a sponge roller for the final coat. Rolling applies paint more evenly than brushing and eliminates bristle marks.
Step 3: The Starry Backdrop
-
Protect the Moons:
Once your moon textures are completely dry, you need to ensure they remain bright. You can carefully paint a backing layer of gold or yellow ochre directly over the moon shapes (on the working side) to seal them from the black background you’ll apply next. -
Create Stars using Splatter:
Load a toothbrush or stiff brush with diluted gold paint. Flick the bristles to splatter tiny droplets across the clear glass areas around the moons. I usually test the splatter density on paper first to avoid large blobs. -
Hand-paint Larger Stars:
Use a fine detail brush to add a few deliberate, slightly larger stars or constellations if desired, varying the size for a natural look. -
Paint the Night Sky:
It’s time for the background. Using a sponge dabber or a soft flat brush, apply opaque black paint over the entire back surface of the glass, covering the stars and painting right over the backs of the dried moon shapes. -
Second Coat:
Let the first black layer dry completely. Hold it up to a light source to check for pinholes or streaks. Apply a second coat of black to ensure total opacity.
Step 4: Finishing Touches
-
Clean Edges:
If any paint seeped onto the side edges of the glass pane, carefully scrape it off with a razor blade or wipe with a damp cloth for a crisp, professional finish. -
Seal the Work:
Once the paint is fully cured (give it at least 24 hours), spray the painted side with a clear gloss sealant. This protects the acrylic and gold leaf from scratching. -
Display:
Flip the glass over so you are viewing the unpainted side. The glass now acts as a protective layer over your artwork, giving the gold a deep, glossy shine.
Now you have a shimmering piece of celestial art ready to lean on a mantel or hang on a wall
Terrazzo Confetti Glass
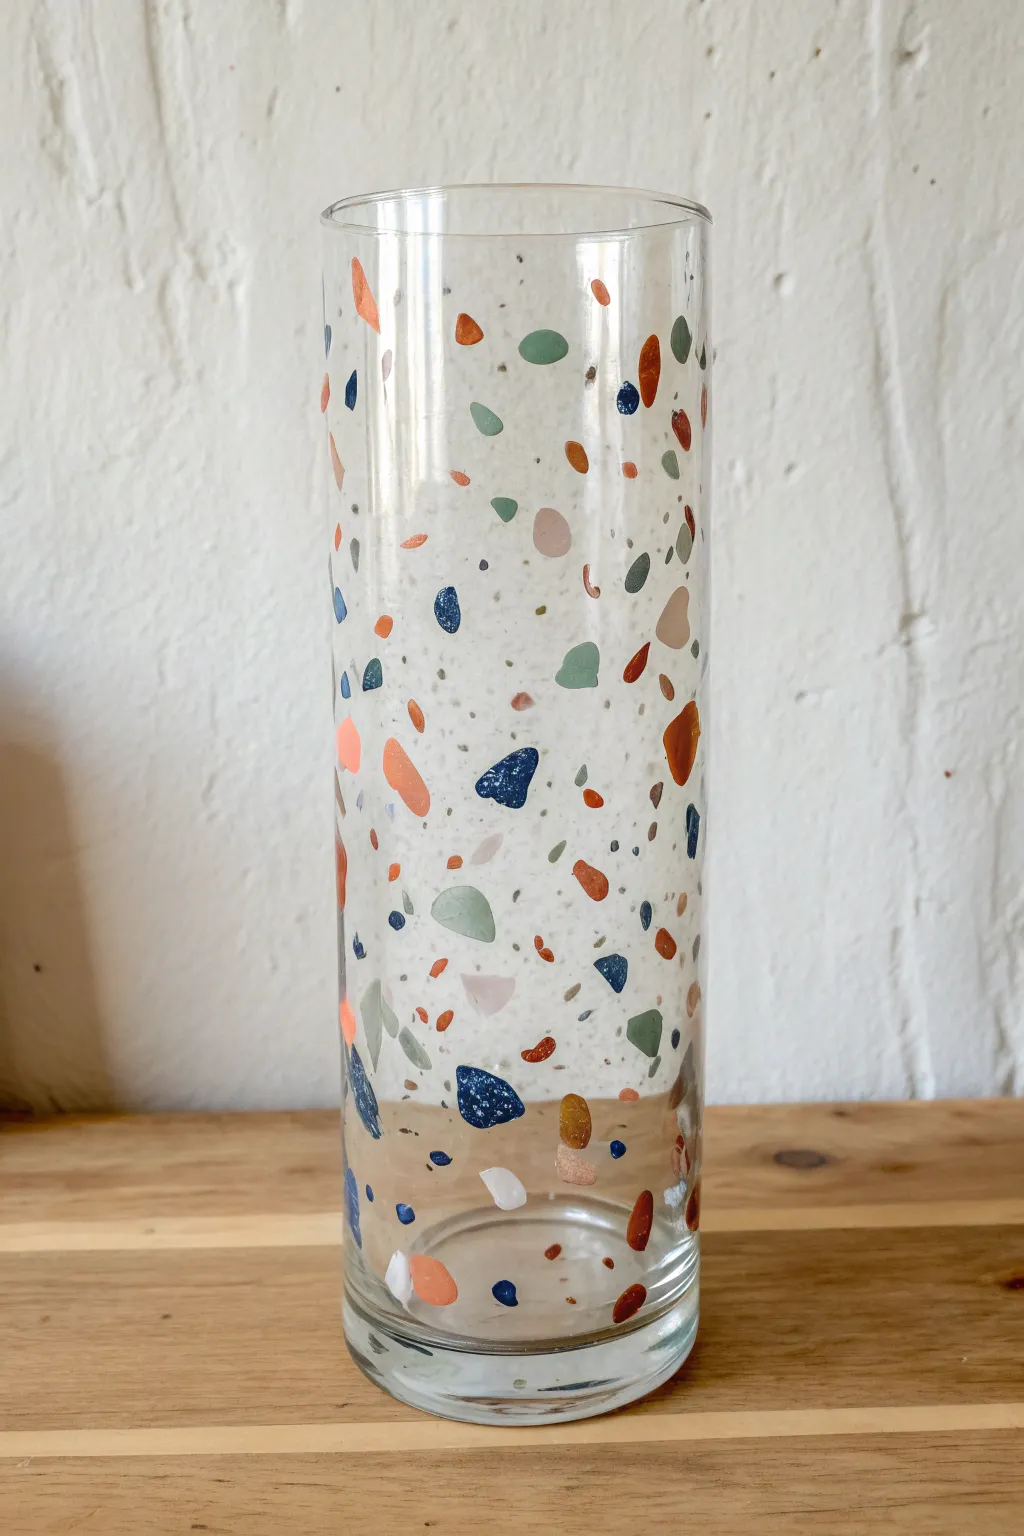
Transform a plain cylinder vase into a trendy piece of decor with this colorful terrazzo-inspired design. The scattered confetti pattern adds a playful, modern touch that looks complicated but is surprisingly simple to achieve with freehand painting.
Step-by-Step Tutorial
Materials
- Tall, clear cylindrical glass vase
- Rubbing alcohol
- Cotton rounds or paper towel
- Multi-surface acrylic craft paints (navy, terracotta, sage green, blush pink, burnt sienna)
- Small flat paint brush (size 2-4)
- Small round paint brush (size 0-1)
- Old toothbrush or stiff bristle brush
- Paper plate or palette
- Cardboard or drop cloth (for splatter protection)
Step 1: Preparation
-
Clean the surface:
Before laying down any color, thoroughly wipe the exterior of your glass vase with rubbing alcohol and a cotton round. This removes oils and fingerprints that could prevent the paint from bonding properly. -
Set up your workspace:
Since we’ll be doing some splattering later, cover your table with cardboard or a drop cloth to catch stray flecks. Squeeze small amounts of all your paint colors onto your palette so they are ready to go.
Step 2: Painting the Large Shapes
-
Start with the darkest color:
Using your small flat brush, dip into the navy blue paint. Paint small, irregular shapes randomly around the surface of the glass. Think of them like broken tiles—some can be triangles, some roughly rectangular, and others just uneven blobs. -
Space them out:
Keep plenty of clear space between your navy shapes. You need room for four or five other colors, so don’t overcrowd the glass with the first hue. -
Add the terracotta tones:
Wipe your brush clean and switch to the terracotta orange paint. Paint similar irregular polygon shapes in the gaps. I like to vary the size here, making some slightly larger and others tiny. -
Layer in the greens:
Clean your brush and pick up the sage green. Add smooth, rounded stone shapes or soft angular pieces. Try to place these next to the blue or orange spots without letting them touch, creating that suspended terrazzo look. -
Fill with neutrals:
Using the blush pink or beige, look for open areas that feel a bit empty. Paint softer, lighter shapes here to balance out the bold dark colors. -
Add deep accents:
Finally, take the burnt sienna or dark brown and add just a few small, sharp accents. These act as the ‘shadow’ stones in the mix and add depth to the overall pattern. -
Refine opacity:
Glass paint can streak. If your shapes look too transparent, let the first coat dry for about 15-20 minutes, then dab a second layer of paint directly over the existing shapes to make the colors solid and opaque.
Shape Variety
Don’t make your shapes too uniform. Mix sharp triangles with soft organic blobs to mimic real crushed stone aggregate.
Step 3: Detailing and Sealing
-
Prepping the splatter:
For the tiny speckles that give the design its realistic stone texture, dilute a small amount of dark grey or black paint with a drop of water. It should be fluid but not dripping wet. -
Create the texture:
Dip an old toothbrush or a stiff bristle brush into the diluted paint. run your thumb across the bristles to flick a fine mist of paint droplets onto the vase. -
Control the spray:
Focus the splatter on areas that look too clean. It’s okay if the dots land on top of your colored shapes; this actually makes the effect look more authentic. -
Add hand-painted specks:
If the splatter feels too light, use your finest round brush (size 0) to manually dot tiny specks of black or dark grey in the empty spaces between the larger shapes. -
Clean up errors:
If any shapes smudged or look messy, use a damp cotton swab or a toothpick to gently scrape away the excess paint while it is still semi-wet to crisp up the edges. -
Curing the paint:
Let the vase dry completely for at least 24 hours. Depending on your paint brand, you may need to cure it in a non-preheated oven (usually 350°F for 30 minutes) to make it dishwasher safe, so check your bottle’s instructions.
Make It Glossy
For a ceramic look, mix baking powder into your paint. For a high-shine finish, brush a clear gloss varnish over each dried shape.
Now you have a custom, artful vessel perfect for holding fresh blooms or sitting pretty on a shelf
Hydro-Dipped Marble Swirls
Transform a plain glass vessel into a high-end decor piece featuring mesmerizing swirls of salmon pink, deep navy, and soft teal. This hydro-dipping technique creates organic, fluid patterns that mimic the look of real polished marble with surprisingly little effort.
Step-by-Step
Materials
- Tall, cylindrical glass vase with a narrow neck
- Large plastic bucket or bin (deep enough to submerge the vase)
- Spray paints (gloss finish): Salmon Pink, Navy Blue, White, Teal/Grey
- Painter’s tape
- Latex or nitrile gloves
- Respirator mask
- Drop cloth or cardboard (for workspace protection)
- Clear gloss sealant spray
- Stick or skewer (for swirling)
- Rubbing alcohol and paper towels
Step 1: Preparation
-
Clean surface:
Begin by thoroughly cleaning the exterior of your glass vase with rubbing alcohol. This removes oils and fingerprints that could prevent the paint from adhering properly. -
Tape the rim:
Carefully apply painter’s tape to the very top rim of the vase if you want to keep the drinking edge or opening clean. Ensure the tape line is straight and pressed down firmly to prevent leaks. -
Base coat application:
In a well-ventilated area, spray the entire vase with a light coat of white spray paint. This acts as a primer and ensures your colored swirls will pop against the glass rather than looking translucent. -
Base coat drying:
Allow this white base layer to dry completely according to the manufacturer’s instructions. A second coat may be necessary if the glass is still visible.
Water Temp Trick
Use room temperature water (around 70°F/21°C). Cold water makes the paint skin over too fast, while hot water can melt the binder. Perfect temp = smoother swirls.
Step 2: Creating the Hydro Dip
-
Prepare the water bath:
Fill your large plastic bucket with water. The temperature should be lukewarm or room temperature—too cold and the paint will clump; too hot and it will disperse too quickly. -
Paint layer 1: The dominant color:
Shake your Salmon Pink spray paint can vigorously. Spray directly onto the water’s surface from about 8-10 inches away, creating a large, central film of color. -
Paint layer 2: Adding contrast:
Immediately spray the Navy Blue paint into the center of the pink circle. Use short bursts to create defined rings or islands of color. -
Paint layer 3: Highlights:
Add the Teal/Grey and White paints, alternating spraying them into different areas of the floating paint film to create complexity. -
Swirl the pattern:
Working quickly before the paint films over, take your skewer or stick and gently drag it through the paint on the water’s surface to create the marbleized swirl effect. -
Strategic swirling:
Avoid over-mixing, which creates a muddy brown color. Aim for large, deliberate strokes to keep the distinct ribbons of pink and navy visible.
Gold Rim Detail
For an luxe touch, use liquid gold leaf paint on the rim after the sealer dries. Apply it with a small brush along the top edge for a gilded finish.
Step 3: Dipping and Finishing
-
The dip:
Put on your gloves. Hold the vase by the neck (or place your hand inside if the opening allows) and slowly submerge it into the water at a 45-degree angle. -
Roll and submerge:
As you push the vase down, slowly rotate it to catch the paint swirls on all sides. Continue until the painted area is fully underwater. -
Clear surface:
While the vase is still submerged, use your hand or a piece of cardboard to swipe away the remaining paint film on the water’s surface. This prevents a second layer of mess from coating the vase as you pull it out. -
Remove and inspect:
Lift the vase out of the clean water. You should now see the beautiful marble pattern adhering to the white base coat. -
Shake off excess:
Gently shake off excess water droplets, but do not touch the wet paint. Stand the vase upright on your drop cloth. -
Dry time:
Allow the vase to dry completely for at least 24 hours. The hydro-dipped layer is fragile while wet. -
Remove tape:
Once fully dry, carefully peel away the painter’s tape from the rim to reveal a crisp edge. -
Seal the art:
Finish by spraying the entire vase with a clear gloss sealant. This protects the design from scratches and gives it that polished, glass-like sheen.
Place your new vase near a window where the sunlight can highlight the glossy, marbleized curves
Iridescent Color-Shift Potion Bottles
Capture the magic of an alchemist’s workshop with this stunning decorative potion bottle. By blending translucent glass paints and fine glitter, you’ll create an iridescent, color-shifting vessel that catches the sunlight beautifully.
Step-by-Step Tutorial
Materials
- Small glass bottle with cork stopper
- Translucent glass paints (teal, magenta/fuchsia, gold)
- Glazing medium or clear glass paint thinner
- Fine iridescent glitter (gold or holographic)
- Mod Podge (gloss) or clear drying craft glue
- Small foam applicators or soft synthetic brushes
- Rubbing alcohol
- Lint-free cloth
- Small disposable cup (for mixing glitter)
- Popsicle stick
Step 1: Preparation & Base Mixture
-
Clean surface:
Begin by removing the cork and thoroughly cleaning your glass bottle with rubbing alcohol and a lint-free cloth. This removes fingerprints and oils that prevent paint adhesion. -
Prepare the glitter medium:
In a small disposable cup, mix a generous amount of Mod Podge (or clear craft glue) with a small splash of water to thin it slightly. It should be viscous but pourable. -
Add the shimmer:
Pour your fine iridescent glitter into the glue mixture. You want a high concentration of glitter so the bottle sparkles intensely once dry. -
Coat the interior:
Pour the glitter-glue mixture inside the bottle. Roll the bottle around slowly so the mixture coats the entire inner surface evenly. -
Drain excess:
Turn the bottle upside down over a waste cup and let the excess glue drain out for about 10-15 minutes. This prevents thick globs from forming at the bottom. -
Initial dry time:
Allow the interior coating to dry completely. This can take several hours or overnight; the glue must turn clear so only the glitter remains visible.
Sparkle Insider
Use ‘extra fine’ glitter rather than chunky craft glitter. The finer particles cling better to the glass curvature and create a magical, misty potion effect rather than a polka-dot look.
Step 2: Painting the Exterior Gradient
-
Dilute the paints:
Squeeze out your teal, magenta, and gold glass paints. Mix each with a drop of glazing medium to increase their transparency; this is crucial for that ‘stained glass’ look. -
Apply the teal:
Using a soft brush or foam dabber, apply the teal paint to the left third of the bottle’s exterior. Use light, vertical strokes. -
Apply the magenta:
On the opposite side (the right third), apply the magenta paint in the same vertical manner. -
Create the gold center:
Apply the gold paint down the middle section of the bottle, overlapping slightly with the teal and magenta wet edges. -
Blend the transitions:
While the paint is still wet, gently dab the areas where colors meet using a clean, dry foam applicator. This creates a soft gradient rather than harsh stripes. -
Check transparency:
Hold the bottle up to a light source. If the color looks too opaque, dab away some paint; if it’s too faint, add a second thin layer after the first creates a tack. -
Cork treatment:
While the bottle dries, lightly brush the top of the cork with a tiny amount of your gold paint for a cohesive, aged look. -
Final cure:
Let the bottle sit undisturbed for at least 24 hours. Depending on your specific paint brand, you may need to oven-bake it for permanence, so check the manufacturer’s label.
Magical Upgrade
Wrap a piece of rustic twine or leather cord around the neck of the bottle and attach a small antique key or a charm to give it an authentic fantasy prop aesthetic.
Place your finished potion on a sunlit windowsill to see the colors glow across the room


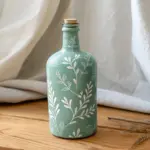

Have a question or want to share your own experience? I'd love to hear from you in the comments below!