I love how a smooth stone can turn into a tiny piece of decor in one cozy painting session. These aesthetic rock painting ideas lean into clean palettes, calming patterns, and designs you’ll genuinely want to keep on your desk or shelf.
Soft Botanical Wreath and Wildflower Rocks
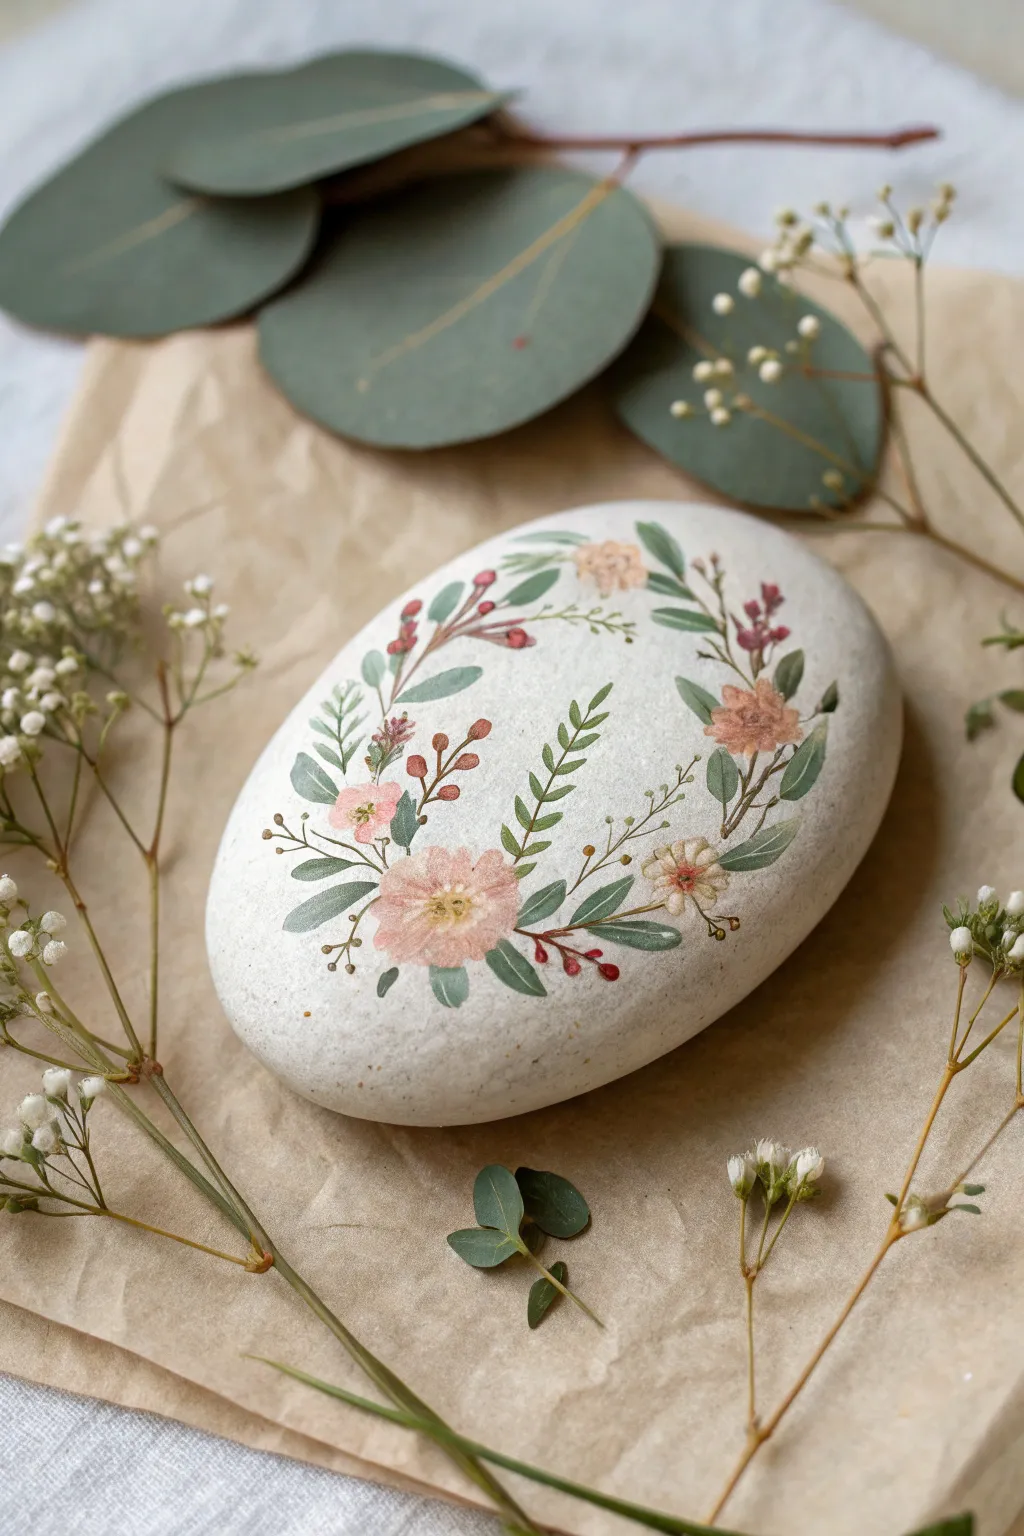
This elegant stone project captures the quiet beauty of a cottage garden with a delicate, circular botanical motif. The soft color palette of blush pinks, dusty greens, and muted earth tones creates a sophisticated centerpiece perfect for a coffee table or desk.
Step-by-Step Tutorial
Materials
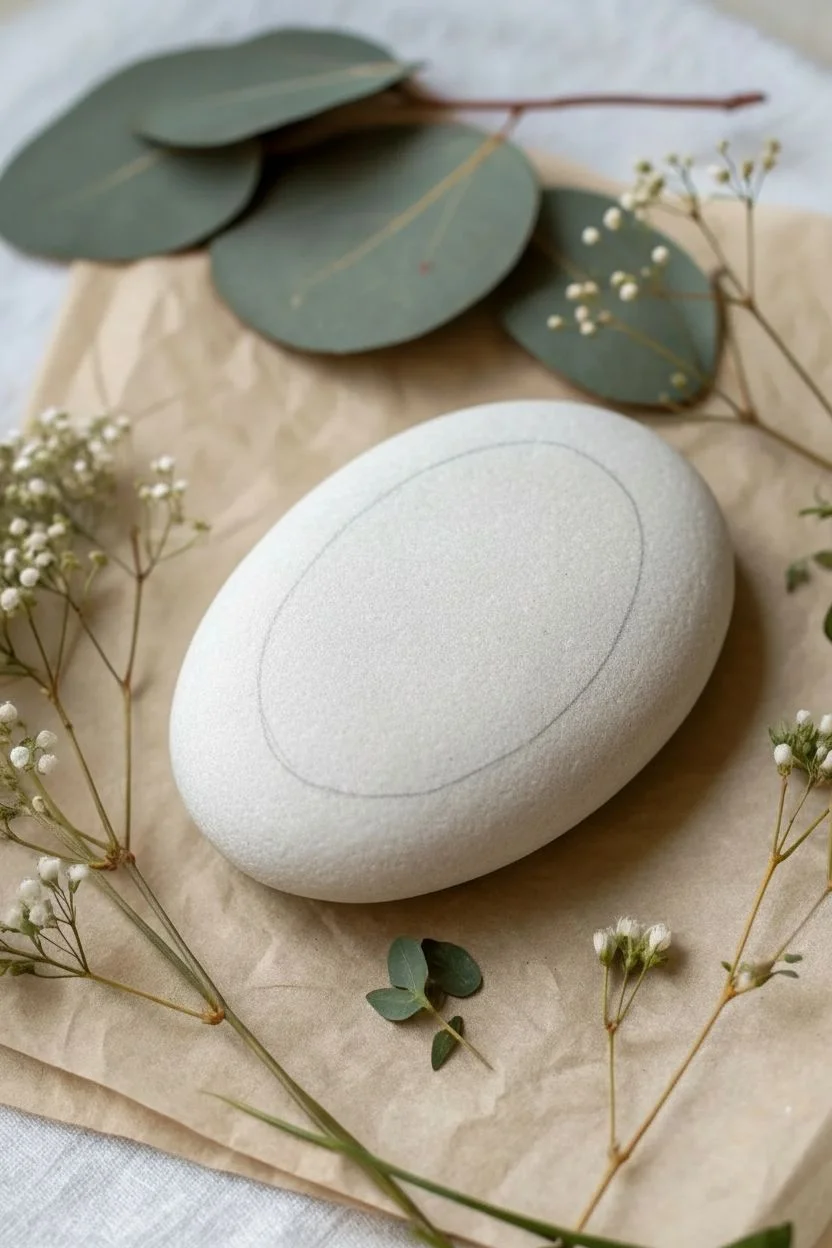
- Smooth, flat oval river rock (light grey or white)
- Matte acrylic paints (titanium white, sage green, olive green, blush pink, coral, burgundy, deep brownish-red)
- Fine detail brushes (sizes 0, 00, and 000)
- Pencil (H or HB for light lines)
- Eraser
- Mixing palette
- Water cup and paper towels
- Matte spray varnish or sealant
Step 1: Preparation & Base
-
Clean and prep:
Scrub your stone with soapy water and let it dry completely to ensure the paint adheres properly. -
Prime the surface:
If your rock is darker than the one shown, gently sponge on a very thin, translucent layer of watered-down white acrylic to create a brighter canvas without losing the stone’s natural texture. -
Sketch the framework:
Using a light hand, draw a faint oval or circle in the center of the rock with your pencil to guide the wreath’s shape.
Step 2: Painting the Greenery
-
Mix your greens:
Create two shades of green: a dusty sage (green mixed with white and a tiny dot of brown) and a deeper olive. -
Start the main stems:
Using your size 00 brush and the sage mixture, paint wispy, curving stems that follow your pencil guide, leaving small gaps for the flowers. -
Paint fern leaves:
For the fern-like fronds, use tiny, rhythmic strokes pulling away from the stem; I find that keeping the pressure very light at the tips creates the most realistic taper. -
Add darker foliage:
Switch to the olive green and paint darker, broader leaves interspersed among the lighter ferns to create depth and contrast. -
Layering details:
Paint thin veins on the larger leaves using your finest brush (000) and a slightly darkened version of your green mix.
Fixing Shaky Lines
If your fine lines look wobbly, thin your paint with a tiny drop of water until it has an ink-like consistency. This helps the paint flow smoothly off the brush without dragging.
Step 3: Adding the Blooms
-
Block in the main flowers:
Mix a soft blush pink color. Paint the base shapes of the wild roses—usually five rounded petals—placed strategically around the wreath. -
Add secondary blooms:
Using a coral or peachy tone, add smaller, fuller flower shapes to balance the composition. -
Detail the petals:
Once the base pink is dry, mix a slightly darker rose shade and paint tiny lines radiating from the center of the flowers to separate the petals. -
Creating flower centers:
Dot the centers of the open flowers with a mix of yellow and light brown to create the stamen cluster. -
Add red berries:
Dip the tip of a stylus or the back of a brush handle into burgundy paint and gently dot small clusters of berries near the tips of the stems. -
Paint berry stems:
Connect these floating red dots to the main wreath with hairline-thin brown strokes.
Pro Tip: Vintage Look
To get that vintage botanical illustration look, wash a very diluted glaze of warm brown or ‘antique white’ over the finished flowers to tone down their brightness.
Step 4: Finishing Touches
-
Review and refine:
Step back and look at the balance; if there are empty spots, add tiny, floating leaves or single dots to fill the space without crowding it. -
Clean up sketch lines:
Ensure the paint is bone dry, then gently erase any visible pencil marks from your initial guide circle. -
Seal the artwork:
Apply two light coats of matte spray varnish, allowing drying time between coats, to protect the delicate details without adding an unnatural gloss.
Place your finished botanical stone within a styled vignette or gift it as a permanent bouquet to a friend


Classic Black-and-White Mandala Dot Rocks
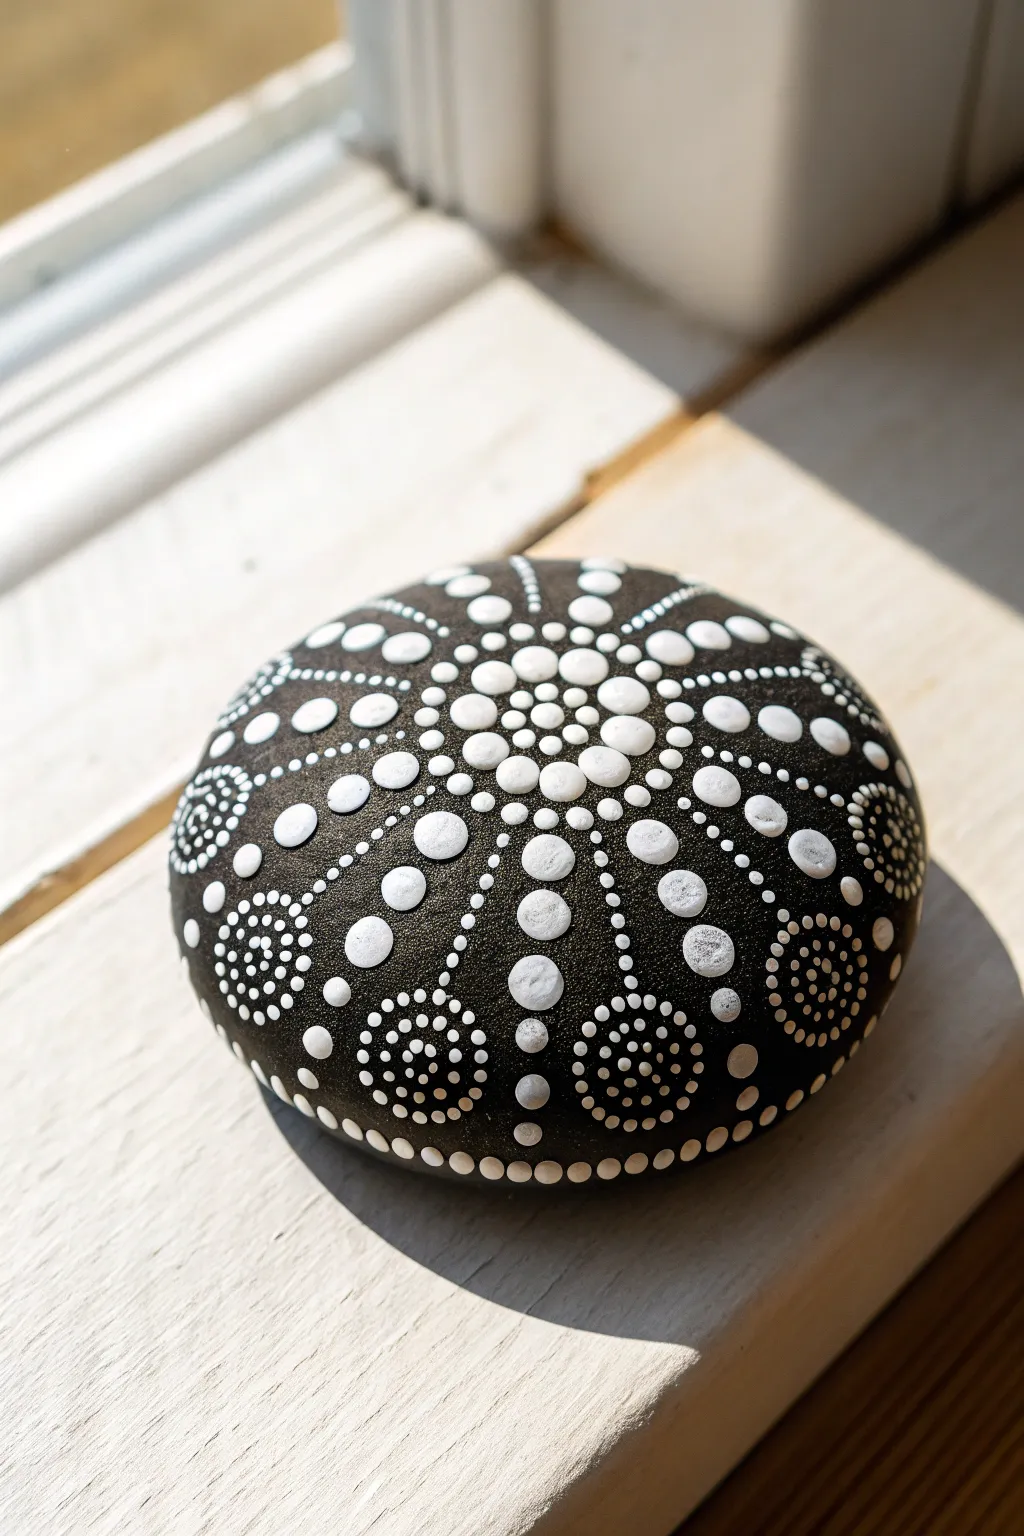
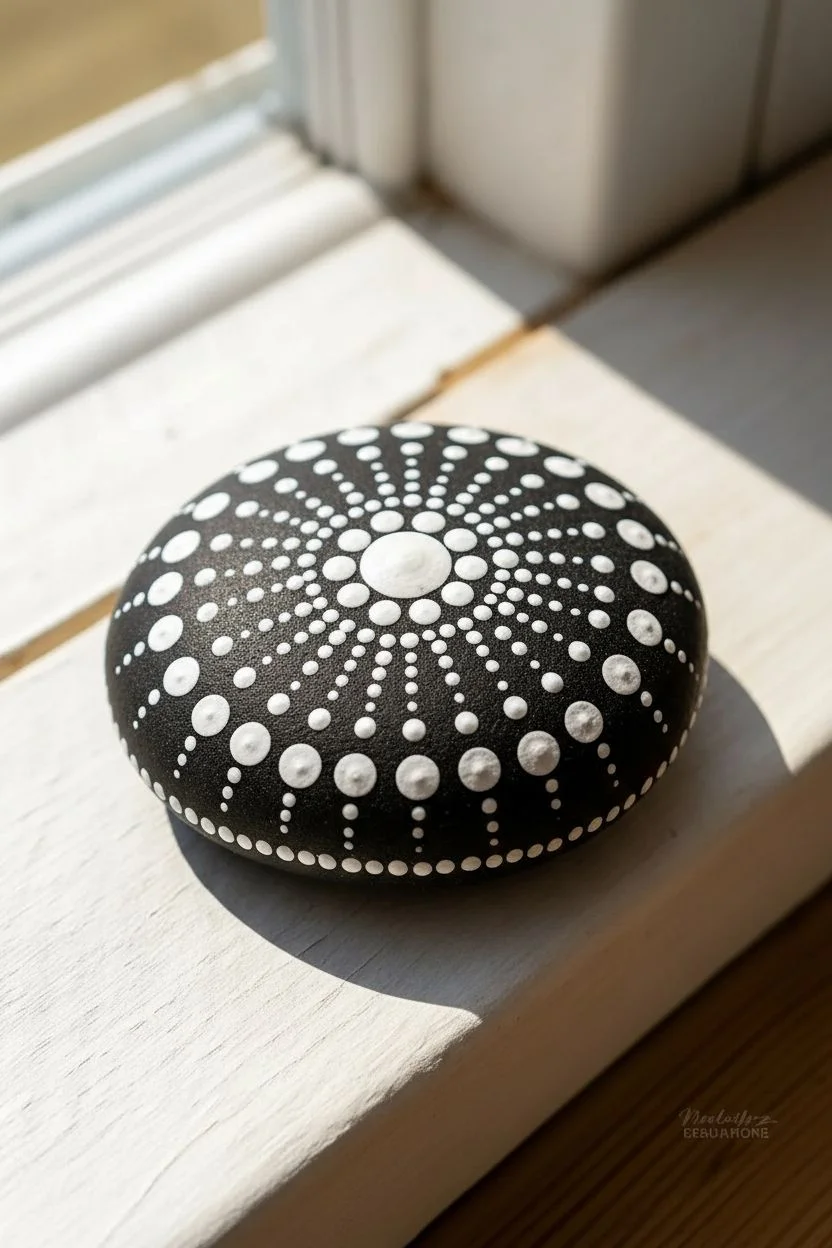
This elegant rock painting project relies on high contrast to make a striking statement, using only crisp white dots against a naturally dark stone background. The design radiates outward in a mesmerizing symmetrical pattern, combining simple dots with concentric circles for a truly hypnotic effect.
Step-by-Step
Materials
- Smooth, round river rock (dark grey or black)
- Black acrylic paint (optional, for base coat)
- White acrylic paint (heavy body or multi-surface works best)
- Dotting tools (various sizes from 1mm to 6mm)
- Matte or satin spray varnish
Step 1: Preparation and Center
-
Prepare the Canvas:
Begin by washing your stone with soap and water to remove any dirt or oils. Let it dry completely. If your natural stone isn’t dark enough, apply a coat of black acrylic paint to create a uniform background. -
Find the Center:
Visually locate the center of the stone’s highest point. Place your first medium-sized dot (about 3-4mm) right in the middle using fresh white paint. -
First Ring:
Using a smaller dotting tool, place tiny dots immediately surrounding the central dot. Aim for about 10-12 dots that lightly touch or sit very close to the center dot. -
Second Ring:
Move up one tool size. Place a ring of dots in the ‘valleys’ between the dots of the previous ring. This technique, called staggering, helps maintain the circular shape.
Consistency Is Key
Mix your paint with a tiny drop of pouring medium or water if it peaks too much. You want the paint to settle into a smooth, raised dome, not a Hershey’s Kiss shape.
Step 2: Expanding the Pattern
-
Third Ring Expansion:
Increase your tool size again. Place a larger dot directly above every other dot from the previous row. This creates space for the intricate pattern to breathe. -
Connecting Dots:
Fills the gaps between your larger dots with two smaller dots to create a continuous circle. -
The Starburst Effect:
Select your largest dotting tool so far. Place a bold white dot at the 12, 3, 6, and 9 o’clock positions relative to your center, then fill in the diagonals so you have eight main radiating points. -
Walking the Dots:
This is a key technique. reload your small tool with paint, place a dot at the top of one of your large ‘starburst’ dots, and then walk the dots down one side without reloading the paint. Repeat on the other side to frame the large dot. -
Repeat Walking:
Continue this ‘walking the dots’ framing technique for all eight of your main radial points.
Step 3: Outer Details and Border
-
Secondary Large Dots:
In the V-shaped spaces created between your starburst points, add a medium-large dot. This fills the negative space and balances the design. -
Framing the New Layer:
Use a very fine tool to create a delicate ring of tiny dots around these new medium-large dots. I find rotating the rock as I work helps keep my hand steady here. -
The Swooping Lines:
Create the long ‘spokes’ seen in the image by placing a graduated series of dots—starting large and getting progressively smaller—radiating outward from the center pattern toward the edge of the stone. -
Circular Motifs:
Near the bottom or outer edge of the design, create standalone circular clusters. Place a central dot and surround it with two rings of progressively smaller, tightly packed dots. -
Edge Finishing:
Finish the design by running a line of evenly spaced medium dots along the lower perimeter of the rock, grounding the entire mandala. -
Final Cure:
Allow the paint to cure for at least 24 hours. The thick dots take longer to dry than standard brushwork. -
Seal the Artwork:
Once fully dry, spray with a matte or satin varnish to protect the paint from chipping without adding too much distracting glare.
Level Up: Gradient Joy
Instead of pure white, mix a gradient of greys. Start with white in the center and slowly darken the grey as you move outward for a tunnel-vision 3D effect.
Place your finished stone near a window or in a garden nook where the light can catch the texture of the dots


Pastel Rainbow Gradient Rocks
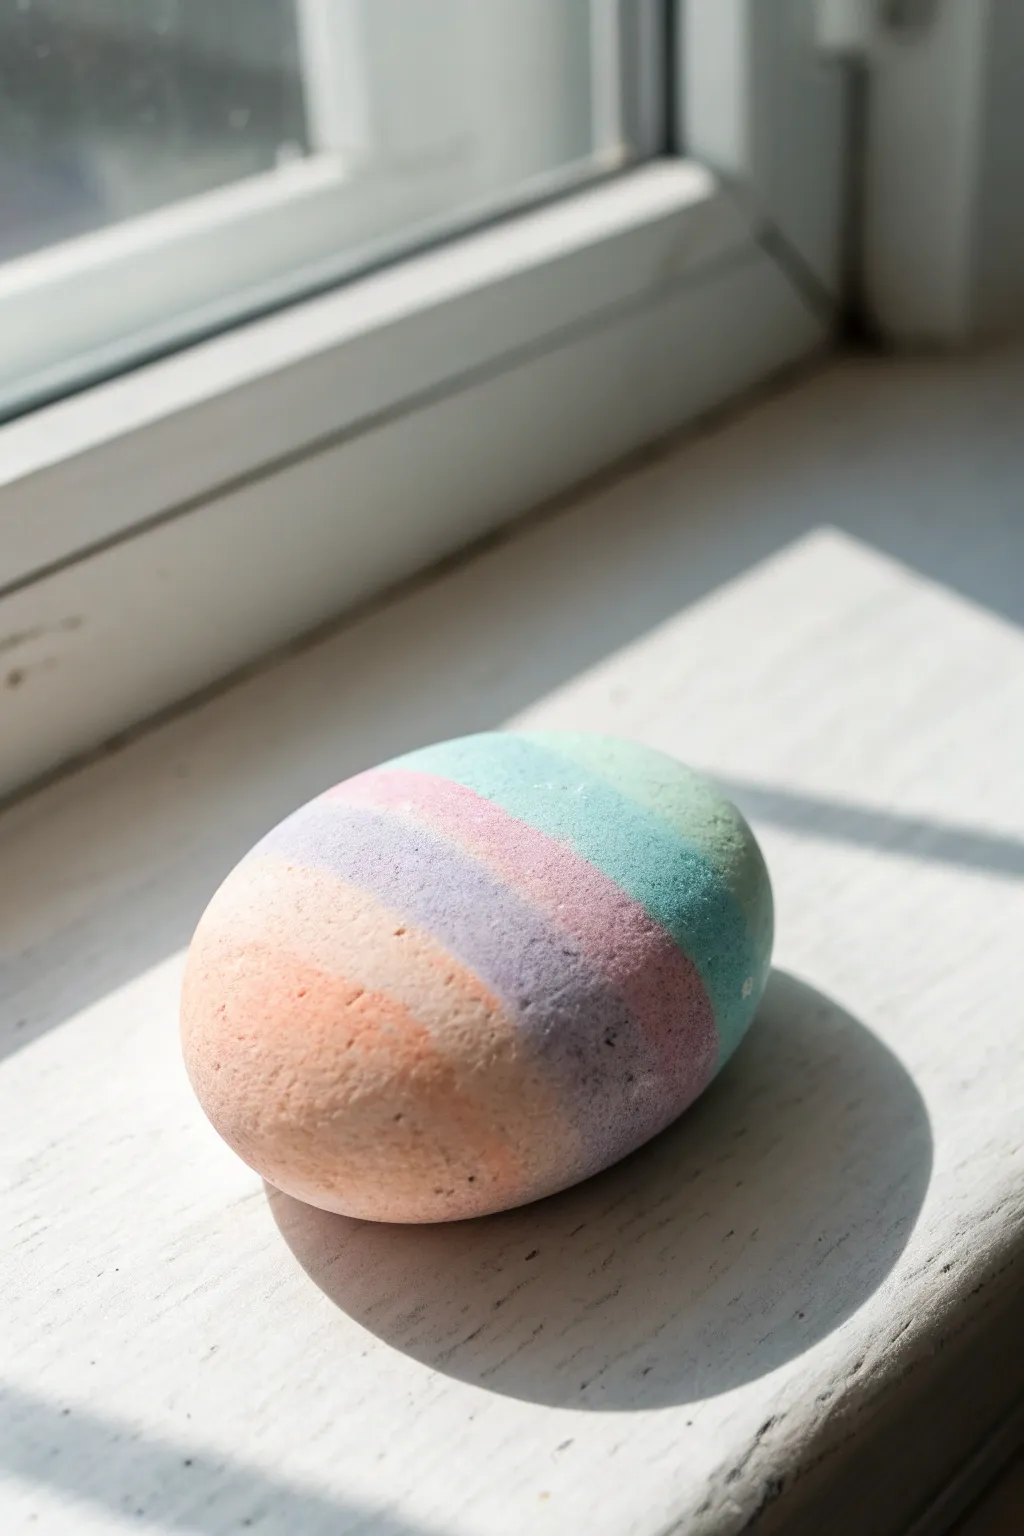
Capture the soft, calming essence of a sunrise with this pastel gradient rock painting. The gentle transition between peach, lavender, and mint creates a soothing decorative piece that looks beautiful on any windowsill.
Step-by-Step Guide
Materials
- Smooth, oval river rock (about palm-sized)
- Mild soap and water
- White gesso or white acrylic primer
- Matte acrylic paints (Peach, Lavender, Soft Pink, Mint Green, Teal)
- Flat shader brush (size 6 or 8)
- Small round brush for touch-ups
- Palette or paper plate
- Sponge dabber (optional)
- Matte spray sealant
Step 1: Preparation and Priming
-
Clean the canvas:
Begin by scrubbing your rock thoroughly with mild soap and warm water to remove any dirt or oils that might prevent paint adhesion. -
Dry completely:
Let the stone dry fully, preferably in the sun, to ensure no moisture remains trapped inside the porous surface. -
Base coat application:
Apply a layer of white gesso or white acrylic primer over the entire top surface of the rock. This step is crucial for making pastel colors pop. -
Smooth the base:
If the first coat looks streaky, let it dry and apply a second thin coat of white. Aim for an opaque, smooth surface.
Seamless Blending
Keep a small sponge handy. While the paint is wet, gently dabbing the line between colors can create a softer, airbrushed transition than a brush alone.
Step 2: Layering the Pastels
-
Start with peach:
Load your flat brush with the peach paint. Starting at one end of the rock (the ‘bottom’), paint a generous curved band that follows the natural rounded shape of the stone. -
Feather the edge:
While the paint is still wet, lightly feather the upper edge of the peach stripe to prepare it for blending. -
Apply the next tone:
Clean your brush and pick up the soft pink or light lavender shade. Paint the next stripe directly adjacent to the peach, slightly overlapping the wet edge. -
Blend the transition:
Using a slightly damp (but not dripping) brush, gently work back and forth where the two colors meet to soften the line. I like to keep a light touch here so the colors merge without becoming muddy. -
Continue the gradient:
Move on to your next cooler tone, perhaps a deeper lavender or blue-violet. Paint this stripe across the middle, continuing to curve the line with the rock’s geometry. -
Add the cool tones:
Apply the teal or light blue paint next. Maintain the same width as the previous stripes for a balanced look. -
Finish with mint:
Paint the final tip of the rock with the mint green shade, blending it softly into the previous teal layer.
Add Some Sparkle
Once the paint is dry, paint a thin line of metallic gold or silver between each color stripe for a sophisticated, high-end geometric look.
Step 3: Refining and Sealing
-
Evaluate the texture:
Allow the first layer of stripes to dry completely. Pastels can sometimes be sheer, so check if you need a second coat to increase opacity. -
Second coat application:
If needed, carefully repaint over each stripe with its respective color to get that solid, chalky finish seen in the photo. -
Clean up edges:
Use a small round brush with a tiny bit of white paint to tidy up perfectly if any colors bled too far or if the bottom edge is messy. -
Dry time:
Let the rock sit undisturbed for at least an hour. The paint needs to be bone dry before sealing. -
Final seal:
Take the rock outside or to a well-ventilated area. Spray it with a matte sealant. Using a matte finish rather than a glossy one is key to maintaining that soft, velvety aesthetic.
Place your finished pastel rock in a sunny spot to enjoy the calming colors every day


Tiny Butterfly and Moth Accent Rocks
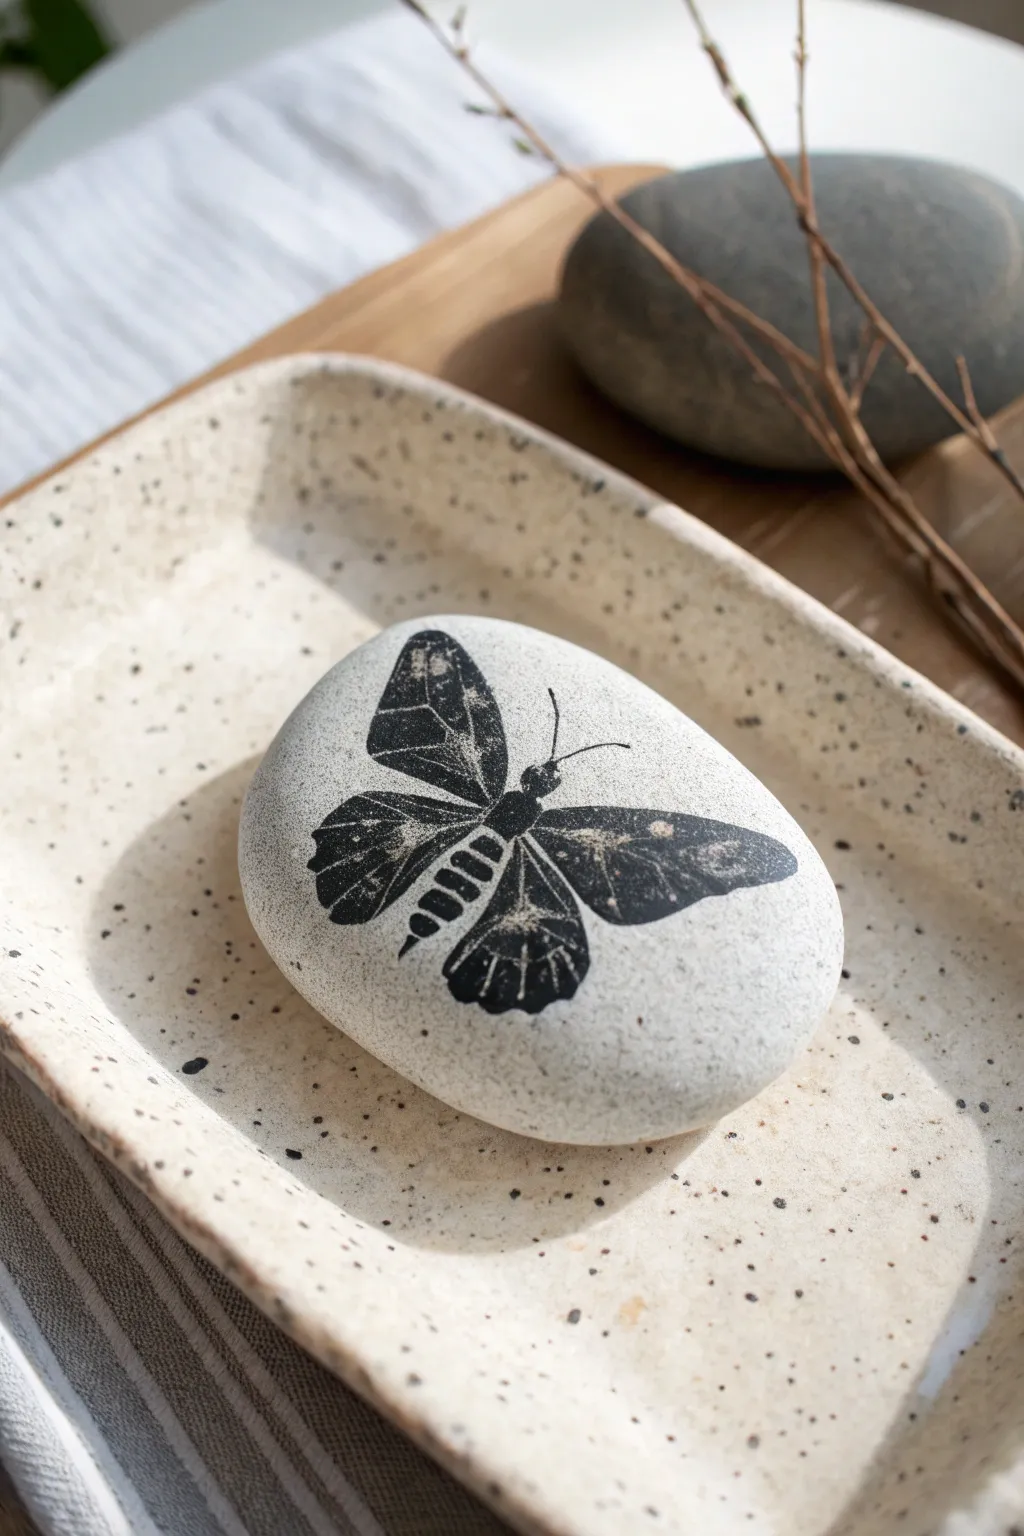

Embrace the beauty of simplicity with this elegant rock project that mimics the look of a vintage botanical print. By transferring a detailed butterfly design onto a smooth white stone, you create a sophisticated accent piece that looks equally stunning in a garden or on a vanity tray.
Step-by-Step
Materials
- Smooth, flat white or light grey river rock (matte finish)
- Black acrylic paint or black permanent ink pad
- Detailed butterfly rubber stamp
- Small foam pouncer or makeup sponge
- Matte spray sealer (clear)
- Scrap paper (for testing)
- Rubbing alcohol and cotton pad
- Fine-point black permanent marker (stipple shading optional)
Step 1: Preparation and Planning
-
Select the perfect canvas:
Choose a rock that is exceptionally smooth and relatively flat on top. A lighter color like off-white or pale grey is crucial for high contrast, ensuring the black ink stands out crisply against the background. -
Clean the surface:
Wipe the rock down thoroughly with rubbing alcohol and a cotton pad. This removes any oils or fine dust that might prevent the ink or paint from adhering properly to the stone’s pores. -
Test your stamp:
Before touching the rock, practice stamping your butterfly design onto a piece of scrap paper. Get a feel for how hard you need to press to get a clear image without smudging the fine lines of the wings.
Step 2: Applying the Design
-
Load the paint:
Squeeze a small amount of black acrylic paint onto a palette. Take your foam pouncer or sponge and dab it into the paint, then dab off the excess on your palette until the sponge feels almost dry. -
Inking the stamp:
Instead of pressing the stamp into the paint, gently dab the sponge over the rubber stamp surface. I find this gives much more control than dipping and prevents paint from clogging the tiny crevices of the butterfly’s veins. -
Check coverage:
Look closely at the rubber stamp. The raised areas should look shiny and black, but there shouldn’t be any globs of paint pooling in the details. -
Position the stamp:
Hover the stamp over the center of the rock to align it. Once you are happy with the placement, commit to the motion and press straight down. -
Apply steady pressure:
Hold the stamp firmly against the curved surface of the rock. Gently ‘rock’ your hand slightly north, south, east, and west without lifting or sliding the stamp. This ensures the flat stamp makes contact with the curved stone surface. -
The reveal:
Lift the stamp straight up, quickly and cleanly. Don’t worry if the image looks slightly distressed or faded in spots; this adds to the vintage, fossil-like aesthetic shown in the photo.
Stamp trick
If your rock is very curved, unmount the rubber stamp from its wooden block. Flexible rubber can bend to hug the rounded stone surface for a print without gaps.
Step 3: Refining and Sealing
-
Assess the details:
Inspect the butterfly’s antennae and body. If the transfer was too light in critical areas, use a fine-point black permanent marker to carefully touch up the lines, keeping a light hand. -
Add texture (optional):
If your print looks too solid, you can gently scratch away tiny bits of dried paint with a needle or toothpick to mimic the weathered texture seen on the wings in the example image. -
Let it cure:
Allow the paint or ink to dry completely. Since the layer is thin, 15 to 20 minutes should be sufficient, but patience is key to avoiding smears during sealing. -
First sealing coat:
Hold your matte spray sealer about 10 inches away from the rock. Apply a very light mist coat. Do not spray heavily, as wet sealer can sometimes cause ink or fresh acrylic to bleed. -
Wait and repeat:
Let the mist coat dry for 30 minutes. This locks the design in place. -
Final protection:
Follow up with a slightly heavier coat of matte sealer to protect the stone from scratches and weather if you plan to keep it outdoors.
Go gold
Once the black ink is dry, add tiny dots of metallic gold paint to the wing tips or body segments for a subtle shimmer that catches the sunlight.
Place your new butterfly stone in a plant pot or on a sunny windowsill to enjoy its delicate charm
BRUSH GUIDE
The Right Brush for Every Stroke
From clean lines to bold texture — master brush choice, stroke control, and essential techniques.
Explore the Full Guide
Cozy Sunset and Ocean Horizon Rocks
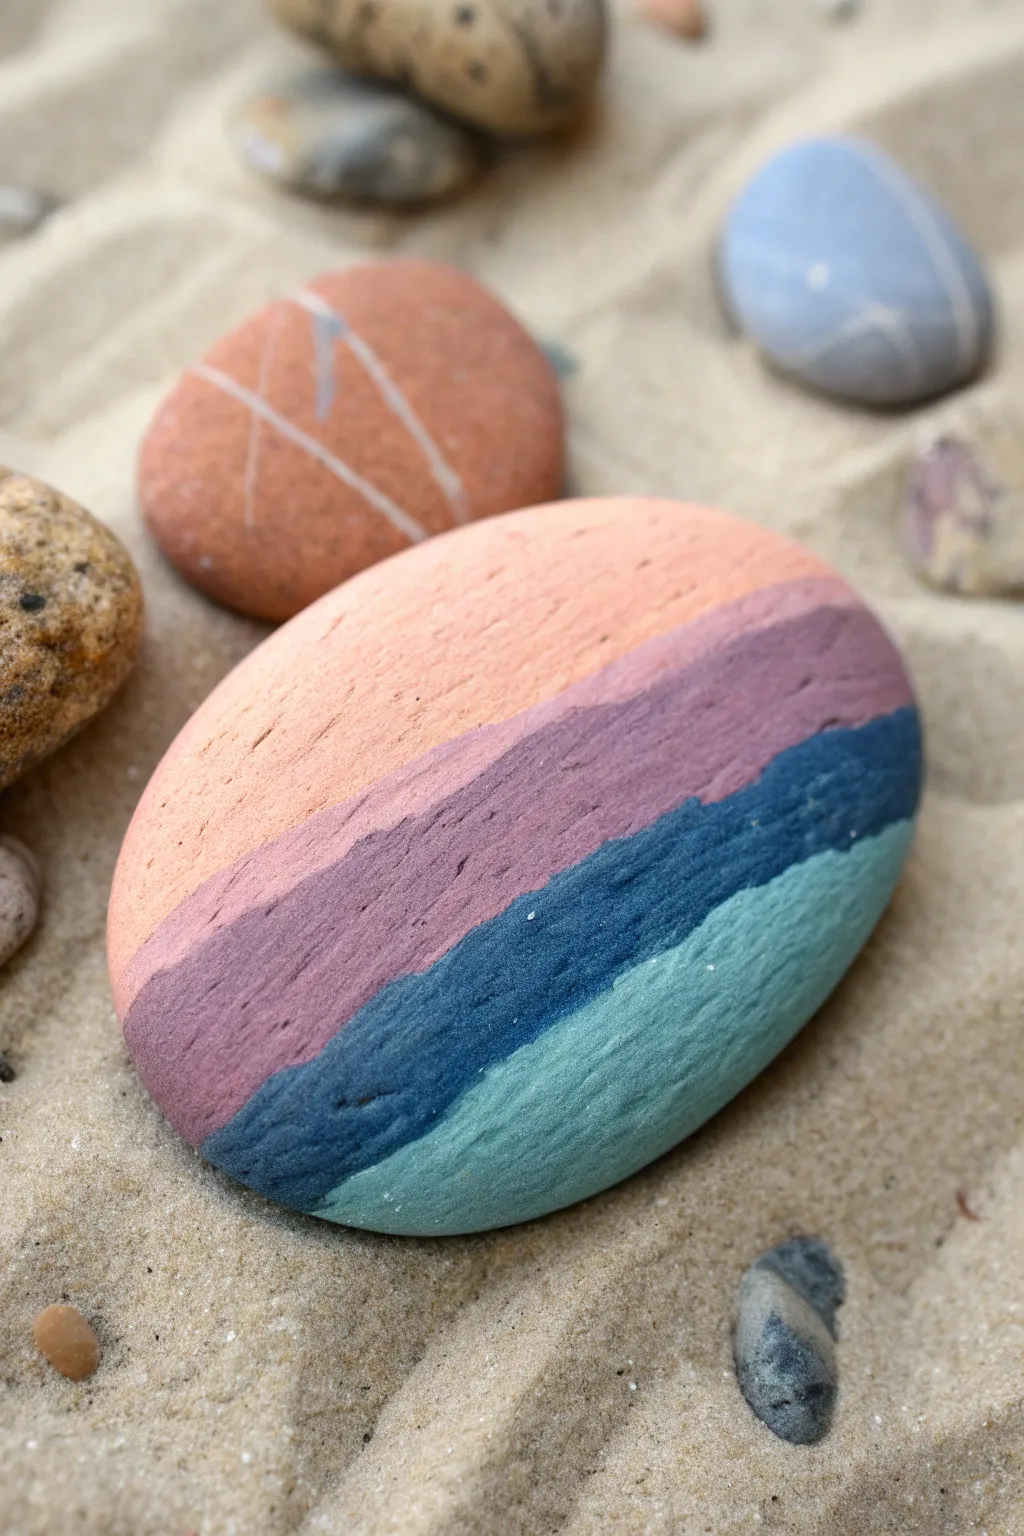
Capture the serene beauty of a twilight seascape with this simple yet stunning striped rock design. This project uses soft, matte blocks of color to create a calming horizon effect that mimics the layers of a setting sun fading into the ocean.
Step-by-Step Guide
Materials
- Smooth, oval-shaped river rock
- Acrylic paints (peach, mauve/dusty rose, deep teal, light teal/seafoam)
- Flat paintbrushes (size 4 and 8)
- Small round detail brush
- Pencil (optional)
- Matte sealant spray or varnish
- Palette or small plate for mixing
- Water cup and paper towels
Step 1: Preparation
-
Clean Your Surface:
Begin by thoroughly washing your chosen stone with soap and water to remove any dirt or oils. Let it dry completely in the sun or use a hair dryer to speed up the process. -
Plan the Bands:
Visualize four distinct, wavy horizontal sections on your rock. If you prefer precision, lightly sketch these organic wave lines with a pencil, ensuring the sections are roughly equal in height but natural in shape.
Keeping it Matte
To perfectly replicate the stone-like finish in the photo, avoid glossy craft paints. Use matte acrylics or mix a tiny bit of cornstarch into standard paint to dull the shine.
Step 2: Painting the Sunset Layers
-
Mix the Peach Tone:
On your palette, mix white with a small drop of orange and a tiny touch of pink to achieve a soft, warm peach color. Aim for a milky, pastel consistency. -
Apply the Top Section:
Using the larger flat brush, paint the top quarter of the rock with your peach mixture. Follow the natural curve of the stone and your pencil line. -
Smooth the Edge:
Create a gently waving bottom edge for the peach section. Don’t make it a straight line; a slight ripple looks more organic. -
Prepare the Mauve:
Mix a dusty purple shade by combining purple, white, and a very small amount of burnt sienna or brown to desaturate it. It should look like a muted twilight cloud. -
Paint the Second Band:
Apply the mauve paint directly below the peach section. Carefully bring the paint up to meet the peach edge without overlapping too much. -
Refine the Connection:
Use the smaller brush to neaten the seam between the peach and mauve. A tiny gap or a very slight overlap is fine, as it adds to the hand-painted texture.
Step 3: Painting the Ocean Layers
-
Mix the Deep Teal:
Create a rich, dark teal by mixing phthalo blue with a little green and a touch of black or dark grey. This layer represents the deep ocean water. -
Apply the Third Band:
Paint the third section with this dark teal color. I find using a size 4 flat brush gives better control here since you are working in the middle of the stone. -
Create Texture:
While applying the dark teal, you can dab the brush slightly to mimic the texture seen in the reference photo, rather than smoothing it out perfectly. -
Mix the Seafoam Green:
For the final bottom band, mix a light teal or turquoise with plenty of white and a hint of the deep teal you just used to harmonize the colors. -
Paint the Bottom Section:
Fill in the remaining bottom portion of the rock with the seafoam shade. Ensure the paint covers all the way down to the base where the rock rests. -
Define the Waves:
Check the boundaries between all colors. The lines should feel like rolling waves—slightly uneven and organic, not ruler-straight.
Gold Leaf Horizon
Add a brilliant metallic accent by painting a thin line of liquid gold leaf between the peach and mauve sections to mimic the sun’s last ray hitting the clouds.
Step 4: Finishing Touches
-
Second Coat:
Once the first layer is dry to the touch, assess the opacity. Apply a second coat to any color band that looks streaky or where the rock shows through. -
Texture Check:
The charm of this piece is its slightly matte, porous look. If your paint is too thick or glossy, dab it gently with a dry paper towel before it fully dries to remove sheen. -
Let it Cure:
Allow the rock to dry completely, ideally overnight, to ensure the layers stick firmly to the stone surface. -
Seal for Protection:
To maintain the natural, non-glossy aesthetic shown in the photo, finish by spraying a light coat of matte varnish or sealer over the entire painted surface.
Place your finished stone on a shelf or in a planter to add a quiet moment of calm color to your room
Modern Abstract Line Art Faces on Rocks
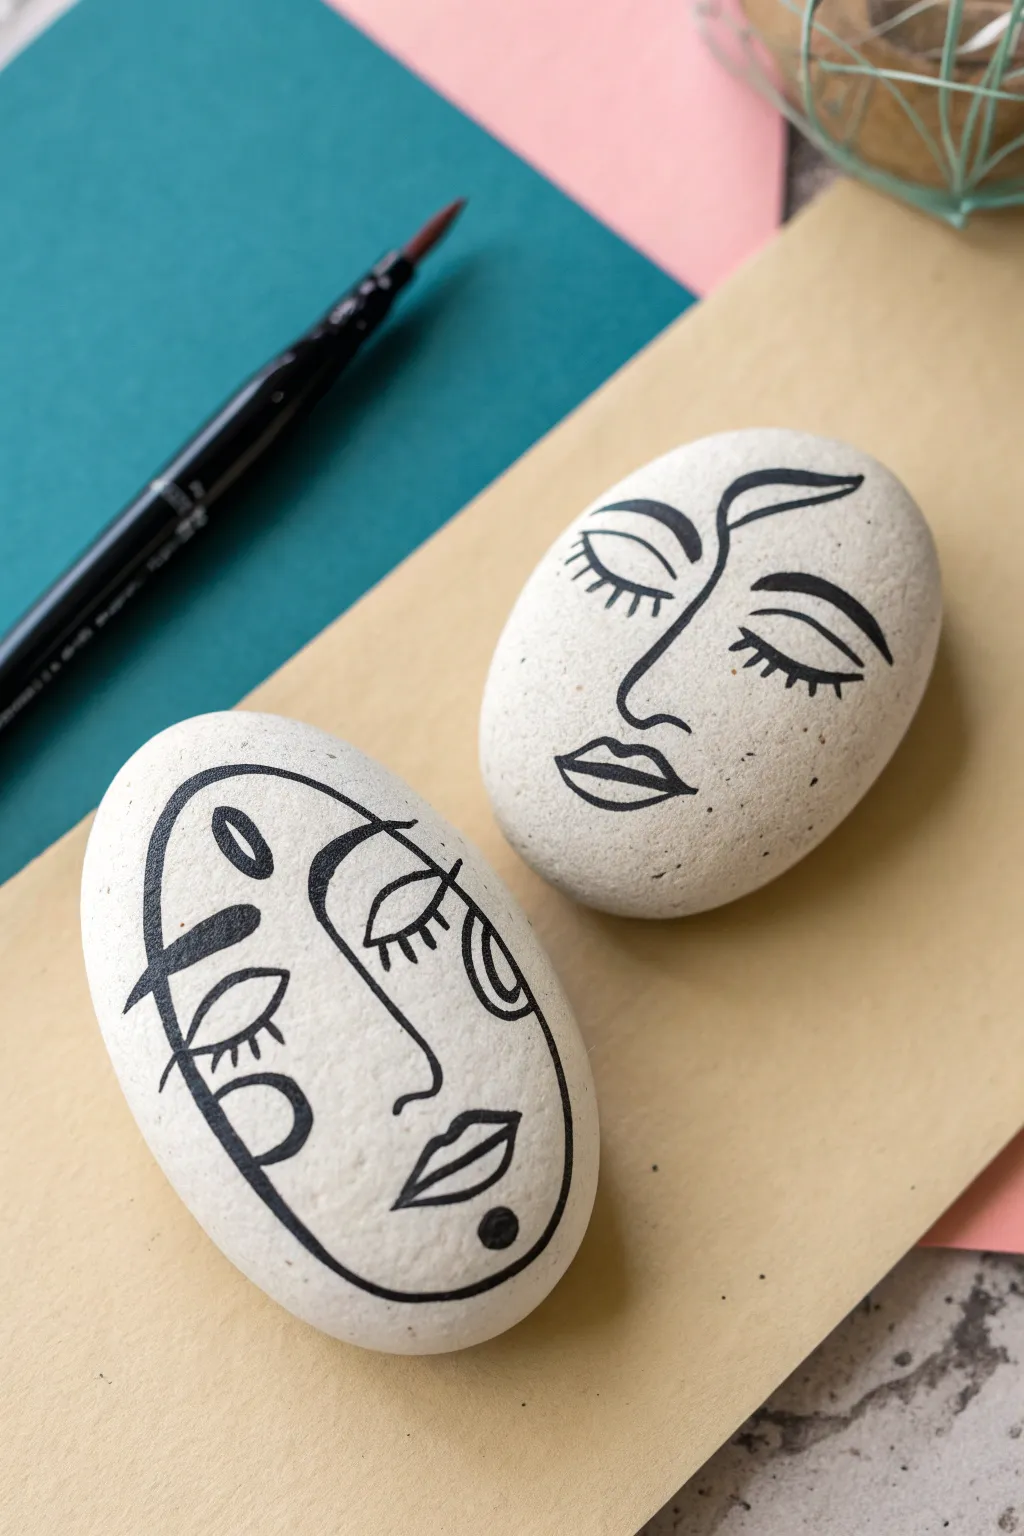
These striking stones bring a touch of gallery-worthy modern art to your home décor using nothing more than smooth pebbles and black paint. The design relies on confident, fluid lines to create abstract faces that feel both timeless and trendy.
Step-by-Step Guide
Materials
- Smooth, flat oval river rocks (light colored)
- Black acrylic paint or a black acrylic paint pen (medium tip)
- Fine-point detail brush (size 0 or 00) if using pot paint
- Pencil (HB or lighter)
- Eraser
- Matte spray sealant (optional)
- Small cup of water
- Paper towel
Step 1: Preparation & Planning
-
Clean the canvas:
Wash your stones thoroughly with soap and water to remove any dirt or oils. Let them dry completely, as moisture will prevent the paint from adhering properly. -
Study the shapes:
Take a moment to look at the natural shape of your rock. Orient it so the smoothest, flattest side is facing up. The stone’s contour often suggests where chin or forehead should go. -
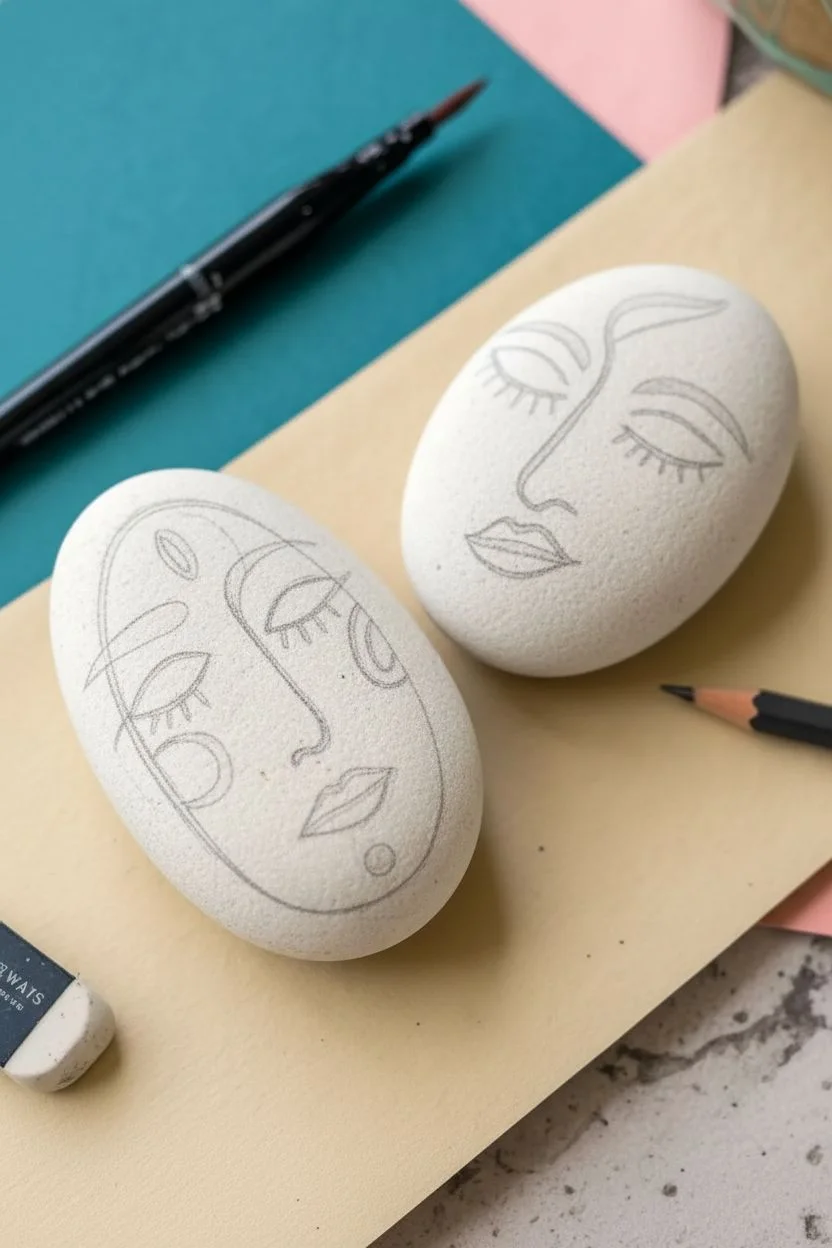
Draft the ‘Dreamer’ (Right Stone):
For the simpler face, lightly sketch a continuous line starting from the forehead down to the nose using your pencil. Keep the pressure very light so graphite doesn’t smudge later. -
Add feature details:
Sketch two closed eyelids with long lashes on either side of the nose bridge. Below the nose, draw a simple upper and lower lip shape. -
Draft the ‘Abstract’ (Left Stone):
For the second stone, sketch an oval outline that follows the rock’s edge but leaves a border. Inside, draw a vertical dividing line that curves to form the nose. -
Complex features:
On the left side of the face, sketch a semi-circle eye and a bold eyebrow. On the right, add a similar eye and a curved line for the cheek. Don’t forget the half-moon shape near the chin.
Steady Hand Secret
Rest your pinky finger on a dry part of the rock while painting. This anchors your hand, giving you much more control over curves.
Step 2: Painting the Lines
-
Prepare your tool:
If using a paint pen, shake it well and press the tip on scrap paper until the ink flows. If using a brush and acrylics, thin your black paint slightly with a drop of water for smoother lining. -
Start with the ‘Dreamer’ nose:
Beginning at the top of the forehead line, trace your pencil mark down to create the nose. I find it helps to exhale slowly while pulling long lines to keep them steady. -
Define the eyes:
carefully paint the curved lines for the eyelids. Use the very tip of your brush or pen to flick the eyelashes outward, making them thick at the base and tapered at the end. -
Bold lips:
Outline the lips and fill them in partly if you want a bolder look, or keep them as open outlines. Ensure the corners crisp and distinct. -
Outline the ‘Abstract’ face:
Moving to the second rock, trace the large outer oval first. Varying the line thickness here creates a more dynamic, artistic look. -
Fill bold areas:
For the abstract face, fill in the solid black shapes first: the left eyebrow, the decorative dot on the chin, and prominent pupils if you added them. -
Connect the features:
Trace the nose line and the eyes. Be careful where lines intersect; allow one wet line to dry for a minute before crossing it with another to avoid smearing. -
Add character marks:
On the simpler face, you can add tiny micro-dots or freckles near the cheek area for texture art imitating stone imperfections.
Color Pop
Add a single spot of color, like a pink cheek circle or gold lips, to make the monochrome design feel even more contemporary.
Step 3: Finishing Touches
-
Erase guidelines:
Once the black paint is 100% bone dry (wait at least 20 minutes), gently gently erase any visible pencil marks. -
Clean up edges:
If any lines look shaky, you can carefully re-go over them to thicken and smooth the curve, or use a damp Q-tip to wipe away wet mistakes immediately. -
Seal the deal:
To protect your art from chipping, especially if these will live outside, apply a light coat of matte spray sealant. Glossy sealant works too but changes the natural stone aesthetic.
Place these sophisticated stones on a stack of books or a desk for an instant creative upgrade to your space

PENCIL GUIDE
Understanding Pencil Grades from H to B
From first sketch to finished drawing — learn pencil grades, line control, and shading techniques.
Explore the Full Guide
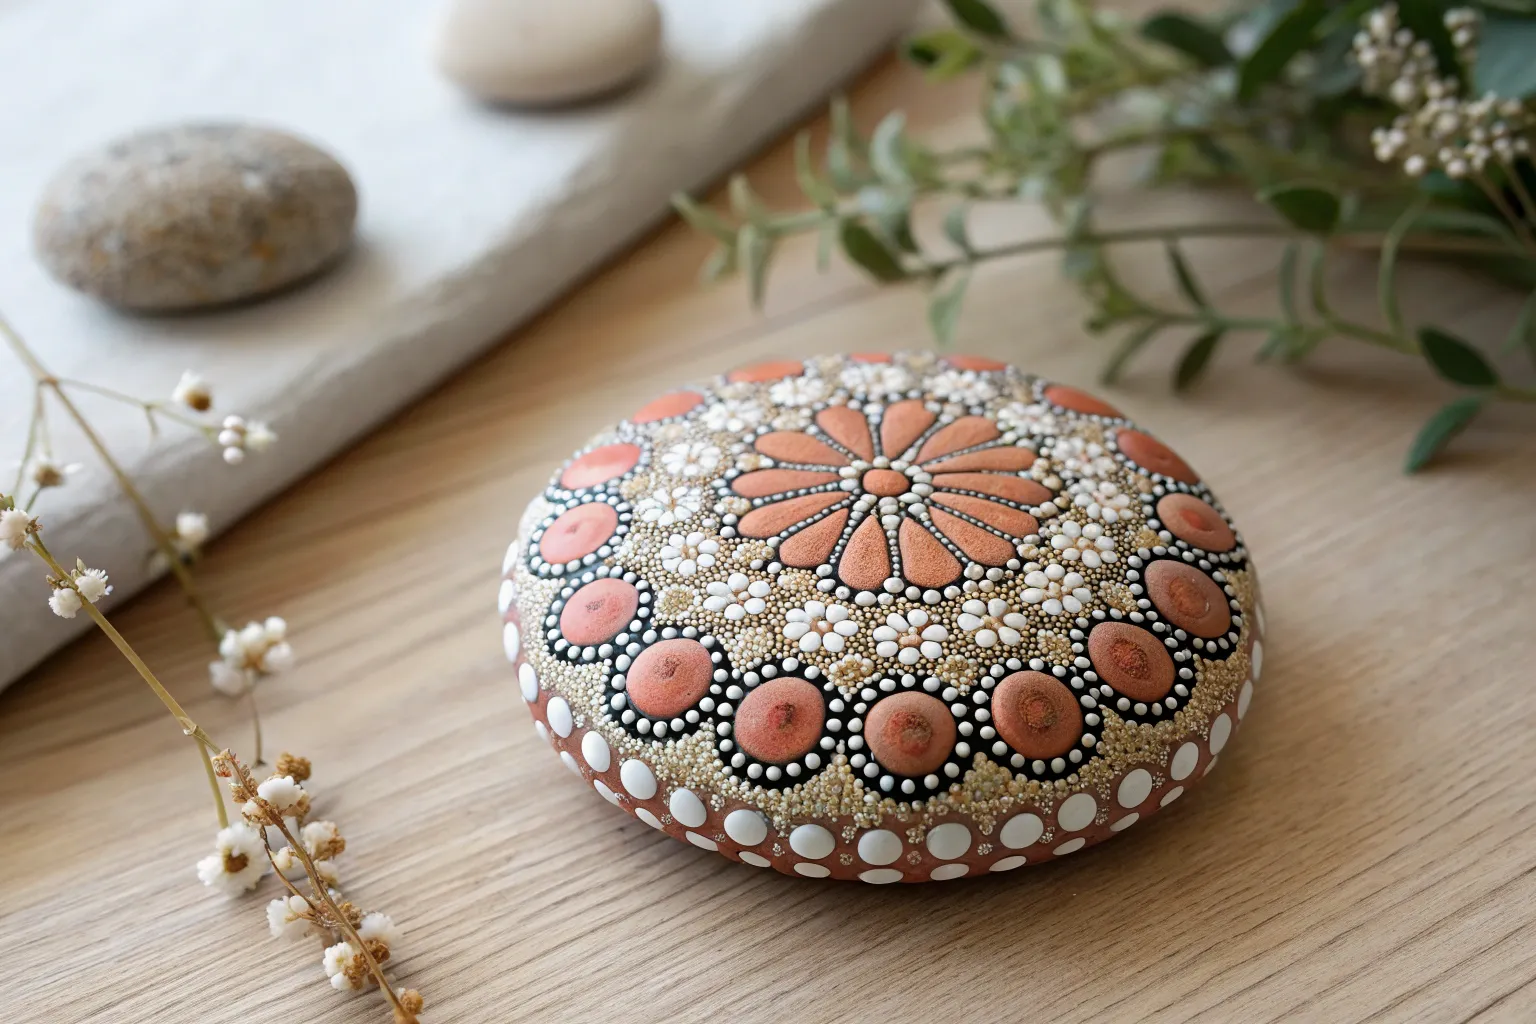
Geometric Pattern Sets (Checks, Stripes, Grids)
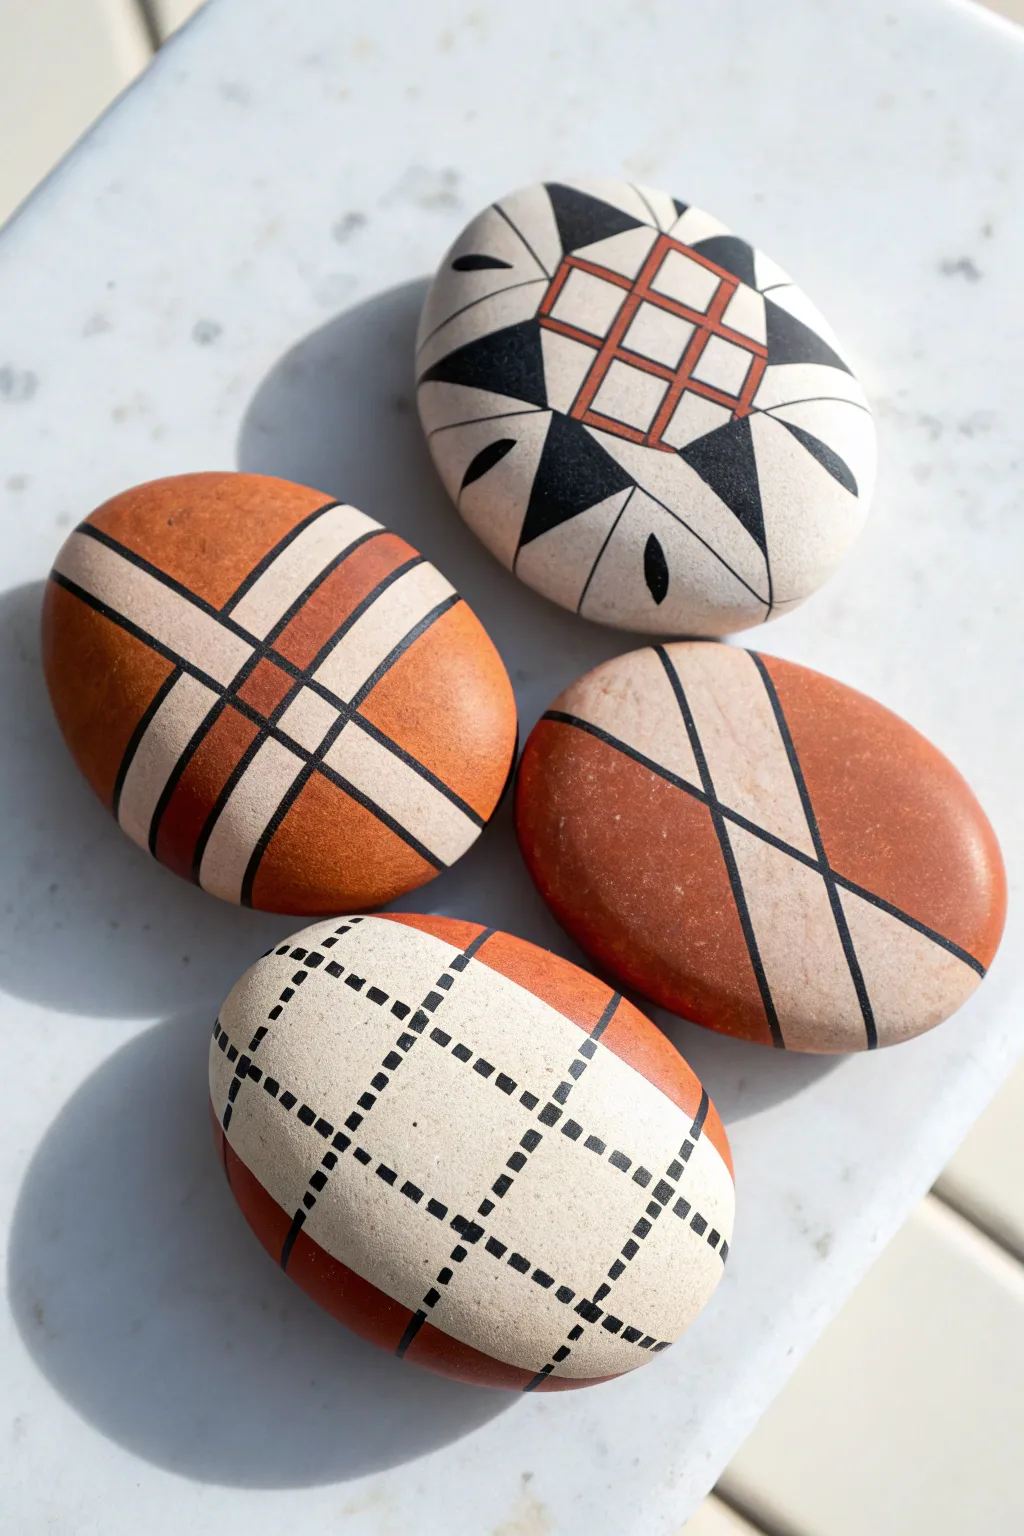
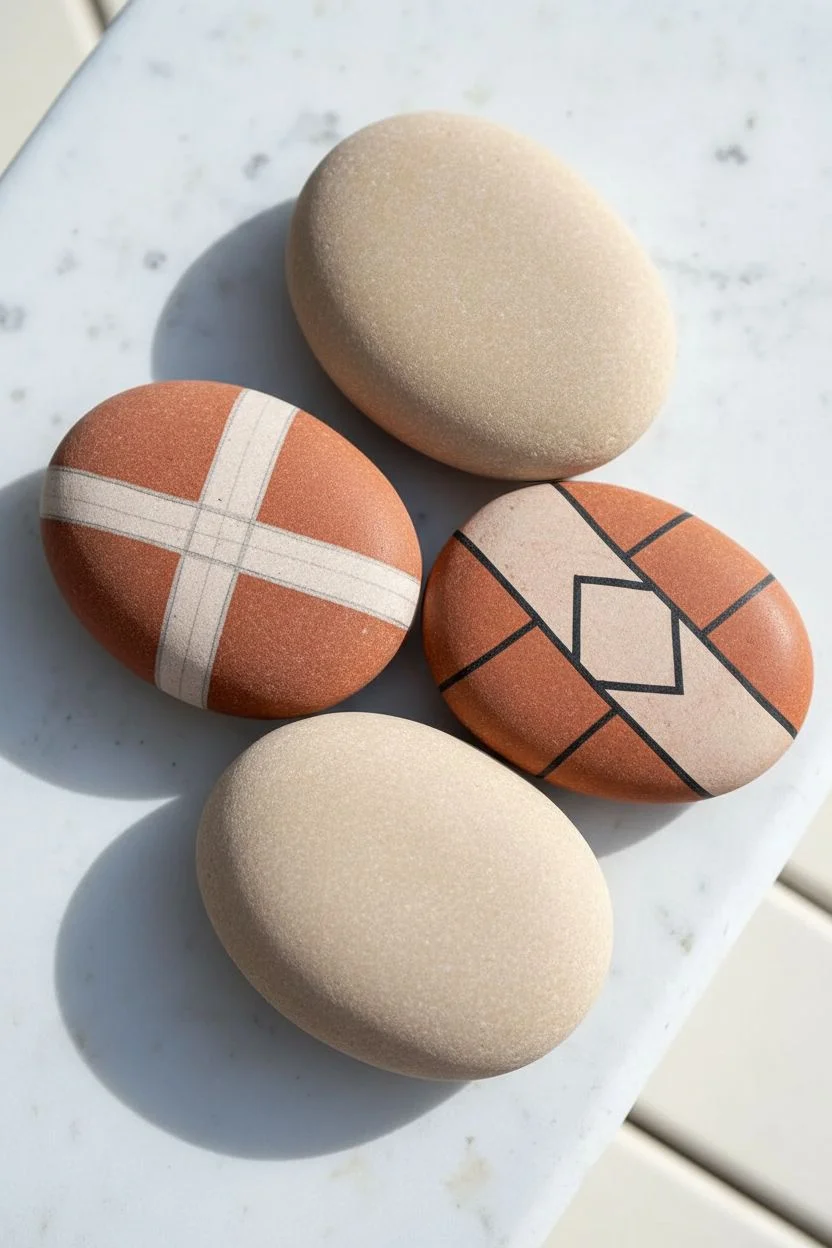
These four distinct stone designs blend warm terracotta tones with crisp black linework to create a modern, cohesive set. From simple grids to complex starbursts, the patterns play with negative space and precision for a sophisticated finish.
Step-by-Step
Materials
- 4 smooth, oval river rocks (cleaned and dried)
- Acrylic paint: Terracotta (or Rust Orange), Cream (or Off-White), and Black
- Fine detail brush (size 0 or 00)
- Flat shader brush (small)
- Pencil for sketching
- Ruler or straight edge (flexible measuring tape is best for curves)
- Matte finish sealant spray
Step 1: Preparation & Base Planning
-
Surface Prep:
Ensure your stones are free of dirt and completely dry. The smoothness of the stone is key here, so if there are rough patches, lightly sand them for a better painting surface. -
Sketching the Divider:
For the two stones that feature large color blocks (the angled cross and the plaid-style), use your pencil to lightly mark the major dividing lines where the cream bands will go.
Step 2: Design 1: The Angled Cross (Right)
-
Painting Color Blocks:
Paint the two outer segments with the terracotta paint, leaving a generously wide ‘X’ shape of raw stone (or paint it cream if your stone isn’t naturally light). -
Creating the Separation:
Once the terracotta is dry, use your detail brush and black paint to outline the terracotta sections. This creates sharp boundaries against the lighter cross. -
The Center Line:
Carefully paint a single thin black line running down the center of each cream arm of the cross, intersecting in the middle.
Wobbly Lines?
If your hand shakes during the long lines, try resting your pinky finger on a dry part of the stone for stabilization. Alternatively, use a fine-tip black paint pen instead of a brush for better control.
Step 3: Design 2: The Plaid Oval (Left)
-
Blocking the Background:
Paint the entire stone terracotta first. This gives a rich, warm base color. -
Establishing the Cross:
Paint a wide cream cross over the terracotta. The vertical band should be centered, while the horizontal band curves around the middle. -
Adding Dimension:
Outline the cream cross with thick black lines. I find it helps to rotate the stone as I pull the brush to keep the line steady. -
The Center Accent:
Paint a small terracotta square right where the cream lines intersect, then outline that square in black to finish the ‘buckle’ look.
Metallic Upgrade
Replace the dashed black lines or the central grid lines with gold leaf or metallic gold paint. This adds a subtle, high-end shimmer that pairs beautifully with the matte terracotta.
Step 4: Design 3: The Dotted Grid (Bottom)
-
The Cream Canvas:
Paint a large, central oval in cream, leaving the very edges of the stone in their natural color or painting them terracotta for contrast. -
Terracotta Tips:
Paint the two ends (tips) of the oval in terracotta, following the curve of the stone. -
Drafting the Grid:
Lightly pencil a grid over the cream section. The lines should curve slightly with the stone’s shape to look 3D. -
Stitching the Lines:
Instead of solid lines, paint small black dashes along your pencil marks to create a ‘stitched’ fabric effect. Keep the spacing consistent.
Step 5: Design 4: The Geometric Starburst (Top)
-
Base and Center:
Start with a clean stone (or paint it cream). In the center top, paint a terracotta grid: a square divided into nine smaller squares. -
The Star Points:
Extending from the central grid, sketch triangular shards radiating outward. Some should be black, some left cream. -
Filling the Black:
Fill in the specific triangular sections with black paint. Notice how the black triangles touch corners with the terracotta grid. -
Detailing the Grid:
Go back to the terracotta center and paint thin cream lines over it to define the separate window-pane squares, effectively creating a grid on top of the orange block. -
Final Touches:
Add the small curved black accents and thin lines near the edges to complete the radial energy of the design.
Step 6: Finishing
-
Cleanup:
Check for any smudges or shaky lines. You can tidy these up by painting over them with the background color. -
Sealing:
Once absolutely dry, apply a matte sealant. A matte finish preserves the natural, earthy aesthetic better than gloss.
Arranged together in a bowl or on a shelf, these stones bring a grounded, artistic touch to your decor
Celestial Moon Phases and Star Map Rocks
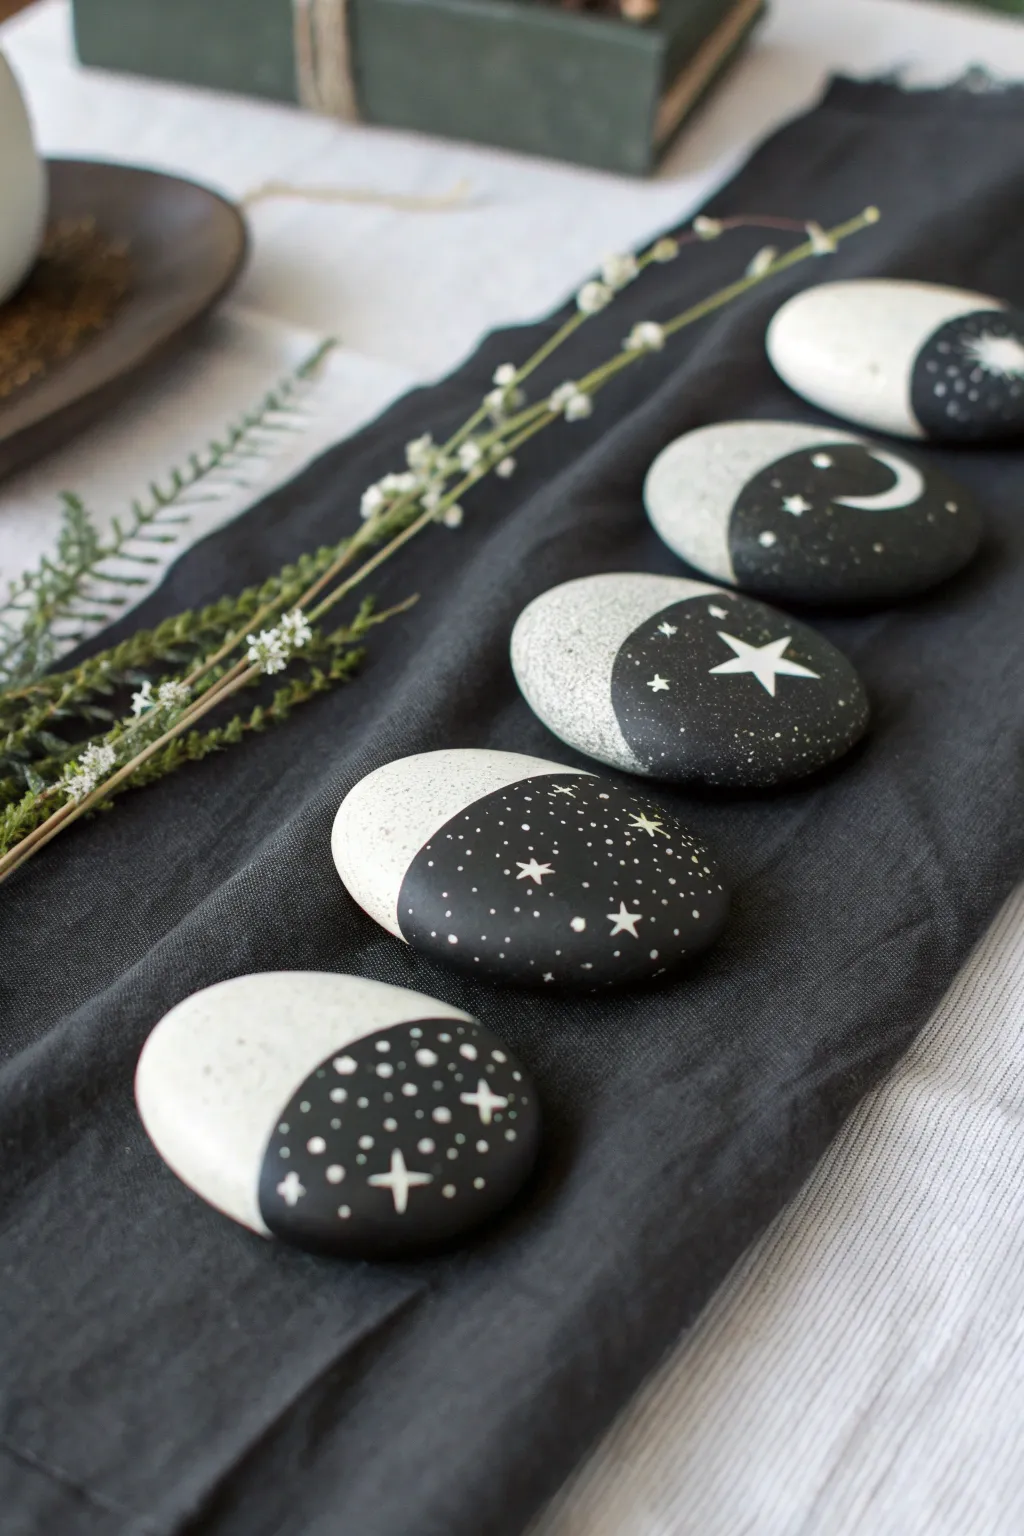
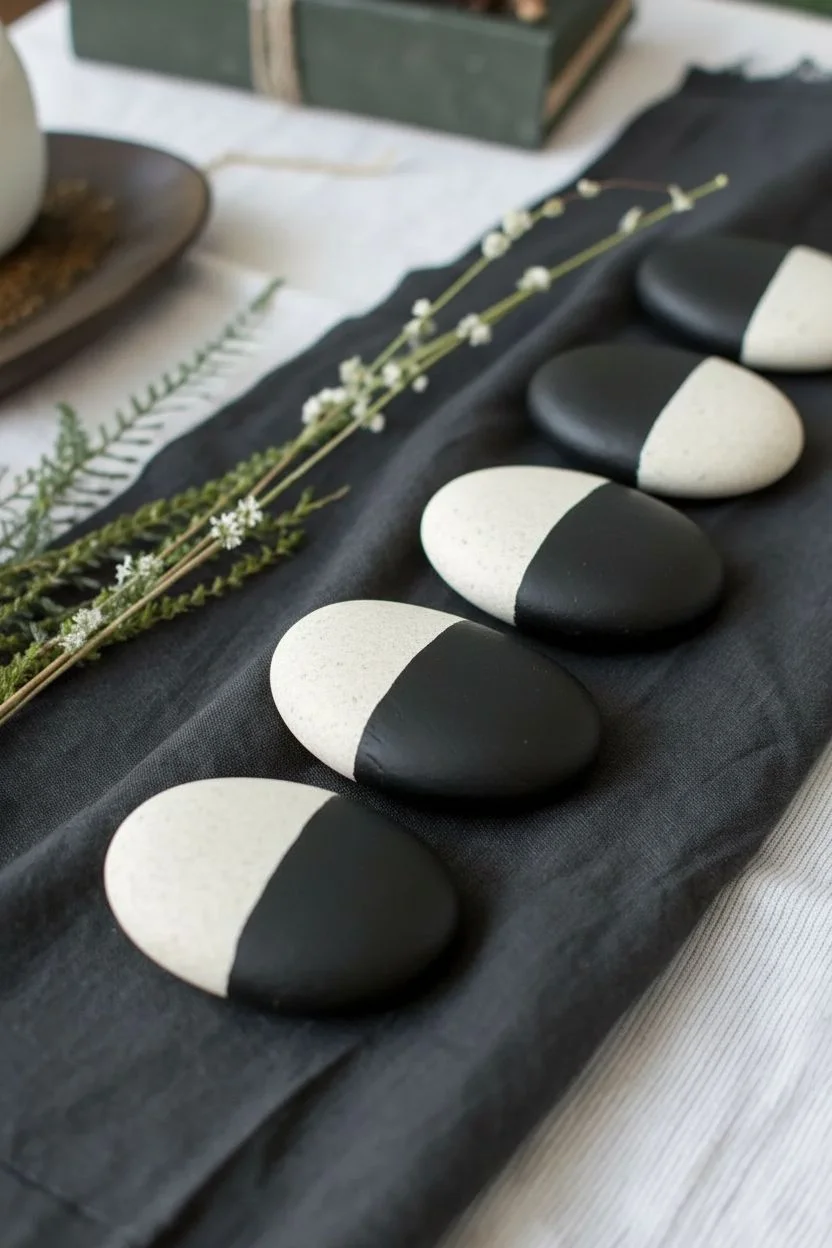
Capture the magic of the night sky with these minimalist, monochrome stones that beautifully balance light and dark. This project creates a stunning five-piece set featuring moon phases and delicate constellations, perfect for meditation altars or celestial decor.
Detailed Instructions
Materials
- 5 smooth, flat river stones (preferably oval or round)
- Matte black acrylic paint
- White or cream acrylic paint
- Painter’s tape or washi tape
- Small flat paintbrush
- Fine detail paintbrush (size 0 or 00)
- Old toothbrush (for splattering)
- Matte varnish or sealant
Step 1: Base Preparation
-
Prepare the Canvas:
Begin by thoroughly washing your stones with soap and water to remove any dirt or oils, then let them dry completely. -
Base Coat (Optional):
If your natural stones are very dark or uneven in color, paint the entire surface with a coat of cream or off-white paint to create a uniform canvas; otherwise, you can leave the light side natural. -
Create the Division:
Decide on the curve for your moon phase. For a crescent or gibbous look, use a curved piece of painter’s tape; for a half-moon, apply a straight strip of tape across the center of the stone. -
Seal the Edge:
Press the tape down firmly, especially at the edge where the paint will meet the stone, to prevent any bleeding underneath.
Step 2: The Night Sky
-
Apply the Darkness:
paint the exposed half of the stone with matte black acrylic. I like to apply two thin coats rather than one thick one for the smoothest finish. -
Let it Dry:
Allow the black paint to dry completely to the touch before attempting to remove the tape. -
The Reveal:
Gently peel back the tape at a sharp angle to reveal the crisp line between the light and dark halves. -
Clean Up Lines:
If any paint bled through, use a tiny brush with a bit of water or white paint to tidy up the dividing edge.
Pro Tip: Crisp Curves
Can’t get the tape to curve perfectly? Cut a circle out of a sticky label or sticker paper and place it on the stone to create that perfect crescent edge.
Step 3: Celestial Details
-
Starry Texture:
Dip an old toothbrush into white paint (slightly watered down) and run your thumb across the bristles to flick tiny specks onto the black section for a distant galaxy effect. -
Adding Major Stars:
Using your finest detail brush, paint small 4-point or 5-point stars on the black background. Varying the size adds depth. -
Moon Features:
On stones representing the crescent moon phase, paint a smaller, crisp white crescent shape within the black field. -
Constellation Lines:
For a ‘star map’ look, connect some of your larger dots with ultra-thin white lines to mimic constellations. -
Highlighting:
Add tiny white dots in clusters around your larger stars to create the look of nebulae or Milky Way dust.
Level Up: Metallic Magic
Instead of plain white for the stars, use metallic silver or pale gold paint. It catches the light beautifully and adds a mystical shimmer to your night sky.
Step 4: Finishing Touches
-
Dry Time:
Ensure all the tiny white details are completely dry so they don’t smear during sealing. -
Sealing:
Apply a coat of matte varnish over the entire stone. A matte finish preserves the organic, stony look better than a glossy one.
Now you have a serene set of celestial stones ready to align your space


Seasonal Tree Series Rocks (Four Seasons)
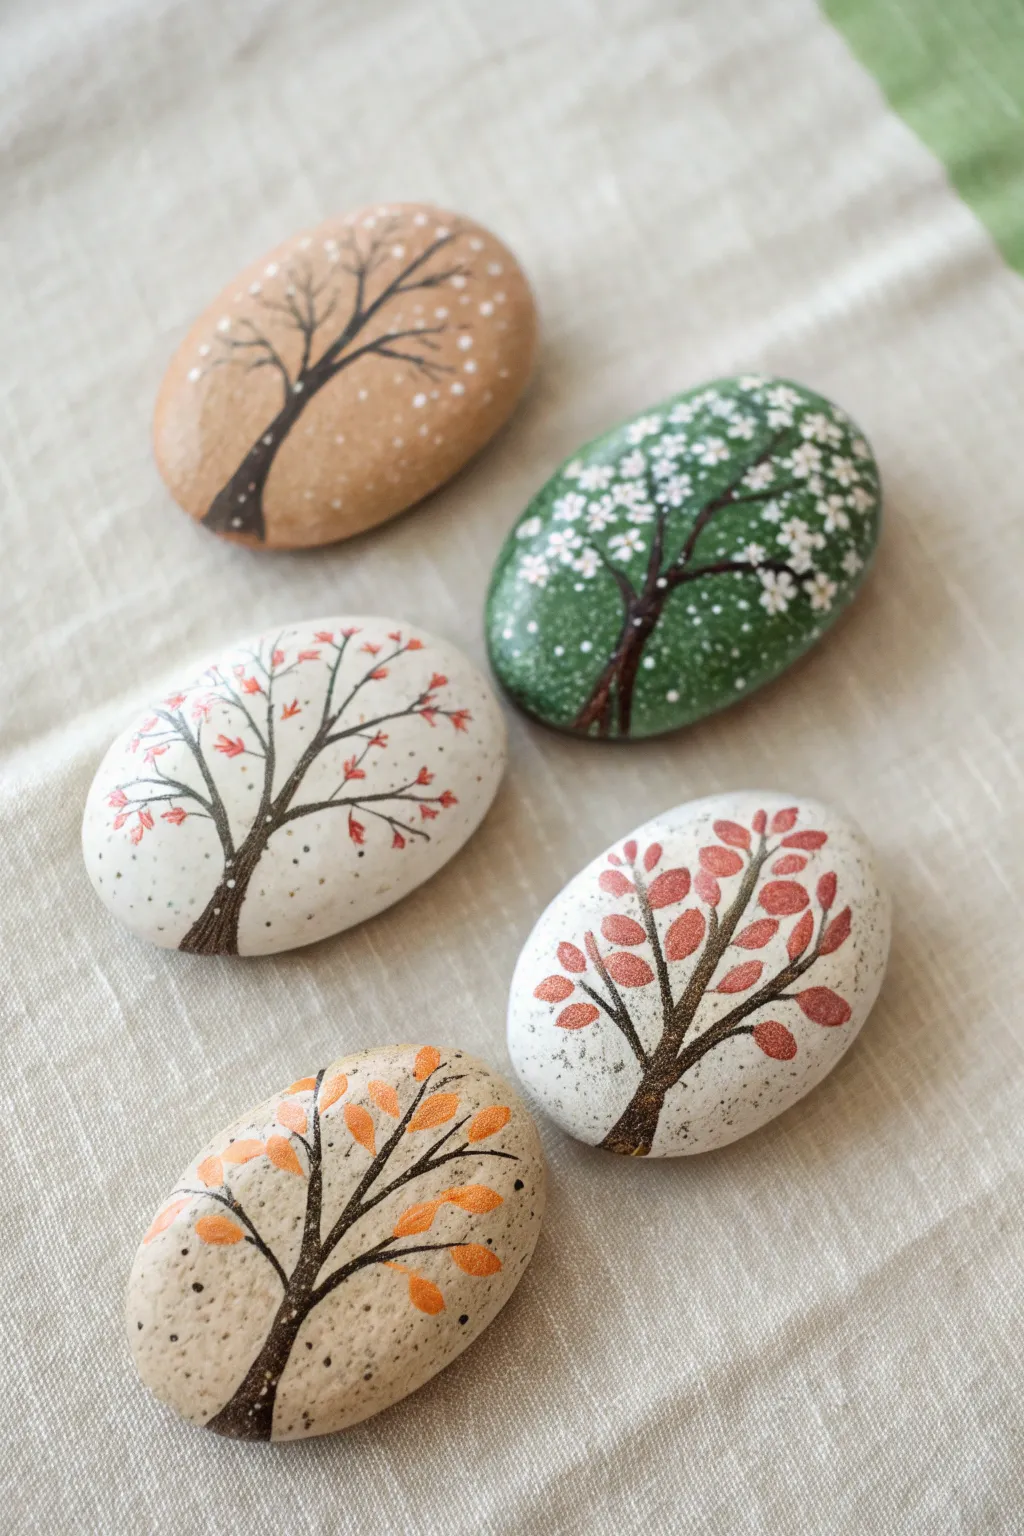

Celebrate the changing year with this charming set of hand-painted river rocks, each depicting a stylized tree in a different seasonal palette. From the delicate white blossoms of spring to the stark beauty of a winter silhouette, these stones make perfect deskweights or garden accents.
Step-by-Step
Materials
- Smooth, oval river rocks (approx. 2-3 inches)
- Acrylic paints (White, Black, Leaf Green, Burnt Orange, Red, Golden Yellow, Metallic Gold/Bronze)
- Fine detail paintbrushes (size 0 and 00)
- Small flat paintbrush (size 4 or 6)
- Acrylic paint markers (black fine tip, optional)
- Clear matte or gloss sealant spray
- Palette or small plate for mixing
- Cup of water and paper towels
Step 1: Base Coat Preparation
-
Clean the surface:
Before painting, scrub your rocks with warm soapy water to remove any dirt or oils. Let them dry completely; moisture trapped inside can ruin the finish later. -
Apply base colors:
For the spring tree, paint the entire top surface of one rock a deep leaf green. For the winter tree, choose a warm tan or beige. The summer and autumn rocks look best on a clean, creamy white background. -
Layer for opacity:
Acrylic paint can be streaky on stone. Apply a second coat of your base colors once the first is dry to ensure solid, opaque coverage. -
Add texture speckles:
To mimic natural stone texture on the white-based rocks, dip an old toothbrush or stiff brush into diluted grey or black paint and flick tiny speckles lightly across the dry surface. This adds organic depth.
Paint Slipping?
If your paint streaks or slides off the rock, the surface might be too magnified or polished. Lightly sand the rock with fine-grit sandpaper to give the paint grip.
Step 2: Designing the Trees
-
Draft the trunk:
Using thin black paint or a black paint pen, draw a curved, Y-shaped trunk starting from the bottom third of the rock. Don’t center it perfectly; a slight offset looks more artistic. -
Branch out:
Extend thinner lines outward from the main Y-shape. Keep your hand loose to create wiggly, natural-looking branches rather than straight sticks. -
Thicken slightly:
Go back over the base of the trunk to thicken it slightly, tapering it as it reaches the ground line so it feels rooted.
Step 3: Seasonal Details
-
Spring blossoms:
On the green rock, dip the very tip of a fine brush into white paint. Dot clusters of five tiny points to create flowers, and add single dots scattered like falling petals. -
Summer canopy:
For a summer look on a white rock, mix different shades of red and pink. Use short, quick dabs to create leafy clusters near the ends of the black branches. -
Autumn foliage:
On another white rock, use burnt orange and metallic bronze. Paint small oval shapes along the branches to represent falling leaves, making them slightly larger than the spring blossoms. -
Winter gold:
For a transitional or late-autumn look on the tan stone, use bright orange and yellow. Paint elongated tear-drop shapes for leaves, keeping them sparse to show the tree structure beneath. -
Snowy silhouette:
For the final winter rock (on a tan or grey base), paint only the bare black branches. Once dry, add tiny white dots on the upper edges of the branches to simulate resting snow.
Metallic Magic
Use a metallic gold paint pen to outline just one side of the trunk or specific leaves. This catches the light and adds a magical, sun-dappled effect.
Step 4: Finishing Touches
-
Refine the lines:
If any leaves covered up your black branches too much, gently re-trace the branch lines over the dried foliage to bring the structure back to the foreground. -
Ground the trees:
Paint a very small, horizontal shadow or patch of ground at the base of each trunk so the trees don’t look like they are floating in space. -
Dry thoroughly:
Allow the rocks to cure for at least 24 hours. The thick dots of paint used for blossoms may take longer to dry than the flat layers. -
Seal the art:
Spray the rocks with a clear sealant. I prefer a matte finish for these to maintain the natural stone look, but gloss will make the colors pop more vividly.
Display them in a row to watch the seasons change right on your windowsill
Micro Doodles and Icon Cluster Rocks
Transform a simple smooth stone into a charming piece of folk art with this detailed pattern of hearts, stars, and leafy vines. The creamy background allows the teal, rust-red, and mustard yellow tones to pop, creating a cozy and intricate aesthetic perfect for display.
Step-by-Step Tutorial
Materials
- Smooth, oval river rock (flat surface is best)
- Acrylic paint: Cream or Off-White (base coat)
- Acrylic paint or Posca paint pens: Rust Red, Mustard Yellow/Gold, Teal/Dark Green
- Extra fine tip paint pen: Black (0.5mm or 0.7mm)
- Extra fine tip paint pen: White
- Flat paintbrush (medium size)
- Clear matte or satin sealant spray
Step 1: Base Preparation
-
Clean and Dry:
Begin by thoroughly washing your rock with warm soapy water to remove any dirt or oils. Let it dry completely for the best paint adhesion. -
Apply the Base Coat:
Using your flat brush, apply a coat of cream or off-white acrylic paint over the entire top surface of the rock. You want a matte, parchment-like finish. -
Layering for Opacity:
Once the first layer is dry to the touch, add a second or even third coat until the natural rock color is completely hidden and the surface looks smooth and even. Allow this to dry fully, preferably for an hour.
Ink Control Pro-Tip
When stippling the background dots, hold the pen vertically upright. Using the pen at an angle can cause the ink to pool or create comet-tails instead of perfect round dots.
Step 2: Painting the Main Motifs
-
Start with Hearts:
Using a rust red paint pen or fine brush, randomly scatter small heart shapes across the stone. Keep them separated to leave room for other elements. Vary the orientation slightly for a natural look. -
Add Golden Stars:
Switch to your mustard yellow or gold color. Draw simple five-pointed stars in the larger open spaces between the hearts. I like to keep these roughly the same size as the hearts. -
Paint Red Flowers:
Using the rust red again, add a few five-pointed flower shapes (resembling stars). Unlike the yellow stars, these will eventually get a center detail. -
Draw Leafy Sprigs:
With a teal or deep green extra-fine paint pen, draw curving stems winding through the empty spaces. Add small, simple leaves along both sides of the stems. -
Vary the Foliage:
Create visual interest by mixing up your leaf styles. For some stems, draw solid, oval leaves. For others, draw thinner, more fern-like fronds to fill tight gaps.
Fixing Smudged Lines
If you accidentally smear a black outline, don’t wipe it! Let it dry completely, then paint over the mistake with your cream base color before redrawing the line.
Step 3: Outlines and Details
-
Outline the Hearts:
Once the red paint is bone dry, use your extra-fine black pen to carefully outline each heart. Keep the line thin and delicate. -
Outline the Stars:
Proceed to outline the yellow stars and red flowers with the same thin black line. Precision helps here, but a little wobble adds to the hand-drawn charm. -
Detail the Leaves:
The green leaves generally don’t need a full outline, but you can draw a thin black line down the center of the larger stems for definition. -
Add Heart Textures:
Inside the red hearts or tan hearts, add tiny black dots or small dashed lines to give them a textured, ‘stitched’ appearance. -
Flower Centers:
Take your white paint pen and place a solid white dot in the absolute center of each red flower shape.
Step 4: Micro Fillers and Finish
-
Stipple the Background:
This is the secret to the cohesive look: take your black fine liner and gently tap tiny dots (stippling) into all the remaining white background space. -
Vary Dot Density:
Ensure the dots are evenly distributed but not too crowded. They should look like speckled vanilla bean ice cream or sand. -
Final Check:
Look over the rock for any accidental smudges or empty spots that look too bare. Add a tiny star or leaf if a gap feels too large. -
Seal the Work:
Allow the ink to cure for at least 24 hours to prevent bleeding. Finish with a light coat of matte or satin spray sealant to protect your tiny doodles.
Place your finished doodle stone on a desk or shelf as a gentle reminder of creativity and patience
Marble-Effect Swirl Rocks
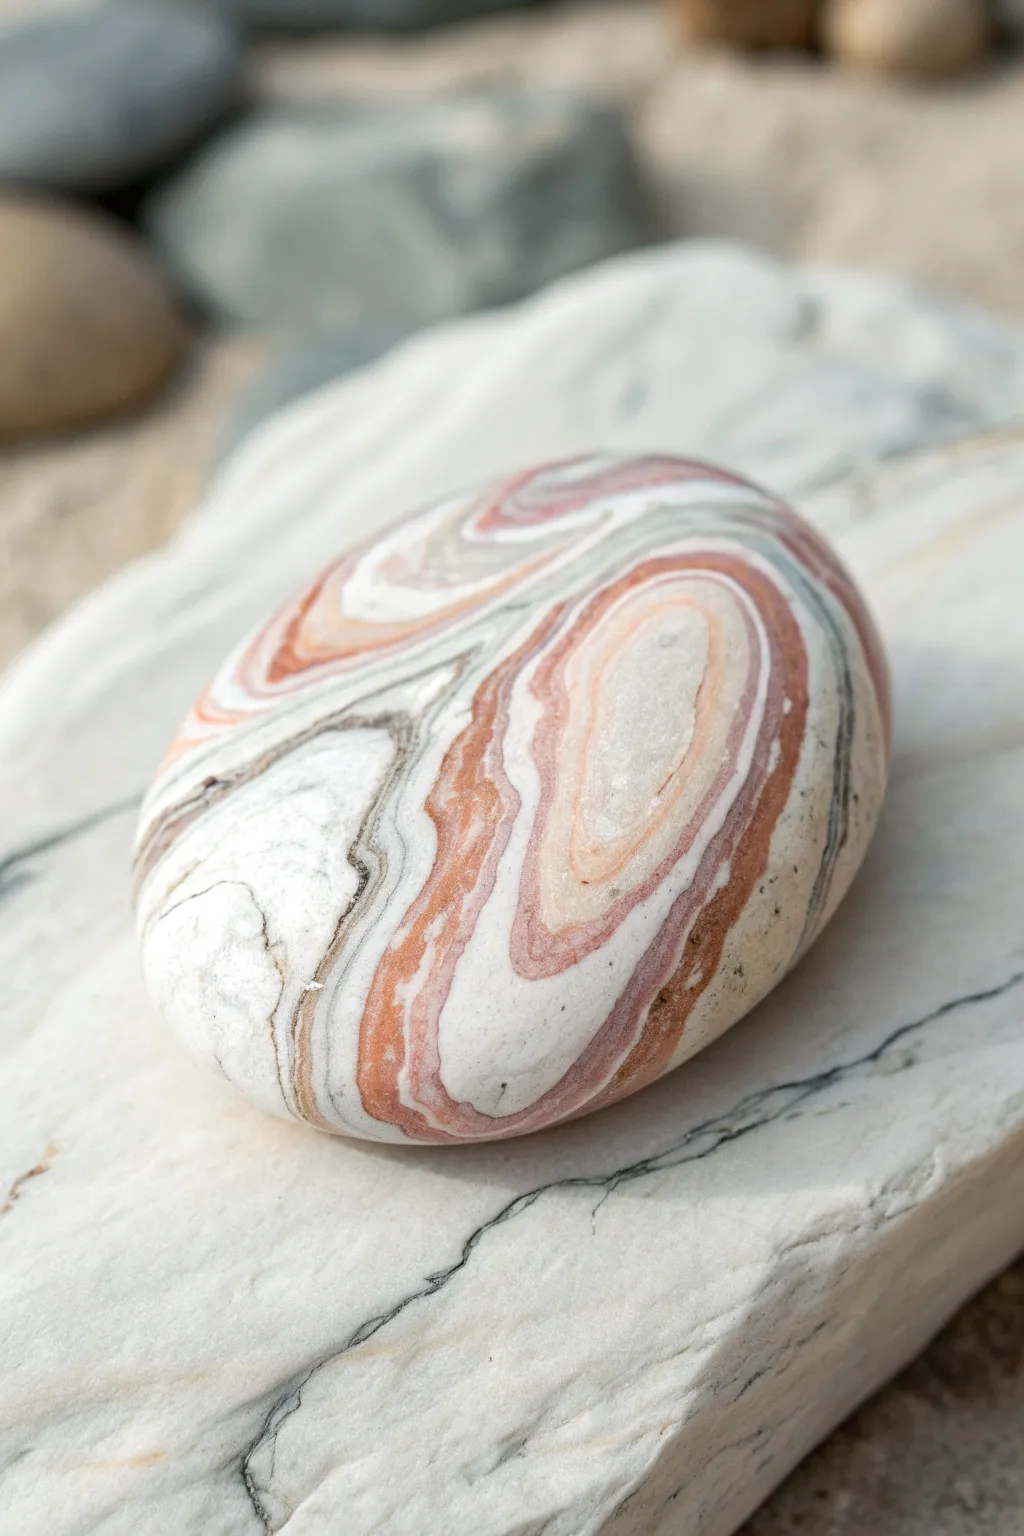
Transform a simple river rock into a mesmerizing piece of faux gemstone art with this elegant marble effect. By layering creamy whites, soft peaches, and terracotta tones, you’ll create fluid bands that mimic the natural beauty of polished agate.
Detailed Instructions
Materials
- Smooth, oval river rock (cleaned and dried)
- Acrylic paints (Titanium White, Unbleached Titanium/Cream, Burnt Sienna, Raw Sienna, Black)
- Fluid medium or pouring medium (optional, to thin paints)
- Fine detail brushes (size 00 or 000)
- Medium round brush (size 2 or 4)
- Palette or mixing plate
- Cup of water and paper towels
- Gloss varnish or resin (for the finished look)
Step 1: Base and Preparation
-
Clean the canvas:
Start with a perfectly clean, dry rock. If the surface is rough, give it a quick sand with fine-grit sandpaper to ensure your fluid lines glide smoothly. -
Mix your palette:
Prepare your colors on the palette. You strictly need a warm off-white (mix white with a tiny dot of brown), a pure white, a soft peach (white mixed with orange/brown), and a deeper terracotta (Burnt Sienna). Keep a tiny bit of black separate for later. -
Consistency check:
For this realistic swirled look, your paint needs to flow. Add a drop of water or fluid medium to your acrylics until they have the consistency of heavy cream; stiff paint won’t create those organic curves. -
Apply the base tone:
Painting the entire rock isn’t strictly necessary if it has a nice natural color, but I prefer to sponge on a base coat of the creamy off-white to give the translucent layers something to grab onto. Let this dry completely.
Wet-on-Wet Magic
For ultra-realistic blending, don’t let layers dry 100%. Painting the next band while the previous is slightly damp creates soft, organic mineral transitions.
Step 2: Creating the Agate Bands
-
Establish the focal point:
Identify where you want the ‘center’ of your agate swirl to be. Using your medium brush and the peach tone, paint a loose, elongated oval shape slightly off-center. -
Layering the white:
While the peach is tacky but not wet, switch to a smaller brush and outline the peach oval with your creamy white color. Don’t make the line perfect; wavy irregularities look more natural. -
Adding depth with terracotta:
Load your brush with the reddish-brown terracotta paint. Paint a band hugging the previous white curve, varying the thickness. Press down to widen the line in some spots and lift up for thinner sections. -
Soft blending:
Before the bands fully dry, use a very slightly damp clean brush to gently drag along the edges where two colors meet. This softens the transition, mimicking the mineral bleed found in real stones. -
Expanding the pattern:
Continue radiating outward with alternating bands of cream, white, and peach. Follow the initial shape but allow the curves to distort and flow around the rock’s contours. -
Creating transparency:
Mix a glaze by adding water to your white paint until it is milky. Paint a thin layer of this over select sections of your dried bands to create a ‘milky quartz’ translucent look.
Step 3: Detailing and Veining
-
Mixing the vein color:
Mix a dark charcoal grey using your black and a touch of white. Dilute this until it is inky. -
Painting the fissures:
Using your finest detail liner brush (size 000), paint erratic, shaky lines that cut through your colorful bands. These represent the mineral veins and cracks. -
Varying line pressure:
Roll the brush slightly or change pressure as you drag it to create veins that go from hairline thin to slightly thicker deposits. -
The outer crust:
Add some darker, rougher markings near the edges of the rock to simulate the rough ‘crust’ often seen on polished agate slices. -
Final highlights:
Add pure titanium white highlights in the very center of the lightest bands to make them pop.
Lines Looks Too Shaky?
If your hands shake, brace your painting hand against the table or the rock itself. Faster, confident strokes often produce smoother curves than slow ones.
Step 4: Finishing Touches
-
Full dry time:
Allow the rock to sit undisturbed for at least an hour. The layers must be bone dry before sealing. -
The polish effect:
This step makes the magic happen. Apply a high-gloss varnish or a coat of clear resin. This mimics the polished surface of a gemstone and deepens the contrast between the darker bands and the milky whites.
Place your finished stone on a shelf or desk and enjoy the calm, earthy vibes it brings to your space
Matte Rocks With Metallic Accent Lines
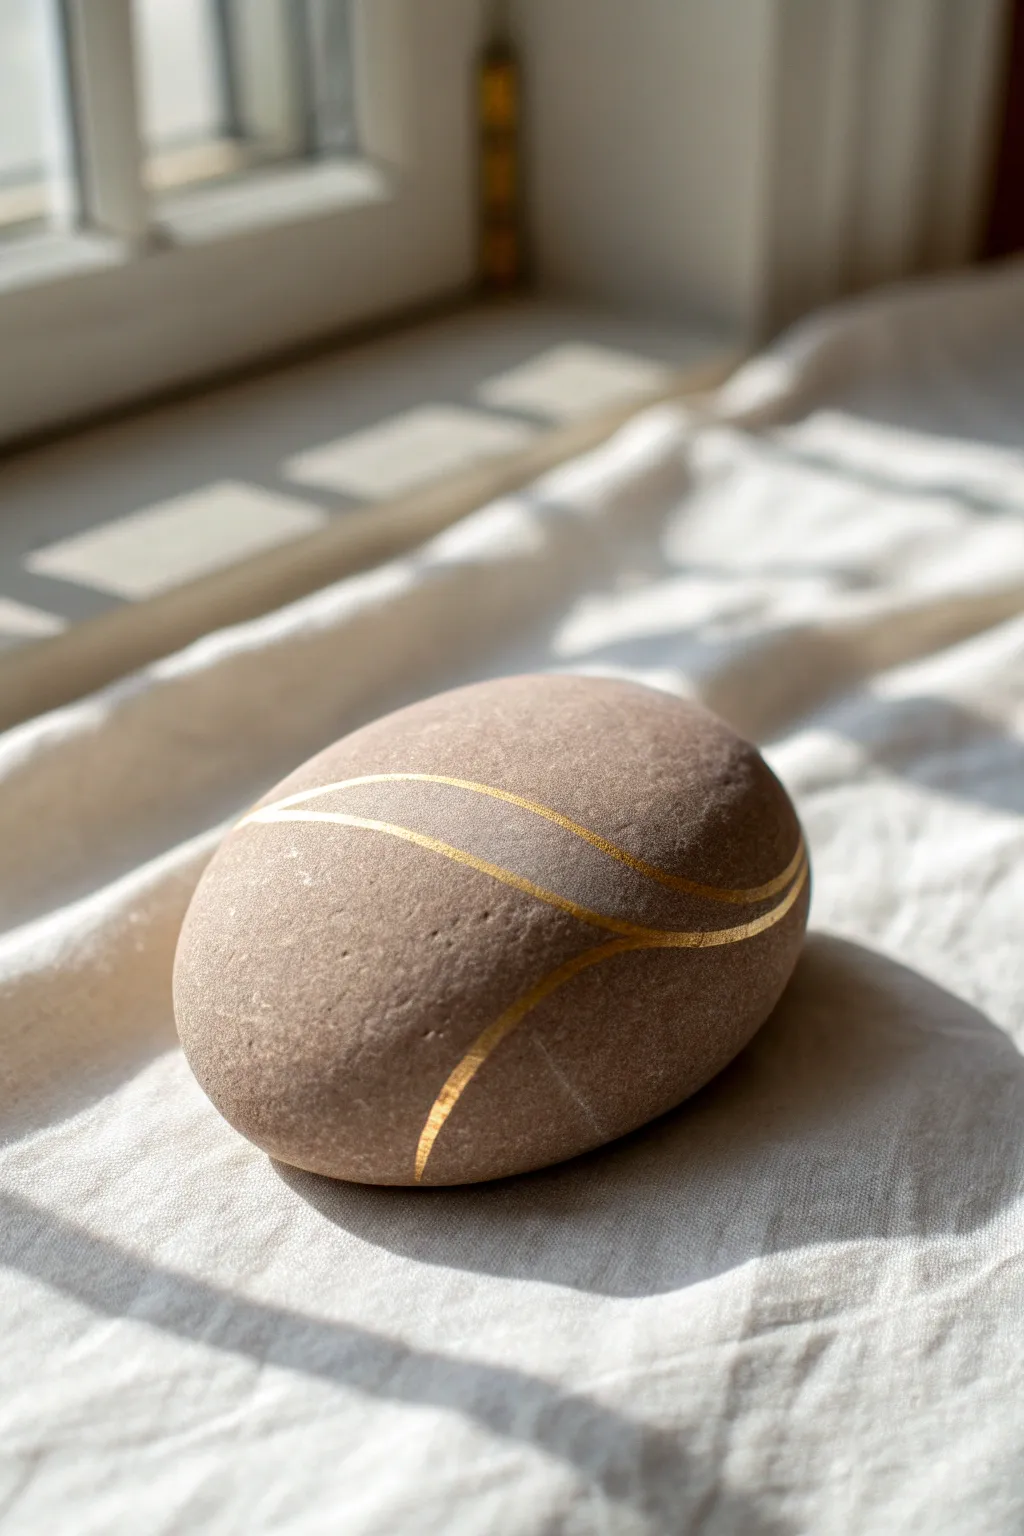
Embrace the beauty of simplicity with this elegant project that combines a smooth, matte stone with sweeping metallic accents. The contrast between the rock’s natural, earthy texture and the precise sheen of gold paint creates a sophisticated décor piece perfect for a modern desk or shelf.
Step-by-Step Guide
Materials
- Smooth river rock (preferably reddish-brown or mauve)
- Mild dish soap and water
- Old toothbrush
- Liquid gold leaf or high-pigment metallic gold acrylic paint
- Fine liner brush (size 0 or 00)
- Matte finish spray sealant (optional, for rock texture)
- Pencil (optional, useful for sketching)
- Paper towels
Step 1: Preparation
-
Finding the Stones:
Begin by selecting the perfect canvas. Look for a river rock that feels smooth to the touch and has a pleasing oval shape. A naturally reddish-brown or mauve tone, like the one in the photo, provides the best contrast for the gold. -
Initial Cleanse:
Wash your chosen stone thoroughly with warm water and a drop of dish soap. Use an old toothbrush to gently scrub away any dirt or moss from the pores. -
Drying Time:
Allow the stone to dry completely. It must be bone dry; trapped moisture can prevent the paint from adhering properly later on. -
Surface Check:
Inspect the surface. If you want the rock to look extra matte and clean like the example, you can spray a very light coat of matte sealant now before painting, though usually, the natural stone finish is perfect.
Choosing Your Gold
Liquid gold leaf offers a much brighter, mirror-like finish compared to standard metallic acrylics. However, it’s oil-based, so clean your brushes with turpentine.
Step 2: Planning the Design
-
Mocking Up:
Hold the rock in your hand and visualize where the curves should flow. The design works best if it follows the natural curvature of the stone’s 3D shape. -
Light Sketching:
Using a regular pencil, very lightly sketch your flowing lines directly onto the rock. Aim for two main parallel curves that sweep across the widest part of the stone. -
Refining the Curve:
Check your pencil lines from different angles. The lines shouldn’t just sit flat on top; they should wrap slightly around the sides to give a sense of movement. -
Adding Variation:
Notice how the lines in the image aren’t perfectly uniform. Sketch a third, shorter line branching off or intersecting if you want to match the complexity of the original.
Geometric Variation
Try tape masking for straight, architectural lines instead of organic curves. Use thin washi tape to create sharp triangles or bands across the stone.
Step 3: Applying the Gold
-
Preparing the Gold:
Shake your liquid gold leaf or metallic acrylic paint vigorously. You want the metallic pigments to be fully suspended for the brightest shine. -
Loading the Brush:
Dip a fine liner brush (size 0 or 00) into the gold. I prefer to wipe the excess off on the rim so the brush isn’t dripping, which helps control the line width. -
Painting the First Line:
Starting at one edge of your pencil sketch, pull the brush smoothly across the surface. Use your whole arm rather than just your wrist to keep the curve fluid. -
Completing the Parallels:
Paint the second parallel line. Keep your hand steady and maintain an even distance from the first line as you traverse the rock’s surface. -
Connecting Strokes:
Add the connecting cross-stroke that joins the two main lines. This stroke should curve gently, rather than being a straight diagonal, to maintain the organic feel. -
Refining Edges:
Go back over any areas where the paint looks thin. Liquid gold leaf is usually opaque in one coat, but acrylics might need a second pass once the first is dry. -
Cleaning Mistakes:
If you wobble, quickly use a damp corner of a paper towel (or a toothpick for tiny errors) to scrape away the wet paint before it sets.
Step 4: Finishing Touches
-
Removing Guidelines:
Once the gold paint is fully cured (check the bottle for timing, usually at least an hour), gently erase any visible pencil marks. -
Assessing the Shine:
Hold the rock up to the light. The gold should catch the light brilliantly against the dull stone surface. -
Optional Protection:
If you plan to keep this outdoors, you must seal it. However, for indoor display, leaving the paint unsealed preserves the maximum metallic shine.
Place your finished piece near a window where the natural light can catch the golden curves throughout the day
Faux Gemstone and Crystal Illusion Rocks
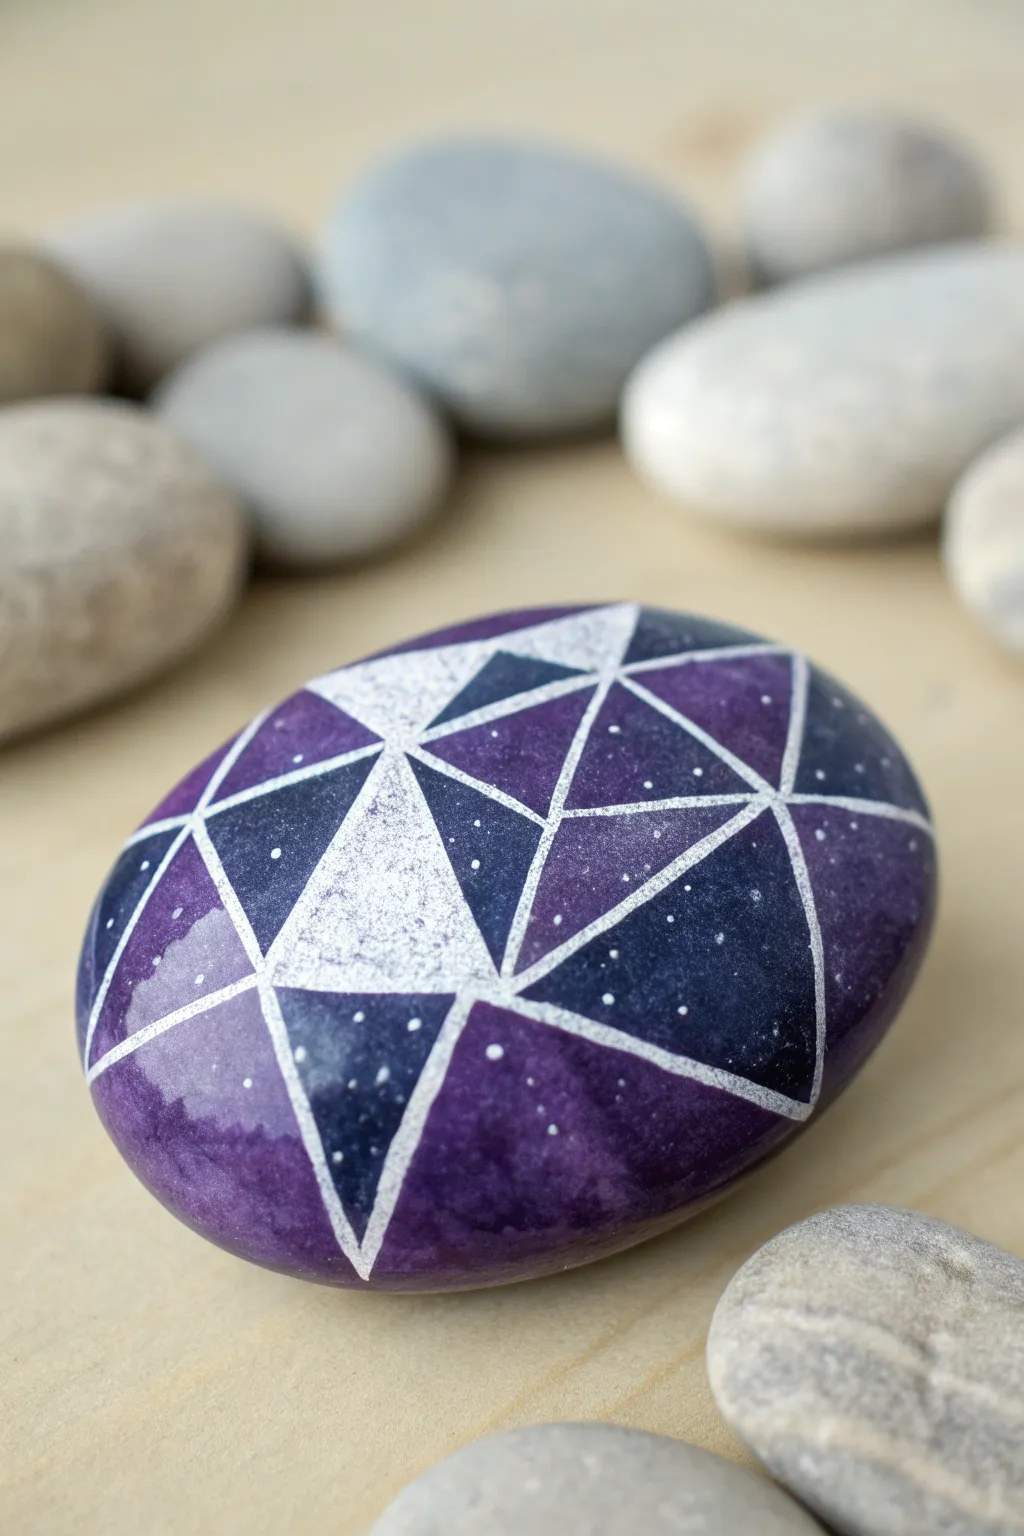

Transform an ordinary smooth stone into a mystical, faceted jewel using this striking geometric technique. The clever use of light and dark purple shades, combined with sharp white lines, creates a mesmerizing 3D crystal illusion that looks like a piece of captured galaxy.
Step-by-Step
Materials
- Smooth, oval river rock (flat surface is best)
- Acrylic paints: deeply opaque violet, navy blue, lavender, and white
- Metallic silver acrylic paint (optional)
- Fine liner brush (00 or 000 size)
- Small flat brush
- Pencil
- Matte or satin varnish
Step 1: Preparation & Base Layout
-
Stone selection:
Choose a stone with a very smooth texture and a nice, rounded oval shape. Wash it thoroughly with soapy water and let it dry completely to ensure the paint adheres properly. -
Prime the surface:
Paint the entire top surface of the rock with a solid coat of your darkest violet or navy blue. This acts as a background and ensures no bare rock shows through later. Let this base coat dry fully. -
Draft the geometry:
Using a pencil, lightly sketch a geometric web of triangles across the rock’s surface. Connect various points to create a faceted look, varying the size of the triangles for a more organic crystal feel.
Steady Hand Trick
Rest your pinky finger on a dry part of the rock or the table while painting the white lines. This creates a pivot point and stabilizes your hand for straighter lines.
Step 2: Creating the Facets
-
Color planning:
Visualize your light source coming from one direction—usually the top left or center. This will determine which triangles should be light (reflections) and which should be dark (shadows). -
Paint the darks:
Select several scattered triangles to be your darkest points. Fill these in carefully with a mixture of navy blue and deep violet to create a ‘night sky’ depth. -
Mid-tone purples:
Fill the adjacent triangles with your standard violet shade. I like to blend a tiny bit of the dark mix into the edges of these triangles while wet to create a subtle gradient within the shape itself. -
High-light tones:
For the triangles that would catch the most light, mix white with a little lavender. Paint these facets cleanly, ensuring opaque coverage. -
Adding the ‘galaxy’ texture:
On the darker violet and navy triangles, use an old toothbrush or a stiff bristled brush to gently flick tiny specks of white paint. This creates the star-like, cosmic dust effect seen in the reference. -
Silver sheen:
If using metallic silver paint, lightly dry-brush over one or two of the lightest triangles to give them a shimmering, crystalline quality. -
Dry time:
Allow all the color blocks to dry completely before moving to the lining stage. Wet paint will smear your crisp lines.
Step 3: Lining & Finishing
-
Load the liner brush:
Thin down your white acrylic paint slightly with water until it has an ink-like consistency. This helps the paint flow smoothly off a fine liner brush without skipping. -
Trace the grid:
Carefully paint over your original pencil lines with the thinned white paint. Use steady, confident strokes to create the ‘framework’ that holds the facets together. -
Clean up intersections:
Pay special attention to where the lines meet at the corners of the triangles. You want these intersections to be sharp, not blobby. -
Add focused highlights:
Place tiny white dots or ‘glints’ in the center of the darkest triangles to enhance the starry look. -
Final drying:
Let the white linework cure for at least an hour to ensure it is hard set. -
Seal the artwork:
Apply a coat of satin or matte varnish. A satin finish often works best here as it mimics the natural sheen of a polished semi-precious stone.
Metallic Magic
Swap the plain white lines for silver or gold metallic paint pens. The metallic shine will make the geometric grid look like real metal setting holding the gems.
Enjoy the peaceful process of turning a simple stone into a complex, sparkling treasure
Mini Still-Life Food Rocks (Fruit Slices and Pastries)
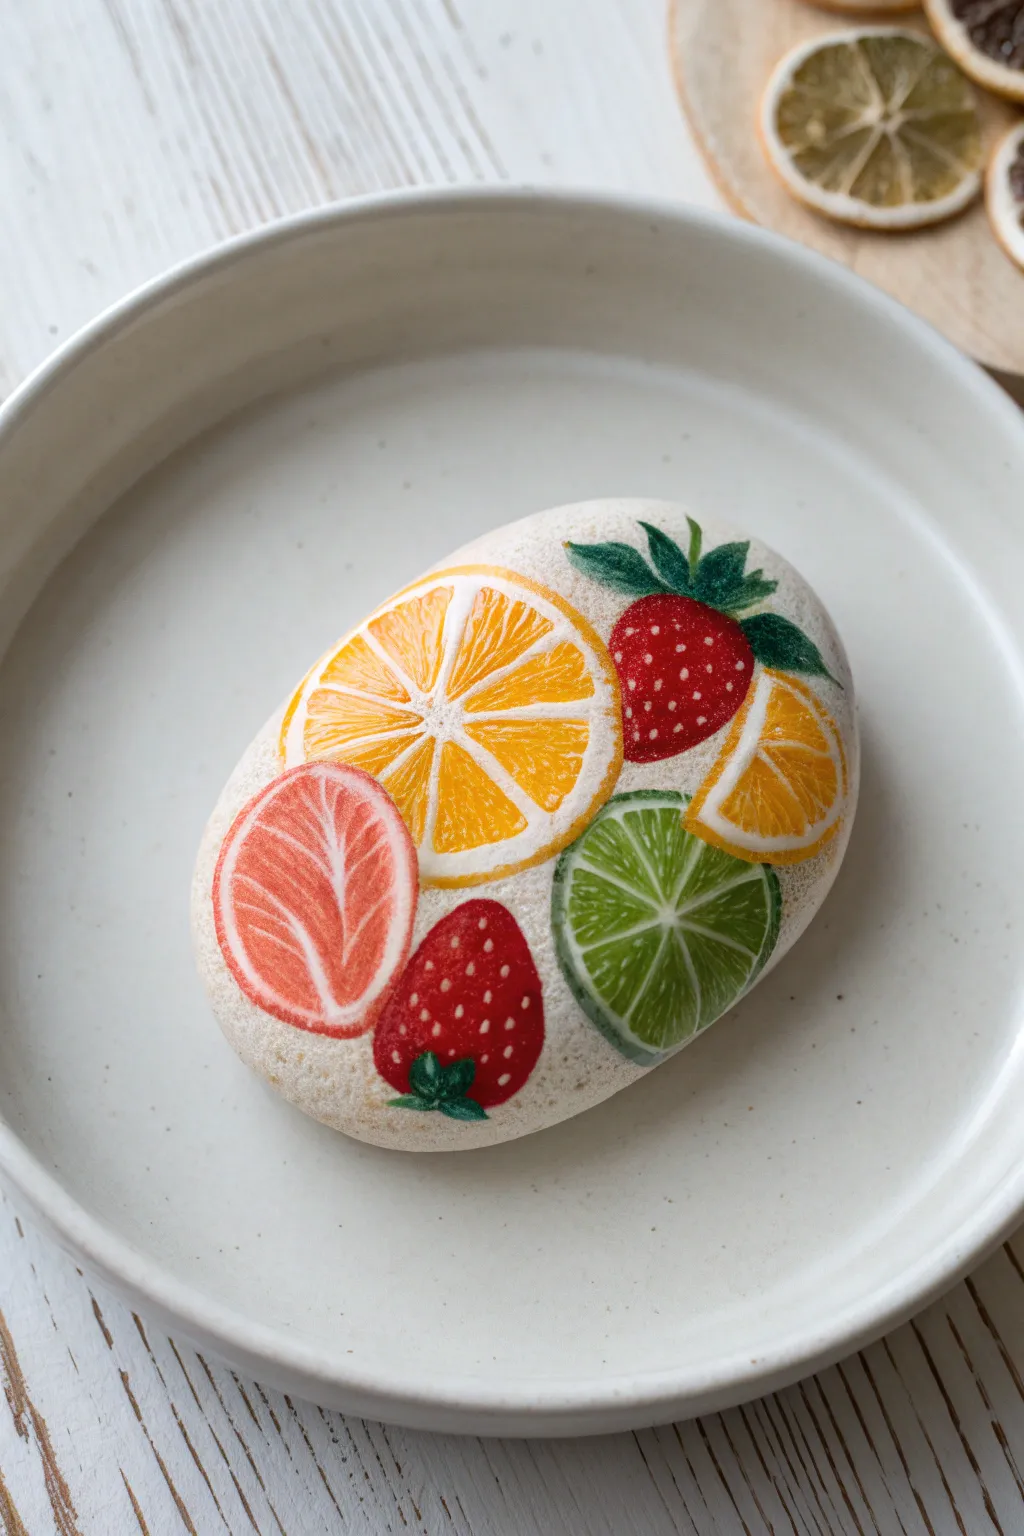
Capture the zest of summer with this delightful rock painting project featuring realistic fruit slices and strawberries. The smooth white background of the stone makes the vibrant citrus colors pop, creating a refreshing mini still-life piece perfect for kitchen decor.
Step-by-Step Guide
Materials
- Smooth, oval river rock (preferably white or light beige)
- Acrylic paints (Titanium White, Cadmium Yellow, Orange, Alizarin Crimson, Sap Green, Lime Green)
- Fine detail brushes (sizes 00, 0, and 1)
- Pencil for sketching
- Palette for mixing
- Water cup and paper towels
- Gloss or matte varnish spray
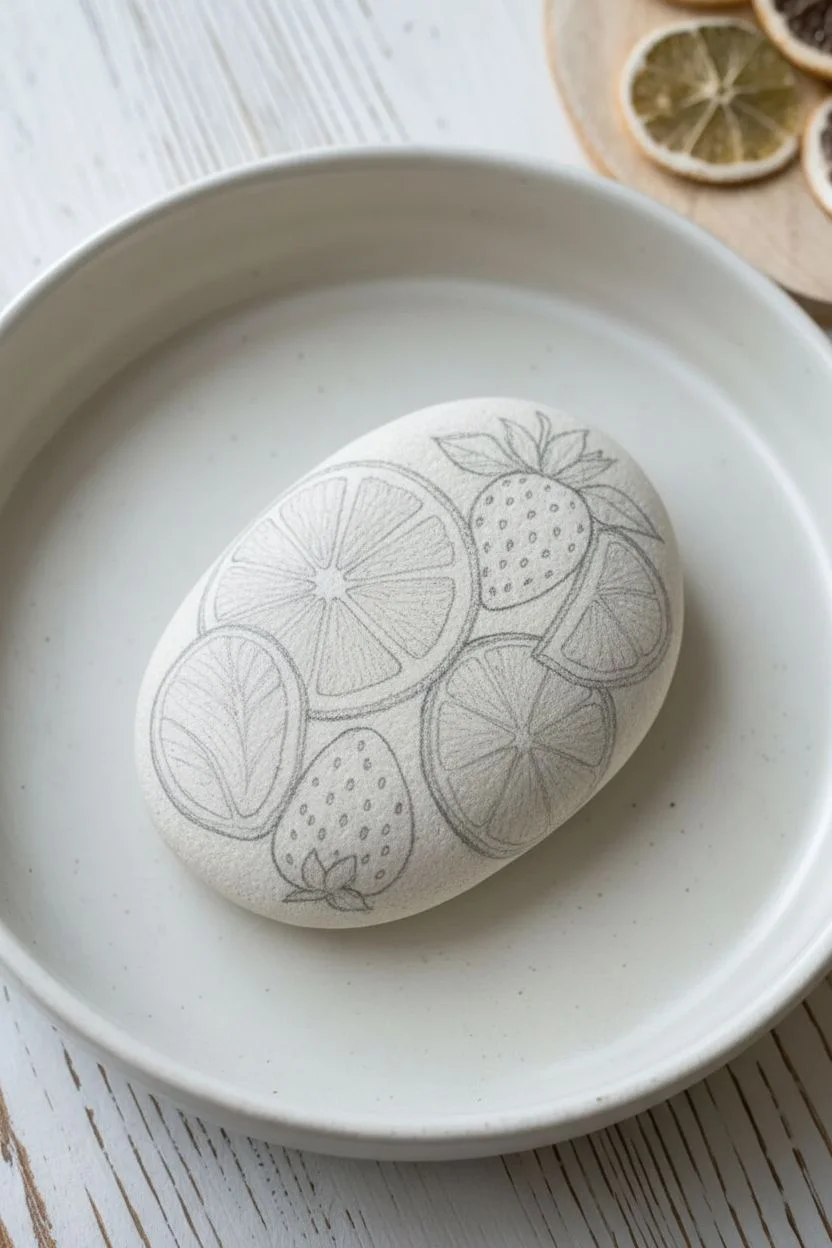
Step 1: Preparation and Sketching
-
Clean the canvas:
Wash your rock thoroughly with soap and water to remove any dirt or oils. Let it dry completely. If your rock isn’t naturally white, apply a base coat of white acrylic paint and sand it lightly once dry for a super smooth surface. -
Plan the composition:
Lightly sketch your fruit arrangement with a pencil. Draw a large orange slice center-left, a lime slice bottom-right, and a lemon wedge tucked near the top right. Add two strawberries—one nestled near the top and another at the bottom. -
Add detail lines:
Within your citrus circles, lightly draw the ‘spokes’ or segments radiating from the center. Don’t press too hard; you just need a guide for where the white pith will go.
Uneven Segments?
If your citrus segments look wobbly, don’t worry. Real fruit is rarely perfect. Use the white paint ‘pith’ step to correct the shapes by painting over the messy edges.
Step 2: Blocking in Colors
-
Base coat the strawberries:
Mix a bright red using Alizarin Crimson and a touch of Orange. Fill in the strawberry shapes carefully. You may need two coats to get a solid, opaque red. -
Paint the orange slice:
Using pure Orange paint, fill in the triangular segments of the large orange slice, leaving the thin gaps between them unpainted (showing the white rock or base coat). Round the outer corners of the triangles slightly to mimic real fruit. -
Paint the lime slice:
Mix Sap Green with a little Yellow or use a pre-mixed Lime Green. Fill in the segments of the lime slice at the bottom, again leaving the white ‘pith’ lines visible between the segments. -
Paint the lemon and pink citrus:
Fill in the lemon wedge segments with bright Yellow. For the slice on the far left, mix white with a tiny bit of red for a pink grapefruit or blood orange inside, painting the flesh area with curved strokes.
Add Water Droplets
Create 3D water drops by painting a small shadow oval, adding a lighter highlight inside, and a bright white dot on top. It makes the fruit look freshly washed.
Step 3: Adding Texture and Detail
-
Highlight the citrus flesh:
Mix a lighter version of each fruit color (orange + white, green + yellow, etc.). Using your smallest brush, dab tiny, irregular dots or short lines inside the fruit segments. This mimics the juicy vesicles of the fruit pulp. -
Refine the pith:
Take Titanium White on a liner brush and clean up the lines between the fruit segments. Paint the outer rim (rind) of each slice white as well. -
Add the colored rinds:
On the very outer edge of the white rind you just painted, add a thin line of the fruit’s skin color—orange for the orange, dark green for the lime, and yellow for the lemon. This little detail adds immense realism. -
Detail the strawberries:
Once the red base is fully dry, use a tiny brush or a toothpick to dot small, seed-like specs in a light yellow or cream color. -
Add strawberry leaves:
Using a dark green, paint the leafy calyx at the top of each strawberry. Use quick, short strokes to make the leaves look jagged and textured.
Step 4: Final Touches and Sealing
-
Add shine highlights:
Mix a watery white glaze or use pure white sparingly. Add tiny, curved reflection lines on the juiciest parts of the fruit slices and a small dot on the strawberries to make them look wet and fresh. -
Clean up edges:
If any paint went outside the lines, use white paint to touch up the background rock color so the fruit edges look crisp. -
Let it cure:
Allow the paint to dry completely, ideally overnight, to ensure no moisture is trapped. -
Varnish:
Spray the rock with a clear varnish. I personally prefer a gloss finish for fruit subjects because it enhances that fresh, juicy appearance.
Place your finished rock in a fruit bowl or on a sunny windowsill to enjoy a touch of permanent summer sweetness


Have a question or want to share your own experience? I'd love to hear from you in the comments below!