When you’re craving something a little darker, weirder, or more honest than a “pretty” sketch, alternative drawing is the perfect playground. Here are my favorite ideas to help you draw from mood, symbols, and raw imagination—no realism required.
Chaotic Doodle Spread Page
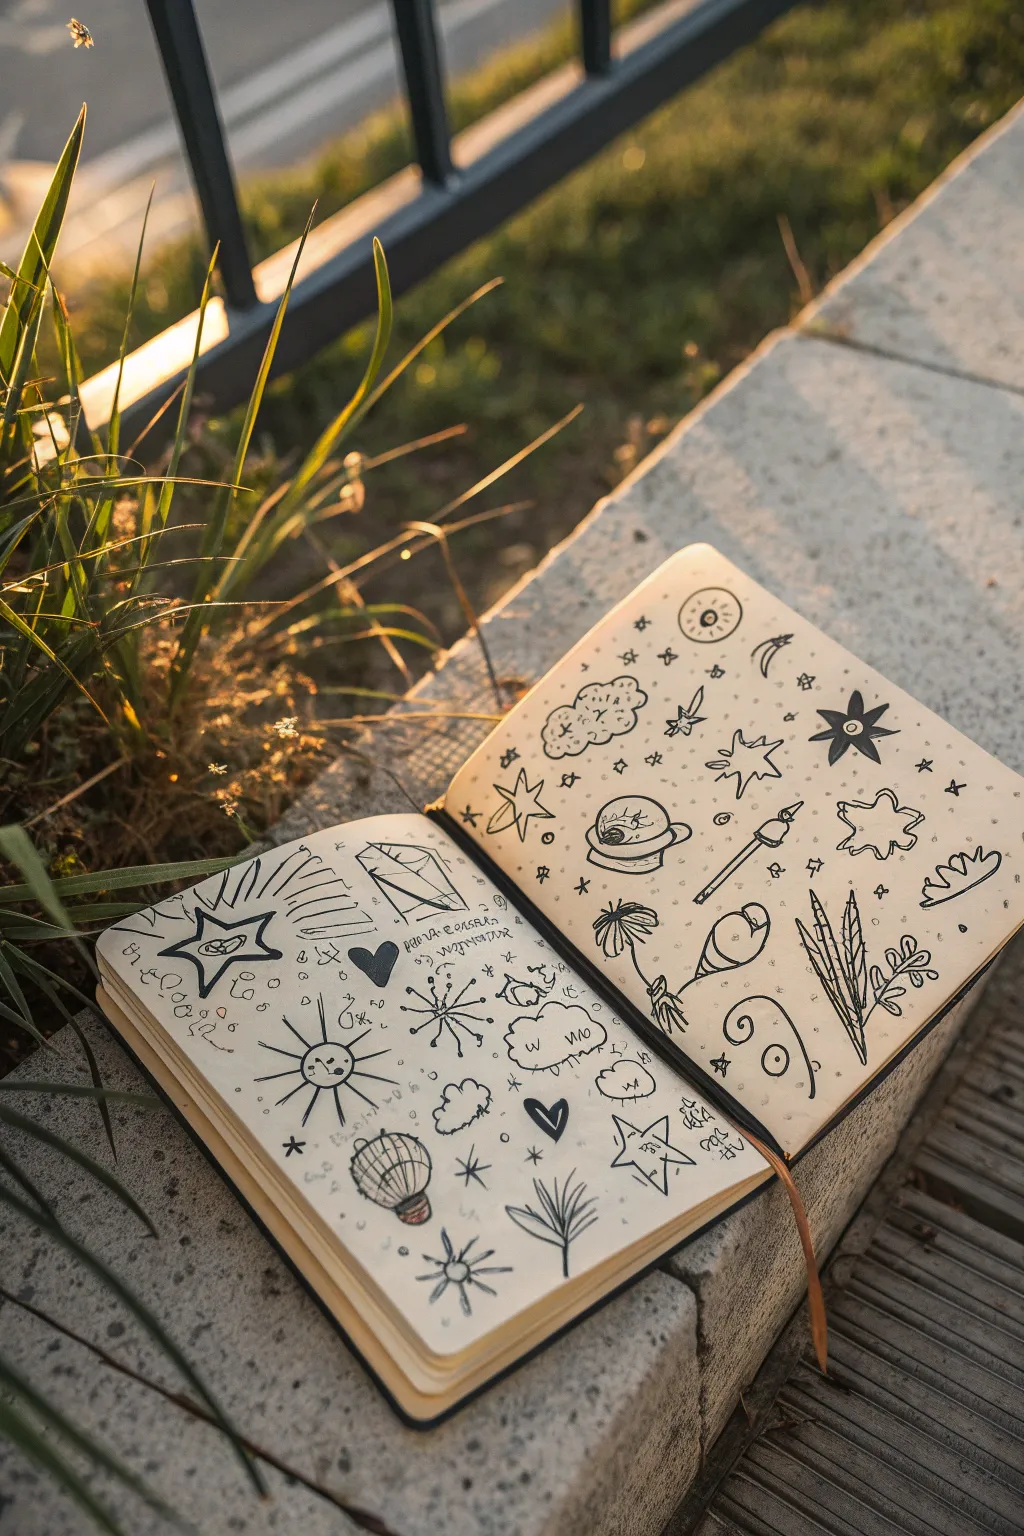
Embrace the imperfect and free-flowing nature of your creativity with this chaotic doodle spread. This project fills two sketchbook pages with a delightful mix of celestial bodies, abstract shapes, and whimsical nature motifs, creating a busy yet harmonious composition.
Detailed Instructions
Materials
- Sketchbook (cream or white paper)
- Black fineliner (0.3mm or 0.5mm)
- Pencil (HB or 2B)
- Eraser
Step 1: Planning the Chaos
-
Open the spread:
Lay your sketchbook flat so you have access to both pages simultaneously. The goal is to make them feel connected, even if the drawings don’t cross the spine. -
Anchor points:
Lightly sketch a few large shapes with your pencil to anchor the composition. Place a large sun shape on the bottom left and a few larger star clusters on the right page to establish balance.
Ink Smearing?
If you are left-handed or working quickly, place a piece of scrap paper under your drawing hand. This acts as a shield, preventing your palm from dragging wet ink across the page.
Step 2: Drawing the Left Page
-
The prominent sun:
Start with the large sun at the bottom center. Draw a circle with a simple, slightly crooked smiley face inside. Add radiating lines of varying lengths all around it. -
Shooting star:
Near the top gutter, ink a large five-pointed star with an eye in the center. Add trailing movement lines behind it to suggest speed. -
Geometric crystal:
Above the sun, draw a geometric crystal shard or prism. Use simple straight lines to create facets inside the shape. -
Hot air balloon:
Below the sun, sketch a tiny, vertically striped hot air balloon. Keep the lines loose and imperfect. -
Nature elements:
Fill the bottom corner with a simple palm leaf frond design. Just a central stem with curved leaves coming off both sides works perfectly. -
Filling the gaps:
Scatter smaller filler doodles around the main elements. Draw tiny hearts, squiggles, small clouds, and little asterisks to reduce the negative space.
Step 3: Drawing the Right Page
-
Celestial corner:
In the top right, draw a collection of space themes: a crescent moon, a ringed planet, and a solid black eight-pointed star. -
Cloud formation:
Create a fluffy, textured cloud near the top left of this page. Use small loops and bumps for the outline and add stippling dots inside for texture. -
The central planet:
Draw a small planet with a prominent ring in the middle area. You can add a little eye inside the planet for a surreal touch. -
Botanical details:
Near the bottom right, sketch a cluster of tall, thin leaves or grass blades. Add a small flower or mushroom shape next to them. -
Abstract symbols:
Draw a ‘magic wand’ or staff floating diagonally. Add a few swirl patterns or spirals near the bottom edge. -
Starry fillers:
Scatter various star shapes—standard five-point stars, four-point glimmer stars, and tiny dots—throughout the remaining white space.
Add Dimension
Use a light grey marker or a dilute wash of watercolor to add simple drop shadows to just the right side of your larger doodles. It makes them pop off the page.
Step 4: Final Touches
-
Inking the lines:
Go over all your pencil sketches with your fineliner. I find that varying my pressure slightly gives the lines a nice organic, hand-drawn feel. -
Solid blacks:
Select specific elements to fill in completely with black ink, like the center of the shooting star eye, certain hearts, or parts of the geometric shapes. This adds contrast. -
Erase guidelines:
Once the ink is completely dry (give it a few minutes to avoid smudges), gently erase any remaining pencil lines. -
Spontaneous addition:
Look for any awkwardly large empty spots. Fill them with tiny dots, circles, or ‘scribble’ text that implies writing without actually forming words.
Now you have a lively, personalized spread that captures a wandering imagination without needing to be perfect


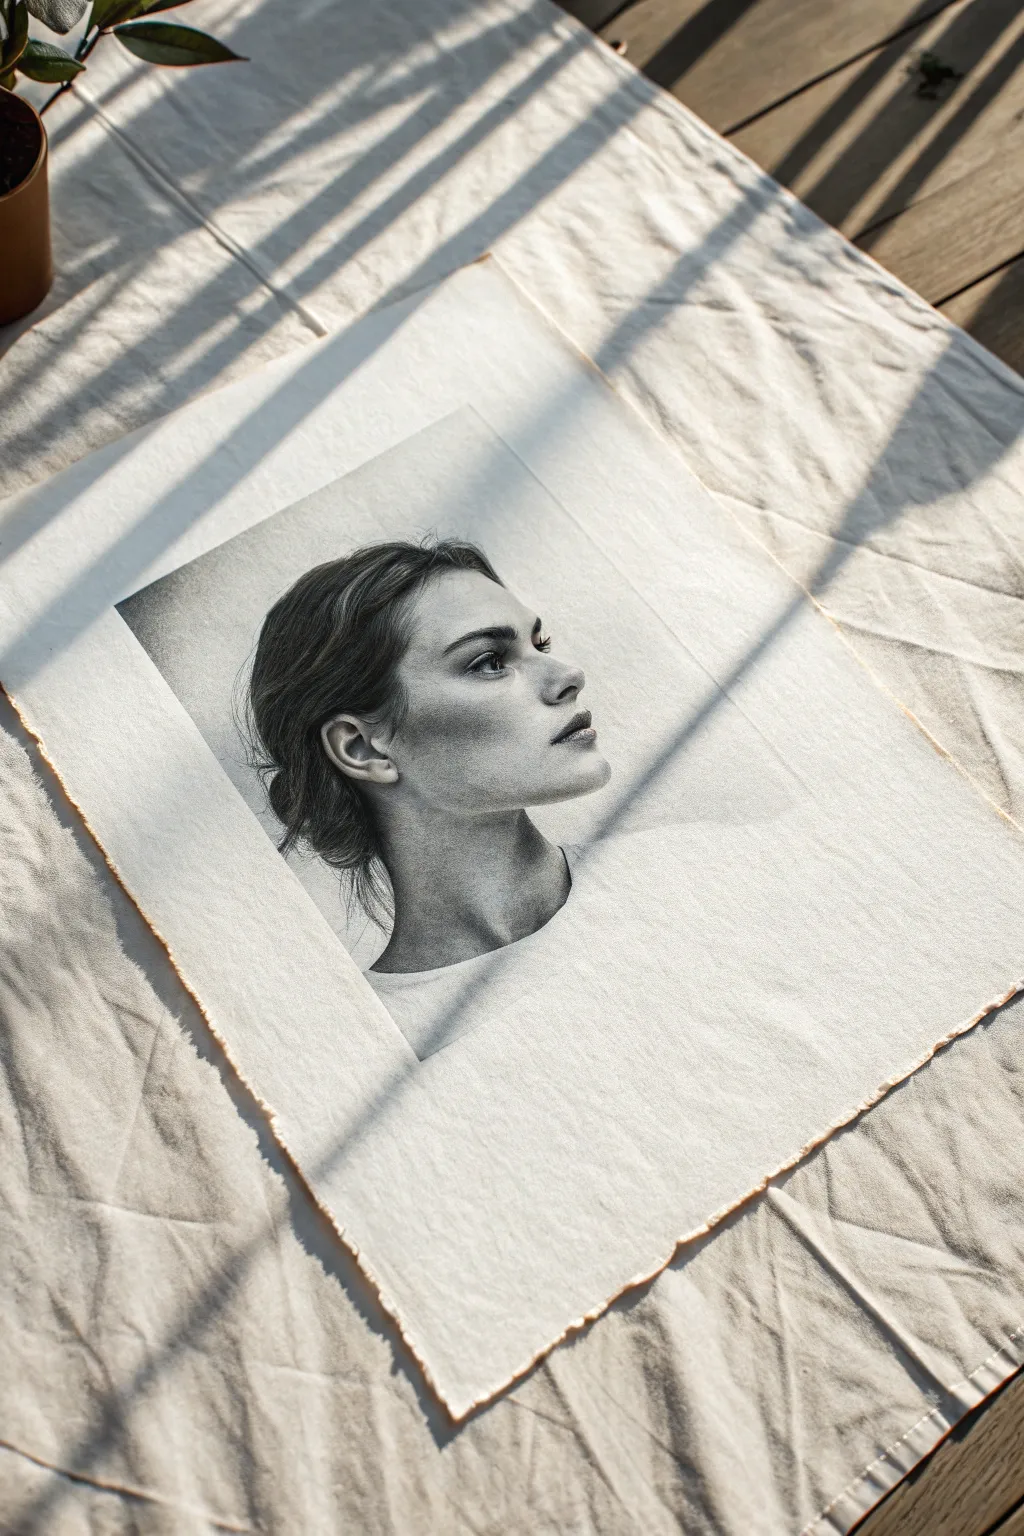
Blind Contour Moody Portrait
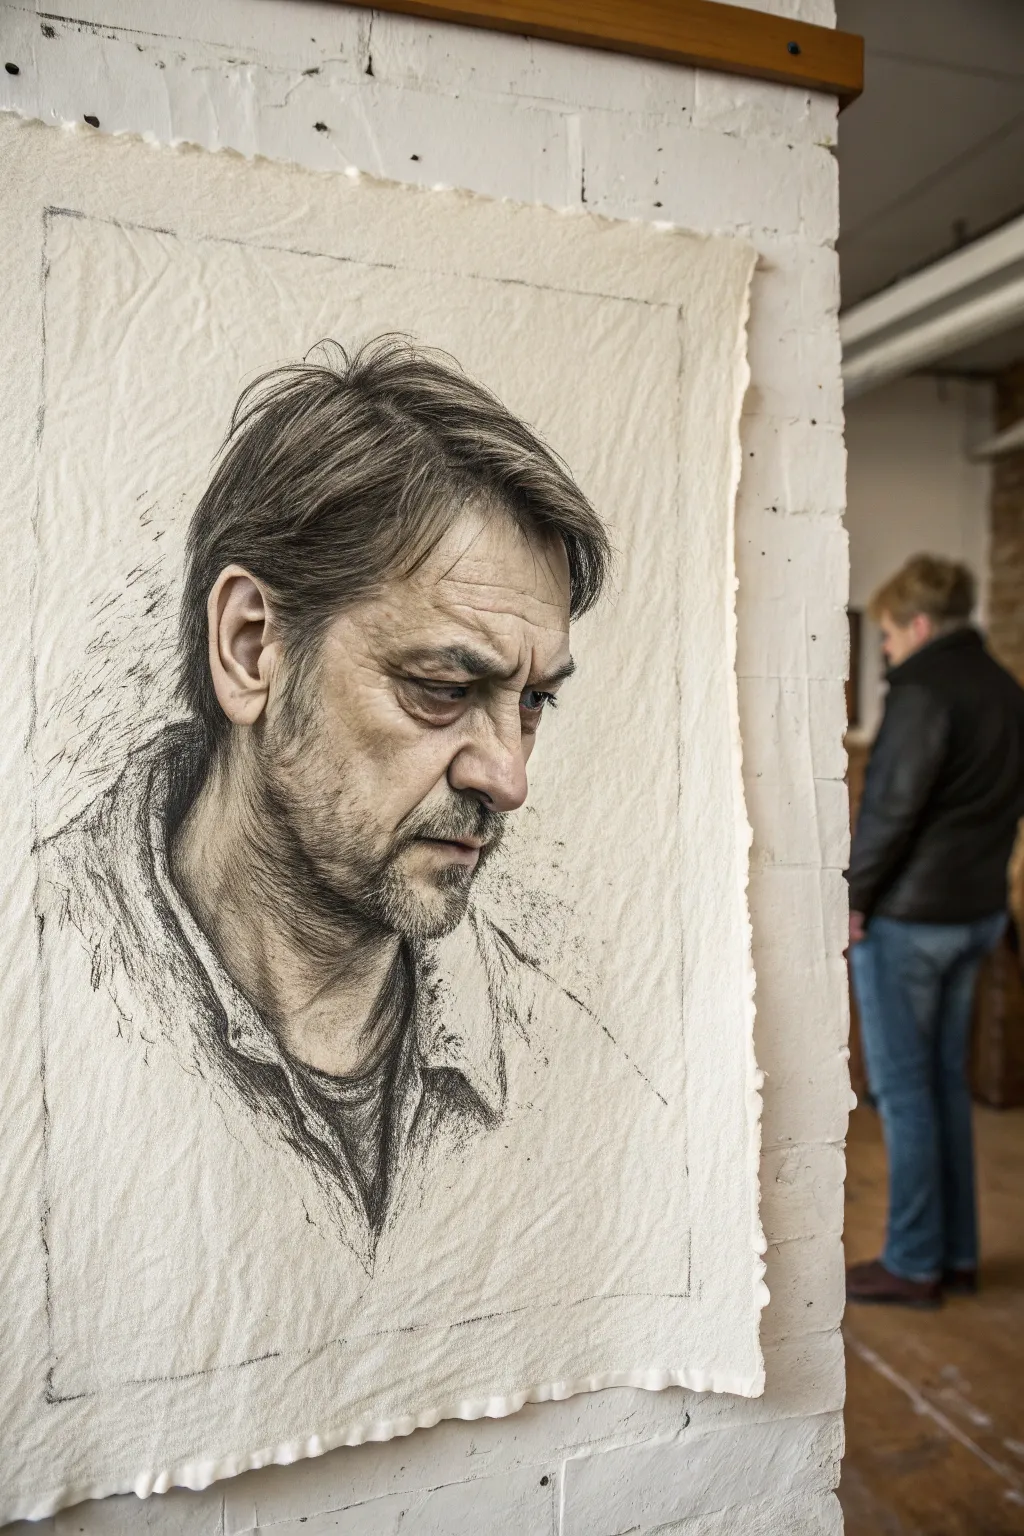
Capture the solemn depth of human emotion with this advanced charcoal portrait study. Using rough, handmade paper adds a tactile dimension that complements the gritty realism of the shading.
Detailed Instructions
Materials
- Heavyweight handmade paper with deckled edge (roughly A2 size)
- Soft vine charcoal
- Compressed charcoal sticks (HB, 2B, 4B)
- Charcoal pencils (soft and medium)
- Kneadable eraser
- Paper blending stump (tortillon)
- Workable fixative spray
- Drawing board and masking tape
Step 1: Preparation and Structure
-
Surface Preparation:
Begin by taping your handmade paper securely to a drawing board. The texture is crucial here, so ensure the paper is flat but don’t stretch it too tight to damage the fibers. -
Basic Proportions via Blocking:
Using a stick of soft vine charcoal, lightly map out the head shape. Don’t focus on features yet; look for the large geometric masses that make up the skull and jawline. -
Establishing the Eye Line:
Mark the horizontal axis for the eyes. In this three-quarter view, pay close attention to the perspective; the eye further away will appear slightly smaller and more foreshortened. -
Refining the Constructive Drawing:
Continue with the vine charcoal to place the nose, mouth, and ear. Keep these lines ephemeral and easily erasable with your kneadable eraser.
Muddy Shadows?
If shadows look gray and lifeless, you’ve overworked the paper. Lift widely with a kneaded eraser to reveal the paper grain again, then re-apply fresh, dark charcoal strokes without blending.
Step 2: Developing the Features
-
The Eyes as Anchors:
Switch to a sharpened charcoal pencil for precision. carefully draw the eyelids and the iris. The expression relies heavily on the heavy upper lids and the shadow cast under the brow bone. -
Sculpting the Nose:
Instead of outlining the nose, shade the side planes. Use compressed charcoal to deepen the nostril shadow, fading it out to suggest the roundness of the tip. -
Mouth and Facial Hair:
Sketch the lips loosely. For the stubble and mustache, use short, directional strokes with a sharp charcoal pencil. Don’t draw every hair; focus on the patches of shadow where the hair is dense. -
Ear Detailing:
Work on the visible ear. The cartilage has complex folds; use high contrast—very dark shadows against the light of the paper—to make it pop.
Step 3: Shading and Texture
-
Laying the Mid-Tones:
Rub a side of a soft charcoal stick over the main shadow areas of the face (cheek hollows, neck, eye sockets). This creates a base tone. -
Following the Form:
Use a blending stump to push the charcoal into the textured paper grain. Follow the contours of the facial muscles to enhance the 3D effect. -
Deepening Shadows:
I find that going back in with 4B compressed charcoal really brings out the drama. Darken the creases around the eyes, the corner of the mouth, and the deepest part of the hair. -
Rendering the Hair:
Use long, sweeping strokes for the hair on top of the head. Combine broad strokes of vine charcoal for the mass, and sharp pencil lines for individual stray strands catching the light. -
Texturing the Skin:
Use the texture of the paper to your advantage for aging skin. Gently drag a medium charcoal stick sideways; it will catch the high points of the paper, mimicking skin pores and wrinkles.
Add Atmosphere
For a grittier look, grind some charcoal onto a separate surface, pick up the dust with a dry brush, and ‘paint’ a soft, hazy background aura around the head.
Step 4: Clothing and Final Touches
-
Sketching the Attire:
Keep the clothing significantly looser than the face to maintain focus on the portrait. Use broad, rough scribbles to suggest a collar and shoulders. -
Clothing Contrast:
Darken the V-shape of the shirt underneath heavily. This dark triangle anchors the head and draws the eye up to the face. -
Lifting Highlights:
Mold your kneadable eraser into a fine point. Dab—don’t rub—to lift charcoal off the paper for the highlights on the nose bridge, forehead, and lower lip. -
Refining Edges:
Softener the perimeter of the hair so it doesn’t look like a helmet. Let the drawing fade naturally into the white of the paper at the bottom. -
Fixing the Image:
Once satisfied, take the drawing outside and spray a light, even coat of workable fixative to prevent smudging.
Step back and admire how the rough texture brings a living, breathing quality to your subject


Non-Dominant Hand Grunge Sketch
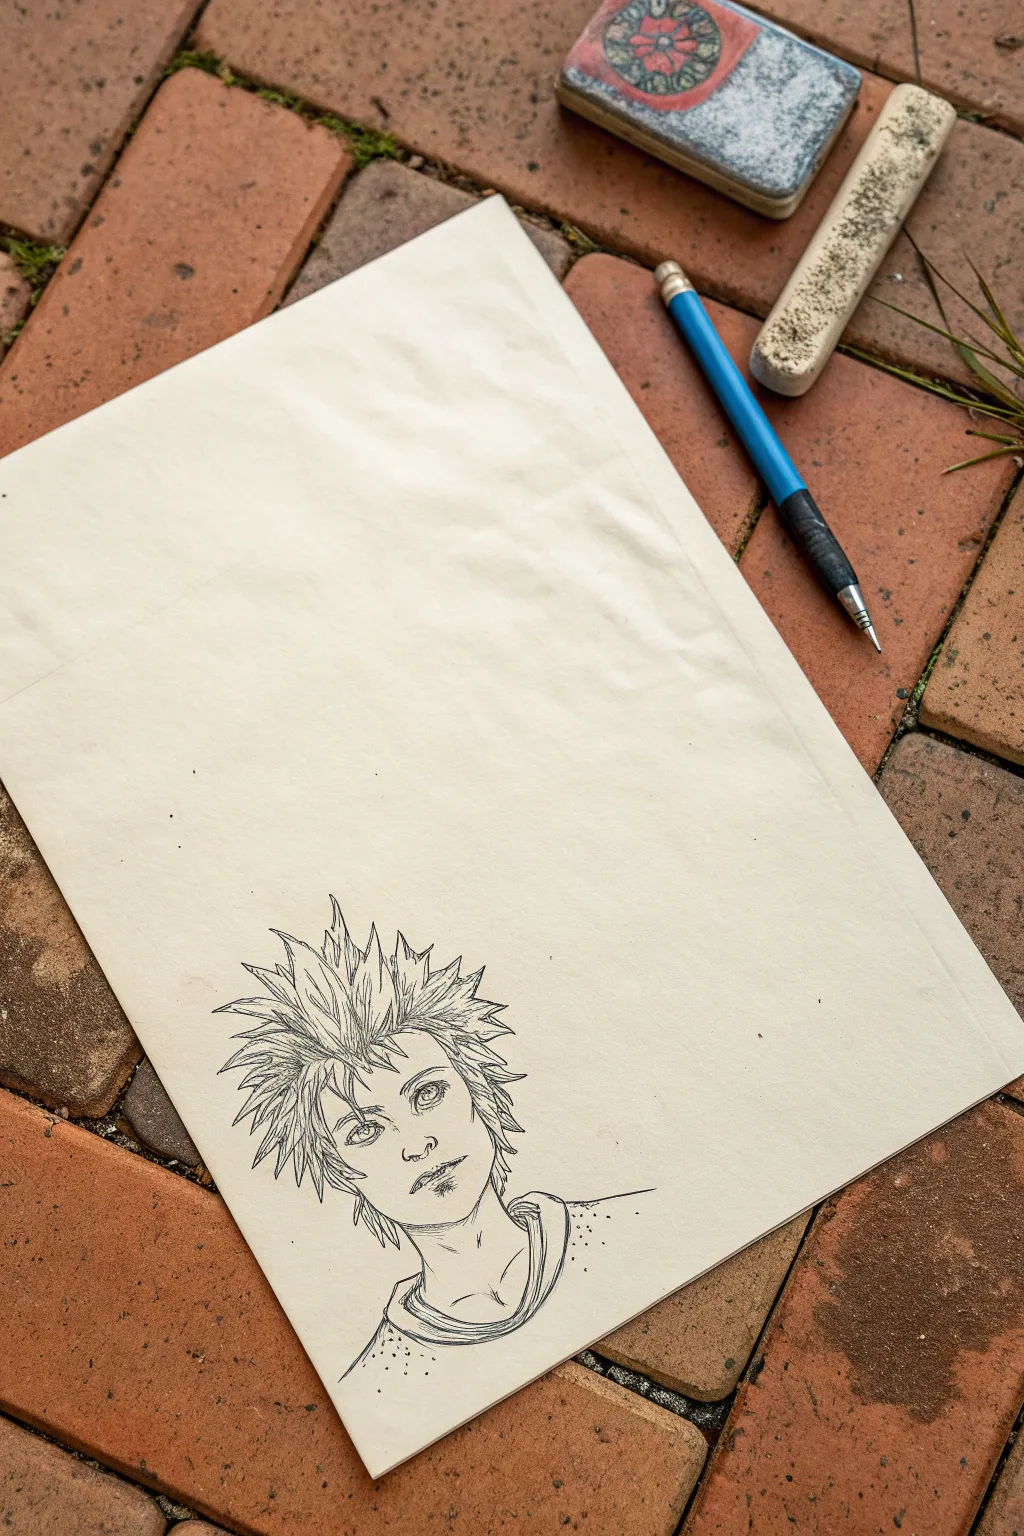
Challenge your artistic control and embrace happy accidents with this quirky sketching exercise. By switching to your non-dominant hand, you’ll create a drawing with a naturally shaky, raw, and expressive aesthetic that’s impossible to fake.
Step-by-Step Tutorial
Materials
- Large sheet of cream or off-white sketchbook paper
- Fine liner pen (01 or 03 size, black ink)
- Graphite pencil (HB or 2B)
- Kneaded eraser
- Flat work surface
- Reference image of a character (optional)
Step 1: Preparation & Loose Layout
-
Position your paper:
Lay your large sheet of cream paper on a flat surface. Orient it vertically to leave plenty of negative space above the drawing area. -
Hold the pencil:
Pick up your graphite pencil with your non-dominant hand. Hold it further back on the barrel than usual to encourage looser, less controlled movements. -
Mark placement:
Lightly indicate where the head will go at the bottom center of the page. Keep this very faint; we want the final ink lines to be the star. -
Sketch the face shape:
Drawing slowly, outline the jawline and chin. Don’t worry if the lines wobble or don’t connect perfectly—that’s the texture we are aiming for.
Embrace the Shake
Don’t correct mistakes! If a line goes rogue, incorporate it. The charm of this style relies entirely on the lack of mechanical precision.
Step 2: Drafting Facial Features
-
Rough in the eyes:
Place two almond shapes for eyes. Since you are using your ‘wrong’ hand, focus on general placement rather than perfect symmetry. -
Add nose and mouth:
Sketch a small, simple shape for the nose and a line for the mouth. Keep the expression neutral or slightly melancholic to match the grunge vibe. -
Outline the hair:
Create the spiky hair silhouette. Use short, jagged strokes that radiate outward from the top of the head. Let the spikes be uneven and wild. -
Neck and shoulders:
Draw the neck lines extending down to the collarbone area. Add a hint of a shirt collar or neckline to ground the portrait.
Use Coffee Stains
Add to the grunge aesthetic by lightly splattering cold coffee or tea across the negative space above the head for a weathered, vintage look.
Step 3: Inking the Grunge Style
-
Switch to ink:
Pick up your fine liner pen with your non-dominant hand. This is where the real commitment happens, as you can’t erase these marks. -
Trace the jawline:
Go over your pencil jawline. Allow your hand to tremble naturally; avoid trying to stabilize it. The shaky line weight adds character. -
Detail the eyes:
Ink the eyes carefully. Fill in the pupils, leaving tiny white spots for highlights. Add small hatched lines under the eyes for tired-looking bags or texture. -
Define the nose and lips:
Ink the nose and mouth. For the lips, use broken lines rather than a solid outline to keep the sketch feeling organic. -
Ink the hair spikes:
Work your way through the hair. Use quick, flicking motions. If lines overlap or cross unexpectedly, leave them; it enhances the messy, energetic look. -
Add internal hair texture:
Draw a few jagged lines inside the main hair outline to suggest clumps and volume. Keep these sparse so the hair doesn’t look too busy. -
Ink the clothing:
Go over the neck and collar lines. Add a few small wrinkles to the fabric around the neckline for realism.
Step 4: Finishing Touches
-
Add stippling:
Using the tip of the pen, add small dots (stippling) around the shoulders and neck area. This technique, which I find very relaxing, creates a scattered shadow effect. -
Enhance shadows:
Add small diagonal hatch marks under the chin and hair fringe to create depth. -
Dry and erase:
Wait at least 5-10 minutes for the finished ink to dry completely to avoid smudging. -
Remove pencil lines:
Gently gently rub the kneaded eraser over the drawing to lift the initial graphite sketch, leaving only the raw, shaky ink lines behind.
Step back and appreciate how loosening your grip created a unique piece full of raw energy and unexpected texture


Layered Angle Overdraw
This project captures the delicate interplay of shadow and light through a high-key portrait executed in graphite. By utilizing deckle-edged paper and letting the negative space do the heavy lifting, you’ll create an ethereal profile that feels both modern and timeless.
How-To Guide
Materials
- Heavyweight textured drawing paper (deckle edge preferred)
- Graphite pencils (HB, 2B, 4B)
- Mechanical pencil (0.5mm, HB)
- Kneaded eraser
- Blending stump or tortillon
- Soft drawing brush (for sweeping away debris)
- Ruler (optional for grid)
- Fixative spray
Step 1: Preparation & Mapping
-
Paper Selection:
Choose a heavyweight paper with a distinct tooth. If your paper doesn’t have deckle edges, you can create them yourself by folding the paper sharply and wetting the crease before carefully tearing it to create that organic, ragged look. -
Basic Blocking:
Using your HB pencil with very light pressure, sketch the general envelope of the head. Focus on the tilt of the neck and the angle of the jawline. -
Proportion Check:
Verify your proportions before adding details. Measure the distance from the chin to the nose, and the nose to the brow ridge to ensure the profile is balanced. -
Outline the Features:
Lightly define the eye, nose, and lips. Keep your lines faint; this is a high-key drawing, so we want to avoid heavy outlines that will be hard to erase later. -
Hair Boundary:
Mark the hairline and the general mass of the hair bun. Don’t draw individual strands yet; just map out the shape.
Smudge Patrol
Graphite smudges easily on white space. Place a clean sheet of scrap paper under your drawing hand to protect the pristine white areas while you work on the details.
Step 2: Shading Features
-
The Eye:
Switch to a mechanical pencil for precision. carefully render the iris and pupil, leaving a small highlight white. Shade the upper lid crease slightly darker to create depth. -
Nostril & Nose:
Use a 2B pencil to darken the nostril. Shade the underside of the nose gently, fading upward into the bridge. The edge of the nose should be defined by the shadow behind it, not a hard line. -
Sculpting the Lips:
Shade the upper lip slightly darker than the lower lip. Use the 2B pencil to darken the corners of the mouth and the line where the lips meet. -
Cheekbone Definition:
This is crucial for the angular look. Use the side of your HB pencil to lay down a broad, soft shadow under the cheekbone. Blend this outward towards the ear using a blending stump. -
Jawline Shadow:
Deepen the shadow under the jawline to separate the head from the neck. This should be one of the darkest areas on the skin to provide contrast.
Layered Texture
Place a textured surface (like sandpaper or fabric) under your drawing paper. Rub soft graphite over it to pick up a subtle ghost texture in the background.
Step 3: Hair & Finishing
-
Base Hair Tone:
Fill in the hair mass with a 2B pencil, following the direction of hair growth. Leave some areas lighter to suggest glossiness. -
Deepening Values:
I like to come in with a 4B pencil now to hit the deepest shadows in the hair, specifically behind the ear and at the nape of the neck. -
Flyaways:
With a sharp mechanical pencil, add loose, stray hairs escaping the bun. These fine lines add realism and softness to the rigid profile. -
The Invisible Shirt:
For the clothing, draw only the faintest suggestion of a neckline shadow. The shirt itself should remain the white of the paper, visually merging with the background. -
Final Blending:
Use your kneaded eraser to lift off any graphite smudges on the face to regain highlights on the cheekbone and nose tip. Soften any harsh transitions with the stump. -
protect the Work:
Once fully satisfied, spray a light coat of fixative to prevent the darker graphite areas from smearing over time.
Now you have a stunning, ethereal portrait that makes beautiful use of negative space
BRUSH GUIDE
The Right Brush for Every Stroke
From clean lines to bold texture — master brush choice, stroke control, and essential techniques.
Explore the Full Guide
Occult Symbol Pattern Fill
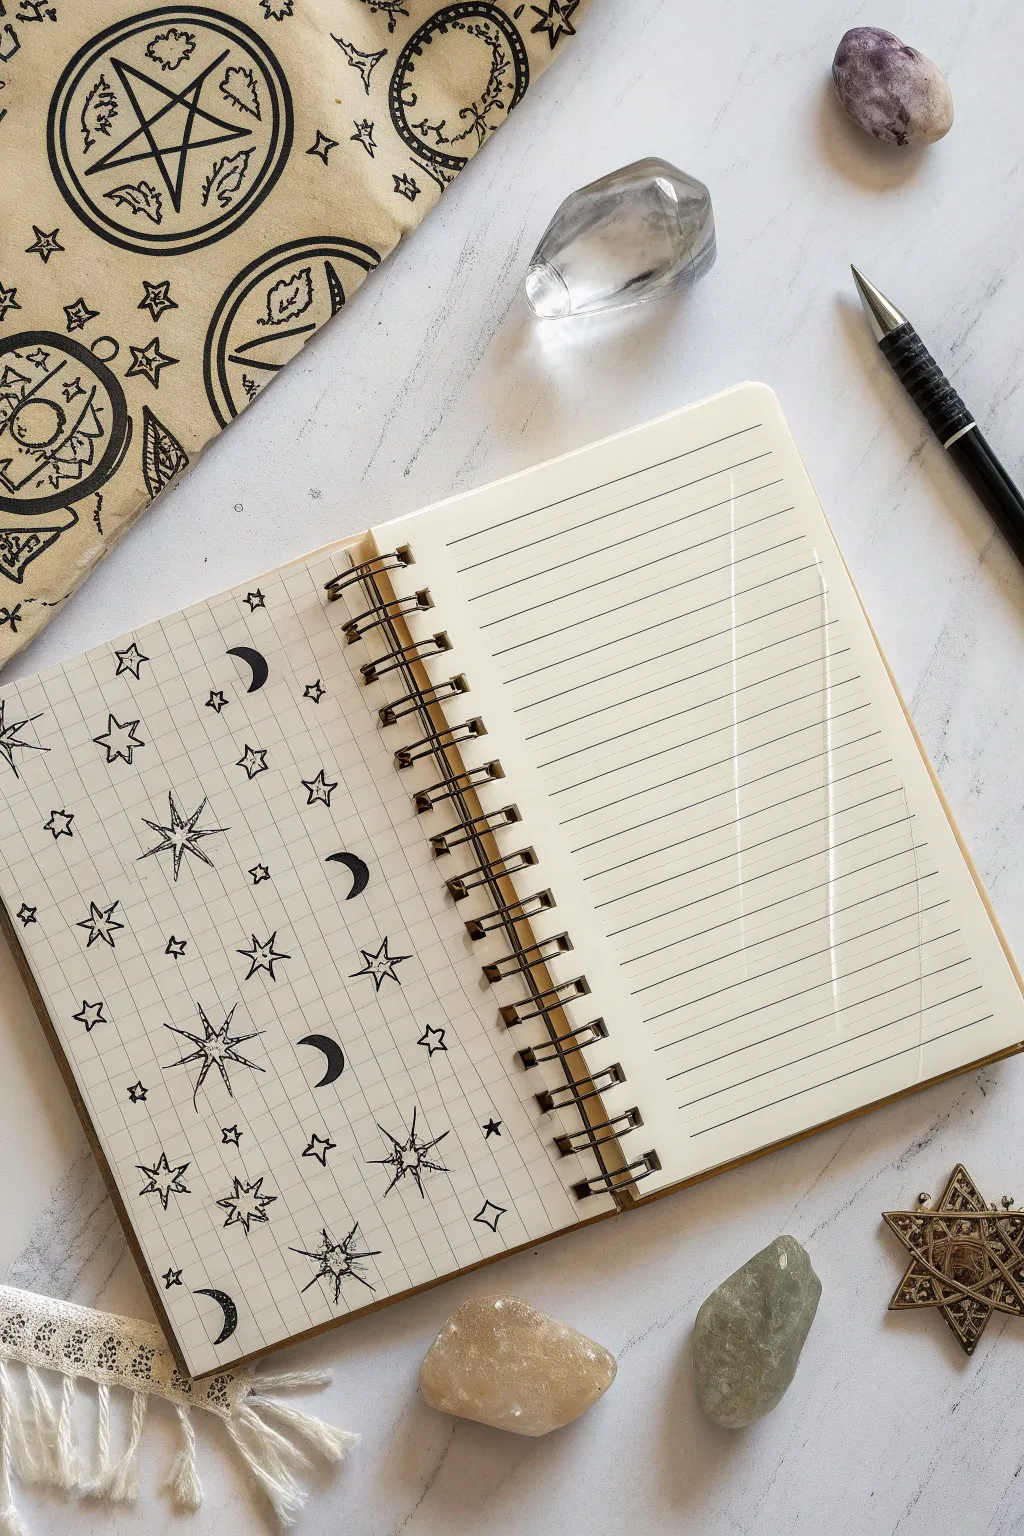
Transform a plain grid page into a mystical pattern study by filling individual squares with celestial icons. This simple repetitive drawing exercise creates a satisfying, cohesive page that looks intricate but is built one small symbol at a time.
How-To Guide
Materials
- Spiral-bound notebook with grid/graph paper
- Fine liner pen (0.3mm or 0.5mm, black ink)
- Pencil (optional for sketching)
- Eraser
Step 1: Planning the Layout
-
Assess the grid:
Open your notebook to a fresh grid page. Take a moment to look at the scale of the squares; you will be using a 2×2 or 3×3 block of squares for larger icons, and single squares for smaller accents. -
Visualize the spacing:
The charm of this pattern lies in the diagonal spacing. Imagine an invisible checkerboard or diagonal lattice where your main symbols will sit, ensuring they aren’t cluttered together.
Step 2: Drawing the Primary Symbols
-
Start with the moon crescents:
Using your fine liner, draw solid black crescent moons scattered across the page. Aim to place one every few inches. -
Vary the moon orientation:
Rotate the crescents as you go—some facing left, some right, some tilted—to keep the pattern dynamic. -
Draw the eight-pointed stars:
In the spaces between moons, draw your largest stars. Start with a simple cross (+), then add a diagonal cross (x) through the center. -
Elongate the rays:
For these large stars, make the vertical and horizontal rays distinctively longer than the diagonal ones, creating a classic compass-rose shape. -
Create the hollow stars:
For a different texture, draw five-pointed stars but leave them open (outline only). Place these in remaining large gaps. -
Add bursting stars:
Draw symbols that look like sparks or sunbursts. Start with a small center dot and flick diverse lengths of lines outward from the center.
Ink Control
Work from the top left to the bottom right (if you are right-handed) to avoid smudging your wet ink as you move across the page.
Step 3: Filling the Gaps
-
Intersperse medium stars:
Look for medium-sized empty areas. Draw simple five-pointed stars here, keeping them smaller than your main ‘hero’ symbols. -
Create tiny twinkle stars:
Draw very small four-pointed stars (just two crossed lines) in the smaller gaps. -
Add diamond accents:
Draw small, hollow diamond shapes to add geometric variety among the organic celestial shapes. -
Sprinkle the filler dots:
This step ties everything together. Gently dot your pen on the paper to create stardust specs in the negative space between larger icons.
Add Some Magic
Use a metallic gold or silver gel pen for the smallest stardust dots or to outline the crescent moons for a subtle shimmer.
Step 4: Refining the Look
-
Check the balance:
Step back and look at the page as a whole. You want an even distribution of ‘weight’—meaning the black filled moons and the delicate line stars are spread evenly. -
Darken lines if needed:
Go back over your crescent moons to ensure the black fill is solid and opaque. I like to re-trace the main lines of the largest stars to give them a bit more definition. -
Clean up edges:
If you sketched with pencil first (which isn’t strictly necessary given the casual style), gently erase those guidelines now that the ink is fully dry. -
Extend to the edge:
Don’t be afraid to draw half-symbols at the very edge of the paper. This makes the pattern feel infinite, like a slice of a larger sky.
Enjoy the meditative process of filling your personal patch of paper sky
Creepy-Cute Character Sheet
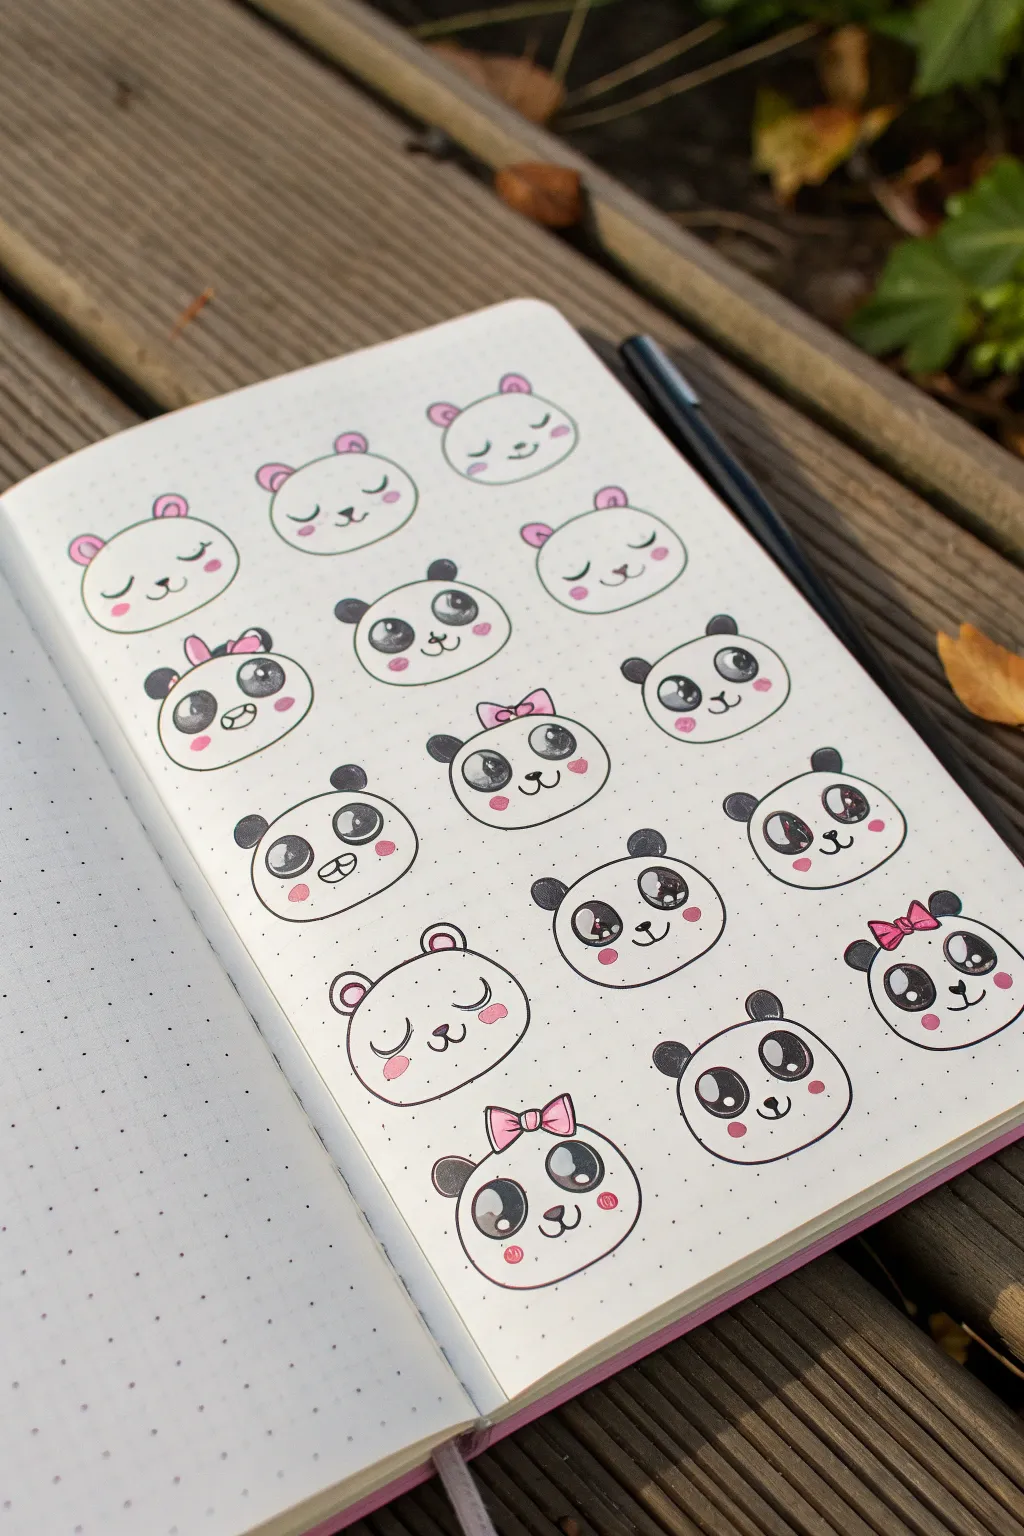
Transform a blank journal page into a grid of adorable expressions with this creepy-cute character sheet. Featuring a mix of sleepy bears and wide-eyed pandas, this simple doodle project is perfect for practicing facial features and adding a touch of sweetness to your sketchbook.
Detailed Instructions
Materials
- Dotted or grid notebook (A5 size recommended)
- Black fine liner pen (0.3mm or 0.5mm)
- Black brush pen or marker (for filling larger areas)
- Pink marker or highlighter (pastel shade)
- Pencil
- Eraser
Step 1: Planning the Layout
-
Establish the grid:
Start by visualizing a grid of 4 rows and 3 columns on your dotted page. Using a pencil, lightly mark the center point for each of the 12 faces to keep them evenly spaced. -
Sketch basic head shapes:
Draw faint oval or slightly flattened circle shapes for all the heads. They don’t need to be perfect circles; a slightly squatter ‘bun’ shape often looks cuter. -
Add ear placements:
Lightly sketch two small semi-circles on top of each head. Vary the spacing slightly if you want variety, but generally keep them at the 10 o’clock and 2 o’clock positions.
Step 2: Inking the Outlines
-
Trace the heads:
Using your black fine liner, go over your pencil lines for the main head shapes. Keep your wrist loose to get smooth curves. -
Ink the ears:
Draw the ears with the same fine liner. For the panda characters, you can leave the inside of the ear empty for now; for the white bears, draw a smaller semi-circle inside to define the inner ear. -
Add accessories:
Select a few random heads to wear bows. Draw a simple bow shape (a circle with two triangles) on one ear or right in the center of the forehead before inking the rest of the outline around it.
Grid Guide
Use the dots in your journal to count spaces (e.g., 4 dots between each head) ensuring perfectly consistent spacing without measuring tools.
Step 3: Drawing Features
-
Create the sleepy faces:
For the top row and the third face in the fourth row, draw curved ‘U’ shapes for closed eyes. Add small eyelashes for extra detail. -
Draw panda eye patches:
For the open-eyed pandas, draw large, tilted oval shapes where the eyes will go. These patches slope downwards towards the nose. -
Add the eyes:
Inside the panda patches, draw large circles for eyes. Add two small white circles inside each eye as highlights—one larger top highlight and a smaller bottom one—before filling the rest in black. -
Noses and mouths:
Place a small oval nose in the center of the face. Connect it to a simple ‘w’ shape or a small line to create the mouth. I like to vary these expressions slightly, making some smile wider than others. -
Refine the details:
Add small details like eyelashes to the open eyes or little curved lines above the eyes for eyebrows to give them different moods.
Oops, Smudged Ink?
If you smudge a line, turn it into a cheek patch or add a tiny heart over the mistake. Kawaii doodles form forgiving patterns where imperfections blend in.
Step 4: Color & Finishing Touches
-
Fill the panda markings:
Use your thicker black marker or brush pen to fill in the panda ears and the eye patches. Be careful not to color over the eyes you drew inside the patches. -
Color the bows:
Take your pink marker and carefully fill in any bows you drew earlier. -
Add rosy cheeks:
Dab two small pink ovals or circles under the eyes of every character. This instant blush effect is key to the kawaii look. -
Color inner ears:
For the white bear characters (the non-pandas), add a touch of pink to the small inner ear shapes you drew. -
Erase pencil lines:
Wait until the ink is completely dry to avoid smudging, then gently erase all your initial pencil sketches to reveal the clean artwork.
Now you have a full sheet of characters ready to act as a mood tracker or just to brighten up your weekly spread

PENCIL GUIDE
Understanding Pencil Grades from H to B
From first sketch to finished drawing — learn pencil grades, line control, and shading techniques.
Explore the Full Guide
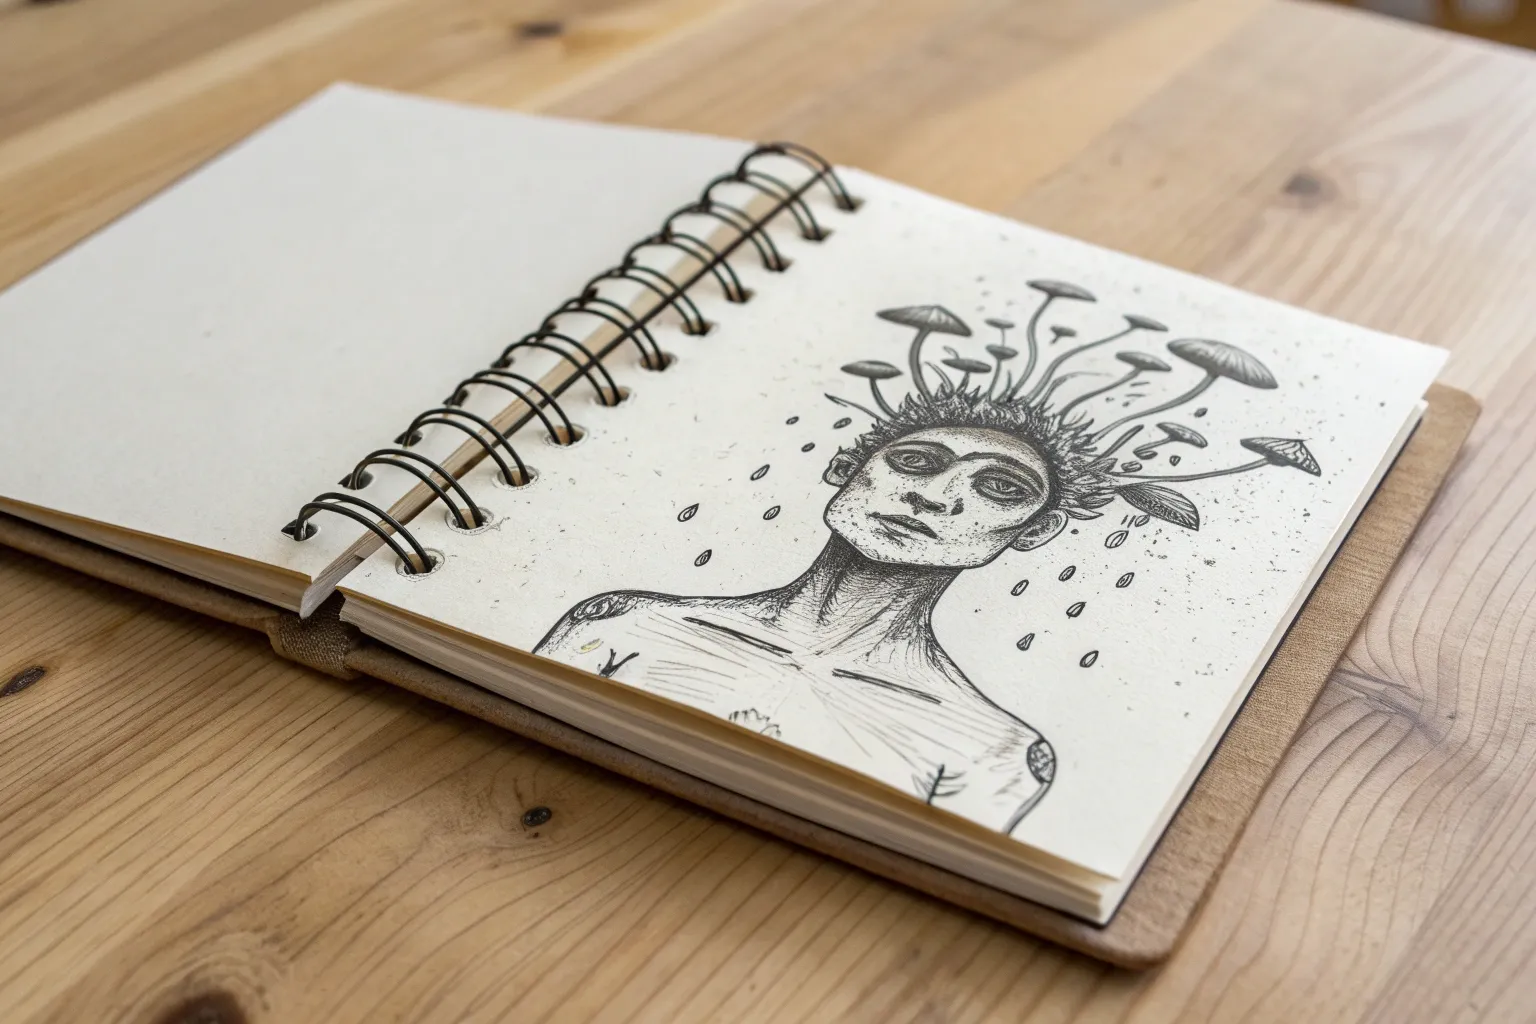
Surreal Body Mashups
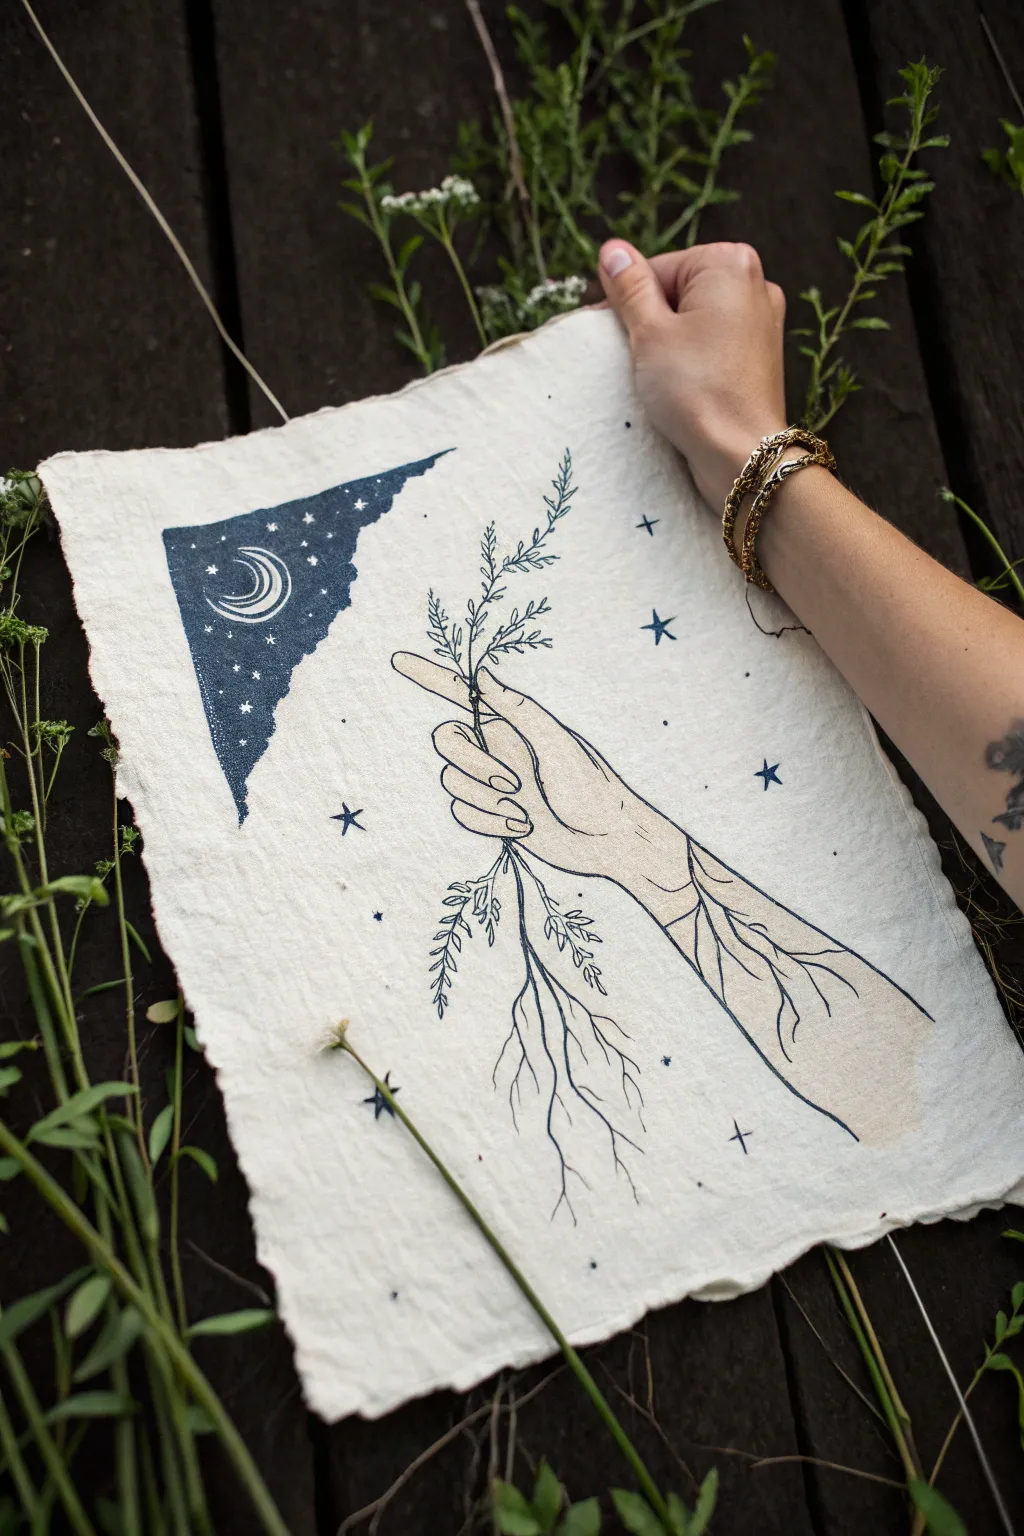
This surreal yet grounding project combines fine line work with celestial motifs on handmade paper. The finished piece creates a beautiful metaphor for connection, merging a human hand with trailing roots in a starry night scene.
Step-by-Step Guide
Materials
- Heavyweight handmade cotton rag paper (roughly A4 size)
- Fine liner pens (black, sizes 01 and 05)
- Indigo or dark blue watercolor paint
- Small round watercolor brush (size 2 or 4)
- White gel pen (fine tip)
- Pencil (HB)
- Kneaded eraser
- Ruler
Step 1: Planning and Sketching
-
Prepare your paper:
Start with a sheet of handmade cotton rag paper. The deckled edges are crucial for the vintage, organic look, so avoid cutting the paper if possible. Place it on a smooth, hard surface for drawing, but be mindful of the paper’s heavy texture. -
Outline the composition:
Using your HB pencil, lightly sketch the main elements. Draw the arm extending from the bottom right corner diagonally toward the center. Instead of a shoulder or elbow, let the bottom of the arm fade out. -
Sketch the hand gesture:
Illustrate the hand in a gentle grasping pose, with the index finger intertwined with a plant stem. The anatomy doesn’t need to be hyper-realistic, but the fingers should look relaxed. -
Merge arm into roots:
This is the ‘mashup’ part. Near the wrist and forearm, lightly draw veins that gradually thicken and transform into wandering tree roots moving downward. Sketch delicate leaves sprouting from the top of the hand. -
Block in the night sky:
In the top left corner, sketch a rough, jagged triangular shape. This will be your window into the night sky. Inside this shape, lightly trace a crescent moon.
Step 2: Inking the Line Art
-
Ink the hand outline:
Switch to your 05 fine liner. Carefully go over the main outline of the hand and fingers. The textured paper might make the pen skip slightly; embrace this, as it adds to the rustic aesthetic. -
Detail the anatomy:
Use the finer 01 pen for the interior details, specifically the fingernails, knuckles, and the creases of the palm. Keep these lines broken and light for a softer look. -
Draw the mutating roots:
Using the 05 pen again, ink the ‘veins’ on the forearm. As you move down, thicken the lines to resemble roots. Make them wiggly and organic rather than straight. -
Create the plant life:
Ink the plant stem held in the fingers and the sprigs emerging from the arm. Use short, repetitive strokes for the tiny leaves to give them texture. -
Erase pencil guides:
Once the ink is completely dry—give it a few minutes to be safe—gently dab the drawing with a kneaded eraser to lift the graphite without damaging the paper surface.
Working with Rag Paper
Cotton rag paper is very absorbent. Move your pen a bit slower than usual to allow the ink to soak in, preventing skipped lines on the textured surface.
Step 3: Adding Celestial Elements
-
Paint the night sky field:
Mix a deep indigo watercolor. Carefully fill in the jagged triangular shape in the top left corner, painting around the crescent moon outline you sketched earlier. -
Refining the edges:
Allow the edges of the painted area to remain somewhat rough and uneven, mimicking a torn piece of paper or a fragment of the universe. -
Add floating stars:
Scattered across the unpainted areas of the paper, draw several five-pointed stars using your blue paint or a blue marker. Vary their sizes for visual interest. -
Detail the moon:
Once the indigo paint is dry, use your 01 black pen to outline the crescent moon and add inner detail lines to the moon’s curve.
Level Up: Gold Leaf
Apply tiny flakes of gold leaf to the crescent moon or the larger stars for a metallic shimmer that catches the light beautifully.
Step 4: Finishing Touches
-
Add white starlight:
Take your white gel pen and dot tiny stars into the dark indigo section. I like to group them in little clusters to mimic constellations. -
Enhance with small dots:
Using the 01 black pen, add tiny stippling dots around the hand and stars on the main paper area to create a sense of magic dust or atmosphere. -
Review and refine:
Step back and look at the balance. If the root area feels too light, thicken a few lines with the 05 pen to weigh it down visually.
Now you have a poetic illustration that perfectly captures the connection between nature and the cosmos
Floating Eye Constellations
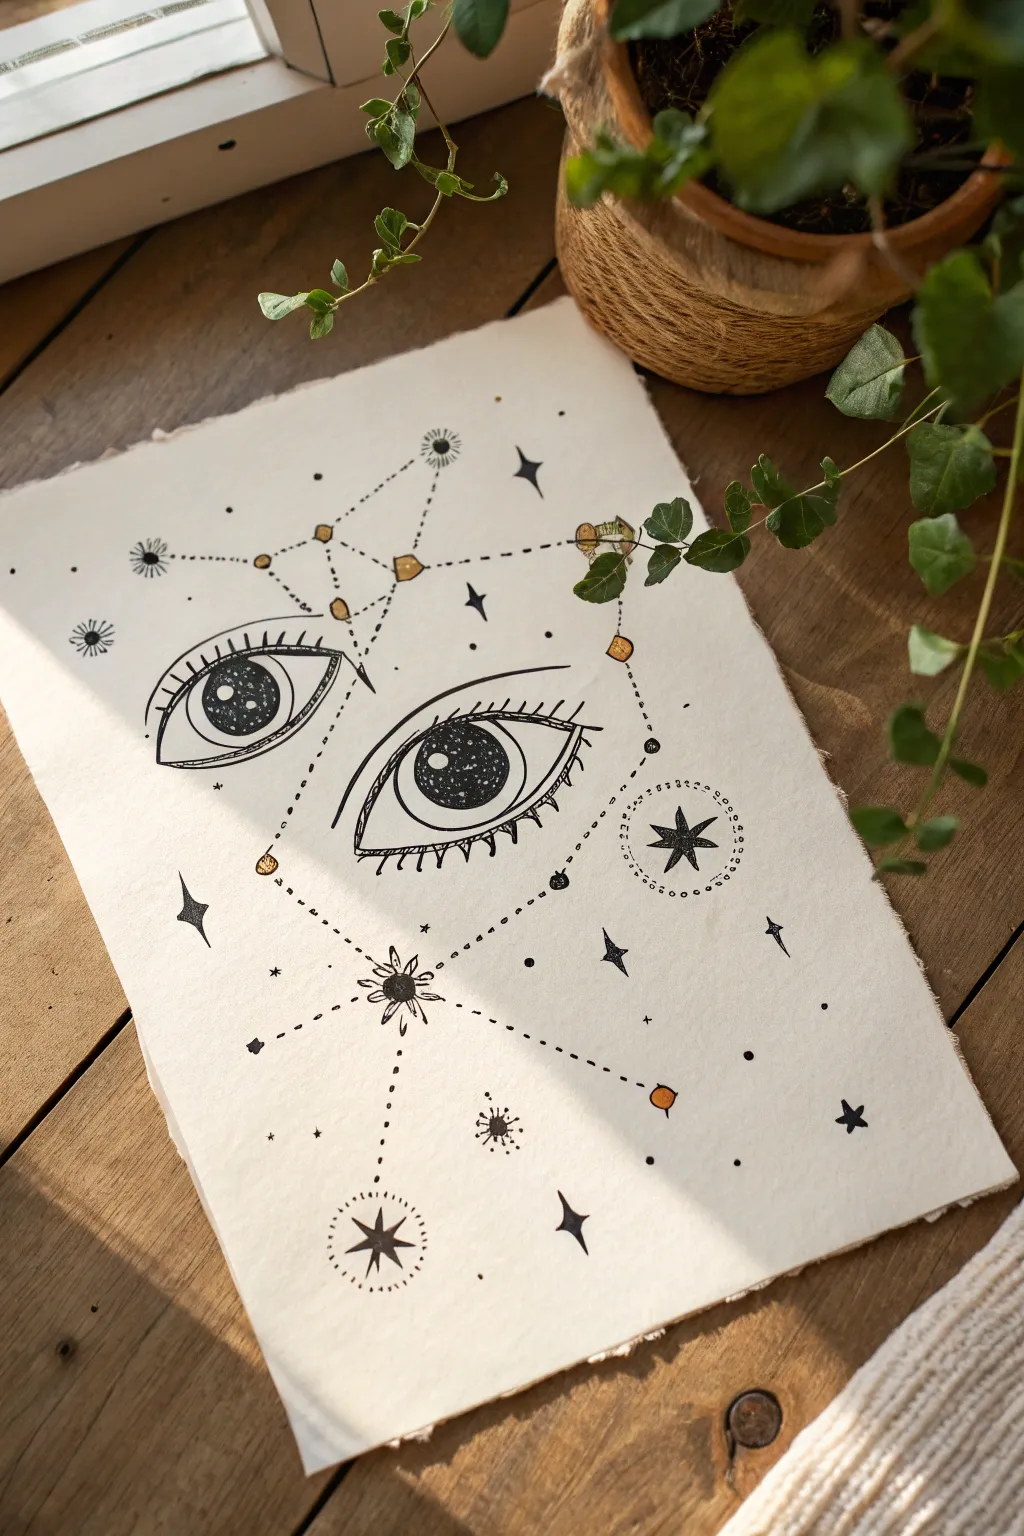
Blend surrealism with astronomy in this captivating ink illustration, featuring stylized eyes adrift among geometric stars. The finished piece combines stark black linework with subtle gold accents on textured paper for a magical, old-world aesthetic.
Step-by-Step Tutorial
Materials
- Heavyweight textured paper (watercolor or mixed media paper, preferably with deckled edges)
- Fine liner pens (sizes 005, 01, and 05, black water-resistant ink)
- Gold ink or gel pen
- Pencil (HB or H)
- Kneaded eraser
- Ruler
Step 1: Planning the Layout
-
Outline the eyes:
Begin by lightly sketching the two almond shapes of the eyes in pencil. Place the left eye slightly higher than the right to create a diagonal flow. Keep the shapes simplified but expressive. -
Sketch the irises:
Draw large circles for the irises within the eye shapes. Leave a small highlight circle near the top right of each pupil to give them life later on. -
Map the constellations:
Using your ruler, lightly draft the geometric constellation lines connecting the eyes to the surrounding space. Draw small circles where the ‘stars’ will be, scattering them around the eyes to frame the composition.
Ink Bleeding?
If ink feathers on textured paper, switch to pigment liners rather than dye-based pens. Work faster and verify your paper is sized for wet media.
Step 2: Inking the Eyes
-
Define the eye contours:
Switch to your 05 fine liner. Carefully trace over your pencil lines for the upper and lower eyelids. For the upper lid, use a slightly thicker line or go over it twice to create the crease weight. -
Detail the irises:
Fill in the pupils solid black, carefully preserving that white highlight circle you sketched earlier. This contrast is crucial for the gaze. -
Create the stippling effect:
Using a 005 or 01 pen, fill the iris area around the pupil with dense stippling (tiny dots). Concentrate the dots near the outer edge and the pupil for depth, leaving the center slightly lighter. -
Add the lashes:
With the 01 pen, draw the eyelashes. Instead of individual hairs, draw them as small, triangular spikes along the lower lash line. Keep the upper lashes defined by a simple, bold crease line above the eye.
Step 3: Drawing the Constellations
-
Ink the connecting lines:
Use the ruler and a 005 pen to ink the straight dotted lines connecting your star points. Break the lines intentionally—don’t make them solid rays, but rather dashed trails. -
Draw the main stars:
Ink the larger star shapes. Create variety: some can be standard five-point stars, while others should be drawn as small sunbursts or circles with radiating lines. -
Add detail to star centers:
For the largest starbursts, fill the center circle with solid black to anchor the lighter lines radiating outward. -
Scatter tiny stars:
Freehand small four-point sparkles and tiny dots in the emptiness between the main constellation lines. This adds fullness to the galaxy effect.
Cosmic Depth
Make the stippling inside the iris extremely dense at the top, fading to sparse at the bottom. This mimics how light hits a real eye.
Step 4: Gold Accents & Finishing
-
Erase pencil guides:
Wait until the black ink is completely dry—I usually give it at least 15 minutes to be safe. Gently gently roll a kneaded eraser over the page to lift the graphite without damaging the paper texture. -
Apply gold nodes:
Take your gold ink or gel pen and fill in specific small circles along the constellation lines. Don’t fill every circle; choose random nodes to create a glittering rhythm. -
Highlight the eyes:
Add a tiny touch of gold to the corner of the eye or as a secondary ring around the iris if you want extra mysticism. -
Create the deckled edge:
If your paper has straight edges, you can tear the edges carefully against a ruler or just roughly by hand to mimic the handmade paper look shown in the example.
Frame your celestial vision or place it on a desk to inspire your next daydreaming session


Ribcage Flower Vase

Contrast the rigid structure of bones with the soft organic flow of wildflowers in this striking ink and colored pencil piece. This illustration transforms a human ribcage into a surreal vessel, sprouting delicate daisies and buds for a hauntingly beautiful effect.
How-To Guide
Materials
- Heavyweight drawing paper (smooth bristol or mixed media paper)
- Pencil (HB or 2H for sketching)
- Fine liner pens (sizes 0.1, 0.3, and 0.5)
- Colored pencils (soft pink, deep rose, sage green, yellow)
- Kneaded eraser
- Anatomy reference photo (optional but helpful)
Step 1: Conceptual Sketch
-
Map the spine:
Begin by lightly drawing a vertical, semi-curved line down the center of your page to represent the spine. This acts as your central anchor for the entire composition. -
Rough in the ribcage:
Sketch the general oval shape of the ribcage around the spine. Don’t worry about individual ribs yet; just capture the volume. Mark where the shoulder blades (scapulae) will sit at the top. -
Draft the main flower stem:
Instead of drawing a skull or neck vertebrae at the top, extend a line upward from the top of the ribcage, curving slightly to the right. This will become the primary stem for the large daisy. -
Position the flowers:
Sketch a circle for the main flower head at the top of your stem. Add smaller lines radiating from the sides of the ribs for the secondary buds and leaves.
Step 2: Anatomical Pencil Details
-
Define the vertebrae:
Starting from the bottom of your spine line, sketch the visible lumbar vertebrae. They should look like stacked, blocky cylinders that get slightly smaller as you move up. -
Sketch the ribs:
Draw the ribs curving outward from the spine and wrapping around to the front. Remember that ribs slope downwards as they wrap around. Leave a gap in the center where the sternum would be, though in this stylized view, we focus mostly on the cage structure. -
Add arm bones:
Sketch the humerus bones hanging loosely at the sides on the left and right. Keep them simple and disconnected at the bottom to emphasize the floating, surreal nature of the drawing. -
Refine the floral elements:
Flesh out the petals on the main daisy, making them slightly irregular for a natural look. Add the sepals (the green base) and leaves along the stem, as well as the smaller rose-like buds floating near the left side.
Smudged Ink?
If you accidentally smear wet ink, don’t scrub it! Wait for it to dry completely, then turn it into a shadow or a stylized ‘decay’ spot with more stippling later.
Step 3: Inking the Structure
-
Outline the bones:
Using a 0.3 pen, carefully trace your pencil lines for the bones. Use somewhat shaky or broken lines occasionally to simulate the texture of old bone rather than smooth plastic. -
Darken the rib interiors:
With a 0.5 pen, color in the ‘inside’ back portions of the ribcage—the negative space between the front ribs and the spine. This creates depth and makes the front ribs pop. -
Add bone texture:
Switch to your 0.1 pen to add stippling (small dots) and tiny scratch marks on the bone surfaces, particularly near the joints and where shadows would fall. -
Ink the botanical elements:
Outline the stems and leaves with the 0.1 pen. Use fluid, continuous strokes here to contrast with the textured, scratchy lines used for the bones. -
Erase pencil guides:
Once the ink is completely dry—give it a few minutes to be safe—gently use your kneaded eraser to remove all underlying graphite.
Level Up: Vintage Vibe
For an antique textbook look, stain your paper with cold coffee or tea and let it dry flat before you start sketching. It adds instant age to the anatomy.
Step 4: Adding Soft Color
-
Color the main bloom:
Take your soft pink pencil and lightly shade the petals of the large daisy, concentrating color at the tips and the base near the center. Leave the middle of the petals nearly white. -
Detail the flower center:
Fill the center of the daisy with yellow, then use a touch of light brown or orange stippling around the edge of the center disk to give it texture. -
Greenery and stems:
Use the sage green pencil for the stems and leaves. Apply more pressure on one side of the stem to suggest a cylindrical shadow. -
Internal accents:
To surreal effect, color the tissue inside the lower right ribcage with a deep rose or reddish-pink. This suggests organs or fleshy interior without being gorey. I find this creates a nice visual balance with the flowers. -
Final shading touches:
Lightly graze the bone edges with a very pale grey or just smudge a tiny bit of graphite to give the white bones volume, ensuring they don’t look purely 2D.
Step back and admire how the delicate floral life interacts with the stark skeletal structure you’ve created.
Vent Art Text Collage
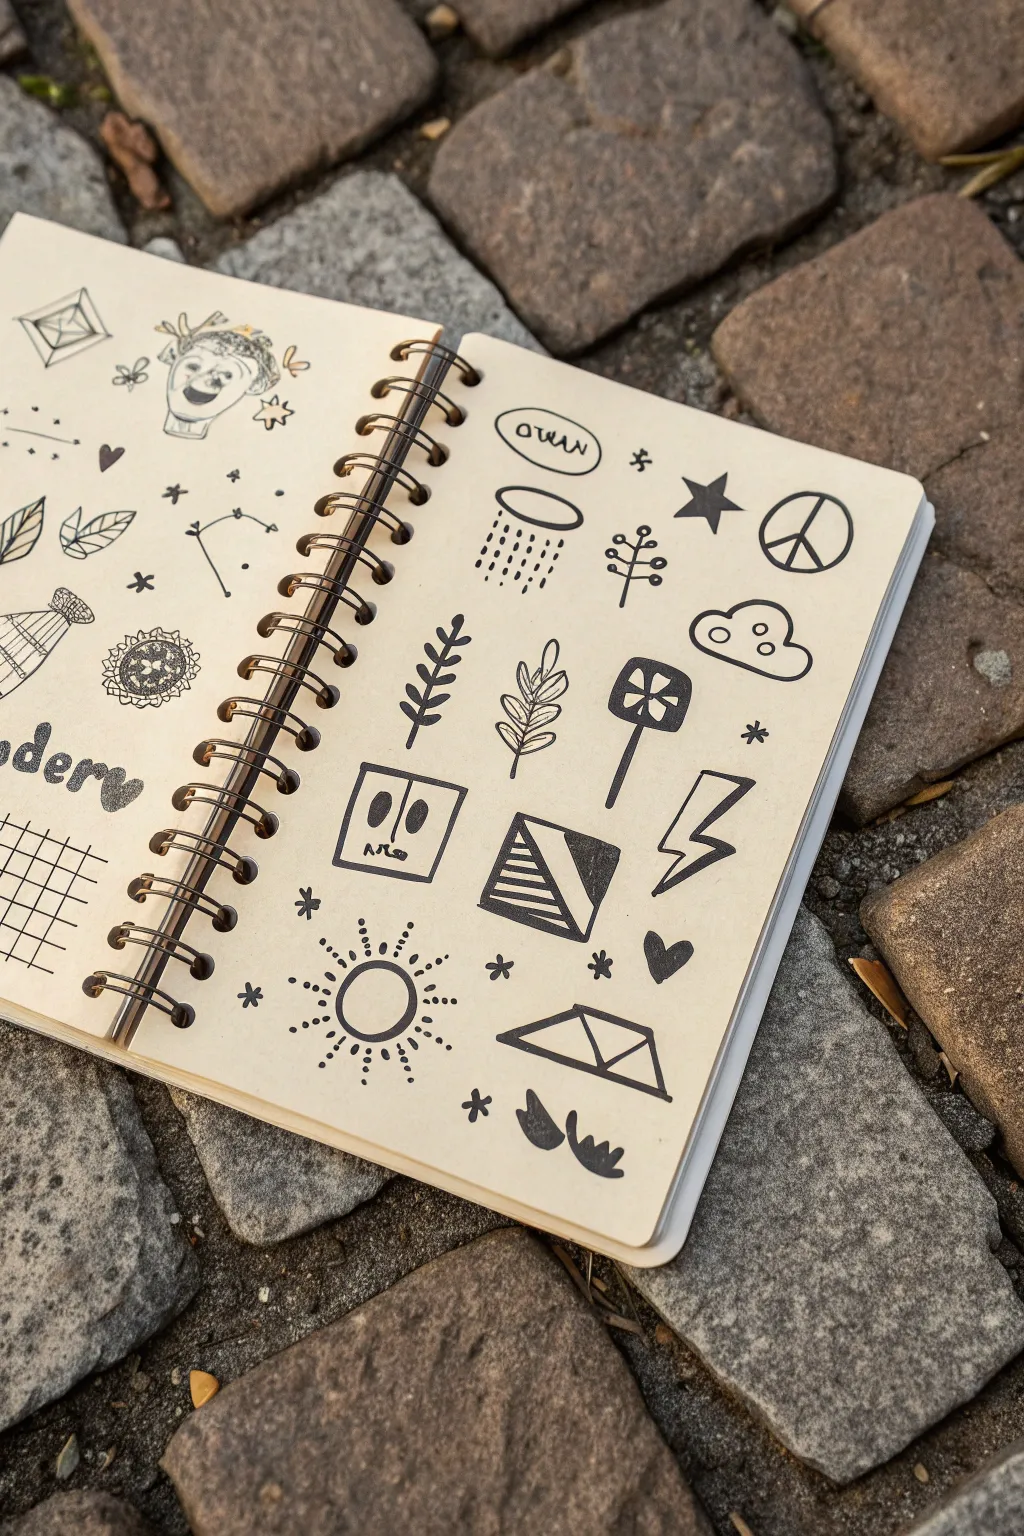
Fill your sketchbook pages with a charming collection of miniature symbols, nature motifs, and abstract icons using bold black ink. This casual, sticker-sheet style layout is perfect for practicing simple line work and exploring visual vocabulary without the pressure of a full composition.
Step-by-Step
Materials
- Spiral-bound sketchbook with cream or off-white paper
- Fine liner pens (sizes 0.3mm and 0.5mm)
- Thick black marker or brush pen (for filling)
- Pencil (HB or 2B)
- Eraser
Step 1: Planning the Layout
-
Survey your space:
Open your sketchbook to a fresh spread. The goal isn’t a single cohesive scene, but an evenly spaced collection of distinct elements. Visualize an invisible grid to keep things balanced but not rigid. -
Lightly sketch placeholders:
Using your pencil, lightly map out where each doodle will go. You don’t need to draw every detail yet, just circles or squares to establish spacing so the page doesn’t feel cluttered later.
Step 2: Drawing Nature Motifs
-
Sketch the vine:
Start near the center of the right page with the crawling vine. Draw a central curved line first, then add alternating almond-shaped leaves going up the stem. -
Add the botanical sprig:
To the right of the vine, draw a vertical line with three pairs of small branches coming off it. Add tiny circles at the end of each branch tip to create berries or buds. -
Draw the geometric leaf:
On the left page, create a pair of leaves but use straight, angular lines inside them to create a geometric texture rather than organic veins. -
Ink the nature elements:
Trace over your pencil lines with a 0.5mm fine liner. Keep your stroke steady and consistent for that clean, graphic look.
Keep it Loose
Don’t use a ruler for straight lines. The slight wobble of a hand-drawn line adds character and fits the informal ‘doodle’ aesthetic perfectly.
Step 3: Creating Symbols & Icons
-
Draw the peace sign:
On the upper right page, draw a clean circle. Bisect it with a vertical line, then add two diagonal lines downward from the center point to the rim. -
Add the cloud and lightning:
Draw a fluffy cloud with a flat bottom near the peace sign. Below it, sketch a sharp, jagged lightning bolt shape. -
Sketch the flower head:
Create a pinwheel-style flower shape inside a rounded square border. Give it a straight stem. This leans into a folk-art aesthetic. -
Draw the stylized face:
In the bottom center, draw a square face with two oval eyes and a squiggly mouth line. Add a vertical line down the middle to give it a robotic or mask-like appearance. -
Ink the outlines:
Go over these shapes with your fine liner. For the lightning bolt, keep the corners sharp.
Ink Smearing?
If your hand smudges the ink, place a scrap piece of paper under your drawing hand as a guard while you work across the page.
Step 4: Adding Geometric & Abstract Details
-
Create the sunburst:
In the bottom left corner, draw a circle. Surround it with alternating long dashes and small dots to create a radiating sun effect. -
Draw the striped box:
Sketch a square divided diagonally. Fill the bottom half with horizontal stripes and leave the top half solid black (we will fill this later). -
Add the rain cloud:
Draw an oval shape. Instead of outlining a cloud, just use rows of small dashed lines falling from it to represent rain. -
Sketch the radiating star:
Draw a simple five-pointed star. I prefer to keep the silhouette solid black to make it pop against the lighter line drawings.
Step 5: Final Inking and Contrast
-
Fill solid areas:
Switch to your thicker marker or brush pen. Identify the areas that need weight: the lightning bolt, the half of the geometric square, the star, and the center of the sun. -
Add tiny fillers:
Look for empty gaps between your main drawings. Fill these spaces with tiny asterisks, dots, or small hearts to tie the page together. -
Erase pencil lines:
Wait at least five minutes to ensure the ink is bone dry. Gently erase all visible pencil sketches to leave a crisp, clean finish. -
Variable line weight:
Take your 0.5mm pen again and re-trace just the outer edges of shapes like the peace sign or the cloud to make them stand out slightly more than the interior details.
Now you have a lively playful spread of icons that serves as a library for your visual ideas
Mini Zine Panel Story
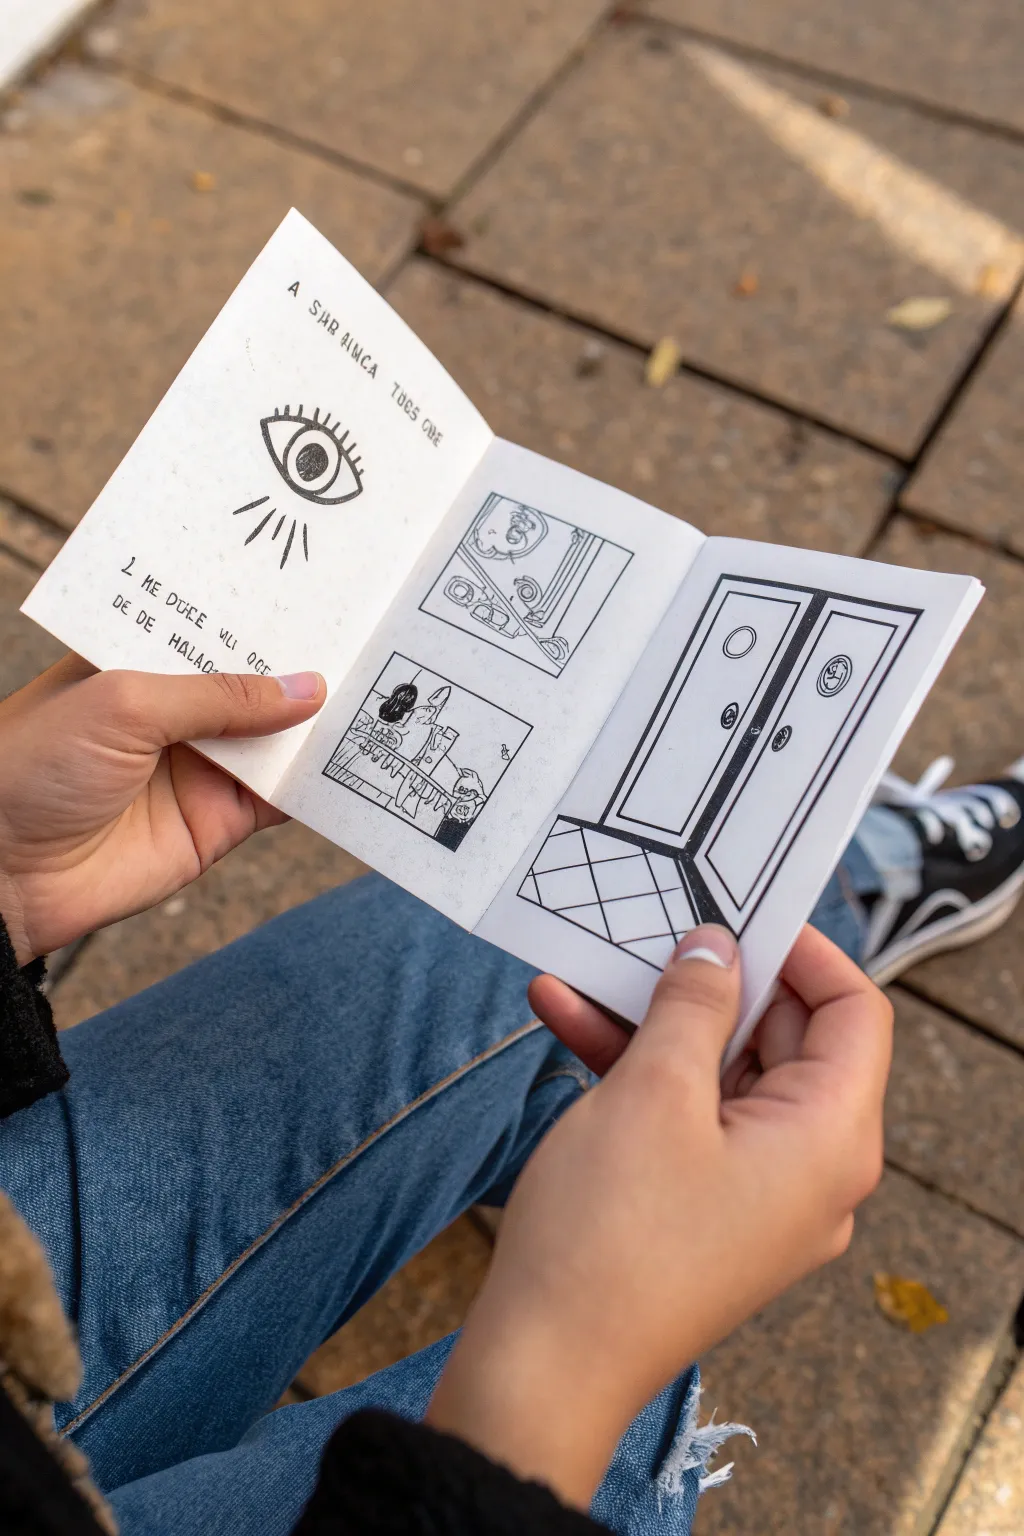
Learn to fold and illustrate a classic eight-page mini zine from a single sheet of paper, featuring cryptic black ink illustrations. This pocket-sized booklet combines simple paper engineering with bold linework to tell a short visual story.
Step-by-Step
Materials
- One sheet of white A4 or Letter printer paper
- Fine liner pen (0.3mm or 0.5mm, black)
- Thicker marker (0.8mm or 1.0mm, black)
- Bone folder (optional, but helpful for crisp creases)
- Scissors
Step 1: Folding the Zine Structure
-
Initial lengthwise fold:
Lay your paper flat on a table in landscape orientation. Fold the paper in half lengthwise (hot dog style), matching the long edges carefully. Crease firmly and unfold. -
Widthwise fold:
Fold the paper in half across the width (hamburger style). Make a sharp crease. Keep the paper folded. -
Quarter folds:
Take one edge of your folded paper and fold it back to meet the spine (the center fold you just made). Flip the paper over and repeat with the other edge. Your paper should now look like an accordion ‘W’ shape when viewed from the end. -
Cutting the slit:
Unfold the paper completely until it is flat again, then fold it in half widthwise (hamburger style) just once. Locate the folded spine in the middle. Cut along this fold, starting from the folded edge and stopping exactly at the chaotic center intersection where the creases meet. -
Forming the booklet:
Unfold the paper completely. Refore the lengthwise crease (hot dog style). Hold the paper at both ends and push inwards; the slit section will diamond out. Keep pushing until the panels touch, creating a plus sign shape. Collapse these pages into a booklet.
Uneven Pages?
If your pages don’t align perfectly when folded, trim the excess edges with scissors (or an X-Acto knife and ruler) after the booklet is fully assembled for a clean, professional finish.
Step 2: Front Cover Illustration
-
Sketch the eye:
With the zine folded, locate the front cover. Using your thinner fine liner, draw a stylized eye in the upper center. Draw an almond shape, then add a perfect circle for the iris and a solid black dot for the pupil. -
Add details:
Draw short, straight lashes extending from the top lid. Add five or six radiating lines below the eye to suggest light or vision. I find adding a double line to the upper lid adds nice depth. -
Lettering:
above the eye, hand-letter a cryptic title like ‘A SHR AIMCA TOCS QUE’ (or your own nonsense text) in small, erratic capital letters. Add smaller text near the bottom edge.
Step 3: Internal Panels
-
Panel layout:
Open to the first spread. On the right-hand page, use a ruler or steady hand to draw two distinct square borders for your comic panels, one stacked above the other. -
Top panel scene:
Inside the top box, sketch a chaotic room corner. Use abstract shapes to suggest furniture or debris. Keep the lines loose and sketchy. -
Bottom panel scene:
In the lower box, draw two figures interacting. Use simple shapes—circles for heads, blocks for bodies. Fill in hair or clothing details with solid black ink to create heavy contrast. -
Adding texture:
Use stippling (small dots) or cross-hatching to create shadows in the corners of your panels.
Xerox Style
To get that gritty, authentic zine look, photocopy your finished original several times, increasing the contrast settings each time. This degrades the lines and adds texture.
Step 4: The Door Illustration
-
Door outline:
Turn the page to a blank spread. Draw a large rectangle that takes up most of the page. Split it vertically down the middle to create double doors. -
Dimension lines:
Draw interior rectangles inside each door panel to simulate molding. Add a small circle near the top of the left door and a circular handle symbol on the right. -
Doorknobs and details:
Place two small, dark circles near the center dividing line for knobs. Use the thicker marker to darken the inner door frame for visual weight. -
Floor perspective:
At the bottom of the page, beneath the doors, draw a grid of diagonal lines to look like tiled flooring leading up to the entrance. This grounds the drawing.
Now you have a mysterious pocket-sized story ready to photocopy and share with friends


Have a question or want to share your own experience? I'd love to hear from you in the comments below!