When I paint the American flag, I like to treat it as a jumping-off point—not a test you have to “get perfect.” Here are my favorite American flag painting ideas that feel doable, display-worthy, and full of room for your own style.
Rustic Barnwood Flag Look

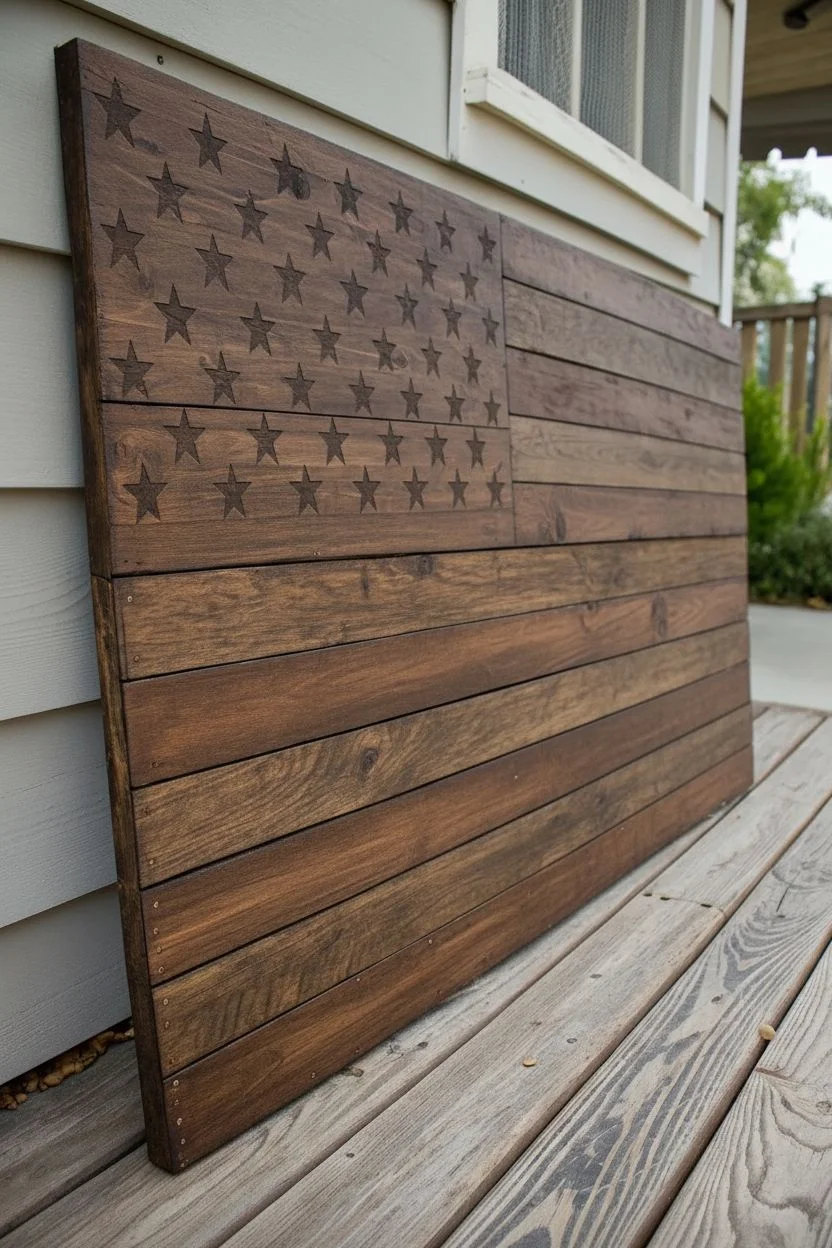
Capture the spirit of heritage with this stunning wooden flag project that mimics the weathered texture of authentic barnwood. Perfect for a porch or living room, this piece combines simple woodworking with clever painting techniques to achieve a beautifully aged aesthetic.
Step-by-Step Tutorial
Materials
- 13 strips of 1×2 or 1×3 lumber (furring strips work great for texture)
- Wood glue
- Pin nailer or brad nailer with nails
- Two thin vertical wood strips (for backing)
- Dark wood stain (e.g., walnut or espresso)
- Red, white, and navy blue latex or acrylic paint
- 50-star stencil (sized to fit your union area)
- Large flat paintbrush
- Stencil brush or sponge dabber
- Fine and medium-grit sandpaper (120 and 220 grit)
- Painter’s tape
- Matte clear sealer spray
Step 1: Construction & Staining
-
Cut the stripes:
Cut your 13 lumber strips to your desired flag length. A standard proportional length is often around 37 inches for a 19.5-inch tall flag, but adjust based on your lumber width. -
Create the union field:
Visualize the blue field (the union). You’ll need to cut the top 7 strips shorter to accommodate the blue section. Determine the width of your union (typically about 40% of the flag’s width) and cut those top 7 strips accordingly. -
Assemble the union board:
Instead of using separate short strips for the blue field, cut a solid piece of plywood or edge-glue shorter boards together to create a smooth, solid rectangle that fits perfectly into the gap created in the top 7 rows. -
Lay out the flag:
Arrange all your wood pieces on a flat surface to dry-fit the flag. Ensure the long stripes are at the bottom and the shorter stripes align with the union block. -
Secure the backing:
Flip the arranged pieces over gently. Apply wood glue to your two vertical backing strips and lay them perpendicular across the back. Use a brad nailer to secure each front slat to these back supports. -
Sand for character:
Once assembled, give the entire face a light sanding. Don’t aim for perfection; leaving some rough saw marks actually helps the rustic barnwood illusion later on. -
Apply the base stain:
Stain the entire flag using a dark walnut or espresso color. Why stain first? When we distress the paint later, this dark wood tone will reveal itself underneath, adding instant age and depth. -
Let it cure:
Allow the stain to dry completely according to the can’s instructions. If it’s tacky, the paint won’t adhere properly.
Step 2: Painting & Distressing
-
Mask the union:
Use painter’s tape to protect the area designated for the blue union. This ensures your red and white stripe painting doesn’t accidentally wander into the star field. -
Paint the stripes:
Paint the 13 stripes, alternating red and white, starting with red at the very top. I prefer to use a slightly dry brush here—don’t flood the wood with paint. You want a thin coat that allows some wood grain texture to remain visible. -
Paint the union:
Once the stripes are dry to the touch, remove the tape. Now, carefully paint the union rectangle deep navy blue. -
Position the stencil:
Wait for the blue paint to dry fully. Center your 50-star stencil over the blue field and tape it down securely so it doesn’t shift. -
Stipple the stars:
Using a stencil brush and white paint, use a straight up-and-down pouncing motion to fill in the stars. Use very little paint on your brush to prevent bleeding under the stencil edges. -
Distress the surface:
Here is the magic step. Take your medium-grit sandpaper and sand strictly side-to-side along the grain. Focus on edges and high spots, sanding until you see the dark stain peeking through the red, white, and blue paint. -
Clean the dust:
Wipe the entire flag down with a tack cloth or a slightly damp rag to remove all the sanding dust, revealing the rich, worn finish. -
Seal the deal:
Spray the finished piece with a clear matte sealer. This protects the wood and locks in that dusty, antique look without adding an artificial glossy shine.
Dry Brushing Tip
When painting over the stain, dip your brush then wipe mostly it off on cardboard first. This ‘dry brush’ leaves thin, scratchy streaks that look naturally weathered immediately.
Burn It Up
Before staining, gently run a handheld propane torch over the wood grain. This chars the soft grain and adds incredible depth and authentic rustic texture under the stain.
Now you have a stunning piece of patriotic decor that looks like it has weathered decades of history


Waving Flag With Soft Shading

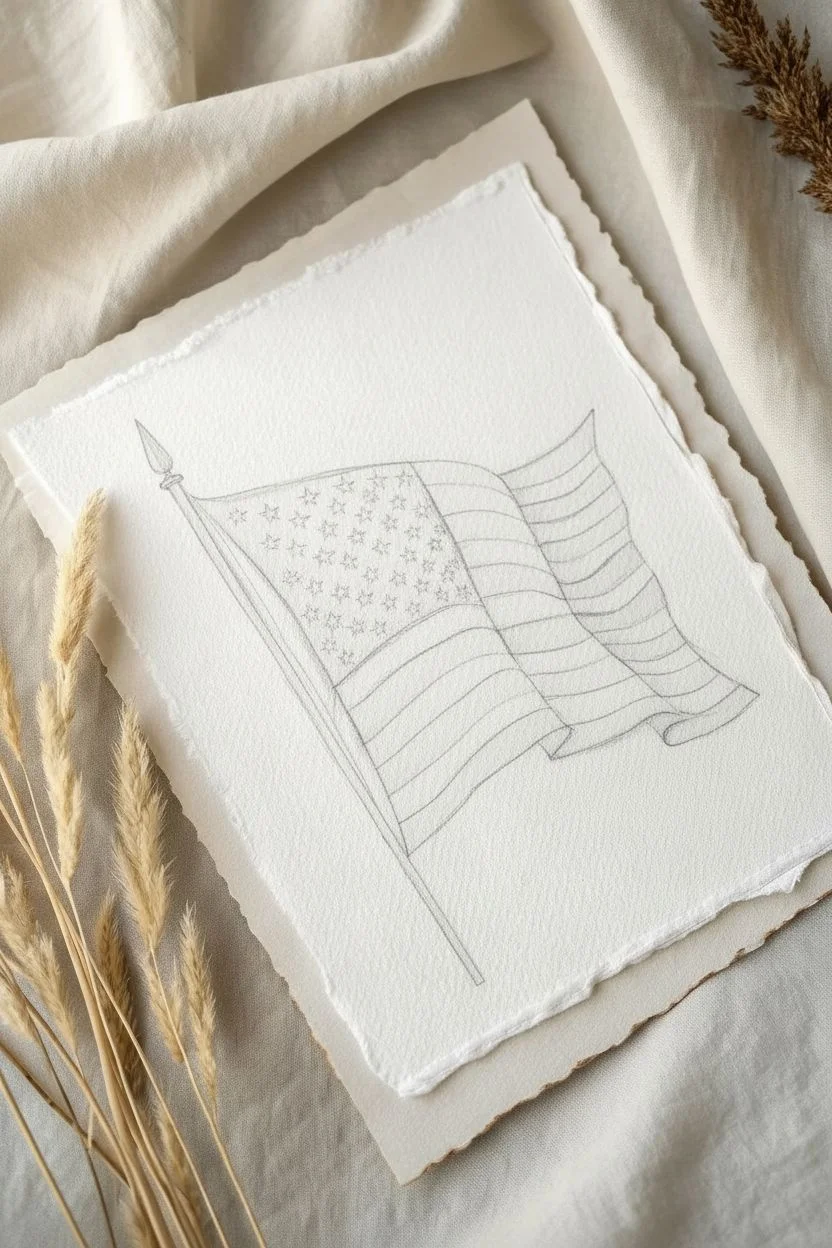
Capture the spirit of freedom with this elegant watercolor tutorial featuring a beautifully waving American flag. The soft, rippled shading and delicate deckle-edged paper give this piece a timeless, vintage feel perfect for patriotic decor.
How-To Guide
Materials
- Cold press watercolor paper (deckle-edge preferred, or tear your own)
- Watercolor paints (Alizarin Crimson, Ultramarine Blue, Burnt Sienna, Payne’s Gray)
- Round brushes (sizes 2, 4, and 8)
- Pencil (HB or H for light lines)
- Kneaded eraser
- Two jars of water
- Paper towels
- Masking fluid (optional)
- White gouache (optional, for stars)
Step 1: Sketching the Wave
-
Draft the pole:
Begin by lightly drawing a diagonal line for the flagpole, tilting it slightly to the right. Add a small ornamental spear shape at the top and a simple round knob just below it. -
Outline the flag shape:
Draw the top and bottom edges of the flag using undulating, wavy lines to simulate movement in the wind. Ensure the fabric looks like it is folding back on itself in soft S-curves. -
Define the canton:
Mark out the rectangular canton (the blue field) in the top left corner. Remember to make its bottom and right edges follow the same wavy distortion as the rest of the flag. -
Sketch the stripes:
Lightly sketch the thirteen stripes. Follow the contours of your top and bottom waves carefully; the stripes should curve upwards in the ‘hills’ and downwards in the ‘valleys’ of the fabric folds.
Step 2: Painting the Canton & Stars
-
Prepare the blue mix:
Mix Ultramarine Blue with a touch of Payne’s Gray to get a deep, naval blue. It should be saturated but transparent. -
Mask or paint negative space:
If you are confident, paint the blue field carefully around the small star shapes, leaving the white paper exposed. Alternatively, use white gouache later, or apply small dots of masking fluid now and let them dry completely. -
Add shadows to the blue:
While the blue paint is still slightly damp, drop in a slightly darker version of your blue mix into the folds where the fabric dips away from the light. This creates immediate volume. -
Lift highlights:
Using a clean, damp brush (the ‘thirsty brush’ technique), gently lift a little pigment from the raised areas of the wave in the blue field to show where the light hits.
Wave Logic
Visualize the flag as a 3D surface before painting. The ‘hills’ (bumps) catch the light and stay pale; the ‘valleys’ (dips) are where your shadows must be darkest.
Step 3: Painting the Stripes
-
Mix the red:
Prepare a mix of Alizarin Crimson with a tiny touch of Burnt Sienna to warm it up, avoiding a candy-apple red look in favor of a vintage fabric tone. -
Paint the red stripes:
Painting every other stripe red, work wet-on-dry for control. Start with a flat wash of color for each red stripe. -
Shadow the red curves:
Before the stripes dry fully, add a second layer of slightly more concentrated red into the ‘valleys’ of the waves. Soften the edges with a wet brush so the shadow gradients smoothly into the light. -
Shadow the white stripes:
The white stripes aren’t truly white. Mix a very dilute, watery grey-blue. Gently glaze this shadow color into the deep folds of the white stripes, leaving the peaks of the waves bright white paper. -
Deepen the folds:
Once the first layers are dry, mix a deeper purplish-shadow tone (Alizarin Crimson + a touch of Blue). Glaze this into the deepest crevices of both the red and white stripes to exaggerate the fabric’s rippling dimension.
Tea Staining
For an even more antique look, lightly brush strong tea or diluted coffee over the entire paper (avoiding the painted flag) after the artwork is completely dry.
Step 4: Pole & Final Details
-
Paint the flagpole:
Use a mix of Burnt Sienna and a little grey for a weathered wood look. Paint the pole, keeping the left side lighter and the right side darker to indicate cylindrical form. -
Detail the finial:
Paint the decorative top piece with a bronze tone (Burnt Sienna + Yellow Ochre), leaving a tiny sliver of white paper for a metallic highlight. -
Refine the stars:
If you used masking fluid, rub it off now. If you painted negative space, tidy up the edges. Or, if you waited, paint the stars now using opaque white gouache and a very fine detail brush. -
Add the botanical accent:
Mix a soft, watery blue-grey. Paint a simple, whimsical sprig of leaves freely floating near the bottom corner to balance the composition. -
Create the cord:
With a very fine liner brush and dilute grey paint, draw a faint, thin line representing the halyard (rope) running parallel to the flagpole.
Step back and admire the gentle movement you’ve captured in your patriotic masterpiece


Easy Tape-Resist Flag Stripes
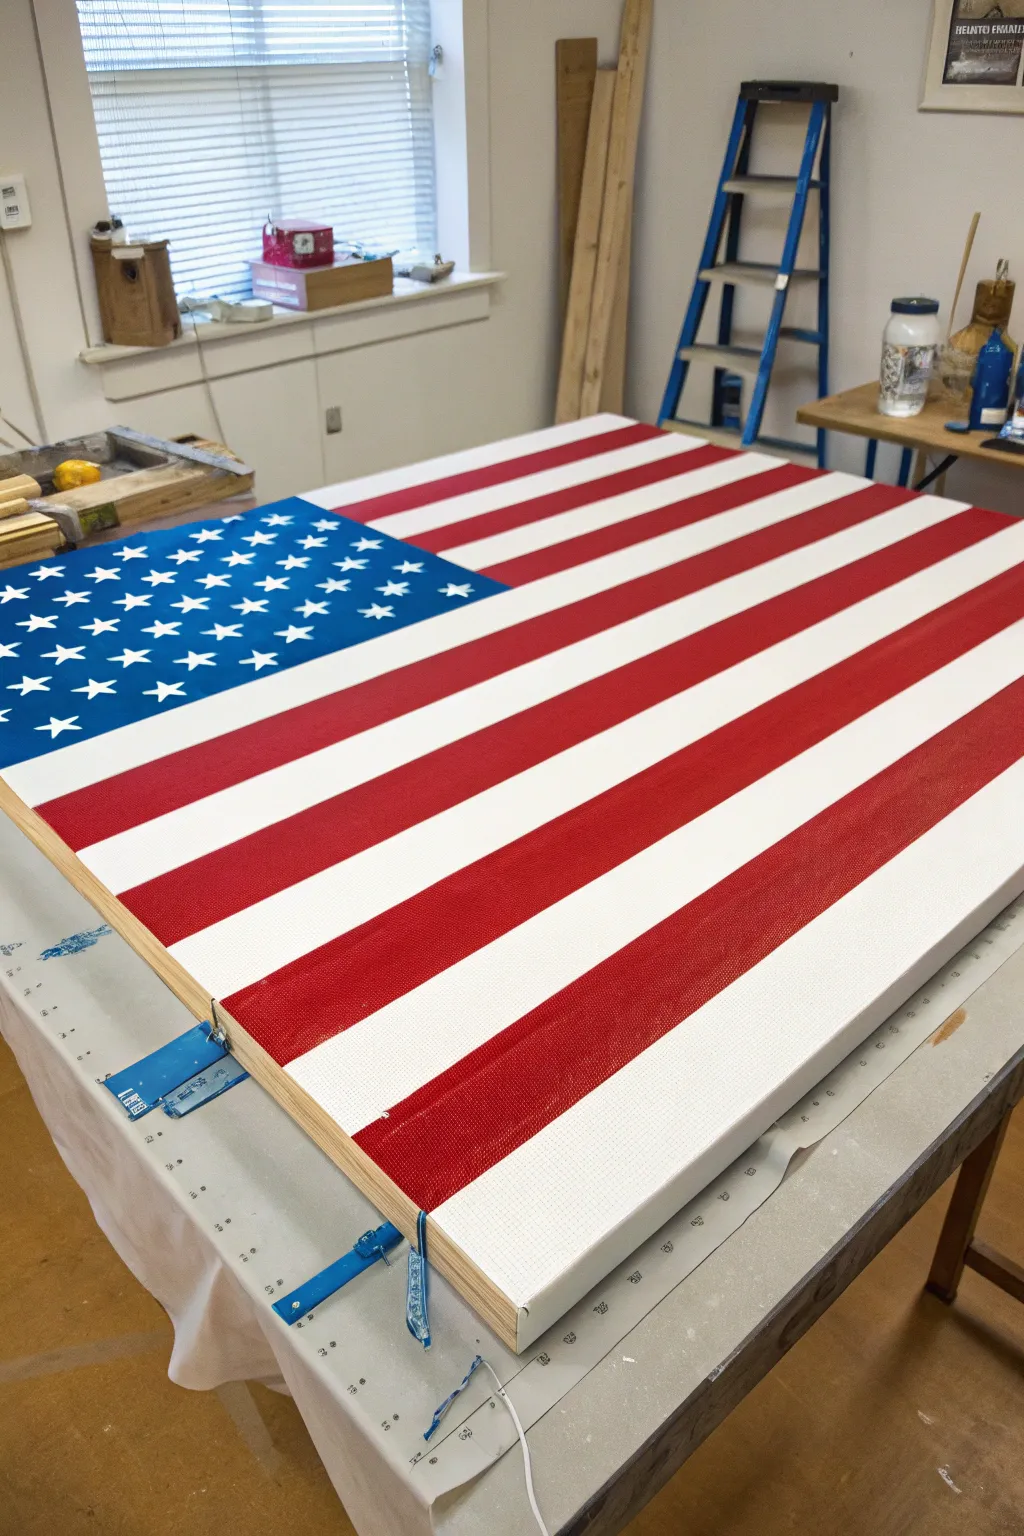
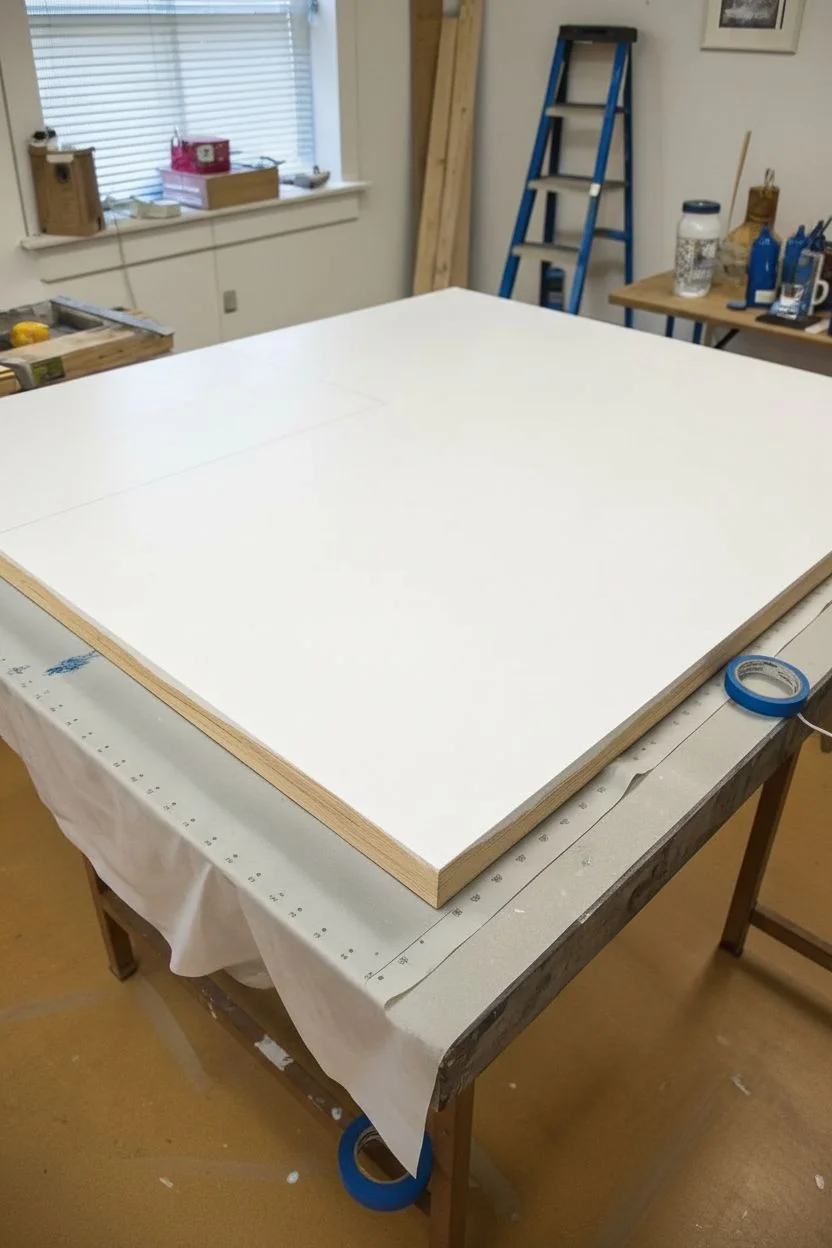
Achieve clean lines and patriotic bold colors with this easy-to-follow American flag painting project. Using painter’s tape creates sharp, professional-looking stripes on a sturdy wooden panel that makes a striking statement piece for any room.
Step-by-Step Tutorial
Materials
- Large wooden art panel or gallery-wrapped canvas (approx. 24″ x 36″)
- White acrylic gesso or primer
- Red acrylic paint (Cadmium Red or similar bright red)
- Blue acrylic paint (Phthalo Blue or Navy)
- White acrylic paint
- Blue painter’s tape (1-inch width works best)
- Star stencil or star stickers
- Foam roller and tray
- Small paintbrush for touch-ups
- Ruler or T-square
- Pencil
- Kraft paper or drop cloth
Step 1: Preparation and Base Coat
-
Set up your workspace:
Begin by covering your work table with kraft paper or a drop cloth to catch any drips. Lay your wooden panel flat on the surface. -
Prime the surface:
Pour white gesso or primer into your paint tray. Using the foam roller, apply an even coat over the entire face and sides of the panel. -
Establish the white base:
Once the primer is dry, apply two solid coats of white acrylic paint using the foam roller. This will serve as your white stripes later, so ensure the coverage is opaque and smooth. -
Let it cure fully:
Allow the white base coat to dry completely. If the paint is even slightly tacky, the tape in the next step might peel it off, so patience is key here.
Step 2: Creating the Stripes
-
Measure the stripe width:
Calculate the width for your 13 stripes based on your panel’s height. Use a pencil and ruler to make small tick marks along the left and right edges of the panel to guide your taping. -
Tape the white stripes:
Apply strips of blue painter’s tape across the panel where the white stripes will be. Remember, you are covering the areas you want to *stay* white. -
Seal the tape edges:
Press the tape down firmly along every edge. I find that running a clean credit card or a bone folder over the tape ensures a tight seal that prevents paint bleed. -
Block out the union:
Measure a rectangle in the top left corner for the blue field (the union). Tape off the boundaries of this box to keep red paint out of the blue area. -
Apply the red paint:
Using a clean foam roller, apply red acrylic paint to the exposed stripe areas. Roll gently and don’t overload the roller to minimize bleeding under the tape. -
Add a second red coat:
Once the first red coat is dry to the touch, apply a second coat for deep, rich color saturation.
Seal Prior to Painting
Before painting red, brush a thin layer of matte medium or white paint over the tape edges. This seals the gap and prevents red bleed-under.
Step 3: The Blue Field and Stars
-
Reveal the stripes:
Carefully peel off the tape strips covering the white stripes while the red paint is still slightly damp to get the cleanest edge. -
Mask for the blue field:
Once the red stripes are fully dry, tape off the edges surrounding the blue union rectangle to protect your fresh red and white stripes. -
Paint the union:
Use a foam brush or roller to fill in the rectangle with your navy blue acrylic paint. You may need two coats for full opacity. -
Dry the blue field:
Let the blue paint dry completely before moving on to the stars. The surface needs to be stable for stenciling. -
Position the stars:
Place your star stencil over the blue field. Secure it with small pieces of tape so it doesn’t shift while painting. -
Paint the stars:
Using a stencil brush or a small sponge with a very small amount of white paint, dab (don’t brush) up and down over the stencil openings. -
Remove stencil and touch up:
Lift the stencil straight up to avoid smearing. Use a tiny detail brush and white paint to tidy up any star points that aren’t perfectly sharp. -
Final dry:
Allow the entire piece to dry overnight before hanging.
Fuzzy Tape Lines?
If paint bleeds under the tape, wait for it to dry fully, then use a small flat brush and the base color to carefully touch up the edge.
Hang your patriotic masterpiece proudly knowing you achieved those perfect stripes yourself


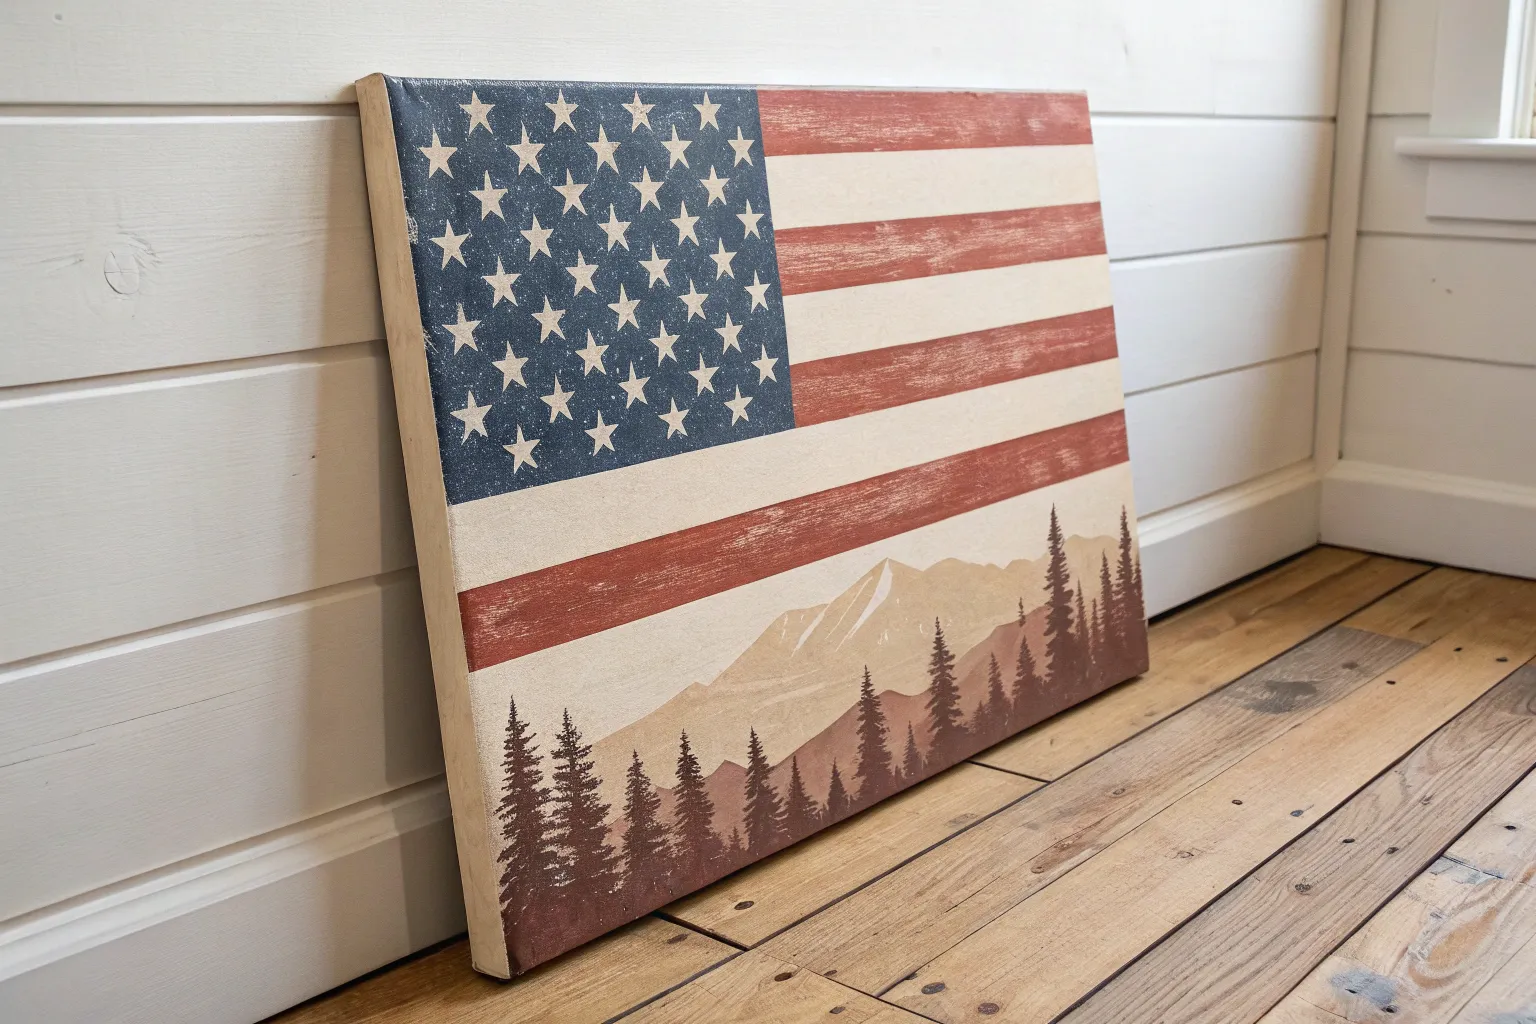
American Flag Sky With Pine Silhouettes

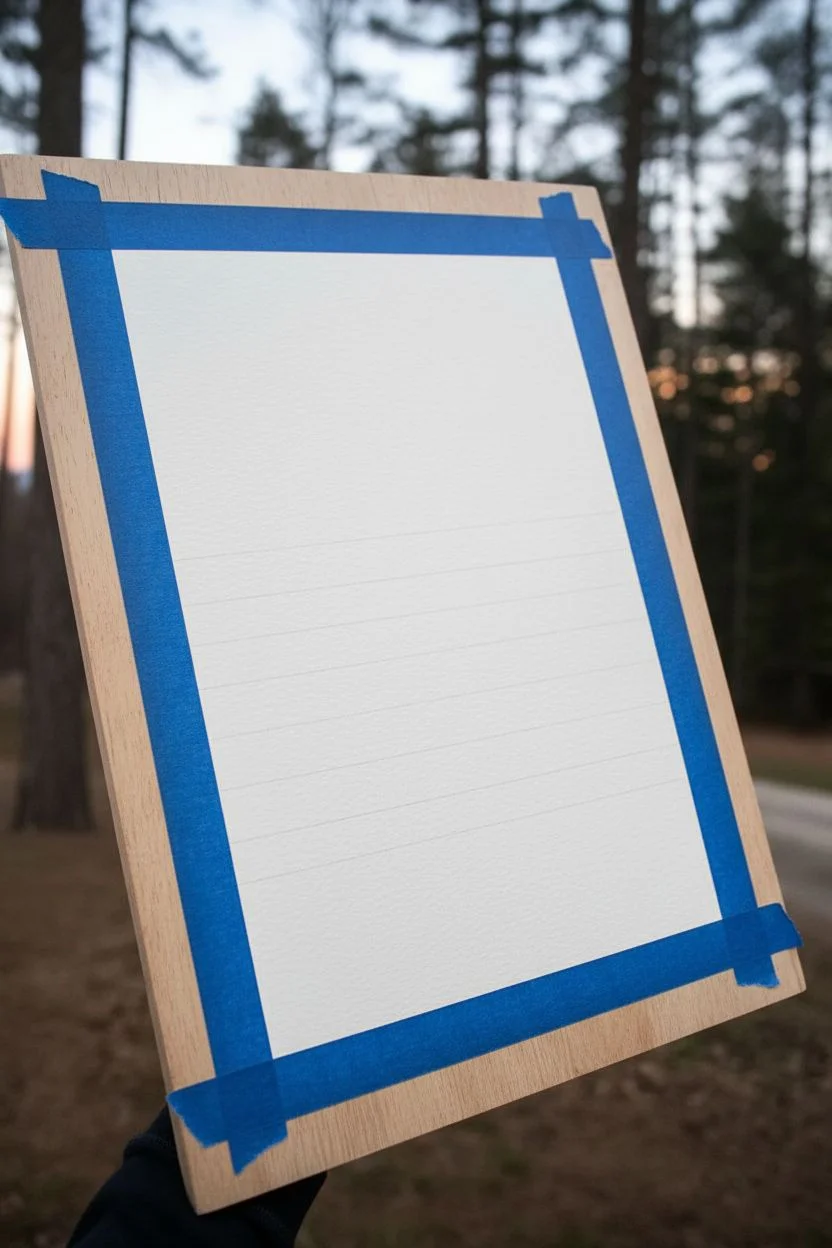
This stunning watercolor painting reimagines the American flag as a dusk landscape, blending patriotic imagery with the natural world. Instead of stark red and white stripes, the sky transitions from a starry blue to warm sunset bands, grounded by a silhouette of pine trees.
Detailed Instructions
Materials
- Cold press watercolor paper (140 lb / 300 gsm)
- Painter’s tape or washi tape
- Watercolor paints (Indigo, Prussian Blue, Alizarin Crimson, Cadmium Red, Yellow Ochre, Lamp Black)
- White gouache or white gel pen
- Large flat wash brush
- Medium round brush (size 6 or 8)
- Small liner brush (size 0 or 1)
- Jar of clean water
- Paper towels
- Pencil and ruler
Step 1: Preparing the Canvas
-
Tape the borders:
Secure your watercolor paper to a board or table using painter’s tape. Create a crisp, even border on all four sides to frame the artwork. -
Sketch the guidelines:
Using a ruler and a very light pencil touch, draw a horizontal line roughly one-third up from the bottom. This will be your horizon line. Above this, lightly mark out about 5 or 6 horizontal bands for the ‘stripes’ section, leaving the top third open for the ‘stars’ field.
Step 2: Painting the Sky
-
Start the blue field:
Load your flat brush with deep indigo or Prussian blue. Paint the top third of the paper using a wet-on-dry technique to get a solid, saturated color. As you move downward, introduce a little water to soften the edge slightly, but keep it mostly dark. -
Blend the transition:
While the bottom edge of the blue is still slightly damp, introduce a murky purple-grey mix (blue mixed with a touch of red) to create a cloud-like transition zone before the red stripes begin. -
Paint the red stripes:
For the stripes, we want a faded, atmospheric look rather than sharp lines. Mix a muted red using Alizarin Crimson and plenty of water. Paint the first band below the blue field using wet horizontal strokes. -
Create the white stripes:
Instead of leaving the paper pure white, mix a very pale, warm wash using a tiny amount of yellow ochre or a dilute dirty pink. Paint the ‘white’ stripes with this wash to mimic a sunset glow. -
Gradient the colors:
As you move lower down the paper toward the horizon line, add more yellow ochre to your red and white mixtures. The stripes should transition from cooler reds at the top to warm peach and golden tones near the horizon. Let the stripes bleed into each other slightly for a natural sky effect. -
Dry completely:
Allow the entire sky section to dry completely. This is crucial before moving to the next steps to prevent the stars or trees from bleeding into the background.
Pro Tip: Misty Effect
For the foggy tree line at the bottom, dampen the paper slightly before painting the distant trees. The black paint will bloom softly, creating an instant misty atmosphere.
Step 3: Adding the Stars
-
Map out the stars:
Using a white gel pen or a fine brush with white gouache, carefully dot the positions of your stars in the dark blue section. I find it helps to place the larger stars first to ensure good distribution. -
Draw the star shapes:
Paint small five-pointed stars over your guide dots. Vary the sizes slightly—some should be distinct stars, while others can be simple dots to represent distant starlight. -
Fade into the red:
Bring a few stars down into the transitional purple/red cloud area, but make them sparser to mimic how stars fade near the horizon light.
Level Up: Metallic Touch
Use metallic silver watercolor or a silver gel pen for the stars instead of white. This adds a subtle shimmer that catches the light differently from various angles.
Step 4: The Pine Forest Silhouette
-
Mix the black:
Load a medium round brush with highly concentrated pigment. You want a deep black-blue mix; combine Lamp Black with a touch of Indigo to give it depth so it doesn’t look flat. -
Paint the distant tree line:
Along the bottom horizon line (over the yellow/peach sky area), paint a jagged, uneven row of small vertical strokes to represent a distant forest. Vary the heights to make it look organic. -
Start the main tree:
Choose a spot on the right side for the large focal pine tree. Draw a straight vertical line for the trunk using the tip of your brush, extending from the bottom border up into the red stripes. -
Add pine branches:
Starting from the top of the trunk, use quick, dabbing motions to create branches. The branches should be narrow at the top and get wider and heavier as you move down the tree. -
Detail the texture:
Use the very tip of your brush or a liner brush to add tiny, stray textured needles on the edges of the branches for a realistic silhouette. -
Misty forest floor:
To create the foggy forest floor shown in the reference, dilute your black paint significantly with water. Paint a wash over the bottom section of the distant trees, blending the dark tree bases into a soft, misty grey bloack at the very bottom edge. -
The Reveal:
Once the paint is 100% dry, slowly peel away the painter’s tape at a 45-degree angle to reveal your crisp, clean borders.
Step back and admire your patriotic twilight landscape
BRUSH GUIDE
The Right Brush for Every Stroke
From clean lines to bold texture — master brush choice, stroke control, and essential techniques.
Explore the Full Guide
Sunset Flag Over a Horizon Line
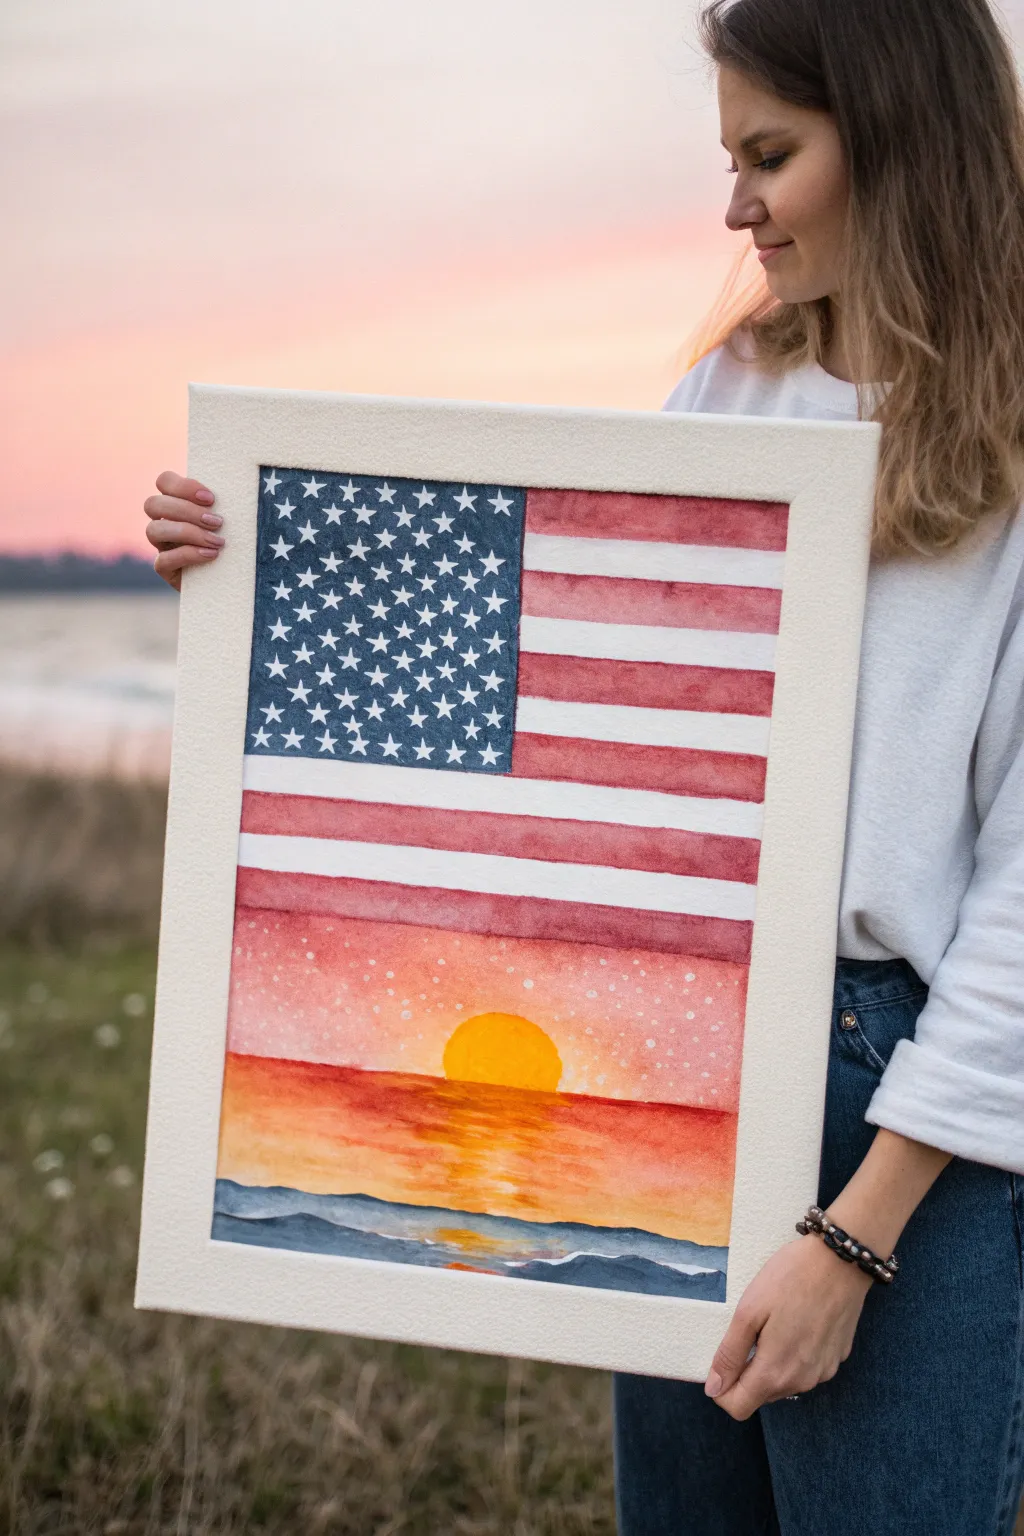
This stunning watercolor project merges patriotic symbolism with the serenity of nature, transforming the traditional stripes of the American flag into a glowing sunset over the ocean. It creates a seamless visual journey from national pride to natural beauty.
Step-by-Step Guide
Materials
- High-quality watercolor paper (140lb cold press recommended)
- Watercolor paints (Indigo blue, Alizarin crimson or deep red, cadmium yellow, orange, burnt sienna)
- White gouache or white ink
- Painter’s tape or masking tape
- Ruler and pencil
- Watercolor brushes (flat wash brush, round size 6, detail brush size 0 or 1)
- Jar of water and paper towels
- White or cream mat board frame (optional)
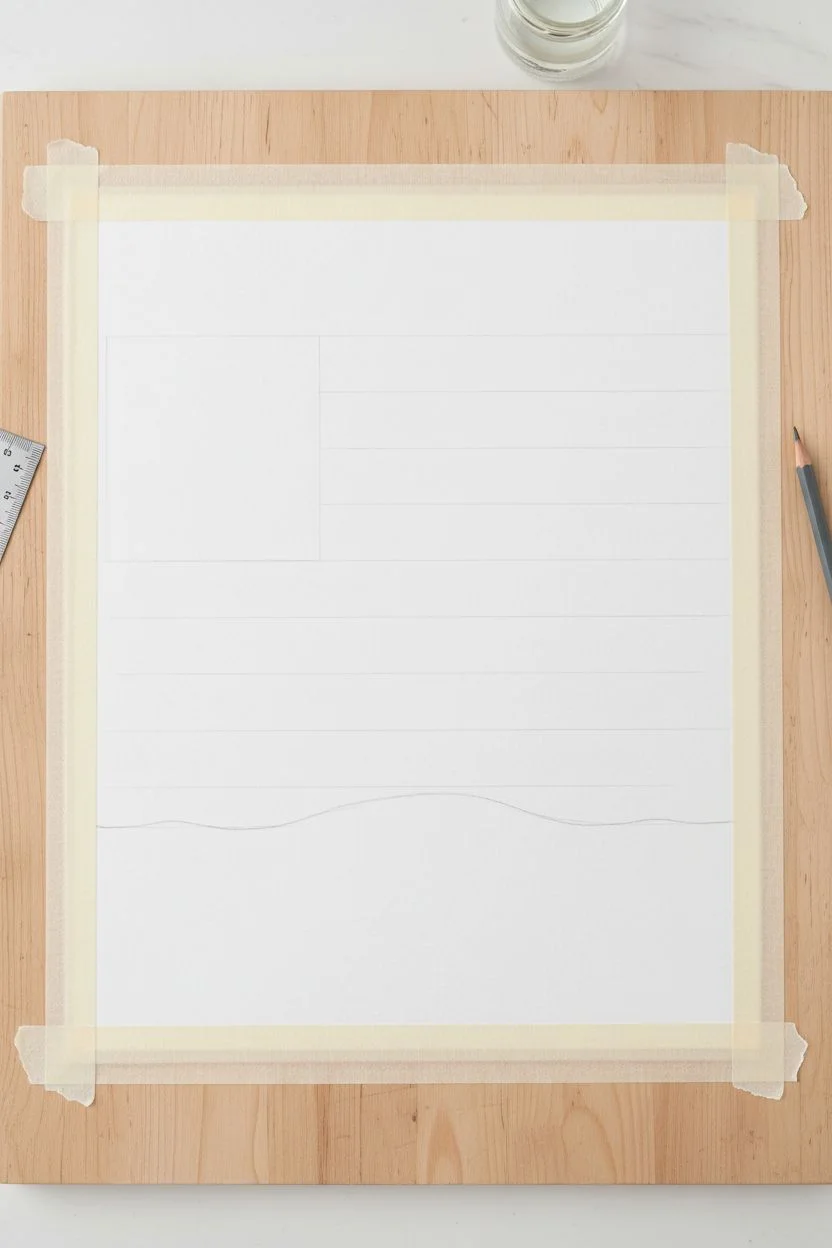
Step 1: Planning and Foundation
-
Prepare the paper:
Begin by taping down all four edges of your watercolor paper to a board or table. This prevents buckling and ensures a crisp white border if you plan to frame it later. -
Sketch the layout:
Using a ruler and a light pencil touch, draw the rectangle for the canton (the blue field) in the upper left. Then, lightly mark out the horizontal lines for the stripes. -
Draw the horizon line:
Decide where your flag stripes will end and the seascape will begin. In the reference, the bottom third of the painting transitions into water, so draw a gentle horizon line below where the sun will sit.
Bleeding Colors?
If your red stripes are bleeding into the white stripes too much, your paper is too wet. Let the red layer dry completely before painting adjacent areas or using a damp brush nearby.
Step 2: Painting the Canton and Upper Stripes
-
Paint the blue field:
Load your brush with a deep indigo blue. Carefully paint the rectangular canton area. You can vary the water intensity slightly to give it a textured, cloud-like appearance rather than a flat block of color. -
Paint the top red stripes:
Using a flat brush, paint the top few red stripes using a deep red or Alizarin crimson. Keep the edges relatively crisp. -
Start the transition:
As you move down to the stripes located near the middle of the flag, begin watering down your red paint significantly. You want the stripes to start looking translucent as they approach the sunset area.
Pro Tip: Masking Fluid
For perfectly crisp white stripes and stars, apply masking fluid to those areas before you start painting. Rub it off only after the paint is totally dry.
Step 3: The Sunset Transition
-
Paint the sun:
Using clean yellow paint, create a semi-circle sun sitting right on your horizon line. Let the yellow be intense and bright. -
Create the sunset sky:
Here is where the magic happens. Paint the sky area (behind where the lower stripes would be) using a wet-on-wet technique. Blend oranges, pinks, and soft reds around the sun. -
Integrate the stripes:
While the sunset sky is still damp, paint the remaining lower ‘stripes’ using a diluted reddish-orange. Let these horizontal lines bleed slightly into the sunset background for a soft, dreamy look. -
Add white speckles:
While the sunset area dries, you might notice it needs texture. If you want a starry or sparkling effect like the reference, you can flick a tiny amount of clean water or white gouache over the pinkish sky section once it’s mostly dry.
Step 4: The Seascape and Details
-
Paint the water base:
Below the horizon line, wash in a mix of orange and yellow to represent the reflection of the sun on the water. Keep your brush strokes horizontal. -
Add the waves:
Using a darker blue or grey-blue, paint the ocean waves at the very bottom. Create varied, undulating shapes to suggest movement. -
Refine reflections:
Add touches of red or darker orange into the water area to mimic the reflection of the stripes and sunset colors on the wet surface. -
Paint the stars:
Once the indigo canton is completely bone-dry, use opaque white gouache and a fine detail brush to paint the 50 stars. Alternatively, you can simplify the pattern with small white dots if painting distinct stars feels too daunting. -
Final touches:
Review the transition zones. If the distinction between the flag stripes and the sunset is too sharp, soften the edges with a damp, clean brush. -
Remove tape and frame:
Wait for the entire piece to dry completely. Peel off the tape gently at a 45-degree angle to reveal clear borders, then place it in your prepared mat or frame.
Hang your finished piece where the evening light can catch those warm sunset tones
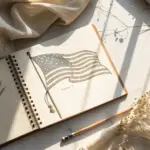
Minimalist Flag With Gestural Stripes
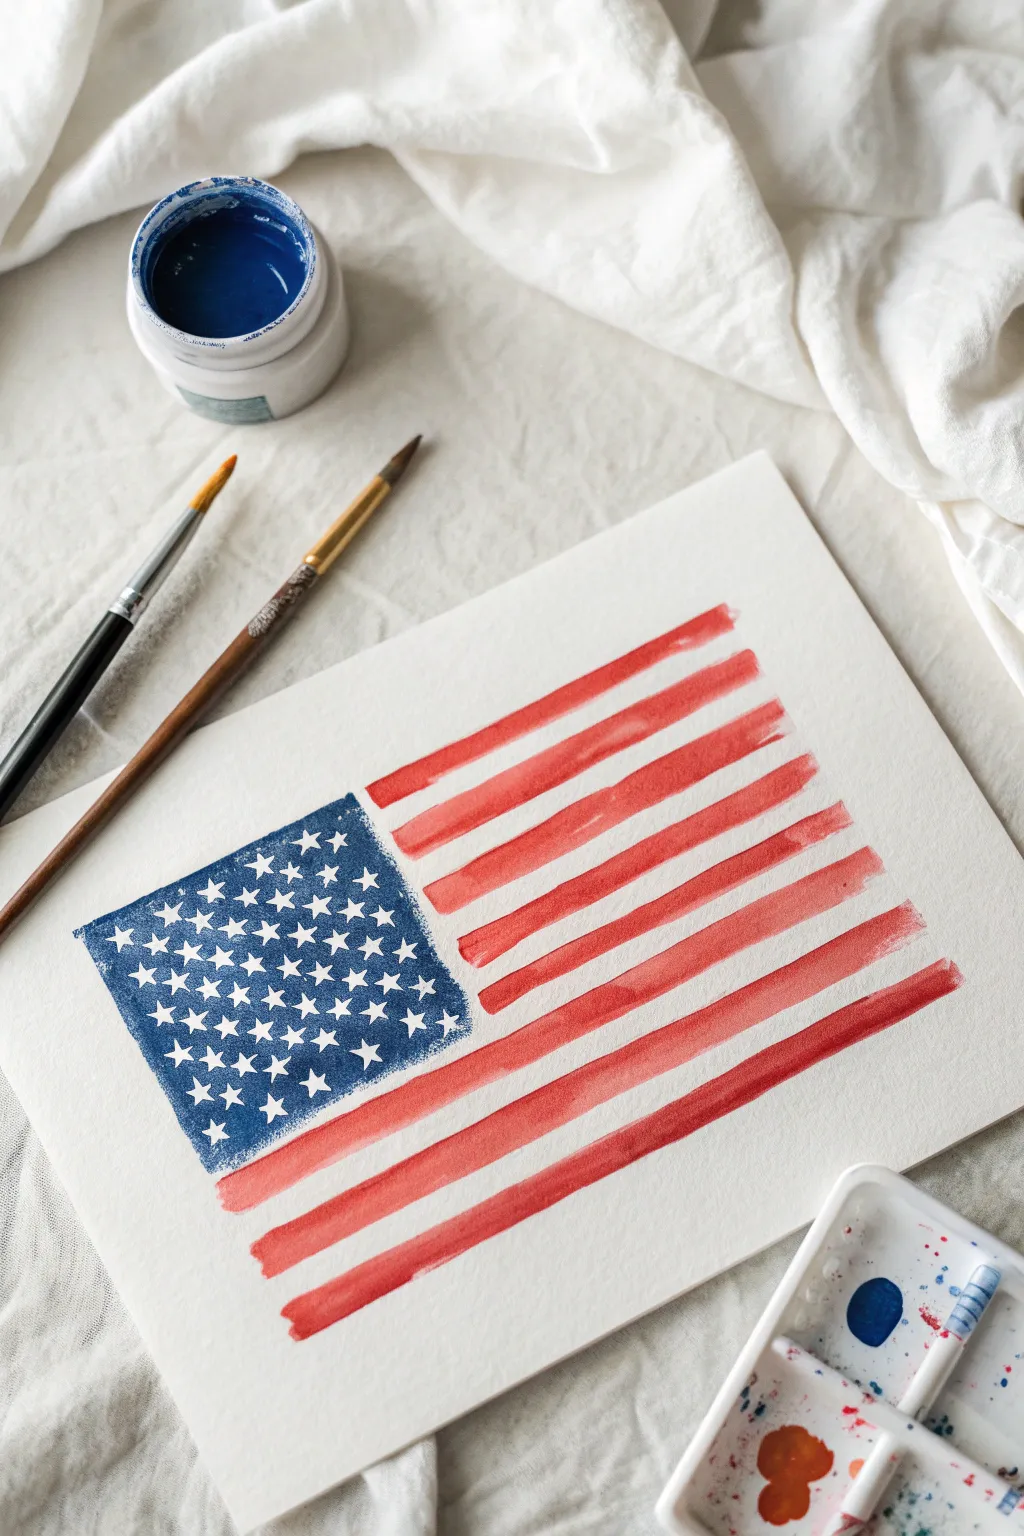
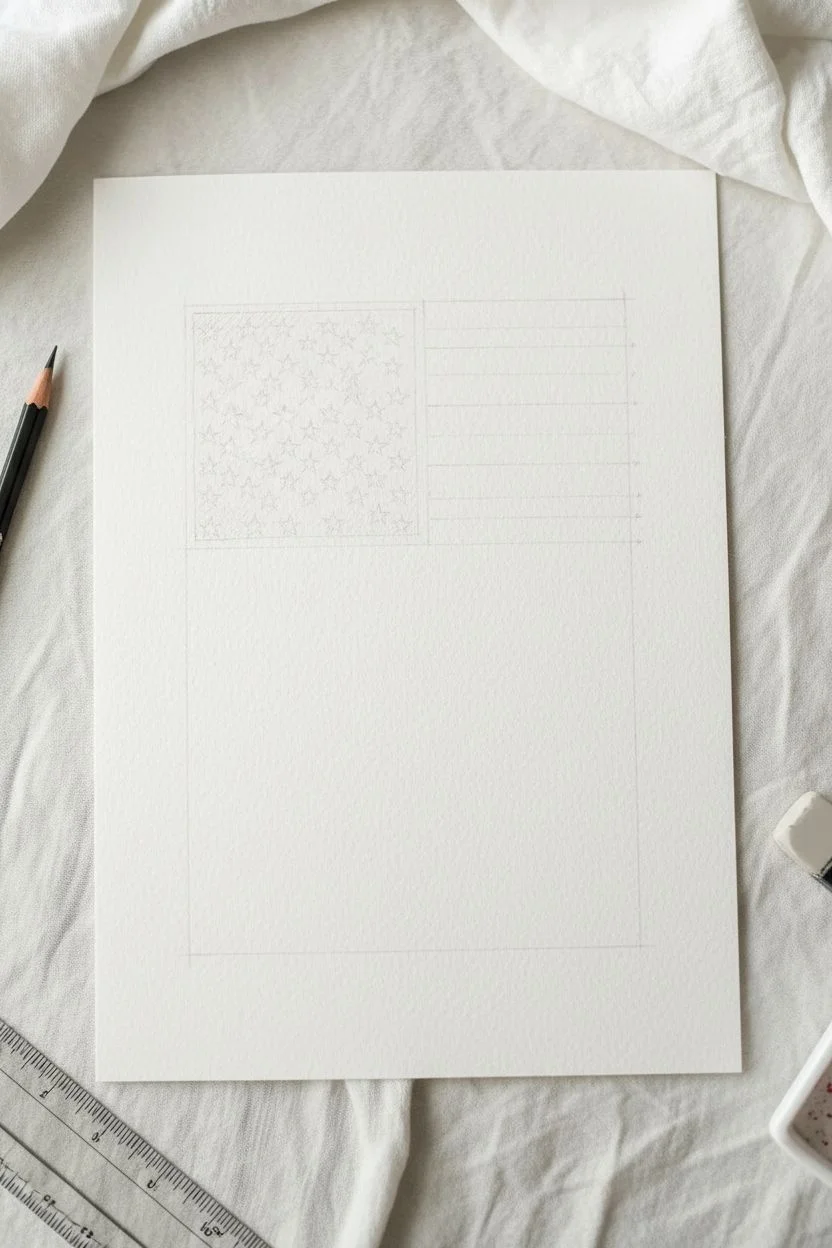
Embrace the fluid, imperfect beauty of watercolor with this simple yet striking American flag study. By focusing on gestural stripes and reserving whitespace for the stars, you can create a piece that feels both patriotic and effortlessly artistic.
Step-by-Step Tutorial
Materials
- Cold press watercolor paper (140lb/300gsm)
- Watercolor paints (Ultramarine Blue, Cadmium Red or similar)
- Medium round brush (size 6 or 8)
- Small round brush (size 2 or 3)
- Masking fluid (optional)
- Painter’s tape or washi tape
- Jar of clean water
- Paper towel
- Pencil (HB or H)
- Ruler
Step 1: Planning the Layout
-
Observe the proportions:
Before putting brush to paper, look closely at the reference. The blue canton (the rectangle with stars) takes up roughly the top left quarter of the flag area. -
Mark the boundaries:
Using a ruler and a very light pencil touch, draw a rectangle to define the outer edges of your flag on the watercolor paper. Keep these lines faint so they don’t show through the paint later. -
Define the canton:
Lightly sketch the rectangular area for the blue field in the upper left corner. This box should vertically span approximately the top seven stripes. -
Plot star positions:
The most challenging part is the negative space for the stars. Lightly mark small dots or tiny circles where each star will go, arranging them in the standard alternating row pattern. -
Mark stripe guidelines:
Make small tick marks along the right edge of your paper to guide where your seven red stripes will go. You don’t need to draw the full lines across—just having start and end points helps keep things straight without looking rigid.
Bleeding Lines?
If your red stripes accidentally touch the wet blue canton and bleed, quickly dab the spot with a dry paper towel corner to lift the color, then let it dry fully before retouching.
Step 2: Painting the Blue Field
-
Prepare the blue mix:
Load your palette with a generous amount of deep blue, like Ultramarine or Indigo. You want a saturated mix, not too watery, to get that bold contrast. -
Protect the stars (Method A):
If you have masking fluid, use an old brush or a toothpick to carefully dot in the star shapes. Let this dry completely before painting over it. -
Protect the stars (Method B):
If painting directly like the example, you will be painting *around* the star shapes. This is negative painting. Start with your small brush (size 2 or 3). -
Outline the first stars:
Dip your small brush in the blue paint and carefully outline the shape of the top-left star. Work slowly, defining the points of the star by painting the blue background. -
Fill the gaps:
Continue painting around your penciled star marks. I find it easiest to work in small clusters, outlining 3-4 stars and then filling the blue space between them. -
Create texture:
As you move across the blue field, allow the paint load to vary slightly. Some areas can be darker and wetter, while others can be slightly lighter, creating a lovely mottled texture. -
Refine the edges:
Once the interior is filled, use the brush to square off the outer edges of the blue rectangle, ensuring a crisp border. -
Let it dry:
Let the blue section dry completely. If you move to the red stripes too soon, damp blue paint might bleed into your pristine white stripes.
Step 3: Painting the Stripes
-
Mix the red:
Clean your brush thoroughly and mix a vibrant red. Cadmium Red is classic, but mixing in a touch of Alizarin Crimson can deepen it nicely. -
Test the consistency:
Test the paint on a scrap piece of paper. You want a fluid consistency that glides across the paper but holds its edge. -
Start the top stripe:
Using your medium round brush (size 6 or 8), load it with red paint. Place the tip at the right edge of the blue canton and pull the stroke decisively toward the right edge of the paper. -
Maintain a loose hand:
Don’t try to make the stripe perfectly rectangular. Let the brush vary in pressure; if the stroke breaks slightly or has ragged ends (dry brushing), that adds character. -
Painting the short stripes:
Continue painting the red stripes that sit to the right of the blue field. Leave a gap of white paper between each red stripe roughly equal to the width of the stripe itself. -
Transition to long stripes:
Once you pass the bottom of the blue canton, your red stripes will span the full width of the flag. Start these from the far left edge. -
Vary the saturation:
As you paint the lower stripes, allow some to be slightly more transparent by adding a tiny bit more water. This prevents the flag from looking like a flat sticker. -
Final adjustments:
check the balance. If any red stripe looks too faint compared to the bold blue, you can carefully glaze a second layer over it once the first is dry.
Vintage Look
For an antique feel, do a tea wash first! Brew strong black tea, paint it over the entire paper, and let it dry completely before starting your flag painting to create an aged, parchment effect.
Once the paint is fully dry, erase any visible pencil marks to reveal your clean, patriotic artwork.

PENCIL GUIDE
Understanding Pencil Grades from H to B
From first sketch to finished drawing — learn pencil grades, line control, and shading techniques.
Explore the Full Guide
Coastal Flag With Ocean Stripes
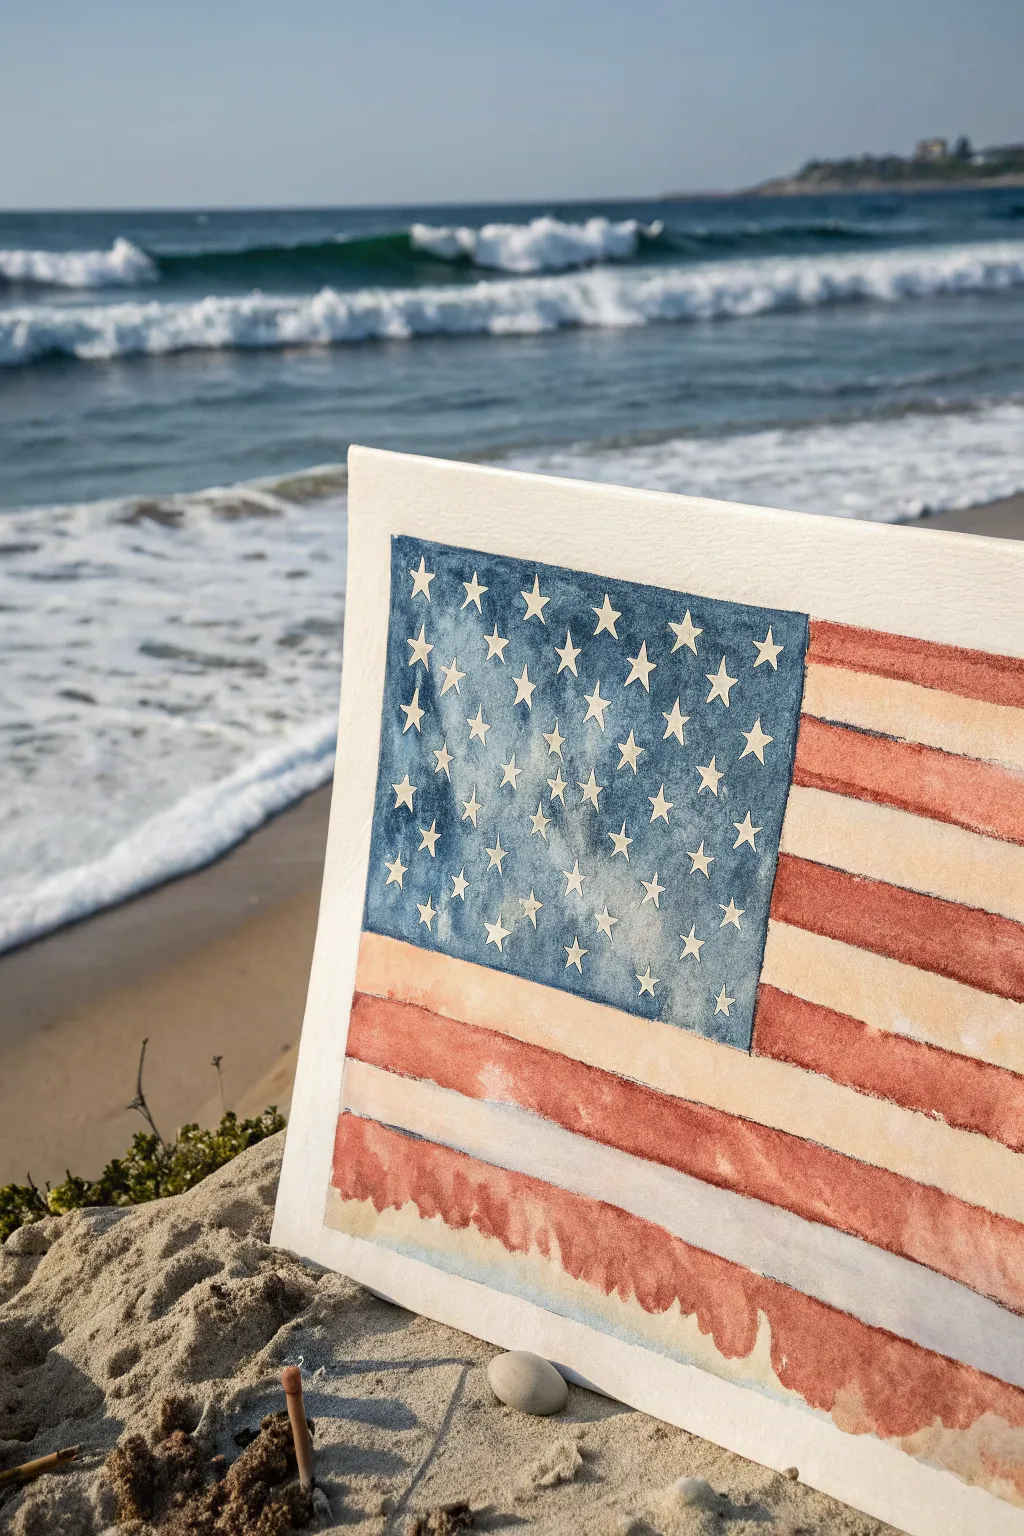
Capture the breezy spirit of the shore with this loose, expressive watercolor flag painting that mimics the movement of ocean waves. Using wet-on-wet techniques, you will create soft edges and beautiful texture bloom that give the stripes a natural, weathered look perfect for coastal decor.
Step-by-Step
Materials
- Cold press watercolor paper (140lb/300gsm), blocked or taped down
- Watercolor paints (Indigo or Prussian Blue, Alizarin Crimson, Burnt Sienna)
- White gouache or masking fluid
- Flat wash brush (3/4 inch)
- Round brush (size 6 or 8)
- Small detail brush (size 0 or 1)
- HB pencil and ruler
- Jar of clean water
- Paper towels
- Palette for mixing
Step 1: Preparation and Sketching
-
Secure the paper:
Tape your watercolor paper down firmly to a board or table using painter’s tape to prevent buckling when the paper gets wet. -
Draft the layout:
Using a ruler and pencil, lightly sketch the rectangular union box in the upper left corner. Then, mark out the thirteen horizontal stripes, keeping your lines faint so they don’t show through the lighter white stripes later. -
Define the stars:
You have two choices here: carefully draw small stars in the union box to paint around later, or apply small dots of masking fluid where the stars will be to preserve the white paper. Let the masking fluid dry completely before proceeding.
Coastal Texture
Make the paint look sand-worn by sprinkling a tiny pinch of table salt onto the wet red stripes. Brush it off once fully dry for a speckled, aged effect.
Step 2: Painting the Union
-
Mix the blue:
Create a deep, moody blue by mixing Indigo or Prussian Blue with a tiny touch of Burnt Sienna to desaturate it slightly, giving it that classic naval feel. -
Apply the wash:
Using your round brush, fill in the union box. If you didn’t use masking fluid, paint carefully around your pencil stars (negative painting). If you used masking fluid, wash freely over the area. -
Create texture:
While the blue paint is still wet, drop in tiny amounts of clean water or darker pigment in random spots. This creates ‘blooms’ and variation that impart a weathered, fabric-like texture.
Step 3: Painting the Stripes
-
Mix the red:
Dilute Alizarin Crimson with water to create a soft, faded red. We aren’t looking for a bright fire engine red; a slightly vintage, sun-bleached hue works best here. -
First stripe pass:
Using the flat wash brush, paint the top red stripe. Don’t worry about perfect straight edges; a little wobble adds to the ‘flag waving in the breeze’ effect. -
Add stripe variation:
While the stripe is still wet, touch the bottom edge of the wet paint with a slightly more saturated red mixture. Let it bleed upward to create a gradient effect, like a wave receding. -
Continue the pattern:
Skip the white stripe area and paint the next red stripe. Repeat this process down the flag. I find it helpful to wait a minute between stripes so your hand doesn’t accidentally smudge the wet paint above. -
Soften the edges:
On the bottom-most red stripes, allow the paint to pool slightly at the bottom edge. This creates the darker, uneven drying lines seen in the reference image, which adds wonderful character.
Driftwood Frame
Enhance the beach theme by mounting your finished painting on a piece of weathered wood or creating a floating frame using collected driftwood sticks.
Step 4: Finishing Touches
-
Shadow the white stripes:
The white stripes shouldn’t be stark white. Mix a very watery, pale gray-blue wash and run it along the bottom edge of each white stripe to create a shadow cast by the red stripe above it. -
Refine the stars:
Once the blue union is bone dry, rub off the masking fluid (if used). If you negatively painted around them, use white gouache now to tidy up the points of the stars and make them pop. -
Add fabric texture:
Take a nearly dry brush with faint gray paint and lightly drag it horizontally across the flag to simulate the texture of heavy canvas or the grain of the paper. -
Final assessment:
Step back and look at the overall balance. If the red looks too light after drying (watercolors always dry lighter), add a second glaze of red just along the bottom edges of the stripes for depth.
Once dry, you have a beautiful piece of patriotic art that feels right at home on the coast
Mountain Range Flag Landscape
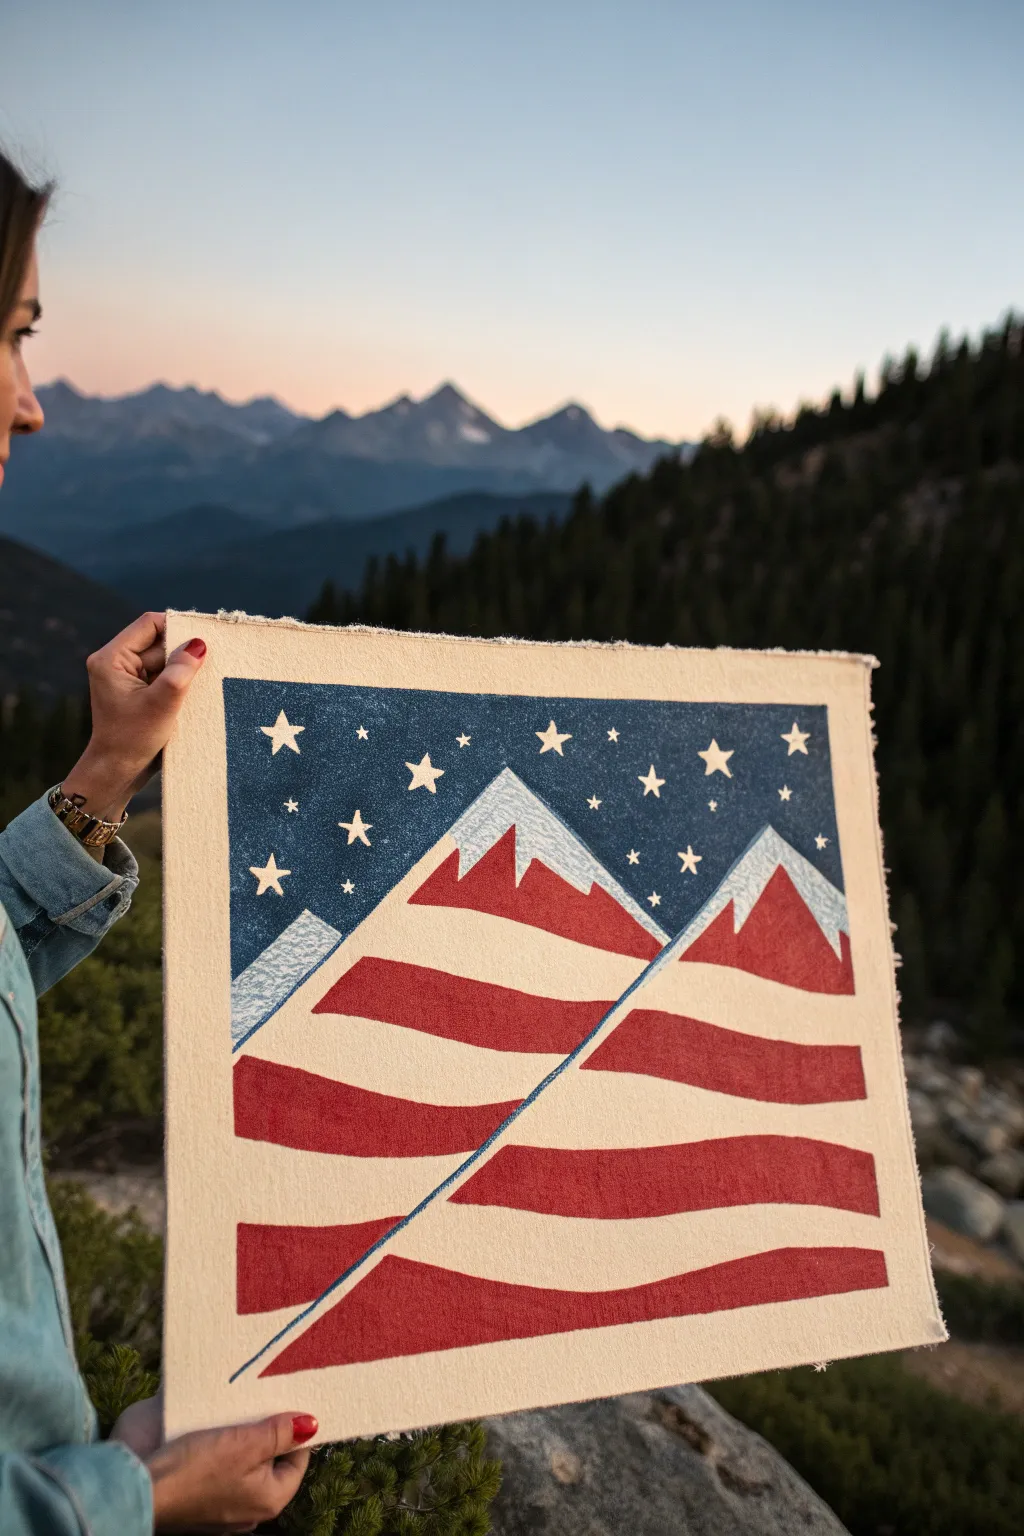
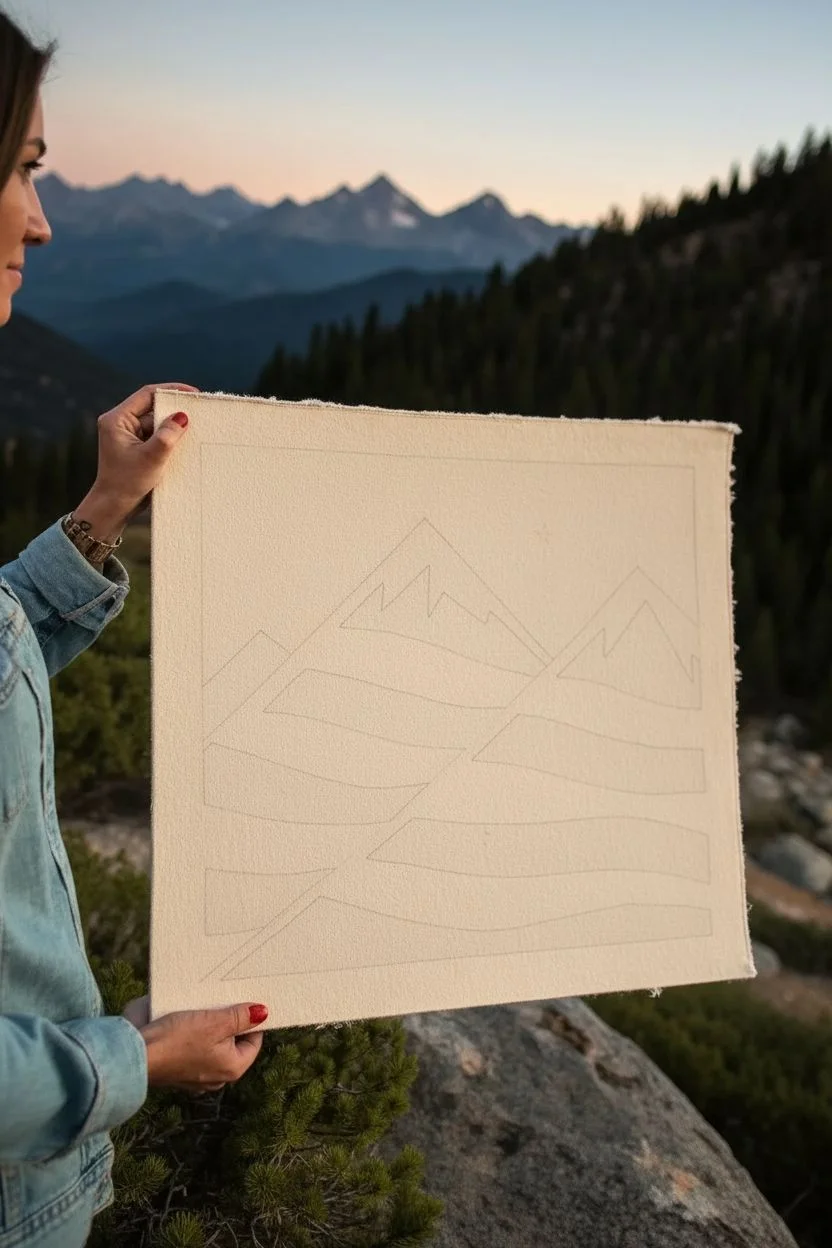
Blend the majesty of the great outdoors with American pride in this stylized mountain landscape. Using bold blocks of color and crisp lines, you’ll transform a simple canvas scrap into a modern piece of Americana art that looks equally at home in a cabin or a gallery wall.
Step-by-Step Guide
Materials
- Heavyweight unprimed canvas fabric (approx. 12×12 inches)
- Acrylic craft paints (Deep Navy Blue, Barn Red, Titanium White)
- Flat shader brushes (medium and small)
- Fine liner brush (for stars)
- Painters tape or masking tape (1/4 inch or similar width)
- Pencil
- Ruler
- Palette or paper plate
- Cardboard or mat board (for backing)
Step 1: Preparing the Composition
-
Prep the canvas:
Cut a square of unprimed canvas fabric. Don’t worry about perfect edges; pull a few loose threads from each side to create a rustic, frayed fringe effect. -
Map the mountains:
Using a pencil and ruler, lightly sketch three large triangles to form your mountain range. The central peak should be the largest, with two smaller peaks flanking it on the sides. -
Define the snow caps:
Draw jagged, irregular zigzag lines near the top third of each triangle to separate the snowy peaks from the striped mountain bases. -
Create the stripe guides:
Within the lower portion of the mountains (below the snow line), use your ruler to draw wavy, undulating horizontal lines. These will become the red and white stripes of the flag pattern.
Step 2: Painting the Sky and Snow
-
Block in the sky:
Load a medium flat brush with Navy Blue paint. Carefully paint the entire background area around the mountains, ensuring you get crisp edges along the slopes. -
Add the snowy peaks:
Switch to a clean brush and fill in the mountain tops with Titanium White. You can let a little of the canvas texture show through here to mimic rough snow. -
Texture the snow:
Mix a tiny drop of blue into your white paint to create a very pale icy shade. Add subtle shadows to one side of the snow caps to give them dimension. -
Paint the white stripes:
Using your pencil guides, paint the alternating white stripes on the mountain bodies. I like to do the white stripes first so I don’t accidentally drag red paint into them later.
Clean Lines Hack
If you have trouble painting straight edges, use washi tape to mask off the mountain slopes before painting the blue sky. Peel it off while the paint is still slightly wet.
Step 3: Adding the Red Stripes
-
Fill the red stripes:
Once the white paint is dry to the touch, use Barn Red to fill in the remaining wavy stripes. Use a smaller flat brush to keep the edges neat against the background and next to the white stripes. -
Refine the edges:
Go back with a small brush and touch up any areas where the red and white meet the blue sky to ensure sharp, clean lines. -
Add the diagonal divider:
There is a distinct diagonal line cutting upward through the composition in the reference. Use a liner brush or piece of tape to create this thin blue line that separates the foreground mountain from the back, adding graphic interest.
Add Vintage Texture
Once the paint is fully dry, lightly sand the entire surface with fine-grit sandpaper. This distresses the paint and exposes the canvas weave for a worn, vintage look.
Step 4: The Starry Finish
-
Plan the stars:
Wait for the blue sky to dry completely. Lightly tap small pencil dots where you want your stars to go, varying the spacing for a natural look. -
Paint main stars:
Using a fine liner brush and white paint, carefully hand-paint five-pointed stars over your guide dots. Don’t worry if they aren’t perfect; handmade charm is part of the style. -
Add distant stars:
For variety, paint tiny dots or smaller four-point sparkles in the empty blue spaces to represent distant stars. -
Final touches:
Inspect the frayed edges. If any paint bled too far onto the fringe, simply pull those specific threads out to clean up the border.
Now you have a rugged, patriotic piece of art ready to display.


Soaring Bird Silhouette With Flag Fill
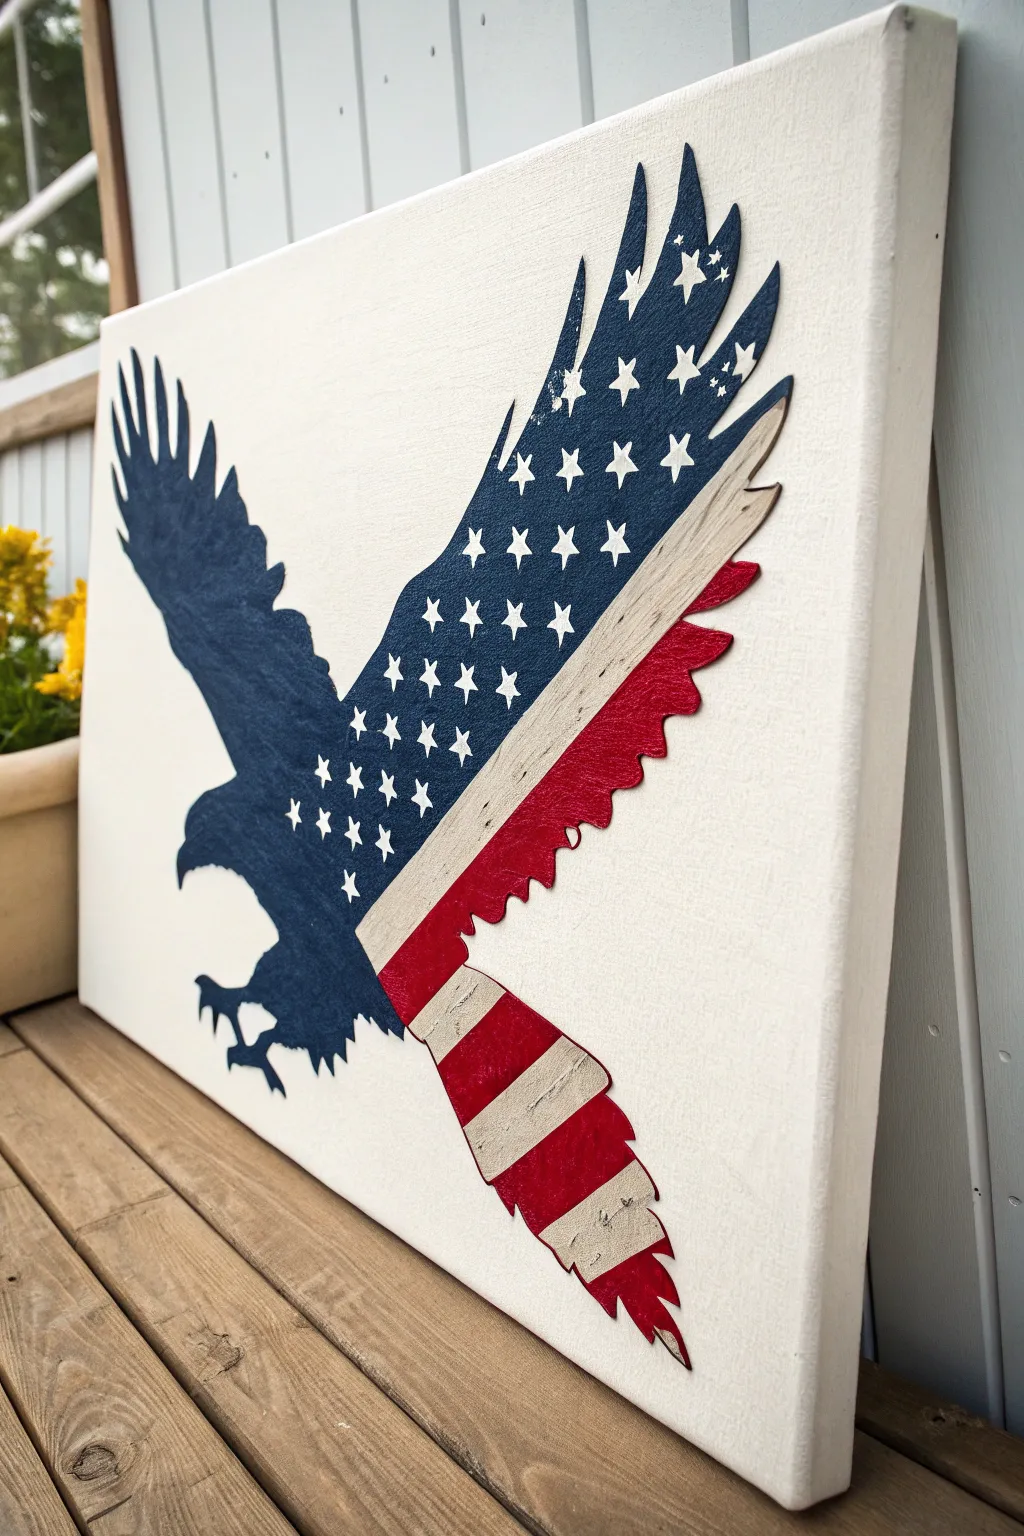
This striking project combines the powerful silhouette of a bald eagle with the timeless patterns of the American flag for a stunning piece of wall art. The crisp lines and weathered finish give it a professional yet handcrafted look that serves as a perfect focal point for patriotic decor.
How-To Guide
Materials
- Large stretched canvas (roughly 16×20 or 18×24 inches)
- Adhesive vinyl or contact paper (for stenciling)
- Transfer tape
- Electronic cutting machine (Cricut/Silhouette) or X-Acto knife
- Acrylic craft paint: Navy Blue, Barn Red, Titanium White
- Assorted stencil brushes or makeup sponges
- Fine-grit sandpaper (optional for distressing)
- Matte clear sealer spray
- Weeding tools
- Computer with eagle silhouette vector file
Step 1: Preparation & Design
-
Prepare the canvas:
Start with a clean, stretched canvas. If you want the background to be a specific shade other than the raw primed white, give the entire canvas two coats of white or off-white acrylic paint now and let it dry completely. -
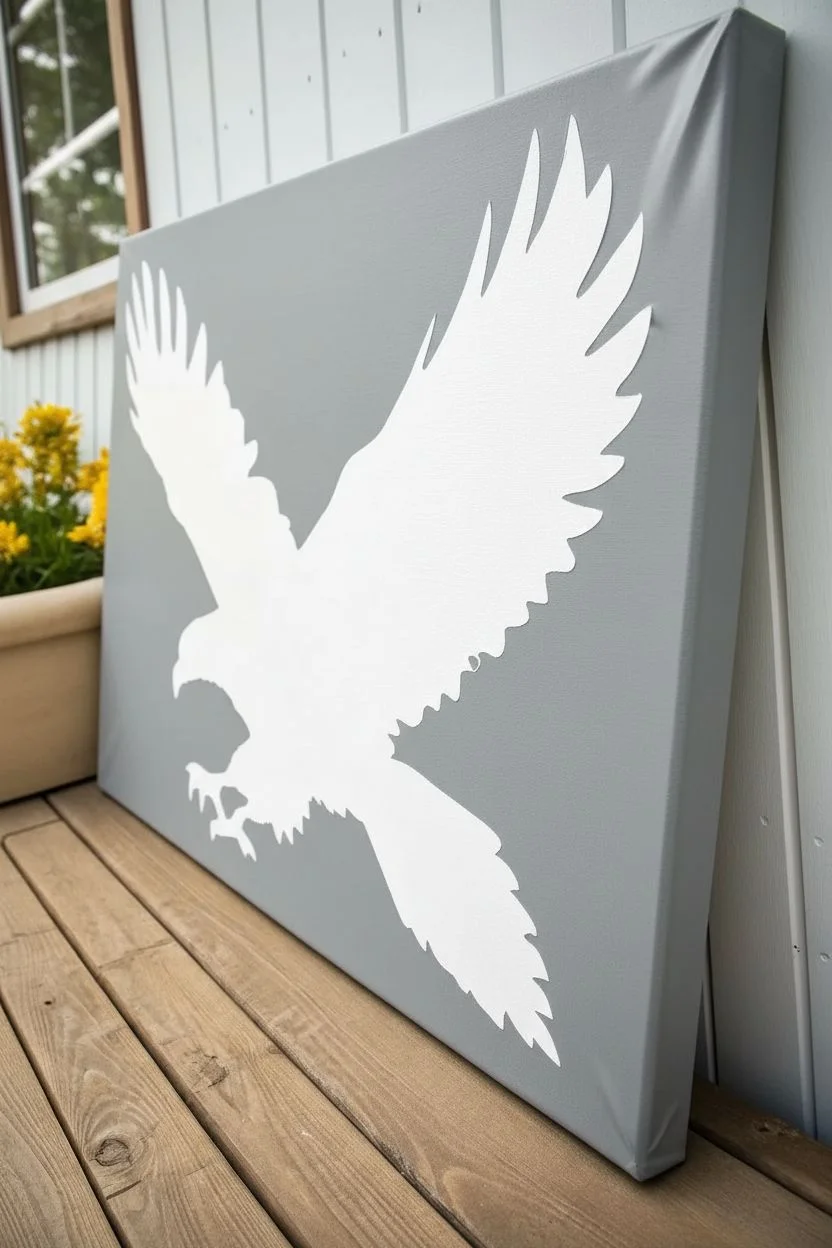
Create the stencil design:
Using your design software, load a silhouette of a flying eagle. Scale it to fill about 75% of your canvas diagonally. -
Cut the silhouette:
Cut your eagle shape out of adhesive vinyl. Since we are creating a negative stencil, careful weeding is essential. Remove the eagle shape itself, leaving the surrounding ‘negative’ vinyl intact. -
Apply transfer tape:
Apply a large sheet of transfer tape over your vinyl stencil. Use a scraper tool or credit card to burnish it down firmly so the vinyl lifts easily from its backing paper. -
Position the stencil:
Carefully place the vinyl onto your canvas. Center the eagle diagonally, pressing it down firmly. Peel away the transfer tape slowly, ensuring the vinyl stays stuck to the canvas texture.
Bleeding Lines?
If paint seeps under your stencil, don’t panic. Wait for it to dry completely, then use a tiny flat brush with your background color (white) to carefully ‘erase’ the mistake.
Step 2: Painting the Flag Pattern
-
Seal the edges:
To prevent paint bleed, lightly dab a thin layer of white paint (or your background color) along all the inner edges of the eagle stencil. This seals any tiny gaps between the vinyl and the canvas texture. -
Block out the blue field:
Visualize the flag draped over the bird. The main body, head, and upper wing will be the blue field. Use painter’s tape to mask off the diagonal line where the stripes will begin. -
Paint the navy section:
Using a stencil brush and a dabbing motion, fill the upper section with Navy Blue paint. Two thin coats are better than one thick coat to avoid ridges. -
Paint the red stripes:
Once the blue is dry to the touch, move to the lower wing and tail feathers. Using a ruler and pencil, lightly mark stripe guides. Paint alternating Barn Red stripes, leaving the white canvas exposed for the white stripes. -
Let the base coats dry:
Allow the red and blue sections to dry completely before moving on to the stars. This usually takes about 20-30 minutes depending on humidity.
Pro Tip
Use ‘removable’ or Oracal 631 vinyl for stenciling on canvas. Permanent vinyl is too sticky and might rip the priming off your canvas when you try to remove it.
Step 3: Detailing & Finishing
-
Create star stencils:
While the paint dries, cut a small separate stencil with multiple small stars. Alternatively, you can buy a pre-made star pattern stencil. -
Apply the stars:
Place your star stencil over the dried blue section. Using a dry stencil brush with a tiny amount of Titanium White paint, lightly stipple the stars. I find that off-loading most of the paint on a paper towel first gives the sharpest points. -
Weathering the stripes (optional):
For the slightly rustic look seen in the photo, lightly dry-brush a very small amount of white or grey paint over the red stripes to soften them, or use fine sand paper to scuff the paint once fully dry. -
Reveal the artwork:
This is the best part. Carefully peel away the large negative vinyl stencil. Pull at a sharp angle close to the canvas to keep edges crisp. -
Touch up edges:
Inspect the edges of your eagle. If any paint bled under the stencil, use a small detail brush and white paint to tidy up the silhouette. -
Seal the project:
Once you are happy with the finish and everything is bone dry, take the canvas outside and apply a coat of matte clear sealer to protect the artwork and unify the sheen.
Hang your new patriotic masterpiece proudly and enjoy the bold statement it makes in your home
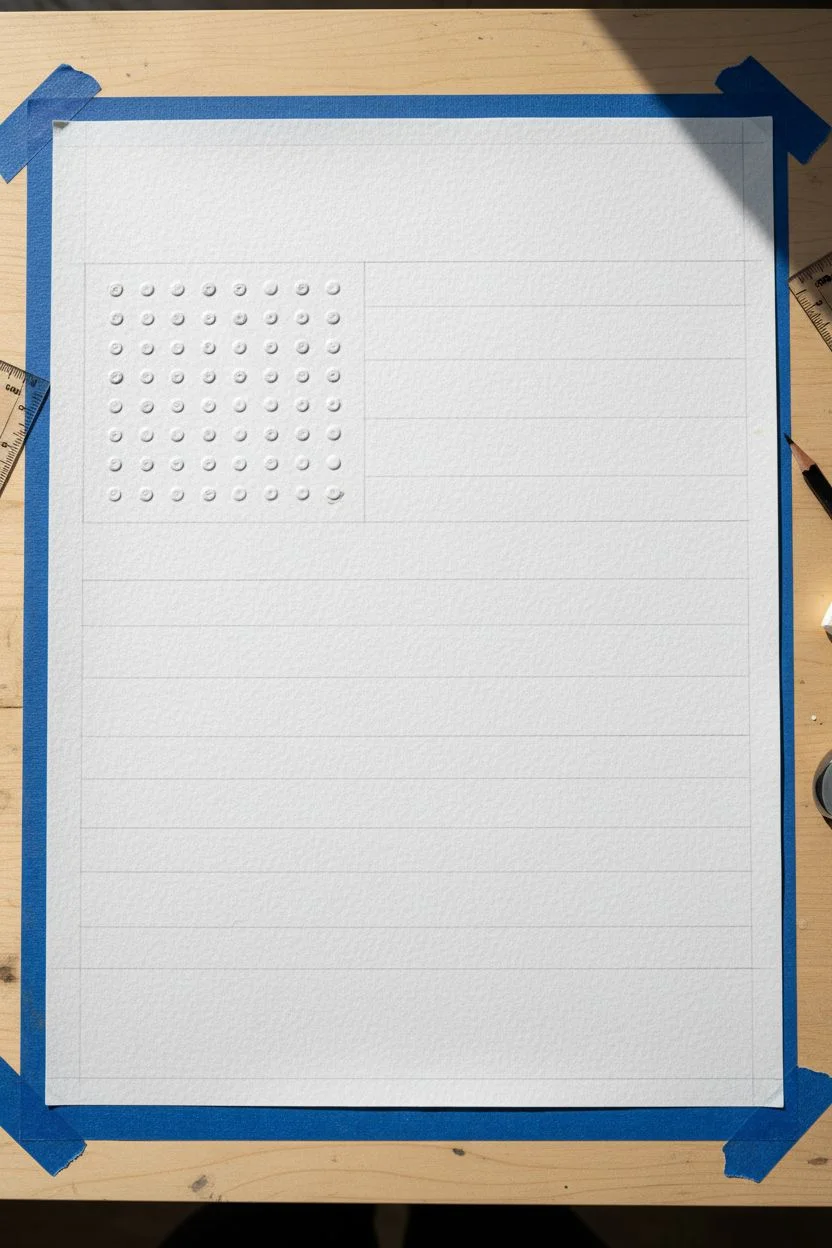
Negative-Space Flag With Masked Shapes
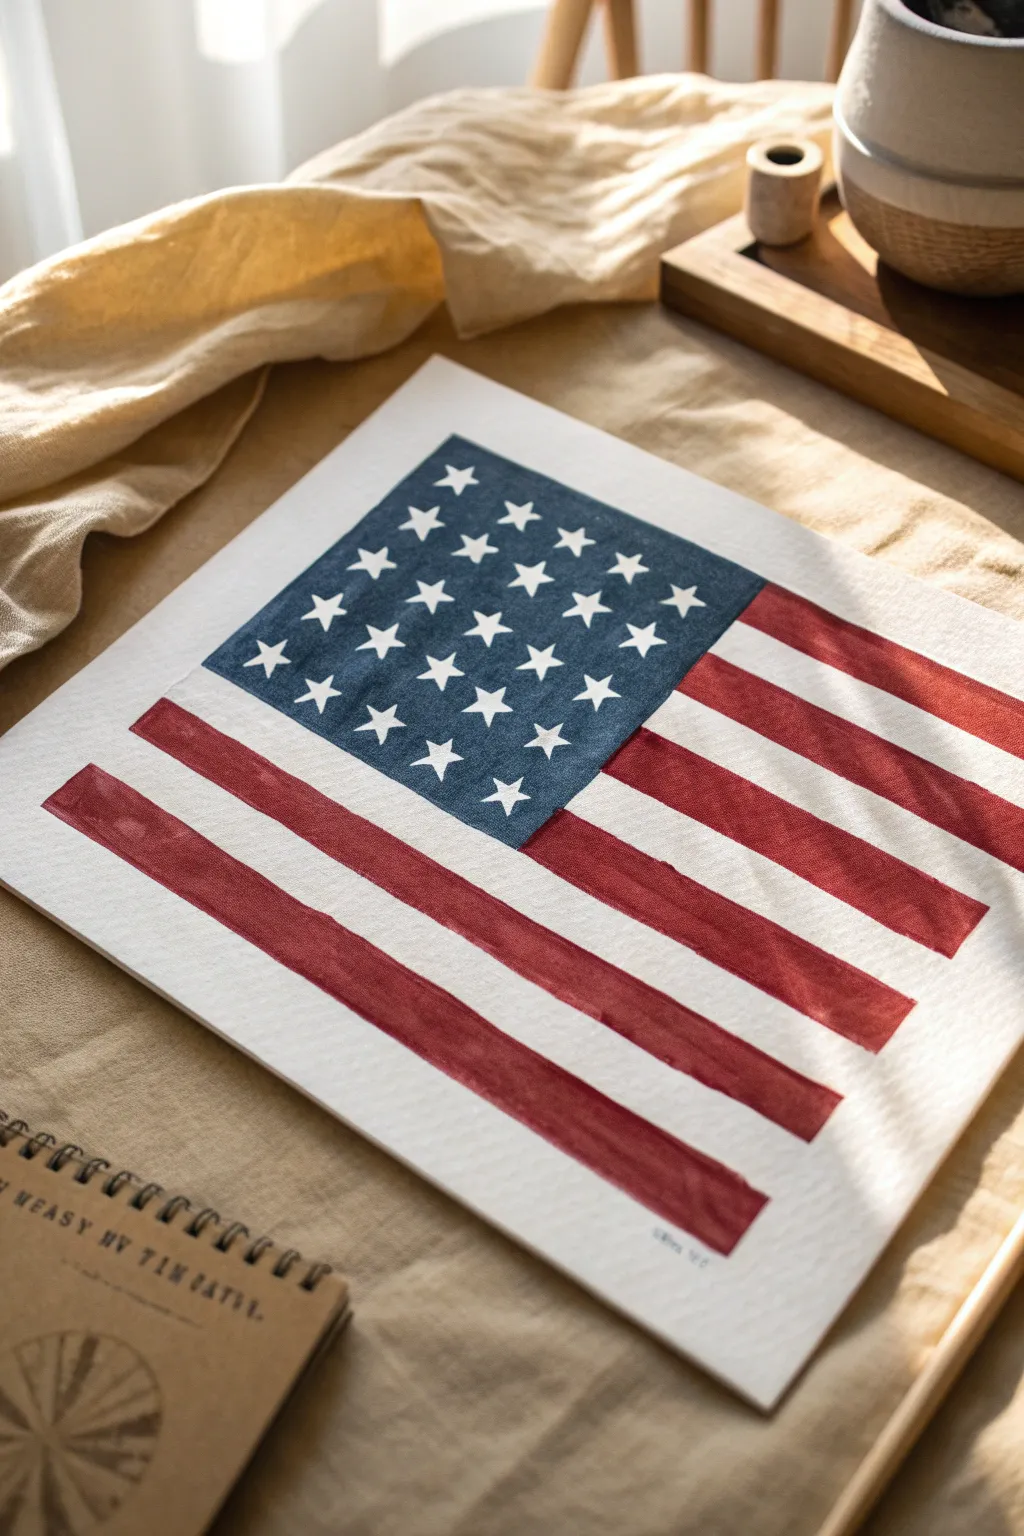
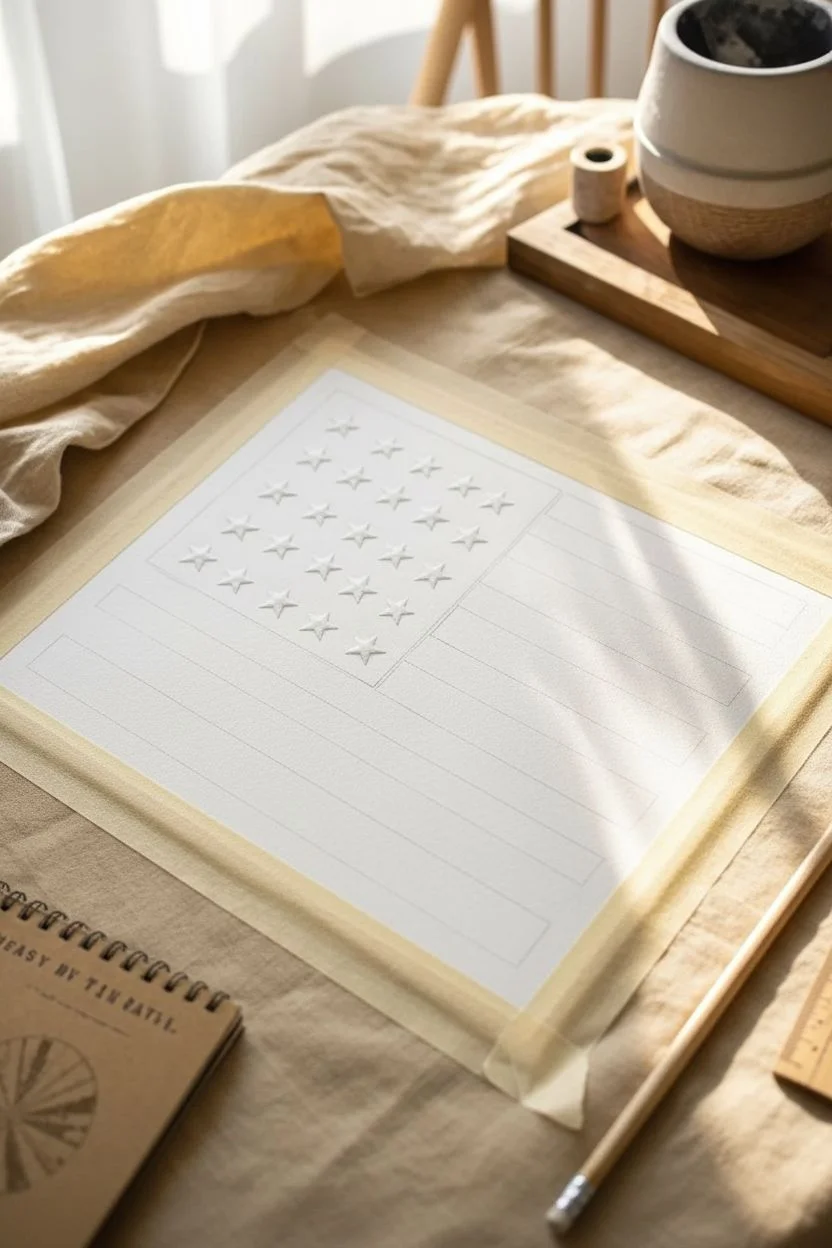
This project uses simple masking techniques to create a crisp yet hand-painted American flag where the white paper itself forms the stars and stripes. The result is a clean, modern take on patriotic decor that highlights the texture of your watercolor paper.
Detailed Instructions
Materials
- Heavyweight cold-press watercolor paper (140lb/300gsm)
- Painter’s tape or masking tape (1 inch width)
- Star stickers (approximately 0.5 to 0.75 inch)
- Deep navy blue watercolor or acrylic paint
- Barn red or crimson watercolor or acrylic paint
- Flat shader brush (approx. 3/4 inch)
- Medium round brush
- Ruler
- Pencil
- Palette for mixing
Step 1: Planning and Masking
-
Paper preparation:
Start by taping down your watercolor paper to a board or table surface to prevent buckling. Ensure the edges are sealed well if you want a clean border, though this design floats in the center. -
Outline the flag:
Using a ruler and a very light pencil touch, draw a rectangular boundary for your flag in the center of the paper. -
Mark the union:
Measure and lightly outline the canton (the rectangular blue field) in the top left corner. It should span roughly half the width of your flag and cover the top seven stripes’ vertical area. -
Apply star stickers:
Place your star stickers inside the blue canton area. Arrange them in the classic staggered pattern—rows of six alternating with rows of five—or a simpler straight grid depending on your sticker size. Press them down firmly to ensure paint won’t seep underneath. -
Plan the stripes:
Lightly mark the stripe locations with your pencil. You need 13 stripes total. The top stripe is red, alternating down to a bottom red stripe. The white stripes will be left unpainted.
Bleeding Paint?
If paint bleeds under the star stickers, wait for it to dry, then use a white gel pen or white gouache to tidy up the star points and cover the mistake.
Step 2: Painting the Union
-
Mix the blue:
Prepare a deep navy hue. If you are using watercolors, keep the mixture saturated rather than too watery to get that bold contrast against the white stars. -
Paint the blue field:
Using your medium round brush or the edge of a flat brush, carefully paint the blue rectangle. Paint right over the star stickers. -
Refine the edges:
Ensure the edges of your blue rectangle are relatively straight, but don’t worry about perfection; the hand-painted look adds charm. -
Let it dry completely:
Wait for the blue paint to be bone dry. This is crucial before moving to the red stripes to avoid bleeding colors.
Vintage Effect
After the red and blue dry, apply a very watery wash of tea or diluted brown paint over the white stripes to age the flag instantly.
Step 3: Painting the Stripes
-
Mix the red:
Mix a muted, vintage red color. I personally like adding a tiny touch of brown or orange to primary red to keep it from looking too bright and candy-like. -
Paint the short stripes:
Start with the top seven stripes that sit to the right of the blue union. Paint the red stripes (1st, 3rd, 5th, 7th) using the flat shader brush. Use single, confident strokes if possible. -
Paint the long stripes:
Continue painting the remaining six full-width stripes below the union area. Remember, you can freehand these for a looser look, or use tape if you want razor-sharp lines. -
Check consistency:
Look for any lighter areas in your red paint. If you want a more solid look, apply a second coat once the first is dry. I often leave it single-coated for that textured watercolor feel. -
Dry thoroughly:
Allow the entire painting to dry completely. Touch the paper gently to ensure no paint is cool or damp.
Step 4: The Reveal
-
Peel the stars:
Use a craft knife tip or a fingernail to gently lift the edge of each star sticker. Peel them off slowly to reveal the crisp white paper underneath. -
Erase guidelines:
Once you are certain the paint is cured, gently erase any visible pencil marks from the white stripes or around the border. -
Sign your work:
Add a small signature or date in pencil at the bottom right corner for a professional finish.
Frame your artwork simply to let the bold colors and negative space pattern stand out on your wall


Have a question or want to share your own experience? I'd love to hear from you in the comments below!