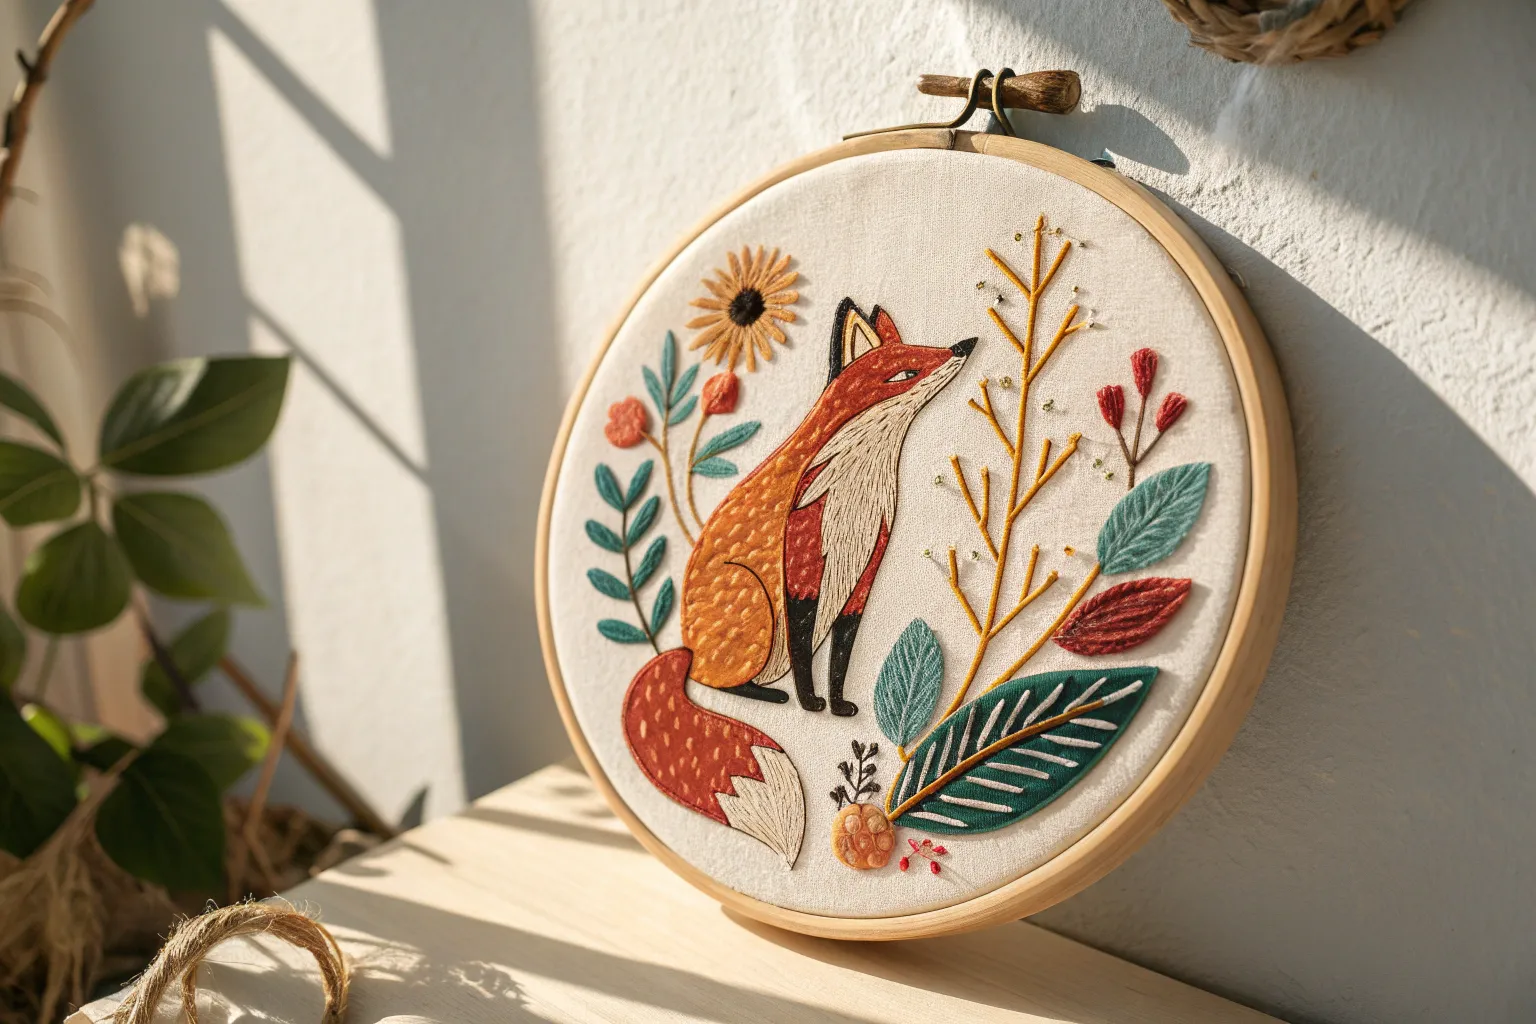
Animals are my favorite excuse to play with texture, color, and personality—one whisker at a time. Here are 20 animal art ideas you can jump into right now, from easy sketches to a few delightfully extra, artsy experiments.
Simple Pet Line Drawing
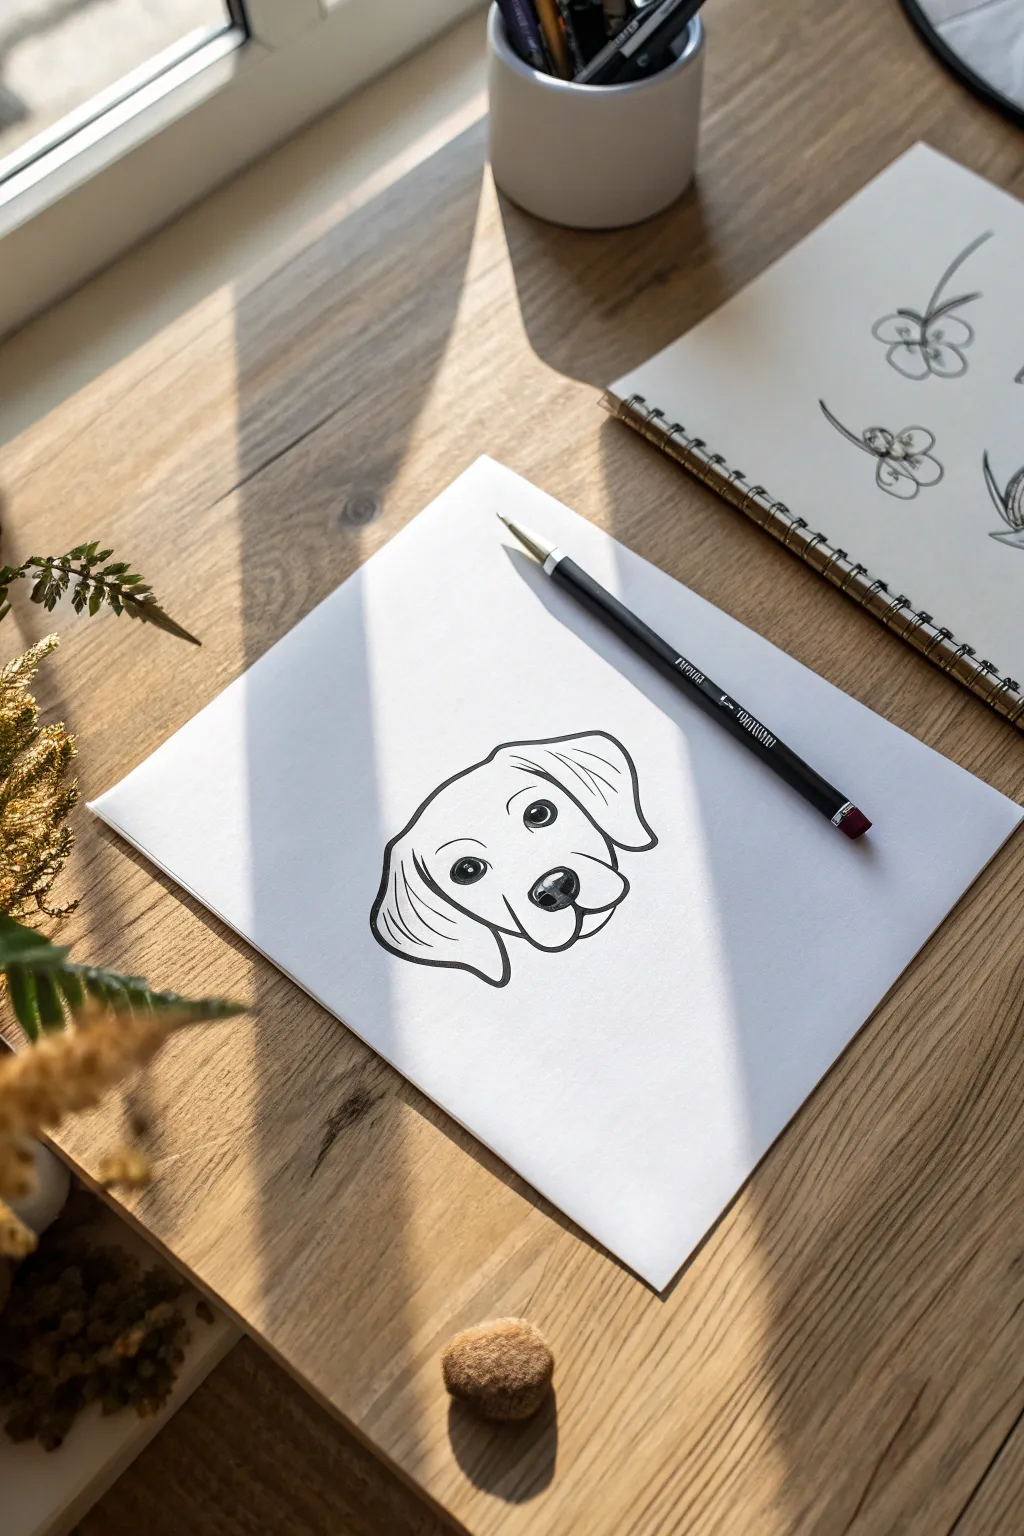
Capture the sweetness of a furry friend with this streamlined, illustrative line drawing style. By varying your line weight and keeping details minimal, you can create a professional-looking pet portrait that feels both modern and affectionate.
Step-by-Step Guide
Materials
- High-quality white drawing paper or cardstock (rectangular cut)
- Graphite pencil (HB or 2B for sketching)
- Black fine liner or ink pen (0.5mm or 0.8mm for final lines)
- Eraser (kneaded eraser preferred)
- Reference photo of a dog (Labrador or Retriever style works well)
Step 1: Sketching the Framework
-
Outline the head shape:
Start by lightly sketching a broad, rounded shape for the top of the dog’s head. Think of it as a soft dome that will eventually connect to the ears. -
Map the muzzle:
Below the dome, draw a slightly smaller, rounded rectangle shape for the muzzle area. This should overlap slightly with the bottom of your first dome to create a continuous snout. -
Position the ears:
Lightly sketch two large, drooping triangles on either side of the head. For this floppy-eared breed, let the shapes hang down to about the chin level, keeping lines loose and curvy. -
Place facial features:
Draw a faint horizontal guideline across the center of the face. Mark two circles for eyes on this line and a soft triangle shape for the nose within the muzzle area.
Wobbly Lines?
If your hand shakes while inking, try moving your entire arm from the shoulder, not just your wrist. Draw lines quickly; slow movement often leads to more wobbles.
Step 2: Designing the Expression
-
Refine the eyes:
Inside your eye circles, draw dark pupils but leave a small white circle in each for the ‘catchlight’ or reflection. This brings the drawing to life. -
Shape the nose:
Add detail to the nose triangle by curving the top edge and adding two comma-shapes for nostrils. I find that making the nose slightly larger adds a cute, puppy-like quality. -
Draw the mouth:
From the bottom of the nose, draw a vertical line heavily curving outward to the left and right to form the upper lips (flews). Add a small curve underneath for the lower jaw. -
Add character lines:
Sketch small eyebrow curves above the eyes to give an attentive expression. Add a few faint lines on the muzzle to suggest whiskers without drawing them individually.
Step 3: Final Inking and Weight
-
Start the main outline:
Switch to your black ink pen. Begin tracing over your pencil sketch, starting with the outer contour of the ears. Use confident, smooth strokes rather than short, scratchy ones. -
Define the head shape:
Ink the top of the head. When you reach the connection point between the ear and the skull, create a small overlap or crease line to show depth. -
Ink the eyes carefully:
Carefully outline the eyes. Fill in the pupils solid black, ensuring you preserve those tiny white reflection spots. -
Darken the nose:
Outline the nose and nostrils. Fill in the nostrils completely black, but leave the top of the nose white or lightly textured to show it’s wet and shiny. -
Create line variation:
Go back over the outer contour lines (the ears and jawline) to make them slightly thicker. Heavier lines on the outside and thinner lines for facial features create better visual hierarchy. -
Detail the fur:
Add just a few internal lines on the ears to suggest folds in the fur. Keep these lines thin and tapering so they don’t look like distinct shapes. -
Final Cleanup:
Once the ink is completely dry—give it a full minute—gently erase all your graphite pencil guidelines to reveal the crisp, clean illustration.
Pro Tip: Line Weight
Use a thicker pen (0.8mm) for the outer silhouette and a thinner pen (0.3mm or 0.5mm) for internal details like eyes and whiskers to add professional depth.
Frame your clean and modern pet portrait or scan it to create custom greeting cards for friends


Pencil Pet Portrait With Soft Shading
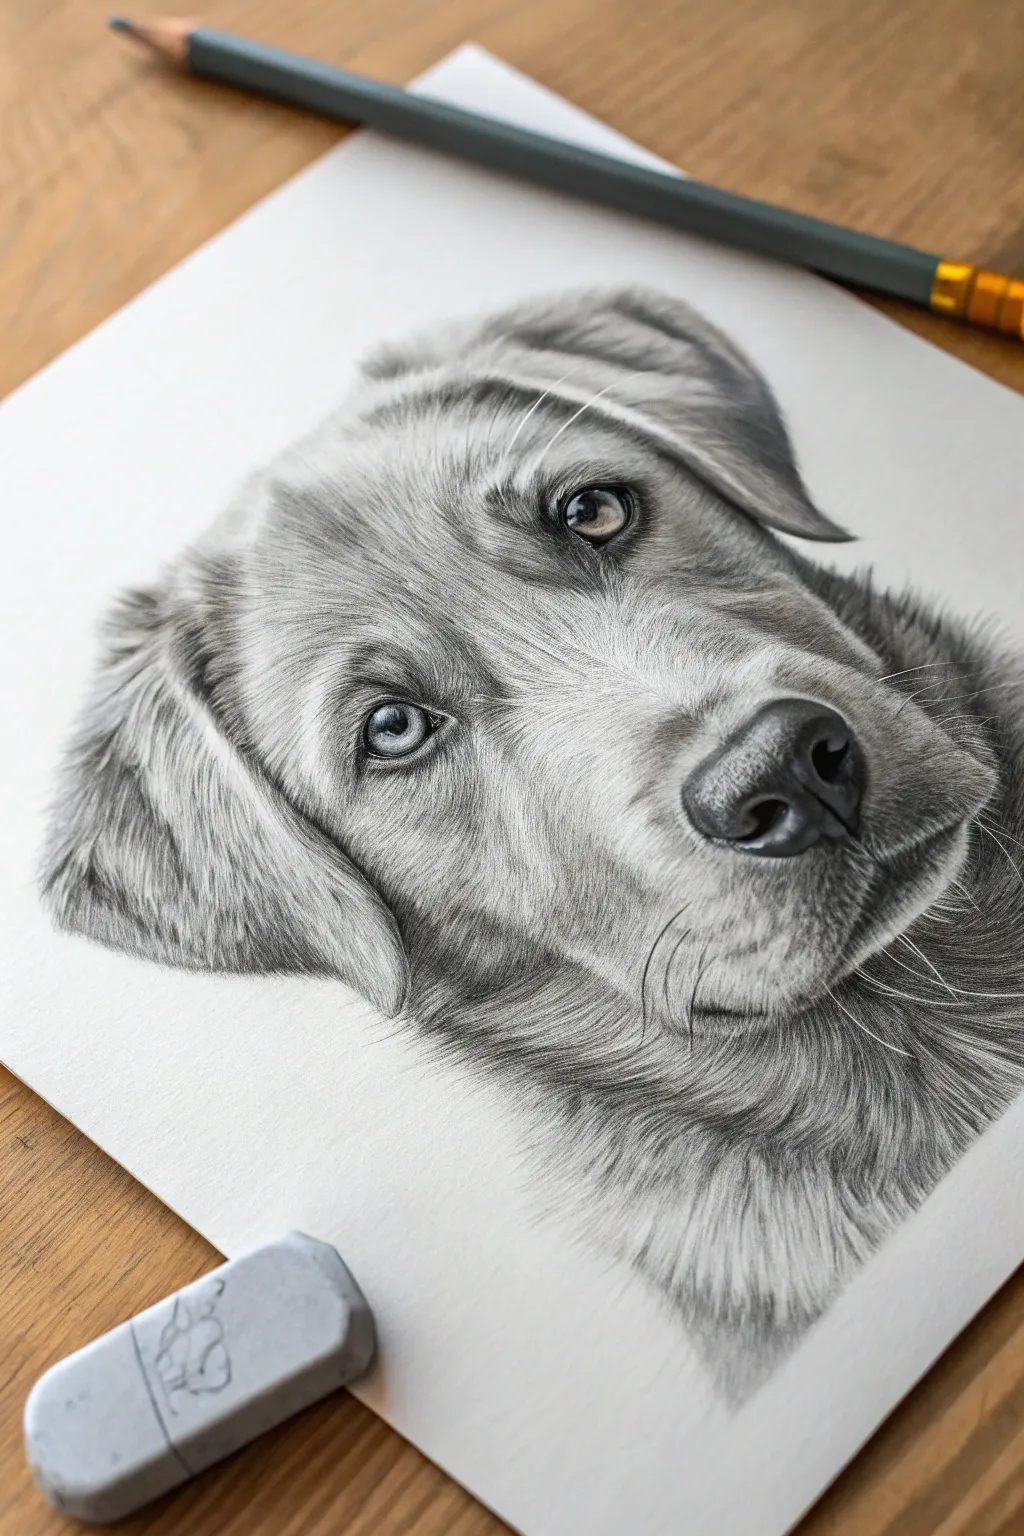
Capture the gentle gaze of a young dog with this realistic pencil study, focusing on soft textural fur and deep, expressive eyes. This project balances fine detail with broad, smooth shading to create a lifelike portrait that seems to pop off the paper.
Detailed Instructions
Materials
- High-quality drawing paper (smooth or Bristol board preferred)
- Graphite pencils (4H, HB, 2B, 4B, 6B)
- Mechanical pencil (0.5mm, HB lead) for fine hairs
- Kneaded eraser
- Standard vinyl eraser
- Blending stump or tortillon
- Tissue or cotton brightness to smooth shading
- Pencil sharpener
Step 1: Shaping the Foundation
-
Light scaffolding:
Begin with a 4H pencil to lightly sketch the overall head shape. Focus on the triangular drop of the ears and the rounded snout area. Keep these lines barely visible so they don’t show through later. -
Placing features:
Mark the position of the eyes, nose, and mouth line. The eyes should be spaced evenly, and the nose needs to feel centered on the muzzle’s curve. Double-check proportions now before committing darkness. -
Map the fur direction:
Using the same light pencil, draw faint arrows or flow lines indicating which way the fur grows. On the snout, it moves outward; on the ears, it flows down. This map is crucial for realistic texture.
Step 2: The Eyes and Nose
-
Pupil depth:
Switch to a 4B or 6B pencil to fill in the pupils. They need to be the darkest point on the page to create life. Leave a crisp, uncolored circle for the white highlight—do not use an eraser for this; preserve the white of the paper. -
Iris detailing:
Use an HB pencil to shade the iris, darkening the outer rim and fading slightly inward. Draw tiny radiating lines from the pupil outward to mimic iris fibers. -
Nose structure:
Outline the nostrils with your 4B pencil. Shading the nose requires a leather-like texture, so use a stippling motion (tiny dots) rather than smooth strokes on the main nose pad. -
Highlight management:
Preserve the highlights on the top of the wet nose. Shade around them deeply with a 2B, blending slightly to soften the transition from wet shine to dark skin.
Keep it Clean
Place a scrap sheet of paper under your drawing hand. This prevents your palm from smudging your work or transferring oils to the paper as you move across the fur texture.
Step 3: Fur Texture and Shading
-
Base tone application:
Using the side of an HB pencil, lay down a very light, smooth layer of grey over the shadowy areas of the face (under the ears, beneath the chin). Blend this out with a tissue for a soft, cloudy base. -
Initial fur strokes:
Switch to your mechanical pencil. Start closest to the nose with short, sharp ticks. Follow your direction map religiously. The hair here is very short and stiff. -
Building the forehead:
Move up to the forehead. Use longer lighter strokes here. I find it helpful to flick the pencil up at the end of each stroke to taper the hair like a real follicle. -
Ear texture:
The fur on the ears is longer and softer. Use a 2B pencil for softer, wavier lines. Layer these strokes over each other to build volume, leaving some areas lighter to suggest folds in the ear flap. -
Deepening shadows:
Go back in with a 4B pencil to darken the areas where fur overlaps, specifically where the ears meet the head and under the chin. This separation creates the 3D form. -
Mid-tone blending:
Take your blending stump and gently drag it in the direction of the fur growth over your pencil strokes. This softens the individual lines so it looks like a coat, not just stripes. -
Second fur layer:
Sharpen your B or 2B pencil to a fine point. Draw a second layer of distinct hairs over the smoothed areas to bring back definition and crispness.
Make it Pop
For ultra-realistic eyes, add a tiny reflection of a window or landscape inside the pupil’s highlight. It hints at the world the dog is looking at.
Step 4: Final Details
-
Whiskers:
Press firmly with a sharp HB pencil to flick out the whiskers from the muzzle. These should be long, confident curves. If you need white whiskers against dark fur, use a sharp edge of your eraser or a white gel pen. -
Neck fluff:
The chest fur is usually fluffier. Use loose, scribbly strokes that fade out at the bottom of the page to create a vignette effect, drawing focus back to the eyes. -
Highlight recovery:
Take your kneading eraser and dab it (don’t rub) on the forehead and bridge of the nose to lift off graphite. This brings back the light hitting the highest points of the bone structure. -
Final contrast check:
Step back. Identify the darkest darks again (nostrils, pupils, shadow under ear) and reinforce them with your 6B if they have faded during blending.
Now you have a timeless portrait that captures the gentle spirit of man’s best friend


Watercolor Animal Face Study
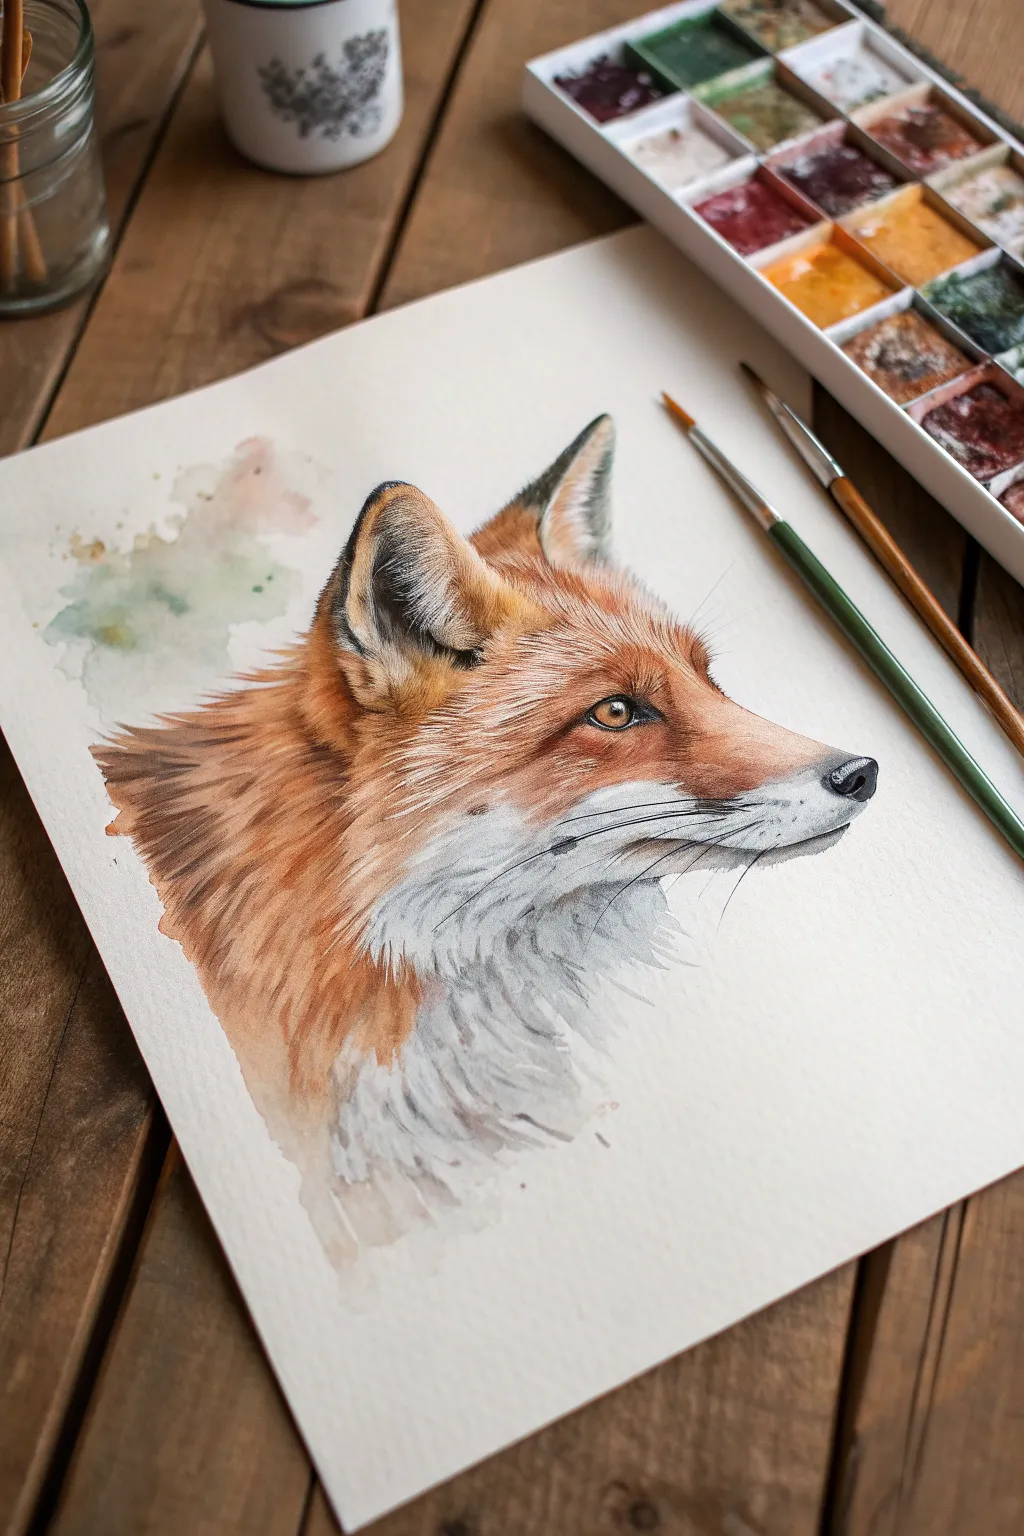
Capture the clever elegance of a red fox with this detailed watercolor tutorial. By combining loose, expressive washes with crisp, dry-brush detailing, you’ll create a lifelike portrait that balances realism with painterly charm.
Step-by-Step Tutorial
Materials
- Hot press watercolor paper (300 gsm)
- Watercolor paints (Burnt Sienna, Yellow Ochre, Burnt Umber, Payne’s Gray, Lamp Black, Alizarin Crimson)
- Round brushes (sizes 2, 4, and 8)
- Fine liner brush (size 0 or 00)
- Pencil (HB) and kneaded eraser
- Masking fluid (optional)
- Two jars of water
- Paper towels
- White gouache (for highlights)
Step 1: Sketching and Preparation
-
Map the proportions:
Begin with a light HB pencil sketch. Start with a circle for the main cranial area and extend a wedge shape downwards for the muzzle. Pay close attention to the triangular ears and the almond shape of the eye. -
Refine the contour:
Tighten your drawing, marking the boundary where the famous russet fur meets the white fur on the cheek, throat, and muzzle. Don’t press too hard; you want these lines to disappear under the paint. -
Protect the whites:
If you are less confident with brush control, apply a thin layer of masking fluid to the whiskers and the brightest highlight in the eye. Let this dry completely.
Muddy Fur?
If your fur texture looks like a solid blob, you likely didn’t let the layers dry enough. Wait for the paper to be cool to the touch before adding new detailed strokes.
Step 2: The First Washes
-
Wet-on-wet background:
Before painting the fox, wet the area behind the head slightly with clean water. Drop in diluted Payne’s Gray and a touch of sap green or burnt umber to create a ghostly, abstract background splash. Let it bleed naturally, then let it dry. -
Base coat for the fur:
Mix a watery wash of Yellow Ochre and a touch of Burnt Sienna. Apply this loosely over the head, ears, and neck, strictly avoiding the white cheek and muzzle areas. This creates a glowing undertone. -
Shadows in the white:
While the orange layer dries, dilute Payne’s Gray until it’s barely visible. Gently paint the shadow areas of the white fur under the jaw and on the neck to give the form volume.
Step 3: Building Fur Texture
-
Developing the russet tones:
Switch to a size 4 brush. Mix a richer Burnt Sienna with a hint of Alizarin Crimson for warmth. Start layering short, directional strokes that follow the growth of the fur—up the forehead and back towards the neck. -
Darkening the ears:
The backs and tips of fox ears are often dark. Mix Burnt Umber and Lamp Black. Apply this to the ear tips and the inner ear shadows, feathering the edges so they don’t look like cutouts. -
Painting the eye:
This is crucial for life. Use Yellow Ochre for the iris, letting it dry. Then, use black for the pupil and outline the eye with a dark brown. Leave a tiny speck of white paper (or use gouache later) for the reflection. -
Mid-tone texture:
With a mix of Burnt Umber and Sienna, add shorter strokes around the muzzle and eyes. The fur here is shorter and denser than on the neck.
Flicking Technique
For the finest whiskers, don’t drag the brush slowly. Load a rigger brush and flick your wrist quickly and confidently for a tapered, natural line.
Step 4: Detailed Refinements
-
Deepening the neck fur:
I like to use a dryer brush technique here. Load a size 4 brush with concentrated Burnt Umber and drag it through the neck area to create separation between the thick clumps of fur. -
Transition zones:
Work on the area where red meets white. Use a damp, clean brush to soften these edges slightly, or paint tiny, faint hairs crossing the boundary for realism. -
The nose:
Paint the nose using distinct shapes of black and dark grey rather than one solid blob. Leave a small sliver of lighter grey on the top edge to simulate a wet shine. -
Final fur details:
Using your smallest liner brush and a dark mix, add individual hairs inside the ears and along the crest of the neck to break up any solid blocks of color.
Step 5: Concluding Touches
-
Whiskers and highlights:
Once everything is bone dry, remove any masking fluid. If you didn’t mask, use white gouache and a liner brush to paint long, sweeping whiskers extending from the muzzle. -
Correcting the eye:
Add a final dot of white gouache to the eye catchlight if it got lost. This spark creates the focused, intelligent look characteristic of foxes. -
Final assessment:
Step back. If the white chest fur looks too flat, glaze a tiny amount of very watered-down blue-grey over the bottom sections to push them into shadow.
Sign your name near the bottom and enjoy your beautiful wildlife study


Acrylic Big-Cat Eyes Close-Up
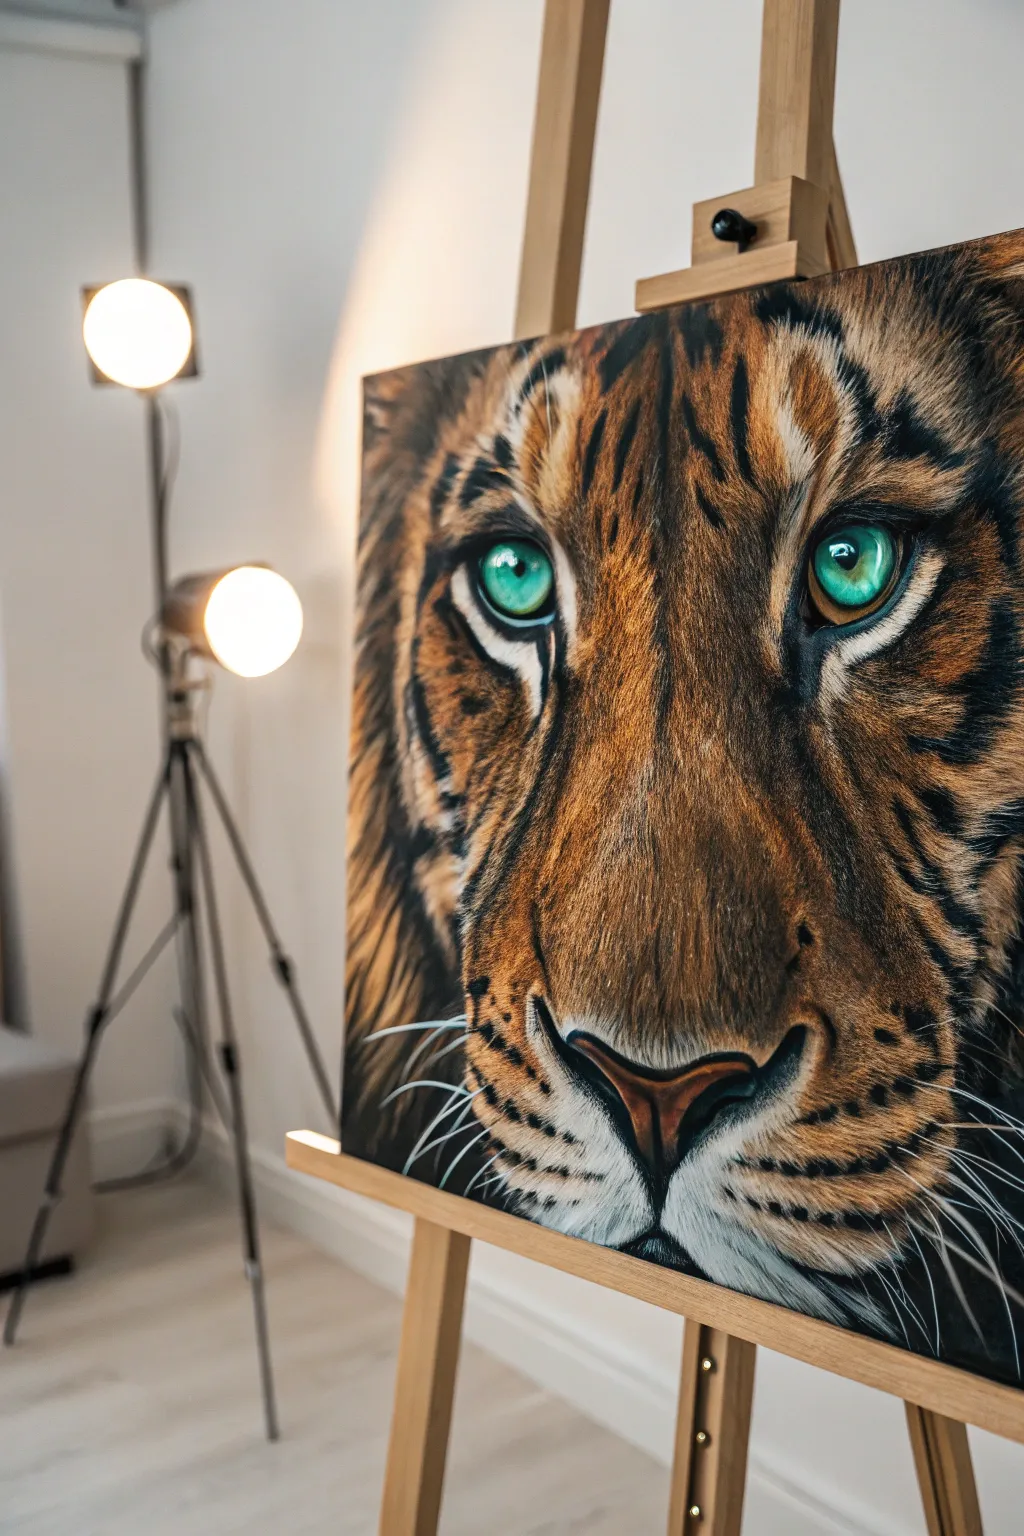
Capture the intense beauty of a tiger’s soul with this close-up acrylic painting tutorial focusing on piercing green eyes. You will learn to layer fur textures and create depth that makes the animal seem to look right through the canvas.
Step-by-Step
Materials
- Square stretched canvas (approx. 24×24 inches)
- Acrylic paints: Titanium White, Mars Black, Burnt Sienna, Yellow Ochre, Phthalo Green, Cadmium Yellow, Raw Umber
- Assorted brushes: 1 inch flat brush, filbert brushes (sizes 4 and 8), detailed liner brush (size 0 or 00)
- Palette and water container
- Charcoal pencil or chalk for sketching
- Slow-drying medium (optional for blending)
Step 1: Sketching and Underpainting
-
Map the features:
Begin by lightly sketching the tiger’s face layout with charcoal. Focus on the triangular relationship between the eyes and the nose. The nose should be centrally placed and quite large, while the eyes need to be perfectly symmetrical. -
Block in darks:
Using a flat brush and Mars Black mixed with a touch of Burnt Sienna to warm it, paint the major stripes. Don’t worry about fur detail yet; just establish where the dark patterns will sit around the brows and cheeks. -
Establish the mid-tones:
Mix Burnt Sienna with Yellow Ochre. Fill in the bridge of the nose and the forehead area with this warm, rusty base coat. Keep the paint relatively thin here so the canvas texture still grabs subsequent layers. -
Brighten the muzzle:
Paint the muzzle area and the patches under the eyes with Titanium White colored with a tiny drop of Raw Umber. This creates an off-white base that isn’t too stark.
Step 2: The Eyes and Nose
-
Base the iris:
For the emerald eyes, mix Phthalo Green with a little Cadmium Yellow. Paint the entire iris area with this solid, dark green base. -
Add inner luminosity:
While the base is tacky, mix more Yellow and White into your green. Apply this lighter mix in a U-shape at the bottom of the iris, blending upward to create a glowing effect. -
Define the pupil:
Use pure Mars Black and a small round brush to paint the pupil. Make sure the edges are crisp. Add a thick black outline around the iris rim to inset the eye. -
The crucial highlight:
With pure Titanium White, place a distinct reflection highlight near the top of the pupil, overlapping onto the iris slightly. This instantly brings the tiger to life. -
Sculpting the nose:
Paint the nose leather with a mix of Burnt Sienna and a touch of red or terracotta. Add shadow depth to the nostrils using dark brown, and highlight the top curve of the nose leather with a pale pinkish-tan.
Uneven Eyes?
Turn your canvas upside down. This tricks your brain into seeing shapes rather than ‘eyes,’ making it much easier to spot and correct asymmetry issues.
Step 3: Fur Texture and Details
-
Layering dark fur:
Switch to a filbert brush. Over your dark blocked areas, flick varied strokes of black and dark brown to create the illusion of hair direction. Ensure the strokes flow away from the center of the face. -
Building orange depth:
Using your ochre and sienna mix, start layering short, rapid strokes over the bridge of the face. Work from dark to light, layering lighter orange tones on top of the darker base. -
Refining white areas:
Clean your brush thoroughly. On the muzzle and under-eye areas, apply fresh white paint with a smaller brush in short ‘flicking’ motions. Let some of the shadow color show through between hairs. -
Blending the transitions:
Where the white muzzle meets the orange cheek, gently interlace the strokes. I like to use a slightly dry brush here to drag colors into one another for a soft transition. -
Intensifying shadows:
Deepen the shadows right next to the nose bridge and under the brow ridge with a glaze of Raw Umber. This makes the snout pop forward realistically.
Level Up: Gloss Varnish
Once fully dry, apply a high-gloss varnish ONLY to the eyes and nose leather. Leave the fur matte. This contrast makes the wet features look hyper-realistic.
Step 4: Final Touches
-
Whisker spots:
On the white muzzle, paint rows of small black dots. These are the follicle points where the whiskers will emerge. -
Drawing whiskers:
Thicken slightly watery white paint on your liner brush. With a confident, quick motion, pull long, thin lines outward from the black follicle dots. Vary the pressure so they taper at the ends. -
Final highlights:
Add tiny, sharp strokes of pure white on the very bridge of the nose and the wetline of the lower eyelid to create a moist texture.
Step back and admire the fierce elegance of your new wildlife masterpiece
BRUSH GUIDE
The Right Brush for Every Stroke
From clean lines to bold texture — master brush choice, stroke control, and essential techniques.
Explore the Full Guide
Feather Pattern Bird Painting
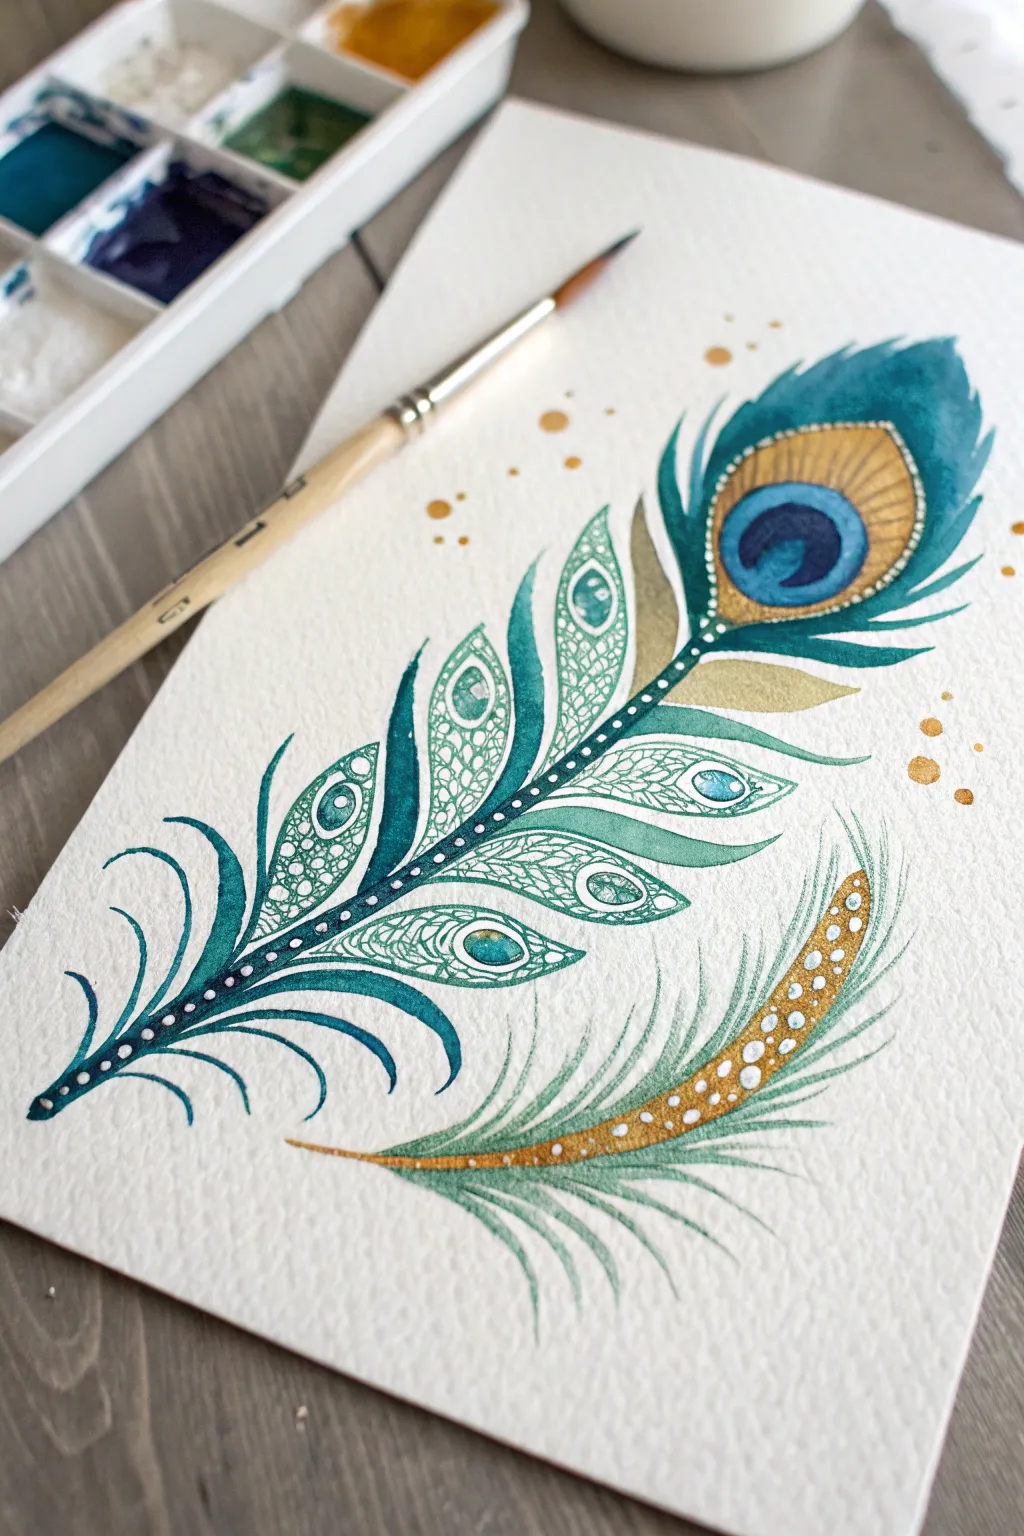
Capture the iridescent beauty of a peacock feather with this stylized watercolor illustration. Combining fluid washes with intricate, pen-like patterns creates a stunning piece that sits somewhere between realistic study and decorative art.
How-To Guide
Materials
- Cold press watercolor paper (300 gsm)
- Watercolor paints (phthalo blue, viridian green, sap green, yellow ochre, indigo)
- White opacity gouache or a white gel pen
- Gold metallic watercolor paint or ink
- Round watercolor brushes (size 4 and size 0/00 detailer)
- Pencil (HB) and eraser
- Palette for mixing
- Jar of clean water
- Paper towels
Step 1: Sketching the Structure
-
Draw the spine:
Begin by lightly sketching a curved line diagonally across your paper to serve as the feather’s central quill (rachis). -
Outline the eye:
Near the top right of your spine, draw an egg-shaped oval for the main ‘eye’ of the peacock feather. Inside this, sketch a smaller circle, and a kidney-bean shape inside that for the deep blue pupil. -
Define the vanes:
Instead of drawing thousands of hair-like barbs, stylize the feather by drawing larger, leaf-shaped sections extending from the spine. Make them curl upwards elegantly. -
Add the secondary feather:
Sketch a smaller, simpler curved feather below the main one, mirroring the curve but flowing in the opposite direction.
Step 2: Watercolor Base Layers
-
Paint the eye pupil:
Mix a deep indigo blue and fill in the kidney-bean shape in the center of the eye. Let the edges be crisp. -
Create the eye halo:
Paint the ring surrounding the pupil with a bright phthalo blue. While wet, you can drop in a tiny hint of teal for variation. -
Gold accents:
Using yellow ochre or metallic gold paint, fill in the outer oval of the eye. This creates that classic warm glow contrasting against the cool blues. -
Painting the vanes:
For the leaf-shaped vanes, prepare a mix of viridian and teal. Paint only the outer edges or alternating sections of these shapes, leaving the interiors blank or very filled with a very pale wash. This negative space is crucial for the pattern work later. -
Lower feather base:
Paint the spine of the lower feather in gold. Then, add wispy green strokes extending outward, keeping the paint translucent and airy.
Wobbly Lines?
If your fine lines are shaky, try exhaling slowly as you make the stroke. Faster strokes are often smoother than slow, hesitant ones. Practice on scrap paper first.
Step 3: Intricate Patterning
-
Detailing the eye:
Once the gold section is dry, use a fine detail brush (size 00) with dark brown or indigo to paint thin, radiating lines inside the gold oval, mimicking the texture of the barbs. -
Patterning the vanes:
Inside the pale ‘leaf’ shapes of the main feather, use a darker teal or green mix to paint delicate patterns. I like to paint scale-like scallops, tiny lattice lines, or small circles. -
Adding gradients:
To add depth, glaze a darker green-blue at the base of each vane where it meets the central spine. -
Defining the spine:
Paint the main central quill with a dark teal or almost black line. Break the line with tiny white dots later, or lift paint now while wet to create a dashed look.
Extra Shimmer
Mix a tiny amount of iridescent medium into your teal paint. This gives the feather a subtle, realistic sheen that changes as you tilt the paper in the light.
Step 4: Magical Final Touches
-
White dot accents:
This is where the magic happens. Using detailed white gouache or a gel pen, add rows of tiny dots along the spine and outlining specific vane shapes to make them pop. -
Decorating the lower feather:
Add a row of white dots along the golden spine of the smaller bottom feather for continuity. -
Gold splatter:
Load your brush with watery gold paint and gently tap it against another brush handle over the paper to create decorative splatters around the composition. -
Final highlights:
Add a tiny white reflection dot to the dark blue pupil of the feather’s eye to give it a glossy, gem-like appearance.
Allow the metallic accents to dry completely before framing your elegant feather art
Sleeping Bunny Minimal Line Art
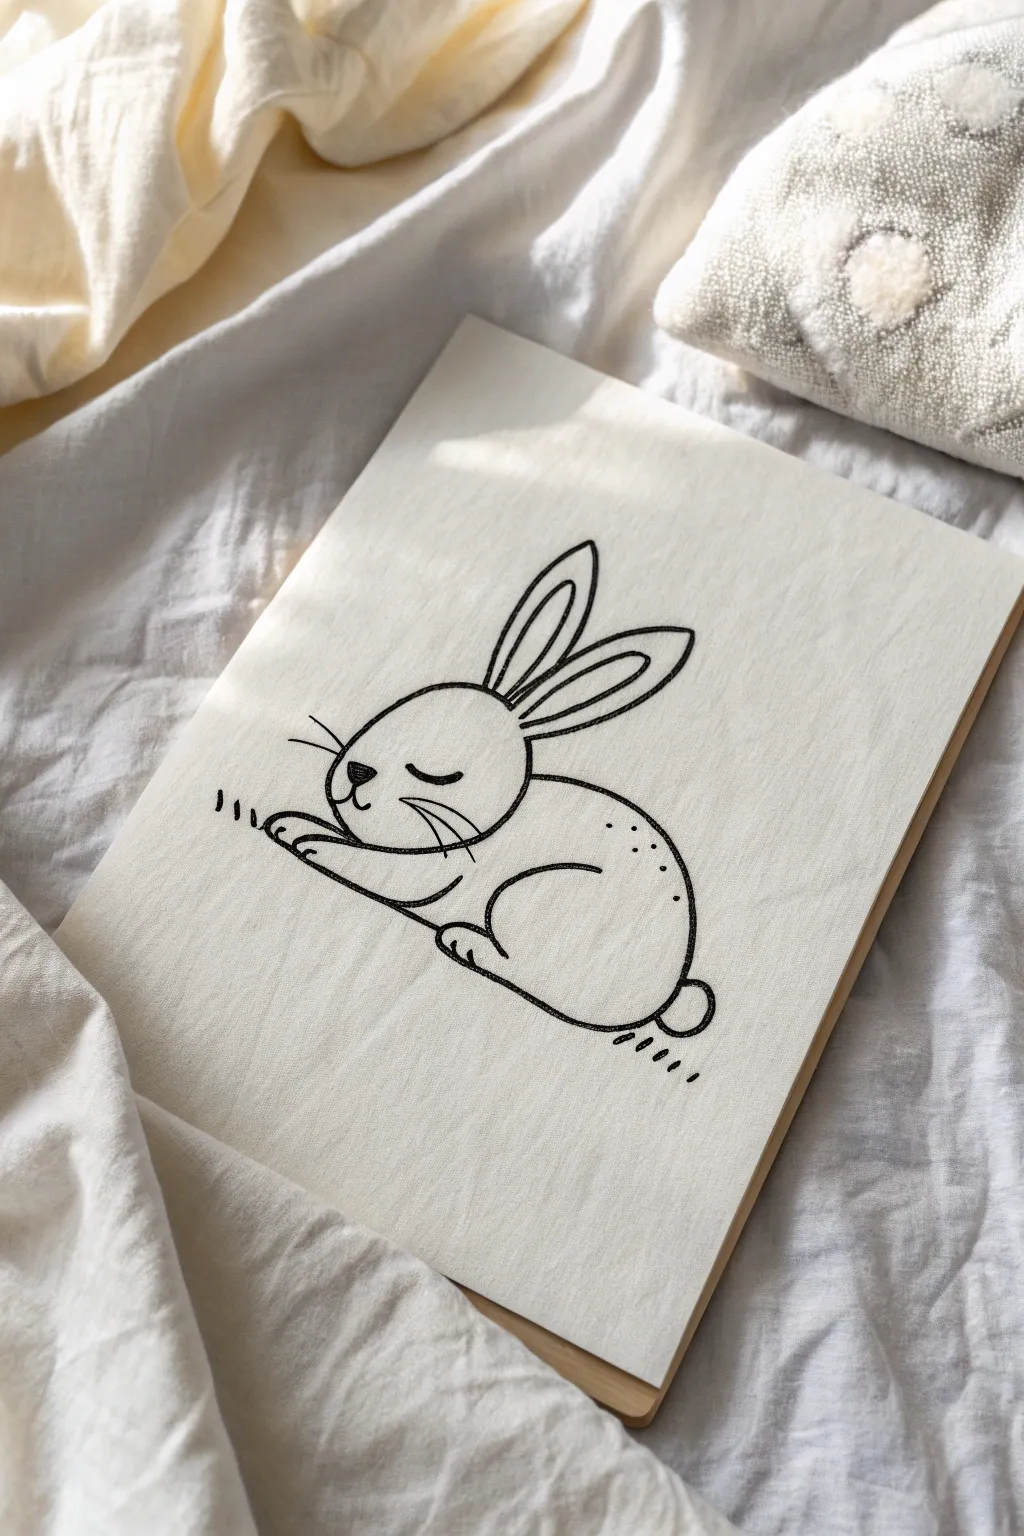
Capture the peaceful essence of a sleeping rabbit with this simple yet charming minimalist line art project. Using bold strokes on a textured surface creates a modern, calming piece perfect for a nursery or cozy corner.
Step-by-Step Guide
Materials
- Thick illustration board or wood panel (approx. A4 size)
- Cream or off-white acrylic paint
- Wide flat paintbrush
- Black permanent marker or paint pen (medium-thick tip)
- Pencil (HB or lighter)
- Eraser
- Ruler (optional)
- Reference image of the bunny
- Matte spray varnish (optional)
Step 1: Preparing the Base
-
Prime the surface:
Begin by coating your board or wood panel with the cream acrylic paint. Use your wide flat brush and apply long, even strokes to cover the entire surface. -
Wait for drying:
Allow the first coat to dry completely. If the original surface color shows through, apply a second coat for a solid, opaque background. -
Check the texture:
Once fully dry, run your hand over the surface. It should be smooth but have a slight tooth from the paint, which helps the ink adhere better later.
Steady Hands
Rest the side of your hand on a clean sheet of paper while drawing. This prevents hand oils from smudging the canvas and keeps your lines stable.
Step 2: Sketching the Outline
-
Draft the head shape:
Using your pencil very lightly, draw an oval shape tilted slightly to the left. This will serve as the bunny’s head. -
Add the body curve:
Extend a curved line from the bottom right of the head to form a rounded, bean-like shape for the body. -
Position the ears:
Sketch two long, looped ear shapes sticking up from the top of the head. Make sure the one in the back is slightly overlapping or just behind the front ear. -
Refine the details:
Lightly sketch the small triangular nose, the closed eye (a simple U-shape), and the curved lines for the paws tucked under the chin. -
Review proportions:
Take a step back to look at your sketch. Adjust the size of the cotton-tail bump or the length of the ears until the balance feels right.
Step 3: Inking the Lines
-
Test your marker:
Before touching the board, test your black marker or paint pen on a scrap piece of paper to ensure the ink flows smoothly without bleeding. -
Commit to the outline:
Start tracing over your pencil lines with confident, steady strokes. When I do this, I find it helpful to pull the pen toward me rather than pushing it away. -
Define the face:
Ink the closed eyelid and the nose. Fill in the small nose completely with black to make it stand out. -
Draw the whiskers:
Add three quick, lively strokes on the left cheek for whiskers. Keep them loose and slightly curved. -
Add texture dots:
On the bunny’s rear flank, gently tap your pen to create a small cluster of dots. This creates a suggestion of shading or fur texture. -
Finalize the form:
Complete the body outline, including the small round tail at the back. Ensure the lines connecting the head to the body flow smoothly. -
Create ground marks:
Add a few short, dashed lines under the front paws and the back tail to ground the figure, suggesting grass or a soft bed.
Add Color
For a subtle pop, use a pale pink watercolor or diluted acrylic to add a very faint blush to the bunny’s cheeks or inner ears.
Step 4: Finishing Touches
-
Erase pencil marks:
Wait at least 15 minutes to ensure the ink is bone dry. Then, gently erase any visible pencil sketch lines still showing. -
Inspect line weight:
Look over your drawing. If some lines look too thin, carefully go over them again to thicken the stroke for a bolder look. -
Seal the artwork:
To protect your piece, you can lightly mist it with a matte spray varnish. This prevents the ink from fading and keeps dust away.
Hang your peaceful creation on the wall to bring a sense of calm to any room

PENCIL GUIDE
Understanding Pencil Grades from H to B
From first sketch to finished drawing — learn pencil grades, line control, and shading techniques.
Explore the Full Guide
Geometric Fox Color Blocks
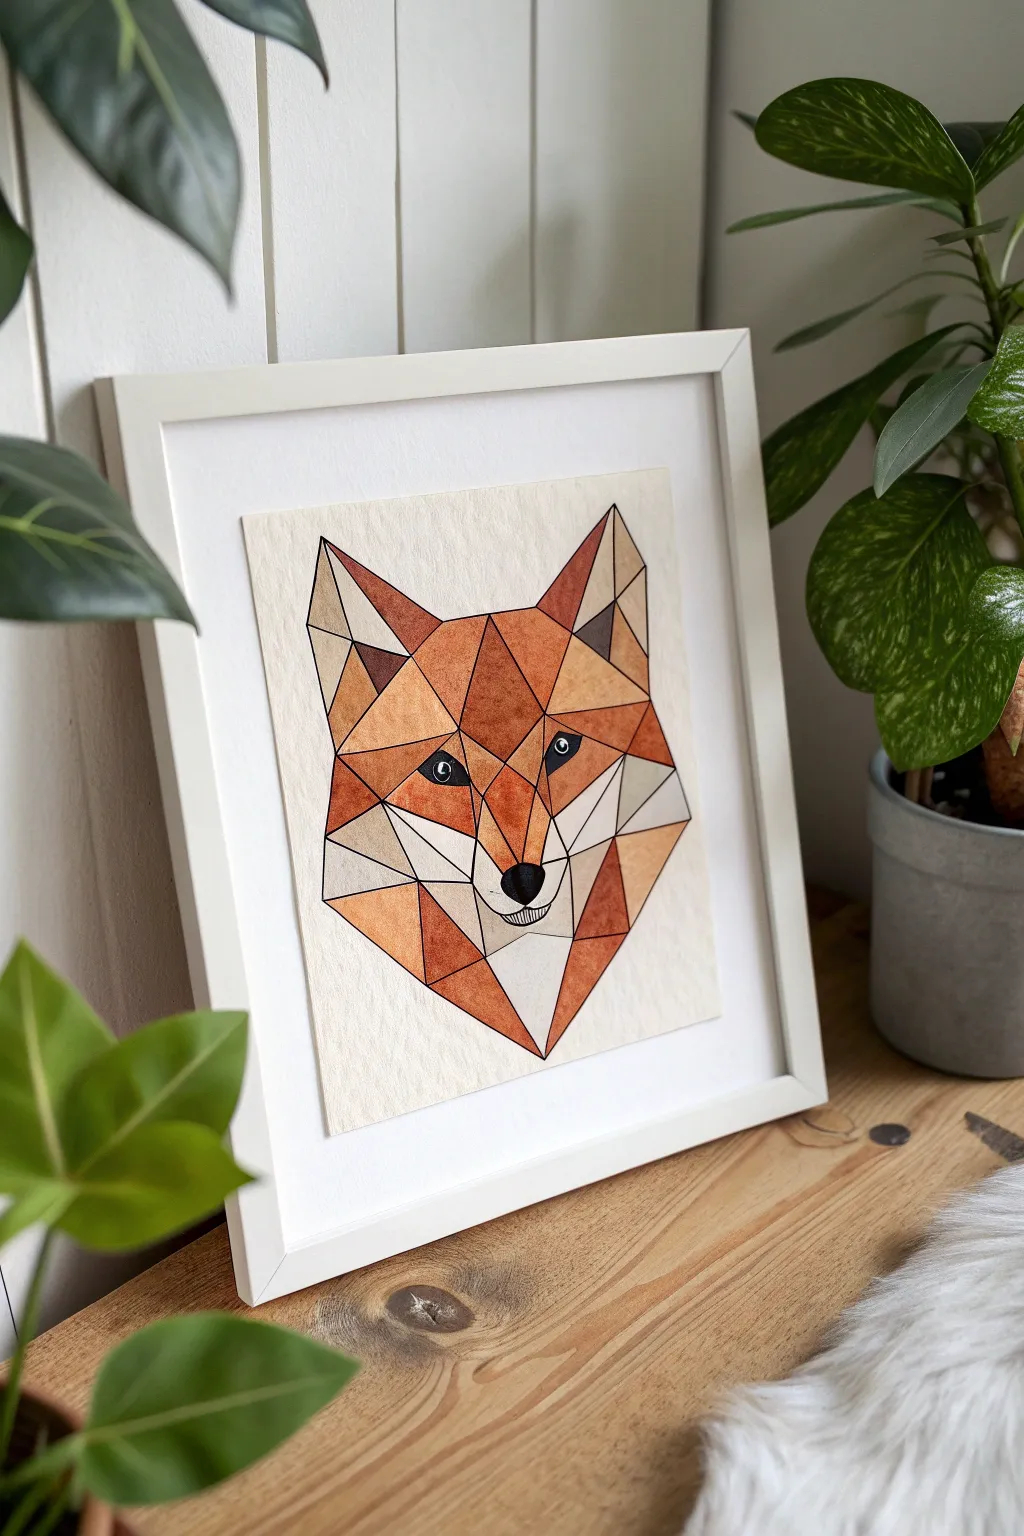
Capture the spirit of the forest with this modern, geometric fox portrait that blends crisp linework with the fluid beauty of watercolor. By breaking the animal’s face down into simple triangular color blocks, you achieve a striking 3D effect that looks professional yet is surprisingly approachable for beginners.
Detailed Instructions
Materials
- Cold-press watercolor paper (at least 140lb/300gsm)
- Pencil (HB) and eraser
- Ruler
- Waterproof fine liner pen (black, 0.5mm or 0.8mm)
- Watercolor paints (burnt sienna, yellow ochre, raw umber, cadmium orange)
- Round watercolor brushes (size 2 and 4)
- Masking tape
- Palette for mixing
- Jar of clean water
- Paper towels
Step 1: Planning the Geometry
-
Prepare your workspace:
Tape your watercolor paper down to a flat board or table using masking tape along all four edges. This prevents the paper from buckling when it gets wet and creates a clean border. -
Sketch the centerline:
Use your ruler to draw a very faint vertical line down the center of your paper. This guide helps keep the fox symmetrical. -
Outline the main shape:
Lightly sketch the large, inverted diamond shape that forms the fox’s head. Place two large triangles on top for the ears to establish the overall silhouette before diving into details. -
Draw the internal grid:
Using your ruler, start breaking the large shapes into smaller triangles and polygons. I like to start from the nose and work outward found the eyes, connecting points to creating that faceted, crystal-like appearance. -
Refine the facial features:
Sketch the eyes as small almonds within their respective geometric sockets, and define the nose as a small, rounded-off triangle at the bottom convergence point.
Bleeding Lines?
If colors run into adjacent shapes, you likely didn’t let neighboring sections dry. Work on opposite sides of the face to allow dry time.
Step 2: Inking the Structure
-
Trace with waterproof pen:
Go over your pencil lines with the waterproof fine liner. Use the ruler again for the straight edges to keep the geometric look incredibly sharp. -
Detail the eyes and nose:
Fill in the pupils and the nose completely with black ink, leaving a tiny white circle in each eye for a highlight. Add vertical hatching lines on the chin area for texture. -
Erase pencil marks:
Wait at least 15 minutes to ensure the ink is totally dry, then gently erase all visible graphite lines to clean up the canvas.
Step 3: Painting the Color Blocks
-
Mix your palette:
Prepare three distinct puddles of paint: a light golden yellow (yellow ochre), a medium rusty orange (cadmium orange + burnt sienna), and a deep brown shadow tone (burnt sienna + raw umber). -
Paint the first triangles:
Start with your lightest yellow-orange mix. Paint a few non-touching triangles, such as the top of the cheeks or parts of the forehead. Painting non-adjacent sections prevents colors from bleeding into each other. -
Add mid-tones:
Move to the medium rusty orange. Fill in the center of the forehead and the triangles surrounding the eyes. Be careful to stay strictly inside the inked lines. -
Create depth with shadows:
Use the dark brown mix for the ears’ interiors and the triangles under the chin or neck. These dark values act as shadows, giving the fox dimension and making it pop. -
Leave negative space:
Intentionally leave several triangles unpainted—specifically on the muzzle and the lower cheeks. This white space represents the fox’s white fur and balances the heavy colors. -
Vary the saturation:
As you continue filling gaps, dilute your existing mixes with more water for some sections and use more concentrated pigment for others. This variation mimics natural light hitting the ‘facets’ of the face. -
Dry and refine:
Let the first layer dry completely. If some orange sections look too pale, add a second glaze of color to deepen the saturation, just be sure the paper is bone dry first.
Level Up: Metallic Pop
Swap the white cheek sections for gold leaf or metallic watercolor paint. The shimmer adds a luxurious, modern twist to the rustic fox colors.
Step 4: Finishing Touches
-
Check the edges:
Inspect your lines. If paint has slightly covered your black outlines, carefully re-trace those specific lines with your pen to bring back the crisp geometric separation. -
Remove tape and frame:
Peel the masking tape away slowly at a 45-degree angle to reveal your clean border. Place the artwork in a simple white frame to let the bold colors stand out.
Hang your geometric fox near some greenery to echo the natural theme and enjoy your handmade modern art
Paper Mosaic Owl Collage
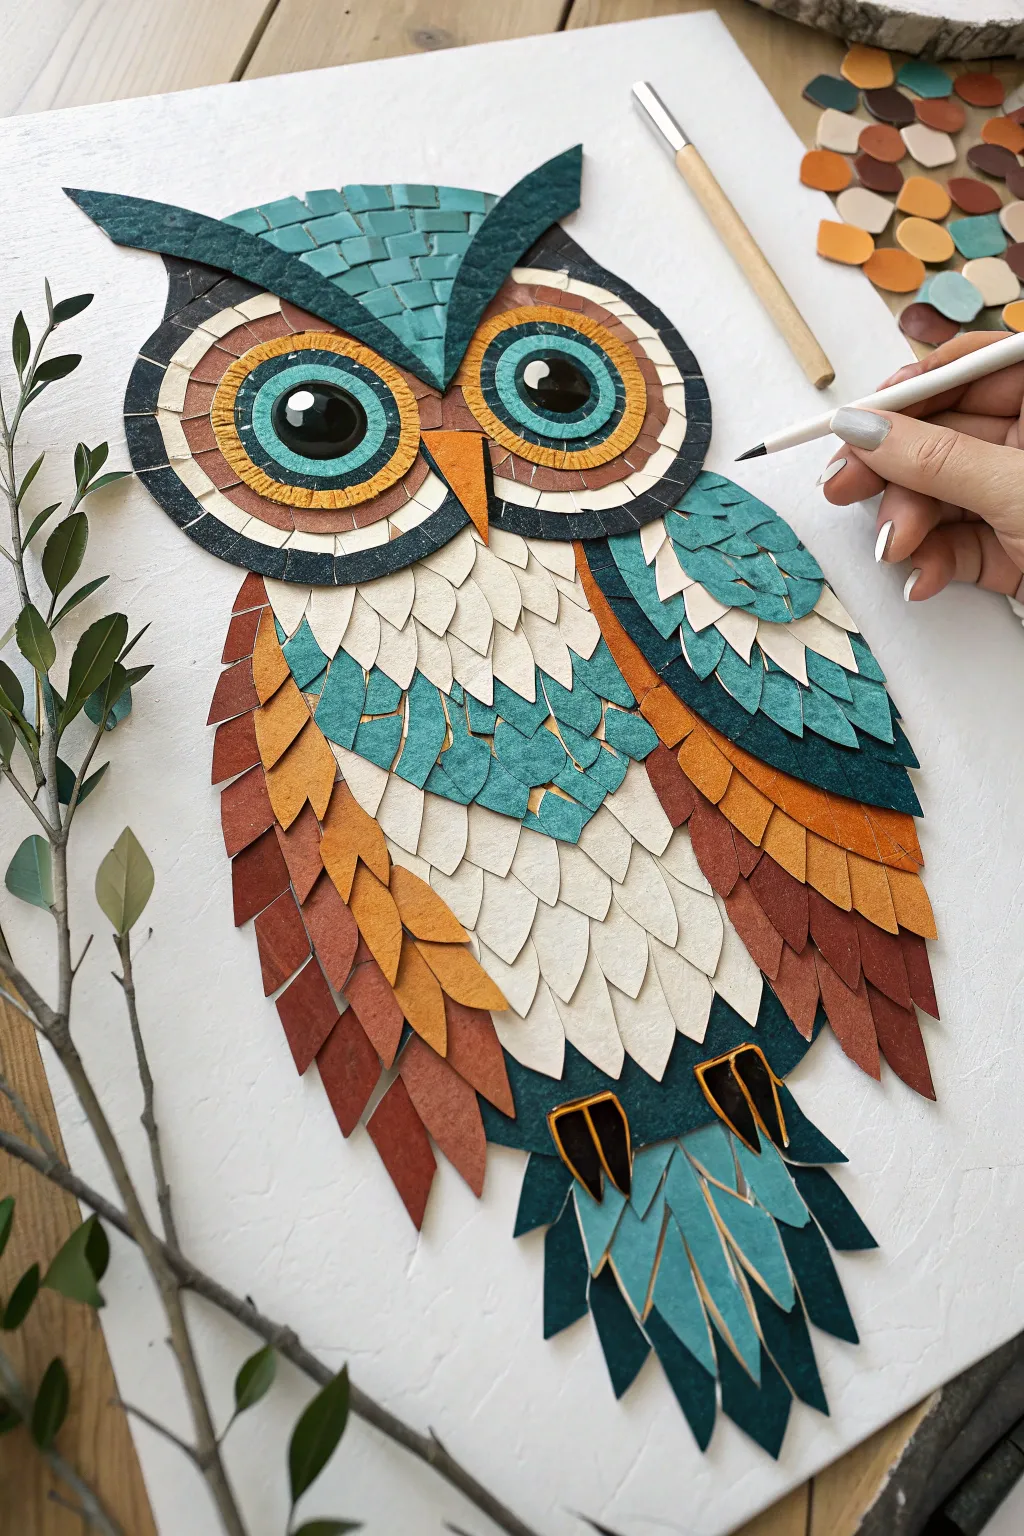
This striking owl collage uses layers of hand-cut paper shapes to create depth, texture, and intricate patterns. The result is a vibrant, dimensional piece of art that mimics the look of a traditional tile mosaic combined with feathery textures.
Step-by-Step Tutorial
Materials
- A3 Heavyweight white cardstock or canvas board (base)
- Textured colored paper or painted thick paper (Teal/Turquoise, Rust/Orange, Brown, Beige/Off-White, Black)
- Pencil and eraser
- Fine-point scissors or precision craft knife
- Clear-drying craft glue or PVA glue
- Fine paintbrush (for glue application)
- White gel pen (optional for highlights)
- Tweezers (for placing small pieces)
Step 1: Preparation & Sketching
-
Prepare your paper palette:
If you are painting your own paper (which adds lovely texture), brush acrylic paints onto thick paper in the required shades: teal, rust, dark brown, and creamy beige. Allow these to dry completely before cutting. -
Sketch the owl outline:
Lightly draw the owl’s silhouette on your white base board. Sketch the large features: the round eyes, the V-shaped brow, the beak, and the basic wing shapes. Focus on getting the proportions right, as these lines will be your guide for gluing.
Step 2: The Head & Face
-
Form the brow:
Cut small, varied rectangular ’tiles’ from your teal paper. Glue them into the brow area above the eyes, arranging them in a slightly curved brick-like pattern to follow the contour of the head. -
Create the eyes:
The eyes are concentric circles. Start by cutting and gluing the outer rings using thin, curved strips of dark brown and white paper. Work inward with rust-colored strips, then a teal ring, and finally a solid black circle for the pupil. -
Add eye highlights:
Place a tiny white crescent or dot within the black pupil to bring the owl to life. This sparkle is crucial for expression. -
The beak:
Cut a sharp, triangular shape from bright orange or rust paper. Glue it centrally below the eyes, ensuring the point overlaps slightly with the chest area.
Pro Tip: Painted Paper
Paint watercolor or acrylic onto thick paper before cutting. The uneven brushstrokes create natural texture that flat colored cardstock can’t verify match.
Step 3: Creating the Feathers
-
Cut the feather shapes:
This is the most time-consuming part. Cut dozens of leaf-shaped feathers in various sizes. You’ll need tiny ones for the face, medium for the chest, and long, slender ones for the wings. -
Group by color:
Organize your cut shapes into piles: beige/white for the chest, teal and rust for the wings, and brown for the outer edges. -
Layer the chest:
Start gluing from the bottom of the belly and work your way up. Overlap the beige and white feather shapes like roof shingles. Mixing subtly different shades of cream adds realistic depth here. -
Fill the central chest pattern:
In the middle of the chest, introduce a V-shaped section of teal feathers. Interlock these with the beige ones to create a seamless transition.
Troubleshooting: Glue Marks
If you get glue on the front of a piece, wait for it to become tacky and gently rub it off with a clean finger or rubber cement eraser rather than wiping wet glue.
Step 4: Wings & Tail
-
Build the wings:
For the wings, use larger, elongated leaf shapes. Layer rust and brown feathers on the outer edges, transitioning to teal on the inner wing sections. Ensure the tips point downward and slightly outward. -
Add detail to the wing edges:
Use sharp, angular cuts for the very edge of the wings to give a distinct silhouette against the white background. -
Construct the tail feathers:
At the very bottom, use your longest, sharpest teal and dark blue polygon shapes. Fan them out slightly to suggest a tail. -
Place the feet:
Cut two claw shapes from black paper with orange outlines or accents. Glue them near the bottom of the beige belly section, just above the tail feathers.
Step 5: Final Touches
-
Refine the brow horns:
Return to the top of the head. Add two sharp, dark teal triangular pieces sticking out on either side of the mosaic brow to form the ‘horns’ or ear tufts. -
Clean up:
Check for any loose edges or gaps where the white background shows through unintentionally. Fill these with tiny slivers of matching colored paper.
Step back and admire the rich textures and colors of your completed paper mosaic owl


Handprint Fish Artwork
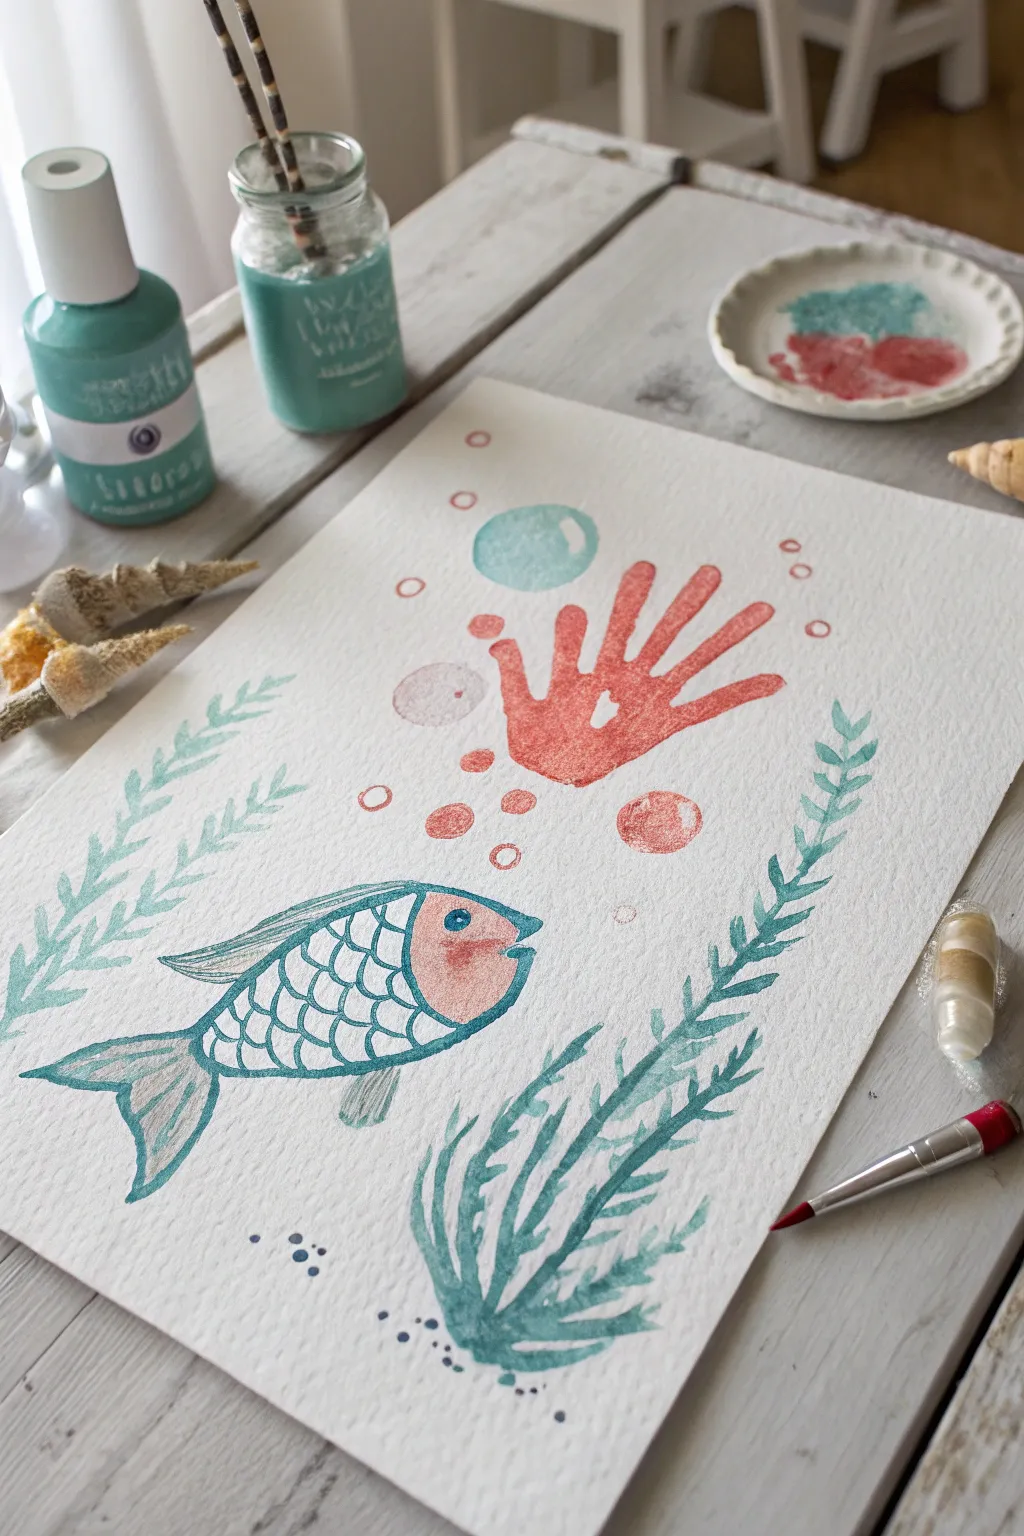
This whimsical watercolor painting combines the classic childhood handprint craft with detailed illustration to create an underwater scene. The focal point is a vibrant coral reef element made from a handprint, surrounded by delicate seaweed and a stylized fish.
Step-by-Step Guide
Materials
- Heavyweight watercolor paper (cold press texture recommended)
- Watercolor paints (teal, salmon pink/coral, cerulean blue)
- Small round brushes (size 2 and 4)
- Flat wash brush (optional, for the handprint)
- Jar of water
- Palette for mixing
- Paper towels
- Pencil (optional for light sketching)
Step 1: Creating the Handprint Coral
-
Prepare the paint:
Mix a generous amount of salmon pink or coral-colored watercolor paint. You want a creamy consistency—not too watery, so the print is solid, but wet enough to transfer texture. -
Paint the hand:
Using a large brush, coat the palm and fingers of your subject’s hand (or your own). Ensure full coverage but avoid big drips. -
Make the impression:
Place the hand firmly onto the upper right center of the paper. Keep the fingers spread slightly to mimic coral branches. Press down on the palm and each finger. -
Lift carefully:
Lift the hand straight up to avoid smearing. Allow this handprint to dry completely before painting near it to prevent colors from bleeding.
Smudged Print?
If the handprint smudges or misses spots, convert those errors into extra coral texture. Use a small brush to dab more paint into the gaps or extend the smear into a new coral branch.
Step 2: Drawing the Fish
-
Outline the body:
Using a teal watercolor mix and a fine brush (size 2), draw a simple almond shape for the fish body in the lower left quadrant of the paper. -
Add fins and tail:
Paint a forked tail at the back and a dorsal fin along the top. Add a smaller pectoral fin near the bottom center of the body. -
Define the head:
Draw a curved line to separate the head from the body. Fill the head area with a diluted wash of the same salmon/coral color used for the handprint. -
Add scales:
Once the outline is dry, use the teal paint to draw scallop-shaped scales across the body. Keep the lines thin and delicate. -
The eye detail:
Paint a small teal circle for the eye within the pink head area, leaving a tiny speck of white paper for a highlight if possible.
Step 3: Seaweed and Bubbles
-
Paint climbing vines:
load your brush with a teal or turquoise mix. Start painting long, wavy stems climbing up the left and right sides of the paper to frame the scene. -
Add leaves:
Along these stems, paint small, fern-like leaves using short, quick brushstrokes. Keep the leaves angling upward. -
Create bottom foliage:
At the bottom center, paint a denser cluster of seaweed using darker, more saturated teal strokes that curve upward like grass. -
Paint large bubbles:
Mix a very watery wash of blue and pink. Paint a few large circles floating above the fish and handprint. While wet, blot the centers slightly with a paper towel to create transparency. -
Add small bubbles:
Using the tip of your smallest brush and red or pink paint, add tiny open circles bubbling up from the fish and around the handprint. -
Final touches:
Add a few clusters of dark blue dots near the seaweed at the bottom to suggest sand or pebbles.
Color Harmony
To make the piece feel cohesive, use the same coral mix from the handprint to paint the fish’s face. This links the two main elements together visually.
Once the paint is fully dry, you can frame your underwater scene to capture a moment in time
Paper Plate Farm Animal Faces
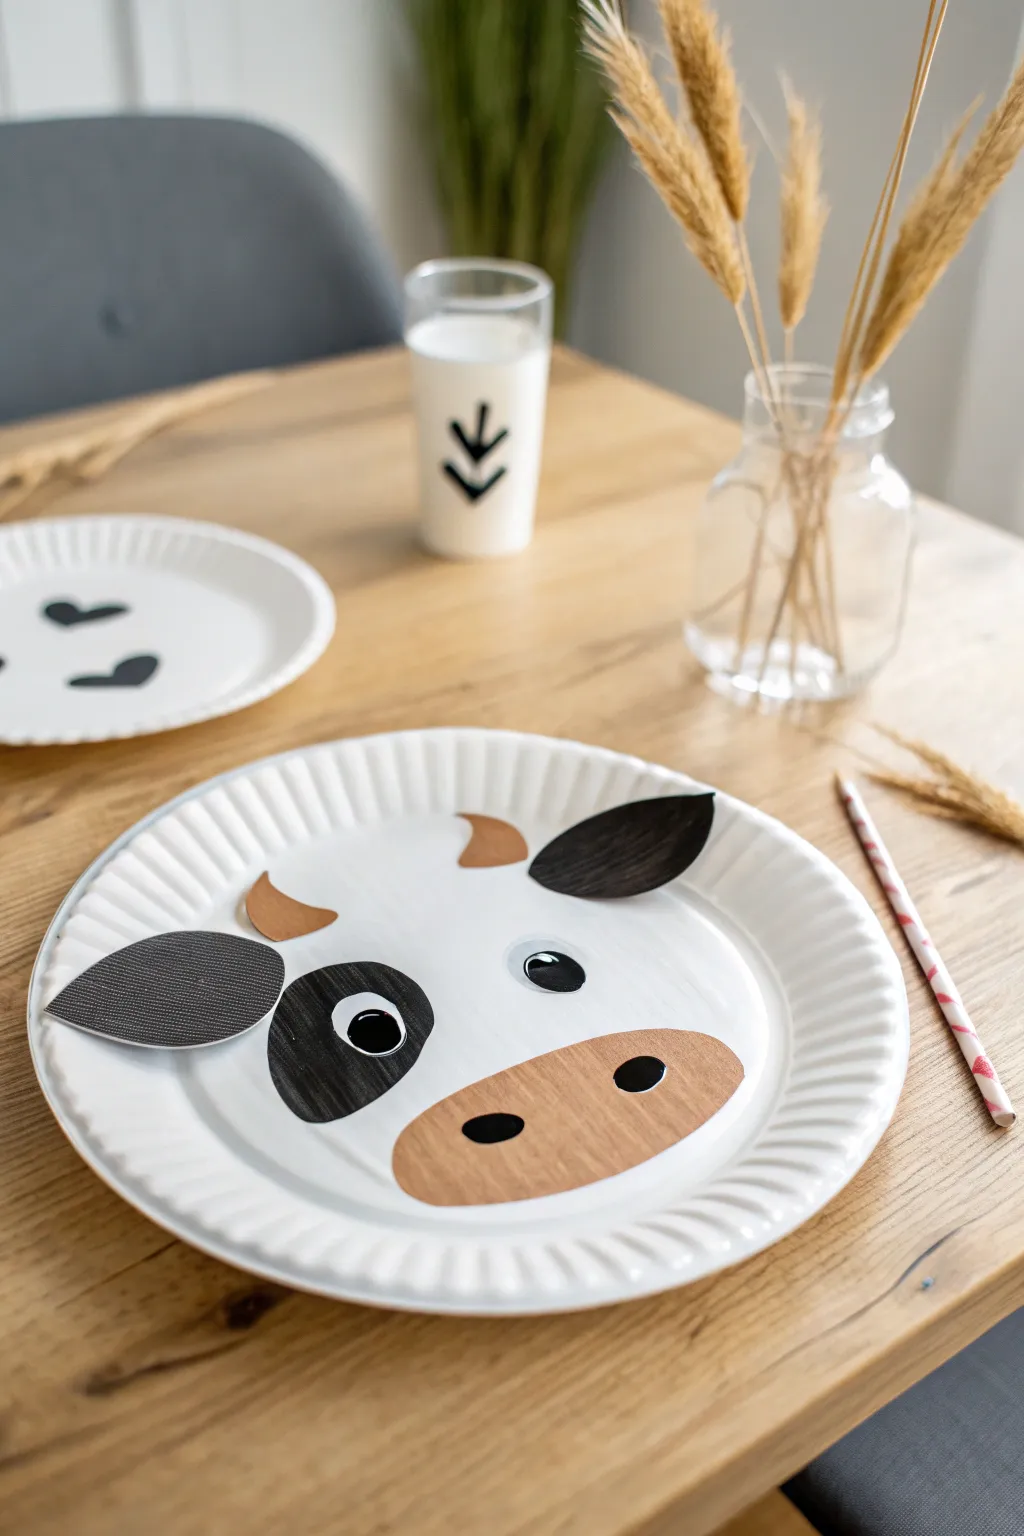
Transform a simple white paper plate into a friendly farmyard cow with just a few snips of construction paper and some glue. This clean, minimalist craft is perfect for exploring shapes and creating adorable wall art without the mess of paint.
Step-by-Step Tutorial
Materials
- Standard white paper plate (uncoated works best)
- Black construction paper or cardstock
- Brown construction paper or kraft paper (light brown)
- Medium brown construction paper (for horns)
- Googly eyes (large/medium)
- Glue stick or craft glue
- Scissors
- Black marker (optional)
- Pencil for sketching shapes
Step 1: Preparing the Shapes
-
Sketch the ears:
Begin by drawing two large, pointed teardrop shapes on your black paper. These should be roughly 3-4 inches long to serve as the cow’s floppy ears. -
Create the nose shape:
On the light brown or kraft paper, sketch a wide, soft oval shape that is slightly flattened on the top and bottom. It should span about half the width of your paper plate. -
Design the horns:
Using the medium brown paper, draw two small, curved triangular shapes. Think of them as little crescent moons with the points softened. -
Make the eye patch:
Draw an irregular oval or large kidney bean shape on the black paper. This will sit behind one eye to give the cow its classic spotted look. -
Cut out construction paper:
Carefully cut out all your drawn shapes—two ears, one nose, two horns, and the black eye patch—smoothing out any jagged edges as you go. -
Prepare the nostrils:
Cut two small, solid black ovals from your leftover black paper scraps. These will be glued onto the nose piece later.
Step 2: Assembling the face
-
Position the horns:
Take your paper plate and orient it so the ridges are facing up. Glue the two brown horns near the top rim of the central circle, spacing them about 3 inches apart. -
Attach the ears:
Apply glue to the wider end of your black teardrop ear shapes. Tuck them slightly behind the rim of the plate, just below and to the outside of the horns, angling them outward. -
Place the eye patch:
Choose one side of the face (left or right) and glue your large black eye patch shape down. Let it overlap slightly with the central space where the eyes will go. -
Add the nose:
Glue the large light brown nose piece near the bottom of the mask. Position it so the bottom edge aligns with the inner circle of the plate. -
Secure the nostrils:
Take the two small black ovals you cut earlier and glue them onto the light brown nose piece, spacing them widely for a cute expression. -
Attach the eyes:
Apply glue to the back of your googly eyes. Place one directly onto the white part of the plate and the other centered inside the black eye patch. -
Final adjustments:
Press down gently on all glued areas to ensure they adhere well to the textured surface of the plate. -
Optional marker detailing:
If you don’t have small black paper scraps for nostrils, you can simply draw two dark ovals directly onto the brown nose piece with a black marker.
Sticky Situation
If using a coated or glossy paper plate, a standard glue stick might not hold heavy cardstock well. Try using tacky craft glue or double-sided tape for a stronger bond.
Make It Interactive
Cut out the center of the mouth area or poke holes near the nose to thread a craft stick through the bottom, turning your art piece into a handheld cow mask.
Now your charming paper plate cow is ready to join the rest of the barnyard crew
Tape-Resist Dinosaur Shapes
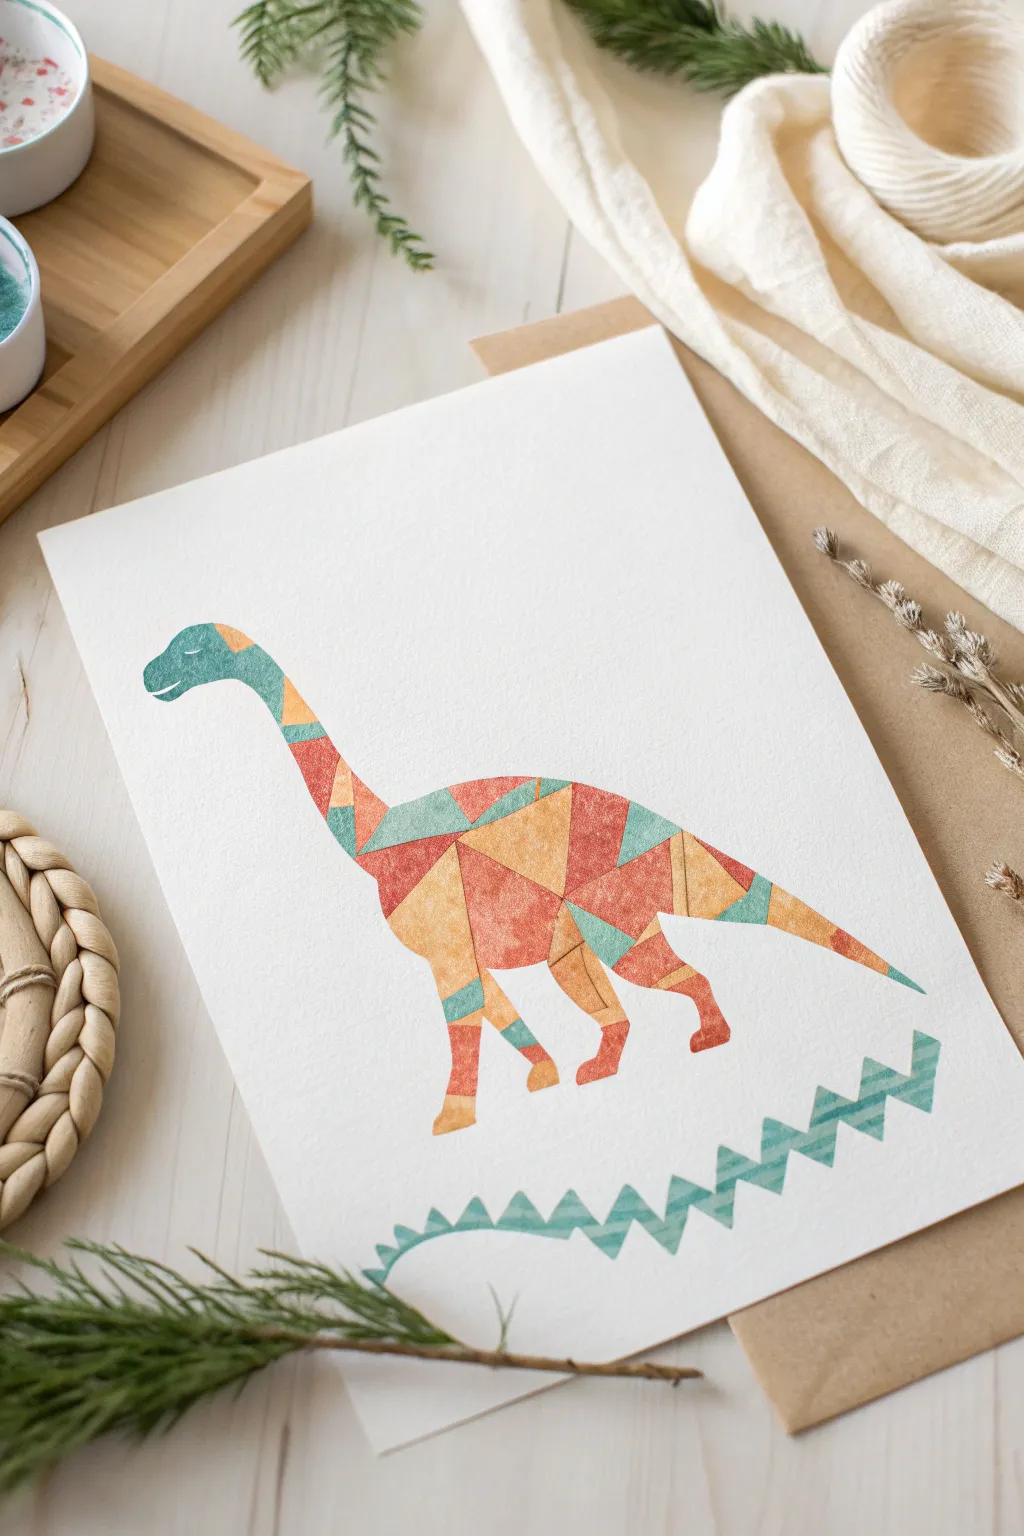
Transform simple watercolor wash and masking tape into a striking prehistoric creature with this geometric art project. By layering translucent colors over white space, you will build a vibrantly textured dinosaur that looks like a modern stained-glass window.
How-To Guide
Materials
- High-quality watercolor paper (cold press, heavy weight)
- Painter’s tape or dedicated masking tape
- Watercolor paints (teal, burnt orange, terracotta red, yellow ochre)
- Pencil and eraser
- Precision craft knife (X-Acto)
- Cutting mat
- Flat shader brushes (medium and small)
- Palette for mixing colors
- Paper towels
Step 1: Planning and Taping
-
Sketch the outline:
Begin by lightly sketching the outline of a long-necked dinosaur on your watercolor paper with a pencil. Keep the lines very faint so they don’t show through later. Focus on a simple silhouette: a long sweeping neck, a rounded body, and a tapering tail. -
Add the ground detail:
Below the dinosaur, draw a zigzag line to represent grass or rocky terrain. This will anchor your composition. -
Apply the perimeter tape:
Now, careful application is key. Place strips of masking tape over the entire drawing. You want to mask off the *negative space* (the background area around the dinosaur). Use your craft knife to carefully cut along your pencil outline, removing the tape from the *inside* of the dinosaur shape while leaving the background covered. -
Create the geometric segments:
Cut thin strips of masking tape, about 1/8th inch (3mm) wide. Place these strips across the dinosaur’s body in a random, intersecting pattern to create triangles and polygons. Ensure the edges of the tape are pressed down firmly to prevent paint seepage. -
Mask the eye:
Cut a tiny curved sliver of tape to act as the dinosaur’s closed eyelid and place it near the top of the head. -
Mask the zigzag ground:
Repeat the masking process for the zigzag pattern at the bottom. Mask off the surrounding white paper, leaving only the zigzag shapes exposed.
Clean Lines Pro-Tip
Before painting, run the back of your fingernail or a bone folder firmly over all tape edges. This ‘burnishing’ seals the tape against the paper texture and stops paint bleeds.
Step 2: Painting the Shapes
-
Prepare your palette:
Mix your watercolor paints. You’ll want a muted, earthy palette: a dusty teal, a warm terracotta red, a golden yellow, and a soft orange. Make sure the consistency is watery enough to be translucent but pigmented enough to show texture. -
Paint the first color group:
Select a few scattered triangles across the dinosaur’s body and fill them with the teal paint. I find it helpful to jump around the body rather than painting adjacent shapes to prevent colors from bleeding into each other if a tape line fails. -
Apply warm tones:
Clean your brush and switch to the terracotta red. Fill in another set of random shapes, varying the size and placement to balance the color distribution. -
Fill remaining segments:
Use the yellow and orange mixtures to fill in the remaining white spaces on the dinosaur’s body. Don’t worry if the paint pools slightly; this adds a lovely texture once dry. -
Paint the ground detail:
For the zigzag pattern at the bottom, use the teal paint again. You can create an ombre effect by making the top of the zigzags darker and diluting the paint with more water as you move downward.
Paper Tearing?
If your tape is sticking too much and tearing the paper, try sticking the tape to your clothes or a clean fabric surface once before applying it to the paper to reduce its tackiness.
Step 3: Revealing the Design
-
Let it dry completely:
This is the hardest part—patience! Let the painting dry completely. If the paper is cold to the touch, it’s still wet. Using a hair dryer on a low setting can speed this up. -
Peel the internal strips:
Start by slowly peeling up the thin strips of tape that created the geometric web inside the dinosaur. Pull the tape back at a 45-degree angle, close to the paper surface, to avoid tearing the fibers. -
Remove the background mask:
Carefully remove the large sections of tape masking the background. Work slowly around the detailed areas like the head and feet. -
Final touches:
Once all tape is removed, check for any rough edges. You can gently erase any visible pencil marks with a clean kneaded eraser if necessary.
Now you have a beautifully textured geometric dinosaur ready to frame or display
Sunset Silhouette Wolf Painting
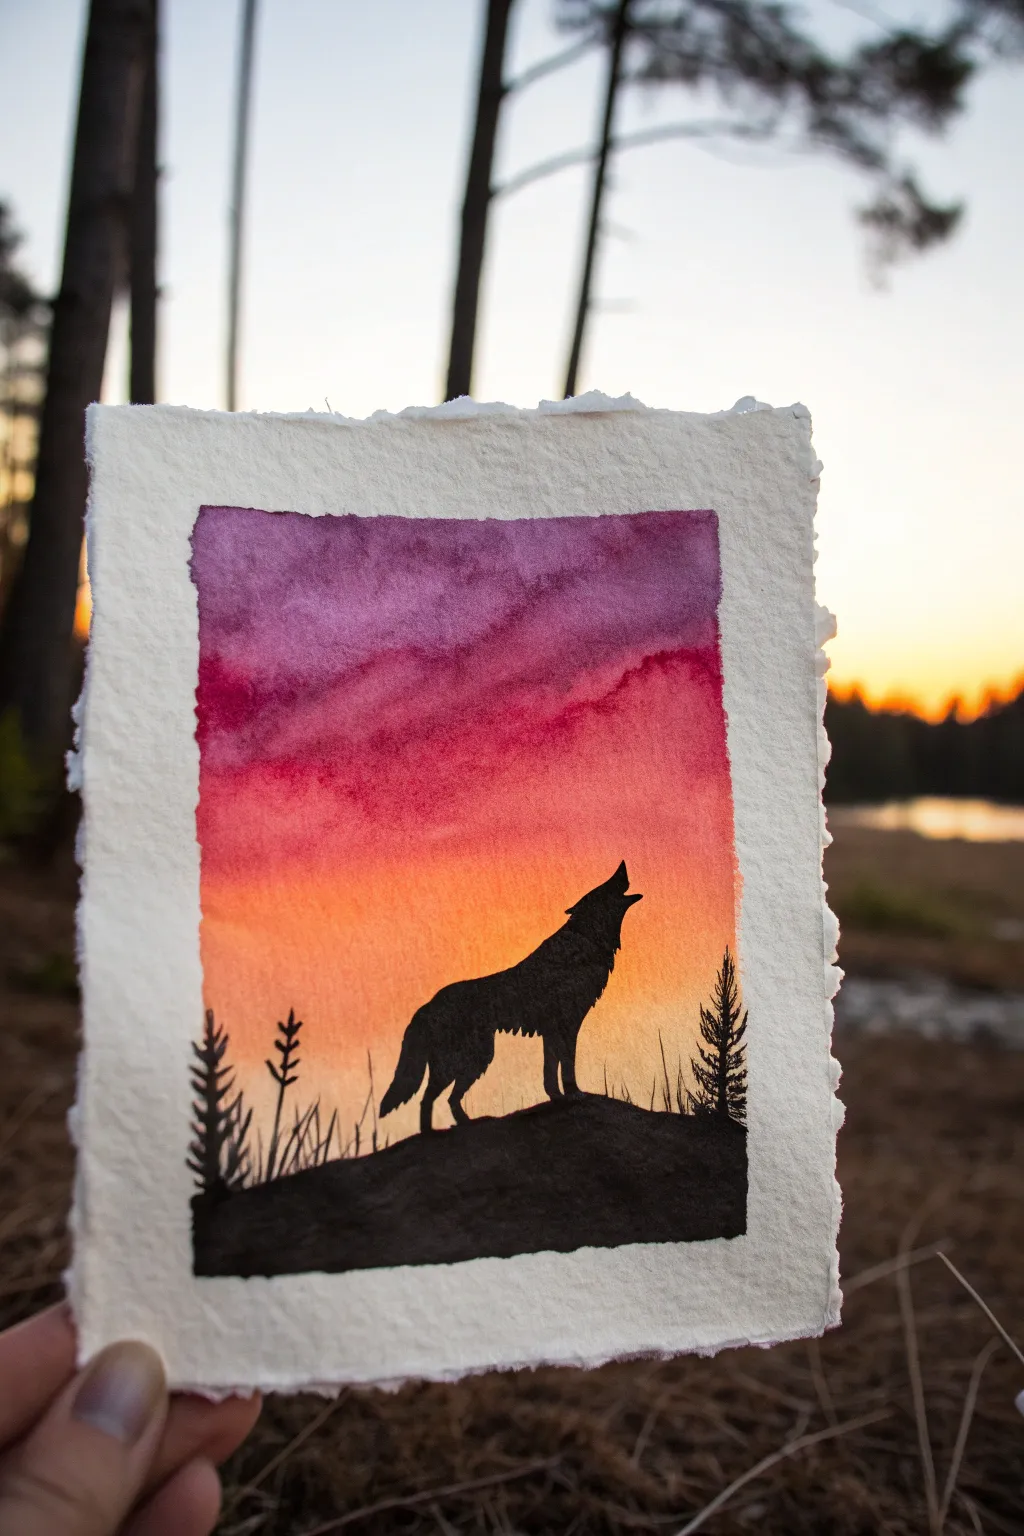
Capture the wild spirit of nature with this striking watercolor silhouette. Using a vibrant sunset gradient as a backdrop, the stark black outline of a howling wolf creates a dramatic and emotive piece of art.
Step-by-Step Guide
Materials
- High-quality watercolor paper (cold press, roughly 300gsm)
- Watercolor paints (Purple/Violet, Alizarin Crimson, Orange, Yellow)
- Black ink, black gouache, or a high-pigment black watercolor
- Flat wash brush (1/2 inch or 3/4 inch)
- Small round detail brush (size 0 or 1)
- Masking tape (optional for edges, though this example uses a free edge)
- Pencil and eraser
- Jar of clean water
- Paper towels
Step 1: Preparing the Sky
-
Paper selection:
Start by selecting a piece of heavy watercolor paper. For this specific look, you can tear the edges of the paper manually to create a deckled, rustic border, or buy paper pre-cut with deckled edges. -
Wet the surface:
Lightly sketch a rectangular boundary for your painting area if you wish, or just eyeball it. Using your flat wash brush, apply a clean coat of water to the rectangular area where you want the sky to be. The paper should be glistening but not forming puddles. -
Apply the yellow base:
Load your brush with a bright, warm yellow. Paint a horizontal strip across the bottom third of your wet rectangle. Let the color flow naturally; the water on the paper will help soften the edges. -
Transition to orange:
While the yellow is still wet, mix a vibrant orange. Apply this directly above the yellow strip, slightly overlapping the two colors so they bleed together to form a seamless gradient. -
Deepen with red:
Move up the paper with a crimson or red hue. lay this color down above the orange, again blending the edges gently. The sky should be getting darker and richer as you move upward. -
Finish with purple:
For the very top of the sky, use a deep violet or purple. Paint the top section, blending it down into the red. You want a smooth transition from the dark purple night sky down to the glowing yellow horizon. -
Add texture:
To create the cloud-like texture seen in the reference, you can dab a clean, slightly damp tissue or thirsty brush into the wet purple and red sections to lift a tiny bit of pigment, or simply let the wet-on-wet technique create natural blooms. Let this layer dry completely before moving on.
Bleeding Colors?
If your sky colors turn into mud, you likely over-mixed them on the paper. Lay each color down once and let the water do the blending work for you.
Step 2: Sketching and Silhouetting
-
Sketch the outline:
Once the background is bone dry, use a pencil to very lightly sketch the outline of the hill and the howling wolf. Keep the hill low to leave space for the sky, and position the wolf slightly off-center for a balanced composition. -
Refine the wolf’s shape:
Pay close attention to the angle of the wolf’s head and the texture of the fur on the neck and tail. A slightly jagged line implies fur, while a smooth line might look unnatural. -
Outline the silhouette:
Switch to your small round brush and load it with black ink or opaque black gouache. I find ink gives the sharpest silhouette against watercolor. carefully outline the wolf’s shape, starting from the nose. -
Fill the form:
Fill in the body of the wolf with solid black. Ensure the coverage is opaque; you don’t want the sunset colors showing through the animal. -
Paint the terrain:
Use the black medium to fill in the hill beneath the wolf paws. Keep the top edge of the hill slightly textured to represent uneven ground or rocks. -
Add distant trees:
On the left and right sides of the hill, use the very tip of your small brush to paint tiny pine trees. Use short, horizontal flicks to create the branches, making them smaller near the top and wider at the base. -
Detail the grass:
Add fine vertical strokes along the top ridge of the hill to suggest tall grass blades or weeds sticking up against the bright sunset. -
Final touches:
Check the opacity of your black areas once they dry. If they look streaky or grey, apply a second coat of black to ensure a stark, dramatic silhouette.
Starlight Sparkle
Once everything is dry, flick a toothbrush with white gouache over the purple section to add a dusting of stars to the night sky.
Now you have a stunning piece of wildlife art that glows with the warmth of a setting sun
Deer Silhouette With Forest Background
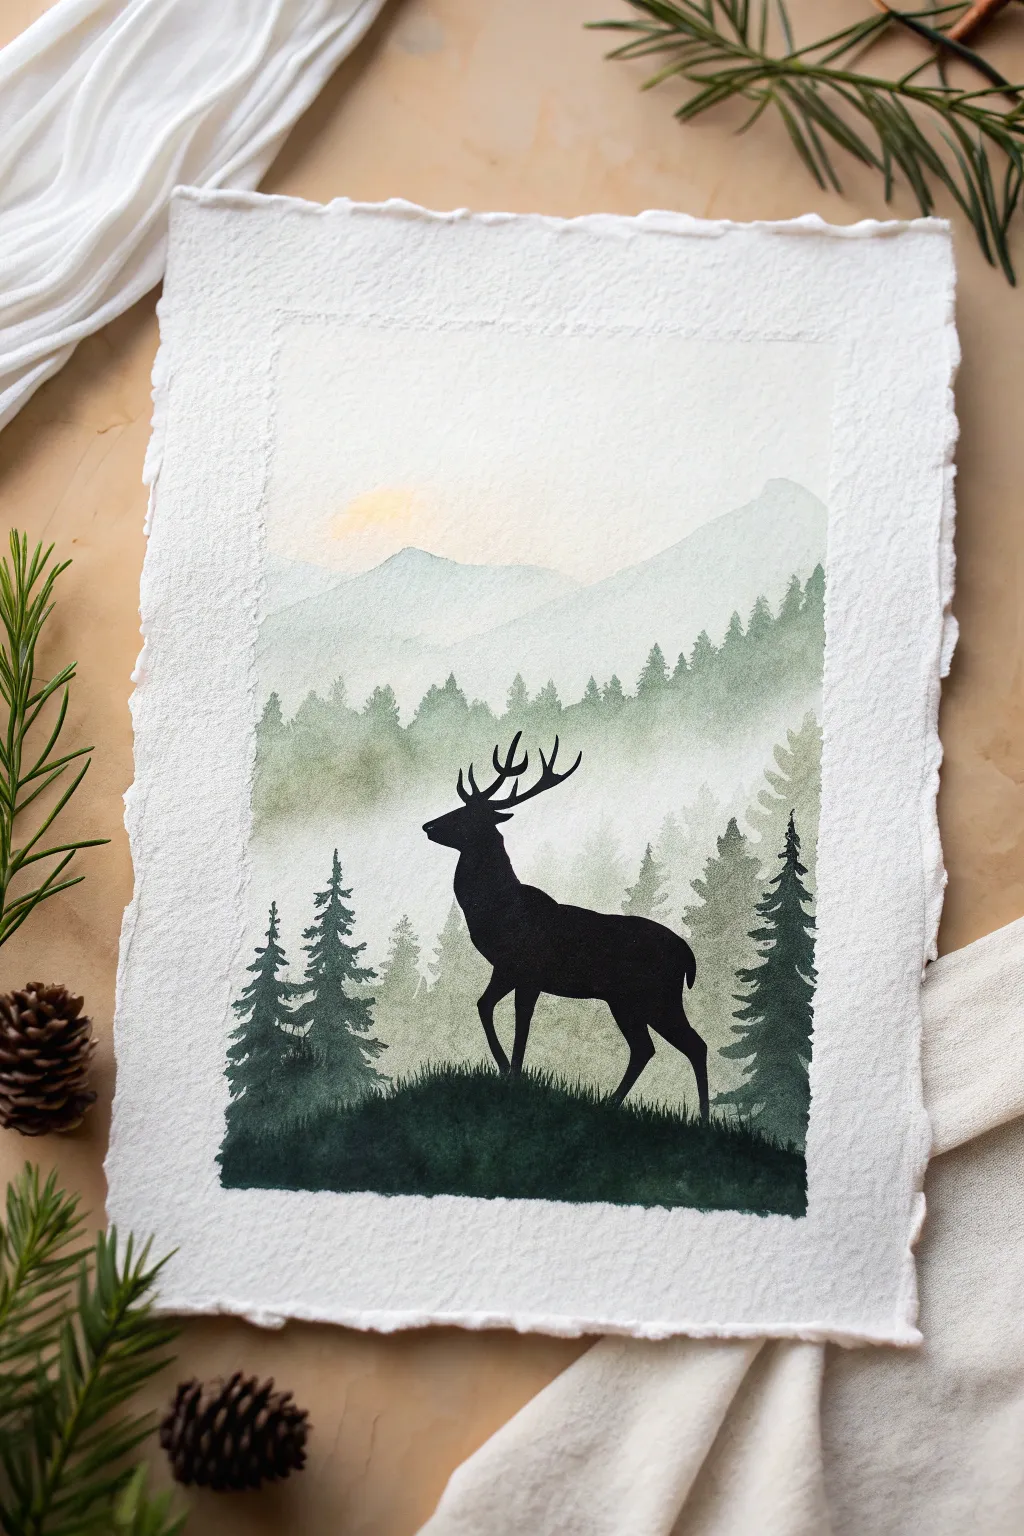
Capture the serene beauty of the wilderness with this atmospheric watercolor piece. Through careful layering and a striking black silhouette, you’ll create a sense of depth that draws the viewer straight into a foggy mountain morning.
Detailed Instructions
Materials
- Cold press watercolor paper (with deckled edges preferred)
- Watercolor paints (Payne’s Gray, Hooker’s Green, Sap Green, Yellow Ochre)
- Black gouache or black India ink
- Round watercolor brushes (sizes 6, 4, and 0)
- Masking tape
- Pencil and eraser
- Paper towels
- Two jars of water
Step 1: Setting the Scene
-
Prepare the paper:
If your paper doesn’t have deckled edges, you can tear the edges by hand against a ruler to mimic the rustic look shown in the photo. Securing the paper to your work surface with masking tape isn’t strictly necessary for the edges, but it helps keep the paper flat during wet washes. -
Sketch the silhouette:
Lightly sketch the outline of the deer standing on a small mound in the lower center of the paper. Keep the pencil lines very faint, as watercolor is transparent. Don’t worry about drawing the trees yet; focus only on the deer’s posture and antlers.
Step 2: Painting the Atmospheric Background
-
First mountain wash:
Mix a very watery, pale wash of Payne’s Gray with a tiny touch of Green. Paint the shape of the distant mountains about a third of the way down the page. -
Add the sun glow:
While the mountain layer is still wet, drop a small amount of diluted Yellow Ochre near the left peak to create a soft, rising sun effect. Let these colors bleed slightly, then allow this layer to dry completely. -
First tree layer:
Mix a slightly stronger version of your green-gray color. using a size 4 brush, paint a jagged tree line below the mountains. Use the tip of the brush to create tiny vertical marks that suggest distant pine tops. -
Create the mist:
Immediately after painting the tree tops, rinse your brush and run clear water along the bottom edge of that fresh paint. This ‘softens the edge’ and makes the color fade out into white paper, creating the illusion of heavy mist. -
Second tree layer:
Once the previous layer is dry, mix a darker, more saturated green (Sap Green mixed with Payne’s Gray). Paint a row of slightly larger trees below the misty area, again softening the bottom edge with clean water. -
Third tree layer:
This is your foreground forest. Mix a rich, dark green. Paint distinct pine tree shapes on the left and right sides of the composition, framing the area where the deer will stand. Don’t paint over the deer sketch, but you can paint behind it. -
Ground cover:
Using the same dark green mixture, fill in the grassy mound at the bottom. Use upward flickering strokes to simulate grass blades along the top edge of the mound.
Keep the Mist Soft
For the best misty effect, use two water jars: one for rinsing dirty paint and one strictly for clean water. Always use the clean water for softening edges.
Step 3: The Silhouette
-
Outline the deer:
Switch to your smallest brush (size 0) and your black gouache or India ink. Carefully outline the deer’s body. Gouache is preferred here because it is opaque and flat, contrasting beautifully with the watery background. -
Fill the form:
Fill in the body of the deer with solid black. Ensure the coverage is even; if you see streaks, wait for it to dry and apply a second coat. -
Detailing the antlers:
With a steady hand and very little pressure on the brush, paint the antlers. I like to stabilize my hand by resting my pinky on a dry part of the paper while doing this delicate work. -
Refine the edges:
Check the connection points where the deer’s hooves meet the grass. You may need to add a few tiny black grass blades overlapping the hooves to ground the animal in the scene. -
Final drying:
Let the black ink dry completely before moving the paper to avoid smudging the silhouette.
Fixing Hard Edges
If a cloud or mist layer dries with a harsh line, wet a stiff brush with clean water and gently ‘scrub’ the edge to reactivate and soften the paint.
Once dry, you’ll have a moody, evocative piece of protective nature art ready to display
Polar Bear With Abstract Line Overlay
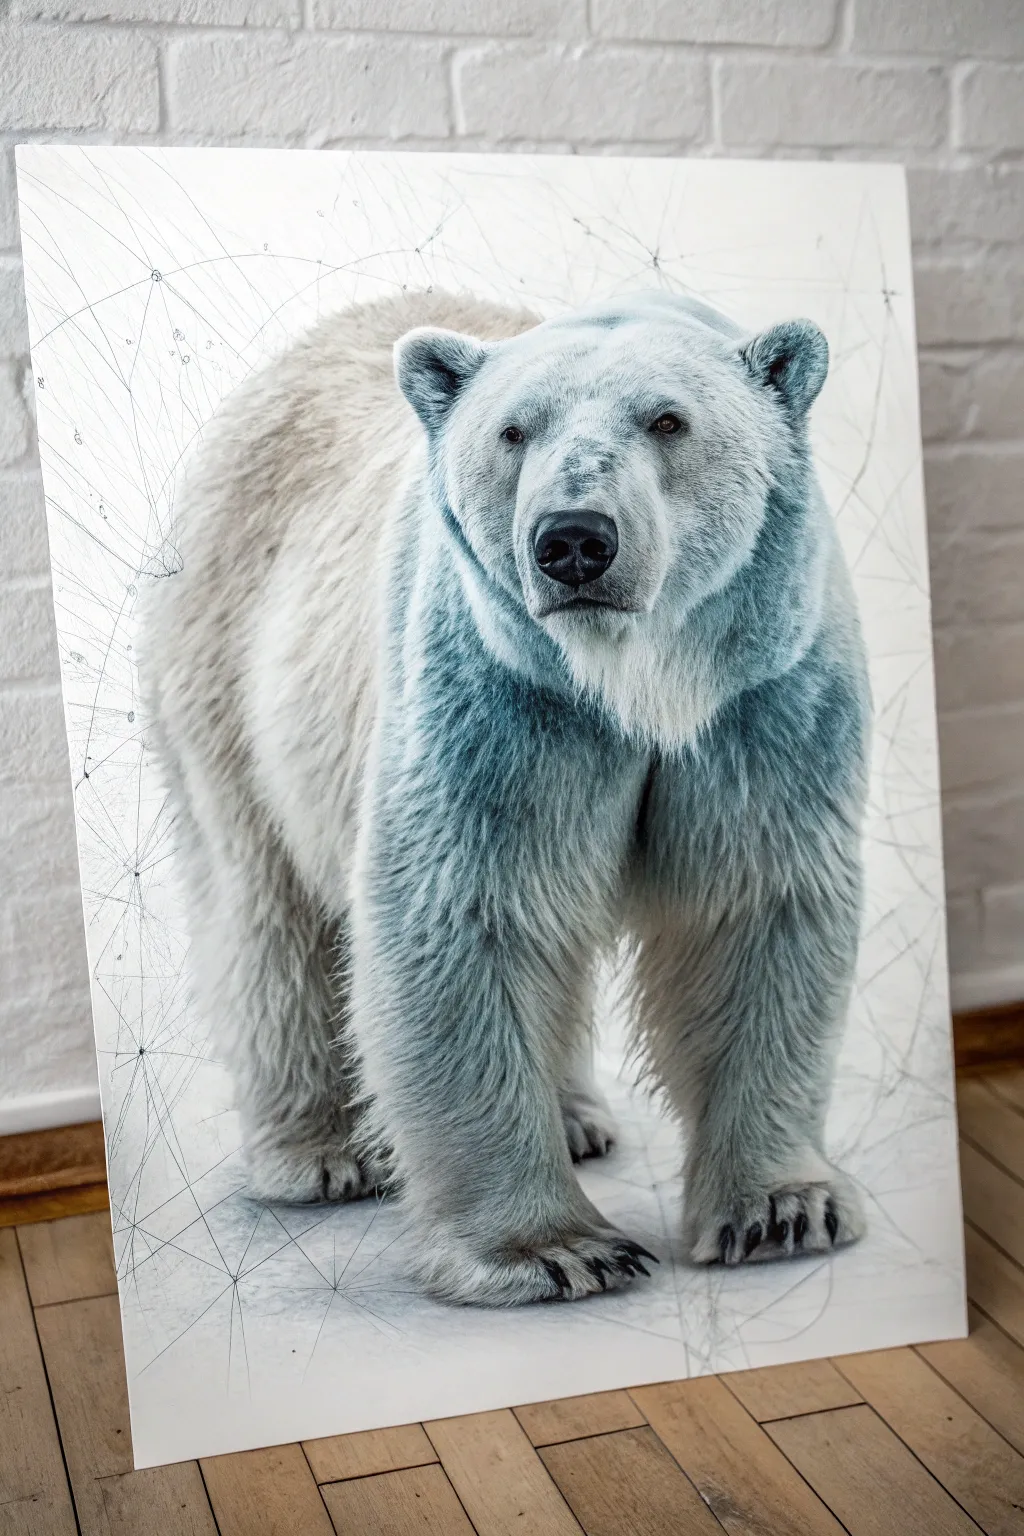
Merge the raw power of nature with delicate geometric precision in this mixed-media canvas piece. By combining a high-definition print with hand-drawn drafting lines, you create a modern, minimalist work that feels both organic and structured.
Step-by-Step
Materials
- Large white canvas (approx 24×36 inches or larger)
- High-resolution polar bear reference photo
- Matte photo transfer medium (or decoupage glue)
- Laser printer and tiling software (Rasterbator or similar) OR professional large-format print
- Fine-point black permanent markers (0.05mm and 0.1mm)
- Long clear ruler (18-24 inches)
- Soft graphite pencil (HB)
- White acrylic paint
- Wide foam brush
- Sponge sealant or clear acrylic matte spray
Step 1: Preparing the Base Image
-
Source your imagery:
Find a high-resolution photograph of a polar bear. The image needs to be crisp because you will be enlarging it significantly. Look for a pose where the bear is standing firmly, as this grounds the geometric lines later. -
Scale the image:
Measure your canvas exactly. Using image editing software or a free tiling tool like ‘The Rasterbator’, scale your image to fit the canvas dimensions. If printing at home on standard paper, the software will split the image into a grid of pages. -
Print the schematic:
Print your image using a laser printer. Laser toner works best for transfer techniques because it doesn’t bleed when wet like inkjet ink does. If you prefer a simpler collage method, you can have a print shop create a single large sheet on lightweight matte paper.
Pro Tip: Line Weight
Vary your pen pressure. Make lines that cross the bear’s dark fur slightly heavier so they remain visible, while keeping background lines whisper-thin for depth.
Step 2: Mounting the Subject
-
Apply the medium:
Lay your canvas flat. Working in sections if using multiple sheets, apply a generous, even layer of photo transfer medium or decoupage glue to the surface of the canvas using a wide foam brush. -
Position the paper:
Carefully place your printed paper onto the wet medium. Since white space is crucial for this aesthetic, ensure the background of your photo blends seamlessly with the white canvas. If your paper has hard edges, you might need to trim close to the bear’s outline first, or plan to paint over the paper edges later. -
Smooth the surface:
Use a brayer or a clean credit card to smooth out the paper starting from the center and pushing outward. This eliminates air bubbles and ensures good adhesion. Let this dry completely—I usually give it at least 24 hours to be safe. -
Blend the edges:
Once dry, take a little white acrylic paint and a sponge brush. Lightly dab paint over any visible paper edges where the photo meets the canvas, feathering it inward toward the bear to create a seamless, ‘floating’ look.
Level Up: Metallic Pop
Use a silver or gold leaf pen for a few select geometric lines. When the light hits the canvas from the side, distinct constellations will shimmer against the matte fur.
Step 3: Drafting the Geometry
-
Plan the anchor points:
Visualize the ‘constellation’ map. Using a soft HB pencil, lightly mark tiny dots around the bear’s perimeter and into the background white space. These will act as the nodes for your lines. -
Connect the nodes:
Place your long clear ruler on the canvas. Connect your pencil dots with very light initial lines. Create triangles and intersecting rays that radiate from the bear’s form outward to the canvas edge. -
Inking the primary lines:
Switch to your 0.1mm fine-point black marker. Trace over your longest, most structural pencil lines. Keep the ruler firm to prevent wobbles, but don’t worry if the line weight varies slightly; it adds character. -
Add detail lines:
Use the finer 0.05mm marker for secondary lines. Draw fainter lines connecting smaller details, like the curve of the ear or the paw, to the background geometry. These should look like faint architectural sketches. -
Emphasize intersection points:
Where three or more lines intersect, darken the node slightly by drawing a tiny circle or simply pressing the pen down for a moment to bleed a small dot. This mimics star charts or polygon meshes. -
Extend off the subject:
Ensure several lines extend past the bear and ‘off the page’ (to the very edge of the canvas). This helps integrate the animal into the white void rather than having it just sit in the middle.
Step 4: Finishing Touches
-
Erase guidelines:
Once the ink is fully dry (give it an hour so it doesn’t smear), gently erase any visible pencil marks with a high-quality white vinyl eraser. -
Seal the artwork:
To protect both the paper print and your delicate ink lines from UV light or moisture, spray the entire canvas with a clear distinct matte acrylic sealer. Do this in a well-ventilated area using sweeping motions.
Hang your new masterpiece in a well-lit area where the subtle lines can be fully appreciated
Scrape-Painted Penguin Texture
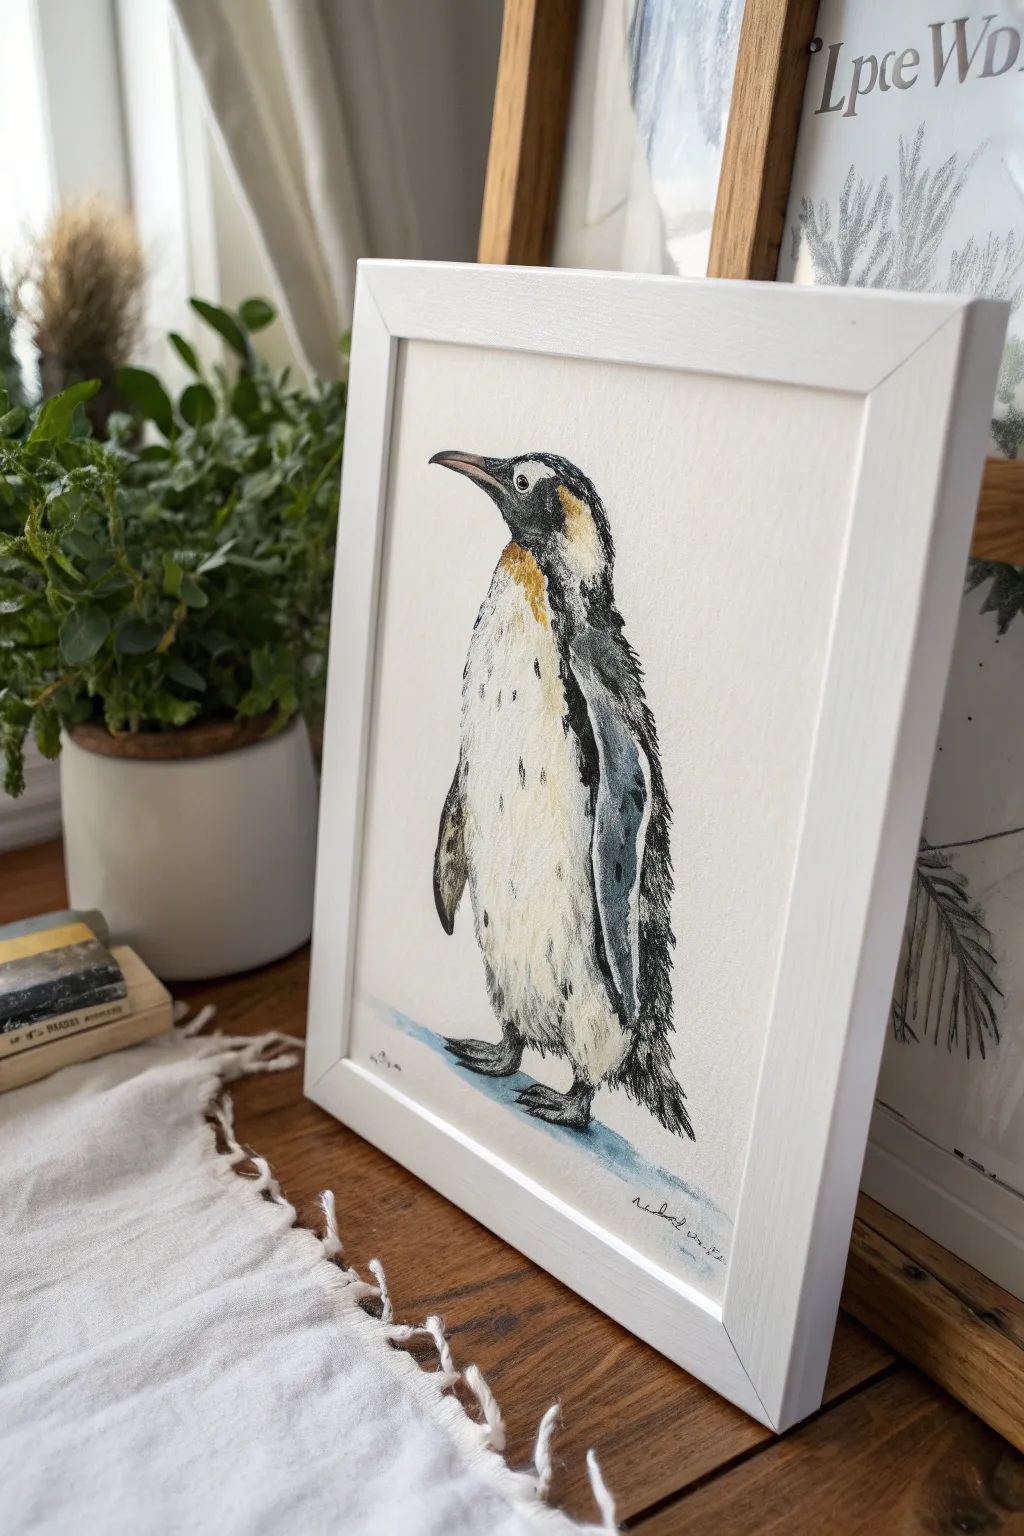
Capture the dignified charm of a penguin with this textured watercolor project that combines soft washes with expressive, scraped details. The result is a crisp illustration with a lively, feathered feel that looks beautiful framed.
Detailed Instructions
Materials
- Cold press watercolor paper (300 gsm)
- Watercolor paints: Payne’s Gray, Lamp Black, Burnt Sienna, Yellow Ochre, Cobalt Blue
- Round watercolor brushes (Size 4 and 8)
- Rigger or liner brush (Size 1)
- Masking fluid (optional)
- Palette knife or an old credit card (for scraping)
- Pencil (HB) and eraser
- Paper towels
- Jar of clean water
- White or light wood frame (for finishing)
Step 1: Sketching and Masking
-
Outline the Shape:
Start with a light pencil sketch. Draw an elongated oval for the body and a smaller circle for the head, connecting them with a curved neck line. Add the beak pointing slightly upward. -
Refine Details:
Define the flipper shape tucked against the side and sketch the feet. Crucially, mark the distinct white patch above the eye that marks this as a Gentoo penguin. -
Protect Highlights:
The chest needs to remain mostly white. If you are worried about paint bleeding, apply a thin layer of masking fluid to the brightest white areas on the belly and the eye patch. Let it dry completely.
Paint drying too fast?
If the paint dries before you can scrape it, lightly mist the area with water or add a drop of blending medium to your paint mix to extend open time.
Step 2: Layering Color
-
The Yellow Patch:
Mix a small amount of Yellow Ochre with a touch of Burnt Sienna. Using a size 4 brush, paint the characteristic patch on the beak and blend it softly into the neck area, creating a warm underlayer. -
Initial Gray Wash:
Create a very watery mix of Payne’s Gray. Lay down a pale shadow on the right side of the belly and under the flipper to give the bird volume. Keep the edges soft by wetting the paper first. -
Darkening the Head:
Switch to a stronger mix of Lamp Black and Payne’s Gray. Carefully paint the head, avoiding the white eye patch and eye. Use the tip of your brush to flick tiny strokes outward at the back of the neck to suggest feathers. -
Painting the Back:
Continue the dark mixture down the bird’s back. While the paint is still wet, drop in hints of Cobalt Blue to add depth and coolness to the black feathers.
Pro Tip: Scratching
For ultra-fine white details like individual whiskers or feather barbs, use an X-Acto knife to gently scratch the paper surface after the paint is fully dry.
Step 3: Creating Texture
-
Scraping Technique:
Immediately after applying the dark paint on the back and flipper, take your palette knife or card edge. Gently scrape through the wet paint in the direction of feather growth to reveal the paper tooth. -
Refining the Scrape:
Vary the pressure as you scrape. Lighter pressure moves pigment around for texture; harder pressure lifts color to show white highlights, mimicking the sheen on wet feathers. -
Defining the Flipper:
Paint the flipper with a saturated dark gray mix. Leave a thin rim of light along the trailing edge to separate it from the body. -
Dry Brush Details:
Once the main washes are dry, load a size 4 brush with thick, almost dry black paint. Drag it lightly over the tail area and lower back to create rough, feathery edges.
Step 4: Final Touches
-
The Eye and Beak:
Paint the eye black, leaving a tiny pinprick of white paper for a highlight. define the beak with a dark line along the separation, blending into reddish-orange at the base. -
Belly Speckles:
Using your smallest brush, dot a few tiny, irregular spots on the upper chest. Keep these sparse to maintain the clean look. -
Painting the Feet:
Mix Payne’s Gray with a little brown. Paint the feet, shading the underside of the toes darker to ground the bird. -
Ground Shadow:
Add a wash of watery Cobalt Blue under the feet to create a suggestion of ice simply and effectively. -
Sign and Frame:
Erase any remaining pencil lines once completely dry. Sign your work near the bottom right and place it in a simple frame to highlight the stark contrast.
Hang your finished penguin in a well-lit spot to enjoy the intricate textures you created
Fork-Stamped Hedgehog Spines
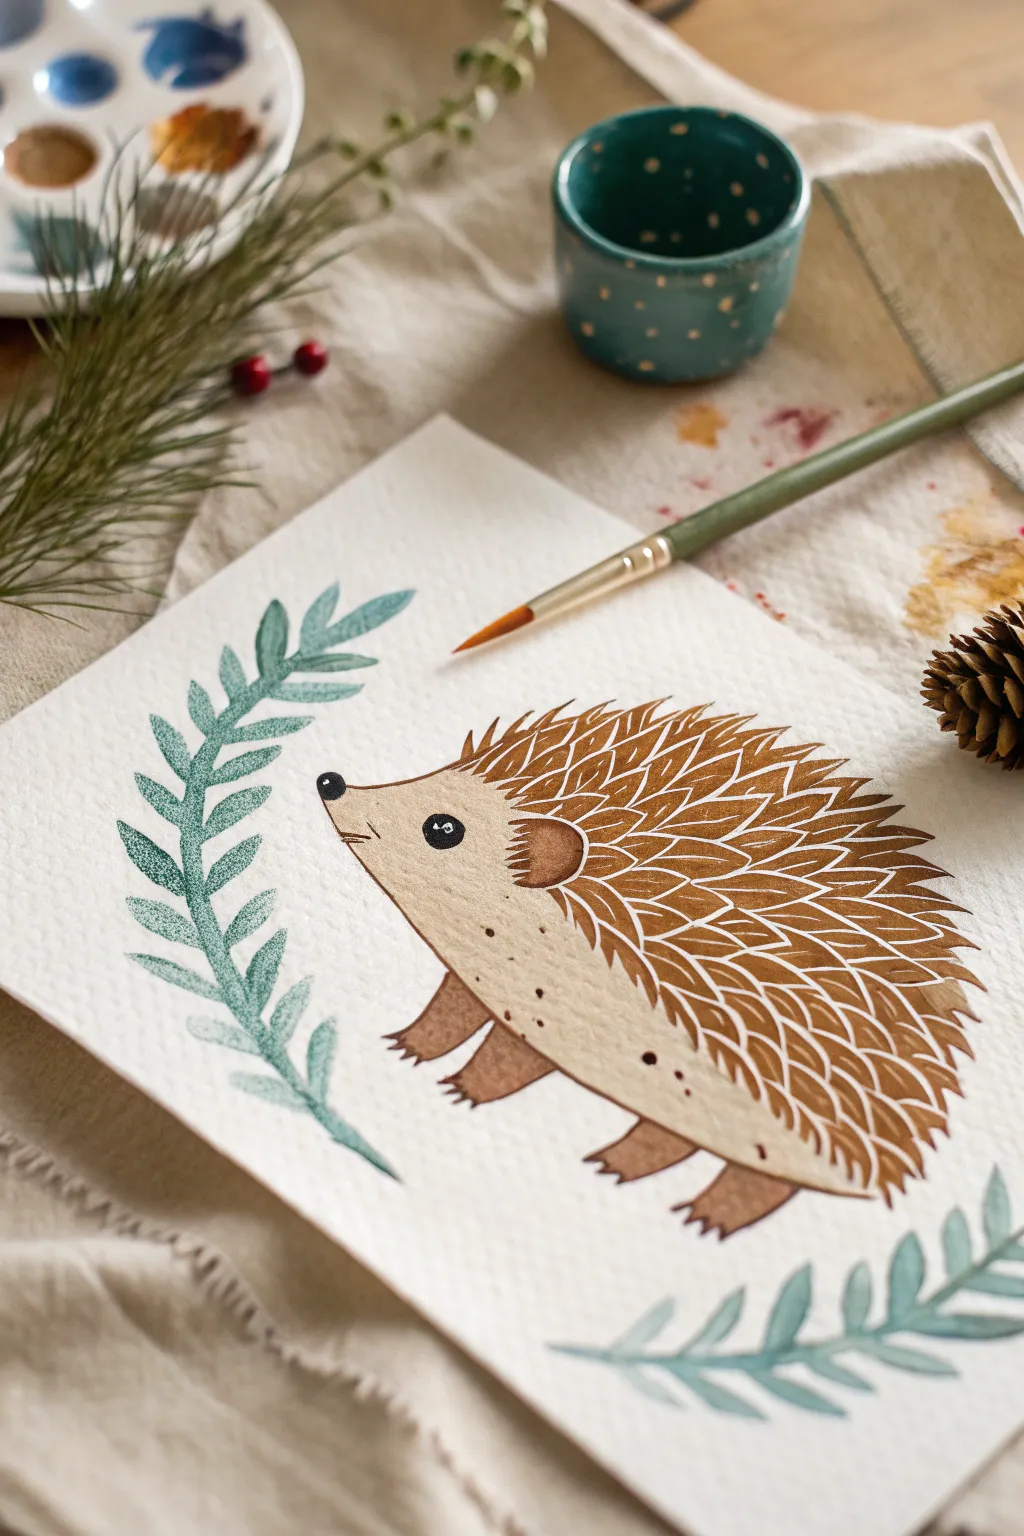
This charming woodland project combines traditional watercolor techniques with a clever kitchen hack to create texture. By using a fork to stamp the spines, you will achieve a stylized, rhythmic pattern that perfectly mimics a hedgehog’s prickly coat.
Step-by-Step
Materials
- Cold press watercolor paper (A4 or 8×10)
- Watercolor paints (shades of brown, ochre, darker sepia, and sage green)
- White gouache or white acrylic paint
- Synthetic round brush (size 6 or 8)
- Fine liner brush (size 0 or 1)
- Standard metal dining fork
- Pencil and eraser
- Water jar
- Paper plate or flat palette for stamping
Step 1: Sketching the Base
-
Outline the body shape:
Begin by lightly sketching a large oval shape for the hedgehog’s body on the lower right side of your paper. Make the left end slightly pointed for the snout and the top curve full and round. -
Add details:
Sketch four small, sturdy legs at the bottom. Draw a rounded ear near the front third of the body and mark a small circle for the eye and a tiny oval for the nose tip. -
Lighten the lines:
Use a kneaded eraser to gently lift the graphite until the lines are faint guidelines that won’t show through the transparent watercolor.
Clean Impressions
Wipe your fork clean between every 2-3 stamps. Paint build-up on the metal tines can cause the white shapes to become blobby rather than sharp spikes.
Step 2: Painting the Body
-
Mix the body color:
Create a dilute wash of yellow ochre mixed with a touch of brown. You want a warm, sandy beige color for the hedgehog’s face and underbelly. -
Paint the underbelly:
Apply this wash to the face, ear, and belly area, carefully avoiding the main spine area on the back. Let the wash fade out slightly where it meets the future spine line. -
Paint the legs:
Using a slightly darker brown, paint in the four legs. Add little claw details at the ends using the tip of your brush. -
Add facial features:
Once the face wash is dry, use a concentrated dark brown or black to paint the round eye (leaving a tiny white highlight), the nose tip, and a thin line for the mouth. -
Detail the ear:
Paint the ear with a medium brown, darker than the face but lighter than the eye. I like to add a slightly darker rim to give it dimension.
Autumn Vibes
Instead of green leaves, use burnt orange, red, and gold paints for the foliage to turn this into a cozy fall scene perfect for seasonal decor.
Step 3: Creating the Spines
-
Prepare the stamping paint:
Mix a thick, creamy puddle of white gouache or acrylic on a paper plate. It needs to be thick enough to hold the fork tine marks without dripping. -
Paint the spine background:
Mix a rich, warm brown watercolor. Paint the entire back area of the hedgehog in this solid color, shaped like a large mound covering the top of the animal. -
Wait for semi-dryness:
Let this brown layer dry just until the surface sheen disappears but the paper is still cool to the touch. -
Stamp the texture:
Dip the tines of your fork into the thick white paint. Press the fork flat onto the brown painted area, following the curve of the back. Lift straight up to leave clean white impressions. -
Layer the pattern:
Continue stamping rows of spines, overlapping them slightly to mimic layers of quills. Angle the fork slightly differently near the edges to follow the body’s contour. -
Refine with a brush:
If there are gaps, use your fine liner brush with the white paint to add individual sharp spines, especially around the outer edges of the brown shape to make it look spiky.
Step 4: Adding Greenery
-
Mix leaf greens:
Create a sage green color by mixing green with a touch of grey or blue. Vary the water ratio to get different transparencies. -
Paint the first stem:
Draw a long, curved line with the tip of your round brush on the left side of the paper, framing the hedgehog. -
Add leaves:
Using a simple press-and-lift motion, paint small leaves extending from the stem. Start pressure at the base of the leaf and lift as you pull away to create a pointed tip. -
Second branch:
Repeat the process on the bottom right corner with a smaller branch to balance the composition. -
Final texture speckles:
Mix a watery brown and tap your brush over the beige body area to add tiny speckles for texture, giving the fur a more organic look.
Allow your woodland friend to dry completely before framing or gifting this textural masterpiece
Leaf-Mane Lion Mixed Media
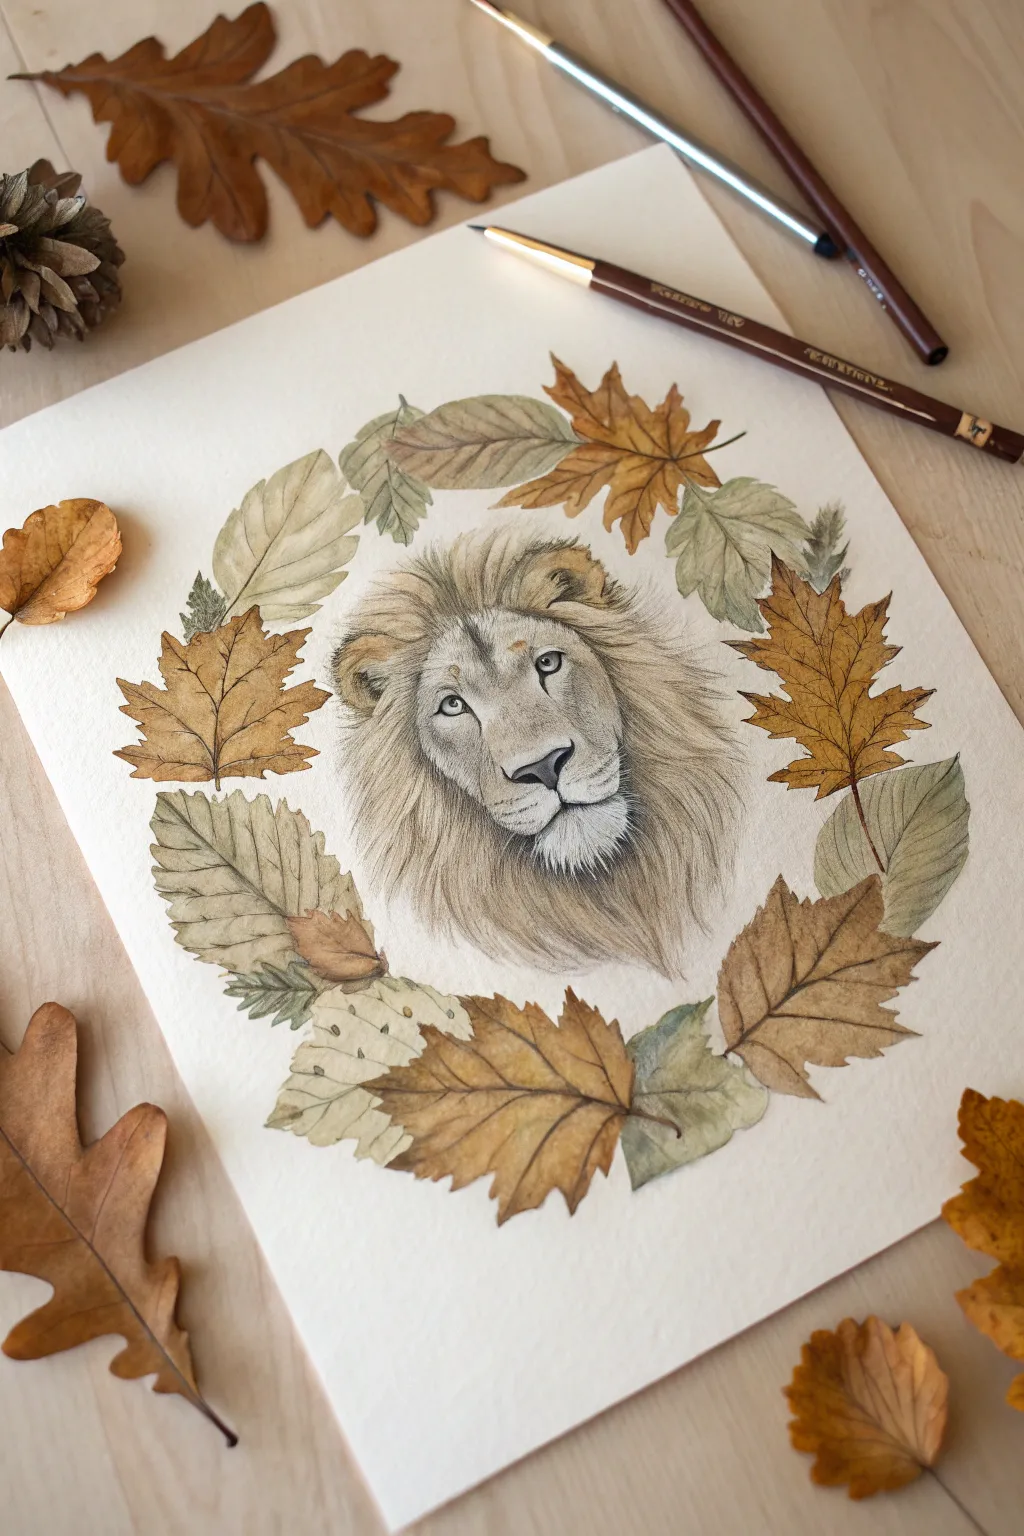
Capture the majesty of the animal kingdom with this detailed mixed media illustration featuring a serene lion portrait encircled by crisp autumn foliage. This project combines precise pencil work with soft watercolor washes to create a piece that feels both grounded and ethereal.
Step-by-Step Tutorial
Materials
- High-quality watercolor paper (cold press, at least 140lb)
- Set of colored pencils (specifically ochre, burnt sienna, sepia, and warm greys)
- Watercolor paints (earth tones: olive green, brown, yellow ochre)
- Fine liner or mechanical pencil for initial sketching
- Small round paintbrushes (size 2 and 4)
- Real autumn leaves for reference (optional but helpful)
- White gel pen or gouache for highlights
- Artist masking tape
Step 1: Sketching the Composition
-
Center Your Subject:
Begin by lightly marking the center of your paper. Sketch a rough circle about 6-8 inches in diameter to guide where your leaf wreath will go, ensuring the lion’s head will fit comfortably within the negative space in the middle. -
Outline the Lion:
In the center, lightly sketch the contours of the lion’s head. Focus on the triangular shape of the nose and the almond shape of the eyes. Keep the mane lines loose and flowing outward toward the wreath boundary. -
Map the Foliage:
Around the perimeter of your circle, sketch the outlines of various leaves. Alternate between jagged maple shapes, oval elm leaves, and broader oak leaves. Overlap them slightly to create depth, but leave small gaps so the wreath feels airy.
Uneven Watercolors?
If your leaf washes look splotchy, wet the shape with clean water first, then drop the pigment in. This ‘wet-on-wet’ technique creates smoother gradients distinct from the sharp pencil lines.
Step 2: Painting the Base Layers
-
Initial Wreath Wash:
Mix a very watery, pale olive green. Using your larger round brush, lay down a base wash on the green leaves. For the autumnal leaves, use a diluted yellow ochre wash. Let the colors bleed slightly but try to keep the edges relatively crisp. -
Lion’s Base Tone:
Apply an extremely faint wash of warm grey or diluted brown to the shadowed areas of the lion’s face—specifically around the eye sockets and under the chin. Leave the muzzle and forehead paper-white for now. -
Drying Time:
Allow the paper to dry completely. If the paper feels cool to the touch, it’s still damp. I usually wait an extra ten minutes just to be safe, as drawing over damp paper can ruin the texture.
Step 3: Detailing the Portrait
-
The Eyes First:
Using a sharp sepia or black colored pencil, draw the pupils and the dark rim around the eyes. Save a tiny speck of white paper for the catchlight to bring the lion to life immediately. -
Fur Texture:
With a grey or taupe pencil, start stroking in the direction of hair growth. Use short, flicking motions on the nose bridge and longer, sweeping strokes for the mane. -
Building While Layers:
Deepen the shadows using a darker brown pencil. Pay attention to the line where the mouth meets the muzzle and the inner ears. Keep your pencil sharp to define individual hairs rather than shading solid blocks. -
The Nose:
Fill in the nose pad with a soft black or dark charcoal grey, fading into a lighter grey at the top to suggest a wet texture.
Go Golden
Add metallic gold paint to the veins of the leaves or flecks in the lion’s eyes. It adds a stunning, regal shimmer that catches the light and fits the tawny color palette perfectly.
Step 4: Refining the Wreath
-
Veining the Leaves:
Return to the leaves with your colored pencils. Use a dark brown or burnt sienna pencil to draw the central veins and branching veins on each leaf. -
Adding Leaf Texture:
Lightly shade the edges of the brown leaves with a rust-colored pencil to make them look dried and curled. For the green leaves, add touches of grey-green pencil to desaturate them. -
Enhancing Contrast:
Look for areas where leaves overlap. Use your darkest brown pencil to add shadow underneath the top leaf, which will pop the wreath into 3D space. -
Connecting the Elements:
Ensure the tips of the lion’s mane gently fade out before they hit the leaves, or slightly overlap them in a ghostly way, to integrate the portrait with the frame.
Step 5: Final Touches
-
Whiskers and Highlights:
Use a white gel pen or a fine brush with white gouache to add the long whiskers on the muzzle. Add tiny dots to the whisker pads for texture. -
Reviewing Values:
Step back and squint at your drawing. If the lion looks too pale compared to the bold leaves, gently layer more graphite or grey pencil into the deepest parts of the mane to balance the visual weight.
Now you have a framed masterpiece that perfectly balances the wildness of nature with delicate artistic control
Blown-Paint Peacock Feathers
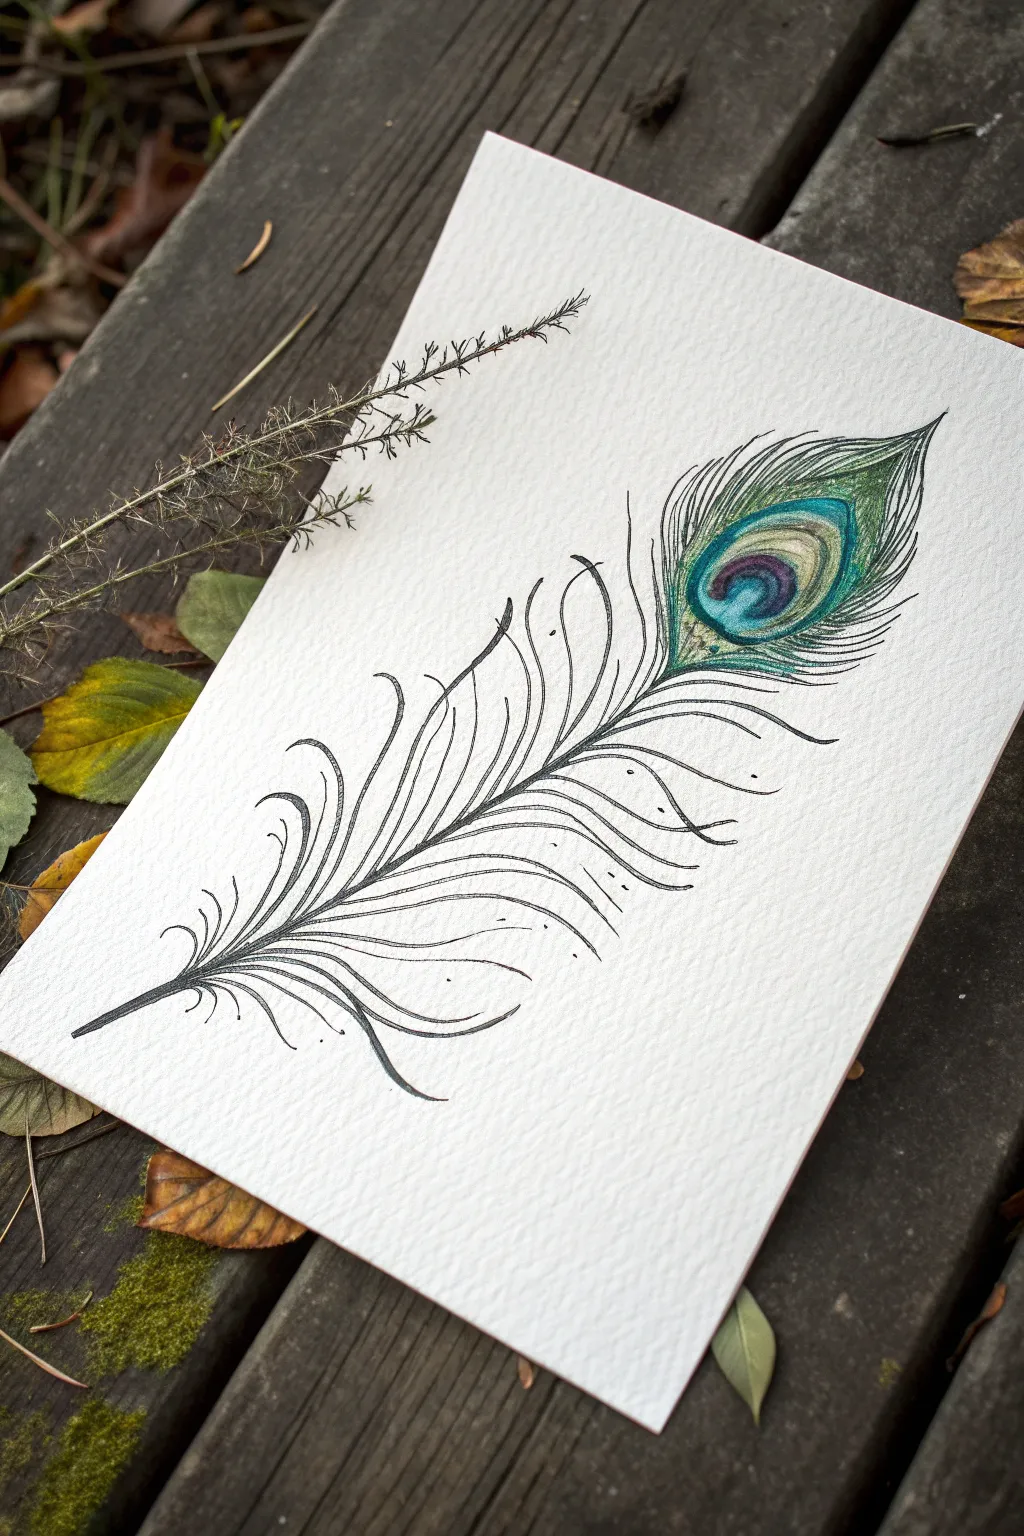
Capture the elegance of nature with this delicate peacock feather illustration. Combining precise ink lines with a splash of vibrant watercolor creates a stunning contrast between the structured barbs and the iridescent eye.
Step-by-Step Guide
Materials
- Cold press watercolor paper (textured surface)
- Fine liner pen (black, waterproof, size 01 or 03)
- Watercolor paints (Emerald Green, Teal, Deep Blue, Purple, Gold)
- Small round watercolor brush (size 2 or 4)
- Pencil (HB)
- Eraser
- Jar of water
- Paper towel
Step 1: Sketching the Structure
-
Draw the quill:
Begin by lightly sketching a long, slightly curved line down the center of your paper using your pencil. This represents the rachis, or the main shaft of the feather. -
Outline the eye:
At the top of your curved line, draw an almond or teardrop shape. Inside this, lightly sketch two concentric ovals to map out the zones for the iridescent colors later. -
Map the barbs:
Sketch faint guide lines radiating outward from the shaft. Instead of straight lines, give them a gentle ‘S’ curve or swirl to mimic the whimsical style shown in the reference.
Uneven Ink Flow?
If your pen lines look shaky, try drawing the curves from your elbow rather than your wrist. Faster strokes often result in smoother, more confident curves.
Step 2: Inking the Details
-
Trace the shaft:
Using your waterproof fine liner, carefully ink the main shaft. Start very thin at the top near the eye and thicken the line slightly as it moves toward the base. -
Ink the eye outline:
Go over the outer shape of the feather’s eye with short, feathery strokes rather than a solid continuous line. This creates a soft, textured edge where the color will fade out. -
Draw upper barbs:
Starting near the eye, draw the dense, shorter barbs. Use quick, confident flicks of your pen to keep the lines tapered and sharp at the ends. -
Create the lower barbs:
Moving down the shaft, draw the longer, separated barbs. Emphasize the curl at the tips. I like to leave plenty of negative space here to keep the drawing feeling airy and light. -
Add floating details:
Add a few tiny dots or specks of ink around the curved barbs to suggest dust or loose particles, adding to the magical feel. -
Erase pencil lines:
Wait until the ink is completely dry—give it a full minute or two—then gently erase all your initial pencil guides to reveal the clean black and white structure.
Step 3: Adding the Color
-
Paint the pupil:
Load your brush with deep purple or indigo watercolor. Carefully fill the smallest, innermost oval of the eye. Keep the paint wet for the next step. -
Blend the middle ring:
Rinse your brush and pick up a vibrant teal or turquoise. Paint the ring surrounding the purple center, letting the wet edges touch so the purple bleeds slightly into the blue. -
Add the outer ring:
Use a warm gold or ochre color for the next ring. Carefully paint around the teal, trying to keep this section relatively distinct to create that glowing effect. -
Paint the green halo:
Mix a bright emerald green. Apply this to the top part of the feather eye, brushing upward into the inked barbs. Use a ‘dry brush’ technique here so the paper texture shows through. -
Final dry brush details:
With a very small amount of teal paint on a damp brush, gently flick color over the inked area immediately surrounding the eye to integrate the drawing with the painting.
Textured Paper Magic
Use cold press watercolor paper! Its bumpy surface breaks up the ink and paint application, giving that organic, vintage look seen in the photo.
Frame your feather on a rustic background or use it as a bookmark for your next great read
Whimsical Party Hat Pet Portrait
Capture the playful spirit of your furry friend with this charming colored pencil portrait featuring a festive party hat. This project combines realistic fur texturing with a fun, illustrative element to create a keepsake that is both dignified and adorable.
Step-by-Step Tutorial
Materials
- High-quality colored pencils (e.g., Faber-Castell Polychromos or Prismacolor)
- Heavyweight drawing paper or Bristol board (vellum surface preferred)
- Graphite pencil (HB) and kneadable eraser
- Reference photo of your pet
- Pencil sharpener (manual hand-crank preferred for long points)
- White gel pen or gouache for highlights
- Ruler
- Blending stump or colorless blender pencil
Step 1: Sketching the Foundation
-
Select your reference:
Choose a photo of your pet where they are looking slightly upward or straight ahead. Lighting should be clear to see fur direction. Print this out alongside a reference for a simple cone party hat. -
Outline the head:
Lightly sketch the basic oval shape of the dog’s head on your paper using an HB pencil. Keep your lines faint so they don’t show through later. Add guidelines for the eyes and nose placement. -
Add the hat shape:
Position a triangle on top of the head for the hat. It should sit naturally between the ears. Sketch a small circle at the very tip for the pom-pom. -
Refine the features:
Draw the almond shapes for the eyes and the soft triangle of the nose. Sketch the general outline of the ears, noting how the fur tufts stick out. -
Map the fur direction:
Instead of drawing every hair, lightly draw arrows or flow lines indicating which way the fur grows, especially around the muzzle, cheeks, and neck ruff.
Pro Tip: Fur texture
Keep your pencil sharp! A blunt tip creates fuzzy, indistinct lines. Rotate your pencil every few strokes to maintain a needle-sharp point for realistic individual hairs.
Step 2: Coloring the Party Hat
-
Base coat for the hat:
Start with the hat to establish your color palette. Fill the triangle shape with a medium teal or seafoam green. Use light, circular strokes to get even coverage without damaging the paper tooth. -
Add hat shadows:
Layer a darker teal or cool blue along the left and right edges of the cone to create roundness. Leave the center slightly lighter to simulate a highlight. -
Create the polka dots:
Using a very sharp white colored pencil, press firmly to burnish small circles over the teal. If the blue shows through too much, you can dab a tiny dot of white gouache or gel pen here later. -
Fluff up the pom-pom:
Use an orange pencil to create the pom-pom. Use short, radiating strokes outward from the center of the ball shape to mimic fuzzy texture. Add some darker burnt orange in the center for depth.
Step 3: rendering the Fur
-
The eyes have it:
Color the eyes first. Use dark browns and blacks for the pupil and iris, but leave a tiny speck of pure white paper for the catchlight. This brings the portrait to life immediately. -
Nose details:
Fill in the nose with a dusty pink or brown, depending on your pet. Stipple tiny dots on the nose leather for texture and darken the nostrils with black or dark grey. -
Layering the undercoat:
Begin the fur by coloring a light base layer of cream or pale ochre over the face and ruff. Keep your pencil strokes following the direction of the fur growth you mapped earlier. -
Building mid-tones:
Switch to a medium brown or caramel color. Sharp pencil in hand, start drawing individual hairs over your base layer. Focus on the darker patches around the eyes and ears. -
Deepening shadows:
Use a dark umber or warm grey to add depth under the chin, beneath the ears, and around the muzzle. I prefer to build this up slowly rather than pressing hard all at once. -
Creating the fluffy chest:
For the long neck ruff, use longer, sweeping strokes. Use a cool grey mixed with cream to create the shadows between the tufts of white fur. -
Refining fur texture:
Go back over the brown areas with a sharper mid-tone pencil to break up any blocky areas. Vary your stroke length—short on the nose, long on the neck. -
Final highlights:
Use a white pencil to add flyaway hairs on the edges of the ears and the chest. If the white isn’t showing up clear enough against the background, outlining slightly with a very pale grey can help.
Troubleshooting: Waxy buildup
If colors stop layering because the surface is too waxy (bloom), lightly spray with fixative, let it dry completely, and then continue adding layers on top.
Step 4: Finishing Touches
-
Clean up:
Use your kneadable eraser to lift any smudges from the background. A clean background is crucial for this style. -
Final assessment:
Prop the drawing up and step back. Check if the hat feels seated on the head properly; add a tiny cast shadow under the brim of the hat onto the fur if needed. -
Frame it:
Once sealed with a fixative spray, place your artwork in a simple cream or white matted frame to let the subject shine.
Hang your new masterpiece in a place of honor or gift it to a fellow pet lover for a smile that lasts
3D Paper Animal Diorama Scene
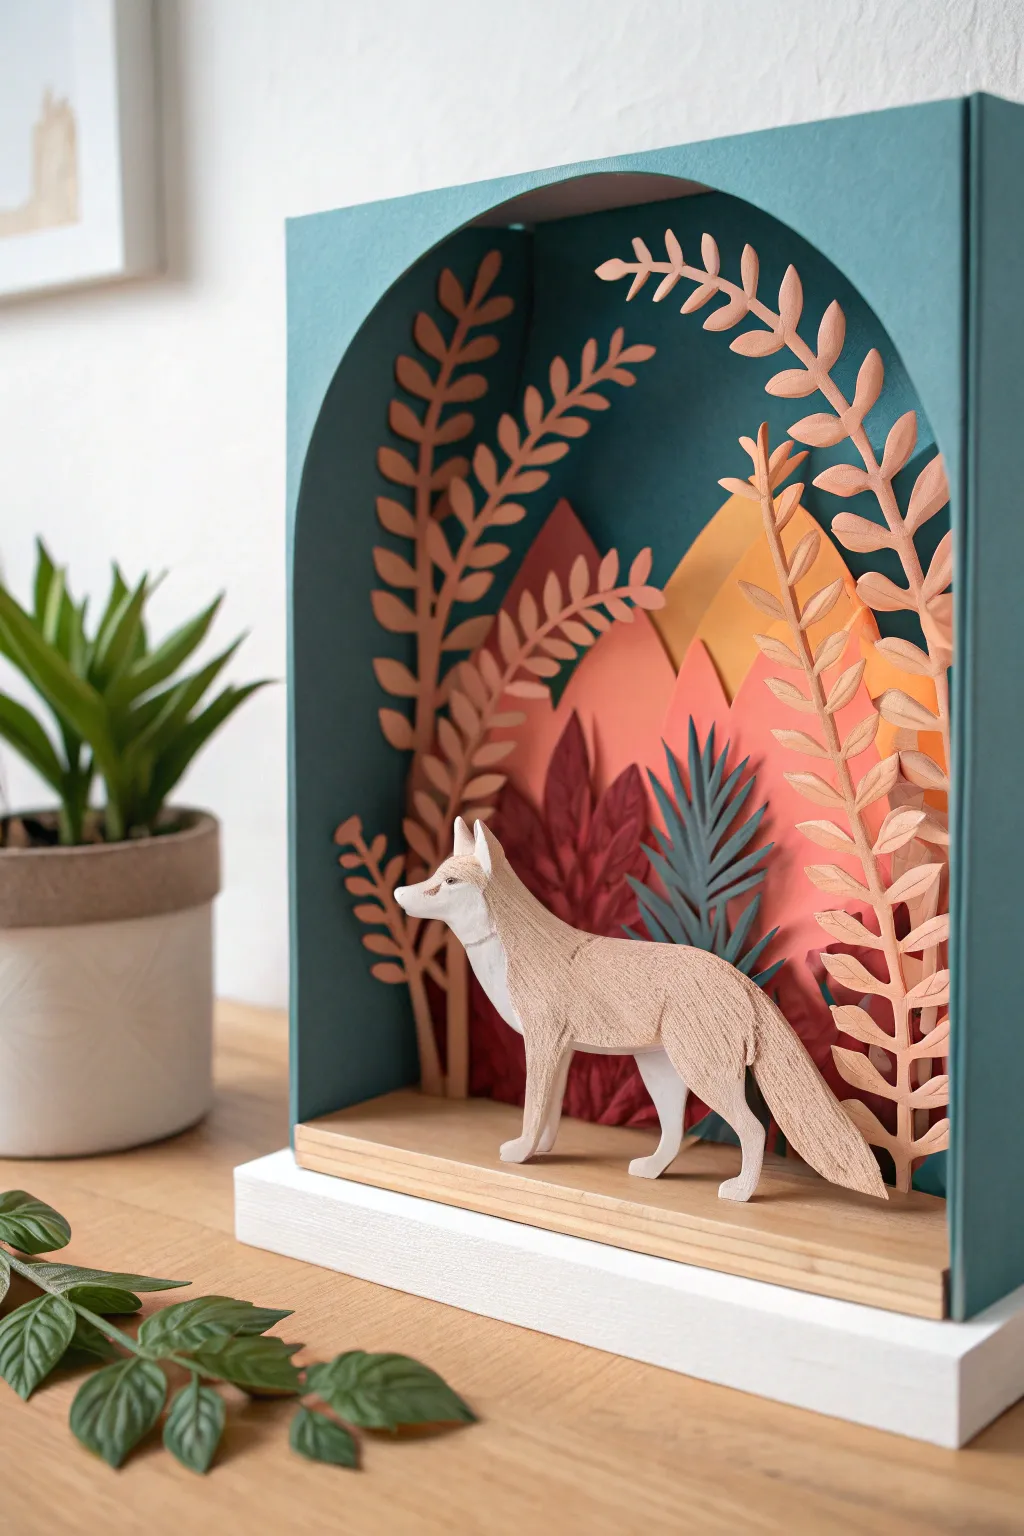
Capture the serene beauty of the forest with this multilayered paper diorama featuring a solitary fox amidst rolling hills and stylized foliage. The clever use of an arched frame creates a cozy, window-like perspective into this miniature world.
Step-by-Step Guide
Materials
- Heavy cardstock (teal, terracotta, burnt orange, golden yellow, burgundy, dark green)
- Thick chipboard or foam board for structural spacing
- Basswood sheet or very thick kraft board (for the fox)
- Wooden base or scrap wood block
- White acrylic paint
- Detail craft knife (e.g., X-Acto) with fresh blades
- Cutting mat
- Tacky glue or strong PVA glue
- Pencil and eraser
- Fine-grit sandpaper
- Ruler
Step 1: Constructing the Frame
-
Design the arch:
Begin by sketching an arch shape onto your teal cardstock. The arch should be tall and elegant, with straight sides leading into a smooth semi-circle at the top. This will be the front face of your shadow box. -
Cut the facade:
Using a sharp craft knife, carefully cut out the arch window. Save the inner piece if you want to use it for scrap later. Cut a second identical piece for the back of the box to ensure symmetry. -
Create the walls:
Measure the height and width of your arch frame. Cut strips of teal cardstock about 2-3 inches wide to serve as the side walls and top curve. The depth depends on how many layers you plan to add inside. -
Assemble the box:
Glue the side strips to the front arch piece. For the curved top, gently flex the cardstock strip as you glue it along the arch’s edge. Reinforce the inside corners with small cardstock tabs if needed for stability.
Uneven Layers?
If your paper layers are drooping or curling, glue a thin strip of matching cardstock vertically behind the stem to act as a hidden spine, keeping the plants upright and rigid.
Step 2: Creating the Landscape Layers
-
Draft the background hills:
On golden yellow and terracotta paper, sketch rolling hill shapes. These should be taller than the mid-ground layers to be visible in the back. -
Cut the foliage elements:
Hand-cut stylized fern and leaf shapes from the burnt orange and burgundy cardstock. Aim for long, sweeping stems with repeating leaf patterns to mimic the style in the photo. Keep the stems long enough to be anchored at the base. -
Craft the detailed succulent:
For the dark green plant behind the fox, cut sharp, spiky leaf shapes. Layer two or three pieces together to give it density and make it stand out against the warm-toned background. -
Arrange the composition:
Before gluing, dry-fit your paper layers inside the box. Place the yellow hills in the back, followed by orange hills, then layer the taller ferns on the sides to frame the future fox. -
Glue the background:
Secure the furthest back layers (yellow hills) directly to the back panel of the box. Use foam spacers or scraps of chipboard between the hill layers and the fern layers to create genuine depth and shadows.
Step 3: Sculpting the Fox
-
Sketch the silhouette:
Draw a sleek fox profile on your basswood sheet or thick kraft board. Focus on capture the alert posture, pointed ears, and bushy tail. -
Cut the primary form:
Carefully cut out the fox shape. If using wood, you might need a scroll saw or heavy-duty craft knife. If using thick board, make multiple shallow passes with your blade rather than one deep cut. -
Add texture:
Using the tip of your knife or a scoring tool, gently scratch fine directional lines into the body to mimic fur texture. Focus on the neck, body, and tail, following the natural direction of hair growth. -
Whitewash details:
Dilute a small amount of white acrylic paint. Paint the face mask, chest, belly, and legs of the fox white. I like to keep the paint slightly sheer so the texture of the material shows through. -
Refine the legs:
To give the illusion of four legs, paint the ‘far’ legs slightly darker or cut small separate pieces for the background legs and glue them behind the main body.
Dynamic Lighting
Install a tiny battery-operated LED wire light behind the front arch frame at the top. This creates a hidden light source that casts dramatic shadows through the paper foliage.
Step 4: Final Assembly
-
Prepare the wooden base:
Cut a wooden block slightly wider than your shadow box. Paint the bottom half white for a modern, two-tone look, leaving the top natural wood exposed. -
Install the floor:
Insert a piece of light wood veneer or beige cardstock into the bottom of the teal box to serve as the ‘ground’ floor. -
Position the fox:
Glue the fox into the center foreground. Ensure the feet engage firmly with the floor; you can use a tiny hidden tab of paper behind the paws for extra support. -
Mount the box:
Apply strong glue to the bottom of your teal shadow box and center it onto the prepared wooden base. Hold it firmly until the bond sets. -
Final touches:
Check for any visible glue strings or loose edges. Use tweezers to adjust any leaning fronds so they frame the fox perfectly without obscuring its face.
Place your finished diorama on a shelf near a plant to echo the nature theme.


Have a question or want to share your own experience? I'd love to hear from you in the comments below!