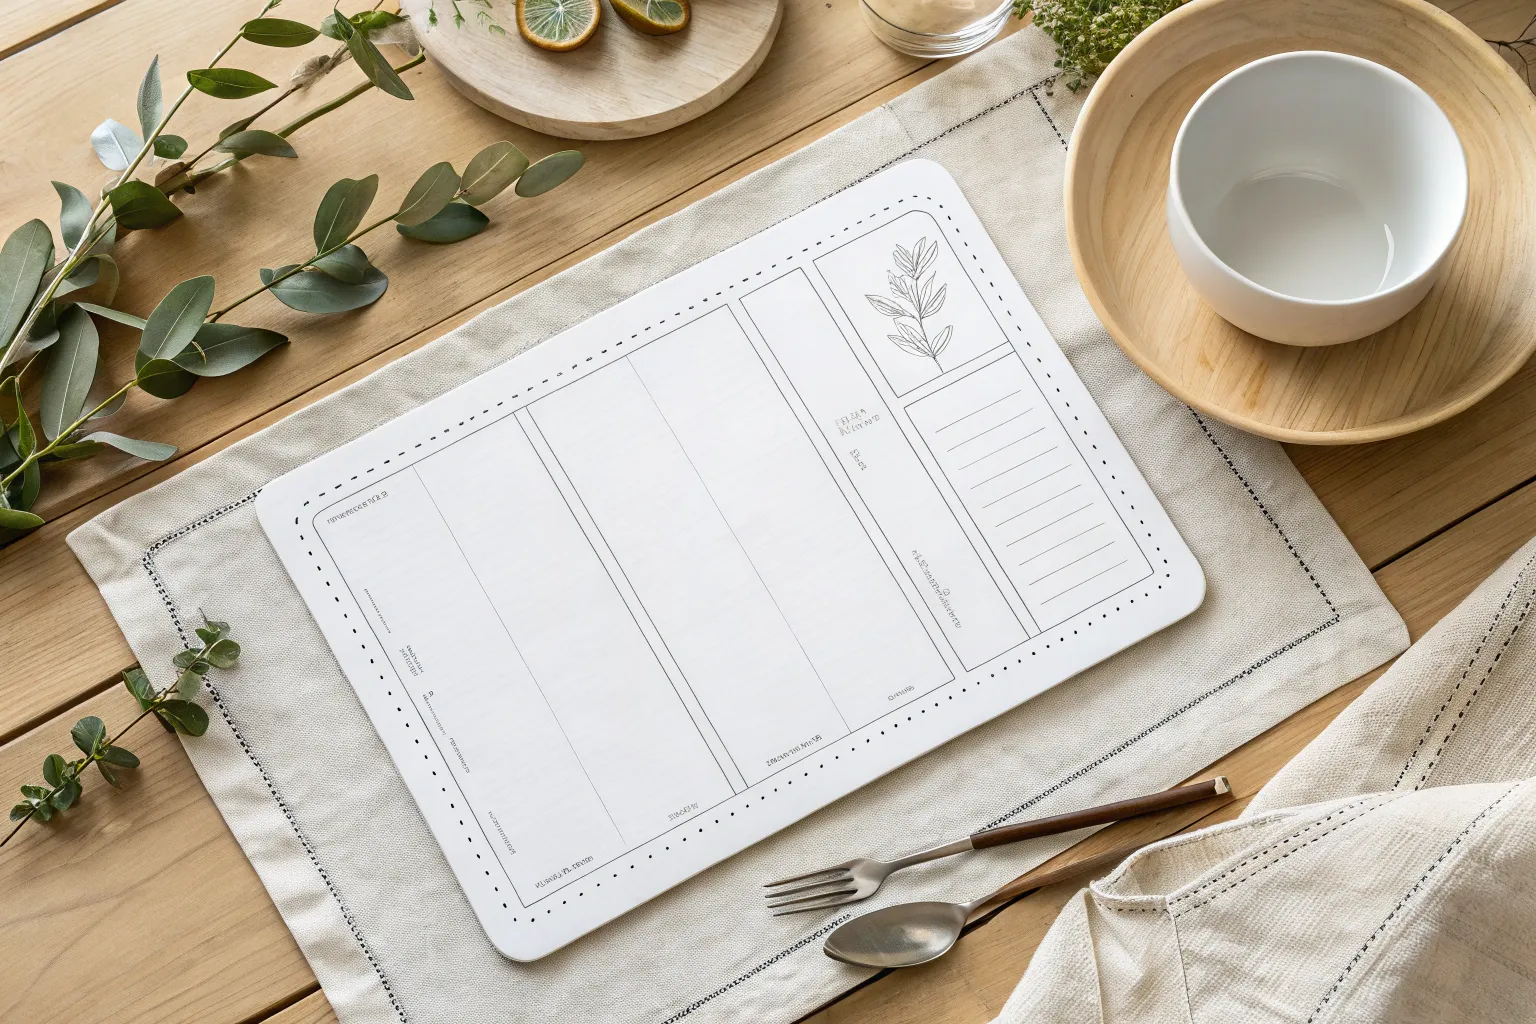
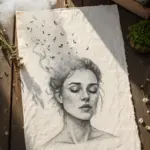
That Animator’s Palate drawing template is small, specific, and honestly kind of magical when you design for it on purpose. Here are my favorite placemat template ideas that read clearly, stay inside the blue safety border, and look great when they animate.
Classic Friendly Cartoon Face
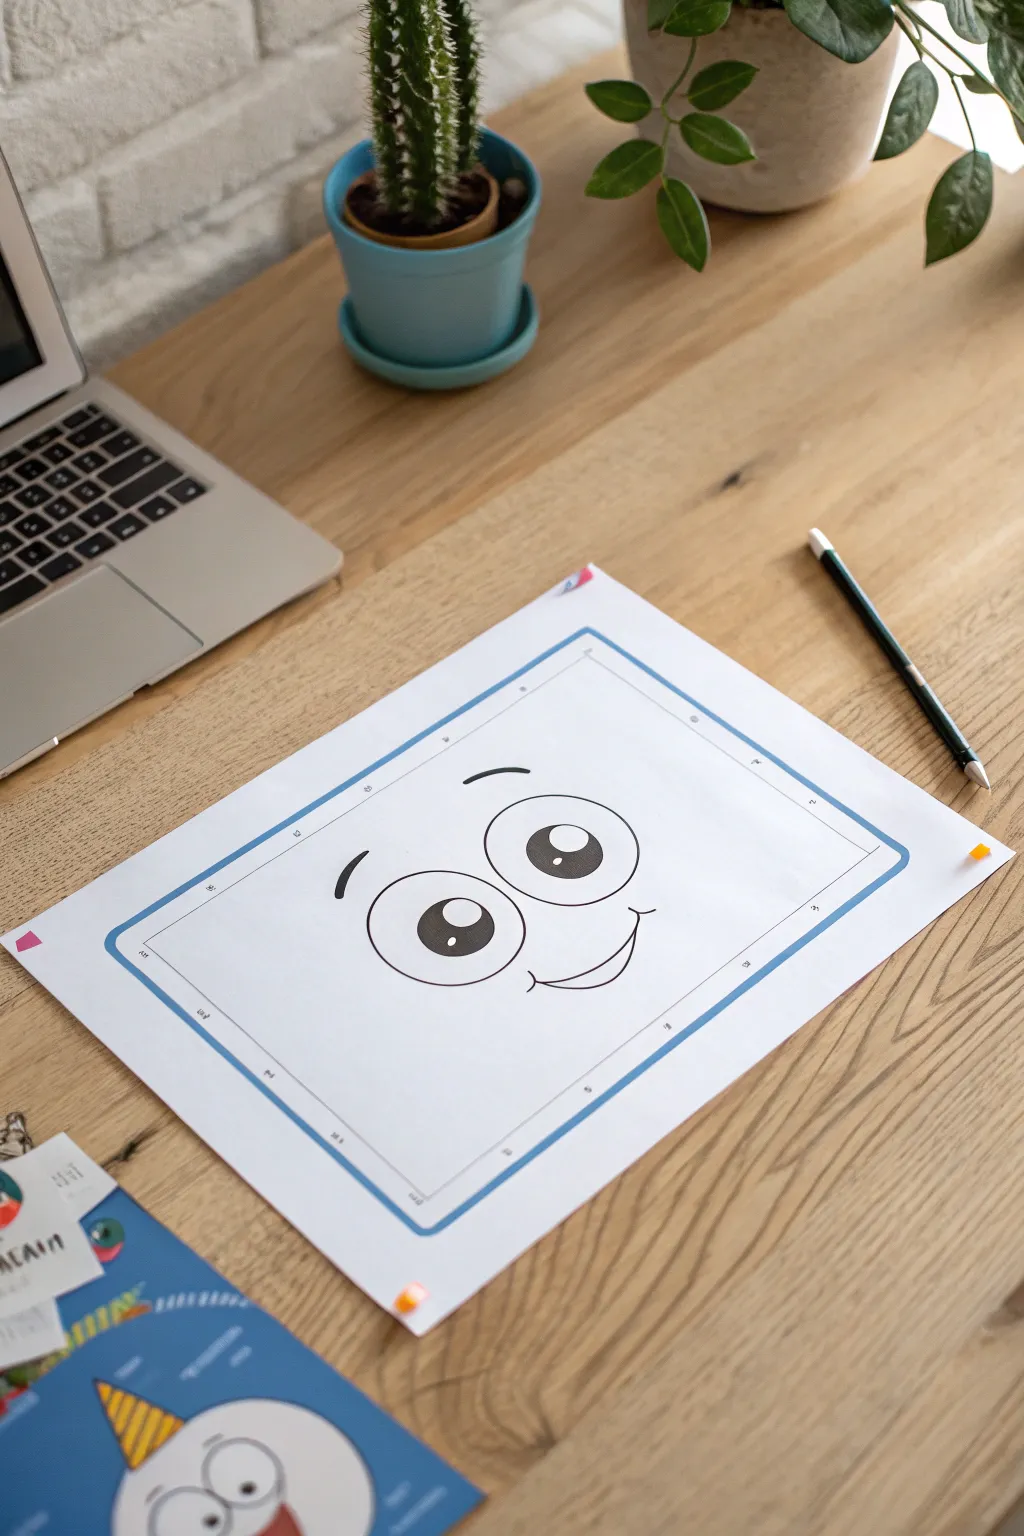
Master the fundamentals of traditional animation with this clean, cheerful character face design. This project focuses on capturing that timeless, wide-eyed look typical of beloved cartoon sidekicks, featuring bold lines and an instantly recognizable expression.
Step-by-Step Tutorial
Materials
- Bright white drawing paper (Letter or A4 size)
- Pencil (HB for sketching)
- Design marker or fine-tip black pen (0.5mm or 0.8mm)
- Blue marker (chisel tip)
- Ruler
- Eraser
Step 1: Setting the Stage
-
Draw the frame:
Begin by using your ruler to lightly pencil a rectangular border about one inch from the edge of your paper. This mimics the classic animation cel format. -
Round the corners:
Instead of sharp 90-degree angles, sketch gentle curves at each of the four corners of your rectangle to soften the look. -
Inking the border:
Take your blue chisel-tip marker and trace over your pencil border. Try to do this in single, confident strokes for each side to keep the color even. -
Add registration marks:
For an authentic animator’s touch, use a black fine-tip pen to add tiny ‘registration marks’ (little crosses or lines) near the corners and midpoints of your blue border.
Step 2: Sketching the Features
-
Position the eyes:
Lightly sketch two large, touching ovals in the center of the page. The left oval should be slightly lower than the right one to give the head a slight tilt. -
Define the pupils:
Inside each eye, draw a large circle for the iris/pupil focused toward the upper right. This makes the character look attentive and friendly. -
Add the highlights:
Draw a smaller circle inside each pupil at the ‘1 o’clock’ position. These reflection spots are crucial for bringing life to the character. -
Draft the eyebrows:
Sketch two short, curved lines floating above the eyes. I find that placing the left one slightly lower than the right adds a playful asymmetry. -
Sketch the smile:
Draw a wide ‘U’ shape centering under the eyes. Add a smaller curved line capping the right end to create a cheek crease.
Wobbly Lines?
Don’t draw from your wrist. Lock your wrist and move your entire arm from the shoulder. This creates much smoother, longer curves for heads and eyes.
Step 3: Inking and Refining
-
Ink the eye outlines:
Switch to your black marker. carefully trace the outer ovals of the eyes. Keep your hand steady to ensure the loops are smooth. -
Fill the pupils:
Outline the pupils first, avoiding the highlight circles. Then, fill them in solid black, ensuring the white highlight remains crisp and clean. -
Trace the eyebrows:
Ink the eyebrows with a stroke that starts slightly thicker and tapers off at the end for a dynamic feel. -
Finalize the mouth:
Trace the main smile line. When you reach the cheek crease on the right, connect it smoothly. -
Clean up:
Once the ink is completely dry—give it a full minute—gently erase all underlying pencil marks so the black lines pop against the white paper. -
Add corner details:
If you want to mimic the reference image perfectly, you can add small colorful sticky tabs or tape to the corners of the paper as if it’s taped to a desk.
Pro Tip: Eye Shine
Make sure your white eye highlights are facing the exact same direction in both eyes. If they are mismatched, the character will look cross-eyed or confused.
Now you have a charming, classic animation-style face ready to be pinned up or scanned

Cute Sailor Outfit Design
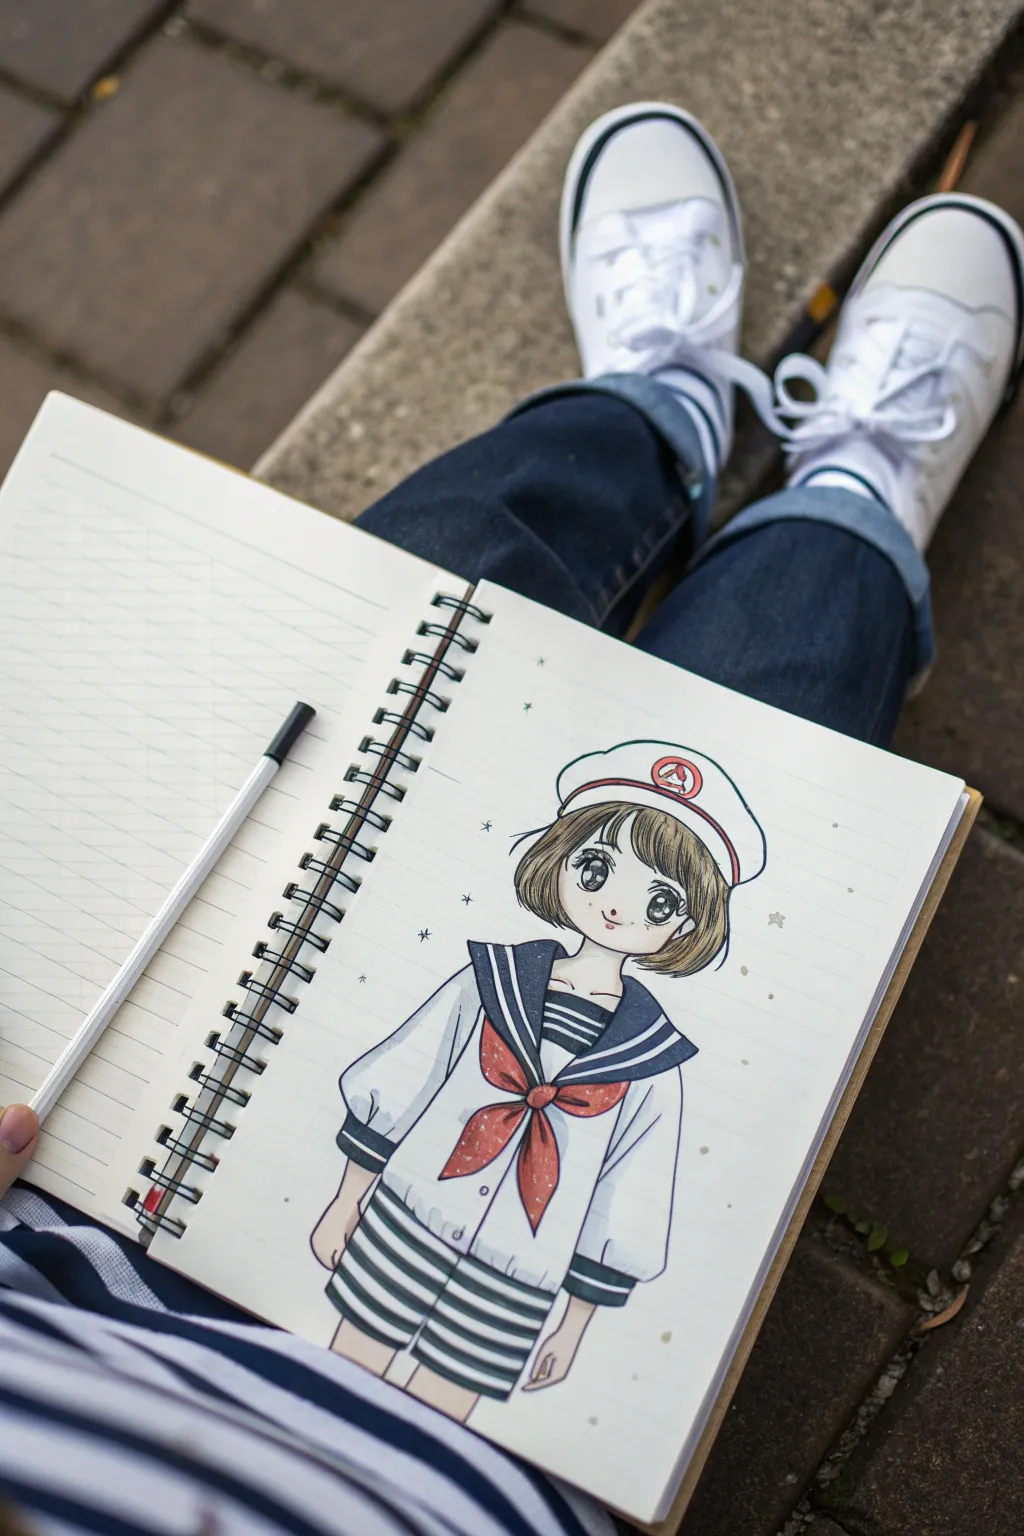
Capture the charm of classic anime character design with this sweet sailor outfit illustration. The drawing features clean linework and soft, marker-style coloring to create a nostalgic and polished look perfect for your sketchbook.
Detailed Instructions
Materials
- Spiral-bound sketchbook (smooth paper recommended)
- Pencil (HB or mechanical)
- Fine liner pens (Black, 0.1mm and 0.3mm)
- Alcohol-based markers (Skin tones, Red, Navy Blue, Grey)
- White gel pen
- Eraser
Step 1: Sketching the Foundation
-
Basic shapes:
Start by lightly sketching a circle for the head. Add a vertical centerline to help place facial features symmetrically. -
Body structure:
Draw the neck and shoulders, extending down into a slight trapezoid shape for the torso. Sketch simple cylindrical shapes for the arms, keeping them relaxed at the sides. -
Outfit blocking:
Outline the sailor collar, which should drape over the shoulders and form a V-neck shape in the front. Sketch the large bow right at the center of the chest. -
Clothing details:
Add the puffed sleeves of the shirt and the loose fit of the top. Below the waist, draw the shorts with horizontal stripes, making sure the fabric looks like it has some volume. -
Hair and hat:
Sketch a short bob hairstyle with bangs framing the face. Top the head with a simple sailor hat, placing it slightly tilted for a cute effect.
Ink Smudge Fix
If your black outline smudges when coloring, let the ink dry longer next time (at least 10 mins). For now, convert the smudge into a shadow with grey marker.
Step 2: Inking and Outline
-
Refine facial features:
Draw large, expressive anime eyes with distinct highlights. Add a small nose and a gentle smile. Make sure the eyes are evenly spaced on your guideline. -
Hair flow:
Using your 0.1mm fine liner, ink the hair strands. Use fluid, quick strokes to keep the hair looking soft rather than stiff. -
Main outlines:
Switch to a 0.3mm pen for the main clothing lines. Outline the sailor collar, the bow, and the shirt. Keep the lines clean and confident. -
Striped details:
Carefully draw the horizontal stripes on the shorts and the trim on the collar and cuffs. Use the thinner 0.1mm pen here so the pattern doesn’t overpower the drawing. -
Clean up:
Once the ink is completely dry, gently erase all your initial pencil guidelines to reveal a stark, clean line art.
Add Texture
Use a colorless blender marker on the red bow to lift slightly some color in the center, creating a soft, velvet-like fabric texture.
Step 3: Coloring and Details
-
Skin tones:
Apply a base layer of light skin tone marker to the face, neck, and legs. While the ink is wet, add a slightly darker shade under the hair and chin for shadow. -
Hair coloring:
Color the hair with a soft brown marker. Leave a faint, lighter band across the bangs to simulate a glossy shine. -
The Navy Blue:
Fill in the sailor collar and the stripes on the shorts with a deep navy blue. Be careful near the edges to keep the color within the lines. -
Red accents:
Color the bow and the emblem on the hat with a vibrant red. I like to layer the color at the knot of the bow to give it a bit of 3D depth. -
Shading white fabric:
Use a very light cool grey marker to add shadows to the white shirt and hat. Focus on areas where fabric folds, like under the sleeves and near the hem. -
Final highlights:
Use a white gel pen to add tiny sparkle dots to the eyes and small touches of shine on the bow or hair. -
Background whimsy:
Scatter a few tiny stars or dots around the character using a thin pen to complete the composition.
Close your sketchbook knowing you’ve created a charming character with classic anime flair


Pirate Costume With Big Shapes
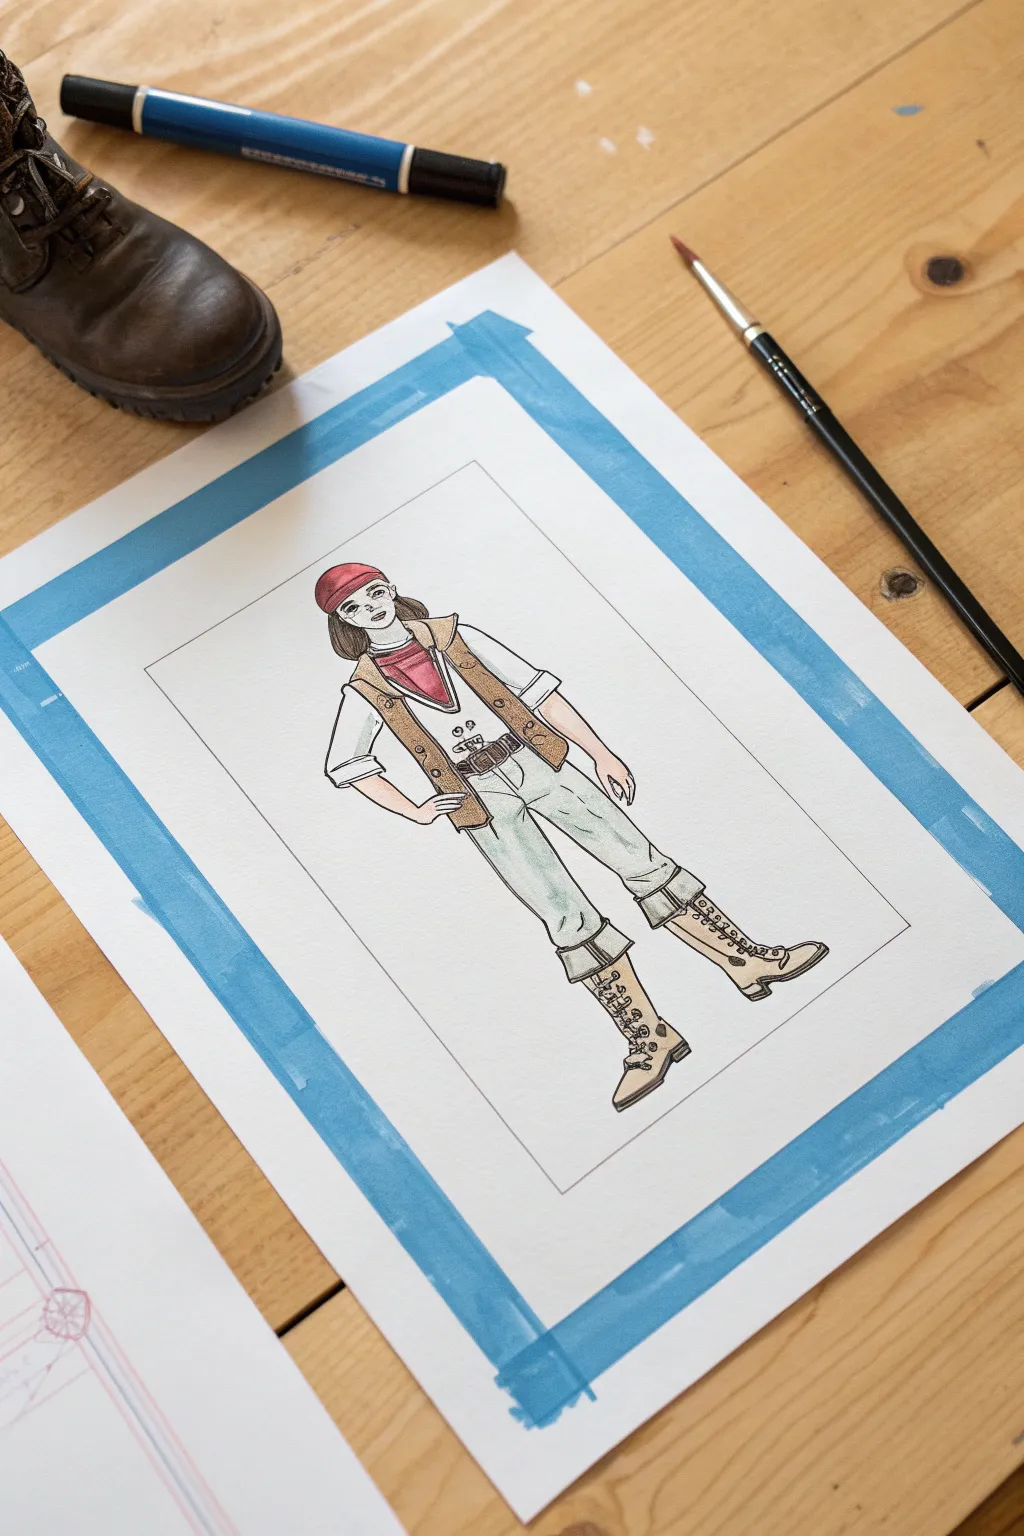
Bring a charming pirate character to life using a classic combination of ink outlines and watercolor washes. This project creates a clean, professional-looking illustration perfect for character design practice or thematic decoration.
How-To Guide
Materials
- Heavyweight watercolor paper or mixed media paper
- Blue painter’s tape or masking tape
- Fine liner pens (waterproof, sizes 0.3 and 0.5)
- Watercolor paints (pan or tube)
- Small round brushes (size 2 and 4)
- Pencil (HB) and eraser
- Ruler
- Jar of water and paper towels
Step 1: Preparation & Sketching
-
Surface setup:
Begin by securing your sheet of paper to a flat, hard surface using blue painter’s tape. Create a border around the edges; this keeps the paper flat when wet and leaves a crisp white frame later. -
Create the boundary:
Using a ruler and a light pencil touch, draw a rectangular frame in the center of your paper. This box will serve as the boundary for your character art. -
Basic anatomy sketch:
Start sketching the pirate’s pose lightly with your pencil. Focus on simple shapes first: an oval for the head, a cylinder for the torso, and lines for legs. Aim for a confident stance with hands on hips. -
Refining the costume:
Draw the costume details over your stick figure. Add the bandana, the open vest, the rolled-up sleeves, and the cropped trousers. Don’t worry about perfect lines yet; just get the shapes right. -
Adding accessories:
Sketch in the crucial pirate accessories like the wide belt with a large buckle, the neck scarf, and high laced boots. Keep the boots large and sturdy-looking to ground the character.
Fixing Smudges
If you accidentally smudge ink, wait for it to fully dry. Then, use white gouache or a white gel pen to cover the mistake before painting over it again.
Step 2: Inking the Lines
-
Outline the main shapes:
Switch to your waterproof fine liner (size 0.5). carefully trace over your pencil lines for the main clothing items like the vest, pants, and boots. Use confident, single strokes rather than sketchy, broken lines. -
Detail work:
Use a thinner pen (0.3) for delicate areas like the facial features, hair strands, and boot laces. This line weight variation adds visual interest to the drawing. -
Erase guidelines:
Once the ink is completely dry—give it a few minutes to be safe—gently erase all the pencil marks. Ensure the paper is clean before you start painting.
Level Up: Texture
After the paint dries, use cross-hatching with your thinnest pen to add texture to the vest or wear-and-tear patters to the pirate trousers.
Step 3: Watercolor Application
-
First wash: Skin tones:
Mix a very watery, pale peach or brown tone. Using your small round brush, apply a light wash to the face, neck, and exposed arms. Keep it transparent; you can always darken it later. -
Painting the bandana and scarf:
Load your brush with a diluted crimson or red. Carefully fill in the bandana on the head and the scarf around the neck. Let the color pool slightly in the corners for natural shading. -
Coloring the vest:
Mix a warm, light brown or tan color. Paint the vest, being careful to paint around the buttons and shirt area. I find painting quickly helps avoid hard drying lines in larger areas. -
Trousers wash:
Use a very pale, watered-down grey or blue-grey for the trousers. Apply the paint loosely to suggest movement and fabric texture without making the pants too dark. -
Boots and belt:
Use a slightly darker, more concentrated brown for the belt and boots. This anchors the figure. Leave tiny slivers of white paper showing on the toes of the boots to simulate a highlight. -
Hair details:
Paint the hair with a dark brown or black wash, running the brush in the direction of the hair growth.
Step 4: Final Touches
-
Adding shadows:
Once the base layers are dry, mix slightly darker versions of your colors. Add thin strokes of shadow under the chin, under the vest arms, and on the inside of the legs to add dimension. -
The border frame:
Using a ruler and your fine liner, go over the initial rectangular frame you drew in pencil to box in the character definitively. -
The reveal:
Wait until the painting is bone dry. Slowly and carefully peel back the blue painter’s tape at a 45-degree angle to reveal your crisp, clean edges and finished artwork.
Now you have a charismatic character illustration ready to frame or add to your portfolio

Superhero Mask and Cape Illusion
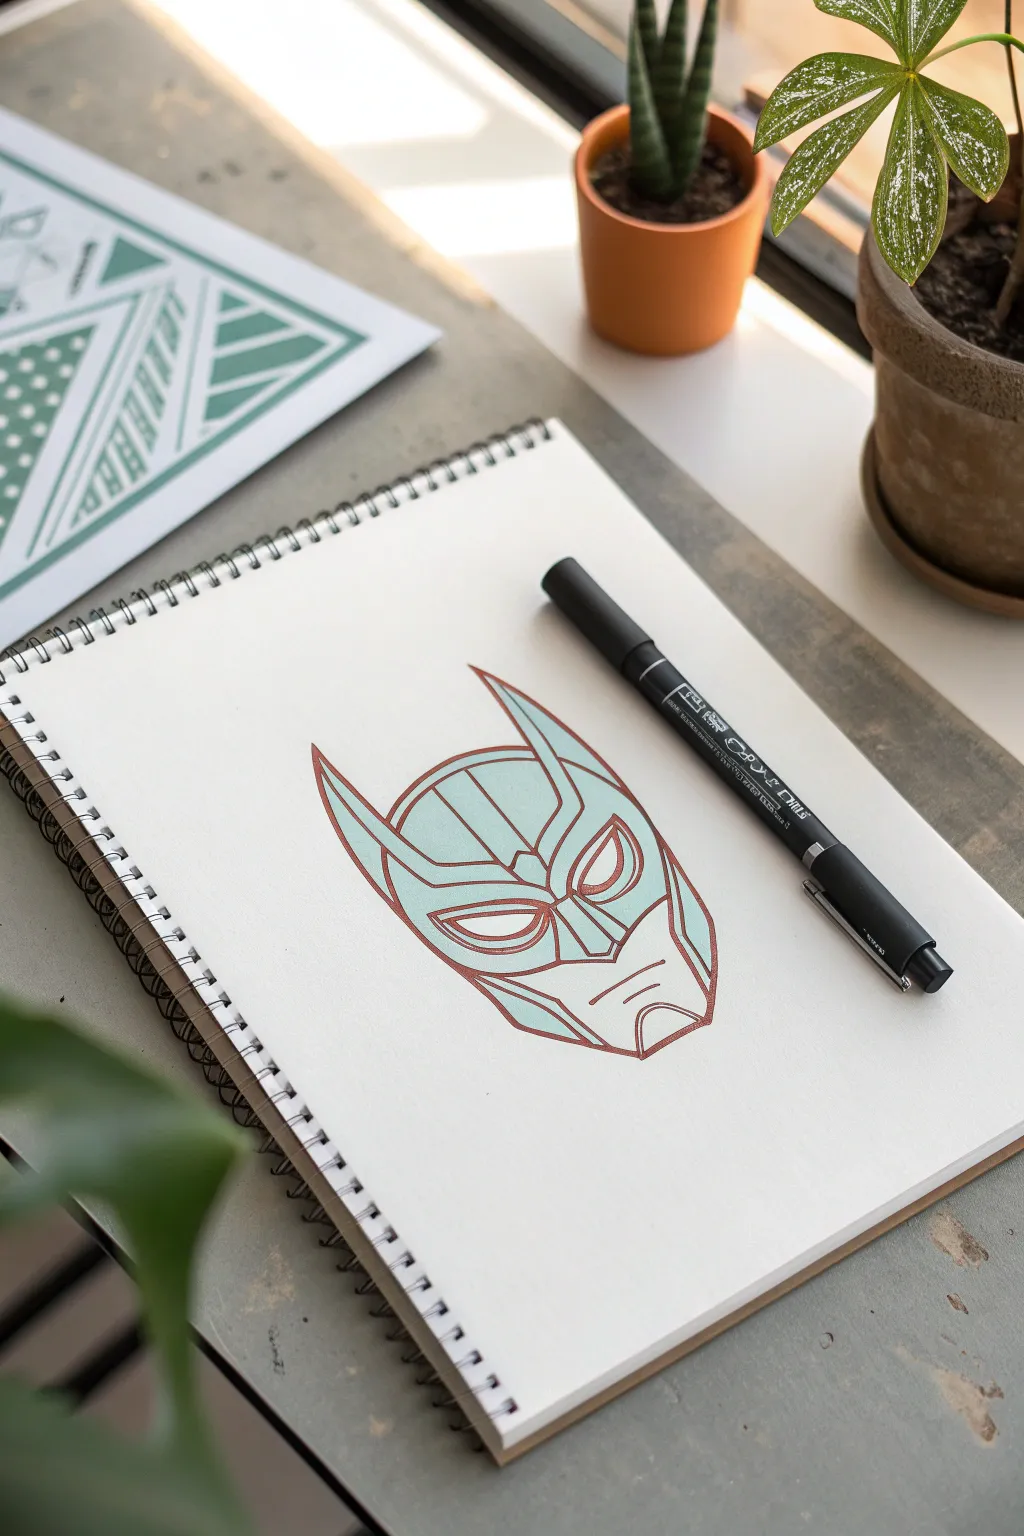
Channel your inner comic book artist with this sleek, angular superhero mask study. The design relies on clean lines and a limited color palette of mint green and terracotta to create a modern, stylized look perfect for a practice sketchbook.
Step-by-Step Guide
Materials
- Spiral-bound sketchbook with smooth, heavyweight paper
- Mechanical pencil (HB lead)
- Eraser
- Fine-point technical pen (black)
- Mint green marker or paint pen
- Terracotta/Rust red marker or fine liner
- Ruler (clear plastic preferred)
Step 1: Structural Layout
-
Establish the centerline:
Begin by lightly sketching a vertical line down the center of your page to ensure symmetry. This will be the anchor for the nose bridge and the peak of the mask. -
Map the basic shape:
Draw an inverted, elongated pentagon shape to define the overall bounds of the head. Keep the chin square and the top wider to accommodate the cowl’s ears. -
Position the ears:
Sketch two tall, pointed triangles extending from the top corners of your basic shape. Aim for a sharp, bat-like silhouette, angling them slightly inward.
Wobbly Lines?
If your straight lines look shaky, don’t hesitate to use a ruler for the inking stage. Even a thick index card works as a quick straight edge.
Step 2: Blocking the Features
-
Define the eye openings:
Draw two large, slanted almond shapes for the mask’s eyes. Position them symmetrically across your centerline, tilting the outer corners upward for an intense expression. -
Create the nose guard:
Connect the inner corners of the eyes with a downward-pointing ‘V’ shape that extends into a geometric nose bridge. -
Outline the jawline:
Refine the jaw area by breaking the curve into straight, angular segments. This robotic style gives the mask its tech-armor aesthetic. -
Add forehead details:
Sketch a central crest on the forehead using parallel vertical lines that fan out slightly towards the top of the cowl.
Level Up: Metallic Pop
Trace the rust-colored lines with a clear glitter gel pen or a very fine metallic copper liner to give the mask a subtle, high-tech sheen.
Step 3: Applying Color
-
Fill the primary zones:
Using your mint green marker, carefully fill in the negative spaces of the mask—specifically the forehead panels, cheeks, and ear insets. Leave the structural lines blank for now. -
Avoid the outlines:
Be precise with your coloring; the white paper showing through as a separation between colors is crucial to this specific style. -
Let the color set:
Allow the green marker to dry completely to prevent bleeding when you add the darker lines next.
Step 4: Final Linework
-
Start the main outlines:
Switch to your terracotta or rust red marker. Trace over your initial pencil construction lines, using confident, continuous strokes. -
Thicken the perimeter:
Go over the outer contour of the mask a second time to create a thicker line weight, separating the object from the background. -
Define the eyes:
Outline the eye sockets carefully. Draw a smaller, inner outline within the white of the eye to suggest depth. -
Add interior details:
Draw the geometric lines across the cheeks and the vertical striations on the forehead. I find it helpful to rotate the sketchbook here to maintain a comfortable hand angle. -
Detail the mouth plate:
Add the small horizontal lines for the mouth and the chin vents using the very tip of your marker for precision. -
Clean up:
Once the ink is fully dry, gently erase any remaining graphite pencil marks visible underneath the color.
Now you have a striking geometric design ready to defend your sketchbook pages

PENCIL GUIDE
Understanding Pencil Grades from H to B
From first sketch to finished drawing — learn pencil grades, line control, and shading techniques.
Explore the Full Guide
Princess-Style Gown on the Template
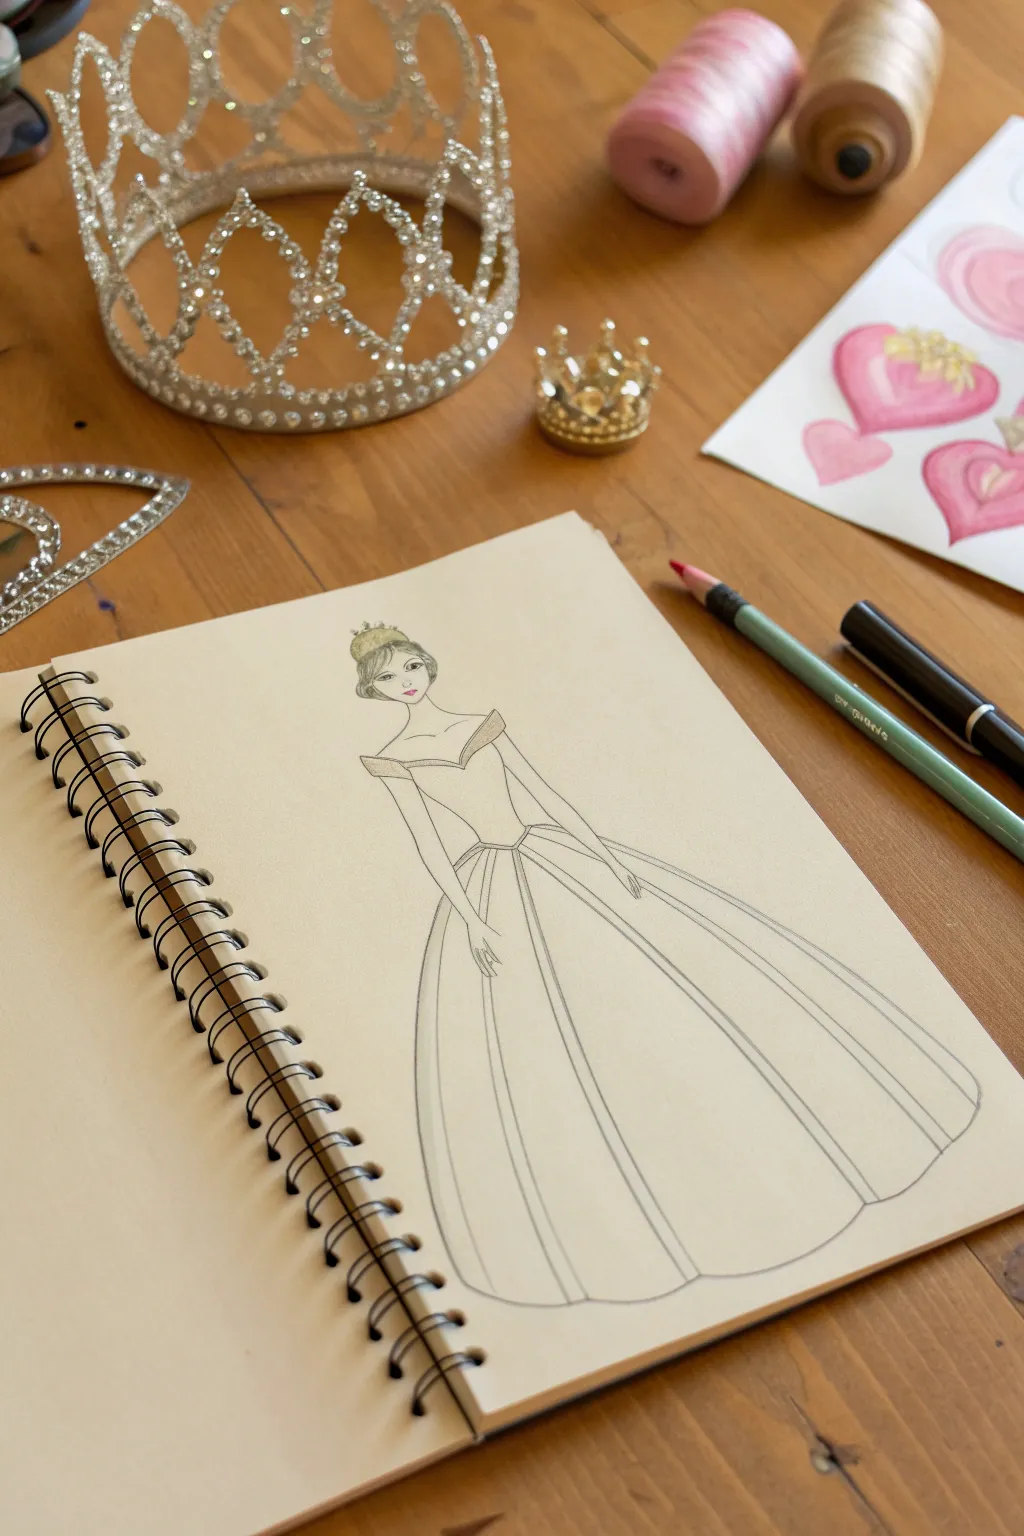
Follow this simple yet elegant guide to sketching a classic princess silhouette on a sketchbook page. This project focuses on clean lines, delicate proportions, and the sweeping flow of a traditional ballgown, perfect for any aspiring fashion illustrator.
How-To Guide
Materials
- Spiral-bound sketchbook (cream or white paper)
- Graphite pencil (HB or 2B)
- Fine liner pen (Black, 0.3mm or 0.5mm)
- Colored pencils (light peach/skin tone, soft gold/yellow)
- Eraser
- Ruler (optional for guidelines)
Step 1: Sketching the Figure
-
Establish the centerline:
Begin by lightly drawing a vertical line down the center of your page to dictate the posture. This ensures your princess stands tall and symmetrical. -
Map the head and torso:
Draw an oval for the head at the top of your centerline. Below that, sketch a gentle trapezoid for the torso and waist, keeping the shoulders slightly wider than the waistline. -
Refine the facial features:
Lightly mark horizontal guides for the eyes, nose, and mouth. Sketch almond-shaped eyes, a small nose, and lips. Add a subtle curve for the jawline to give the face definition. -
Define the hairstyle:
Sketch the hair pulled back into a neat updo or bun. Add a few loose strands near the ears for a softer, more natural look. -
Draw the arms:
Extend lines from the shoulder points down to the hips. Draw slender arms resting gently against the skirt, positioning the hands so they naturally fall just below the waistline.
Clean Lines Secret
Rotate your sketchbook as you draw the long skirt curves. Pulling the pen toward your body often results in smoother, less shaky lines than pushing away.
Step 2: Creating the Gown
-
Outline the bodice:
Design an off-the-shoulder neckline that dips into a V-shape at the chest. Connect this to a fitted waist, emphasizing the ‘V’ point where the bodice meets the skirt. -
Draft the skirt volume:
From the waist, draw two large, sweeping curves outward to the bottom of the page to create the bell shape of the ballgown. I find it helpful to draw these lines quickly to keep the curve smooth. -
Add pleat details:
Inside the main skirt outline, draw long, vertical curved lines originating from the waist. These should fan out toward the hem to represent the fabric’s folds and volume. -
Detail the neckline trim:
Add a double line along the off-the-shoulder neckline to suggest a folded fabric edge or trim. This adds a nice tactile dimension to the bodice. -
Sketch the crown:
Perch a small, delicate tiara on top of the hairstyle. Use small jagged peaks or loops to mimic the sparkle of a real crown.
Texture Boost
Use a white gel pen over the gold crown area after coloring to add tiny ‘shine’ dots, making the jewelry look like it’s catching the light.
Step 3: Inking and Finishing Touches
-
Ink the main outlines:
Take your fine liner pen and carefully trace over your graphite pencil lines. Keep your hand steady and use long, confident strokes for the long skirt lines. -
Refine the face in ink:
Switch to a lighter touch or a thinner pen nib for the facial features. Ink the eyes and lips carefully to preserve the delicate expression. -
Erase pencil marks:
Once the ink is completely dry—give it a minute or two—gently erase all the underlying pencil sketch lines to reveal a clean, crisp illustration. -
Apply subtle color:
Using colored pencils, lightly shade the skin areas (face, neck, and arms) with a pale peach tone. Keep the pressure light for an airy feel. -
Highlight the crown:
Use a soft gold or yellow pencil to fill in the tiara. You can add a tiny touch of this color to the neckline trim if you want to coordinate the accessories. -
Add final details:
If you wish, add tiny circles or dots along the hem or bodice to suggest pearls or beadwork, but keep it minimal to match the elegant style.
Now you have a timeless fashion sketch ready to be embellished or left simply elegant.
Robot With Panel Details

Capture the charm of classic sci-fi with this crisp line drawing of a quirky robot companion. The clean lines and mechanical details make this an excellent exercise in practicing geometric forms and confident inking.
Detailed Instructions
Materials
- White drawing paper or cardstock (A4 or Letter size)
- HB pencil for sketching
- Fine liner pen (0.5mm, black)
- Thicker marker pen (0.8mm or 1.0mm, black)
- Eraser
- Ruler (optional, but helpful for straight lines)
Step 1: Constructing the Core Forms
-
Outline the head:
Start near the top third of your paper. Draw a simple rectangle for the head, keeping the lines light with your pencil since you’ll ink over them later. Leave enough room above for the antenna. -
Add the body block:
Directly beneath the head, draw a short, thin neck rectangle. Below that, sketch a larger, slightly wider square shape for the robot’s main torso. -
Position the limbs:
For the arms, draw curved tubes extending from the shoulders. The left arm should hang down, and the right arm can have a slight bend. For the legs, sketch two vertical cylinders extending from the bottom of the torso. -
Sketch the feet:
At the bottom of the leg cylinders, draw wide, rounded trapezoids or heavy boots to give the robot a solid base to stand on.
Bold Lines Matter
Vary your line weights! Use a thicker pen for the outer silhouette and a thinner pen for internal buttons to make the robot pop.
Step 2: Adding Mechanical Details
-
Create the face:
Draw two large circles for eyes inside the head rectangle. Add concentric circles inside them for pupils. Below the eyes, draw a long, narrow rectangle with vertical lines inside to create a mouth grille. -
Add sensory equipment:
On top of the head, draw a single straight line with a small circle on top for the antenna. Add small rectangular ear-pods on the sides of the head. -
Detail the chest panel:
Draw a smaller square inside the main torso. Within this panel, add rows of small dashes or dots on the left side to look like vents or buttons. -
Insert gauges:
On the right side of the chest panel, draw two small circles and a small square with some scribble-text to represent a digital readout or pressure gauge. -
Joints and grippers:
Add circular joints at the shoulders where the arms attach. At the end of the arms, draw simple C-shaped claws for hands. -
Refine the legs:
Add a ribbed texture to the legs by drawing horizontal curved lines up the shin area, making them look like flexible tubing or springs.
Step 3: Inking and Finishing
-
Begin inking outlines:
Switch to your thicker black marker. Trace the main outer silhouette of the robot—the head, body, and limbs—using confident, continuous strokes. -
Ink the details:
Use the finer 0.5mm pen for the interior details. This includes the eyes, the mouth grille, the chest panel buttons, and the leg ribbing. The thinner line weight helps these details look precise without overwhelming the drawing. -
Add a ground shadow:
Using the thick marker, draw a few quick horizontal hatched lines underneath the feet. This grounds the character so it doesn’t look like it’s floating. -
Create depth:
Add very small bits of stippling (tiny dots) on the neck and leg joints to suggest shadow and metallic texture. -
Double-check lines:
Look over your inked work. If any main outlines feel too thin, carefully go over them again with the thicker marker to bold them up. -
Erase and clean:
Wait at least five minutes to ensure the ink is completely dry. Then, firmly erase all the underlying pencil sketches to reveal the clean artwork.
Wobbly Circles?
Don’t stress if your circles aren’t perfect. A slightly wobbly line actually adds to the hand-drawn, vintage charm of this style.
Now you have a charming mechanical friend ready to animate your sketchbook
BRUSH GUIDE
The Right Brush for Every Stroke
From clean lines to bold texture — master brush choice, stroke control, and essential techniques.
Explore the Full Guide
Space Explorer Suit
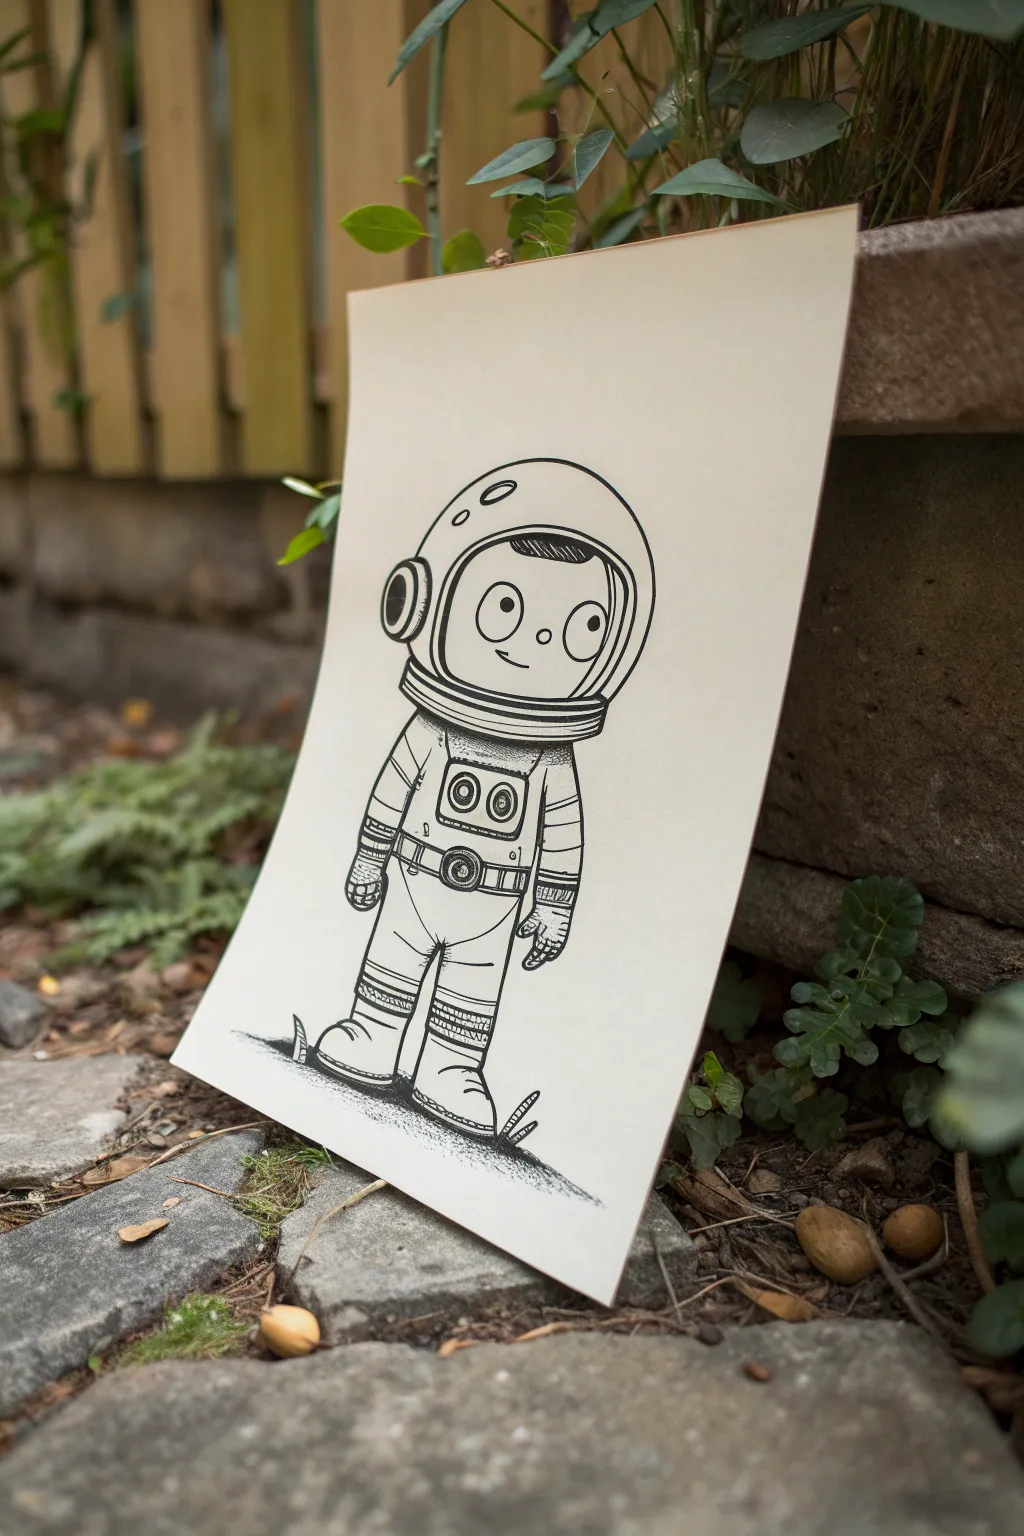
Launch your sketchbook into orbit with this crisp, monochromatic character design that features bold lines and charming details. This project focuses on clean linework and contrast to bring a friendly little astronaut to life on paper
Step-by-Step Tutorial
Materials
- Smooth bristol board or heavyweight mixed media paper
- HB or 2H graphite pencil
- Kneaded eraser
- Fine liner pens (sizes 0.1, 0.3, and 0.5)
- Black brush pen or thick marker
- Ruler (optional)
Step 1: Drafting the Structure
-
Head and helmet base:
Start with a large, slightly squashed circle for the helmet. Inside this, draw a smaller, rectangular shape with rounded corners for the face shield area, leaving ample space for the helmet padding. -
Body blocking:
Directly below the helmet, sketch a smaller, rounded rectangle for the torso. Keep the proportions cute by making the head significantly larger than the body. -
Adding limbs:
Sketch simple cylinders for the arms and legs. The legs should be sturdy and thick, ending in large, boot-shaped ovals. Position the arms hanging naturally at the sides. -
Face placement:
Inside the face shield, lightly draw a horizontal guideline. Place two large circles for eyes and a small, curved line for a smile. Add a tiny ‘c’ shape for the nose and a hinted hairline at the top.
Line Weight Magic
Use a thicker line for the outermost silhouette and a thinner line for interior details. This prevents the drawing from looking flat.
Step 2: Designing the Suit
-
Helmet details:
Draw the rim of the helmet by adding a thick band at the neck area. On the left side of the helmet, add a circular ear-piece or communication device with concentric circles. -
Chest control panel:
On the torso, outline a rectangular box. Inside, draw two circular gauges or buttons side-by-side to give the suit a retro sci-fi feel. -
Belts and bands:
Draw a belt around the waist with a circular buckle. Add ribbed texture bands at the elbows, wrists, knees, and ankles to suggest flexible joint material in the space suit.
Wobbly Circles?
If you struggle drawing perfect circles for the helmet freely, trace the rim of a small cup or masking tape roll for a clean foundation.
Step 3: Refining with Ink
-
The main outline:
Switch to your 0.5 fine liner. Trace over your pencil sketch with confident, steady strokes. Focus on the outer silhouette of the astronaut first to establish the form. -
Facial features:
Use the 0.5 pen for the eyes to make them pop, but switch to a 0.3 pen for the delicate smile and nose. Add a small white highlight circle inside each eye before filling them in black. -
Detailing the joints:
I prefer using the 0.1 pen here to draw the thin, horizontal hatching lines on the elbow, wrist, and knee bands. These lines should be close together to create a flexible texture. -
Control panel specifics:
Carefully ink the chest box and buttons. Add tiny screws or dots in the corners of the panel for a technical look. -
Gloves and boots:
Outline the thick gloves and boots. Add a sole to the boots by drawing a line parallel to the bottom curve.
Step 4: Shading and Finishing
-
Cast shadows:
Determine a light source (usually from top-left). Use the 0.3 pen to add hatching or solid black shadows under the helmet rim, under the armpits, and beneath the belt. -
Texturing the metal:
Add subtle stippling (tiny dots) or short hatch lines on the rounded parts of the helmet and suit to suggest a metallic or matte surface, keeping the center clear for highlights. -
Grounding the figure:
Draw a loose, elliptical shadow beneath the boots using hatching lines. Add a few vertical blades of alien grass or small rocks to place the character in an environment. -
Cleanup:
Wait at least ten minutes for the ink to cure complete. Gently erase all remaining pencil guidelines with your kneaded eraser. -
Contrast check:
Step back and assess your drawing. Use the thicker brush pen or marker to deepen the darkest shadows, particularly under the boots and inside the helmet rim, to maximize visual impact.
Now your traveler is ready to explore unknown galaxies on the page
Undersea Diver Look
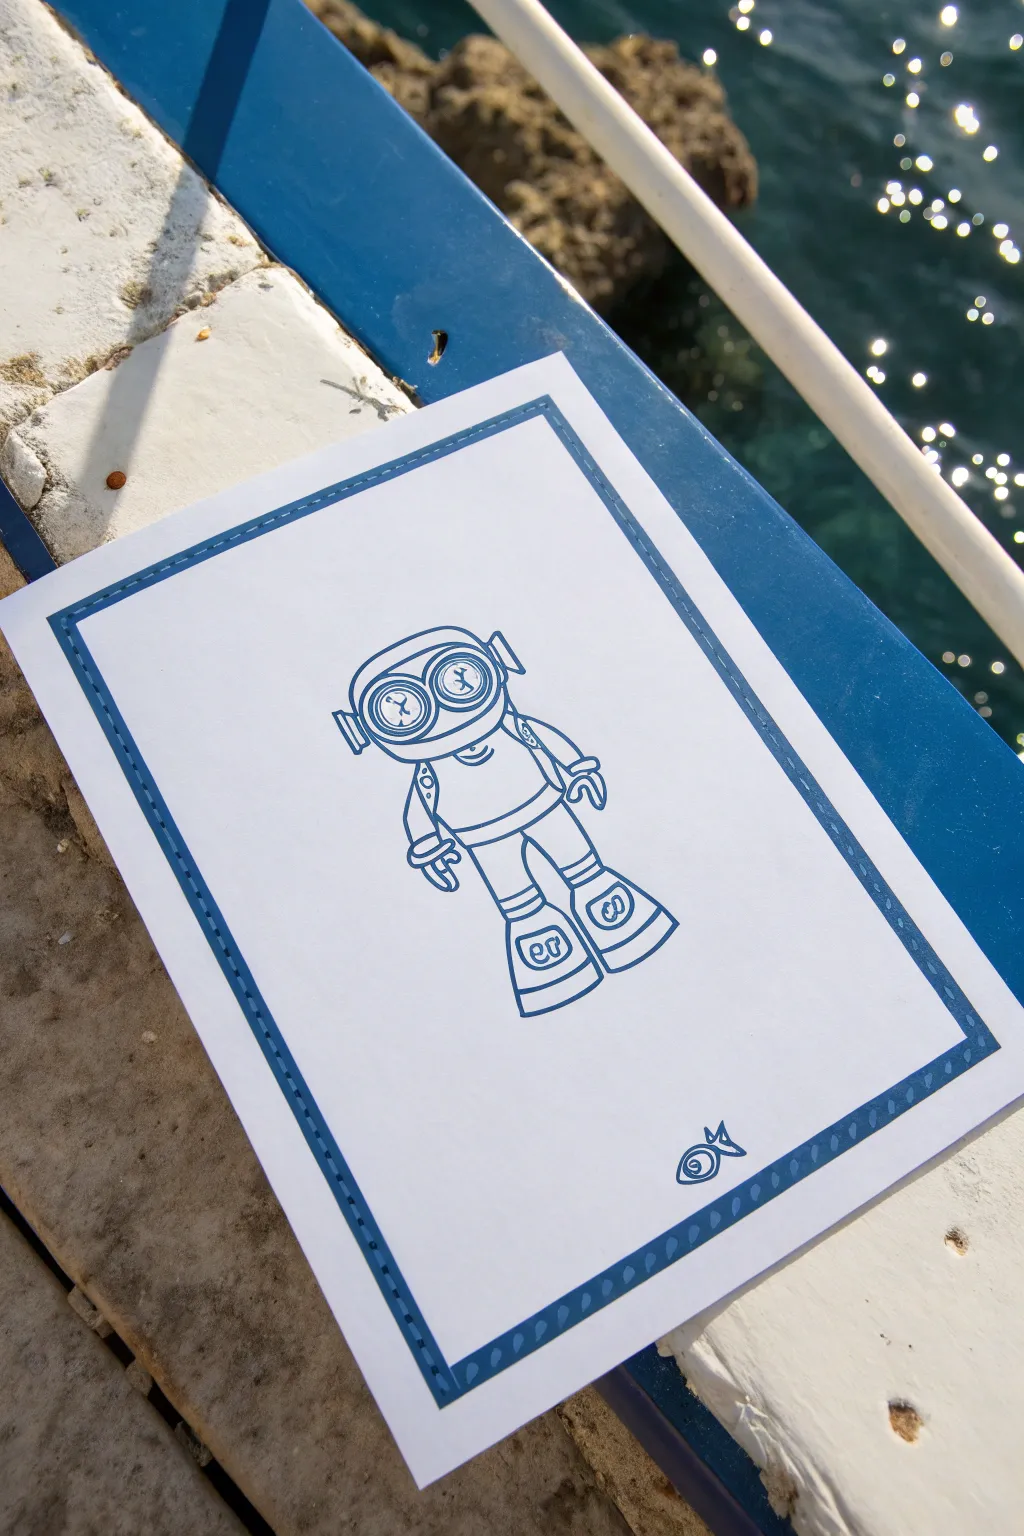
Capture the spirit of underwater exploration with this charming, retro-style robot diver drawing. With its clean lines and nautical border, this piece mimics the fun of a classic animation cel or a ship’s log doodle.
Detailed Instructions
Materials
- Heavyweight white drawing paper or cardstock (8.5 x 11 inches)
- Blue fine-point permanent marker or felt-tip pen
- Blue medium-point marker (for thicker lines)
- Pencil (HB or 2H)
- Eraser
- Ruler
Step 1: Setting the Scene
-
Establish boundaries:
Begin by using your ruler and pencil to mark a border about 1 inch inward from the edge of your paper on all four sides. Draw a light rectangle to serve as your frame. -
Create the decorative stitched edge:
Switch to your blue fine-point marker. Draw over your pencil border line, but instead of a solid line, create a pattern of small dashes or ‘stitches’ all the way around. -
Add corner details:
For a nautical touch, you can double up the border thickness slightly or add small dots between the dashes if you want extra flair, but keeping it simple works best for this clean look. -
Draw the signature icon:
In the bottom right corner, inside the border, sketch a tiny stylized fish symbol using your blue marker.
Step 2: Constructing the Diver
-
Head shape:
Start near the upper center of the page with your pencil. Draw a wide oval for the helmet. Add a slightly curved horizontal line across the middle to separate the ‘face’ area. -
Eyes and goggles:
Inside the helmet’s face area, draw two large circles side-by-side for the eyes. Within those, add smaller circles for pupils and little ‘X’ or reflection marks to make them look like glass lenses. -
Ears and antenna:
Sketch small rectangular protrusions on the sides of the helmet for ‘ears.’ Add a small curved line on top for a simple antenna base. -
Torso structure:
Draw a rounded trapezoid shape extending down from the helmet for the body. It should look sturdy and metallic. -
Arms and joints:
Sketch the arms using curved tubular shapes. Remember to add small circles at the shoulders and elbows to represent robotic joints. -
Hands and claws:
Instead of fingers, draw classic C-clamp or pincer shapes for the hands, giving it that industrial underwater robot vibe. -
Legs and boots:
Draw two sturdy legs extending down. At the bottom, flare them out into large, heavy boots. These should look weighted, like old-fashioned deep-sea diving gear. -
Boot details:
Add oval shapes on the front of the ankles. Inside these ovals, sketch simple patterns or swirls to suggest gears or logos.
Smudge Alert
Blue ink can smudge easily! Place a piece of scrap paper under your drawing hand while you work to protect the clean white areas from oils or wet ink transfer.
Step 3: Inking and Refining
-
Outline the main form:
Once you are happy with the pencil sketch, take your medium-point blue marker and carefully trace over the main exterior lines of the robot to make it pop. -
Detail work:
Switch to the fine-point blue marker for the interior details, like the eyes, the chest plate lines, and the boot decorations. This line weight variation adds professional depth. -
Clean up:
Wait at least five minutes to ensure the ink is completely dry. Then, gently erase all visible pencil marks, being careful not to crumple the paper. -
Final inspection:
Check for any gaps in your lines. If a line looks too thin, go over it once more to ensure a bold, consistent blue stroke throughout the character.
Make it Mobile
Cut out the robot and attach clear fishing line to the limbs using small brads. This turns your static drawing into a jointed paper puppet ready for the sea.
You have constructed a delightful mechanical friend ready to patrol the ocean floor


Spooky Skeleton Suit Styling
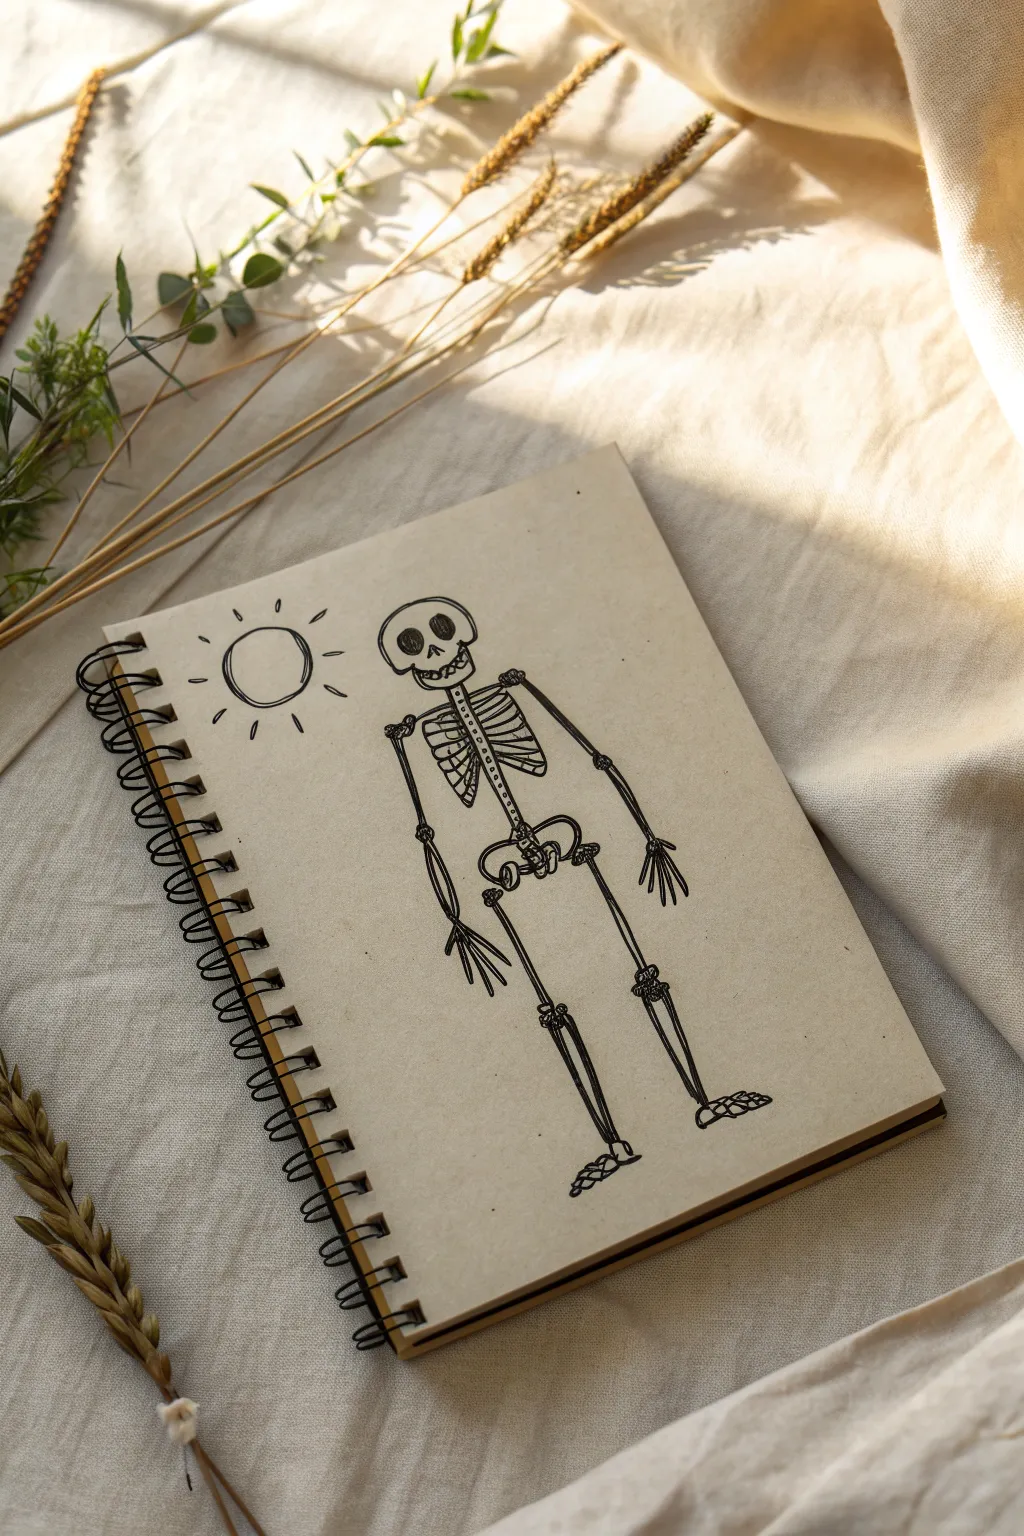
Capture the whimsical side of mortality with this delightful doodle of a friendly skeleton basking in the sun. This simple line art project focuses on basic shapes and relaxed linework, perfect for filling a sketchbook page with character.
How-To Guide
Materials
- Spiral-bound sketchbook with tan or toned paper
- Fine liner pen (black, size 03 or 05)
- Pencil (HB or 2B) for initial sketch
- Soft eraser
Step 1: Laying the Framework
-
Sketch the skull:
Begin near the top center of your page with a soft pencil. Draw a rounded, slightly boxy shape for the cranium and a smaller rectangular shape below it for the jaw. -
Establish the spine:
Drop a vertical line straight down from the skull to act as the spine. Keep it relatively straight to give your skeleton good posture. -
Outline the ribcage:
Draw an inverted U-shape starting just below the neck area. This doesn’t need to be perfect; sketch a general barrel shape that tapers slightly at the bottom. -
Place the pelvis:
At the bottom of your spine line, sketch a butterfly or pretzel-like shape to represent the pelvis. Make sure it’s wider than the spine but not as wide as the ribcage. -
Rough in the limbs:
Using simple stick lines, map out the arms and legs. Draw circles for the shoulder, elbow, and knee joints to help visualize where the bones will connect.
Wobbly Lines?
Don’t stress! Bones are organic shapes. If your lines aren’t perfectly straight, it simply makes the skeleton look more weathered and realistic.
Step 2: Fleshing Out the Bones
-
Define the skull features:
Switch to your fine liner pen. Draw two large, dark ovals for eye sockets and an upside-down heart shape for the nose cavity. -
Add teeth and jaw:
Draw a jagged horizontal line across the mouth area, adding small vertical ticks to create teeth. Outline the jawbone with a firm, continuous line. -
Ink the spinal column:
Draw the spine as a column of small, stacked circles or beads. I find this creates a nice texture compared to a straight line. -
Detail the ribs:
Inside your ribcage outline, draw horizontal bands curving slightly downward. Leave a vertical gap in the center for the sternum. -
Draw the arm bones:
Draw the humerus (upper arm) and radius/ulna (lower arm) as thin, elongated bone shapes. Make the ends knob-like where they meet the joints. -
Create the hand structure:
For the fingers, draw long, spindly lines radiating from the wrist. Add small cross-hatches at the knuckles to suggest segments. -
Construct the legs:
Similar to the arms, draw the femur (thigh) and tibia/fibula (shin) as long, thin bones. Ensure the femur looks slightly sturdier than the arm bones. -
Detail the joints:
At the knees and elbows, draw clusters of small, scribbly circles to represent the knobby bone connections and kneecaps. -
Finish the feet:
Sketch the feet as triangular wedges made of small pebbles or bone segments, tapering into toe bones.
Step 3: Final Touches
-
Draw the sun:
In the upper left corner, draw a loose, hand-drawn circle. Add short lines radiating outward for rays to balance the composition. -
Review and refine:
Look over your inking. If any lines look too thin, go over them again to add weight, especially on the underside of bones to suggest shadow. -
Erase guidelines:
Once the ink is completely dry—give it a full minute—gently erase your initial pencil sketch to leave a clean, crisp drawing.
Add Some Accessories
Give your skeleton personality by drawing a top hat, holding a flower, or wearing big sunglasses to match the sunny weather theme.
Now you have a charming skeletal companion ready for any season
Big Hair, Simple Face Strategy
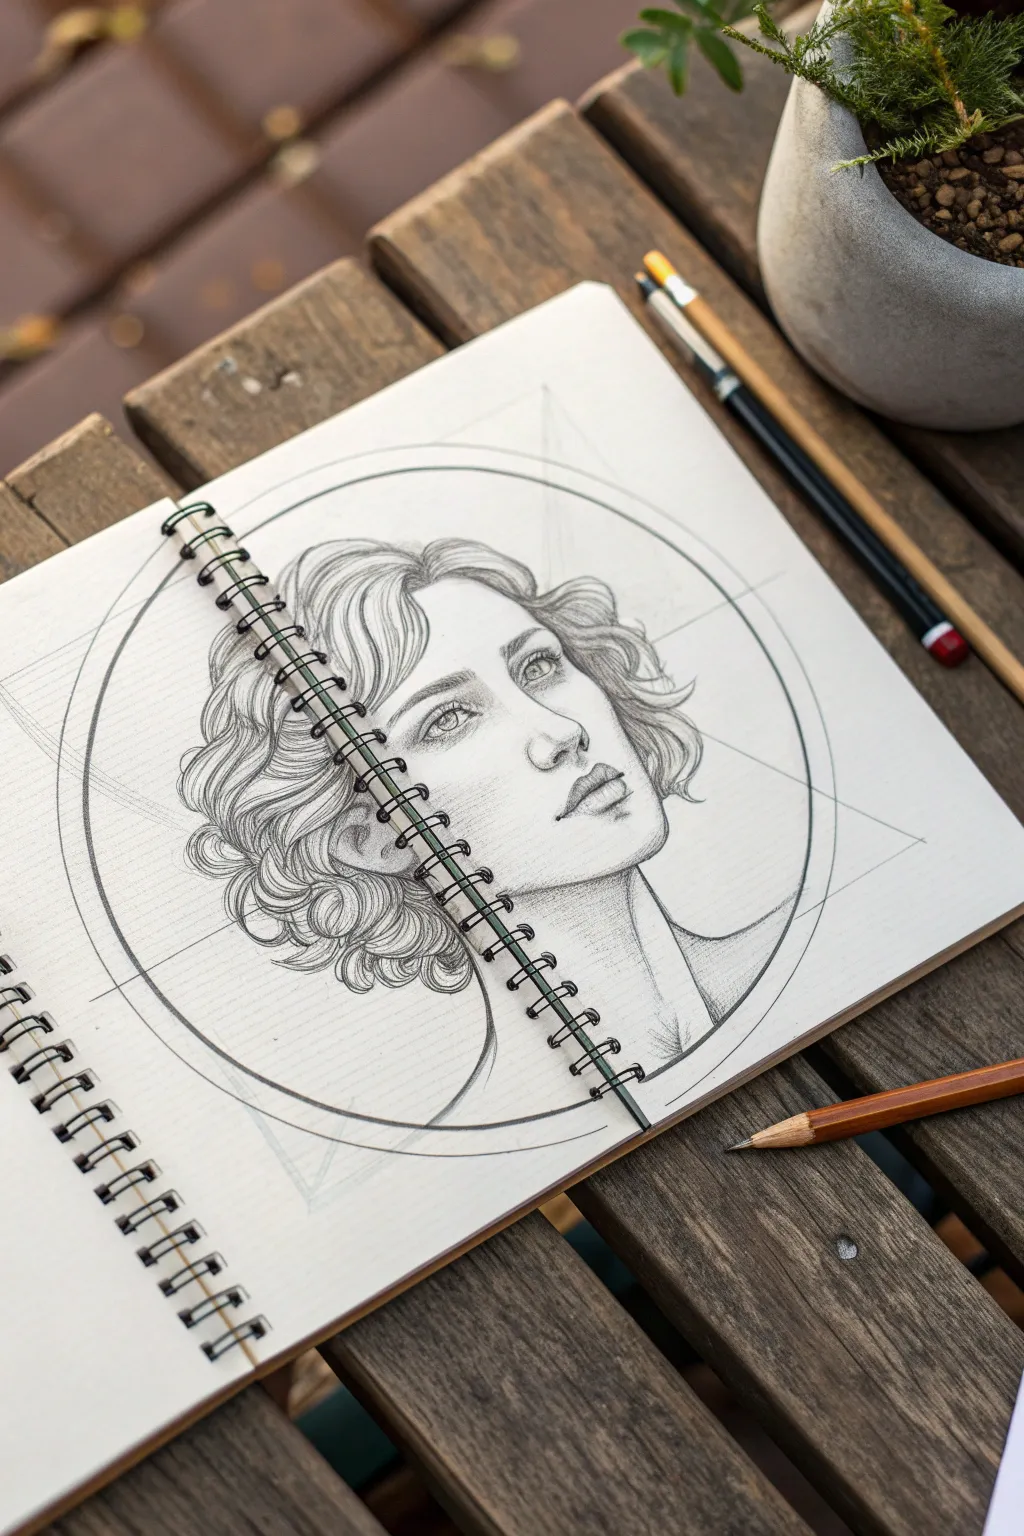
This striking pencil portrait combines classical facial features with voluminous, curly hair, all contained within a sharp geometric layout. The contrast between rigid circles and flowing hair creates a uniquely balanced composition perfect for practicing structure and softness.
Step-by-Step Guide
Materials
- Sketchbook with smooth or medium-tooth paper (heavyweight preferred)
- HB or 2H graphite pencil (for initial layout)
- 2B or 4B graphite pencil (for shading)
- Ruler
- Compass (optional but recommended)
- Kneaded eraser
- Pencil sharpener
Step 1: Geometric Foundation
-
Establish the frame:
Begin by lightly drawing a large circle that dominates the page. You can freehand this for a loose look, but a compass ensures the precision seen in the example. This circle will contain the portrait. -
Add triangular guides:
Draw faint, straight lines intersecting through the circle to form a loose triangular structure or star shape. These act as construction lines to help center the face and add a dynamic background element. -
Outline the head shape:
Inside the circle, sketch the basic oval shape of the head. Position it slightly off-center, tilting upward to the right, so the neck extends down toward the bottom edge.
Uneven Eyes?
If facial symmetry is tricky, turn your drawing upside down. This tricks your brain into seeing shapes rather than ‘eyes,’ making it easier to spot and fix spacing errors.
Step 2: Facial Features
-
Map facial proportions:
Draw a vertical centerline down the face and a horizontal eye line. Since the face is turning, keep the features on the left side slightly compressed due to perspective. -
Sketch the eyes:
Place the eyes along the horizontal guide. Draw the lids with a crisp, clear line. The gaze should be directed upward and slightly to the left, adding a dreamy quality. -
Draft the nose and mouth:
Sketch a refined nose bridge leading to a small, distinct nostril. Below that, draw the lips, focusing on the shadow under the bottom lip to give it volume. -
Refine the contour:
Strengthen the jawline and chin. Notice how the jawline is sharp and clean, contrasting with the softness we will add to the hair later. -
Shade the face:
Using a 2B pencil, add light, smooth shading to the side of the nose, under the eyebrows, and beneath the chin. Keep the skin shading minimal to maintain that fresh, clean look.
Step 3: The Big Hair Strategy
-
Block in hair volume:
Lightly outline the overall shape of the hair. Let the curls expand outward, breaking the boundary of the main circle in some places while staying contained in others. -
Define the waves:
Start drawing individual locks of hair. Instead of drawing every strand, focus on ‘ribbons’ of hair that wave and curl. Use S-curves to create movement. -
Deepen the shadows:
Switch to your softer 4B pencil. I like to press harder in the crevices where hair clumps together or curves inward. This dark contrast is key to making the curls pop. -
Add texture with hatching:
Use fine hatching lines that follow the direction of the hair growth. This directional stroking gives the hair flow and volume. -
Create highlights:
Leave the tops of the curls white or lift graphite with your kneaded eraser. These highlights should follow the bands of hair to simulate sheen. -
Detail the curls:
Add small, tight ringlets at the ends of the hair, especially on the left side near the neck. These circular motions soften the overall silhouette.
Golden Ratio
Instead of a simple circle, construct a golden spiral or Fibonacci sequence as your frame. Arrange the hair curls to flow along this mathematical curve for subconscious appeal.
Step 4: Final Touches
-
Reinforce the geometry:
Go back over your initial circle and straight lines with a steady hand. Make sure they are visible behind the head but don’t overpower the portrait. -
Cross the spiral:
If working in a spiral-bound book, carefully draw the drawing ‘through’ the binding holes, or simply draw the spiral binding itself as an artistic element if working on flat paper. -
Review contrast:
Step back and check your darks. The darkest points should be the pupils, nostrils, and deep hair recesses. Deepen these if necessary. -
Clean up:
Use your eraser to remove any stray smudges on the face or outside the geometric circle, keeping the negative space crisp.
The mix of precise geometry and organic hair creates a sophisticated sketchbook page you can be proud of
Monochrome-to-Color “Reveal” Design
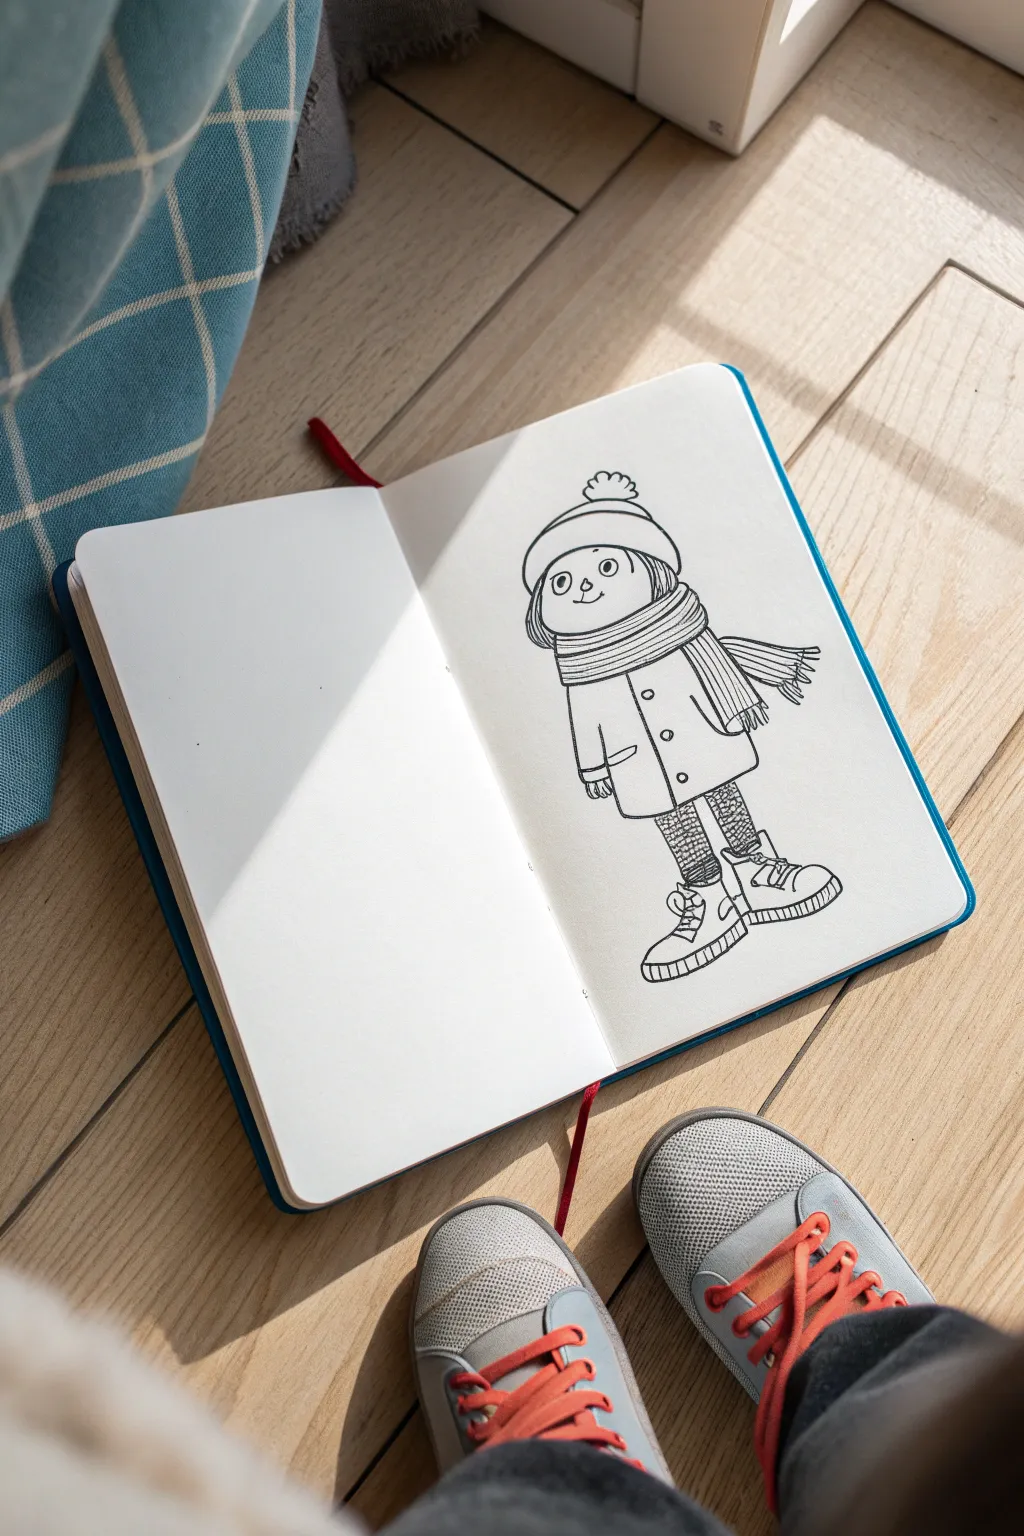
Capture the whimsical charm of cartoon character design with this crisp black-and-white illustration. This project focuses on clean linework and expressive simplicity, perfect for practicing character consistency in your sketchbook.
Step-by-Step
Materials
- Hardcover sketchbook (plain paper)
- Pencil (HB or 2B for sketching)
- Eraser (kneaded or soft vinyl)
- Black fineliner pens (0.3mm and 0.5mm)
- Thicker black marker (optional, for bold outlines)
Step 1: Basic Structure
-
Head shape:
Begin by lightly sketching a wide oval shape for the head. It shouldn’t be a perfect circle; think of a slightly flattened bean shape to give the character personality. -
Adding the hat:
Draw a curved line across the top third of the head for the hat’s brim. Above this, sketch a rounded dome shape for the toque itself. -
Body block:
Below the head, sketch a trapezoid shape for the coat. It should flare out slightly towards the bottom to suggest movement and layers. -
Legs and feet:
Draw two simple stick lines extending from the coat for legs, creating a slight stance. At the end of each, block in chunky oval shapes that will become the winter boots.
Clean Line Confidence
When inking, pull the pen toward your body rather than pushing it away. This gives you more control over the stability of the line and reduces shakiness.
Step 2: Clothing Details
-
The scarf:
Wrap a thick sausage shape around the neck area. Add a trailing end flying off to the right side to suggest a gentle breeze. -
Coat construction:
Refine the coat shape. Add a center line for the buttons and draw small rectangles for pockets near the hips. -
Sleeve definition:
Sketch the arms hanging naturally at the sides. Make the sleeves slightly oversized, ending with simple C-shapes for the hands peeking out. -
Boot structure:
Flesh out the boots. Add a thick sole on the bottom and define the ankle area. Winter boots usually look a bit oversized, so don’t be afraid to make them chunky.
Add a Splash
To mimic the ‘Animator’s Palate’ effect, color only one element, like the red scarf or yellow boots, leaving the rest in black and white.
Step 3: Inking the Drawing
-
Start fresh:
Take your 0.5mm fineliner. Begin outlining the main shapes like the head and coat. Use smooth, continuous strokes rather than sketching chicken-scratch lines. -
Face features:
Switch to a 0.3mm pen for delicate details. Draw two wide, oval eyes with small dots for pupils. Add a tiny triangle nose and a simple curved smile. -
Hat texture:
Outline the hat. At the very top, draw a fuzzy circle using small, zig-zag motions to create the texture of a yarn pom-pom. -
Scarf lines:
Ink the scarf outline. Inside the scarf, add parallel lines following the curve of the fabric to create a ribbed texture. Add fringe lines at the end of the flying scarf tail. -
Coat details:
Ink the coat pockets and the central button line. Draw small circles for the buttons. -
Leggings texture:
On the legs, draw a cross-hatch pattern or a tight knit texture to simulate wool leggings or socks. This contrast distinguishes the legs significantly from the smooth coat. -
Boot treads:
Outline the boots firmly. Add vertical lines along the thick soles to indicate heavy winter treads. Draw laces or flaps if your design calls for them.
Step 4: Final Polish
-
Erase pencil:
Wait for the ink to become completely dry to the touch to avoid smearing. Gently erase all your underlying pencil guide lines. -
Enhance weight:
Using the thicker marker or going over lines with the 0.5mm pen, thicken the outer silhouette of the entire character. This separates the figure from the background. -
Final check:
Look for any broken lines that need connecting, particularly around the scarf edges and the coat hem.
Now you have a charming winter character ready to explore the snowy pages of your sketchbook
Food-Themed Character Costume
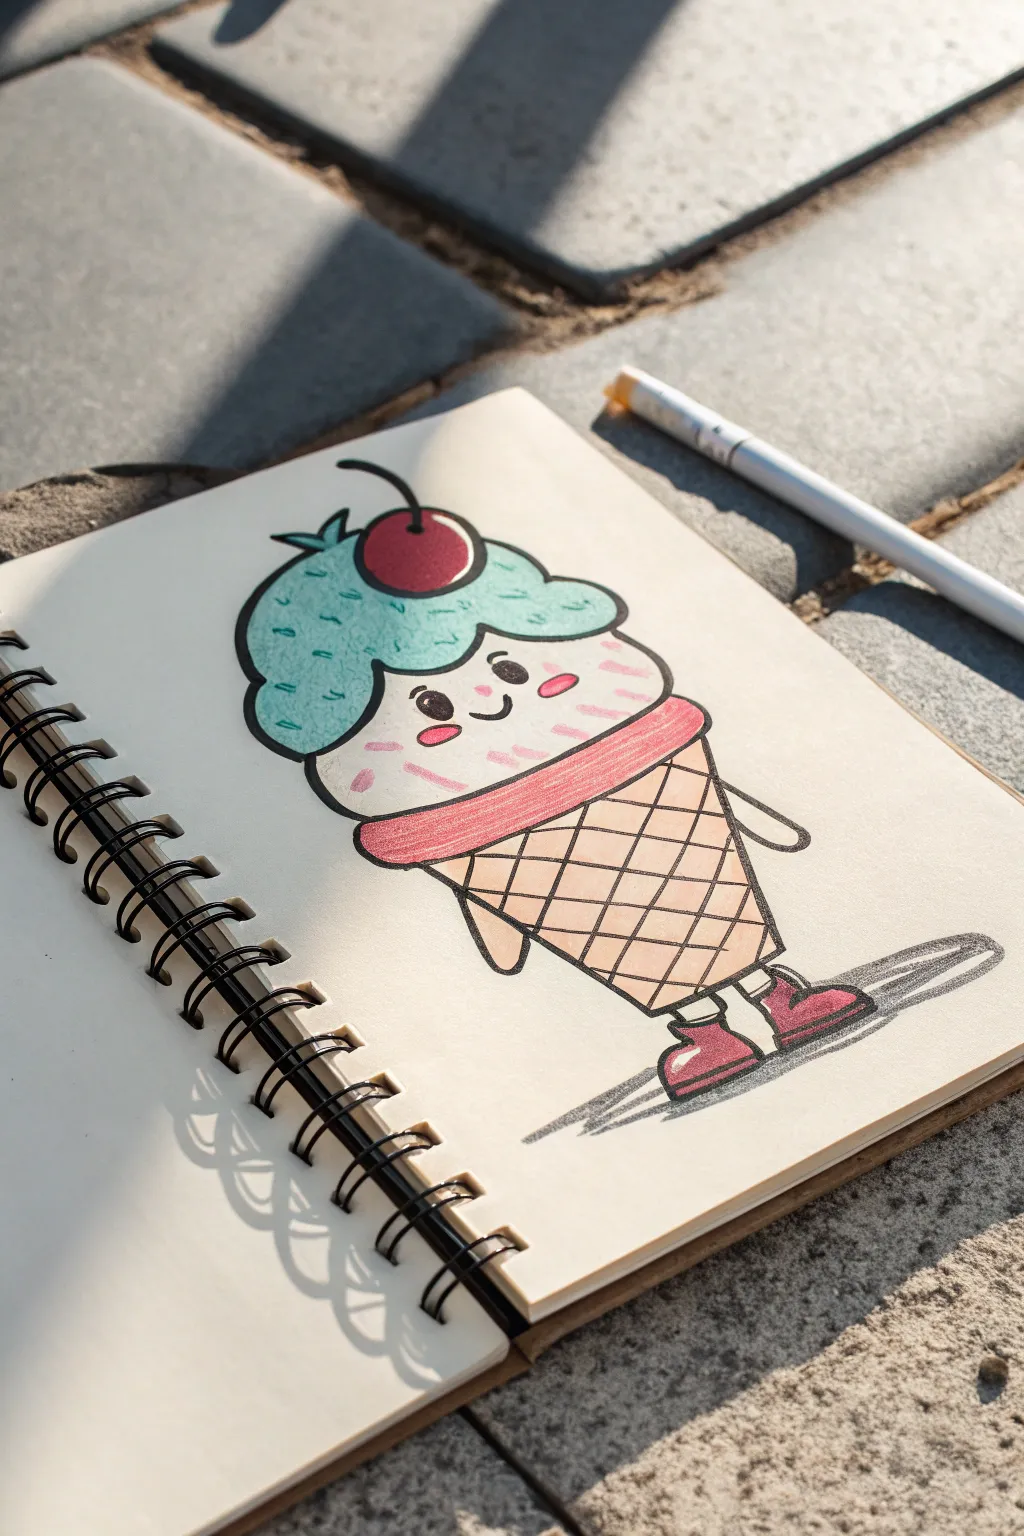
This adorable ice cream cone character brings sweet charm to your sketchbook with its kawaii-style face and jaunty boots. Using clean ink lines and soft color blocking, you’ll create a lively food-themed mascot that seems ready to walk right off the page.
Detailed Instructions
Materials
- Sketchbook or drawing paper
- Pencil (HB or similar for sketching)
- Eraser
- Fine-point black liner pen (0.5mm to 0.8mm)
- Colored pencils or alcohol markers (Mint Green, Light Pink, Dark Pink, Peach/Tan, Dark Red)
- White gel pen (optional for highlights)
Step 1: Basic Sketching
-
Outline the head:
Start near the top of your page by drawing a fluffy, cloud-like shape for the top scoop of ice cream. It should be wider at the bottom and bumpy on top to look like soft serve. -
Add the cherry:
Sit a perfect circle in the middle of the ‘cloud’ shape’s top dip. Draw a curved stem coming out of the center and arching slightly to the left. -
Draw the rim:
Beneath the blue scoop, sketch a wider, rounded rectangle shape for the cone’s rim. Think of it like a thick belt or collar that the ice cream sits in. -
Form the cone body:
Draw a V-shape coming down from the rim, but flatten the point at the bottom so the cone has a flat base to stand on. -
Add limbs:
Sketch two simple tube-like arms sticking out from the side of the cone. For the legs, draw two short lines extending from the flat bottom of the cone. -
Sketch the boots:
Draw cute little boots on the legs. Give them rounded toes and a cuff at the top. Position them slightly apart for a stable stance. -
Create the face:
In the center of the ‘face’ area (below the cloud scoop but above the rim), lightly enable two oval eyes and a small U-shaped smile right between them.
Step 2: Refining and Inking
-
Ink the main outlines:
Go over your pencil sketch with a black liner pen. Use a confident, consistent pressure. Make the outline of the ice cream scoop slightly wavy to emphasize texture. -
Detail the cone pattern:
Draw diagonal lines across the cone body in one direction, then cross them in the other direction to create a classic waffle grid pattern. -
Ink the facial features:
Fill in the eyes with black ink, leaving a tiny white dot in each for a sparkle. Trace the smile and add small oval blush marks on the cheeks. -
Add the shadow:
Draw a messy, oblong shape beneath the boots to represent the ground shadow. Outline this loosely. -
Clean up:
Wait a moment for the ink to dry completely, then gently erase all your underlying pencil sketches so the page looks crisp.
Uneven Ink Lines?
If your hand shakes while inking the long cone lines, try to move your whole arm from the elbow rather than just your wrist for smoother strokes.
Step 3: Coloring
-
Color the top scoop:
Using a mint green or teal pencil, color the cloud-shaped top scoop. Keep the strokes even. Add little darker flecks or V-shapes for texture if you like. -
Color the cherry and rim:
Use a deep red for the cherry and a softer, dusty pink or light red for the thick rim of the cone. -
Shade the face:
Color the face area (the second scoop) with a very pale pink or cream. Add a slightly darker pink to the blush marks on the cheeks. -
Fill the cone:
Use a peach or light tan color for the waffle cone body. I find that pressing harder near the edges gives the cone a nice rounded look. -
Finish the boots:
Color the boots with a dark magenta or reddish-purple to make them pop against the lighter cone colors. -
Add ground shadow:
Use a grey pencil or marker to fill in the shadow shape beneath the feet. Use horizontal strokes to make it look flat against the ground.
Highlight Hack
Use a white gel pen to add a tiny slick shine to the cherry and the rounded tips of the boots after the color ink has fully dried.
Now your sweet character is ready to add a cool vibe to any sketchbook page
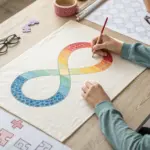
Abstract Geometric “Animation-Proof” Style
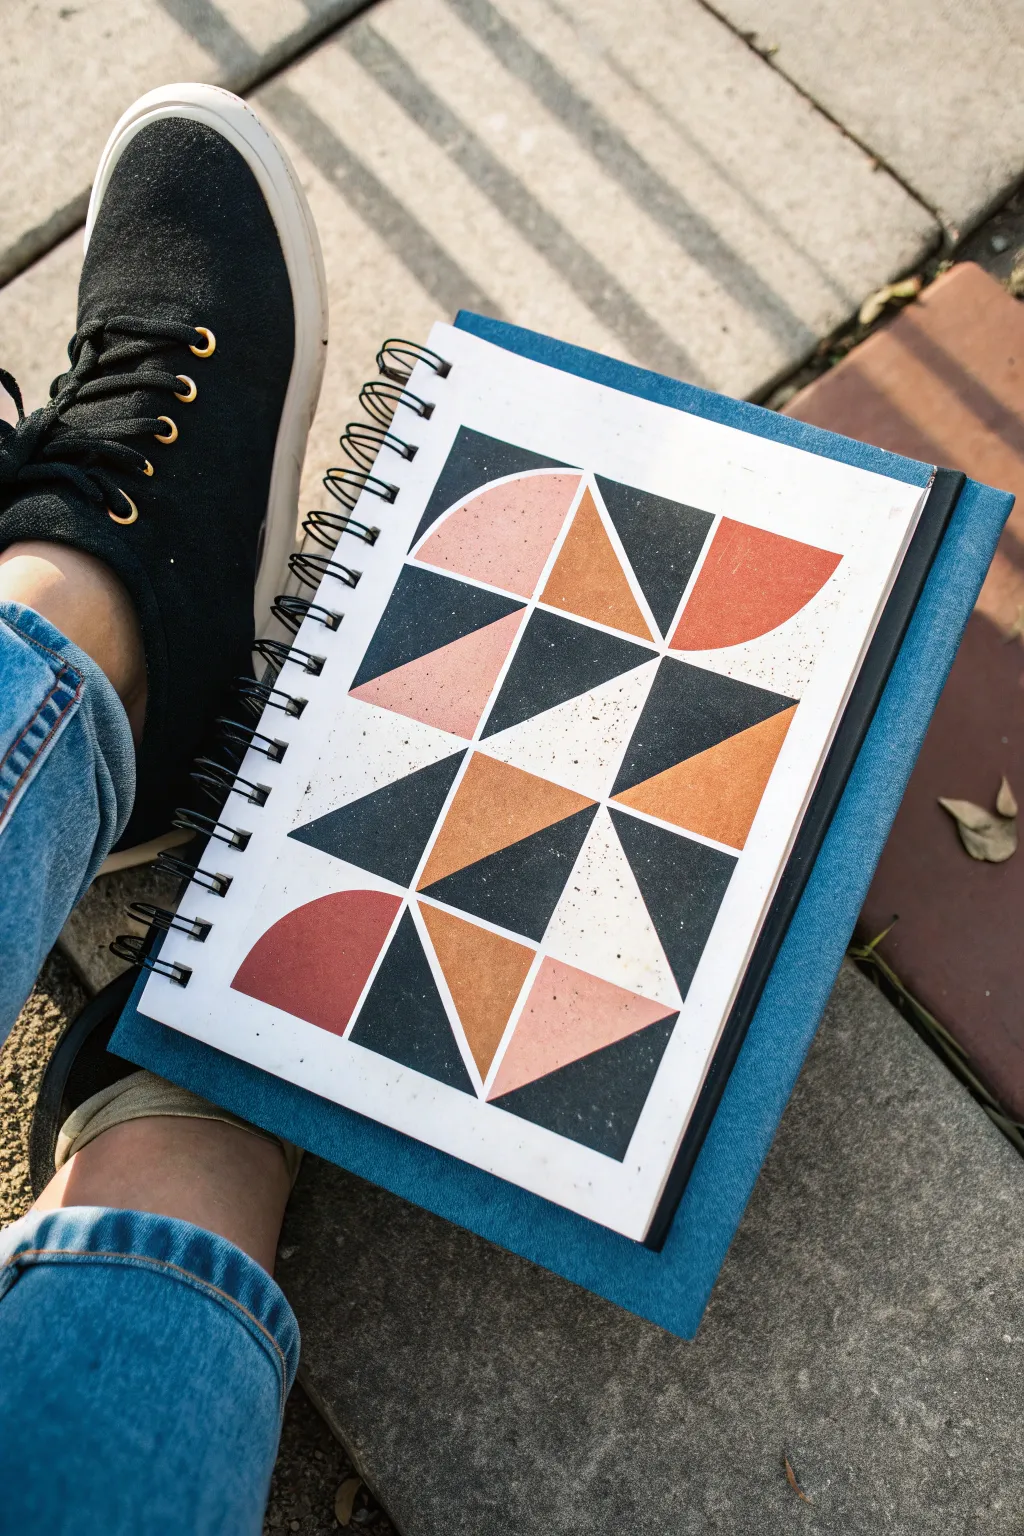
Embrace the beauty of meaningful shapes with this clean, earthy geometric composition that balances structure with organic texture. By using a limited palette of charcoal, terracotta, and peach, you’ll create a striking grid-based design that feels both retro and undeniably modern.
Step-by-Step
Materials
- Spiral-bound mixed media or watercolor sketchbook (heavyweight paper)
- Ruler or straight edge
- Compass or circle stencil
- Pencil (HB or H for light lines)
- Eraser
- Acrylic gouache or matte acrylic paints (Black/Charcoal, Terracotta/Burnt Orange, Peach/Light Pink)
- Small flat brush (size 4 or 6)
- Fine detail brush (size 0 or 1)
- Old toothbrush (for speckling)
- Masking tape (optional, but helpful for crisp edges)
Step 1: Grid Construction
-
Plan the layout:
Begin by analyzing the page dimensions. You want to create a grid that feels balanced; for this specific design, aim for a 3×4 grid structure (3 columns, 4 rows). -
Draw the main grid:
Using your ruler and a pencil with a very light hand, draw the vertical and horizontal lines to establish your twelve main rectangular zones. Keep these lines faint so they are easy to erase later. -
Subdivide the spaces:
Look closely at the reference. Many of the rectangles are split diagonally to create triangles. Lightly sketch these diagonal bisecting lines where needed. -
Add circular elements:
Identify the blocks that contain curves—specifically the quarter-circles in the corners and center. Use a compass set to width of your grid square, or a circle stencil, to sketch these dynamic ‘pie slice’ shapes. -
Define the negative space:
Mark the areas that will remain white with a small ‘W’ or dot. This mental map is crucial so you don’t accidentally paint over the ‘breathing room’ in the composition.
Clean Lines, No Tape
If painting straight lines freehand creates anxiety, use the edge of a credit card or a sturdy piece of cardstock as a movable shield while painting the straight edges.
Step 2: Painting the Shapes
-
Start with the darkest tones:
Mix a deep charcoal or soft black. Using your flat brush, carefully fill in the dark triangular and square sections. The flat edge of the brush is perfect for getting right up to your pencil lines. -
Apply the mid-tones:
Switch to your terracotta or burnt orange paint. Fill in the specific triangles and quarter-circles designated for this warmth. I find it helps to rotate the sketchbook to get the best angle for your hand. -
Fill the light accents:
Clean your brush thoroughly and pick up the peach or light pink shade. Paint the remaining colored sections. Allow this layer to be opaque; you may need a second coat depending on your paint quality. -
Refine the edges:
Once the main shapes are blocked in, use your fine detail brush to sharpen any wobbly lines or corners where the colors meet the white negative space.
Step 3: Texturing and Finishing
-
Prepare the speckle mix:
Dilute a small value of your black or charcoal paint with water until it has an inky consistency. -
Test the spatter:
Dip an old toothbrush into the diluted paint and run your thumb across the bristles over a scrap piece of paper to test the density of the spray. -
Apply texture:
Gently spatter fine droplets over the entire painting. This unifies the clean geometric shapes with an organic, stone-like texture. Focus slightly more on the white areas to break up the brightness. -
Erase guidelines:
Allow the paint—including the tiny speckles—to dry completely. Gently run a kneaded eraser over the exposed white areas to remove any visible pencil grid lines. -
Final assessment:
Check the composition at arm’s length. If any white negative spaces feel too cluttered with accidental paint smudges, you can touch them up with a bit of opaque white gouache.
Blobs Instead of Speckles?
If your toothbrush spatters are too large, your paint is likely too watery or the brush is overloaded. Blot the bristles on a paper towel before spraying the paper.
Now you have a piece of geometric art that looks professionally printed but retains the charm of hand-painted texture

Have a question or want to share your own experience? I'd love to hear from you in the comments below!