When you’re stuck on what your character should wear, anime clothes are the fastest way to spark a whole personality on the page. I pulled together my favorite anime clothes drawing ideas—from classic staples to wild, stylized outfits—so you can fill your sketchbook with options fast.
School Uniform Silhouettes
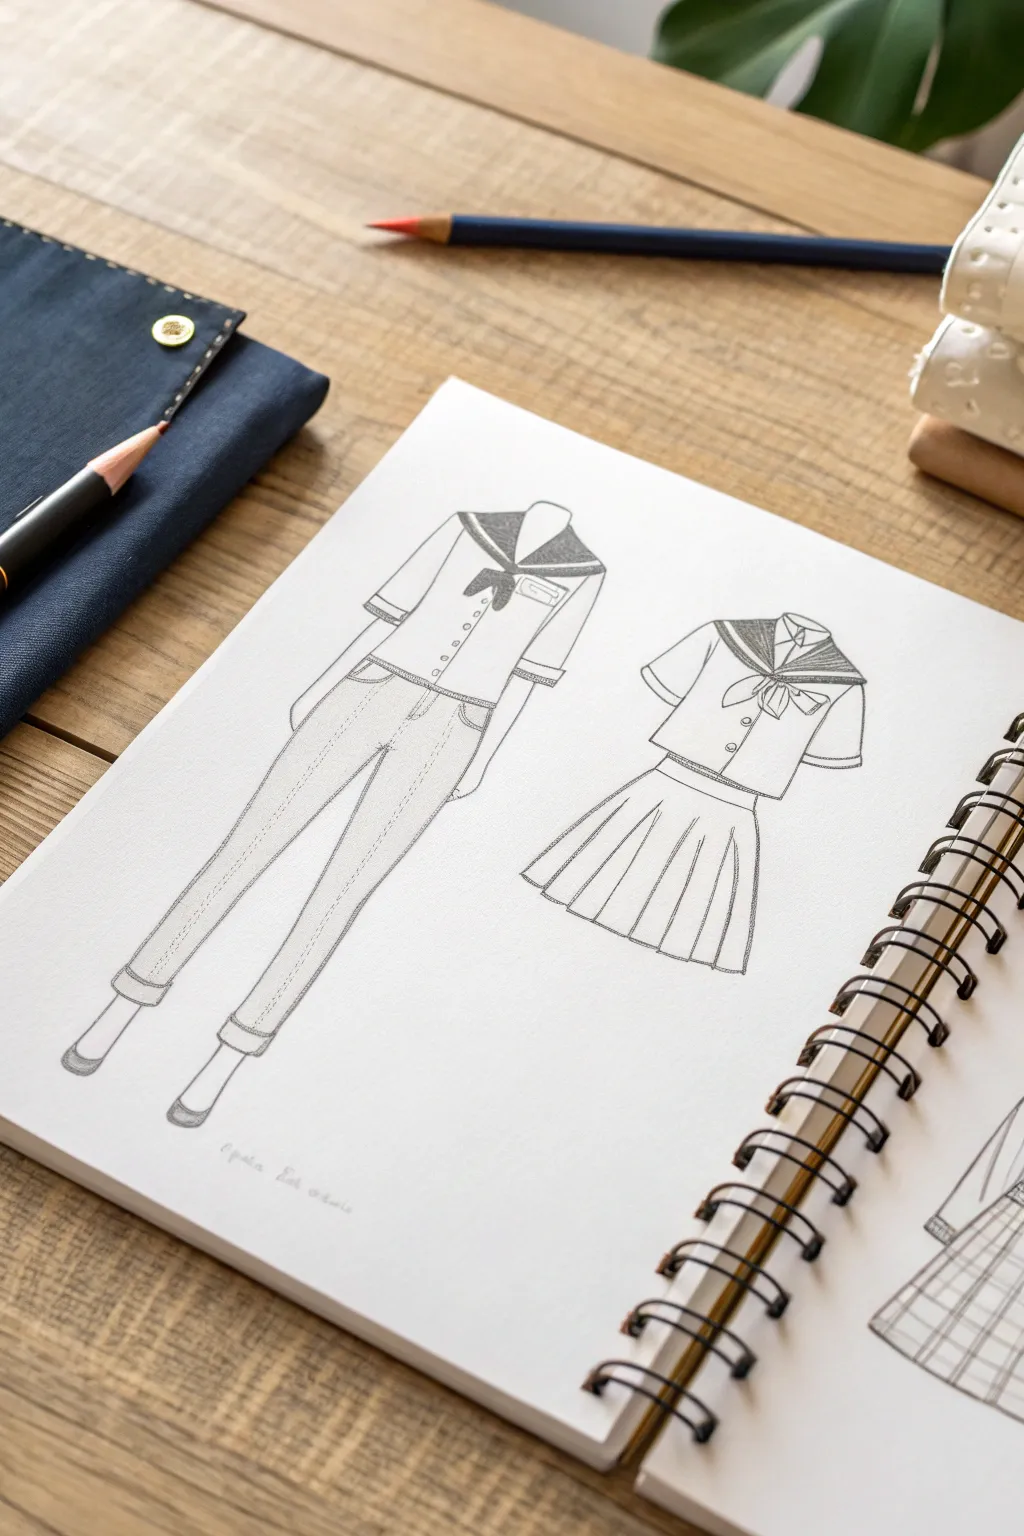
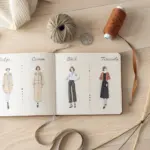
Learn to draw iconic Japanese school uniform silhouettes with clean, confident pencil lines. This tutorial guides you through sketching two distinct variations—a practical pants style and the classic sailor uniform with a pleated skirt—capturing the delicate folds and structure of anime fashion.
Step-by-Step Tutorial
Materials
- Sketchbook or high-quality drawing paper (smooth surface preferred)
- HB or 2B graphite pencil
- Mechanical pencil (0.5mm) for fine details
- Fine-point eraser or kneaded eraser
- Ruler (optional, for pleats and hems)
Step 1: Laying the Foundations
-
Establish the mannequins:
Begin by lightly sketching two faint center lines to establish the vertical axis for each outfit. For the left outfit, draw a simple stick-figure structure for the torso and long legs. For the right outfit, focus just on the torso and hip area where the skirt will flare out. -
Block in the masses:
Using very light geometric shapes, block in the main clothing parts. Draw trapezoids for the shirts, long rectangles for the pant legs on the left, and a flared trapezoid for the skirt on the right. Keep these lines loose; they are just guides. -
Define the necklines:
Sketch the prominent ‘V’ shape for the collar opening on both shirts. This is crucial for the sailor uniform look. Add the back flap of the collar (the sailor collar) resting behind the neck area.
Step 2: Drafting the Left Outfit (Pants Style)
-
Shape the shirt:
Refine the shirt on the left figure. Draw the short sleeves, adding a small cuff detail at the bottom of each sleeve. I like to curve the bottom hem of the shirt slightly upward to suggest the volume of the body underneath. -
Sketch the tie and details:
Add the small tie or scarf loop where the V-neck meets. Draw a row of small circles down the center front for buttons and a small rectangular pocket on the chest. -
Contour the pants:
Outline the trousers, tapering them slightly toward the ankle. Instead of perfectly straight lines, use long, gentle curves to mimic the fabric draping over the leg. -
Add fabric weight:
At the bottom of the pants, sketch a rolled cuff. Draw the simple shapes of loafers or shoes at the very bottom to ground the figure. -
Draw the seams:
Lightly sketch a center seam line down each pant leg. This adds a tailored, formal look to the uniform.
Wobbly Lines?
If your skirting pleats look uneven, use a ruler to mark the bottom hem points first creates a guide. Connect these dots to the waist for perfect spacing.
Step 3: Drafting the Right Outfit (Skirt Style)
-
Refine the top:
On the right figure, tighten the lines of the sailor top. Make the collar flap distinct with a double-line border. Draw the bow tie in the center with soft loop shapes. -
Structure the waistband:
Draw the waistband of the skirt just below the shirt hem. It should curve slightly downward to follow the form of the waist. -
Create the pleats:
This is the trickiest part. Start by drawing the bottom hem of the skirt as a zig-zag line. Then, connect the upper points of the zig-zag up to the waistband with straight lines to create the knife pleats. -
Detail the collar:
Add the classic stripe detail to the sailor collar on the right outfit using steady, parallel lines. This signature detail instantly recognizes the outfit as a seifuku.
Make It Unique
Try varying the collar styles! Change the standard sailor collar to a blazer lapel or a cardigan sweater to create different seasonal uniform variations.
Step 4: Refining and Shading
-
Clean up the linework:
Take your eraser and gently remove the initial construction lines and geometric guides, leaving only the clothing outlines. -
Darken the main lines:
Switch to your mechanical pencil or sharpen your 2B pencil. Go over the final outlines with a confident, darker stroke to make the drawing pop. -
Add fold details:
Add small, controlled creases near the armpits, the elbows (if visible), and where the shirt tucks or hangs. These short, quick strokes suggest fabric tension. -
Apply gentle shading:
Lightly shade the interior of the back collar and the pleats on the right skirt to show depth. Use a simple hatching technique (parallel diagonal lines) for a clean, manga-style look. -
Texture the pants:
Add very light vertical hatching on the pants to suggest a different fabric texture, perhaps denim or heavy cotton, compared to the smoother shirt. -
Final polish:
Make sure your button details are distinct and the shoe outlines are crisp. Add a faint shadow on the ground beneath the feet to anchor the drawing.
Now you have a pair of cleanly sketched uniform designs ready to be evolved into full character illustrations

Pleated Skirt Fold Map
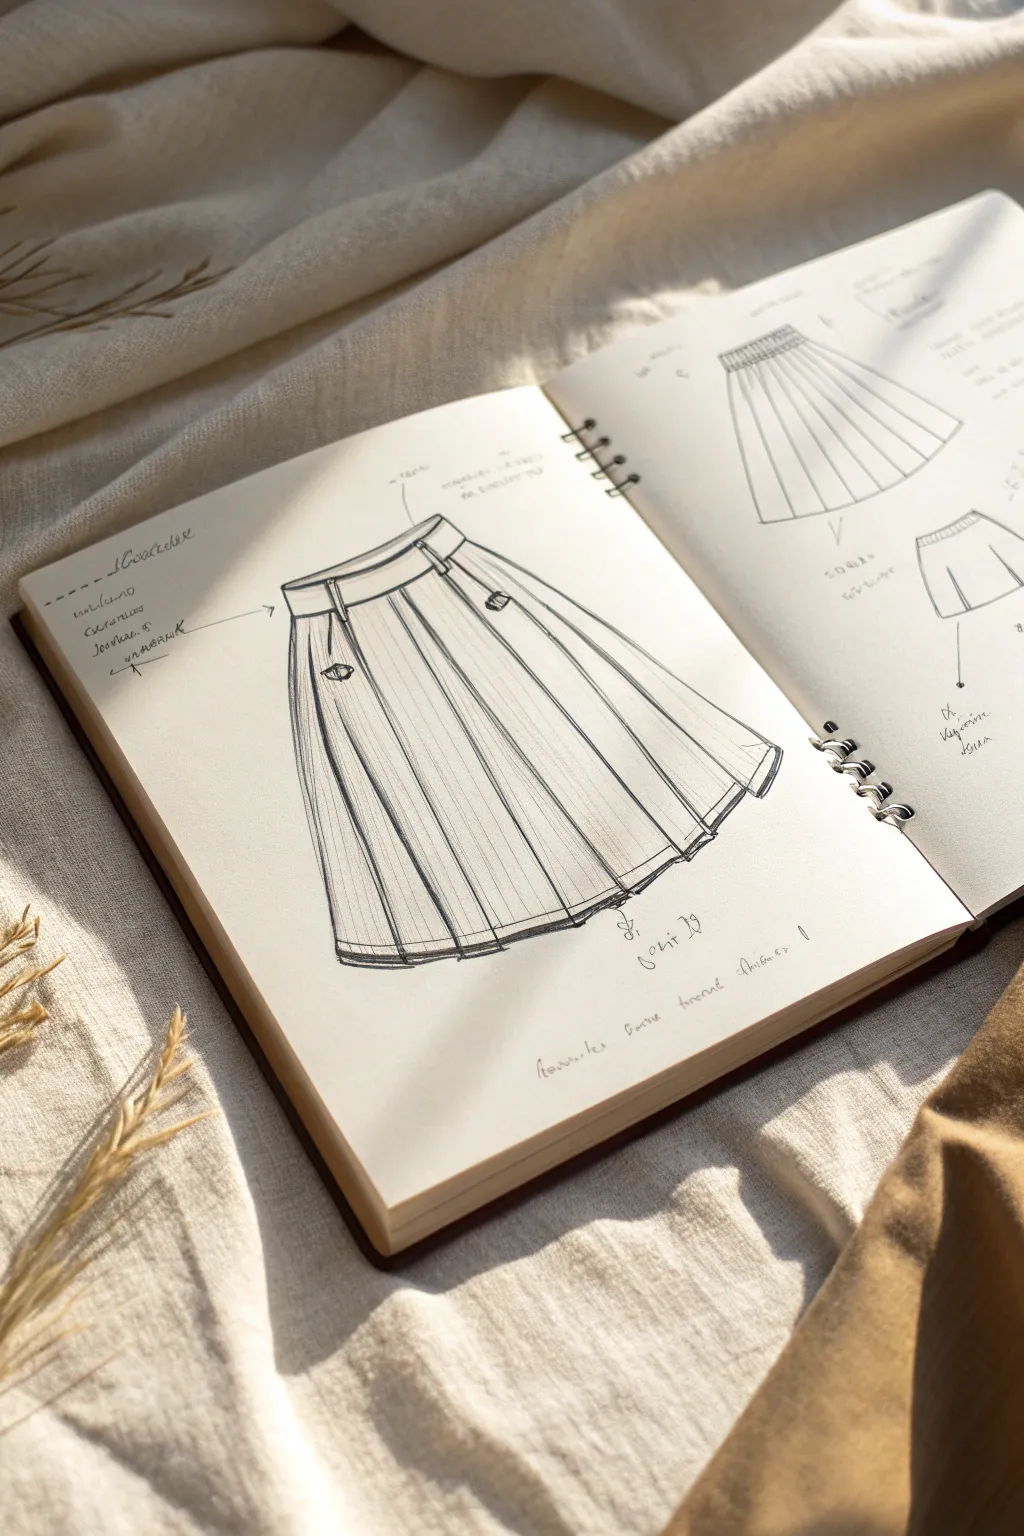
Master the art of fabric folds with this study of a classic knife-pleated skirt, focusing on structure and flow. This pencil sketch captures the crisp lines and soft draping essential for realistic anime clothing design.
Detailed Instructions
Materials
- Sketchbook or drawing paper (smooth texture preferable)
- HB pencil for initial outlines
- 2B or 4B pencil for shading and depth
- Fine-liner pen (optional, for final inking)
- Kneaded eraser
- Ruler (optional, but helpful for structure)
Step 1: Drafting the Basic Structure
-
Establish the Waistline:
Start by drawing a slightly curved horizontal line for the top of the waistband. Draw a parallel curved line about an inch below it to create the width of the band. -
Define the Skirt Silhouette:
From the ends of your waistband, draw two lines angling outward to define the A-line shape of the skirt. These lines should frame how wide the skirt will flare out. -
Curve the Hemline:
Connect the bottom ends of your silhouette lines with a gentle curve. This curve should mirror the curve of the waistband to give the drawing a sense of volume and perspective. -
Mark the Pleat Intervals:
Along the bottom edge of the waistband, make small, evenly spaced tick marks. These will serve as anchor points for where each pleat originates.
Pleat Logic
Remember the ‘Z’ rule: looking at the hem from below, knife pleats look like a zig-zag. Ensure your hemline connects the vertical lines in this saw-tooth pattern.
Step 2: Developing the Pleats
-
Draw the Outer Folds:
From each tick mark on the waistband, draw a long, straight line down toward the hem. These lines represent the outer edge of each pleat. -
Create the Inner Folds:
Beside each outer fold line, draw a secondary line that tucks slightly underneath the previous one. This creates the ‘z’ shape characteristic of knife pleats. -
Detail the Hem:
At the bottom hemline, connect your vertical lines with a zigzag pattern. The outer fold lines should come forward, while the inner fold lines recede back, creating a saw-tooth edge. -
Add Waistband Details:
Draw small vertical loops or rectangles on the waistband for belt loops. I find adding a button closure on the side adds realistic functionality to the design.
Lines look stiff?
Avoid using a ruler for the final vertical lines. A slightly shaky or curved freehand line looks more like draped fabric than a rigid architectural line.
Step 3: Shading and Finishing Touches
-
Clean Up Guidelines:
Use your kneaded eraser to gently lift away any construction lines or heavy graphite smudges, leaving only your defined pleat lines. -
Identify Shadow Areas:
Visualize a light source coming from the top left. This means the right side of each individual pleat (the part tucking under) will be in shadow. -
Apply Base Shading:
Using the side of your 2B pencil, lightly shade the recessed areas between the pleats. Keep the pressure light to maintain a soft fabric look. -
Deepen the Shadows:
Go back over the darkest areas—specifically right under the waistband and deep inside the folds near the hem—with firmer pressure to create contrast. -
Refine the Line Weight:
Darken the outer contour lines of the skirt and the waistband to make the drawing pop off the page. The lines separating the pleats should remain slightly thinner. -
Add Fabric Texture:
Sketch very faint, vertical hatching lines along the flat surfaces of the pleats. This suggests the weave of the fabric without overwhelming the drawing. -
Annotation:
For that authentic fashion-sketch aesthetic, draw small arrows pointing to details like pockets or stitching, labeling them with cursive script.
Now you have a structured reference sketch ready to be adapted into any anime character’s wardrobe

Button-Up Shirts and Tie Options
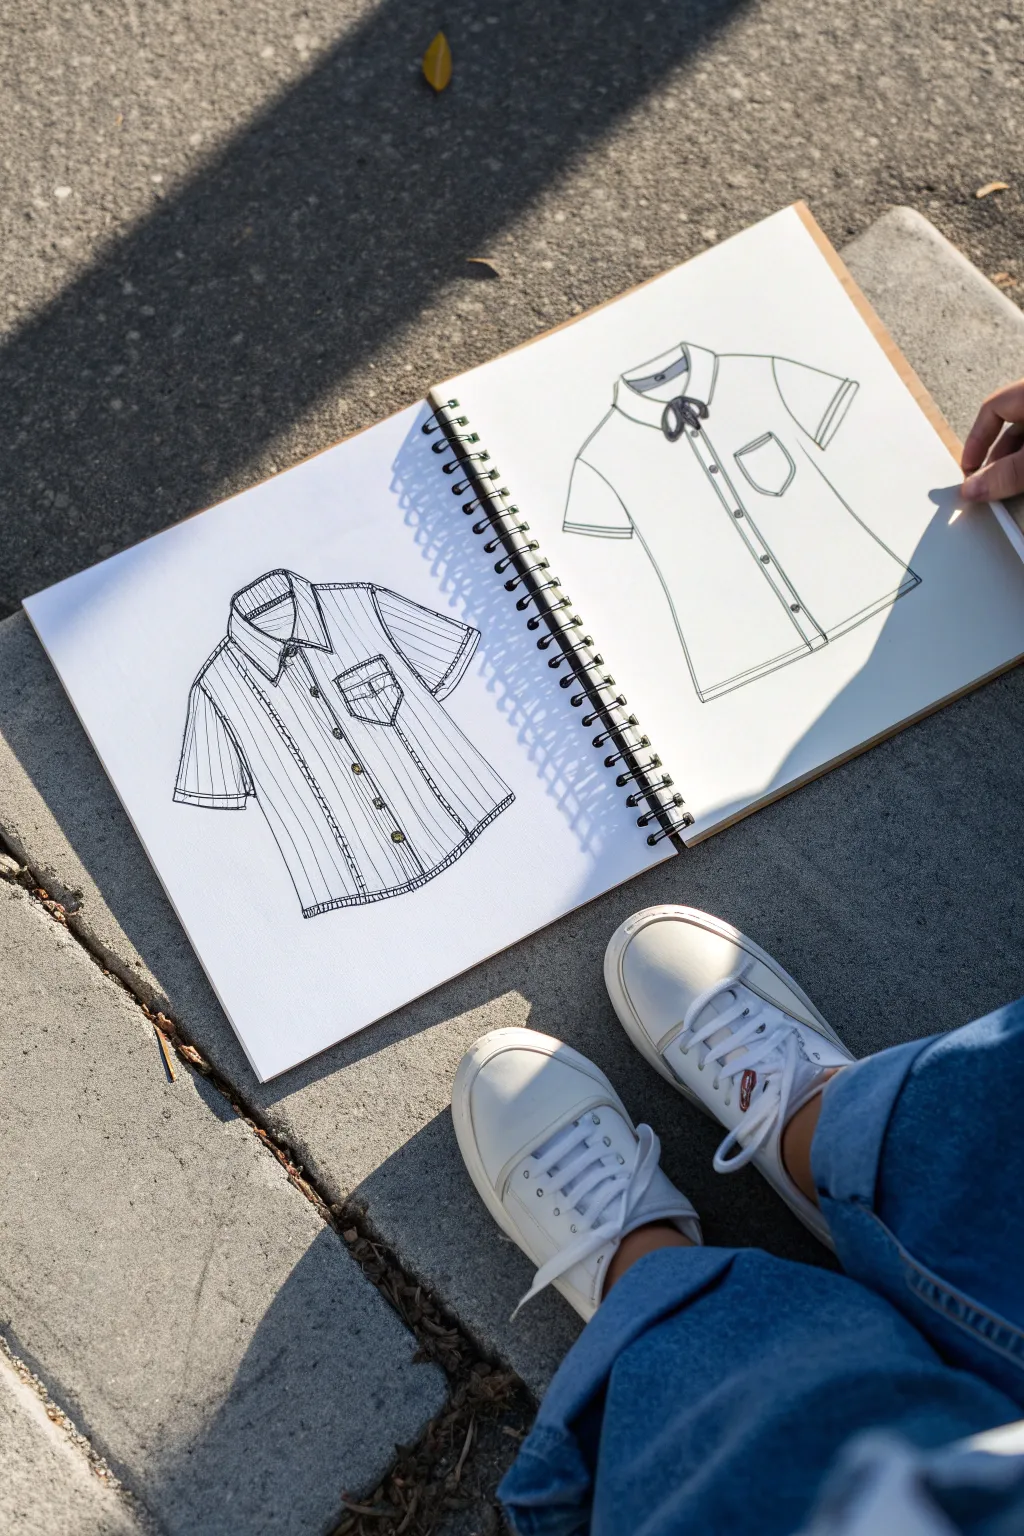
Learn to draw two distinct styles of anime-inspired button-up casual shirts, capturing both structure and relaxed fabric folds. This tutorial guides you through sketching a detailed striped shirt and a simpler design with a bow tie, perfect for expanding your character’s wardrobe concept art.
How-To Guide
Materials
- Spiral-bound sketchbook with smooth paper
- Fine liner pens (0.1mm, 0.3mm, 0.5mm)
- HB or 2B pencil for sketching
- Soft hi-polymer eraser
- Ruler (optional for straight lines)
Step 1: Drafting the Basic Forms
-
Outline the striped shirt torso:
Start on the left page. Lightly sketch a slightly trapezoidal shape for the main body of the shirt, keeping the bottom hem slightly curved to suggest volume. -
Add sleeves and collar base:
Draw angled rectangles for the short sleeves. Sketch a ‘V’ shape for the neckline where the collar will sit, ensuring the shoulders slope gently downward. -
Outline the right-side shirt:
Move to the right page. Repeat the torso sketching process, but make this silhouette slightly more fitted at the waist for a feminine cut. -
Define the second collar:
Sketch a rounded collar shape on the right shirt and add a small ribbon loop at the center of the neck to establish the accessory placement.
Wobbly Stripes?
If hand-drawing stripes is difficult, lightly pencil grid lines first to guide spacing. Follow the shirt’s curve; straight ruler lines look flat.
Step 2: Refining the Left Shirt (Striped)
-
Detail the collar structure:
Using your pencil, define the sharp points of the collar tabs and the back stand. Add the placket (the button strip) running down the center front. -
Draw the pocket:
Place a patch pocket on the left chest area. I like to angle the top flap slightly to match the perspective of the shirt body. -
Ink the main outlines:
Switch to a 0.5mm fineliner. Smoothly trace the outer silhouette, the collar, and the pocket edges. Use confident strokes to avoid wobbly lines. -
Add the stripes:
With a thinner 0.1mm or 0.3mm pen, draw the vertical stripes. Follow the curve of the shirt’s form; these lines shouldn’t be perfectly straight but should wrap slightly around the body. -
Button details:
Draw small circles down the central placket. Add a tiny ‘X’ or four dots inside each button for realism. -
Stitching lines:
Add dashed lines along the hem, sleeve edges, and pocket flaps to represent top-stitching. This adds a great textural feel.
Fabric Texture
Use varied line weights. Thick outer lines suggest heavy fabric, while thin, broken interior lines suggest soft, lightweight blends.
Step 3: Refining the Right Shirt (Ribbon Tie)
-
Ink the silhouette:
Using the 0.5mm pen, ink the outer lines of the second shirt. Keep the hemline clean and singular. -
Define the ribbon:
Carefully ink the bow tie at the collar. Use teardrop shapes for the loops and flowing lines for the dangling ends to suggest soft fabric. -
Add the pocket:
Draw a rounded patch pocket on the chest. Unlike the first shirt, keep this one simple with just a single outline. -
Placket and buttons:
Draw the center front line. Space out small, simple circle buttons down the front, ensuring they align with the center of the shirt. -
Seam details:
Add a thin line at the cuff of the sleeve to show the hem. You can add subtle stress folds near the armpits to imply movement.
Step 4: Final Touches
-
Erase pencil marks:
Wait until the ink is completely dry to prevent smudging. Gently erase all underlying pencil sketches from both drawings. -
Enhance line weight:
Go back with your 0.5mm pen and thicken the lines on the underside of the sleeves and collar to create a subtle shadow effect. -
Cross-hatching details:
On the darker striped shirt, add tiny cross-hatching inside the collar or under the pocket flap to create depth and contrast.
Now you have a reference sheet ready for designing stylish anime outfits


Oversized Hoodie Layering
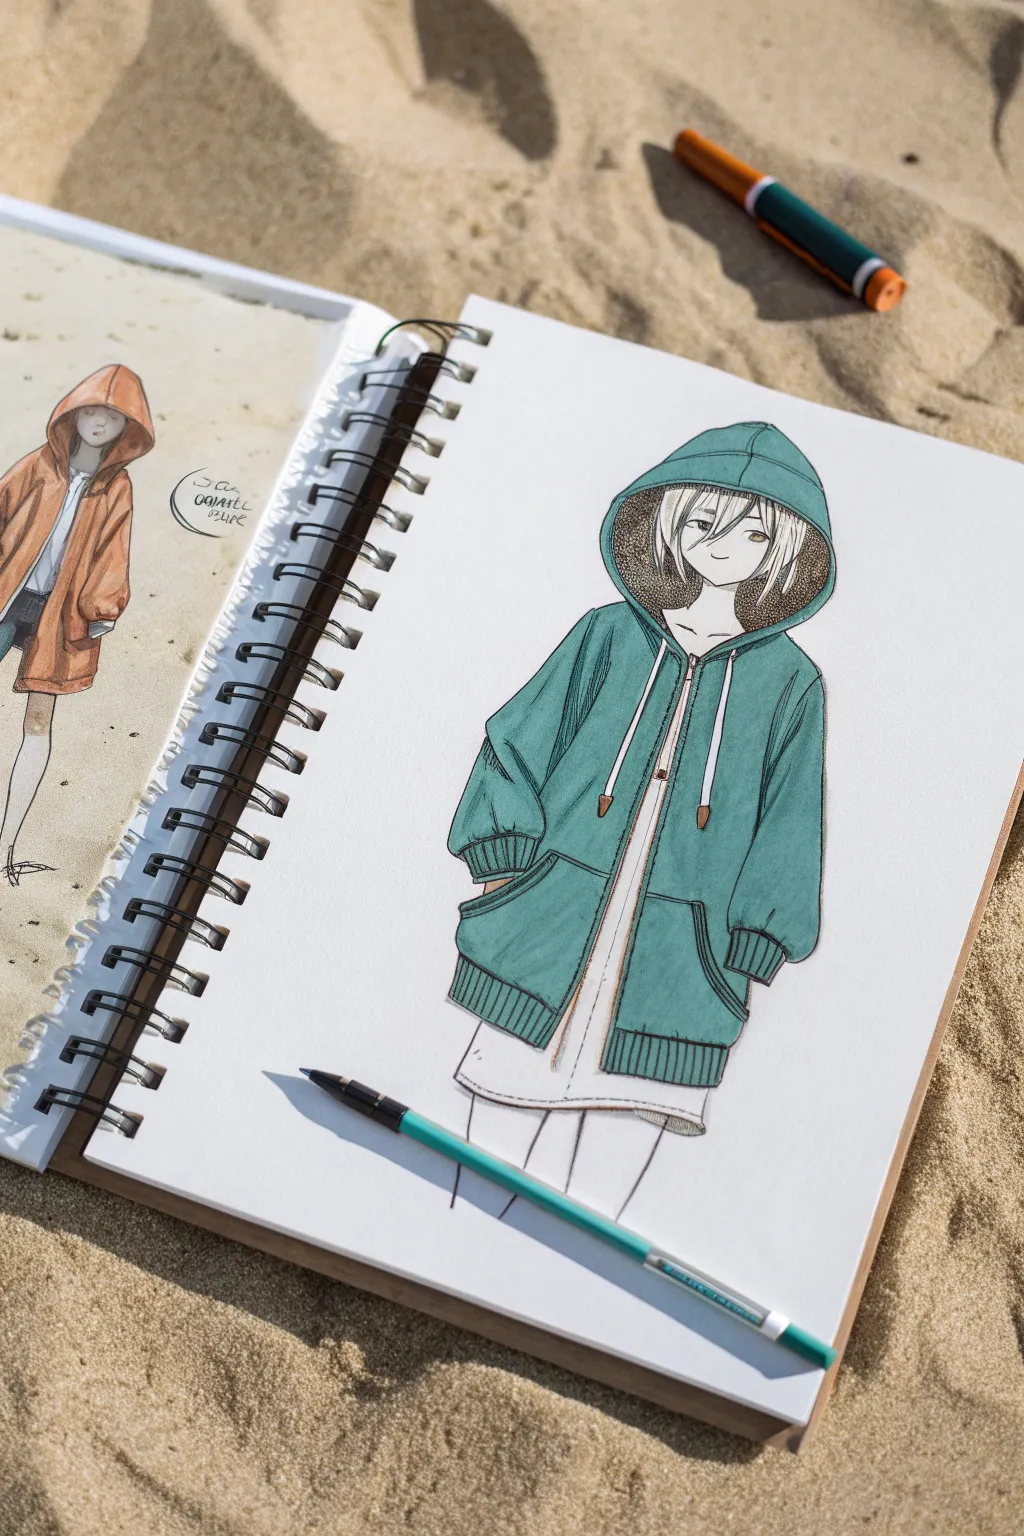
Capture the laid-back vibe of streetwear with this tutorial on drawing an anime character in a slouchy, oversized hoodie. You’ll focus on mastering fabric folds, volume, and layering techniques to create a comfortable, fashionable look.
Step-by-Step
Materials
- Sketchbook or Mixed Media Paper
- HB Pencil
- Fine Liner Pens (0.1mm, 0.3mm, 0.5mm)
- Alcohol Markers (Teal, Warm Grey, Skin Tones, Brown)
- White Gel Pen
- Eraser
Step 1: Drafting the Pose and Volume
-
Basic Framework:
Begin with a light pencil sketch of the character’s body. Since the hoodie is oversized, you don’t need intense muscle detail, but establishing the shoulder width and hip placement is crucial for how the fabric will hang. -
Hoodie Outline:
Draw the main shape of the hoodie over the body frame. Exaggerate the width; the shoulder seams should drop well below the actual shoulders to emphasize the ‘oversized’ fit. -
Adding the Hood:
Sketch the hood resting around the head. Make sure it looks spacious, framing the face loosely rather than hugging the skull tightly. Add the inner lining shape visible near the neck. -
Sleeve Volume:
Draft large, billowy sleeves. They should be widest near the elbow and taper slightly into the ribbed cuffs. Let the fabric bunch up slightly above the cuffs to suggest weight.
Fabric Weight Tip
For oversized clothes, keep fold lines long and smooth rather than short and jagged. This mimics heavy, soft cotton rather than thin, crisp material.
Step 2: Refining Details and Inking
-
Zip and Pockets:
Draw the central zipper line, keeping it slightly open to reveal the layer underneath. Add large kangaroo pockets near the bottom hem, ensuring the openings slant comfortably for hands. -
Drawstrings and Cuffs:
Add thick drawstrings hanging from the hood grommets. Sketch the vertical ribbing lines on the bottom hem and the sleeve cuffs. -
Create Folds:
Add fold lines where the fabric would naturally sag—specifically at the elbows, under the armpits, and where the pockets bulge slightly. Gravity is key here. -
Inking the Lines:
Go over your pencil sketch with a 0.3mm fine liner. Use varying line weight: thicker lines for the outer silhouette and the bottom of the hoodie, and thinner lines for internal details like fabric folds and zipper teeth. -
Texture Detailing:
Use a 0.1mm pen to add very fine hatching or stippling inside the hood to suggest a fuzzy or fleece lining texture. Erase all pencil marks once the ink is fully dry.
Level Up: Pattern Play
Add a simple repeating pattern, like stripes or little stars, to the shirt underneath the hoodie to make the layering pop even more.
Step 3: Coloring and Shading
-
Base Skin Tone:
Apply a light skin tone marker to the face and legs. Keep it flat and even for now. -
Hoodie Base Layer:
Color the entire hoodie with a medium teal alcohol marker. Work quickly to avoid streak marks, saturating the paper evenly. -
Shading the Fabric:
Using a slightly darker teal or a cool grey, add shadows to the hoodie. Focus on areas where the fabric overlaps: under the hood, beneath the sleeves, inside the pockets, and along the zipper line. -
Underlayer and Hair:
Color the hair with a soft beige or platinum blonde tone. Leave the dress or shirt underneath white, but use a very light warm grey to add shadow definitions where the hoodie casts a shadow on it. -
Deepening Shadows:
Go back in with a deeper teal or dark grey to emphasize the deepest folds, particularly where the sleeves bunch up at the wrists and the inner depth of the hood behind the neck. -
Hood Lining:
Color the inside of the hood with a warm brown or dark ochre to create contrast with the cool teal exterior. I like to dab the marker tip here to enhance the texture. -
Final Highlights:
Use a white gel pen to add subtle highlights to the zipper pull, the metal aglets on the drawstrings, and the eyes to bring the character to life.
Now you have a stylish, relaxed character sketch ready to be part of a larger fashion spread

PENCIL GUIDE
Understanding Pencil Grades from H to B
From first sketch to finished drawing — learn pencil grades, line control, and shading techniques.
Explore the Full Guide
Skinny Jeans and Rolled Cuffs
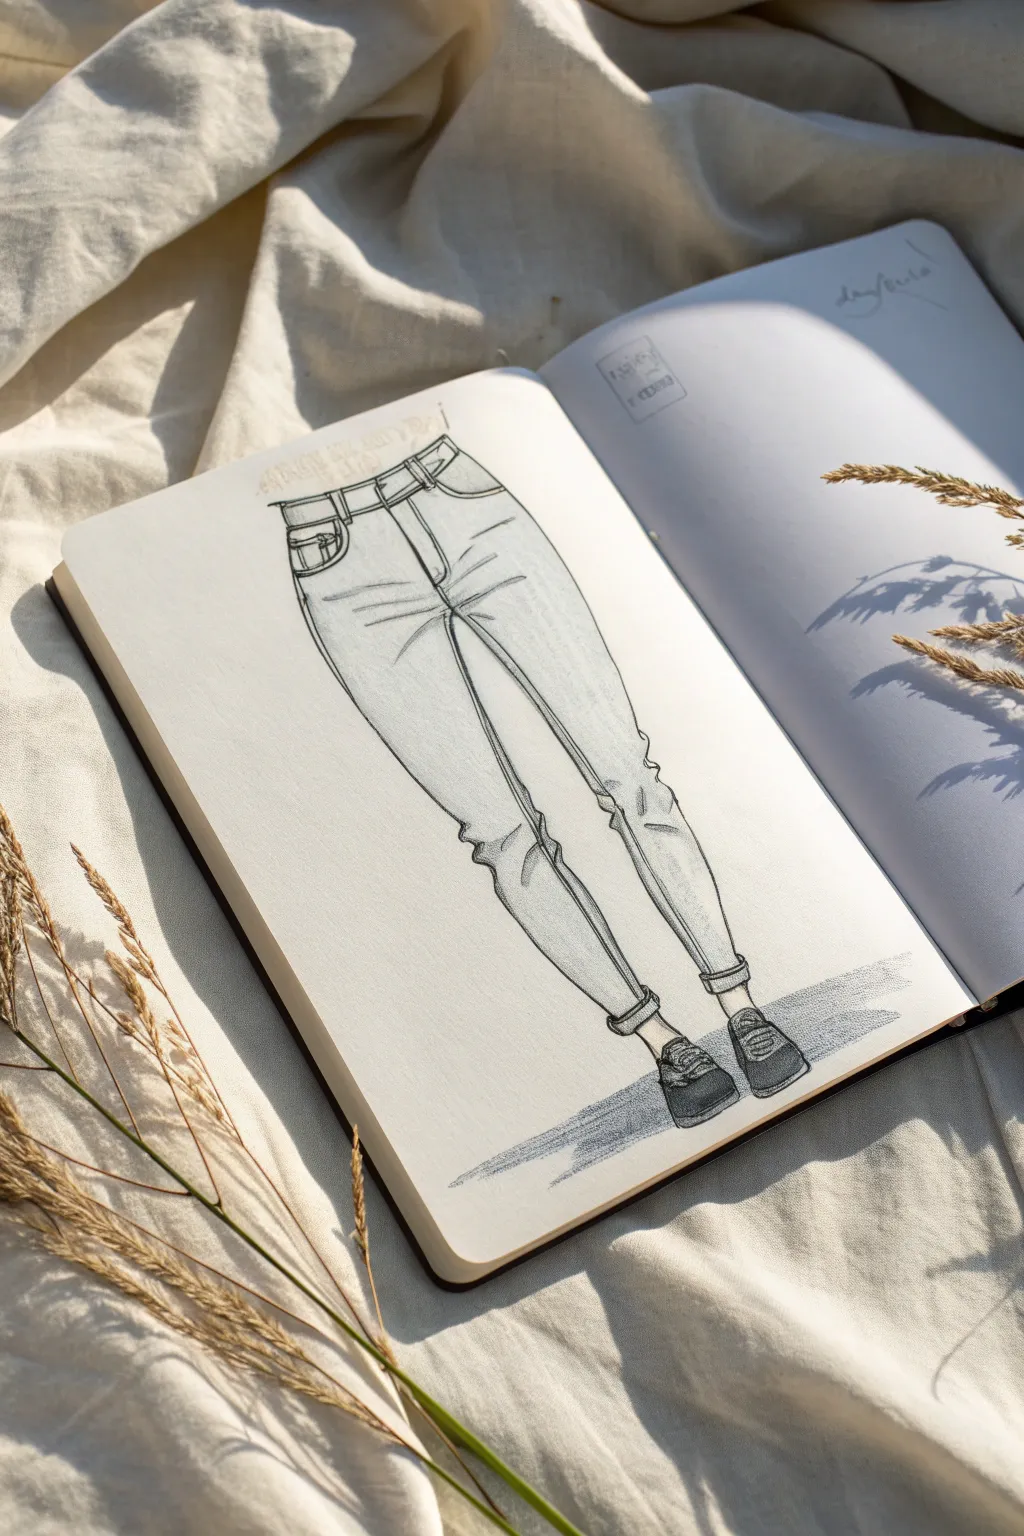
Capture the relaxed vibe of modern streetwear with this clean, focused study of skinny jeans. The high-waisted fit and rolled cuffs create distinct fabric folds that add life and movement to a simple standing pose.
Step-by-Step Guide
Materials
- Sketchbook (heavyweight paper preferred)
- HB or 2B Graphite Pencil
- Fine Liner Pen (0.3mm and 0.5mm)
- Kneaded Eraser
- Soft Gray Marker or Colored Pencil
Step 1: Constructing the Base Form
-
Establish the hip line:
Begin by drawing a faint horizontal curve near the top of your page to represent the waistline. Keep this line light, as it will guide the waistband later. -
Outline the legs:
Sketch two vertical lines descending from the waist. Since these are skinny jeans, taper the lines inward gently as you move down toward the ankles. The legs should be close together but not touching. -
Define the inseam:
Draw the inner leg lines, starting from the crotch point (a few inches below the waistline). These lines should almost mirror the outer lines but meet at the crotch in a soft ‘V’ shape. -
Mark the ankle position:
Stop the leg lines just above where the feet would start. Draw small horizontal ovals at the bottom to indicate where the cuffs will sit.
Fabric Weight Tip
For denim, use angular, broken lines for wrinkles rather than smooth curves. Denim is a stiff fabric and folds sharply compared to softer cotton.
Step 2: Adding Denim Details
-
Draft the waistband:
thickening the initial waist curve into a band. Add belt loops—two visible on the front left and right—and a central button closure. -
Sketch the pockets:
Draw curved lines on the hips for the front pockets. On the left side, add the essential coin pocket detail inside the main pocket curve. -
Create the fly stitching:
Draw a ‘J’ curve extending down from the central button to suggest the zipper flap. Add a parallel line next to it for the double-stitched look typical of denim. -
Indicate the crotch folds:
Sketch radiating lines casually extending from the crotch area outward across the upper thigh. These tension lines show the snug fit of the fabric. -
Form the knee wrinkles:
Around the knee area, draw slightly jagged, horizontal lines. Jeans bunch up here, especially when legs are straight, so don’t make these too perfect. -
Stack the fabric at the ankle:
Just above the cuff, add sharper, angular folds. This ‘stacking’ effect happens when skinny jeans are slightly longer than the leg. -
Roll the cuffs:
Draw the rolled cuffs at the bottom of each leg. Make them thick and cylindrical, wrapping around the ankle. Add seam lines on the sides to show the inside of the denim.
Step 3: Adding Shoes and Shadow
-
Outline the shoes:
Sketch simple loafer or slip-on shapes below the cuffs. Keep the details minimal to maintain focus on the jeans. -
Refine the shoe opening:
Define the opening of the shoe where the foot enters, ensuring it aligns with the direction the legs are facing.
Level Up: Texture
Use a stippling technique (dots) with your finest pen along the seams and shadowed areas to mimic the rough texture of heavy denim fabric.
Step 4: Inking and Shading
-
Ink the main outlines:
Using your 0.5mm pen, trace over your final pencil lines. I prefer to use confident, continuous strokes for the long leg lines to keep the drawing clean. -
Add detail lines:
Switch to a thinner 0.3mm pen for the wrinkles, stitching, and pocket details. These lines should be lighter to add texture without overpowering the main shape. -
Erase pencil marks:
Once the ink is completely dry, gently remove the graphite structure lines with your kneaded eraser. -
Apply subtle shading:
Use a soft gray marker or pencil to add shadows. Focus on the inner thighs, under the pocket rims, and inside the deep folds at the knees and ankles. -
Cast a ground shadow:
Ground the figure by lightly shading a horizontal patch beneath the shoes, extending slightly to the right to suggest a light source.
This simple study is perfect for practicing fabric tension and weight in your fashion illustrations
Structured Jacket Shapes
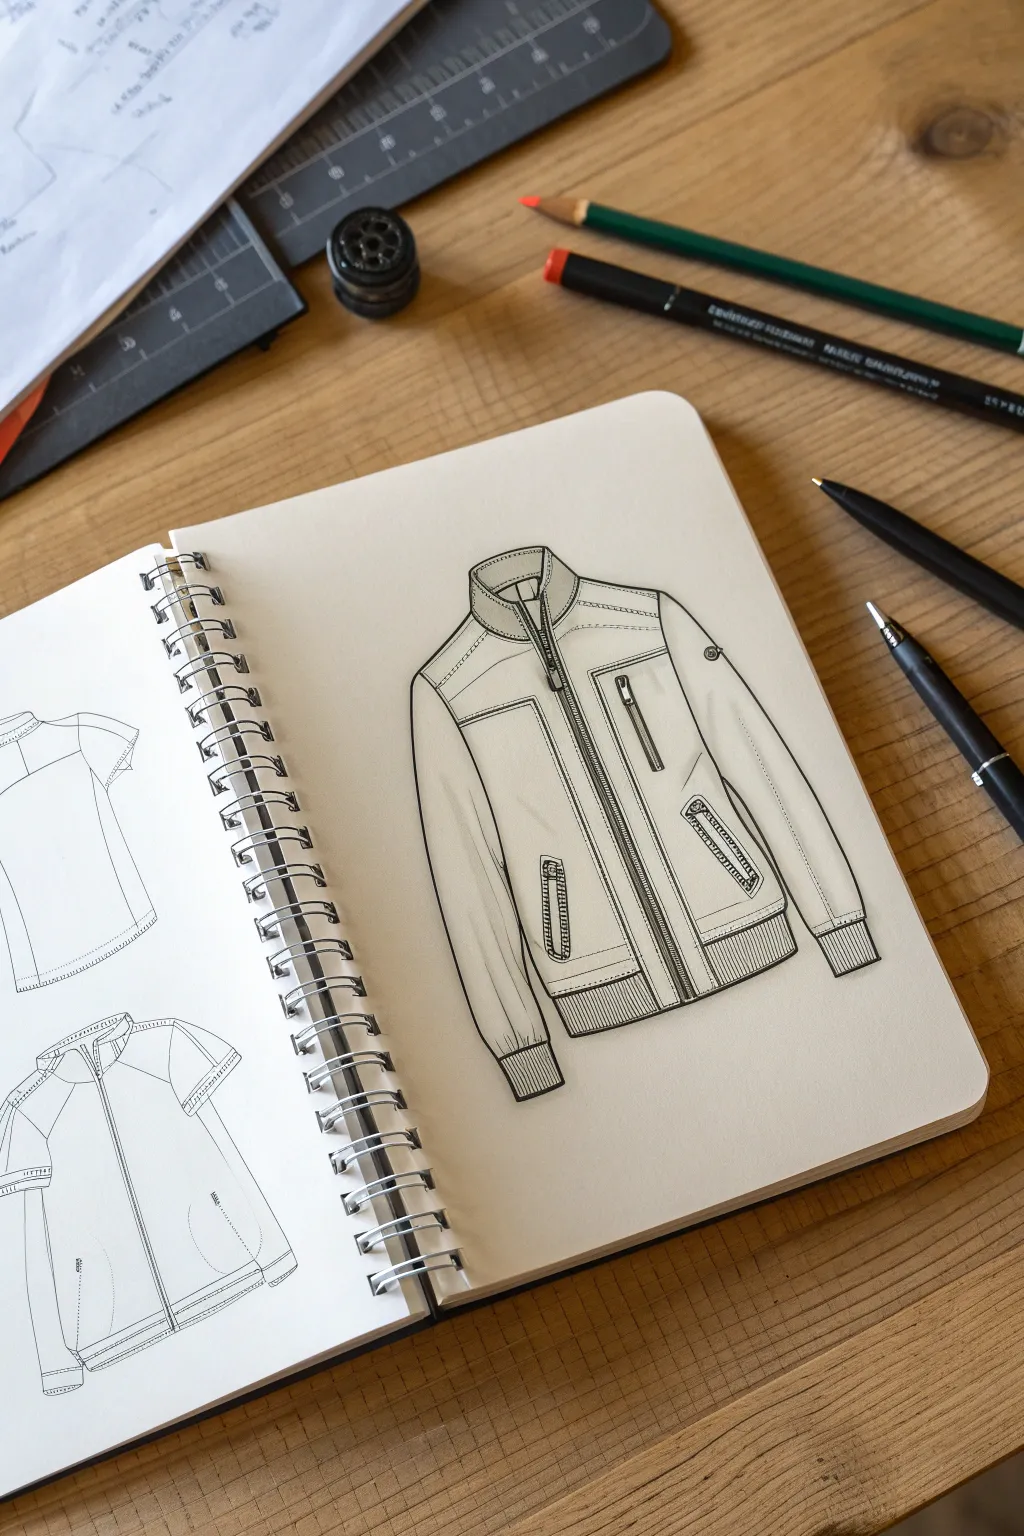
Learn to draw a classic, structured jacket with crisp lines and realistic detailing suitable for anime character design. This tutorial focuses on capturing the weight of the fabric and the precision of zippers and seams using fine liners.
How-To Guide
Materials
- Spiral-bound sketchbook (smooth paper)
- HB graphite pencil
- Kneaded eraser
- Fine liner pens (0.1mm, 0.3mm, and 0.5mm)
- Ruler (optional for zipper lines)
Step 1: Laying the Foundation
-
Establish the torso block:
Begin with your HB pencil by sketching a slightly rectangular shape for the main body of the jacket. Keep the lines light. The shoulders should slope slightly downwards, and the bottom hem should rest around the hip line. -
Add the sleeves:
Attach two long, tubular shapes for the sleeves. Since this is a structured jacket, keep the sleeves relatively straight but taper them slightly towards the cuffs. Let them hang naturally at the sides. -
Define the collar:
Sketch a short, standing collar at the neck. Visualize it wrapping around the back of the neck; I usually draw the back rim slightly higher than the front opening to show perspective. -
Mark the center line:
Draw a faint vertical line down the center of the torso. This will be your guide for the main zipper, ensuring the jacket looks symmetrical.
Fabric Weight Trick
Use broken lines for seams on softer areas and continuous, bold lines for stiff edges. This difference in line weight instantly communicates material thickness.
Step 2: Designing the Structures
-
Draft the ribbing:
At the bottom hem and the ends of the sleeves, draw rectangular bands for the ribbing. These should look snug compared to the looser fit of the jacket body. -
Sketch the yoke and panels:
Add a horizontal seam line across the chest to create a ‘yoke’. Sketch vertical panel lines running down the front of the jacket to suggest a tailored fit. -
Place pockets and zippers:
Lightly outline a vertical chest pocket on the right side. Add two slanted welt pockets near the waist area. Sketch the main zipper housing along your center line. -
Refine the silhouette:
Go over your outer contour lines. Where the fabric bunches slightly (like the inner elbow or armpit), add very subtle, soft curves to suggest stiffness rather than soft draping.
Step 3: Inking and Detailing
-
Outline main contours:
Switch to your 0.5mm fine liner. confidentially trace the main outer silhouette of the jacket, the collar, and the sleeves. Use a steady hand for smooth lines. -
Ink the structural seams:
Using a slightly thinner 0.3mm pen, ink the chest yoke, the vertical panel lines, and the pocket outlines. These lines should be clear but slightly less dominant than the outer edge. -
Draw the main zipper:
With the 0.3mm pen, draw the parallel tracks of the central zipper. Inside the tracks, make tiny horizontal ticks to represent the zipper teeth. -
Detail the ribbed cuffs:
Use a 0.1mm pen to draw the vertical lines inside the cuff and hem bands. Keep these lines consistently spaced to mimic the elastic texture of rib-knit fabric. -
Add stitching details:
This is where the drawing comes to life. Using the 0.1mm pen, add dashed lines running parallel to your seams (collar, yoke, pockets). This ‘topstitching’ effect implies heavy fabric like leather or denim. -
Create pocket texture:
For the zipper pulls and smaller pocket zippers, use the 0.1mm pen to add intricate details. A tiny rectangle for the pull tab adds a nice touch of realism. -
Add clear fold lines:
Add a few minimal, sharp lines near the elbows and armpits to show where the stiff material creases. Don’t overdo it—just one or two sharp lines usually suffice. -
Clean up:
Once the ink is completely dry (give it a moment to avoid smudging), gently erase all underlying pencil sketches with your kneaded eraser. -
Final shading:
Use your finest pen to add very slight hatching in the deepest shadowed areas, such as the inside of the collar or underneath the pocket flaps, to give the jacket volume.
Level Up: Texture
Add tiny clusters of stippling (dots) near the seams or worn areas to suggest leather grain or heavy canvas texture without coloring the whole piece.
Practice drawing this jacket from different angles to really master the volume of the clothing
BRUSH GUIDE
The Right Brush for Every Stroke
From clean lines to bold texture — master brush choice, stroke control, and essential techniques.
Explore the Full Guide
Cozy Sweaters and Ribbed Details
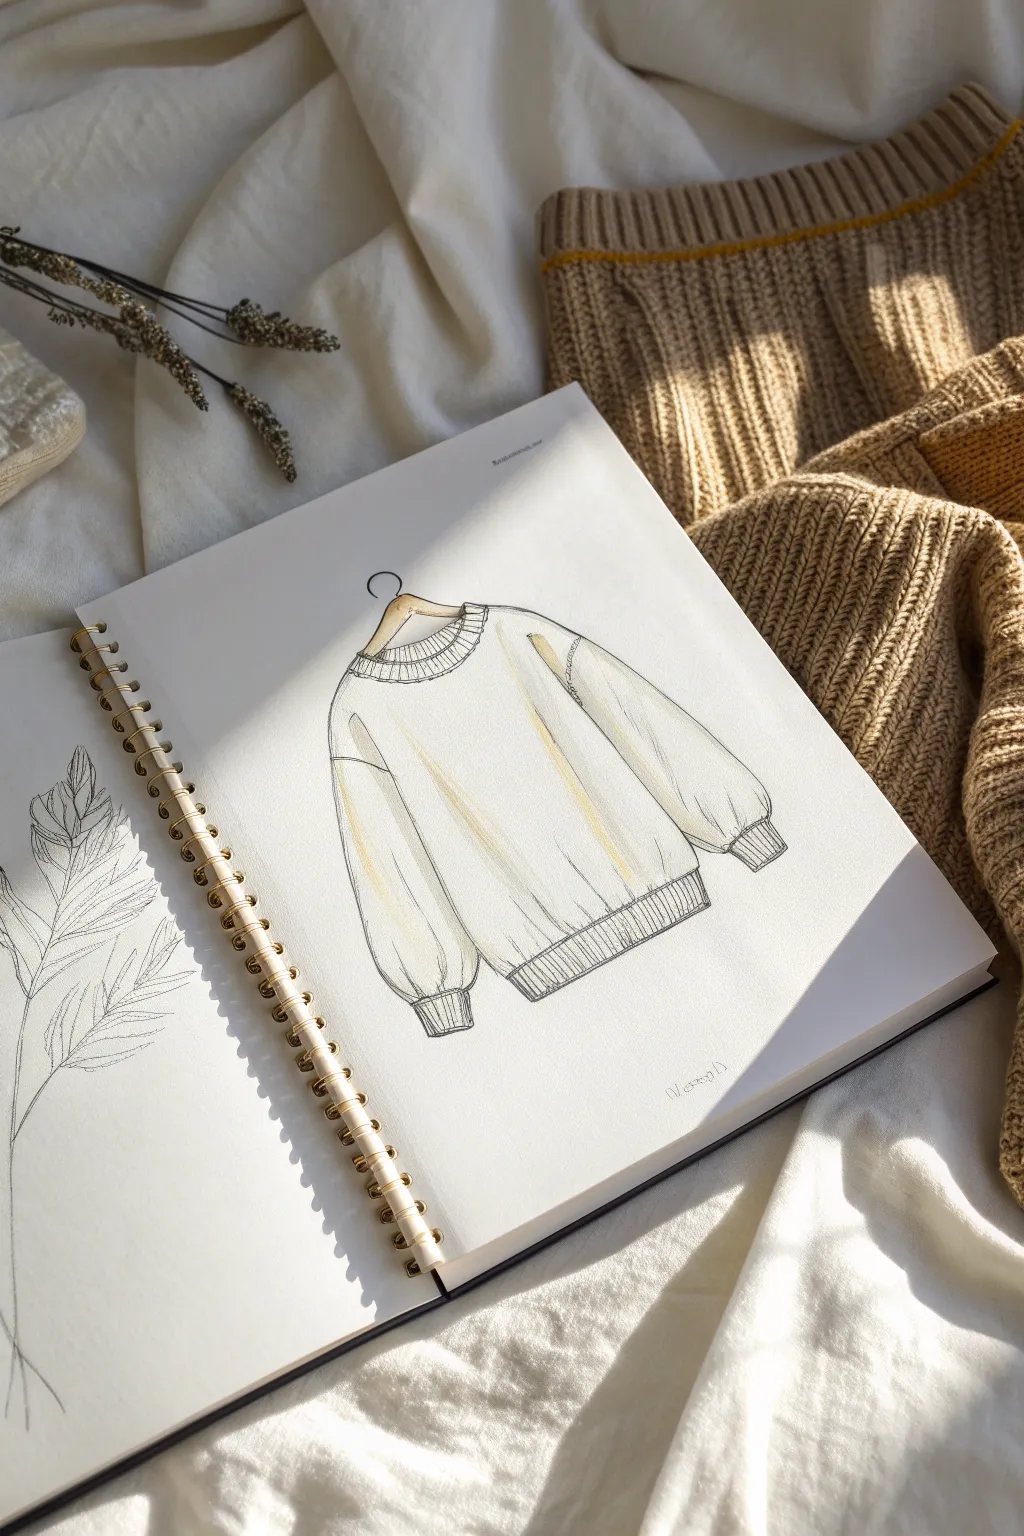
Capture the essence of comfort with this delicate sketchbook illustration of a slouchy, oversized sweater. This project focuses on mastering fabric drapes, ribbed textures, and subtle shading to give your fashion sketches a warm, lived-in feel.
Step-by-Step Guide
Materials
- Sketchbook with smooth, heavy paper (mixed media or hot press)
- H lead pencil for under-drawing
- Fine liner or technical pen (0.1mm and 0.3mm in black)
- Beige or warm ivory alcohol marker (or diluted watercolor)
- Kneaded eraser
- Ruler (optional)
Step 1: Drafting the Basic Shape
-
Position the Hanger:
Start near the top center of your page by sketching the hook and triangular shape of a wooden coat hanger. Keep the lines light, as parts of this might be obscured later. -
Establish the Neckline:
Draw a wide, scooped curve just below the hanger, representing the back of the sweater’s neckline. Add a deeper, matching curve below it for the front collar to show the opening. -
Map the Shoulders:
Extend lines outward from the neckline that slope gently downwards. Oversized sweaters have dropped shoulders, so make these lines longer than a standard shoulder width before curving down for the sleeves. -
Outline the Sleeves and Body:
Draw the sleeves hanging loosely, tapering slightly as they reach the cuffs. Sketch the main body of the sweater as a wide, boxy rectangle that gathers slightly at the bottom hem.
Pro Tip: Gravity Matters
When drawing folds, always consider gravity. On an oversized sweater like this, lines should radiate from the point of tension (the hanger) downward.
Step 2: Defining Details and Texture
-
Create the Collar Ribbing:
Inside the neckline curves, draw vertical lines spaced closely together to mimic ribbed knitting. Add a wavy, uneven line at the bottom edge of the collar where it joins the sweater body to suggest texture. -
Detail the Cuffs:
At the end of each sleeve, draw a rectangular band. Fill this band with vertical striated lines for the ribbing. Add small folds where the sleeve fabric balloons slightly before getting cinched by the tight cuff. -
Sketch the Bottom Hem:
Similar to the cuffs, create a wide band at the bottom of the sweater. Add the vertical rib lines here as well, mirroring the texture of the collar and sleeves. -
Add Fabric Folds:
Draw long, flowing lines originating from the armpits and shoulders, sweeping down towards the center. These drag lines emphasize the weight and looseness of the fabric. -
Refine the Hanger connection:
Ensure the shoulder fabric looks like it is resting heavily on the hanger by slightly curving the sweater outline over the hanger’s ends.
Step 3: Inking and Coloring
-
Ink the Outline:
Using your 0.3mm fine liner, trace the main outer silhouette of the sweater. Use a confident, slightly broken line in areas where the fabric folds to keep it looking soft rather than rigid. -
Ink the Details:
Switch to a finer 0.1mm pen for the ribbing lines on the collar, cuffs, and hem. These lines should be delicate and not overpower the main shape. -
Erase Guidelines:
Once the ink is completely dry, gently roll your kneaded eraser over the entire drawing to lift the graphite structure lines. -
Apply Base Color:
Take your beige or warm ivory marker. Apply broad strokes following the direction of the fabric drape—vertical on the body, diagonal on the sleeves. Leave plenty of white paper showing for highlights. -
Layer Tone for Shading:
Go over the same areas again with the same marker to build up darker values. Focus on the inside of the neck, under the armpits, and along the ribbed edges to create depth. -
Enhance Folds with Color:
Add a quick stroke of marker along the major fold lines you inked earlier. I find this subtle reinforcement really helps the garment look three-dimensional. -
Final Touches:
Add a tiny bit of shading on the wooden hanger to give it form, and deepen the darkest crevices of the sweater with a few final pen scratches if needed.
Troubleshooting: Stiff Lines
If your drawing looks too rigid, try relaxing your wrist. Fabric isn’t perfectly straight; using slightly wobbly or ‘organic’ lines makes the knitwear look softer.
Now you have a cozy, perfectly draped sweater illustration ready for your portfolio
Athletic Sets With Easy Motion Folds
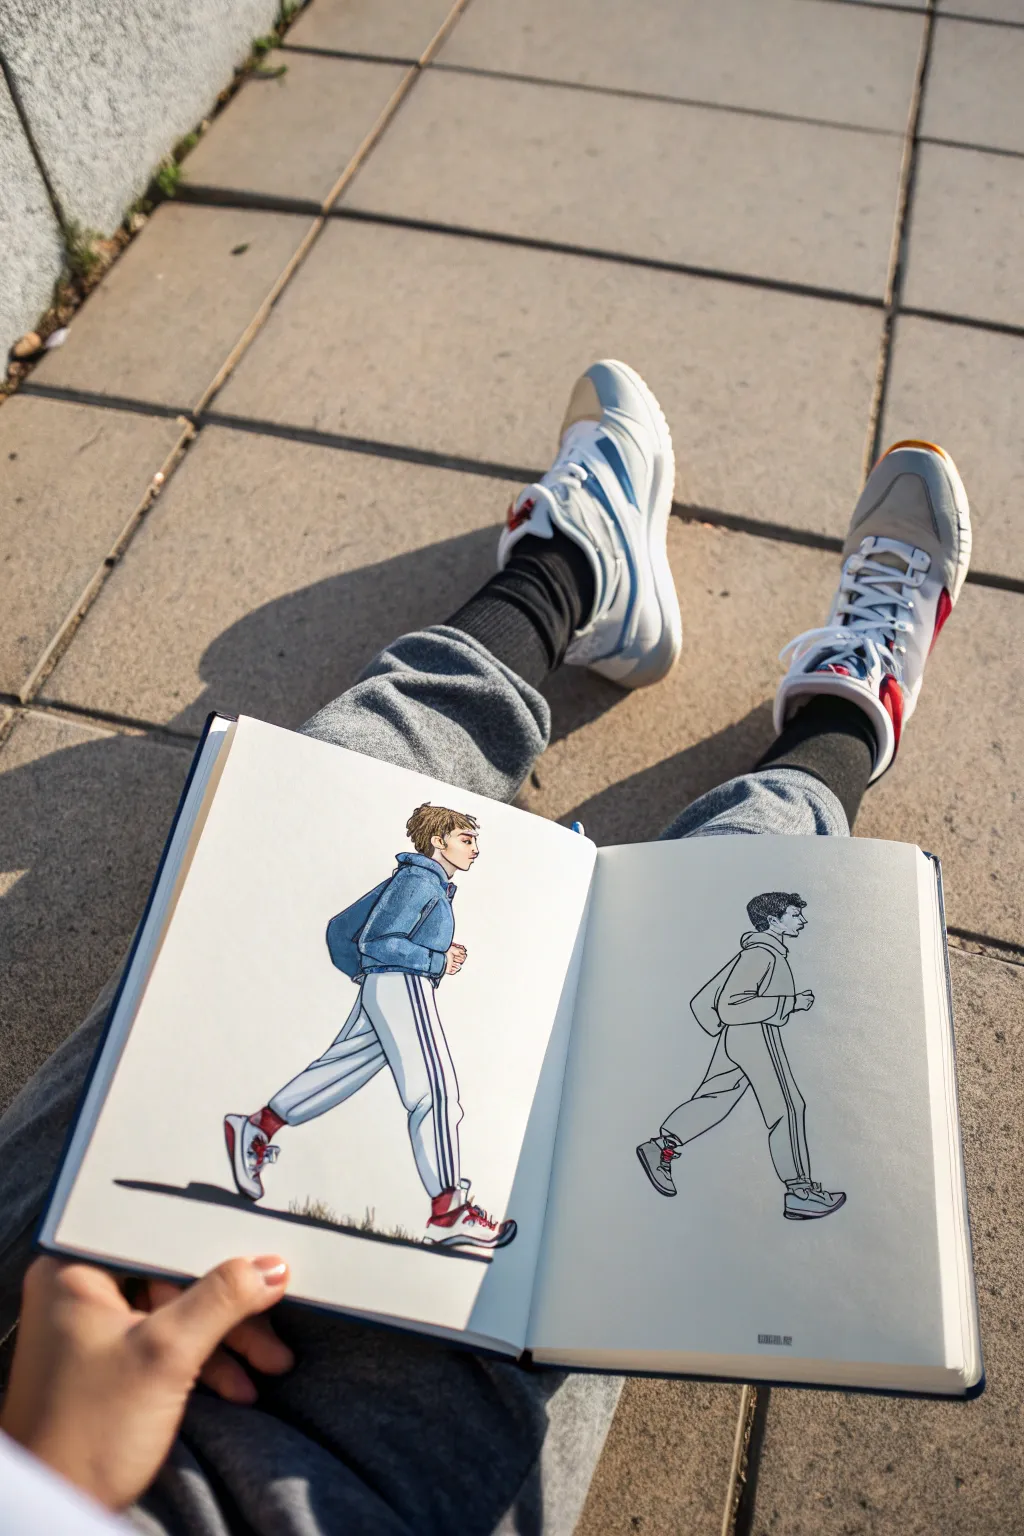
Master the dynamic look of athletic wear in motion with this two-part study. You’ll create a side-by-side comparison featuring a clean line art contour and a fully colored character render, perfect for understanding how fabric folds around a moving body.
Step-by-Step Tutorial
Materials
- Hardbound sketchbook (A4 or similar size)
- H or HB pencil for initial sketching
- Fine liner pens (0.1, 0.3, and 0.5mm)
- Alcohol-based markers (Copic or similar)
- White gel pen for highlights
- Kneaded eraser
Step 1: Initial Motion Framework
-
Establish the Pose:
Begin on the left page with a light pencil skeleton. Draw a ‘walking’ gesture: the torso leaning slightly forward, one leg extending straight out for the heel strike, and the trailing leg pushing off the toes. -
Duplicate the Skeleton:
Mirror your initial skeleton on the right page. Keeping both figures identical in pose ensures your study focuses strictly on how you render the clothing styles differently later. -
Rough in the Volumes:
Flesh out the body forms with cylinders and ovals. Pay attention to the ankles and wrists, as the elastic cuffs of the tracksuit will gather here.
Troubleshooting: Inconsistent Sizes
If your two figures look different sizes, mark top and bottom guidelines across the whole spread before starting. This ensures the heads and feet align perfectly across the seam.
Step 2: Right Page: The Clean Line Study
-
Drafting the Tracksuit:
On the right page, lightly sketch the clothing. Give the jacket volume so it sits away from the back. Draw the pants slightly baggy, tapering at the ankles. -
Adding Motion Folds:
Focus on the stress points. Add ‘V’ shaped folds at the crotch and tension lines pulling from the knee of the forward leg. Sketch bunching fabric at the ankles above the sneakers. -
Inking the Outline:
Using a 0.3mm fine liner, ink the primary silhouette of the character. Keep your lines confident and smooth. -
Descriptive Line Weights:
Switch to a 0.1mm pen for internal details like the pocket seams, the side stripe on the pants, and the smaller wrinkles in the fabric. This contrast prevents the drawing from looking flat. -
Final Clean Up:
Once the ink is completely dry, thoroughly erase all pencil guidelines on the right page to reveal the crisp line art study.
Step 3: Left Page: The Full Color Render
-
Inking the Color Base:
Ink the left-page figure using a 0.5mm pen for the outer contour. We want a slightly bolder line here to contain the color. -
Base Skin Tones:
Apply a pale skin tone marker to the face and hands. While wet, dab a slightly darker peach tone under the hairline and jaw for instant dimension. -
Coloring the Denim Jacket:
Use a medium slate blue for the jacket. I find it best to leave small white gaps near the top of the shoulders to suggest a light source before the ink dries. -
Rendering the Pants:
Color the track pants in a light grey or off-white. Use a cool grey marker to shade the underside of the folds you sketched earlier, emphasizing the cylindrical shape of the legs. -
Adding the Stripes:
carefully draw the double stripes down the side of the leg using a dark blue fine liner or a very sharp colored pencil. -
Sneaker Details:
Color the sneakers with white and accents of red at the ankles. Add a dark grey cast shadow underneath the shoes to ground the figure. -
Hair Texture:
Fill in the hair with a sandy brown. Use short, flicking strokes to mimic the texture of the messy fringe. -
Final Highlights:
Use a white gel pen to add sharp highlights on the nose, the zipper pull, and the glossiest part of the sneakers.
Level Up: Fabric Texture
To make the blue jacket look like denim or fleece, dab the wet marker ink with a textured paper towel or stiff bristle brush before it fully dries.
Step back and appreciate how seeing the line art next to the finished color helps you understand volume and motion


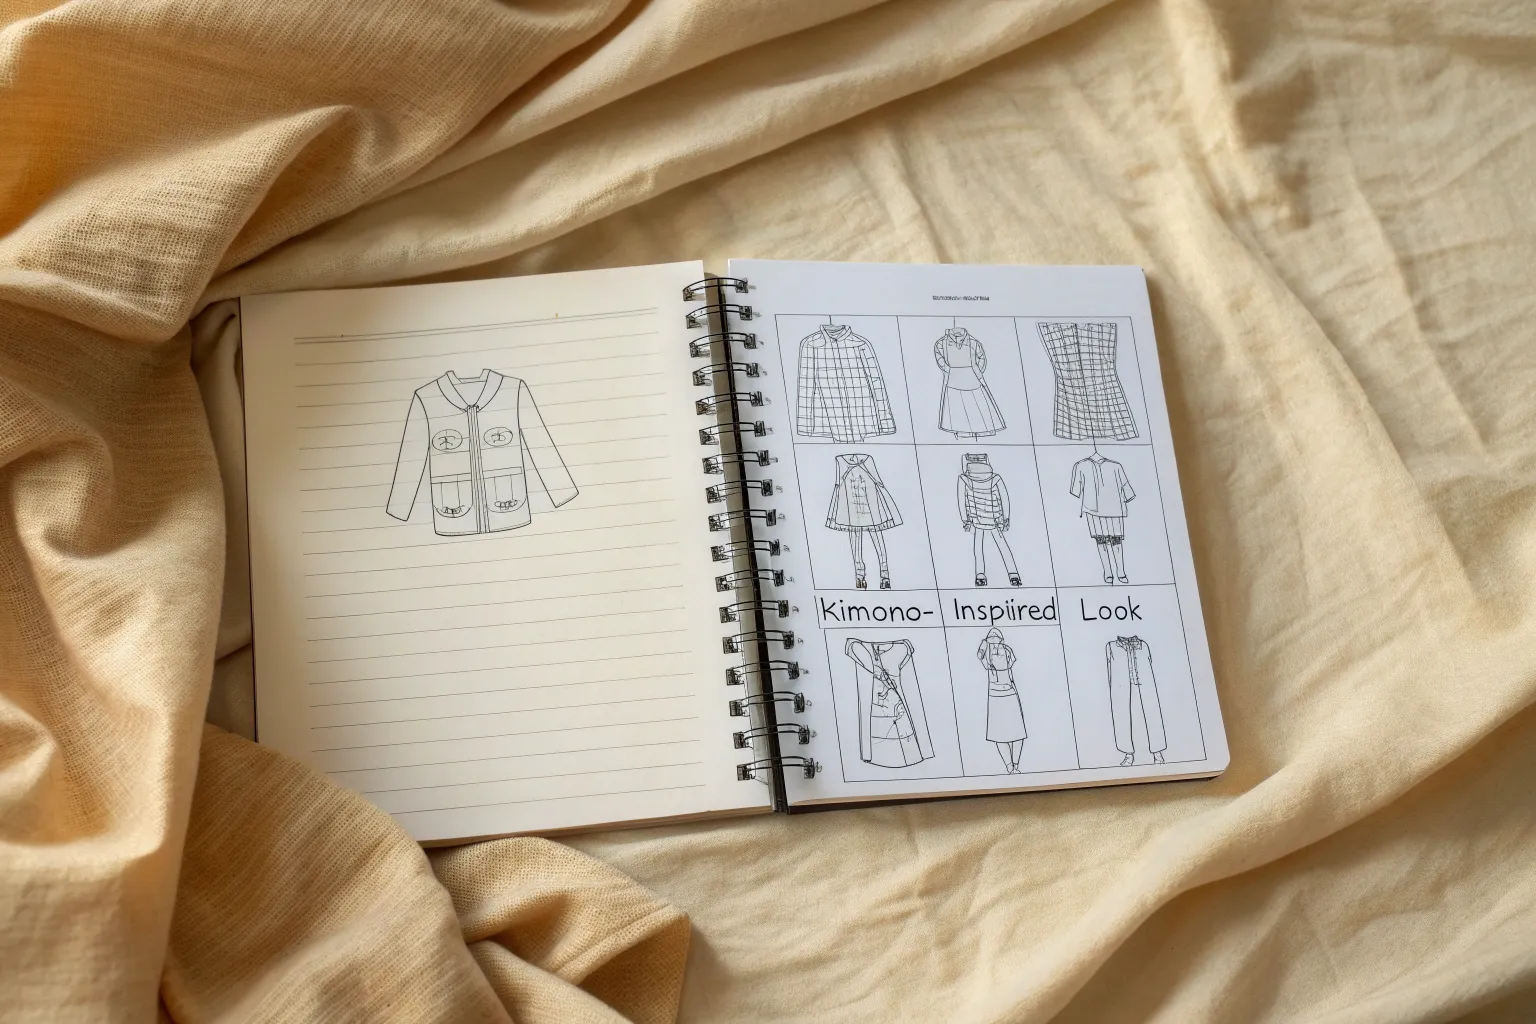
Kimono-Inspired Sleeves and Sashes
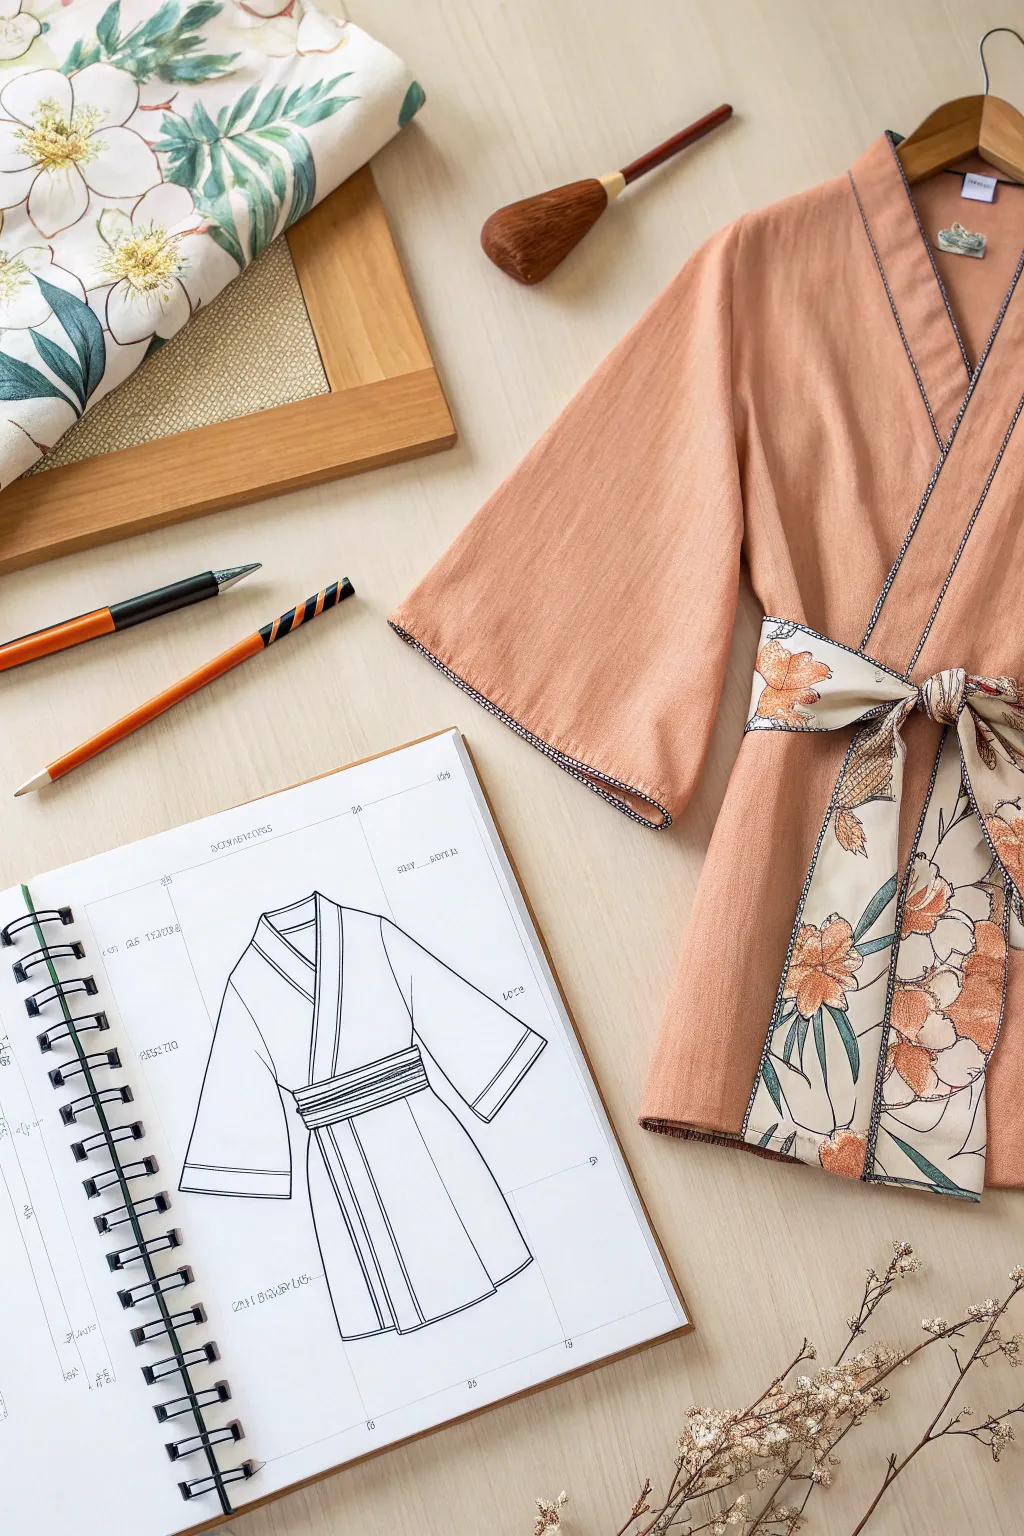
Bridge the gap between fashion illustration and garment construction with this dual-focus project. You will sketch a technical flat of a modern kimono-style robe and then bring it to life with textured fabric and a floral sash.
Step-by-Step Tutorial
Materials
- Spiral-bound sketchbook (heavyweight paper)
- Fine-liner pens (black, sizes 0.3mm and 0.5mm)
- Terra-cotta or peach linen/cotton blend fabric
- Floral print floral fabric (for sash/trim)
- Sewing machine and matching thread
- Fabric scissors and pins
- Tailor’s chalk
- Decorative stitching thread (navy or dark grey)
- Iron and ironing board
Step 1: Conceptualizing the Design
-
Drafting the outline:
Begin in your sketchbook by drawing a simple T-shape foundation lightly in pencil. Create a relaxed silhouette with wide, rectangular sleeves that fall just below the elbow. -
Defining the lapel:
Sketch the ‘eri’ (collar) band running continuously from the neck down the front opening. Keep the lines parallel to ensure it looks like a distinct strip of fabric. -
Adding the obi sash:
Around the waist area of your sketch, draw a wide belt. Illustrate horizontal folds to suggest tension where the fabric wraps around, giving the drawing dimension. -
Inking the technical flat:
Go over your pencil lines with a 0.5mm fine-liner for the main outline. Use a thinner 0.3mm pen for internal details like seam lines on the collar and the folds in the sash.
Step 2: Fabric Preparation and Cutting
-
Sourcing materials:
Choose a terra-cotta linen or textured cotton that holds shape but drapes well. Select a contrasting floral print for the sash that includes hints of the main fabric color. -
Cutting the main body:
Cut two large front panels and one back panel from the terra-cotta fabric. Ensure the width extends past the shoulders to create the dropped-shoulder look characteristic of kimonos. -
Cutting the sleeves:
Cut two large rectangles for the sleeves. Unlike western sleeves, these should be square-edged rather than curved at the armhole. -
Preparing the contrast trim:
From your floral fabric, cut long strips for the sash (obi) and wider panels if you plan to line the front opening with the pattern.
Uneven Collar?
If the collar puckers or twists during sewing, basting it by hand before machine sewing usually prevents the fabric from shifting and ensures a flat lay.
Step 3: Sewing the Garment
-
Assembling the shoulders:
Pin the front panels to the back panel at the shoulder seams right sides together. Stitch and press the seams open flat. -
Attaching the collar:
Fold your collar strip in half lengthwise and press. Pin this along the entire front opening and neck edge, then stitch carefully to create the clean structure seen in your sketch. -
Installing the sleeves:
Sew the rectangular sleeves to the main body while the side seams are still open. This flat construction method is traditional and much easier than setting in a sleeve. -
Closing the sides:
Pin from the bottom hem specifically up through the underarm and to the sleeve cuff in one continuous line. Stitch this long seam on both sides. -
Adding topstitching details:
Using a dark contrast thread (like navy), run a decorative stitch along the edge of the collar and sleeve cuffs. This mimics the illustrative lines in your drawing.
Add Texture
Try using sashiko stitching (a Japanese running stitch) on the shoulders or hem in white thread for an authentic, handcrafted look.
Step 4: Creating the Sash
-
Stitching the sash tube:
Fold your long floral fabric strip in half lengthwise, right sides together. Stitch the long edge and one short end, leaving an opening to turn it. -
Turning and pressing:
Turn the sash right side out using a turning tool or chopstick. Press it flat with a hot iron, ensuring the edges are crisp. -
Final assembly:
Tie the finished sash around the waist of your robe. Adjust the bow so the floral pattern is prominently displayed against the solid peach fabric.
Now you have both a professional design illustration and a wearable garment that matches your vision perfectly
Capes, Cloaks, and Dramatic Outerwear
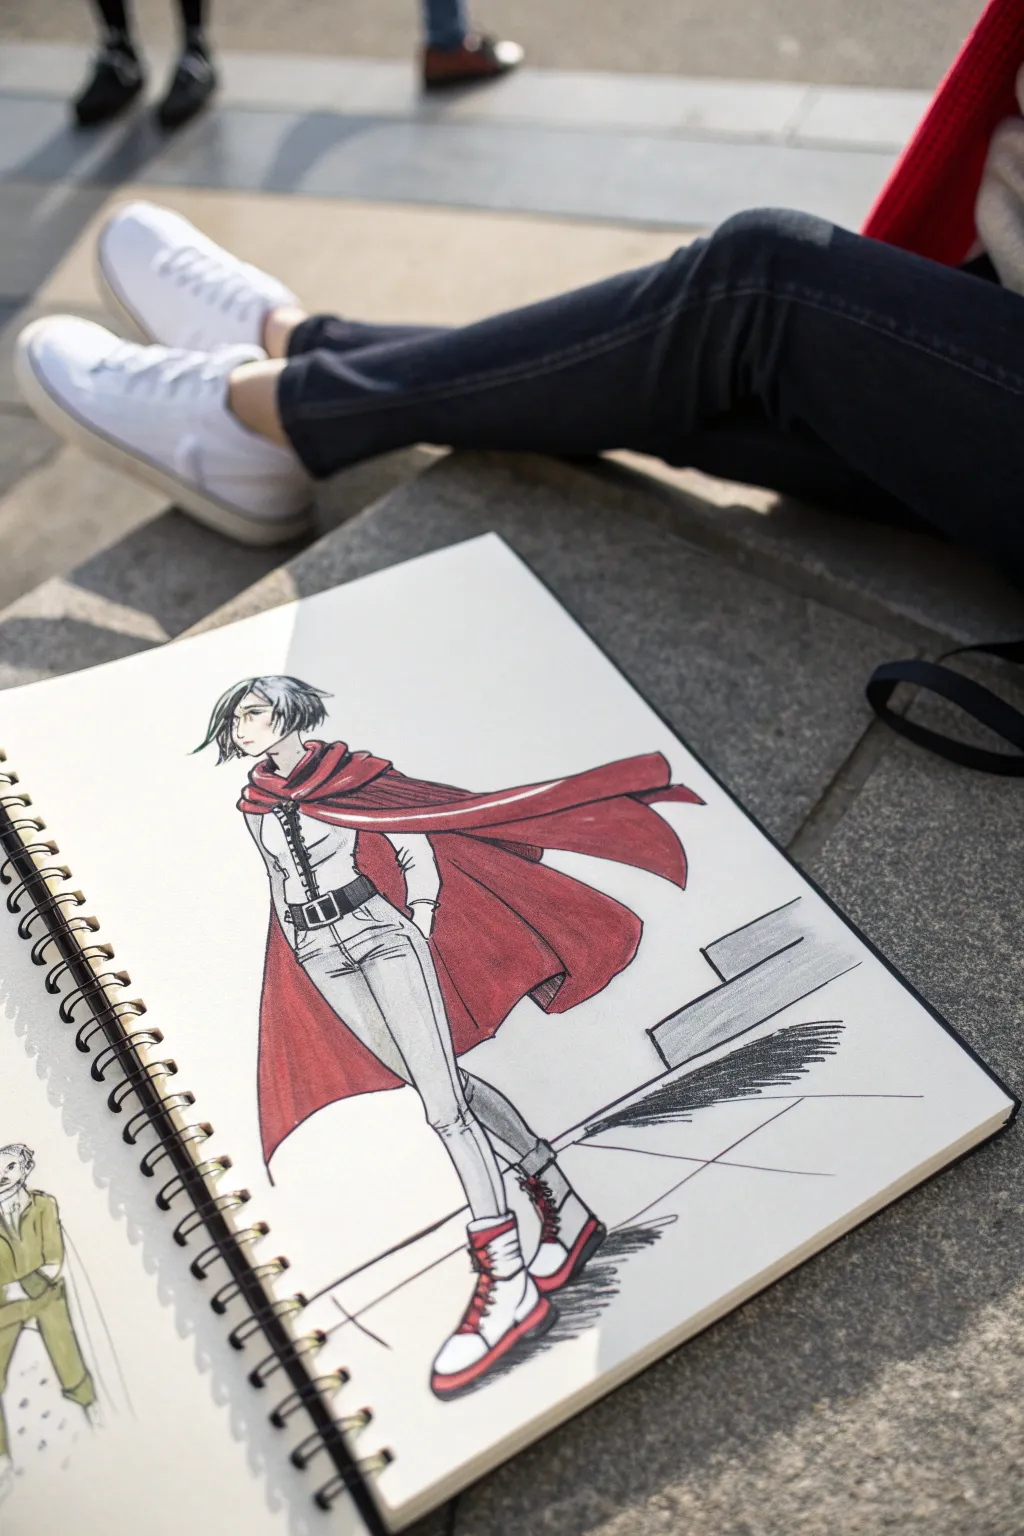
Learn how to draw a stylish anime character striking a pose, featuring a vibrant, billowing red cloak that adds movement and drama to the composition. This tutorial guides you through sketching the figure, inking clean lines, and applying bold marker colors for a professional comic book look.
Detailed Instructions
Materials
- Spiral-bound sketchbook (heavyweight paper)
- H or HB pencil for initial sketching
- Kneadable eraser
- Fine liner pens (black, sizes 0.1mm and 0.3mm)
- Alcohol-based markers (colors: bright red, dark red, cool grey, black, pale skin tone)
- White gel pen for highlights
Step 1: Planning the Figure and Pose
-
Establish the Line of Action:
Begin lightly with your pencil to draw a curved line that represents the spine and leg movement. This curve dictates the ‘sway’ of the hips and gives the pose attitude. -
Sketch the Basic Anatomy:
Block in the head, torso, and hips using simple shapes like ovals and trapezoids. Keep the lines faint so they can be easily erased later. -
Define the Limbs:
Draw the arms and legs. Position the right leg stepping forward and the left leg back. One hand should be tucked nonchalantly into a pocket, while the other hangs naturally. -
Draft the Clothing Base:
Sketch a fitted button-up shirt and slim trousers over your anatomy frame. I like to mark the belt line clearly to separate the torso from the legs. -
Outline the Boots:
Sketch the shape of high-top sneakers on the feet. Pay attention to the chunky soles and the way the tongue of the shoe sits against the shin.
Uneven Marker Ink?
If your large red areas look streaky, work faster while the ink is still wet. Circular motions blend better than straight lines for large fills.
Step 2: Drawing the Cloak and Details
-
Map the Cloak’s Flow:
Draw a large, sweeping line starting from the shoulders and blowing out to the right. This defines the top edge of the cape. -
Add Fabric Folds:
Connect the bottom of the cape to the character’s back, adding jagged, wavy lines to simulate heavy fabric catching the wind. Draw folds radiating from the neck clasp. -
Refine Facial Features:
Draw the character’s face in a 3/4 view. Add sharp, distinct eyes, a small nose, and a short, messy bob hairstyle that frames the face. -
Add Clothing Details:
Draw the belt buckle, the seams on the jeans, and the buttons on the shirt. This is the time to add the laces to the high-top sneakers.
Step 3: Inking and Coloring
-
Ink the Outline:
Using a 0.3mm fine liner, carefully go over your pencil lines. Use confident, smooth strokes for the long lines of the legs and cape. -
Add Finer Details:
Switch to a 0.1mm pen for delicate areas like the facial features, hair strands, and shoe laces. Let the ink dry completely before erasing pencil marks. -
Color the Skin and Hair:
Use a pale skin-tone marker for the face and neck. For the hair, use a black or very dark grey marker, leaving small white gaps for highlights. -
Shade the Outfit:
Color the pants and shirt with cool greys. Use a lighter grey for the base and a darker grey for shadows in the folds of the fabric. -
Fill the Cape:
Color the cape with a vibrant red marker. Apply the color in long strokes following the direction of the wind to minimize streakiness. -
Depict Shadows on the Cape:
Once the red base is dry, go over the fold areas and the underside of the cape with a darker red or maroon marker to create depth and volume. -
Color the Boots:
Match the boots to the cape by coloring the main panels red, leaving the toes and soles white for contrast. -
Cast the Shadow:
Using a dark grey or black marker, draw a long, stretched shadow on the ground to the right of the figure, mimicking the direction of the cape. -
Final Highlights:
Use a white gel pen to add small reflections to the eyes and the metal belt buckle to make them pop.
Give It a Background
Draw simple geometric shapes or stairs behind the character using light grey marker to place them in an urban environment without distracting from the figure.
Now you have a dynamic anime illustration ready to be the start of your own character design portfolio
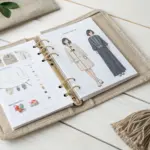
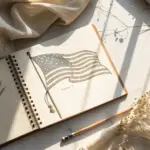
Paper-Doll Wardrobe Layout
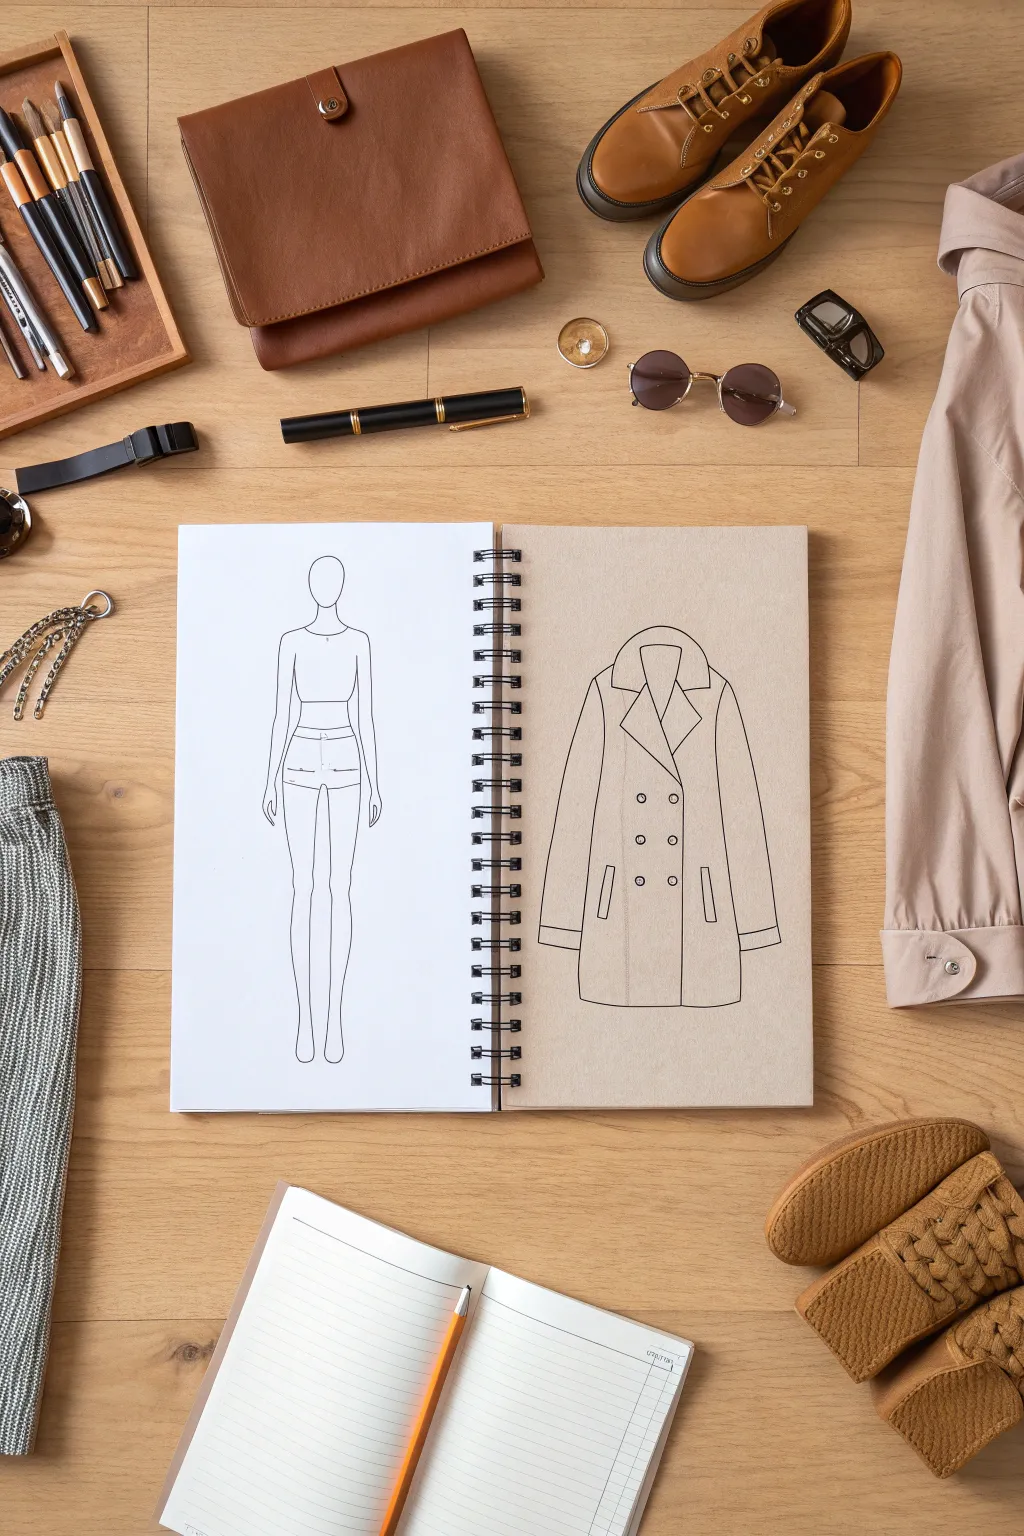
This project creates a delightful mix-and-match wardrobe layout using a dual-toned sketchbook. By drawing a base figure on white paper and an outfit overlay on toned paper, you’ll capture the essence of fashion design brainstorming in a clean, minimalist style.
How-To Guide
Materials
- Wire-bound sketchbook (mixed paper: white and kraft/toned)
- HB graphite pencil
- Fine liner pen (0.3mm or 0.5mm, black)
- Eraser (kneaded preferred)
- Ruler or straight edge
- Reference photo of a coat or fashion item
- Tracing paper (optional, for transfer)
Step 1: Drawing the Base Figure
-
Establish the proportions:
Begin on the white left-hand page of your open sketchbook. Lightly sketch a vertical center line to guide your symmetry. Mark the head, shoulder line, waist, hips, and ankles to create a standard 9-head fashion croquis proportion. -
Flesh out the body shape:
Connect your landmarks with smooth, confident curves to define the neck, shoulders, and torso. Keep the pose neutral—standing straight with arms slightly away from the body—so that clothes can be easily ‘draped’ over it later. -
Add basic undergarments:
Sketch a simple tank top and fitted shorts onto the figure. This serves as your ‘base layer’ and ensures the figure isn’t nude, giving it a playful paper-doll aesthetic. -
Refine the line art:
Once you are happy with the pencil sketch, take your black fine liner and carefully trace over your final lines. Focus on clean, continuous strokes rather than sketchy, broken lines. -
Clean up the page:
Wait a moment for the ink to dry completely to avoid smudging, then erase all the underlying graphite guidelines to leave a crisp, professional-looking illustration.
Step 2: Designing the Wardrobe Item
-
Prepare the kraft paper side:
Move to the right-hand page, which features the kraft or toned paper. Visualize where the coat would sit relative to the figure on the left; you want them to feel like part of the same collection. -
Outline the coat silhouette:
Using your pencil, draft the outer shape of a classic trench coat or pea coat. Start with the shoulder slope, matching the width of your figure’s shoulders so the scale looks correct. -
Detail the collar and lapels:
Draw a V-shape for the neckline and add the wide, angular flaps of the lapels. Symmetry is key here, so measure from a mental center line to ensure both lapels match. -
Add structural elements:
Sketch the sleeves hanging straight down. Add a horizontal line near the bottom to hemlines. Don’t forget the vertical center opening where the buttons will go. -
Draft pockets and buttons:
Place two rectangular pocket flaps on the hip area. Space out the buttons evenly in a double-breasted formation (two columns of buttons). -
Inking the garment:
Switch back to your fine liner. Outline the entire coat with a steady hand. For the pockets and internal seams, use a slightly lighter touch or a thinner pen size if you have one available. -
Erase and finalize:
Gently erase the pencil marks from the kraft paper. Be careful, as some toned papers can shed fibers if rubbed too vigorously.
Ink Bleeding Issues?
If your fine liner bleeds into the kraft paper fibers, switch to a ballpoint pen or a pigment liner specifically designed for porous paper. Test on a back page first.
Step 3: Styling the Flat Lay
-
Arrange the workspace:
To recreate the full artistic vibe, place your open sketchbook on a wooden surface. Position a high-quality pen or fountain pen horizontally above the book. -
Frame with accessories:
Place related fashion items around the perimeter. Adding leather shoes, a matching bag, or sunglasses near the top adds narrative context to your design work. -
Include texture:
Drape a piece of actual fabric or a garment sleeve (like the beige coat sleeve in the image) on the side to bridge the gap between your drawing and reality. -
Add a separate notebook:
Position a smaller open notebook with lined paper at the bottom, perhaps with a pencil resting on it, to suggest notes or measurements are being taken.
Digital Overlay
Photograph your layout, then import it into a drawing app. Use layers to digitally colour the coat without risking the original drawing.
Now you have a chic, portfolio-ready display that perfectly showcases your fashion design process
Front, Side, and 3/4 Outfit Turnarounds
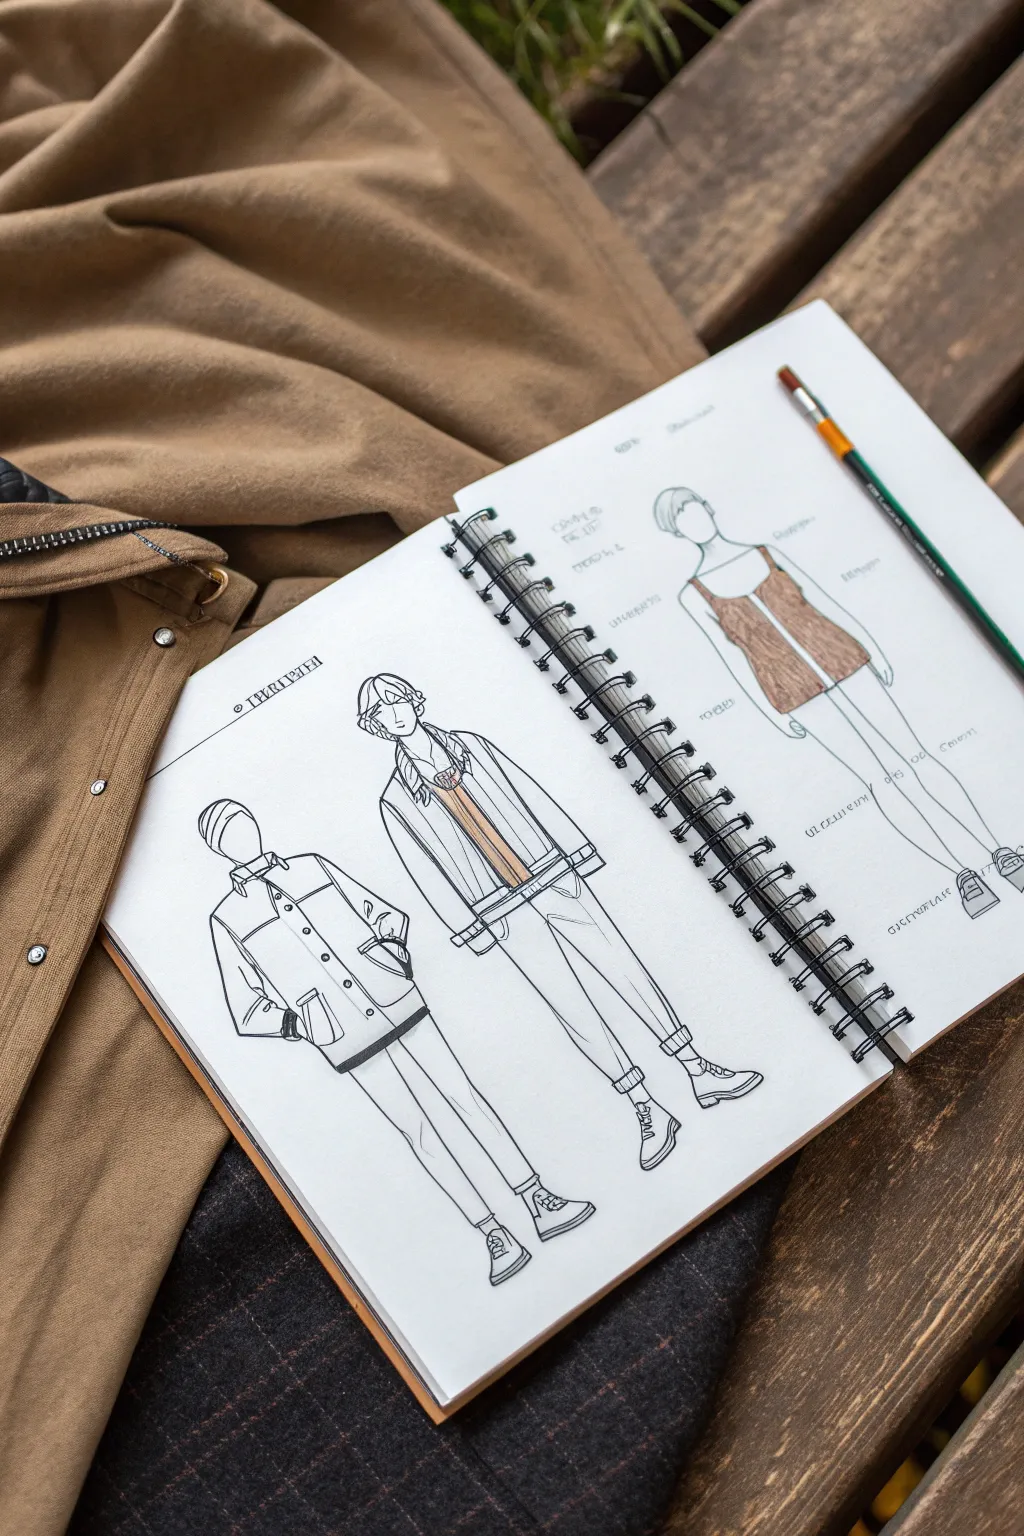
This tutorial guides you through creating a stylish fashion illustration spread in your sketchbook, featuring casual anime-inspired outfits. The focus is on clean lines, light shading, and capturing the drape of coats and layers in a minimalist aesthetic.
Step-by-Step Tutorial
Materials
- Spiral-bound sketchbook (heavyweight paper preferred)
- Mechanical pencil (0.5mm or 0.7mm)
- Fine liner pen (0.3mm or 0.5mm, black)
- Alcohol markers (warm grey, beige, light brown)
- White gel pen (optional for highlights)
- Reference fabric or a real coat (for texture inspiration)
Step 1: Drafting the Poses
-
Create the wireframes:
Start on the left page with two figures. Draw a simple stick figure skeleton for the front-facing character on the left, and a slightly taller 3/4 view skeleton on the right. Keep the heads purely oval for now. -
Flesh out the bodies:
Add cylindrical shapes over your stick figures to build volume for the arms, legs, and torso. Since these are fashion illustrations, you can elongate the legs slightly for a stylized anime look. -
Draft the female figure:
On the right page, draw a third figure. This one should be a simpler female form, focusing on the torso and upper legs to showcase a dress or tunic design.
Fabric Texture Trick
To make the coat look heavy, stop your ink lines just short of intersecting at corners. This ‘breathing room’ suggests a thick material turn rather than a sharp paper fold.
Step 2: Designing the Outfits
-
Sketch the left figure’s coat:
On the far left figure, draw a structured, boxy coat. Focus on the collar detail and large buttons down the front. Sketch the hands casually tucked into the pockets to create realistic fabric tension. -
Detail the center figure’s layers:
For the middle character, sketch an open jacket over a sweater or shirt. Draw the lapels folding back naturally and add a scarf or collar detail around the neck area. -
Draft the garment on the right:
On the right page, sketch a sleeveless tunic or dress. Since the reference shows a textured look, keep the outline slightly loose to suggest a softer fabric like wool or knit. -
Refine the pants and shoes:
Add slim-fit trousers to both male figures. Observe how pants bunch slightly around the ankles and sketch simple boots or high-top sneakers. -
Add facial features and hair:
Sketch simple, sweeping hairstyles. Keep facial features minimal—just a nose line or a simple jawline—to keep the focus primarily on the fashion.
Flat Lay Styling
To photograph your work like the example, place your sketchbook on a wooden surface and drape a real coat nearby with similar tones to create a cohesive color palette.
Step 3: Inking and Coloring
-
Line the artwork:
Take your fine liner pen and carefully trace over your key pencil lines. Use confident, single strokes rather than ‘petting’ the line. Vary your line weight: thicker for outer jacket edges, thinner for interior folds. -
Erase pencil marks:
Wait for the ink to dry completely. I always double-check this to avoid smudging, then gently erase all the underlying graphite sketch lines. -
Apply base color to the center outfit:
Using a beige or light brown marker, color the inner shirt/sweater of the middle figure. Apply the ink vertically to mimic the weave of the fabric. -
Texture the right-side garment:
For the dress on the right page, use a brown marker. Instead of solid coloring, use a scribbling or stippling motion to create a textured, fuzzy appearance. -
Add handwritten annotations:
Using a small, neat print, add notes around the figures. You can write mock fabric names, measurements, or design notes in a stylized font to mimic a designer’s workbook. -
Stipple shading:
Use your fine liner to add tiny stipple dots on the darker areas of the dress on the right page to suggest depth and shadow.
Step 4: Final Touches
-
Enhance the boots:
Focus on the shoes of the standing figures. Add small details like laces and sole treads to ground the characters. -
Add context elements:
Draw faint horizon lines or floor shadows under the feet so the figures don’t look like they are floating in space. -
Review and refine:
Look over the entire spread. If any lines look too thin, thicken them up to balance the visual weight across the two pages.
You now have a clean, professional-looking fashion spread that captures the essence of anime street style.
Outfit Families by Color Palette
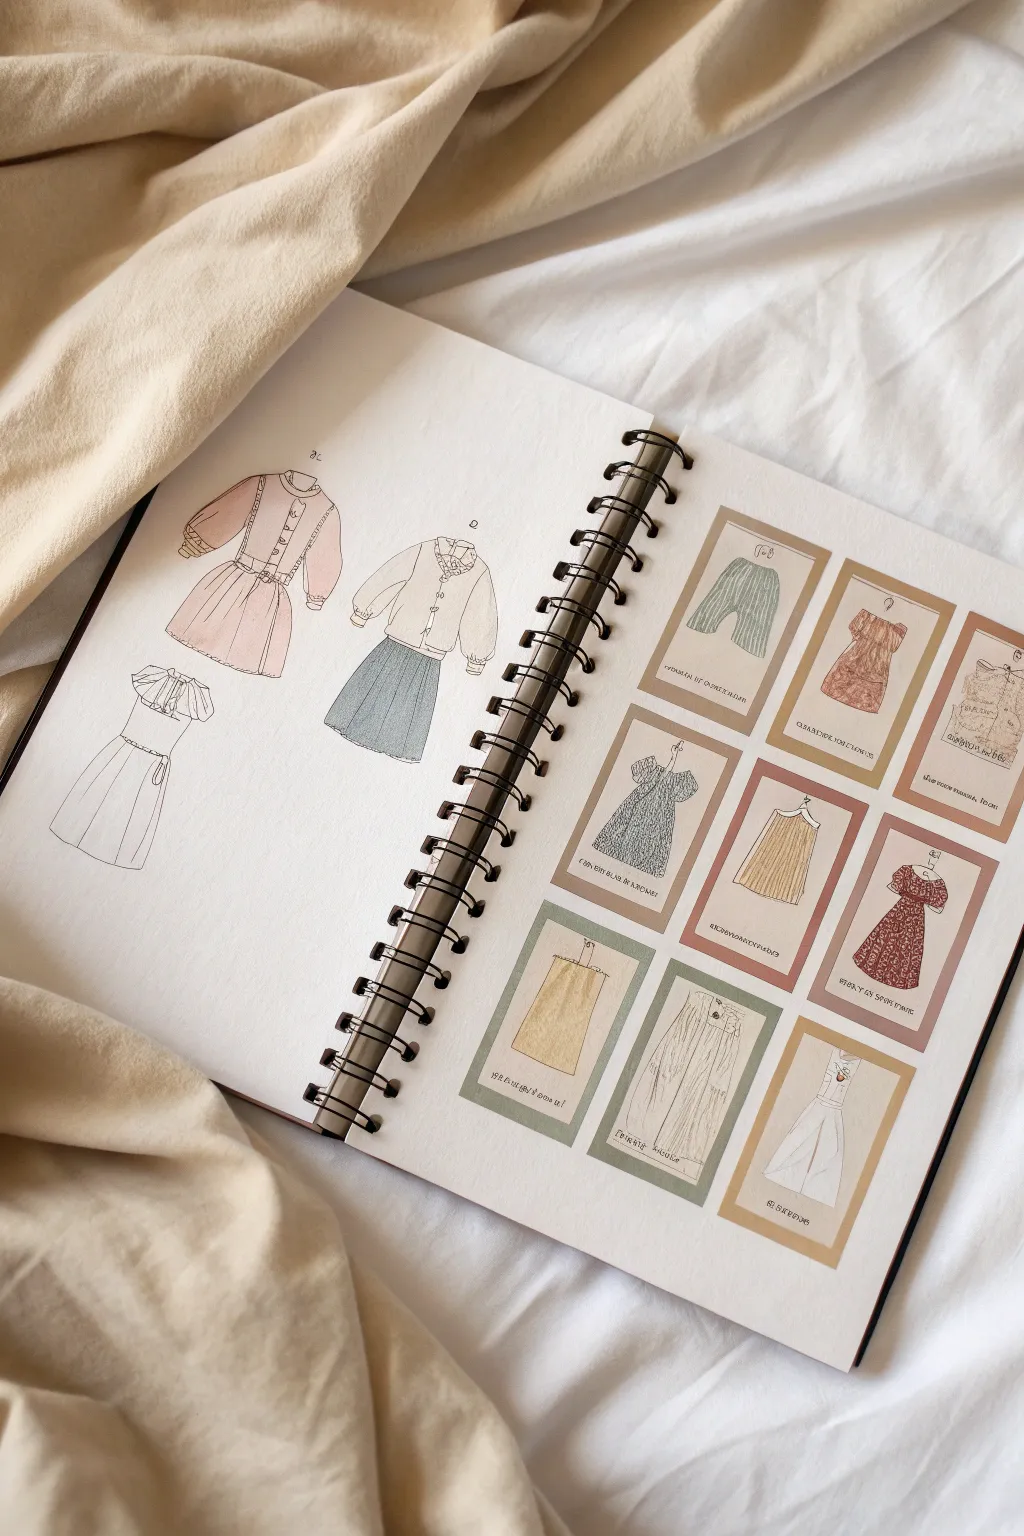
Create a charming fashion planning spread featuring soft, vintage-inspired anime outfits. This project combines loose clothing sketches with neat, card-style swatches to organize outfit families by color palette.
Step-by-Step
Materials
- Spiral-bound sketchbook (heavyweight mixed media paper)
- Pencil (HB or 2B)
- Fine liner pens (0.1mm and 0.3mm, black or sepia)
- Colored pencils or watercolor markers (muted pastels: dusty pink, sage green, slate blue, beige)
- Ruler
- Eraser
Step 1: Drafting the Layout
-
Page Division:
Visualize your open sketchbook as two distinct zones. The left page will host free-floating character outfit sketches, while the right page will be organized into a structured grid for your ‘wardrobe cards’. -
Sketching Forms (Left Page):
Lightly sketch the outlines of three main garments on the left page using your pencil. Start with a simple bodice shape and add flowing skirt lines. Don’t worry about anatomically perfect bodies; focus on how the fabric hangs. -
Grid Setup (Right Page):
On the right page, use a ruler to mark out a 3×3 or 3×4 grid of rectangles. Each rectangle should look like a trading card, roughly 2 inches wide by 3 inches tall. Leave even spacing between them for a clean look.
Smudge Control
If your fine liner smears when you color over it, switch to waterproof ink pens or let the ink cure for at least 30 minutes before coloring.
Step 2: Drawing the Outfits
-
Detailing the Main Outfits:
Return to the left page sketches. Define the details: add puff sleeves to the top dress, a collar to the blouse, and pleats to the skirts. Keep lines fairly loose to maintain a sketchy aesthetic. -
Filling the Cards:
Inside each rectangle on the right page, sketch a single garment item. Mix it up with pants, skirts, simple dresses, and aprons. Center each item so it looks like a catalog entry. -
Inking the Lines:
Go over your pencil sketches with a 0.1mm fine liner. Use broken, delicate lines for fabric folds to suggest softness. For structural seams, use a slightly firmer continuous line. -
Inking the Borders:
Carefully ink the rectangular borders of your cards on the right page. You might want to double-line them or thicken the border slightly to make the ‘cards’ pop against the white paper. -
Clean Up:
Once the ink is completely dry, gently erase all underlying pencil marks to reveal a clean, crisp line art base.
Washi Tape Borders
Instead of drawing ink borders for the cards, use thin strips of solid-colored washi tape to frame each garment sketch for a textured, scrapbook look.
Step 3: Coloring and Styling
-
Base Colors (Left Page):
Select a dusty pink for the first dress. Apply color lightly, leaving small white highlights on the shoulders and skirt curves to indicate volume. -
Secondary Outfit:
For the second outfit, color the skirt a slate blue and the top a warm beige. Use vertical strokes on the skirt to emphasize the texture of the fabric. -
Palette Logic:
On the right page, group your colors. Color the top row of cards with cool tones (blues, greens), the middle with warm neutrals, and the bottom with earthy reds or browns. This creates the ‘outfit family’ effect. -
Adding Texture:
If using colored pencils, layer a second coat of color in the shadow areas—under collars, inside pleats, and along the hemline—to add depth. -
Card Backgrounds:
For the cards on the right, consider coloring the background of the rectangle a very light beige or cream, leaving the garment white or colored, or conversely, color the garment and leave the background white. -
Pattern Details:
Use your 0.1mm pen to add tiny patterns to specific garments, like small polka dots on a dress or thin stripes on a pair of pants. -
Labeling:
Add tiny, scribbled text beneath each garment inside the cards. It doesn’t need to be legible—just squiggly lines to simulate handwritten notes or Japanese characters for that aesthetic catalog feel. -
Final Touches:
Review the spread. If any color feels too flat, add a tiny bit of cross-hatching with your pen in the darkest shadow areas to bring uniform contrast to both pages.
Now you have a beautifully organized reference page for your next anime character design session
Unexpected Genre Mashup Outfits
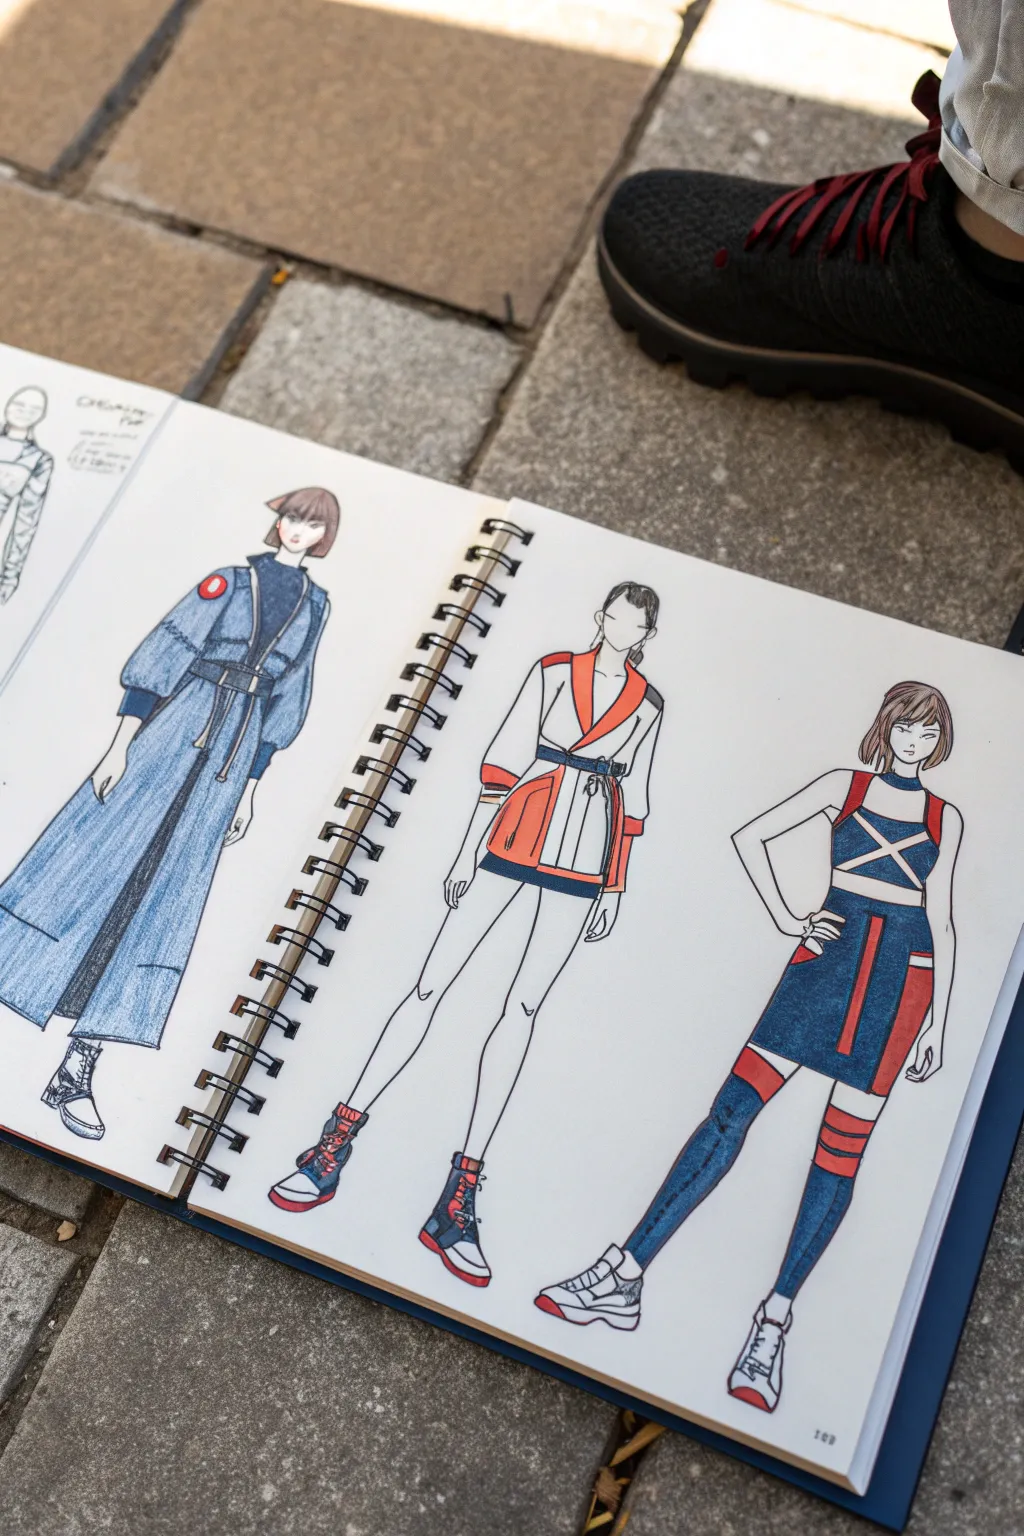
Bring your anime character concepts to life with this trio of fashion-forward designs that blend different genres into a cohesive collection. This tutorial guides you through sketching, inking, and coloring three distinct outfits—from a dramatic long coat to sporty tech-wear—right in your sketchbook.
Step-by-Step Guide
Materials
- Spiral-bound sketchbook (heavyweight paper recommended)
- H or HB graphite pencil for initial sketching
- Fine liner pens (0.1mm, 0.3mm, and 0.5mm)
- Alcohol-based markers (Cool Greys, denim blues, bright red/orange)
- White gel pen for highlights
- Kneaded eraser
- Ruler (optional for geometric details)
Step 1: Laying the Groundwork
-
Establish the croquis:
Start by lightly sketching three standing figures (croquis) evenly spaced across your sketchbook pages. Keep the poses simple—standing straight or slightly popped hip—to show off the clothing clearly. Use simple geometric shapes (ovals for heads, cylinders for limbs) to get the proportions right before adding anatomical details. -
Define the head shapes:
Refine the head shapes, adding loose hairstyles for each model. For the left figure, map out a bob cut; for the center, a sleek ponytail or bun; and for the right, a loose, shoulder-length style. Keep the faces minimal for now, focusing just on the jawline and hair volume. -
Draft the left outfit silhouette:
On the first figure, sketch a long, oversized coat that reaches the ankles. Give it puffy sleeves that gather at the elbows and a wide, belted waist. Draw a vertical line down the center to indicate the opening, and add a high collar underneath. -
Draft the center outfit silhouette:
For the middle figure, draw a shorter, kimono-inspired jacket that stops at the upper thigh. Sketch wide sleeves and a wrap-style front. Pair this with fitted shorts visible just underneath the jacket hem to create a sporty, agile look. -
Draft the right outfit silhouette:
On the third figure, sketch a crop top with a crisscross design and harness straps. Add a high-waisted mini skirt with panel details. Don’t forget to sketch the base for thigh-high socks or leggings that extend down to the ankles.
Step 2: Refining and Inking
-
Detail the clothing folds:
Go back over your pencil sketches to add weight. Draw natural drapery lines where the fabric bunches at the waist, elbows, and knees. For the long coat, emphasize the vertical drape; for the center jacket, focus on the stiffness of the lapels. -
Add boots and shoes:
Draw the footwear for each model. Sketch high-top combat boots for the left figure, chunky sneakers for the center, and sporty trainers for the right. Add lace details and thick soles to ground the designs. -
Initial inking pass:
Using a 0.3mm fine liner, carefully trace over your final pencil lines. Keep your hand steady for the long, straight lines of the coat and skirt panels. Use confident, sweeping strokes for the legs and arms. -
Add line weight variety:
Switch to a 0.5mm pen to darken the outer contours of the clothing, separating the figures from the background. Use a thinner 0.1mm pen for delicate details like facial features (eyes, nose, mouth), hair strands, and shoelaces. This creates a professional, dynamic look. -
Clean up the sketch:
Once the ink is completely dry—give it a solid minute or two—take your kneaded eraser and gently remove all the underlying graphite sketch lines so the page looks crisp.
Clean Lines Pro-Tip
To keep marker ink from bleeding outside your lines, color the shapes first, leaving a tiny gap at the edge, and then do your final inking on top of the dried color.
Step 3: Coloring and Styling
-
Base layer: Denim blue:
Select a denim-blue alcohol marker. Color the entire long coat on the left, leaving the undershirt uncolored. Apply the same blue to the skirt panels and leg warmers on the right figure. Use long vertical strokes to avoid streakiness. -
Accenting with red-orange:
Take a bright red or orange marker to add contrast. Color the lower half of the center jacket, the belt on the left coat, and the straps/harness details on the right figure. This limited color palette ties the three separate designs together into a single collection. -
Adding dark values:
Use a dark grey or black marker for the undershirts, the collar areas, and parts of the shoes. This helps anchor the bright colors and adds depth to the layered clothing pieces. -
Shading the fabric:
Go back in with your blue marker (or a second layer of the same shade) to add shadows. Focus on areas where the fabric folds, under the belts, and beneath the jacket hems. I find that deepening the color in the ‘creases’ makes the flat sketch suddenly look three-dimensional. -
Skin tone and hair:
Lightly color the skin on the legs, arms, and faces with a pale flesh-toned marker. Add a simple swipe of color to the hair—browns or dark greys work well to keep the focus on the vibrant outfits. -
Final highlights:
Use a white gel pen to add tiny highlights. touches on the buckles, the glossy parts of the shoes, and perhaps a sheen line on the hair. This small step brings that final sparkle to the artwork.
Uneven Color?
If your marker strokes look streaky, work faster while the ink is still wet on the paper. Saturation helps the ink blend seamlessly, smoothing out visible lap lines.
Now you have a stylish anime fashion collection ready for your portfolio


Have a question or want to share your own experience? I'd love to hear from you in the comments below!