If you’re drawing characters, the outfit does so much of the storytelling before they ever say a word. Here are my favorite anime outfit ideas—from classic staples to weirder, more stylized concepts you can remix into your own designs.
Classic School Uniform Remix
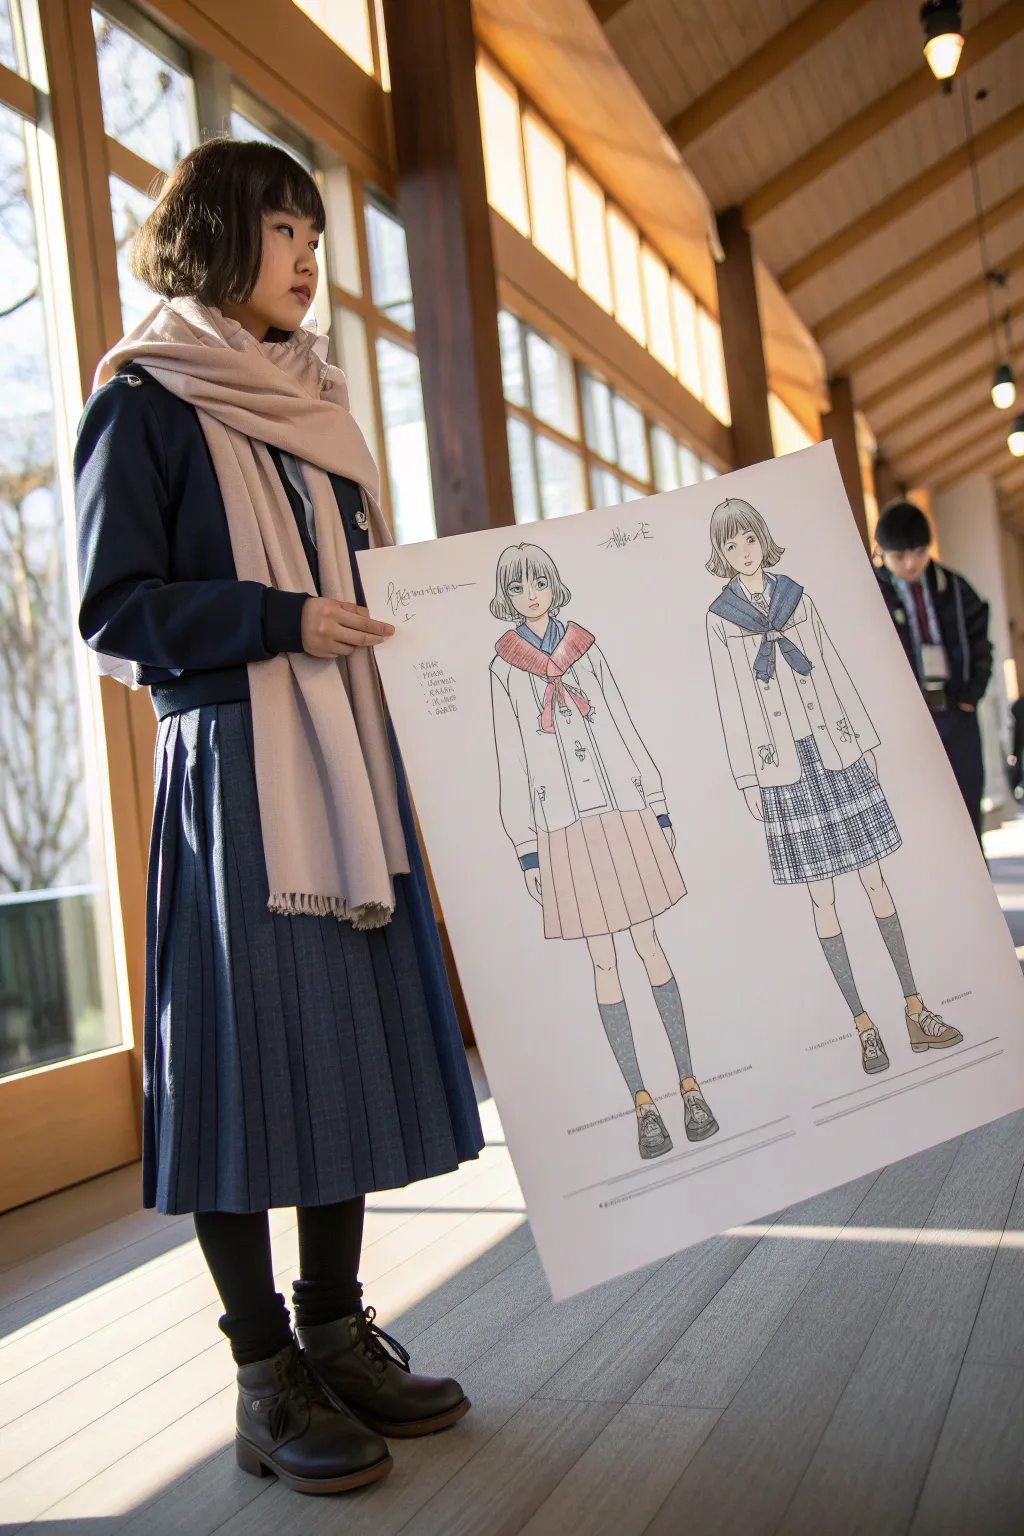
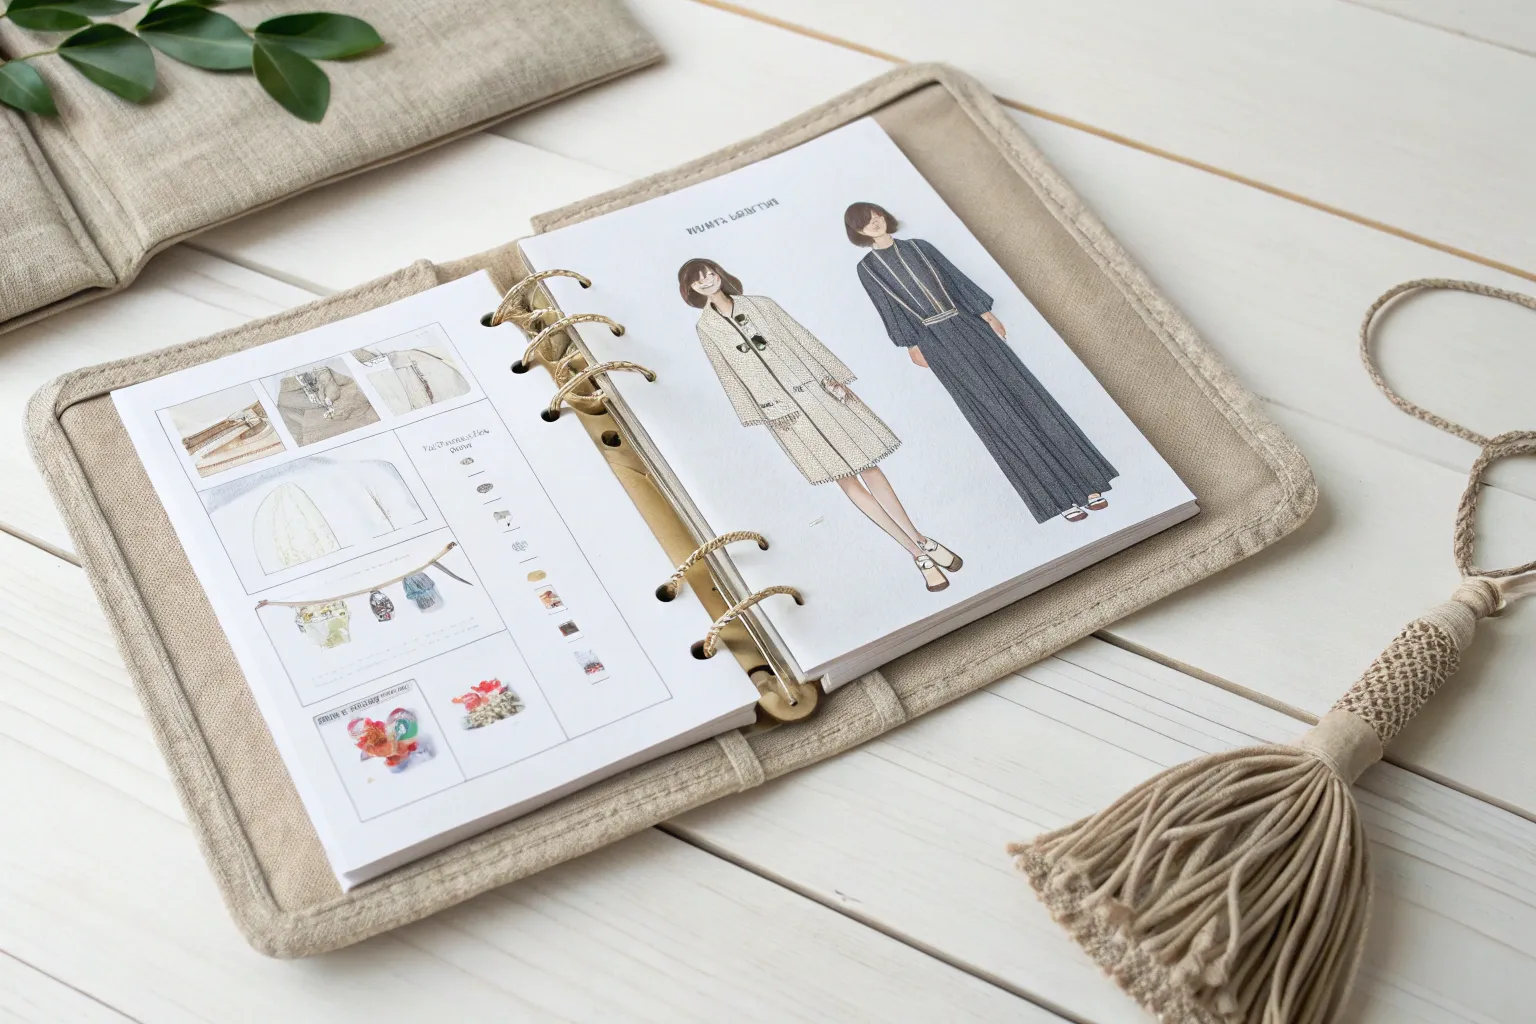
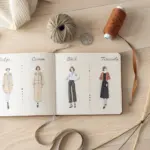
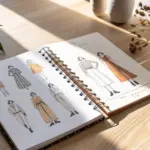
Bring your anime fashion concepts to life with this professional-style character design presentation board. featuring clean line art and gentle coloring markers, this project captures the essence of classic school uniform aesthetics on a large format poster.
How-To Guide
Materials
- Large white poster board (A1 or A2 size)
- HB and 2B graphite pencils
- Kneaded eraser and high-quality vinyl eraser
- Fine liner pens (0.1mm, 0.3mm, 0.5mm) in black or dark sepia
- Alcohol-based markers (Copic or similar) in skin tones, navy, beige, pink, and grey
- Ruler or T-square
- Reference images of school uniforms (seifuku and blazers)
- Light table or tracing paper (optional)
Step 1: Planning and Layout
-
Conceptualize the poses:
Begin by sketching rough thumbnails on scratch paper. Aim for a standard ‘model sheet’ pose: usually a standing front or ¾ view that clearly displays the clothing details without obscuring limbs. -
Scale your figures:
Measure your poster board and determine the height of your figures. They should be large enough to be seen from a distance but leave ample negative space around the edges. Mark the top of the head and bottom of the feet lightly with a ruler to ensure both figures are the same height. -
Draft the anatomy:
On the poster board, lightly sketch the stick figure skeletons using your HB pencil. Keep your lines incredibly faint so they don’t groove the paper. Focus on harmonious proportions, typically 6-7 heads tall for high school anime characters.
Step 2: Penciling the Details
-
Flesh out the body shapes:
Build the muscle and skin forms over your skeletons. Defines the curves of the legs and the shape of the face, keeping the style consistent with the ‘shoujo’ or ‘seinen’ look you want. -
Sketch the primary uniform (Left Figure):
Draw the first outfit. For the left figure, sketch a blazer-style uniform with a soft, thick scarf wrapped around the neck. Pay attention to how the scarf drapes and overlaps the jacket collar. -
add skirt pleats:
Draft the pleated skirt. Start with the hemline as a zigzag, then pull the lines up toward the waistband. Remember that gravity affects the fabric; pleats shouldn’t be perfectly rigid. -
Sketch the secondary uniform (Right Figure):
For the second figure, sketch a classic sailor-style collar (seifuku) with a distinct neckerchief and a patterned skirt. Add a cardigan or light jacket over the top if desired, ensuring the sailor collar sits visibly outside.
Pro Tip: Line Weight
Vary your line weight! Use thicker lines for the outer silhouette and heavy fabrics, and thinner, broken lines for delicate details like hair strands or fabric folds.
Step 3: Inking the Lines
-
Clean up the sketch:
Use your kneaded eraser to lift off excess graphite until only a faint ghost image remains. This prevents the graphite from smearing into your ink. -
Outline the face and hair:
Using a 0.1mm fine liner, carefully ink the facial features and hair strands. Use fluid, quick strokes for hair to keep it looking soft. -
Ink the clothing:
Switch to a 0.3mm pen for the main clothing outlines. Use a 0.5mm pen for the outermost silhouette to give the character weight. Add small wrinkles at the elbows and waist to suggest fabric tension. -
Detail the accessories:
Ink the shoes, socks, and small buttons. Be precise with the shoelaces and the texture of the loafers.
Troubleshooting: Bleeding
If markers bleed through the poster board, place a scrap sheet of paper underneath your hand while working. Also, avoid pausing the marker tip in one spot.
Step 4: Coloring and Finishing
-
Apply skin tones:
Start with your lightest alcohol marker skin tone. Fill in the face and legs. Add a slightly darker shade under the hairline and chin for dimension. -
Color the hair:
Use a light grey or beige for the hair. Leave a white highlight band across the bangs and crown to simulate shine, blending the color out from the roots and tips. -
Fill in the uniforms:
Color the blazer and skirt. For the plaid skirt on the right figure, lay down the base color first, let it dry, and then carefully draw the plaid grid lines with a darker marker or colored fine liner. -
Add shading:
I like to use a cool grey marker to add shadows to the white shirts and socks. This adds instant volume without muddying the colors. -
Write text annotations:
Using a ruler to keep your lines straight, write design notes or character names next to the figures in a stylized, handwritten font. Include fabric details or color codes if you want that authentic designer feel. -
Final erase:
Once the ink and markers are totally dry (give it at least 30 minutes), create a clean finish by erasing any remaining pencil guides with a vinyl eraser.
Step back and admire your professional-grade character design showcase


Cozy Oversized Hoodie Streetwear
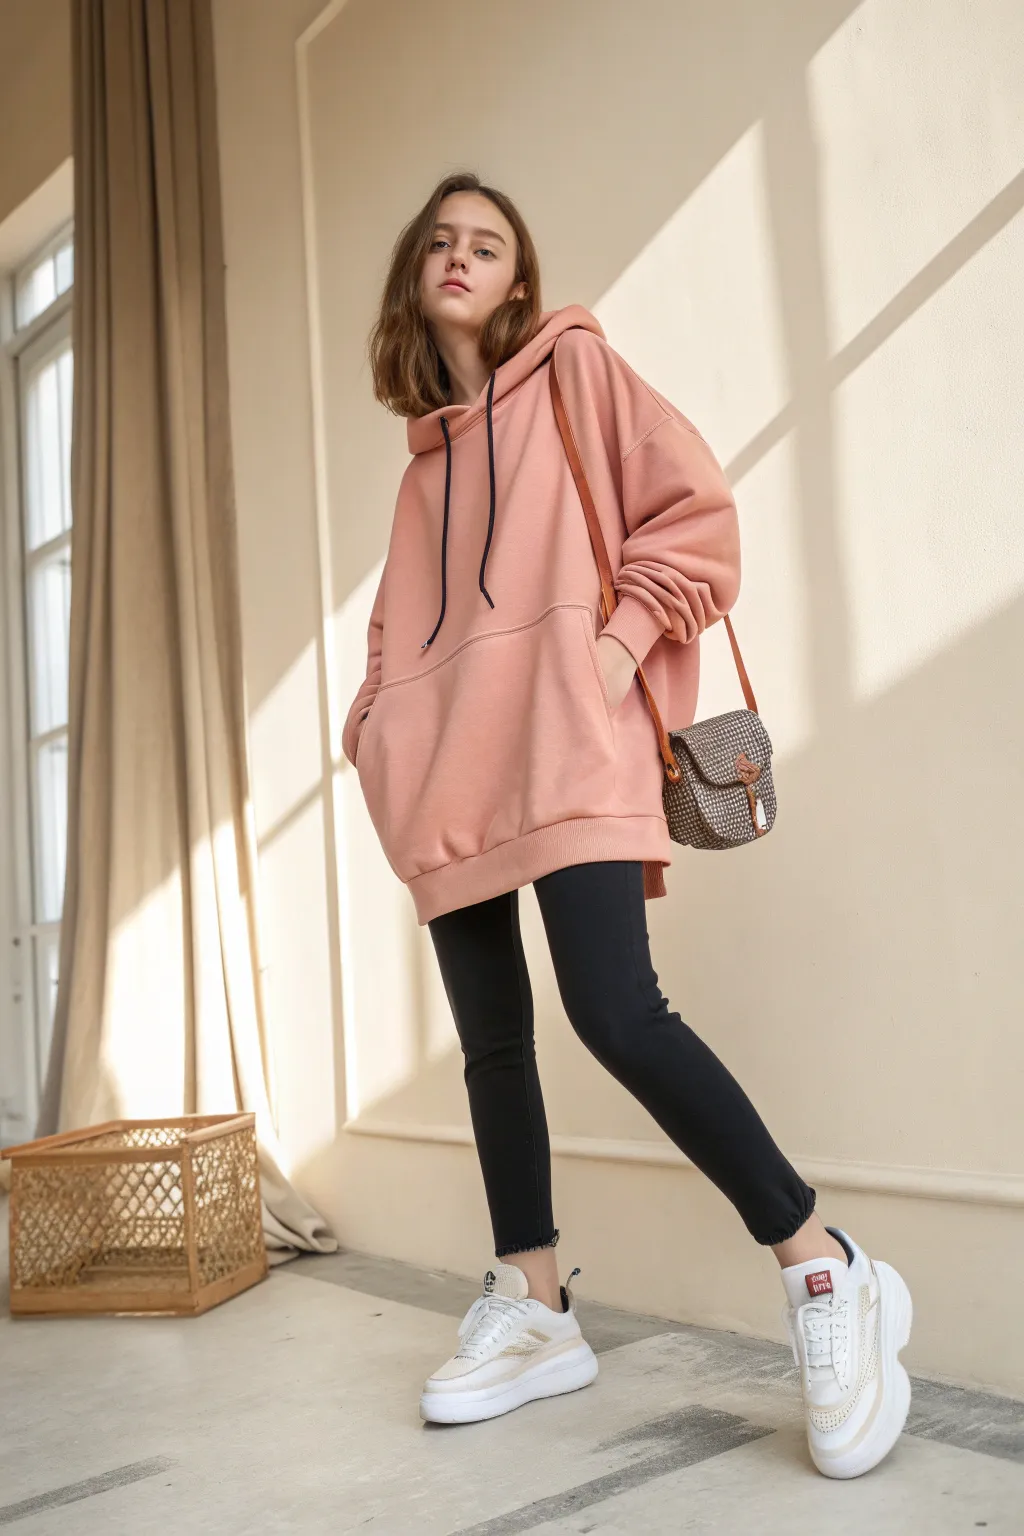
Recreate this effortlessly cool streetwear look that channels relaxed anime vibes with modern comfort. This tutorial guides you through assembling the perfect oversized aesthetic, focusing on silhouette and key accessories.
Step-by-Step Tutorial
Materials
- Oversized peach-pink hoodie (with black drawstrings)
- Black skinny jeans or leggings (ankle length)
- White chunky sneakers or dad shoes
- Small crossbody bag (patterned or solid neutral)
- No-show socks
- Curling wand (optional for hair)
- Wicker basket (optional prop)
Step 1: Setting the Base
-
Choose the right hoodie:
Select a hoodie that is at least two sizes larger than your standard fit. Look for a dusty pink or peach tone rather than a hot pink. The key is in the ‘drop shoulder’ seam, which should fall well below your actual shoulder for that authentic slouchy look. -
Check the hoodie details:
Ensure the hoodie has a large front kangaroo pocket and contrasting black drawstrings. If your hoodie has matching strings, you can easily swap them out for black shoe laces or cord to mimic the graphic contrast in the reference. -
Select the bottoms:
Wear fitted black skinny jeans or opaque leggings. The contrast between the baggy top and tight bottoms is crucial for the ‘lollipop’ silhouette common in anime character designs. -
Adjust the length:
The pants should hit right at the ankle bone. If they are too long, cuff them slightly or choose a cropped style. showing a hint of ankle adds to the casual vibe.
Hoodie Hack
To keep the hood from falling too flat, wear a structured tee underneath or lightly stuff the hood fabric to maintain that fluffy anime shape.
Step 2: Accessorizing
-
Pick the footwear:
Step into a pair of chunky white sneakers. Look for a design with a thick sole and mixed textures (mesh and leather) to ground the outfit visually. Keep them pristine for a crisp look. -
Lace them loosely:
Don’t tie your laces too tight; a looser lacing pattern adds to the relaxed energy. I find that leaving the top eyelet empty often helps the shoe sit better against the ankle. -
Add the bag:
Sling a small, structured bag over one shoulder. A neutral brown or subtle patterned bag works best to complement the pink without overpowering it. Adjust the strap so the bag hits right at your hip bone. -
Position the bag:
Let the bag hang naturally to the side or slightly toward the back, ensuring it doesn’t interrupt the clean lines of the hoodie’s front.
Step 3: Styling the Pose & Look
-
Hair preparation:
Style your hair in loose, natural waves. If your hair is straight, use a large-barrel curling wand on random sections and brush them out immediately for a ‘bedhead’ texture. -
Body language:
Stand with your feet shoulder-width apart. Shift your weight on one leg and extend the other slightly forward, creating a dynamic angle. -
Hand placement:
Tuck both hands into the kangaroo pocket of the hoodie. This pulls the fabric taut across the back and emphasizes the oversized volume. -
Chin up:
Tilt your head back slightly and look down towards the camera lens (or viewer) with a relaxed, neutral expression. This adds a tough of confident attitude. -
Shoulder stance:
Let your shoulders drop completely. Do not hunch; just let the weight of the heavy fabric dictate your posture.
Level Up: Color Grade
When editing your final photo, slightly desaturate the background and boost the luminance of the pinks for that soft, dreamy anime aesthetic.
Step 4: Refining the Environment
-
Find the light:
Position yourself near a large window where natural light can create strong shadows. The interplay of light and shadow on the hoodie folds adds dimension. -
Background check:
Ensure the background is neutral—creams, beiges, or light wood tones work perfectly to let the pink hoodie pop. -
Add a prop:
Place a rustic element, like a woven wicker basket or crate, on the floor nearby. It balances the composition and adds a touch of ‘slice of life’ realism.
Now you are ready to rock this comfortable, character-inspired street style with confidence


Sporty Track Set With Pop Colors

Channel the stylish athletic vibes of 90s anime with this custom-sewn tracksuit featuring bold color blocking. This project transforms simple beige sportswear fabric into a cohesive, vintage-inspired set with eye-catching teal and coral accents.
Step-by-Step Guide
Materials
- Cream or light beige mid-weight track fabric (polyester blend or cotton jersey)
- Deep teal rib-knit fabric
- Bright coral/orange rib-knit fabric
- Teal zipper (approx. 22 inches)
- Two smaller teal pocket zippers
- Cream sewing thread
- Sewing machine with zig-zag or serger capability
- Tracksuit sewing pattern (jacket with stand collar + joggers)
- 1-inch wide elastic for waistband
- Fabric scissors & pins
- Iron & ironing board
Step 1: Preparing the Base
-
Pattern prep:
Begin by laying out your jacket and pant pattern pieces. To accommodate the stripes, you’ll need to slice the sleeve pattern and the outer side leg pattern vertically. Add a 1/2 inch seam allowance to both cut edges where the stripe panel will be inserted. -
Cut the main fabric:
Cut all your main body pieces (front, back, lower legs, remaining sleeve parts) from the cream fabric. Ensure the grainline runs parallel to the vertical cuts. -
Create the stripe panels:
Cut 2.5-inch wide strips of both the teal and coral fabrics. The length should match your sleeve and pant leg measurements. -
Join the stripe colors:
Place one teal strip and one coral strip right sides together. Sew them lengthwise with a stretch stitch or serger to create a single two-tone panel.
Step 2: Assembling the Jacket
-
Insert sleeve stripes:
Pin your new two-tone panel between the split sleeve pieces. The teal side should face the back of the sleeve, and coral towards the front. Stitch along both sides and press the seams flat. -
Attach the collar:
Cut the collar piece from the teal fabric. Fold it in half lengthwise, right sides together, and stitch the short ends. Turn it right side out and pin it to the jacket neckline, stretching slightly if needed to fit. -
Install the zipper:
I usually like to use double-sided wash-away tape here to hold the zipper in place before sewing. Stitch the teal zipper to the center front edges, ensuring the collar seams align perfectly at the top. -
Sew side seams and pockets:
Install the small welt pockets using the smaller teal zippers on the front panels. Then, sew the front and back jacket pieces together at the side seams and shoulders. -
Cuffs and hem:
Finish the sleeve ends with teal rib-knit cuffs. Create a hem band using the cream fabric and attach it to the bottom of the jacket for a gathered, bomber-style fit.
Use Stabilizer Tape
Apply fusible knit stay tape along the zipper area before sewing. This prevents the stretchy fabric from puckering or waving when you attach the zipper.
Step 3: Constructing the Pants
-
Insert leg stripes:
Similar to the sleeves, insert the long two-tone stripe panel between the side splits of the pant legs. Ensure the colors are oriented the same way as the jacket for continuity. -
Inseam stitching:
Sew the inseams of each leg, starting from the crotch point down to the ankle. Use a stretch stitch to prevent popping threads during movement. -
Crotch seam:
Turn one leg right side out and place it inside the other leg (which should be inside out). Match the crotch seams and stitch continuously from front waist to back waist. -
Waistband assembly:
Fold the top edge of the pants down to create a casing, leaving a small 2-inch gap at the back. Thread your 1-inch elastic through using a safety pin, test the fit, sew the elastic ends together, and close the gap. -
Ankle cuffs:
measure your ankle circumference and cut cream fabric bands slightly smaller than that measurement. Fold them, attach to the pant bottoms, and serge the raw edges for a professional finish. -
Final press:
Steam press all seams, paying special attention to the side stripes to make them lie perfectly flat against the beige fabric.
Add a Logo Patch
Embroider or iron on a small, quirky icon on the chest (like the red blob in the photo) to give it that authentic ‘team jersey’ anime aesthetic.
Put on your completed set and enjoy the comfort of your custom-made anime sportswear


Sailor-Collar Casual Variant
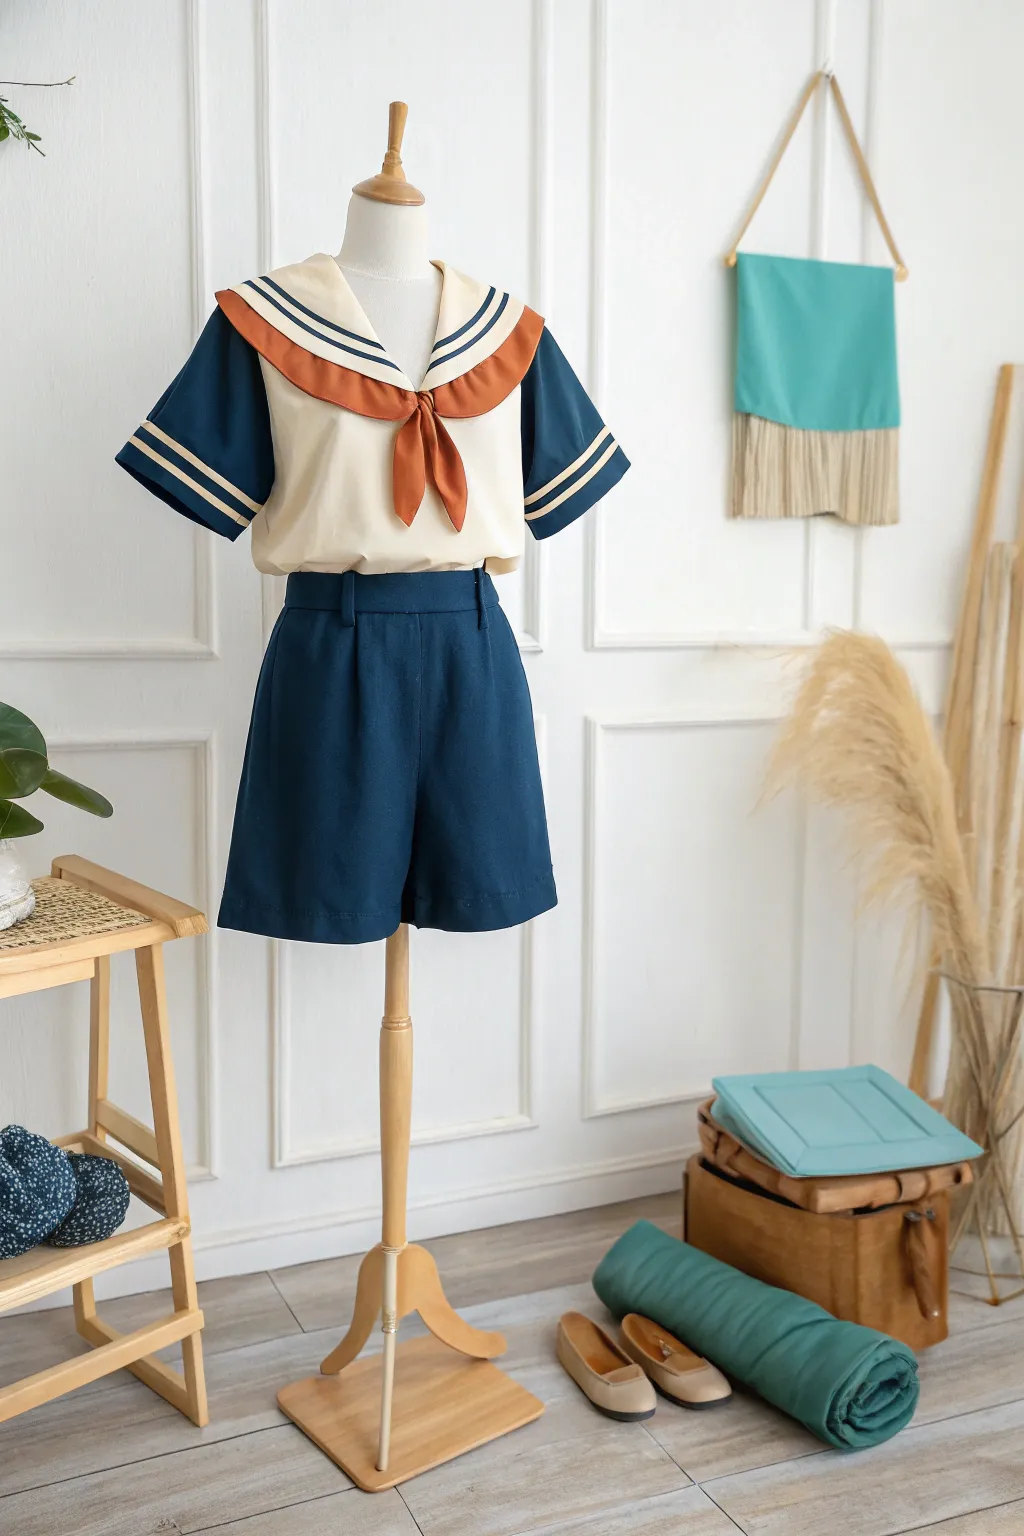
This charming two-piece ensemble reimagines the classic school uniform with a relaxed, color-blocked twist, perfect for daily wear or casual cosplay. The combination of deep navy, soft cream, and burnt orange creates a warm, vintage aesthetic that is both nostalgic and trendy.
Step-by-Step Tutorial
Materials
- Cream cotton or linen fabric (bodice)
- Navy blue twill or cotton blend (sleeves and shorts)
- Burnt orange/rust cotton fabric (collar and tie)
- Navy blue bias tape or ribbon (approx. 1/4 inch width)
- Lightweight fusible interfacing
- Matching thread (cream, navy, orange)
- Sewing machine
- Fabric scissors and pins
- Iron and ironing board
- Basic shirt and shorts sewing pattern (similar to a loose blouse and pleated shorts)
- Zipper and button for shorts
- Elastic (optional for back waistband)
Step 1: Constructing the Sailor Top
-
Pattern Preparation:
Begin by modifying your basic shirt pattern. You need a loose-fitting bodice and separate sleeve pieces. Draft a sailor collar pattern that fits the neckline, extending it squarely down the back and curving slightly over the shoulders to meet in a V-neck at the front. -
Cut the Bodice:
Cut the front and back bodice pieces from the cream fabric. Remember to add seam allowances if your pattern doesn’t include them. -
Cut the Sleeves:
Cut two sleeve pieces from the navy blue fabric. For this look, aim for a slightly oversized, elbow-length cut. -
Sleeve Detailing:
Before assembling the sleeves, measure about 2 inches up from the hem edge of your flat sleeve piece. Pin and topstitch two parallel rows of cream bias tape or ribbon across the width of the fabric to create the classic stripes. -
Shoulder Assembly:
Sew the front and back bodice pieces together at the shoulder seams. Press the seams open flat for a clean finish. -
Prepare the Collar:
Cut two collar pieces from the burnt orange fabric and one from interfacing. Iron the interfacing to the wrong side of the top collar piece for stability. Sew the two collar pieces right sides together, leaving the neck edge open. Clip the corners, turn right side out, and press firmly. -
Collar Trim:
Carefully pin navy bias tape along the outer perimeter of the collar, following the curve. Topstitch it down slowly to ensure the lines remain smooth and parallel to the edge. -
Attach the Collar:
Baste the finished collar to the neckline of the bodice. I prefer to attach a neck facing at this stage to cleanly sandwich the raw edges of the collar and bodice together. -
Tie Loop:
Created a small fabric loop or sewn-in knot from the orange fabric at the base of the V-neck to hold the tie, or simply sew the main tie pieces directly into the V-point depending on your preference. -
Final Assembly:
Attach the navy sleeves to the cream bodice armholes. Sew up the side seams from the hem of the shirt all the way to the end of the sleeve. Hem the bottom of the shirt and the sleeves.
Uneven Stripes?
If bias tape puckers on curves, steam iron it into a curved shape *before* pinning it to the collar. It helps it lie flat without twisting.
Step 2: Tailoring the Shorts
-
Cut the Shorts:
Using your shorts pattern, cut out the pieces from the navy fabric. Ensure you transfer all markings for pleats or darts. -
Create Pleats:
Fold and press the front pleats on the shorts legs according to your pattern. Baste them across the top waist edge to hold them in place during assembly. -
Install Pockets:
If your pattern includes side seam pockets (highly recommended!), install them now before sewing the side seams together. -
Sew Leg Seams:
Sew the inner leg seams and the side seams of the shorts. Finish the raw edges with a zigzag stitch or serger to preventing fraying. -
Waistband Construction:
Construct the waistband. Interface the waistband piece for structure. Attach belt loops if desired, positioning them evenly around the band. -
Attach Waistband:
Sew the waistband to the top edge of the shorts. Insert your zipper at the center front or side seam, and finish with a button or hook-and-bar closure. -
Hemming:
Fold up the hem of the shorts. Hand stitch firmly for an invisible finish or machine stitch for durability.
School Crest Detail
Embroider a custom school crest or emblem on the left breast pocket or sleeve for added anime authenticity and character flair.
Press your entire outfit thoroughly for that crisp, tailored look and you are ready for class

PENCIL GUIDE
Understanding Pencil Grades from H to B
From first sketch to finished drawing — learn pencil grades, line control, and shading techniques.
Explore the Full Guide
Idol-Inspired Stage Outfit
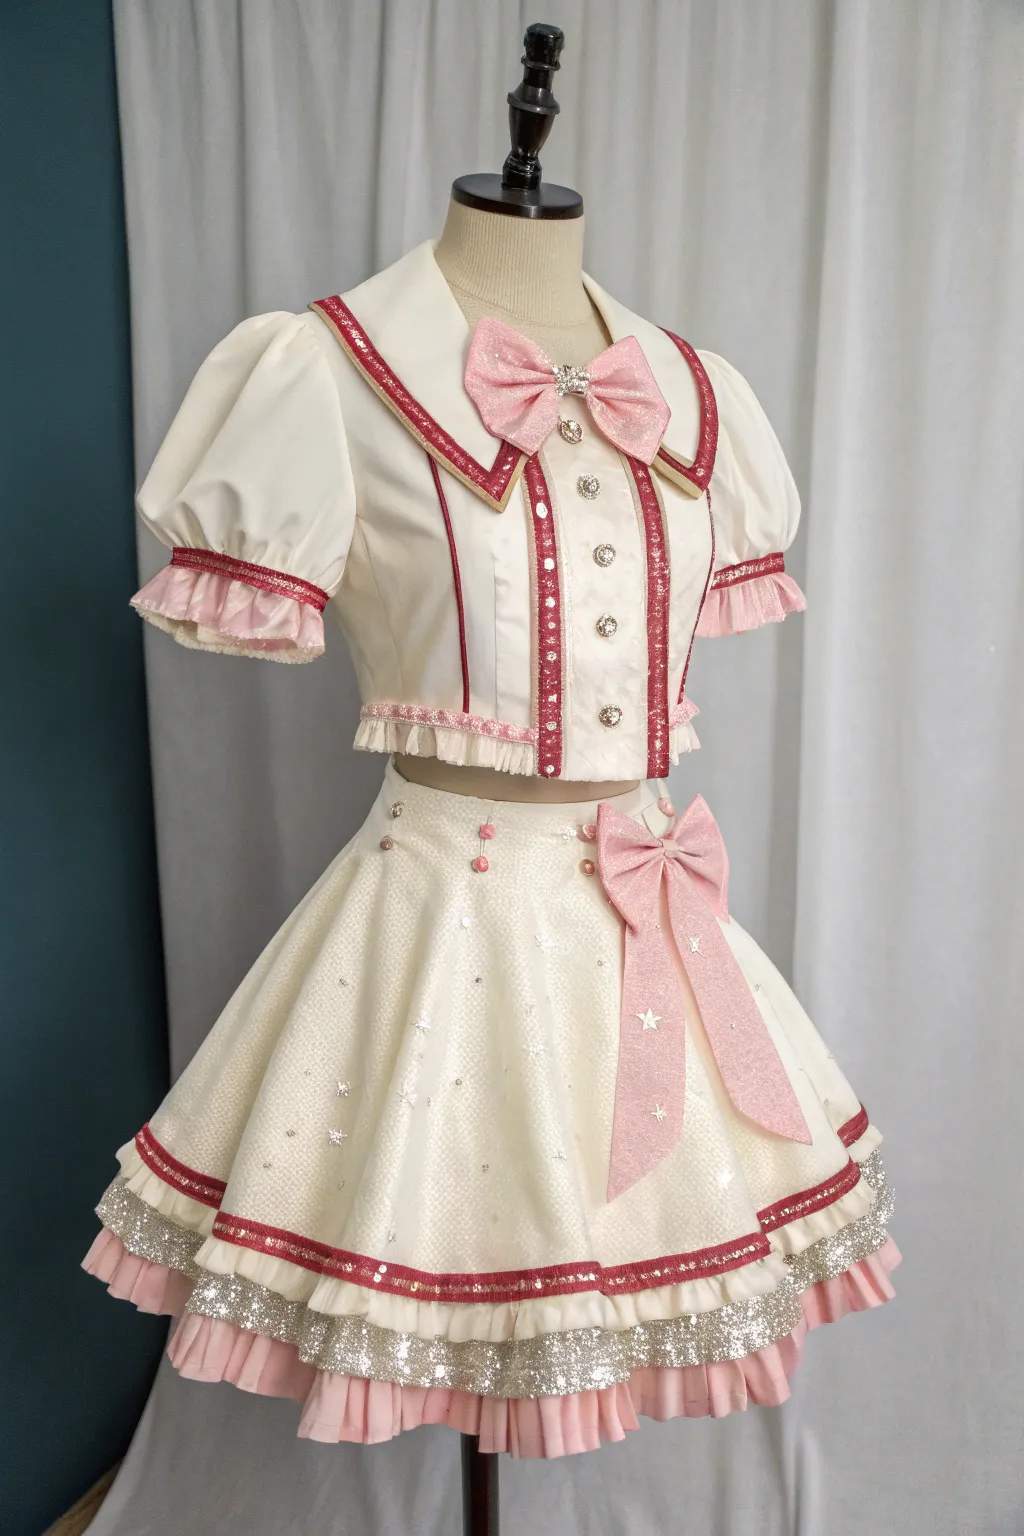
Transform into the center of attention with this charming two-piece idol costume featuring a puff-sleeve top and a voluminous, multi-layered skirt. This cream, pink, and red ensemble captures the magical girl aesthetic with glittering trims, oversized bows, and delicate star embellishments.
Step-by-Step
Materials
- Cream satin or heavy cotton fabric (base)
- Light pink chiffon or organza (ruffles)
- Red glitter ribbon or trim (approx. 1 inch width)
- Silver sequin fabric or wide trim
- Large rhinestones or decorative buttons
- Pink glitter fabric (for bows)
- Small star studs or iron-on patches
- Fray check sealant
- Zipper (hook and eye optional)
- Petticoat (essential for shape)
- Sewing machine and basic sewing kit
Step 1: Constructing the Top
-
Draft the bodice pattern:
Begin with a basic cropped bodice block. Alter the neckline to be a wide V-shape to accommodate the sailor collar later. Ensure the hem ends just above the natural waist for that idol silhouette. -
Assemble the puffy sleeves:
Cut out short, wide sleeve pieces and gather the fabric at the shoulder cap and the cuff. Stitch the underarm seams. Attach a wide band of pink ruffled chiffon to the hem of each sleeve before attaching the cuff band. -
Add sleeve details:
Sew a strip of red glitter trim directly onto the sleeve cuff, covering the seam where the pink ruffle meets the cream fabric. This creates a clean, professional border. -
Create the sailor collar:
Cut two triangular collar pieces from your cream base fabric. Sew red glitter trim along the outer edges, leaving about an inch of space from the edge for a layered look. Attach the collar to the neckline of the bodice. -
Sew the placket and buttons:
Construct the center front placket. Apply vertical strips of red glitter trim on either side of the button area. Sew on your decorative jeweled buttons down the center creates a focal point. -
Finish the top hem:
Finish the bottom edge of the crop top by sewing a gathered strip of pink chiffon, topped with a thinner pink glitter trim, creating a cute peplum effect. -
Make the chest bow:
Using pink glitter fabric, sew a medium-sized bow. Add a center loop and attach a rhinestone brooch to the middle. Pin or stitch this securely at the base of the collar.
Clean Sequin Lines
When sewing the silver sequin band, remove the sequins from the seam allowance area first. This prevents the needle from breaking and stops the scratchy sequins from chafing against your skin.
Step 2: Creating the Skirt
-
Cut the skirt panels:
This is a circle skirt design. Cut your waist radius on the cream fabric, ensuring it’s high-waisted. The length should be mini but allow for hemming. -
Add star embellishments:
Before assembling, scatter and attach small silver star studs or iron-on patches across the front panels of the skirt fabric. I find it easier to do this while the fabric is flat. -
Prepare the bottom tiers:
You will need three distinct layers for the hem. Cut long strips of silver sequin fabric, pink chiffon, and cream fabric. Gather them significantly to create ruffles. -
Attach the first ruffle layer:
Sew the gathered pink chiffon ruffle to the very bottom edge of your main skirt pieces. -
Attach the silver layer:
Sew the wide silver sequin ruffle slightly higher than the pink layer, so the pink peeks out from underneath. Topstitch carefully to avoid breaking needles on sequins. -
Apply the trim border:
Sew a horizontal strip of red glitter trim and a small cream ruffle just above the silver sequin layer. This hides the raw edge of the silver fabric and adds a defined stripe. -
Assemble the skirt:
Sew the side seams of the skirt (installing a zipper in the back or side seam). Attach a waistband interfacing for stiffness. -
Create the waist bow:
Make a large, dramatic bow with long tails using the pink glitter fabric. Notch the ends of the tails into a V-shape. Add a few star studs to the tails for continuity. -
Final Assembly:
Attach the large bow to the right hip of the waistband. Add decorative buttons or pink pearls along the front waistband for extra detail. Wear over a fluffy petticoat to achieve the full volume.
Make It Glow
Sew a delicate string of battery-operated fairy lights into the hem of the petticoat underneath. The soft glow will shine through the cream fabric for a true stage performance effect.
Put on your completed costume and get ready to shine brightly on your own personal stage
Magical Heroine Silhouette Set
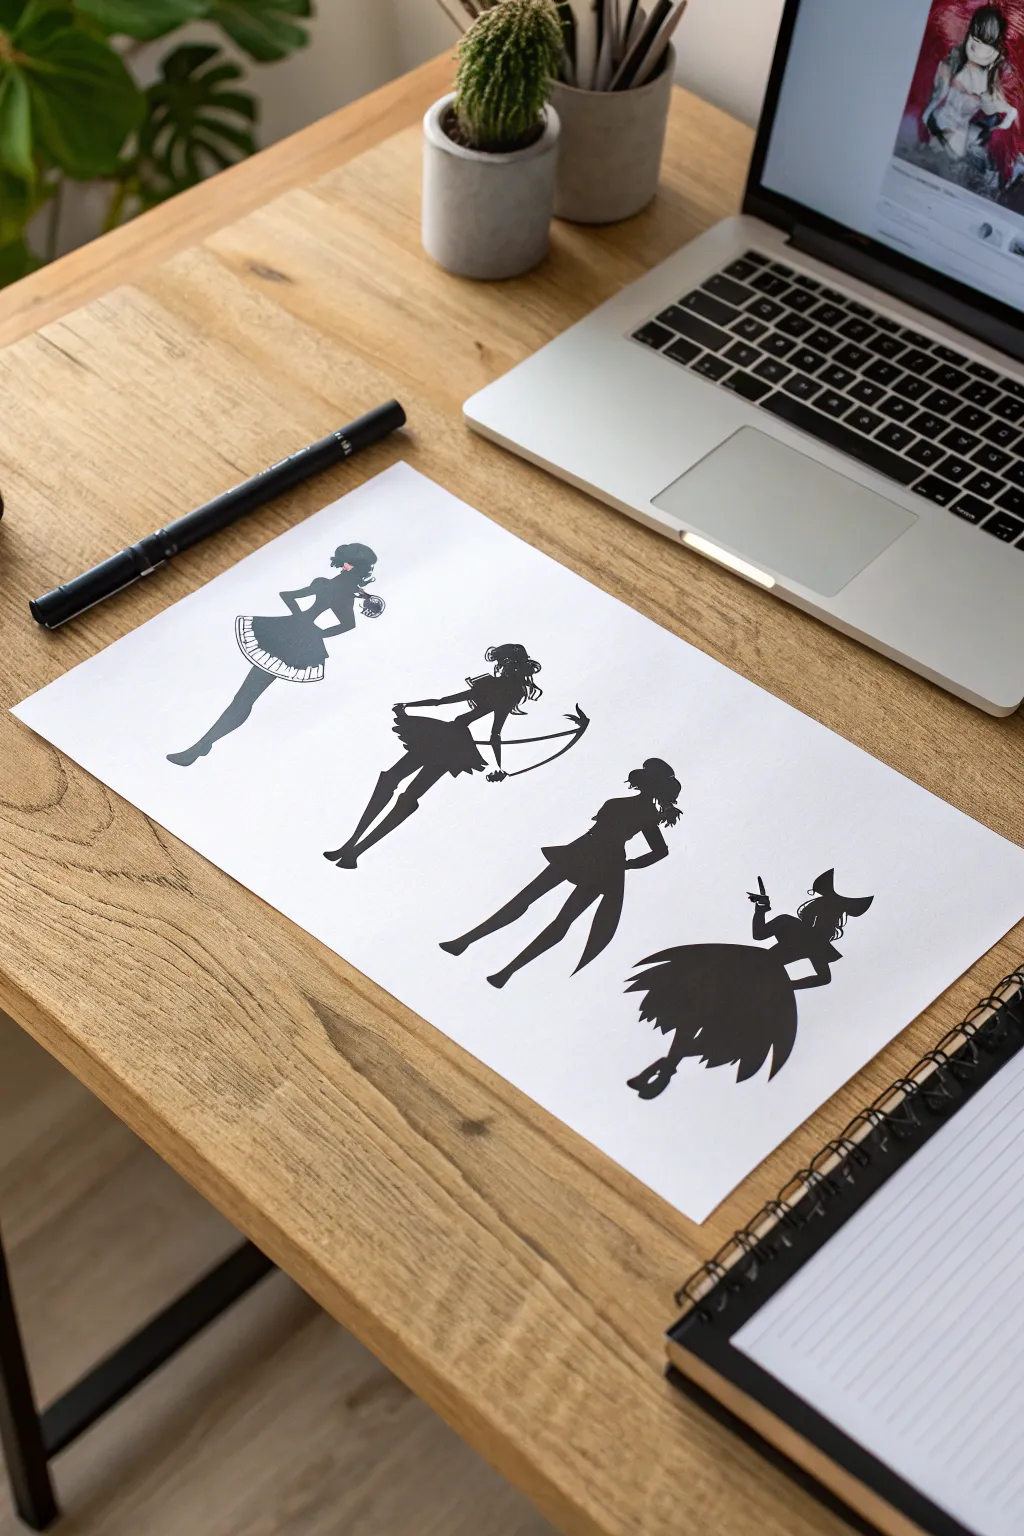
Capture the elegance and dynamism of anime magical girls with this striking silhouette art project. Using bold black ink on crisp white paper, you’ll create four distinctive character poses that emphasize costume shape and movement without needing complex shading.
Step-by-Step Tutorial
Materials
- High-quality white drawing paper (A4 or Letter size)
- Pencil (HB or 2B)
- Eraser
- Fine liner pen (0.3mm or 0.5mm) for outlines
- Broad tip black marker or brush pen for filling
- Ruler
- Reference images of magical girl poses
Step 1: Planning and Sketching
-
Prepare your workspace:
Clear a flat surface on your desk, ensuring you have good lighting. Place your white paper horizontally to accommodate all four figures side-by-side. -
Establish the ground line:
Using a ruler, lightly mark a subtle baseline or imagine an invisible line where the characters’ feet will rest to ensure they look grounded and proportional to each other. -
Rough layout:
Lightly sketch four vertical stick figures evenly spaced across the page. This ensures you won’t run out of room for the final character or crowd them too closely. -
Define the first pose:
Starting from the left, sketch the first character. Focus on a dainty, standing pose with one hand on the hip and the other holding a small object near the face. Give her a short, ruffled skirt and knee-high socks. -
Sketch the archer:
For the second figure, draw a dynamic pose holding a bow. Sketch a flowing skirt that kicks out to the left, suggesting movement, and outline her holding the bow vertically. -
Create the confident stance:
Draw the third figure in a strong, wide stance. One leg should be stepped forward or to the side. Sketch a shorter uniform-style skirt and a hand resting firmly on her hip. -
Outline the final magician:
For the fourth figure on the right, sketch a character with a larger, more voluminous dress. Add details like a witch’s hat or large bow on the head and a hand raised in a casting gesture. -
Refine the silhouettes:
Go back over your pencil sketches and firm up the outlines. Focus purely on the *outer* shape—ruffles on skirts, strands of hair, and shoe heels—since internal details won’t be seen.
Keep it Sharp
When inking hair or ruffles, pull your pen strokes outward from the body to the tip. This creates a natural taper and keeps the silhouette looking crisp rather than blunt.
Step 2: Inking and Filling
-
Trace with fine liner:
Take your fine liner pen and carefully trace the final outer perimeter of each character. Move slowly around delicate areas like fingers, hair spikes, and skirt frills to keep them sharp. -
Erase pencil marks:
Once the fine liner ink is completely dry (give it a minute or two), gently erase all the underlying pencil sketches so the paper is perfectly clean before maximum black is applied. -
Outline interior gaps:
If there are negative spaces—like the gap between an arm and a waist, or between legs—outline those specifically so you don’t accidentally color them in later. -
Fill delicate areas:
Use the fine liner or a slightly thicker medium pen to fill in the tiniest details first, such as wisps of hair, fingers, or thin weapon handles. -
Switch to broad marker:
For the main body shapes, switch to your broad tip marker or brush pen. This will provide a solid, consistent black coverage much faster than the small pen. -
Fill the first two figures:
Work from left to right (if right-handed) to avoid smudging. Fill in the first standing girl and the archer, using long strokes to minimize streak marks. -
Fill the remaining figures:
Continue filling in the third and fourth characters. Be extra careful with the large dress on the final figure; I find that coloring in circular motions helps keep the ink saturation even on large patches. -
Check for light spots:
Hold the paper up to good light. If you see any uneven grey patches where the marker didn’t soak in fully, do a second coat of ink over those specific areas. -
Final clean up:
Use your white eraser one last time to remove any scuffs or dust around the figures, ensuring the contrast remains striking.
Digital Hybrid
Scan your finished drawing and import it into editing software. You can then fill the black silhouettes with galaxy textures or gradients for a magical, modern look.
Now you have a stylish set of character concepts ready to frame or scan for your digital portfolio
BRUSH GUIDE
The Right Brush for Every Stroke
From clean lines to bold texture — master brush choice, stroke control, and essential techniques.
Explore the Full Guide
Sharp High-Collar Long Coat Look
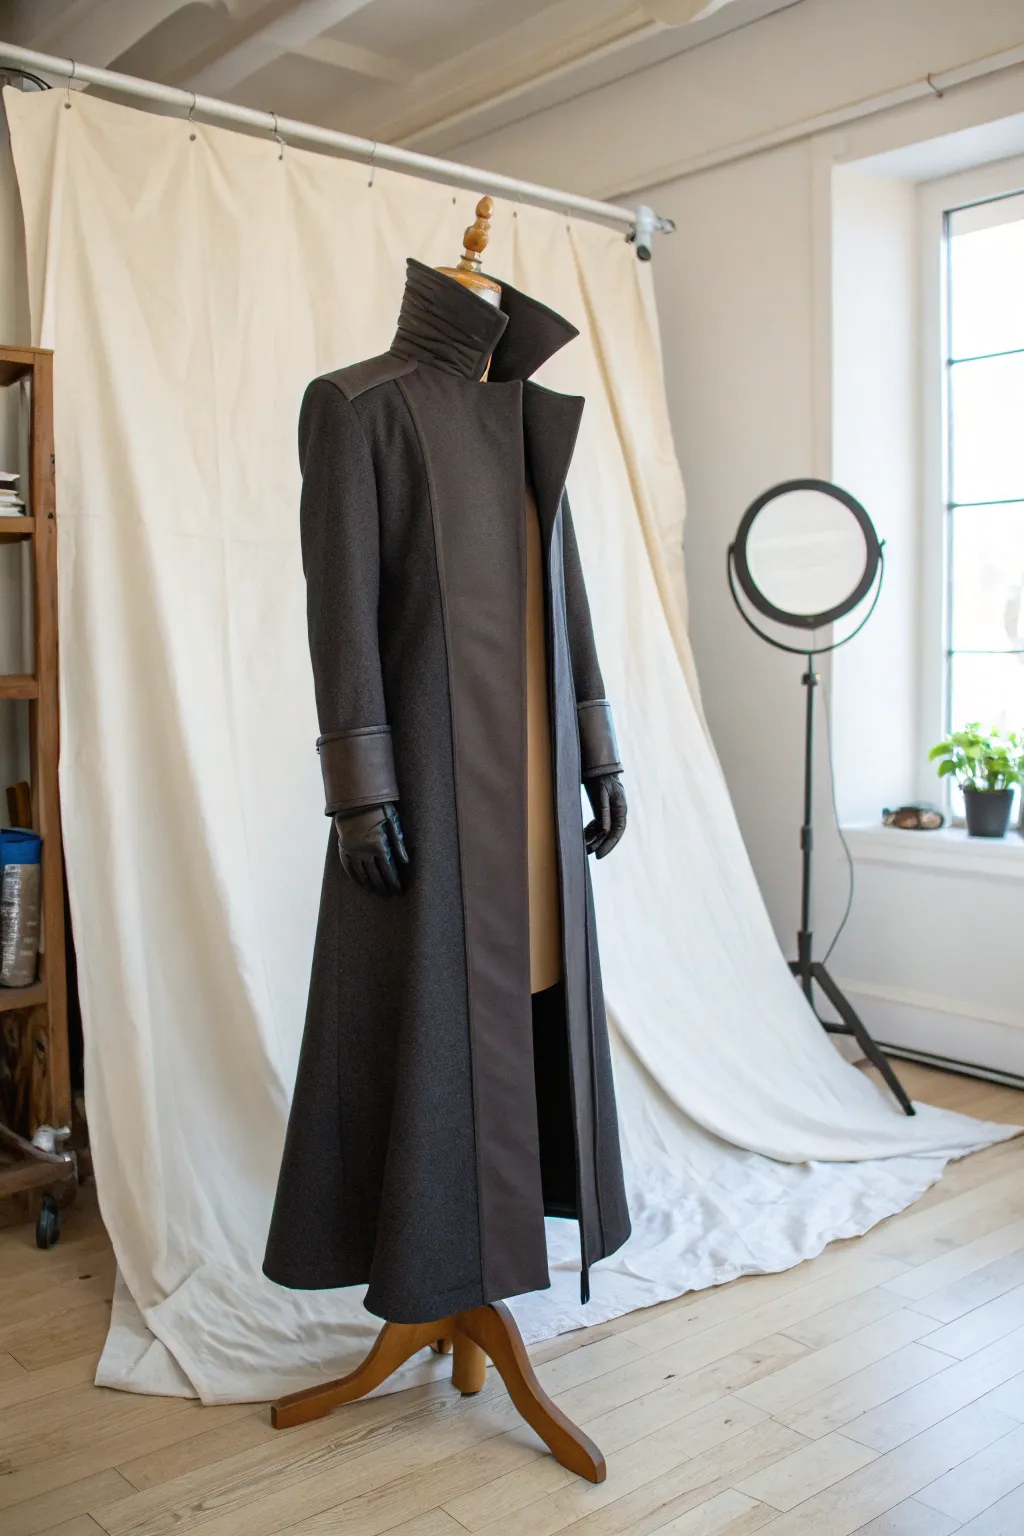
Channel the imposing elegance of an anime antagonist or a high-fantasy commander with this structured, floor-length coat. Featuring a dramatic funnel collar and sleek leather accents, this sewing project balances military precision with avant-garde flair.
How-To Guide
Materials
- Heavyweight wool or wool-blend coating fabric (charcoal grey)
- Faux leather or vinyl fabric (dark brown or black)
- Polyester lining fabric (black or dark grey)
- Heavyweight fusible interfacing
- Tailor’s chalk or marking pen
- Sewing machine with heavy-duty needles (leather needles for accents)
- Teflon or walking foot
- Iron and pressing cloth
- Matching thread and heavy-duty topstitching thread
- Long coat pattern (trench or military style) to modify
Step 1: Pattern Adaptation & Cutting
-
Choose your base:
Begin with a commercial pattern for a long military coat or trench coat. You need a design with princess seams to achieve that fitted-yet-flared silhouette. -
Modify the collar:
Redraft the collar pattern piece. Instead of a standard lapel, extend the collar stand significantly upward to create a funnel neck that can cover the chin, maintaining a rectangular shape when unrolled. -
Design the lapel panels:
Trace the front facing pieces. You will need to cut separate panels for the lapels and the front opening edge to be made in the contrast leather material. -
Lengthen the hem:
Adjust the skirt length to hit just above the ankle. Add extra flare to the side and back seams for that dramatic ‘swish’ when walking. -
Cut the wool:
Lay out your heavy wool fabric and cut the main bodice, sleeves, and skirt panels. Mark all notches and grainlines carefully. -
Cut the accents:
Cut the lapel facings, front bands, and deep cuff rectangles from your faux leather. Be mindful of needle holes in leather; pin only in seam allowances.
Crisp Leather Seams
Since you can’t iron faux leather directly, use a rubber mallet to pound thick seams flat before topstitching. It sounds aggressive, but it works perfectly.
Step 2: Structural Assembly
-
Apply interfacing:
Fuse heavyweight interfacing to the collar pieces, the front facings, and the leather cuff pieces. This structure is non-negotiable for keeping that collar standing tall. -
Construct the bodice:
Sew the wool back panels and side panels together. Press seams open using a wooden clapper if you have one to get them perfectly flat. -
Attach the leather front:
Using a Teflon foot or walking foot, sew the leather front bands to the wool front panels. Lengthen your stitch slightly to prevent the leather from tearing. -
Shoulder seams:
Join the front and back bodice pieces at the shoulders. Press this seam open with a pressing cloth to protect the wool.
Skipped Stitches?
If the machine skips on the leather transition, switch to a fresh Microtex or Leather needle and slightly increase the thread tension.
Step 3: Collar & Sleeves
-
Construct the collar:
If you want the quilted look seen in the reference, stitch horizontal rows across the inner collar stand before assembling. Sew the outer and inner collar pieces together, right sides facing. -
Attach collar to neck:
Pin the collar to the neck opening. I prefer to baste this by hand first because the bulk of the leather and wool can slip under the machine foot. -
Prepare the sleeves:
Sew the sleeve inseams. Create the cuffs by sewing the leather rectangles into loops and attaching them to the sleeve hems, then fold them upward and tack in place. -
Set the sleeves:
Ease the sleeve caps into the armholes. This coat requires a crisp shoulder, so you might consider adding a small shoulder pad for extra definition.
Step 4: Finishing
-
Construct the lining:
Sew the polyester lining pieces together using the same modification as the outer shell, minus the facings. -
Bag out the coat:
With right sides together, sew the lining to the coat along the front edges and neckline. Leave a turning gap in the hem or one sleeve. -
Turn and press:
Turn the coat right side out. Use a point turner for the collar corners. Press the edges carefully, avoiding direct heat on the leather parts. -
Topstitch:
Run a row of topstitching along the leather front panels and the collar edge to keep everything crisp and flat. -
Hemming:
Hand-stitch the hem of the wool coat and the lining so they hang freely but are connected at the seams.
Put on your completed coat and enjoy the commanding silhouette you have created
Fantasy Ranger Layers
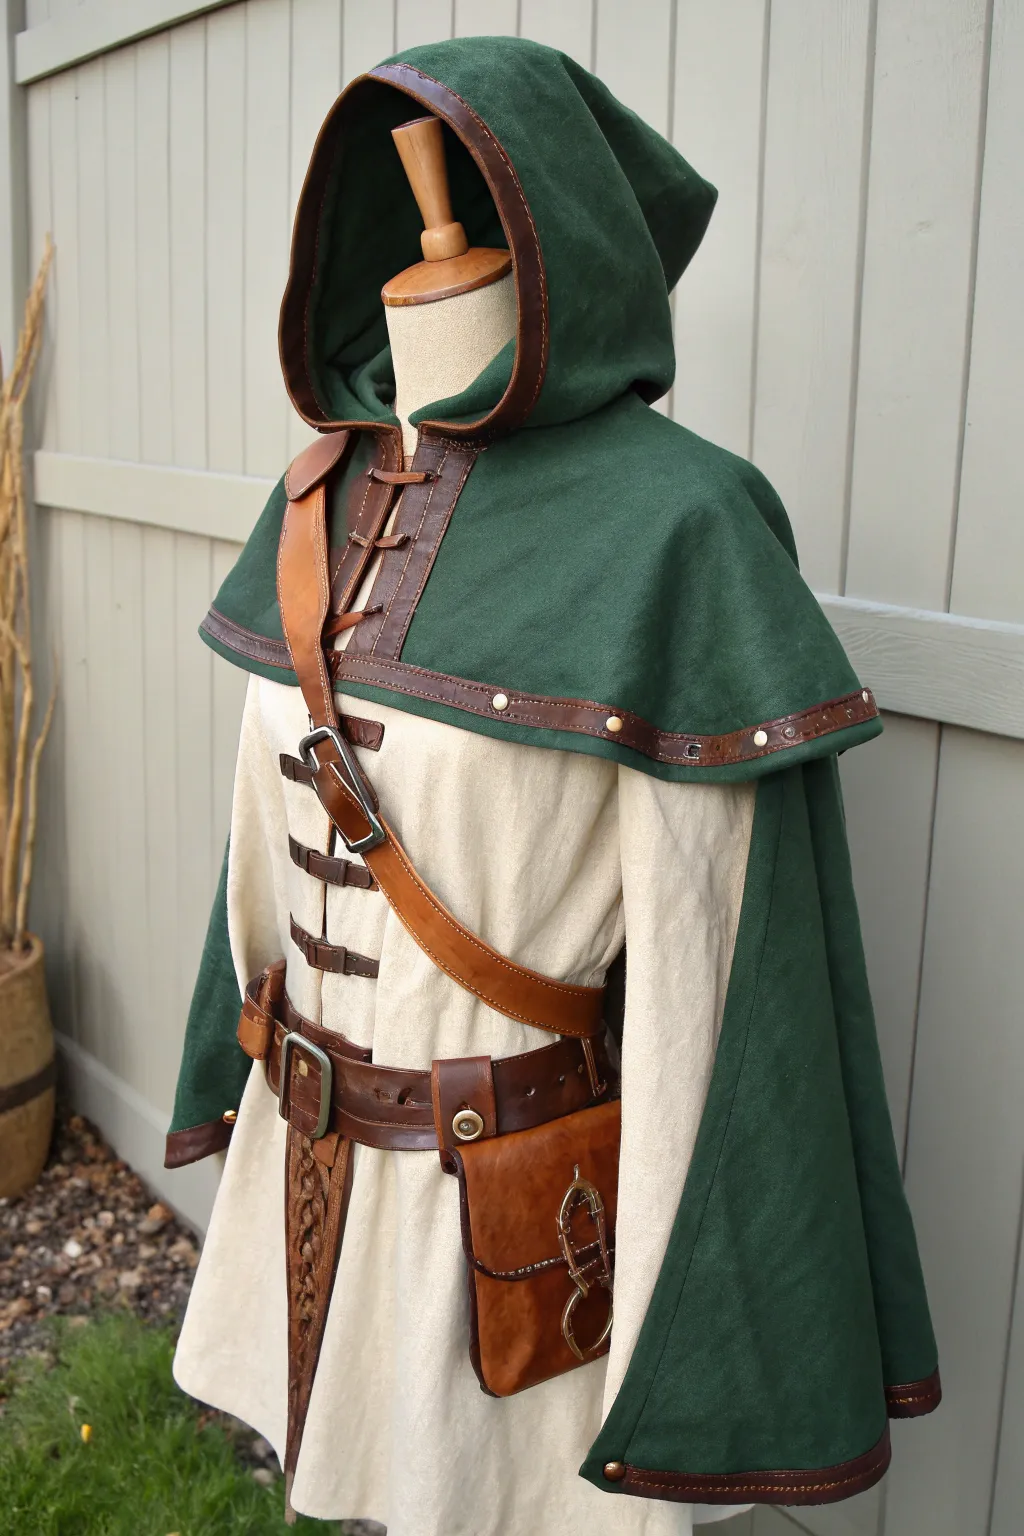
Step into the role of a woodland protector with this multi-layered fantasy ranger outfit. Combining sturdy linen with rugged leather accents, this project creates a believable, functional costume perfect for anime conventions or LARP adventures.
Detailed Instructions
Materials
- Heavyweight forest green wool or wool-blend fabric (for cloak)
- Cream or off-white linen fabric (for tunic)
- Medium-weight vegetable-tanned leather (for trim and straps)
- Heavyweight belt leather
- Leather dyes (dark brown and cognac)
- Brass buckles, rivets, and snaps
- Leather hole punch and rivet setter
- Heavy-duty sewing machine with leather needle
- Waxed linen thread
- Tailor’s chalk
- Sewing pins and clips
Step 1: Constructing the Base Tunic
-
Draft the pattern:
Begin by drafting a simple T-tunic pattern based on your measurements. Extend the length to mid-thigh and add extra width to the sleeves for that relaxed, medieval drape. Keep the neckline high and round. -
Cut and sew the main body:
Cut your cream linen according to the pattern. Sew the shoulder seams and side seams, leaving ample room at the bottom hem for movement. I favor French seams here for durability and a cleaner finish inside. -
Add the placket reinforcement:
This tunic features distinctive leather closures. Cut a strip of your lighter leather about 2 inches wide and the length of the chest opening. Sew this down the center front where your closures will go. -
Install the toggle straps:
Cut six small strips of dark brown leather. Loop them through rectangular brass rings or create simple strap closures, then rivet or stitch them horizontally across the front placket, spacing them evenly.
Step 2: Crafting the Green Hooded Mantle
-
Pattern the mantle:
Draft a circle skirt-style pattern for the shoulder mantle, ensuring it covers the shoulders fully. Add a large, roomy hood pattern piece that attaches to the neck curve. -
Cut the wool:
Cut the mantle and hood pieces from your forest green wool. If the wool is itchy, cut a duplicate set from a lightweight lining fabric. -
Attach the hood:
Sew the back seam of the hood, then pin and sew the bottom of the hood to the neck hole of the mantle. Press the seam allowances open to reduce bulk. -
Prepare the leather trim:
Cut long, thin strips of leather (approx. 1 inch wide) to serve as binding. Dye them a rich chocolate brown and seal the edges. You will need enough to go around the entire hood opening and the bottom hem of the mantle. -
apply leather binding:
Fold the leather strips over the raw edges of the wool. Using a leather needle and heavy-duty thread, topstitch the leather binding into place. Go slowly here; keeping the leather edge consistent requires patience. -
Detail the hem:
For the specific look in the photo, add small brass rivets or decorative studs along the leather hem binding at regular intervals, spaced about 3 inches apart. -
Create the neck closure:
Fashion a small leather tab with a buckle or lace-up system at the throat directly below the hood. This keeps the heavy mantle secure while moving.
Leather Too Stiff?
If your leather trim is struggling to curve around the hood, dampen the leather strip slightly with a sponge. Wet leather is pliable; sew it while damp and let it dry in shape.
Step 3: Leather Accessories & Assembly
-
Make the cross-body strap:
Cut a strap of heavy leather long enough to go across the chest. Install a large functional buckle near the front for adjustment. This decorative element adds visual complexity to the simple tunic. -
Craft the utility belt:
Cut a wide belt from your thickest leather. Dye it to match the trim. Punch holes and attach a heavy single-prong buckle. Add a secondary, thinner belt that hangs lower on the hips for a layered ranger aesthetic. -
Assemble the pouch:
Using a simple envelope pattern, cut leather for a hip pouch. Wet-mold the front flap if you want it to hold a specific shape, then stitch the sides. Attach belt loops to the back. -
Add pouch hardware:
Install an interesting closure mechanism, like the distinct hook-and-ring clasp seen in the photo. Rivet this securely to the pouch flap. -
Final weathering:
To avoid looking too ‘new’, gently sandpaper the edges of the leather and high-friction areas of the fabric. I like to rub a little dark wax into the leather creases to enhance the rugged look. -
Dress the mannequin:
Layer the tunic first, followed by the mantle. Place the cross-body strap underneath the mantle’s hood but over the shoulder. Finally, cinch everything with the utility belt and pouch.
Level Up: Hidden Pockets
Add hidden pockets into the inner lining of the green mantle. Perfect for hiding modern items like phones or wallets without breaking the intense fantasy immersion.
Now wearing your complete ranger set, you are ready to scout the treeline and defend your party.


Light Armor With Cloth Undersuit
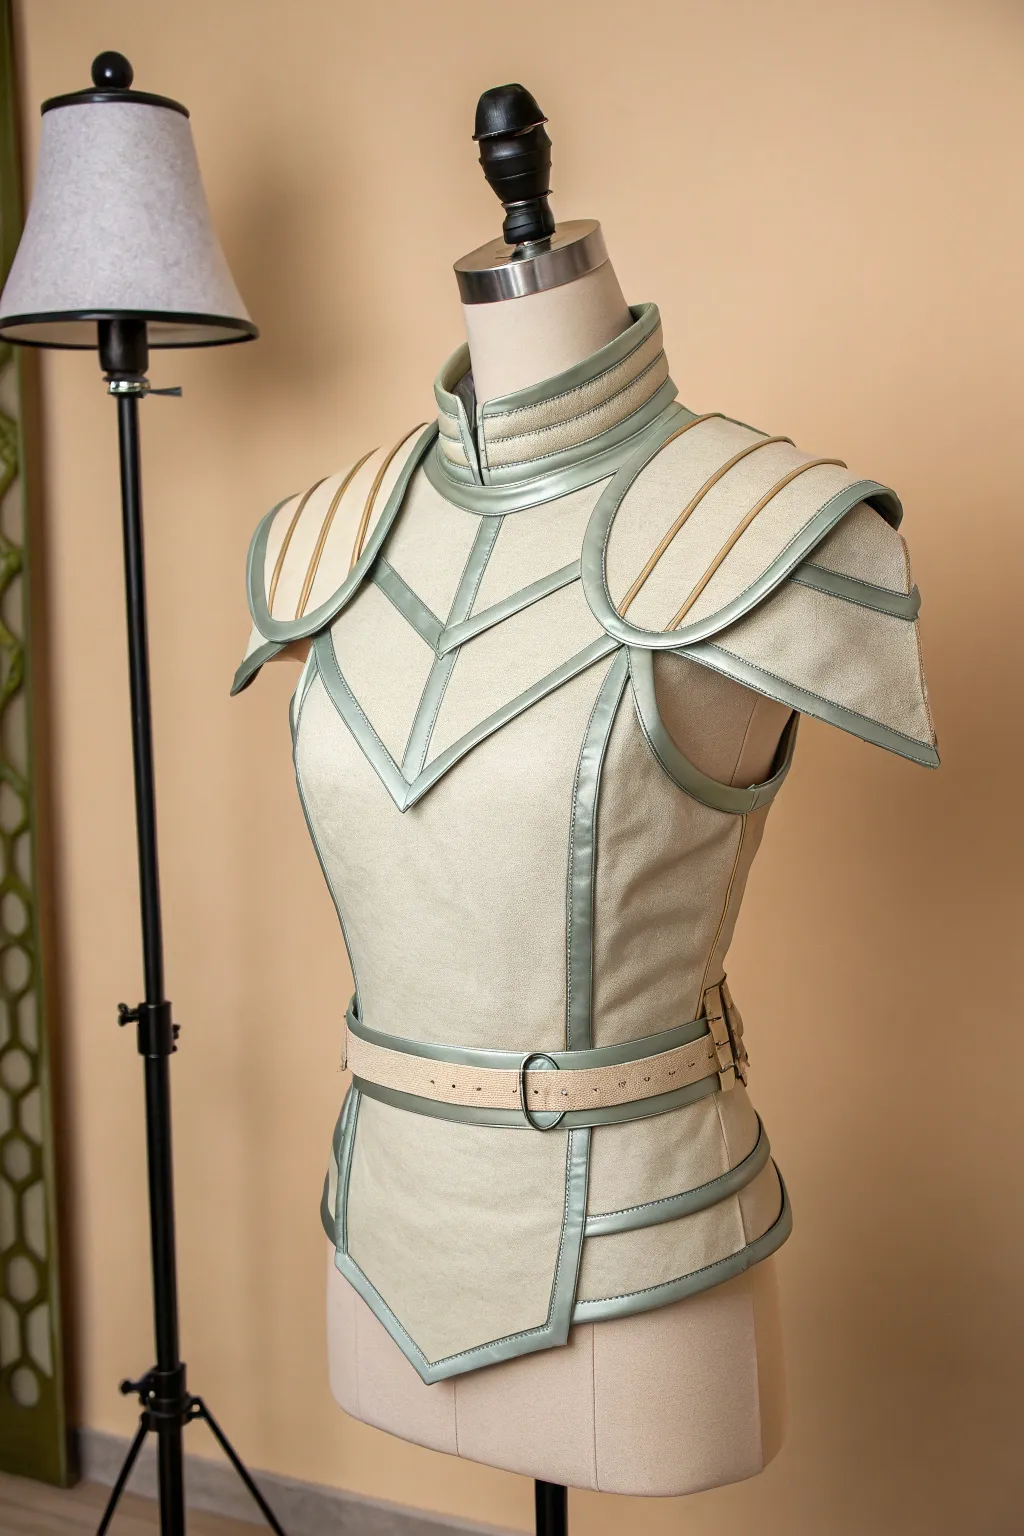
This anime-inspired light armor blends the structure of a breastplate with the comfort of a cloth undersuit, creating a sleek, combat-ready silhouette. The design features layered shoulder pauldrons, vinyl piping accents, and a distinct segmented bodice perfect for fantasy cosplay.
Step-by-Step Guide
Materials
- Heavyweight cream canvas or faux suede (outer fabric)
- Medium-weight lining fabric (cotton or satin)
- Fusible interfacing (heavyweight or buckram)
- Metallic sage/silver vinyl or faux leather (for piping/trim)
- Gold cording or trim
- Silver rectangular buckle
- Sewing machine with zipper foot or piping foot
- Pattern paper and pencils
- Fabric glue (E6000 or similar)
- Heavy-duty thread
- Standard sewing notions (pins, scissors, measuring tape)
Step 1: Patterning and Base Structure
-
Draft the bodice pattern:
Creating a custom pattern is essential for this fitted look. Start with a basic bodice block, extending the length onto the hips. Draw the distinct ‘V’ shape lines across the chest and the vertical segmentation lines down the center front. -
Design the pauldrons:
Draft a teardrop-shaped shoulder piece that curves over the upper arm. Create a second, slightly smaller layer that sits underneath the main piece to add dimension. -
Cut and interface panels:
Cut your cream fabric pieces according to the drafted lines. Crucially, cut matching duplicate pieces from heavyweight interfacing and iron them onto the wrong side of your main fabric panels to give them that semi-rigid ‘armor’ feel. -
Create the custom piping:
Cut long strips of your metallic sage vinyl, about 1-1.5 inches wide. Fold these strips around a thin cord (or just fold them flat for a bias-tape look) and stitch close to the edge to create the trim that defines the armor segments.
Clean Corners Pro Tip
When sewing piping around sharp corners (like the chest chevron), clip little notches into the vinyl seam allowance. This lets the trim bend sharply without bunching up.
Step 2: Assembling the Body
-
Segment construction:
Instead of sewing standard seams, sandwich your vinyl piping between the cut panels of the bodice. Stitch carefully using a piping foot or zipper foot to get close to the trim without sewing over it. -
Assemble the chest detailing:
Pay special attention to the inverted chevron shapes on the chest. Sew these angled pieces first, ensuring the points of the ‘V’ are sharp and the piping flows continuously. -
Side seams and lining:
Sew the front and back bodice pieces together at the side seams. Repeat the entire construction process (minus the piping) with your lining fabric. With right sides together, sew the lining to the main body at the armholes and neck, then turn right side out. -
Collar construction:
Construct a stiff Mandarin collar using two layers of main fabric and heavy interfacing. I like to add a horizontal strip of vinyl piping across the middle of the collar before attaching it to the neck hole for continuity.
Level Up: Weathering
Mix watered-down brown acrylic paint and lightly brush it into the seams where the cream fabric meets the vinyl piping. Wipe away the excess for instant battle-worn depth.
Step 3: Pauldrons and Finishing
-
Assemble the shoulder pauldrons:
Sew the vinyl trim around the entire perimeter of your shoulder patterns. If you want them to hold a curve, you might consider heat-shaping a layer of EVA foam inside, though heavy interfacing usually suffices. -
Add gold accents:
On the top layer of the shoulder pauldron, glue or hand-stitch three strips of gold cording. These should fan out slightly, following the curve of the shoulder. -
Attach shoulders to body:
Hand-stitch the finished pauldrons to the shoulder seams of the main tunic. Only attach them at the very top seam so they can move freely as you lift your arms. -
Construct the belt:
Cut a strip of cream fabric for the belt, interfacing it heavily. Stitch vinyl piping along the top and bottom edges. Attach the decorative buckle to the front, and use hook-and-loop tape or snaps in the back for closure. -
Hemming the bottom:
Finish the bottom edge of the tunic with a final wide strip of vinyl binding. Ensure the point at the center front is symmetrical and sharp.
Step 4: Final Details
-
Applying the hip armor:
Create the lower hip panels that sit beneath the belt line. These should also be piped with vinyl. Attach them to the interior lining or construct them as a separate skirt piece worn underneath. -
Pressing and shaping:
Use a pressing cloth to carefully iron the fabric sections flat. Avoid ironing directly on the vinyl trim, as it will melt. This step sets the ‘hard’ look of the armor.
Once the final hem is pressed, you will have a stunning piece of structured armor ready for your next adventure
Modern Witch Street-Fantasy

Channel the cozy magic of a forest dweller with this textured, multi-layered witch costume featuring a scalloped hem dress and a structured capelet. The rich plum and charcoal palette creates a grounded, street-fantasy aesthetic perfect for modern magical realism.
Step-by-Step
Materials
- Charcoal grey medium-weight linen or cotton blend fabric (approx. 4 yards)
- Plum or oxblood cotton twill or wool blend fabric (approx. 2 yards)
- Wide leather belt with buckle
- Faux leather scraps for hat band
- Heavyweight fusible interfacing (for the hat)
- Sewing machine and coordinating thread
- Layered gold necklaces and pendants
- Mannequin or dress form
- Fabric scissors, pins, and tailor’s chalk
- Wire (optional for hat brim stability)
Step 1: Drafting and Sewing the Base Dress
-
Cutting the Bodice:
Begin by drafting or using a basic bodice pattern with a high neckline. Cut your front and back pieces from the charcoal grey fabric, ensuring you leave a 5/8-inch seam allowance around all edges. -
Assembling the Waist:
Sew the side seams and shoulder seams of the bodice. I like to press these seams open immediately to ensure the linen lies flat against the body. -
Creating the Skirt Panels:
Cut a full circle skirt or gathered rectangle from the grey fabric. The length should fall just below the knee. Before attaching it, cut a matching strip of plum fabric about 4 inches wide for the under-hem layer. -
Scalloping the Hem:
On the bottom edge of the grey skirt fabric, use a cup or circular object to trace a scalloped edge with tailor’s chalk. Carefully cut along these curved lines. -
Adding the False Layer:
Sew the plum strip to the inside of the grey skirt so it peeks out from beneath the scallops, creating the illusion of a full petticoat underneath. Topstitch along the scallop edge for a crisp finish. -
Completing the Dress:
Attach the skirt to the bodice at the waistline. Install a zipper or button closure at the back, then hem the bottom edge of the purple layer.
Fabric Choice Matters
Use linen-blends for the dress and wool-blends for the cape. Synthetic fabrics often look too shiny for a ‘hedge witch’ vibe. Natural fibers fray beautifully for rustic edges.
Step 2: Constructing the Hooded Capelet
-
Cutting the Cape Shape:
Using the plum fabric, cut a curved shoulder cape pattern that extends just past the elbows. You will need two pieces if you want it self-lined for weight, which I highly recommend for better drape. -
Drafting the Hood:
Cut two large hood profile pieces. This hood is oversized, so ensure the depth is generous enough to accommodate the hat if pulled up. -
Assembling the Hood:
Sew the curved back seam of the hood pieces together. Press the seam allowance to one side and topstitch it flat for a rugged look. -
Attaching Hood to Cape:
Pin the neck edge of the hood to the neck edge of the capelet. Sew them together, trim the bulk, and press. Finish the front edges with a simple rolled hem.
Step 3: Crafting the Signature Hat
-
The Brim Structure:
Cut two large donut shapes for the brim from the grey fabric and one from heavyweight interfacing. Sandwich the interfacing between the fabric layers to create a stiff, wide brim. -
Forming the Cone:
Cut a large quarter-circle for the hat’s cone. Sew the straight edges together to form the point. If you want that jaunty bent tip, hand-tack a tuck near the top on the inside. -
Hat Assembly:
Pin the bottom of the cone to the inner circle of the brim. Sew carefully, clipping curves as needed to ease the fabric in without puckering. -
Adding the Band:
Cut a strip of brown faux leather and wrap it around the base of the cone. Secure it with fabric glue or a few hand stitches at the back.
Weathering the Witch
Dilute some brown or black acrylic paint with water and lightly sponge the hem of the dress and the tip of the hat. This gives the outfit a travel-worn, authentic adventurous look.
Step 4: Styling and Accessories
-
Layering the Jewelry:
The key to this look is clutter. Drape multiple gold chains of varying lengths around the neck. Attach a heavy pendant specifically to the longest chain so it sits centered on the torso. -
Belting the Waist:
Cinch the dress at the natural waist with the wide brown leather belt. Don’t center the buckle perfectly; offset it slightly for a casual vibe. -
Adding Belt Charms:
Loop extra strips of leather through the belt or attach distinct metal rings to hang ‘potions’ or keys. In the image, a vertical leather strap hangs down, holding a metal ring accent. -
Final Adjustments:
Place the capelet over the shoulders and adjust the hood so it rests comfortably around the neckline without hiding the necklaces completely.
Now you are ready to wander the streets or the woods in a costume that feels both magical and handmade
Cute Pastel Layering Board
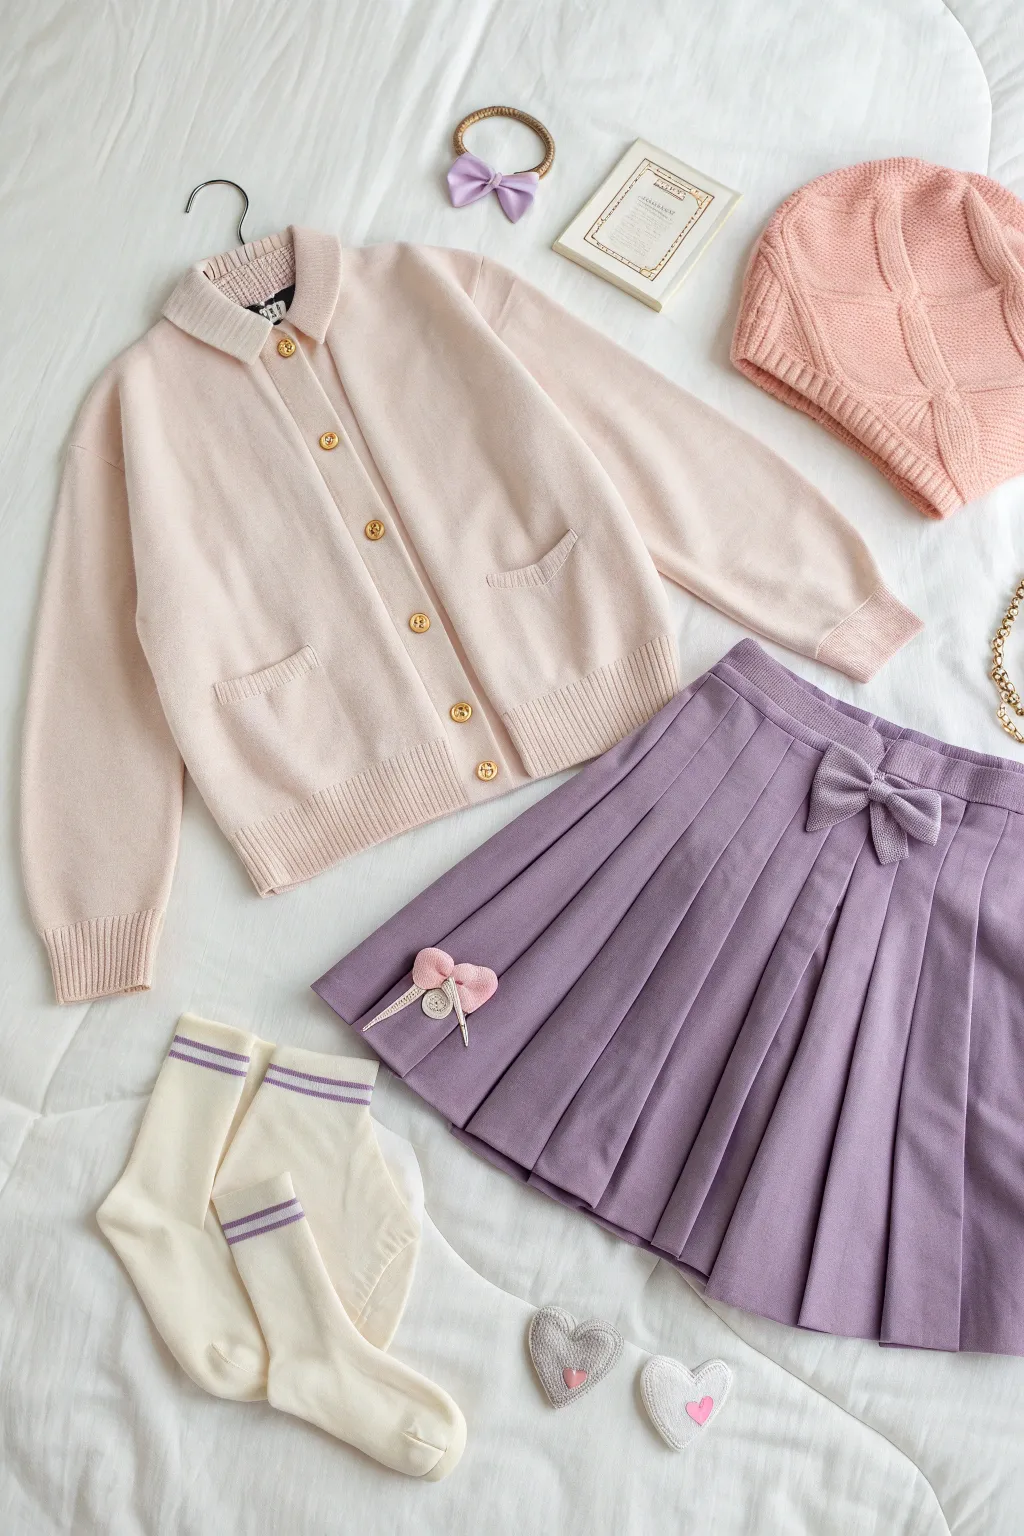
Capture the essence of soft anime aesthetics with this meticulously arranged outfit flat lay. This project focuses on styling and photographing a cohesive pastel school-style ensemble that looks straight out of a shoujo manga.
Detailed Instructions
Materials
- Light beige or cream cardigan with gold buttons
- Lavender pleated mini skirt with bow detail
- Pink cable-knit beret
- Cream knee-high socks with lavender stripes
- Hair accessories: lavender bow tie, heart clips
- Small props: vintage postcard, gold chain accessory
- White bedding or textured white fabric backdrop
- Natural lighting source
- Camera or smartphone
- Steamer or iron
Step 1: Base Preparation
-
Selecting the Backdrop:
Choose a clean, white surface with soft texture. A duvet cover or bedsheet works perfectly because the natural wrinkles add depth without distracting from the clothes. Ensure the fabric is relatively smooth but not perfectly ironed for that cozy, lived-in feel. -
Lighting Setup:
Position your setup near a large window to utilize soft, diffused natural light. Avoid direct sunlight which causes harsh shadows; if the sun is too bright, tape a thin white sheet over the window to diffuse it. -
Garment Prep:
Before laying anything down, inspect your main pieces. Use a steamer to remove any deep creases from the cardigan and skirt, as wrinkles show up clearly in photos.
Light & Air
To keep the photo looking airy, leave plenty of negative white space around the items. Don’t frame too tightly.
Step 2: Styling the Core Outfit
-
Placing the Cardigan:
Lay the beige cardigan on the left side of your frame. Button it up so it holds its shape, but angle the sleeves slightly outward to give it a relaxed, wearable look. -
Positioning the Skirt:
Place the lavender pleated skirt diagonally below and to the right of the cardigan. The waistband should sit close to the cardigan’s hem, suggesting how they would be worn together without touching. -
Skirt Details:
Fan out the pleats gently. Make sure the bow on the waistband is prominently displayed and centered, as it’s a key focal point. -
Adding Socks:
Fold the cream socks loosely and place them in the bottom left corner. Arrange them so the lavender stripes are visible, creating a visual link to the skirt color.
Step 3: Accessorizing and Balancing
-
The Headwear Anchor:
Place the pink cable-knit beret in the top right corner. This balances the visual weight of the cardigan on the left. -
Small Accessories:
Add the lavender hair bow near the collar area of the cardigan, suggesting where it might be worn. Place the heart-shaped knitted clips near the bottom right to fill negative space. -
Atmospheric Props:
Tuck a small vintage-style card or book near the top center, slightly angled. Just peeking out adds a narrative element without cluttering the scene. -
Metallic Accents:
Drape the gold chain accessory loosely near the edge of the frame or partially on the skirt to add a touch of shine and texture.
Wrinkle Woes
If a stubborn wrinkle appears on camera, try gently pulling the fabric taut from the sides just outside the frame before shooting.
Step 4: Adjusting and Shooting
-
Create Movement:
Nudge the sleeves and edges of the fabrics to create gentle curves. Straight lines can look rigid, so I like to add slight waves to the fabric to make it feel organic. -
Pink Ribbon Placement:
Place the small pink bow pin directly on the skirt for an extra layer of detail styling. -
Final Check:
Stand on a chair or use a step stool to look directly down at your arrangement. Check for uneven spacing or awkward shadows. -
The Shot:
Hold your camera parallel to the floor. Take multiple shots, adjusting the exposure slightly brighter to enhance the pastel tones.
Your dreamy anime-inspired flat lay is now ready to inspire your followers
Dark Gothic Lace And Leather Mix
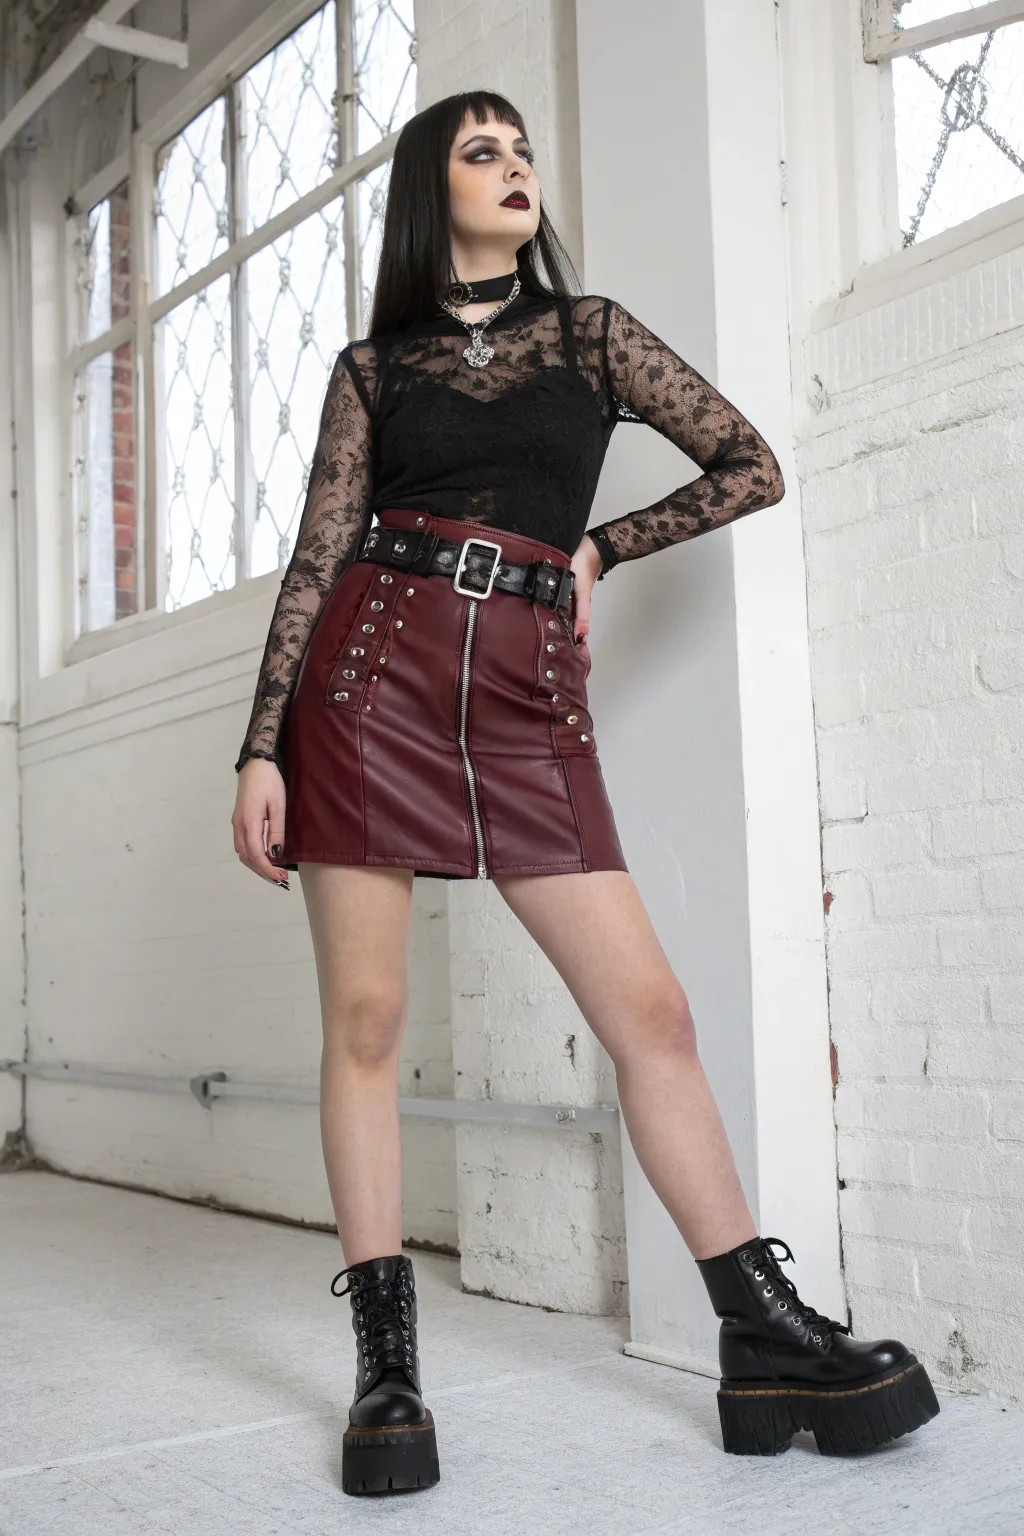
This striking look combines delicate textures with edgy hardware for a classic dark gothic aesthetic perfect for anime-inspired styling. Follow this guide to assemble the complete outfit, focusing on layering lace, faux leather, and statement accessories.
How-To Guide
Materials
- Black sheer long-sleeve lace top
- Basic black camisole or tank top
- Burgundy faux leather mini skirt with zipper detail
- Wide black grommet belt with silver buckle
- Silver chain layered necklace with pendant
- Black choker with O-ring detail
- Black platform combat boots
- Sheer black tights (optional)
- Dark plum lipstick
- Black liquid eyeliner
Step 1: Base Layer & Top
-
Start with the foundation:
Begin by putting on a fitted black camisole or tank top. This provides necessary coverage under the sheer layer while keeping the silhouette sleek and dark. -
Layer the lace:
Pull on the sheer black lace long-sleeve top over the camisole. Look for a floral lace pattern that fits snugly against the arms but offers breathing room in the torso. -
Adjust the fit:
Ensure the lace top is tucked neatly if it’s long, or pulled down smoothly if it’s a bodysuit style, to prevent bunching under the skirt later.
Style Tip: Texture Contrast
The key to this look is the clash between the soft, romantic floral lace and the tough, shiny faux leather. Don’t be afraid to mix these opposites.
Step 2: Skirt & Belt Assembly
-
Add the color pop:
Step into the burgundy faux leather mini skirt. Position it to sit high on your natural waist, which elongates the leg line and creates an anime-style proportion. -
Secure the zipper:
Zip up the central front zipper completely. The silver hardware is a key visual element here, so ensure the zipper line is straight and centered. -
Add the belt:
Thread a wide black belt through the skirt loops if available, or simply secure it over the waistband. A belt with grommets and a large square silver buckle adds crucial industrial edge. -
Tighten for silhouette:
Cinch the belt firmly at the smallest part of your waist to emphasize the hourglass shape typical of gothic anime character designs.
Step 3: Accessorizing
-
Necklace layering:
Start with the tightest neck piece: the black choker. Position it comfortably around the middle of your neck. -
Add the pendant:
Layer the silver chain necklace underneath the choker. I like to let the pendant rest right at the collarbone or just below, filling the visual space of the sheer neckline. -
Check the metals:
Ensure all your hardware matches—silver zipper, silver belt buckle, and silver jewelry create a cohesive look.
Level Up: Fishnets
Add ripped fishnet tights under the skirt or wear fishnet gloves over the lace sleeves for extra grunge texture and dimension.
Step 4: Footwear & Makeup
-
The power boots:
Put on chunky black platform combat boots. Lace them up tightly all the way to the top eyelets for a clean, military-inspired finish. -
Dark eyes:
Apply a dramatic black winged eyeliner. Keep the lines sharp and extended outwards to mimic stylized anime eyes. -
Vampy lips:
Finish the styling with a dark plum or deep red matte lipstick. Use a lip liner first to get crisp edges that match the sharpness of the outfit.
Now step out with confidence in your assembled dark gothic ensemble
Deconstructed Detachable Sleeves
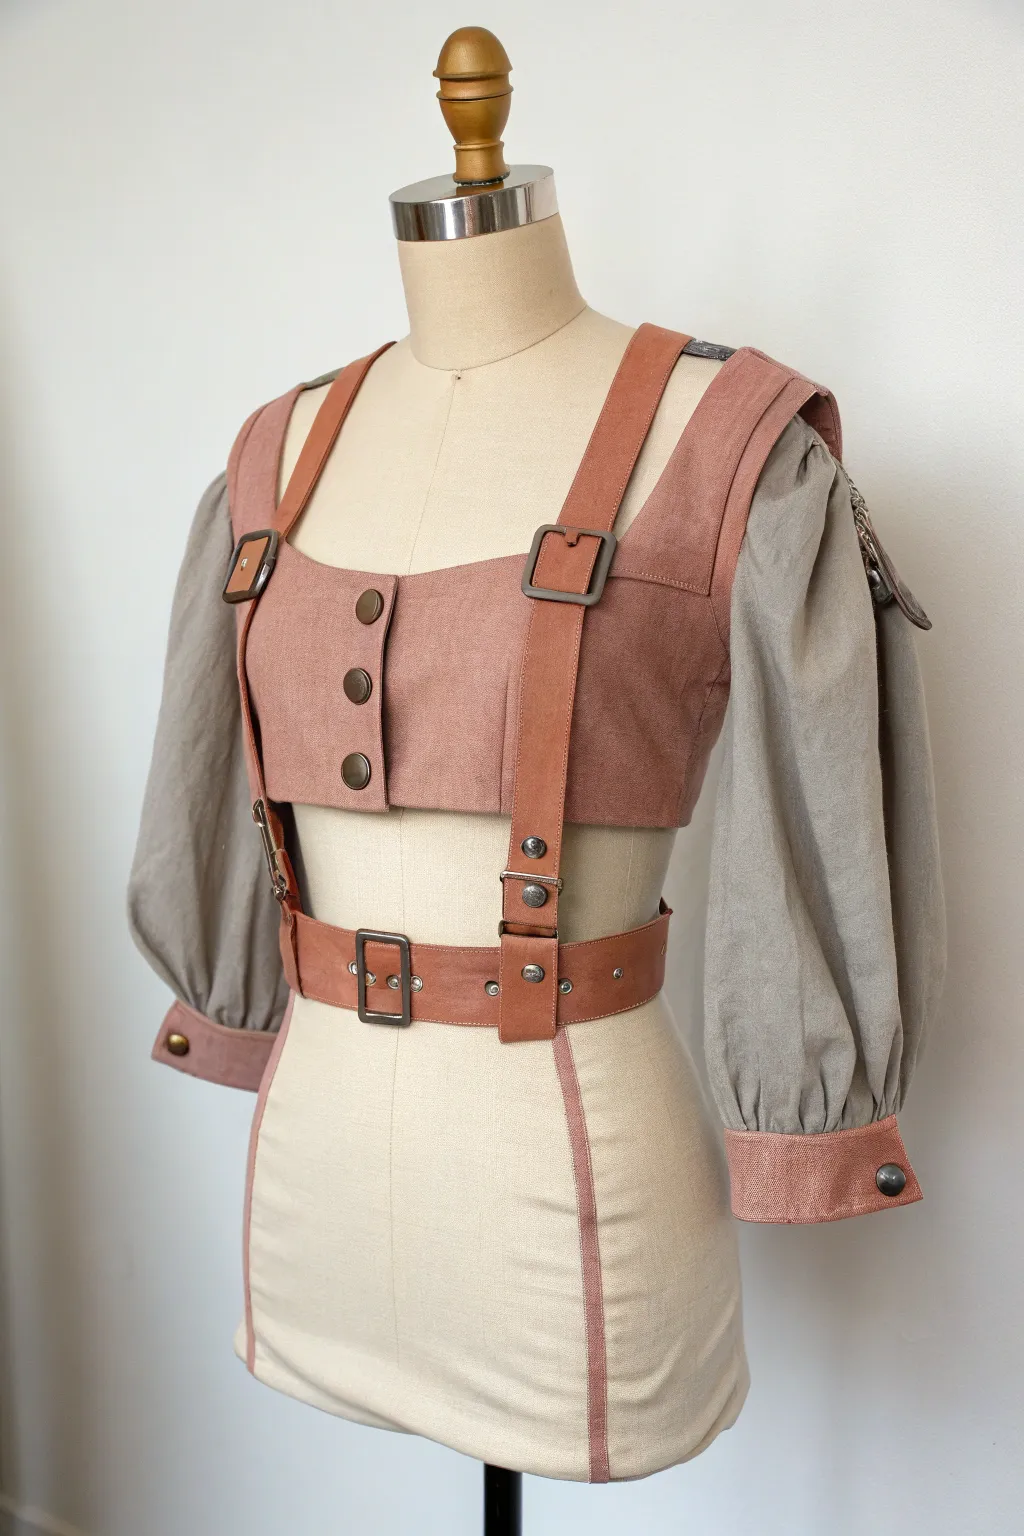
This project combines a structured faux-suede crop top with romantic, detachable puff sleeves for a versatile, anime-inspired look. The mix of sturdy hardware and soft linen creates a perfect balance between adventurer gear and casual fantasy wear.
Detailed Instructions
Materials
- Dusty rose faux suede fabric (approx. 1 yard)
- Grey-beige linen or cotton blend fabric (approx. 1 yard)
- Interfacing (medium weight)
- Lining fabric (cotton or poly-blend)
- 3 large antique brass buttons
- 2 rectangular metal buckles (approx. 1.5 inch)
- 1 rectangular metal belt buckle
- Snap fasteners or buttons for sleeve cuffs
- Matching thread
- Sewing machine
- Pattern paper
- Pins and clips
Step 1: Drafting and Cutting
-
Create the bodice pattern:
Start by drafting a basic crop top pattern. The front should have a square neckline and an overlap for the button closure. Divide the pattern into three main panels: a center front panel (button placket), a side front panel for shaping, and a back panel. -
Draft the sleeve pattern:
Draft a bishop sleeve pattern but modify the cap. Instead of a full cap, create a straight or slightly curved top edge that will tuck under the shoulder straps. Ensure there is plenty of width for gathering to create the ‘puff’ effect. -
Design the harness elements:
Draft long rectangular strips for the shoulder straps (approx. 2 inches wide) and the waist belt. You will also need smaller tabs for the buckle attachments. -
Cut the fabric:
Cut your bodice pieces from the faux suede and the lining fabric. Cut the sleeve pieces from the linen. Don’t forget to cut interfacing for the button placket, cuffs, straps, and belt to add necessary structure.
Suede Sewing Struggles
If the faux suede sticks to your machine’s foot, stick a piece of matte scotch tape on the bottom of the presser foot or use a walking foot to help it glide.
Step 2: Assembling the Bodice
-
Sew bodice panels:
Stitch the faux suede front and side panels together. Press seams open flat—using a clapper here can help flatten bulky suede seams without high heat. -
Attach the lining:
Assemble the lining pieces identically to the outer shell. With right sides together, sew the lining to the main bodice along the neckline and armholes, leaving the bottom open for turning. -
Construct the button placket:
Turn the bodice right side out and press thoroughly. Topstitch along the front edge where the buttons will go. Mark and sew three buttonholes on the right side, then hand-sew the antique brass buttons on the left. -
Hem the bodice:
Fold the raw bottom edges of the shell and lining inward toward each other. Pin securely and topstitch along the bottom hem to close the bodice.
Level Up: Weathering
For a true adventurer vibe, lightly sand the edges of the suede with fine-grit sandpaper and use diluted brown acrylic paint to dirty the linen hems.
Step 3: Creating the Detachable Sleeves
-
Form the sleeves:
Sew the inseam of your linen sleeve rectangles to form a tube. Gather the bottom edge of the sleeve until it fits your wrist measurement plus ease. -
Make the cuffs:
Cut two rectangles from the pink faux suede for cuffs. Apply interfacing, then fold them in half lengthwise. Sandwich the gathered bottom edge of the linen sleeve into the cuff, pin, and topstitch to secure. -
Add cuff hardware:
Install a heavy-duty snap or sew a button and buttonhole on each cuff for closure. -
Gather the sleeve head:
Run two rows of gathering stitches along the top edge of the sleeve. Gather it down to match the width of the armhole area on your bodice. Bind this raw edge with a strip of bias tape or a thin strip of the suede fabric for a clean finish.
Step 4: Staps and Hardware
-
Sew the shoulder straps:
Fold your long suede strips right sides together, stitch along the long edge, and turn right side out. Press flat. Repeat for simpler short tabs that will hold the buckles. -
Attach buckles:
Loop a short tab through each rectangular buckle and sew it securely to the top front of the bodice corners. It needs to be strong enough to hold the strap tension. -
Connect the straps:
Sew the long straps to the back of the bodice securely. Bring them over the shoulder to meet the front buckles. I find it helpful to try it on specifically at this stage to get the strap length exactly right before final stitching. -
Construct the belt:
Create the waist belt using the same tube-turning method as the straps. Topstitch around the perimeter for a professional look. Attach the belt buckle to one end and punch eyelets on the other end. -
Final Assembly:
The sleeves are designed to be worn underneath the straps or attached via hidden snaps underneath the shoulder strap if you want them secure. Position them so the suede straps cover the top bound edge of the linen sleeve. Pair the bodice and belt over a simple cream dress or skirt base.
Enjoy styling this flexible piece by mixing and matching the sleeves with other outfits
Techwear Utility Harness Outfit
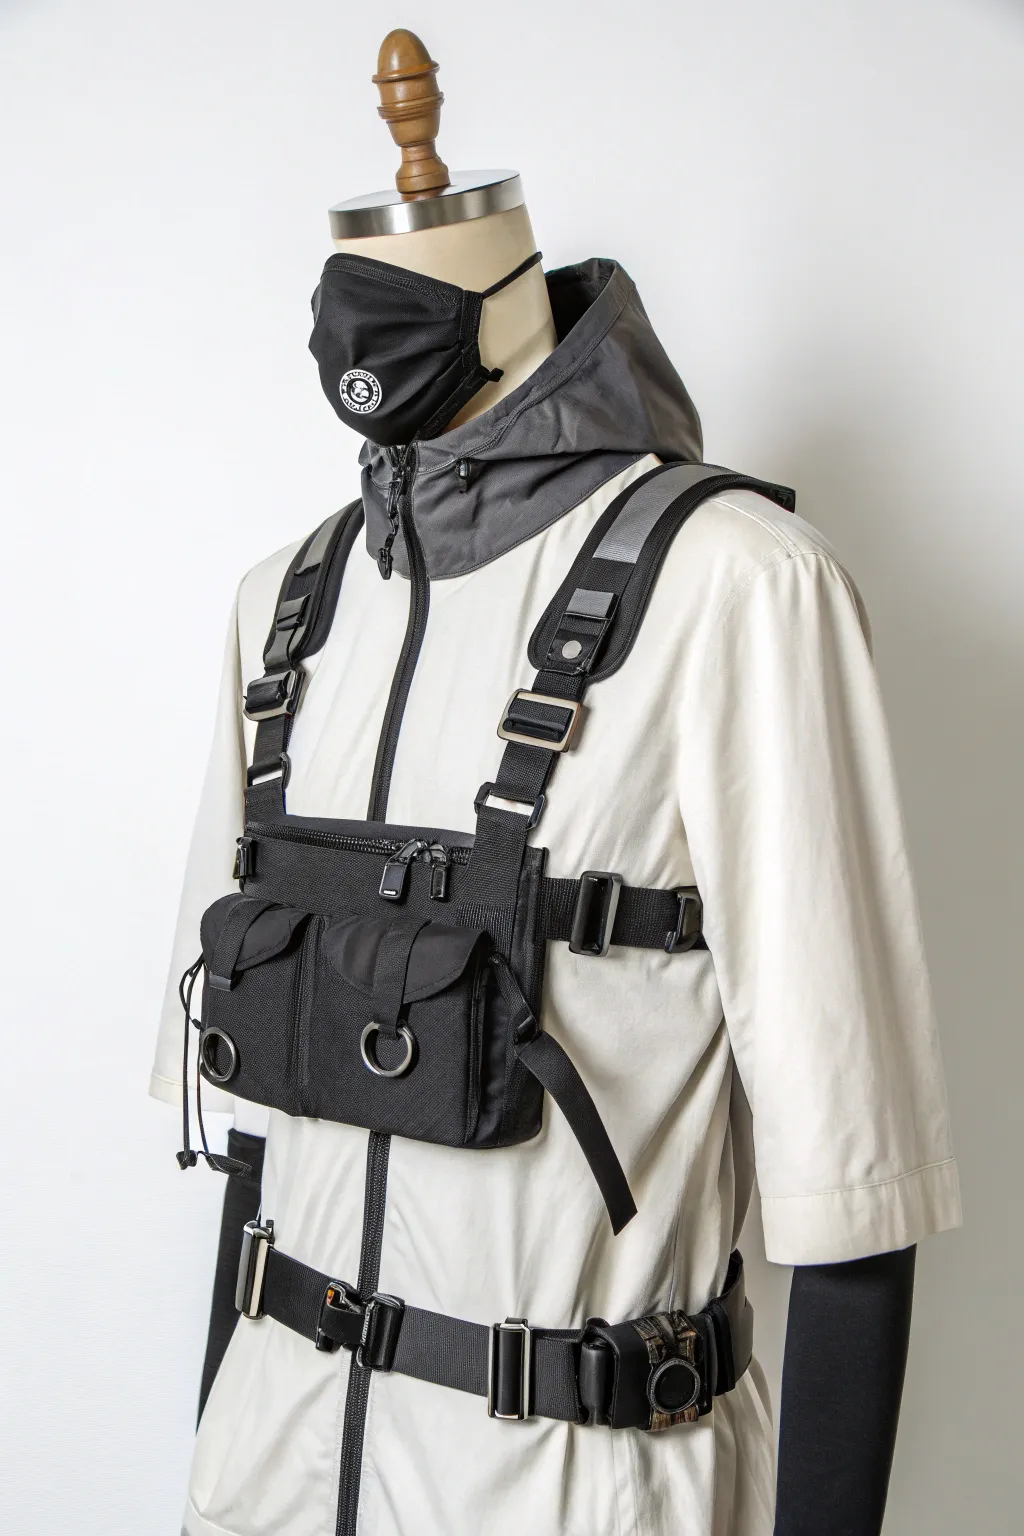
Embrace the utilitarian aesthetic of techwear by constructing your own multi-pocket chest harness. This project involves sewing a robust tactical rig made from durable Cordura nylon, complete with magnetic snaps, webbing adjusters, and a sleek, functional design perfect for completing an anime-inspired urban outfit.
Step-by-Step Guide
Materials
- 500D or 1000D Cordura Nylon fabric (black)
- Nylon webbing (1-inch width)
- Nylon webbing (1.5-inch width)
- Grosgrain binding tape (black)
- Heavy-duty nylon thread (black)
- 2 rectangular ladder lock buckles
- 2 side-release buckles (plastic or metal)
- 2 large metal O-rings
- Magnetic snap buttons or heavy-duty snaps
- YKK zippers (black, #5 size)
- Sewing machine with heavy-duty needles (Size 90/14 or 100/16)
- Chalk or fabric marker
- Rotary cutter and mat
- Lighter or hot knife (for sealing webbing)
Step 1: Base Panel Construction
-
Create the main pattern:
Draft a rectangular pattern for the main chest panel, approximately 10 inches wide by 6 inches tall. Cut two pieces of Cordura fabric to these dimensions, adding a 1/2 inch seam allowance on all sides. -
Prepare the back panel:
Take one of the rectangles to be the back face. If you want padding, cut a piece of 3mm EVA foam slightly smaller than the seam allowance and baste it to the wrong side of this fabric piece. -
Install the top zipper:
Align your zipper face down along the top edge of the front fabric panel. Sew it in place. Then, sandwich the zipper by placing the back panel (right side down) on top and sewing through all layers. Flip right side out and topstitch for a clean finish. -
Stitch the perimeter:
With right sides together, sew around the remaining three sides of the pouch, leaving the corners slightly rounded if desired. Turn the pouch right side out through the open zipper and poke out the corners carefully. -
Bind the edges:
For that rugged tactical look, instead of turning the bag inside out, you can sew the panels wrong-sides together and bind the raw outer edges with grosgrain tape. I find this adds necessary structure to the rig.
Step 2: Front Pocket Assembly
-
Cut pocket components:
Cut fabric for two pleated bellows pockets. You will need a main rectangle for each body and a separate flap piece. Calculate dimensions to fit side-by-side on your main panel, leaving space in between. -
Create the bellows pleats:
Fold the sides and bottom of your pocket fabric to create a box pleat or bellows shape. This gives the pocket volume. Press these folds with an iron to hold the shape before sewing. -
Attach O-ring details:
Before attaching the pockets, cut a small tab of 1-inch webbing. Slide a metal O-ring onto it and sew this tab securely to the center front of each pocket panel. This is a crucial aesthetic detail. -
Sew pockets to base:
Position the pleated pockets onto the front of the main chest panel. Edge stitch around the sides and bottom, ensuring the pleats remain flat where they are sewn down. -
Construct the flaps:
Sew two layers of fabric together for each pocket flap, turn them right side out, and topstitch. Attach magnetic snaps or heavy-duty snaps to the underside of the flap and the corresponding spot on the pocket body. -
Attach flaps:
Sew the top edge of the flaps directly onto the main panel, just above the pocket opening. Run a second row of stitching for reinforcement.
Tactical Texture
Use X-Pac fabric instead of Cordura for a waterproof, diamond-textured finish that looks even more high-tech and futuristic.
Step 3: Harness & Strap System
-
Prepare shoulder straps:
Cut two long lengths of 1.5-inch webbing for the shoulder straps. To add comfort, you can sew a wider strip of Cordura padded with foam to the section that sits on the shoulder, then stitch the webbing on top of it. -
Install ladder locks:
At the top corners of your main chest panel, sew short tabs of webbing holding the rectangular ladder lock buckles. These will connect to the shoulder straps. -
Create the H-harness back:
Connect the two shoulder straps in the back with a horizontal piece of webbing to create an ‘H’ shape preventing slippage. Stitch box-x patterns at all connection points for extreme durability. -
Add side straps:
Cut two lengths of 1-inch webbing for the side waist straps. Sew one end of each strap to the side edges of the main chest panel. -
Attach release buckles:
Thread the side release buckles onto the waist straps. Sew the mating buckle parts to the back harness assembly so the entire rig clips around the torso under the arms. -
Final adjustments:
Burn all raw webbing ends with a lighter to prevent fraying. Thread all straps through their respective buckles and adjust the fit on a dress form or yourself. -
Detailing:
Add extra decorative elements like zipper pulls made of paracord or additional small metal D-rings on the shoulder straps to maximize the techwear vibe.
Needle Breaks?
Sewing through thick webbing layers is tough. Switch to a denim needle and hand-crank the machine wheel over the thickest humps to avoid breakage.
With your rig complete, you have a versatile statement piece ready to layer over hoodies or jackets for that cyberpunk edge
Seasonal Winter Scarf And Gloves Set
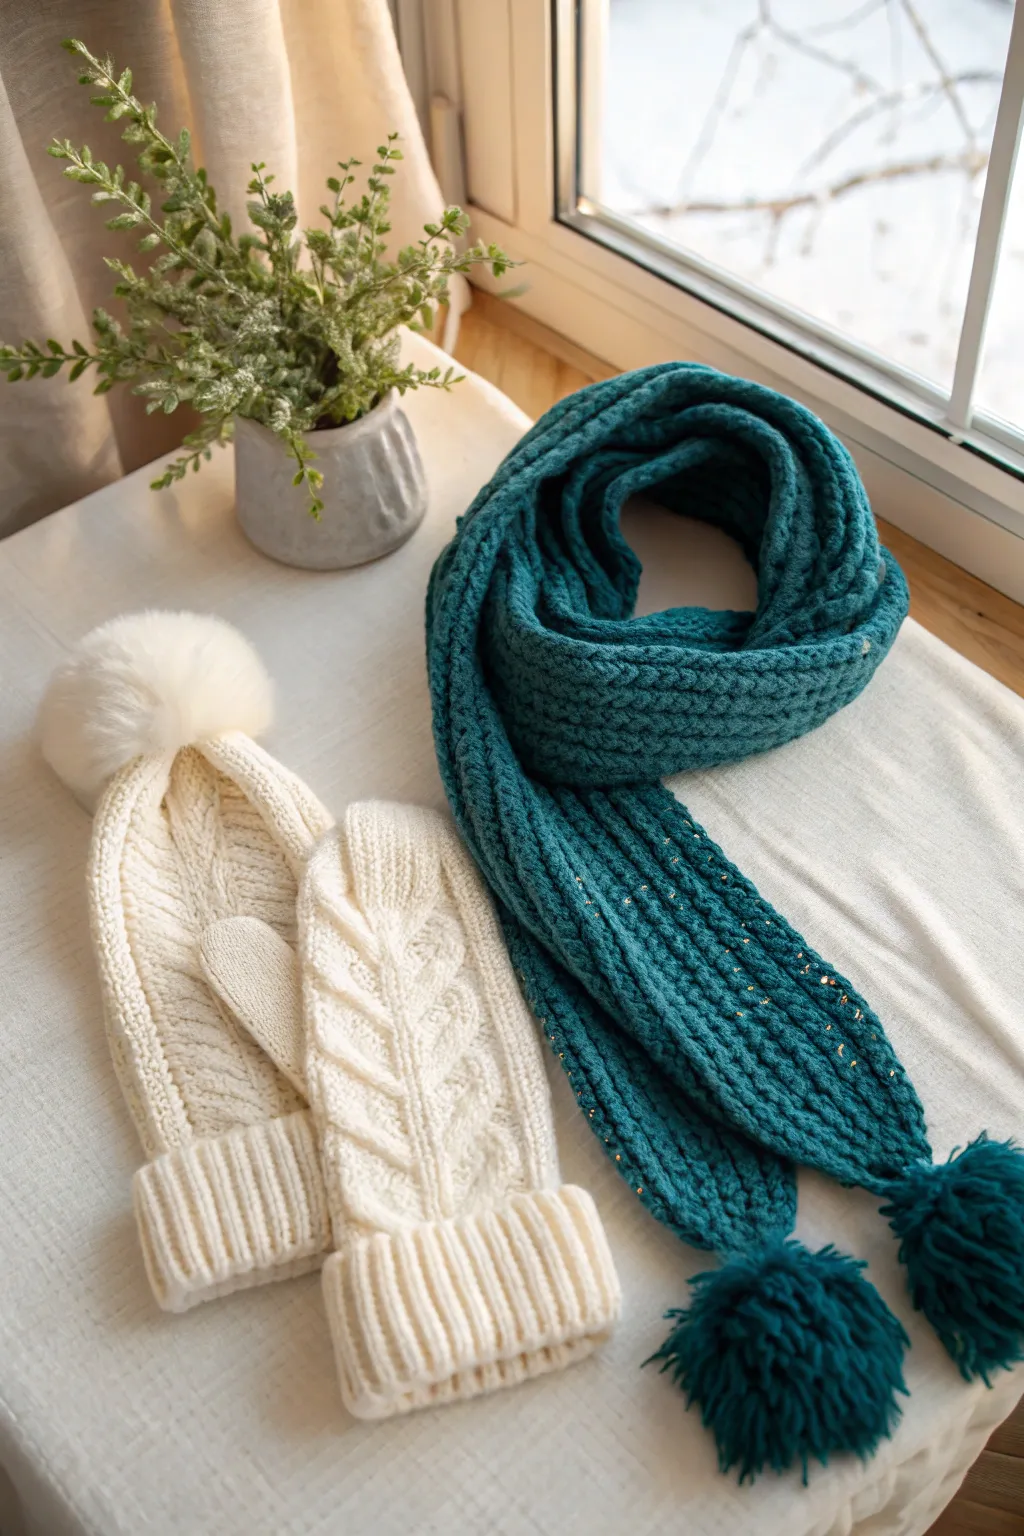
Embrace the winter chill with this luxurious matching set featuring cable-knit cream mittens and a textural teal scarf flecked with subtle shimmer. Perfect for an anime-inspired winter outfit, this project combines classic cable techniques with simple, squishy ribbing for maximum warmth and style.
Step-by-Step Tutorial
Materials
- Cream worsted weight yarn (wool blend recommended)
- Deep teal bulky weight yarn with sequins or metallic thread
- Set of US 6 (4.0mm) double-pointed needles (for mittens)
- US 10 (6.0mm) straight or circular needles (for scarf)
- Cable needle
- Faux fur pom-pom (cream/white)
- Large pom-pom maker or cardboard
- Tapestry needle
- Scissors
- Stitch markers
- Waste yarn
Step 1: Knitting the Cabled Mittens
-
Cast on cuffs:
Using the cream yarn and US 6 double-pointed needles, cast on 40 stitches. Divide evenly across 3 or 4 needles and join in the round, being careful not to twist. -
Work the ribbing:
Knit in a K2, P2 rib pattern for approximately 2.5 to 3 inches. This creates a snug, folded-style cuff that keeps cold air out. -
Establish pattern:
Transition to the hand. Place a marker for the beginning of the round. Start the central cable panel on the back of the hand (typically over the first 16-20 stitches) while knitting the palm stitches in plain stockinette. -
Execute the cable:
For the cable motif shown, work a braided or staghorn cable. Slip 2 stitches to the cable needle, hold in back, K2, then K2 from cable needle. Repeat symmetrically on the other side of the center stitch to create the branching effect seen in the photo. -
Thumb gusset setup:
After about an inch of pattern, start increasing for the thumb gusset on the palm side. Increase 1 stitch on either side of a designated stitch every other round until you have about 14-16 gusset stitches. -
Separate thumb:
Place the thumb gusset stitches onto waste yarn to hold them for later. Cast on 2 stitches over the gap to bridge the hand and continue working in the round. -
Finish the hand:
Continue working the cable pattern on the back and stockinette on the palm until the mitten reaches the tip of your pinky finger. -
Decrease top:
Shape the top by knitting two together (K2tog) at the start and SSK at the end of each needle section every round until 8 stitches remain. Cut yarn and thread through remaining loops to close. -
Complete the thumb:
Pick up the held gusset stitches plus 2 from the hand gap. Knit plain stockinette in the round until it reaches the thumbnail, then decrease rapidly and close. -
Add the pom-pom:
Securely sew the faux fur pom-pom to the very top tip of one or both mittens if desired, or save it for a matching hat. The image shows a hat, but adding a small fur accent to the cuff is a cute variation.
Hiding the Magic
Gap at the thumb base? Use the yarn tail from picking up stitches to stitch that little hole shut from the inside. No one will ever know it was there.
Step 2: Creating the Sparkle Scarf
-
Cast on scarf:
Switch to your US 10 needles and the teal bulky yarn. Cast on a number of stitches divisible by 2 (around 24-30 stitches for this width). -
Start Fisherman’s Rib:
This scarf uses a fluffy rib stitch. Row 1: Knit all stitches. Row 2: *Purl 1, Knit 1 into the stitch below the next stitch on the left needle*, repeat to end. This creates that deep, squishy texture. -
Continue length:
Repeat the pattern row until the scarf is quite long—at least 60 inches to allow for the wrap-around look shown in the photo. I generally knit until I have just enough yarn left for the pom-poms. -
Bind off:
Bind off loosely in pattern. A tight bind-off will make the ends scrunch up, so keep your tension relaxed here. -
Make yarn pom-poms:
Using the remaining teal yarn and a large pom-pom maker (or a 4-inch piece of cardboard), wrap the yarn thick and full. You want these to be substantial. -
Secure pom-poms:
Tie the center of your pom-poms very tightly with a strong piece of matching yarn. Trim the edges to make them perfectly round and fluffy. -
Attach to scarf:
Sew one heavy pom-pom securely to each end of the scarf. Weave in the tails thoroughly so they don’t wiggle loose with wear.
Step 3: Finishing Touches
-
Block the set:
Soak the mittens and scarf briefly in cool water with wool wash. Gently squeeze out excess water and lay them flat on a towel to dry. Pin the cable pattern on the mittens slightly to open up the design. -
Trim loose ends:
Once fully dry, snip any remaining yarn tails that have popped out during blocking.
Anime Flair
Add a small charm or bow to the cuff of the mittens for extra character detail. You can also weave a thin velvet ribbon through the cable twists.
Wrap yourself up in your handmade warmth and enjoy the cozy aesthetic you have created
Festival Yukata-Inspired Styling
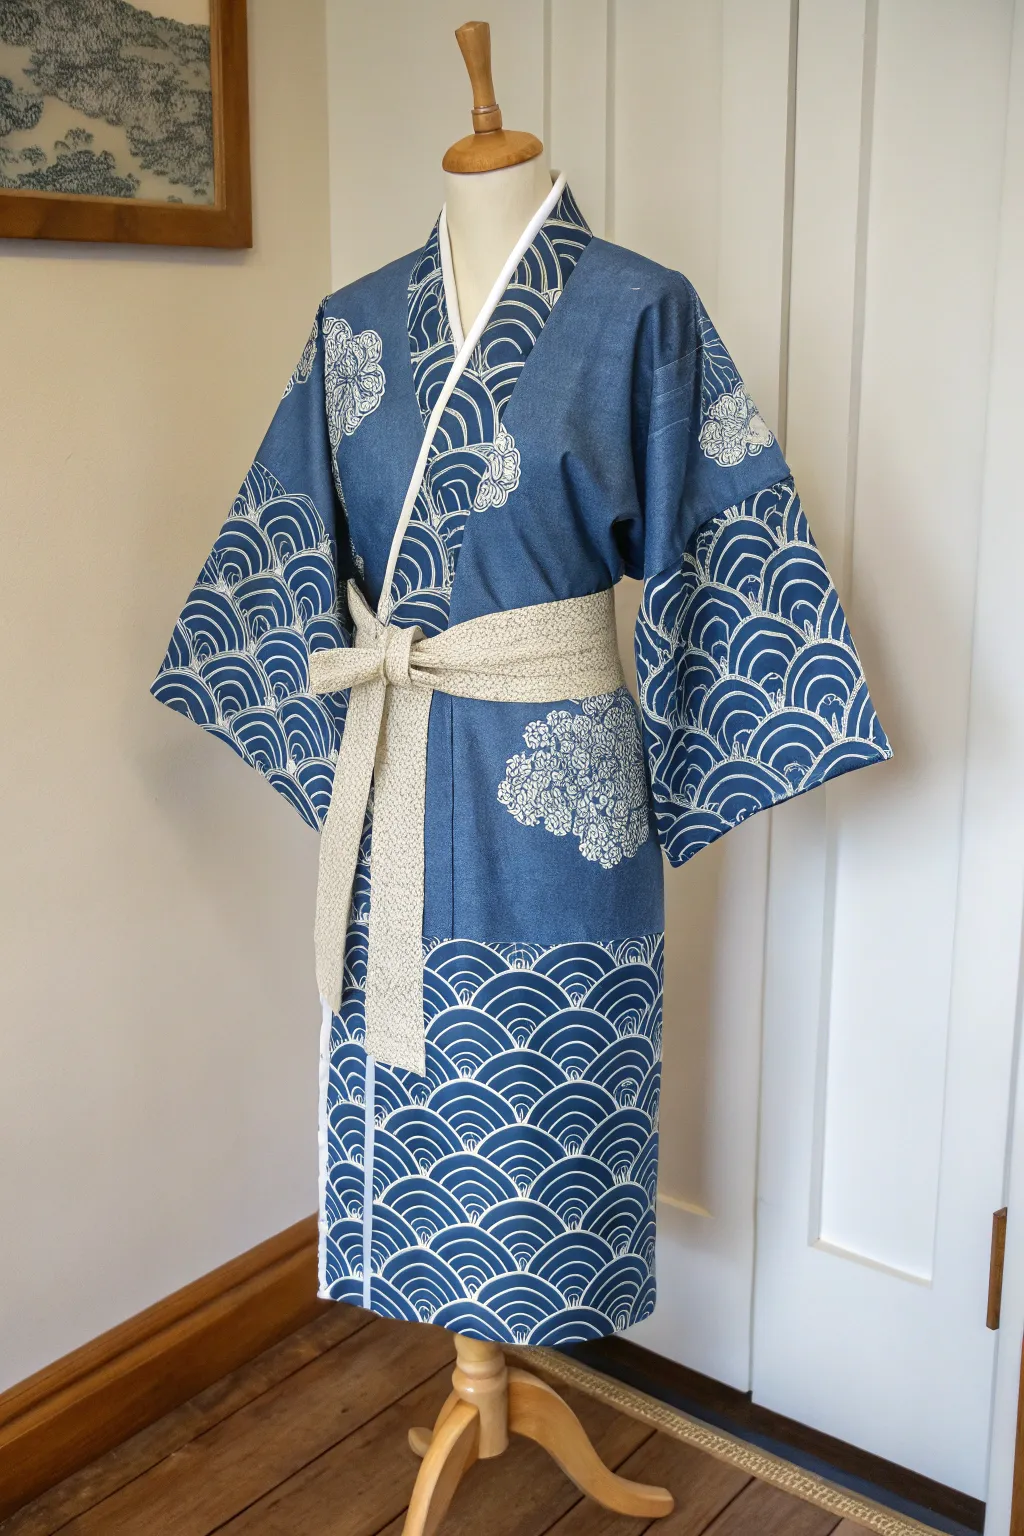
Embrace the spirit of summer festivals with this stunning, traditional-style yukata featuring the classic Seigaiha (blue ocean wave) motif. This garment combines bold patterns with solid color blocking for a modern, anime-ready aesthetic that looks professional but is surprisingly accessible to sew.
How-To Guide
Materials
- 3-4 yards of medium-weight blue cotton fabric (featuring Seigaiha/wave print)
- 2 yards of solid denim-blue cotton (for color blocking)
- Using traditional rolls (tanmono) is ideal, but standard bolt width works too
- 1 yard of white cotton (for collar facing)
- 2 yards of cream/beige patterned fabric (for the sash/obi)
- Matching blue and cream thread
- Sewing machine
- Tailor’s chalk or fabric marker
- Iron and ironing board
- Long ruler or yardstick
- Fabric shears and pins
Step 1: Cutting the Panels
-
Measure and plan:
Standard yukata depend on rectangular panels rather than curved pattern pieces. Measure your height and arm span to determine length. You will need: 2 Body Panels, 2 Sleeve Panels, 2 Overlaps (Okumi), and 1 Collar strip (Eri). -
Cut the wave fabric:
Cut your Seigaiha wave fabric for the bottom hem section (approx. 20-25 inches tall), the main sleeve rectangles, and the upper shoulder area if you are piecing the pattern like the example image. -
Cut the solid blue fabric:
Cut the solid denim-blue fabric for the main mid-body section. The goal is to create a panel that mimics a solid kimono worn under a haori, or simply a modern distinct block. -
Piece the body panels:
Lay out your body panels. Stitch the solid blue section to the top of the wave-patterned bottom section using a straight stitch. Press the seam allowances flat or open to reduce bulk; I prefer to serge or zig-zag these edges first.
Clean Corners Pro-Tip
When sewing the square sleeves, stop sewing 1/2 inch from the corner, leave the needle down, lift the presser foot, and pivot the fabric 90 degrees.
Step 2: Assembling the Body
-
Create the center back seam:
With right sides together, sew the two main body panels together along the back center line, stopping about halfway up if you want a back seam, though traditional yukata often use a single full-width piece. For this pieced look, ensure your horizontal seams (where solid meets wave) align perfectly. -
Attach the Okumi panels:
Sew the narrower overlap panels (Okumi) to the front edge of the body panels. These allow the robe to wrap comfortably around the waist. -
Hem the sleeves:
Take your sleeve rectangles. Hem the outer vertical edge (the sleeve opening) with a narrow double-fold hem before attaching them to the body. -
Attach sleeves to body:
Match the center of the sleeve top to the shoulder line of the body. Sew the sleeve to the body, leaving the bottom few inches of the armpit area unsewn for the classic ‘miyatsukuchi’ opening. -
Sew side seams and sleeve bottoms:
Fold the garment at the shoulders (right sides facing). Sew from the sleeve cuff, along the bottom curve, and down the side of the body. Remember to leave the armpit vent open if desired, or sew it shut for a simpler construction.
Level Up: Floral Appliqué
Use white fabric paint and a stencil (or bleach pen) to add the subtle white floral clusters seen on the chest and shoulder for extra detail.
Step 3: The Collar and Sash
-
Prepare the collar (Eri):
Cut a long strip of your main blue fabric (approx 4-5 inches wide) and a matching strip of white interfacing or stiff cotton. -
Adding the piping detail:
Fold a 1-inch strip of white cotton in half lengthwise and press. Baste this piping to the edge of your collar strip so a thin white line peaks out, mimicking an underlayer. -
Attach the collar:
Pin the center of the collar to the center back neck. Ease it down the front edges of the panels/Okumi. Stitch in place, then fold the collar over to the inside and hem by hand or stitch-in-the-ditch for a clean finish. -
Hem the bottom:
Try on the yukata to check the length. Fold up the bottom hem to your desired height (usually ankle length) and stitch a wide, sturdy hem. -
Sew the Obi Sash:
Cut your cream fabric into a strips 6-8 inches wide. Sew them end-to-end to create a sash at least 3 times your waist measurement. Fold in half lengthwise (right sides together), sew the long edge, turn right side out, and press flat.
Wrap the left side over the right, tie your new obi sash in a simple bow, and you are ready for the summer festival season
Squad Coordination Outfit Pack
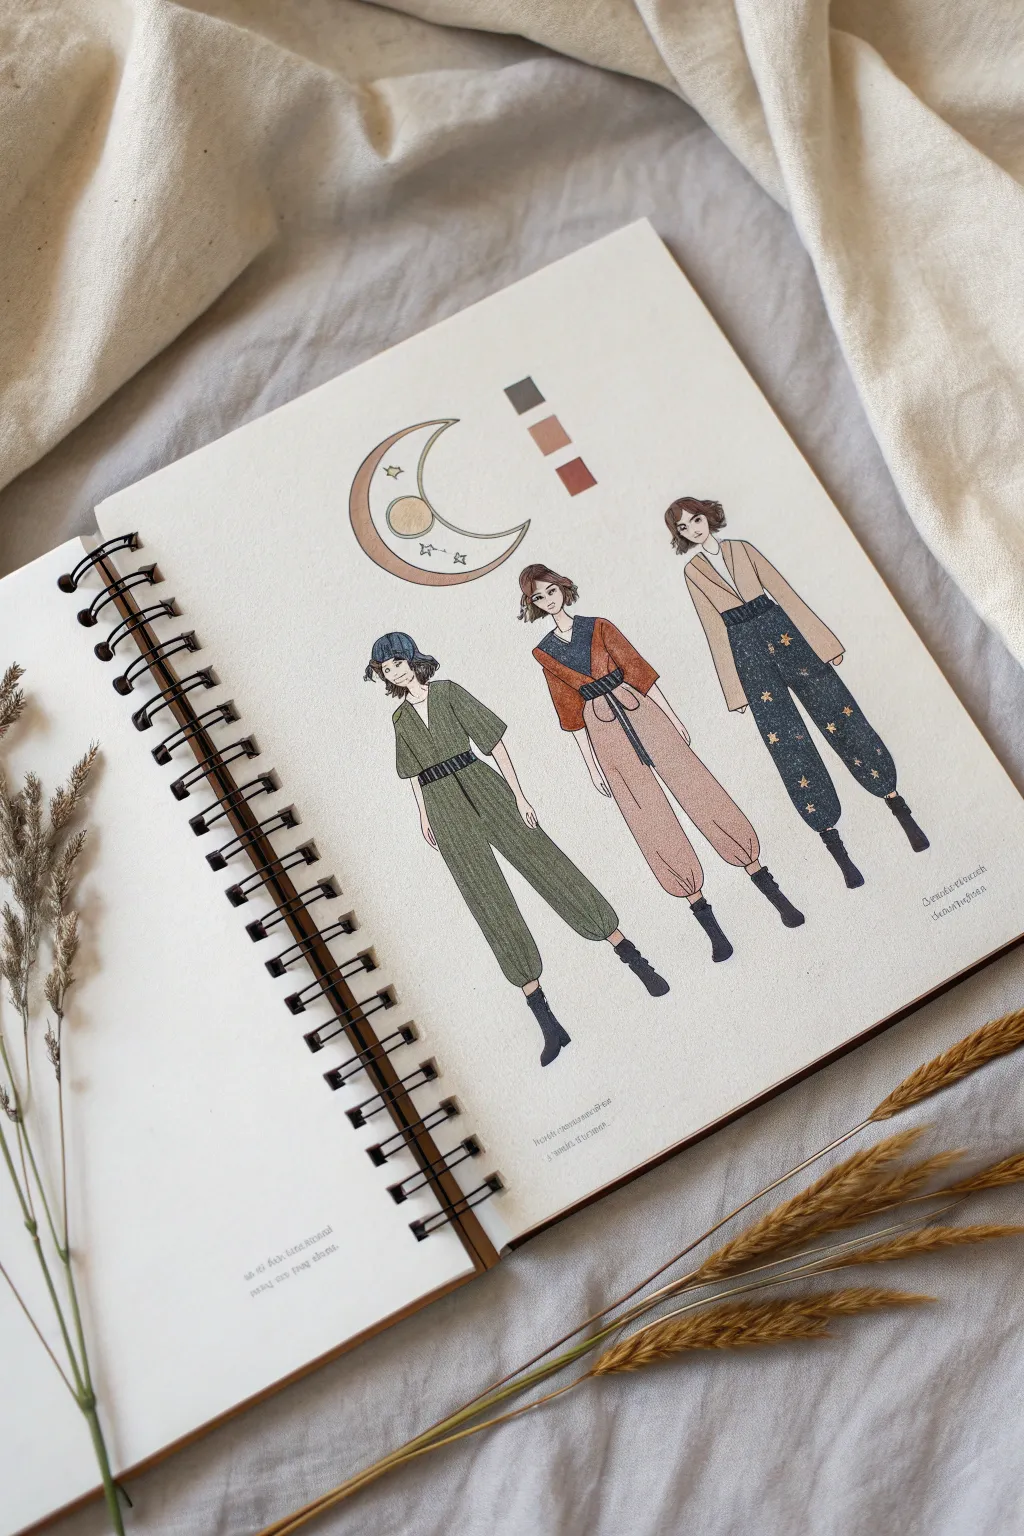
Design a cohesive trio of anime-inspired outfits using a moon-and-stars motif in this sketchbook project. The illustration features loose, relaxed marker work combined with fine-line detailing to create a stylish, coordinated look perfect for character design practice.
Step-by-Step
Materials
- Spiral-bound sketchbook (heavyweight paper)
- Pencil (HB or 2B)
- Kneaded eraser
- Fine liner pens (0.1mm and 0.3mm, black)
- Alcohol-based markers (muted greens, terracottas, navy blue, beige/tan)
- Gold gel pen or metallic marker
- White gel pen
Step 1: Planning and Sketching
-
Layout composition:
Visualize the page layout first. Reserve the top center for the moon motif and color palette, and place three evenly spaced figures in the bottom two-thirds of the page. -
Draft the moon:
Lightly sketch a large crescent moon at the top. Don’t close the inner curve perfectly; leave it open or add a smaller circle intersecting it to create a stylized, geometric celestial symbol. -
Sketch the figures:
Draw three standing fashion croquis (rough figure outlines) in a row. Keep the poses simple and relaxed—hands in pockets or hanging loosely—to match the casual fashion vibe. -
Design the outfits:
Sketch the clothing details on your figures. For the left figure, draw a green jumpsuit with a wide belt. The middle figure gets a wrap-style top with high-waisted harem pants. The right figure needs a blazer and patterned trousers. -
Add celestial details:
Mark where the patterns will go. I like to pencil in tiny stars on the rightmost figure’s pants and the moon symbol to guide the ink later.
Pro Tip: Fabric Weight
Make the harem pants on the middle figure look flowy by bunching the ink lines heavily at the ankles but keeping the thighs smooth and open.
Step 2: Inking and Lines
-
Outline the figures:
Using a 0.1mm fine liner, carefully go over your pencil lines. Keep the hair loose and slightly sketchy to maintain that anime aesthetic. -
Refine clothing folds:
Add small wrinkle lines at the elbows, knees, and waistbands to show fabric weight. Don’t overdo it; just a few lines suggest volume. -
Ink the moon motif:
Go over the moon design at the top with a slightly thicker 0.3mm pen to make it a focal point. -
Erase guidelines:
Wait for the ink to become completely dry to the touch, then gently remove all graphite lines with your kneaded eraser.
Troubleshooting: Bleeding
If your navy marker bleeds into the beige jacket, wait for it to dry fully, then use a white gel pen to crisp up the defining line between the garments.
Step 3: Coloring
-
Base skin tones:
Apply a pale skin tone marker to the faces, necks, and hands. Keep it flat for a clean, illustrative look. -
Left figure basics:
Color the leftmost jumpsuit with a muted olive green marker. Use a dark grey or black for the boots and the belt detail. -
Middle figure earth tones:
For the center outfit, use a terracotta or rust-orange for the wrap top and a soft beige-pink for the pants. Color the sash in a contrasting dark tone. -
Right figure navy & tan:
Fill the blazer with a light tan or camel color. For the trousers, use a deep navy blue marker. This dark background is crucial for the star pattern later. -
Add swatches:
Next to the moon sketch, draw three small squares and fill them with your main palette colors (olive, terracotta, navy) to serve as a design reference.
Step 4: Finishing Touches
-
Moon coloring:
Color parts of the moon crescent with the tan marker, leaving some sections white or using a very pale grey for contrast. -
Metallic stars:
Using a gold gel pen or metallic marker, draw small stars and dots on the navy blue trousers of the rightmost figure. Add a few gold accents to the moon motif as well. -
Texture detail:
If you want the fabric to look textured like in the reference, use a colored pencil in a slightly darker shade to add light hatching over the dried marker ink. -
Grounding shadows:
Add a tiny pool of light grey shadow under the feet of each character so they don’t look like they are floating in space.
Now you have a perfectly coordinated fashion spread that brings a touch of cosmic style to your sketchbook
Realistic-to-Anime Outfit Translation Sheet
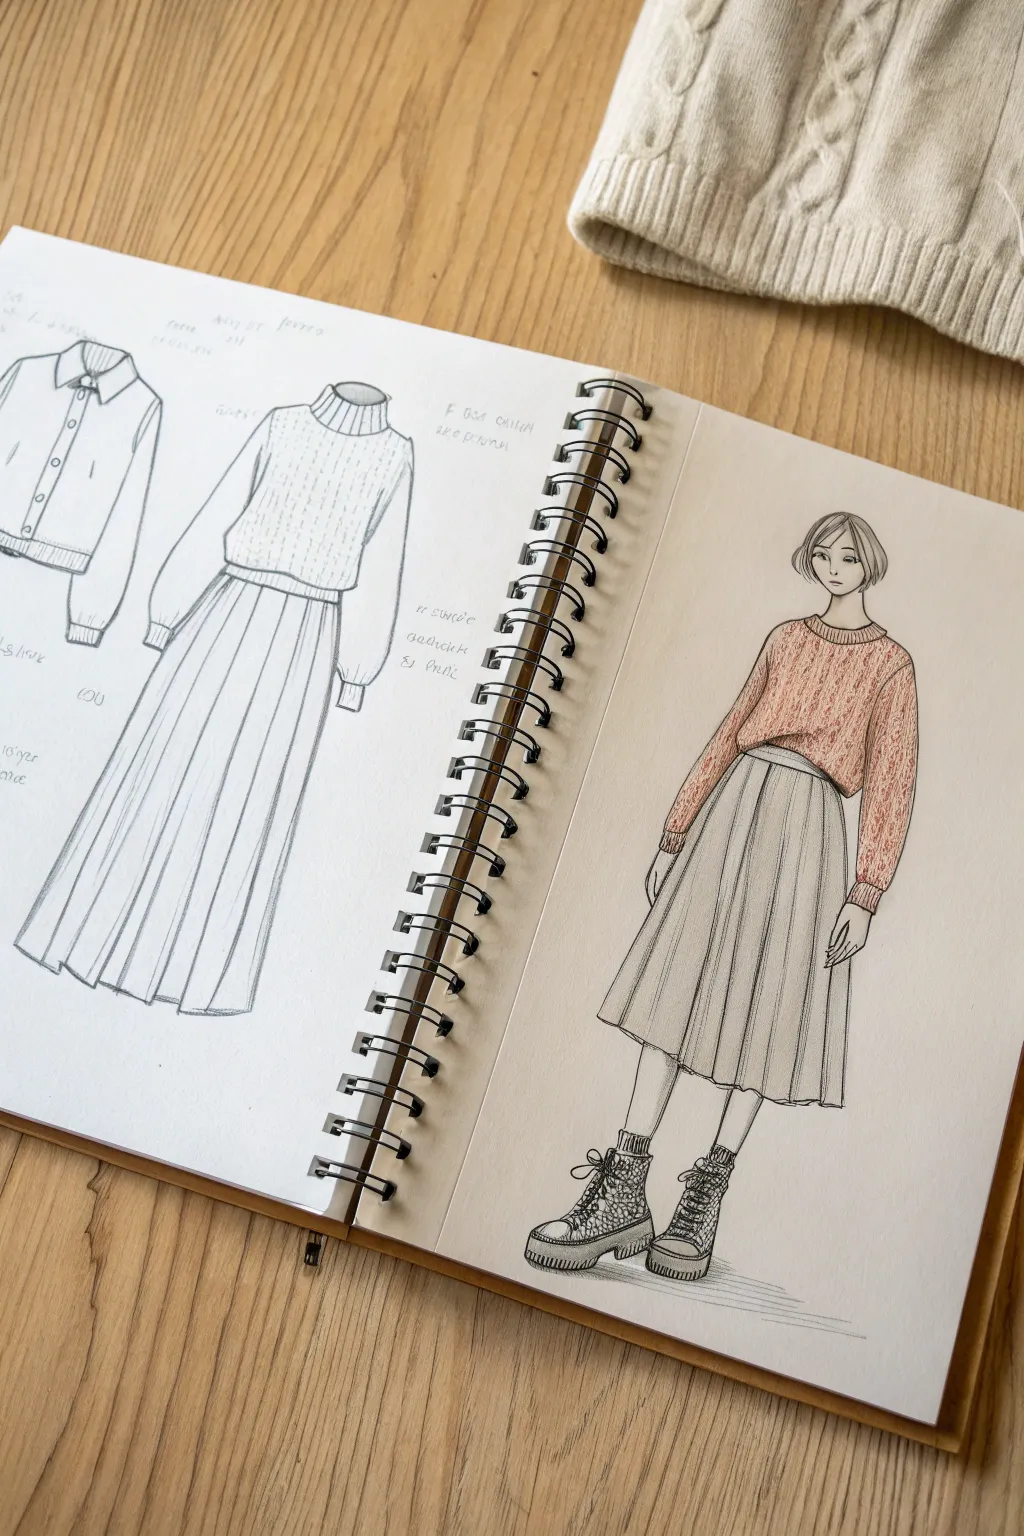
This tutorial guides you through creating a realistic fashion sketchbook spread, featuring conceptual rough sketches on one side and a polished, colored anime-style model on the other. It captures the design process from initial idea to final look, perfect for visualizing outfit translations.
Detailed Instructions
Materials
- Spiral-bound sketchbook (A4 or similar size, heavy mixed-media paper)
- H or HB graphite pencil for initial outlines
- Fine liner pens (0.1mm, 0.3mm, 0.5mm, black ink)
- Colored pencils (focused on terracotta/rust, warm grays, and muted browns)
- Eraser (kneaded eraser preferred)
- Reference photo of knitwear (optional, for texture details)
Step 1: Conceptual Drafting (Left Page)
-
The Shirt Sketch:
On the top left of the left-hand page, lightly sketch a casual collared shirt or light jacket. Focus on the geometry of the collar and the center button line. Keep the lines loose and swift to mimic a designer’s brainstorming process. -
The Main Outfit Draft:
To the right of the shirt, sketch the primary outfit: a turtleneck sweater tucked into a long, pleated maxi skirt. Don’t worry about perfect anatomy here; it’s a flat lay sketch. Draw the sleeves slightly billowing. -
Adding Construction Lines:
Draw vertical lines down the skirt to indicate pleats. Add ribbed texture lines to the turtleneck collar and cuffs using short, repetitive strokes. -
Annotating the Design:
Use your pencil to scribble small design notes around the sketches. These don’t need to be legible—they add to the aesthetic of a ‘working’ sketchbook. Add small arrows pointing to details like cuffs or hemlines.
Step 2: Character Illustration (Right Page)
-
Pose Framework:
On the right page, lightly sketch a stick figure to establish the pose. The model should be standing straight with legs slightly apart, arms relaxed at the sides. This is a classic fashion croquis stance. -
Fleshing Out the Figure:
Build the body shape over your framework. Since this is an anime style, keep the shoulders slightly narrow and the head somewhat larger in proportion to the body. Sketch a bob haircut framing the face. -
Draping the Clothes:
Sketch the oversized sweater over the torso. Ensure the shoulder seams drop down the arm for that ‘slouchy’ look. Draw the skirt starting high at the waist, flaring out slightly as it goes past the knees. -
Refining the Face:
Draw the facial features with a fine mechanical pencil. Place large, expressive eyes typical of anime, a small nose, and a simple line for the mouth. Add the hair strands, tucking one side behind the ear. -
Inking the Outline:
Using a 0.3mm fine liner, go over your clean pencil lines. Use a steady hand for the long lines of the pleated skirt. -
Varying Line Weight:
Switch to a 0.5mm pen for the outer contours of the sweater and boots to give them weight. Use the 0.1mm pen for delicate details like facial features and hair strands. -
Boots Detail:
Draw the combat boots carefully, adding laces and a thick treaded sole. This grounds the character and adds a modern edge to the outfit.
Fixing Smudges
If you smudge graphite on the white paper, dab it with a kneaded eraser rather than rubbing. This lifts the dirt without damaging the paper tooth.
Step 3: Color and Texture
-
Sweater Base:
Take a terracotta or rust-colored pencil and lightly fill in the sweater. Use small, circular motions to avoid harsh directional streaks. -
Knit Texture:
Go back over the sweater with the same color, applying more pressure to create a ‘cable knit’ pattern. I find making small ‘v’ shapes mimics the yarn texture beautifully. -
Skirt Shading:
Use a warm gray pencil for the skirt. Instead of coloring it solid, shade primarily within the folds of the pleats. Leave the ridges of the pleats lighter to indicate where the light hits. -
Skin Tones:
Lightly color the face, neck, and hands with a pale cream or beige pencil. Add a tiny bit of blush to the cheeks for life. -
Boots and Hair:
Color the hair a soft brown, leaving a white streak for highlight. For the boots, use a darker gray or black pencil, simulating a snake-skin or textured leather pattern with small, irregular scales. -
Final Shadows:
Add a cast shadow beneath the boots using horizontal hatching with a gray pencil to ground the figure on the page.
Add Fabric Swatches
Tape small squares of real fabric or yarn next to your sketches on the left page. It adds incredible tactile realism to the fashion design concept.
Now you have a stunning, professional-looking fashion spread that bridges concept art with final character design


Have a question or want to share your own experience? I'd love to hear from you in the comments below!