If you’re in the mood to draw something dreamy, symbolic, and flowing, Aquarius is such a fun muse. I love how the water bearer theme lets you play with elegant linework, magical water shapes, and a little cosmic mystery.
Aquarius Glyph With Flowing Water
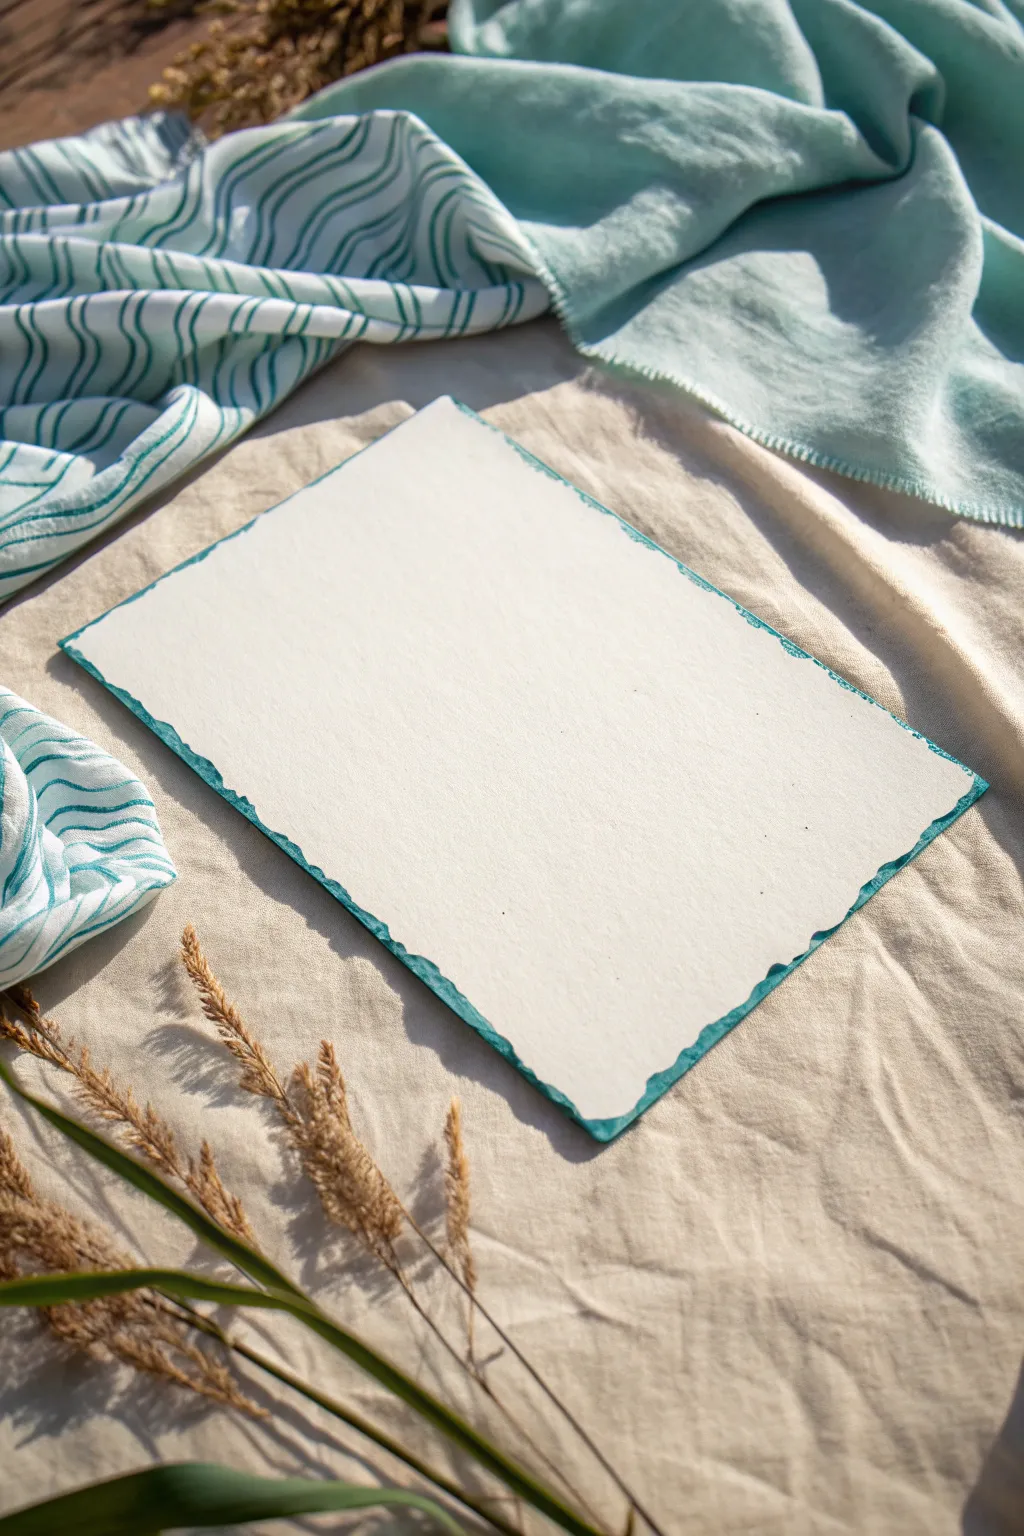
Create a stunning canvas for your Aquarius artwork by customizing high-quality watercolor paper with a vibrant, hand-painted deckled edge. This simple yet elegant preparation adds a splash of aquamarine color that perfectly frames any water-themed glyph or illustration.
Step-by-Step
Materials
- Heavyweight watercolor paper (300gsm or higher)
- Ruler (metal preferred)
- Water cup
- Small paintbrush or water brush pen
- Teal or turquoise watercolor paint (or gouache)
- Paper towels
- Palette or mixing tray
- Protective work surface
Step 1: Creating the Deckled Edge
-
Measure your paper:
Decide on the final dimensions for your artwork. Using a pencil, lightly mark the desired size on your larger sheet of watercolor paper, leaving about an inch of extra margin on all sides of your intended final border. -
Wet the tear line:
Dip a clean brush into plain water. Run the wet brush slowly and precisely along the line where you intend to tear the paper. The goal is to soften the fibers without soaking the entire sheet. -
Weaken the fibers:
Go over the wet line a second time to ensure the water has penetrated the paper’s surface. Let it sit for about 30-60 seconds to allow the fibers to loosen up. -
Position your ruler:
Place your metal ruler firmly along the wet line. Press down hard with your non-dominant hand to keep the ruler from slipping during the tearing process. -
Tear the paper:
Gently lift the corner of the paper and pull it slowly towards you and against the ruler’s edge. This tearing action creates the beautiful, organic ‘deckled’ look rather than a sharp, scissor-cut edge. -
Repeat all sides:
Repeat the wetting and tearing process for all four sides of your paper until you have a rough, textured rectangle.
Uneven Tearing?
If the paper isn’t tearing easily, re-wet the line and wait longer. Thicker paper needs more time for water to soak deep into the fibers before tearing.
Step 2: Painting the Border
-
Prepare your paint:
Squeeze a small amount of teal or turquoise watercolor paint onto your palette. I like to dilute it slightly with water to get a fluid consistency, but keep the pigment strong for a bold border. -
Load your brush:
Saturate a medium-sized round brush with your turquoise mix. Before touching the paper, blot off any major drips on a paper towel so you have control over the flow. -
Edge application technique:
Hold the brush at a 45-degree angle against the torn edge of the paper. Gently dab and drag the brush along the very rim of the paper. -
Encourage bleeding:
Allow the bristles to occasionally slip just barely onto the top surface of the paper. This creates a jagged, uneven colored border that mimics the movement of water. -
Intensify the color:
While the first layer is still damp, dab a more concentrated, less diluted pigment into random spots along the edge. This adds depth and variety to the teal tone. -
Control the seep:
If the paint starts bleeding too far into the center of the paper, quickly use a clean, slightly damp brush to lift the excess pigment or blot it gently with a corner of a paper towel. -
Finishing touches:
Inspect the perimeter for any white gaps on the torn fibers. Fill these in with a light wash so the color feels continuous all the way around. -
Dry completely:
Lay the paper flat on a clean surface to dry completely. Wait until the edges are bone dry before sketching your Aquarius design in the center to prevent smudging.
Bleed Control
Work on dry paper for a crisp border. If you want a misty, soft look, lightly mist the edges with water before applying the teal paint tailored to your style.
Your custom-edged paper is now ready for your creative Aquarius glyph or watercolor flow design


Aquarius Constellation Portrait
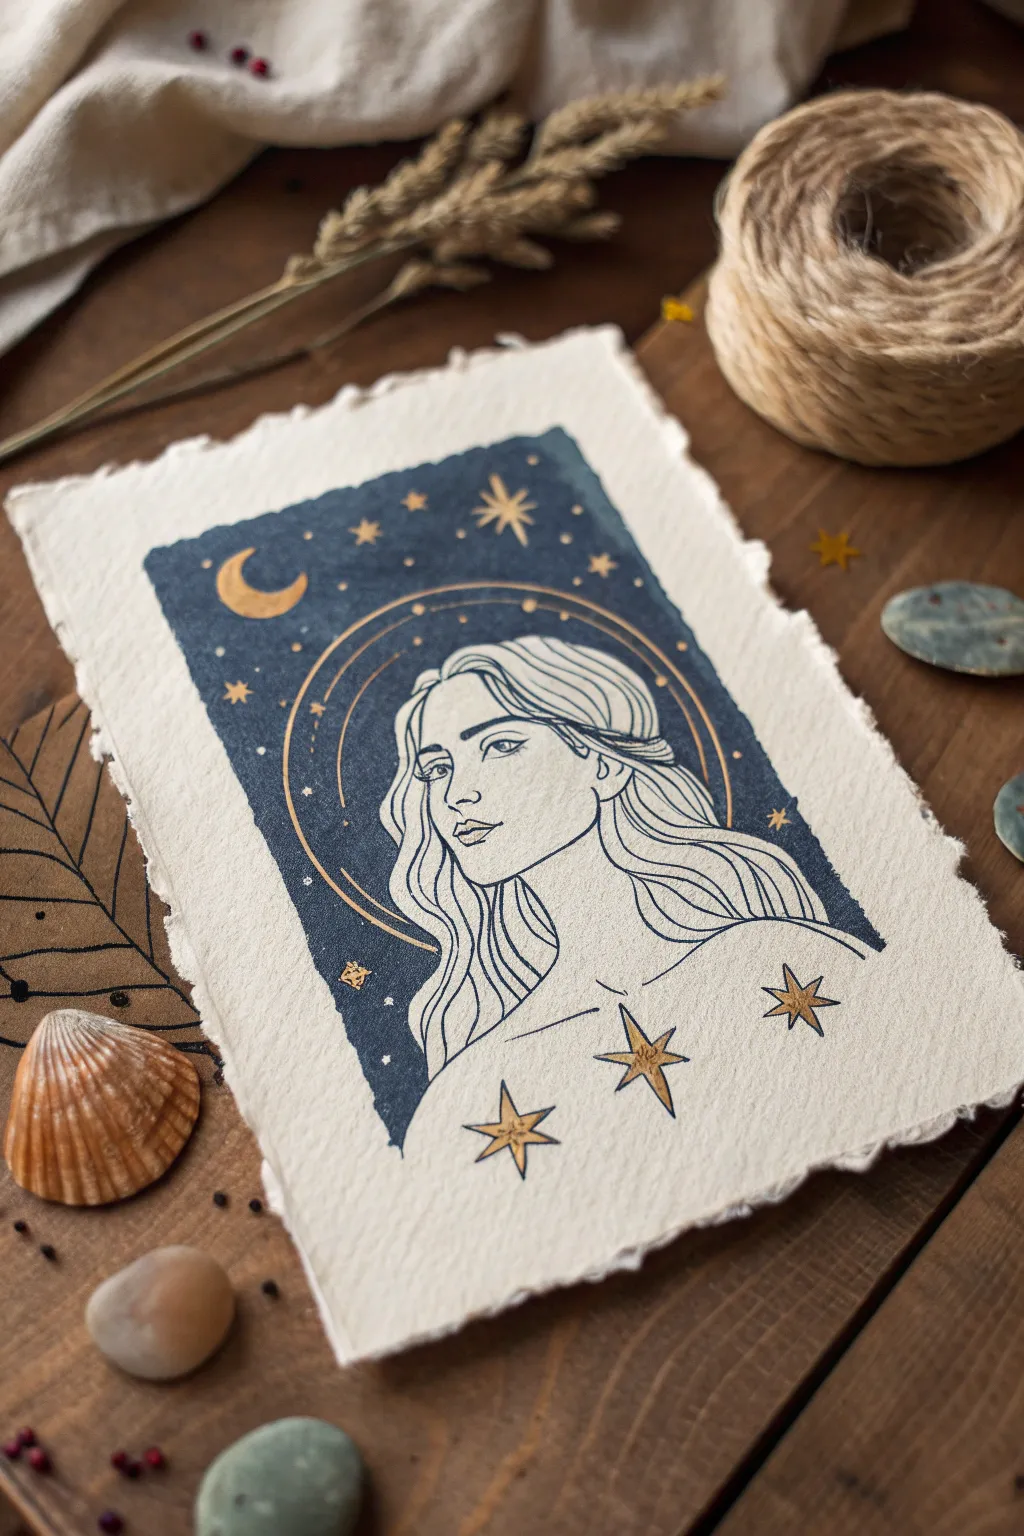
Capture the ethereal essence of the water bearer with this mixed-media portrait, combining deep indigo washes with precise linework. The deckle-edge paper and gold accents give the piece an ancient, tarot-card quality that feels both timeless and modern.
Step-by-Step Guide
Materials
- Heavyweight cold-press watercolor paper (300 gsm)
- Deep indigo or Payne’s gray gouache paint
- Fine liner pens (sizes 005, 01, and 03)
- Gold metallic paint or gold leaf pen
- Flat shader brush (size 6 or 8)
- Round detail brush (size 2)
- Pencil (HB) and kneadable eraser
- Ruler
- Deckle-edge scissors or a ruler for tearing paper
Step 1: Preparing the Canvas
-
Shape the Paper:
Start by creating that vintage, handmade look. If your paper doesn’t already have deckled edges, you can tear it manually against a straight edge or use specialized scissors to create a rough, uneven border. -
Draft the Composition:
Lightly sketch a vertical rectangle in the center of your page to serve as the background boundary. Don’t worry about perfect straight lines; a little wobble adds character. -
Sketch the Portrait:
Inside the lower half of the rectangle, sketch the profile of the woman. Focus on flowing hair lines and a serene expression. Her shoulders should extend slightly out of the bottom of the rectangle’s boundary.
Clean Lines Pro-Tip
When painting the indigo background around the hair, stroke *away* from the pencil line rather than along it. This prevents paint from accidentally bleeding into the figure’s face space.
Step 2: Applying the Background
-
Outline the Negative Space:
Mix your indigo gouache with a small amount of water to get a creamy consistency. Using the round brush, carefully paint around the outer edge of the woman’s hair and profile, defining the silhouette. -
Fill the Night Sky:
Switch to your flat shader brush to fill in the rest of the rectangular background. I prefer to use horizontal strokes here to give the sky a slight texture as it dries. -
Create the Jagged Edge:
As you paint the outer edges of the rectangle, allow the brush to lift naturally, creating a rough, ‘stamp-like’ edge rather than a perfect geometrical box. Let this layer dry completely.
Step 3: Inking the Details
-
Define the Face:
Using an 01 fine liner, ink the woman’s facial features. Use confident, smooth strokes for the nose and jawline to keep the drawing clean. -
Detail the Hair:
Switch to a slightly thicker 03 pen for the main contours of the hair, then use the 005 pen to add delicate internal strands and waves. Let the lines flow downwards, mimicking water. -
Add Celestial Halos:
Use your gold paint or metallic pen to draw two concentric circular arcs behind her head. These should sit on top of the blue background, framing her face like a halo. -
Paint the Crescent Moon:
In the upper left corner of the blue background, paint a solid gold crescent moon. Ensure the paint is opaque enough to stand out against the dark indigo.
Level Up: Cosmic Texture
Before the blue background dries completely, sprinkle a pinch of salt onto the wet paint. Brush it off when dry to create a starry, galaxy-like texture in the negative space.
Step 4: Golden Accents & Finishing
-
Add Stars to the Sky:
Scatter small gold stars and dots across the blue background. Mix four-point stars with simple dots for variety. -
Foreground Stars:
Draw three large, prominent five-point stars on the white paper across the bottom of her figure (on her chest area). These balance the composition. -
Highlight the Stars:
For the large foreground stars, outline them in black ink first, then fill the centers with gold paint. Adding a tiny central dot or line in black can add depth. -
Erase and Clean:
Once all ink and paint are fully dry—give it extra time for the metallic parts—gently erase any visible pencil marks. -
Final Inspection:
Check your indigo background. If it looks patchy, you can carefully add a second coat in thin areas, but be careful not to paint over your gold details.
Now you have a mystical celestial portrait ready to be framed or gifted to your favorite Aquarius


Celestial Water Bearer Silhouette
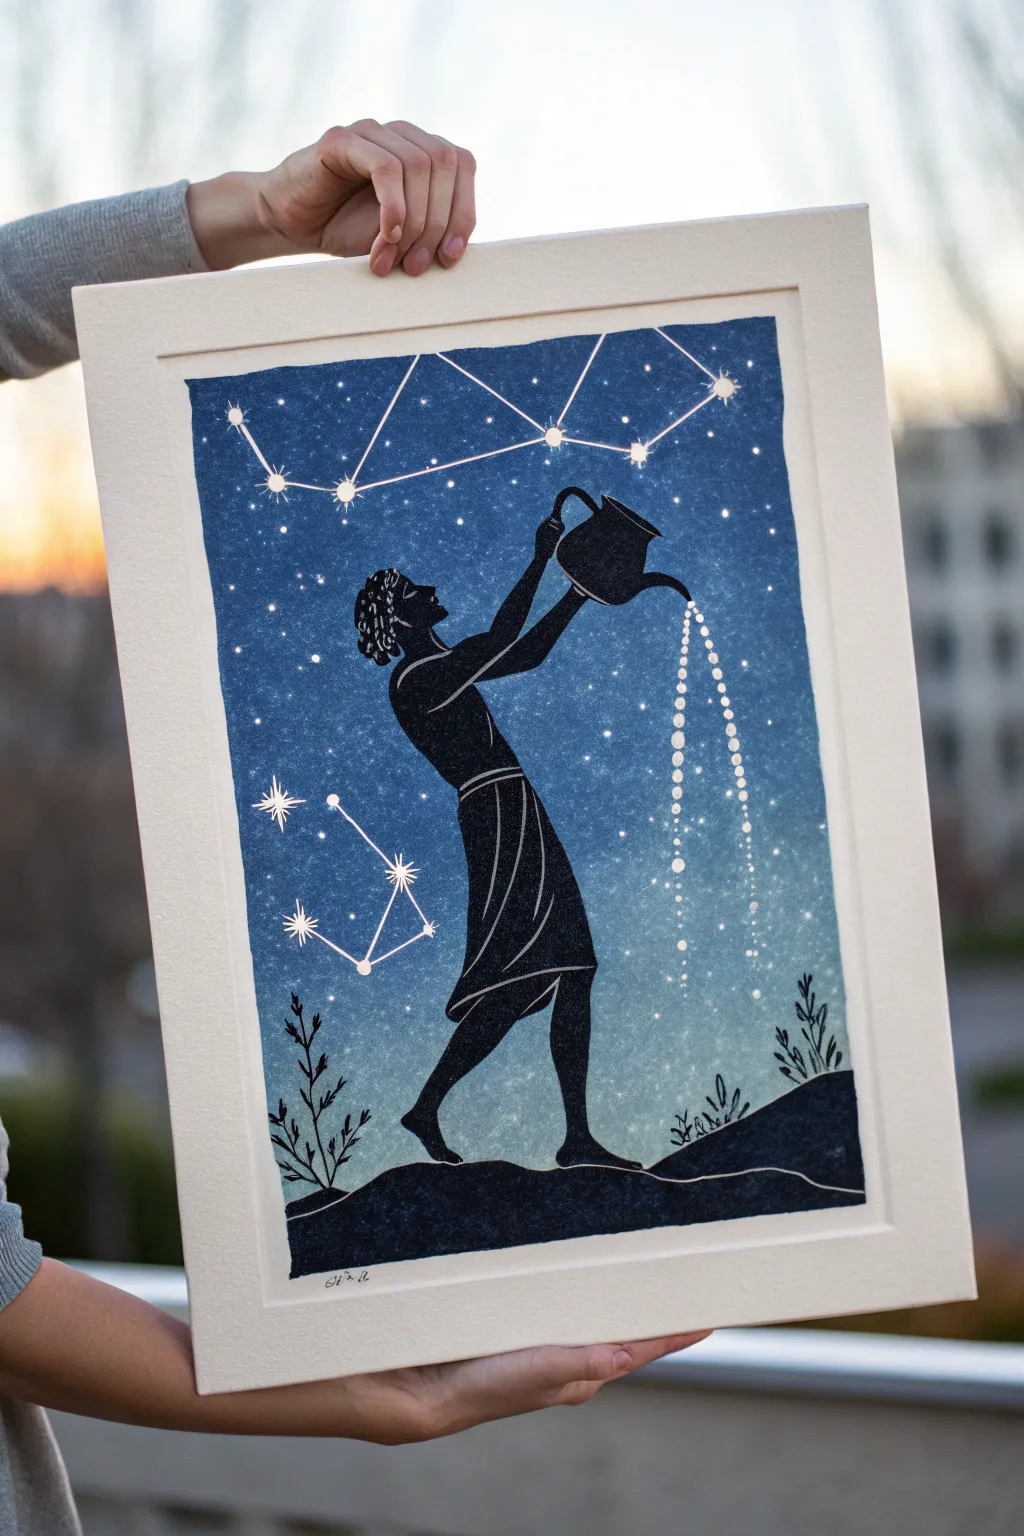
Capture the mystic energy of the water bearer with this striking Aquarius relief print. This project combines a deep, starry gradient background with a crisp black silhouette to create a piece that feels both ancient and modern.
Detailed Instructions
Materials
- Linoleum block (soft-cut or traditional)
- Linocut carving tools (V-gouge and U-gouge)
- Block printing ink (Black)
- Block printing ink (Phthalo Blue and White)
- Brayer (rubber roller)
- Printmaking paper (heavyweight, white)
- Pencil and transfer paper
- Glass palette or acrylic sheet for mixing
- Barren or wooden spoon for burnishing
- Fine detail paintbrush
- White acrylic paint or opaque white ink
Step 1: Carving the Design
-
Prepare your sketch:
Begin by sketching the Aquarius figure on paper. Focus on the silhouette shape—the figure holding the pitcher high. Remember that printing reverses images, so if direction matters to you, flip your drawing horizontally before transferring. -
Transfer to block:
Place transfer paper (carbon side down) on your linoleum block, then tape your sketch on top. Trace over your lines firmly with a pencil to transfer the design onto the surface. -
Carve the negative space:
Using a V-gouge, carefully carve outline around the figure, the ground, and the pitcher. You want the figure to remain raised (uncarved) so it prints black. Carve away the rest of the background using a U-gouge, clearing out large areas. -
Refine the details:
Switch back to your smallest tool to carve the internal details of the skirt folds and the hair texture. These are ‘white lines’ in the final print, so you are carving away material where you want thin white lines to appear inside the black shape. -
Add texture to the ground:
Use a U-gouge to create organic, wavy lines for the ground beneath the figure’s feet. Don’t smooth it out completely; leaving some texture adds visual interest to the earth. -
Test print:
Do a quick test print on scrap paper with black ink to check your carving. Look for ‘chatter’ (unwanted ridges in the background) and carve them away if they interfere with the silhouette.
Clean Lines Tip
Warm your lino block with a hairdryer for 30 seconds before carving. The heat softens the material significantly, allowing your gouge to glide through for smoother curves without slipping.
Step 2: Creating the Background
-
Prepare the gradient:
On your glass palette, squeeze out a line of dark blue ink at the top and white ink at the bottom, blending them slightly in the middle to create a transition zone. -
Roll the gradient:
Charge your brayer by rolling it up and down over the inks. Don’t lift the roller; just move it back and forth until the roller itself has a smooth gradient from dark blue to light blue. -
Print the sky base:
Roll this gradient directly onto a fresh sheet of printmaking paper. This forms the atmospheric background. Let this layer dry completely before proceeding to the main figure.
Ink Fixing
If your black silhouette looks patchy or ‘salty’ after printing, the ink was likely too thin. You can carefully touch up the solid black areas with a small brush and black ink after it dries.
Step 3: Printing the Figure
-
Ink the block:
Clean your brayer and squeeze out black block printing ink. Roll it out until it sounds sticky (like velcro), then apply an even layer of black ink to your carved linoleum block. -
Align the paper:
Carefully place your dry, gradient-painted paper face down onto the inked block. Ensure the gradient is oriented correctly, with the darker blue at the top for the night sky. -
Burnish the print:
Using a baren or the back of a wooden spoon, rub the back of the paper in small circles. Apply firm, even pressure, paying special attention to the edges of the silhouette and the fine internal lines. -
The reveal:
Gently peel one corner of the paper up to check coverage. If the black looks solid, slowly peel the entire sheet off the block and set it aside to dry.
Step 4: Starry Details
-
Map the constellations:
Once the black ink is fully dry, lightly sketch the constellation lines (like Aquarius or others) in the sky area using a very light pencil touch. -
Paint the stars:
Dip a fine detail brush into opaque white acrylic paint. Dot the major stars first at the points of your constellation lines, making them slightly larger than the surrounding stars. -
Connect the lines:
With a steady hand and very little paint on the brush, draw thin, straight lines connecting the constellation stars. -
Create the water flow:
Dip the handle end of your paintbrush into the white paint to stamp perfect circles. Create a cascading stream of dots falling from the pitcher, graduating the size from large to small as they fall. -
Add background stars:
Fill the rest of the dark blue sky with tiny white dots for distant stars. I like to cluster them slightly to mimic the Milky Way rather than spacing them perfectly evenly. -
Frame your work:
Once all paint is dry, mount your print behind a white mat board and frame it to give the piece a professional, gallery-ready finish.
Hang your celestial masterpiece where it can catch the light and inspire flowing creativity.


Minimal One-Line Aquarius
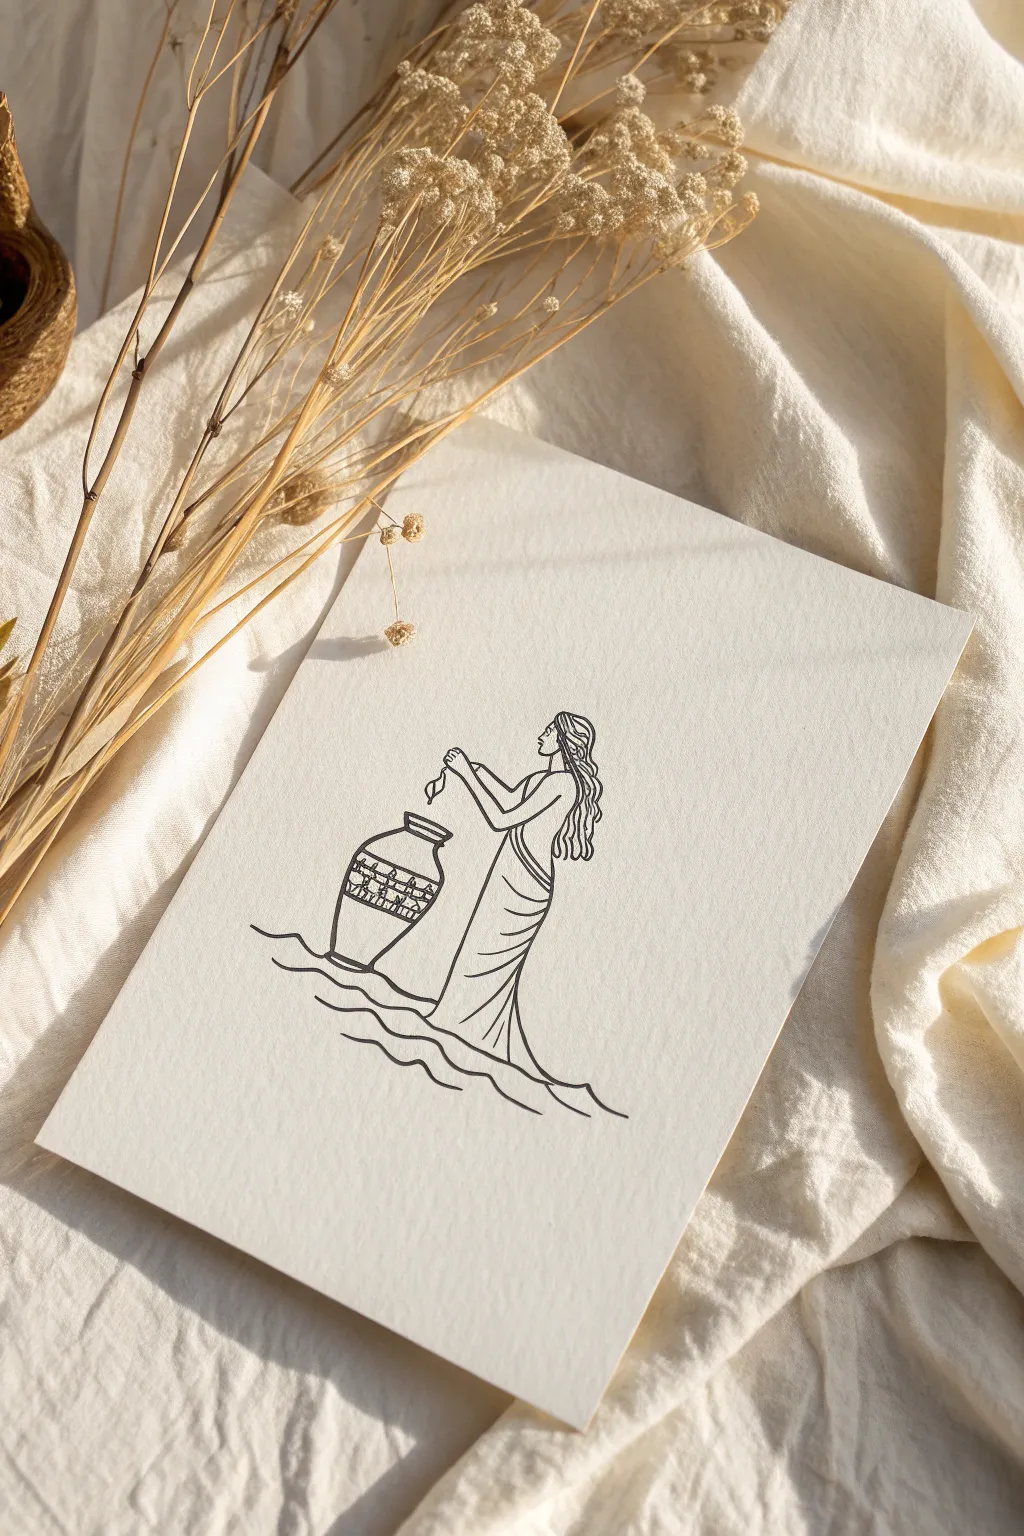
Capture the essence of the Water Bearer with this elegant, minimalist line drawing. This project focuses on clean linework and negative space to create a sophisticated piece of zodiac art perfect for framing.
Step-by-Step Guide
Materials
- High-quality textured paper (e.g., cold press watercolor paper, 300gsm, cream or off-white)
- Fine liner pen (black, 0.3mm or 0.5mm tip)
- Graphite pencil (HB or 2H for sketching)
- Kneadable eraser
- Ruler (optional)
- Reference image of Aquarius/Woman with urn
Step 1: Planning and Sketching
-
Prepare the paper:
Cut your textured paper to your desired size (A5 or 5×7 inches works beautifully for this delicate scale). Place it on a smooth, hard surface to ensure your lines won’t wobble due to uneven texture underneath. -
Establish the horizon:
Lightly sketch a very faint horizontal guide near the bottom third of the paper. This won’t be a straight line in the final art, but it helps position where the water and the figure’s feet will interact. -
Map out the figure’s posture:
Using your pencil, sketch a gentle ‘S’ curve to define the spine of the figure. She should be standing tall but leaning slightly forward as if pouring from a vessel. -
Position the urn:
Sketch an oval shape for the urn’s opening near the figure’s waist level, slightly to the left. Draw the body of the urn angling downwards. It should look heavy and grounded. -
Refine the anatomy:
Lightly draw the arms. Notice how one arm reaches across to support the bottom of the urn, while the other holds the neck. Keep the anatomy simple; we aren’t looking for photorealism, but graceful geometry. -
Sketch the dress folds:
Draw sweeping, curved lines wrapping around the legs. These curves are crucial—they suggest the form of the body underneath the fabric without needing to draw the legs explicitly. -
Detail the hair:
Outline the hair flowing down her back. The lines should be wavy and organic, contrasting with the structured shape of the urn. -
Add pattern details:
Lightly pencil in the horizontal bands on the urn. You can use small triangles or zig-zags to mimic ancient pottery designs.
Uneven Lines?
If your hand shakes, embrace it. Slightly organic, wavering lines often look more artistic than perfectly straight ruler lines in this style.
Step 2: Inking the Final Piece
-
Test your pen:
Before touching the final paper, scribble on a scrap piece of the same paper type. Ensure the ink flows smoothly and isn’t bleeding into the paper fibers. -
Begin with the profile:
Start inking at the forehead or nose. Use a steady, confident hand. I find that holding your breath for just a second during tricky curves helps stabilize the line. -
Ink the hair and back:
Flow from the head down into the hair. Keep these lines long and continuous rather than short and sketchy to maintain that elegant aesthetic. -
Define the arms and urn:
carefully trace your pencil lines for the arms. When you reach the urn, make the lines slightly bolder or slower to emphasize its weight compared to the fabric. -
Draw the dress drapery:
Ink the curved lines of the skirt. Ensure these lines don’t all touch the outlined back; leaving small gaps can make the drawing feel airier and less rigid. -
Add the water ripples:
At the bottom, draw the wavy lines representing water. Let these lines extend horizontally past the figure to ground the composition. Vary the wave height slightly for movement. -
Detail the pottery pattern:
Fill in the geometric patterns on the urn. Use a very light touch here so the decoration doesn’t overpower the main outline of the vase. -
Inking the final pour:
Draw the small shape of water exiting the urn. It should look like a droplet or a small stream connecting the vessel to the ground water.
Step 3: Finishing Touches
-
Let it dry completely:
Wait at least 10 to 15 minutes. Ink can look dry on the surface but still be wet in the paper tooth. Smudging now would be heartbreaking. -
Erase the sketch:
Gently roll your kneadable eraser over the drawing to lift the graphite. Do not scrub hard, as this can damage the texture of the paper. -
Assess line weight:
Look at your drawing from a distance. If any main outlines look too thin, carefully go over them one more time to thicken them, particularly on the shadow side of the figure.
Add a Splash of Color
Dilute a single drop of blue watercolor and tap it lightly onto the water waves or the urn for a subtle, monochromatic pop.
Place your finished artwork in a simple floating frame or display it with dried botanicals to complete the natural aesthetic

PENCIL GUIDE
Understanding Pencil Grades from H to B
From first sketch to finished drawing — learn pencil grades, line control, and shading techniques.
Explore the Full Guide
Ornamental Art Nouveau Aquarius
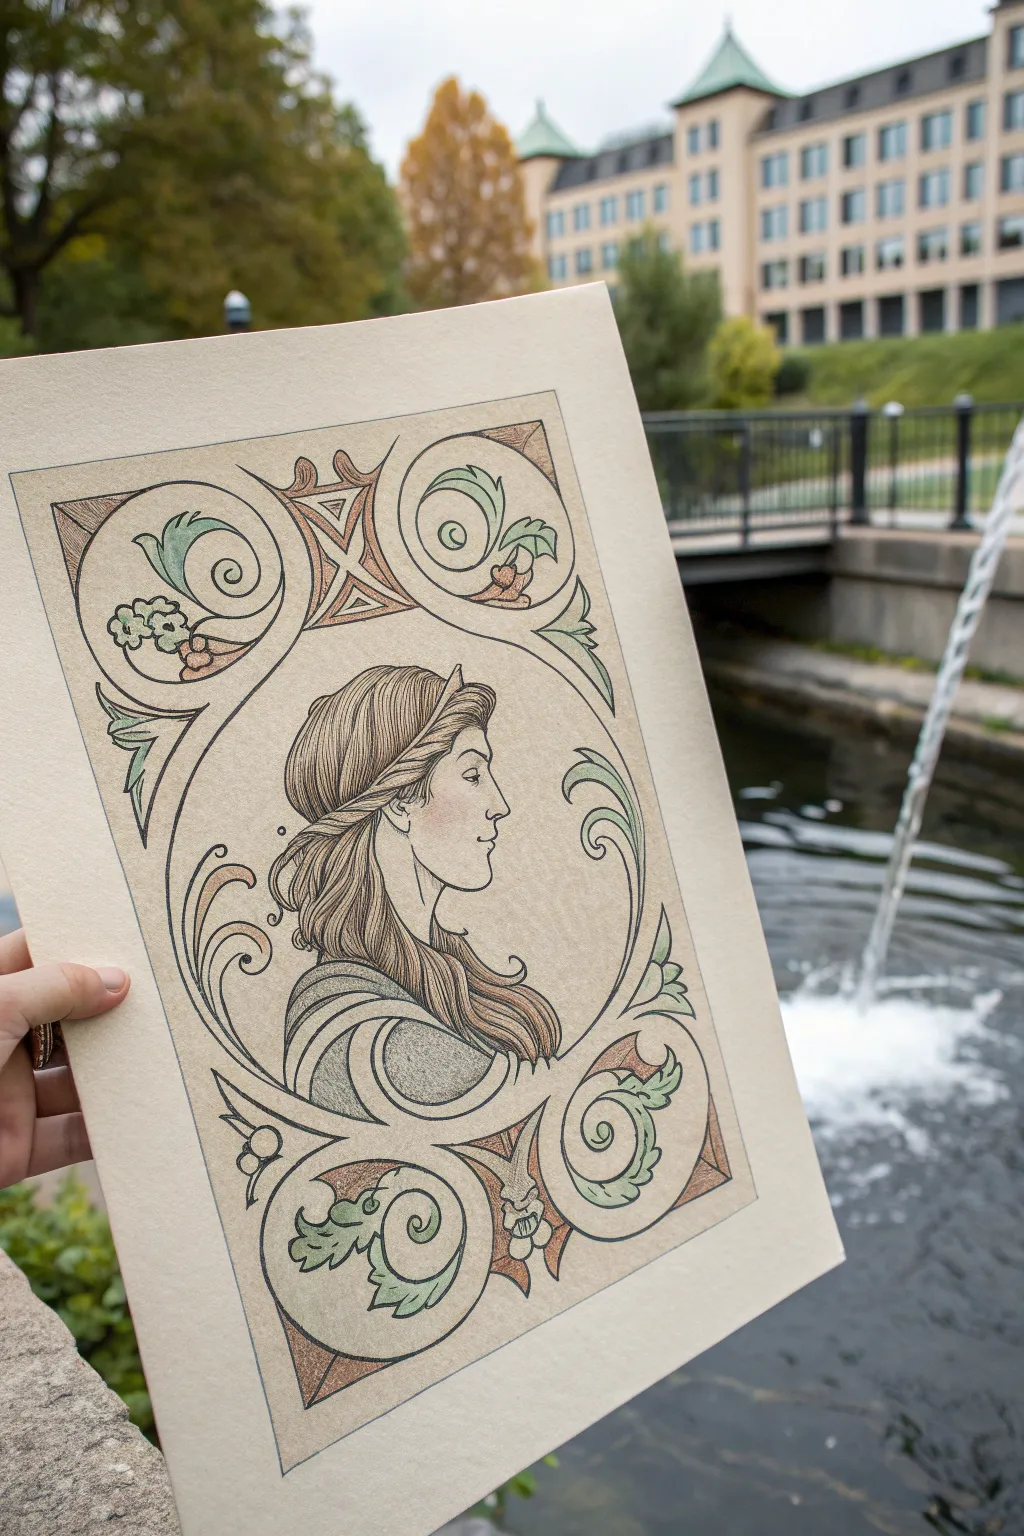
Capture the elegance of the Art Nouveau era with this structured yet flowing portrait design. You’ll combine precise geometric framing with organic floral motifs and a delicate profile drawing in soft, muted tones.
How-To Guide
Materials
- Cream or tan toned mixed-media paper (heavyweight)
- Graphite pencil (HB or 2H)
- Fine liner pens (black, sizes 0.1, 0.3, and 0.5)
- Colored pencils (muted greens, terracotta, brown, peach)
- Ruler
- Compass or circle template
- Eraser (kneaded is best)
Step 1: Setting the Structure
-
Define the borders:
Begin by lightly drawing a large rectangle centered on your paper. Inside this, draw a slightly smaller rectangle to create a border about half an inch wide. This forms the containment for your Art Nouveau design. -
Draw the corner circles:
Using a compass, lightly sketch a large circle in each of the four corners, ensuring they touch the inner border lines. These will house the scrolling leaf motifs later. -
Create the central oval:
Sketch a large oval shape in the center of the rectangle tailored to fit between your corner circles. This negative space is where the portrait will reside. -
Connect the geometry:
Draw connecting lines between the circles, creating triangular spaces at the top, bottom, and sides. Keep these lines light as they are just guides for final inking.
Smooth Operator
To get those perfect Art Nouveau curves, lock your wrist and move your entire arm from the shoulder while drawing long lines.
Step 2: Sketching the Portrait
-
Profile outline:
In the center oval, lightly sketch the profile of a woman facing right. Focus on a classic straight nose and a defined jawline typical of Art Nouveau illustrations. -
Hair flow:
Draw the hair sweeping back from the forehead, tucked loosely, and flowing down over the shoulders. Add a subtle headband or tiara line across the forehead. -
Defining features:
Refine the eye (keep the lid heavy and relaxed), the nostril, and the lips. Add the lines of the neck and the curve of the shoulder. -
Fabric drapes:
Sketch the folds of her garment around the shoulders using sweeping, curved lines that mimic the swirly style of the border.
Smudge Alert
If your hand drags across the paper while inking, place a clean scrap sheet of paper under your drawing hand to protect your work.
Step 3: Adding Ornamental Details
-
Corner swirls:
Inside your four corner circles, draw large, curling spiral shapes, resembling stylized fern fronds or acanthus leaves. -
Leafy accents:
Add small, jagged leaf shapes sprouting from the spirals. Keep the edges crisp and stylized rather than realistic. -
Geometric fillers:
In the triangular gaps between circles, add X-shapes or small diamonds to create a stained-glass effect. -
Side flourishes:
Extend long, slender vine tendrils from the corner circles down the sides of the central oval, framing the portrait further.
Step 4: Inking and Coloring
-
Main outlines:
Go over your pencil lines with a 0.3 or 0.5 black fine liner. Use smooth, confident strokes for the long curves of the border and hair. -
Detail work:
Switch to a 0.1 pen for delicate details like the facial features, individual strands of hair, and the finest veins in the leaves. -
Erase guidelines:
Once the ink is completely dry, gently erase all graphite marks to leave a clean, crisp illustration. -
Color the leaves:
Using a muted green colored pencil, shade the leaf motifs. Apply more pressure at the base of the leaves and fade out towards the tips for a gradient effect. -
Warm accents:
Use a terracotta or rust-colored pencil to fill in the geometric shapes between the circles and minimal accents on the floral buds. -
Skin tones:
Very lightly shade the face with a peach or cream pencil. Add a touch of pink to the cheek and lips for life, keeping it subtle. -
Hair shading:
Color the hair with a medium brown, using stroke lines that follow the direction of the hair growth to enhance the flow.
Now you have a timeless, elegantly framed portrait ready to display or gift
Tattoo-Style Aquarius Flash
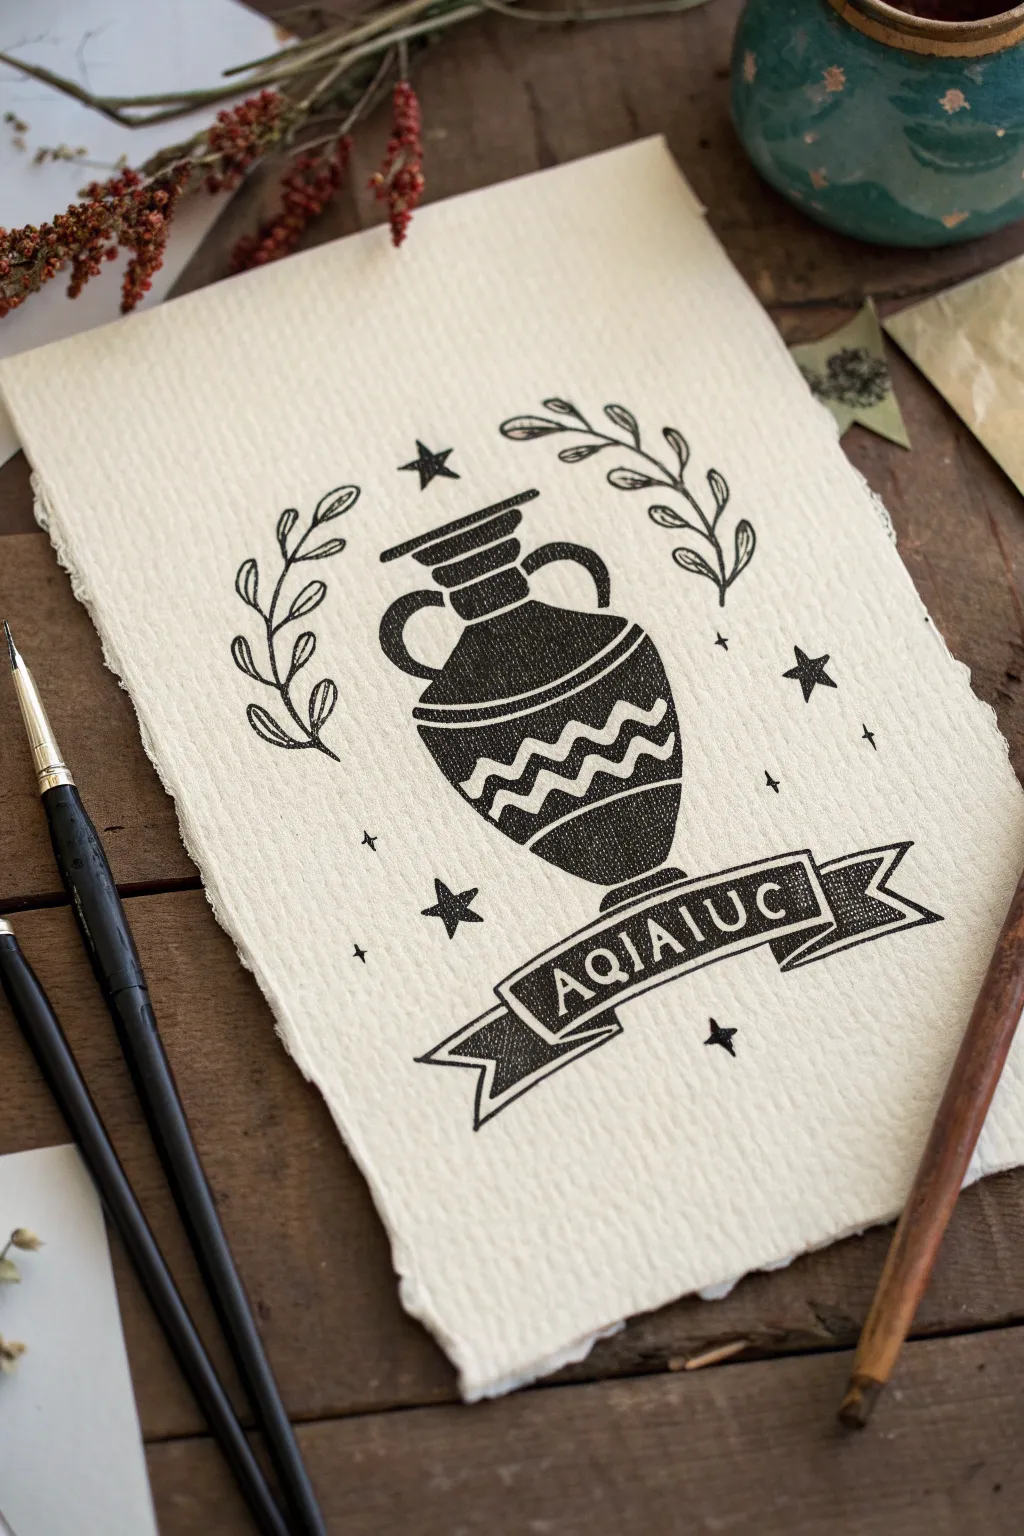
This project captures the essence of the Water Bearer with a classic, tattoo-flash inspired illustration of an amphora. The design features bold black ink work on textured paper, combining distinct linework with solid fills for a striking, timeless aesthetic.
Step-by-Step
Materials
- Heavyweight textured paper (cold press watercolor or rough grain)
- Black India ink or high-quality waterproof drawing ink
- Fine liner pens (sizes 0.1, 0.3, and 0.5)
- Small round paintbrush (size 0 or 1)
- Pencil (HB or 2H)
- Kneaded eraser
- Ruler
Step 1: Planning and Sketching
-
Paper selection:
Begin by selecting a thick paper with visible tooth or raw edges, as this adds to the vintage feel of the art. A rough watercolor paper works perfectly here. -
Center layout:
Using your pencil lightly, mark the vertical center line of your paper to ensure symmetry for the vase. -
Outline the amphora:
Sketch the main body of the water vessel. Start with the wide, rounded shoulder and taper it down to a narrow base. Add a tiered neck at the top. -
Add handles:
Draw two curved handles connecting the neck to the rounded shoulders. Keep them symmetrical, curving outward like ears. -
Sketch the banner:
Beneath the vase, sketch a flowing ribbon or banner. It should curve slightly upward in the middle, with folded ends tucking behind. -
Lettering guide:
Lightly rule guidelines inside the banner to keep your letters even, then sketch in ‘AQUARIUS’ (or your chosen text) in a bold serif font.
Ink Bleeding?
Textured paper can sometimes cause ink to spiderweb. If this happens, apply a thin layer of clear gesso to the paper before inking to seal the fibers.
Step 2: Inking the Forms
-
Main outlines:
Switch to your 0.5 fineliner or a dip pen. go over the main outline of the vase, making the line slightly thicker on the underside of curves to suggest weight. -
Pattern work:
Draw two parallel bands across the belly of the vase. Inside this band, sketch loose, wavy zig-zag lines representing water. Leave space between them for the black fill. -
Laurel branches:
On either side of the vase, draw a curved stem rising upwards. Add simple, leaf-shaped loops along the stems, keeping them open and airy. -
Celestial details:
Scatter a few five-pointed stars around the composition. Mix sizes—one large star above, and smaller ones floating near the sides. -
Filling the blacks:
Using your small round brush and India ink, carefully fill in the main body of the vase. I find it safest to outline the water zig-zags first, then fill around them so the white paper shows through. -
Inking the banner:
Outline the banner ribbon carefully. Fill in the background of the ribbon with black ink, leaving the letters white (negative space). This requires a steady hand.
Level Up: Gold Leaf
Apply liquid gold leaf or metallic gold ink to the zig-zag water lines or the stars. The contrast against the matte black ink looks incredible.
Step 3: refining and Texturing
-
Adding texture:
Once the large black areas are dry, use your finest 0.1 pen to add tiny stippling or hatching marks near the edges of the vase to soften the solid black. -
Leaf details:
Add a single central vein line to some of the leaves on your laurel branches, but don’t overwork them; keep the vegetative elements simple. -
Star touches:
Fill in the stars with solid black. For the tiny dot stars or ‘sparkles,’ just press the tip of your pen down firmly. -
Letter clarity:
Check your white letters inside the black banner. If any lines look wobble, carefully sharpen the black edges around them to square them off. -
Clean up:
Wait until the ink is completely bone-dry. Use your kneaded eraser to gently lift any remaining pencil guidelines. -
Edge treatment:
If your paper allows, gently tear the edges against a ruler to create a deckled, torn-paper look that frames the tattoo style nicely.
Display your celestial artwork in a floating frame to show off those beautiful rough paper edges.
BRUSH GUIDE
The Right Brush for Every Stroke
From clean lines to bold texture — master brush choice, stroke control, and essential techniques.
Explore the Full Guide
Hair That Turns Into Water

This serene illustration captures the essence of Aquarius by merging a calming portrait with the fluidity of water. Using a monochromatic blue palette, you’ll learn to ink flowing hair that transforms effortlessly into stylized ocean waves.
Detailed Instructions
Materials
- Cold press watercolor paper (deckled edge preferred)
- Pencil (HB or H for light sketching)
- Kneaded eraser
- Fine liner pens (Black, 0.1mm and 0.3mm)
- Watercolor paints (Indigo, Prussian Blue, Cerulean Blue)
- White gel pen or white gouache
- Round watercolor brushes (Size 2 and 4)
- Masking tape (optional)
Step 1: Sketching the Foundations
-
Outline the face profile:
Begin by lightly sketching the profile of the face in the center of your paper. Focus on a peaceful expression with a closed eye, a gentle nose slope, and full lips. Keep the neck long and elegant. -
Draft the hair flow:
Instead of drawing individual strands, sketch large, ribbon-like shapes that originate from the scalp. Allow these ribbons to curve and undulate like ocean waves, flowing downwards and outwards. -
Add celestial details:
Sketch a few simple five-pointed stars floating around the hair. Draw a thin, whimsical ribbon that floats above the head, connecting to one of the stars. -
Refine the wave shapes:
Go back over your hair shapes and emphasize the ‘hook’ or curl at the ends of the ribbons to mimic crashing waves. Ensure the composition feels balanced on the page.
Control Your Saturation
Test your blue mixes on a scrap paper first. You want a high contrast between your dark indigo and your pale wash to make the graphic shapes pop.
Step 2: Inking the Design
-
outline the main features:
Using your 0.1mm fine liner, carefully trace your pencil lines. Start with the face profile to establish the anchor of the drawing. -
Ink the hair waves:
Switch to a 0.3mm pen if you want bolder outer lines for the hair. Trace the flowing wave shapes, keeping your hand steady to create smooth, continuous curves. -
Add internal hair details:
Inside the larger hair shapes, draw thinner flowing lines that follow the direction of the wave. These don’t need to be perfectly parallel; organic variation looks more like water. -
Erase pencil guides:
Wait until the ink is completely dry to avoid smudging. Then, gently use a kneaded eraser to lift all graphite marks from the paper.
Fixing Wobbly Lines
If your inked curves aren’t smooth, thicken the line slightly on the outer edge of the curve. Variation in line weight can actually make the piece look more dynamic.
Step 3: Painting the Blues
-
Prepare your palette:
Mix three distinct shades of blue: a deep, dark indigo for shadows; a mid-tone Prussian blue; and a watered-down cerulean for the lightest areas. -
Paint the background wash:
Using a very dilute, pale blue wash, paint a rectangular background behind the head, leaving a rough, organic border. I find it helpful to paint around the stars to keep them white. -
Fill the dark waves:
Apply your deepest indigo to the underside of the hair waves and the areas closest to the neck. This creates depth and separation between the strands. -
Apply mid-tones:
Use the Prussian blue to fill in the alternating sections of hair. The contrast between the dark indigo and this mid-tone will give the hair its structured, graphic look. -
Blend the gradients:
If you want a softer look in certain waves, use a clean, damp brush to drag a little pigment from a dark area into a lighter area before it dries. -
Tone the stars:
Paint the floating stars with a medium blue tone, different enough from the background wash so they stand out.
Step 4: Final Celestial Touches
-
Paint interior patterns:
Once the base blue layers are dry, take your fine brush and the dark indigo paint to add swirls, dots, and crescent moon shapes inside the lighter hair sections. -
Add starlight with white:
Using a white gel pen or opaque white gouache, add tiny clusters of dots to the darkest parts of the hair. This mimics the reflection of stars on water. -
Highlight the waves:
Add thin white lines along the upper curves of the hair waves to suggest glossy highlights or foam. -
Create background sparkle:
Dot a few tiny specks of dark blue or indigo into the pale background wash to integrate the celestial theme. -
Deckle the edges (optional):
If your paper has straight edges, you can carefully tear the edges against a ruler to create the rustic, handmade look shown in the reference.
Allow the entire piece to dry fully before displaying this tranquil water spirit
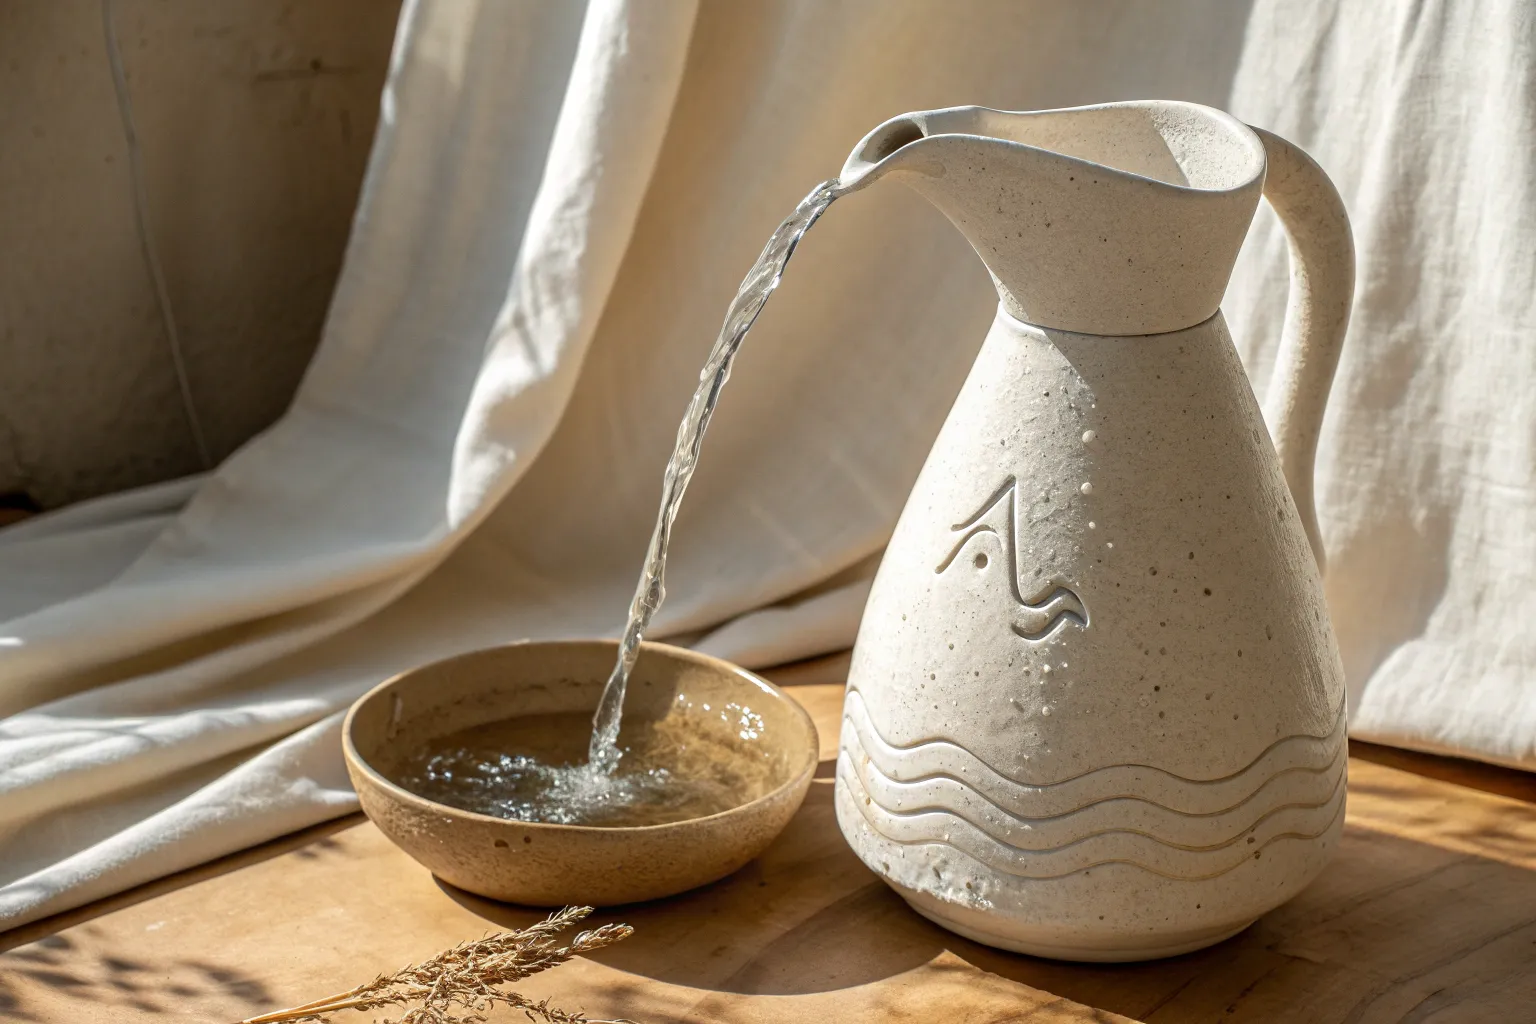
Water Stream Spells Out Aquarius
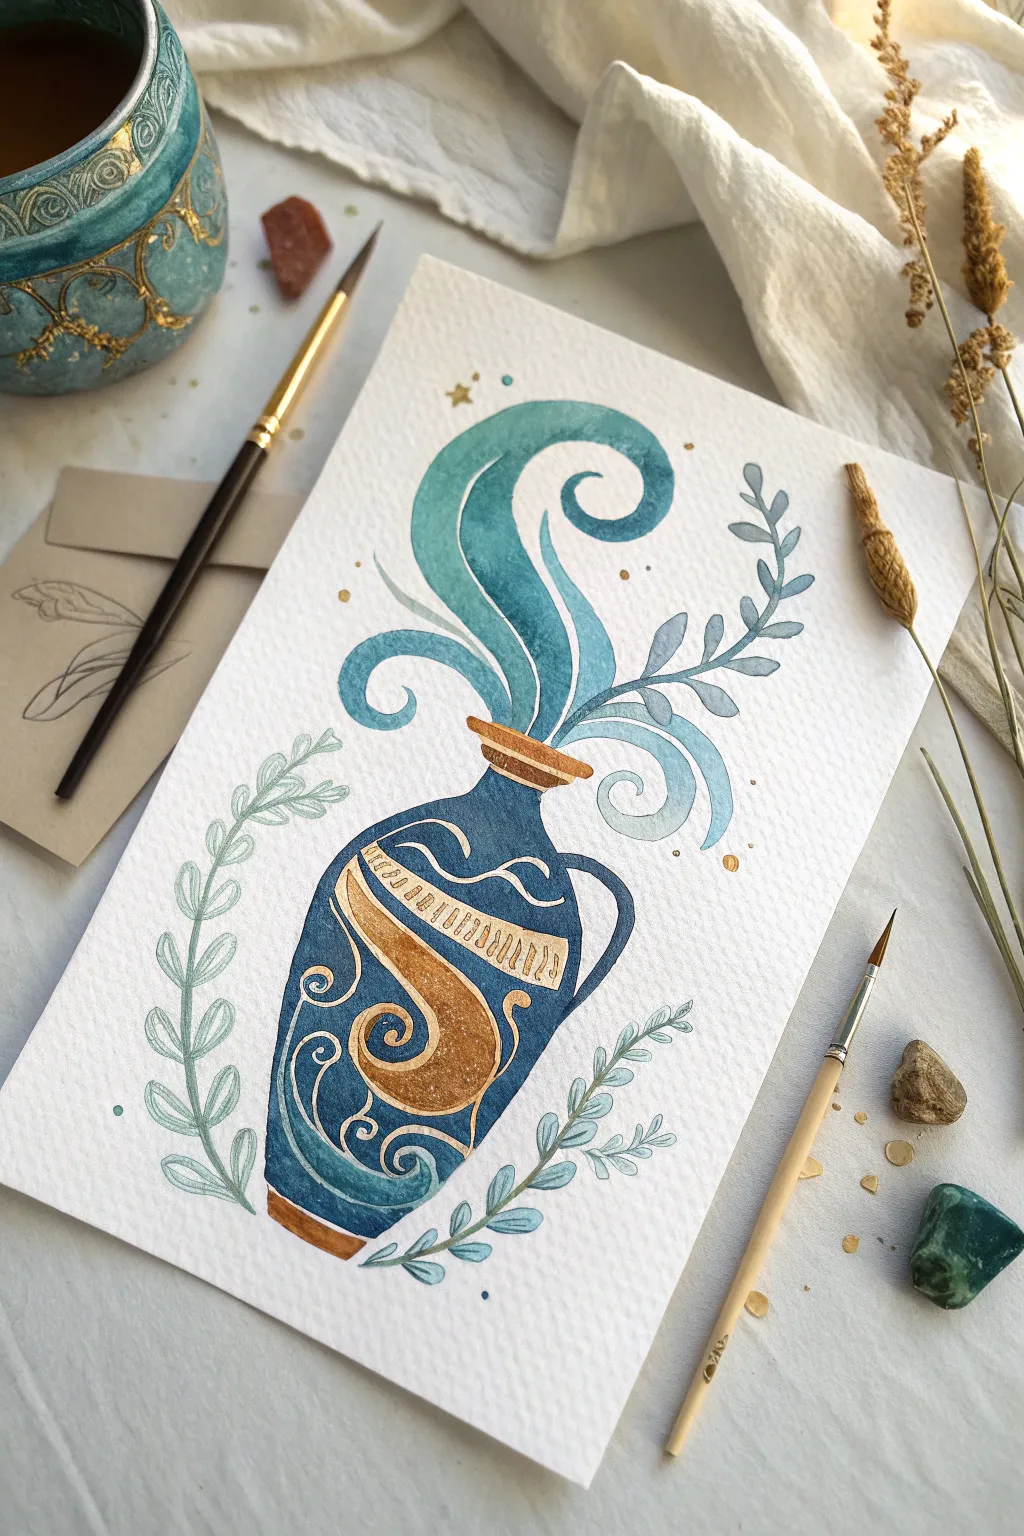
This elegant watercolor painting captures the essence of the Aquarius water-bearer through a stylized Grecian urn overflowing with magical, swirling waters. The composition balances deep, moody blues with sparkling gold accents, making it a sophisticated piece of zodiac art.
Step-by-Step Tutorial
Materials
- Cold press watercolor paper (300 gsm)
- Watercolor paints: Indigo, Prussian Blue, Teal, Turquoise
- Metallic watercolor or gold gouache
- Round brushes (sizes 2, 4, and 0 for details)
- Pencil (HB) and kneaded eraser
- Jar of clean water
- Paper towels
Step 1: Sketching the Composition
-
Outline the urn shape:
Begin by lightly sketching the central urn in the lower half of your paper. Draw a bulbous body that tapers toward the bottom, with a narrow neck and a flared rim. Add a small handle loop on the right side. -
Add decorative bands:
Inside the urn shape, sketch a large, sweeping ‘S’ curve or ribbon shape across the center. Draw curved lines near the neck and base to mark off distinct decorative bands. -
Sketch the flowing water:
Erupting from the urn’s mouth, draw three main plumes of water. Create large, C-shaped swirls that curve upwards and to the left, resembling stylized ocean waves or smoke. -
Place botanical elements:
Frame the urn by sketching simple leafy branches curving upwards on both the left and right sides. Keep these lines loose and organic to contrast with the structured urn.
Step 2: Painting the Blues
-
Wash the urn base:
Mix a deep Indigo blue. Carefully paint the main body of the urn, working around the decorative ‘S’ ribbon and the banded areas. Use a wet-on-dry technique to keep edges crisp. -
Paint the water swirls:
Switch to a Teal or Turquoise shade. Paint the rising water plumes, starting with a saturated color near the urn’s opening and adding more water to your brush as you move up the swirl to create a gradient effect. -
Add leafy details:
Using a diluted mixture of Blue-Grey or a soft Teal, paint the botanical leaves on either side. These should be much paler than the urn to ensure they remain in the background. -
Deepen shadows:
Once the first layer on the urn is dry, use a concentrated Prussian Blue to add shadows along the edges of the vase to give it a rounded, 3D form.
Fixing Wobbly Lines
If your gold fine lines look shaky, switch to a gold gel pen instead of a brush. It offers much more control for beginners.
Step 3: Adding the Gold Accents
-
Fill the ribbon:
Using your gold metallic paint or gouache, fill in the large ‘S’ curve ribbon on the urn’s body. I suggest doing this slowly with a size 2 brush for opaque coverage. -
Paint decorative patterns:
With a fine liner (size 0) brush and gold paint, add delicate hatch marks or ‘ladder’ lines inside the ribbon. Paint the rim of the vase and the bottom base in solid gold. -
Create filigree details:
Using the same fine brush, paint swirling filigree lines and small circles over the dark blue sections of the urn. These light gold lines will pop beautifully against the indigo background. -
Add magical specks:
Dip a stiff brush in gold paint and tap it over the paper to create a subtle splatter of ‘stars’ around the water flow. You can also paint distinct larger dots or small stars manually.
Level Up: Texture
Sprinkle a pinch of salt onto the wet indigo paint of the urn before it dries. This creates a mesmerizing, stone-like texture.
Step 4: Final Touches
-
Define the water:
Mix a slightly darker shade of your teal. Add thin lines along the inner curves of the water swirls to define the flow and separation of the streams. -
Highlight the leaves:
Add a tiny central vein line to some of the blue-grey leaves using a slightly darker version of the same color, keeping it subtle. -
Clean up edges:
Check the silhouette of the urn. If any gold went outside the lines, you can carefully touch it up with the indigo paint once everything is completely dry.
Allow your painting to dry completely before framing your celestial masterpiece


Aquarius Water As Geometric Shapes
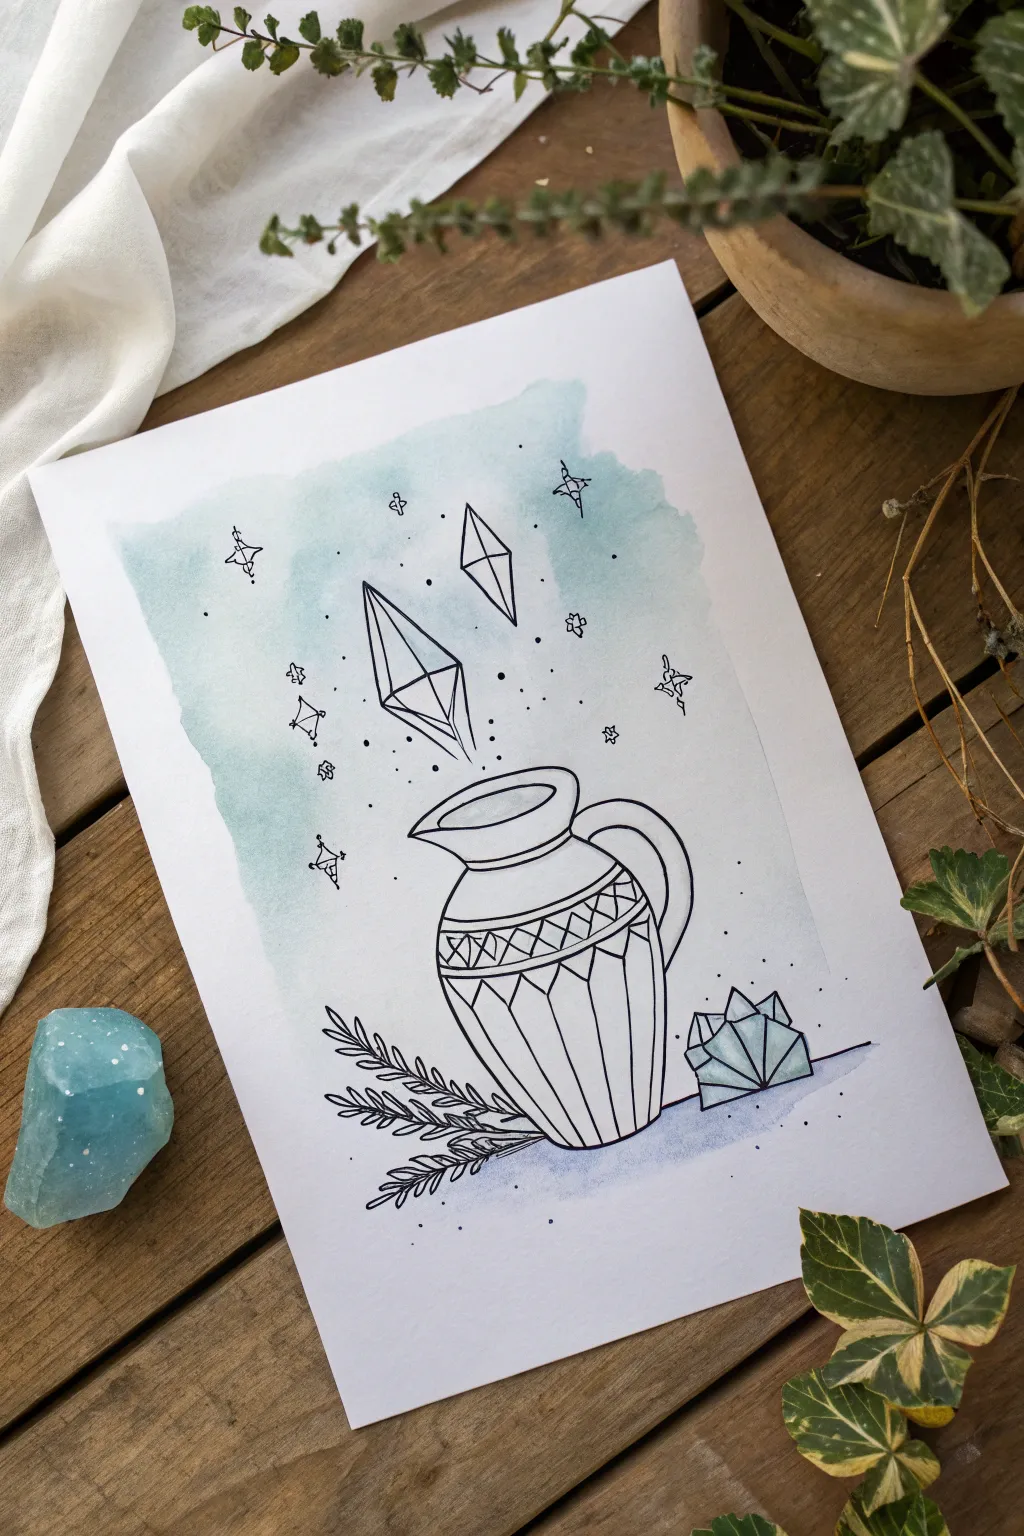
This celestial illustration combines clean ink line work with a soft, ethereal watercolor wash to create a modern interpretation of the Aquarius water bearer. The design swaps traditional flowing water for geometric crystals, giving it a mystical and structured feel.
How-To Guide
Materials
- Cold press watercolor paper (A5 or A4)
- Watercolors (Cerulean Blue, Prussian Blue, or Turquoise)
- Round watercolor brush (size 6 or 8)
- Clean water and paper towels
- Pencil (HB) and eraser
- Fine liner pens (black, sizes 0.3mm and 0.5mm)
- Ruler (optional for straight lines)
Step 1: Creating the Watercolor Background
-
Prepare your mix:
Before touching the paper, mix a watery puddle of your chosen blue paint. You want a very diluted, transparent wash—think of a soft morning sky. -
Lay the initial wash:
Using your round brush, paint a loose, irregular patch of blue in the center of your paper. Keep the edges organic and soft rather than painting a perfect square. -
Add depth:
While the first layer is still wet, drop a slightly more concentrated amount of blue into the top left and bottom right areas. This creates a subtle gradient effect as it dries. -
Let it dry completely:
Patience is key here. Wait until the paper is bone dry and cool to the touch before moving on to sketching. If you start too soon, your pencil lines might groove the paper or your ink might bleed.
Wobbly Lines?
If your hand shakes while inking the long geometric lines, try moving your entire arm from the shoulder rather than just your wrist. It creates smoother strokes.
Step 2: Sketching the Composition
-
Draft the pitcher shape:
Lightly sketch the central water pitcher. Start with an oval for the opening, a curved neck, and a bulbous body that tapers down. Add a curved handle on the right side. -
Add geometric details:
Decorate the pitcher’s neck with a band of zig-zags or diamonds. Detailed vertical lines going down the body of the pot add structure and volume to the vessel. -
Sketch the floating crystals:
Instead of splashing water, draw two or three elongated diamond shapes floating upward from the pitcher’s mouth. Use a ruler if you want perfectly straight edges. -
Ground the object:
At the base of the pitcher, sketch a cluster of jagged crystals on the right and a few simple fern-like botanical sprigs on the left. -
Plan the celestial elements:
Mark out spots for tiny stars, sparkles, and dots around the upper floating crystals to fill the empty space.
Make It Sparkle
After the ink is dry, use a metallic gold or silver gel pen to trace over the stars and the centers of the crystals for a magical, shimmering finish.
Step 3: Inking the Lines
-
Outline the main pitcher:
Switch to your thicker fine liner (0.5mm) to trace the main silhouette of the pitcher. A confident, continuous line looks best for the curves. -
Ink the crystal shapes:
Carefully ink the floating geometric diamonds. I like to double-check my corners are sharp here, as it contrasts nicely with the rounded pot. -
Detail the pitcher patterns:
Use the finer 0.3mm pen for the intricate patterns on the pitcher, like the zig-zag neck band and the vertical stripes. Thinner lines help these details recede slightly so they don’t overpower the outline. -
Ink the botanical elements:
Draw the leaves at the base with simple, singular strokes for the stems and small loops for leaves. Keep this linework fairly loose. -
Add background magic:
Using your finest pen, draw the small four-pointed stars and scatter tiny dots (stippling) around the crystals to suggest magic dust.
Step 4: Final Touches
-
Erase pencil guides:
Once you are absolutely certain the ink is dry (give it a few extra minutes just to be safe), gently erase all visible pencil marks. -
Add subtle shading:
For a little extra dimension, you can add a tiny bit of diluted blue watercolor to the bottom facets of the ground crystals, or use hatched ink lines to shadow the inside of the pitcher’s mouth.
Frame your new celestial artwork or gift it to the favorite Aquarius in your life
Surreal Aquarius Water Portal
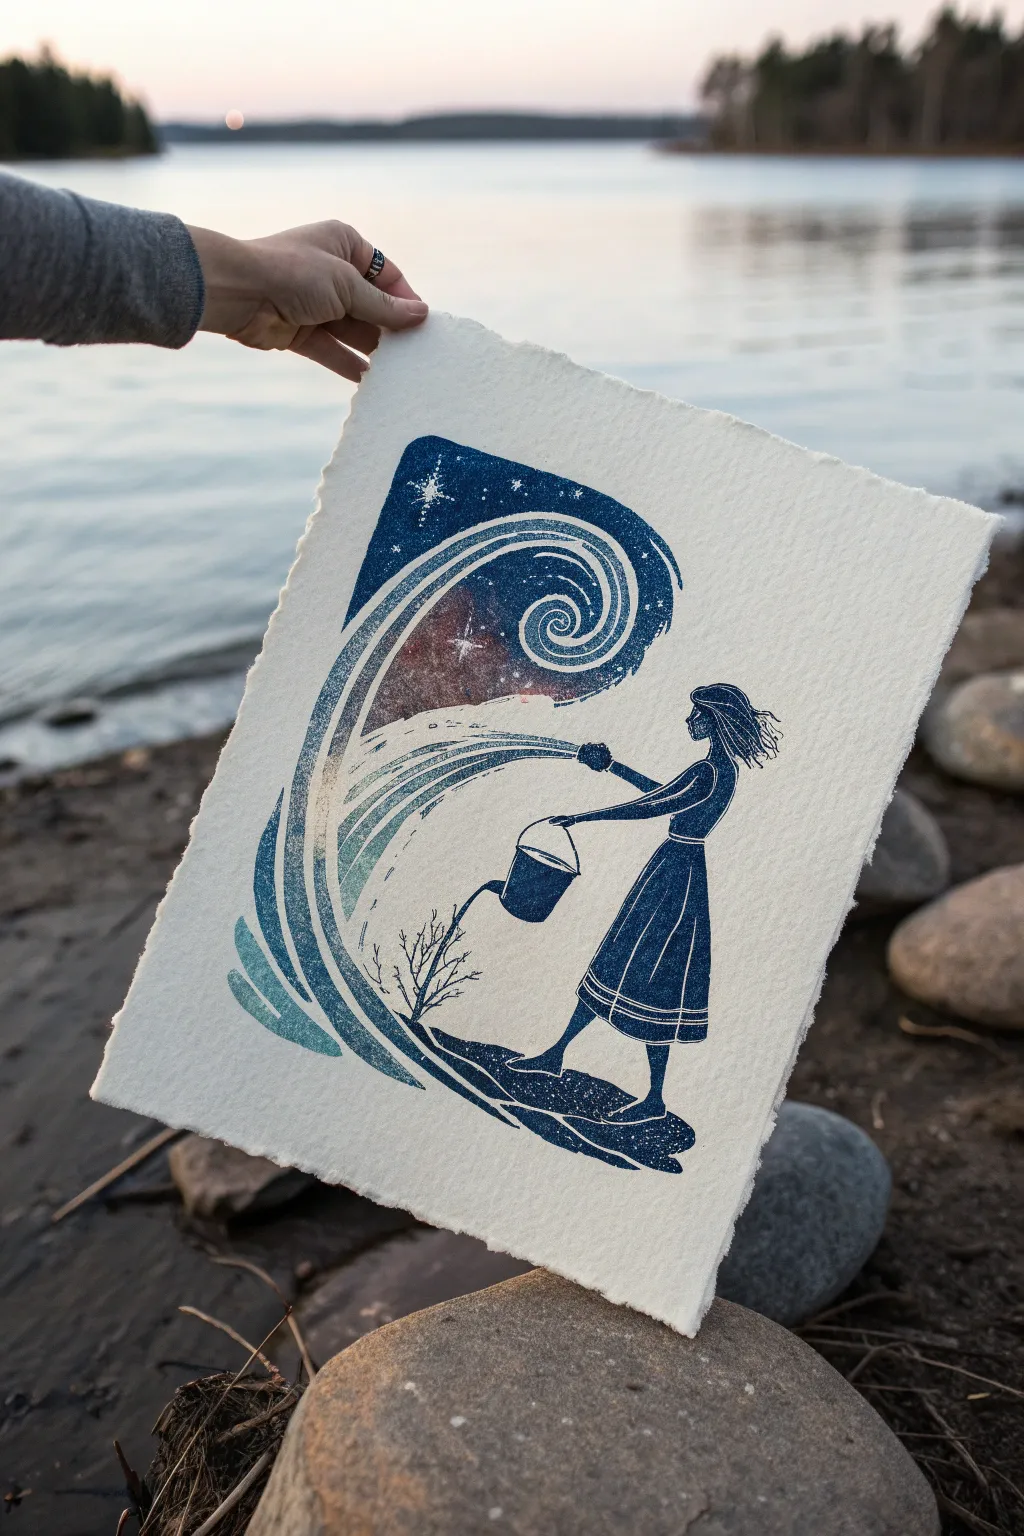
This project transforms the classic Aquarius imagery into a dreamlike linocut print where the water bearer’s vessel pours out a swirling starry galaxy. The finished piece combines deep indigo inks with the rustic charm of deckle-edged paper for a mystical, handmade aesthetic.
Step-by-Step Guide
Materials
- Soft-cut linoleum block (approx 5×7 or A5 size)
- Linoleum carving tools (V-gouge and U-gouge)
- Oil-based relief ink (Prussian Blue or Indigo)
- Block printing paper with deckle edge (heavyweight)
- brayer (rubber roller)
- Tracing paper
- Carbon transfer paper
- Pencil and eraser
- Inking plate or piece of glass
- Baren or wooden spoon (for burnishing)
Step 1: Design & Transfer
-
Sketch your concept:
Start by drawing your design on plain paper first. Sketch a standing female figure in a long dress holding a bucket or vessel. Instead of simple water, draw the liquid flowing out as a large, stylized wave that curves upward into a spiral. -
Add cosmic details:
Within the upper curve of the wave, sketch in small stars—some as simple dots, others as four-pointed glints. This area will become the ‘portal’ aspect of the piece. -
Incorporate negative space:
Plan for the wave to have defined bands of white space. Drawing distinct lines that follow the curve of the water will help give the impression of flow and motion. -
Prepare the transfer:
Trace your final design onto tracing paper. Note that block printing creates a mirror image, so if you want the figure facing right, your carving block needs to show her facing left. Flip your tracing paper over before the next step. -
Transfer to the block:
Place carbon paper on your linoleum block, then tap down your flipped tracing paper. Go over your lines firmly with a pencil to transfer the guide onto the rubber surface.
Step 2: Carving the Block
-
Outline fine details:
Using your smallest V-gouge tool, carefully carve along the outlines of the figure, the dress folds, and the bucket. Remember, you are carving away the parts that will remain white. -
Define the stars:
For the stars in the wave, carve small notches or crosses. Keep the area around them solid so they print as white sparkles against the dark background. -
Carve the water flow:
Switch to a medium gouge to carve the flowing lines of the water. Long, confident strokes work best here to mimic the fluidity of the liquid. -
Clear large areas:
Use a wide U-gouge to clear away the large negative space around the figure and outside the wave portal. I usually leave some texture here to add character, rather than making it perfectly smooth. -
Create the ground texture:
Carve the ground beneath the figure’s feet with horizontal, slightly jagged strokes to suggest earth or rock. -
Add texture to the wave:
For the darker parts of the wave, create a ‘noise’ texture by dabbing the gouge lightly to remove tiny specks, giving it a celestial, galaxy-like appearance.
Patchy Ink Coverage?
If your print looks too salty or speckled, your paper might be too textured. Try dampening the paper slightly with a misting bottle before printing to help it grab the ink better.
Step 3: Inking & Printing
-
Prepare your ink:
Squeeze a small amount of indigo or Prussian blue ink onto your inking plate. Roll your brayer back and forth and lift it frequently until the ink has a velvety texture and a consistent ‘hissing’ sound. -
Ink the block:
Roll the ink onto your carved block in thin layers. Apply it horizontally, then vertically, ensuring even coverage on all raised surfaces without flooding the fine carved lines. -
Position the paper:
Carefully align your deckle-edged paper over the inked block. Once the paper touches the ink, do not shift it or the image will smudge. -
Burnish the print:
Using a baren or the back of a wooden spoon, rub the back of the paper in circular motions. Apply firm, even pressure, paying special attention to the edges and the detailed figure area. -
Check the transfer:
Carefully lift one corner of the paper while holding the rest down to peek at the ink transfer. If it looks patchy, lay it back down and burnish that specific spot some more. -
The reveal:
Slowly peel the paper entirely off the block to reveal your print. Set it aside in a safe, flat place to dry, which can take a few days for oil-based inks.
Add a Gradient
Create an ‘ombre’ galaxy effect by putting dark blue and purple ink side-by-side on your roller. As you roll onto the block, the colors will blend for a true cosmic feel.
Enjoy the meditative process of carving and the unique character each hand-pressed print reveals


Have a question or want to share your own experience? I'd love to hear from you in the comments below!