If you’ve been craving a fresh wall moment without committing to a full mural, painted arches are my favorite shortcut to instant style. I love how an arch can frame a spot, fake a little architecture, and make your space feel intentionally designed.
Classic Solid Arch Backdrop
Transform a plain alcove or flat wall into a stunning focal point with this Mediterranean-inspired painted arch. Using a rich, earthy terracotta tone and a textured application technique, you will achieve that authentic, old-world plaster look without major renovations.
Step-by-Step
Materials
- Terracotta or rust-colored matte wall paint (e.g., ‘Burnt Sienna’ or ‘Spiced Pumpkin’)
- White or off-white matte wall paint for the border
- Pencil
- String and push pin (or tape measure)
- Painter’s tape (high-quality)
- Small angled sash brush (1.5 – 2 inch)
- Medium paint roller with a textured nap (3/8 or 1/2 inch)
- Sea sponge or large stipple brush
- Drop cloths
- Sanding block (medium grit)
Step 1: Planning and Preparation
-
Measure the space:
Begin by measuring the width of your wall or existing niche. Locate the exact center point and mark it lightly with a pencil at the height where you want the arch’s curve to begin. -
Draw the arch curve:
To get a perfect semi-circle, tie a string to a pencil. Pin the other end of the string to your center mark. Adjust the string length to half the width of your niche, then swing the pencil upward to draw your curved guideline. -
Define the vertical lines:
Use a level or a plumb line to draw straight vertical lines down from the ends of your arch curve to the floor (or baseboard). This creates the full outline of your arch shape. -
Tape the edges:
Carefully apply painter’s tape along the outside of your pencil lines. For the curved top, use small, overlapping pieces of tape or specialized flexible masking tape to maintain a smooth radius. -
Protect the area:
Lay down your drop cloths to protect the flooring. If your niche has a ledge or if you are painting near trim, ensure those areas are thoroughly taped off as well.
Bleeding Lines?
If paint bleeds under the tape, let it dry fully. Then, place new tape over the colored area and lightly seal the edge with the original wall color before repainting.
Step 2: Painting the Base Layer
-
Cut in the edges:
Dip your angled sash brush into the terracotta paint. Carefully paint along the inside edge of your tape line, creating a border about 2 to 3 inches wide. This ensures a crisp edge where the roller can’t reach. -
Roll the first coat:
Pour your paint into a tray and load up the roller. Apply the first coat to the main body of the arch. Don’t worry about perfect opacity yet; just aim for even coverage. -
Let it dry:
Allow this initial coat to dry completely according to the manufacturer’s instructions. This usually takes about 2 to 4 hours. -
Apply the second coat:
Once dry, apply a second coat with your roller. This layer should provide the deep, saturated color seen in the photo.
Step 3: Adding Texture and Detail
-
Preparing for texture:
While the second coat is still slightly tacky (or apply a fresh thin third coat working in sections), you will add the rustic texture. This mimics the look of lime wash or plaster. -
Stippling technique:
Take a damp sea sponge or a stipple brush and lightly dab it over the wet paint. I find that rotating my wrist slightly with each dab prevents a repetitive pattern. -
Focus on the edges:
Pay special attention to the inner corners and edges of the niche. Dabbing texture here helps soften the transition and enhances the depth of the alcove. -
Optional: Dry brushing:
For extra dimension, dip a dry brush into a tiny amount of lighter paint (or your wall color mixed with the terracotta). Offload most of the paint on a paper towel, then lightly whisk it over the dried textured surface to highlight the peaks. -
Remove tape:
Ideally, peel off the painter’s tape while the final coat is still slightly damp. Pull the tape away from the fresh paint at a 45-degree angle to ensure a razor-sharp line. -
Touch up:
Inspect the edges for any bleed-through. If found, use a small artist’s brush and your original white wall color to correct any imperfections.
Faux Plaster Effect
Mix 1 part baking soda to 4 parts paint for a gritty, plaster-like texture. It adds incredible depth and authenticity to the Tuscan vibe.
Step back and admire how this simple painted feature brings warmth and architectural character to your room.


Two-Tone Subtle Arch
This project transforms a plain wall into a Mediterranean-inspired focal point using concentric painted arches and color blocking. The soft, limewash-style texture creates depth and warmth, perfect for framing a workspace or cozy nook.
Step-by-Step Guide
Materials
- Terracotta or warm ochre latex paint (matte finish)
- Light cream or beige latex paint (matte finish)
- White wall paint (for negative space)
- Painter’s tape (high quality)
- Pencil
- String
- Thumbtack or small nail
- Level
- Measuring tape
- Angled sash brush (2-inch)
- Paint roller and tray
- Glaze medium or water (for texture)
- Rags or sponge (drawing texture)
Step 1: Measuring & Mapping
-
Determine the Center:
Find the center point of where you want your arch to be on the wall. Measure the width of your desk to ensure the arch frames it perfectly, leaving equal space on both sides. -
Set the Pivot Point:
Decide on the height of your arch’s curved top. Mark a center point with a pencil at the height where the straight vertical lines stop and the curve begins. Place a thumbtack or small nail securely at this precise spot. -
Create the Compass:
Tie a piece of non-stretchy string to the nail. Tie a pencil to the other end. Adjust the length so the pencil reaches the desired outer edge of the largest arch. -
Draw the Outer Arch:
Keeping the string taut, draw a large semi-circle on the wall. This will be the top edge of your terracotta band. -
Draw the Inner Bands:
Shorten the string by about 4-5 inches to draw the bottom edge of the terracotta band. Shorten it again by another 2-3 inches for the top of the inner beige arch. Finally, shorten it slightly to define the inner fill zone if you want a border, though in this design, the inner section is solid. -
Extend Verticals:
Use a long level to draw straight vertical lines down from the ends of your semi-circles to the floor (or baseboard). This connects the arch to the ground.
Bleeding Lines?
If paint seeps under the tape, wait for it to dry completely. Then, use a small angled brush and the base wall color to carefully ‘erase’ the mistake by painting over it.
Step 2: Painting the Outer Band
-
Tape the Edges:
Carefully apply painter’s tape along the pencil lines for the outer terracotta band. Press the edges of the tape down firmly to prevent bleeding. -
Seal the Tape:
Paint a very thin layer of your existing wall color (white) over the edge of the tape. This seals the tape so any seepage is invisible, ensuring a crisp line later. -
Mix the Texture:
To achieve the plaster-like look seen in the photo, mix your terracotta paint with a small amount of glaze or water. This makes it slightly translucent. -
Paint the Top Arch:
Apply the terracotta paint within the taped curved area. Use a brush to apply it in cross-hatch (X-shaped) strokes rather than straight lines to create that subtle, clouded texture. -
Add the Corner Detail:
For the angular section near the floor, mark a diagonal line starting about 2 feet up the left vertical line down to the floor. Tape off this area and paint it with the same textured terracotta technique.
Pro Tip: Faux Plaster
For more texture, mix a spoonful of baking soda into your paint cup. It creates a gritty, authentic plaster feel that adds incredible depth to the arch.
Step 3: Painting the Inner Sanctuary
-
Tape the Inner Arch:
Once the outer band is dry to the touch, tape off the boundary for the large inner arch. Leave a gap of white wall space between the terracotta band and this new section as shown in the image. -
Apply the Base Coat:
Roll or brush on your solid beige or cream color for the large central arch area. It doesn’t need to be perfect yet. -
Build Texture:
While the paint is still wet, I like to go back in with a dry brush or a rag. Dab and swirl gently to lift small amounts of paint and create a mottled, suede-like effect. -
Layering Up:
If the color is too sheer, let it dry and apply a second coat using the same cross-hatch or dabbing motion to maintain the depth. -
Remove Tape:
Slowly peel off the painter’s tape while the paint is still slightly tacky—pulling at a 45-degree angle away from the painted area gives the cleanest edge. -
Touch Ups:
Use a small artist’s brush to fix any tiny imperfections or bleeds with your original white wall paint.
Step back and admire how this simple architectural illusion adds instant warmth and structure to your room.


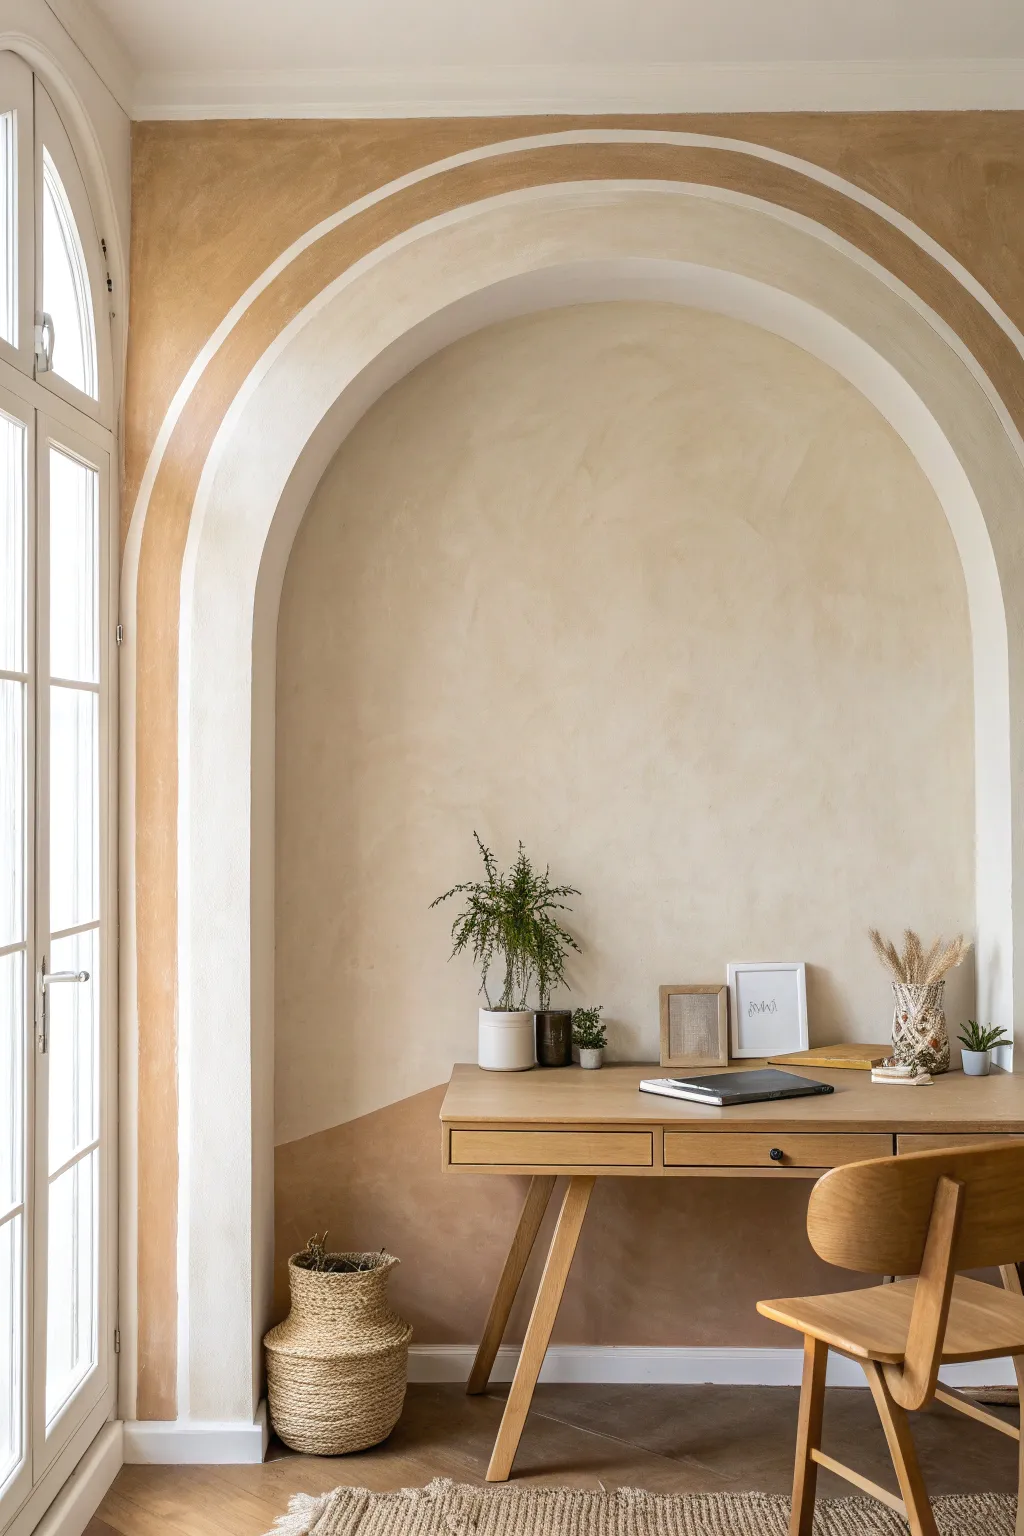
Desk Zone Arch for a Home Workspace
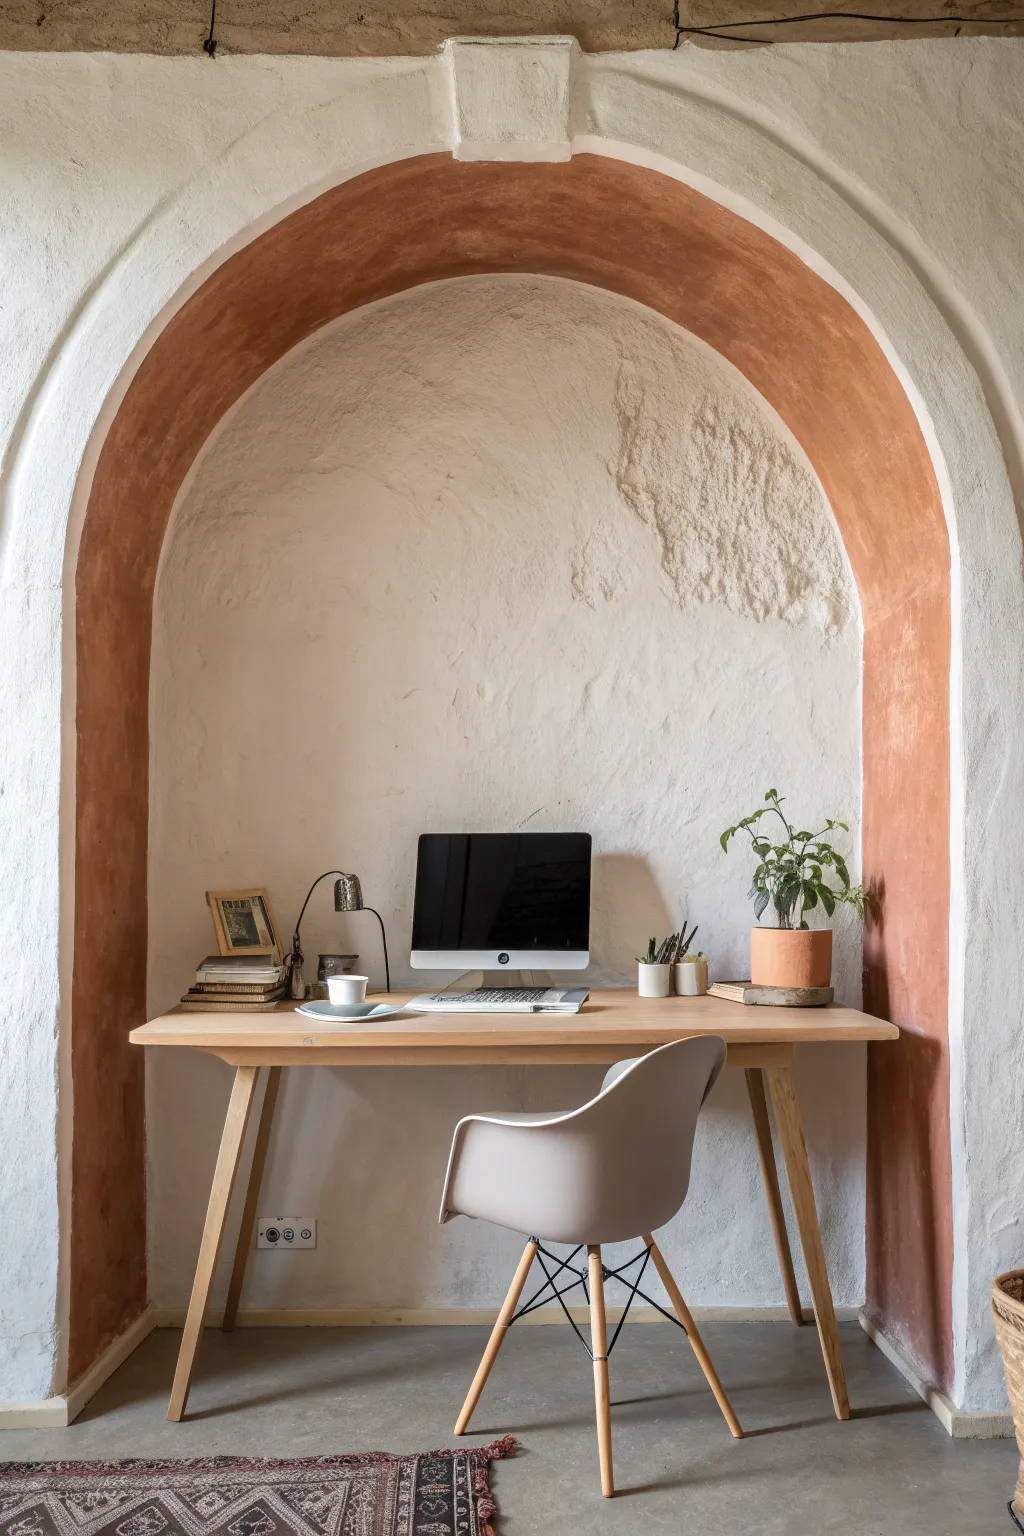
Transform a simple architectural niche into a striking focal point by painting just the inner curve in a warm, earthy tone. This technique, emphasizing the depth and texture of the archway while keeping the face clean, adds instant Mediterranean character to your workspace.
How-To Guide
Materials
- Matte latex paint (terracotta or rust orange)
- Painter’s tape (high adhesion for rough surfaces)
- Small angled sash brush (1.5 to 2 inch)
- Mini foam roller and tray
- Damp clean cloth
- Spackle (optional, for repairs)
- Fine-grit sandpaper
- Drop cloth
Step 1: Preparation & Masking
-
Clean the surface:
Before putting any tape down, wipe the entire inner surface of the arch with a damp cloth to remove plaster dust or oils. This ensures your tape sticks and paint adheres properly. -
Inspect the plaster:
Check the archway for any significant chips or holes. While the rough organic texture is part of the charm, fill any structural cracks with spackle and sand smooth once dry. -
Tape the front edge:
Carefully apply painter’s tape along the front-facing edge of the wall where it meets the arch. Press the edge of the tape down firmly with your fingertip to seal it tight against the texture. -
Tape the back edge:
Repeat the taping process on the back edge where the arch depth meets the back wall. This creates a contained ‘strip’ for your color. -
Seal the tape edges:
To prevent bleeding on textured walls, I like to run a very thin layer of your existing white wall paint over the tape edges first. This seals any tiny gaps before the color goes on.
Bleeding Lines?
Textured plaster often causes tape bleed. If lines aren’t crisp, use a tiny artist brush with the white wall color to ‘eraser’ mistakes after the color dries.
Step 2: Painting the Reveal
-
Cut in the edges:
Dip your angled sash brush into the terracotta paint. Carefully paint along the tape lines on both the front and back edges of the arch depth. -
Work in sections:
Don’t try to outline the whole arch at once. Work in 2-foot sections, cutting in the edges and then filling the center, to maintain a wet edge. -
Fill the middle:
Use your mini foam roller to fill in the space between your brush strokes. The roller helps get paint into the subtle undulations of the plaster without leaving brush marks. -
Check for holidays:
Inspect the surface from different angles. Texture walls often have tiny pits (holidays) that catch shadows; dab these spots with the tip of your brush to ensure full coverage. -
Allow to dry:
Let the first coat dry completely according to the manufacturer’s instructions, typically about 2-4 hours. -
Apply the second coat:
Repeat the cutting and rolling process for a second coat to achieve a rich, opaque color.
Step 3: Finishing Touches
-
Remove tape while damp:
Once the final coat is tacky but not fully cured (usually about an hour after painting), slowly peel off the painter’s tape at a 45-degree angle. -
Touch up the lines:
If the rough texture caused any bleed-through, use a small artist’s brush and your original white wall paint to carefully clean up the line. -
Define the keystone:
If your arch has a keystone detail at the top like the one shown, use your small brush to paint carefully around its edges, ensuring the color hugs the shape without painting the face of the stone itself. -
Final cure:
Allow the paint to fully cure for at least 24 hours before moving furniture or shelves back into the niche to avoid scuffing your new work.
Keystone Detail
For the keystone (the center top block), stop the color exactly at the crease where the block protrudes. This highlights the architectural relief.
Now enjoy the visual warmth this architectural detail brings to your daily work routine


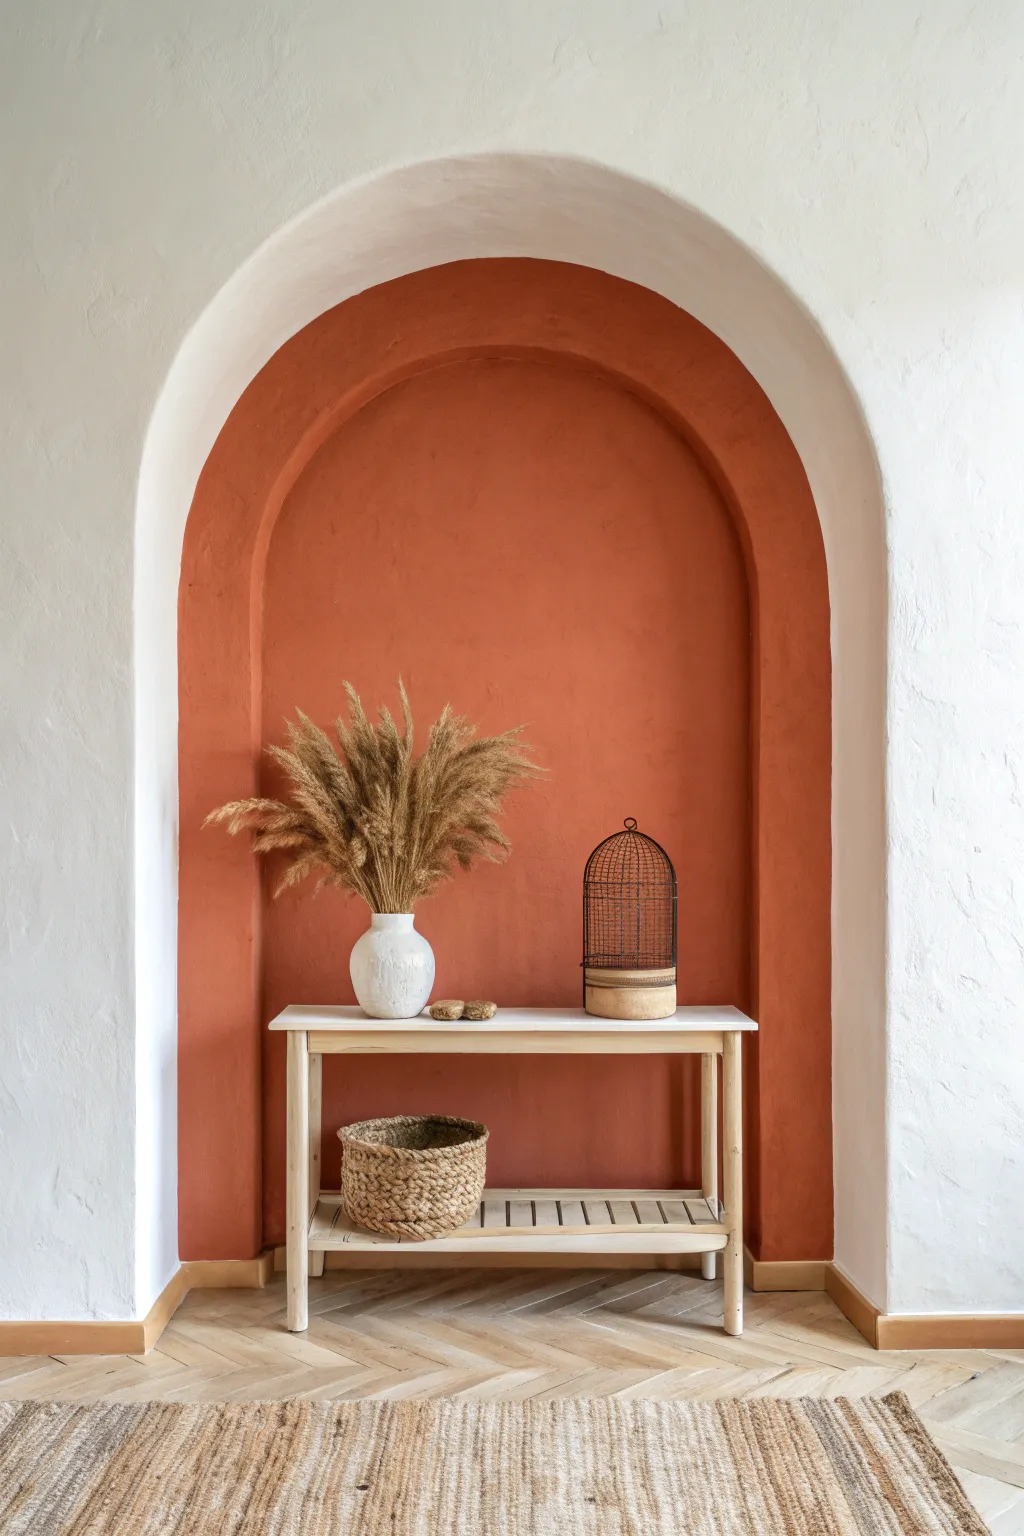
Dining Nook Framing Arch
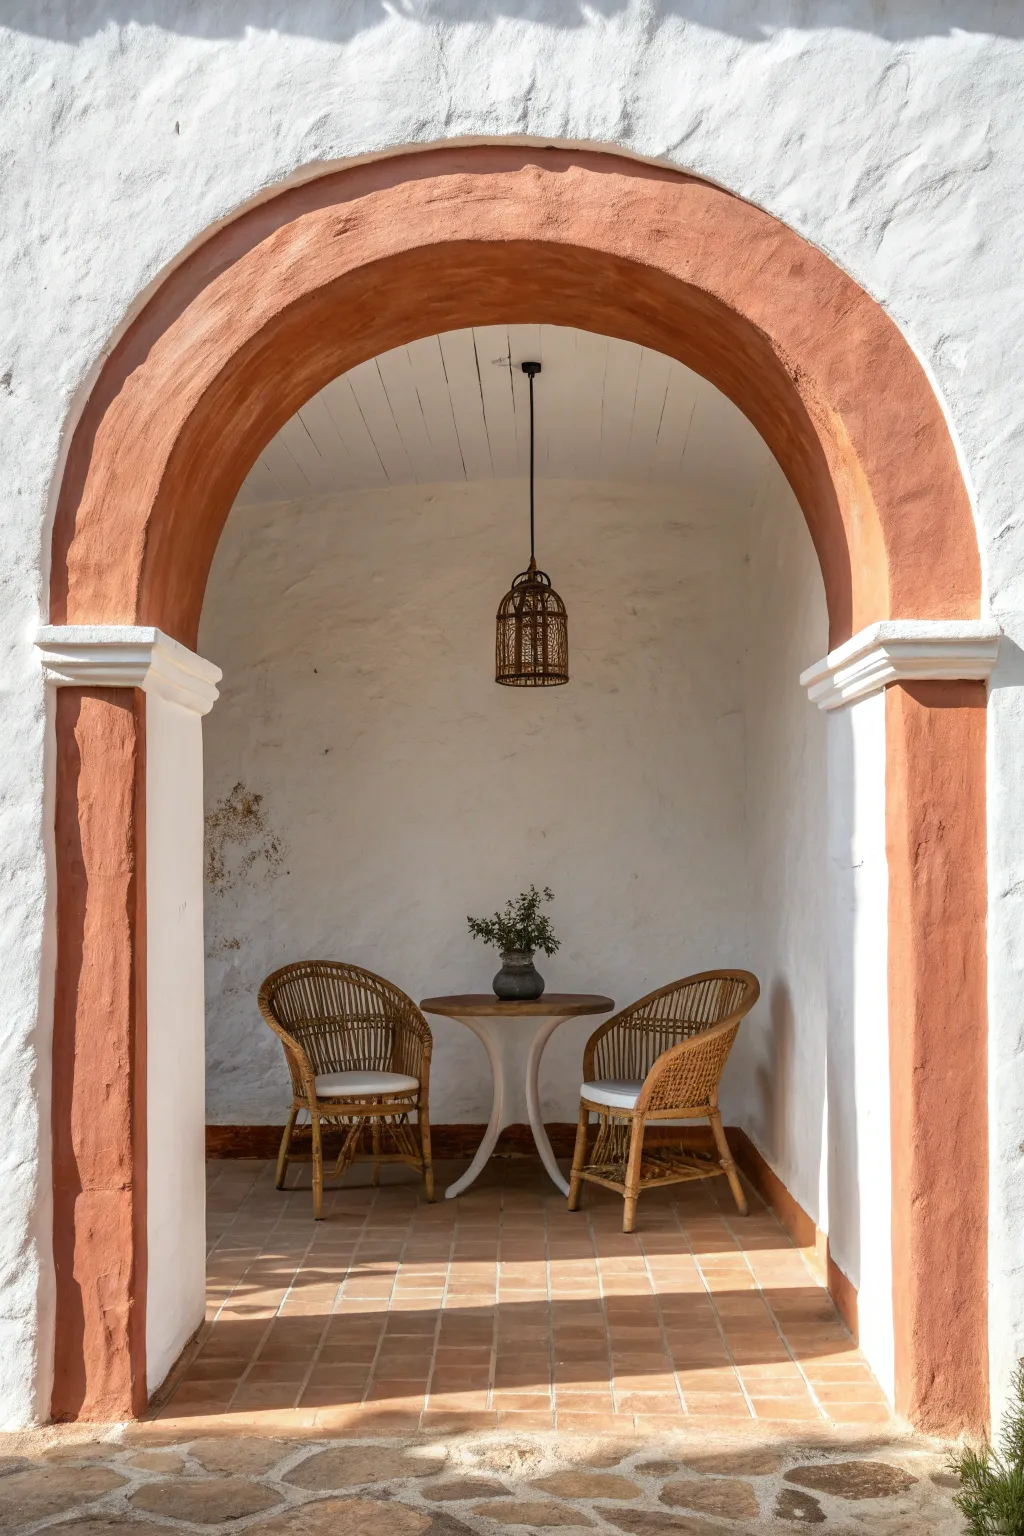
Transform a plain doorway or alcove into a stunning architectural feature with this faux-stone painting technique. This project mimics the warmth of Mediterranean clay and frames your dining nook with a rich, textured border that feels instantly inviting.
Step-by-Step Tutorial
Materials
- High-quality painter’s tape (1.5 or 2 inch width)
- Drop cloth
- Terracotta-colored latex paint (exterior grade if outdoors)
- White latex paint (for base/touch-ups)
- 2.5-inch angled sash brush
- 4-inch foam roller
- Medium-grit sanding sponge
- Damp rag
- Pencil
- String and thumb tack (optional, for measuring curves)
- Plaster or stucco patch (if adding texture)
Step 1: Preparation & Layout
-
Clean the surface:
Begin by thoroughly cleaning the archway surface. Remove any dust, cobwebs, or loose paint with a stiff brush and a damp rag to ensure proper adhesion. -
Define the boundaries:
Decide exactly where your terracotta band will start and stop. This project highlights the face of the arch and the inner jambs, but stops at the white stucco wall. -
Tape the edges:
Apply painter’s tape precisely along the outer edge where the arch meets the flat wall. Press the tape edge down firmly with a putty knife or fingernail to prevent bleed-through. -
Address the molding:
If your arch has decorative molding capitals like the example, tape carefully around their complex curves. I find using small pieces of torn tape helps navigate these tight corners better than long strips.
Step 2: Creating the Texture
-
Assess the surface:
The charm of this look lies in the rustic, uneven texture. If your current arch is perfectly smooth drywall, you may want to add character before painting. -
Apply texture (optional):
Dab a little stucco patch or joint compound onto the arch face using a sponge or crumpled rag. Don’t smooth it out; you want those peaks and valleys to catch the light. -
Dry and prime:
Allow any added texture to dry completely. If you applied patches, prime those specific spots so the final paint color absorbs evenly.
Pro Tip: Custom Colors
Don’t settle for a flat orange. Mix a tiny drop of dark brown or charcoal into your terracotta paint to dirty it up slightly; this grounds the color and makes it look like natural clay.
Step 3: Painting the Arch
-
Cut in the edges:
Dip your angled sash brush into the terracotta paint. carefully cut in along the tape lines and tight corners around the molding. -
Roll the broad areas:
Use the 4-inch foam roller to fill in the larger flat surfaces of the arch face and the inner jambs. The foam roller helps push paint into the textured crevices without leaving heavy brush marks. -
Check for holidays:
Inspect the surface for ‘holidays’—missed spots where the white shows through the texture. Use your brush to stipple paint into deep pores or cracks. -
Apply the second coat:
Once the first coat is dry to the touch (usually 2-4 hours), apply a second coat for rich, opaque color depth. This particular terracotta shade looks best when fully saturated.
Troubleshooting: Bleed Through
If paint bleeds under the tape onto the textured wall, don’t wipe it! Let it dry fully, then gently scrape the excess off with a craft knife or touch up with the original wall color.
Step 4: Finishing Touches
-
Weathering the look:
For that authentic aged appearance, dip a nearly dry brush into a slightly lighter peach or watered-down white paint. Lightly drag it over the highest points of the texture. -
Remove tape:
Ideally, peel off the painter’s tape while the final coat is still slightly tacky. Pull the tape away from the wet paint at a 45-degree angle to ensure a crisp line. -
Touch up the white:
Inspect the white molding capitals. If any terracotta paint bled onto them, use a small artist’s brush and white paint to clean up the transition points. -
Final clean up:
Step back and check the symmetry. If the outer edge feels too rough against the stucco, you can soften it by lightly dabbing the edge with a damp decorative sponge.
Now that your framed arch is complete, you have a beautiful focal point that adds warmth and dimension to your space
BRUSH GUIDE
The Right Brush for Every Stroke
From clean lines to bold texture — master brush choice, stroke control, and essential techniques.
Explore the Full Guide
Bedhead Arch Behind the Pillow Line
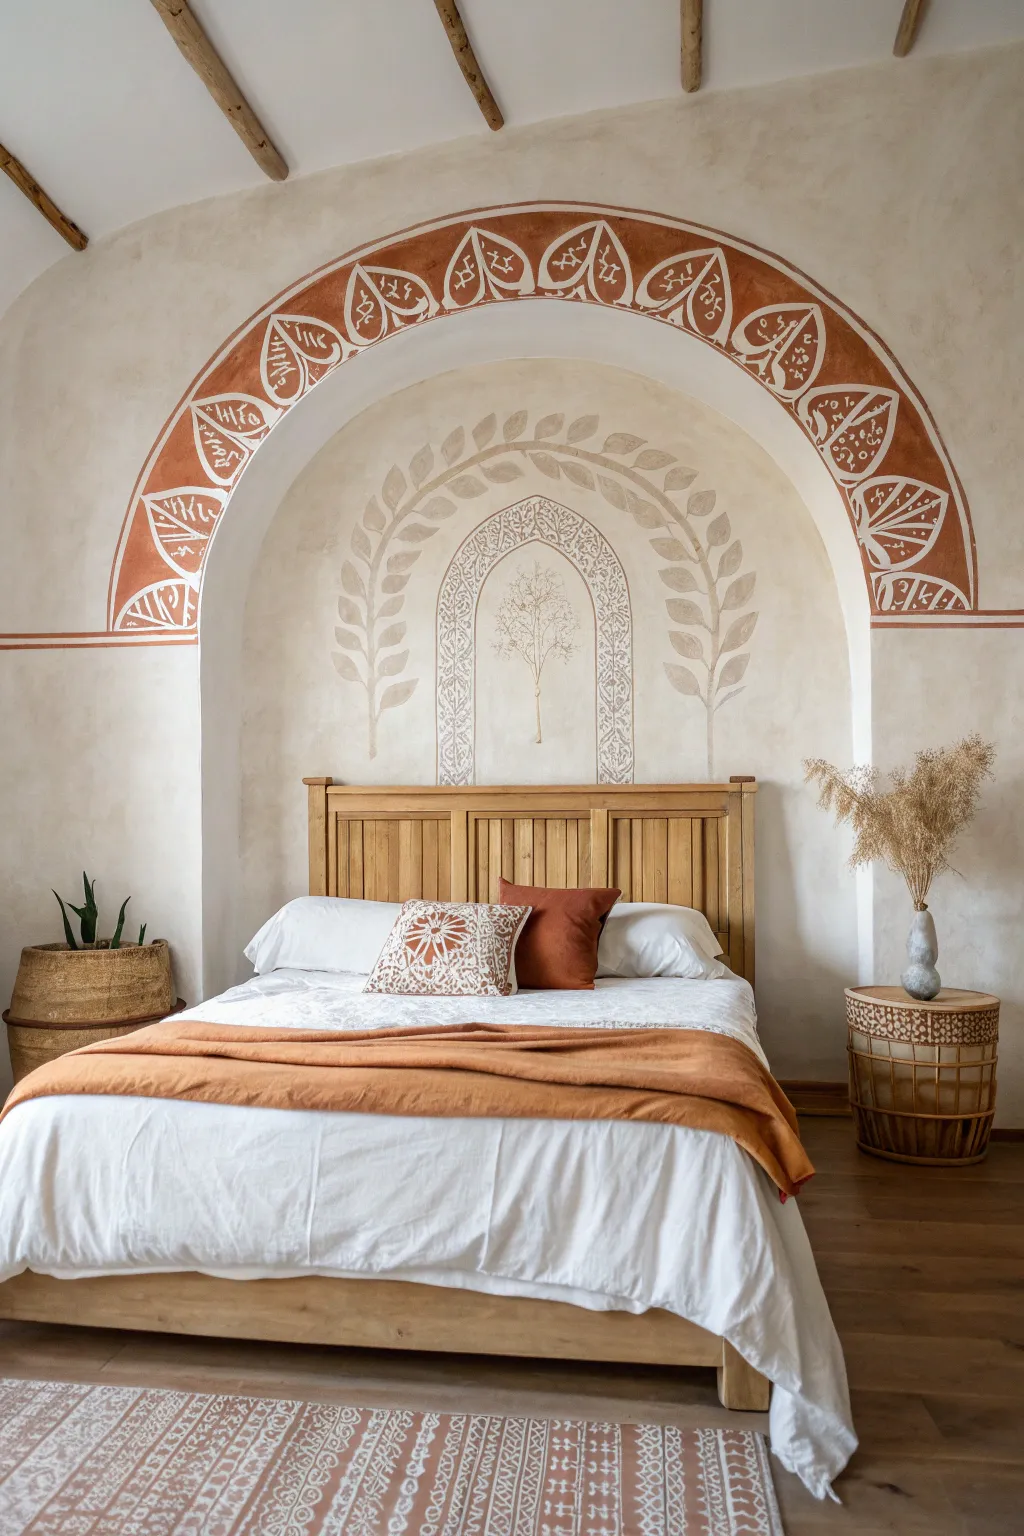
Transform your bedroom into a Mediterranean sanctuary with this stunning recessed arch mural. Featuring rich terracotta tones and delicate leaf motifs, this project creates a sophisticated, multi-dimensional focal point that frames your bed perfectly.
Step-by-Step
Materials
- Pencil and string (or a laser level)
- Painter’s tape (1-inch width)
- Terracotta paint (flat or matte finish)
- Cream or off-white wall paint (base color)
- Soft beige-grey paint (for inner leaves)
- Fine-point detail brush (round size 2 or 4)
- Medium angle sash brush (2-inch)
- Small flat artist brush
- Measuring tape
- Warm water and rags for cleanup
- Tracing paper or stencil film (optional)
Step 1: Planning and Base Structure
-
Measure your space:
Begin by finding the exact center of your bed and marking a vertical line up the wall to determine the peak of your arch. Ensure the width extends about 6-10 inches beyond the headboard on either side. -
Draw the main outer arch:
Using the string-and-pencil method, tie a string to a tack at your center point. Adjust the string length to your desired radius and lightly sketch the large semi-circle that will become the terracotta border. -
Define the border width:
Shorten your string by about 8-10 inches and draw a second, smaller semi-circle inside the first one. This gap creates the thick band where the main leaf pattern will live. -
Sketch the inner arch details:
Inside the main arch space, lightly sketch the location for the secondary leaf garland and the central architectural motif. I find it helpful to just mark the top and bottom points first to ensure everything stays centered. -
Tape the horizontal line:
Run a strip of painter’s tape horizontally across the wall where the arch legs end, creating a crisp line that will eventually connect to the rest of the room’s trim line.
Pro Tip: The String Trick
Use a non-stretchy string (like fishing line or wire) for your compass. Yarn stretches, which leads to egg-shaped arches. Double-check measurements often.
Step 2: Painting the Terracotta Border
-
Cut in the edges:
Using your medium sash brush and terracotta paint, carefully cut in the outer and inner edges of the large arch band. Take your time to keep the curve smooth. -
Fill the band:
Fill in the rest of the band with the terracotta paint. Apply two coats if necessary for a rich, opaque color, allowing at least 2 hours of drying time between coats. -
Draft the negative space leaves:
Once the terracotta is fully dry, use white chalk or a light pencil to sketch a repetitive leaf pattern inside the band. The design relies on ‘negative space’—you aren’t painting leaves; you are painting the cream outline *around* the terracotta shapes. -
Paint the leaf outlines:
Switch to your small flat artist brush and the cream base color. Carefully paint the thick outlines around your sketched leaf shapes, leaving the terracotta color showing through as the ‘leaf.’ -
Add vein details:
With a fine-point detail brush and the cream paint, add small lines inside the terracotta leaf shapes to create veins and decorative dots.
Step 3: Creating the Inner Murals
-
Paint the beige leaf garland:
Using the soft beige-grey paint, freehand two large, curving branches that mirror the shape of the arch. Start from the bottom and sweep upward, letting the branches meet near the top. -
Fill the garland leaves:
Add simple, oval shaped leaves along your beige branches. Keep the paint application slightly sheer or ‘scumbled’ to mimic a fresco look. -
Outline the central arch:
In the very center, use a diluted version of your beige-grey paint to outline a small, intricate architectural window shape. Use a ruler for the vertical sides to keep them straight. -
Draft the intricate patterns:
Lightly pencil in filigree or vine patterns inside the borders of this small central arch. -
Detail the central motif:
Using your finest detail brush and the beige paint, go over your pencil lines. Keep your hand steady and pressure light for delicate, thin lines. -
Add the central tree:
Paint a faint, delicate tree silhouette in the middle of the smallest arch. This should look like a faded sketch, so use very little paint on your brush.
Level Up: Texture Wash
Mix a glazing medium into your cream top-coat and rag-roll it over the inner section before painting the details. This creates an authentic ‘aged plaster’ texture.
Step 4: Finishing Touches
-
Extend the horizon line:
Using the terracotta paint, create a thin double stripe that runs horizontally from the base of the arch across the rest of the wall, tying the mural into the room’s architecture. -
Erase visible markings:
Once all paint is completely cured (wait at least 24 hours), gently erase any visible pencil or chalk lines with a clean, white eraser. -
Touch up edges:
Check the outer edges of your main arch against the wall color. If you wobbled, use a small brush and the wall color to neaten the curve.
Step back and admire how this architectural illusion adds depth and warmth to your bedroom
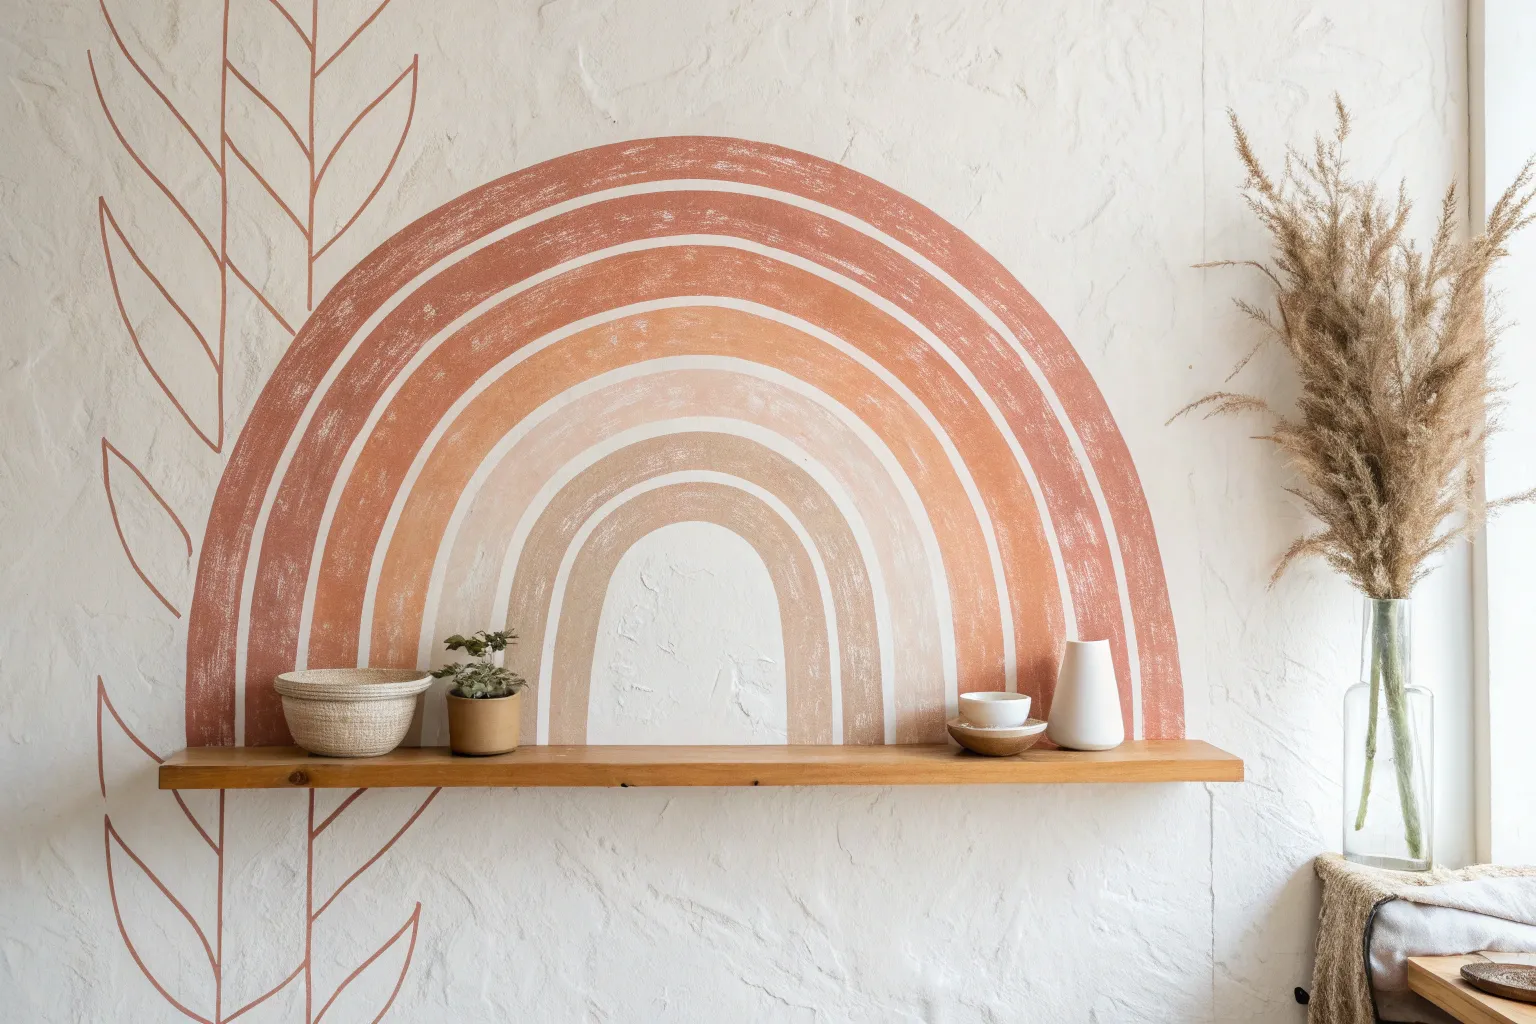
Nested Arches in Coordinated Shades
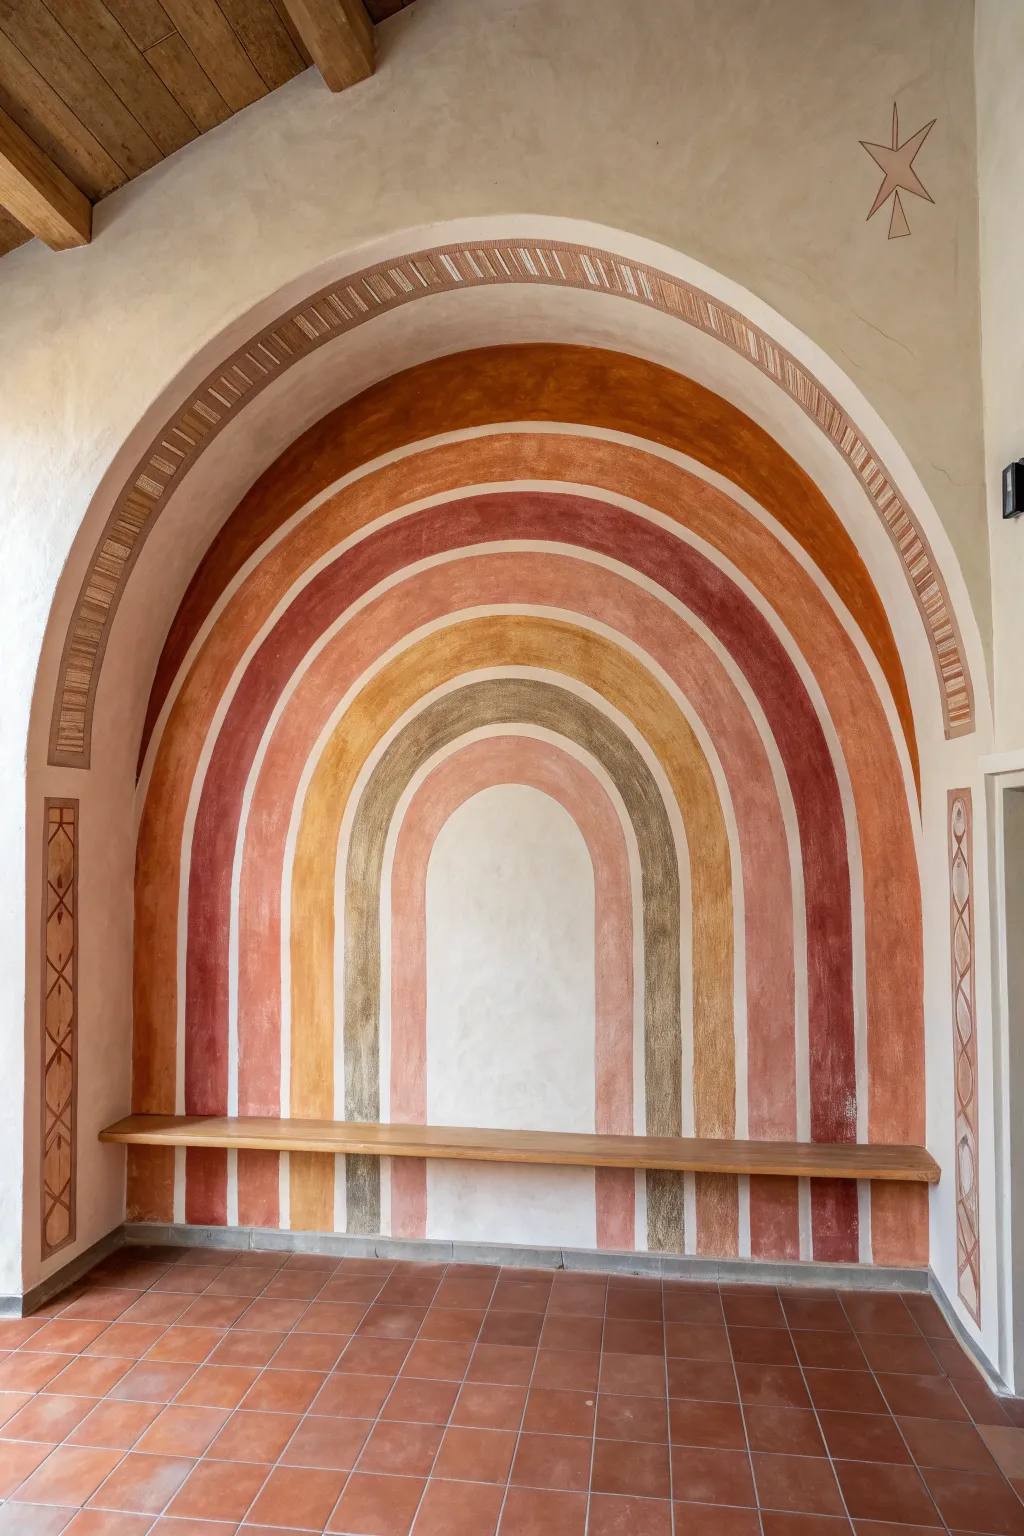
Transform a plain alcove or a flat wall into a stunning architectural feature with this nested arch mural. Using a palette of warm terracottas, muted mustards, and soft pinks, this project creates an illusion of depth and warmth that feels both ancient and modern.
Step-by-Step Guide
Materials
- Matte latex interior paint (5-6 distinct earthy shades)
- Pencil and eraser
- String or twine (non-stretchy)
- Painter’s tape or thumb tack
- Small angled sash brush (1.5 – 2 inch)
- Artist’s detail brush
- Small foam roller
- Measuring tape
- Level
- Drop cloth
- Optional: Glaze medium for a textured look
Step 1: Preparation & Mapping
-
Prepare the canvas:
Begin by cleaning your wall surface thoroughly to remove dust and grease. Lay down a drop cloth to protect your flooring, especially since you will be painting all the way down to the baseboard or floor tiles. -
Find the center point:
Measure the width of your intended arch area. Mark the exact center point on the floor or just above the baseboard. This central vertical line is crucial for symmetry, so use a level to draw a very faint vertical guide line up the wall. -
Establish the anchor point:
Decide on the height of your smallest, innermost arch. Mark this point on your vertical center line. This will be the pivot point for your string compass. -
Create a string compass:
Tie a piece of non-stretchy string to a pencil. Determine the radius of your smallest arch and tape or pin the other end of the string to your central anchor point. -
Draw the first arch:
Holding the string taut and the pencil perpendicular to the wall, draw your first semi-circle lighty. Extend the vertical lines straight down from the ends of the arch to the floor using your level. -
Map the nested layers:
For the concentric arches, lengthen your string by the desired width of each stripe (about 4-6 inches works well). Keep the anchor point the same. Draw each subsequent arch, followed by its vertical legs, until you have mapped out the entire design.
Wobbly Lines?
If your hand isn’t steady, fix wobbly curves by painting the lighter color over the edge of the darker mistake. A flat artist brush works best for this correction.
Step 2: Painting the Arches
-
Select your palette ordering:
Plan your color order before opening a can. I usually number my pencil sketched bands 1 through 6 to avoid confusion once the paint starts flowing. The image uses an alternating rhythm of dark terracotta, mustard, rose, and grey-brown. -
Cut in the edges:
Start with the outermost arch. Using your angled sash brush, carefully hand-paint the curved edge. Don’t worry about using painter’s tape for the curves; a steady hand yields a more organic, fresco-like finish. -
Fill the band:
Once the edges are cut in, use a small foam roller or a larger brush to fill in the body of the arch band. Maintain a wet edge to prevent lap marks. -
Move inward:
Work your way inward to the next band. It is best to let adjacent colors dry to the touch before starting the next one to prevent accidental smearing. -
Refine the lines:
As you paint the straight vertical sections of the arch legs, you can use painter’s tape and a level for crisp lines, or continue freehanding for that textured, plaster look.
Faux Plaster Effect
Mix baking soda or sand into your paint for a gritty, true plaster texture. This adds dimension and hides minor imperfections in your drywall surface.
Step 3: Finishing Touches
-
Clean up the transitions:
Use a fine artist’s brush to tidy up any spots where the colors meet. If you want a slight gap between bands to show the white wall beneath (as seen in some styles), carefully paint the wall color back in with the detail brush. -
Add texture (optional):
To mimic the limewash look in the photo, you can dry-brush a slightly lighter shade over the dried base coat, or use a damp rag to soften the paint while it’s still tacky. -
Install the ledge (optional):
If you are recreating the full look with the shelf, mount a floating wooden plank across the width of the arches at the point where the curve transitions to the straight leg. Ensure it is perfectly level. -
Final cure:
Allow the entire mural to cure for at least 24 hours before placing any objects against it or styling the shelf.
Step back and admire how a simple repeated shape has completely redefined the atmosphere of your room

PENCIL GUIDE
Understanding Pencil Grades from H to B
From first sketch to finished drawing — learn pencil grades, line control, and shading techniques.
Explore the Full Guide
Double Arch Side-by-Side
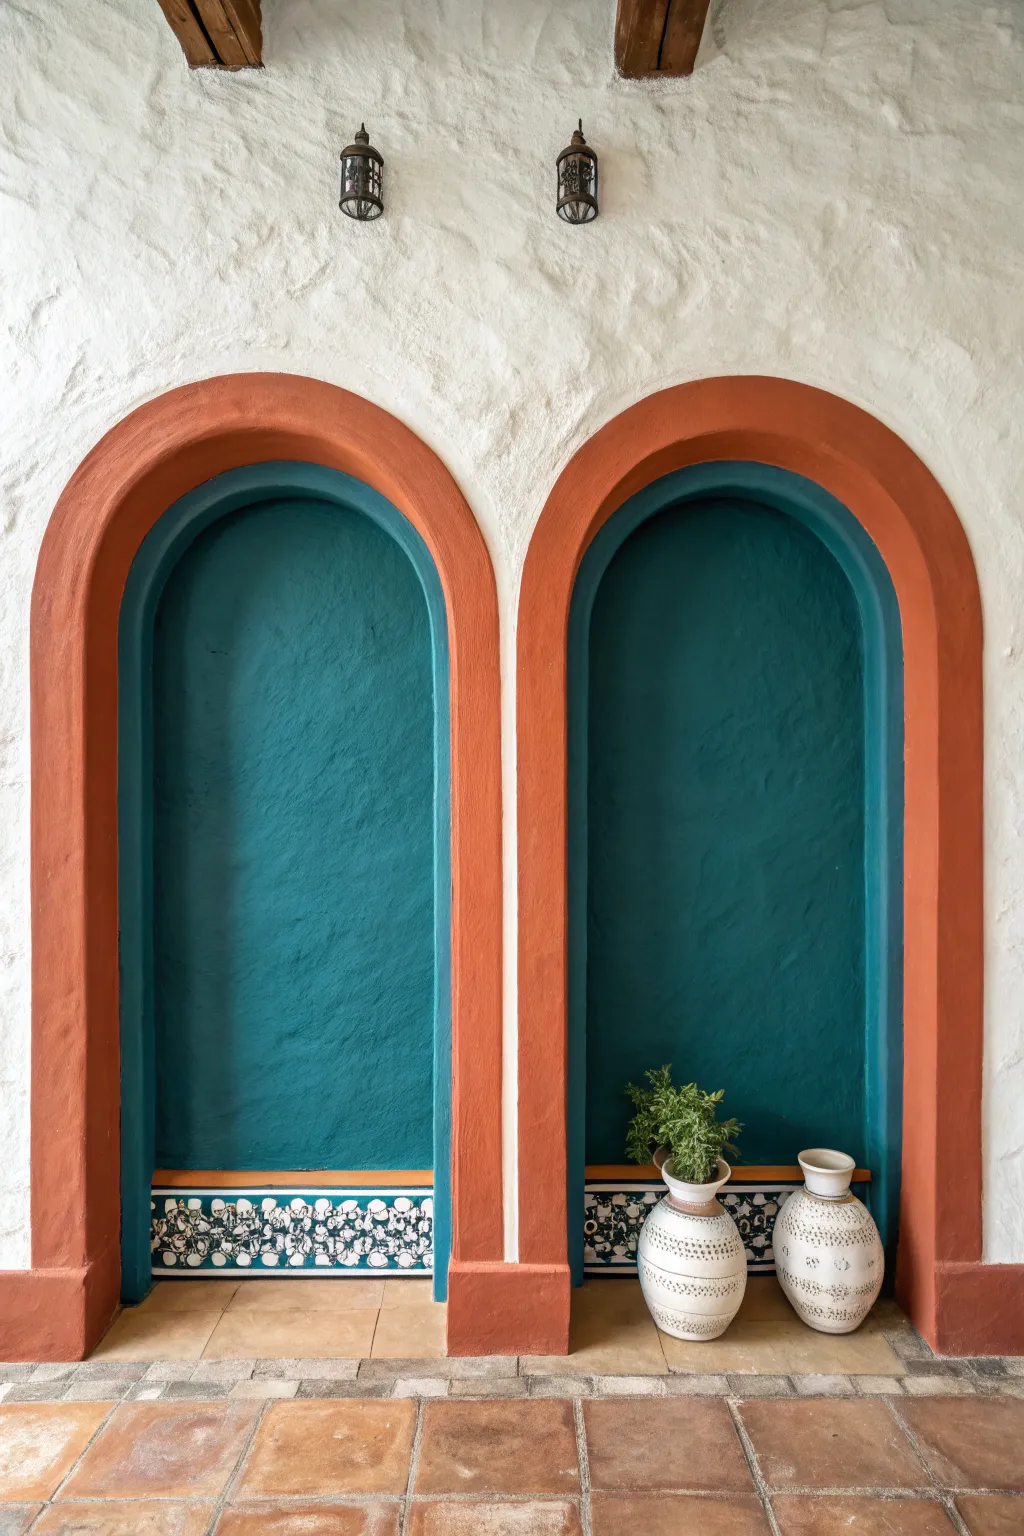
Bring the warmth of a Mediterranean villa into your home with this stunning dual-arch mural feature. By combining bold terracotta borders with deep teal insets and faux tile detailing, you can transform a plain wall into an architectural statement without any structural renovation.
Step-by-Step
Materials
- Painter’s tape (high-quality, multi-surface)
- Pencil and string (or a laser level)
- Measuring tape
- Terracotta orange interior latex paint (satin finish)
- Deep teal/petroleum blue interior latex paint (flat or eggshell finish)
- White acrylic paint (for tile details)
- Black acrylic paint (for tile details)
- Medium angled sash brush (2-inch)
- Small foam roller and tray
- Detail brushes (fine round and flat)
- Cardboard or stiff paper (for stencil making)
- Drop cloth
Step 1: Planning and Outlining
-
Measure and mark centers:
Begin by determining the placement of your two arches. Measure the total width of your wall space and mark the center point for each arch, ensuring equal spacing between them and from the side walls. -
Draw the straight sides:
Use a level or laser level to draw the vertical lines for the outer terracotta frame first. You want these to be substantial, about 4-6 inches wide for visual impact. Draw the inner vertical lines next to define the niche space. -
Trace the arch curve:
To create the perfect semi-circle top, pin a string to the center point of your arch width. Tie a pencil to the other end so the length matches the distance to the outer edge. Swing the pencil to draw the outer curve, then shorten the string to draw the inner curve. -
Refine the base:
At the bottom of your designated niche area, measure up about 4-5 inches to create the space where the ’tile’ border will go. Mark this section clearly so you don’t paint over it with the wall colors. -
Tape the edges:
Carefully apply painter’s tape along the outer straight lines of the terracotta arch. For the curved top, use small, overlapping pieces of tape or flexible painter’s tape to navigate the radius smoothly without buckling.
Bleed-Through Blues?
If paint bleeds under the tape, wait for it to dry. Use a small, stif-bristled brush and the original wall color to touch up the edges. It works like an eraser for crisp lines.
Step 2: Painting the Structure
-
Paint the outer arch:
Using your sash brush, cut in the edges of the terracotta frame. Then, use a small foam roller to fill in the rest of the orange border. I find that two coats provide the richest color, so let the first coat dry completely before applying the second. -
Tape the inner boundary:
Once the terracotta paint is fully cured (give it at least 24 hours to be safe), tape off the inner edge of the orange frame to protect it while you paint the blue niche. -
Fill the niche:
Apply the deep teal paint to the inner arched area. Use a brush for the edges and corners to ensure full coverage, especially if your wall has a textured stucco finish like the inspiration photo. Roll the center for a smooth finish. -
Create the base ledge:
Paint the narrow horizontal strip separating the blue niche from the tile area in the same terracotta orange color to act as a visual ‘ledge’. -
Remove tape:
Peel off the tape while the final coat is still slightly tacky to ensure a crisp, clean line.Pull the tape away from the paint at a 45-degree angle.
Add 3D Texture
Mix a handful of baking soda or plaster of Paris into the teal paint before applying. This creates a gritty, stucco-like texture that makes the niche look like real masonry.
Step 3: Faux Tile Detail
-
Prepare the tile background:
Paint the bottom rectangular section (below the ledge) with a dark background color, likely a very dark blue or black, to serve as the grout lines and depth. -
Create a simple stencil:
Cut a small square or floral motif out of cardstock or stiff paper. This doesn’t need to be complex; a simple four-petal flower shape works beautifully to mimic Spanish tiles. -
Stipple the pattern:
Using a stencil brush or a small sponge, dab white acrylic paint through your stencil onto the dark background. Repeat the pattern horizontally across the bottom strip. -
Add hand-painted details:
Use a fine detail brush to connect the stenciled shapes with small vines or dots. Don’t worry about perfection; the hand-painted look adds to the authentic, rustic charm.
Step back and enjoy the depth and architectural interest you have just added to your room
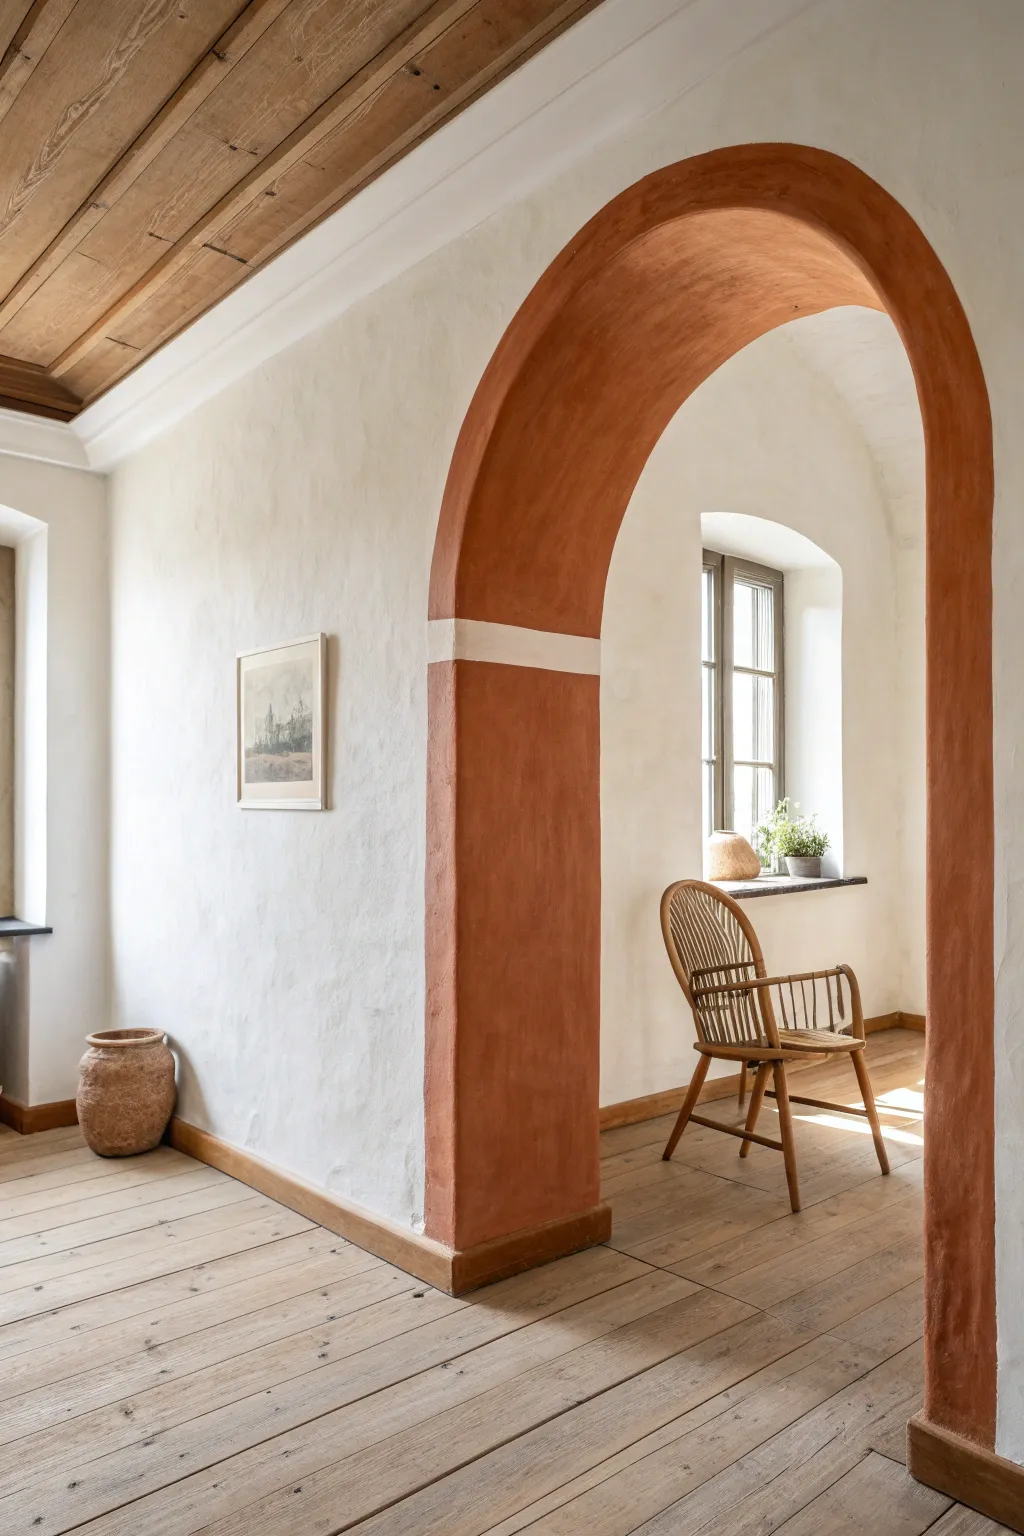
Half Arch for a Low, Modern Moment
Transform a basic doorway into a stunning architectural feature using color blocking to highlight the depth of an arch. This project uses a warm terracotta hue to paint the underside (soffit) and upper section of an existing archway, creating a sophisticated, modern focal point.
Step-by-Step Tutorial
Materials
- Painter’s tape (high quality)
- Terracotta or rust-colored interior latex paint (matte finish)
- Small angled sash brush (1.5 to 2 inch)
- Small roller frame and microfiber roller cover (4 inch)
- Drop cloth
- Damp rag for clean up
- Sanding sponge (fine grit)
- Step ladder
Step 1: Preparation
-
Clean surface:
Begin by thoroughly wiping down the inside of the archway and the immediate surrounding wall area to remove any dust or grease. -
Check for imperfections:
Inspect the plaster for any bumps or holes; fill holes with spackle and sand down any bumps lightly with a fine-grit sanding sponge. -
Define the boundaries:
Decide exactly where your color will stop. For this look, we are painting the entire underside (soffit) of the arch, plus the wall space above the picture rail line on the back wall if applicable, effectively ‘capping’ the room. -
Tape the edges:
Apply painter’s tape carefully along the outer edges of the arch face. Press the tape down firmly with your thumbnail or a putty knife to prevent bleed-through.
Bleeding Edges?
If paint bleeds under the tape, wait for it to dry fully. Then, apply a tiny amount of the original wall color over the bleed to erase it.
Step 2: Cutting In
-
Load the brush:
Dip your angled sash brush about one-third of the way into the terracotta paint, tapping off excess on the side of the can. -
Paint the edges:
Carefully cut in along the tape line where the flat wall meets the curved underside of the arch. This requires a steady hand and patience. -
Feather the paint:
As you paint the edge, feather the paint inward toward the center of the arch soffit so avoid leaving a thick ridge of paint that the roller can’t smooth out. -
Address corners:
If you are painting the back wall ceiling section as shown, cut in corners where the wall meets the ceiling.
Step 3: Rolling and Finishing
-
Prepare the roller:
Load your 4-inch mini roller with paint, ensuring it’s fully saturated but not dripping. -
Roll the curve:
Starting from the bottom of one side, roll paint onto the curved underside of the arch. Use smooth, consistent strokes moving upward. -
Blend section:
Work in manageable sections, rolling into the wet edge of your brushwork to create a seamless finish without brush marks. -
Check coverage:
Allow the first coat to dry completely according to the paint can’s instructions. Dark earthy tones often look patchy after just one coat. -
Second coat:
Apply a second coat, repeating the cutting-in and rolling process. I find this second pass is where the color really gains its richness and depth. -
Remove tape:
While the second coat is still slightly tacky (not fully dry), carefully peel back the painter’s tape at a 45-degree angle. This prevents the dried paint from peeling off with the tape. -
Touch ups:
Inspect the edges for any bleeds. If necessary, use a tiny artist’s brush and your original wall color to clean up the line.
Texture Play
Mix a texture additive or fine sand into your paint for a plaster-like, old-world Mediterranean feel that adds tactile interest.
Step back and admire how a simple pop of color adds architectural depth to your space


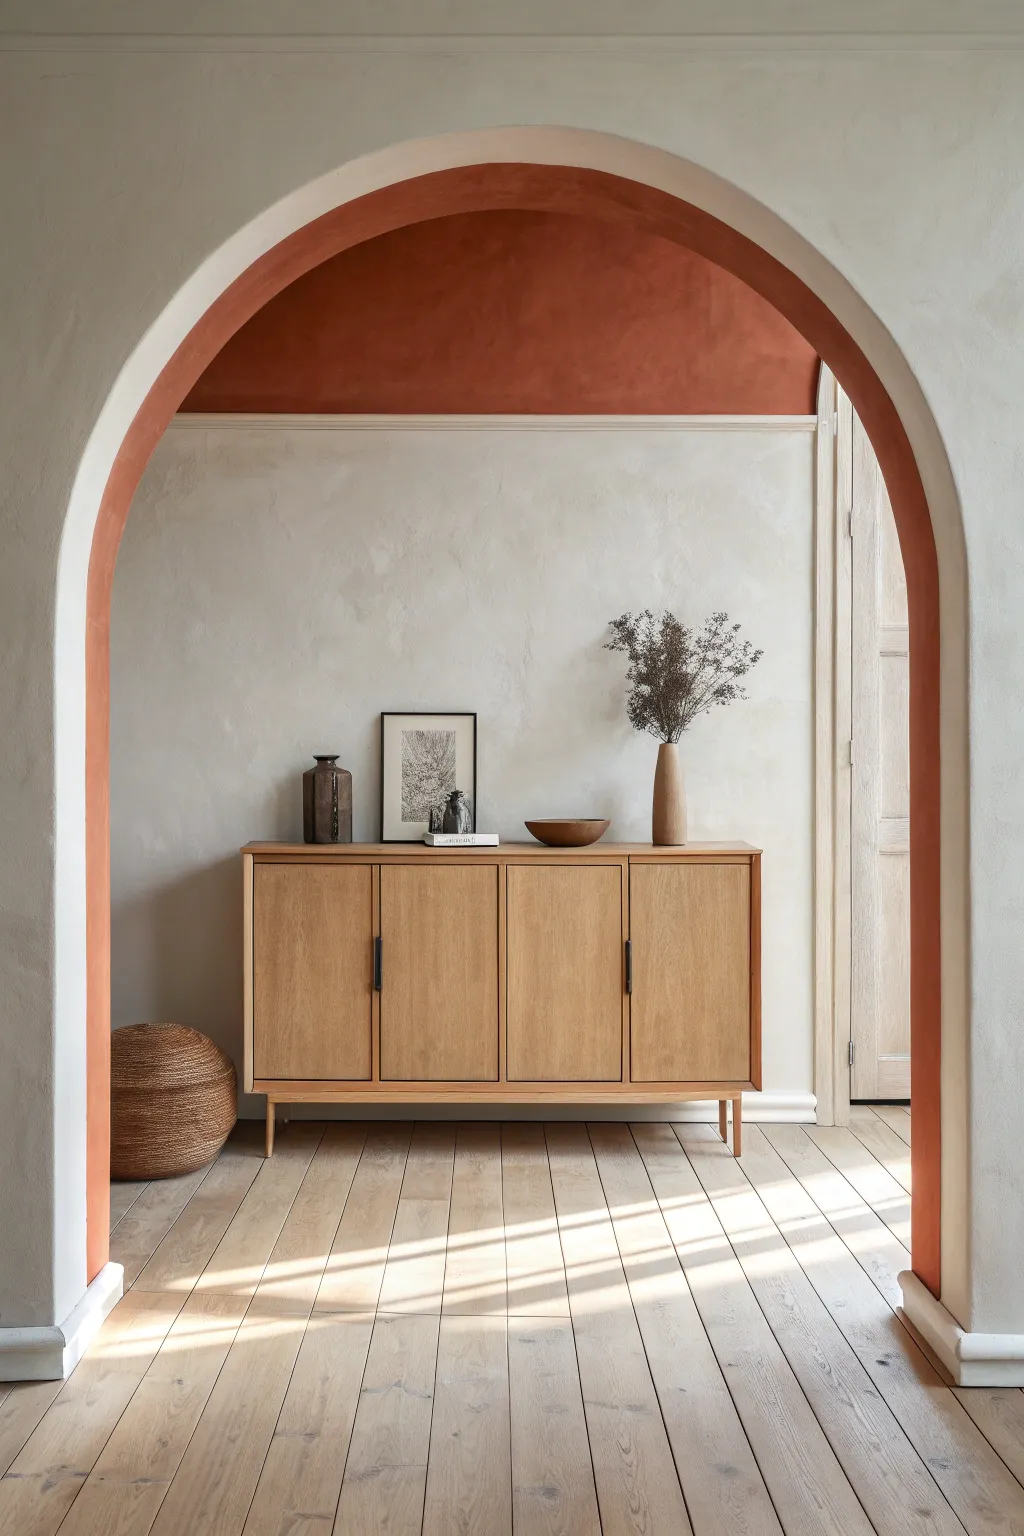
Corner-Wrapping Arch Illusion
Transform a standard doorway into a striking architectural feature with this textured, terracotta-style paint technique. This method creates a warm, Mediterranean feel that mimics the look of aged clay or plaster, adding instant character to any room.
Step-by-Step
Materials
- Rust/Terracotta colored latex paint (matte or flat finish)
- White or cream latex paint (matching your wall color)
- Glazing medium
- Painter’s tape (high quality)
- Pencil
- String and pushpin (or a large compass)
- Wide paint brush (3-4 inch)
- Natural sea sponge or texturing rag
- Small angled sash brush
- Measuring tape
- Level
- Drop cloth
Step 1: Preparation and Mapping
-
Clean the surface:
Begin by thoroughly wiping down the wall area around the doorway to remove any dust or grease. This ensures the paint adheres properly and texture effects don’t get muddy. -
Measure the horizontal band:
Decide on the height of the white horizontal band that interrupts the arch. Measure up from the floor on both sides of the doorway to ensure your marks are perfectly level with each other. Mark these spots lightly with a pencil. -
Outline the arch shape:
If your doorway isn’t already arched, you’ll need to create the shape. Use a pushpin at the center of the doorway opening and tie a string to a pencil. Pull the string taut and trace the perfect semi-circle above the door frame. Extend vertical lines down the sides. -
Tape the boundaries:
Apply painter’s tape along the pencil lines you just drew to define the outer edge of your arch. However, do not tape the horizontal band area yet; we want to preserve that negative space. -
Mask the horizontal band:
Now, place strips of tape horizontally across the arch columns to block out the white stripe. Press the edges down firmly with your fingernail or a credit card to prevent paint bleed.
Step 2: Creating the Base Coat
-
Mix the base color:
Pour your terracotta paint into a tray. If the paint feels too thick, you can thin it very slightly with water to make it more workable for layering, but standard consistency is usually fine. -
Apply the first layer:
Using a wide brush, apply the terracotta paint inside your taped area. Don’t worry about perfect smoothness; brush strokes add to the organic plaster look. Cover the vertical columns and the overhead arch. -
Address the inner jambs:
Don’t forget the inside depth of the arch (the jambs). Paint these fully to create the illusion of a solid structural element, not just a flat drawing on the wall. -
Let it dry completely:
Allow this first coat to dry for at least 4-6 hours. It must be dry to the touch before you start the texturing process.
Uneven Texture?
If the sponge texture looks too repetitive, rotate your wrist and the sponge with every blot. Use a dry brush to lightly feather out any heavy splotches while the glaze represents wet.
Step 3: Adding Texture and Depth
-
Prepare the glaze:
Mix one part terracotta paint with one part glazing medium. This makes the paint translucent and slower to dry, allowing you to manipulate the finish. -
Apply the glaze:
Working in small sections (about 2 feet at a time), brush on the glaze mixture over the dry base coat. -
Create texture:
While the glaze is wet, use a damp sea sponge or a bunched-up rag to vaguely blot the surface. This lifts some pigment and creates that mottled, old-world plaster effect seen in the photo. -
Soften the edges:
I like to gently pat the edges near the tape line to ensure the color density varies slightly, making it look worn rather than mechanically perfect. -
Repeat until covered:
Continue this glaze-and-blot technique up the columns and over the arch curve, blending the sections as you go so there are no hard stop lines.
Pro Tip: Depth Illusion
Mix a tiny drop of dark brown or black into your glaze for just the inner corners/jambs of the arch. This slight shadow effect makes the wall look much thicker than it actually is.
Step 4: Detailing and Reveal
-
Dry and inspect:
Let the texture layer dry overnight. In the morning, check for any spots that look too uniform and add a tiny bit more glaze if needed. -
Remove the tape:
Carefully peel away the painter’s tape at a 45-degree angle. Do this slowly to avoid ripping any existing wall paint. -
Clean up the white band:
If any terracotta paint bled into the white horizontal stripe area, use a small angled brush and your white wall paint to touch it up, creating a crisp distinguishing line. -
Softening the outer edge (Optional):
For a truly authentic look, you might want the outer edge to look slightly hand-plastered. Use a tiny artists’ brush to slightly feather the very edge of the terracotta line so it isn’t razor-sharp, mimicking applied stucco. -
Final clear coat (Optional):
If this arch is in a high-traffic hallway, consider applying a matte clear sealer over the terracotta areas to protect the finish from scuffs.
Step back and admire how this simple paint technique has added architectural weight and Mediterranean warmth to your space
Painted Arch With Floating Shelves Inside
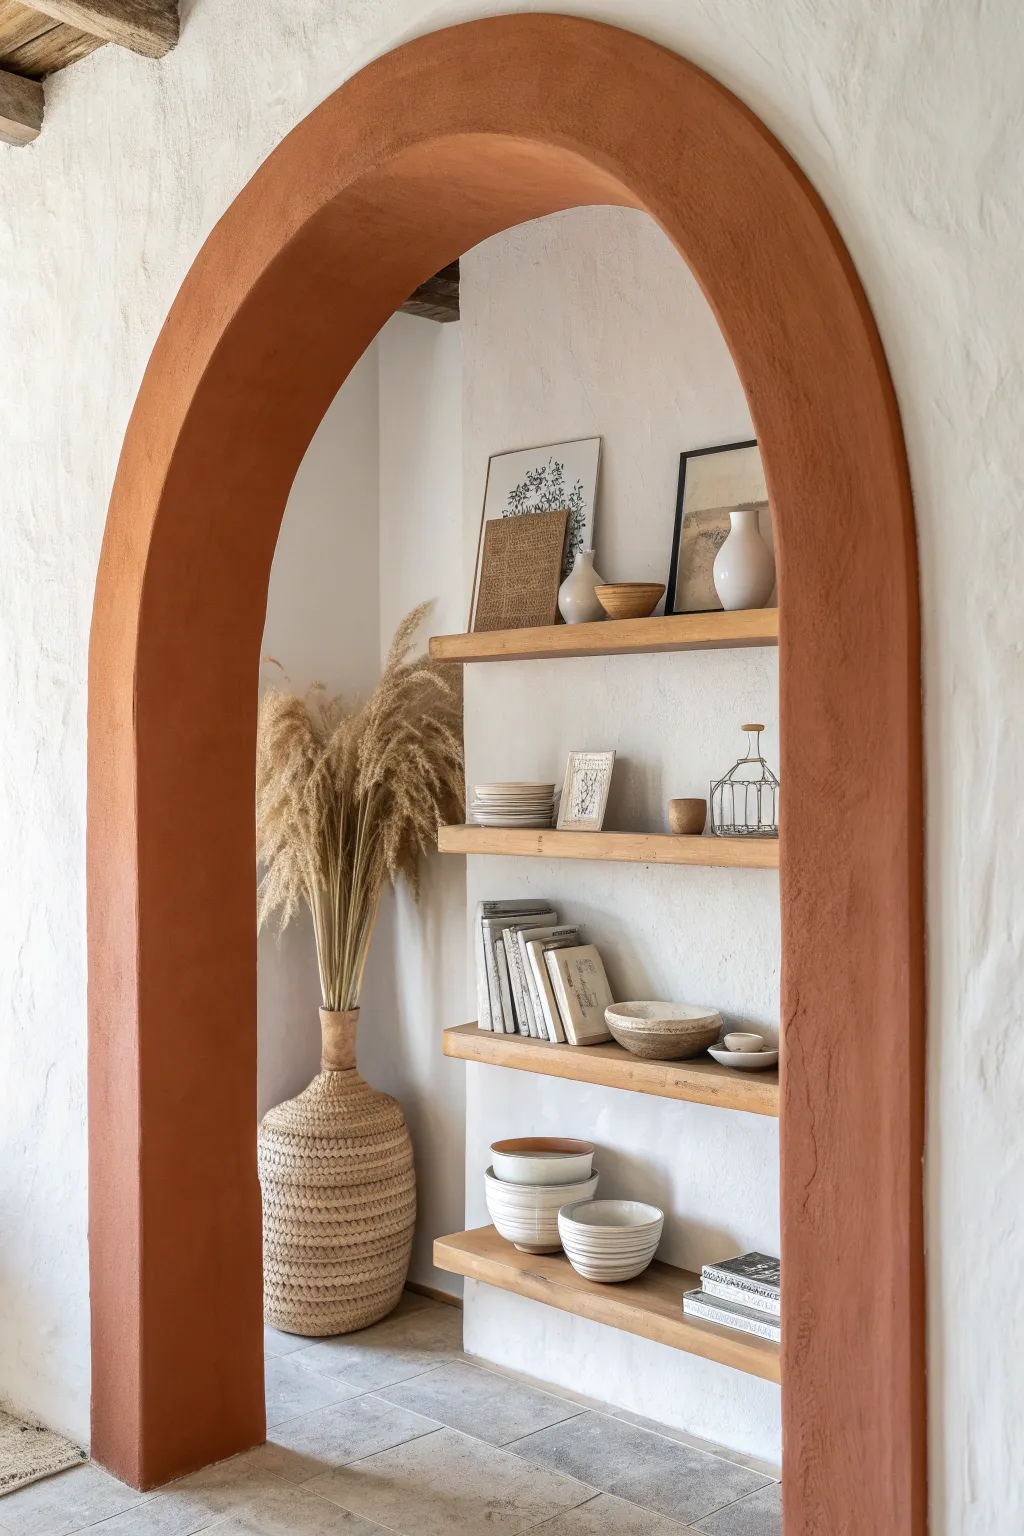
Transform a standard recessed niche or alcove into a stunning architectural focal point with this clever painting technique. By framing floating shelves with a warm, earthy arch, you create depth and Mediterranean charm instantly.
How-To Guide
Materials
- High-quality painter’s tape
- Pencil
- String and thumbtack (or a large compass tool)
- Plumb line or long level
- Measuring tape
- Terracotta or rust-colored interior matte latex paint
- White wall paint (for touch-ups)
- 2-inch angled sash brush
- 4-inch foam roller or small nap roller
- Drop cloth
- Fine-grit sandpaper (optional)
Step 1: Planning and Mapping
-
Assess the space:
Begin by observing your niche or wall alcove. If you are painting an existing recessed area like the one shown, focus on the flat facial wall surrounding the opening, not the interior walls. -
Determine the width:
Measure the total width of the opening. Decide how wide you want the painted ‘frame’ to be. The example shows a substantial border, approximately 6-8 inches wide on either side. -
Establish the vertical lines:
Using a measuring tape, mark the outer vertical boundaries of your arch. Use a long level or a plumb line to ensure these marks are perfectly straight from the floor up to where the curve will begin. -
Tape the sides:
Apply long strips of painter’s tape along these vertical lines. Run your finger firmly over the edge of the tape closest to the paint area to prevent bleeding. -
Find the center point:
Measure the distance between your two vertical tape lines to find the exact horizontal center. Mark this center point on the wall above the niche opening.
Clean Curve Trick
Work in small sections on the curve. Load the brush, exhale, and drag only the very tip of the bristles along your pencil line. Don’t press hard.
Step 2: Drafting the Curve
-
Set up the compass:
Cut a piece of non-stretchy string to a length matching the radius of your arch (half the total width between your tape lines). Tie a pencil to one end and a thumbtack to the other. -
Position the anchor:
Place the thumbtack exactly on your center mark. Depending on the arch shape, this anchor point might need to be lower than the top of the vertical lines to create a perfect semi-circle. -
Draw the outer arc:
Pulling the string taut, swing the pencil from the top of the left tape line up and over to the top of the right tape line. Draw lightly to avoid gouging the wall. -
Define the inner edge:
If your niche has a sharp drywall corner, the inner edge is already defined. If you are painting this on a flat wall to create a faux niche, you would repeat the circle process with a shorter string.
Step 3: Painting the Feature
-
Cut in the edges:
Dip your angled sash brush into the terracotta paint. Carefully hand-paint the curved top edge. The tape won’t help here, so move slowly and use confidence in your stroke. -
Protect the niche interior:
If you are worried about splatters, tape off the inner corner where the face of the wall meets the recessed niche. -
Roll the main sections:
Use the small roller to fill in the large vertical sections between the tape and the opening. Roll vertically for a smooth finish. -
Fill the archway:
Continue rolling carefully up into the arched section, blending your roller texture with the brush strokes you made earlier. -
Repeat with a second coat:
Allow the first coat to dry completely (usually 2-4 hours). Apply a second coat to ensure rich, opaque color coverage.
Textural Upgrade
Mix a textured additive or a bit of baking soda into your paint for a plaster-like, old-world feel that mimics authentic adobe architecture.
Step 4: Finishing Touches
-
Remove the tape:
While the second coat is still slightly tacky (not soaking wet, but not fully cured), slowly peel off the painter’s tape at a 45-degree angle. This ensures a crisp line. -
Clean up the curve:
If the hand-painted curve looks a little wobbly, use a small artist’s brush and your original white wall paint to essentially ‘erase’ mistakes and sharpen the edge. -
Style the shelves:
Once the paint has cured for at least 24 hours, dust off your shelves and arrange your decor to complement the new warm border.
Step back and enjoy how this simple paint application brings refined structure and warmth to your room
Round Mirror Centered in an Arch
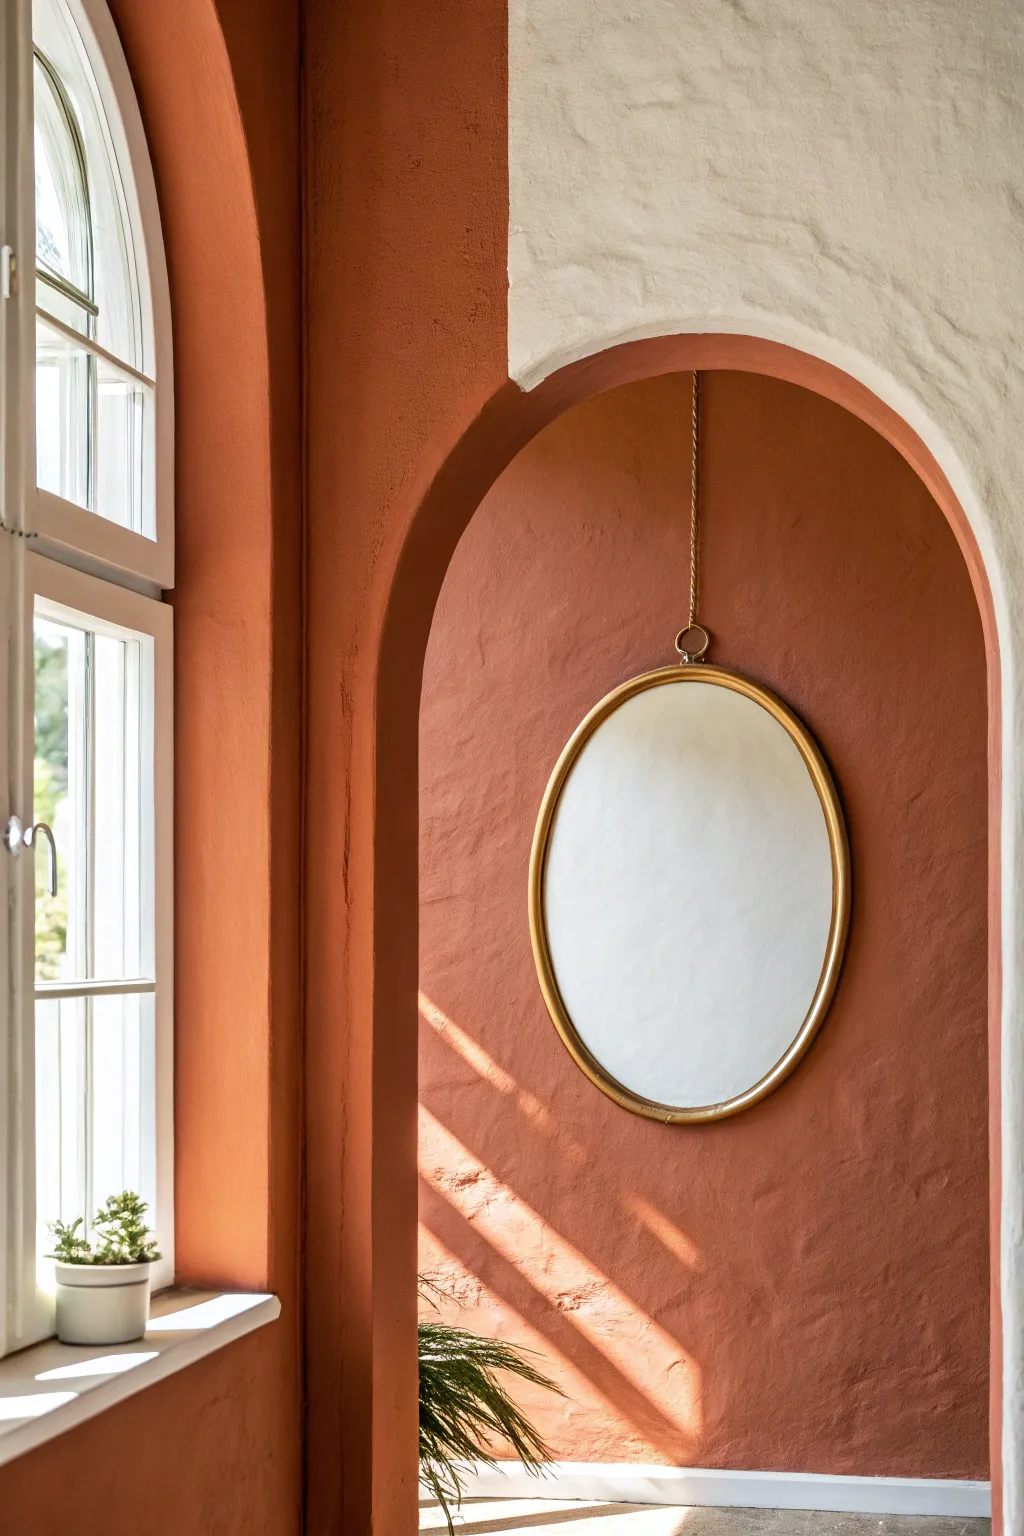
Transform a plain white wall into a Mediterranean-inspired focal point by painting a bold, textured arch to frame a simple round mirror. This project uses warm earthy tones and clever placement to add architectural depth without requiring any actual construction.
Step-by-Step Guide
Materials
- Warm terracotta interior paint (matte finish)
- White wall paint (for touch-ups or base)
- Large round gold-framed mirror
- Pencil
- Tape measure
- Laser level (optional but helpful)
- String and push pin (for drawing the arch)
- Painter’s tape
- Angled sash brush (2 inch)
- Small roller with a textured nap (3/8 inch or 1/2 inch)
- Drop cloth
- Wall anchor and screw (appropriate for mirror weight)
- Decorative chain or rope for hanging (if desired)
Step 1: Planning and Layout
-
Clean and prep:
Start by wiping down the wall surface with a damp cloth to remove any dust or oils that might prevent the paint from adhering properly. -
Determine the width:
Measure the width of your mirror. You want the arch to be significantly wider than the mirror—aim for at least 8-10 inches of clearance on each side for a balanced look. -
Mark the sides:
Use your tape measure and pencil to mark the two vertical lines that will form the straight sides of the arch. A laser level is fantastic here to ensure perfectly plumb lines, but a long spirit level works too. -
Tape vertical lines:
Apply painter’s tape along the outside of these vertical pencil marks. press the edge down firmly with your fingertip to prevent paint bleed. -
Find the center point:
Measure the exact distance between your taped lines to find the center point. Mark this point at the height where you want the curve of the arch to begin.
Texturizing Trick
To mimic real plaster, mix a small amount of baking soda or specialized paint texturizer into your paint before rolling. Test on scrap cardboard first!
Step 2: Drawing the Arch
-
Create a compass:
Tie a piece of non-stretch string to a pencil. Measure the string so the distance from the pencil tip to the knot matches exactly half the width of your arch. -
Anchor the string:
Place a push pin or nail lightly into your center mark. Loop the string around it so the pencil tip touches the inner edge of one vertical tape line. -
Trace the curve:
Keeping the string taut, sweep the pencil upward and over to the opposite side to draw a perfect semi-circle connecting your two vertical lines. -
Refine the line:
Step back and check your curve. If it looks shaky, lightly erase and try again until you have a smooth, confident line.
Step 3: Painting the Feature
-
Cut in the curve:
Using your angled sash brush, carefully paint along the inside edge of your curved pencil line. This requires a steady hand; I find exhaling slowly while making the stroke helps reduce jitter. -
Fill the edges:
Continue using the brush to paint a 2-3 inch border along the tape lines and the curve, creating a frame for your roller. -
Roll the center:
Use the roller to fill in the main body of the arch. A roller with a thicker nap (3/8 or 1/2 inch) will help deposit more paint and create that slight plaster-like texture seen in the photo. -
First coat drying:
Let the first coat dry completely according to the can’s instructions, usually about 2-4 hours. -
Apply second coat:
Repeat the cutting in and rolling process for a second coat to ensure rich, opaque color coverage. -
Remove tape:
Pull the painter’s tape off carefully while the second coat is still slightly tacky to ensure a crisp edge without peeling up dried paint.
Uneven Arch Curve?
If your hand-painted curve is wobbly, use a small artist’s brush with the original wall color to neatly ‘erase’ mistakes and sharpen the line.
Step 4: Installation
-
Mark hanging spot:
Once the paint is fully cured (give it 24 hours just to be safe), measure to find the exact center of the arch again for your mirror placement. -
Install hardware:
Drill and install a sturdy wall anchor suited for your wall type and the mirror’s weight. -
Hang the mirror:
Suspend the mirror using a decorative chain or rope to mimic the look in the image, or hang it directly on the hook if preferred. -
Add greenery:
Place a potted plant near the base of the arch or on a nearby windowsill to complement the earthy tones with fresh green contrast.
Step back and enjoy the warmth and sophisticated depth this simple painted feature brings to your room
Window-Boosting Arch Frame Trick
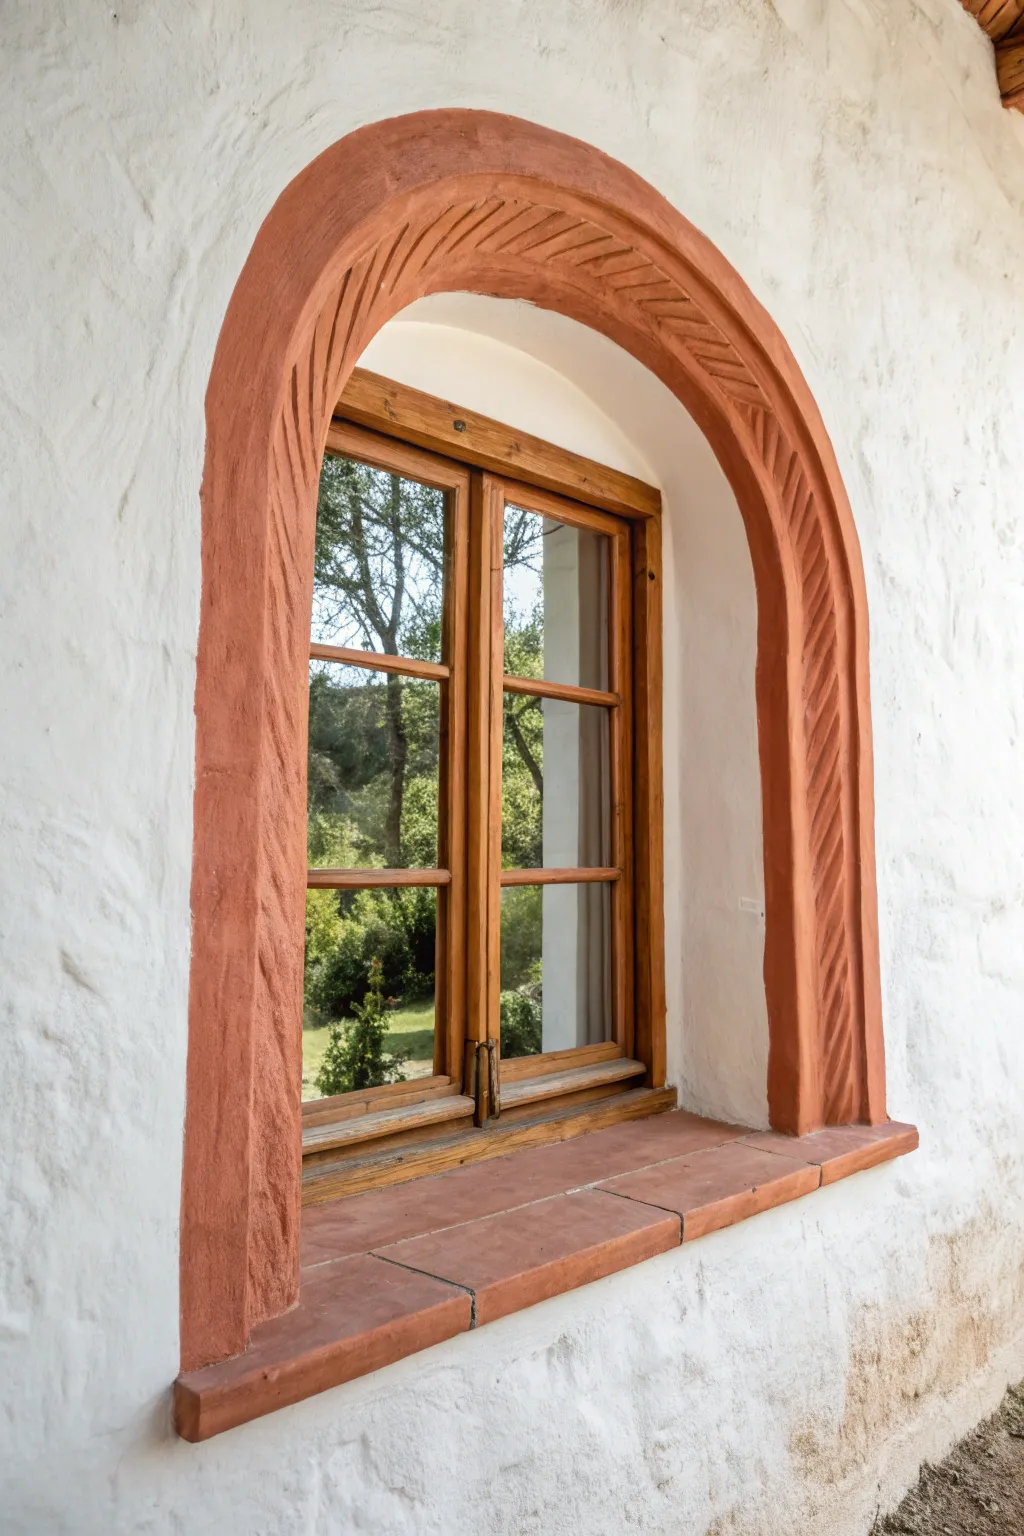
Transform a plain window into a Mediterranean-inspired focal point with this clever paint and texture technique. By simulating the look of carved terracotta stone, you add instant architectural depth and warmth to a simple white wall.
How-To Guide
Materials
- High-quality painter’s tape (multi-surface)
- Pencil and string (for the arch guide)
- Joint compound or pre-mixed smooth stucco patch
- Putty knife or small trowel
- Terracotta-colored exterior latex paint (matte finish)
- Dark brown acrylic paint or glaze (for antiquing)
- Small stiff-bristled brush
- Carving tool (e.g., chopstick, clay tool, or end of a paintbrush)
- Medium-grit sanding sponge
- Matte clear sealer (exterior grade if outdoors)
Step 1: Planning and Surface Prep
-
Clean the surface:
Begin by thoroughly cleaning the wall area around your window to ensure the joint compound adheres properly. Eliminate any dust, grease, or loose paint chips. -
Measure the arch:
Find the center point of your window header. Tape a piece of string to this center point with a pencil attached to the other end to act as a compass. -
Draw the outline:
Draw your outer arch line first, keeping the string taut. Shorten the string to draw the inner arch line, maintaining a consistent width of about 4-6 inches for the frame. -
Tape the boundaries:
Carefully apply painter’s tape along the pencil lines you just drew. Press the edges down firnly with a credit card or fingernail to prevent bleed-through later.
Step 2: Creating the Texture
-
Apply the base compound:
Using a putty knife, spread a layer of joint compound or smooth stucco patch within your taped area. Aim for a thickness of about 1/8 to 1/4 inch. -
Smooth the surface:
Run your trowel lightly over the wet compound to smooth out major peaks, but don’t worry about perfection; a little irregularity adds to the rustic stone look. -
Carve the diagonal lines:
While the compound is still wet but slightly set (wait about 10-15 minutes), use your carving tool to draw diagonal grooves. I find starting from the top center and working down each side helps keep the angles symmetrical. -
Deepen the border lines:
Run your tool along the inner and outer edges of the arch (just inside the tape) to create a distinct separation ‘groove’ that mimics separate stonework. -
Remove tape promptly:
Carefully peel away the painter’s tape while the compound is still wet. If you wait until it’s dry, it might crack your new edges. -
Allow to cure:
Let the textured arch dry completely. This usually takes 24 hours, depending on humidity and thicknes.
Textural Pro Tip
For a grittier sandstone feel, mix a handful of clean, fine sand into your paint before applying the final coat. It catches the light beautifully.
Step 3: Painting and Finishing
-
Sand edges lightly:
Once fully dry, use a sanding sponge to gently knock down any sharp ridges or jagged bits on the edges of your carving lines. -
Apply base color:
Brush on your terracotta-colored latex paint. Use a stiff brush to work the paint into all the carved crevices and grooves you created. -
Apply a second coat:
After the first coat is dry to the touch, apply a second coat for rich, opaque coverage. -
Mix an antiquing glaze:
Mix a small amount of dark brown paint with water (about a 1:4 ratio) to create a thin, watery wash. -
Apply the wash:
Brush the dark wash over the dried terracotta paint, focusing heavily on the carved grooves. -
Wipe back the excess:
Immediately use a damp rag to wipe the dark wash off the raised surfaces. This leaves the shadow color in the grooves, highlighting the texture. -
Paint the sill:
Don’t forget the windowsill. If you have tiles, clean and paint them to match; if not, paint the sill with the same terracotta color to ground the arch. -
Seal the work:
Finish with a coat of matte clear sealer to protect your faux stone from moisture and fading.
Level Up: Faux Grout lines
Use a straight edge to carve horizontal lines every 8-10 inches across the arch. This makes the arch look like it’s built from individual stone blocks.
Enjoy the warm, rustic charm your new architectural feature brings to the space


Have a question or want to share your own experience? I'd love to hear from you in the comments below!