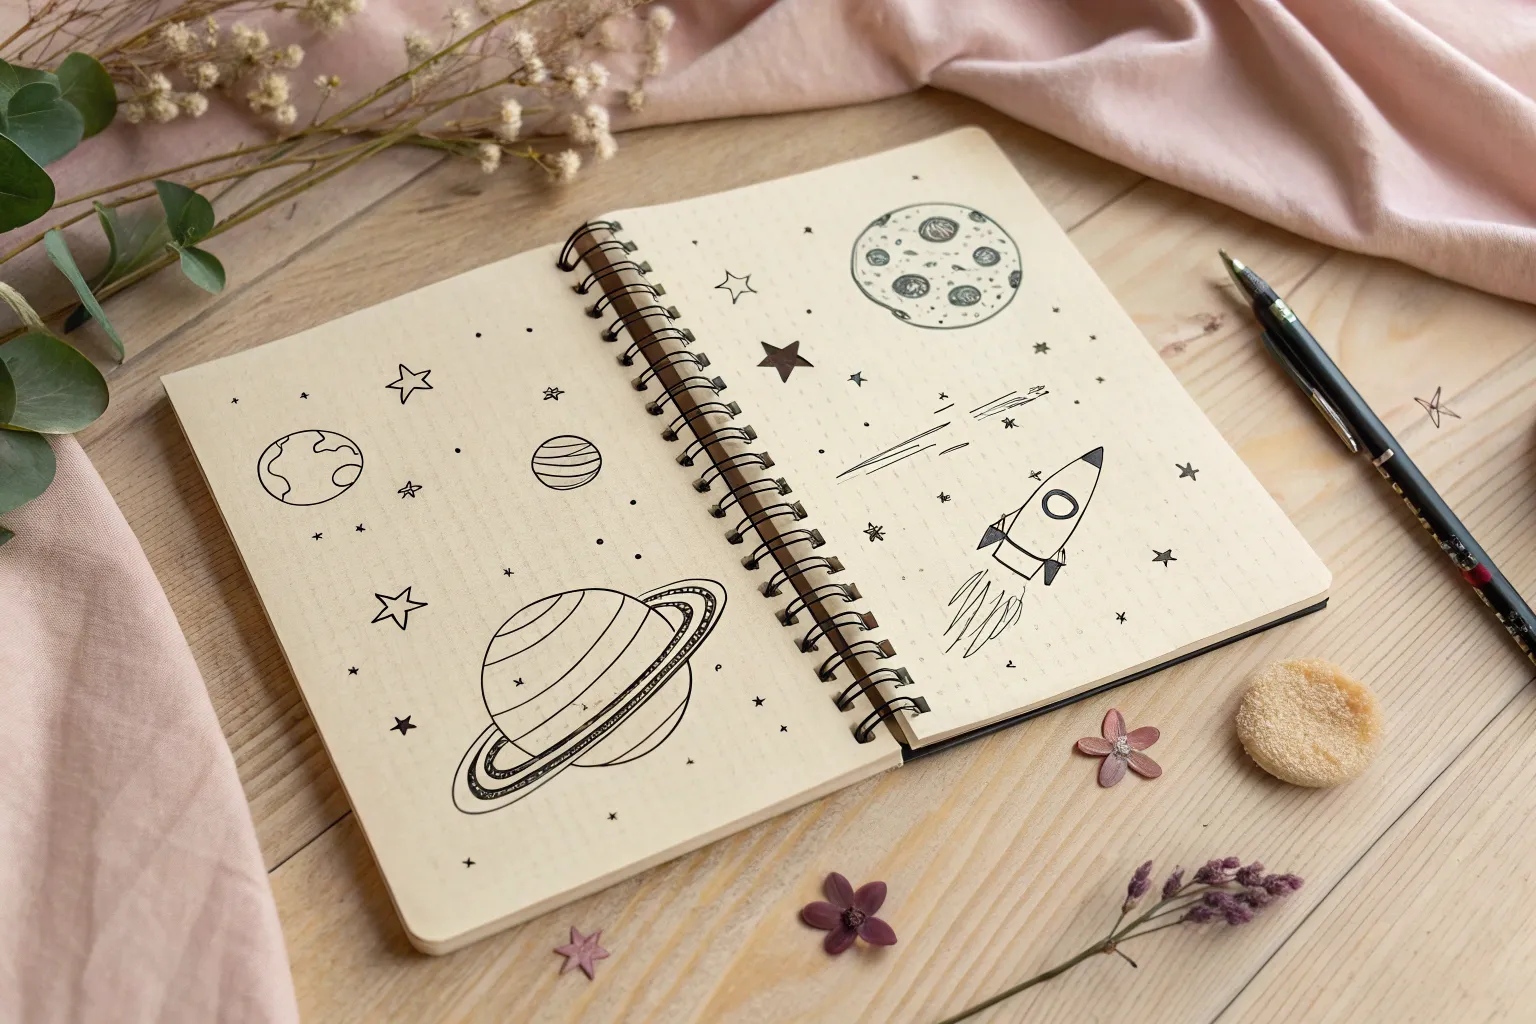
Whenever I’m not sure what to draw, I reach for astronomy—because you can go from tiny doodles to dramatic, inky scenes without leaving your sketchbook. Here are my favorite astronomy drawing ideas that feel approachable, satisfying, and full of that quiet cosmic magic.
Moon Phases Strip
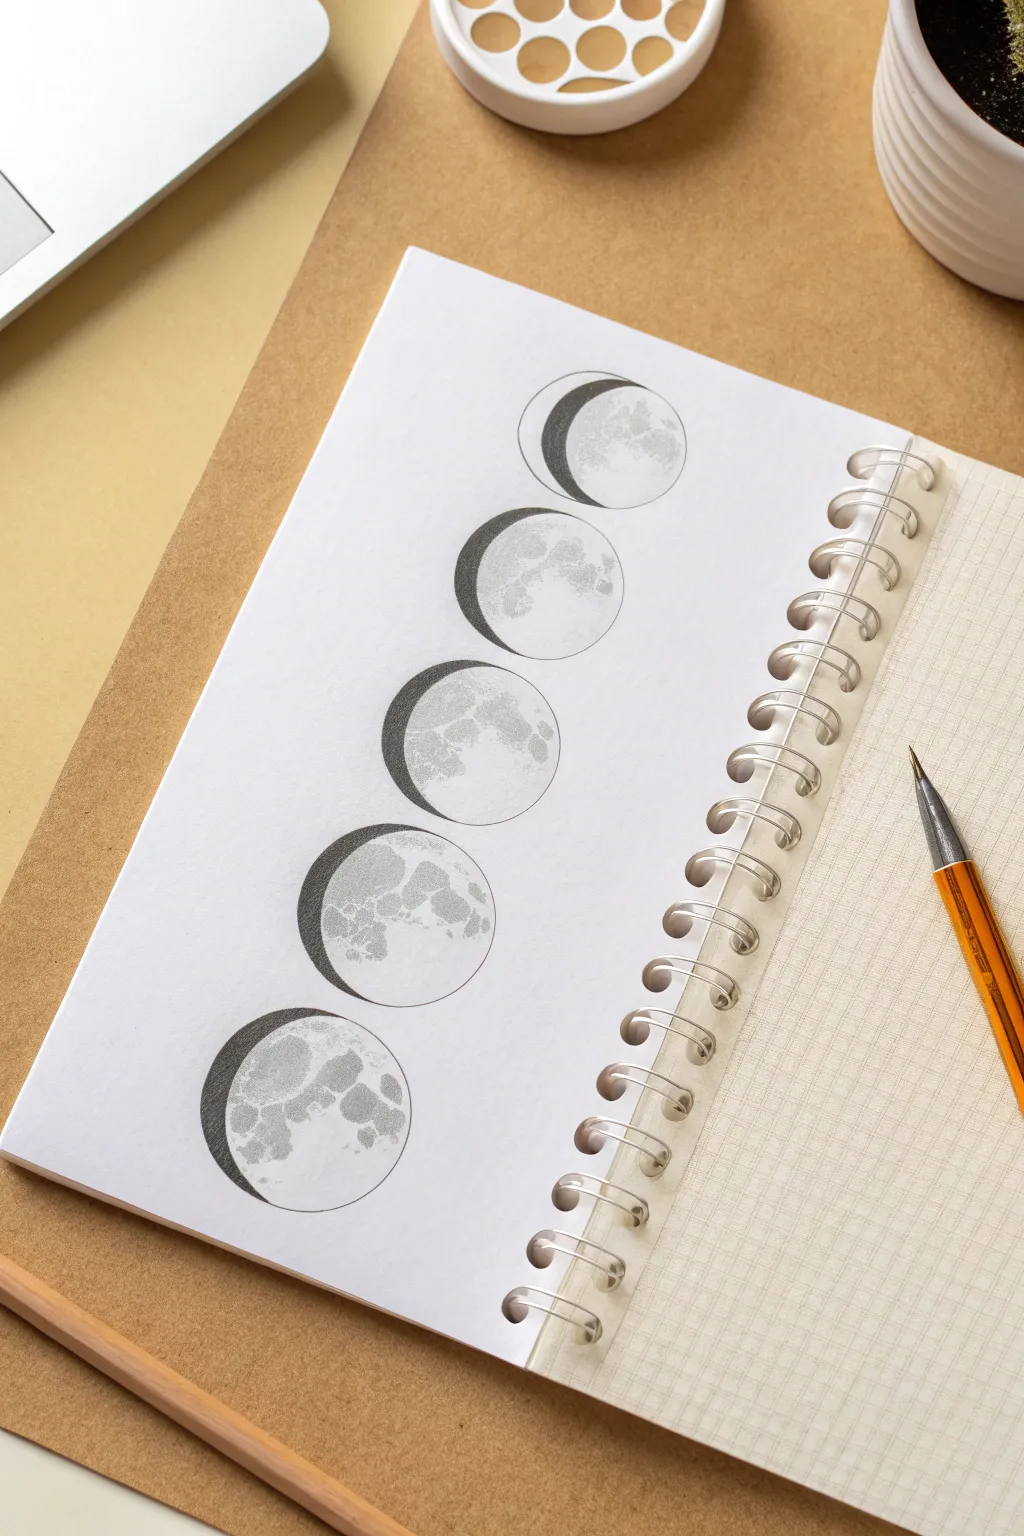
Capture the subtle beauty of lunar progression with this detailed graphite study. You will create a vertical strip of five moon phases, focusing on realistic crater textures and the delicate play of light across the lunar surface.
Step-by-Step Tutorial
Materials
- Spiral-bound sketchbook or drawing paper
- Compass or circular stencils (approx. 1.5 – 2 inches diameter)
- Graphite pencils (HB, 2B, 4B)
- Mechanical pencil (0.5mm) for fine details
- Blending stump or tortillon
- Kneaded eraser
- Ruler
Step 1: Planning the Layout
-
Measure the vertical axis:
Begin by lightly drawing a vertical centerline down the middle of your page to ensure your moons align perfectly. -
Space the circles:
Using a ruler, mark five center points along your line. Aim for equal spacing between them so the composition feels balanced, leaving about half an inch between each circle. -
Draw the outlines:
Use your compass or a circular stencil to draw five identical circles based on your center points. Keep your pressure very light so these guidelines can be erased or integrated later.
Smudge Alert
Place a scrap piece of paper under your hand as you work. This prevents the oils in your skin from transferring and keeps you from smearing the lower moons while drawing the upper ones.
Step 2: Defining the Terminators
-
Mark the phase curves:
For this particular study, we are depicting a progression of crescents. For each circle, lightly sketch the inner curve (the terminator line) where the light meets the shadow. Start with a thin crescent at the top and gradually widen the lit area for subsequent moons, or vice versa as seen in the reference. -
Refine the curves:
Check that the curve of the terminator helps suggest the sphere’s volume. It shouldn’t be a straight line but an arc that follows the sphere’s contour.
Crater Depth Trick
For realistic craters, always shadow the side closest to your light source and highlight the opposite rim. This simple reversal creates an instant 3D popping effect.
Step 3: Mapping the Terrain
-
Sketch the maria:
Looking at a moon reference photo, lightly outline the major dark patches (lunar maria). These shapes are unique and help the viewer instantly recognize the subject as the moon. -
Place primary craters:
Identify the largest impact craters, especially those near the terminator line where shadows will be most dramatic. Sketch their positions as small ellipses or circles. -
Vary the terrain:
Ensure the shapes of the maria differ slightly from top to bottom if you are depicting the same moon face rotating, or keep them consistent to show the shadow moving across a stationary face. In the reference, the texture implies a consistent face with shifting shadow.
Step 4: Shading and Texture
-
Fill the dark side:
Using a 2B or 4B pencil, shade the ‘dark side’ of the moon. Instead of making it solid black, apply a very dark grey to represent the unlit portion, leaving a crisp edge against the white paper. -
Shade the maria:
Switch to an HB pencil to gently fill in the maria shapes on the lit side. These should be a mid-tone grey—distinctly lighter than the shadowed side but darker than the highlands. -
Detail the terminator:
This is the most critical step for realism. Along the terminator line, add focused contrast. Let the shadows lengthen into the craters to show depth. -
Stipple for texture:
I find that using a stippling motion (tiny dots) or very small circular scumbles with a mechanical pencil creates the perfect rough, rocky texture for the lighter areas of the moon. -
Soften distinct edges:
Use a blending stump to very gently soften the transitions within the maria. Be careful not to smudge the crisp outer edge of the moon circle.
Step 5: Final Touches
-
Lift highlights:
Take your kneaded eraser and pinch it into a fine point. Dab—don’t rub—areas where crater rims catch the light to brighten them back to pure white. -
Clean the edges:
Go around the outer circumference of each moon with a sharp eraser to ensure a perfect circle, removing any stray graphite dust. -
Deepen the blacks:
Do a final pass with your 4B pencil on the shadowed crescent side to ensure proper contrast against the delicate grey textures of the lit side.
Now you have a serene lunar record to keep in your sketchbook


Ringed Planet Close-Up
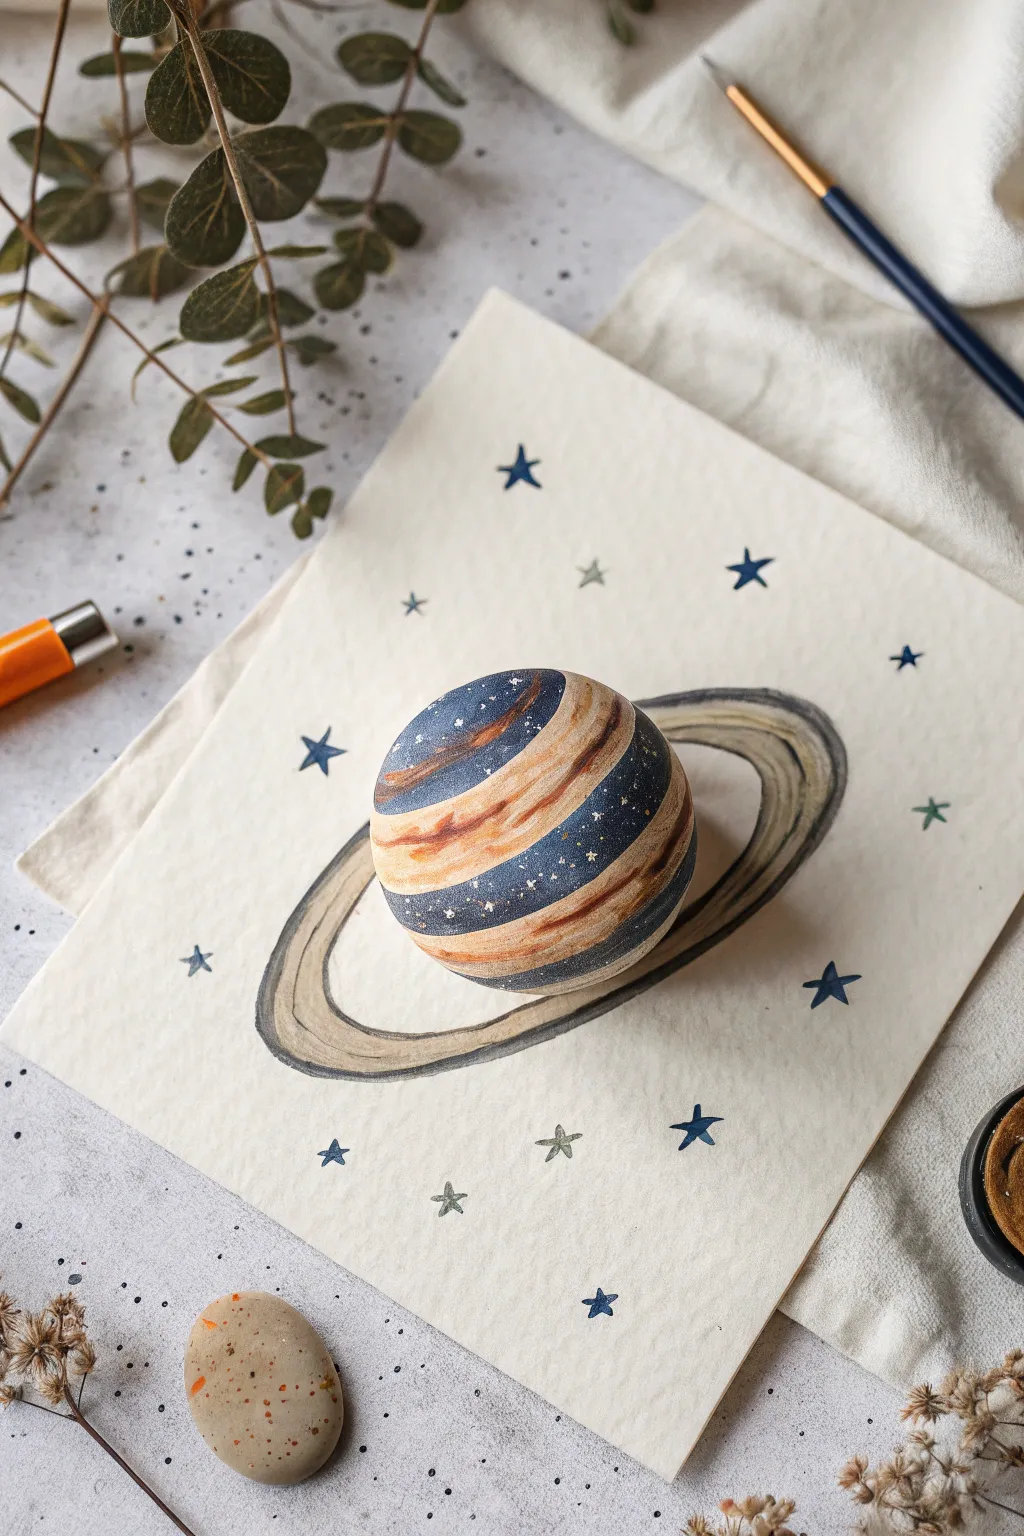
Bring the cosmos off the page with this clever mixed-media project that combines flat illustration with a painted 3D element. By placing a hand-painted wooden sphere directly onto a watercolor background, you create a striking optical illusion of a planet emerging from its rings.
Step-by-Step
Materials
- Small wooden craft sphere (approx. 1.5 – 2 inches)
- Heavyweight watercolor paper (cold press for texture)
- Watercolor paints (Payne’s Gray, Burnt Sienna, Yellow Ochre)
- Acrylic paints (White, Navy Blue, dark brown)
- Pencil and eraser
- Fine detail paintbrush
- Medium round paintbrush
- Gold or silver metallic paint (optional)
- Matte varnish (optional)
Step 1: Painting the Planetary Sphere
-
Base coat the sphere:
Start by painting your wooden sphere with a solid coat of white acrylic paint. This primes the wood and ensures your later colors will pop. If the wood grain is very strong, you might need a second coat after the first dries. -
Map out the bands:
Visualize the planet’s stripes. Using a mix of Navy Blue and a touch of black, paint wide, horizontal bands across the upper and lower sections of the sphere, leaving the equator area white for now. -
Add warm tones:
In the white equatorial gap, paint sweeping streaks of burnt orange and tan. Mix your browns with a little white to get that creamy, gas-giant look. Don’t worry about perfect lines; natural planetary atmosphere is turbulent and uneven. -
Blend the transitions:
While the paint is still slightly tacky, use a damp, clean brush to gently feather the edges where the blue and orange bands meet. This creates a soft, atmospheric transition rather than a hard stripe. -
add starry details:
Once the main colors are dry, dip an old toothbrush or a stiff brush into watered-down white acrylic. Run your thumb over the bristles to flick tiny specks of ‘stars’ onto the dark blue sections of the planet. I find this gives it a magical, deep-space depth. -
Seal the sphere:
Let the sphere dry completely. If you want to protect the paint handling, give it a quick coat of matte varnish.
Paint Rolling Off?
If acrylic paint slides off the sphere, the wood might be sealed or too smooth. Lightly sand the surface with fine-grit sandpaper to give the paint some ‘tooth’ to grab onto.
Step 2: Creating the Backdrop
-
Position the planet:
Place your dry painted sphere in the center of your watercolor paper. Lightly trace a circle around the base with a pencil so you know exactly where the planet will sit. -
Sketch the rings:
Draw an elliptical ring system around your traced circle. The rings should go behind the planet area and come around the front. Keep the pencil lines very faint so they don’t show through the paint later. -
Paint the rings:
Using watered-down watercolor paints in gray and sepia tones, fill in the ring shape. Leave some streaks of white paper showing through to mimic the gaseous, icy texture of planetary rings. -
Deepen the shadows:
Add a darker wash of Payne’s Gray to the back section of the rings (the part that will be ‘behind’ the sphere) and underneath where the sphere casts a shadow. This is crucial for the 3D illusion. -
Defined edges:
Take a fine liner brush with a more concentrated dark gray or brown and outline the outer and inner edges of the rings to give them clear definition against the paper. -
Scatter the stars:
Paint small five-pointed stars randomly around the background using blue or gray watercolor. Vary the sizes to create a sense of distance. -
Add detail to stars:
For extra dimension, add tiny dots of disparate colors (like a dull green or faint red) near some stars, or use a tiny dot of metallic paint in the center of the larger starts.
Step 3: Assembly
-
Final placement:
Once the paper is completely bone-dry, place a small dab of strong craft glue or a double-sided adhesive dot in the center of your traced circle. -
Secure the planet:
Press your painted sphere firmly onto the spot. Ensure the stripes of the planet align nicely with the angle of the painted rings for a cohesive look.
Make It Sparkle
Use gold leaf or metallic gold paint for the thin highlighted bands on the planet’s rings. It catches the light beautifully when displayed on a desk or shelf.
Now you have a miniature world that literally pops off the page, ready to be displayed


Simple Solar System Lineup
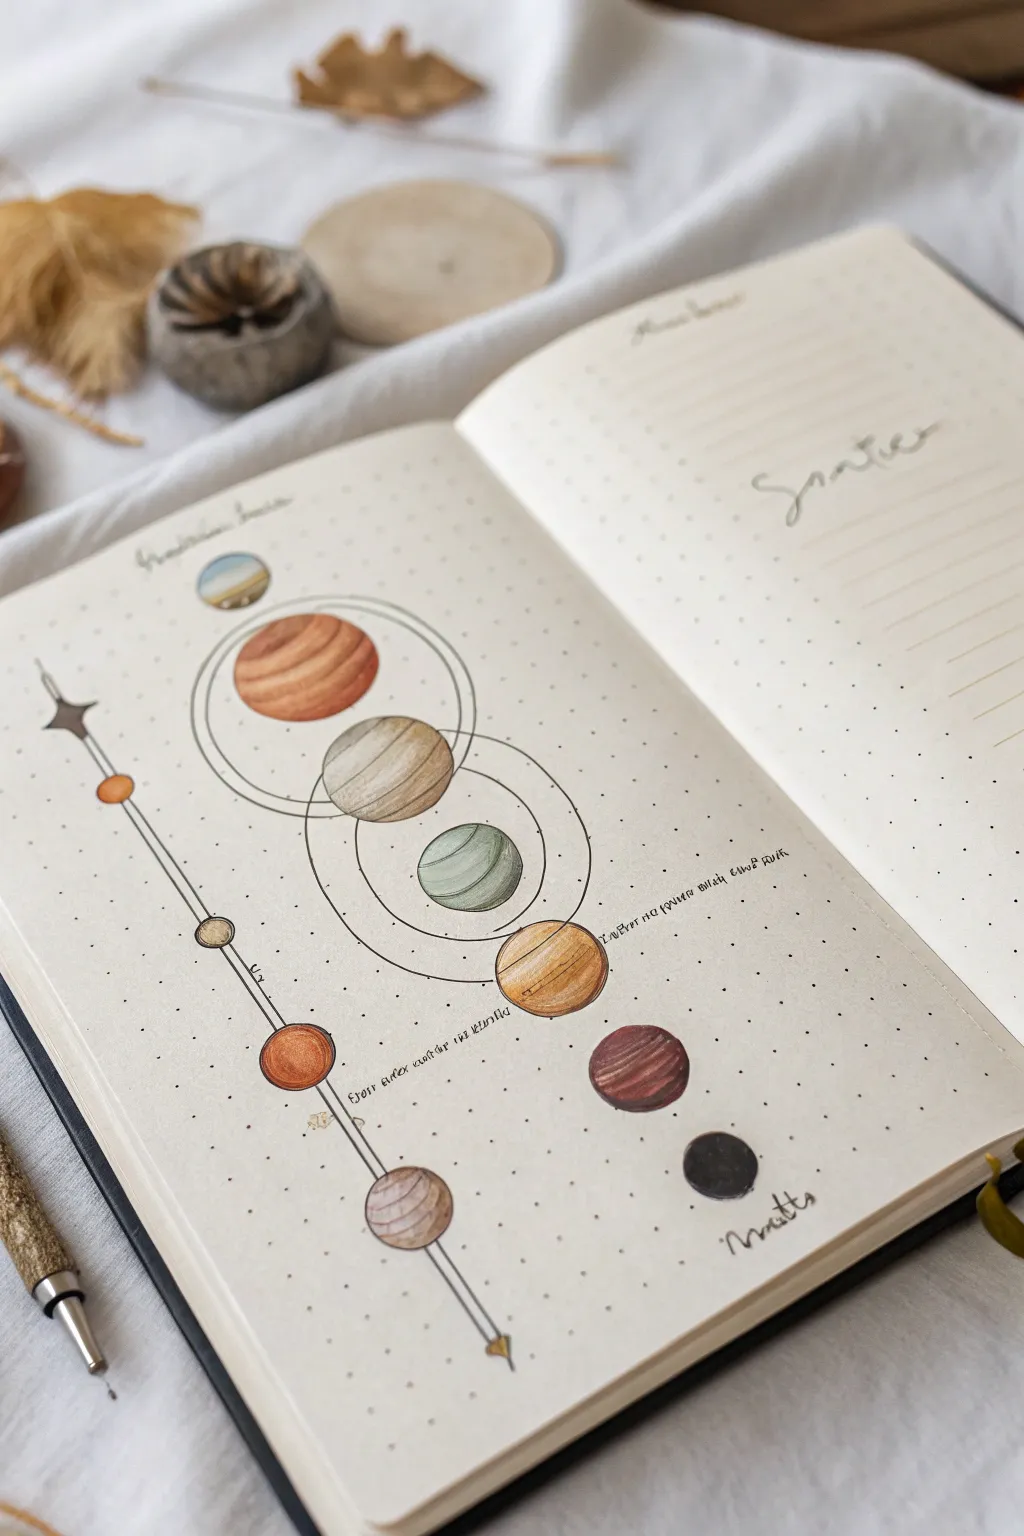
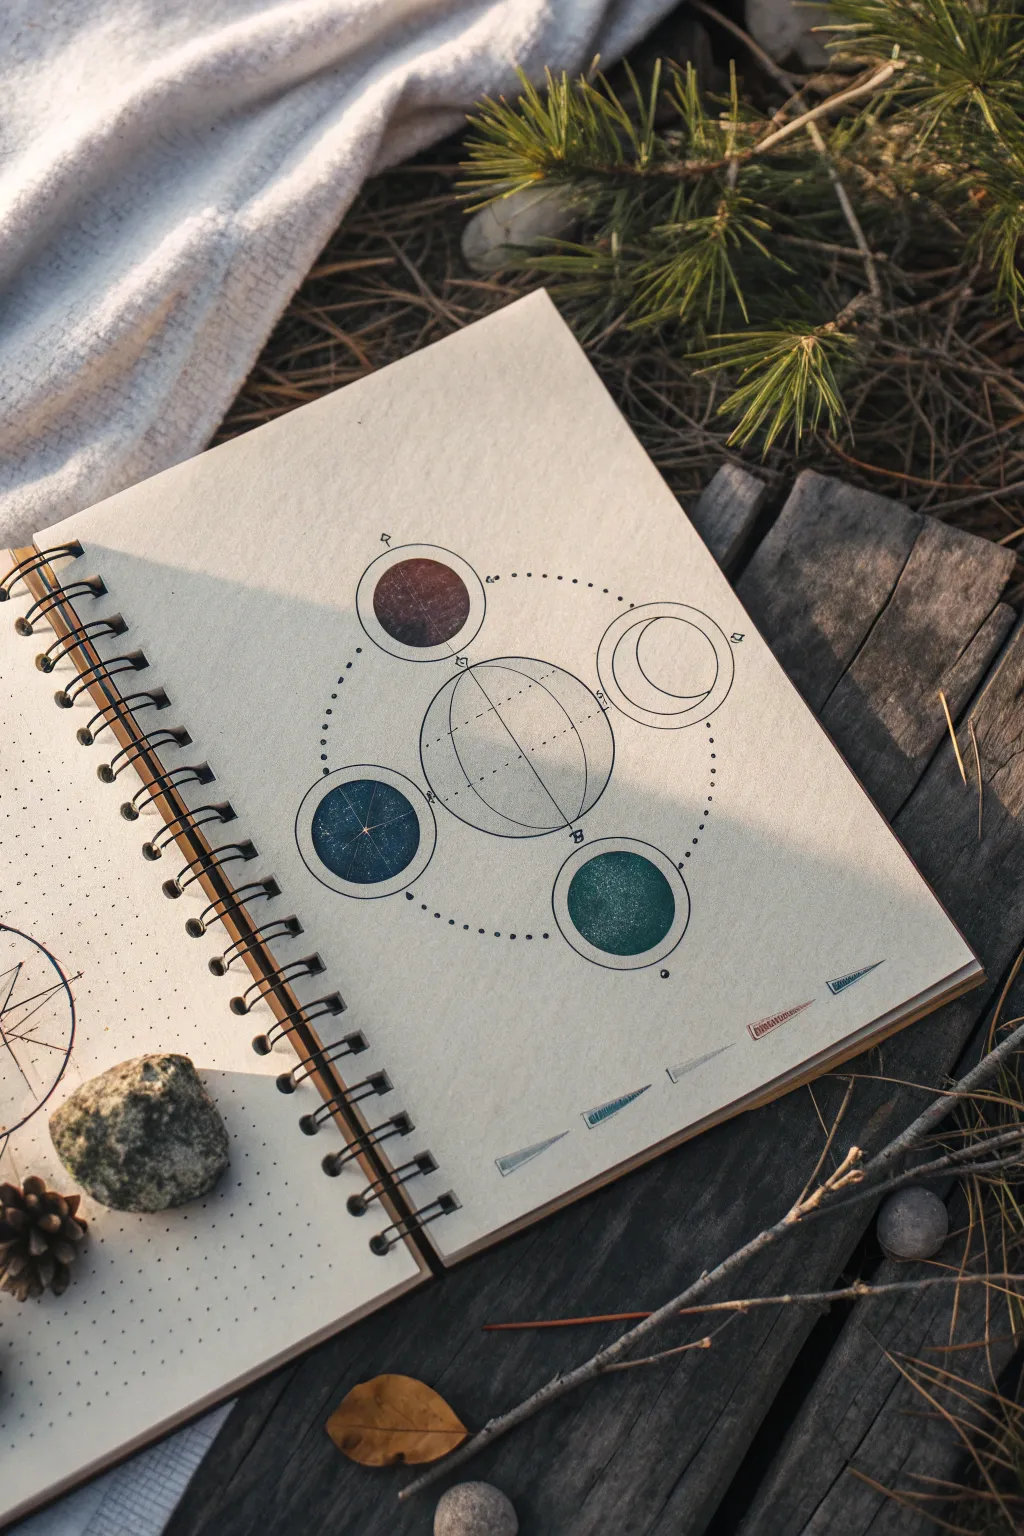
This elegant bullet journal spread captures a stylized, vertical alignment of planets connected by delicate geometric lines. The soft, earthy color palette and dotted grid background give it a structured yet whimsical astronomical feel.
Step-by-Step Guide
Materials
- A5 dotted notebook (bullet journal)
- Pencil (HB or H)
- Eraser
- Fine liner pen (black or dark sepia, 0.1mm and 0.3mm)
- Colored pencils or alcohol markers (muted earth tones: rust, ochre, sage green, brown, grey)
- Circle stencil or compass
- Ruler
Step 1: Planning the Layout
-
Establish the central axis:
Begin by lightly drawing a vertical guide line down the left-third of your page using a ruler and pencil. This will serve as the anchor for the smaller planetary bodies and the connecting rod. -
Mark planet positions:
Along the center of the page, lightly mark the vertical positions for the larger planets using small dots. Space them out evenly, leaving room at the top and bottom. Notice the largest planet is near the top, getting gradually smaller downwards. -
Sketch the main circles:
Using a circle stencil or compass, pencil in the main column of five planetary bodies in the center. Vary the sizes: a medium circle at the top, a large one below it, followed by three progressively smaller circles. -
Sketch the side elements:
On your left-hand guide line, sketch smaller circles corresponding to the central planets. Connect them with a long, thin vertical rod design that looks like an antenna or a planetary alignment tool.
Ink Smudge Rescue
If you accidentally smudge the ink while erasing, turn it into a ‘gas cloud’ or nebula feature by gently blending it out with a white colored pencil or a little white gouache.
Step 2: Adding Geometric Details
-
Draft the orbital rings:
Around the top three large planets, lightly sketch intersecting circular rings. These shouldn’t be perfect ovals but rather thin circles that overlap the planets, creating a geometric, diagram-like aesthetic. -
Connect the components:
Draw horizontal or diagonal lines connecting the ‘antenna’ rod on the left to specific planets in the center column. Use your ruler to keep these lines crisp. -
Add the bottom planets:
Below the main cluster, sketch two final, smaller circles to represent the furthest planets, isolated from the geometric web above. -
Refine the rod design:
Add details to the left-hand rod, such as a star-shaped finial at the top and a pointed tip at the bottom. Small nodes can be drawn where the connecting lines meet the rod.
Step 3: Inking the Outline
-
Outline the planets:
Switch to your 0.3mm fine liner. Carefully trace the planet circles. I prefer to break the line slightly where the orbital rings will pass in front, though a solid line works too for a bolder look. -
Ink the geometric lines:
Use a thinner 0.1mm pen and a ruler for the straight lines and the orbital rings. A thinner line weight here helps push these elements into the background, making the planets pop. -
Add lettering:
If you wish to include the handwritten notes seen in the image, use the 0.1mm pen to write small, cursive labels next to specific planets or lines. Keep the handwriting tiny and delicate. -
Erase pencil marks:
Wait for the ink to dry completely—smudging is the enemy here. Once safe, gently erase all underlying pencil sketches.
Metallic Accents
Use a gold or silver gel pen to re-trace the orbital rings or add tiny flecks of stardust in the background. This subtle shimmer adds a magical touch when the page catches the light.
Step 4: Coloring and Shading
-
Base colors for top planets:
Using colored pencils, lightly shade the top planet in a soft blue-grey. For the large Jupiter-like planet, use a warm terracotta or rust color. -
Add texture with banding:
Planets aren’t flat colors. Add horizontal bands of darker pigment across the rust planet to simulate gas giant storms. Do the same for the beige/grey planet below it using horizontal strokes. -
Color the smaller bodies:
Color the middle green planet (Uranus-inspired) with a muted sage. The lower planets can be colored in ochre, deep brown, and finally a dark charcoal for the bottom-most circle. -
Shade for dimension:
Add a crescent of shadow on the right side of each sphere using a darker shade of your base color or a soft grey pencil. This simple step instantly turns flat circles into 3D spheres. -
Color the left rod:
Fill in the small nodes on the left rod with matching colors to link them visually to the main planets. Leave the rod itself uncolored or shade it very lightly with grey.
Now you have a beautifully structured astronomical chart ready to track your habits or simply decorate your journal


Starry Sky Gradient
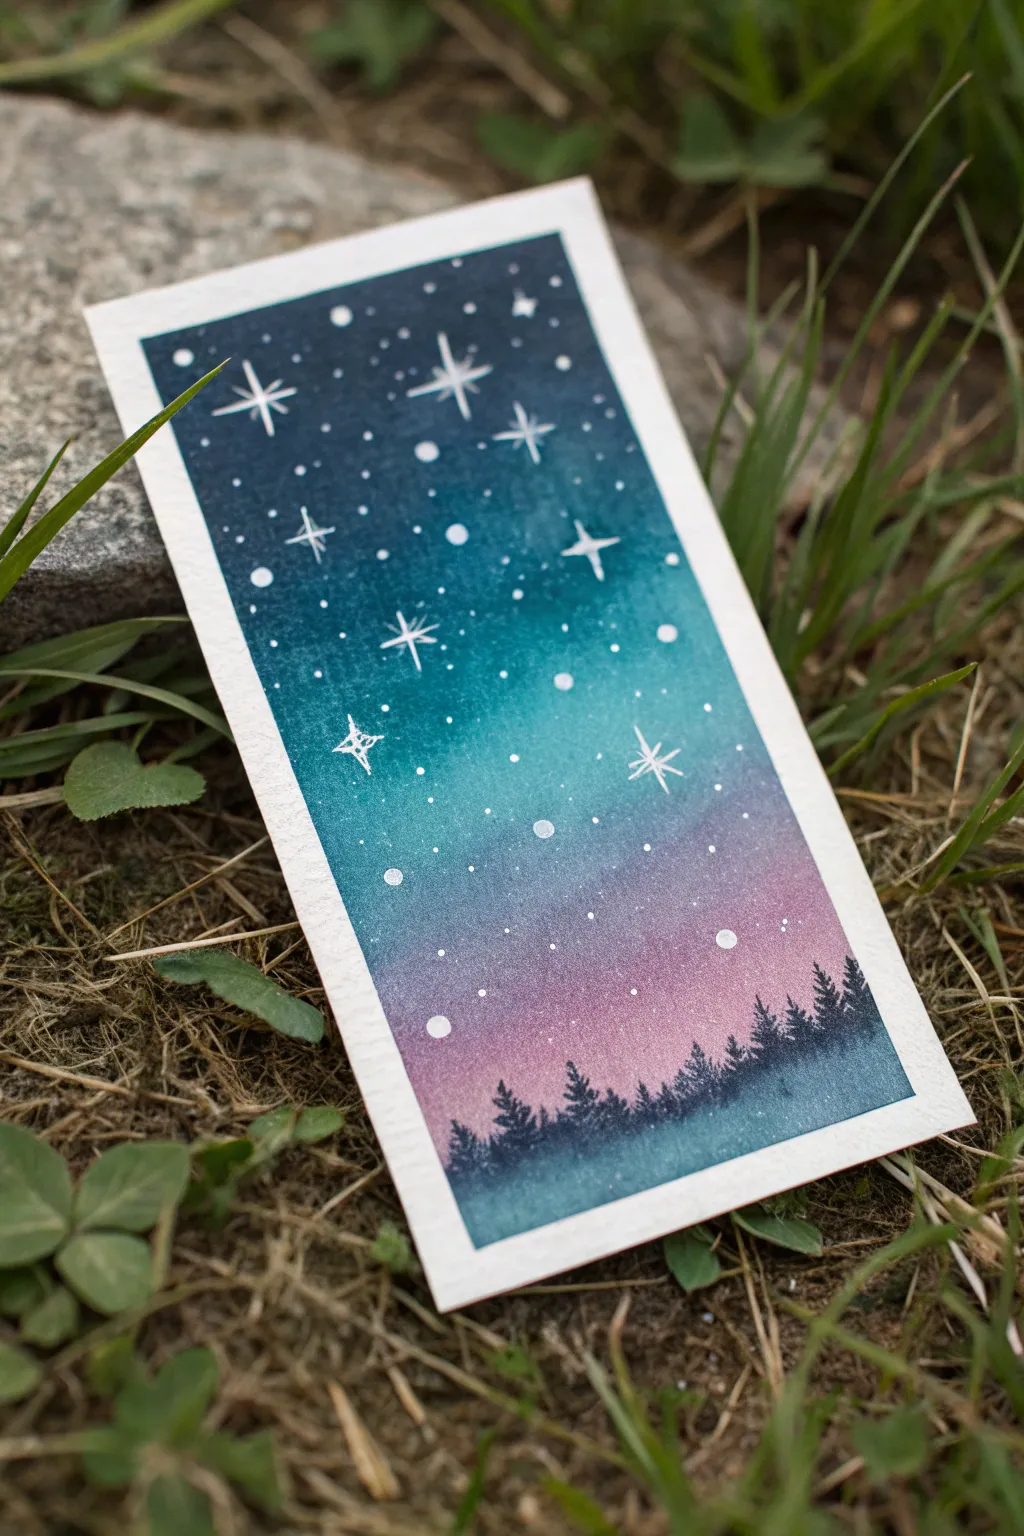
Capture the magic of a northern sky with this ethereal watercolor bookmark featuring a seamless color gradient. This project combines blending techniques with delicate white ink details to create a portable piece of starlit art.
Detailed Instructions
Materials
- Cold press watercolor paper (300gsm), cut into a bookmark strip
- Watercolor paints (Indigo, Turquoise/Teal, Magenta/Purple)
- Painter’s tape or masking tape
- A flat wash brush or medium round brush
- Clean water and blending palette
- White gel pen (e.g., Gelly Roll or Posca)
- White gouache or acrylic ink (optional for splatter)
- Fine liner brush (if using gouache)
- Paper towels
Step 1: Setting the Stage
-
Tape edges:
Begin by securing your watercolor paper strip to a flat, hard surface using painter’s tape. Create a border of about 1/4 inch on all four sides to ensure crisp, clean white edges once finished. -
Pre-wet the paper:
Use a clean, damp brush to apply a very light coat of water to the entire painting area. The paper should sheen slightly but not have standing puddles, performing a ‘wet-on-wet’ technique to help colors blend.
Muddy Colors?
If your teal and purple create a brown sludge where they meet, let the teal layer dry slightly (not fully) before adding the purple. This prevents them from over-mixing.
Step 2: Creating the Gradient
-
Start dark:
Load your brush with concentrated Indigo or a deep Navy Blue. Apply this to the top third of the bookmark, painting horizontally back and forth to get solid coverage. -
Transition to teal:
Clean your brush slightly and pick up a vibrant Turquoise or Teal. Paint the middle section, slightly overlapping with the dark blue above. Let the wet paint merge naturally where they touch. -
Add the glow:
Clean your brush thoroughly. Pick up a watery mix of Magenta or Purple. Paint the bottom third, blending it upward into the teal. The transition might look muddy if over-mixed, so try to use just a few strokes to mesh the colors. -
Smooth the blend:
If I notice harsh lines, I like to take a clean, damp brush and gently run it horizontally across the transition zones to soften the gradient. Tilt the board slightly to encourage gravity to help the blending. -
Dry completely:
This is crucial: allow the background to dry 100%. If the paper is cold to the touch, it’s still damp. Using a heat tool or hairdryer can speed this up, but air drying is safest.
Level Up: Metallic Pop
Trace over the largest four-point stars with a silver or gold metallic gel pen to make the constellation genuinely shimmer when the light hits it.
Step 3: Adding the Silhouette
-
Mix shadow color:
Create a very thick, opaque mixture of Indigo or Paynes Gray. You want this paint to be much less watery than your background layers so it stands out sharp. -
Paint tree line:
Using the tip of a small round brush, dab a jagged line across the very bottom of the painted area (over the purple section) to suggest the ground and base of the forest. -
Form the trees:
Using quick, small vertical strokes, pull paint upward from the base line to create simple pine tree shapes. Keep them loose; varied heights make the forest look more organic. -
Texture the pines:
Add tiny horizontal dabs on the sides of your vertical lines to mimic pine boughs. Ensure the trees are completely dry before moving to the stars.
Step 4: Starlight Details
-
Splatter stars:
Load a toothbrush or stiff brush with white gouache or acrylic ink diluted slightly with water. Flick the bristles to spray fine white specks across the upper blue and teal sections. -
Draw large stars:
Using a white gel pen, draw several four-pointed stars. Start with a vertical line, cross it with a horizontal one, and keep the center point sharp. -
Add constellations:
Place specific larger dots among the splatter using the gel pen. I sometimes gently tap the pen tip to create varying sizes of ‘planets’ or brighter distant stars. -
Highlight the horizon:
Optionally, add a tiny dot or two near the tree line as if a star is setting or peeking through the branches. -
The reveal:
Once all ink and paint is bone dry, slowly peel away the painter’s tape at a 45-degree angle. This reveals the satisfying, crisp white frame around your galaxy.
Slip this peaceful night scene into your favorite book and enjoy the view

PENCIL GUIDE
Understanding Pencil Grades from H to B
From first sketch to finished drawing — learn pencil grades, line control, and shading techniques.
Explore the Full Guide
Constellation Connect-the-Dots
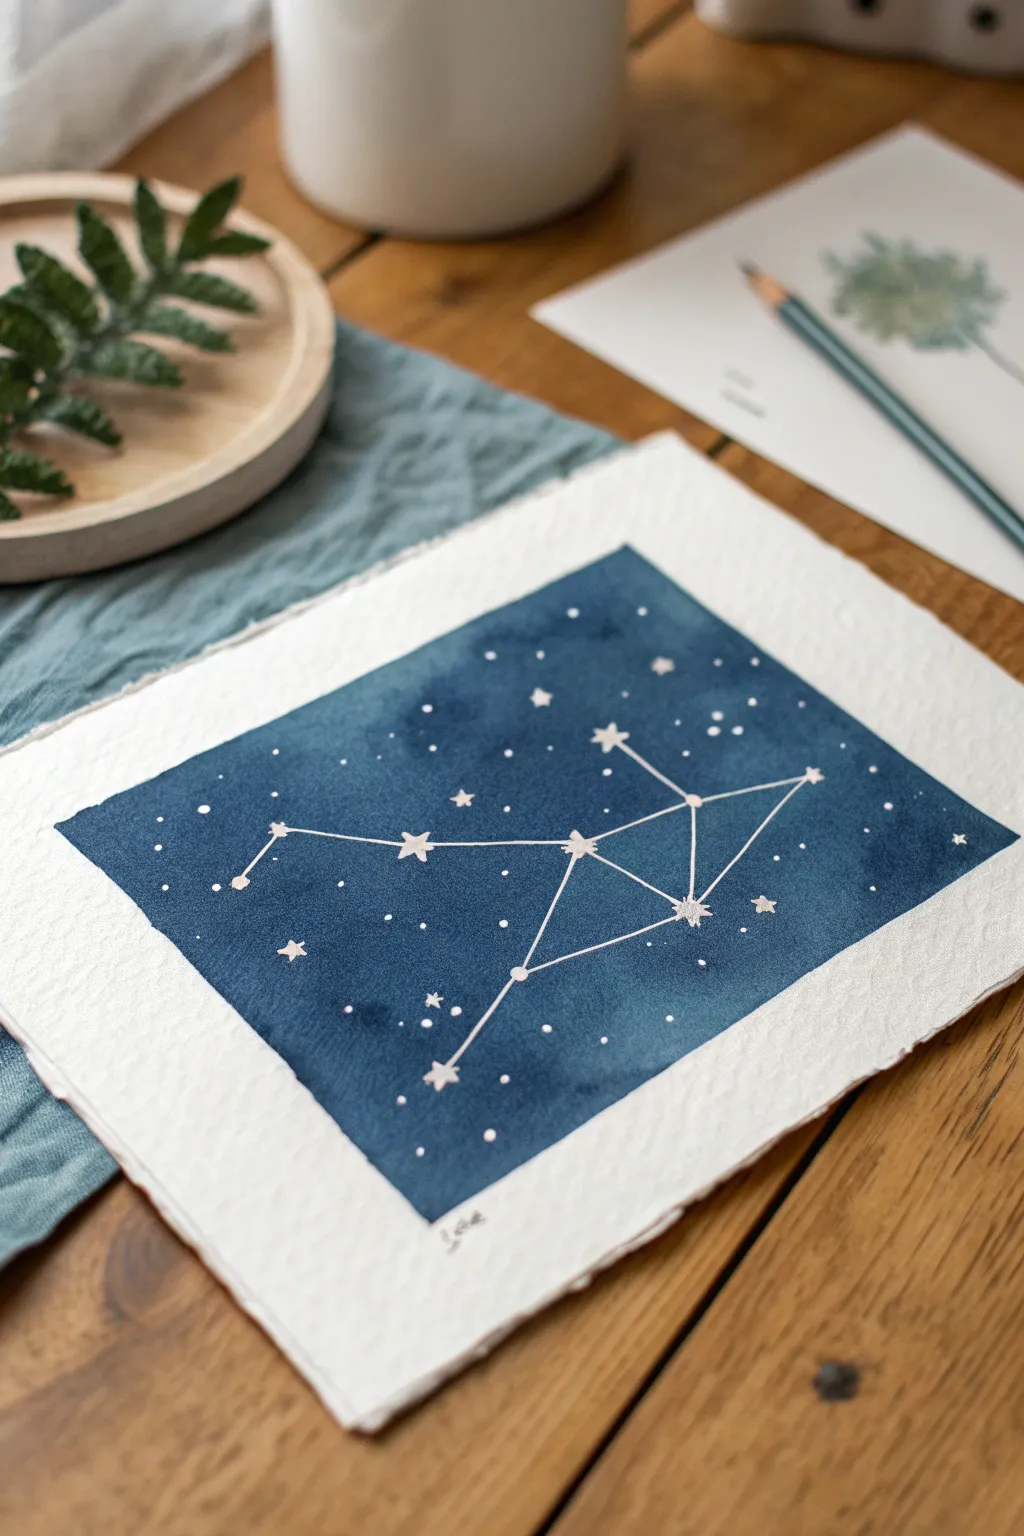
Capture the magic of the night sky with this minimalist constellation art piece. Using a rich watercolor wash as your backdrop, you’ll map out the stars of Libra with delicate white ink to create a stunning, contrast-filled illustration.
Step-by-Step Guide
Materials
- Cold press watercolor paper (300 gsm)
- Painter’s tape or masking tape
- Watercolor paints (Indigo, Payne’s Gray, Prussian Blue)
- Large round watercolor brush (size 10 or 12)
- Small detail brush (size 0 or 1)
- White gel pen or white gouache
- Ruler
- Pencil and eraser
- Jar of water and paper towels
Step 1: Creating the Night Sky
-
Prepare your paper:
Begin by tearing or cutting your watercolor paper to your desired size (around 5×7 or 8×10 inches). If you prefer the rustic look shown in the example, gently tear the edges against a ruler instead of cutting with scissors. -
Mask the borders:
Tape down your paper onto a hard board or table surface using painter’s tape. Create a border of about 1 inch on all sides. Press the tape edges down firmly to prevent paint from seeping underneath. -
Wet the surface:
With your large brush and clean water, apply a clear wash over the entire rectangular area inside the tape. The paper should be glisten with moisture but not have puddles. -
Mix your cosmic blue:
On your palette, mix a deep, saturated blue. I like to combine Indigo with a touch of Payne’s Gray to get that deep, midnight hue. -
Apply the base wash:
Load your large brush with the dark blue mix and drop it onto the wet paper. Start from the corners and let the pigment bloom and spread naturally. -
Add depth variation:
While the paint is still wet, drop in more concentrated pigment in random areas to create a cloudy, atmospheric texture. This mimics the uneven darkness of real space. -
Let it dry completely:
Allow the wash to dry fully. This is crucial—if the paper is damp, your pen lines will bleed. You can use a hairdryer on a low setting to speed this up.
Starry Splatter
For a more organic galaxy effect, load a stiff brush with white gouache and flick the bristles with your thumb to spray tiny mist-like stars over the background.
Step 2: Mapping the Stars
-
Draft the constellation:
Lightly sketch the Libra constellation (or your chosen sign) with a pencil. Mark simple dots for the star positions first to ensure the proportions look right before connecting them. -
Draw the main stars:
Using your white gel pen or a fine brush with white gouache, draw small 5-point stars over your key pencil marks. Make the central stars slightly larger than the peripheral ones. -
Connect the dots:
Use a ruler and your white pen to draw straight, crisp lines connecting the main stars. Keep the pressure light so the lines don’t look too bulky. -
Add background stars:
Dot the surrounding blue space with tiny specks of white to represent distant stars. Vary the sizes—some can be simple dots, while others can be tiny crosses. -
Create a focal star:
Choose one main star to highlight, drawing it slightly larger with more pronounced points to serve as an anchor for the composition. -
Clean up the edges:
Once the ink is totally dry, carefully peel away the painter’s tape. Pull it at a 45-degree angle away from the painting to avoid tearing the paper. -
Sign your work:
Add your signature or tiny initials in pencil just below the painted rectangle on the white border for a professional finishing touch.
Metallic Magic
Swap the white ink for silver or gold metallic watercolor paint for the constellation lines. It catches the light beautifully when viewed from an angle.
Now you have a piece of captured starlight ready to frame or gift to a friend
Retro Rocket Ship Icons
Capture the nostalgia of classic space exploration with this pattern of retro rocket ships sketched on dot grid paper. The simple, bold lines create a whimsical fleet that looks fantastic as a page filler or a decorative border.
How-To Guide
Materials
- Dot grid notebook or journal
- Fine liner pen (0.3mm or 0.5mm, black)
- Pencil (HB or H)
- Eraser
- Ruler (optional, for spacing)
Step 1: Planning the Fleet
-
Map out the grid:
Visualize a grid layout on your dot paper. You want to space the rockets evenly, skipping about 4-5 dot rows between vertical neighbors and staggering them horizontally like a brick pattern. -
Sketch the fuselages:
Using your pencil, lightly draw the main body of each rocket. Aim for a long, narrow bullet shape—rounded at the top and slightly wider at the base, spanning roughly 3-4 dot grid squares high. -
Add nose cones:
Capping off the top of each bullet shape, sketch a small horizontal curve to define the separate nose cone area. -
Draft the fins:
At the base of the rocket body, sketch two triangular wings sticking out to the left and right. Add a third vertical stabilizer in the center bottom.
Star Power
Vary the size of your background stars. Having a mix of large outlines and tiny solid dots creates depth, making the rockets feel like they are flying through a vast field.
Step 2: Inking the Details
-
Outline the body:
Switch to your black fine liner. With a steady hand, trace over your pencil lines for the main fuselage, ensuring the curves meet neatly at the tip. -
Define the wings:
Ink the triangular side fins. For a dimensional look, draw a second line inside the wing shape parallel to the body, making them look like attached components rather than flat triangles. -
Draw the window:
Place a distinct circle in the upper third of the rocket body. Draw a smaller circle inside it to create the classic porthole window frame. -
Add the engine nozzle:
At the very bottom center, draw a small rectangular or trapezoidal shape connecting the fuselage to where the flame will be. -
Create the center fin detail:
Draw the center stabilizer fin directly over the engine nozzle area. Adding a few tiny horizontal hatch lines here gives it a technical, mechanical texture.
Level Up: Retro Color
Use mildliners or colored pencils to add accents. Try a muted teal for the fins and a soft orange for the blast flames to maintain that vintage 1950s sci-fi aesthetic.
Step 3: Adding Motion and Finishing Touches
-
Blast off flames:
Below the engine nozzle, sketch a burst of fire. Don’t overthink this shape—use jagged, wavy lines that taper downward to suggest thrust. -
Internal texturing:
Add three or four very short vertical lines inside the flame shape to indicate speed and heat intensity. -
Scatter the stars:
Fill the negative space between your rockets with small hand-drawn stars. Alternate between 5-point star outlines and simple 4-point sparkle shapes. -
Add tiny space dust:
To make the page feel full without looking cluttered, add single dots and tiny circles randomly around the rockets and stars. -
Erase guidelines:
Wait at least five minutes for the ink to fully set to avoid smearing. Then, gently erase all underlying pencil sketches. -
Final check:
Scan your fleet for any broken lines or gaps in the ink. I usually go back and darken the porthole circles slightly to make them pop against the white paper.
Your page is now ready to launch your next big idea.
BRUSH GUIDE
The Right Brush for Every Stroke
From clean lines to bold texture — master brush choice, stroke control, and essential techniques.
Explore the Full Guide
Telescope on a Tripod
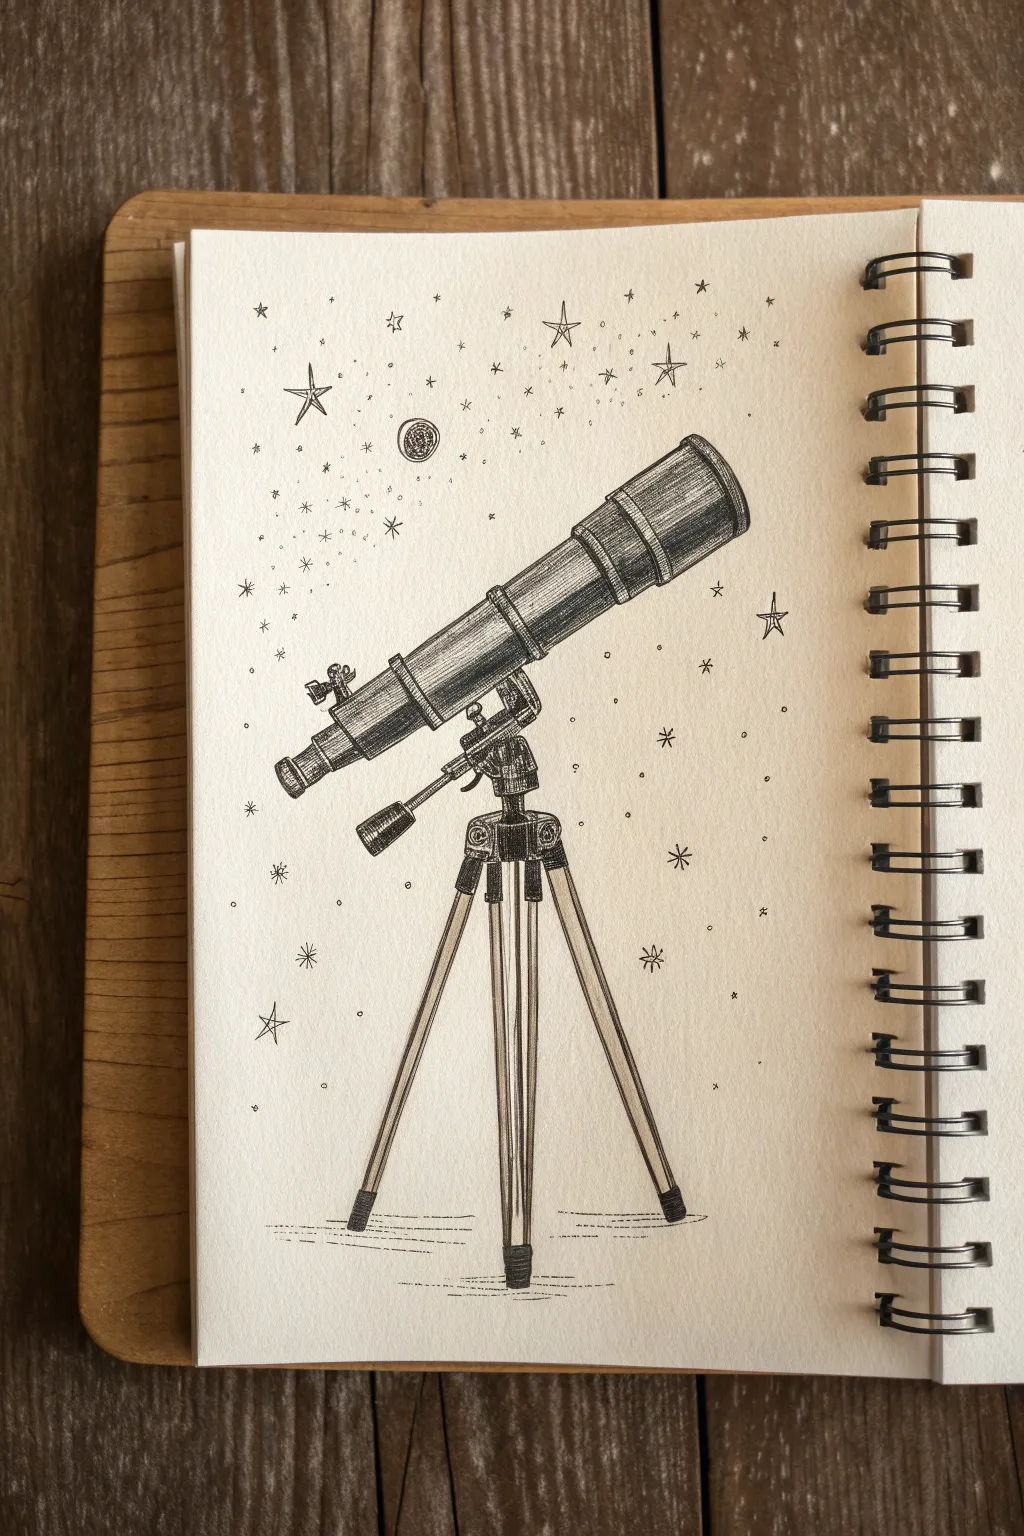
Capture the wonder of the night sky with this detailed pen-and-ink illustration of a classic refracting telescope. Using simple hatching techniques and varying line weights, you’ll create a vintage-style observatory piece right in your sketchbook.
Step-by-Step Tutorial
Materials
- Spiral-bound sketchbook (heavyweight paper preferred)
- HB graphite pencil
- Kneaded eraser
- Fine liner pens (sizes 0.1, 0.3, and 0.5)
- Ruler
Step 1: Penciling the Structure
-
Establish the angle:
Begin by lightly drawing a diagonal line across the upper half of your page. This will be the central axis of the telescope tube, pointing upwards toward the top right corner. -
Block in the tube:
Sketch a long, narrow rectangle around your central axis line. Break this rectangle into three distinct sections that get slightly wider towards the top end, representing the sliding telescopic parts. -
Add the lens and eyepiece:
At the top (wider) end, draw a thin rim for the objective lens cap. At the bottom (narrower) end, sketch a small cylinder for the eyepiece and a tiny focus knob protruding from the side. -
Sketch the mount:
Around the middle section of the telescope, draw the U-shaped mount and axis joint that connects the tube to the tripod legs. Don’t forget the small counterbalance arm extending downwards. -
Plot the tripod legs:
Use your ruler to draw three long, diverging lines for the legs. The central leg should face you directly, while the other two spread outward. Add the joint details at the top where they meet the mount. -
Detail the tripod feet:
Cap off the bottom of each leg with a rubber foot or spike detail, and add a few horizontal lines beneath them to ground the object.
Cylinder Shading Tip
When hatching the round telescope tube, curve your hatch lines slightly. This contour hatching tricks the eye into seeing a 3D rounded surface.
Step 2: Inking the Outline
-
Define the main lines:
Switch to your 0.5 pen. specific Trace over your main pencil lines for the telescope body and tripod legs. Use confident, steady strokes, but allow for a slight organic wobble to keep that hand-drawn charm. -
Ink the hardware details:
Use a 0.3 pen to outline the smaller mechanical parts like the knobs, the mount hinges, and the distinct bands separating the telescope sections. -
Erase guidelines:
Once the ink is completely dry—I usually give it a full five minutes to be safe—gently erase all your graphite sketch lines with the kneaded eraser to reveal a clean framework.
Step 3: Shading and Texture
-
Hatching the tube:
Using the 0.1 pen, add shading to the telescope tube. Draw closely spaced parallel lines (hatching) that curve slightly along the cylindrical form. Keep the hatching denser on the bottom side of the tube to suggest shadow and volume. -
Cross-hatching darker areas:
For the darker bands connecting the telescope sections, use cross-hatching (layers of lines intersecting at angles) to create deep blacks and contrast against the metallic tube. -
Wood grain on legs:
On the wooden tripod legs, draw long, vertical lines that run the length of the legs. Vary the pressure and stop and start the lines to mimic wood grain texture. -
Shading metal hardware:
Add small, tight vertical marks on the mount and knobs. Leave small patches of white paper untouched on the highest points to act as metallic highlights. -
Grounding shadow:
beneath the tripod feet, scratch in some quick horizontal lines to create a cast shadow, anchoring the heavy equipment to the ground.
Level Up: Cosmic Splash
Before starting the ink stars, add a light wash of blue watercolor or diluted ink behind the telescope area to make your night sky pop.
Step 4: The Celestial Background
-
Draw the stars:
Scatter different types of stars around the upper portion of the page. Mix simple five-point stars, tiny dots for distant stars, and small crosses for twinkling effects. -
Add a planet:
Near the top, draw a small circle for a planet or moon. Fill it with stippling (lots of tiny dots) or small swirls to give it a cratered, textured surface. -
Create a dust cloud effect:
Use your 0.1 pen to create a very sparse cloud of stippling dots drifting behind the telescope, connecting the stars loosely like a Milky Way band.
Close your sketchbook knowing you’ve captured a beautiful instrument of discovery
Meteor Shower Mini Scene
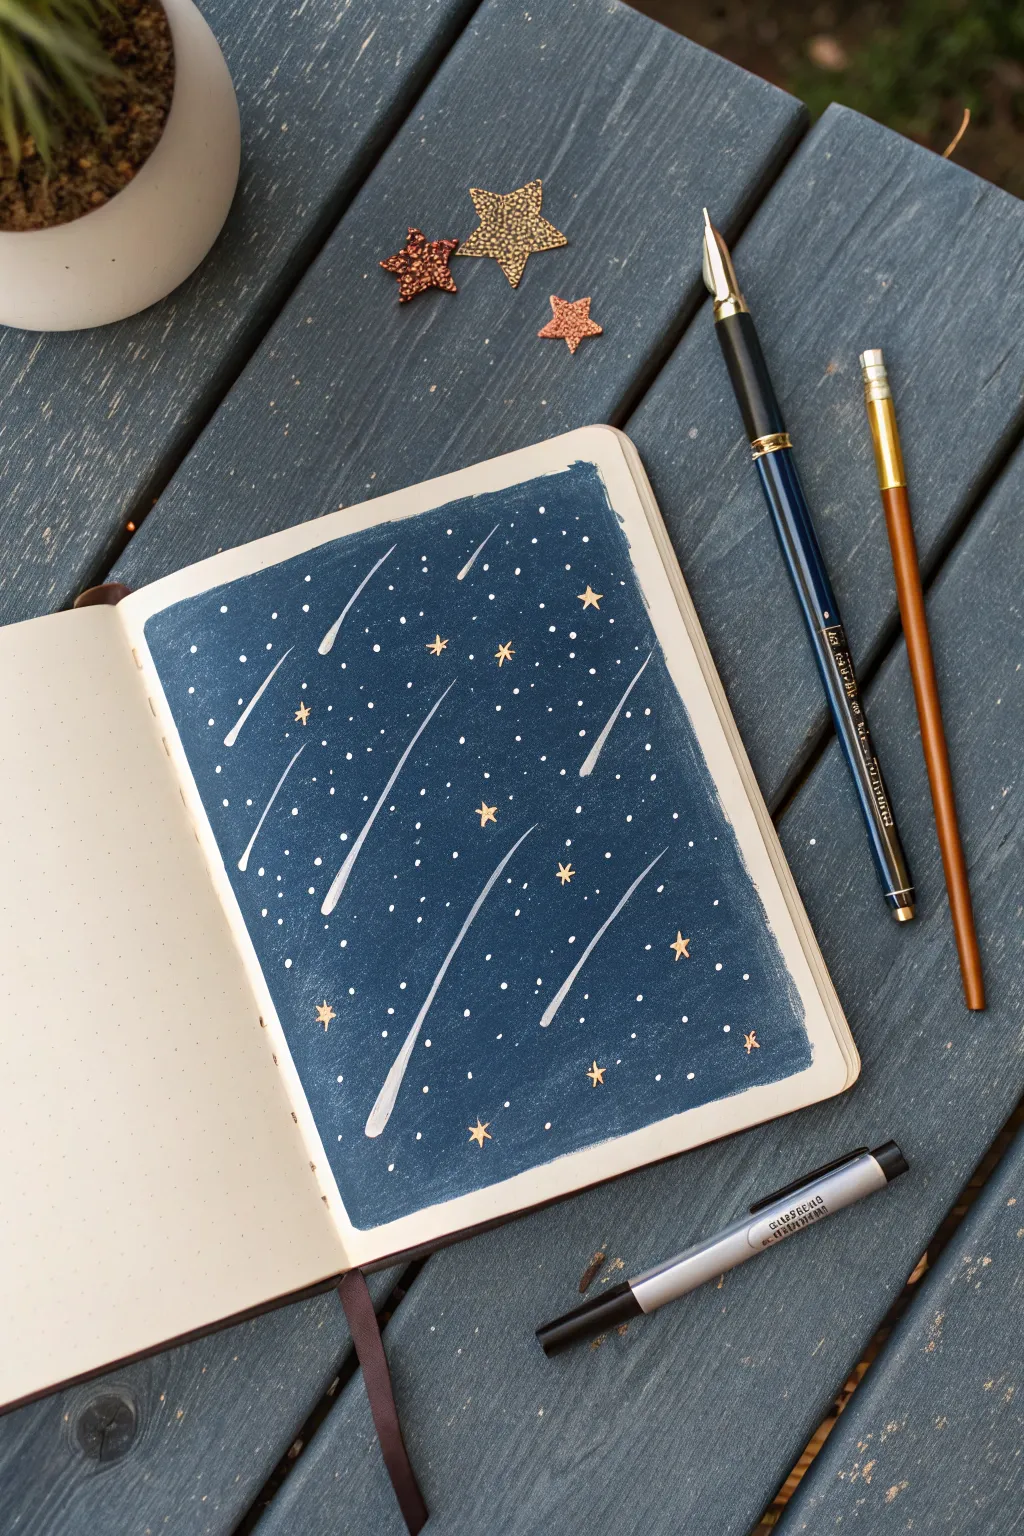
Capture the magic of a falling star with this striking, high-contrast sketchbook spread. Using a deep blue base and dynamic white streaks, you will create a sense of movement that brings a quiet night sky to life.
Detailed Instructions
Materials
- Sketchbook or bullet journal (heavyweight paper recommended)
- Masking tape or painter’s tape
- Dark blue gouache or acrylic paint
- Flat paintbrush (medium size)
- White gel pen or fine white paint marker
- Gold star confetti or stickers
- White acrylic ink or watered-down white paint
- Small round brush (for details)
Step 1: Setting the Scene
-
Define the boundaries:
Begin by taping off the edges of your sketchbook page with masking tape. This creates a clean, crisp border around your painting, making it look like a framed window into space. -
Protect the binding:
Pay close attention to the inner spine edge. Ensure the tape is pressed firmly into the crease so paint doesn’t seep onto the opposing page. -
Apply the base coat:
Using a flat brush, apply a solid layer of dark blue paint across the entire taped-off area. Gouache works beautifully here for its matte finish, but acrylic is a durable alternative. -
Check opacity:
If the first layer looks streaky or translucent once it starts to dry, add a second coat. You want a deep, opaque midnight blue to make the white details pop. -
Let it dry fully:
Patience is key. Allow the blue background to dry completely before moving on. If it’s cool to the touch, it’s still wet.
Clean Lines Pro-Tip
To prevent paint bleeding under the tape, seal the tape edge first with a very thin layer of clear matte medium or white paint before applying the blue.
Step 2: Creating the Stars
-
Prepare the splatter:
Dilute a small amount of white acrylic paint or use white ink. The consistency should be like heavy cream—fluid enough to fly off a brush but thick enough to stay opaque. -
Test the splatter:
Before hitting the page, tap your loaded brush over a scrap piece of paper to check the size of the droplets. -
Create the starfield:
Gently tap the handle of your brush against another brush or your finger over the dried blue background. Vary the density, leaving some areas sparse and others clustered. -
Add specific stars:
Once the splatter is dry, use your white gel pen to manually add a few larger, distinct dots for brighter stars. -
Add golden accents:
Place a few small gold star stickers or confetti pieces randomly throughout the sky. I like to use an odd number of stickers for a more natural composition. -
Draw drawn stars:
Using a gold or bronze metallic pen, draw a few tiny four- or five-pointed stars to complement the stickers.
Level Up: Galaxy Glow
Before adding stars, sponge on faint patches of lighter teal or purple paint over the dark blue to create a subtle nebula cloud effect.
Step 3: The Meteor Shower
-
Plan the direction:
Decide on a single direction for your falling stars to ensure the movement feels cohesive. In the example, they flow diagonally from the top right to bottom left. -
Paint the meteor heads:
Using a white paint pen or a fine brush with white paint, create the ‘head’ of the meteor. This should be the widest and most opaque part of the line. -
Drag the tails:
Quickly pull the pigment downward to create a tapering tail. Lift your pen or brush off the paper gradually as you stroke to get that fading, trailing effect. -
Vary line lengths:
Make some meteors long and dramatic, and others short and subtle. This variety creates depth and makes the shower look more energetic. -
Check the balance:
Step back and look at the spread. Fill in any large empty gaps with a tiny dot or a faint meteor streak. -
The reveal:
Once absolutely everything is dry, slowly peel away the masking tape at a 45-degree angle to reveal those satisfying crisp edges.
Now you have a stunning celestial window in your journal ready for your next big idea


Cratered Full Moon Shading
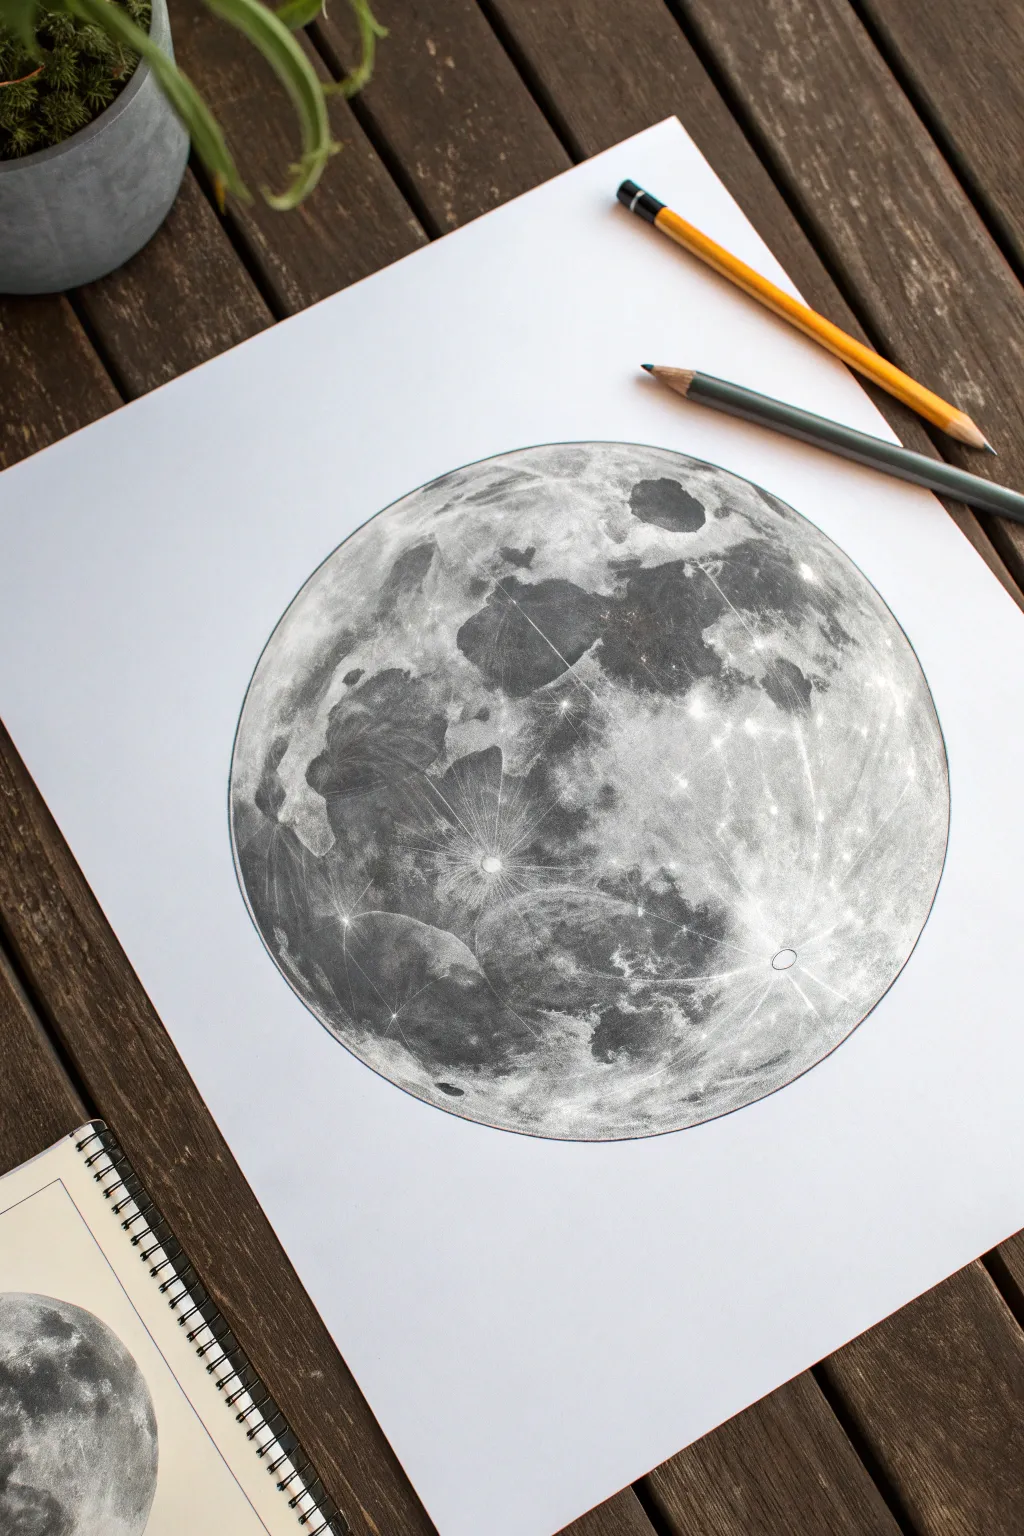
Capture the stark beauty of our nearest celestial neighbor with this detailed graphite study. By focusing on high-contrast shading and radial crater patterns, you will create a dimensional, luminous moon that pops right off the page.
Step-by-Step Tutorial
Materials
- Smooth heavyweight drawing paper (bristol or hot press)
- Graphite pencils (H for outlines, HB, 2B, 4B, and 6B for shading)
- Circular stencil, compass, or a round object to trace
- Kneaded eraser
- Precision eraser (pencil click eraser or zero eraser)
- Blending stumps (tortillons) or cotton swabs
- Tissue paper for hand rest
Step 1: Foundation and Mapping
-
Draw the boundary:
Begin by lightly tracing a perfect circle onto your paper using a compass or a large round object. Keep this line very faint using an H pencil, as you don’t want a heavy outline in the final realistic drawing. -
Map the maria:
Lightly sketch the shapes of the lunar maria (the dark ‘seas’) inside the circle. These are the large, irregular dark patches visible on the moon’s face. Focus on getting their general placement correct rather than perfect detail right now. -
Locate major craters:
Mark the positions of the most prominent craters, specifically Tycho (the bright one with rays near the bottom) and Copernicus (towards the left center). Just draw small circles to hold their place.
Step 2: Developing the Dark Tones
-
Start the shading:
Switch to a 2B pencil and begin shading the maria. Use small, circular motions to create an even texture rather than linear strokes. Avoid pressing too hard; you can always build up darkness later. -
Deepen the shadows:
Layer over the darkest areas of the maria with a 4B or 6B pencil to create depth. The moon is high contrast, so don’t be afraid of going quite dark in these ‘sea’ regions. -
Blend the tones:
Use a blending stump to smooth out your graphite application in the dark areas. This pushes the graphite into the paper tooth and creates that misty, regolith-like texture found on the lunar surface.
Smudge Alert
Graphite creates dust. Always keep a piece of scrap paper under your drawing hand to prevent dragging your palm across finished sections and ruining the crisp whites.
Step 3: Crater Details and Rays
-
Define the highlands:
The lighter areas (highlands) need texture, not just white paper. Use an HB pencil to lightly scumble (scribble lightly) texture across the white areas, leaving the brightest craters untouched. -
Create the crater rays:
For the Tycho crater near the bottom, use a ruler or straight edge to lightly mark the direction of the ejecta rays radiating outward. These are the bright streaks that shoot across the moon’s surface. -
Lift the highlights:
Here is where the magic happens: take your precision eraser or a pinched piece of kneaded eraser and ‘draw’ white lines radiating out from the Tycho impact site. Lift the graphite to reveal sharp, bright rays cutting through the grey areas. -
Detail the crater rims:
Use a sharp 4B pencil to add deep shadows inside the crater rims on the side opposite your light source. This creates the illusion of depth and a 3D effect.
Eraser Technique
Don’t just rub back and forth. Press and lift your kneaded eraser to pick up graphite cleanly. This creates bright, star-like highlights without damaging the paper surface.
Step 4: Refining and Polishing
-
Add satellite craters:
Dot the surface with tiny specks and small ringlets using a sharp HB pencil to represent smaller craters. Vary their size and density, concentrating them more in the southern highlands. -
Soften edges:
The transition between light and dark on the moon isn’t always sharp. Use a dirty blending stump to soften the edges of the maria so they look organic and geological, not like painted shapes. -
Enhance contrast:
Do a final pass with your darkest pencil (6B) to punch up the deepest shadows one last time. High contrast is key to that glowing moon effect. -
Clean the perimeter:
Take your kneaded eraser and meticulously clean up the outer edge of the main circle. The moon needs a crisp, sharp edge against the white paper to look suspended in space. -
Protect the work:
If you plan to store this, lightly spray it with a fixative to prevent the heavy graphite application from smearing.
Step back and admire how a simple circle has transformed into a complex, cratered world
Spiral Galaxy Swirl
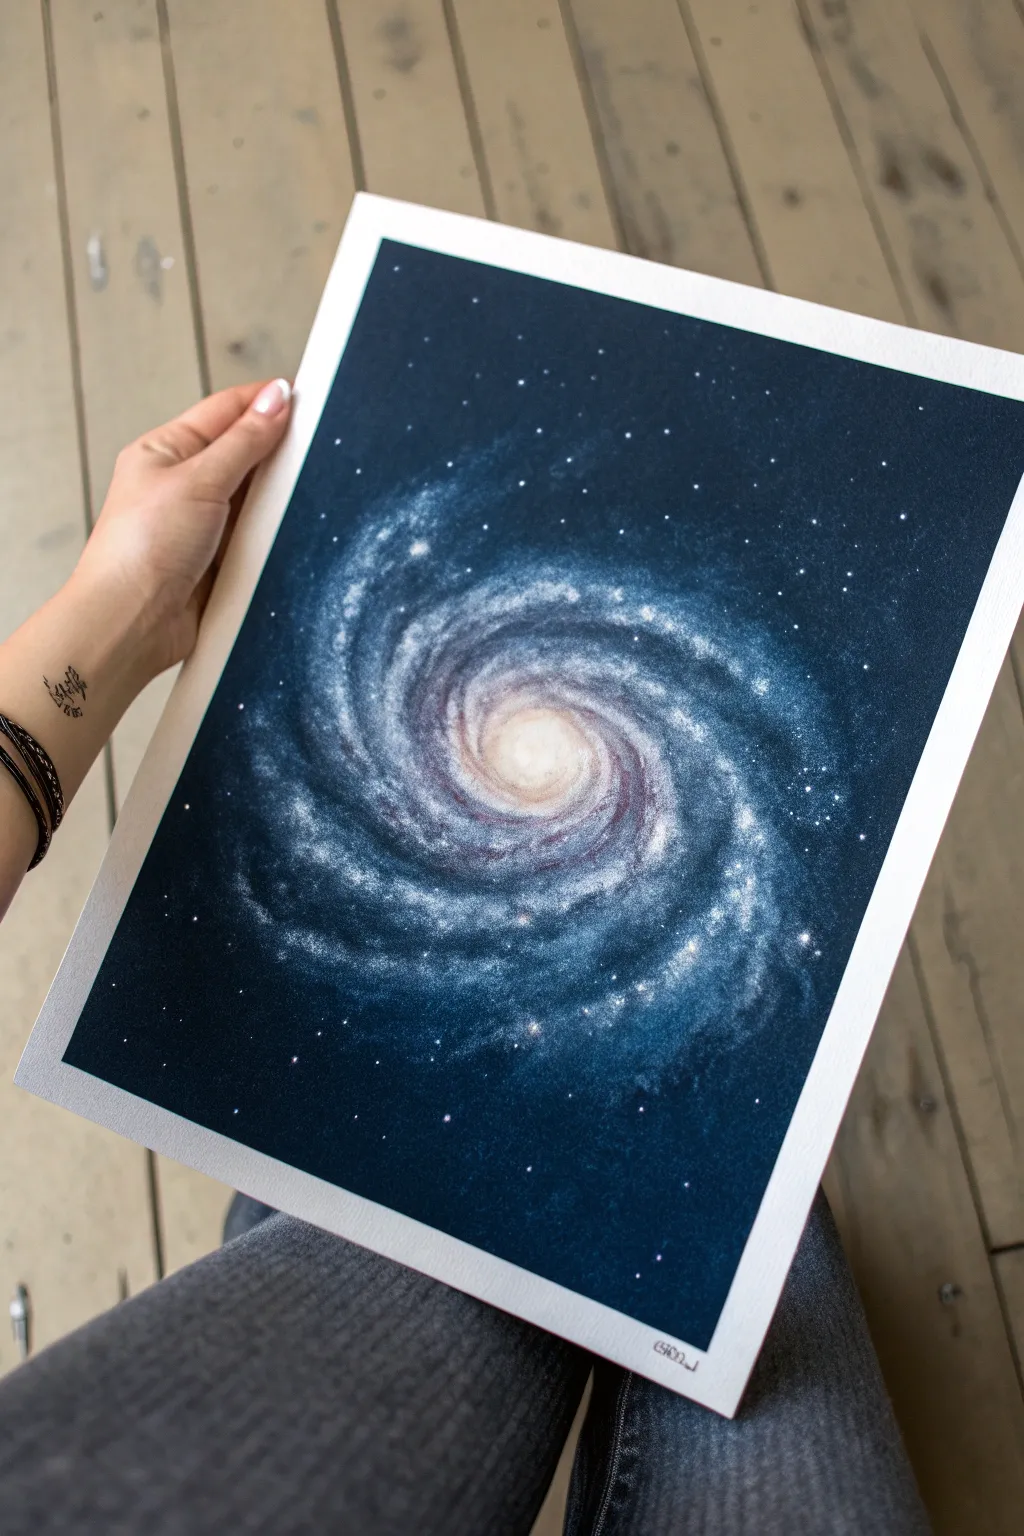
Capture the ethereal beauty of deep space with this watercolor project, featuring a mesmerizing spiral galaxy set against a deep navy cosmos. The soft blending of watercolors perfectly mimics the gaseous clouds and clustered starlight of a distant nebula.
Step-by-Step
Materials
- High-quality watercolor paper (cold press, 300gsm)
- Painter’s tape or masking tape
- Watercolor paints (Indigo, Prussian Blue, Alizarin Crimson, White Gouache)
- Round brushes (large size 8-10 for washes, small size 0-2 for details)
- Sea salt (optional for texture)
- Old toothbrush
- Pencil and eraser
- Two jars of water
- Paper towels
Step 1: Preparation & Sketching
-
Tape the Edges:
Secure your watercolor paper to a board using painter’s tape. Create a clean border of about half an inch all around; press down firmly to prevent paint from bleeding underneath. -
Sketch the Spiral:
Lightly sketch the spiral shape of the galaxy using a hard pencil (like an H or 2H). Focus on a central oval for the core and draw loose, sweeping arms radiating outward to guide your painting.
Muddy Colors?
If your galaxy looks muddy, you likely overworked the paper while it was wet. Let the layer dry completely, then glaze over with transparent color to fix it.
Step 2: Painting the Galaxy Core
-
Wet the Center:
Using a clean brush and clear water, wet the central oval area of your galaxy sketch until it glistens slightly but isn’t pooling. -
Apply Warm Tones:
Drop in a very diluted wash of Alizarin Crimson or a soft pinkish-orange into the wet center. Keep this extremely pale, as the center needs to remain the brightest part of the painting. -
Begin the Spiral Arms:
While the paper is still damp, mix a light blue wash. Paint curved strokes following your spiral lines, allowing the blue to touch the pink edge softly so they bleed together without creating harsh lines.
Step 3: Building Depth
-
Deepen the Blues:
As you move outward along the spiral arms, switch to a stronger concentration of Prussian Blue. Use a dabbing motion to create the texture of gas clouds rather than smooth strokes. -
Darken the Voids:
Mix a dark Indigo or Payne’s Grey. carefully paint the spaces *between* the spiral arms. This negative painting technique will make the glowing arms pop forward visually. -
Blend the Edges:
Soften the transition between the bright arms and the dark space by using a slightly damp brush to blur the edges of your indigo paint. -
Layering Colors:
Once the first layer is semi-dry, go back in with more concentrated purples and blues on the galaxy arms to add dimension. I find that layering these colors while the paper is slightly damp creates a lovely, cloudy texture. -
Create Texture:
If you want extra stellar texture, sprinkle a pinch of sea salt onto the wettest dark blue areas. Let it sit until completely dry to create unique star-like blooms.
Add Metallic Magic
Mix metallic silver or iridescent medium into your white star paint. The stars will shimmer when the light hits them, adding a magical depth.
Step 4: The Deep Space Background
-
Fill the Background:
Load your largest brush with a thick, creamy mix of Indigo and Black. Paint the remaining corners and outer edges of the paper, making it as dark as possible to contrast with the bright galaxy. -
Blend Inward:
Work this dark background color inward, blending it seamlessly into the outer edges of the spiral arms so the galaxy appears to fade into the abyss. -
Allow to Dry:
Let the entire painting dry completely. This is crucial before moving to the final details to prevent smudging. Use a hairdryer on a low setting if you are impatient.
Step 5: Stars and Details
-
Prepare the Stars:
Squeeze out a small amount of white gouache or opaque white watercolor. Dilute it slightly with water until it has a milky consistency. -
Splatter Technique:
Dip an old toothbrush into the white paint. Hold it over the painting and run your thumb across the bristles to spray fine mist droplets, creating distant stars. Concentrate more splatters near the galaxy arms. -
Detail Larger Stars:
Using your smallest detail brush (size 0 or 00), hand-paint a few larger, brighter stars in the foreground. You can add tiny cross shapes to make them twinkle. -
Highlight the Core:
If the center lost its brightness, use a very dry brush with a tiny bit of white gouache to gently dry-brush the very center of the spiral, bringing back the glow. -
Reveal the Border:
Once the white paint is fully dry, slowly peel off the masking tape at a 45-degree angle to reveal your crisp, clean edges.
Now you have a stunning piece of the cosmos captured on paper
Nebula Cloud With Star Speckles
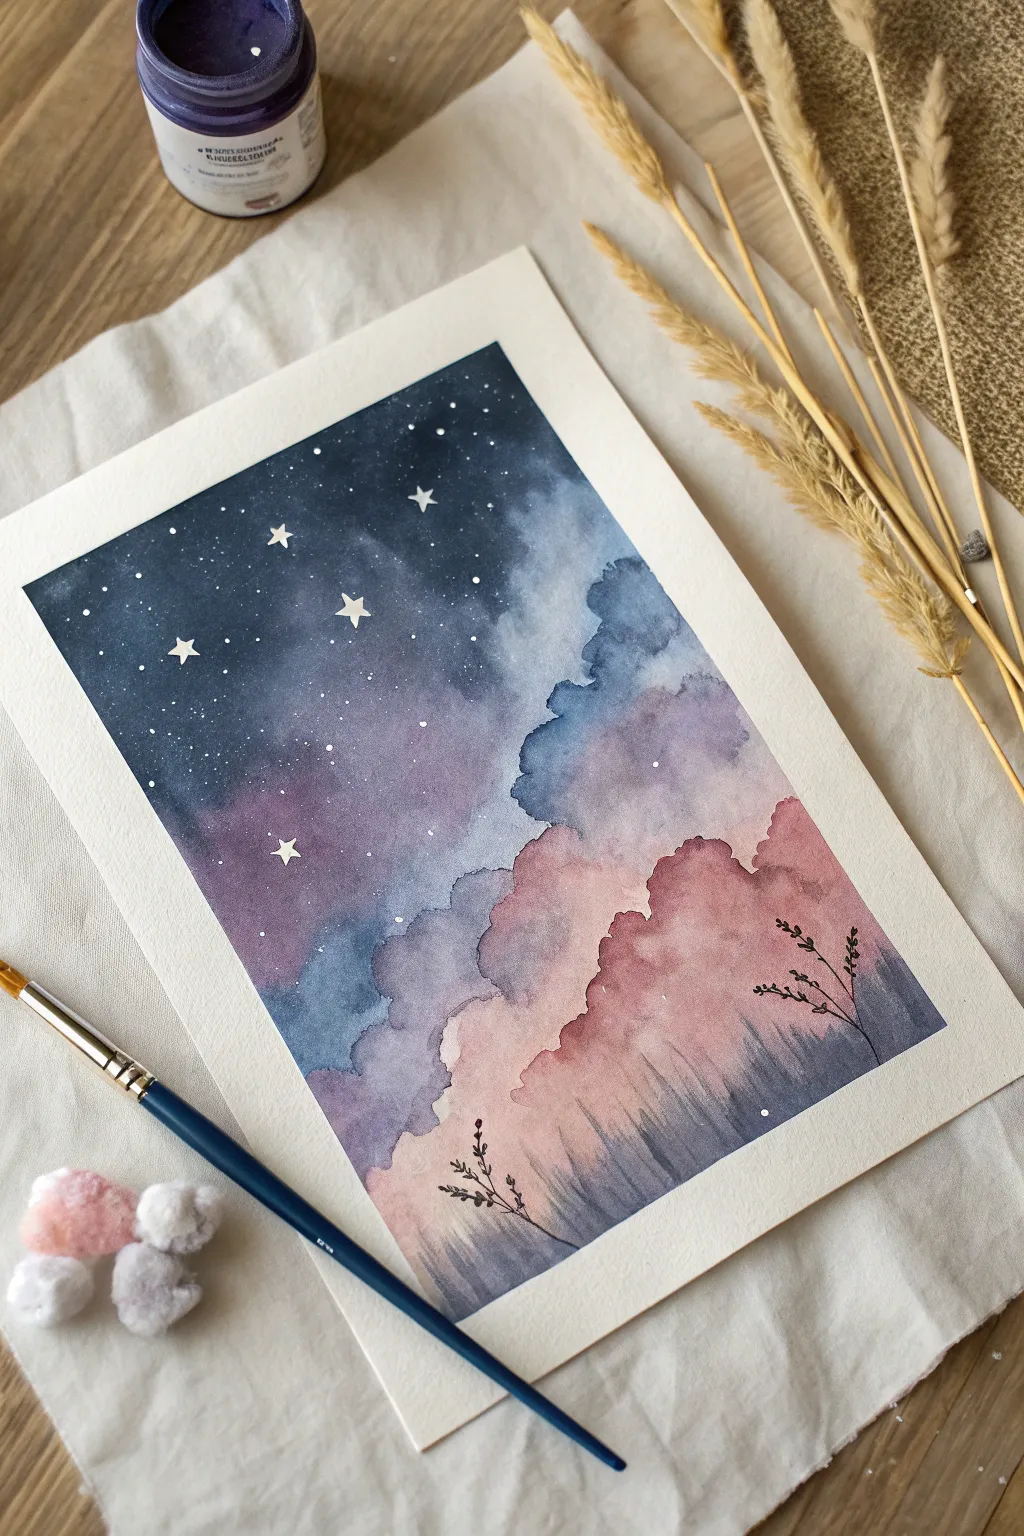
Capture the ethereal beauty of a nebula meeting a sunset with this dreamy watercolor project. Soft clouds in shades of pink, purple, and indigo drift beneath a starry canopy, creating a gentle celestial landscape.
Step-by-Step Guide
Materials
- Cold-pressed watercolor paper (300gsm)
- Painter’s tape or masking tape
- Watercolor paints (Indigo, Prussian Blue, Violet, Rose, Burnt Umber)
- Round brushes (sizes 6 and 2)
- White gouache or white gel pen
- Washi tape or scrap paper (for masking edges)
- Clean water jars
- Paper towels
- Fine-liner pen (black, optional)
Step 1: Preparation and Base Sky
-
Secure your paper:
Tape down all four edges of your watercolor paper to a hard board using painter’s tape. This creates a clean white border and prevents the paper from buckling when wet. -
Wet the sky area:
Using your larger round brush and clean water, thoroughly wet the top two-thirds of the paper. We want a wet-on-wet technique to help the dark colors blend seamlessly. -
Apply the deepest blue:
Load your brush with a concentrated mix of Indigo. Start painting from the very top edge, moving downwards with horizontal strokes. Let the pigment flow freely into the wet paper. -
Transition to lighter blue:
Rinse your brush slightly and pick up Prussian Blue. Blend this into the bottom edge of the Indigo, pulling the color down to about the halfway point of your paper. -
Create the cloud tops:
While the blue sky is still damp but not soaking, use a clean, slightly damp brush to ‘lift’ irregular cloud shapes along the bottom edge of the blue. Alternatively, dab in clean water to create soft blooms that mimic fluffy cloud edges.
Soft Edges Tip
If your cloud edges look too sharp or hard after drying, use a barely damp, clean brush to gently scrub the edge and soften the transition.
Step 2: Painting the Clouds
-
Mix your cloud colors:
Prepare puddles of Violet and a soft Rose on your palette. You want these to be fairly diluted for a soft, transparent look. -
Paint the first cloud layer:
Start painting the fluffy tops of the clouds right beneath your blue sky. Use the Violet mix first, allowing it to bleed slightly into the damp blue edge above for a hazy transition. -
Add warmth with rose:
As you move lower down the paper, switch to your Rose color. Paint rounded, billowing cloud shapes, overlapping the violet slightly to create new purple tones where they mix. -
Deepen the shadows:
While the cloud layer is still wet, drop in a tiny bit of darker purple or a mix of Indigo and Violet into the bottom curves of the clouds to give them volume and dimension. -
Ground the composition:
Towards the very bottom, mix a grayish-purple using Burnt Umber and Violet. Paint vertical, loose strokes to suggest tall grasses or a distant treeline fading into the mist. -
Allow to dry:
This is crucial—let the painting dry completely. If the paper feels cold to the touch, it’s still damp. Wait until it is room temperature and bone dry.
Add Moonlight
Paint a faint, translucent circle of white gouache behind one of the cloud peaks before adding the stars to create a hidden moon effect.
Step 3: Stars and Details
-
Spatter the stars:
Dilute some white gouache with a little water until it has a creamy consistency. Load a small brush or toothbrush and tap it over the dark blue sky section to create tiny, random star specks. -
Paint larger stars:
Using a size 0 or 2 brush (or a white gel pen) and thick white gouache, carefully paint a few larger, five-pointed stars scattered across the darkest part of the sky. -
Add the constellations:
Connect a few of your painted stars with extremely thin white lines if you want to suggest a constellation, or focus on painting a few sparkling cross-shapes for variety. -
Draw the silhouette plants:
Mix a very dark, concentrated black-blue or use a black fine-liner pen. On the bottom right and left corners, draw delicate, thin stems rising up. -
Add leaves and buds:
Add tiny leaves or buds to your silhouette stems. Keep them sparse and delicate so they don’t overpower the soft clouds behind them. -
Final reveal:
Once all ink and paint is 100% dry, carefully peel away the painter’s tape at a 45-degree angle to reveal your crisp, clean borders.
Now you have a serene slice of the night sky ready to frame or gift
Comet With Flowing Tail
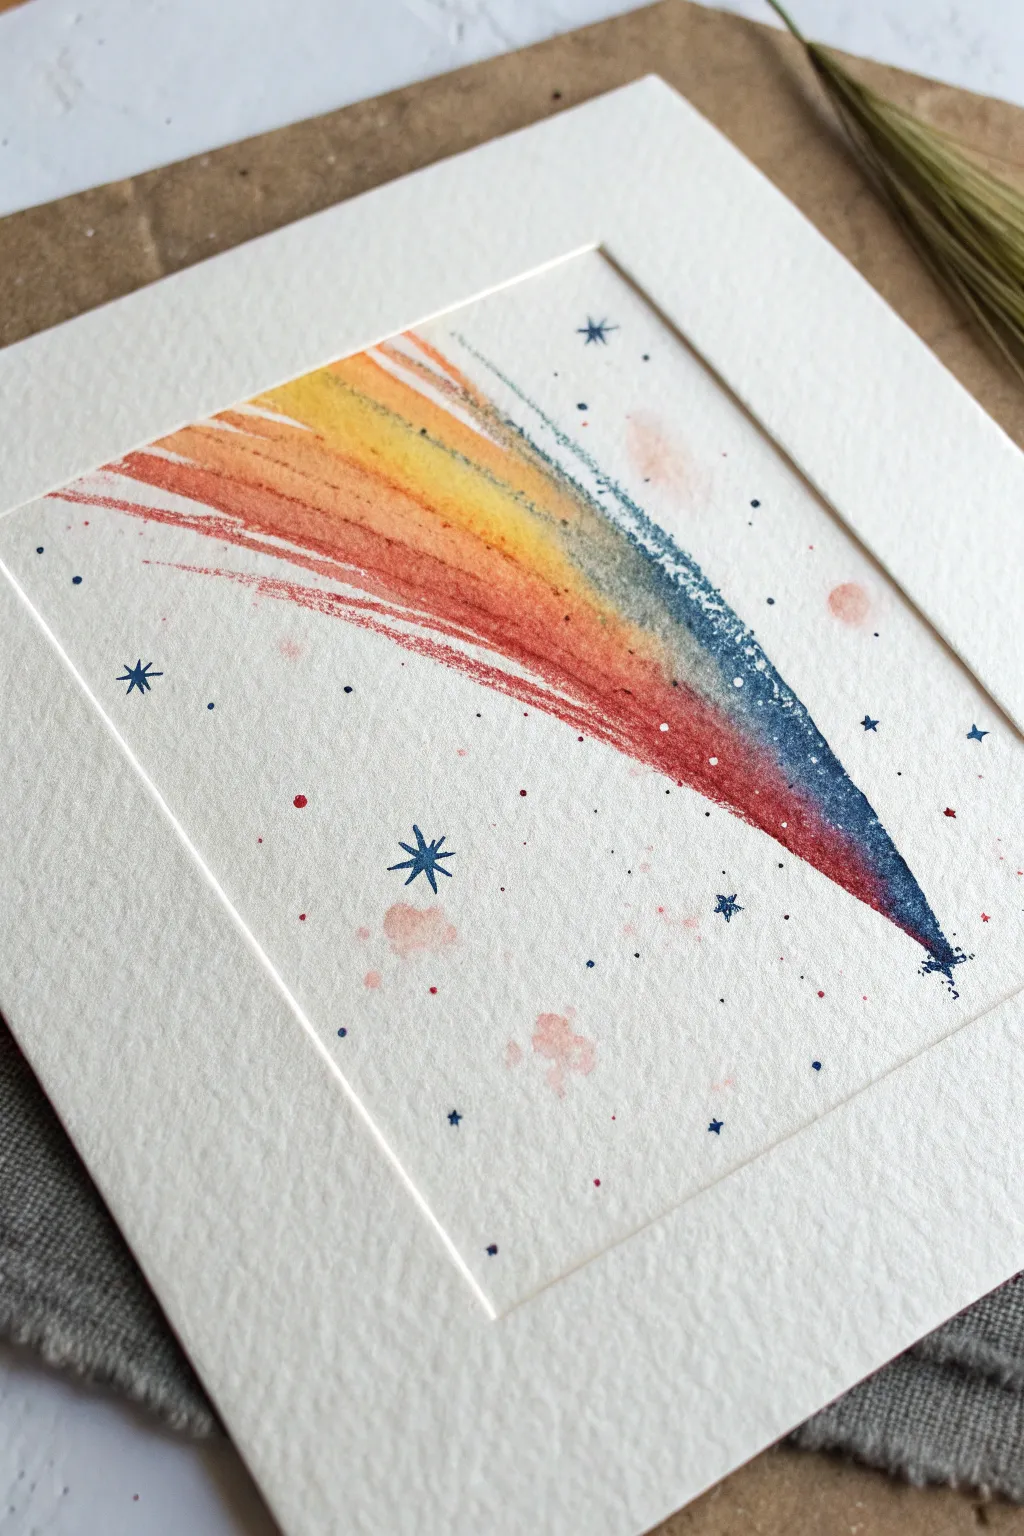
Capture the dynamic motion of a celestial traveler with this vibrant watercolor project. By blending warm yellows and reds into cool blues on textured paper, you’ll create a stunning comet trail that looks like it’s racing across the night sky.
Detailed Instructions
Materials
- Cold press watercolor paper (heavy texture recommended)
- Watercolor paints (Indigo/Navy Blue, Crimson Red, Cadmium Yellow, Payne’s Grey)
- Round brushes (Size 8 for the tail, Size 2 for details)
- Clean water jar
- Paper towels
- White or cream picture mount/mat (optional)
- Masking tape
Step 1: Preparation and Base Shape
-
Secure the paper:
Tape your watercolor paper down to a flat surface or board using masking tape. This prevents the paper from buckling when it gets wet and creates a clean edge if you are painting to the border. -
Plan the trajectory:
Visualize a diagonal line moving from the top left corner toward the bottom right. This will be the path of your comet. No pencil sketch is needed; it’s better to keep the flow organic. -
Mix the comet head color:
Load your larger brush with a deep Indigo or Navy Blue. Make sure the paint is creamy and saturated, not too watery, as we want the head of the comet to be bold. -
Paint the comet head:
In the lower right quadrant, press your brush down firmly to create the rounded head of the comet, then drag it slightly upward and to the left to start the transition into the tail.
Step 2: Creating the Gradient Tail
-
Introduce the red transition:
While the blue edge is still slightly damp, rinse your brush and pick up Crimson Red. Start painting just overlaps the fading blue, pulling the stroke upward towards the top left. -
Establish the directional flow:
Use quick, sweeping strokes for the red section. The goal is to mimic speed, so let the bristles separate slightly to create streaky textures. -
Add the yellow lead:
Rinse your brush thoroughly. Load it with Cadmium Yellow and apply it to the very top left of the tail, dragging it down to meet and blend with the red section. -
Refine the dry brush effect:
I like to dry my brush slightly on a paper towel before creating the upper edges of the tail. Drag this drier brush from the colored areas outward into the white space to create rough, feathery edges that suggest dissipating gas. -
Strengthen the core:
If the colors look too pale, drop a bit more concentrated pigment into the center of the wet areas—more blue at the bottom, more red in the middle—letting them bleed naturally. -
Darken the leading edge:
Add a touch of Payne’s Grey or intense Indigo to the very tip of the comet head to give it weight and contrast against the vibrant tail.
Textured trailing
For the streak effect in the tail, fan the bristles of your brush out with your fingers before dragging the paint across the paper.
Step 3: Stars and Details
-
Let the tail dry:
Allow the main comet shape to dry completely. If you work on the background too soon, the stars might bleed into softness. -
Paint distinct stars:
Switch to your Size 2 brush. Using the Navy Blue, paint several five or six-pointed stars scattered around the background. vary their sizes for depth. -
Add distant stardust:
Dip the small brush in blue or grey paint and tap the handle against a finger to splatter tiny dots across the background. Keep the spray controlled near the comet. -
Incorporate subtle color variation:
Mix a very watery wash of faint red or pink. Gently dab a few soft, amorphous spots in the background to suggest distant nebulae or gas clouds. -
Detail tiny specks:
Using the tip of your smallest brush, dot in tiny red and blue specks manually in areas that look too empty, balancing the composition. -
Final assessment:
Check the comet head. If it needs definition, use the small brush to add a few jagged, irregular marks at the very front to simulate debris. -
Mount the artwork:
Once fully dry, remove the tape. Place a bevel-cut mount or mat over the painting to frame the composition and make the colors pop.
Cosmic glam
Mix a tiny amount of metallic silver or iridescent medium into your blue paint for stars that actually shimmer in the light.
Now you have a dynamic piece of space art ready to be framed or gifted to a fellow gazer
Banded Gas Giant Study
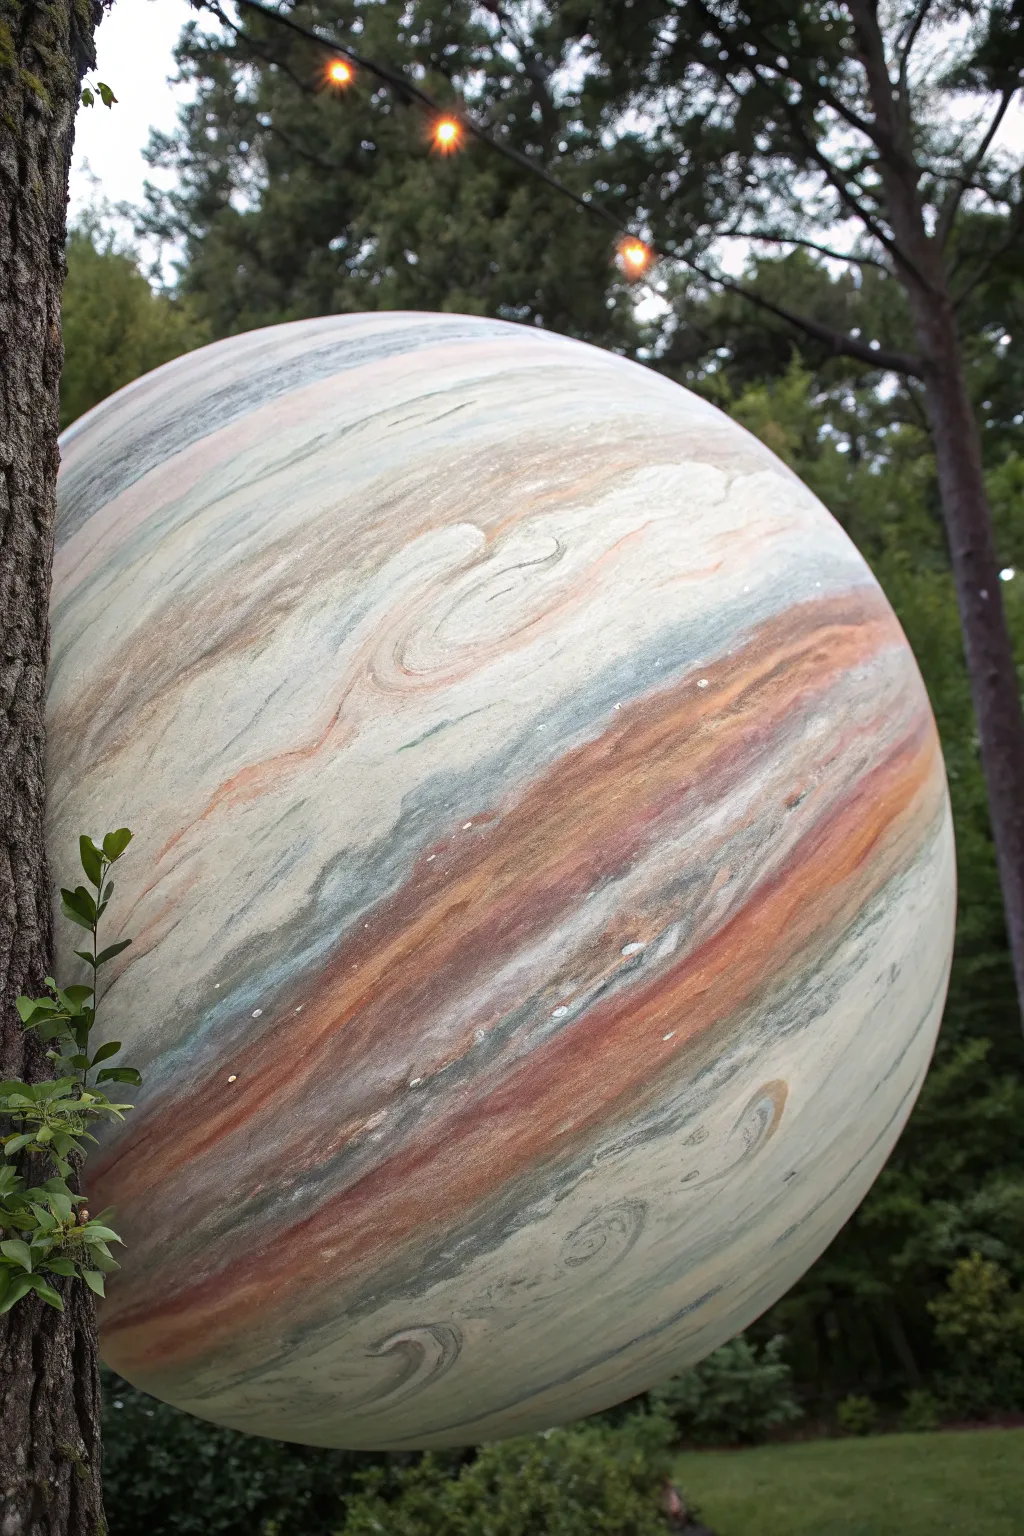
Bring the grandeur of the solar system down to Earth with this large-scale, spherical painting project that mimics the turbulent atmosphere of a gas giant. Using soft blending techniques and a muted palette of creams, rusts, and teals, you will transform a simple sphere into a stunning planetary model.
Step-by-Step Tutorial
Materials
- Large exercise ball or smooth polystyrene sphere
- Gesso or white primer
- Acrylic paints (Titanium White, Unbleached Titanium, Burnt Sienna, Raw Umber, Paynes Grey, Teal)
- Glazing medium or slow-drying medium
- Large flat brushes (2-3 inch)
- Medium filbert brushes
- Sea sponge or rag
- Spray varnish (matte or satin)
- Drop cloth
Step 1: Preparation & Base Coat
-
Set the Stage:
Place your sphere on a drop cloth. If using an exercise ball, ensure it is fully inflated and stable. You may want to prop it inside a box or bucket to keep it from rolling while you work. -
Prime the Surface:
Apply a coat of gesso to the entire sphere to help the acrylics adhere to the plastic or foam surface. Let this dry completely, then add a second coat if the color of the base object is still showing through. -
Background Tone:
Mix Titanium White with a small amount of Unbleached Titanium to create a warm, creamy off-white. Paint the entire sphere with this color to serve as the lightest atmospheric layer.
Paint Lifting?
If wet paint lifts the layer below, the bottom layer wasn’t dry enough. Let it dry fully, then use a lighter touch.
Step 2: Establishing the Bands
-
Prepare the Glaze:
Mix your acrylic colors with a generous amount of glazing medium. You want the paint to be translucent and slow-drying so you can manipulate it on the surface. -
Map the Equator:
Using a large flat brush, apply a broad sweep of watered-down Burnt Sienna across the middle of the sphere. Don’t worry about perfect straight lines; gas giants have turbulence, so a wavy motion adds realism. -
Add Secondary Bands:
Above and below your central rust-colored band, softly apply streaks of Paynes Grey mixed with a touch of Teal. These cooler tones create visual depth against the warm center. -
Softening Edges:
While the paint is still wet, use a clean, dry brush or a soft rag to gently wipe horizontally across the boundaries where colors meet. This feathers the edges, creating that gaseous, hazy look rather than hard stripes.
Glowing Atmosphere
Mix iridescent pearl medium into your white paint for the final highlights to give the gases a shimmering, cosmic quality.
Step 3: Creating Texture & Storms
-
Building Layers:
Go back into the rust-colored bands with a more saturated mixture of Burnt Sienna and Raw Umber. Apply this in thinner, varied strokes within the existing bands to mimic cloud density. -
The Great Red Spot:
Identify a focal point on one of the rust bands. Use a filbert brush to swirl a darker concentration of Burnt Sienna into an oval shape, leaving the center slightly lighter. -
Swirling Eddies:
Load a smaller brush with the creamy white base color. While the underlying colored bands are tacky, drag the white paint through them in circular, hooking motions to create “eddies” and turbulent storms. -
Adding Contrast:
I like to mix a tiny bit of dark grey into the teal for shadows. Paint thin, thread-like darker lines separating the major bands to suggest deeper atmospheric troughs. -
Dry Brushing Highlights:
Once the main layers are dry to the touch, take a dry brush with very little pure Titanium White paint on it. Lightly whisk it over the highest points of your storms to make them pop.
Step 4: Finishing Touches
-
Check for Dull Spots:
Step back and look at the sphere from a few feet away. If any area looks too flat or uniform, blot a damp sea sponge with diluted paint over that spot to break up the texture. -
Refining the Poles:
The top and bottom of the sphere often have less distinct banding. Use a sponge to dab a mix of grey and white at the poles for a mottled, icy cap appearance. -
Final Cure:
Allow the entire sphere to dry for at least 24 hours. Because of the glazing medium, the thickest parts of the paint may take longer to cure than standard acrylics. -
Sealing the Planet:
Take the project outside or to a ventilated area. Apply two thin coats of matte or satin spray varnish to protect the paint and unify the surface sheen.
Hang your finished planet or nestle it in the garden for a touch of celestial wonder.
Satellite With Solar Panels
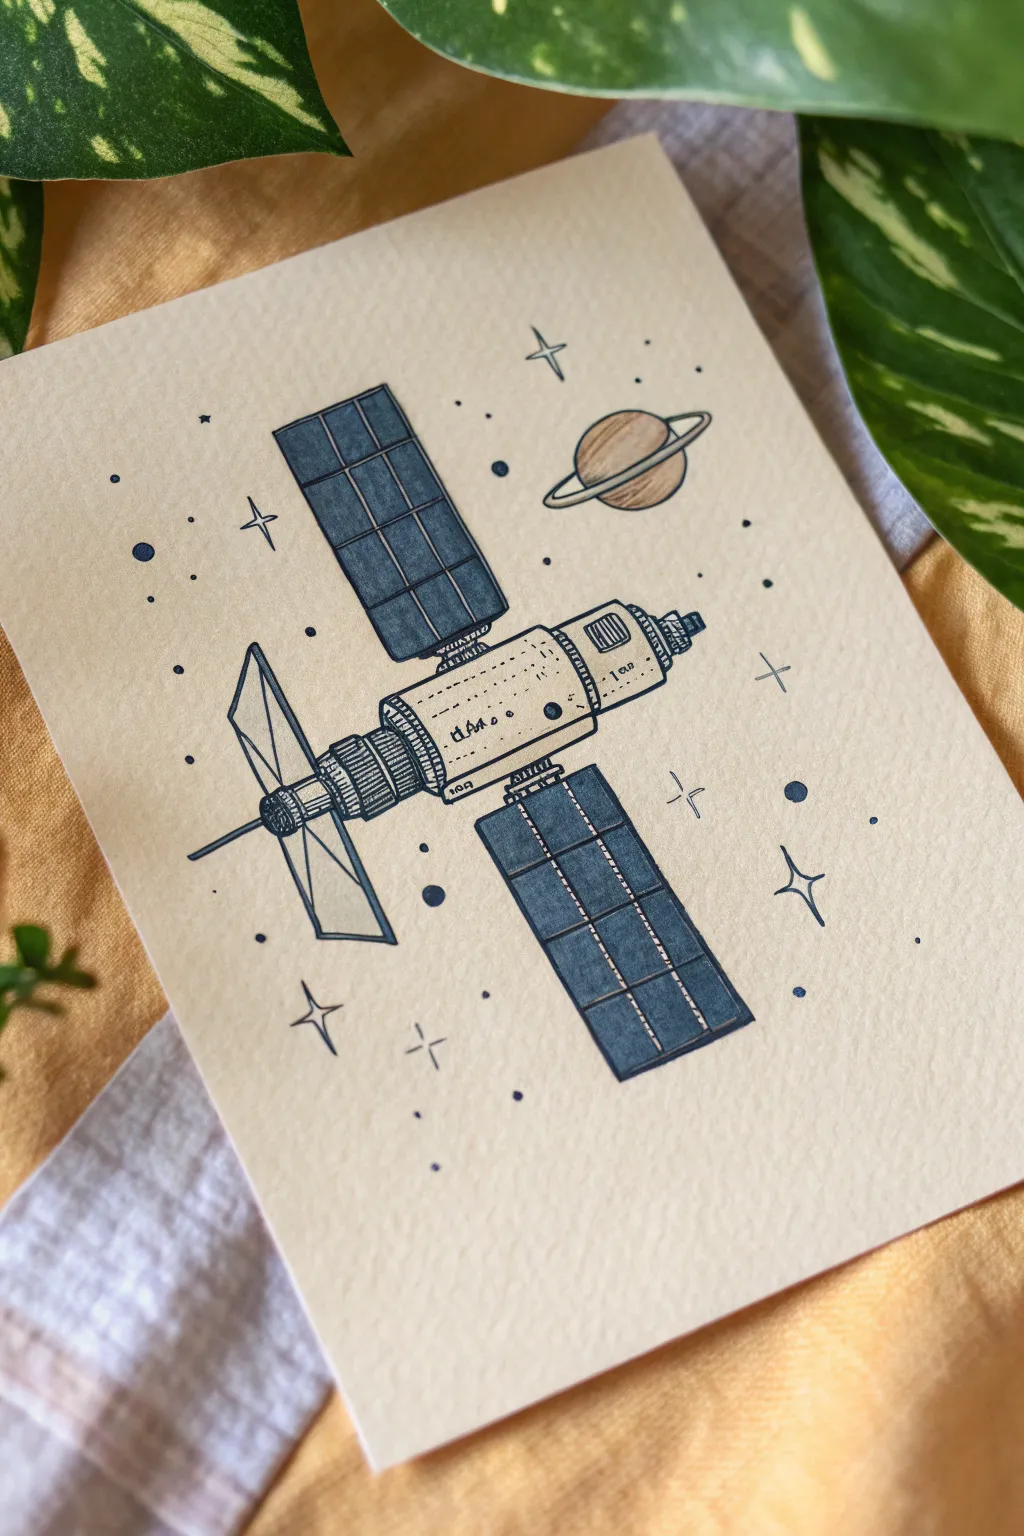
Capture the quiet beauty of space exploration with this detailed yet minimalist satellite illustration. Using clean ink lines and a limited color palette of deep navy and soft beige, you’ll create a striking piece of art that feels like a vintage scientific diagram.
Step-by-Step
Materials
- Heavyweight cream or off-white drawing paper (smooth bristol or hot press watercolor paper)
- Pencil (HB or 2H for sketching)
- Eraser (kneaded preferred)
- Fine liner pens (Black or Dark Indigo, sizes 0.1, 0.3, and 0.5mm)
- Ruler
- Colored pencils or markers (Navy Blue, Light Beige/Tan)
- White gel pen (optional)
Step 1: Planning the Structure
-
Establish the central axis:
Begin by lightly sketching a diagonal line across the center of your paper using a ruler. This will serve as the main body line for the satellite to ensure everything stays aligned. -
Block out the main cylinder:
Draw a long, pill-shaped cylinder along the center of your axis line. Divide this cylinder into three main sections: a wider head, a central body, and a narrower tail section. -
Sketch the solar panel wings:
Draw two long, rectangular shapes extending perpendicularly from the central body. Angle them slightly to give a sense of 3D perspective—make the top panel look like it’s tilting slightly away and the bottom one tilting slightly toward you. -
Add the rear antenna:
On the left side (the tail end), sketch a large, open trapezoid shape that looks like a folding fan or a wireframe wing. Add a central stick extending through it. -
Place the celestial elements:
In the upper right corner, lightly sketch a circle with an elliptical ring around it for the planet. Scatter small dots and tiny crosses around the background to mark where stars will go.
Wobbly Lines?
Don’t stress if your long straight lines aren’t perfect. Technical drawings often have ‘jitter.’ Go over the line again slightly thicker to hide the wobble.
Step 2: Inking the Details
-
Outline the main body:
Switch to your 0.3mm pen. Carefully trace the outline of the central cylinder. Use your ruler for the straight edges but keep the corners slightly rounded for a manufactured look. -
Detail the mechanics:
Using a 0.1mm pen, add the technical details on the cylinder. Draw small horizontal bands, tiny circles for rivets, and a grid texture on the narrower neck section connecting the body parts. -
Ink the solar panels:
Outline the rectangular solar panels with the 0.3mm pen. Draw a grid inside each panel to represent individual solar cells, consisting of two vertical lines and about five horizontal lines per panel. -
Structure the antenna:
Ink the rear wireframe antenna. Draw the outer frame and the internal ‘X’ supports. I find it helpful to turn the paper here to get the straightest lines without smudging. -
Ink the background elements:
Trace the planet and its ring. For the stars, draw a mix of simple dots, small circles, and four-pointed ‘sparkle’ shapes using the 0.1mm pen. -
Erase pencil guides:
Wait until the ink is completely dry to the touch, then gently erase all your initial pencil sketches to leave a clean black-and-white framework.
Pro Tip: Grid Spacing
When drawing the grid on the solar panels, mark the spacing with small dots first before drawing the full lines to ensure the cells remain equal in size.
Step 3: Adding Color and Depth
-
Color the solar panels:
Take a navy blue marker or colored pencil and fill in the grid squares of the solar panels. Leave the thin grid lines uncolored (paper white) to make the details pop. -
Shade the satellite body:
Using a very light touch with a tan or beige pencil, shade the underside of the cylindrical body to give it volume. Keep the top rounded area the color of the paper for a highlight. -
Color the planet:
Fill in the planet with the beige pencil, adding slightly more pressure at the bottom curve for shadow. Leave the ring uncolored or very lightly shaded. -
Enhance the heavy lines:
Go back with a 0.5mm pen and thicken the outer silhouette of the solar panels and the main body. This change in line weight adds visual weight and separates the object from the background. -
Fill background stars:
Select a few of the larger circle ‘stars’ and fill them in with the navy blue color to balance the composition. -
Final texture check:
Add tiny stippling (dots) with your 0.1mm pen on the shadowed side of the satellite body and the planet to imply a grainy, retro texture.
Now you have a sleek, space-age diagram ready to be framed or sent as a card
Space Probe Sketch Notes
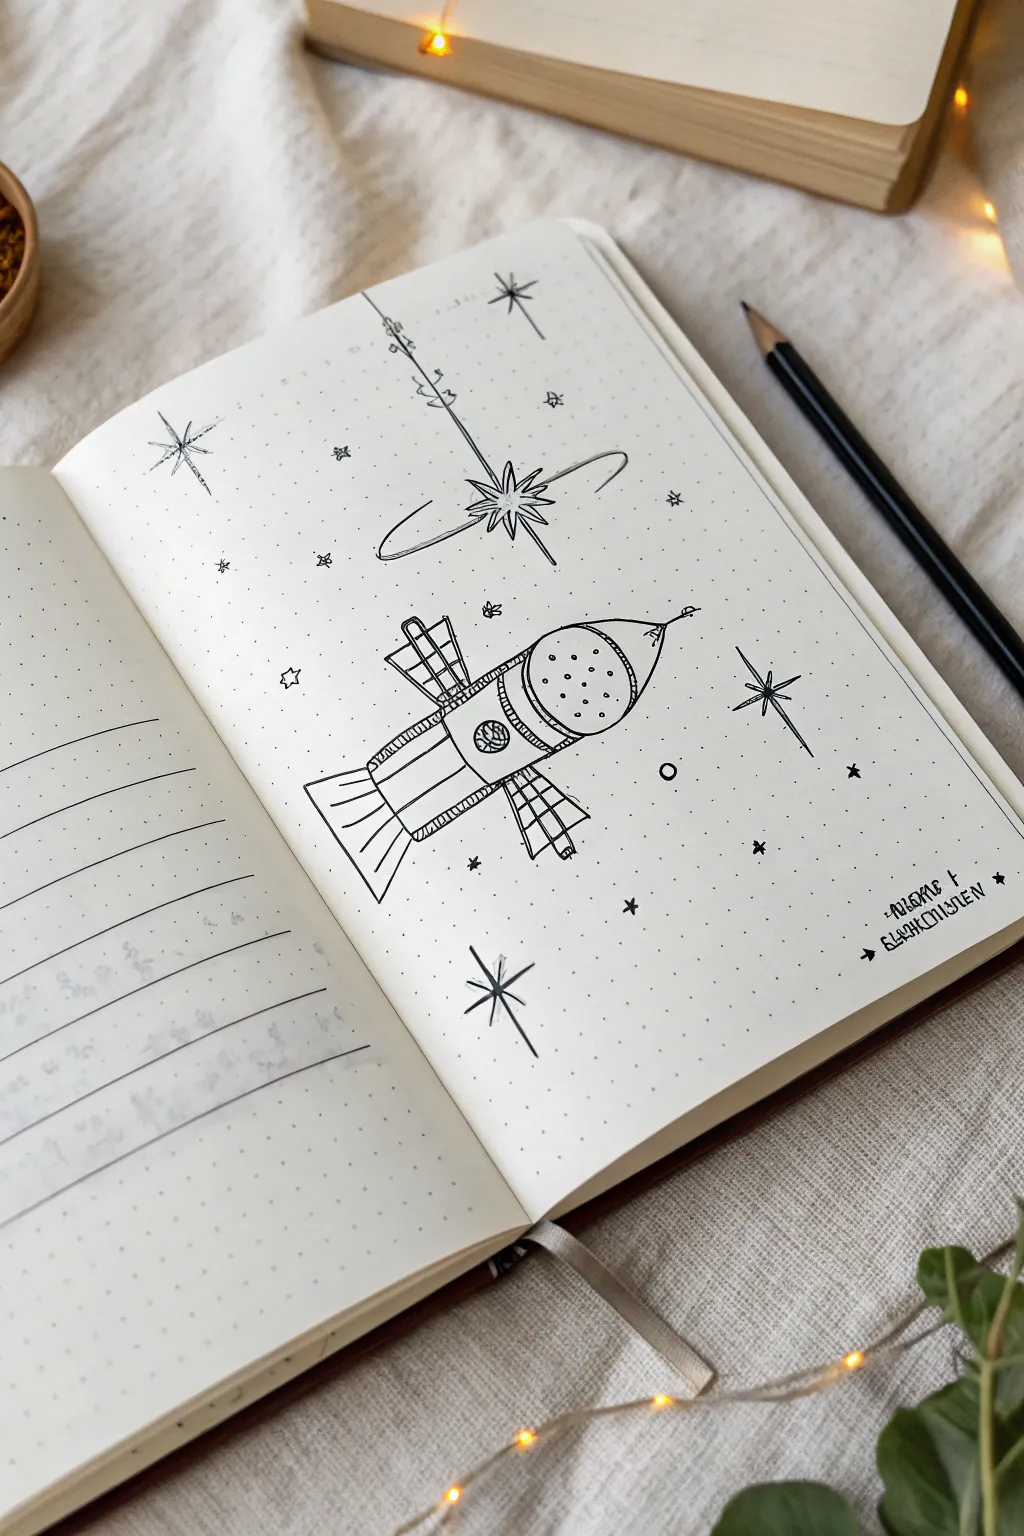
Capture the charm of early space exploration with this clean, linear doodle style that fits perfectly into any bullet journal spread. Featuring a stylized satellite and twinkling stars, this project uses simple geometric shapes to build a complex-looking illustration.
Step-by-Step Guide
Materials
- Dotted grid notebook or sketchbook
- Pencil (HB or lighter)
- Eraser
- Fine liner pen (0.3mm or 0.5mm, black)
- Finer detail pen (0.05mm or 0.1mm, black)
- Ruler (optional, but helpful for solar panels)
Step 1: Drafting the Main Shapes
-
Establish the central axis:
Start by lightly sketching a diagonal line across the center of your page to guide the angle of the spacecraft. This ensures your probe doesn’t look crooked later on. -
Draw the main body:
Sketch a long cylinder along your guide line. Divide this cylinder into three distinct sections: a cone-shaped nose at the top right, a rounded middle section, and a rectangular base at the bottom left. -
Add the engine nozzle:
At the very bottom left of your rectangular base, draw a trapezoid shape flaring outwards to represent the rocket engine nozzle. -
Sketch the solar panels:
On the middle section of the body, pencil in two rectangular wings extending outwards on opposite sides. Angle them slightly to give the object a bit of 3D perspective.
Wobbly Lines?
Don’t stress if your lines aren’t perfectly straight. A slightly shaky line actually adds to the organic, hand-drawn ‘sketch note’ aesthetic of this style.
Step 2: Inking the Spacecraft
-
Outline the silhouette:
Switch to your 0.3mm or 0.5mm pen. Carefully trace the outer edges of the entire spacecraft, keeping your lines confident and smooth. -
Define the body segments:
Draw the lines separating the nose cone, the mid-body, and the base. Add a double line between segments to create the look of metal bands or connection points. -
Detail the nose cone:
Inside the rounded nose cone area, draw a circle. Fill this circle with tiny dots (stippling) to suggest texture or sensors. Add a small antenna protruding from the very tip. -
Texture the mid-section:
On the rectangular body section, draw a series of parallel vertical lines to create a ribbed texture. I find breaking these lines occasionally helps it look more like worn metal. -
Detail the solar panels:
Draw a grid pattern inside your solar panel rectangles. Make the grid lines slightly thinner than the outline to prevent the drawing from looking too heavy. -
Add the circular window:
Draw a small circle on the side of the main body, drawing a grid inside it to look like a reinforced porthole or communication dish.
Step 3: Background Elements
-
Draft the star pole:
Above the ship, lightly pencil a vertical line. Draw a large 8-point star attached to it, surrounded by an orbital ring. -
Ink the orbital star:
Ink the vertical pole with tiny horizontal dashes (like an antenna). Ink the star with sharp points, and draw the orbital ring as a broken, sweeping curve that goes behind the star. -
Add scattered stars:
Draw several 4-point and 8-point stars around the page. Vary their sizes to create depth in your space scene. -
Create space dust:
Using your finest pen (0.05mm), gently dot the background area. Cluster the dots more densely near the ship and stars, and spread them out as you move toward the page edges. -
Add tiny planetary details:
Draw a few tiny open circles or minuscule planet shapes to fill empty voids, keeping them very small so they don’t distract from the main subject. -
Lettering:
In the bottom right corner, write a small caption or date using a quirky, faux-Cyrillic or sci-fi font style to match the retro theme.
Cosmic Color
Use a light grey marker to add shadows to one side of the probe, or add a wash of watercolor behind the stars for a nebula effect.
Step 4: Finishing Touches
-
Erase pencil lines:
Wait until the ink is completely dry—give it a good few minutes to avoid smearing. Gently erase all your graphite guidelines. -
Final contrast check:
Look for areas that need more definition. You might want to thicken the outer line of the spaceship slightly to make it pop against the starry background.
Now you have a charming piece of space history preserved in your notebook
Eclipse Diagram Drawing
This minimalist diagram captures an abstract representation of planetary alignment using clean lines and stippled textures. It combines scientific precision with an artistic, journal-style aesthetic perfect for tracking celestial movements or simply decorating a bujo spread.
Step-by-Step Tutorial
Materials
- Dotted grid transparency spiral notebook
- Compass tool
- Fine liner pens (sizes 0.1, 0.3, and 0.5)
- Ruler
- Pencil and eraser
- Alcohol-based markers (rust red, teal, deep blue)
- White gel pen
Step 1: Setting the Structure
-
Find your center:
Locate the center of your page using the dot grid as a guide. Mark this spot lightly with a pencil; this will be the anchor for your central sphere. -
Draw the main axis circles:
Using a compass, draw a 2-inch diameter circle in the center. Then, adjust your compass to draw four smaller, equal-sized circles (about 1 inch diameter) positioned at the North, South, East, and West points relative to the center circle. Leave specific gaps between them as shown in the reference. -
Create the orbital path:
Set your compass point back to the very center of the page. Widen the radius so the pencil lead hits the center of the four outer circles. Draw a faint guide circle connecting them all. -
Ink the outlines:
Trace over your pencil circles with a 0.3 fine liner. For the central sphere, draw the vertical axis line extending slightly beyond the circle’s edge, adding small decorative serif-like marks at the poles.
Bleed-through Check
Alcohol markers bleed through common paper. If using standard notebook paper, place a scrap sheet behind your page or switch to colored pencils for the planets.
Step 2: Adding Geometric Detail
-
Bisect the central sphere:
Draw an equatorial line horizontally across the center sphere. Add two curved, longitudinal lines on either side of the vertical axis to give the sphere a 3D globe effect. -
Dotted connections:
Using the 0.5 pen and a ruler, carefully place dots along the large orbital path you penciled in earlier, creating a dotted line that connects the four outer circles. Leave space where the lines essentially pass ‘behind’ the planets. -
Detailing the empty circle:
For the right-hand circle, draw a crescent shape inside it to represent a Moon phase. Keep the lines crisp and leave the interior white for now. -
Add symbolic markers:
Draw tiny, decorative symbols or letters outside the circles at the cardinal points (North, South, East, West) using your finest 0.1 pen.
Step 3: Color & Texture
-
Color blocking:
Fill in the top circle with a rust-red marker, the bottom with teal, and the left with deep blue. Apply the ink smoothly to avoid streaks. -
Stippling for depth:
Once the marker ink is dry, use a 0.1 pen to add stippling (tiny dots) inside the colored circles. Focus the dots on one side of each circle to suggest shadow and curvature. -
Creating the cosmic texture:
On the deep blue (left) circle, use a white gel pen to add a subtle cross-star flare and tiny specks of ‘dust’ to make it look like a celestial body. -
Lower key:
At the bottom right of the page, draw three small, elongated triangles using your accent colors (teal and red). These act as a color key or legend. -
Final erase:
Wait at least 10 minutes to ensure all ink is completely set. Gently erase any visible pencil guidelines, being careful near the heavily saturated marker areas.
Level Up: Metallic Pop
Trace the orbital dotted lines with a gold or silver metallic pen instead of black. It adds a subtle shimmer that catches the sunlight.
Close your notebook knowing you’ve captured a tiny piece of the cosmos on paper
Astronomy Symbol Doodle Collage
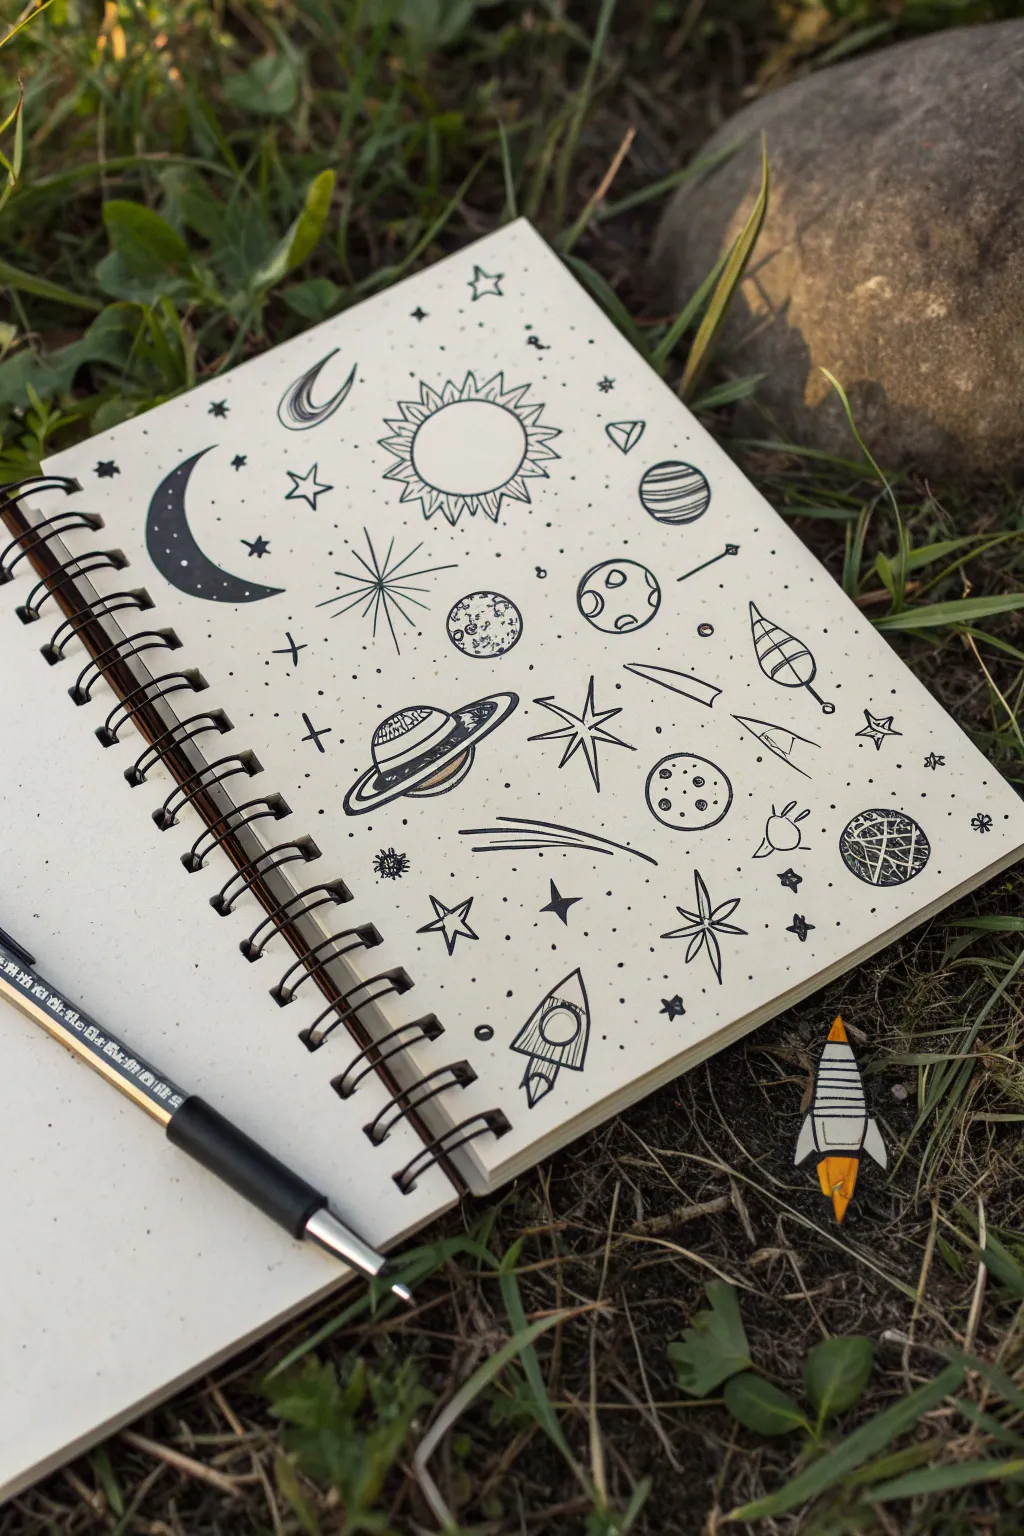
Transform a blank page into a universe of whimsical icons with this astronomy symbol doodle collage. The high-contrast black ink against cream paper creates a classic, field-guide aesthetic perfect for art journals.
Detailed Instructions
Materials
- Spiral-bound sketchbook (cream or off-white paper recommended)
- Black fineliner pens (0.3mm and 0.5mm sizes)
- Pencil (HB or H for light sketching)
- Soft eraser
- Small ruler (optional)
Step 1: Planning and Layout
-
Visualize the composition:
Before putting ink to paper, lightly map out where your largest elements will go using a pencil. Place the sun near the top center and the crescent moon to the left to anchor the page. -
Sketch the primary celestial bodies:
Softly sketch the outline of the sun with its triangular rays, the large crescent moon, and the central ringed planet (Saturn). Just focus on basic shapes like circles and curves for now. -
Distribute medium elements:
Sketch circles for the smaller planets, moons, and the rocket ship shapes in the open gaps. Aim for a randomized but balanced spacing so no area looks too cluttered or too empty.
Ink Smearing?
If you are left-handed or using slow-drying gel pens, work from the top-left corner down to the bottom-right to prevent your hand from dragging through wet ink.
Step 2: Inking Major Elements
-
Define the sun:
Using a 0.5mm pen, trace the central circle of the sun. Carefully draw the jagged, triangular rays radiating outward, doubling the lines for the triangles to give them erratic, sketchy energy. -
Fill the crescent moon:
Outline the large crescent shape on the left. Fill the entire shape with solid black ink, leaving tiny circular specks white to represent craters or texture within the darkness. -
Detail the ringed planet:
Ink the central sphere of the Saturn-like planet. Draw the rings as flattened ovals slicing through the center, adding parallel lines on the planet’s surface for atmospheric bands. -
Draw the cratered moon:
Ink one of the medium circles. Inside, draw small, imperfect circles of varying sizes to suggest craters, grouping them slightly to one side for a 3D effect. -
Create the striped planet:
For the planet near the top right, draw a simple sphere and fill it with horizontal stripes. Vary the thickness of the stripes to make it visually interesting. -
Ink the rocket:
Trace the rocket ship at the bottom. Use crisp, geometric lines for the fuselage and fins, and draw a small circle for the window.
Add Dimension
Use a light grey marker or a very diluted black watercolor wash to add simple shadows to the right side of the planets for a subtle 3D effect.
Step 3: Adding Variety and Shape
-
Draw the star types:
Introduce different star styles. Draw a classic five-pointed star, an eight-pointed burst (like a compass rose), and several simple four-pointed sparkles scattered throughout the page. -
Add comets and shooting stars:
Draw the ‘swooshing’ tails of comets using three or four quick, curved lines trailing behind a star or circle head. I find pulling the pen quickly creates the most dynamic tail shapes. -
Incorporate abstract elements:
Draw the geometric crystal shape (diamond) near the top right and the organic, leaf-like pod shape to add surreal variety to the cosmic theme. -
Create the asteroid:
Near the bottom right, ink a circle and fill it with a chaotic mesh of intersecting lines to represent a textured, rocky asteroid.
Step 4: Atmosphere and Fillers
-
Scatter tiny stars:
Switch to a thinner 0.3mm pen. Fill the remaining negative spaces with tiny five-pointed stars, small plus signs, and little open circles. -
Add stippling dots:
To make the drawing feel cohesive, add groups of single dots (stippling) in the emptiest areas. This simulates distant galaxies and cosmic dust. -
Thicken outlines:
Revisit your main doodles (like the sun and planets) and thicken the outer profile lines slightly. This makes them pop against the background filler. -
Erase pencil guides:
Once the ink is completely dry—give it a good five minutes to be safe—gently erase all underlying pencil sketches to reveal the crisp black lines.
Now you have a stunning page of cosmic symbols to reference for future projects or simply enjoy as a stand-alone artwork
Astronomy Title Page Lettering
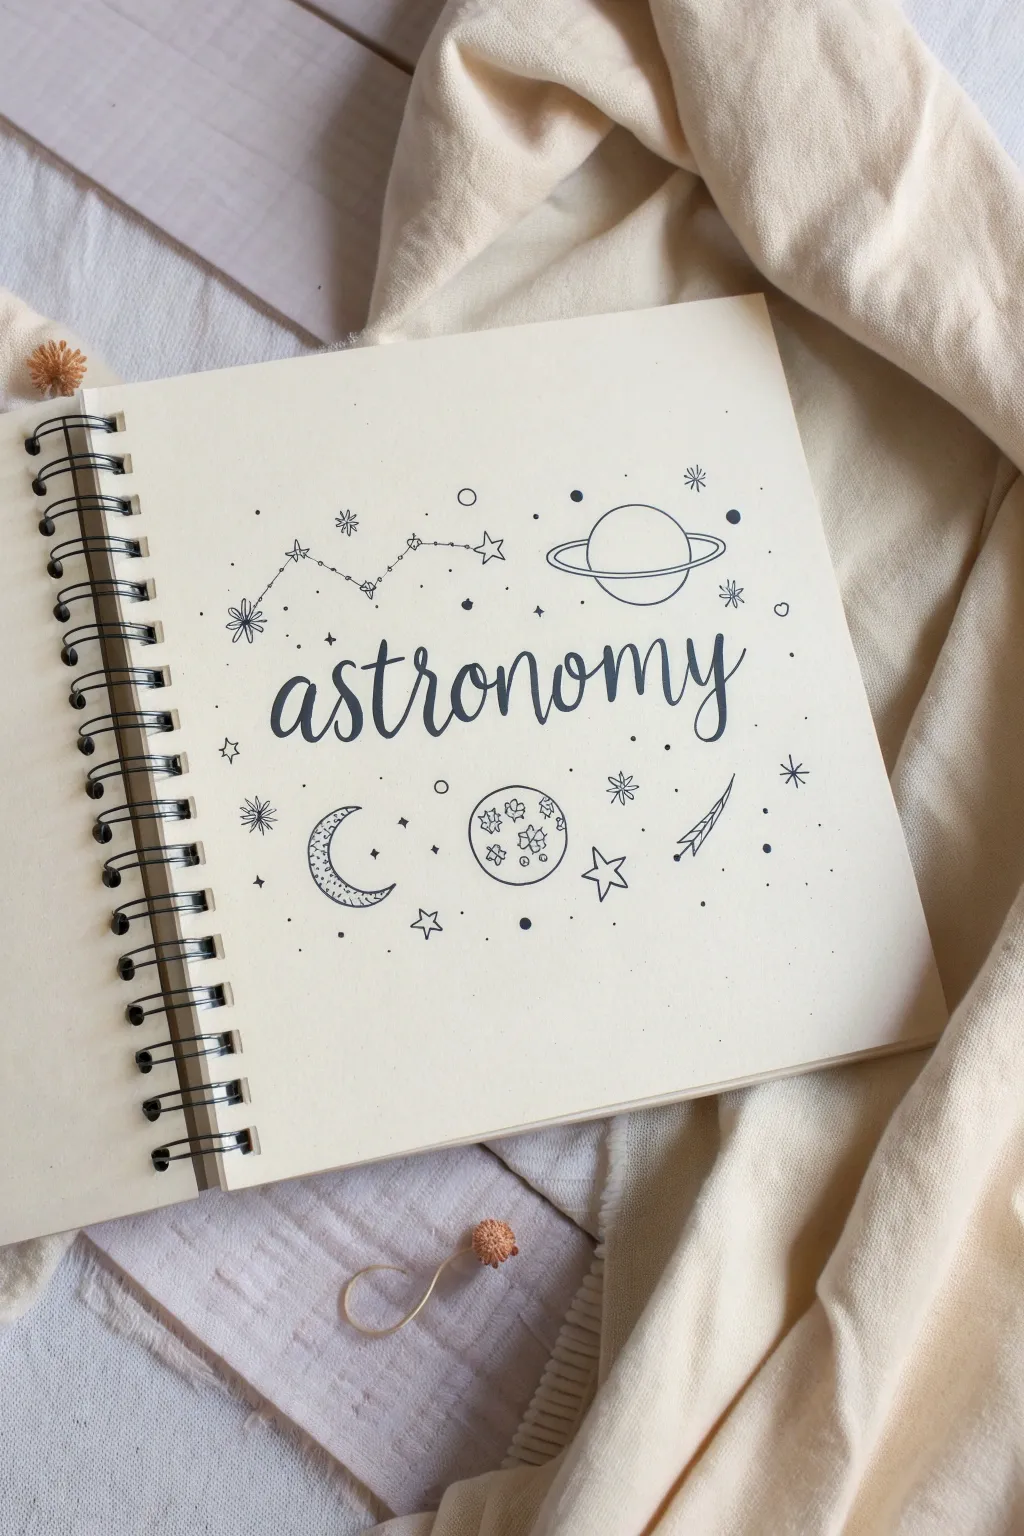
Capture the wonder of the cosmos with this minimalist astronomy title page. Featuring elegant, sweeping script and delicate line drawings of planets and stars, this layout makes a perfect opening for a bullet journal or sketchbook dedicated to the night sky.
How-To Guide
Materials
- Spiral-bound sketchbook (cream or white paper)
- Pencil (HB or 2H for sketching)
- Fine liner pen (0.3mm or 0.5mm, black)
- Fine liner pen (0.1mm or 0.05mm for details)
- Brush pen or calligraphy marker (black)
- Eraser (kneaded preferred)
- Ruler (optional)
Step 1: Planning the Layout
-
Center the word:
Begin by lightly sketching the word ‘astronomy’ in the center of your page using a pencil. Aim for a script style where the letters are all lower-case and connected. -
Check spacing:
Ensure there is ample white space above and below the word. The text should span about two-thirds of the page width to allow breathing room for the doodles. -
Sketch main celestial bodies:
Lightly sketch the outline of the large Saturn-like planet in the upper right quadrant. Draw the moon crescent in the lower left. -
Add secondary elements:
Pencil in the full moon circle containing craters below the text. Sketch the constellation diagram in the upper left, connecting small dots with lines. -
Fill the gaps:
Map out where your smaller stars, dots, and the shooting star (lower right) will go. Keep the distribution balanced so the page feels full but not cluttered.
Ink Smudges?
If you smudge the ink, turn it into a nebula! gently stipple tiny dots over the smudge to camouflage it as a cluster of distant stars.
Step 2: Inking the Lettering
-
Trace the downstrokes:
Using your brush pen or a thicker fine liner (0.5mm), trace the pencil sketch of ‘astronomy’. Apply slightly more pressure on the downstrokes to create that calligraphy variation. -
Refine the upstrokes:
Use a lighter touch or the very tip of the brush pen for the upstrokes and connecting lines between letters. This contrast gives the word its elegance. -
Checking consistency:
Pause to make sure the loops on letters like ‘l’, ‘y’, and ‘s’ are smooth and rounded. -
Let it dry:
Allow the lettering ink to dry completely to prevent smudging while you work on the surrounding illustrations.
Step 3: Drawing the Cosmos
-
Outline Saturn:
Switch to your standard fine liner (0.3mm). Ink the circle of the planet, ensuring the line breaks where the rings pass in front of it. -
Draw the rings:
Draw the elliptical rings around the planet. Add an inner line on the rings to give them dimension. -
Detail the crescent moon:
Outline the crescent shape in the bottom left. Fill the interior with tiny stippling dots or small jagged lines to create a textured, cratered surface. -
Ink the full moon:
Draw the circle for the moon below the text. Inside, draw irregular, organic shapes to represent the ‘seas’ or maria, adding small dots for texture. -
Create the constellation:
In the top left, draw small stars (asterisks or 5-pointed shapes). Use a ruler or a steady hand to connect them with a thin, dashed or solid line. -
Add the shooting star:
In the bottom right, draw the comet or shooting star with a trailing tail made of several lines converging into a point. -
Scatter the stars:
Using your thinnest pen (0.1mm), ink the remaining assorted stars. Mix large 5-pointed outlines with simple asterisks and tiny solid dots. -
Add cosmic dust:
I like to finish by randomly placing very small dots (stippling) throughout the empty spaces to simulate distant stars and give the piece cohesion.
Add Magic
Use a metallic gold or silver gel pen to fill inside the hollow stars or trace the planet rings for a subtle shimmer that catches the light.
Step 4: Finishing Touches
-
Erase guidelines:
Wait firmly until all ink is bone dry (give it a few minutes). Gently erase all remaining pencil marks with a kneaded eraser to avoid crumpling the paper. -
Assess contrast:
Look at the composition from a distance. If any lines look too thin against the bold lettering, carefully thicken them with your pen.
Now you have a beautifully balanced title page ready to begin your journey through the stars
Geometric Orbit Pattern Art
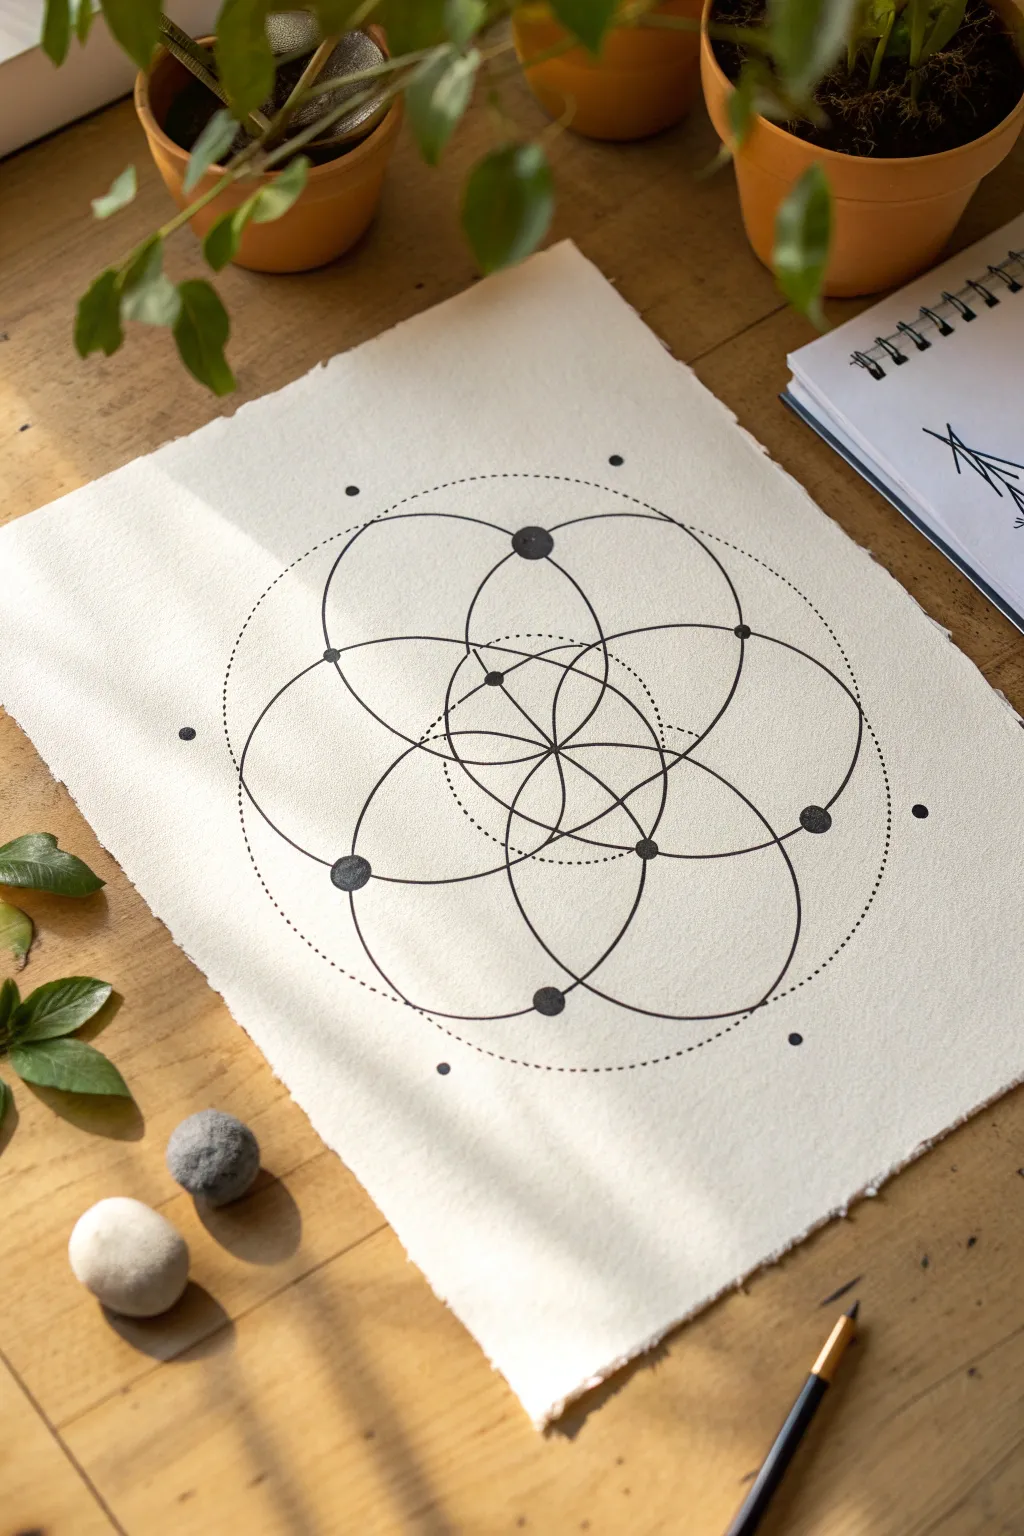
Blend the precision of geometric drafting with astronomical aesthetics in this elegant Seed of Life drawing. This project creates a minimalist orbital map using simple compass work and inked details on beautiful textured paper.
Step-by-Step Tutorial
Materials
- High-quality textured paper (watercolor or handmade cotton paper)
- Pencil (HB or H for light lines)
- Compass with a pencil holder
- Fine liner pens (0.1mm, 0.3mm, and 0.5mm)
- Ruler
- Eraser (kneaded eraser preferred)
- Circular template (optional, for perfect dots)
Step 1: Setting the Foundation
-
Paper Preparation:
Begin with a sheet of heavy-weight, textured paper. If your paper has deckled edges like the example, center your workspace to ensure the design floats nicely in the middle without feeling cramped. -
Establish the Center:
Using your ruler, lightly mark the absolute center of your paper with a pencil. This single point will be the anchor for the entire geometric expansion. -
The First Circle:
Set your compass to a radius of approximately 2 inches (or scaled to your paper size). Place the needle on your center mark and draw the first central circle lightly in pencil. -
Marking Intersections:
Keep the compass radius exactly the same. Place the compass needle anywhere on the circumference of that first circle and make a small mark on the line. This establishes the starting point for the next phase.
Step 2: Constructing the Seed of Life
-
Drawing the Second Circle:
Place the compass needle on the mark you just made on the circumference. Draw a second full circle. It should pass exactly through the center of your first circle. -
Creating the Pattern:
Move your compass needle to the point where the second circle intersects the first one. Draw a third circle. Continue this process around the central circle until you have drawn six surrounding circles. -
Completing the Flower:
You should now have a central flower shape bounded by six petals. Check your symmetry; if the last circle doesn’t line up perfectly with the first, double-check your compass width. -
Outer Ring Boundary:
Widen your compass significantly so the pencil tip touches the outermost edge of your circle cluster. Draw a large, light guide circle that encompasses the entire design.
Compass Pro-Tip
Tape a small piece of sandpaper to your desk. Run your compass lead over it to create a chisel edge. This keeps your pencil lines razor-thin for better accuracy.
Step 3: Inking the Orbits
-
Tracing the Primary Arcs:
Switch to a 0.5mm fine liner. I find it safest to place the pen in the compass holder if possible, or trace very carefully freehand over your pencil lines. Ink the full circumferences of all seven interconnected circles. -
Adding the Dotted Halo:
Using a 0.3mm pen, ink the large outer boundary circle you drew earlier, but create a dotted or dashed line instead of a solid one to suggest an orbital path. -
The Inner Dotted Circle:
Reset your compass to a slightly smaller radius than the main circles. Draw a faint pencil circle centered on the very middle of the design, cutting through the petals. Ink this line with a delicate dotted pattern.
Level Up: Gold Leaf
Apply gold leaf to just the central ‘sun’ dot or the six primary planetary dots. The metallic shine contrasts beautifully against the matte black ink.
Step 4: Celestial Details
-
Placement of Major Planets:
Identify the six intersection points on the outer edges of the central cluster. Using a 0.5mm pen or a stencil, fill in solid black circles (about 3-4mm wide) at these junctions to represent major planetary bodies. -
Marking the Axis:
Locate the vertical axis of the drawing. Add smaller solid dots at the very top and bottom intersections of your main circles. -
Outer Satellites:
On the large outer dotted ring, place four small dots: top, bottom, left, and right, aligning them with the central symmetry of the piece. -
Adding Diagonal Markers:
Place four additional small dots floating outside the main design, positioned diagonally (roughly at 45-degree angles) between the main cardinal points. -
Erasing Guidelines:
Wait at least 15 minutes for the ink to cure completey. Gently run your kneaded eraser over the entire piece to lift the graphite, leaving only the crisp black ink.
Step back and admire the cosmic balance of your finished geometric chart
Minimal One-Line Space Icons
Transform the edge of your notebook into a slice of the night sky with these crisp, minimalist space icons. This tutorial guides you through creating a vertical column of celestial bodies, perfect for adding a touch of wonder to your bullet journal or planner.
Step-by-Step
Materials
- Spiral-bound dot grid notebook
- Fine liner pen (black, 0.3mm or 0.5mm tip)
- Pencil (HB or 2B)
- Eraser
- Ruler (optional)
Step 1: Planning and Layout
-
Define the drawing area:
Since we are working with a dot grid notebook, use the dots as your guide. Locate a column of dots near the right edge of the page, roughly an inch from the trim. This vertical line will serve as the central axis for your doodles. -
Space out your icons:
Lightly mark eight evenly spaced points down this axis with your pencil. Leave about 4-5 grid squares between each mark to ensure the drawings don’t feel crowded.
Grid Guide
Use the dot grid to count squares—make your circles 4×4 squares wide and stars 3×3 squares tall for perfect uniformity.
Step 2: Sketching the Shapes
-
Top star outline:
At the very top mark, sketch a simple eight-pointed star. Start with a vertical cross, then add a smaller diagonal cross through the center. -
Crescent moon curve:
Move down to the second mark. Draw a ‘C’ shape for the outer curve of the moon. Close the shape with a smaller inner curve, creating a tapering crescent that faces left. -
Simple burst star:
For the third icon, sketch a six-pointed asterisk. Keep the lines relatively thin and equal in length. -
Diamond sparkle:
Below the asterisk, draw a four-pointed star that looks elongated, like a diamond or a compass rose. The vertical points should be longer than the horizontal ones. -
Full moon circle:
Sketch a perfect circle for the fifth icon. You can trace a small coin or a stencil if freehand circles are tricky for you. -
Textured planet:
Move to the next spot and draw another circle, slightly larger than the previous one. Inside, lightly sketch irregular blob shapes to represent craters or continents. -
Radiant starburst:
For the seventh icon, draw a small central point and sketch about eight to ten lines radiating outward. Make them slightly irregular in length for a twinkling effect. -
Bottom five-point star:
Finally, at the bottom mark, sketch a classic five-pointed star. Keep the angles sharp and the points symmetrical.
Cosmic Color
Fill the shapes with metallic gel pens in gold or silver for a shimmering effect that pops against the white paper.
Step 3: Inking and Details
-
Inking the simple lines:
Take your fine liner pen. Start with the simpler shapes like the top star, asterisk, and diamond sparkle. Draw over your pencil lines with confident, single strokes. -
Refining the crescent:
Ink the crescent moon. Ensure the points where the curves meet are sharp and precise. -
Inking the full moon:
Trace the circle of the full moon. Instead of leaving it empty, use the pen to add tiny stippling dots inside. Keep the dots denser on one side to suggest shadow and texture. -
Detailing the planet:
Ink the outer circle of the textured planet. Then, outline the internal crater shapes. I like to add a few tiny dots or lines inside the craters to give them depth. -
Finishing the starburst:
Ink the radiant starburst. You can double up a few of the radiating lines to make the star look brighter and more dynamic. -
Completing the five-point star:
Ink the final five-pointed star. Ensure the lines connect cleanly at the corners without overshooting. -
Dry and erase:
Let the ink dry completely for at least five minutes to prevent smudging. Once dry, gently erase all underlying pencil marks to reveal the crisp black illustrations.
Now you have a beautifully aligned column of space icons ready to track your habits or just decorate your page


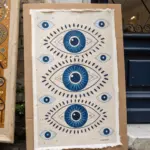

Have a question or want to share your own experience? I'd love to hear from you in the comments below!