
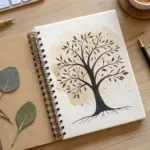
Every year when the air turns crisp, I get the itch to paint all the autumn colors—the golds, the rust reds, the deep browns, all of it. Here are my favorite autumn art ideas that feel approachable, satisfying, and totally made for that cozy, creative seasonal mood.
Golden Autumn Tree Landscape
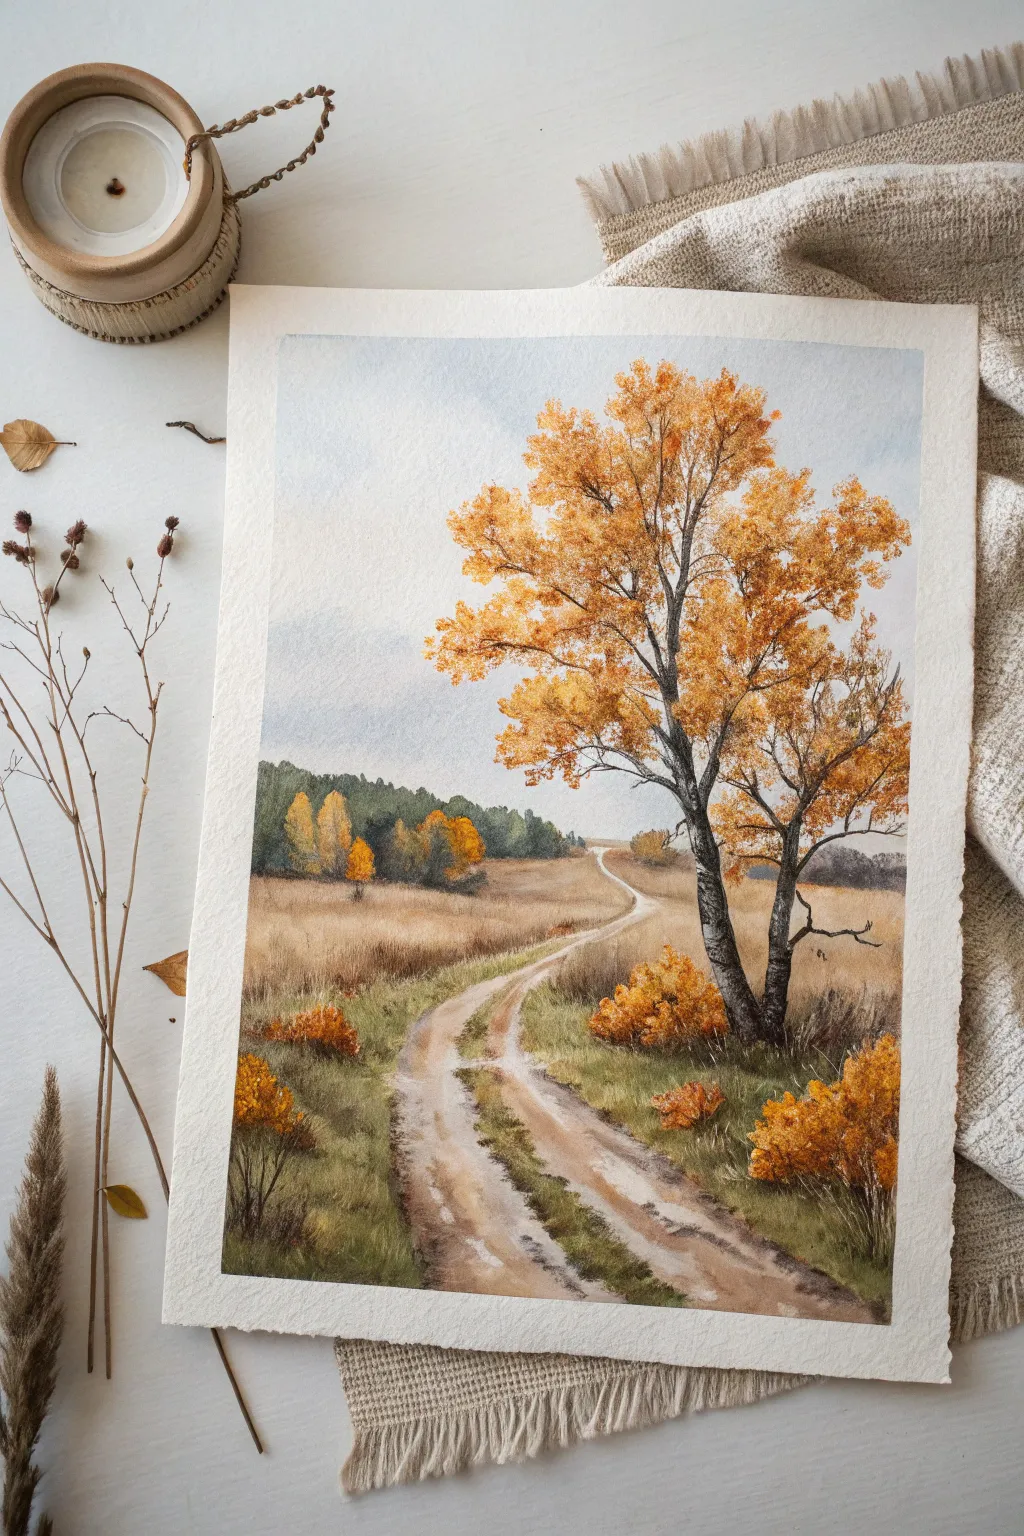
Capture the crisp, quiet beauty of a fall afternoon with this serene watercolor landscape. You’ll learn to paint a winding dirt path that draws the eye into a golden horizon, framed by a majestic tree in full autumn regalia.
Step-by-Step Tutorial
Materials
- Cold press watercolor paper (300 gsm)
- Watercolor paints (Yellow Ochre, Burnt Sienna, Burnt Umber, Sap Green, Ultramarine Blue, Paynes Gray)
- Round brushes (sizes 4, 8, and 12)
- Fine liner brush (size 0 or 1)
- Masking tape
- Pencil (HB) and kneadable eraser
- Two jars of water
- Paper towels or cotton rag
- Palette for mixing
Step 1: Preparation and Sketching
-
Secure the paper:
Tape down all four edges of your watercolor paper to a board using masking tape. This creates that crisp white border seen in the final piece and prevents the paper from buckling when wet. -
Sketch the horizon:
Using your HB pencil, lightly draw the horizon line about one-third of the way up the paper. Keep the line faint so it doesn’t show through the paint later. -
Map the path:
Sketch the winding dirt road starting wide at the bottom center and narrowing significantly as it curves toward the horizon line. Add the rough outline of the main tree on the right side, focusing on trunk placement.
Muddy colors?
If your greens and oranges are turning brown where they meet, let the first color dry completely before applying the second. Patience prevents unwanted mixing.
Step 2: Painting the Sky and Background
-
Wet-on-wet sky:
Clean your large brush and wet the entire sky area with clean water. While glistening, drop in a very diluted mix of Ultramarine Blue and a touch of Paynes Gray for a soft, cloudy day feel. -
Soft clouds:
While the sky is still damp, lift out pigment with a clean, dry paper towel to create soft white cloud shapes if you wish, or leave it as a smooth gradient. -
Distant trees:
Mix Sap Green with a little Ultramarine Blue for a cool, distant green. Once the sky is dry, paint the band of trees along the horizon. Keep the top edges jagged to suggest treetops. -
Adding autumn touches:
While the distant tree line is still wet, drop in tiny spots of Yellow Ochre or Burnt Sienna to suggest turning leaves in the distance.
Step 3: Middle Ground and Fields
-
Base wash for fields:
Mix a large wash of Yellow Ochre and a tiny bit of Burnt Sienna. Apply this loosely over the grassy areas on either side of the road, leaving the road itself unpainted for now. -
Texturing the grass:
While the field wash is damp but not soaking, use a smaller brush to flick in some darker green (Sap Green + Burnt Umber) near the bottom corners to create the illusion of closer, taller grass. -
Road foundation:
Paint the dirt road with a very watery mix of Yellow Ochre and Burnt Umber. While wet, lift out the center areas of the tracks with a thirsty brush to create highlights where the light hits the ruts. -
Defining the ruts:
Once the road base is dry, use a smaller brush and a darker mix of Burnt Umber and Paynes Gray to paint the shadows inside the tire tracks and along the road edges.
Natural Sponging
For realistic leaf texture, try dipping a small piece of natural sea sponge into your paint and dabbing it on the paper instead of using a brush.
Step 4: The Golden Tree
-
Trunk and branches:
Using your fine liner brush and a mix of Paynes Gray and Burnt Umber, paint the main trunk of the prominent tree. Use shaky, organic strokes for the branches, letting them taper off as they reach outward. -
Foliage base layer:
Mix a vibrant Yellow Ochre. Using a round brush, stipple (dab repeatedly) the general shape of the tree’s canopy. Keep the edges airy and leave gaps where the sky peeks through. -
Building volume:
While the yellow layer is still slightly wet, stipple in Burnt Sienna on the shadow side (usually the bottom and left side of leaf clumps) to give the foliage depth. -
Deepest shadows:
Mix a small amount of Burnt Umber with your orange mix. Dab this sparingly into the darkest crevices of the tree canopy to separate the clusters of leaves. -
Lower bushes:
Repeat the stippling technique for the smaller orange bushes lining the road and in the foreground. Use bright orange notes here to create balance with the main tree.
Step 5: Final Details
-
Enhancing the grass:
With a dry brush technique and slightly thicker paint, add vertical strokes in the immediate foreground to suggest individual stalks of dry grass. -
Contrast check:
Step back and assess your values. Darken the tree trunk or the shadows in the road ruts if the painting looks too washed out. -
Remove tape:
Wait until the paper is completely bone dry—warm to the touch—before carefully peeling off the masking tape at a 45-degree angle.
Now you have a tranquil autumn scene that preserves the golden warmth of the season forever


Birch Trees With Falling Leaves
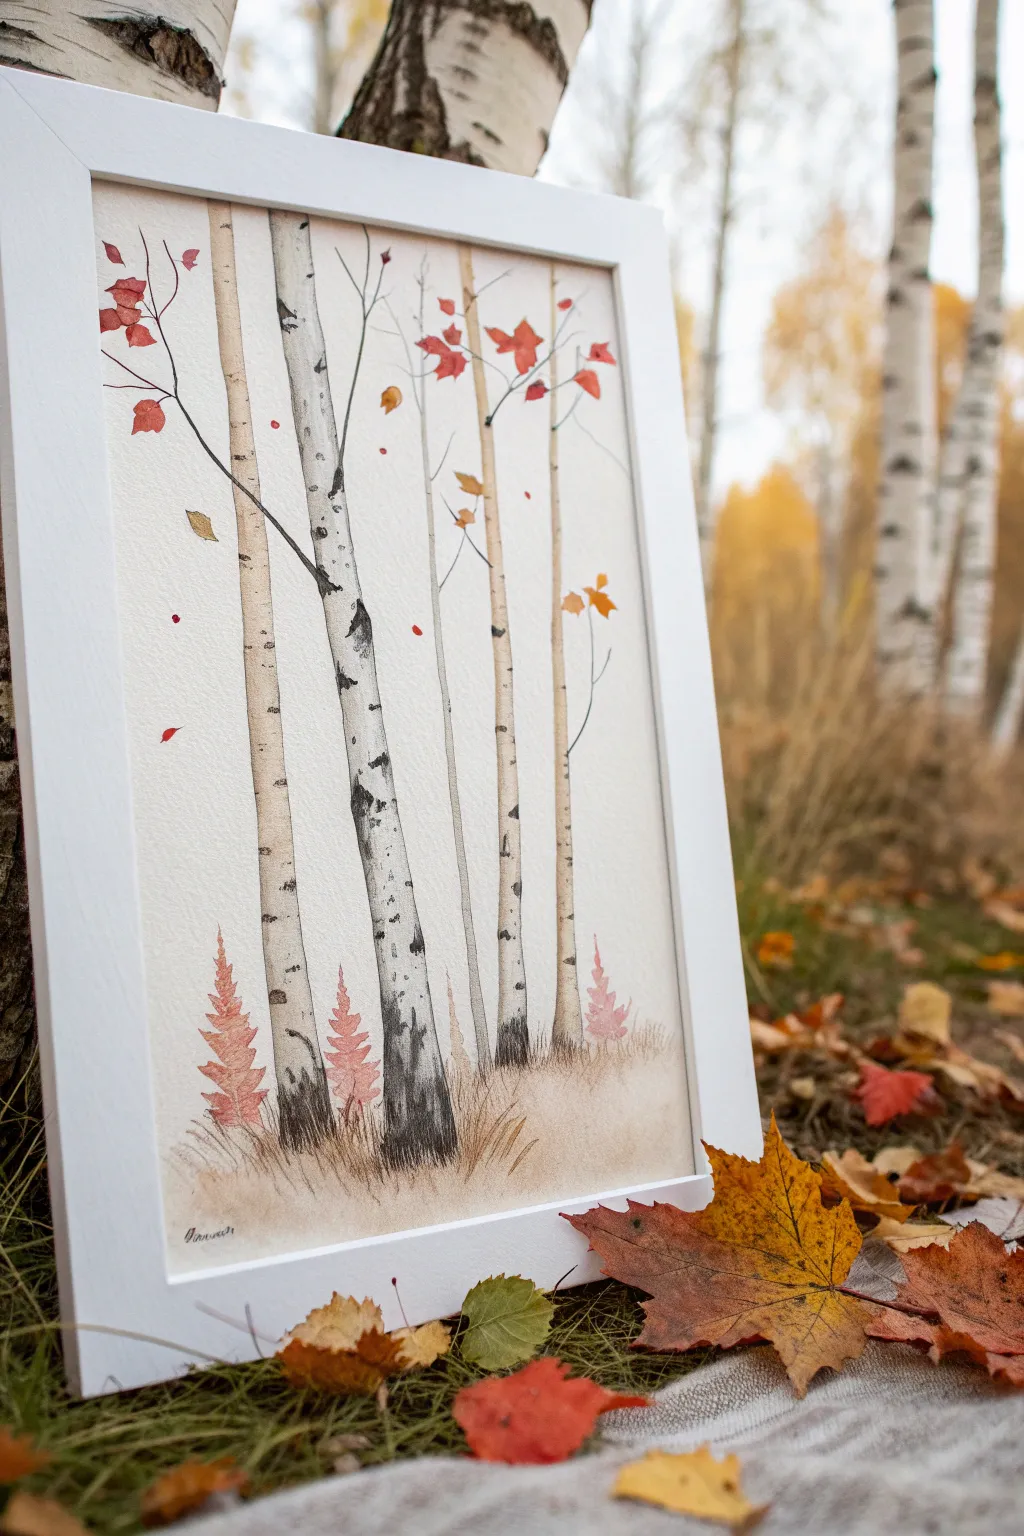
Capture the serene beauty of a crisp fall day with this delicate watercolor painting of white birch trees. Using simple masking techniques and warm autumnal hues, you’ll create a piece that feels both airy and grounded in nature.
Step-by-Step Guide
Materials
- Cold press watercolor paper (approx. 9×12 inches)
- Watercolor paints (Payne’s Gray, Burnt Sienna, Yellow Ochre, Red, Orange)
- Masking fluid or white artist tape
- Round brushes (sizes 2, 4, and 8)
- Fine liner brush or rigger brush
- Pencil and eraser
- Jar of water and paper towels
- White frame for display
Step 1: Planning the Composition
-
Sketch the layout:
Begin by lightly sketching the outline of five to seven birch trunks. Vary their thickness slightly, but keep them generally slender and vertical. Ensure they are spaced irregularly to look natural, rather than like a fence. -
Add branch guides:
Draw faint lines where the major branches will extend from the trunks. Birch branches tend to reach upward at sharp angles before curving slightly.
Clean Lines
If your masking fluid tore the paper upon removal, the paper was likely too soft or the fluid stayed on too long. Next time, remove it within 24 hours.
Step 2: Painting the Trees
-
Mask the trunks:
This is the most crucial step for crisp edges. Carefully apply masking fluid to the main trunks of your sketched trees. If you don’t have fluid, you can use strips of artist tape, though fluid allows for more organic shapes. Let this dry completely. -
Apply the background wash:
Mix a very dilute wash of Yellow Ochre with a tiny touch of Burnt Sienna. Using your largest brush, paint a loose, watery background over the paper, avoiding the very bottom area. This creates that soft, hazy autumn atmosphere. -
Remove the mask:
Once the background wash is bone dry, gently rub off the masking fluid or peel away the tape. You should now have stark white shapes of trees against your tinted background. -
Shadow the trunks:
Mix a very watery grey using Payne’s Gray. Paint down the right side of each trunk to create a cylindrical form, softening the edge with clean water so it fades into the white bark. -
Add bark markings:
Using a size 2 brush and concentrated Payne’s Gray (almost black), paint the distinctive horizontal lenticels and markings. Start at the edge of the trunk and flick inward. Vary the pressure to make some markings heavy and others fine. -
Paint the tree bases:
Darken the pigment at the very bottom of the trunks where they meet the ground, grounding the trees visually.
Step 3: Adding Branches and Foliage
-
Draw fine branches:
Switch to your liner or rigger brush. With a dark grey-brown mix, paint delicate lines extending from the trunks. Let your hand shake slightly to give the twigs a natural, organic tremble. -
Paint the leaves:
Mix vibrant reds and oranges. Using the tip of a round brush, dab small leaf shapes onto the branches. Don’t overdo it—birches lose leaves quickly, so scattering them sparsely looks most realistic. -
Create falling leaves:
Paint a few isolated red or yellow leaves floating in the empty space between trees to suggest a gentle breeze.
Metallic Magic
Mix a tiny amount of gold watercolor paint into your yellow leaves. When the light hits the painting, the foliage will shimmer like real sunlight.
Step 4: Foreground Details
-
Paint the ground layer:
Use a wash of Burnt Sienna and Ochre at the bottom of the paper to create the forest floor. Use upward flicking motions to suggest dried grass blades. -
Add fern accents:
With a reddish-brown mix, paint small, fern-like shapes near the base of the trees. Keep the brush strokes loose and upward-facing. -
Final touches:
Check your contrast. Add darker blacks to the bark notches if needed, or add a few tiny dots of red in the air for distant falling leaves. Sign your work in the corner. -
Frame the piece:
Once absolutely dry, place your artwork in a clean white frame to echo the color of the birch bark and make the fall colors pop.
Enjoy the peaceful feeling this autumn scene brings to your space


Color-Blocked Fall Trees
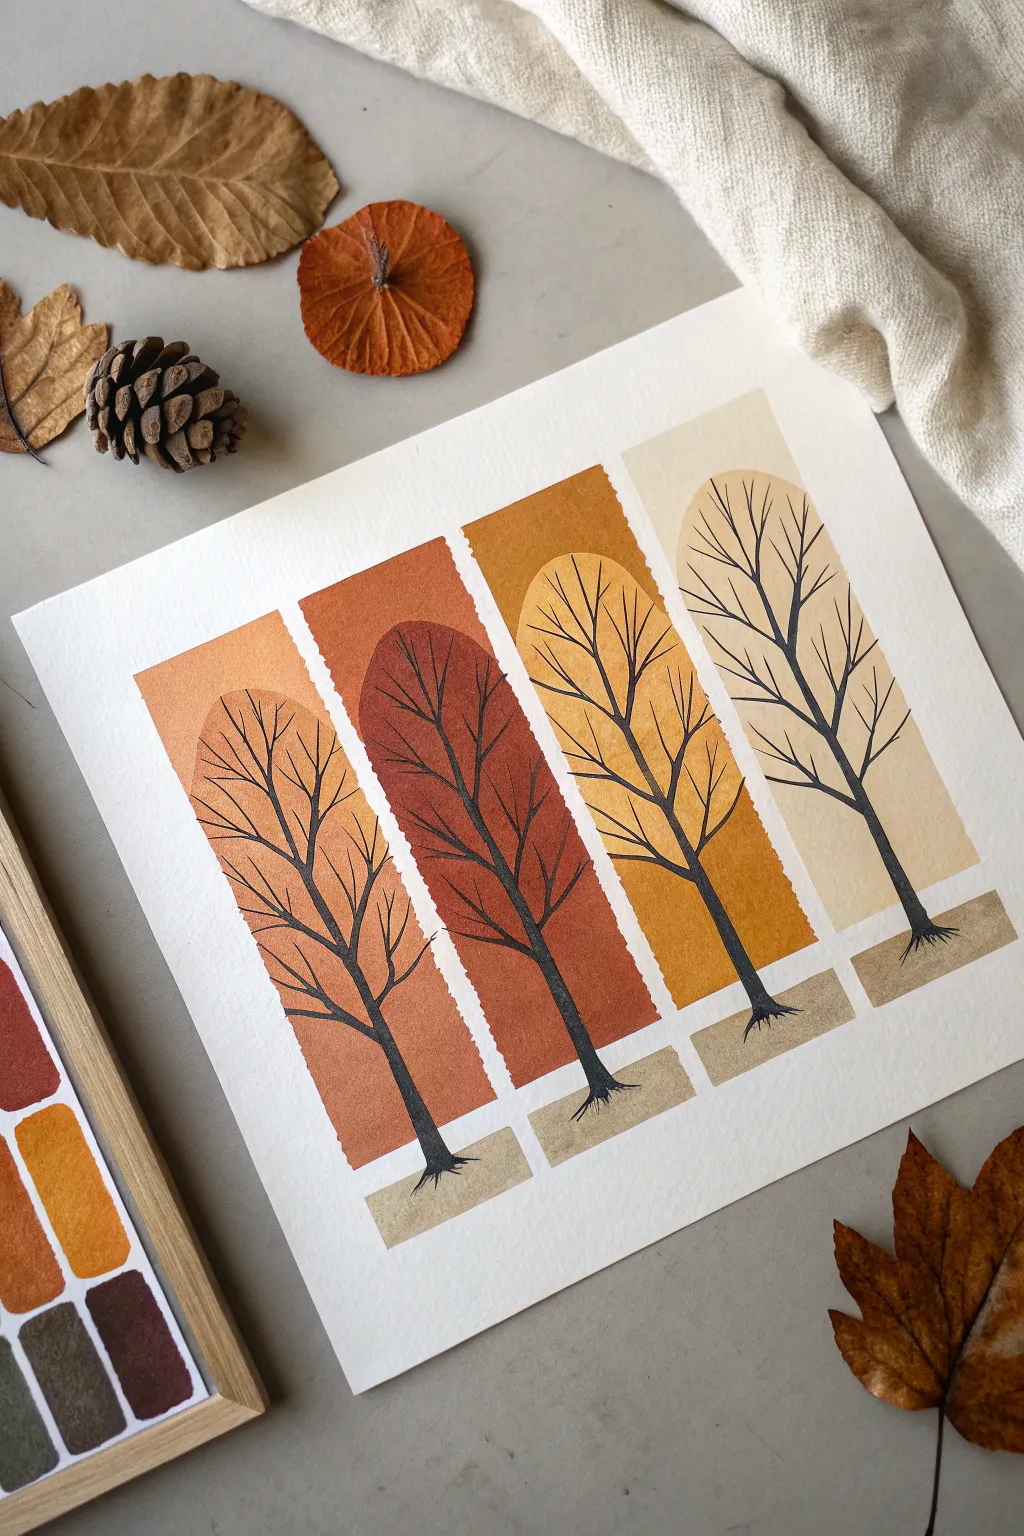
Embrace the changing season with this clean, minimalist watercolor project that combines geometric precision with organic line work. You’ll create four stylized autumn trees using vertical color blocking to represent the canopy, resulting in a modern piece perfect for seasonal decor.
Step-by-Step Guide
Materials
- Cold-press watercolor paper (at least 140lb/300gsm)
- Watercolor paints (burnt sienna, burnt umber, yellow ochre, and a pale cream/buff)
- Flat shader brush (approx. 3/4 inch)
- Fine liner brush (size 0 or 00) or a black micron pen
- Washi tape or masking tape (low tack)
- Ruler
- Pencil and adhesive eraser
- Palette for mixing
- Two jars of water
- Paper towels
Step 1: Setting the Structure
-
Grid layout:
Begin by lightly measuring out four vertical rectangular columns on your watercolor paper. These will become the backgrounds for your trees. Leave about an inch of white space between each column to keep the look clean and distinct. -
Masking boundaries:
To achieve those crisp, satisfying edges, apply vertical strips of washi tape along the pencil lines of your four columns. Press down firmly to prevent paint from bleeding underneath. -
Grounding squares:
Measure a small horizontal gap near the bottom of each column—about 1/4 inch of white space—and then mark off small rectangles at the very base. These smaller blocks will act as the ‘earth’ or ground for each tree.
Uneven Edges?
If paint bled under the tape, don’t panic. Use a tiny amount of white gouache or opaque white gel pen to clean up the line and sharpen the rectangle’s edge.
Step 2: Blocking in Color
-
Mixing the palette:
Prepare four distinct autumn shades. I usually aim for a gradient effect: a soft muted orange, a deep russet red, a golden mustard yellow, and a pale beige. -
Painting the first block:
Using your flat shader brush, fill the first vertical column with your muted orange wash. Keep the paint fluid but not puddling. -
Creating the arc:
This is crucial: at the top of the color block, don’t paint straight across. Instead, use the tip of your brush to create a rounded, arch-like shape. Similarly, curve the bottom edge slightly upward to mimic the canopy shape. -
The remaining columns:
Repeat this process for the remaining three columns, using a different color for each. Clean your brush thoroughly between colors to keep the mustard yellow and beige crisp. -
Painting the ground:
Mix a diluted light brown or grey-beige wash. Fill in the small rectangular ‘ground’ blocks at the bottom. Keep this color neutral so it doesn’t compete with the vibrant leaves. -
Patience is key:
Let the paint dry completely. This might take 20-30 minutes. If you try to remove the tape too early, you’ll tear the paper or smudge the crisp lines. -
The reveal:
Gently peel away the washi tape at a 45-degree angle. You should now have four perfect, rounded vertical blocks of color hovering above four small ground blocks.
Level Up
Add subtle texture by splattering clean water onto the color blocks while they are still wet, creating “blooms” that look like dappled light on leaves.
Step 3: Adding the Silhouette
-
Starting the trunks:
Switch to your fine liner brush with concentrated black watercolor (or black ink). Start at the base block and draw a thin trunk reaching upwards into the colored canopy. -
Root details:
Where the trunk hits the ‘ground’ block, paint small, spindly roots that fan out slightly. This visually anchors the tree so it doesn’t look like it’s floating. -
Primary branches:
Extend the main trunk about two-thirds of the way up the colored block. From there, split the line into two or three varying main branches reaching toward the top of the arch. -
Branching out:
Add secondary branches growing from your main lines. Keep your hand loose and let the lines tremble slightly; nature rarely produces perfectly straight lines. -
Fine details:
Fill in the empty spaces with tiny, wispy twigs. Ensure the branches generally follow the curvature of the colored arch, but don’t be afraid to let a few tips touch the very edge of the paint. -
Repeating the process:
Draw the skeletons for the remaining three trees. Try to vary the branching patterns slightly so they look like individuals rather than carbon copies. -
Reference check:
Step back and look at the composition. If any tree looks too sparse, add a few more delicate lines near the center to add visual weight.
Once dry, frame your artwork to bring a touch of structured autumn warmth to your wall


Oak Leaf Botanical Drawing
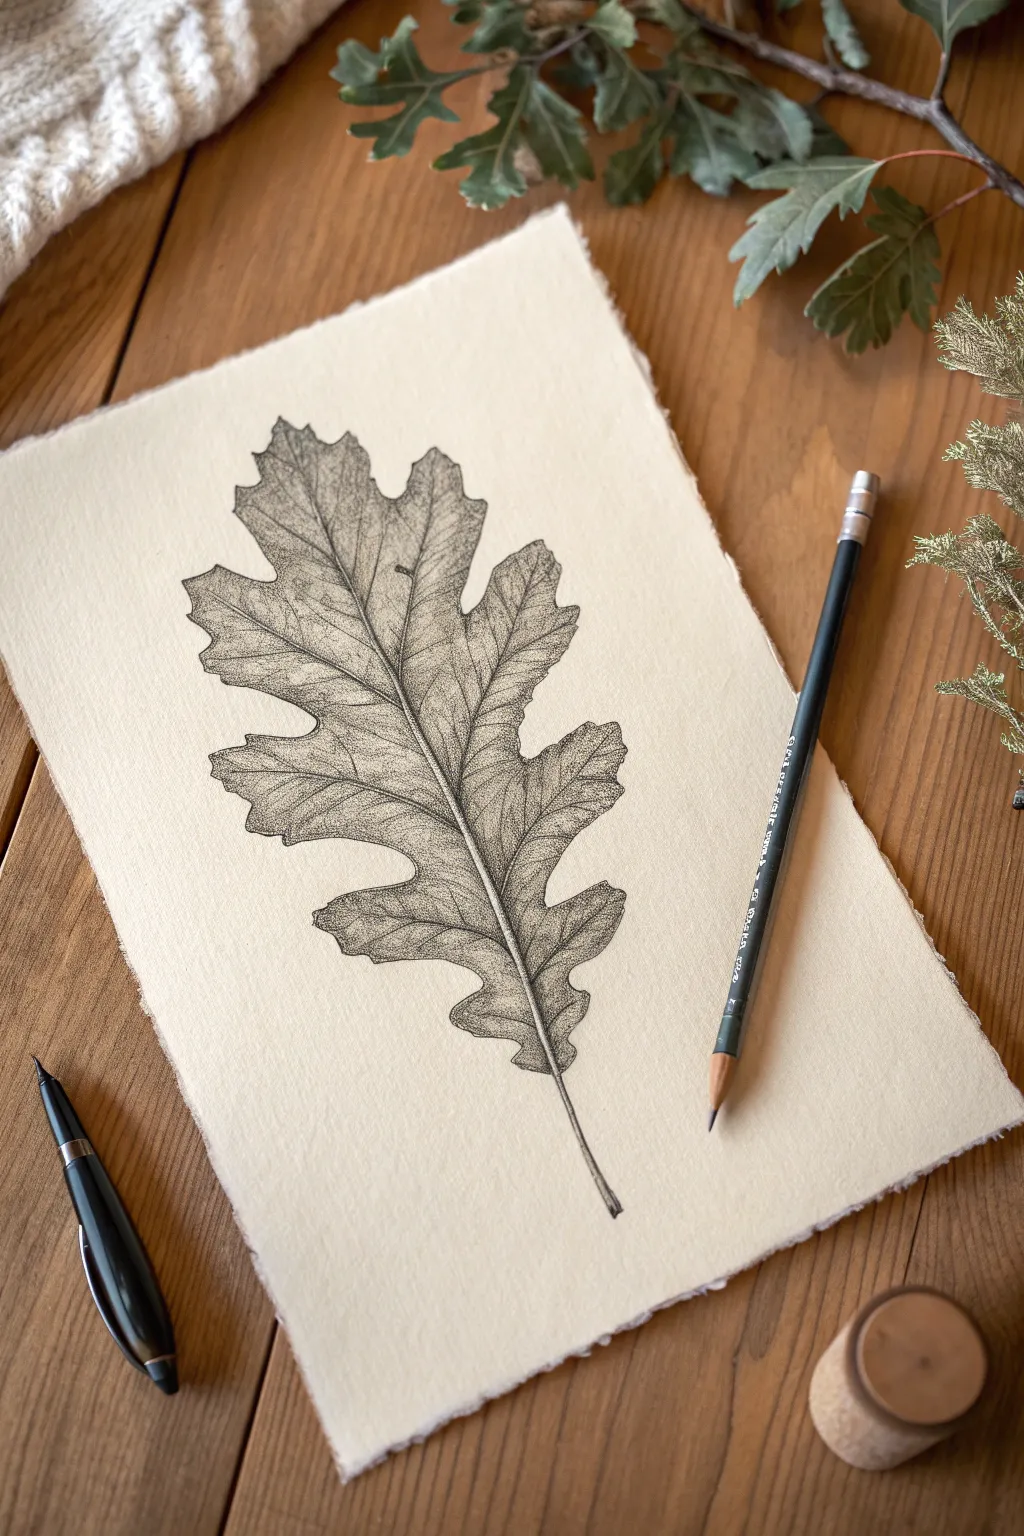
Capture the delicate beauty of autumn with this detailed botanical study of a dried oak leaf. Using traditional stippling techniques on textured paper, you’ll create a piece with rich depth and a vintage scientific aesthetic.
Step-by-Step Guide
Materials
- Heavyweight textured paper (like cold press watercolor paper or handmade cotton rag)
- H or HB graphite pencil for outlining
- Fine liner pens (sizes 005, 01, and 03 in black archival ink)
- Kneaded eraser
- Real oak leaf for reference (optional but helpful)
Step 1: Sketching the Structure
-
Establish the curve:
Begin by drawing a gentle ‘S’ curve lightly with your graphite pencil down the center of your paper. This will act as the midrib (main vein) and determine the flow of the leaf. -
Outline the lobes:
Lightly sketch the general outline of the leaf lobes. Oak leaves are asymmetrical, so allow the lobes on the left and right to vary in size and shape. Keep your lines faint so they can be erased later. -
Refine the edge:
Go back over your outline and add the jagged, irregular details typical of a dried leaf. Look for places where the leaf edge curls slightly or creates sharp points. -
Add secondary veins:
From the central midrib, sketch veins branching out into each lobe. These should not be perfectly straight; give them a slight wobble to mimic organic growth.
Patience is Key
Stippling takes time. Don’t rush or tap too hard, or you’ll hook the pen tip. Keep your wrist loose and think of it as a meditative process rather than a race.
Step 2: Inking the Foundation
-
Ink the main lines:
Switch to your 01 size pen. Carefully trace the midrib first, then the outer contour of the leaf. Use a broken line technique in areas where the leaf feels lighter or more delicate. -
Detail the veins:
Ink the secondary veins branching into the lobes. As you get closer to the edge of the leaf, let the lines become thinner or fade out. -
Erase pencil marks:
Once the ink is completely dry (wait at least 5 minutes to avoid smudging), gently roll your kneaded eraser over the drawing to lift all graphite guidelines.
Step 3: Shading with Stippling
-
Begin the dotwork:
Using the 005 pen (the finest tip), start placing small dots along the sides of the midrib. This establishes the deepest channel of the leaf. -
Build the shadows:
Concentrate more dots where the veins meet the midrib and along the bottom edges of the lobes. The closer the dots are together, the darker the shadow will appear. -
Create texture:
Move outward toward the center of the lobes with fewer, more scattered dots. This transition from dense to sparse dots creates the illusion of a curved, 3D surface. -
Darken the edges:
Dried leaves often curl at the edges. Use the 01 pen to add a denser cluster of dots along the very tips and valleys of the leaf outline to show this curling effect. -
Add imperfections:
I like to add a few random spots or blemishes using tiny clusters of dots to make the specimen look real and weathered. -
Deepen contrast:
Switch to the 03 pen for the darkest shadow areas only, such as the very base of the stem or deep folds. Use this sparingly to avoid overpowering the delicate texture. -
Review vertical volume:
Look at your drawing from a distance. If the leaf looks too flat, add more mid-tone stippling (moderately spaced dots) in the middle of the leaf sections to round them out. -
Final stem details:
Add linear texture to the stem base. Instead of just dots, use very short, thin lines running parallel to the stem to suggest a woody texture.
Coffee Stain effect
Before drawing, lightly brush your paper with diluted tea or coffee and let it dry. This creates an aged, parchment-like background that complements the botanical style perfectly.
Now you have a timeless piece of botanical art ready for framing or gifting
BRUSH GUIDE
The Right Brush for Every Stroke
From clean lines to bold texture — master brush choice, stroke control, and essential techniques.
Explore the Full Guide
Autumn Silhouette Sunset
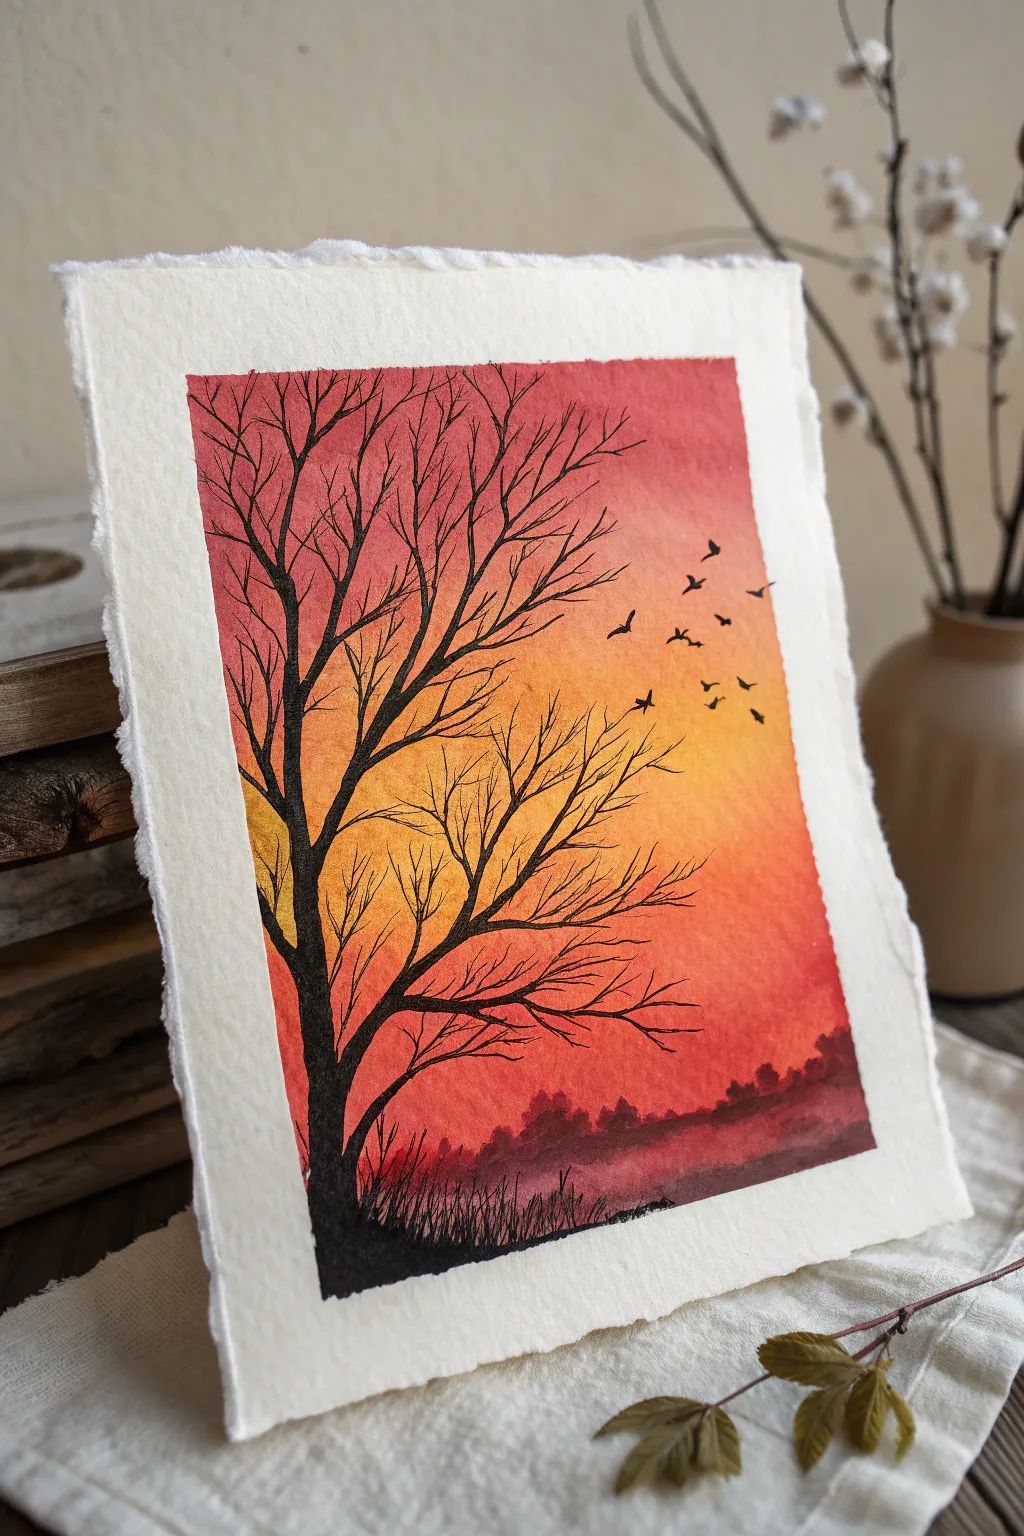
Capture the fiery essence of an autumn evening with this vibrant watercolor silhouette painting. The stark black branches against a glowing gradient of red and orange create a dramatic contrast that feels both warm and peaceful.
Step-by-Step Tutorial
Materials
- Cold-press watercolor paper (300gsm, preferably with deckle edges)
- Masking tape
- Watercolor paints (Alizarin Crimson, Cadmium Orange, Cadmium Yellow, Payne’s Gray or Ivory Black)
- Flat wash brush (3/4 inch or 1 inch)
- Round brushes (sizes 6 and 2 for details)
- Clean water jar
- Paper towels
- Pencil (HB or lighter)
Step 1: Painting the Sky Gradient
-
Tape the Edges:
Secure your watercolor paper to a board using masking tape. Create a border of about 1 inch on all sides to frame the painting cleanly. -
Pre-wet the Sky Area:
Using your large flat brush and clean water, gently wet the entire area inside the taped border. The paper should glisten but not have puddles. -
Apply the Yellow Glow:
Load your brush with Cadmium Yellow and paint a horizontal band across the middle-lower section. This will be the brightest part of the sunset. -
Introduce Orange:
While the yellow is still wet, add Cadmium Orange directly above and slightly below the yellow band, blending the edges softly where they meet. -
Deepen with Crimson:
Mix a strong wash of Alizarin Crimson. Apply this to the top third of the paper and the very bottom strip, blending it down into the orange layers. -
Smooth the Transitions:
Clean your flat brush, dry it slightly on a paper towel, and gently run it horizontally across the transition zones to create a seamless gradient from red to orange to yellow. -
Let it Dry Completely:
Allow the background to dry fully. The paper must be bone-dry before adding the black silhouette, or the ink will bleed. I often use a hairdryer on a low setting to speed this up.
Clean Lines Pro Tip
For the finest twigs, try using a black waterproof fineliner pen (0.3mm or 0.5mm) instead of a brush. It gives you incredible control for delicate details.
Step 2: Creating the Shadowy Landscape
-
Paint the Distant Treeline:
Mix a diluted wash of Payne’s Gray or Black with a touch of Crimson. Using a size 6 round brush, dab in a soft, uneven horizon line near the bottom to represent distant bushes. -
Add the Foreground Ground:
Load your brush with saturated black paint. Fill in the bottom left corner with a solid, opaque layer, creating a slight slope for the main tree to stand on. -
Texture the Grass:
Using the tip of a smaller brush, flick upward quickly from the black ground layer to create the suggestion of tall, dry autumn grass.
Fixing Back-Runs
If cauliflower-like blooms appear in your sky, it means you added water to drying paint. Don’t fight it; let it dry and call it a cloud texture.
Step 3: Detailing the Tree and Birds
-
Sketch the Main Trunk:
With the size 2 round brush and thick black paint (cream consistency), paint the main trunk rising from the left foreground. Keep the base wide and taper it as it goes up. -
Branch Outwards:
Extend the main branches from the trunk, reaching them diagonally toward the upper right corner to span across the sunset. -
Add Fine Twigs:
Switch to your finest brush point. Add delicate, twiggy extensions to the ends of the branches. Make these lines jagged and random for a natural, leafless look. -
Review Branch Density:
Look at the negative space. Ensure some areas are dense with twigs while others remain open to let the yellow glow shine through. -
Paint the Birds:
Using the very tip of your smallest brush, paint small ‘v’ shapes or tick marks in the open sky area on the right to represent a flock of birds in the distance. -
Remove the Tape:
Once the black paint is 100% dry, slowly peel off the masking tape at a 45-degree angle to reveal your crisp white border.
Enjoy the warmth of your handmade sunset every time you look at it
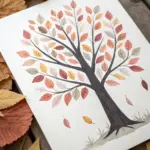
Handprint Autumn Tree Keepsake
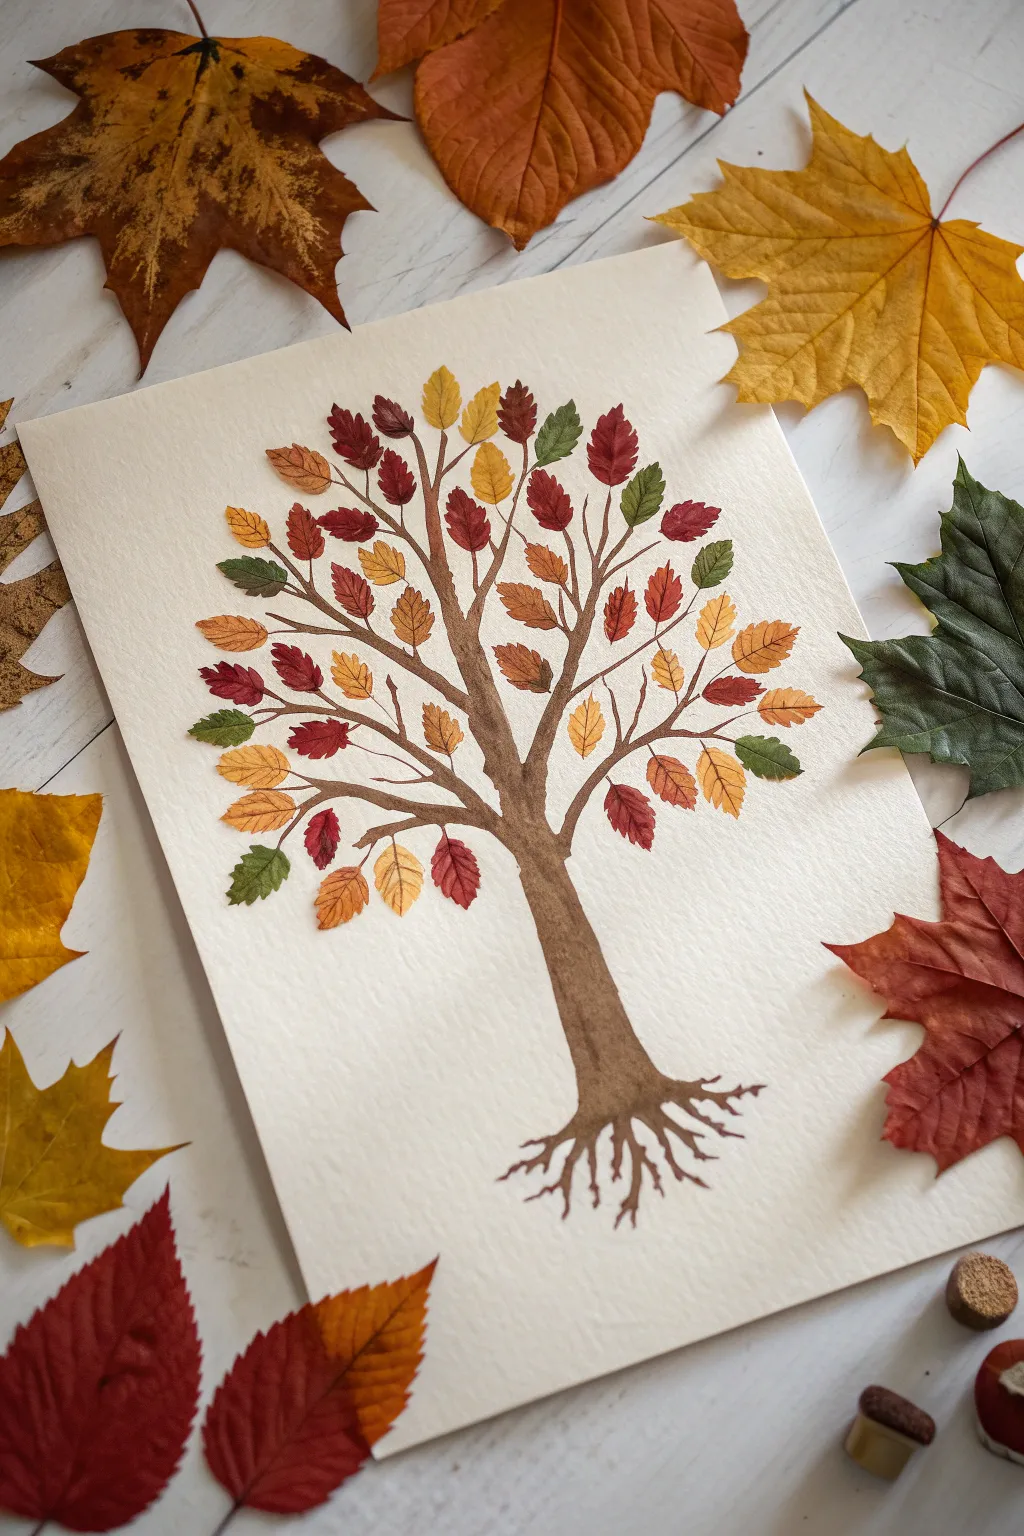
Capture the vibrant essence of fall with this delicate watercolor tree painting, featuring individual leaves in a rich spectrum of autumn hues. The detailed trunk and branching roots ground the piece, creating a balanced and elegant seasonal decoration.
Step-by-Step Tutorial
Materials
- Thick cold-press watercolor paper (300gsm)
- Watercolor paint set (tubes or pans)
- Round watercolor brushes (size 2 and size 6)
- Pencil (HB or lighter)
- Eraser
- Two jars of water
- Paper towels
- Palette for mixing
Step 1: Sketching the Skeleton
-
Outline the trunk:
Begin by lightly sketching the trunk’s main shape in the center of your paper. Make the base wider and taper it gently as it moves upward. -
Add the root system:
Sketch a network of gnarled roots at the base. Instead of straight lines, use wavy, organic strokes that fan out downward, mimicking the way real roots grip the soil. -
Create the main branches:
From the top of your trunk, draw three or four main branches extending outward. Keep these lines faint so they won’t show through the paint later. -
Fill in smaller twigs:
Branch off from your main limbs with smaller, thinner twigs. Aim for a balanced, rounded canopy shape, but keep it irregular enough to look natural.
Step 2: Painting the Tree Structure
-
Mix your brown:
Create a warm, medium brown on your palette by mixing Burnt Umber with a touch of Yellow Ochre. Make enough to cover the whole trunk. -
Paint the trunk base:
Using the size 6 brush, fill in the main trunk. Work with wet paint on dry paper to keep the edges crisp and controlled. -
detail the roots:
Switch to the smaller size 2 brush to navigate the intricate root system. Darken the paint slightly at the very bottom of the roots to add visual weight. -
Extend the branches:
Continue using the small brush to paint the branches. As you move away from the trunk, apply less pressure to the brush so the lines naturally taper and become thinner. -
Add texture:
While the trunk is still slightly damp, drop in a tiny bit of darker brown along the right edge of the trunk to suggest shadow and bark texture. Let this layer dry completely.
Fixing Blobs
If a leaf is too wet and forms a puddle, dry your brush on a paper towel and touch the tip to the puddle. The brush will wick away excess water instantly.
Step 3: Adding the Foliage
-
Prepare your autumn palette:
Pre-mix four distinct puddles of color: deep crimson red, pumpkin orange, golden yellow, and olive green. Keep the consistency milky—not too watery, not too thick. -
Practice the leaf shape:
The leaves are simplified almond shapes with serrated or jagged edges. I find it helpful to practice a few on a scrap piece of paper first to get the wrist motion right. -
Paint the red leaves:
Start with the red mixture and size 2 brush. Paint small, individual leaves attached to the tips of various branches. Scatter them randomly rather than clustering them all in one spot. -
Add orange tones:
Rinse your brush thoroughly and switch to orange. Fill in gaps between the red leaves, ensuring each leaf has a tiny stem connecting it to a branch. -
Incorporate yellow highlights:
Paint the yellow leaves next. Place some of these near the top of the canopy to mimic sunlight hitting the upper foliage. -
Finish with green:
Add the olive green leaves last. These represent the leaves that haven’t quite turned yet, adding a nice contrast to the warm tones. -
Detail the veins:
Once the leaves are 100% dry, mix a very dark, thin brown. Use the very tip of your smallest brush to paint a delicate central vein down the middle of a few select leaves for added definition.
Add Sparkle
Once the painting is fully dry, use a metallic gold watercolor or gel pen to add tiny veins to the yellow leaves. It catches the light beautiful.
Frame your beautiful tree alongside some collected acorns or dried leaves to complete the seasonal display

PENCIL GUIDE
Understanding Pencil Grades from H to B
From first sketch to finished drawing — learn pencil grades, line control, and shading techniques.
Explore the Full Guide
Zentangle Pattern Pumpkins
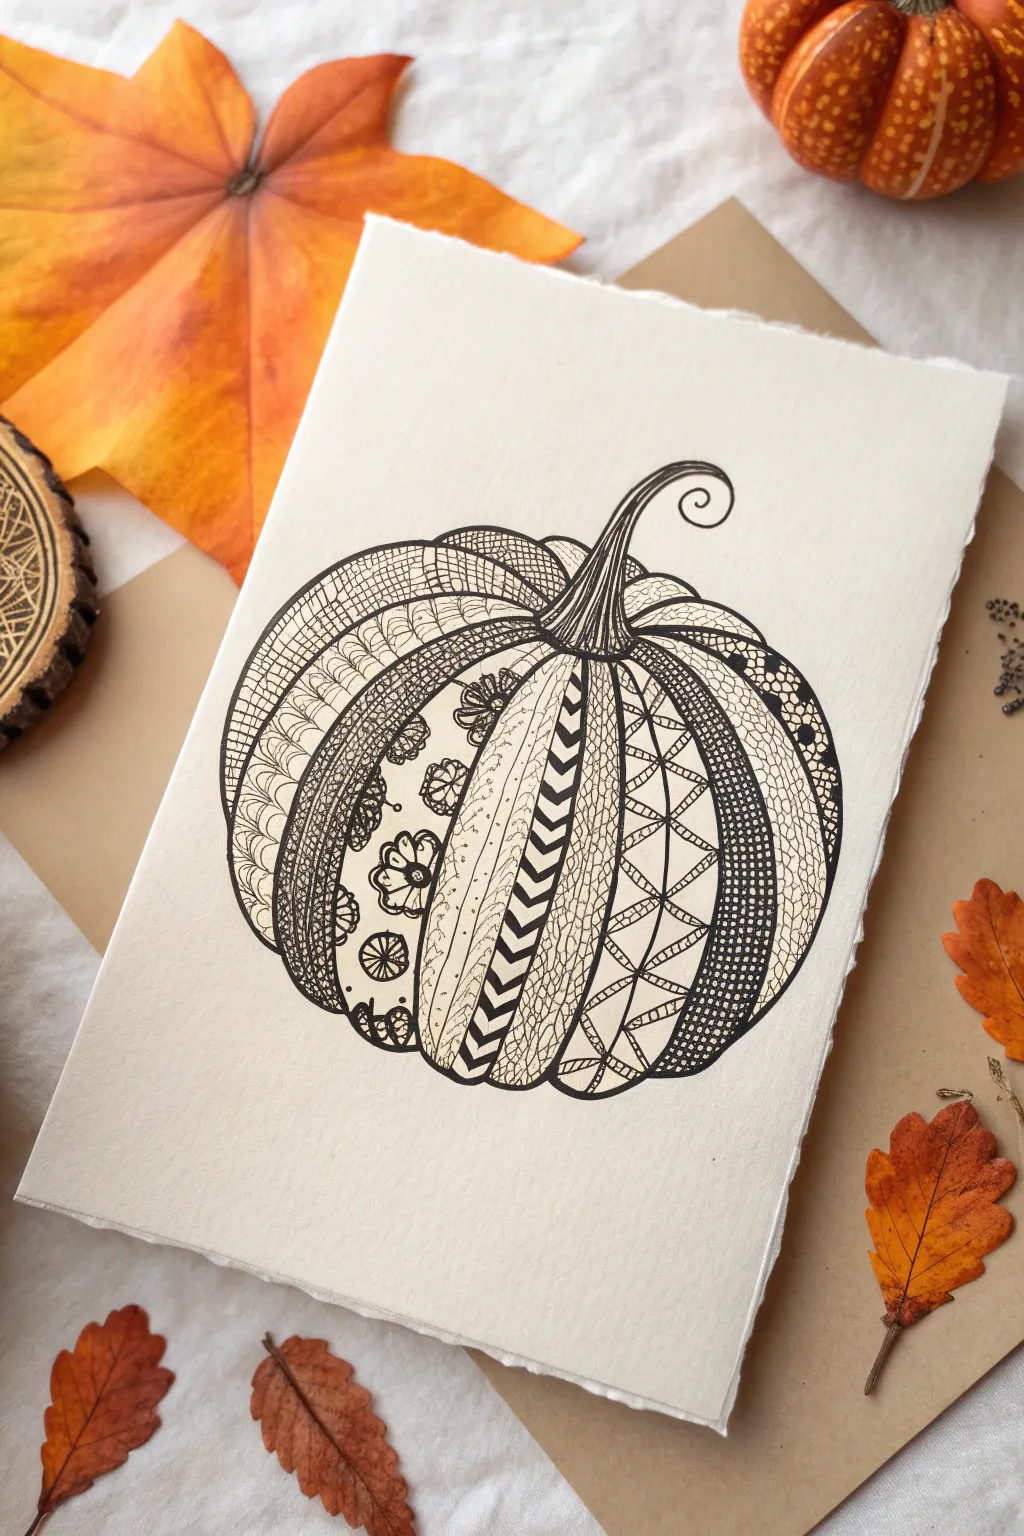
Capture the essence of fall with this meditative art project that transforms a simple pumpkin outline into a gallery of intricate patterns. Using fine liners on textured paper, you’ll explore the relaxing world of Zentangle-inspired doodling to create a sophisticated seasonal card or print.
Step-by-Step Guide
Materials
- Heavyweight textured cardstock or watercolor paper (cream or off-white)
- Pencil (HB or 2B)
- Eraser
- Fine liner pens (Black, sizes 01, 03, and 05)
- Ruler (optional, but helpful for geometric sections)
Step 1: Drawing the Base Structure
-
Outline the pumpkin shape:
Begin lightly with your pencil. Sketch a wide, slightly flattened oval shape for the pumpkin’s body, keeping your lines loose and faint so they are easy to adjust. -
Add the stem:
Draw the stem curving elegantly out of the top center. Extend it into a playful, curly tendril on the right side to add whimsical character to the organic shape. -
Divide into segments:
Draw curved vertical lines starting from the base of the stem down to the bottom of the pumpkin. These lines define the distinctive ridges or ribs of the pumpkin, creating separate sections for your patterns. -
Refine the segments:
Review your pencil lines and ensure the segments vary slightly in width to look natural. Once satisfied with the layout, lightly erase any heavy graphite so only faint guides remain.
Smudge Prevention
Place a scrap piece of paper under your drawing hand. This acts as a shield, preventing oils from your skin from touching the paper and stopping your hand from smearing fresh ink.
Step 2: Inking the Outline
-
Ink the main ribs:
Switch to your 05 fine liner (thicker nib). Carefully trace over your pencil lines defining the outer pumpkin shape and the internal ribs. A slightly thicker line here helps contain the busy patterns later. -
Detail the stem:
Using an 01 pen, draw fine lines running up the length of the stem, following its curve. This wood-grain texture gives the stem dimension and contrasts with the decorative body. -
Let the ink set:
Pause for a moment to let the outlining ink dry completely before erasing any remaining pencil marks to avoid smudging your crisp black lines.
Add Subtle Shading
To render the pumpkin more 3D, use a grey brush pen or graphite pencil to add light shading specifically where the ribs curve inward toward the stem and bottom.
Step 3: Filling with Patterns
-
Segment 1: Cross-hatching grid:
Starting on the far left segment, use the 01 pen to draw a simple grid. Fill the squares with diagonal cross-hatching marks to create a woven texture effect. -
Segment 2: Scalloped scales:
Move to the next section inward. Draw rows of small overlapping U-shapes or scallops. I like to keep these tight and repetitive, like fish scales or roof tiles. -
Segment 3: Floral focus:
In the third segment, draw relatively large, spread-out flowers. Surround the flowers with tiny stippled dots or small circles to fill the negative space without overwhelming the floral motif. -
Segment 4: Chevrons (Center):
For a bold central rib, draw a column of crisp zig-zag chevrons. Fill in alternating triangles with solid black ink using your 05 pen to create striking high contrast. -
Segment 5: Vertical lines:
To separate the busy patterns, fill the next segment with simple, closely spaced vertical lines that follow the curve of the pumpkin rib. -
Segment 6: Geometric triangles:
Create a crisscross diamond pattern. Inside select diamonds, draw smaller triangles or lines to add geometric complexity. -
Segment 7: Dense mesh:
On the far right segment, draw a tight grid or mesh pattern. You can darken intersections or add tiny dots inside the squares to give it visual weight.
Step 4: Final Touches
-
Balance the blacks:
Step back and look at your drawing. Use the 05 pen to selectively thicken lines or fill small areas with solid black if the drawing looks too light or grey. -
Clean up borders:
Go over the main segment dividers one last time if the patterns have obscured them. A bold border helps separate the different textures clearly. -
Final erase:
Do a final pass with your eraser to remove any stray graphite marks, leaving purely the sharp black ink on the cream paper.
Display your intricate pumpkin drawing in a rustic frame or lean it on a mantle for instant autumn charm
Moonlit Autumn Woods Scene
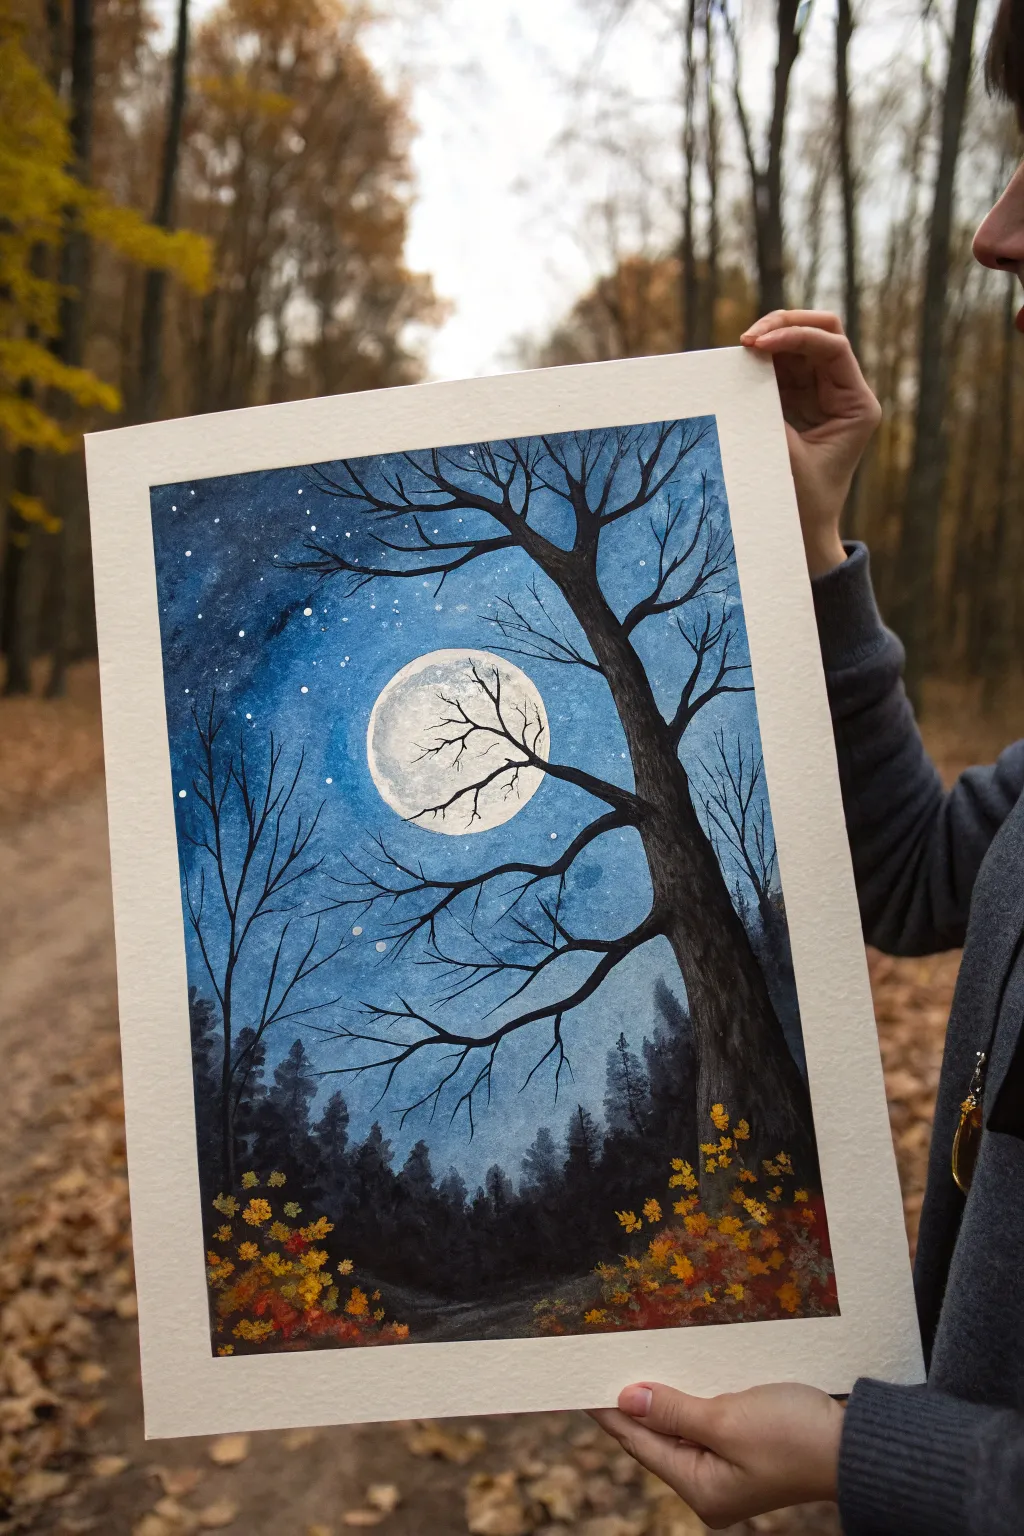
Capture the serene magic of an autumn evening with this atmospheric painting featuring a glowing full moon and stark branch silhouettes. The contrast between the radiant moon and the deep blue sky creates a captivating focal point, framed perfectly by warm fall foliage.
Detailed Instructions
Materials
- Watercolor paper (cold press, 300 gsm)
- Watercolor paints (Indigo, Prussian Blue, Cerulean Blue, Lamp Black, Burnt Umber)
- White Gouache or opaque white watercolor
- Yellow ochre and orange watercolor or gouache for leaves
- Round brushes (flats for sky, distinct detail brushes for branches)
- Masking tape
- Circular object or compass for moon tracing
- Old toothbrush or splatter brush
- Two jars of water
- Paper towels
Step 1: Preparing the Sky
-
Tape and trace:
Begin by taping down all four edges of your paper to a board to create a clean white border. Place a circular object, like a roll of tape or a jar lid, in the upper center of the page and lightly trace around it with a pencil to define your moon. -
Wet the sky:
Using a large flat brush, wet the entire sky area around the moon circle with clean water. Be careful not to get water inside the moon circle itself—you want that paper to stay dry and white for now. -
First wash:
Load your brush with Cerulean Blue and apply it around the moon, letting the color diffuse outward. As you move further from the moon, start blending in Prussian Blue to darken the sky. -
Deepening the night:
While the paper is still damp, introduce Indigo to the outer edges and top corners of the painting. This vignette effect pushes the focus toward the bright center. I like to tilt the board slightly to help the gradients blend naturally. -
Starry details:
Let the sky dry completely. Once dry, load a brush or toothbrush with slightly watered-down white gouache. Flick the bristles to create a spray of stars, focusing them away from the bright moon area.
Bleeding Sky?
If blue paint bleeds into your moon, don’t panic. Blot it immediately with a tissue. Once dry, paint over the mistake with opaque white gouache to restore the circle’s shape.
Step 2: Painting the Moon
-
Base texture:
Mix a very dilute wash of gray using a touch of black and plenty of water. Dab this lightly onto the moon’s surface, leaving generous patches of white paper showing to represent the craters. -
Defining craters:
While the moon is damp, drop slightly darker gray pigment into the shadow areas of the craters to give them dimension. Soften any hard edges with a clean, damp brush.
Step 3: The Silhouettes
-
Distant trees:
Mix a dark grey-blue color. Using a medium round brush, paint a jagged, uneven horizon line along the bottom third of the paper to represent a distant fir forest. Keep the tops pointed and irregular. -
Main trunk:
Using a saturated mix of Black and Burnt Umber, paint the main tree trunk on the right side. Make the base thick and taper it as it reaches upward, allowing the trunk to curve slightly for a natural look. -
Adding texture:
While the trunk is wet, lift out a few tiny highlights on the right side using a dry brush or paper towel to suggest moonlight hitting the bark. Add deeper black to the left edge for shadow. -
Major branches:
Extend thick branches from the main trunk, reaching them across the composition. Ensure one or two main branches cross directly in front of the moon to create depth. -
Fine twigs:
Switch to a rigger brush or a very fine detail brush. Paint delicate, spindly twigs extending from the larger branches. Use a shaky hand intentionally here; nature is rarely perfectly straight.
Pro Tip: Texture Trick
Sprinkle a tiny pinch of salt onto the wet sky wash while it’s still drying. The salt pushes pigment away, creating beautiful, crystalline textures that look like distant galaxies.
Step 4: Autumn Foreground
-
Base foliage:
At the very bottom of the painting, dab in dark, shadowy bushes using your black-brown mix to ground the composition. -
Adding color:
Load a brush with opaque Yellow Ochre or bright orange gouache. Stipple small leaf shapes over the dark foreground bushes. -
Layering leaves:
Add touches of red and brighter yellow on top of the ochre to simulate sunlight or moonlight catching the autumn leaves. Let some ‘falling’ leaves drift slightly upward or separate from the main clumps. -
Final touches:
Review the painting for contrast. If the moon needs to pop more, carefully intensify the dark blue sky right next to the moon’s edge. -
Reveal:
Wait for the paint to be bone-dry. Slowly peel away the masking tape at a 45-degree angle to reveal your crisp, professional border.
Frame your piece with a wide white mat to emphasize the contrast between the dark sky and the bright moon


One Tree From Peak Color to Bare Branches
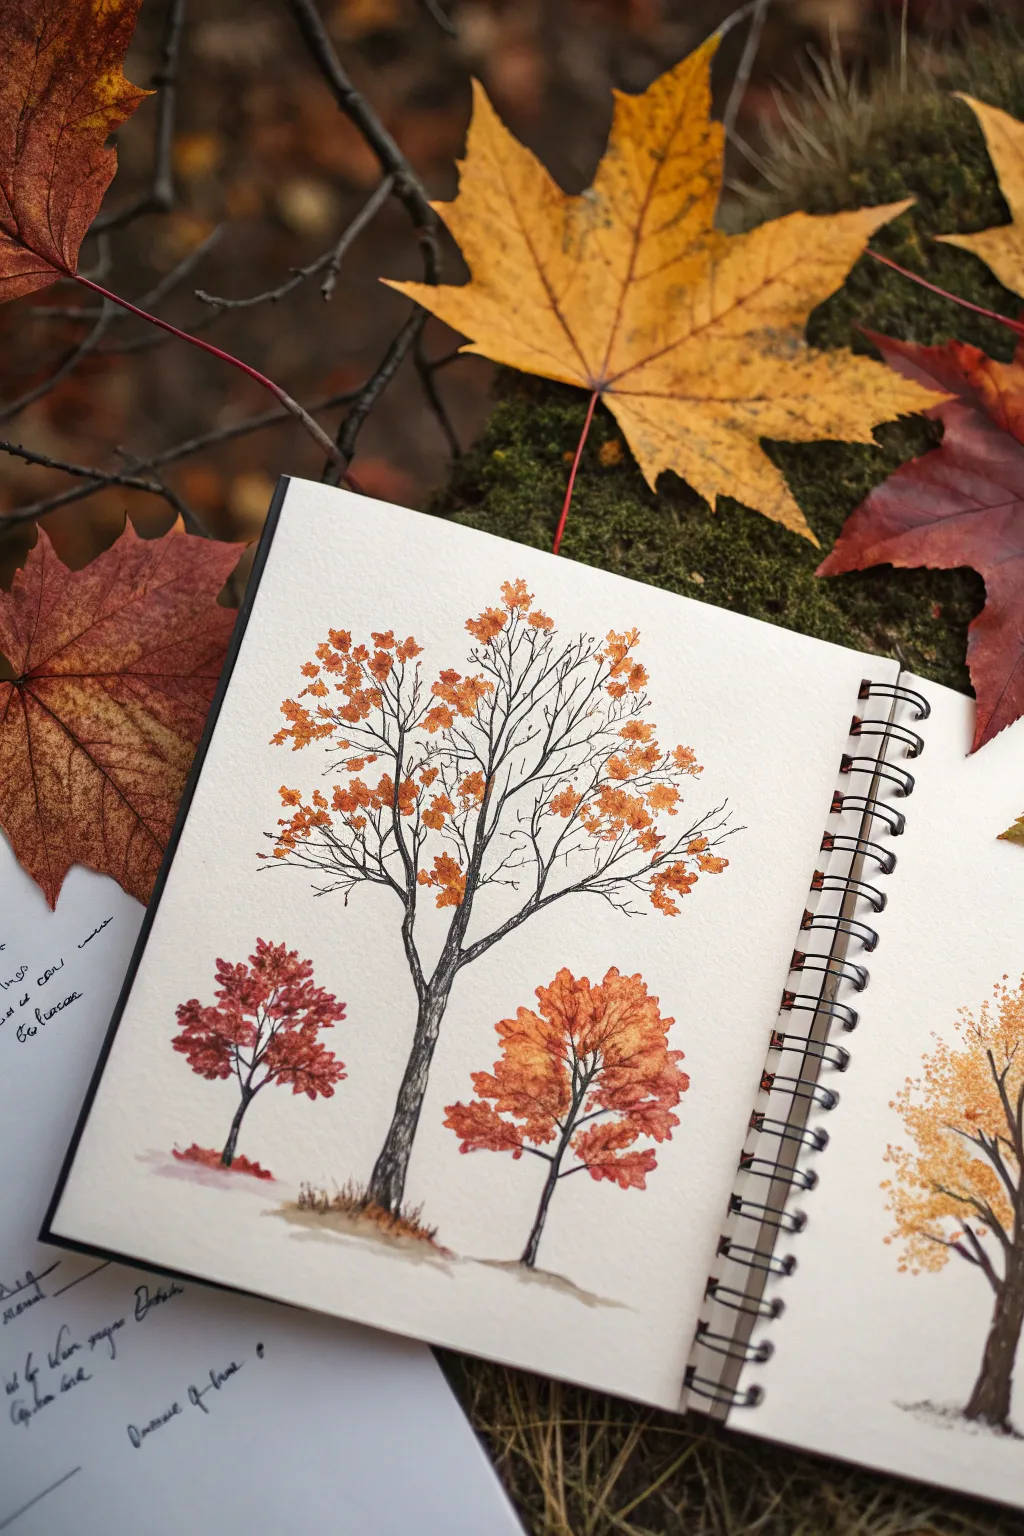
Capture the fleeting beauty of fall with this delicate mixed-media study featuring trees in various stages of leaf loss. Combining the fluidity of watercolor with the precision of ink creates a striking contrast that perfectly mimics the texture of bark and crisp foliage.
How-To Guide
Materials
- Heavyweight watercolor paper or mixed-media sketchbook
- Fine liner pens (black, sizes 01 and 03)
- Watercolor paints (Burnt Sienna, Yellow Ochre, Alizarin Crimson, Sepia)
- Round watercolor brushes (size 2 and 4)
- Pencil (HB) and eraser
- Paper towel
- Jar of water
Step 1: Sketching the Skeleton
-
Plan the composition:
Visualize where your trees will sit on the page. The main focal point is a tall, central tree, flanked by two smaller studies. Lightly mark the ground line and the vertical axis for each trunk with your HB pencil to ensure they stand straight. -
Draft the trunks:
Sketch the outline of the main tree trunk, letting it taper gradually as it moves upward. Don’t make the lines perfectly straight; add subtle bumps and knots to suggest organic growth. Repeat this for the smaller trees on the left and right. -
Branch structure:
Extend branches from the main trunk in a ‘V’ or ‘Y’ formation. For this specific look, keep the upper branches fine and intricate, reaching toward the sky. Remember that branches get thinner the further they preserve from the trunk.
Ink Bleeding?
Ensure your fine liner is waterproof before painting! Test it on a scrap piece of paper. If it bleeds, do the watercolor layer first, let it dry completely, and then draw the ink details on top.
Step 2: Inking the Details
-
Outline the bark:
Using the 03 fine liner, go over your pencil lines for the main trunk. Instead of a solid line, use broken, jittery strokes to mimic rough bark texture. Darken the undersides of the branches slightly more to give them weight. -
Add texture:
Switch to the finer 01 pen. Draw vertical, slightly wavy lines running up the trunk to create the grain of the wood. Leave some white space between lines so the watercolor can shine through later. -
Define the twigs:
For the finest outer twigs, use quick, confident flicks of the wrist with the 01 pen. These should look erratic and natural rather than stiff. -
Erase guidelines:
Wait until the ink is completely dry—smudging is a real heartbreaker here—then gently erase all visible pencil marks.
Add Sparkle
Once the painting is dry, use a white gel pen to add tiny highlights on the darkest parts of the trunk or a few dots on the leaves to simulate sunlight catching the morning dew.
Step 3: Watercolor Washes
-
Paint the trunk base:
Mix a diluted wash of Sepia or a dark brown. Using the size 4 brush, paint the trunk, letting the color be darkest at the base and on the shadowed side (usually the right or left, just choose one and stick to it). Keep the center slightly lighter for a rounded 3D effect. -
Grounding the trees:
While the trunk bottom is still slightly damp, add a small swipe of brown and watered-down Yellow Ochre at the roots. This bleeds the tree into the ground, anchoring it so it doesn’t look like it’s floating. -
Mixing leaf colors:
Prepare three distinct puddles of color: a bright orange (mix Yellow Ochre + a touch of Alizarin Crimson), a deep red (Alizarin Crimson with a tiny drop of brown), and a golden yellow.
Step 4: Foliage & Finishing Touches
-
The small red tree:
For the small tree on the left, load your size 2 brush with the deep red mix. Dab the pigment onto the paper using a stippling motion. Don’t paint individual leaves; just create ragged clusters to suggest a full canopy. -
The central tree leaves:
This tree is losing its leaves, so we need a lighter touch. Dip your brush in the orange mix and dab small, irregular spots near the ends of the ink branches. I like to let these dry briefly and then add a second, smaller dab of darker tint on top for depth. -
The bushy tree:
For the tree on the bottom right, create a denser shape using the orange and golden yellow mixes. Wet the paper slightly in the shape of the crown first, then drop the pigment in to let it bloom softly, creating a fluffy texture. -
Scattered leaves:
Add a few tiny dots of color falling from the branches or resting on the ground line to suggest fallen leaves. -
Final contrast check:
Once the paint is bone dry, determine if any ink lines have been obscured. You can gently re-trace over key branches or add a few final ink scribbles inside the painted leaf clusters to integrate the ink and watercolor layers.
Now you have a serene study that celebrates the structural elegance of autumn trees


Have a question or want to share your own experience? I'd love to hear from you in the comments below!