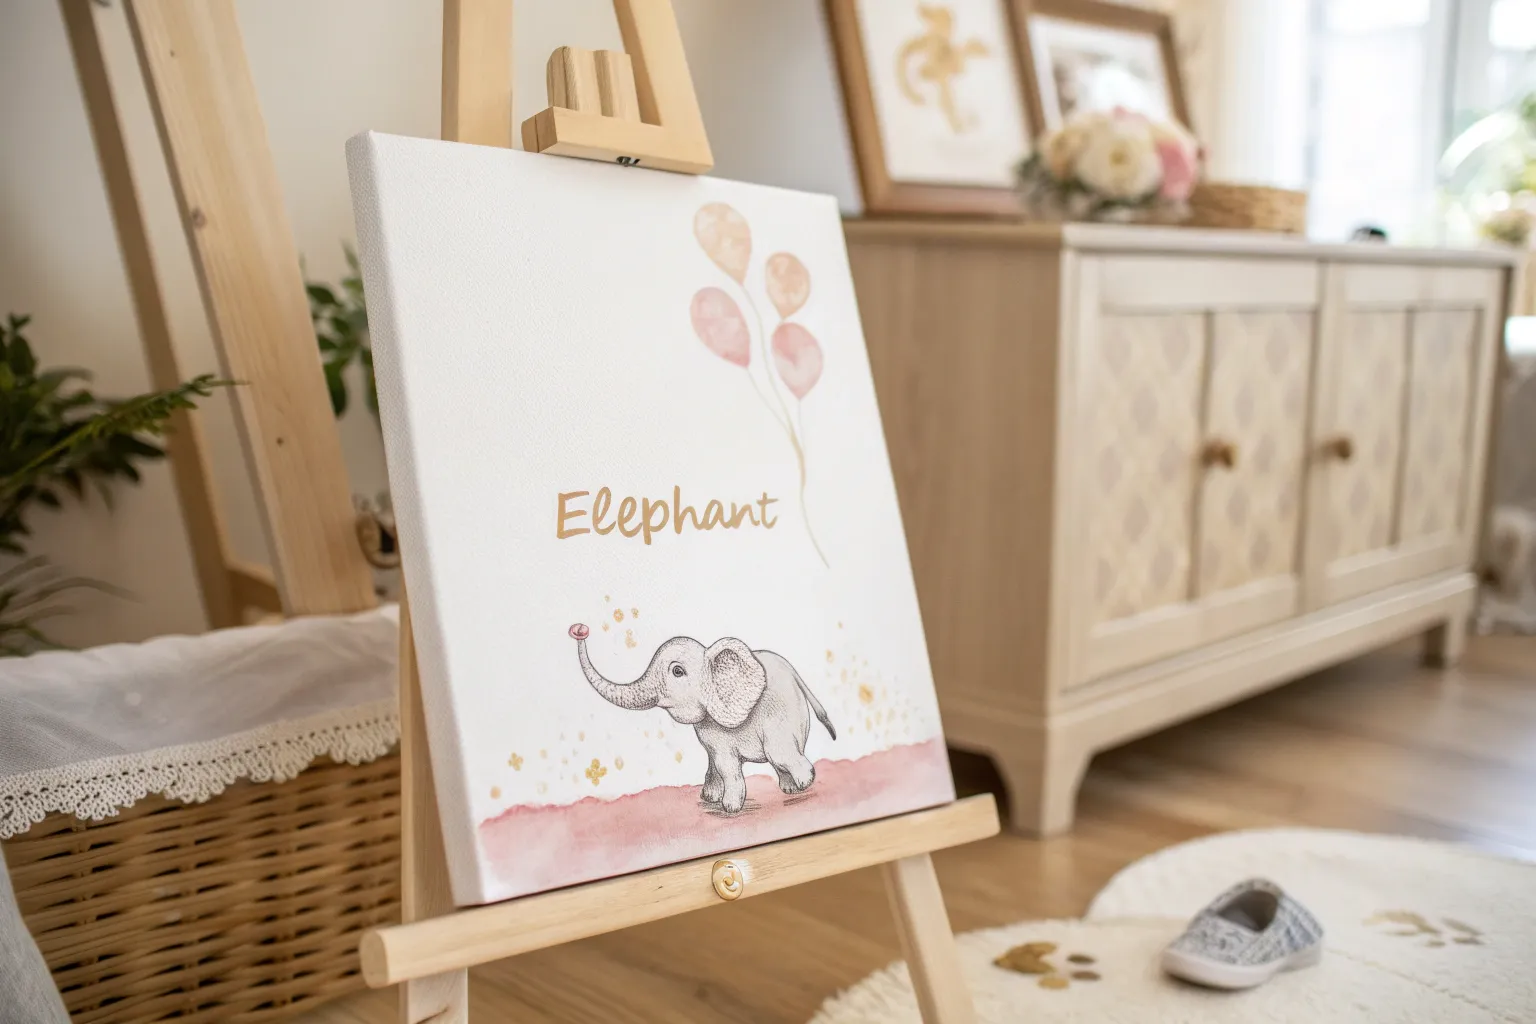
Baby canvas art is my favorite kind of project because it’s equal parts adorable memory and real-deal decor you’ll actually want to hang up. Whether you’re involving your little one in the process or painting something baby-themed for the nursery, these ideas keep it sweet, doable, and frame-worthy.
Baby Handprint Flower Bouquet Canvas
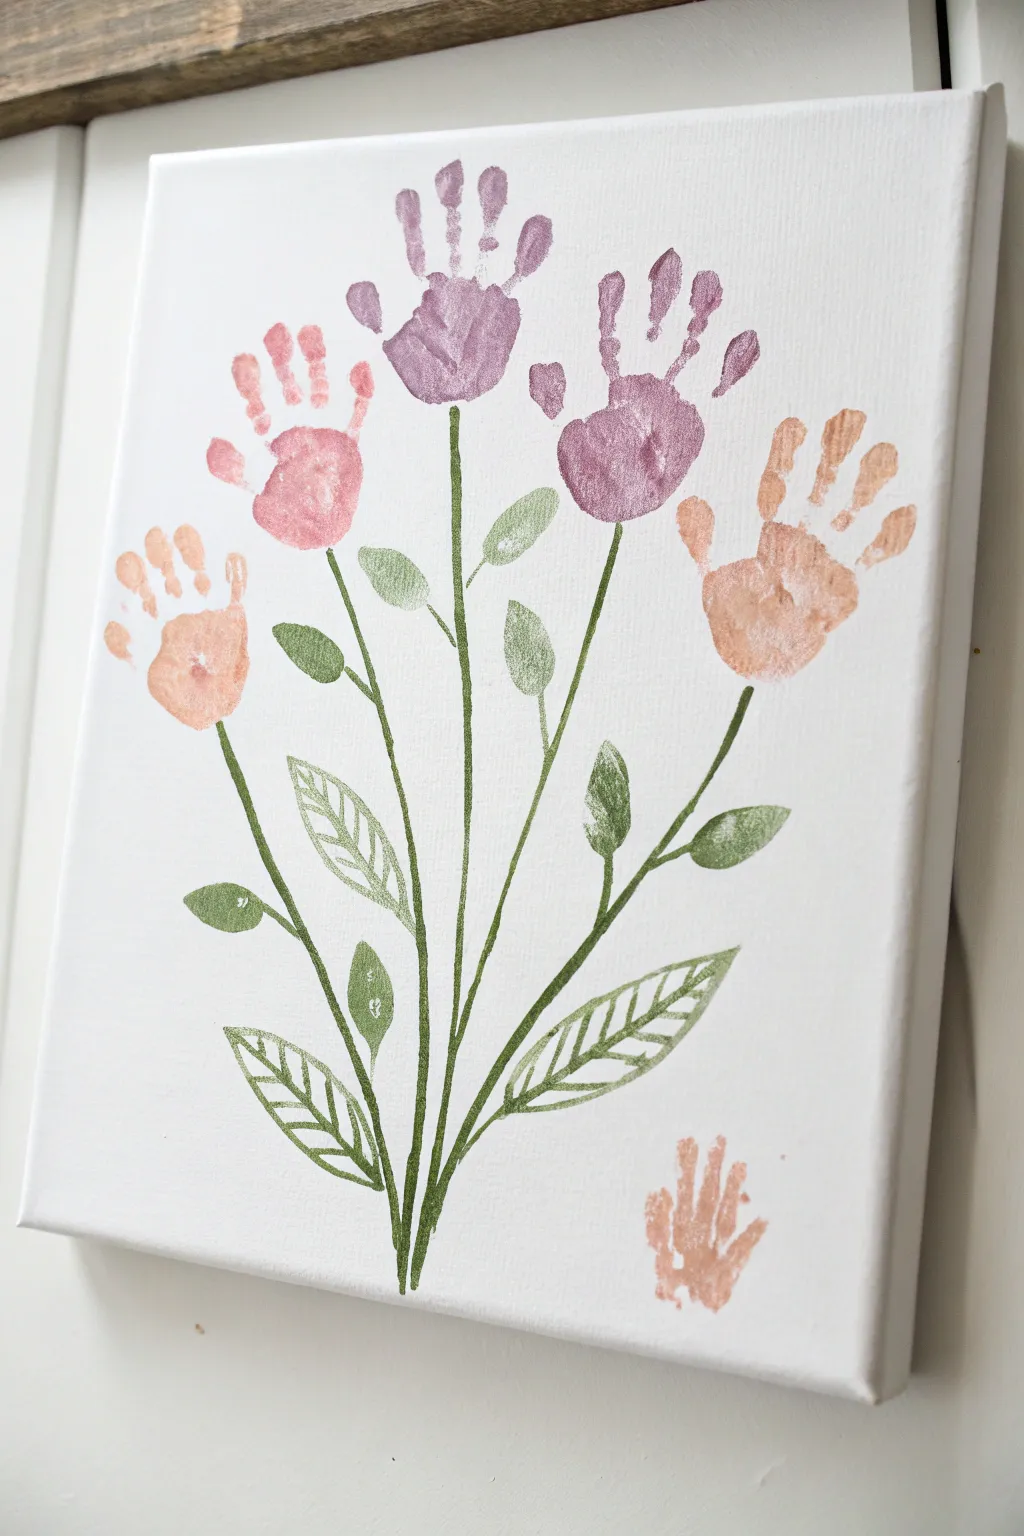
Turn tiny handprints into a forever garden with this sweet floral canvas art. Using gentle pastel shades and simple painted stems, you’ll create a blooming keepsake that captures just how small those little fingers once were.
Detailed Instructions
Materials
- Rectangular stretched canvas (e.g., 11×14 or 12×16 inch)
- Non-toxic acrylic craft paints (peach, pink, light purple, dark mauve, green)
- Foam brushes or large soft paintbrushes
- Fine liner brush or thin round brush for stems
- Baby wipes or damp cloth
- Pencil (optional)
- Paper plate or palette
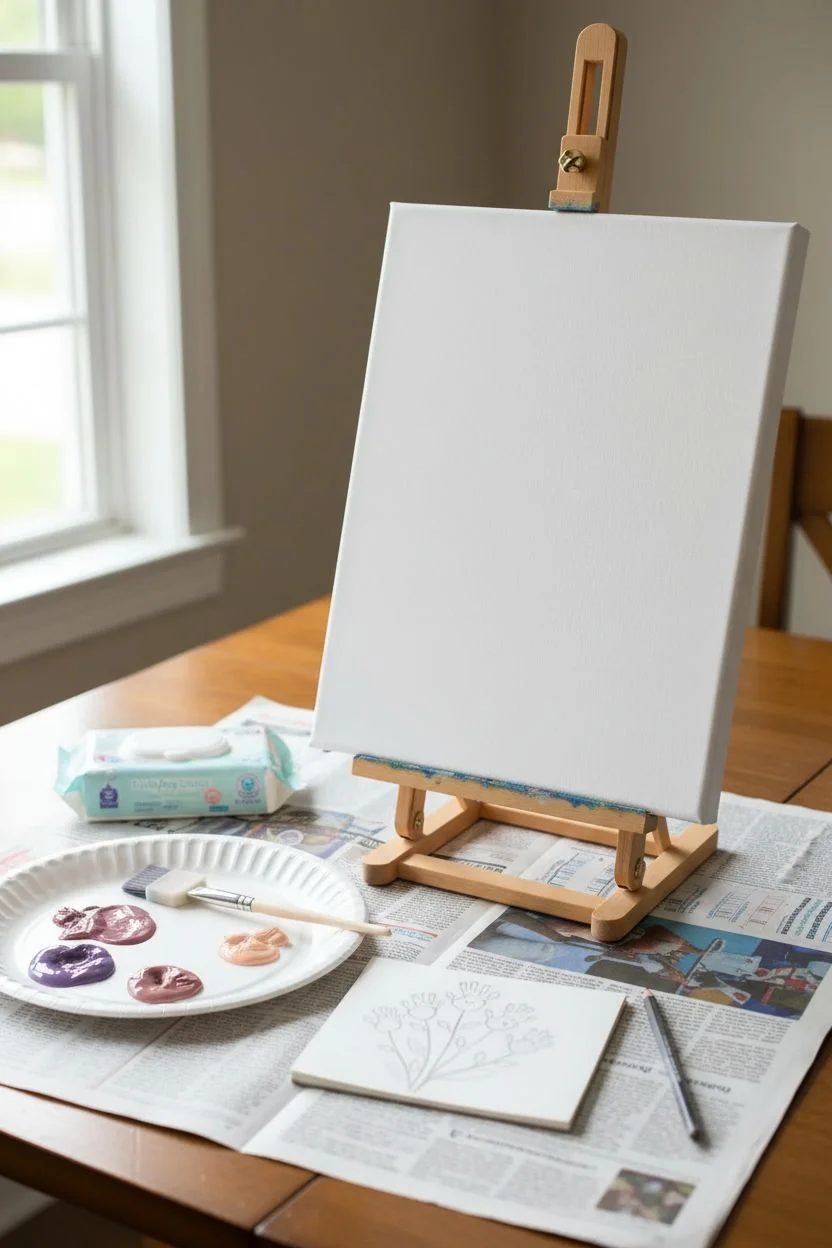
Step 1: Planning and Prep
-
Set up your workspace:
Lay down newspaper or a protective cloth on a flat table. Have your canvas ready and keep a pack of baby wipes within arm’s reach—painting with little ones can get messy fast. -
Visualize the layout:
Looking at your canvas, imagine an invisible fan shape spreading out from the bottom center. You will need space for five handprints: one high in the center, two slightly lower on the sides, and two lower still on the outer edges.
Little Wiggles Pro-Tip
Work with a sleeping baby or strap them into a high chair for better control. If their hand clenches, gently tickle the back of their hand to help them open it flat.
Step 2: Creating the Blooms
-
Prepare the center paint:
Squeeze a dollop of purple paint onto your palette. Use a foam brush to apply a smooth, even layer of paint to your child’s hand. Make sure to cover the palm and all five fingers adequately but not so thickly that it becomes slippery. -
Print the center flower:
Guide the painted hand to the top center of the canvas. Press down firmly on the palm and each finger to ensure a good transfer. Lift the hand straight up to avoid smearing. This is your tallest flower. -
Wipe and switch colors:
Immediately clean off the purple paint with baby wipes before it dries. Next, prepare a lighter mauve or dark pink color for the two flowers flanking the center one. -
Add the middle tier:
Paint the hand again with the new color. Place one print to the left and slightly below your center flower. Repeat the process for the right side, aiming for symmetry but embracing any wiggles. -
Print the lowest flowers:
Clean the hand again and switch to a peach or orange shade. Stamp these final two prints on the far left and far right, positioning them lower than the others to create a full bouquet shape. -
Let the prints dry:
Allow the handprints to dry completely before moving on to the stems. This prevents accidental smudging of your beautiful blooms.
Oops! Smudged Print?
If a print smears badly, quickly wipe it away with a damp cloth before it sets. If a faint stain remains, let it dry and dab a little white paint over it before retrying.
Step 3: Painting the Garden
-
Mix your stem color:
While the flowers dry, mix a natural green shade. If you only have a bright green, I like to mix in a tiny dot of red or brown to create a more earthy, botanical green. -
Paint the main stems:
Using a thin liner brush, paint a line from the bottom center of the wrist of each handprint, curving them all to meet at a single point at the bottom center of the canvas. -
Add leafy details:
Along the stem lines, paint simple oval shapes for leaves. Vary the sizes, making some small and others slightly larger. Fill these in with solid green paint. -
Create texture with varied leaves:
For visual interest, leave some larger leaves as outlines rather than filling them in completely. Paint an outline of a leaf shape and add a line down the center and diagonal veins. -
Add small accent leaves:
Paint tiny, solid green leaves directly attached to the stems near the top, close to the flower heads (the handprints). This mimics the sepals and connects the print visually to the stem. -
Check for balance:
Step back and look at your bouquet. If any area looks too empty, add an extra painted leaf or a curling vine tendril to fill the space. -
Optional signature:
If you have a very tiny baby or sibling, you can add a small contrasting handprint in the bottom corner as a ‘signature,’ or simply use a marker to date the canvas once dry.
Hang this lovely bouquet in the nursery or give it as a heartfelt gift to grandparents who will cherish those tiny prints forever


Baby Footprint Butterfly Keepsake Painting
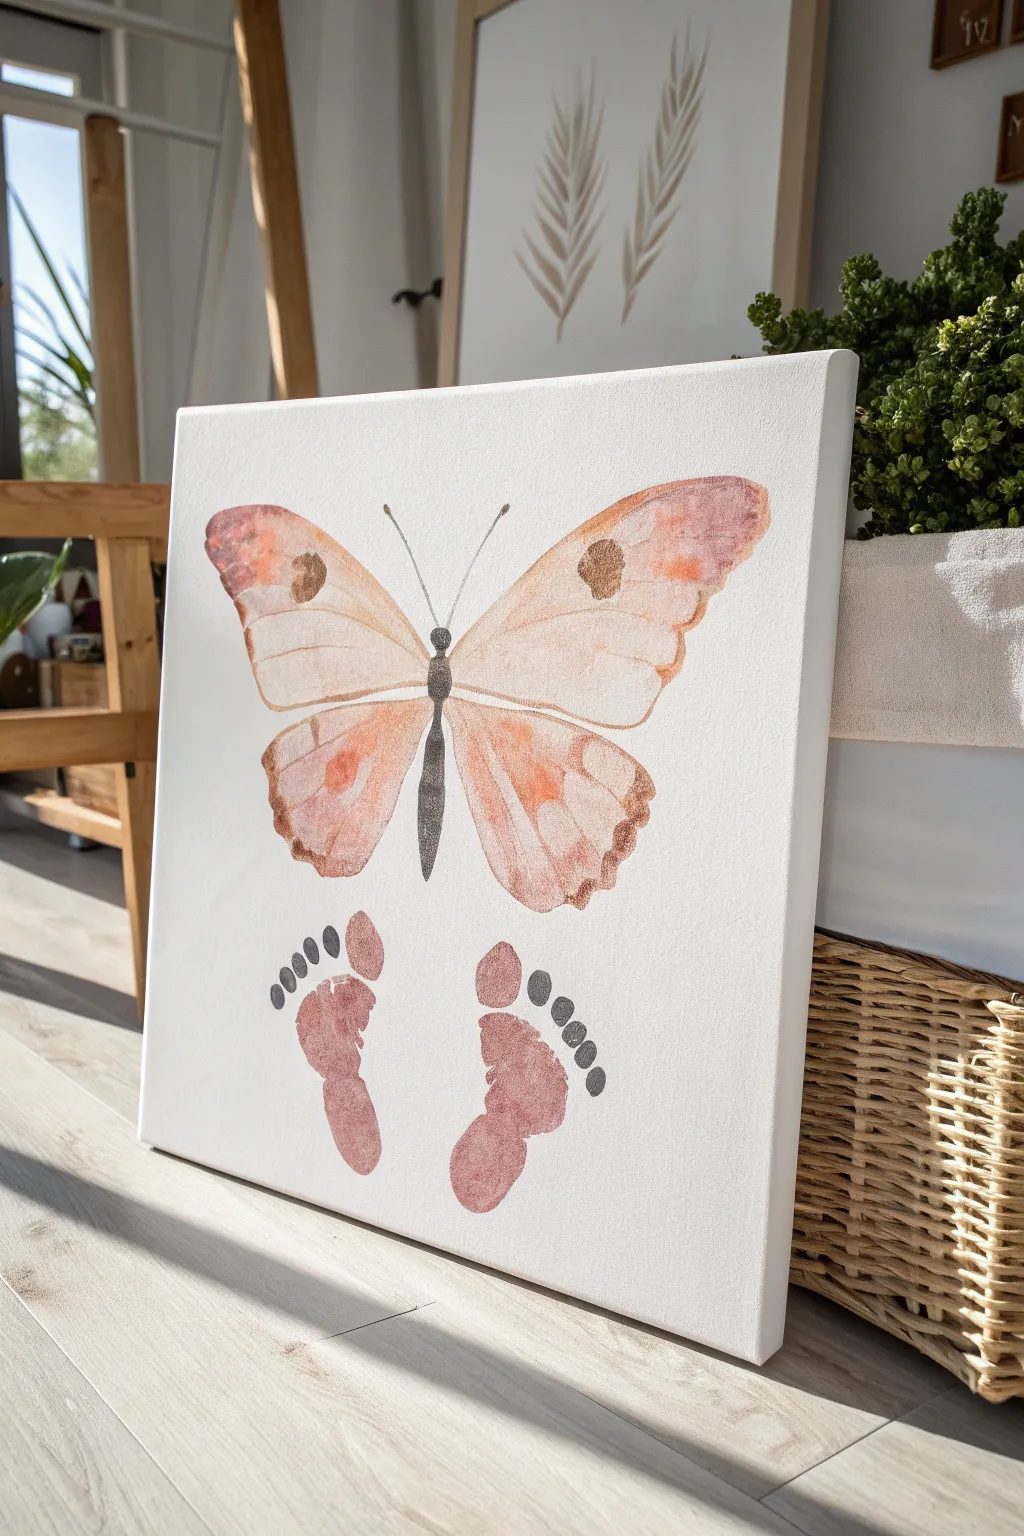
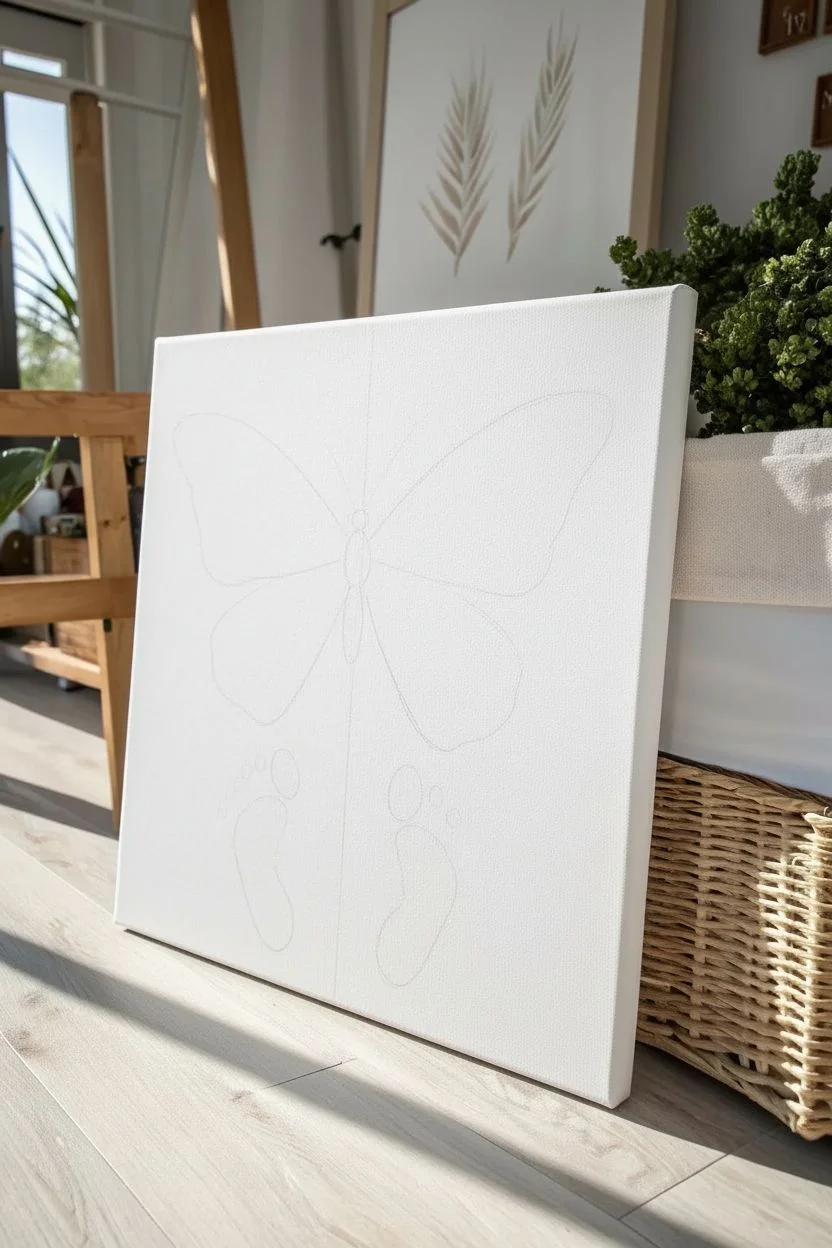
This tender keepsake captures the fleeting size of tiny feet by transforming them into playful art beneath a delicate watercolor butterfly. The soft peach and terracotta tones create a sophisticated, gender-neutral piece perfect for a nursery gallery wall.
Step-by-Step Tutorial
Materials
- Square stretched canvas (approx. 12×12 or 16×16 inches)
- Acrylic paints: warm peach, terracotta/rust, dark grey, white, and a hint of gold
- Soft synthetic paintbrushes (medium flat brush, small round detail brush)
- Water cup and palette (or paper plate)
- Baby wipes or damp cloth (essential for clean feet!)
- Pencil for light sketching
- Paper towels
Step 1: Planning and Sketching
-
Prepare your workspace:
Set up a clean, flat surface. Since this project involves baby feet, having wipes and towels within arm’s reach before you open any paint is a lifesaver. -
Mark the layout:
Lightly sketch a vertical centerline on your canvas with a pencil to ensure symmetry. Mark roughly where the butterfly body will go (upper center) and leave ample space at the bottom for the footprints. -
Outline the wings:
Using your pencil very faintly, draw the two upper wings of the butterfly. They should be somewhat triangular with rounded edges. Draw the lower wings slightly smaller and teardrop-shaped.
Smudged Print Rescue
If a footprint smudges, don’t panic. Use a damp Q-tip to wipe away wet acrylic from the canvas immediately. If it stains, wait for it to dry and paint over it with white before trying again.
Step 2: Painting the Butterfly
-
Mix the base wing color:
Create a watery wash of the warm peach acrylic paint. You want it semi-transparent to mimic a watercolor effect, so dilute the acrylic with a generous amount of water. -
Fill the wings:
Paint the inside of your wing outlines with this peach wash. Don’t worry about being perfectly even; the variation in opacity adds to the organic, watercolor look. -
Add dimension:
While the base is still slightly damp, dip your brush into the terracotta or rust color. Gently touch the outer edges and tips of the wings, letting the darker color bleed slightly into the peach center. -
Paint the spots:
Mix a small amount of gold with your rust color. Paint the distinct circular spots on the upper wings for a bit of textural contrast. -
Define the veins:
Using a very fine liner brush and watered-down rust paint, draw delicate veins radiating from the center of the wings outward. -
Create the body:
Take your dark grey paint (unmixed) and careful paint the butterfly’s thorax and abdomen down the centerline. It should be segmented and tapered at the bottom. -
Add antennae:
With the smallest brush or even a fine-tip dark marker, draw two thin, curved antennae extending from the head. I like to add tiny ‘club’ shapes at the tips for realism.
Make it Shimmer
Mix a tiny amount of iridescent medium or pearl white paint into your peach wing color. This gives the butterfly a magical, subtle sheen that catches the light beautifully.
Step 3: Adding the Footprints
-
Mix the footprint color:
Combine terracotta and a touch of white to create a dusty rose or clay hue. It should be darker than the butterfly wings but harmonious with the palette. -
Prepare the foot:
Generously coat the bottom of the baby’s left foot with the paint using a sponge brush. Avoid globs of paint; a smooth, even layer gives the clearest print. -
Stamp the left print:
Press the foot onto the canvas below the left wing. Use a heel-to-toe rolling motion and gently press each toe down to ensure contact. -
Clean and repeat:
Wipe that foot immediately! Then, repeat the process with the right foot, mirroring the placement on the right side of the canvas. -
Add toe details:
If the toe prints came out faint or incomplete, you can very carefully touch them up with a small brush using the same paint color to define the shape. -
Paint the footprint arches:
Above the toes of each footprint, paint five small charcoal-grey dots in an arc, mimicking the shape of toes. This stylistic element visually links the footprints back to the butterfly artwork. -
Final touches:
Once everything is fully dry, gently erase any visible pencil lines from your initial sketch.
Hang this lovely piece in a spot that gets natural light to highlight the delicate watercolor effects you created


Baby Handprint Heart Canvas
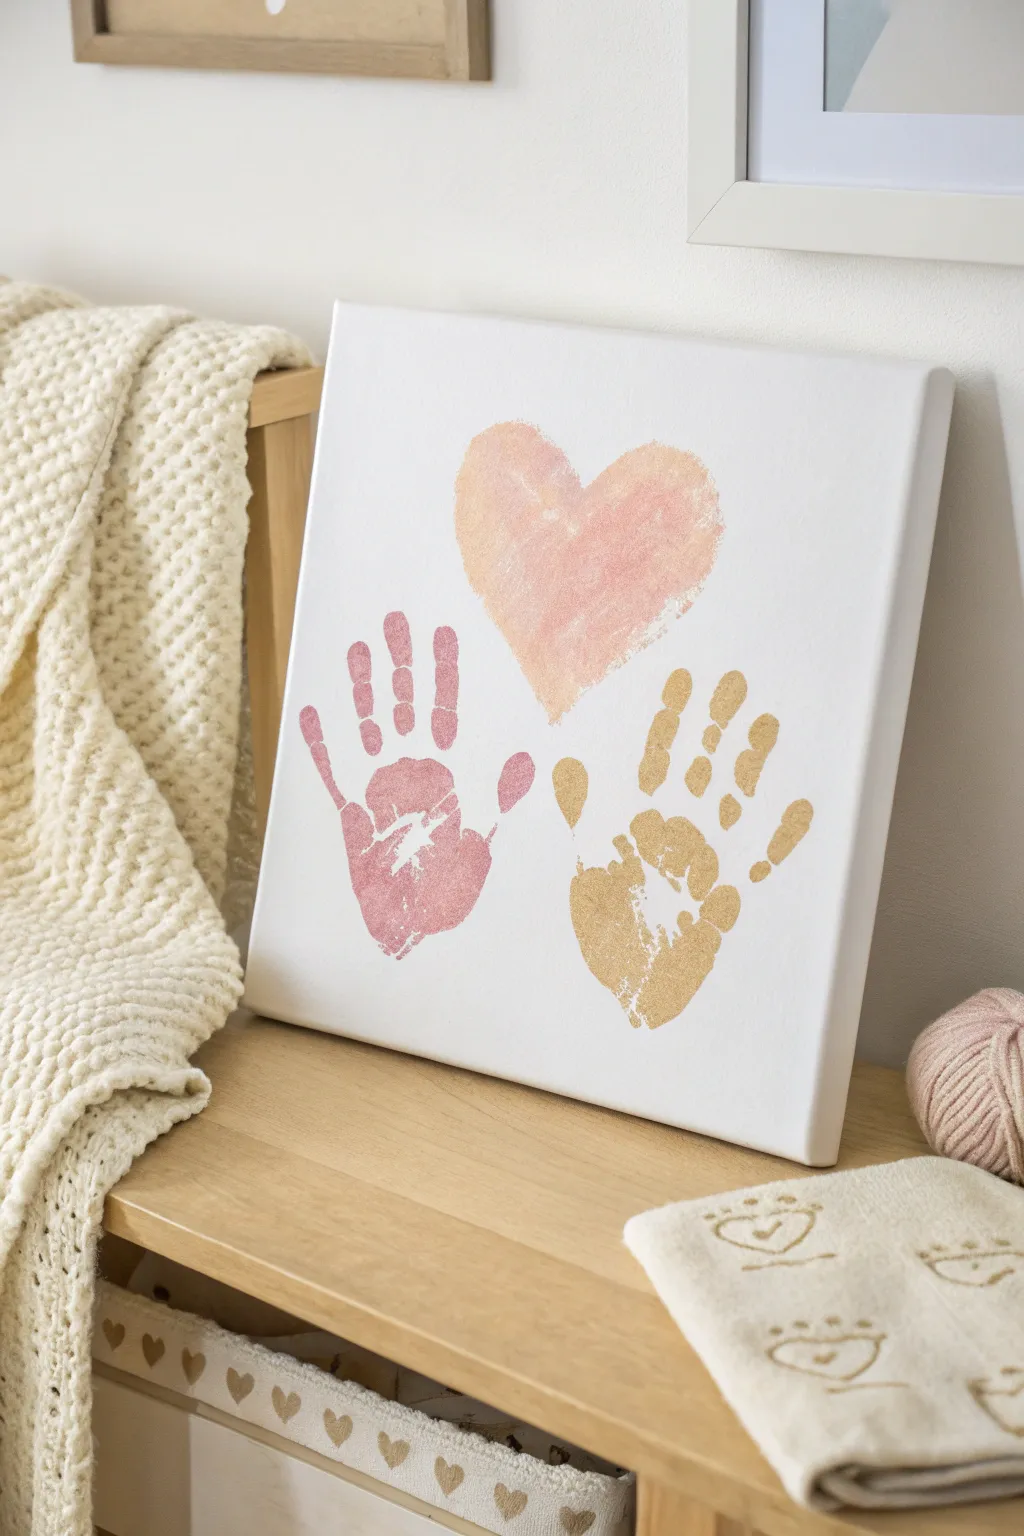
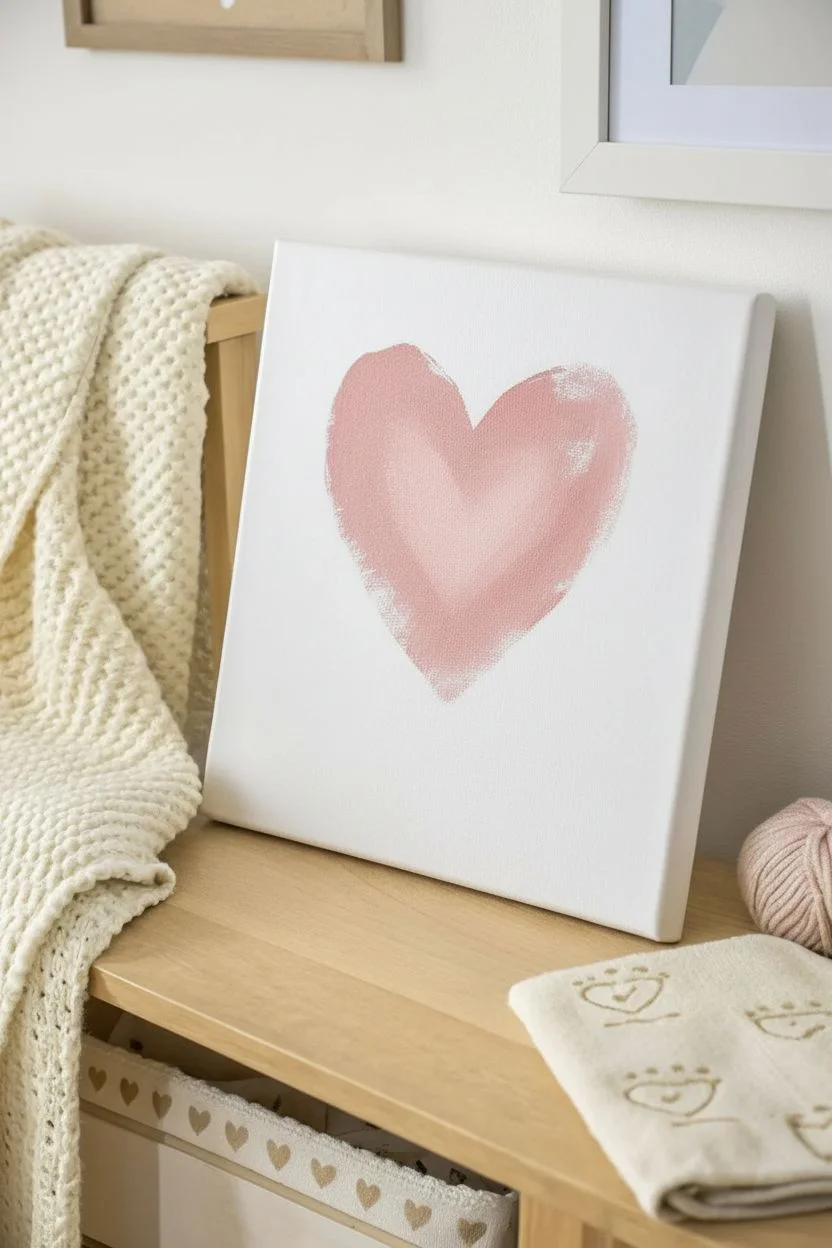
Capture a moment in time with this tender canvas art featuring your little one’s handprints nestled beneath a soft, painted heart. The combination of dusty rose and gold creates a sophisticated nursery palette that transforms simple prints into modern decor.
Detailed Instructions
Materials
- Square stretched canvas (approx. 12×12 inches)
- Acrylic paint in dusty rose/blush pink
- Acrylic paint in metallic gold
- Wide flat paintbrush
- Sponge brush or foam pouncer
- Paper plate or palette
- Baby wipes or damp cloth (for quick cleanup)
- Pencil (optional)
- Scrap paper
Step 1: Painting the Heart
-
Prepare the palette:
Squeeze a generous amount of dusty rose acrylic paint onto your paper plate. If the pink is too vibrant, mix in a tiny drop of white or grey to achieve that muted, soft look shown in the photo. -
Sketch the outline:
Lightly sketch a wide, soft heart shape in the upper center of the canvas with a pencil. Keep the lines very faint so they won’t show through the paint later. -
Establish the first layer:
Using a wide flat brush, fill in the heart shape. Use a dry-brush technique—load the brush lightly—to keep the edges slightly textured and feathery rather than perfectly sharp. -
Add dimension:
While the paint is still wet, dip your brush into a slightly lighter shade of pink (or mix white into your existing pile) and dab it into the center of the heart to create a subtle highlight. -
Let it dry completely:
Allow the heart to dry fully before moving on. This prevents smudging the heart when you are positioning baby’s hands later.
Step 2: Creating the Handprints
-
Plan the positioning:
Hold your baby’s hands over the canvas without paint first to visualize spacing. You want the prints angled slightly outward below the heart. -
Prepare the pink paint:
Refresh the dusty rose paint on your palette. Use a sponge brush to apply an even, thin layer of paint to your child’s left hand. Avoid thick globs, which can cause slipping. -
Print the left hand:
Gently guide the painted hand onto the left side of the canvas below the heart. Press down on the palm and each finger to ensure good contact. -
Lift carefully:
Lift the hand straight up quickly to avoid smearing the print. Immediately clean the hand with baby wipes. -
Prepare the gold paint:
Squirt metallic gold acrylic onto a clean spot on your palette. Use a fresh sponge brush to coat the child’s right hand thoroughly. -
Print the right hand:
Position the gold hand to the right, mirroring the angle of the pink print. I find it helps to gently hold the wrist steady while pressing down. -
Verify finger contact:
Make sure the fingertips press into the canvas texture. The metallic paint can sometimes be more slippery, so firm pressure is key. -
Clean and dry:
Lift the hand straight up and clean those fingers immediately. Let the canvas dry undisturbed for several hours.
Smudge Savior
If a print smears, don’t panic! Quickly wipe it away with a damp cloth while the paint is wet. If a stain remains, paint over the area with white acrylic, let dry, and try again.
Step 3: Finishing Touches
-
Inspect the edges:
Check the sides of your canvas. If any stray paint marks appeared during handling, touch them up with white paint. -
Seal the artwork (optional):
Once fully cured (after 24 hours), you can apply a clear matte spray varnish to protect the prints from dust and fading over time.
Add a Name
Use a fine-tip paintbrush or a gold paint pen to write the baby’s name and the date along the bottom edge or curved underneath the handprints for a true archival finish.
Hang this sweet masterpiece in the nursery as a reminder of how small their hands once were


Baby Initial Tape-Resist Canvas
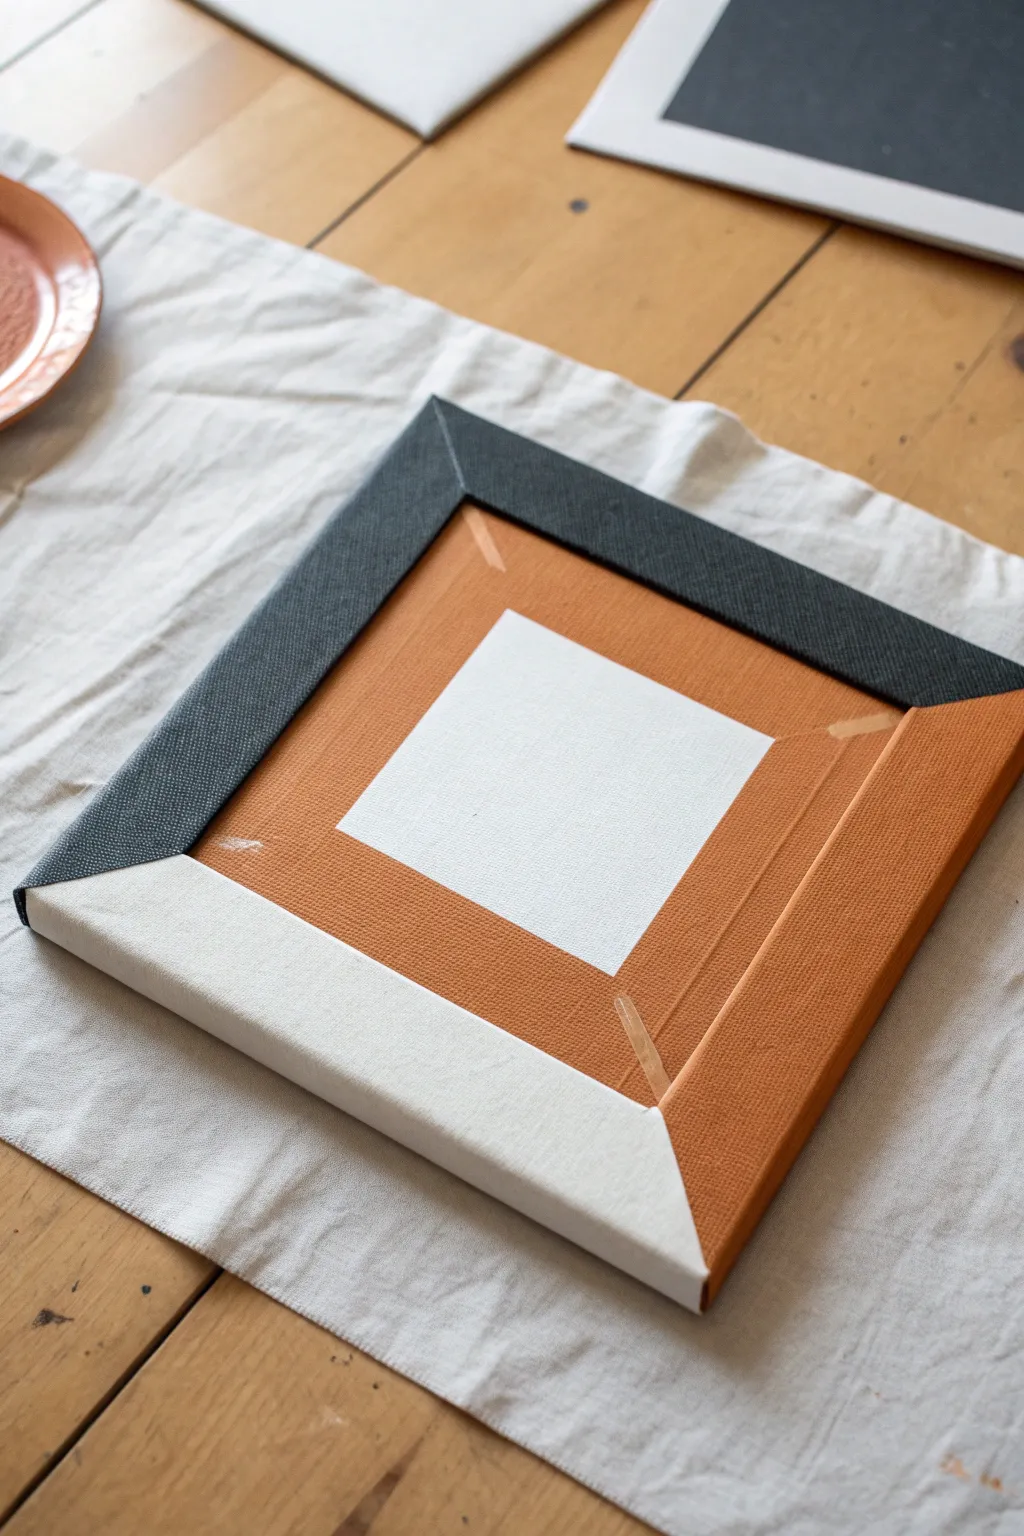

Create a bold, modern piece of art using a simple masking technique that turns negative space into a striking focal point. This geometric design combines raw canvas white with warm terracotta and deep charcoal for a sophisticated, structured look perfect for a modern nursery.
How-To Guide
Materials
- Small square stretched canvas (e.g., 8×8 or 10×10 inches)
- Painter’s tape or dedicated masking tape (various widths if desired)
- Acrylic paint in ‘Terracotta’ or ‘Rust Orange’
- Acrylic paint in ‘Charcoal’ or ‘Soft Black’
- Flat synthetic paintbrush (medium size)
- Scissors
Step 1: Planning and Taping
-
Clean the canvas:
Before starting, wipe the canvas surface gently with a clean, dry cloth to remove any dust that might prevent the tape from sticking securely. -
Isolate the center:
Decide on the size of your central white square. Place four strips of painter’s tape to form a perfect square in the middle of the canvas. -
Seal the edges:
Run your fingernail or a credit card firmly along the inner edges of the tape square created in the previous step. This is crucial to prevent paint from bleeding under the tape and ruining clean lines. -
Create the L-shape zone:
To define the area that will become the dark charcoal section, apply diagonal strips of tape at two opposite corners of the canvas, connecting them to the central square boundaries. -
Check symmetry:
Step back and look at your tape layout. The exposed canvas should now look like a large ‘L’ shape wrapping around a central square, plus another corner section.
Bleeding Lines?
If paint bleeds under the tape, wait for it to dry completely. Then, use a small flat brush and white acrylic (or gesso) to carefully paint over the mistake and straighten the line.
Step 2: Applying Color
-
Load the brush:
Squeeze a generous amount of the terracotta orange paint onto your palette. Dip your flat brush in, ensuring it’s well-coated but not dripping. -
Paint the first section:
Apply the orange paint to the large L-shaped area surrounding the central square. Use long, smooth strokes. -
Paint away from the tape:
When painting near the tape edges, try to brush *away* from the tape line rather than into it. This helps minimize paint being forced under the adhesive. -
Paint the canvas sides:
Don’t forget to wrap the orange color around the outer edges of the canvas for a professional, finished look. -
Let the orange dry:
Allow this layer to dry completely to the touch. This usually takes about 20-30 minutes depending on the thickness of your paint application. -
Apply the charcoal section:
Once the orange is dry and you have taped off the boundary for the dark section (if you didn’t do it initially), paint the remaining outer corner areas with the charcoal paint. -
Cover the dark edges:
Paint the sides of the canvas that correspond to the charcoal sections so the color wraps around seamlessly. -
Add a second coat:
If the canvas texture is still showing through too much, apply a second coat of both colors to ensure solid, opaque coverage.
Step 3: The Reveal
-
Wait for semi-dryness:
Wait until the final coat of paint is dry to the touch but not fully cured—usually about 30 minutes after painting. -
A gentle peel:
Select one corner of the tape. Pull it slowly and steadily at a 45-degree angle away from the painted area. I find this angle gives the sharpest line. -
Reveal the center:
Remove the tape covering the central square last to reveal the crisp white canvas underneath. -
Touch ups:
If necessary, use a tiny detailed brush and a bit of white paint (or gesso) to tidy up any spots where color might have bled slightly.
Initial It
Make this extra personal by using tape to create the baby’s first initial inside final white square before painting, leaving a negative-space letter in the center.
Hang your modern masterpiece on the nursery wall or prop it on a shelf for a touch of geometric style
BRUSH GUIDE
The Right Brush for Every Stroke
From clean lines to bold texture — master brush choice, stroke control, and essential techniques.
Explore the Full Guide
Baby Fingerprint Balloon Bunch Painting
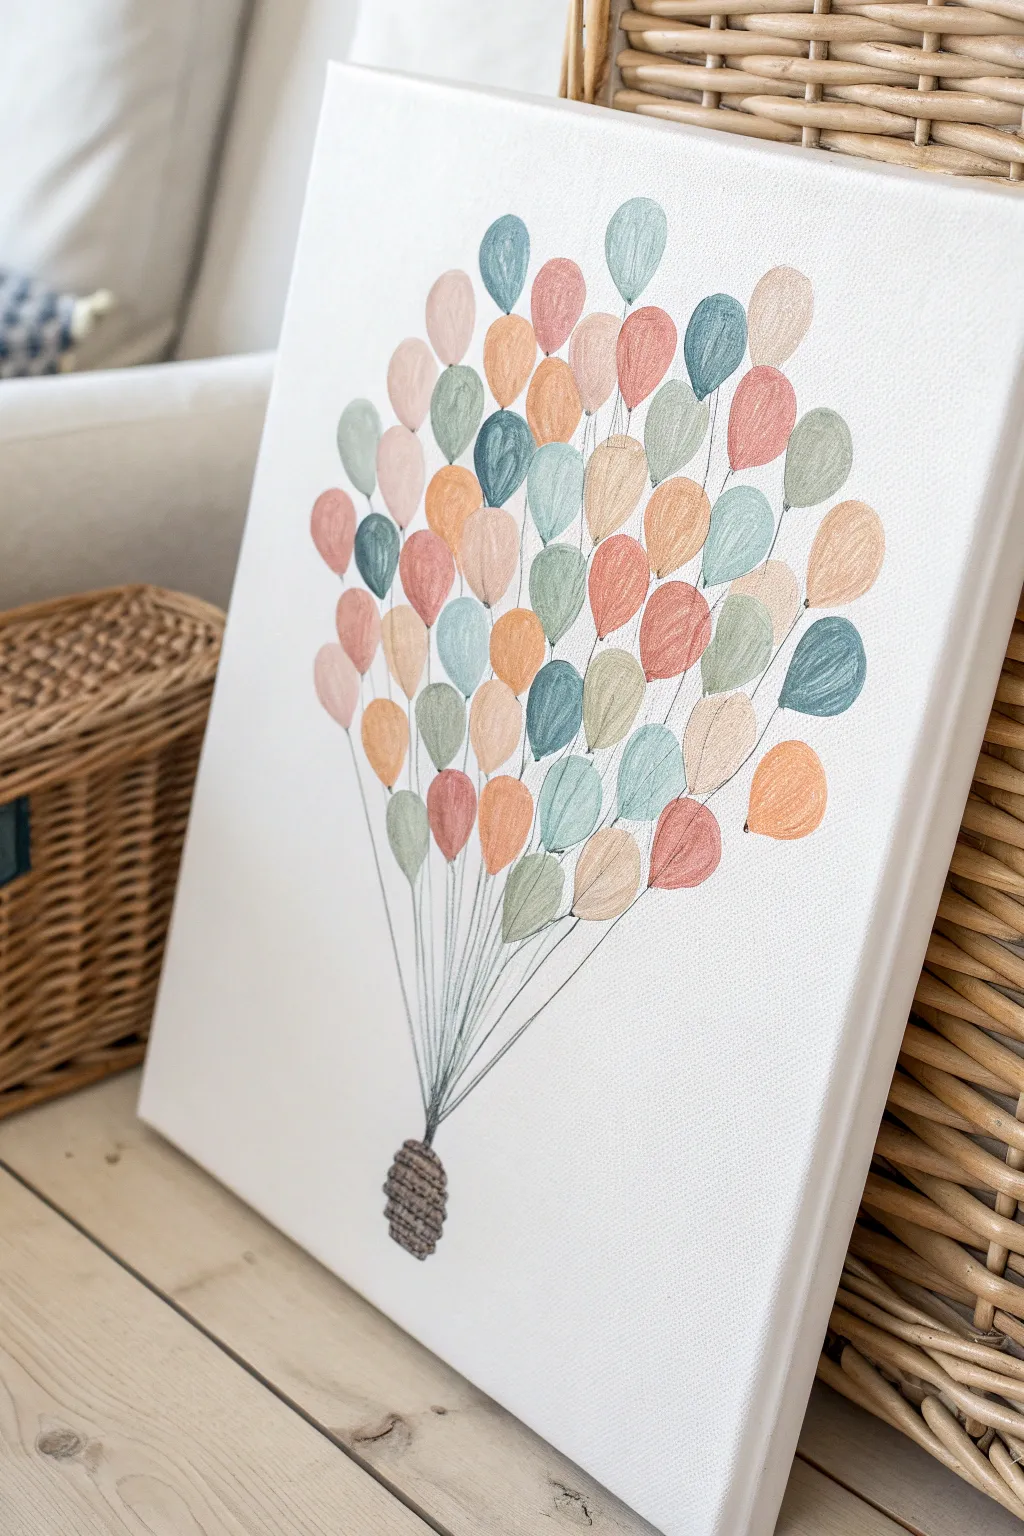
This adorable keepsake transforms simple fingerprints into a soaring bouquet of pastel balloons, perfect for a nursery or playroom wall. The soft, muted color palette gives it a vintage storybook feel while capturing a moment in time with your little one’s help.
Detailed Instructions
Materials
- Stretched canvas (e.g., 12×16 inches)
- Acrylic craft paints in muted pastel tones (sage green, dusty rose, peach, light blue, cream)
- Fine-tip black waterproof pen or marker (0.5mm or smaller)
- Small flat paintbrush (optional, for touch-ups)
- Paper plate or palette
- Baby wipes or damp cloth (essential for clean-up)
- Pencil (HB or lighter)
- Ruler
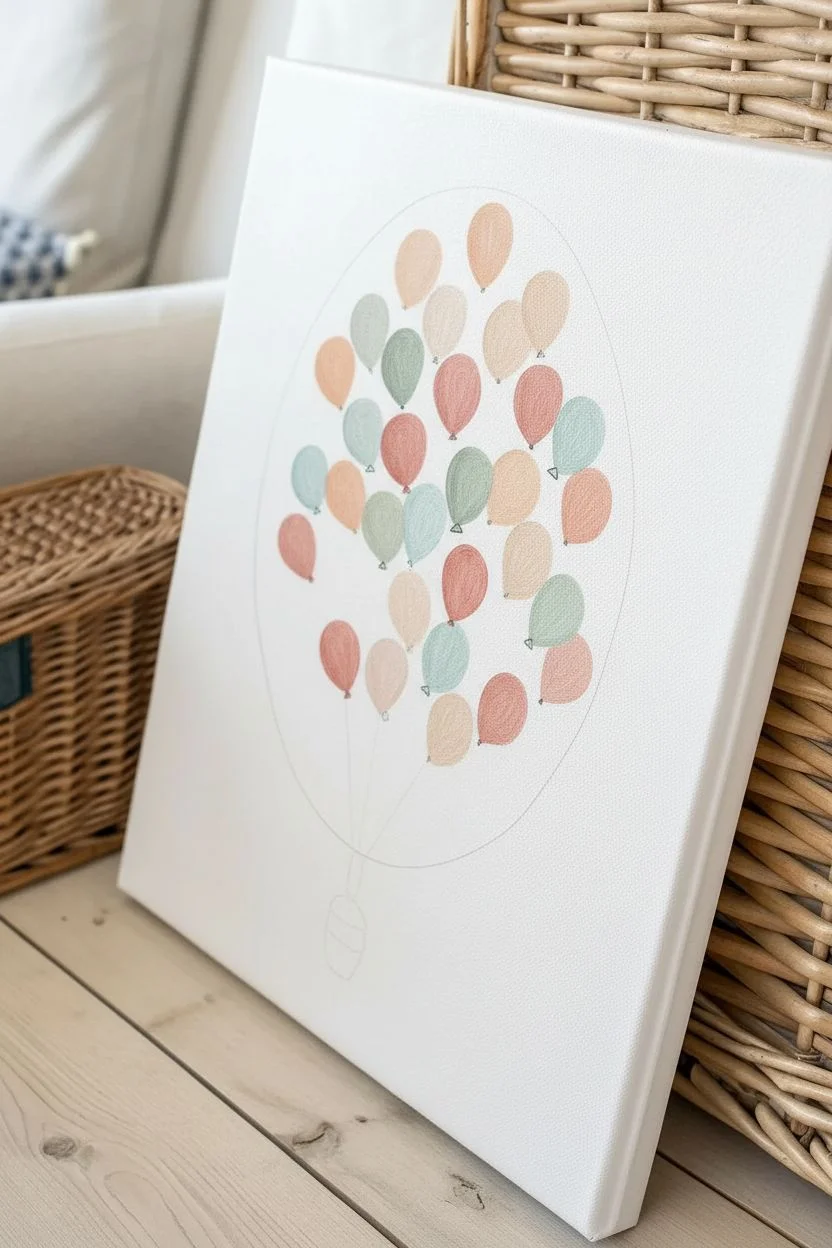
Step 1: Planning the Layout
-
Mark the center:
Start by finding the vertical center of your canvas near the bottom edge. Make a very faint mark with your pencil about 2-3 inches from the bottom where the balloon strings will gather. -
Visualize the shape:
Imagine a large oval or egg shape floating above your center mark. This is where the ‘balloon cloud’ will live. You can lightly sketch this boundary if it helps, but keeping it freehand looks more organic.
Clean Prints Only
Keep baby wipes immediately next to you. Wipe the child’s finger completely clean between every single color change to keep your pastel tones from turning brown or muddy.
Step 2: Creating the Balloons
-
Prepare your palette:
Squeeze dime-sized amounts of your pastel acrylic paints onto the paper plate. If the colors are too bright, mix in a tiny drop of white or grey to achieve that dusty, vintage look shown in the photo. -
Start the first layer:
Dip your child’s thumb or index finger into a color. Blot it once on a scrap paper to remove excess globs, then press it firmly onto the canvas near the top of your imagined oval. -
Vary the angles:
Continue adding fingerprints, slightly varying the angle of the finger press each time so the balloons tip left and right rather than standing perfectly straight. -
Build the bunch:
Work your way down from the top, clustering the prints. Overlap them slightly—just like real balloons crowded together—but let the bottom layer dry completely before overlapping to avoid muddy colors. -
Mix colors strategically:
Alternate colors randomly so no two same-colored balloons are touching. Aim for a balanced distribution of the greens, blues, pinks, and peaches. -
Fill the shape:
Keep adding prints until you have a dense, satisfying oval shape. Make sure the bottom of the clutter tapers inward slightly, pointing toward your pencil mark at the bottom. -
Dry completely:
This is crucial: Let the paint dry fully. Because fingerprint paint can be thicker, give it at least an hour. The paint must be hard to the touch before drawing lines.
Add 3D Texture
Once the paint is dry, use a tiny bit of white puffy paint or a white gel pen to add a small ‘highlight’ curve to the top right of each balloon for a shiny, 3D effect.
Step 3: Adding the Strings and Details
-
Draw the knot:
At your bottom pencil mark, use the fine-tip black pen to draw a small, textured knot or basket. Sketch tight, horizontal scribbles stacked on top of each other to mimic a woven rope texture. -
Connect the bottom row:
Starting with the lowest balloons, place your ruler from the bottom of the balloon print to the top of the knot. Draw a straight, thin line connecting them. -
Connect the middle layers:
For balloons in the middle of the pack, draw lines that disappear behind the front balloons. Don’t draw over the paint; stop the line when you hit another balloon. -
Connect the top layer:
Repeat for the top balloons. These strings will be the longest and should look like they are threading through the gaps in the bunch. -
Add balloon tails:
At the base of each fingerprint balloon, add a tiny black triangle or a little squiggly knot detail where the string meets the paint. This makes them look like tied balloons rather than floating shapes. -
Refine the lines:
Go over the main gathering point lines near the knot again to darken them, emphasizing where all the tension is holding the bunch together.
Hang your masterpiece in a spot with good natural light to show off those precious little prints
Baby Footprint Elephant (Foot As The Body)
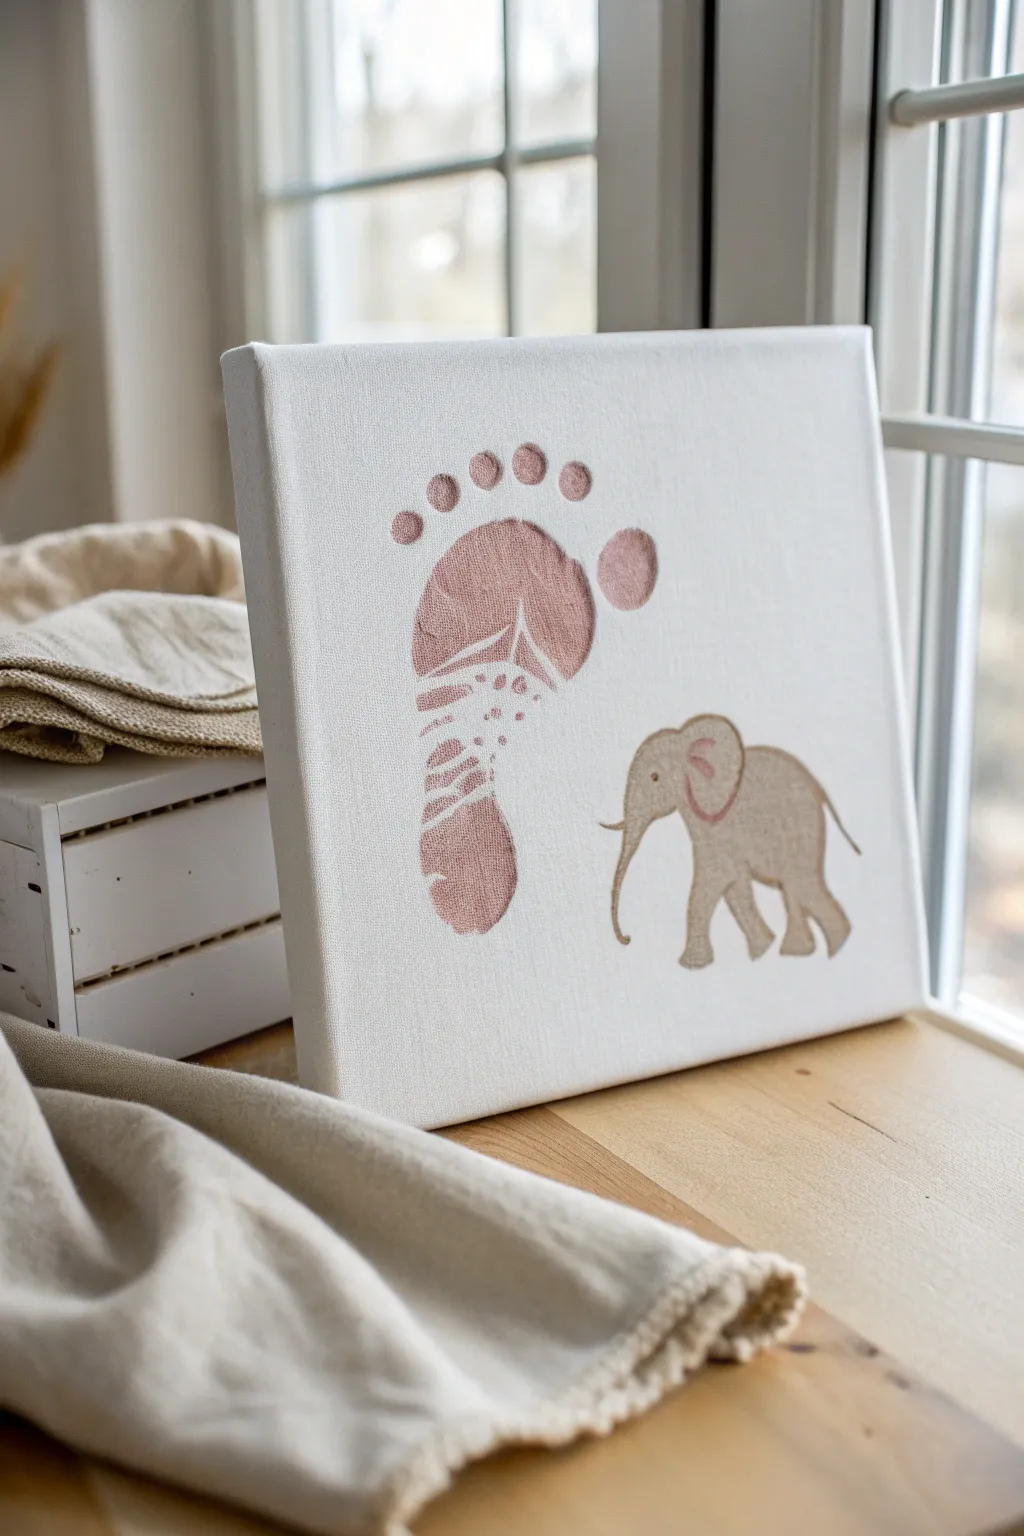
This heartwarming canvas project pairs your little one’s footprint with a sweet, hand-painted elephant companion. The contrast between the textured footprint and the smooth painted figure creates a timeless piece of nursery decor that captures a fleeting moment.
Step-by-Step
Materials
- Small white stretched canvas (square format recommended)
- Non-toxic, baby-safe acrylic craft paint (muted pink or mauve)
- Acrylic craft paint (light beige or taupe for the elephant)
- Fine-tipped paintbrush (round size 2 or 4)
- Flat paintbrush (size 6 or 8)
- Palette or paper plate
- Baby wipes or damp cloth
- Pencil for sketching
- Matte varnish (optional)
Step 1: Capturing the Print
-
Prepare the workspace:
Set up a clean, flat surface with your canvas ready. Keep baby wipes immediately accessible—efficiency is key when working with infants. -
Apply paint to the foot:
Using the flat paintbrush, coat the bottom of your baby’s foot with the muted pink paint. Apply enough for good coverage, but not so much that it becomes slippery or globs up. -
Position the print:
Orient the canvas vertically. You want the footprint to be on the left side, slightly above the center line. Guide the foot down gently, heel first, then toes. -
Press and lift:
Press down firmly on the toes and the ball of the foot to ensure the skin texture transfers. Lift the foot straight up to avoid smearing the print. -
Clean up and dry:
Immediately clean the baby’s foot. Allow the canvas footprint to dry completely before moving on to the painting phase; this usually takes about 20-30 minutes.
Step 2: Sketching the Companion
-
Outline the elephant:
Once the print is dry, lightly sketch a small elephant using a pencil. Position it to the right and slightly lower than the footprint. -
Refine the shape:
Draw a rounded back, four sturdy legs, and a small tail sticking out. Add the trunk curving downward. -
Add the ear detail:
Sketch a large, rounded ear on the side of the head. Keep the lines faint so they won’t show through the lighter paint later.
Smudge Rescue
If the footprint smudges, turn it into a cloud or bush and try stamping again in a new spot, or simply paint over the white background to reset.
Step 3: Painting the Elephant
-
Fill in the body:
Using your beige or taupe paint and a fine brush, carefully fill in the body of the elephant, working around the ear area first. -
Paint the legs:
Paint the four legs, adding slight curves at the bottom for feet. I find it helpful to use very short strokes here to mimic the texture of the canvas slightly. -
Define the trunk and tail:
With the very tip of your brush, trace the trunk line and the thin tail. Keep the paint fluid so the lines remain smooth. -
Paint the ear:
Mix a tiny drop of the pink footprint color into your beige paint to create a soft blush tone. Use this to fill in the inner part of the ear. -
Add facial details:
Once the beige paint is dry to the touch, use a very fine point (or even a toothpick) to add a tiny dot for the elephant’s eye using dark brown or black paint.
Adding Dimensions
Glue a tiny ribbon bow to the elephant’s tail or create ‘grass’ under their feet using strands of green embroidery thread for a mixed-media 3D effect.
Step 4: Final Touches
-
Check for gaps:
Look closely at your painted elephant. If the canvas weave is showing through too much, apply a second thin coat of beige paint. -
Erase guidelines:
If any pencil marks are still visible around the edges of your paint, gently erase them once the artwork is 100% dry. -
Seal the memory:
For longevity, brush a layer of matte varnish over the entire canvas. This protects the print from fading and dust over the years.
Hang this sweet creation in the nursery as a gentle reminder of how small those feet once were

PENCIL GUIDE
Understanding Pencil Grades from H to B
From first sketch to finished drawing — learn pencil grades, line control, and shading techniques.
Explore the Full Guide
Parent And Baby Animal Pair Canvas
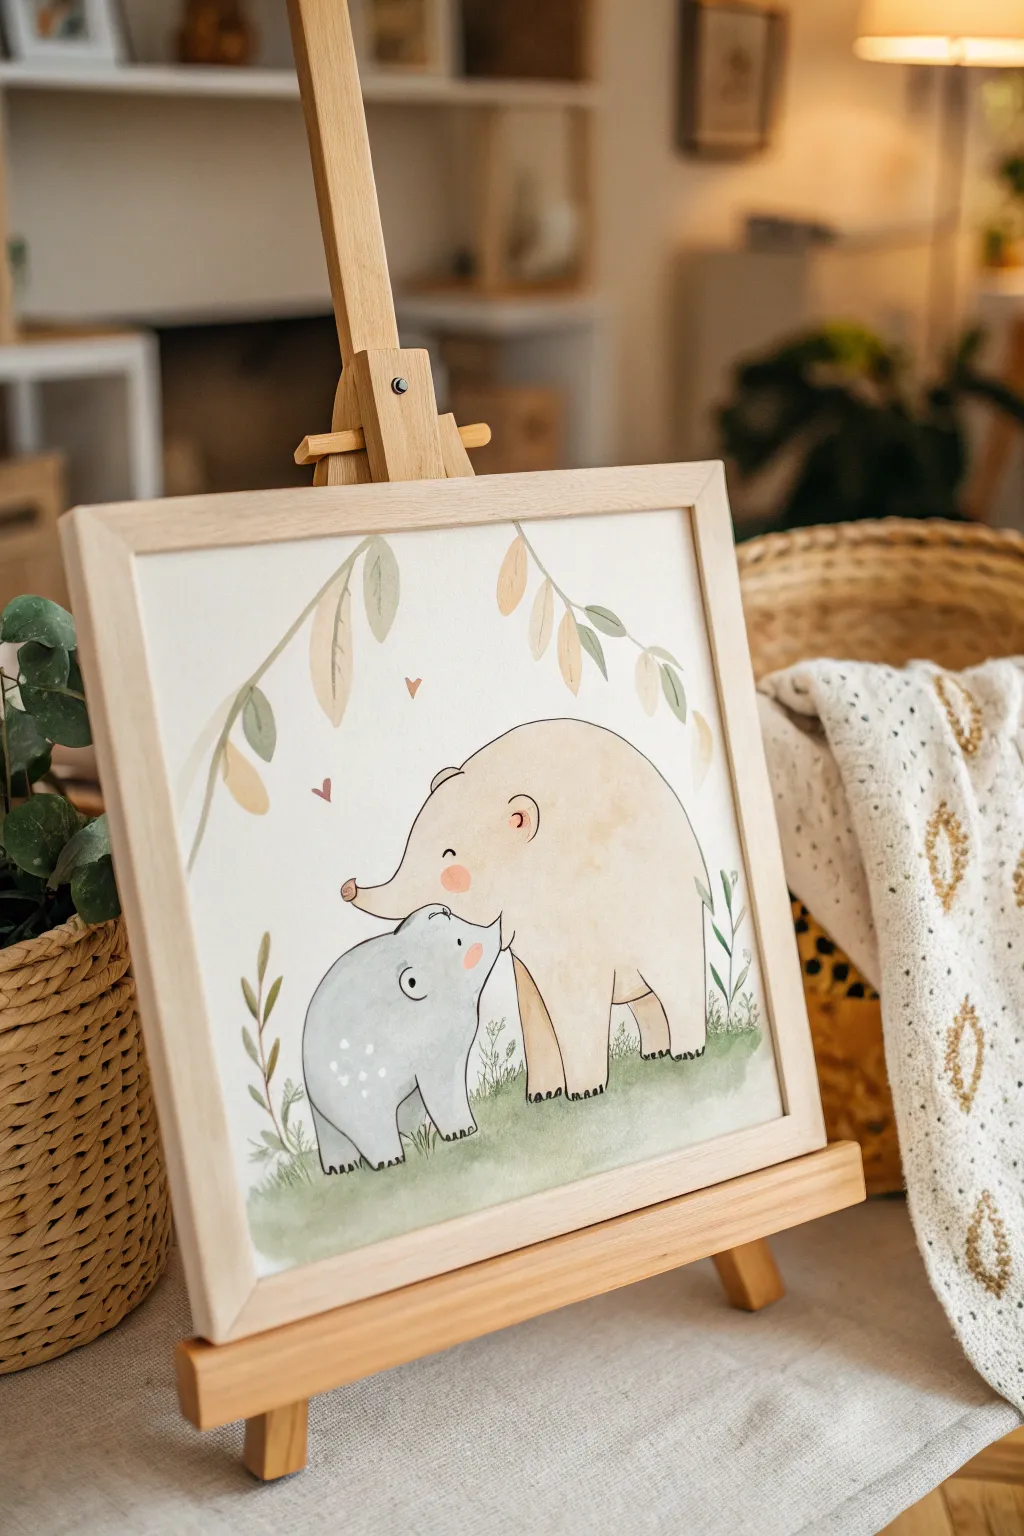
This sweet, minimalist artwork captures a tender moment between a parent and baby bear (or perhaps hippo-bear hybrids!) in soft, earthy tones. The gentle watercolor effect creates a nursery-perfect look that feels warm, inviting, and peaceful.
Step-by-Step Guide
Materials
- Square canvas board or watercolor canvas (approx. 10×10 or 12×12 inches)
- Light wood floating frame (optional, for finishing)
- Acrylic paints (in beige/sand, soft grey, dusty green, sage, white, and rust/terracotta)
- Watercolor medium for acrylics (to achieve the translucent look) or actual watercolors if using watercolor paper
- Fine liner brush (size 0 or 00), preferably dark brown or black
- Medium round brush (size 4 or 6)
- Pencil and eraser for sketching
- Clean water jar
- Paper towels
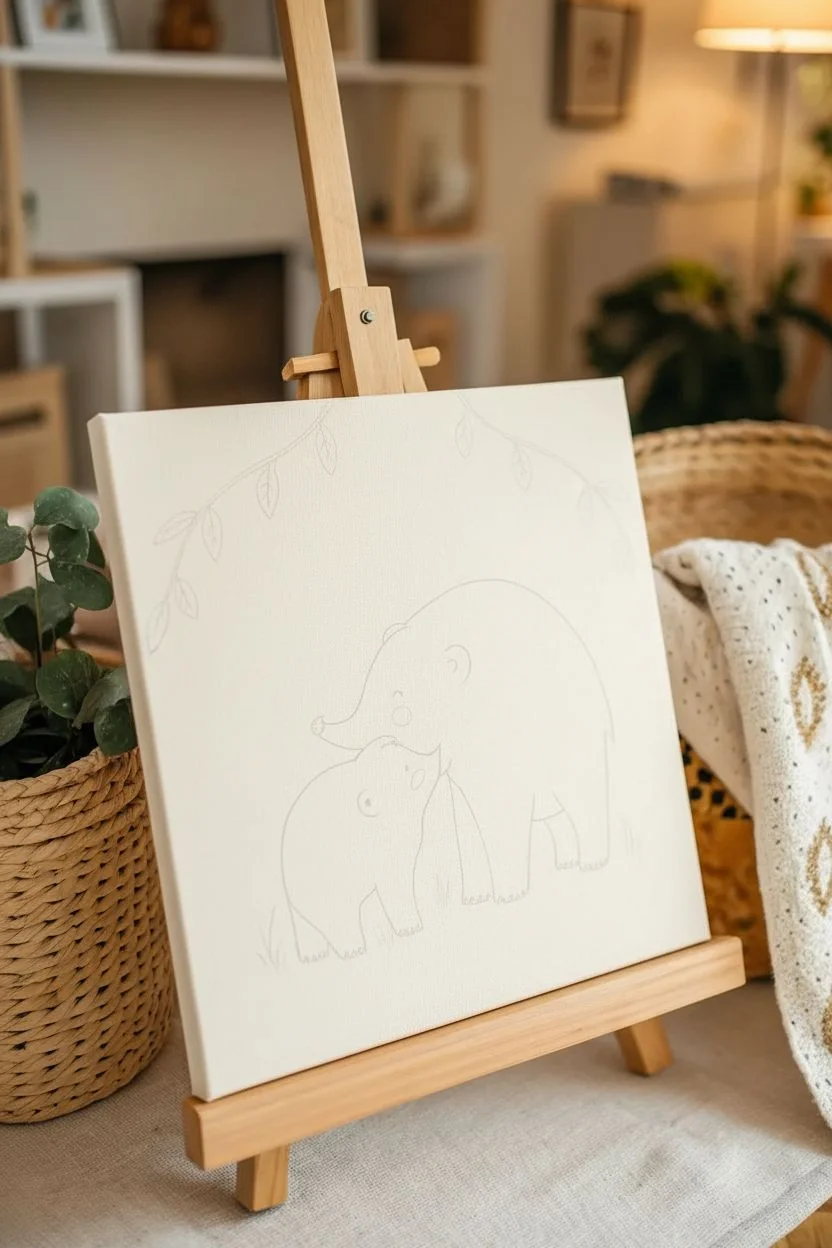
Step 1: Sketching the Figures
-
Map out the shapes:
Begin by lightly sketching a large, rounded hump shape on the right side of the canvas for the parent animal. It should be an elongated oval that curves downward for the head. -
Position the baby:
Draw a smaller, rounded shape nestled directly under the parent’s chin. The baby’s back should curve upwards, creating a snug fit like a puzzle piece. -
Refine the outlines:
Add the details: rounded ears on top of the heads, short sturdy legs for both, and a slight curve for the snouts where they meet in a nuzzle. Keep your pencil lines very faint so they won’t show through the paint later. -
Add nature elements:
Sketch curving branches hanging from the top corners, framing the scene. Add a few vertical lines at the bottom to indicate blades of grass.
Step 2: Applying the Washes
-
Mix the parent’s color:
Mix a generous amount of beige or sandy yellow paint with water (or watercolor medium). You want a consistency that is fluid and semi-transparent, like tea. -
Paint the parent bear:
Using your medium round brush, fill in the parent’s body. I like to work wet-on-dry here to keep the edges somewhat crisp but the interior soft. -
Create variation:
While the paint is still damp, dab a tiny bit of slightly darker tan color near the bottom of the legs and the back curve to add subtle volume without harsh shading. -
Paint the baby:
Mix a very watered-down soft grey. Paint the baby figure, being careful not to let the wet grey paint touch the wet beige paint of the parent, or the colors will bleed. Let them touch only after one is dry, or leave a hair-thin gap. -
Add cheeky details:
Once the main bodies are dry to the touch, mix a diluted heavy cream or white. Add subtle spots on the baby’s back rump for texture. -
Paint the rosy cheeks:
Take a tiny amount of diluted pink or rust paint. Gently dab a circle on the cheek area of both animals to give them a healthy, happy glow.
Bleeding Lines?
If your black outline bleeds into the colored wash, the base paint wasn’t 100% dry. Use a hair dryer on a cool setting to ensure the colored layers are bone-dry before inking.
Step 3: Painting the Surroundings
-
Base of green:
Mix a watery sage green. Paint a loose, uneven wash across the bottom of the canvas to ground the figures. It doesn’t need to be a straight line; let it be organic. -
Paint the foliage:
Using the same sage green and perhaps a slightly more yellow-green variation, paint the leaves on the hanging branches and the small plants sprouting near the animals’ feet. -
Add dried leaves:
Use a warm ochre or mustard yellow to paint a few dried leaves hanging from the top branches to add warmth to the color palette. -
Sprinkle some love:
With a small brush and rust-colored paint, add two or three tiny hearts floating in the negative space between the leaves and the animals.
Personalize It
Customize the artwork for a specific name! Paint the baby’s name in a matching whimsical font along the curve of the green grass at the bottom.
Step 4: Inking and Definition
-
Prepare the liner:
This step brings the illustration to life. Use a very fine liner brush with watered-down black or dark brown acrylic. Alternatively, a waterproof fine-tip artistic pen works wonders here. -
Outline the bodies:
Outline the animals with a shaky, organic line. Don’t try to be perfectly straight; the charm lies in the hand-drawn feel. Add small ‘toes’ to the bottom of the feet. -
Facial features:
Draw tiny dots for eyes. Add a small curve for the smiles and the nose shapes. The parent’s eye should be a simple arc (closed eye) to suggest contentment. -
Grass details:
Add quick, vertical strokes over your green wash to simulate individual blades of grass and stems. -
Final drying:
Allow the entire piece to dry completely before framing or sealing with a matte varnish spray.
Once framed, this tender scene will add a calm and loving atmosphere to any nursery wall
Baby Name In Watercolor-Style Acrylic Wash
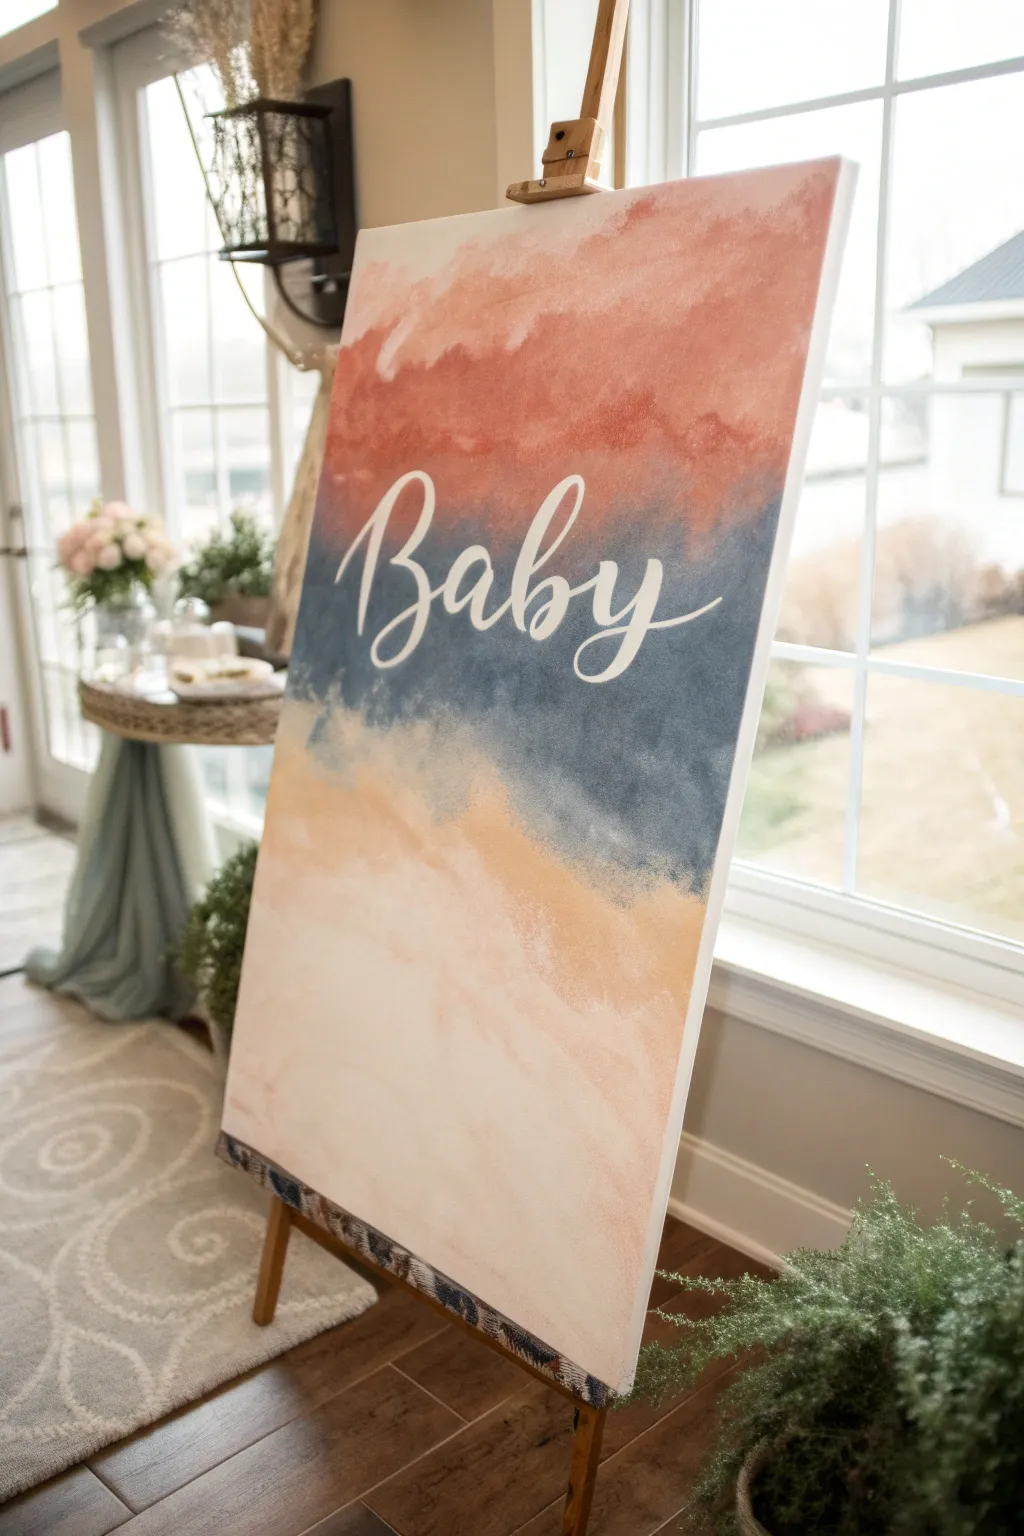
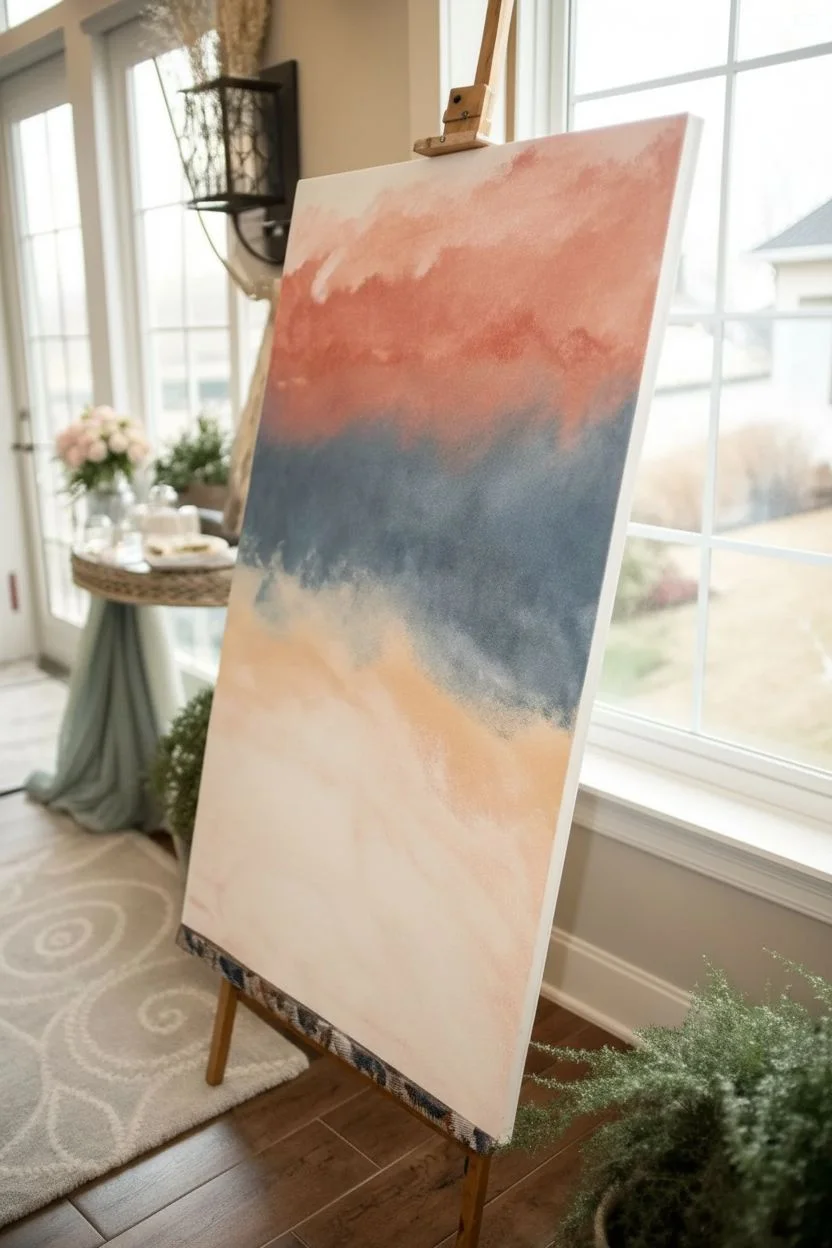
Create a stunning statement piece for a nursery or shower with this ethereal, large-scale canvas art. Using acrylics thinned with water, you’ll achieve the soft, blending look of watercolor while maintaining the durability and vibrancy of acrylic paint on canvas.
Step-by-Step Tutorial
Materials
- Large stretched canvas (24×36 or similar)
- Acrylic paints: Burnt Sienna, Navy Blue, and White
- Paint mixing cups or palette
- Water spray bottle/mister
- Wide flat wash brush (2-3 inch)
- Medium round brush
- Small liner brush (for lettering)
- Pencil or chalk
- Paper towels
- Water container
Step 1: Preparing the Colors
-
Mix your base shades:
Begin by squeezing your acrylic paints into separate cups. You’ll need three primary mixtures: a deep coral (Burnt Sienna mixed with a touch of White), a rich Navy Blue, and a warm cream (White with a tiny dot of Burnt Sienna). -
Create the wash consistency:
Add water gradually to each cup. You are aiming for a consistency similar to heavy cream or half-and-half—fluid enough to drip slightly but opaque enough to hold color. If it feels too thin, add more paint; too thick, add a splash more water.
Step 2: Creating the Background Wash
-
Pre-wet the canvas:
Lightly mist the entire canvas surface with your spray bottle. This helps the acrylics flow and blend like true watercolor without soaking into the weave too quickly. -
Apply the top band:
Load your wide brush with the coral mixture. Starting at the top edge, paint horizontal strokes, allowing the bottom edge of this band to be uneven and organic. Don’t aim for a straight line. -
Blend the transition:
While the coral is still wet, rinse your brush quickly and load it with the navy blue wash. Apply this to the middle section of the canvas, slightly overlapping the bottom of the coral section. -
Soften the edges:
Use a clean, damp brush to gently feather the area where the coral and navy meet. Mist lightly with water if the paint is drying too fast, encouraging them to bleed into one another securely. -
Add the bottom tone:
Rinse your brush thoroughly and pick up the cream/beige mixture. Paint the bottom third of the canvas, blending it upwards into the navy blue section just as you did before. -
Create texture:
While the paint is wet, dab a crumpled paper towel lightly over random areas to lift pigment and create cloudy, watercolor-like textures. -
Let it dry completely:
Allow the canvas to dry flat for at least 2-3 hours. The heavy water content means this will take longer than standard acrylic painting.
Flow Control
If the acrylic wash isn’t moving enough, mix in a few drops of acrylic flow improver or glazing medium. This keeps the binder strong while increasing fluidity.
Step 3: Lettering the Name
-
Sketch the layout:
Once the background is bone dry, use a pencil or piece of white chalk to lightly sketch the word ‘Baby’ (or your chosen name) across the navy center section in a flowing script font. -
Plan the stroke width:
Identify the downstrokes of your letters (the lines where your pen would move downwards). Lightly double these lines with your chalk to indicate where the lettering should be thicker. -
Paint the base letters:
Using pure White acrylic paint (undiluted for opacity) and a medium round brush, paint over your sketch. Focus on smooth, continuous lines. -
Thicken the downstrokes:
Go back over the downstrokes to thicken them, creating that classic calligraphy look. I find it helpful to turn the canvas sideways to get a better angle on difficult curves. -
Refine the edges:
Switch to your small liner brush to sharpen the tails of the letters and clean up any blurry edges on your script. -
Apply a second coat:
White over dark blue will likely need a second pass. Once the first layer of lettering is dry to the touch, carefully paint over the word again to ensure it pops brilliantly against the background. -
Erase guidelines:
After the lettering is fully cured (give it overnight to be safe), gently wipe away any visible chalk marks with a damp cloth or erase pencil lines.
Metallic Accent
For a luxe upgrade, trace the outer edge of the white lettering with a very thin gold paint pen, or add gold leaf flakes along the border of the blue and coral sections.
Set this beautiful canvas on a wooden easel to greet guests or hang it prominently in the nursery for a soft, welcoming touch


Baby Soundwave-Inspired “Lullaby” Line Painting
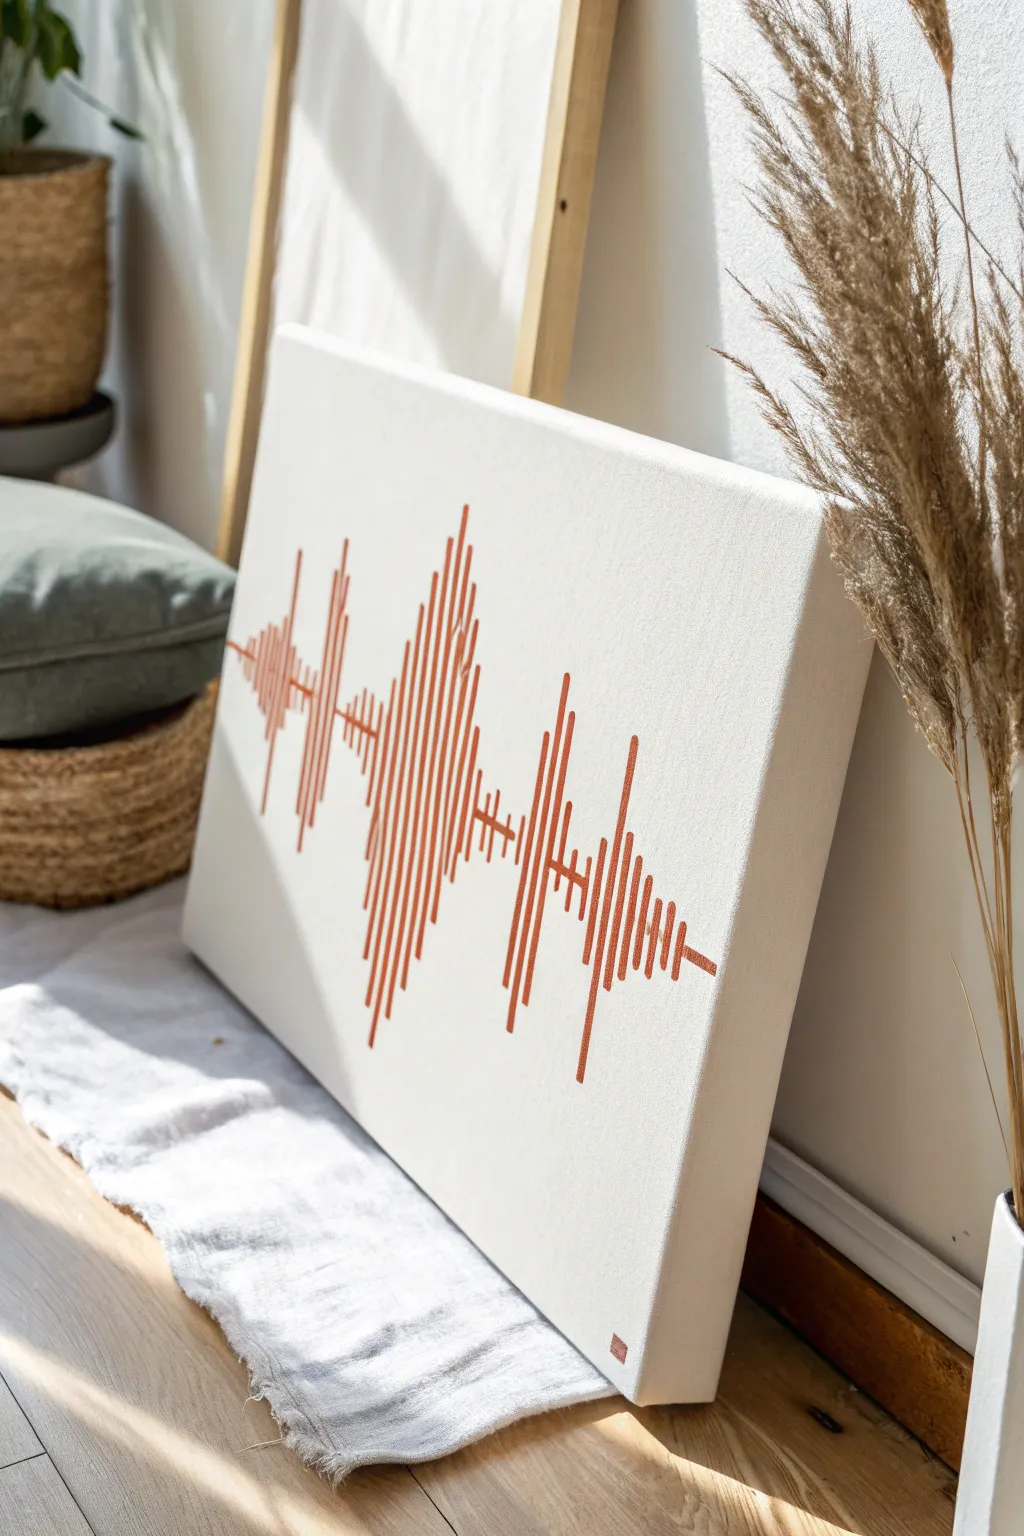
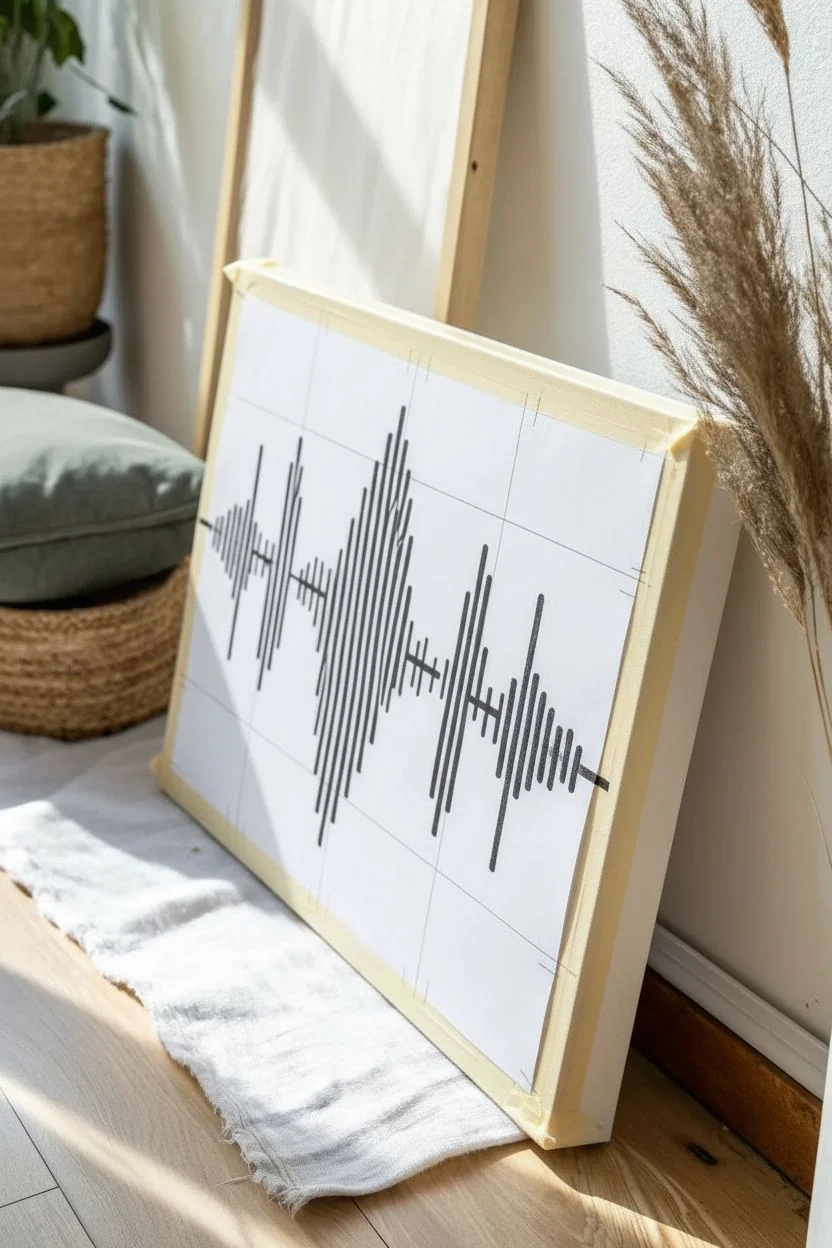
Capture the visual rhythm of your baby’s favorite lullaby or even their first giggle with this minimalist and deeply personal artwork. Using a simple soundwave pattern in a warm, earthy tone, you can transform fleeting audio into a modern keepsake that looks stunning on a nursery wall.
Step-by-Step Tutorial
Materials
- Rectangular stretched canvas (16×20 or similar)
- White acrylic paint (gesso if canvas is unprimed)
- Burnt orange or terracotta acrylic paint
- Computer and printer (for the template)
- Paper
- Pencil
- Ruler or straight edge
- Masking tape or painter’s tape
- Flat shader brush (small/medium width)
- Fine liner brush
- Graphite transfer paper (optional)
Step 1: Preparation & Design
-
Prime the canvas:
Even if your canvas is pre-primed, apply a fresh coat of white acrylic paint to ensure a pristine, opaque background. Let this dry completely before moving on. -
Generate the soundwave:
Use a free online audio editor or soundwave generator to record a snippet of your baby’s laugh, heartbeat, or a line from a lullaby. Take a screenshot of the resulting wave pattern. -
Simplify the design:
The goal isn’t scientific accuracy but artistic representation. Look at your screenshot and identify vertical bars of varying heights. You don’t need every tiny spike; focus on the main clusters of sound. -
Create a template:
Print your screenshot tailored to the size of your canvas. You might need to tile it across two sheets of paper if the canvas is wide. -
Establish the centerline:
Using a ruler and a very light pencil touch, draw a horizontal line straight across the middle of your canvas. This will act as the anchor for your soundwave bars so they stay perfectly aligned.
Straight Line Secret
For ultra-crisp vertical bars, place two strips of masking tape vertically for every single bar. It takes longer to prep, but guarantees perfect edges.
Step 2: Transferring the Pattern
-
Position the template:
Tape your printed soundwave paper onto the canvas, ensuring the middle of the wave aligns with your pencil centerline. -
Transfer the guides:
If using graphite paper, slip it under the printout and trace the vertical lines. If freehanding, simply mark the top and bottom points of each major vertical bar lightly with a pencil. -
Remove the template:
Take off the paper and tape. You should now have a series of vertical marks or faint lines indicating where your paint needs to go. -
Refine the lines:
With your ruler, lightly connect your top and bottom marks to the centerline, creating vertical guidelines for each bar of the soundwave.
Make it Interactive
Print a QR code linking to the actual audio file of the heartbeat or laugh, and paste it discreetly on the back or bottom corner of the canvas.
Step 3: Painting the Wave
-
Mix your color:
Prepare your burnt orange or terracotta paint. Add a tiny drop of water to improve the flow, which helps create crisp edges on the canvas texture. -
Start with the center bars:
Dip your flat shader brush into the paint. I find it easiest to start with the tallest, central bars and work outward to avoid smudging the wet paint with my hand. -
Paint the vertical strokes:
Paint each vertical line using the width of the flat brush as your guide. Keep the width consistent for all bars to maintain a graphic, modern look. -
Taper the edges:
For the very top and bottom of each bar, you can leave them squared off for a digital look, or slightly rounded for a softer feel. Just be consistent across the whole piece. -
Add the connecting line:
Using the fine liner brush, carefully paint a thin horizontal line connecting all the vertical bars through their center. This unifies the wave. -
Detail the quiet spots:
In areas where the sound is quiet (short bars), switch to your smaller brush to ensure those tiny lines don’t get too thick or blobby. -
Check opacity:
Depending on your paint quality, the orange might be slightly translucent. Once the first passes are dry, apply a second coat to the bars to make the color pop solidly against the white.
Step 4: Finishing Touches
-
Clean up edges:
If any orange paint strayed outside the lines, use a small brush with white paint to ‘erase’ the mistake once the orange is fully dry. -
Erase pencil marks:
Gently erase any visible graphite guidelines that weren’t covered by paint. Be sure the paint is 100% cured to avoid smearing. -
Add a signature:
Sign your work in the bottom corner with a small square or initial, matching the minimalist vibe of the piece.
Hang this waveform in the nursery as a visual reminder of the most beautiful sounds in your life
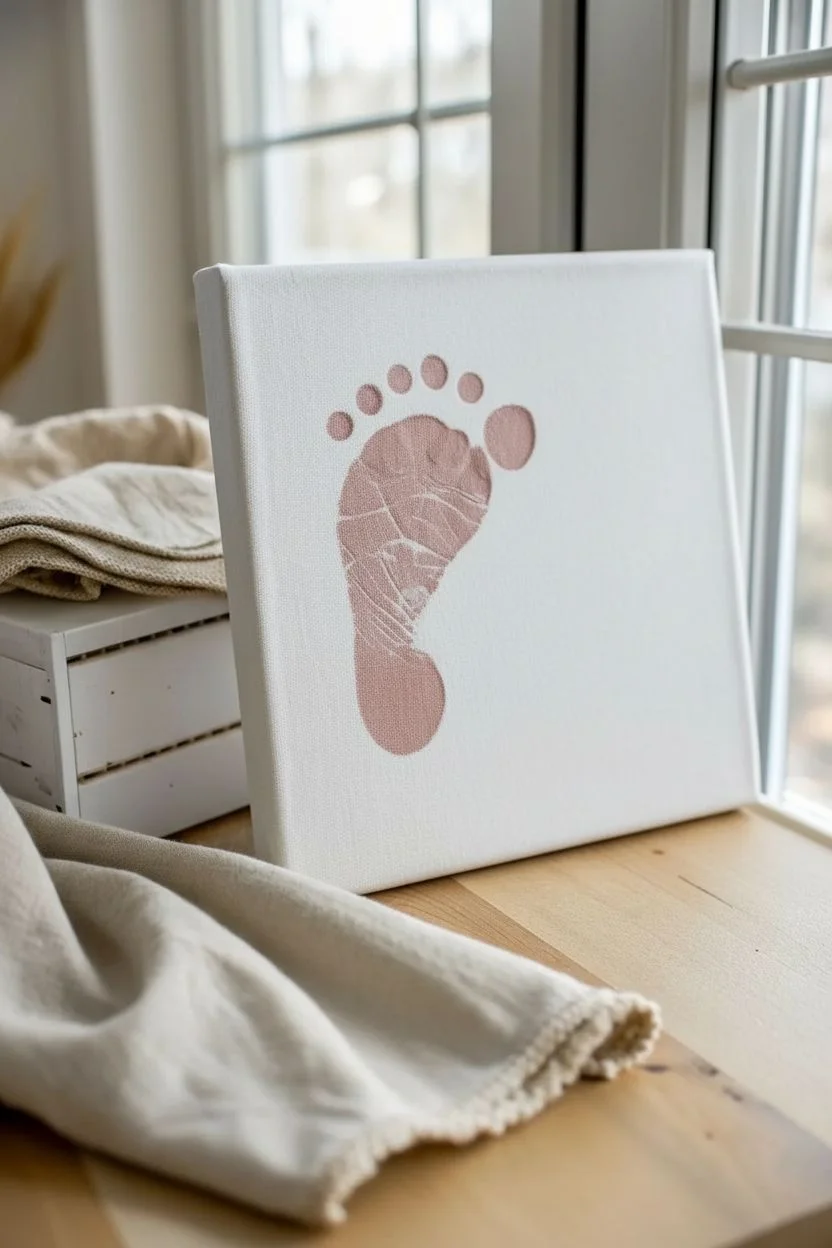
Baby “Tiny Toes” Minimalist Negative Space Canvas

Capture the fleeting memory of tiny toes with this elegant minimalist canvas that turns simple footprints into modern art. By using a gentle dusty rose background with crisp white prints, this piece achieves a sophisticated look that blends seamlessly with contemporary nursery décor.
Step-by-Step
Materials
- Square stretched canvas (10×10 or 12×12 inch)
- White acrylic paint (heavy body preferred)
- Dusty rose or mauve acrylic paint
- Wide flat paintbrush (1-2 inch)
- Foam sponge brush
- Baby-safe ink pad (white) OR washable white tempera paint
- Removable adhesive vinyl or contact paper (optional for true negative space)
- Scissors
- Baby wipes (essential!)
- Matte varnish spray (optional)
Step 1: Painting the Base Color
-
Prepare the workspace:
Lay down newspaper or a drop cloth to protect your surface. Ensure your canvas is clean and free of dust or lint. -
Mix your shade:
If you don’t have a pre-mixed dusty rose, create it by mixing white with a touch of red and a tiny drop of brown or green to desaturate the pink. Aim for the muted, earthy pink tone seen in the photo. -
Apply the first coat:
Using your wide flat brush, apply a smooth, even layer of the dusty rose paint across the entire front of the canvas. -
Paint the edges:
Don’t forget the sides of the canvas! Continue the color around the edges for a professional, gallery-wrapped finish. -
Dry and repeat:
Let the first coat dry completely (about 20-30 minutes). Apply a second coat to ensure full opacity and hide the canvas texture. -
Ensure total dryness:
Allow the pink base to cure fully before attempting any footprinting. I usually wait at least an hour to be safe.
Step 2: Creating the Footprints
-
Prepare the foot paint:
Squeeze a small amount of white heavy body acrylic or tempera onto a paper plate. Use the foam brush to spread it into a thin, even layer. -
Test the consistency:
Press your thumb into the paint and stamp it on a scrap piece of paper. You want texture, but not globs of paint. -
Paint the foot:
Gently hold the baby’s foot and use the foam brush to apply the white paint to the sole. Ensure you cover the heel, the ball of the foot, and each individual toe. -
Position the first print:
Hover the foot over the left side of the canvas, ensuring the heel is lower than the toes to mimic a natural standing position. -
The press:
Press the foot firmly onto the dried pink canvas. Gently press down on the toes to ensure they make contact. -
The lift:
Lift the foot straight up—do not drag it or slide it—to keep the edges crisp. -
Clean immediately:
Wipe the baby’s foot thoroughly with baby wipes before the paint starts to dry on their skin. -
Repeat for the right foot:
Apply paint to the second foot. Position it on the right side of the canvas, slightly offset or parallel depending on your preference. -
Stamp the second print:
Press firmly and lift straight up. Don’t worry if the texture looks distressed or speckled; this adds to the artistic charm. -
Touch-ups (Optional):
If a toe didn’t stamp clearly, you can use a tiny detail brush with a speck of white paint to lightly suggest the missing area, but keep it subtle.
Clean Print Tip
For wiggling babies, practice stamping on plain paper first. Once you get a rhythm and the baby is calm, move to the actual canvas.
Step 3: Finishing and Protection
-
Let it cure:
Allow the white footprints to dry completely. Since the paint was applied thinly via stamping, this should happen relatively quickly. -
Seal the artwork:
To protect the piece from dust and UV light, take the canvas outside and apply a light coat of matte varnish spray. -
Mount and display:
Once dry, the canvas is ready to be placed on a floating shelf or hung on the wall.
Level Up: 3D Effect
After the white paint dries, mix a tiny bit of darker rose paint and add a very thin shadow line to one side of the prints.
Now you have a timeless keepsake that freezes a moment in time with beautiful simplicity


Have a question or want to share your own experience? I'd love to hear from you in the comments below!