If you’ve ever looked at a plain baby onesie and thought “this needs a little magic,” you’re in the right place. I love onesie painting because it’s beginner-friendly, fast, and you end up with a tiny wearable artwork that feels so personal.
Classic Baby Name and Tiny Icon Onesie
Recreate this sweet, minimalist look that mimics the charm of a pencil sketch on fabric. This project uses fine lines and a touch of glitter to turn a simple word into a keepsake-worthy design perfect for newborn photos.
How-To Guide
Materials
- White or cream cotton baby onesie (pre-washed)
- Black fabric marker (fine tip)
- Copper or rose gold glitter fabric paint (dimensional or flat)
- Small detail paintbrush (round size 0 or 1)
- Piece of cardboard or cardstock
- Pencil and eraser
- Ruler
- Iron and press cloth (for heat setting)
Step 1: Preparation & Sketching
-
Prep the fabric surface:
Begin by washing and drying your onesie without fabric softener to ensure the ink adheres properly. -
Create a barrier:
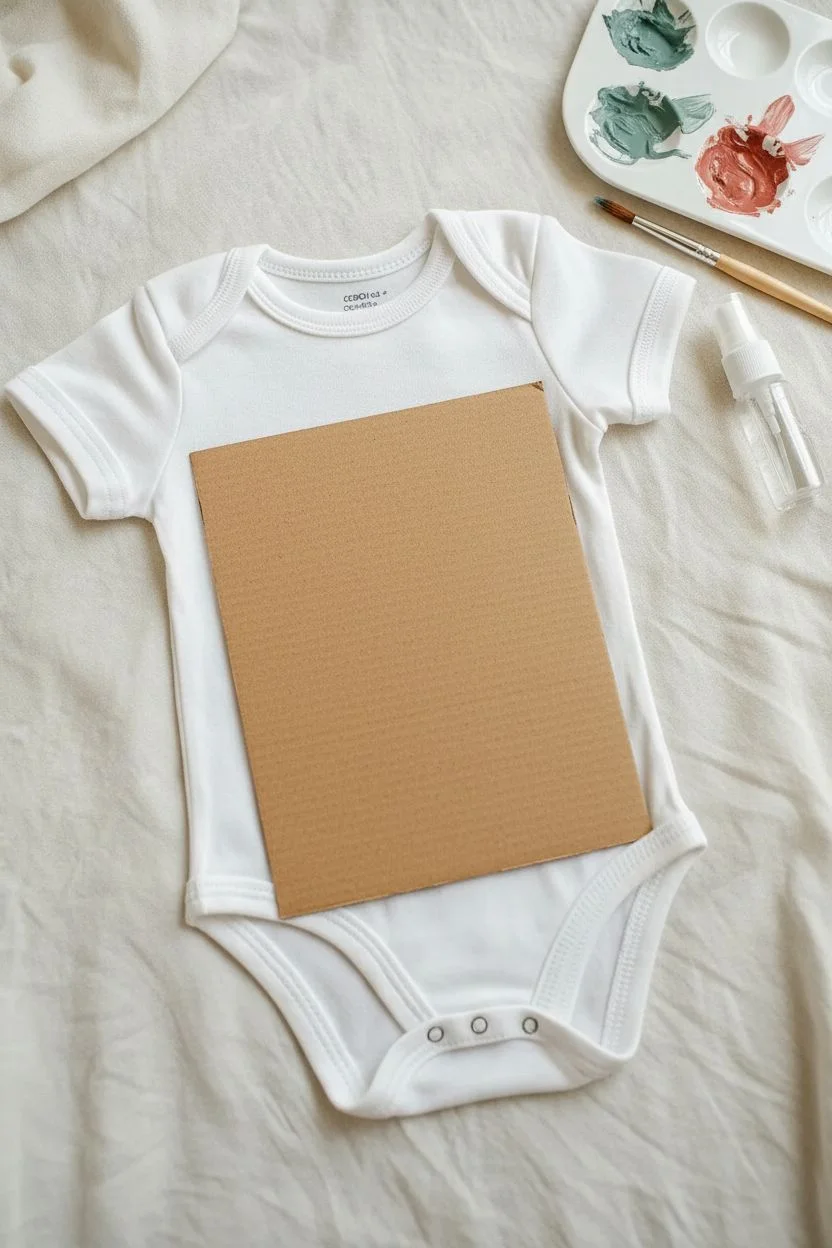
Insert a piece of cardboard or thick cardstock inside the onesie, positioning it under the chest area where you will be working. This prevents any ink from bleeding through to the back layer. -
Smooth the canvas:
Use your hands to smooth out the fabric, pulling it slightly taut but not over-stretched, to create a flat working surface. -
Draft guidelines:
Using a ruler and a light pencil touch, draw a faint horizontal line across the chest to keep your lettering straight. -
Sketch the letters:
Lightly sketch the word ‘BABY’ (or your chosen name) in a serif font. Aim for tall, slightly narrow letters to mimic the style in the photo. Don’t worry about perfection; the charm is in the hand-drawn feel. -
Add the icon:
Draw a small, simple heart centered directly above the text.
Step 2: Inking the Outlines
-
Trace the main lines:
Take your fine-tip black fabric marker and trace over your pencil letters. Use short, deliberate strokes rather than one continuous line to give it that sketch-book quality. -
Add the serif details:
Go back to the ends of each letter line and add small dots or distinct serifs. Thicken the vertical strokes slightly by going over them a second time. -
Create the sketchy texture:
Inside the letters, add a few very faint, quick scribble lines or fill strokes. You don’t want to color it in solid black; you want it to look like a quick pencil shading. -
Let the ink settle:
Allow the black marker to dry for about 10-15 minutes before erasing any stray pencil marks. I like to be extra careful here to avoid smudging.
Bleeding Lines?
If your marker bleeds into the fabric grain, switch to a fabric pen with a pigment ink base rather than a dye base, or dab the tip lighter and faster.
Step 3: Adding the Glitter Accent
-
Prepare the glitter paint:
Squeeze a small amount of copper or rose gold glitter fabric paint onto a palette or scrap paper. -
Fill the heart:
Using a very small detail brush (size 0 or 1), pick up the glitter paint and fill in the heart shape you drew earlier. -
Build opacity:
Applying one thin layer first allows it to dry faster. If you want more sparkle, wait for the first coat to dry to the touch and add a second layer for density. -
Clean edges:
If the heart edges look uneven, you can carefully refine them with the tip of your paintbrush while the paint is wet.
Personalize It
Swap the heart for other simple icons relative to the baby’s nursery theme, like a tiny star, a minimalist flower, or a geometric crown.
Step 4: Finishing Touches
-
Dry completely:
Let the onesie sit flat for at least 24 hours to ensure both the marker and glitter paint are fully cured. -
Heat set the design:
Once dry, place a press cloth (or a scrap of cotton fabric) over the design. Set your iron to medium heat (no steam) and press for 1-2 minutes to permanently set the artwork. -
Remove the insert:
Take out the cardboard barrier from inside the onesie.
Your custom-designed onesie is now ready to be gifted or worn for a special photo session


Sweet Heart Border Onesie
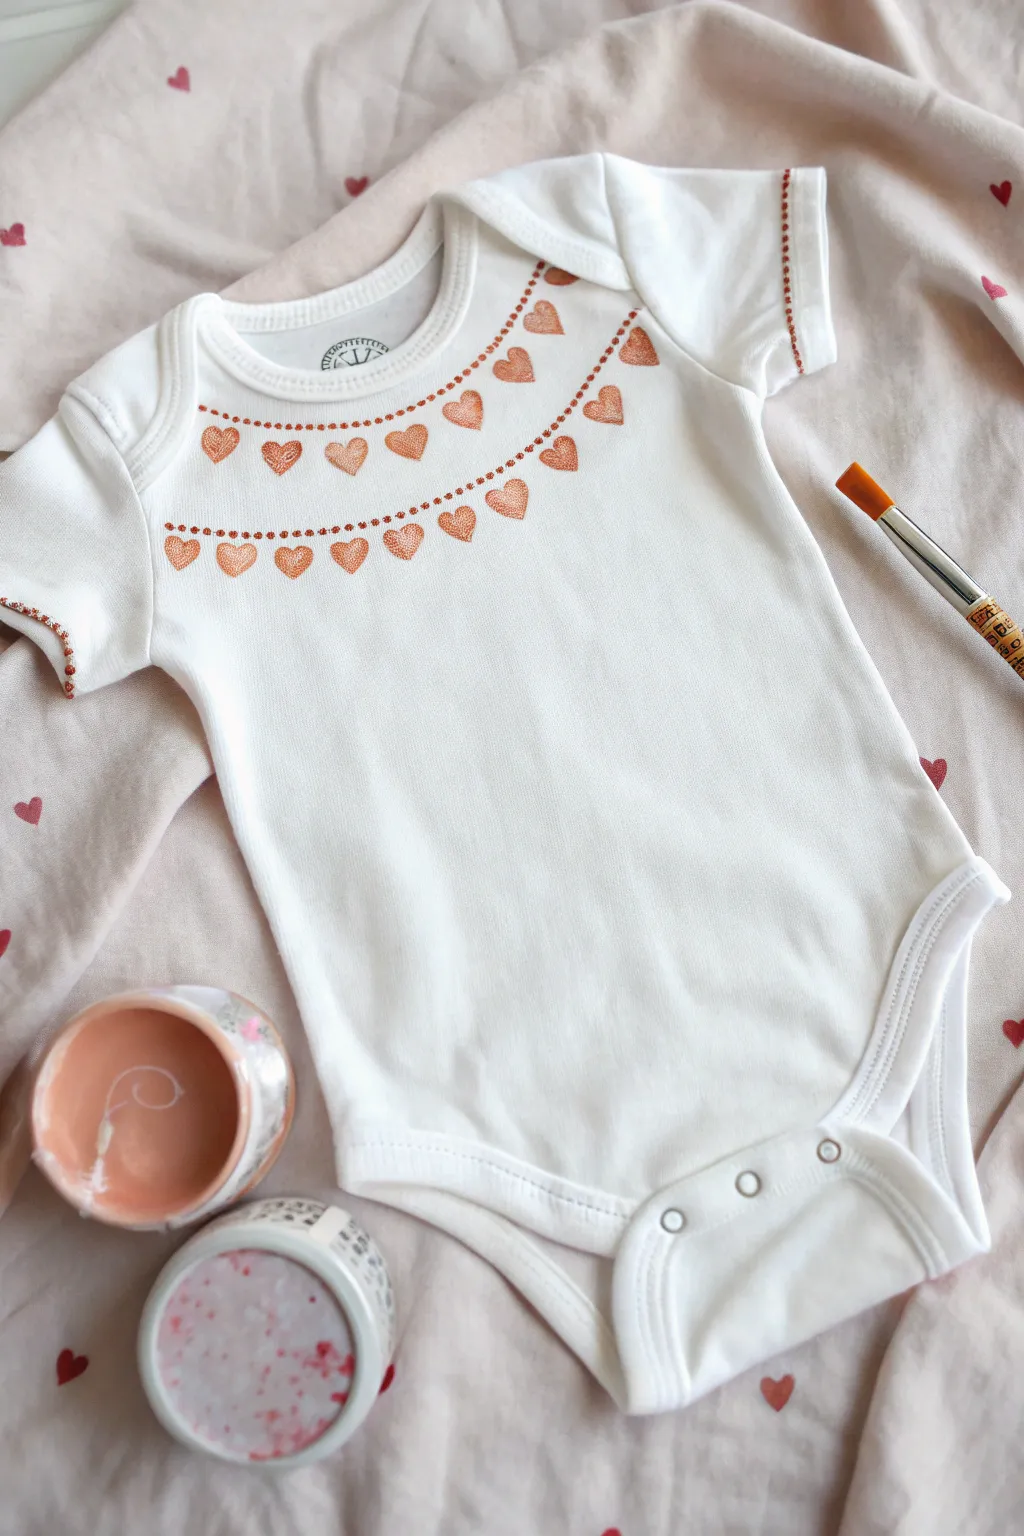

Bring a touch of elegance to a plain white bodysuit with this delicate copper heart design. The shimmering garlands drape beautifully around the neckline, creating a sweet, jewelry-inspired look that’s perfect for everyday wear or special photos.
Step-by-Step Guide
Materials
- White baby onesie (pre-washed and dried)
- Metallic copper or rose gold fabric paint
- Fine-point paintbrush (size 0 or linear brush)
- Small flat shader brush (size 2 or 4)
- Piece of cardboard or cardstock (to insert inside)
- Fabric marking pen or pencil (disappearing ink)
- Paper plate or palette
- Ruler or measuring tape
Step 1: Preparation and Planning
-
Prepare the fabric:
Before you begin, ensure the onesie has been washed without fabric softener to help the paint adhere properly. Iron it flat to remove wrinkles. -
Protect the layers:
Slide a piece of cardboard or stiff cardstock inside the onesie. This is crucial as it prevents the paint from bleeding through to the back layer of the fabric. -
Mark the first curve:
Using your fabric marking pen, lightly draw a gentle curve about 1 inch below the neckline seam. Start near one shoulder seam and end near the other to mimic a necklace shape. -
Mark the second curve:
Sketch a second, wider curve approximately 1.5 inches below your first line. This double-swag effect adds lovely dimension to the chest area.
Step 2: Painting the Chain Details
-
Load your fine brush:
Dip just the tip of your fine-point brush into the metallic copper paint. You don’t need much; a small bead on the tip works best for dots. -
Dot the top garland:
Following your top guide line, gently press the brush tip to create small, evenly spaced dots. Aim for a spacing of about 2-3mm between each dot. -
Dot the bottom garland:
Repeat the dotting process along the lower guide line. Try to keep your hand steady, but don’t worry if the dots aren’t perfectly identical—it adds to the handmade charm. -
Detail the sleeves:
Add a matching touch by painting a row of tiny dots along the very edge of the sleeve hems.
Paint Consistency Tip
If your metallic paint feels too thick or gloopy, mix in a tiny drop of water or textile medium. It helps the dots stay round rather than forming peaks.
Step 3: Adding the Hearts
-
Switch brushes:
Clean your fine brush and pick up the small flat shader brush for painting the hearts. -
Plan heart placement:
Mark faint dots along your garlands where you want the hearts to hang. Spacing them about an inch apart usually looks balanced. -
Paint the top row hearts:
Starting on the top garland, paint small hearts hanging downwards from your chain. The copper paint should be opaque, so you might need a second coat after the first dries. -
Paint the bottom row hearts:
Continue painting hearts along the second, lower garland. I like to stagger these slightly so they sit in the gaps between the hearts on the row above. -
Refine the shapes:
Use your fine-point brush to sharpen the bottom point of each heart and round out the tops for a crisp silhouette. -
Connect the hearts:
Once the hearts are painted, use the fine brush to draw a tiny vertical line connecting the top center of each heart to the dotted chain above it.
Add Some Sparkle
While the copper paint is wet, sprinkle ultra-fine loose glitter over the hearts. Shake off the excess once dry for a shimmering 3D texture.
Step 4: Finishing Up
-
Check for gaps:
Stand back and look at the design. If any dots look faint or any hearts look thin, touch them up carefully now. -
Let it cure:
Allow the paint to dry completely flat for at least 24 hours. Don’t remove the cardboard insert until the paint is dry to the touch. -
Heat set the design:
Once dry, verify your specific paint’s instructions. Most require heat setting with an iron (no steam) over a pressing cloth for 3-5 minutes to make the design permanent. -
Remove guide lines:
If your marking pen lines are still visible, follow the manufacturer’s instructions (usually a dab of water or heat) to remove them.
Once heat set, this precious garment is ready to be gifted or worn.


Easy Tape-Resist Stripes Onesie
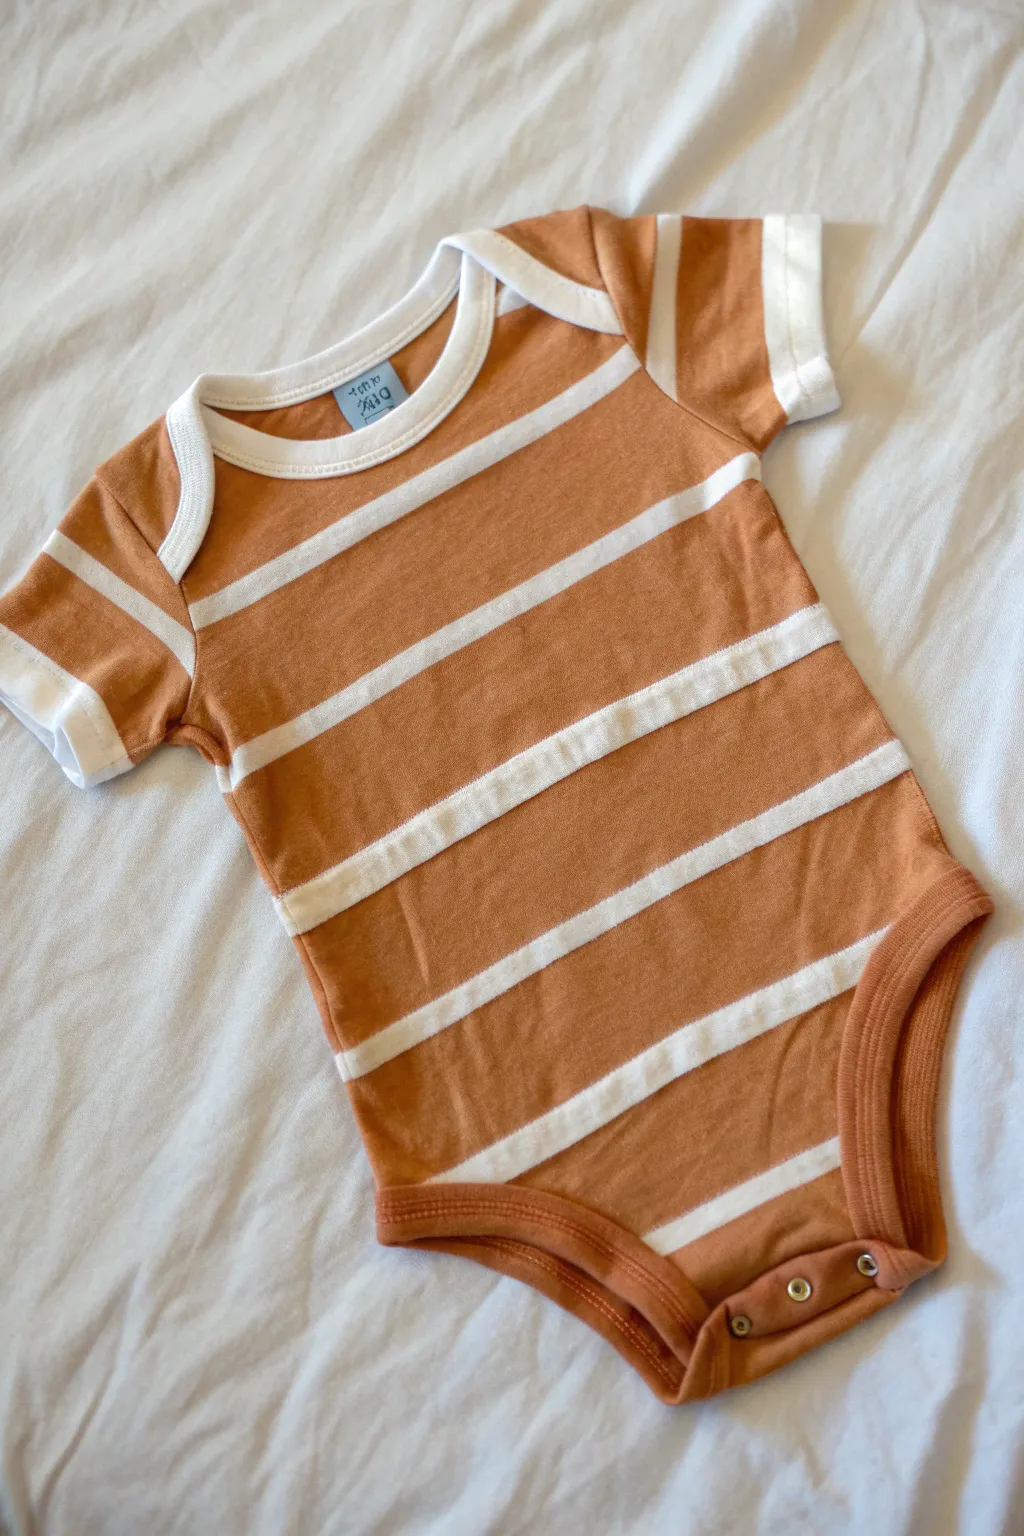
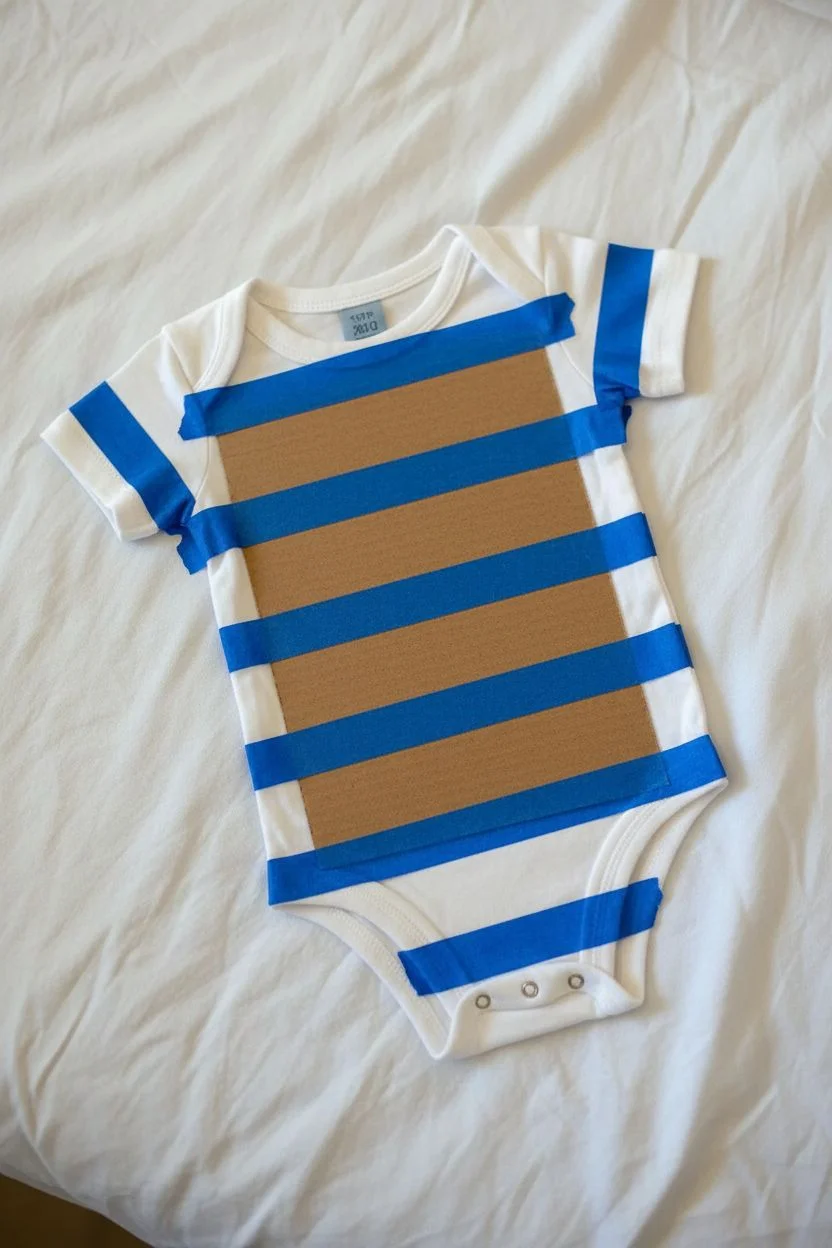
Transform a plain white bodysuit into a trendy, boho-inspired piece with this simple tape-resist method. The result is a clean, graphic look featuring warm terracotta bands that pop against crisp white lines.
Step-by-Step
Materials
- Plain white cotton baby onesie (pre-washed)
- Fabric paint or soft body acrylic mixed with fabric medium
- Color: Burnt Orange, Sienna, or Terracotta
- Painter’s tape or passing tape (0.5 to 1 inch width)
- Flat paintbrush (1-inch width)
- Piece of cardboard (to fit inside the onesie)
- Iron (for heat setting)
- Press cloth or parchment paper
Step 1: Preparation & Taping
-
Prepare the fabric:
Ensure your white onesie has been washed and dried without fabric softener. This removes sizing chemicals and helps the paint adhere properly to the fibers. -
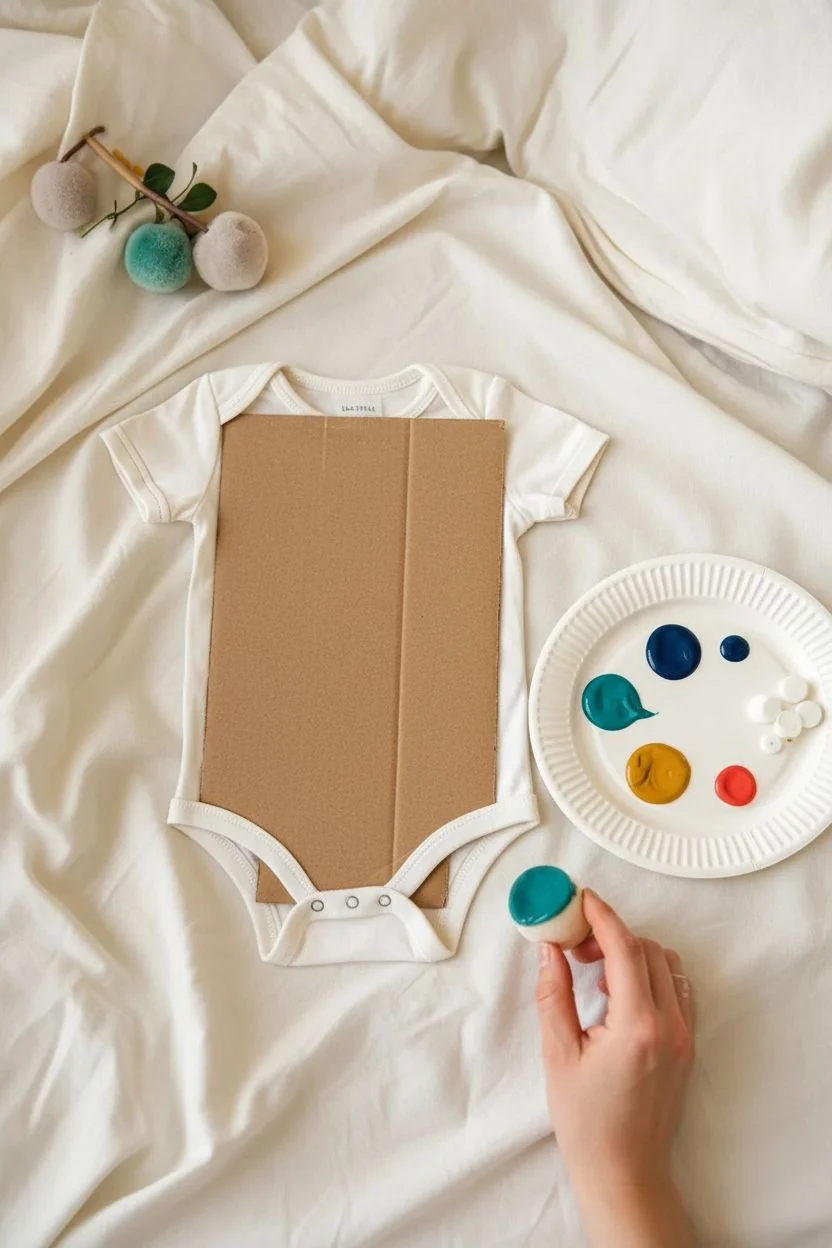
Insert the barrier:
Cut a piece of cardboard to the shape of the onesie’s torso and slide it inside. stretch the fabric slightly so it’s taut but not distorted. This prevents paint from bleeding through to the back. -
Plan the stripes:
Lay the onesie flat on your work surface. Decide on the spacing of your stripes. For the look in the photo, the white negative space is thinner than the painted orange sections. -
Apply the first tape line:
Apply a strip of painter’s tape horizontally across the chest, just under the armpits. Smooth it down firmly with your fingernail to seal the edges. -
Continue taping the body:
Place subsequent strips of tape down the torso. To mimic the photo, leave wider gaps (about 1.5 to 2 inches) between the tape strips for the orange paint, and use the tape itself (about 0.5 to 1 inch) to mask off the white lines. -
Tape the sleeves:
Don’t forget the sleeves! Align short pieces of tape on the sleeves to match the height of the chest stripes, creating a continuous horizontal line across the garment. -
Seal the edges:
Run your finger or a plastic card along every edge of the tape one last time. This is crucial for achieving crips lines and preventing paint seepage.
Seal Avoids Bleeding
Before applying the orange paint, paint a thin layer of white over the tape edges. This seals the gap, so any bleeding is white-on-white and invisible.
Step 2: Painting Process
-
Mix your paint:
Squeeze your terracotta or burnt orange fabric paint onto a palette. If using acrylics, mix them with fabric medium according to the bottle instructions (usually 1:2 or 1:1) to keep the fabric soft. -
Paint the first stripe:
Dip your flat brush into the paint. Start painting the exposed fabric between the tape strips. -
Apply with care:
Brush away from the tape edges rather than pushing paint underneath them. I find this technique significantly reduces bleeding creates a much sharper line. -
Cover the neckline and hems:
Carefully paint the fabric right up to the neckline binding and the bottom snaps. You can leave the ribbing/binding white for a professional contrasting finish. -
Apply a second coat:
Let the first layer dry to the touch (about 20 minutes). If the orange looks patchy, apply a second thin coat for solid, opaque coverage. -
Remove the tape:
This is the best part. While the paint is still slightly damp (not wet, but not fully cured), slowly peel off the tape at a 45-degree angle to reveal your crisp white lines. -
Fix mistakes:
If any tiny seepages occurred, use a small detail brush with white paint to carefully touch up the edges.
Step 3: Finishing Touches
-
Let it cure:
Allow the onesie to dry completely flat for at least 24 hours. Do not move or fold it while it dries. -
Heat set the design:
Once fully dry, turn the onesie inside out or place a press cloth over the painted areas. Iron on a cotton setting (no steam) for 3-5 minutes to permanently set the pigment. -
Final wash:
Wait 72 hours before washing the garment. When you do, turn it inside out and wash on a gentle cycle to keep the stripes looking fresh.
Ombre Effect Upgrade
Mix a little white into your orange paint for each successive stripe going down. This creates a beautiful gradient fade from dark terracotta to light peach.
Now you have a custom, boutique-style bodysuit ready for your little one to wear


Polka Dot Confetti Onesie

Bring a burst of joy to baby’s wardrobe with this festive, confetti-inspired design. The playful scattering of colorful dots creates a lively pattern that feels both modern and timeless, perfect for everyday wear or a special celebration.
How-To Guide
Materials
- White cotton baby onesie (pre-washed)
- Fabric paints (Teal, Navy Blue, Mustard Yellow, Coral, Red, Mint Green)
- Round sponge pouncers (small size, approx. 0.5 inch)
- Round sponge pouncers (medium size, approx. 0.75 inch)
- Cardboard insert or stiff paper
- Paper plate or painting palette
- Iron (for heat setting)
- Clean cloth or parchment paper
Step 1: Preparation & Setup
-
Pre-wash the fabric:
Before starting, wash and dry the onesie without using fabric softener. This removes factory sizing and ensures the paint adheres properly to the fibers. -
Insert the barrier:
Cut a piece of cardboard to fit inside the body of the onesie. Slide it in carefully to separate the front layer from the back, preventing paint from bleeding through to the other side. -
Smooth the surface:
Flatten the fabric over the cardboard with your hands to remove any major wrinkles. A smooth canvas ensures your circles stay perfectly round. -
Prepare your palette:
Squeeze distinct quarter-sized puddles of your chosen fabric paint colors onto a paper plate. Keep them separate to avoid muddying the hues.
Step 2: Stamping the Confetti
-
Load the first sponge:
Select your medium-sized sponge pouncer. Dip it into your first color—I usually start with the teal—ensuring the bottom is evenly coated but not dripping with excess paint. -
Test the stamp:
Press the sponge onto a scrap piece of paper first. This helps you gauge how much pressure is needed and removes excess blobs of paint. -
Apply the anchor dots:
Stamp 5-7 dots of this first color randomly across the front of the onesie. Aim for a scattered look rather than a grid, leaving plenty of white space between them. -
Switch colors and tools:
Wipe off your pouncer or grab a clean one. Dip it into the second color, perhaps the navy blue, and repeat the stamping process. -
Vary the sizes:
Now, switch to the smaller pouncer for your third color, like the mustard yellow. Mixing the dot sizes adds that organic, falling-confetti visual effect. -
Continue layering colors:
Proceed with the coral and red paints. Place these dots in the larger gaps, being careful not to let wet dots touch each other. -
Fill the edges:
Stamp a few partial dots flowing off the seams at the sides, neckline, and leg holes. This makes the pattern look like it was cut from a larger fabric roll rather than isolated in the center. -
Add high-contrast accents:
Use your smallest sponge or even the handle end of a paintbrush to add tiny accents of the mint green or light blue in the remaining empty spaces. -
Check for visual balance:
Step back and look at the onesie as a whole. If any area looks too empty, add a small dot there to even out the composition. -
Paint the sleeves:
Don’t forget the sleeves! Slide small scraps of cardboard inside them and stamp 2-3 dots on each sleeve to continue the pattern seamlessly.
Clean Edges Pro-Tip
Twist the sponge slightly as you lift it off the fabric. This breaks the suction and leaves a crisper edge on your circle, preventing peaked centers.
Step 3: Finishing Touches
-
Allow to dry completely:
Let the onesie sit undisturbed for at least 24 hours. The paint needs to cure fully before you handle it further. -
Prepare for heat setting:
Once dry, remove the cardboard insert. Turn the onesie inside out or place a clean cloth over the painted design. -
Heat set the design:
Run a hot iron (no steam) over the painted areas for 3-5 minutes. This seals the pigment into the fabric so it can survive the washing machine. -
Final inspection:
Check your handiwork. The paint should feel flexible and integrated with the fabric, ready for wear.
Metallic Level Up
Mix one metallic gold or silver fabric paint into your rotation. A few shimmering dots will catch the light and make the ‘confetti’ look festive.
This cheerful creation is now ready for playdates and picture perfect moments
BRUSH GUIDE
The Right Brush for Every Stroke
From clean lines to bold texture — master brush choice, stroke control, and essential techniques.
Explore the Full Guide
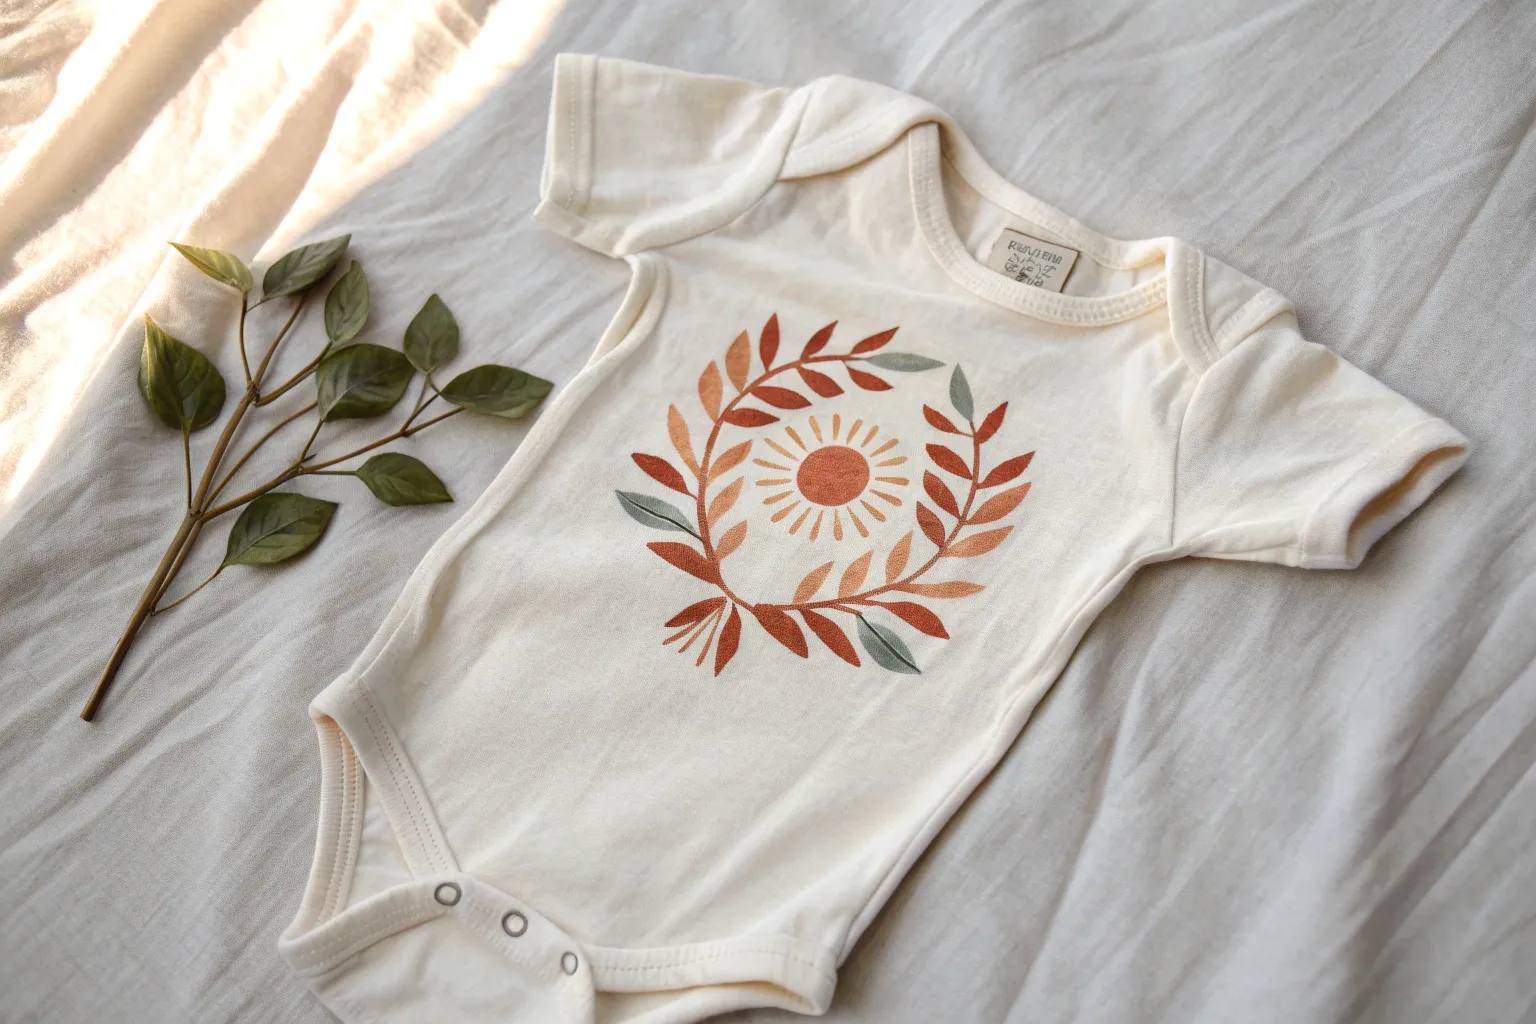
Floral Wreath Initial Onesie
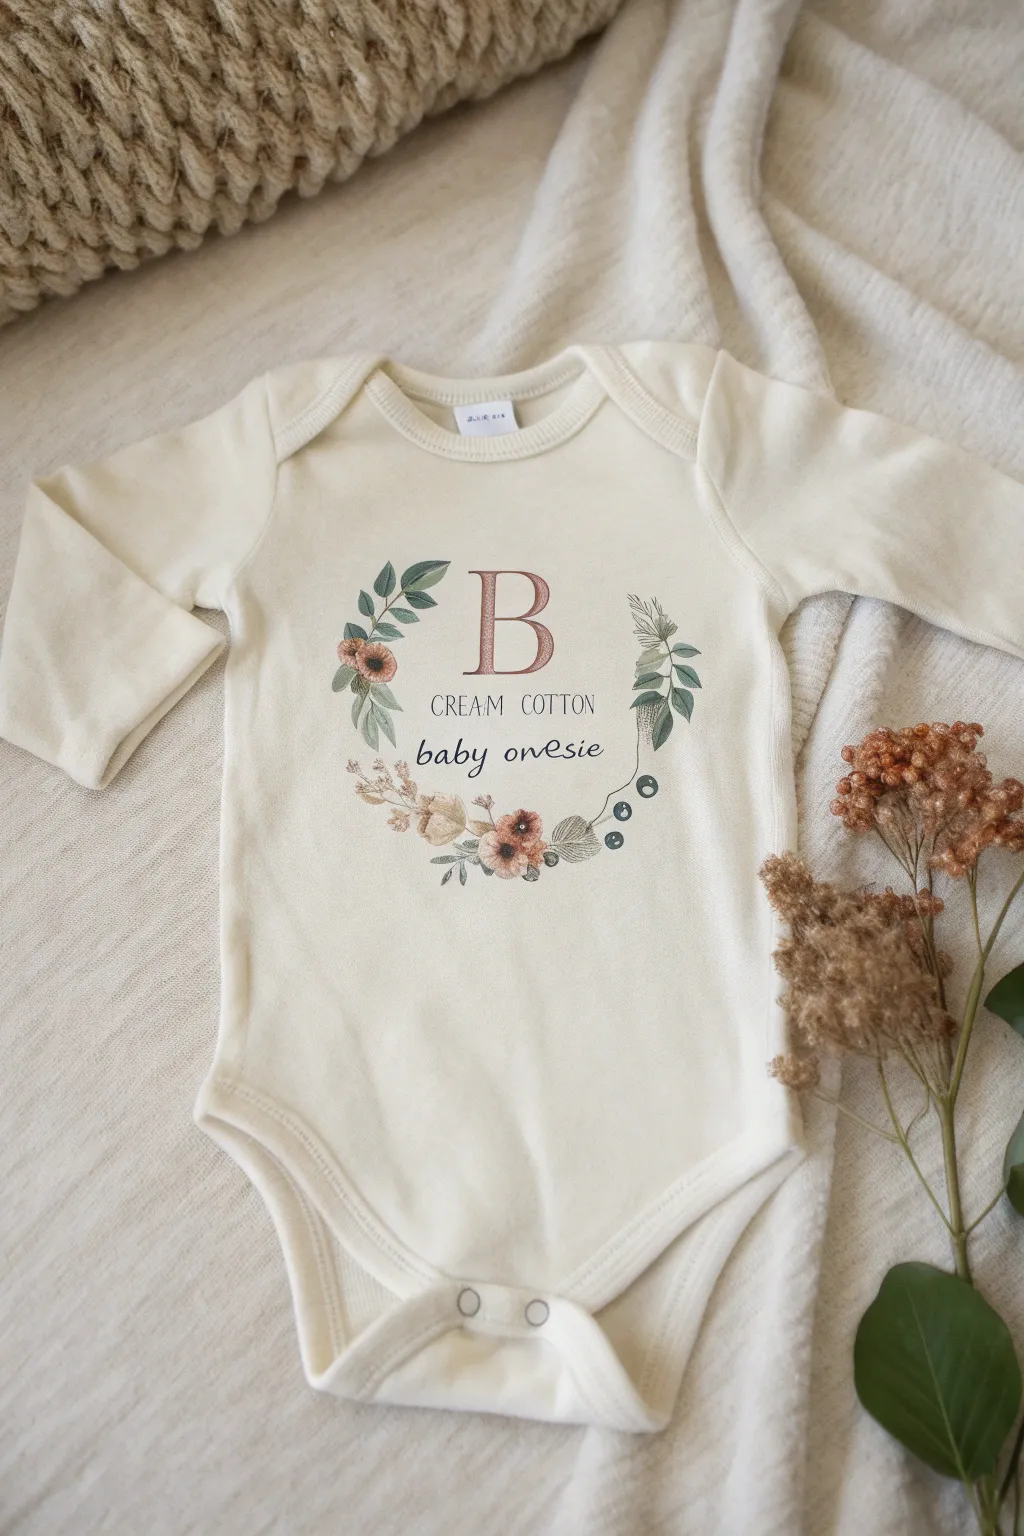
Create a sophisticated and personalized gift with this delicate floral wreath onesie. Featuring a warm copper-toned initial surrounded by muted greens and dusky pink blooms, this design brings a timeless, vintage-inspired charm to baby’s wardrobe.
Step-by-Step
Materials
- Cream long-sleeve cotton onesie (pre-washed)
- Fabric medium
- Acrylic paints (dusky pink, sage green, forest green, copper/rose gold metallic, brown, white)
- Set of small round brushes (sizes 0, 2, and 4)
- Fine liner brush (size 00 or 000)
- Cardboard insert
- Disappearing ink fabric marker or pencil
- Computer and printer (for stencil)
- Painter’s tape or stencil adhesive
- Iron and pressing cloth
Step 1: Preparation & Lettering
-
Prep the fabric surface:
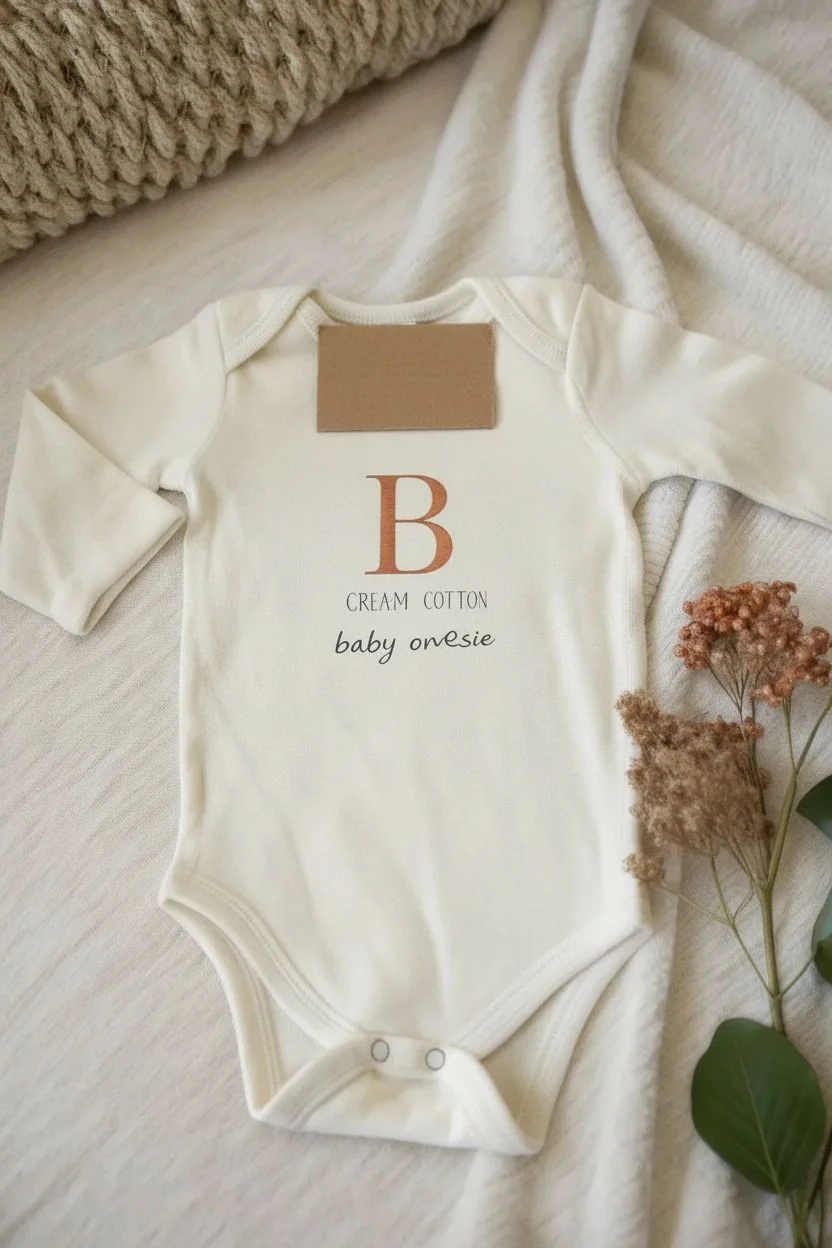
Begin by washing and drying your onesie without fabric softener to ensure the paint adheres properly. Once dry, slide a smooth piece of cardboard inside the onesie to stretch the fabric slightly and prevent paint from bleeding through to the back. -
Create the letter template:
Print out a large serif letter ‘B’ (or your chosen initial) in a font like Times New Roman or Garamond. Adjust the size so it fits comfortably in the center of the chest area, around 3-4 inches tall. -
Transfer the initial:
Place the template under the top layer of fabric (on top of the cardboard insert) if the fabric is sheer enough to see through. Trace the outline lightly with your disappearing ink marker. If the fabric is too thick, cut out the paper letter and trace around it directly on the front. -
Mix the metallic base:
Mix your copper or rose gold acrylic paint with fabric medium according to the bottle’s instructions (usually 1:2 or 1:1). Achieving the right consistency is key; you want it creamy but not too watery. -
Fill in the letter:
Using a size 4 flat or round brush, carefully fill in the traced letter. Apply thin, even strokes in the vertical direction of the letterform. You might need two coats for opaque coverage; let the first coat dry for about 20 minutes before adding the second. -
Add text details:
If you wish to include the small text like ‘CREAM COTTON’ or ‘baby onesie’ underneath, use a very sharp pencil to draft the letters. Carefully go over them with a fine liner brush and dark grey or black fabric paint, keeping the pressure extremely light.
Clean Lines Secret
For the crisp serif font, use painter’s tape to mask off the straight edges of the ‘B’ before painting. This guarantees sharp lines without needing a steady hand.
Step 2: Painting the Wreath
-
Draft the wreath placement:
I usually like to lightly sketch a loose circle or oval around the letter using the disappearing ink pen to guide where the foliage will sit, ensuring it stays balanced on both sides. -
Mix leaf colors:
Prepare a palette of greens. You’ll want a muted sage (green + white + tiny touch of brown) and a deeper forest green. Mix fabric medium into all your colors before starting. -
Paint structural stems:
Using a size 0 or 00 brush and the darker green, paint thin, curving stems sweeping upwards on the left and right sides of the letter. Keep the lines wispy and tapering at the ends. -
Add the main leaves:
Switch to a size 2 brush and the sage green mixture. Paint long, almond-shaped leaves branching off the main stems. Press down at the base of the leaf and lift up as you drag the brush to create a pointed tip. -
Layer in darker foliage:
Add smaller, specialized leaves using the darker forest green mix. These can be grouped in pairs or threes to add visual weight and contrast against the lighter sage leaves. -
Paint the flowers:
Mix a dusky pink tone (pink + tiny bit of brown + white). With a size 2 brush, dab small, circular shapes along the lower curve of the wreath. Blend a slightly darker rust color into the wet paint near the center of each flower for depth. -
Detail the blooms:
Once the flower bases are tacky-dry, use your fine liner brush with dark brown paint to add tiny dots or stippling in the center of the blooms to resemble pollen or seeds. -
Add decorative berries:
Using a dark blue-grey paint, add small clusters of round berries on the lower right side of the wreath. Add a tiny dot of white to each berry as a highlight to make them look spherical. -
Incorporate wheat accents:
Mix a beige or wheat color. Paint delicate, feathery sprigs tucked behind the flowers or main leaves to fill in any gaps and add texture. -
Final touches:
Step back and look at the design. Use the fine liner to add thin veins to the larger leaves or tiny loose stems to balance the composition.
Step 3: Finishing
-
Dry thoroughly:
Allow the painted design to dry completely for at least 24 hours. Don’t rush this, as the paint needs to cure. -
Heat set the design:
To make the onesie washable, place a pressing cloth (or a scrap of cotton fabric) over the dry design. Iron on medium-high heat (cotton setting) without steam for 3-5 minutes, moving the iron constantly to lock in the paint.
Texture Pop
Enhance the dimension by using embroidery floss. After heat setting, stitch French knots over the flower centers or berries for a mixed-media effect.
Once heat set, this beautiful custom piece is ready to be gifted or worn for a special milestone photo
Woodland Animal Stencil Onesie
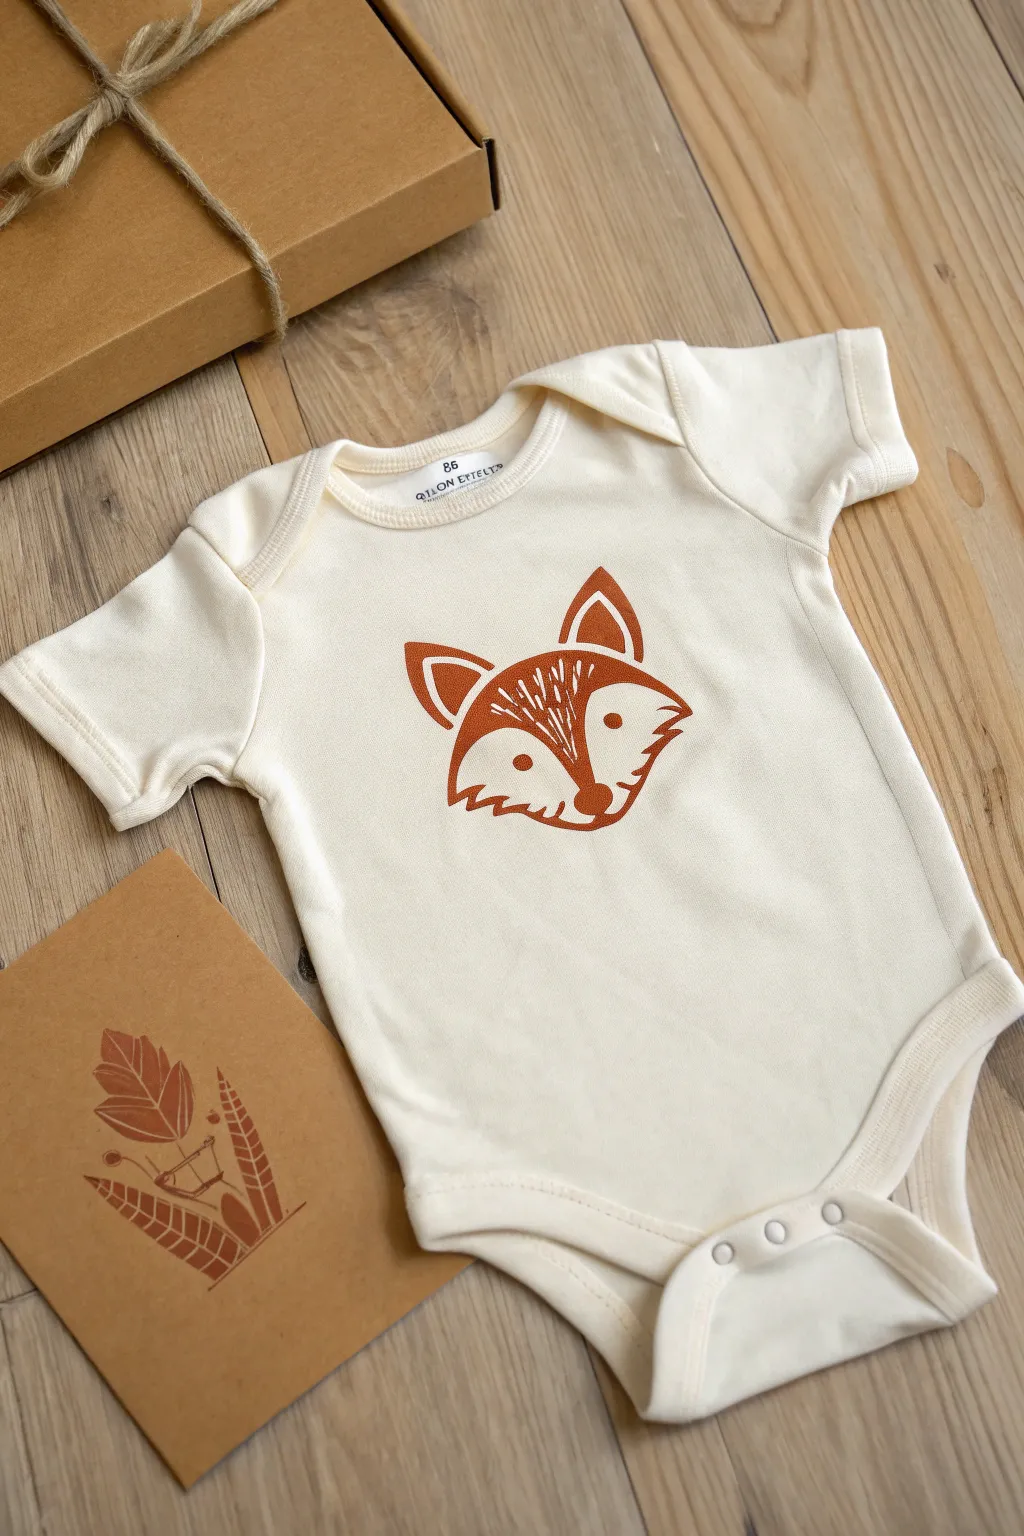
Bring a touch of the forest to your little one’s wardrobe with this adorable, minimalist fox design. Using a stencil technique creates rugged, clean lines and that classic screen-printed look right at home.
Step-by-Step Tutorial
Materials
- White or cream cotton baby onesie (pre-washed)
- Rust or terracotta fabric paint
- Stencil vinyl or freezer paper
- Craft knife and cutting mat
- Sponge pouncer or stencil brush
- Cardboard insert
- Iron
- Printer and paper
- Masking tape
Step 1: Preparing the Stencil
-
Find your fox:
Search for a simple ‘geometric fox head silhouette’ clip art online or sketch your own design resembling the photo. Adjust the size on your computer to fit the chest area of your specific onesie size. -
Print the template:
Print your chosen design onto standard printer paper first to check the sizing against the garment. Make sure it’s not too wide for the onesie’s neckline seams. -
Trace onto cutting material:
If using freezer paper, trace the design onto the matte side. If using stencil vinyl, you can often run it directly through a cutting machine, or tape your printout over the vinyl and cut through both layers. -
Cut the negative space:
Using a sharp craft knife on a cutting mat, carefully cut out the parts of the fox that will be painted—the main head shape, the ears, and the snout details. You are creating a negative stencil, so discard the inner fox pieces. -
Don’t forget the details:
Pay special attention to ‘floating’ pieces, like the white sparkle in the eyes or the separation between the cheek fur. You’ll need to keep these small bits of paper or vinyl to iron/stick back on later.
Crisp Edge Secret
Iron not sticking perfectly? Run the hot iron over the freezer paper one last time right before painting to re-melt the wax seal instantly.
Step 2: Adhering and Painting
-
Insert protection:
Slide a piece of cardboard inside the onesie. This prevents the paint from bleeding through to the back of the shirt and stretches the fabric slightly to ensure a smooth surface. -
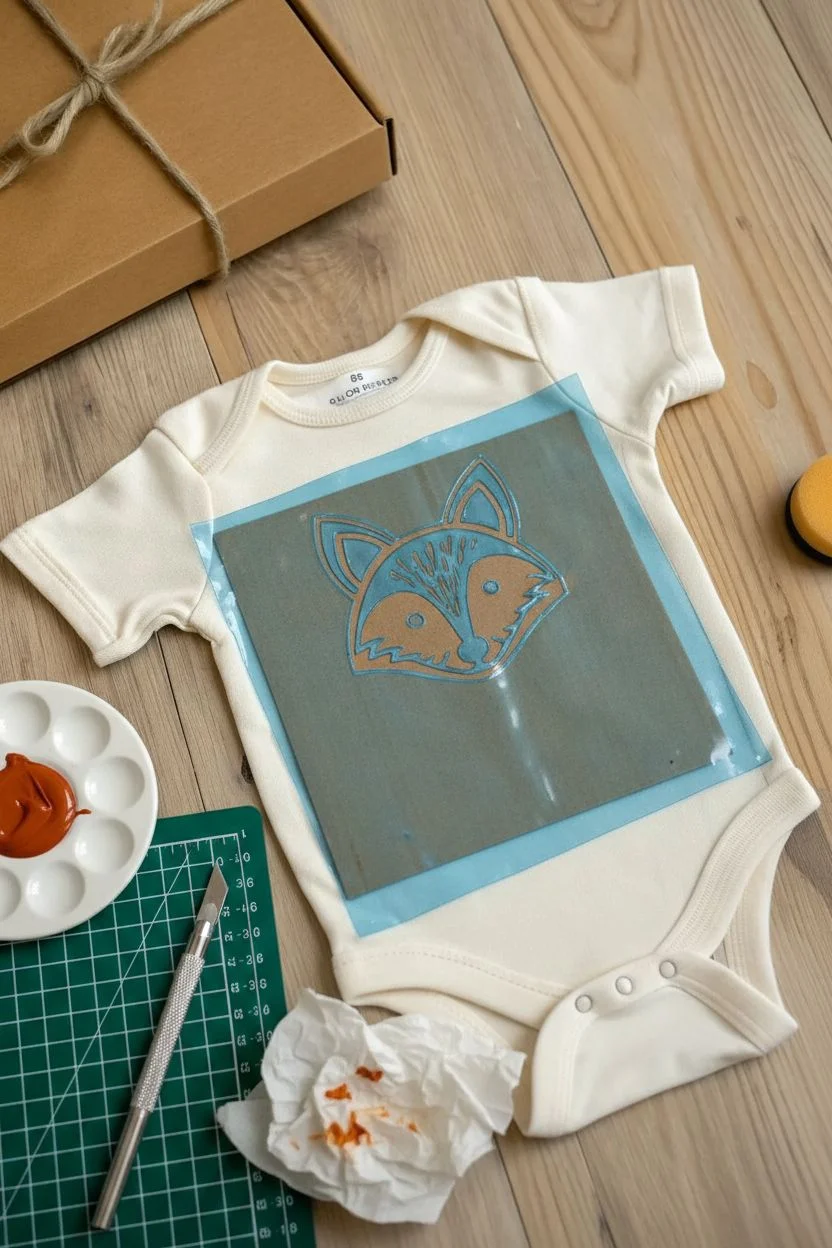
Position the stencil:
Place your main stencil piece on the center chest. If using freezer paper, face the shiny side down. If using vinyl, peel the backing and stick it down. -
Secure the stencil:
Iron the freezer paper stencil on a medium (no steam) setting until it bonds to the fabric. For vinyl, burnish the edges firmly with a credit card to prevent leaks. -
Place the details:
Carefully position those small floating inner pieces (eyes, nose highlights) inside the main cutout area and iron or stick them down securely. -
Load your tool:
Squeeze a small amount of rust-colored fabric paint onto a palette or paper plate. Dab your sponge pouncer or stencil brush into the paint. -
Offload excess paint:
I always tap the sponge onto a paper towel several times to remove excess paint. A ‘dry brush’ technique is crucial here to prevent paint from seeping under the stencil edges. -
Apply the paint:
Using an up-and-down dabbing motion (never side-to-side sweeping), apply the paint over the stencil openings. Build up coverage slowly. -
Add a second coat:
Let the first layer dry to the touch for about 5–10 minutes, then dab on a second coat if you want a deeper, more solid terracotta color.
Step 3: Finishing Touches
-
Remove the stencil:
While the paint is still slightly tacky (not completely dry), carefully peel away the main stencil. Use tweezers or the tip of your craft knife to lift off the small inner detail pieces. -
Dry completely:
Allow the onesie to dry flat for at least 24 hours. Don’t rush this, or the paint might crack. -
Heat set the design:
Once fully dry, place a thin cloth or parchment paper over the design and iron it on a cotton setting for 3–5 minutes. This seals the paint so the onesie stays washable.
Go Full Forest
Create a matching set by stenciling a small pine tree or acorn on a coordinating pair of baby pants or a canvas gift bag.
Now you have a charming, custom piece ready for a baby shower gift or a woodland-themed photo shoot

PENCIL GUIDE
Understanding Pencil Grades from H to B
From first sketch to finished drawing — learn pencil grades, line control, and shading techniques.
Explore the Full Guide
Safari Spots and Stripes Onesie
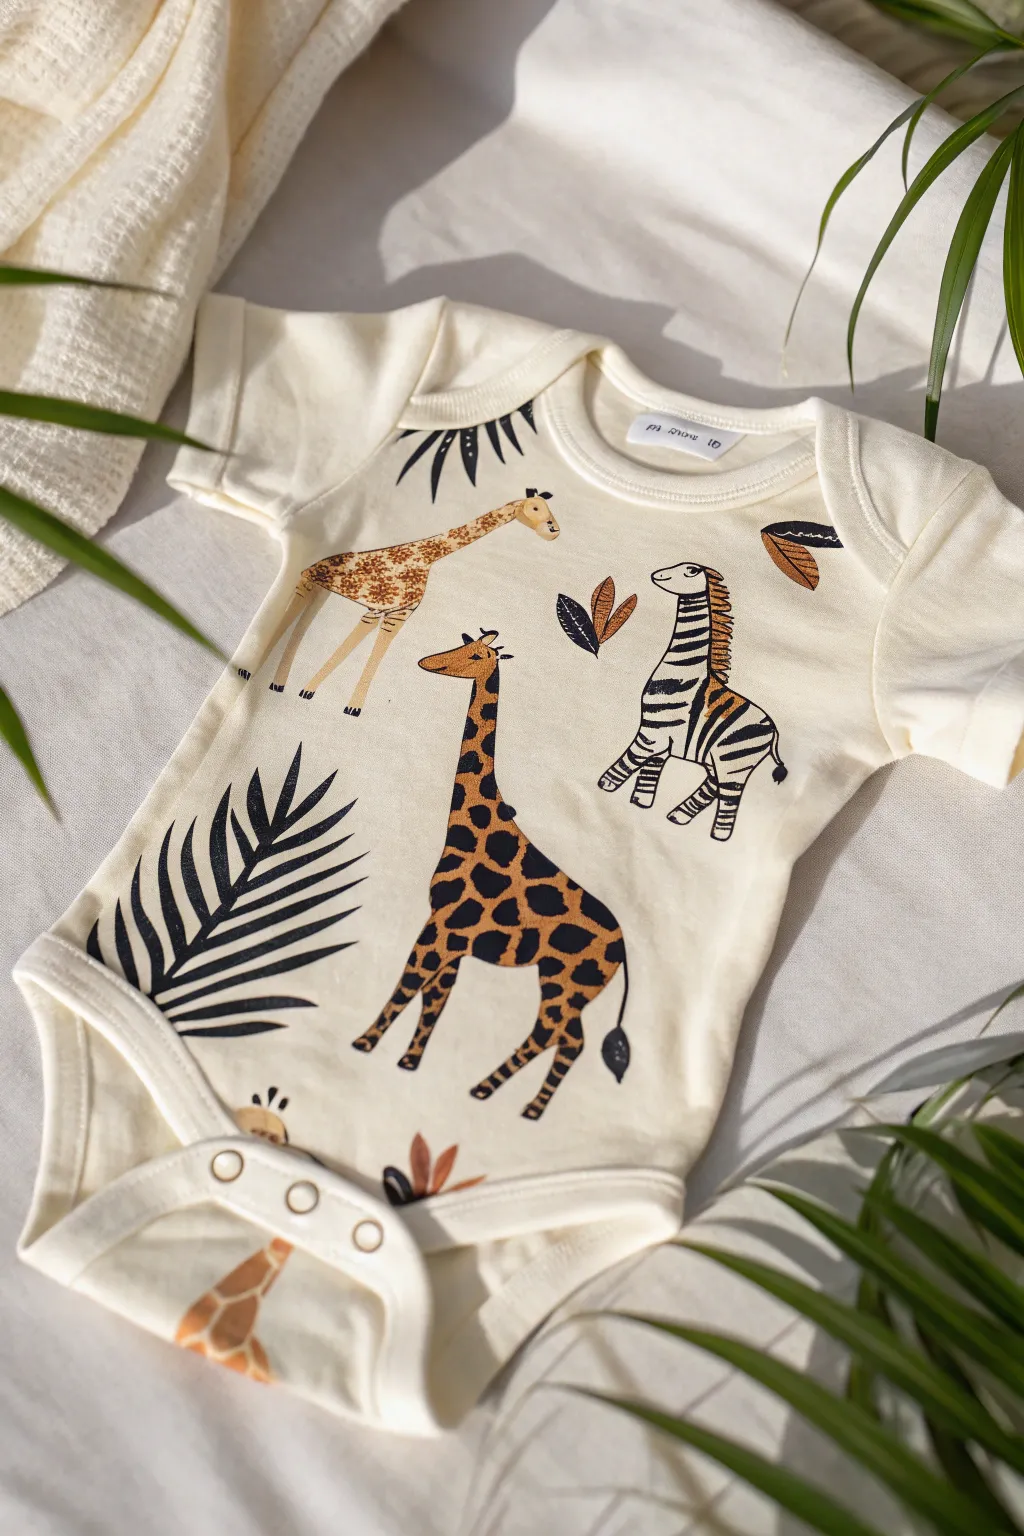
Bring the savannah to your nursery with this charming safari-themed onesie featuring cheerful giraffes and a striking zebra. Using fabric markers or paints, you’ll create a playful pattern of animals and foliage on a soft cream background.
Detailed Instructions
Materials
- Cream or off-white cotton onesie (pre-washed)
- Cardboard insert
- Fabric markers (black, golden yellow, brown, orange-brown)
- Fabric paint (optional, for solid black areas)
- Fine-point black fabric liner pen
- Pencil and eraser
- Iron (for heat setting)
Step 1: Preparation & Sketching
-
Prepare your canvas:
Begin by sliding a piece of cardboard inside the onesie. This is crucial as it stretches the fabric slightly for a smooth surface and prevents ink from bleeding through to the back. -
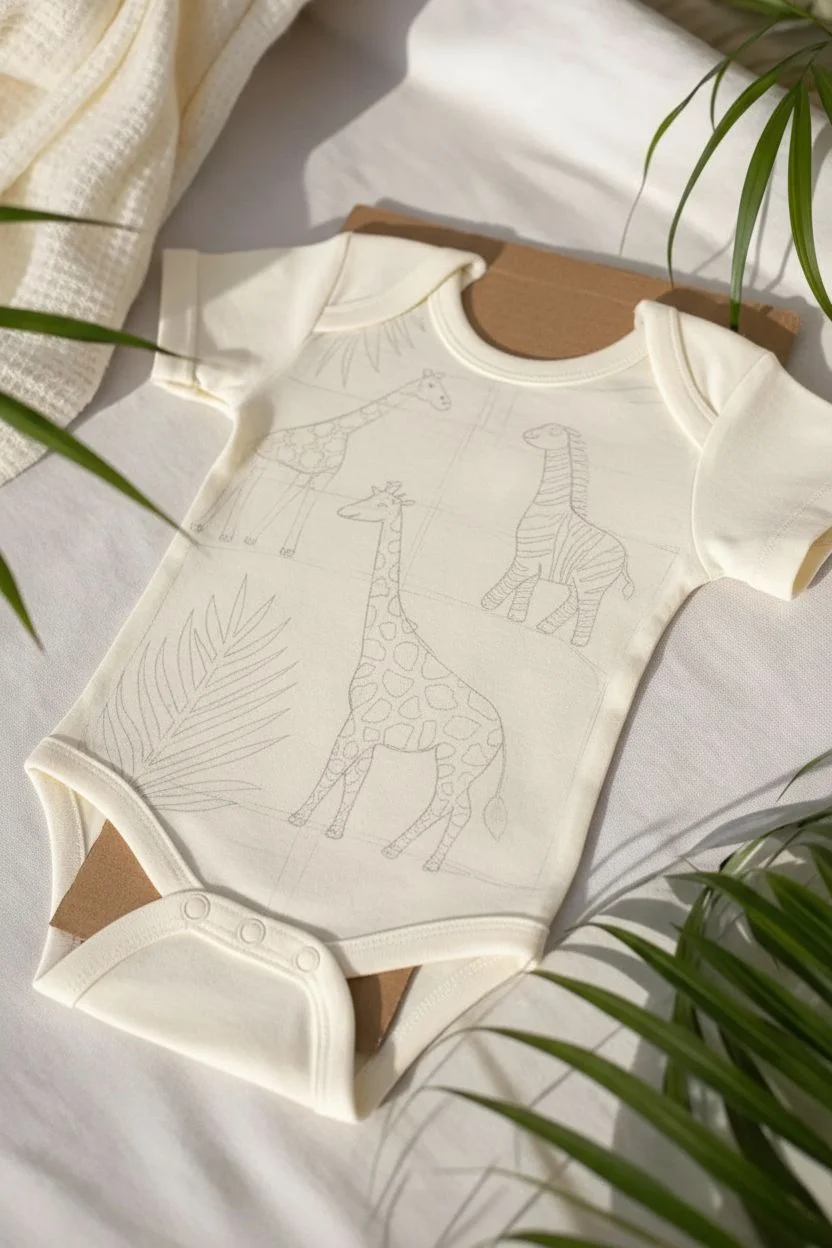
Plan the layout:
Observe the reference image. Notice the diagonal flow of the design. Lightly sketch the main elements with a pencil: a large giraffe in the center, a smaller giraffe near the shoulder, a zebra on the right, and large palm fronds framing the left side. -
Refine the animal shapes:
Go back over your pencil sketches to define the shapes. Give the giraffes long necks and small ossicones (horns). Sketch the zebra in a seated or trotting pose with a distinctive mohawk-style mane.
Ink Bleeding?
If your markers bleed into the fabric grain, the ink is too wet or the fabric is too loose. Keep the fabric taut against the cardboard and use lighter, quicker strokes rather than pressing down hard.
Step 2: The Center Giraffe
-
Outline the main giraffe:
Using a fine-point black fabric marker, trace your pencil outline for the large central giraffe. Keep the lines clean but slightly organic for a hand-drawn look. -
Add the spots:
Switch to a golden-yellow or light orange marker. Fill in the entire body of the giraffe *except* for the spots. Alternatively, color the body yellow and then draw dark brown irregular polygons on top. The reference shows dark shapes on a colored background. -
Detail face and hooves:
Use your black fine liner to draw the eye, nostril, and mouth. Color the hooves and the tuft of the tail black. Add a little brown shading to the ossicones.
Step 3: The Zebra & Smaller Giraffe
-
Outline the zebra:
Trace the zebra’s outline with your fine black pen. Don’t forget the stiff mane standing up along the neck. -
Create the stripes:
Draw bold black stripes across the zebra’s body. I suggest varying the thickness—some wide, some tapered—to make it look natural. Leave the muzzle and underbelly white (or the natural cream color of the fabric). -
Finish the top giraffe:
Move to the smaller giraffe near the neckline. Outline it in black, but for this one, try a lighter texture. Use a stippling technique or tiny cross-hatching with brown ink to create a textured pattern instead of solid spots.
Level Up: Texture
Make the zebra’s mane pop by using a tiny amount of puff paint for the bristles, or sew a few strands of black embroidery thread onto the tail for a tactile 3D effect.
Step 4: Foliage & Finishing Touches
-
Draw the large palm leaf:
On the left side, draw a long, curved stem in black. Add long, tapered leaves extending from the stem. Fill these leaves in with solid black ink or paint for a high-contrast silhouette look. -
Add floating leaves:
Scatter a few smaller, two-toned leaves around the animals to fill empty space. Draw a leaf shape, split it down the middle, and color one half navy or black and the other half a rusty brown or orange. -
Erase pencil lines:
Once you are absolutely certain the ink is dry (give it at least an hour), gently erase any visible pencil sketch lines. -
Heat set the design:
Follow the instructions on your specific fabric markers. Typically, this involves ironing the design on a high cotton setting (no steam) for a few minutes to make it wash-fast.
Your little explorer will look adorable in this custom safari gear, ready for wild adventures
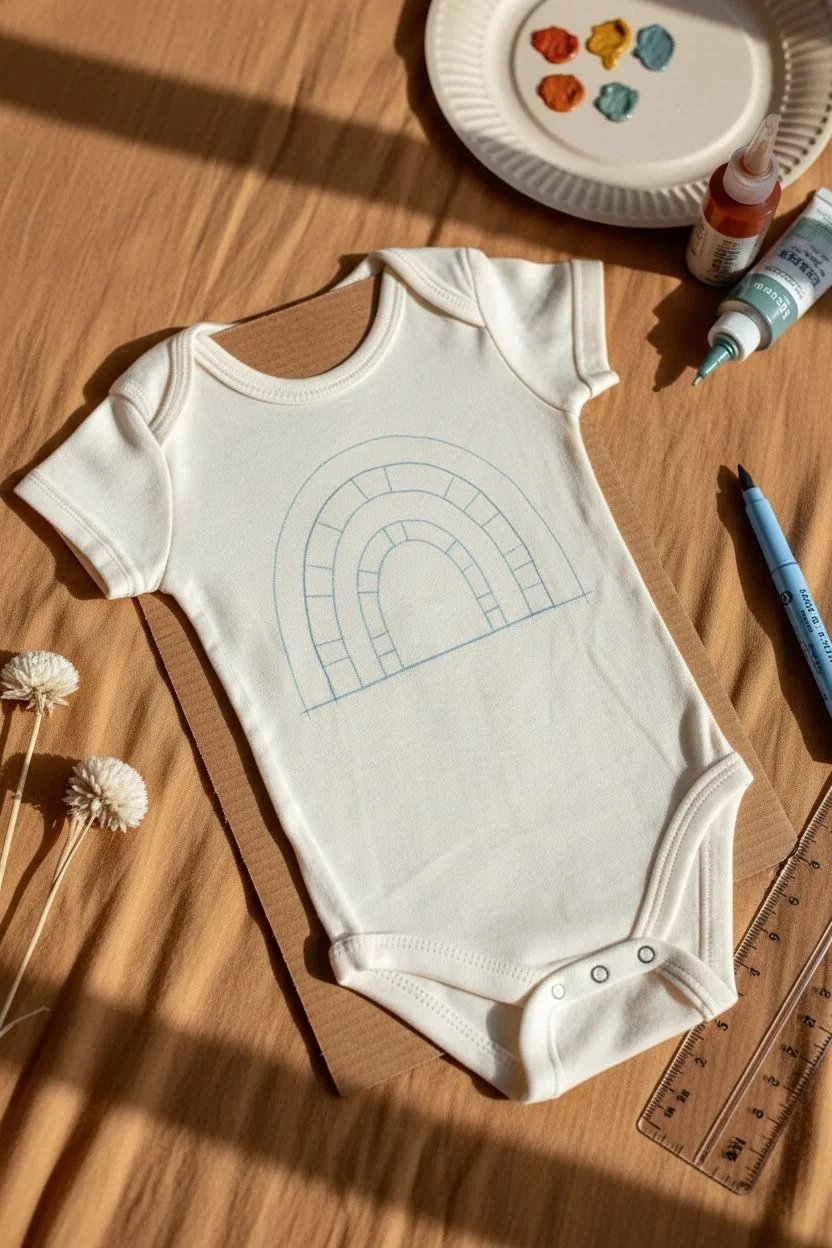
Rainbow Arc and Cloud Onesie
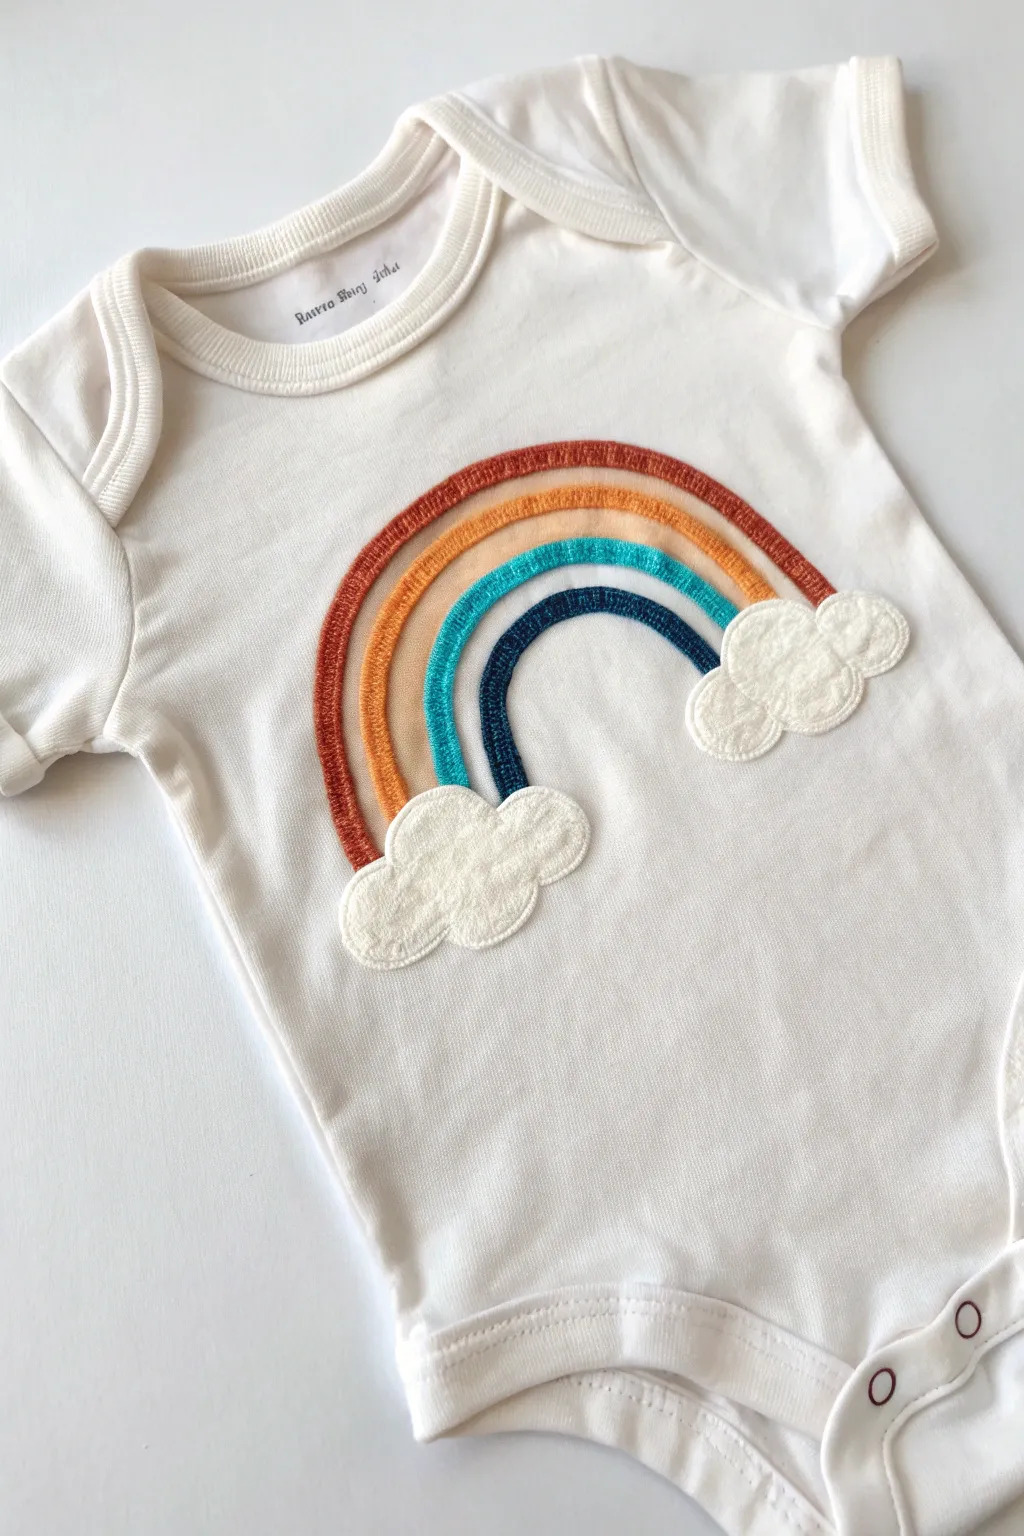
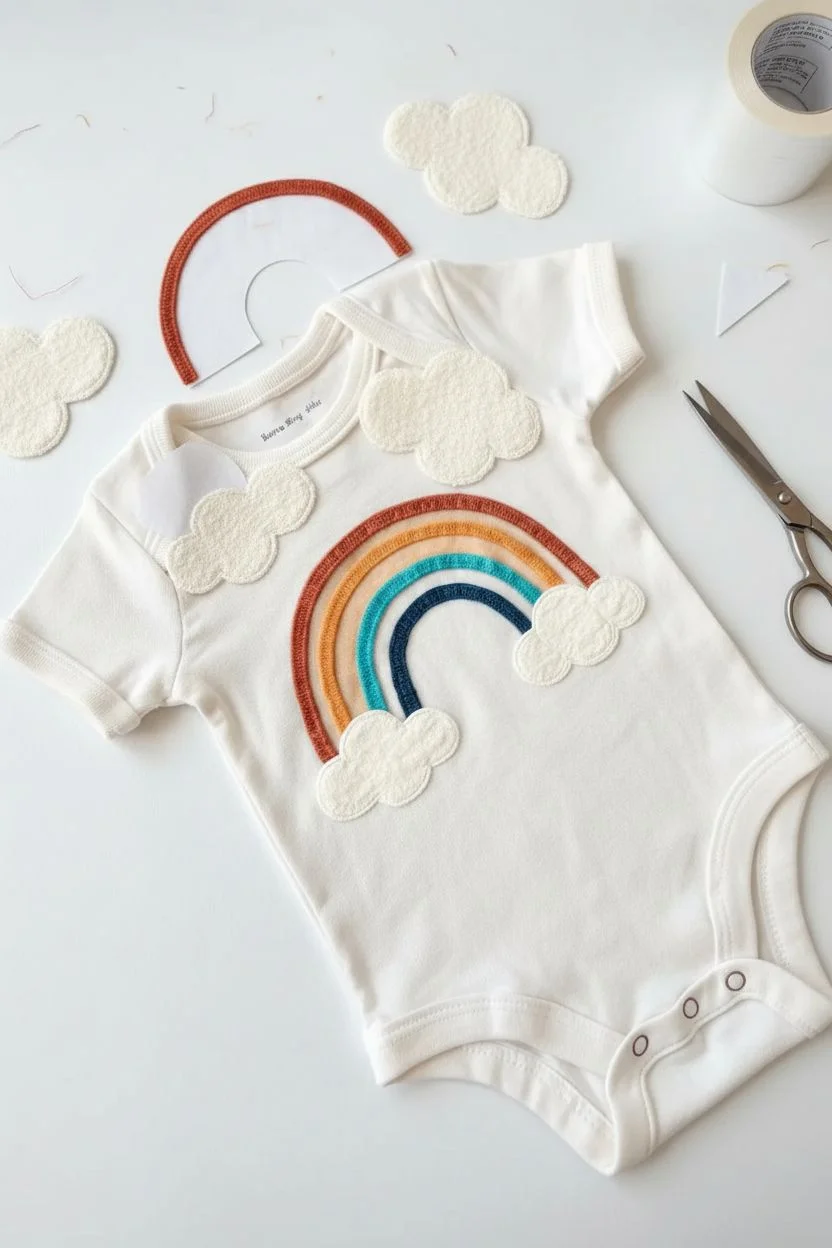
Bring a touch of boho charm to baby’s wardrobe with this delightful fabric appliqué project. Featuring rustic, earthy tones in a playful arc and soft, puffy clouds, this creates a tactile and visually sweet design that stands out from standard prints.
How-To Guide
Materials
- Plain white cotton baby onesie (pre-washed)
- Fabric scraps (rust red, mustard yellow, teal blue, navy blue)
- Textured cream fabric (bouclé, sherpa, or felt) for clouds
- Double-sided fusible web (like HeatnBond Lite)
- Iron and ironing board
- Fabric scissors
- Sewing machine with embroidery thread
- Water-soluble fabric marker
- Tear-away stabilizer (optional but recommended)
Step 1: Preparing the Shapes
-
Draft your design:
Start by sketching your rainbow arc on a piece of paper to get the sizing right for the onesie’s chest area. The arcs should be uniform in width, creating a classic bridge shape. -
Trace the bands:
Trace each individual rainbow band separately onto the paper side of your double-sided fusible web. Remember to leave a small gap between pieces when tracing so you can cut them apart easily. -
Iron to fabric:
Roughly cut around your traced fusible web shapes, then iron them onto the wrong side (back) of your chosen colored fabrics: rust for the top, mustard second, teal third, and navy for the smallest inner arc. -
Cut out the arcs:
Using sharp fabric scissors, carefully cut out each arc along the traced lines. Peel off the paper backing to reveal the shiny adhesive side. -
Prepare the clouds:
Draw two fluffy cloud shapes on the fusible web. Iron these onto the back of your textured cream fabric (bouclé or heavy felt works beautifully here for that 3D look) and cut them out.
Choosing Fabrics
For the softest feel, use jersey knit scraps for the rainbow stripes. It moves with the baby and won’t feel stiff against their tummy.
Step 2: Fusing the Design
-
Mark the center:
Lay the onesie flat and use a water-soluble marker to find the center chest point. This ensures your rainbow doesn’t end up crooked. -
Layer the rainbow:
Arrange the four colored arcs on the onesie first. I find it easiest to place the largest outer rust arch first, then nest the others inside to ensure tight gaps. -
Add the clouds:
Position a cloud at the base of each side of the rainbow, making sure they slightly overlap the ends of the colored arcs to hide any uneven edges. -
Fuse in place:
Once perfectly positioned, press with a hot iron (no steam) according to the fusible web instructions to bond the pieces permanently to the onesie.
Make It 3D
Make the clouds tactile! Don’t iron them flat; lightly stuff a small amount of poly-fill under the center of the cloud before sewing it shut.
Step 3: Stitching for Texture
-
Stabilize the fabric:
Place a sheet of tear-away stabilizer inside the onesie, directly behind the design area. This prevents the stretchy knit fabric from puckering while you sew. -
Setup the machine:
Set your sewing machine to a tight satin stitch (zigzag stitch with very short length). Test the tension on a scrap piece of fabric first. -
Stitch the arcs:
Sew around the perimeter of each colored band with matching thread. The satin stitch gives it that raised, embroidered look seen in the photo. -
Detailing the interior:
For extra texture, you can add a line of running stitch through the center of each color band, though the perimeter satin stitch is the most critical for durability. -
Outline the clouds:
Switch to cream or off-white thread. Sew around the edges of the cloud shapes. Since this fabric is thicker, go slowly to avoid skipped stitches. -
Cloud contours:
Add definition to the clouds by stitching a few internal swirls or curves, creating the ‘puffy’ distinct sections visible in the finished jumper. -
Cleanup:
Trim all loose threads carefully close to the fabric surface so little fingers don’t pull them. -
Remove stabilizer:
Gently tear away the stabilizer from the inside of the onesie. If any small bits remain in the stitching, you can use tweezers to pull them free.
This charming, personalized keepsake is now ready for baby to wear or to be gifted at the next shower


Moon and Stars Night-Sky Onesie
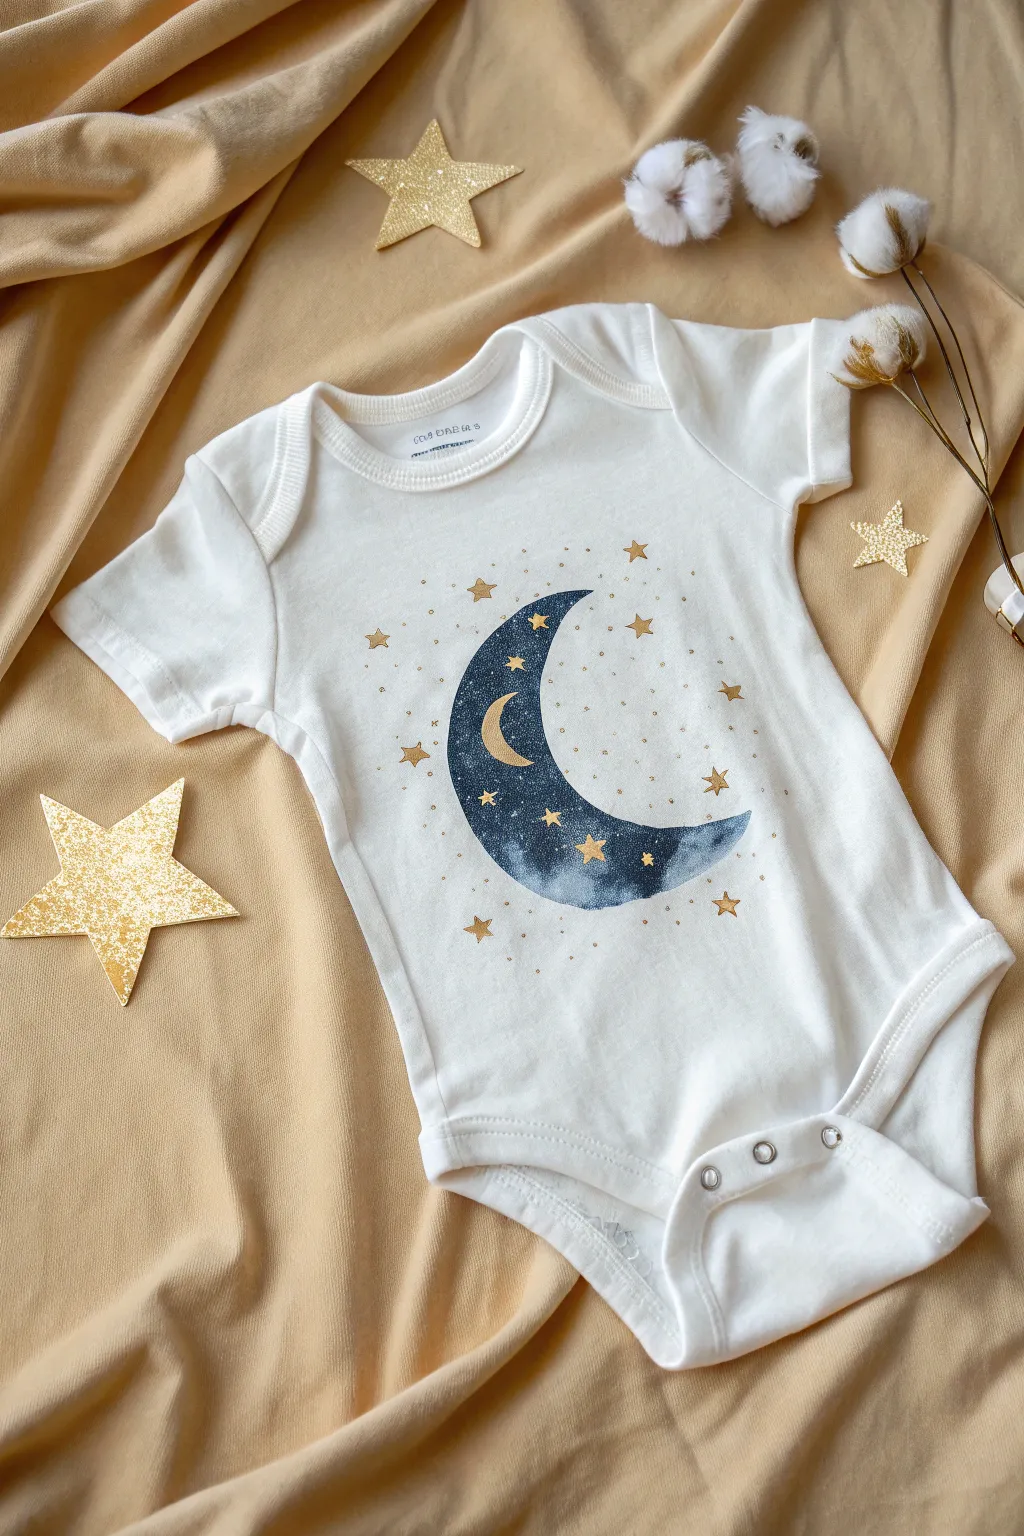
Capture the magic of a starry night with this dreamy celestial onesie design. Using fabric paints to create a watercolor effect, you’ll paint a deep indigo crescent moon dusted with golden constellations, perfect for a little dreamer’s wardrobe.
Step-by-Step Guide
Materials
- White cotton baby onesie (pre-washed and dried)
- Fabric medium or textile medium
- Dark blue acrylic paint or fabric paint (indigo or navy)
- Black acrylic paint (optional, for deepening the blue)
- Gold metallic fabric paint
- Small piece of cardboard (to insert inside the onesie)
- Round paintbrushes (sizes 2 and 4)
- Fine liner brush (size 0 or 00)
- Water cup and paper towels
- Pencil or disappearing fabric marker
- Palette or paper plate
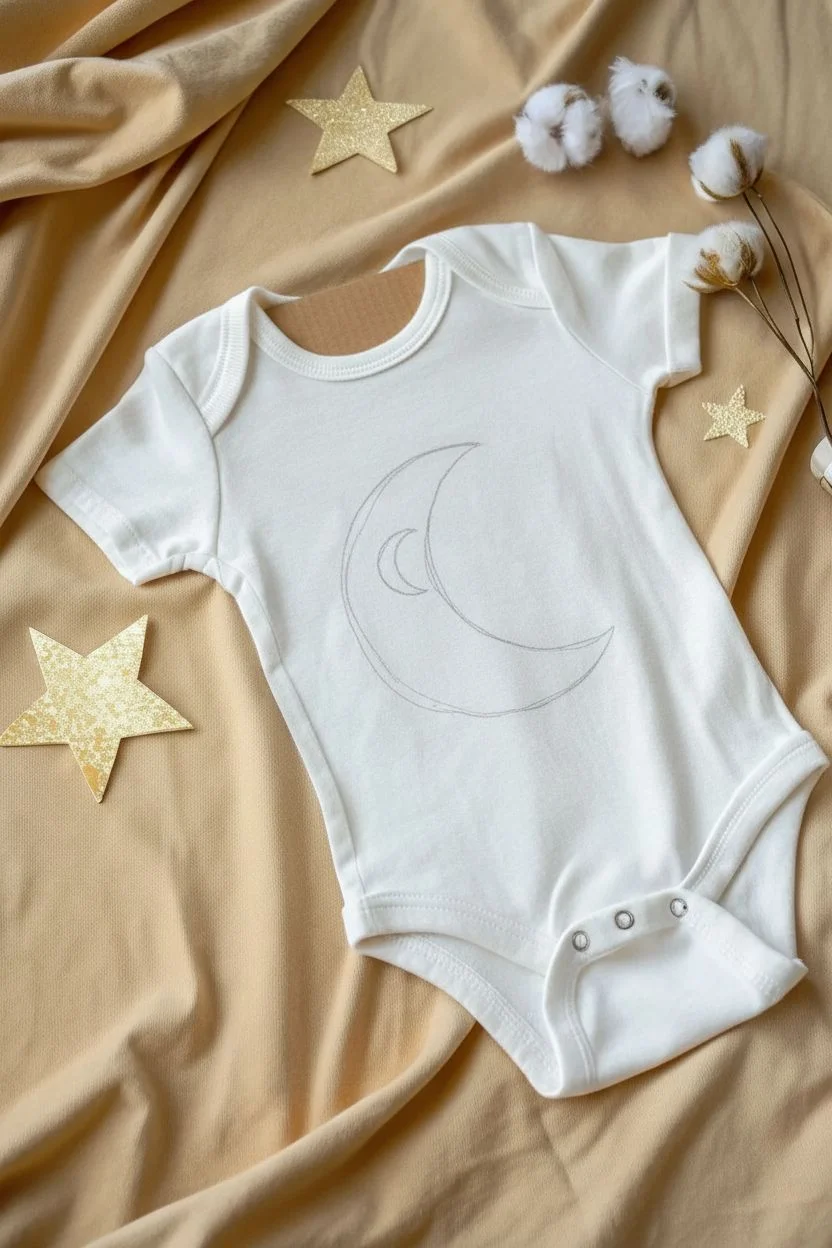
Step 1: Preparation & Sketching
-
Prepare the fabric:
Begin by inserting a piece of cardboard inside the onesie, directly behind the chest area. This stretches the fabric slightly to provide a smooth surface and prevents paint from bleeding through to the back layer. -
Outline the moon:
Using a pencil or disappearing ink fabric marker, lightly sketch a large ‘C’ shape for the crescent moon in the center of the chest. Don’t worry about perfection; a slightly organic shape adds to the hand-painted charm.
Bleeding Lines?
If the paint starts feathering into the fabric, your mix is too watery. Let it dry, then paint over the edges with undiluted white fabric paint to clean the line.
Step 2: Painting the Watercolor Moon
-
Mix the base color:
On your palette, mix your dark blue fabric paint with a generous amount of fabric medium. The goal is to thin the paint so it behaves like watercolor but remains permanent. I find a 1:1 ratio is a good starting point. -
Create a gradient wash:
Dip your size 4 brush into water, then into your paint mix. Start painting inside your moon outline. Apply the paint heavier on the outer curve of the crescent to create a deep, saturated edge. -
Pull the color inward:
While the paint is still wet, clean your brush slightly and use just water to pull the dark blue pigment toward the inner curve of the moon. This creates a faded, cloudy watercolor effect where the inner edge is lighter than the outer edge. -
Add depth:
Mix a tiny dot of black into your blue to create a midnight navy shade. While the moon is still damp, dab this darker color randomly onto the moon’s surface to create texture and ‘craters,’ blending gently. -
Let it dry completely:
This step is crucial. Allow the blue base layer to dry fully before adding metallic details. If you rush, the gold will mix with the blue and turn muddy. A hair dryer on a cool setting can speed this up.
Step 3: Adding the Golden Stars
-
Paint the main stars:
Using the metallic gold paint and a size 2 brush, paint standard five-point stars. Place three or four larger stars directly on top of the blue moon, and scatter four or five around the outside of the moon. -
Add a crescent detail:
Paint a small, slender gold crescent moon shape directly onto the dark blue moon surface for a whimsical layered effect. -
Create mid-sized stars:
Switch to your fine liner brush. Paint smaller, simple four-point stars (like cross shapes) in the open white space surrounding the moon. -
Add ‘stardust’ dots:
Dip the tip of the fine liner brush or the non-brush end of a paintbrush into the gold paint. Dot tiny specks of gold loosely around the entire design to mimic distant stars and cosmic dust. -
Create a constellation effect:
If you see large empty spaces, add tiny groups of three dots near each other to suggest distant star clusters.
Cosmic Sparkle
While the gold paint is still wet, sprinkle a tiny pinch of ultra-fine cosmetic glitter onto the stars. Shake off excess once dry for a magical 3D shimmer effect.
Step 4: Finishing Touches
-
Review and refine:
Step back and look at the composition. If any gold stars look too transparent, add a second coat of gold paint once the first layer is dry for extra shine. -
Heat set the design:
Once the artwork is completely dry (wait at least 24 hours), remove the cardboard. Place a pressing cloth or piece of scrap cotton over the painted design and iron on medium heat (no steam) for 3-5 minutes to permanently set the ink.
Now you have a stunning, boutique-quality garment ready for gifting or a special photo shoot
Birth Stats Typography Onesie

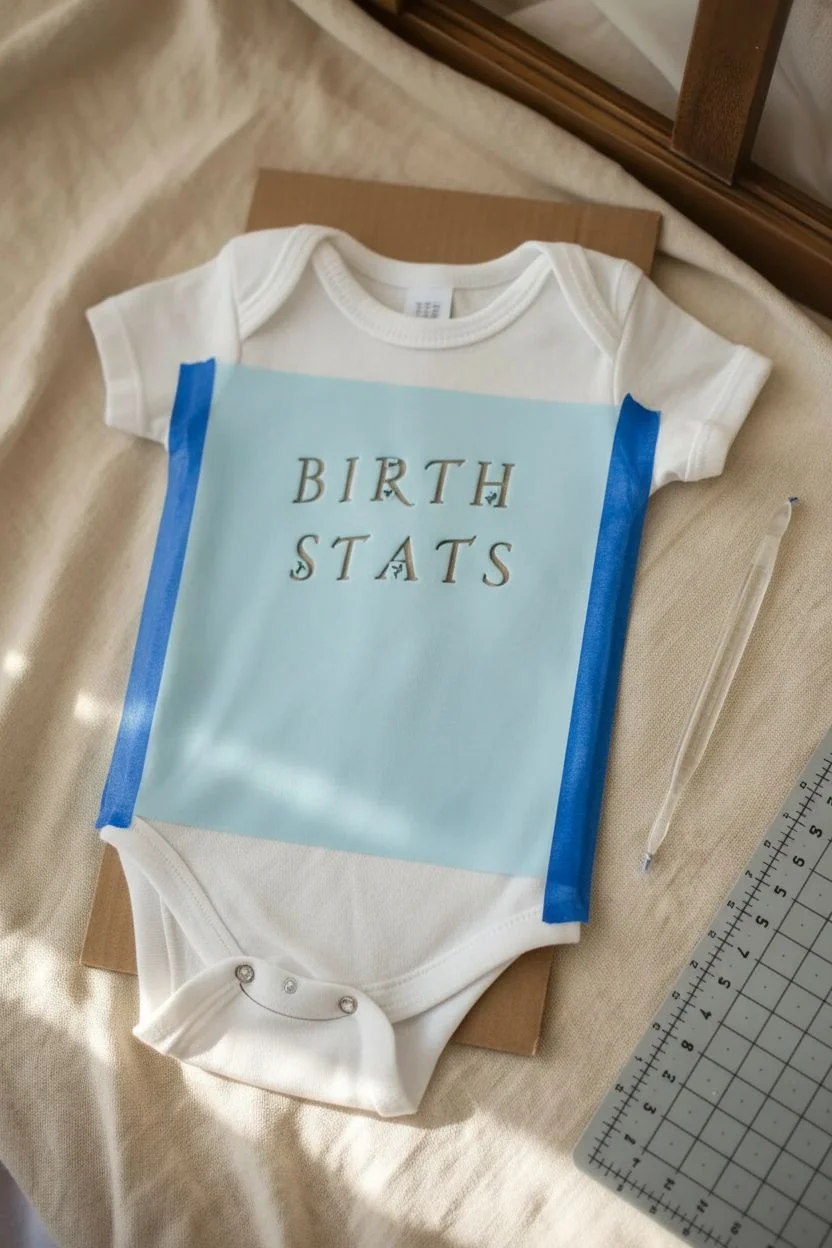
Create a timeless keepsake with this elegant typography onesie, featuring a crisp serif font that announces the baby’s arrival in style. This project uses precise stenciling techniques to achieve professional-looking lettering that stands out beautifully against soft white cotton.
How-To Guide
Materials
- White cotton baby onesie (pre-washed)
- Black fabric paint (soft-body or screen printing ink work best)
- Adhesive stencil vinyl or freezer paper
- Cutting machine (Cricut/Silhouette) or X-Acto knife and cutting mat
- Transfer tape (if using vinyl)
- Small stencil brush or foam pouncer
- Piece of cardboard (to fit inside the onesie)
- Iron and pressing cloth
- Computer with design software or word processor
Step 1: Design and Preparation
-
Choose your typography:
Begin by selecting a classic serif font such as Times New Roman, Garamond, or Baskerville on your computer. Type out the words ‘BIRTH STATS’ in all capital letters, adjusting the tracking (space between letters) so it feels balanced and readable. -
Size the design:
Measure the chest area of your onesie to determine the optimal width for your text. Typically, a width of 4 to 5 inches works well for a newborn size. Resize your digital design accordingly. -
Prepare the stencil material:
If using a cutting machine, mirror the image if you are cutting HTV, but for a paint stencil, cut it as normal on stencil vinyl. If cutting by hand, print your design onto standard paper first, then tape it securely over your freezer paper (shiny side down) or vinyl. -
Cut the stencil:
Carefully cut out the letters. If doing this by hand with an X-Acto knife, go slow on the curves of the ‘S’ and the serifs of the ‘T’. Remember, you are removing the letters themselves to create negative space for the paint. -
Weed the design:
Remove the cut-out letter shapes. Be absolutely sure to keep the small inner pieces (counters) of letters like ‘B’, ‘R’, and ‘A’. You will need these to complete the forms.
Step 2: Applying the Stencil
-
Prep the fabric:
Iron the onesie to remove any wrinkles, as a perfectly flat surface is crucial for crisp lines. Insert a piece of cardboard inside the onesie effectively preventing the paint from bleeding through to the back. -
Position the stencil:
Place your main stencil piece onto the center of the chest. If using adhesive vinyl, use transfer tape to move the entire design at once, ensuring the spacing remains accurate. If using freezer paper, position it shiny side down. -
Secure the inner pieces:
Carefully place those tiny inner counters (for the B, R, and A) back into their correct spots. Take your time here; misalignment is very noticeable with serif fonts. -
Adhere the stencil:
Press the adhesive vinyl firmly with a scraper tool to ensure a tight seal. For freezer paper, use a dry iron on medium heat to press the paper until it adheres temporarily to the fabric. -
Masking off:
I like to use painter’s tape to cover any exposed fabric around the edges of the stencil, just in case my brush slips outside the boundaries.
Bleeding edges?
If paint bleeds, use a white fabric marker or a tiny brush with white fabric paint to carefully touch up the perimeter and cover the mistake.
Step 3: Painting and Finishing
-
Load your brush:
Dip your stencil brush or foam pouncer into the black fabric paint. Offload most of the paint onto a paper towel until the brush is almost dry. Too much paint causes bleeding under the stencil. -
Apply the first layer:
Using a straight up-and-down dabbing motion (never dragging), apply a very light coat of paint over the letters. It may look patchy at first, but this is better than a gloopy mess. -
Build coverage:
Let the first coat dry for a few minutes, then apply a second formatting coat using the same dabbing technique. Focus on getting crisp edges near the stencil walls. -
Remove the stencil:
While the paint is still slightly tacky (but not wet), carefully peel away the main stencil. Use tweezers or a weeding tool to gently lift off the small inner pieces of the letters. -
Fix imperfections:
Inspect the edges. If you see tiny rough spots, use a very fine artist’s liner brush with a minuscule amount of paint to sharpen the serifs. -
Dry and cure:
Allow the paint to dry completely for at least 24 hours. Once dry, follow the manufacturer’s instructions to heat set the ink, usually by ironing over the design with a pressing cloth for 3-5 minutes.
Add Real Stats
Below the main text, use a smaller font size to paint the actual birth date, weight, and time for a truly personalized display piece.
Your sophisticated onesie is now ready for a memorable photoshoot or to be wrapped as a unique gift
Monthly Milestone Number Onesie Set
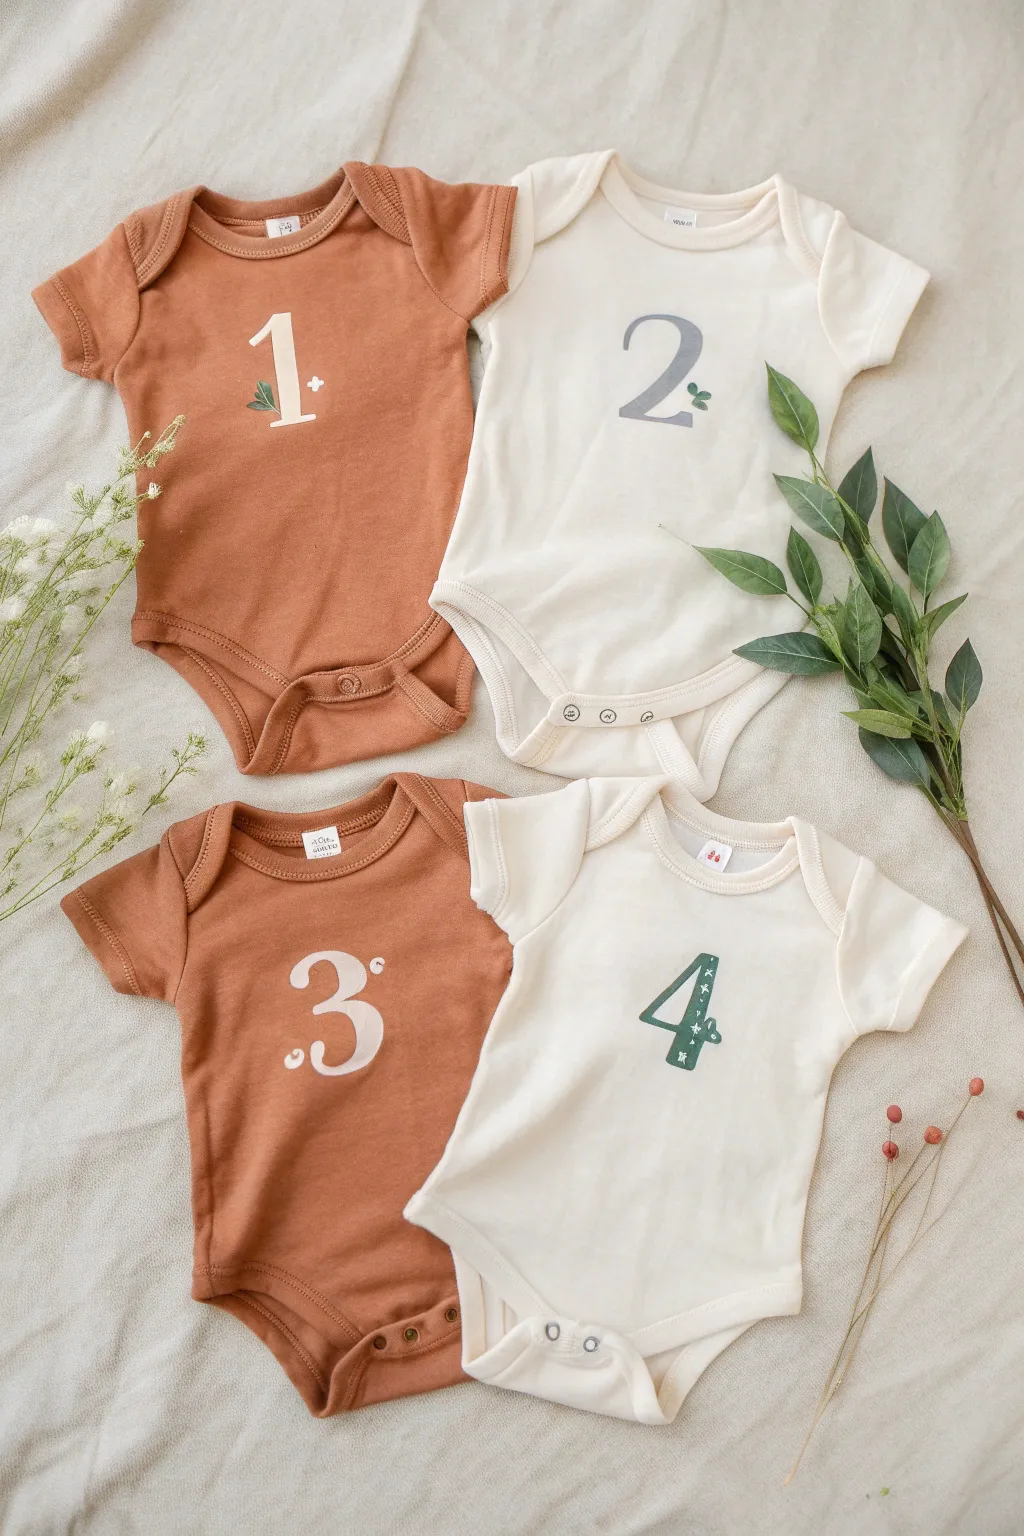
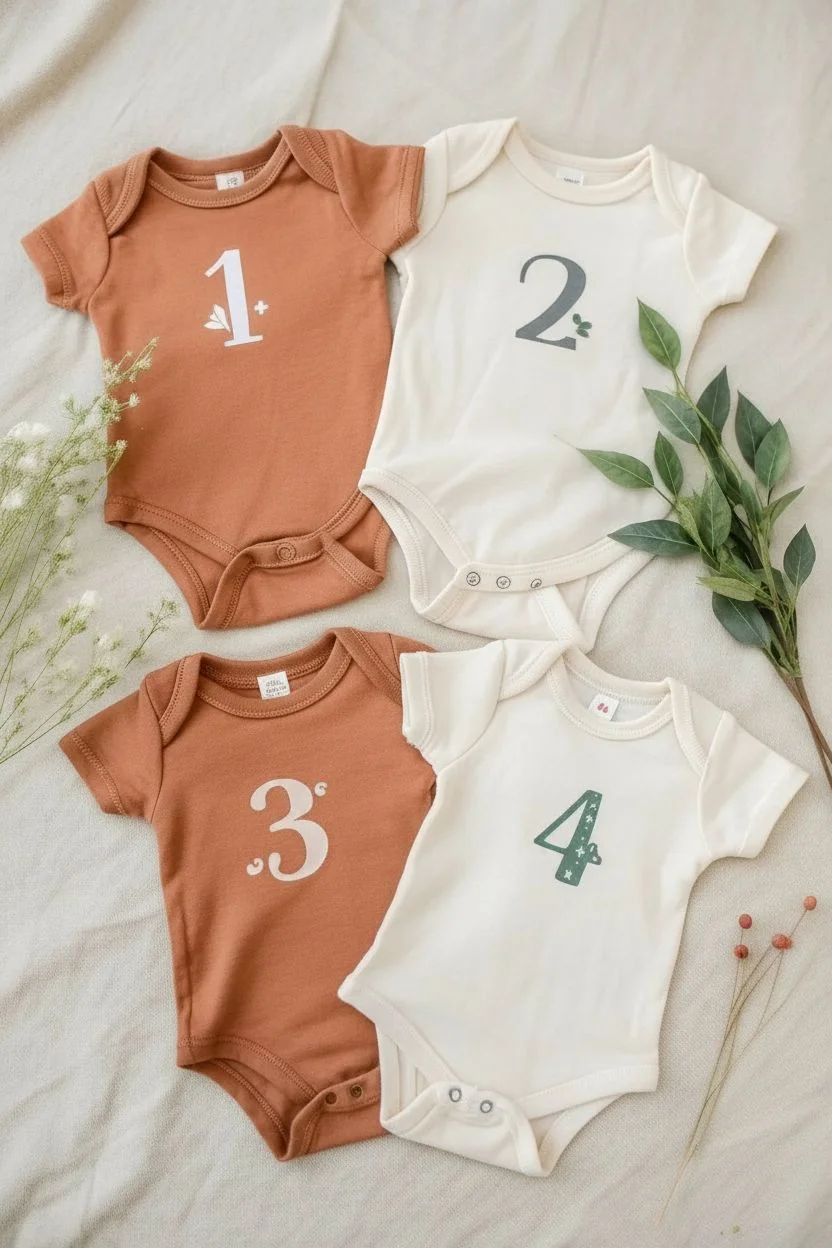
Celebrate each month of growth with this charming, minimalist set of milestone onesies featuring earthy tones and delicate botanical details. The mix of rust and cream fabric creates a warm, gender-neutral aesthetic perfect for monthly photo shoots.
Step-by-Step Guide
Materials
- 2 Rust/terracotta baby bodysuits (cotton)
- 2 Cream/off-white baby bodysuits (cotton)
- Fabric paint (White, Dark Grey, Muted Green)
- Stencil vinyl or freezer paper
- Cutting machine (Cricut/Silhouette) or X-Acto knife
- Self-healing cutting mat
- Sponge pouncers or stencil brushes
- Fine detail paintbrush (size 0 or 1)
- Cardboard inserts
- Iron and pressing cloth
Step 1: Preparation & Design
-
Pre-wash fabrics:
Begin by washing and drying your onesies without fabric softener. This removes sizing chemicals and ensures the paint adheres permanently to the cotton fibers. -
Prepare cardboard supports:
Cut four pieces of cardboard slightly smaller than the width of the onesies. Insert one into each bodysuit to prevent paint from bleeding through to the back layer. -
Create the number stencils:
Design or trace classic serif numbers 1 through 4. If using a cutting machine, cut these out of stencil vinyl. If working manually, trace onto freezer paper and carefully cut out the number shapes using an X-Acto knife. -
Apply stencils:
Center your stencils on the chest of each onesie. For vinyl, use transfer tape to place them. For freezer paper, iron the shiny side down onto the fabric until it adheres securely.
Clean Edges Trick
Before applying your main color, paint a thin layer of the fabric’s background color over the stencil steps first. This seals the edges so no main color bleeds through.
Step 2: Painting the Numbers
-
Mix your colors:
Prepare your palette. You will need a crisp white for the rust onesies, a dark grey for the number ‘2’, another white for ‘3’, and a muted forest green for ‘4’. -
Load the sponge:
Dip your sponge pouncer into the paint, then dab off the excess onto a paper towel. You want the sponge to be almost dry to prevent paint from seeping under the stencil edges. -
Paint Number 1:
On the first rust onesie, gently pounce white paint over the number 1 stencil using straight up-and-down motions. -
Paint Number 2:
Move to the first cream onesie. Apply the dark grey paint to the number 2 stencil, ensuring even coverage but keeping the layer thin. -
Paint Number 3:
For the second rust onesie, apply white paint to the number 3. I like to do two thin coats here, letting the first dry for 10 minutes, to ensure the white pops against the dark fabric. -
Paint Number 4:
On the final cream onesie, use the muted green paint for the number 4. -
Remove stencils:
While the paint is still slightly tacky (don’t wait for it to fully dry), carefully peel away the stencils to reveal clean lines.
Fixing Bleeds
If paint seeps under the stencil, wait for it to dry completely. For white fabric, scrape gently with a craft knife. On colored fabric, touch up carefully with matching fabric paint.
Step 3: Adding Details
-
Hand-paint the botanical accent (No. 1):
Using a fine detail brush and green paint, add two small leaves stemming from the bottom serif of the number 1. -
Add the plus sign:
With the white paint and detail brush, add a tiny ‘+’ symbol or sparkle just to the right of the number 1. -
Detailing Number 2:
Paint two small green leaves growing out of the tail of the number 2 using the detail brush. -
Accenting Number 3:
Dip the back end of your paintbrush into white paint to create small, perfect dots. Place one dot near the top curve and one near the bottom curve of the 3. -
Embellishing Number 4:
Use a white paint pen or fine brush to add tiny dashes or ‘stitches’ directly on top of the green number 4 for a textured look.
Step 4: Finishing Touches
-
Dry completely:
Allow the painted onesies to dry flat for at least 24 hours. -
Heat set the design:
Once fully dry, place a pressing cloth over the painted areas and iron on a high heat setting (no steam) for 3-5 minutes to cure the paint and make it washable.
Now you have a custom, boutique-style set ready to track those precious first months
Handprint or Footprint Keepsake Onesie
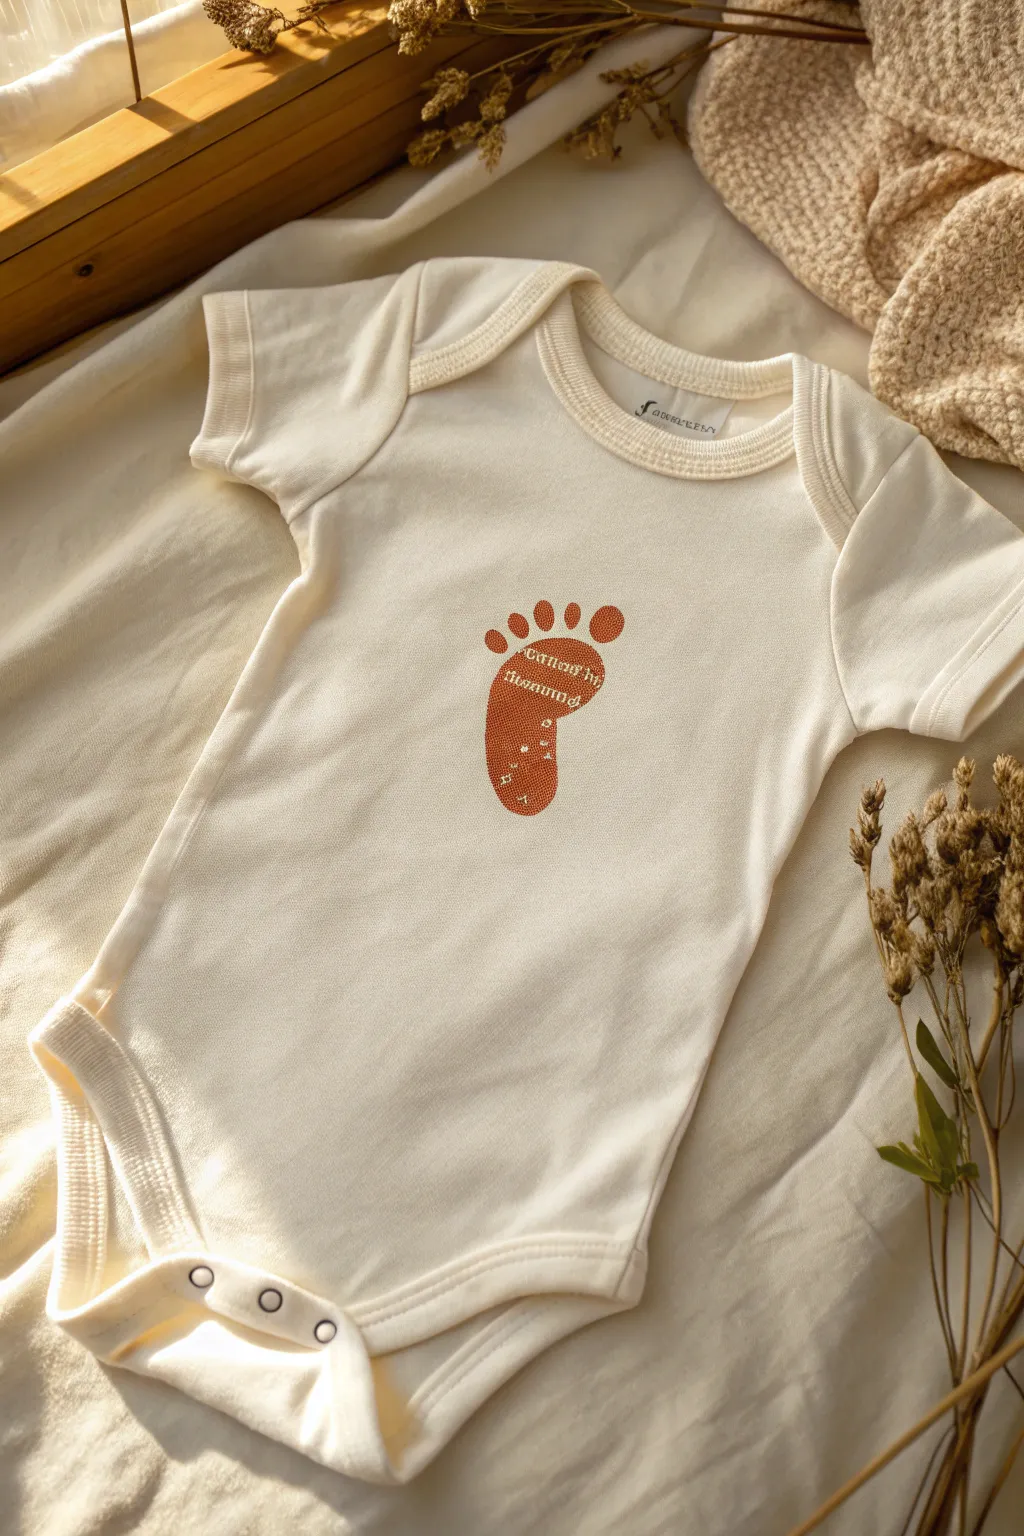

Capture a precious moment in time with this minimalist and earthy footprint keepsake. The warm terracotta tone adds a modern, gender-neutral touch, while the delicate white lettering and sparkle details create a magical finish.
Detailed Instructions
Materials
- White cotton baby onesie (pre-washed)
- Fabric paint (terracotta or burnt orange)
- Fabric paint (white)
- Small foam roller or large sponge brush
- Fine-point detail brush (size 0 or 00)
- Piece of cardboard (to fit inside onesie)
- Palette or paper plate
- Baby wipes (essential for quick cleanup!)
- Stencil (optional, for lettering)
Step 1: Preparation & Footprint
-
Prepare the workspace:
Lay the pre-washed onesie flat on a clean, solid table. Insert a piece of cardboard inside the onesie, positioning it under the chest area where the design will go. This prevents paint from bleeding through to the back. -
Ready the paint:
Squeeze a generous amount of terracotta fabric paint onto your palette. I usually aim for a creamy consistency; if it’s too thick, it won’t transfer well, but too thin and it will smudge. -
Coat the foot:
Using a foam roller or sponge brush, apply an even coat of paint to the baby’s foot. Ensure the entire sole and all five toes are covered, but avoid globs of paint which can make the print slippery. -
Make the impression:
Firmly but gently press the painted foot onto the center of the chest area. Press down on the heel and individual toes to ensure a complete print. -
Lift and clean:
Lift the foot straight up—don’t roll it off—to keep the edges crisp. Immediately clean the baby’s foot with wet wipes before the paint starts to dry on their skin. -
Touch up edges:
If the print is slightly patchy, use a small brush with a tiny amount of terracotta paint to carefully fill in key missed spots while maintaining the natural texture of the skin print. -
Dry completely:
Allow the footprint to dry fully. This is crucial because you will be painting on top of this layer. Follow the manufacturer’s instructions, but usually, 2-4 hours is safe.
Step 2: Adding Details
-
Plan the text:
Decide on your short phrase, such as a name or ‘Little Steps.’ Lightly sketch the letters inside the heel or sole area using a white chalk pencil if you need a guide. -
Paint the letters:
Dip your fine-point detail brush into the white fabric paint. Carefully paint your chosen words directly over the dried terracotta paint. Use a stippling motion for a textured look or smooth strokes for clean lines. -
Add sparkles:
Using the very tip of the fine brush, add tiny clusters of dots and small four-point stars (cross shapes) around the text and near the toes to create a magical sparkle effect. -
Check opacity:
The white paint might absorb slightly into the darker terracotta. If the text looks faded after ten minutes, carefully apply a second coat of white to make it pop. -
Final cure:
Let the entire design dry for at least 24 hours. If your fabric paint requires heat setting, iron the design from the inside out (no steam) once fully dry.
Clearer Prints
For the sharpest footprint, do the stamping while the baby is asleep or strapped into a high chair. A moving foot creates a blurry, unusable smudge.
Level Up
Instead of painting the text by hand, use a custom vinyl stencil or iron-on vinyl (HTV) for the lettering to get perfectly crisp, professional-looking typography.
Now you have a timeless keepsake that captures just how tiny they once were
Soft Watercolor-Wash Background Onesie
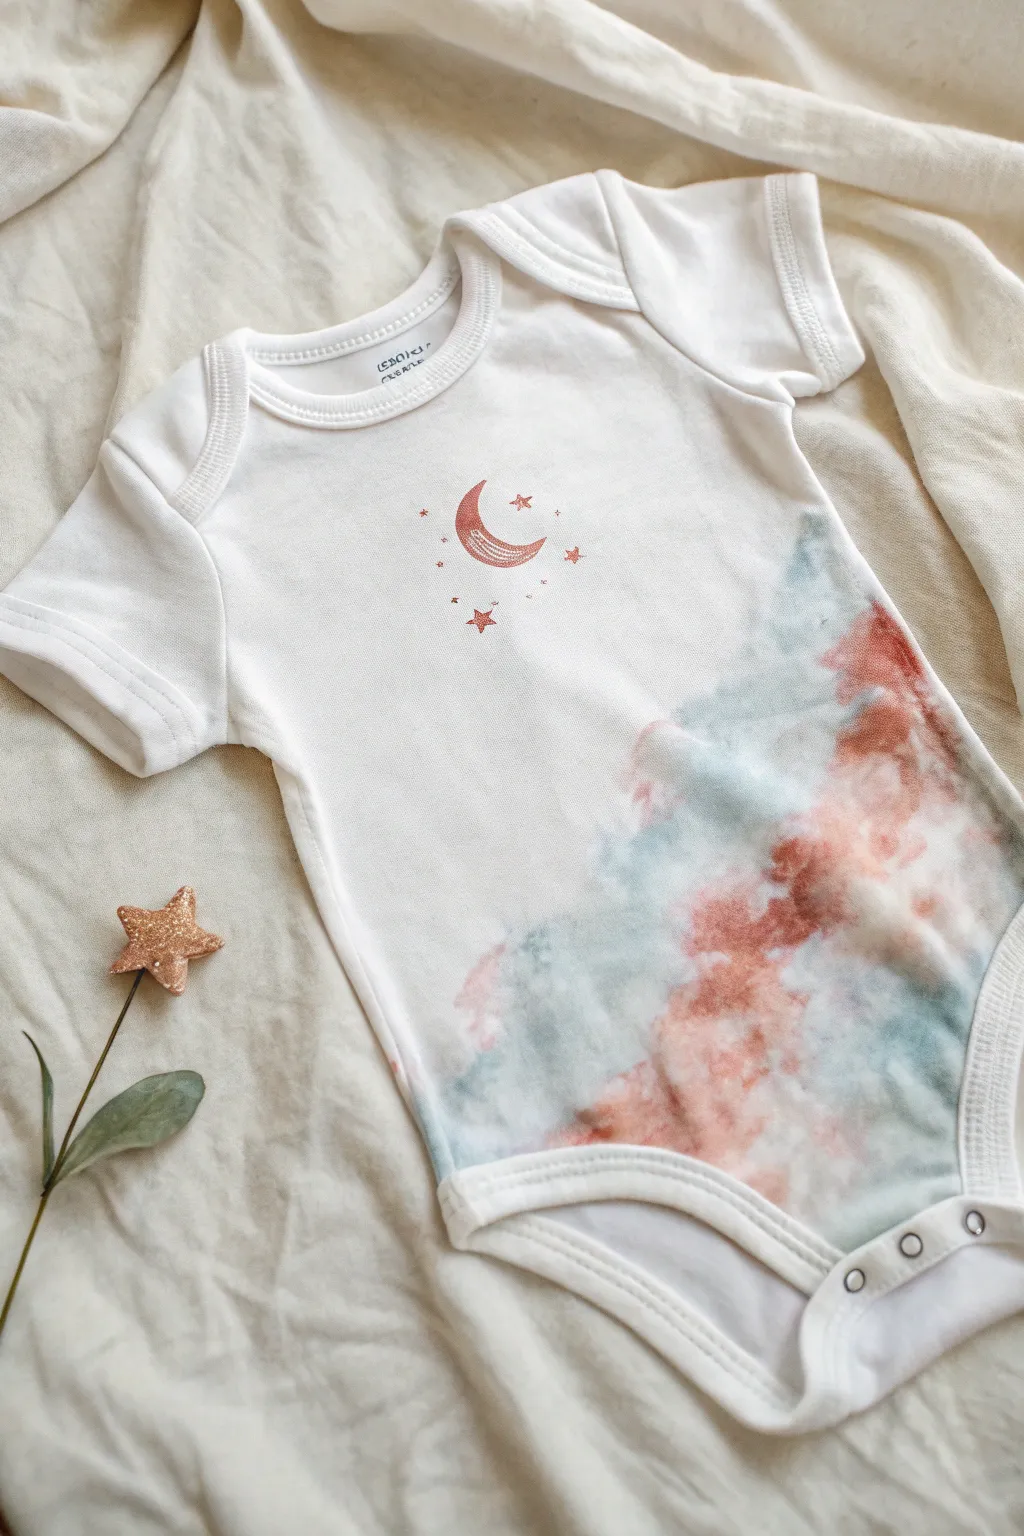
This dreamy project combines a soft, cloud-like watercolor wash with delicate celestial stamping to create a unique piece for a little star. The gentle blend of muted teal and terracotta creates a modern, gender-neutral palette that looks adorable on any baby.
Step-by-Step Tutorial
Materials
- White cotton baby onesie (pre-washed)
- Fabric medium
- Acrylic craft paints (Terracotta/Burnt Sienna, Sage Green/Muted Teal)
- Small spray bottle with water
- Paint palette or plastic plate
- Soft synthetic paintbrush (medium size)
- Moon and stars rubber stamp
- Fabric ink pad (Rust or Copper color) OR fine detail brush and terracotta paint
- Cardboard insert or thick paper
- Iron (for heat setting)
Step 1: Preparation
-
Pre-wash the fabric:
Ensure your onesie is pre-washed without fabric softener to remove any sizing chemicals that might prevent the paint from absorbing evenly. -
Insert protective barrier:
Slide a piece of cardboard or thick paper inside the onesie. This is crucial to prevent the paint and water from soaking through to the back of the garment. -
Mix your medium:
On your palette, mix your acrylic paints with fabric medium according to the bottle instructions (usually 1:1 or 2:1 paint to medium). This makes the paint flexible and washable. -
Create the watercolor consistency:
Add water to your paint mixtures gradually. You want a very thin, watery consistency that will spread easily, almost like stained water rather than thick paint.
Splotch Control
If water leaves a hard ring mark as it dries, lightly feather that edge with a barely-damp brush to blend it back into the white fabric before it sets.
Step 2: Painting the Watercolor Wash
-
Dampen the fabric:
Lightly mist the bottom half of the onesie with your spray bottle. The fabric should be damp but not soaking wet; this helps the colors bleed softly. -
Apply the first color:
Dip your brush into the watered-down sage green/teal mixture. Dab it randomly onto the damp fabric, starting near the bottom leg openings and working up slightly. -
Soften edges:
Use a clean, wet brush to pull the edges of the green paint outward, creating those soft, cloudy shapes rather than hard lines. -
Add the contrast color:
While the fabric is still damp, pick up the terracotta wash. Apply this in the white spaces between the green patches, letting them touch and slightly blend where they meet. -
Build the gradient:
Continue adding dabs of both colors, concentrating the heaviest pigment at the bottom and fading out as you reach the middle of the torso. I like to keep the upper edge very irregular and organic. -
Encourage bleeding:
If the colors aren’t blending enough, give the painted area another very light mist of water to encourage that beautiful watercolor bloom effect. -
Dry completely:
Let the onesie dry flat completely. This may take a few hours because of the water content. The colors will lighten slightly as they dry.
Step 3: Adding the Celestial Details
-
Position the stamp:
Locate the center of the chest area, well above your watercolor wash line. -
Ink the stamp:
Load your moon and stars rubber stamp with rust-colored fabric ink. If you don’t have a pad, you can lightly brush a thin layer of undiluted terracotta fabric paint directly onto the rubber stamp. -
Test the impression:
Press the stamp onto a scrap piece of paper or fabric first to ensure you have the right amount of ink and no globs. -
Stamp the design:
Firmly press the stamp onto the onesie. Apply even pressure without rocking the stamp to get crisp lines. -
Add hand-painted details (optional):
If your stamp didn’t transfer perfectly or you want extra sparkle, use a very fine detail brush to touch up the stars or add tiny dots around the moon.
Stamp Sharpness
t-shirt fabric stretches! Put a piece of fine sandpaper under the fabric (inside the shirt) when stamping to grip the fibers and prevent slipping.
Step 4: Sealing the Artwork
-
Final dry:
Allow the stamped design to dry for at least 24 hours to ensure everything is set. -
Heat set:
Turn the onesie inside out (or place a cloth over the design). Iron on a medium-high cotton setting without steam for 3-5 minutes to permanently fix the design.
Now you have a soft, artistic onesie that is ready for cozy cuddles and sweet dreams
Sunset Ombre Fade Onesie
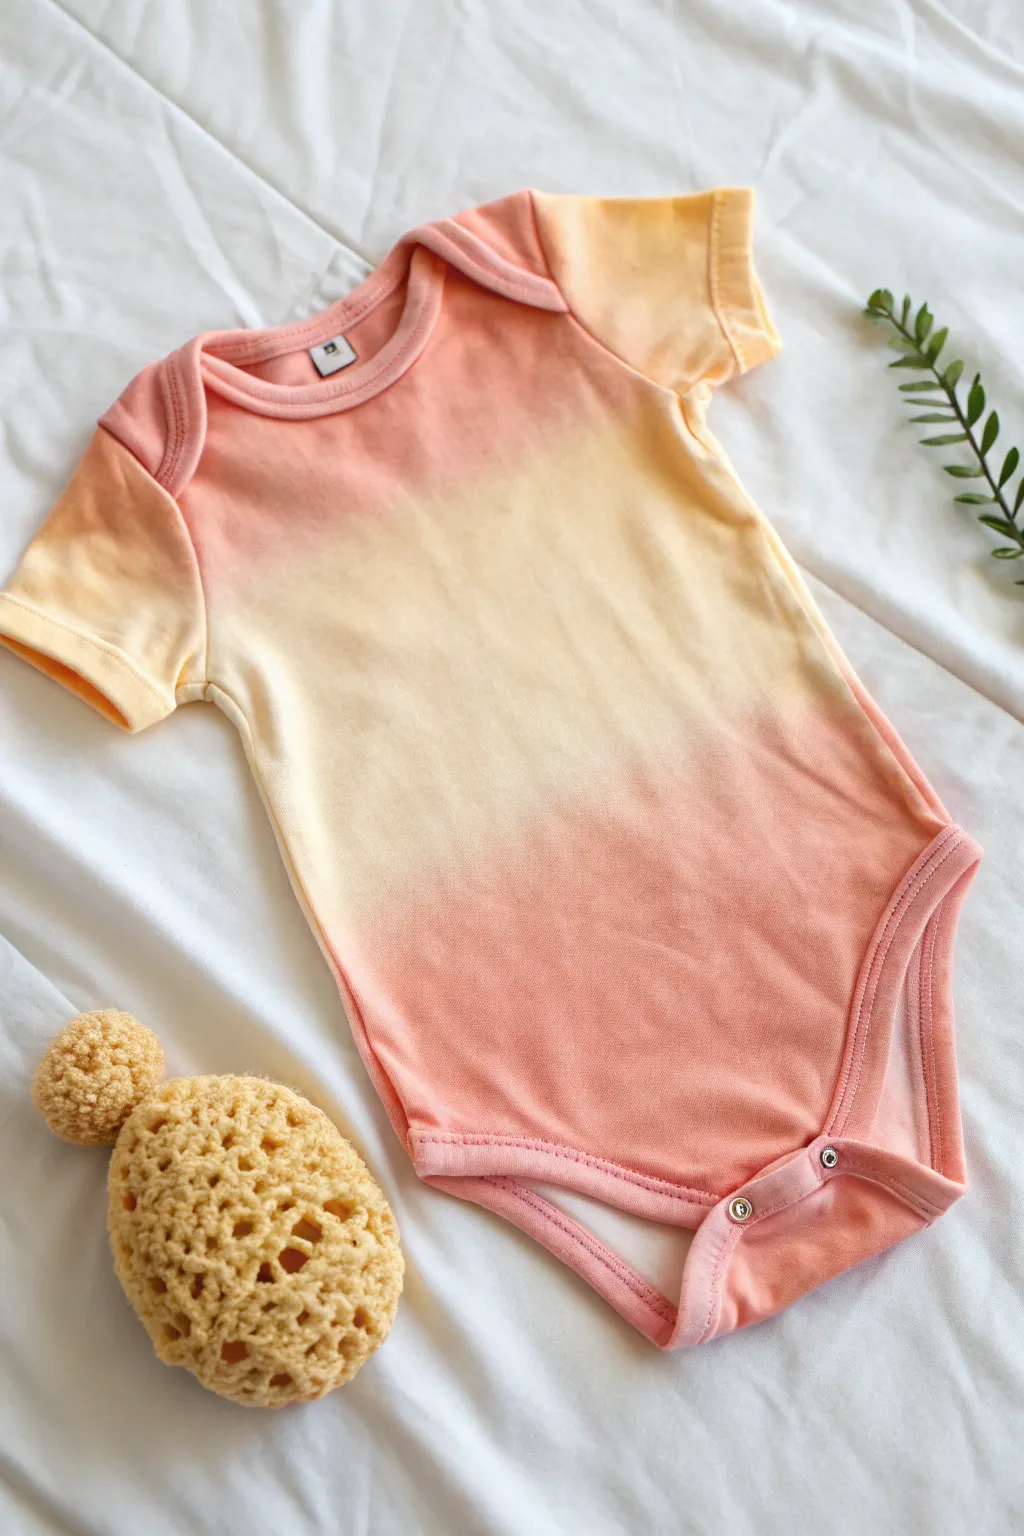
Capture the warmth of a summer evening with this soft gradient onesie that transitions from peachy pinks to creamy yellows. This dip-dye technique creates a seamless, professional-looking fade that feels gentle and organic.
Step-by-Step Guide
Materials
- White cotton baby onesie (pre-washed)
- Fabric dye (Peach or Coral)
- Fabric dye (Golden Yellow or Buttercup)
- Two plastic tubs or buckets
- Rubber gloves
- Plastic table cover
- Old spoon or stirring stick
- Warm water
- Paper towels
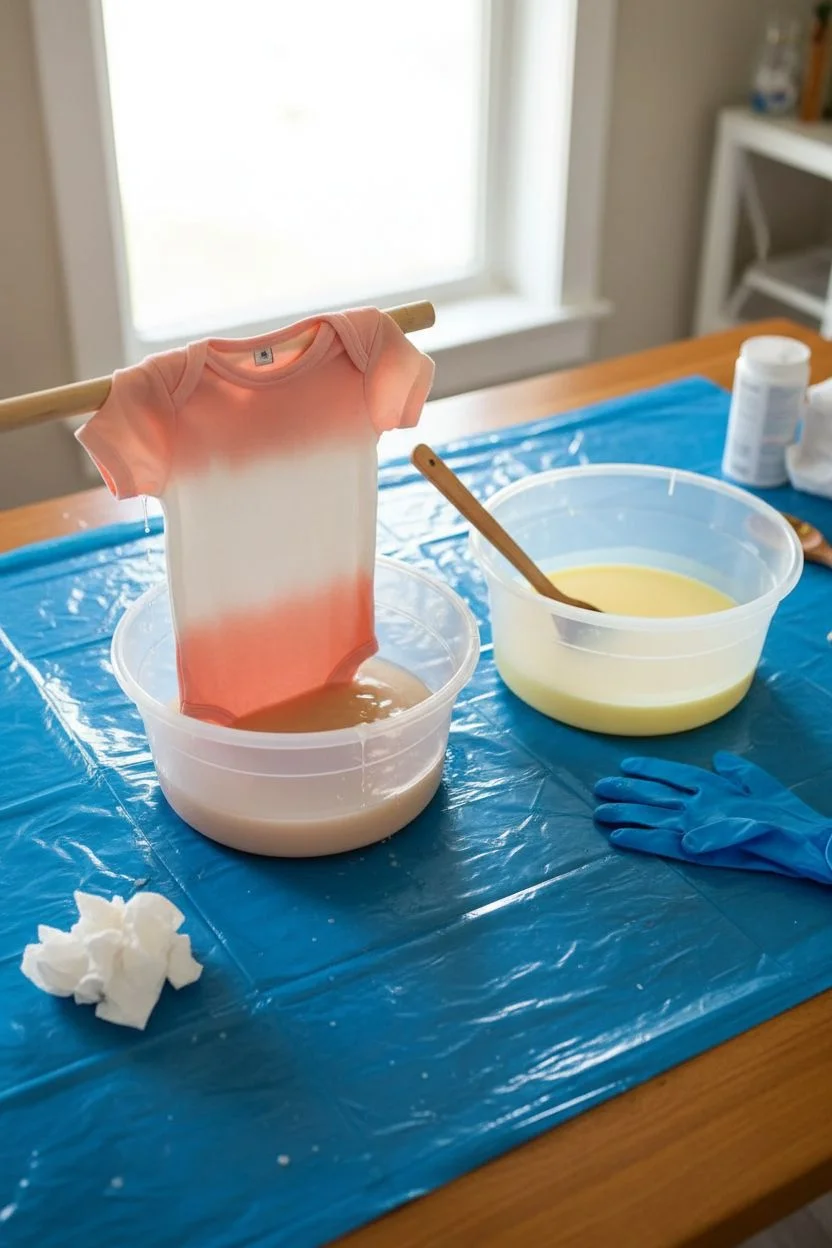
Step 1: Preparation
-
Set up your workspace:
Begin by covering your work surface with a plastic tablecloth to protect it from stains. Arrange your two plastic tubs side-by-side. -
Prepare the fabric:
Run the white onesie under warm water until it is completely saturated. Squeeze out the excess water gently so it remains damp but not dripping wet. Damp fabric helps the dye bleed softly for that smooth ombre look. -
Mix the dyes:
Fill your first tub with warm water and mix in the Peach/Coral dye according to the package instructions. In the second tub, do the same with the Golden Yellow dye. Ensure the powder or liquid is fully dissolved.
Step 2: Creating the Gradient
-
Dip the top section:
Holding the onesie by the bottom leg openings, lower the top third of the garment (neck and sleeves) into the Peach dye bath. -
Let it soak:
Allow the top section to sit in the dye for about 3-5 minutes. Occasionally lift it slightly and lower it back down to prevent a harsh line from forming. -
Rinse the top:
Remove the top section and quickly rinse just the dyed area under cold water until the water runs mostly clear. Squeeze out excess liquid. -
Dip the bottom section:
Now, flip the onesie over. Hold it by the shoulders and dip the bottom third (the leg openings and snaps area) into that same Peach dye bath. -
Soak the bottom:
Let this bottom section soak for 3-5 minutes, mirroring the intensity of the top. I find keeping the timing consistent here is key for balance. -
Rinse the bottom:
Rinse the bottom section under cold water until clear, keeping the undyed middle section as dry as possible. -
Dip the middle:
Fold the onesie loosely so you can submerge the middle white section into the Yellow dye bath. -
Overlap slightly:
Ensure the yellow dye bath overlaps slightly with the edges of the peach sections. This overlap creates that beautiful orange transition tone. -
Monitor the yellow:
Yellow dye can be lighter, so you might want to leave this section in for 5-8 minutes to ensure the color is vibrant enough to stand out against the peach. -
Initial full rinse:
Remove the onesie and rinse the entire garment under cold running water. Keep rinsing until the water runs completely clear.
Patchy Color?
If the dye looks blotchy, the fabric wasn’t wet enough. Always ensure the onesie is evenly damp before dipping to help the color wick smoothly.
Step 3: Finishing Up
-
Wash independently:
Place the onesie in the washing machine on a gentle cold cycle with a mild detergent. Do not include other clothes for this first wash. -
Dry the onesie:
Tumble dry on low or hang it up to air dry. Air drying often preserves the brightness of the dye a bit longer. -
Iron smooth:
Once fully dry, iron the onesie on a cotton setting to smooth out wrinkles and really showcase the gradient transition.
Make it Sparkle
Once the onesie is dry, add a few iron-on gold stars or a cute vinyl decal phrase over the yellow center for added customization.
Now you have a beautifully blended garment perfect for a sunny day out
Negative-Space Silhouette Stencil Onesie
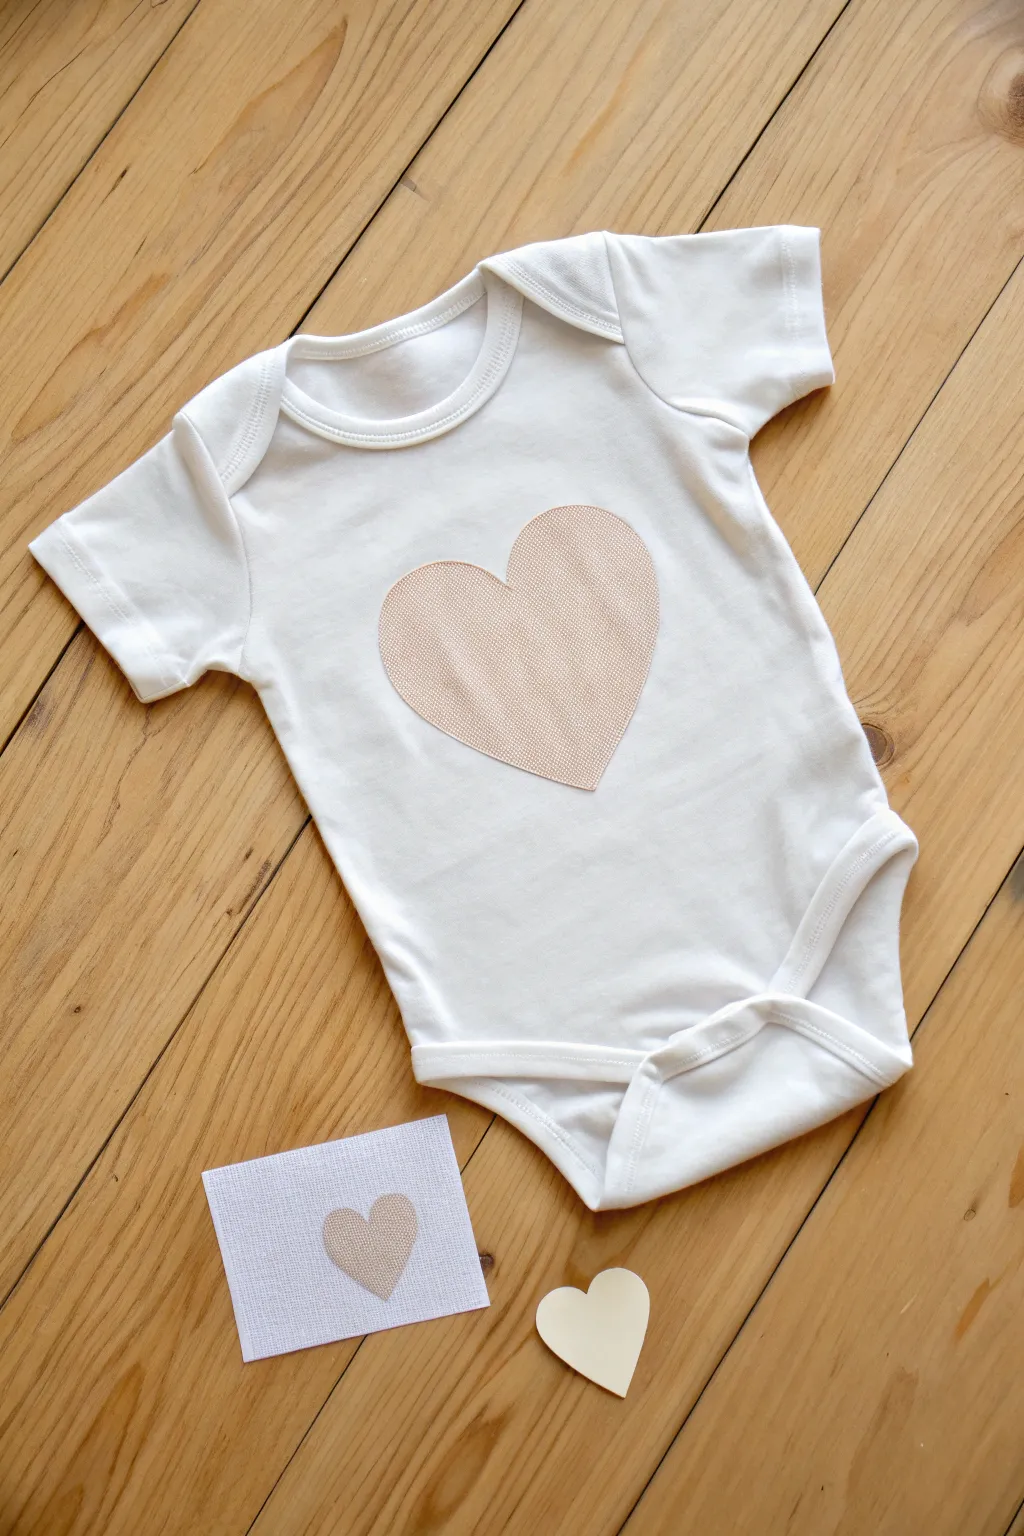

Create a delicate and heartwarming design with this negative-space silhouette technique. Using a simple stencil and fabric paint, you’ll achieve a soft, textured heart motif that looks professionally printed yet handmade with love.
Step-by-Step
Materials
- White cotton baby onesie (pre-washed and dried)
- Freezer paper or adhesive vinyl (for stencil)
- Hobby knife or sharp scissors
- Iron and ironing board (if using freezer paper)
- Fabric paint (soft beige, blush pink, or similar subtle tone)
- Fabric painting medium (optional, if using acrylics)
- Small piece of corrugated cardboard
- Stencil brush or cosmetic sponge wedge
- Paper plate or palette
- scrap paper for testing
Step 1: Preparing the Stencil
-
Design your heart:
Begin by drawing a simple, symmetrical heart shape on the non-shiny side of your freezer paper or the backing of your adhesive vinyl. For this look, aim for a heart about 4-5 inches wide. -
Cut the shape:
Carefully cut out the heart shape using sharp scissors or a hobby knife. For this project, you are actually creating a ‘negative’ stencil, meaning you want the hole shaped like a heart, but wait—looking closely at the reference, the heart is the painted part. So, cut out the *outside* frame if you want a painted heart, or cut out the heart shape itself to mask the area if you want a white heart on a painted background. *Correction*: The image shows a painted heart on white fabric. Therefore, we need a standard stencil where the heart is the open space. -
Refining the stencil:
Cut a square of freezer paper significantly larger than your drawn heart. Use a hobby knife to cut out the heart shape from the center, leaving you with a large paper square with a heart-shaped window. Keep the solid heart cutout for the matching card later. -
Prep the onesie:
Insert the piece of corrugated cardboard inside the onesie. This is crucial as it creates a smooth painting surface and prevents paint from bleeding through to the back of the garment.
Bleeding Edges?
If paint bleeds under the stencil, use a fine-tip paintbrush dipped in white fabric paint (or the onesie’s color) to carefully touch up and sharpen the outline.
Step 2: Applying the Stencil
-
Position the stencil:
Place your freezer paper stencil (shiny side down) onto the center of the onesie’s chest area. Measure from the armpits to ensure it is centered. -
Secure the stencil:
Run a hot iron (no steam) over the freezer paper. The heat will temporarily fuse the waxy side to the fabric, creating a crisp seal that prevents paint from seeping under the edges. Pay extra attention to the points and curves of the heart. -
Prepare your paint:
Squeeze a small amount of fabric paint onto your paper plate. To match the image, choose a soft blush or oatmeal color. I recommend mixing a tiny drop of brown into white if you can’t find the perfect premixed shade. -
Offload excess paint:
Dip your stencil brush or sponge into the paint, then dab it repeatedly on a scrap paper or clean part of the plate until the brush is almost dry. This ‘dry brush’ technique is the secret to that soft, textured look.
Pro Tip: Texture
Use a coarse-bristle stencil brush rather than a sponge if you want to replicate the specific woven-look texture visible in the reference photo.
Step 3: Painting the Heart
-
Begin stippling:
Start applying the paint using a vertical up-and-down pouncing motion. Do not stroke or drag the brush. -
Work the edges first:
Concentrate on the edges of the stencil cutout first. By pouncing lightly over the edge of the paper onto the fabric, you ensure a crisp line. -
Fill the center:
Move toward the center of the heart, maintaining that light pouncing motion. The goal is even coverage, but allowing a tiny bit of the fabric weave to show through adds to the vintage charm. -
Check density:
Assess the color. If it looks too faint, let the first layer dry for about 5 minutes and then apply a second light coat. The image shows a solid but soft opacity.
Step 4: Finishing Touches
-
Peel and reveal:
While the paint is still slightly tacky (don’t wait for it to fully cure), gently peel away the freezer paper stencil. Pull slowly at a sharp angle to avoid lifting any paint strings. -
Create the matching card:
Remember that solid heart cutout you saved? Place it onto a small piece of textured cardstock. Use your leftover paint on the brush to stipple around the *outside* of this heart shape to create a negative space silhouette, or use the stencil method again for a matching positive shape like the onesie. -
Let it cure:
allow the onesie to dry flat for at least 24 hours. Don’t rush this part. -
Heat set:
Once fully dry, place a thin cloth or pressing sheet over the painted design and iron it on a med-high setting for 3-5 minutes to permanently set the fabric paint.
Now you have a charming, custom outfit ready for gifting or a sweet photoshoot
Stamped Fruit Pattern Onesie
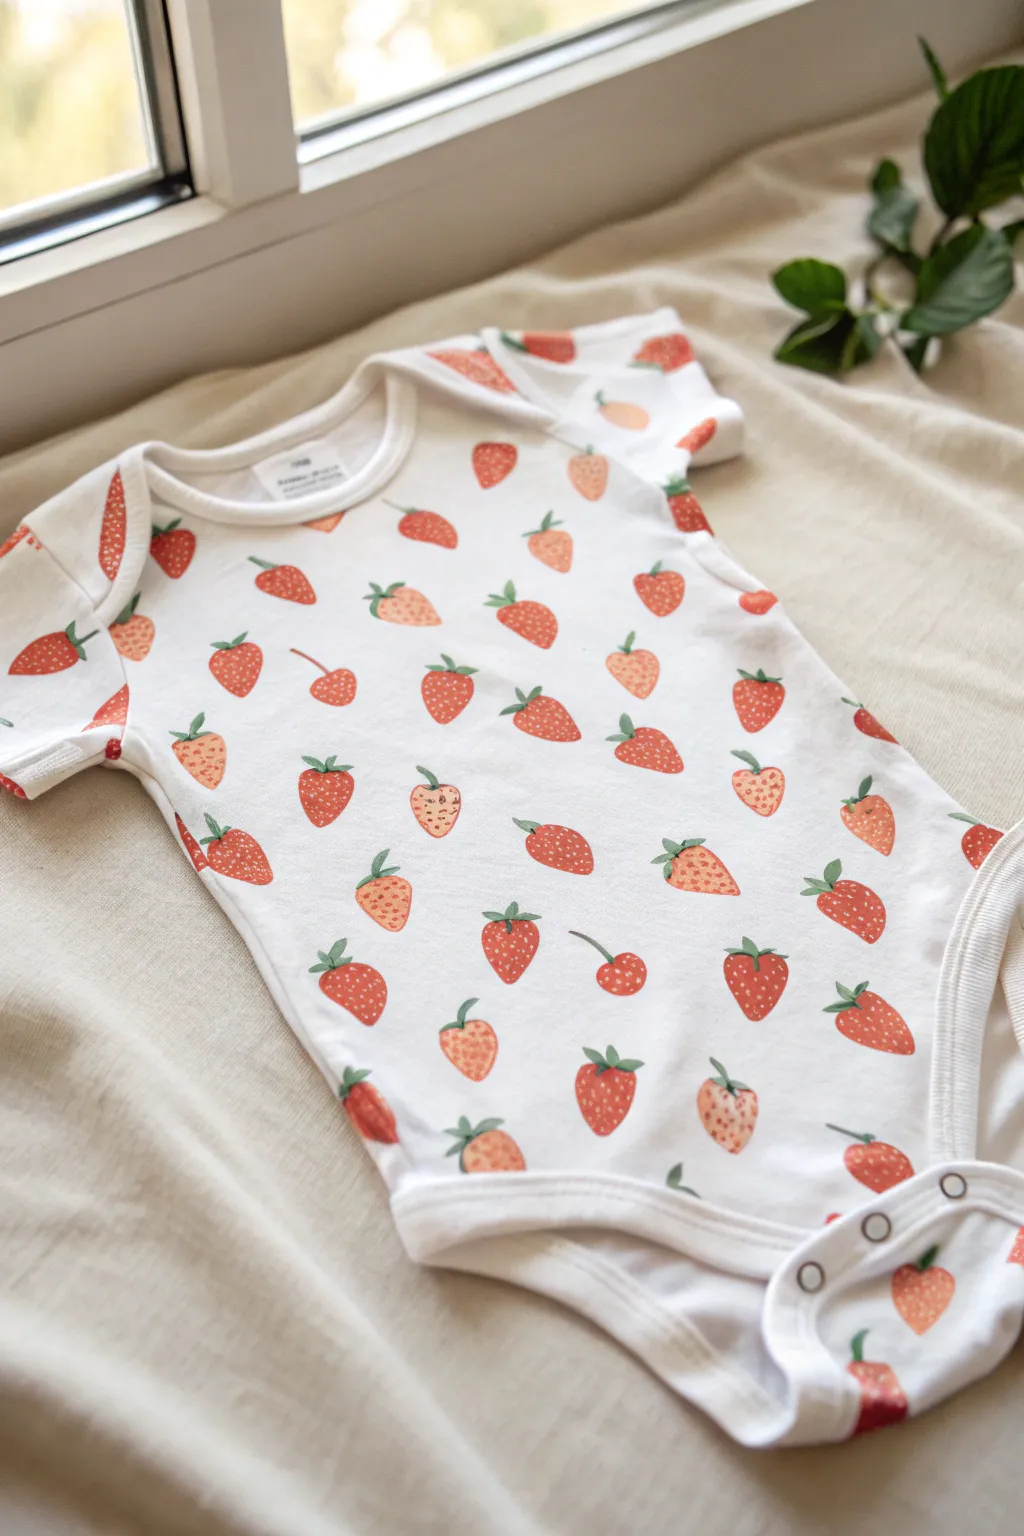
Create a sweet, summery garment for a little one with this adorable strawberry-stamped onesie project. Using simple carved stamps and fabric paint, you’ll achieve a charming, organic pattern featuring red and coral berries scattered playfully across the fabric.
Step-by-Step Tutorial
Materials
- White cotton baby onesie (pre-washed and dried)
- Soft-cut block printing carving block (rubber or linoleum)
- Linoleum carving tool with V-shaped gouge
- Fabric paint in Strawberry Red, Coral, and Leaf Green
- Small foam pouncers or sponges
- Fine detail paintbrush (size 0 or 1)
- Pencil and scrap paper
- Cardboard insert or stiff paper
- Iron for heat setting
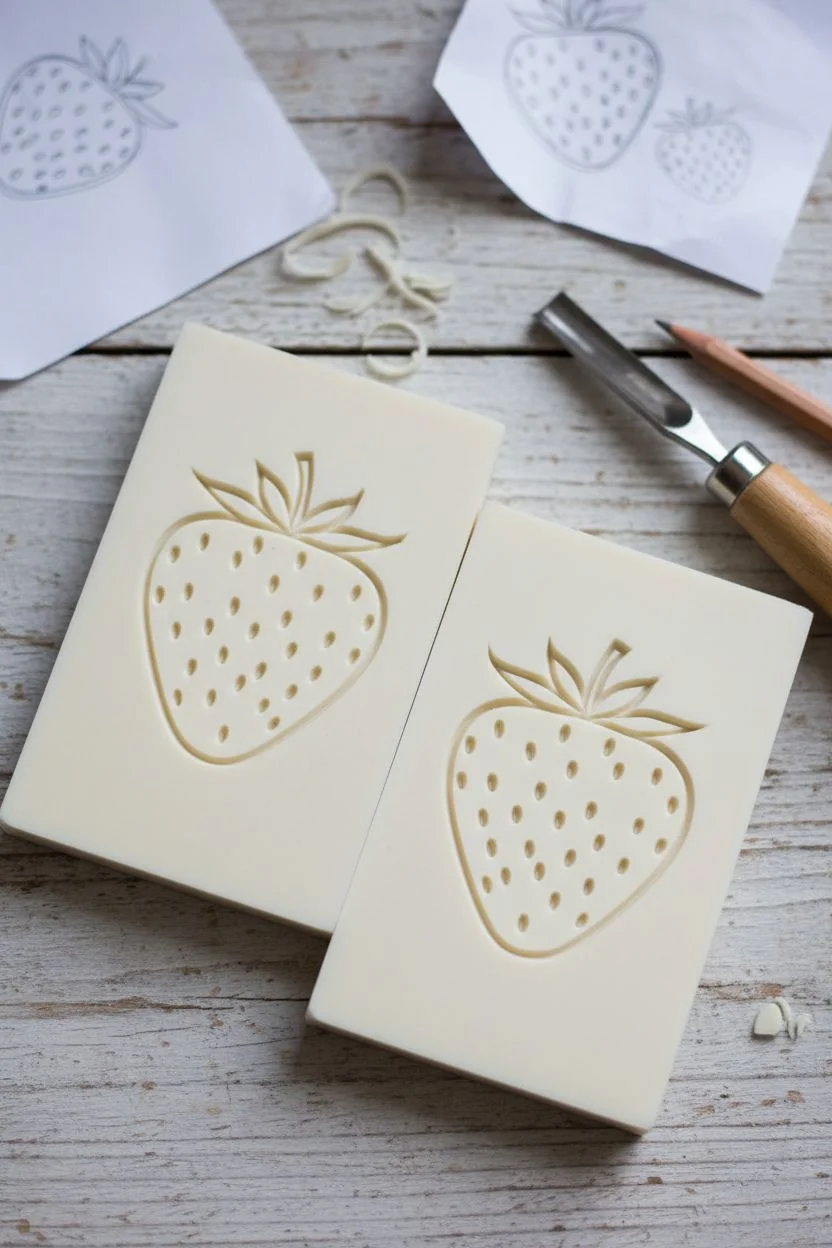
Step 1: Carving Your Stamps
-
Sketch the designs:
Begin by sketching a simple strawberry shape onto your carving block with a pencil. Aim for a slightly rounded, organic triangle shape about 1 inch tall. Draw a second, slightly different strawberry shape to add variety to your pattern. -
Carve the outlines:
Using your linoleum cutter with a V-gouge, carefully carve away the rubber around your pencil outlines. Remember to cut away from your body for safety. You want the strawberry shape to be the raised surface. -
Add seed details:
To create the seed texture, use the tip of your carving tool to make tiny, shallow gouges directly into the surface of the strawberry shape. Randomly scatter these little divots; these areas will not pick up paint, leaving white ‘seeds’ in your print. -
Cut out the stamps:
Use a craft knife or scissors to cut the excess rubber block away from your carved shapes, leaving just enough border to hold onto while stamping.
Stamp Fixes
If you get a patchy print, simply use your detail brush to fill in the missing color while the paint is still wet. Imperfections add charm!
Step 2: Stamping the Berries
-
Prepare the onesie:
Slide a piece of cardboard inside the onesie. This is crucial as it creates a flat surface for stamping and prevents the paint from bleeding through to the back of the garment. -
Load the red paint:
Squeeze a small amount of Strawberry Red fabric paint onto a palette or paper plate. Dab a foam pouncer into the paint and lightly tap it onto your first strawberry stamp. The surface should be evenly coated but not dripping. -
Stamp the first berries:
Press the stamp firmly onto the fabric. Rock it ever so slightly to ensure the edges make contact, then lift straight up. Place these red strawberries randomly across the onesie, leaving plenty of gaps for the other color. -
Switch to coral:
Clean your stamp or switch to your second strawberry design. Load this stamp with Coral fabric paint using a fresh pouncer. Stamp these lighter berries into the empty spaces between the red ones. -
Ensure random rotation:
As I work across the fabric, I like to rotate the stamp slightly for each impression—some pointing up, some angled left or right—to keep the pattern feeling playful and dynamic. -
Fill the edges:
Don’t forget the seams and edges. Stamp partial berries going off the side of the onesie to make it look like the fabric was cut from a larger patterned cloth.
Add Dimension
Mix a tiny drop of white into your red paint for a third shade of pink to add even more depth to your berry patch.
Step 3: Adding the Details
-
Dry the base layer:
Allow the stamped berries to dry to the touch, usually about 20-30 minutes, before moving on to the leaves. This prevents smudging while you work. -
Paint the leaves:
Using your fine detail brush and Leaf Green paint, hand-paint small leafy tops onto each berry. A simple three-stroke motion (center leaf, left leaf, right leaf) works perfectly for a loose, illustrative look. -
Add stem variety:
For variety, paint a few longer, curved stems on some of the berries, or add a tiny green dot where a stem might have been picked off. -
Optional seed emphasis:
If some of your stamped seed divots filled in with paint, you can use a very fine brush with white paint (or a toothpick) to re-add tiny seed dots on top of the dried berries.
Step 4: Finishing Up
-
Complete drying:
Let the onesie sit flat until the paint is completely dry. Follow the manufacturer’s instructions on your fabric paint bottle, often 24 hours. -
Heat set the design:
Once fully dry, heat set the paint to make it permanent and washable. Turn the onesie inside out or place a cloth over the design, then iron on a cotton setting (no steam) for several minutes.
Now you have a custom-printed outfit ready for sunny days and photo ops
Puffy Outline Doodle Onesie
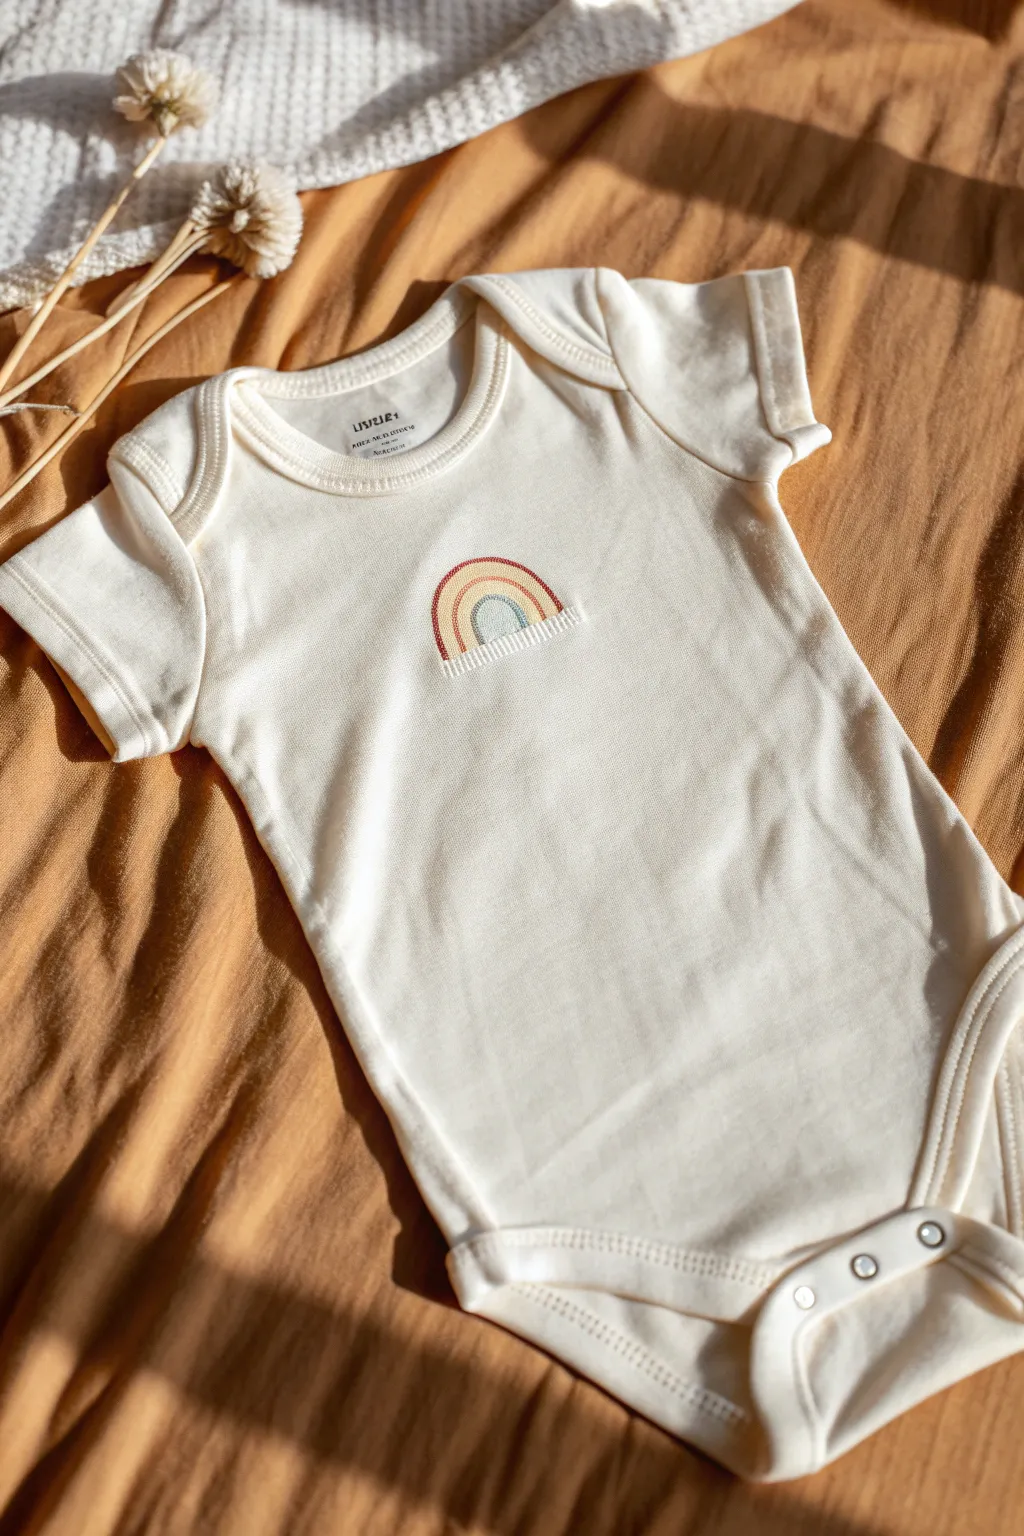
Achieve the cozy look of embroidery without a needle and thread using this dimensional paint technique. This design mimics the texture of a stitched rainbow patch, featuring puffy raised lines in a calming, earthy color palette.
Detailed Instructions
Materials
- White or cream cotton baby onesie (pre-washed)
- Dimensional fabric paint (Puff paint) in muted tones: rust orange, mustard yellow, sage green, and slate blue
- Fine-tip applicator nozzles for paint bottles
- Disappearing ink fabric marker or tailor’s chalk
- Cardboard insert
- Ruler or straight edge
- Paper plate (for testing flow)
Step 1: Preparation
-
Pre-wash the garment:
Before you begin, wash and dry the onesie without using fabric softener. This removes sizing chemicals and ensures the paint adheres permanently to the fibers. -
Insert the barrier:
Slide a piece of cardboard inside the onesie, positioning it directly behind the chest area. This stretches the fabric slightly to create a smooth surface and prevents paint from bleeding through to the back. -
Smooth the canvas:
Use your hands to smooth out any wrinkles over the cardboard. Depending on how wrinkled the fabric is, you might want to give it a quick iron to ensure your lines stay perfectly straight. -
Check your paint flow:
Squeeze a small amount of each paint color onto a paper plate. You want to ensure the nozzle is clear of dried clumps and get a feel for how much pressure produces a steady line.
Step 2: Drafting the Design
-
Mark the baseline:
Using your ruler and disappearing ink marker, draw a horizontal line about 2 inches long in the center of the chest. This will be the flat bottom of your rainbow. -
Sketch the outer arch:
Lightly sketch the largest arch first, connecting it to the ends of your baseline. Don’t worry if it’s not perfect on the first try; the marker will vanish later. -
Fill in the inner arches:
Sketch three smaller concentric arches inside the first one. Leave a small gap between each line where the ‘fabric’ would show through in a real patch.
Uneven Squeezing?
If an air bubble causes a paint splatter, quickly scoop it up with a Q-tip or a toothpick efficiently before it soaks into the fibers.
Step 3: Painting the Texture
-
Start with the center:
Take your slate blue puff paint and trace over the smallest, innermost arch. Instead of a smooth sweep, use a tiny back-and-forth zigzag or a series of very close vertical lines to mimic the look of satin stitching. -
Add the second layer:
Moving outward, use the sage green paint for the next arch. Apply the paint thickly enough that it stands up from the fabric, maintaining that faux-thread texture. -
Create the yellow arch:
Apply the mustard yellow paint to the third arch. I find it helpful to rotate the entire onesie as I work around the curve to keep my hand angle consistent. -
Finish the outer arch:
Use the rust orange paint for the final, largest arch. Ensure the lines are dense and opaque so no white fabric shows through the paint itself. -
Create the base stitching:
Using white or cream dimensional paint (matching the onesie color), draw short vertical lines underneath the rainbow arches. This creates the illusion of raw fabric edges or a fringe detail often found on sewn patches.
Add Sparkle
For a magical touch, lightly dust fine iridescent glitter over the wet paint. When dry, shake off the excess for a subtle shimmer.
Step 4: Finishing Up
-
Inspect the edges:
Look closely at your ‘stitches.’ If any areas look too flat, carefully dab a little extra paint on top to build up the 3D relief. -
Dry flat:
Keep the cardboard inside and let the onesie dry flat in a safe place. Dimensional paint takes longer to dry than standard acrylics, usually requiring at least 4 hours for the surface to set. -
Full cure time:
Wait a full 72 hours before wearing or washing to allow the paint to cure completely deep down. -
Steam the markings:
Once fully dry, if any marker lines are still visible, hold a steam iron above the design (do not touch the paint!) or dab with a damp cloth to remove the ink. -
Puff activation:
If your brand of paint requires heat to puff up fully, follow the manufacturer’s instructions now, typically by using a hair dryer or ironing on the reverse side.
This charming faux-embroidery design makes a wonderful keepsake or a heartfelt gift for a new arrival
Abstract Color-Block Modern Onesie
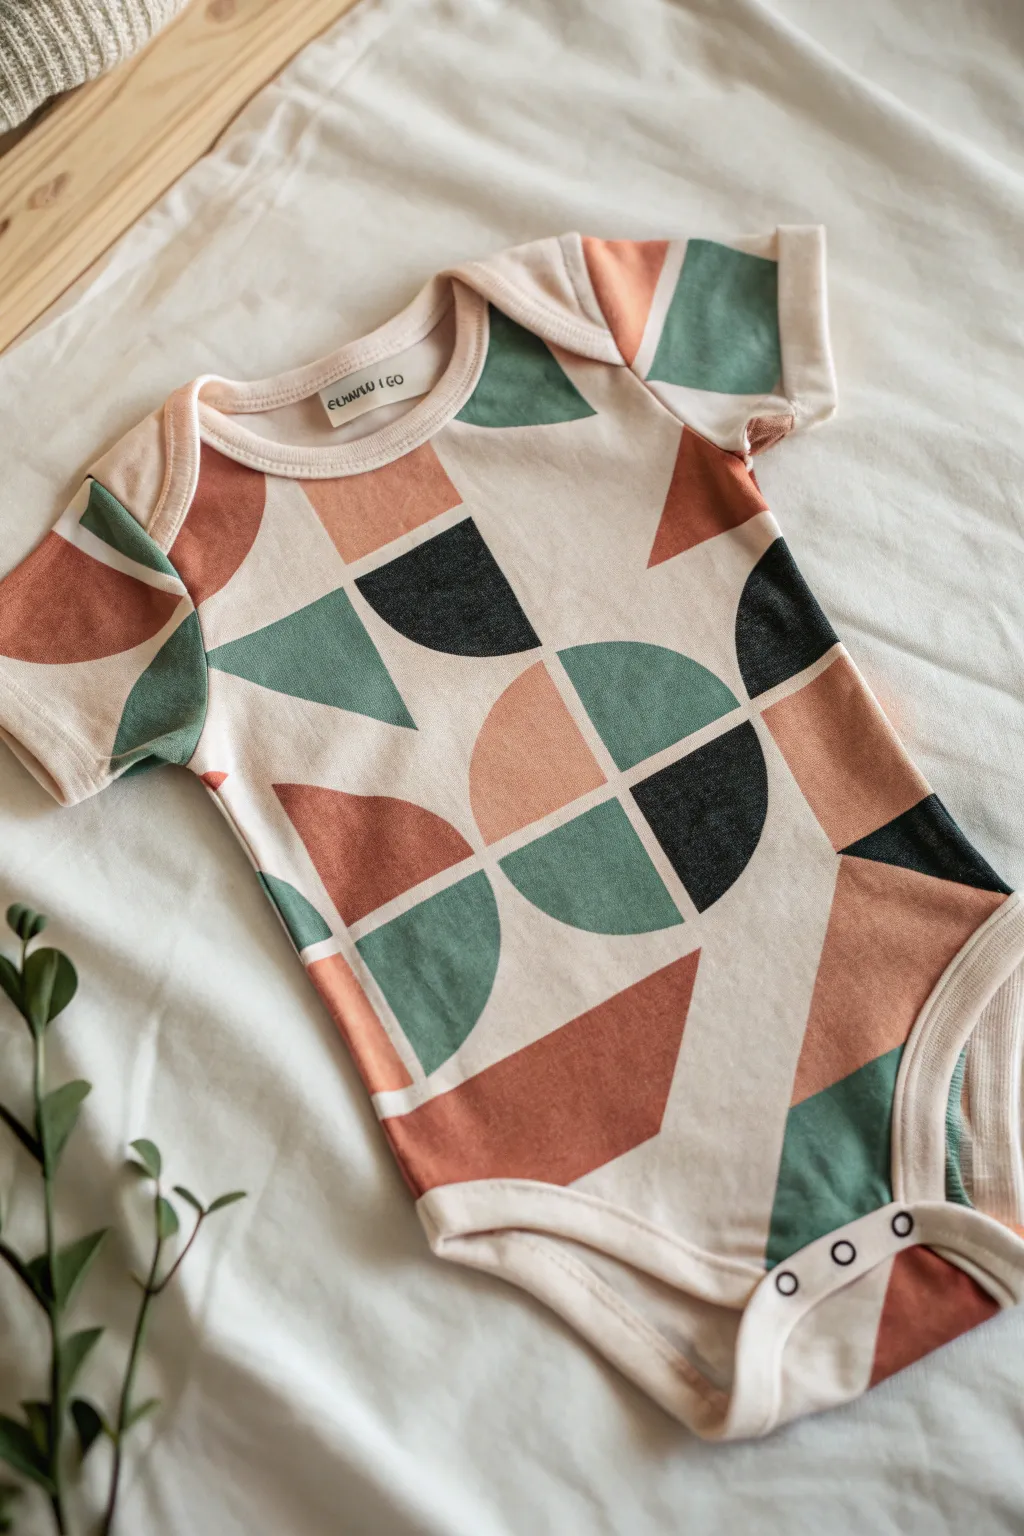
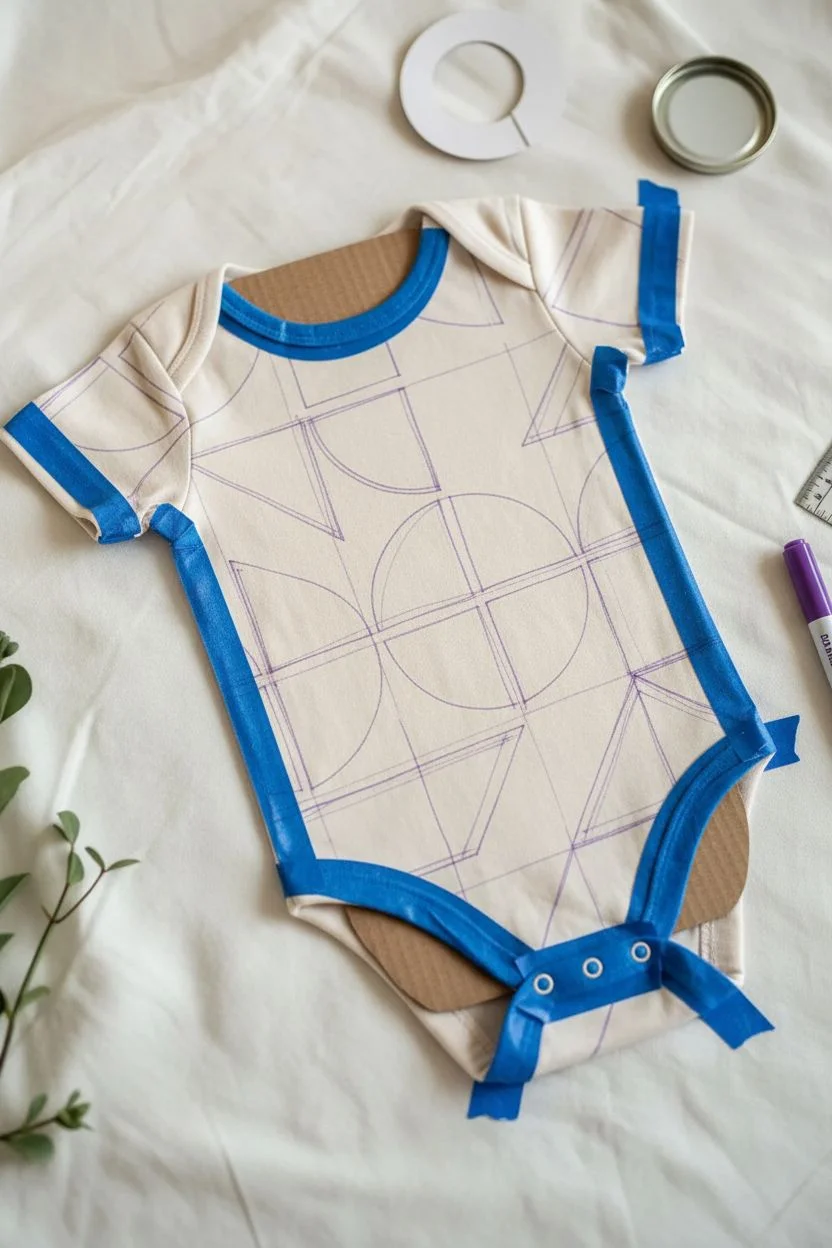
Transform a plain cream onesie into a trendy, boutique-style garment with this geometric color-block design. Using a palette of muted terracotta, sage, and charcoal, you’ll create bold shapes that look professionally printed rather than hand-painted.
Step-by-Step Guide
Materials
- Plain cream or beige baby onesie (pre-washed)
- Fabric paints (Terracotta/Rust, Sage Green, Charcoal/Black)
- Textile medium (optional, if using acrylics)
- Cardboard insert
- Painter’s tape or masking tape (various widths)
- Flat shader brushes (medium and small)
- Circle stencils or household round objects (cups, lids)
- Ruler
- Fabric marker or disappearing ink pen
- Iron (for setting)
Step 1: Preparation & Layout
-
Pre-wash and Prep:
Begin by washing and drying your onesie without fabric softener to ensure the paint adheres properly. Once dry, slide a piece of cardboard inside the body and sleeves to prevent paint from bleeding through to the back. -
Plan the Grid:
This design relies on an invisible grid structure. Using a ruler and a disappearing ink pen, lightly mark vertical and horizontal guidelines to help organize your shapes. I like to imagine the shirt divided into four or six large quadrants. -
Draft the Circles:
Using your circle stencils or household lids, trace several full circles at the intersections of your grid lines. Don’t cover the whole shirt yet; just place 3-4 large circles strategically. -
Bisect and Quarter:
Use your ruler to draw lines straight through the center of your circles, dividing them into semicircles or quarter-wedges. This creates that classic Bauhaus look seen in the photo. -
Add Triangles and Rectangles:
In the negative spaces between your circles, sketch varying sizes of triangles and angled rectangles. Aim for a balanced composition where shapes touch but don’t overcrowd each other.
Step 2: Painting the Shapes
-
Tape for Crisp Lines:
For the straight edges of your triangles and rectangles, apply painter’s tape firmly. Press down on the edges with your fingernail to stop paint from seeping under. -
Paint the Terracotta Layers:
Start with your rust/terracotta color. Select specific shapes—a semicircle here, a triangle there—scattered across the design to keep the color balanced. Apply a thin, even coat. -
Apply Sage Green:
Switch to a clean brush and fill in your designated sage green sections. Be careful where shapes touch; if a wet green shape touches a wet terracotta one, they will bleed. Let neighbors dry first. -
Add Charcoal Accents:
Use the charcoal or soft black paint for the high-contrast elements. In the example, these are often quarter-circles or small wedges. Use a smaller flat brush for these to stay within the lines. -
Freehand Curved Edges:
While tape works for straight lines, the curved edges of the circles need a steady hand. Load a flat brush and carefully glide it along the curve of your traced line. -
Second Coat:
Once the first layer is dry to the touch, apply a second coat to any colors that look patchy. The fabric tends to absorb the first layer, so a second pass creates that solid, printed look. -
Remove Tape:
Carefully peel away your painter’s tape while the paint is still slightly tacky to avoid cracking the edges. If you see any bleeds, tidy them up with a tiny bit of the background colored paint or a damp Q-tip.
Bleeding edges?
If paint bleeds under the tape, wait for it to dry completely. Then, use a small stiff brush and a tiny bit of white/cream paint to ‘erase’ the mistake by painting over it.
Step 3: Finishing Touches
-
Wait and Dry:
Allow the painted onesie to dry completely flat for at least 24 hours. Do not disturb it, as thick fabric paint can take time to cure underneath the surface. -
Heat Set the Design:
To make the onesie washable, turn it inside out. Use an iron on a medium setting (no steam) and press the back of the design area for 3-5 minutes to lock in the pigments.
Freezer Paper Trick
For perfect circles, cut the shape out of freezer paper (shiny side down). Iron it onto the fabric to create a temporary stencil that blocks paint perfectly, then peel off.
Now you have a custom, designer-quality baby outfit ready for the next photo op
Controlled Splatter Galaxy Onesie
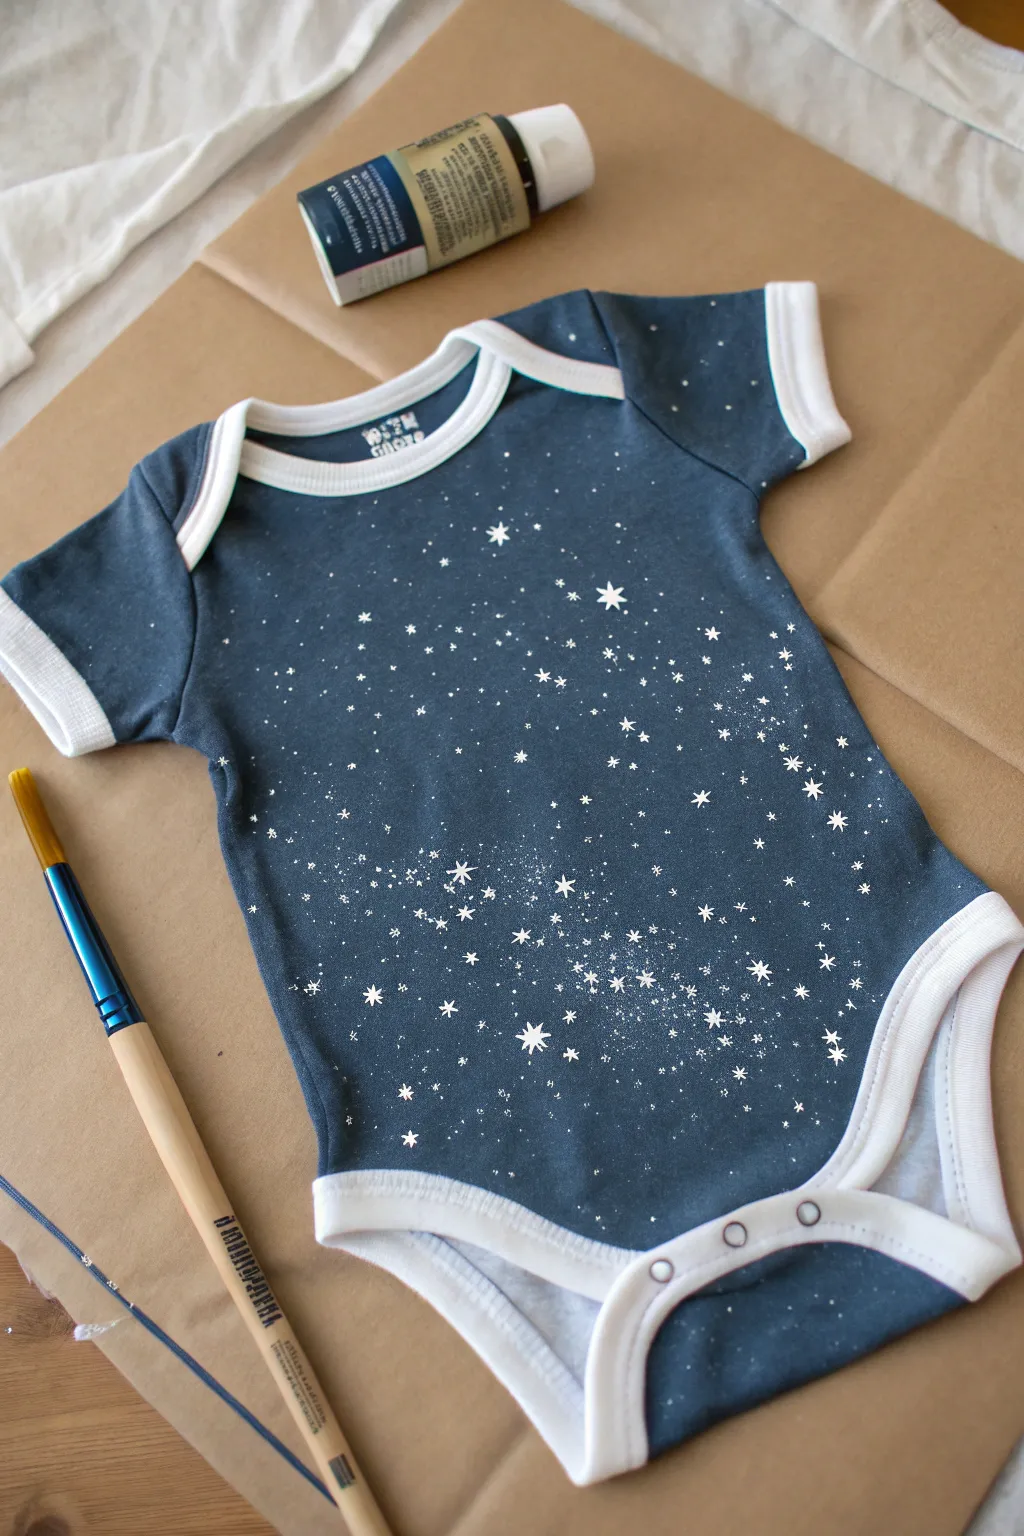
Transform a plain dark bodysuit into a dazzling window to the universe with this simple fabric painting project. The combination of fine mist splatters and hand-painted twinkling stars creates a dreamy, cosmic effect perfect for your little stargazer.
Step-by-Step
Materials
- Dark blue or navy cotton baby onesie (pre-washed)
- White fabric paint (soft finish recommended)
- Small round paintbrush (size 2 or 4)
- Stiff-bristled toothbrush or stencil brush (for splattering)
- Cardboard insert
- Paper plate or palette
- Water cup
- Drop cloth or newspapers to protect your surface
Step 1: Preparation
-
Wash and dry:
Before you begin, wash the onesie without fabric softener to remove any sizing chemicals. This ensures the paint adheres permanently to the fibers. -
Prepare your workspace:
Cover your entire table with newspaper or a drop cloth. Splatter painting can get messy, and tiny droplets travel further than you might expect. -
Insert protective barrier:
Cut a piece of cardboard to fit inside the onesie. Slide it between the front and back layers of fabric to prevent paint from bleeding through to the back. -
Smooth the fabric:
Pull the fabric taut against the cardboard insert so there are no wrinkles, which could distort your star patterns.
Step 2: Creating the Milky Way
-
Load the splatter brush:
Squeeze a small amount of white fabric paint onto your palette. Dip the tips of your stiff toothbrush or stencil brush into the paint. -
Test consistency:
Test your splatter on a scrap piece of paper first. If the paint is too thick, dampen the brush slightly with water, but don’t make it runny. -
Create the dense cluster:
Hold the brush about 6 inches above the center of the onesie. Use your thumb to flick the bristles back, releasing a fine mist of paint. -
Concentrate the stars:
Focus your heaviest splattering in a diagonal swath across the onesie to mimic the Milky Way. I like to do a few heavy flicks here to create a bright focal point. -
Fade the edges:
Move the brush higher up and flick more gently around the edges of the onesie, creating a lighter dusting of stars that fades out toward the seams. -
Check for blobs:
Inspect the fabric for any large, unintentional paint blobs. If you find one, simply gently dab it with the corner of a paper towel or plan to turn it into a larger painted star later. -
Let the base dry:
Allow this layer of fine splatter to dry for about 15-20 minutes. It doesn’t need to be cured, just dry to the touch so you don’t smudge it.
Clean Splatter Tip
Use a piece of paper to mask off the collar and arm cuffs before you start splattering. This keeps the trim crisp and clean while the body gets the star treatment.
Step 3: Painting the Constellations
-
Switch brushes:
Pick up your small, round paintbrush (size 2 or 4 works best for detail). -
Paint large hero stars:
Dip into the white paint and identify 5-7 spots on the onesie where you want prominent stars. These should be scattered randomly. -
Form the star points:
For these main stars, paint a simple cross shape first (+), then add a smaller diagonal cross (x) over the center to create an 8-pointed glimmer. -
Add medium stars:
Use the tip of the brush to add slightly smaller, 4-pointed stars (just a simple cross shape) in the empty spaces between the dense splatter groups. -
Create variation:
Use the handle end of your paintbrush dipped in paint to dot in solid, distinct circular stars that are larger than the splatter mist but smaller than the hand-painted stars. -
Review the composition:
Step back and look at the overall balance. If any area looks too empty, add a few tiny hand-painted dots specifically in that void.
Glow Up
Mix a tiny amount of glow-in-the-dark fabric medium into your white paint for the larger stars. The onesie will look normal by day but reveal a hidden galaxy at night.
Step 4: Finishing Up
-
Dry thoroughly:
Let the onesie dry flat for at least 24 hours. The thicker hand-painted stars will take longer to dry than the splatter. -
Heat set:
Once fully dry, remove the cardboard. Iron the design from the backside (inside out) on a cotton setting for 3-5 minutes to heat-set the fabric paint for washability.
Now you have a celestial masterpiece ready for your little one to wear
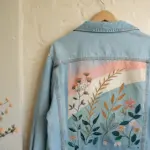


Have a question or want to share your own experience? I'd love to hear from you in the comments below!