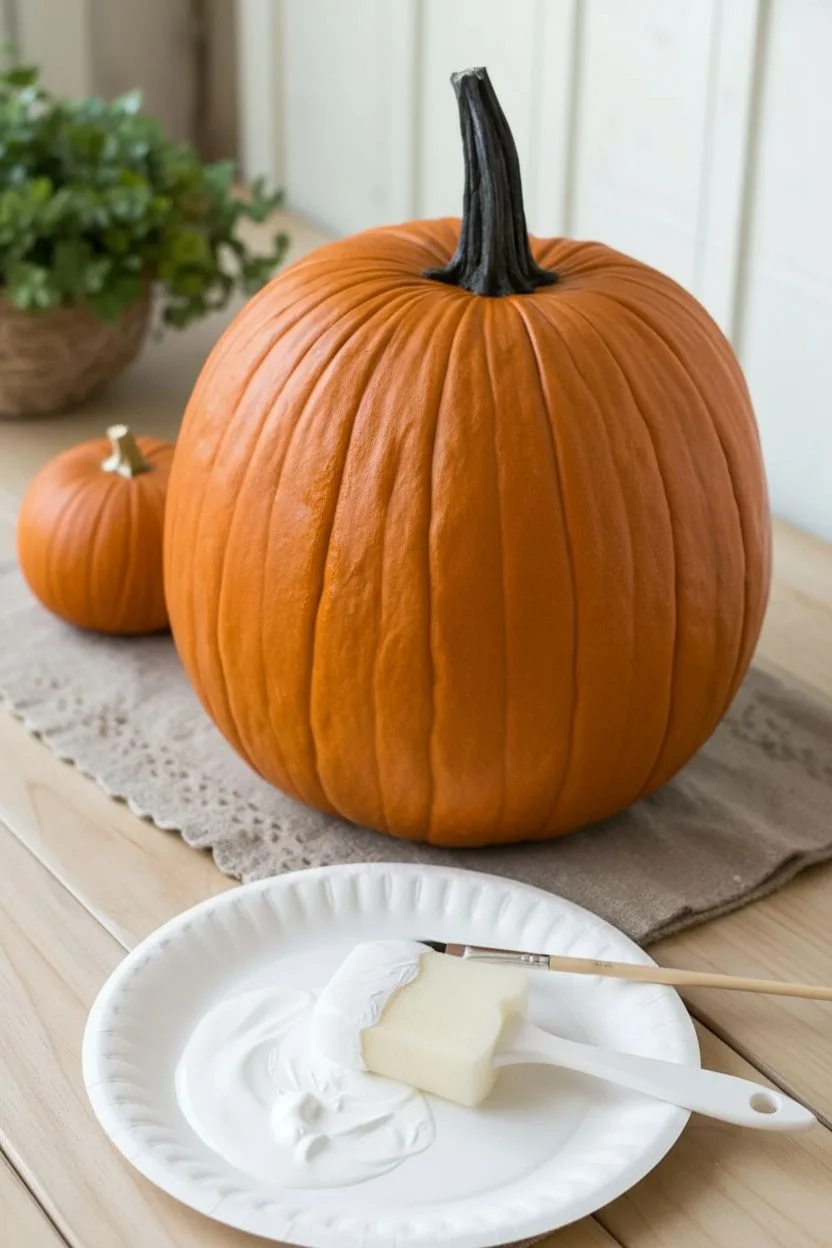
If you want something sweet, simple, and totally frame-worthy for baby’s first pumpkin, paint is the easiest way to make a keepsake without the stress of carving. These baby-safe pumpkin paint ideas are all about tiny handprints and footprints—the kind of little details you’ll be so glad you captured.
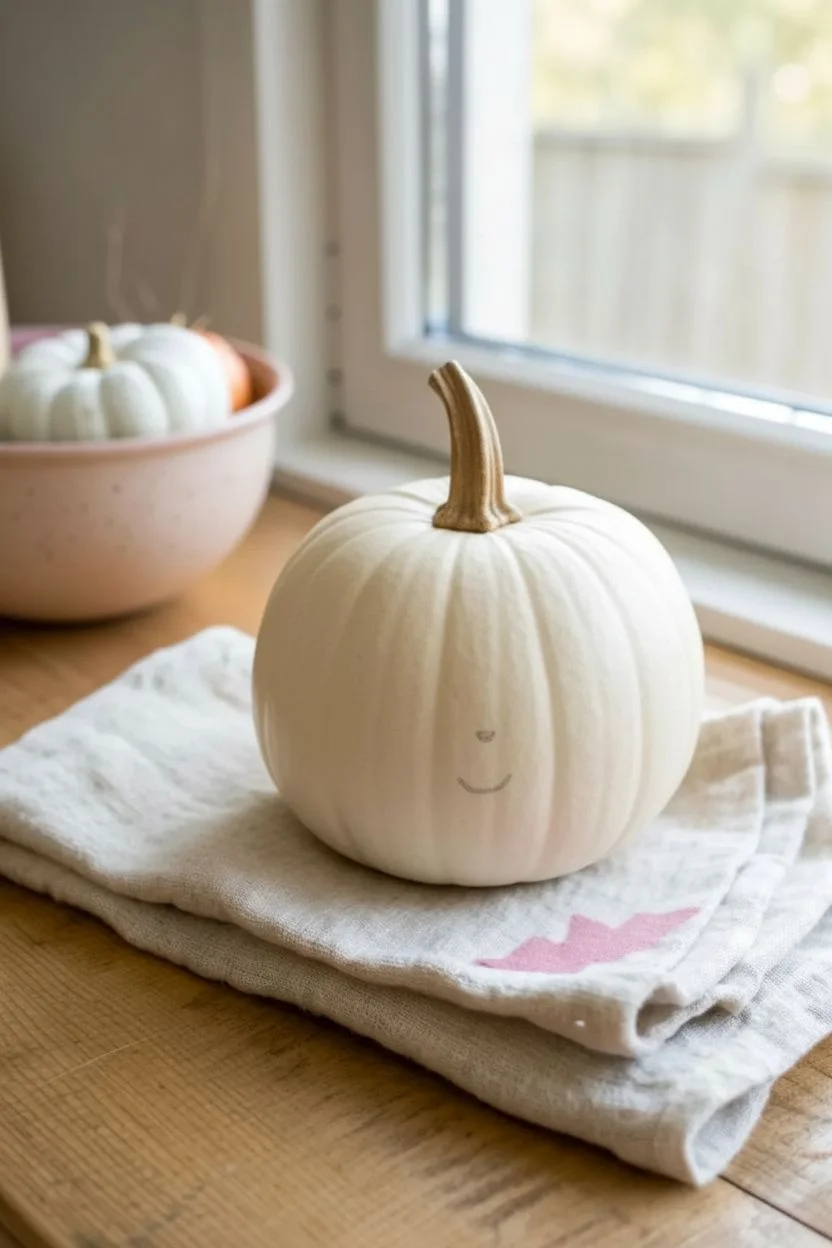
Classic BOO Baby Footprints Pumpkin
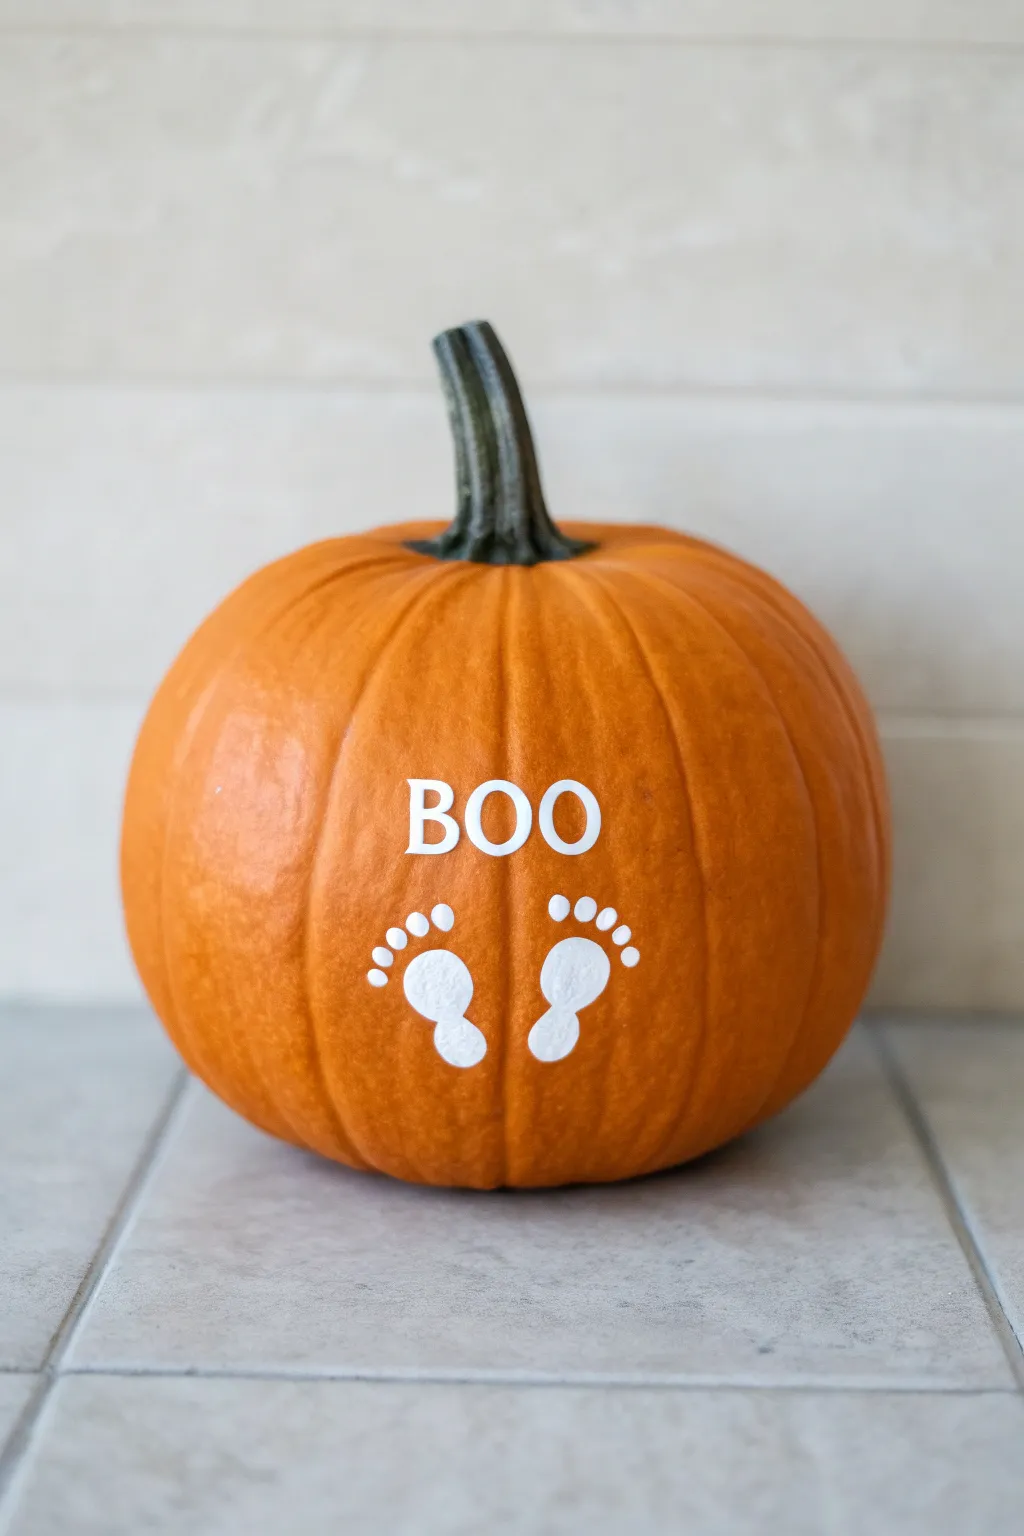
Capture a sweet moment in time with this adorable keepsake pumpkin featuring your little one’s footprints. The classic combination of a bright orange pumpkin and crisp white paint creates a festive design that doubles as a precious memory.
Step-by-Step
Materials
- Medium-sized orange pumpkin (smooth surface)
- White non-toxic acrylic craft paint or tempera paint
- Small foam paintbrush or wide flat paintbrush
- Fine-tipped paintbrush (for lettering)
- Baby wipes or damp paper towels
- A helper (to hold the baby)
- Stencil (optional, for the letters)
- Pencil or chalk
- Clear sealant spray (optional)
Step 1: Preparation & Planning
-
Clean surface:
Start by thoroughly wiping down your pumpkin with a damp cloth to remove any dirt or oils from the pumpkin patch. Dry it completely with a clean towel. -
Positioning check:
Look for the smoothest, flattest side of the pumpkin. Avoid deep ridges or bumps where you plan to place the footprints, as smooth skin ensures the clearest print. -
Draft the text:
Using a pencil or a piece of chalk, lightly sketch the word ‘BOO’ in uppercase serif letters about halfway up the pumpkin’s face. Leave enough room underneath for the feet.
Clean Print Pro-Tip
Make a practice print on a piece of paper first. This gets the baby used to the sensation of cold paint and removes excess paint globs for a cleaner final stamp.
Step 2: Painting the Text
-
Outline the letters:
Dip your fine-tipped paintbrush into the white acrylic paint. Carefully trace over your pencil lines for the ‘B’, ‘O’, and ‘O’. -
Fill in the letters:
Once outlined, use the same brush to fill in the body of the letters. You may need a second coat to make the white truly opaque against the orange skin. -
Clean edges:
If any lines look shaky, use a damp cotton swab to gently wipe away mistakes while the paint is still wet. Let the text dry completely before moving to the messy part.
Step 3: The Footprints
-
Set the scene:
Set up your station comfortably. I find it easiest to sit on the floor with the pumpkin stabilized between my knees or propped against a wall so it won’t roll. -
Paint the left foot:
Have your helper hold the baby securely. Using the foam brush, apply a generous, even layer of white paint to the bottom of the baby’s left foot. Work quickly so it doesn’t dry. -
Print the left foot:
Guide the painted foot onto the pumpkin surface below the text, angling the toes slightly outward to the left. Press the heel first, then roll gently to the toes. -
Lift and clean:
Lift the foot straight off the pumpkin surface to avoid smudging. Immediately wipe the baby’s foot clean with baby wipes. -
Paint the right foot:
Repeat the process with the right foot. Apply the white paint generously to the sole. -
Print the right foot:
Press the right foot onto the pumpkin next to the first print, angling the toes slightly outward to the right to create a V-shape arrangement. -
Clean up baby:
Thoroughly clean the second foot before admiring your work. This is the most crucial step to prevent white footprints all over your floors.
Level Up: Add A Date
Use a black fine-point permanent marker or a very thin brush to write the year or the baby’s age in months on the back of the pumpkin as a hidden memory.
Step 4: Finishing Touches
-
Touch up prints:
Baby prints are rarely perfect on the first try. If a toe didn’t stamp fully, use your fine-tipped brush to dab a little paint into the missing area to complete the shape. -
Refine the text:
Check your ‘BOO’ lettering again. If the paint has soaked in and looks faded, apply one final top coat to make the letters pop. -
Let it dry:
Allow the pumpkin to sit undisturbed for at least an hour until the thickest parts of the paint consistently feel dry to the touch. -
Seal (optional):
If you want the pumpkin to last longer outside, lightly mist the painted area with a clear acrylic sealant spray to protect the design from moisture.
Place your adorable pumpkin on the porch and enjoy the sweetest decoration of the season


Two Footprint Ghosts Floating on a Pumpkin
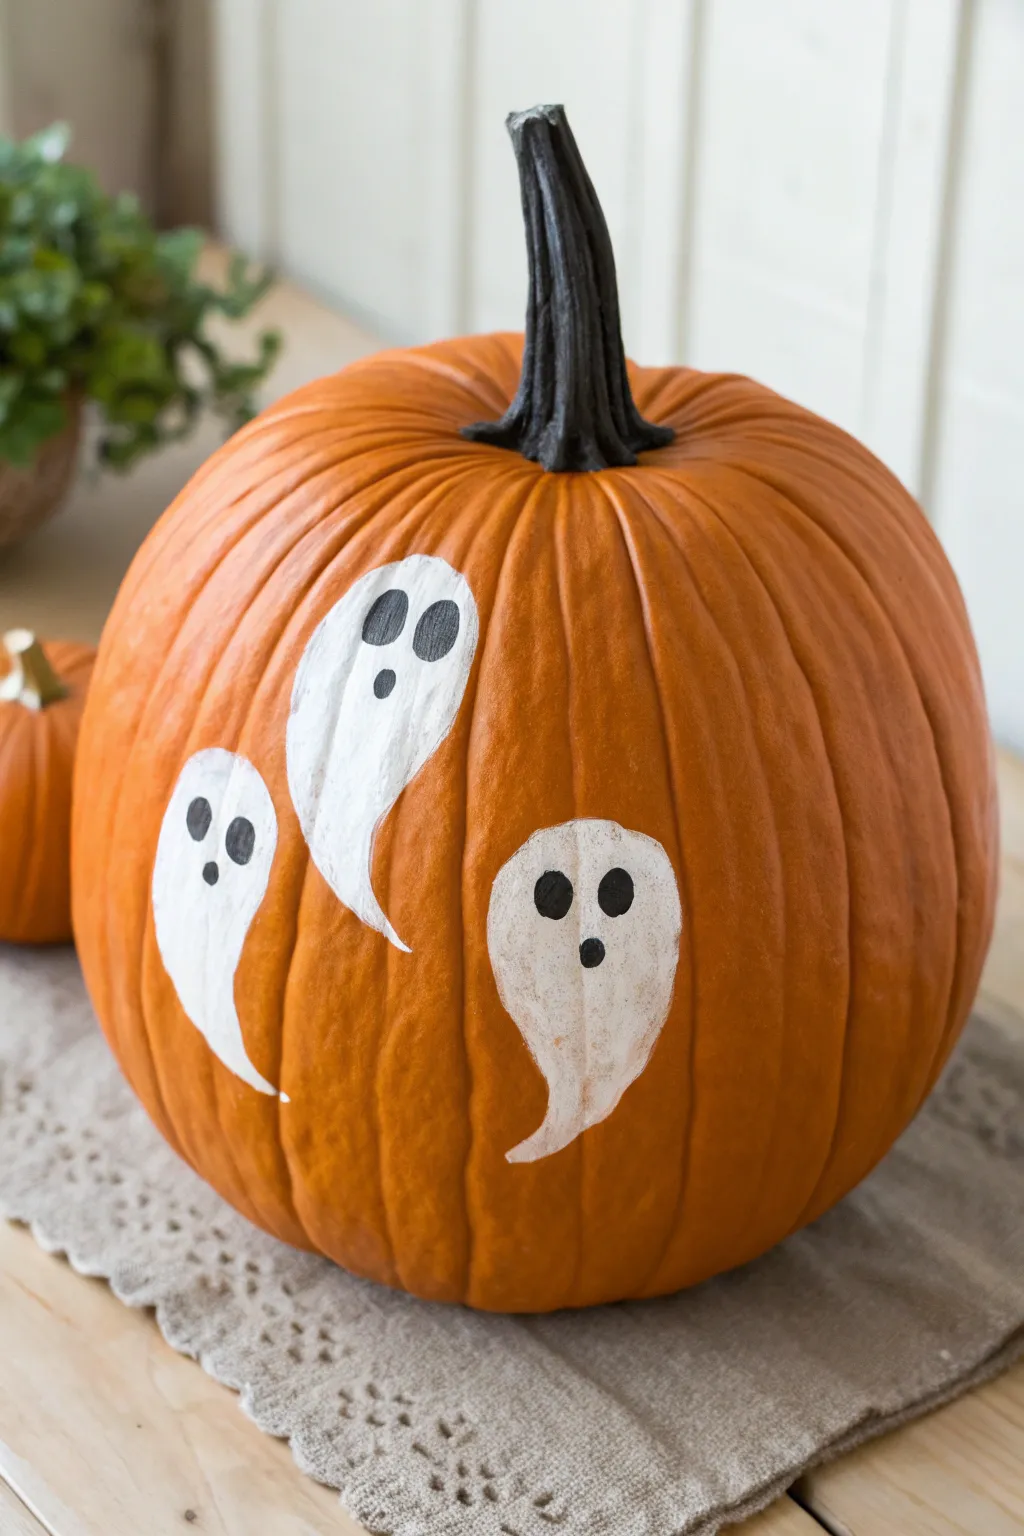
Transform tiny feet into floating phantoms with this adorable keepsake pumpkin project. By using your baby’s footprints as the base, you’ll create a trio of friendly ghosts that capture a moment in time on a classic fall canvas.
Step-by-Step Tutorial
Materials
- Large orange pumpkin (real or faux)
- White acrylic paint (non-toxic)
- Black acrylic paint
- Foam sponge brush
- Small round detail brush
- Baby wipes or damp cloth
- Paper plate or palette
- Clear sealant spray (optional)
Step 1: Preparation
-
Clean the surface:
Wipe down your pumpkin thoroughly with a damp cloth to remove any dirt or waxy residue. A clean, dry surface ensures the paint adheres properly and prevents peeling later on. -
Set up your station:
Lay down some newspaper or a drop cloth. Place your pumpkin on a stable surface at a comfortable height for stamping. -
Prepare the white paint:
Squeeze a generous amount of non-toxic white acrylic paint onto a paper plate. You want a puddle large enough to coat a foam brush easily.
Smudge Control
If a foot wiggles and smudges the print, don’t panic. Simply wipe it away immediately with a wet cloth before it dries and try again.
Step 2: Creating the Ghosts
-
Ink the foot:
Using the foam sponge brush, gently coat the bottom of your baby’s foot with white paint. Ensure even coverage from heel to toe, but avoid thick globs that might smear. -
First stamp:
Have a helper hold the pumpkin steady. Gently press the painted foot against the pumpkin surface, rocking it slightly from heel to toe to ensure the arch makes contact. -
Lift carefully:
Pull the foot straight back from the pumpkin surface to avoid dragging the paint. Immediately wipe the foot clean with a baby wipe before moving on. -
Repeat the process:
Repeat the painting and stamping process two more times to create a group of three ghosts. Position them at slightly different heights and angles for a floating effect. -
Fill in the gaps:
While the general shape comes from the foot, you might need to touch up the edges. Use a small brush to fill in the heel area if the paint was too thin, creating a solid white ghost shape. -
Shape the tail:
I extend the heel section just slightly with a brush to give it a little curve, making it look more like a wispy ghost tail than just a plain heel. -
Let it dry:
Allow the white paint to dry completely. This is crucial—if the white is still wet, the black facial features will bleed and turn gray.
Make it Sparkle
While the white paint is still wet, sprinkle a little iridescent white glitter over the ghosts to give them a magical, shimmering glow in the sunlight.
Step 3: Adding Details
-
Paint the eyes:
Dip your small round detail brush into black acrylic paint. Paint two small vertical ovals near the wider ‘toe’ end of the print for the ghost’s eyes. -
Add the mouth:
Paint a round or oval mouth below the eyes. Vary the expression—one can be a surprised ‘O’ shape, while another could be smaller and rounder. -
Stem makeover:
If your pumpkin’s stem looks dull, give it a quick coat of black paint to match the ghostly features and add contrast to the orange skin. -
Final touches:
Check your ghosts for any uneven edges. If necessary, use a tiny bit of white paint to clean up the outline around the black features once they are dry. -
Seal (optional):
If this pumpkin will live outside on a porch, lightly mist it with a clear acrylic sealant spray to protect the precious prints from moisture.
Display your haunted masterpiece proudly as a sweet memento of how small those little feet once were


Upside-Down Handprint Ghost With Wavy “Boo”
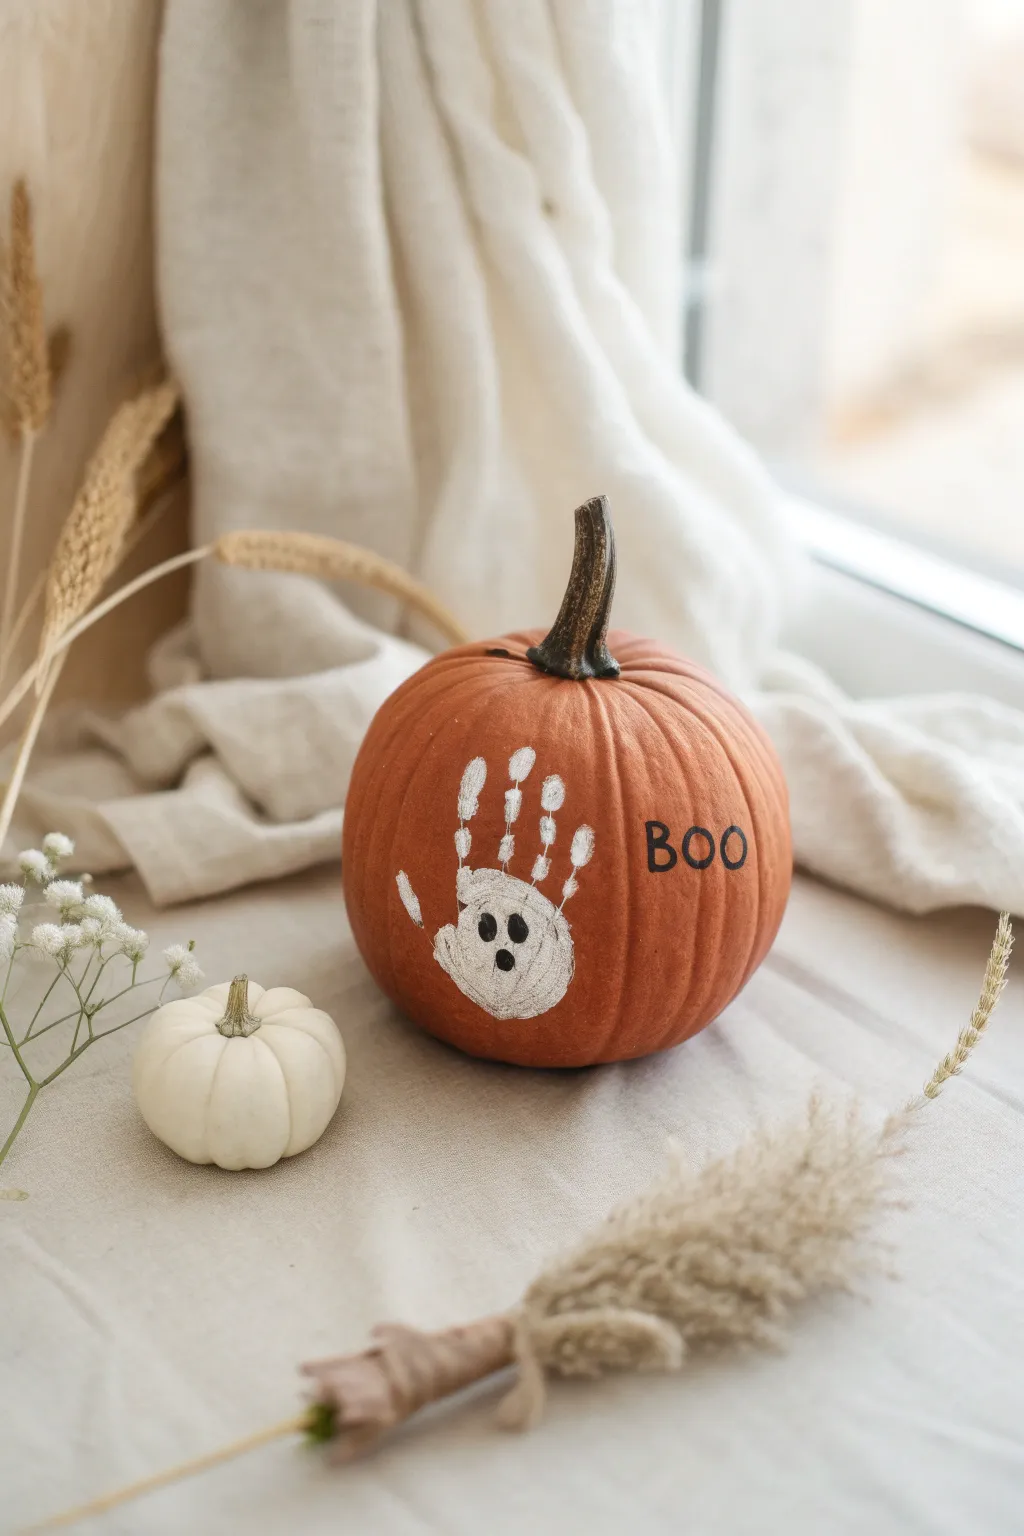
Transform a tiny pumpkin into a ghostly keepsake with this simple yet adorable design. By turning a little white handprint upside down and adding a few details, you create a friendly phantom perfect for a baby’s first Halloween.
Step-by-Step
Materials
- Small sugar pumpkin or pie pumpkin (smooth surface is best)
- White acrylic paint (non-toxic/washable works best for baby skin)
- Black acrylic paint or a black paint pen
- Medium paint brush (sponge brush works well for hands)
- Fine detail paint brush (if not using a paint pen)
- Baby wipes or damp paper towels
- Paper plate or palette
- Newspaper or drop cloth
Step 1: Preparation
-
Clean surface:
Begin by gently wiping down your pumpkin with a damp cloth to remove any dirt or oils from the patch. This ensures the paint adheres properly. -
Dry completely:
Let the pumpkin surface air dry completely before attempting to apply any paint. -
Setup:
Lay down newspaper or a drop cloth on your work surface. Since you are working with a baby or toddler, it helps to have everything within arm’s reach before you start.
Wiggly Fingers Helper
If your baby tends to clench their fist, try painting their hand while they are holding a small toy, then gently remove the toy and uncurl their fingers right before printing.
Step 2: Creating the Ghost
-
Prepare paint:
Squeeze a generous amount of white acrylic paint onto your paper plate. You want a decent puddle to ensure full coverage. -
Paint the hand:
Using a sponge brush or medium brush, coat your child’s palm and fingers with a thick, even layer of white paint. I like to work quickly here so the paint doesn’t dry on their warm skin before we print. -
Positioning:
Hold the pumpkin steady with one hand. Position your child’s hand with fingers pointing downward—this creates the trailing ‘ghostly’ look. -
The press:
Gently but firmly press their hand onto the side of the pumpkin. Ensure the palm makes contact for the ghost’s head, and lightly press each finger to create the body. -
Lift off:
Carefully lift the hand straight away from the pumpkin surface to avoid smudging the print. -
Quick clean:
Before moving on, immediately wipe the child’s hand with baby wipes to prevent stray white fingerprints elsewhere. -
Touch ups:
Inspect the print. If the palm area is too patchy, use your brush to lightly fill in the white space to make a solid head shape, but try to leave the finger streaks natural. -
Drying time:
Allow the white handprint to dry completely. This usually takes about 15-20 minutes, depending on how thick the paint is.
Step 3: Adding Details
-
Ghost face:
Once dry, dip a fine detail brush into black paint (or use a black paint pen). Paint two small oval eyes in the center of the palm area (the ghost’s head). -
Ghost mouth:
Paint a larger oval or circle below the eyes to create a surprised ‘O’ mouth expression for your ghost. -
Lettering:
To the right of the ghost, carefully hand-letter the word ‘BOO’ using the black paint. Keep the letters simple and slightly playful. -
Outline options:
If you want the text to pop more, you can go over your letters a second time once the first coat dries for a darker, bolder finish. -
Final dry:
Let the black details dry completely undisturbed for at least an hour to prevent any accidental smears.
Smudged Print Fix
Don’t panic if the print slides! While the paint is wet, quickly wipe it off with a damp paper towel and try again. Acrylic removes easily from pumpkin skin before it dries.
Display your new little ghost on a windowsill or porch for a personalized touch to your seasonal decor


Handprint Spider Crawling Up the Pumpkin
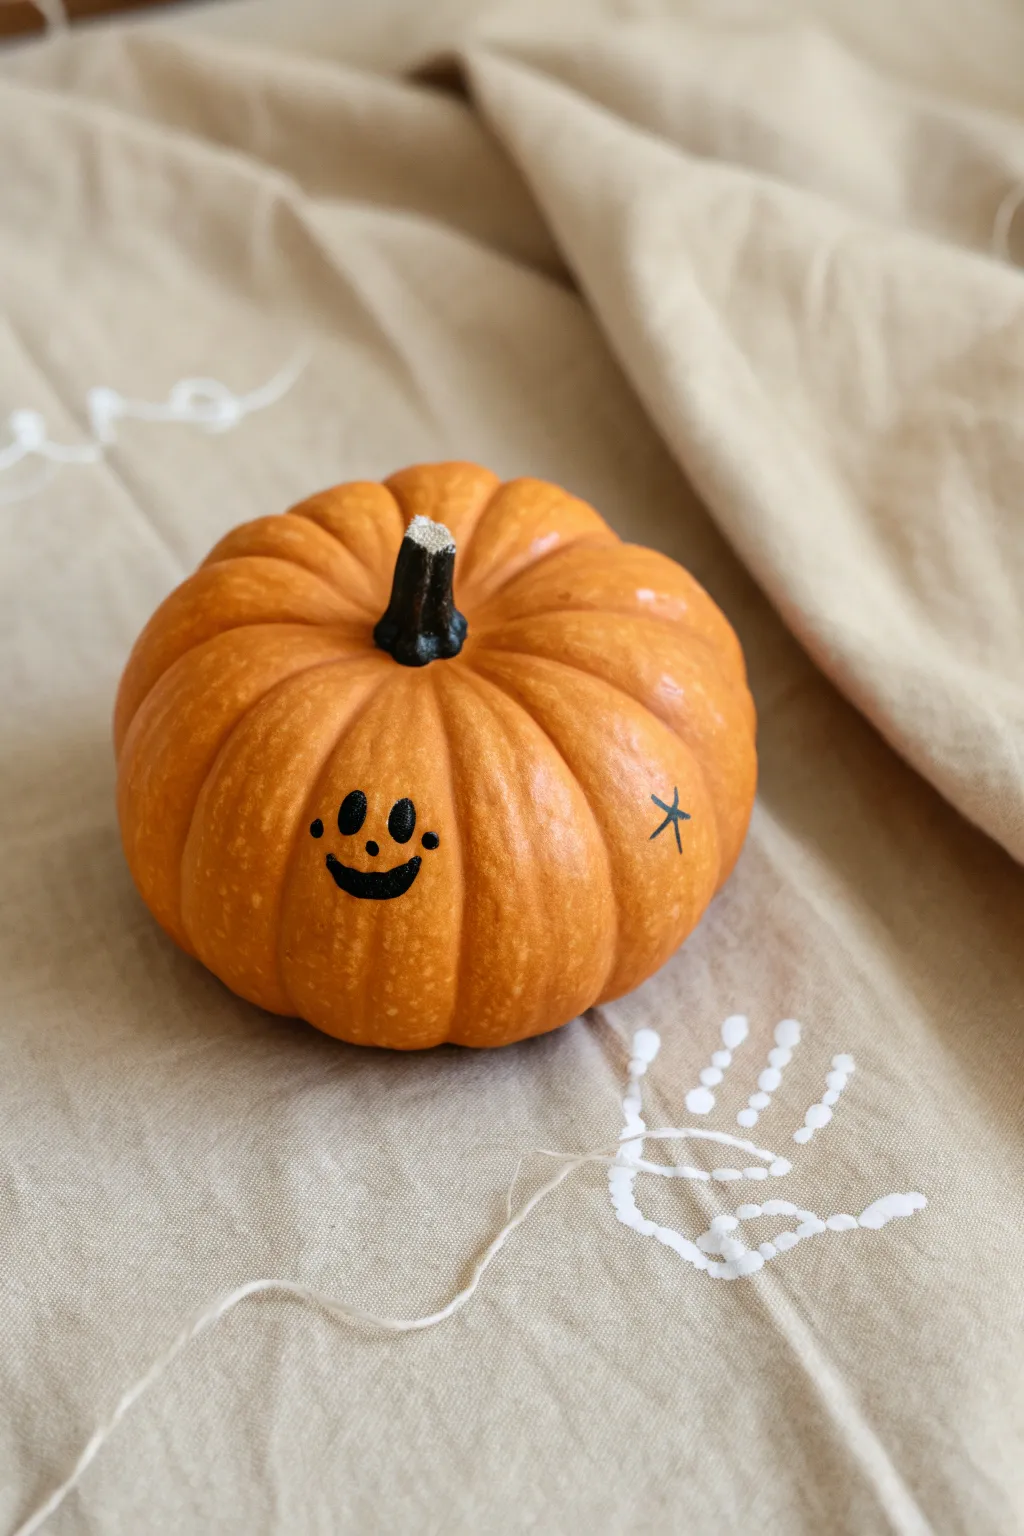
This adorable project transforms a miniature pumpkin into a friendly character with just a few strokes of paint. It’s the perfect low-stress decorating idea for tiny hands or parents wanting a sweet, minimal Halloween touch.
How-To Guide
Materials
- Small orange pumpkin (pie pumpkin or miniature gourd)
- Black acrylic paint or paint pen
- Small round paintbrush (if not using a pen)
- Damp cloth for cleaning the pumpkin
- Beige fabric or drop cloth (optional for display background)
- White fabric paint (optional for background)
Step 1: Preparation
-
Select your pumpkin:
Choose a small, round pumpkin with a relatively smooth surface. Look for one that sits flat without wobbling. -
Clean the surface:
Wipe the pumpkin down gently with a damp cloth to remove any dirt or dust. A clean surface ensures the paint adheres properly. -
Dry completely:
Let the pumpkin air dry fully before applying any paint. Trapped moisture can cause the paint to peel later.
Paint Pen vs. Brush
Using a paint pen gives you much more control for tiny features like the nose and eyes compared to a brush.
Step 2: Painting the Face
-
Plan the face placement:
Visualize where you want the face to go. Aim for the center of the pumpkin’s smoothest side, roughly halfway down the vertical curve. -
Paint the left eye:
Using black acrylic paint and a small brush, or a black paint pen, create a small, solid oval for the left eye. Keep it vertical. -
Paint the right eye:
Paint a matching oval for the right eye next to the first one, leaving a small gap between them. -
Add cheeks (optional):
For extra cuteness, dot two tiny circles just outside and slightly below the eyes. -
Create the nose:
Place a very small dot right in the center, slightly below the eyes, to serve as a cute button nose. -
Draw the smile curve:
Starting below the nose, paint a gentle U-shaped curve. Keep the line fairly thick for a bold look. -
Thicken the smile:
Go back over the bottom of the smile curve to thicken it slightly, giving it a friendly, open-mouthed appearance. -
Add detail element:
On the side of the pumpkin, away from the face, paint a simple ‘X’ or four-pointed star shape using thin lines. This adds a bit of whimsy. -
Let it dry:
Allow the black paint to dry completely. Acrylics usually take about 15-20 minutes to be touch-dry.
Step 3: Optional Background Setup
-
Prepare the fabric:
If you want to recreate the full scene, lay out a piece of beige linen or cotton fabric. -
Add white accents:
Dip a finger or a stamp into white fabric paint and press it onto the cloth to create the patterned handprint or decorative dots seen in the background. -
Let fabric dry:
Wait for the fabric patterns to dry before placing your pumpkin on top to avoid smudging. -
Final arrangement:
Place your happy pumpkin in the center of your decorated cloth for a charming seasonal vignette.
Uneven Surface?
If the pumpkin has deep ridges, paint the face on a wider ridge rather than spanning across a deep groove.
Enjoy your cheerful little pumpkin creation on a mantle or tablescape all season long
BRUSH GUIDE
The Right Brush for Every Stroke
From clean lines to bold texture — master brush choice, stroke control, and essential techniques.
Explore the Full Guide
My 1st Halloween Milestone Pumpkin With Handprint Signature
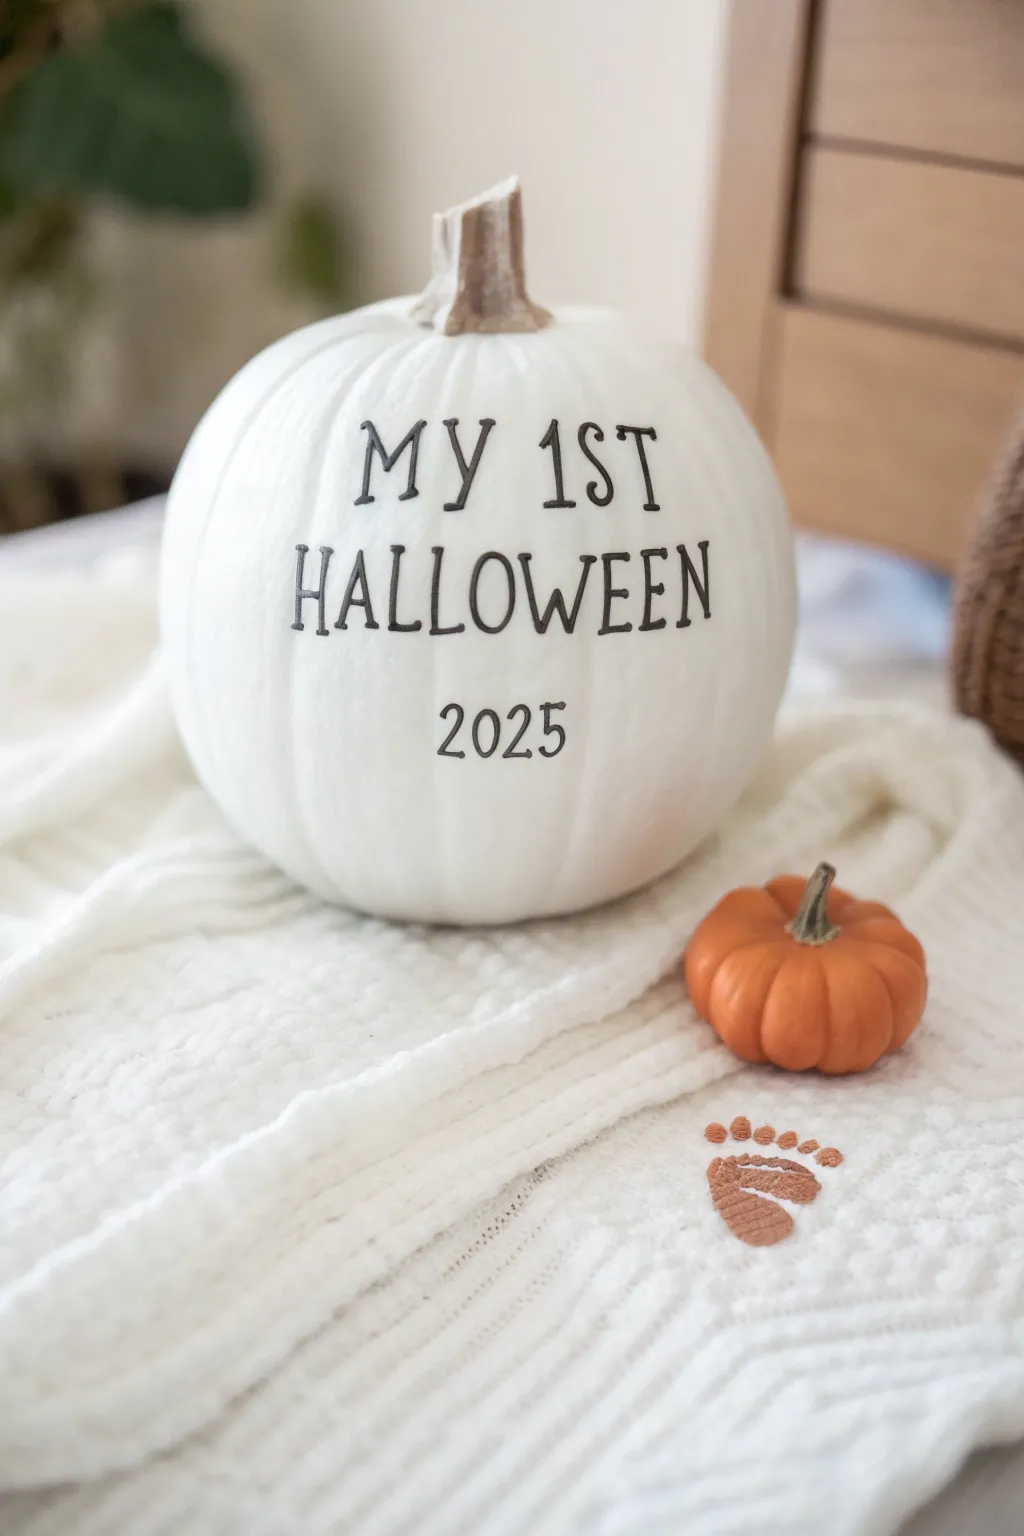
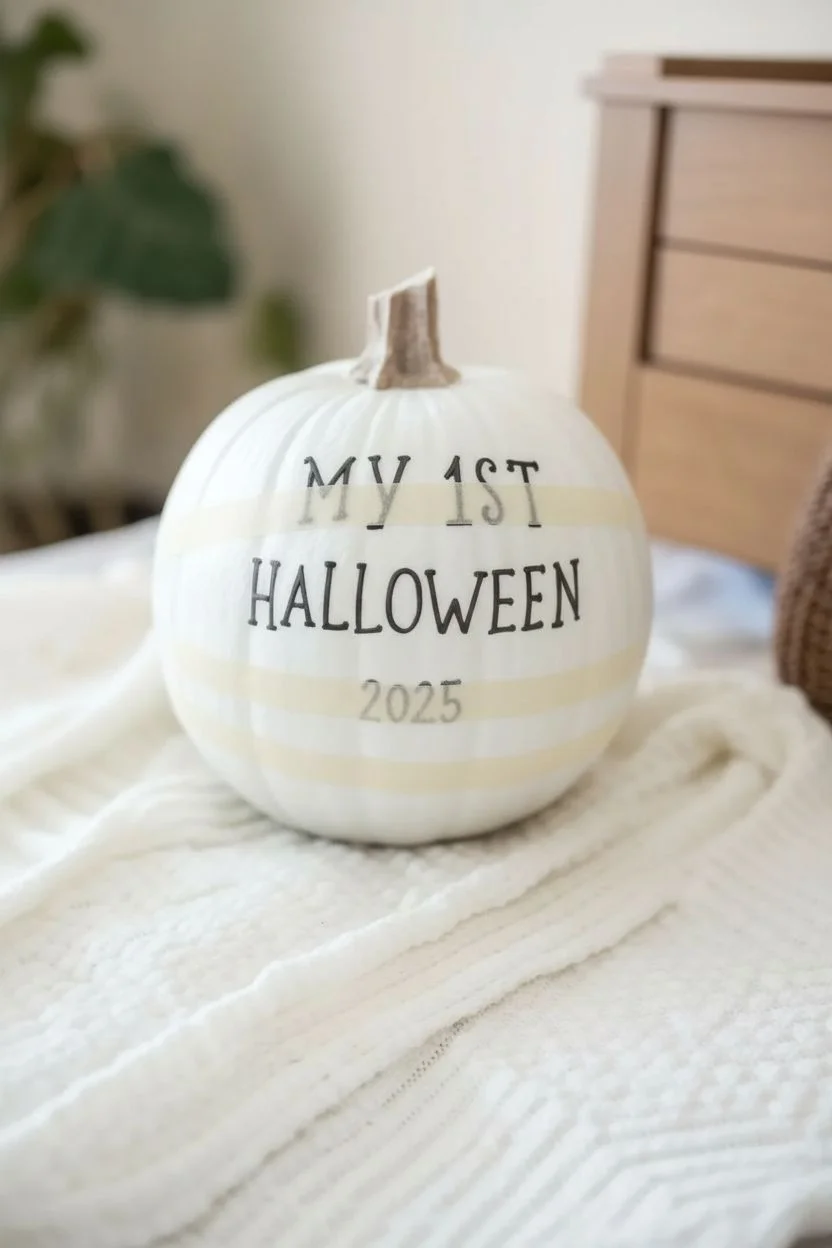
Capture the sweetness of your baby’s first spooky season with this elegant, minimalist pumpkin design. Featuring crisp, handwritten-style typography on a clean white background, this keepsake is perfect for nursery decor or photoshoots.
Detailed Instructions
Materials
- Medium-sized faux pumpkin (white)
- Black fine-tip paint pen or permanent marker
- Pencil
- Eraser
- Printed text template (optional)
- Painter’s tape or masking tape
- Matte sealant spray (optional)
- Tracing paper (optional)
Step 1: Preparation & Planning
-
Choose your canvas:
For a lasting keepsake, I recommend using a high-quality faux white pumpkin rather than a real one. This ensures you can display it year after year without rot. -
Clean the surface:
Wipe down the pumpkin’s surface with a slightly damp cloth to remove any dust or oils, then dry it completely with a lint-free towel. -
Plan the spacing:
Decide on your text layout. The phrase ‘MY 1ST’ sits on the top curve, ‘HALLOWEEN’ spans the widest middle section, and the year anchors the bottom. -
Create a guide:
Use small pieces of painter’s tape to mark the horizontal lines where each row of text will sit. This is crucial for keeping your letters straight on a round object.
Use A Transfer Method
Can’t freehand? Print your text, rub graphite heavily on the back of the paper, tape it to the pumpkin, and trace the letters hard to transfer the design.
Step 2: Drafting the Design
-
Sketch the letters:
Lightly sketch the words using a pencil. Aim for a whimsical, slightly elongated serif font style, similar to a typewriter look. -
Check the alignment:
Step back and look at your pencil sketch from a few feet away. Ensure the word ‘HALLOWEEN’ is centered relative to ‘MY 1ST’ and the date. -
Refine the serif details:
Go back over your pencil lines and add the little ‘feet’ or serifs to the ends of the letters (like the top of the ‘1’ or the bottom of the ‘Y’).
Step 3: Inking the Text
-
Prime your pen:
Shake your black paint pen well and press the nib down on a scrap piece of paper until ink flows smoothly. -
Start from the top:
Begin carefully tracing over your pencil lines with the paint pen, starting with ‘MY 1ST’. Brace your hand against the table surface for steadiness. -
Lettering technique:
Use slow, deliberate strokes. If the pumpkin has deep ridges, lift your pen slightly as you cross over them to avoid ink pooling in the grooves. -
The main event:
Ink the word ‘HALLOWEEN’. Since these letters are larger, maintain consistent spacing between characters. -
Add the date:
Finish by inking ‘2025’ at the bottom. Keep these numerals just slightly smaller than the top row of text for visual balance. -
Let it dry:
Allow the paint pen ink to dry completely for at least 30 minutes. Be careful not to smudge wet wet ink with your palm.
Make It Personal
Use copper or orange paint on the back of the pumpkin to add your baby’s actual handprint or footprint, creating a true 360-degree memory piece.
Step 4: Final Touches
-
Clean up sketch lines:
Once you are absolutely certain the ink is dry, gently erase any visible pencil marks. Use a white eraser to avoid leaving colored residue. -
Thicken if needed:
If any lines look too thin or faint, go over them a second time with the paint pen to darken the black contrast. -
Seal the memory:
To protect your work, take the pumpkin outside and spray a very light coat of matte sealant over the text. This prevents chipping over time.
Place your finished pumpkin in the nursery or use it as a charming prop for those adorable milestone photos
Sleepy Baby Face Pumpkin With Tiny Handprint “Cheeks”
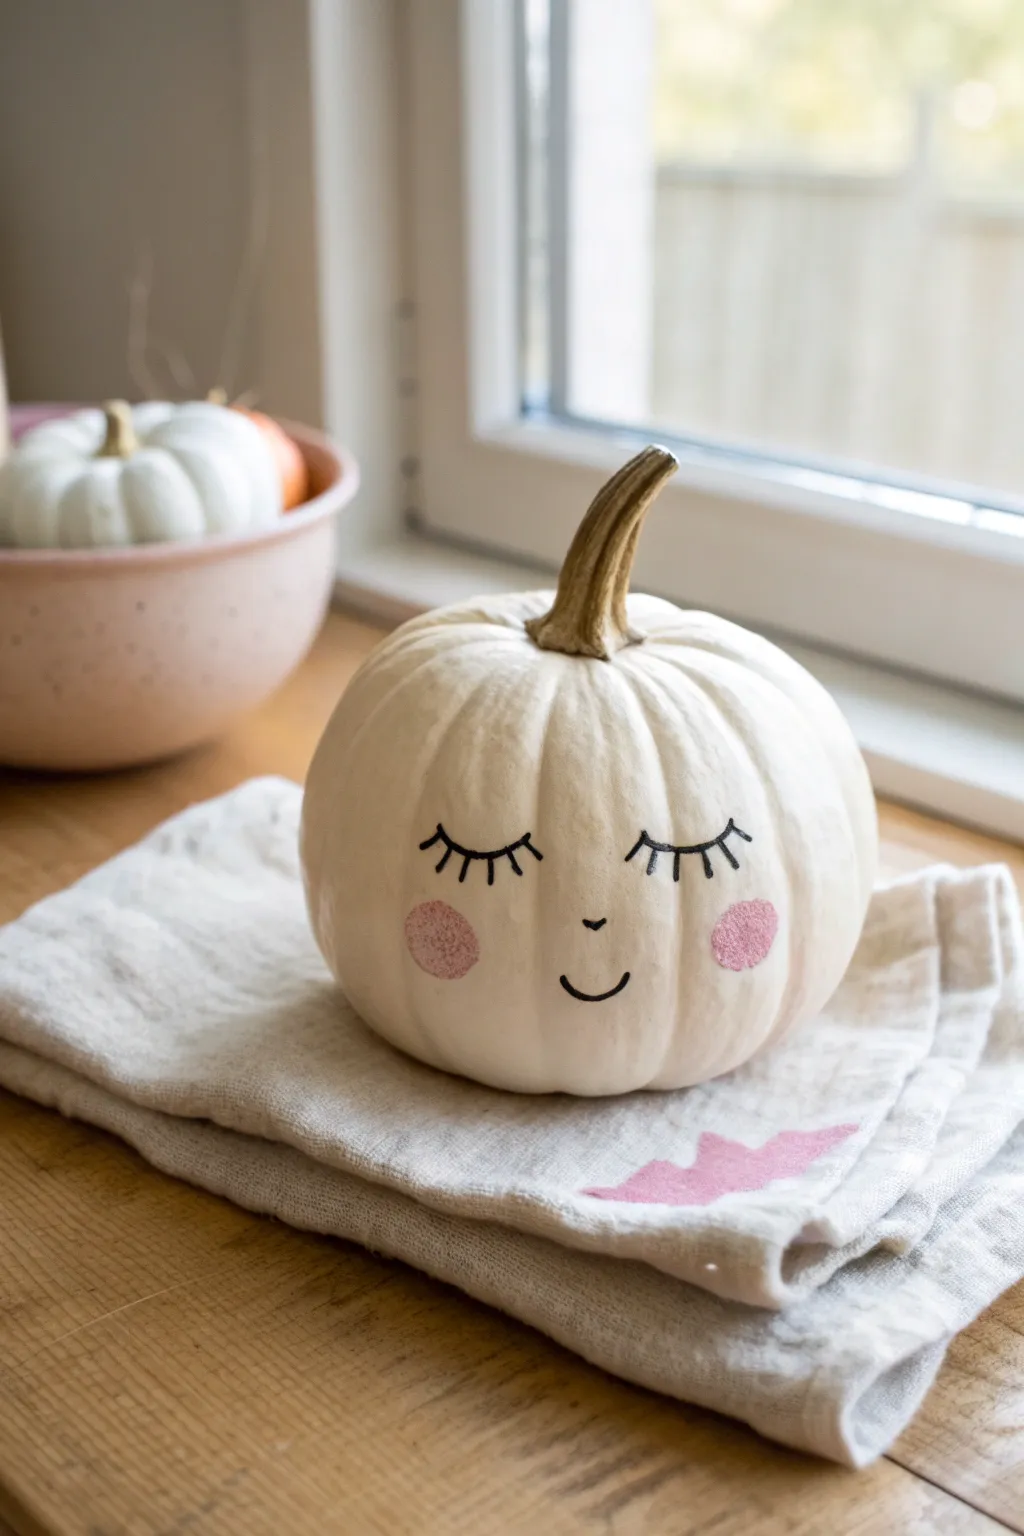
This adorable project transforms a simple white pumpkin into a peaceful sleeping baby face, complete with rosy cheeks. It’s a minimalist, no-carve decoration that adds a gentle touch of whimsy to your nursery or fall display.
How-To Guide
Materials
- Small-to-medium white pumpkin (real or faux)
- Black acrylic paint or black paint pen (fine tip)
- Soft pink acrylic paint
- Small round sponge applicator or round foam pouncer
- Fine liner paintbrush (if not using a paint pen)
- Paper towel or baby wipes
- Matte finish sealer spray (optional)
- Pencil for sketching
Step 1: Preparing the Canvas
-
Clean surface:
Begin by wiping down your pumpkin with a damp cloth or baby wipe to remove any dirt or oils. If you are using a real pumpkin, ensure the surface is completely dry before proceeding. -
Check the stem:
Inspect the stem area. If there’s any loose debris or dirt tucked around the base of the stem, brush it away gently with an old toothbrush or dry cloth so it doesn’t fall into wet paint later. -
Plan facial placement:
Look at your pumpkin and choose the smoothest side to be the face. Visualize where the eyes and mouth will sit; generally, focusing on the lower two-thirds of the pumpkin gives a cuter, more ‘baby-like’ proportion.
Step 2: Sketching the Features
-
Light pencil sketch:
Using a pencil, very lightly sketch two U-shaped curves for the closed eyes. Try to place them evenly on either side of the center vertical ridge. -
Add the nose:
Mark a tiny dot or a very small, soft curve in the center slightly below the eyes to represent a button nose. -
Draft the smile:
Sketch a simple, small upward curve for the mouth. Keeping the mouth somewhat small and close to the nose enhances the sweet expression. -
Review symmetry:
Step back and look at your pencil marks. Don’t worry if they aren’t perfectly symmetrical—slight variations add character—but adjust rubbed-out lines now before painting.
Oops! Smudged Line?
Don’t panic! If you smudge the black paint, dip a Q-tip in a tiny bit of rubbing alcohol (or water for fresh paint) and gently erase the mistake.
Step 3: Painting the Face
-
Trace the eyes:
Using your black paint pen or a fine liner brush with black acrylic, carefully trace over the U-shaped eye curves. Keep your hand steady by resting your pinky finger on the pumpkin surface. -
Adding eyelashes:
Draw three to five short, straight distinct lines radiating upward from each eye curve to create the lashes. I like to make the middle lash slightly longer than the side ones for a fluttery look. -
Define the nose:
Go over your nose mark. A tiny downward ‘v’ or a simple dot works best here. Keep it subtle. -
Paint the smile:
Trace the smile line with a smooth, continuous stroke. Tapering the ends very slightly by lifting the pen or brush as you finish the curve keeps it looking delicate. -
Let the black dry:
Allow the black lines to dry completely for about 10-15 minutes. This is crucial to prevent smudging when you add the cheeks.
Make It Sparkle
While the pink cheek paint is still wet, sprinkle a tiny pinch of iridescent glitter onto the circles for a magical, dreamy shimmering effect.
Step 4: Adding the Rosy Cheeks
-
Prepare pink paint:
Squeeze a small amount of soft pink acrylic paint onto a palette or paper plate. You don’t need much, just a dime-sized amount. -
Load the sponge:
Dip your round foam pouncer or sponge applicator into the paint. Dab it off onto a paper towel a few times to remove excess paint; you want a textured, stamped look, not a globs of paint. -
Drafting cheek placement:
Hold the sponge over the pumpkin without touching it to gauge the position. The cheeks should sit slightly outside and below the outer corner of each eye. -
Stamp the cheeks:
Press the sponge firmly and straight down onto the pumpkin surface. Do not twist the sponge. Lift it straight off to leave a perfect, textured circle. -
Second cheek:
Repeat the stamping process on the other side. Try to apply the same amount of pressure so the opacity matches the first cheek. -
Drying time:
Let the pink cheeks dry fully. Acrylics usually surface dry in about 20 minutes, but give it an hour to be safe. -
Optional sealing:
If you plan to keep this pumpkin for a long time or display it outside, lightly mist it with a matte finish sealer spray to protect your artwork.
Now you have a serene little pumpkin friend to quietly watch over the room while your little one sleeps

PENCIL GUIDE
Understanding Pencil Grades from H to B
From first sketch to finished drawing — learn pencil grades, line control, and shading techniques.
Explore the Full Guide
Pacifier-Smile Pumpkin With a Baby Footprint Accent
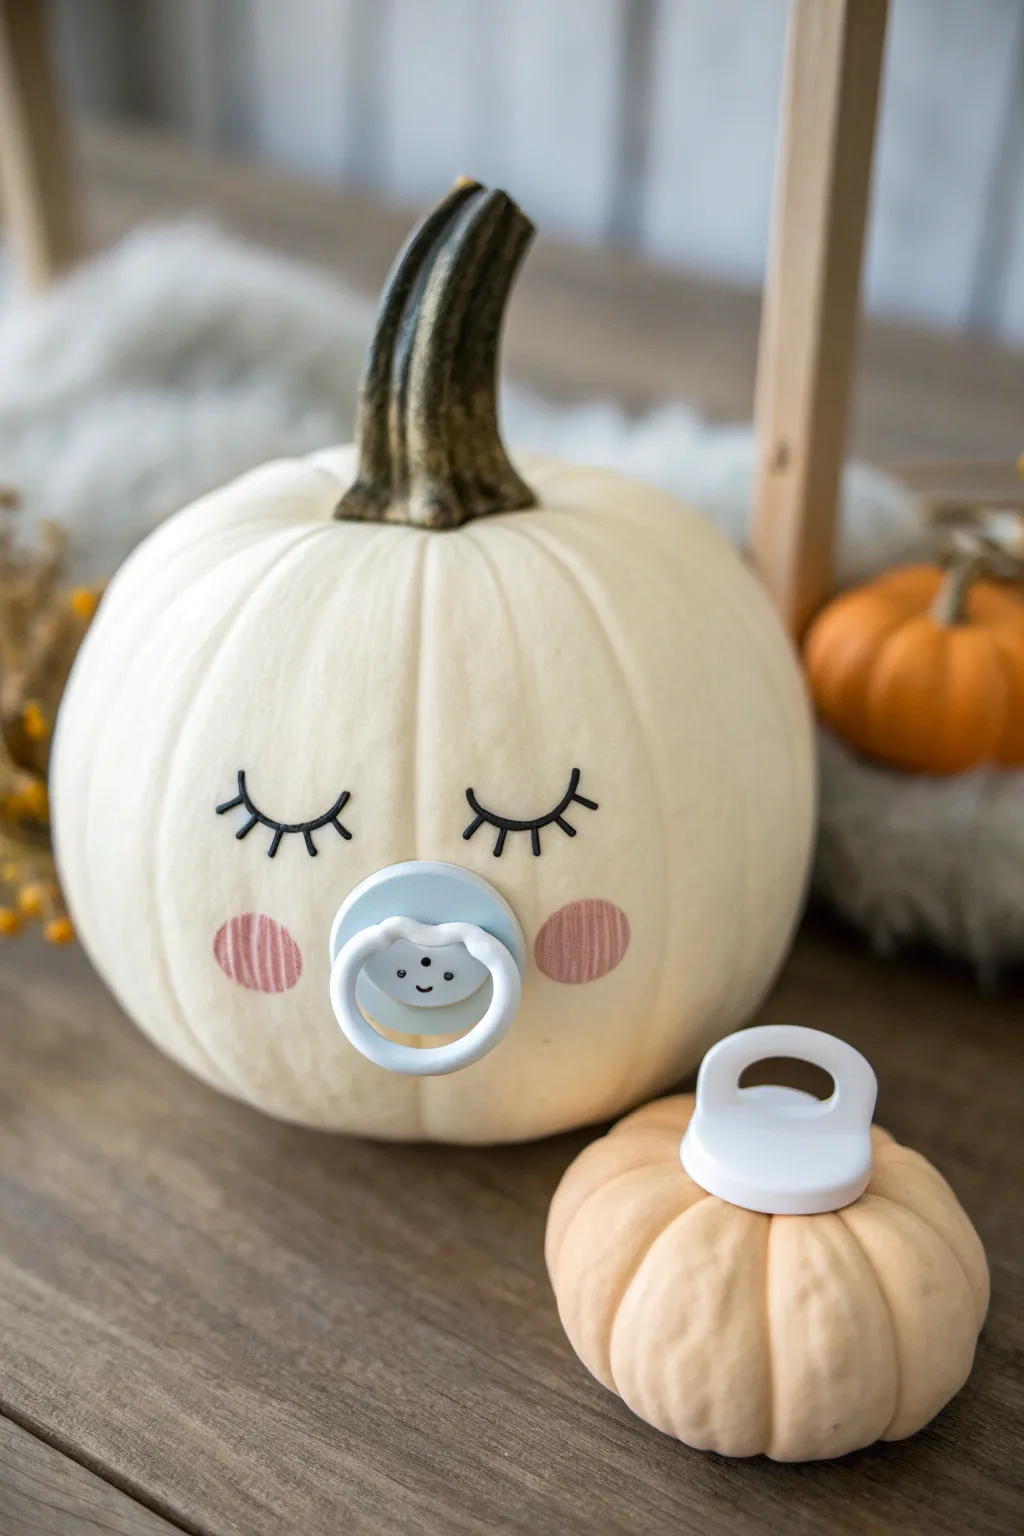
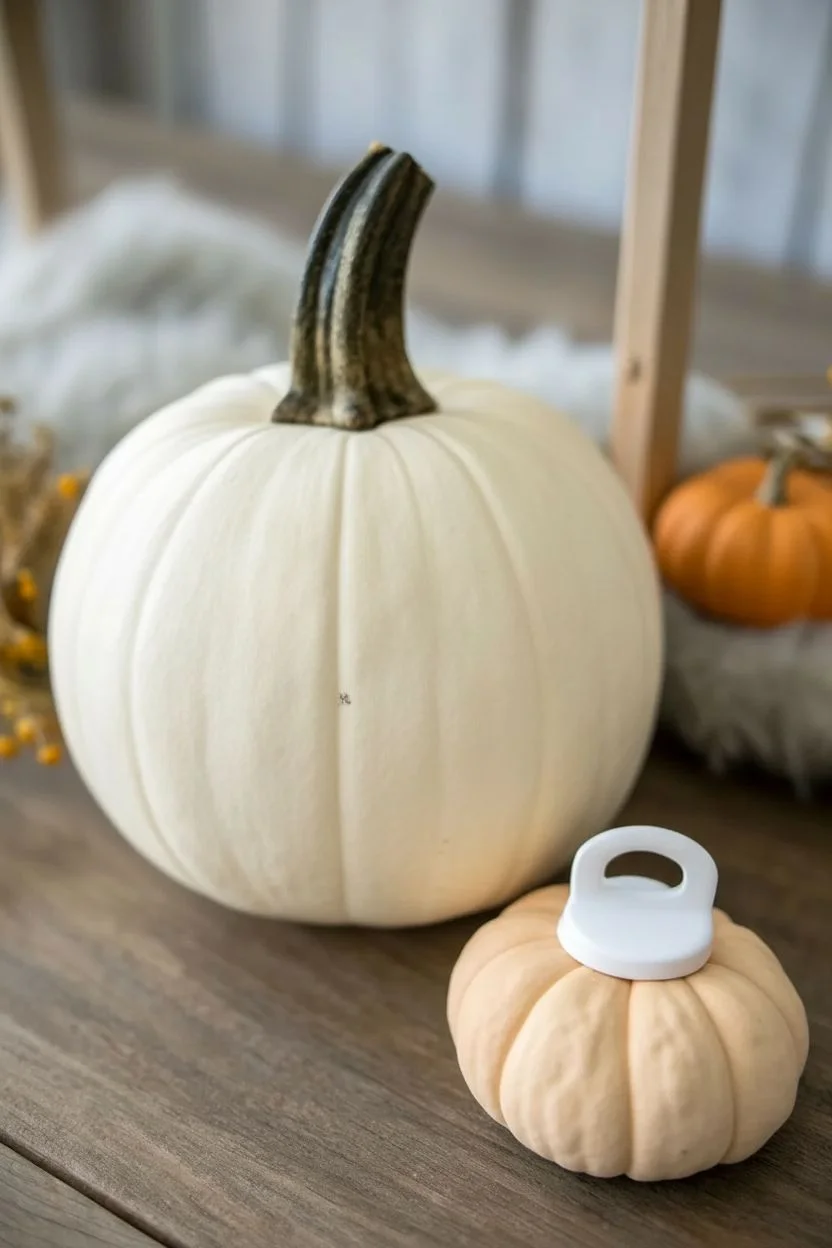
Transform a simple white pumpkin into an adorable sleeping newborn with just a few clever touches. This sweet design features painted lashes, rosy cheeks, and a real pacifier for a three-dimensional effect that makes a perfect nursery decoration or baby shower centerpiece.
Step-by-Step
Materials
- Medium-sized faux or real white pumpkin (smooth surface is best)
- Black acrylic paint or a thick black paint marker
- Soft pink acrylic paint
- Small round paintbrush
- Round foam pouncer (approx. 1 inch)
- Small blue or neutral-colored pacifier
- Hot glue gun and glue sticks
- Craft knife or drill (for stem removal on real pumpkins)
- Strong craft adhesive (E6000) – optional alternative to hot glue
- Baby footprint stamp kit or ink pad (for the accent)
- Clear matte sealant spray
Step 1: Preparation & Base
-
Clean the surface:
Whether using a real or faux pumpkin, wipe the surface down thoroughly with a damp cloth to remove dust or waxy residue. Let it dry completely. -
Visualize the face:
Hold the pumpkin and identify the smoothest side to serve as the ‘face.’ Look for a spot where the vertical ridges are spaced somewhat evenly to frame the eyes. -
Mark the center:
Use a pencil to lightly mark the center point where you intend to place the pacifier. This will anchor the rest of your design.
Clean Lines
If you are nervous about painting curved eyelids, trace the rim of a small cup or shot glass with a pencil first to get perfect semicircles.
Step 2: Painting the Features
-
Draft the eyes:
With a pencil, lightly sketch two downward-curving semicircles for the closed eyelids. aim for symmetry on either side of the vertical ridge lines. -
Paint the lids:
Using a fine-tip paintbrush or paint marker, carefully trace over your pencil lines with black paint. I like to stabilize my hand against the table for smoother curves. -
Add the lashes:
Paint three to four small, upward-flicking lines coming off each eyelid to create the eyelashes. Keep the center lash the longest and angle the side lashes slightly outward. -
Create the cheeks:
Dip your round foam pouncer into the soft pink paint. Dab off excess paint onto a paper towel until the texture is almost dry—this prevents drips and creates a soft, plush look. -
Stamp the blush:
Press the foam pouncer gently onto the pumpkin cheeks, slightly below and outside the eyes. A single press usually works, but you can tap it lightly a few times for better coverage. -
Add texture lines (optional):
To mimic the hatched style in the example, wait for the pink circle to dry, then use a tiny brush to paint subtle vertical lines over the pink area in a slightly darker rose shade.
Little Siblings
Make a whole family of pumpkins! Use smaller gourds painted solid orange or peach as ‘rattles’ or ‘twins’ to sit next to your main creation.
Step 3: Attaching the Pacifier
-
Prep the pacifier:
If the pacifier has a silicone nipple, you can cut it off with scissors so the plastic shield sits flush against the pumpkin. Alternatively, drill a small hole in the pumpkin to insert the nipple. -
Apply adhesive:
Apply a generous ring of hot glue to the back rim of the pacifier shield. -
Secure the mouth:
Press the pacifier firmly onto your center mark. Hold it in place for 30-60 seconds until the glue sets completely.
Step 4: The Footprint Accent
-
Plan the placement:
Choose a spot on the side or back of the pumpkin for the footprint accent mentioned in the title. This keeps the face uncluttered while adding a personal touch. -
Ink the foot:
Using a baby-safe ink pad or a darker shade of paint, coat your baby’s foot (or use a stamp if this is just for decor). -
Transfer the print:
Carefully press the foot against the pumpkin surface. Rock the foot slightly from heel to toe to ensure the arches transfer, then lift straight off. -
Dry and seal:
Once all paint is fully dry (give it at least an hour), take the pumpkin outside and mist it lightly with a clear matte sealant to protect the design.
Now you have a sweet, sleeping pumpkin pal ready to charm visitors all autumn long
Bow or Ribbon “Collar” Pumpkin With Footprint Keepsake Front
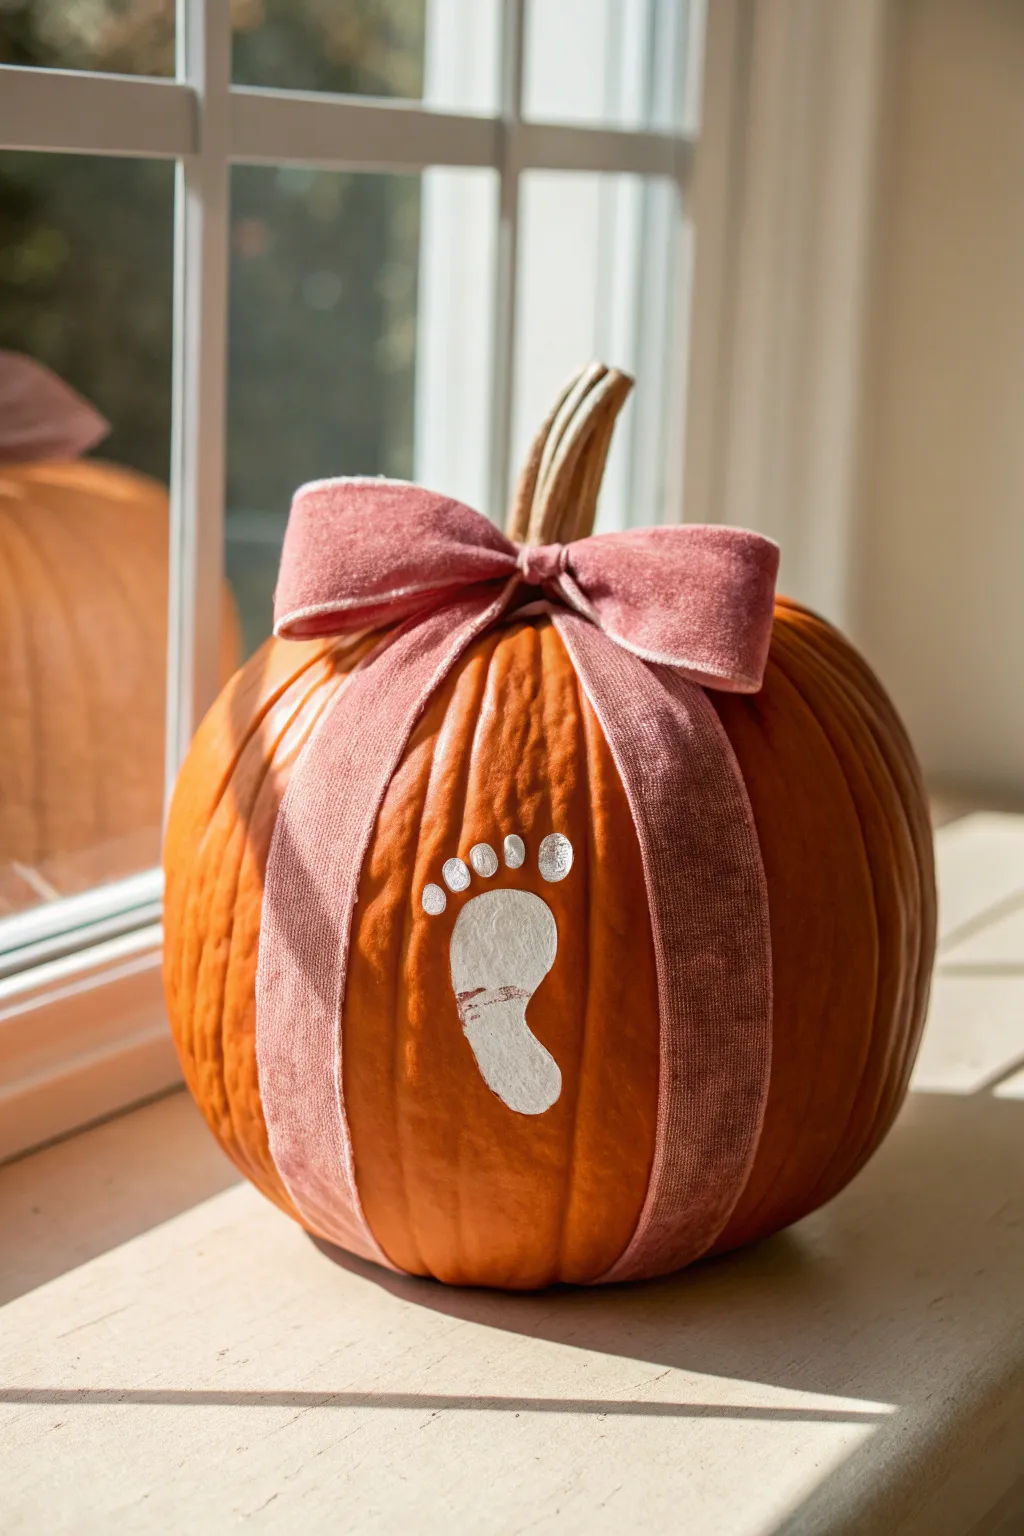
Celebrate a little one’s first autumn with this elegant and sentimental keepsake pumpkin. Featuring a charming velvet bow and a delicate white footprint, this project transforms a simple gourd into a treasured memory you’ll want to display year after year.
Detailed Instructions
Materials
- Medium-sized orange pumpkin (real or faux)
- White acrylic paint (non-toxic)
- Wide pink velvet ribbon (wired or non-wired)
- Foam brush or large flat paintbrush
- Scissors
- Baby wipes or damp cloth
- Paper plate or palette
- Clear matte sealer spray (optional)
- Hot glue gun and glue sticks (optional)
- Floral wire or pipe cleaner (optional)
Step 1: Preparation
-
Clean the surface:
Begin by thoroughly wiping down your pumpkin with a damp cloth to remove any dirt or dust. If using a real pumpkin, ensure it is completely dry before proceeding. -
Plan placement:
Hold the pumpkin and decide which side has the smoothest surface. This area will be best for capturing a clear footprint.
Clearer Prints
Practice the footprint on a piece of paper first. This gets the baby used to the sensation and helps you gauge how much paint creates the crispest impression.
Step 2: Capturing the Footprint
-
Prepare the paint:
Squeeze a generous amount of white acrylic paint onto a paper plate. You want enough to coat the baby’s foot evenly without it being drippy. -
Coat the foot:
Using a foam brush, gently paint the bottom of the baby’s foot. Ensure you cover the heel, the ball of the foot, and each tiny toe. -
Position the baby:
It helps to have a helper hold the baby. Position the baby’s foot over the smoothest part of the pumpkin you selected earlier. -
Press and print:
Press the foot firmly onto the pumpkin surface. Roll the foot slightly from heel to toe to ensure the arch and toes make contact. -
Lift away:
Lift the foot straight off the pumpkin to avoid smearing the paint. Immediately clean the baby’s foot with wipes. -
Touch up:
If the print is a little faint in spots, you can use a small detail brush to lightly fill in the shape, but I prefer keeping the natural texture of the print for authenticity. -
Let it dry:
Allow the white paint to dry completely. This usually takes about 30 to 60 minutes depending on how thick the paint application was.
Step 3: Adding the Velvet Bow
-
Measure the ribbon:
Cut a long length of the pink velvet ribbon. You will need enough to wrap around the pumpkin vertically and tie a generous bow. -
Wrap the pumpkin:
Place the center of the ribbon under the base of the pumpkin. Bring the two ends up strictly vertical on the sides, meeting at the top near the stem. -
Secure the base knot:
Tie a tight single knot right at the base of the pumpkin stem. Ensure the ribbon creates vertical lines that frame the footprint perfectly. -
Form the loops:
Create two large loops with the remaining ribbon ends to start your bow. -
Tie the bow:
Cross the loops and pull one through the center hole, tightening to form a classic bow shape. Adjust the placement so it sits snugly against the pumpkin stem. -
Fluff and adjust:
Pull the loops to make them wide and full. If your ribbon is wired, use your fingers to give the loops a nice, rounded volume. -
Trim the tails:
Trim the tails of the ribbon so they drape down the sides of the pumpkin but don’t obscure the footprint. You can cut them at an angle or in a ‘V’ shape for a polished look.
Smudged Print?
If the print smears while wet, wipe it off quickly with a damp cloth and dry the pumpkin surface completely before trying again. Acrylic is forgiving while wet.
Step 4: Finishing Touches
-
Secure the ribbon:
If the ribbon feels loose, apply a tiny dot of hot glue under the knot near the stem to keep it from slipping. -
Seal (Optional):
If this pumpkin will be kept for a long time (faux pumpkin) or placed outdoors, spray a light coat of clear matte sealer over the dried paint.
Place this adorable artwork on a sunny windowsill or mantel to enjoy the cozy sentimental vibes all season long


Tiny Fingerprint Bats Flying Across the Pumpkin
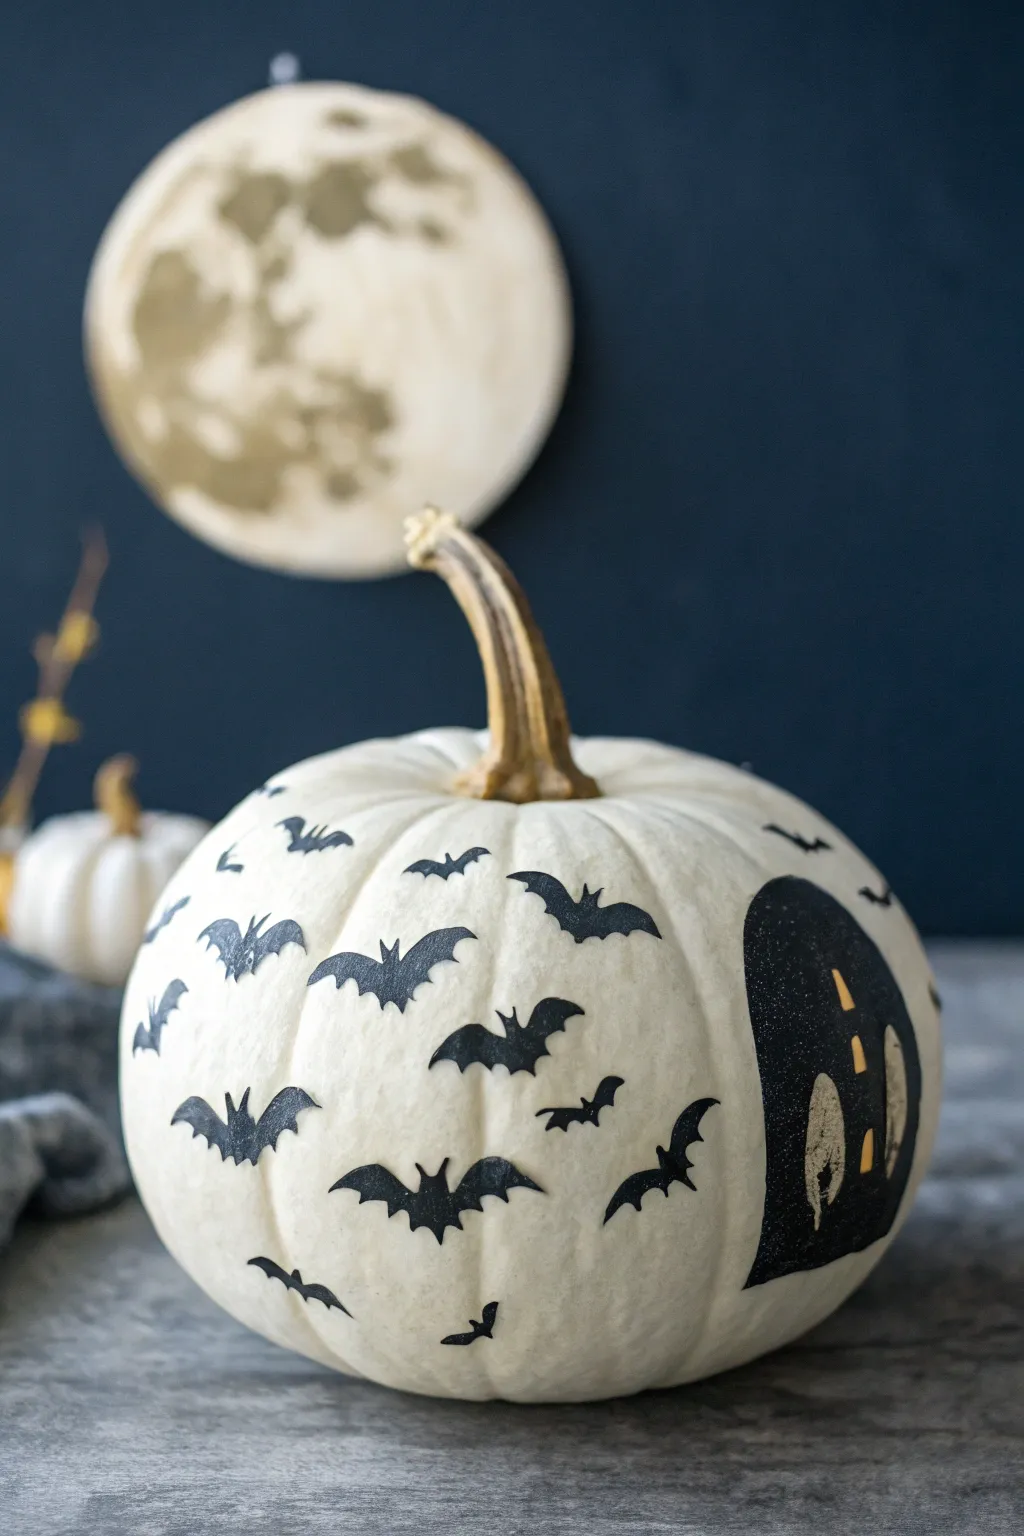
For a baby-safe and adorable project, transform tiny fingerprints into a swarm of flying bats on a pristine white pumpkin. This technique creates a lovely textured silhouette effect that captures the charm of Halloween without any spooky frights.
How-To Guide
Materials
- White pumpkin (real or faux)
- Black nontoxic acrylic craft paint
- Yellow acrylic craft paint
- Small flat paintbrush
- Tiny detail brush
- Paper plate or palette
- Baby wipes or damp cloth
- Black permanent marker (optional for outlines)
Step 1: Setting the Scene
-
Prepare your pumpkin:
Wipe down the surface of your white pumpkin with a damp cloth to remove any dust or dirt so the paint adheres properly. -
Plan the layout:
Visualize where you want the swarm of bats to fly. They look best moving diagonally across the pumpkin’s curve, perhaps starting from a ‘home base’ like a haunted house.
Step 2: Creating the Haunted House
-
Outline the structure:
On the side of the pumpkin, use your small flat brush and black paint to gently outline a simple, tall arch shape which will be the haunted building. -
Fill it in:
Fill in the entire outlined arch with black paint. You may need two coats here to get that opaque, solid black look. -
Add windows:
Once the black paint is completely dry to the touch, use the tiny detail brush dipped in yellow paint to add small rectangles or ovals for windows. -
Refine the light:
If the yellow looks too transparent against the black, let it dry and dab a second layer of yellow right on top.
Smudged Prints?
If a print smudges, turn it into a cloud or a larger bat. You can also wipe wet acrylic immediately with a damp paper towel to try again.
Step 3: Fingerprint Bats
-
Prepare the paint:
Squeeze a small puddle of black paint onto your paper plate. It shouldn’t be too thick, so spread it slightly with a brush if needed. -
Stamp the body:
Gently press your baby’s thumb (or index finger for smaller bats) into the black paint. Blot it once on a scrap paper to remove excess globbiness. -
Apply to pumpkin:
Press the painted finger onto the pumpkin surface. This oval print will serve as the bat’s body. -
Repeat the flock:
Create several body prints scattered across the pumpkin, varying the angles slightly to make them look like they are swooping and diving. -
Clean up quickly:
I always keep wipes handy to clean little fingers immediately after printing so paint doesn’t end up on furniture.
Wing Detail Trick
Use a black fine-tip permanent marker to draw the wing outlines first, then fill them in with paint. It gives you more control than a brush.
Step 4: Adding Wings
-
Start the wings:
Using the tiny detail brush and black paint, paint a small curved line extending out from the top left of a fingerprint body. -
Shape the wing:
From the end of that curve, bring the line back down toward the body with jagged, scalloped edges to mimic a bat wing shape. -
Mirror the side:
Repeat the process on the right side of the fingerprint. Don’t worry about perfect symmetry; irregular wings look more organic. -
Fill the wings:
gently fill in the wing outlines with black paint, blending them seamlessly into the stamped body. -
Vary sizes:
For some bats, paint longer, more dramatic wings, and for others, keep them short and stubby to create depth. -
Add tiny bats:
In the empty spaces, use just the tip of your brush to paint tiny ‘V’ or ‘M’ shapes to represent distant bats flying in the background. -
Final drying time:
Allow the entire pumpkin to sit undisturbed for at least an hour until the thickest parts of the paint are fully hardened.
Now you have a spooky yet sweet keepsake of those tiny hands to display on your porch or mantle
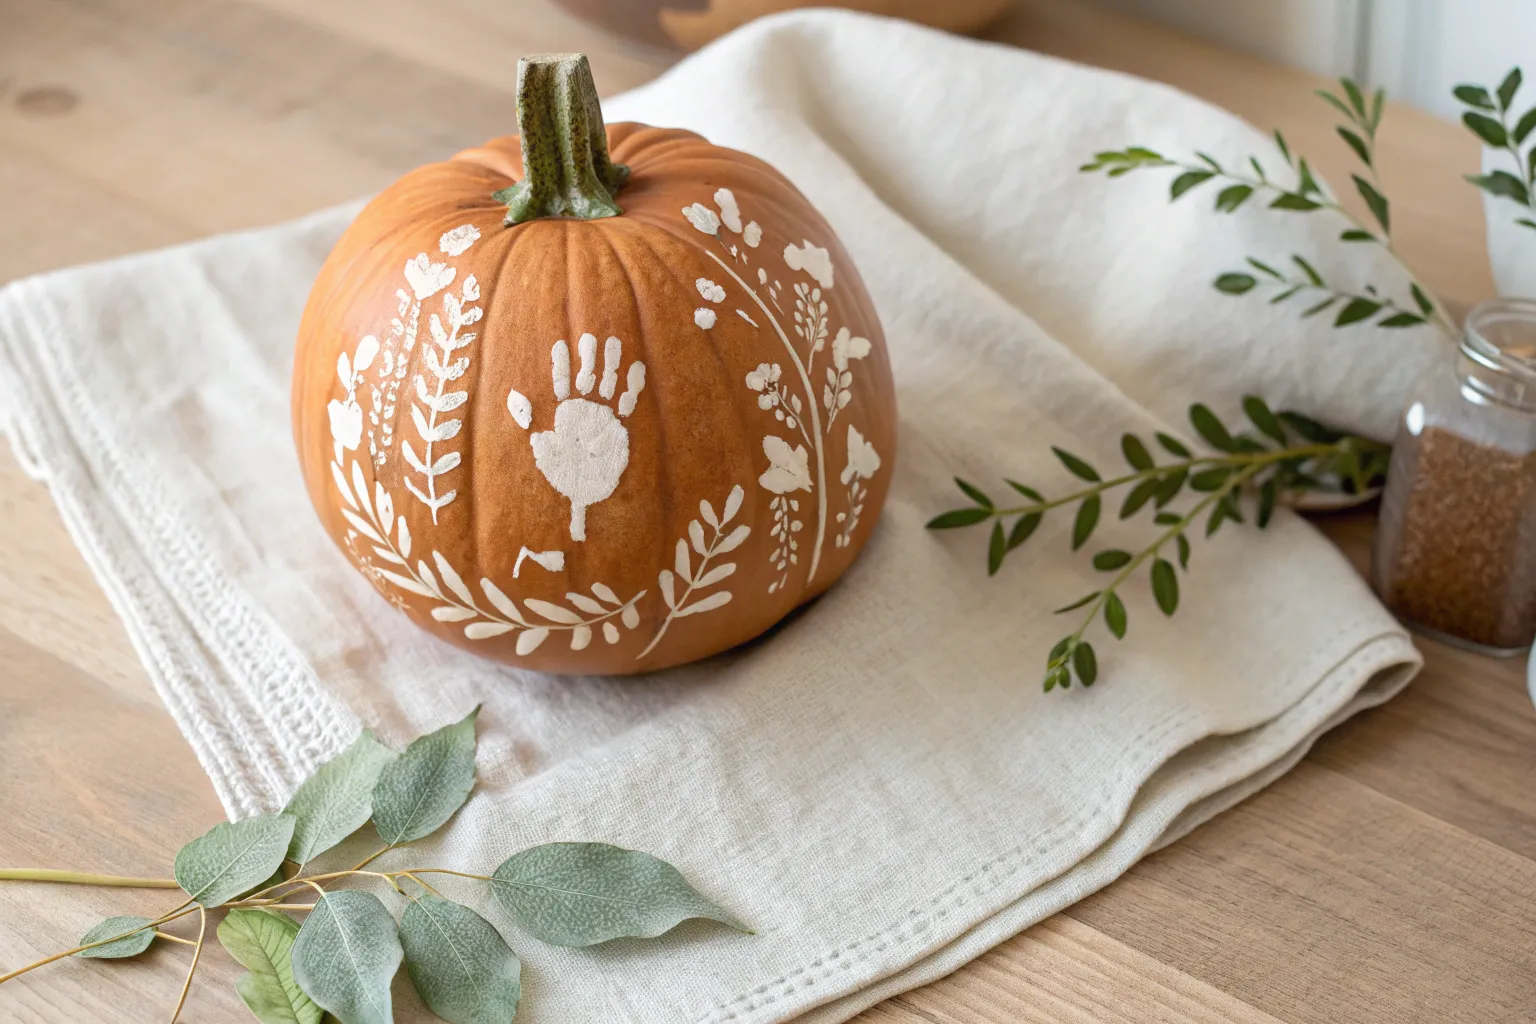
Baby Footprint Pumpkin Patch Scene
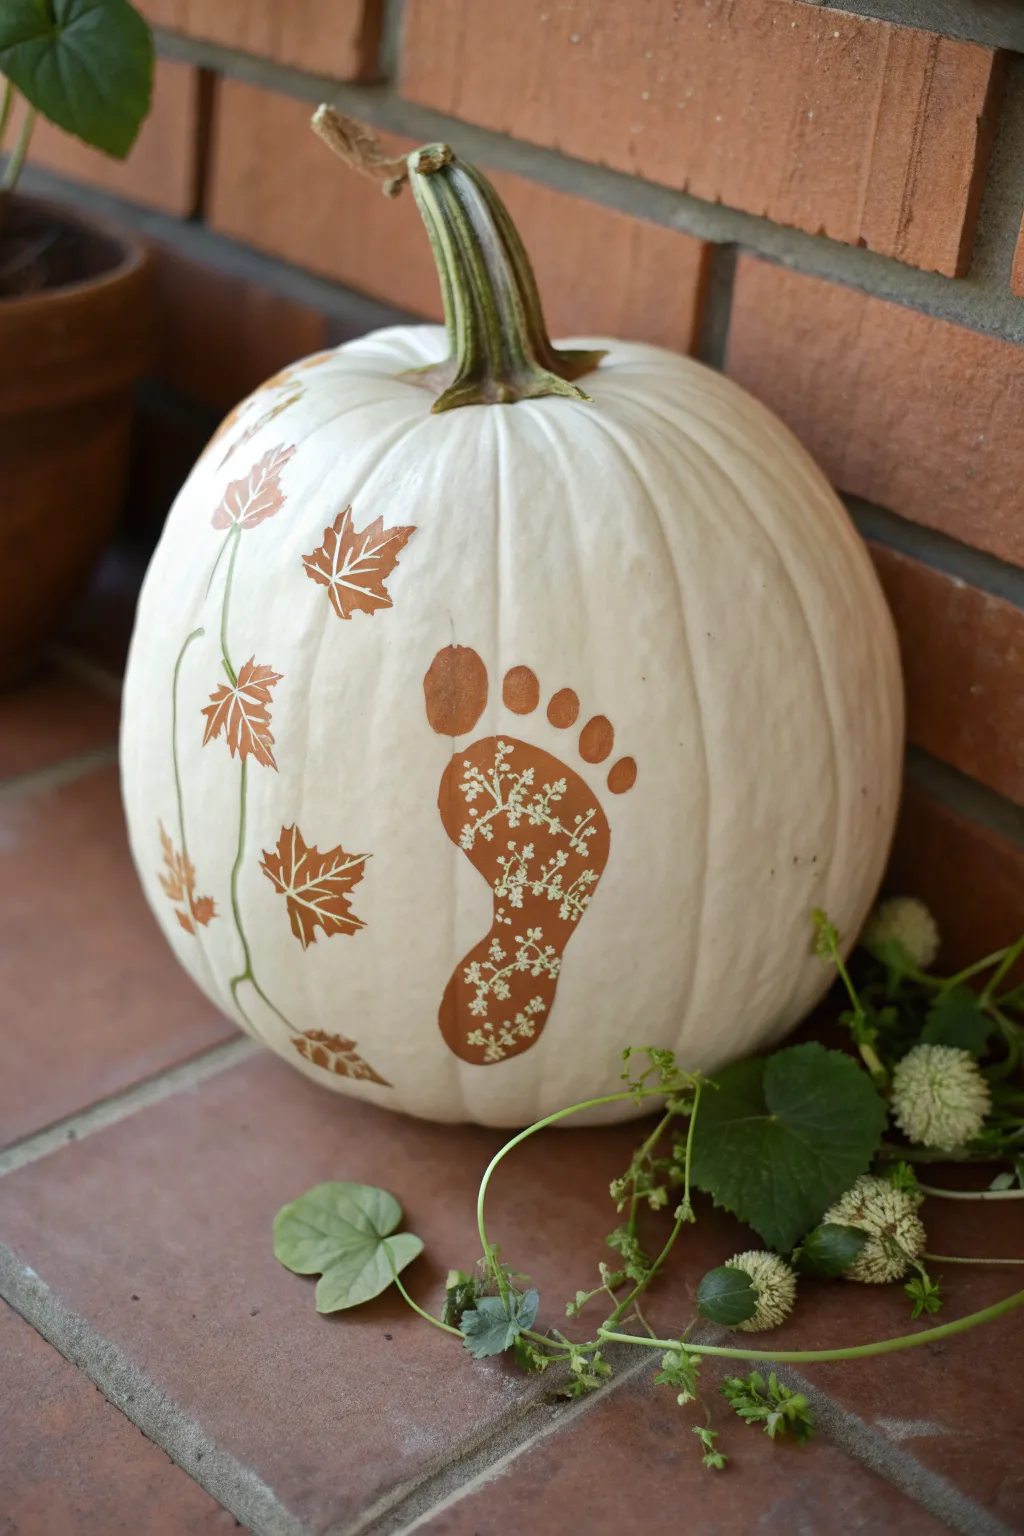
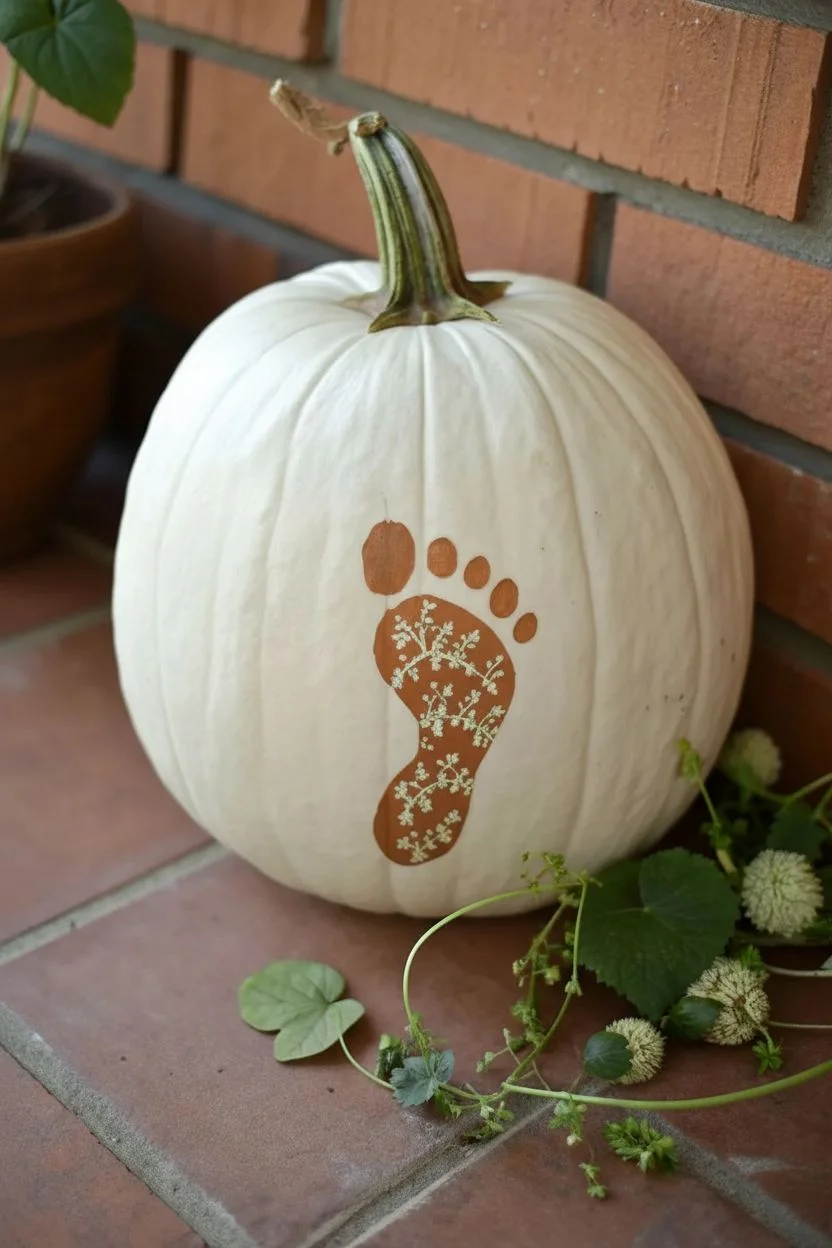
Capture a tiny moment in time with this elegant nature-inspired design. By combining a classic baby footprint with delicate botanical patterns and trailing vines, you turn a simple white pumpkin into a sophisticated piece of fall decor.
Step-by-Step Guide
Materials
- Medium-sized white pumpkin (real or faux)
- Brown acrylic craft paint (burnt sienna or similar earthy tone)
- Fine detail paintbrush (size 0 or 00)
- Small round paintbrush (size 2 or 4)
- Small floral/botanical rubber stamp or stencil (tiny flowers/leaves)
- White acrylic paint (if using a stamp)
- Damp cloth or baby wipes
- Paper plate or palette
- Pencil (optional)
Step 1: Preparation & The Footprint
-
Clean and dry:
Start by wiping down your white pumpkin with a damp cloth to remove any dust or dirt. If using a real pumpkin, ensure the skin is completely dry before applying paint so the design adheres properly. -
Prepare the baby’s foot:
Squeeze a nickel-sized amount of brown acrylic paint onto your palette. Use a soft brush or sponge to coat the bottom of the baby’s foot evenly; avoid applying it too thickly, as globs can slide and smudge the print. -
Stamp the footprint:
Carefully press the painted foot onto the center-front of the pumpkin. Rock the foot gently from heel to toe to ensure all toes make contact with the pumpkin’s curved surface. -
Lift and clean:
Lift the foot straight off the pumpkin to avoid smearing. Immediately wipe the baby’s foot clean. If the print is faint in spots, you can carefully touch it up with your round brush, but keeping the natural texture of the skin print usually looks best. -
Create the floral mask (Option A):
If you look closely at the inspiration, the floral pattern inside the foot is white. If you are painting this ‘wet,’ you can use a clean, dry rubber stamp with a tiny floral pattern. Press the clean stamp into the wet brown paint on the pumpkin to lift the color, revealing the white skin underneath. -
Create the floral detail (Option B):
Alternatively, let the brown footprint dry completely. Then, take a tiny floral stamp or stencil, dip it lightly in white paint, and stamp the pattern directly over the dried brown footprint.
Step 2: Painting the Vines
-
Plan the vine path:
Visualize a trailing vine creeping up the left side of the pumpkin. You can lightly sketch a curving line with a pencil if you want a guide, starting from the bottom left and reaching toward the stem. -
Paint the main stem:
Mix a tiny bit of green into your brown paint to create an olive-brown tone for the stems. Using your fine detail brush, paint a thin, wavering line following your planned path. Keep the pressure light to maintain a delicate line width. -
Add leaf outlines:
Along the vine, identify 4-5 spots for leaves. Switch to the plain brown paint. Use your small round brush to paint the silhouettes of maple-style leaves. Think of a central point and paint three to five jagged lobes radiating outward. -
Fill the leaves:
Fill in your leaf outlines with the brown paint. You don’t need them to be perfectly opaque; a slightly translucent application makes them look like pressed leaves or watercolor. -
Add veining detail:
While the brown paint on the leaves is still slightly wet, use a clean, dry fine brush or a toothpick to gently scratch fine lines through the paint, creating the look of leaf veins (sgraffito technique). -
Connect the leaves:
Use your detail brush again to ensure every leaf is firmly connected to the main vine with a tiny stem. -
Add tendrils:
To soften the look, add a few curly cues or tendrils branching off the main vine using the very tip of your detail brush.
Stamp Smartly
For the floral pattern inside the footprint, use a stamp that is smaller than the baby’s heel. A repeating pattern stamp works best for seamless texture.
Step 3: Finishing Touches
-
Clean up edges:
Examine your work for any accidental smudges. Since the background is white, you can easily clean up tiny mistakes by painting over them with a bit of white acrylic paint. -
Seal the stem:
If the pumpkin’s natural stem looks dry or dull, you can lightly brush it with a clear matte sealant to bring out its natural green and brown tones. -
Allow to cure:
Let the entire project dry undisturbed for at least 24 hours. Acrylic paint dries quickly to the touch, but giving it time ensures it hardens fully against the pumpkin skin.
Add Dimension
Mix a tiny drop of gold paint into your brown leaf color. It won’t glitter heavily but will give the leaves a lovely, warm autumn glow in the sunlight.
Place your beautiful keepsake on the porch or a mantle to enjoy the season
Handprint Mummy Wrap Pumpkin
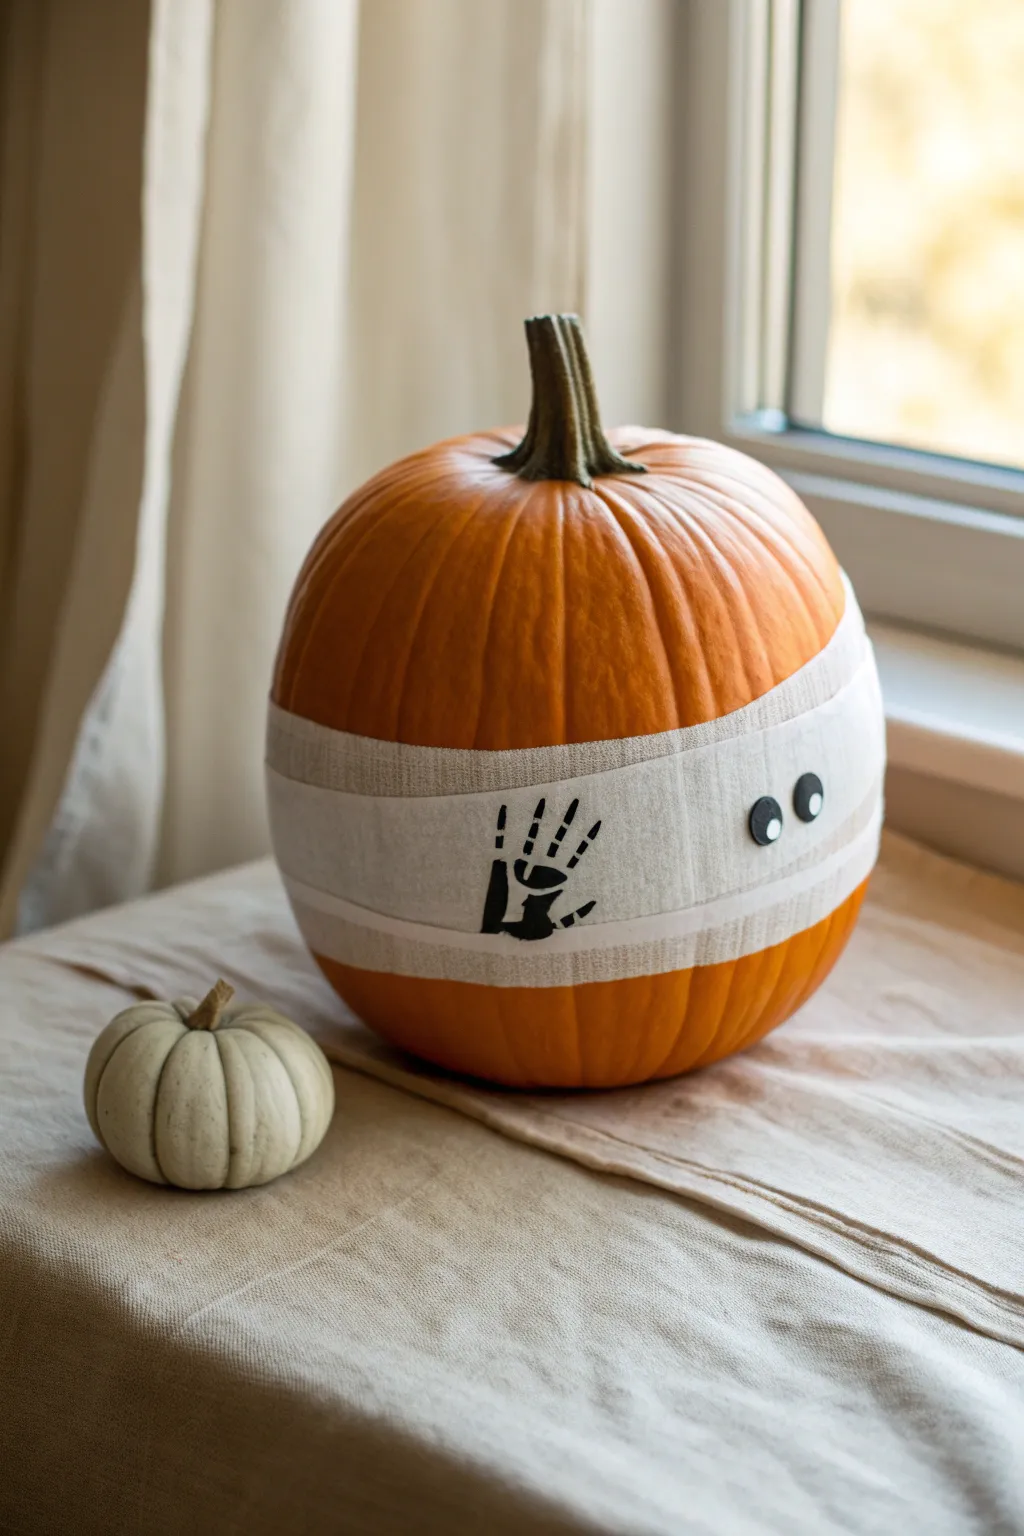

Transform a classic orange pumpkin into a friendly, unwinding mummy using just a few simple craft supplies. This no-mess project combines wrapped gauze with a striking black skeleton handprint for a decoration that adorable and just slightly spooky.
How-To Guide
Materials
- Medium-sized orange pumpkin (real or faux)
- White cotton gauze tape, medical tape, or thin strips of white fabric
- Black acrylic paint
- Small foam brush or dedicated paintbrush for hands
- Googly eyes (medium size)
- Hot glue gun or strong craft glue
- Paper plate (for paint)
- Baby wipes (for cleanup)
- Scissors
Step 1: Wrapping the Mummy
-
Clean surface:
Before starting, wipe down the surface of your pumpkin with a slightly damp cloth to remove any field dust or dirt, ensuring the adhesive and paint will stick properly. Let it dry completely. -
Anchor the wrap:
Take your roll of white gauze tape or fabric strip. Secure the starting end to the back of the pumpkin using a small dab of hot glue or by tucking it under itself if using self-adhesive tape. -
Initial winding:
Begin winding the tape horizontally around the pumpkin’s midsection. You don’t need to cover the entire pumpkin; focus on creating a wide band around the middle, about 4-5 inches tall. -
Layering for texture:
As you wrap, overlap the layers slightly. Don’t pull too tight; let the natural texture of the fabric or gauze show. If you twist the strip occasionally, it adds a nice, ancient mummy look. -
Secure the end:
Once you have a solid white band around the middle, cut the tape. Secure the loose end at the back of the pumpkin with another small dot of glue so the front looks seamless.
Smudged Print Rescue
Hand slid during stamping? Don’t panic. Paint over the smudge with white acrylic to ‘erase’ it, let dry, and re-stamp. Or, turn the smudge into a spooky spider with a fine liner brush.
Step 2: Creating the Skeleton Handprint
-
Prepare the paint:
Squeeze a generous amount of black acrylic paint onto a paper plate. You want enough to coat a hand but not so much that it’s gloopy. -
Paint the hand:
Using a foam brush, paint the palm and fingers of your child’s hand (or your own!). Ensure even coverage, but avoid thick pools of paint which might smudge. -
Add skeleton details:
For the skeleton effect seen in the photo, I sometimes wipe away small horizontal lines of paint across the fingers with a baby wipe before stamping, creating ‘knuckle’ gaps. Alternatively, you can paint the hand normally and add white lines later. -
The stamp:
Carefully press the painted hand onto the center of the white gauze wrapping. Press down firmly on the palm and each finger to ensure transfer to the textured fabric. -
The lift:
Lift the hand straight off the pumpkin to avoid smearing the print. Have those baby wipes ready immediately for quick cleanup. -
Touch-ups:
If the fabric texture caused any gaps in the print that you don’t like, use a small detail brush dipped in black paint to fill them in gently.
Step 3: Bringing it to Life
-
Eye placement:
Take two medium-sized googly eyes. Position them on the right side of the gauze wrapping, spaced a little apart from the handprint. -
Gluing eyes:
Apply a small dot of glue to the back of each eye and press them firmly onto the gauze. Placing them slightly askew can give the mummy a goofy, confused expression. -
Final check:
Inspect the wrapping to make sure no edges are peeling up. If the gauze looks too pristine, you can gently fray the edges with your fingernail for a more weathered appearance.
Gauze Texture Trick
If using medical gauze, tea-stain strips first! Dip them in weak black tea and let dry before wrapping. This gives an aged, dusty tomb look compared to bright white.
Place your little mummy pumpkin on a windowsill or porch to greet trick-or-treaters with a high-five
Layered Footprint Heart Keepsake Pumpkin
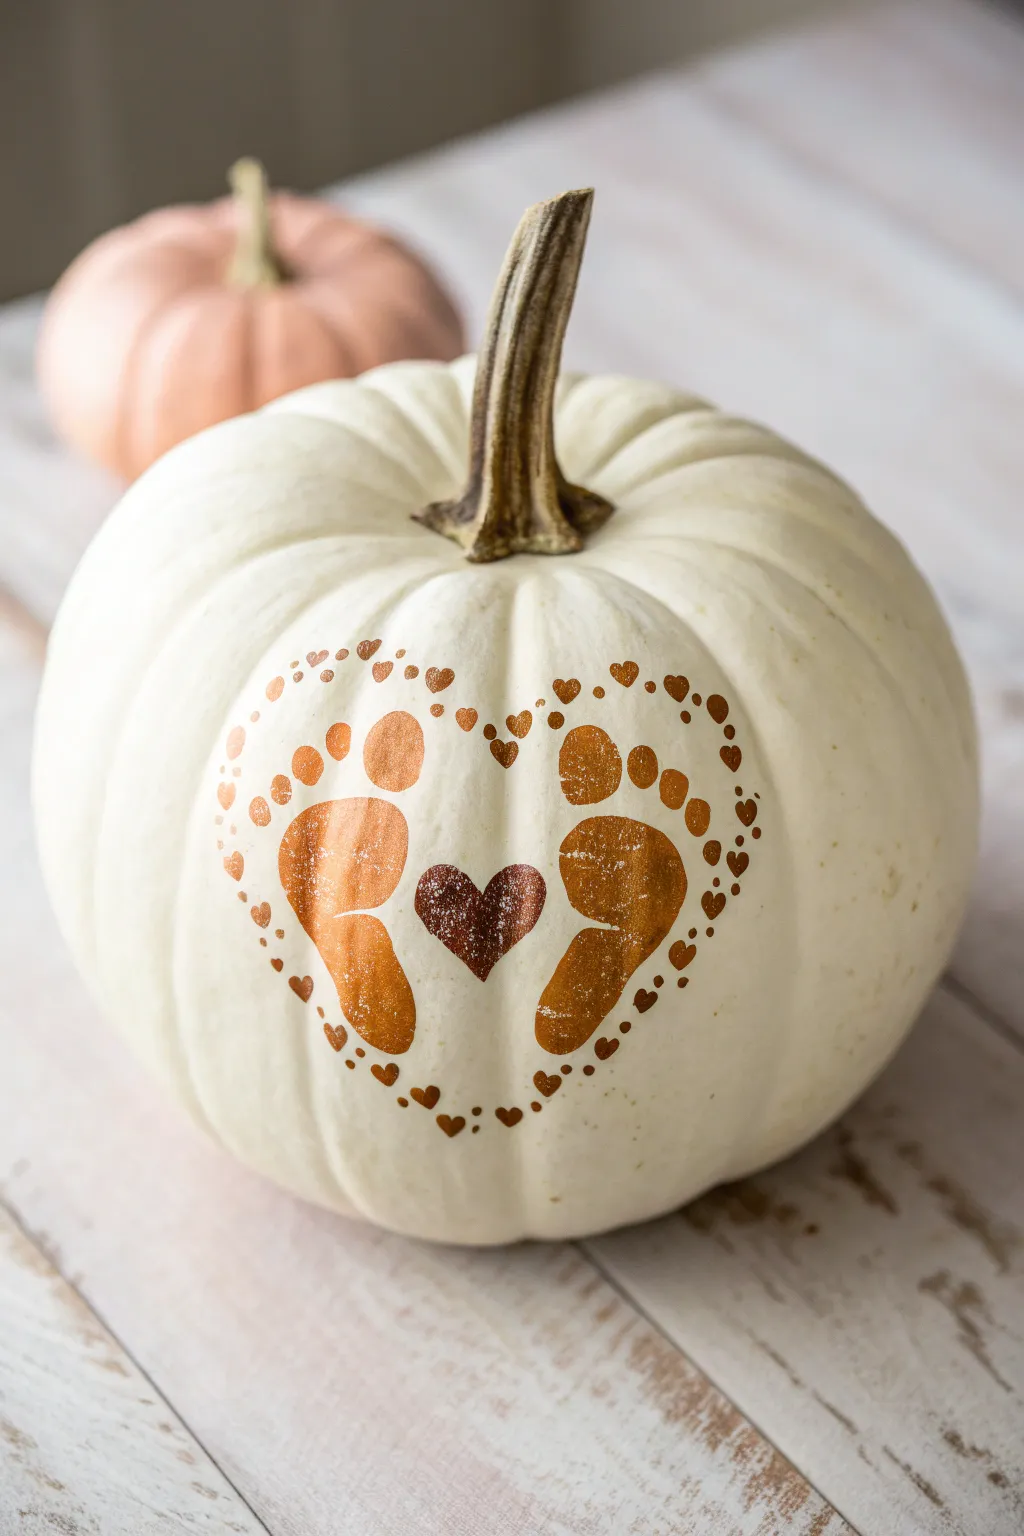
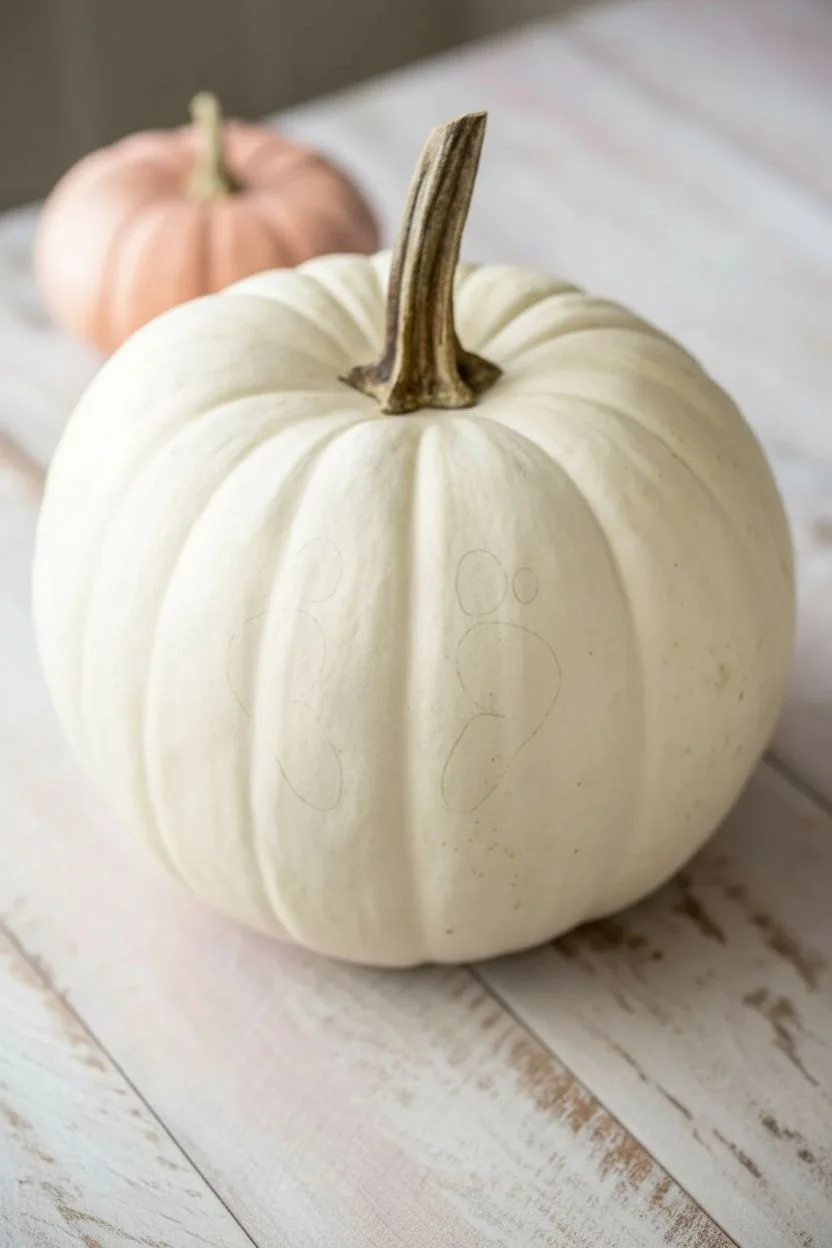
Capture a precious moment in time with this elegant white pumpkin keepsake featuring your little one’s footprints. The metallic copper paint creates a warm, sophisticated contrast against the white gourd, forming a loving heart shape surrounded by delicate details.
Step-by-Step Tutorial
Materials
- Medium-sized white pumpkin (real or faux)
- Metallic copper or bronze acrylic paint
- Small foam sponge brush
- Fine-point paintbrush (size 0 or 1)
- Small flat paintbrush
- Baby wipes or damp paper towels (essential for quick cleanups)
- Paper plate or palette
- Pencil (light touch)
Step 1: Preparation & Planning
-
Clean surface:
Begin by wiping down your pumpkin with a damp cloth to remove any dust or dirt. If using a real pumpkin, ensure it is completely dry before painting. -
Sketch the layout:
Lightly visualize where the heart shape will sit. You can use a pencil to make incredibly faint guide marks for the left and right footprint positions to ensure they tilt inward to form a heart shape.
Wiggle Proofing
Make this a two-person job: have one person hold the baby securely while the other guides the foot onto the pumpkin to prevent smears.
Step 2: Creating the Footprints
-
Prepare the paint:
Squeeze a generous amount of metallic copper paint onto your paper plate. You want enough to coat a foot quickly but not so much that it’s gloppy. -
Coat the first foot:
Using the sponge brush, gently dab paint onto your baby’s left foot. Cover the entire sole and toes evenly. I usually work fast here so the baby doesn’t wiggle too much. -
Stamp the left side:
Gently press the painted foot onto the left side of the pumpkin face, angling the heel inward and the toes outward to create the left half of a heart shape. Press the toes down individually to ensure a good print. -
Clean and repeat:
Immediately wipe the baby’s foot clean. Repeat the painting process on the right foot. -
Stamp the right side:
Press the right foot onto the pumpkin, mirroring the left print. The heels should be close together at the bottom, and the toes should flare out, leaving a heart-shaped negative space in between. -
Touch up prints:
If the prints came out a bit patchy—which often happens with pumpkins—use your small flat brush and a little extra copper paint to fill in the main shape of the sole and toes while keeping the edges authentic.
Errant Smudges?
If a footprint smears, quickly wipe it off with a wet wipe before it dries. If a stain remains, dab a little white acrylic paint over it to conceal.
Step 3: Adding the Heart Details
-
Paint the center heart:
Right in the center of the white space between the two footprints, where the heels curve away, paint a solid heart using the small flat brush and copper paint. -
Allow to dry:
Let the main footprints and center heart dry to the touch so you don’t accidentally smudge them while working on the border. -
Start the border:
Load your fine-point paintbrush with copper paint. You will be creating a dotted outline that frames the entire footprint arrangement. -
Create heart confetti:
Instead of round dots, paint tiny mini-hearts for the border. Start at the top center above the prints and paint a small heart facing downward. -
Work symmetrically:
Work your way down both sides, painting these tiny copper hearts. Space them somewhat irregularly to give it a whimsical, falling-confetti look. -
Vary the shapes:
Mix in a few simple dots or smaller circles among the tiny hearts to add texture to the border line. -
Complete the loop:
Continue the pattern until the two lines of tiny hearts meet at the bottom point beneath the footprint heels, effectively closing the large heart shape. -
Review and refine:
Step back and look at the composition. If any areas of the border look too sparse, add a tiny dot or heart to fill the gap. -
Final dry:
Let the entire pumpkin sit undisturbed for at least an hour to ensure the metallic paint cures completely.
This beautiful keepsake will be a warm reminder of how tiny those feet once were every autumn season
Tape-Resist Stripes Revealing a Baby Footprint Center
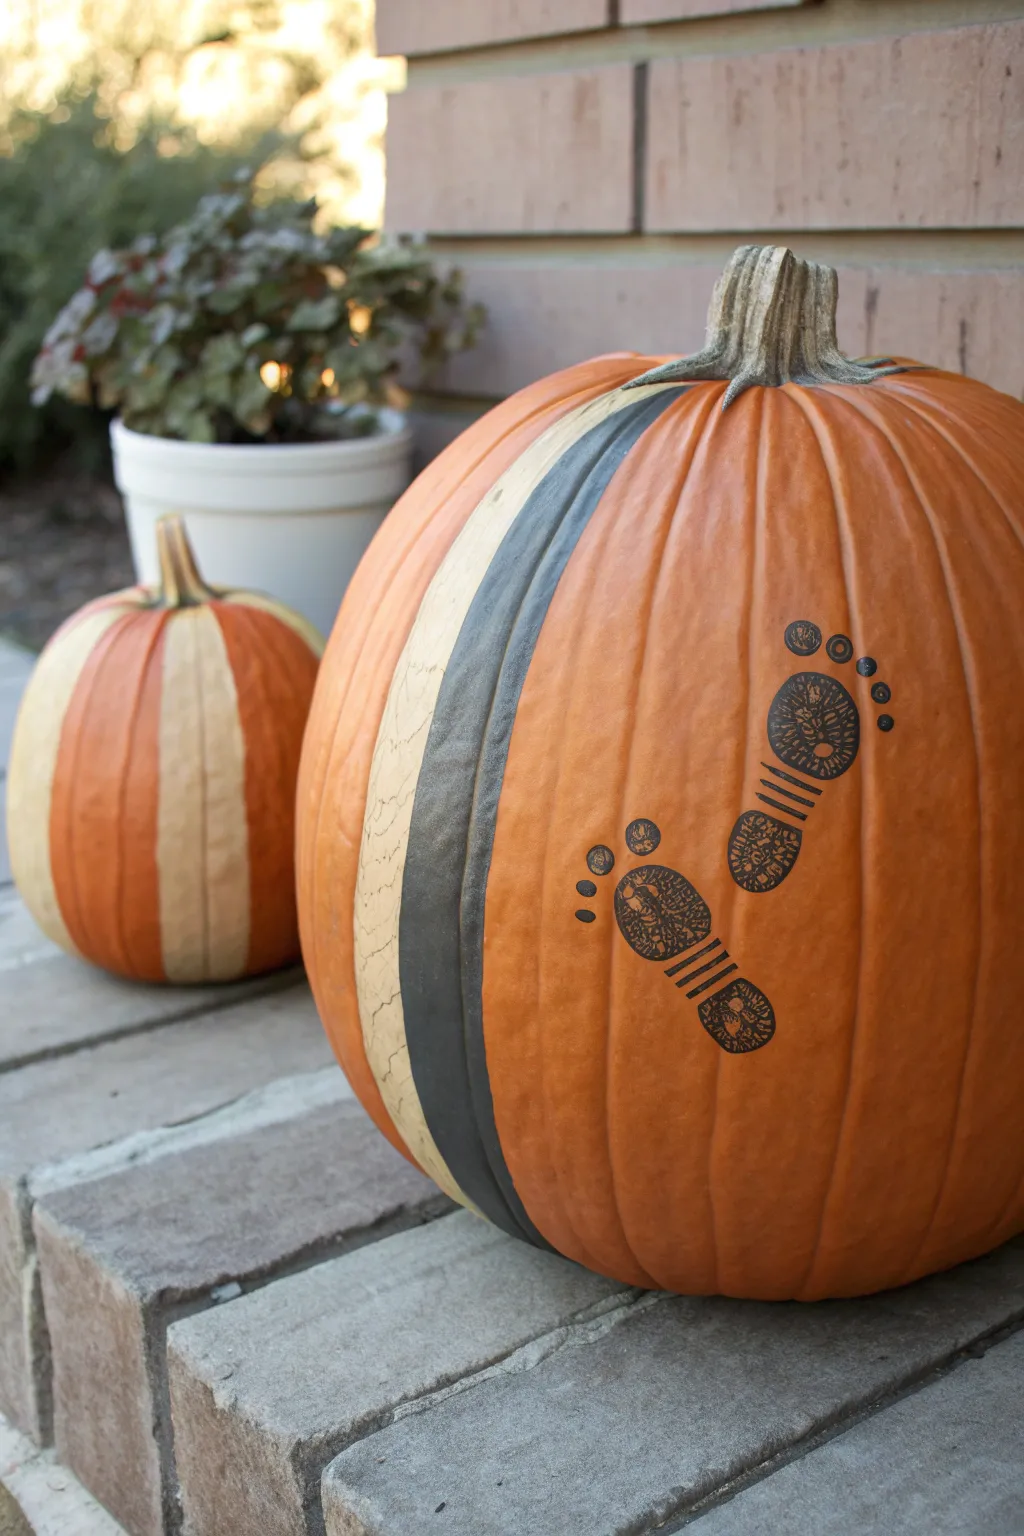
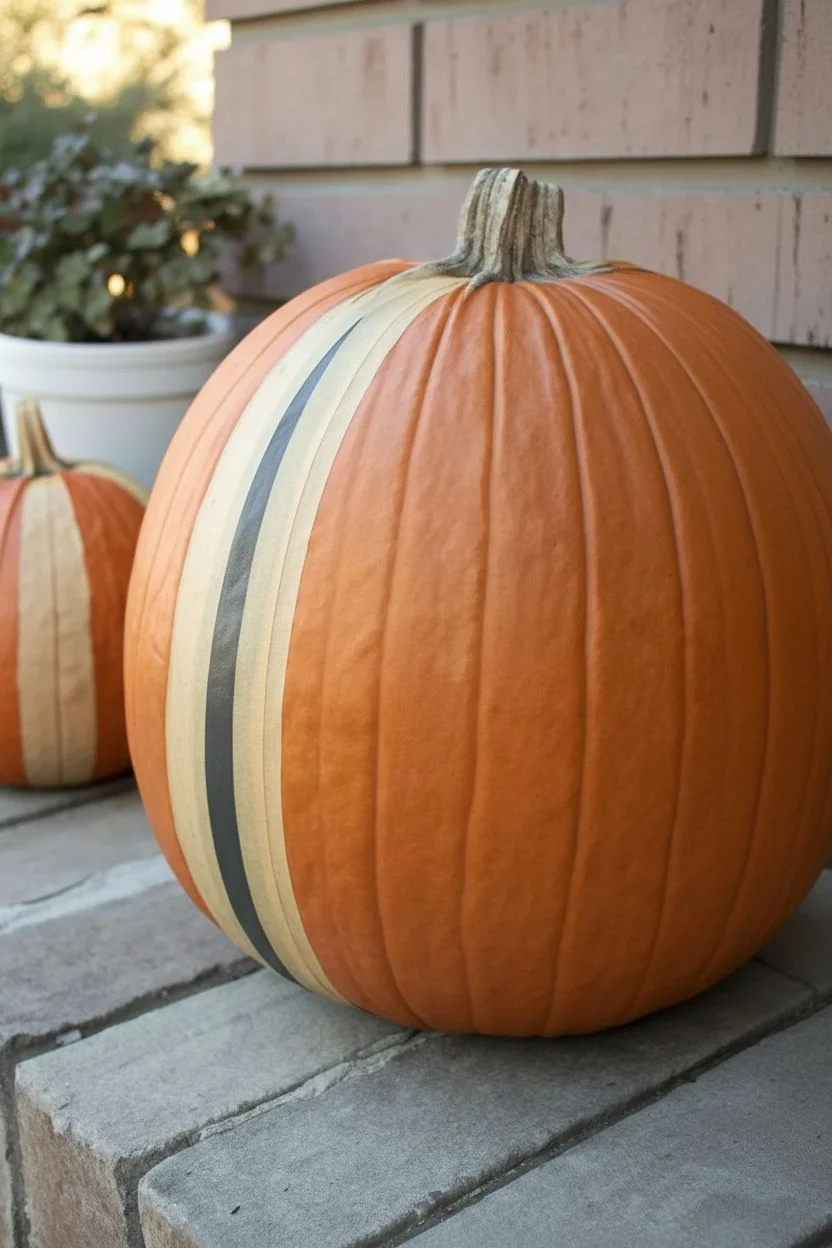
Capture a sweet moment in time with this modern, graphic pumpkin design that features bold painted stripes alongside your little one’s footprints. The contrast of the cream and charcoal bands against the natural orange rind creates a sophisticated backdrop for a precious keepsake.
How-To Guide
Materials
- Large orange pumpkin (cleaned and dried)
- Painter’s tape or masking tape (1-inch width)
- Cream or off-white acrylic craft paint
- Charcoal or dark grey acrylic craft paint
- Black acrylic craft paint (for footprints)
- Medium flat paintbrush
- Small foam brush
- Paper plate or palette
- Baby wipes or damp cloth (essential for clean-up)
- Clear acrylic sealer spray (optional)
Step 1: Preparation & Taping
-
Clean surface:
Begin by wiping down your pumpkin with a damp cloth to remove any dirt or field dust. Dry it completely with a towel so the tape will adhere properly. -
Plan your layout:
Visualize where you want the stripes. This design features two wide bands on the left side, leaving a large open space on the right for the footprints. -
Apply first tape line:
Apply a strip of painter’s tape vertically down the pumpkin, following the natural curve of the ribs. This will define the left edge of your cream stripe. -
Define the stripe width:
Place a second piece of tape parallel to the first, roughly 2 to 3 inches away. Press the edges of the tape down firmly with your fingernail to prevent paint from bleeding under.
Stamp Success
Does your baby curl their toes when painted? Gently tickle the top of their foot immediately after applying paint—this reflex often makes them fan their toes out right before you stamp.
Step 2: Painting the Stripes
-
Paint the cream stripe:
Using the flat paintbrush, fill in the space between your first two tape lines with the cream acrylic paint. You may need two coats for opaque coverage; let the first coat dry for about 15 minutes before applying the second. -
Remove tape carefully:
While the second coat is still slightly wet, gently peel back the tape. This trick often helps keep the edges crisp. -
Tape the second stripe:
Once the cream paint is entirely dry to the touch, mask off the area for the charcoal stripe. Place one piece of tape directly over the edge of your dried cream stripe to get them perfectly adjacent, or leave a tiny hairline gap if you prefer separation. -
Define the outer edge:
Place another strip of tape 2 to 3 inches to the right of the cream stripe to finish the boundary for the dark stripe. -
Paint the charcoal stripe:
Fill this new section with charcoal or dark grey paint. I find that dark colors usually cover well in one generous coat, but apply a second if you see streaks. -
Reveal the design:
Carefully remove the tape immediately after painting. Allow the entire pumpkin to dry completely for at least an hour before attempting the footprints.
Step 3: Adding the Footprints
-
Prepare the station:
Set up a comfortable spot to hold the baby. Have your black paint poured onto a paper plate and the foam brush ready. Keep the wipes within arm’s reach. -
Test the stamp:
Practice stamping on a piece of paper first. Apply paint to the foot with the foam brush—avoiding big globs—and press onto the paper to gauge how much pressure is needed. -
Paint the first foot:
Coat the bottom of the baby’s right foot with a thin, even layer of black paint using the foam brush. Make sure to get the little toes. -
Stamp the pumpkin:
Firmly but gently press the painted foot onto the open orange space of the pumpkin, positioned at a slight angle. Roll the foot slightly from heel to toe to ensure a good print. -
Clean immediately:
Wipe the baby’s foot instantly with a baby wipe before the paint dries on their skin. -
Repeat for second foot:
Apply paint to the left foot. Position this print slightly higher and to the left of the first one to simulate a walking motion. -
Final touch-ups:
If the print is a little light in spots, you can very carefully dab in a bit more black paint with a small brush, though keeping the rustic texture of the print looks charming. -
Seal the art:
Once everything is bone dry (give it 24 hours), spray a light coat of clear acrylic sealer over the painted areas if you plan to keep the pumpkin on a porch exposed to humidity.
Level Up: Name & Date
Use a fine-tip white paint pen or a permanent marker to write the baby’s name and the year in a calligraphy style underneath the footprints or along the curve of the cream stripe.
Place your personalized pumpkin on the porch to welcome visitors with this adorable milestone memory.
Minimal Modern Pumpkin With One Bold Footprint and Name
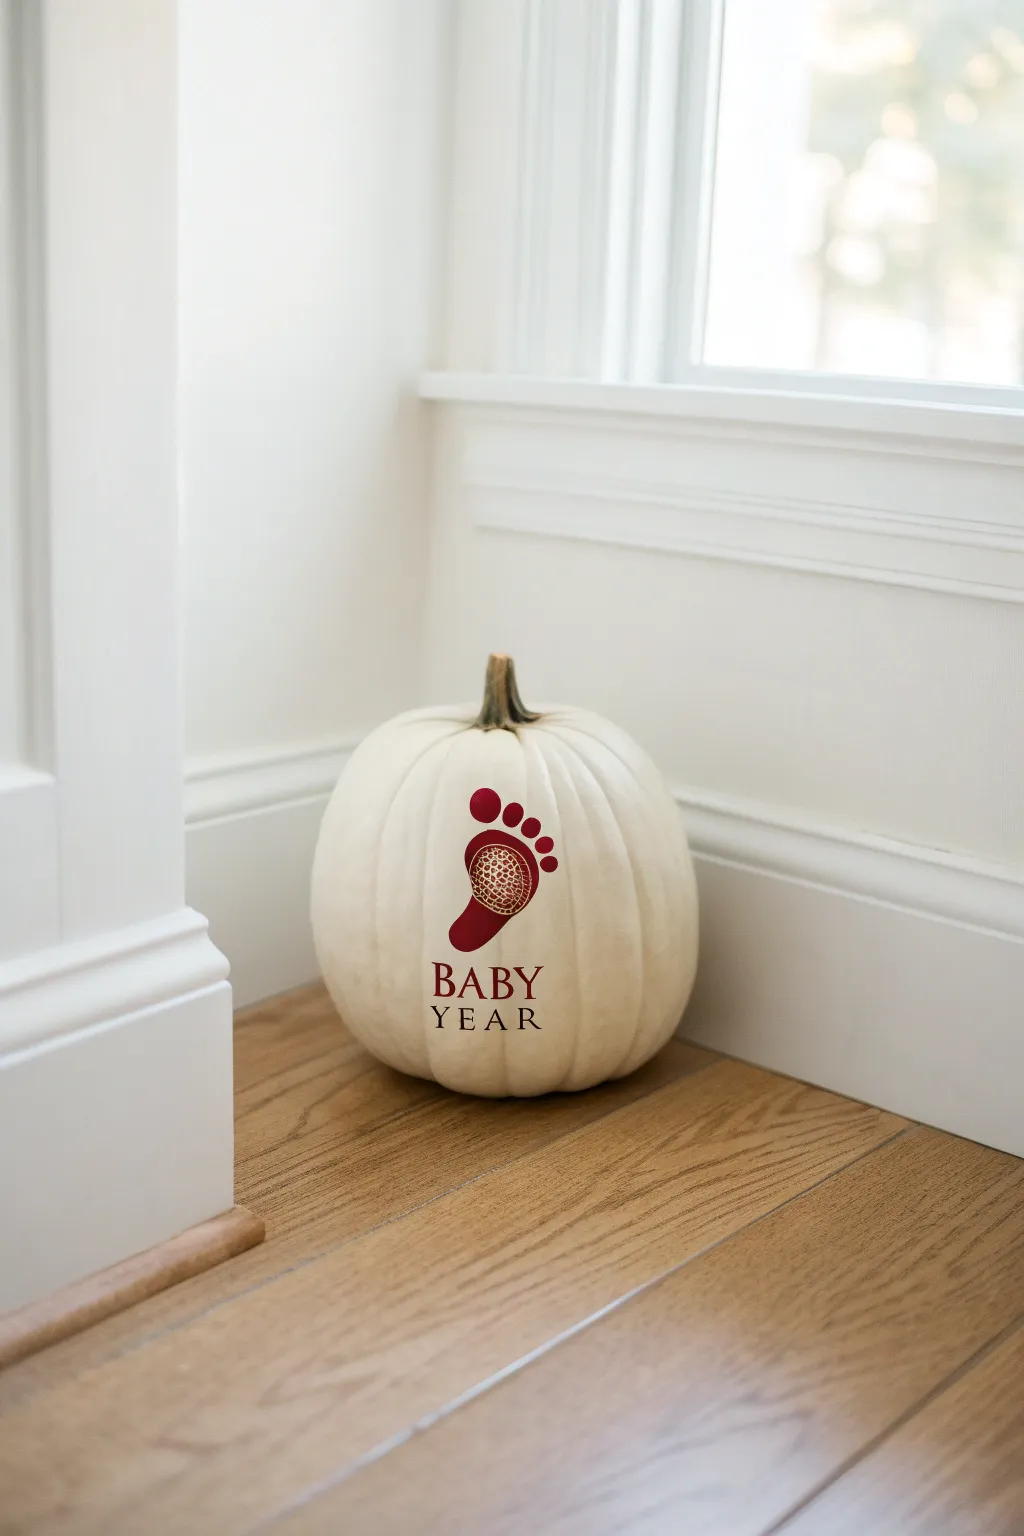
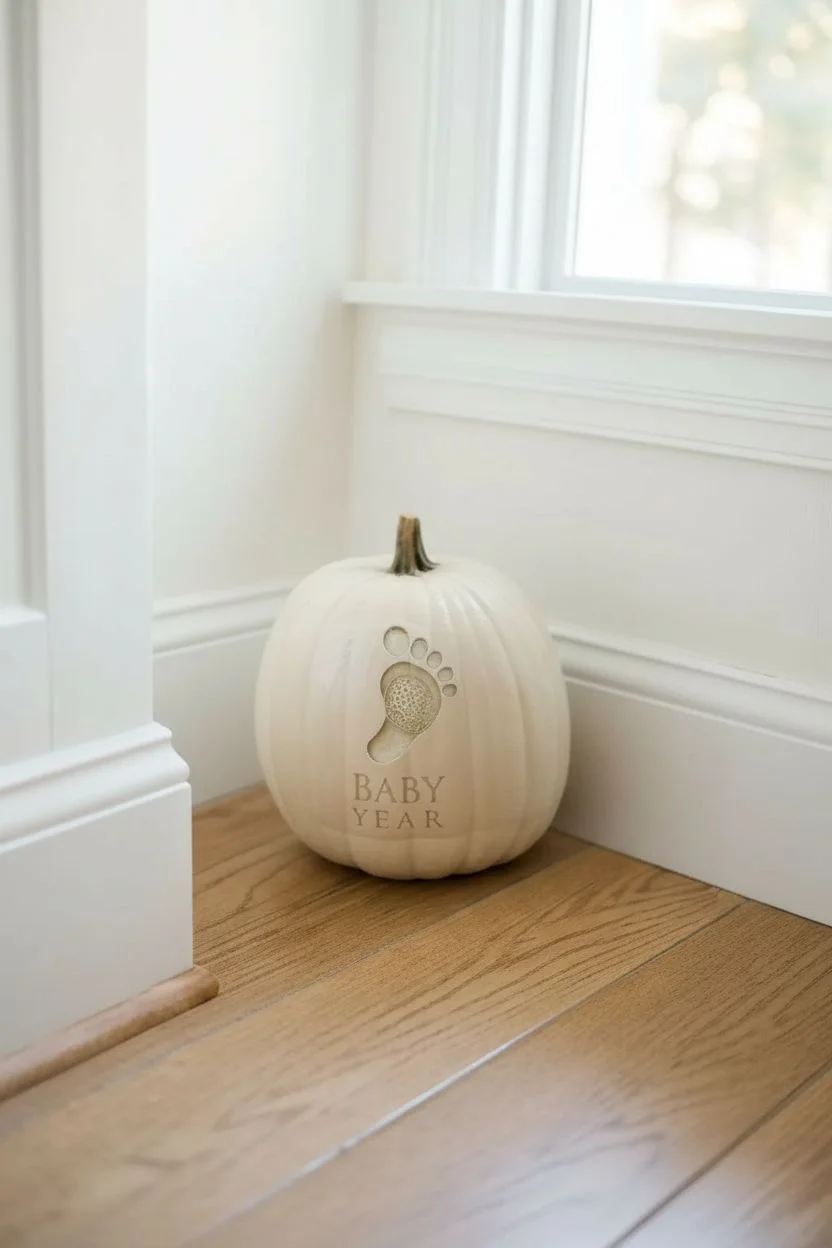
Celebrate a new arrival with this clean and sophisticated pumpkin design that serves as a beautiful keepsake. Using a crisp white pumpkin as your canvas highlights the single, bold footprint and classic typography for a look that fits perfectly in any modern home.
How-To Guide
Materials
- White pumpkin (real or high-quality faux)
- Deep red or maroon acrylic craft paint
- Small foam pouncer or cosmetic sponge
- Fine-grit sandpaper (optional)
- Rubbing alcohol and cotton balls
- Computer and printer for stencil creation
- Adhesive vinyl or contact paper
- Craft knife or cutting machine (like a Cricut or cameo)
- Transfer tape
- Small flat tip paintbrush
- Matte spray sealer
Step 1: Preparation and Stencil Creation
-
Clean the surface:
Before anything else, gently wipe down the entire surface of your white pumpkin with rubbing alcohol on a cotton ball. This removes natural waxes, oils, or store dirt that prevents paint or stencils from adhering properly. -
Inspect the canvas:
Run your fingers over the face of the pumpkin where you plan to paint. If there are any rough bumps or warts, gently sand them down with fine-grit sandpaper to create a smooth area for the stencil. -
Design the footprint:
Find a stock image of a baby footprint that includes a textured interior pattern, similar to the grid look in the photo, or choose a solid footprint for an easier version. Import this into your cutting machine software. -
Add the text:
Below the footprint graphic, type the word ‘BABY’ and the birth year (e.g., ‘2024’) in a classic serif font like Times New Roman or Garamond. Arrange them so they are centered and balanced relative to the foot. -
Cut the stencil:
Load your adhesive vinyl into your cutting machine and cut out the design. Remember, you are creating a stencil, so you will be weeding out (removing) the letters and the footprint shape itself, leaving the negative space. -
Prepare for transfer:
Apply transfer tape over the top of your vinyl stencil. Use a scraper tool or credit card to burnish it firmly, ensuring the vinyl sticks to the tape.
Pro Tip: Curved Surface
Pumpkins are round! Cut tiny slits in the unprinted parts of your vinyl transfer tape. This allows the stencil to overlap itself and mold around the pumpkin’s curve without warping the design.
Step 2: Applying the Design
-
Position the stencil:
Align the stencil on the smoothest ‘face’ of the pumpkin. Start by sticking down the center vertically, then gently smooth the vinyl outward toward the sides to accommodate the pumpkin’s curve. -
Seal edges:
Press down firmly on all the cut edges of the letters and the footprint. It is critical that the vinyl has a complete seal against the pumpkin skin to prevent paint bleed. -
Remove transfer tape:
Slowly peel back the transfer tape at a sharp angle. If any vinyl lifts, lay the tape back down and rub it again before proceeding. -
The sealing trick:
I like to take a tiny bit of white paint (matching the pumpkin) or clear matte medium and lightly dab it over the stencil cutouts first. This seals the edges, so if any paint bleeds under, it’s invisible.
Troubleshooting: Bleeding
If paint bleeds under the stencil, don’t panic. Once dry, you can gently scrape excess paint away with a craft knife or cover the mistake with a tiny touch of white paint.
Step 3: Painting and Finishing
-
Load the paint:
Pour a small amount of deep maroon acrylic paint onto a palette. Dab your foam pouncer or cosmetic sponge into the paint, then offload most of it onto a paper towel until the sponge looks almost dry. -
Apply first coat:
Gently pounce the sponge straight up and down over the stencil openings. Do not drag or brush sideways. The first coat should be very light and might look patchy. -
Second coat:
Allow the first layer to dry for about 10–15 minutes. Apply a second light coat using the same pouncing motion to achieve full opacity and that rich red color. -
Reveal the design:
While the second coat is still slightly tacky (not fully wet, but not rock hard), carefully peel away the vinyl stencil. Pulling while slightly damp helps prevent the vinyl from ripping up dried paint edges. -
Pick out centers:
Use a weeding tool, a pin, or the tip of a craft knife to very carefully lift out the small vinyl pieces ‘islands’ inside the letters ‘A’, ‘B’, ‘R’, and the separate toe circles. -
Clean up:
If there are any tiny bleeds or rough edges, use a small flat brush dipped in a tiny bit of water or white paint to tidy up the lines. -
Seal the work:
Once fully dry (give it at least an hour), lightly mist the painted area with a matte spray sealer to protect the design from scratches or moisture.
Place your finished masterpiece near a window or entryway to warmly welcome guests during the season
Nursery Keepsake Display: Painted Pumpkin With Handprint + Year Tag
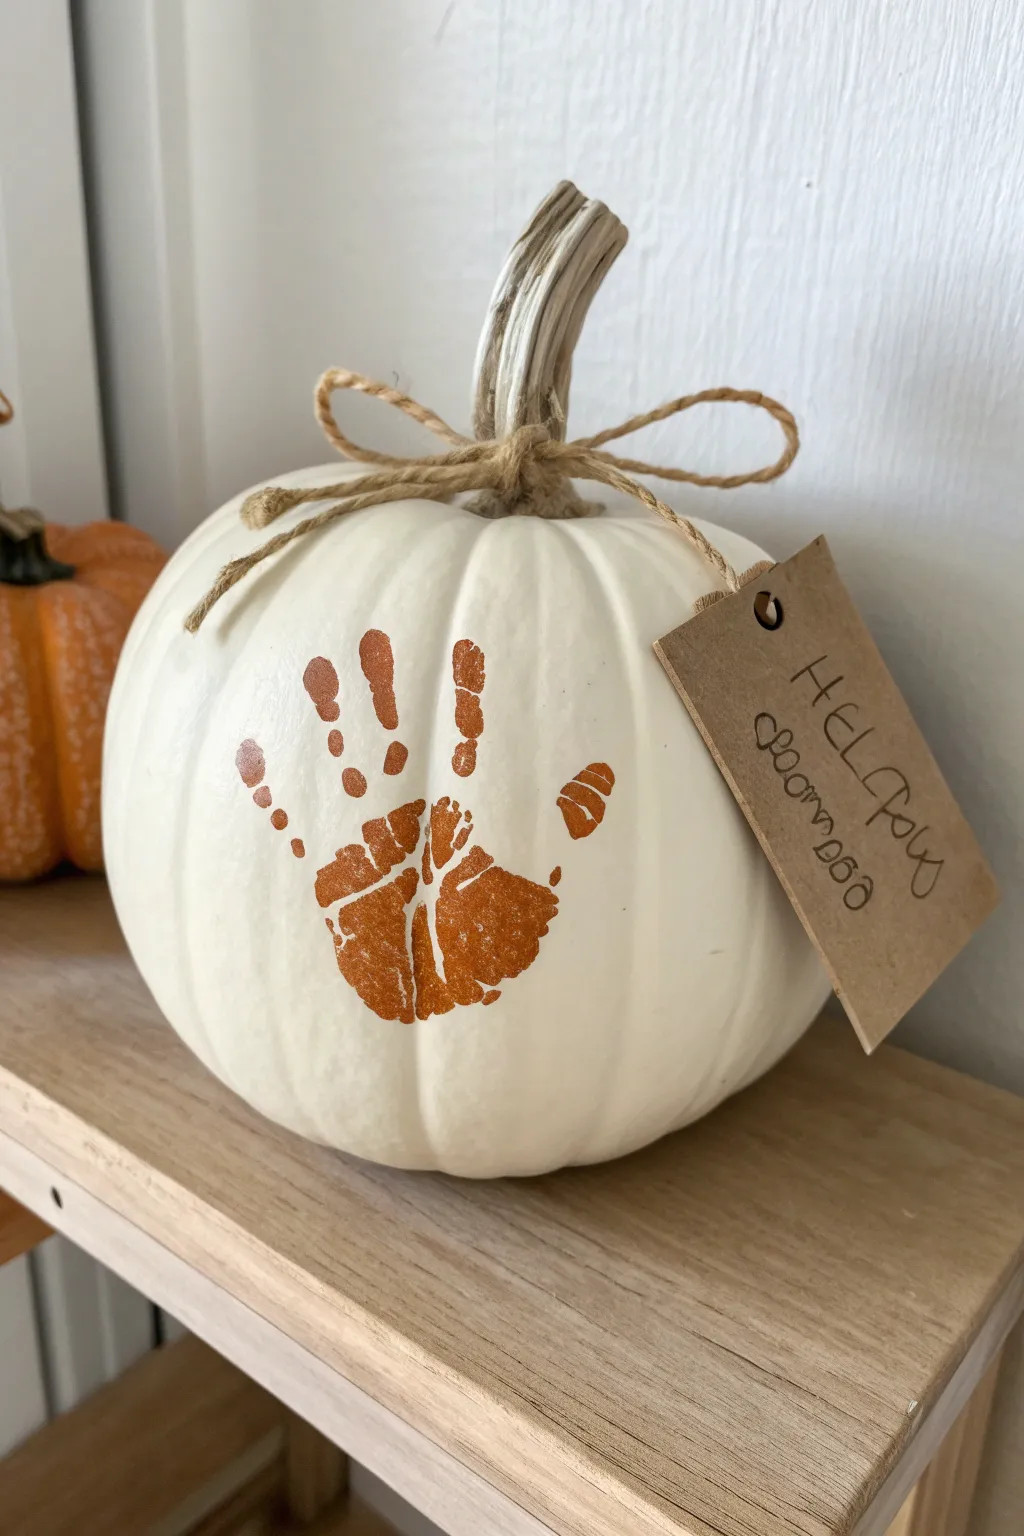
Capture the fleeting magic of your baby’s tiny size with this elegant and minimalist keepsake pumpkin. Featuring a clean white base and a classic orange handprint, this project transforms a simple seasonal gourd into a treasured nursery decoration.
Step-by-Step Tutorial
Materials
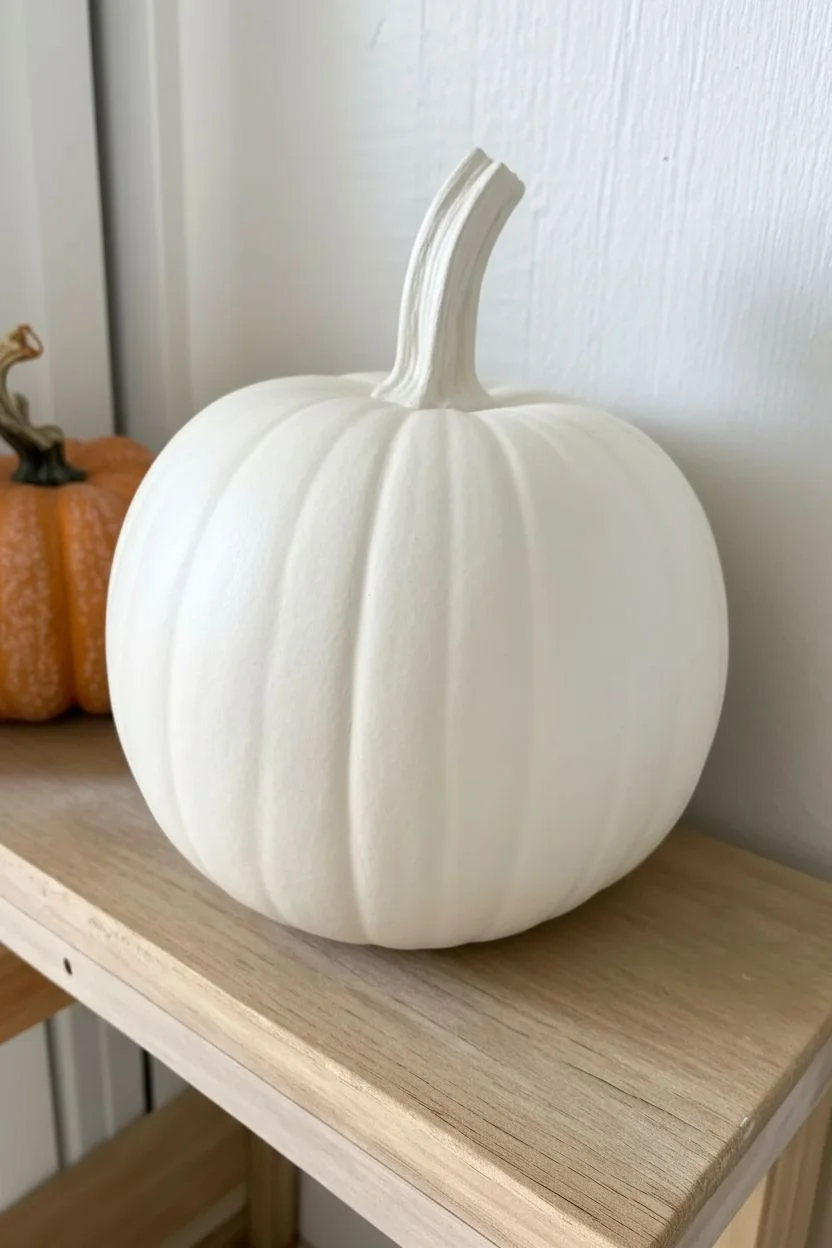
- Medium white craft pumpkin (faux)
- Orange acrylic craft paint
- Foam sponge brush
- Natural jute twine
- Kraft paper gift tag
- Fine-point black marker or pen
- Baby wipes or damp cloth (essential for quick cleanup)
- Paper plate or palette
- Scissors
Step 1: Preparation & Practice
-
Clean the surface:
Begin by wiping down your white faux pumpkin with a damp cloth to remove any dust or oils. Let it dry completely to ensure the paint adheres properly. -
Prepare the workspace:
Set up a comfortable area where you can hold your baby securely. I like to lay down some old newspaper or a drop cloth just in case things get messy. -
Load the paint:
Squeeze a generous amount of orange acrylic paint onto your paper plate. -
Test the consistency:
Dab your foam sponge brush into the paint. You want the sponge saturated but not dripping; too much paint leads to a slippery print that lacks defined lines.
Clean Print Secret
Does baby clench their fist? Gently press the back of their hand against a flat surface for a second. This reflex causes the palm to open flat, making it easier to apply paint.
Step 2: The Handprint
-
Coat the hand:
Gently hold your baby’s hand open and use the sponge brush to apply a layer of orange paint. Cover the entire palm and fingers, but avoid the deep crevices between fingers to keep the print clean. -
Check coverage:
Look at the hand quickly before printing. If the paint is drying too fast, dab a little more fresh paint on top so the print transfers solidly. -
Positioning:
Hold the pumpkin steady with one hand (or have a helper hold it). Aim for the center of the pumpkin’s smoothest side, away from deep vertical grooves if possible. -
Press and roll:
Press your baby’s hand firmly onto the pumpkin surface. Since pumpkins are curved, gently roll the hand slightly from palm to fingertips to ensure every part makes contact. -
The lift:
Lift the hand straight up and away from the pumpkin surface to avoid smudging the wet paint. -
Clean up baby:
Immediately use those baby wipes to clean the paint off your little one’s hand before it dries or they touch anything else. -
Touch ups:
Inspect the print essential details. If a finger didn’t print fully, you can carefully use a small paintbrush to fill in the missing section, though the imperfect texture adds charm. -
Drying:
Allow the handprint to dry completely, which usually takes about 30 to 60 minutes depending on how thick the paint application was.
Add Subtle Sparkle
Before the orange paint dries completely, lightly sprinkle fine translucent glitter over the wet handprint. Shake off the excess for a shimmering finish that catches the light.
Step 3: Tag & Assembly
-
Write the tag:
Take your kraft paper tag and use a fine-point marker to write a message. ‘Hello Pumpkin’ or the current year are classic choices that look great in simple handwriting. -
Cut the twine:
Cut a length of jute twine, roughly 24 inches long, so you have plenty of slack for tying a bow. -
Thread the tag:
Slip one end of the twine through the hole in your tag and slide it down toward the center point of the string. -
Wrap the handle:
Place the center of the twine (with the tag) behind the pumpkin stem. Wrap the twine around the base of the stem a couple of times to secure it. -
Tie the bow:
Bring the ends to the front and tie a simple shoelace bow. Adjust the loops so they look balanced and perky. -
Final trim:
Trim the tails of the twine if they are hanging too low, ensuring they don’t obscure the cute handprint you just created.
Place your adorable creation on a nursery shelf for a seasonal touch that freezes time


Have a question or want to share your own experience? I'd love to hear from you in the comments below!