That back-to-school feeling is basically a whole mood—fresh notebooks, sharpened pencils, and just a little nervous excitement. Let’s turn that energy into back to school drawings you can sketch fast, personalize, and have a ton of fun with.
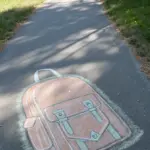
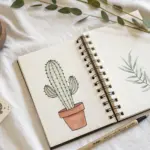
Back-to-School Doodle Collage
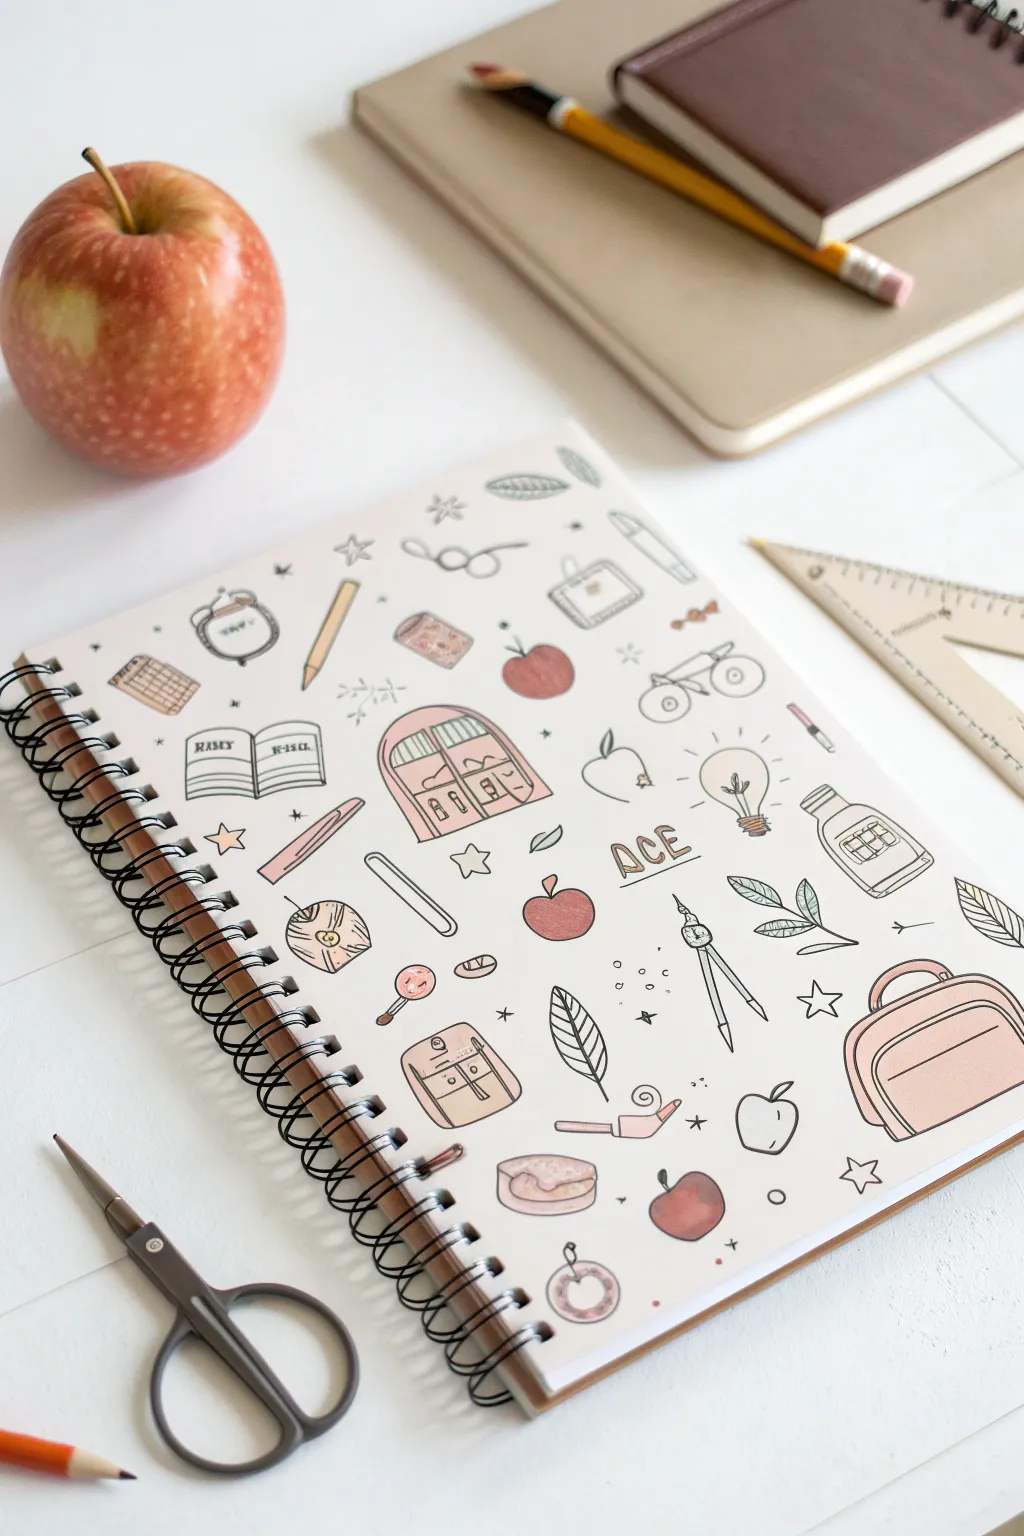
Transform a plain spiral notebook into a personalized stationery piece with this charming back-to-school doodle collage. Using fine liners and soft colored pencils, you’ll create a scattered pattern of iconic school supplies that feels both nostalgic and fresh.
Step-by-Step Tutorial
Materials
- Plain spiral-bound notebook (kraft or white cover)
- Pencil (HB or 2H for sketching)
- Eraser (kneaded preferred)
- Black felt-tip fine liner (0.3mm or 0.5mm)
- Colored pencils (muted pinks, reds, sages, and grays)
- Ruler (optional, for spacing)
Step 1: Planning and Sketching
-
Map out the anchor points:
Begin by lightly sketching your largest items first to establish balance. Place the backpack, the open book, and the detailed window shape in a zig-zag formation across the cover so no area feels too heavy. -
Add secondary objects:
Fill in the gaps with medium-sized icons. Sketch the apples, lightbulb, compass tool, and the ‘ACE’ lettering. Keep the orientation varied—some items can tilt left or right for a playful look. -
Fill the voids:
Look for empty white spaces and lightly sketch smaller filler items like individual leaves, stars, paperclips, glasses, and tiny circles. The goal is an even distribution without objects touching.
Step 2: Inking the Outlines
-
Trace steady lines:
Switch to your black fine liner. Start tracing over your pencil sketches with a steady hand. Don’t worry about perfect straight lines; a slightly wavering line adds to the hand-drawn charm. -
Ink the structural items:
Outline the geometric shapes first, like the pages of the open book and the windows. For the backpack, use smooth, rounded strokes to suggest soft fabric. -
Detail the organic shapes:
Ink the apples and leaves. For the leaves, add a simple center vein line but keep the detailing minimal. -
Add textural details:
Use your pen to add tiny details that bring the doodles to life: drawing the filament inside the lightbulb, the grid on the calculator, and the wood grain texture on the pencil. -
Let the ink settle:
Allow the ink to dry completely for at least 5-10 minutes to prevent smudging. I usually use this time to sharpen my colored pencils. -
Erase guidelines:
Gently erase all underlying pencil marks. Hold the paper taut with one hand to avoid crinkling the cover while erasing.
Smudge Prevention
Place a scrap piece of paper under your drawing hand while you color. This acts as a shield, preventing oils from your hand from smearing the pencil or ink.
Step 3: Adding Pastel Color
-
Select your palette:
Limit your colors to a muted palette of soft reds, salmon pinks, and sage greens to replicate the reference style. Avoid neon or fully saturated primaries. -
Color the focal reds:
Use a soft red or salmon pencil to color the apples and the apple slice. Apply the color lightly, perhaps leaving a small white spot on the upper curve for a highlight. -
Apply decorative pinks:
Use the pink shade for the backpack, the window frame, and the eraser on the pencil. Color using small circular strokes to get an even, smooth texture. -
Add subtle shading:
Go back over the bottom edges of the red and pink items with a slightly heavier hand to create a simple shadow, giving the doodles a bit of dimension. -
Tint the greens and grays:
Use a very pale sage green for the leaves. For metal items like the compass and the jar lid, use a light grey or simply a very faint layer of black pencil. -
Highlight the ‘ACE’ text:
Color the interior of the sketched letters ‘ACE’ with a warm beige or light brown to make them stand out without overpowering the illustration.
Make it Stickers
Instead of drawing directly on the cover, draw these on sticker paper. You can then cut them out individually and arrange them on laptops or binders.
Step 4: Finishing Touches
-
Add whimsical elements:
Scatter tiny black ink dots, teeny stars, or ‘sparkles’ (little crosses) in any remaining large white spaces to tie the whole composition together. -
Strengthen outlines:
If any colored pencil wax has obscured your black lines, go back over crucial outlines one last time with your fine liner to make them crisp again.
Enjoy using your custom-designed notebook for your daily journaling or class notes
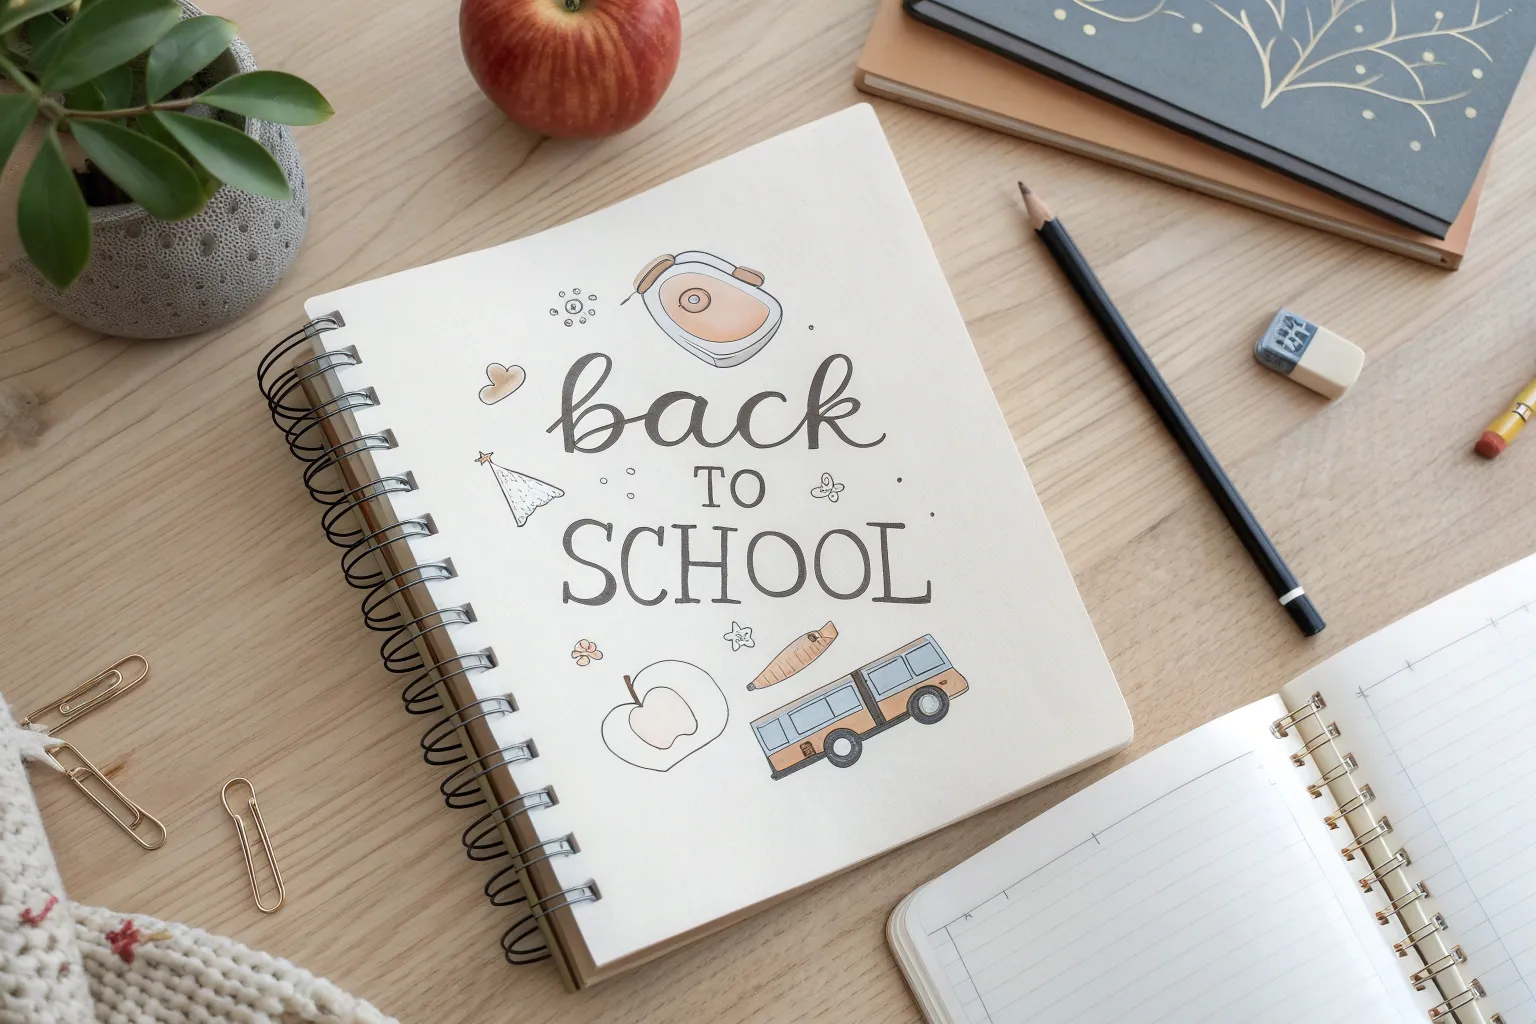
Bubble Letter “Back to School” Title
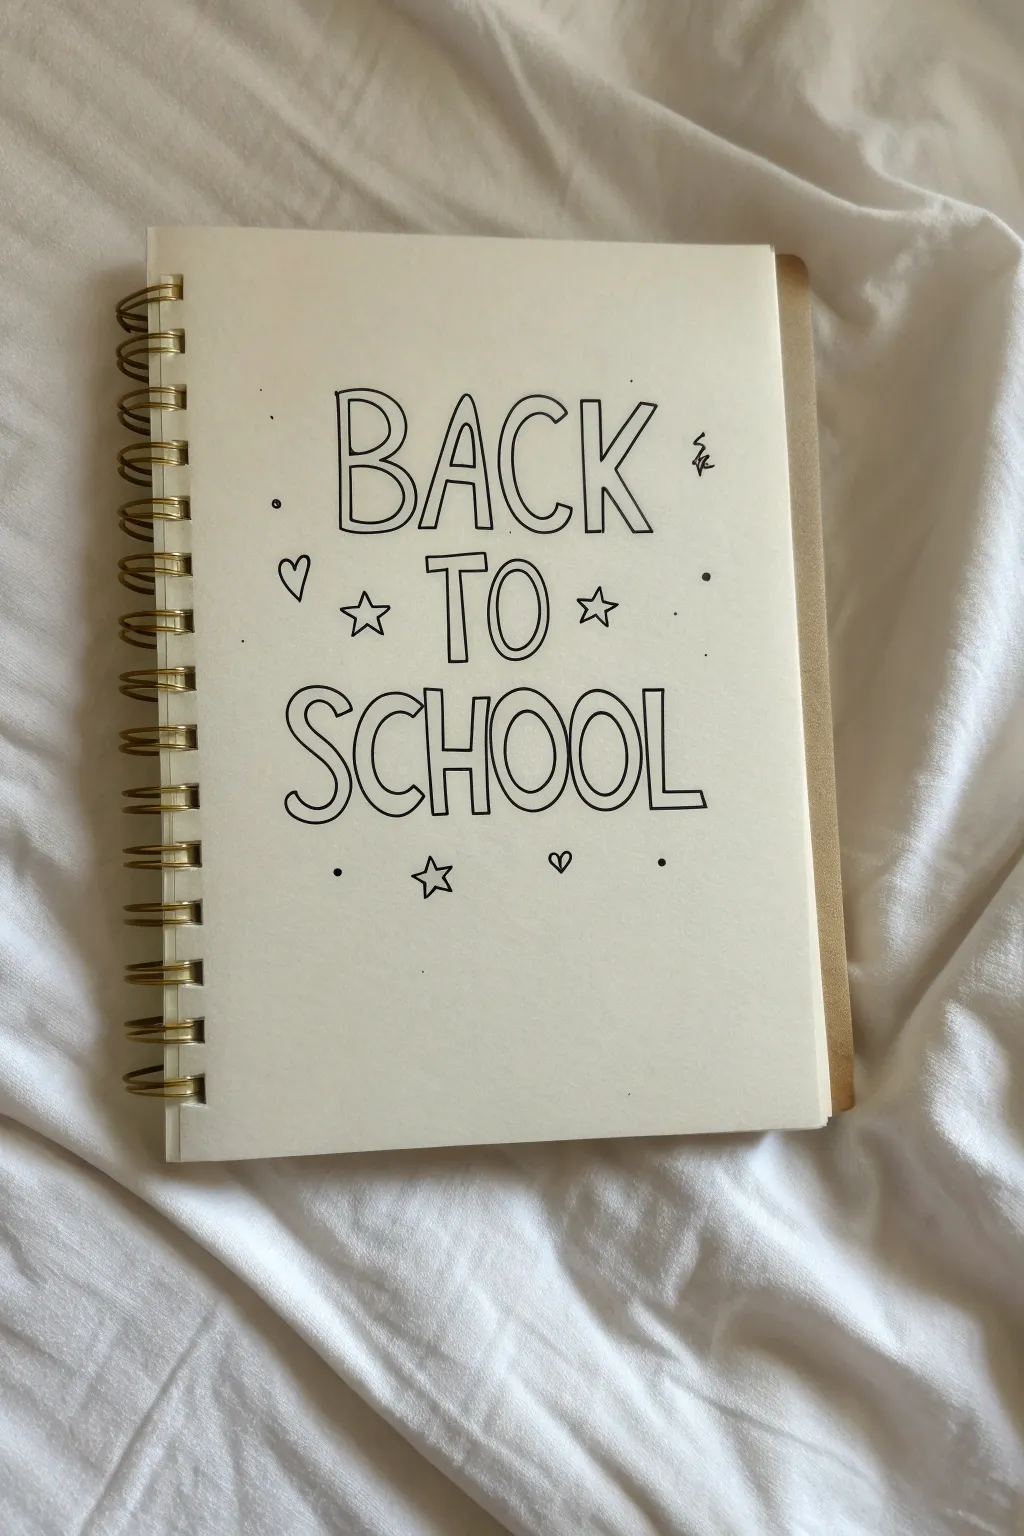
Kick off the academic year with a clean and minimalistic title page that sets a positive tone for your studies. This design features playful yet neat bubble lettering surrounded by dainty stars and hearts, perfect for personalizing the first page of a new spiral notebook.
Step-by-Step Guide
Materials
- Spiral-bound notebook (cream or white paper)
- Pencil (HB or H for light sketching)
- Fine liner pen (black, 0.5mm or 0.8mm)
- Eraser (kneaded or high-quality polymer)
- Ruler (optional, for spacing)
Step 1: Planning and Sketching
-
Analyze the layout:
Visualize the page divided into three main horizontal sections. The word ‘BACK’ will sit at the top, ‘TO’ in the middle, and ‘SCHOOL’ at the bottom providing a solid base. -
Sketch guidelines:
Using your pencil very lightly, draw three horizontal baselines where your words will sit. Keep the spacing generous between the lines to ensure the text doesn’t look cramped. You want the middle line for ‘TO’ to be slightly shorter since the word is smaller. -
Draft the letters skeleton:
Sketch the letters ‘BACK’, ‘TO’, and ‘SCHOOL’ as simple stick letters first. Focus on centering each word on the page. Use your ruler here if you struggle to keep the letters upright. -
Create the bubble shapes:
Now, outline around your stick skeleton to create the bubble effect. Keep the lines straight rather than curvy for a ‘block’ letter look. The corners should be slightly rounded, not sharp 90-degree angles. -
Check proportions:
Step back and look at your sketch. The ‘S’ in ‘SCHOOL’ might need extra width, and the two ‘O’s in ‘SCHOOL’ should match the ‘O’ in ‘TO’ for consistency. -
Refine the shapes:
Go over your bubble outlines and make sure the thickness of the letters is relatively uniform. Erase the internal skeleton lines gently so they don’t confuse you later. -
Sketch the decorations:
Lightly draw small open stars on either side of the word ‘TO’. Add a small heart on the left side under ‘BACK’ and a tiny squiggle on the right side. -
Add bottom details:
Sketch a small heart and a star below the word ‘SCHOOL’, spacing them out to fill the empty white space.
Consistent Widths
To keep letters looking uniform, imagine the width of your pinky finger is the standard thickness for every part of every letter.
Step 2: Inking and Finishing
-
Start inking the text:
Take your black fine liner. Starting from the top left with the ‘B’, carefully trace over your pencil bubble outlines. Use confident, steady strokes rather than short, scratchy ones. -
Ink the middle section:
Move down to the word ‘TO’. Ensure the inner shapes (like the triangle inside the ‘A’ and the oval inside the ‘O’) are neat and centered. -
Finish inking the text:
Outline the word ‘SCHOOL’. Watch out for the ‘S’ curves; take them slowly to keep them smooth. -
Ink the doodles:
Trace over your stars and hearts. For the stars, try to make the points sharp and crisp. -
Add dot accents:
Using the tip of your pen, add tiny dots scattered randomly around the words. Place a few near the stars and some in the negative space between letters to tie the composition together. -
Let the ink set:
Wait at least 2-3 minutes for the ink to dry completely. This is crucial because fresh ink smears easily when erased. -
Erase pencil marks:
Hold the paper taut with one hand and gently erase all the remaining pencil guidelines with the other. Be careful near the spiral binding so you don’t wrinkle the page. -
Final inspection:
Check for any gaps in your lines. If a line looks too thin or disconnected, carefully touch it up with the pen to make the connection solid.
Wobbly Lines?
If your long straight lines are shaky, try moving your entire arm from the shoulder, rather than just moving your wrist.
Now you have a charming title page ready to be filled with notes and ideas for the upcoming term


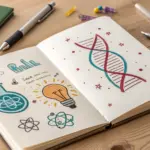
Science Class Beaker and Test Tubes
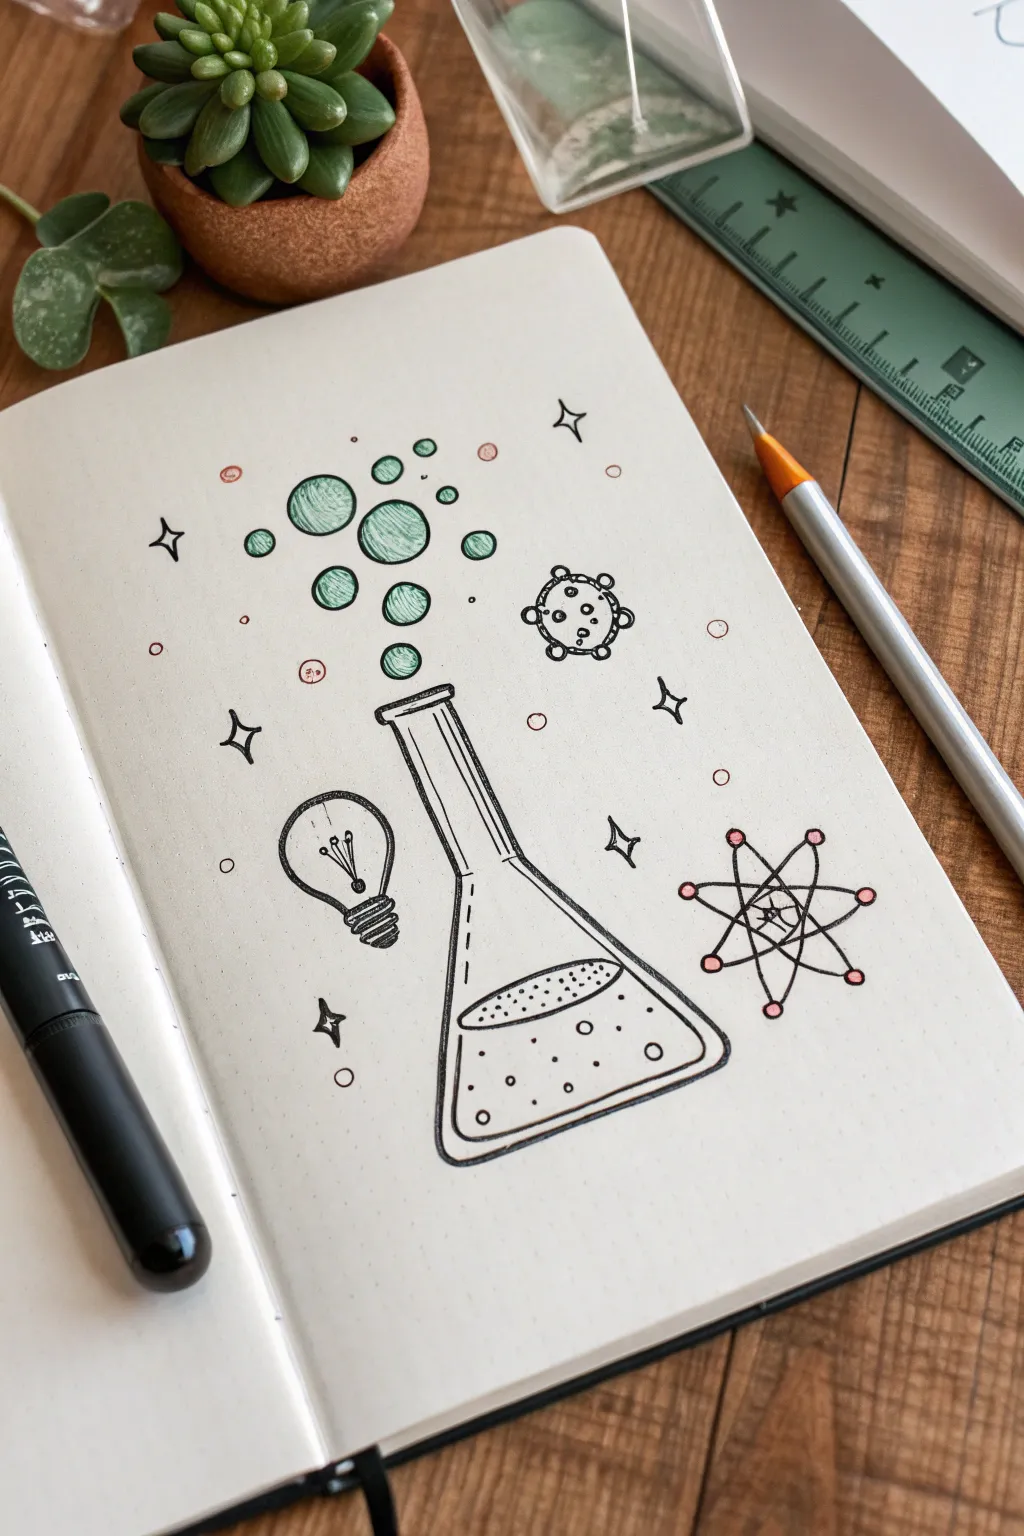
Capture the excitement of chemistry class with this playful doodle featuring a bubbling flask and scientific symbols. This clean line-art style uses simple black ink and touches of soft color, making it a perfect addition to bullet journals or science notebooks.
Step-by-Step
Materials
- Dotted or grid notebook paper
- Pencil (HB or mechanical)
- Eraser
- Fine liner pen (Black, 0.3mm or 0.5mm)
- Green colored pencil or mildliner
- Pink colored pencil or mildliner
- Silver or Grey drawing pencil (optional)
Step 1: Sketching the Apparatus
-
Outline the flask shape:
Start by sketching the Erlenmeyer flask in the lower center of your page. Draw a wide, flat-bottomed triangle shape with rounded corners, tapering smoothly upward into a narrower neck. -
Add the rim and details:
At the top of the neck, draw a small, flattened oval to create the opening rim. Just below that, sketch a slightly curved line across the neck to define the glass thickness. -
Draw the liquid level:
Inside the wide body of the flask, draw a curved line to indicate the surface of the liquid. I like to make this line slightly wavy to suggest movement. -
Add dimension:
Sketch a second line tracing the inner edge of the flask’s bottom and sides, stopping at the neck. This double line creates the illusion of thick glass.
Step 2: Adding Scientific Elements
-
Position the atom:
To the right of the flask, sketch a small atom symbol. Draw three intersecting elongated ovals (ellipses) centered around a single nucleus point. -
Outline the lightbulb:
To the left of the flask, draw a lightbulb shape. Start with a circle, then extend the bottom into a narrower, threaded base. -
Sketch the virus/molecule:
Above the flask and slightly to the right, draw a small circle with tiny protruding bumps or spikes to represent a virus or complex molecule. -
Create the bubbles:
Draw circles of varying sizes rising from the mouth of the flask. Start with smaller circles near the opening and make them larger as they float upward to the left. -
Sprinkle in sparkles:
fill the empty space around your main elements with small four-pointed stars (sparkles) and tiny circles to make the composition feel magical.
Uneven Circles?
Drawing perfect circles freehand is tough! If yours look lopsided, thicken the outline on one side to reshape it, or embrace the organic look—bubbles are rarely perfect spheres anyway.
Step 3: Inking the Drawing
-
Ink the flask outline:
Using your black fine liner, carefully trace over your pencil lines for the flask. Use a confident, steady hand for the long straight lines of the neck. -
Define the liquid:
Ink the liquid surface line. Add small stippling (dots) just below this line to give the liquid some texture and depth. -
Ink the surrounding icons:
Trace the lightbulb, atom, and molecule/virus. For the atom, add small circles at the intersections of the ellipses to represent electrons. -
Ink the bubbles and stars:
Go over the rising bubbles. Draw a small crescent shape inside each bubble to act as a reflection highlight. -
Add lightbulb filament:
Inside the lightbulb, draw a simple filament—two small lines connecting to a wiggly wire in the center. -
Erase pencil sketch:
Wait a moment for the ink to dry completely to avoid smudging, then gently erase all visible pencil marks.
Glow Up
Use a white gel pen to add tiny bright distinct highlights on top of the green bubbles and inside the glass flask after coloring. It makes the glass look super shiny and realistic!
Step 4: Color and Final Touches
-
Color the bubbles:
Use a green colored pencil to fill in the rising bubbles. Use a circular motion and press lighter near the highlight crescent to make them look round. -
Highlight the liquid:
Apply the same green color lightly to the top layer of the liquid inside the flask. -
Add atomic accents:
Take a pink pencil and color the small electron circles on your atom diagram. You can also color a few of the tiny background circles pink. -
Detail the lightbulb base:
If you have a grey pencil or pen, shade the threaded base of the lightbulb. If not, you can create a hatching pattern with your black pen. -
Final assessment:
Check your drawing for any gaps. Add a few extra loose dots in the background to balance the composition if it feels too empty.
Now you have a dynamic science doodle ready to experiment with in your next journal spread


Cute Character School Supplies
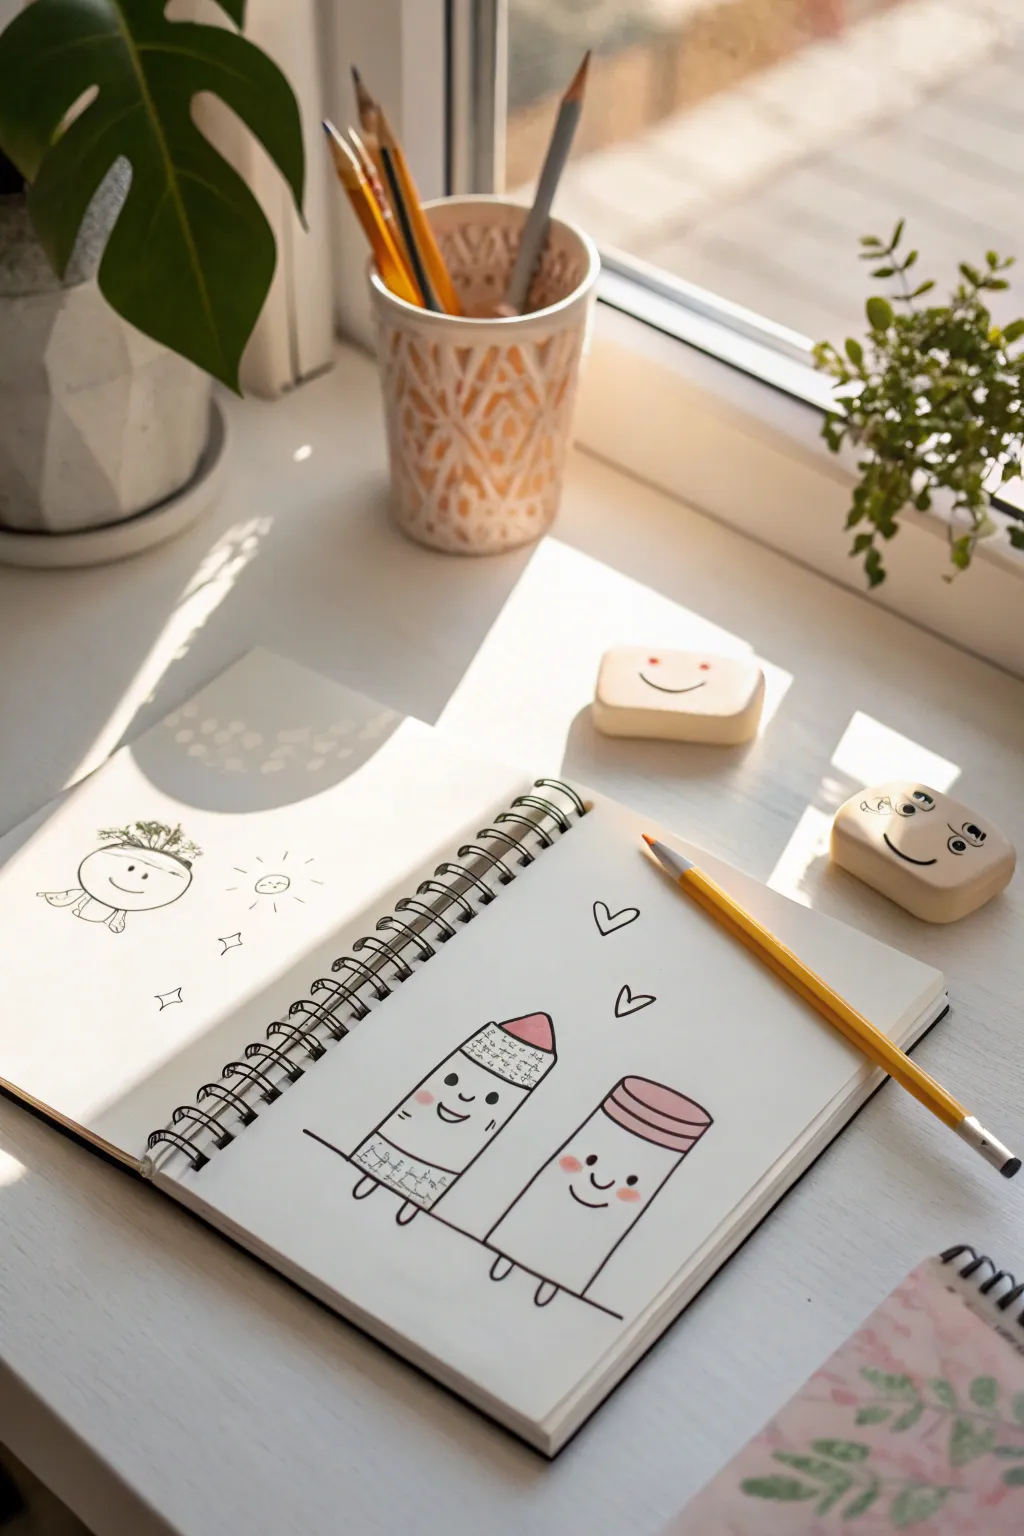
Brighten up your sketchbook with this adorable pair of smiling school supplies. This simple line art style uses clean strokes and soft pink accents to create a heartwarming scene perfect for back-to-school season.
Step-by-Step Tutorial
Materials
- Spiral-bound sketchbook or drawing paper
- HB or 2B pencil for sketching
- Fine-liner pen (black, 0.5mm or 0.8mm)
- Pink colored pencil or pastel
- Yellow pencil (optional for coloring)
- Eraser
Step 1: Sketching the Characters
-
Outline the left character:
Start by drawing a tall rectangle on the left side of the page for the first character. Round off the top corners slightly to give it a soft, friendly shape, but keep the bottom flat. -
Add the pointy top:
Draw a triangle shape on top of the rectangle to create the crayon tip. Separate the tip from the body with a slightly wavy horizontal line to mimic a paper wrapper edge. -
Outline the right character:
Next to the crayon, draw a slightly shorter, wider rectangle for the second character. Round the bottom corners of this one. -
Create the lid:
Draw a smaller oval-like shape or rounded rectangle on top of this second figure to represent a lid, giving it a slight 3D perspective by showing the top surface. -
Anchor the feet:
At the bottom of each character, draw two tiny U-shapes for little stick-figure feet. Connect the feet with a simple horizontal ground line so they aren’t floating in space.
Wobbly Lines?
Don’t stress about perfect straight lines! A little wobble adds to the hand-drawn, doodle aesthetic. If a line goes astray, just thicken the outline to hide it.
Step 2: Adding Faces and Details
-
Draw the crayon’s face:
In the upper third of the crayon’s body, draw two small solid black dots for eyes. Add a wide U-shape for a happy, smiling mouth right between them. -
Draw the marker’s face:
Repeat the process for the second character, placing the eyes and smile slightly lower down to give them different personalities. -
Add wrapper details:
On the crayon (left), draw a second wavy horizontal line near the bottom. Inside the top and bottom bands created by these lines, sketch very faint scribbles or tiny shapes to suggest text or pattern on the wrapper. -
Detail the lid:
On the right character’s lid, draw two curved horizontal lines to suggest the ridges on a glue stick or marker cap. -
Add floating hearts:
Draw two simple heart outlines floating in the space above and between the characters to show their friendship.
Step 3: Inking and Coloring
-
Ink the main lines:
Trace over your pencil lines with a black fine-liner pen. Use a confident, steady hand for the long vertical lines of the bodies. -
Thicken slightly:
I like to go over the outer silhouette lines a second time to make the characters pop against the paper, leaving the interior face details slightly thinner. -
Erase guidelines:
Once the ink is completely dry (wait at least a minute to avoid smudges), gently erase all the underlying pencil sketches. -
Color the crayon tip:
Take your pink colored pencil and gently shade in the triangular tip of the left character. Apply a little more pressure on the left side for a sense of dimension. -
Color the lid:
Using the same pink pencil, color the lid of the right character. Shade the top surface slightly lighter than the side of the lid. -
Add rosy cheeks:
Draw small pink ovals slightly below drawings’ eyes to give them glowing, rosy cheeks. This really brings the cuteness to life. -
Bonus sketch:
If you have extra space on the left page, consider drawing a simple circular character face with a sprout on top, as seen in the inspiration image.
Customize It
Turn these into different supplies! Make the rectangle yellow for a classic No. 2 pencil, or add a ruler gradation to the side of the second character.
Now you have a sweet pair of sketched friends ready to brighten up your school day
BRUSH GUIDE
The Right Brush for Every Stroke
From clean lines to bold texture — master brush choice, stroke control, and essential techniques.
Explore the Full Guide
Back-to-School Time Capsule Page
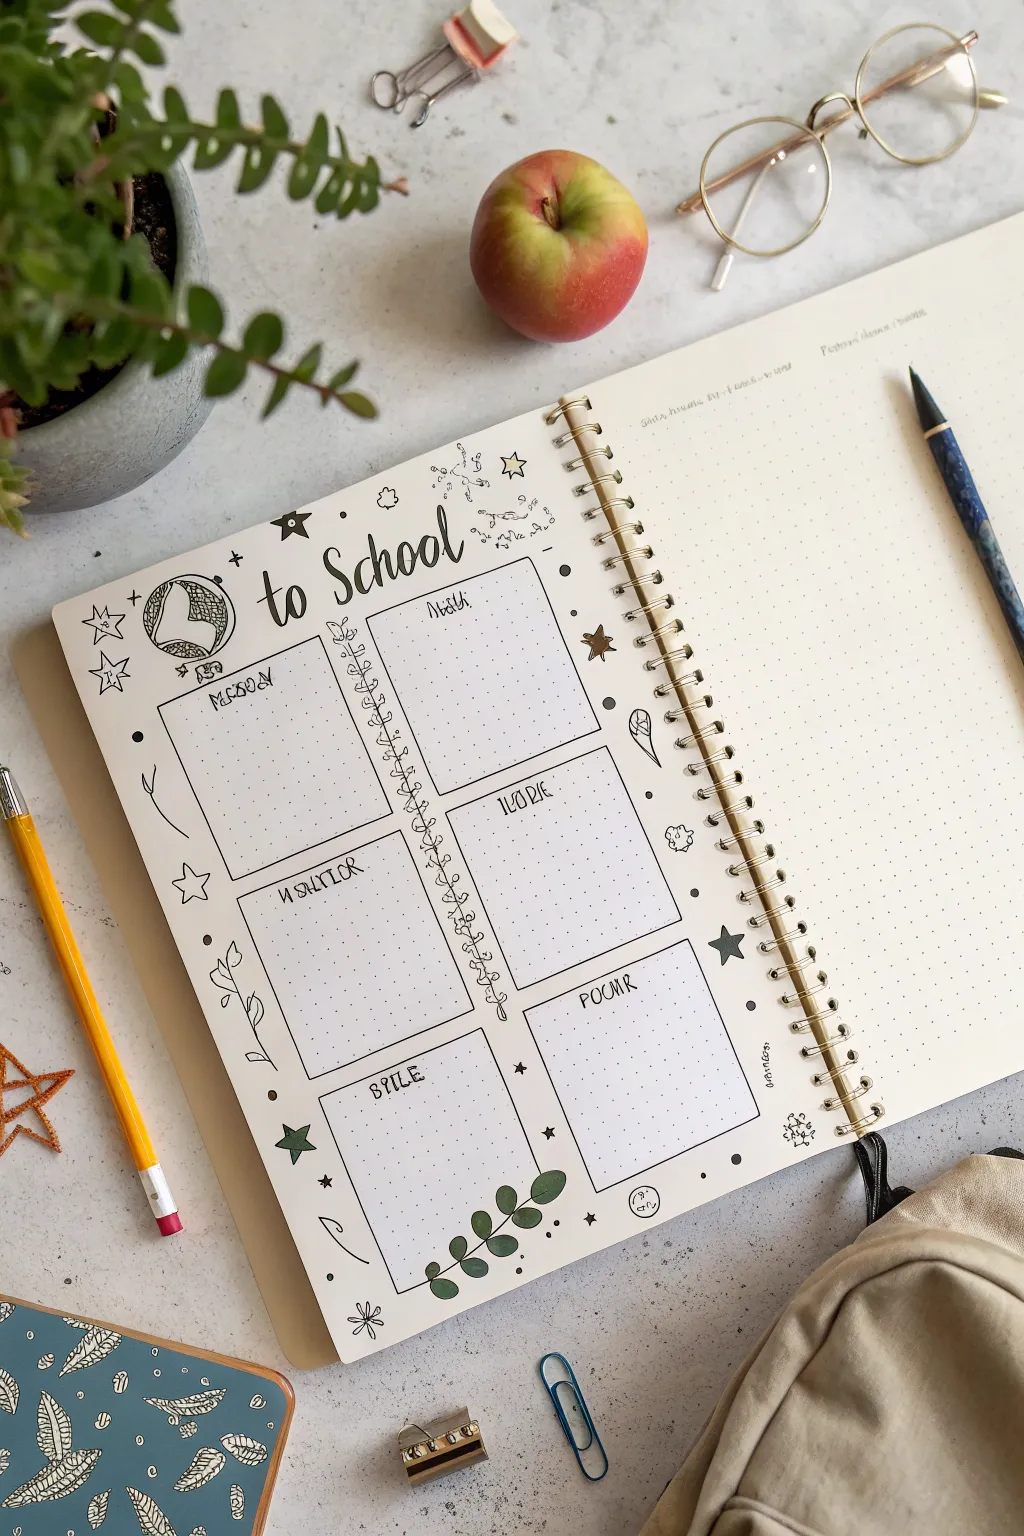
Get organized for the new semester with this charming, hand-drawn bullet journal layout. This spread features a clean grid for daily tasks, accented with whimsical doodles and a botanical touch to make planning feel less like a chore.
Step-by-Step Tutorial
Materials
- Dotted grid notebook
- Fine liner pen (black, 0.3mm or 0.5mm)
- Pencil
- Eraser
- Ruler
- Optional: Green colored pencil or marker for accents
Step 1: Layout Structure
-
Mark the margins:
Begin by deciding on the margins for your page. A standard approach is to leave about 2-3 grid squares empty on all four sides to frame your content nicely. -
Sketch the title area:
At the top of the page, lightly pencil in a rough header space about 2 inches tall. This is where your ‘to School’ title will go. -
Create the grid layout:
Using your ruler and pencil, draw a large rectangle that fills the rest of the page below the header. Divide this into two vertical columns of equal width. -
Define the daily boxes:
Divide each column horizontally into three equal sections. You should now have a total of six rectangular boxes for your daily planning.
Ink Smearing?
If your ruler drags ink across the page, glue a penny to each end of the ruler’s underside. This lifts the edge slightly off the paper to prevent smudges.
Step 2: Inking and Lettering
-
Ink the boxes:
Go over your pencil grid lines with a black fine liner pen. Keep your hand steady, but don’t worry if the lines aren’t perfectly straight—a little wobble adds character. -
Letter the main title:
In the top header space, write ‘to School’ in a bouncy, faux-calligraphy script. Thickening the downstrokes of the letters gives it a polished look without needing a brush pen. -
Add daily headers:
Inside the top of each of the six boxes, write the days of the week or subject names. The example uses a playful, slightly capitalized print style. -
Draw the central vine divider:
Draw a vertical line down the gutter between the two columns. Create a vine effect by drawing small, looped leaves extending from both sides of this center line.
Step 3: Doodles and Details
-
Add corner accents:
Draw small clusters of stars and simple geometric shapes like triangles or circles in the upper left corner near the title and scattered around the page borders. -
Draw the icon:
To the left of the main title, sketch a small circular icon. In the example, it looks like a stylized globe or apple; keep the lines loose and artistic. -
Sketch organic elements:
In the bottom right corner and along the left margin, draw simple leafy branches. These soften the rigid grid structure. -
Ink the doodles:
Trace over all your decorative pencil sketches with the fine liner, adding tiny dots or ‘stardust’ around the larger doodles for texture. -
Add a final leafy flourish:
At the very bottom center, draw a slightly larger branch with rounded leaves that overlaps the bottom border of the planner boxes. -
Color accents:
If you wish, use a green pencil or marker to fill in just the leaves at the bottom for a subtle pop of color, leaving the rest monochrome. -
Clean up:
Once the ink is completely dry—I usually wait at least five minutes to be safe—erase all remaining pencil guidelines gently to reveal the clean layout.
Creative Twist
Instead of days of the week, label the six boxes with subjects (Math, History, etc.) to track homework assignments specifically by class.
Now you have a structured yet creative space to tackle your weekly goals


Have a question or want to share your own experience? I'd love to hear from you in the comments below!