
If you love painting motion, drama, and texture, basketball art is basically a dream subject. Here are my favorite basketball painting ideas—from classic hoop moments to bold, unexpected styles you can totally make your own.
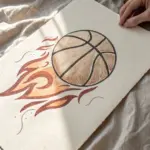
Flaming Basketball “On Fire” Look

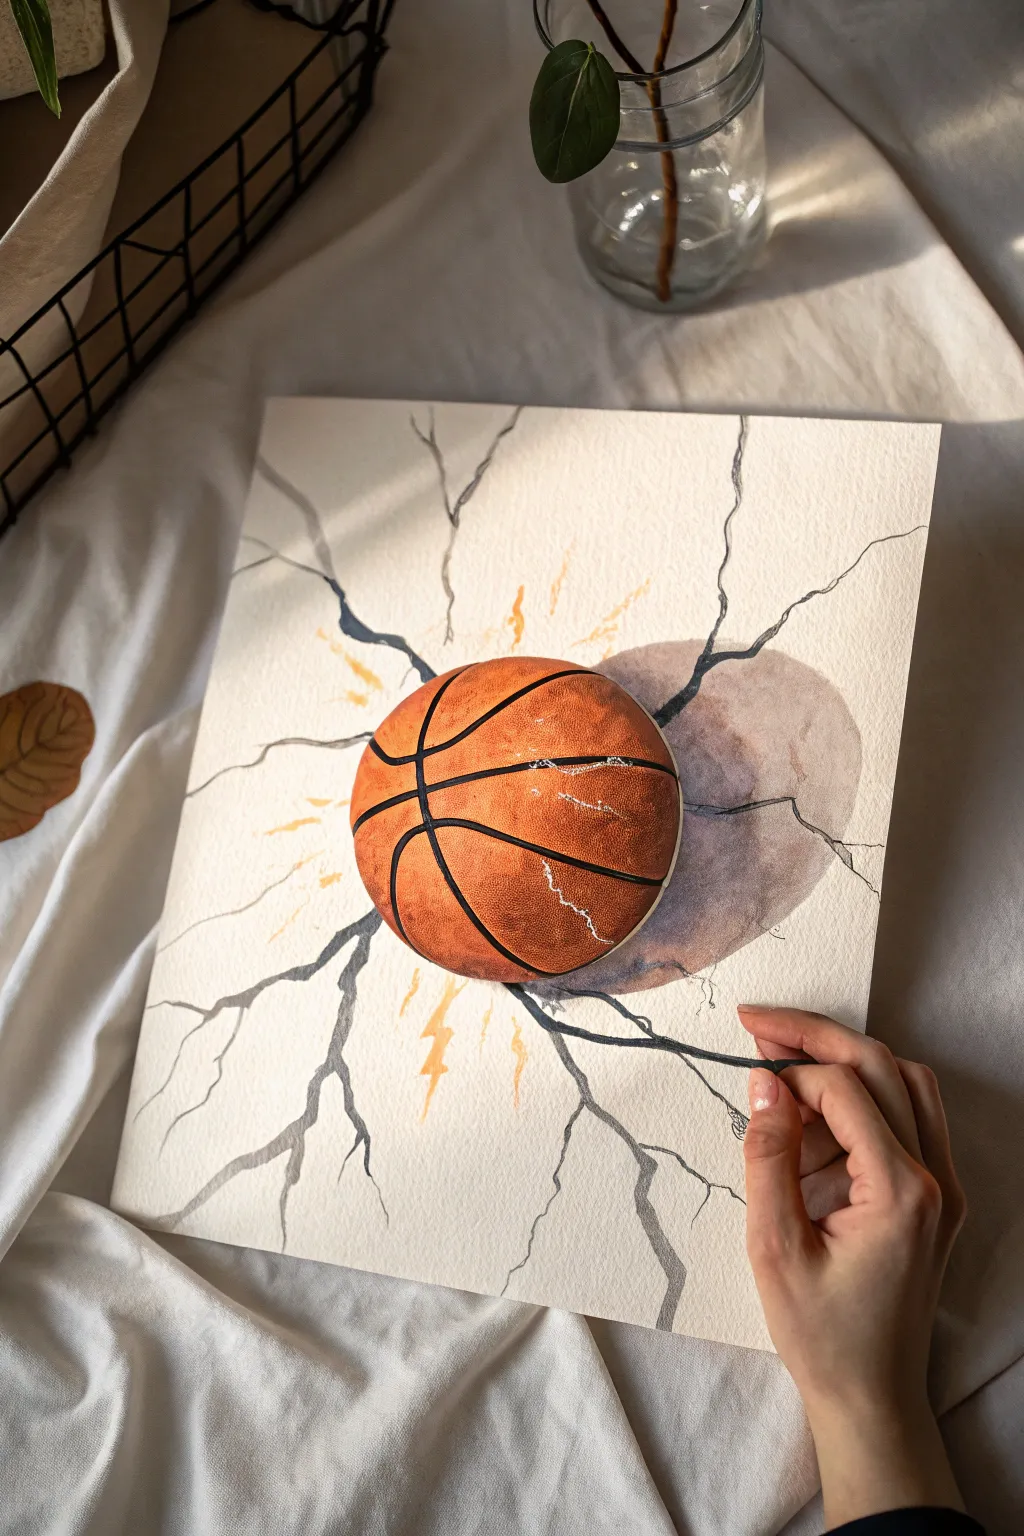
Ignite your creativity with this dynamic project that captures the energy of a basketball in motion. By combining a textured, realistic ball with a loose, expressive watercolor background, you’ll create a striking piece of wall art that looks like it’s burning up the court.
Step-by-Step Tutorial
Materials
- Thick watercolor paper (cold press, 300lb recommended)
- Masking fluid
- Watercolors (black, phthalo blue, burnt sienna, orange, yellow)
- Acrylic paint (burnt umber, titanium white, black, orange)
- Round brushes (sizes 4 and 8)
- Fine liner brush or black acrylic marker
- Sponge or stiff bristle brush for texture
- Painter’s tape
- Pencil and circular object (for tracing)
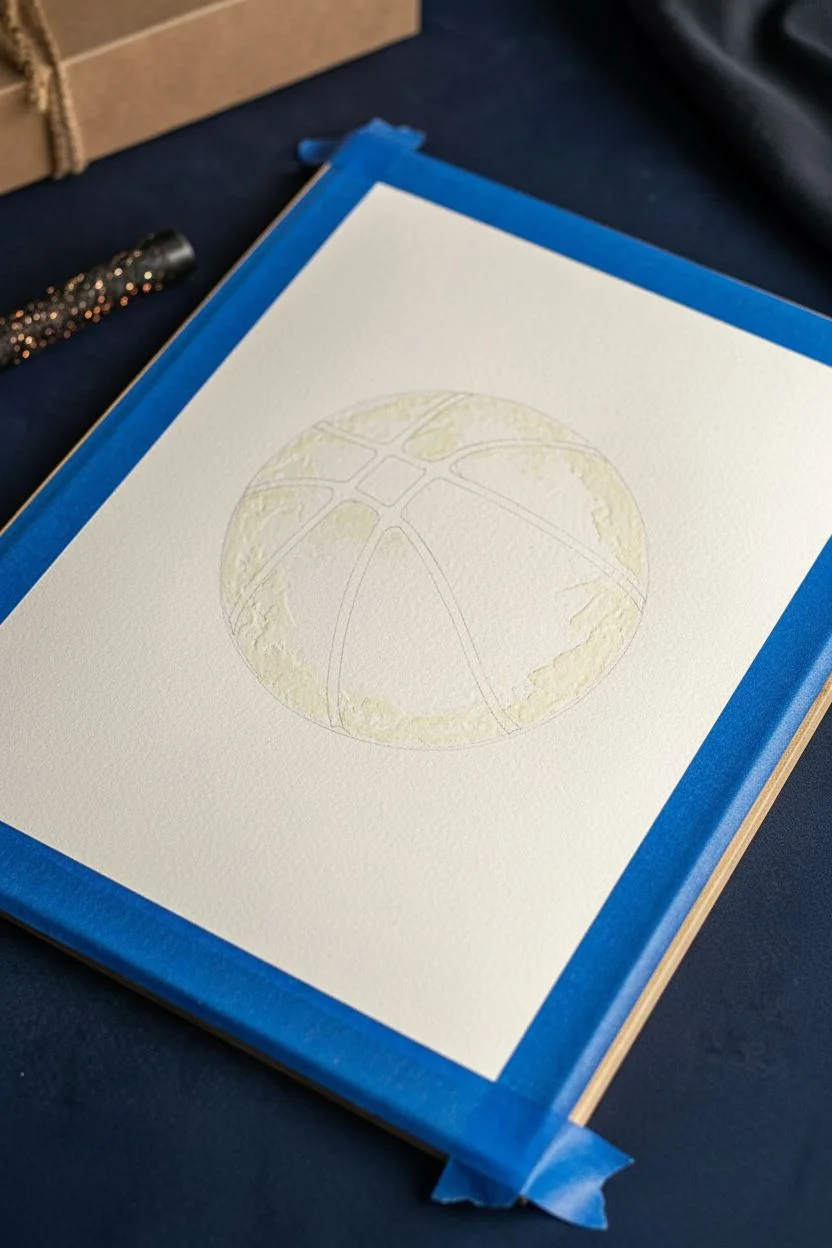
Step 1: Setting the Scene
-
Paper preparation:
Begin by taping down all four edges of your watercolor paper to a board. This prevents buckling when we apply the wet washes later. -
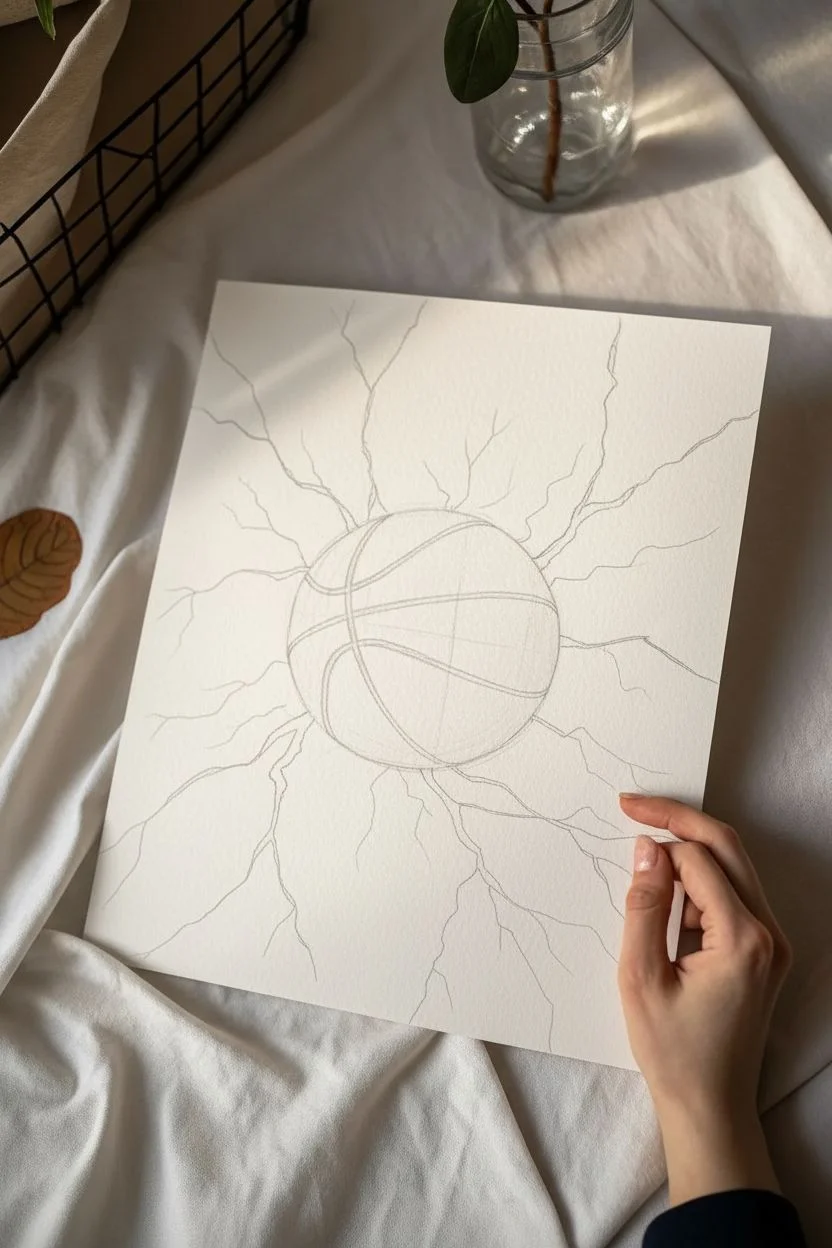
Sketching the ball:
Use a bowl or compass to trace a perfect circle in the center of the paper. Lightly sketch the curved contour lines of the basketball seams. Don’t press too hard; you want these guides to disappear later. -
Masking the subject:
Apply a layer of masking fluid carefully over the entire circle of the basketball. This ensures our flaming background remains completely separate from the ball, keeping the edges crisp.
Fixing Flatness
If the ball looks flat, darken the shadow side significantly more than you think you need. High contrast is the key to creating a 3D illusion.
Step 2: Creating the Inferno Background
-
Wet-on-wet start:
Once the masking fluid is totally dry, wet the paper surrounding the ball with clean water. We want the background to be moody and smoky. -
Applying the smoke:
Drop in watered-down black and dark blue watercolor into the wet areas, concentrating the darkness at the bottom left. Let the pigments bleed and bloom naturally to create a smoke effect. -
Igniting the fire:
While the paper is still slightly damp, introduce vibrant yellow and orange near the right side of the ball. Drag these colors outward in flickering strokes to simulate flames trailing behind the movement. -
Adding embers:
Load a stiff brush with concentrated orange paint and flick the bristles to splatter tiny dots around the flames. These represent flying sparks and embers. -
Reveal the canvas:
Wait for the background to dry completely—this is crucial. Then, gently rub away the masking fluid to reveal the pristine white circle underneath.
Step 3: Painting the Basketball
-
Base layer texturing:
Step away from watercolors here. Mix burnt sienna and orange acrylic paint. Instead of brushing it on smooth, dab it on with a sponge or a dry, stiff brush to mimic the pebbled leather texture of a basketball. -
Building shadows:
While the base is tacky, mix a little burnt umber into your orange. Sponge this darker shade along the bottom left curve of the ball to create a 3D spherical form. -
Highlighting:
Mix a touch of white into your original orange shade. Dab this lighter color on the upper right quadrant of the ball where the light hits it. Softly blend the transition areas with your sponge. -
Defining the seams:
Using a very steady hand and a fine liner brush (or a black acrylic paint marker), trace over your original pencil lines to create the thick black rubber channels. Make slightly wider lines near the edges to enhance the perspective. -
Integration:
Glaze a very thin, watery layer of yellow watercolor over the right edge of the ball where it meets the fire. This orange glow ties the object to the background environment. -
Final smoke details:
I like to add a few final wisps of dark gray watercolor slightly overlapping the bottom of the ball to make it look like it’s truly cutting through the smoke.
Level Up: Gloss Effect
Add a tiny dot of pure white acrylic to the highlight area and coat the finished ball (only) with a gloss varnish for a wet, shiny look.
Now step back and admire how the contrasting textures make the ball pop right off the page

Impact Crack or Shatter Effect
Create a stunning optical illusion where a basketball seems to burst right out of the page, cracking the surface around it. This dynamic mixed-media effect combines realistic shading with comic-style impact lines for a piece that truly jumps off the paper.
Step-by-Step
Materials
- Heavyweight watercolor paper or mixed media paper (A4 or similar)
- Pencil and eraser
- Compass or circular object for tracing
- Gouache or acrylic paints (orange, burnt sienna, white, black)
- Fine liner pens (black, 0.5mm and 0.8mm)
- Small round brushes (size 2 and 4)
- White gel pen or fine brush with white ink
- Yellow ochre watercolor or diluted paint (optional for glow)
Step 1: Drafting the Impact
-
Position the ball:
Start by finding the center of your paper. Use a compass or trace a round object (like a mug or bowl) to draw a perfect circle for your basketball outline. Keep your pencil pressure light so it can be erased later. -
Sketch the seams:
Draw the iconic curved lines of the basketball seams. Start with a horizontal line across the middle, then add the vertical line intersecting it. Finally, add the two curving ‘U’ shapes on the sides to complete the standard basketball pattern. -
Map the cracks:
Lightly sketch jagged lines radiating outward from the ball. Imagine lightning bolts striking the ground; make them uneven and branching. Ensure the thickest part of the cracks touches the ball’s edge to imply force.
Pro Tip: Shadow Realism
Don’t use pure black for shadows. Mix purple or dark blue with a tiny bit of orange (the complementary color). This creates a rich, realistic shadow that makes the ball truly pop.
Step 2: Painting the Basketball
-
Base coat:
Mix a vibrant orange with a touch of burnt sienna to get a classic basketball leather color. Paint the entire circle, avoiding the thin lines you drew for the seams if possible, though painting over them is fine since we’ll darken them later. -
Build dimensional form:
To make the ball look spherical, determine your light source (in the reference, it’s coming from the top left). Paint a slightly lighter orange mix on the top left quadrant and a darker, burnt orange shading on the bottom right. -
Add texture:
While the paint is still slightly tacky, use a dry, stiff brush to stipple small dots of darker brown over the surface. This mimics the pebbled leather texture of a real ball. -
Define the seams:
Once the base is dry, use a fine brush with black paint or a thick black marker to go over the seam lines. Vary the thickness slightly to follow the curve of the ball, making them thinner at the edges. -
Highlights and scratches:
Using a white gel pen or a very fine brush with white paint, add small, scratchy highlights to the top left area. I like to add a few jagged white lines across the ball’s surface to simulate scuffs from the impact.
Step 3: Creating the Shatter Effect
-
Inking the cracks:
Take your black fine liner or a small brush with black ink and trace your pencil crack lines. Make the lines jagged and nervous, varying the pressure to get thick and thin variations. -
Adding depth to cracks:
Go back over the main crack lines and thicken the areas closest to the ball. This tapering effect helps create the illusion that the paper is physically splitting open. -
Energy bursts:
Near the impact zone (around the ball), paint small, sharp bursts of yellow or gold using gouache or watercolor. These little ‘shockwaves’ add energy and movement to the static image. -
Shadow casting:
This is crucial for the 3D effect. Paint a soft, greyish-purple shadow on the paper directly to the right of the ball. The shadow should mimic the shape of the ball but feel elongated and distorted by the ‘cracked’ surface. -
Refining the shadow edge:
Ensure the shadow interacts with the cracks. Where a crack line runs through the shadow, the shadow should darken slightly, suggesting depth within the fissure. -
Final texture check:
Examine the white paper surface. If it feels too flat, lightly stipple a very faint grey or texture near the cracks to suggest dust or debris kicked up by the impact. -
Paper sculpting (Optional):
For an extreme 3D look, you can gently score the main crack lines with a blade (don’t cut all the way through) and slightly push the paper sections up or down.
Level Up: Physical Texture
Cut a real basketball graphic or photo into a circle and glue it onto the painting with foam tape. This adds physical height to the artwork, enhancing the 3D trompe l’oeil illusion.
Now showcase your explosive artwork by hanging it where the lighting matches your painted shadows for maximum impact


Geometric Court Lines and Ball
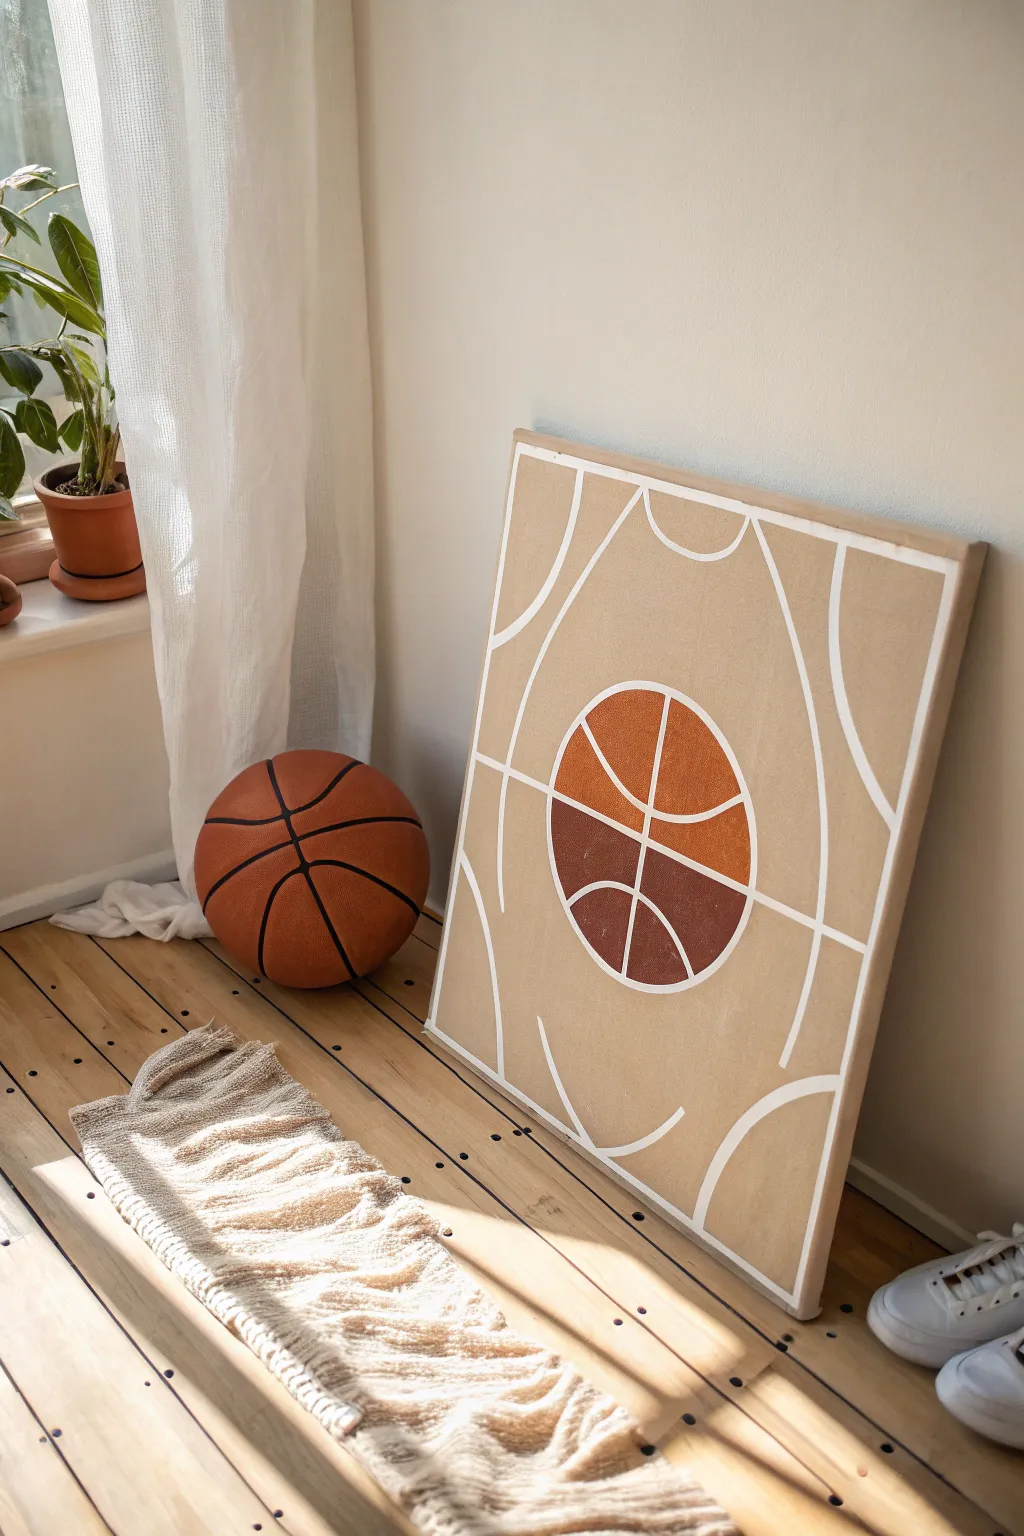
This minimalist wall art captures the essence of the game with a clean, geometric basketball court design and a stylized, block-color ball. Using a warm, neutral palette, it serves as a modern tribute to hoops culture that fits surprisingly well into sophisticated decor.
How-To Guide
Materials
- Large rectangular stretched canvas (approx. 24×30 inches)
- Acrylic paints: warm beige/tan (background), white, burnt orange, dark brown
- Painter’s tape (various widths, primarily 1/4 inch or thin drafting tape)
- Wide flat brush or foam roller
- Medium flat synthetic brush
- Small detail brush
- Compass or round object for tracing (large dinner plate)
- Pencil
- Ruler or yardstick
Step 1: Planning the Layout
-
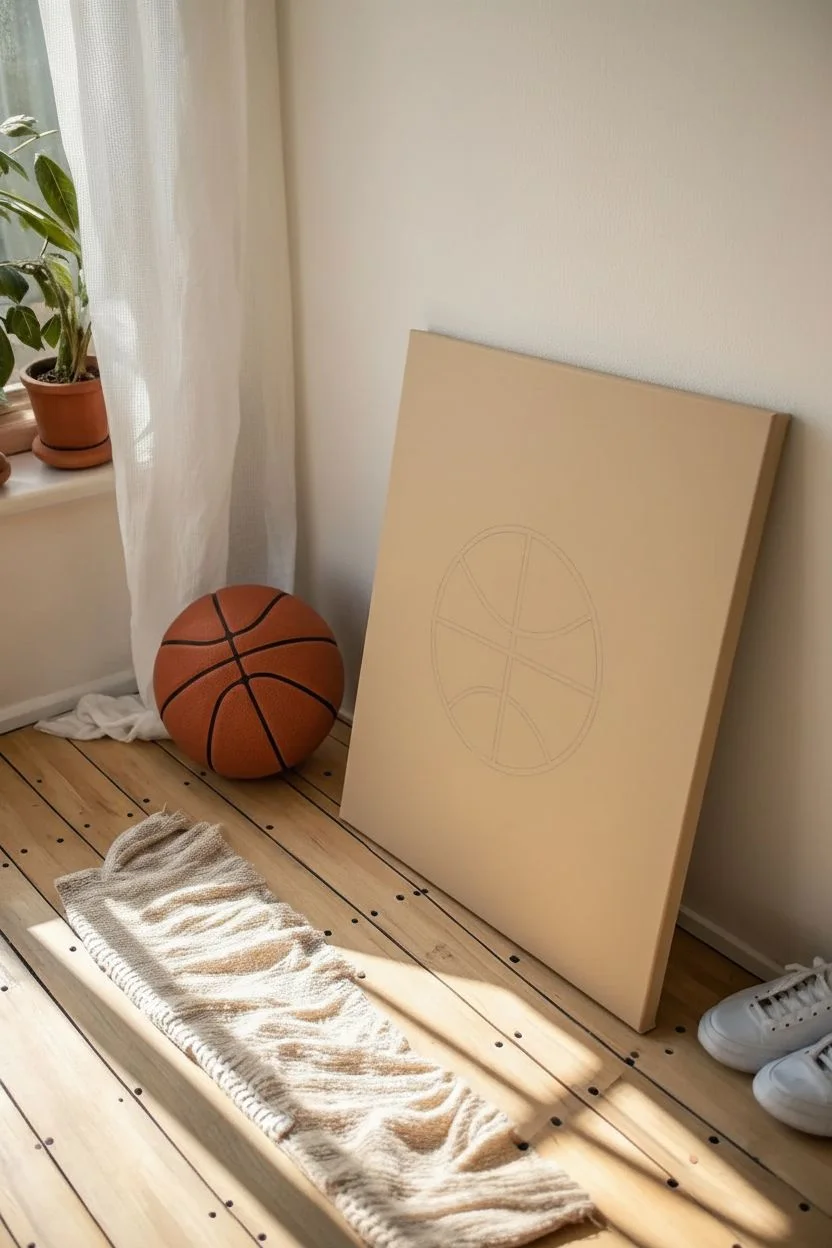
Base coat:
Begin by painting the entire canvas with your warm beige or tan acrylic paint. Use a wide flat brush or a small foam roller to ensure an even, opaque coat. You may need two coats for full coverage; let it dry completely between layers. -
Find the center:
Once the base is fully dry, use a ruler to lightly mark the exact center of the canvas with a pencil. This will be the anchor point for your basketball. -
Draw the ball:
Using a compass or by tracing a large round object like a dinner plate, outline a perfect circle in the center of the canvas around your mark. -
Sketch the court lines:
Lightly sketch the abstract court lines. Start with the ‘key’ shape curving around the ball, and add the sidelines and three-point arcs. Don’t worry about perfection; this style benefits from a slightly stylized approach.
Bleeding Lines?
If paint bleeds under your tape, don’t panic. Wait for it to dry fully, then use a small angular brush and your background beige color to touch up the edges for a crisp finish.
Step 2: Creating the Negative Space
-
Apply tape:
This is the trickiest part but crucial for clean lines. Apply thin painter’s tape or drafting tape over your pencil lines. These taped areas will remain the beige background color later, acting as the ‘white lines’ of the court. -
Seal the edges:
Press the tape down firmly with your fingernail or a credit card to prevent paint bleed. I like to paint a very thin layer of the beige base color over the tape edges first; this seals them perfectly. -
Ball details:
Inside the center circle, sketch the seams of the basketball. Instead of curved lines, think of them as segments dividing the ball into four distinct quadrants. -
Tape the ball seams:
Apply tape over these seam lines inside the circle as well. This creates that segmented, modern look shown in the inspiration photo.
Step 3: Painting the Design
-
Paint the white lines:
Using a small flat brush, carefully paint the white outlines *over* the tape lines that represent the court markings (the arcs and key lines). In this specific design, the white lines are actually painted onto the beige background, rather than revealed by peeling tape. Use a steady hand to follow your sketches. -
Refine the lines:
If painting freehand lines feels too risky, you can use a white paint pen for more control over the curves of the three-point line and center circle. -
Block in the ball colors:
Now focus on the basketball itself. Paint the top two quadrants with the burnt orange acrylic paint. Use a medium brush to get close to the tape or pencil lines without going over. -
Add depth:
Paint the bottom two quadrants of the ball with the dark brown paint. This two-tone approach gives the ball a graphical sense of shadow and form. -
Second coats:
The orange and brown pigments are often translucent. Apply a second coat to the basketball sections to ensure solid, bold color. -
White seam details:
Once the orange and brown sections are dry, use a fine detail brush or white paint pen to draw the curved lines separating the quadrants, mimicking the rubber seams of a basketball.
Make it 3D
Mix sand or modeling paste into your orange and brown paint before applying. This adds a gritty, realistic texture that mimics the actual surface of a basketball.
Step 4: Finishing Touches
-
Clean up borders:
Check the edges of your white court lines. If any look shaky, use a small brush with your original beige background color to ‘erase’ mistakes and sharpen the edges. -
Add texture (optional):
If you want the textured look seen in the photo, you can lightly stipple the paint on the basketball sections with a stiff, dry brush before the paint sets completely. -
Dry and seal:
Allow the painting to dry overnight. If you plan to hang this in a sunny spot, apply a clear matte varnish spray to protect the colors from fading.
Hang your new geometric masterpiece and enjoy the modern, sporty vibe it brings to the room


Have a question or want to share your own experience? I'd love to hear from you in the comments below!