If your bathroom walls feel a little bare, the right bathroom canvas art can turn that everyday space into a mini mood reset. I’m sharing my favorite bathroom canvas art ideas that work in steamy rooms and still feel personal, polished, and you.
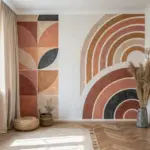
Spa Words Triptych Above the Tub
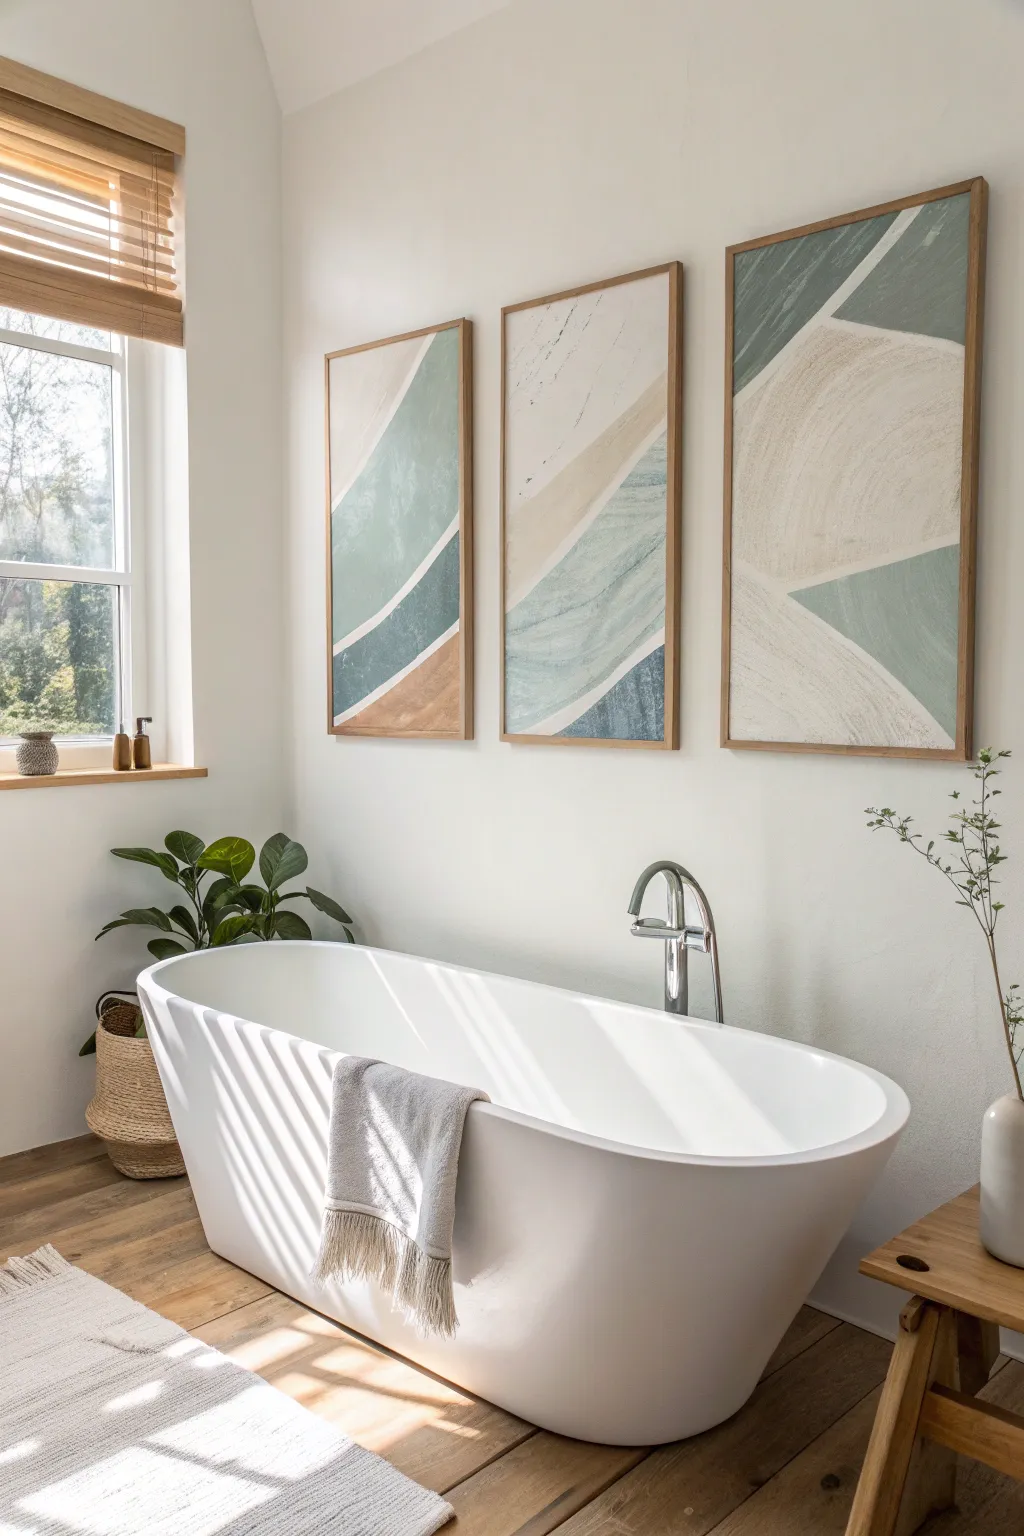
Bring the calming essence of a spa into your bathroom with this large-scale abstract triptych. Featuring sweeping curves and a muted palette of sage, cream, and terracotta, these textured canvases create a cohesive and tranquil focal point above your tub.
Detailed Instructions
Materials
- 3 Large stretched canvases (e.g., 24×36 inches)
- Acrylic paints (Sage Green, unbleached Titanium, Terracotta, Slate Blue, White)
- Modeling paste or texture medium
- Large flat paintbrushes (various sizes)
- Palette knives
- Pencil
- Painter’s tape (optional)
- Matte varnish
- Floating wood frames (light oak finish)
Step 1: Preparation and Planning
-
Map out the flow:
Lay your three canvases side-by-side on a large flat surface or floor. Treat them as one giant canvas for now. -
Sketch the primary curves:
Using a pencil, lightly draw large, sweeping curves that start on the left canvas and flow continuously across the middle and right canvases. These lines define the separate color blocks. -
Refine the composition:
Aim for variety in your sections; some curves should be steep, others gentle. Ensure the lines traverse the gaps between canvases so the eye naturally connects the panels.
Textural Depth
Mix sand into your paint for the bottom ‘earth’ sections. This gritty contrast against the smooth upper curves adds incredible tactile variety.
Step 2: Adding Texture
-
Apply the base texture:
Using a palette knife, spread a thin layer of modeling paste over specific sections of the canvas where you want visual interest. -
Create directional movement:
Drag the palette knife in the direction of your pencil curves to create ridges that mimic the flow of the design. -
Rough up the surface:
For the larger cream sections, I like to use a dry, stiff brush to stipple the wet paste slightly, giving it a stone-like appearance. Let this dry completely, usually overnight.
Step 3: Painting the Color Blocks
-
Mix your palette:
Prepare your acrylic colors. Mix a generous amount of white into your sage green and slate blue to strip away the saturation, aiming for soft, chalky pastels. -
Paint the lightest sections:
Start with the unbleached titanium or cream color. Fill in the largest curved sections using a wide flat brush, allowing the paint to catch on the textured ridges you created earlier. -
Apply the greens and blues:
Fill in the adjacent swoops with your muted sage green and slate blue mixes. Don’t worry about perfect edges yet; a little overlap adds to the organic look. -
Add the contrast:
Paint the smallest sections (usually at the bottom) with the darker terracotta or brown tone to ground the composition. -
Refine the edges:
Once the base coats are dry, go back with a smaller brush to tidy up the lines where colors meet. You want clean curves, but they don’t need to be razor-sharp like a geometric print.
Uneven Lines?
If your curves look shaky, use a flexible drafting curve or a bent piece of thin moulding as a guide for your brush to steady your hand.
Step 4: Finishing Touches
-
Dry brush highlights:
Dip a dry brush into pure white paint and wipe most of it off. Lightly skim the brush over the textured areas to highlight the ridges and add depth. -
Seal the artwork:
Once the paint is fully cured, apply a coat of matte varnish. This protects the acrylic from bathroom humidity. -
Frame the panels:
Place each canvas into a light oak floating frame. Secure them from the back according to the frame instructions. -
Hang with precision:
Install the triptych above your tub, ensuring equal spacing (about 2-3 inches) between each frame to maintain the continuous flow of the design.
Step back and enjoy the calming atmosphere your custom art brings to the space

Eucalyptus Botanical Canvas Set
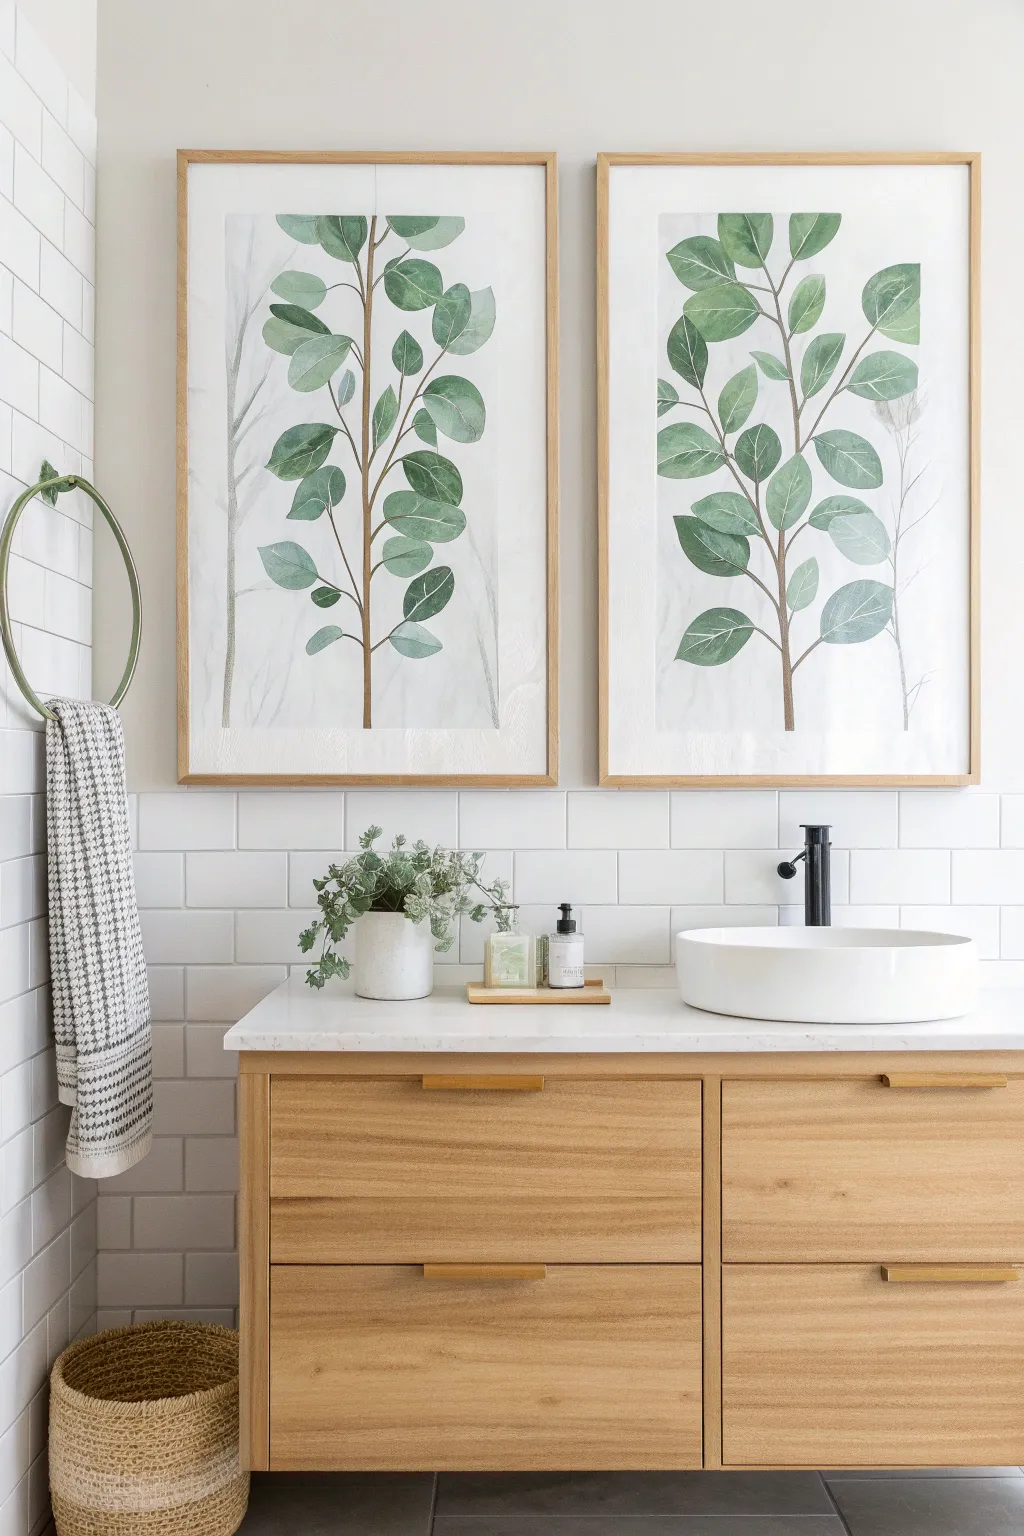
Bring the calming essence of a spa into your bathroom with this pair of large-scale eucalyptus botanical paintings. The soft, watery greens and delicate branches create a serene focal point that perfectly complements natural wood tones.
How-To Guide
Materials
- Two large sheets of heavy watercolor paper (at least 22″x30″) or pre-primed canvas
- Watercolors (Sap Green, Hooker’s Green, Burnt Umber, Yellow Ochre)
- Round watercolor brushes (Size 10 and Size 6)
- Pencil (HB or lighter)
- Water cups
- Paper towels
- Two large light wood frames (custom size or 24″x36″)
Step 1: Sketching the Composition
-
Plan your layout:
Before touching brush to paper, visualize the composition. You want two vertical branches that gently mirror each other but aren’t identical. One should curve slightly left, the other slightly right, creating a sense of balance when hung together. -
Draw the central stems:
Using a very light hand and an HB pencil, draw a single, long distinct vertical line up the center of each page. Give the line a slight, organic wandering quality rather than using a ruler. -
Add branch offshoots:
Sketch smaller lines branching off the main stem at roughly 45-degree angles. Alternate the placement of these branches—left, then right, then left again—as you move up the stem. -
Outline the leaves:
Lightly sketch the eucalyptus leaves. Aim for rounded, coin-like shapes near the bottom and slightly more elongated ovals towards the top. Vary their sizes to keep the look natural. -
Refine the background hints:
If you want that subtle, shadowy background effect seen in the inspiration, lightly sketch a few very faint, ghostly stems behind the main subject. These will be painted in a wash later.
Step 2: Painting the Foliage
-
Mix your greens:
Create a palette of greens. Mix Sap Green with a touch of Burnt Umber for a natural, earthy olive tone. For a cooler variant, mix Hooker’s Green with a tiny bit of blue or gray. -
Prepare the main stem color:
Mix a watery brown using Burnt Umber and a hint of Yellow Ochre. This shouldn’t be too dark; keep it translucent. -
Paint the main stem:
Using your size 6 brush, carefully paint the central stem and the small offshoots. Keep the pressure inconsistent so the line varies in thickness slightly, mimicking real wood. -
Paint the first leaf layer:
Load your size 10 brush with the lighter green mixture. Paint the shapes of the leaves using the wet-on-dry technique. Start at the stem and pull the brush outwards to form the leaf tip. -
Add color variation:
While the first leaves are still wet, drop in a tiny amount of the cooler or darker green mixture at the base of the leaf near the stem. Watch the pigment bloom naturally into the wet area. -
Create the ‘ghost’ branches:
For those subtle background elements, dilute your green-grey paint heavily with water until it is very faint. Paint simple, thin stems and vague leaf shapes in the background, avoiding the main wet leaves. -
Dry completely:
Let this layer dry fully. I usually step away for at least an hour to ensure no smudging happens during the detail phase.
Uneven Watercolors?
If you get ‘cauliflower’ blooms in your paint, don’t panic. Gently wet the area with clean water and lift excess pigment with a paper towel, or embrace the texture as part of the organic look.
Step 3: Details & Framing
-
Enhance leaf veins:
Once dry, use the size 6 brush with a slightly darker green mix to paint a thin central vein line on some—but not all—leaves. This selective detailing adds depth without clutter. -
Deepen the shadows:
Look for areas where leaves might overlap or connect to the stem. Add a small glaze of darker green here to create dimension. -
Final stem touches:
Reinforce the brown stem in a few spots where the leaves connect, ensuring the transition from green leaf to brown wood looks deliberate. -
Review and erase:
Check your painting for any stray pencil marks that are still visible and gently erase them, being careful not to damage the painted surface. -
Mounting the art:
Center your finished painting on the backing board of your frame. If your paper is wavy from the water, you may need to press it under heavy books overnight first. -
Assemble the frame:
Clean the glass thoroughly on both sides. Place the glass, then the art, and finally the backing into the light wood frame. Secure the clips.
Pro Tip: Testing Colors
Keep a scrap piece of the same watercolor paper next to you. Before applying paint to your main art, test the color and transparency on the scrap to ensure it’s not too dark.
Hang these serene botanical prints side by side to transform your bathroom into a peaceful retreat


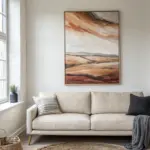
Calm Coastal Horizon Painting
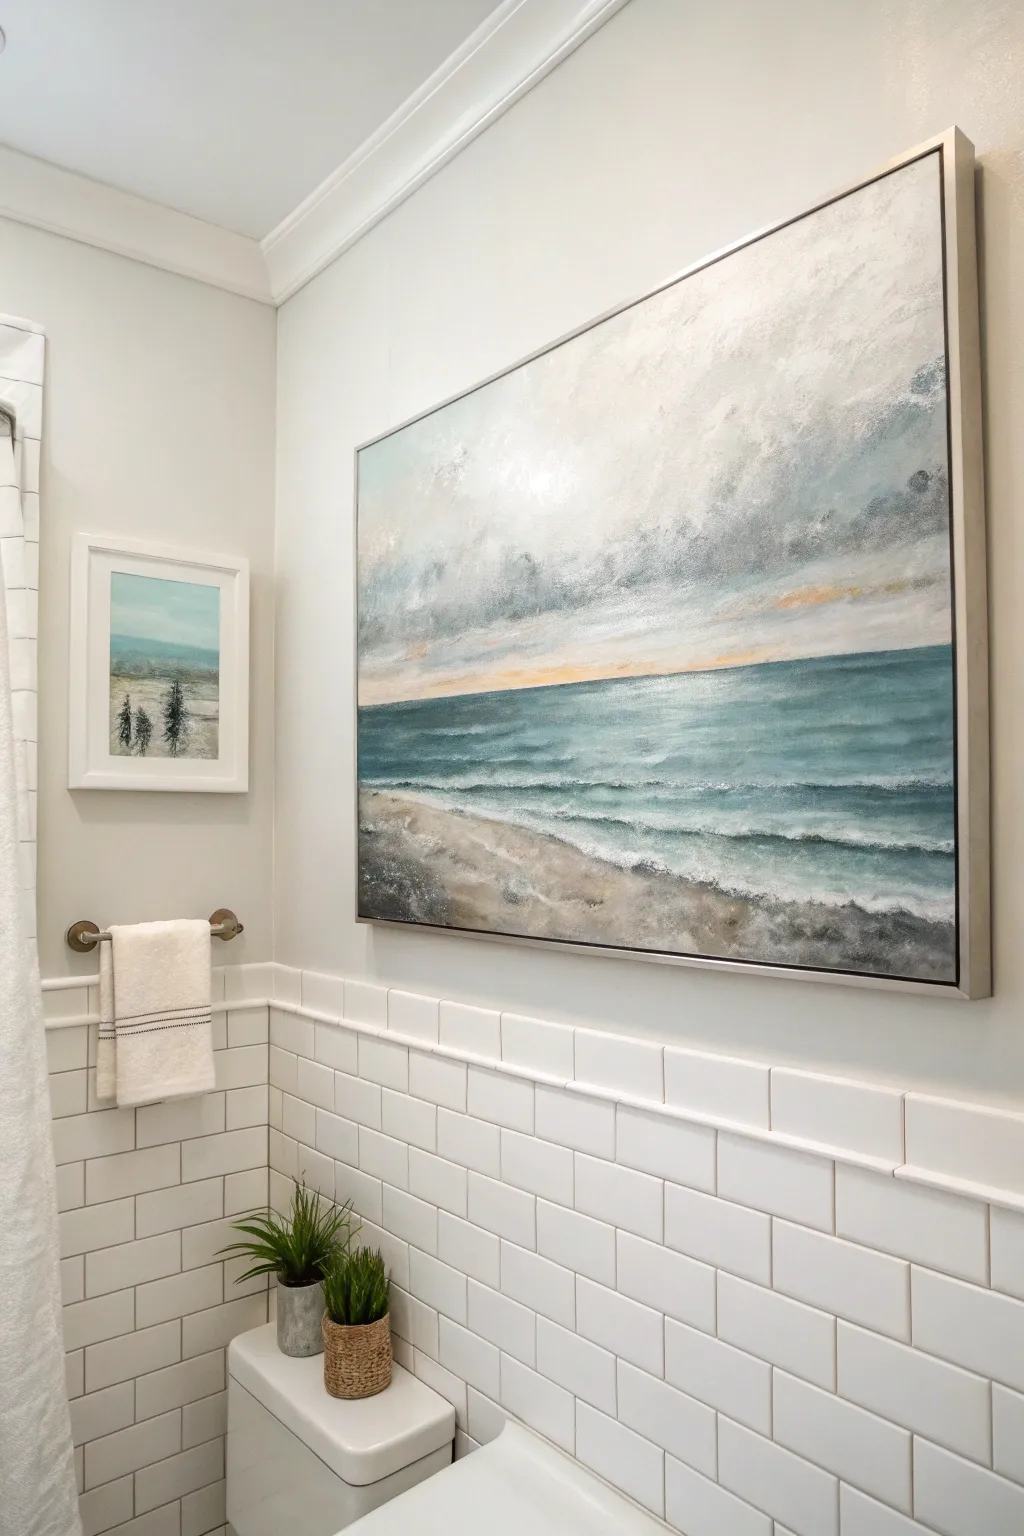
Bring the calming yet dramatic energy of the coast into your bathroom with this large-scale seascape painting. Featuring a moody, cloud-filled sky meeting a vibrant teal ocean, this piece uses simple blending techniques to create a professional-looking horizon that soothes the senses.
Step-by-Step
Materials
- Large stretched canvas (24×36 inches or larger)
- Acrylic paints: Titanium White, Payne’s Grey, Phthalo Blue, Teal/Turquoise, Raw Sienna, Burnt Umber, and a touch of Cadmium Orange
- Large flat brush (2-3 inch width)
- Medium flat brush (1 inch)
- Small round brush for details
- Palette knife (optional for texture)
- Water container and paper towels
- Float frame (silver or light wood) for finishing
Step 1: Setting the Scene
-
Establish the horizon line:
Begin by deciding where your horizon will sit. For this composition, place it just below the center line of the canvas. Draw a very faint pencil line across the width to guide you, ensuring it is level. -
Map out the color zones:
Mentally divide your canvas into three zones: the sky (top half), the ocean (middle strip), and the sand (bottom strip). This doesn’t need to be drawn, but helps you visualize where your colors will transition. -
Prime the sky:
With your largest brush, apply a thin wash of Titanium White mixed with a tiny bit of water across the entire upper section. This ‘wet-on-wet’ base will help your clouds blend softly later.
Softening the Skies
Use a clean, dry dedicated blending brush to gently sweep over your cloud edges while the paint is still wet. This removes brushstrokes and creates that ethereal, misty look.
Step 2: Painting the Moody Sky
-
Create the grey base:
Mix Titanium White with a small amount of Payne’s Grey. Start brushing this into the upper corners of the canvas using sweeping, crisscross strokes to create depth and movement. -
Add cloud definition:
While the grey is still wet, pick up pure White on your dirty brush. Dab and swirl it into the grey areas to form cloud shapes. I like to keep the edges soft by lightly sweeping over them with a dry brush. -
Introduce the sunset glow:
Near the horizon line, mix white with a tiny touch of Cadmium Orange and Raw Sienna. Blend this warm, pale peach color horizontally right above your pencil line, fading it upward into the grey clouds. -
Darken the storm clouds:
Add a slightly darker mixture of Payne’s Grey and Blue just above the peach horizon line to create contrast, simulating the heavy bottom of storm clouds.
Horizon Line Woes
If your horizon line looks shaky or crooked, place a strip of painter’s tape across the dry sky area before painting the ocean. Peel it off while the blue paint is still wet.
Step 3: Developing the Ocean and Sand
-
Paint the deep water:
Mix Phthalo Blue with a touch of Payne’s Grey and Teal. Paint a solid horizontal band right at the horizon line. Ensure this line is crisp and straight against the sky. -
Transition to shallow water:
As you move down the canvas, gradually mix more White and Teal into your blue mixture. Use horizontal strokes to mimic the flow of water, lightening the color significantly as you approach the shore area. -
Lay the sandy foundation:
Mix Titanium White, Raw Sienna, and a speck of Burnt Umber. Apply this to the bottom section of the canvas using uneven, slightly textured strokes to resemble sand. -
Blend the shoreline:
Where the water meets the sand, allow the wet teal paint to slightly mix with the wet tan paint. This muddying is natural and creates a realistic transparency where the waves lap the shore.
Step 4: Detailing Waves and Foams
-
Create wave ridges:
Using a smaller flat brush and a mix of White and Teal, paint thin, imperfect horizontal lines across the blue water area to Suggest swells and wave crests. -
Add the sea foam:
Load a brush with thick Titanium White. Tap the brush along the shoreline where the water meets the sand to create the foamy break of a wave. Don’t smooth this out too much; texture is good here. -
Enhance texturing:
For added dimension, use a palette knife or a dry brush to drag thick white paint lightly over the sand area, mimicking sea foam that has washed up and settled. -
Refine the horizon:
Step back and check your horizon line. If the paint has bled, use a steady hand and your darkest blue mix to tidy up the edge, ensuring it remains the sharpest part of the painting. -
Final highlights:
Add tiny hints of the sunset peach color into the wet sand area to show the reflection of the sky on the wet beach. -
Frame the piece:
Once fully dry (give it 24 hours), install the canvas into a silver float frame to match the cool tones of the artwork and give it a polished, gallery-ready appearance.
Hang your finished masterpiece in the bathroom to create a spa-like retreat that you can enjoy every day

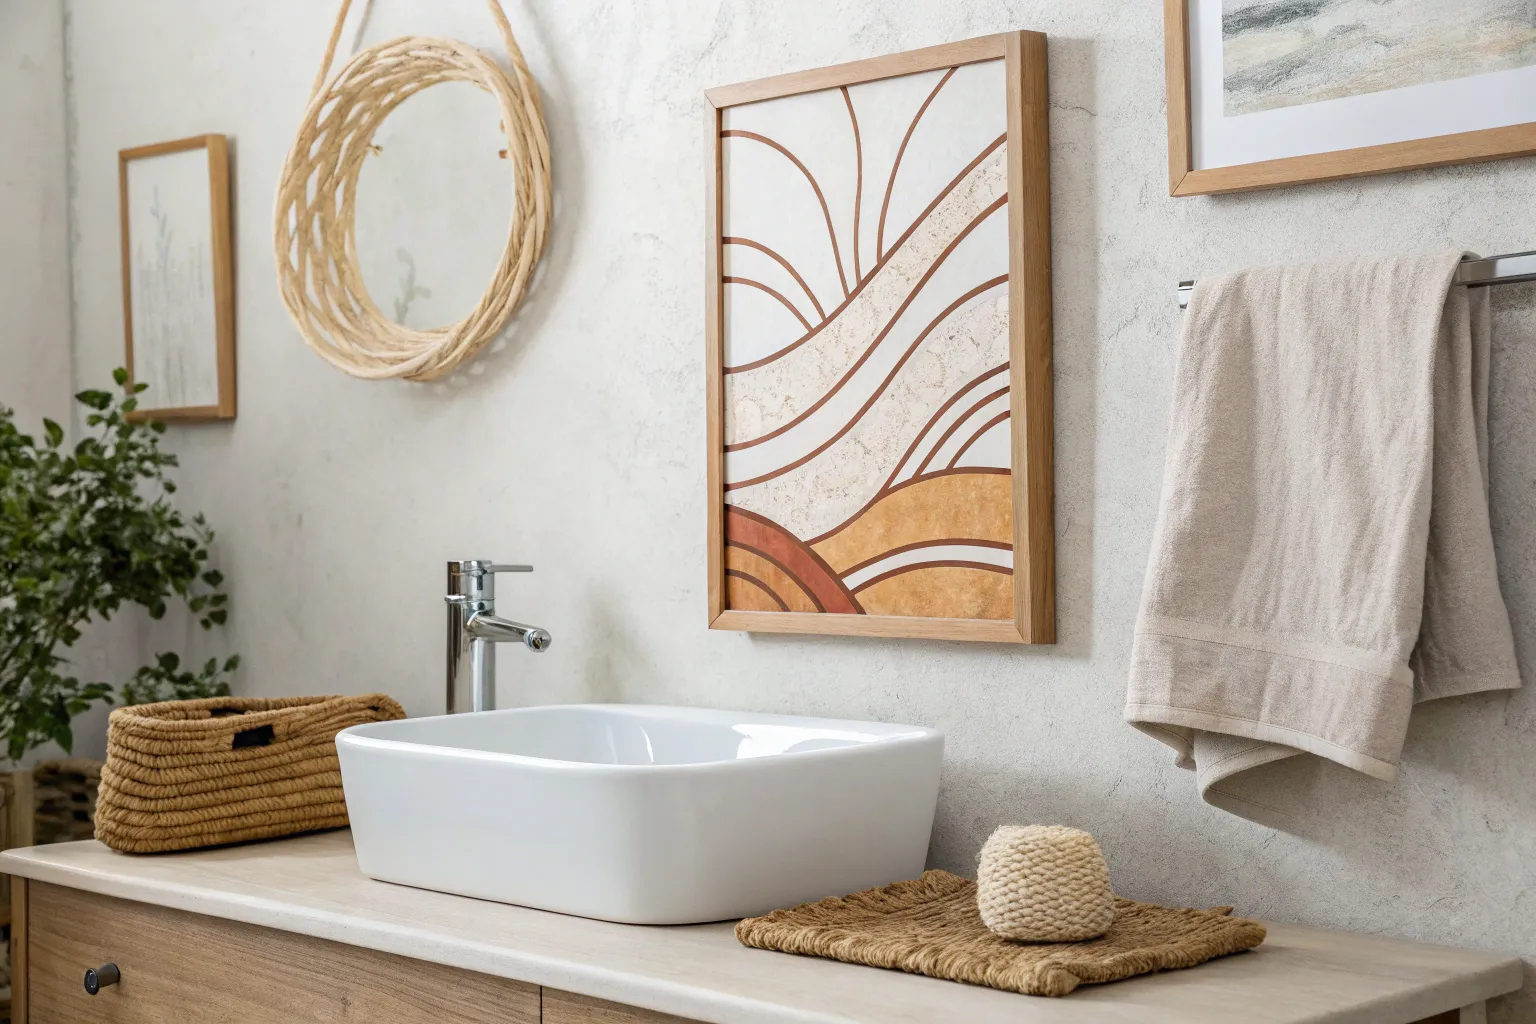
Warm Neutral Abstract for Tile Walls
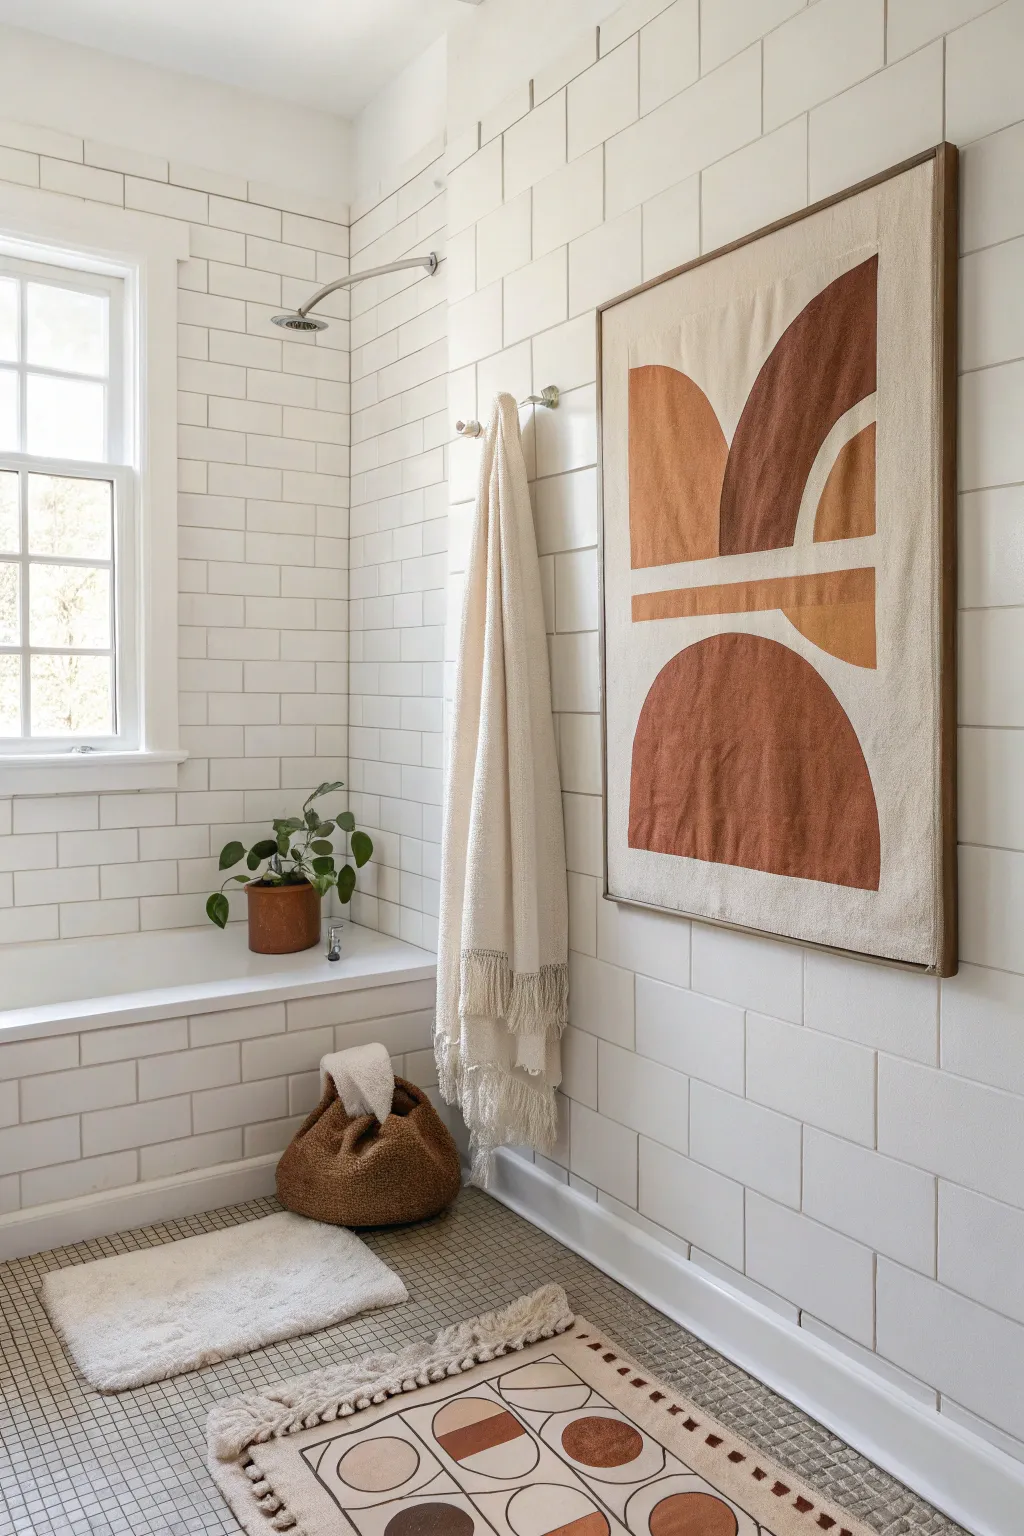
Bring warmth to a tiled bathroom with this minimalistic abstract art piece featuring bold geometric curves and rich, earthy tones. The texture of the unprimed canvas combined with rust and ochre shades creates an inviting, organic feel perfect for relaxing spaces.
Step-by-Step Guide
Materials
- Large canvas (unprimed or linen-look preferred)
- Wooden floating frame (custom or pre-made)
- Acrylic paints (terracotta, burnt sienna, yellow ochre, warm beige)
- Textile medium (optional, for softer finish)
- Wide flat wash brush (2-3 inch)
- Medium angle brush
- Pencil
- Large ruler or straight edge
- Painter’s tape
- Paper plate or palette
- String and pushpin (for drawing curves)
Step 1: Planning and Sketching
-
Prepare the canvas:
If you are using raw canvas cloth, stretch it over your frame first. If you bought a pre-stretched canvas that is white gessoed but want that natural look, give it a base coat of a warm ‘linen’ beige paint mixed with a tiny drop of brown. -
Mark the center lines:
Using your large ruler, lightly mark a horizontal line slightly above the vertical center of the canvas. This will separate the top shapes from the bottom arch. -
Draft the bottom arch:
To create a perfect semi-circle for the large bottom shape, find the center point of your lower section. Place a pushpin there, tie a string to it, and tie a pencil to the other end of the string to create a makeshift compass. -
Draw the bottom curve:
Keep the string taut and swing the pencil to draw a large, smooth arch. This shape should fill most of the bottom half, leaving some breathing room at the edges. -
Outline top shapes:
For the upper section which is asymmetrical, you can sketch freehand for an organic look. Draw a large quarter-circle on the left and a taller, steeper arch shape on the right. -
Add detail elements:
Sketch the smaller internal curves inside the top right arch, and the horizontal bar that separates the top and bottom sections. Keep your pencil lines light so they won’t show through lighter paint colors.
Step 2: Painting the Composition
-
Mix your colors:
Prepare your palette. You’ll need three distinct tones: a deep rust/brown, a medium terracotta orange, and a lighter golden ochre. I find that mixing a little white into the ochre helps it pop against the natural canvas. -
Paint the large bottom arch:
Start with your medium terracotta shade. Using the wide flat brush, fill in the large bottom semi-circle. Use long, confident strokes to minimize texture buildup. -
Define edges:
Switch to your medium angle brush to carefully paint the clean edges of the arch. This tool gives you much sharper control than the large wash brush. -
Fill the top left shape:
Using the golden ochre tone, paint the quarter-circle shape in the upper left quadrant. Ensure the paint is opaque enough to cover the canvas texture. -
Paint the dark accents:
Use the deep rust/brown color for the tall arch shape on the upper right side. This dark value anchors the top portion of the composition. -
Add the horizontal bar:
Paint the horizontal strip that separates the top and bottom halves. You can use the golden ochre here to balance the color distribution across the canvas. -
Fill remaining details:
Complete the small nested curve within the top right section using the golden ochre color. Step back occasionally to check for color balance. -
Apply second coats:
Let the first layer dry completely (about 30-60 minutes). Apply a second coat to any areas that look streaky or transparent to achieve a solid, graphic look. -
Clean up lines:
Once everything is dry, if any edges look wobble, use a small detail brush with the background canvas color (or white/beige mix) to touch up the negative space.
Uneven Edges?
If your hand isn’t steady, apply painter’s tape along the straight edges of your geometric shapes. For curves, just go slow with a small angled brush.
Fabric Texture
Mix your acrylics with a textile medium. This thins the paint slightly without losing pigment, allowing it to soak into the canvas weave like dyed fabric.
Hang your new geometric masterpiece and enjoy the modern warmth it adds to your walls
BRUSH GUIDE
The Right Brush for Every Stroke
From clean lines to bold texture — master brush choice, stroke control, and essential techniques.
Explore the Full Guide
Black-and-White Minimal Bath Line Art
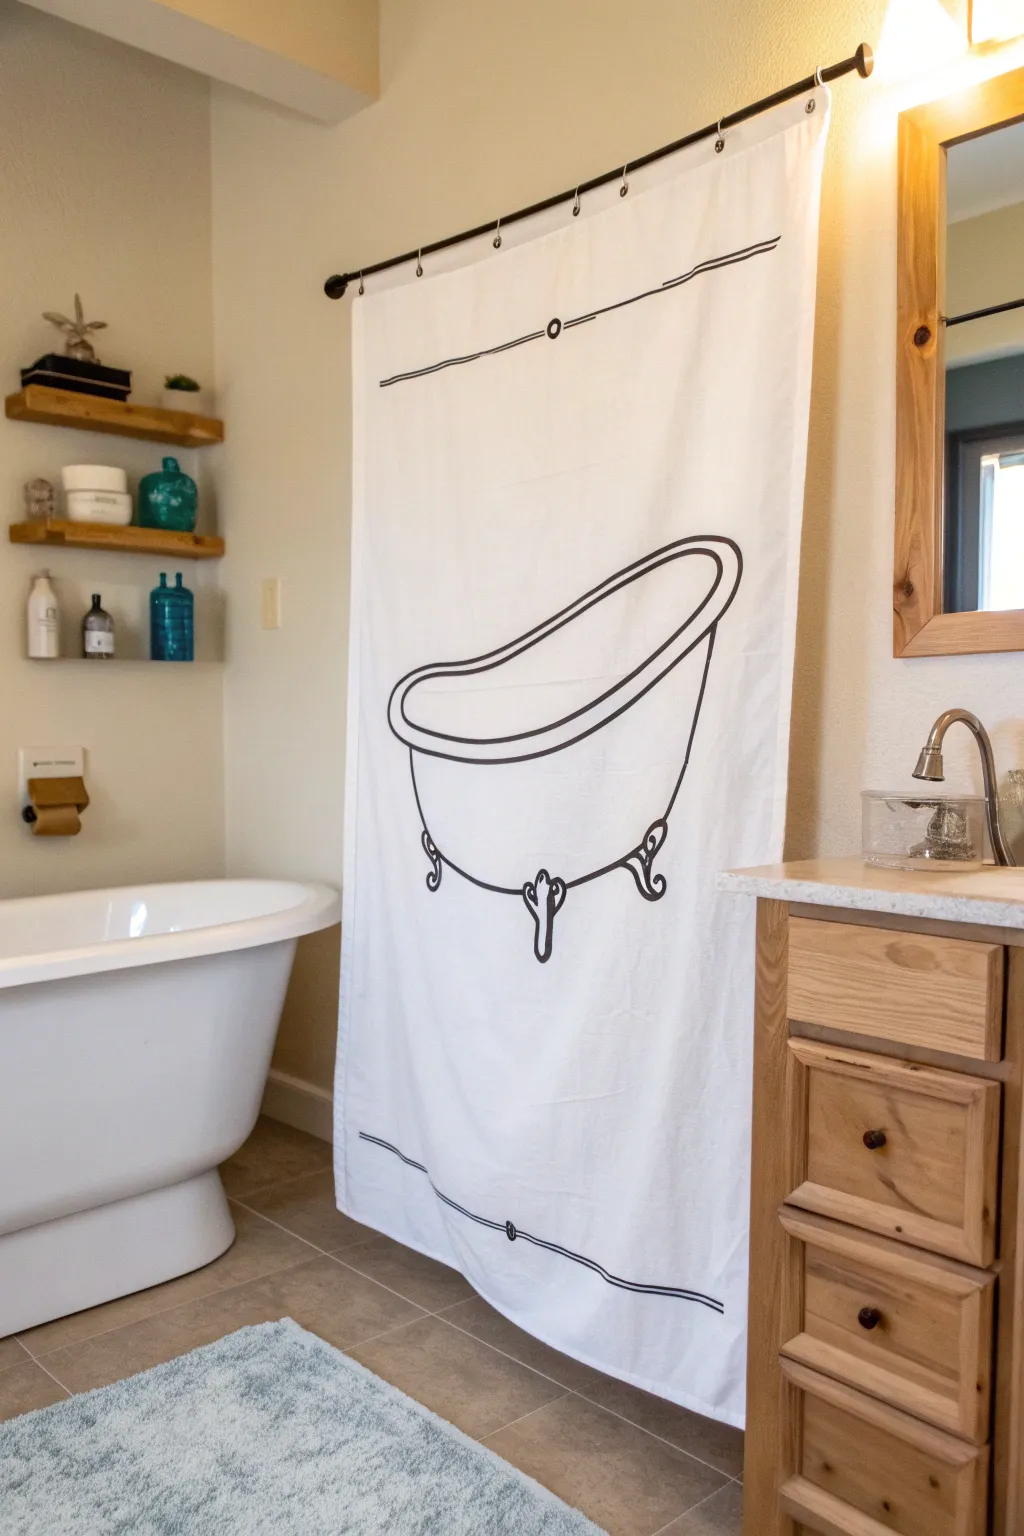
Transform a plain white shower curtain into a minimalist statement piece with this oversized line art project. Using fabric markers or paint, you will create a charming, vintage-style clawfoot tub illustration that adds instant character to your bathroom.
How-To Guide
Materials
- White fabric shower curtain (cotton or polyester blend)
- Black fabric paint or permanent fabric markers (broad tip)
- Pencil for sketching
- Large angled paintbrush (if using paint)
- Projector (optional but recommended)
- Painter’s tape or masking tape
- Cardboard or plastic drop cloth (large enough to fit under the curtain)
- Iron and ironing board
- Reference image of a clawfoot tub
Step 1: Preparation and Setup
-
Wash and dry:
Begin by washing and drying your fabric shower curtain to remove any factory sizing or stiffness. This ensures the paint or ink adheres properly to the fibers. -
Smooth the surface:
Iron the curtain thoroughly to remove all creases. A smooth surface is crucial for achieving clean, uninterrupted lines later. -
Protect your workspace:
Lay down your cardboard or plastic drop cloth on a large flat surface, like a clean floor or a large dining table. Tape it down if necessary to prevent shifting. -
Position the curtain:
Spread the shower curtain flat over your protected surface. Secure the corners with painter’s tape to pull the fabric taut, which stops it from bunching up while you draw.
Bleeding Lines?
If the ink starts feathering into the fabric, stop immediately. Use a hairdryer to dry the wet spot, then restart using less pressure or switch to a thicker fabric paint instead of a marker.
Step 2: Drafting the Design
-
Set up the projection:
If you are using a projector, set it up to cast the image of a clawfoot tub onto the center of the curtain. Adjust the size so it fills the middle third of the fabric nicely. -
Outline the main shape:
Using a pencil, lightly trace the projected image. Start with the large oval for the rim of the tub. -
Add the body:
Sketch the deeper curve underneath the rim to form the basin of the tub. Keep your hand steady but light. -
Detail the feet:
Draw the ornate claw feet at the bottom. These have distinctive curves, so take your time tracing the scrollwork details. -
Sketch the borders:
Turn off the projector. Use a long straightedge or a taut piece of string to pencil in the horizontal decorative lines near the top and bottom of the curtain, ensuring they are parallel to the hem.
Step 3: Painting the Lines
-
Test your medium:
Before committing to the main art, test your marker or paint on a hidden hem or a scrap piece of similar fabric to check for bleeding. I always do this to avoid surprises with ink spread. -
Begin the rim:
Start applying the black fabric paint or marker over your pencil lines. Begin with the upper rim of the tub, using long, confident strokes rather than short, sketchy ones. -
Thicken the line weight:
Go back over the rim lines to thicken them slightly. The lines on the tub should be bold and clearly visible from a distance. -
Paint the basin:
Trace the curve of the tub basin. Try to maintain a consistent line width that matches the rim you just finished. -
Define the feet:
Fill in the details of the claw feet. You can make these lines slightly thinner or more delicate than the main tub body to accentuate the decorative style. -
Checking consistency:
Step back and look at the overall balance. If any sections look too faint, apply a second coat of paint or marker to ensure a deep, solid black.
Add Dimension
Make the tub pop by adding a very subtle gray shadow line strictly on one side of the tub basin curves. This simple addition gives the 2D drawing a slight 3D effect.
Step 4: Finishing Touches
-
Execute the borders:
Carefully trace the horizontal border lines at the top and bottom. Add small decorative circles or knots in the center of these lines if your design calls for them. -
Let it cure:
Allow the curtain to dry completely undisturbed. Refer to your paint or marker manufacturer’s instructions for specific drying times, usually at least 24 hours. -
Heat set the design:
Once dry, heat set the ink to make it permanent. Place a thin cloth over your design and iron on a high, dry setting (no steam) for several minutes over each painted section. -
Final inspection:
Hang the curtain up and check for any spots you might have missed. Touch up carefully if needed, let dry, and you represent ready to shower in style.
Now you have a custom piece of large-scale art that doubles as functional bathroom decor
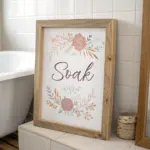
Handwashing Typography as Decor

Bring a touch of polite whimsy to your bathroom vanity with this simple yet elegant typography art piece. By combining a clean canvas with a delicate script font and a minimalist wood frame, you create a spa-like reminder that feels intentional rather than nagging.
Detailed Instructions
Materials
- Pre-stretched white canvas (8×10 or 9×12 inch)
- Black acrylic paint or paint marker (fine tip)
- Thin balsa wood or basswood strips (1/4 inch thick)
- Wood stain (light oak or natural)
- Foam brush or lint-free rag
- Wood glue or heavy-duty craft glue
- Pencil
- Ruler
- Computer and printer (for stencil)
- Carbon transfer paper or graphite paper
- Masking tape
- Hand saw or craft knife
- Fine-grit sandpaper
Step 1: Designing the Typography
-
Select your font:
Begin by searching for a casual, handwritten script font on your computer. You want something legible but with a flowing, connected style like the one in the photo. -
Layout your text:
Open a word processor or design software and type ‘handwashing reminder’. Adjust the size so it will fit comfortably in the center of your canvas size, leaving ample white space around the edges. -
Print the template:
Print your design on standard printer paper. Place it over your canvas to double-check that the scale looks balanced and pleasing to the eye.
Uneven Ink Flow?
If using a paint marker, pump the tip on a scrap paper often. If it blotches on the canvas, let it dry completely, paint over it with white acrylic, and try again.
Step 2: Creating the Stencil Transfer
-
Prepare the transfer:
Place a sheet of carbon transfer paper (dark side down) directly onto the center of the canvas. Position your printed text template on top of the carbon paper. -
Secure the layers:
Use small pieces of masking tape to secure the paper stack to the canvas so it doesn’t shift while you are tracing. -
Trace the design:
Using a pencil or ballpoint pen, firm trace over the outline of every letter. Press hard enough to transfer the carbon, but not so hard that you dent the canvas fabric. -
Reveal the guide:
Gently lift one corner to check that the transfer is visible before removing the papers completely. You should see a faint gray outline of your text on the canvas.
Step 3: Painting the Lettering
-
Outline the script:
Using a fine-tip black paint marker or a very thin liner brush with black acrylic paint, carefully trace the outer edges of your penciled letters. -
Fill the letters:
Once outlined, fill in the body of the letters. A paint marker offers more control here, especially for the thin upstrokes of the cursive font. -
Check for consistency:
Go back over your downstrokes (the parts of the letters where the pen would move downward) and thicken them slightly to mimic calligraphy. -
Let it cure:
Allow the paint or ink to dry completely. I prefer to wait at least an hour to ensure nothing smudges during the framing process.
Pro Tip: Faux Calligraphy
To get that professional look without a calligraphy pen, simply thicken only the ‘downstrokes’ of your letters manually while keeping horizontal and upstrokes thin.
Step 4: Building the Frame
-
Measure the canvas depth:
Measure the thickness (depth) of your canvas. Your wood strips should be slightly wider than this depth so the frame sits flush with the back but creates a nice lip on the front. -
Cut the side pieces:
Measure against the long side of the canvas canvas. Mark your balsa wood and cut two strips to this exact length using a craft knife or small hand saw. -
Cut the top and bottom:
Measure the width of the canvas PLUS the thickness of the two wood strips you just cut. This ensures the top and bottom pieces will span the entire width, covering the ends of the side pieces. -
Sand the edges:
Lightly sand any rough cut ends with fine-grit sandpaper to ensure a clean, professional join.
Step 5: Staining and Assembly
-
Stain the wood:
Using a foam brush or rag, apply a light coat of wood stain to all sides of your wood strips. Wipe away excess immediately for a light, natural look similar to the reference photo. -
Dry the wood:
Let the stained wood dry completely according to the manufacturer’s instructions. -
Apply glue:
Run a thin bead of wood glue along the side edge of the canvas itself. Press the corresponding wood strip firmly against it. -
Secure to dry:
Use clamps or masking tape to hold the wood strip tightly against the canvas while the glue sets. Repeat to attach all four sides of the frame.
This charming, lightweight sign is now ready to prop up by the sink or hang on the wall for a gentle nudge toward hygiene

PENCIL GUIDE
Understanding Pencil Grades from H to B
From first sketch to finished drawing — learn pencil grades, line control, and shading techniques.
Explore the Full Guide
Playful Bathroom Humor Canvas
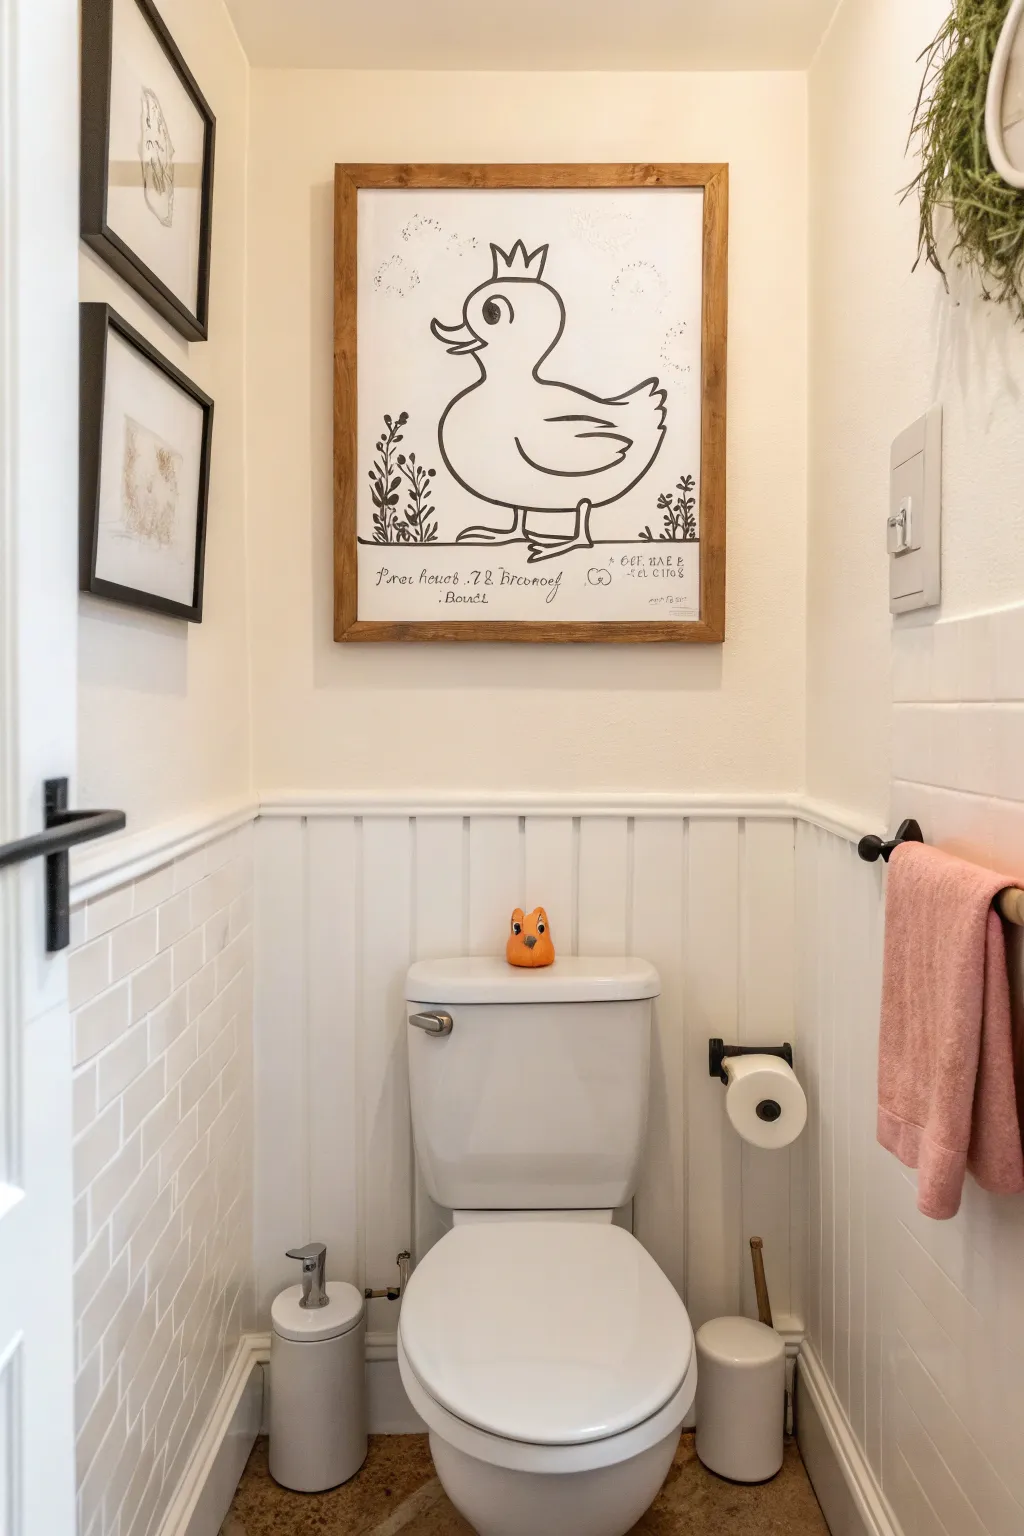
Bring a touch of regal whimsy to your powder room with this charming illustration of a crowned duck. This project combines simple line drawing techniques with a rustic wood frame for a piece that feels both vintage and playfully modern.
Step-by-Step Guide
Materials
- Large white stretched canvas (approx. 18×24 inches)
- Black acrylic paint or India ink
- Round brush (size 4 or 6)
- Fine liner brush (size 0 or 1)
- Graphite pencil (HB)
- Large quirk eraser
- Ruler or T-square
- Carbon transfer paper (optional)
- 1×2 inch lumber strips (for framing)
- Wood stain (medium walnut or oak)
- Wood glue
- Small finishing nails or brad nailer
- Sandpaper (220 grit)
Step 1: Sketching the Royal Portrait
-
Prepare the canvas:
Start with a clean, white stretched canvas. If the surface feels too rough, give it a very light sanding with fine sandpaper to ensure your brush glides smoothly later. -
Map out proportions:
Using your pencil lightly, divide the canvas visually. The duck body should occupy the center-right roughly two-thirds of the vertical space, leaving room at the top for the crown and at the bottom for the text. -
Draft the major shapes:
Sketch a large oval on its side for the body. Add a smaller circle above the left side of the oval for the head, connecting them with a curved neck line. -
Detail the head and crown:
Draw the beak profile pointing left, keeping it slightly open for a friendly expression. Add a large oval eye. Sketch a simple three-point crown resting jauntily on top of the head. -
Add wing and tail features:
Inside the body oval, sketch a wing shape that mimics the curve of the back. Extend the rear of the body into small, upturned tail feathers. -
Draw the feet and ground:
Sketch two simple webbed feet. Underneath, draw a horizontal line to ground the figure, giving the duck somewhere to stand. -
Include botanical accents:
On the left and right sides of the duck, sketch some simple vertical plant stalks with small leaves to frame the figure. -
Draft the text layout:
Using a ruler, lightly mark guidelines for the bottom script. Pencil in the whimsical text—don’t worry about it being perfectly legible; the charm is in the faux-vintage script style.
Pro Tip: Steady Hand
Rest your pinky finger on a dry part of the canvas while painting fine lines. It creates a stable pivot point for smoother curves.
Step 2: Inking the Masterpiece
-
Mix your paint:
If using acrylics, thin your black paint slightly with water until it has an inky consistency that flows easily off the brush but remains opaque. -
Outline the main body:
Using the #4 or #6 round brush, carefully trace over your pencil lines for the duck’s body, head, and feet. Keep the line weight fairly consistent but allow for natural variation at corners. -
Fill in the eye detailing:
Paint the pupil of the eye solid black, leaving a small white circle for a highlight to give the character life. Add the eyebrow arch. -
Paint the plants:
Switch to a slightly smaller brush if needed. Paint the stems and leaves with quick, deliberate strokes. I like to press down at the base of a leaf and lift up to create a taper. -
Letter the script:
Using the fine liner brush, go over the text at the bottom. Use light pressure for upstrokes and heavier pressure for downstrokes to simulate calligraphy. -
Add faint decorative elements:
Dip a dry brush into very little grey or watery black paint and dab faint, bubbly shapes or clouds near the head for texture. -
Erase guidelines:
Allow the paint to dry completely (wait at least an hour). Gently erase any visible pencil marks with a large eraser.
Step 3: Building the Rustic Frame
-
Measure and cut lumber:
Measure the outer dimensions of your canvas. Cut your 1×2 lumber to create a frame that fits snugly around the canvas. -
create the frame:
Use butt joints or miter cuts depending on your preference. Butt joints (flat ends against each other) look more rustic and match the style well. -
Stain the wood:
Apply your chosen wood stain with a rag. Wipe off excess after a few minutes to reveal the grain. Let it dry fully. -
Attach the frame:
Place the canvas inside the frame. Secure it by nailing through the outside of the frame into the wooden stretcher bars of the canvas using finishing nails.
Troubleshooting: Shaky Lines
If your painted lines look jittery, your paint is likely too thick. Add a drop of water to improve flow, or use a paint marker for more control.
Hang your new aristocratic artwork and enjoy the smile it brings to your daily routine
Whimsical Animal Portrait for the Powder Room
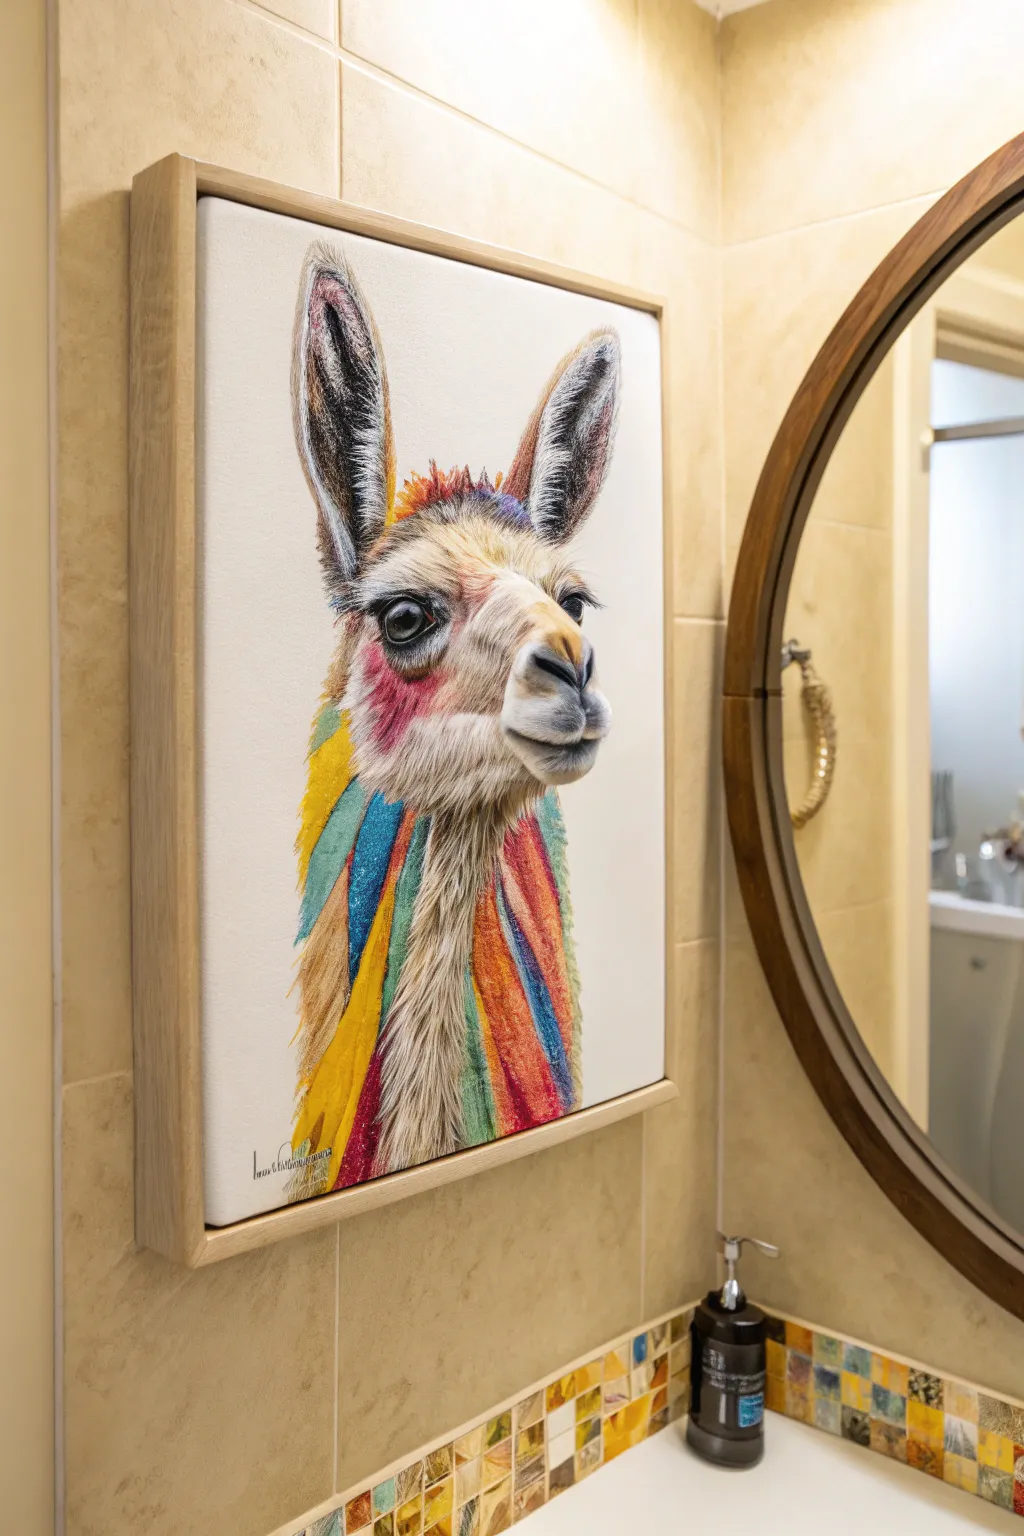
Brighten up a neutral powder room with this charmingly quirky llama portrait, featuring realistic fur textures blended with vibrant splashes of rainbow color. This project combines acrylic sketching with bold color blocking to create a piece that feels both artistic and playfully modern.
Step-by-Step Tutorial
Materials
- Pre-stretched canvas (16×20 or 18×24 inches)
- Acrylic paints (Titanium White, Mars Black, Burnt Umber, Yellow Ochre)
- Bright acrylic paints (magenta, turquoise, bright yellow, orange, violet)
- Set of synthetic brushes (flat shader, round #4, fine liner #0 or #00)
- Graphite transfer paper and stylus (optional)
- Pencil for sketching
- Floater frame (light oak or pine)
- Acrylic matte medium or glazing liquid
- Paper towels
- Water cup
- Palette or paper plate
Step 1: Preparation and Sketching
-
Prime the canvas:
Ensure your canvas is clean. If it isn’t pre-primed, apply two coats of white gesso, sanding lightly between coats for a smooth surface suitable for detailed fur work. -
Map out the composition:
Lightly sketch the llama’s outline using a pencil. Place the head slightly off-center or centered depending on your preference, but ensure the long neck extends all the way to the bottom edge. Pay attention to the large, expressive ears and the distinctive snout shape. -
Refine the facial features:
Before painting, double-check the placement of the eyes and nostrils. The eyes should be wide and set on the sides of the head. Lightly mark the areas where the ‘rainbow’ fur patches will flow down the neck.
Fur Texture Tip
Don’t over-blend your fur strokes. Let each flick of the brush stand alone. If it looks too chunky, wait for it to dry and flick thinner, lighter strokes over the top to break it up.
Step 2: Painting the Llama Base
-
Block in the neutrals:
Mix a light beige using Titanium White and a touch of Yellow Ochre and Burnt Umber. Apply this base color to the snout, face, and the non-colorful parts of the ears and neck. Keep the application fairly thin so you don’t lose your sketch lines. -
Establish the shadows:
Using a thinned wash of Burnt Umber, paint in the darker areas around the eyes, inside the ears, and under the chin. This creates the foundational 3D form before we add the texture. -
Detail the eyes:
Switch to a small round brush. Paint the eyes using Mars Black, leaving a tiny circle of white paper or painting a dot of Titanium White later for the reflection highlight. This brings the animal to life immediately. -
Create the nose and mouth:
Paint the nostrils and mouth slit with a dark gray (mix black and white). Soften the edges with a dry brush to make the muzzle look velvety rather than hard.
Fixing “Muddy” Colors
If your rainbow stripes start looking brown where they overlap, stop immediately. Let the first layer dry completely before painting the neighboring or overlapping color.
Step 3: Adding the Rainbow Fur
-
Lay down color blocks:
Identify the sections of the neck and chest that will be colorful. Paint broad, vertical stripes of your bright colors—yellow, teal, magenta, and orange—following the direction of hair growth. Don’t worry about fur texture yet; just get the pigment down. -
Add facial color accents:
Dilute some magenta and orange with glazing liquid or water. Gently glaze these colors onto the cheeks and the tuft of hair between the ears (the poll) to integrate the colorful theme into the face naturally. -
Start the fur texture:
Once the color blocks are dry, mix lighter versions of each color (add white). Using a fine liner brush or a small flat brush turned on its side, flick rapid, short strokes downward over the colored areas to simulate layering hair. -
Layering the realistic fur:
Move back to the beige face areas. Using a mix of white and cream paint on a liner brush, paint individual hairs radiating outward from the nose and eyes. I find it helpful to rotate the canvas to get the angle of the strokes just right. -
Blend color and realism:
Where the natural beige fur meets the rainbow stripes, overlap your brushstrokes. Paint some beige hairs extending over the color, and some colored hairs extending up into the neck, creating a soft, blended transition. -
Enhance the ear texture:
Use Titanium White on a liner brush to create the fluffy, long hairs inside the ears. Add dark, almost black, strokes for the outer rim and the deep interior shadows to create high contrast.
Step 4: Finishing Touches
-
Deepen the contrast:
Go back in with your darkest brown or black to deepen the shadows right under the jawline and in the deepest folds of the neck fur. This makes the bright colors pop even more. -
Add final highlights:
With pure Titanium White, add the brightest highlights to the wettest part of the nose, the eye reflection, and the very tips of the fluffiest fur on the ears and chest. -
Seal the painting:
Allow the paint to cure for at least 24 hours. Apply a coat of varnish (matte or satin works best for this style) to protect the artwork from bathroom humidity. -
Frame the piece:
Place the finished canvas into a light wood floater frame. Secure it from the back using offset clips or screws provided with the frame kit to achieve that high-end gallery look.
Hang your new masterpiece near a mirror to double the whimsical impact in your space


Vintage Bathtub Illustration Canvas
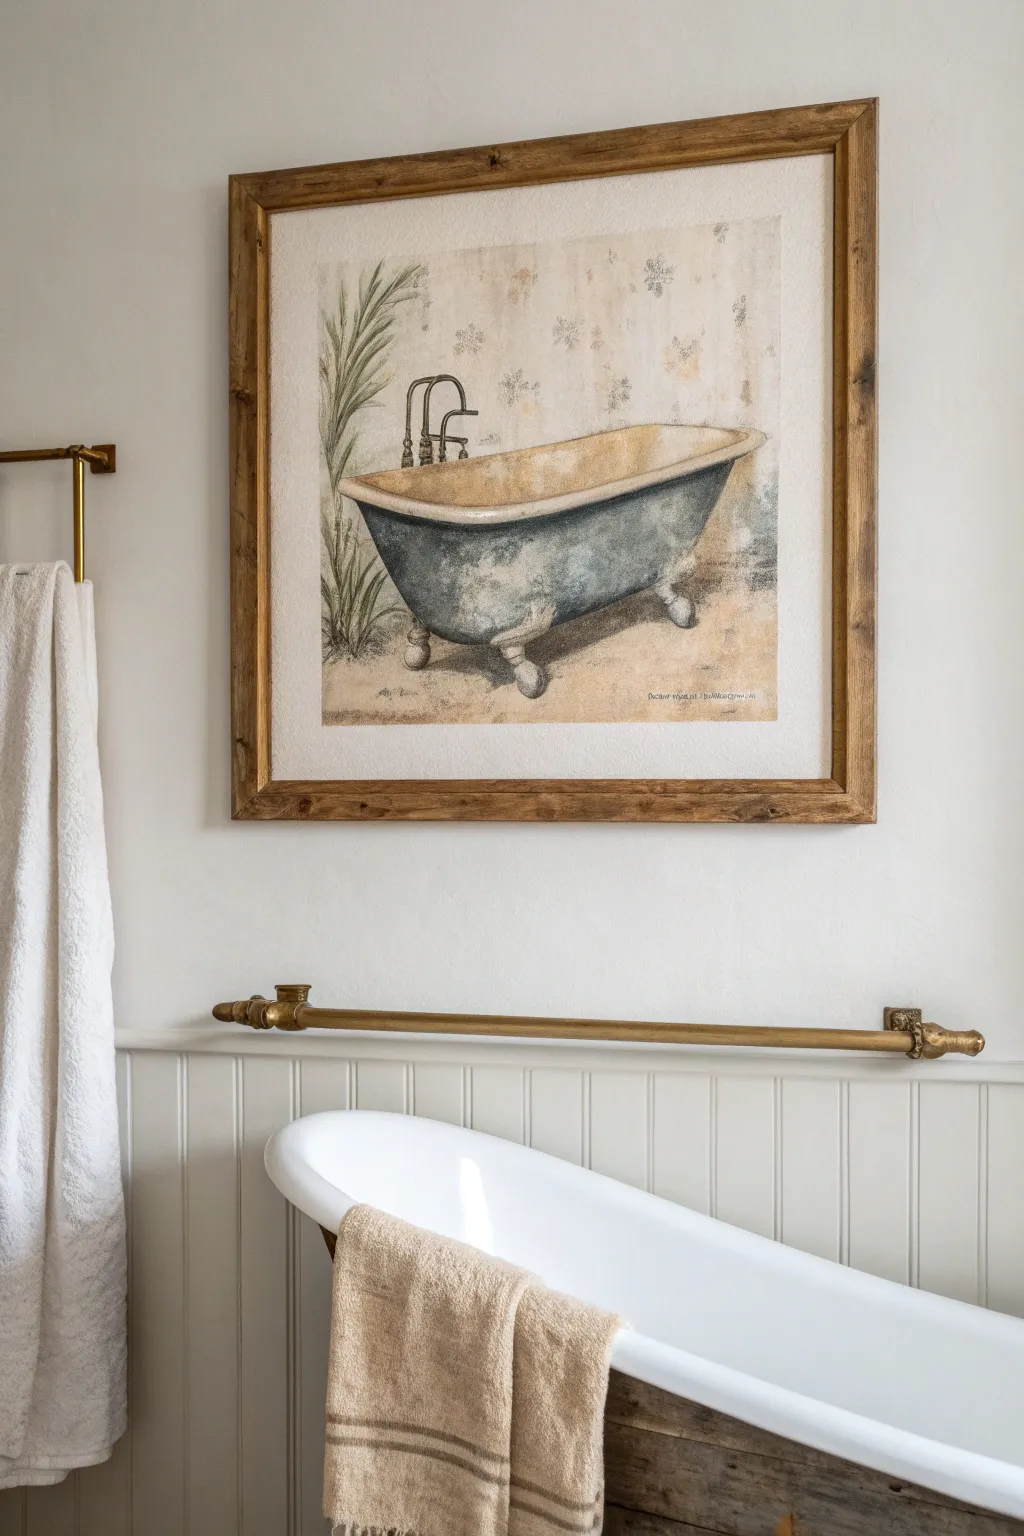
Bring a touch of nostalgic elegance to your bathroom with this charming vintage bathtub illustration. This project captures the soft textures of age-old porcelain and brass using acrylics and glazes for a timeless watercolor effect.
How-To Guide
Materials
- Pre-stretched canvas (square format, approx. 20×20 inches)
- Acrylic paints (Payne’s grey, raw umber, yellow ochre, titanium white, sap green, metallic gold)
- Matte gel medium
- Assorted brushes (1-inch flat, medium filbert, fine liner)
- Pencil and eraser
- Reference image of a vintage clawfoot tub
- Paper towels
- Water container
- Sea sponge (optional)
- Rustic wooden frame (custom or store-bought)
Step 1: Sketching and Background
-
Prepare the Surface:
Begin by priming your canvas with a thin coat of titanium white mixed with a tiny drop of yellow ochre. This eliminates the stark white of the canvas and provides a warm, aged base that mimics old paper. -
Sketch the Outline:
Lightly sketch the shape of the clawfoot tub using a pencil. Focus on the graceful curve of the rim and the sturdy stance of the feet. Don’t worry about perfection; a loose sketch adds to the illustrative charm. -
Add Decorative Elements:
Draw the tall, arched faucet hardware rising from the back of the tub. Softly outline where your potted plant will sit on the left side, keeping the leaves organic and flowing. -
Create a Wall Pattern:
For the subtle wallpaper effect in the background, mix a very diluted wash of raw umber. Use a worn brush to dab faint, irregular floral or damask patterns on the upper half of the canvas. Keep it ghostly and faded.
Step 2: Painting the Tub
-
Base Color for the Tub:
Mix Payne’s grey with a touch of raw umber and white to create a dusty blue-grey. Apply this to the body of the tub using a medium filbert brush, using sweeping, curved strokes that follow the tub’s shape. -
Adding Shadows:
While the base coat is still slightly tacky, deepen your grey mix and paint the shadowed areas—specifically underneath the rim and toward the bottom curve of the tub. Blend the edges softly. -
Highlighting the Porcelain:
Mix titanium white with a speck of yellow ochre for the interior rim of the tub. Paint the inside curve, blending it downward into the shadowed interior for depth. -
Distressing the Finish:
To achieve that weathered look, dilute some white paint until it’s like milk. Scumble (dry brush) this over parts of the blue tub body to suggest faded enamel or soap residue textures.
Watery Wash Trick
For a watercolor look with acrylics, use matte medium instead of just water to thin paints. It keeps the pigment suspended without breaking the binder.
Step 3: Details and Refining
-
Painting the Feet:
Use a mix of white and Payne’s grey to block in the claw feet. Once dry, add shadows to define the toes and ornamental shapes. Keep the contrast soft to match the vintage aesthetic. -
Brass Hardware:
Paint the faucet and plumbing lines with a mixture of raw umber and yellow ochre. I like to add tiny touches of metallic gold on the highest points of the pipes to catch the light. -
Painting the Greenery:
Using sap green mixed with raw umber, paint the plant leaves with quick, confident strokes. Vary the pressure on your brush to create tapering leaf shapes that look natural. -
Adding Floor Texture:
Ground the tub by painting a soft, sandy wash underneath it using yellow ochre and white. Don’t make a hard floor line; just let the color fade out naturally. -
Shadowing the Floor:
Add cast shadows under the feet using a thin wash of raw umber. This ensures the tub looks heavy and planted, rather than floating in space.
Muddy Colors?
If your grey tub looks too brown or muddy, let the layer dry completely before adding highlights. Wet-on-wet blending can sometimes over-mix colors.
Step 4: Final Touches and Framing
-
Enhancing the Age:
Mix a very thin glaze of raw umber and matte gel medium. Brush this over the entire dried painting, wiping it back immediately with a paper towel. This unifies the colors and adds an antique patina. -
Final Outline Accent:
With your finest liner brush and watered-down dark grey paint, selectively re-outline key areas like the faucet handle or the rim of the tub to bring back definition lost during glazing. -
Frame Selection:
Choose a rustic, medium-tone wood frame. The natural grain complements the organic feel of the painting. Mount your canvas securely within the frame.
Hang your new masterpiece in the restroom to create a serene, spa-inspired atmosphere tailored just for you
Soap Bubbles Ombre Abstract
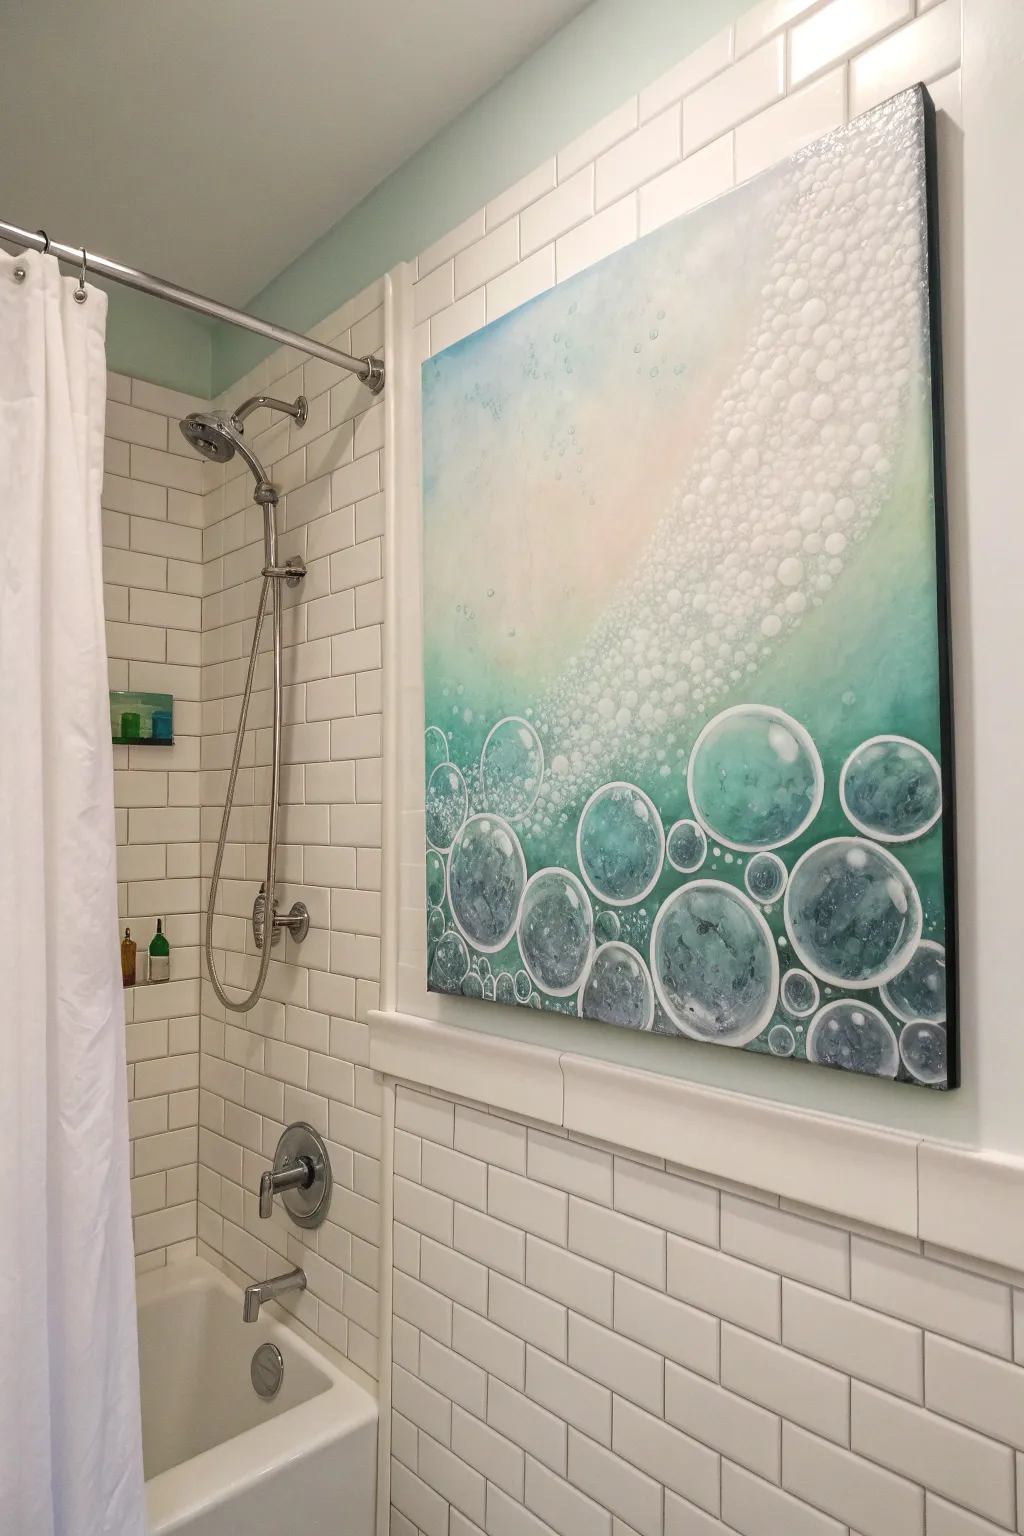
Capture the ethereal beauty of bath time with this stunning mixed media canvas that combines soft watercolor effects with bold, graphic bubbles. The piece features a soothing ombre transition from deep teal to airy white, creating a sense of movement and depth perfect for a spa-like bathroom retreat.
Step-by-Step
Materials
- Large gallery-wrapped canvas (24×30 or similar)
- Acrylic paints: Teal/Turquoise, Deep Green, Phthalo Blue, Titanium White
- Acrylic glazing medium or flow improver
- Large flat brush (2-inch)
- Medium round brushes and detail liner brushes
- White acrylic ink (optional but recommended for opacity)
- Circular objects for tracing (cups, lids, tape rolls of various sizes)
- White pencil or chalk
- Spray bottle with water
- Paper towels or sea sponge
Step 1: Creating the Ombre Background
-
Prepare the Palette:
Begin by squeezing out your main colors: teal, deep green, and white. Create a few transition shades on your palette by mixing the teal with increasing amounts of white to get a range of aquas and mints. -
Paint the Base Dark Layer:
Using your large flat brush, apply the darkest mix of teal and deep green to the bottom third of the canvas. Don’t worry about being too neat; random brushstrokes add organic texture here. -
Start the Gradient Transition:
While the bottom layer is strictly wet, pick up your mid-tone teal color and start painting the middle section. Blend the bottom edge of this new color into the top edge of the dark section using horizontal sweeping motions. -
Lighten the Upper Canvas:
Clean your brush thoroughly. Mix a large amount of white with a tiny dot of teal to create a very pale, milky aqua. Apply this to the top third of the canvas, blending downwards into the mid-tones. -
Mist and Blend:
To get that dreamy, seamless look, lightly mist the canvas with water from your spray bottle. Use a clean, slightly damp brush to soften any harsh lines where the colors meet, creating a misty atmosphere. -
Create Texture and Splatters:
While the paint is still damp, take a crumpled paper towel or sea sponge and dab gently at the transition areas to lift a little pigment. Splatter some watered-down white paint or ink over the top right corner to simulate tiny fizzing bubbles.
Step 2: Drafting the Bubbles
-
Dry Completely:
Allow the background to dry fully. If the canvas feels cool to the touch, it still holds moisture, so give it extra time or use a hair dryer on a low setting. -
Map Out Large Spheres:
Select your largest circular objects (like a wide cup or masking tape roll). Place them randomly along the bottom edge, allowing some to hang off the canvas. Trace lightly with a white pencil. -
Add Medium and Small Circles:
Fill in the gaps with medium-sized lids and small caps. Vary the heights slightly to make the bubbles look like they are floating upward, clustering them denser at the bottom. -
Outline in White:
Using a thin round brush and pure Titanium White (or white acrylic ink for smoother flow), carefully paint over your pencil tracings. Vary the line thickness—make the bottom curves slightly thicker to indicate weight and reflection.
Circle Hack
If you struggle painting perfect circles freehand, use the rim of a plastic cup dipped in white paint to ‘stamp’ your initial bubble shapes onto the canvas.
Step 3: Detailing and Dimension
-
Glaze the Bubble Interiors:
Mix a tiny amount of your background teal with a lot of glazing medium. Paint inside the bubble outlines, keeping the center slightly more transparent than the edges to create a glass-like volume. -
Add Darker Shadows:
Mix a dark translucent teal (darker than the background behind the bubble). Paint a crescent shape inside the bottom curve of each bubble to simulate the shadow cast by the sphere’s curvature. -
Create Inner Reflections:
With watered-down white paint, add soft, blurry patches on the top-left inside edge of the bubbles. This mimics the environmental light hitting the surface. -
Paint Sharp Highlights:
Using your smallest detail brush and pure, un-thinned white paint, add crisp, brilliant highlights. A dot or a small curve near the top rim makes the bubbles look wet and shiny. -
Enhance the Cluster:
Between the large defined bubbles, use the handle end of a paintbrush dipped in white paint to dot tiny clusters of ‘foam.’ Group these tightly together to connect the larger shapes. -
Final White Glaze:
I like to add a final touch of dry-brushing with white paint diagonally across the upper right portion of the painting. This mimics a shaft of light or a dense patch of micro-bubbles dissolving into the air.
Add 3D Texture
Mix iridescent medium or heavy gel gloss into your white paint for the final highlights. This makes the bubbles physically raised and shimmery.
Hang your bubbly masterpiece in the bathroom to create a serene, spa-like atmosphere every time you walk in
Small Vertical Pair by the Vanity Mirror
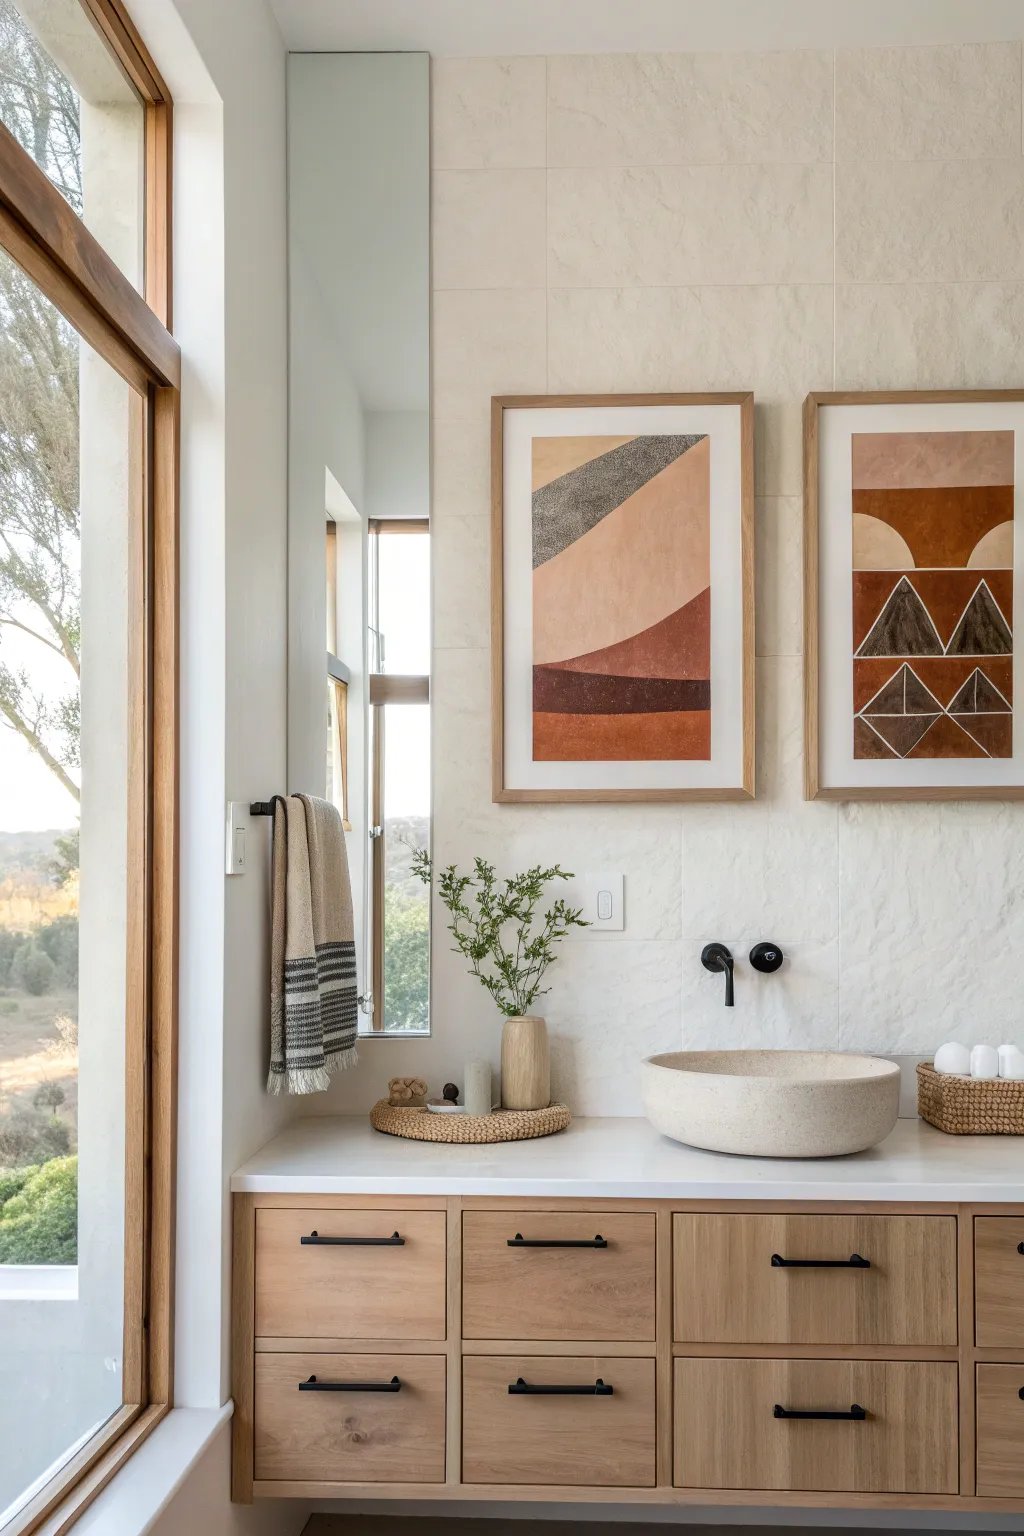
Bring the warmth of the desert into your bathroom with these two complementary abstract paintings featuring rich terracottas, sands, and deep charcoal greys. Using acrylics on heavy paper, you’ll create textured layers that mimic sedimentary rock and geometric forms for a modern, organic look.
Detailed Instructions
Materials
- Two sheets of heavy textured watercolor paper (11×17 inches or similar)
- Acrylic paints (burnt sienna, yellow ochre, raw umber, titanium white, mars black)
- Painter’s tape or masking tape
- Flat shader brushes (1-inch and 1/2-inch)
- Palette knife or old credit card
- Clean water and paper towels
- Two matching light wood frames with mats
- Ruler and pencil
Step 1: Preparation & Layout
-
Prep the surface:
Begin by taping the edges of your watercolor paper down to your work surface. This creates a clean white border for framing and prevents the paper from buckling when wet. -
Map the left design:
For the first piece (curved layers), use a pencil to lightly sketch three distinct wavy zones. Start with a large curve sweeping down from the top right, then a middle horizon line, and finally a base layer. -
Map the right design:
On the second sheet, use a ruler to draw a grid. Create a top rectangular zone, a middle band for triangles, and a bottom section for diamonds or inverted triangles to mimic the geometric pattern shown.
Clean Lines Hack
For the geometric shapes on the right piece, use small strips of painter’s tape to mask off the triangles. This guarantees razor-sharp edges without needing a steady hand.
Step 2: Painting the Left Piece (Wavy Landscape)
-
Mix the sand tone:
Combine yellow ochre with plenty of titanium white and a tiny dot of burnt sienna to create a pale, sandy beige. Apply this to the large central swooping section using a 1-inch flat brush. -
Create texture:
While the sand paint is still tacky, blot it gently with a dry paper towel to lift small spots of pigment, giving it a stone-like texture. -
Paint the top dark band:
Mix mars black with a touch of white to make a charcoal grey. Paint the top-most curved section. I like to use a fairly dry brush here to let the paper’s tooth show through, adding grit. -
Layer the bottom tones:
Mix burnt sienna with a little raw umber for a deep rust color. Paint the section just below the sand color. Let it dry, then paint the very bottom stripe with a brighter, unmixed burnt sienna. -
Add separation lines:
Once the main shapes are dry, use a very thin brush or the edge of your palette knife to paint a thin, dark brown line between the rust layers to distinguish them.
Step 3: Painting the Right Piece (Geo Shapes)
-
Block in the background:
Using the same pale sand mix from the first painting, fill in the very top section. Let it dry completely. -
Paint the sun shapes:
Mix a light peach using white and a tiny bit of burnt sienna. Paint two semi-circles rising from the bottom of the top sandy section. -
Fill the middle band:
Apply the deep rust color (burnt sienna/umber mix) to the rectangular band surrounding your sun shapes. -
Detail the triangles:
For the middle row of triangles, use the charcoal grey mix. Outline the triangles first with a small brush, then fill them in with vertical, scratchy strokes to simulate texture. -
Outline the geometry:
Use a white paint pen or a fine liner brush with white acrylic to draw the structural lines of the triangles and the bottom geometric shapes. -
Fill the bottom diamonds:
Fill the bottom geometric shapes with the deep rust color, leaving the white outlines visible. Allow some of the white of the paper to peek through for a vintage feel.
Add Dimension
Mix a teaspoon of baking soda into your acrylic paint relative to the amount of paint on your palette. This creates a raised, gritty texture perfect for the “stone” sections.
Step 4: Finishing Touches
-
Dry and flatten:
Allow both paintings to dry overnight. If the paper has curled slightly, place them under heavy books for a few hours. -
Remove tape:
Carefully peel away the painter’s tape at a 45-degree angle to reveal your crisp, clean borders. -
Frame them up:
Place the artwork into the mats and secure them in the light wood frames. Ensure the glass is clean before sealing the back.
Hang your new gallery pair vertically or side-by-side to add a sophisticated, handmade touch to your vanity area
Color-Pulled Palette to Match Towels
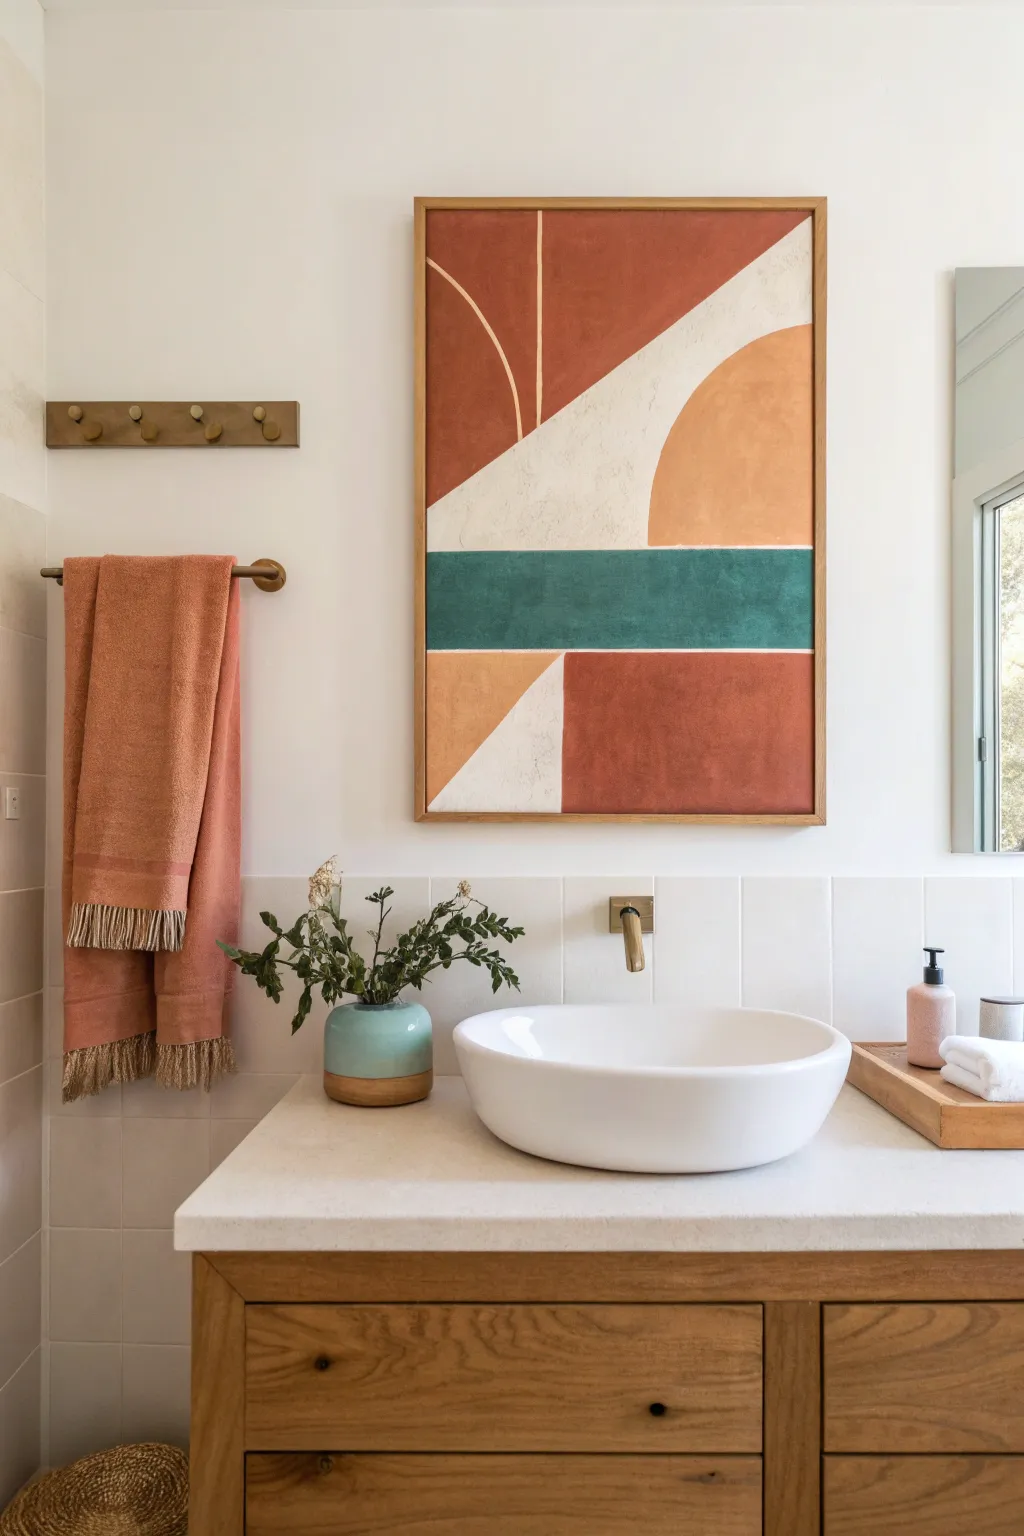
Bring the warmth of the desert into your bathroom with this abstract geometric canvas art that perfectly coordinates with earthy towel sets. The textured, matte finish gives it a high-end, hand-painted look that feels both organic and modern.
How-To Guide
Materials
- Large rectangular stretched canvas (24×36 inches or similiar)
- Painter’s tape (various widths, including fine line tape)
- Acrylic paints: Burnt Sienna, Terracotta, Teal/Deep Turquoise, Ochre/Peach, and Titanium White
- Gesso or texture medium (optional for added grit)
- Wide flat wash brush (2 inch)
- Medium flat brush (1 inch)
- Thin liner brush
- Pencil and eraser
- Ruler or T-square
- Palette or paper plate
- Water cup and paper towels
- Floating wooden frame kit (pine or light oak)
Step 1: Planning and Prepping
-
Prime the Surface:
Start by giving your canvas a fresh coat of white gesso if it isn’t pre-primed. If you want that tactile, plaster-like look seen in the photo, mix a little texture paste or sand into your white acrylic paint for the base layer. -
Visualize the Layout:
Study the composition. The artwork is divided into roughly three horizontal bands, with the middle teal band being the thinnest relative to the top and bottom. Lightly mark these three main horizontal zones on your canvas edges with a pencil. -
Block the Teal Band:
Use a ruler to draw the horizontal lines defining the central band. Apply painter’s tape along the outside edges of these pencil lines to mask off the top and bottom sections, ensuring the teal paint stays crisp. -
Paint the Center Strip:
Mix a deep teal using turquoise and a touch of burnt umber to desaturate it slightly. Paint the middle strip completely. Apply two coats if necessary for full opacity, then peel the tape while the paint is still slightly damp to avoid tearing.
Step 2: Drafting the Shapes
-
Sketch the Diagonals:
Once the teal band is fully dry, use your ruler to sketch the large diagonal white stripe in the top section. It starts narrow on the left (above the teal line) and widens as it goes up to the top right corner. -
Draw the Arches:
Freehand or use a large round object (like a mixing bowl or plate) to lightly sketch the curves. You need a large quarter-circle on the top right (ochre section) and a subtle curve suggestion on the top left (terracotta section). -
Masking Complex Shapes:
Apply tape along the straight edge of your diagonal white section. For the curved sections, you can either trust your steady hand or carefully cut masking tape into curves to protect the white areas.
Bleeding Edges?
If paint bleeds under your tape, wait for it to dry completely. Then, simply paint over the mistake with the original base color using a small brush.
Step 3: Applying Color
-
Painting the Top Left:
Mix a rich Terracotta or Rust color. Paint the top left section, being careful around the diagonal tape line. Let this section dry completely. -
Painting the Top Right Arch:
Mix an Ochre or muted Peach tone. Fill in the quarter-circle shape in the upper right corner. I usually use a smaller flat brush here to cut in the curve cleanly against the white background. -
The Bottom Section:
The bottom third is split into two blocks. Tape off a diagonal line to separate the left triangle from the right rectangle. -
Fill the Lower Colors:
Paint the small left triangle in the same Ochre/Peach hue used above. Paint the larger right rectangle in the deep Rust/Terracotta shade. Remove all tape carefully. -
Refining the White:
Use Titanium White (mixed with a tiny drop of ochre for warmth) to paint the negative spaces—the diagonal strip and the triangle at the bottom left. Even if the canvas is white, this step adds essential texture.
Texture Boost
Mix baking soda into your acrylic paint (1:4 ratio) before applying. This creates a gritty, ceramic-like texture that looks amazing under bathroom vanity lights.
Step 4: Detailing and Framing
-
Adding Fine Lines:
Mix a light cream color. Using your thinnest liner brush, carefully paint the organic vertical line and the curved arch line over the Rust section in the top left. Keep your hand loose so the lines look hand-painted, not mechanical. -
Touch Ups:
Inspect your edges. If any paint bled under the tape, use a small angled brush and the appropriate background color to neaten the lines. -
Varnish:
To protect against bathroom humidity, apply a layer of matte varnish over the entire painting. Do not use gloss, as it will ruin the earthy aesthetic. -
Prepare the Frame:
While the varnish dries, assemble your floating frame. If the wood is unfinished, you might want to seal it with a clear wax or matte polyurethane to prevent warping in a damp bathroom. -
Final Assembly:
Place your canvas into the floating frame, securing it from the back with the hardware provided in your kit. The gap between canvas and frame creates a professional shadow line.
Hang your masterpiece near your matching towels and enjoy the cohesive spa atmosphere you’ve created.
Geometric Tile-Inspired Canvas Pattern
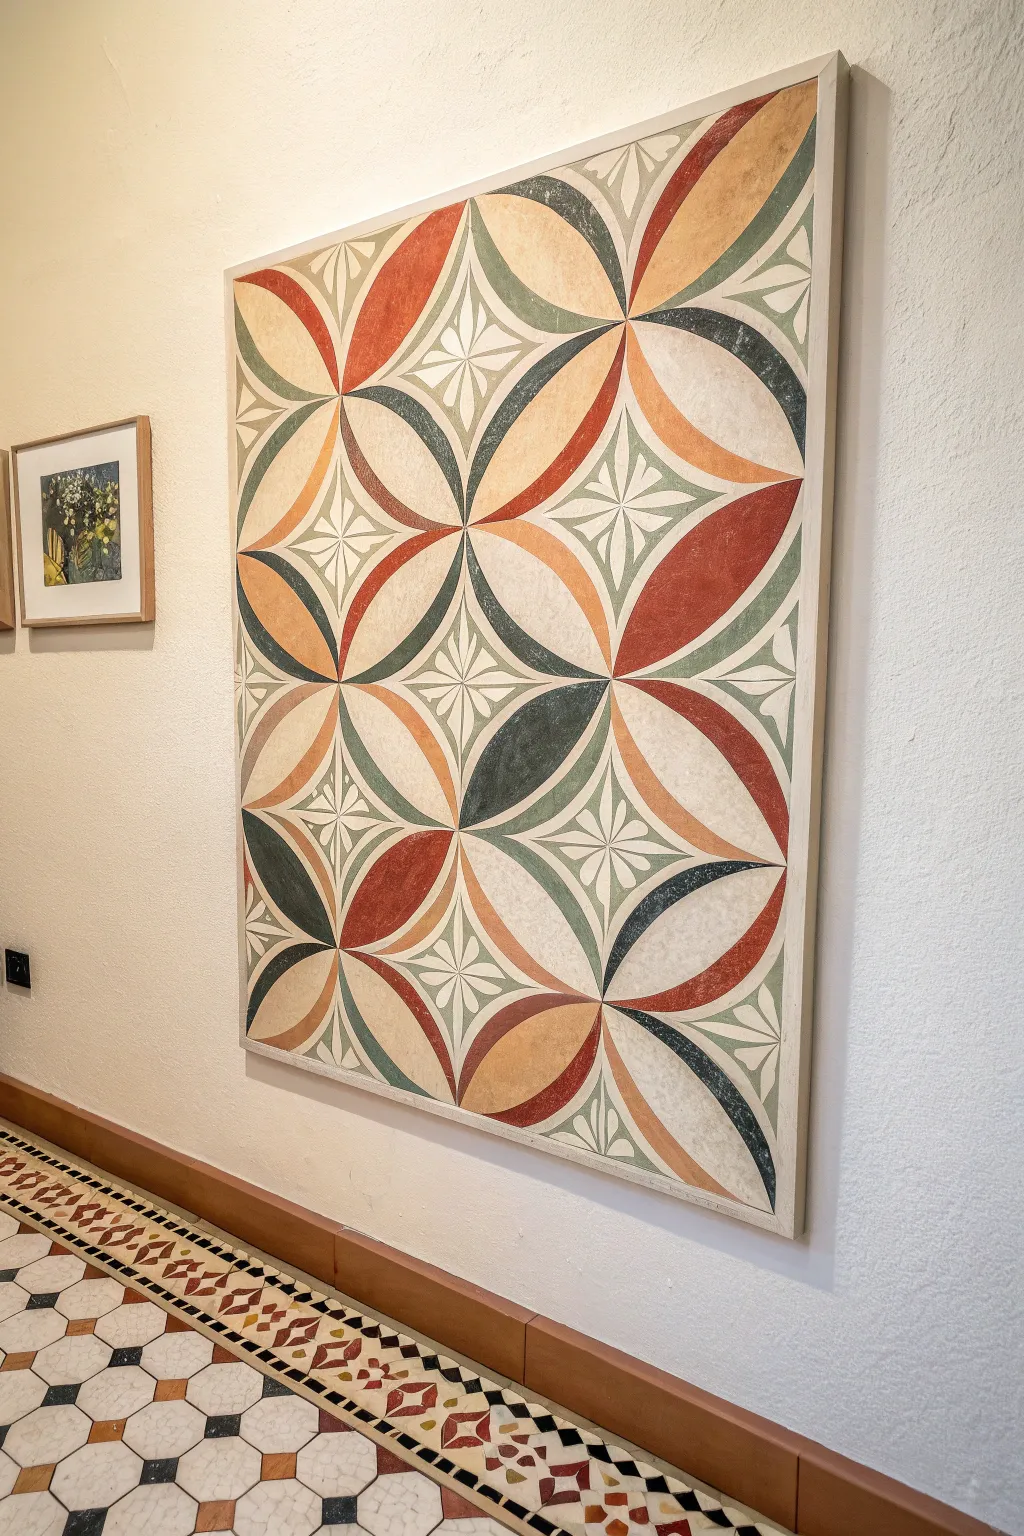
Bring the timeless elegance of vintage cement tiles to your walls without a single drop of grout. This large-scale canvas project recreates the intricate beauty of Mediterranean encaustic patterns using simple geometry and warm, earthy acrylics.
Step-by-Step
Materials
- Large square canvas (e.g., 36×36 inches)
- Acrylic paints (terracotta, sage green, deep gray-blue, mustard yellow, off-white)
- Large compass or a string and tack for drawing circles
- Long ruler or straight edge
- Pencil and eraser
- Painter’s tape (optional curves tape)
- Flat shader brushes (various sizes)
- Small round detail brush
- Matte varnish spray
Step 1: Drafting the Grid
-
Base coat:
Begin by painting your entire canvas with two coats of an off-white or cream acrylic paint to serve as the ‘grout’ background color. Allow this to dry completely for at least 3-4 hours. -
Find the center:
Using your ruler, lightly mark the exact horizontal and vertical center lines of the canvas to create four equal quadrants. -
Create a grid:
Subdivide each quadrant further. If your canvas is 36 inches, marks at every 9 inches will give you a 4×4 grid. Lightly draw these grid lines with a pencil. -
Set your radius:
Set your compass (or measure your string) to exactly half the width of one grid square. This radius is crucial for the arcs to meet perfectly.
Step 2: Drawing the Pattern
-
Draw primary circles:
Place the point of your compass at the intersection of your grid lines. Draw a circle. Repeat this at every intersection point across the canvas. -
Connect the arcs:
You should now see the overlapping petal shapes forming. The pattern in the image relies on circles centered on the grid intersections, creating four-pointed ‘stars’ and large circular loops. -
Sketch interior details:
Inside the four-pointed star shapes (formed where four circles meet), lightly sketch a smaller floral star motif. Draw a simple four-petal flower shape centered in that negative space. -
Refine the lines:
Go over your pencil lines to ensure they are visible enough to paint within, but light enough to cover. Erase any confusing construction lines that aren’t part of the final design.
Uneven Arcs?
If your compass creates a hole in the canvas center, place a small piece of cardboard or masking tape under the pivot point to protect the surface while spinning.
Step 3: Painting the Design
-
Block in the petals:
Start with the large, leaf-like shapes created by overlapping circles. Paint these in alternating colors—sage green, terracotta, and mustard yellow—following the symmetrical pattern shown in the reference. -
Paint the background shapes:
Fill in the larger rounded areas connecting the petals. I find using a flat brush helps keep the edges crisp against the curves without needing masking tape. -
Add dark accents:
Use your deep gray-blue paint for specific accent curves or petals to anchor the design and provide contrast. -
Detail the stars:
Switch to your small round brush. Carefully paint the small four-petal floral motifs inside the diamond/star shaped gaps. Leave the background off-white color showing around them to mimic the tile look.
Faux-Grout Pro Tip
Mix a tiny bit of fine sand or baking soda into your base off-white paint layer. This subtle grit adds authentic texture that mimics real cement grout.
Step 4: Finishing Touches
-
Clean up edges:
Once the main colors are dry, use your off-white background mix to touch up any ragged edges or places where colors bled over the lines. -
Texture technique:
To mimic the worn texture of cement tiles, dry brush a tiny amount of off-white paint lightly over the colored areas. This creates a slightly chalky, aged appearance. -
Seal the work:
Finish with a coat of matte spray varnish. Avoid glossy finishes, as real encaustic tiles have a distinctively matte, powdery surface. -
Frame it:
For a polished look, add a simple wooden floating frame around the canvas, or paint the edges a solid neutral color to complete the illusion.
Hang your new faux-tile masterpiece and enjoy the architectural charm it adds to your space
Moody Monochrome Wash for a Half Bath
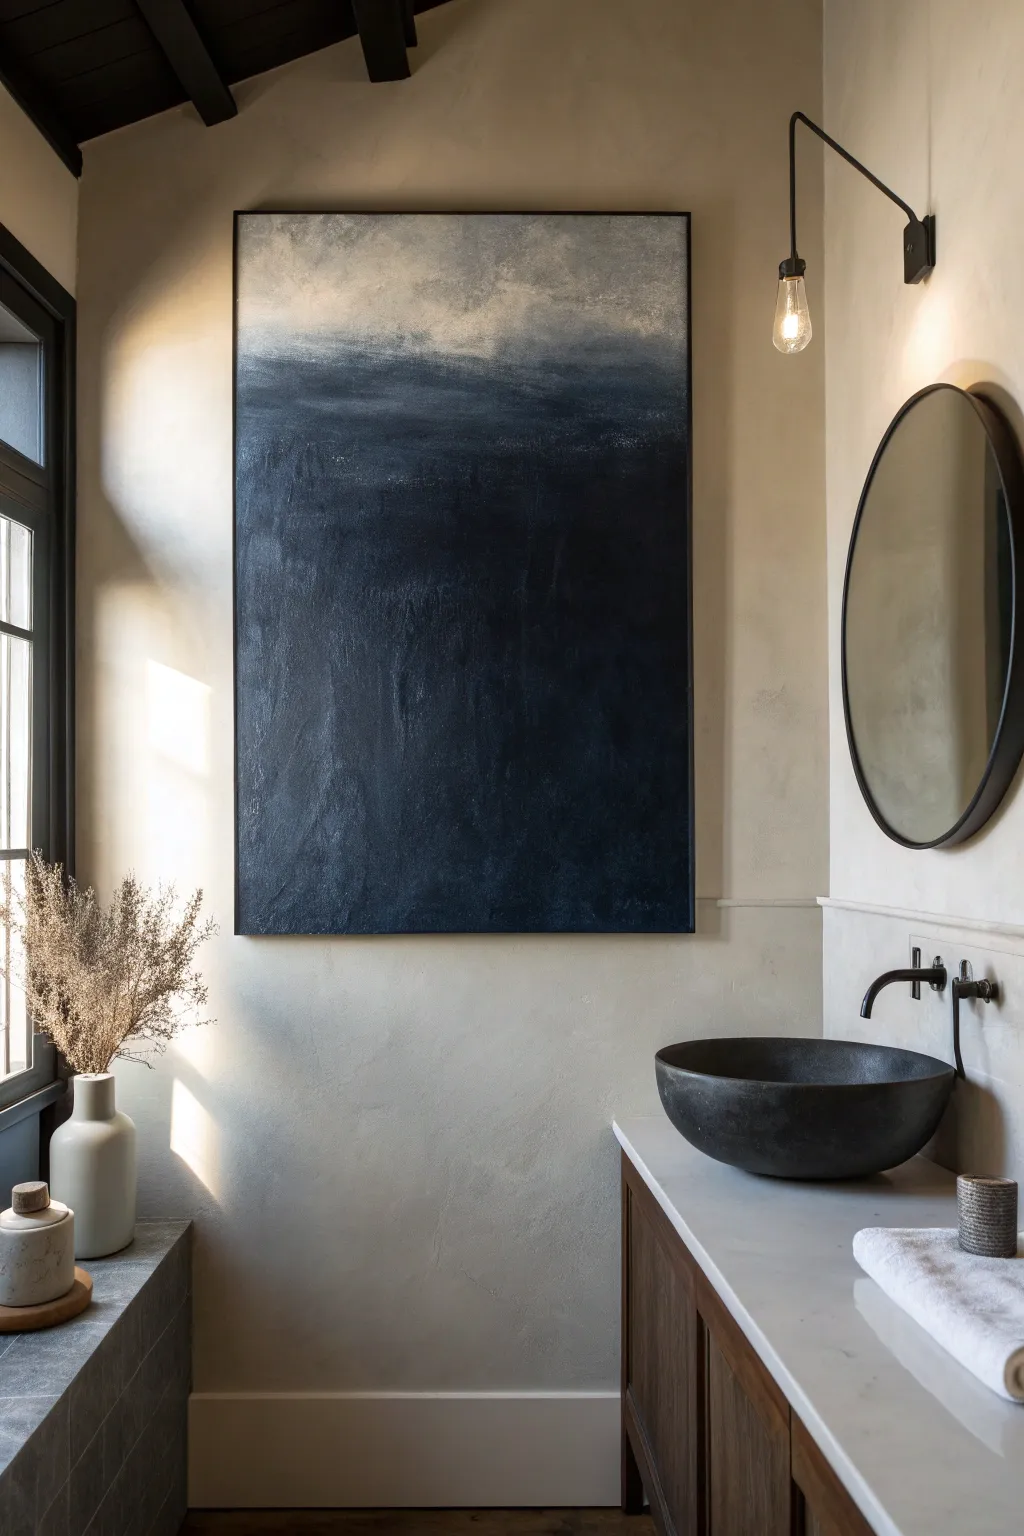
Embrace the drama of the sea with this expansive abstract piece that captures the moody transition from deep abyss to a lighter, misty surface. This dark, textured canvas adds instant sophistication and depth to a smaller bathroom space, acting as a portal to a serene, stormy horizon.
Step-by-Step Guide
Materials
- Large canvas (e.g., 36”x48” or larger)
- Black acrylic gesso
- Heavy body acrylic paints: Prussian Blue, Mars Black, Titanium White, and Raw Umber
- Matte medium or glazing liquid
- Large flat paintbrush (3-4 inch)
- Medium round brush
- Natural sea sponge
- Spray bottle with water
- Clean cotton rags
- Drop cloth
Step 1: Setting the Abyss Foundation
-
Prime the canvas:
Begin by covering your entire canvas with black acrylic gesso. This provides an immediate deep, dark base that will make your subsequent blue layers feel richer and more intense. Let this dry completely before moving on. -
Mix your darkest shade:
On your palette, create a mix of about 70% Mars Black and 30% Prussian Blue. You want a color that looks black at first glance but reveals a subtle blue undertone in the light. -
Apply the bottom anchor:
Using the large flat brush, apply this black-blue mixture to the bottom two-thirds of the canvas. Use vertical, sweeping strokes to create a sense of deep water rising up. -
Create texture:
While the paint is still wet, lightly mist the canvas with water and drag a dry rag vertically through sections of the paint. This lifts small amounts of pigment to create ghostly, streaks that mimic rain or deep currents.
Pro Tip: Atmospheric Depth
Mix a glazing liquid into your dark blue layer. This transparency allows the black gesso underneath to show through, creating a vibration of color that feels much deeper than flat opaque paint.
Step 2: Building the Stormy Transition
-
Introduce pure blue:
Load your brush with pure Prussian Blue mixed with a generous amount of matte medium. The medium makes the paint translucent. -
Create the mid-section:
Paint over the upper area of the dried black base, starting from the middle and working upwards. Stop about 10 inches from the top edge. -
Blend downward:
Before the blue layer dries, use a clean, slightly damp brush to blend the bottom edge of the blue into the black base, ensuring there are no harsh lines, just a shadowy gradient. -
Add depth variations:
Dip a sea sponge into a mix of Prussian Blue and a tiny touch of Raw Umber. Dab this sporadically in the middle section to add organic texture that breaks up the flat color. -
Scumble the transition:
Use a dry brush technique—wiping most paint off the brush—to ‘scumble’ the blue mixture upwards into the empty top section, creating a feathery, uneven edge.
Step 3: The Misty Horizon
-
Mix the horizon color:
Combine Titanium White with a very small amount of Raw Umber and a dot of the Prussian Blue. You want a dirty, stormy grey-white, not a bright white. -
Paint the top band:
Apply this lighter mixture to the very top strip of the canvas. Use horizontal strokes here, contrasting with the vertical energy of the darkness below. -
Merge the zones:
With a clean, dry large brush, gently blend the meeting point between the light top band and the dark blue middle. Use horizontal sweeping motions to simulate fog rolling over the water. -
Intensify the darkness:
Step back and look at the bottom half. If it dried too light, apply a glaze of pure black mixed with water to deepen the abyss, darkening the bottom corners specifically. -
Add subtle highlights:
Mix a pale blue-grey. Using the tip of a round brush, add very faint, almost invisible horizontal scratches or whisps in the transition zone to suggest distant waves or wind. -
Final texture pass:
Looking at the reference, notice the gritty texture. Mimic this by dipping a stiff brush into un-thinned paint (black or dark blue) and stippling it aggressively into areas that look too smooth. -
Seal the work:
Once fully dry (give it at least 24 hours due to the layers), apply a matte varnish. A glossy finish would reflect too much light and ruin the moody absorption of the dark colors.
Troubleshooting: Harsh Lines
If your blend between dark and light looks too structured or stripe-like, mist the area heavily with water until it drips slightly, then blur the transition with a soft, clean rag.
Hang your new moody masterpiece in a well-lit spot to let the subtle gradients truly shine
Subtle Metallic Accents on Sealed Canvas
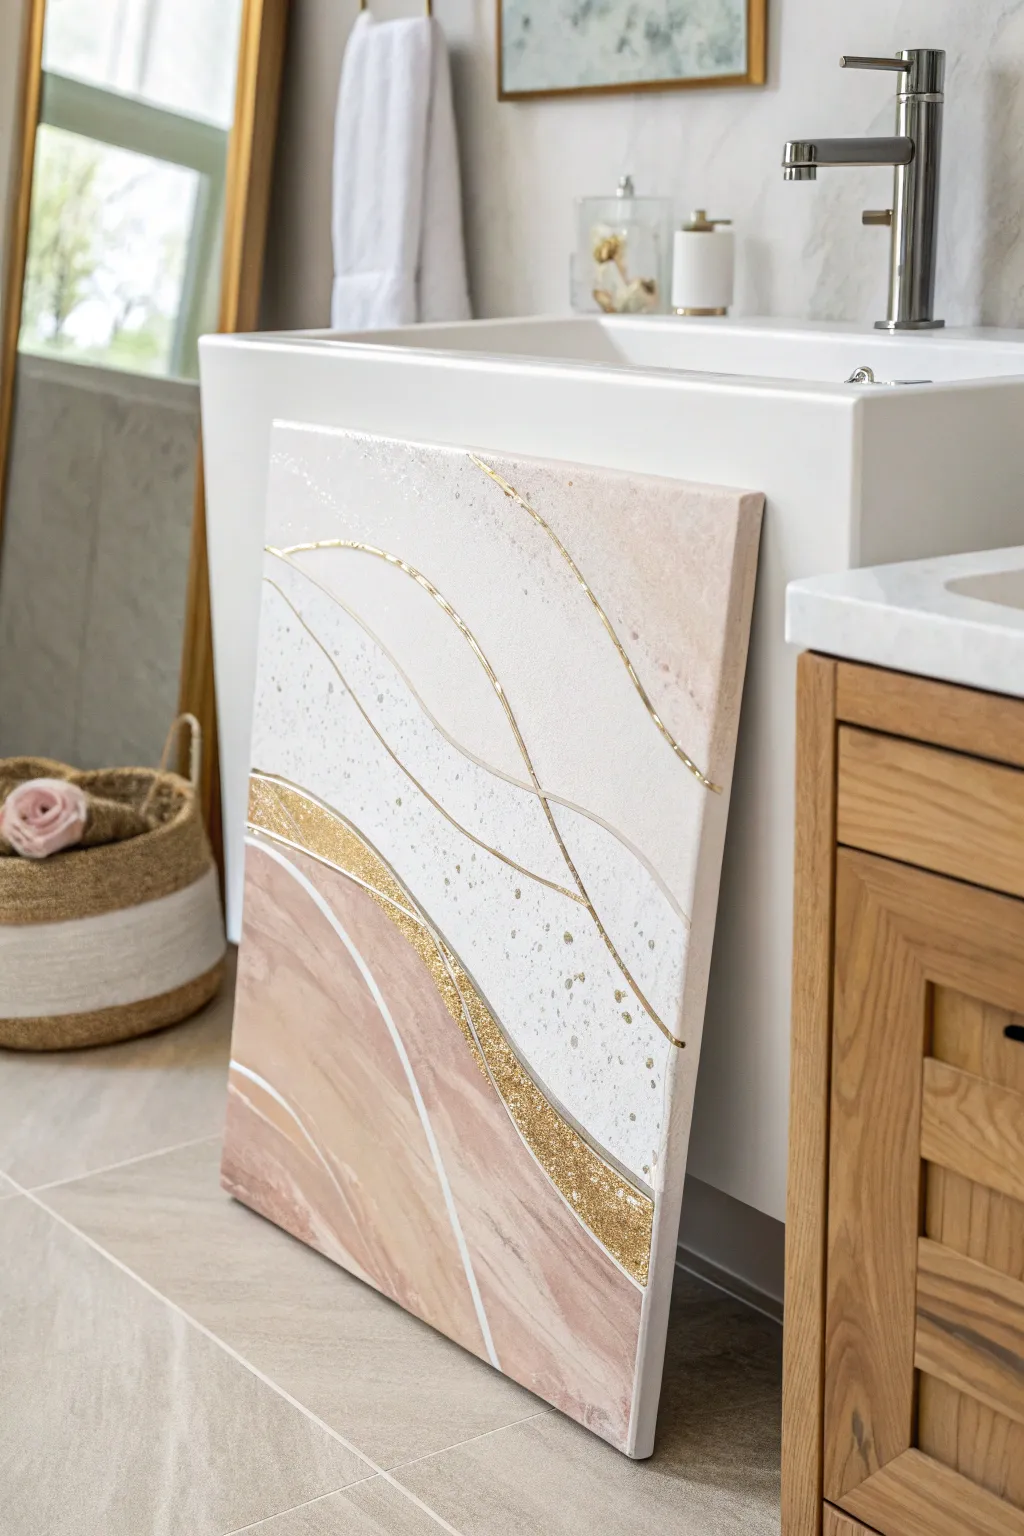
This elegant abstract piece mimics the soothing layers of sand and sea foam using a soft blush and white palette accented by striking metallic gold. The textured details and glittering curves add a touch of luxury perfect for elevating a bathroom vanity space.
Detailed Instructions
Materials
- Rectangular stretched canvas (e.g., 16×20 inches)
- Acrylic paints: Titanium White, Blush Pink, Beige/Sand
- Metallic gold paint pen (medium tip)
- Gold glitter (fine) and Gold glitter paint
- Mod Podge or craft glue
- Texture paste or molding paste
- Palette knife
- Wide flat brush (2-inch)
- Small round brush
- Masking tape or painter’s tape
- Old toothbrush (for splattering)
- Clear acrylic sealer spray (satin or gloss)
Step 1: Creating the Textured Base
-
Prepare the canvas:
Lay your canvas on a protected surface. If you want a very smooth application later, give it a quick coat of gesso, but for this textured look, the raw canvas works fine. -
Map out the design:
Lightly sketch three main sweeping, curved sections with a pencil. The bottom section will be blush pink, the middle a mix of white and texture, and there will be a distinct glitter band separating them. -
Apply texture paste:
Using a palette knife, spread texture paste primarily in the upper white section. Don’t smooth it out completely; leave ridges and peaks to create visual interest that mimics sea foam or clouds. -
Dry the texture:
Allow the texture paste to dry completely. This usually takes a few hours, but you can speed it up with a hair dryer on a low cool setting if you’re impatient.
Glitter Control
If glitter sheds after the first seal, apply a layer of diluted liquid glue (50/50 glue and water) over the glitter band before the final spray seal.
Step 2: Layering Color
-
Paint the bottom section:
Mix your blush pink with a tiny drop of beige to warm it up. Use the wide flat brush to paint the bottom third of the canvas in sweeping, curved strokes following your pencil lines. -
Add dimension to the pink:
While the pink is still slightly wet, streak in a little white paint using the same brush. This marble-like effect gives the ‘sand’ area movement and depth. -
Paint the upper section:
Paint the textured upper section with Titanium White. Ensure you get the paint into the crevices of the texture paste, but let the raised ridges catch the light. -
Create the splatter effect:
Dilute a small amount of beige or grey paint with water until it’s inky. Dip an old toothbrush into it and flick the bristles with your thumb to mist the white section with subtle speckles.
Step 3: Gilding the Lines
-
Prepare the glitter band:
Identify the curved band separating the pink bottom from the white top. Apply a generous layer of Mod Podge or craft glue to this specific area. -
Apply loose glitter:
Generously pour fine gold glitter over the wet glue. I like to gently press it down with the back of a spoon to ensure adhesion. -
Shake off excess:
Once the glue is tacky but gripping the glitter, tilt the canvas over a piece of paper to catch the excess glitter to reuse later. Let this dry completely. -
Seal the glitter:
Top the dry glitter band with a coat of gold glitter paint or a clear gloss medium. This prevents ‘shedding’ later—essential for a bathroom environment. -
Draw metallic lines:
Shake your gold paint pen well. Draw freehand, flowing lines across the white textured section. Vary the pressure to make some lines thick and others thin for an organic feel. -
Add white accents:
Use a small round brush with white paint to add thin, solid lines cutting through the pink section, echoing the curves of the gold lines above.
Paint Pen Tip
If the texture paste is too rough for the paint pen, try lightly sanding just the path where you want the gold lines to go for a smoother flow.
Step 4: Finishing Touches
-
Refine the edges:
Paint the sides (depth) of the canvas either white or pink to wrap the design around the edge, giving it a polished, professional gallery look. -
Seal the artwork:
Since this will live in a humid bathroom, sealing is crucial. Take the canvas to a well-ventilated area and apply two light coats of clear acrylic sealer spray. -
Final cure:
Let the sealer cure for at least 24 hours before leaning or hanging the art near water sources.
Place your finished artwork on the vanity or mount it on the wall to enjoy your custom spa-like creation
Textured “Spa Stone” Mixed-Media Canvas
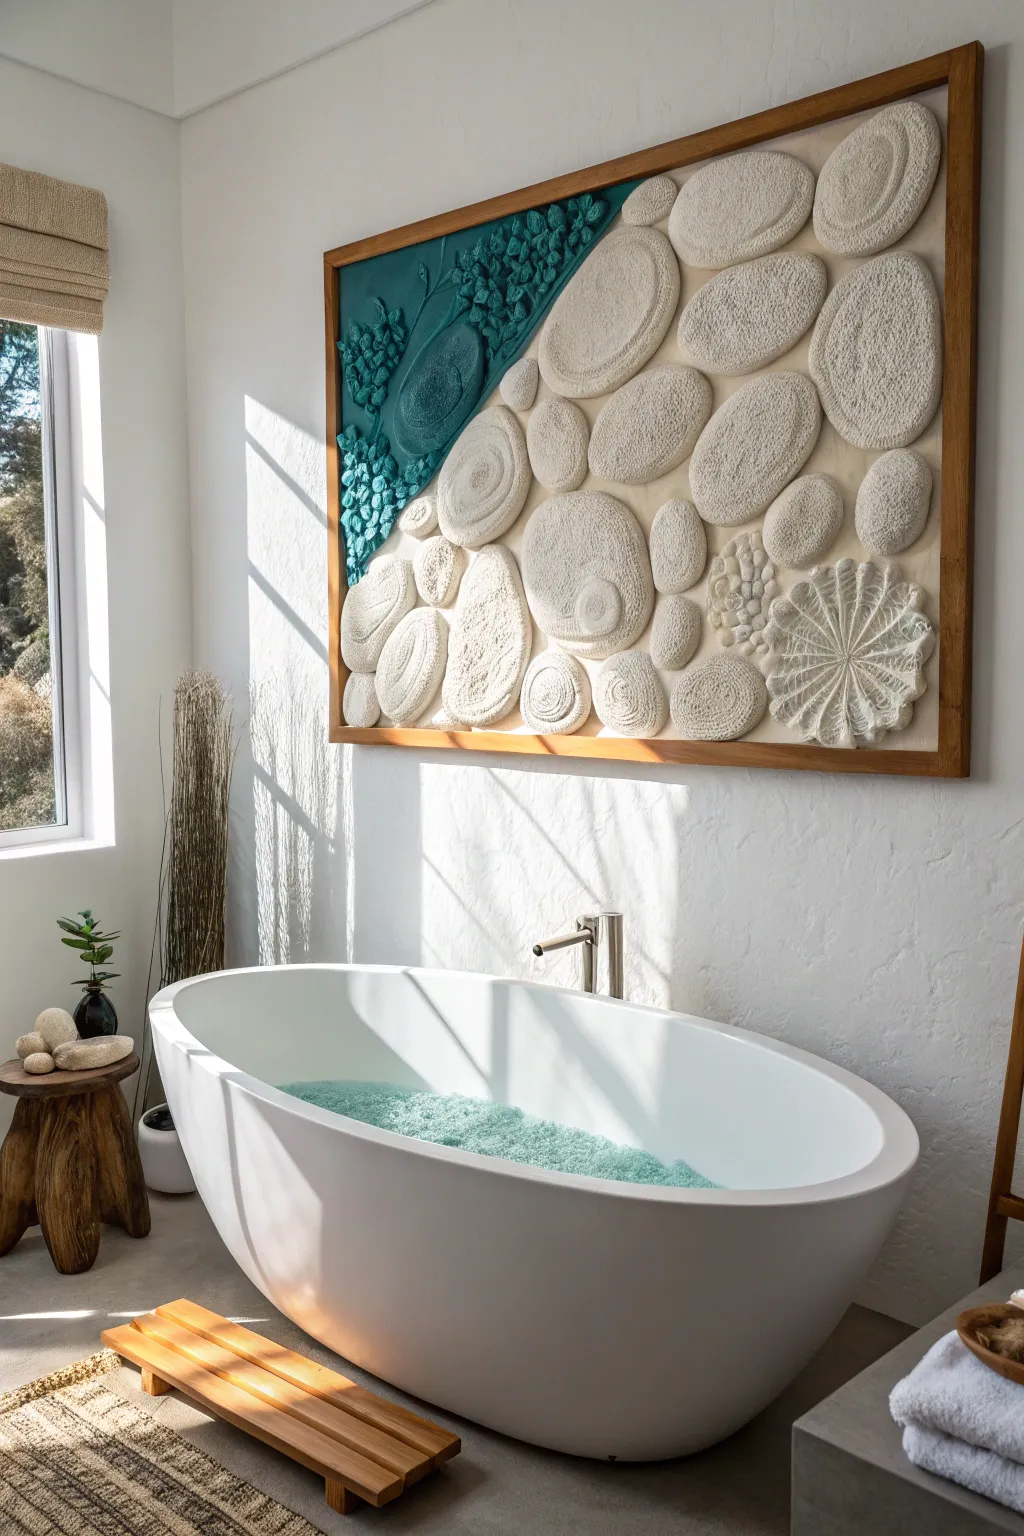
Bring the serene atmosphere of a high-end spa directly into your bathroom with this striking mixed-media wall sculpture. Combining the softness of textile art with organic shapes, this project creates a tactile masterpiece featuring tufted-style stones and rich, embossed aquatic textures.
Step-by-Step Guide
Materials
- Large wooden framed canvas (approx. 36″ x 48″)
- Heavy body acrylic modeling paste or joint compound
- Thick cotton macrame cord (various thicknesses: 5mm, 10mm)
- White and cream wool roving or chunky yarn
- Strong craft glue (e.g., E6000 or heavy-duty PVA)
- Acrylic paints: Teal, Phthalo Green, White, Cream, Sandy Beige
- Palette knives and sculpting tools
- Scissors
- Cardboard or foam core scraps (for structure)
- Coarse sea sponge or stippling brush
Step 1: Base Preparation & Layout
-
Define the Zones:
Sketch a diagonal dividing line across your canvas using a pencil. Roughly 1/3 of the top-left corner will be the teal textured water zone, and the remaining bottom-right area will host your spa stones. -
Create Stone Armatures:
Cut various oval and round shapes from cardboard or foam core to serve as the bases for your large stones. These will give the artwork dimension without making it too heavy. -
Arrange the Composition:
Lay your cardboard cutouts onto the canvas to test the arrangement. Aim for a natural, organic flow where stones cluster together tightly. Once satisfied with the layout, trace their positions lightly on the canvas.
Glue Control
When wrapping yarn coils, use a toothpick to spread glue evenly. Too much glue can seep through fibers and leave shiny, hard spots on your soft stones.
Step 2: Sculpting the Aquatic Zone
-
Apply the Base Paste:
Using a wide palette knife, spread a thick layer of modeling paste or joint compound over the top-left section you marked for the ‘water’ area. -
Embed Texture:
While the paste is wet, press small scraps of leftover cardboard, balled-up paper, or dried clay bits into it to create heavy relief. Cover these inclusions with more paste to smooth them into organic lumps. -
Stipple the Surface:
Take a coarse sea sponge or a crumpled foil ball and press it repeatedly into the wet paste around your lumps. This creates a rough, coral-like or bubbly water texture. -
Emboss Floral Motifs:
Use a finer sculpting tool to carve stylized leaf or seaweed outlines into the wettest parts of the paste near the border where the stones will go. -
Dry Completely:
Let this section dry thoroughly. Because the paste is thick, I recommend leaving it for at least 24 hours to prevent cracking.
Level Up: Hidden Gems
Embed small, real polished quartz or river stones into the modeling paste gaps between the large textile stones for a surprising mixed-media contrast.
Step 3: Creating the Textile Stones
-
Wrap the Coils:
Take your cardboard stone bases and apply a generous layer of glue to the surface. Starting from the center, coil the thick macrame cord or chunky yarn outward in a spiral pattern. -
Vary the Textures:
For some stones, switch to wool roving. Pull the roving apart slightly to fluff it up, then gently adhere it to the cardboard base in concentric circles for a softer, ‘tufted’ look. -
Create the Fossil Stone:
Select one medium-sized circular base. Instead of simple coiling, arrange lengths of cord in a radial pattern like bicycle spokes or a sand dollar design to mimic a fossil. -
Mount the Stones:
Apply heavy-duty construction adhesive to the back of each finished textured stone and press them firmly onto the canvas in your pre-traced positions. -
Fill the Gaps:
Use smaller bits of yarn, small clay pebbles, or extra dabs of modeling paste to fill the deep crevices between the large stones, ensuring the raw canvas doesn’t peek through awkwardly.
Step 4: Painting and Finishing
-
Paint the Water:
Mix a deep Teal with a touch of Phthalo Green. Paint the entire textured ocean section, ensuring you get the brush into all the nooks and crannies of the sponge texture. -
Highlight the Texture:
Once the base coat is dry, mix a lighter version of the teal using white. Lightly dry-brush this over the raised areas of the texture to make the embossed details pop. -
Unify the Stones:
Dilute a cream or warm white acrylic paint slightly with water. Gently brush this over your cord and yarn stones. This unifies the different fiber shades and stiffens the textile slightly for durability. -
Add Dimension to Stones:
Mix a very watery beige wash. Carefully dab this into the crevices between the rope coils and around the base of the stones to create artificial shadows and depth. -
Protect the Frame:
If your canvas came with a wooden frame, use painter’s tape to protect it during a final matte spray varnish coat, or simply leave the textures raw for a more organic feel.
Hang this substantial piece in a well-ventilated bathroom to enjoy your private spa view every day


Have a question or want to share your own experience? I'd love to hear from you in the comments below!