
Your bathroom door is one of those sneaky design spots that can completely shift the vibe of a small space with just a little paint. I love treating it like a mini canvas—something you see from the hallway and from inside the bathroom, tying everything together in one bold (or subtle) move.
Classic Bright White With Crisp Casing
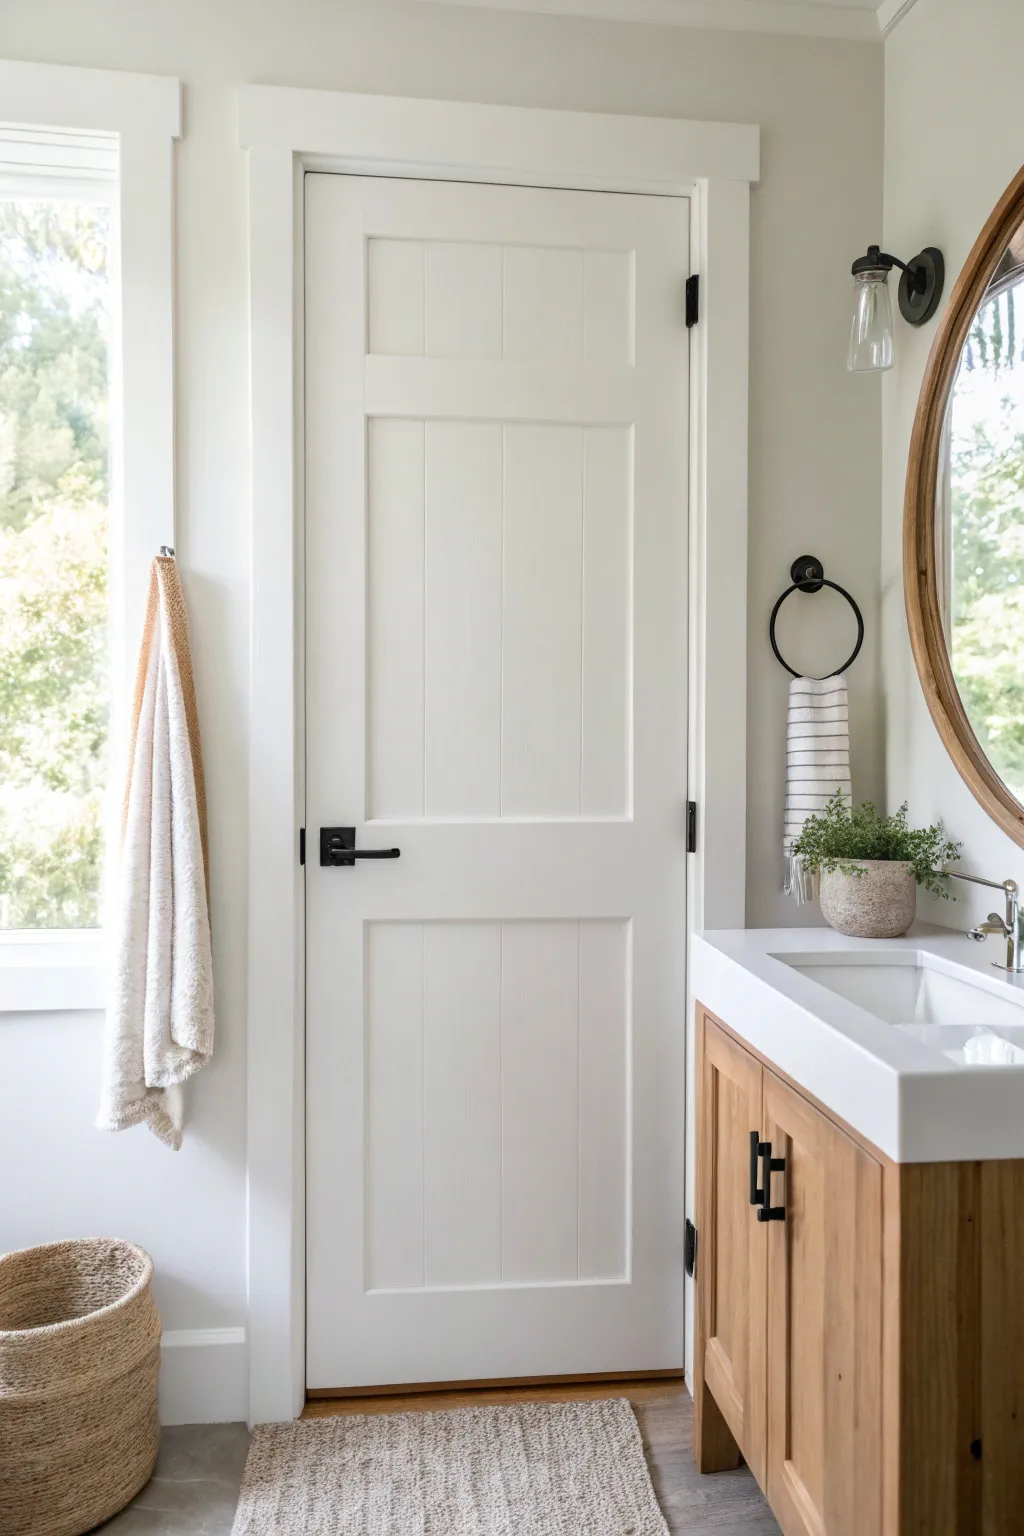
Transform a standard interior door into a bright, clean statement piece with a professional-grade white finish. This project focuses on achieving that seamless, factory-like smoothness on both the door and its surrounding casing, brightening your bathroom instantly.
How-To Guide
Materials
- Interior semi-gloss or satin enamel paint (Bright White)
- High-adhesion primer (stain-blocking)
- 220-grit sandpaper or sanding sponges
- Liquid deglosser (optional but recommended)
- Painter’s tape
- Drop cloths
- Screwdriver (for hardware removal)
- Wood filler (if needed)
- Angled sash brush (2-inch)
- Mini foam roller or microfiber roller (4-inch)
- Paint tray
- Clean rags
- Tack cloth
Step 1: Prep Work & Hardware Removal
-
Clear the area:
Begin by removing any rugs, towels, or decor near the door to give you ample workspace. Lay down a drop cloth underneath the door, extending it well past the swing range. -
Remove hardware:
Use your screwdriver to take off the handle, lock mechanisms, and strike plates. While you can tape around hinges, removing the door entirely usually yields the best results; if keeping it hung, cover the hinges precisely with painter’s tape. -
Clean surface:
Wipe down the entire door and casing with a damp rag and mild detergent to remove oils and dust. Let it dry completely. -
Scuff sand:
Lightly sand all surfaces with 220-grit sandpaper. You aren’t trying to remove old paint, just creating a ‘tooth’ for the new coat to grip. -
Fill imperfections:
Inspect the door for dings or scratches. Apply a small amount of wood filler to these spots, let dry, and sand flush. -
Final clean:
Wipe away all sanding dust with a tack cloth. This step is crucial for that smooth finish.
Step 2: Priming the Surface
-
Tape edges:
Apply painter’s tape to the wall where it meets the door casing to protect your wall color. -
Cut in primer:
Dip your angled sash brush into the primer. Start by painting the recessed corners of the panels and the detailed edges of the casing. -
Roll flat surfaces:
Use the mini roller to apply primer to the flat vertical and horizontal rails, as well as the center panels. Aim for thin, even coverage rather than opacity here. -
Check for drips:
Before the primer sets, quickly scan for any drips in the corners or along the edges and smooth them out with your brush. -
Sand primer:
Once fully dry, run your hand over the surface. If it feels rough, do a very quick pass with fine sandpaper and wipe with a tack cloth.
Paint Conditioner Tip
Add a splash of paint conditioner (like Floetrol) to your latex paint. It slows drying time, reducing brush marks for a spray-finish look.
Step 3: painting Topcoats
-
Plan your order:
For a paneled door, I find it easiest to work inside out: panels first, then the vertical center stile, followed by horizontal rails, and finally the outer vertical stiles. -
Brush the details:
Using your bright white enamel, brush paint into the recessed molding of the panels. Feather the edges so they don’t dry with hard lines. -
Roll the panels:
Immediately roll the flat center of the panels. Use long strokes to smooth out the texture. -
Paint the frame:
Move to the stiles and rails. Brush or roll the paint with the grain of the wood (or simulated grain). Keep a ‘wet edge’ to avoid lap marks. -
Coat the casing:
Paint the door frame (casing) last, using long vertical strokes for the side jambs and a horizontal stroke for the header. -
Dry and recoat:
Allow the first coat to dry according to the manufacturer’s instructions—usually 4 to 6 hours. Apply a second coat following the exact same process for full, rich coverage.
Upgrade the Hardware
Swap old brass knobs for matte black levers or modern square rosettes. The contrast against bright white paint looks incredibly high-end.
Step 4: Finishing Touches
-
Remove tape:
Pull the painter’s tape off while the final coat is still slightly tacky to ensure a razor-sharp line. -
Reinstall hardware:
Once the paint is fully cured (give it at least 24 hours if possible to avoid sticking), screw the handles and hinges back into place. -
Clean hardware:
Give your hardware a final polish with a clean cloth to remove any fingerprints before admiring your work.
Step back and enjoy the instant brightness and modern feel your freshly painted door brings to the room


Moody Charcoal for Instant Contrast
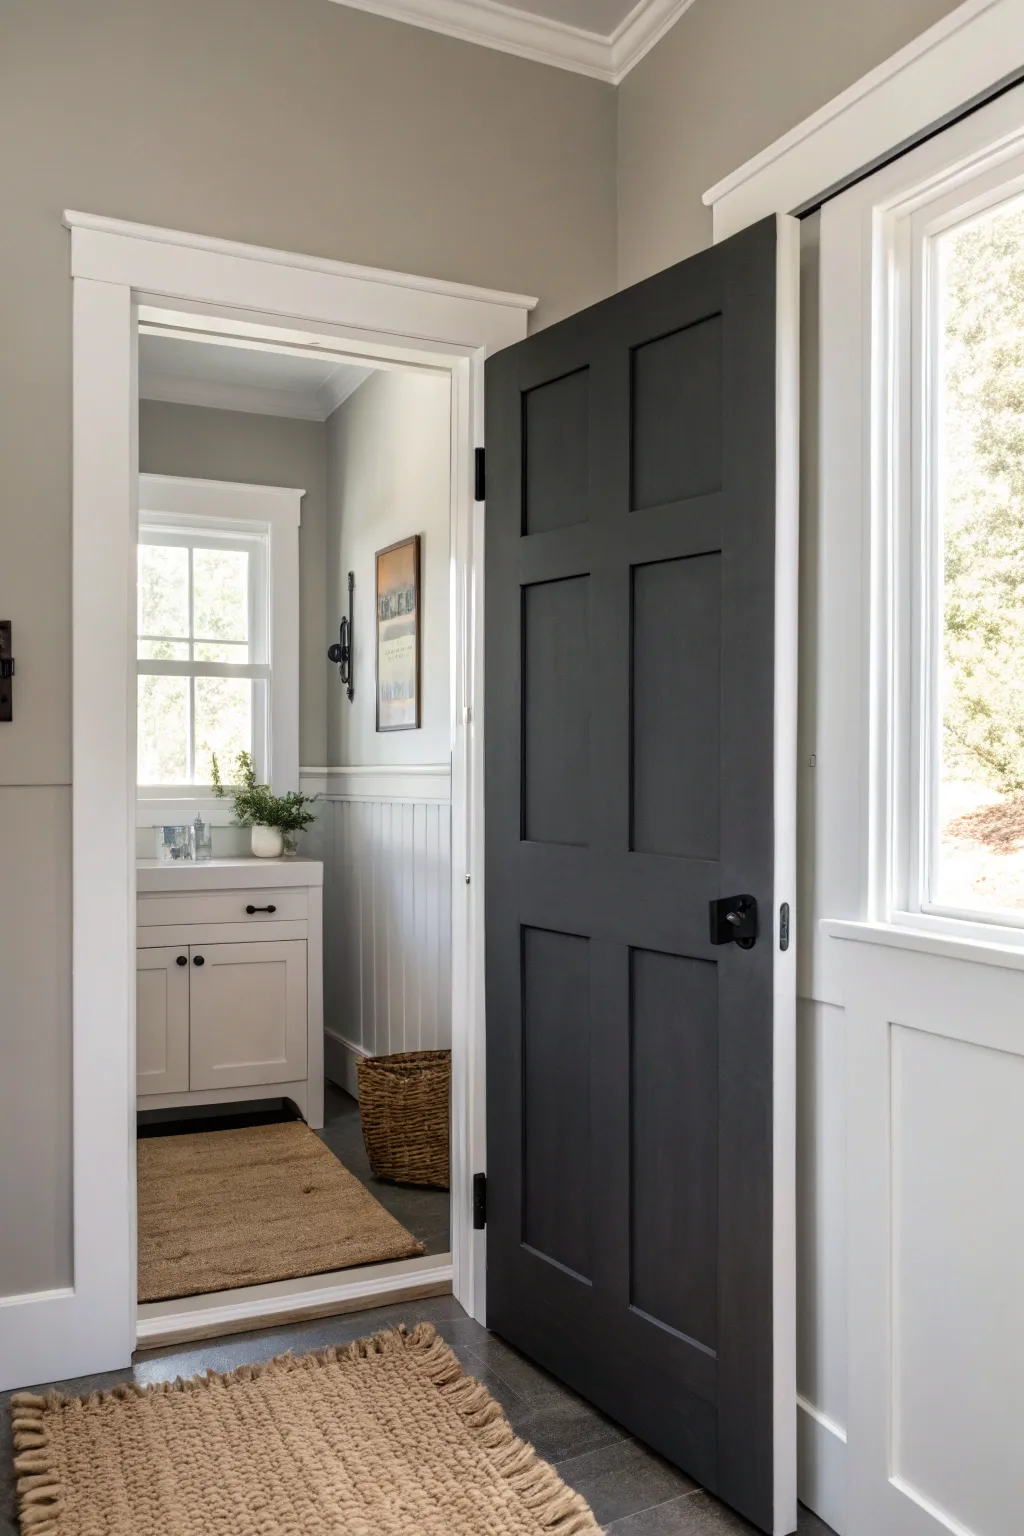
Transform a standard interior door into a striking focal point with a moody charcoal finish that adds depth and sophistication. This project bridges modern and classic styles, creating a crisp contrast against white trim.
Step-by-Step
Materials
- Interior semi-gloss or satin enamel paint (Charcoal/Dark Gray)
- High-quality primer (tintable gray recommended)
- 220-grit sandpaper
- Tack cloth
- Painter’s tape (1.5-2 inch width)
- 2-inch angled sash brush
- 4-inch foam or microfiber mini roller
- Paint tray and liners
- Screwdriver
- Drop cloths
- Wood filler (optional)
Step 1: Preparation
-
Remove Hardware:
Begin by removing the door handle, hinges, and strike plate using a screwdriver. It is much easier to paint a door flat on sawhorses, but you can paint it in place if you carefully tape off the hinges. -
Clean Surfaces:
Wipe down the entire door with a mild degreaser or TSP substitute to remove dirt, oils, and fingerprints. Let it dry completely. -
Fill Imperfections:
Inspect the door for any deep scratches or dents. Fill these with wood filler, allow it to dry, and sand flush. -
Sand the Door:
Lightly scuff the entire surface with 220-grit sandpaper. You aren’t trying to remove old paint, just creating a ‘tooth’ for the new coat to adhere to. -
Remove Dust:
Vacuum up the sanding dust and follow up with a tack cloth to ensure the surface is perfectly clean. Dust is the enemy of a smooth finish. -
Protect Surroundings:
If painting in place, lay down drop cloths and apply painter’s tape to the hinges (if not removed) and the door jamb latch area.
Sticky Door Syndrome?
If the door sticks to the jamb after closing, rub a colorless candle or paraffin wax along the edges of the door where it meets the frame to reduce friction.
Step 2: Priming
-
Apply Primer:
For a dark charcoal color, I suggest using a gray-tinted primer. Paint the recessed panel areas first with your brush, then roll the flat surfaces. -
Check for Drips:
While the primer is wet, smooth out any drips in the corners of the panels. Let the primer dry according to the manufacturer’s instructions. -
Light Sand:
Once dry, give the primed surface a very quick, light sanding with 220-grit paper to knock down any raised grain or texture. Wipe clean.
Step 3: Painting
-
Paint Recessed Panels:
Dip your angled sash brush and paint the recessed moulding of the top panels first. Be generous but avoid pooling paint in the corners. -
Paint Panel Centers:
Switch to your mini roller to paint the flat center of each panel. Roll vertically with the grain. -
Paint Vertical Center Stile:
Paint the vertical strip running down the center of the door (excluding the outer edges). Brush or roll with the grain. -
Paint Horizontal Rails:
Paint the horizontal rails next. Start at the top and work your way down, slightly varying your brush strokes to blend into the wet edges of the vertical stiles. -
Paint Outer Stiles:
Finish by painting the two long vertical stiles on the far left and right edges of the door. Use long, smooth strokes from top to bottom. -
Paint Door Edges:
Don’t forget the latch edge of the door. If painting the inside edge (hinge side), only do so if the door is open and will remain open until fully dry. -
Dry and Recoat:
Allow the first coat to dry for at least 4-6 hours. Apply a second coat following the exact same order: panels, center stile, rails, outer stiles.
Floetrol Flow
Add a conditioner like Floetrol to your latex paint. It slows drying time, allowing brush marks to level out for a factory-smooth finish.
Step 4: Finishing
-
Cure Time:
Let the final coat cure for at least 24 hours before reinstalling hardware. Dark paint can show scuffs easily if it hasn’t hardened. -
Reinstall Hardware:
Ideally, install new matte black hardware to complete the high-contrast look, or reinstall your original handle. -
Clean Up:
Remove tape carefully. If paint has bridged the tape and the door, score the edge gently with a utility knife before pulling.
Enjoy the dramatic transformation your new moody charcoal door brings to the space


Deep Navy Blue Spa Vibes
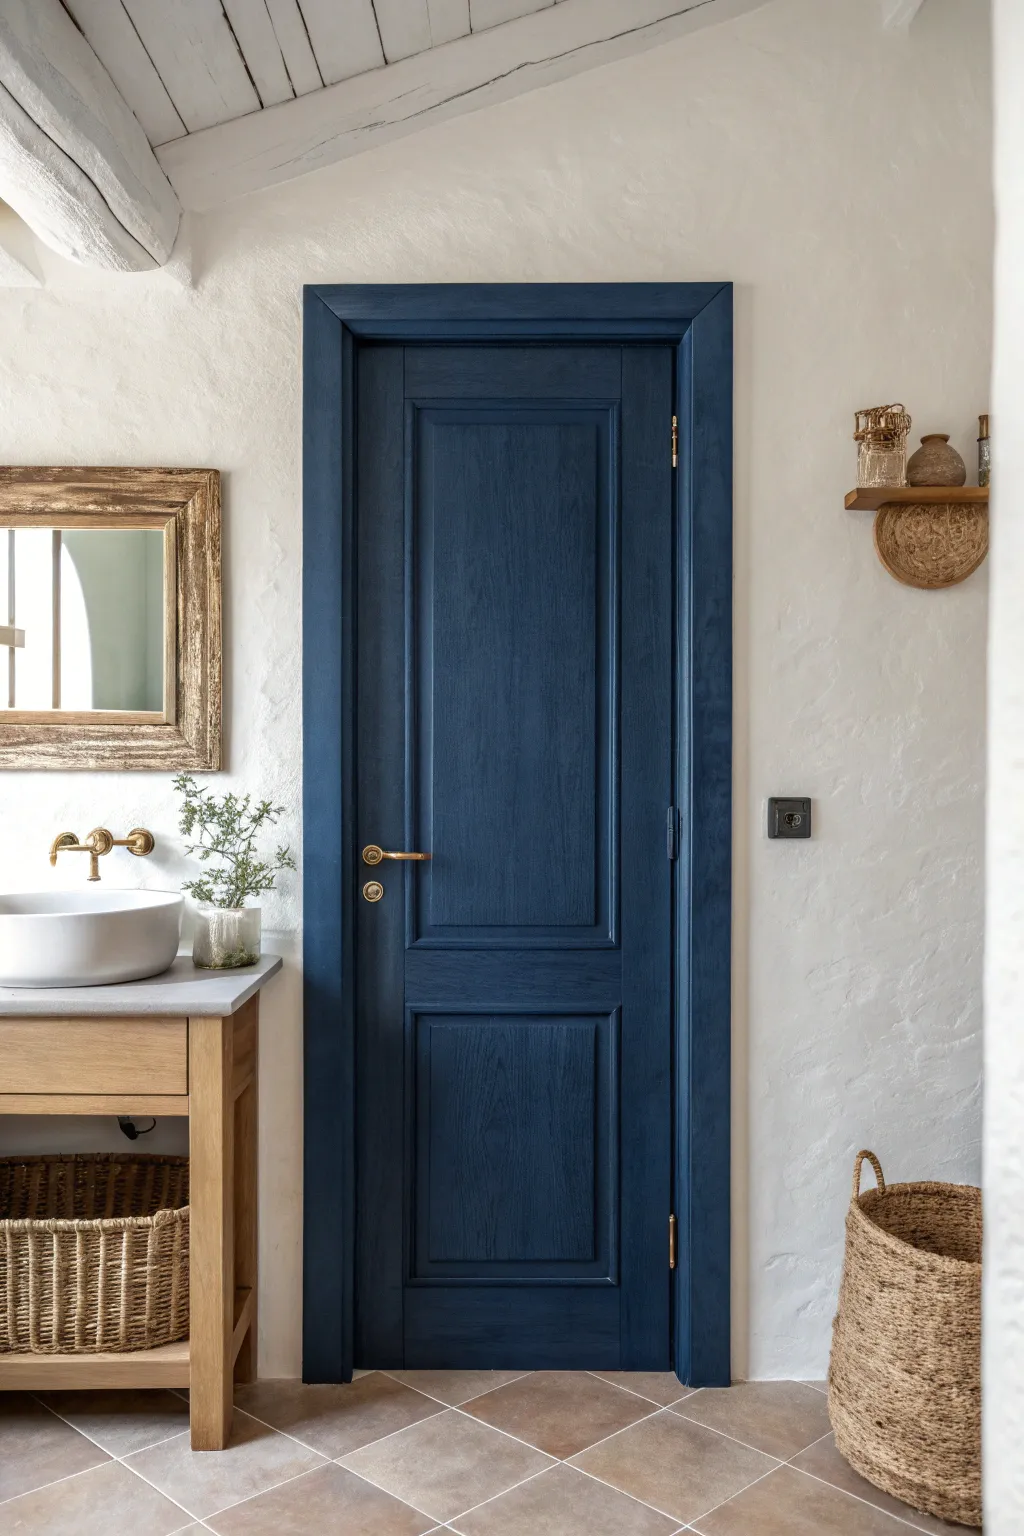
This project brings a rich, sophisticated anchor to a bright bathroom by transforming a standard wooden door with a deep, matte navy finish. The contrast between white textured walls and the dark blue creates an instant spa-like sanctuary.
Detailed Instructions
Materials
- Interior wood door (existing or new)
- Deep navy blue paint (satin or semi-gloss finish)
- High-quality bonding primer
- Sanding block (medium and fine grit)
- Painter’s tape
- Drop cloths
- Screwdriver (for hardware removal)
- Mild degreaser or TSP substitute
- microfiber tack cloth
- 2-inch angled sash brush
- 4-inch foam roller or velour roller
- Paint tray and liners
- Wood filler (optional)
Step 1: Preparation & Cleaning
-
Remove the door:
While it is possible to paint a hanging door, I find taking it off the hinges yields the most professional result. Tap the hinge pins out with a hammer and screwdriver, then lay the door flat on sawhorses or a drop cloth. -
Strip the hardware:
Use your screwdriver to remove the door handle, lock mechanism, and hinges. Place all screws and parts in a labeled bag so nothing gets lost during the painting process. -
Clean thoroughly:
Bathroom doors collect moisture, hairspray, and grime. Scrub the entire surface with a mild degreaser or TSP substitute to ensure the paint adheres properly. -
Fill imperfections:
Inspect the wood for deep scratches or dents. Apply a small amount of wood filler with a putty knife, let it dry, and sand it flush with the surface.
Step 2: Sanding & Priming
-
Scuff sand the surface:
Using a medium-grit sanding block, sand the entire door to remove the old semi-gloss shine. You don’t need to strip it to bare wood, just create a “tooth” for the primer to grab. -
Remove dust:
Wipe away the sanding dust with a dry cloth, then follow up with a tack cloth to pick up every last micro-particle. Dust is the enemy of a smooth navy finish. -
Tape edges:
If your door has glass inserts or if you kept the hinges on, apply painter’s tape carefully to protect those areas. -
Apply primer:
Coat the door with a bonding primer. Use an angled brush for the recessed panel corners first, then roll the flat surfaces. This is crucial when going from a light door to a dark color. -
Light sand between coats:
Once the primer is fully dry, give it a very light pass with fine-grit sandpaper to knock down any brush ridges or bumps.
Sticky Situation?
If the door feels ‘sticky’ when closing even after drying, apply a tiny amount of clear wax or talcum powder along the edge where it meets the frame to prevent peeling
Step 3: Painting the Navy Finish
-
Cut in the details:
Stir your navy paint thoroughly. Dip your angled sash brush and paint into the recessed corners and molding profiles of the panels first. -
Feather the edges:
Immediately smooth out any paint that pooled in the corners to avoid drips. You want a thin, even coat here. -
Roll the first coat:
Use a foam or velour roller to paint the flat panels, followed by the vertical center stile, then the horizontal rails, and finally the outer vertical stiles. This order helps manage wet edges. -
Let it dry completely:
Wait the full recommended drying time on the can. Dark colors often take longer to cure and can stay tacky if rushed. -
Sand for perfection:
Very gently sand the first coat with fine-grit paper. This step is the secret to that factory-finish feel. -
Apply the second coat:
Repeat the painting process: brush the details, then roll the flats. A second coat creates the true depth and richness of the navy hue. -
Check for coverage:
Inspect the door in good light. If the underlying color is still peeking through, a third thin coat might be necessary for deep pigments like navy.
Go for Gold
To truly match the spa vibe, swap old silver hinges and knobs for unlacquered brass hardware. The warm metal pops beautifully against the cool navy tones
Step 4: Reassembly
-
Cure time:
Let the door dry for at least 24 hours before handling significantly. Paint needs time to harden so the hardware doesn’t dig into the fresh finish. -
Reinstall hardware:
Screw the hinges, lock, and handle back into place. Gold or brass hardware looks particularly stunning against the navy backdrop. -
Hang the door:
enlist a helper to lift the door back onto the hinges and tap the pins back in.
Enjoy the calm elegance your new statement door brings to the space


Muted Sage Green for a Calm Bathroom Door
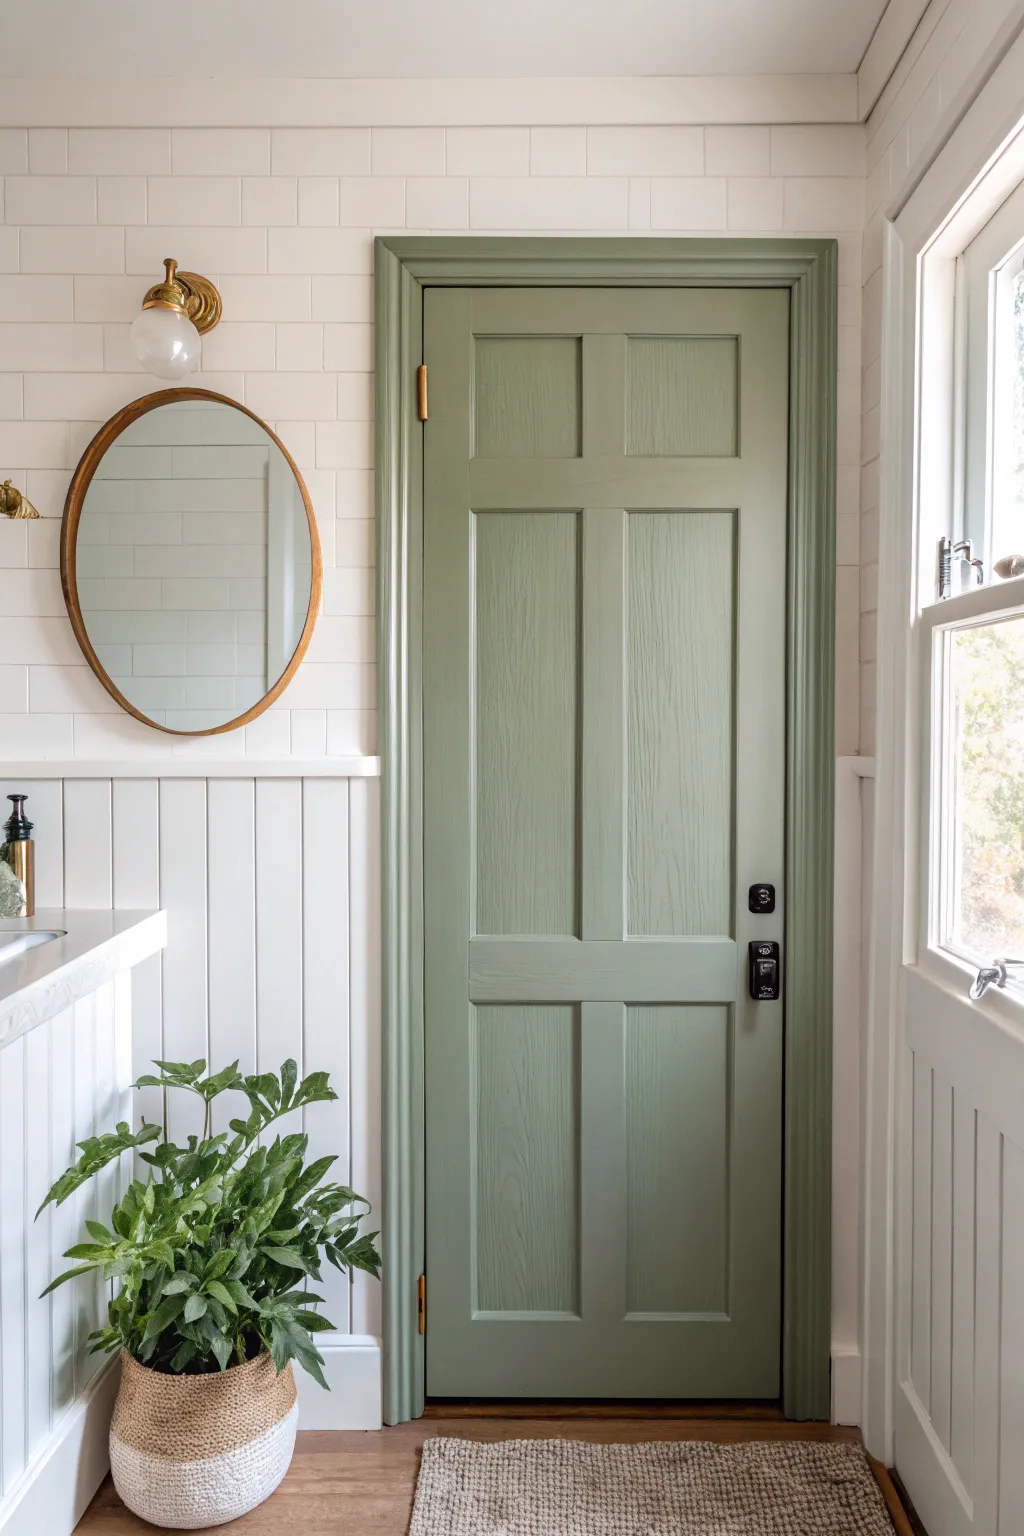
Transform a standard bathroom door into a calming focal point with this muted sage green finish. This project balances earthy serenity with durable functionality, creating a spa-like entrance that complements bright white wall treatments beautifully.
Step-by-Step Guide
Materials
- Interior door paint (Satin or Semi-Gloss finish)
- Color: Muted Sage Green (e.g., Farrow & Ball Lichen or similar)
- High-quality angled sash brush (2 inch)
- 4-inch foam or microfiber mini roller
- Paint tray and liners
- Fine-grit sandpaper (220-grit)
- Tack cloth
- Painter’s tape
- Screwdriver (for hardware removal)
- Drop cloth
- Mild degreaser or TSP substitute
Step 1: Preparation
-
Clear the area:
Before you begin, lay down a drop cloth underneath the door to protect your flooring. If possible, remove the door from its hinges and lay it flat on sawhorses; painting flat prevents drips, although painting it while hanging is perfectly fine if you are careful. -
Remove hardware:
Using a screwdriver, take off the doorknob, deadbolt, and any other hardware. It is much easier to get a clean finish without taping around tricky curves. Keep all screws and parts organized in a small baggie. -
Clean thoroughly:
Bathroom doors accumulate humidity residue and hand oils. Wipe the entire surface down with a mild degreaser or TSP substitute to ensure the new paint adheres properly. -
Sand for adhesion:
Once the door is dry, lightly scuff the surface with 220-grit sandpaper. You aren’t trying to strip the old paint, just creating a ‘tooth’ for the new coat to grab onto. -
Dust removal:
Vacuum up the sanding dust, then wipe the door down with a tack cloth. This step is crucial for that smooth, professional finish shown in the photo. -
Tape hinges:
If you left the door hanging, apply painter’s tape carefully over the hinge plates to protect them from stray brush strokes.
Step 2: Detail Painting
-
Start with panels:
Begin painting the recessed panels first. Use your 2-inch angled sash brush to push paint into the corners and molding profiles of the six inset squares. -
Feather the edges:
As you brush the molding, lightly feather the paint out onto the flat panel surfaces to avoid hard ridges of paint accumulating in the corners. -
Vertical stiles:
Next, focus on the central vertical strip (the mullion) and the outer vertical strips (the stiles). Paint these with long, smooth strokes, following the grain direction. -
Horizontal rails:
Paint the horizontal rails (the cross pieces) last. When brushing where the horizontal rails meet the vertical stiles, be careful to keep your brush strokes straight to mimic the joinery of the wood.
Pro Tip: Order Matters
Paint the panels first, then the center vertical stile, then the horizontal rails, and finish with the two outer vertical stiles. This mimics real wood construction.
Step 3: Rolling and Finishing
-
Roll the flats:
Switch to your 4-inch mini roller for the larger flat surfaces of the door. This helps achieve a uniform texture without visible brush marks. -
Inspect for drips:
Check the corners of the recessed panels immediately. Gravity pulls paint down, and I often find little pools forming there—smooth them out with a dry brush tip before they tack up. -
Allow to dry:
Let the first coat dry completely according to the manufacturer’s instructions. Sage green pigments can sometimes look streaky on the first pass, so don’t worry about coverage yet. -
Light scuff sand:
For an ultra-smooth finish, run your finest sandpaper very lightly over the dry first coat to knock down any dust nibs, then wipe with the tack cloth again. -
Apply second coat:
Repeat the painting process—brushing the details first, then rolling the flats—for the second coat. This layer will deepen the sage color and provide the true coverage. -
Paint the frame:
While the door dries, paint the door frame and casing in the same sage green to create the comprehensive, built-in look seen in the inspiration image. -
Reinstall hardware:
Once the paint has cured for at least 24 hours (so it doesn’t stick to the metal), screw your hardware back into place and remove the tape from the hinges.
Level Up: Hardware Swap
To exactly match the inspiration, swap standard silver knobs for matte black hardware. The contrast against the soft sage green adds a modern, sophisticated edge.
Enjoy the peaceful ambiance your newly refreshed bathroom entrance brings to your home
BRUSH GUIDE
The Right Brush for Every Stroke
From clean lines to bold texture — master brush choice, stroke control, and essential techniques.
Explore the Full Guide
Airy Powder Blue for a Clean Look
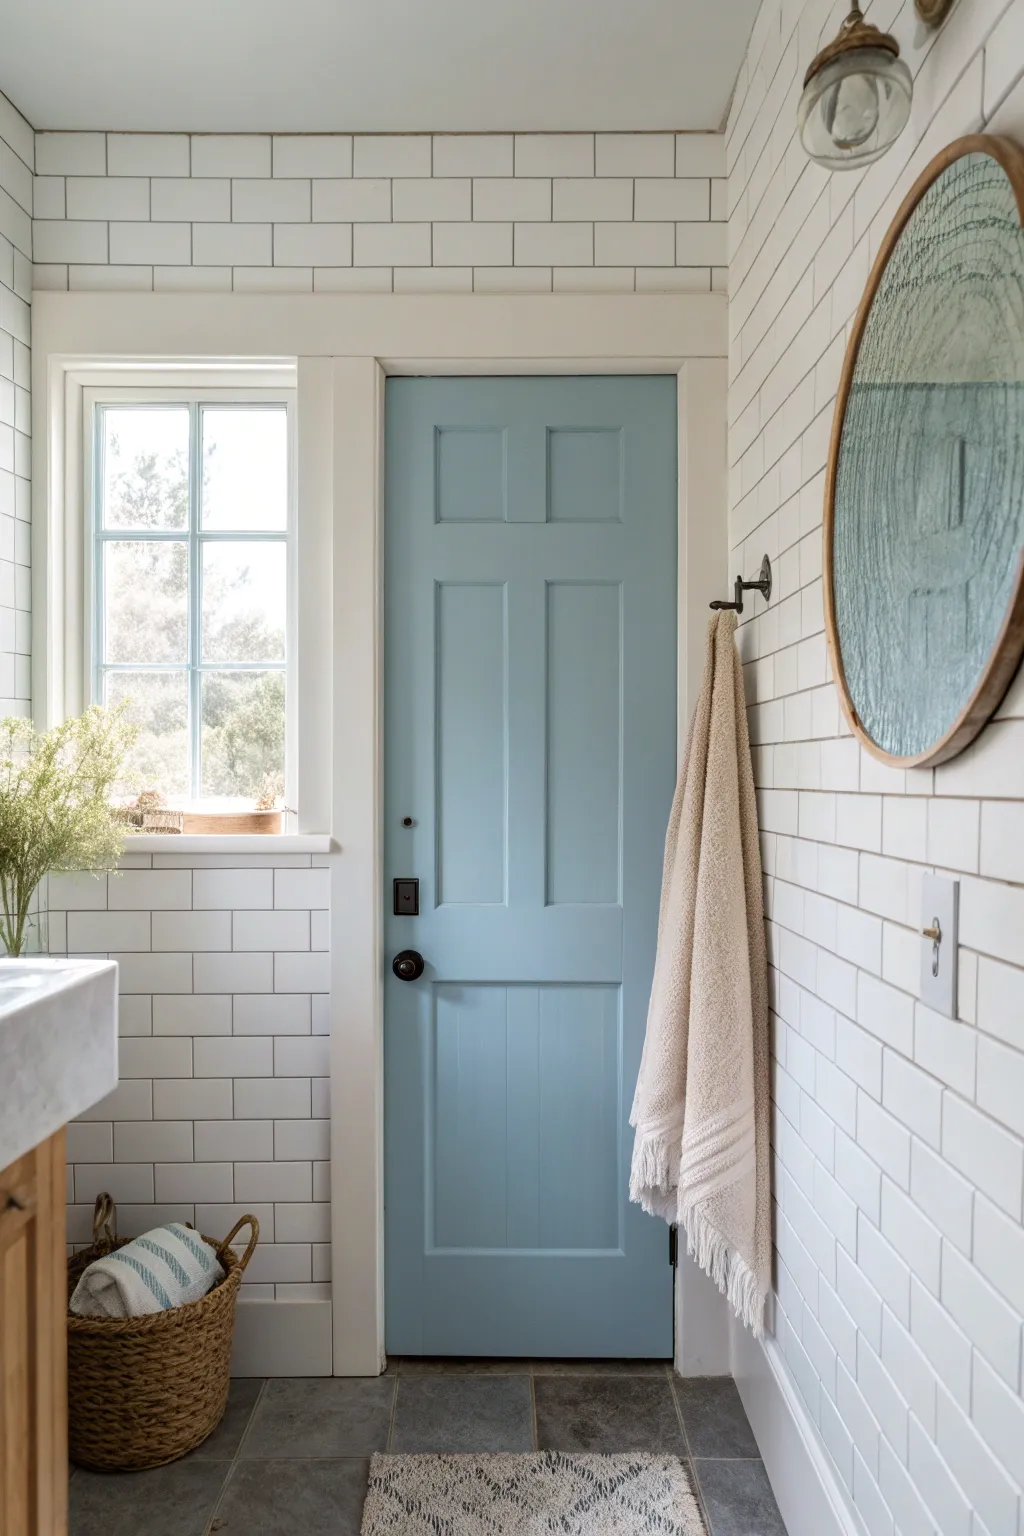
Recreating this airy, spa-like vibe starts with transforming a standard interior door into a serene focal point using a soft powder blue shade. This project brings a clean, coastal touch to your bathroom that perfectly complements white subway tile and natural textures.
Detailed Instructions
Materials
- Interior semi-gloss or satin paint (Powder Blue)
- High-quality bonding primer
- Medium-grit sandpaper (120-150 grit)
- Fine-grit sandpaper (220 grit)
- TSP substitute or degreaser
- Painter’s tape
- Drop cloths
- Screwdriver (for hardware removal)
- 2-inch angled sash brush
- 4-inch foam roller or mohair roller
- Paint tray
- Tack cloth or clean rags
Step 1: Preparation & Cleaning
-
Remove Hardware:
Before you begin, use a screwdriver to remove the doorknob, lock plates, and hinges if you plan to paint the door off the frame. Taking the hardware off ensures a much cleaner finish than taping around it. -
Clean the Surface:
Wipe down the entire door with a TSP substitute or a mild degreaser to remove hand oils, dust, and bathroom humidity residue. A clean surface is crucial for paint adhesion. -
Protect the Area:
Lay down drop cloths to protect your floor. If you left the door on its hinges, use painter’s tape to meticulously cover the hinges and the door jamb edges to prevent stray brush marks. -
Sand the Finish:
Scuff sand the entire door using medium-grit sandpaper (120-150 grit). You aren’t trying to strip the old paint completely, just creating a dull surface so the new primer grabs hold effectively. -
Remove Dust:
Vacuum up the sanding dust, then wipe the door with a tack cloth or a slightly damp rag to ensure no microscopic particles remain.
Brushwork Secret
Add a paint conditioner like Floetrol to your latex paint. It slows drying time, allowing brush marks to level out for a factory-smooth finish.
Step 2: Priming the Door
-
Apply Primer to Recesses:
Dip your angled sash brush into the bonding primer. Start by painting the recessed corners and edges of the door panels first. -
Roll the Flat Surfaces:
Switch to your 4-inch roller for the flat panels and the stiles (vertical pieces) and rails (horizontal pieces). Aim for a thin, even coat rather than a thick one. -
Let it Cure:
Allow the primer to dry completely according to the manufacturer’s instructions. A well-dried base is the secret to a durable finish. -
Light Sanding:
Once dry, verify the surface is smooth. I prefer to do a quick pass with fine-grit (220) sandpaper to knock down any bumps or brush strokes, then wipe away the dust.
Sticky Door Syndrome?
If the door sticks after painting, dust the edges with a little talcum powder or rub with a paraffin wax candle to reduce friction while it fully cures.
Step 3: Painting the Powder Blue
-
Paint Panel Details:
Stir your powder blue paint thoroughly. Using your clean angled brush, paint the recessed moldings of the top panels first. Work from the top of the door down to prevent drips ruining your lower work. -
Paint Panel Centers:
Use the roller or brush to fill in the flat center of the panels. If using a brush, follow the wood grain direction. -
Paint Vertical Center Stile:
Paint the vertical strip of wood that runs down the center of the door, between the panels, keeping your brush strokes vertical. -
Paint Horizontal Rails:
Next, paint the horizontal rails (top, middle, and bottom). Brush horizontally, slightly overlapping the fresh wet edge of the vertical center stile to blend them. -
Paint Outer Stiles:
Finish by painting the long vertical stiles on the far left and right edges of the door. Long, smooth strokes work best here. -
Dry and Recoat:
Let the first coat dry for the recommended time (usually 2-4 hours). Apply a second coat following the exact same order: panels, center stile, rails, then outer stiles.
Step 4: Finishing Touches
-
Remove Tape:
If you taped hinges or edges, carefully score the edge of the tape with a utility knife before peeling it off to ensure you don’t pull up any paint. -
Cure Time:
Ideally, let the door cure for at least 24 hours before closing it tight, as latex paints can remain tacky and might stick to the frame. -
Reinstall Hardware:
Screw the doorknob and lock plates back into place. The contrast of dark oil-rubbed bronze hardware looks particularly striking against this soft blue.
Enjoy the tranquil atmosphere your newly painted door brings to the space
Blush Pink That Stays Subtle
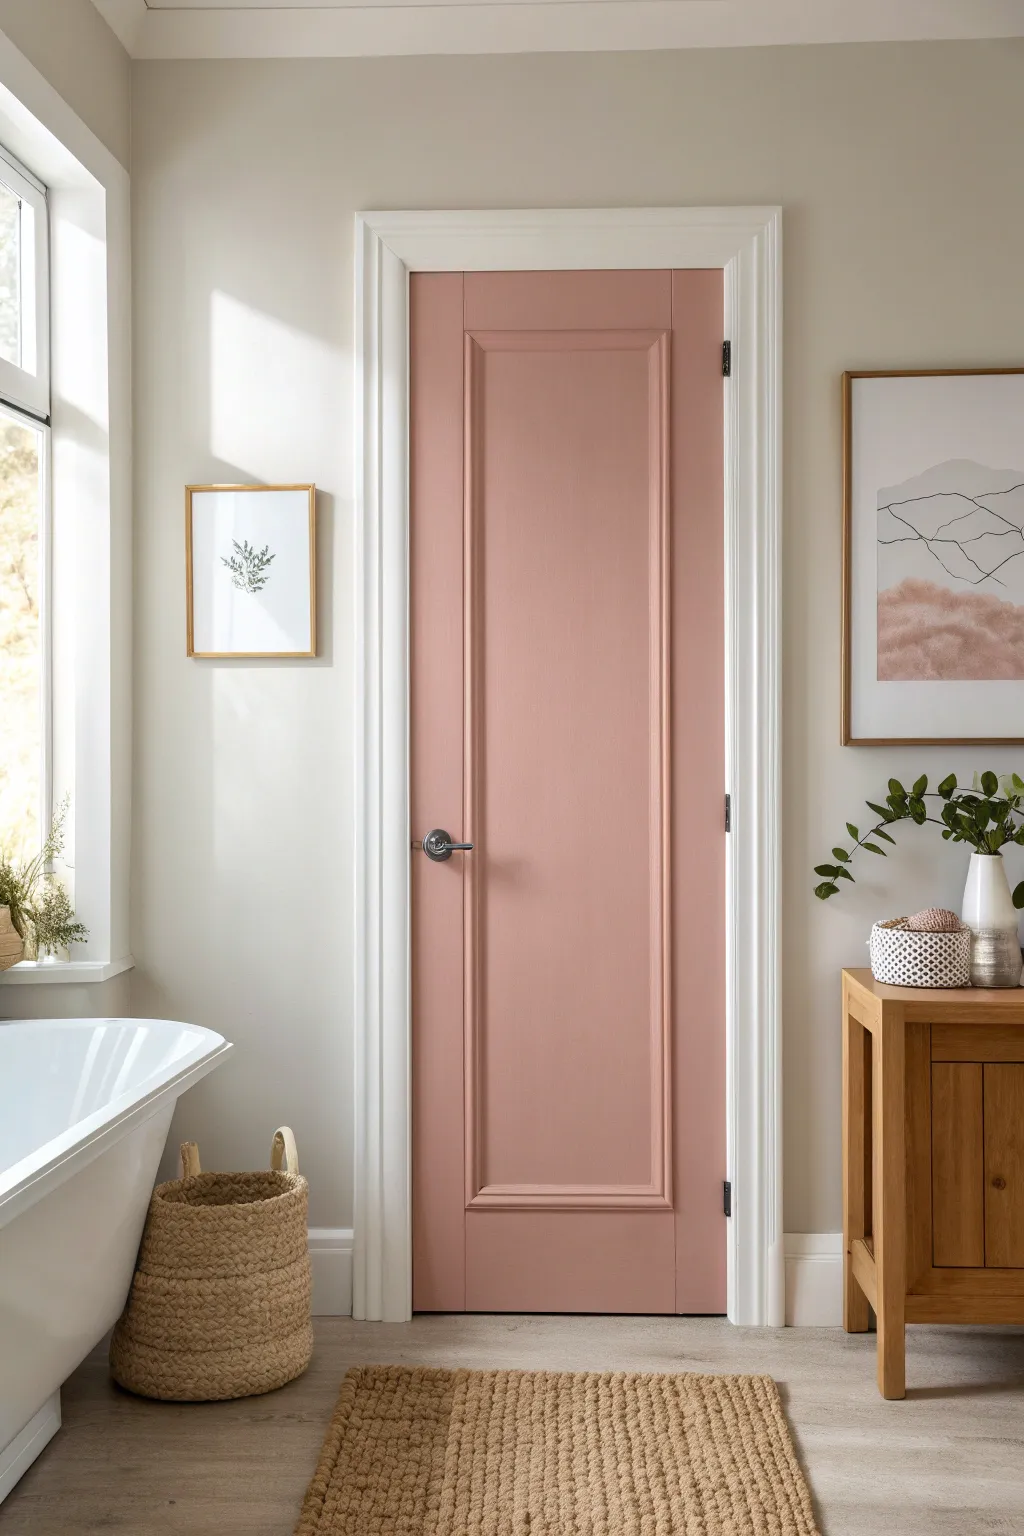
Transform a standard interior door into a soft statement piece with this subtle blush pink finish. The gentle warmth of the color pairs beautifully with neutral walls, creating a serene and modern bathroom retreat.
Step-by-Step
Materials
- Interior semi-gloss or satin paint (Blush Pink shade)
- White primer (stain-blocking)
- Medium-grit sandpaper (120-150 grit)
- Fine-grit sandpaper (220 grit)
- Painter’s tape
- Drop cloths
- Screwdriver
- TSP substitute or degreaser
- Clean rags
- Wood filler (if needed)
- Putty knife
- 2-inch angled sash brush
- 4-inch foam or mohair roller
- Small roller tray
Step 1: Preparation & Hardware Removal
-
Protect the area:
Lay down drop cloths to protect your flooring from dust and paint drips. Ensure the cloth is tucked right up against the door frame. -
Remove the hardware:
Using a screwdriver, carefully remove the doorknob, latch plate, and hinges if you plan to take the door off its frame. If painting while hanging, simply cover the hinges thoroughly with painter’s tape. -
Clean surface thoroughly:
Wipe down the entire door with a TSP substitute or a strong degreaser. Bathroom doors often collect hairspray residue or humidity grime that can prevent paint adhesion. -
Mask the edges:
Apply painter’s tape to the door jambs if you aren’t painting them, or to the wall if you are painting the trim. Press the tape edges down firmly with a credit card to seal them.
Sticky Situation?
If the door sticks to the jamb after closing, the paint hasn’t fully cured. Dust the door edges slightly with baby powder or apply a small wax strip to prevent peeling.
Step 2: Sanding & Repairs
-
Scuff sand the surface:
Using medium-grit sandpaper, lightly sand the entire door. You don’t need to strip the old paint completely, just scuff it up to give the primer something to grab onto. -
Fill imperfections:
Inspect the door for dents or scratches. Apply a small amount of wood filler with a putty knife, let it dry, and then sand it flush with the surface. -
Remove dust:
Vacuum up the sanding dust, then wipe the door with a slightly damp rag or tack cloth to ensure a perfectly clean surface.
Step 3: Priming
-
Cut in the panels:
Dip your angled sash brush into the primer. Start by painting the recessed corners and edges of the interior panels first. -
Roll the flat surfaces:
Use the foam or mohair roller to apply primer to the large, flat vertical panels and the outer stiles and rails. -
Sand the primer:
Once the primer is fully dry, lightly run fine-grit sandpaper (220) over the surface. This crucial step knocks down any bumps and ensures a silky smooth topcoat.
Add Dimension
For a higher-end look, swap out basic builder-grade hinges and doorknobs for matte black or brushed satin nickel hardware to contrast sharply with the soft pink.
Step 4: Painting the Blush Pink
-
Stir the paint:
Mix your blush pink paint thoroughly. I like to lift the stick occasionally to check that the pigment isn’t settling at the bottom. -
Brush the molding details:
Just like with priming, start with the angled brush. Paint the recessed molding around the panels first, smoothing out any drips in the corners immediately. -
Paint the panels:
Switch to your roller and paint the inner vertical panels. Use light pressure to avoid creating roller lines. -
Paint the center rail:
Roll the horizontal rail directly in the middle of the door. Feather the edges slightly where it meets the vertical stiles. -
Paint the vertical stiles:
Finish by rolling the long vertical sides (stiles) of the door. Always roll with the grain of the wood or the molded texture. -
Paint the edges:
Don’t forget the thin edges of the door. If the door opens inward, paint the hinge edge; if outward, paint the latch edge. -
Let dry and assess:
Allow the first coat to dry according to the manufacturer’s instructions. It may look streaky, but resist the urge to touch it while wet. -
Apply second coat:
Repeat the painting process for a second coat to get that rich, true color depth. -
Reinstall hardware:
Once the paint has cured for at least 24 hours (or longer in humid bathrooms), remove the tape and screw your hardware back into place.
Enjoy the warmth and character your new colorful door brings to your bathroom space

PENCIL GUIDE
Understanding Pencil Grades from H to B
From first sketch to finished drawing — learn pencil grades, line control, and shading techniques.
Explore the Full Guide
Sunny Butter Yellow as a Happy Pop
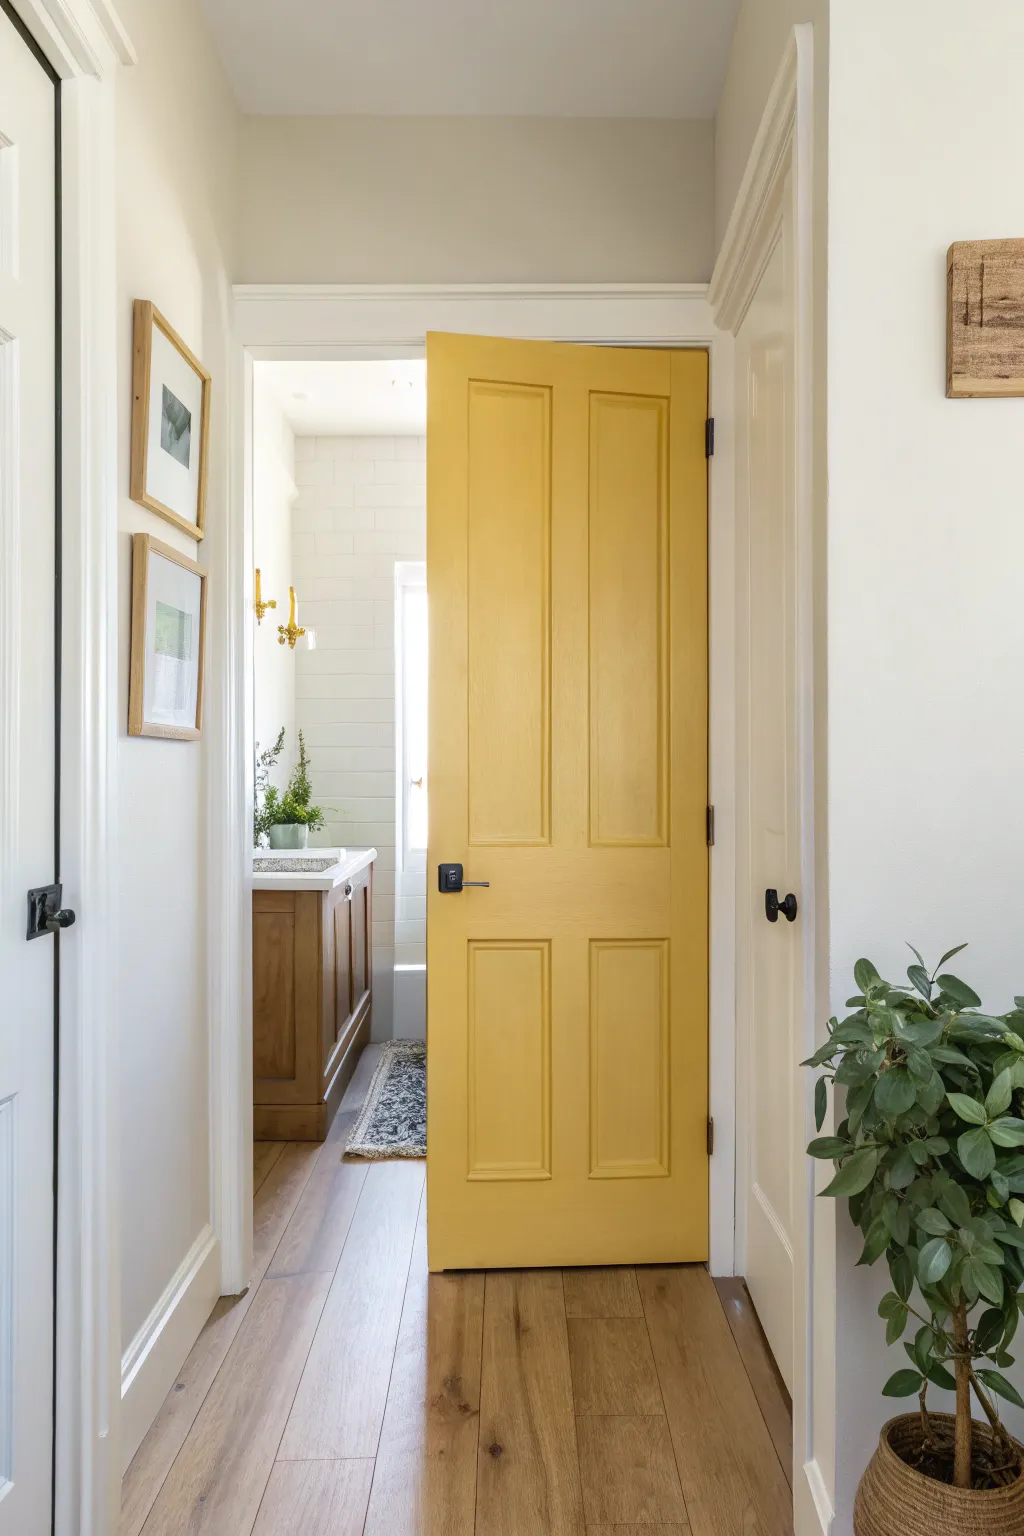
Transform a standard interior door into a cheerful focal point with this vibrant butter yellow paint project. The finish is smooth and professional, bringing a warm, inviting glow that instantly brightens up a neutral hallway.
Step-by-Step Guide
Materials
- Interior door (solid core preferred)
- Sanding block (120-grit)
- Sandpaper (220-grit)
- High-quality bonding primer
- Butter yellow interior paint (Satin or Semi-Gloss finish)
- 2-inch angled sash brush
- 4-inch foam roller
- Paint tray and liners
- Painter’s tape
- Screwdriver
- Drop cloth
- Tack cloth or microfiber rag
- Mild degreaser or TSP substitute
Step 1: Preparation & Hardware Removal
-
Prepare the workspace:
Lay down a drop cloth in a well-ventilated area. While you can paint the door on its hinges, taking it down creates a smoother finish and prevents drips, so set up sawhorses if you choose to remove it. -
Remove hardware:
Use a screwdriver to carefully take off the doorknob, lock mechanism, and hinges if you’ve taken the door down. Store all screws and parts in a labeled bag so nothing gets lost. -
Clean surface thoroughly:
Wipe the entire door down with a mild degreaser or a TSP substitute to remove dirt, oils, and handprints, which ensures the new paint adheres perfectly. -
Protect hinges (if leaving on):
If you are painting the door while it hangs, cover the hinges completely with painter’s tape, cutting the edges precisely with a craft knife for a clean seal.
Avoiding Brush Marks
Add a paint conditioner like Floetrol to your yellow latex paint. It slows drying time, allowing the paint to self-level and eliminate brush strokes.
Step 2: Sanding & Priming
-
Initial light sanding:
Using a 120-grit sanding block, scuff the entire surface of the door. You aren’t trying to strip the old paint, just creating a ‘tooth’ for the primer to grip. -
Dust removal:
After sanding, thoroughly wipe away all dust using a tack cloth. Any leftover particles will create bumps in your final finish. -
Apply bonding primer:
Paint a coat of high-quality bonding primer over the entire door. Start with the recessed panels using your brush, then roll the flat surfaces. This is crucial when going from a darker color to a bright yellow. -
Let primer cure:
Allow the primer to dry completely according to the manufacturer’s instructions. If the primer feels rough, give it a very gentle pass with 220-grit sandpaper and wipe clean.
Sticky Door Situation
If the door sticks to the frame after reinstalling, rub a little clear candle wax or paraffin along the edge where it touches the jamb.
Step 3: Painting the Panels
-
Stir the yellow paint:
Open your butter yellow paint and stir it thoroughly to ensure the pigments are evenly distributed, as yellows can separate easily. -
Start with recessed areas:
Dip your 2-inch angled sash brush into the paint and coat the recessed rectangular molding profiles first. Keep the coat thin to avoid pooling in the corners. -
Paint the inner panels:
Switch to your 4-inch foam roller or use the brush to fill in the flat center panels of the door. -
Feather the edges:
While the paint is wet, lightly feather out any ridges of paint that have spilled onto the horizontal or vertical rails to keep things smooth.
Step 4: Painting the Frame & Finish
-
Paint the vertical center stile:
Roll or brush the vertical strip of wood that runs down the center of the door, between the panels. -
Paint the horizontal rails:
Apply paint to the horizontal top, middle, and bottom rails. I prefer to use long, continuous strokes here to mimic the grain direction of the wood. -
Paint the outer stiles:
Finally, paint the long vertical stiles on the far left and right edges. Finish by painting the door edges themselves. -
Allow to dry:
Let the first coat dry completely essential—usually 4 to 6 hours depending on humidity. -
Apply second coat:
Repeat the entire painting process for a second coat. Yellow is a low-hiding color, so a second (or even third) coat is key for a rich, solid butter tone. -
Reinstall hardware:
Once the final coat has cured for at least 24 hours (so it’s not tacky), remove any tape and screw the hardware back into place.
Enjoy the warmth and cheer your freshly painted butter yellow door brings to your hallway every time you walk by
Match the Door to the Vanity Color
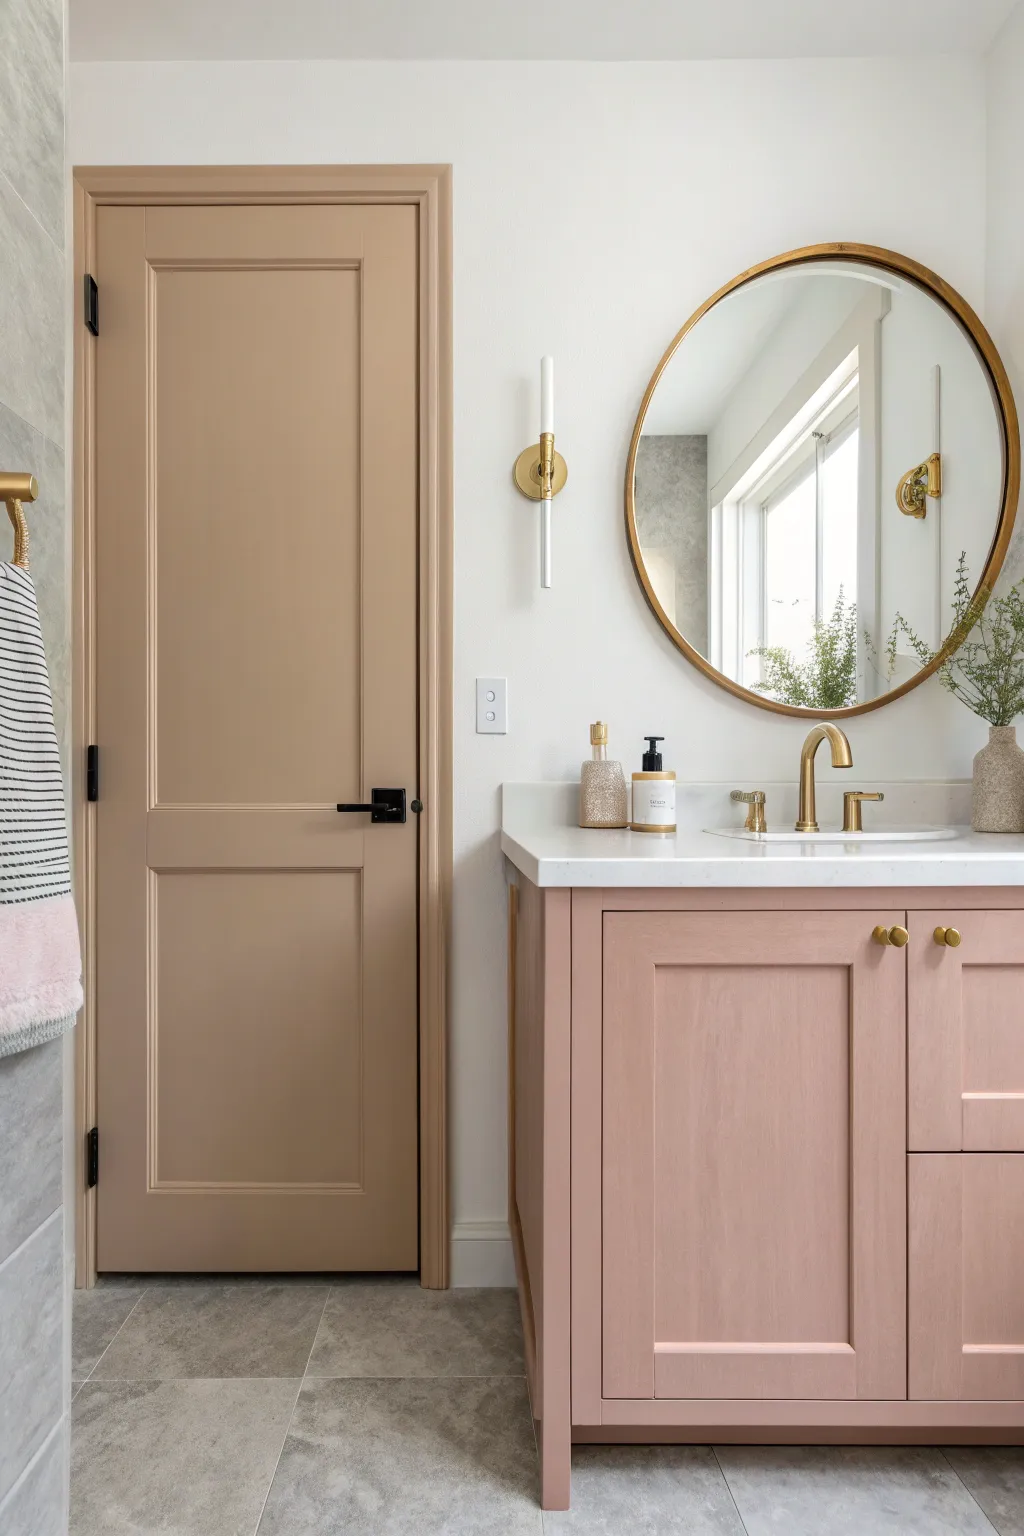
Creating a monochromatic flow between your bathroom vanity and entry door instantly elevates a standard bathroom into a custom-designed space. This project focuses on prepping and painting a standard interior door to perfectly match a pinkish-beige vanity for a seamless, high-end look.
Step-by-Step
Materials
- Interior semi-gloss or satin paint (color matched to vanity)
- High-quality angled sash brush (2-2.5 inch)
- 4-inch foam roller or mohair roller for smooth finishes
- Paint tray and liners
- Painter’s tape
- Sanding sponge or 220-grit sandpaper
- Liquid deglosser (optional but recommended)
- Clean tack cloths
- Screwdriver or drill (for hardware removal)
- Drop cloths
- Wood filler (if repairing holes)
- Primer (stain-blocking)
Step 1: Preparation
-
Color matching:
Before buying a gallon, take a drawer front or a paint chip from your vanity to the paint store. Ask for a precise computer color match to ensure the door and vanity are identical twins, not just distant cousins. -
Hardware removal:
Using a screwdriver, carefully remove the door handle, strike plate, and hinges if you are painting the door off the frame. If leaving the door hung, just remove the handle and tape off the hinges meticulously. -
Clean the surface:
Wipe down the entire door with a mild degreasing cleaner to remove finger oils and dust. A clean surface is critical for adhesion. -
Sand and smooth:
Lightly scuff sand the entire door surface using 220-grit sandpaper. You aren’t trying to strip the old paint, just creating ‘teeth’ for the new coat to grab onto. -
Dust removal:
Vacuum up the sanding dust, then wipe the door with a tack cloth to catch every last distinct particle. -
Protect the perimeter:
Apply painter’s tape along the door frame interior (the jambs) if you aren’t painting them, or protect the adjacent walls if you are painting the trim too.
Pro Tip: Floetrol Magic
Add a paint conditioner like Floetrol to your latex paint. It slows drying time, allowing brush and roller marks to level out perfectly for a factory-smooth finish.
Step 2: Painting the details
-
Prime the surface:
Apply a coat of high-quality stain-blocking primer. This is crucial if going from a dark color to this lighter beige, or if the door has never been painted. -
Start with panels:
Dip your angled sash brush and begin painting the recessed areas of the door panels first. Work paint into the corners but watch for pooling. -
Painting the molding:
Continue with the brush to paint the molded edges surrounding the panels. Keep a wet edge to avoid brush marks. -
Check for drips:
I like to do a quick pass over the corners I just painted to smooth out any excess paint before it starts to get tacky.
Troubleshooting: Sticky Door
If the door sticks to the jamb after closing, rub a plain white candle or clear wax along the edges where they touch. This lubricates the surface and prevents paint from peeling.
Step 3: Rolling and finishing
-
Vertical stiles:
Switch to your 4-inch roller. Paint the vertical center stile (the strip between panels) first, rolling with the grain. -
Horizontal rails:
Roll the horizontal rails (top, middle, and bottom sections). Use a brush to lightly feather the edges where the rails meet the stiles if texture builds up. -
Outer stiles:
Finish by rolling the long vertical stiles on the far left and right of the door runs. Roll from top to bottom in long, consistent strokes. -
Dry and assess:
Let the first coat dry completely according to the can’s instructions. Usually, this takes 4-6 hours depending on humidity. -
Second coat:
Repeat the entire painting process for a second coat to achieve that rich, solid color depth shown in the photo. -
Remove tape:
Score the edge of the painter’s tape with a utility knife before peeling it off slowly at a 45-degree angle. Do this while the paint is slightly fresh to prevent peeling. -
Reinstall hardware:
Once the door has cured for at least 24 hours to avoid tackiness, screw your black or gold hardware back into place.
Now step back and admire how this simple color synchronization makes your entire bathroom feel completely custom designed


Paint Door and Trim in a Color Drench
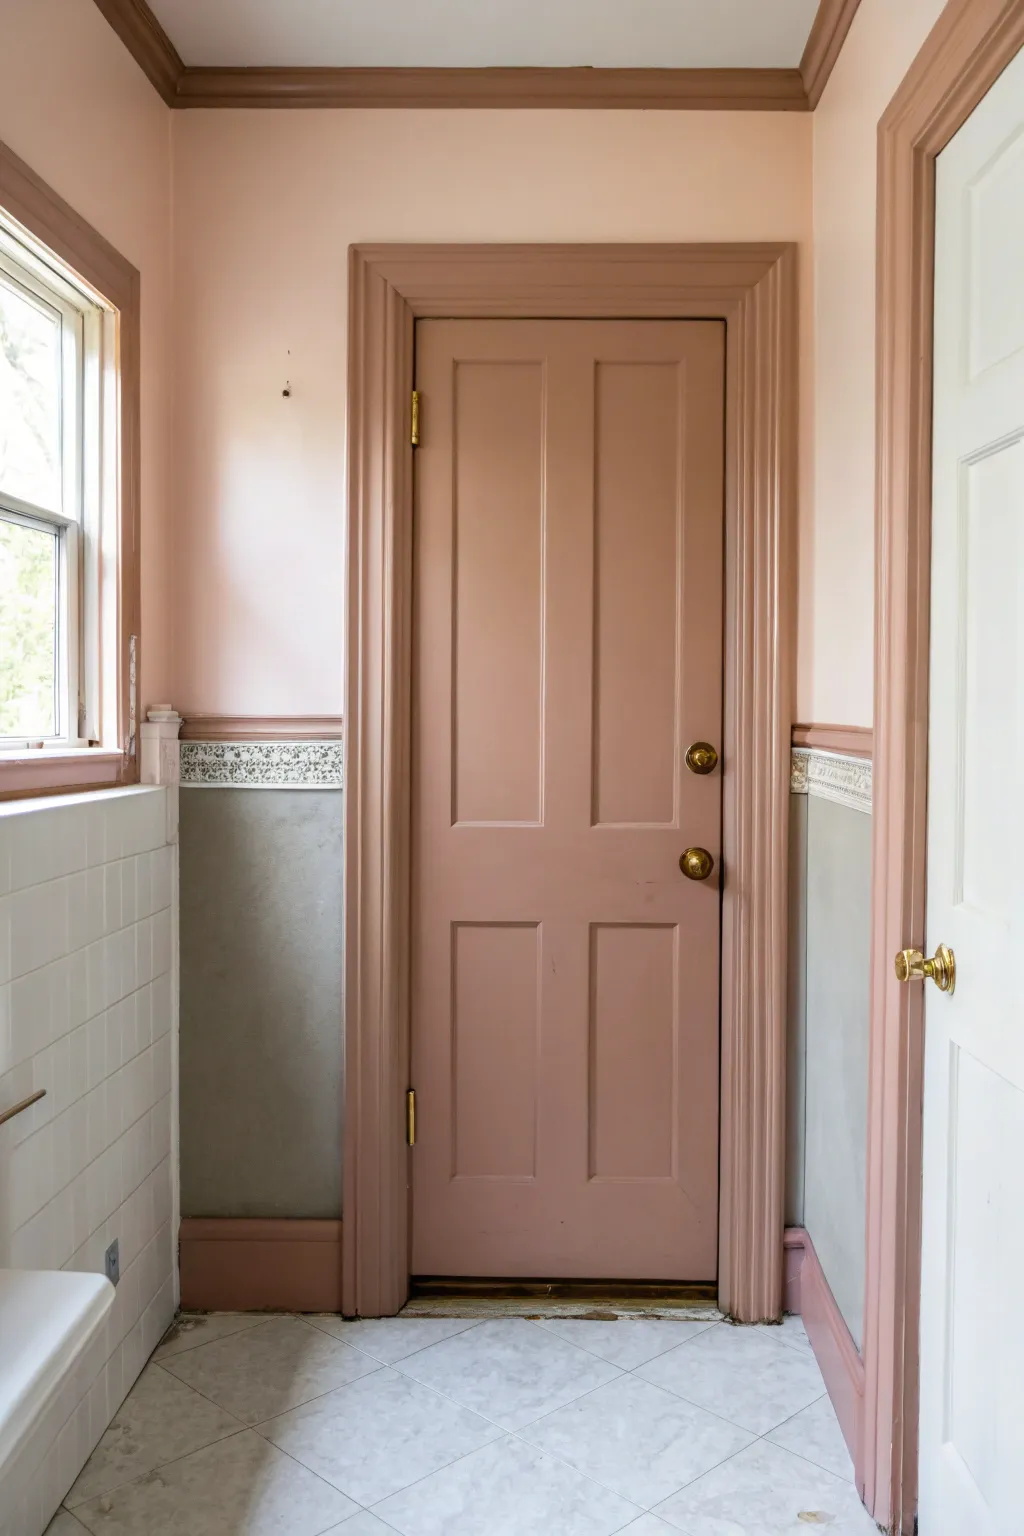
Transform a standard bathroom entryway by enveloping the woodwork in a single, cohesive dusty rose hue. This ‘color drench’ technique unifies the door, casing, crown molding, and baseboards for a sophisticated, seamless look that instantly elevates the space.
Detailed Instructions
Materials
- Interior semi-gloss or satin enamel paint (dusty rose/terracotta shade)
- Angled sash brush (2.5 inch)
- Small foam roller and tray
- Painter’s tape (multi-surface)
- Fine-grit sanding sponge (220 grit)
- Tack cloth
- Drop cloths
- Screwdriver
- Wood filler (optional)
- Primer (if covering dark paint or bare wood)
Step 1: Preparation & Hardware Removal
-
Clear and protect:
Start by removing any rugs or movable items from the bathroom. Lay down drop cloths to protect the tile floor, ensuring you tape the edges of the cloth down so they don’t slide around while you work. -
Remove hardware:
Use your screwdriver to remove the doorknobs and lock mechanisms. While you could tape around them, taking them off ensures a much cleaner finish and prevents accidental paint splatters on the metal. -
Clean surfaces:
Wipe down the door, door frame, window trim, crown molding, and baseboards with a mild degreaser or soapy water to remove dust and bathroom grime. -
Patch and fill:
Inspect the woodwork for any deep scratches or holes. Apply a small amount of wood filler where needed, smoothing it out with a putty knife. -
Scuff sand:
Once the filler is dry, lightly sand all surfaces—shiny paint won’t stick well to shiny surfaces. The goal isn’t to remove the old paint, but to dull the gloss. -
Dust off:
Wipe everything down with a tack cloth to remove all sanding dust.
Step 2: Masking & Cutting In
-
Tape boundaries:
Apply painter’s tape carefully along the edges where the trim meets the wall, ceiling, and floor tiles. Press the tape edge down firmly with a putty knife or fingernail to prevent bleed-through. -
Prime (if needed):
If you are painting over raw wood or a very dark color, apply a coat of primer now. If the existing paint is light and in good condition, you can often skip this. -
Cut in the molding:
Dip your angled brush into the rose paint. Start at the top with the crown molding, painting the edges and crevices that a roller can’t reach. -
Paint window and door casing:
Move down to the window and door casings. Use long, smooth strokes with the brush to lay the paint into the grooves of the trim.
Sticky Door Syndrome
If the door sticks after painting, check the edges. Paint buildup can tighten the fit. Sand the edges slightly where it rubs, or apply a little clear wax to the jamb to reduce friction.
Step 3: Painting the Door & Trim
-
Door panels first:
For the door itself, start by brushing paint into the recessed panels. I find it works best to feather the paint out towards the flat surfaces to avoid heavy buildup in the corners. -
Roll the flats:
Use the foam roller for the large, flat vertical stiles and horizontal rails of the door. This helps achieve a smooth, factory-like finish without brush marks. -
Paint the baseboards:
While the door dries, paint the baseboards along the floor. Be extra careful near the tile floor grout lines. -
Dry and assess:
Let the first coat dry completely according to the can’s instructions usually 2-4 hours. -
Light sand between coats:
Very lightly run the fine sanding sponge over the dry paint to knock down any bumps or raised grain, then wipe with the tack cloth. -
Apply second coat:
Repeat the painting process for a second coat. This coat will provide the true depth and richness of that ‘drenched’ color look.
Pro Tip: Order of Operations
For panel doors, paint in this order: recessed panels first, then the horizontal rails, and finally the vertical stiles. This mimics the wood grain direction of real joinery.
Step 4: Finishing Touches
-
Remove tape:
Carefully peel off the painter’s tape while the second coat is still slightly tacky. Pulling at a 45-degree angle away from the paint line helps keep the edge crisp. -
Touch up:
Check for any spots where paint might have bled or missed. Use a small artist’s brush for tiny corrections near the wall paper or tiles. -
Reinstall hardware:
Once the paint has cured (ideally waiting 24 hours so it’s not soft), screw your doorknobs and hardware back into place.
Now step back and admire how a single color can turn functional trim into a major design statement
Keep Trim White for High-Contrast Edges
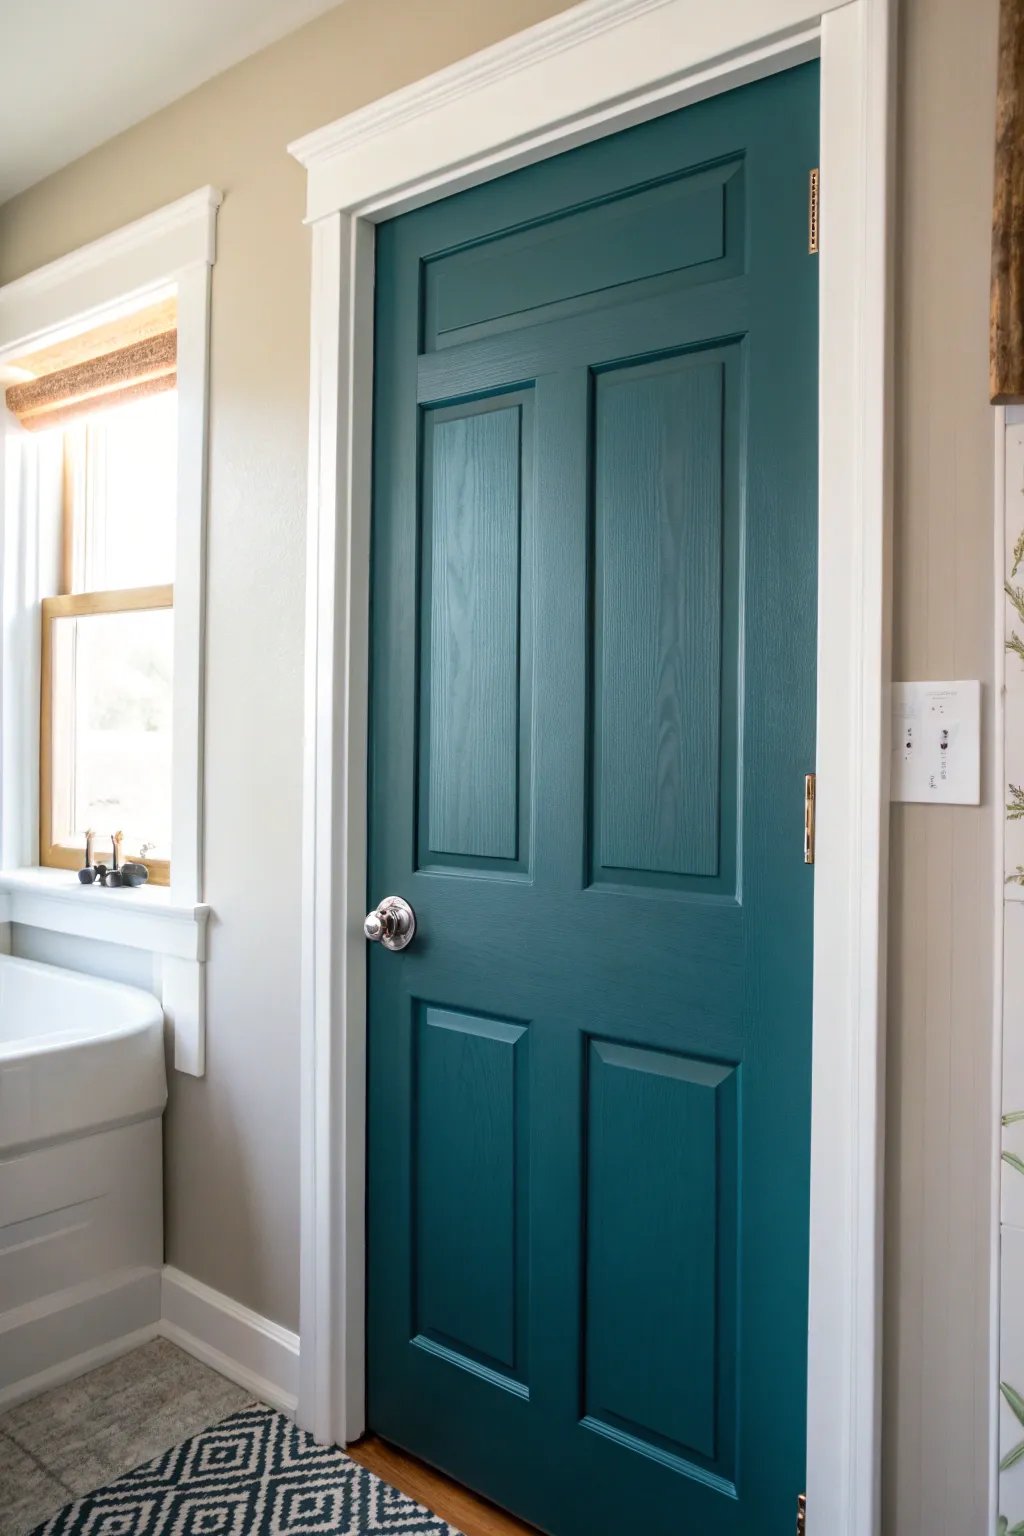
Transform a standard interior door into a striking focal point by pairing a deep, rich teal with bright white trim. This project is all about precision and contrast, creating a professional finish that adds architectural interest to your bathroom.
Step-by-Step Guide
Materials
- Interior semi-gloss or satin paint (Deep Teal)
- Interior semi-gloss paint (Bright White)
- Small angled sash brush (1.5 – 2 inch)
- 4-inch foam roller or short-nap microfiber roller
- Paint tray
- Fine-grit sandpaper (220-grit)
- Tack cloth or damp rag
- Painter’s tape
- Screwdriver
- Drop cloth
- Cleaning solution (TSP or mild detergent)
Step 1: Preparation
-
Hardware removal:
Start by removing the door knob and strike plate using a screwdriver. Painting around hardware rarely looks clean, so taking a few minutes to remove it ensures a professional edge. -
Surface cleaning:
Wipe down the entire door and the surrounding trim with a mild detergent or TSP solution to remove dust, oils, and fingerprints. -
Light sanding:
Gently scuff the door and trim with 220-grit sandpaper. You aren’t trying to strip the old paint, just roughing up the surface mainly to help the new coat adhere better. -
Dust removal:
Thoroughly wipe away all sanding dust using a tack cloth or a damp rag, ensuring a perfectly smooth base. -
Taping (optional):
If you aren’t confident in your cutting-in skills, apply painter’s tape to the wall around the trim. However, for the trim-to-door transition, we will rely on a steady hand or taping after one part is dry.
Sticky Door Syndrome?
If the door sticks to the jamb after closing, stick clearer bumper dots or rub a little candle wax along the edge where it meets the frame to prevent the fresh paint from bonding.
Step 2: Painting the Trim
-
Cutting in the trim:
Dip your angled sash brush into the bright white paint. Carefully paint the edges of the trim where it meets the wall and the inner jamb where the door sits. -
Filling the trim faces:
Paint the flat faces of the casing. Use long, smooth strokes to minimize brush marks, working from the top down. -
Second coat:
Allow the white paint to dry completely according to the can’s instructions. Apply a second coat for full, opaque coverage and let it cure fully before moving to the door color.
Step 3: Painting the Door
-
Protecting the trim (optional):
If you want extra security, apply painter’s tape to the freshly painted (and fully cured) white stop molding where the door closes, so teal paint doesn’t accidentally transfer. -
Painting recessed panels:
Using your angled brush and the teal paint, start with the recessed areas of the door panels. Brush the paint into the corners and grooves first. -
Feathering the edges:
Immediately feather out any paint that pools in the corners to prevent drips. Smooth the paint on the flat inner panels with vertical strokes. -
Painting the rails and styles:
Switch to your small roller or continue with the brush for the vertical (stiles) and horizontal (rails) flat sections. Follow the grain direction: paint the center vertical stile first, then the horizontal rails, and finally the two long outer vertical stiles. -
Detailed edge work:
Carefully paint the hinge edge of the door. I like to keep a damp rag handy here just in case a stray drop hits the hinges, allowing for a quick cleanup. -
Drying and assessing:
Let the first coat of teal dry completely. Dark colors often look streaky after one coat; this is normal so don’t be discouraged. -
Second teal coat:
Apply a second coat using the same method: panels first, then rails and stiles. This builds the rich, deep color saturation seen in the photo. -
Edge cleanup:
Check the edges of the door. While the paint is still tacky, ensure there are no drips running down the sides.
Upgrade the Hardware
Take this renovation further by swapping the old knob for a matte black or brushed gold handle, which pops beautifully against the deep teal background.
Step 4: Finishing Touches
-
Tape removal:
If you used tape, remove it slowly at a 45-degree angle while the paint is still slightly tacky to prevent peeling. -
Curing time:
Leave the door open for at least 24 hours if possible. Even dry paint can stick or peel if the door is closed too tightly against the jamb before fully curing. -
Reinstalling hardware:
Once the paint is rock hard, screw the doorknob and strike plate back into place.
Now step back and enjoy the fresh, bold entrance you’ve created for your space
Two-Tone Panels on a Paneled Bathroom Door
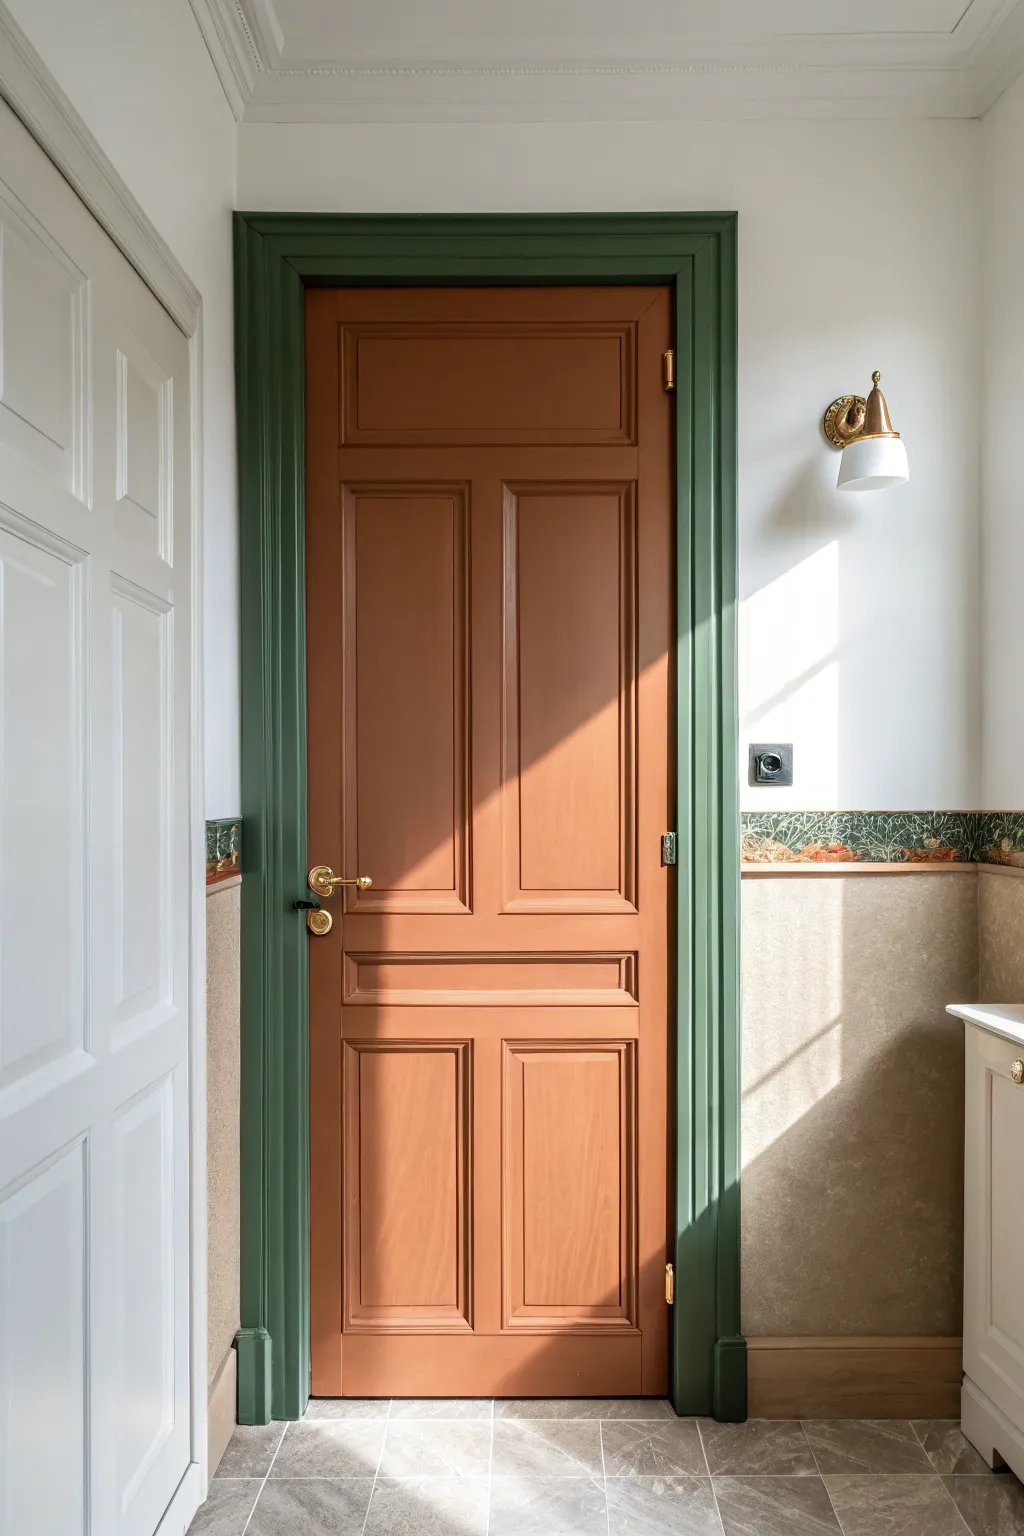
Transform a standard paneled door into a warm, vintage-inspired focal point by pairing a rich terracotta hue with a deep forest green architrave. This two-tone approach highlights the architectural details of the woodwork against simple white walls.
Step-by-Step Tutorial
Materials
- Interior wood primer (high adhesion)
- Satin or eggshell finish paint (Terracotta/Burnt Orange)
- Satin or eggshell finish paint (Forest Green)
- Painter’s tape (delicate surface)
- Sandpaper (120 and 220 grit)
- Tack cloth or microfiber rags
- Sash brush (1.5 – 2 inch)
- Mini foam roller or short nap roller
- Small paint tray
- Drop cloth
- Screwdriver (for removing hardware)
- Wood filler (optional)
Step 1: Preparation
-
Clear the area:
Lay down your drop cloth to protect the flooring, as you’ll be working right down to the threshold. -
Remove hardware:
Using a screwdriver, carefully remove the door handle, lock plates, and escutcheons. While you can tape around these, removing them ensures a much cleaner, professional finish. -
Clean the surfaces:
Wipe down both the door and the frame with a damp cloth and a mild degreaser to remove hand oils and dust. -
Sand for adhesion:
Lightly scuff both the door and the door frame with 120-grit sandpaper. You aren’t trying to strip the old paint, just creating a ‘key’ for the new primer to grab onto. -
Patch imperfections:
If there are any deep dings or scratches, fill them with wood filler now. Once dry, sand smooth with 220-grit sandpaper. -
Remove dust:
Wipe everything down thoroughly with a tack cloth to ensure absolutely no dust remains.
Clean Edges Trick
To prevent paint bleed, pressing down tape isn’t enough. Seal the tape edge with a tiny amount of the *base* color (white) first, then paint your green on top.
Step 2: Painting the Door (Terracotta)
-
Tape the hinges:
Apply painter’s tape carefully over the hinge plates to keep them free of paint. -
Prime the door:
Apply a coat of primer to the door. Use a brush for the recessed panel edges and a roller for the flat surfaces. Let this dry completely according to the can’s instructions. -
Cut in the panels:
Starting with your terracotta paint, use a sash brush to paint the recessed molded edges of the door panels first. -
Roll the center panels:
Immediately use your mini roller to paint the flat center rectangles of the panels, smoothing out any brush marks from the previous step. -
Paint the rails and stiles:
Paint the horizontal rails and vertical stiles next. I usually follow the wood grain direction to keep the finish looking natural. -
Apply second coat:
Once the first coat is fully dry, lightly sand with 220-grit paper if needed, wipe clean, and apply a second coat of terracotta for full opacity.
Step 3: Painting the Frame (Forest Green)
-
Mask the walls:
Apply delicate surface painter’s tape to the wall right along the outside edge of the door frame. -
Mask the door edge:
Wait until the door paint is fully cured (at least 24 hours) and then gently tape the edge of the door where it meets the frame stop. -
Prime the frame:
Brush a coat of primer onto the door frame and architrave, being careful near the floor. -
Paint the architrave:
Using your sash brush, apply the forest green paint to the frame. Work in long, smooth strokes from top to bottom. -
Detail the edges:
Pay distinct attention to the inner edges where the green frame meets the terracotta door color to ensure a crisp line. -
Final coat and reveal:
Apply a second green coat. While the paint is still slightly tacky, carefully peel away the tape at a 45-degree angle to reveal sharp lines.
Vintage Hardware
For a truly authentic look, swap modern chrome handles for unlacquered brass or antique gold levers. The patina will stand out beautifully against the terracotta.
Reattach your hardware once the paint has cured for a few days to enjoy your bold new entryway
Different Colors on Each Side for Flow
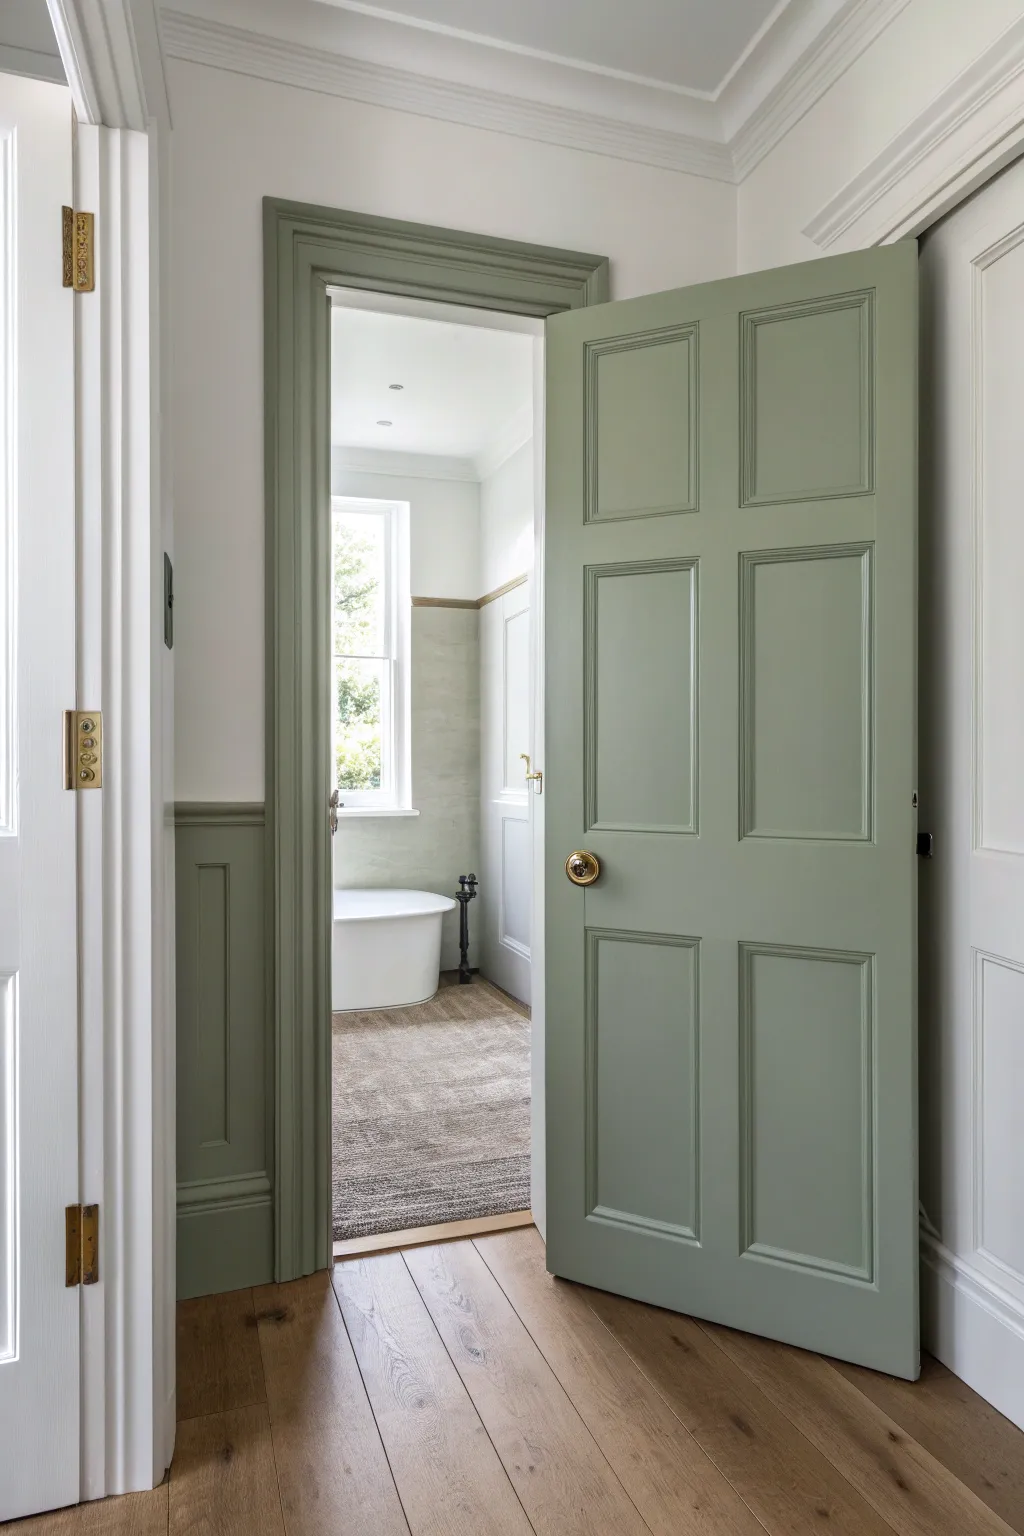
Bring a sense of seamless flow to your home by painting your bathroom door and its surrounding trim in a soothing, earthy sage green. This project focuses on matching the door color to wainscoting for a cohesive, built-in look while maintaining a clean white on the adjoining hallway woodwork.
Step-by-Step Guide
Materials
- Sage green interior satin or semi-gloss paint
- White semi-gloss paint (for hallway side)
- High-quality angled sash brush (2 inch)
- Mini foam roller and tray
- Painter’s tape (multi-surface)
- Fine-grit sandpaper (120 and 220 grit)
- Tack cloth
- Screwdriver (for removing hardware)
- Drop cloths
- Wood filler (if repairs are needed)
Step 1: Preparation and Protection
-
Clear and clean:
Begin by removing the door knob and latch plate using your screwdriver. Store the hardware and screws in a labeled bag so nothing gets lost. Wipe down the entire door, the door frame, and the wainscoting with a damp cloth to remove dust and grime. -
Protect the floor:
Lay down drop cloths to cover the wood flooring completely. Ensure the cloth is tucked right up against the base molding to catch any potential drips. -
Sand surfaces:
Lightly sand the door, the frame, and the wainscoting with 120-grit sandpaper. You aren’t trying to strip the paint, just scuffing the glossy surface to give the new primer and paint something to grip. -
Remove dust:
Vacuum up the sanding dust, then wipe every surface down thoroughly with a tack cloth.
Latch Edge Logic
The rule of thumb: paint the latch edge the color of the room the door opens INTO. Since this door opens into the bathroom, the edge gets painted green.
Step 2: Defining the Separation
-
Tape the latch edge:
This is the most critical step for a two-tone door. Open the door and look at the vertical edge where the latch mechanism sits. You want the green to wrap around from the bathroom side to this edge. -
Establish the line:
Apply painter’s tape vertically along the corner edge where the door face meets the hallway side. This ensures the green color stops cleanly at the hallway face, keeping that side white. -
Tape trim boundaries:
Tape off the walls above the wainscoting and the floor where it meets the plinth blocks. Run your fingernail or a putty knife firmly over the tape edges to prevent paint bleed.
Step 3: Painting the Green Side
-
Cut in the wainscoting:
Using your angled sash brush and the sage green paint, carefully cut in around the edges of the wainscoting panels and the baseboards. -
Roll the flat areas:
Use the mini foam roller to fill in the larger flat sections of the wainscoting. This ensures a smooth, brush-mark-free finish on the paneling. -
Paint the door panels:
Moving to the door itself, start by painting the recessed panels with your brush. Work the paint into the corners, then smooth it out. -
Paint the stiles and rails:
Paint the vertical stiles and horizontal rails of the door. I like to paint the horizontal rails first, then the long vertical stiles, feathering the edges to blend them. -
Paint the frame:
Apply the green paint to the door frame (jamb) and the casing on the bathroom side. Don’t forget the door stop strip inside the frame. -
Dry and assess:
Allow the first coat to dry completely according to the manufacturer’s instructions. -
Sand between coats:
Once dry, very lightly sand the surfaces with 220-grit sandpaper to knock down any raised grain or dust nibs, then wipe clean with a tack cloth. -
Apply second coat:
Repeat the painting process for a second coat on the wainscoting, door frame, and door. This deepens the color and ensures solid coverage.
Sticky Door Syndrome
If the door sticks after painting, rub a clear candle or bar of soap along the stopping edge of the frame. This lubricates the contact point preventing paint lift.
Step 4: Finishing Touches
-
Remove tape:
Carefully peel away the painter’s tape while the second coat is still slightly tacky (or score the edge with a utility knife if fully dry) to ensure a crisp line. -
Check the hallway side:
Inspect the hallway side of the door. If any green paint bled over or if the white looks dingy, tape off the dry green edge and apply a fresh coat of white paint to the hallway-facing side. -
Reinstall hardware:
Once the paint has cured (ideally wait 24 hours to prevent sticking), reinstall the doorknob and latch plate.
Step back and admire how the color continuity creates a serene, designer-quality transition into your bathroom space
Paint an “Inset Frame” for Instant Detail
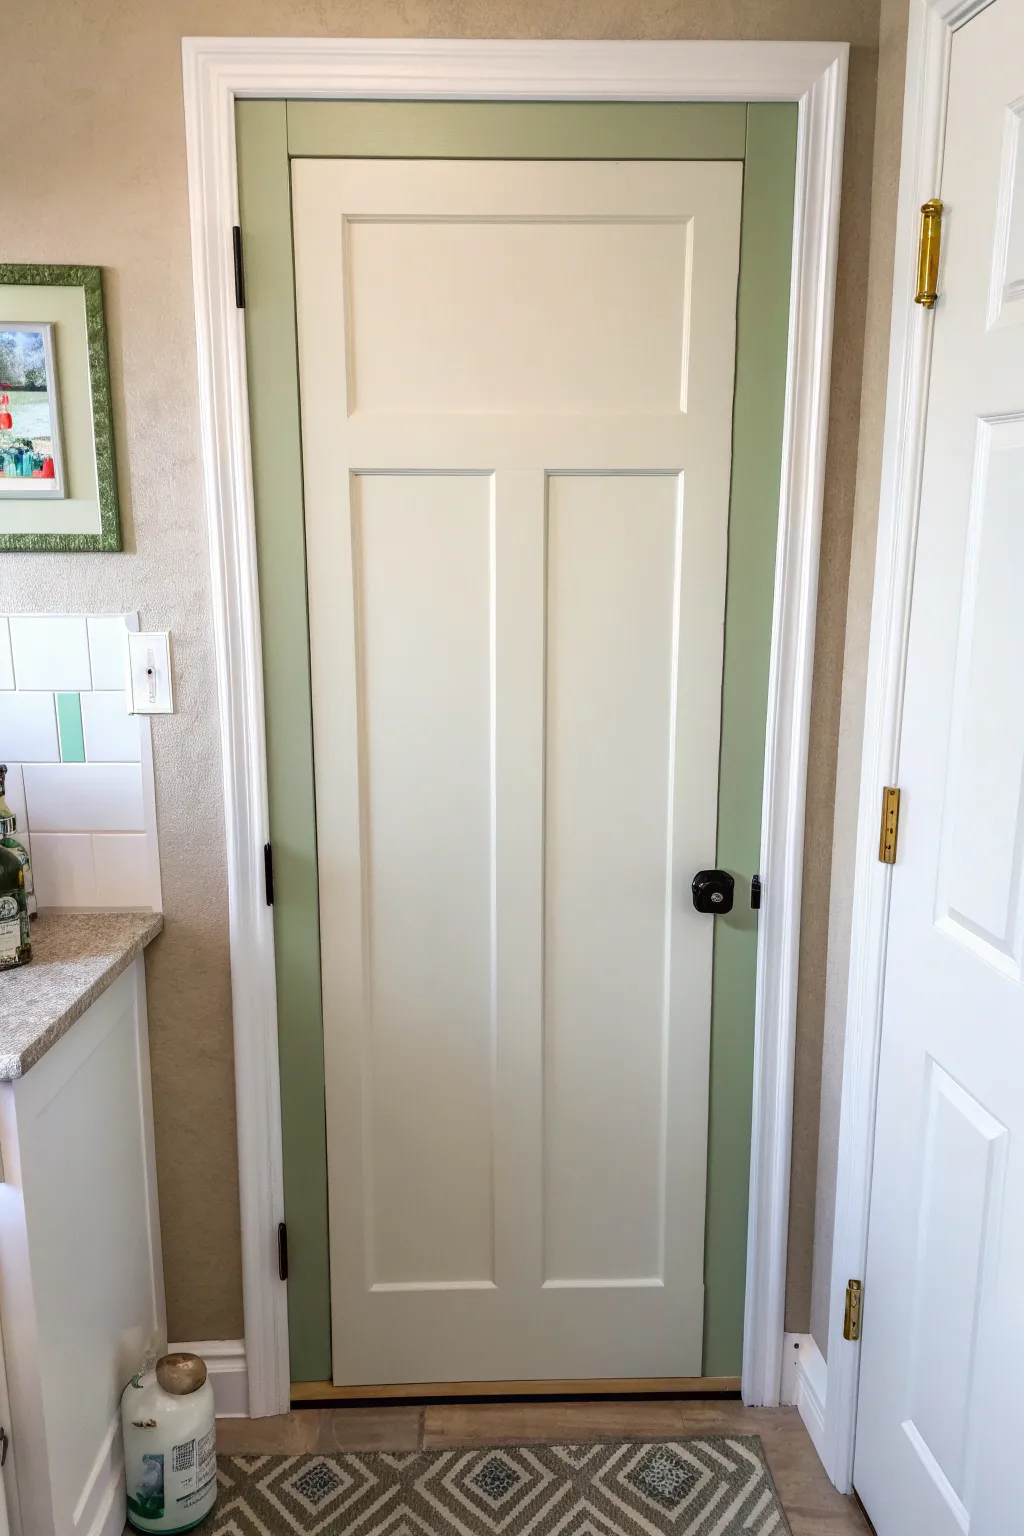
Transform a plain door into a custom architectural feature by painting the door stop and jamb a contrasting color. This unexpected splash of sage green creates a sophisticated framing effect that highlights the door’s craftsmanship without overwhelming the space.
How-To Guide
Materials
- Semi-gloss interior trim paint (Sage Green)
- Small angled sash brush (1.5 inch)
- High-quality painter’s tape (multi-surface)
- Sandpaper (220-grit)
- Clean rag or tack cloth
- Screwdriver (for hardware removal)
- Stir stick
- Drop cloth
Step 1: Preparation & Taping
-
Clear the Area:
Begin by removing any rugs or obstacles near the door swing. Lay down a drop cloth to protect your flooring from stray drips. -
Remove Hardware:
Use a screwdriver to remove the strike plate on the door jamb. It’s much cleaner to paint behind it than to tape around it. -
Clean Surfaces:
Wipe down the door jamb and stop—the thin strip of wood the door closes against—with a damp rag to remove dust and grime. Let it dry completely. -
Light Sanding:
Gently scuff the surfaces you intend to paint with 220-grit sandpaper to help the new paint adhere better. Wipe away the dust with a tack cloth. -
Tape the Casing:
Apply painter’s tape carefully along the edge where the door casing (the outer trim) meets the jamb. Press the edge down firmly to prevent bleed-through. -
Tape the Door Edge:
Open the door slightly and apply tape to the edge of the door slab itself to protect it from accidental brush strokes.
Hinge Helper
Don’t remove the hinges! Cover them completely with painter’s tape and use a craft knife to trim the excess tape right to the metal edge.
Step 2: Painting the Frame
-
Stir the Paint:
Open your sage green accent color and stir it thoroughly until the pigment is perfectly uniform. -
Cut In the Edges:
Dip just the tip of your angled sash brush into the paint. Carefully paint along the tape line where the jamb meets the white casing. -
Paint the Header:
Move to the top horizontal part of the door jamb (the header). Apply paint in smooth horizontal strokes, working from one corner to the other. -
Work Down the Sides:
Paint the vertical sides of the jamb. I find it easiest to work from the top down to catch any potential drips before they set. -
Paint the Door Stop:
Carefully paint the door stop—the raised strip of wood in the center of the jamb. Ensure you get into the corners where the stop meets the flat jamb. -
Check for Pools:
Inspect the corners and hinge recesses for pooling paint. smooth these out immediately with a light brush stroke. -
Let Dry:
Allow the first coat to dry according to the manufacturer’s instructions, usually about 2-4 hours.
Step 3: Finishing Touches
-
Second Coat:
Apply a second coat using the same method to ensure rich, opaque color coverage. -
Remove Tape:
While the second coat is still slightly tacky (not fully cured), slowly peel off the painter’s tape at a 45-degree angle to ensure a crisp line. -
Reinstall Hardware:
Once the paint is fully cured (give it at least 24 hours to avoid sticking), screw the strike plate back into position. -
Clean Up:
Fold up your drop cloth and wash your brush with warm soapy water immediately.
Two-Tone Option
For extra depth, paint the door stop a darker shade of the same green than the rest of the jamb creates a shadow-box effect.
Enjoy the subtle pop of color every time you walk into the room
Graphic Stripes for a Modern Bathroom Door
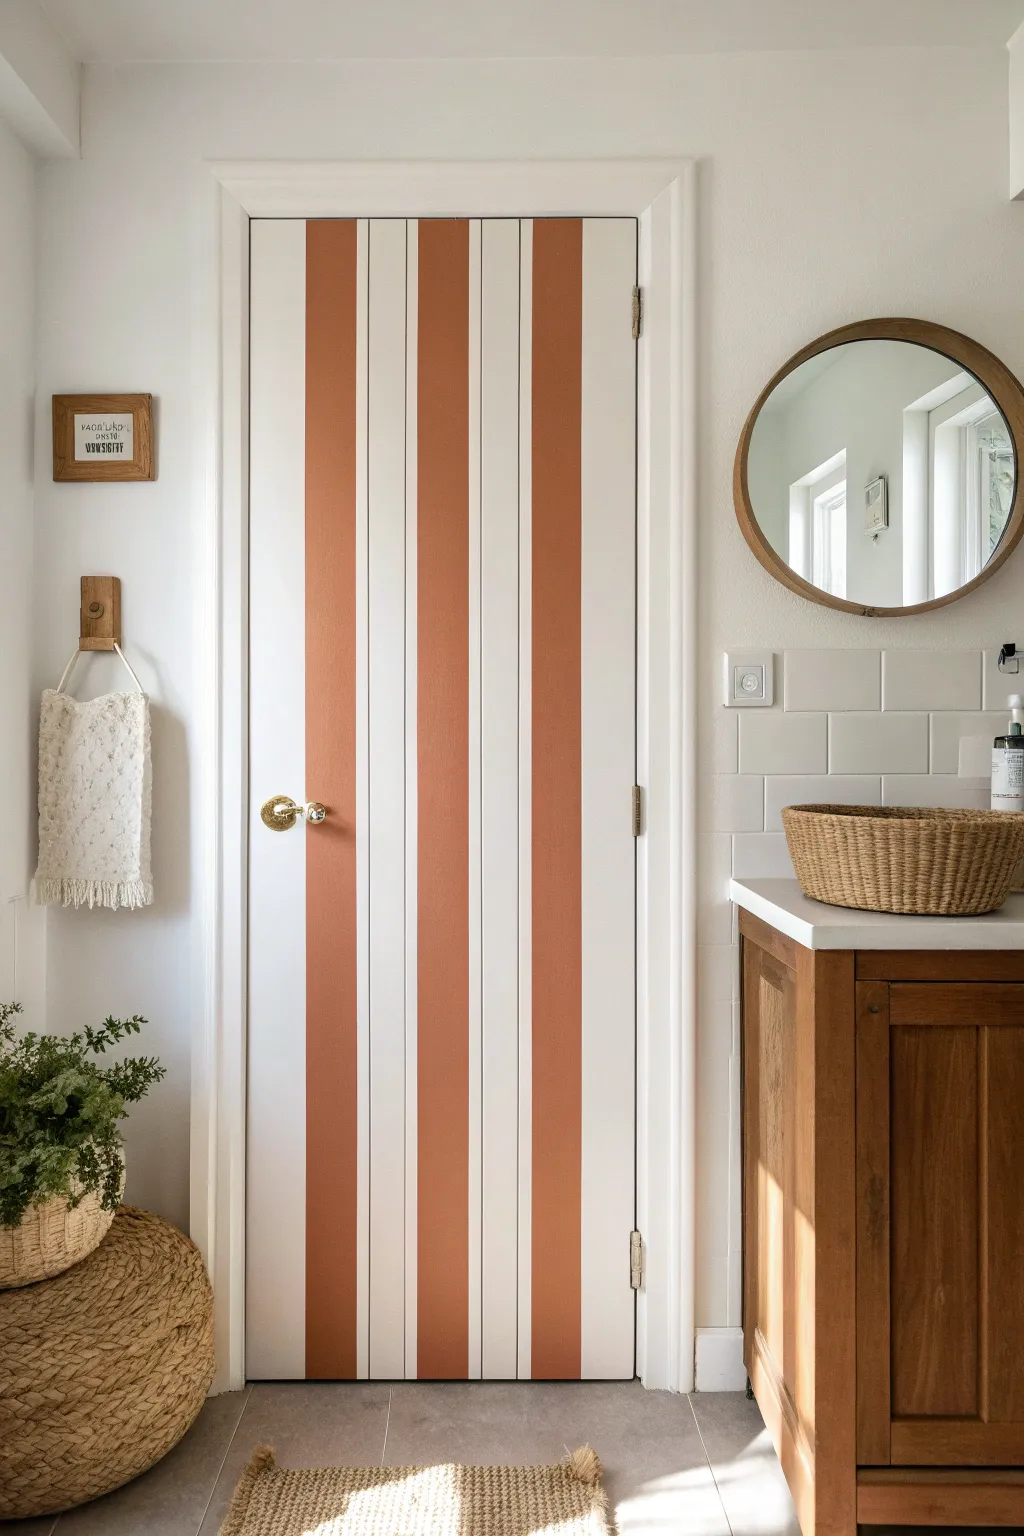
Transform a plain white interior door into a striking focal point with these bold, retro-inspired stripes. The warm terra cotta tones contrast beautifully with crisp white lines, adding immediate character and a custom feel to your bathroom space.
Step-by-Step
Materials
- Interior semi-gloss door paint (white base)
- Interior semi-gloss paint (terra cotta/rust orange)
- Small foam roller (4-inch) and handle
- High-quality angled sash brush (1.5 or 2 inch)
- Painter’s tape (multi-surface, 1-inch width)
- Painter’s tape (delicate surface, 1-inch width)
- Tape measure
- Pencil
- Laser level or long spirit level
- Sanding block (fine grit, 220)
- Clean tack cloth or rag
- Screwdriver (for removing hardware)
- Drop cloth
Step 1: Preparation & Base Coat
-
Remove Hardware:
Begin by removing the door handle and any other hardware like hooks or locks using a screwdriver. This ensures clean lines and prevents accidental painting on fixtures. -
Optional: Demount Door:
For the absolute best results, take the door off its hinges and lay it flat on sawhorses. However, painting it while hanging is perfectly fine if you protect the floor with a drop cloth. -
Clean and Sand:
Wipe the door down thoroughly to remove dust and grime. Lightly scuff sand the entire surface with a 220-grit sanding block to help the new paint adhere better. -
Wipe Down:
Remove all sanding dust using a damp rag or a tack cloth. Any remaining dust will get trapped under your tape later, compromising your crisp lines. -
Apply Base Color:
Roll on two even coats of your white semi-gloss base paint. Use the foam roller for the flat surfaces and the brush for edges. Allow full drying time between coats according to the manufacturer’s instructions. -
Full Cure:
Let the final white coat cure for at least 24 hours. This is crucial—if the base paint is soft, the tape you apply in the next phase allows for peeling.
Step 2: Measuring & Taping
-
Determine Stripe Width:
Measure the total width of your door. For this look, plan for three wide colored stripes and two thinner white gaps, plus white borders on the sides. A good rule of thumb is 5-6 inches for the colored stripes. -
Mark Central Line:
Find the dead center of the door width. Use a pencil and your level (a laser level is fantastic here) to lightly mark a vertical plumb line down the center. -
Mark Outer Stripes:
Measure outward from your center line to mark the edges of your central stripe, then measure the gap space, and finally the outer stripes. Mark these positions at the top, middle, and bottom of the door. -
Apply Tape lines:
Apply the painter’s tape vertically along your pencil marks. Remember to place the tape on the *outside* of the area you want to paint, keeping the paintable zone open. -
Seal the Tape Edges:
Run a credit card or your fingernail firmly along the edge of the tape to ensure a tight seal. I always double-check the hinge areas to make sure the tape hasn’t lifted. -
The Bleed Prevention Trick:
Brush a very light layer of your *base white paint* over the edges of the tape. This seals the tape line; if any paint bleeds under, it will be white and match the base, keeping your final color line razor-sharp.
Seal the Deal
Painting a thin layer of the *base* color over the tape edge before the main color prevents bleeding. It acts as a barrier for perfect crisp lines.
Step 3: Painting & Reveal
-
Apply Color – First Coat:
Using a clean foam roller, apply the terra cotta paint between the tape lines. Use a light hand to avoid pushing paint under the tape. -
Apply Color – Second Coat:
Once the first coat is dry to the touch, apply a second coat for full opacity. This color often needs two coats to really pop against the white. -
Remove Tape:
Remove the tape while the final coat is still slightly tacky (usually 30-45 minutes after painting). Pull the tape slowly at a 45-degree angle away from the painted line. -
Touch Up:
Inspect your lines once dry. Use a tiny artist’s brush and the appropriate color to fix any small imperfections or bleeds. -
Reinstall Hardware:
Once the paint has cured fully (give it a good 24 hours to avoid tackiness), screw the door handle and hinges back into place to complete the transformation.
Go Horizontal
Want to visually widen a small powder room? Use the exact same technique but orient the stripes horizontally instead of vertically.
Step back and admire how a simple geometric pattern completely refreshes the feel of the room
Painterly Ombre Wash for a One-of-a-Kind Door
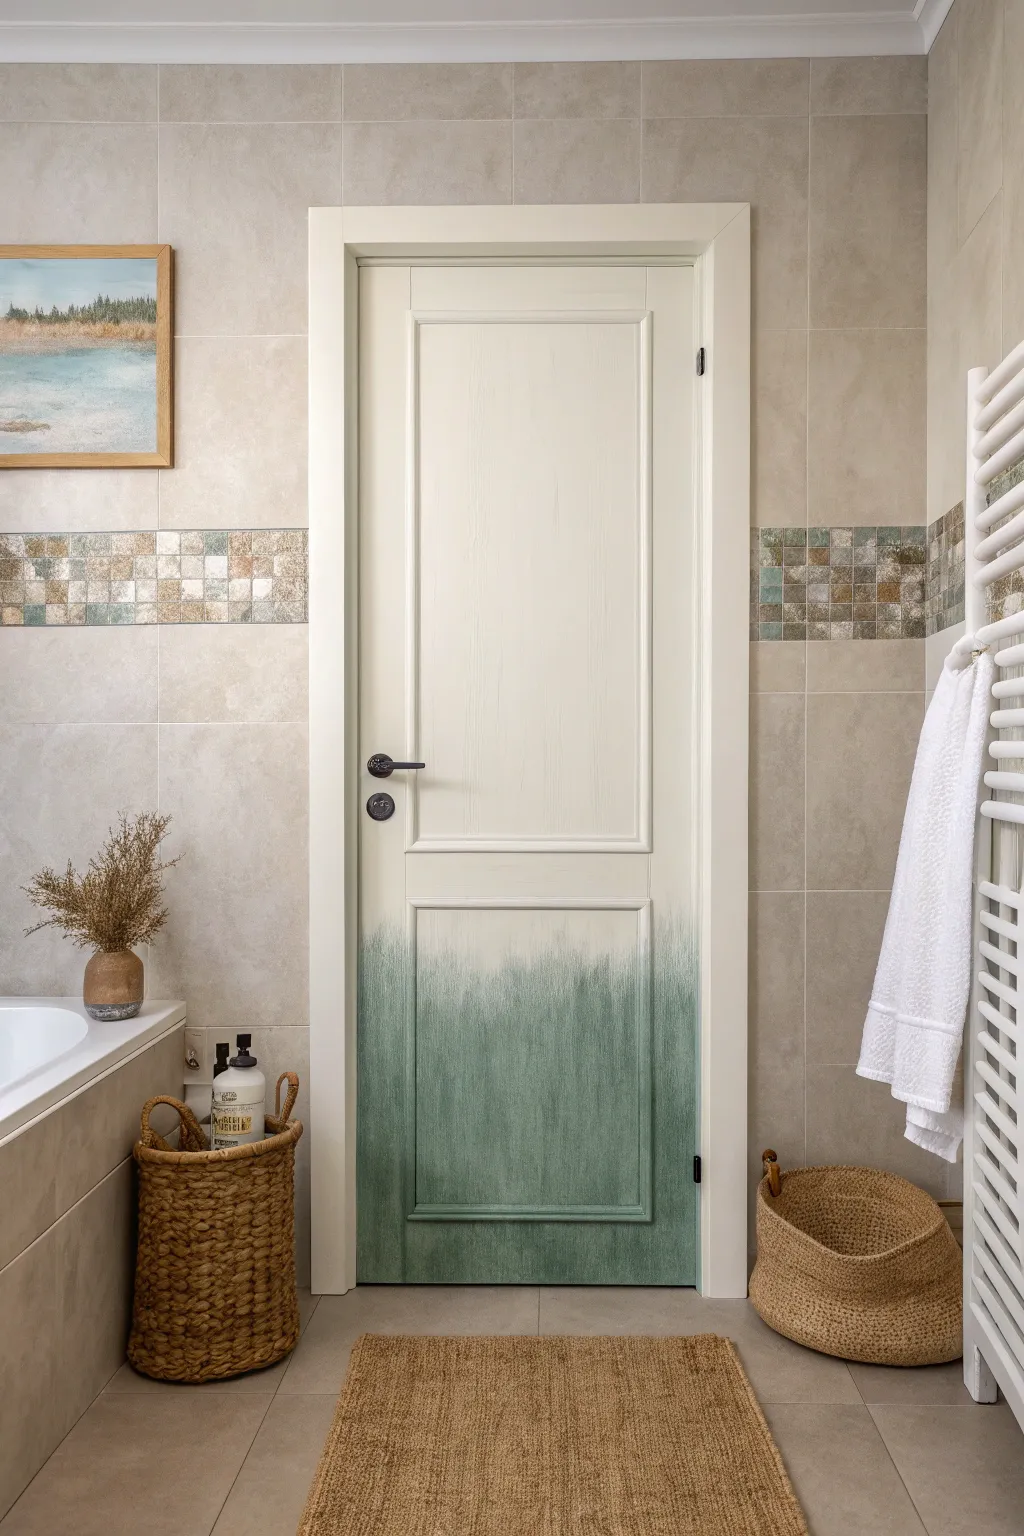
Transform a standard interior door into a piece of functional art with a soft, misty transition of color. This painterly ombre effect blends a creamy white base into a grounding teal, creating a serene, spa-like atmosphere perfect for a bathroom.
How-To Guide
Materials
- Interior semi-gloss or satin paint (Cream/Off-White)
- Interior semi-gloss or satin paint (Teal/Sage Green)
- Painter’s tape
- Drop cloth
- Sandpaper (120 and 220 grit)
- Cleaning cloth and degreaser
- High-quality angled sash brush
- 2-inch flat chip brush or old synthetic brush (for dry brushing)
- Small foam roller and tray
- Clean rag or paper towels
Step 1: Preparation & Base Coat
-
Prepare the workspace:
Lay down a drop cloth underneath the door to catch drips. Use painter’s tape to protect the hinges, door handle, and lock mechanism. If you are comfortable removing the hardware, that yields the cleanest result, but taping works perfectly fine here. -
Clean surface:
Wipe down the entire door with a degreaser or mild soap solution to remove oils and fingerprints, which is crucial for adhesion. -
Sand lightly:
Scuff sand the entire surface with 120-grit sandpaper to give the paint something to grip. Wipe away the dust with a damp cloth. -
Apply the base color:
Using a small foam roller for the flat panels and a brush for the molding, apply your cream or off-white base color to the entire door. This ensures a uniform background. -
Dry and repeat:
Allow the first coat to dry completely according to the can’s instructions. Apply a second coat if necessary to get solid, opaque coverage.
Step 2: Creating the Ombre Effect
-
Mark the transition zone:
Mentally divide the door. For this look, the color starts heavy at the bottom and fades out just below the middle rail. You don’t need a pencil line, just a general idea of where you want the fade to ‘evaporate.’ -
Paint the solid bottom:
Dip your angled brush into the teal paint. Paint the bottom panel solid, working your way up from the floor. Use the brush to get into the corners and molding profiles deeply. -
Roll the lower section:
While the paint is wet, use a roller on the flat, recessed panel at the bottom to smooth out brush strokes, stopping about 6-8 inches below where you want the fade to begin. -
Begin the transition:
Switch to your dry brush (the chip brush). Dip just the very tips into the teal paint, then dab most of it off onto a paper towel until the brush is almost dry. -
Feather the paint upward:
Start where the solid teal paint ends. Using quick, vertical flicking motions, drag the paint upward. The goal is to create jagged, uneven streaks that thin out as they go higher. -
Work in sections:
Don’t try to blend the whole width at once. Focus on 4-inch sections, working from the solid color up into the white space. -
Soften the edges:
The transition shouldn’t look like scratches. If the streaks are too harsh, take a clean, slightly damp rag and gently dab (don’t wipe) the top of the feathering to blur the line. -
Layer the dry brush:
Once the initial feathering is tacky, go back in with an even drier brush. Add very faint, tall strokes that reach higher than the main color block to create that ‘misty’ uneven top edge. -
Address molding details:
Pay special attention to the recessed molding strips. Use a small detail brush to carry the color up inside the grooves, feathering it out at the same height as the flat panels so the effect looks continuous. -
Review from a distance:
Step back about five feet to look at the door as a whole. I find this helps identify spots that look too heavy or gaps that need a touch more color. -
Final touches:
If you went too high with the teal, wait for it to dry, then dry-brush a little of the original cream color downward to correct it. -
Remove tape:
Once the paint is dry to the touch, carefully peel away the painter’s tape from the hardware.
Glazing Liquid Secret
Mix a clear glazing liquid into your teal paint (1 part paint to 4 parts glaze). This makes the paint translucent and dry slower, giving you more time to blend perfectly.
Texturize the Fade
For a ‘rain-washed’ look, use a coarse-bristled brush for the transition strokes. If you want a softer, cloud-like fade, use a sea sponge to dab the boundary instead.
Enjoy the calming, artistic focus this custom door brings to your space


Have a question or want to share your own experience? I'd love to hear from you in the comments below!