
Basement window wells don’t have to feel like a gloomy afterthought—you can turn them into a little scene that’s actually fun to look at from inside. Think of it like a tiny outdoor “still life” you get to compose with texture, light, and greenery.
Stacked Stone Liner for a Natural Look
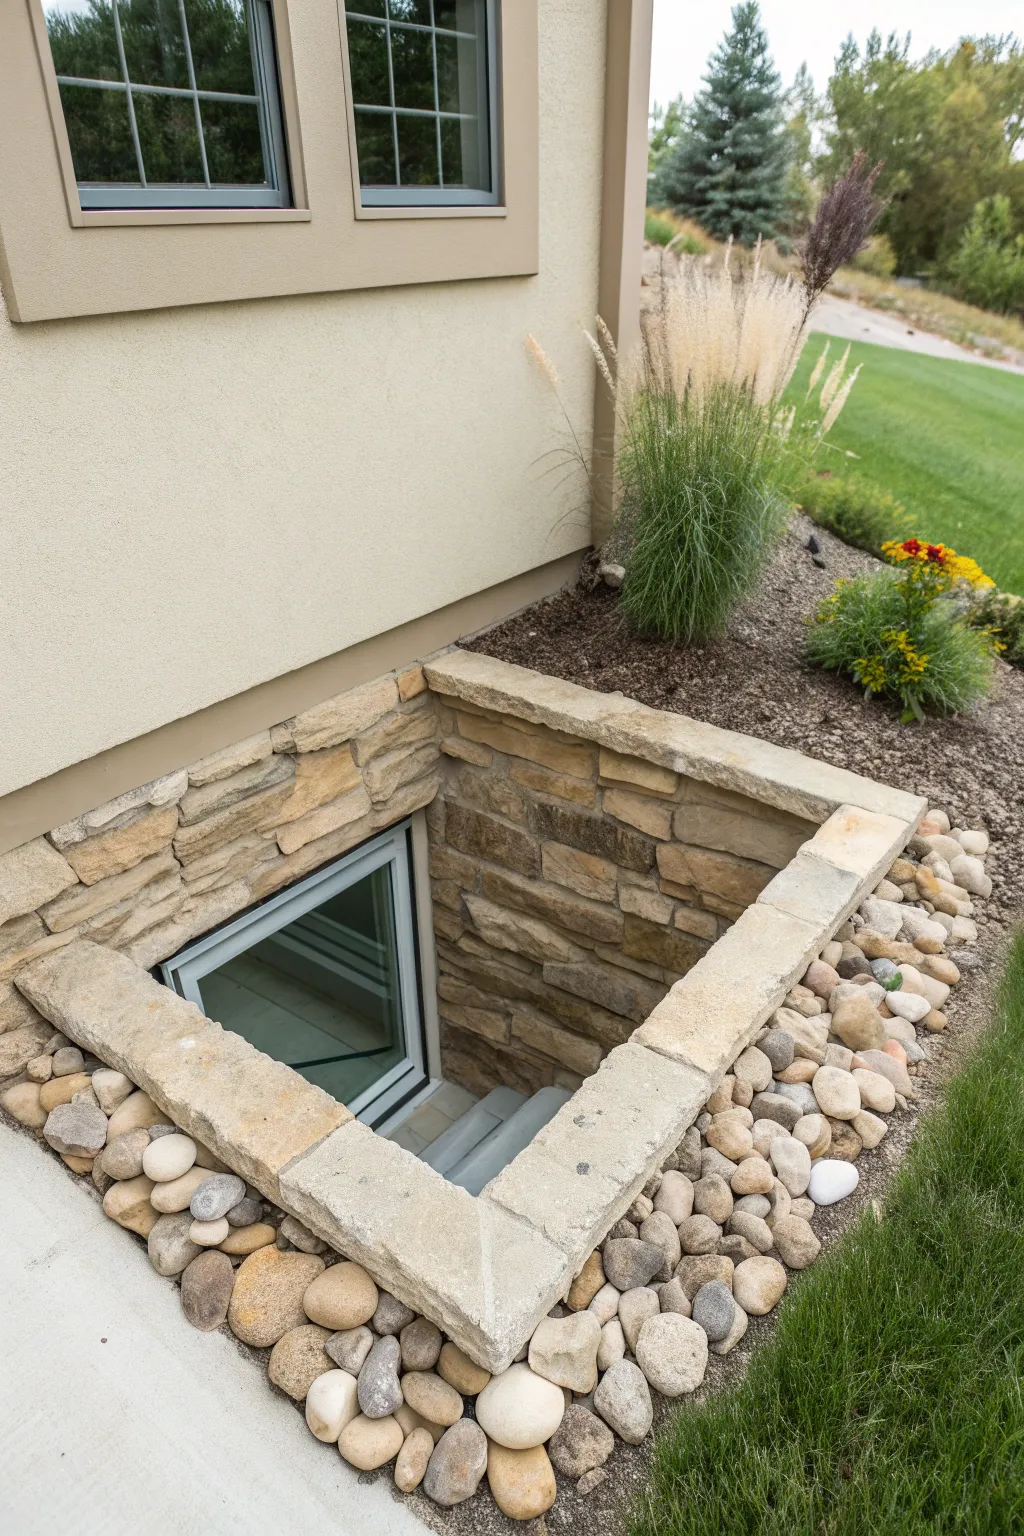
Transform a utilitarian basement window well into a stunning architectural feature using the timeless appeal of natural stone. This project combines safety with aesthetics, creating a light-filled egress that feels like a deliberate garden design element rather than just a necessity.
Step-by-Step
Materials
- Stacked stone veneer (flat and corners)
- Concrete masonry units (CMU blocks) or poured concrete base
- Type S mortar mix
- Concrete bonding agent
- Heavy-duty landscape fabric
- Washed river rock (various sizes)
- Capstone pavers (bullnose or flat edge)
- Notched trowel (1/2 inch)
- Masonry saw or angle grinder with diamond blade
- Rubber mallet
- Level (4-foot)
- Sponge and bucket
- Gravel for drainage base
Step 1: Structural Preparation
-
Excavate and form:
Begin by excavating the area around the window to the required depth and width for a code-compliant egress. Ensure you have ample space for the structural walls. -
Establish drainage:
Lay a thick base of gravel at the bottom of the excavation to ensure water drains away from the foundation. This is critical for preventing frost heave behind your stone work. -
Build the core walls:
Construct the U-shaped retaining wall using CMU blocks or poured concrete. This provides the structural strength; the stone is merely a decorative skin. Verify vertical plumb frequently.
Step 2: Installing the Stone Veneer
-
Prime the surface:
Clean the concrete walls thoroughly. Apply a concrete bonding agent to ensure maximum adhesion for the mortar layer. -
Mix the mortar:
Mix Type S mortar to a peanut butter consistency. It should be firm enough to hold a shape but wet enough to spread easily. -
Start at the bottom corners:
Apply a scratch coat of mortar to the bottom corner of the wall. Press a corner stone piece firmly into place. I always start with corners because they dictate the alignment for the flat sections. -
Work in layers:
Continue installing stones row by row, working from the bottom up. Butter the back of each stone with mortar before pressing it onto the wall. -
Integrate flat sections:
Fill the space between corners with flat veneer stones. Select shapes that fit tightly together to minimize gaps, creating that dry-stacked appearance. -
Cut to fit:
Use a masonry saw or angle grinder to trim stones where necessary, especially as you approach the top edge or near the window frame. -
Check for level:
Periodically place your level across a row of stones to ensure you aren’t drifting. Small adjustments now prevent crooked lines later.
Loose Stone Fix
If a stone slips while the mortar is wet, use small plastic shims or wooden wedges to hold it in place until the bond sets. Remove shims after 24 hours.
Step 3: Capping and Finishing
-
Prepare the capstone:
Once the veneer reaches the top, prepare the top surface for the capstones. These heavy pavers frame the well and protect the veneer layers below. -
Install the capstones:
Mortar the capstones into place, ensuring they overhang the veneer slightly (about 1 inch) to direct water runoff away from the stone face. Use a rubber mallet to tap them level. -
Clean off excess:
Immediately wipe away any mortar smears on the stone face using a damp sponge. Dried mortar is incredibly difficult to remove later without acid. -
Add landscape fabric:
Lay heavy-duty landscape fabric around the perimeter of the finished well to prevent weeds from growing through your rock border. -
Border with river rock:
Backfill the area surrounding the top of the well with washed river rock. This creates a soft transition between the hardscape and your lawn. -
Final planting:
Add ornamental grasses or small perennials near the river rock border to soften the edges and integrate the structure into your garden landscape.
Add Integrated Lighting
Install low-voltage LED hardscape lights just under the capstones during installation. This creates a beautiful downward wash of light at night.
Enjoy the view from your basement knowing you have created a safe and beautiful exit point


Painted Walls in a Soft, Bright Color
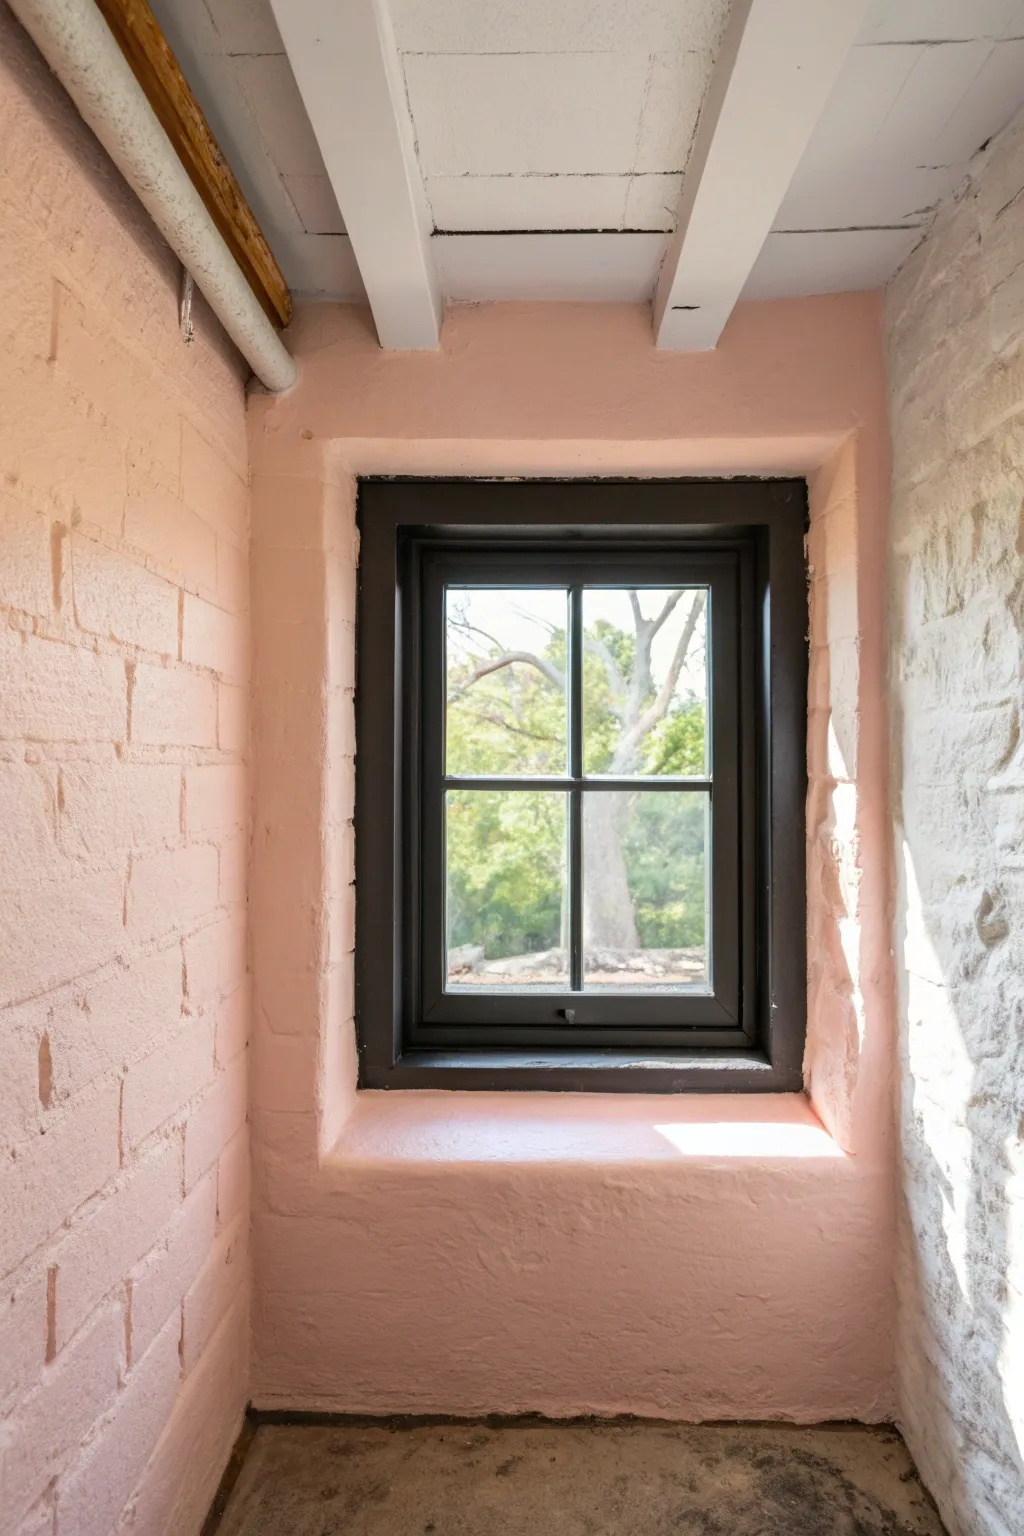
Transform a dark basement corner into a bright, airy focal point with this simple painting project. By layering soft peach tones over textured brick and contrasting them with a crisp black window frame, you create a space that feels intentional and inviting.
Detailed Instructions
Materials
- Wire brush
- TSP substitute (trisodium phosphate)
- Masonry primer (high-quality bonding primer)
- Interior latex paint (Soft Peach/Blush Pink)
- Interior latex paint (Matte Black)
- Interior latex paint (Bright White)
- 2-inch angled sash brush
- 4-inch mini roller with 1/2-inch nap for rough texture
- Painter’s tape
- Drop cloths
- Vacuum
Step 1: Preparation and Cleaning
-
Clear the area:
Remove any window treatments or hardware from the nook area. If the floor is unfinished concrete like ours, simply sweep it clean; otherwise, lay down a heavy canvas drop cloth to protect the flooring. -
Scrub the masonry:
Using a stiff wire brush, vigorously scrub the brick walls to remove any loose mortar, efflorescence (white powdery deposits), or flaking paint from previous layers. This ensures a solid bonding surface. -
Vacuum debris:
Use a shop vacuum with a brush attachment to pull dust and grit out of the deep mortar joints and crevices you just loosened. -
Wash the walls:
Mix a TSP substitute with warm water according to package directions. Scrub the brick surfaces down thoroughly to remove grease and grime, rinsing with a clean sponge and water afterwards. Let the brick dry completely for at least 24 hours.
Uneven Coverage?
Brick is porous and thirsty. If the peach color looks blotchy after drying, don’t worry. A third thin coat, applied specifically to the ‘swallow’ spots, usually evens out the sheen perfectly.
Step 2: Prime and Paint the Brick
-
Tape off edges:
Apply painter’s tape carefully around the inner edge of the window frame and along the ceiling line where the brick meets the wood or drywall. -
Apply masonry primer:
Using a 2-inch brush, cut in the primer along the grout lines and corners first. Follow up with a thick-nap mini roller to cover the face of the bricks, pressing firmly to get primer into the pores. Allow this to dry for the manufacturer’s recommended time. -
Cut in the peach color:
Once primed, start with your soft peach latex paint. Use the angled sash brush to paint inside the deep mortar joints first, as rollers often miss these recesses. -
Roll the first coat:
Load your mini roller generously and apply the peach paint to the brick faces. Use a ‘W’ pattern to distribute the paint, then back-roll to smooth it out. -
Inspect and touch up:
Brick is tricky; inspect the wall from different angles to spot missed pinholes. Use your brush to dab paint into any deep pits the roller missed. -
Apply second coat:
After the first coat is dry to the touch, apply a second coat for full, opaque coverage that hides the original masonry color entirely.
Step 3: Painting Trim and Details
-
Tape the glass and wall:
Once the wall paint is fully cured (give it a day if possible), tape off the brick surrounding the window frame. Also, tape off the window glass panes precisely to ensure clean lines. -
Paint the window frame:
Using a small artist’s brush or a very narrow sash brush, apply matte black paint to the window sash and frame. Keep your strokes long and even to minimize brush marks. -
Recalibrate edges:
I find it helpful to remove the tape from the glass while the black paint is still slightly tacky; this prevents the paint from peeling up with the tape later. -
Paint the ceiling/soffit:
If your nook has an exposed ceiling or soffit above, paint the structural beams or planks with bright white paint to reflect light downward. Use a fresh roller for the flat surfaces and a clean brush for the corners. -
Clean up borders:
Remove the remaining tape from the wall perimeter. If any peach paint bled onto the white ceiling or black frame, use a small artist’s brush for precise touch-ups. -
Address the pipes:
If there are exposed utility pipes (like the white PVC in the image), give them a fresh coat of paint to either blend in with the wall or stand out as a white accent, depending on your preference. -
Final cure:
Allow the entire space to cure for several days before placing any objects on the deep sill to prevent sticking.
Sill Durability
Since basement window ledges often collect moisture or dust, consider using a semi-gloss finish specifically for the flat sill area. It’s much easier to wipe clean than matte paint.
Enjoy the surprising warmth this pop of color adds to your subterranean space

Hanging Planters That Frame the View
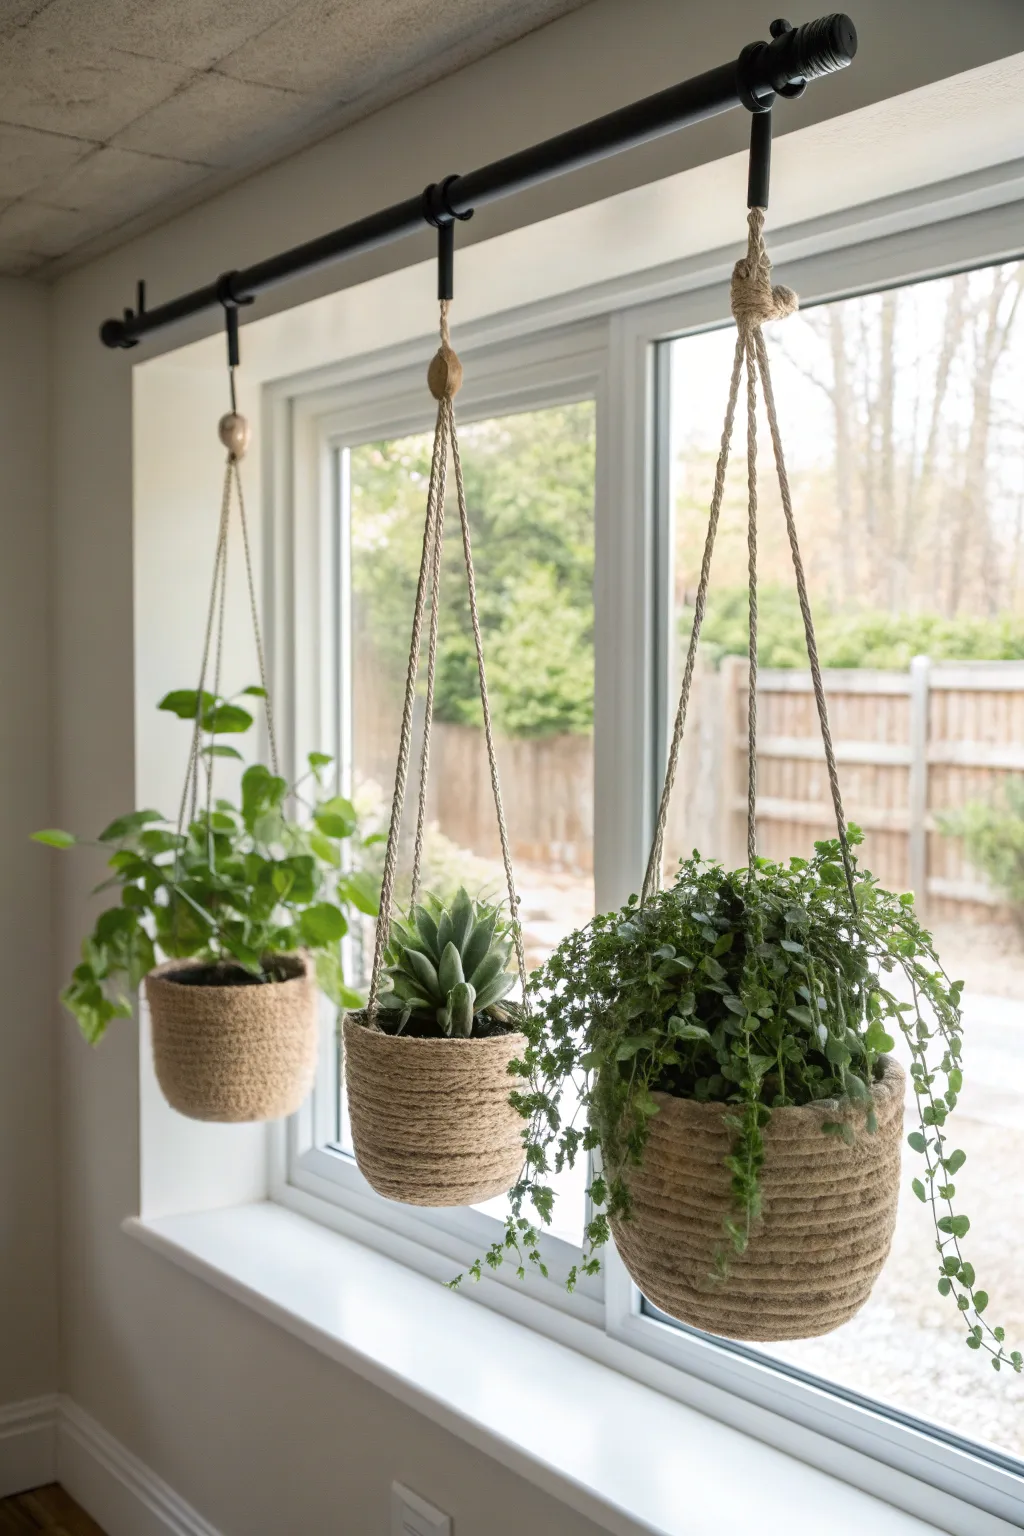
Frame your window view with this rustic-modern trio of hanging planters, combining the industrial edge of black piping with the natural warmth of jute rope. This project transforms standard pots into textured, floating displays that draw the eye upward and bring vibrant greenery directly into your living space.
Step-by-Step Tutorial
Materials
- 3 plastic or terracotta pots (various sizes)
- Thick jute rope (approx. 8mm-10mm thickness)
- Hot glue gun and plenty of glue sticks
- Jute twine (thinner, for hanging)
- 3 large wooden beads (approx. 1 inch diameter with large holes)
- Black industrial pipe curtain rod kit (approx. 1/2 inch diameter)
- Wall/ceiling mounting hardware for the rod
- Scissors
- Drill and bits
- Pencil and level
- Potting soil and 3 plants (trailing varieties work best)
Step 1: Mounting the Industrial Rod
-
Measure and Mark:
Begin by determining the perfect height for your rod. Hold the black industrial pipe against the wall or ceiling above your window frame to visualize the placement. Use a pencil to mark the screw holes for the mounting flanges on either side, using a level to ensure the rod will sit perfectly straight. -
Install Anchors:
Drill pilot holes at your marked spots. If you aren’t drilling directly into studs, gently tap in sturdy drywall anchors to ensure the rod can support the weight of watered plants. -
Secure the Flanges:
Screw the round mounting flanges into place securely. I like to double-check they are tight against the surface, as this foundation supports the entire display. -
Assemble the Rod:
Thread the main pipe into the mounted flanges. If your kit has elbow joints, attach those now to complete the industrial look. Ensure everything feels rigid and secure before testing it with any weight.
Tight Coils Trick
Rotate the pot, not the rope, as you glue. This helps keep tension even and prevents gaps between your rope rows for a seamless professional finish.
Step 2: Creating the Rope-Wrapped Pots
-
Start the Base Coil:
Take your first pot and the thick jute rope. Apply a generous dab of hot glue to the very center of the pot’s bottom. Press the rope end into the glue and spiral it tightly around itself to create a flat coil base. -
Continue Wrapping Upwards:
Work your way up the sides of the pot, applying a line of hot glue every few inches and pressing the rope firmly into it. Keep the rows snug against each other so no pot surface shows through. -
Navigating the Rim:
When you reach the top rim, continue gluing the rope slightly over the lip to conceal the plastic or clay edge completely. Cut the rope cleanly on the inside of the rim and secure the end with extra glue to prevent fraying. -
Repeat for All Pots:
Follow the same wrapping process for the remaining two pots. Slight variations in pot size or shape add organic interest to the final arrangement.
Step 3: Rigging the Hangers
-
Measure Hanging Lengths:
Decide how low you want each planter to hang. Cut three long pieces of the thinner jute twine for each pot (9 pieces total). Remember to cut them at least double your desired hanging length to account for knots and wrapping. -
Create the Pot Cradle:
For one pot, take three twine lengths and knot them together securely at one end. This large knot will sit centrally underneath the pot to support it. -
Secure the Cradle:
Place the pot on top of the large knot. Bring the three twine strands up evenly around the sides of the pot. To keep them in place, use a dab of hot glue to tack each string to the rope-wrapped rim of the planter—this adds stability so the pot doesn’t tip. -
Add the Wooden Bead:
Gather the three strands together several inches above the plant foliage. Thread all three through a large wooden bead. Slide the bead down to create a cinched look that frames the plant beautifully. -
Form the Top Loop:
Determine the final hanging height for this specific planter. Tie all three strands into a sturdy loop at the top, ensuring it’s large enough to slide over the black pipe rod.
Ombre Dip Dye
Dip the bottom third of your wrapped pots into a diluted paint or fabric dye bath for a trendy two-tone or ombre effect before planting.
Step 4: Final Assembly
-
Install the Plants:
Pot your chosen greenery into the rope-wrapped containers. Trailing plants like ivy, pothos, or string of pearls look particularly stunning cascading over the textured rope. -
Hang and Adjust:
Slide the loop of each planter onto the mounted industrial rod. Arrange them at varied heights if you cut the strings differently, or keep them uniform for a streamlined look. -
Final Styling:
Step back and adjust the spacing between the planters. Fluff the foliage and ensure the wooden beads are sitting straight for that polished, crafted finish.
Enjoy the lively, fresh atmosphere your new vertical garden brings to the room


Tiered Steps That Double as Display Space
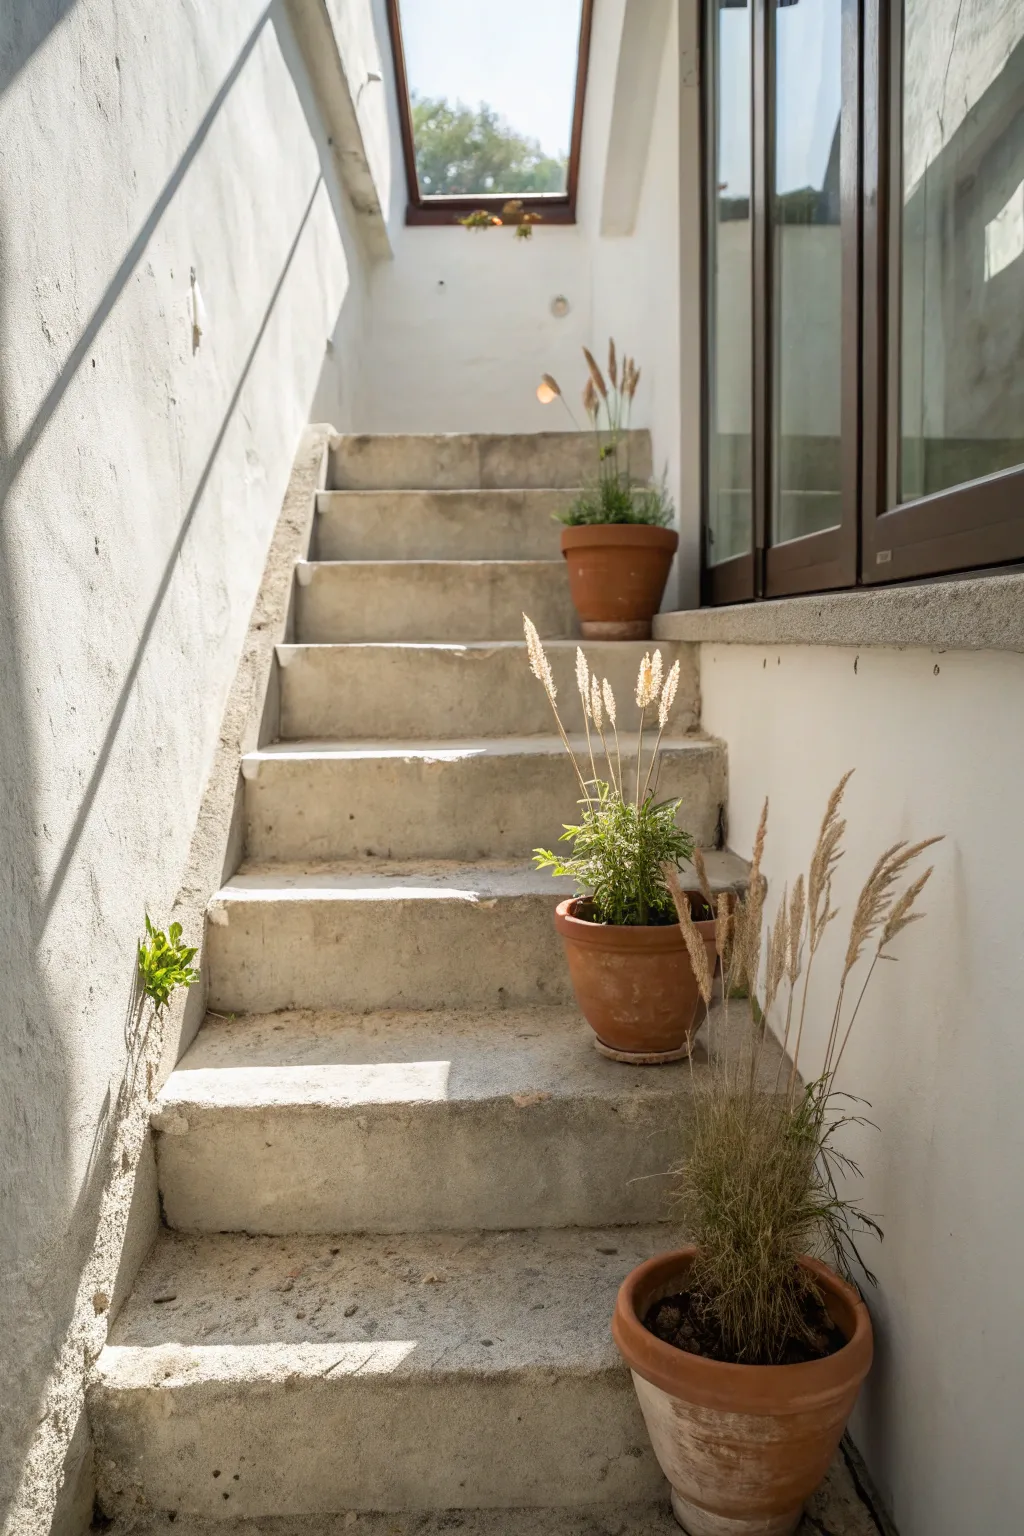
Transform a utilitarian basement walk-out or tiered window well into a minimalist garden gallery using simple concrete steps and carefully placed terracotta planters. This clean, architectural look relies on the interplay of rough textures, warm light, and the gentle height variation of ornamental grasses.
Detailed Instructions
Materials
- Concrete mix (standard high-strength)
- Wooden planks (2×8 or similar for riser forms)
- Plywood sheets (for side forms if needed)
- Wooden stakes and screws
- Level and measuring tape
- Trowel and concrete float
- White masonry paint or stucco finish
- Wide paintbrush or roller
- 3 terracotta pots (varying slightly in size/height)
- Potting soil
- Ornamental grasses (e.g., Feather Reed Grass or dried stems)
Step 1: Forming the Tiered Structure
-
Assess the dimensions:
Measure the width and total rise of your window well area. You need to calculate how many steps will fit comfortably; aiming for a standard riser height of about 7-8 inches generally works best for walking and display. -
Prepare the ground:
Clear the slope of debris and loose dirt. Compact the soil firmly to prevent settling later, creating a crude stair shape in the dirt itself to reduce the amount of concrete needed. -
Build the side forms:
If you don’t have existing walls, stake plywood sheets into the sides to create the boundary for your pour. Ensure these are braced heavily on the outside so the concrete doesn’t bow them out. -
Install riser boards:
Cut your wooden planks to the exact width of the well. Place the bottom riser board first, securing it with stakes driven deep into the ground. Level it perfectly horizontal. -
Stack the subsequent risers:
Position the next riser board for the second step. I like to fasten it to the side forms or use side cleats to hold it in place. Repeat this layout all the way to the top, checking that each board is level and plumb. -
Reinforce the forms:
Add extra bracing to the front center of wider steps if necessary. Concrete is incredibly heavy, and you don’t want a blowout midway through your project.
Sun-Kissed Stucco Tip
To get that warm, aged wall look, mix a tiny drop of yellow ochre or raw sienna pigment into your white masonry paint. It softens the glare.
Step 2: Pouring and Finishing Concrete
-
Mix the concrete:
Prepare your concrete mix according to the bag instructions. You want a consistency that isn’t too soupy—think thick oatmeal—so it holds its shape on the slope. -
Pour the bottom step:
Start filling from the bottom step up. Shovel the concrete into the form, vibrating it slightly with your shovel or a hammer tap on the form boards to release air bubbles. -
Level and float:
Screed the top of the step level with the riser board using a straight piece of wood. Then, use a magnesium float to smooth the surface, bringing the ‘cream’ to the top for a nice finish. -
Proceed upwards:
Continue pouring and floating each step, working your way up the staircase. Ensure each step is fully filled before moving to the next. -
Edge the steps:
Once the concrete has stiffened slightly (usually after 30-45 minutes), run an edging tool along the front edge of each step to create a rounded, professional nosing that resists chipping. -
Cure the concrete:
Let the concrete cure slowly. Keep it damp by misting it with water or covering it with plastic sheeting for a few days to prevent cracking.
Drainage Check
Ensure your steps slope very slightly forward (1/8 inch) so rain or sprinkler water runs off and doesn’t pool near the foundation or house wall.
Step 3: Texture and Styling
-
Remove forms:
Carefully pry away the wooden forms after the concrete has set hard (usually 24-48 hours). Be gentle to avoid damaging the green concrete edges. -
Apply wall texture:
For the side walls, apply a rough stucco coat or a thick, textured white exterior masonry paint. Use a wide brush and use messy, cross-hatch strokes to mimic the rustic, sun-washed look in the photo. -
Select your pots:
Choose three simple terracotta pots. I prefer using ones that have aged a bit or have a matte finish to contrast with the bright white walls. -
Plant the greenery:
Fill the pots with ornamental grasses. For an exact match to the image, use dried stalks or grasses that have gone to seed, which provide that lovely beige, feathery texture that catches the light. -
Arrange the display:
Place the pots on alternating steps—one low, one middle, one high. Stagger them slightly (left, right, right) to create a visual diagonal flow that draws the eye upward toward the light source.
Step back and enjoy the serene, sunlit path you’ve created from a simple functional space
BRUSH GUIDE
The Right Brush for Every Stroke
From clean lines to bold texture — master brush choice, stroke control, and essential techniques.
Explore the Full Guide
Wood-Cribbed Walls for a Rustic Feel
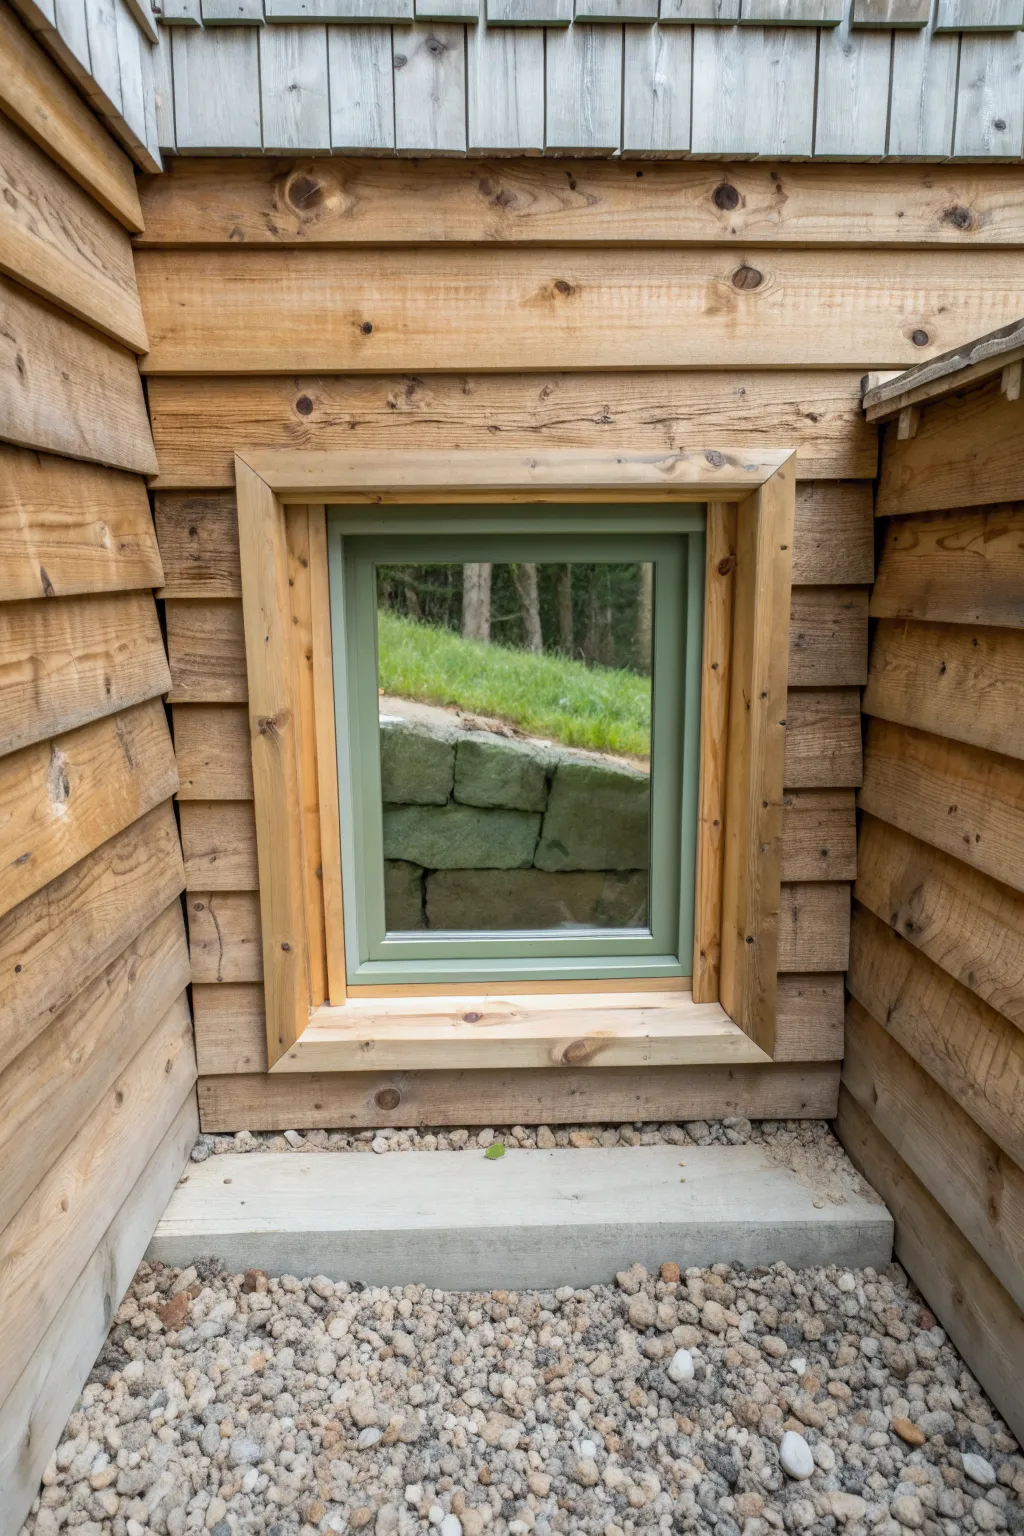
Transform a utilitarian concrete window well into a charming architectural feature with this wood-cribbed design. The natural grain of the horizontal timber siding brings warmth and a cabin-like aesthetic to an otherwise stark basement view.
Step-by-Step Guide
Materials
- Pressure-treated 2×4 lumber (framing)
- Cedar or larch lap siding/cladding boards
- Concrete screws or masonry anchors
- Galvanized or stainless steel framing nails
- Stainless steel trim nails or siding nails
- Heavy-duty landscape fabric
- Washed river rock or pea gravel
- Miter saw
- Hammer drill (masonry bit)
- Level
- Exterior wood sealer or clear stain
- Paintbrush
Step 1: Preparation and Framing
-
Clear the area:
Begin by digging out the existing window well area if necessary, ensuring you have enough depth for drainage. Remove any old metal liners, debris, or vegetation to start with a clean slate. -
Assess drainage:
Check the bottom of the well. Ensure there is a functional drain connected to your perimeter weeping tile or a deep gravel pit to prevent water accumulation against the window. -
Measure the opening:
Measure the height, width, and depth of the concrete well walls. Plan for three framing sections: two side walls and one rear wall facing the window, matching the dimensions of your excavated area. -
Build the side frames:
Construct two vertical ladder-style frames using pressure-treated 2x4s. These will act as the skeleton for your side walls. Space your horizontal supports about 16 inches apart to provide solid backing for the siding. -
Install the frames:
Position the treated frames against the earth or concrete retaining walls. Use a hammer drill and masonry anchors to secure these frames firmly into the existing concrete foundation or retaining wall sides. -
Check for plumb:
As you anchor the frames, use a large level to ensure they are perfectly vertical. If the old walls are slanted, you may need to shim behind the wood framing to get a straight surface.
Use Stainless Fasteners
Always use stainless steel nails and screws for cedar or redwood. Galvanized fasteners can react with the natural tannins in the wood, causing ugly black bleeding streaks.
Step 2: Cladding Installation
-
Cut the siding:
Measure the width of your rear wall and cut your cedar lap siding to size. I find it helpful to cut only a few boards at a time to account for any slight variations in the frame width. -
Install the starter board:
Start at the very bottom of the rear wall. Nail your first board level, ensuring the bottom edge is at least an inch above the final gravel grade to prevent rot. -
Work your way up:
Continue installing boards upward, overlapping each one by about an inch (or according to the reveal of your specific siding profile). Use stainless steel nails to prevent unsightly rust streaks later. -
Clad the side walls:
Once the rear wall is finished, proceed to cladding the two side walls. Carefully measure angles if your well flares outward. Miter the corners where the side walls meet the rear wall for a tight, professional joint. -
Frame the window trim:
Construct a box-frame around the window itself using wider cedar boards (like 1×4 or 1×6). This ‘picture frame’ creates a clean transition between the window unit and your new siding walls. -
Install the window sill:
Place a thick timber sill at the bottom of the window frame. Ensure it slopes slightly away from the glass to shed rainwater effectively.
Step 3: Finishing Details
-
Cap the top edges:
Install a cap rail along the top edge of your wood walls where they meet the ground level. This protects the end grain of your siding and framing from direct rain exposure. -
Apply finish:
Apply a high-quality exterior clear stain or sealer to all exposed wood surfaces. This preserves the natural golden hue of the cedar and protects it from UV graying and moisture damage. -
Install landscape fabric:
Lay down heavy-duty landscape fabric at the bottom of the well. This barrier separates the soil from your decorative stone and prevents weeds from popping up. -
Pour the gravel base:
Fill the bottom of the well with clean washed river rock or pea gravel. Spread it evenly to a depth of about 3-4 inches, covering the landscape fabric completely. -
Final inspection:
Check all corners and trim pieces for loose nails or rough edges. Sand down any splinters and give the glass a good clean to enjoy your new view.
Add Uplighting
Install low-voltage waterproof LED well lights in the gravel base pointing up the wood walls. It creates incredible mood lighting for the basement room.
Now you can enjoy a warm, natural view from your basement that feels more like a sunken garden than a utilitarian shaft
A “Faux View” Backdrop Using Tall Greenery
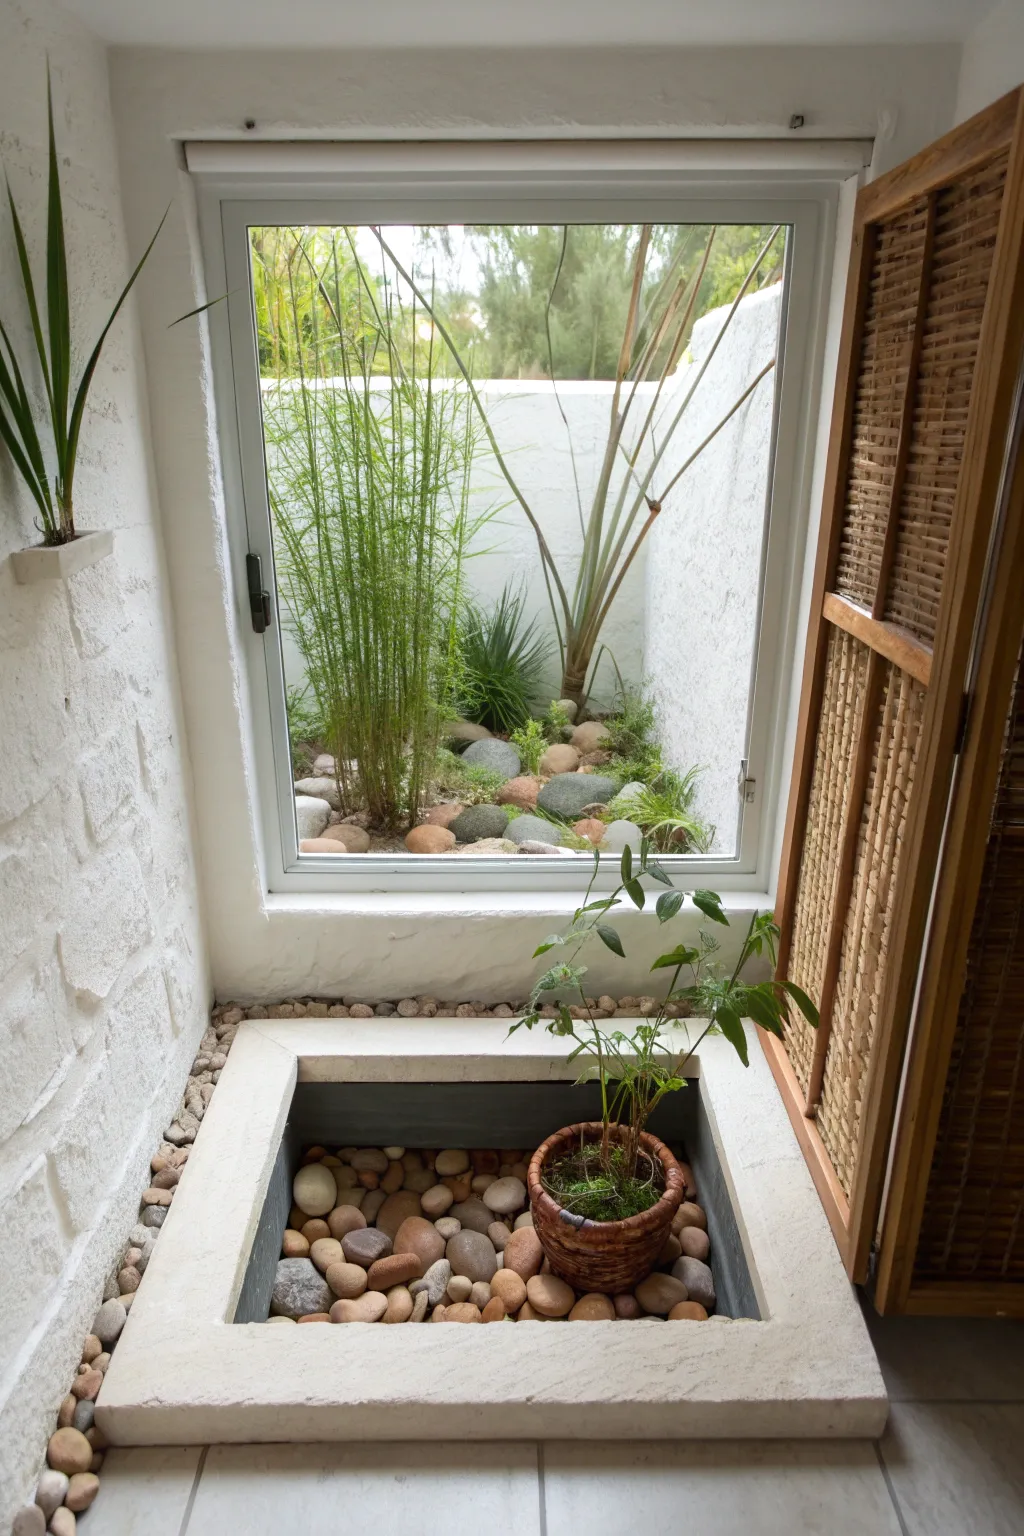
Transform a dark basement corner into a serene escape by constructing this dual-layer garden feature that blurs the line between inside and out. This project creates a stunning visual depth using a sunken indoor planter box that visually connects to a bright, rock-filled exterior window well.
Detailed Instructions
Materials
- White exterior masonry paint
- River rocks (mixed sizes in grey and tan tones)
- Pea gravel or sand (for base)
- Tall faux horsetail reeds or bamboo stalks
- Live or high-quality faux ornamental grasses
- Potted indoor palm or fern
- Wicker planter basket
- Limestone or concrete finish pavers (for indoor curb)
- Waterproofing membrane (if building the indoor trough)
- Decorative pebble mix (for indoor trough)
- Bamboo or reed privacy screen
- Spackle or textured wall compound
Step 1: Setting the Exterior Scene
-
Prep the walls:
Clean the exterior window well walls thoroughly. If the concrete is stained or dark, apply two coats of bright white exterior masonry paint. This brightens the space significantly and reflects light into the basement. -
Create the base layer:
Pour a layer of pea gravel or sand at the bottom of the well to ensure good drainage. Level it out so your decorative rocks sit evenly. -
Arrange the rocks:
Place larger river rocks towards the back and corners to create depth. Fill the remaining floor area with medium-sized smooth stones in natural grey and tan hues, leaving spaces for planting. -
Install vertical greenery:
Plan the placement of your tall plants. I prefer to group tall horsetail reeds or bamboo on the left side to frame the view without blocking it entirely. -
Add lower foliage:
Tuck smaller ornamental grasses or leafy plants around the base of the taller reeds and near the rocks. The goal is a natural, unmanicured look. -
Check the view:
Go inside and look through the window. Adjust the position of rocks and plants to ensure the composition looks balanced from your primary indoor viewing angle.
Step 2: Constructing the Indoor Planter
-
Build the curb:
If your space doesn’t have an existing sunken area, construct a low rectangular curb using limestone blocks or concrete pavers. Arrange them to form a square frame directly beneath the window. -
Apply finish to the curb:
For a seamless look, you can face the curb with a textured compound that matches the walls or simply choose stone that complements the room’s flooring. -
Line the trough:
Ensure the interior of the curb area is waterproofed if it’s a true depression. If it’s just a surface feature, lay down a protective liner to save your floor from scratches. -
Fill the indoor bed:
Fill the bottom of your indoor planter box with the same smooth river stones used outside. This visual continuity tricks the eye into thinking the spaces are connected. -
Position the feature plant:
Place a medium-sized indoor plant, like a fern or small palm, into a rustic wicker basket. Nest the basket into the river stones so it feels grounded.
Drainage Check
Ensure your exterior window well has a functioning drain before adding layers of rock. Accumulated water can damage your foundation or drown live plants.
Step 3: Adding Texture and Detail
-
Texture the walls:
To mimic the rustic feel of the image, apply a textured white stucco or heavy plaster finish to the interior walls flanking the window. -
Install the side planter:
Mount a small, unobtrusive ledge or pocket planter on the left wall at eye level. Pop in a spiky plant like a snake plant or dracaena to break up the vertical white space. -
Create the rock border:
Run a narrow border of loose pebbles along the floor where the wall meets the ground. This ‘French drain’ look adds an architectural detail that softens the room’s edges. -
Add the privacy screen:
Install a tall bamboo or rattan privacy screen to the right of the window. This introduces a warm wood tone that contrasts beautifully with the cool white stone and green plants.
Night Mode
Hide small, solar-powered uplights behind the exterior rocks to illuminate the tall grasses at night for a dramatic shadow effect.
Enjoy the peaceful atmosphere of your new garden view, which brings light and life to your basement space

PENCIL GUIDE
Understanding Pencil Grades from H to B
From first sketch to finished drawing — learn pencil grades, line control, and shading techniques.
Explore the Full Guide
Night Glow With Subtle, Indirect Lighting
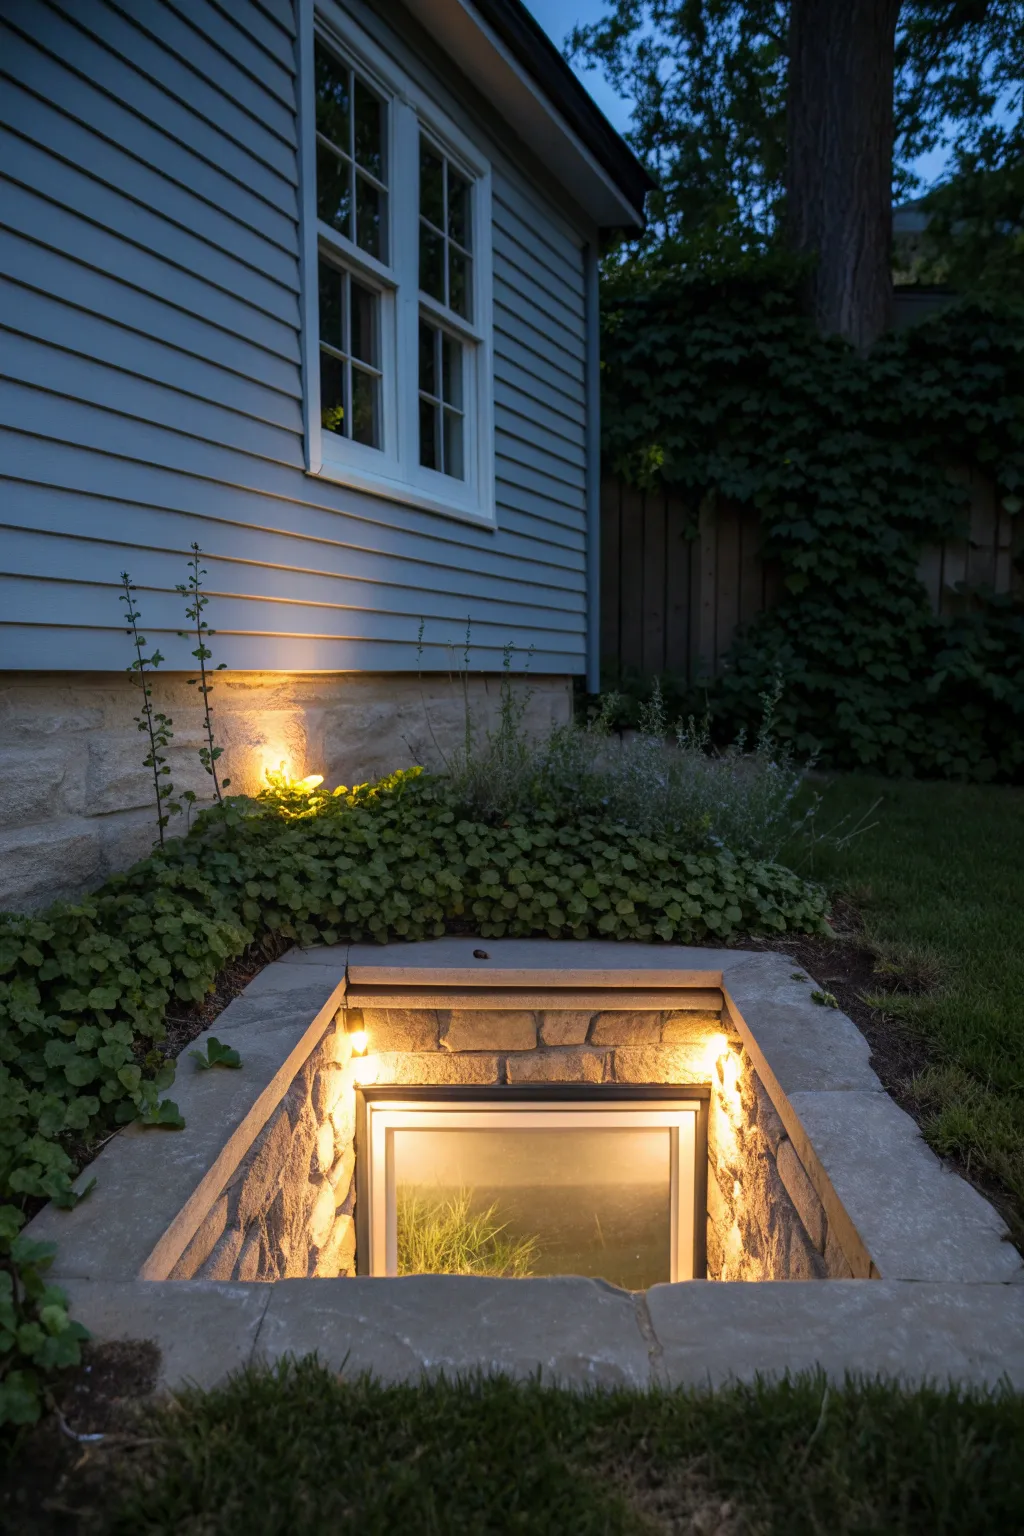
Transform a dark, utilitarian window well into a glowing garden feature that enhances your home’s exterior ambiance. By integrating stone textures and concealed lighting, this project creates a warm, inviting view from both inside the basement and the backyard.
Step-by-Step Tutorial
Materials
- Retaining blocks or natural stone veneer
- Flat capstones or pavers (for the rim)
- Concrete adhesive or mortar
- Gravel for drainage
- Outdoor-rated low-voltage LED strip lights or puck lights
- Low-voltage transformer and timer
- Outdoor wiring and wire nuts
- Hammer drill (if mounting to concrete)
- Caulk gun
- Landscape fabric
- Ground cover plants (e.g., ivy or vinca)
Step 1: Preparing the Well Structure
-
Assess and Excavate:
Begin by digging out the area around your basement window to the desired depth, ensuring you have enough space for the stone retaining walls. verify that existing drainage is functional to prevent water buildup. -
Install the Base:
Lay down a solid base of compacted gravel or a concrete footer where your stone walls will sit. This crucial step prevents settling and cracking later on. -
Build the Walls:
Construct the tiered walls using your chosen retaining blocks or stone veneer over a concrete form. Apply heavy-duty concrete adhesive between layers for stability, checking for level as you build upward. -
Address the Top Rim:
Pause before installing the final capstone layer. This is where we will hide the wiring, so ensure the top surface of the wall is clean and dry.
Step 2: Installing the Lighting System
-
Run the Wiring:
Drill a discreet hole through the foundation or run conduit alongside the house to bring your low-voltage wire to the window well site. Leave plenty of slack wire to work with. -
Position the Fixtures:
For the “hidden source” look shown in the image, mount small LED puck lights or waterproof strip lights directly under the lip of the future capstones. Testing their position at night before permanent mounting helps you aim the beam perfectly. -
Secure the Lights:
Use manufacturer clips or outdoor-rated adhesive to fix the lights to the underside of the stone rim or the vertical wall face, aiming them downward to wash the stone texture with light. -
Connect to Power:
Wire the lights back to your transformer using waterproof wire nuts. I always wrap these connections with electrical tape for an extra layer of moisture protection.
Light Temperature Tip
Use 2700K or 3000K warm white LEDs. Cooler 5000K lights interact poorly with stone, making it look grey and sterile rather than cozy.
Step 3: Finishing Touches
-
Install Capstones:
Place the flat capstones over the top of the wall, using adhesive to secure them. Ensure they overhang slightly to protect the lights underneath from direct rain and view. -
Backfill and Plant:
Fill the space behind the stone walls with soil. Plant dense ground cover like ivy or creeping jenny around the perimeter to soften the hard stone edges. -
Add Exterior Uplighting (Optional):
To mimic the full effect in the photo, place a small landscaping spotlight near the foundation to cast a gentle wash of light up the siding. -
Clean the Glass:
Thoroughly clean the basement window glass inside and out. The new lighting will highlight any dirt, so a crystal-clear pane is essential. -
Final System Test:
Wait for dusk and turn the system on. Adjust the angle of your exterior spotlight if necessary to reduce glare and maximize the warm glow on the stone.
Level Up: Automation
Connect your transformer to a smart outdoor plug. This lets you schedule the well lights to turn on at sunset and off at bedtime automatically.
Now you have a stunning architectural feature that brightens your basement view


Have a question or want to share your own experience? I'd love to hear from you in the comments below!