There is something truly magical about staring at a blank canvas and knowing you can transform it into a stunning piece with just a few colors and simple strokes. These approachable projects focus on high-contrast compositions and forgiving techniques like silhouettes and organic textures, perfect for discovering your inner artist without the pressure of perfection.
Classic Gradient Sunset Silhouette
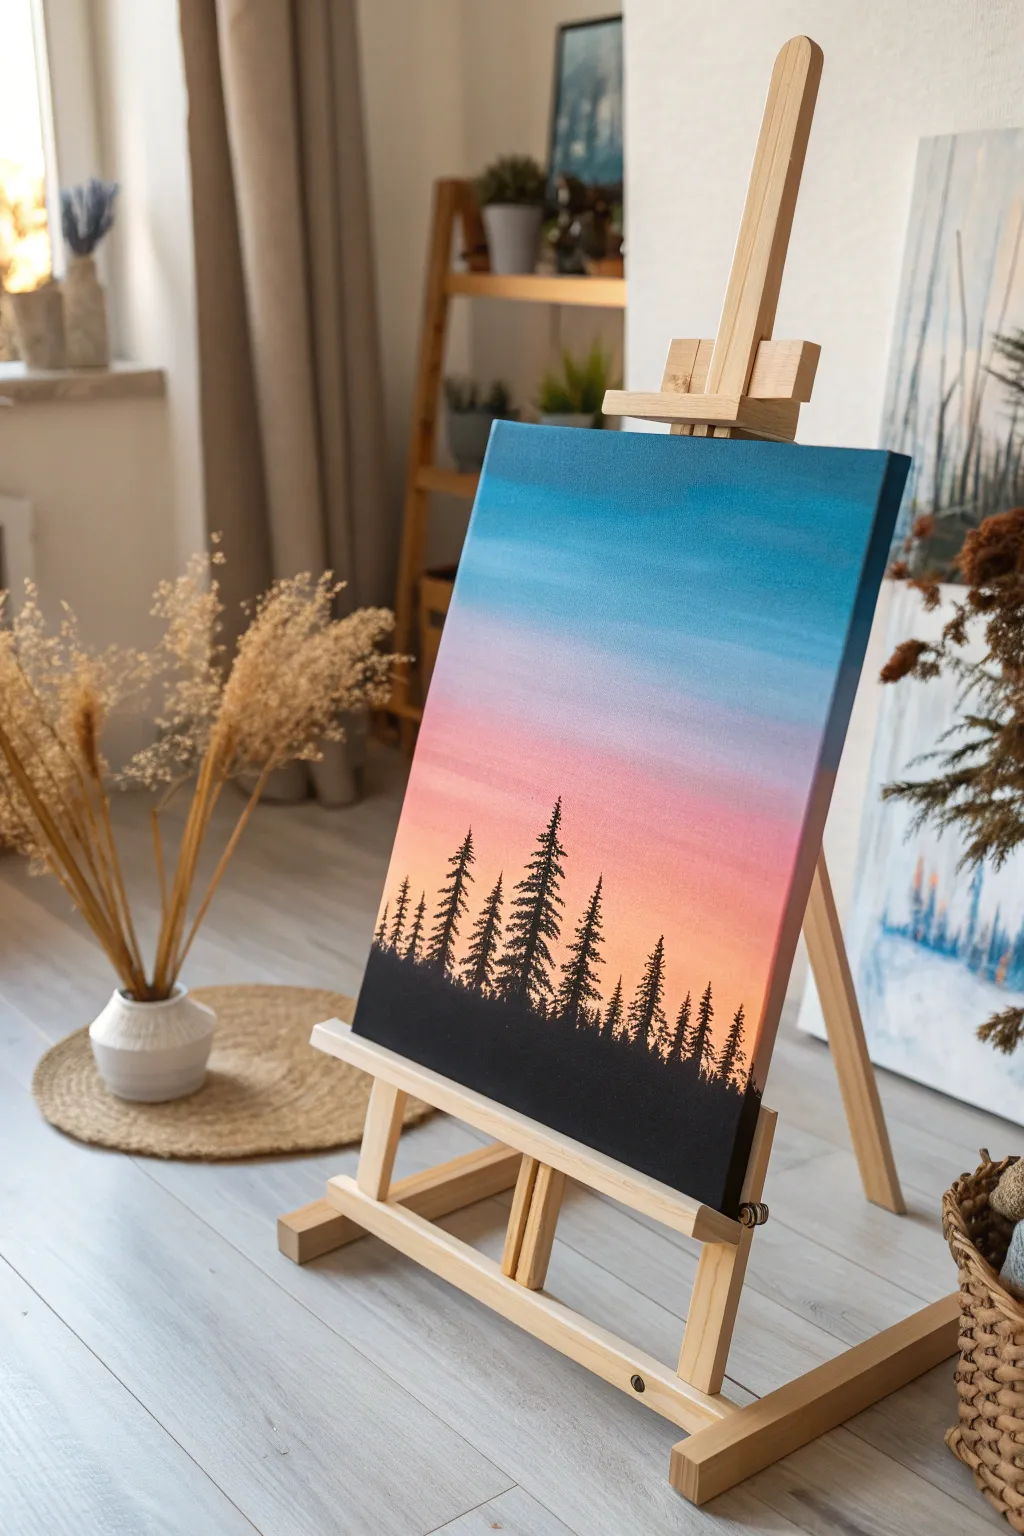
Capture the calm beauty of twilight with this striking landscape that pairs a soft, colorful gradient against high-contrast foreground details. This project is perfect for mastering acrylic blending techniques while creating a professional-looking piece of art.
Step-by-Step Tutorial
Materials
- Stretched canvas (e.g., 11×14 inch)
- Acrylic paints: Phthalo Blue, Magenta, Cadmium Yellow, Titanium White, Mars Black
- Large flat wash brush (1-inch)
- Small round brush or liner brush
- Palette and water cup
- Paper towels
Step 1: Painting the Sky Gradient
-
Prepare the canvas:
Start by lightly misting your canvas with water or brushing a very thin coat of water over it. This helps the acrylics blend smoothly without drying too fast. -
Apply the upper sky:
Load your large flat brush with Phthalo Blue. Paint horizontal strokes across the top one-third of the canvas. -
Lighten the blue:
Without washing the brush completely, pick up a little Titanium White. Paint the area just below the dark blue, blending the seam where they meet using long, sweeping horizontal strokes. -
Introduce the pinks:
Clean your brush thoroughly. Mix Magenta with a generous amount of White to create a soft pink. Apply this to the middle section of the canvas. -
Blend the transition:
While the paint is still wet, gently brush the boundary between the light blue and the pink. If the colors aren’t moving, I sometimes dip just the corner of the brush in water to encourage the blend. -
Add the glowing horizon:
Rinse the brush again. Mix Cadmium Yellow with White and a tiny touch of Magenta to create a warm peach color. Paint the bottom third of the sky area. -
Final sky smoothing:
Clean the brush and dry it slightly so it is damp but not dripping. Run the brush horizontally across the entire canvas from top to bottom one last time to soften all transitions. -
Let it dry:
Allow the background to dry completely. The canvas must be dry to the touch before adding the black trees, or they might bleed into the sky.
Fixing Muddy Skies
If blending blue and orange turns gray/brown, stop immediately. Let the paint dry fully, then repaint the layers. Keep a strip of pink or white between blue and orange.
Step 2: Creating the Silhouette
-
Define the ground:
Switch to pure Mars Black paint. Use the flat brush to paint an uneven, solid black hill across the very bottom of the canvas to create the forest floor. -
Outline the trunks:
Using a small round brush, paint thin vertical lines rising from the ground. Vary the heights, making some tall and others short to create a natural rhythm. -
Start the foliage:
Starting at the top of a tree line, use the tip of your small brush to tap tiny dashes. Keep them very narrow at the peak. -
Widen the branches:
As you work your way down the trunk, make your dabbing strokes slightly wider. Use a zig-zag motion to mimic pine branches reaching out. -
Create texture:
Don’t aim for perfect symmetry. Leave small gaps between branches so the sunset colors peek through the trees. -
Fill the forest:
Continue this process for all the vertical lines you painted. I like to group some trees closer together to make the forest feel dense. -
Refine the edges:
Use a liner brush with slightly watered-down black paint to add the very sharp tips to the tops of the trees. -
Add final details:
Paint a few tiny, shorter trees in the gaps between the large ones to simulate distance and depth.
Pro Tip: Better Branches
For realistic pine texture, try using an old, frayed brush or a fan brush turned vertically. The irregular bristles do the work of creating random needles for you.
Step back and admire your tranquil sunset scene, now ready to bring a peaceful vibe to any room.


Splatter Paint Galaxy Sky
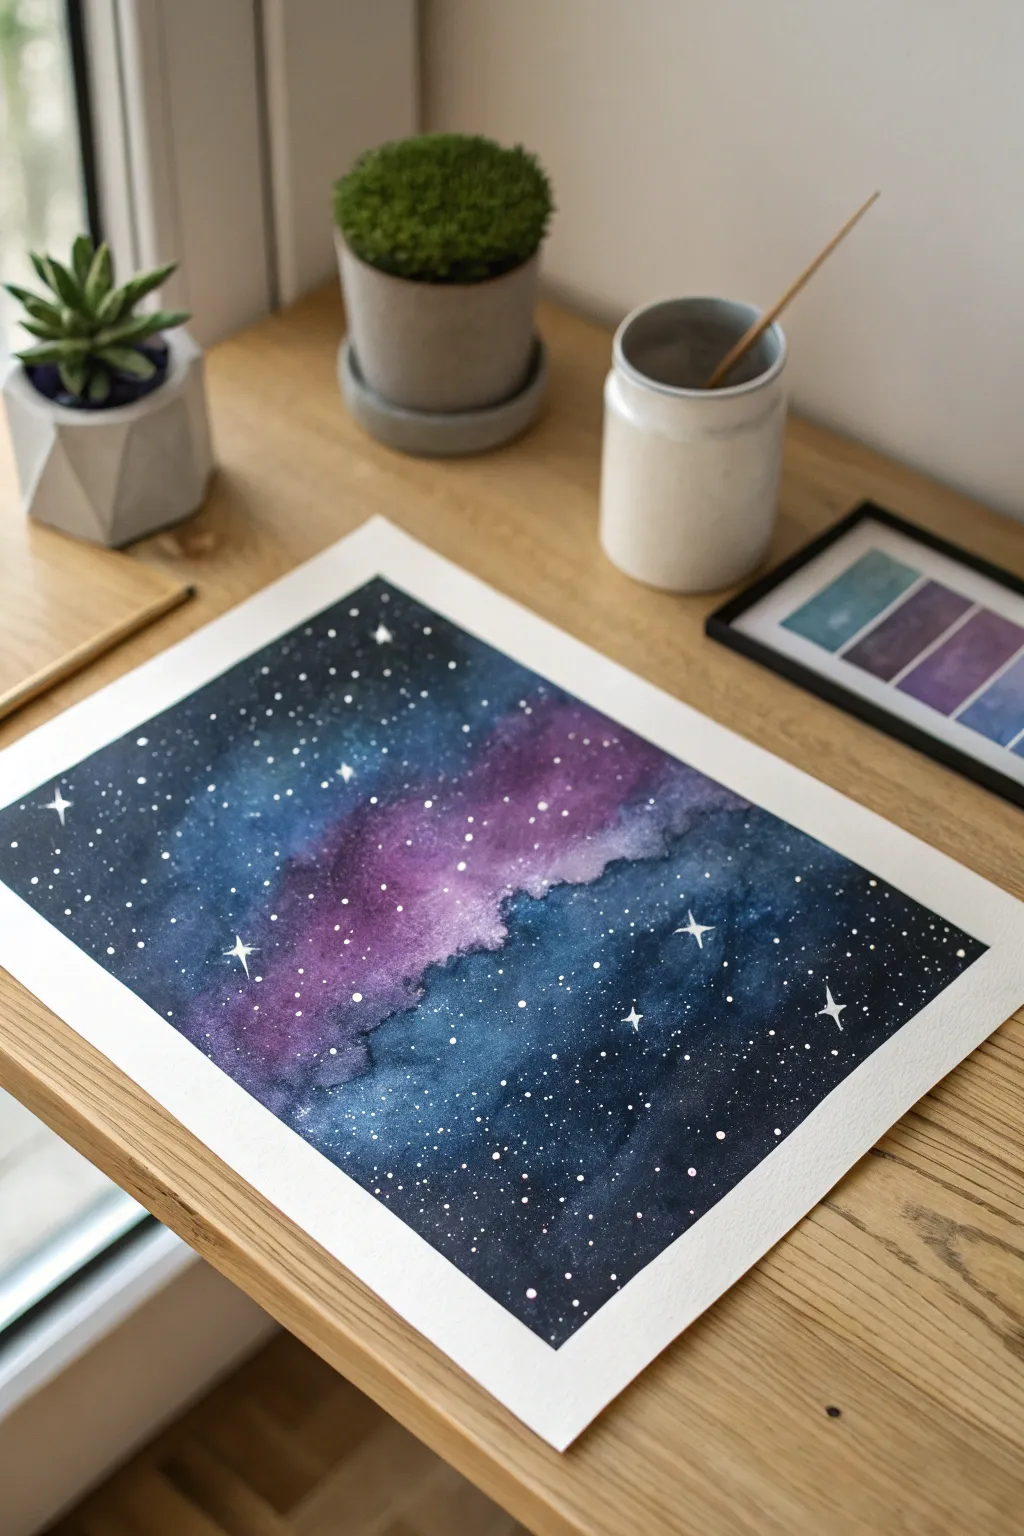
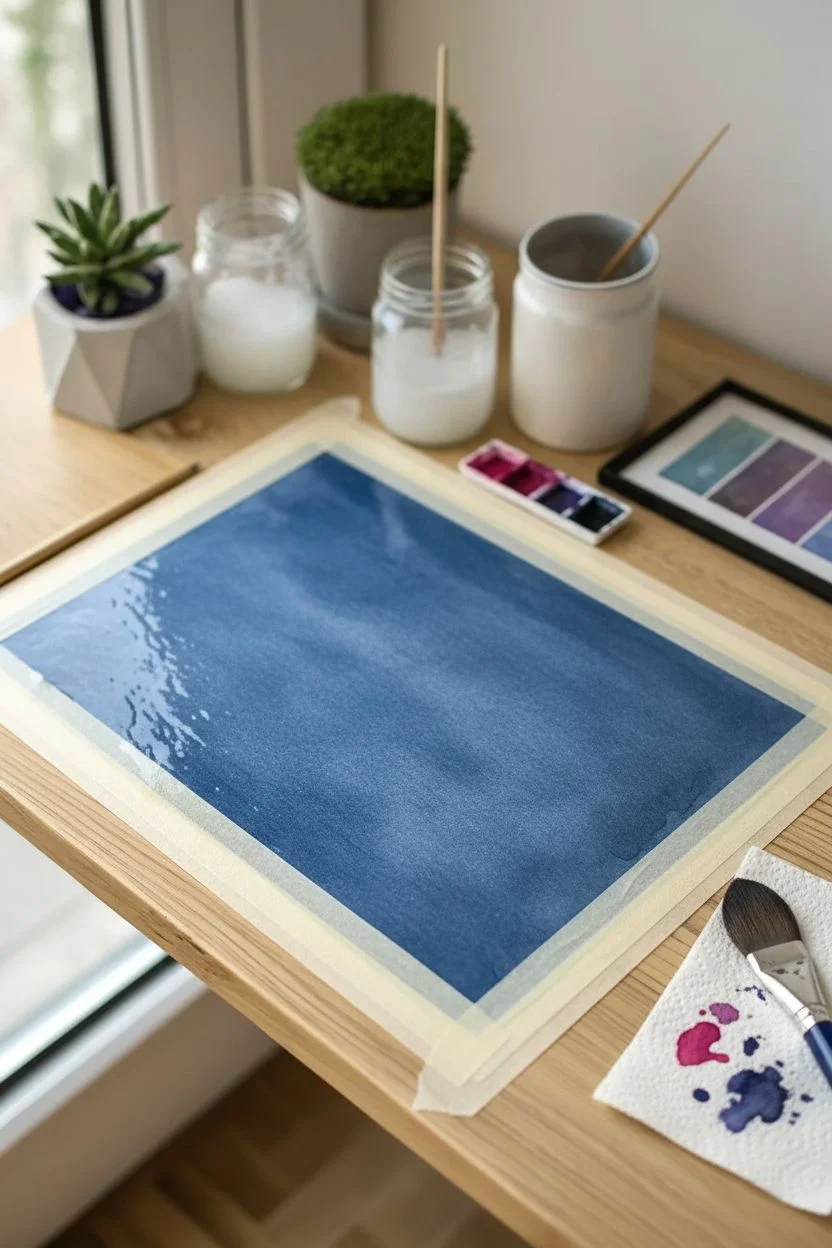
Capture the magic of the night sky with this beginner-friendly watercolor project that looks much more complex than it actually is. Using simple wet-on-wet techniques, you’ll blend vibrant purples and deep blues to create a stunning nebula background for your own personal star field.
Detailed Instructions
Materials
- Cold press watercolor paper (300gsm recommended)
- Painter’s tape or masking tape
- Watercolor paints (Indigo, Violet, Magenta, Black)
- White gouache or opaque white acrylic paint
- Large round brush (size 10 or 12)
- Fine detail brush (size 0 or 1)
- Old toothbrush
- Two jars of water
- Paper towels
- Mounting board or flat surface
Step 1: Preparing the Void
-
Secure the canvas:
Place your watercolor paper on a board and tape down all four edges firmly with painter’s tape. This creates the crisp white clean border seen in the final piece and prevents the paper from buckling. -
Activate paints:
Add a few drops of clean water to your watercolor pans to soften them up, specifically your magenta, purple, deep blue, and black. -
Wet the paper:
Using your large clean brush, apply a generous layer of clean water over the entire paper surface. The paper should look glossy and reflective, but there shouldn’t be puddles forming.
Muddy Galaxy?
If your colors are turning brown/gray, you are likely over-mixing on the paper. Let the wet-on-wet technique do the work—place colors side-by-side and let gravity blend them.
Step 2: Creating the Nebula
-
Start with light:
Load your large brush with magenta or vibrant purple. Paint an uneven, diagonal streak across the center of the wet paper, allowing the paint to bloom naturally. -
Add mid-tones:
Switch to a deep blue or violet distinct from the first color. Paint around the edges of your pinkish streak, letting the colors touch and bleed into each other slightly. -
Deepen the space:
Mix a strong concentration of indigo or prussian blue. Apply this to the outer areas of the paper, moving towards the corners, leaving the central colorful streak bright. -
Create the abyss:
Mix black with your indigo to create an almost-black hue. Dab this concentrated dark paint into the very corners and edges to create a vignette effect. -
Blend softly:
If the transitions look too harsh, clean your brush, dry it slightly on a paper towel, and gently tickle the areas where colors meet to encourage blending. -
Add texture:
I like to splatter a tiny bit of clean water onto the still-wet paint with my fingertips; this pushes the pigment away and creates subtle ‘cloud’ textures. -
First drying phase:
Let this layer dry completely. The paper must be bone dry before the next step to keep the stars crisp.
Add a Silhouette
Once the galaxy is dry, use solid black paint to add a simple silhouette along the bottom edge, like a jagged mountain range or a line of pine trees, for added scale.
Step 3: Starlight to Finish
-
Enhance darkness (Optional):
If your dried galaxy looks too pale, re-wet just the dark corners and add another layer of indigo/black for contrast, then dry again. -
Prepare the stars:
Squeeze a pea-sized amount of white gouache onto a palette. Mix in a drop of water until it has the consistency of heavy cream. -
The splatter technique:
Dip an old toothbrush into the white mix. Hold it over the painting and run your thumb across the bristles to spray fine mist ‘stars’ across the galaxy. -
Concentrate the stars:
Focus more splatter on the darker areas of the painting to create high contrast, leaving the lighter nebula section slightly less crowded. -
Painting large stars:
Switch to your fine detail brush. Dip it in the white paint and carefully draw a few larger four-pointed stars (a simple cross shape) scattered randomly. -
Highlighting:
Place a solid white dot in the center of your cross-shaped stars to make them glow. -
Final dry:
Allow the white gouache to dry completely, which usually happens quite fast. -
The reveal:
Slowly peel away the masking tape at a 45-degree angle, away from the painting, to reveal those perfect clean edges.
Frame your cosmic masterpiece or scan it to use as a stunning background for hand-lettered quotes


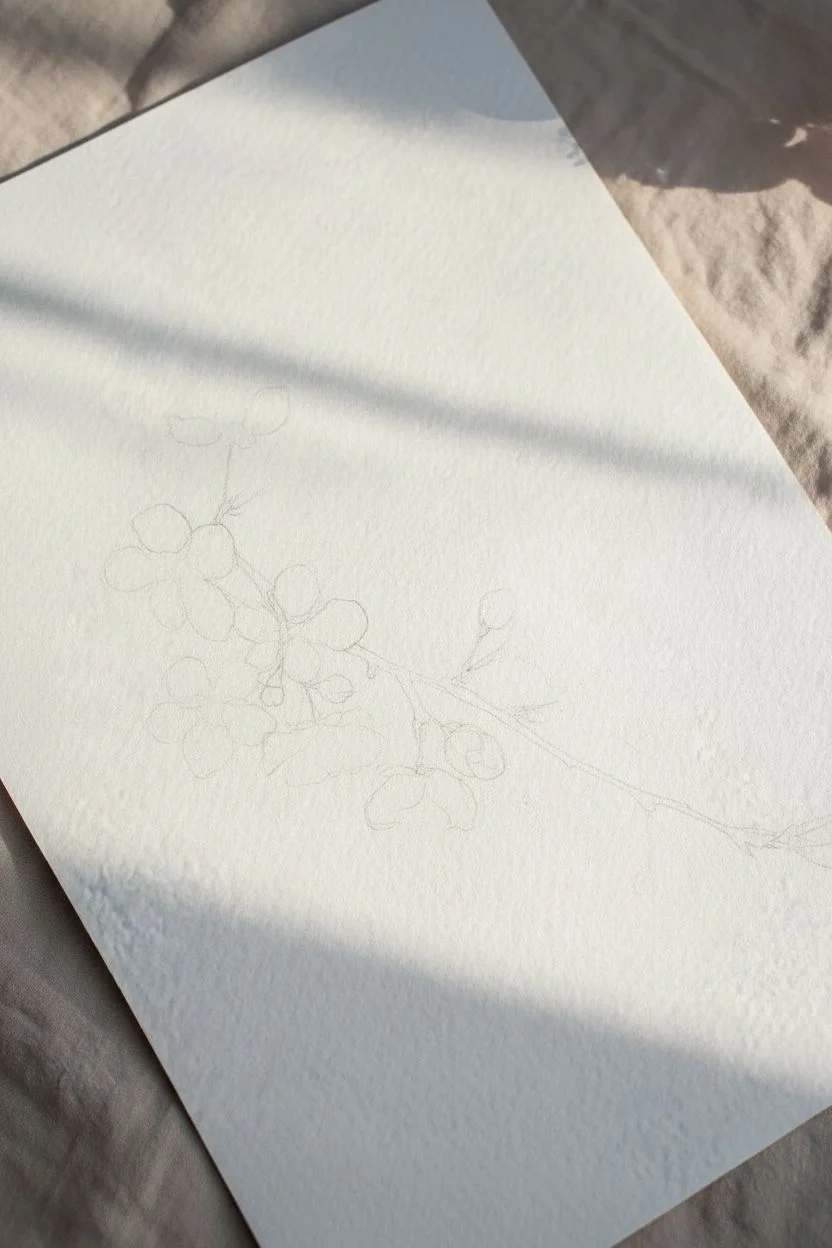
Dabbed Cherry Blossom Branch
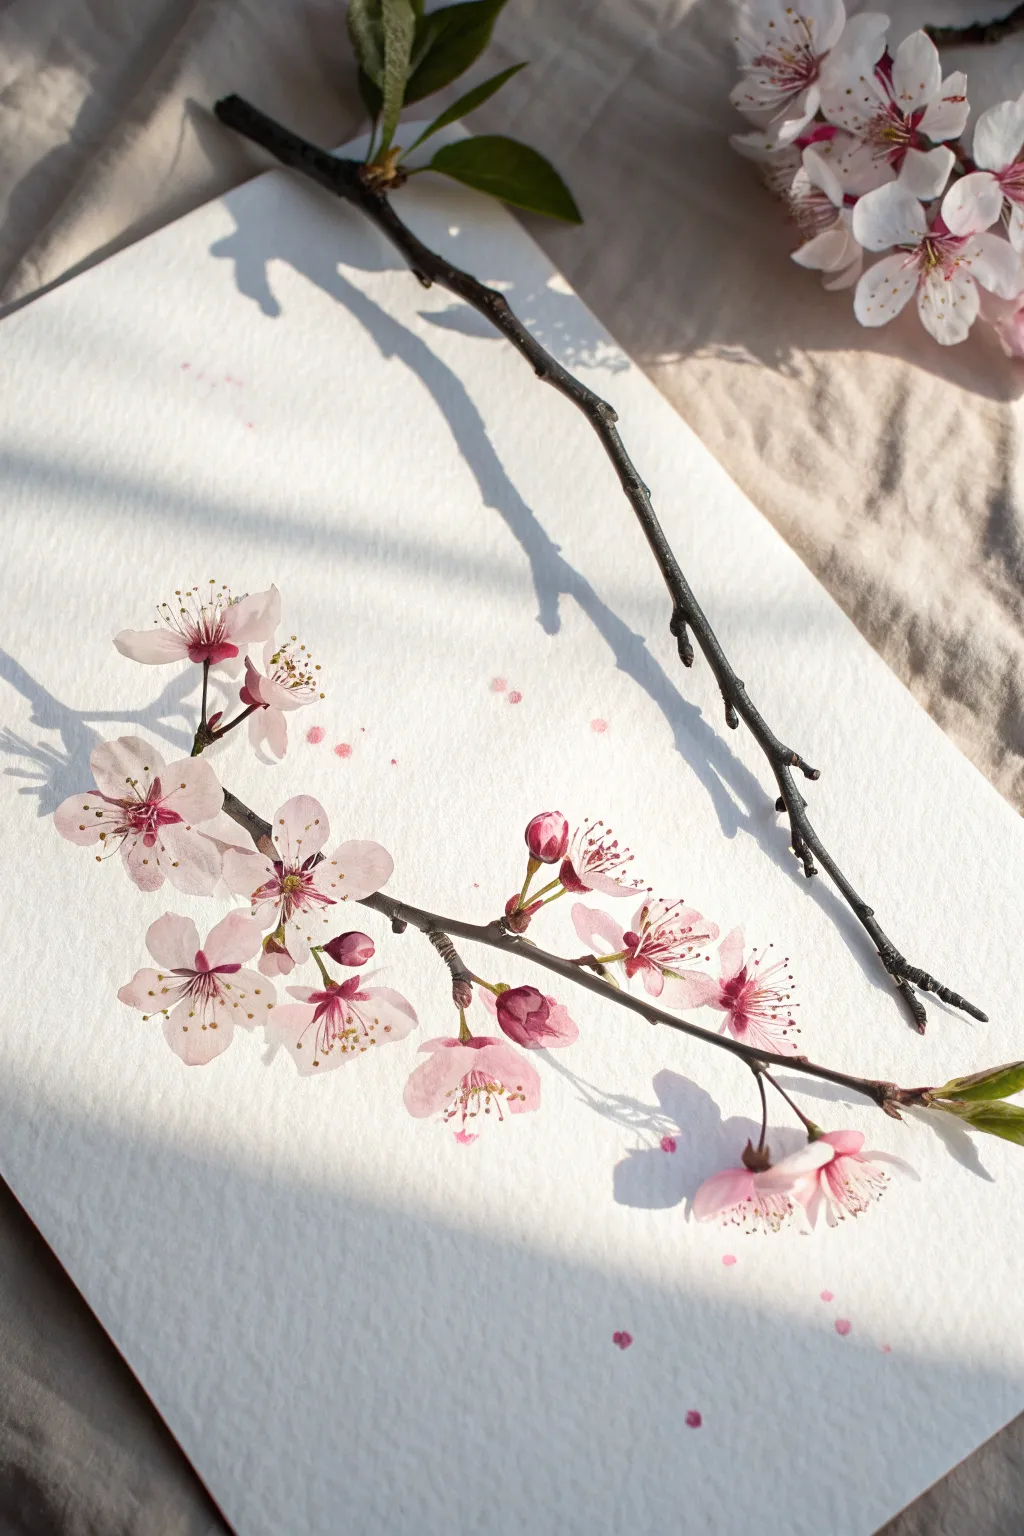
Capture the fleeting beauty of spring with this soft and airy watercolor study. By combining loose, watery washes with fine details, you will create a realistic yet artistic branch that looks like it just fell onto the paper.
Step-by-Step Tutorial
Materials
- Cold press watercolor paper (140lb/300gsm)
- Watercolor paints (Alizarin Crimson, Burnt Umber, Sap Green, Lemon Yellow)
- Round brushes (fluffy size 6, pointed size 2)
- HB Pencil and kneaded eraser
- Two jars of water
- Ceramic palette or white plate
Step 1: Sketching the Composition
-
Map the branch:
Using a sharp HB pencil, lightly draw a diagonal line stretching from the bottom right to the middle left of your paper. Make the line slightly jagged rather than perfectly straight to mimic natural wood. -
Placement circles:
Sketch very faint, loose circles along the branch where you want your main flower clusters to sit. Add a few small tear-drop shapes for un-opened buds. -
Lighten lines:
Roll your kneaded eraser over the sketch. You want the graphite to be barely visible so it disappears under the translucent paint.
Step 2: Painting the Blooms
-
Mix the base pink:
Dilute Alizarin Crimson with plenty of water until you have a very pale, transparent tea-rose pink. -
First petals:
Using the size 6 brush, paint five small, rounded petal shapes for the main open flower. Leave a tiny sliver of white paper between the petals so they don’t merge into a blob. -
Adding depth:
While the petals are still damp, drop a slightly more concentrated crimson mix into the very center of the flower. Watch the color bleed outward naturally to create a soft gradient. -
Painting buds:
For the buds, use a more saturated pink mix. Paint tight oval shapes near the branch tips, making the bottom of the bud darker than the top. -
Variation:
Repeat this process for the other flowers. I like to vary the water ratio slightly for each bloom so some look faded and others look fresh. -
Let it dry:
Allow the flower layer to dry completely before moving on. The paper should feel cool to the touch if it is still damp.
Water Control Tip
Work ‘wet-on-dry’ for the branch to get crisp edges, but use ‘wet-on-wet’ for petals (dropping color into wet paper) to keep them looking soft and organic.
Step 3: The Branch and Wood
-
Mix the wood tone:
Create a dark, rich brown by mixing Burnt Umber with a touch of blue or black to desaturate it. -
Painting the main branch:
Using your size 2 brush, paint the main branch with shaky, confident strokes. Vary the pressure on the brush to make the line thick and thin. -
Skip and stop:
Be careful to lift your brush when you encounter a painted flower. The branch should appear to go behind the blooms. -
Connecting stems:
Paint very fine, short stems connecting the flowers and buds to the main branch. Add small knobby textures where the stems join the wood.
Level Up: Texture
For a rougher bark texture, gently dab the wet brown branch with a crumpled tissue to lift small patches of paint, creating natural highlights on the wood.
Step 4: Fine Details
-
Flower centers:
Mix a deep magenta (Crimson + a tiny bit of brown). With the very tip of your size 2 brush, flick tiny lines radiating from the center of the open flowers. -
Pollen dots:
Take thick opacity Lemon Yellow paint directly from the tube or pan. Dot the ends of your magenta lines to create the pollen anthers. -
Leaves:
Mix Sap Green with a little yellow for a spring-green hue. Add tiny, young leaves emerging from the branch tips and around the buds. -
Artistic splatter:
Dilute a little pink paint on your brush. Hold it over the paper and tap the handle against a finger to send a fine mist of pink speckles across the white space.
Now step back and admire how a few simple dabs of color have transformed into a fresh spring branch.


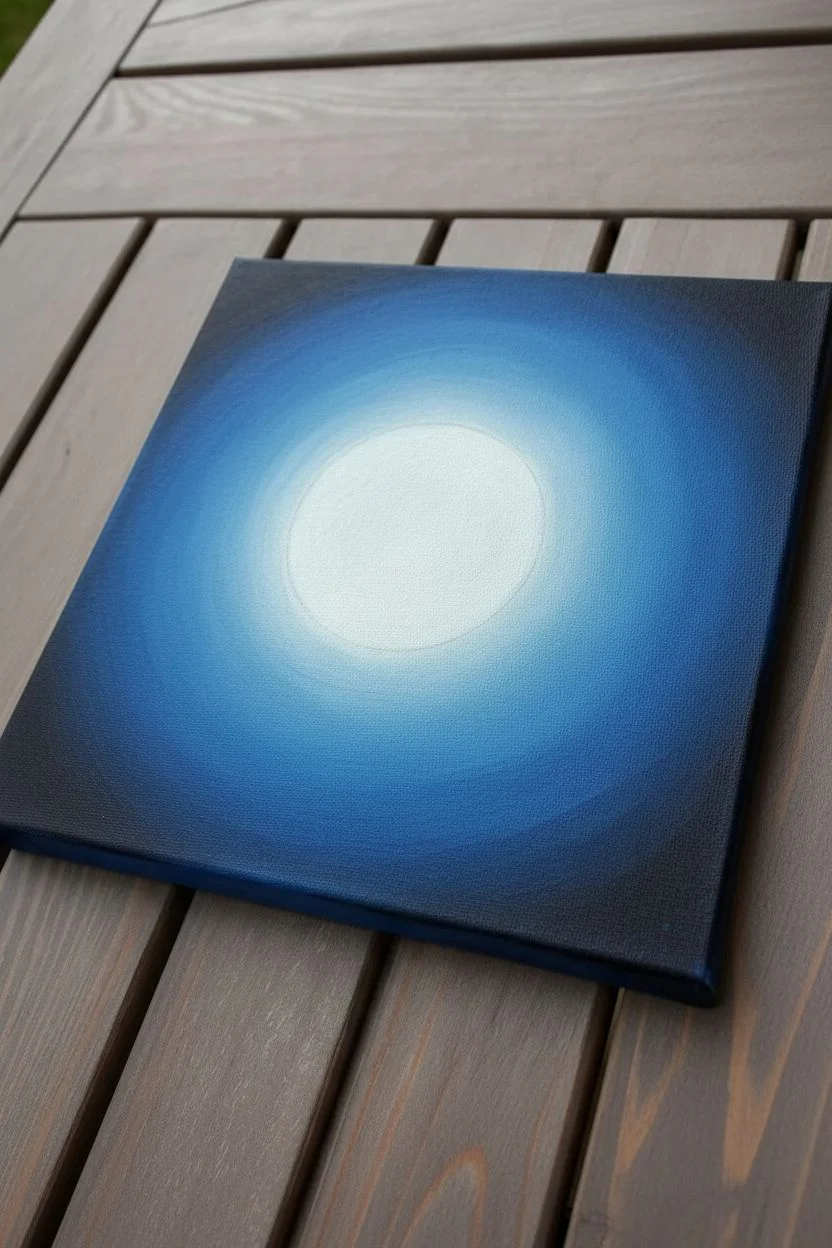
Large Glowing Full Moon
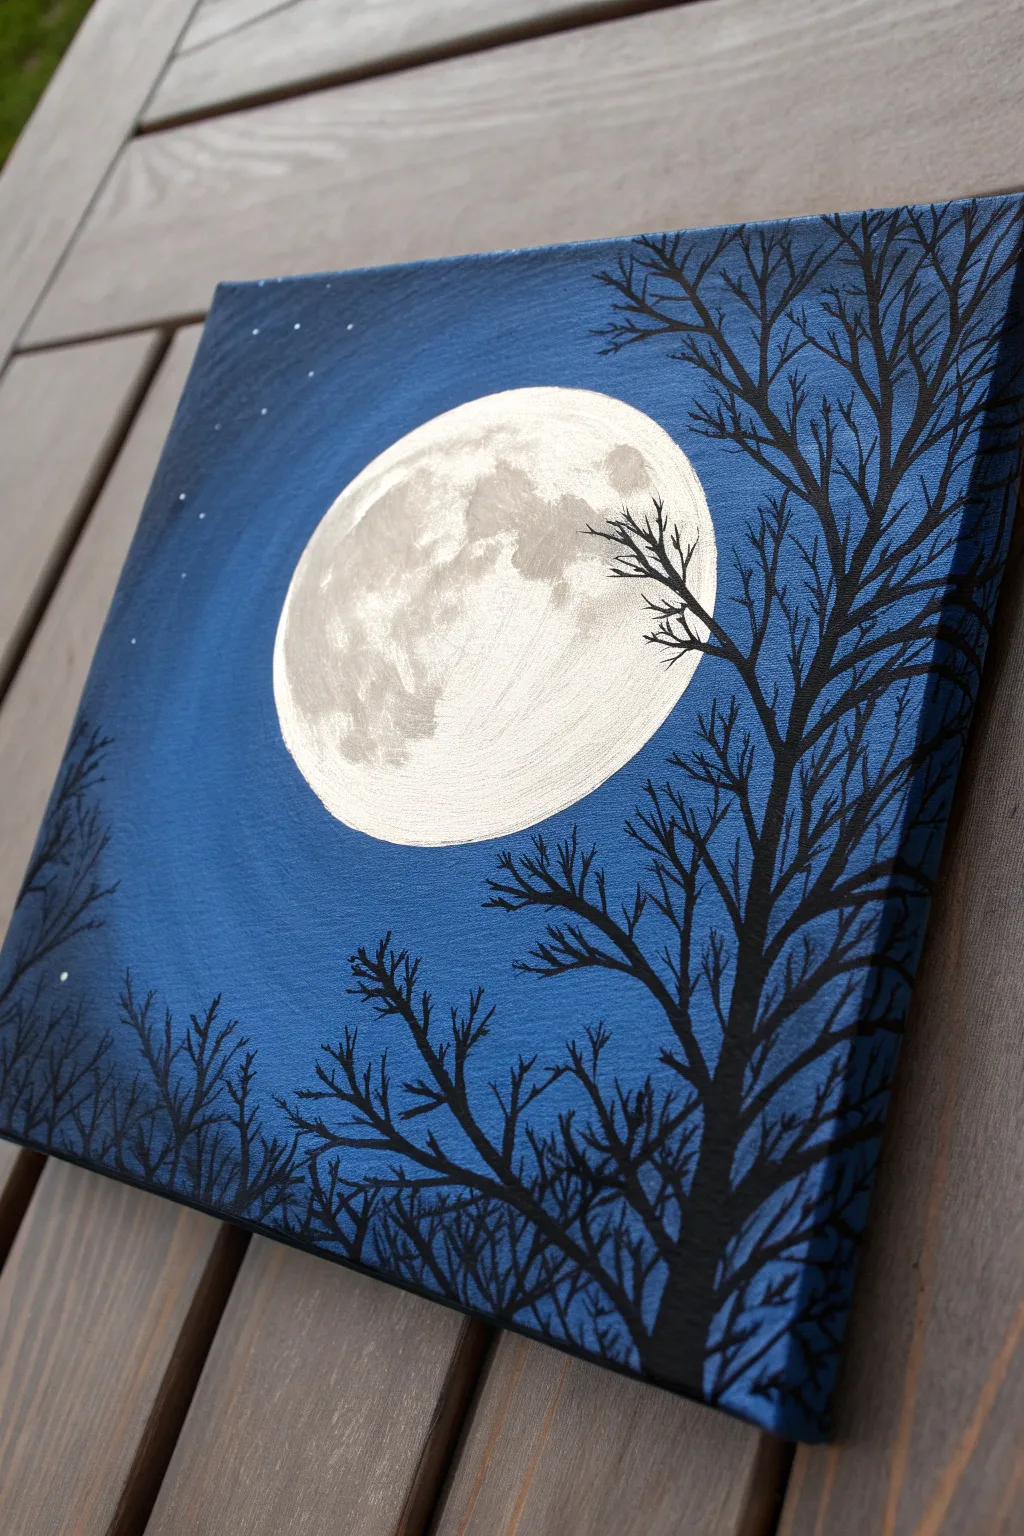
Capture the serene beauty of a crisp night with this high-contrast painting featuring a glowing moon and delicate tree silhouettes. This project is perfect for practicing radial blending and fine brush control.
Step-by-Step Guide
Materials
- Square canvas (e.g., 10×10 inches)
- Acrylic paints: Titanium White, Mars Black, Phthalo Blue, Ultramarine Blue
- Large flat brush or wash brush
- Small round brush
- Fine liner brush (0 or 00 size)
- Small piece of sponge or stiff brightness brush
- Round object for tracing (like a bowl)
- Pencil
- Palette and water cup
Step 1: Setting the Sky
-
Trace the moon:
Place your round object slightly off-center on the canvas and lightly trace a circle with a pencil to define the moon’s position. -
Mix the glow color:
On your palette, mix a large amount of Titanium White with a tiny drop of Phthalo Blue to create a very pale, icy blue. -
Paint the inner ring:
Paint the area immediately surrounding your traced circle with this pale blue, brushing outward about two inches. -
Deepen the blue:
Mix pure Phthalo Blue with a touch of Ultramarine. Paint this into the wet pale blue, blending outward in a circular motion. -
Darken the edges:
For the corners and outer edges, mix Blue with a small amount of Black to create a deep navy. Apply this to the outer perimeter. -
Perfect the blend:
Use a clean, damp flat brush to gently smooth the transition lines between the light ring and the deep blue corners until the gradient looks soft. -
Wrap the edges:
Don’t forget to extend your sky colors onto the sides of the canvas for a finished, professional look. -
Dry completely:
Allow the background to dry fully. I usually take a short break here to ensure the moon paint won’t pick up any blue later.
Step 2: The Moon & Stars
-
Base coat the moon:
Fill in the traced circle with pure Titanium White. You may need two coats to cover the canvas texture completely. -
Texture the surface:
Mix a very light grey. Using a small sponge or a dry, stiff brush, gently dab irregular patches onto the white moon to mimic craters. -
Soften the craters:
While the grey is wet, dab over it lightly with a clean brush to soften the edges so the texture looks natural, not polka-dotted. -
Add stars:
Dip a small brush into thinned white paint and carefully dot tiny stars into the darkest parts of the sky, varying the spacing.
Chunky Trees?
If your tree branches look thick or rough, your paint is likely too heavy. Add water to the black paint until it is the consistency of heavy cream to get crisp, sharp lines.
Step 3: Silhouette Trees
-
Prepare inky black:
Mix black paint with a few drops of water until it flows like ink. This helps create smooth, sharp distinct lines. -
Paint the main trunk:
On the right side, paint a thick tree trunk that extends from the bottom corner all the way to the top edge. -
Add major branches:
Draw thick branches splitting off the main trunk, angling them upward and diagonally across the moon. -
Create fine twigs:
Switch to your fine liner brush. Add delicate twigs growing off the main branches, using very light pressure for thin tips. -
Add background trees:
On the bottom left, paint smaller, thinner treetops rising from the bottom edge to create depth. -
Fill the ground:
Paint a solid black strip along the very bottom of the canvas to connect the trees and ground the scene.
Make it Sparkle
For a magical touch, wait for the painting to dry, then use a silver metallic paint pen to add tiny highlights on the edges of the moon craters or the tips of the branches.
Now step back and admire the peaceful night atmosphere you have created on canvas.
BRUSH GUIDE
The Right Brush for Every Stroke
From clean lines to bold texture — master brush choice, stroke control, and essential techniques.
Explore the Full Guide
Q-Tip Lavender Field
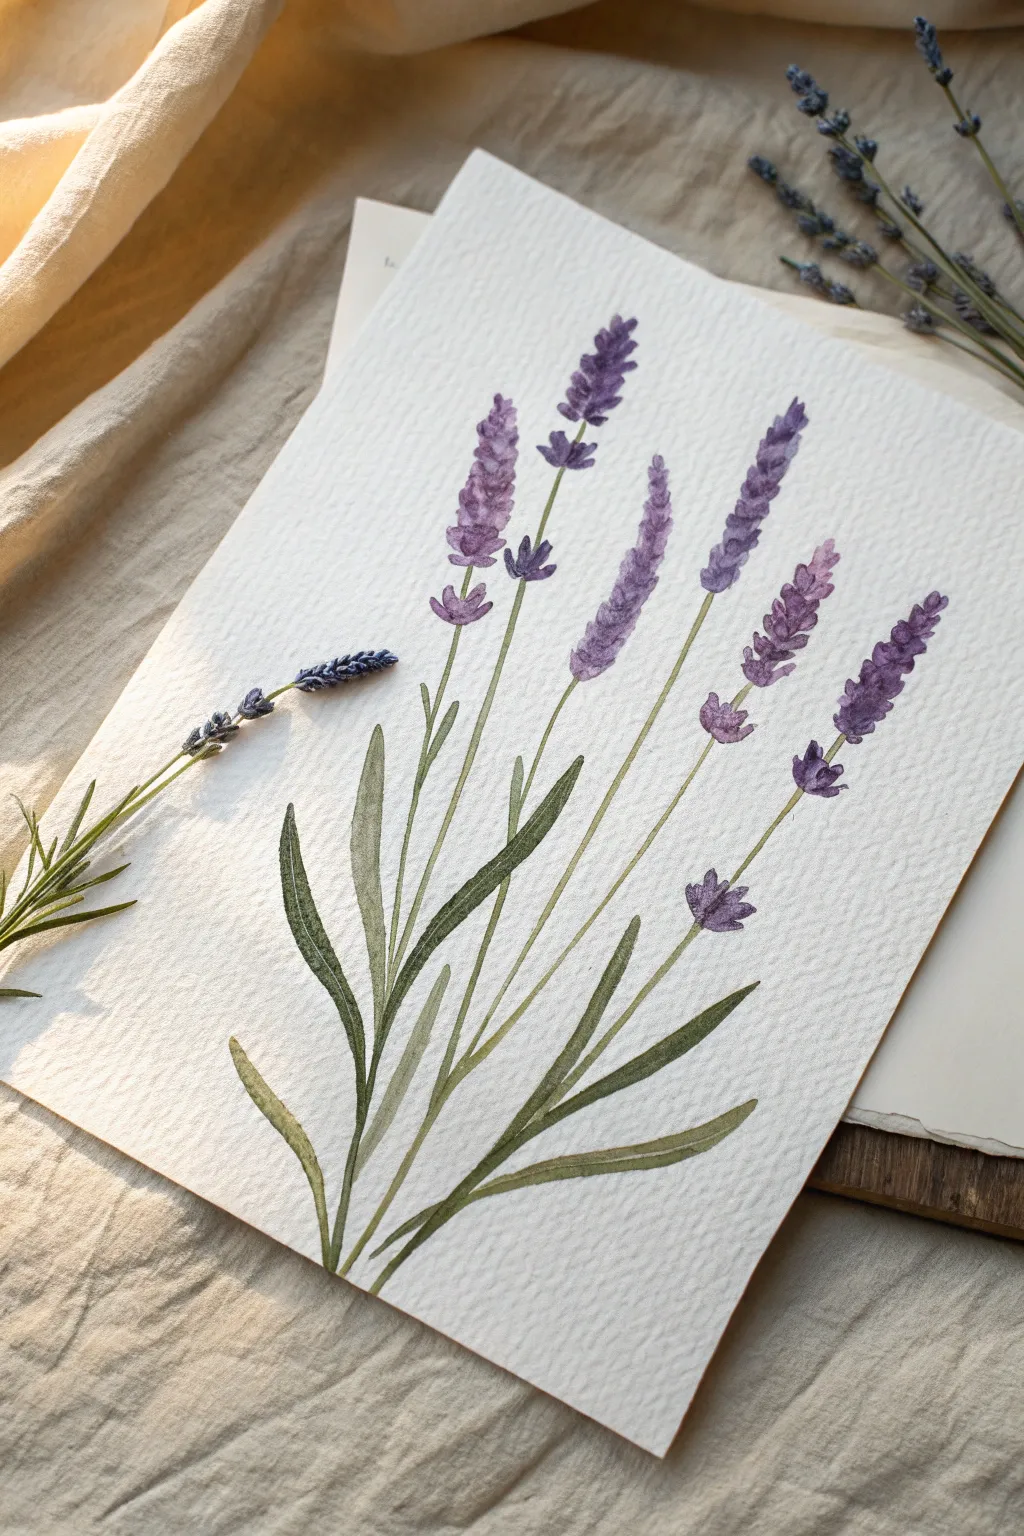
This delicate botanical study captures the calming elegance of lavender with soft watercolor textures. Using simple brush strokes and careful blending, you will create a realistic composition that looks beautiful on greeting cards or framed wall art.
How-To Guide
Materials
- Cold press watercolor paper (300gsm)
- Watercolor paints (Violet, Ultramarine Blue, Sap Green, Burnt Umber)
- Round brush size 6 (for leaves)
- Round brush size 2 (for intricate details)
- HB Pencil and kneaded eraser
- Mixing palette
- Jar of clean water
- Paper towel
Step 1: Sketching & Stems
-
Map the composition:
Lightly sketch five curved lines radiating from the bottom center to represent the stems, varying their heights and angles for a natural look. -
Mark boundaries:
Place small tick marks to indicate where the flower spikes will start and end on each stem so you don’t paint green where the purple should be. -
Mix the green:
On your palette, mix Sap Green with a tiny touch of Burnt Umber or Violet to desaturate the color, creating a realistic, earthy sage green. -
Paint the stems:
Using the very tip of your size 2 brush, paint thin, steady lines over your pencil marks to establish the main stems. -
Rotate for comfort:
I find it helpful to rotate the paper as I work to keep my hand at a comfortable angle for these long, delicate lines.
Step 2: Painting the Foliage
-
Switch brushes:
Switch to the size 6 brush to paint the leaves, loading it generously with your mixed green shade. -
Technique: Press and lift:
Start at the base of a stem, touch the tip to the paper, press the belly of the brush down to widen the stroke, then pull and lift up to create a sharp, tapered point. -
Build the foliage:
Add leaves in pairs or alternating patterns along the lower half of the stems, varying their lengths and curvature. -
Add depth:
While the green paint on the leaves is still wet, drop in a slightly darker green mixture at the very base of the leaf to create a natural shadow gradient. -
Reference the drying time:
Let the greenery dry completely before moving on to the flowers; this ensures the purple won’t accidentally bleed into the green stems.
Pro Tip: White Space
Don’t paint the flower clusters as solid blocks. The white paper showing through acts as a highlight, making the lavender look airy and textured rather than heavy.
Step 3: Creating the Blooms
-
Prepare purple shades:
Mix two puddles of paint: a watery, pale violet for the base petals and a concentrated violet-blue (mix Violet with Ultramarine) for the shadows. -
Start the buds:
Using the size 2 brush and the pale violet, paint the flower buds starting at the top of a stem using a ‘dab and lift’ motion. -
Shape the clusters:
Create small, teardrop-shaped marks, clustering them tightly near the top tip and spacing them out slightly more as you work down the spike. -
Mind the gaps:
Leave tiny slivers of white paper pointing through between the individual purple dabs to mimic the texture of separate flower buds. -
Wet-on-wet shading:
While the pale violet dabs are still damp, quickly touch the tip of your brush with the dark purple mixture into the bottom of individual buds. -
Bleed effects:
Allow the dark color to bleed slightly into the pale color naturally, creating volume and shadow without covering the whole bud. -
Repeat the process:
Continue this technique for all five flower heads, making some clusters taller and others shorter for variety. -
Final details:
paint a few stray purple buds slightly detached from the main cluster to simulate loose petals or organic, imperfect growth.
Level Up: Scented Art
Once the painting is fully dry, you can lightly mist the back of the paper with real lavender essential oil spray to give your artwork a sensory dimension!
Once the paint settles, frame your serene artwork against a neutral background to let those calming violets truly pop.
Geometric Tape Resist Art
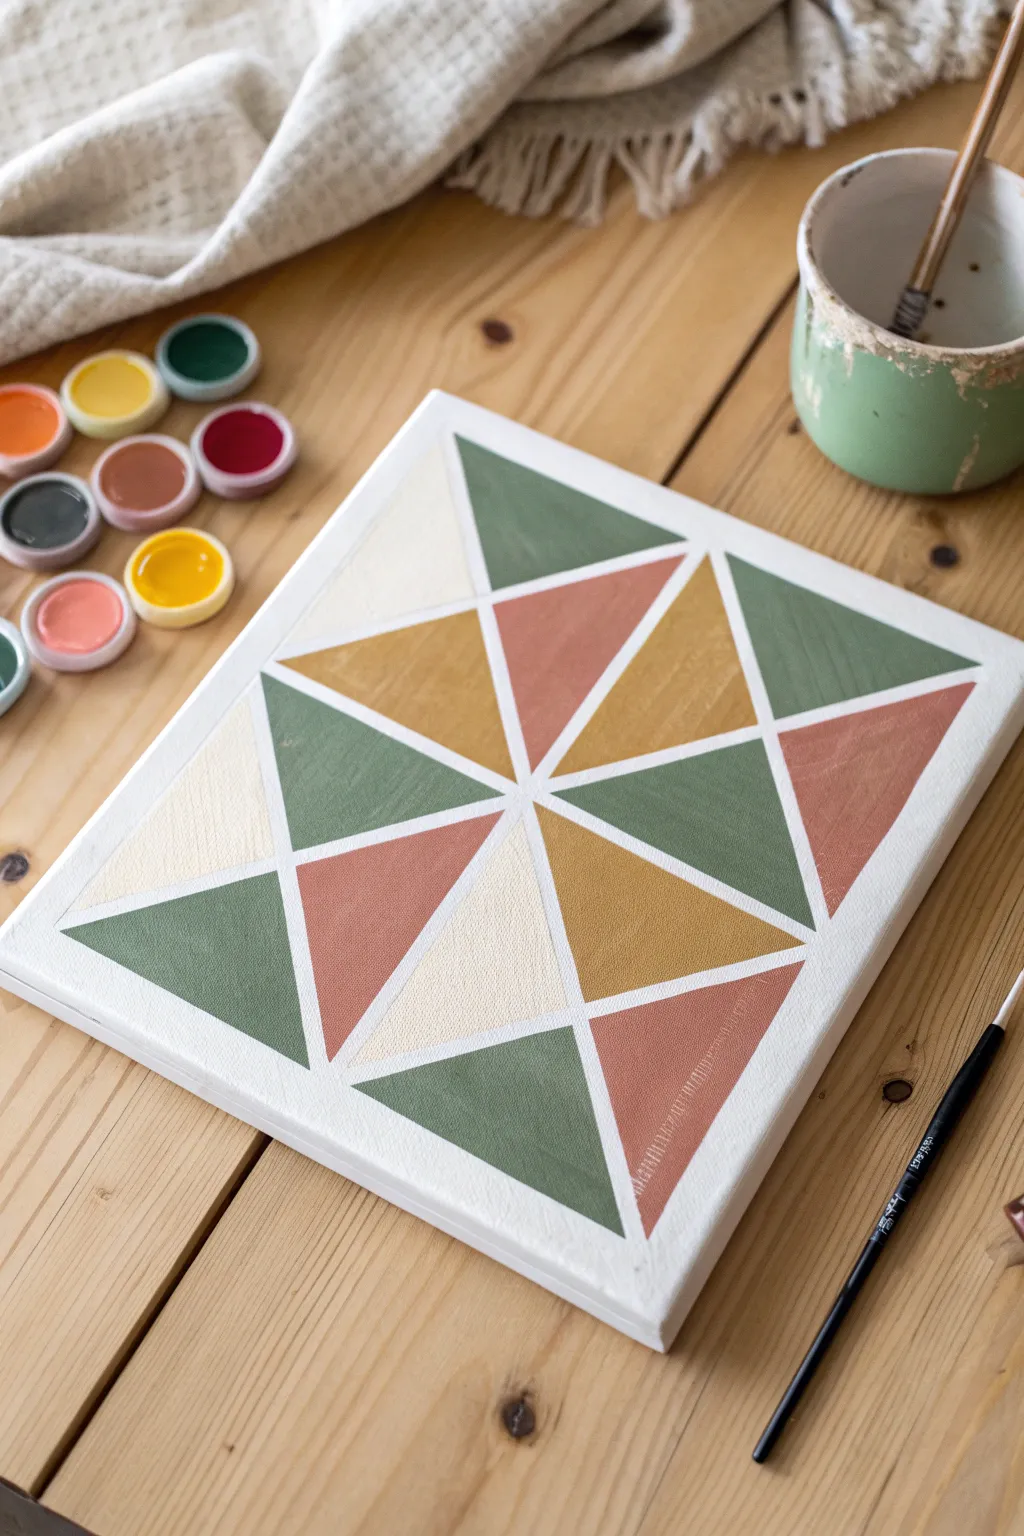
Learn to create a crisp, modern geometric painting using the tape resist method. This project combines earthy, muted tones with sharp white lines to create a piece of art that looks professionally printed but is surprisingly simple to paint by hand.
Detailed Instructions
Materials
- Square stretched canvas (approx. 10×10 or 12×12 inches)
- Acrylic paints: Sage Green, Terracotta (or Muted Pink), Mustard Yellow, Cream, and Titanium White
- Painter’s tape or masking tape (approx. 1/4 inch width works best)
- Flat synthetic paintbrushes (small and medium)
- Ruler and pencil
- Palette or paper plate
- Paper, old credit card, or bone folder (for burnishing)
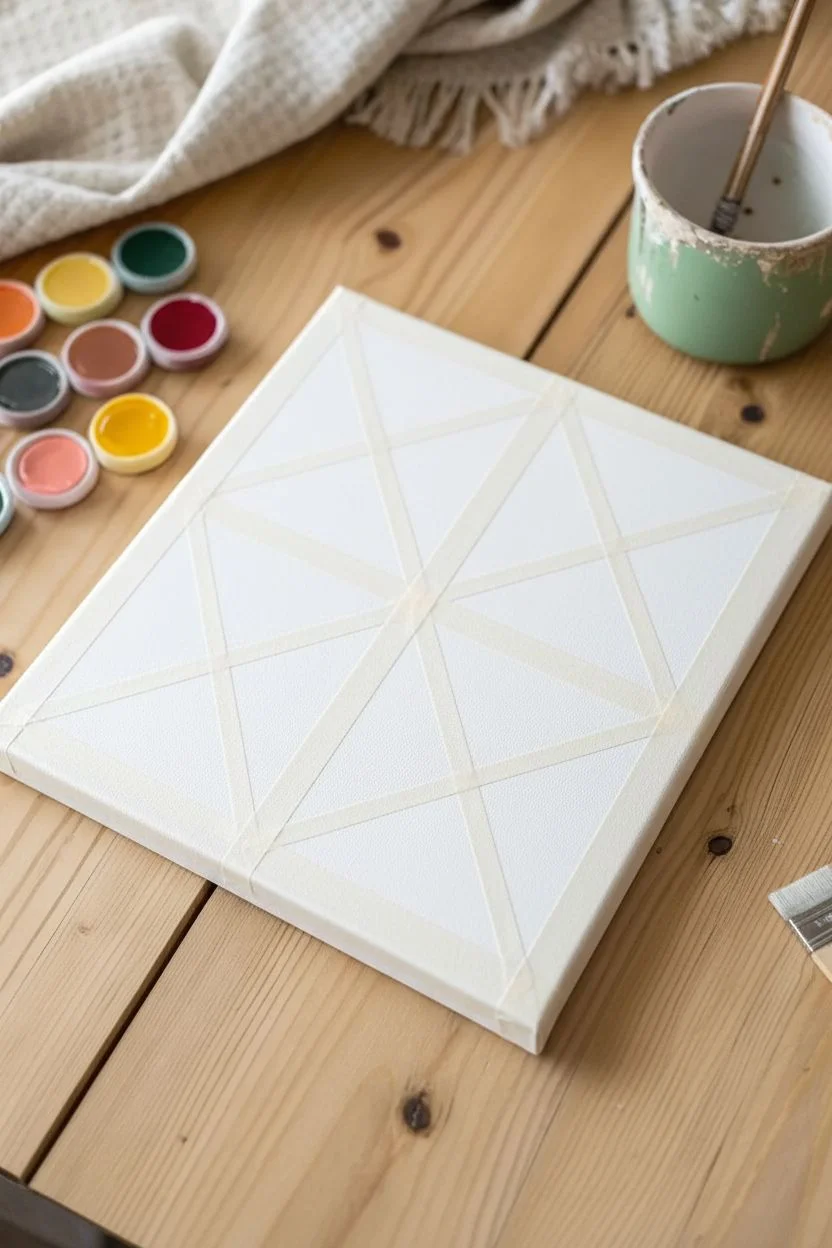
Step 1: Prepping the Grid
-
Prime the surface:
Start by painting your entire canvas with a layer of Titanium White acrylic paint. Even if the canvas is already white, this ensures the texture is consistent and helps the tape seal better later on. -
Mark the center:
Once the base coat is completely dry, use your ruler to lightly mark the exact center of the canvas with a pencil. -
Create the main cross:
Apply a strip of tape vertically down the center and another horizontally across the center to create a large plus sign, dividing the canvas into four equal quadrants. -
Add diagonals:
Inside each of the four separate quadrants, apply two diagonal strips of tape from corner to corner, creating an ‘X’ shape within each square. This will give you the triangular pattern shown in the photo. -
Burnish the tape:
Run a clean finger, bone folder, or the edge of an old credit card firmly along all the tape strips. I find this step crucial for preventing paint from sneaking underneath the edges. -
Seal the edges:
Paint a thin layer of your Titanium White base color over the tape edges. This bleeds white paint under the tape (which matches the canvas) and creates a barrier for the colored paints.
Step 2: Applying Color
-
Select your palette:
Squeeze out your Sage Green, Terracotta, Mustard Yellow, and Cream paints onto your palette. If your colors are too bright, mix in a tiny dot of brown or white to achieve that dusty, boho look. -
Plan the color balance:
Look at the pattern and decide where colors will go. Try to avoid having two of the same color touching; aim for a balanced distribution like a sudoku puzzle. -
Paint the Sage Green:
Using a small flat brush, fill in the designated green triangles. Use smooth strokes from the tape inward to avoid pushing paint under the tape edge. -
Apply the Terracotta:
Rinse your brush thoroughly and paint the pinkish-red sections. Make sure the paint is opaque; if it looks streaky, let it dry briefly and apply a second coat. -
Fill in Mustard Yellow:
Paint the yellow triangles next. This color often requires two coats for full coverage, so be patient and let the layers dry in between. -
Finish with Cream:
Paint the remaining triangles with the Cream color. Even though it is light, painting it rather than leaving the raw white canvas adds a rich texture to the finished piece. -
Check for gaps:
Hold the canvas up to a light source to spot any missed spots or thin patches, touching them up as needed before the paint fully cures.
Crisp Line Secret
Don’t skip the ‘sealing’ step! Painting the base color (white) over the tape before adding color is the absolute best way to get laser-sharp lines.
Step 3: The Reveal
-
Let it set:
Allow the painting to dry until it is touch-dry but not fully cured (usually about 20-30 minutes depending on paint thickness). -
Peel the tape:
Carefully peel the tape away at a 45-degree angle. Pull slowly and steadily to reveal the crisp white lines underneath. -
Final touch-ups:
If any paint bled through, use a tiny detail brush with Titanium White to clean up the lines. If a line is jagged, you can gently scrape excess paint away with a craft knife.
Level Up: Texture
Mix a small amount of baking soda or modeling paste into your acrylics before painting. This adds a raised, plaster-like texture for a tactile 3D effect.
Hang your new geometric masterpiece on the wall or lean it on a shelf for an instant splash of modern color

PENCIL GUIDE
Understanding Pencil Grades from H to B
From first sketch to finished drawing — learn pencil grades, line control, and shading techniques.
Explore the Full Guide
Fireflies in a Mason Jar
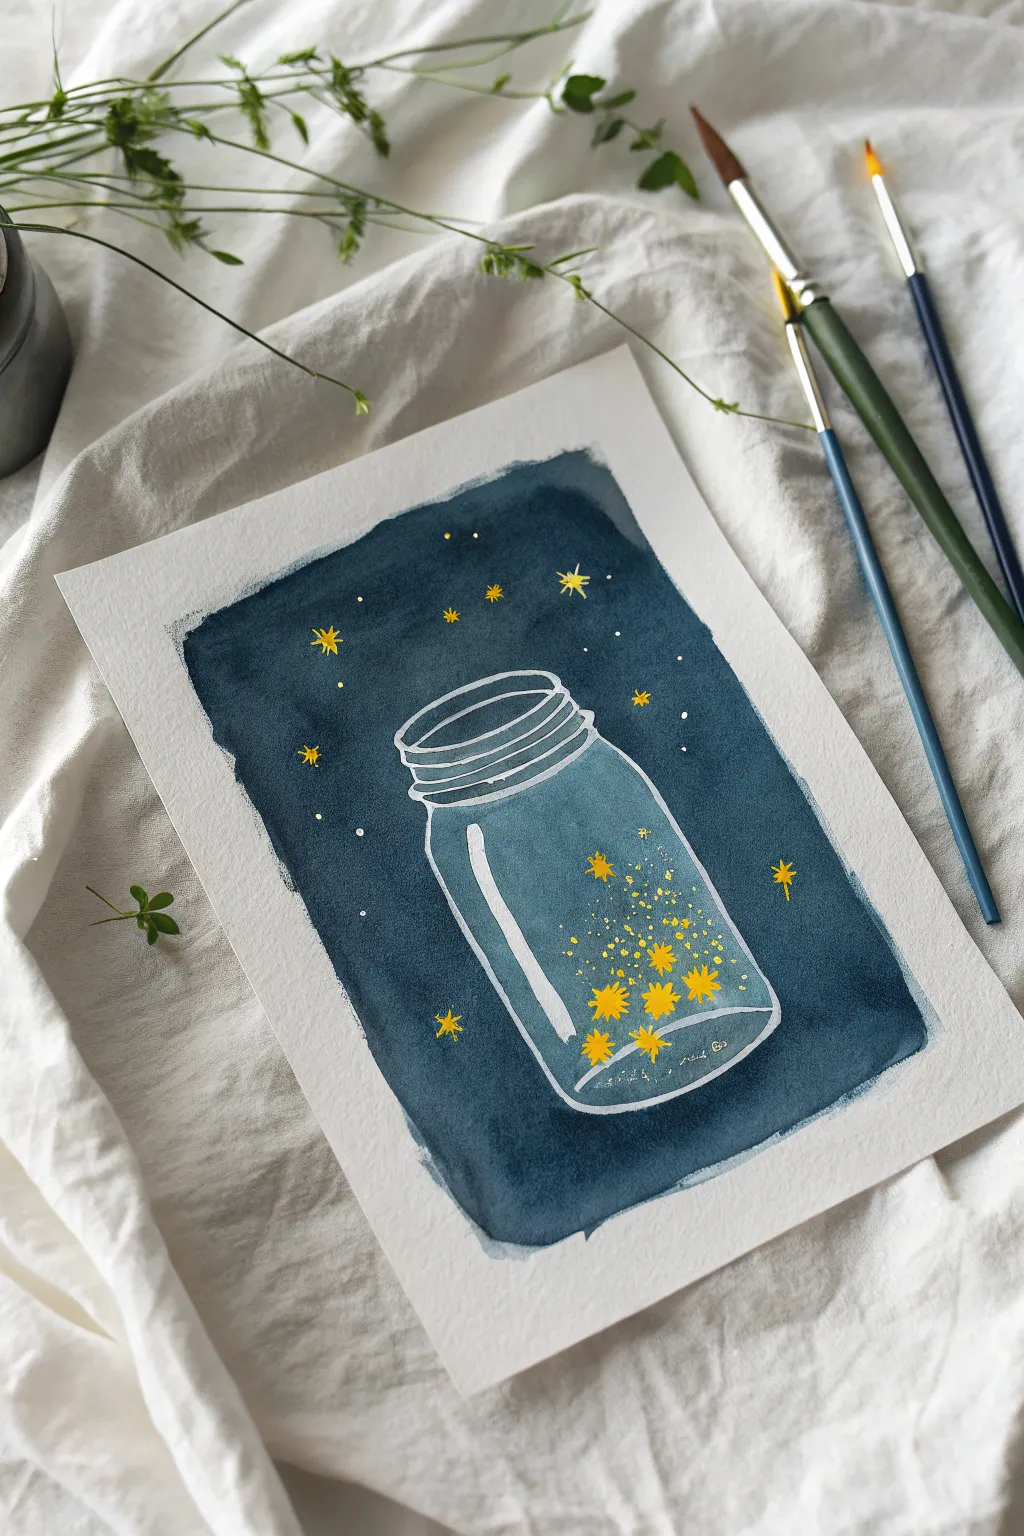
Capture the whimsy of a summer evening with this high-contrast painting project. Using simple layering techniques, you will learn how to make bright lights glow against a dark, moody background.
Step-by-Step Guide
Materials
- Cold press watercolor paper (A5 recommended)
- Dark Blue Watercolor (Indigo or Payne’s Gray)
- Opaque White Gouache, Acrylic, or White Gel Pen
- Yellow Gouache or opaque watercolor
- Round brush (size 6 or 8)
- Detail brush (size 0 or 1)
- Pencil
- Water cup and palette
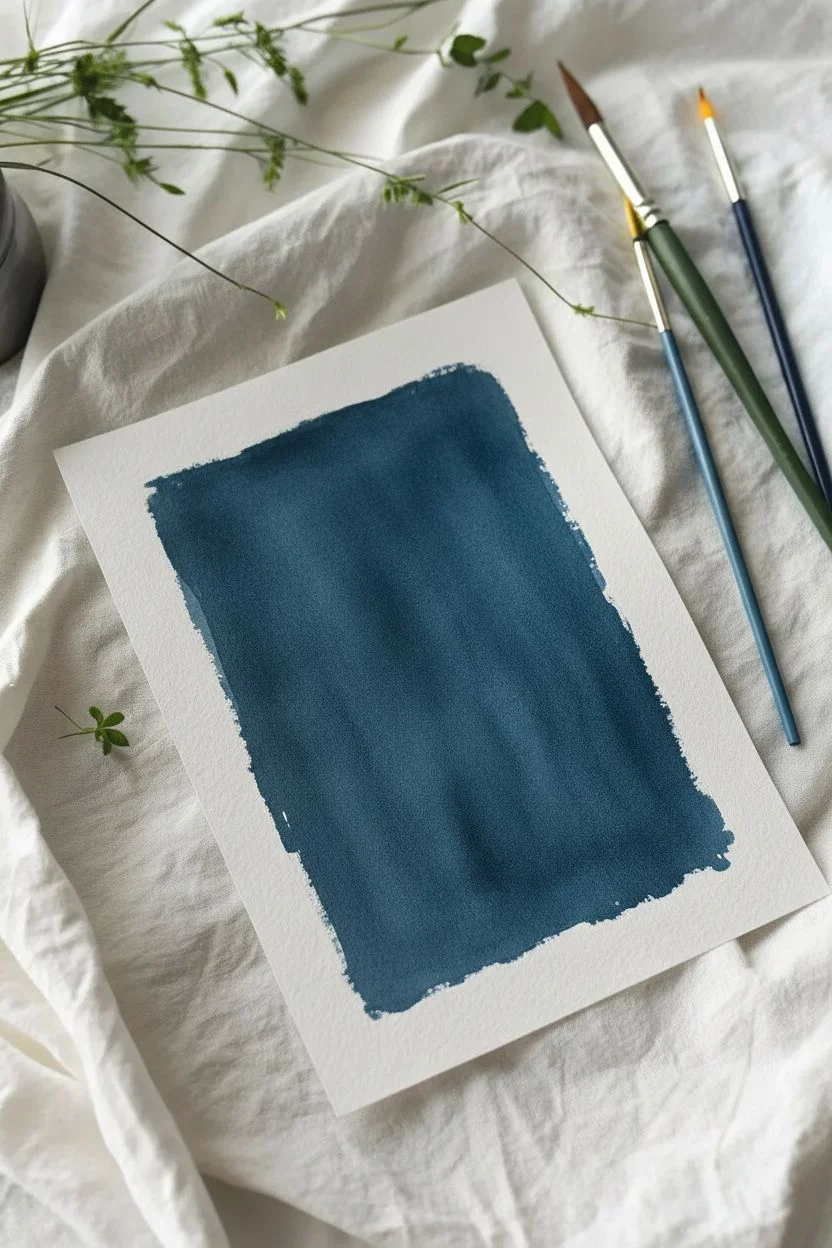
Step 1: Setting the Scene
-
Outline the area:
Lightly mark the four corners of a rectangle in the center of your paper with a pencil to guide your background shape. -
Mix the background color:
Load your larger round brush with a deep, saturated blue like Indigo; keep the pigment heavy and use less water for a dark night sky. -
Paint the night sky:
Fill in the rectangular space with your dark blue, allowing the edges to remain slightly rough and organic rather than using tape. -
Wait for drying:
Allow the background layer to dry completely; the paper must be bone-dry to the touch so the white lines in the next phase stay crisp and bright.
White turning blue?
If your white lines look grey or light blue, the background wasn’t fully dry. Let it dry completely, then go over the lines a second time.
Step 2: Constructing the Jar
-
Prepare the white:
Switch to your fine detail brush and mix white gouache to a creamy consistency, or prime your white gel pen if you prefer using ink. -
Start the opening:
Paint a horizontal, flattened oval near the top third of the blue background to form the jar’s rim. -
Add the threads:
Draw two or three curved parallel lines directly underneath the rim to create the threaded neck of the jar. -
Form the body:
Extend lines outward from the neck for the shoulders, then curve them straight down to define the sides of the mason jar. -
Close the shape:
Connect the two side lines at the bottom with a shallow, gentle curve to complete the jar outline. -
Add glass reflections:
Paint a thick, vertical streak of white along the inner left side of the jar to simulate a reflection on the glass. -
Balance the highlights:
Add a shorter, thinner highlight line on the opposite right side and a small curved line along the bottom interior.
Step 3: Igniting the Lights
-
Paint the main fireflies:
I like to clean my detail brush thoroughly here before switching to opaque yellow paint to ensure the color stays bright. -
Create the stars:
Paint small asterisk (*) shapes inside the jar to represent the brightest glowing fireflies. -
Add the swarm:
Stipple a cluster of small yellow dots around the asterisks, concentrating the density near the bottom of the jar. -
Decorate the sky:
Paint a few larger yellow stars and scattered dots in the dark blue space outside the jar to balance the composition. -
Final details:
Using your white paint again, dot a few tiny white specks in the background to represent distant stars.
Make it Shimmer
Swap the yellow gouache for metallic gold watercolor to make the fireflies actually shimmer when the light hits the paper.
Frame your glowing masterpiece or gift it to someone who brings light into your life.
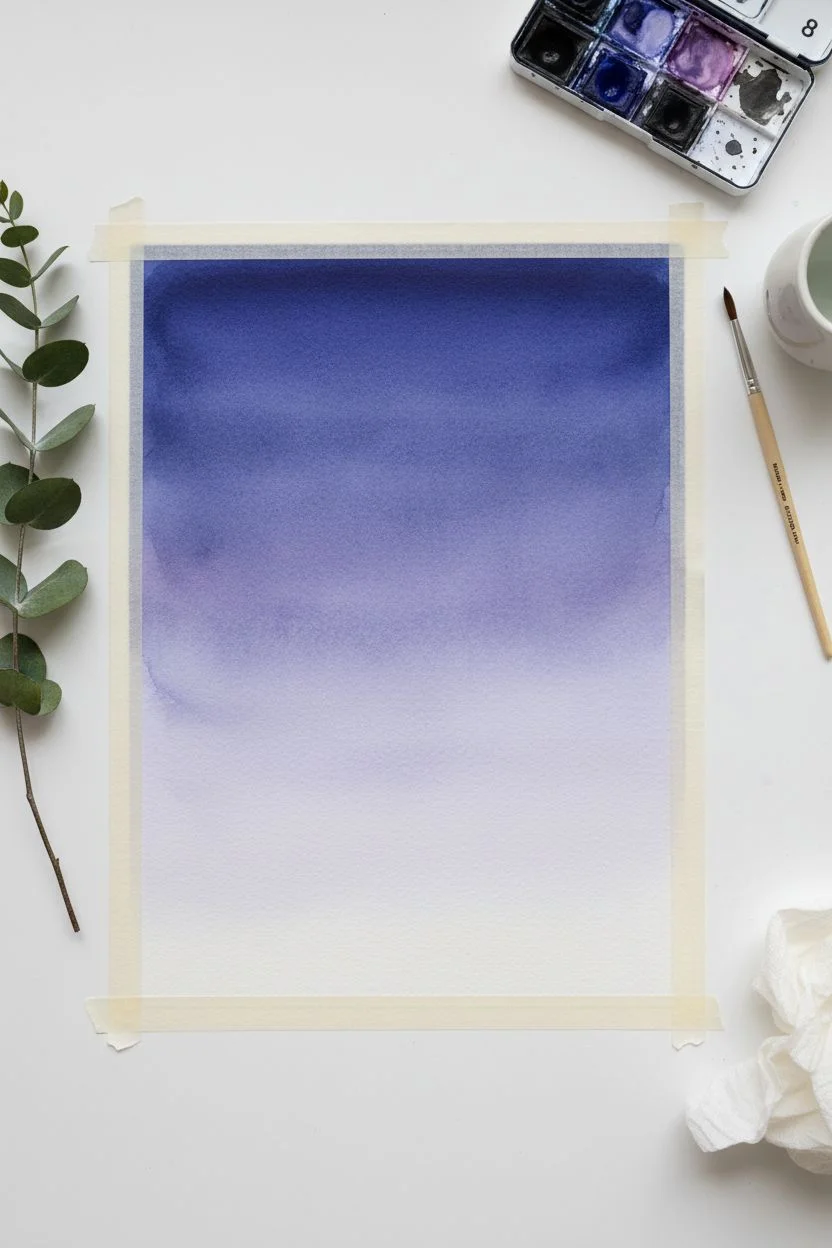
Layered Ombré Mountains
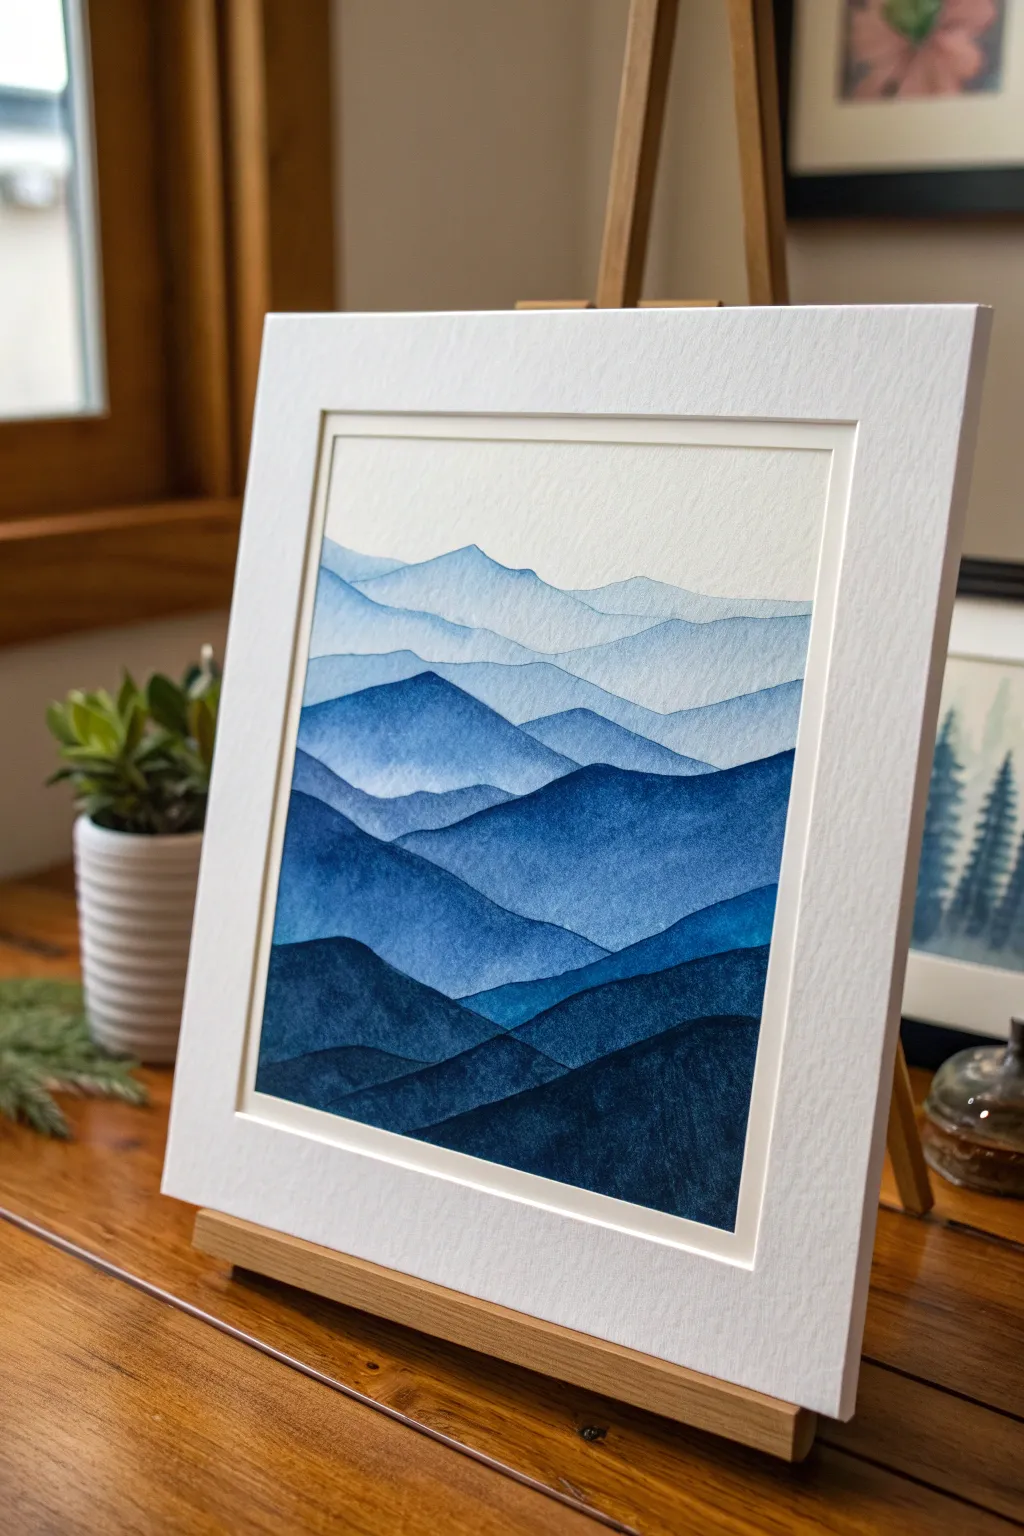
Master the art of atmospheric perspective with this stunning monochromatic landscape that mimics the look of distant, misty ranges. By using just one color and varying the water-to-pigment ratio, you will create depth and tranquility in a piece that looks incredibly professional.
Detailed Instructions
Materials
- Cold press watercolor paper (140lb/300gsm)
- Watercolor paint (Indigo, Prussian Blue, or Payne’s Gray)
- Round watercolor brushes (size 6 and 10)
- Masking tape or painter’s tape
- Drawing board or rigid surface
- Mixing palette
- Two jars of water
- Paper towels
- Pencil and eraser
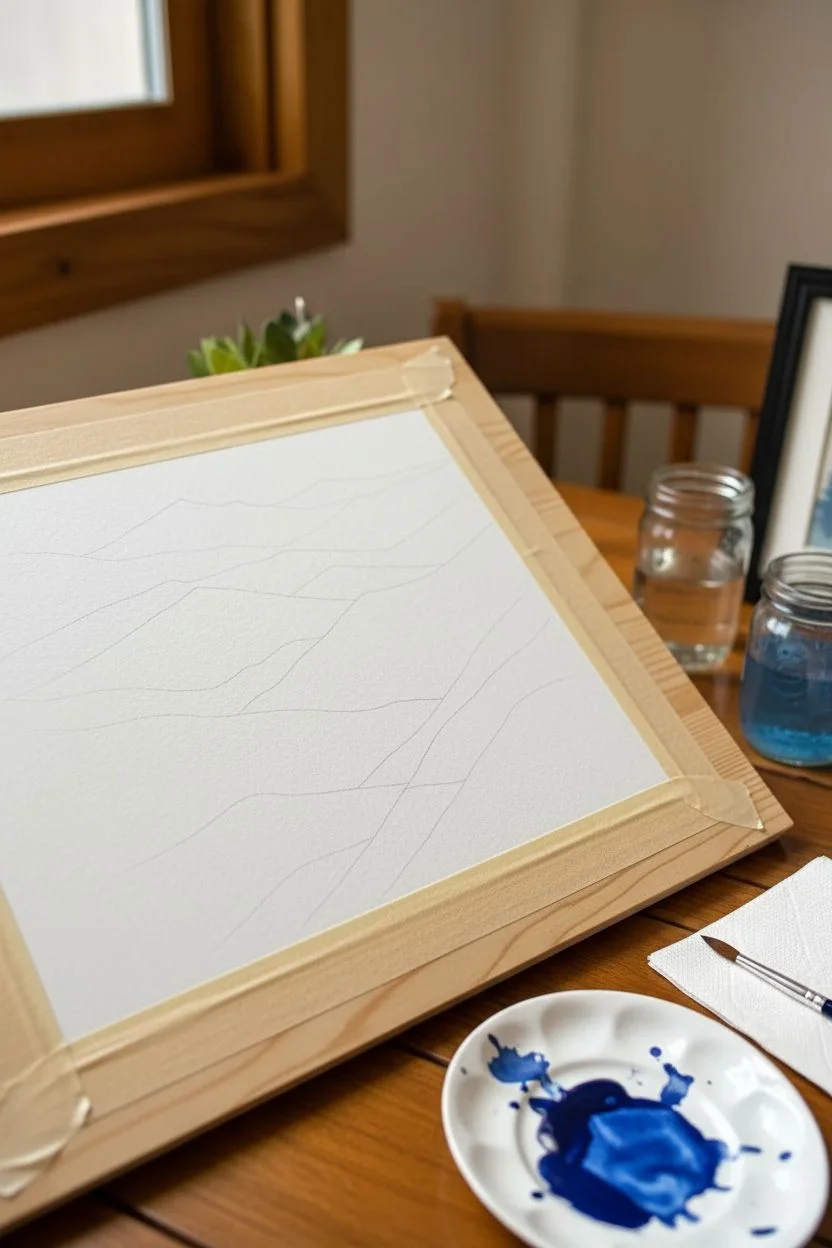
Step 1: Preparation and Planning
-
Secure the paper:
Tape all four edges of your watercolor paper to a board or table using masking tape. Press the edges down firmly to prevent water from seeping underneath, which ensures a crisp border later. -
Sketch the ranges:
Using a pencil, lightly sketch 5 to 7 wavy, organic lines horizontally across the paper to map out your mountain ranges. -
Vary the heights:
Ensure your lines aren’t parallel; make some peaks high and steep while others are rolling and low to create visual interest. -
Prepare your palette:
Squeeze a generous amount of your chosen blue paint onto the palette. You will be using this single color for the entire painting.
Clean Edges 101
To prevent paint from bleeding under the tape, run a clean, slightly damp brush over the tape edge to ‘seal’ it before you start painting.
Step 2: Painting the Distant Layers
-
Mix the first wash:
Create a very watery puddle of paint for the sky and farthest mountains. It should be 90% water and 10% pigment, roughly the transparency of weak tea. -
Paint the first range:
Load your brush and paint the area above your top-most pencil line. This represents the faint, distant mountains fading into the sky. -
Fade the bottom:
I like to use a clean, damp brush to soften the bottom edge of this first shape so it doesn’t leave a harsh line where the next mountain will be. -
Let it dry completely:
This is crucial: allow the paper to dry until it is no longer cool to the touch. If you paint too soon, the layers will bleed into each other. -
Mix the second value:
Add a tiny bit more pigment to your puddle to make it slightly darker than the first layer. -
Paint the second range:
Paint the shape of the second mountain range, letting the paint overlap the bottom faded edge of the previous layer.
Golden Hour Glow
Swap the monochrome blue for a sunset palette: start with pale yellow at the top, transitioning to orange, red, and finally purple at the bottom.
Step 3: Building Depth and Foreground
-
Darken the mix:
For the middle layers, mix in more paint. The consistency should start looking like milk—opaque enough to stand out against the pale background. -
Create the middle ground:
Paint the next two layers of mountains, ensuring distinct, hard drying lines along the top ridges. This creates that ‘cut out’ distinct look. -
Review drying times:
Patience is key here; use a hairdryer on a low setting if you want to speed up the drying process between these layers. -
Mix the darkest value:
For the final foreground mountains, create a mixture that is heavy on pigment with very little water, similar to the consistency of heavy cream. -
Paint the foreground:
Fill in the bottom-most mountain shapes with this rich, dark color. This anchors the painting and maximizes the sense of depth. -
Add separation:
If the foreground layers look too similar, drop a tiny bit of pure pigment into the wet paint at the very bottom edge for a gradient effect. -
Final dry:
Allow the entire painting to dry completely, preferably overnight or for several hours, to ensure the paper settles. -
Reveal the border:
Slowly peel the masking tape away at a 45-degree angle, pulling away from the painting to avoid tearing the paper.
Now you have a serene, atmospheric landscape ready to act as a peaceful centerpiece for any room


Winter Birch Trees
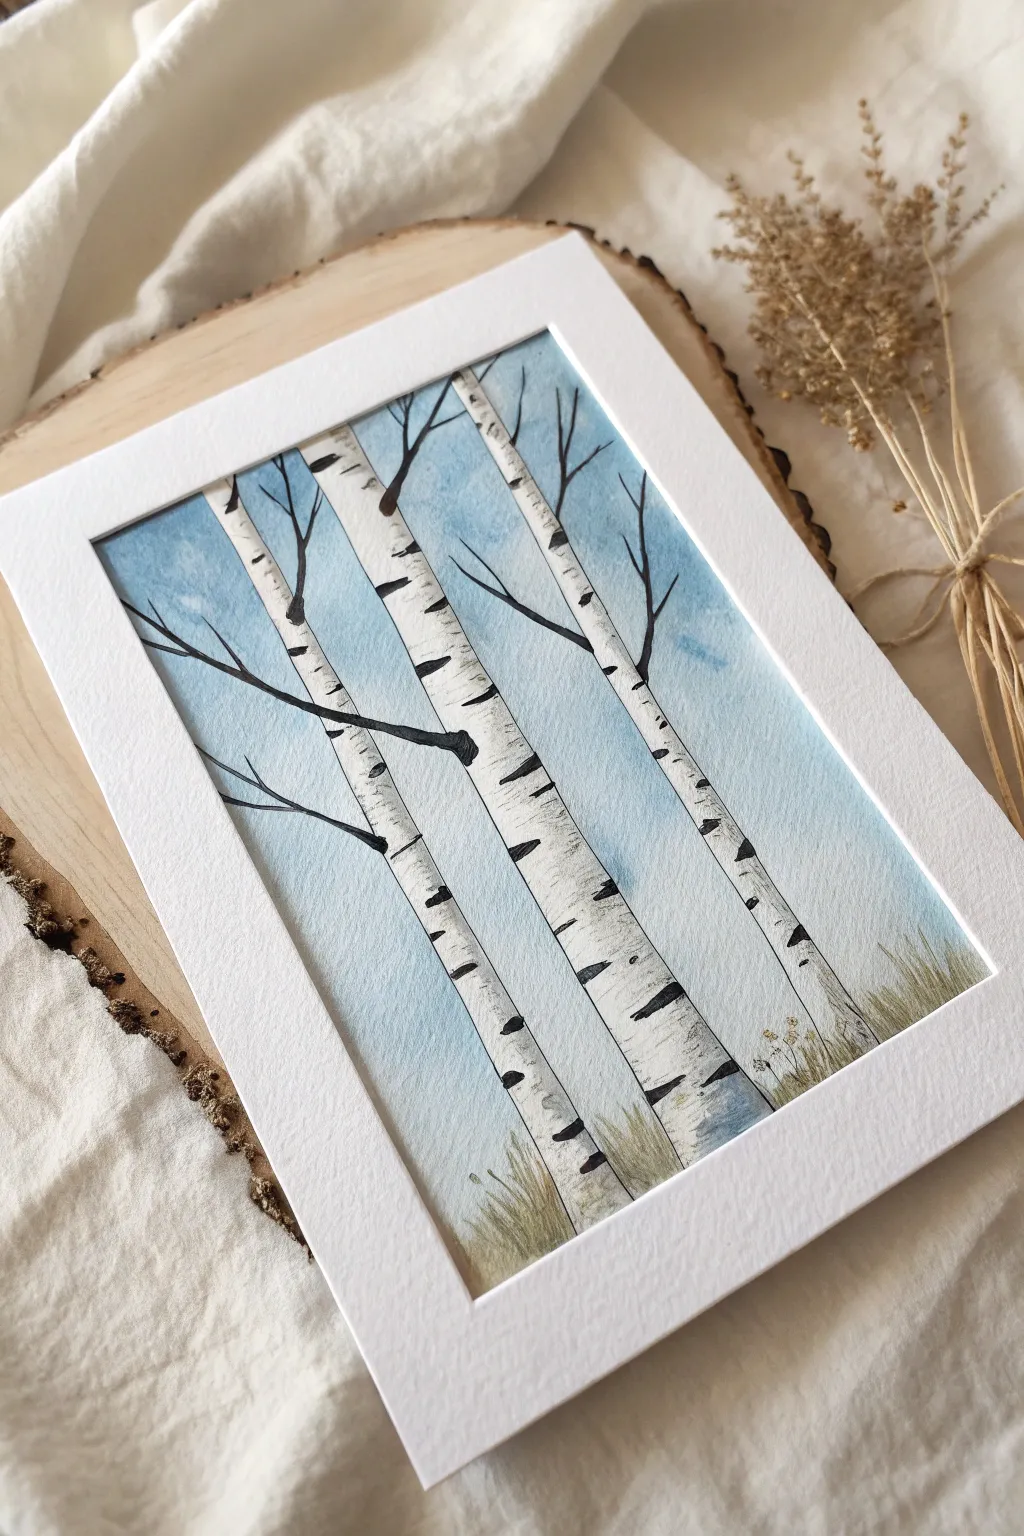
Capture the crisp, serene beauty of winter with this high-contrast watercolor project. Using negative space to create brilliant white tree trunks against a soft blue sky makes for a striking yet simple composition.
Detailed Instructions
Materials
- Cold press watercolor paper (approx 5×7 inches)
- Painter’s tape or masking tape
- Watercolors (Cerulean Blue, Burnt Umber, Payne’s Grey or Black)
- Round brushes (size 6 for wash, size 0 or 1 for details)
- Pencil and eraser
- Paper towels
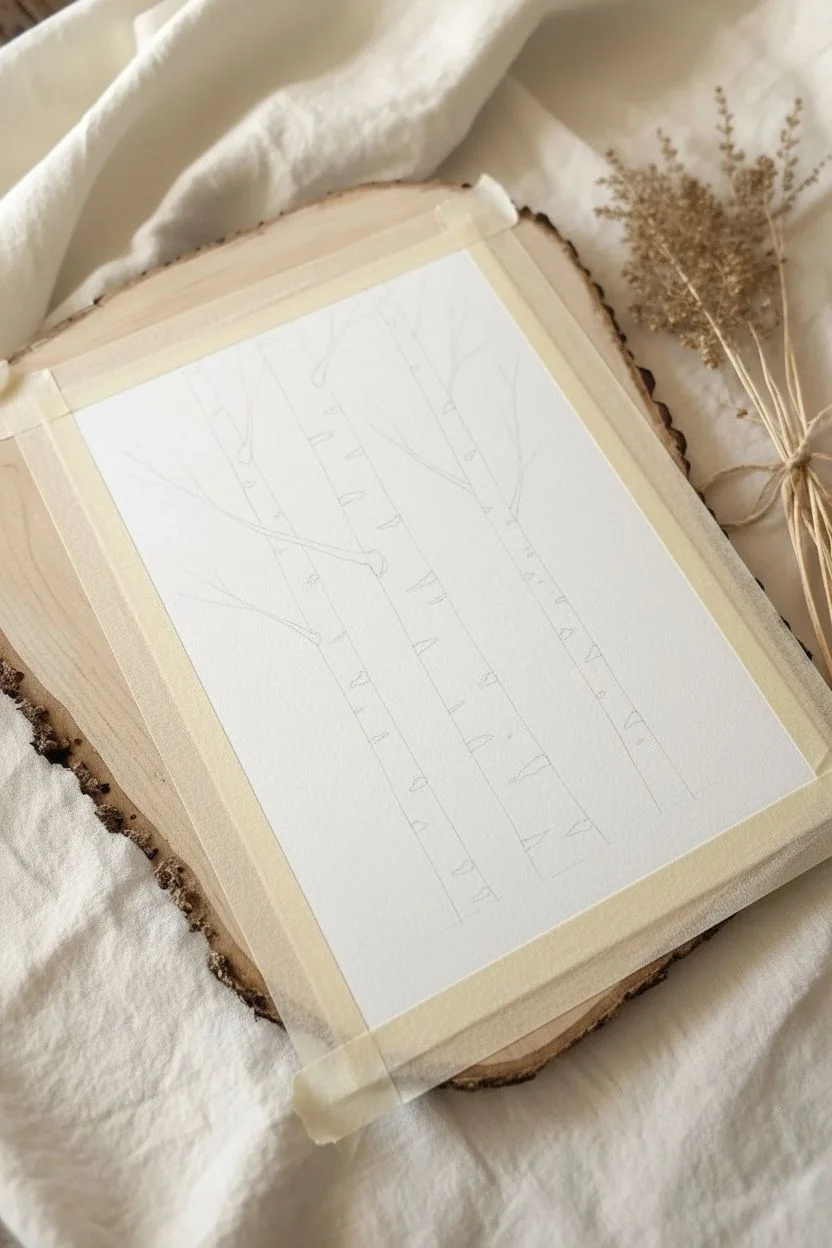
Step 1: Preparation and Sketching
-
Tape the borders:
Secure your watercolor paper to a hard board or table by applying painter’s tape along all four edges. This creates the clean, professional white border seen in the final piece. -
Sketch the trunks:
Using a pencil, lightly draw three vertical tree trunks. Make them slightly uneven in width and tint them at slight angles so they aren’t perfectly parallel. -
Extend the lines:
Ensure your pencil lines go all the way from the bottom grass area off the top edge of the paper, creating tall, continuous forms. -
Add branch guides:
Sketch a few thin lines extending outward from the trunks to indicate where the main branches will go, but keep these very faint.
Clean Lines?
If you struggle to paint around the trees perfectly, you can apply masking fluid over the trunk sketches before painting the sky. Rub it off once the sky is dry.
Step 2: Painting the Sky
-
Mix the sky color:
Dilute a Cerulean or sky blue with plenty of water on your palette to create a light, transparent wash. -
Paint around the trees:
Using your size 6 brush, carefully paint the blue sky, working around the pencil lines of the trees. The trunks must remain clean, dry white paper. -
Create a gradient:
Apply the blue a bit darker near the top and add more water as you move down, letting the color fade almost to white near the bottom. -
Let it dry completely:
Wait until the sky is 100% bone dry before touching the paper again. This prevents the black details from bleeding into the blue.
Level Up: Texture
Use an old credit card to scrape lines into the horizontal black wet paint on the bark. It moves the pigment slightly and adds a raw, scratched texture suitable for birch.
Step 3: Shadows and Dimensions
-
Mix a shadow tone:
Create a very watery grey mix. You can make this by mixing a tiny dot of black with a lot of water. -
Shade the trunks:
Run a thin line of this pale grey along just the right side of each white trunk. This gives the flat paper a cylindrical, rounded look. -
Soften the shadow:
I like to immediately run a clean, damp brush along the inner edge of that grey line to soften it, so the shadow blends gently into the white bark.
Step 4: Adding Details
-
Paint main branches:
Switch to your smallest brush (size 0 or 1). Using concentrated black or dark grey paint, draw thin lines for the major branches extending from the trunks. -
Add fine twigs:
extending from the main branches, paint even thinner ‘V’ shaped twigs reaching up toward the sky. -
Create bark markings:
Using the tip of your brush and thick black paint, make small horizontal dashes across the trunks. Vary perfectly straight lines with slight curves to mimic peeling bark. -
Add triangular knots:
Where a branch meets the trunk, paint a small dark triangle or ‘eye’ shape to anchor the branch visually to the tree. -
Vary the marks:
Ensure the markings are random—some clumped together, some spread out—to keep the trees looking natural.
Step 5: Foreground and Finish
-
Paint the grass:
Mix a muted olive or brownish-green. Use quick, upward flicking motions at the base of the trees to simulate dry winter grass. -
Layer the grass:
Add a few touches of darker brown grass in the foreground to create depth. -
Reveal the border:
Once the paper is completely dry to the touch, slowly peel the tape away at a 45-degree angle to reveal clear edges.
Pop your finished piece into a simple white mat frame to emphasize the modern, clean aesthetic of the birch grove.
Saguaro Cactus at Golden Hour
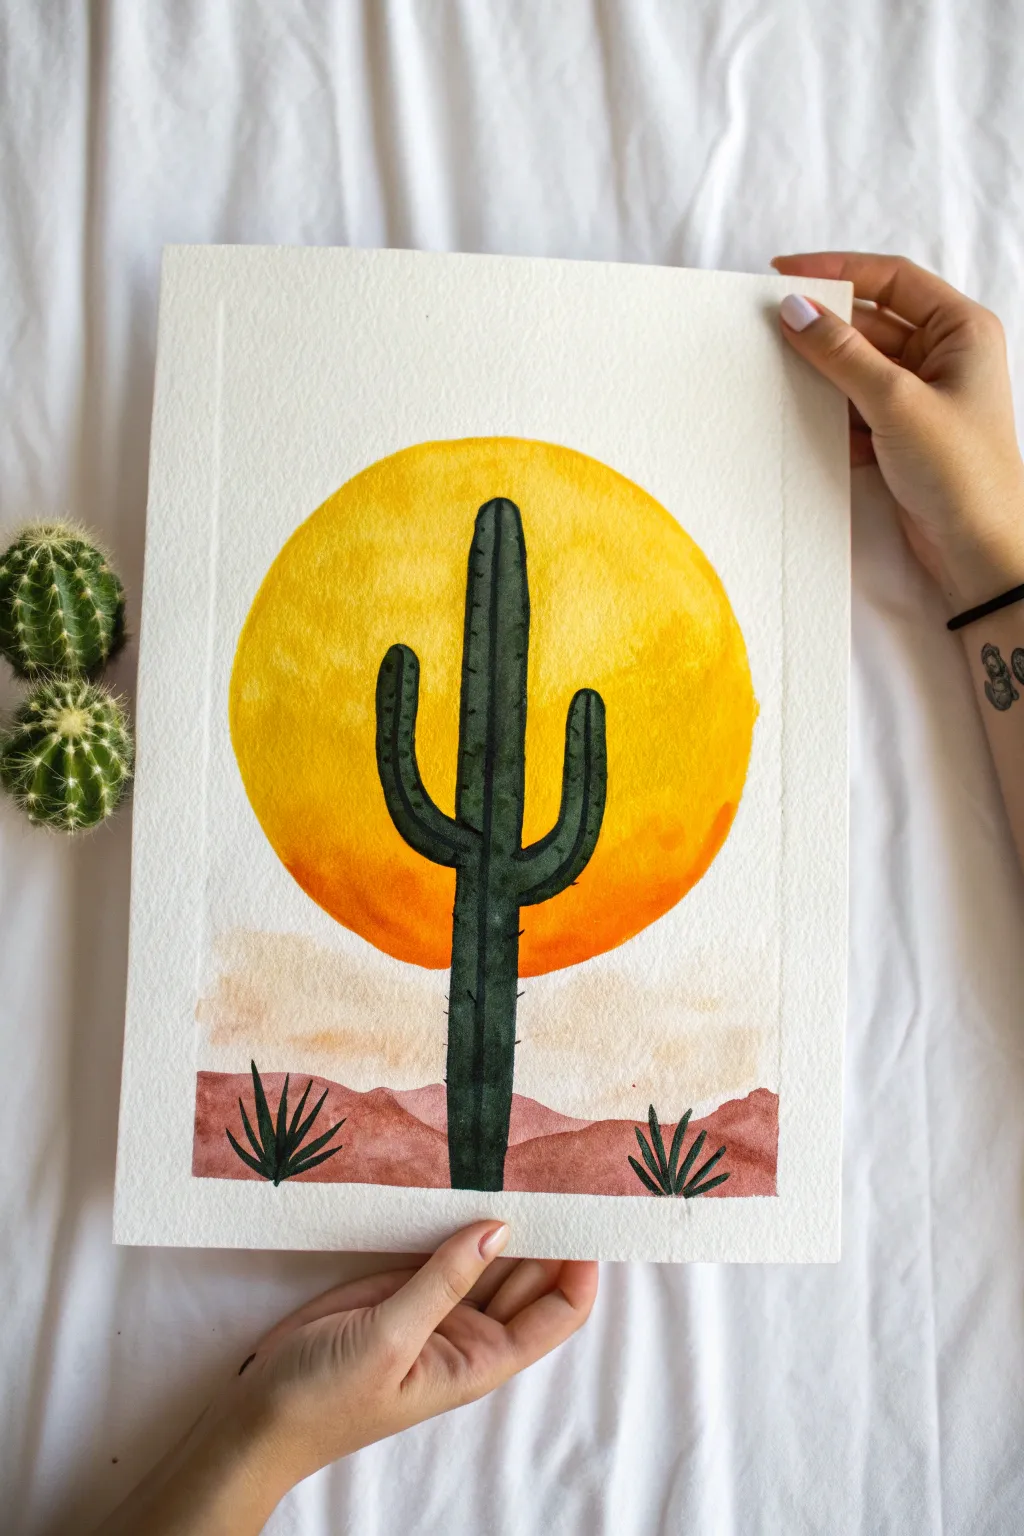
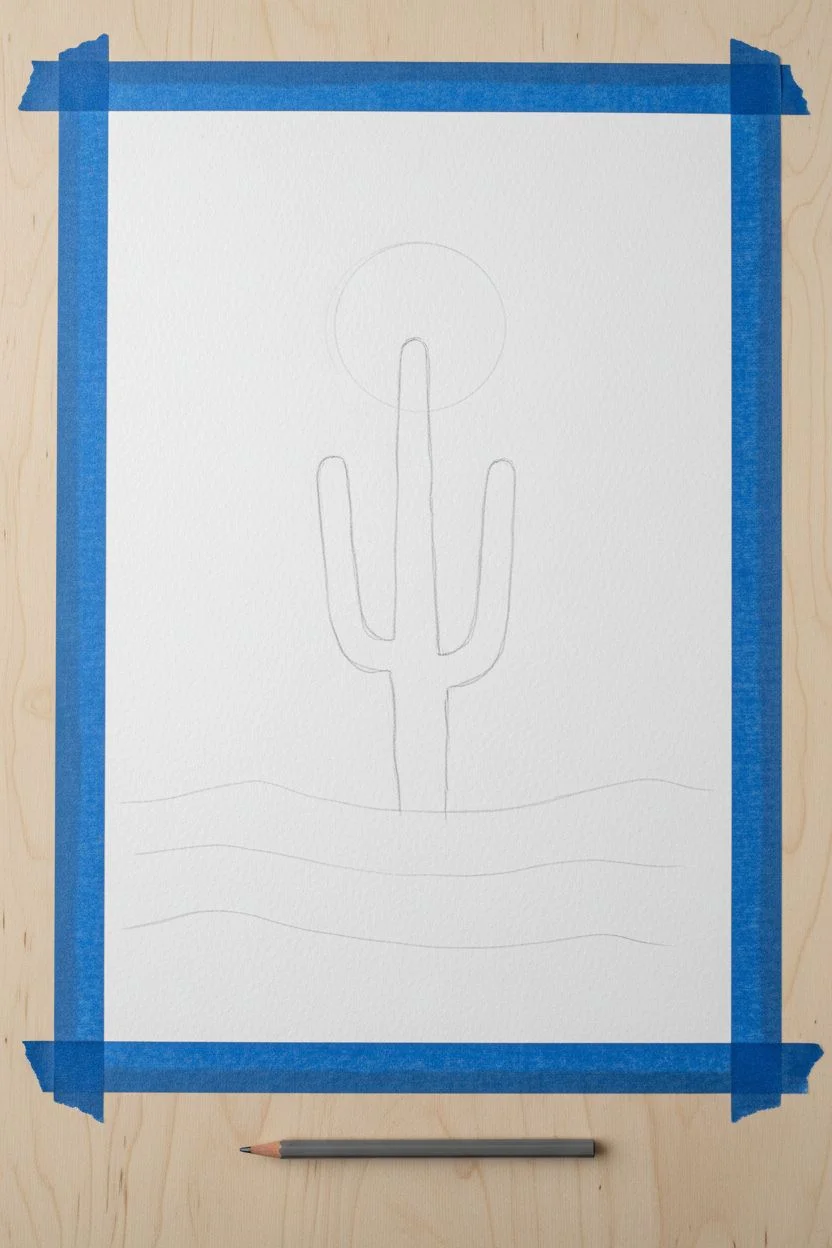
Capture the warmth of a desert sunset with this vibrant watercolor project. By silhouetting a crisp green cactus against a glowing sun, you’ll create a striking contrast that looks impressive but is surprisingly simple to achieve.
Step-by-Step Guide
Materials
- Cold press watercolor paper (300 gsm)
- Watercolor paints (Yellow, Orange, Burnt Sienna, Dark Green, Black)
- Round brushes (Size 6 and Size 2)
- Masking tape or painter’s tape
- Pencil and eraser
- Circular object for tracing (like a small bowl)
- Jar of water
- Paper towels
Step 1: Setting the Scene
-
Secure the borders:
Begin by taping down all four edges of your watercolor paper to a drawing board or table. This creates that crisp white frame seen in the final piece and keeps the paper from buckling. -
Trace the sun:
Place your circular object near the center of the page, slightly towards the top. Lightly trace around it with a pencil to define the sun. -
Sketch the landscape:
Draw two gentle, wavy horizontal lines across the bottom third of the paper. Use a faint touch here; the top line is for distant dunes, and the bottom for the immediate foreground. -
Outline the cactus:
Lightly sketch the Saguaro cactus silhouette in the center. Make the main trunk overlap the sun, with one arm reaching up on the left and a slightly lower arm on the right.
Circle Pro Tip
To keep the sun perfectly round without pencil marks showing, lay your masking tape roll on the paper and trace the *inside* or *outside* lightly.
Step 2: Painting the Backdrop
-
Base layer for the sun:
Dip your larger round brush into clean water and dampen the inside of your pencil circle. Load up a bright yellow paint and fill the entire circle. -
Create the gradient:
While the yellow is still wet, drop a touch of orange paint into the bottom curve of the sun. Tilt the paper slightly or use your brush to gently blend it upward, creating a sunset glow. -
Drying time:
Allow the sun layer to dry completely. If the paper is cool to the touch, it’s still damp—wait until it is room temperature to ensure clean edges later. -
Distant dunes:
Mix a very watery, pale beige or diluted burnt sienna. Paint the strip of land directly below the sun, creating the distant sand dunes. -
Foreground terrain:
Once the previous strip is dry, mix a darker, more saturated burnt sienna or terracotta color. Paint the bottom-most section of the land to create depth.
Level Up: Texture
Before the terracotta ground layer dries, sprinkle a tiny pinch of table salt on the wet paint. Brush it off when dry for a sandy desert texture.
Step 3: Cactus & Details
-
Mix a deep green:
Create a rich, dark green by mixing your standard green with a tiny loose touch of black or red to desaturate it. We want a silhouette look, so the paint should be fairly opaque. -
Fill the cactus form:
Using the size 6 brush, carefully fill in the sketched cactus shape. I find it easiest to outline the edges first with the tip of the brush, then fill the center. -
Add vertical texture:
While the green is drying but not fully set, use a slightly darker shade of green to paint thin vertical lines down the length of the trunk and arms to mimic the ribs of the cactus. -
Refine the edges:
Switch to your size 2 small brush. Make sure the edges of the cactus arms are rounded and smooth against the bright yellow sun. -
Paint the spines:
Using the very tip of your small brush and the darkest green mix, paint tiny, short tick marks along the outer edges of the cactus skins to represent spines. -
Foreground succulents:
Paint two small agave-like plants in the bottom corners using the same dark green. Use quick, upward strokes that taper to a point for the leaves. -
The reveal:
Wait until the entire painting is perfectly dry. Slowly peel away the masking tape at a 45-degree angle to reveal your clean white border.
Frame your desert scene or gift it to a friend to bring a little warmth into their home
Blocky City Skyline
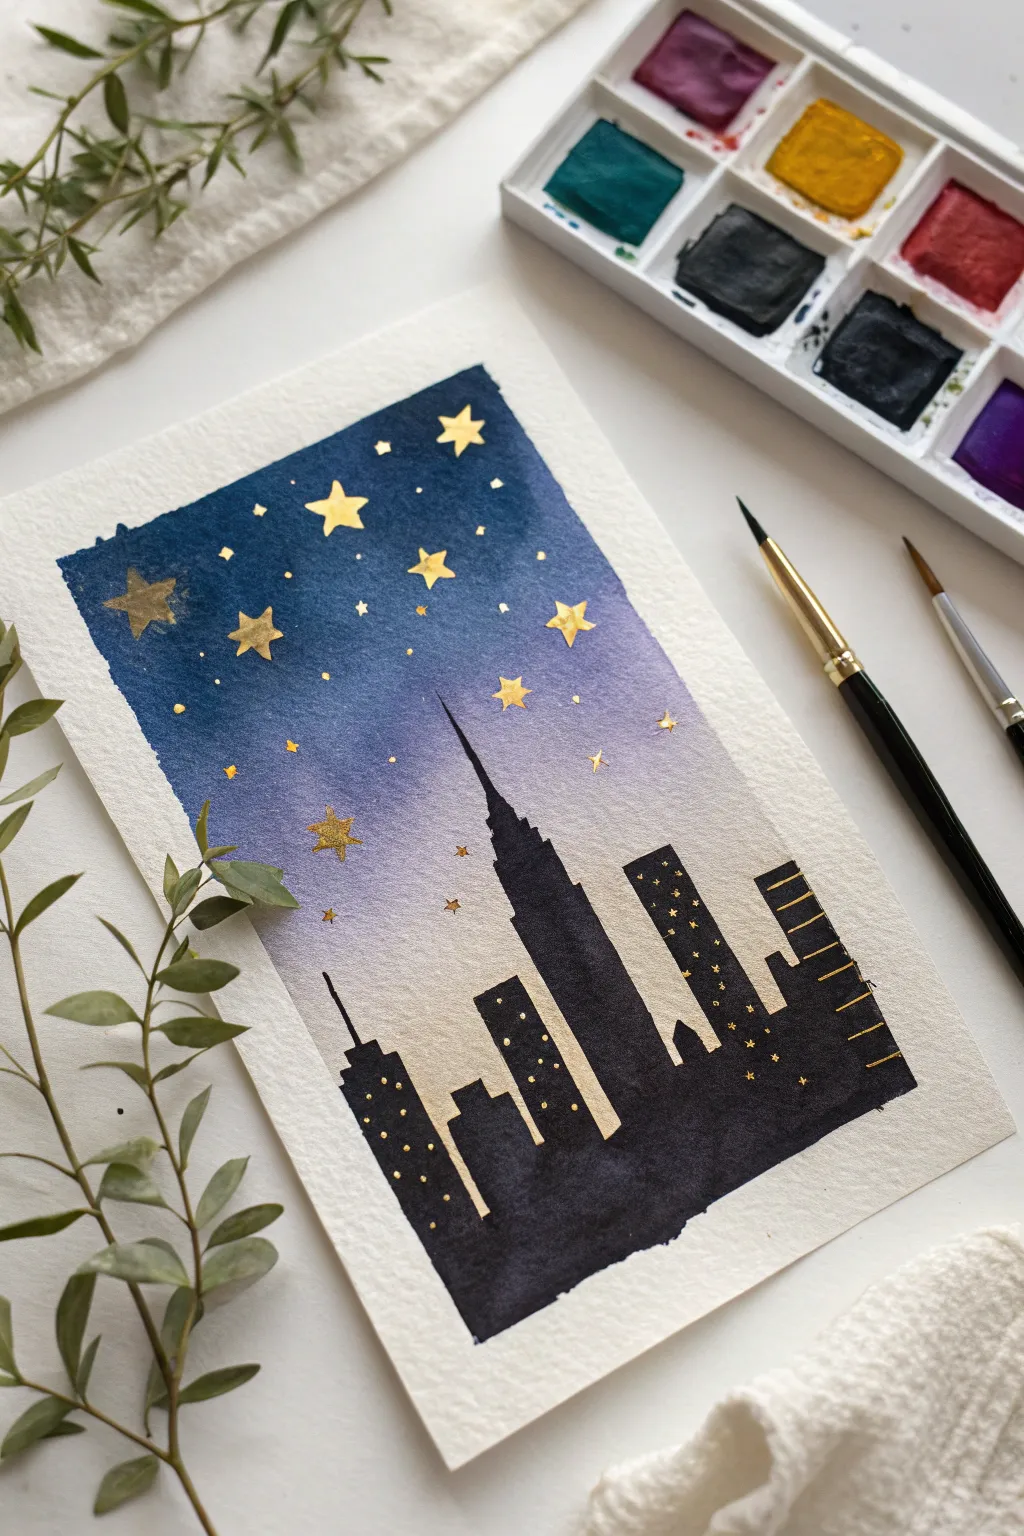
Capture the magic of a sleepless city with this beginner-friendly watercolor project that combines a moody gradient sky with high-contrast silhouettes. The addition of metallic gold details brings the scene to life, making it sparkle against the deep indigo background.
Step-by-Step
Materials
- Cold-press watercolor paper (300 gsm)
- Watercolor paints (Indigo, Violet, Black)
- Metallic gold paint (watercolor or gouache) or a gold gel pen
- Round brush (size 6 or 8)
- Detail brush (size 0 or 2)
- Masking tape or washi tape
- Pencil and eraser
- Jar of water & paper towel
Step 1: Creating the Gradient Sky
-
Secure the paper:
Tape down all four edges of your watercolor paper to a board or table. This creates that satisfying crisp white border and prevents buckling while the paper is wet. -
Pre-mix colors:
Prepare a puddle of deep indigo blue and a separate puddle of purple or violet on your palette. You want plenty of pigment ready to go. -
Wet the paper:
Using your larger round brush and clean water, gently wet the paper surface from the top down to just above where the buildings will sit. The paper should be glistening, not swimming. -
Apply the night sky:
Load your brush with indigo and paint a horizontal strip across the top third of the paper. The wet surface will help the color spread softly. -
Blend the transition:
Rinse your brush slightly and pick up the purple paint. Apply it just below the blue, letting the colors touch and merge naturally where they meet. -
Fade to the horizon:
Clean your brush and use just damp bristles to drag the purple paint downward, fading it into a very pale wash or white space near the bottom third of the page. -
Thorough drying:
Allow the sky to dry completely before proceeding. I find that patience here is key—if the paper is cool to the touch, it’s still too wet for the next step.
Step 2: Painting the Silhouette
-
Sketch the skyline:
Using a pencil, very lightly draw the outline of your city. Place the tallest skyscraper (modeled after the Empire State Building) slightly off-center, flanked by blocky rectangular buildings of varying heights. -
Prepare opaque black:
Mix your black watercolor with very little water. You want a creamy, ink-like consistency that will cover the background completely in one coat. -
Outline the spire:
Switch to your detail brush. Carefully paint the sharp needle-like antenna and the stepped top of the central skyscraper first to ensure precision. -
Fill the shapes:
Continue painting the rest of the building outlines, then fill in the bodies of the buildings with solid black. Try to keep the vertical edges as straight as possible. -
Add side details:
For the shorter buildings on the far left and right, add tiny antennae or uneven rooflines to give the silhouette more character. -
Dry the city:
Let the black paint dry fully. Since the paint is thicker here, it might take a few extra minutes.
Golden Pro Tip
For the window details, use a ruler to lightly mark horizontal levels with a pencil before painting. This keeps your windows perfectly aligned across the skyscraper.
Step 3: Adding the Sparkle
-
Mix the gold:
Activate your metallic gold paint with a drop of water until it flows smoothly, or prep your gold pen. -
Paint the stars:
Using the tip of your detail brush, paint a few five-pointed stars in the dark blue section of the sky. Vary their sizes for interest. -
Add distant starlight:
Dot the tip of the brush around the larger stars to create tiny speckles representing distant stars. -
Illuminate the city:
Paint small dashes, squares, or dots of gold onto the black buildings to represent lit windows. Group them in clusters rather than covering every inch. -
The reveal:
Once all paint is bone dry, slowly peel away the masking tape at a 45-degree angle to reveal your clean edges.
Troubleshooting Edges
If black paint bleeds into the sky, your background wasn’t dry enough. Let it dry, then use a stiff damp brush to gently lift the mistake, or cover it with a larger gold star.
Frame your glittering cityscape or gift it to a friend who loves the urban night view
Dandelion Wish Silhouette
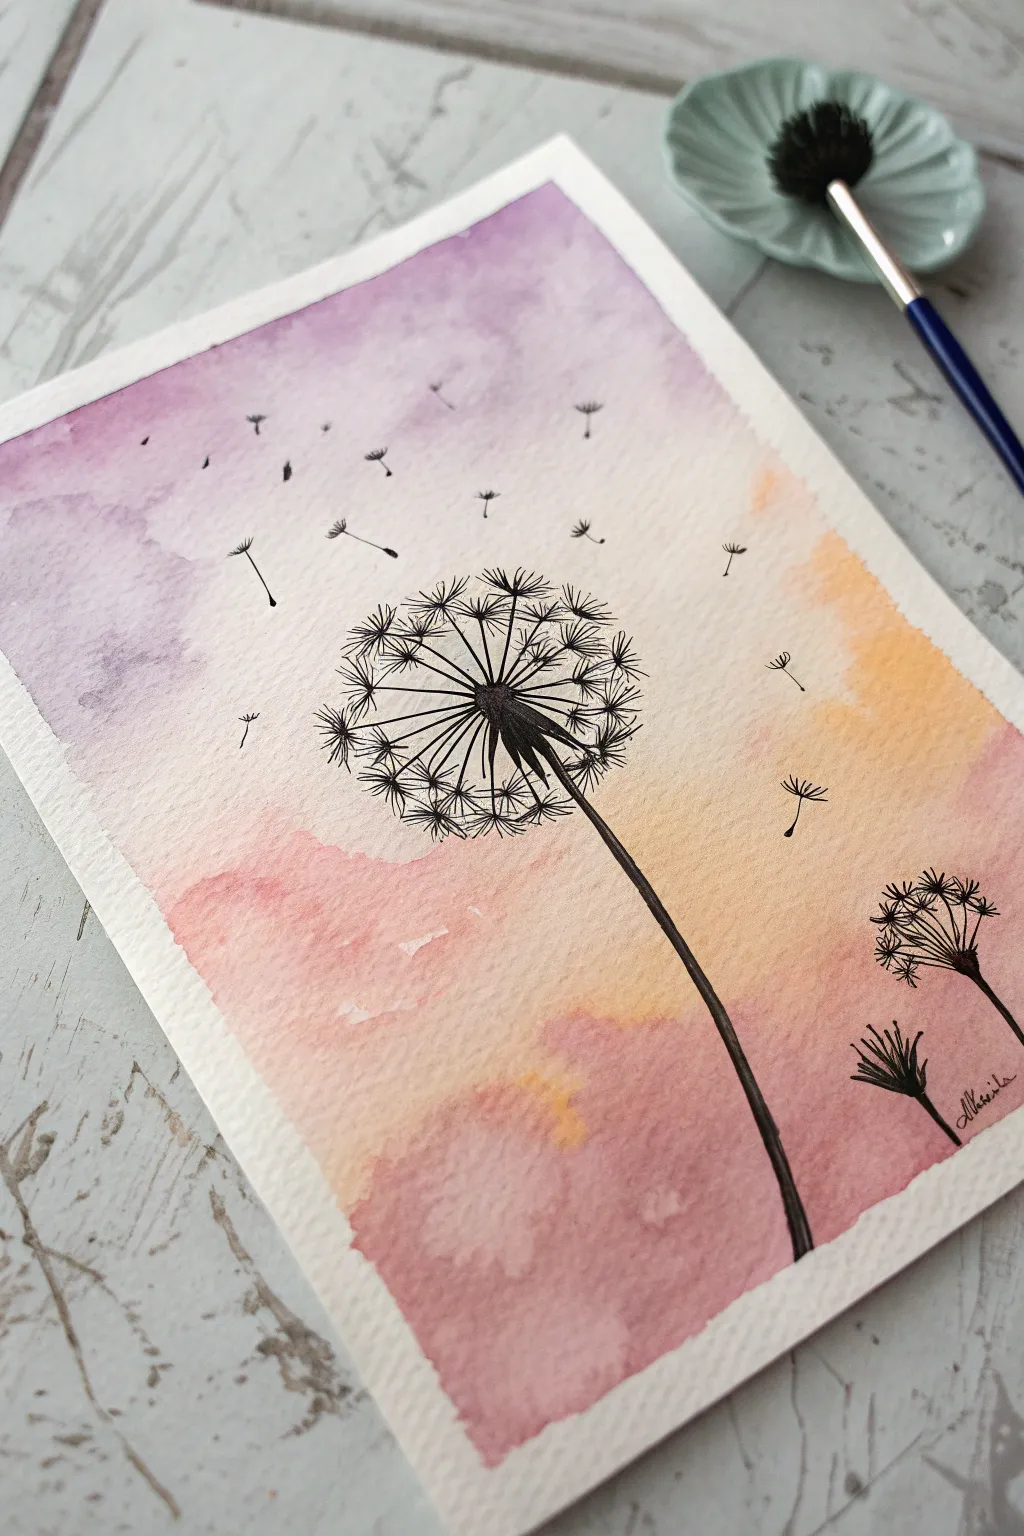
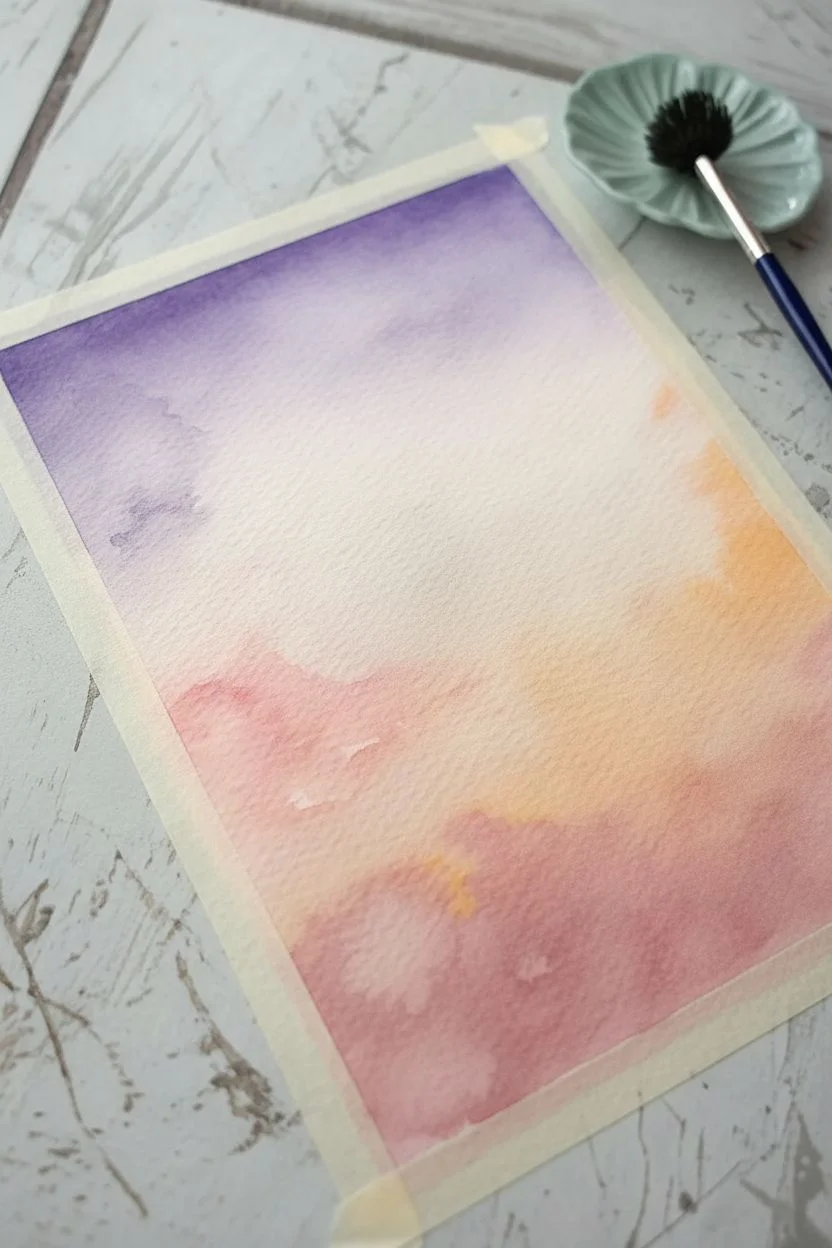
Contrast is key in this beginner-friendly project that combines soft, dreamy watercolors with crisp, black ink illustrations. You will create a vibrant sunset gradient that serves as the perfect backdrop for a delicate dandelion silhouette blowing in the breeze.
How-To Guide
Materials
- Cold press watercolor paper (300 gsm)
- Watercolor paints (violet, rose pink, yellow ochre)
- Round watercolor brush (size 6 or 8)
- Black waterproof fine liner pen (sizes 01 or 03)
- Glass of clean water
- Masking tape
- Paper towels
Step 1: Painting the Sky
-
Secure the paper:
Tape all four edges of your watercolor paper down to your work surface using masking tape to create a clean border and prevent buckling. -
Wet the surface:
Dip your round brush in clean water and apply an even coat over the entire paper until it glistens, but avoid leaving large puddles. -
Apply the purple:
Load your brush with a watery violet or lavender mix. Dab this into the top left corner, letting it spread naturally into the wet paper. -
Blend in pink:
Rinse your brush slightly and pick up a rose pink color. Apply this diagonally across the middle, allowing it to touch and bleed into the purple edge. -
Add warm tones:
Clean your brush and pick up a yellow ochre or soft orange. Fill the remaining space on the bottom right, blending it gently upwards into the pink area. -
Soften transitions:
I like to use a clean, slightly damp brush to gently sweep over the areas where colors meet if the lines look too harsh, creating a seamless gradient. -
Let it dry completey:
Allow the paper to dry completely. The paper must be bone dry before you switch to ink, or the pen lines will feather and bleed.
Step 2: Inking the Silhouette
-
Draw the main stem:
Using your black fine liner, draw a long, slightly curved line starting from the bottom third of the paper, reaching up toward the center. -
Create the center:
At the top of the stem, draw a small, solid black oval shape to serve as the heart of the dandelion head. -
Add radiating spokes:
Draw thin, straight lines radiating outward from the center oval in all directions, like the spokes of a wheel, varying their lengths slightly. -
Detail the seed fluff:
At the end of each spoke, draw tiny ‘V’ shapes or little branched lines to represent the fluffy texture of the seeds. -
Build density:
Add a few more shorter spokes and fluff lines in the gaps to make the dandelion head look full and round. -
Draw floating seeds:
moving upward and to the left, draw individual seeds drifting away. Draw a small line for the stem and the ‘V’ fluff at the top. -
Vary the sizes:
Make some floating seeds smaller and simpler—just tiny distinct marks—to indicate they are further away in the distance. -
Add the side flower:
In the bottom right corner, draw a smaller, semi-circular dandelion head that hasn’t fully opened yet, along with its stem. -
Final reveal:
Once the ink is fully dry, carefully peel away the masking tape at a 45-degree angle to reveal your crisp white borders.
Fixing Feathered Ink
If your black lines start to look fuzzy or spread, your paper is still damp. Stop immediately and use a hair dryer on a low, cool setting to fully dry the paper before continuing.
Add Magic
Use a white gel pen to add tiny highlight dots to the center of the black dandelion head or add a few white sparkles in the purple section to turn the sunset into a twilight sky.
Display your beautiful silhouette art on a shelf or frame it to brighten up a small corner of your room.
Reflective Lake Horizon
Capture the peaceful transition of day to night with this soft, reflective seascape painting. Using gentle horizontal strokes and a warm palette, you’ll learn to mirror the sky onto the water for a stunning, symmetrical effect.
Step-by-Step Tutorial
Materials
- Square canvas
- Acrylic paints (Titanium White, Cadmium Yellow, Rose Pink, Violet, Burnt Umber)
- Large flat brush (1-inch)
- Medium flat brush
- Small round detail brush
- Palette and water cup
- Ruler and pencil
- Paper towels
Step 1: Setting the Scene
-
Define the Horizon:
Use a ruler and pencil to draw a straight horizontal line slightly below the center of the canvas to separate the sky from the water. -
Mix the Glow:
On your palette, mix a generous amount of Titanium White with a small touch of Cadmium Yellow and a speck of Rose Pink to create a pale peach glow. -
Base Sky Layer:
Using the large flat brush, paint the area immediately above the pencil line with your peach mixture, using long, horizontal strokes. -
Transition to Pink:
While the paint is still wet, mix a little more Rose Pink into your peach color and apply it above the horizon glow, blending the two sections where they meet. -
Upper Sky:
Clean your brush, then mix Violet with Rose Pink and White. Apply this soft mauve color to the top third of the canvas. -
Smooth the Gradient:
I like to use a clean, dry brush to gently sweep back and forth over the color transitions, ensuring a seamless fade from the purple top to the yellow-peach horizon.
Sticky Paints?
If acrylics dry too fast and strip, mix in a slow-drying medium or mist the canvas lightly with water. This keeps paints workable for those buttery smooth gradients.
Step 2: Clouds and Texture
-
Forming Cloud Streaks:
Switch to a medium flat brush and mix a slightly darker version of the mauve sky color. -
Diagonal Movements:
Use the narrow edge of the brush to paint diagonal sweeping streaks starting from the top left corner, angling down towards the center. -
Feathering:
Lightly feather the edges of these clouds with a clean brush so they look soft and wispy rather than rigid. -
Lower Clouds:
Add thin, flat horizontal cloud lines near the horizon using a mix of Rose Pink and a tiny drop of Burnt Umber for contrast.
Step 3: Mirroring the Water
-
Reverse Gradient:
To paint the lake, replicate the sky colors in reverse order, starting with the pale peach glow just below the horizon line. -
Deepening the Water:
Paint the bottom section of the canvas with the mauve and pink tones, blending them upwards into the peach area. -
Creating Ripples:
While the water paint is wet, pull your brush horizontally across the canvas to create a slightly blurred, watery texture. -
Adding Reflection Details:
Load your brush with the cloud color and paint loose, horizontal zig-zags on the water to mimic the reflection of the clouds above. -
Water Highlights:
Mix a bright pastel yellow and paint very thin horizontal dashes near the center of the lake to suggest light skimming the surface.
Level Up: 3D Pop
Add dimension by applying the final bright water highlights with a palette knife instead of a brush. The thick, textured paint will catch the light like real waves.
Step 4: The Horizon Line
-
Mixing Dark Tones:
Create a dark, rich color by mixing Burnt Umber with Violet. Avoid using pure black to keep the painting’s tone cohesive. -
Painting the Land:
With the medium flat brush, paint a solid strip along the pencil horizon line to create the distant shore. -
Tree Texture:
Use the corner of your brush to dab tiny, uneven bumps along the top edge of the land strip to simulate the tops of trees. -
Land Reflection:
Paint a slightly narrower, blurred strip of this dark color directly below the land in the water section. -
Final Blur:
Gently run a clean brush horizontally through the dark water reflection to distort it slightly, settling it into the lake surface.
Step back and admire how the warm glow of your sunset brings a peaceful atmosphere to the room
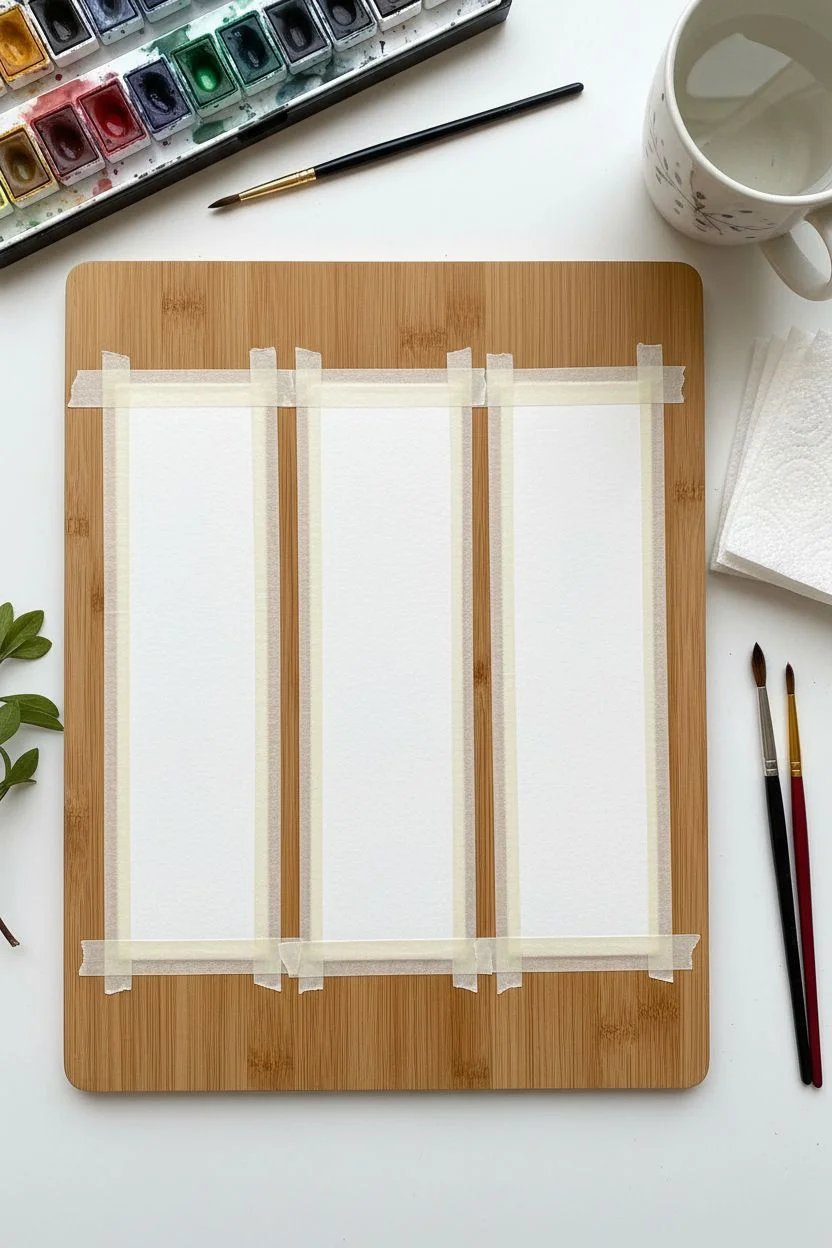
Vertical Landscape Bookmarks
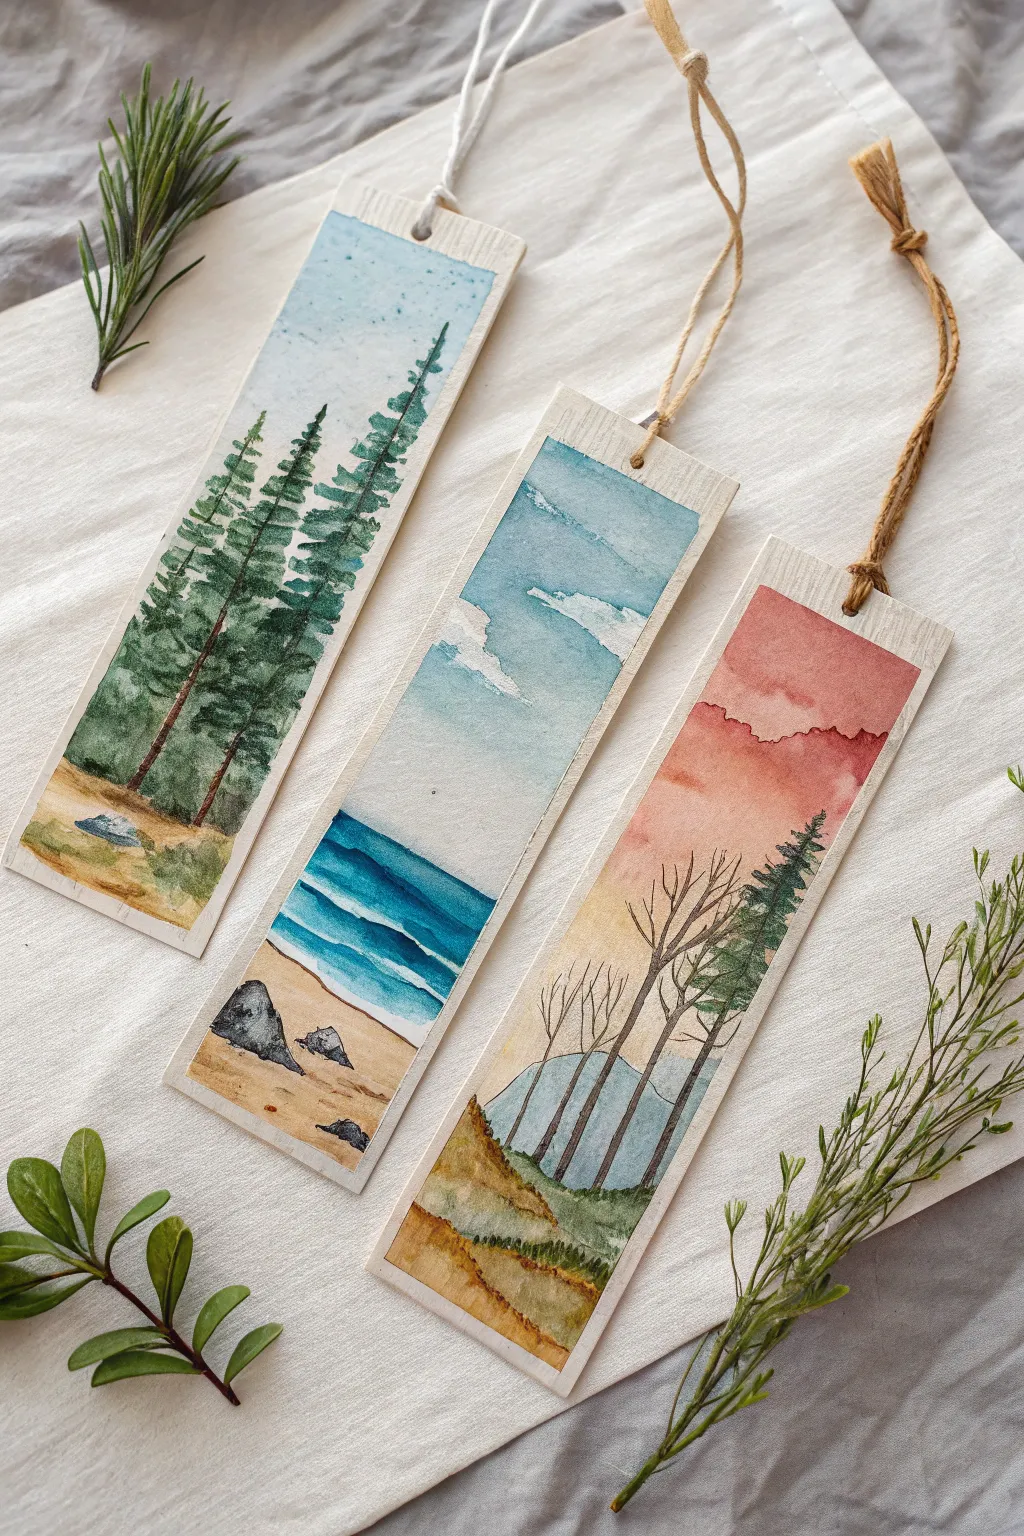
These charming vertical landscapes capture three distinct moods of nature using simple watercolor techniques. They are the perfect size for testing out color blends and make functional, heartfelt gifts for the book lovers in your life.
Detailed Instructions
Materials
- 300gsm Cold press watercolor paper
- Watercolor paints (pan or tube)
- Round brushes (size 2 for details, size 6 for washes)
- Masking tape or washi tape
- Rigid board (for taping down paper)
- Jar of clean water
- Paper towels
- Hole punch
- Natural jute twine
Step 1: Preparation
-
Cut and size:
Cut your watercolor paper into three strips, approximately 2 inches wide by 6 inches tall. -
Secure the paper:
Tape each strip down to your rigid board using masking tape along the very edges; this keeps the paper flat while wet and creates a clean border if desired.
Step 2: The Pine Forest
-
Sky and ground base:
Using a diluted blue, paint a very light wash at the top third of the strip. Paint the bottom inch with a light yellow-ochre wash for the ground. -
Tree structures:
Mix a dark evergreen shade. Using the tip of a size 2 brush, draw three vertical lines for trunks, varying their heights. -
Pine branches:
Starting from the top of each trunk, use a small dabbing motion to paint branches extending outward, getting wider as you move down. -
Ground details:
While the ground area is dry, add texture with darker brown paint and paint a small grey rock shape near the bottom left corner.
Cloud Lifting Trick
To soften the hard edges of your clouds in the beach scene, create the blue sky wash first, then immediately use a crumpled paper towel to dab and ‘lift’ the wet paint away.
Step 3: The Sunny Coast
-
Cloudy sky:
Paint the top half with a bright cerulean blue. Leave irregular white shapes of unpainted paper to represent fluffy clouds. -
Ocean horizon:
Below the sky, paint a straight horizon line with a deep blue. Dilute the paint with water as you pull the color downward to create a lighter, transparent turquoise near the shore. -
Sandy shore:
Paint a warm beige wash for the beach, meeting the ocean edge carefully. I like to leave a tiny sliver of white paper between the water and sand to look like sea foam. -
Foreground rocks:
Once the sand is fully dry, paint angular rock shapes in the foreground using a mix of Payne’s grey and black.
Fixing Blooms
If you see ‘cauliflower’ shapes in your sky gradients, it means you added water to drying paint. Let the layer dry completely, then try glazing over it with a damp brush.
Step 4: Golden Hour Woods
-
Sunset gradient:
Start at the top with a dusty red or clay color. While wet, blend in orange, then fade into a pale yellow towards the middle of the paper. -
Distant hills:
Mix a watery grey-blue and paint a low mountain silhouette in the background where the yellow sky ends. -
Foreground terrain:
Paint a sloping hill at the bottom with earthy greens and browns, creating a textured look for grass. -
Bare trees:
Using your finest brush and dark brown paint, create thin, branching trees on the left side, keeping the lines delicate to resemble winter branches. -
Right-side pine:
Balance the composition by painting a single green pine tree on the right slope, using the same dabbing technique as the first bookmark.
Step 5: Finishing Touches
-
Drying and peeling:
Ensure all bookmarks are completely dry to the touch before carefully peeling off the masking tape at a 45-degree angle. -
Punching holes:
Use a single-hole punch to create a centered hole about half an inch from the top edge of each bookmark. -
Adding twine:
Cut three lengths of jute twine. Fold a piece in half, push the loop through the hole, and pull the tails through the loop to secure it.
Place these inside your current read to add a little window to the outdoors every time you turn the page.


Have a question or want to share your own experience? I'd love to hear from you in the comments below!