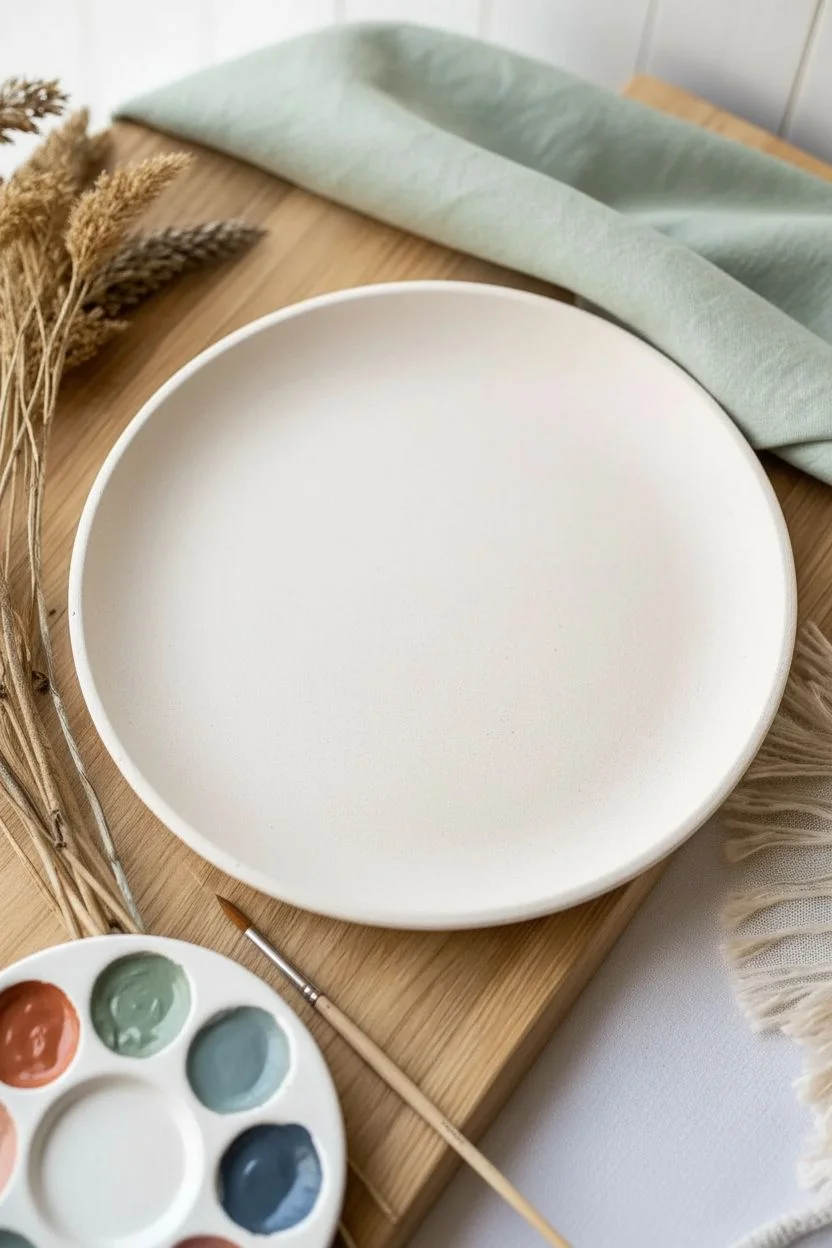
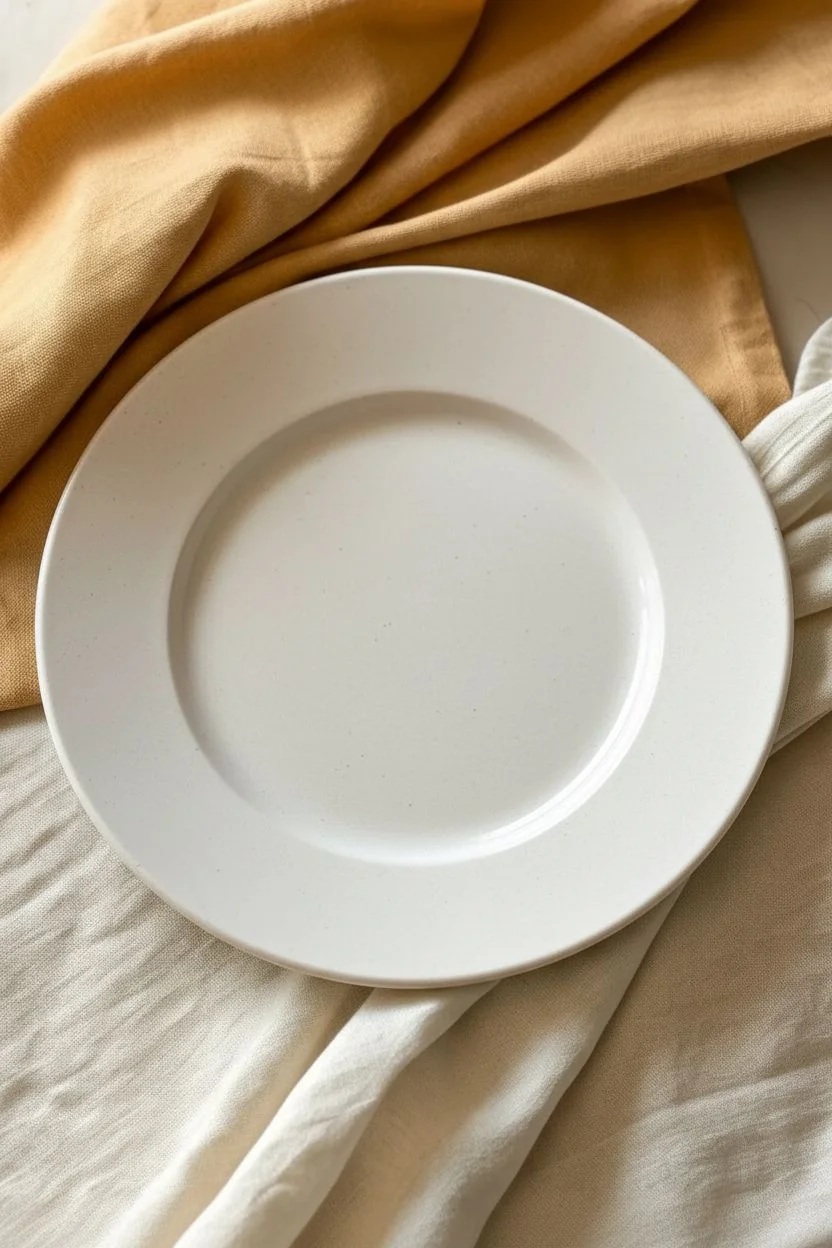
If you’ve got a plain plate and a tiny spark of curiosity, you’ve already got everything you need to start plate painting. These beginner plate painting ideas are the kind of projects I teach when you want quick wins, clean results, and that “I made this!” feeling without stressing over perfection.
Classic Polka Dot Plate
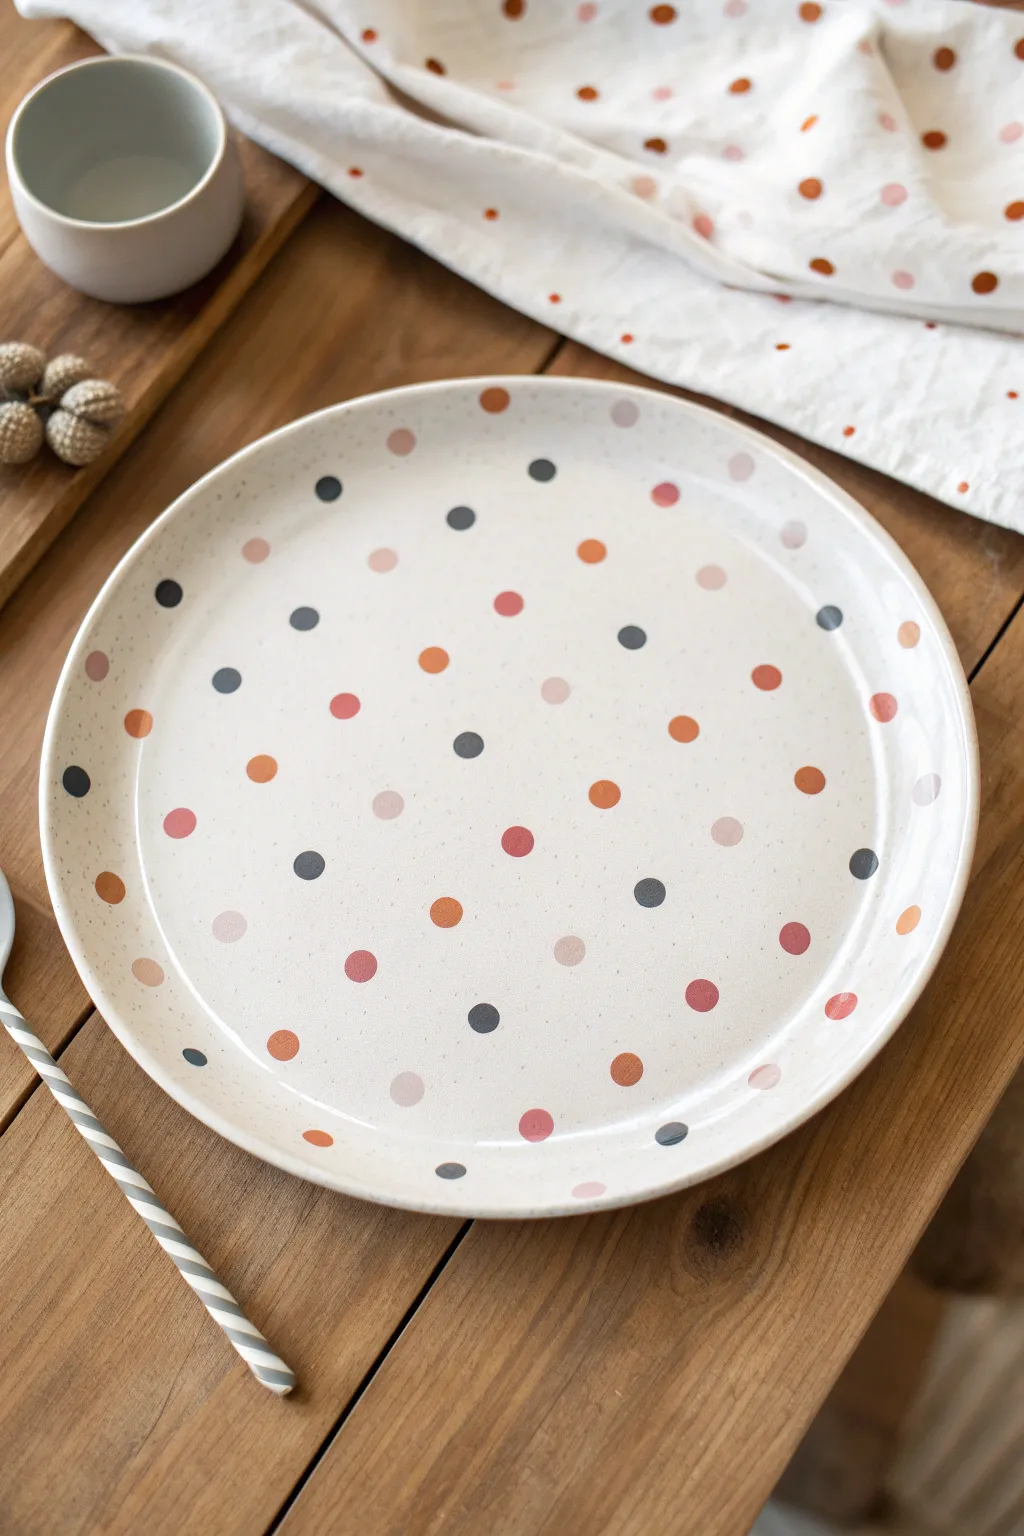
Transform a plain white ceramic plate into a festive piece of decor with this simple yet rhythmic polka dot design. The soft, muted color palette featuring terracotta, slate grey, and dusty pink gives it a sophisticated, modern bohemian feel that mimics high-end speckled stoneware.
Step-by-Step
Materials
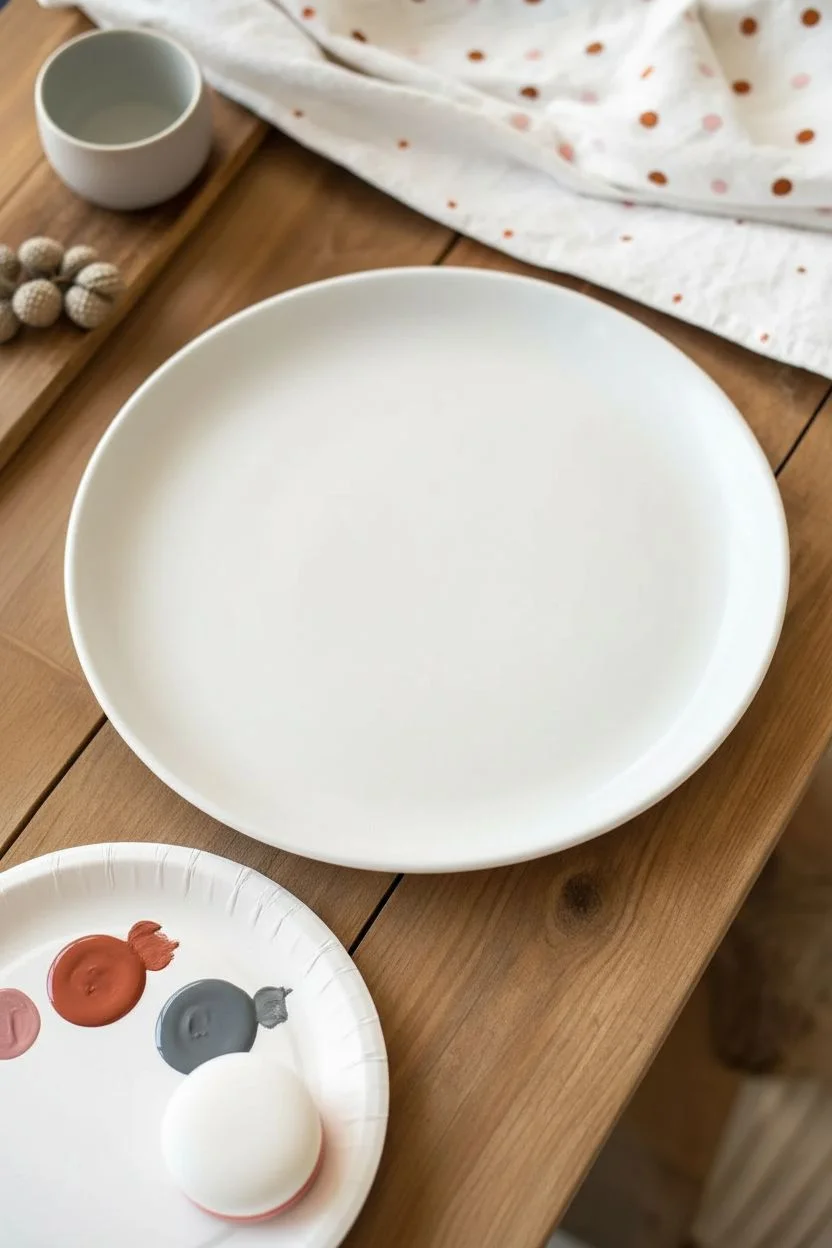
- Plain white ceramic plate (dinner or salad size)
- Ceramic or porcelain paints (Terracotta/Rust, Slate Grey, Dusty Pink)
- Foam pouncers (small, round sponges on sticks) or round sponge daubers in uniform size (approx. 1cm)
- Rubbing alcohol and paper towel
- Paper plate or palette
- Cotton swabs (Q-tips) for cleanup
- Oven (for curing the paint)
Step 1: Preparation
-
Clean the Surface:
Before any paint touches the plate, it is crucial to remove any invisible oils or fingerprints. Wipe the entire surface of the plate thoroughly with rubbing alcohol and a paper towel. -
Dry Completely:
Allow the alcohol to evaporate completely for a few minutes. A clean, bone-dry surface ensures the paint adheres properly and doesn’t peel later. -
Prepare Your Palette:
Squeeze a small amount of each paint color—Terracotta, Slate Grey, and Dusty Pink—onto your paper plate. Make sure there is enough space between colors so they don’t accidentally mix.
Clean Edges Only
For perfectly crisp circles specifically on the curved rim, try using the eraser end of a fresh pencil instead of a foam pouncer. It’s firmer and handles the angle better.
Step 2: Painting the Pattern
-
Load the Tool:
Take your round foam pouncer and dip it vertically into the Slate Grey paint. Dab it a few times on a clean part of the palette to remove excess paint; you want an even coat, not a gloopy blob. -
Start with Grey Anchors:
Begin pressing grey dots randomly across the plate. Aim for a scattered, non-linear arrangement, leaving plenty of open white space between them for the other colors. Press straight down and lift straight up to keep the circle perfect. -
Switch Colors:
Wipe your pouncer clean or switch to a fresh one. Now, pick up the Terracotta (rust) color. Load the sponge just as before, ensuring even coverage. -
Add Warm Accents:
Place the terracotta dots in the gaps between the grey ones. Try to avoid placing two dots of the same color right next to each other. This color adds the warm, earthy tone that anchors the design. -
Introduce the Pink:
Finally, load a pouncer with the Dusty Pink paint. Fill in the remaining large gaps with this softer hue. It acts as a bridge between the dark grey and the warm rust tones. -
Check Density:
Step back and look at the plate from a distance. If you see any large white voids that look unbalanced, add a dot there. The beauty of this pattern is its controlled chaos, so exact spacing isn’t necessary. -
Refine the Edges:
Don’t be afraid to let a few dots sit right near the rim or the curve of the plate. This makes the pattern feel continuous, like it was printed on the material.
Paint Peeling off?
If the dots lift after drying, you applied the paint too thickly. Use less paint on the sponge and dab gently to create thin, durable layers rather than one thick one.
Step 3: Finishing Touches
-
Clean Mishaps:
If any dots smudged or aren’t perfectly round, dip a cotton swab in a little rubbing alcohol or warm water (depending on paint instructions) and carefully wipe away the error while the paint is wet. -
Create the Speckled Effect (Optional):
To mimic the stone look in the reference image, dip a stiff bristle brush (like a toothbrush) into the grey paint, pull the bristles back with your finger, and gently flick tiny mist-like speckles over the entire plate. -
Initial Drying:
Let the plate sit undisturbed for at least 24 hours (or as specified by your paint brand). This air-dry period allows the paint to settle and harden slightly before heat curing. -
Bake to Cure:
Place your cold plate into a cold oven. Set the temperature to 300°F (150°C) or the manufacturer’s recommended temperature. turning the oven on with the plate inside prevents thermal shock. -
The Curing Process:
Once the oven reaches temperature, bake for 30-35 minutes. Then, turn the oven off and—this is key—leave the plate inside until the oven is completely cool.
Enjoy using your custom speckled plate for appetizers or distinct jewelry storage.


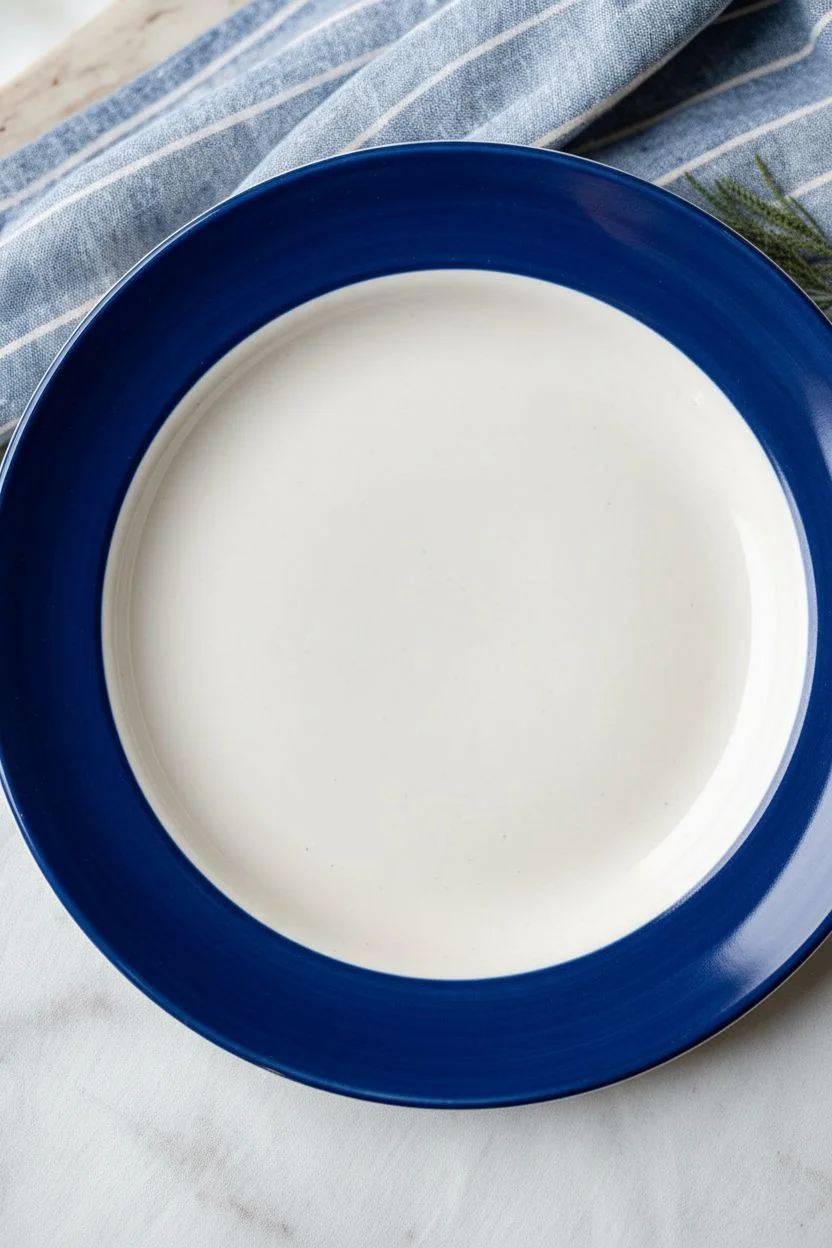
Simple Stripes Around the Rim
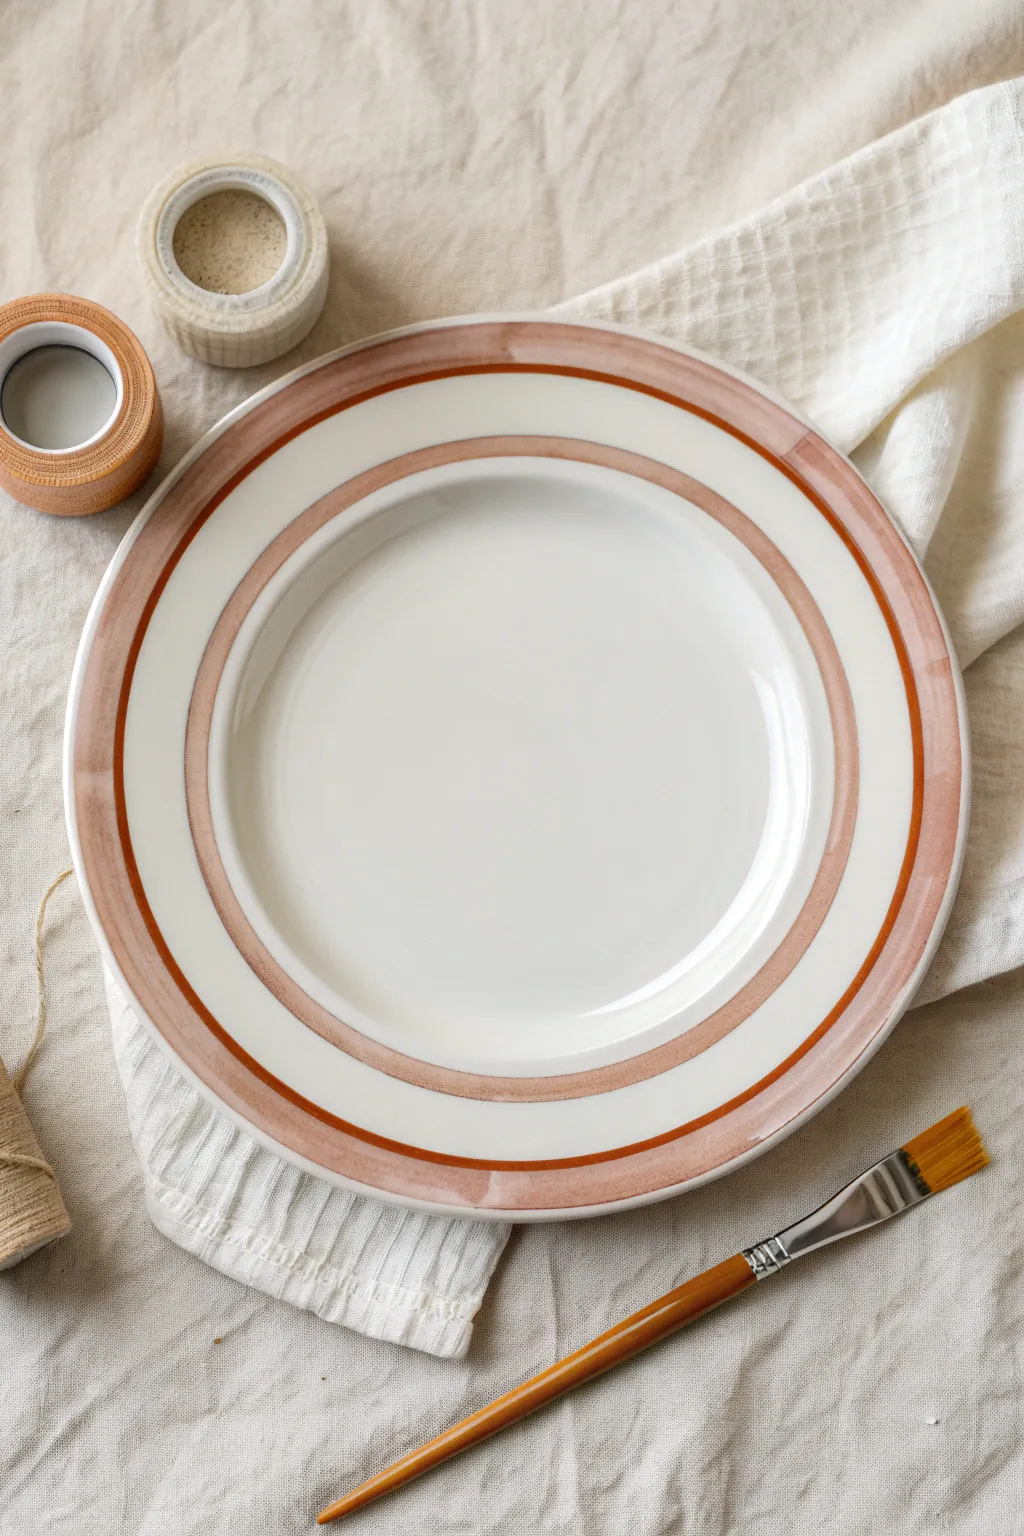
Master the art of understated elegance with this dual-tone striped plate design. Combining soft, warm pinks with striking burnt orange accents creates a modern, pottery-studio look that belies its simplicity.
Detailed Instructions
Materials
- White ceramic plate (rimmed dinner plate preferred)
- Ceramic paint or porcelain paint (Pale Pink/Blush)
- Ceramic paint or porcelain paint (Burnt Orange/Terracotta)
- Flat shader brush (medium width, roughly 1/2 inch)
- Fine liner brush or small round brush
- Rubbing alcohol
- Cotton pads or paper towel
- Pottery wheel or lazy susan (highly recommended)
- Palette or small dish for paint
- Domestic oven (for curing)
Step 1: Preparation & Setup
-
Clean surface:
Begin by thoroughly wiping down your entire plate with rubbing alcohol on a cotton pad. This removes any invisible oils or fingerprints that could prevent the paint from adhering properly. -
Set up the spin:
Place your plate in the absolute center of your lazy susan or banding wheel. Give it a gentle spin and watch the edge; adjust the position until the plate spins completely true without wobbling side to side. -
Prepare the palette:
Squeeze out a generous amount of your pale pink blush paint. You want enough ready so you don’t have to stop mid-stripe to reload too often.
Steady Hands
Can’t keep your hand steady? Rest your pinky finger directly on the dry center of the plate while holding the brush, treating it like a compass pivot point.
Step 2: Painting the Blush Bands
-
Load the flat brush:
Fully load your flat shader brush with the pale pink paint. Ensure the bristles are coated but not dripping. -
Position the outer band:
Rest your hand on a stable surface (like a stack of books or a heavy can) next to the wheel to steady it. Hold the brush so the flat edge is aligned with the outer rim of the plate. -
Spin and paint:
Gently start spinning the wheel with one hand while lowering the brush onto the rim with the other. Let the motion of the wheel do the work, applying a single continuous wide band of pale pink along the outer edge. -
Smooth the stroke:
Keep the brush in place for a few rotations to smooth out the paint distribution and ensure opacity. -
Position the inner band:
Move your brush inward, targeting the area just before the plate dips into the center well. This second blush stripe should be roughly the same width as the first. -
Paint interior ring:
Repeat the spinning process, holding your hand steady to create a second thick ring of pale pink. Don’t worry if the edges aren’t razor-sharp; that organic look adds charm. -
Dry break:
Wait about 15-20 minutes for these base layers to become touch-dry. I find rushing this step usually leads to smudging when applying the darker lines.
Make It a Set
Reverse the colors for a companion plate: paint the wide bands in burnt orange and the thin accent lines in the pale blush pink.
Step 3: Adding the Terracotta Accents
-
Switch brushes:
Load your fine liner brush with the darker burnt orange paint. This color needs to be fluid, so add a tiny drop of water or medium if it feels too thick. -
Anchor your hand:
Re-establish your hand rest. Stability is critical for these thinner lines. -
Inner rim accent:
Position your brush tip just inside the outer pink band, leaving a tiny gap of white if possible, or slight overlap if preferred. Spin the wheel to create a thin, consistent terracotta line. -
Center well definition:
Move to the inner pink band. Place your brush right at the interior edge where the plate floor begins. Spin to apply the final thin terracotta ring. -
Corrections:
If any paint splattered or went astray, use a damp cotton swab or a toothpick to gently scrape or wipe it away while wet.
Step 4: Curing
-
Full dry:
Let the plate dry completely for at least 24 hours. The paint must be fully hardened before baking. -
Cold oven start:
Place the plate in a cool oven. Do not preheat, as thermal shock can crack the ceramic. -
Bake:
Set the oven to the temperature recommended on your paint bottle (usually around 300°F/150°C) and bake for 30-35 minutes. -
Cool down:
Turn the oven off and leave the plate inside until the oven is completely cold. This ensures durability.
Now you have a beautifully custom piece of tableware ready for your next dinner party


Tape-Blocked Geometric Triangles
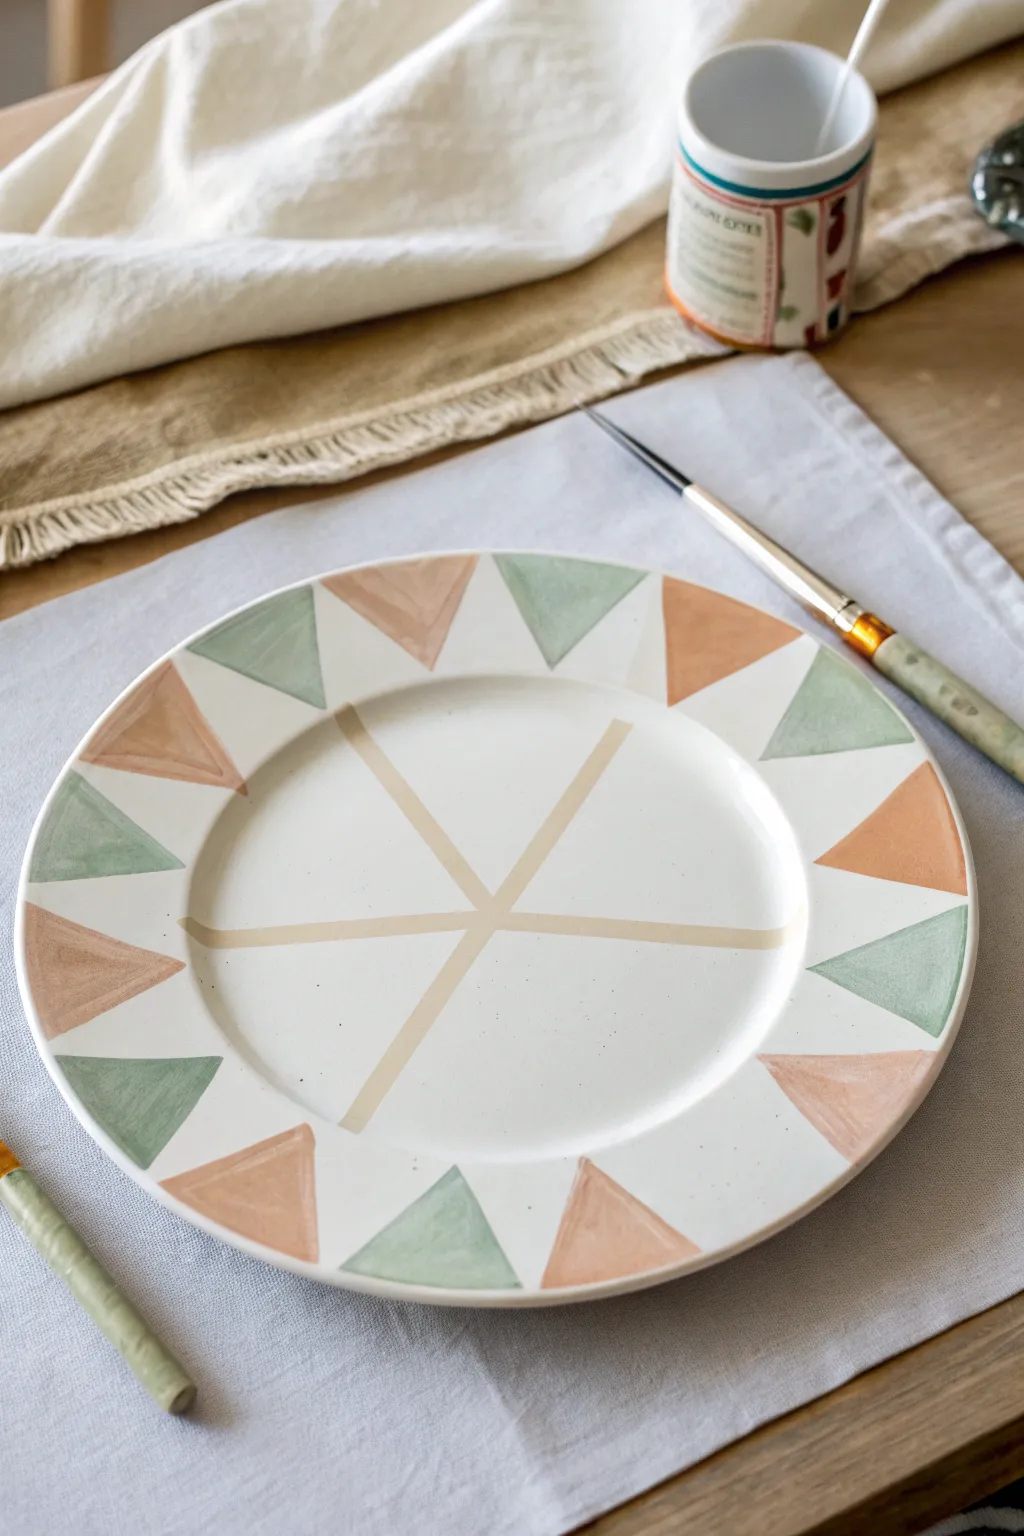
Achieve a modern, airy look with this simple tape-resist technique that creates clean geometric shapes in soft, earthy tones. The combination of sage green and terracotta triangles around the rim frames a delicate central star design perfectly.
Step-by-Step
Materials
- White ceramic plate (bisk or glazed ceramic paint-ready)
- Ceramic paints (Sage Green, Terracotta/Peach, Beige/Tan)
- Painter’s tape or Washi tape (low tack)
- Fine detail paintbrush
- Medium flat paintbrush
- Rubbing alcohol
- Paper towel
- Oven (for curing, if required by paint type)
Step 1: Preparation & Masking
-
Clean surface:
Begin by wiping down your ceramic plate with rubbing alcohol and a paper towel. This removes any oils or fingerprints that could prevent the paint from adhering properly. -
Plan the rim:
Visualize the rim as a clock face. You want to place triangles at regular intervals. If you need a guide, use a small piece of tape to mark the 12, 3, 6, and 9 o’clock positions lightly. -
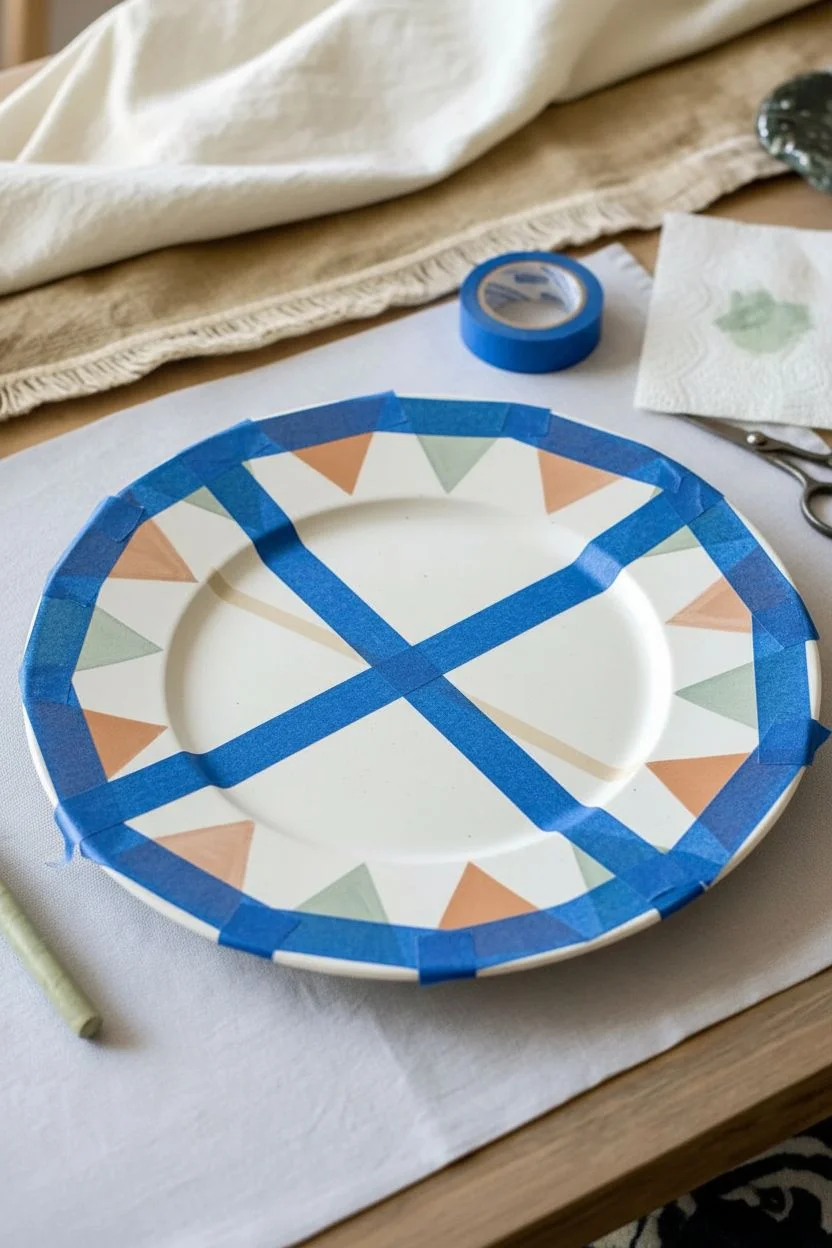
Mask the rim triangles:
Cut strips of painter’s tape to form triangle shapes. Since painting *inside* a stencil is easier, use the tape to block off the areas *between* the triangles. Essentially, create V-shapes with tape along the rim where the white space will remain. -
Check the spacing:
Ensure your taped V-shapes leave open triangular spaces pointing inward towards the center of the plate. Alternate the spacing so you have room for two colors throughout the rim. -
Mask the center:
For the central star design, place three long strips of thin tape (or cut standard tape into thin strips) across the center of the plate, intersecting in the middle to form six spokes like a wheel. -
Seal edges:
Run your fingernail firmly over all tape edges. This is crucial to prevent paint from bleeding underneath and ensures crisp, sharp lines.
Step 2: Painting the Design
-
Mix your palette:
Prepare your ceramic paints. If the colors are too bold, mix in a tiny drop of white or a complementary tone to achieve that soft, washed-out look shown in the image. -
Paint sage triangles:
Using your medium flat brush, fill in every other triangle space on the rim with the Sage Green paint. Brush from the tape inward to avoid pushing paint under the edge. -
Paint terracotta triangles:
Clean your brush thoroughly, then fill the remaining alternating triangle spaces with the Terracotta/Peach color. Apply thin, even coats; two thin coats are better than one thick one. -
Paint the center spokes:
For the central design, you aren’t painting the masked area—you are painting the *negative* space if you masked it that way, or painting directly over the tape? Actually, looking closer at the image, the beige lines look hand-painted or masked in reverse. Let’s adjust: Use your fine detail brush to freehand paint beige lines *between* the spokes if you didn’t mask, or simply paint over the masked strip area if you used a reverse stencil method. Given the image, the easiest route is to remove the center tape we applied earlier to use it as a visual guide, and then paint beige lines directly over those phantom lines. -
Alternative Center Method:
Better yet, for the center lines shown: apply two pieces of tape parallel to each other with a small gap in between. Paint the gap beige. Repeat this three times to create the intersecting lines. -
Let paint set:
Allow the paint to dry until it is tacky but not fully hardened. This usually takes about 10-15 minutes depending on the brand.
Bleeding Lines?
If paint seeps under the tape, wait for it to dry completely, then gently scratch the excess off with a craft knife or wooden toothpick for a crisp edge.
Step 3: Finishing Touches
-
Remove tape:
Carefully peel back the tape at a 45-degree angle. Do this slowly to ensure you don’t pull up any paint with the adhesive. -
Touch ups:
If any lines look jagged or paint bled through, use a dampened cotton swab or a toothpick to gently scrape away excess paint while it’s still relatively fresh. -
Dry completely:
Let the plate sit undisturbed for at least 24 hours to ensure the design is fully dry to the touch. -
Bake to cure:
Follow the instructions on your specific ceramic paint bottle. Most require baking in a non-preheated oven for 30-40 minutes at around 300°F (150°C) to make the design permanent and dishwasher safe.
Make It Yours
Try varying the size of the triangles for an eclectic look, or use metallic gold paint for the center lines to add a touch of elegance.
Once baked and cooled, your custom geometric plate is ready to add a pop of artistic flair to your table setting


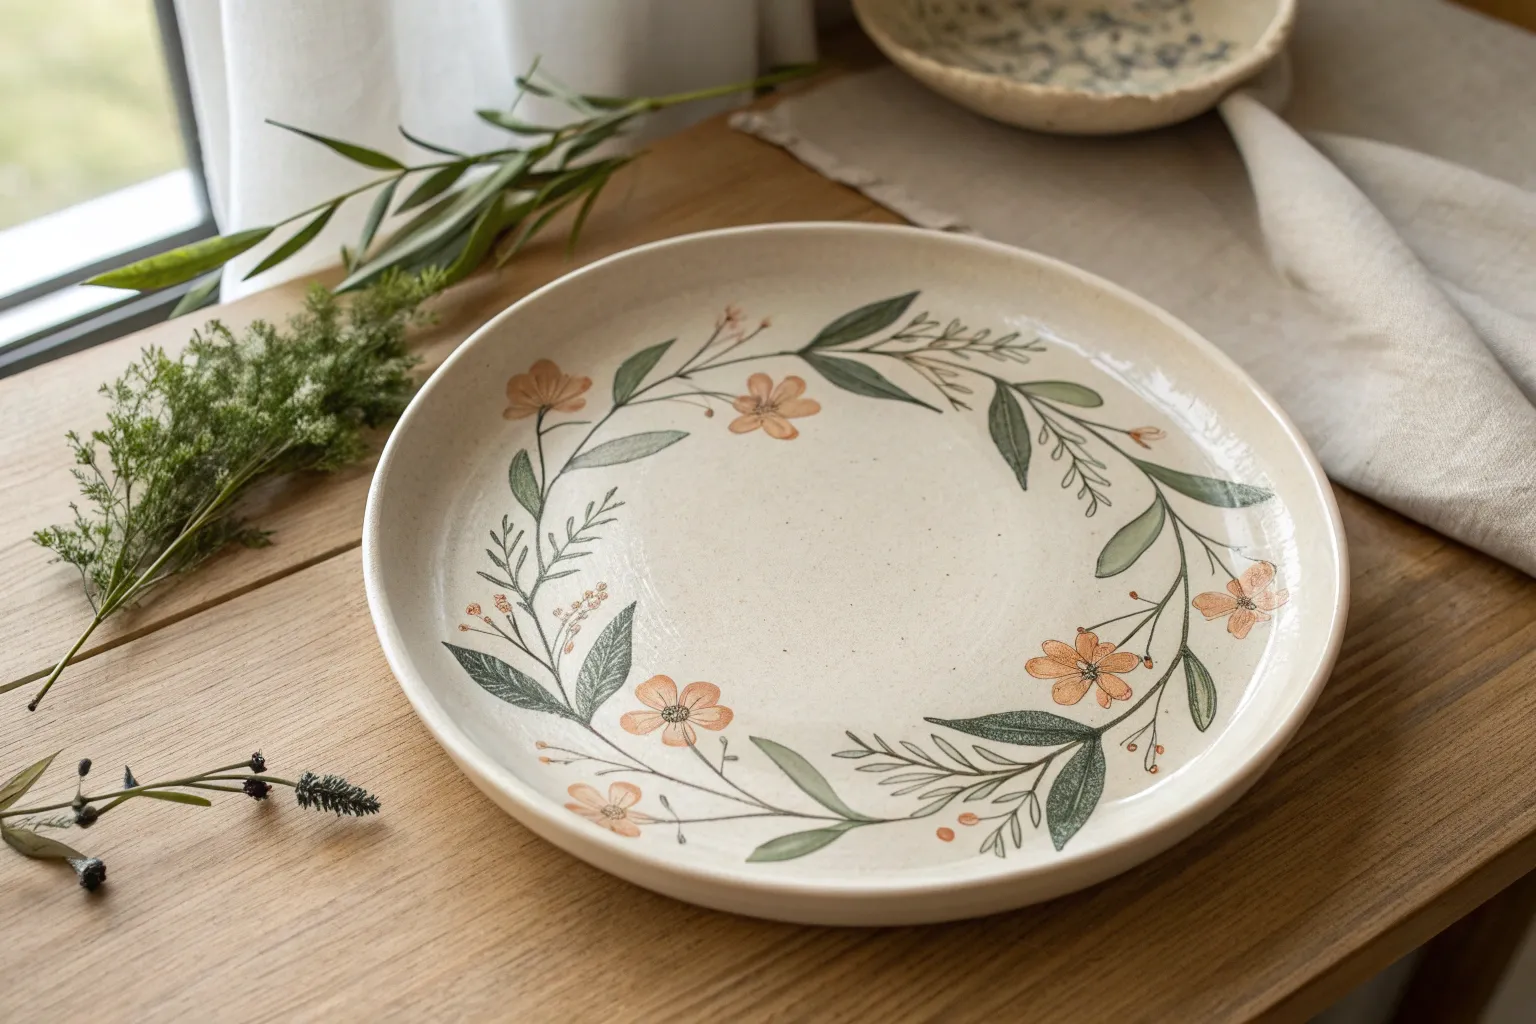
Easy Daisy Flowers Made With Dots

Bring the charm of a summer meadow to your table with this delightfully simple ceramic project. The cheerful combination of crisp white petals and textured yellow centers creates a timeless floral pattern that looks professionally glazed but is easily achievable at home.
Step-by-Step Guide
Materials
- Bisque-fired ceramic plate (flat rim preferred)
- Underglaze (White)
- Underglaze (Mustard Yellow or Golden Ochre)
- Round paintbrush (size 4 or 6)
- Small detail brush (size 0 or 1)
- Clear dipping glaze (or brush-on glaze)
- Pencil for sketching (optional)
- Palette or small dish for paints
- Water cup and paper towels
Step 1: Planning and Preparation
-
Clean surface:
Begin by wiping down your bisque plate with a damp sponge. This removes any ceramic dust that might prevent the underglaze from adhering properly to the surface. -
Map out spacing:
Visualize where your flowers will sit. You want them evenly spaced but not perfectly gridded, creating a natural feel. You can lightly mark the center of each flower with a pencil if you’re worried about spacing; pencil marks will burn off in the kiln.
Brush Shape Matters
Use a filbert brush (rounded tip) instead of a square shader. The rounded shape naturally creates perfect petal curves with single strokes.
Step 2: Painting the Petals
-
Load your brush:
Dip your round brush (size 4 or 6) into the white underglaze. Ensure the bristles are fully saturated but not dripping. -
The press-and-drag method:
To create a petal, place the tip of the brush near the center point of your imaginary flower. Press down gently to widen the stroke, then drag slightly outward and lift up to create a tapered end. -
Complete the first flower:
Continue painting petals in a radial pattern around your center point. Aim for about 10-12 petals per flower. Don’t worry if they aren’t identical; variation adds character. -
Fill the plate:
Repeat this process across the entire surface of the plate. Remember to let some flowers run off the edge of the rim for a professional, textile-like pattern. -
Second coat:
Once the first layer of white is dry to the touch, apply a second coat to each petal. This ensures the white pops brightly against the clay body after firing. -
Check opacity:
If your underglaze looks streaky, a third thin coat might be necessary. You want a solid, opaque white.
Step 3: Adding the Centers
-
Prepare yellow underglaze:
Clean your brush thoroughly or switch to a fresh one. Pour a small amount of mustard yellow or golden ochre onto your palette. -
Paint the base circle:
Paint a simple solid circle in the middle of each flower. It should overlap the inner tips of the white petals slightly to connect the design. -
Stipple for texture:
Here I prefer to use the tip of a smaller detail brush. Load it with extra yellow paint and gently tap or ‘stipple’ over the west yellow circle. -
Isolate the texture:
This stippling technique leaves tiny raised dots or texture within the center, mimicking the pollen of a real daisy. Let this dry completely.
Smearing Paint?
If your clear glaze smears the daisies, your underglaze wasn’t dry enough. Wait 24 hours before glazing or lightly bisque fire the design first.
Step 4: Finishing Touches
-
Add speckles (optional):
To mimic the speckled clay look seen in the photo, dilute a tiny bit of brown underglaze with water. Flick the bristles of a toothbrush over the plate to create subtle speckles. -
Clean the bottom:
Flip the plate and ensure the foot ring is completely free of glaze or underglaze so it doesn’t stick to the kiln shelf. -
Apply clear glaze:
Once all underglaze design work is bone dry, apply a clear transparent glaze over the entire piece. Dipping is usually best for even coverage, but brushing works if you are careful not to smear the design. -
Final wipe:
Wipe the foot ring one last time with a wet sponge. -
Fire:
Fire the plate in the kiln according to the clay and glaze manufacturer’s temperature guidelines (typically cone 06 or cone 6).
Enjoy your lovely new floral plate at your next breakfast gathering
BRUSH GUIDE
The Right Brush for Every Stroke
From clean lines to bold texture — master brush choice, stroke control, and essential techniques.
Explore the Full Guide
One-Brush Leafy Branch
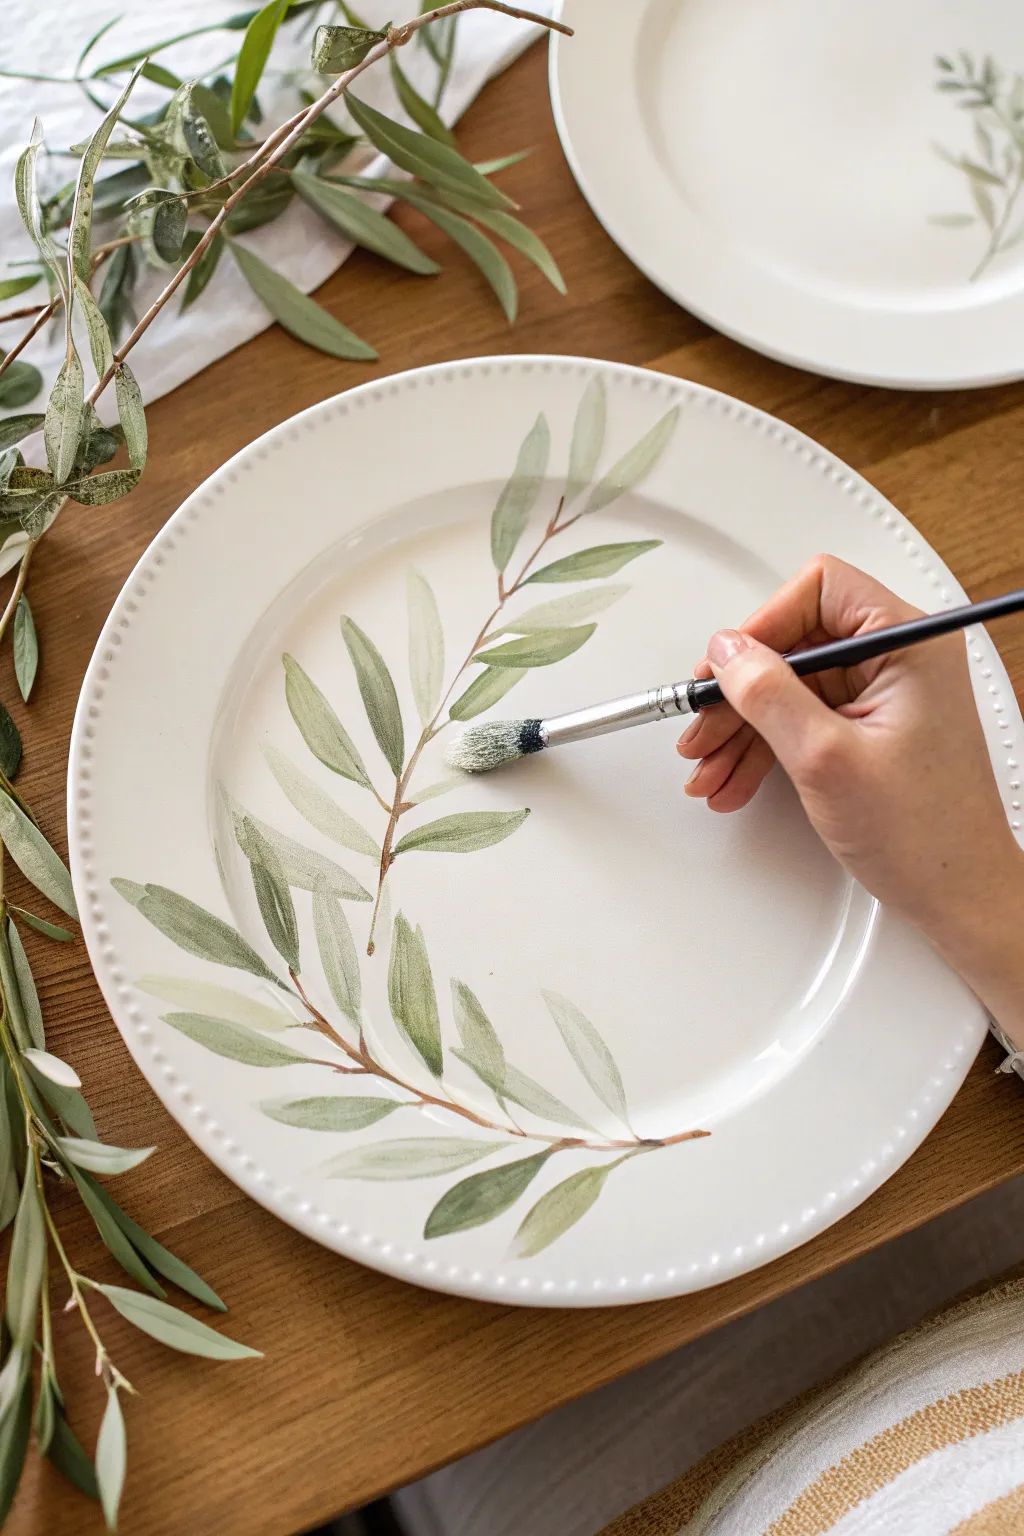
Capture the graceful simplicity of nature with this elegant olive branch design, perfect for adding a touch of rustic charm to plain dinnerware. Using just a single brush and a few earthy tones, you’ll create soft, translucent leaves that seem to drift across the ceramic surface.
Detailed Instructions
Materials
- White or cream ceramic plate (oven-safe)
- Pebeo Porcelaine 150 paints (or similar ceramic paint)
- Colors: Olive Green, Bronzite (brown), Ivory (for mixing)
- Medium round brush (size 6 or 8)
- Rubbing alcohol
- Paper towels
- Palette or small dish
- Home oven for curing
Step 1: Preparation & Practice
-
Clean surface:
Before you begin painting, it is crucial to remove any oils or fingerprints from your plate. Wipe the entire surface thoroughly with rubbing alcohol and let it dry completely. -
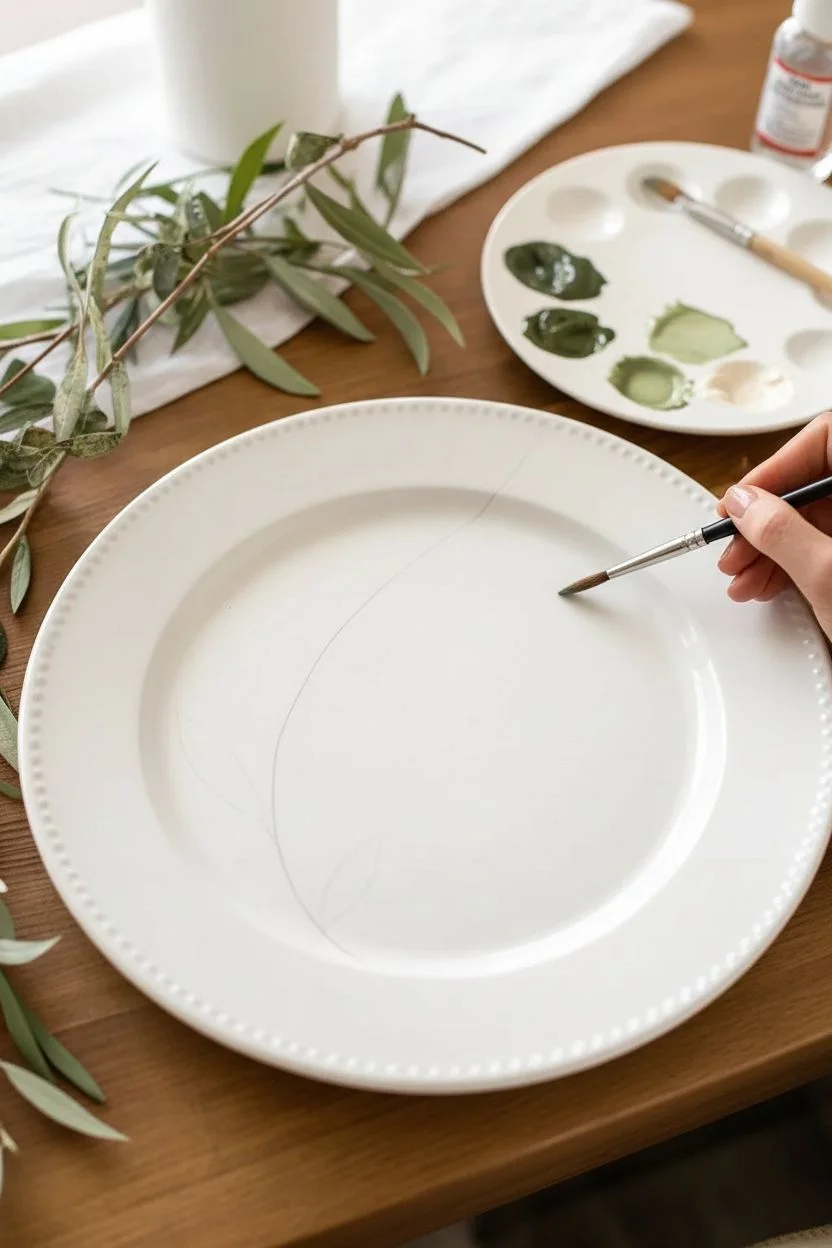
Draft the curve:
Visualize a gentle ‘C’ curve or an ‘S’ curve flowing across one side of the plate. If you are nervous about free-handing, lightly sketch this main spine line with a pencil; the graphite will burn off later in the oven. -
Mix your greens:
On your palette, prepare two shades of green. Mix a pure olive green, and then create a second, lighter version by mixing olive green with a touch of ivory or thinning it slightly with medium to potential transparency.
Step 2: Painting the Stem
-
Load the brush:
Load your round brush with the brown paint. You want the paint to be fluid but not drippy, so roll the tip on your palette to create a sharp point. -
Paint the main vein:
Starting from the bottom of your imagined curve, paint a very fine, thin line extending upwards. Use only the very tip of the brush and lift pressure as you reach the end of the stem for a tapered look. -
Add side branches:
While the main stem is wet or dry (it works either way), add tiny, short offshoot lines along the main stem. These will be the anchor points for your leaves.
Fixing blobs
If you press too hard and make a blob instead of a leaf, don’t wipe it all off. Use a dry brush to lift just the center of the puddle, leaving a darker outline for a stylized look.
Step 3: Creating the Leaves
-
Mastering the stroke:
The leaf shape relies on a ‘press and lift’ technique. Touch the tip of the brush to the plate near a stem branch, press down so the belly of the brush creates the width of the leaf, and then slowly lift while dragging to create a point. -
Practice first:
I highly recommend trying this stroke a few times on a piece of paper or a spare tile before committing to the plate to get the pressure right. -
First set of leaves:
Load your brush with the darker olive green. Paint leaves sporadically along the stem, alternating sides. Don’t fill every spot yet; leave plenty of room for the lighter leaves. -
Add variation:
Clean your brush and switch to your lighter green mix. Fill in the gaps with new leaves. Overlapping a dark leaf with a lighter one creates beautiful depth and a realistic watercolor effect. -
Connect the leaves:
If any leaves are floating too far from the stem, use a tiny amount of brown paint on the very tip of your brush to draw a hairline connection back to the main branch. -
Refine the tips:
Check the ends of your leaves. If they look too blunt, you can gently drag the wet paint out with a clean, slightly damp brush to extend the tips into finer points.
Level Up: Metallic accents
Once the green leaves are dry but before baking, add tiny dots of gold ceramic paint near the base of the leaves to suggest berries or buds.
Step 4: Finishing & Curing
-
Clean up edges:
Use a cotton swab dipped in rubbing alcohol to wipe away any stray marks or reshape any leaves that look wonky. Do this while the paint is still relatively fresh. -
Check rim spacing:
Ensure your design doesn’t run over the eating area too heavily if you plan to use cutlery often, though most ceramic paints are durable. The rim is the safest place for the design. -
Dry time:
Allow the plate to dry for at least 24 hours. This air-drying phase is critical to ensure the moisture evaporates before baking. -
Bake to cure:
Place the plate in a cold oven. Set the temperature to 300°F (150°C). Once it reaches temperature, bake for 35 minutes. -
Cool down:
Turn the oven off and leave the plate inside until it is completely cool. Removing it while hot can cause the ceramic to crack due to thermal shock.
Once baked and cooled, your custom botanical plate is ready to bring a fresh, artistic feel to your next dinner party
Monogram Initial in the Center

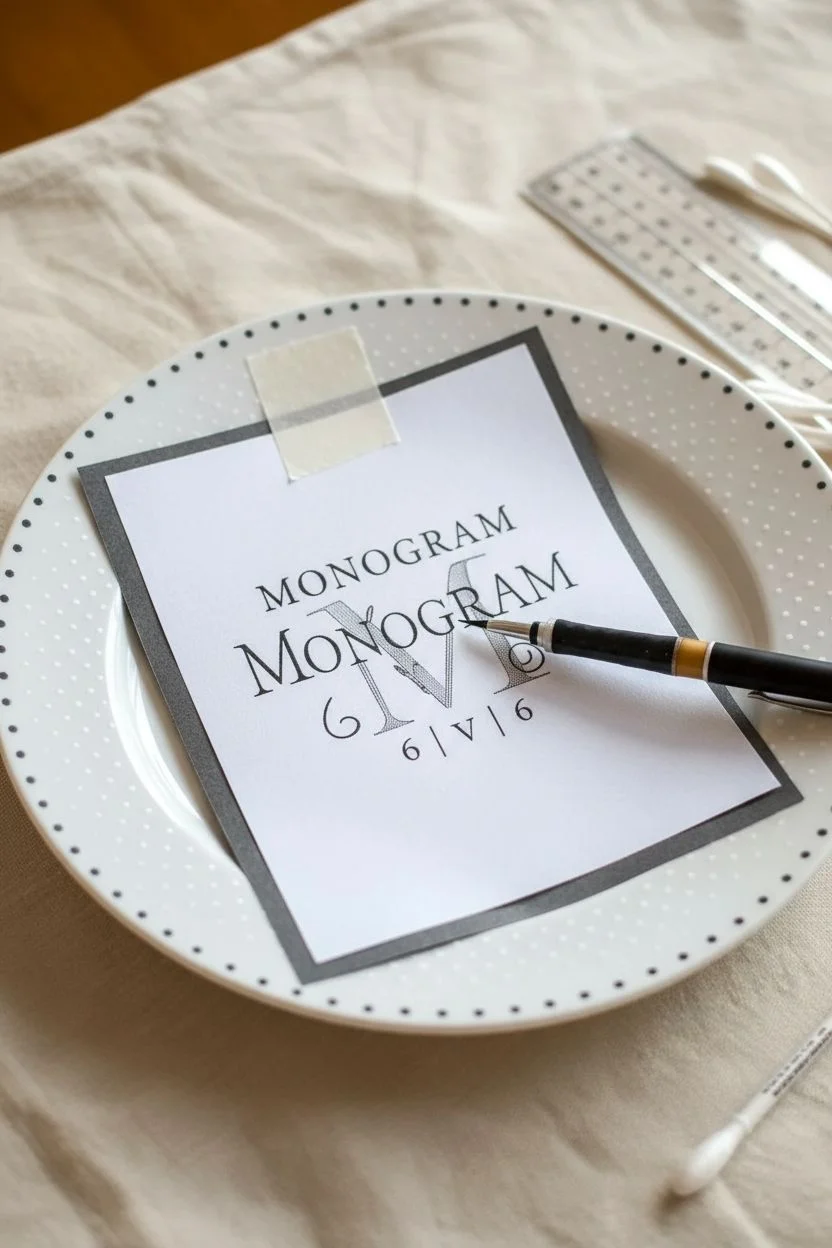
Transform a plain white ceramic plate into a personalized keepsake with this elegant monogram design. Featuring simple black dot detailing and refined typography, this project achieves a high-end, custom look using basic painting tools.
Step-by-Step Tutorial
Materials
- Plain white ceramic plate (dinner or salad size)
- Black porcelain paint pen (fine tip)
- Black porcelain paint pen (medium tip)
- Computer and printer
- Paper
- Graphite transfer paper (or a soft lead pencil)
- Masking tape
- Cotton swabs
- Rubbing alcohol
- Oven (for curing)
Step 1: Preparation & Design
-
Clean the surface:
Begin by thoroughly washing your plate with soap and water to remove any grease or dust. -
De-grease with alcohol:
Wipe the entire surface, especially the rim and center, with a cotton ball soaked in rubbing alcohol. This ensures the paint adheres perfectly without peeling later. -
Design your text:
On your computer, create your layout. Choose a serif font for the word ‘MONOGRAM’ (or your last name) and a larger, elegant serif initial for the background. Size it to fit the center well within the rim. -
Optional detail addition:
Add small decorative flourishes or numbers under the name if you want to replicate the ‘6 | V | 6’ style seen in the example, or keep it simple with just the name. -
Print and trim:
Print your design on standard paper and cut around the text so it’s easy to position on the plate.
Step 2: Transfering the Monogram
-
Position the design:
Place your paper template in the exact center of the plate. Use a ruler to measure from the rim to the text on all sides to ensure it is perfectly centered. -
Secure with tape:
Once satisfied with the placement, tape the top edge of the paper to the plate to create a hinge. -
Insert transfer paper:
Slide a piece of graphite transfer paper (dark side down) under your template. If you don’t have transfer paper, scribble heavily on the back of your printout with a pencil to create your own. -
Trace the design:
Using a ballpoint pen or pencil, trace over the outline of your letters with firm pressure. Be careful not to move the paper. -
Reveal the guide:
Lift the paper to check that your faint guidelines have transferred clearly onto the ceramic surface.
Oops! Smudged Ink?
Don’t panic! While the paint is wet, a Q-tip dipped in rubbing alcohol acts like a magic eraser. Just wipe the mistake away, let the spot dry, and repaint.
Step 3: Painting the Centerpiece
-
Outline the main text:
Shake your fine-tip black porcelain paint pen well and depress the nib to start the flow on a scrap paper. Carefully trace the outlines of the word ‘MONOGRAM’. -
Fill in the letters:
Gently fill in the letters of the main word. Keep your hand steady and try to make single, fluid strokes for the serifs. -
Sketch the background initial:
For the large ‘M’ behind the text, use a lighter touch. In the example, this letter has a shaded or stippled texture rather than solid black. I like to use tiny dots or very thin hatching lines to distinguish it from the solid foreground text. -
Add lower details:
Draw the decorative flourishes or numbers underneath using the fine tip pen, maintaining that delicate line weight. -
Clean up edges:
If you make a small smudge or a line goes rogue, quickly wipe it away with a damp cotton swab before the paint sets.
Double Initial Depth
Make the background initial (the large ‘M’) significantly lighter gray by using a silver paint pen instead of black styles, creating a lovely 3D layered effect.
Step 4: Adding the Rim Detail
-
Plan the spacing:
To space the rim dots evenly, imagine the plate is a clock. Place a small guide dot at 12, 3, 6, and 9 o’clock. -
Fill the gaps:
Add a dot precisely halfway between each of your ‘clock’ points, and continue subdividing the spaces until you have your desired density of dots. -
Create the outer ring:
Using the medium tip pen, press straight down to create uniform dots along the outermost edge of the rim. -
Add inner rings:
Create one or two concentric rows of dots slightly further inside the rim. Stagger these dots (placing them in the windows between the outer dots) for a honeycomb-like pattern. -
Allow to dry:
Let the paint dry completely for at least 24 hours. The ink needs to settle before the baking process. -
Bake to cure:
Place the plate in a cool oven, then set the temperature to 300°F (150°C). Bake for 30-35 minutes. Turn the oven off and let the plate cool completely inside to prevent cracking.
Now you have a sophisticated piece of custom dinnerware ready to display or gift

PENCIL GUIDE
Understanding Pencil Grades from H to B
From first sketch to finished drawing — learn pencil grades, line control, and shading techniques.
Explore the Full Guide
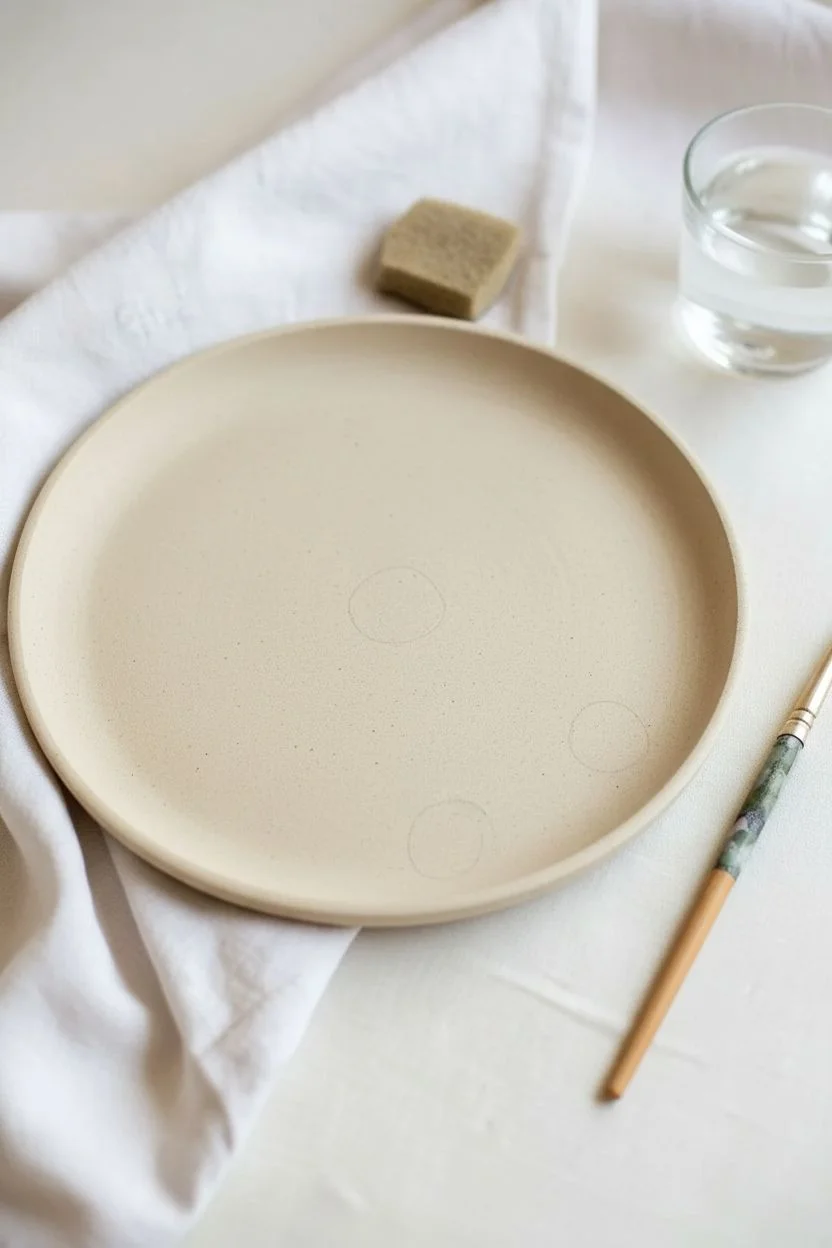
Scattered Heart Confetti
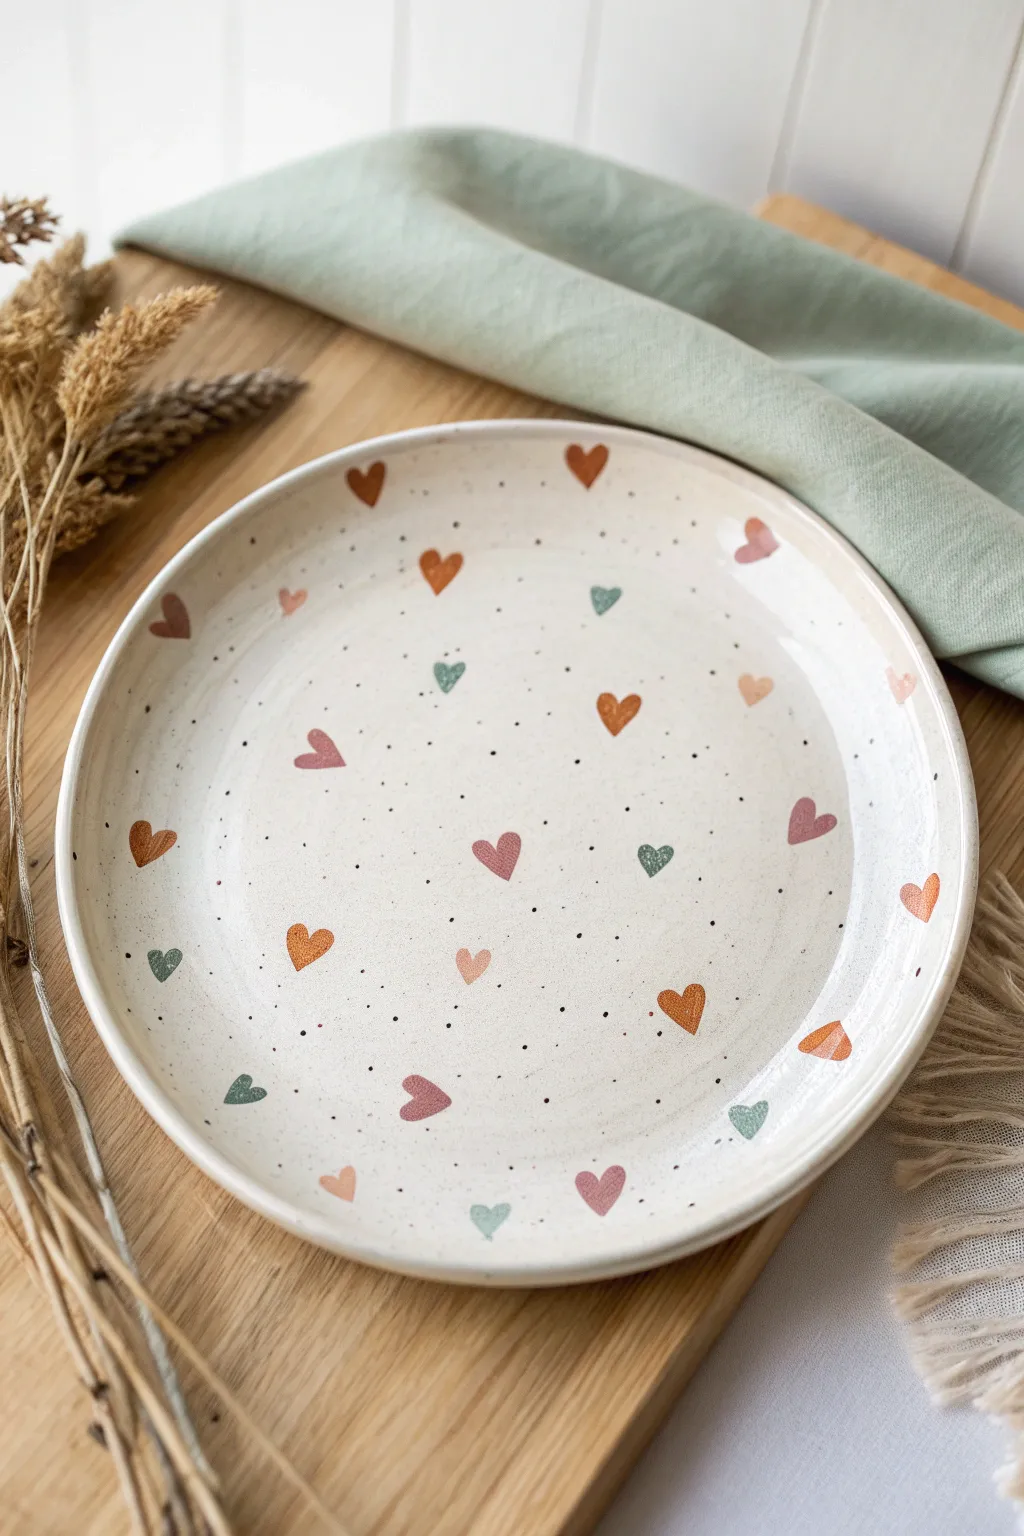
Transform a plain ceramic dish into a piece of charming decor with this simple scattered heart pattern. The combination of muted earth tones and delicate speckles creates a modern, playful look that feels effortlessly handmade.
Step-by-Step
Materials
- Bisque-fired ceramic plate (white or cream)
- Underglaze paints: terracotta, sage green, blush pink, slate blue
- Small round brushes (size 0 and 2)
- Old toothbrush or stiff bristle brush
- Black underglaze (for speckling)
- Clear dipping glaze
- Palette or small dishes for paint
- Water cup and paper towels
Step 1: Planning and Base Work
-
Clean the surface:
Start by wiping down your bisque plate with a slightly damp sponge to remove any dust or oils that might prevent the glaze from adhering properly. -
Shake the glazes:
Ensure all your underglaze bottles are shaken vigorously. Pour a small amount of each color (terracotta, sage, blush, slate) onto your palette. -
Visual mapping:
Visualize a random pattern. The goal is ‘organized chaos’—you don’t want the hearts to form lines, but you want them evenly spaced across the entire surface.
Variation Trick
Make your hearts slightly different sizes—some tiny, some medium—to give the pattern more depth and movement than uniform stamping.
Step 2: Painting the Hearts
-
Start with the primary color:
Dip your size 2 brush into the terracotta color. Paint small hearts randomly across the plate, leaving plenty of empty space between them. -
Rotate the hearts:
As you paint, rotate the orientation of the hearts. Some should be upright, others tilted left or right, to create a tumbling confetti effect. -
Switch to sage green:
Rinse your brush thoroughly. Load it with sage green and fill in some of the empty gaps with green hearts, keeping them roughly the same size as the orange ones. -
Add blush pink accents:
Introduce the blush pink color next. Because this is a lighter shade, I like to apply it a bit thicker or plan for a second coat to ensure opacity. -
Finish with slate blue:
Use the slate blue for the final set of hearts. Use these to fill any awkward large gaps that remain. -
Second coats:
Once the first hearts are dry to the touch (they will look chalky), go back and add a second coat of glaze to each heart to ensure bold, solid color after firing. -
Rim details:
Don’t forget the curve! Paint a few hearts partially sliding up the rim or near the edge to make the pattern feel continuous.
Step 3: The Speckled Effect
-
Prepare the splatter:
Dilute a small amount of black underglaze with water until it reaches an inky, fluid consistency. -
Test the consistency:
Dip an old toothbrush into the black ink. Test the spray on a piece of paper first by running your thumb across the bristles. -
Apply the speckles:
Hold the toothbrush over the plate and flick the bristles to create a fine mist of black dots over the entire surface, including over the hearts. -
Control the density:
Move your hand around constantly to avoid creating large black puddles in one spot. Aim for a light, even dusting. -
Let it dry completely:
Allow the plate to dry overnight or for several hours until all moisture has evaporated from the bisque.
Blurry Hearts?
If your hearts smudge when glazing, you likely didn’t let the underglaze dry long enough. Wait until the paint is chalky and room temperature.
Step 4: Finishing
-
Apply clear glaze:
Dip the entire plate into clear dipping glaze using tongs, or brush on three even coats of clear brushing glaze. -
Check for pinholes:
Smooth out any drips or bubbles in the clear glaze with your finger before it dries completely. -
Fire the piece:
Place the plate in the kiln for a cone 06 or cone 6 firing, depending on your clay and glaze specifications.
Once fired, this delightful confetti plate is ready to bring a touch of joy to your next meal
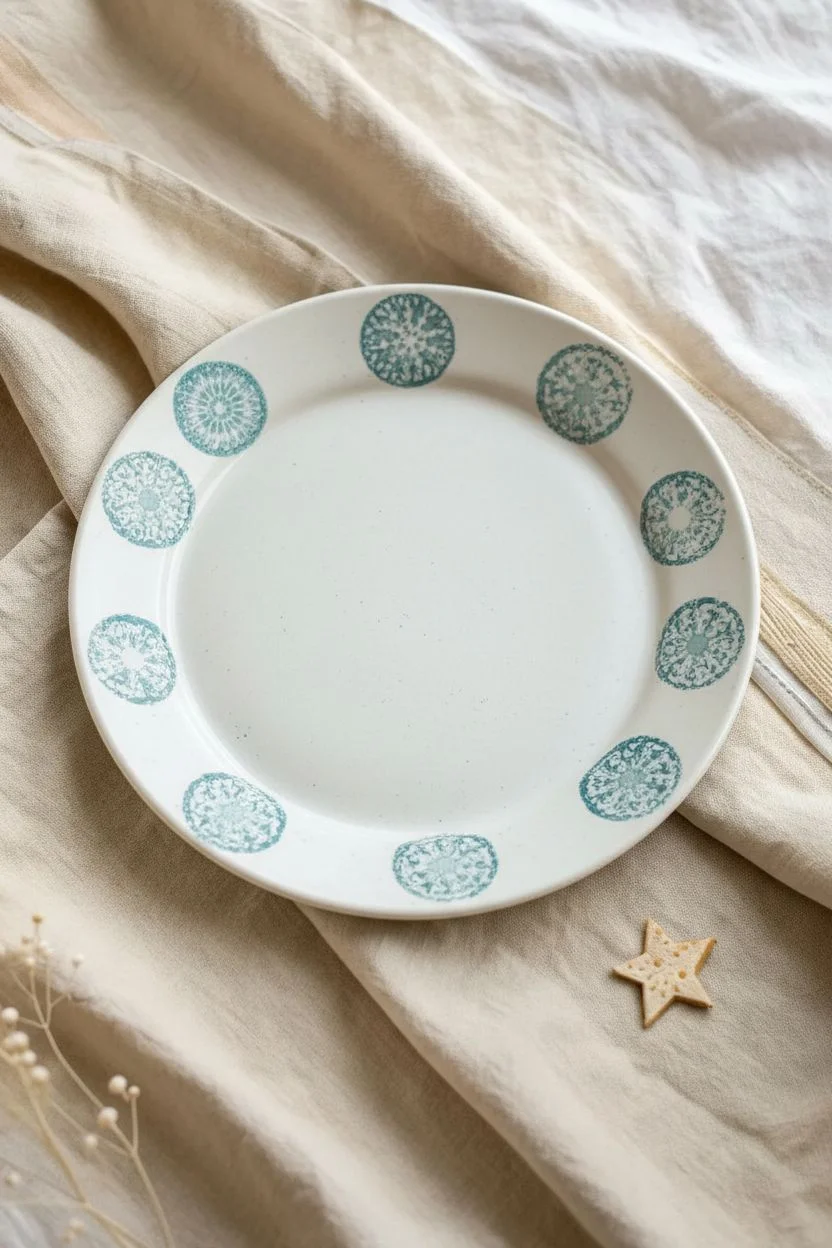
Minimal Fruit Slices (Lemon or Orange)
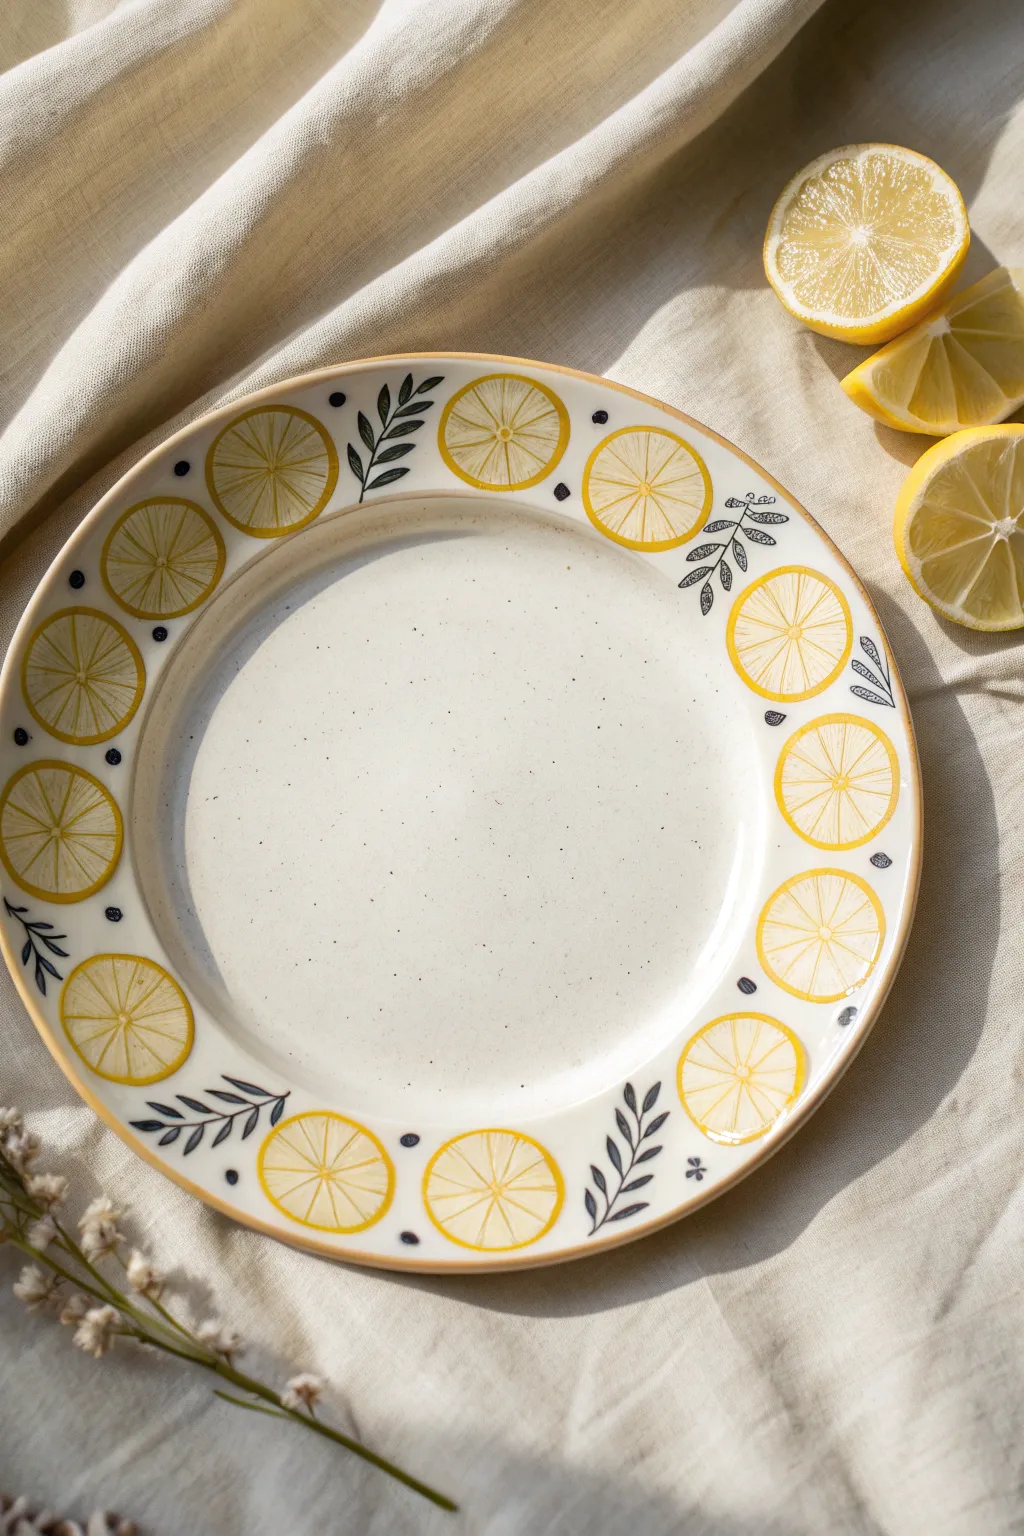
Bring the refreshing charm of a citrus grove to your table setting with this delightful plate painting project. The design features a cheerful repeating pattern of lemon slices and simple botanical leaves dancing around the rim, leaving the center clean and crisp.
Detailed Instructions
Materials
- White ceramic plate (wide rim recommended)
- Ceramic or porcelain paints (Yellow, Black/Charcoal Grey)
- Fine liner brush (size 0 or 00)
- Small round brush (size 2)
- Small circular object or stencil (approx. 1-1.5 inch)
- Pencil (for sketching)
- Paper towel
- Water cup
- Oven (for baking the paint, if required by brand)
Step 1: Preparation & Layout
-
Clean the surface:
Before you begin, thoroughly wash and dry your plate. Wipe the rim down with rubbing alcohol to remove any oils or fingerprints, ensuring the paint adheres perfectly. -
Plan the spacing:
Visualize the rim as a clock face. You’ll want to space your lemon slices evenly. Lightly mark positions with a pencil if you need guidance, aiming for roughly 12-14 lemon slices around the circumference. -
Trace the circles:
Using your small circular object or stencil, lightly trace circles around the rim with your pencil. Leave a gap of about an inch between each circle to make room for the leaf details later.
Uneven Lines?
If your lines feel shaky, don’t wipe the whole thing off! Use a toothpick to gently scratch away wobbly edges once the paint is semi-dry for cleaner lines.
Step 2: Painting the Lemons
-
Outline the rind:
Dip your fine liner brush into the yellow paint. Carefully trace over your pencil circles to create the outer rind of the lemons. Keep the line steady but don’t worry about perfection; a slightly organic line looks more natural. -
Add the segments:
Once the outer circles are done, paint a small dot in the absolute center of each circle. Draw thin straight lines radiating from this center point to the rind, creating triangular segments like a bicycle wheel or pizza slices. -
Thicken the inner rind:
Go back over your radiating lines. Just inside the outer yellow circle, paint a second, slightly smaller circle to create the thickness of the pith/rind. -
Round the corners:
Soften the look of the segments by rounding the inner corners of each triangle slightly, so they look like distinct fruit sacs rather than rigid geometric shapes. -
Fill with wash:
I like to water down the yellow paint slightly here to create a translucent ‘juice’ effect. Lightly fill inside the segments, being careful to leave the lines between them white (the color of the plate). -
Add darker accents:
While the yellow is still damp, you can add a tiny touch of slightly more concentrated yellow to the outer edge of some segments to give them depth and dimension.
Step 3: Adding Botanical Details
-
Sketch leaf placement:
Identify the empty spaces between your lemon slices. Plan to alternate the direction of your botanical sprigs for visual interest. -
Paint the stems:
Using the fine liner brush and black or charcoal grey paint, draw a sweeping, curved line in the gaps between the lemons. These are your main stems. -
Add the leaves:
Paint small, simple almond shapes branching off the main black stems. Keep these leaves delicate and airy; they shouldn’t overpower the fruit. -
Draw leaf veins:
If your brush is fine enough, add a single tiny line down the center of each black leaf for extra detail. -
Intersperse dots:
To fill any awkward empty spaces or balance the composition, add tiny black dots or ‘berries’ near the leaves or floating near the lemons.
Mix It Up
For a ‘fruit salad’ set, paint a companion plate using orange paint for oranges, or pink and green for watermelons, keeping the same botanical style.
Step 4: Finishing Touches
-
Clean up edges:
Inspect your work. If you made any smudges, use a damp cotton swab or toothpick to gently scrape away the excess paint while it’s still workable. -
Let it cure:
Allow the paint to air dry completely according to the manufacturer’s instructions, usually at least 24 hours. -
Bake to set:
Place the plate in a cold oven. Set the temperature to the level specified on your paint bottle (often 300°F or 150°C). Once it reaches temperature, bake for the required time (usually 30-35 minutes), then turn the oven off and let the plate cool inside completely to prevent cracking.
Your vibrant new plate is now ready to add a splash of summer sunshine to your next meal


Simple Animal Silhouette
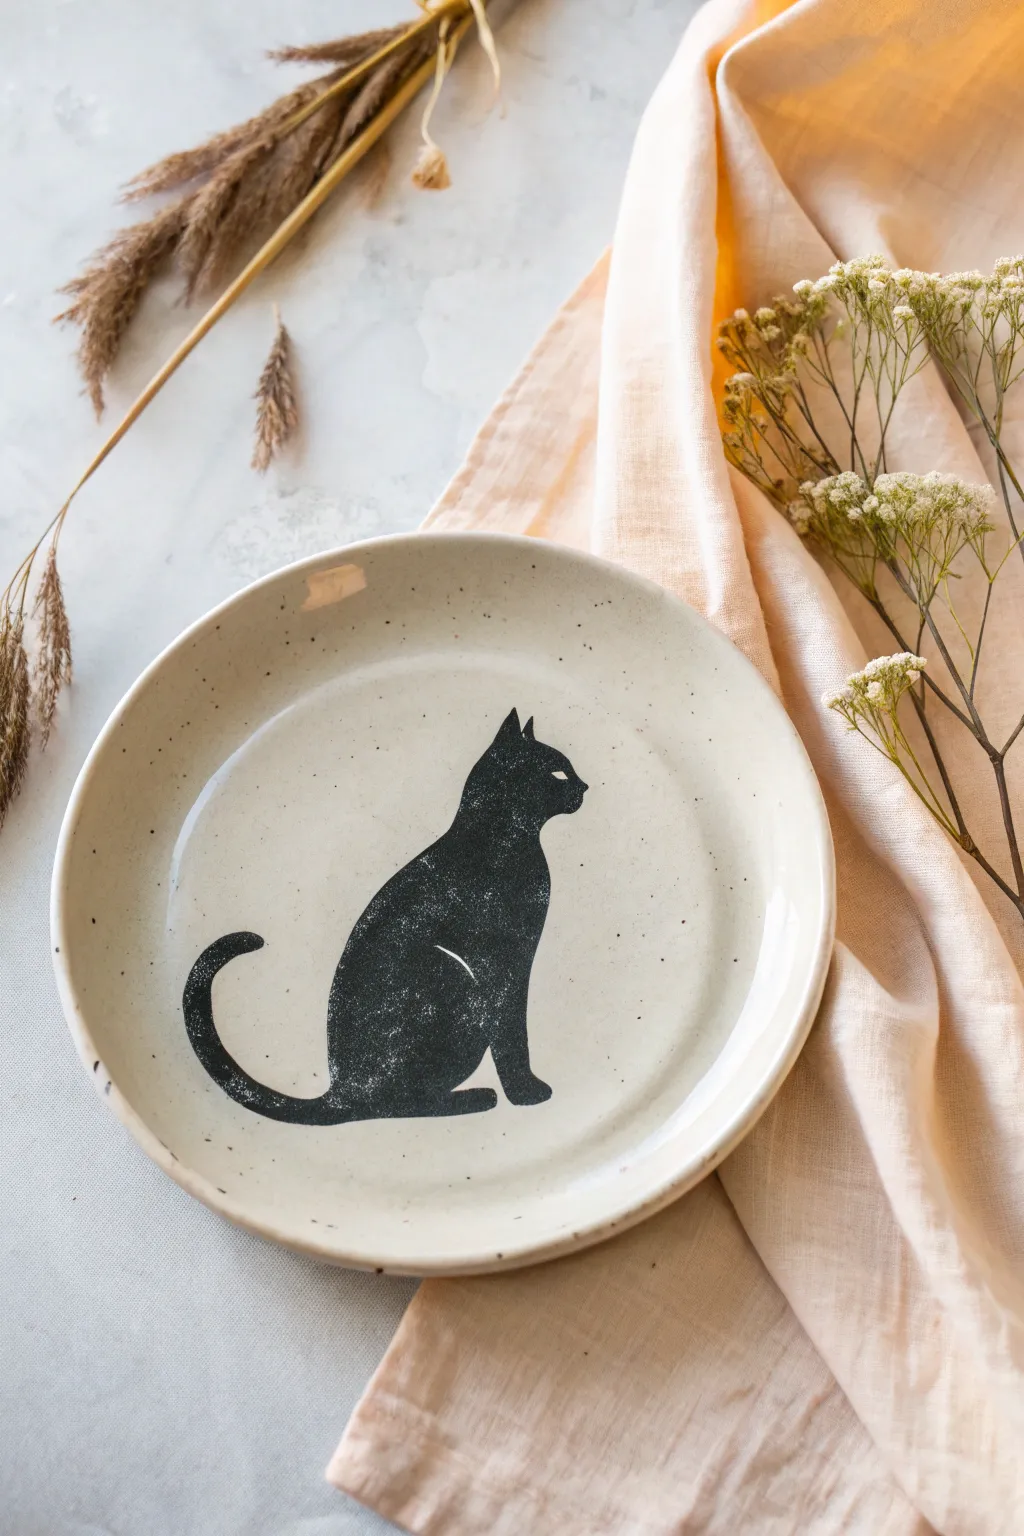
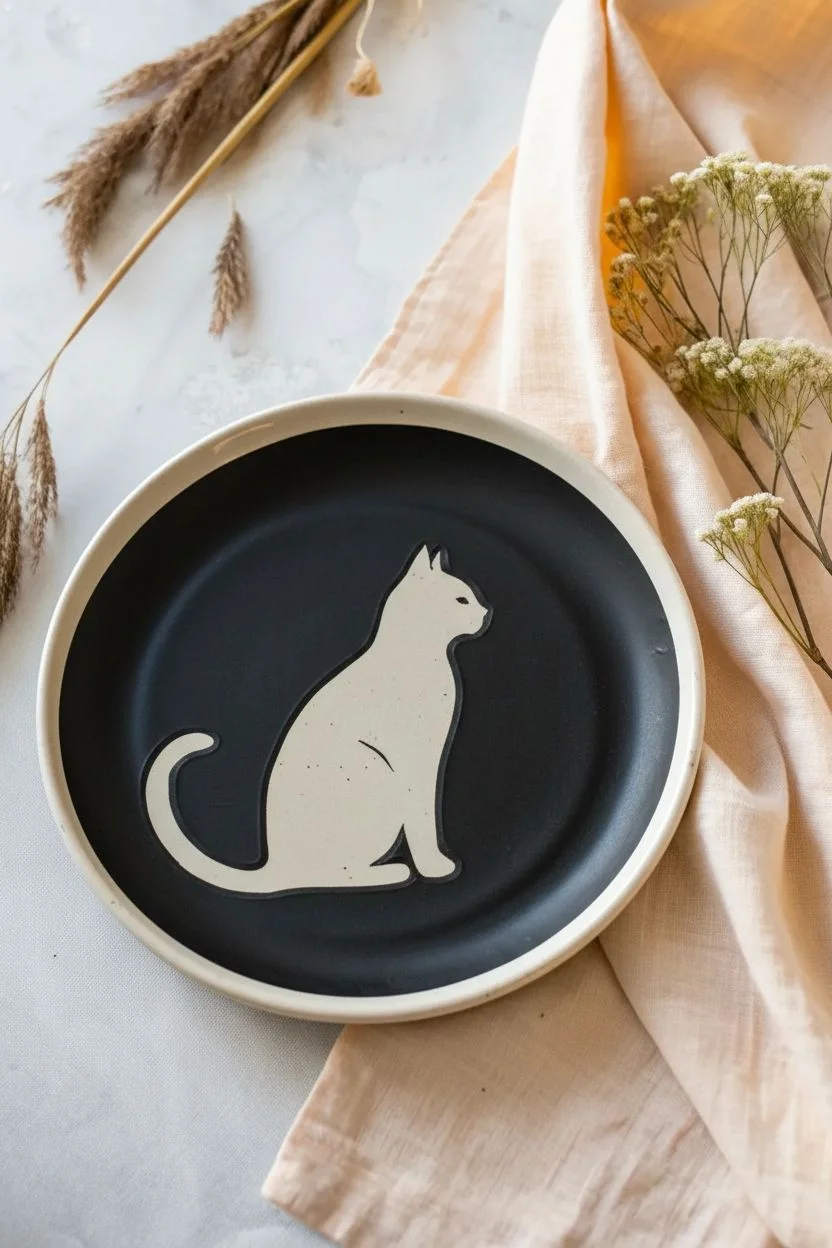
This charming project captures the quiet elegance of a feline friend using a simple silhouette technique on a ceramic plate. The result is a modern, speckled piece with a hand-stamped feel that looks stylish on any table or wall display.
How-To Guide
Materials
- White or cream ceramic plate (bisque or glazed)
- Black porcelain or ceramic paint
- Adhesive stencil film or contact paper
- Silhoutte stencil design (cat)
- Hobby knife or cutting machine
- Sponge dabber or stippling brush
- High-grit sandpaper (optional)
- Rubbing alcohol
- Lint-free cloth
- Oven (for curing)
Step 1: Preparation and Stencil Creation
-
Clean surface:
Begin by thoroughly cleaning your ceramic plate with rubbing alcohol and a lint-free cloth. This removes any oils or dust that might prevent the paint from adhering properly. -
Select design:
Find a simple side-profile silhouette of a sitting cat. You can draw this yourself on paper or print a template found online to trace. -
Transfer to film:
Trace or print your cat design onto the adhesive stencil film or contact paper. Make sure the size fits comfortably in the center well of your plate. -
Cut the stencil:
Using a sharp hobby knife, carefully cut out the interior of the cat shape. You need the negative space, so keep the surrounding sheet intact and discard the cat cut-out itself. -
Apply stencil:
Peel the backing off your negative stencil and center it on the plate. Press down firmly, especially around the edges of the cut-out, to prevent paint from bleeding underneath.
Step 2: Painting the Silhouette
-
Prepare paint:
Squeeze a small amount of black ceramic paint onto a palette or scrap paper. You want a creamy consistency, not too runny. -
Load the sponge:
Dab your sponge or stippling brush into the paint, then tap it off on a paper towel. The sponge should be relatively dry to create that textured, vintage look rather than a solid pool of ink. -
Stipple the edges:
Begin dabbing paint lightly along the edges of the stencil first. Use straight up-and-down motions to ensure sharp lines. -
Fill the center:
Work your way inward to fill the body of the cat. Don’t aim for perfectly solid coverage; allowing some tiny speckles to show through mimics the look in the reference photo. -
Add texture:
I prefer to go over the area a second time very lightly with a nearly dry sponge to even out the tone without making it look heavy or glossy.
Clean Lines Secret
Before applying black paint, seal the stencil edge with a thin layer of clear medium or mod podge. This blocks seepage for ultra-crisp lines.
Step 3: Finishing and Curing
-
Remove stencil:
While the paint is still slightly tacky but starting to set—usually after about 10 minutes—carefully peel away the stencil film. -
Add speckles (optional):
To mimic the speckled pottery look, you can dilute a tiny bit of brown or black paint and flick it lightly over the entire plate using a toothbrush. -
Clean edges:
If any paint bled under the stencil, use a damp cotton swab or a toothpick to gently scrape away the excess and refine the cat’s outline. -
Dry:
Allow the plate to air dry completely for at least 24 hours. The paint needs to fully dehydrate before baking. -
Bake to cure:
Place the plate in a cool oven, then set the temperature according to your paint manufacturer’s instructions (usually around 300°F/150°C). Bake for the specified time, usually 30-40 minutes. -
Cool down:
Turn off the oven and leave the plate inside to cool down gradually with the door closed. This prevents thermal shock and cracking.
Whimsical Details
Use the non-brush end of a paintbrush dipped in paint to add a tiny moon or stars above the cat’s head for a nighttime scene.
Once cooled, your custom plate is ready to be displayed as a piece of minimalist art or gifted to a cat lover
Modern Line Art Face
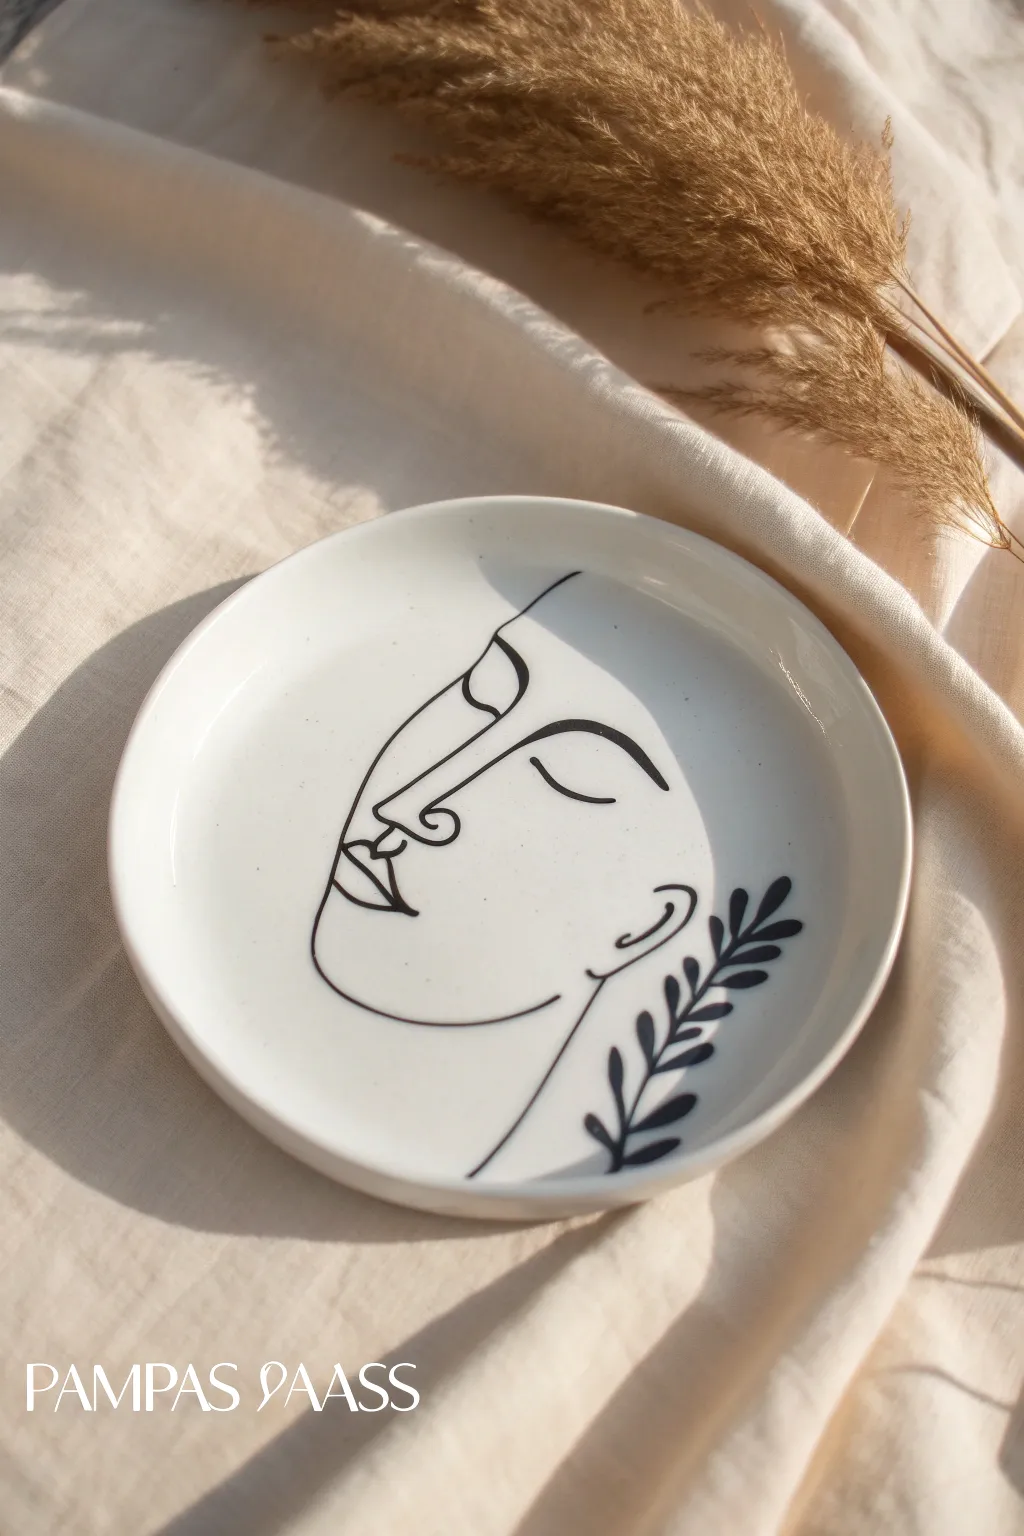
Capture the essence of modern decor with this elegant line art project that transforms a plain white dish into a statement piece. Using simple flowing strokes, you will create an abstract face profile accented by a delicate botanical motif.
Step-by-Step
Materials
- Small white ceramic plate (approximately 6-8 inches)
- Black porcelain paint pen (fine tip) or porcelain line paint
- Rubbing alcohol
- Cotton pads or paper towel
- Pencil (soft graphite, e.g., 2B or 4B)
- Paper for sketching
- Scissors
- Tape
- Cotton swabs (for cleanup)
- Oven (for curing, if required by your paint brand)
Step 1: Preparation & Planning
-
Surface Cleaning:
Begin by thoroughly cleaning your ceramic plate. Wipe it down with rubbing alcohol and a cotton pad to remove any oils, fingerprints, or dust, as these prevent the paint from adhering properly. -
Sketching the Concept:
Grab a piece of paper and a pencil to practice the design first. Draw a simple profile: start with a brow line that dips into a nose, loops for a nostril, and curves for lips and a chin. -
Refining the Lines:
Add the eye detail—a simple curved line with a closed lid look—and a defining line for the jaw. Don’t forget the leafy branch that sits near the ear area. -
Sizing the Template:
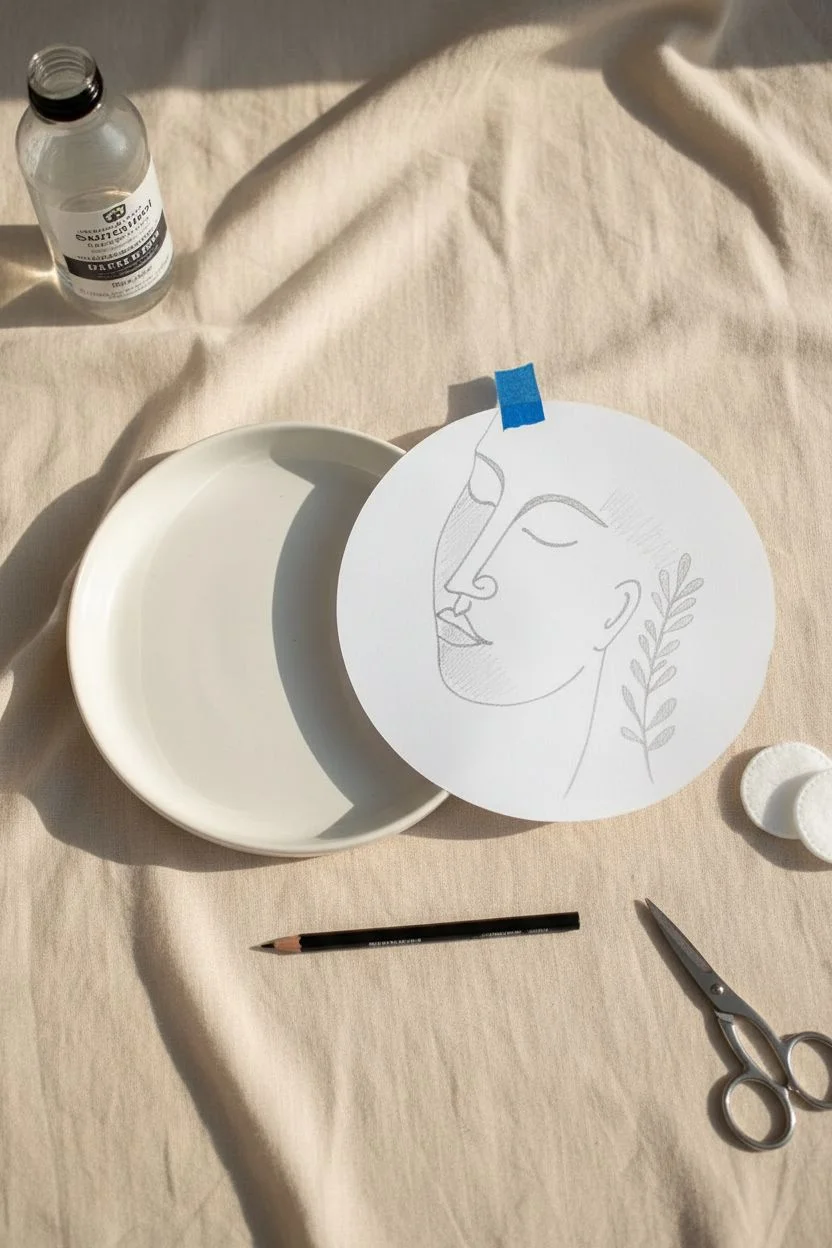
Once you are happy with your drawing, cut the paper into a circle slightly smaller than your plate to ensure the scale is correct for the actual surface.
Step 2: Transferring the Design
-
Graphite Transfer Method:
Flip your drawing over and scribble heavily with your soft pencil over the lines on the back. This creates a DIY carbon paper effect. -
Positioning:
Place the paper drawing-side up onto the center of the plate. Use a small piece of tape to secure it so it doesn’t shift while you work. -
Tracing:
Trace over your original drawing lines with firm pressure. When you lift the paper, you should see faint graphite guidelines on the ceramic surface. -
Check the Guidelines:
Inspect the faint lines on the plate. If any areas are too hard to see, you can very lightly sketch over them directly on the ceramic with your pencil to make them clearer.
Steady Hand Secret
Rest your pinky finger on a dry part of the plate while drawing. It acts as a stabilizer/anchor, giving you much smoother control over curves.
Step 3: Painting the Artwork
-
Prime the Pen:
Shake your black porcelain paint pen well. Press the tip down on a scrap piece of paper until the ink flows smoothly and consistently. -
Start the Profile:
Begin at the top of the forehead line. Using steady, even pressure, trace the brow and the long line down the nose. Try to keep your hand relaxed to avoid shaky lines. -
Nose and Mouth Details:
Execute the small loop for the nostril and the abstract curves for the lips. These small details require a lighter touch to keep the lines crisp. -
The Eye and Jaw:
Draw the closed eye with a single sweeping curve. Then, trace the jawline starting from the chin and moving upward toward where the ear would be. -
Adding the Leafy Branch:
Draw a central stem line curling slightly near the jaw. Add small, filled-in almond shapes along the stem to create the leaves. Use the very tip of the pen to get sharp points on the leaves. -
Correcting Mistakes:
If a line goes astray, don’t panic. Quickly use a damp cotton swab or a little rubbing alcohol to wipe away the wet paint before it sets.
Gold Accent Upgrade
Once the black ink is cured, add a second layer of luxury by tracing just the leafy branch with a metallic gold porcelain pen for a mixed-metal look.
Step 4: Finishing Touches
-
Initial Drying:
Let the paint sit undisturbed for at least 24 hours (or per your paint manufacturer’s instructions). I like to put it in a cupboard so dust doesn’t settle on the wet ink. -
Remove Guidelines:
Once the paint is fully dry to the touch, gently wipe away any remaining visible pencil marks with a damp cloth or cotton swab. -
Baking to Cure:
Place the plate in a *cool* oven. Set the temperature to the manufacturer’s recommendation (usually around 300°F/150°C). Allow the oven to heat up with the plate inside to prevent cracking. -
Cooling Down:
After baking for the required time (typically 30-40 minutes), turn the oven off and leave the plate inside until it is completely cool. This gradual cooling is crucial for durability.
Now you have a stunning piece of modern art that is ready to be displayed on your wall or used as a chic trinket dish
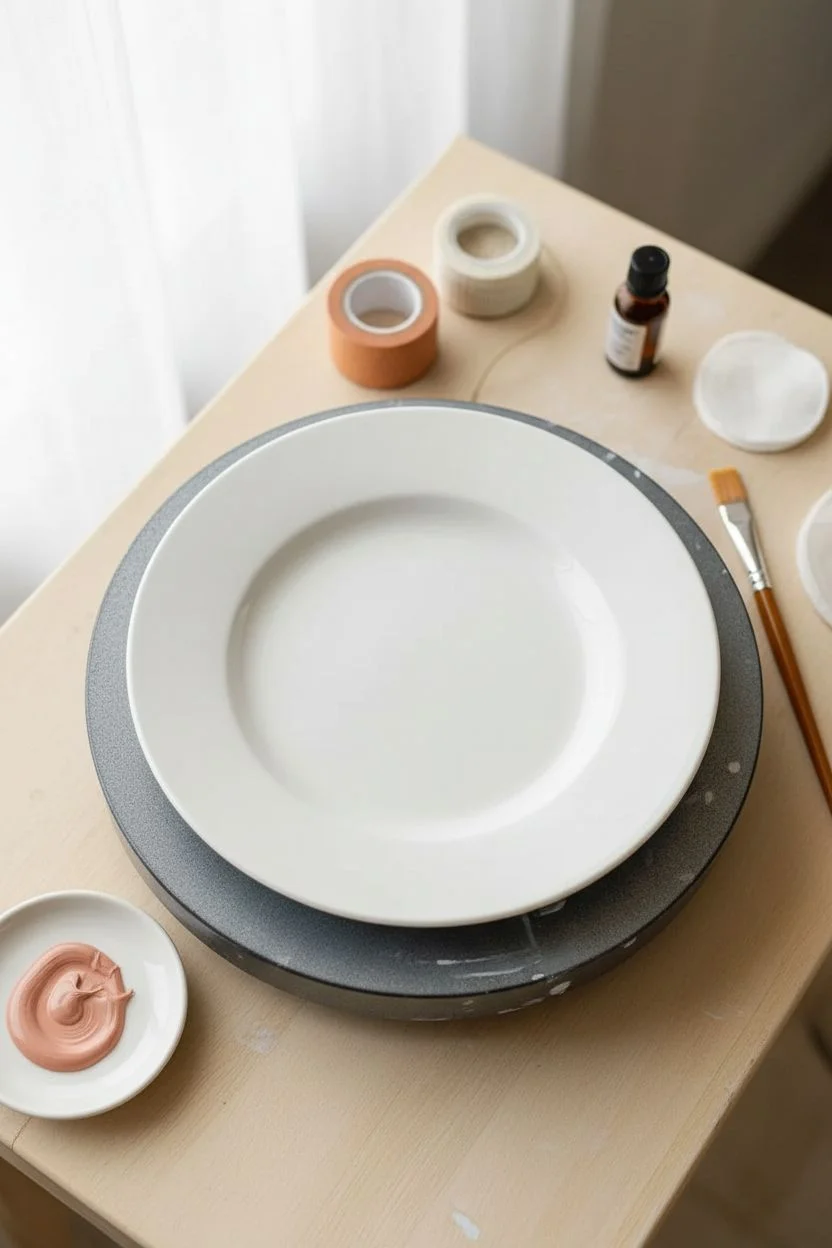
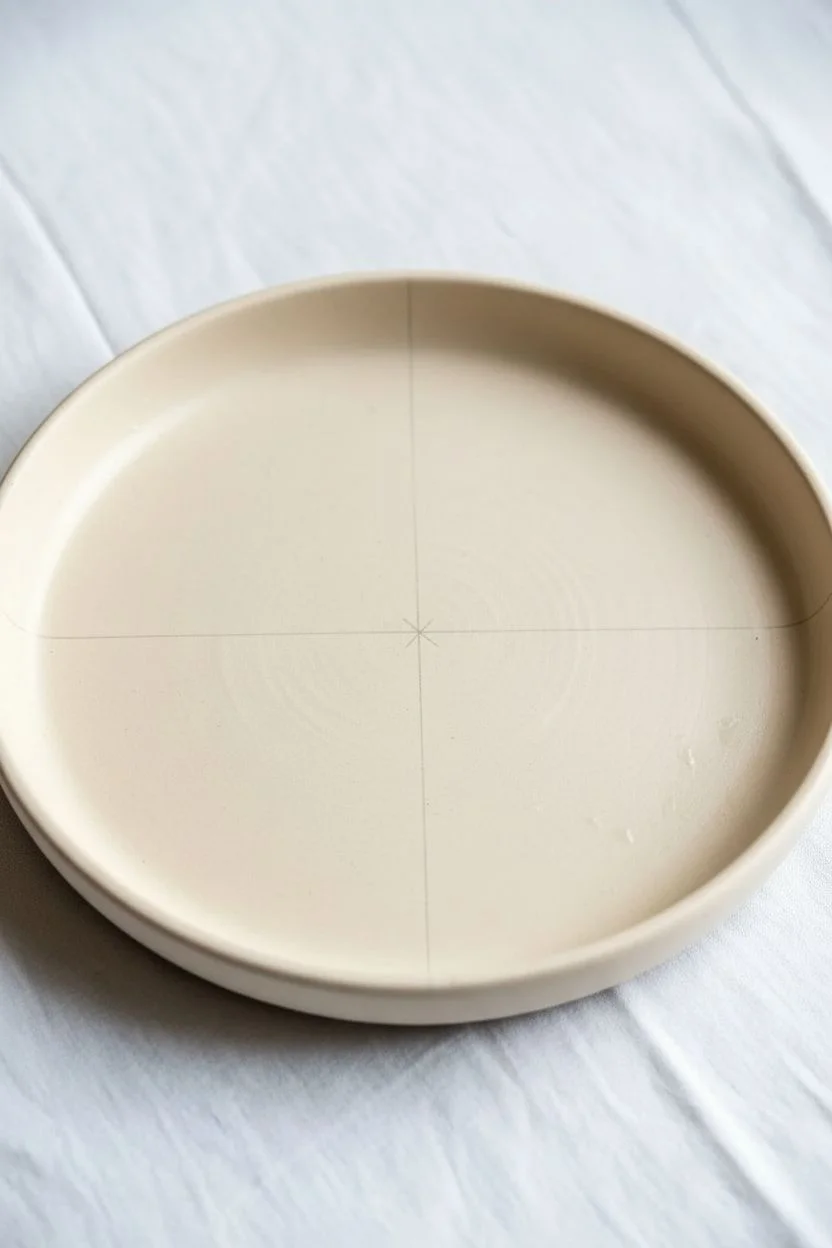
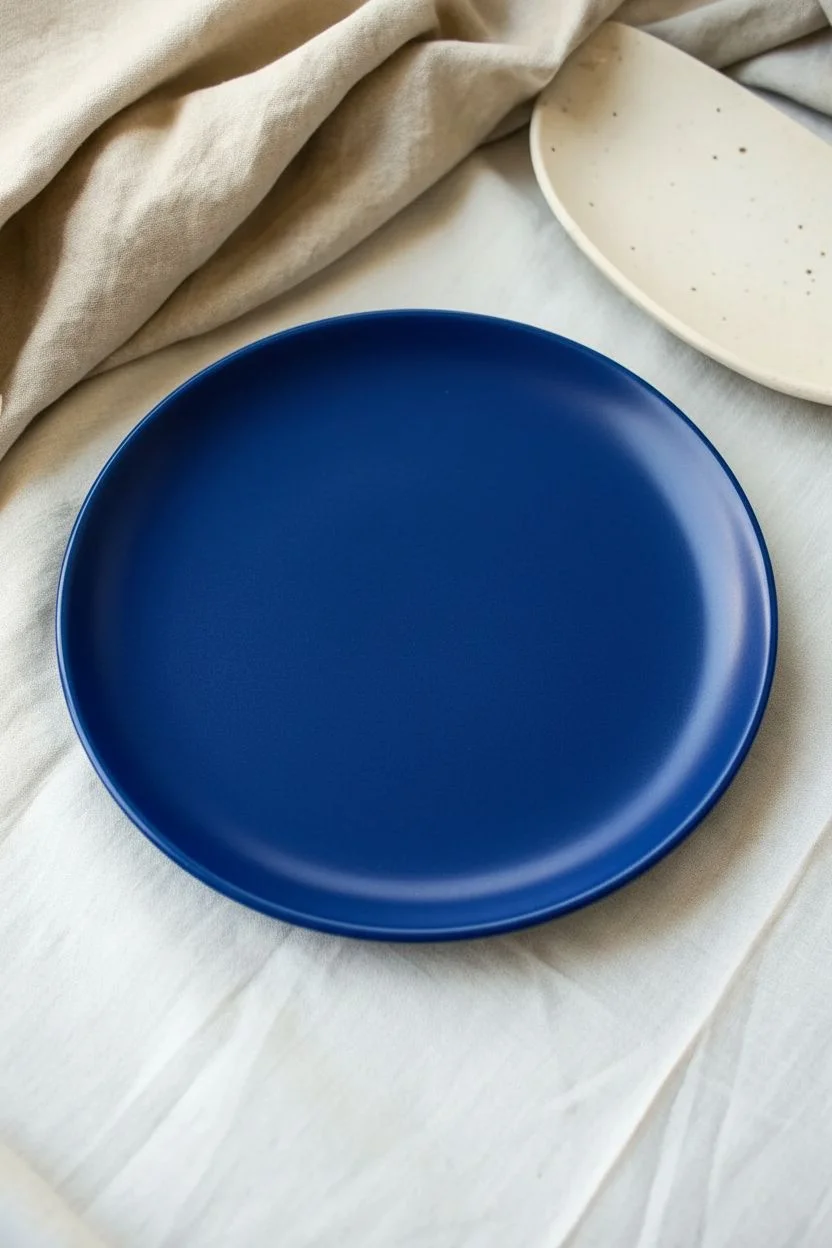
Ombre Rim Fade
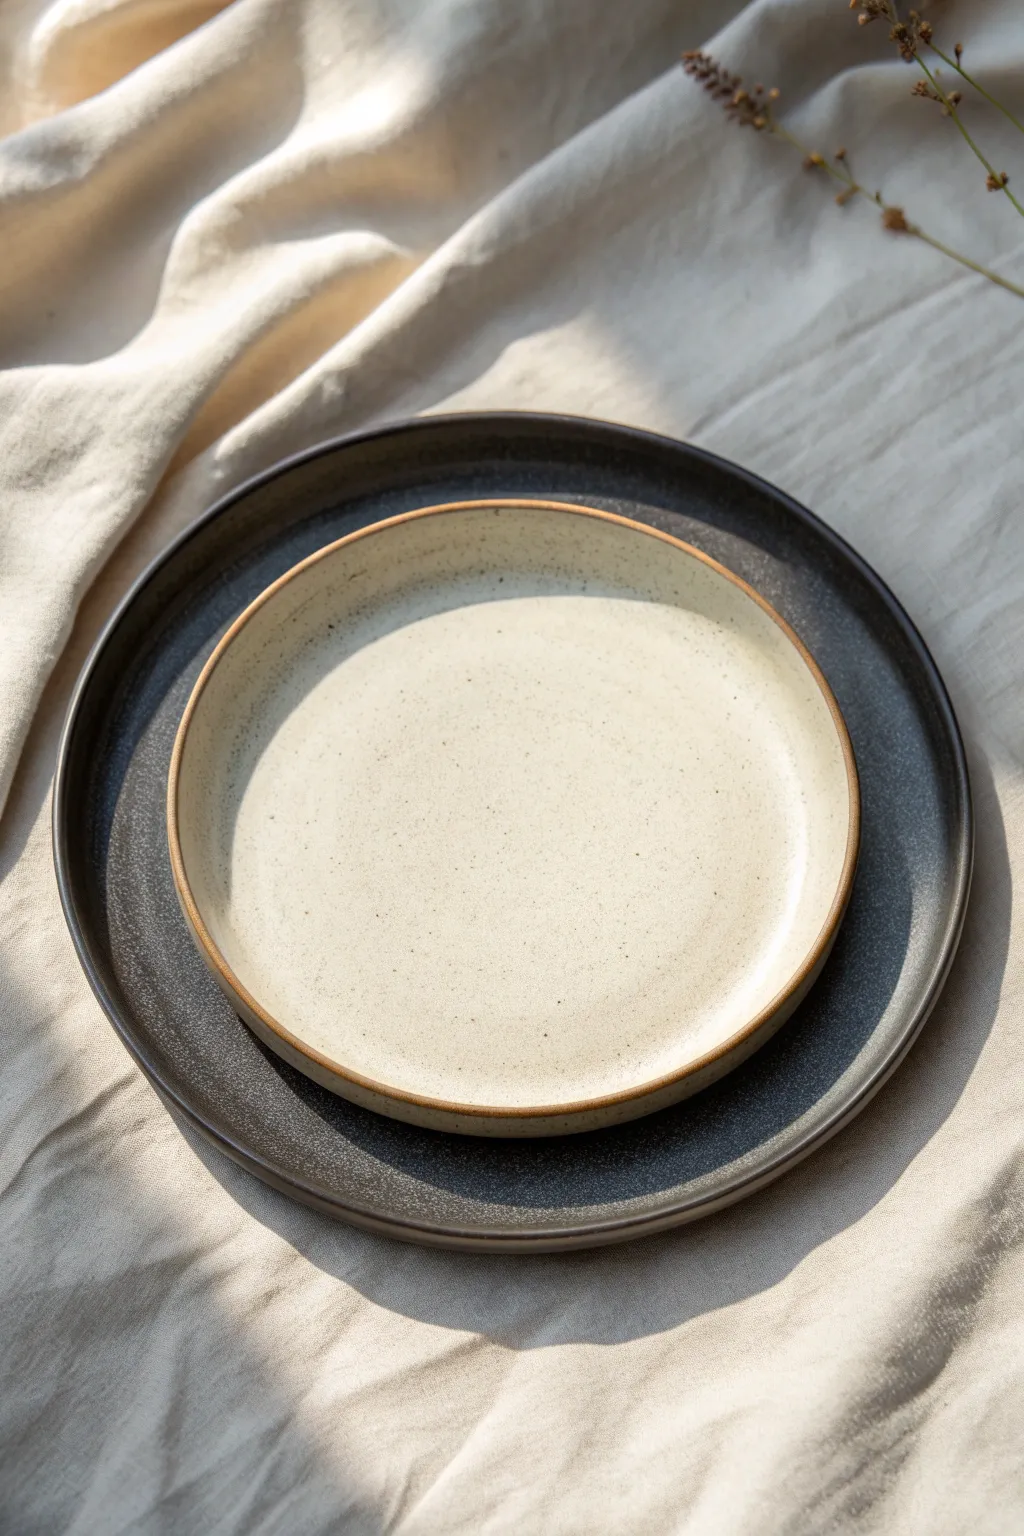
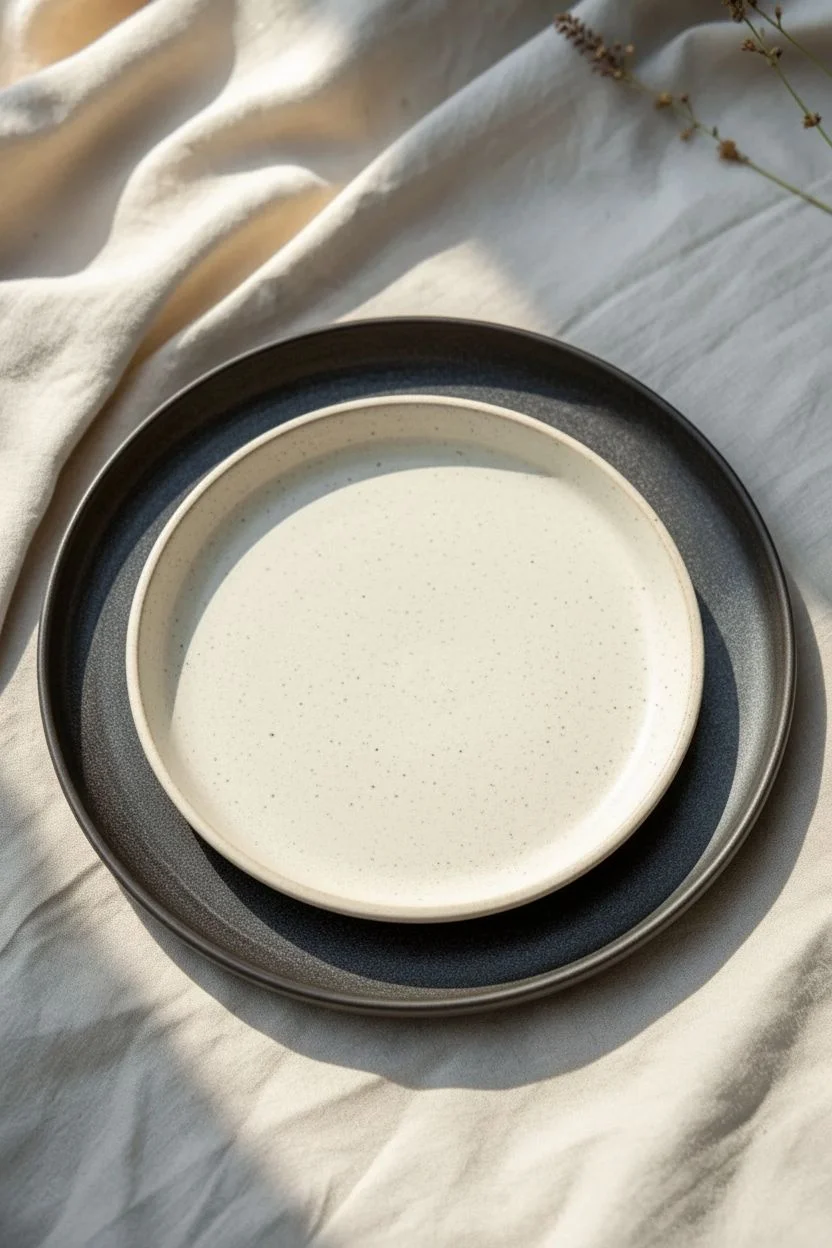
Elevate a simple ceramic plate with this understated yet sophisticated ombre rim effect. By blending a warm, tan glaze into a speckled cream center, you create a natural, earthy look that mimics high-end stoneware.
How-To Guide
Materials
- Bisque-fired ceramic plate (flat profile)
- Glaze: Speckled Cream or Oatmeal
- Glaze: Warm Tan or Caramel
- Soft fan brush
- Small round detail brush
- Sponge
- Water container
- Clean cloth
Step 1: Preparation and Base Coat
-
Clean surface:
Begin by wiping down your bisque plate with a slightly damp sponge. This removes any kiln dust or oils from your hands that might resist the glaze. -
Mix the base glaze:
Stir your Speckled Cream glaze thoroughly. These glazes often contain heavy sedimentary particles that create the speckles, so ensure everything from the bottom is well-incorporated. -
First coat application:
Using a soft fan brush, apply a smooth, even layer of Speckled Cream to the entire top surface of the plate. Work in long, sweeping strokes to avoid heavy brush marks. -
Dry and repeat:
Allow the first coat to dry until it loses its sheen and feels chalky to the touch. Apply a second coat, brushing in the opposite direction (cross-hatching) to ensure full coverage. -
Third coat mastery:
For a truly opaque and professional finish, I like to add a third coat. This ensures the speckles are dense and consistent. Let this dry completely before moving to the rim.
Wet-on-Wet Blending
Work quickly while blending the rim! If the base glaze dries too much, wet the area slightly with clean water before adding the tan rim color.
Step 2: Creating the Ombre Rim
-
Prepare the rim color:
Pour a small amount of your Warm Tan glaze onto a palette. You may want to thin it slightly with a drop of water to make it more translucent for better partial blending. -
Initial rim definition:
Load your small round detail brush with the tan glaze. Carefully paint a thin line along the very edge of the plate’s rim. Don’t worry if it’s not perfectly even yet. -
Widening the band:
Go around the rim again, slightly widening the tan band. The goal is to have the darkest pigment at the very edge of the plate. -
The blending technique:
While the tan glaze is still damp, rinse your brush and leave it barely moist. Gently drag the inner edge of the tan line toward the center of the plate. -
Feathering:
Use a light, feathering motion to pull the color inward. You want the tan to fade into the cream base, creating a soft transition rather than a hard line. -
Second pass for depth:
Once the first rim layer is dry, apply a very thin second coat of tan just to the outermost milliliter of the rim. This intensifies the ‘crust’ look often found on handmade pottery. -
Refining the blend:
If there are any harsh lines, use a clean, slightly damp sponge to carefully dab the transition area, softening the gradient further.
Step 3: Finishing Up
-
Check the underside:
Flip the plate carefully. Depending on your preference, you can leave the bottom unglazed (bare bisque) or apply a coat of a contrasting dark glaze like the one seen on the bottom plate in the image. -
Edge cleanup:
Use a damp sponge to wipe away any glaze that may have dripped onto the foot ring (the bottom ridge the plate sits on) to prevent it from sticking to the kiln shelf. -
Final inspection:
Look for pinholes or bubbles in your glaze. Smooth them out gently with your finger. The finish should look powdery and consistent. -
Firing:
Fire the plate according to the specific cone instructions on your glaze bottle (usually Cone 5 or 6 for stoneware glazes).
Glaze Crawling?
If the glaze pulls back leaving bare spots, it might be too thick. Ensure each layer is fully dry before adding the next, and keep coats thin.
Once fired, you’ll have a beautifully organic plate ready for styling your table
Beginner Mandala Dot Ring
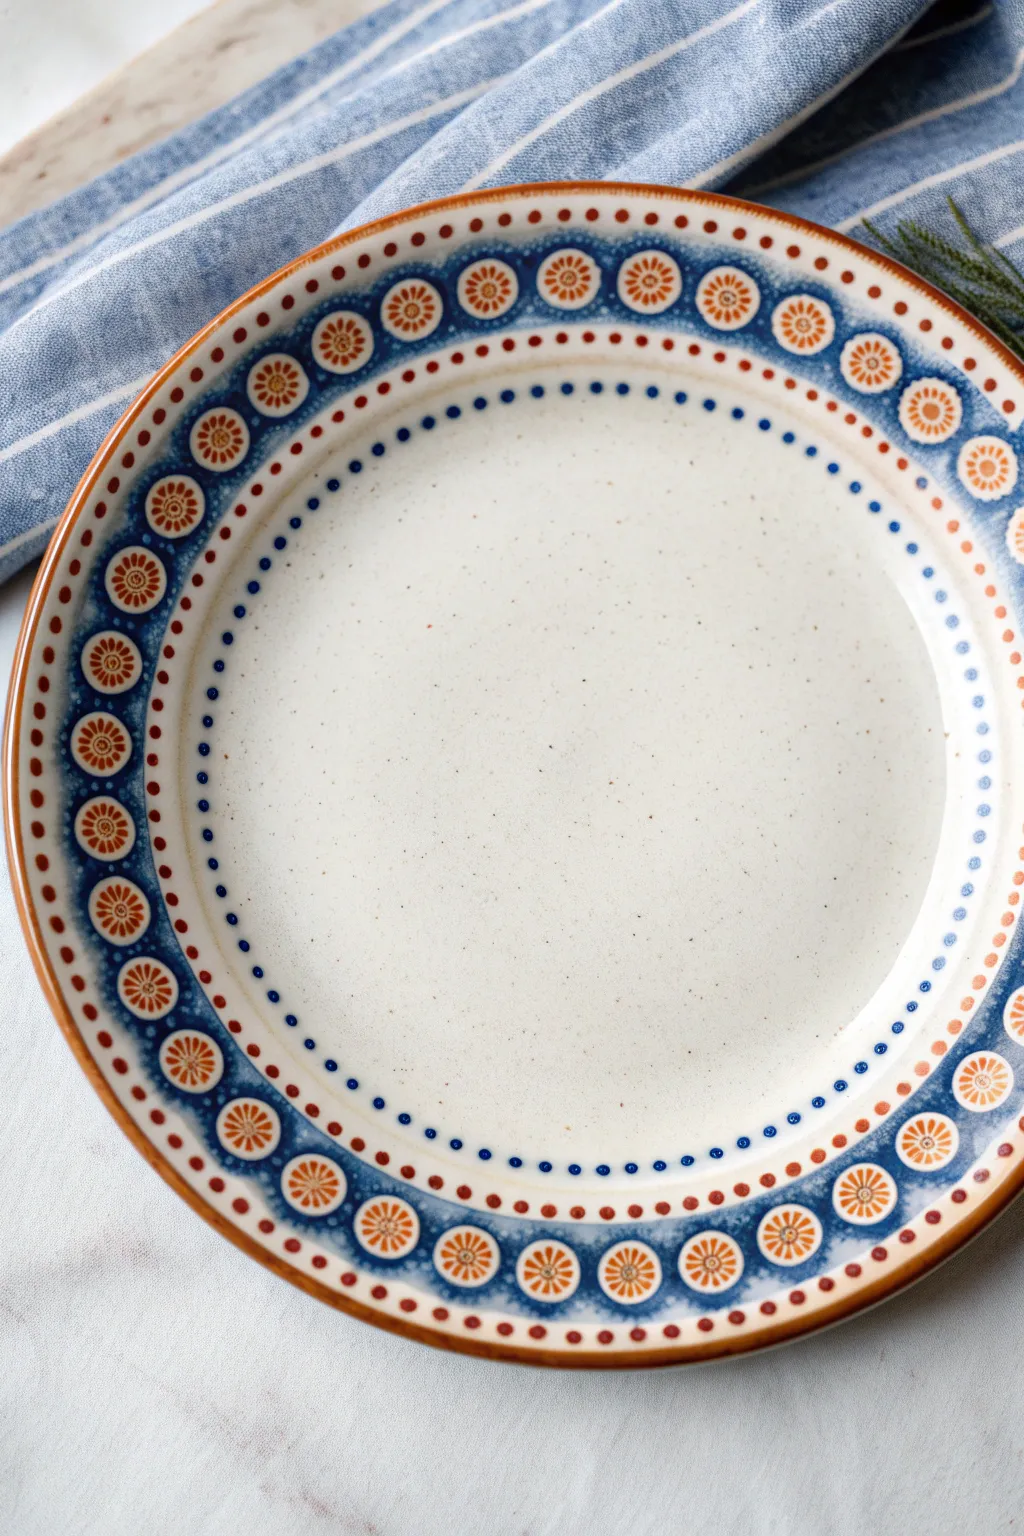
Transform a plain ceramic dish into a stunning piece of faux-Polish pottery with this intricate yet approachable rim design. Using simple dotting tools and a steady hand, you’ll build layers of deep blue and warm terracotta to create a festive border that frames any meal beautifully.
Detailed Instructions
Materials
- Plain white or cream ceramic plate (glazed)
- Pebeo Porcelaine 150 paints (or similar ceramic paint) in Navy Blue, Terracotta/Burnt Orange, and Cream
- Rubbing alcohol and cotton pads
- Fine detail paintbrush (size 0 or 00)
- Set of dotting tools (various sizes)
- Flat shader brush (1/2 inch)
- Oven (for curing, if required by paint)
Step 1: Preparation and Base Ring
-
Clean surface:
Begin by wiping down your entire plate with rubbing alcohol on a cotton pad. This removes invisible oils or fingerprints that prevent ceramic paint from adhering properly. -
Mix the blue:
On your palette, prepare a generous amount of Navy Blue paint. If it feels too thick, add a drop of medium to improve flow, as you want smooth, non-streaky coverage. -
Paint the main band:
Using the flat shader brush, paint a continuous wide band around the rim of the plate. Leave about a 1/4-inch gap from the very outer edge. -
Refine edges:
While the blue paint is wet, use a damp Q-tip or a clean, rigid brush to neaten the inside and outside edges of your blue band, ensuring it’s a consistent circle. -
Initial drying:
Let this blue foundation dry completely. I usually give this step at least an hour because we will be painting contrasting colors directly on top.
Step 2: Creating the Floral Mandalas
-
Load warm color:
Load a medium-sized dotting tool with the Terracotta or Burnt Orange paint. -
Place center dots:
Press a firm dot of orange directly into the center of the blue band. Space these dots evenly around the entire circumference, leaving equal room between them for petals. -
Form the petals:
Using a fine detail brush or a very small dotting tool, pull slightly elongated teardrops or lines radiating outward from each orange center dot to create a sunburst or flower shape. -
Add cream centers:
Once the orange flowers are tacky or dry, use a tiny dotting tool to place a pin-sized dot of Cream or White in the very center of each orange motif. -
Outer framing:
Switch back to your blue paint and a fine brush. Carefully paint a thin circle outline around each orange flower to separate it visually from the background band.
Use a Spacer Guide
Before painting, lightly mark the circle with a pencil in quadrants (12, 3, 6, and 9 o’clock) to keep your spacing even as you work around.
Step 3: Detailed Dot Work
-
Inner rim dots:
Dip a small dotting tool into the Navy Blue paint. Create a ring of small, evenly spaced dots just inside the main blue band, on the white ceramic surface. -
Outer rim dots:
Repeat this process on the very outer edge of the plate (the white gap you left earlier), placing blue dots that align with the spaces between the flowers. -
Border accents:
Using the Terracotta paint and a small tool, add a sequence of tiny dots directly onto the blue band’s outer edges, framing the floral section. -
Speckled center effect:
To mimic the rustic look of stoneware, dip a toothbrush into watered-down grey or brown paint. Run your thumb over the bristles to gently flick tiny speckles onto the white center of the plate. -
Rim finish:
For the finishing touch, paint a very thin line of Terracotta around the literal physical edge of the plate to frame the entire design.
Smudged a Dot?
Don’t panic! Wait for it to dry completely, then gently scrape the mistake off with a craft knife or toothpick before re-dotting.
Step 4: Curing
-
Full dry:
Allow the plate to dry for at least 24 hours to ensure all moisture has evaporated from the paint layers. -
Bake to set:
Place the plate in a cold oven. Set the temperature to 300°F (150°C) or as specified by your paint manufacturer. Bake for 35 minutes, then turn the oven off and let the plate cool completely inside.
Once baked and cooled, your beautiful bohemian plate is ready to be displayed or used for light snacks
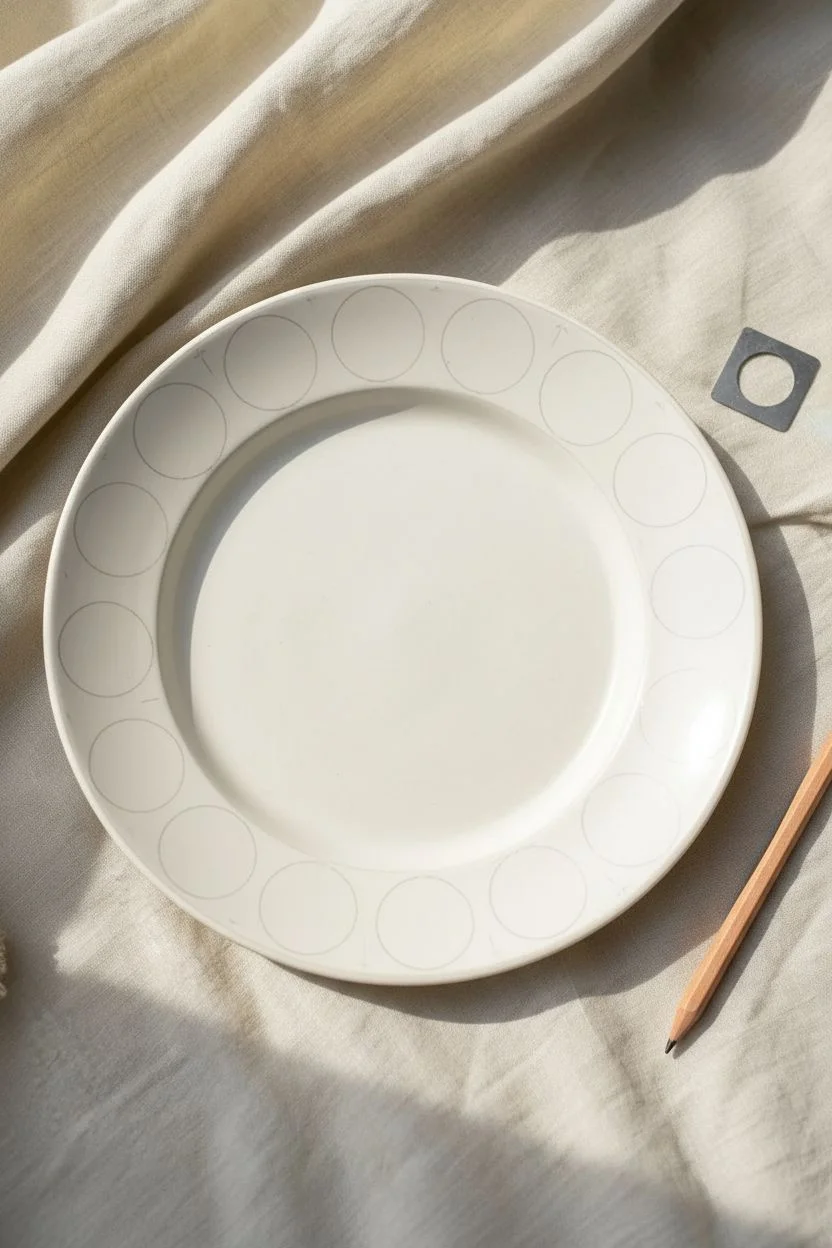
Scalloped Border Like a Vintage Edge
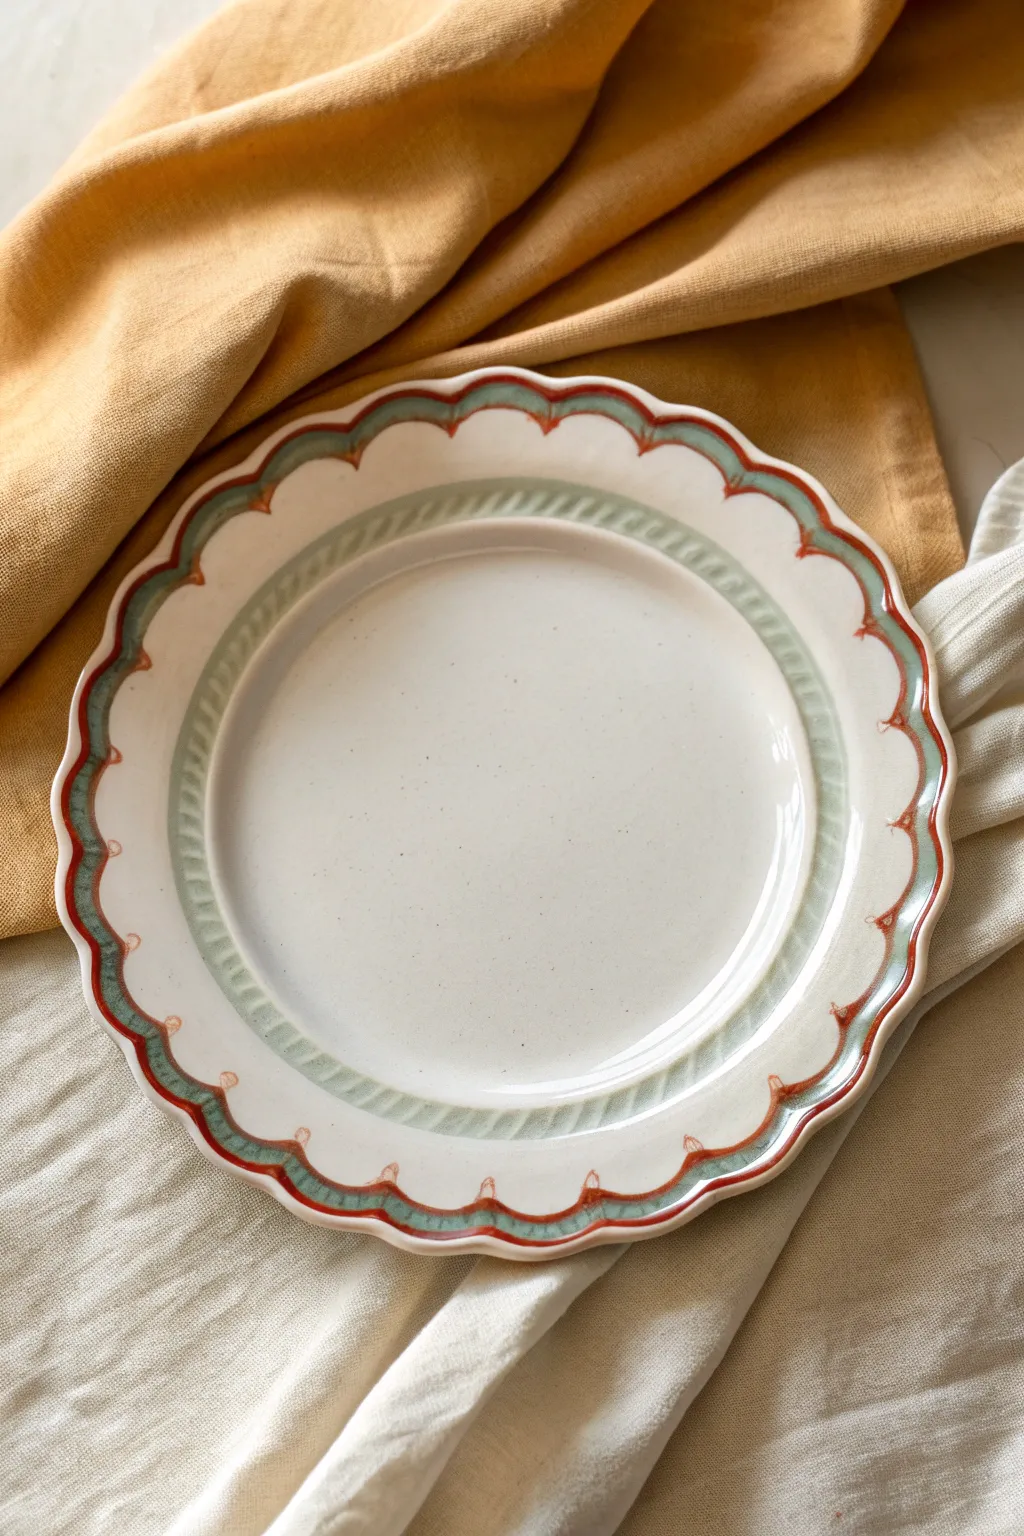
Transform a plain ceramic plate into a charming piece of heirloom-style pottery with just a few simple painted details. This design mimics the classic look of antique dinnerware using a wavy red scalloped border and a soft sage green inner rim.
Step-by-Step Tutorial
Materials
- Plain white or cream ceramic plate (glazed)
- Pebeo Porcelaine 150 paint (or similar ceramic paint) in Burnt Red
- Pebeo Porcelaine 150 paint in Sage Green or Mixing White + Green
- Small round brush (size 1 or 2) for details
- Flat shader brush (size 4 or 6) for the inner rim
- Isopropyl alcohol or white vinegar
- Paper towels
- Oven (for curing)
Step 1: Preparation
-
Clean the Surface:
Before dipping your brush, wipe the entire plate down thoroughly with isopropyl alcohol or white vinegar on a paper towel. This removes invisible oils and fingerprints that could prevent the paint from adhering properly.
Wobbly Lines?
Keep a damp cotton bud nearby. If a scallop curve goes astray, wipe it away immediately and retry. Use your pinky finger as a stabilizing bridge.
Step 2: The Inner Rope Rim
-
Mix Your Green:
Prepare your sage green paint. If the color is too opaque, I like to dilute it slightly with a specialty thinner or just a tiny drop of water to achieve that semi-translucent, glazed watercolor look. -
Base Ring Placement:
Locate the recessed ring or the slope where the plate’s center meets the rim. Using your flat shader brush, paint a continuous band of pale sage green around this inner circle. -
Add Texture:
While the green paint is still wet, gently drag a dry brush or a toothpick through it at diagonal angles to create a faint ‘rope’ or diagonal stripe texture. -
Clean the Edges:
Use a damp cotton swab to clean up the inner and outer edges of your green ring so it looks neat and intentional. -
Dry Time:
Let this green layer dry to the touch for about 15-20 minutes before moving on to the red details so you don’t smudge your work.
Level Up: Antique Look
Mix a tiny amount of glaze medium with brown paint and wash it over the red scalloped edge, then wipe most off to simulate aged crazing in the glaze.
Step 3: The Scalloped Border
-
Mark Anchor Points:
To keep your scallops even, visualize the plate like a clock face. Make tiny red dots at 12, 3, 6, and 9 o’clock right on the outer edge, then fill in equally spaced dots between them. -
Paint the Arches:
Using your small round brush loaded with Burnt Red, paint a curved arch connecting each mental anchor point. The top of the scallop should face inward toward the center of the plate. -
Thicken the Line:
Go back over your red arches. Make the line slightly thicker at the peak of the curve and thinner where it dips down to the edge of the plate, giving it a calligraphic feel. -
Add the Green Shadow:
Clean your small brush and pick up the sage green again. Carefully paint a thin line framing the *outside* of each red scallop, following the curve exactly. -
Connect the Peaks:
Where the red scallops dip down to the plate’s edge, add a tiny extra dab of red paint to create a defined point or ‘tear drop’ shape that points outward.
Step 4: Finishing Touches
-
Check for Speckles:
If your base plate wasn’t already speckled, you can flick a stiff toothbrush dipped in diluted brown or grey paint over the surface to mimic that stoneware clay appearance. -
Final Cleanup:
Inspect your lines one last time. Any stray marks can be gently scraped off with a craft knife or wiped with alcohol if the paint hasn’t fully cured. -
Air Dry:
Allow the painted plate to air dry for at least 24 hours. The paint needs to be fully dry beneath the surface before heat setting. -
Bake to Cure:
Place the plate in a *cold* oven. Set the temperature to 300°F (150°C). Once it reaches temperature, bake for 35 minutes. -
Cool Down:
Turn the oven off and leave the plate inside until completely cool. Removing it while hot can cause the ceramic to crack due to thermal shock.
Now you have a stunning faux-vintage plate ready for display or a special dinner
Sponge-Stamped Texture Blocks
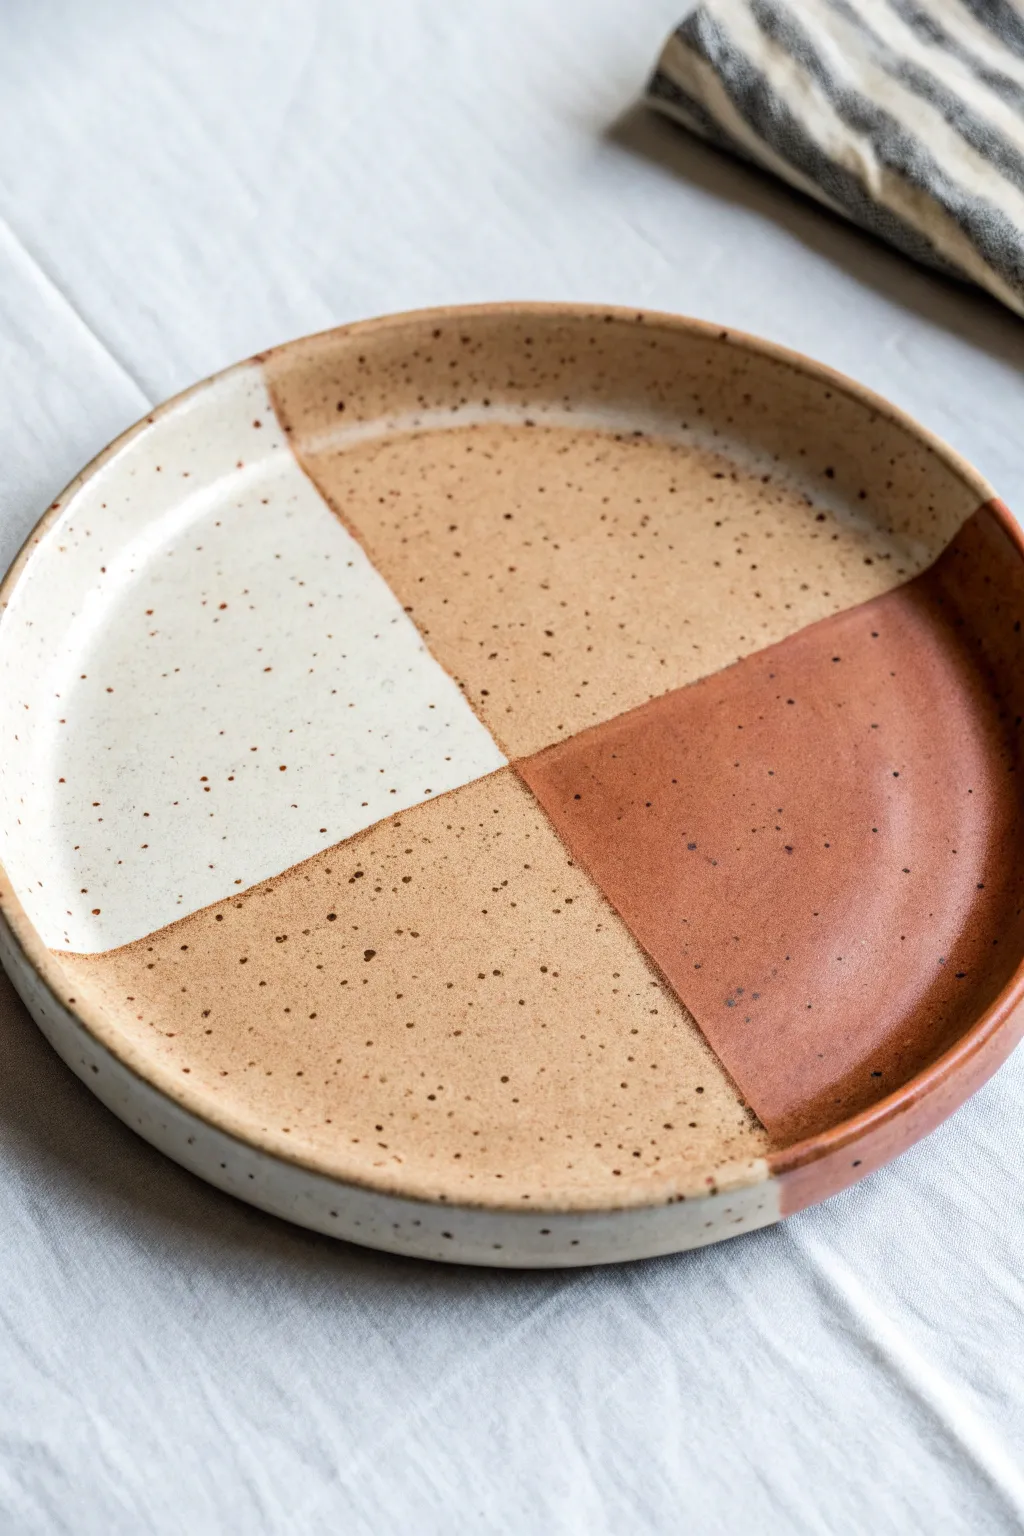
Transform a plain ceramic bisque plate into a modern piece of art using simple color-blocking techniques and sponge textures. The earthy palette of cream, tan, and terracotta creates a warm, rustic feel that is enhanced by a delightful speckled finish.
Detailed Instructions
Materials
- Bisque ceramic plate (low sided)
- Glaze paints (Cream, Sand/Tan, Terracotta/Rust)
- Dark brown or black glaze for speckling
- Pencil
- Ruler or straight edge
- Painter’s tape (optional for crisp lines)
- Wide flat brush
- Small round brush
- Old toothbrush or stiff bristle brush
- Water container
- Clear dipping glaze (if required for your firing method)
Step 1: Planning the Design
-
Clean surface:
Begin by wiping down your bisque plate with a slightly damp sponge to remove any kiln dust or oils from your hands. -
Find the center:
Using your ruler, lightly mark the exact center of the plate. -
Mark quadrants:
Draw two straight lines intersecting at the center mark, essentially dividing your plate into four equal pie slices or quadrants. Keep the pencil lines light so they burn off in the kiln or are easily covered.
Step 2: Applying the Base Colors
-
Select your quadrant colors:
Decide on your color arrangement. For this look, choose two opposing quadrants for the Sand/Tan color, one for Cream, and one for Terracotta. -
Painting the first block:
Load a wide flat brush with the Cream glaze. Carefully paint one quadrant, starting from the center and working outward to the rim. Ensure you paint the edge of the rim corresponding to this section. -
Creating the diagonal pair:
Switch to your Sand/Tan color. Paint the quadrant directly next to the cream one, and then paint the quadrant diagonally opposite to it. This creates that balanced, asymmetrical look. -
Adding the accent color:
Fill in the final remaining quadrant with the Terracotta/Rust glaze. I like to use the edge of the flat brush to get really close to the pencil lines without crossing over. -
Second coat:
Allow the first layer to dry until it loses its sheen. Apply a second coat to all sections to ensure solid, opaque coverage, repeating the process for a third coat if your glaze is particularly translucent. -
Clean up lines:
If any paint crossed the lines, gently scrape the excess away with a craft knife or clean it up with a damp stiff brush before the glaze sets completely.
Clean Edges Trick
Use thin automotive detailing tape instead of standard painter’s tape. It curves better and leaves sharper lines on bisque.
Step 3: Adding Texture and Detail
-
Prepare the speckle mix:
Dilute a small amount of dark brown or black glaze with a drop of water. It should be fluid but not watery. -
Loading the spatter tool:
Dip an old toothbrush or a stiff bristle brush into the diluted dark glaze. Test the spray on a piece of paper first to gauge the density. -
Applying speckles:
Hold the brush over the plate and run your thumb across the bristles to flick tiny droplets of glaze onto the surface. aim for an even distribution across all colors. -
Rim detailing:
Using a small round brush, define the rim edge. If you want a more natural look, allow the quadrant colors to wrap over the edge, but ensuring the transition points on the rim match the lines on the face of the plate. -
Checking the underside:
Flip the plate carefully. You can continue the quadrant lines onto the back or leave it plain, but make sure the rim is tidied up. -
Final drying:
Let the piece dry completely overnight. The glaze will turn powdery and chalky to the touch. -
Clear glaze application:
If your colored glazes are underglazes, you will need to apply a clear transparent glaze over the entire piece. Dip or brush it on according to manufacturer instructions. -
Firing:
Have the plate fired in a kiln according to the specifications of the clay and glaze you used (typically cone 06 or cone 6).
Go Geometric
Instead of quadrants, try dividing the plate into three unequal sections or distinct stripes for an Art Deco variation.
Once fired, you will have a durable, beautifully textured plate ready for serving or display
Bubble-Print Background With Simple Shapes
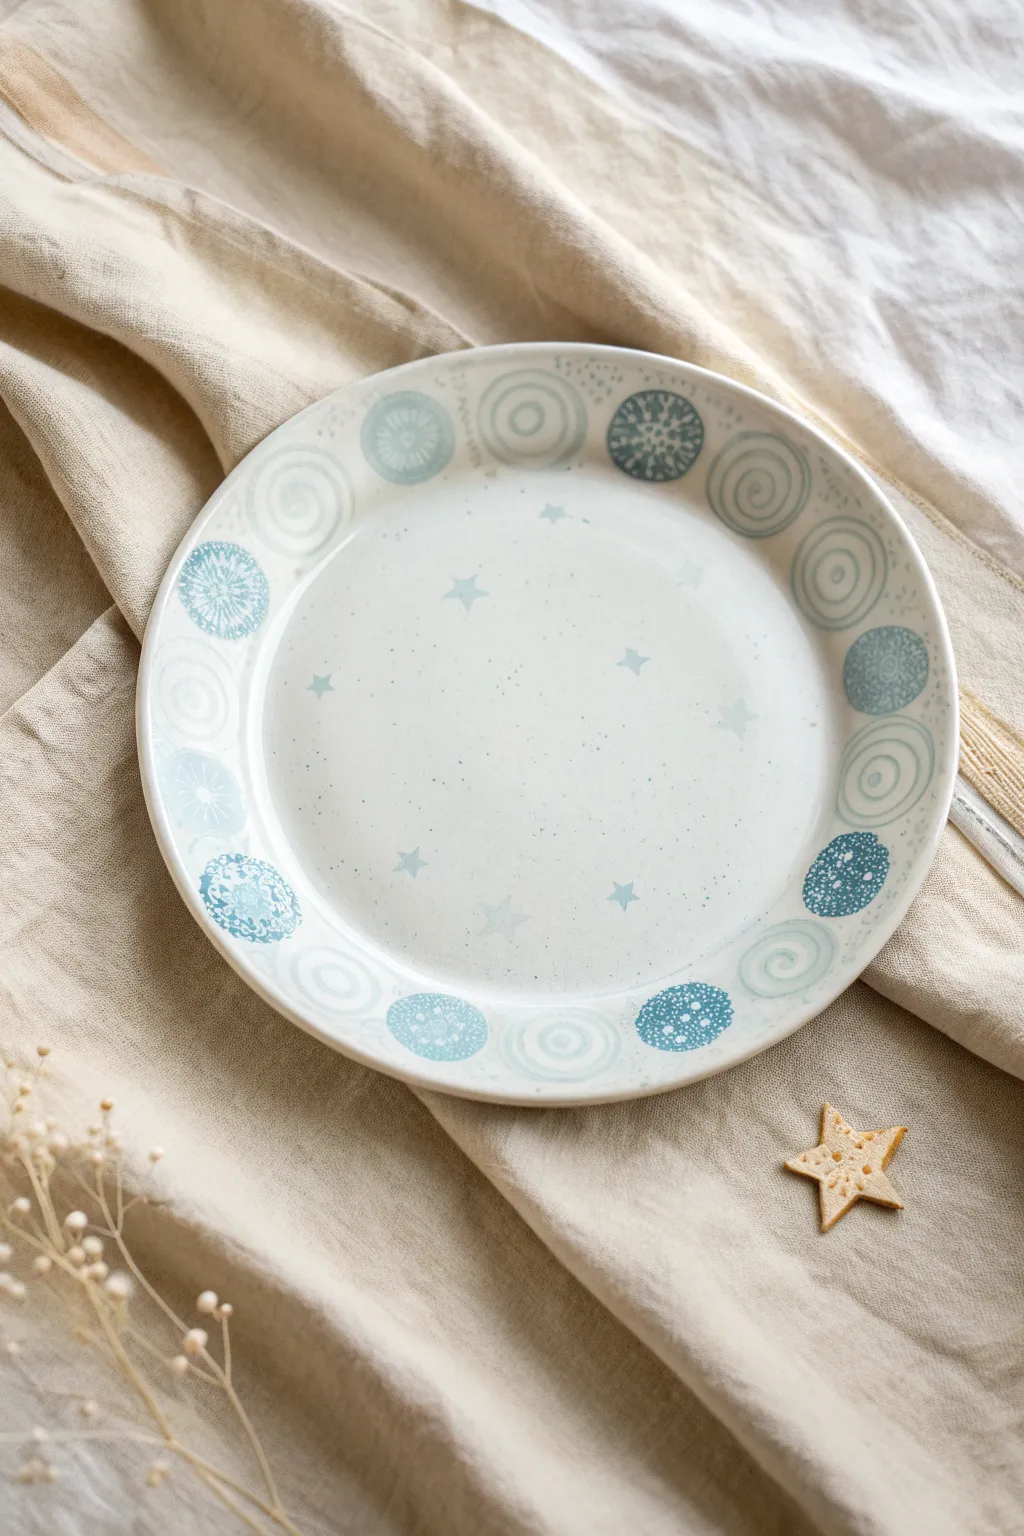
Transform a plain white dish into a wintery wonderland using a playful bubble technique and gentle brushwork. This design combines the unpredictability of bubble prints with structured spirals for a soothing, cohesive look.
Step-by-Step
Materials
- Plain white ceramic plate (bisque or glazed, based on paint choice)
- Ceramic paint or porcelain markers (light blue, teal, dusty blue)
- Small cup or bowl for bubble solution
- Liquid dish soap
- Drinking straw
- Small round paintbrush (size 2 or 4)
- Old toothbrush or stiff bristle brush
- Paper towels
- Varnish or sealant (if using non-bake paints)
- Oven (for curing, if required by your paint)
Step 1: Creating the Bubble Prints
-
Prepare the solution:
In a small cup, mix a teaspoon of teal ceramic paint, a squirt of dish soap, and a splash of water. Stir it well until the liquid is fluid but still pigmented. -
Blow bubbles:
Insert your drinking straw into the mixture and blow gently until a mound of bubbles creates a dome over the top of the cup. -
Transfer the print:
Gently press a piece of paper or a sponge onto the bubbles to lift the pattern, then dab this onto the rim of your clean, dry plate to create circular, organic textures. Alternatively, if you are brave, you can lift the bubbles with a spoon and place them directly on the rim. -
Repeat spacing:
Continue adding these bubble-texture circles around the rim, leaving a gap about the size of a tangerine between each one. You want roughly six to eight bubble circles total. -
Alternative method:
If the bubble technique is too messy, simply dab a round sponge into teal paint and stamp it onto the rim for a similar textured effect. -
Clean up edges:
If any paint smirked outside the desired circular shape, use a damp Q-tip to wipe away the excess while it is still wet.
Bubbles Popping Too Fast?
Add a few drops of glycerin or corn syrup to your paint-soap mixture. This thickens the bubble walls, making them last longer so you have more time to transfer the print.
Step 2: Painting the Spirals
-
Mix a lighter blue:
On your palette, prepare a lighter shade of blue, perhaps mixing your teal with a bit of white if needed. This provides a nice contrast to the bubble prints. -
Draw the center spiral:
In the empty spaces between the bubble prints, use your small round brush to paint a loose spiral. Start from the center and wind outward. -
Add outer rings:
Around each painted spiral, add one or two loose, concentric circles to frame the shape, mimicking the design in the reference photo. -
Vary the opacity:
It looks lovely if the paint isn’t perfectly solid; let the brush strokes show slightly to give it a handmade watercolor feel.
Step 3: Adding the Sparkle
-
Paint center stars:
Dip a fine-tip brush into your lightest blue paint. In the center well of the plate, paint scattered five-point stars. Keep them small and delicate. -
Vary star sizes:
Make some stars slightly larger and others tiny, spreading them out randomly like a constellation. -
Speckle effect:
Dilute a small amount of dark teal paint with water. Dip an old toothbrush into this mixture. -
Splattering:
Hold the toothbrush over the center of the plate and run your thumb across the bristles to flick tiny specks of paint across the surface. -
Rim details:
Do the same speckling technique lightly over the rim to tie the design together. -
Wait to dry:
Allow the paint to dry completely. This usually takes 24 hours, but check your specific paint bottle instructions. -
Curing:
Once dry, bake the plate in a cool oven (usually engaging the heat after the plate is inside to prevent cracking) according to the manufacturer’s directions to set the design permanently.
Add Metallic Flair
Once the base design is dry, trace over the stars or add tiny dots in the centers of the spirals using a gold or silver porcelain marker for a festive touch.
Now you have a frosty, custom-designed plate perfect for winter snacks
Night Sky Galaxy Splash
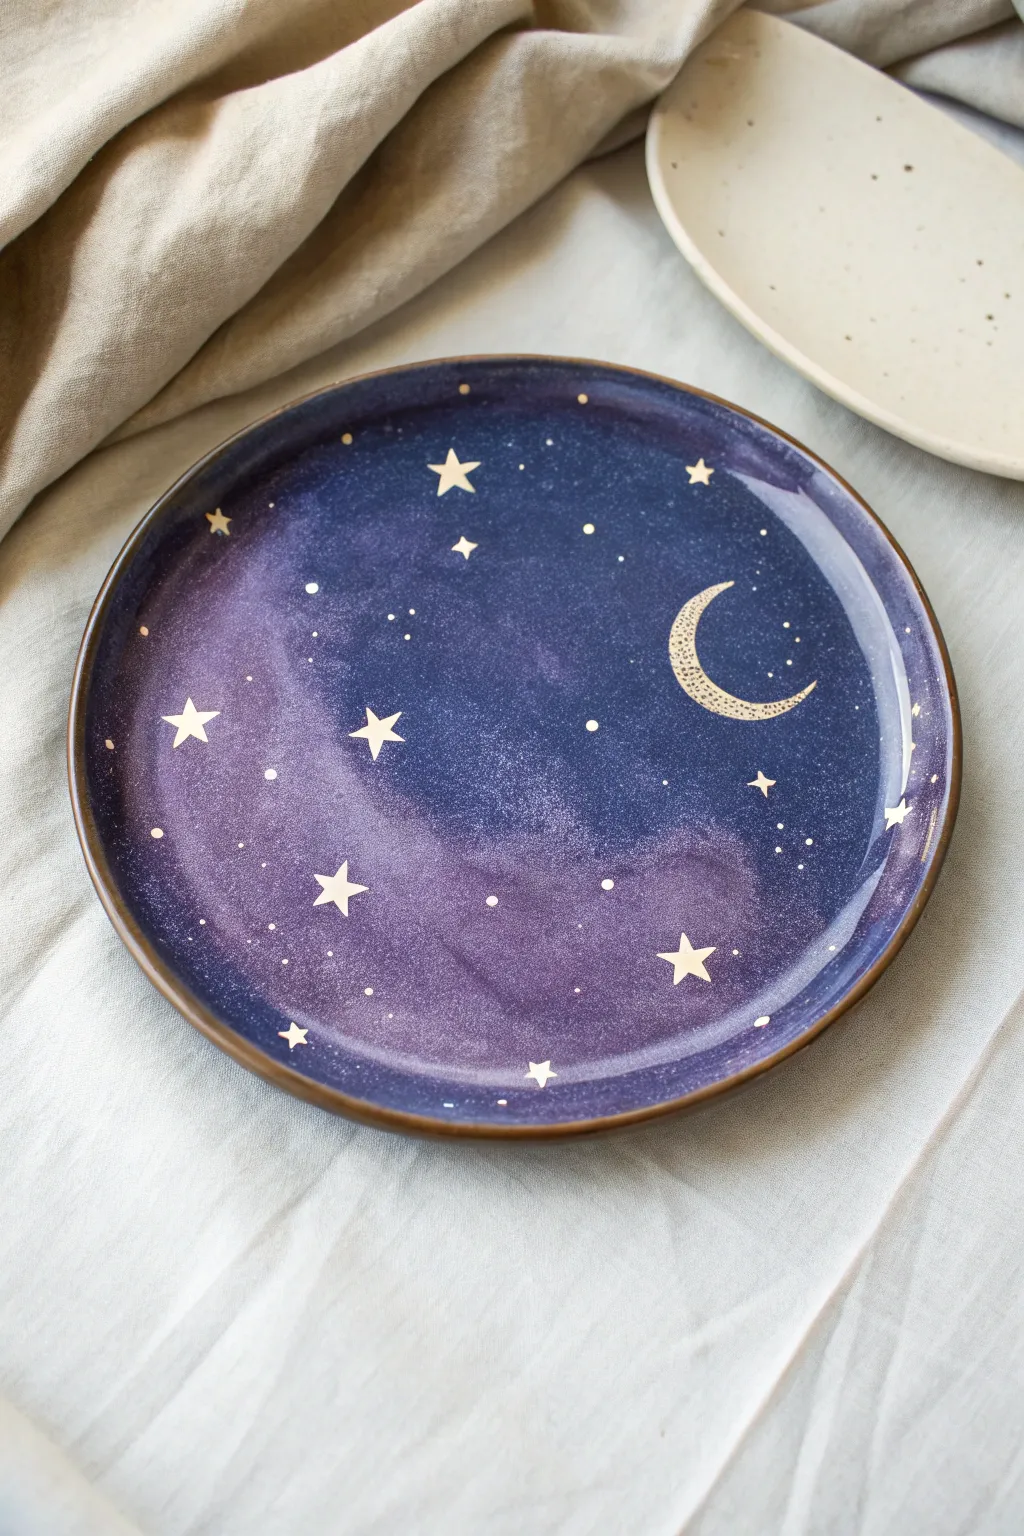
Transform a plain ceramic plate into a dreamy, cosmic masterpiece using simple painting techniques and celestial motifs. This project features a deep indigo background swirled with lighter purples to mimic a nebula, accented with delicate gold stars and a crescent moon.
How-To Guide
Materials
- Plain white ceramic plate (bisque or glazed, depending on paint type)
- Ceramic paints (Deep Indigo, Violet, White, Gold)
- Small sponge or sponge pouncer
- Fine detail paintbrush (size 0 or 00)
- Medium flat paintbrush
- Masking tape or painter’s tape (optional)
- Water cup and paper towels
- Rubbing alcohol
- Clear ceramic glaze or sealant (food-safe if intended for use)
Step 1: Preparation & Base Coat
-
Clean the Surface:
Begin by wiping down your entire plate with rubbing alcohol and a paper towel. This removes any oils or fingerprints that might repel the paint. -
Mix Your Base Color:
Pour a generous amount of Deep Indigo paint onto your palette. If it feels too thick, mix in a tiny drop of water or glazing medium to help it flow. -
Apply the First Layer:
Using your medium flat brush, apply a smooth, even coat of the Deep Indigo across the entire face of the plate. Don’t worry if it looks slightly streaky; we are building depth. -
Dry and Repeat:
Let the first coat dry until it loses its sheen. Apply a second coat of indigo to ensure a solid, opaque background.
Step 2: Creating the Galaxy Effect
-
Prepare the Nebula Colors:
On your palette, mix a little White into your Violet paint to create a lighter, lavender shade. Keep some pure White nearby as well. -
Sponging the Texture:
Dampen your small sponge slightly and dip it into the lavender mixture. Dab off the excess paint on a paper towel—you want a ‘dry brush’ effect, not a wet blob. -
Applying the Cloud:
Gently pounce the sponge in a curved, diagonal motion across the lower-left section of the plate. This creates the soft, cloudy nebula look. -
Blending the Edges:
While the paint is still tacky, use a clean corners of the sponge to soften the edges where the purple meets the dark blue, blurring the transition. -
Adding Highlights:
Dip a very small area of your sponge into pure White paint. Lightly tap this into the center of your purple nebula patch to add brightness and distinct depth. -
Splattering Stars (Optional):
For tiny background stars, load a toothbrush or stiff brush with watered-down white paint. Run your thumb over the bristles to flick tiny specks across the whole plate. -
Dry Completely:
Allow the galaxy background to dry fully before moving on to the detailed gold work. If the paint is wet, your stars will bleed.
Fixing Smudges
If you make a mistake with the gold stars, use a slightly damp cotton swab or toothpick to lift the wet paint off the dark background immediately.
Step 3: Adding Celestial Details
-
Drafting the Moon:
I like to lightly sketch the crescent moon shape with a pencil first to ensure the curve is pleasing. The pencil mark will burn off in the kiln or wash away. -
Painting the Moon:
Using your finest detail brush loaded with Metallic Gold paint, carefully outline and fill in the crescent moon on the right side of the plate. -
Adding Moon Texture:
Once the gold base is semi-dry, use the tip of your brush to stipple tiny dots or dashes of a darker shade (or unpainted negative space) inside the moon to give it a cratered texture. -
Painting Large Stars:
With the detail brush and gold paint, add several five-pointed stars. Start by painting a ‘V’ shape, then cross a horizontal line through it to guide your points. -
Varying Star Sizes:
Paint smaller, four-pointed sparkle shapes (just a cross +) scattered randomly around the larger stars and the moon. -
Adding Dot Stars:
Use the handle end of your paintbrush dipped in white or gold paint to dot perfect circles into the empty celestial spaces. -
Rim Detail:
Finish the painting process by carefully running the side of your brush along the very rim of the plate with gold paint to frame the artwork. -
Final Cure:
Follow the specific instructions on your paint bottle. This usually involves baking the plate in a home oven for 30 minutes or applying a food-safe sealant.
Add Constellations
Personalize the sky by arranging the small gold dots into your favorite zodiac constellation, connecting them with hair-thin painted lines.
Now you have a stunning piece of functional art that captures the magic of the night sky right on your table
Faux Stained-Glass Sections With Bold Outlines
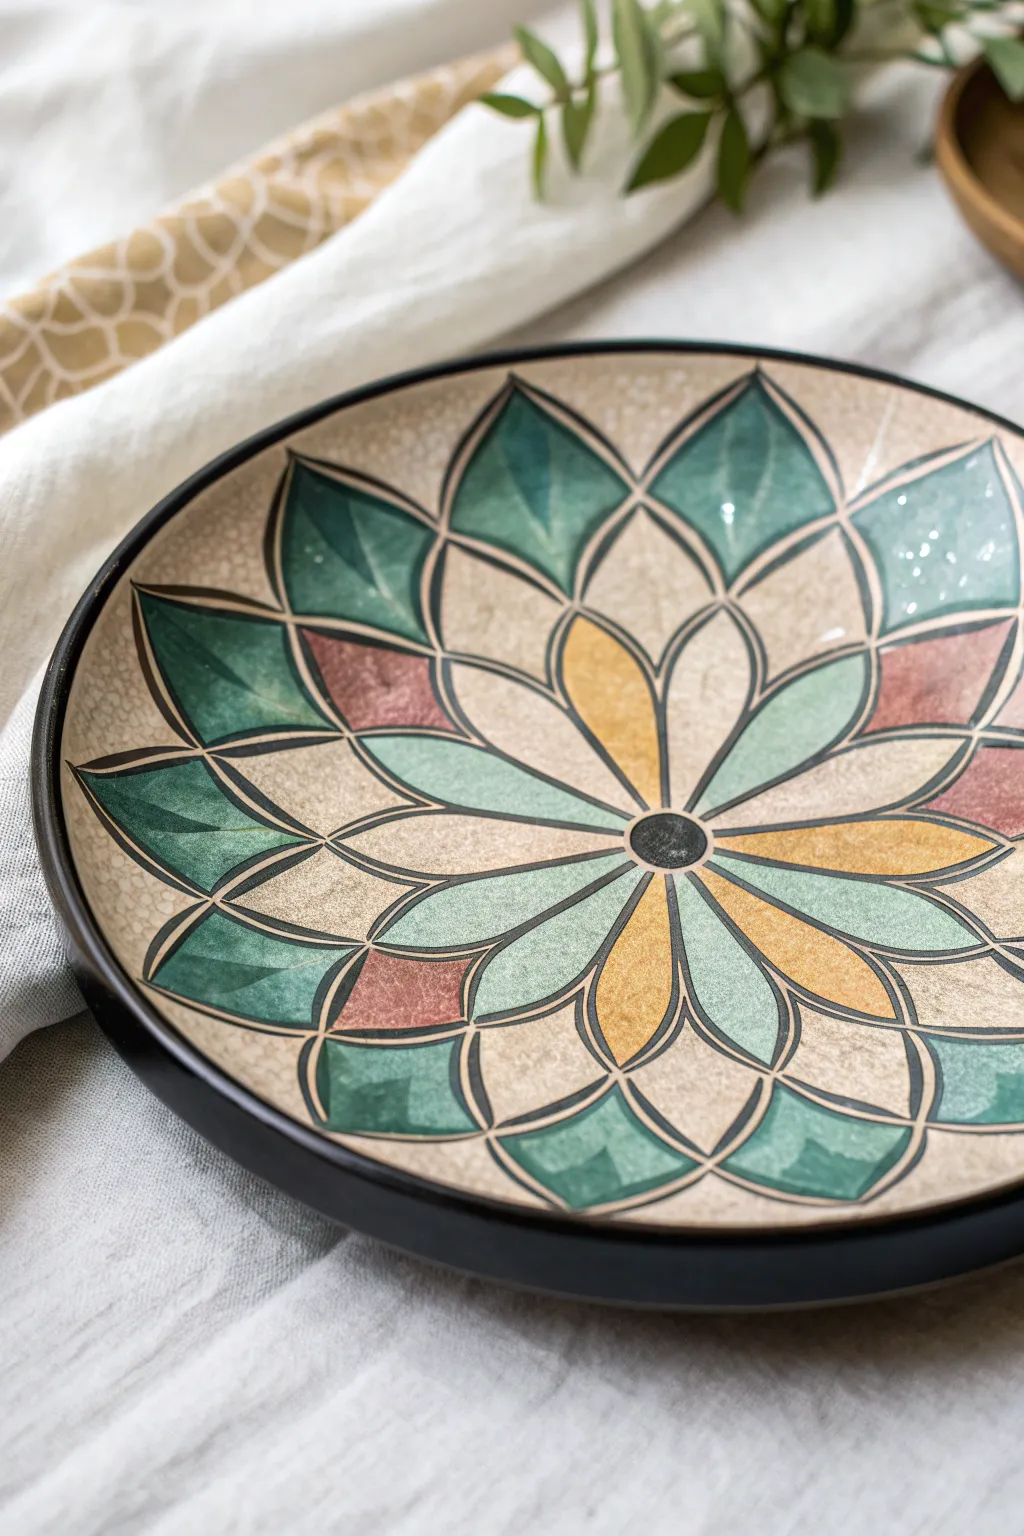
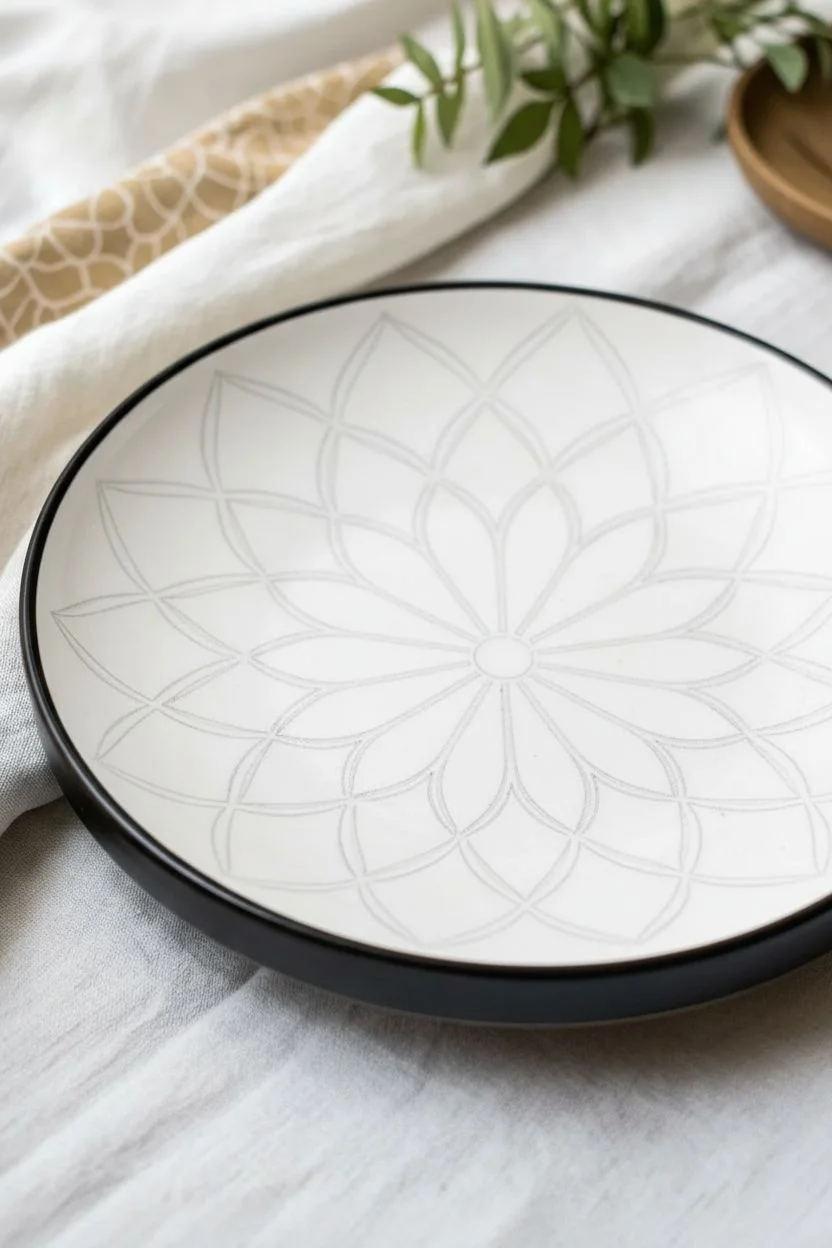
Achieve the sophisticated look of stained glass on ceramic without the need for a kiln or complex firing. This project uses bold black outliners to create crisp sections that are filled with soft, translucent washes of color for an elegant finish.
Step-by-Step Guide
Materials
- White or beige ceramic plate (smooth surface)
- Black porcelain outliner paint (in a squeeze tube or pen)
- Porcelain or glass paints (transparent/translucent type)
- Colors: Teal/Turquoise, Golden Yellow, Terracotta/Red-Brown, Beige/Sand
- Soft synthetic round brushes (sizes 2 and 4)
- Rubbing alcohol
- Paper towels
- Pencil and paper (for drafting)
- Carbon transfer paper (optional)
- Cotton swabs (for clean-up)
Step 1: Preparation & Drafting
-
Clean the surface:
Before adding any paint, wipe the entire plate down thoroughly with rubbing alcohol on a paper towel. This removes invisible oils and fingerprints that could prevent the paint from adhering properly. -
Draft your design:
On a piece of paper, trace the circumference of your plate’s center indent. Draw a small circle in the very center, then sketch a 12-petal flower radiating from it. Add a second layer of pointed petal shapes between the first set. -
Transfer the pattern:
Position your paper sketch over the plate. If you have carbon transfer paper, slide it underneath and trace the lines. Alternatively, you can sketch the basic guidelines lightly directly onto the ceramic using a grease pencil or a soft graphite pencil.
Oops! Leaking Lines?
If color bleeds through a gap in your black outline, wait for it to dry completely. Then, simply paint over the leak with the black outliner to seal it back up.
Step 2: The Outline Framework
-
Start the center:
Using the black porcelain outliner tube, squeeze a small, solid black dot in the very center of the plate. Keep your pressure consistent to avoid blobs. -
Draw the main spokes:
Draw the lines for the first layer of flower petals radiating from the center dot. The lines should be thick and raised, acting as a dam for the liquid paint later. -
Complete the flower structure:
Continue drawing the outer pointed shapes and the curved connections. Ensure every line connects fully to its neighbor; any gaps will allow the colored paint to leak into the wrong section. -
Define the rim:
Paint the raised outer rim of the plate solid black. You may want to switch to a brush and standard black heavy-body porcelain paint for this larger area to get smooth coverage. -
Let the lines cure:
This is crucial: let the black outlines dry completely before proceeding. Depending on your brand of outliner, this takes anywhere from 1 to 24 hours. If you rush this, the colors will smear.
Step 3: Adding Color
-
Mix the background wash:
To create the speckled, aged look on the uncolored petals, mix a tiny drop of beige paint with a little thinner or water. Dab this into the ‘white’ sections to give them a textured, stone-like appearance rather than stark white. -
Paint the yellow petals:
Using a small number 2 brush, load up your transparent golden yellow paint. Drop the paint into the center star-flower petals. I like to dab the paint rather than brush it, allowing it to pool slightly for that glass-like effect. -
Fill the teal sections:
Select the outer diamond shapes and the inner petal accents for your teal color. Apply the paint generously enough to cover brush strokes, but not so much that it spills over your black barrier lines. -
Add the terracotta accents:
Identify the small diamond shapes between the main petals. Fill these with your terracotta or reddish-brown paint to add warmth and contrast to the cool teal. -
Fill outer triangles:
Paint the remaining outer triangular sections with teal or a slightly darker shade of green to frame the central mandala. -
Create texture (Optional):
While the colored paint is still wet, you can lightly tap it with a dry brush or a piece of crumpled plastic wrap to create the subtle ‘mottled’ texture seen in the reference image.
Level Up: Crackle Effect
Apply a specialized ‘crackle medium’ over the dry colors before the final seal. This mimics the crazing found on antique pottery for a true vintage aesthetic.
Step 4: Finishing Touches
-
Check for gaps:
Hold the plate up to the light to check for pinholes where the paint didn’t cover the ceramic. Fill these in with tiny dots of color. -
Clean the edges:
If any paint went over the black rim, wipe it away quickly with a damp cotton swab or touch up the black rim after everything else is dry. -
Curing or baking:
Follow the instructions on your specific paint bottles. Some brands require air drying for 21 days to become dishwasher safe, while others need to be baked in a home oven at a low temperature (usually around 300°F/150°C) for 35 minutes.
Once baked and cured, your plate is ready to be displayed as a stunning piece of faux-stained glass art


Have a question or want to share your own experience? I'd love to hear from you in the comments below!