A plain plaster belly cast is basically a blank canvas with built-in curves—my favorite kind of painting challenge. Here are my go-to belly cast painting ideas to turn that bump mold into a meaningful pregnancy keepsake you’ll genuinely love seeing every day.
Handprints and Tiny Footprints
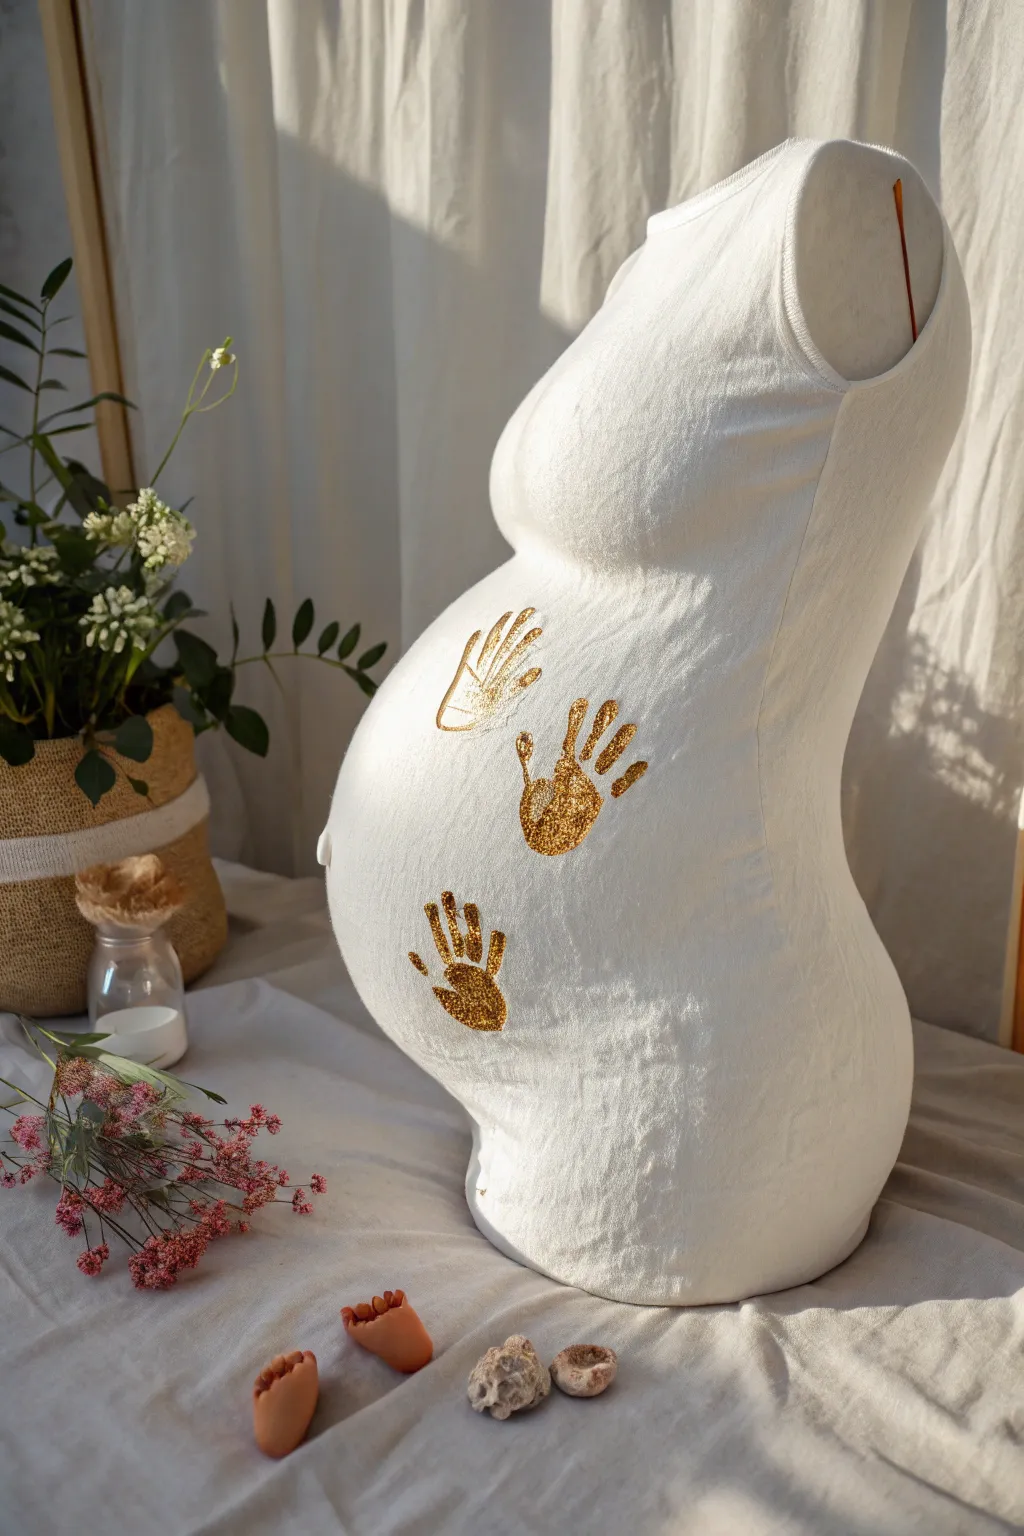
This elegant and minimalist design turns a simple white belly cast into a cherished family keepsake using shimmering gold leaf or glitter paint. The three handprints cascading down the curve of the belly represent a loving connection, creating a stunning piece of decor that radiates warmth and memory.
Step-by-Step Tutorial
Materials
- Prepared and primed white belly cast
- Gold leaf adhesive (sizing) or gold acrylic paint
- Gold leaf sheets or loose gold glitter (fine grain)
- Pencil
- Soft synthetic paintbrushes
- Dry stiff-bristled brush (for gold leaf removal)
- Gloss or satin clear sealant spray
- Disposable gloves
- Damp cloth
Step 1: Preparation and Planning
-
Surface check:
Ensure your belly cast is fully cured, sanded smooth, and primed with a clean coat of white gesso or acrylic paint. -
Dry run positioning:
Take a moment to visualize where you want the handprints. Hold your hand (or your partner’s and children’s hands) over the cast to find the most natural-looking arrangement. -
Marking placement:
Lightly mark the wrist position for three diagonal prints with a pencil: one near the top left, one in the center, and one lower down toward the right.
Clean Lines Hack
If you’re nervous about messy edges, trace your hand with a pencil first, then fill inside the lines with adhesive using a brush rather than stamping your hand directly.
Step 2: Creating the Handprints
-
Applying the adhesive:
If using gold leaf, paint a generous layer of sizing adhesive directly onto your palm and fingers. If using paint, apply a thick coat of gold acrylic instead. -
The first stamp:
Press your hand firmly onto the top marked spot of the cast. Rock your palm slightly to ensure the center touches the curved surface. -
Lifting carefully:
Peel your hand away slowly from the wrist up to avoids smudging the adhesive or paint outline. -
Repeat the process:
Clean your hand immediately, dry it, and re-apply fresh adhesive or paint for the second and third prints, following your diagonal path down the belly. -
Touch-ups:
Inspect the stamped adhesive. If the print looks patchy, use a small brush to fill in missing areas with more adhesive, keeping the hand shape natural. -
Setting time:
Let the adhesive sizing become tacky. This usually takes about 15 to 30 minutes depending on the brand; it should feel sticky but not wet.
Adhesive too Dry?
If the gold leaf isn’t sticking, the adhesive may have dried too much. Apply a very thin second coat of sizing to the patchy areas and wait for it to get tacky again.
Step 3: Adding the Gold
-
Applying gold leaf:
Gently lay a sheet of gold leaf over the tacky handprint area. Don’t worry if it cracks; just ensure the sticky parts are covered. -
Alternative: Glitter method:
If you are using glitter instead of leaf, generously sprinkle fine gold glitter over the tacky adhesive until the handprint is fully obscured. -
Pressing it down:
Use a soft, dry brush to gently pat the gold material into the adhesive, ensuring it adheres to every ridge of the handprint. -
Brushing away excess:
Once the adhesive is fully dry underneath, use a stiffer dry brush to vigorously sweep away the loose gold leaf or excess glitter. -
Refining edges:
Use a smaller brush to clean up the edges between the fingers, leaving a crisp, shimmering hand shape against the white background.
Step 4: Finishing and Display
-
Cleaning up:
Wipe the white areas of the cast with a slightly damp cloth to remove any stray gold dust or glitter particles. -
Sealing the work:
Take the cast to a well-ventilated area and spray a light, even coat of clear gloss or satin sealant to protect the gold from tarnishing. -
Final cure:
Allow the sealant to dry completely for 24 hours before handling or displaying your artwork. -
Optional embellishment:
For a complete scene like the inspiration photo, you can arrange small clay baby feet replicas or dried flowers at the base of your display.
Now you have a timeless memorial of your pregnancy journey that shines beautifully in the light


Butterflies and Vines
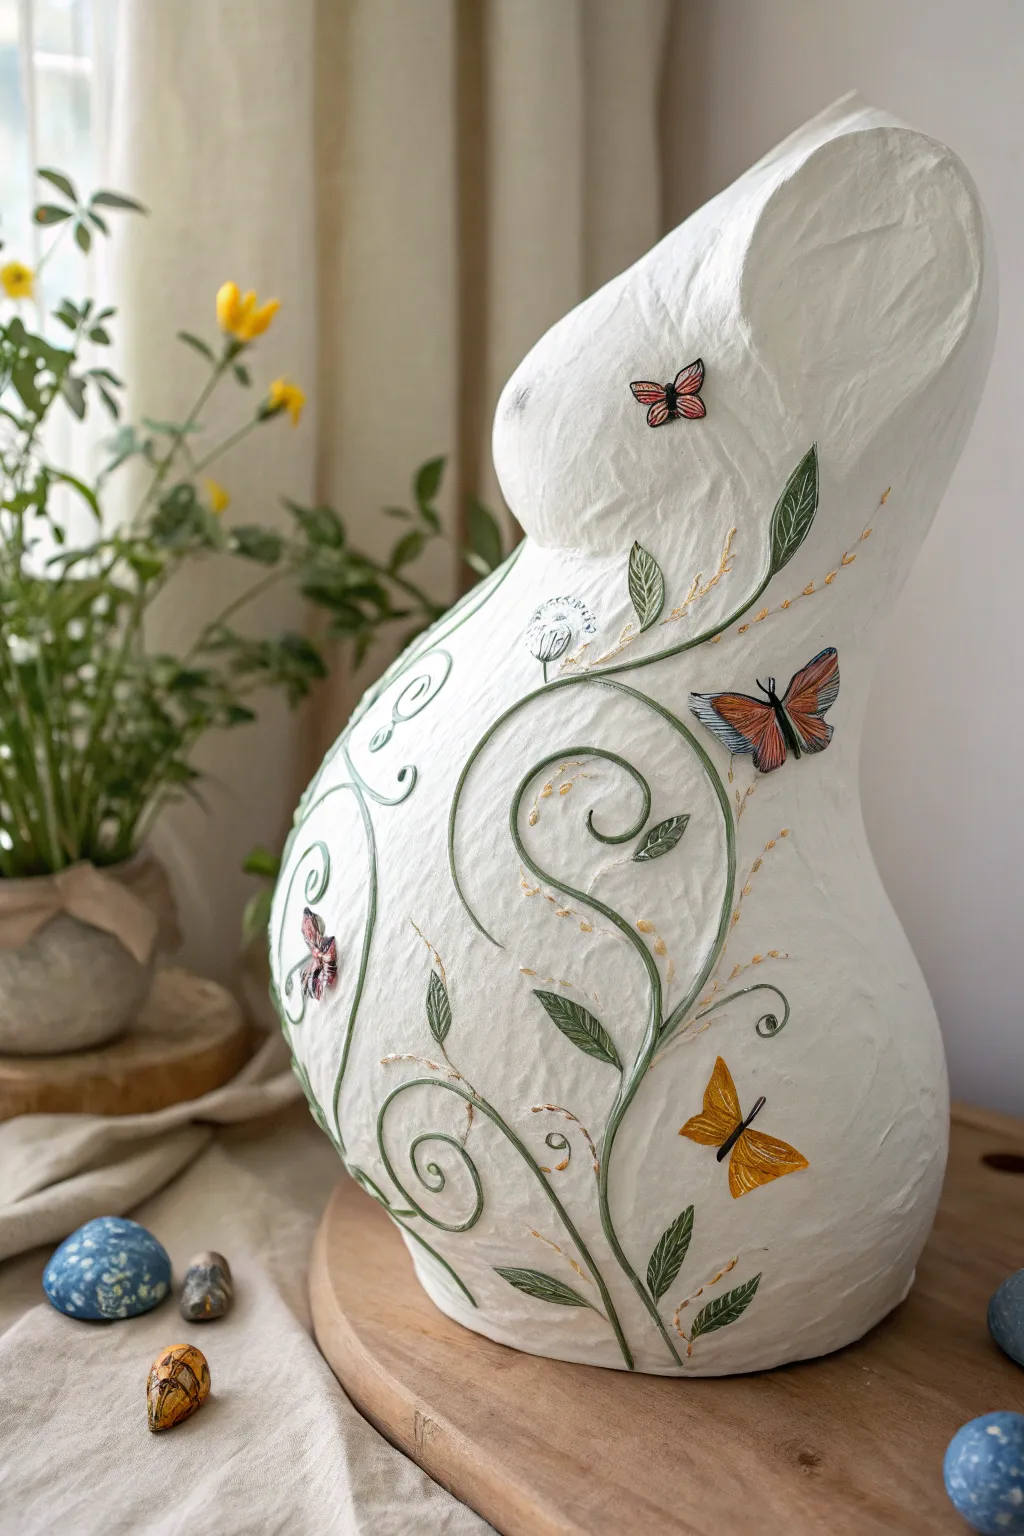
Transform a simple belly cast into an enchanted garden sculpture using raised textures and delicate painting techniques. This elegant design features swirling vines and fluttering butterflies that seem to lift right off the surface, creating a beautiful keepsake full of movement and life.
How-To Guide
Materials
- Prepared white plaster belly cast (sanded smooth)
- White gesso or acrylic primer
- Paper clay or modeling paste (for vine relief)
- Puffy paint or 3D fabric paint (alternative for vines)
- Acrylic paints (olive green, forest green, muted orange, red, black, yellow, white)
- Fine detail brushes (sizes 00, 0, and 2)
- Matte or satin varnish
- Pencil
- Sculpting tools or toothpick
- Gold metallic paint or pen (for accents)
Step 1: Preparation and Sketching
-
Prime the Surface:
Ensure your cast is fully dry and sanded. Apply two coats of white gesso to seal the plaster and create a unified, bright white canvas. Let the first coat dry completely before adding the second. -
Plan the Flow:
Lightly sketch your design with a pencil. Start with a large S-curve that moves from the bottom hip area up towards the opposite side of the chest. -
Add Secondary Vines:
Branch off from your main curve with smaller spirals and tendrils. Keep them loose and organic looking, rather than perfectly symmetrical. -
Place the Butterflies:
Sketch outline placements for three to four butterflies. Position them as if they are interacting with the vines or fluttering upwards.
Clay Cracking?
If your paper clay vines crack while drying, mix a tiny bit of water into fresh clay to make a paste and fill the cracks, then sand smooth once dry.
Step 2: Creating Texture
-
Sculpt the Vines:
Roll very thin snakes of paper clay or texturing paste. Carefully press these along your pencil lines to create raised vines. Alternatively, pipe the lines using a bottle of 3D puffy paint for a smoother finish. -
Shape the Leaves:
Form small teardrop shapes from your clay and press them onto the vines. Use a sculpting tool or toothpick to press a center vein into each leaf for added realism. -
Butterfly Bodies:
Build up the bodies of the butterflies slightly with your texturing medium so they aren’t flat against the cast. -
Dry Time:
Allow all the textured elements to dry completely. If you used paper clay, this might take overnight; puffy paint usually needs 4-6 hours.
Level Up: Paper Wings
Instead of painting the butterflies directly on the cast, paint them on stiff watercolor paper, cut them out, and glue only the bodies down for 3D wings.
Step 3: Painting the Details
-
Base Coat the Vines:
Using a size 2 brush, paint the raised vines in a soft olive green. Don’t worry about perfect coverage yet; a little white showing through adds depth. -
Leaf Detailing:
Paint the leaves with a darker forest green, focusing on the outer edges or the veins to create contrast against the lighter vine stems. -
Butterfly Wings – Base:
Block in the butterfly wing colors. For the monarch style, use a muted orange fading into yellow near the body. For the smaller ones, try soft pinks or reds. -
Butterfly Patterns:
Once the wing color is dry, use your finest 00 brush and black acrylic to paint the veins and wing edges. Keep your hand steady and your paint fluid. -
Highlights:
Add tiny white dots to the black edges of the butterfly wings. I find this simple step instantly brings the insects to life.
Step 4: Finishing Touches
-
Gold Accents:
Using gold paint or a metallic pen, draw wispy, floating sprigs and tiny dots around the main vines to simulate pollen or magic dust. -
Shadowing:
Mix a very watery grey wash. Paint a thin line along one side of the raised vines and leaves to enhance the 3D effect and cast a subtle shadow. -
Seal the Work:
Apply a protective coat of matte or satin varnish over the entire cast. This protects the plaster and unifies the sheen of the different paints.
Display your botanical masterpiece on a stand or hang it on the nursery wall to cherish this beautiful moment in time


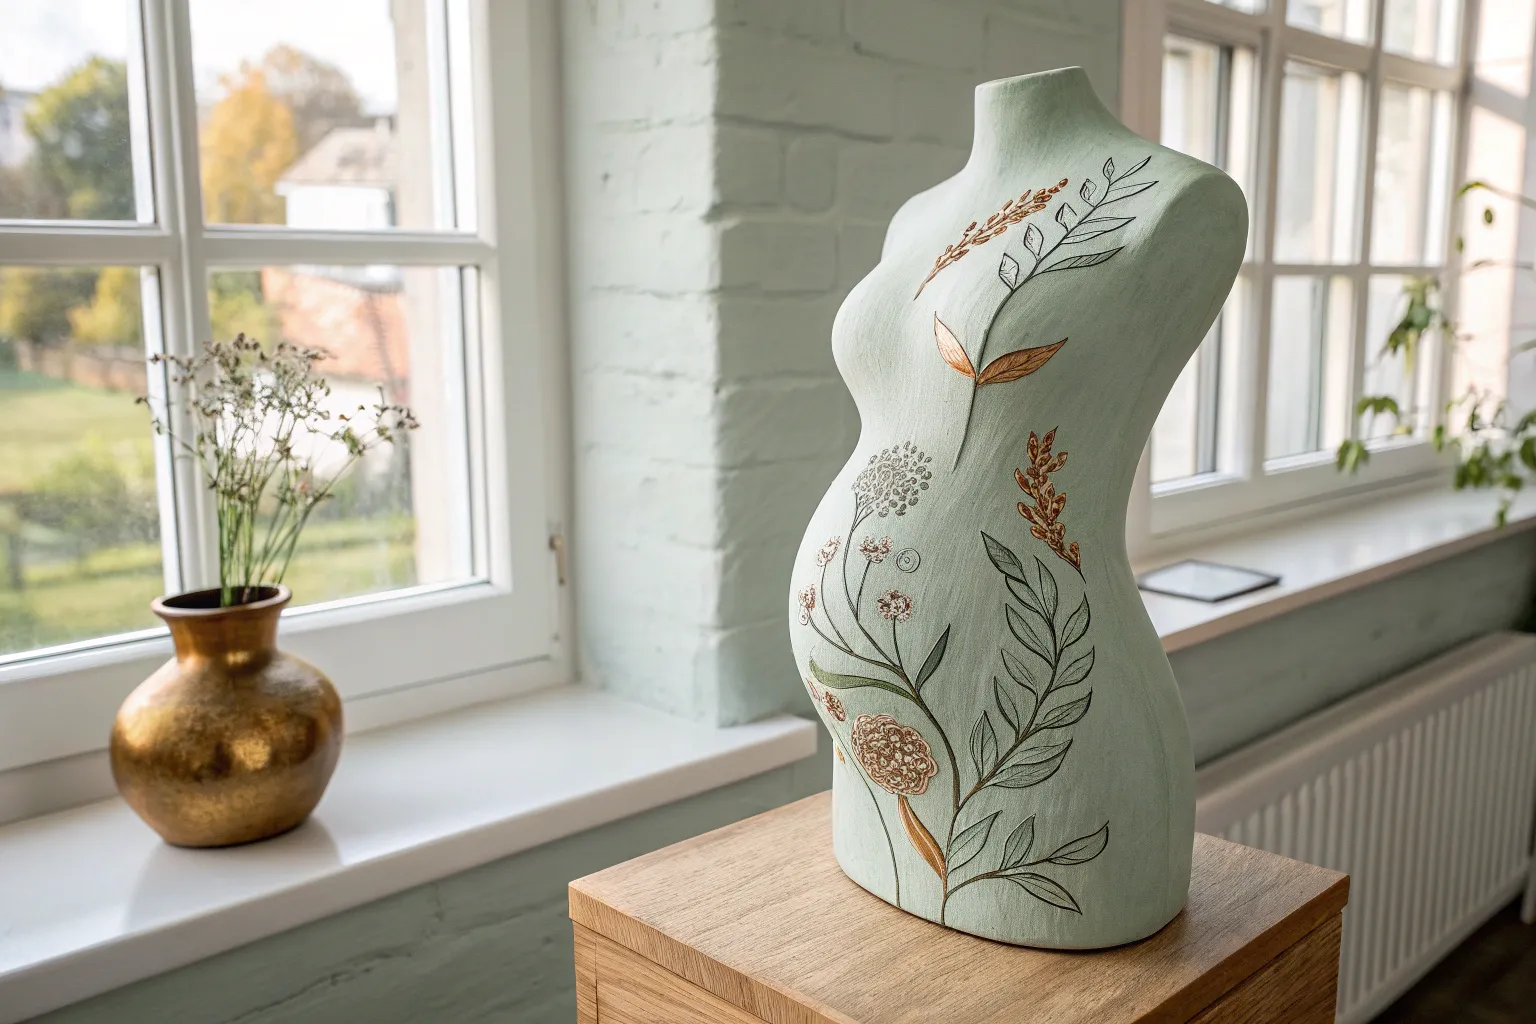
Faux Ceramic Blue-and-White Pattern
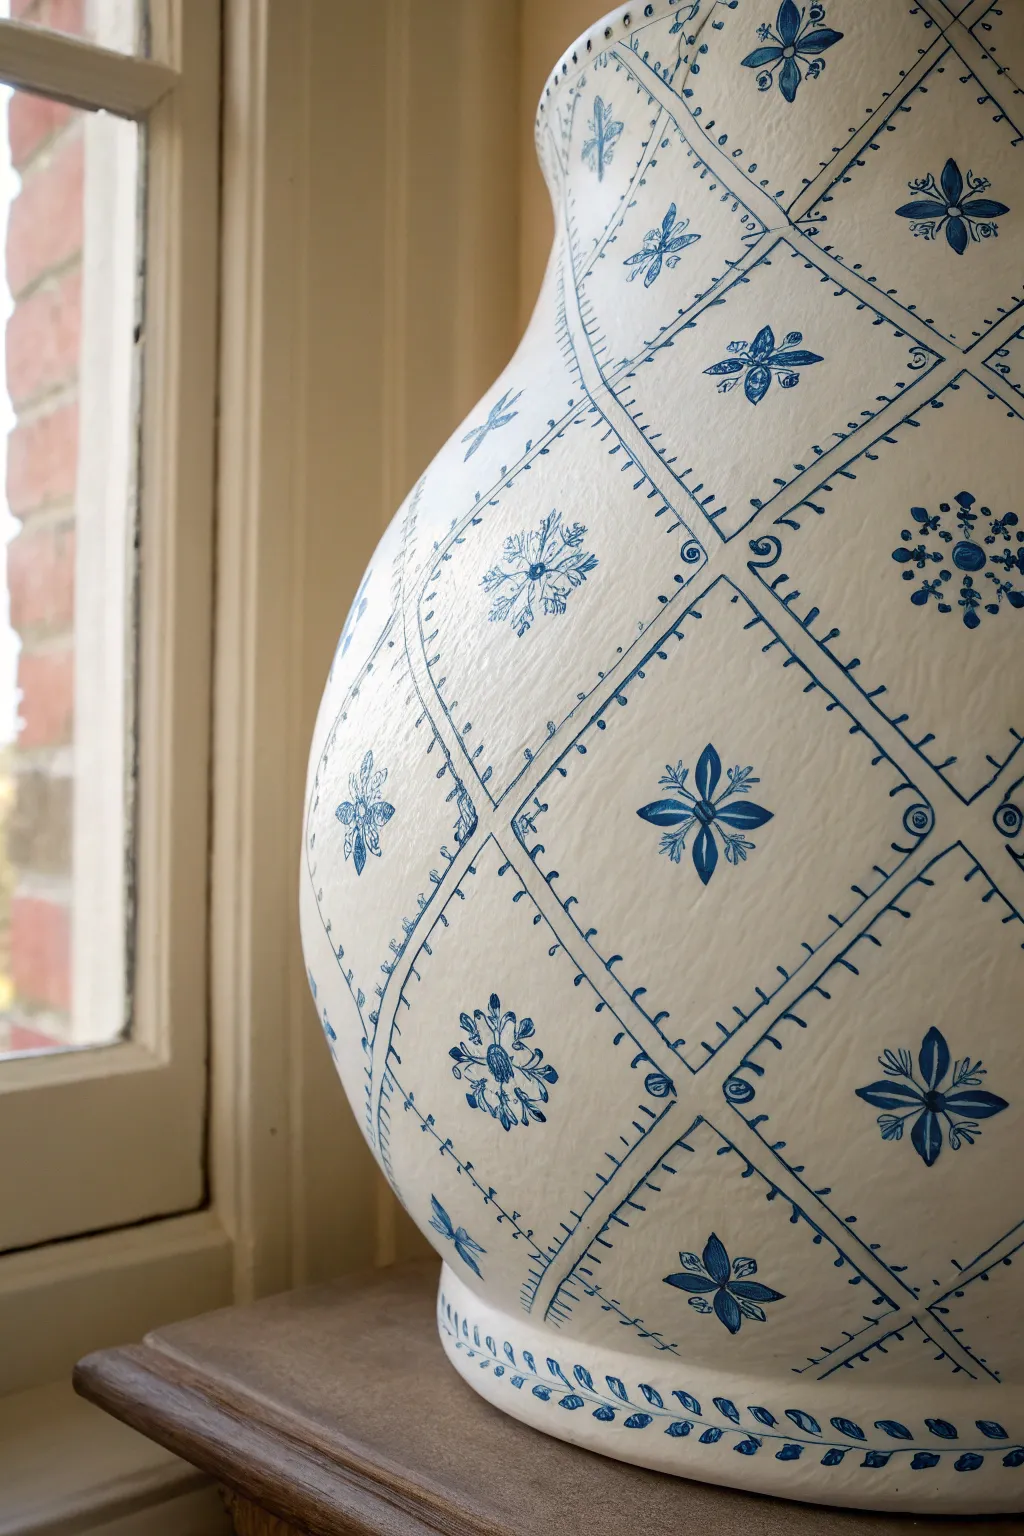
Transform a simple belly cast into a stunning piece of faux pottery with this classic blue-and-white design. By creating a grid of geometric florals and stitched borders, you can achieve the timeless elegance of Dutch Delftware or Mediterranean ceramics.
Step-by-Step Tutorial
Materials
- Finished and dried belly cast (plaster gauze)
- Gesso or white acrylic primer
- Sandpaper (fine grit)
- White acrylic paint (matte or eggshell finish)
- Cobalt blue acrylic paint
- Navy blue acrylic paint (optional, for depth)
- Flexible sewing tape measure
- Pencil
- Fine liner brush (size 0 or 00)
- Small round brush (size 2)
- Matte spray varnish
Step 1: Preparation & Base Coat
-
Surface Prep:
Begin by lightly sanding your dried plaster belly cast to smooth out the roughest ridges of the gauze strips. Don’t worry about getting it perfectly glass-smooth; a little texture mimics the feel of hand-thrown pottery. -
Prime the Cast:
Apply a generous coat of Gesso over the entire exterior. This seals the plaster and provides a bright, uniform surface for your painting. -
Apply the White Base:
Once the primer is dry, paint the entire cast with two coats of white acrylic paint. I prefer using an eggshell finish here because it has a slight sheen that resembles bisqueware without being too glossy. -
Dry Time:
Allow the base coat to cure fully for at least 24 hours. A completely dry surface is crucial for the pencil measuring step.
Step 2: Drafting the Design
-
Find the Center:
Using your flexible measuring tape, locate the vertical center line of the belly cast and mark it lightly with a pencil. -
Mark the Grid Points:
Starting from the center, measure and mark points every 2-3 inches diagonally to create a diamond lattice pattern. Keep your measurements consistent so the diamonds remain uniform in size. -
Connect the Dots:
Lightly sketch the connecting lines between your points to form the full diamond grid. The lines will curve naturally with the shape of the cast, which adds to the 3D vase illusion. -
Plan the Motifs:
Sketch a simple floral or starburst design in the center of every other diamond. Alternating the filled diamonds with empty ones prevents the pattern from looking too cluttered.
Wobbly Lines?
If your brushstrokes are shaky, try resting your pinky finger on a dry part of the cast for stability. Thinning your paint slightly with water also helps lines flow smoother.
Step 3: Painting the Details
-
Line the Diamonds:
Using a fine liner brush and cobalt blue paint mixed with a tiny drop of water for flow, paint over your pencil grid lines. Keep your hand steady but relaxed. -
Create the Stitch Border:
Paint a second, parallel line inside each diamond shape, about 1/8th of an inch away from the main grid line. -
Add Cross-Hatching:
Between the two parallel blue lines, paint tiny perpendicular ticks or ‘stitch’ marks. This detail creates the ornate border effect seen in the reference image. -
Paint the Starbursts:
For the snowflake-like designs, start with a central dot using your small round brush. Paint four main petals extending outward (top, bottom, left, right). -
Add Diagonals:
Paint four smaller, thinner petals diagonally between the main four petals. -
Detail the Florals:
On the simpler floral motifs, use a ‘press and lift’ motion with your round brush to create teardrop-shaped leaves radiating from the center. -
Decorate the Corners:
In the corners where the diamonds meet, add a small blue dot or a tiny circle to anchor the grid visually. -
Rim Decoration:
Finish the bottom and top edges of the cast with a simple repeating leaf or vine pattern to frame the artwork. -
Erase and Seal:
Once the paint is completely dry (wait overnight), gently erase any remaining visible pencil marks. Spray the entire cast with a matte varnish to protect your intricate work.
Classic Pottery Vibe
To get that authentic Delftware look, don’t mix your blue completely uniform. Let some brushstrokes carry more pigment than others for a natural, hand-painted variation.
Display your beautiful new sculpture on a shelf or wall to celebrate this special moment in time


Metallic Accents With Gold Leaf Touches
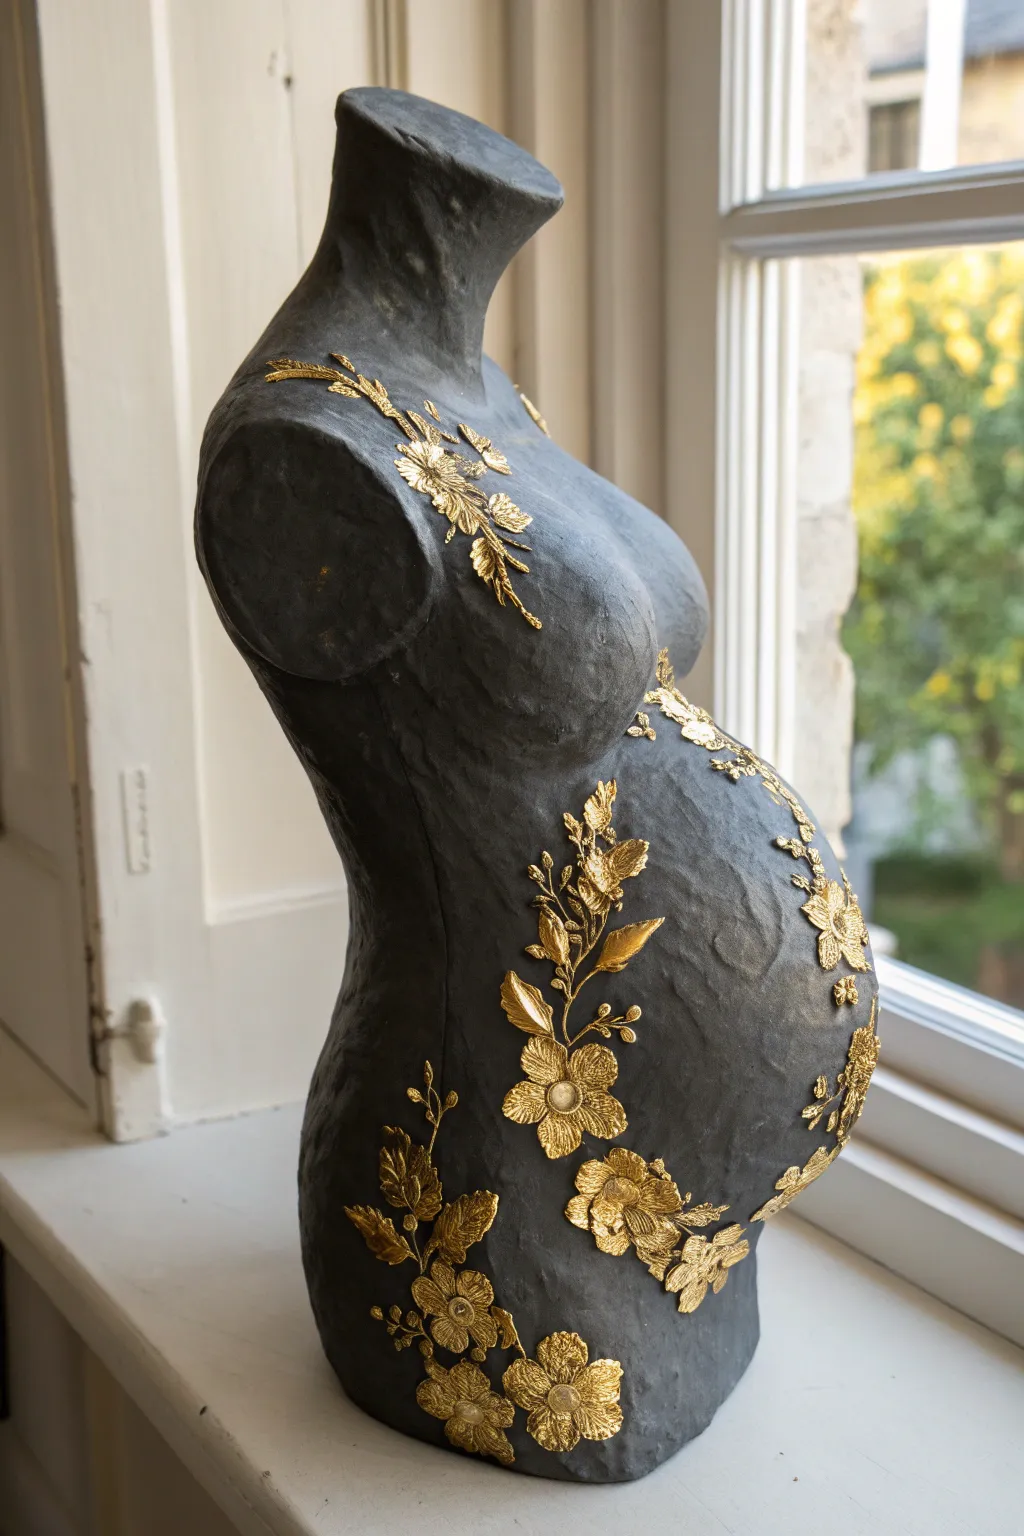
Transform a belly cast into a piece of modern art with this stunning high-contrast design. By combining a deep, chalky matte black base with raised, metallic floral vines, you create an elegant and timeless keepsake.
Step-by-Step Guide
Materials
- Prepared belly cast (sanded)
- Black gesso or matte black acrylic paint
- Wide flat paintbrush
- Heavy-texture floral lace or embroidered appliqué trim (gold or white)
- Mod Podge or strong craft glue (if using lace without adhesive)
- Gold leaf sheets
- Gold leaf adhesive (sizing)
- Gold leaf sealer (optional)
- Two soft paintbrushes (one for glue, one for leaf)
- Stiff bristle brush (for burnishing)
- Metallic gold acrylic paint (for touch-ups)
- Matte spray varnish
Step 1: Base Preparation
-
Finish sanding:
Ensure your cast is completely smooth. Any bumps will show up clearly against the matte black finish, so take a little extra time here to sand down rough plaster edges. -
Prime the surface:
Apply a coat of black gesso or matte black acrylic paint to the entire exterior. Use a wide flat brush to minimize visible strokes and let it dry completely. -
Apply a second coat:
Paint a second layer of black to ensure full, opaque coverage. The goal is a deep, velvety finish that absorbs light. -
Seal the matte:
Once the paint is bone dry, spray the entire cast with a matte varnish. This protects the dark paint from fingerprints during the gilding process.
Clean Lines Pro Tip
Can’t find thick lace? Use a hot glue gun to draw the vine pattern directly on the cast. Once hard, paint it black and apply gold leaf for a similar 3D effect.
Step 2: Applying the Relief Design
-
Select your trimming:
Choose lace or embroidered appliqués that have a distinct floral vine pattern. Look for pieces with a raised texture, as this will hold the gold leaf beautifully. -
Map the layout:
Cut your lace or trim into individual vines and flowers. Dry-fit them onto the cast, creating two main focal points: one trailing down from the shoulder and another curving up the side of the belly. -
Adhere the texture:
Thoroughly coat the back of your lace pieces with Mod Podge or strong craft glue. Press them firmly onto the painted cast. -
Secure edges:
Pay close attention to the edges of the lace flowers. Use a smaller brush to dab extra glue under any lifting petals to ensure flush contact with the cast. -
Dry completely:
Allow the glue to cure fully. The lace needs to be stiff and immovable before you start the gilding process.
Level Up: Antique Look
For a vintage vibe, lightly brush a dark brown antique wax over the gold leaf once it’s dry. It settles into the lace crevices, making the gold look aged.
Step 3: Applying Gold Leaf
-
Apply sizing:
Using a small, soft brush, paint the gold leaf adhesive (sizing) carefully over the surface of the lace appliqués. Avoid getting too much on the black background. -
Wait for tackiness:
Let the adhesive sit until it becomes tacky but not wet. Consult your specific brand’s instructions, but this usually takes 15-30 minutes. -
Place the leaf:
Gently lay a sheet of gold leaf over the tacky lace areas. Don’t worry if it cracks or wrinkles; that adds to the textured look. -
Press into crevices:
Use a dry, soft brush to gently tamp the gold leaf down, pushing it into the weave and patterns of the lace embroidery. -
Brush away excess:
Once covered, take a stiff bristle brush and vigorously brush over the gilded areas. This will flake off the excess leaf that isn’t stuck to the adhesive. -
Refine the edges:
Continue brushing until the sharp edges of the lace pattern are revealed and the loose gold dust is removed from the black background.
Step 4: Finishing Touches
-
Clean up the background:
If any gold leaf stuck to the black paint where you didn’t want it, use a tiny bit of black paint to cover those mistakes. -
Enhance highlights:
I prefer to take a tiny detail brush with metallic gold acrylic paint and add small dots or highlights to the center of the flowers for extra dimension. -
Seal the gilding:
Apply a specialized gold leaf sealer or a thin coat of gloss varnish just over the golden areas to prevent tarnishing over time.
Display your masterpiece in a prominent spot where the natural light can catch distinct shimmer of the gold vines
BRUSH GUIDE
The Right Brush for Every Stroke
From clean lines to bold texture — master brush choice, stroke control, and essential techniques.
Explore the Full Guide
3D Paper Flowers and Painted Base
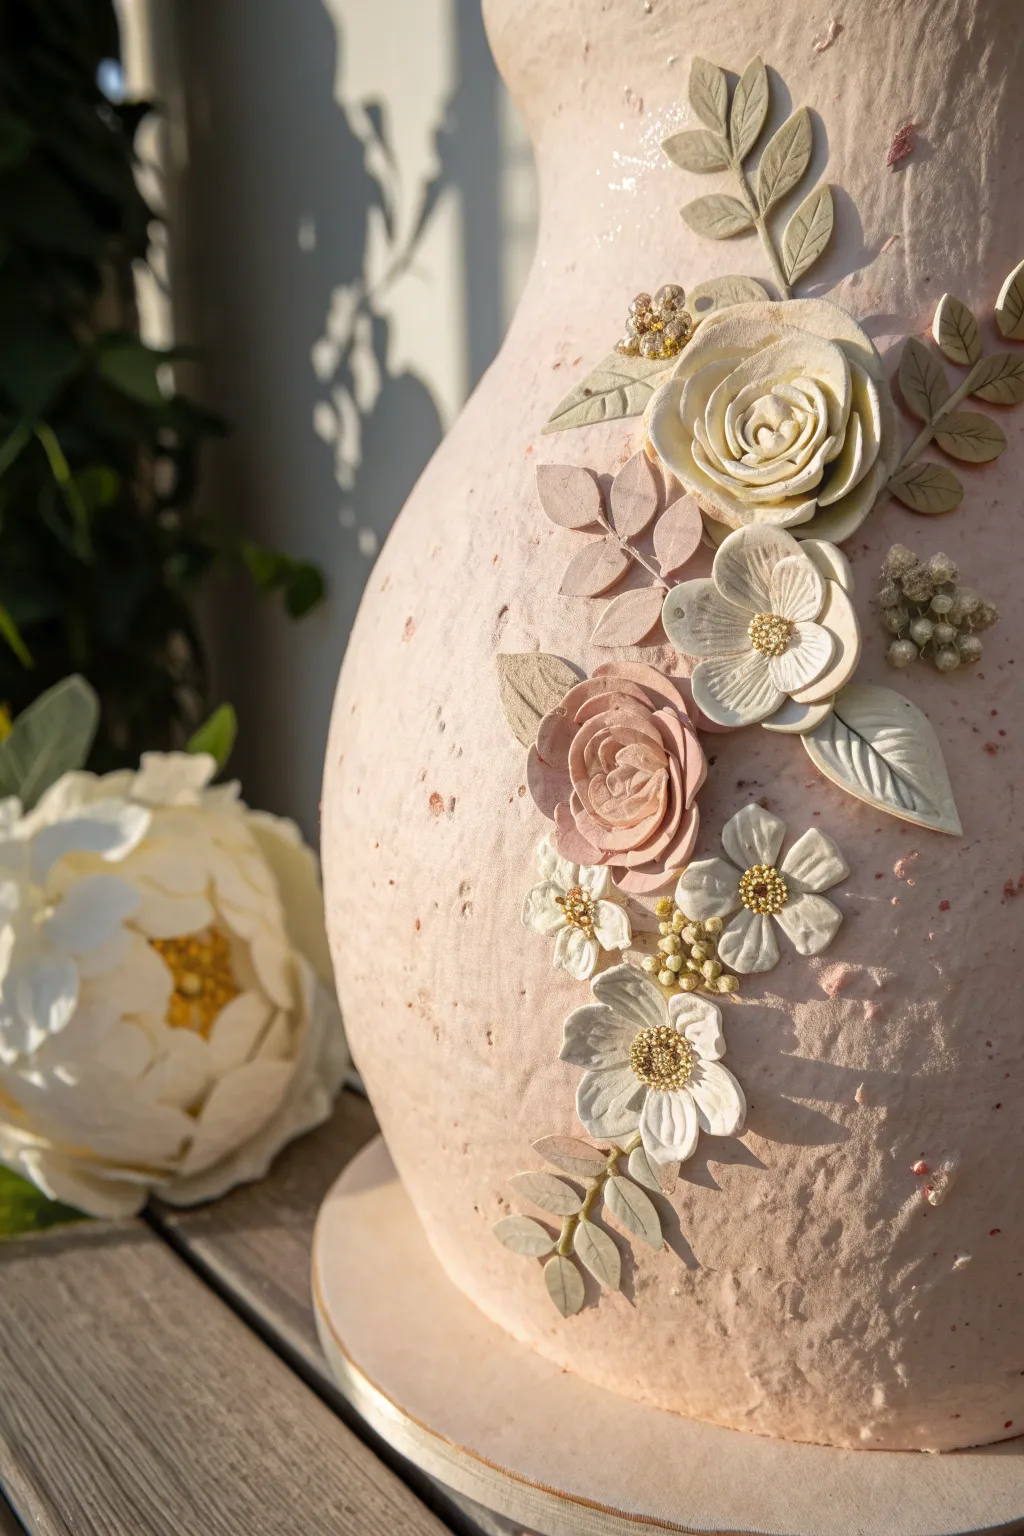
This project transforms a simple belly cast into a sculptural masterpiece featuring a unique, textured stone-like finish and delicate 3D floral appliqués. The soft blush tones and metallic gold accents create a timeless keepsake that celebrates maternity with sophistication.
Step-by-Step
Materials
- Plaster belly cast (cured and dry)
- Gesso primer
- Coarse texture medium (or sand mixed with acrylic paint)
- Blush pink acrylic paint
- Soft peach acrylic paint
- Heavyweight cardstock (cream, white, dusty rose, olive green)
- Flower shaping tools (ball stylus, foam mat)
- Small gold beads or seed beads
- Craft glue or hot glue gun
- Matte spray sealant
- Scissors or cutting machine
- Wide flat paintbrush
- Small detail paintbrush
Step 1: Creating the Textured Base
-
Prime the surface:
Begin by applying a generous coat of Gesso over the entire dry belly cast to seal the plaster and create a consistent working surface. -
Mix the texture:
In a mixing bowl, combine the blush pink acrylic paint with a coarse texture medium. If you don’t have texture medium, mixing clean fine sand into the paint works beautifully to achieve that organic, stone-like feel. -
Apply the base coat:
Using a wide flat brush, stipple the textured paint onto the cast. Instead of brushing back and forth, use an up-and-down dabbing motion to enhance the roughness and avoid distinct brush strokes. -
Add dimension:
While the base is still slightly tacky, lightly dab a very small amount of the soft peach paint onto random high points of the cast to create subtle color variation and depth. -
Let it cure:
Allow the painted cast to dry completely, preferably overnight, as the textured layers can be thick and hold moisture longer than standard paint.
Glue Not Sticking?
Textured surfaces can be tricky for adhesion. Try using a thick gel medium or heavy-body acrylic paint as ‘glue’ for the flowers, or use a high-temp hot glue gun.
Step 2: Crafting the Floral Appliqués
-
Cut the petals:
Cut your cardstock into various flower shapes. You’ll need five-petal shapes for the flat flowers and spiral shapes or individual petals for the roses. Use a mix of cream and dusty rose paper. -
Shape the leaves:
Cut leaf shapes from the olive green and cream cardstock. Using the edge of your scissors or a scoring tool, gently score a vein down the center of each leaf. -
Form the roses:
For the roses, roll your spiral cut paper tightly from the outside in, securing the base with a dab of glue. Gently fold back the outer petals to open the bloom. -
Sculpt the open flowers:
Place your flat flower cutouts on a foam mat. I find that pressing a ball stylus into the center of the bloom causes the petals to curl upward naturally, giving them a lifelike 3D effect. -
Add metallic centers:
Apply a drop of clear drying glue to the center of the open flowers. Carefully sprinkle gold seed beads into the glue or place a cluster of pre-made gold stamens for a touch of sparkle.
Step 3: Assembly and Finishing
-
Plan the composition:
Before gluing, lay your flowers and leaves onto the cast to determine the best arrangement. A cascading curve that follows the natural shape of the belly usually looks most elegant. -
Attach the foliage:
Glue the leaves down first to serve as the background layer. Allow some leaves to curl away from the surface slightly to maintain the 3D effect. -
Secure the blooms:
Glue the largest flowers in place first as focal points, then fill in the gaps with the smaller buds and filler flowers. -
Add final details:
If you have extra gold beads, glue a few tiny clusters directly onto the textured cast surface near the flowers to mimic scattered pollen or dewdrops. -
Seal the artwork:
Once everything is dry and secure, finish with a very light mist of matte spray sealant to protect the paper from humidity and dust without ruining the texture.
Soften the Paper
Lightly mist your cardstock with water before shaping with the stylus. This breaks the paper fibers, allowing for deeper curves without creasing or tearing.
Step back and admire how the rugged texture perfectly complements the delicate paper blooms you have created


Have a question or want to share your own experience? I'd love to hear from you in the comments below!