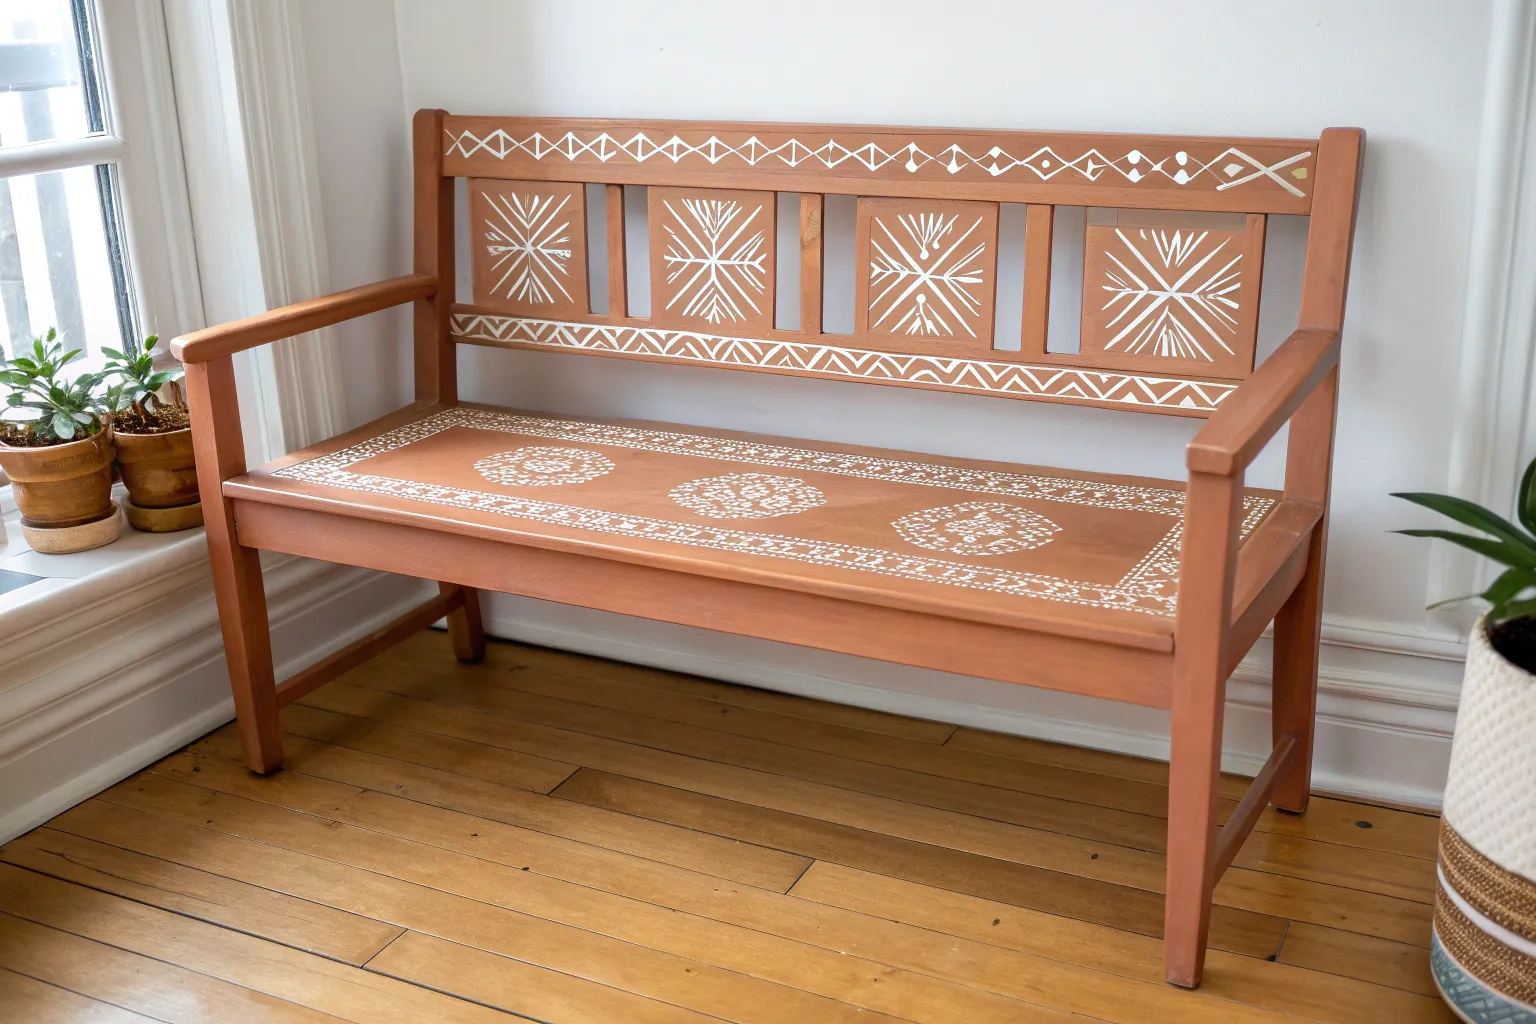
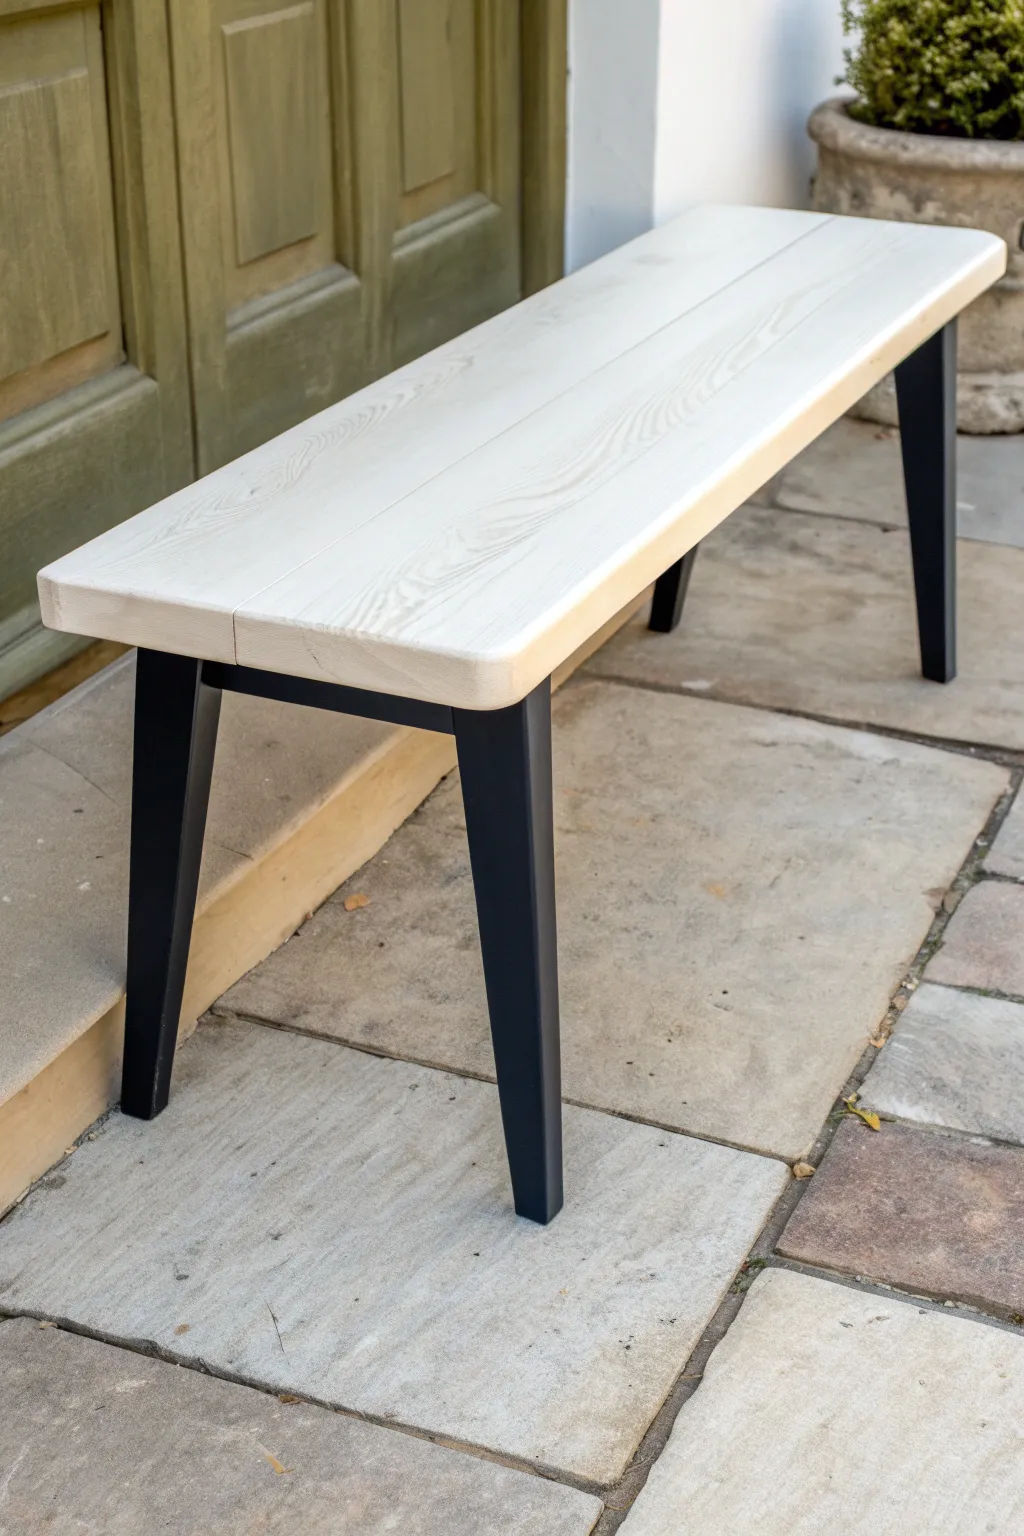
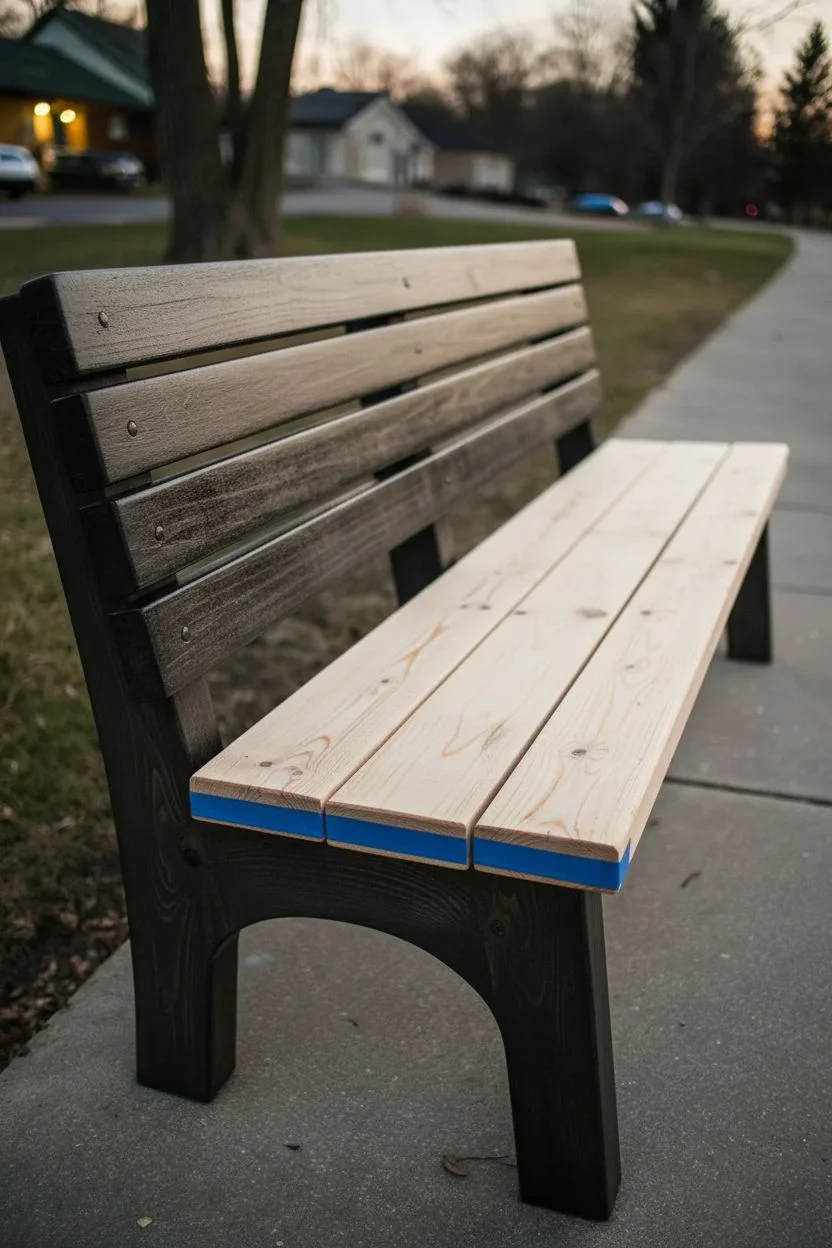
A bench is one of my favorite pieces to paint because it’s functional, visible, and basically begging to become a little piece of art. If you’re craving a quick refresh or a full-on statement, these bench painting ideas will get your creativity moving fast.
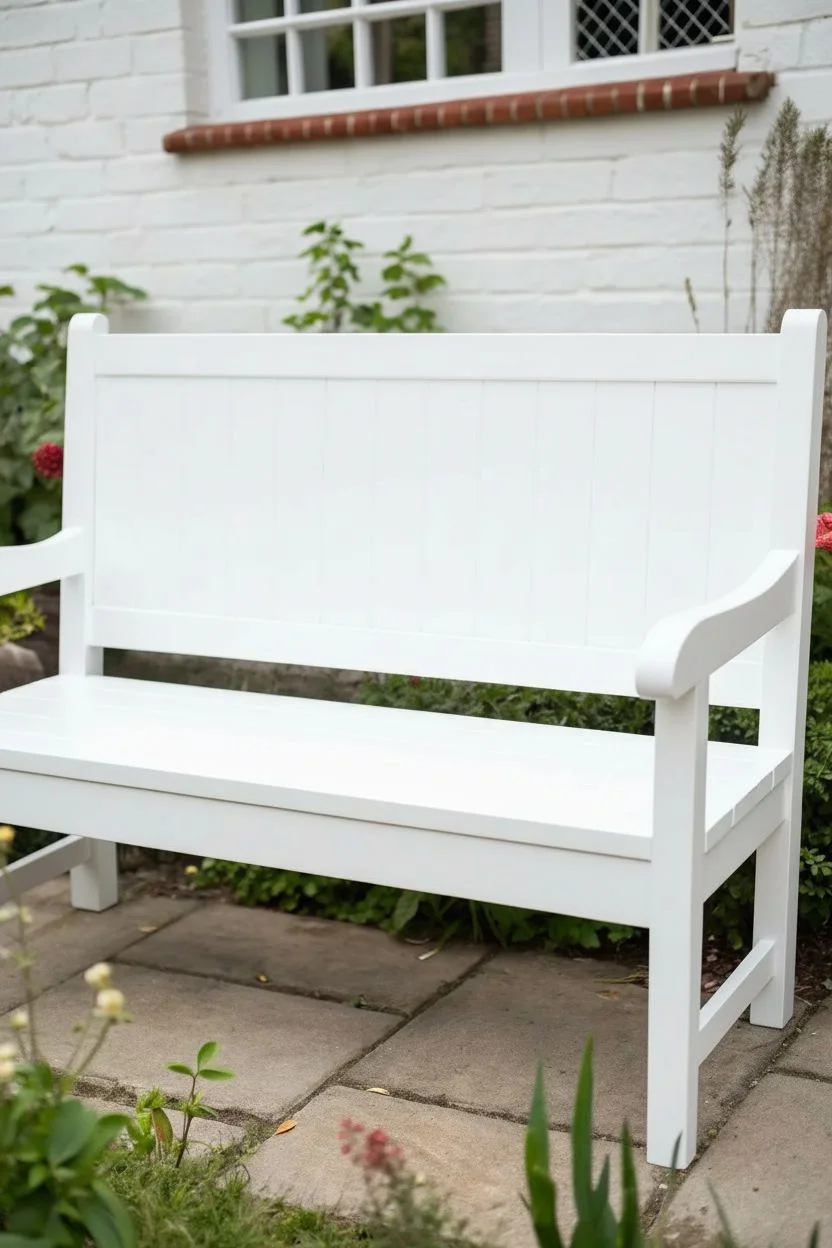
Solid Color Statement Bench
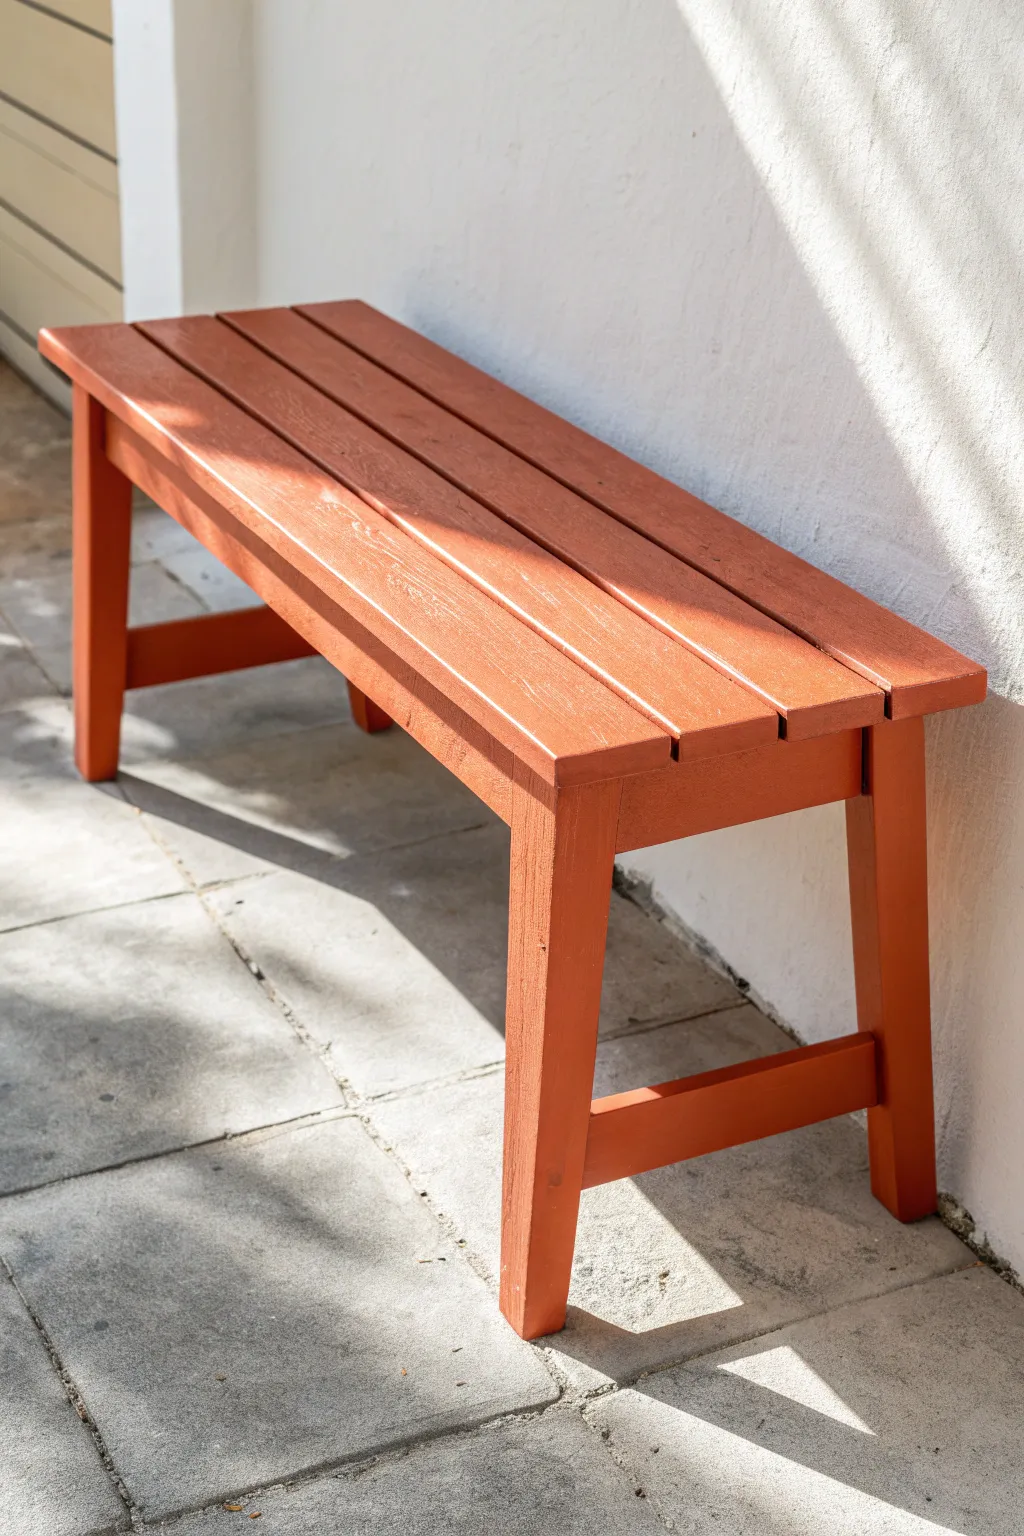
Warm hues like this vibrant terracotta can instantly turn a simple wooden bench into a welcoming focal point for any patio or entryway. This project focuses on achieving a smooth, solid finish that stands up to the elements while offering a bold pop of color against neutral walls.
Step-by-Step Tutorial
Materials
- Wooden bench (slatted style preferred)
- Sandpaper (80, 150, and 220-grit)
- Orbital sander (optional but recommended)
- Tack cloth or microfiber rags
- Exterior wood primer
- Exterior semi-gloss paint (Terracotta or Burnt Orange)
- 2-inch angled synthetic brush
- 4-inch foam roller and tray
- Drop cloth or plastic sheeting
- Painter’s tape
- Wood filler (for repairs)
- Screwdriver (if disassembly is needed)
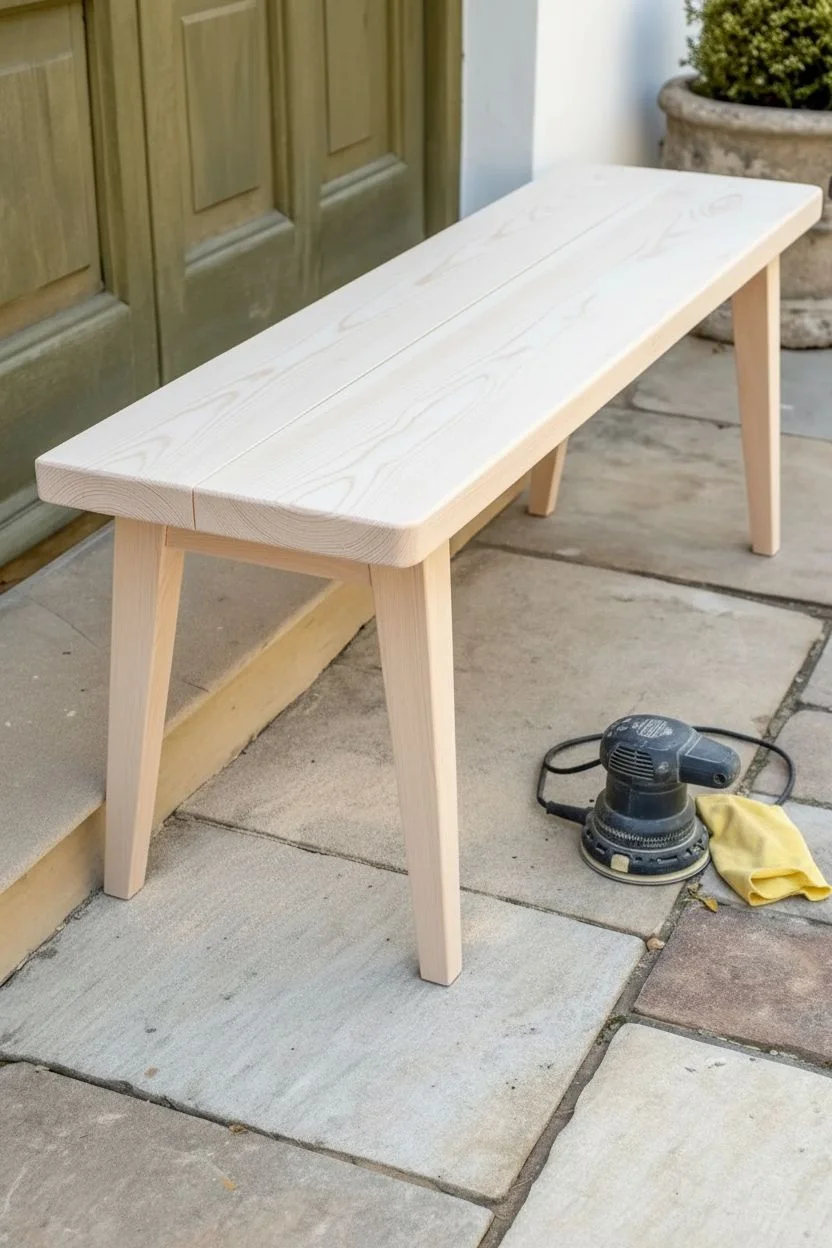
Step 1: Preparation & Repairs
-
Assess the surface:
Begin by inspecting your bench for any loose screws, nails, or rough splinters. If the bench is old, check for rot; if it’s new unfinished wood, ensure it is dry and clean. -
Tighten hardware:
Use a screwdriver or wrench to tighten any wobbly legs or loose slats. A stable base is crucial before you start adding layers of paint. -
Fill imperfections:
If you find deep gouges or nail holes, press a small amount of wood filler into them. Smooth it over with a putty knife and let it dry completely according to the package instructions. -
Rough sanding:
Start with 80-grit sandpaper to remove any old peeling paint or to break the seal of a previous glossy finish. Since this bench has many flat slats, an orbital sander saves a lot of time here. -
Smooth things out:
Switch to 150-grit sandpaper to smooth out the roughness from the first pass. This stage is about creating a texture that feels nice to the touch and accepts primer well. -
Clean the dust:
Wipe the entire bench down thoroughly with a tack cloth. Sawdust is the enemy of a smooth finish, so I like to be extra diligent here to ensure no particles are left behind.
Brush Maintenance Tip
Wrap your wet brush and roller tightly in a plastic grocery bag or foil between coats. This keeps the paint from drying out so you don’t have to wash your tools during the drying break.
Step 2: Priming for Durability
-
Apply the primer:
Coat the entire bench with a high-quality exterior wood primer. Use a brush to get into the gaps between the slats and the corners where the legs meet the seat. -
Check for drips:
As you prime, keep a close eye on the underside of the slats and the legs. Smooth out any drips immediately with your brush to prevent unsightly bumps later. -
Let it cure:
Allow the primer to dry fully. This usually takes just a few hours, but check your can’s label. A dry surface ensures the topcoat bonds properly. -
Light sanding:
Once the primer is dry, lightly scuff the surface with fine 220-grit sandpaper. This knocks down any raised grain and ensures a professional-grade smoothness.
Make It Yours
For a modern twist, dip the bottom 3 inches of each leg in gold or metallic bronze paint after the main color dries. It adds a subtle, chic detail usually only seen on high-end furniture.
Step 3: Painting the Statement Color
-
Flip and start underneath:
Turn the bench upside down on your drop cloth. Start painting the undersides of the slats and the inside of the legs first. This ensures no missed spots are visible from low angles. -
Paint the legs:
Flip the bench right-side up. Using the brush, paint the legs and the support braces. Long, vertical strokes work best here to minimize brush marks. -
Painting the slats:
For the top slats, you can use a small foam roller for speed on the flat surfaces, then immediately follow up with a brush to smooth the texture (a technique called back-brushing). -
Focus on the gaps:
Turn your brush vertically to push paint into the gaps between the seat slats. Do this carefully to avoid heavy drips running down the sides. -
First coat drying time:
Let this first coat of terracotta paint dry for at least 4-6 hours. It might look a little patchy or streaky at this stage, but don’t worry, the second coat will fix it. -
Apply the second coat:
Repeat the painting process for a second coat. This layer provides the true depth of color and the protective shell needed for outdoor furniture. -
Final inspection:
While the paint is still wet, do one last check for runs or drips, especially around the edges of the slats. Smooth them out gently with the tip of your brush. -
Full cure:
Let the bench cure for at least 24 to 48 hours before placing it in direct sunlight or sitting on it to prevent the paint from feeling tacky.
Place your newly painted bench in a sunny spot and enjoy the warm, vibrant energy it brings to your outdoor space


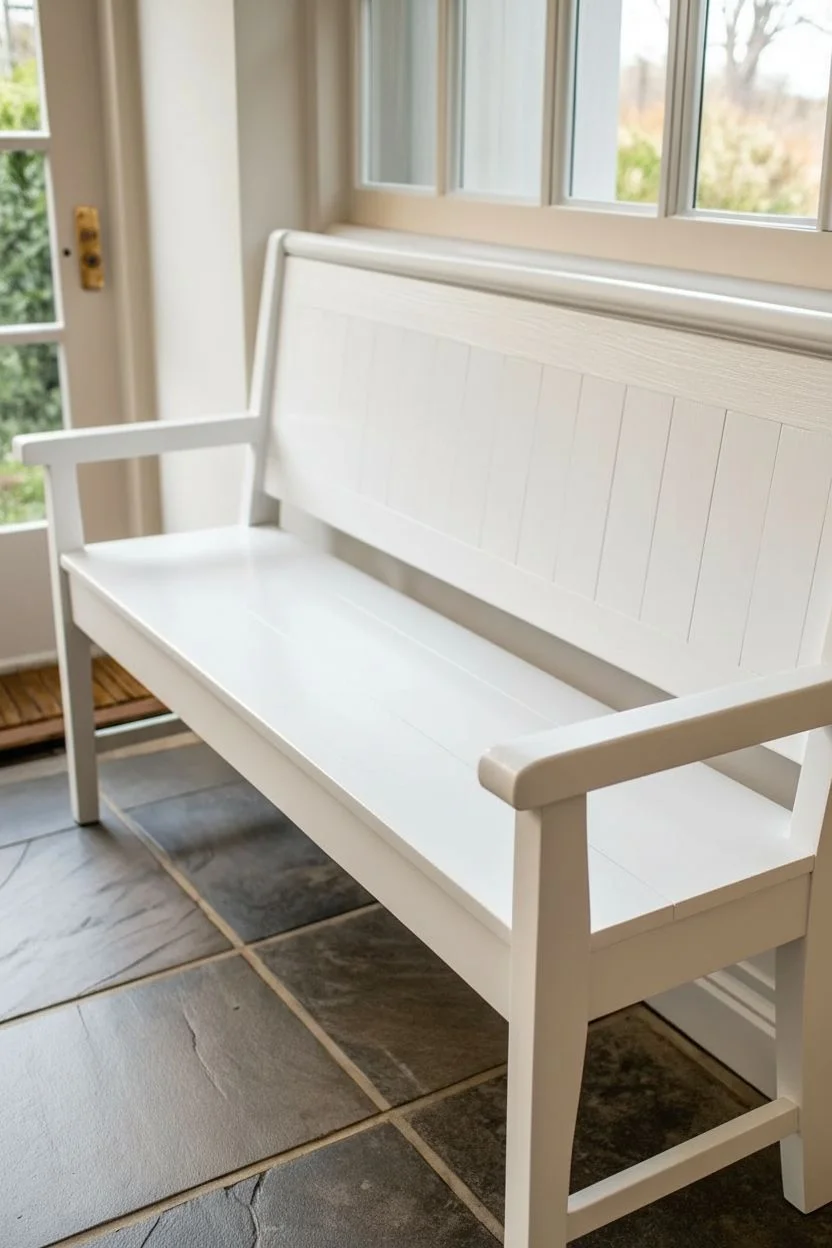
Two-Tone Seat and Legs
Achieve a sleek, contemporary look by combining a soft whitewashed seat with striking matte black legs. This two-tone finish highlights the natural wood grain on top while grounding the piece with a bold, modern base.
Step-by-Step Guide
Materials
- Wooden bench (unfinished or sanded down)
- White or off-white water-based wood stain
- Matte black outdoor paint (exterior latex or mineral paint)
- Exterior clear matte topcoat (polyurethane or spar urethane)
- Orbital sander with 120 and 220 grit discs
- Tack cloth or microfiber rags
- Painter’s tape
- Synthetic bristle brush (2-inch)
- Foam brush or staining pad
- Clean cotton rags for wiping
- Drop cloth
Step 1: Preparation & Sanding
-
Clean surface:
Begin by wiping down the entire bench to remove any dust, cobwebs, or dirt. Ensuring a clean slate is crucial for adhesion. -
Sand the top:
Using an orbital sander with 120-grit paper, sand the bench seat thoroughly to remove any old finish or rough spots. Follow the direction of the wood grain. -
Sand the legs:
Switch to sanding the legs. Since these will be painted opaque black, you don’t need to be as delicate as the top, but ensure the surface is smooth and scuffed for paint grip. -
Step up the grit:
Switch to 220-grit paper for the bench seat only. This creates that buttery smooth surface that feels great to sit on and takes stain evenly. -
Remove dust:
Vacuum up the sanding dust, then wipe the entire piece with a tacky cloth or a slightly damp rag to catch fine particles.
Bleed-Through Blues?
If the white stain looks yellow or pinkish, the wood tannins are bleeding. Seal the raw wood with a clear, water-based shellac first, then apply your white stain on top.
Step 2: Whitewashing the Seat
-
Mask the legs:
Apply painter’s tape carefully around the top of the legs where they meet the seat underside. This prevents the white stain from dripping onto areas meant for black paint. -
Apply stain:
Stir your white wood stain well. Using a foam brush or rag, apply a generous coat to the top and sides of the wooden seat, working in long strokes. -
Wipe back:
Let the stain sit for about 2-3 minutes. Then, take a clean cotton rag and wipe off the excess stain in the direction of the wood grain. This reveals the texture while keeping the color light. -
Evaluate opacity:
If you want a more opaque, milky look, let the first coat dry for an hour and repeat the application and wiping process. I prefer keeping just one coat to let the knots show through. -
Dry time:
Allow the stained seat to dry completely according to the manufacturer’s instructions, usually 4-6 hours.
Step 3: Painting the Legs
-
Reverse mask:
Once the seat is fully dry, cover the edges of the seat near the legs with painter’s tape to protect your fresh whitewash. -
Flip the bench:
Carefully turn the bench upside down or on its side onto a drop cloth to access the legs more easily. -
First coat of black:
Apply your matte black outdoor paint to the legs using a synthetic bristle brush. Apply thin, even coats to avoid drips running down the angled legs. -
Sand lightly:
Once the first coat is dry, lightly hand-sand with a fine-grit sponge to knock down any raised grain or brush strokes. -
Second coat:
Apply a second coat of black paint for full, rich coverage. Remove the tape while the paint is still slightly tacky to ensure a crisp line.
Add a Metallic Touch
For a luxe upgrade, dip the bottom 3 inches of the black legs in metallic gold or copper paint to create a sophisticated ‘dipped’ leg effect.
Step 4: Sealing and Finishing
-
Apply sealer to seat:
Brush a coat of outdoor-rated clear matte poly over the whitewashed seat. The matte finish preserves the natural, driftwood-like aesthetic. -
Seal the legs:
Although outdoor paint is durable, adding a clear coat over the black legs adds extra protection against scuffs and moisture. -
Final cure:
Let the bench cure in a dry, ventilated area for at least 24 to 48 hours before placing it outside or sitting on it.
Enjoy the striking contrast of your newly refreshed bench on your patio or porch


Slat-by-Slat Color Blocking
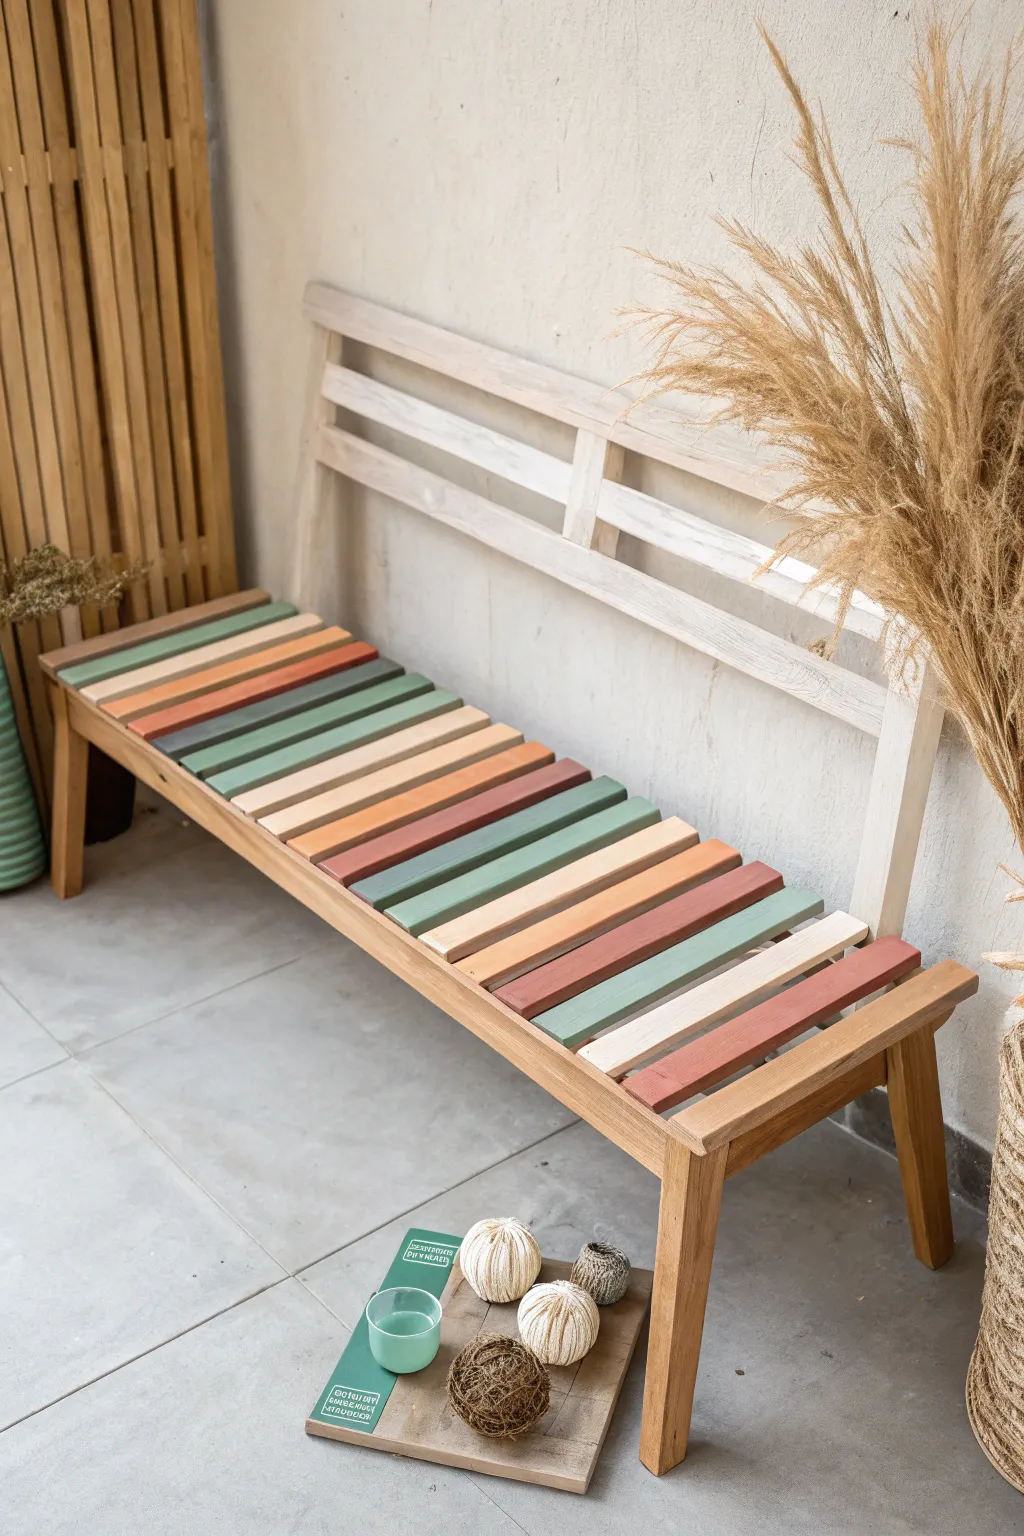
Transform a plain wooden bench into a modern statement piece with this slat-by-slat color blocking technique. Using a palette of muted greens, terra cottas, and warm neutrals, you’ll create a rhythmic, striped design that feels organic yet structured.
Step-by-Step
Materials
- Wooden slat bench (unfinished or sanded)
- Sandpaper (120 and 220 grit)
- Painter’s tape (multi-surface)
- Acrylic or chalk paints (sage green, forest green, terra cotta, rust orange, peach, cream)
- Small angled paint brushes (1-inch width)
- Clear matte polyurethane sealant
- Clean rags or tack cloth
- Drop cloth
- Screwdriver (if disassembling is needed)
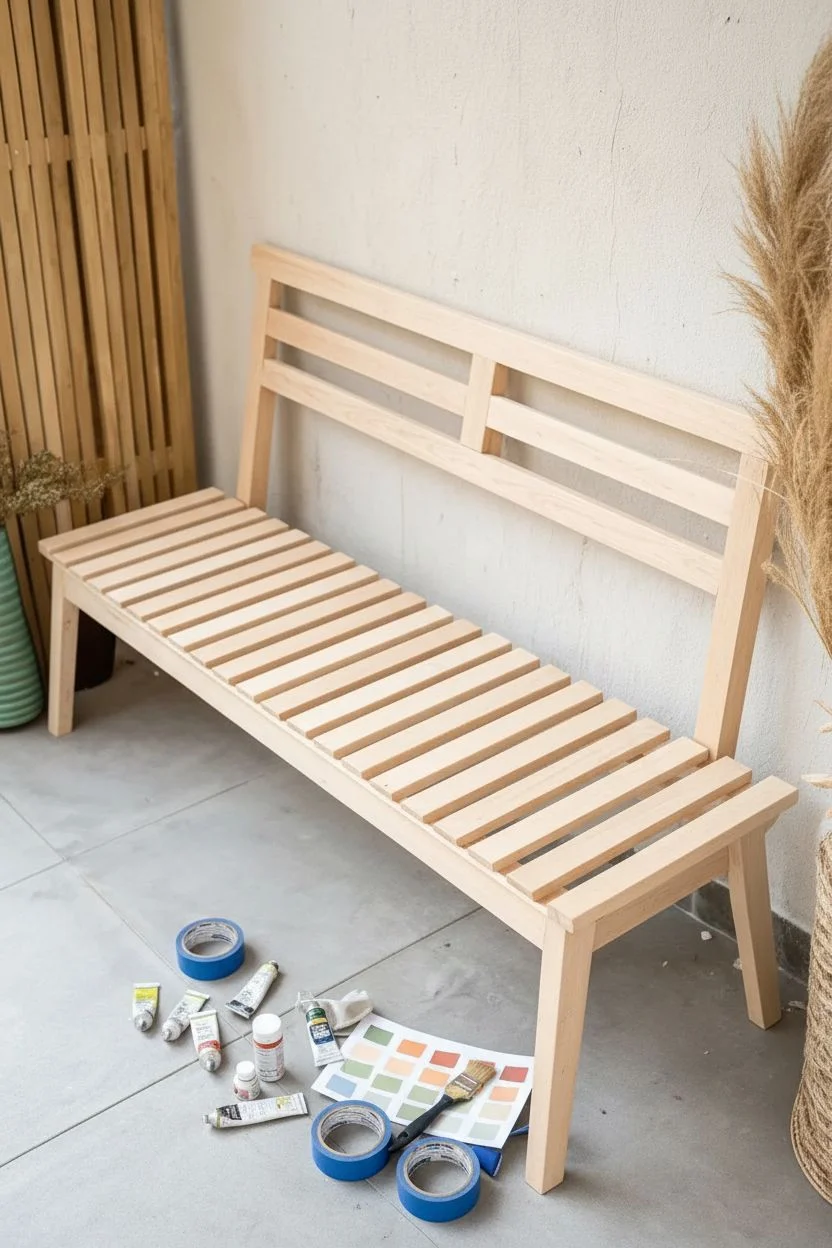
Step 1: Preparation & Planning
-
Assess the Surface:
Inspect your bench for any existing finish. If the wood has a glossy varnish or old paint, you’ll need to sand it down to raw wood using 120-grit sandpaper to ensure the new paint adheres properly. -
Smoothing the Grain:
Follow up with 220-grit sandpaper over the entire seat area and backrest. This fine sanding creates a buttery smooth base that helps your color blocks look professional rather than rough. -
Clean Thoroughly:
Wipe away every speck of sawdust using a tack cloth or a slightly damp rag. Dust is the enemy of crisp paint lines, so take your time here. -
Map Your Palette:
Before opening a can, embrace a bit of planning. Lay out your paint colors in the order you want them to appear on the slats. I like to test the sequence on a scrap piece of paper first to ensure the rhythm of greens and oranges feels balanced.
Paint Planning Technique
Number your slats with small pieces of tape before you start. Write the intended color code on each tab so you don’t lose track of your pattern mid-project.
Step 2: Applying the Colors
-
Tape the Edges:
Apply painter’s tape to the wooden frame rails that run perpendicular to the slats. Because we want the color only on the slats themselves, this protects the side supports from accidental brushstrokes. -
Whitewash the Backrest:
Dilute a bit of cream or white paint with water (about a 50/50 mix). Brush this wash over the backrest slats to give them a light, airy look that contrasts with the colorful seat but doesn’t hide the wood grain entirely. -
Start Painting the Slats:
Begin with your first color on the far left slat. Use a small angled brush to carefully paint the top and sides of the individual slat. Don’t overload your brush; thin, even coats prevent drips down the sides. -
Alternate Colors:
Move across the bench, applying your chosen pattern. Remember to clean your brush thoroughly between color changes, or use a separate cheap brush for each shade to speed up the process. -
Mind the Gaps:
The hardest part is getting the paint down into the gaps between slats without hitting the neighbors. If the gaps are tight, I suggest using a small artist’s brush for precision work on the vertical edges. -
Second Coats:
Let the first layer dry for roughly an hour. The lighter colors, like peach and cream, will likely need a second pass to achieve full opacity. -
Leaving Natural Accents:
Review your pattern. In the project image, some slats are left a very light natural wood tone (or painted a pale cream). Ensure these ‘breathing room’ slats are clean or freshly painted to maintain the pattern structure.
Step 3: Finishing Touches
-
Remove Tape:
Once the paint is tacky but not fully cured, carefully peel back the painter’s tape at a 45-degree angle. Pulling while slightly wet helps ensure a crisp line without chipping the paint. -
Touch Ups:
Inspect the edges where the slats meet the frame. If any paint bled under the tape, carefully scrape it away with a fingernail or use a tiny bit of sandpaper to clean up the line. -
Seal the Seat:
Since this bench is for sitting, protection is vital. Stir your matte polyurethane gently (don’t shake or you’ll get bubbles) and apply a thin, even coat over the entire seat area. -
Final Cure:
Allow the first coat of sealer to dry according to the can’s instructions, then lightly sand with 220-grit paper and apply a second coat for durability.
Fixing Drips Between Slats
If paint drips onto the side of a neighboring slat, wipe it immediately with a wet Q-tip or rag. If it dries, use a folded piece of sandpaper to gently buff it off.
Now you have a beautifully custom piece of furniture that brings a warm, artistic touch to your space.


Crisp Striped Bench
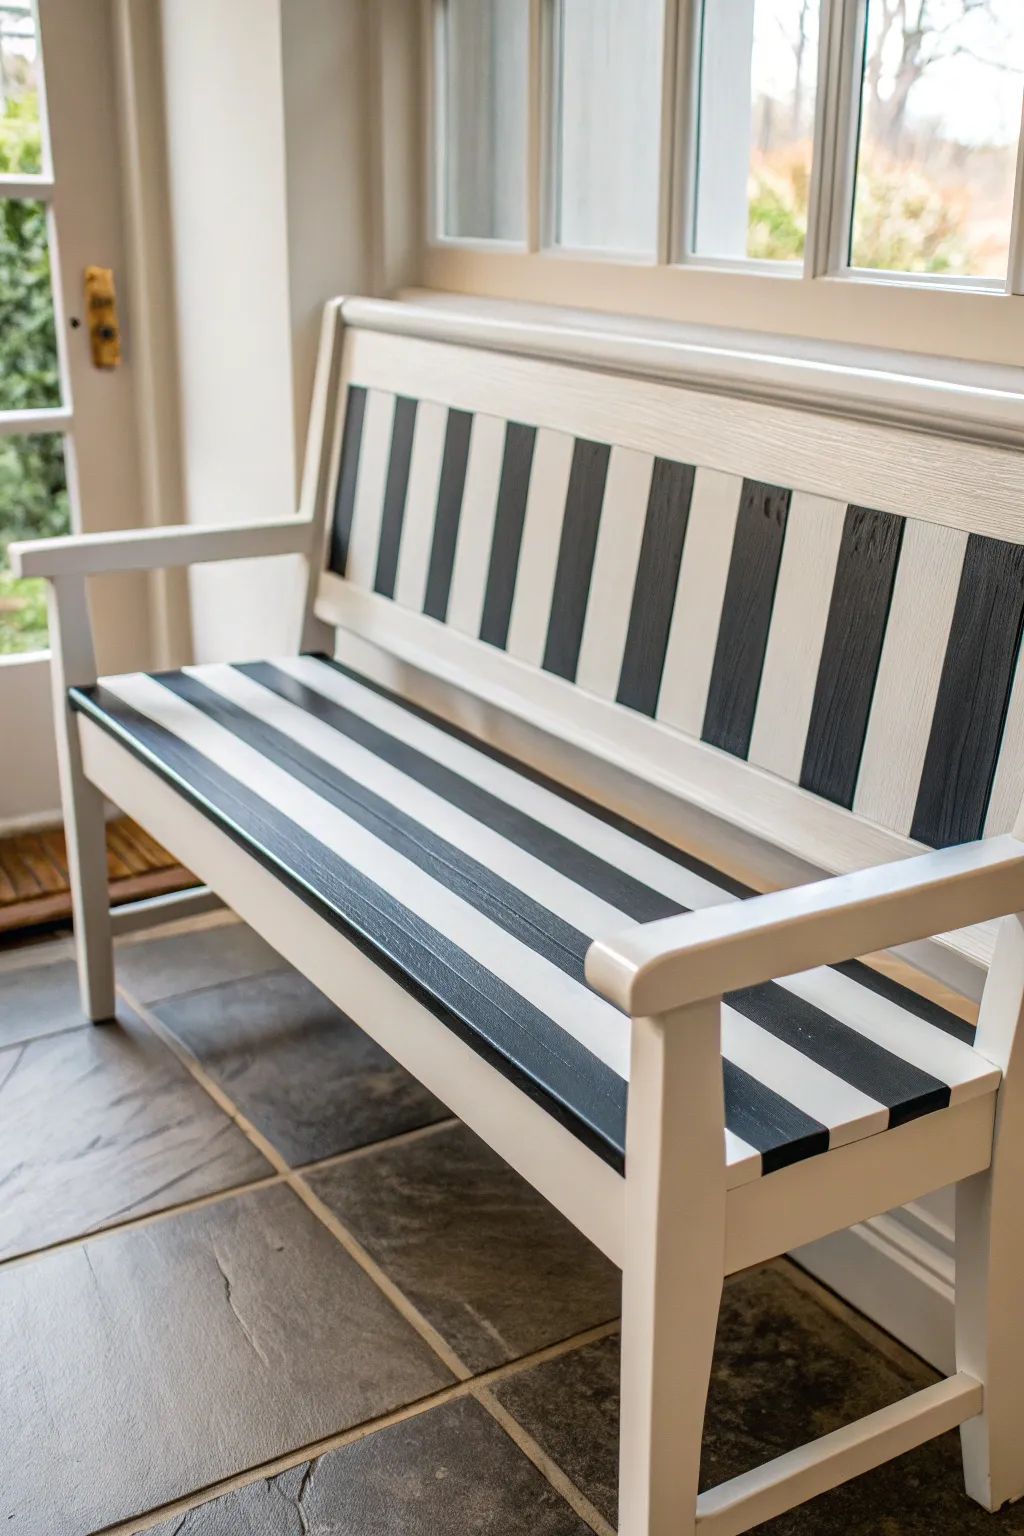
Transform a plain wooden bench into a modern statement piece with this high-contrast stripe design. The crisp black and white vertical lines create a sophisticated rhythm that brings visual interest to any entryway or sunroom.
How-To Guide
Materials
- Wooden bench (sanded and clean)
- Primer (oil-based or high-quality latex)
- White semi-gloss paint (enamel or furniture paint)
- Black semi-gloss paint
- Painter’s tape (multi-surface)
- Measuring tape
- Pencil
- Small foam roller
- 2-inch angled paintbrush
- Small artist brush (for touch-ups)
- Sandpaper (220-grit)
- Tack cloth
- Clear polyurethane topcoat (optional)
Step 1: Preparation and Base Coat
-
Clean the surface:
Begin by thoroughly cleaning your bench with a damp cloth and mild detergent to remove any dust, grease, or grime. Allow it to dry completely before moving on. -
Sand for adhesion:
Lightly scuff the entire surface with 220-grit sandpaper. This isn’t about removing old finish entirely, but creating ‘tooth’ for the new paint to grab onto. -
Wipe away dust:
Use a tack cloth to pick up every speck of sanding dust. Any leftover debris will show up under your smooth paint finish. -
Prime the bench:
Apply a coat of high-quality primer. I find that a foam roller works best for the flat seat and back areas to avoid brush strokes, while an angled brush handles the legs and corners. Let this dry according to the can’s instructions. -
Apply the white base:
Paint the entire bench with your white semi-gloss paint. Two thin coats are always better than one thick coat to prevent drips. Let the paint cure for at least 24 hours so it’s hard enough to withstand tape without peeling.
Bleeding Lines?
If paint bleeds under the tape, wait for it to fully dry. Then, re-tape precisely over the messy line and touch up with the original base color to sharpen the edge back up.
Step 2: Marking and Taping
-
Measure the center:
Find perfectly centered points on both the backrest top rail and the front edge of the seat. Mark these lightly with a pencil. -
Calculate stripe width:
Decide on your stripe width based on the bench size—2 to 3 inches usually looks proportional. Ensure your math allows the pattern to end symmetrically on both sides. -
Mark the stripe intervals:
Using your measuring tape, mark the intervals for your stripes along the top edge of the backrest and the front edge of the seat. Tick marks are sufficient here. -
Connect the lines:
Use a long straightedge or level to lightly draw pencil lines connecting your tick marks. Ensure the lines on the backrest align perfectly with the lines on the seat for a continuous look. -
Tape firmly:
Apply painter’s tape along your pencil lines. Remember that you need to tape on the ‘outside’ of the areas that will remain white. Press the edges of the tape down firmly with your fingernail or a credit card. -
Seal the tape edges:
For razor-sharp lines, brush a very thin layer of your *white base paint* over the edges of the tape. This seals any gaps; if paint bleeds under, it will be white-on-white and invisible.
Go Horizontal
Switch the orientation! Instead of vertical stripes, run the lines horizontally across the backrest and seat length for a design that visually widens the piece.
Step 3: Painting Stripes and Finishing
-
Paint the black stripes:
Once the sealing layer is dry, apply your black paint between the tape lines. Using a small foam roller helps achieve a flat, factory-like finish without brush ridges. -
Apply a second coat:
Black paint can sometimes streak. Apply a second coat to ensure deep, opaque coverage. Don’t overload the roller. -
Remove tape promptly:
Carefully peel off the painter’s tape while the final coat of black paint is still slightly tacky, not fully dry. Pull the tape away at a 45-degree angle to slice through the paint film cleanly. -
Touch up errors:
Inspect your work closely. If any bleeds occurred, use a tiny artist’s brush and the appropriate color to correct the line manually. -
Protect the surface:
Since benches are high-traffic furniture, apply a clear water-based polyurethane topcoat over the entire piece once perfectly dry to protect your crisp stripes from scuffs and scratches.
Enjoy the sleek, graphic impact your new custom bench adds to your home
BRUSH GUIDE
The Right Brush for Every Stroke
From clean lines to bold texture — master brush choice, stroke control, and essential techniques.
Explore the Full Guide
Soft Pastel Porch Bench
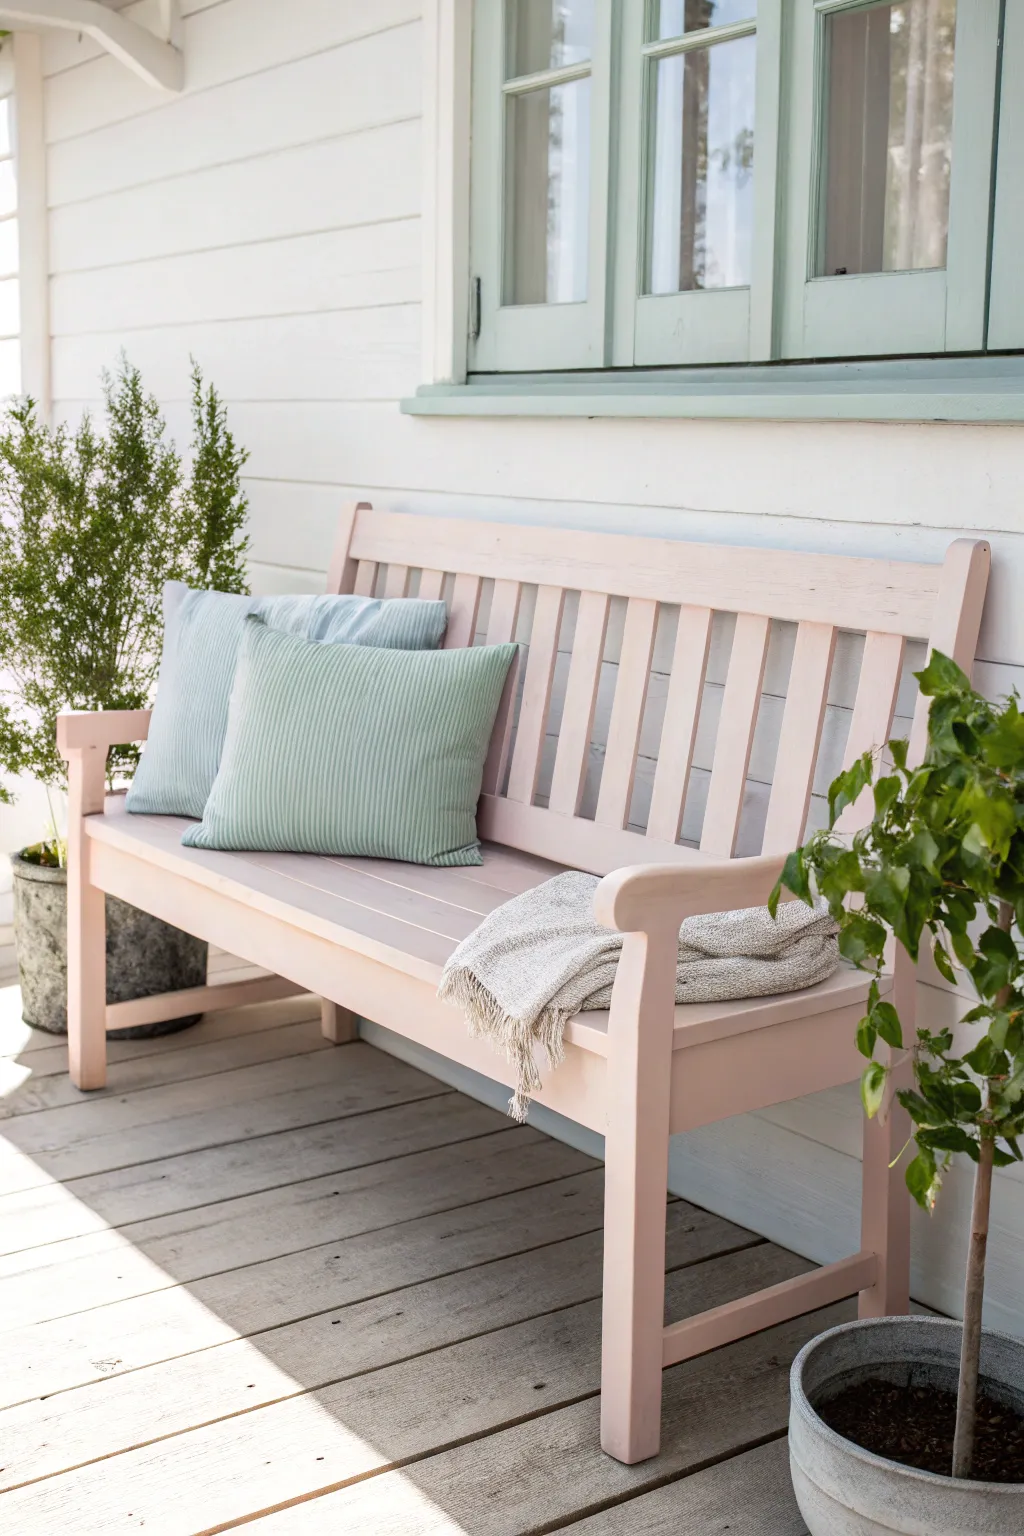
Transform a standard wooden garden bench into a welcoming, soft focal point with this delicate pastel pink finish. The gentle blush hue pairs beautifully with sage green accents and natural wood decking for a serene outdoor escape.
Step-by-Step Guide
Materials
- Wooden garden bench (unfinished or previously painted)
- Medium-grit sandpaper (120-150 grit)
- Fine-grit sandpaper (220 grit)
- Tack cloth or microfiber rags
- Outdoor wood primer (stain-blocking)
- Exterior satin or semi-gloss paint in pastel pink (e.g., ‘Pale Dogwood’ or ‘Blush’)
- 2-inch angled synthetic sash brush
- 4-inch foam roller and tray
- Drop cloths
- Painter’s tape (optional)
- Mild detergent and water bucket
Step 1: Preparation & Cleaning
-
Assess the Surface:
Begin by inspecting your bench for any loose nails, splinters, or rough patches that need repair before you start the painting process. -
Clean Thoroughly:
Mix a mild detergent with warm water and scrub the entire bench to remove dirt, mildew, and grease. Let the wood dry completely for at least 24 hours. -
Sand the Wood:
Using medium-grit sandpaper, go over the entire bench to remove old glossy finishes or smooth out rough timber. Always sand in the direction of the wood grain to avoid scratches. -
Remove Dust:
Wipe down every slat and crevice with a tack cloth or damp microfiber rag to ensure absolutely no dust remains, as this will ruin your smooth finish.
Sticky Situation?
If the paint feels tacky after drying, humidity is likely the culprit. Move the bench to a climate-controlled area or point a fan at it for 24 hours to help the paint cure fully
Step 2: Priming for Durability
-
Flip and Prime:
Turn the bench upside down on your drop cloth. Apply your outdoor wood primer to the underside of the seat and legs first to ensure total coverage. -
Prime the Top:
Flip the bench right-side up. Using your brush for corners and the foam roller for flat slats, apply a thin, even coat of primer over the rest of the bench. -
Check for Bleed-Through:
If you notice knots in the wood showing through the primer, touch them up with a second dab of primer to prevent sap from discolouring your pink paint later. -
Light Sanding:
Once the primer is fully dry, lightly scuff the surface with fine-grit sandpaper. This creates the perfect tooth for your topcoat.
Step 3: Painting the Pastel Finish
-
Mix the Paint:
Stir your pastel pink exterior paint thoroughly. Pigments in light colors can settle quickly, so give it a good mix to ensure the color is uniform. -
Start with Slats:
Begin painting the vertical back slats. I find an angled sash brush works best here to get inside the narrow gaps between the wood without causing drips. -
Roll the Seat:
Use the foam roller to apply paint to the long, flat bench seat slats. This helps achieve a smooth, factory-like finish without visible brush strokes. -
Detail Work:
Use your brush to paint the arms, legs, and any decorative curves on the front. Watch carefully for drips accumulating on the underside of the arms. -
Dry and Recoat:
Allow the first coat to dry according to the manufacturer’s instructions (usually 4-6 hours). Adding a second coat is crucial for that rich, opaque pastel look. -
Apply Second Coat:
Repeat the painting process, moving from the difficult slat areas to the smooth surfaces. Two thin coats are always better than one thick, gloopy one. -
Final Inspection:
Walk around the bench and check for missed spots, especially under the seat lip or behind the back legs. Touch up lightly with your brush. -
Cure Time:
Let the bench cure for at least 2-3 days before placing cushions on it. This prevents the paint from feeling tacky or peeling when you sit down.
Level Up Your Look
For a subtle vintage vibe, lightly distress the edges with fine sandpaper after the final coat dries, revealing just a hint of the wood or white primer underneath
Now step back and admire how this soft hue brings a fresh, calm atmosphere to your outdoor seating area
Ombre Fade Bench Seat

Give a simple wooden bench a contemporary update with a soft, blushing ombre stripe down its center. This project blends natural wood tones with a delicate gradient effect, creating a sophisticated accent piece that feels both organic and modern.
How-To Guide
Materials
- Wooden bench (unfinished or sanded down)
- Sandpaper (120 and 220 grit)
- Masking tape or painter’s tape
- Water-based wood stain or diluted acrylic paint (Rose/Pink color)
- Water-based wood stain or diluted acrylic paint (Darker Red/Terracotta color)
- Clean lint-free rags
- Small paintbrush or foam brush
- Clear matte polyurethane or wood wax
- Water spray bottle or damp sponge
- Drop cloth
Step 1: Preparation
-
Clean and prep the surface:
Begin by ensuring your bench is completely clean. If you are working with an old piece, wipe away any dust or grime with a damp cloth and let it dry. -
Sand the wood:
Using 120-grit sandpaper, lightly sand the entire seat surface to remove any old finish or rough spots. Follow up with 220-grit for a smooth finish that will accept the stain evenly. -
Dust off surfaces:
Wipe the bench down with a tack cloth or a slightly damp rag to remove all sanding dust. This is crucial for a clean gradient. -
Mark the center:
Measure the width of your bench seat to find the exact center. You can mark this lightly with a pencil at the very ends of the bench if needed as a guide, though we are going for a freehand look.
Step 2: Creating the Ombre Stripe
-
Mix your stains:
Prepare your two colors. If using acrylic paint, dilute it with water (about 1 part paint to 2 parts water) to create a wash that allows the wood grain to show through similar to a stain. -
Dampen the wood:
Lightly mist the center area of the bench with water using a spray bottle or damp sponge. Damp wood helps the color bleed and blend softer, which is key for the ombre effect. -
Apply the darkest center line:
Using your darker red/terracotta mix, paint a thin, straight line directly down the center of the bench seat. It doesn’t need to be geometrically perfect. -
Apply the lighter tone:
Immediately paint a stripe of the lighter rose pink on either side of the dark center line while the first line is still wet. -
Blend the transition:
Take a clean, slightly damp rag and gently rub the area where the dark and light colors meet to soften the line. Work quickly so the paint doesn’t dry. -
Fade the edges out:
Dip your rag into a tiny bit of the lighter pink wash. Rub this along the outer edges of your stripe, dragging the color outward until it fades completely into the natural wood. -
Check the intensity:
Step back and look at the gradient. I like to let this dry briefly to see the true color, then add a second layer to the very center if more depth is needed. -
Feather uneven spots:
If any hard lines appear, use a damp clean rag to buff them out aggressively before they cure completely.
Uneven Blotchy Color?
If the wood absorbs color unevenly, apply a wood conditioner before staining. This pre-treatment helps softwoods like pine accept stain consistently without dark blotches.
Step 3: Sealing and Finishing
-
Allow to dry completely:
Let the bench sit undisturbed for at least 4-6 hours, or until the wood feels bone dry to the touch. -
Apply the first coat of sealer:
Stir your clear matte polyurethane gently. Apply a thin, even coat over the entire bench seat, following the direction of the wood grain. -
Sand lightly between coats:
Once the first coat is dry (check manufacturer instructions), lightly hand-sand with 220-grit paper to knock down any raised grain. -
Wipe away dust:
Clean off the sanding residue thoroughly before proceeding. -
Apply final topcoat:
Brush on a second coat of sealant for durability. This protects your artwork from sitting wear and tear. -
Finish the legs:
If you want the legs to match the natural wood tone of the seat, apply the same clear coat to the legs and support bars now. -
Final cure:
Let the piece cure for a full 24 hours before sitting on it or placing objects on the surface.
Pro Tip: Dry Brushing
For the softest fade at the outer edges, use a ‘dry brush’ technique. Wipe almost all paint off your brush, then lightly drag it from the color toward the bare wood.
Enjoy your bench’s new look, offering a subtle pop of color that invites everyone to take a seat

PENCIL GUIDE
Understanding Pencil Grades from H to B
From first sketch to finished drawing — learn pencil grades, line control, and shading techniques.
Explore the Full Guide
Leafy Greenery Wrap Bench
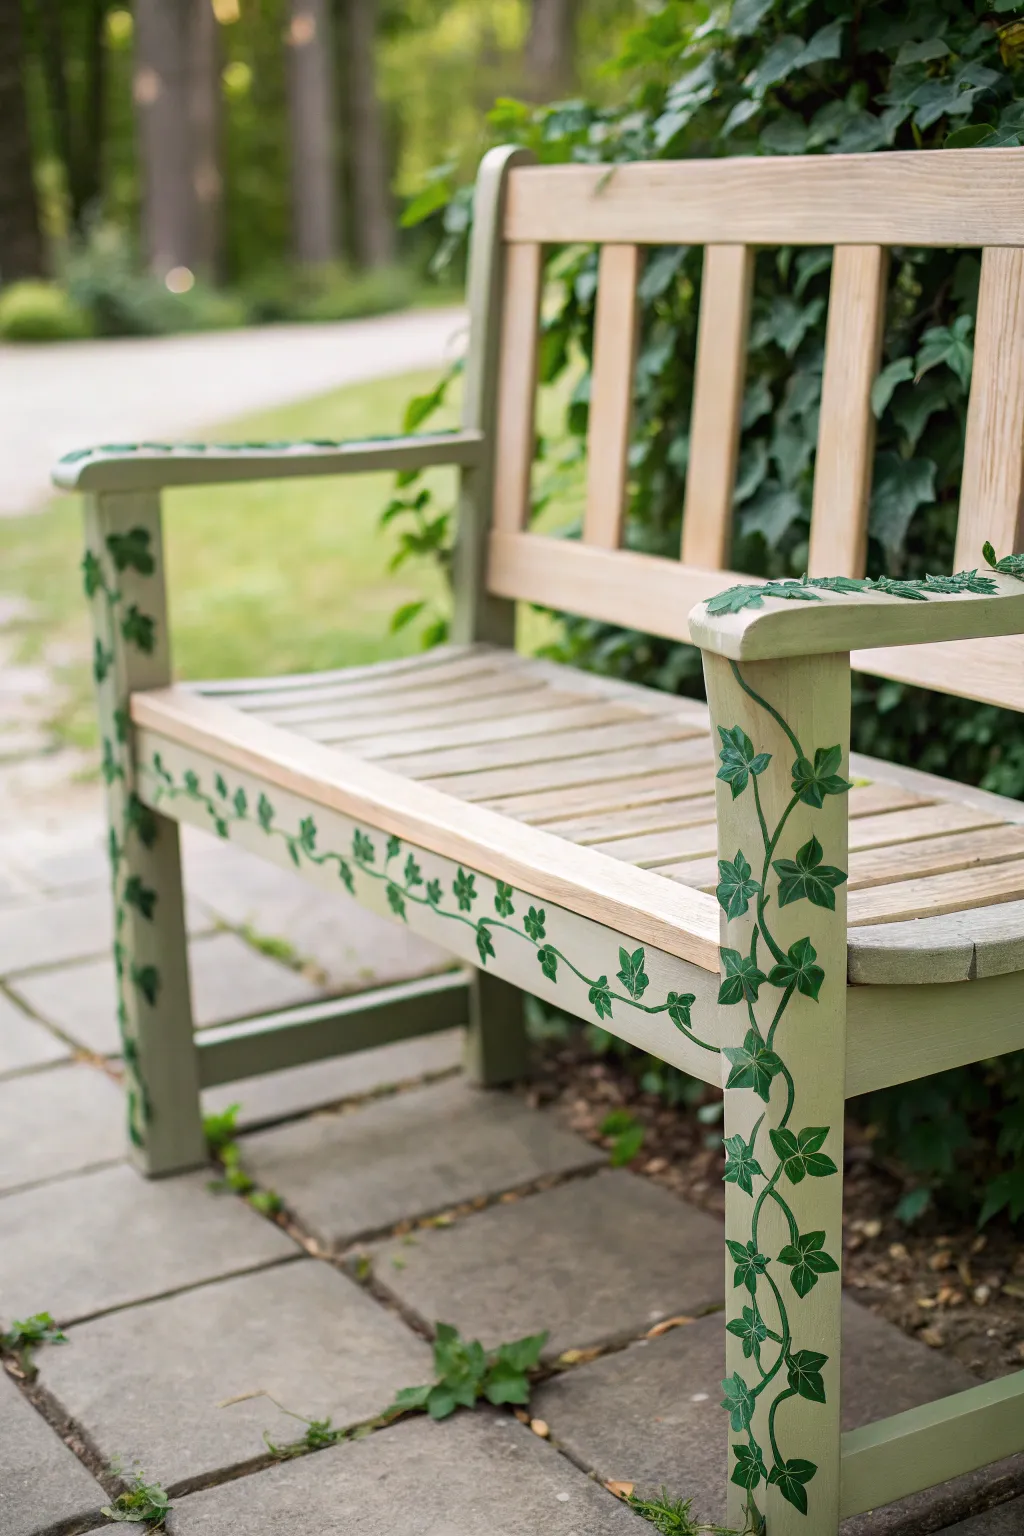
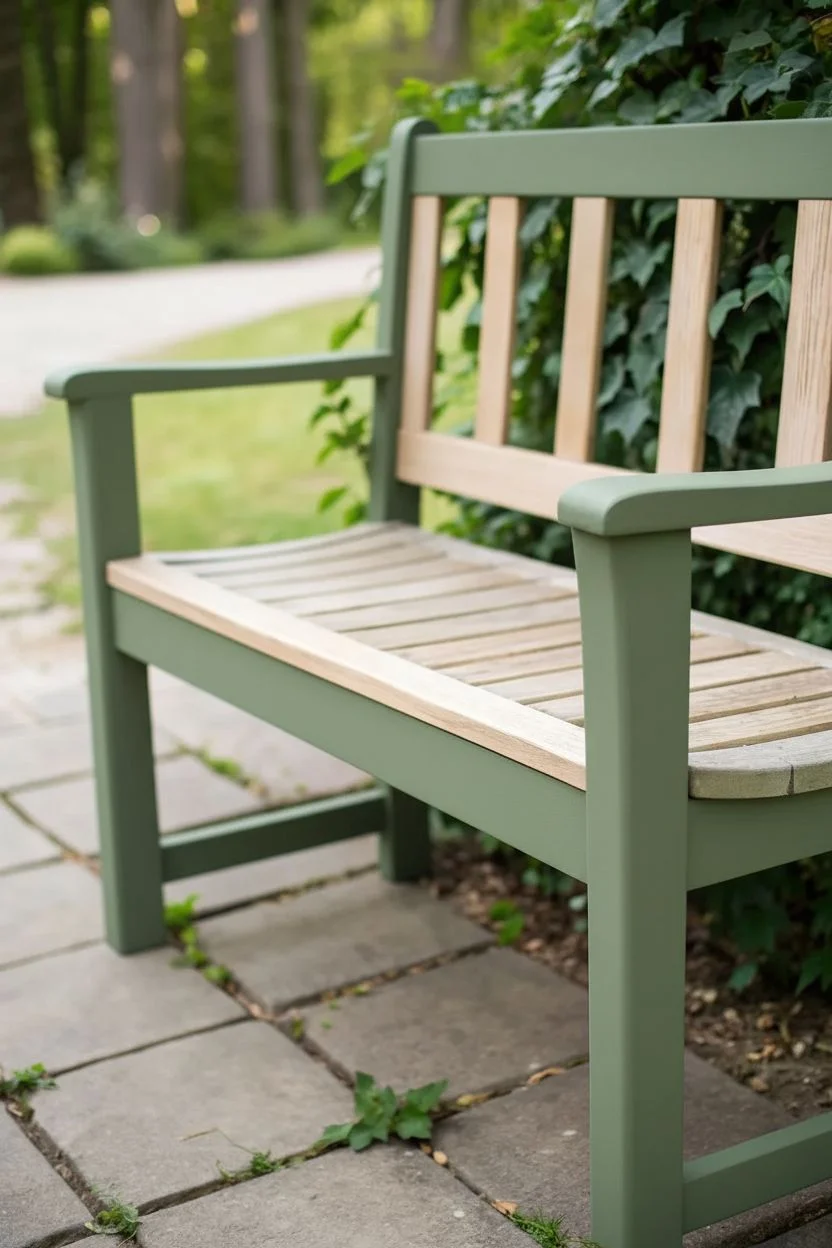
Transform a plain wooden bench into an enchanted garden seat with this delicate botanical design. The painted ivy vines appear to naturally climb up the legs and arms, blending beautifully with the soft sage green framework.
Detailed Instructions
Materials
- Wooden garden bench (slatted style preferred)
- Sandpaper (120 and 220 grit)
- Painter’s tape
- Primer (wood bonding)
- Sage green outdoor acrylic paint (or chalk paint)
- Dark forest green acrylic paint
- Medium leaf green acrylic paint
- Fine detail brush (size 0 or 1)
- Small round brush (size 4 or 6)
- Pencil
- Outdoor matte polyurethane sealer
- Lint-free rags
Step 1: Preparation & Base Coat
-
Clean the surface:
Before you begin, scrub down the bench thoroughly. Remove any dirt, moss, or old flaking varnish and let the wood dry completely. -
Sand for adhesion:
Lightly sand the entire bench with 120-grit sandpaper to scuff up the surface. Follow up with 220-grit for a smoother finish, then wipe away all dust with a damp rag. -
Protect the natural wood:
Decide which parts will remain natural wood—in this design, it’s the seat slats and backrest slats. Apply painter’s tape carefully to the edges of these slats where they meet the frame. -
Prime the frame:
Apply a coat of quality wood primer to the legs, armrests, and structural supports. This ensures your sage green paint adheres properly and lasts outdoors. -
Apply the sage green:
Once the primer is dry, paint the frame with your sage green outdoor paint. Use smooth, long strokes to minimize brush marks. -
Second coat coverage:
Let the first coat dry fully (check your paint can for times), then apply a second coat of sage green for a solid, opaque finish. -
Seal the natural wood (optional):
If your natural wood slats look dry, now is a good time to rub in a little clear weather-sealer or teak oil while the green paint cures.
Natural Flow Tip
Don’t make your leaf spacing too perfect. Nature is random! Cluster two or three leaves together in some spots, and leave longer stretches of bare stem in others for realism.
Step 2: Painting the Vines
-
Sketch the path:
Using a pencil, very lightly draw a winding line traveling up the front legs. Let it meander naturally, crossing over itself occasionally. -
Extend the design:
Continue your pencil line along the side support rail and up onto the armrests. I like to have a few vines ‘spill’ over the top edge of the arm for a realistic look. -
Paint the main stems:
Mix a small amount of dark forest green with a touch of brown if available. Using your fine detail brush, paint over your pencil lines to create thin, wandering vine stems. -
Outline the leaves:
With the detail brush and dark forest green, paint small, five-pointed ivy leaf shapes attached to the stem. Vary the sizes—smaller near the top, larger near the bottom. -
Fill the leaves:
Switch to the medium leaf green paint. Fill in the centers of your leaf outlines, but leave a very thin rim of the dark outline visible for definition. -
Add highlights:
Mix a tiny bit of white or yellow into your leaf green. Add a small swoop or dot to one side of each leaf to simulate sunlight hitting the foliage. -
Create vein details:
Go back to your fine detail brush and the dark green paint. Carefully paint a central vein and two side veins inside the larger leaves to give them texture. -
Add tendrils:
Paint tiny, curly cues coming off the main stem in empty spaces. These little tendrils make the ivy look like it is actively gripping the wood.
Step 3: Finishing Up
-
Cure time:
Allow your painted artwork to dry for at least 24 hours. Acrylics need time to harden before being sealed. -
Remove tape:
Carefully peel off the painter’s tape revealing the crisp line between the sage frame and the natural wood slats. -
Seal the artwork:
Apply two coats of outdoor matte polyurethane over the painted sections (and the whole bench if desired) to protect your handiwork from rain and UV rays.
Seasonal Switch
Change the vibe by swapping the ivy for different plants. Try painting climbing roses for a cottage core look or purple wisteria draping down the legs for a romantic feel.
Enjoy your beautiful new garden seat that looks perfect in any season
Oversized Floral Garden Bench
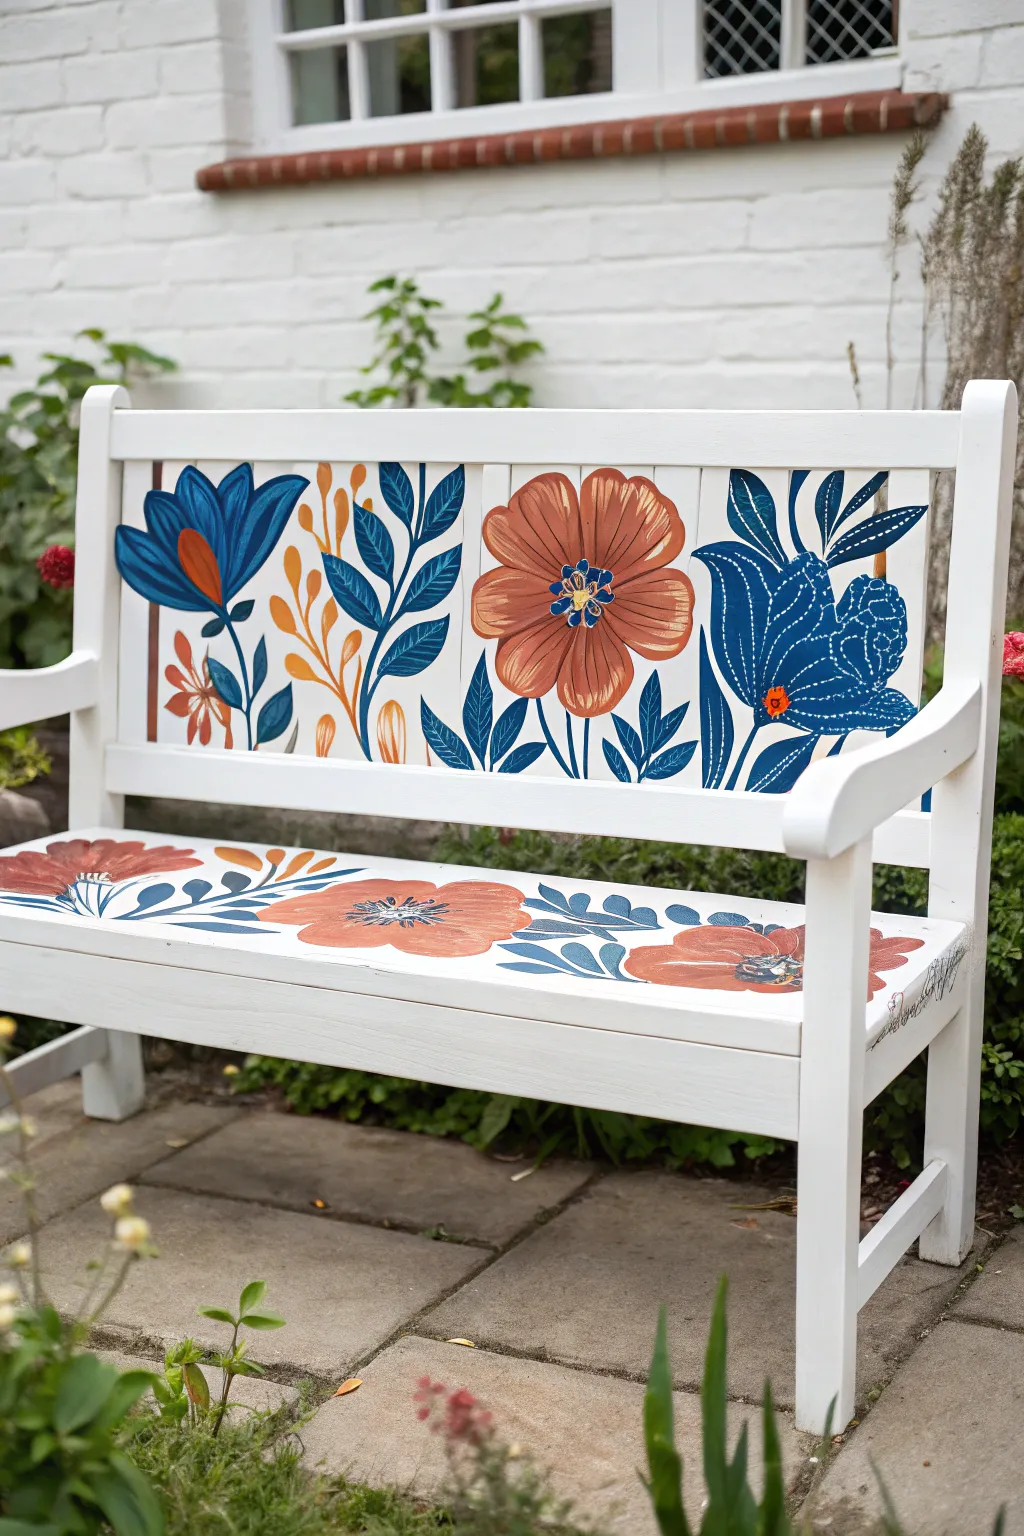
Transform a plain garden bench into a stunning statement piece with bold, oversized botanicals. The striking combination of deep navy, rust orange, and bright whites creates a modern cottage feel that looks hand-painted yet polished.
How-To Guide
Materials
- Wooden garden bench (cleaned and sanded)
- Exterior primer (white)
- Exterior latex or acrylic paint: bright white, navy blue, rust orange, sky blue, golden yellow
- Paintbrushes: 2-inch angled sash brush, assorted round and flat artist brushes (sizes 4-10)
- Sandpaper (120 and 220 grit)
- Pencil and eraser
- Painter’s tape based on your preference
- Large floral stencils (optional)
- Clear outdoor polyurethane sealer (matte or satin)
Step 1: Preparation & Base Coat
-
Clean the Surface:
Begin by thoroughly cleaning your bench with a stiff brush and mild soapy water to remove moss, dirt, and old varnish. Let it dry completely in the sun. -
Sand for Adhesion:
Scuff sand the entire bench with 120-grit sandpaper. You don’t need to strip it to bare wood, just rough up the existing finish so the primer sticks. -
Wipe Down:
Remove all sanding dust with a damp tack cloth or microfiber towel. Any leftover dust will create a bumpy finish. -
Apply Primer:
Coat the entire bench with a high-quality exterior primer. If you are painting over dark wood, you might need two coats to prevent bleed-through. -
Paint the Base Color:
Once the primer is dry, apply two coats of bright white exterior paint using your 2-inch angled brush. Allow at least 4 hours of drying time between coats.
Paint Choice Matters
Use “porch and floor” enamel for the base white if possible. It is self-leveling and remarkably durable against foot traffic and weather.
Step 2: Drafting the Design
-
Sketch the Layout:
Using a pencil, lightly sketch your oversized floral design onto the back slats. I like to start with the large central flower to anchor the design, then add the flanking blue blooms. -
Plan the Seat:
Sketch a repeating pattern of horizontal flowers across the seat slats. Ensure the stems flow naturally along the length of the bench. -
Refine the Shapes:
Go back over your sketch to define the petals and leaves. The style here is illustrative and clean, so aim for smooth curves rather than jagged edges.
Step 3: Painting the Florals
-
Block in Orange Blooms:
Use a medium flat artist brush to fill in the large central flower on the back and the seat flowers with rust orange paint. Apply two thin coats for opaque coverage. -
Paint Navy Elements:
Using a separate brush, fill in the large flanking flowers on the backrest and the leaf sprays on the seat with your deep navy blue shade. -
Add Secondary Blues:
Paint the remaining smaller leaves and secondary flower petals using a lighter sky blue or a mix of your navy and white. -
Detail the Centers:
Once the base colors are dry, use a small round brush (size 4) to add the flower centers. Use navy blue for the orange flowers and add tiny dots of golden yellow for contrast. -
Add Linear Details:
Mix a slightly lighter shade of orange (add a drop of white) and use a fine liner brush to paint delicate veins on the rust petals. Do the same with a lighter blue on the navy leaves. -
Clean Up Edges:
Inspect your work for any wobbles. Use a small brush with your white base paint to tidy up the outlines of your flowers for a crisp look.
Add Dimension
Mix a tiny bit of white into your main petal colors while wet to create subtle highlights on the tips of the leaves and flowers.
Step 4: Sealing & Protection
-
Let Cure:
Allow the painted artwork to cure for at least 24-48 hours. The paint needs to be fully hard before sealing. -
Apply Sealer:
Apply a coat of clear outdoor polyurethane. Use long, smooth strokes to avoid bubbles. I prefer a satin finish as it offers durability without too much glare. -
Final Coat:
Once the first coat is dry, lightly sand with 220-grit sandpaper for smoothness, wipe clean, and apply a second and final coat of sealer.
Place your newly refreshed bench in a cozy garden nook and enjoy the view


Night-Sky Galaxy Bench

Transform ordinary outdoor seating into a cosmic journey with this stunning galaxy-themed bench. By combining dark wood stains with a vibrant, sponge-painted nebula effect on the seat, you’ll create a functional piece of art that looks like a slice of the night sky.
Step-by-Step Tutorial
Materials
- Wooden garden bench (unfinished or sanded)
- Dark charcoal or ebony wood stain
- Exterior polyurethane sealer (satin finish)
- Acrylic paints: Black, Deep Violet, Navy Blue, Teal, Magenta, Titanium White
- Assorted paintbrushes (medium flat brush, fine liner brush)
- Natural sea sponge or synthetic texture sponge
- Painter’s tape
- Old toothbrush
- Sandpaper (120 and 220 grit)
- Clean rag or tack cloth
Step 1: Preparation and Staining
-
Clean and Sand:
Begin by removing any old finish or dirt from your bench. Sand the entire surface with 120-grit sandpaper to strip it down, followed by 220-grit for a smooth finish. Wipe away all dust with a tack cloth. -
Tape Off the Seat:
Since the seat slats will be the galaxy focal point, protect them with painter’s tape if you want to keep the stain off them, or simply plan to paint over the stain later. For this specific look, sticking to the backrest and legs for the stain works best. -
Apply Dark Stain:
Using a rag or brush, apply the charcoal or ebony wood stain to the backrest slats, legs, and armrests. Work with the grain, wiping off excess after a few minutes to achieve a semi-transparent, dark gray look that still shows wood grain. -
Dry and Seal:
Allow the stain to dry completely according to the manufacturer’s instructions. Once dry, apply a initial thin coat of exterior sealer to the stained areas to lock the color in before you start painting details.
Cosmic Depth
Mix a tiny drop of neon pink or electric blue into your white ‘star’ paint. It won’t look pink, but it makes the stars appear to glow brightly against the dark background.
Step 2: Creating the Galaxy Seat
-
Base Coat:
Paint the seat slats entirely black using exterior-grade acrylic paint. This provides the necessary depth for the galaxy colors to pop. Let this base coat dry fully. -
Sponge the Nebula Blues:
Dampen your sea sponge slightly and dip it into Navy Blue paint. Dab off most of the paint on a paper towel—you want a dry texture, not a glob. Gently sponge random cloudy clusters across the black slats. -
Layer in Purples:
While the blue is still slightly tacky or just dry, switch a fresh section of sponge. Dip into Deep Violet and dab it near and partially overlapping the blue sections. I like to twist the sponge slightly as I press to create organic, swirling shapes. -
Add Vivid Highlights:
Using Magenta and Teal sparigly, sponge smaller, concentrated areas within the darker purple and blue clouds. This creates the ‘glowing’ center of your nebula clouds. -
Blend the Edges:
If any sponge marks look too harsh, take a clean, slightly damp sponge and lightly tap the edges to soften the transition back into the black background. -
The Starfield Sputter:
Dilute a small amount of Titanium White paint with water until it’s inky. Dip an old toothbrush into it, point it at the bench seat, and run your thumb across the bristles to flick a fine mist of tiny stars across the galaxy.
Glow Up
Mix glow-in-the-dark powder into your white paint for the final layer of stars. During the day it looks normal, but at night your bench will come alive.
Step 3: Painting the Constellations
-
Sketch Larger Stars:
Using a fine liner brush and pure Titanium White, paint larger, manual stars on top of the galaxy seat. Use a simple five-point star shape or a four-point diamond ‘twinkle’ shape. -
Map the Backrest:
Move up to the stained backrest. Using the same fine brush, paint scattered white stars directly onto the dark stained wood. Placing a few stars on the legs helps integrate the design. -
Define the Points:
For the largest stars on the backrest and legs, go back over them with a second coat of white to ensure they stand out opaque against the dark wood grain. -
Add Subtle Clusters:
Dip the very tip of your brush handle into white paint and dot tiny clusters of stars on the grey wood to mimic distant star fields, balancing out the larger hand-painted stars.
Step 4: Final Protection
-
Cure Time:
Let all your acrylic paint work dry for at least 24 hours. This ensures no moisture is trapped under the sealer. -
Top Coat Sealing:
Apply at least two to three coats of exterior satin polyurethane over the entire bench—both the painted seat and stained backrest. This is crucial for weatherproofing and protecting your artwork from UV fading.
Now you have a perfect spot to sit and admire the real stars above


Have a question or want to share your own experience? I'd love to hear from you in the comments below!