Some of the sweetest best friend painting ideas are the ones that feel like your friendship—simple, personal, and full of tiny memories. I pulled together a mix of classic favorites and more unexpected concepts so you can paint something that really feels like “us.”
Split Canvas Painting That Connects in the Middle
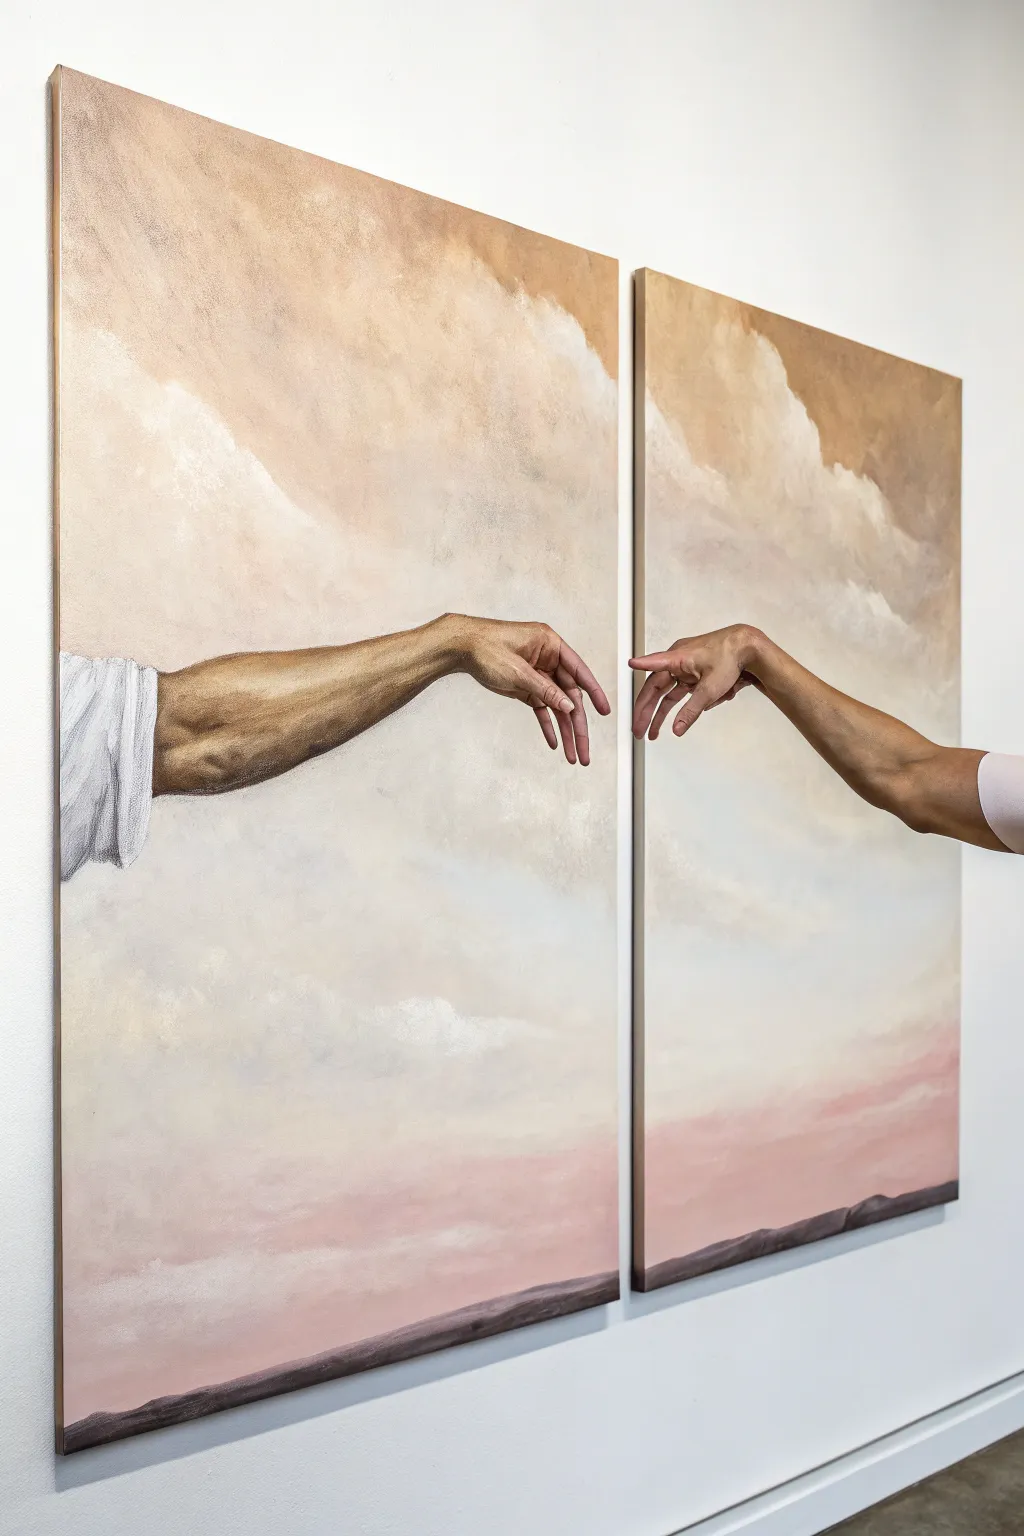

This stunning split canvas project reimagines a classic gesture of connection, creating a seamless narrative across two separate panels. With its ethereal cloudscape background and realistic arm studies, it serves as a sophisticated and meaningful tribute to the bond between best friends or partners.
Detailed Instructions
Materials
- Two large rectangular gallery-wrapped canvases (e.g., 24×36 inches each)
- Acrylic paints (Titanium White, Burnt Umber, Yellow Ochre, Burnt Sienna, Alizarin Crimson, Ultramarine Blue, Mars Black)
- Gesso (optional for priming)
- Large flat brushes for background blending
- Medium filbert brushes for skin tones
- Small round detail brushes (sizes 0 and 2)
- Palette knife
- Soft charcoal pencil or transfer paper
- Reference photo of arms reaching out
- Slow-drying blending medium (acrylic retarder)
- Easel or large wall space to hang canvases side-by-side
Step 1: Setting the Sky and Horizon
-
Prepare the workspace:
Place your two canvases side-by-side either on a wall or a large easel. It is crucial that they touch or are very close together during the sketching and background painting phases to ensure the image flows continuously. -
Mix the sky gradient:
Create a palette for the sky using Titanium White, a touch of Yellow Ochre, and Burnt Sienna for the upper warmth. For the lower pinkish clouds, mix White with a tiny dot of Alizarin Crimson and Burnt Umber to desaturate it. -
Paint the upper atmosphere:
Using a large flat brush and plenty of blending medium, paint the upper two-thirds of both canvases. Use cross-hatching strokes to blend the warm beige tones into soft whites, creating a fluffy, cloud-like texture that spans across the gap between canvases. -
Establish the lower horizon:
Transition the sky into the pinkish hues near the bottom. Blend this area smoothly while the paint is still wet to create a hazy, dreamlike atmosphere. -
Ground the composition:
Mix a dark purple-grey using Ultramarine Blue, Alizarin Crimson, and Burnt Umber. Paint a low, rolling mountain range at the very bottom of both canvases, ensuring the ridge line matches up perfectly where the canvases meet.
Alignment Pro-Tip
Clamp the two canvases together at the back while sketching and painting the horizon line. This prevents them from shifting and ensures your continuous lines match perfectly.
Step 2: Sketching the Figures
-
Outline the arms:
Once the background is completely dry, unite the canvases again. Use a soft charcoal pencil to lightly sketch the arms. The left arm should enter from the left edge, and the right arm from the right edge, meeting near the center gap. -
Check alignment:
Step back frequently to ensure the angles of the arms look natural and that the fingers are positioned to almost touch across the split. The negative space between the fingers is just as important as the fingers themselves. -
Refine anatomy:
Lightly mark the location of key anatomical features like the wrist bone, elbow crease, and knuckles to guide your painting.
Make It Personal
Instead of generic arms, take reference photos of your own arm and your best friend’s arm. Capture unique details like tattoos, jewelry, or specific birthmarks for authenticity.
Step 3: Painting the Flesh Tones
-
Mix base skin values:
Prepare three distinct mixtures for the skin: a shadow tone (Burnt Umber + Alizarin Crimson), a mid-tone (Yellow Ochre + Burnt Sienna + White), and a highlight tone (mostly White + faint Yellow Ochre). Keep these mixtures handy on your palette. -
Block in the forms:
Start by blocking in the darkest shadow shapes on the arms using a filbert brush. Look at your reference to see where the muscles curve and cast shadows. -
Apply mid-tones:
Fill in the remaining skin areas with your mid-tone mixture, blending the edges where it meets the shadow tone to create roundness in the limbs. -
Add the sleeve detail:
On the left canvas, paint the gathered sleeve using cool whites (White + tiny touch of Blue). Use greyish strokes to indicate the folds and creases of the fabric where it pushes up against the bicep.
Step 4: Refining and Detailing
-
Develop specific anatomy:
Switch to your smaller round brushes. I like to focus heavily on the hands here, adding definition to the knuckles, fingernails, and the webbing between fingers using your highlight and shadow tones. -
Enhance contrast:
Deepen the darkest crevices (like under the arm or between fingers) with a mix of Burnt Umber and a tiny bit of Blue. This high contrast makes the arms pop against the soft background. -
Add specular highlights:
With a clean detail brush, apply pure white or very light cream paint to the highest points—the tops of the knuckles, the wrist bone, and the tension in the tendons. -
Final blending check:
Ensure the background clouds around the arms look seamless. You can gently dry-brush a little translucent cloud color over the edges of the arms in select spots to make them feel truly integrated into the environment. -
Varnish and seal:
Allow the painting to cure for several days. Once fully dry, apply a satin or matte varnish to protect the surface and unify the sheen across both panels.
Hang your masterpieces with a small one-inch gap between them to let the viewer’s eye bridge the connection


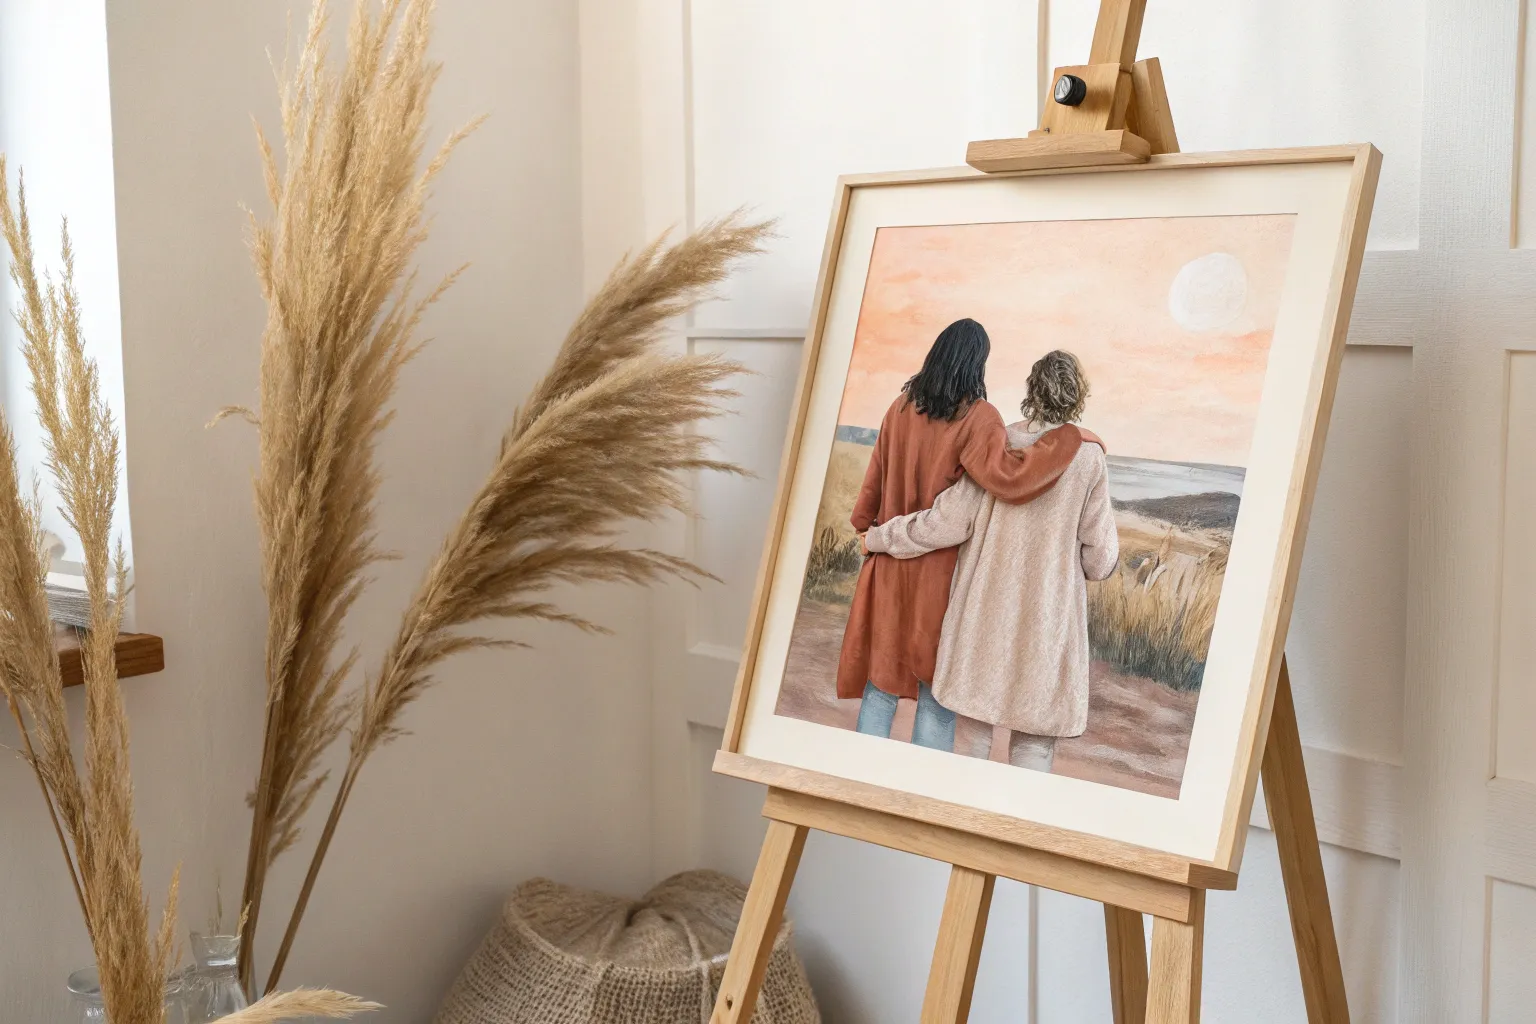
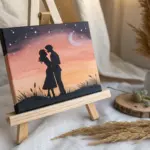
Silhouettes Holding Hands Against a Colorful Sky
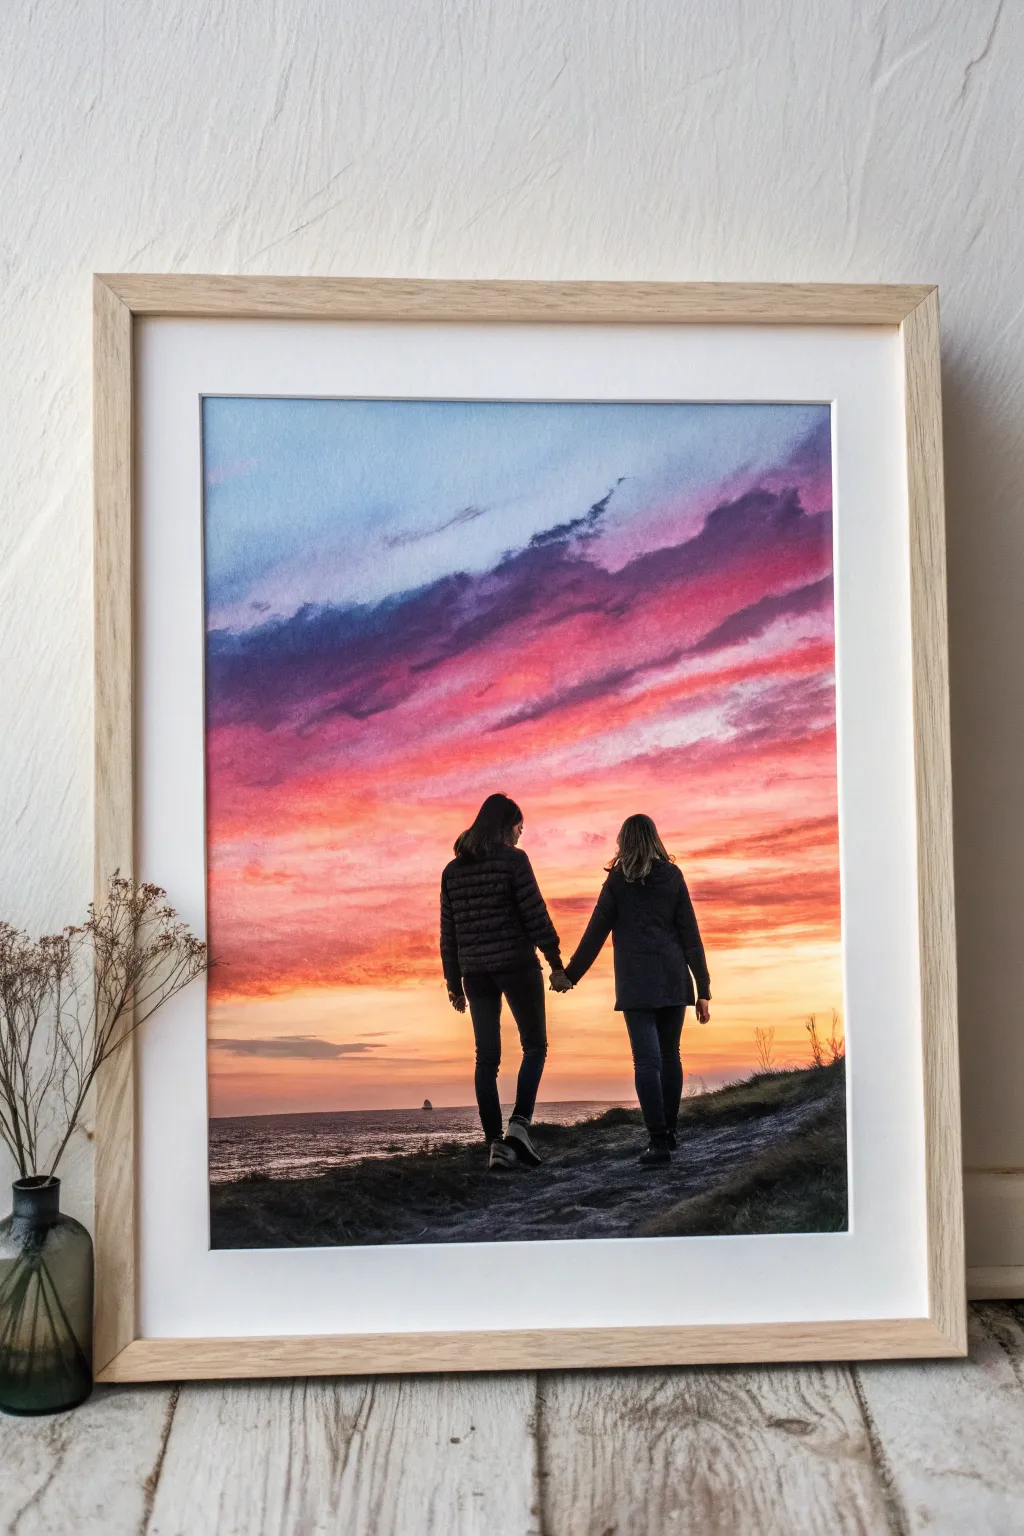
Capture the warmth of friendship with this stunning watercolor painting featuring two friends walking hand-in-hand against a vibrant sunset. The contrast between the brilliant, fiery sky and the crisp, dark silhouettes creates an emotional and timeless keepsake.
Step-by-Step Guide
Materials
- High-quality watercolor paper (cold press, 300gsm)
- Watercolor paints (Indigo, Alizarin Crimson, Cadmium Yellow, Orange, Burnt Umber)
- Gouache paint (Black) or black waterproof ink
- Large flat brush or wash brush
- Medium round brush (size 6 or 8)
- Fine detail brush (size 0 or 1)
- Masking tape
- Pencil and eraser
- Jar of clean water
- Paper towels
- Mixing palette
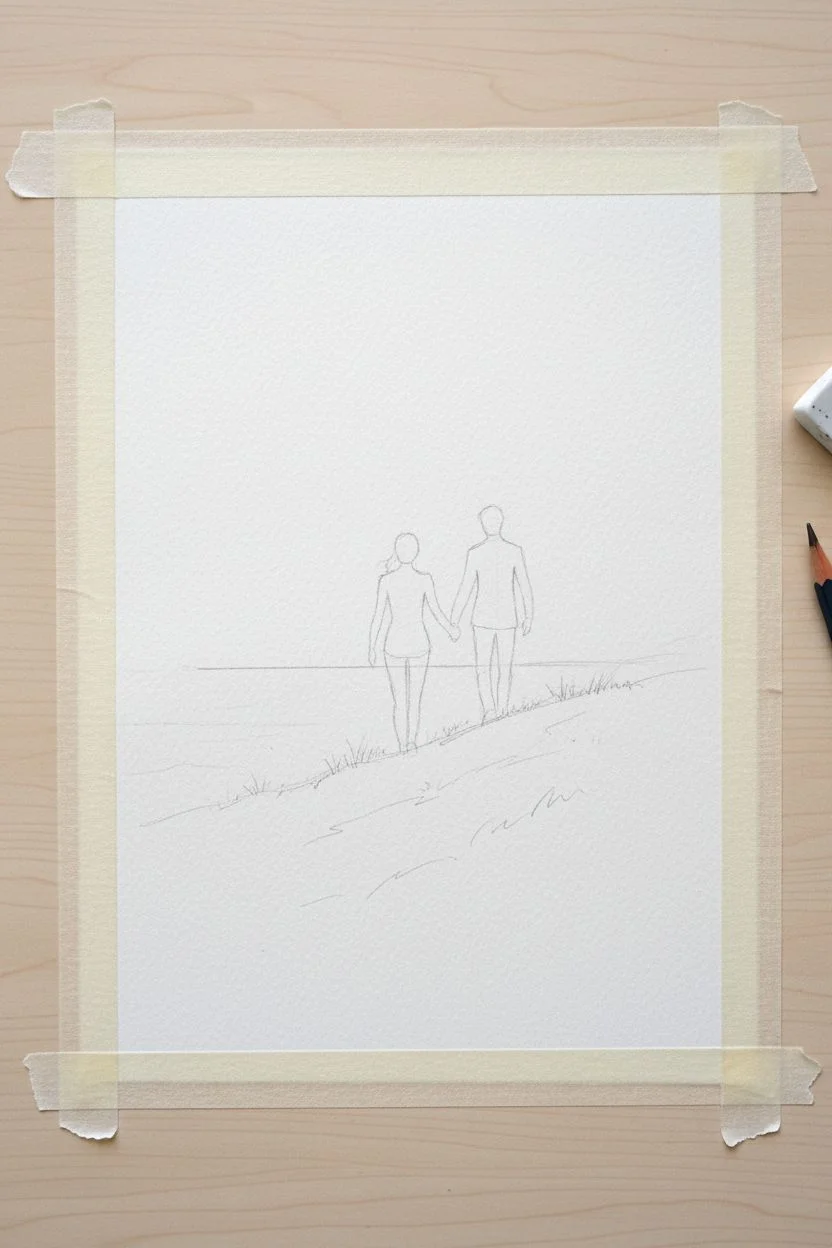
Step 1: Preparation & Sketching
-
Prepare your surface:
Begin by taping down your watercolor paper to a board or table on all four sides. This prevents the paper from buckling when you add the wet washes for the sky. -
Sketch the horizon:
Draw a very light horizon line roughly in the lower third of the paper. Keep it straight, possibly indicating a slight unevenness for the grassy path on the right. -
Lightly outline the figures:
Using a faint pencil touch, outline the two figures walking away. Focus on their posture and the connection of their hands. Don’t worry about internal details like clothing folds, as these will be filled in with solid black later. -
Define the foreground:
Sketch the rough shape of the grassy hill or path they are walking on, ensuring it slopes naturally towards the horizon line.
Muddy Skies?
If your blue and orange paints mix and turn gray/brown, let the blue layer dry completely before glazing the orange over it, or leave a small gap of white paper between them.
Step 2: Painting the Sky
-
Pre-wet the sky area:
Using your large flat brush, apply clean water to the entire sky area above the horizon line. The paper should be glistening but not forming puddles. -
Apply the blue tones:
While the paper is wet, load your brush with a watery mix of indigo or a cool blue. Paint the very top of the sky, letting the color bleed downwards naturally. -
Introduce the purples:
Mix a bit of crimson with your blue to create a purple hue. Paint this below the blue section, sweeping across the paper in diagonal, cloud-like strokes to suggest drama in the clouds. -
Add warmth:
Rinse your brush thoroughly. Pick up your orange and crimson paints. Apply these vibrant colors in the middle section of the sky, blending gently where they meet the purple to avoid creating muddy brown edges. -
Paint the horizon glow:
Near the horizon line, use yellow and light orange to create the brightest part of the sunset. This light source should appear to be behind the figures. -
Refine the clouds:
While the paint is still damp but not soaking, use a smaller brush with slightly more concentrated purple/indigo paint to dab in darker cloud streaks across the colored background. -
Let it dry completely:
Wait for the sky layer to be bone try. This is crucial; if it’s damp, your black silhouettes will bleed into the sky.
Step 3: Painting the Foreground & Figures
-
Paint the water:
If you are including the hint of ocean on the left, use horizontal strokes of a dark, muted purple-blue mix below the horizon line, leaving tiny slivers of white paper for reflections. -
Fill the grassy path:
Mix a dark, muddy green or brownish-black using burnt umber and indigo. Paint the ground area below the figures. I like to use a dry brush technique here to mimic the texture of rough grass. -
Start the silhouettes:
Switch to your black gouache or waterproof ink for maximum opacity. Using a medium round brush, carefully fill in the bodies of the two figures. -
Refine edges:
Use your fine detail brush to neaten the edges of the jackets, hair, and legs. Crisp edges are essential for a convincing silhouette effect. -
Paint the holding hands:
Pay special attention to the clasped hands. Use the fine brush to ensure the connection is clear and delicate, not a blob. -
Add foreground texture:
With the black paint, add tiny upward flicks along the top edge of the grassy hill to represent blades of grass silhouetted against the bright lower sky. -
Final touches:
Check for any light patches in your silhouettes and apply a second coat of black if needed to make them completely solid and dark.
Level Up: Texture
Sprinkle a tiny pinch of salt onto the wet sky paint while it’s drying. Brush it off once dry to create unique star-like textures in the upper atmosphere.
Once fully dry, remove the tape carefully to reveal a crisp border and frame your beautiful sunset moment


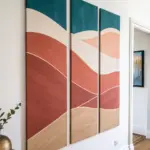
Sun and Moon Duo on Two Canvases
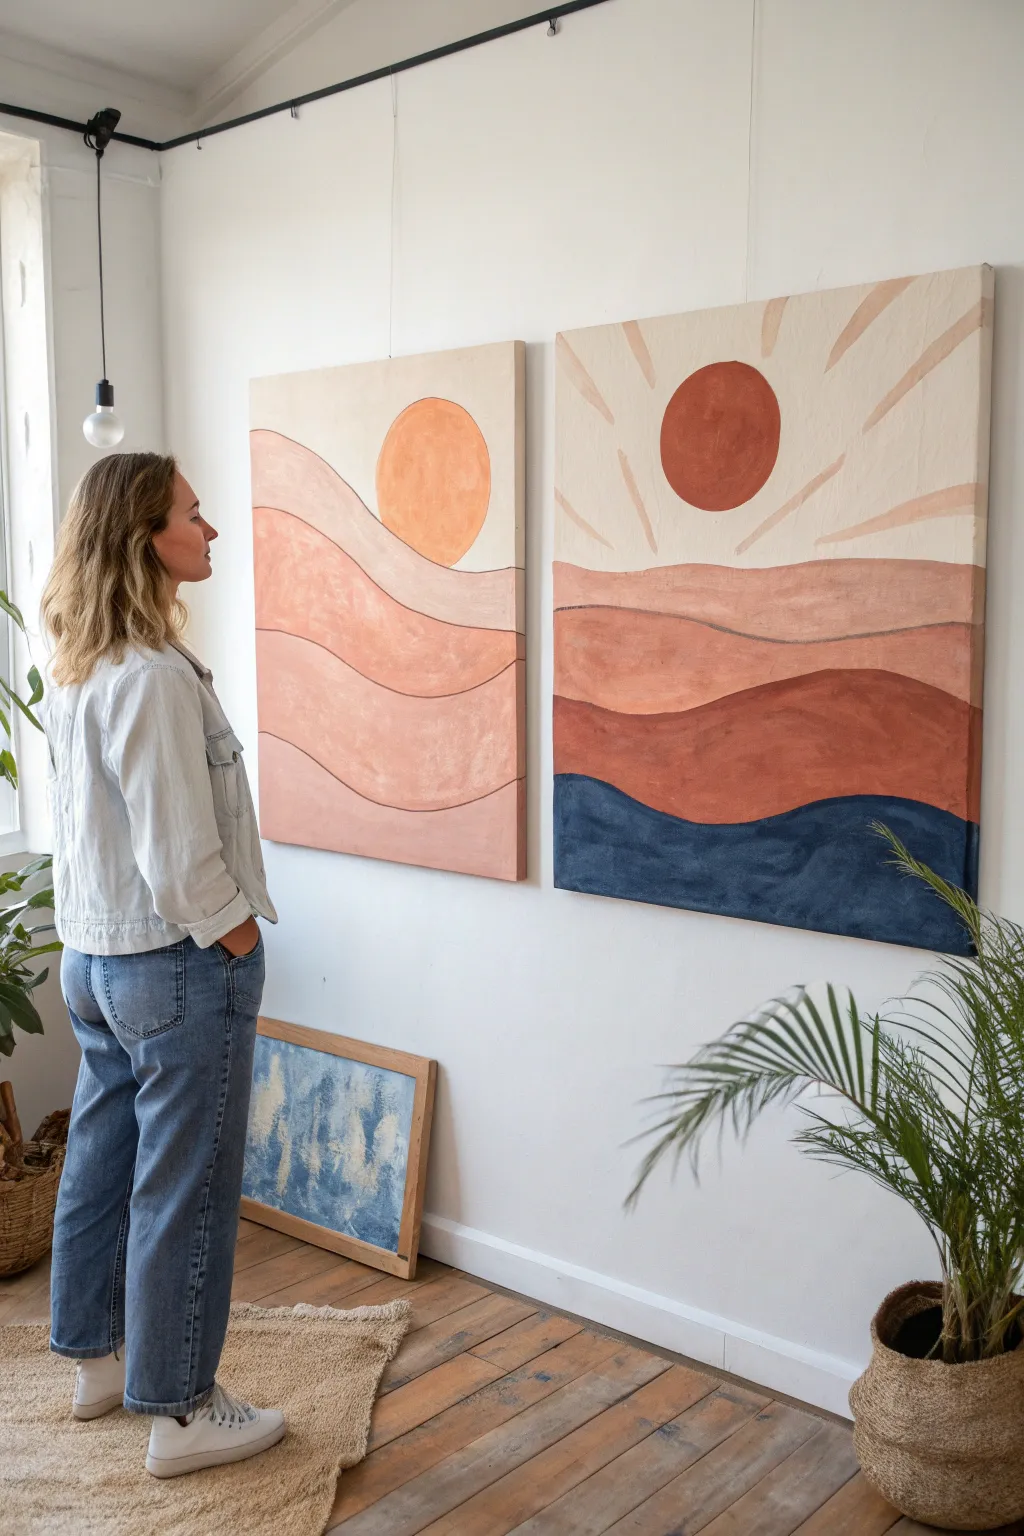
Capture the warmth of a sunrise and the mystery of sunset with this coordinating diptych, perfect for painting side-by-side with your best friend. The soft, sweeping curves and gentle earthy tones create a stunning visual flow that connects two separate canvases into one cohesive masterpiece.
Step-by-Step Guide
Materials
- Two large rectangular canvases (at least 24×36 inches recommended)
- Acrylic paints: Burnt Sienna, Yellow Ochre, Titanium White, Navy Blue, Terracotta, Peach
- Large flat brushes (2-inch)
- Medium round brushes
- Pencil and eraser
- Palette or paper plates for mixing
- Painter’s tape or masking tape
- Cup of water and paper towels
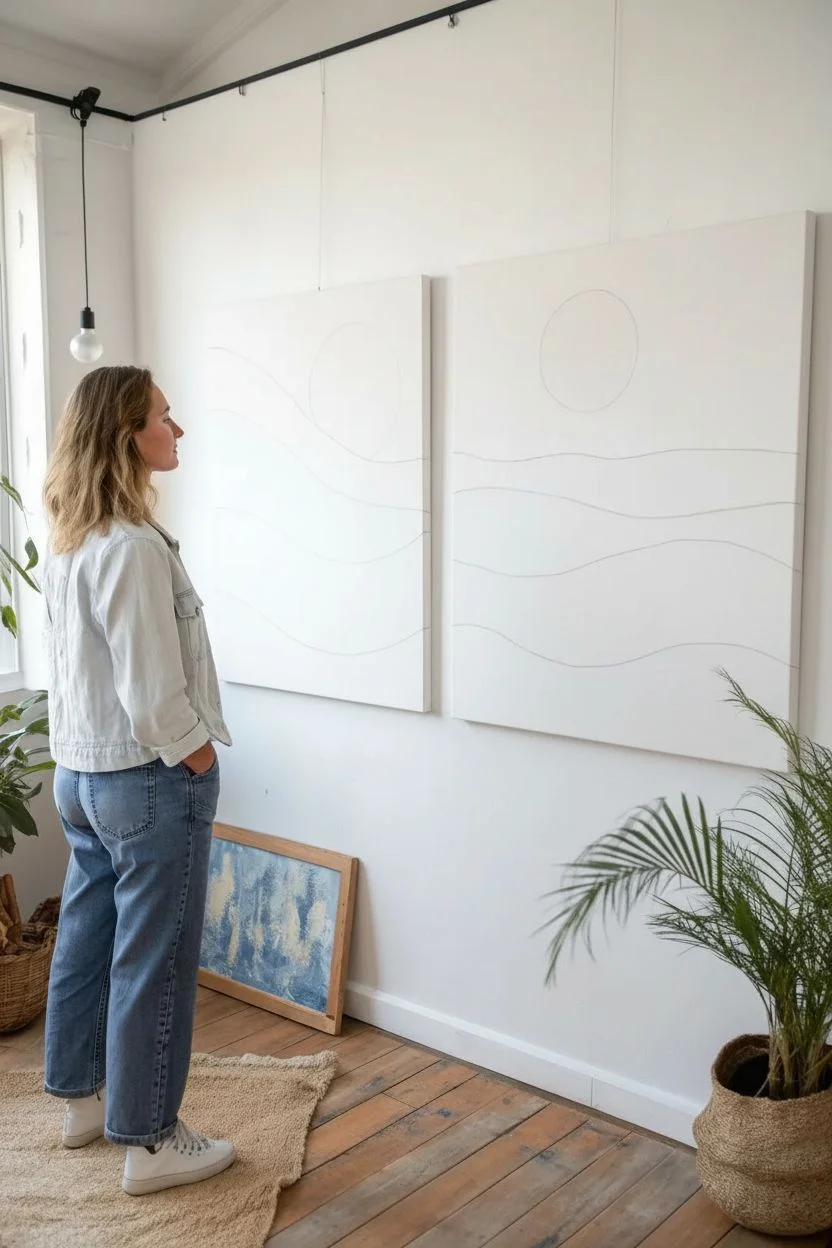
Step 1: Planning and Sketching
-
Prepare the workspace:
Set up both canvases side-by-side. If you are painting with a friend, place the canvases close enough that you can visualize the lines connecting across both surfaces. -
Sketch the horizon lines:
Using a pencil, lightly draw 4-5 wavy, organic lines horizontally across both canvases. Ensure the lines start on one canvas and appear to continue onto the second one, creating a continuous landscape effect. -
Add the celestial bodies:
On the left canvas, draw a large circle resting on the second hill line from the top. On the right canvas, draw a circle floating higher in the sky area. -
Sketch the rays:
On the right canvas only, sketch broad, slightly curved rays radiating outward from the floating sun circle.
Step 2: Painting the Left Canvas (Day/Sunrise)
-
Mix the sky color:
Create a pale cream by mixing a large amount of Titanium White with a tiny dot of Yellow Ochre. Paint the sky area around the sun shape. -
Paint the sun:
Mix peach and white to create a soft, warm orange. Fill in the large circle, keeping the edges crisp. -
Fill the top hill:
Mix a dusty rose color using White, Burnt Sienna, and a touch of Peach. Paint the first wave section just below the sun. -
Paint the middle section:
Deepen your dusty rose mixture with a little more Burnt Sienna. Paint the wide middle section of the hills. -
Complete the bottom:
For the bottom-most section, mix White with a small amount of Terracotta for a grounded, earthy pink tone.
Uneven Curves
If your hand is shaky while outlining the hills, dilute your paint slightly with water. Thinner paint flows smoother than thick paint, making long, continuous lines much easier to control.
Step 3: Painting the Right Canvas (Evening/Sunset)
-
Base coat the sky:
Use the same cream mixture from the first canvas to paint the entire sky area, painting right over your ray sketch lines lightly so you can still see them. -
Paint the bold sun:
Use pure Terracotta mixed with a touch of Burnt Sienna for a deep red-orange sun. This creates a strong focal point. -
Add the rays:
Mix a slightly darker beige than your sky color. Carefully paint the ray shapes radiating from the sun, leaving the cream background visible between them. -
Paint the horizon hills:
Mirror the colors from the left canvas for the top two hill sections to maintain continuity. Use the dusty rose and Terracotta mixes here. -
Add the deep sea:
For the bottom-most wave on this side, switch to a dark Navy Blue. This heavy contrast anchors the painting.
Add Texture
Mix a texture medium or modeling paste into your acrylics for the hill sections. This adds a tactile, relief quality that makes the landscape look earthy and organic.
Step 4: Refining and Outlining
-
Outline the waves:
Mix a diluted, thin wash of Burnt Sienna. Using a medium round brush, carefully trace the border lines between each hill section on both canvases to define the shapes. -
Refine the sun edges:
I like to go back with my smallest brush and sharpen the edges of the suns to make sure they are perfectly round. -
Touch up the sides:
Don’t forget to paint the edges (gallery wrap) of your canvases so the design wraps around to the wall. -
Final smooth check:
Look at the texture. If the paint looks too streaky, apply a second coat to any translucent areas once the first layer is dry.
Hang these pieces with a few inches of space between them to let the landscape flow across your wall


Two Best Friends, One Shared Playlist Painting


Celebrate the soundtrack of your friendship with this delicate watercolor illustration featuring a heart listening to music. The soft washes and crisp ink lines create a whimsical, hand-drawn look perfect for a greeting card or framed gift.
Step-by-Step Tutorial
Materials
- Cold press watercolor paper (300 gsm)
- Watercolor paints (Light red, Peach, or Coral)
- Fine liner pen (Black, 0.3mm or 0.5mm)
- Small round watercolor brush (Size 4 or 6)
- Pencil (HB)
- Eraser
- jar of clean water
- Paper towel
Step 1: Sketching the Layout
-
Outline the heart:
Start by lightly sketching a simple heart shape in the center of your watercolor paper. Keep the lines very faint since watercolor is transparent and pencil marks can be hard to erase later. -
Position the earphones:
Draw two earbud shapes resting inside the heart lobes. Imagine where ears would be on a person and place the buds there, slightly angled inward. -
Draw the cables:
Sketch the cables extending downwards from the earbuds. Let them cross over each other naturally in a loose loop at the bottom to create a realistic, draped look. -
Add musical notes:
Scatter a few musical notes—eighth notes and quarter notes—floating above the heart. Vary their angles slightly to mimic movement.
Step 2: Applying Watercolor
-
Mix your heart color:
Dilute a red or coral watercolor paint with plenty of water to create a soft, translucent wash. Test the color on a scrap piece of paper first to ensure it isn’t too dark. -
Paint the first layer:
Fill in the heart shape with your wash, carefully painting around the earbud shapes so they remain white. Keep the edges fully wet to avoid harsh lines forming mid-stroke. -
Add shading:
While the paint is still slightly damp, drop a tiny bit of more concentrated pigment into the bottom point of the heart and along the edges for depth. Let these colors bleed naturally. -
Paint the earbuds:
Mix a very watery grey or light beige. Paint the main body of the earbuds, leaving the mesh part unpainted for now. -
Shade the mesh:
Once the earbud body is dry, use a slightly darker grey to fill in the mesh area. I like to dab a paper towel on it quickly to give it a textured, porous look. -
Let it dry completely:
Allow the entire painting to dry completely. The paper should feel cool to the touch if it is still damp, so wait until it is room temperature.
Wet-on-Wet Magic
To get that soft, dreamy look on the heart, wet the paper with clean water first before touching it with paint. The pigment will spread by itself.
Step 3: Inking and Details
-
Outline the earbuds:
Using your fine liner pen, carefully trace the outlines of the earbuds. Add small details like the separation line between the plastic casing and the mesh. -
Texture the mesh:
Stipple the grey mesh area with tiny dots using the very tip of your pen to simulate the speaker texture. -
Trace the wires:
Go over your pencil lines for the cables. Try to use long, confident strokes rather than short sketching motions to keep the wire looking smooth. -
Ink the musical notes:
Fill in the heads of the musical notes with solid black ink and draw the stems carefully. -
Erase pencil marks:
Once you are absolutely certain the ink is dry (give it an extra minute just to be safe), gently erase any visible pencil lines. -
Optional texture:
For a finishing touch, you can rip the edges of the watercolor paper against a ruler to create the deckled edge look seen in the reference photo.
Smudged Ink?
If your pen smears when erasing, switch to a waterproof archival ink pen, or wait at least 30 minutes before erasing pencil lines.
Now you have a sweet, visual playlist to share with your best friend
BRUSH GUIDE
The Right Brush for Every Stroke
From clean lines to bold texture — master brush choice, stroke control, and essential techniques.
Explore the Full Guide
Two Cities, One Friendship Skyline Diptych
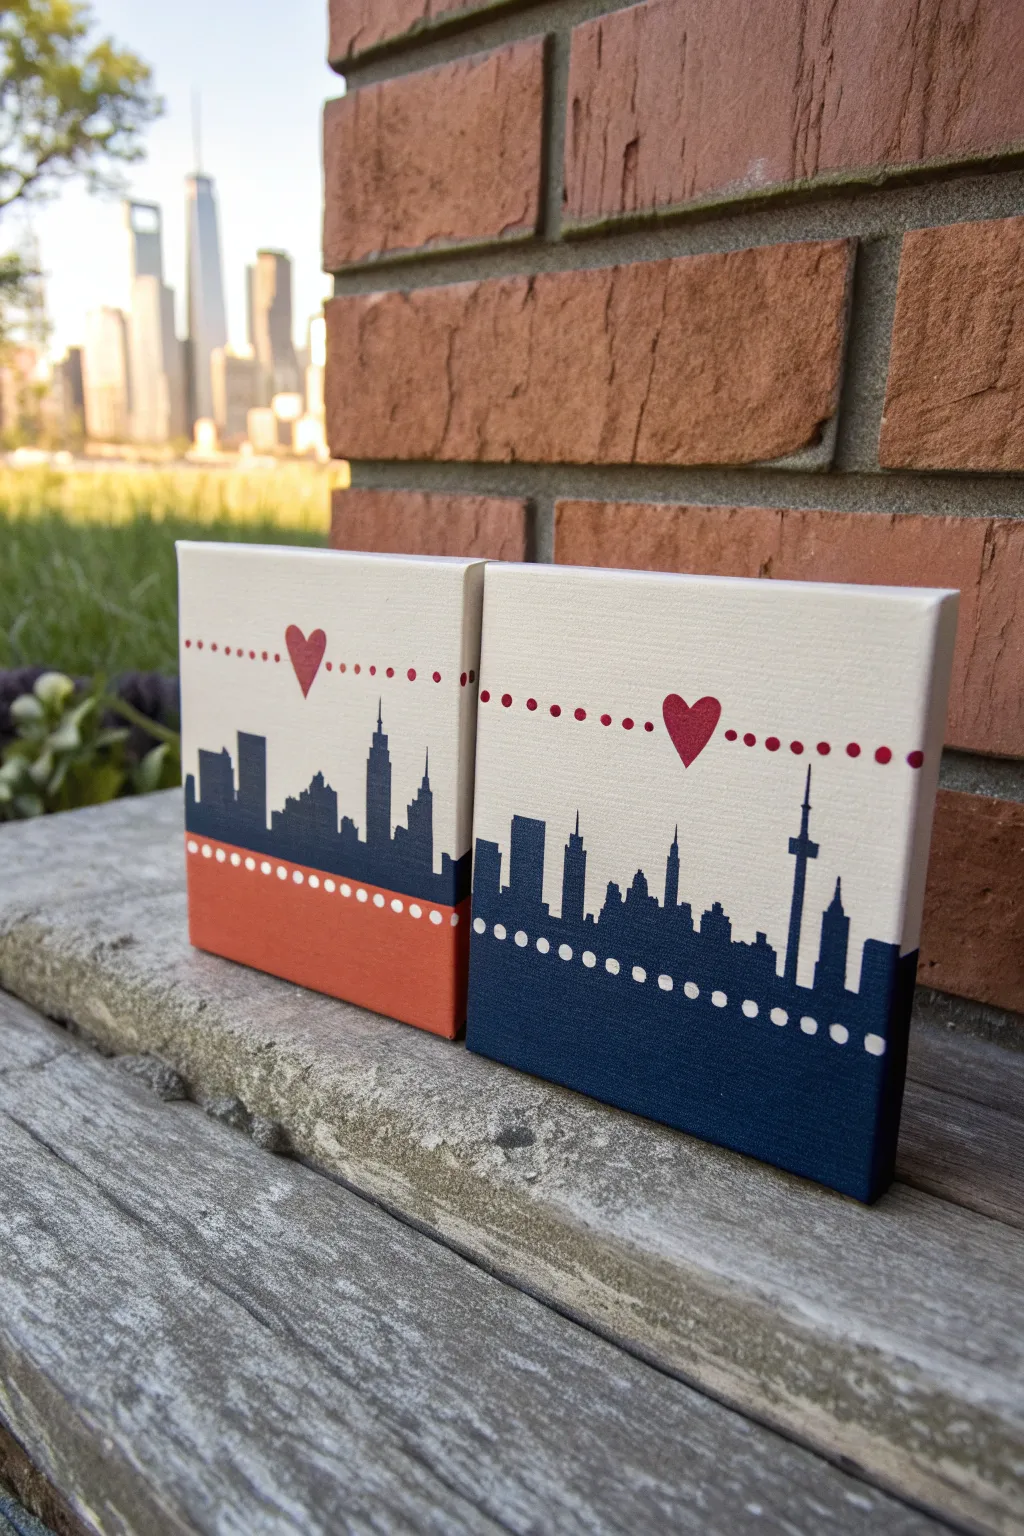
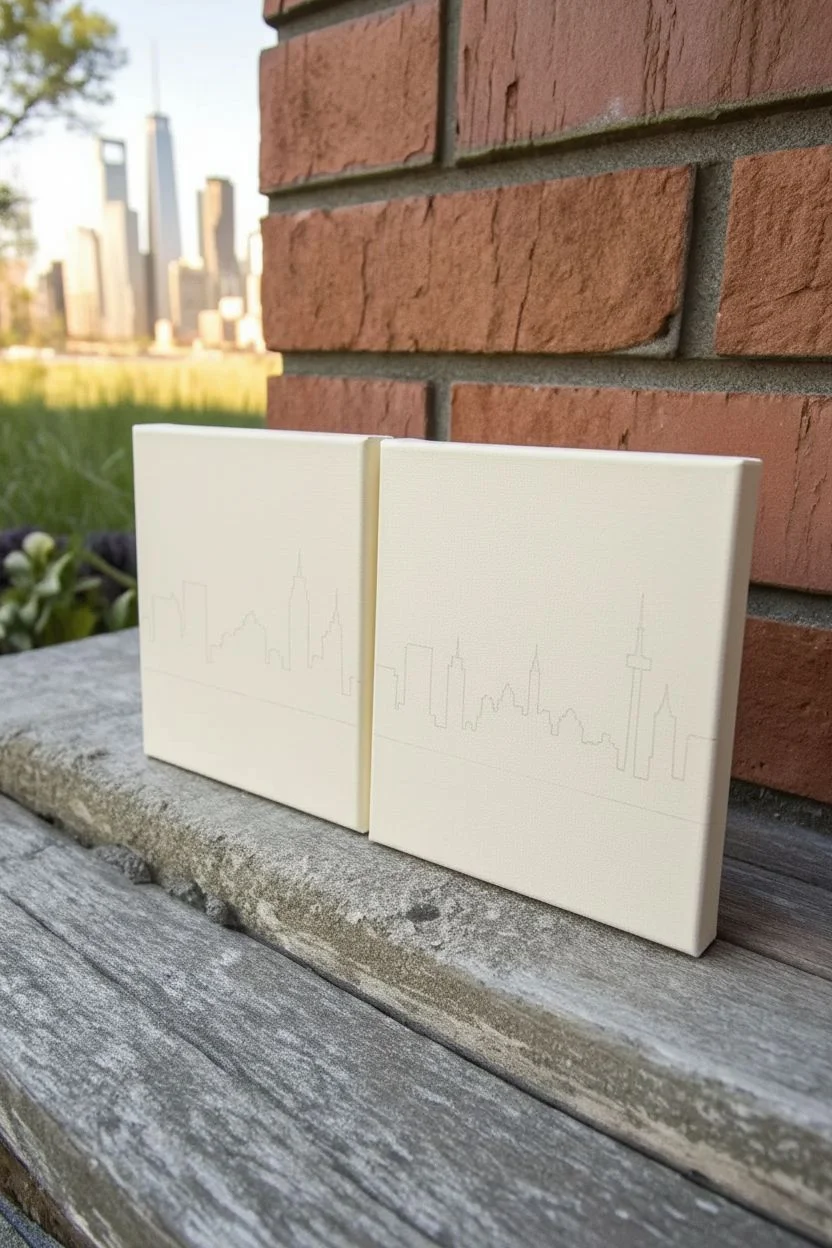
Celebrate a friendship that spans the miles with this graphic, minimalist set of canvases connecting two distinct city skylines. This project uses clean lines, bold silhouettes, and a connecting heart motif to show that distance means nothing when the bond is strong.
How-To Guide
Materials
- Two small square stretched canvases (4×4 or 6×6 inches)
- Acrylic paint (navy blue, burnt orange/terracotta, cream/off-white, red)
- Flat shader brushes (medium and small)
- Fine liner brush or paint pen (red and white)
- Painter’s tape or masking tape
- Pencil and eraser
- Ruler
- Carbon paper (optional for tracing)
- Reference photos of two city skylines
Step 1: Base Preparation
-
Prime the background:
Begin by painting the entire front surface and sides of both canvases with a creamy off-white acrylic paint. You want a solid, opaque base, so apply two to three thin coats, letting each dry completely to avoid brushstrokes. -
Mark the horizon line:
Once the base is bone-dry, use a ruler to lightly draw a horizontal pencil line across the lower third of both canvases. Make sure the lines are at the exact same height on both canvases so they match up perfectly when placed side-by-side. -
Draft the skylines:
Lightly sketch the skyline silhouettes above your horizon line. For accuracy, search for ‘simple skyline silhouette [city name]’ online. Focus on recognizable landmarks like the Empire State Building or the CN Tower. Keep the shapes blocky and graphical rather than hyper-detailed.
Uneven Dots?
If freehanding circles is tricky, dip the non-brush end (the handle tip) of your paintbrush into the paint and stamp it onto the canvas for perfect, uniform dots every time.
Step 2: Painting the Silhouettes
-
Block in the first city:
On the first canvas, mix a deep navy blue. Use a small flat brush to carefully fill in the skyline silhouette you drew. Ensure the bottom edge is crisp against your horizon line. -
Paint the first base block:
Below the horizon line on this first canvas, paint the remaining bottom rectangle in a contrasting color, like the burnt orange shown in the example. I find that taping off the skyline with painter’s tape helps get a razor-sharp line here. -
Block in the second city:
On the second canvas, repeat the process with the deep navy blue for the skyline. The buildings should look like a continuation of the style from the first canvas. -
Paint the second base block:
For the bottom section of the second canvas, you can either match the orange or flip the color scheme. In the example, the artist used the same navy blue for the base to create asymmetry across the pair. -
Refine the edges:
Go back with a very fine brush to sharpen the tips of spires and antennas. These tiny details define the city and make the silhouette readable.
Step 3: Connecting Details
-
Draft the ‘connection line’:
Place the two canvases side-by-side on your table. Use a ruler to lightly mark a path for the dotted line that will run across the sky of both pieces. -
Paint the red hearts:
In the center of where your dotted line will be on each canvas, paint a small, classic red heart. It should float prominently above the tallest buildings. -
Add the red dots:
Using a fine liner brush or a red paint pen, carefully add the dotted line extending out from the hearts to the edges of the canvas. Keep the spacing consistent. -
Add the decorative base dots:
Along the bottom block of color on both canvases, add a row of larger dots. Use white paint on the blue base and stick with white (or a very light cream) on the orange base. -
Clean up side edges:
Don’t forget the sides of your canvas. The design should wrap around. Extend the horizon lines and base colors onto the sides for a professional, finished look. -
Final touches:
Check for any pencil marks showing through and erase them gently. Seal your work with a matte or satin varnish to protect the paint and give the colors a unified sheen.
Level Up: Map Overlay
Instead of a solid color block at the bottom, decoupage actual map scraps of the specific cities onto the lower section before sealing for a deeper personal connection.
Hang these canvases together on one wall or mail one to your friend so you’re always connected by art
Then-and-Now Best Friend Diptych
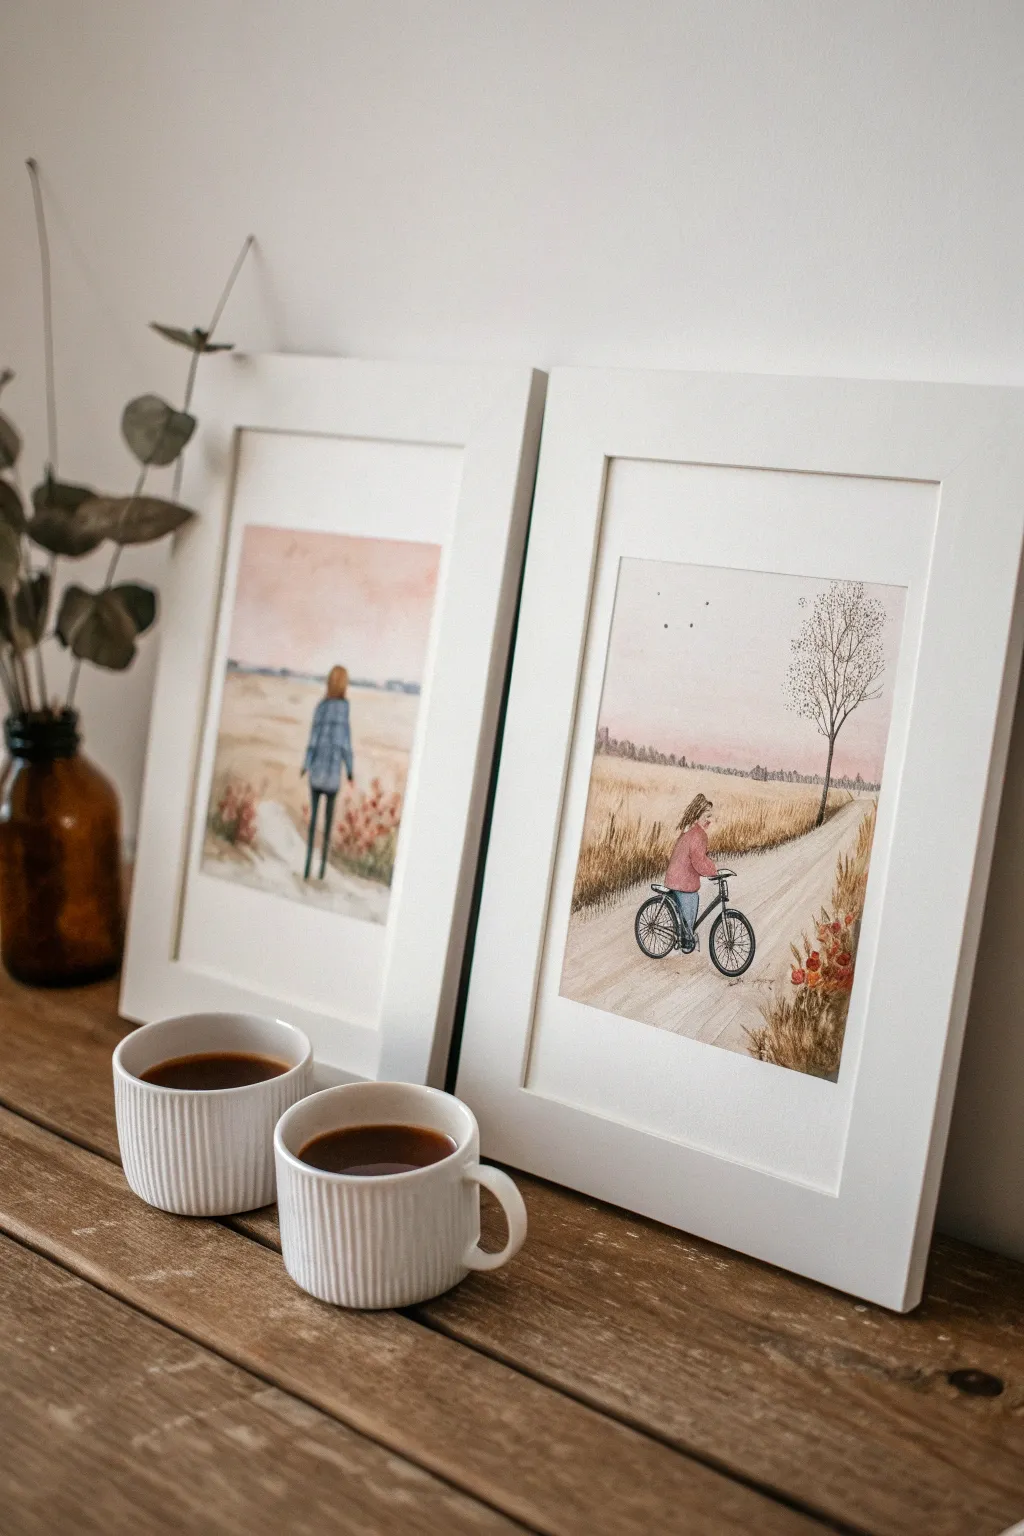
Capture the enduring spirit of friendship with this pair of soft, illustrative watercolors that depict two distinct moments in time. Using muted earth tones and delicate ink detailing, you’ll create a diptych that feels like a cherished memory pulled straight from a storybook.
Step-by-Step
Materials
- Cold press watercolor paper (300 gsm)
- Watercolor paints (Yellow Ochre, Burnt Sienna, Payne’s Grey, Alizarin Crimson, Sap Green)
- Small round brushes (size 2 and 4)
- Fine liner pen (0.1 or 0.3mm, waterproof, black)
- Two matching white frames with mats
- Pencil (HB) and kneaded eraser
- Masking tape
- Jar of water and paper towels
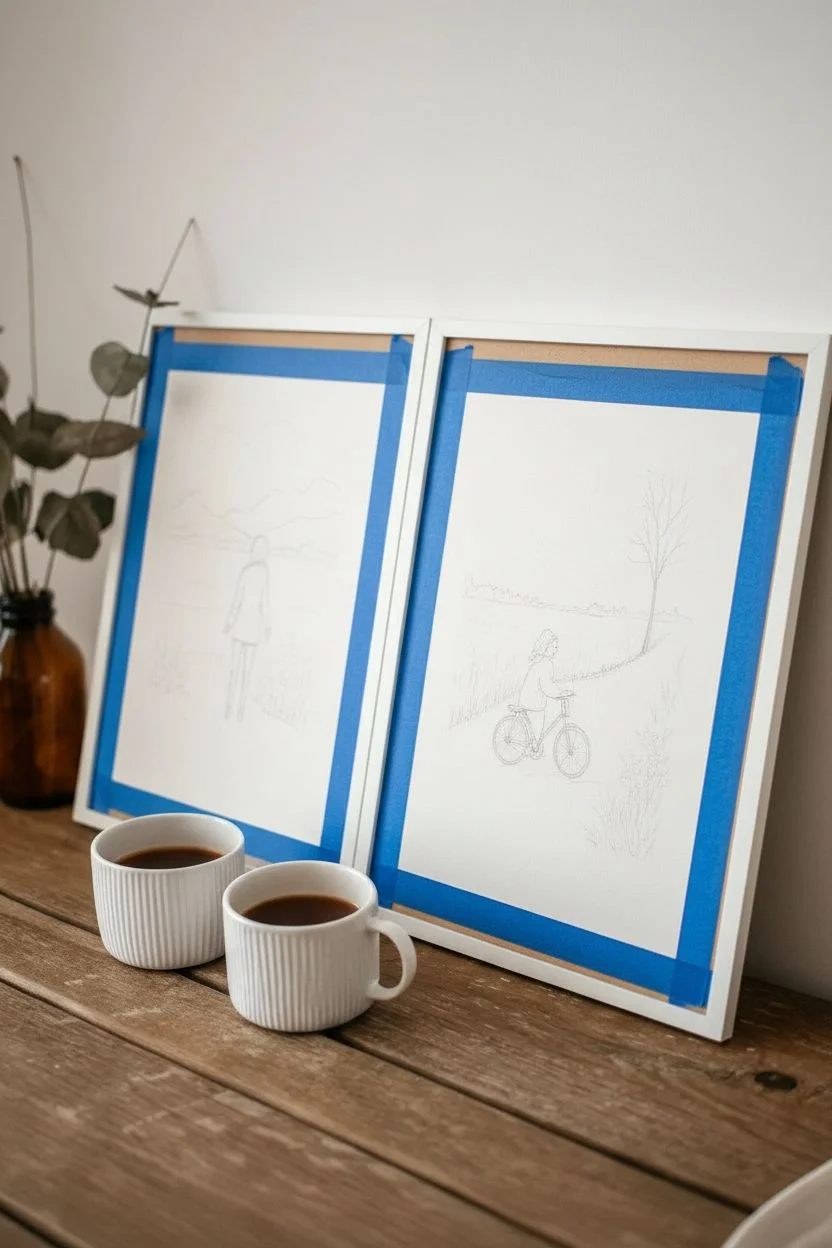
Step 1: Sketching the Scenes
-
Prepare the paper:
Cut two pieces of watercolor paper to fit your frame openings. Tape the edges down to a board to prevent buckling and create a clean white border. -
Draft the ‘Walking’ scene:
On the first sheet, lightly sketch a horizon line about one-third down from the top. Draw a simple figure walking away from the viewer in the center foreground, focusing on the shape of a coat and jeans rather than detailed anatomy. -
Draft the ‘Biking’ scene:
On the second sheet, sketch a diagonal path receding from the bottom left to the center right. Place a figure on a bicycle in the lower left quadrant and a skinny, bare tree on the right side of the path. -
Refine the details:
Add faint suggestions of tufts of grass and distant tree lines in the background of both sketches. Keep pencil lines extremely light so they won’t show through the transparent paint later.
Wet-on-Dry Trick
For the crisp grass blades in the foreground, ensure your paper is 100% dry before painting. This prevents the strokes from blurring into the background wash.
Step 2: Painting the Atmosphere
-
Wash the sky:
Mix a very dilute wash of Alizarin Crimson and a touch of Yellow Ochre for a dusty pink sky. Wet the sky area first with clean water, then drop in the color, letting it fade towards the horizon. -
Add distant texture:
While the sky is still slightly damp near the horizon, dab in a mix of Payne’s Grey and Burnt Sienna to create a soft, out-of-focus tree line in the distance. -
Base layer for the fields:
For the fields, use a large wash of Yellow Ochre muted with a tiny bit of Payne’s Grey. Apply this loosely to the ground areas, leaving white space for the path and the figures. -
Deepen the field colors:
While the base wash is wet, charge in touches of Burnt Sienna to suggest depth and variations in the tall grass.
Customize the Hair
Paint the hair color and style to match you and your best friend exactly. You can even add a specific scarf or backpack that holds shared meaning for you.
Step 3: Figures and Foreground
-
Paint the clothing:
Once the background is dry, use a size 2 brush to paint the figures’ clothes. I like to use a cool Payne’s Grey for jeans and a warm pink or blue for the jackets to make them pop against the neutral field. -
Define the path:
On the biking scene, paint the dirt road using a very watery mix of Payne’s Grey and brown. Use directional brushstrokes that follow the perspective of the road going into the distance. -
Texture the foreground:
Using a relatively dry brush, flick fast, upward strokes of Burnt Sienna and Olive Green in the corners to create the look of tall, detailed wheat or wildflowers closest to the viewer. -
Add floral pops:
Dot in tiny specks of red or orange amongst the foreground grass to suggest wildflowers, mirroring the warmth of the sky.
Step 4: Inking and Finishing
-
Outline the figures:
Once the paint is bone dry, use your fine liner pen to loosely outline the figures. Keep the lines broken and sketchy rather than solid and cartoonish. -
Detail the bicycle:
Carefully draw the bicycle wheels and frame over the dried paint. The pen works best here for getting the crisp mechanical details that a brush might smudge. -
Draw the tree:
On the biking painting, use the pen to draw the trunk and delicate branches of the bare tree. Add tiny dots or scratches near the top branches to simulate sparse leaves or birds. -
Add movement birds:
Place three or four tiny ‘v’ shapes in the sky of the biking scene to balance the composition and suggest vastness. -
Frame the work:
Remove the tape carefully at an angle. Place your finished paintings into the mat openings and secure them, then assemble the frames.
Hang these side-by-side to tell a beautiful story of friendship moving through the seasons of life


Have a question or want to share your own experience? I'd love to hear from you in the comments below!