
When I’m painting rocks for a best friend, I want the design to feel like a tiny, hold-in-your-hand love letter. These best friend rock painting ideas are all about sweet symbols, shared memories, and matching designs that look gift-ready the moment they dry.
Classic “Best Friends” Hand-Lettering

This project celebrates the beauty of simplicity with bold, clear lettering on a naturally textured canvas. The contrast between the organic stone and crisp black text creates a modern, affectionate token perfect for gifting to your closest companion.
Step-by-Step Tutorial
Materials
- Smooth, oval river rock (light-colored)
- Mild dish soap and scrub brush
- Fine-grit sandpaper (optional)
- Pencil (HB or lighter)
- Black acrylic paint marker (fine tip)
- Black acrylic paint marker (medium tip)
- Red acrylic paint marker or acrylic paint with fine brush
- Water-based matte or satin sealant
- Eraser
Step 1: Preparation
-
Select the perfect canvas:
Look for a stone that is relatively flat and oval-shaped. A lighter color like beige, cream, or light gray provides the best background for the black lettering to pop. -
Clean the surface:
Wash the rock thoroughly with warm water and mild dish soap to remove any dirt or oils that might repel the paint. -
Dry completely:
Allow the stone to dry fully in the sun or overnight. Trapped moisture can ruin the paint finish later. -
Smooth the texture:
If your rock has rough bumps where you plan to write, lightly sand the surface with fine-grit sandpaper to create a better writing area, then wipe away the dust.
Fixing Wobbly Lines
If a line goes astray, wait for it to dry completely. Then, gently scrape the error off with a toothpick or paint over it with a mix of white and beige paint to match the stone.
Step 2: Drafting the Design
-
Plan the layout:
Visually divide the rock into two horizontal lines. The word ‘BEST’ will sit on the top line, slightly offset to the left to make room for the heart. -
Sketch the word ‘BEST’:
Using a pencil, lightly sketch the letters B-E-S-T in a loose, uppercase sans-serif style. Keep the letters slightly rounded and distinct from one another. -
Adding the heart placeholder:
Lightly sketch the outline of a heart to the right of ‘BEST’. It should be roughly the same height as the letters. -
Sketch ‘FRIENDS’:
On the line below, sketch the word ‘FRIENDS’. I find it helpful to center this word relative to the entire composition above, usually starting the ‘F’ slightly indented under the ‘B’. -
Check spacing:
Step back and look at your pencil sketch. Ensure the letters are legible and the spacing feels balanced before you commit to ink.
Add Dimension
Add tiny white highlight dots inside the thickest parts of the black letters and on the curve of the red heart to give the text a glossy, bubbly sticker effect.
Step 3: Painting and Detailing
-
Outline the top row:
Using a fine-tip black paint marker, carefully trace over your pencil lines for the word ‘BEST’. Work slowly to keep the edges crisp. -
Thicken the strokes:
Switch to a medium-tip marker or go over your lines again to add weight to the letters. The goal is a bold, almost ‘hand-stamped’ look. -
Letter the bottom row:
Trace the word ‘FRIENDS’ with the fine-tip marker first. Note how the ‘S’ at the end kicks up slightly for a playful touch. -
Fill in the lettering:
Go back over ‘FRIENDS’ with the medium tip to match the thickness of the top row. Pay special attention to the corners of the letters like ‘E’ and ‘F’ to keep them sharp. -
Paint the heart:
Using a red paint marker or a small brush with red acrylic paint, fill in the heart shape. Start from the center and push the paint outward to the sketched edge. -
Let the paint set:
Allow the black and red paint to dry completely. This usually takes about 15-20 minutes, depending on the humidity.
Step 4: Finishing Touches
-
Clean up sketch lines:
Once you are absolutely certain the paint is dry, gently erase any visible pencil marks remaining around the letters. -
Apply the first coat of sealer:
In a well-ventilated area, spray a light coat of matte or satin sealant over the rock. Keep the can moving to avoid drips. -
Final cure:
Let the first coat dry, then apply a second coat for durability, especially if this rock will be placed outdoors.
This charming stone is now ready to serve as a paperweight or garden decor for that special friend


Names or Nicknames in Cute Script

Celebrate your friendship with this charming two-stone set featuring elegant script and minimalist doodles. These matching smooth stones come together to form one sweet message, making them a perfect, heartfelt gift to share.
Step-by-Step Guide
Materials
- Two smooth, oval river rocks (approx. 3-4 inches wide)
- Sandpaper (fine grit)
- White or cream acrylic paint (matte finish)
- Wide flat paintbrush
- Fine tip black acrylic paint pen (0.7mm or extra fine)
- Medium tip black acrylic paint pen (1mm – 3mm)
- Pencil and eraser
- Matte spray sealant
Step 1: Preparation & Base Coat
-
Prepare the surface:
Begin by washing your stones thoroughly with soap and water to remove any dirt or oils. Let them dry completely, then lightly sand the surface if there are any rough patches to ensure a smooth canvas for your lettering. -
Apply the first base layer:
Using your wide flat brush, paint the top surface of both stones with the white or cream acrylic paint. I like to keep the brush strokes long and in one direction for a clean finish. -
Let it dry:
Allow the first coat to dry fully. This usually takes about 15-20 minutes, depending on the thickness of the paint. -
Apply a second coat:
Add a second layer of base paint to ensure the natural color of the rock doesn’t show through. Let this dry completely before moving on to the sketching phase.
Ink Flow Tip
Test your paint pen on a scrap piece of paper before touching the rock to ensure a smooth, blob-free flow.
Step 2: Design & Lettering
-
Lightly sketch the text:
With a pencil, very lightly sketch ‘Best’ on one stone and ‘Friend’ on the other. Center the words, leaving room above ‘Best’ for the heart and below ‘Friend’ for the leaf sprig. -
Outline the main text:
Take your medium tip black paint pen and trace over your pencil letters. Use a steady hand and pull the pen toward you for smoother curves. -
Thicken the downstrokes:
To create that faux-calligraphy look, go back over the downward strokes of each letter (the parts where your pen moved down). Thicken these lines slightly while leaving the upward strokes thin. -
Add the main heart:
On the ‘Best’ stone, draw a large, bold heart outline slightly above the text using the medium tip pen. Give it a playful, slightly imperfect shape. -
Detail the heart:
Switch to your fine tip pen. Inside the large heart, add tiny stippling dots or small dashed lines to give it texture without filling it in completely. -
Draw the leaf sprig:
On the ‘Friend’ stone, beneath the text, draw a long, horizontal curved line with the fine tip pen. Add small, tear-drop shaped leaves alternating along the stem.
Step 3: Doodles & Finishing Touches
-
Add accent hearts:
Using the fine tip pen, scatter two or three tiny open hearts around the word ‘Best’ and one small heart above the ‘i’ in ‘Friend’. -
Draw solid hearts:
Fill in a few tiny solid black hearts near the edges of the ‘Best’ stone for visual contrast. -
Incorporate stars:
Draw simple five-pointed stars or small asterisks (*) near the edges of the ‘Best’ stone to fill empty negative space. -
Add stippling details:
On the ‘Friend’ stone, use the fine tip pen to create a dusting of tiny dots around the outer perimeter of the design. This frames the word beautifully. -
Erase pencil lines:
Once you are absolutely certain the ink is 100% dry (give it at least 30 minutes), gently erase any visible pencil marks. -
Seal the artwork:
Finish by applying a light coat of matte spray sealant. Hold the can about 10-12 inches away and spray in a sweeping motion to prevent ink from running.
Add Some Sparkle
Use a metallic gold or silver pen to highlight the center of the stars or the veins of the leaves for a chic touch.
Place these stones side-by-side on a shelf or gift one to your best friend to keep you connected


Matching Initials With a Shared Heart
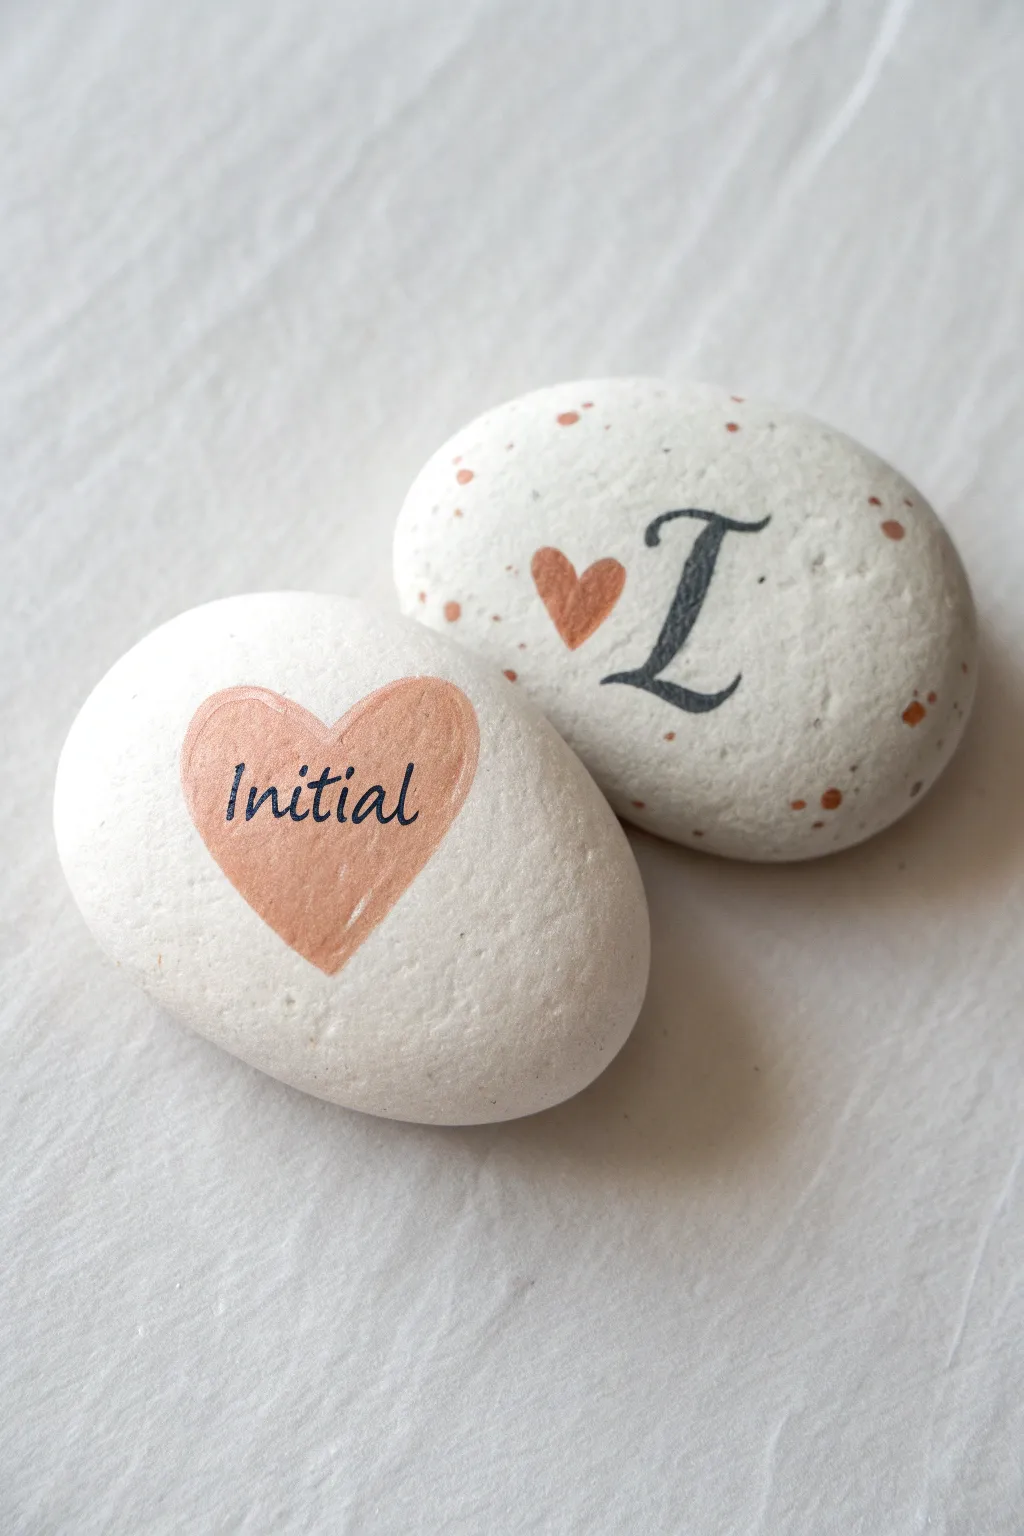
Celebrate your connection with these simple yet elegant matching stones, featuring a warm, shared color palette and personalized initials. The clean white background makes the peach heart and crisp black lettering pop, creating a modern keepsake.
Step-by-Step
Materials
- Two smooth, white river rocks or pebbles (similar size)
- White acrylic paint (matte finish)
- Peach or terracotta acrylic paint
- Black paint pen (fine tip) or liner brush with ink
- Soft flat paintbrush (size 6 or 8)
- Small round paintbrush (size 2)
- Old toothbrush or stiff bristle brush
- Pencil
- Matte varnish or sealant spray
Step 1: Base Preparation
-
Clean the surface:
Begin by washing your stones with soap and water to remove any dirt or oils that might prevent the paint from sticking. -
Dry thoroughly:
Let the stones dry completely in the sun or use a hairdryer to speed things up. -
Prime the stones:
Apply an even coat of white acrylic paint to the top face of both stones. -
Second coat:
Once the first layer is dry, add a second coat of white to ensure a solid, opaque background that hides the natural stone color.
Uneven Splatter?
If your paint isn’t flicking easily, mix in a tiny drop of water. Test the splatter density on a scrap piece of paper before aiming at the stone.
Step 2: Designing the Left Stone
-
Sketch the heart outline:
Using a pencil lightly, draw a medium-sized heart in the center of the first stone. Aim for a slightly rounded, soft shape. -
Fill the heart:
Dip your small round brush into the peach or terracotta paint and carefully fill inside your pencil lines. -
Smooth the paint:
I recommend doing two thin layers for the heart rather than one thick gloopy one, as this prevents distinct ridges from forming. -
Let it cure:
Wait until the painted heart is entirely dry to the touch before attempting to write on it. -
Add the text:
Take your fine-tip black paint pen and write a full name or word (like ‘Initial’ in the example) across the center of the peach heart in a flowing script.
Add Metallic Flair
Outline the peach hearts with a very fine gold paint pen, or add a few gold splatters to the second stone for an elegant shimmer.
Step 3: Designing the Right Stone
-
Sketch the initial:
On the second stone, lightly sketch a large capital initial letter slightly off-center to the right. -
Ink the letter:
Trace over your pencil sketch with the black paint pen. Thicken the downstrokes of the letter to give it a faux-calligraphy look. -
Add the mini heart:
To the left of the initial, paint a small peach heart using the tip of your small brush. This visually connects it to the first stone. -
Prepare for speckling:
Cover your workspace or place the stone inside a cardboard box to contain the mess for the next step. -
Create the splatter effect:
Dip a toothbrush or stiff brush into slightly watered-down peach paint. Run your thumb across the bristles to flick tiny specks of paint onto the stone around the initial. -
Clean up details:
If any large blobs land where you don’t want them, quickly dab them up with a damp cotton bud.
Step 4: Finishing Touches
-
Inspect the work:
Look closely at your lettering lines; touch up any jagged edges with the black pen for a crisp finish. -
Erase pencil marks:
Once absolutely everything is dry, gently erase any visible pencil sketch lines. -
Seal the art:
Apply a coat of matte varnish or spray sealant to protect the paint from chipping and to unify the sheen of the different paints.
Give one rock to your best friend and keep the other as a symbol of your lasting bond


Two Stick Figures Holding Hands
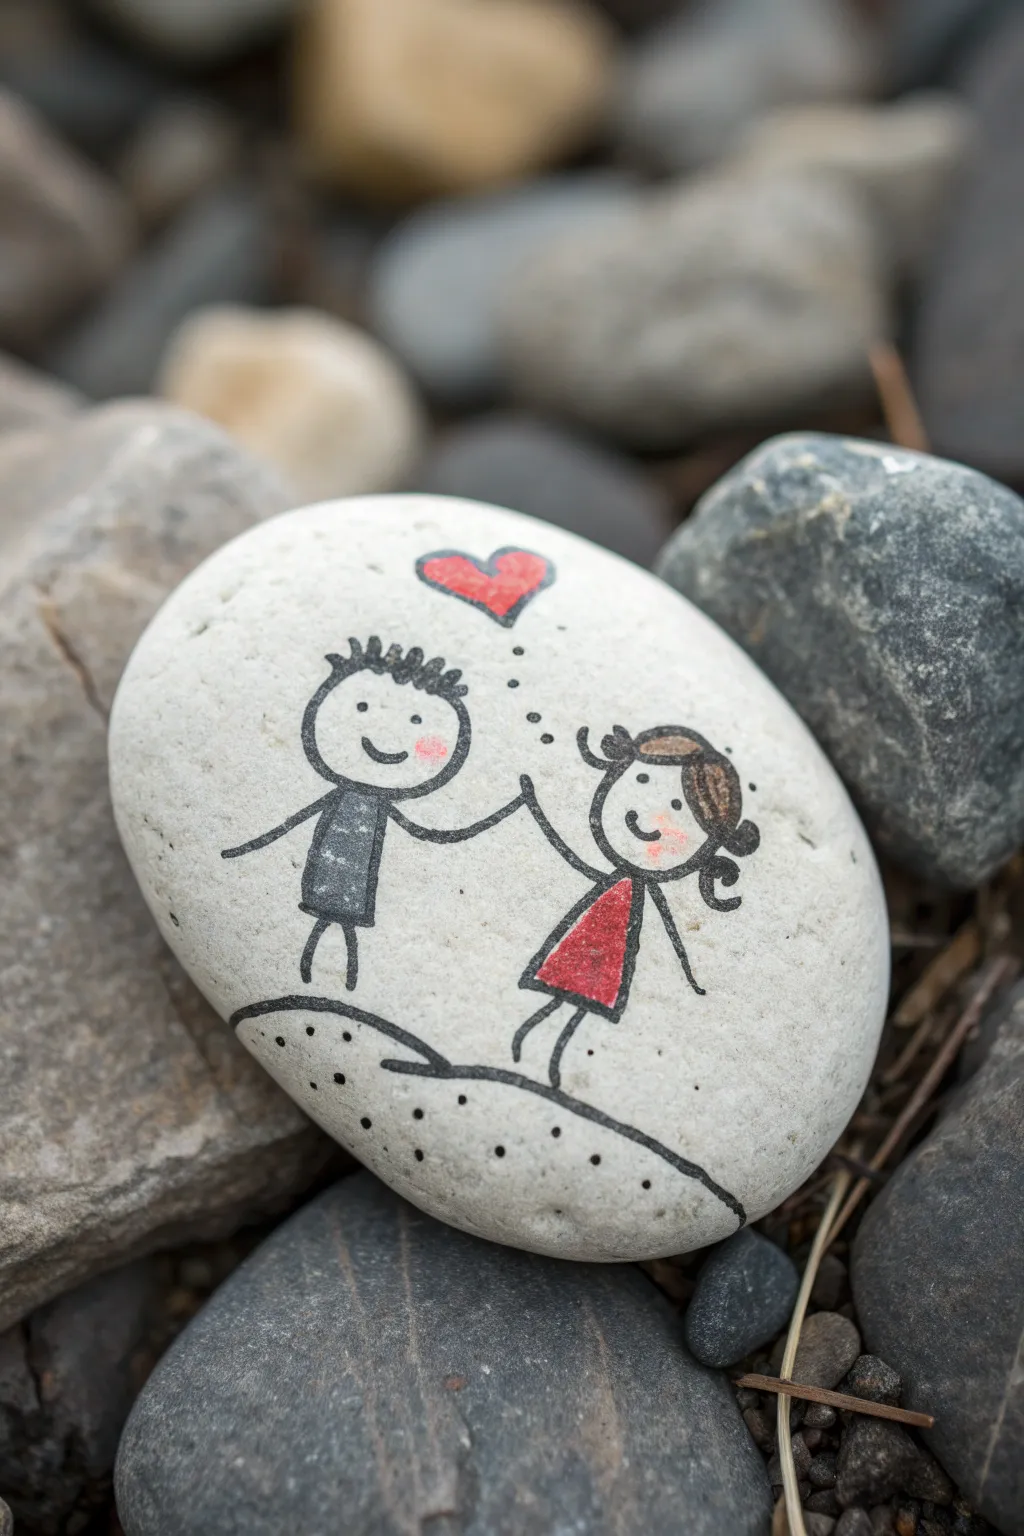
This charmingly simple rock painting captures the sweet innocence of friendship with two smiling stick figures holding hands. Using a smooth, white canvas, the minimalist black linework pops beautifully against pops of red and brown.
Step-by-Step Guide
Materials
- Smooth, flat river rock (rounded oval shape)
- White acrylic paint (matte finish)
- Black fine-point paint pen (0.5mm or 0.7mm) or graphic liner
- Red acrylic paint or paint pen
- Grey acrylic paint or paint pen
- Brown acrylic paint or paint pen
- Small round detail brush (size 0 or 1)
- Clear matte varnish sealer
Step 1: Base Preparation
-
Clean the stone:
Begin by washing your stone with warm soapy water to remove any dirt or oils. Scrub it gently and let it dry completely before starting. -
Prime the surface:
Apply a coat of white acrylic paint to the entire top surface of the rock. This creates that clean, paper-like background essential for this doodle style. -
Add a second coat:
Once the first layer is dry to the touch, add a second coat of white to ensure full opacity so the natural rock color doesn’t peek through. -
Let it cure:
Allow the white base to dry thoroughly. I prefer to leave it for at least an hour, as drawing with pens on tacky paint can ruins the nibs.
Smudge Prevention
Paint pens can smear easily on smooth rocks. Always work from left to right (if right-handed) and let black lines dry for 5 mins before touching nearby areas.
Step 2: Drafting and Outlining
-
Sketch the ground:
Using a pencil very lightly, draw a curved hill at the bottom third of the rock to ground your figures. -
Draw the heads:
Sketch two circles side-by-side above the hill. Keep them roughly the same size, leaving a little space between them for their arms. -
Outline the bodies:
Sketch a rectangular shape for the left figure’s torso and a triangular A-line shape for the right figure’s dress. -
Add the limbs:
Draw simple stick legs and arms. Make sure the inner arms reach toward each other and connect in a ‘V’ shape to show them holding hands. -
Ink the main lines:
Take your black fine-point paint pen and trace over your pencil lines for the ground, bodies, and heads. Do not fill anything in yet; just focus on clean outlines.
Step 3: Adding Color and Detail
-
Fill the clothing:
Use a small brush or a colored paint pen to fill the boy’s shirt with grey and the girl’s dress with a bright red. -
Add the hair:
For the left figure, use the black pen to draw short, spiky strokes on top of the head. For the right figure, use brown paint to paint a side-swept hairstyle and a small bun. -
Draw the heart:
Paint a small, floating red heart centered above the space between their heads. -
Create faces:
Using the fine black pen, add two small dots for eyes and a wide U-shape for a smile on each face. -
Flush the cheeks:
Very lightly dab a tiny amount of diluted red or pink paint on the cheeks to give them a rosy glow. You can use your finger to smudge it slightly for a softer look.
Personalize It
Make it a portrait of specific friends! Change the hair colors to match yours, or add tiny accessories like glasses, a baseball cap, or a flower in the hair.
Step 4: Final Touches
-
Detail the hair:
Once the brown paint is dry, use your black pen to add a few definition lines over the girl’s hair to suggest strands and movement. -
Add thought bubbles:
Dot three or four tiny black specks leading from the figures up toward the heart, creating a subtle ‘thought bubble’ effect. -
Texture the ground:
Add a few random black dots on the white ground area below the horizon line to give the terrain a bit of sandy texture. -
Seal the artwork:
Finish by applying a clear matte varnish over the entire rock. This protects the delicate pen lines from scratching or fading.
Place your finished friendship stone in a garden or gift it to your best pal as a permanent reminder of your bond
BRUSH GUIDE
The Right Brush for Every Stroke
From clean lines to bold texture — master brush choice, stroke control, and essential techniques.
Explore the Full Guide
Besties With Matching Hoodies

Capture the warmth of friendship with this adorable painted stone featuring two best friends bundled up in matching hoodies. The soft pastel colors and simple cartoon style make this a relaxing project that results in a heartwarming keepsake.
Detailed Instructions
Materials
- Smooth, oval-shaped river rock (cleaned and dried)
- White gesso or acrylic primer
- Pencil and eraser
- Fine liner pens (black, waterproof, 0.1mm and 0.5mm)
- Acrylic paints (Soft Pink, Sage Green, Burgundy, Olive Green, Cream/Beige for skin)
- Small round paintbrushes (sizes 0 and 2/0)
- Matte varnish or sealant spray
Step 1: Base Prep & Sketching
-
Prime the surface:
Start by coating the top surface of your clean rock with white gesso or primer. This creates a bright, neutral background that helps the colors pop, rather than painting directly on bare stone. Let it dry completely. -
Outline the hoodies:
Using a light pencil, draw two large interconnected teardrop shapes side-by-side. The left one should be slightly shorter. These will form the main hoods and bodies. -
Add facial openings:
Draw an oval inside the upper part of each teardrop for the faces. Make sure the hoods look snug around where the faces will be. -
Sketch the bodies:
Extend the shapes downward to create their seated posture. Draw crossed legs by adding curved angular lines at the bottom of each figure. -
Detail the faces:
Lightly sketch the bands of bangs (hair) across the foreheads and mark small curved lines for the closed, smiling eyes.
Step 2: Blocking in Color
-
Paint the skin tones:
Mix a gentle cream or beige tone and carefully fill in the face ovals. Apply two thin coats for opaque coverage, allowing drying time in between. -
Fill the pink hoodie:
Use your soft pink acrylic to paint the left figure’s hood and jacket area. Use a small brush to work carefully around the face shape. -
Fill the green hoodie:
Paint the right figure’s hood and jacket using a sage green color. I find that slightly watering down the paint helps it flow better into the small corners near the neck. -
Paint the pants:
Use burgundy for the left figure’s legs and a darker olive green for the right figure’s legs to create contrast with the jackets. -
Add hair color:
Fill in the bangs area with a dark brown or reddish-brown paint, keeping the line crisp against the forehead skin tone.
Ink Smearing?
If your black fineliner smudges when you apply varnish, switch to a spray sealant. Mist it lightly from 12 inches away for the first coat to ‘set’ the ink without dragging a brush through it.
Step 3: Fine Details & Outlining
-
Add rosy cheeks:
Dip a dry brush into very little pink paint and gently dab blushing circles onto the cheeks of both figures. -
Start the outlining:
Once all paint is 100% dry, grab your 0.5mm waterproof black pen. Trace the main outer lines of the hoodies and legs to define the shapes. -
Draw garment details:
Add the center zippers, pocket flaps, and hood drawstrings with the fine liner. Small details like the zipper pull make a big difference. -
Define the faces:
Switch to a finer 0.1mm pen to draw the closed ‘U’ shaped eyes, small smiling mouths, and individual strands of hair in the bangs. -
Ground the figures:
Sketch a simple, jagged horizon line behind and under them to suggest they are sitting on the ground, adding a few tiny dashes for texture. -
Add atmospheric dots:
Using a tiny dotting tool or toothpick, add white or pale pink dots around the figures to create a magical, snowy, or pollen-filled atmosphere. -
Seal the artwork:
Finish by applying a coat of matte varnish. This protects your fine line work from smudging and preserves the colors for years.
Make it Personal
Customize the hair color or hoodie colors to match you and your real-life best friend. You can even write your initials or a ‘BFF’ message on the back of the stone.
Give this stone to your best friend as a permanent reminder of your cozy connection
Split Heart Across Two Rocks
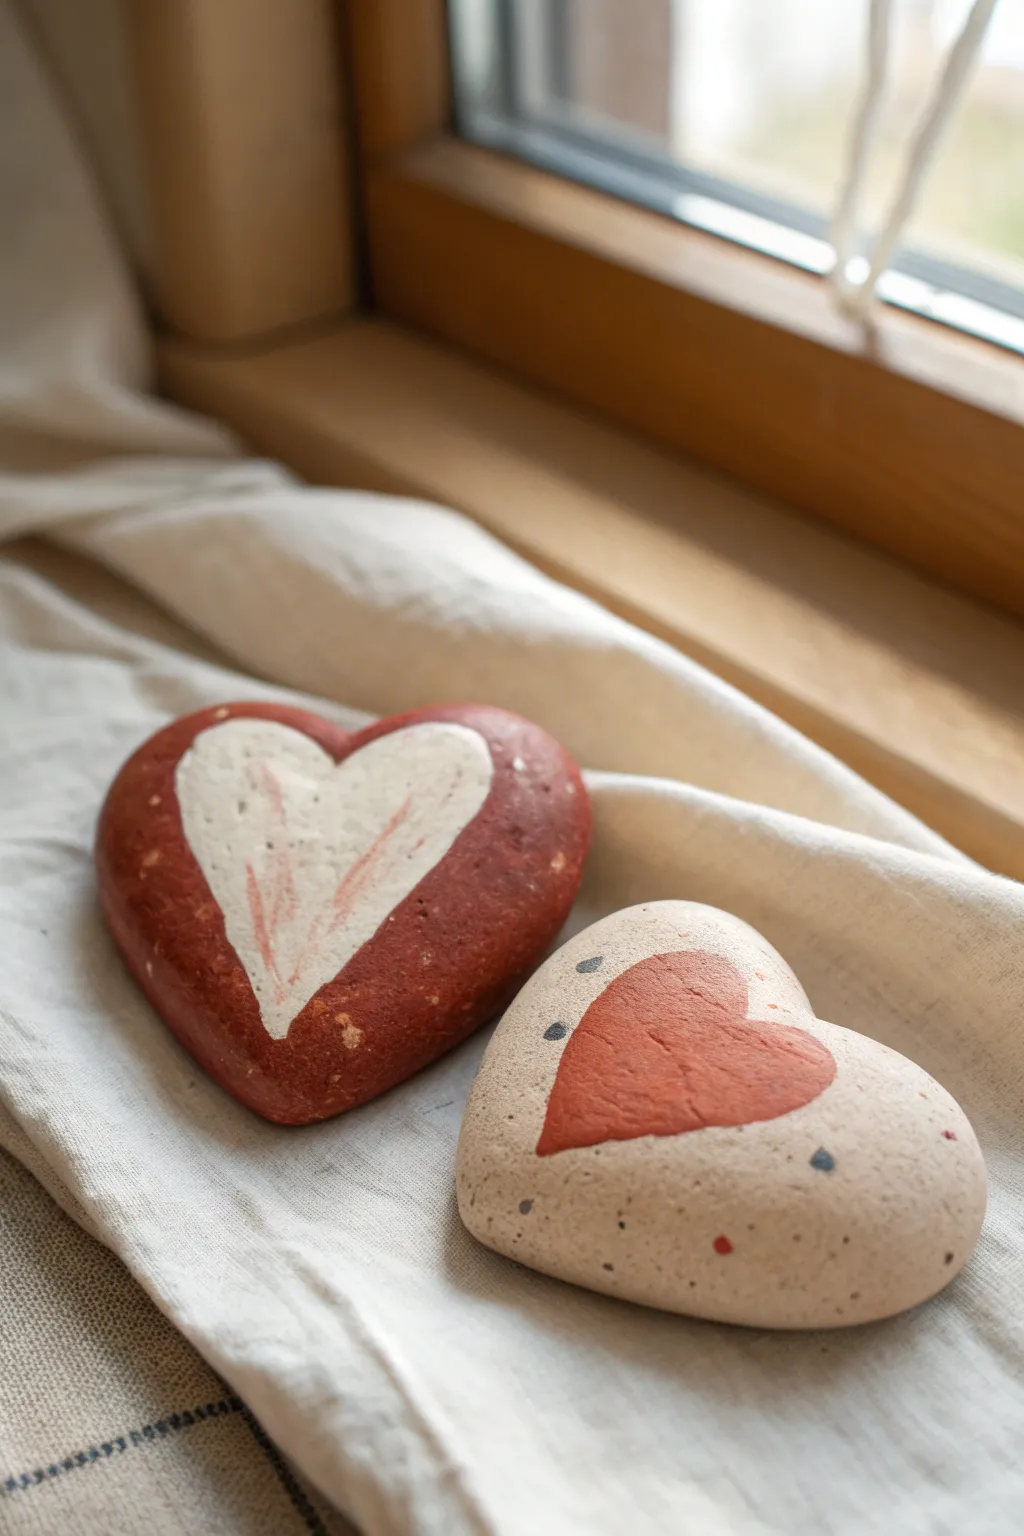
Celebrate contrast and connection with these inverted color scheme rocks that mimic the warmth of terracotta and cream. Using simple heart motifs on smooth, naturally shaped stones creates a modern, rustic look perfect for sharing with your best friend.
Step-by-Step Guide
Materials
- Two smooth, heart-shaped or oval river stones
- Acrylic paint (Deep terracotta red/brick red)
- Acrylic paint (Cream or off-white)
- Acrylic paint (Black or dark grey for speckling)
- Small flat paintbrush
- Fine detail paintbrush
- Old toothbrush (for speckling)
- Matte finish sealer or varnish
- Palette or paper plate
- Pencil
Step 1: Preparation and Base Coats
-
Clean the surfaces:
Begin by washing your stones thoroughly with soap and water to remove any dirt or oils. Let them dry completely, as moisture will prevent the acrylic paint from adhering properly. -
Paint the red stone base:
Select the first stone to be your ‘red’ stone. Using the flat brush, cover the entire top surface with the deep terracotta red paint. You may need two coats for full opacity, allowing the first to just dry to the touch before adding the second. -
Paint the cream stone base:
While the red stone is drying, take the second stone and coat it entirely with your cream or off-white acrylic paint. This creates a lighter, sandy base that contrasts beautifully with the first rock. -
Dry thoroughly:
Set both stones aside. It is crucial that these base coats are completely dry before you attempt to sketch or paint the heart designs on top, otherwise the colors will muddy.
Natural Stone Texture
For the cream stone, mix a tiny pinch of baking soda into the paint. This creates a gritty, authentic stone texture that feels real to the touch.
Step 2: Painting the Hearts
-
Sketch the outlines:
Lightly sketch a heart shape in the center of each painted stone using a pencil. Aim for a slightly organic, hand-drawn look rather than a perfect geometric shape, which adds to the rustic charm. -
Fill the white heart:
On the dry red stone, use a smaller brush to fill in the pencil outline with the cream paint. I always start from the center and work outward to the edges to keep the outline crisp. -
Add texture to the white heart:
Don’t worry about making the white heart perfectly solid. Apply the paint somewhat thinly or use dry brush strokes to let a tiny bit of the red base peek through, giving it a weathered texture. -
Fill the red heart:
Switch to the cream stone. Using the terracotta paint, fill in the heart outline you sketched. This creates the inverted color effect that links the two stones together visually. -
Refine edges:
Use your fine detail brush to neaten up the edges of both hearts. If the paint bled slightly, you can touch it up with the base color once the heart is dry.
Speckles Too Big?
If your toothbrush splatters large globs instead of mist, wipe the bristles on a paper towel first. The brush should be damp, not dripping wet.
Step 3: Details and Finishing
-
Create the splatter mix:
Mix a small amount of black or dark grey paint with a drop of water on your palette. You want a consistency that is fluid like ink but not too runny. -
Speckle the cream stone:
Dip an old toothbrush or a stiff brush into the thinned dark paint. Hold it over the cream stone (masking off the red heart if you prefer it clean) and run your thumb across the bristles to flick tiny specks onto the surface. -
Add larger dots:
For the specific look in the photo, add a few larger, deliberate dots on the cream stone using the back of your paintbrush handle dipped in dark grey and red paint. -
Detail the red stone:
Add subtle texture to the white heart on the red stone by lightly streaking in a tiny bit of red paint with a very dry brush, mimicking faint scratches or artistic shading. -
Final drying time:
Allow all the detail work and speckling to dry completely. This usually takes about 20-30 minutes depending on how thick the paint application was. -
Seal the artwork:
Apply a coat of matte varnish over both stones. A matte finish is essential here to maintain the natural, stone-like appearance rather than making them look like plastic.
Place these stones together on a windowsill or gift one to a friend to keep your connection close

PENCIL GUIDE
Understanding Pencil Grades from H to B
From first sketch to finished drawing — learn pencil grades, line control, and shading techniques.
Explore the Full Guide
Infinity Symbol With “Friends Forever”
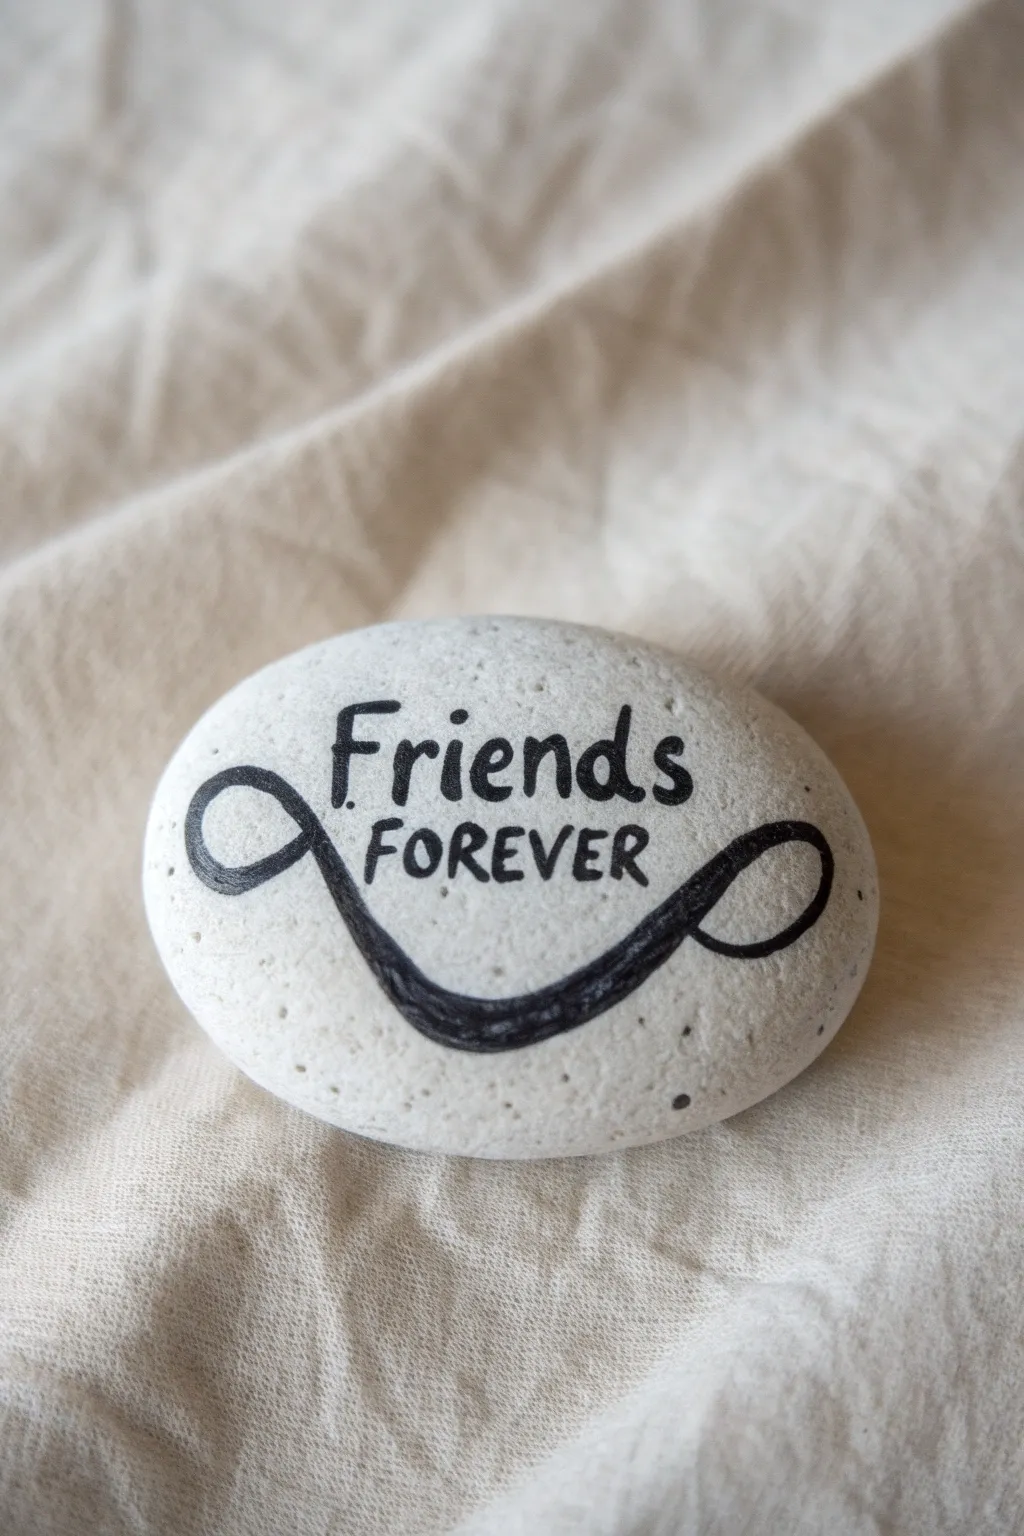
Celebrate an unbreakable connection with this elegantly simple rock painting design. Using a smooth, pale stone as your canvas, this project combines bold lettering with a stylized infinity loop to symbolize a friendship that lasts a lifetime.
How-To Guide
Materials
- Smooth, flat oval river rock (light grey or white)
- Fine-point black paint pen or permanent marker
- Medium-point black paint pen (for thicker lines)
- Pencil (HB or lighter)
- White eraser
- Matte or satin sealant spray
- Soap and water (for cleaning)
- Paper towel
Step 1: Preparation & Sketching
-
Clean the canvas:
Begin by washing your stone thoroughly with warm soapy water to remove any dirt or oily residue. Rinse it well and let it dry completely before starting, as moisture can trap beneath the paint. -
Map out the design:
Using a light pencil, gently sketch a horizontal guideline across the center of the rock. This will help keep your text straight. -
Draft the text:
Lightly write the word ‘Friends’ in a casual, slightly cursive print on the top half. Just below it, sketch ‘FOREVER’ in smaller, all-caps block letters to create a nice visual contrast. -
Sketch the infinity loop:
Draw the infinity symbol swooping underneath the text. Instead of a standard figure-eight, stretch the loops out to the sides and let the bottom curve dip deeply like a smile, cradling the words above.
Bleeding Lines?
If the ink bleeds into the rock’s porous surface, apply a clear matte base coat or a layer of white acrylic paint first to seal the pores before writing.
Step 2: Inking the Lettering
-
Outline ‘Friends’:
Take your fine-point black paint pen and carefully trace over your pencil lines for the word ‘Friends’. Focus on getting clean edges on the letters. -
Thicken the downstrokes:
To give the text a hand-lettered feel, go back over the ‘Friends’ text and slightly thicken the vertical lines (downstrokes) of each letter. I find this adds a lovely calligraphy effect without needing special nibs. -
Ink ‘FOREVER’:
Using the same fine-point pen, trace the ‘FOREVER’ text. Keep these letters relatively uniform in thickness, as the block style looks best when crisp and simple. -
Check for gaps:
Inspect your lettering for any faint spots. Touch up the black ink to ensure it is solid and opaque against the light stone background.
Step 3: Creating the Symbol
-
Trace the loop:
Switch to your medium-point paint pen if you have one, or continue with the fine point. Trace the entire infinity loop shape you sketched earlier. -
Thicken the curve:
Build up the thickness of the line, especially on the bottom curve where the loop dips. This weighted line anchors the design visually. -
Refine the loops:
Make sure the side loops are open and clear. The line should taper slightly as it curves back up towards the main horizontal swoops. -
Smooth the edges:
Go over the perimeter of your black shape to smooth out any jittery lines. The goal is a fluid, continuous motion look.
Pro Tip: Pen Basics
Store your paint pens horizontally when not in use. This keeps the ink mixed well and prevents the tip from either drying out or getting overly saturated.
Step 4: Finishing Touches
-
Let the ink dry:
Allow the black ink to dry completely. This usually takes about 10–15 minutes depending on the humidity and the type of pen used. -
Erase guidelines:
Once you are absolutely certain the ink is dry, gently erase any visible pencil marks. Be careful not to rub too hard over the paint. -
Seal the stone:
Take your rock to a well-ventilated area. Hold the sealant spray about 10 inches away and apply a light, even coat to protect your artwork from the elements. -
Final cure:
Let the sealant cure according to the manufacturer’s instructions before gifting the stone to your best friend.
This customized stone is now ready to serve as a lasting reminder of your friendship
Two Birds on a Wire
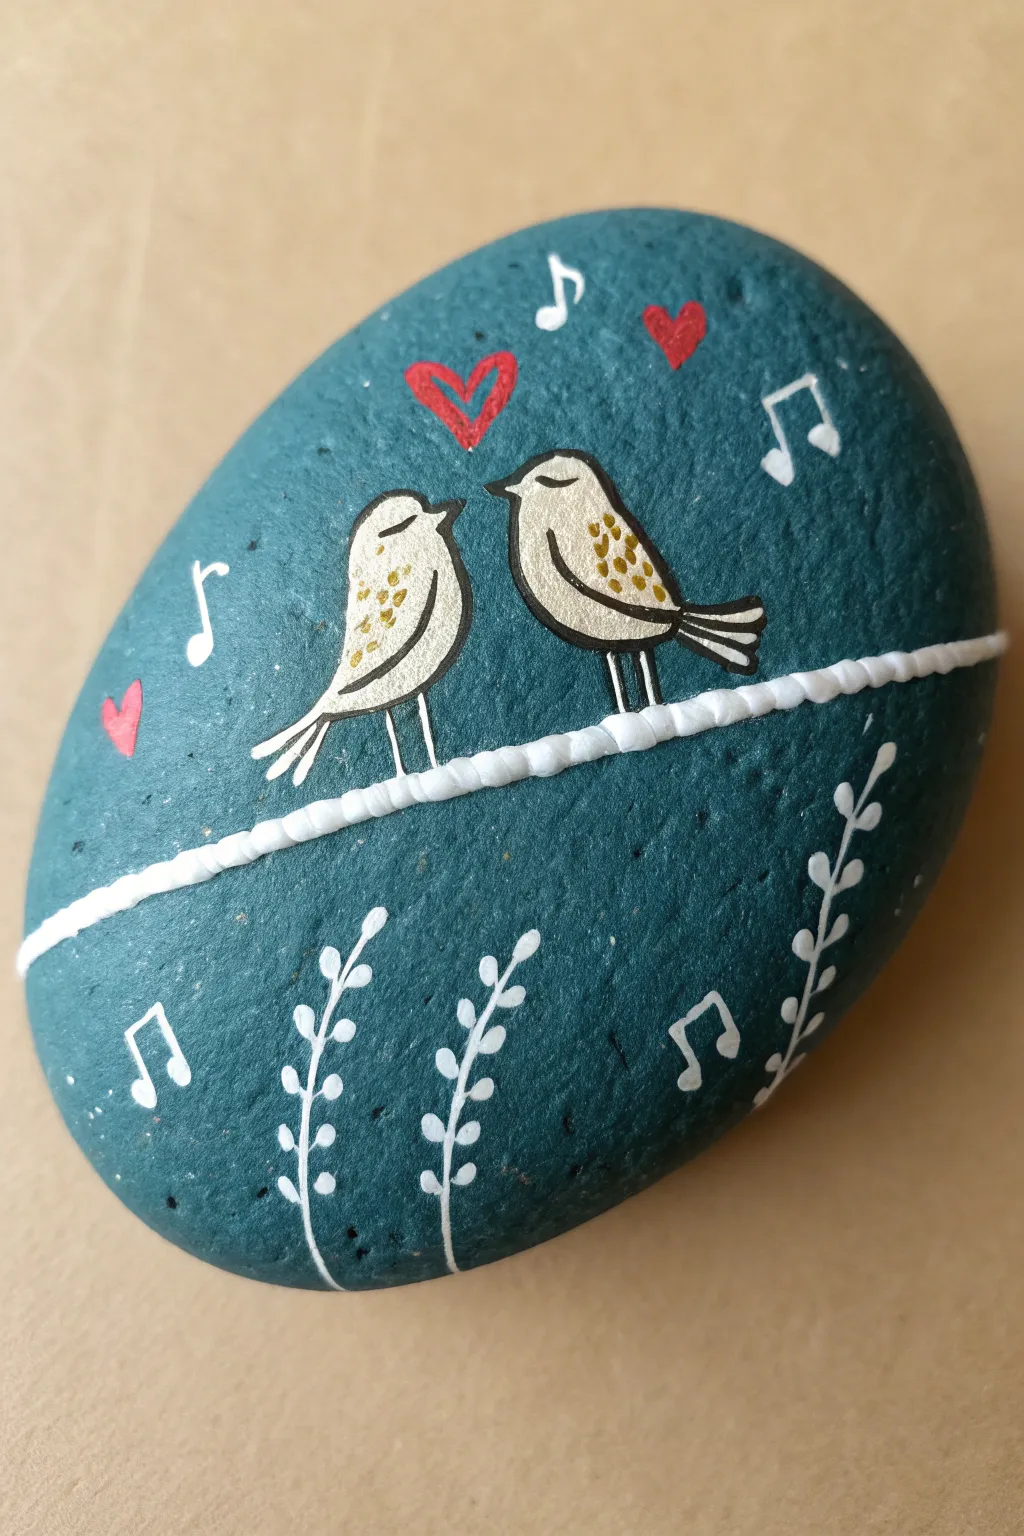
Capture the sweetness of friendship or romance with this adorable rock painting featuring two chirping birds perched on a wire. The deep teal background makes the white details and golden speckles pop, creating a charming gift for someone special.
Detailed Instructions
Materials
- Smooth, oval river rock
- Acrylic paint: dark teal, white, black, red, metallic gold
- Fine liner brushes (00 and 0 sizes)
- Medium flat brush
- Dotting tool or toothpick
- Acrylic paint markers (optional: white, black)
- Spray varnish or sealant
Step 1: Setting the Scene
-
Clean the surface:
Begin by washing your rock with soap and water to remove any dirt or grease. Dry it thoroughly before starting. -
Apply the base coat:
Paint the entire surface of the rock with a dark teal acrylic paint. You will likely need two coats to get a solid, opaque finish. I like to let the first coat dry completely before adding the second to avoid lifting the paint. -
Paint the wire:
Once the teal is dry, mix a tiny drop of water into your white paint to improve flow. Use a fine liner brush to paint a horizontal line across the middle of the rock. It doesn’t need to be perfectly straight; a slight curve adds character. -
Thicken the wire texture:
Go over your white line with small, overlapping dabs or short strokes rather than a smooth sweep. This creates the slightly twisted, rope-like texture seen in the photo.
Uneven Lines?
If your black outlines look shaky, wait for them to dry completely. Then, use the original cream or white isolate the mistake and carefully paint over the wobble to ‘erase’ it.
Step 2: Painting the Birds
-
Outline the bodies:
Using a very fine brunch or a white paint pen, draw the outlines of the two birds sitting on the wire. Make the bird on the left slightly smaller and facing right, while the right bird faces left so they look at each other. -
Fill the shapes:
Carefully fill in the bird outlines with solid white paint. This acts as a primer so the details stand out later. Let this layer dry fully. -
Add the wing details:
Mix a creamy, off-white or very light beige. Paint a simple wing shape inside each bird body. Add three small tail feathers extending behind each bird. -
Outline in black:
Switch to your finest detail brush and black paint (or a fine tip black marker). Outline the entire bird shape, the wings, and the tail feathers. Keep your hand steady and rest your pinky on the table for stability. -
Add beaks and legs:
Draw tiny triangles for beaks—open slightly to show they are singing. Paint simple stick legs extending down to the wire, outlining them in black for definition. -
Paint the eyes:
Draw a small curve for the closed eyelids on each bird to give them a peaceful, happy expression. -
Add texture:
Dip a toothpick or small dotting tool into metallic gold paint. Add tiny clusters of dots on the wings and back area of the birds to give them a shimmering, feathered texture.
Add Sparkle
Mix a tiny pinch of ultra-fine iridescent glitter into your final clear coat or varnish. This makes the dark teal background shimmer subtly like a night sky.
Step 3: adding the Melody and Charm
-
Paint the hearts:
Using a small brush and bright red paint, create a few small hearts floating above the birds. You can paint a larger, open heart outline directly between them. -
Add music notes:
With your fine white brush or pen, draw scattered music notes (eighth notes and quarter notes) around the birds to suggest a song. -
Create the vines:
In the bottom half of the rock, paint thin, white curved lines extending upward from the bottom edge. These are the stems of your foliage. -
Paint leaves:
Add small, teardrop-shaped leaves along the white stems. Alternate the leaves left and right for a natural vine look. -
Final touches:
Check for any uneven edges or spots that need a second coat of color. Once fully dry—usually 24 hours to be safe—seal your artwork with a clear spray varnish to protect it from the elements.
Place your finished rock in the garden or give it to your best friend to let them know they make your heart sing


Sun and Moon Best Friend Pair
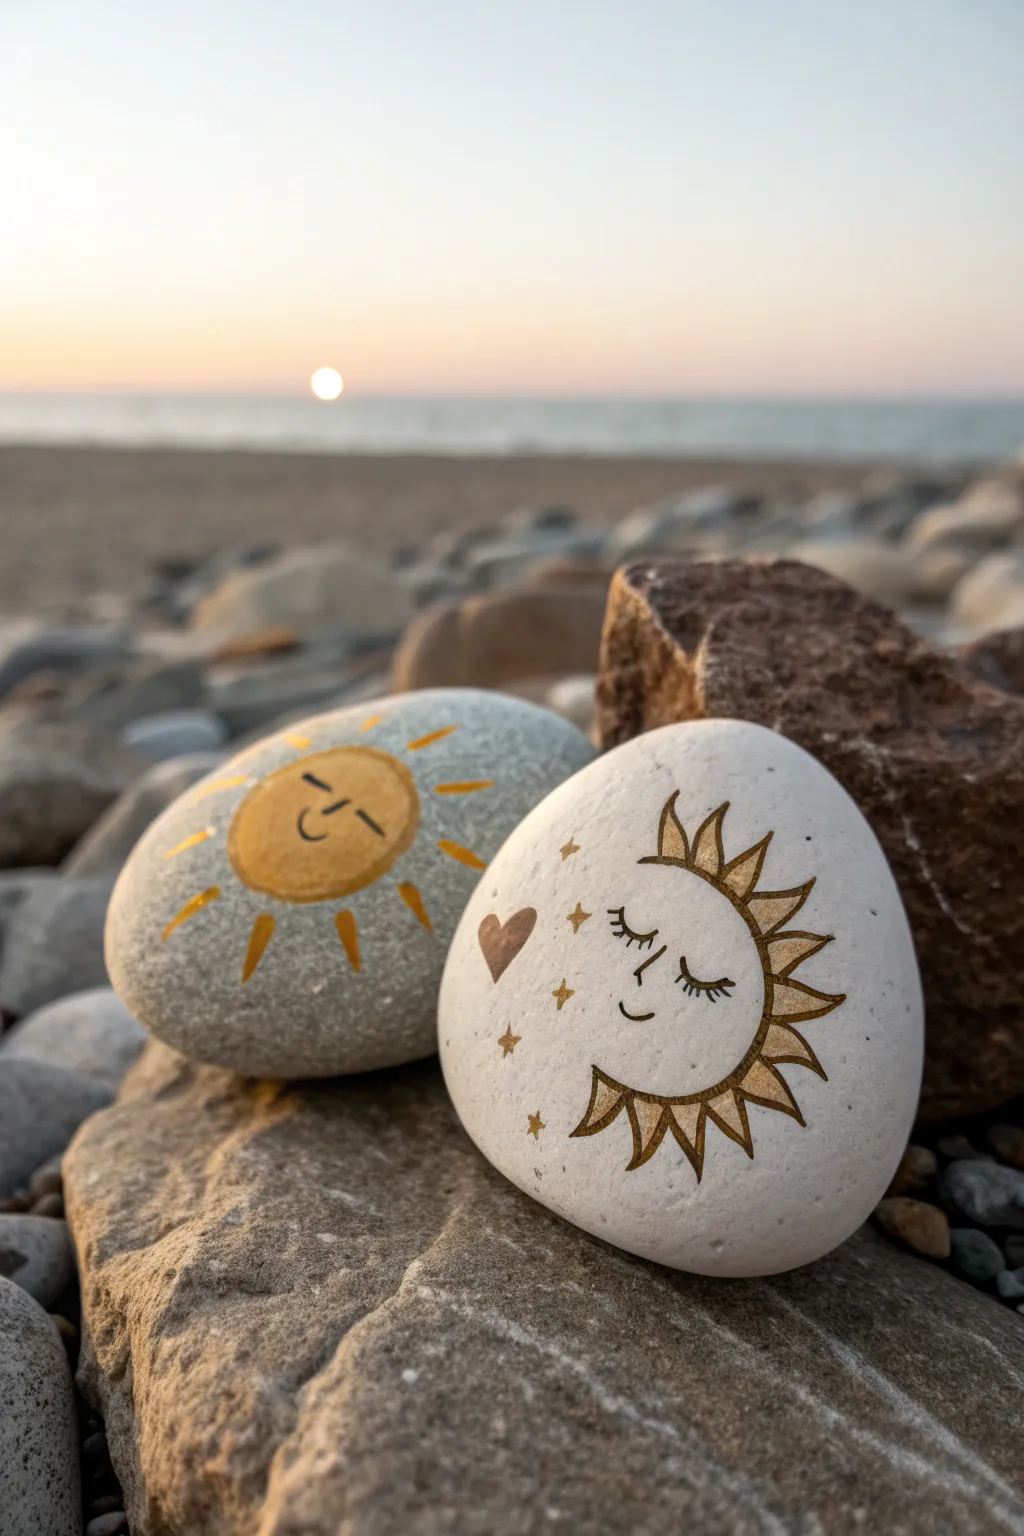
Celebrate your friendship with these complementary celestial stones that perfectly balance day and night. The soft metallic gold against smooth grey and white surfaces creates an elegant, dreamy aesthetic perfect for sharing.
Step-by-Step
Materials
- One smooth, round grey river stone
- One smooth, round white stone (or use white acrylic to basecoat)
- Metallic gold paint marker (fine point)
- Metallic gold paint marker (medium point)
- Metallic gold acrylic paint (optional, for filling large areas)
- Black fine-liner pen (permanent ink, e.g., Micron or ultra-fine Sharpie)
- Small flat brush
- Pencil and eraser
- Matte spray varnish or sealant
Step 1: Sun Stone Preparation
-
Select your canvas:
Choose a naturally grey, smooth stone that feels nice in the hand. Clean it thoroughly with soap and water, then let it dry completely to ensure the paint adheres. -
Draft the sun:
Using a pencil, lightly sketch a simple circle in the center of the grey stone. This will be the sun’s face. -
Add the rays:
Sketch radiating lines around the central circle. Vary the lengths slightly—some short dashes and some longer rays—to give it a playful, shining effect. -
Draw the face:
Sketch a simple, happy face inside the circle. Two small dashes for closed eyes mixed with a curved smile creates a peaceful expression.
Marker Flow Issues?
If your gold marker creates streaks, press the tip on scrap paper to re-saturate it. Wait for the first layer to fully dry before adding a second to prevent lifting.
Step 2: Painting the Sun
-
Fill the center:
Use the medium-point gold marker or a brush with gold acrylic paint to fill in the central circle. You may need two coats for a solid, opaque shimmer. -
Define the rays:
Switch to the fine-point gold marker or a small detail brush. Carefully trace over your sketched rays, making the lines thick enough to catch the light. -
Add facial details:
Once the gold center is fully dry, take your black fine-liner pen. Draw the simple sleeping eyes and the smile directly over the gold paint.
Step 3: Moon Stone Preparation
-
Prepare the base:
If you don’t have a naturally white stone, paint a smooth stone with two coats of white acrylic paint. Let it dry completely. -
Sketch the crescent:
Lightly draw a large crescent moon shape on the right side of the stone. Include the profile of a face—a forehead, nose, and chin—along the inner curve. -
Add celestial details:
Sketch sun-style rays emerging from the outer curve of the moon. Then, scatter a few small stars and a heart shape on the open left side of the stone.
Add Sparkle
While the gold paint is still slightly wet, adhere tiny craft rhinestones or a dusting of iridescent glitter to the moon’s rays for extra magical texture.
Step 4: Painting the Moon
-
Outline the moon:
Use the fine-point gold marker to trace the profile of the moon face and the outer crescent curve. Keep your hand steady for crisp lines. -
Create the rays:
Draw the triangular rays extending from the moon’s outer edge using the gold marker. Fill these triangles in carefully so they look solid. -
Fill the decorative icons:
Color in the small heart and the scattered four-point stars with the gold marker. I find that dotting the center of the star first helps keep it symmetrical. -
Detail the moon face:
Use the black fine-liner to draw a sleepy eye with prominent lashes on the moon’s face. Add a tiny curve for the mouth and a blush mark if desired.
Step 5: Finishing Touches
-
Clean up sketch lines:
Once all paint and ink are 100% dry, gently erase any visible pencil marks with a soft eraser. Be gentle to avoid scratching the gold paint. -
Seal the artwork:
To protect your friendship stones from the elements or handling, spray them with a thin coat of matte varnish. Allow to dry in a well-ventilated area.
Give one stone to your best friend and keep the other to symbolize your connection regardless of day or night
Two Cats Cuddled Up
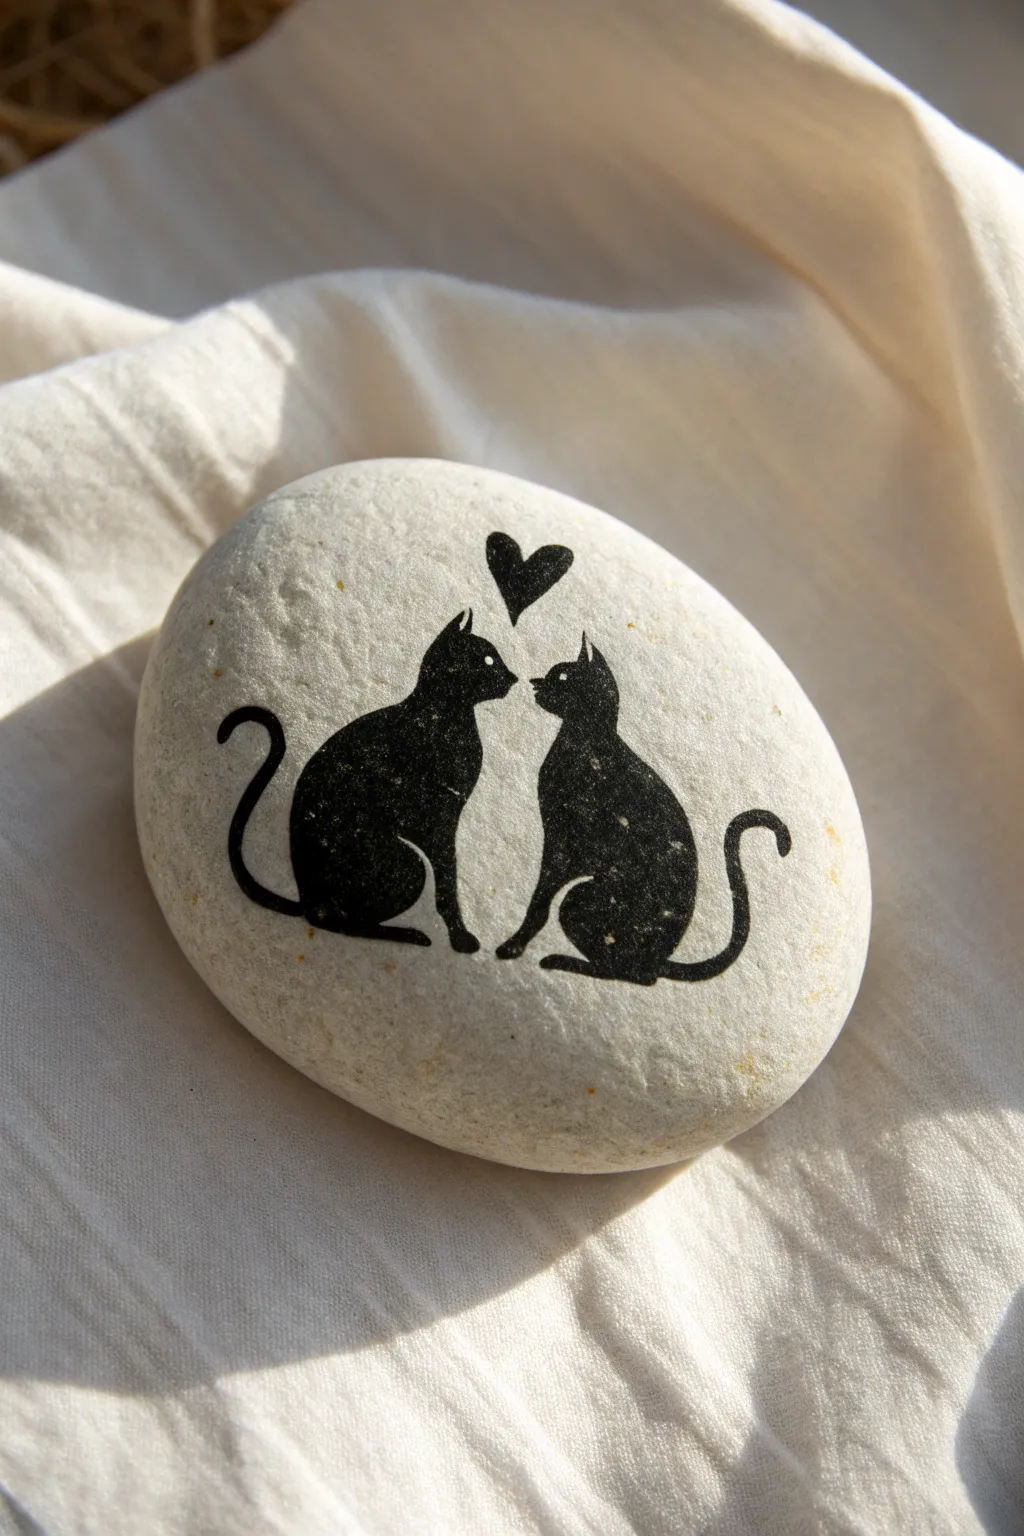
Celebrate friendship or romance with this strikingly simple monochrome design featuring two cats gazing at each other. The contrast between the smooth white stone and the crisp black silhouettes creates a timeless, minimalist look that is incredibly satisfying to paint.
How-To Guide
Materials
- Smooth, flat river rock (white or very light grey)
- Black acrylic paint (high pigment)
- Fine liner brush (size 00 or 000)
- Small round brush (size 1)
- Pencil (HB or lighter)
- Eraser
- Paint palette or small dish
- Clear matte or satin varnish spray
- Water cup and paper towel
Step 1: Preparation and Sketching
-
Clean Your Canvas:
Begin by washing your stone thoroughly with warm soapy water to remove any dirt or oils. Let it dry completely, ensuring no moisture remains in the pores of the rock. -
Position the Center:
Visualize the center of the rock where the two cats will meet. I like to make a tiny, faint mark right in the middle to help guide the symmetry of the design. -
Sketch the Left Cat:
Using a light pencil, lightly draw the outline of the left cat. Start with a small circle for the head, then curve down into a pear-shape for the body. -
Outline the Right Cat:
Mirror your first shape on the right side. The noses should be close but not touching, and the bodies should sit at the same level. -
Add the Ears:
Draw small, pointed triangles on top of both heads. Make sure the ears are perky and alert. -
Sketch the Tails:
Draw the tails curling upward behind each cat. For the left cat, curb the tail in an ‘S’ shape; for the right, a simpler upward curve works well. -
Place the Heart:
Sketch a small floating heart centered just above and between the two cat heads.
Steady Hand Trick
Rest your pinky finger on the dry part of the rock while painting. This anchors your hand, giving you much better control for painting those tiny ears.
Step 2: Painting the Silhouettes
-
Prepare Your Paint:
Dispense a small amount of black acrylic paint. If the paint feels too thick, mix in a tiny drop of water to improve the flow for outlining. -
Outline the Shapes:
Using your finest liner brush (size 000), carefully trace over your pencil lines. Keep your hand steady and breathe out as you pull the longer strokes for smooth curves. -
Fill the Bodies:
Switch to a slightly larger round brush (size 1) to fill in the main body shapes. Apply the paint opaque and solid, leaving no white stone showing through. -
Detail the Tails:
Switch back to the fine liner brush to fill in the tails. Since these are thin, a single confident stroke often looks better than trying to color it in. -
Refine the Edges:
Look closely at your silhouettes. Smooth out any jagged edges or bumps with the liner brush to ensure the cats look sleek. -
Paint the Heart:
Carefully fill in the heart shape above the cats. Use the very tip of your brush to get the sharp point at the bottom of the heart. -
Add Whiskers (Optional):
If you are feeling confident, add tiny, almost invisible flicks for whiskers, though the silhouette looks great without them too.
Oops! Paint Splatter?
If you make a mistake with the black paint, let it dry completely. Then, scratch it off gently with a toothpick or paint over it with white acrylic.
Step 3: Finishing Touches
-
Let it Cure:
Allow the black paint to dry completely. This usually takes about 15-20 minutes depending on how thick your paint layer is. -
Erase Guidelines:
Once the paint is 100% dry, gently erase any visible pencil marks. Be very light-handed to avoid scuffing the paint. -
Seal the Artwork:
Protect your design with a coat of clear varnish spray. A matte finish keeps the natural look of the stone, while satin adds a soft sheen.
Now you have a charming, durable piece of art that perfectly captures the bond of friendship
Pinky Promise Hands

This sweet and simple project turns an ordinary smooth stone into a token of affection. With its soft pink center and bold, hand-drawn outline, it captures the charm of a quick sketchbook doodle brought to life.
Step-by-Step Guide
Materials
- Smooth river rock (light grey or white works best)
- Pink acrylic paint or POSCA paint pen
- Black fine-tip paint pen (0.7mm or 1mm)
- Small flat paintbrush (if using tube paint)
- Pencil and eraser
- Clear matte sealant spray
Step 1: Preparation & Sketching
-
Clean the surface:
Start by washing your rock thoroughly with warm, soapy water to remove any dirt or oils. -
Dry completely:
Let the stone dry fully in the sun or use a hairdryer to speed up the process; paint won’t stick well to damp stone. -
Plan placement:
Hold the rock in your palm to find the flattest, most central spot for your design. -
Lightly sketch:
Using a pencil, very lightly draw a simple heart shape in the center. Don’t press too hard, as graphite can sometimes smudge into lighter paint colors. -
Check symmetry:
Look at your sketched heart from a distance to ensure it feels balanced, though a little wonkiness adds to the hand-drawn charm.
Smooth Rock Tip
If your rock is too porous, paint tends to soak in and look dull. Prime the area with a clear acrylic medium first to create a smooth, sealable surface.
Step 2: Painting the Heart
-
Fill the color:
Take your pink paint pen or a small brush with pink acrylics and fill in the heart shape. -
Watch the edges:
Don’t worry about getting the edges razor-sharp right now, as the outline will cover them later, but try to stay within your pencil guidelines. -
Double check opacity:
If the grey of the rock shows through too much, let the first coat dry completely and add a second thin layer for a more solid pink. -
Allow to cure:
Wait for the pink paint to be fully dry to the touch before moving on. Paint pens dry quickly, usually within 5-10 minutes.
Step 3: Outlining & Details
-
Draft the outline:
Using your black fine-tip paint pen, trace over the edge of the pink heart. -
Create the style:
I prefer to use a slightly loose hand here; go over the line twice in some spots to give it a sketchy, doodle-like vibe rather than a perfect vector line. -
Add the radiating lines:
Draw short, small dashes radiating outward from the heart to simulate a glowing effect. -
Space them out:
Typically, make three dashes on the left curve and three on the right curve, keeping them roughly equidistant but casual. -
Check the nib:
If your black pen starts skipping over the textured rock surface, give it a quick shake and press the nib on a scrap piece of paper to get the ink flowing again. -
Final dry:
Let the black ink sit for at least 30 minutes to ensure it won’t smear during sealing.
Shaky Lines?
If your black outline looks too wobbly, thicken the line slightly in that specific area. A intentionally bolder, uneven line enhances the doodle aesthetic.
Step 4: Sealing
-
Spray sealant:
In a well-ventilated area, hold your sealant spray about 12 inches away from the rock. -
Apply lightly:
Mist the rock gently with a matte sealant to protect the design without making it overly shiny, preserving the natural stone look. -
Rotate and finish:
Once the top is dry, you can flip it over and seal the back if desired, just to keep the finish uniform.
This little heart rock is ready to be gifted as a pocket-sized reminder of friendship.
Puzzle Pieces That Fit Together
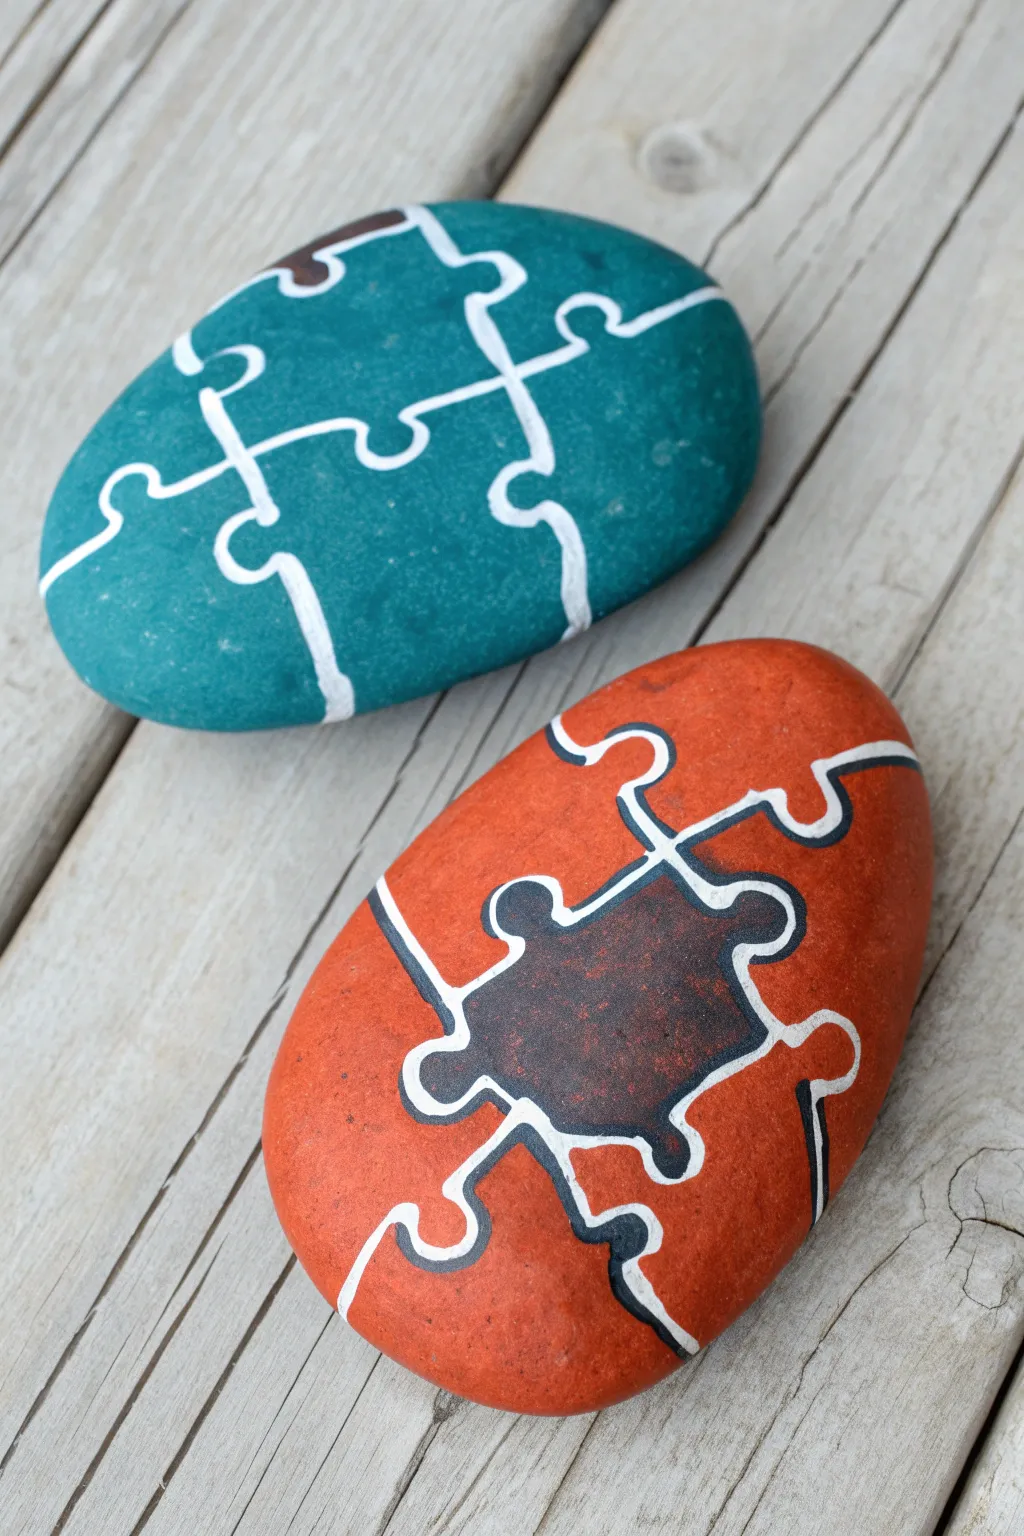
Celebrate your connection with these interlocking puzzle piece rocks that prove you and your best friend are the perfect fit. The design features bold, solid base colors overlaid with simple white linework to create the illusion of puzzle pieces, complete with a unique accent piece on one stone.
Step-by-Step Tutorial
Materials
- Two smooth, oval river rocks (similar size)
- Acrylic paint (teal, terracotta orange, dark maroon/brown, white)
- Flat paintbrushes (medium size)
- Fine liner brush or white paint pen (extra fine tip)
- Pencil
- Clear matte or glossy sealant spray or varnish
- Water cup and paper towels
Step 1: Base Coat Application
-
Clean the surface:
Begin by washing your rocks with mild soap and water to remove any dirt or oils. Let them dry completely before starting to ensure the paint adheres properly. -
First color block:
Paint the first rock entirely with the teal acrylic paint. You will likely need two to three coats to get a solid, opaque coverage where the rock’s natural color doesn’t show through. -
Second color block:
Paint the second rock with the terracotta orange paint. Again, apply multiple thin layers rather than one thick gloppy one, allowing each layer to dry to the touch in between. -
Dry time is key:
Allow both rocks to dry fully. If the paint feels cool to the touch, it is likely still wet underneath; give it another 10-15 minutes just to be safe.
Step 2: Drafting the Design
-
Sketch the grid:
Using a pencil, very lightly draw a cross shape on the teal rock to divide it into four roughly equal quadrants. This acts as the skeleton for your puzzle pieces. -
Add the knobs and sockets:
Turn the straight lines of your cross into puzzle shapes by sketching ‘knobs’ (the outward bumps) and ‘sockets’ (the inward semi-circles) along the lines. Keep the shapes rounded and classic. -
Sketch the orange rock:
Repeat the process on the orange rock. However, for the central intersection, plan for a larger, central puzzle piece that sits right in the middle, rather than a simple four-way split. -
Define the accent piece:
On the orange rock, identify which segment will be the ‘missing’ or accented piece. Sketch its outline clearly in the center.
Smooth Operator
If your white paint lines look shaky or translucent, switch to a water-based acrylic paint pen (0.7mm tip) instead of a brush for much easier control.
Step 3: Painting the Details
-
Paint the accent piece:
Fill in the specific puzzle shape you chose on the orange rock with dark maroon or brown paint. Use a smaller flat brush for this to stay neatly within your pencil lines. -
Start the white outlines:
Load a fine liner brush with white paint (or prime your white paint pen). Start tracing over your pencil sketches on the teal rock. Keep your hand steady and the line width consistent. -
Outline the orange rock:
Move to the orange rock and trace the white puzzle lines. Be careful when outlining the dark maroon section; the white line should act as a border between the orange and maroon sections. -
Thicken the lines:
Go back over your white lines a second time. The goal is a bold, crisp line that stands out against the colored background, so a second pass usually helps solidify the white opacity. -
Optional shadowing:
If you want extra depth, mix a tiny drop of black into your base colors and paint a very thin shadow line along one side of the white puzzle borders. -
Clean up edges:
Inspect your rocks for any smudges. If the white line went wonky, use a bit of the original base color to touch it up and straighten the edge.
Level Up: Hidden Messages
Before sealing, create a truly secret bond by writing a hidden message or your initials on the BACK of your friend’s puzzle piece rock.
Step 4: Finishing Touches
-
Let it cure:
Wait for the white lines and accent colors to dry completely. This is crucial because smearing the white lines at this stage is heartbreaking. -
Seal the deal:
Take the rocks to a well-ventilated area and apply a coat of clear sealant. I prefer a matte finish for a natural stone look, but gloss will make the colors pop more vividly. -
Gift prep:
Once the sealer is dry, they are ready to be split up between you and your best friend.
Give one to your friend and keep the other so you’re always connected, even when apart
Friendship Bracelet Pattern Stripes
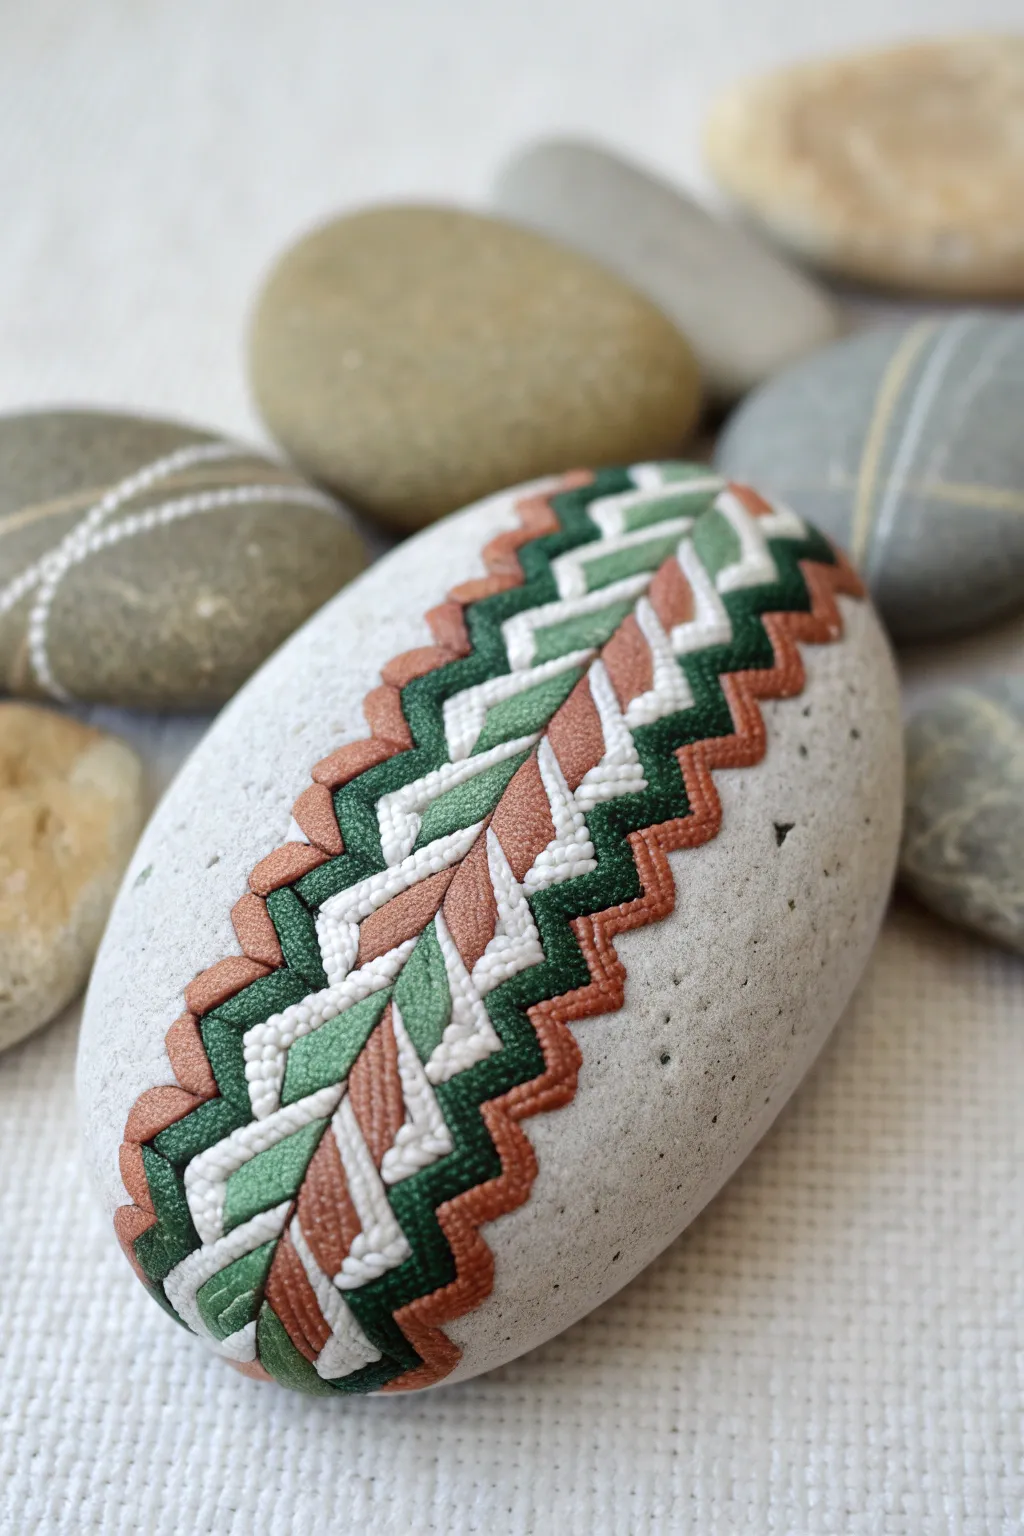
Capture the nostalgic charm of a classic woven friendship bracelet painted directly onto stone. This intricate design uses clever shading and geometric precision to create a realistic, faux-embroidery texture that looks like threads resting on the rock surface.
Step-by-Step Guide
Materials
- Smooth, oval river rock (light grey or white works best)
- Fine grit sandpaper
- Pencil and eraser
- Acrylic paints: Dark forest green, moss green, white, terracotta/copper, dark brown
- Detail brushes: Size 0 and 00 liner brushes
- Fine tip white paint pen (optional)
- Ruler or flexible measuring tape
- Matte varnish
Step 1: Preparation and Grid
-
Prep the surface:
Clean your rock thoroughly with soapy water and let it dry. Sand the surface lightly if there are any bumps that might interfere with fine line work. -
Establish the centerline:
Using your pencil and a ruler, draw a faint vertical line straight down the center of the rock’s face. This will be the spine of your chevron pattern. -
Mark the width:
Draw two parallel lines on either side of the center line, roughly 1.5 inches apart total, to define the outer boundaries of the ‘bracelet.’ -
Create the chevron guide:
Sketch a series of ‘V’ shapes down the center column. Keep the spacing consistent, roughly 1/4 inch apart. These V’s guide the flow of the faux threads.
Step 2: Painting the Base Colors
-
Start with the center chevrons:
Using your detail brush, paint the innermost ‘V’ shapes with moss green. Apply the paint in short, diagonal strokes that mimic the direction of thread fibers. -
Add the white layer:
moving outward, paint the next layer of V-shapes in white. Ensure these touch the green layer seamlessly. I find using a slightly thicker paint consistency here helps build texture. -
Paint the copper accents:
Add the terracotta or copper stripe next. Instead of a solid block, paint this section as individual diagonal dashes to emphasize the woven look. -
Define the borders:
Paint the outermost zigzag edge in dark forest green. This creates a strong contrast against the light stone background.
Thread Illusion
Always pull your brush strokes toward the center ‘V’ point. This mimics how real thread is pulled when knotting a bracelet.
Step 3: Creating the Embroidery Texture
-
Simulate thread texture:
Once the base coats are dry, go back over each section with a lighter version of the base color. Paint tiny, diagonal hatch marks on top of the solid shapes. -
Refine the white threads:
Use a liner brush or a fine white paint pen to draw very distinct, diagonal lines over the white sections. These should look like individual strands of embroidery floss. -
Add interweaving shadows:
Mix a tiny amount of black into your base colors to create a shadow shade. Apply this thinly right where the different color zones meet to make it look like the threads are tucking under each other. -
Highlight the ridges:
Mix white into your green and terracotta paints. Carefully dab this highlight onto the center of each small diagonal stroke to make the ‘threads’ look round and raised.
Match Your Bestie
Create a matching pair but reverse the color palette (swap the green and copper placements) for a true friendship set.
Step 4: Detailing and Sealing
-
Deepen the outer edge:
Use dark brown or black to outline the very exterior edge of the entire pattern. This drop shadow lifts the design off the rock. -
Clean up the stone:
If you made any stray marks on the bare heavy stone, use a damp Q-tip or a touch of grey paint to conceal them. -
Final texture check:
Look closely at the copper sections. If they look too flat, dry brush a tiny bit of bright orange or white on the highest points of the zigzags. -
Varnish:
Apply a coat of matte varnish. A glossy finish might ruin the illusion of soft fabric thread, so matte is essential here.
Give this stone to your best friend as a permanent symbol of your woven bond
Two Little Houses, One Street
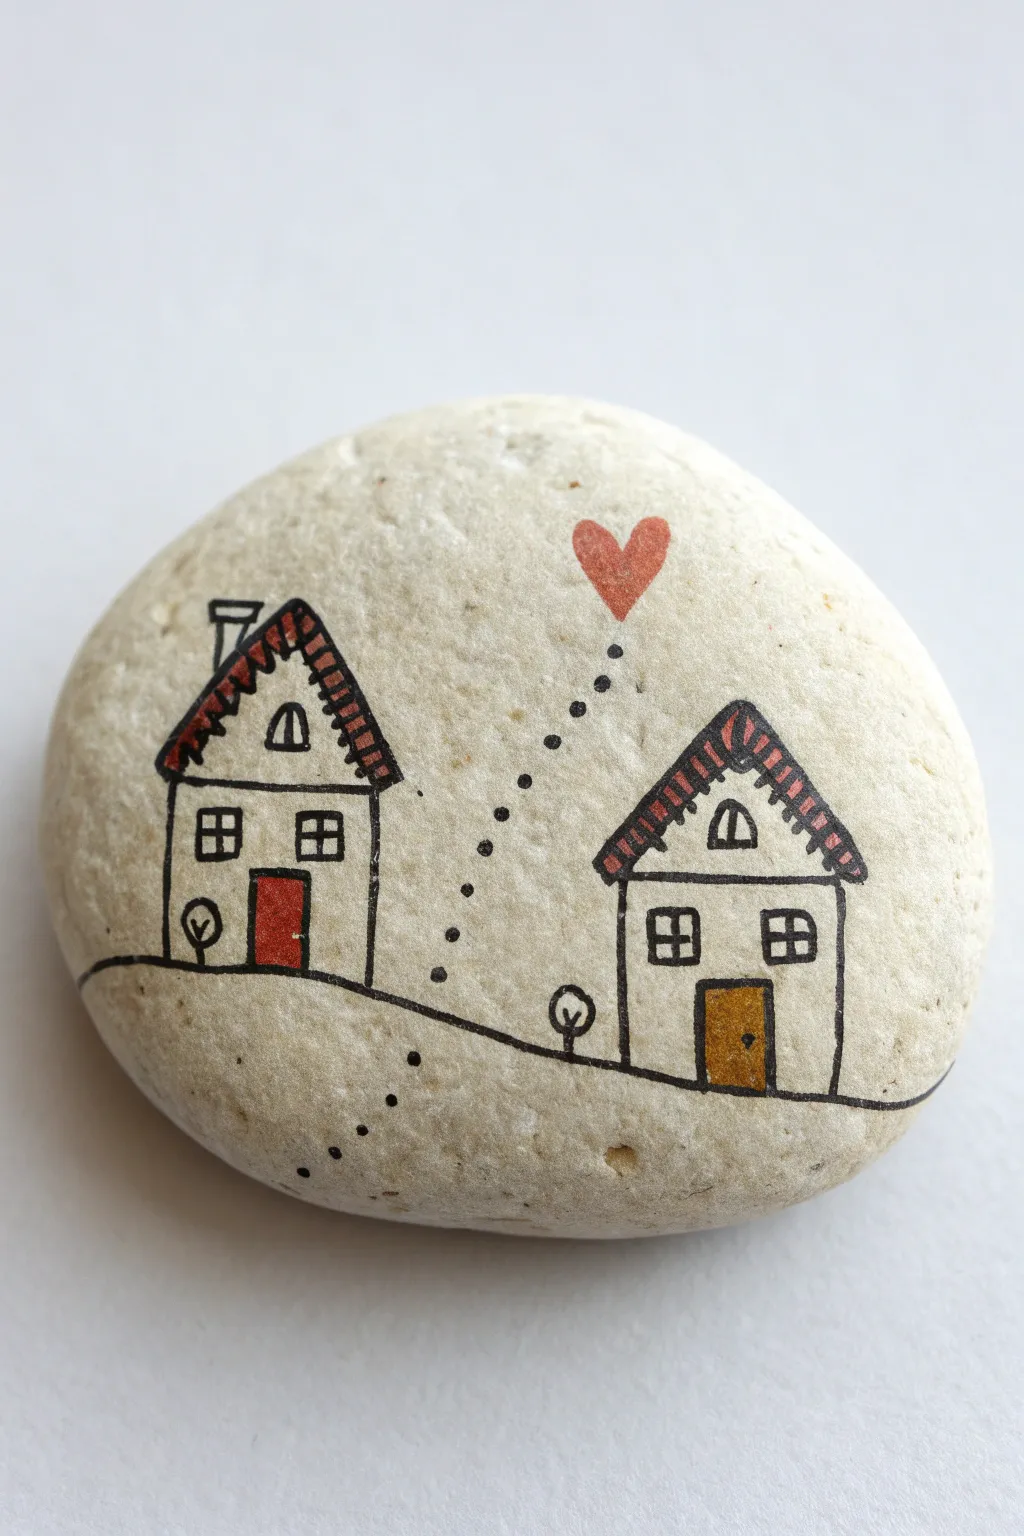
This minimalist design celebrates friendship across distances with two charming cottages linked by a dotted path and a single heart. The look is clean and illustrative, using a smooth, pale stone as a natural canvas for the ink details.
Step-by-Step Tutorial
Materials
- Smooth, light-colored river rock (flat surface is best)
- Fine-point black permanent marker or technical pen (0.3mm or 0.5mm)
- Red acrylic paint or paint pen
- Mustard yellow or gold acrylic paint or paint pen
- Small fine-detail paintbrush (if using bottled paint)
- Pencil and eraser
- Matte spray sealer or varnish
Step 1: Drafting the Layout
-
Clean the surface:
Begin with a clean, dry rock. Wash away any dust or grit with soap and water, and let it dry completely to ensure your pens won’t clog. -
Sketch the ground line:
Using a pencil very lightly, draw a curved horizon line across the lower third of the rock. It doesn’t need to be perfectly straight; a slight slope adds character. -
Position the houses:
Roughly sketch two simple house shapes sitting on your horizon line. Place one on the left and one on the right, leaving a gap in the center for the connecting trail. -
Add a chimney:
Draw a small rectangle chimney on the roof of the left house.
Ink Control Pro-Tip
If your black pen tip feels sticky on the stone, scribble on paper for a second to restore flow. Ink flows best on very smooth stones, so avoid porous surfaces.
Step 2: Inking the Structures
-
Outline the ground:
Take your fine-point black pen and trace over the horizon line. Extend the line all the way to the edges of the rock face. -
Ink the house shapes:
Go over your pencil sketches for the main body and roof of both houses. Keep your lines steady, but don’t worry if they have a slightly hand-drawn wobble—it adds to the whimsical style. -
Create the roof texture:
Draw horizontal lines inside the roof triangles to create a striped pattern. Then, fill in every other stripe with black ink to create a bold, graphic look. -
Add the chimney details:
Ink the chimney on the left house, keeping it simple. You can leave it white or add a tiny stripe or two.
Level Up: Personalize It
Write the tiny initials of you and your best friend inside the attic windows or on the doors for a hidden, personal touch that only you two will notice.
Step 3: Adding Architectural Details
-
Draw the windows:
Inside the house bodies, draw small square windows with a ‘plus’ sign in the middle for panes. The left house gets two side-by-side; the right house gets two spread slightly apart. -
Add attic windows:
Draw a small arched window near the peak of the roof on both houses. Divide these with a simple vertical line. -
Draw the doors:
Sketch a rectangular door at the bottom center of each house. Don’t ink the bottom edge of the door distinct from the ground line. -
Plant some trees:
Draw a tiny tree next to each house using a simple line for the trunk and a small circle or oval for the foliage. Add a little ‘V’ shape inside the foliage circle to suggest branches.
Step 4: Applying Color
-
Paint the left door:
Using a very fine brush or a paint pen, fill in the door on the left house with red paint. Be careful to stay inside the inked lines. -
Paint the right door:
Fill in the door on the right house with your mustard yellow or gold paint. -
Add door knobs:
Once the paint is fully dry, use your black pen to add a tiny dot on each door for the handle. -
Create the floating heart:
Paint a small red heart hovering in the sky space between the two roofs. You can sketch it with pencil first to get the symmetry right.
Step 5: Connecting the Scene
-
Plot the trail:
Visualize a path connecting the bottom left of the rock to the floating heart. I usually start marking from the bottom up to ensure smooth spacing. -
Ink the dotted path:
Using your black pen, make small dots starting from the bottom edge of the rock, moving up diagonally, passing between the houses, and ending right at the tip of the heart. -
Erase pencil lines:
Wait at least 15 minutes to ensure all ink and paint is bone dry. Then, gently erase any visible pencil marks. -
Seal the artwork:
Finish by applying a light coat of matte spray sealer. This protects the ink from smudging and preserves the colors without making the rock too glossy.
Give this stone to your friend as a reminder that you’re always connected by heart
Best Friend Bouquet With Two Birth Flowers
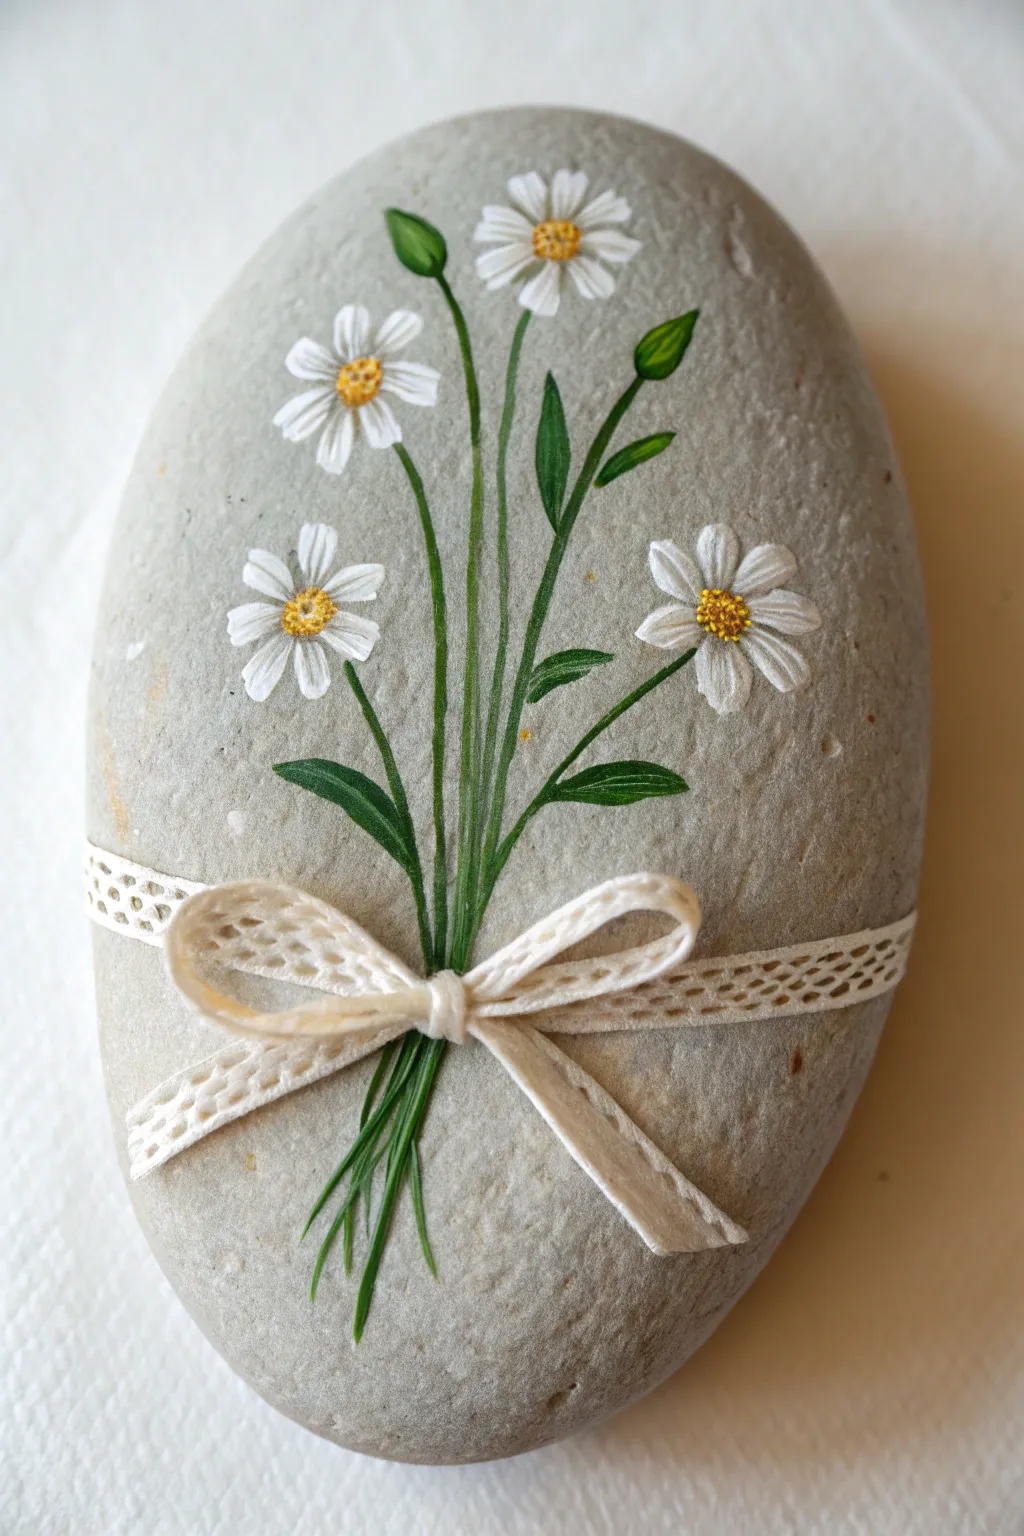
Transform a simple grey river rock into a heartfelt keepsake featuring a charming bouquet of white daisies. This project uses precise brushwork to create realistic petals and stems, all tied together with a beautifully rendered faux-lace bow.
Step-by-Step Guide
Materials
- Smooth, oval river rock (medium grey)
- White acrylic paint (high opacity)
- Titanium White acrylic paint (for mixing)
- Yellow ochre acrylic paint
- Golden yellow acrylic paint
- Burnt sienna or dark brown acrylic paint
- Sap Green acrylic paint (medium tone)
- Dark Green acrylic paint (shadow tone)
- Olive Green acrylic paint (highlight tone)
- Fine liner brush (size 00 or 000)
- Small round brush (size 1 or 2)
- Pencil (HB or lighter)
- Matte or satin varnish
Step 1: Planning and Base Stems
-
Clean surface:
Begin by washing your stone thoroughly with soap and water to remove any dirt or oils. Let it dry completely before starting. -
Draft the layout:
Lightly sketch the general shape of the bouquet using a pencil. Mark where the four main flower heads will sit and indicate a slight curve for the stems to give them a natural flow. -
Paint main stems:
Load your fine liner brush with Sap Green. Paint long, slender lines for the stems, starting from the bottom third of the rock and extending up to your flower markings. Keep the pressure light to ensure the lines remain thin. -
Add stem variety:
Mix a tiny bit of Olive Green into your Sap Green. Add a few shorter, accent stems and the small stems that will hold the buds near the top. -
Create leaf foundations:
Using the small round brush, paint simple, elongated leaf shapes branching off the main stems. Press down at the base of the leaf and lift as you pull away to create a tapered point. -
Deepen the greenery:
Once the base green is dry, use Dark Green to add shadows to the lower parts of the leaves and the bottom section of the stem bundle where they are grouped together.
Step 2: Painting the Flowers
-
Block in white petals:
Using the small round brush and opaque White paint, create the petals for the four main daisies. Start from the outside and pull your stroke inward toward the center. -
Shape the petals:
Ensure the petals vary slightly in length and direction. I find that leaving a small unpainted gap in the very center helps define the flower structure later. -
Paint the buds:
At the top of the taller stems, paint small, tightly closed oval shapes in White. Add a tiny stroke of green at their base to connect them to the stem. -
Second coat:
White paint on a grey stone often needs a boost. Apply a second layer to the petals once the first is dry to make them pop against the background. -
Add petal details:
Mix a very watery grey (a tiny drop of black in white). Use the fine liner to add extremely subtle shading lines at the base of the petals where they meet the center, adding depth. -
Create flower centers:
Dot the centers of the open daisies with Yellow Ochre. Use a stippling motion (up and down) rather than a smooth stroke to mimic pollen texture. -
Highlight and shadow centers:
Add tiny dots of Golden Yellow on the top edge of the center for sunlight, and miniscule dots of Burnt Sienna on the bottom edge for shadow.
Control Your Lines
For the thinnest stems, thin your acrylic paint with a drop of water until it is an ‘inky’ consistency. This helps the paint flow smoothly off the liner brush without skipping.
Step 3: The Lace Bow
-
Outline the ribbon:
With your fine liner brush and a mix of White and a tiny drop of brown (creating a cream/ecru shade), outline the shape of the bow and the ribbon trailing horizontally across the stems. -
Fill the ribbon:
Fill in the ribbon shape with the cream color. It doesn’t need to be perfectly solid; a little translucency is okay for lace. -
Paint the knot:
Add a slightly brighter highlight of pure White to the center knot of the bow to make it appear raised and dimensional. -
Create the lace texture:
This is the crucial detail step. Use the fine liner with slightly watered-down brown or dark grey paint. Paint a grid or small ‘x’ pattern over the cream ribbon to simulate the holes in the lace. -
Refine the edges:
Use the cream color to tidy up the edges of the ribbon, making them slightly bumpy or scalloped to look like real fabric lace. -
Protective finish:
Once the entire painting is completely dry (give it at least 24 hours to be safe), seal it with a coat of matte or satin varnish to protect your fine details.
Birth Flower Twist
Swap the daisies for your best friend’s actual birth flower—like violets for February or roses for June—to make the gift even more personal.
This charming floral stone makes a permanent reminder of friendship that will never wilt
Two Favorite Drinks, Side by Side
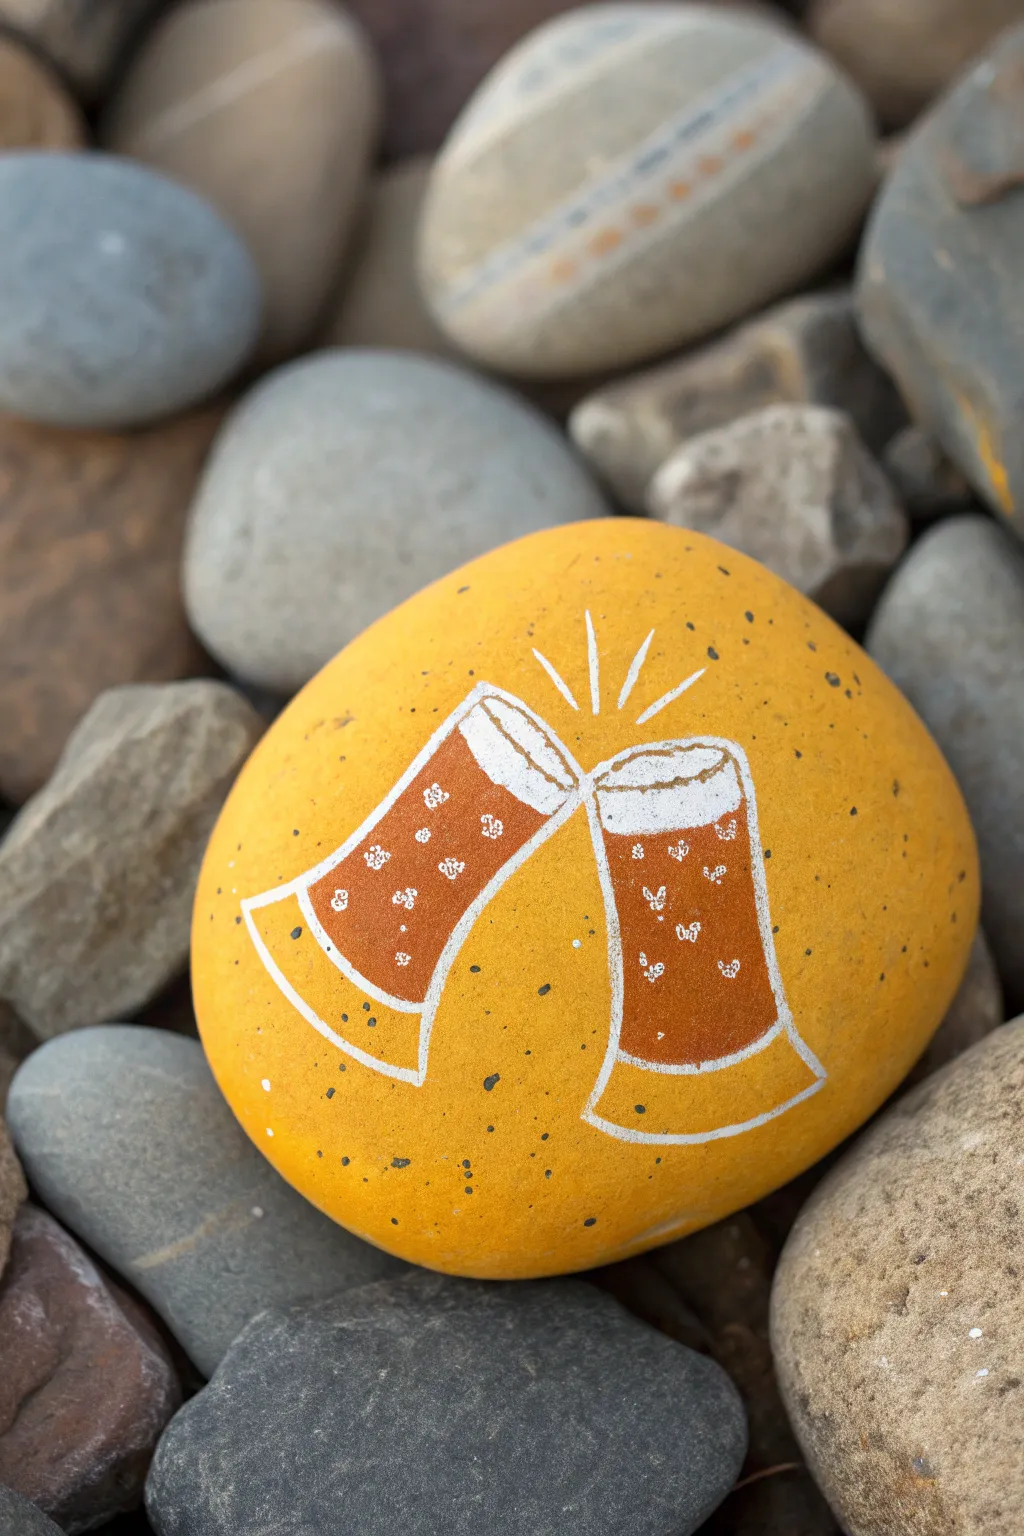
Celebrate your favorite drinking buddy with this cheerful, bright yellow stone featuring clinking glasses. It’s a simple yet spirited design that captures the joy of sharing a cold one with your best friend.
Detailed Instructions
Materials
- Smooth, round river rock
- Yellow acrylic paint (bright, sunny shade)
- Amber or light brown acrylic paint
- White extra-fine tip paint pen (Posca or similar)
- White acrylic paint
- Black or dark grey fine tip paint pen (for speckling)
- Small flat brush
- Detail liner brush
- Sealant (spray or varnish)
Step 1: Setting the Scene
-
Prepare the Surface:
Begin by scrubbing your rock with soap and water to remove any dirt or oils. Let it dry completely before painting to ensure the base coat sticks properly. -
Apply the Base Coat:
Load a flat brush with your bright yellow acrylic paint. Cover the top surface of the rock evenly. You will likely need two or three coats to get a solid, opaque finish, letting each layer dry in between. -
Add Texture:
I like to add a little depth to the background, so take an old toothbrush or a stiff brush, dip it lightly in dark grey or black paint, and flick tiny speckles across the yellow surface. Keep this very subtle and minimal.
Uneven Lines?
If your paint pen lines look shaky, wait for them to dry fully. Then, gently scrape the excess off with a toothpick to straighten the edge before reapplying.
Step 2: Drafting the Design
-
Sketch the Outlines:
Once the yellow base is fully dry, lightly sketch the two glasses using a pencil. Position them tilted toward each other so their rims touch in the center, creating a V-shape. -
Outline the Glass Shape:
Trace over your pencil lines using the extra-fine white paint pen. Draw the top ovals for the rims first, then extend the lines down for the tapered glass bodies and the sturdy bases.
Make it Yours
Swap the amber paint for deep red or clear sparkling white to represent wine or champagne, customizing the drinks to match your friends’ favorites.
Step 3: Pouring the Drinks
-
Fill the Liquid:
Switch to your amber or light brown paint and a small detail brush. Carefully paint inside the white outlines, leaving a small gap at the top for foam and a strip at the bottom for the thick glass base. -
Create the Foam:
At the top of the amber sections, dab white acrylic paint to create a fluffy foam head. Allow the white paint to be slightly uneven to mimic the texture of bubbles.
Step 4: Refining the Details
-
Define the Rims:
Go back over the top rims of the glasses with your white paint pen to ensure the lines are crisp and distinct against the foam. -
Add Bubbles:
Using the very tip of your detail brush or a toothpick, add tiny groupings of white dots inside the amber liquid. These represent carbonation bubbles rising up. -
Draw the ‘Clink’:
Above the point where the glasses touch, use the white paint pen to draw three simple lines radiating upward. This little motion mark emphasizes the moment of impact. -
Clean Up Lines:
If any amber paint went over the white outlines, touch them up now with the white pen to keep the graphic style sharp and clean.
Step 5: Finishing Touches
-
Dry Completely:
Let the rock sit undisturbed for at least an hour to ensure the thickest parts of the paint are fully cured. -
Seal the Artwork:
Apply a clear spray sealer or brush-on varnish. This protects your toast from chipping and gives the ‘glass’ a nice shiny finish.
Now you have a permanent toast to friendship that will last forever.
Mini Snapshot-Style Bestie Portraits

Immortalize your friendship with these nostalgic, vintage-style painted stones that look like little cameo brooches. Using smooth river rocks as your canvas, these charming portraits capture personalities with whimsy and warmth.
Step-by-Step Tutorial
Materials
- Smooth, flat, oval river rocks
- Gesso or white acrylic primer
- Acrylic paints (skin tones, hair colors, green, terra cotta/rust)
- Fine detail brushes (sizes 00 and 000)
- Small flat brush (size 2 or 4)
- Pencil
- Matte varnish/sealer
- Mixing palette
- Water cup and paper towels
Step 1: Preparing the Canvas
-
Clean the surface:
Before you begin, scrub the rocks with soapy water to remove any dirt or oils that might prevent the paint from sticking, then let them dry completely. -
Prime the portrait area:
Paint a solid oval shape in the center of the rock using gesso or white acrylic paint. This creates your ‘frame’ interior and ensures the colors pop against the grey stone. -
Outline the frame:
Once the white base is dry, carefully paint a thin terra cotta or rust-colored line around the edge of your white oval to create a simple frame border.
Step 2: Sketching and Blocking
-
Lightly sketch the features:
Using a pencil, very lightly draw the outline of the head, shoulders, hair, and facial features inside the oval. Keep the composition simple—head and shoulders work best for this scale. -
Paint the skin base:
Mix a skin tone suitable for your subject and fill in the face and neck area. You may need two thin coats for opaque coverage. -
Block in the clothes:
Paint the clothing area below the neck. In the example, notice the simple shapes: a greenish jacket for one and a rust-colored top for the other. -
Fill the hair:
Block in the hair shape with a solid base color—brown for one, reddish-blonde for the other. Don’t worry about strands yet, just get the main shape down.
Natural Stone Look
Leave the outer rim of the rock unpainted. The contrast between raw stone and the delicate painting makes it feel like an ancient artifact.
Step 3: Adding Details
-
Refine the hair texture:
Using your smallest brush, add darker lowlights and lighter highlights to the hair to suggest curls or a bob cut. Short, curved strokes work well for curly hair. -
Paint facial features:
This is the delicate part. Use the 000 brush to dot the eyes (blue with tiny pupils) and paint a simple, smiling mouth using a red-orange mix. -
Add blush and definition:
I like to water down a tiny bit of red paint to create a translucent blush on the cheeks and the tip of the nose for that charming, illustrative look. -
Clothing patterns:
Add simple patterns to the clothes, like the white polka dots on the rust shirt or the collar details on the green jacket. -
Decorative foliage:
Paint simple vine or leaf motifs curving around the top of the portrait inside the frame. Use small brushstrokes to create leaves in green or orange.
Uneven Surfaces?
If the rock has tiny pits, apply a thicker second coat of gesso to the oval area only. Sand it lightly when dry for a perfectly smooth painting surface.
Step 4: Finishing Touches
-
Tidy the outlines:
If any paint went outside the lines, use the background rock color or re-paint the frame border to clean up the edges. -
Add shadows:
Paint a very faint shadow under the chin to separate the head from the neck, adding just a touch of depth. -
Seal the artwork:
Once the paint is completely bone-dry, apply a coat of matte varnish. This protects the portrait without adding an artificial glossy shine.
Display these little treasures on a window sill or turning them into unique paperweights for your desk
Coordinates of Where You Met
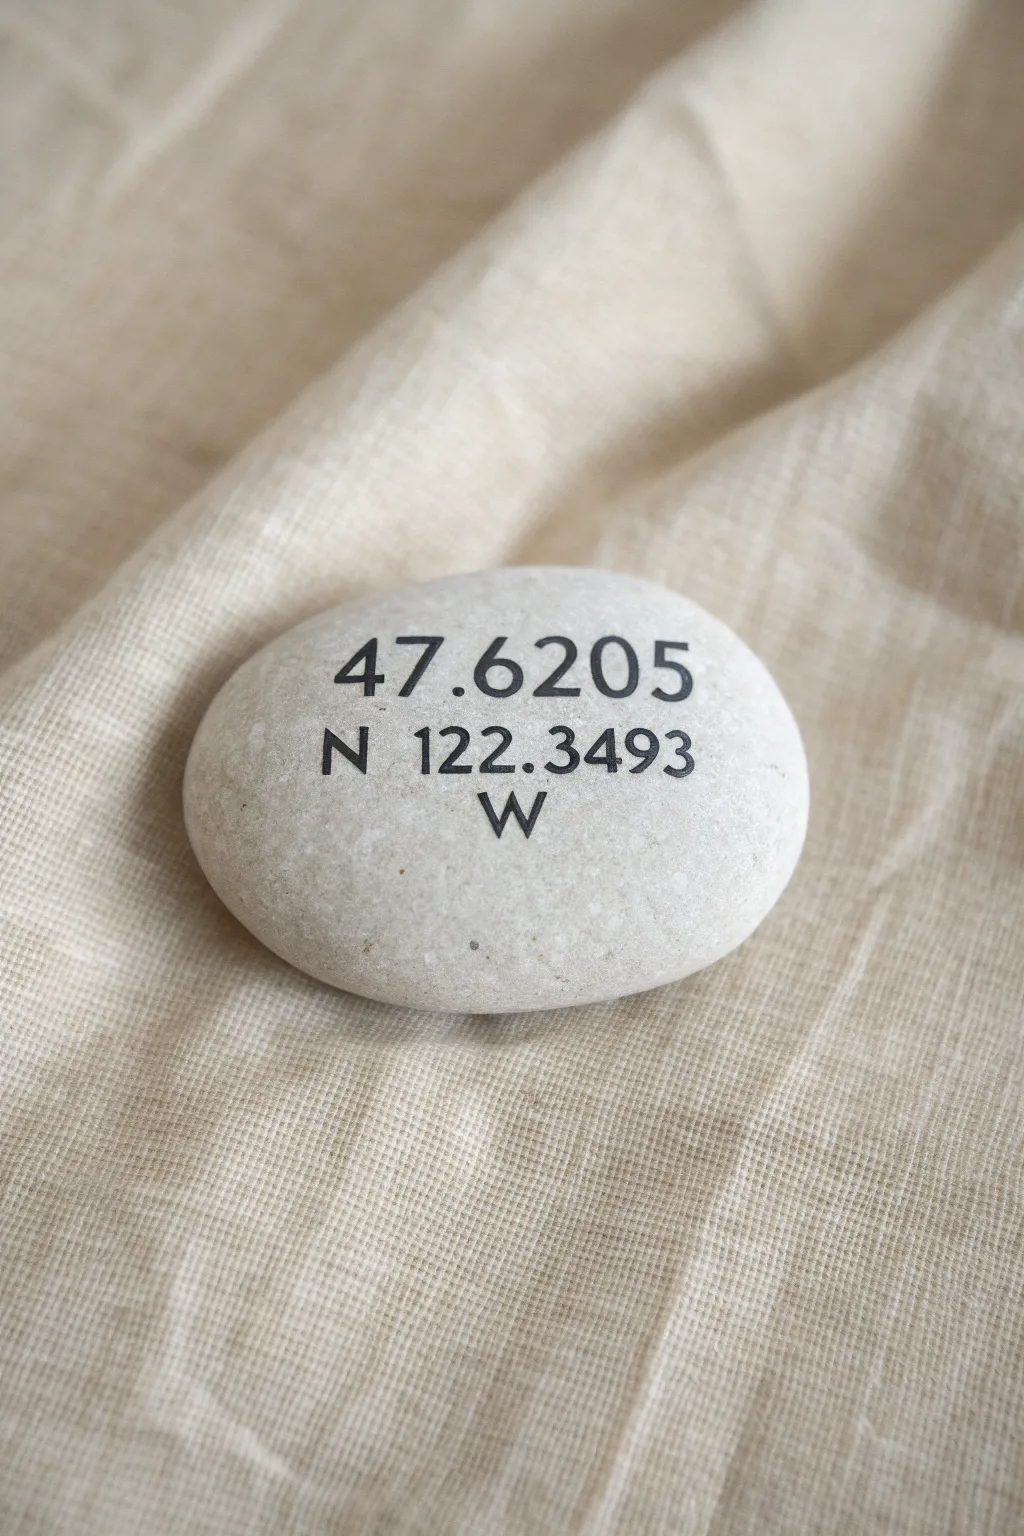
These simple yet striking stones preserve the exact spot where your friendship began using clean, typographic-style lettering. A smooth river rock serves as the perfect canvas for this modern, minimalist memento that marks a special location in time.
Detailed Instructions
Materials
- Smooth, light-colored river rock (flat surface preferred)
- Black fine-point acrylic paint pen (0.7mm or smaller)
- Pencil
- Eraser
- Ruler or straight edge
- Matte spray sealant
- Smartphone or computer for coordinate lookup
- Printed text template (optional)
- Graphite transfer paper (optional)
Step 1: Preparation & Planning
-
Find the perfect rock:
Select a stone that is light in color—white, cream, or light grey—so the black text stands out sharply. The surface should be as smooth and flat as possible to ensure your lettering remains crisp and legible. -
Clean the surface:
Wash your rock thoroughly with warm, soapy water to remove any dirt or oils. Let it dry completely for several hours; moisture trapped inside can ruin the paint later. -
Locate your coordinates:
Use a map app on your phone or computer to find the exact latitude and longitude of where you met your best friend. Simplify the numbers to four decimal places for a cleaner look. -
Draft your design:
Sketch out the layout on a piece of scratch paper first. Decide if you want the coordinates stacked in two lines or three. The sample image uses a three-line structure: latitude numbers on top, N and longitude numbers in the middle, and W at the bottom.
Step 2: Transferring the Design
-
Mark guidelines:
Using a ruler and a sharpened pencil, very lightly draw horizontal baselines on the rock where your text will sit. I find this essential to keep the numbers from looking wavy. -
Create a letter spacing guide:
Mark the center point of your rock on the guidelines. Working outward from the center helps ensure your text is perfectly symmetrical on the stone. -
Sketch the numbers:
Lightly sketch the coordinates onto the rock using the pencil. Focus on simple, sans-serif shapes to mimic a printed font. Keep your pencil pressure very light so it’s easy to erase later. -
Refine the shapes:
Go back over your pencil sketch to thicken the lines where necessary, creating a ‘bold’ font effect. Make sure the tops of numbers like ‘4’ and ‘7’ align neatly. -
Check alignment:
Take a step back and look at the rock from a distance. Verify that the N and W indicators are balanced relative to the numbers.
Use a Stencil Trick
Print your coordinates on paper in your chosen font. Rub charcoal on the back, place it on the rock, and trace over the letters to transfer a perfect guide.
Step 3: Inking & Finishing
-
Prime the paint pen:
Shake your black acrylic paint pen well and press the tip on a scrap piece of paper until the ink flows smoothly. Do not start directly on the rock to avoid blobs. -
Outline the characters:
Carefully trace the outer edges of your penciled numbers and letters. Use steady, slow strokes. If you’re right-handed, work from left to right to prevent smudging your work. -
Fill in the bold text:
Once the outlines are dry (give it a minute), gently color in the thickened parts of the numbers. Be careful not to over-saturate the area, which can cause the ink to run into the stone’s pores. -
Clean up edges:
If any lines look shaky, you can sometimes very gently scrape away excess dried paint with a toothpick or craft knife for a sharper edge. -
Erase guidelines:
Wait until the paint is 100% dry—I usually give it at least an hour to be safe. Then, gently erase any visible pencil marks with a soft eraser. -
Seal the memory:
To protect the lettering without changing the rock’s natural look, finish with a light coat of matte spray sealant. Hold the can 12 inches away and apply in a sweeping motion.
Add a Hidden Detail
Paint a small, simple heart or date on the back of the rock in a gold or silver metallic pen for an extra secret surprise.
This sophisticated little stone is now ready to serve as a permanent reminder of the place where a great friendship started
Inside Joke Doodle Rock
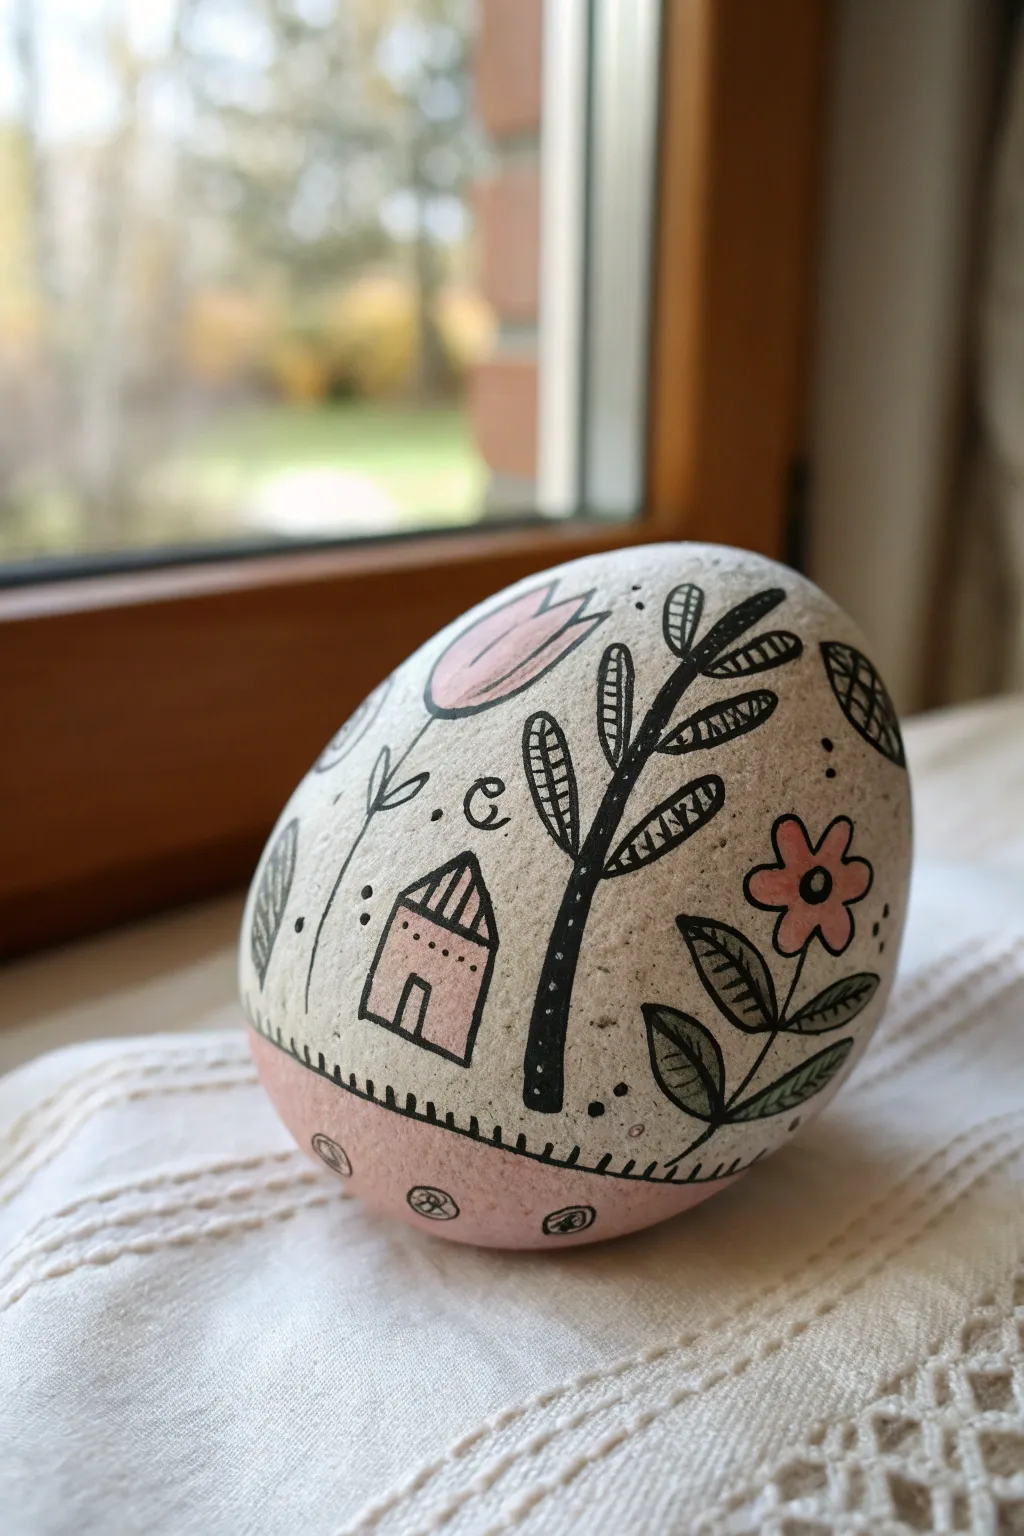
This charming project turns a smooth river stone into a tiny, self-contained world featuring a folk-art style house and garden. Using a limited palette of black ink and soft pink paint, you’ll create a doodle-inspired design that feels both playful and sophisticated.
Step-by-Step Guide
Materials
- Smooth, egg-shaped river rock (white or light grey)
- Pencil and eraser
- Fine grit sandpaper (optional)
- Black fine-point permanent marker or paint pen (0.5mm or 0.7mm)
- Soft pink acrylic paint
- Small flat brush (size 2 or 4)
- Small round brush (size 0 or 1)
- Matte spray sealant
Step 1: Preparation and Base Layout
-
Clean surface:
Begin by washing your stone thoroughly with soap and water to remove any dirt or oils. If the surface is bumpy, you can lightly sand it, but the natural texture usually adds character. Let it dry completely. -
Initial sketch:
Using a pencil, lightly sketch a horizon line around the bottom third of the rock. This doesn’t need to be perfectly straight; a slight curve follows the rock’s natural shape better. -
Drafting main elements:
Sketch the outline of a small house with a pitched roof near the left side. Then, draw a tall, leafy tree in the center and a simple five-petaled flower on the right to balance the composition.
Ink Smearing?
If your black pen drags or lifts the pink paint, the paint isn’t fully cured. Wait another 20 minutes locally or blast it briefly with a hair dryer on cool setting.
Step 2: Painting the Color Accents
-
Painting the base:
Load your small flat brush with soft pink acrylic paint. carefully fill in the bottom section of the rock, painting right up to your pencil line. This creates the ‘ground’ area. -
Adding the house color:
Switch to your smaller round brush and fill in the body of the house with the same pink paint. I find it helpful to dab the paint on gently for the small flower petals on the right side as well. -
Tulip detail:
Paint a small, floating tulip shape in the upper left area. Don’t worry about outlines yet; just get the solid blocks of color down. -
Drying time:
Let the paint dry completely. This is crucial—if the paint is tacky, your ink pens will clog or smear in the next steps.
Step 3: Inking the Outlines
-
Tree structure:
Using your fine-point black marker or paint pen, draw the main trunk of the central tree. Make the trunk fairly thick and color it in solid black. -
House details:
Outline the pink house rectangle. Add a striped roof by drawing a triangle on top and filling it with vertical lines. Don’t forget a tiny door and a few dots for windows. -
Leaf patterns:
Draw the branches extending from the tree. Instead of solid leaves, draw oval outlines and fill them with simple hatched lines or stripes for a stylized, folk-art look. -
Flower outlining:
Outline the pink flower petals on the right. Add a small circle in the center and fill it with black ink, leaving a tiny white speck for a highlight if you can manage it. -
Bottom foliage:
Draw leafy stems coming up from the bottom right, overlapping the pink flower slightly. Use the same hatched line technique for the leaves to keep the style consistent.
Make It Personal
Hide a tiny initial or date inside the pattern of the house roof or within the leaves of the tree to transform this decorative piece into a subtle keepsake.
Step 4: Adding Texture and Final Touches
-
Ground definition:
Draw a line separating the unpainted stone from the pink painted bottom. Along this line, add small vertical tick marks to represent grass. -
Base decoration:
On the pink painted base, draw small, evenly spaced circles. Inside each circle, add a simple scribble, spiral, or cross-hatch pattern. -
Background doodles:
Fill the empty white space with tiny details. Add dots, small circles, a spiral ‘cloud’, and a few stray sprigs of grass to make the scene feel full and busy. -
Checkered accents:
Add a floating leaf or seed pod on the far right edge, filling it with a checkerboard pattern for visual interest. -
Final clean-up:
Once the ink is 100% dry, gently erase any visible pencil lines that weren’t covered by ink or paint. -
Sealing:
Finish by spraying the rock with a matte sealant. This protects the acrylic and ink from chipping or fading over time without adding too much shine.
Place your finished rock on a sunny windowsill or gift it to a friend to brighten their workspace
Hidden Message in Morse Code Dots
Transform a simple stone into a sleek communicator with this modern, typographic design. The deep blue background and crisp white dots create a striking contrast, perfect for hiding a secret message—or simply celebrating the code itself—in plain sight.
How-To Guide
Materials
- Smooth, oval river rock
- Deep navy blue acrylic paint
- Burnt sienna or reddish-brown acrylic paint
- White acrylic paint or white paint pen (fine tip)
- Flat paintbrush (medium)
- Fine liner brush or detail brush
- Dotting tool or toothpick
- Pencil
- Ruler or straight edge (flexible tape measure works best)
- Painter’s tape (optional)
- Matte or satin varnish
Step 1: Base Coat & Layout
-
Clean the surface:
Begin by washing your rock with warm, soapy water to remove any dirt or oils. Let it dry completely before starting to ensure the paint adheres properly. -
Apply the background:
Paint the entire top surface of the rock with the deep navy blue acrylic paint. You might need two or three thin coats to get full, opaque coverage. Allow each coat to dry thoroughly. -
Mark the center stripe:
Once the blue base is bone dry, lightly sketch two parallel horizontal lines across the middle of the rock using a pencil. This will define the width of your message band. -
Paint the message band:
Fill in the space between your pencil lines with the burnt sienna paint. Use a steady hand and a flat brush to create clean edges. I find that applying two coats here makes the color really pop against the dark blue. -
Refine the edges:
If your sienna stripe has wobbly edges, go back in with the navy blue and a fine brush to tidy up the lines. The goal is a sharp, crisp boundary between the two colors.
Step 2: Lettering & Details
-
Map out the text:
Lightly write the words ‘MORSE CODE’ (or your chosen secret word) in pure center of the brown stripe using a pencil. Check your spacing to ensure it sits evenly. -
Paint the letters:
Using a fine tip white paint pen or a very small liner brush with thinned white acrylic, carefully trace over your pencil letters. Keep the stroke width consistent for a modern font look. -
Double-check opacity:
White paint over a dark or medium color often needs a second pass. Once the first layer of text is dry, retrace the letters to make them bright and solid. -
Plan the dots:
visualize where your dot rows will go. You want one row just above the brown stripe and one row just below it, sitting on the blue background. -
Dot the top row:
Dip your dotting tool or the flat end of a toothpick into white paint. Gently press dots in a satisfying, even line just above the sienna stripe. Try to keep the spacing uniform. -
Dot the bottom row:
Repeat the process for the bottom row of dots below the stripe. Align them vertically with the top row dots if possible for a symmetrical layout. -
Add secondary details:
If you want extra texture like in the reference, you can add slightly smaller dots further out towards the edges of the rock, following the same curve.
Wobbly Lines?
If you struggle painting straight lines on a curved rock, use thin strips of washi tape or flexible painter’s tape to mask off the stripe area before painting the brown section.
Step 3: Finishing Touches
-
Clean up sketches:
Once all paint is completely dry—give it a good hour—gently erase any visible pencil marks from your initial sketching. -
Seal the rock:
Apply a coat of matte or satin varnish to protect your work. A matte finish gives it that sophisticated, smooth stone look seen in the photo. -
Let it cure:
Allow the varnish to cure fully according to the bottle instructions before handling or gifting your secret message rock.
Pro Tip: Dot Consistency
Reload your dotting tool with fresh paint after every single dot. This ensures every dot is exactly the same size and prevents the fading ‘tail’ effect.
Now you have a stylish, coded keepsake to share with your best friend
Glow Night Sky With Two Named Stars
Create a mesmerizing piece of the cosmos right in the palm of your hand with this galaxy rock painting. Swirls of deep violet and cosmic blue create a stunning backdrop for twinkling stars and two prominent shooting stars representing you and your best friend.
Step-by-Step Tutorial
Materials
- Smooth, oval river rock (about 3-4 inches wide)
- Black acrylic paint
- Titanium white acrylic paint
- Purple (violet/magenta) acrylic paint
- Deep blue (ultramarine or phthalo) acrylic paint
- Flat paintbrush (medium size)
- Small sponge or makeup sponge wedge
- Fine detail paintbrush (size 0 or 00)
- Toothpick or dotting tool
- Clear acrylic sealer (spray or brush-on)
Step 1: Setting the Stage
-
Prep the surface:
Begin by washing your rock with soap and water to remove any dirt or oils. Let it dry completely before starting. -
Base coat:
Paint the entire top surface of the rock with black acrylic paint. You want a solid, opaque background, so applying two coats works best here. Allow the first coat to dry to the touch before adding the second. -
Full dry:
Ensure the black base is strictly dry before moving on to the galaxy colors to prevent muddying.
Cosmic Softness
When sponging the nebula colors, the sponge should be almost dry. Too much paint creates solid blobs; you want a sheer, misty texture so the black shows through slightly.
Step 2: Creating the Galaxy
-
Prepare the sponge:
Take a small piece of sponge or a makeup wedge. If you don’t have one, scrunched-up foil can work in a pinch for texture. -
Dab purple nebulas:
Dip the sponge lightly into your purple paint and dab off most of the excess on a paper towel. Gently sponge a cloudy, diagonal patch across the left-center of the rock. Keep the edges soft and faded. -
Add blue depth:
Using a fresh corner of the sponge (or a clean one), repeat the process with deep blue paint on the right side of the rock. I like to overlap the colors slightly in the middle to create a seamless transition. -
Highlight the clouds:
Mix a tiny drop of white into your purple and blue paints separately to create lighter versions. Sparingly sponge these lighter highlights into the center of your colored patches to give the galaxy depth and a glowing effect. -
Let it set:
Allow the sponge work to dry completely. Acrylics dry fast, so a few minutes should suffice.
Blobby Stars?
If your white stars look like thick blobs rather than points of light, your paint is too thick. Add a single drop of water to the white paint to help it flow smoothly off the brush.
Step 3: Starry Details
-
Splatter stars:
Dilute a small amount of white paint with water until it’s inky. Dip a stiff brush or old toothbrush into it and flick the bristles to spray tiny, distant stars across the black and colored areas. -
Large stars placement:
Switch to your fine detail brush. Paint four or five larger, five-pointed stars scattered across the galaxy. Place a prominent one near the bottom center and another in the purple nebula. -
Refining star shapes:
Go back over your five-pointed stars to sharpen the points. Use the very tip of your brush to make them look crisp against the dark background. -
Adding medium stars:
Using a toothpick or a small dotting tool dipped in undiluted white paint, place distinct dots around the galaxy. Vary the size by pressing harder for larger dots and lighter for tiny specks. -
Create star clusters:
Group a few tiny dots close together in the darker black areas to simulate distant star clusters.
Step 4: The Named Stars
-
Drafting the shooting stars:
Identify the spot on the right blue side for your special ‘named stars’. You will be painting two distinct lines. -
Painting the trails:
With your fine liner brush and slightly thinned white paint, drag two thin, parallel curved lines diagonally downwards. Let the paint fade out at the tail end to look like a comet trail. -
Solidifying the heads:
Add a slightly thicker dab of white paint at the top (start) of each line to represent the head of the shooting star. -
Final touches:
Look over your rock. If any black areas feel too empty, add a tiny white dot or cross-shaped sparkle to balance the composition. -
Seal the galaxy:
Once the paint is absolutely dry (give it at least an hour), apply a coat of clear acrylic sealer. A glossy finish looks fantastic on space themes as it deepens the black and makes the colors pop.
Give this celestial token to your best friend as a reminder that they are a superstar in your universe


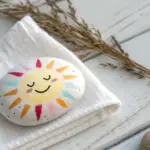
Have a question or want to share your own experience? I'd love to hear from you in the comments below!