Birds are one of my favorite things to paint because you can go as realistic or as playful as you want and it still feels like a bird. Here are some bird painting ideas that start classic and beginner-friendly, then get more experimental once you’re warmed up.
Classic Bird on a Branch
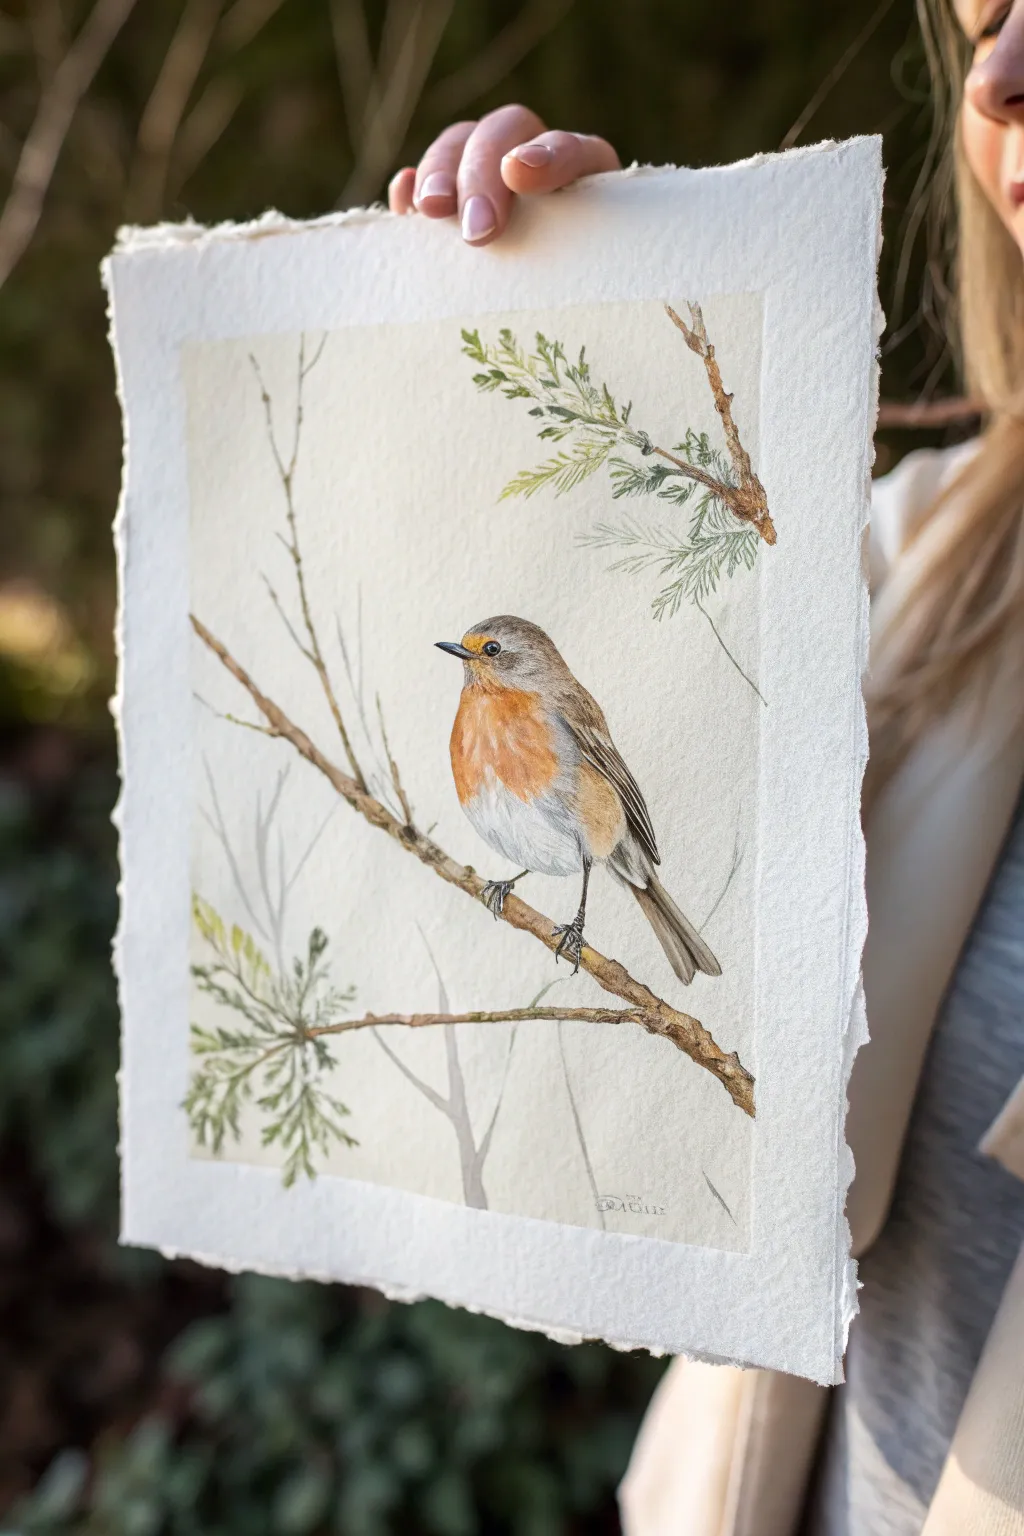
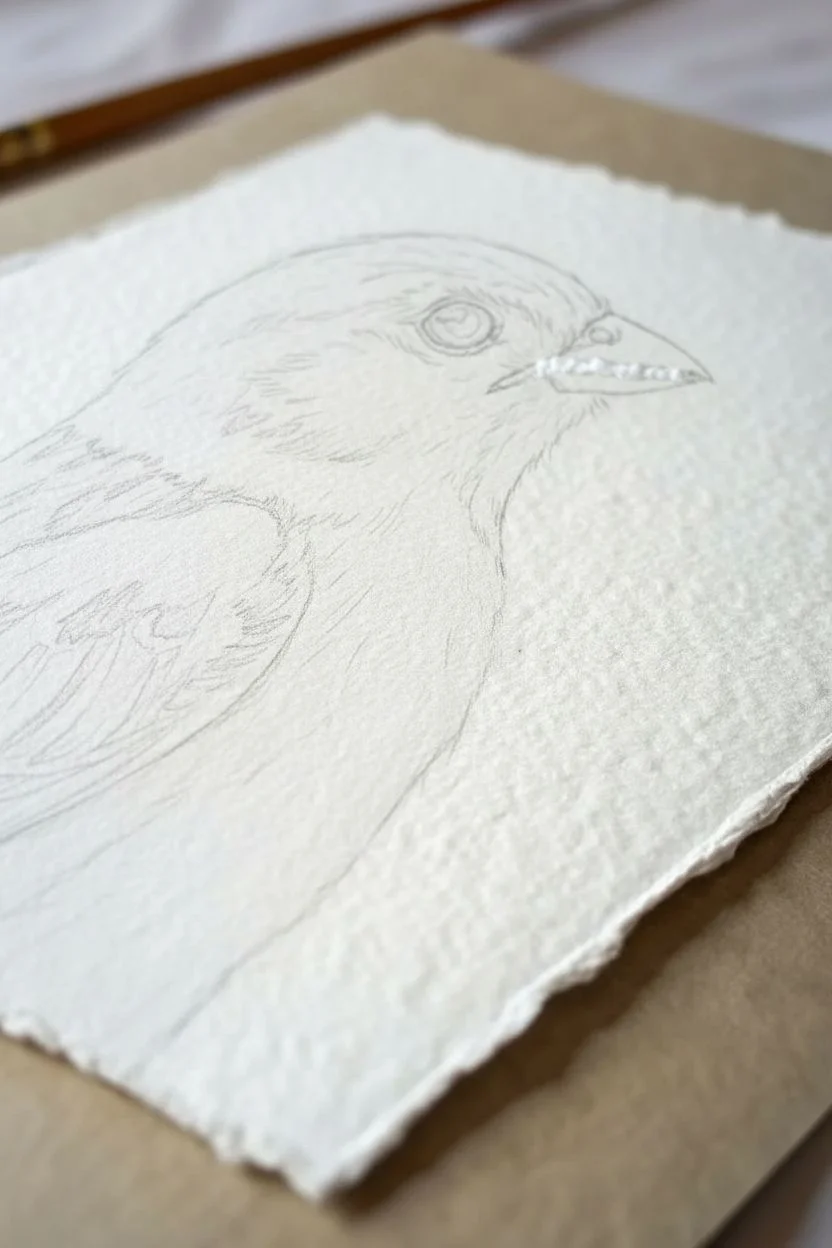
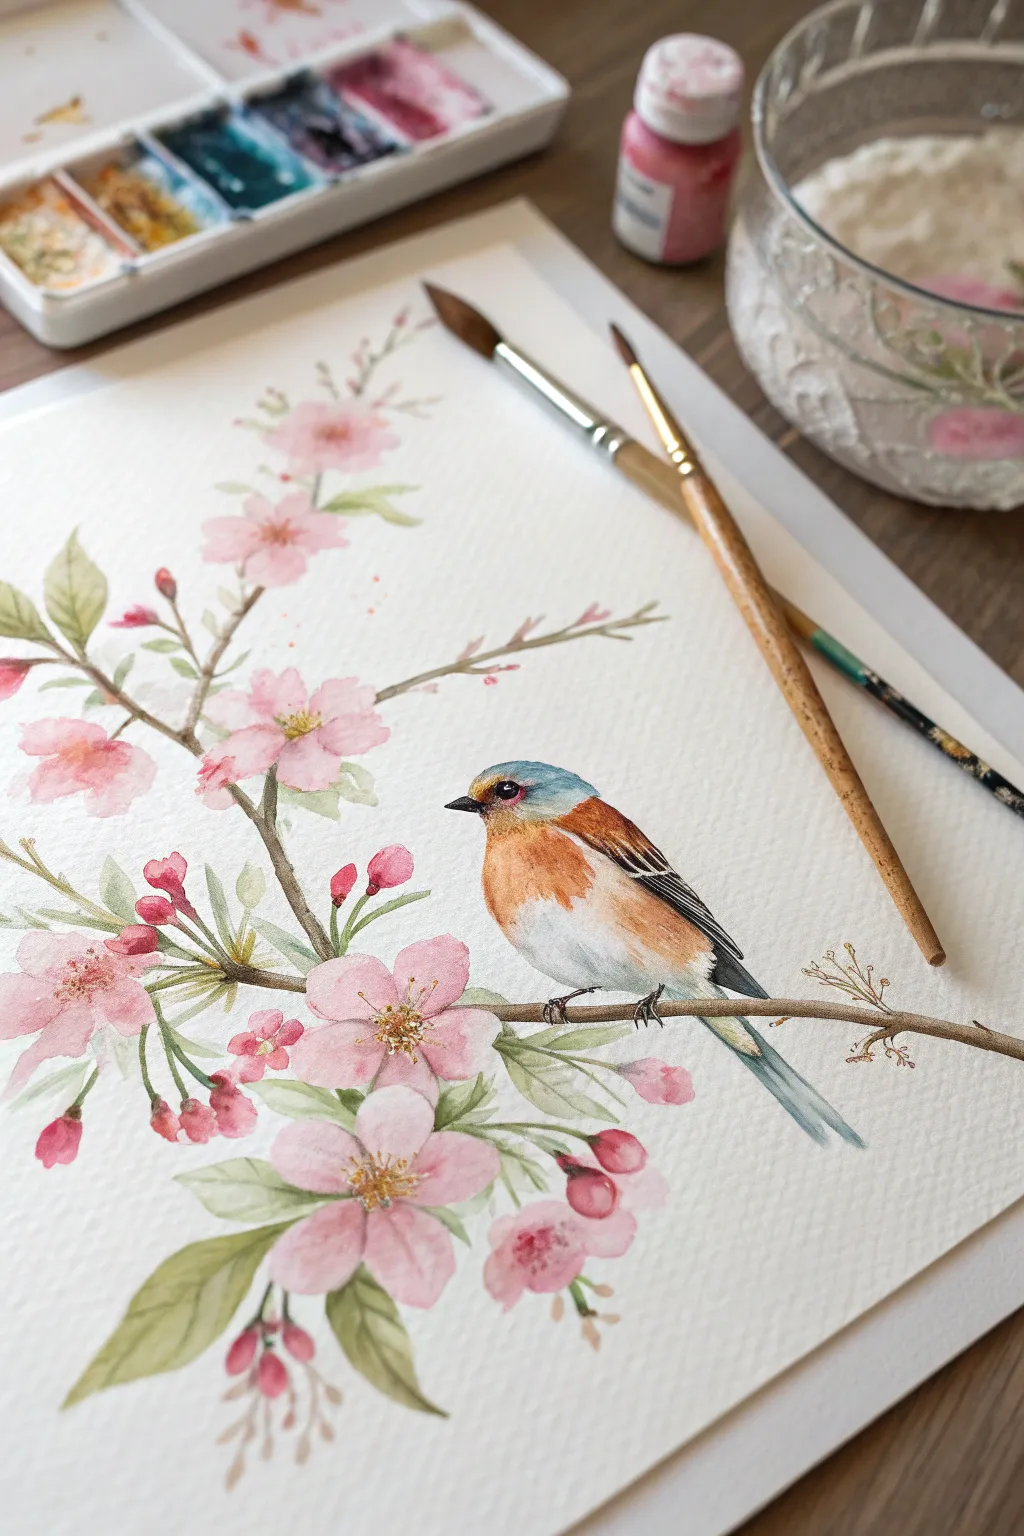
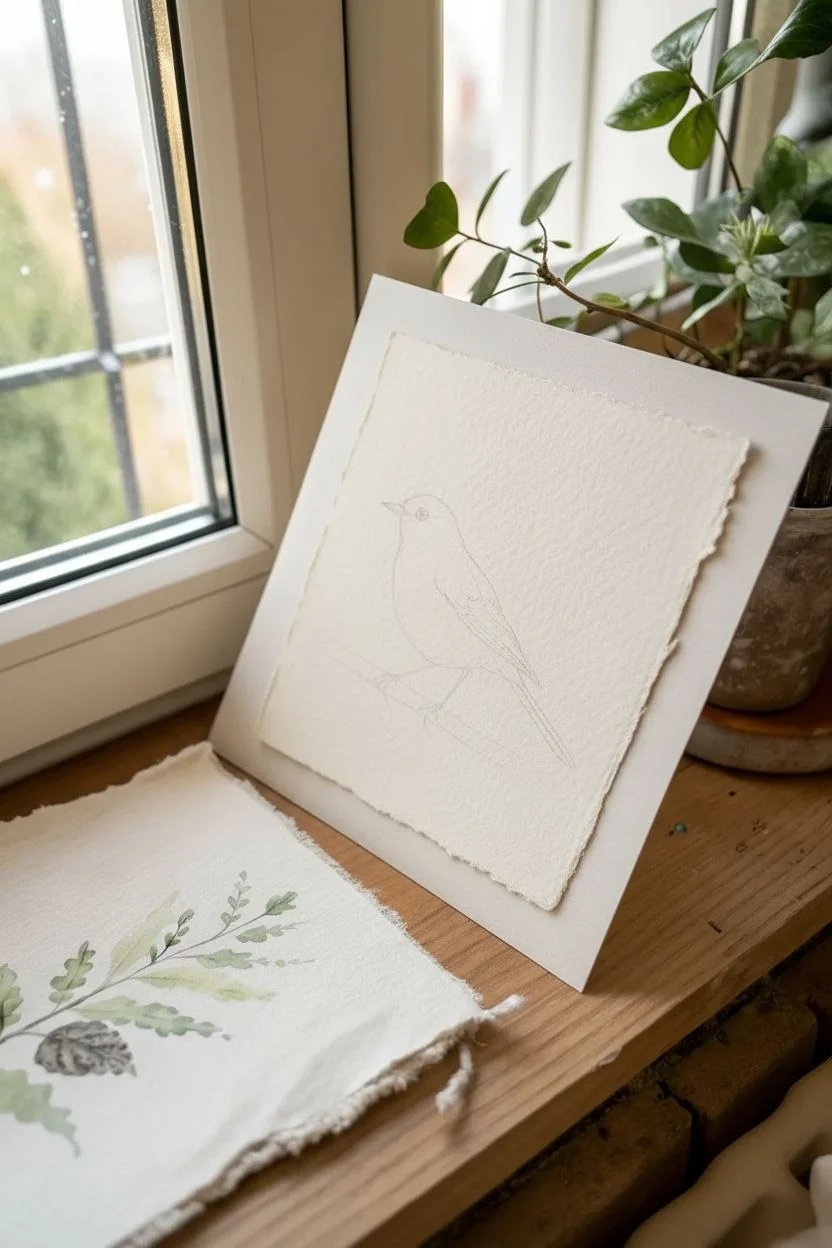
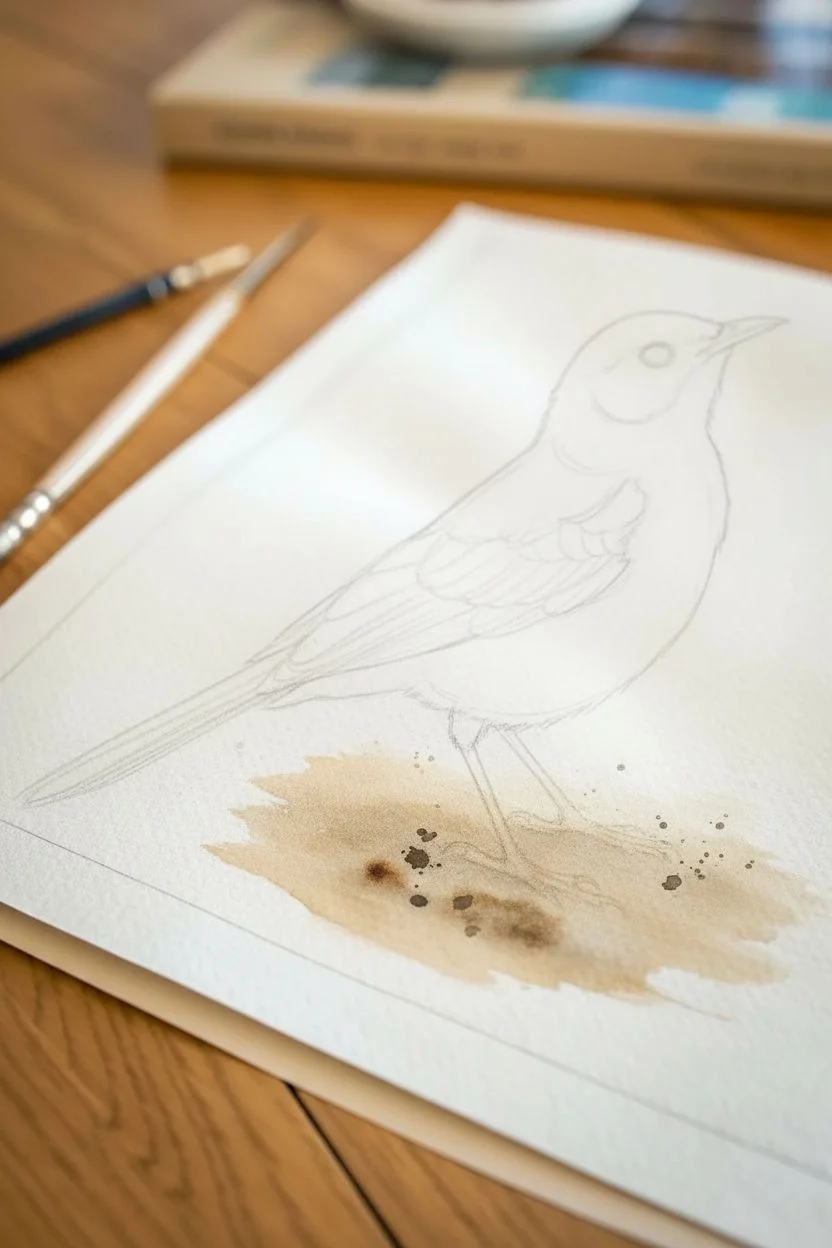
Capture the delicate beauty of a European Robin perched on a wintry branch in this realistic watercolor study. The painting features fine details on heavyweight, deckled-edge paper, creating an elegant, botanical illustration feel.
Step-by-Step
Materials
- Heavyweight cold-press watercolor paper (300gsm or heavier) with deckled edges
- Watercolor paints (Burnt Sienna, Payne’s Grey, Yellow Ochre, Burnt Umber, Sap Green, Ultramarine Blue)
- Small round brushes (sizes 0, 2, and 4)
- Fine liner brush (size 000)
- HB pencil for sketching
- Kneaded eraser
- Two jars of water
- Paper towel
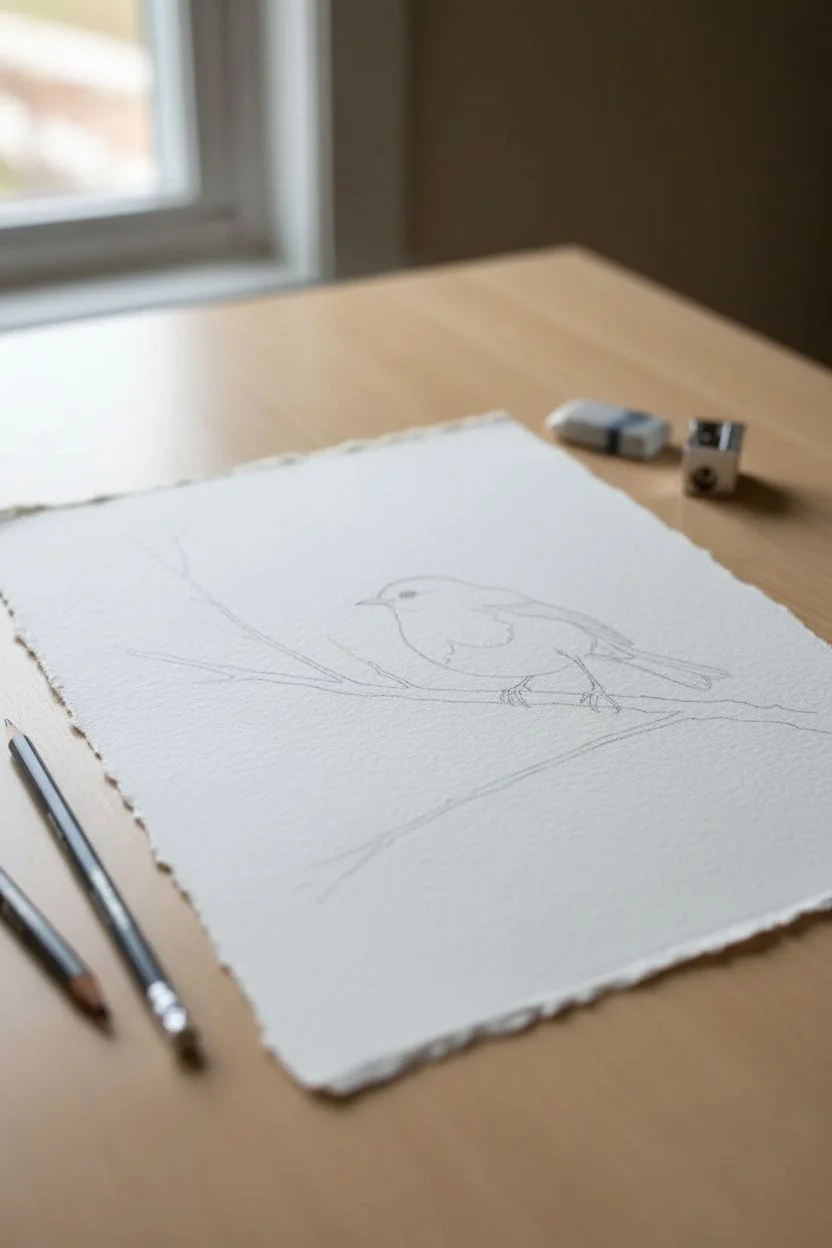
Step 1: Preparation and Sketching
-
Prepare the paper:
Select a high-quality sheet of handmade or cold-press paper. If it doesn’t have deckled edges, you can gently tear the edges against a ruler to create that rough, organic look seen in the photo. -
Outline the composition:
Using an HB pencil, lightly sketch the main diagonal branch stretching from the bottom left to the middle right. Add the vertical thinner twig rising on the left side. -
Shape the bird:
Place the robin just noticeably off-center on the main branch. Start with a circle for the head and an oval for the body, connecting them with smooth lines to form the neck and back. -
Refine the details:
Sketch the wing tucked against the body, the long tail feathers extending downwards, and the thin legs gripping the branch. Mark the boundary where the orange breast meets the white belly.
Step 2: Painting the Robin
-
Base wash for the breast:
Mix a diluted Burnt Sienna with a touch of Yellow Ochre. Apply a wet-on-dry wash to the breast area, keeping the edges soft where the color fades into the white belly. -
Base wash for the back:
While the breast dries, mix a light wash of Burnt Umber and Payne’s Grey. Paint the head, back, and wings, carefully avoiding the eye area and beak. -
Deepening the orange:
Once the first layer is dry, glaze a more saturated Burnt Sienna over the center of the breast to create volume. Leave the edges lighter to embrace the roundness of the bird. -
Detailing the wings:
Switch to a size 0 or 2 brush. Using a darker mix of Burnt Umber, paint the individual flight feathers on the wing with thin, directional strokes. Layer these strokes to build texture. -
The facial features:
With your smallest brush and a thick mix of Payne’s Grey (almost black), carefully paint the eye, leaving a tiny dot of white paper for the highlight. Paint the beak, keeping the top mandible slightly darker. -
Shadows and fluff:
Mix a very watery grey-blue using Ultramarine and a touch of Umber. Add subtle shading under the wing and on the white belly to suggest soft, fluffy feathers.
Muddy colors?
If your feathers look muddy, let the paper dry completely between layers. Patience is key in watercolor; working on damp paper blends colors too much for crisp feather details.
Step 3: The Branch and Botanical Elements
-
Painting the branch structure:
Mix Burnt Umber and Yellow Ochre. Paint the main branch using uneven strokes to mimic rough bark. Vary the pressure on your brush to create thick and thin sections naturally. -
Adding texture to the wood:
While the branch is still slightly damp, drop in concentrated dark brown (Burnt Umber + Payne’s Grey) into the shadowed underside of the branch and around the knobs. -
Painting the cypress leaves:
Use Sap Green mixed with a little Yellow Ochre for a muted, natural green. Paint the sprigs of evergreen foliage at the branch tips and upper corner using short, dabbed strokes to look like needles. -
Background twigs:
For the faint, blurry twigs in the background, use a very diluted grey-brown wash. Paint these loosely and lightly to suggest depth and distance.
Add Winter Frost
To give the scene a winter feel, lightly dry-brush white gouache on the tops of the branches and the tips of the green foliage to mimic a dusting of morning frost.
Step 4: Final Touches
-
The feet:
Using a dark grey mix and a fine liner brush, paint the legs and claws gripping the textured wood. Add tiny highlights with white gouache if you lost the paper white. -
Enhancing contrast:
I like to step back here and check values. Strengthen the darks under the wing and the texture on the bark with your darkest brown mix to make the bird pop against the pale paper.
Mount your finished piece on a contrasting mat board to highlight those beautiful deckled edges


Songbird Portrait Close-Up
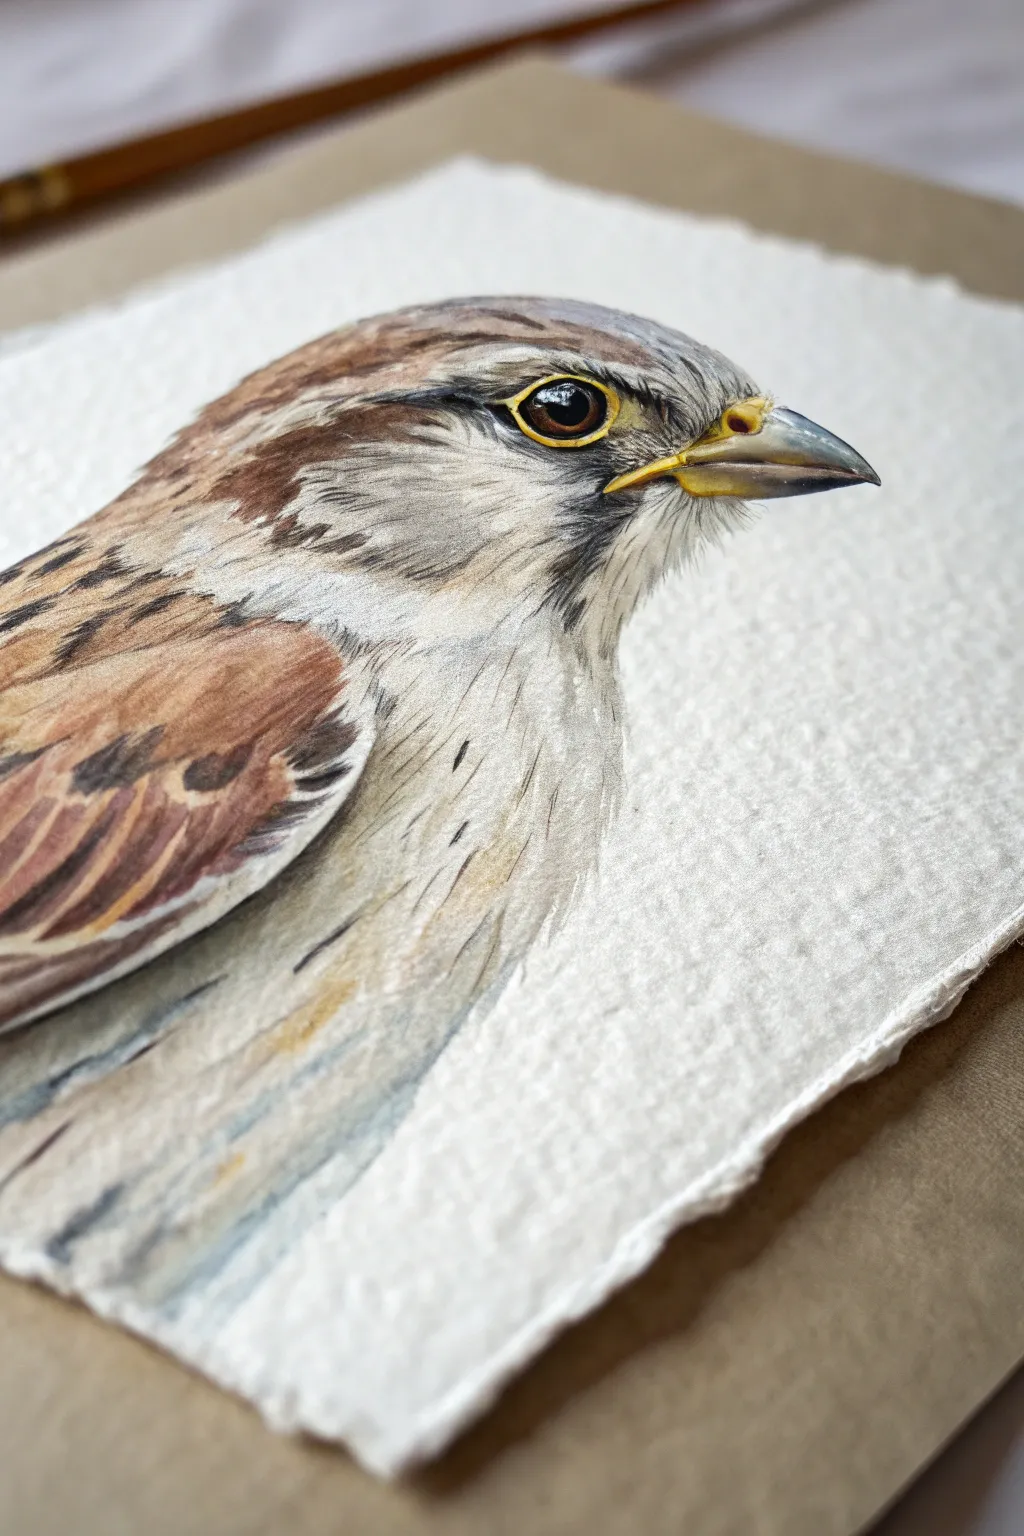
Capture the delicate beauty of a common songbird with this detailed watercolor portrait focusing on texture and lifelike features. You’ll work on high-quality cold press paper to achieve stunning feather effects and a gleam in the bird’s eye.
Detailed Instructions
Materials
- Cold press watercolor paper (300 gsm or heavier)
- Watercolor paints (Burnt Sienna, Burnt Umber, Yellow Ochre, Payne’s Grey, Lamp Black)
- Round brushes (sizes 2, 4, and 00 for details)
- Masking fluid
- HB Pencil
- Kneaded eraser
- Mixing palette
- Two jars of water
- Paper towels
Step 1: Sketching and Preparation
-
Outline the subject:
Begin with a very light pencil sketch of the sparrow’s head. Focus on getting the proportions of the beak relative to the eye correct. The beak should be roughly triangular, and the eye should sit just slightly back from the corner of the mouth. -
Mark feather groups:
Lightly delineate where the major feather groups change direction, specifically around the cheek patch and the crown of the head. Keep lines faint so they don’t show through the paint later. -
Protect highlights:
Apply a tiny dot of masking fluid to the highlight in the bird’s eye. You can also add a thin line of masking fluid along the top ridge of the beak to preserve the white of the paper for a natural shine.
Step 2: The Eye and Beak
-
Base layer for the eye:
Mix a warm, golden brown using Yellow Ochre and a touch of Burnt Sienna. Paint the iris ring around the pupil pupil area, keeping it wet. -
Deepening the pupil:
While the iris is still slightly damp, drop in Lamp Black for the center pupil. This softness helps the eye look round rather than flat. -
Beak undertones:
Wash the beak area with a very pale mix of Payne’s Grey and a hint of Yellow Ochre near the base (the fleshy corner). Let this layer dry completely. -
Defining the beak:
Using a size 2 brush, add darker glazes of Payne’s Grey to the tip and underside of the beak. Leave the middle area lighter to suggest volume.
Pro Tip: Fur & Feather Texture
Don’t outline every single feather. Suggest detail by focusing on the shadows *between* feather clumps rather than painting the feathers themselves.
Step 3: Feather Texture and Layers
-
Initial wash:
Wet the head area with clean water (avoiding the eye and beak). Drop in a soft wash of diluted Burnt Sienna on the crown and back, and a very pale grey on the cheek and chest. -
Building warmth:
Once the initial wash is tacky but not soaking, strokes of stronger Burnt Sienna and Burnt Umber can be added to the wing area to imply individual feathers. -
Creating direction:
Switch to a size 00 or 0 brush. Using a ‘dry brush’ technique with minimal water, start flicking tiny strokes of Payne’s Grey and Burnt Umber in the direction of feather growth. -
Cheek details:
The cheek feathers are finer. Use a pale grey wash and very delicate, short strokes to create the soft, downy texture under the eye. -
Dark markings:
Paint the characteristic dark markings of the sparrow. Add the dark streak through the eye and the bib on the throat using a mix of Burnt Umber and Lamp Black. -
Wing definition:
Paint the distinct shapes of the flight feathers on the wing with a rich mix of Burnt Sienna and dark brown, leaving thin gaps between them to suggest structure.
Troubleshooting: Muddy Colors
If your browns look dull or muddy, let the paper dry completely. Then, glaze over them with a pure, transparent color like Burnt Sienna to restore vibrancy.
Step 4: Refining Details
-
Chest texture:
For the chest feathers, use very watery grey paint. I like to make quick, vertical dashes that fade out at the bottom to mimic soft plumage blending into the white paper. -
Remove masking:
Gently rub away the masking fluid from the eye and beak. If the white eye highlight looks too stark, soften it with a clean, slightly damp brush. -
Enhance the eye:
Add a thin ring of yellow-orange around the eye skin to make it pop, and darken the very edge of the eyelids with black for contrast. -
Final feather flicks:
Go over the darkest areas of the head and wing one last time with your smallest brush, adding crisp, dark lines to specialized feathers to bring the image into sharp focus.
Step back and admire the soulful expression of your finished avian portrait


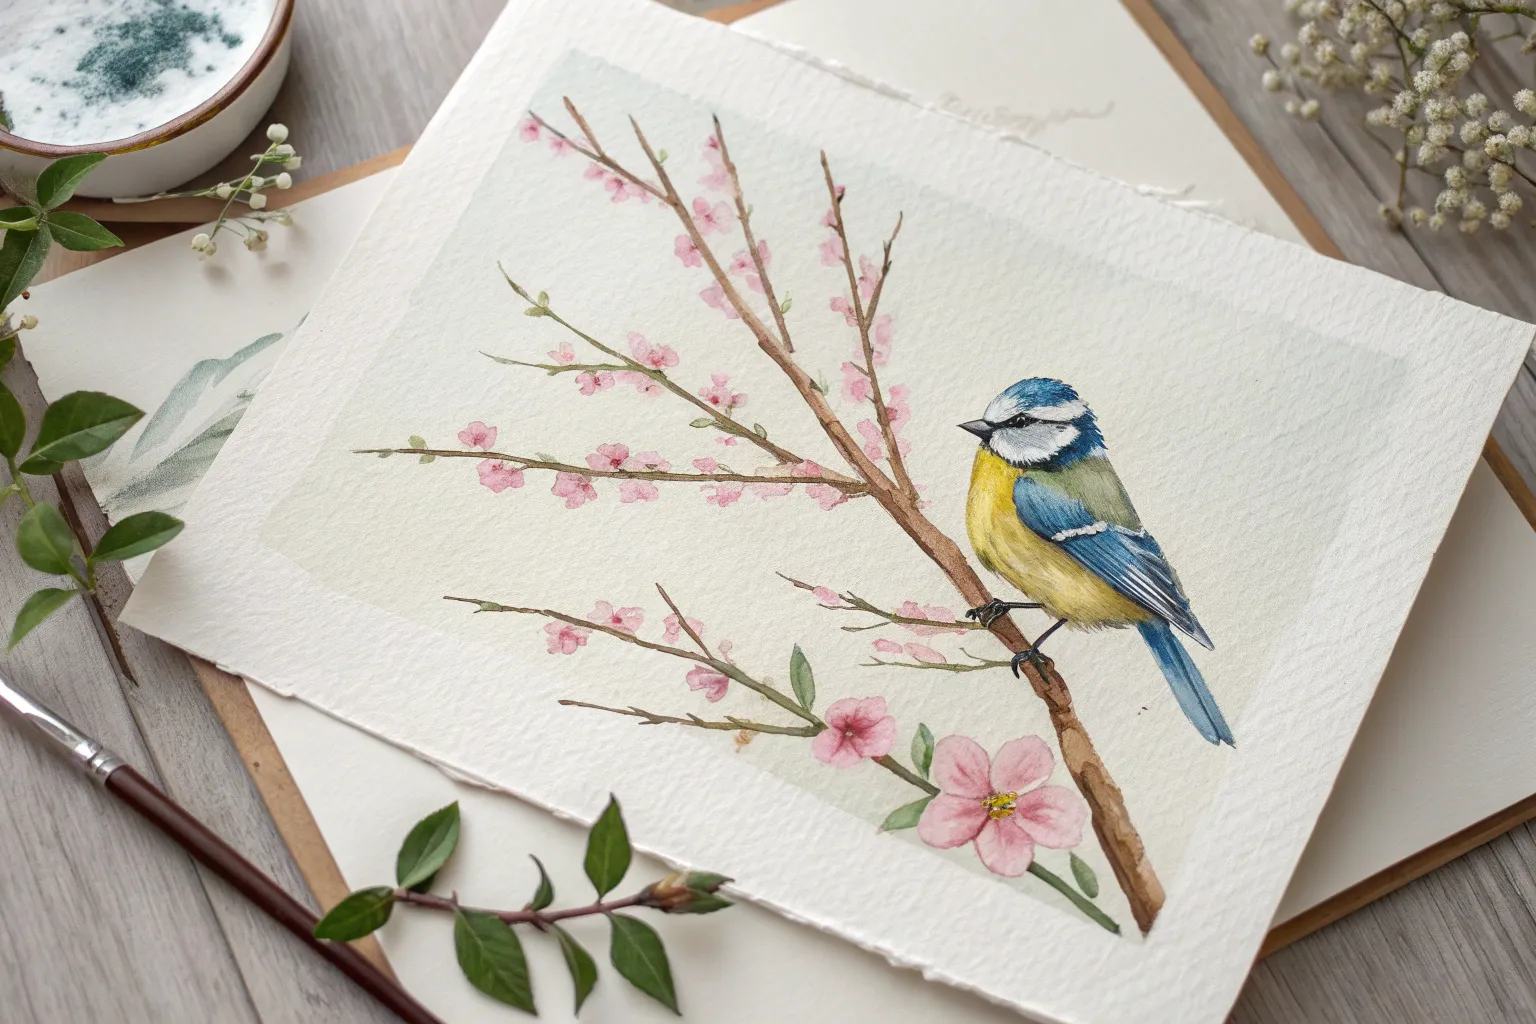
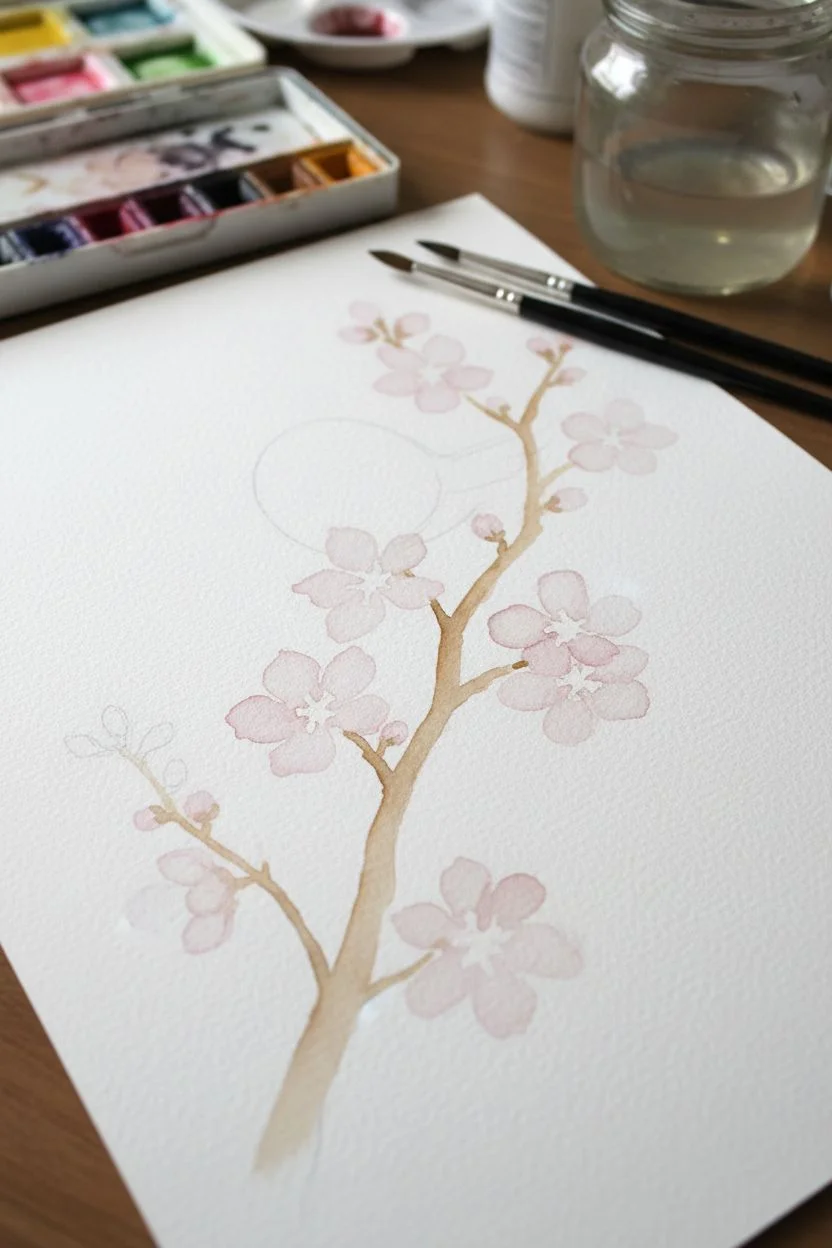
Bright Bird With a Simple Wash Background
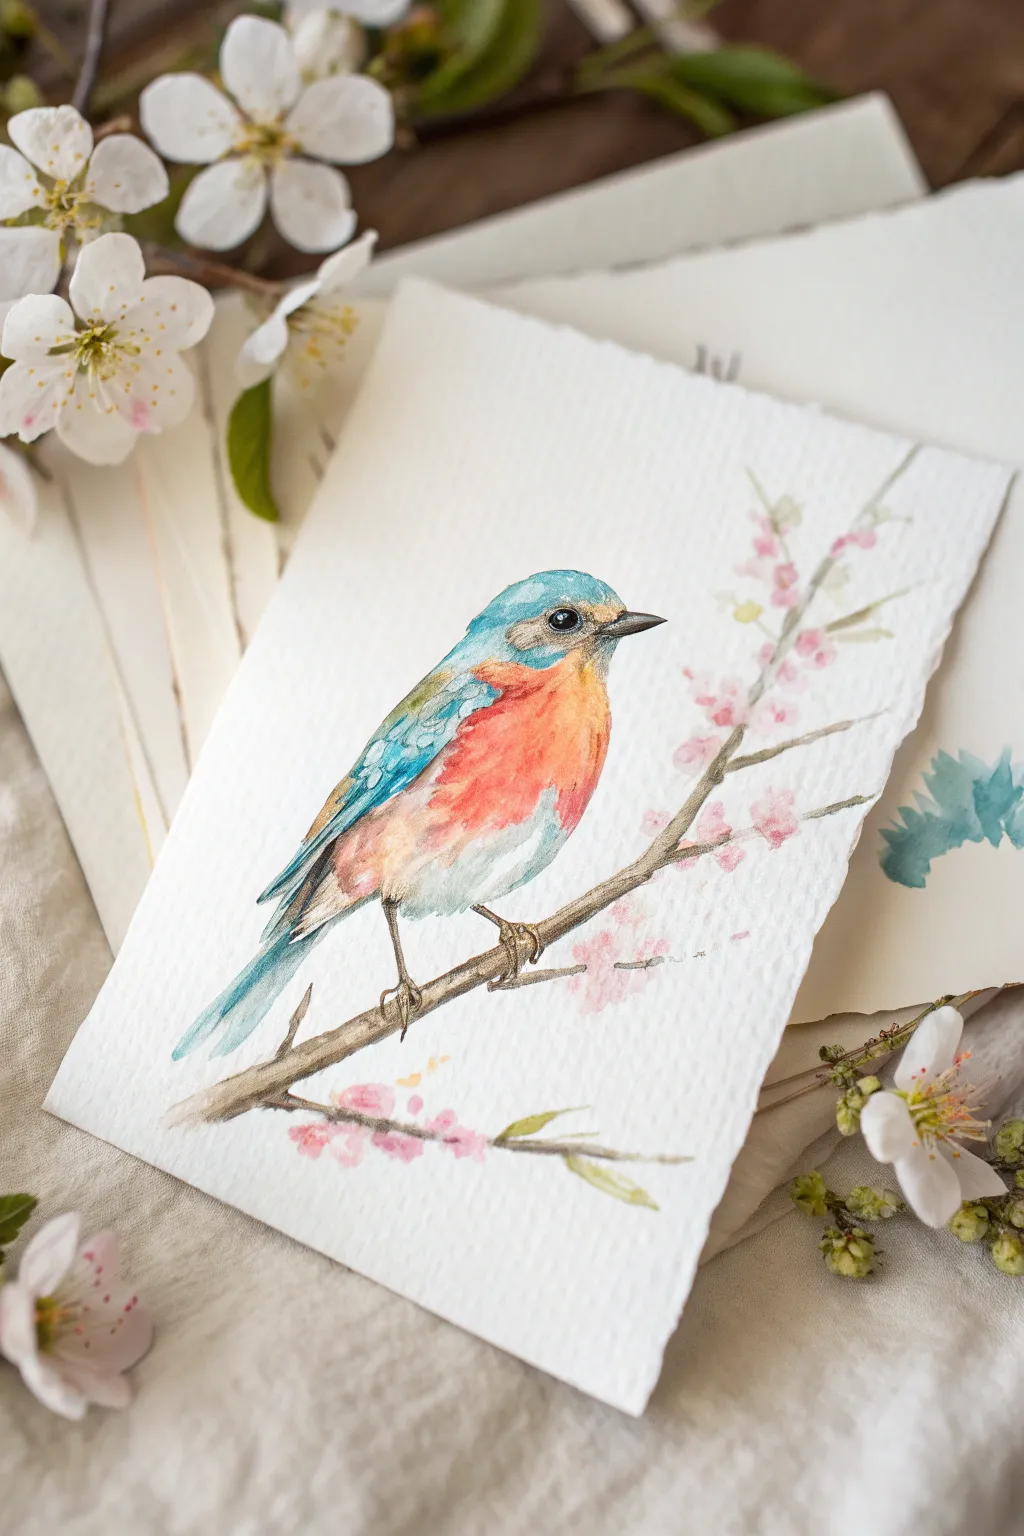
Capture the delicate beauty of spring with this watercolor study of a bluebird perched amongst soft pink blossoms. The combination of vibrant blues and warm peachy tones creates a joyful contrast against the crisp white of textured paper.
Step-by-Step
Materials
- Cold-press watercolor paper (300 gsm or heavier)
- Watercolor paints (Cerulean Blue, Ultramarine, Burnt Sienna, Alizarin Crimson, Sap Green, Sepia, Payne’s Gray)
- Round brushes (sizes 2, 4, and 6)
- Fine liner brush (size 0 or 00)
- Pencil (HB or 2H)
- Kneaded eraser
- Jar of clean water
- Paper towels or cotton rag
- Masking fluid (optional)
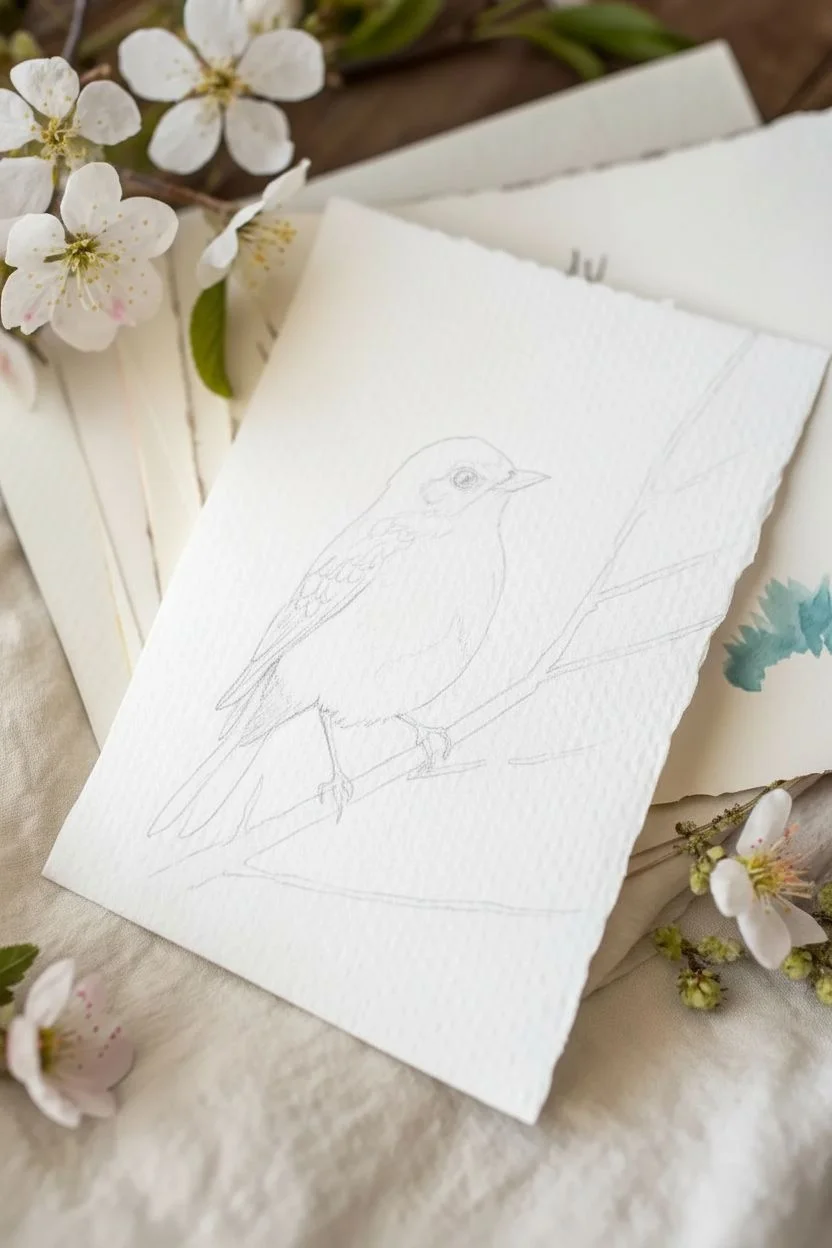
Step 1: Sketching the Composition
-
Outline the bird:
Start with a light pencil sketch. Draw an oval for the body and a smaller circle for the head to get the proportions right. Connect them with smooth lines to form the neck and back. -
Add details:
Refine the beak shape, ensuring it’s sharp and pointed slightly downward. Mark the wing position and the long tail feathers extending downwards. -
Place the branch:
Draw a diagonal line for the main branch, intersecting the bird’s feet. Add smaller twig offshoots for the blossoms. Keep these lines very faint so they don’t show through the pale pink paint later. -
Clean up:
Use a kneaded eraser to lift up almost all the graphite, leaving just a ghost of an image to guide your brush.
Muddy colors?
If the blue wing and orange chest touch while wet, they will turn brown. Let the blue section dry completely before painting the orange chest right next to it.
Step 2: Painting the Bird
-
First wash of blue:
Mix a watery Cerulean Blue. Using a size 4 brush, paint a light wash over the head and back. While the paper is still damp, drop in a touch of Ultramarine near the wing shoulder and top of the head for variation. -
Adding warmth:
Clean your brush thoroughly. Mix a diluted Burnt Sienna with a tiny dot of Alizarin Crimson to make a peach color. Paint the chest area, letting it bleed slightly into the white underbelly area but keeping a distinct edge where it meets the blue wing. -
Deepening the wings:
Once the initial wash is dry, use a thicker mixture of Cerulean and a bit of Sap Green or Turquoise to paint the detailed feathers on the wing. Use short, directional strokes to mimic the texture of feathers. -
Tail feathers:
Paint the long tail feathers with a mix of Cerulean and Payne’s Gray. Keep the tips slightly translucent to maintain a light feel. -
The eye and beak:
Switch to your smallest brush (size 0). Mix a very dark Sepia or Black. Carefully paint the eye, leaving a tiny speck of white paper unpainted for the highlight—this brings the bird to life. Paint the beak with a lighter gray-black mix. -
Final bird details:
Add fine lines on the wings using Payne’s Gray to suggest individual feather separation. I like to add a tiny touch of dry-brushed white gouache if I lose my highlights, but try to preserve the paper white if you can.
Step 3: The Branch and Blossoms
-
Painting the wood:
Mix Sepia and Burnt Sienna for a warm brown. Paint the main branch using a size 4 brush. Vary the pressure to make the branch look organic—thick in some spots, thin in others. -
Adding texture:
While the branch is damp, drop in concentrated Sepia on the shadowed underside. Let this bleed naturally for a rounded effect. -
Soft blossoms:
Dilute Alizarin Crimson to a very pale pink wash. Paint loose, irregular blobs for the flower buds along the twig offshoots. Don’t try to draw perfect petals; just suggest the shape. -
Blossom centers:
While the pink is still wet, touch the centers of a few flowers with a slightly darker pink or purple mix to add depth. -
Connecting the blooms:
Use the liner brush and a diluted green-brown mix to connect the floating pink blossoms to the main branch with delicate stems. -
Adding feet:
Using the liner brush and dark Sepia, paint the bird’s feet gripping the branch. The claws should wrap around the wood, anchoring the bird firmly.
Alive eyes
The white highlight in the eye is crucial. If you accidentally painted over it, use a white gel pen or a dot of white gouache to add that spark of life back in.
Step 4: Finishing Touches
-
Review contrast:
Step back and look at your painting. If the bird feels flat, add a glaze of Cobalt Blue to the shadowed side of the head and wing. -
Bottom flourish:
Paint a few loose pink touches and a green leaf or two at the very bottom branch tip to balance the composition, keeping edges soft and dreamy.
Allow your painting to dry fully before erasing any remaining pencil marks to reveal your crisp, finished artwork


Bird Silhouette at Sunset

Capture the serene beauty of dusk with this high-contrast silhouette project. By combining a soft, blended gradient background with stark black ink, you can create a striking piece that mimics the magic of a real sunset.
Detailed Instructions
Materials
- Heavyweight watercolor paper or mixed media paper (at least 140lb/300gsm)
- Watercolor paints (Pink, Lavender, Pale Blue, Peach)
- Black India ink or high-flow black acrylic paint
- Medium flat brush (for the wash)
- Fine liner brush (size 0 or 00)
- Round brush (size 2 or 4)
- Masking tape or painter’s tape
- Pencil and eraser
- Water cups and paper towels
- Reference photo of a bird silhouette
Step 1: Preparing the Sky
-
Tape the edges:
Begin by taping down all four edges of your watercolor paper to a board or table. This creates a crisp border later and prevents the paper from buckling while wet. -
Pre-wet the paper:
Using your large flat brush and clean water, apply a gentle wash over the entire paper surface. You want it damp and glistening, but not forming puddles. -
Apply the horizon color:
Load your brush with a watery peach or soft pink. Paint a horizontal band across the bottom third of the paper, letting the wet surface help diffuse the edges upwards. -
Blend the middle tones:
Rinse your brush slightly and pick up a lavender or soft violet shade. Apply this directly above the pink layer, gently overlapping them so they bleed together seamlessly. -
Add the upper sky:
Finally, add a very pale blue to the top third of the page. Use horizontal strokes to blend it down into the purple, creating a smooth gradient from cool top to warm bottom. -
Let it dry completely:
This is crucial—wait until the paper is bone dry and flat. If it feels cool to the touch, it is still wet. Using a hair dryer on a low setting can speed this up.
Bleeding Lines?
If black ink bleeds into the sky, your background wasn’t dry enough. Let it dry fully, then fix jagged edges with a white gel pen or thick gouache to ‘erase’ the mistake.
Step 2: Drafting the Silhouette
-
Sketch the branch:
Lightly sketch a diagonal line rising from the bottom left to the center right. Keep the line slightly jagged and angled to look organic, not perfectly straight. -
Add the bird’s form:
Place an oval shape on the branch for the bird’s body. Add a smaller circle for the head and a distinct, sharp triangle for the beak. -
Refine the outline:
Connect your shapes to form the smooth contour of the bird. Pay attention to the tail feathers extending downward and the small feet gripping the branch. -
Add twig details:
Sketch finer, smaller twigs branching off the main limb, particularly in the lower right corner, to add complexity to the silhouette.
Add Depth
Mix a tiny drop of white into your black paint for the distant, thinner twigs. This slight gray shift pushes them into the background, creating atmospheric depth.
Step 3: Inking the Contrast
-
Outline with black:
Switch to your fine liner brush and black India ink (or acrylic). Carefully trace the outer edge of your bird sketch first to establish a crisp boundary. -
Fill the body:
Use the slightly larger round brush to fill in the body of the bird. Ensure the black is opaque; apply a second coat if the background color shows through. -
Paint the main branch:
Paint the main branch line. Vary the thickness of your stroke—thicker near the base and thinning out towards the tip—to mimic natural wood growth. -
Detail the feet:
With the liner brush, carefully paint the tiny claws wrapping around the branch. This small detail grounds the bird so it doesn’t look like it’s floating. -
Add fine twigs:
Using the very tip of your liner brush and a light hand, paint the delicate lower twigs. I find that quick, confident flicks often create more natural-looking twigs than slow, shaky lines. -
Final drying and reveal:
Allow the black ink to dry completely. Once safe, slowly peel away the masking tape at a 45-degree angle to reveal your clean white border.
Now you have a tranquil moment of nature preserved forever on paper
BRUSH GUIDE
The Right Brush for Every Stroke
From clean lines to bold texture — master brush choice, stroke control, and essential techniques.
Explore the Full Guide
Two Birds Sharing a Branch
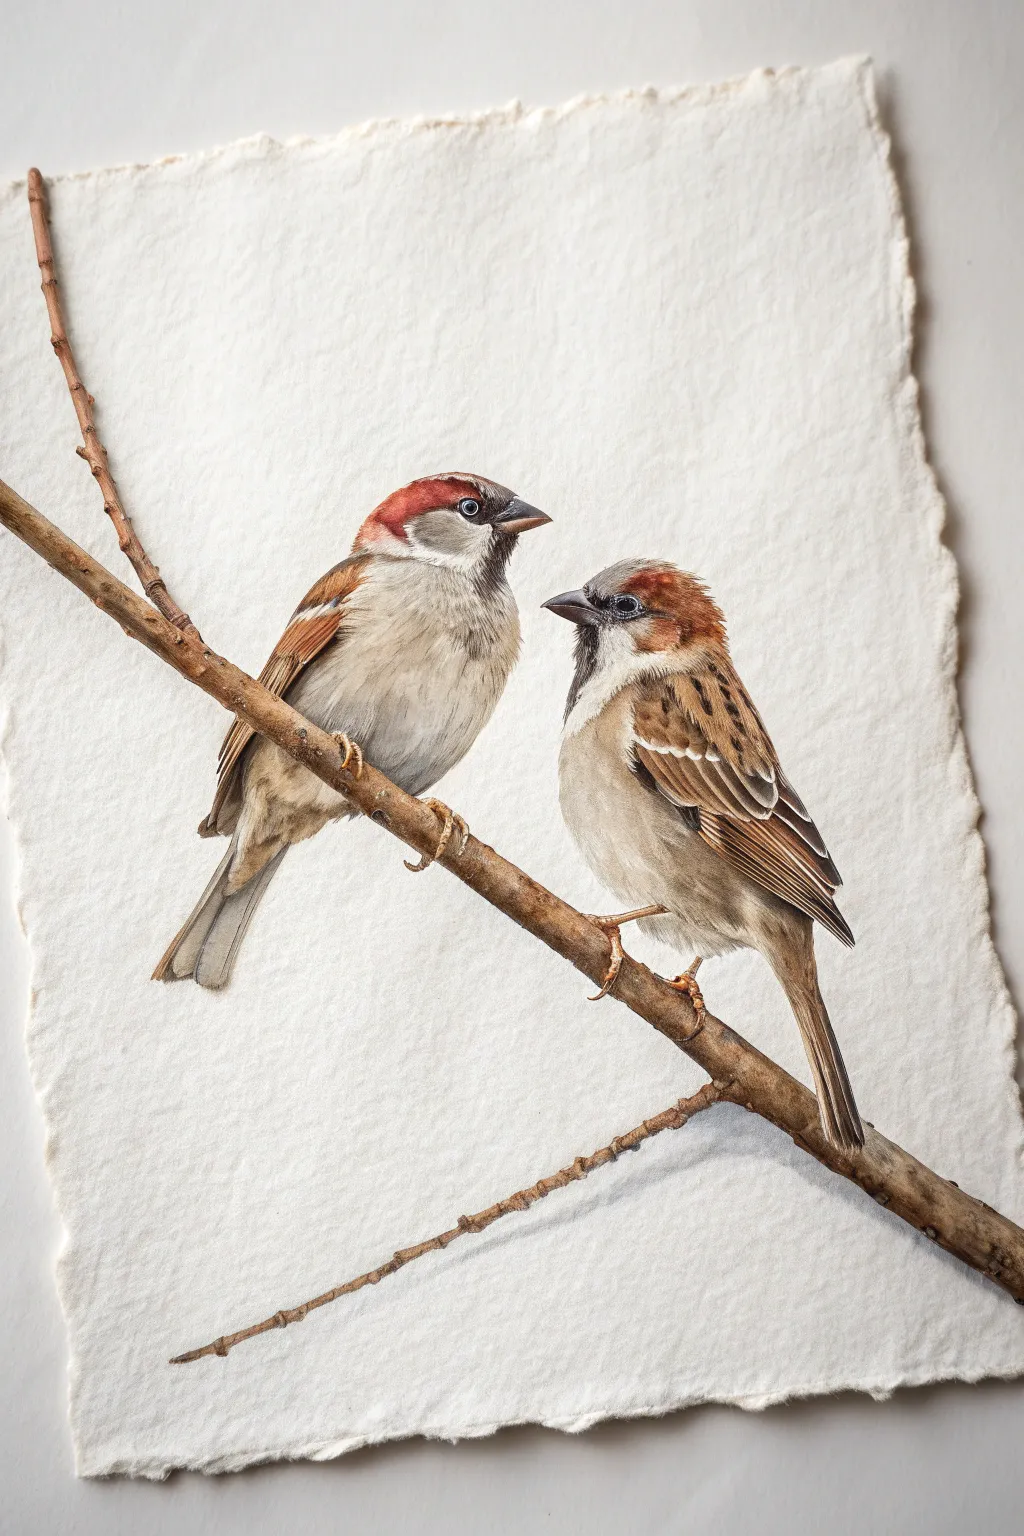
Capture the delicate charm of two sparrows perched together with this realistic watercolor project. The naturally textured edges of the paper add a rustic, organic feel that perfectly complements the earthy tones of the birds.
How-To Guide
Materials
- Heavyweight cold-press watercolor paper (300lb is ideal)
- Watercolor paints (burnt sienna, raw umber, yellow ochre, payne’s grey, crimson, ultramarine blue, titanium white gouache)
- Round brushes (sizes 2, 4, and 8)
- Detail liner brush (size 00)
- Pencil (HB) and kneadable eraser
- Masking tape
- Water cups and paper towels
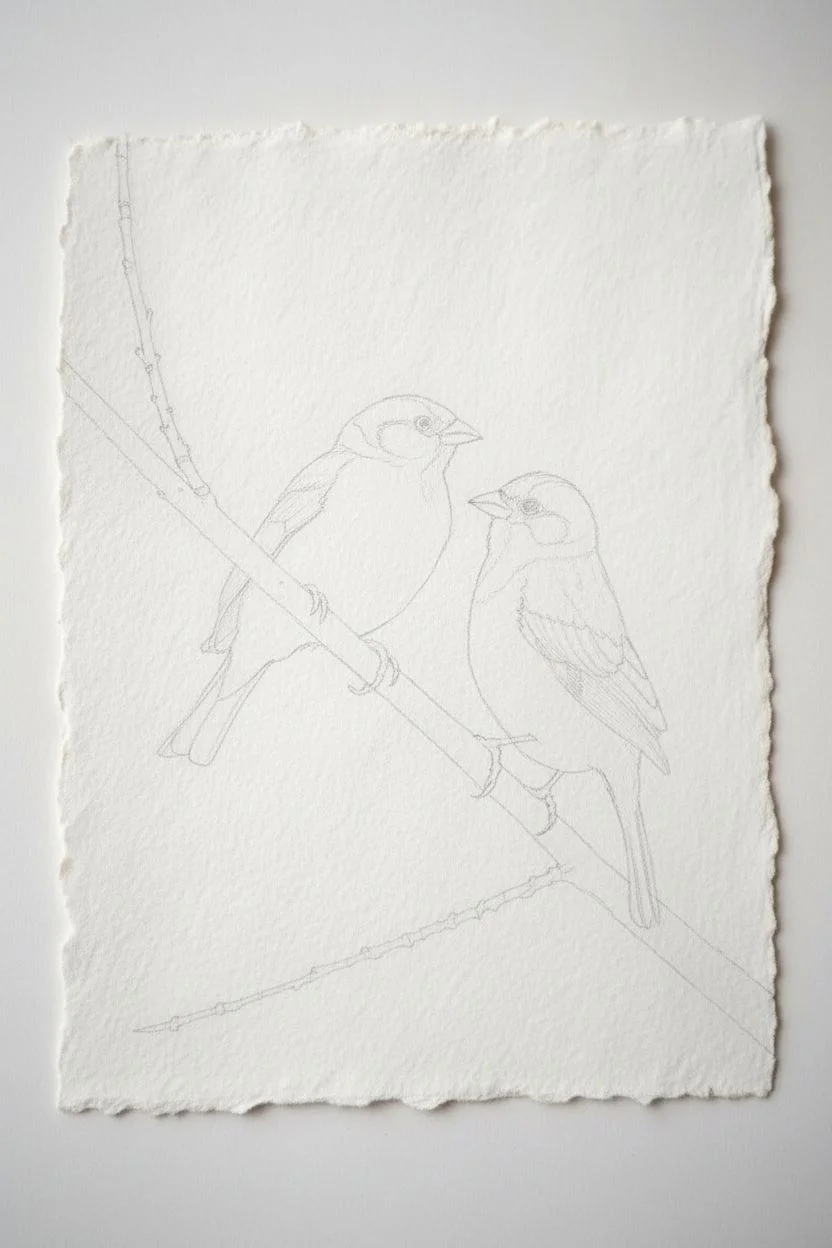
Step 1: Preparation and Sketching
-
Prepare the paper edge:
If your paper doesn’t have a deckle edge naturally, you can create a faux one. Simply wet a line of water along the edges of your watercolor sheet, wait a moment, and gently tear the paper along the wet line to create that soft, fibrous border. -
Map the composition:
Lightly sketch a diagonal line across the page for the main branch. Ensure it runs from the lower right to the upper left to match the reference. -
Outline the birds:
Draw two oval shapes for the bird bodies sitting on the branch. The left bird should be facing right, and the right bird facing left, looking at each other. -
Refine the details:
Add the details of the heads, beaks, and tail feathers. Sketch in the smaller twigs branching off the main limb. Keep your pencil lines very faint so they don’t show through the paint later.
Muddiness
If your bird’s chest looks muddy, let it dry completely. Then, gently lift the dirty color with a clean, damp brush and paper towel before reapplying fresh color.
Step 2: Painting the Birds
-
Base wash for bodies:
Mix a very dilute wash of yellow ochre and a touch of raw umber. Apply this to the breast and belly areas of both birds, keeping it wet-on-dry to control the edges but letting the center stay soft. -
Adding head color:
While the bodies dry, mix burnt sienna with a tiny dot of crimson. Paint the cap of the left bird and the brow area of the right bird. Use short, controlled strokes to simulate feathers. -
Defining the wings:
Load your size 4 brush with a stronger mix of burnt sienna and raw umber. Paint the intricate patterns on the wings, leaving thin slivers of white paper showing to represent wing bars. -
Building grey tones:
Mix ultramarine blue with a little burnt sienna to make a soft grey. Use this to shadow the underside of the bellies and the area around the neck of the left bird. -
Facial features:
Switch to your size 2 brush. Use a concentrated mix of Payne’s grey and brown to paint the dark patches around the eyes and the ‘bib’ on the chest. -
The beaks:
Paint the beaks using a dark grey-black mix. Leave a tiny speck of white paper unpainted on the top curve of each beak to act as a highlight. -
Eye details:
With the detail liner brush, paint the eyes jet black, leaving a minuscule white highlight. I find adding a tiny ring of light grey around the eye helps it pop.
Step 3: The Branch and Fine Details
-
Base coat for the branch:
Mix raw umber and a touch of burnt sienna. Paint the main branch in a single, fluid stroke where possible, varying the pressure to change the thickness. -
Branch texture:
While the branch is still slightly damp, drop in darker brown (burnt umber) on the underside to create volume and shadow. -
Adding twigs:
Use the liner brush to pull out the thin, spindly twigs branching off the main limb. Make these lines slightly shaky for a natural look. -
Feet and claws:
Paint the feet gripping the branch using a mixture of yellow ochre and burnt sienna. Ensure the claws wrap convincingly around the wood. -
Feather texture:
Once the birds are totally dry, use the liner brush and a slightly thicker mix of your body colors to paint tiny, individual feather strokes on the chest and wings. -
White highlights:
Use a small amount of titanium white gouache to add sharp highlights to wing feathers and the edges of the tail, bringing crispness to the soft watercolor.
Add Depth
Add a very faint, diluted shadow of grey-blue on the paper directly beneath the branch and tail feathers. This lifts the subject off the stark white background.
Step back and admire the lively connection between your two painted sparrows
Bird Among Blossoms
Capture the delicate beauty of spring with this soft watercolor scene featuring a vibrant bunting perched among blooming branches. You’ll layer translucent washes to create depth in the petals while using wet-on-dry techniques for the bird’s detailed feathers.
Step-by-Step Guide
Materials
- Cold press watercolor paper (300 gsm)
- Watercolor paints (Alizarin Crimson, Sap Green, Burnt Sienna, Cerulean Blue, Ultramarine, Paynes Grey, Yellow Ochre)
- Round brushes (flats sizes 4, 8 and a fine liner size 0)
- Pencil (HB or H) and kneaded eraser
- Two jars of water
- Paper towels
- Palette
Step 1: Sketching & Initial Washes
-
Create the framework:
Lightly sketch the main branch diagonally across the paper, starting from the bottom left and reaching towards the top right. Add the bird perched on the lower third of the main branch, outlining its round body, tail, and head shape lightly. -
Map the blossoms:
Draw clusters of five-petaled flowers along the branches. Vary their sizes and angles—some facing forward, some as tight buds. Keep pencil pressure minimal so graphite doesn’t smudge into the paint later. -
Branch base layer:
Mix a watery wash of Burnt Sienna with a touch of Paynes Grey. Using a size 4 round brush, paint the branches. Let the color fade out near the tips where new growth would be lighter. -
Petal wash:
Dilute Alizarin Crimson until it’s a very pale pink. Wash this over the flower shapes, leaving small white gaps in the centers for highlights. I like to keep this layer very wet and loose.
Muddy colors?
If your pinks and greens are turning brown where they touch, let the first color dry completely before painting an adjacent area. Patience creates crisp colors.
Step 2: Building the Bird
-
Head and back:
While the flowers dry, mix Cerulean Blue with a hint of Ultramarine. Paint the top of the bird’s head and wings. Drop in slightly darker blue while wet to shadow the curve of the skull. -
Rusty chest:
Mix Burnt Sienna with a tiny dot of Alizarin Crimson for a warm, rusty orange. Paint the chest and throat area, carefully blending the edge where it meets the blue head using a clean, damp brush for a soft transition. -
Wing details:
Switch to your size 0 liner brush. Use a concentrated mix of Burnt Sienna and Paynes Grey to paint the primary flight feathers. Leave thin white stripes unpainted to mimic the wing bars. -
Facial features:
With the fine brush and nearly black Paynes Grey, paint the beak and the eye. Leave a tiny speck of white paper in the eye for the catchlight, which brings the bird to life immediately. -
Tail feathers:
Wash a pale blue-grey over the tail area. Once dry, add linear strokes of darker blue to suggest individual feathers.
Level Up: Background Wash
Before starting, wet the entire background (avoiding the bird) and drop in very faint blue and pink. This creates a soft-focus atmosphere behind the subject.
Step 3: Floral Details & Leaves
-
Leaf variation:
Mix Sap Green with a little Yellow Ochre for a fresh spring green. Paint the leaves, letting your brush stroke follow the shape of the leaf—press down for the belly and lift for the tip. -
Deepening the pinks:
Go back to the flowers with a slightly stronger mix of Alizarin Crimson. Paint the center of the petals and the undersides to create a cupped, 3D effect. -
Adding stamens:
Mix a thick, creamy Yellow Ochre or gold. Using the very tip of your smallest brush, dot the centers of the open flowers. Add tiny lines radiating from the center with a brown mix for filaments. -
Bud details:
Paint the tight buds with a darker, more saturated pink on the bottom and blend upwards to pale pink. Add green sepals at the base of each bud. -
Branch texture:
Add texture to the wood by dry-brushing a dark brown mix along the bottom edge of the branches. This creates shadow and roughness. -
Feet placement:
Carefully paint the bird’s feet gripping the branch using a grey-brown mix. Ensure the toes wrap convincingly around the wood form. -
Final splatters:
Cover the bird with a scrap of paper. Load a brush with watery pink paint and tap it against another brush handle to create tiny, magical speckles around the flowers.
Frame your delicate springtime scene in a simple wood frame to let the colors truly sing

PENCIL GUIDE
Understanding Pencil Grades from H to B
From first sketch to finished drawing — learn pencil grades, line control, and shading techniques.
Explore the Full Guide
Bird in Flight With Motion Blur Strokes
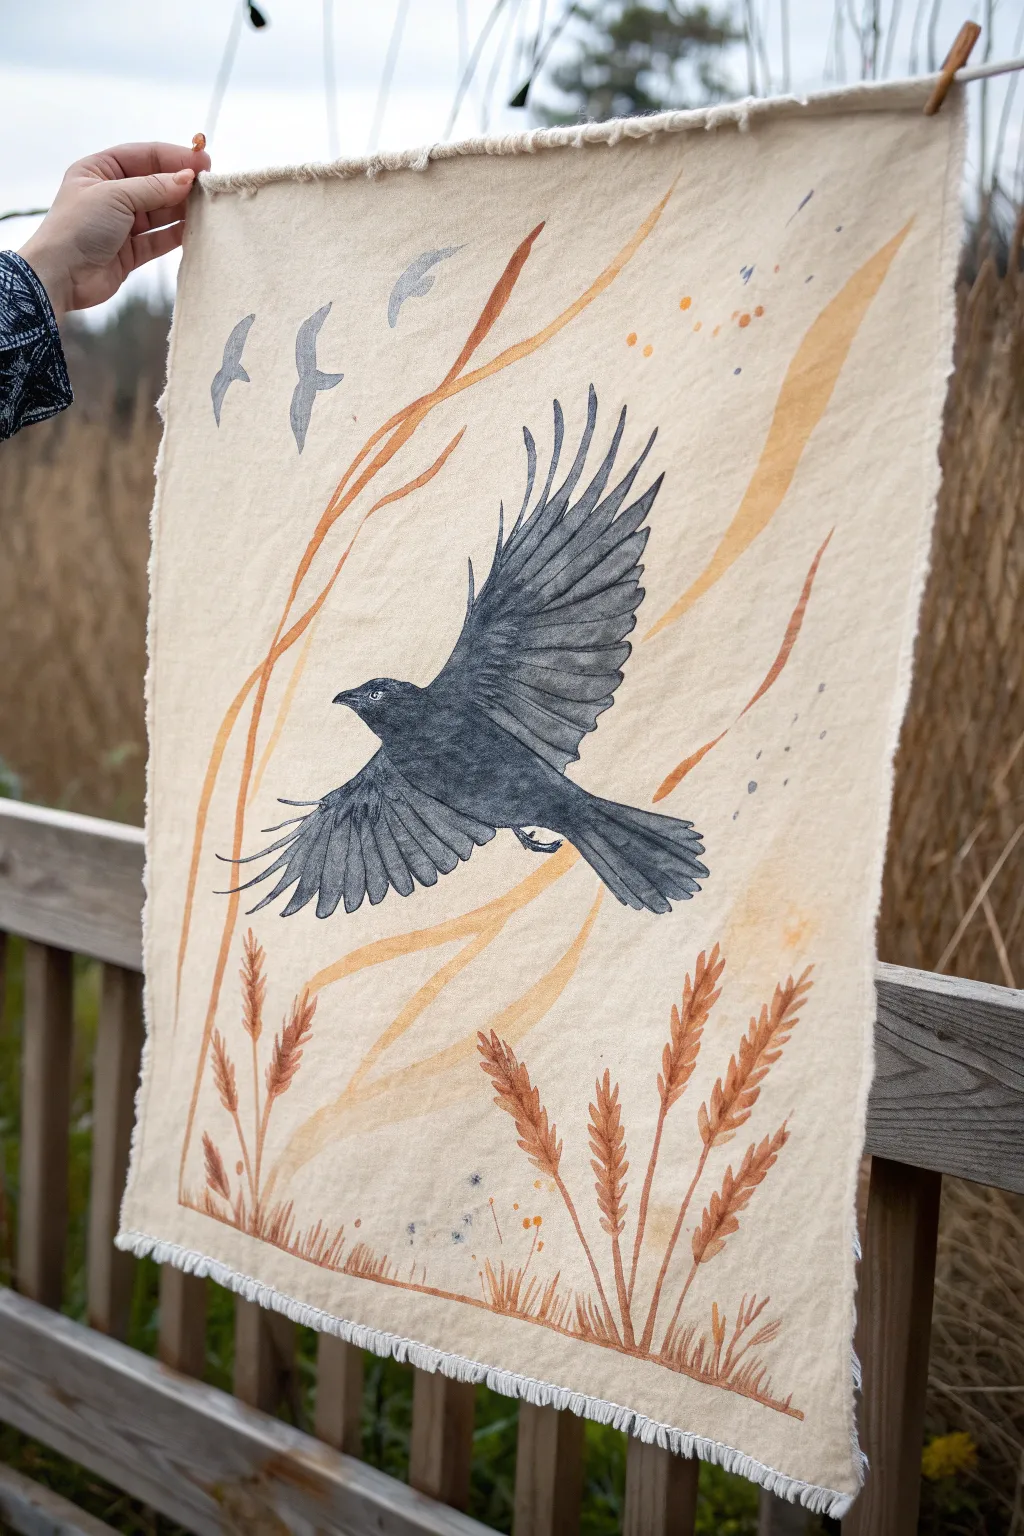

Capture the freedom of flight with this rustic fabric wall hanging featuring a detailed black bird soaring above golden fields. The textured fabric base adds a wonderful organic quality to the painting, making the motion lines and wheat stalks feel grounded and earthy.
Detailed Instructions
Materials
- Heavyweight unbleached cotton or linen fabric (approx. 18×24 inches)
- Fabric medium
- Acrylic paints (Mars Black, Titanium White, Ultramarine Blue, Yellow Ochre, Burnt Sienna, Raw Umber)
- Paintbrushes (flat shader, round #4, fine liner)
- Pencil or chalk for sketching
- Palette or mixing plate
- Water cup and paper towels
- Fray check or fabric glue (optional)
- Iron and ironing board
Step 1: Preparation & Sketching
-
Prepare the fabric canvas:
Cut your fabric to the desired size. Instead of using scissors for clean edges, tear the fabric quickly to create the frayed, raw edge look seen in the reference. Iron the fabric flat to remove any creases. -
Sketch the composition:
Lightly sketch your design onto the fabric using a pencil or white chalk. Start with the large central bird, positioning it slightly off-center. Draw the sweeping, curved lines for the wind or motion effect, and sketch the wheat stalks at the bottom. -
Outline the distant flock:
In the upper left corner, sketch three simple silhouettes of smaller birds in the distance to create depth.
Fabric Medium Magic
Don’t skip the fabric medium! It prevents the acrylic from drying stiff and cracking, keeping your banner flexible and soft to the touch.
Step 2: Painting the Foreground Bird
-
Mix the base dark tone:
Combine Mars Black with a touch of Ultramarine Blue and fabric medium. The blue adds richness to the black feathers so they don’t look flat. The fabric medium ensures the paint moves smoothly on the textured cloth. -
Block in the body:
Fill in the main body and head of the bird with your dark mixture. Leave the beak and eye area blank for now. -
Paint the wings:
Using a flat brush, paint the primary feathers of the wings. Stroke outward from the body to the tips, following the natural curve of a wing. Don’t make it solid black; let the brush texture show slightly. -
Add feather details:
Mix a dark grey using Black and White. With a smaller round brush, paint individual feather shapes on top of the base layer, particularly on the lower wing and tail feathers to define them. -
Define the face:
Paint the beak with a mix of black and a tiny dot of white for a highlight. Use a fine liner to paint the eye: a black pupil surrounded by a very light grey or white ring to make it pop. -
Highlight the plumage:
Mix a lighter, cool grey. Dry brush this color lightly over the upper wing coverts and the back of the neck to simulate light hitting the glossy feathers.
Go Botanical
Instead of wheat, try painting local flora like lavender sprigs, pine branches, or fern fronds to match the season or your local landscape.
Step 3: Background Elements
-
Paint the distant birds:
Mix a pale, watery grey (White + tiny dot of Black). Paint the three silhouettes in the upper left. Keep them flat and simple, as they are far away. -
Create the wind swooshes:
Mix Yellow Ochre with a lot of fabric medium and water to create a semi-transparent glaze. Paint the large, sweeping curved bands behind the bird. The transparency allows the texture of the fabric to show through. -
Deepen the wind tones:
While the yellow glaze is still damp, add a streak of Burnt Sienna near the edges of the swooshes to give the ‘wind’ some dimension and warmth. -
Add splatter details:
Dilute some Burnt Sienna and Grey paint with water. Load your brush and tap it against your finger to create small, energetic splatters around the wind lines and the bird’s tail.
Step 4: The Wheat Field
-
Paint the stalks:
Using Burnt Sienna mixed with a little Yellow Ochre, paint the thin, vertical stems rising from the bottom edge. Curve them slightly as if they are blowing in the wind. -
Form the wheat heads:
Switch to a round brush. Using a darker mix of Burnt Sienna and Raw Umber, press the brush down and lift up quickly to create teardrop shapes stacked on top of each other, forming the heads of wheat. -
Details and grass:
Use a fine liner with diluted brown paint to add wispy grass blades at the very bottom edge to ground the wheat stalks. -
Final touches:
Step back and assess your work. If the edges of your fabric need securing, run a thin line of fray check along the frayed border, though I usually prefer letting it fray naturally for that rustic charm.
Hang your finished masterpiece on a wooden dowel or clip it to a line to enjoy a piece of wild nature indoors
Minimalist Bird With Bold Negative Space
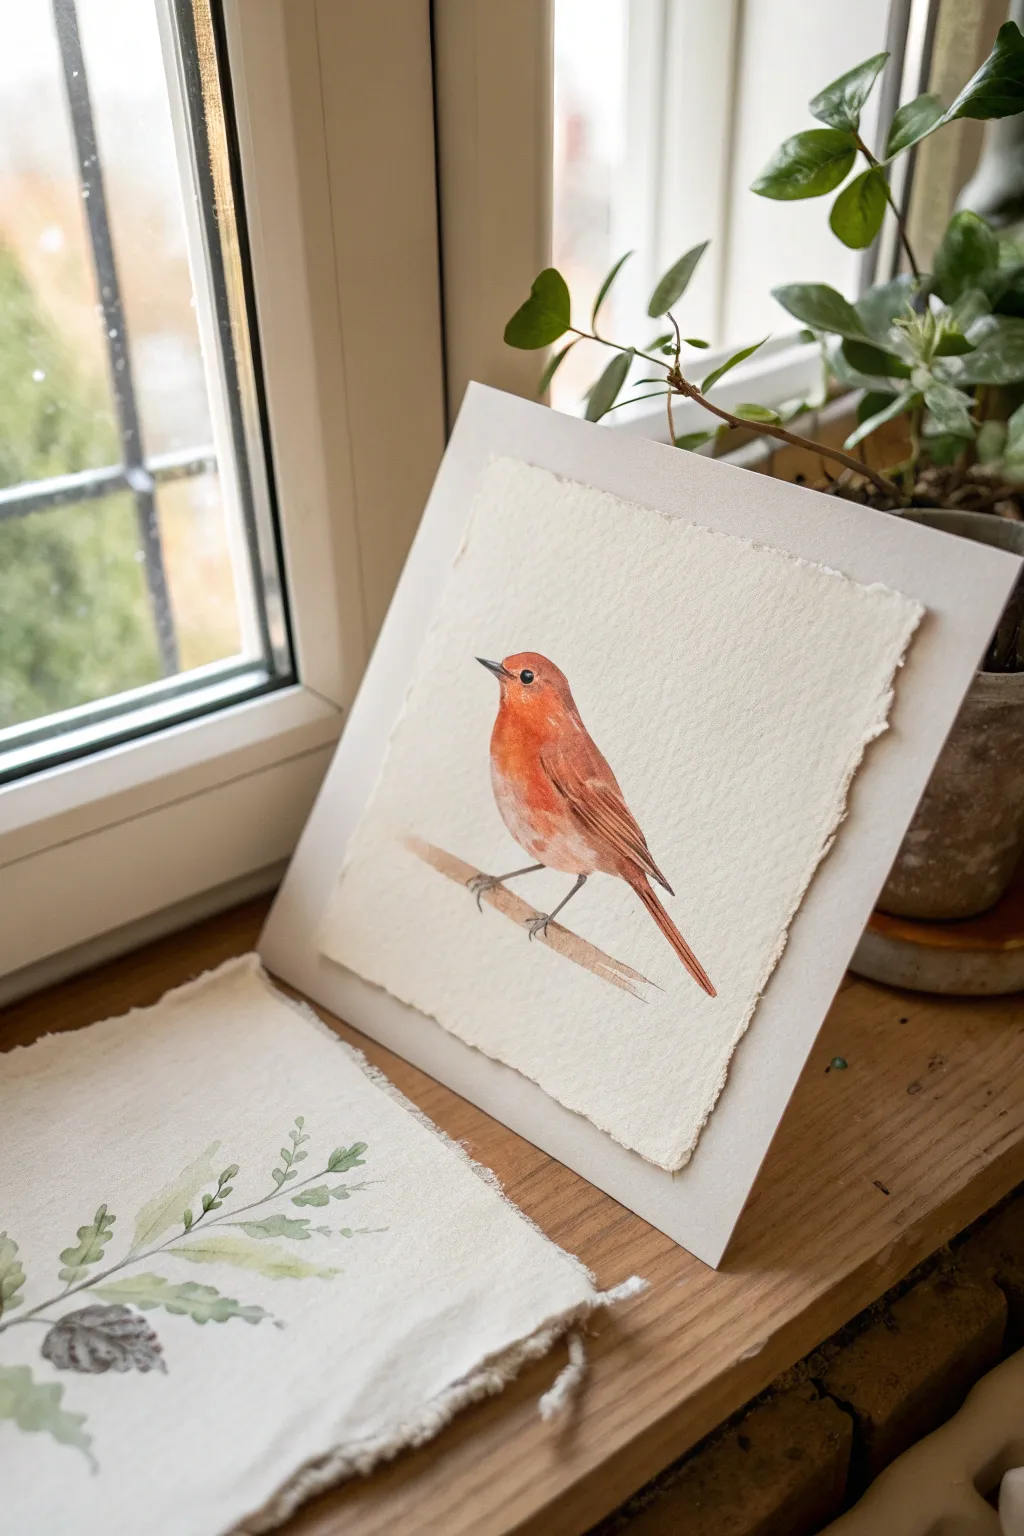
Capture the delicate beauty of a perched songbird with this minimalist watercolor project. The charm of this piece lies in the contrast between the vibrant orange-red plumage and the soft, textured handmade paper that frames it.
Step-by-Step Guide
Materials
- Square sheet of heavy handmade watercolor paper (cold press, roughly 6×6 inches)
- Larger white mounting board or cardstock
- Watercolor paints (Vermilion, Burnt Sienna, Payne’s Grey, Yellow Ochre)
- Small round watercolor brushes (sizes 2 and 4)
- Fine liner brush (size 0 or 00)
- Pencil (HB or H)
- Kneaded eraser
- Clean water and paper towels
- Double-sided tape or mounting photo tabs
Step 1: Preparation and Sketching
-
Paper Selection:
Choose a piece of handmade paper with distinct ‘deckle’ (rough) edges. This texture is crucial for the vintage, organic look of the final piece. -
Light Sketching:
Using an H or HB pencil, very lightly sketch the diagonal branch rising from left to right in the lower third of the paper. -
Bird Outline:
Draw the simple tear-drop shape of the bird’s body perched on the branch. Add a small circle for the head, a tiny triangular beak, and the downward angle of the tail feathers. -
Refining Details:
Refine your sketch to indicate the wing position tucked against the body and the placement of the eye. Keep these lines faint so they don’t show through the watercolor later.
Edge Protection
When painting near the deckle edge, place a scrap piece of paper underneath to catch any brush slips and keep your work surface clean.
Step 2: Painting the Bird
-
Base Wash:
Mix a watery wash of Vermilion and a touch of Yellow Ochre. Apply this to the breast and head area, leaving a tiny spot of white paper around the eye for a highlight. -
Adding Warmth:
While the orange layer is still slightly damp, drop in a slightly more saturated Burnt Sienna near the bottom of the belly and under the wing to create a sense of roundness. -
Wing Definition:
Switch to your size 2 brush. Mix Burnt Sienna with a tiny bit of Payne’s Grey to get a reddish-brown. Paint the wing feathers using long, thin strokes following the curve of the body. -
Tail Feathers:
Using the same reddish-brown mix, paint the long tail feathers extending downwards past the branch. Keep the edges crisp. -
Deepening Shadows:
I like to wait for the first layers to dry completely here. Once dry, glaze a thin, watery layer of Payne’s Grey over the lower belly and the shadow side of the wing to add dimension. -
Facial Features:
Using the fine liner brush and concentrated Payne’s Grey (almost black), carefully paint the eye, preserving that tiny white highlight. Paint the beak, making it sharp and precise.
Step 3: The Branch and Legs
-
Branch Base:
Mix a pale wash of Burnt Sienna and Yellow Ochre. Paint the branch with a single confident stroke, allowing the color to fade out at the edges for a vignetted look. -
Branch Texture:
While the branch is damp, drop darker brown pigment along the bottom edge to create a shadow and suggest cylindrical form. -
Painting Legs:
With your finest brush and a dark grey mix, draw the thin, delicate legs gripping the branch. Use quick, confident lines to avoid shakiness. -
Feet Detail:
Add the tiny claws wrapping around the wood. Make sure the bird looks like it is resting ‘on’ the branch, not floating above it.
Float Mounting
Use foam tape instead of flat tape to raise the artwork slightly off the backing board. This creates a shadow and highlights the paper’s texture.
Step 4: Finishing Touches
-
Final Assessment:
Step back and check your values. If the bird looks flat, add a little more shadow under the wing or beak. -
Clean Up:
Once the paint is bone dry, gently erase any visible pencil marks with the kneaded eraser. Be careful not to damage the paper surface. -
Mounting:
Apply double-sided tape or mounting tabs to the back center of your painting. Adhere it to the center of your larger white backing board. -
Pressing:
Place a clean sheet of paper over the artwork and weigh it down with a heavy book for a few hours to ensure it sits perfectly flat on the mount.
Now you have a serene piece of nature art ready to display on a shelf or gift to a bird lover


Loose Impressionist “Feather Flicks” Bird
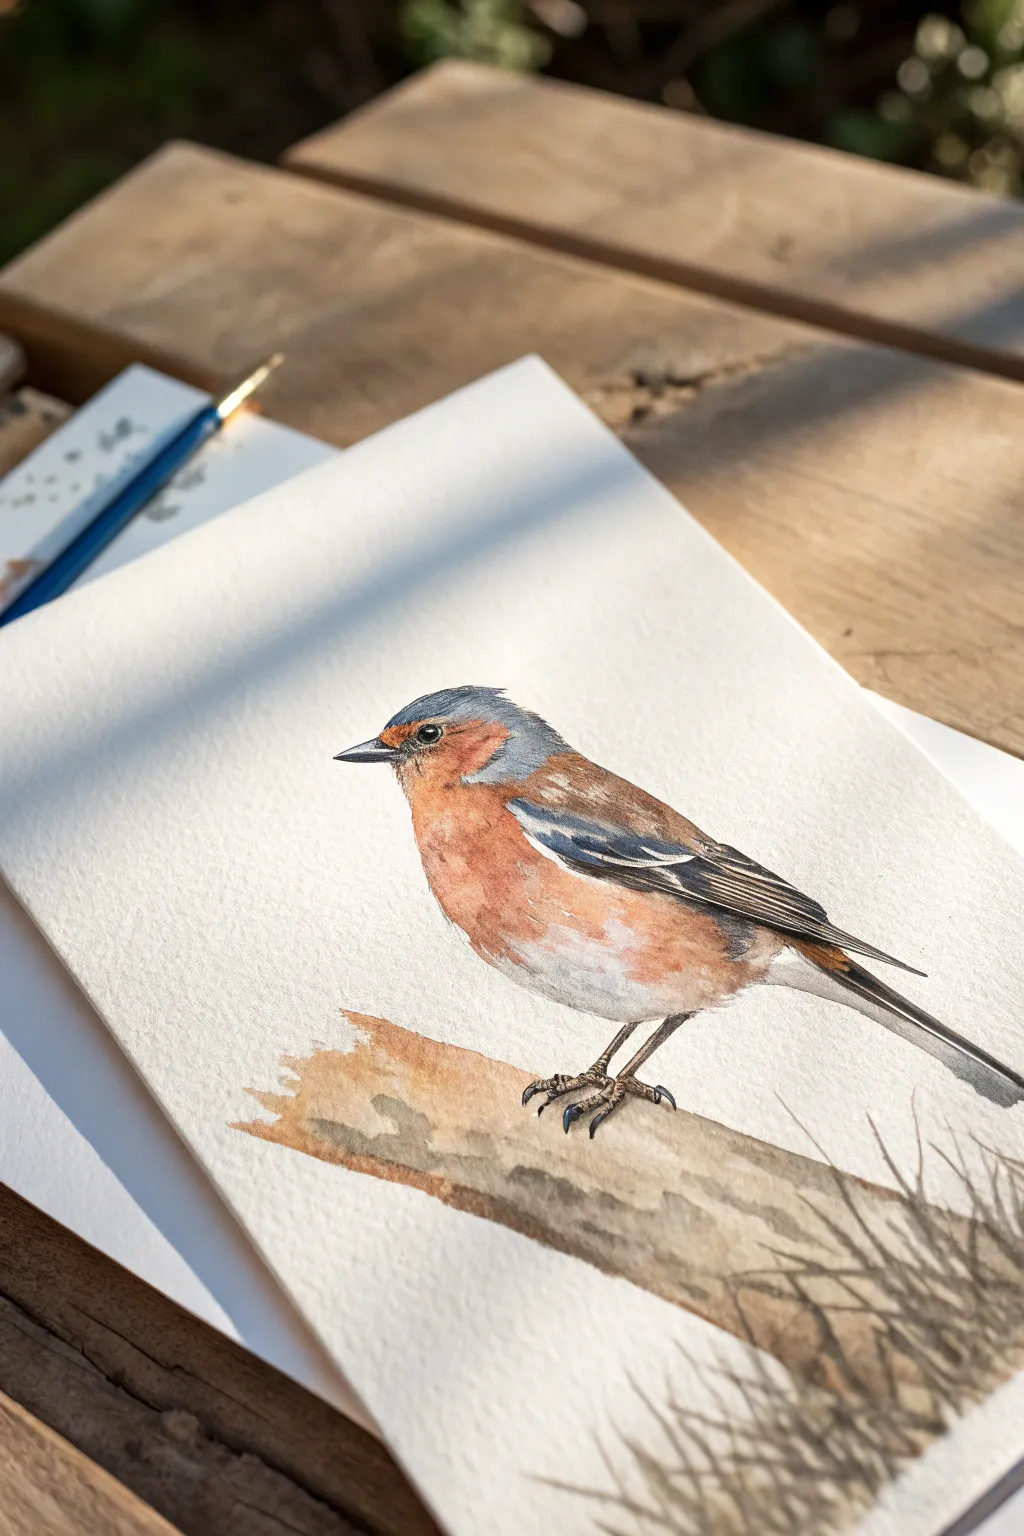
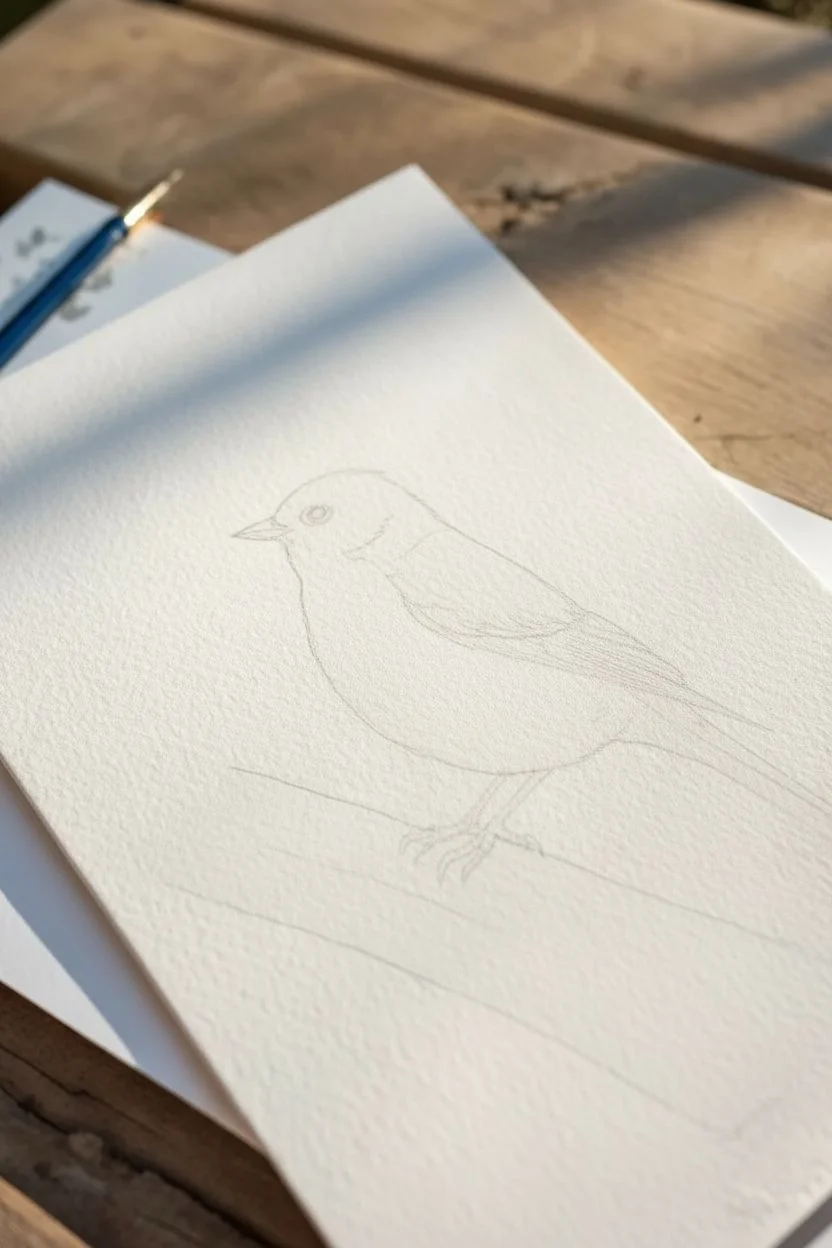
Capture the delicate beauty of a garden chaffinch with watercolors, focusing on soft warm tones and fine feather details. This project balances precise, realistic features with a more relaxed, textured branch to create a lively and natural composition.
Step-by-Step
Materials
- Cold press watercolor paper (300 gsm)
- Watercolor paints (Burnt Sienna, Ultramarine Blue, Yellow Ochre, Burnt Umber, Payne’s Grey, Alizarin Crimson)
- Round brushes (Size 4 for washes, Size 00 or 1 for details)
- HB or 2B pencil
- Kneaded eraser
- Two jars of water
- Paper towel
Step 1: Sketching the Form
-
Basic shapes:
Begin by lightly sketching an oval for the bird’s body and a smaller circle for the head. Connect them with gentle curves to form the neck. -
Refine the outline:
Refine the beak shape, making it small and conical. Mark the position of the wing, tapering it towards the tail feathers which should extend straight back. -
Eye and branch:
Place the eye carefully near the beak line; getting this placement right is key to the bird’s expression. Sketch a simple diagonal branch for the bird to perch on. -
Clean up:
Use a kneaded eraser to lift almost all the graphite, leaving only the faintest ghost lines to guide your painting.
Step 2: Initial Color Washes
-
Breast color:
Mix a watery wash of Burnt Sienna with a tiny touch of Alizarin Crimson to create a warm, rusty pink. Apply this loosely to the breast and cheek area, keeping the edges soft. -
Head cap:
While the breast is drying, mix a diluted blue-grey using Ultramarine Blue and a touch of Burnt Sienna. Paint the top of the head (the cap) and the nape of the neck. -
Wing base:
Apply a light wash of Yellow Ochre and Burnt Umber to the upper wing area, leaving a distinct white gap for the wing bar stripes. -
Branch texture:
Paint the branch with a mix of Burnt Umber and Yellow Ochre. I like to use the side of the brush here to let the paper texture show through, creating a rough wood effect.
Muddy colors?
If your warm breast feathers turn muddy, you likely overworked the delicate wet paper. Let layers dry completely between glazes to keep that rusty orange vibrant.
Step 3: Building Depth and Detail
-
Deepening the reds:
Once the first layer is dry, glaze a slightly more saturated mix of Burnt Sienna over the breast, concentrating the pigment under the chin and wing for shadow. -
Wing details:
Switch to your smaller brush. Use a dark mix of Payne’s Grey and Burnt Umber to paint the flight feathers. Paint individual long strokes, being careful to preserve the white paper for the chaffinch’s distinctive white wing bars. -
The eye:
Paint the eye using a thick, dark mix of Payne’s Grey. Leave a tiny speck of white paper unpainted for the catchlight to bring the bird to life. -
Facial features:
Paint the beak with a watered-down blue-grey, darkening the tip. Add small, flicking strokes around the beak and eye with a fine brush to suggest tiny feathers.
Soft Background
Wet the paper around the bird before painting a very pale blue or green background. The wet-on-wet technique creates a blurry, distant bokeh effect.
Step 4: Final Textures
-
Feather flicks:
Using your smallest brush and a mix of Burnt Umber, add fine, flicking lines over the back and wings to create the illusion of individual feather layers. -
Shadows:
Add a cool shadow mix (Ultramarine and Burnt Sienna) under the belly where it meets the legs to give the bird weight. -
Feet and claws:
Draw the delicate legs and claws gripping the branch using a fine liner brush and dark brown paint. Ensure the claws look like they are curving around the wood. -
Branch definition:
Strengthen the shadows on the underside of the branch. While the paint is still damp, you can drop in darker brown spots to simulate knots or bark texture. -
Grassy foreground:
To frame the bird, paint very loose, quick strokes in the bottom right corner using diluted browns and greys to suggest out-of-focus dried grass or twigs.
Step back and admire how the sunlight seems to catch on the soft breast feathers of your finished bird
Patterned Folk-Art Bird
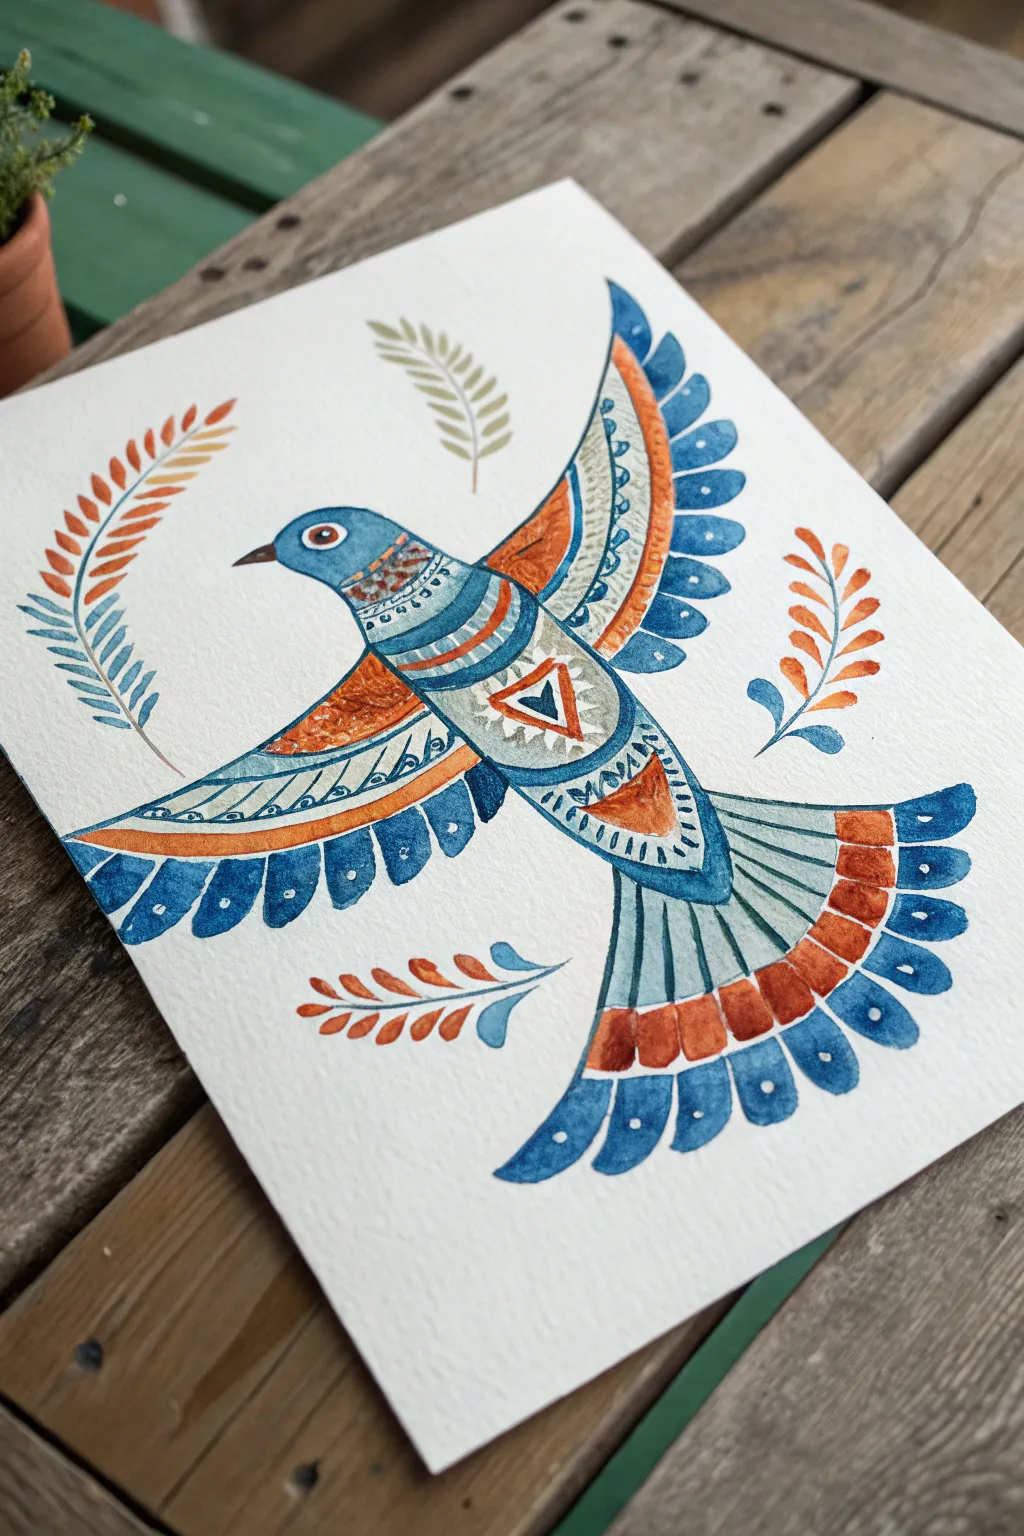
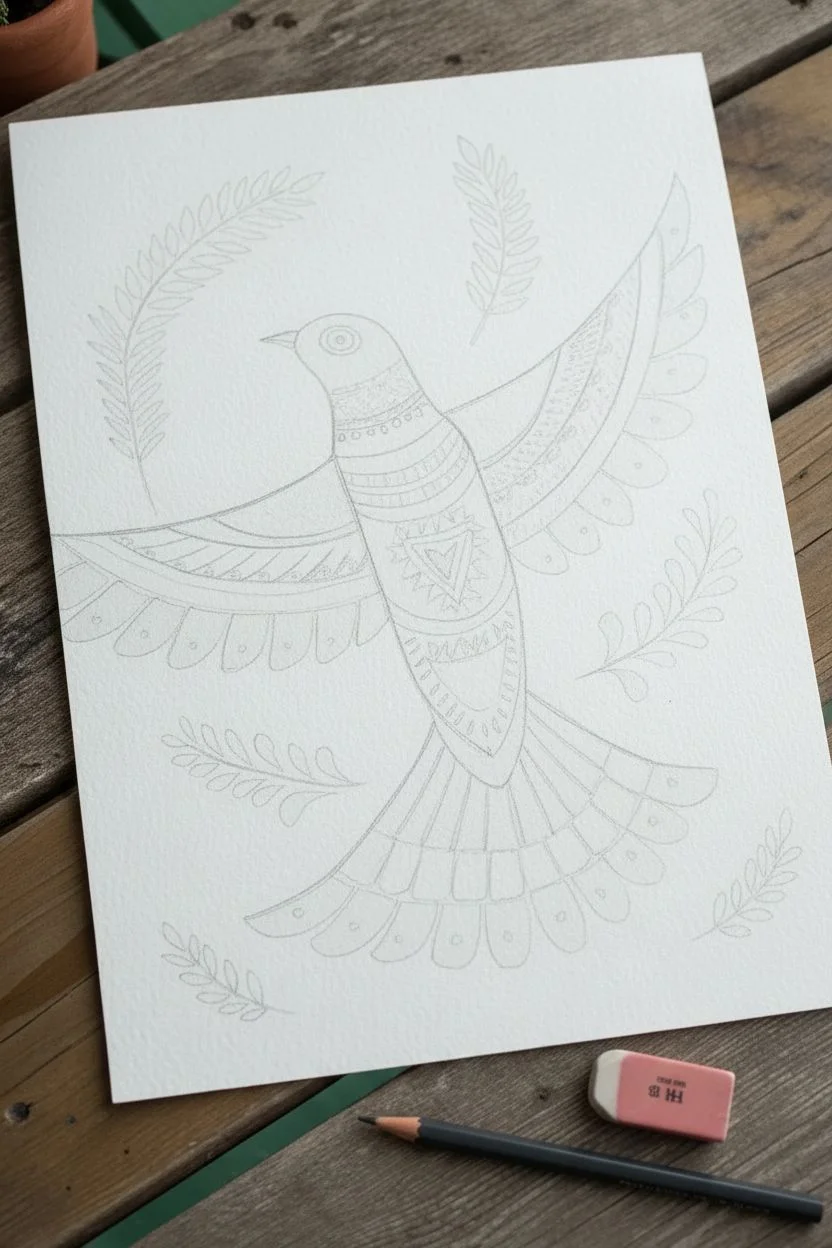
Capture the charm of traditional folk art with this vibrant watercolor bird, featuring intricate geometric patterns and a warm blue-and-orange palette. This project combines simple shapes with decorative line work to create a piece that feels both rustic and refined.
Step-by-Step Guide
Materials
- Cold press watercolor paper (300 gsm)
- Watercolor paints (Indigo, Cerulean Blue, Burnt Sienna/Rust, Yellow Ochre)
- Round watercolor brushes (Size 6 for washes, Size 0 or 00 for details)
- Pencil (HB or H) and eraser
- Jars of clean water
- Paper towels
- White gouache or white gel pen (optional for highlights)
Step 1: Sketching the Framework
-
Draw the basic shapes:
Start by lightly sketching a teardrop shape for the body, tilting it diagonally to create a sense of movement. Add a smaller circle for the head at the top left of the teardrop. -
Add the wings and tail:
Extend two curved, sweeping shapes from the upper back for the wings—one stretching up and back, the other extending forward and down. Fan out a wide tail shape at the bottom of the body. -
Define the sections:
Within the wings and body, lightly draw lines to separate the areas where different colors and patterns will go. I like to mark out the triangular pattern on the chest and the bands on the wings now so painting is easier later. -
Sketch the botanical accents:
Draw four curving sprigs of leaves around the bird to frame it—two larger ones on the top left and right, and two smaller ones near the bottom. Keep the leaf shapes simple and almond-like.
Bleeding Colors?
If your blue and orange sections bleed into each other, you’re painting too fast. Ensure adjacent shapes are bone-dry before painting wet next to them, or use a hair dryer to speed up the process.
Step 2: Layering the Watercolor
-
Paint the blue base layers:
Using a diluted mix of indigo and cerulean blue, paint the head, the upper section of the wings, and the tips of the tail feathers. Leave small gaps between sections to keep colors from bleeding. -
Add the orange accents:
Mix a warm rust orange using Burnt Sienna. Fill in the center strip of the tail, the middle band of the wings, and the leaf sprigs surrounding the bird. -
Create the lighter zones:
For the patterned areas on the chest and lower wings, use a very watery wash of pale blue-grey or leave the paper bare if you want high contrast. Let these base layers dry completely. -
Deepen the blues:
Once dry, go back in with a more saturated indigo to paint the darker blue details: the scalloped tips of the wings, the dark band on the neck, and the final feathers of the tail. -
Paint the beak and eye:
Carefully paint the beak with a dark brown or black mix. For the eye, paint a small orange circle with a dark pupil in the center, leaving a tiny speck of white paper for a highlight.
Step 3: Adding Folk Patterns
-
Detail the chest triangle:
Using your smallest brush (size 0), paint a rust-orange triangle in the center of the chest. Surround it with small dash marks or ‘teeth’ to create a sunburst effect. -
Decorate the neck:
Paint fine horizontal stripes across the neck area. Between the stripes, add tiny dots or wavy lines using the tip of your brush to mimic embroidery stitches. -
Embellish the wings:
On the light grey bands of the wings, add thin indigo lines and small geometric triangles or zig-zags. This requires a steady hand, so stabilize your wrist against the table. -
Pattern the orange sections:
On the dried rust-colored sections of the wings, use a darker brown or concentrated orange to add texture—small stippled dots or faint cross-hatching work well here. -
Refine the tail feathers:
Draw lines separating the individual tail feathers using a dark blue mix. At the tip of each blue tail feather, add a small white dot using white gouache or a gel pen for a pop of brightness. -
Outline the botanicals:
Give the orange leaves a finished look by adding a very thin, broken outline or center vein in a darker rust color to suggest texture without being too rigid. -
Final touches:
Step back and assess your contrast. If the patterns look too faint, darken your lines with a second pass of paint. Add a few extra dots around the wing tips for whimsy.
Make It Golden
Swap the rust orange for metallic gold watercolor paint on the wings and halo leaves. This adds a shimmering, illuminated manuscript quality that looks stunning in the light.
Now you have a charming piece of folk art ready to be framed or given as a card
Rainbow Color-Study Cartoon Birds
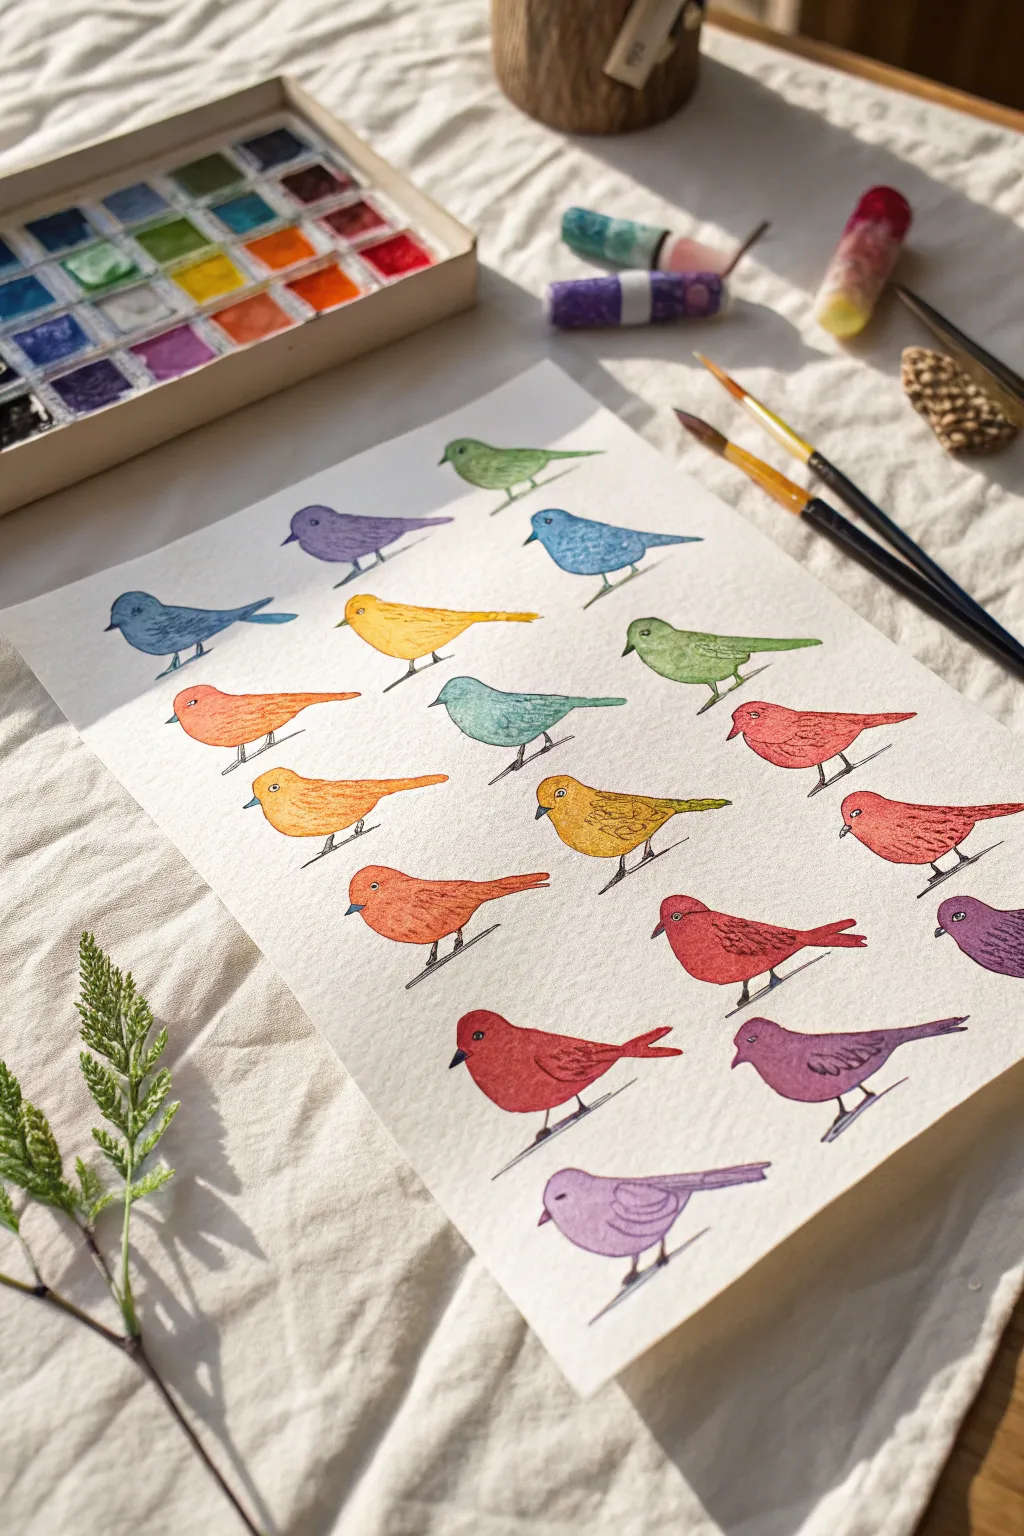
This delightful watercolor project transforms a simple, repetitive bird shape into a vibrant exploration of color theory. By painting the same character in shifting hues, you create a harmonious and cheerful composition perfect for practice or display.
Step-by-Step Tutorial
Materials
- Cold press watercolor paper (A4 or 9×12 inch)
- Watercolor pan set (diverse palette recommended)
- Small round brushes (size 2 and 4)
- Fine liner pen (black, waterproof, 0.1 or 0.3mm)
- Pencil (HB)
- Clean water jar
- Paper towels for blotting
Step 1: Sketching the Flock
-
Plan the layout:
Lightly visualize a grid on your paper. You’ll want roughly four birds across and four birds down, though staggering them slightly creates a more natural, organic look compared to a strict grid. -
Draw the basic body shape:
Start with the first bird in the top left. Draw a simple, smooth shape that resembles a teardrop on its side, with a rounded chest and a tapering tail. Keep the pencil lines very faint so they won’t show through the paint later. -
Add details:
Give the bird a small triangular beak and a circular eye. Sketch a simple wing shape—a smaller tear-drop curve inside the body. -
Repeat the process:
Continue drawing these bird shapes across the page. Vary the tilt of the bodies slightly; have some looking up or down to give each one personality. -
Add legs:
Draw simple stick legs for each bird. They can be standing on an invisible wire, so keeping the feet aligned on a slight diagonal or horizontal plane helps grounding them.
Wet-on-Dry Precision
Work wet-on-dry (wet paint on dry paper) rather than wetting the paper first. This gives you crisp edges for the cartoon shapes and better control.
Step 2: Painting the Rainbow
-
Prepare your palette:
Activate your watercolor pans with a drop of water each. You will be working generally from cool colors (blues/purples) at the top left to warm colors (reds/oranges) towards the bottom right, though you can mix them up for a more scattered look. -
Start with cool tones:
Load your size 4 brush with a diluted blue. Paint the body of the first bird, carefully working around the eye so it stays white. I like to keep the wash fairly even, but allowing a little water pooling adds nice texture. -
Transitioning colors:
For the next bird, mix a slightly different shade—perhaps a purple or a teal. Paint the body just like the first one. The goal is to have each bird correspond to a unique color swatch from your paint set. -
Painting the warm tones:
As you move down the paper, switch to your greens, yellows, oranges, and reds. Ensure you rinse your brush thoroughly between distinct color families to avoid muddying the bright hues. -
The wing details:
While the body paint is still slightly damp (but not soaking), drop a slightly more concentrated amount of the same pigment into the wing area. This creates a subtle shadow effect without hard lines. -
Let it dry:
Allow the entire page to dry completely. The paper should feel room temperature to the touch, not cool.
Pattern Play
Instead of solid colors, try painting different patterns on each bird’s sweater-like body, such as polka dots, stripes, or checks, using white gouache over the dry watercolor.
Step 3: Inking and Definition
-
Outline the body:
Using your waterproof fine liner, carefully trace over your pencil lines for the bird’s outer shape. A broken or sketching line style adds to the charming, illustrative feel. -
Define the wing:
Ink the wing shape. You can add two or three small ‘u’ shapes inside the wing to suggest feathers. -
The face details:
Ink the beak—you can leave it hollow or fill it in black for contrast. Draw the eye carefully, adding a tiny dot in the center for the pupil. -
Legs and feet:
Trace the stick legs. Add a grounding line under the feet if you like, or just let them stand freely. -
Erase pencil marks:
Once you are certain the ink is 100% dry, gently erase any visible pencil sketch lines to clean up the artwork.
Now you have a colorful flock that perfectly showcases your watercolor palette
Textured Bird Using Dry Brush and Splatter
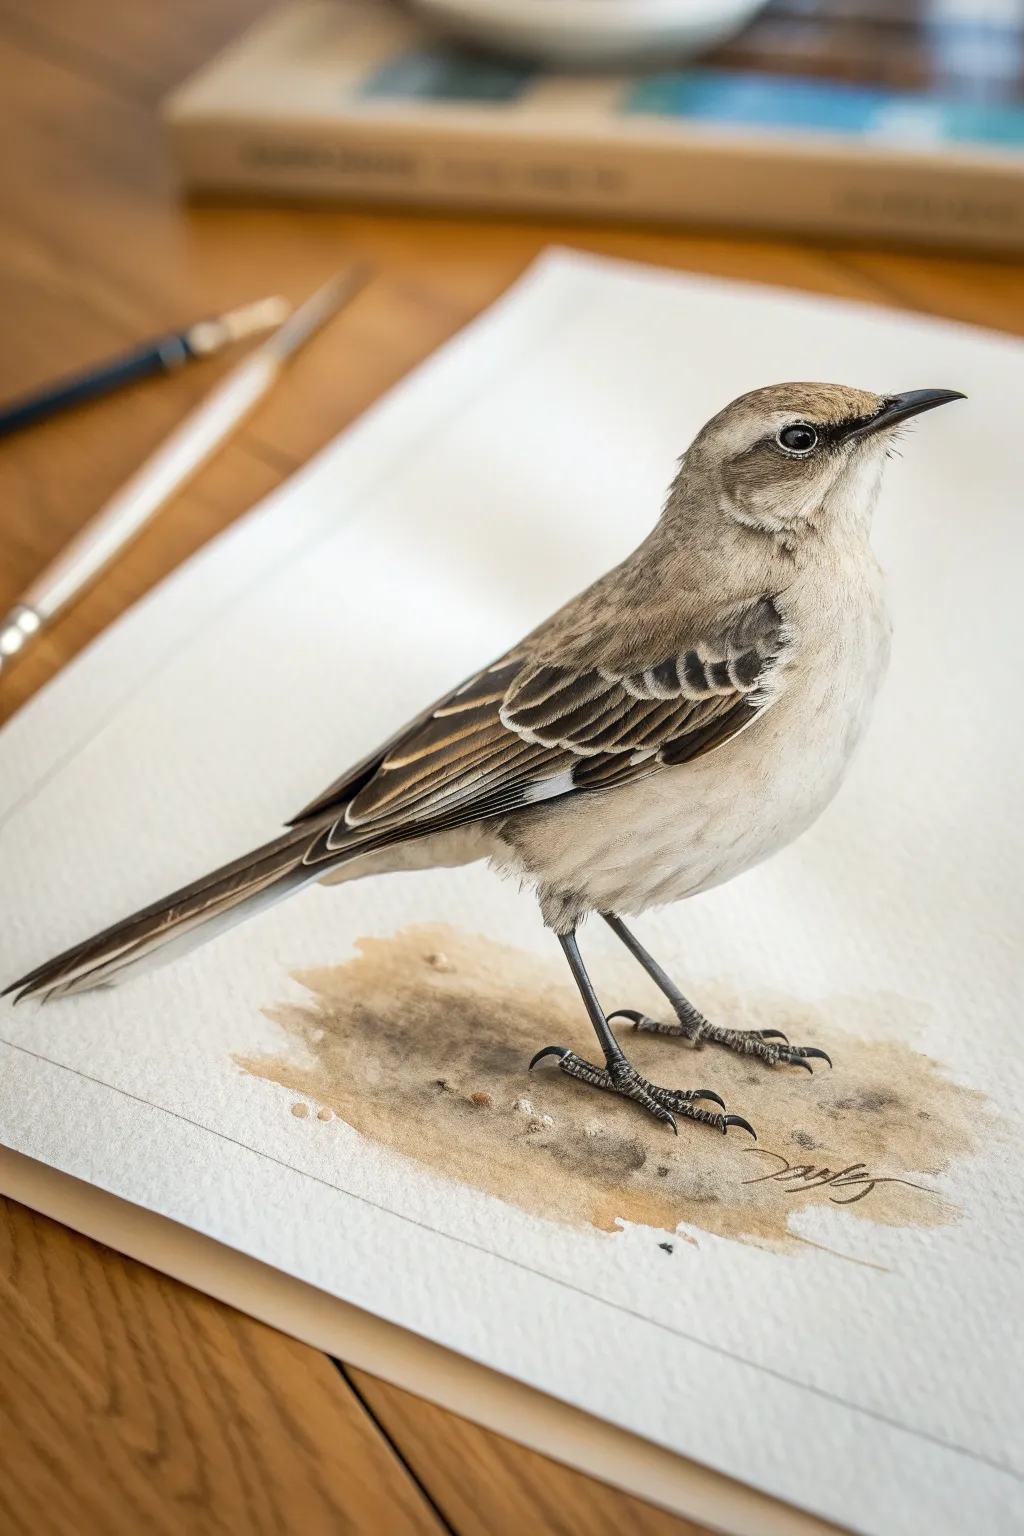
This project combines precise, realistic detailing with loose, expressive textures to capture a lifelike bird standing on a sun-dappled patch of earth. By using dry brush techniques for feathers and wet washes for the ground, you can achieve a stunning contrast between the soft bird and its gritty environment.
Step-by-Step
Materials
- Hot press watercolor paper (smooth finish)
- Watercolor paints (Sepia, Yellow Ochre, Burnt Umber, Payne’s Grey, Raw Sienna)
- Fine liner brushes (sizes 00 and 1)
- Round watercolor brushes (size 4 and 8)
- White gouache or white gel pen
- HB pencil and kneaded eraser
- Palette for mixing
- Paper towels
- Clean water
- Old toothbrush (optional for splatter)
Step 1: Sketching and Creating the Base
-
Outline the bird:
Start with a light HB pencil sketch of the bird. Focus on the posture: the chest should be puffed slightly forward, the legs angled back, and the beak pointed slightly upward. Keep your lines faint so they disappear under the paint. -
Establish the ground wash:
Mix a watery pool of Yellow Ochre with a touch of Sepia. Using your size 8 round brush, lay down an irregular, organic patch of color beneath the bird’s feet. Don’t try to be neat; let the edges bleed and fade naturally. -
Add ground texture:
While the ground wash is still damp, drop in concentrated spots of Burnt Umber and Sepia to simulate pebbles and shadows. You can gently flick the bristles of your brush to splatter tiny dots for a sandy effect. -
Base tone for the bird:
Once the sketch is ready, apply a very pale wash of Raw Sienna and a drop of Grey over the entire bird body, avoiding only the eye and the brightest white mark on the wing. Let this dry completely.
Step 2: Detailed Feathering
-
Define the head:
Switch to your size 1 brush. Mix a warm taupe color using Sepia and White gouache (to make it opaque) or just dilute the watercolor heavily. Paint short, directional strokes starting from the beak, moving over the head to mimic short feathers. -
Paint the eye:
Use concentrated Payne’s Grey or Black for the eye. Leave a tiny speck of white paper for the highlight, or add it later with white gouache. Paint a dark line extending from the eye to the beak to anchor the expression. -
Create the wing structure:
The wings require defined layering. Start with the darker flight feathers at the rear. Use a mix of Sepia and Payne’s Grey to paint the long, darker shapes of the primaries, leaving thin light gaps between them for separation. -
Layer the coverts:
Moving up the wing, paint the smaller covert feathers. These should look like overlapping scales. Use a dark brown outline for each feather, fading into a lighter brown center to create volume. -
Dry brush the chest:
To make the chest look soft and fluffy, use a ‘dry brush’ technique. Load your brush with pale grey-brown paint, dab most of it off on a paper towel, and lightly scuff the brush over the belly area. This catches the tooth of the paper just enough to suggest soft down.
Control your brush moisture
For the fluffy chest texture, your brush must be nearly bone dry. Test the stroke on a scrap piece of paper first; if it leaves a solid line, blot it again before touching your artwork.
Step 3: Refining and Anchoring
-
Deepen the contrast:
Go back into the wing feathers with your darkest Sepia mix. Reinforce the shadow areas where feathers overlap. This contrast is what makes the wing look three-dimensional rather than flat. -
Paint the beak:
Using a size 00 brush, paint the beak with Payne’s Grey. Make the top mandible slightly darker than the bottom one. Ensure the point is very sharp. -
Construct the legs:
Paint the legs using a dark charcoal grey. Pay attention to the knobby joints and the scales on the toes. The legs should look thin but sturdy enough to support the bird. -
Add talons and shadows:
Paint the sharp claws with black. Immediately after, add a small, soft shadow directly under the claws on the painted ground using diluted Sepia. This grounds the bird so it doesn’t look like it’s floating. -
Highlighting:
Using white gouache or a gel pen, add tiny, crisp highlights to the edge of the wing feathers and the rim of the eye. I find this simple step instantly brings the bird to life. -
Final texture check:
Look at the belly and under-tail area. If it looks too flat, add a few loose strokes of pale grey to suggest shadow and form. -
Sign and dry:
Once you are happy with the balance of detail and loose texture, sign your work near the ground wash (incorporating the signature into the texture looks great) and let it dry flat.
Add life with color
Try glazing a tiny amount of diluted burnt sienna or rusty orange over the bird’s flank or cheek area after the main paint dries to give the feathers a warm, sunlit glow.
You now have a beautifully textured bird portrait that perfectly captures the balance between soft feathers and rugged earth
Double-Exposure Bird With Landscape Inside

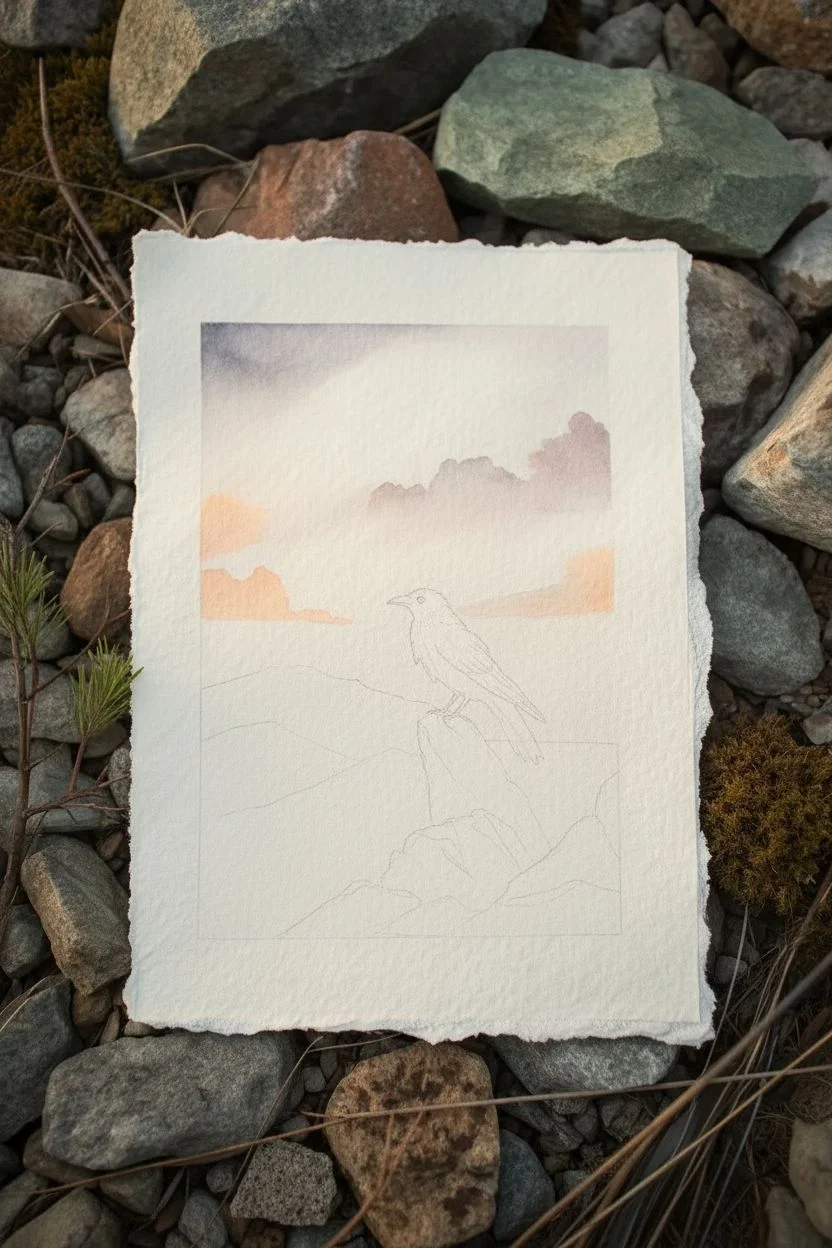
Capture the solemn beauty of a mountain landscape featuring a solitary raven perched atop rugged stones. This watercolor project combines atmospheric washes with precise linework to create depth, contrasting soft sunset clouds against stark silhouettes.
How-To Guide
Materials
- Cold press watercolor paper (deckle edge optional)
- Watercolor paints (Payne’s Grey, Indigo, Burnt Sienna, Yellow Ochre, Alizarin Crimson)
- White gouache or white ink
- Pencil (H or HB)
- Kneaded eraser
- Round brushes (sizes 2, 4, and 8)
- Fine liner brush or rigger brush
- Masking fluid (optional but helpful)
- Two jars of water
- Paper towels
Step 1: Sketch and Sky
-
Establish the horizon:
Begin by lightly sketching the outline of the painting area. Position the main rock formation in the lower right third and place the bird atop the highest point. Draw a faint horizon line about one-third of the way up from the bottom. -
Sketch the silhouette:
Refine the outline of the raven. Focus on the beak shape and the jagged look of the tail feathers. Sketch the rough shapes of the foreground rocks, keeping the lines light so they won’t show through the paint later. -
Prepare the paper:
If you want crisp white edges like the reference photo, tape off your border now. Alternatively, for a raw look, simply paint freehand within a pencil rectangle. -
Wet-on-wet sky base:
Using your size 8 brush, wet the entire sky area with clean water, stopping just above the mountain line and carefully painting around the bird and rock outlines. -
Drop in warm tones:
While the paper is wet, dilute Yellow Ochre with a touch of Burnt Sienna. Drop this warm, peachy mix into the lower sky area to suggest a setting sun. -
Add cloud texture:
Mix a very dilute violet-grey using Alizarin Crimson and a tiny bit of Indigo. While the paper is still damp, dab in soft cloud shapes in the upper sky, letting them bloom naturally.
Natural Edges Pro-Tip
To mimic the handmade paper look in the photo, tear your watercolor paper against a ruler before starting rather than cutting it with scissors. This creates a soft ‘deckle’ edge.
Step 2: Mountains and Mid-Ground
-
Paint the distant range:
Once the sky is fully dry, mix a wash of Alizarin Crimson and Yellow Ochre for the farthest mountain range. Paint this silhouette right below the sky, keeping the bottom edge soft by adding water to fade it out. -
Create atmospheric depth:
For the middle mountain range, mix Indigo with a little white gouache or plenty of water to create a hazy blue-grey. Paint this layer overlapping the previous one slightly, implying distance. -
Start the pine forest:
Mix a darker, more saturated blue-green using Indigo and Payne’s Grey. Using the tip of a size 4 brush, paint the distant tree line. Use vertical strokes that are wider at the bottom and tapered at the top. -
Detail the trees:
Go back into your tree line while it’s damp to add darker values at the base of the trees. This grounds them and adds volume to the forest.
Avoiding Muddy Skies
If your clouds turn green where they meet the sunset yellow, your paper was too wet or you mixed too much on the page. Let the yellow layer dry completely before glazing the grey clouds over it.
Step 3: The Raven and Foreground
-
Base coat for the rocks:
Mix a watery wash of Payne’s Grey and Burnt Sienna. Apply this loosely to the rock formation, leaving small gaps of white paper for highlights on the upper edges. -
Shadowing the stone:
I like to wait until the base layer is just barely damp, then use a concentrated mix of the same colors to paint the cracks and shadowed undersides of the rocks, creating three-dimensional form. -
Paint the raven:
Using pure Payne’s Grey or a mix of Indigo and Black, carefully fill in the bird. Leave a tiny sliver of unpainted paper along the wing’s top edge to separate it from the body. -
Feather details:
Once the black paint is dry, use a very fine brush with slightly lighter grey to render the suggestion of folded wing feathers and the eye. -
Foreground trees:
With your darkest green-black mix, paint the large pine trees on the right side and behind the rocks. Use a stippling motion or jagged zig-zags to mimic pine needles. -
Grass textures:
Use a rigger brush or fine liner with white gouache (or white ink) to flick thin blades of grass over the dark bottom area of the painting. Add a few dark strokes as well for variety. -
Final highlights:
Add tiny touches of white gouache to the raven’s eye and beak for a glint of life, and define the sharpest edges of the rocks with a little extra contrast.
Allow the painting to dry flat completely before mounting it or framing it behind glass to preserve the delicate layers
Surreal Bird Made of Unexpected Shapes
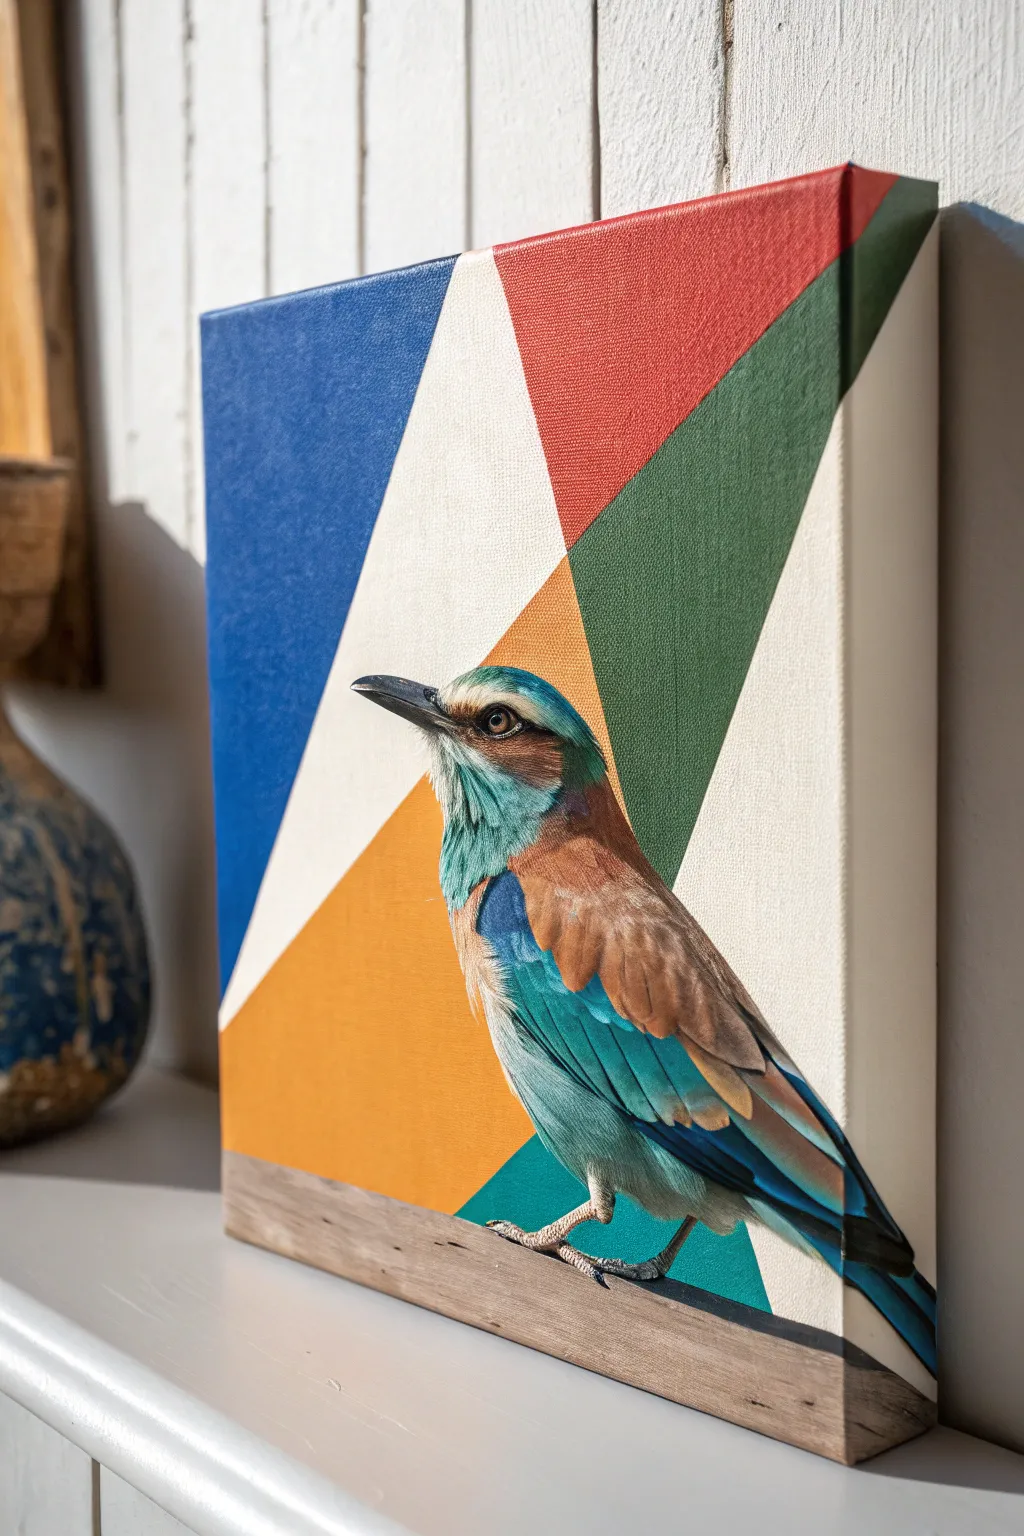
Merging crisp, modern abstraction with detailed wildlife portraiture, this project creates a striking visual contrast. You’ll layer a hyper-realistic European Roller bird over a bold background of interlocking geometric color blocks.
Step-by-Step Tutorial
Materials
- Square stretched canvas (approx. 12×12 inches)
- Acrylic paints (Phthalo Blue, Cadmium Red, Emerald Green, Cadmium Orange, Titanium White, Burnt Umber, Yellow Ochre, Black)
- painter’s tape (low-tack)
- Graphite transfer paper
- Pencil and eraser
- Ruler
- Flat synthetic brushes (various sizes for background)
- Fine detail brushes (sizes 0, 00, and 1 for the bird)
- Matte medium (optional)
Step 1: Planning and Geometric Background
-
Prime the Surface:
Ensure your stretched canvas is clean and primed with gesso. If the canvas texture is very rough, you might apply an extra coat of gesso and sand it down lightly for a smoother painting surface. -
Map the Geometry:
Using a ruler and a light pencil touch, draw the diagonal lines that form the background triangles. Refer to the reference image to replicate the large intersection of shapes. -
Tape the First Shapes:
Apply painter’s tape along the pencil lines to mask off the areas you aren’t painting yet. It’s crucial to burnish the tape edges down firmly with your thumbnail to prevent paint bleed. -
Seal the Edge:
For razor-sharp lines, I like to brush a tiny amount of matte medium or white paint along the tape edge first; this seals any gaps so your color won’t seep underneath. -
Apply the Blue and Red:
Paint the upper left triangle with a solid coat of blue and the upper right section with red. Use a flat brush for even coverage, applying two coats if necessary for full opacity. -
Tape and Paint Remaining Colors:
Once the first sections are completely dry, carefully remove the tape and re-tape to expose the green, orange, and white sections. Paint these areas with the same care, ensuring flat, solid color blocks. -
Paint the Faux Wood Base:
At the bottom of the canvas, paint a horizontal strip to resemble a wooden plank. Use a mix of Burnt Umber and White for a base gray-brown tone.
Clean Lines Secret
Peel your painter’s tape while the acrylic paint is still slightly damp, not bone dry. This prevents the dried paint ‘skin’ from ripping up along with the tape.
Step 2: Painting the Bird
-
Transfer the Outline:
Once the geometric background is 100% dry, place graphite transfer paper over the canvas. Lay your reference drawing of the bird on top and trace the outline so the bird sits perched on the faux wood strip. -
Base Color Blocking:
Block in the main colors of the bird using thinned acrylics. Use turquoise for the chest, reddish-brown for the back, and dark blue for the wings. Don’t worry about details yet; just map the colors. -
Detailing the Face:
Switch to your smallest brush. Paint the eye using black with a tiny white reflection dot to bring it to life. Add the black eye-mask markings and the beak using dark gray, adding a highlight on the upper mandible. -
Feather Texture – Chest:
Using a size 0 brush, create the appearance of feathers on the turquoise chest. Use short, fine strokes in a slightly lighter turquoise to build volume and fluffiness. -
Feather Texture – Wings:
Define the flight feathers with longer, smooth strokes. Layer dark blues and blacks, leaving crisp edges between the overlaps. Add highlights of lighter blue on the feather edges for dimension. -
Refining the Back:
For the brownish back feathers, use small, scalloped brushstrokes. Mix Burnt Sienna with a touch of Ochre for the highlights to make the feathers look soft and layered. -
Feet and Claws:
Paint the feet gripping the wooden block using a mix of grey and pale yellow. Add small shadows underneath the claws to ground the bird onto the wood.
Metallic Touch
For a glamorous twist, swap the white or grey geometric section with gold or silver leaf. It adds a luxurious texture contrast against the matte bird feathers.
Step 3: Finishing Integration
-
Wood Texture Detail:
Return to the bottom wooden strip. Dry-brush distinct grain lines using darker brown and black. Add a distinct shadow directly under the bird on the wood to enhance the realism. -
Wrap the Edges:
Extend the geometric lines and colors around the sides of the canvas. This gallery-wrap style gives the piece a polished, sculptural look without needing a frame. -
Final Varnish:
Once the painting has cured for at least 24 hours, apply a satin varnish. This unifies the sheen of the different paint colors and protects your detailed work.
Hang your finished piece in a well-lit spot where the geometric colors can truly pop against the wall

Have a question or want to share your own experience? I'd love to hear from you in the comments below!