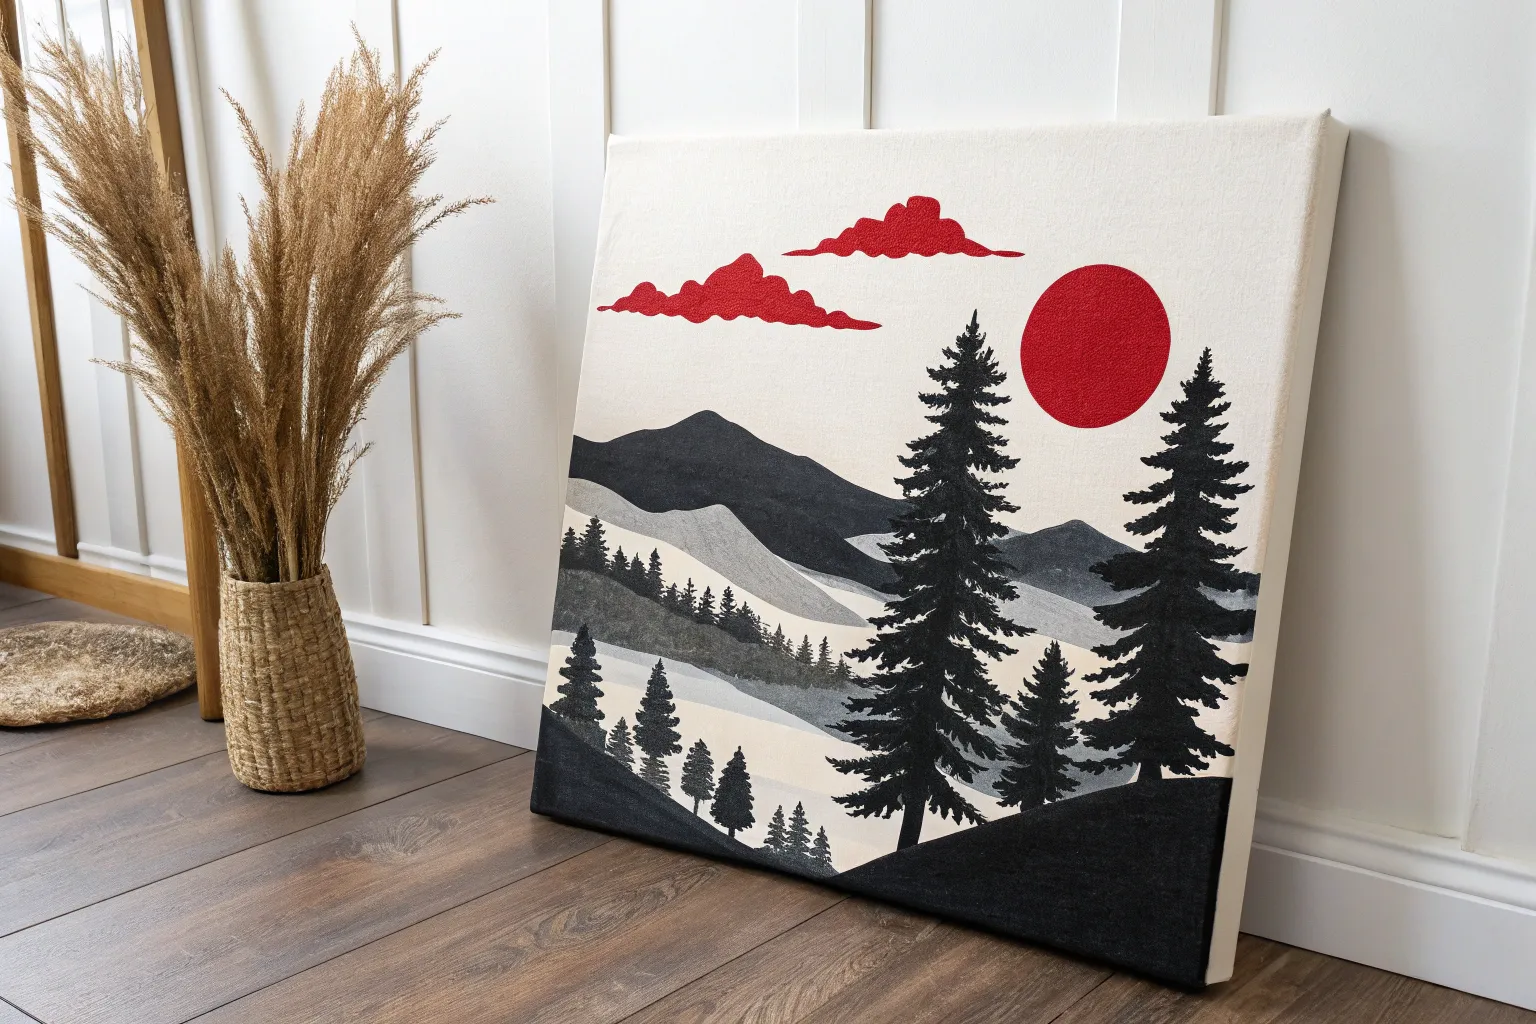
Black and red is one of my favorite duos for instant drama—bold, moody, and impossible to ignore. If you’re craving high-contrast art that feels intense but still super doable, these ideas will get your brush moving fast.
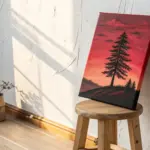
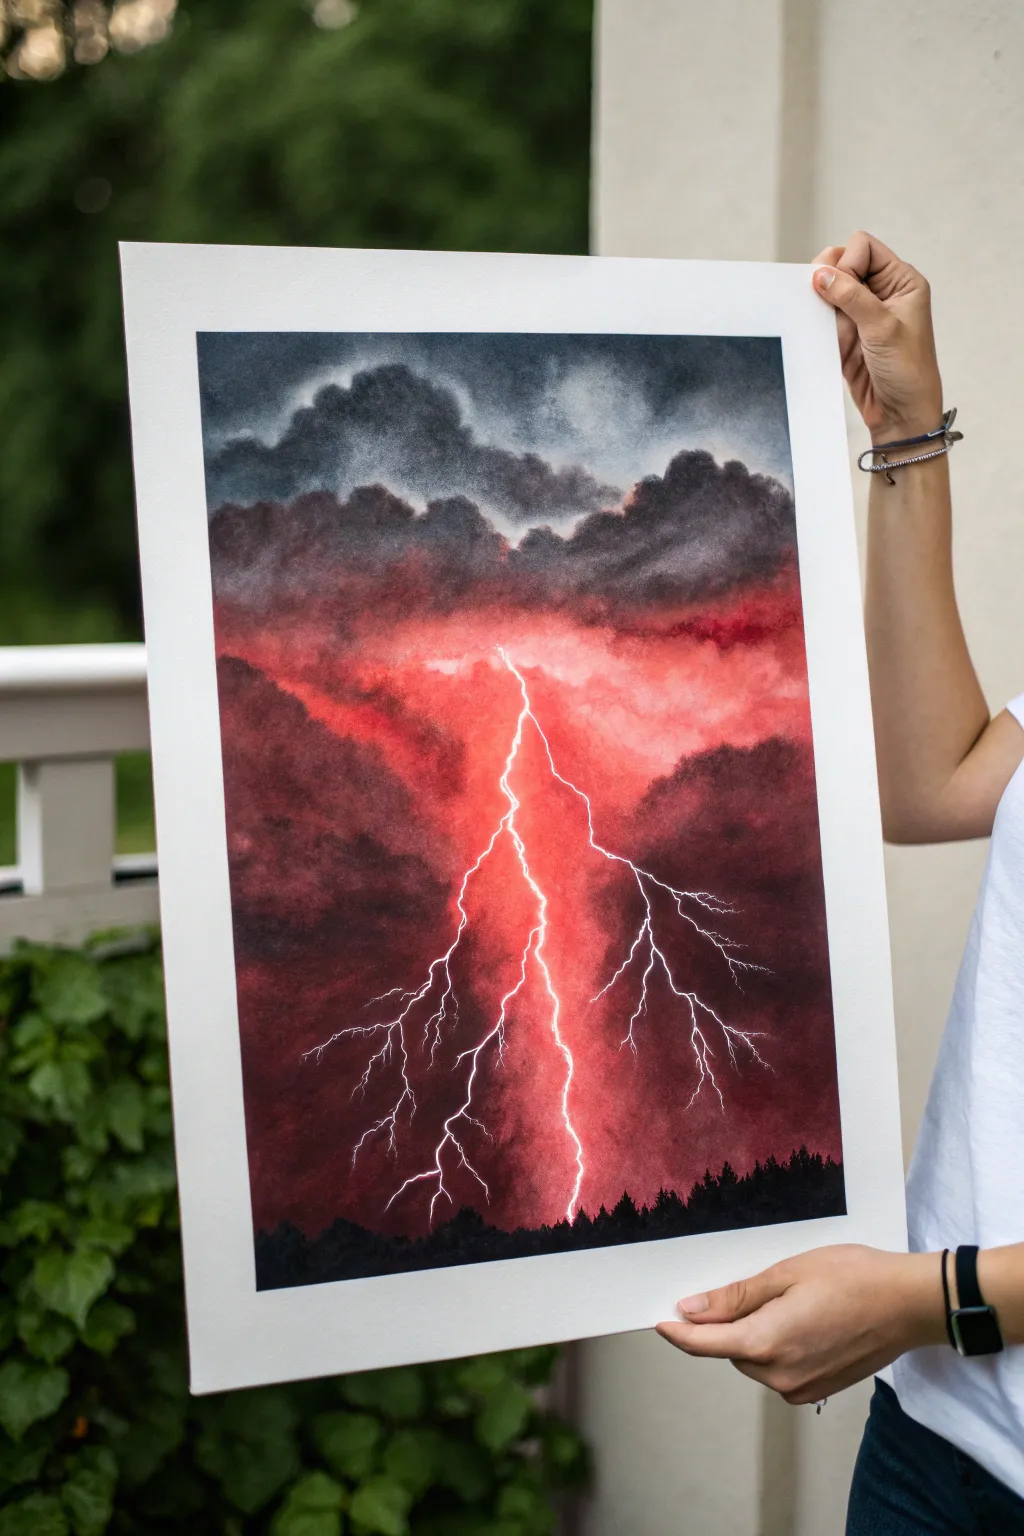
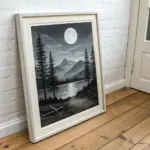
Black Silhouette Tree on a Red Sky
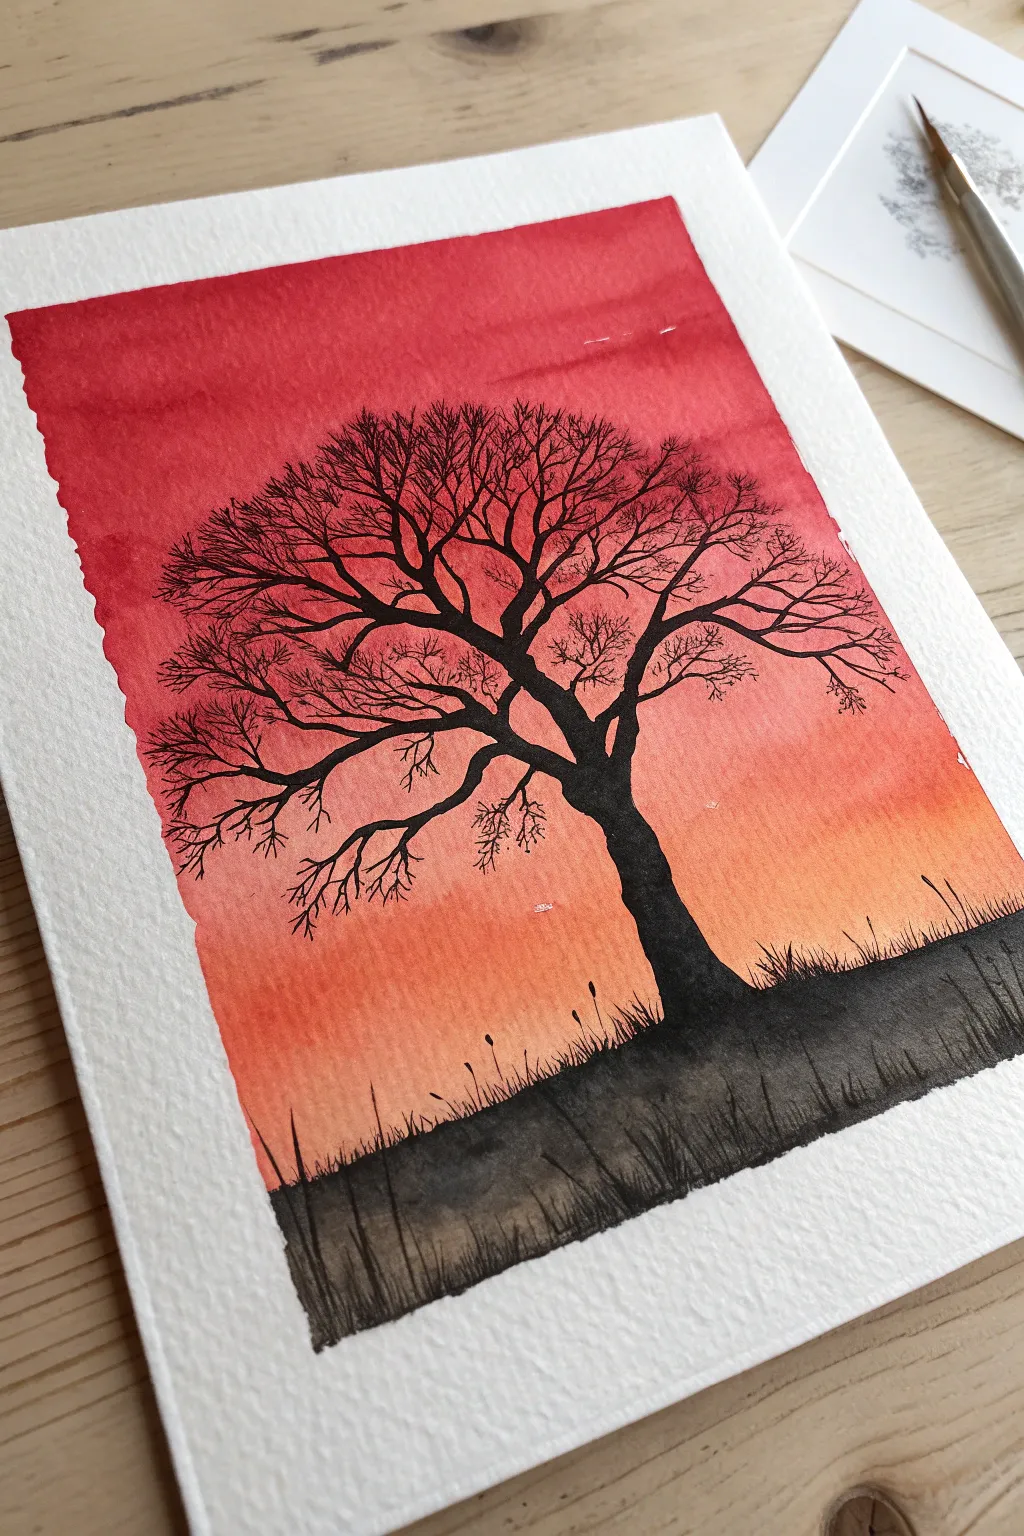
Capture the dramatic contrast of a winter sunset with this striking watercolor project. By combining a vibrant red-to-orange wash with a detailed black ink silhouette, you’ll create a moody and atmospheric piece that pops right off the page.
Step-by-Step Tutorial
Materials
- Cold press watercolor paper (300 gsm)
- Masking tape
- Watercolor paints (Alizarin Crimson, Cadmium Red, Cadmium Orange)
- Black waterproof fine liner pens (0.1 and 0.5 sizes)
- Black India ink or concentrated black watercolor
- Large flat wash brush (1 inch)
- Round brush (size 6)
- Small detail brush (size 0 or 00)
- clean water jars (2)
- Paper towels
Step 1: Setting the Sky
-
Secure the paper:
Begin by taping down all four edges of your watercolor paper to a rigid board. This prevents the paper from buckling when we add the heavy water wash. -
Prepare the colors:
Mix a generous amount of your red tones. You’ll need a deep, cool red like Alizarin Crimson for the top and a warmer Cadmium Red mixed with a touch of orange for the lower section. -
Wet the surface:
Take your large flat brush and apply a coat of clean water across the entire sky area, stopping about an inch above where the ground line will be. -
Apply the crimson:
While the paper is glistening wet, load your brush with the deepest red. Start at the very top edge and paint sweeping horizontal strokes, letting the color bleed downwards. -
Create the gradient:
Rinse your brush slightly and pick up your orange-red mix. Blend this into the bottom edge of the crimson, working your way down the paper. The colors should fuse naturally. -
Fade to light:
As you reach the horizon line, use a clean, damp brush to pull the orange down, fading it out into the white of the paper. This creates a glowing horizon effect. -
Add subtle texture:
I like to tilt the board slightly so the pigment settles irregularly, creating subtle horizontal streaks that mimic cloud layers. -
Complete drying:
This is crucial: allow the sky to dry completely. It must be bone dry before you add the silhouette, or the black ink will bleed into the red.
Bleed Control
If you notice the red sky forming a hard line while drying, immediately soften the edge with a barely damp brush to maintain that dreamy gradient transition.
Step 2: Designing the Silhouette
-
Draw the trunk:
Using a round brush and black India ink (or very concentrated black watercolor), paint the main trunk. Keep it slightly off-center for a better composition. -
Establish the ground:
Paint a solid black uneven strip at the bottom for the ground. Don’t make it perfectly straight; let it rise and fall slightly to look like natural terrain. -
Branching out:
Switch to your smaller round brush. Extend the main branches outward from the trunk, tapering them as they reach toward the edges of the paper. -
Adding fine twigs:
For the intricate upper canopy, switch to a waterproof fine liner pen (size 0.5). Draw the secondary branches, ensuring they fork and divide naturally. -
Micro-detailing:
Use the 0.1 fine liner for the tiniest outer twigs. A shaky hand is actually helpful here—jagged, organic lines look more realistic than straight ones. -
Dense canopy:
Keep adding fine lines until the crown of the tree looks dense and interconnected. The mesh of black lines against the red sky creates the visual impact. -
Texture the trunk:
If the black paint on the trunk looks too flat, use the fine liner to add tiny vertical hatch marks along the edges to suggest bark texture.
Add Some Birds
Use your finest pen to add tiny ‘V’ shapes in the distance. Painting a few small birds flying toward the tree adds movement and scale to the scene.
Step 3: Finishing Touches
-
Grassy textures:
With the 0.1 fine liner or the smallest brush, flick quick, upward strokes from the black ground line. Vary the height and angle to resemble wild grass. -
Foreground variety:
Add a few slightly taller ‘weeds’ or seed heads rising above the standard grass height to break up the horizon line. -
Final wash:
Mix a very watery, transparent grey wash. Glaze over the bottom section of the black ground once it’s dry to soften the starkness and add depth to the soil. -
Reveal the edges:
Once the artwork is absolutely dry, carefully peel away the masking tape at a 45-degree angle to reveal the crisp white border.
Mount your finished piece in a simple white frame to really make those fiery colors glow against the stark silhouette


Red Poppy Blooms on a Black Field
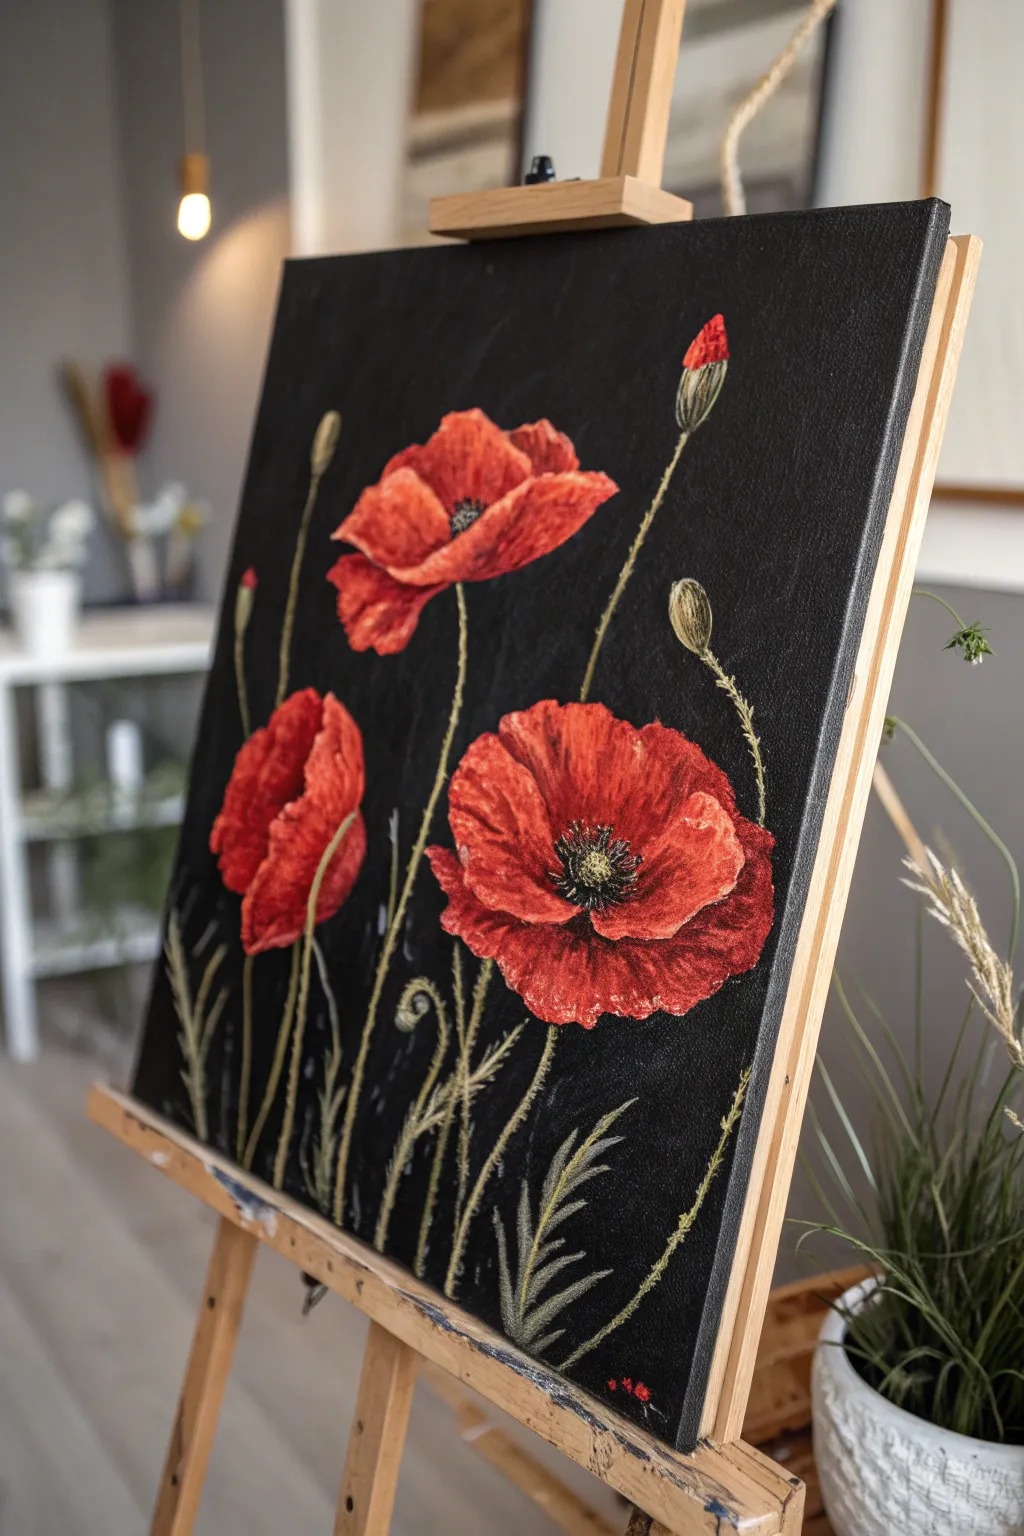
This striking acrylic painting contrasts vibrant, textured red poppies against a deep black background, creating a moody and modern botanical piece. The project focuses on capturing the delicate petals and fine stems using layering techniques and subtle highlighting.
How-To Guide
Materials
- Stretched canvas (vertical orientation)
- Black acrylic paint (heavy body preferred)
- Red acrylic paint (warm, like Cadmium Red)
- Deep red or crimson acrylic paint (like Alizarin Crimson)
- Orange-red acrylic paint (like Vermilion)
- White acrylic paint
- Yellow ochre and dark green acrylic paint (for stems)
- Flat brush (large, for background)
- Filbert brushes (sizes 6-8, for petals)
- Round brushes (size 0-2, for stems and centers)
- Palette knife (optional, for center texture)
- Easel
Step 1: The Dark Foundation
-
Prepare the canvas:
Begin by cleaning your canvas surface of any dust. Set it vertically on your easel to get a good perspective on the composition. -
Paint the background:
Using a large flat brush, apply a solid coat of black acrylic paint across the entire canvas. Ensure the coverage is opaque; you may need two coats. Let this dry completely before moving on. -
Sketch the composition:
Lightly sketch the placement of your three main flowers using a white charcoal pencil or very diluted white paint. Place the largest bloom low and to the right, a slightly smaller one high and center-left, and a side-facing bud on the lower left. -
Map the stems:
Sketch the long, slender stems curving upwards. Add small oval shapes for the unopened buds at the top right and mid-right areas.
Don’t Over-Blend
Poppy petals have a crinkled, papery texture. Avoid smoothing your paints too much; let the brushstrokes remain visible to mimic delicate organic veins.
Step 2: Blooming Petals
-
Base layer for petals:
Load a medium filbert brush with your deepest crimson red. Fill in the petal shapes you sketched, focusing on the overall silhouette rather than individual petal detail at this stage. -
Define the layers:
Once the base is tacky, mix a standard bright red. Paint the outer edges of the petals, using sweeping strokes that curve inward toward the flower center to mimic the cup shape of a poppy. -
Add highlights:
Mix a small amount of orange-red or add a touch of white to your bright red. Apply this to the top edges of the petals where the light hits. I find that scumbled, slightly broken strokes add a lovely papery texture here. -
Deepen the shadows:
Use a mix of crimson and a tiny dot of black (or purple) to paint the inner depths of the flower cup, right near the center, to create dimension and depth. -
Refine the large poppy:
For the main bottom-right flower, ensure the petals look open and wide. Layer lighter reds on the foreground petals and keep the background petals slightly darker. -
Paint the side-facing bloom:
On the left flower, focus on the cup shape. The petals should overlapping tightly, showing mostly the underside.
Step 3: Stems and Details
-
Paint the green stalks:
Mix a dull, olive green using yellow ochre, a touch of green, and a tiny bit of white. Using a fine round brush, paint the stems with long, continuous strokes. -
Texture the stems:
Poppy stems are hairy. Use your smallest liner brush with a very light, diluted green-white mix to add tiny, rapid tick-marks along the sides of the stems to create fuzz. -
Create the unopened buds:
Paint the oval bud shapes in green at the top of the stems. Add a small ‘cap’ of red peeking out at the very tip where the flower is about to burst. -
Paint the center pollen:
In the center of the open flowers, dab a dark green or black circle. Use a small brush or palette knife to stumble some texture here. -
Add the stamens:
With a fine liner brush and white or pale yellow paint, create tiny dots surrounding the dark center circle to represent the pollen-heavy stamens. -
Final foliage:
At the very bottom, add some fern-like leaves using quick, feathery strokes in muted green to ground the composition without distracting from the blooms. -
Review and touch up:
Step back from the easel. If any red looks too flat, add a final glaze of bright orange-red to the highlights to make them pop against the black void.
Go Metallic
For a glamorous twist, use gold leaf or metallic gold paint for the flower centers and the tiny hairs on the stems instead of white or yellow.
Allow the painting to dry thoroughly before hanging it to bring a dramatic splash of color to your wall


Black Mountains With a Red Sunset Band
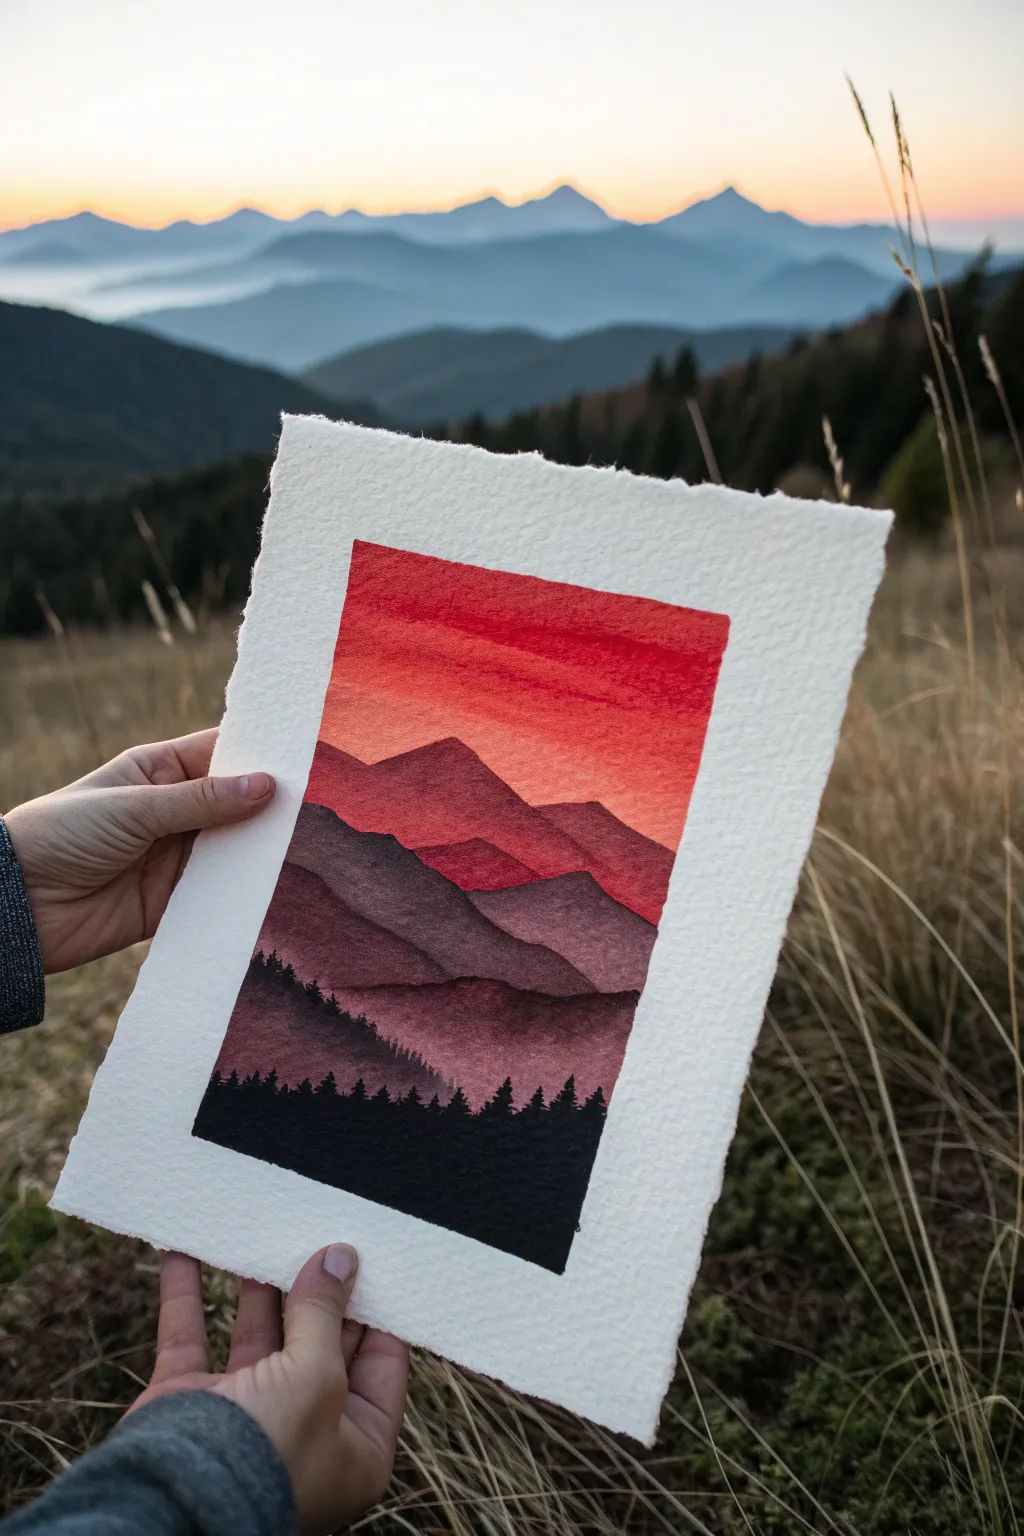
This stunning watercolor landscape captures the drama of twilight with bold red skies fading into shadowy peaks. The high-contrast composition relies on simple layering techniques to create depth, moving from a vibrant background to a pitch-black foreground.
Step-by-Step Guide
Materials
- Cold press watercolor paper (300 gsm or heavier, preferably with deckled edges)
- Masking tape or painter’s tape
- Watercolor paints: Cadmium Red, Alizarin Crimson, Payne’s Grey, Lamp Black
- Large flat wash brush
- Medium round brush (size 6 or 8)
- Small detail brush (size 0 or 1)
- Jar of clean water
- Paper towels
- Mixing palette
Step 1: Preparing the Sky
-
Tape the borders:
Secure your paper to a flat board using masking tape. For this specific look, tape off a crisp rectangular window in the center of the paper, leaving a wide margin of white space around the painting area to frame the intense colors. -
Pre-wet the paper:
Dip your large flat brush into clean water and dampen the entire rectangular area inside the tape. The paper should glisten slightly but not have standing puddles; this wet-on-wet technique allows for a smooth sky gradient. -
Apply the first wash:
Load your brush with a watery mix of Cadmium Red. Start at the very top of the rectangle and sweep across, gradually pulling the color downward. As you move down, dip your brush in water to dilute the paint, fading it out before you reach the halfway mark. -
Deepen the sky:
While the paper is still damp, mix a stronger concentration of Cadmium Red with a touch of Alizarin Crimson. Apply this to the top third of the sky to increase the intensity, letting it bleed naturally into the lighter wash below. -
Add cloud streaks:
Use a slightly drier brush with the crimson mix to drag horizontal streaks across the upper sky. These subtle bands mimic high-altitude clouds catching the setting sun. -
Let it dry completely:
Before moving to the mountains, the sky must be bone dry. If the paper is cool to the touch, it’s still wet. Patience here prevents your sharp mountain ridges from blurring into the sky.
Step 2: Layering the Mountains
-
Mix the distant mountain color:
Create a mix of Alizarin Crimson and a tiny drop of Payne’s Grey. You want a muted, dusty red tone that is darker than the sky but lighter than the foreground. -
Paint the first range:
Using your medium round brush, paint the outline of the furthest mountain range about halfway down the paper. Fill in the shape below this line with a watery wash of the same color. -
Allow to dry:
Wait for this first mountain layer to dry completely. This hard edge is crucial for creating the illusion of distance. -
Mix the middle range color:
Add more Payne’s Grey to your previous red mixture to create a deep, purplish-charcoal tone. It should be significantly darker than the previous layer. -
Paint the middle peaks:
Paint a second mountain range starting lower than the first. Vary the peaks and valleys to keep the landscape interesting, and fill the area down toward the bottom, leaving just the lowest strip empty. -
Dry again:
Ensure this layer is fully dry before proceeding to the final step. I usually use a hairdryer on a low setting here to speed things up.
Bleeding Lines?
If your paint bleeds under the tape, try using a hairdryer to heat the tape slightly before pressing it down firmly. This activates the adhesive for a tighter seal.
Step 3: The Foreground Silhouette
-
Prepare the darkest black:
Load your palette with pure Lamp Black. You want a thick, opaque consistency, similar to heavy cream, to ensure no light from the paper shines through. -
Block in the bottom land:
Paint a solid black mass at the very bottom of the composition. This will be the ground from which your trees grow. -
Switch to the detail brush:
Pick up your smallest brush (size 0 or 1) to paint the treeline. The tip needs to be sharp to create convincing pine needles. -
Paint the pine trees:
Start with a vertical line for the trunk, then use tiny flicking motions to create branches angling downward. Make the trees vary in height, grouping some together for a natural forest look. -
Refine the edges:
Ensure the transition between the solid black ground and the trees is seamless. Fill in any gaps at the base of the trees with solid black. -
The reveal:
Once the black paint is 100% dry, slowly peel off the masking tape at a 45-degree angle. This reveals the crisp white border that makes the colors pop.
Golden Touch
Once dry, use a metallic gold pen to outline just the peaks of the middle mountain range. It adds a magical ‘sun-kissed’ rim light effect.
Frame this vibrant piece in a simple black frame to let those intense sunset hues take center stage


Red Koi on Black Water
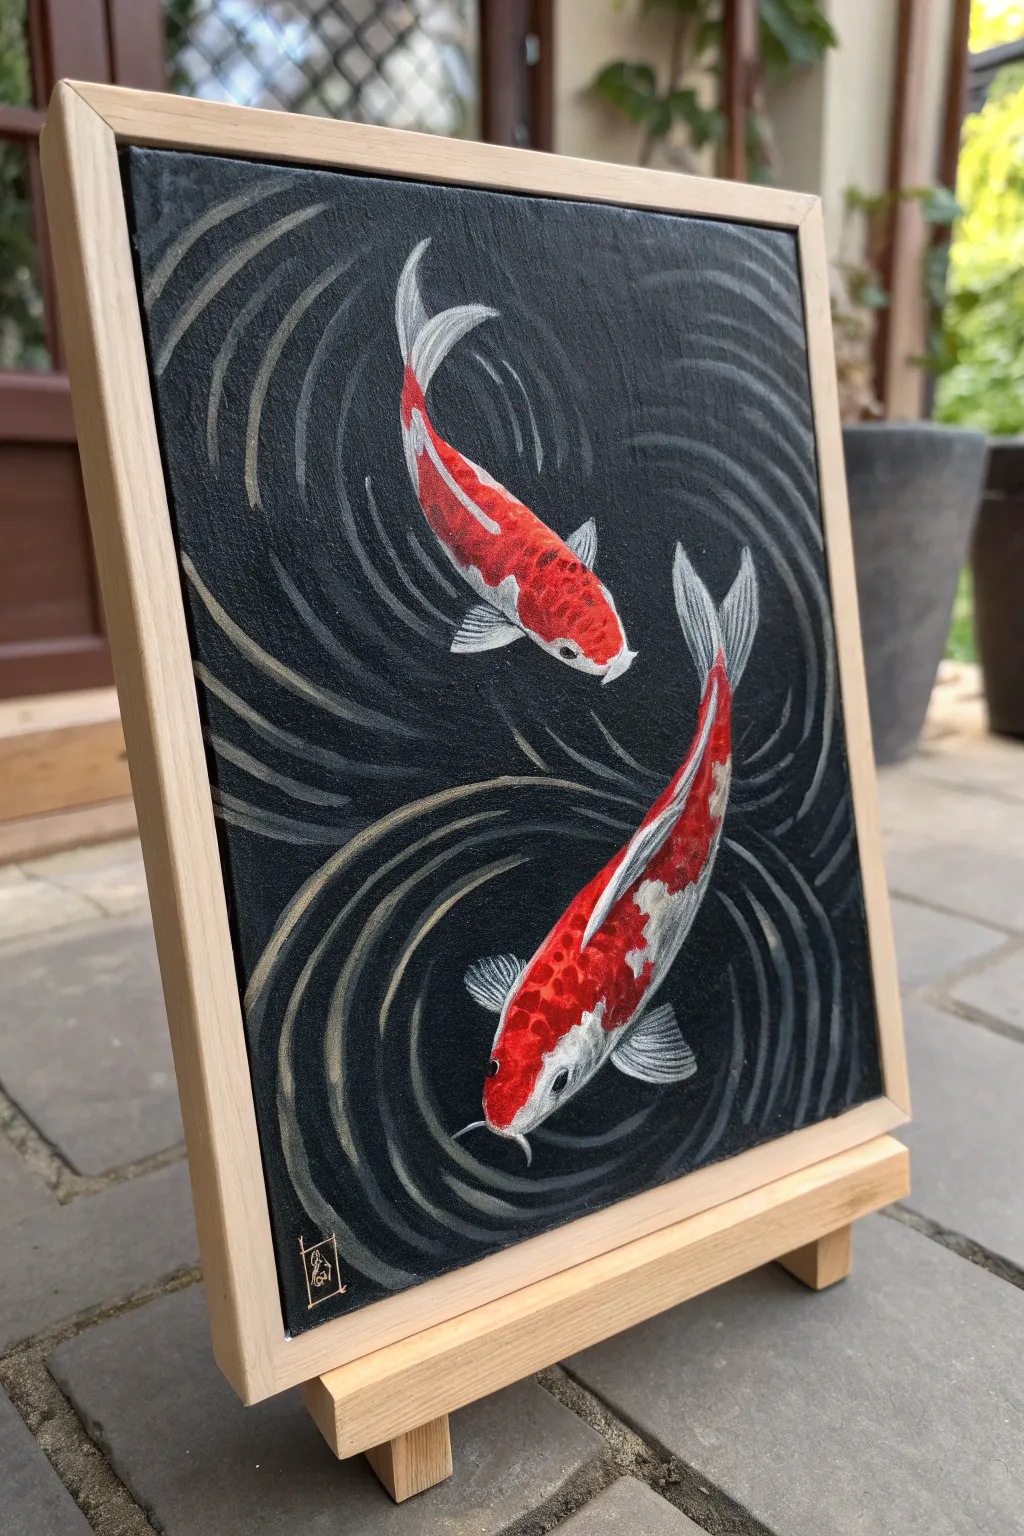
Capture the graceful movement of two Koi fish swimming against a stark, deep black background in this striking contrast piece. The bright reds and whites of the fish pop beautifully against the dark, rippled water, creating a serene yet dramatic artwork.
Detailed Instructions
Materials
- Stretched canvas (approx 8×10 or 9×12 inches)
- Acrylic paints: Carbon Black, Titanium White, Cadmium Red Medium, Cadmium Red Deep (or Alizarin Crimson)
- Flat shader brush (size 6 or 8)
- Round detail brushes (size 0 and 2)
- Filbert brush (size 4)
- White or grey chalk pencil
- Palette and water cup
- Paper towels
- Floating frame (light wood finish)
Step 1: Setting the Scene
-
Prime the background:
Begin by covering your entire canvas with Carbon Black acrylic paint. Use a larger flat brush for this to ensure smooth, even coverage. You may need two coats to ensure no white canvas texture peeks through. Let this dry completely before moving on. -
Sketch the composition:
Once the black base is bone dry, lightly sketch the outlines of two Koi fish using a white or grey chalk pencil. Position the top fish swimming diagonally downwards and the bottom fish swimming diagonally upwards, creating a flowing, circular composition. -
Block in the white base:
Using a size 4 filbert brush and Titanium White, paint the entire body shape of both fish. This white underpainting is crucial because red paint is naturally translucent and will look muddy if painted directly over black.
Step 2: Painting the Fish
-
Define the patterns:
Referencing the photo, pencil in the separation lines where the red markings will go on the dried white base. The bottom fish has large blotches on its back, while the top fish is mostly red with white fins and a white tail. -
First layer of red:
Mix a vibrant red using Cadmium Red Medium. Apply this to the patterned areas you marked out. Keep the paint fluid but not watery. -
Add depth to the red:
While the red is still slightly tacky or after it dries, blend in a small amount of Cadmium Red Deep or Alizarin Crimson along the spines and edges of the red patches to give the fish volume and roundness. -
Refine the white areas:
Go back over the remaining white sections with fresh Titanium White to brighten them up. I like to use a clean round brush here to ensure the edges between the red and white are crisp. -
Paint the fins and tails:
Using a thin detail brush (size 0), paint delicate lines in the fins and tails. Use a mix of white with a tiny drop of black to create a very pale grey for the webbing between the fin rays, highlighting the rays themselves in pure white.
Uneven Coverage?
If your red paint looks streaky or transparent, let it dry fully and apply a second coat. Red pigments are naturally weak and often need layering for opacity.
Step 3: Details and Water
-
Add facial details:
With your smallest brush, carefully dot the eyes with black. Add a tiny white reflection dot to each eye to bring them to life. Use pale grey to outline the mouth and gills slightly for definition. -
Create the scale texture:
Mix a diluted, semi-transparent white/grey glaze. Very gently paint small ‘C’ shapes or cross-hatching over the bodies to suggest scales without overpowering the color. -
Mix the ripple color:
On your palette, mix Titanium White with a little black to create a medium grey. You want this color to be visible against the black background but softer than the bright white of the fish. -
Paint the primary ripples:
Using a size 2 round brush, paint curved lines radiating outward from the fish. These should follow the movement of the fish, swirling around their bodies. Keep the lines uneven and tapering at the ends. -
Layer lighter ripples:
Add a little more white to your grey mix. Paint thinner, shorter ripple lines inside and alongside the darker grey ones. This validates the feeling of movement and light reflecting on the water surface. -
Final touches:
Assess the whole painting. If any black background areas look patchy, carefully touch them up. Sign your artwork in the corner with a metallic or light-colored pen. -
Framing:
Once the painting is cured (wait at least 24 hours), mount it into a light wood floating frame. The natural wood tone complements the orange-red tones of the fish perfectly.
Pro Tip: Fluid Motion
When painting the water ripples, hold your brush by the end of the handle. This loosens your wrist and creates smoother, more organic curves compared to a tight grip.
Now you have a tranquil, elegant piece of art that brings a touch of Zen to any room
BRUSH GUIDE
The Right Brush for Every Stroke
From clean lines to bold texture — master brush choice, stroke control, and essential techniques.
Explore the Full Guide
Abstract Splatter: Ink and Crimson
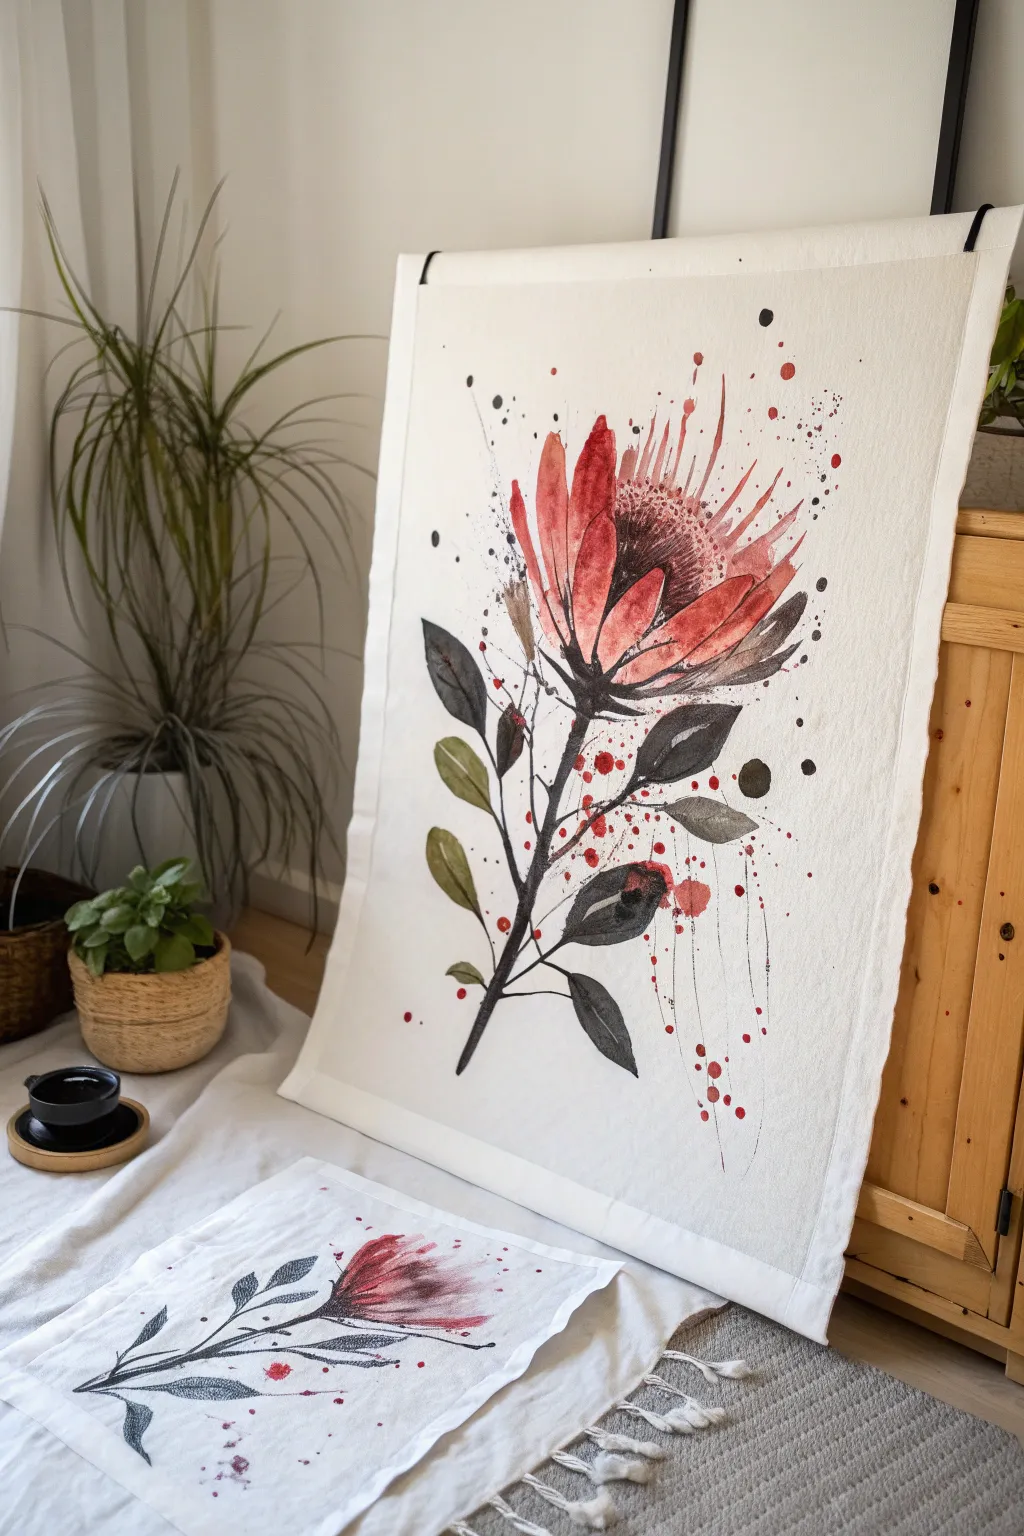
This striking floral study combines the soft bleed of watercolor with the defining contrast of black ink to create a modern, slightly abstract interpretation of a Protea bloom. The interplay between sharp, jagged lines and fluid crimson washes gives the piece a dynamic, almost rebellious energy.
Step-by-Step Guide
Materials
- Heavyweight watercolor paper or primed cotton canvas sheet
- Watercolor paints (Alizarin Crimson, Burnt Sienna, Payne’s Grey, Deep Green)
- Black waterproof India ink or high-flow acrylic ink
- Pointed round watercolor brushes (Sizes 4, 8, and 12)
- Rigger brush or liner brush for fine details
- Spray bottle with clean water
- Paper towels
- Masking tape or clips
- Pencil for sketching
- Palette for mixing
Step 1: Sketch and Base Washes
-
Prepare the surface:
Begin by taping down your paper or hanging your canvas sheet flat against a board to prevent buckling. If you are using loose canvas like the example, clip the top edge to a rigid backing board. -
Light charcoal sketch:
Lightly sketch the central stem and the large, cup-like shape of the Protea bloom. Don’t worry about perfect botanical accuracy; focus on the upward-sweeping gesture of the petals. -
Wet the bloom area:
Using your large round brush, wet the area inside your flower sketch with clean water. You want the paper damp but not dripping. -
Initial red wash:
Load your Size 12 brush with Alizarin Crimson mixed with a touch of Burnt Sienna. Drop this color into the wet petals, starting from the base and letting it bleed upward. -
Adding depth:
While the first layer is still damp, mix a more concentrated red. Dab this into the center and base of the flower to create a gradient of intensity.
Step 2: Structural Leaves and Stem
-
Base green tones:
Mix Deep Green with a little Burnt Sienna to create an earthy olive tone. Paint the lower leaves using the Size 8 brush, using a press-and-lift motion to create the leaf shape. -
Darkening the foliage:
While the green is wet, touch the edges or tips with a dark Payne’s Grey or black watercolor to introduce that moody, shadowed look. -
Drawing the stem:
Paint the main stem connecting the flowers and leaves. Use a darker, almost black mixture here to anchor the composition.
Loose is Best
Don’t overwork the ink outlines. Quick, confident strokes capture the energy better than slow, shaky tracing. It’s okay if the ink line misses the edge of the paint.
Step 3: Ink Definition and Details
-
Dry completely:
Wait for all the watercolor layers to be bone dry. This is crucial so your sharp ink lines don’t bleed into the soft paint. -
Ink outlines:
Dip your rigger or small round brush into the black India ink. Loosely trace the edges of the petals and leaves. Don’t close every shape; broken lines add character. -
The flower center:
Stipple (dot) black ink into the center of the bloom to create the dense texture typical of Proteas. I like to let some dots cluster tightly while others drift outward. -
Adding texture lines:
Use the very tip of your brush to flick quick, upward lines inside the petals, mimicking the veins and texture of the flower. -
Dark accents:
Paint solid black shapes for certain leaves or shadow areas behind the main bloom to push the red petals forward visually.
Metallic Accent
Once the piece is fully dry, add subtle touches of gold leaf or metallic gold ink to the tips of the stamen in the center for a luxurious, modern finish.
Step 4: Splatter and Finishing
-
Controlled splatters:
Load a brush with watery red paint. Hold it over the painting and tap the handle with another brush to send fine sprays of color around the bloom. -
Ink droplets:
Repeat the splatter technique with black ink, focusing on the areas near the stem and the outer edges of the composition. -
Veining details:
If any leaves look too flat, use a fine liner brush with slightly diluted black ink to draw delicate veins over the dried green wash. -
Final assessment:
Step back and look at the balance. If the top feels too light, add a few floating ink dots or ‘pollen’ specks to draw the eye upward.
Hang your bold botanical piece using a simple poster hanger or clips to maintain that effortless studio aesthetic
Geometric Blocks in Black, Red, and White
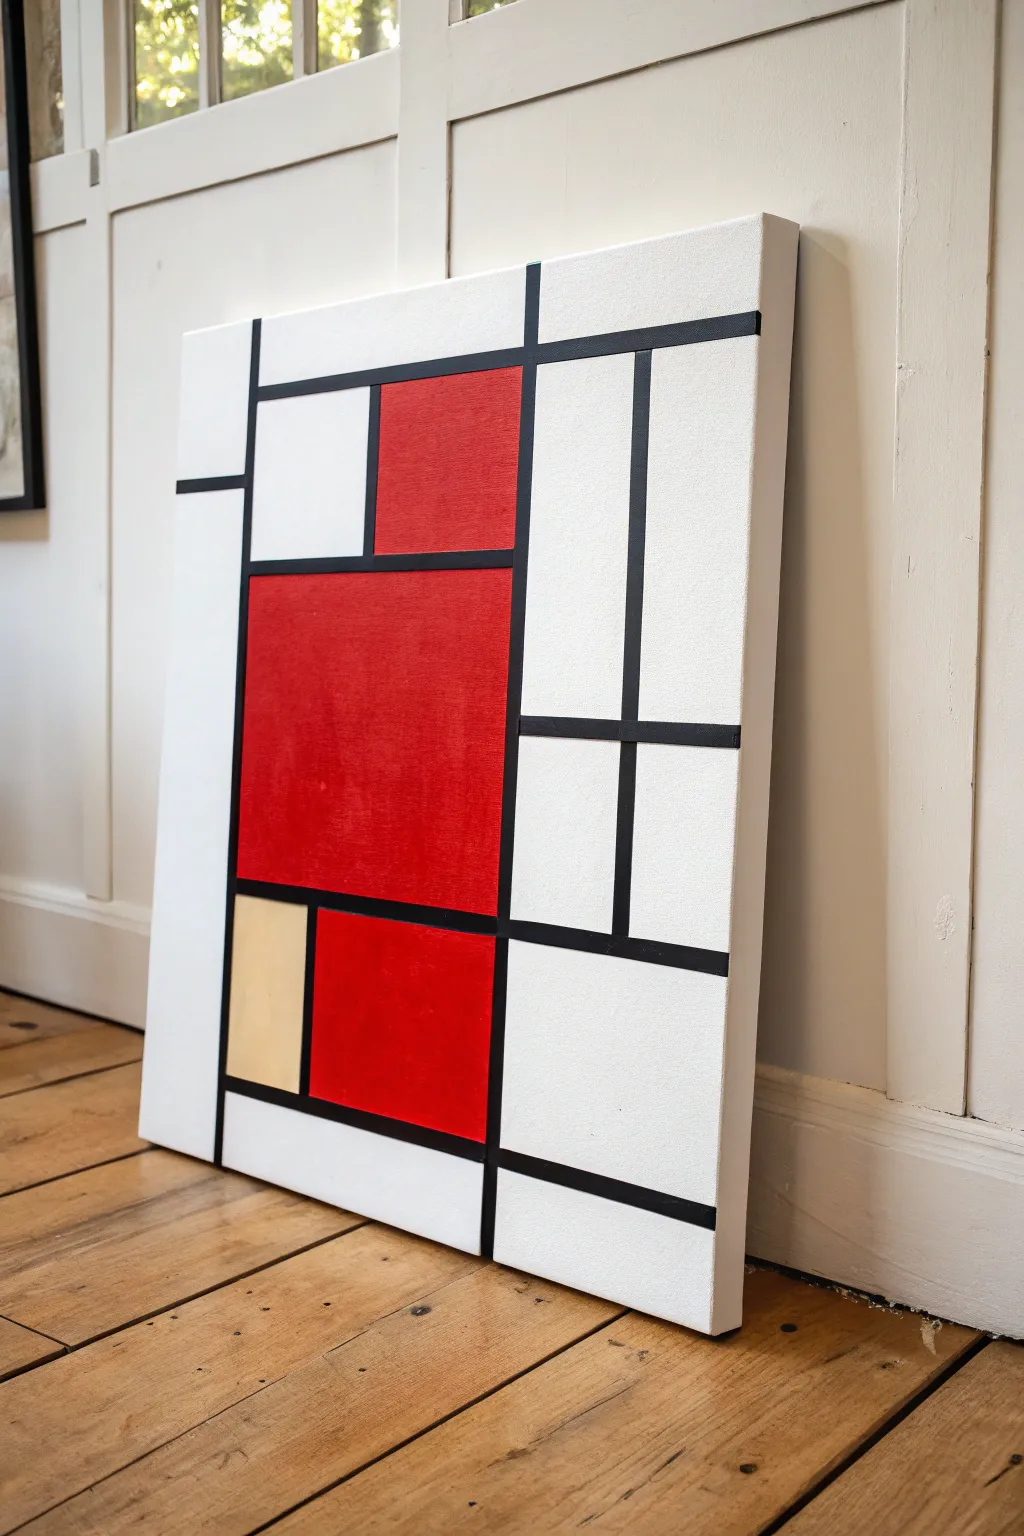
Channel the masters of De Stijl with this structured, geometric composition that creates a bold statement using simple black lines and blocks of vibrant red and white. This balanced, abstract piece brings a classic modernist aesthetic into your living space without requiring advanced brush skills.
Step-by-Step
Materials
- Stretched canvas (rectangular format, e.g., 16×20 or 18×24 inches)
- Acrylic paint: Heavy body Titanium White
- Acrylic paint: Cadmium Red Deep (or similar bold red)
- Acrylic paint: Mars Black
- Acrylic paint: Unbleached Titanium or Cream (for the lower left block)
- Painter’s tape (various widths, 0.25 inch and 0.5 inch recommended)
- Ruler or T-square
- Pencil
- Flat synthetic paintbrushes (1-inch and small angle brush)
- Matte or satin varnish (optional)
Step 1: Planning and Priming
-
Prime the Surface:
Begin by applying an even coat of Titanium White across the entire canvas, including the edges. This ensures the raw canvas texture doesn’t dull your crisp lines later. Allow this base coat to dry completely for at least an hour. -
sketch the Grid:
Using a ruler or T-square, lightly sketch your grid layout with a pencil. Mimic the asymmetrical design shown: create a large central vertical channel on the right, and stack horizontal blocks on the left. Don’t press too hard, as you want the lines to be easily covered. -
Define the Black Lines:
Decide on the thickness of your black grid lines. For this specific look, the lines aren’t uniform; the horizontal divider near the top is thinner than the vertical lines. Mark these variations lightly on your sketch.
Bleeding Lines?
If paint bled under the tape, wait for it to dry fully. Then, place a Post-it note or tape straight edge over the mistake and scrape the bleed away gently with an X-Acto knife or paint over it.
Step 2: Creating the Grid
-
Tape the First Lines:
Apply painter’s tape to mask off the areas that will eventually be black. For now, you are actually taping *outside* the lines to paint the boxes first, or taping *over* the lines to protect the white background. I find it easiest to tape off the color blocks first. -
Refine the Tape Edges:
Run a credit card or your fingernail firmly along the edges of the tape. This trick creates a seal that prevents paint from bleeding underneath, essential for those razor-sharp geometric edges. -
Seal with White:
Apply a very thin layer of Titanium White paint over the edges of your tape. If any paint bleeds under the tape, it will be white and invisible against your primed background, effectively sealing the edge.
Step 3: Adding Color
-
Paint the Large Red Block:
Identify the large central rectangle on the left side. Fill this area with Cadmium Red Deep. Use a flat brush and vertical strokes to minimize texture. This large block is the visual anchor of the piece. -
Apply Second Coats:
Reds can be somewhat transparent. Let the first coat dry to the touch, then apply a second or third coat until the color is solid and opaque. -
Paint the Upper Red Square:
Fill in the smaller square directly above the large red rectangle with the same red paint. Ensure the white space between them (which will become a black line) remains clean. -
Paint the Lower Red Block:
Fill in the rectangular section at the bottom center with the red paint. Because this sits low in the composition, ensure the coverage is solid all the way to the bottom edge of the canvas. -
Add the Cream Accent:
Locate the small rectangle in the bottom left corner. Paint this with Unbleached Titanium or a soft cream color. This subtle variation breaks up the stark red-white-black palette. -
Fill White Sections:
If your original white base coat looks uneven next to the fresh red paint, apply a fresh coat of Titanium White to the dedicated white blocks for a uniform finish. -
Remove Tape:
Once the color blocks are tacky but not fully hardened, carefully peel back the tape. pulling at a 45-degree angle away from the wet paint.
Texture Play
Mix a little modeling paste into the red acrylic paint before applying it. This adds a subtle, raised physical texture to the color blocks while keeping the black grid lines completely flat.
Step 4: The Black Framework
-
Re-tape for Lines:
Allow the color blocks to dry completely—ideally overnight. Now, tape off the borders to create the black grid lines. You are essentially creating ‘gutters’ between your color blocks. -
Paint the Grid:
Fill these channels with Mars Black. Use a smaller flat brush to control the flow. Don’t overload the brush, as ridges of black paint can distract from the flat, graphic look. -
Paint the Edges:
Extend the black grid lines over the sides of the canvas. This gallery-wrap effect makes the painting look finished from all angles. -
Final Tape Removal:
Peel away the final masking tape to reveal your crisp grid. If you see any small bleeds, use a tiny detailed brush and the background color to carefully touch them up. -
Varnish:
Once the painting is fully cured (give it a few days), apply a coat of matte varnish. This unifies the sheen of the different paint colors and protects the white areas from dust.
Hang your new geometric masterpiece in a well-lit spot where the bold contrast can truly shine

PENCIL GUIDE
Understanding Pencil Grades from H to B
From first sketch to finished drawing — learn pencil grades, line control, and shading techniques.
Explore the Full Guide
Red Lightning Over Black Clouds
Capture the raw power of nature with this striking watercolor painting, featuring a jagged lightning bolt cutting through a blood-red sky. The high contrast between the deep shadowy clouds and the brilliant electric strike creates a dramatic, moody atmosphere perfect for your wall.
Detailed Instructions
Materials
- Cold press watercolor paper (heavier weight, 300gsm)
- Watercolor paints: Alizarin Crimson, Cadmium Red, Lamp Black, Payne’s Grey, Indigo
- White gouache or white gel pen
- Large round brush (size 10-12)
- Medium round brush (size 6)
- Fine detail brush (size 0 or 1)
- Masking fluid (optional but recommended)
- Old brush or masking fluid applicator
- Painter’s tape
- Water cups
- Paper towels
Step 1: Preparation & Masking
-
Secure your paper:
Tape down all four edges of your watercolor paper to a board or table. This prevents buckling when the paper gets wet and creates that crisp white border seen in the final piece. -
Sketch the strike:
Lightly pencil the main trajectory of your lightning bolt down the center. Keep the line jagged and unpredictable rather than straight. -
Protect the white:
Using an old brush or applicator, carefully apply masking fluid over your pencil line. Add smaller tributary branches forking off the main bolt. If you don’t have masking fluid, you can skip this and leave the paper white (which is tricky) or paint it white later with gouache. -
Let it cure:
Wait for the masking fluid to dry completely. It should feel rubbery and not tacky to the touch before you add any water.
Stormy Texture Tip
While the dark cloud paint is still wet, spritz a tiny bit of water or sprinkle salt on the grey areas. This creates unique bloom textures that mimic chaotic storm turbulence.
Step 2: Painting the Sky
-
Wet-on-wet base:
Pre-wet the entire sky area with clean water using your largest brush. The paper should shine but not have puddles. -
The red core:
Load your large brush with a mix of Cadmium Red and water. Drop this vibrant color into the center of the paper, surrounding the masked lightning bolt. Let the paint bloom outward naturally. -
Deepening the red:
While the paper is still damp, mix Alizarin Crimson for a deeper tone. Apply this around the edges of the bright red center, blending outwards to start the transition into darkness. -
Dark upper clouds:
Mix Payne’s Grey with a touch of Indigo. Using the medium brush, paint the top third of the paper. Use swirling motions to suggest heavy, rolling storm clouds, letting the grey bleed slightly into the upper red section. -
Shadowy sides:
Bring the dark grey mix down the sides of the paper, framing the red center. The goal is to make the red look like an internal glow, so keep the center brightest. -
Building texture:
While the paint is drying but still slightly cool, dab in concentrated Lamp Black into the darkest corners and the very top edge. This creates depth and volume in the clouds. -
Dry completely:
Let this layer bone dry. If the paper feels cold to the back of your hand, it’s still wet.
Make It Pop
Instead of pure white, mix a tiny dot of yellow or very pale blue into your final lightning highlight. It adds a warmer or cooler electrical feel compared to the stark white paper.
Step 3: Details & Contrast
-
Second layer intensity:
Re-wet areas that look faded. I usually add a second glaze of Alizarin Crimson near the center to make the glow really pop against the dark clouds. -
Identifying cloud shapes:
Use a smaller brush with dark grey to define the bottom edges of the upper clouds, giving them a more distinct, billowy shape. -
The forest silhouette:
Mix a thick, opaque black (Lamp Black with very little water). Along the very bottom edge of the painting, paint tiny vertical strokes to simulate distant spruce or pine trees. -
Varying tree heights:
Ensure the treeline isn’t perfectly flat. Make some trees taller and others shorter to create a realistic, organic horizon. -
Remove masking:
Once everything is 100% dry, gently rub off the masking fluid with your finger or a rubber cement pickup tool to reveal the stark white paper underneath.
Step 4: Electrifying Finishes
-
Enhancing the bolt:
Use white gouache or a white gel pen to tracing over the lightning. The masking fluid leaves a crisp edge, but adding gouache allows you to make the center of the bolt intensely bright opaque white. -
Adding fine tendrils:
With your finest detail brush and white gouache, paint very thin, hair-like sparks branching off the main bolt that were too small to mask earlier. -
The glow effect:
Take a clean, damp brush and very gently soften the red paint right next to the main lightning bolt. This slight lifting of pigment creates a ‘halo’ effect, making the lightning look like it’s glowing. -
Final assessment:
Step back and check your contrast. If the clouds need more drama, you can dry-brush a little more black over the dark areas. -
Reveal:
Carefully peel away the painter’s tape at a 45-degree angle to reveal your clean white borders.
Frame this intense piece behind glass to protect the delicate surface and amplify the deep colors
Black City Skyline With Red Neon Glow
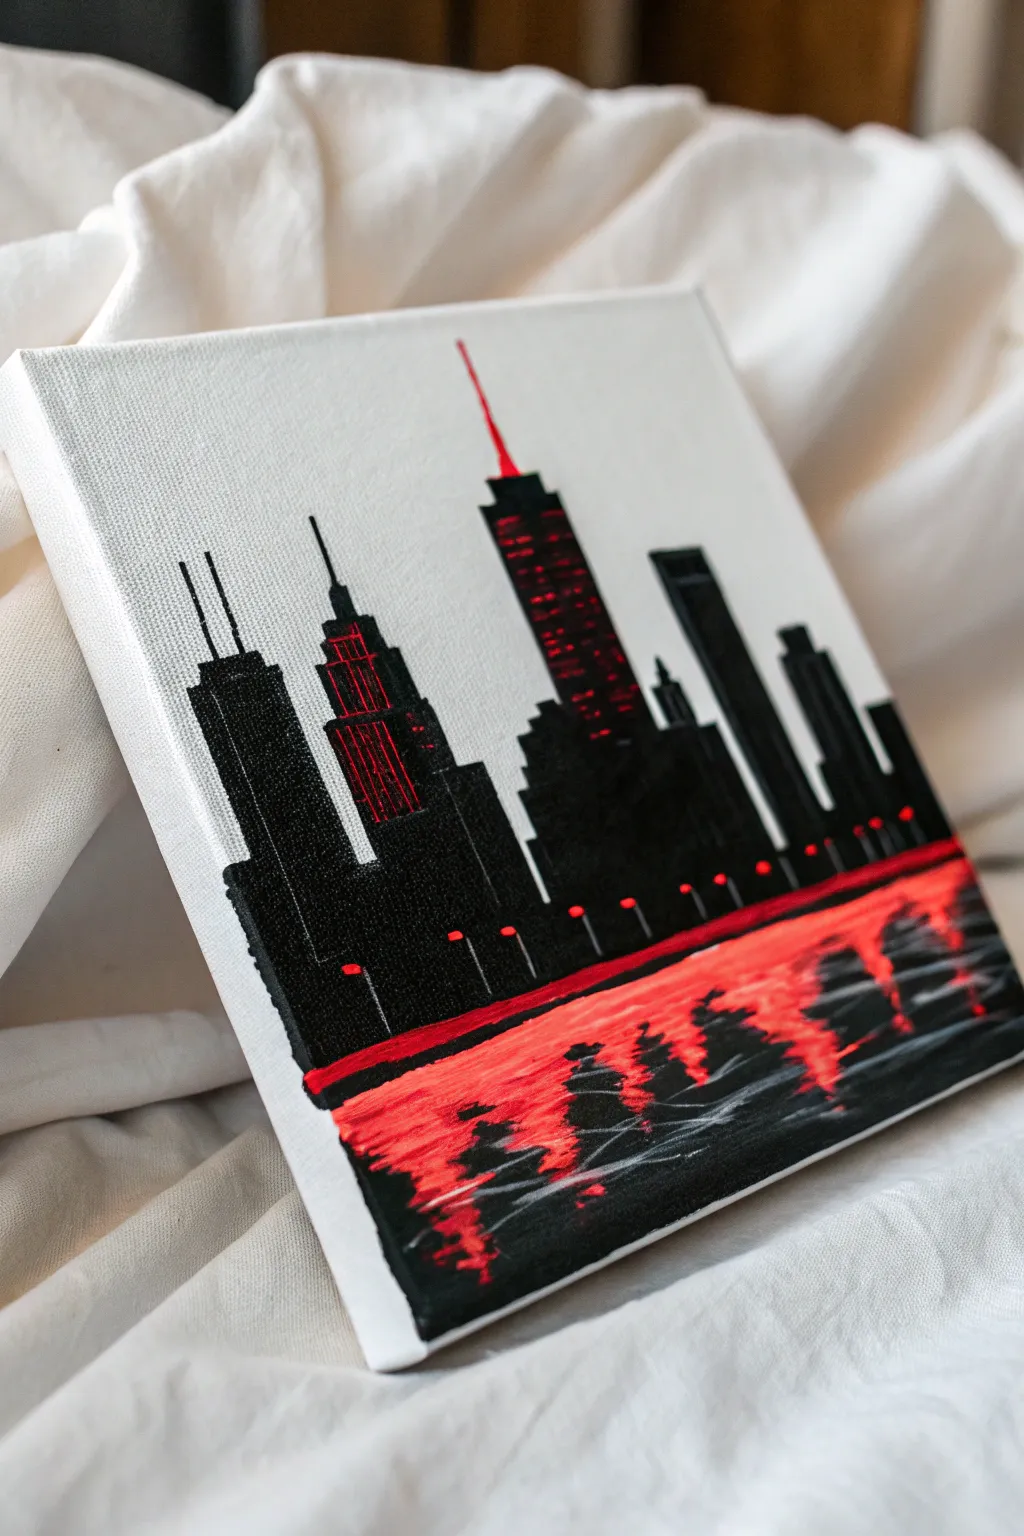
Capture the electric energy of a city at night with this bold, minimalist cityscape. Using stark black silhouettes against a crisp white background, you’ll create drama with vibrant red neon accents and a reflective waterway.
Step-by-Step
Materials
- Small square canvas (e.g., 8×8 or 10×10 inches)
- Acrylic paint: Mars Black, Titanium White, Cadmium Red (or a bright neon red)
- Flat shader brushes (medium and small)
- Fine liner brush (for details)
- Ruler or painter’s tape
- Pencil and eraser
- Palette or paper plate
- Cup of water and paper towels
Step 1: Planning the Layout
-
Prepare the canvas:
Start with a clean, white canvas. If your canvas isn’t pre-primed or looks a bit dull, give it a fresh coat of Titanium White acrylic paint to ensure a bright background and smooth texture. Let this dry completely before moving on. -
Establish the horizon:
Using a ruler, lightly draw a horizontal line with your pencil across the bottom third of the canvas. This line separates the city buildings from the water reflection below. -
Sketch the skyline:
Lightly sketch the outlines of varying skyscrapers above your horizon line. Mix up the shapes—include some classic tiered buildings (like the Empire State Building), slanted roofs, and simple rectangular blocks. -
Add detail elements:
Don’t forget to draw the vertical antennas on the tallest buildings. These thin lines add crucial height and realism to the silhouette.
Sharper Lines Trick
Use painter’s tape for the sides of the rectangular buildings. It creates perfectly straight vertical edges that make the architecture look crisp and professional.
Step 2: Painting the Silhouette
-
Outline in black:
Load a small flat brush or liner brush with Mars Black paint. Carefully trace the outer edges of your building sketches. Keep your hand steady to get crisp, sharp lines against the white sky. -
Fill the buildings:
Switch to a slightly larger flat brush to fill in the building shapes with solid black paint. Apply the paint smoothly to avoid obvious brushstrokes, ensuring opaque coverage. -
Refine the antennas:
Use your finest liner brush with slightly thinned black paint to ink the antennas. A fluid consistency helps create long, straight lines without the brush dragging. -
Create the waterline:
Paint a solid black strip right along the horizon line you drew earlier. This grounds the buildings before you start the water effects.
Metallic Upgrade
Swap the standard red acrylic for a metallic red or even a fluorescent neon red paint. This will make the lights actually shimmer under room lighting.
Step 3: Adding the Red Glow
-
Paint the red highlights:
With a clean small brush, apply bright red paint to specific areas on the buildings. Focus on creating vertical lines of windows on the tiered skyscraper and the antenna tips. -
Layering for brightness:
Red paint can be translucent on dark backgrounds. I find it works best to let the first red layer dry and adhere a second coat to make the ‘neon’ effect really pop. -
Add street level lights:
Dot small touches of red along the base of the buildings at the shoreline to represent streetlights or traffic lights glowing in the distance.
Step 4: Reflections on Water
-
Base the water:
Paint the area below the horizon black, but leave it slightly streaky rather than solid. You want some texture here. -
Draft the red reflection:
While the black is still slightly tacky or dry (depending on your preference), use a flat brush to pull horizontal strokes of red paint across the water area. -
Intensify the reflection:
Apply thicker, brighter red paint directly under the red-lit buildings. Use a zigzag motion to mimic the distortion of light rippling on water. -
Add white ripples:
Load a liner brush with a tiny amount of white paint mixed with a drop of water. Swiftly paint very thin, jagged horizontal lines through the water area to suggest cresting waves catching the light. -
Deepen the shadows:
Go back in with pure black on a small brush to cut back into the red reflection, breaking up the color so it looks like separated waves rather than a solid block. -
Final touches:
Assess the balance. If the red reflection looks too uniform, add a few more erratic black streaks. Ensure the antenna tip is the brightest red point on the canvas.
Step back and admire how a few simple colors can create such a moody and sophisticated atmosphere


Black Portrait With Red Color Splash
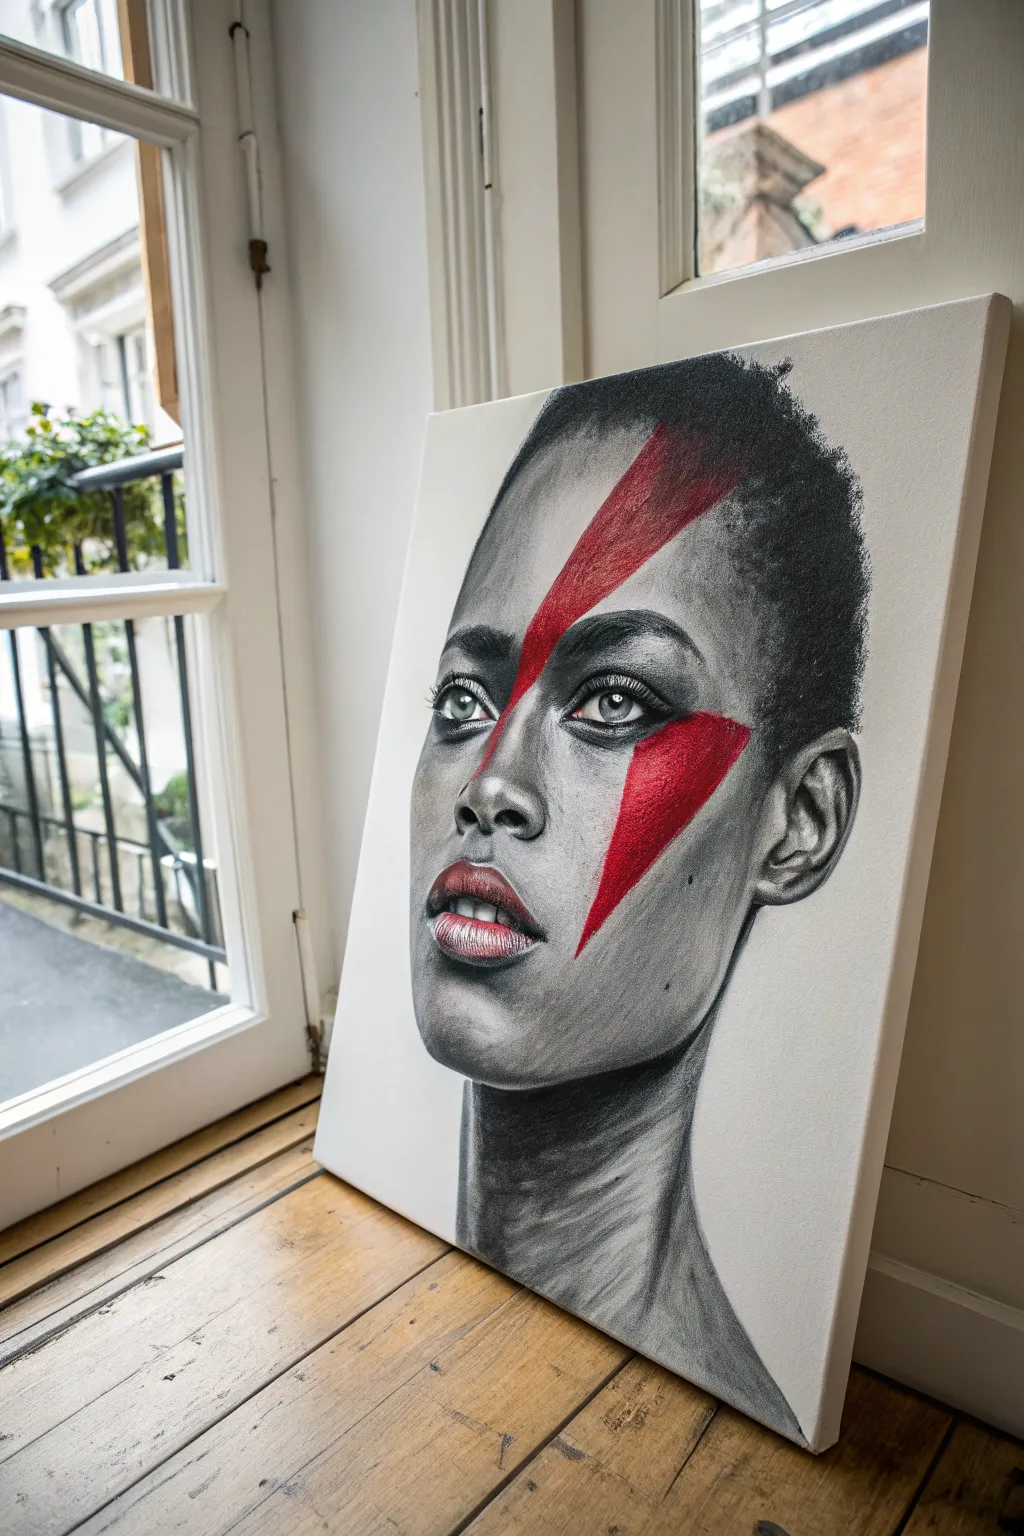
This striking project combines the raw, gritty texture of charcoal realism with a bold splash of graphic color. By juxtaposing a monochrome portrait against a vibrant red lightning bolt, you create a modern, edgy homage to classic pop culture iconography.
How-To Guide
Materials
- Stretched canvas (rectangular, portrait orientation)
- White gesso primer
- Charcoal sticks (soft, medium, hard)
- Charcoal pencils (various grades)
- White charcoal pencil or pastel pencil
- Acrylic paint (Bright Red or Cadmium Red)
- Angled synthetic paintbrush (medium size)
- Kneaded eraser
- Blending stumps (tortillons)
- Workable fixative spray
- Reference photo of a model
Step 1: Preparation and Sketching
-
Prime the Surface:
Since you are working on canvas, start by applying two to three coats of white gesso. Sand lightly between coats to create a smoother surface, which will help the charcoal adhere better than raw canvas texture would. -
Grid or Freehand Sketch:
Lightly sketch the outline of your subject using a hard charcoal pencil. Focus on getting the proportions of the eyes, nose, and lips accurate, as these are the focal points. Keep lines faint so they can be easily erased or blended later. -
Map the Lightning Bolt:
Draw the outline of the lightning bolt shape across the face. It should start high on the forehead, cross over the eye, and zag down the cheek. Mark this area clearly but lightly—you need to keep this space pristine and free of heavy charcoal dust.
Step 2: The Charcoal Portrait
-
Lay Down Shadows:
Using a soft charcoal stick, begin blocking in the darkest areas of the portrait, such as the hair, the nostrils, and the deep shadows under the chin. Don’t worry about detail yet; focus on establishing your value range. -
Blend the Base Values:
With a large blending stump or a soft cloth, smooth out the charcoal you just applied to create soft, mid-tone greys for the skin. This establishes the underlying structure of the face. -
Refine Facial Features:
Switch to charcoal pencils for precision. Sharpen them to a fine point and work on the eyes, defining the iris and pupil. Remember to leave tiny specks of white canvas for the catchlights in the eyes. -
Build Skin Texture:
Layer lighter charcoal over your mid-tones to create the curvature of the cheeks and forehead. Use a kneaded eraser to lift off charcoal for highlights on the nose bridge, cheekbones, and lips. -
Detailing the Hair:
Use the side of a charcoal stick to create the texture of short, cropped hair. Stipple or scumble the charcoal to mimic the tight curls, keeping the edges slightly soft to suggest volume. -
Protect the Red Zone:
As you shade near the lightning bolt outline, be extremely careful. I find it helpful to mask this area with a sticky note or just work very slowly to ensure no black dust smudges into the area destined for red paint. -
Enhance Contrast:
Go back in with your darkest charcoal pencil to deepen the shadows around the eyes and under the jawline. High contrast is key to making the final red pop. -
Highlighting:
Use a white charcoal pencil or pastel to add extreme highlights to the lips and the wet line of the lower eyelid. This adds a realistic moisture effect.
Clean Edges Trick
Use masking tape for the lightning bolt outline before painting. Press edges down firmly to prevent bleed-through, but peel it off while the paint is still slightly wet.
Step 3: Adding the Color Splash
-
Set the Charcoal:
It is crucial to spray the entire piece with a workable fixative at this stage. This prevents the charcoal dust from mixing with your paint and turning it muddy. Let it dry completely. -
First Coat of Red:
Squeeze out your bright red acrylic paint. using a clean, angled brush, carefully fill in the lightning bolt shape. The first layer might look streaky or absorb into the canvas, which is normal. -
Refining Edges:
Use the sharp edge of your angled brush to get crisp, clean lines where the red meets the grey portrait. The contrast between the organic skin texture and the graphic shape is essential. -
Second Coat:
Once the first layer is dry, apply a second coat of red. This ensures the color is opaque and vibrant. A little texture in the brushstrokes here can add visual interest. -
Mixing Media Highlights:
To make the bolt sit ‘on’ the face realistically, you can lightly glaze a tiny bit of darker red or mixed black/red on the side of the nose where the bolt would naturally fall into shadow. This is subtle but effective. -
Final Fixative:
Give the entire painting one last light coat of fixative or varnish to seal both the charcoal and the acrylic, protecting it from smudging.
Muddy Paint?
If charcoal dust is dirtying your red paint, your fixative layer wasn’t heavy enough. Stop, let the paint dry, spray again heavily, and repaint the red.
Step back and admire how the fierce red slash transforms a classic portrait into a piece of modern rock-and-roll art
Negative Space Flames in Black and Red
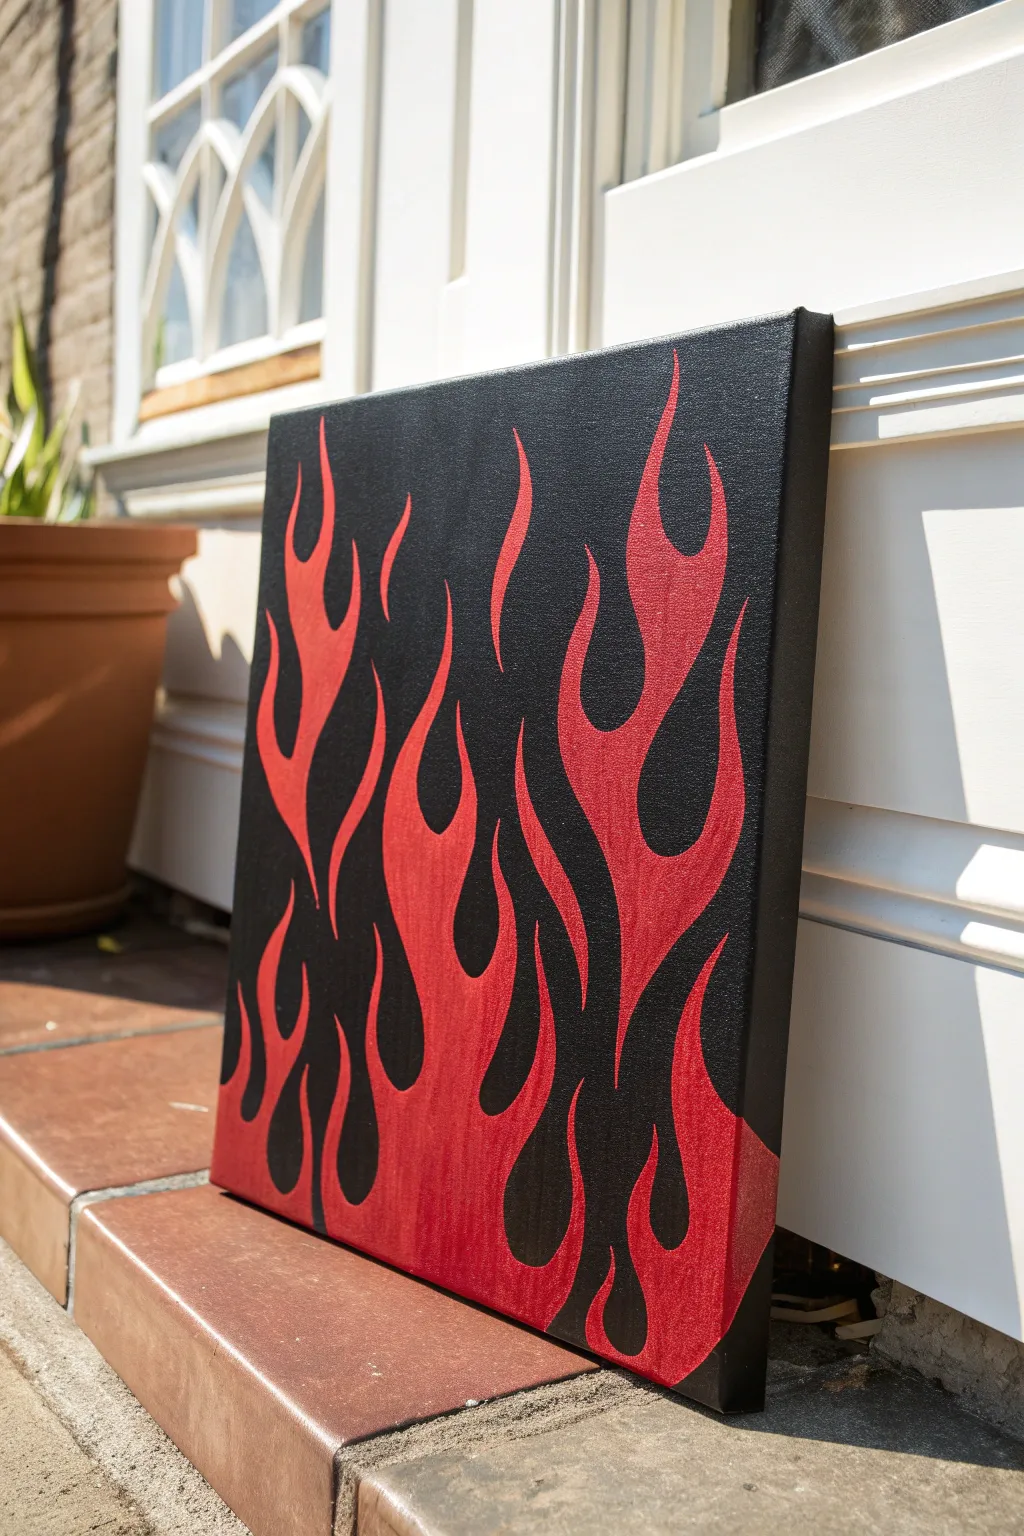
Ignite your canvas with this striking negative space flame design, where bold red fire cuts sharply against a deep black background. This graphic style mimics the classic hot rod or street art aesthetic, focusing on clean lines and high contrast without the need for complex blending.
How-To Guide
Materials
- Square stretched canvas (e.g., 12×12 or 16×16 inches)
- Acrylic paint: Mars Black or Carbon Black
- Acrylic paint: Bright bold Red (e.g., Cadmium Red Medium or Pyrrole Red)
- Wide flat brush (1-2 inch) for background coverage
- Medium filbert brush
- Small round detail brush (size 1 or 2) for sharp points
- White tonal pencil or chalk for sketching
- Container with water
- Paper towels
- Palette or paper plate
Step 1: Preparing the Void
-
Prime the surface:
Begin by ensuring your canvas is clean and dust-free. If your canvas isn’t pre-primed black, you’ll need to create the base. Squeeze a generous amount of black acrylic paint onto your palette. -
Paint the background:
Using your wide flat brush, cover the entire canvas in black. Use long, horizontal strokes to ensure an even, smooth finish. Don’t worry about texture; we want a flat, matte look. -
Check the edges:
Don’t forget to paint the sides of the canvas black as well. This gives the finished piece a professional, gallery-ready appearance without needing a frame. -
Let it cure:
Allow the black background to dry completely. It must be bone dry before you start sketching, otherwise, the white pencil will dig into the paint and create a muddy gray mess.
Uneven Coverage?
Red paint over black often looks streaky. Don’t overwork wet paint! Let the first thin layer dry completely, then apply a second or third coat for solid opacity.
Step 2: Drafting the Inferno
-
Sketch the primary shapes:
Using a white charcoal pencil or chalk, lightly sketch the outline of your flames. Start from the bottom edge and draw wavy, organic shapes reaching upward. -
Establish the flow:
Vary the heights of your flames. In the reference image, the flames are taller on the right and left sides, dipping slightly in the middle, creating a dynamic composition. -
Refining the tips:
Focus on making the tips of the flames sharp and curved. Think of them like elongated hooks or flowing teardrops. The ‘negative space’ concept relies on these interesting interplay shapes between the red and black. -
Adding floating sparks:
Draw a few detached flame ‘licks’ or sparks floating above the main fire mass. This adds movement and prevents the design from looking too heavy at the bottom.
Step 3: Igniting the Canvas
-
Outline in red:
Load your small round brush with red paint. Carefully trace over your white pencil lines. Getting a crisp edge here is crucial for that graphic look. -
Fill the base:
Switch to your medium filbert brush for larger areas. Fill in the main body of the flames at the bottom of the canvas. Apply the paint generously to get solid opacity. -
Work upwards:
Paint upwards into the thinner tendrils of the fire. As the space gets tighter, switch back to your smaller round brush to maintain control. -
Sharpen the points:
Use the very tip of your small brush to pull the red paint out into needle-sharp points at the top of each flame lick. I find holding my breath for a second helps steady my hand for these tiny details. -
Second coat application:
Red pigment is often naturally translucent. Once the first layer is dry to the touch, apply a second coat of red directly over the first to make the color pop vibrantly against the black. -
Review edges:
Inspect the boundary between the red and black. If any black shows through unevenly, or if your line is shaky, use the small brush to smooth it out. -
Clean up mistakes:
If you accidentally painted red where it shouldn’t be, wait for it to dry, then use a small amount of black paint to ‘erase’ the mistake and reshape the flame. -
Erase guidelines:
Once the painting is totally dry (give it a few hours), use a slightly damp cloth or soft eraser to gently wipe away any visible white chalk marks from your initial sketch.
Add Dimension
Mix a tiny drop of yellow into your red and paint only the very bottom center of the flames. This subtle gradient mimics the hotter core of a real fire.
Hang your fiery creation on a light-colored wall to interpret the contrast and bring some heat to your decor


Have a question or want to share your own experience? I'd love to hear from you in the comments below!