If you want easy black girl painting ideas that still feel powerful and beautiful, you’re in the right place. I’m all about simple shapes, bold color, and hairstyle-focused portraits that look amazing without stressing over tiny facial details.
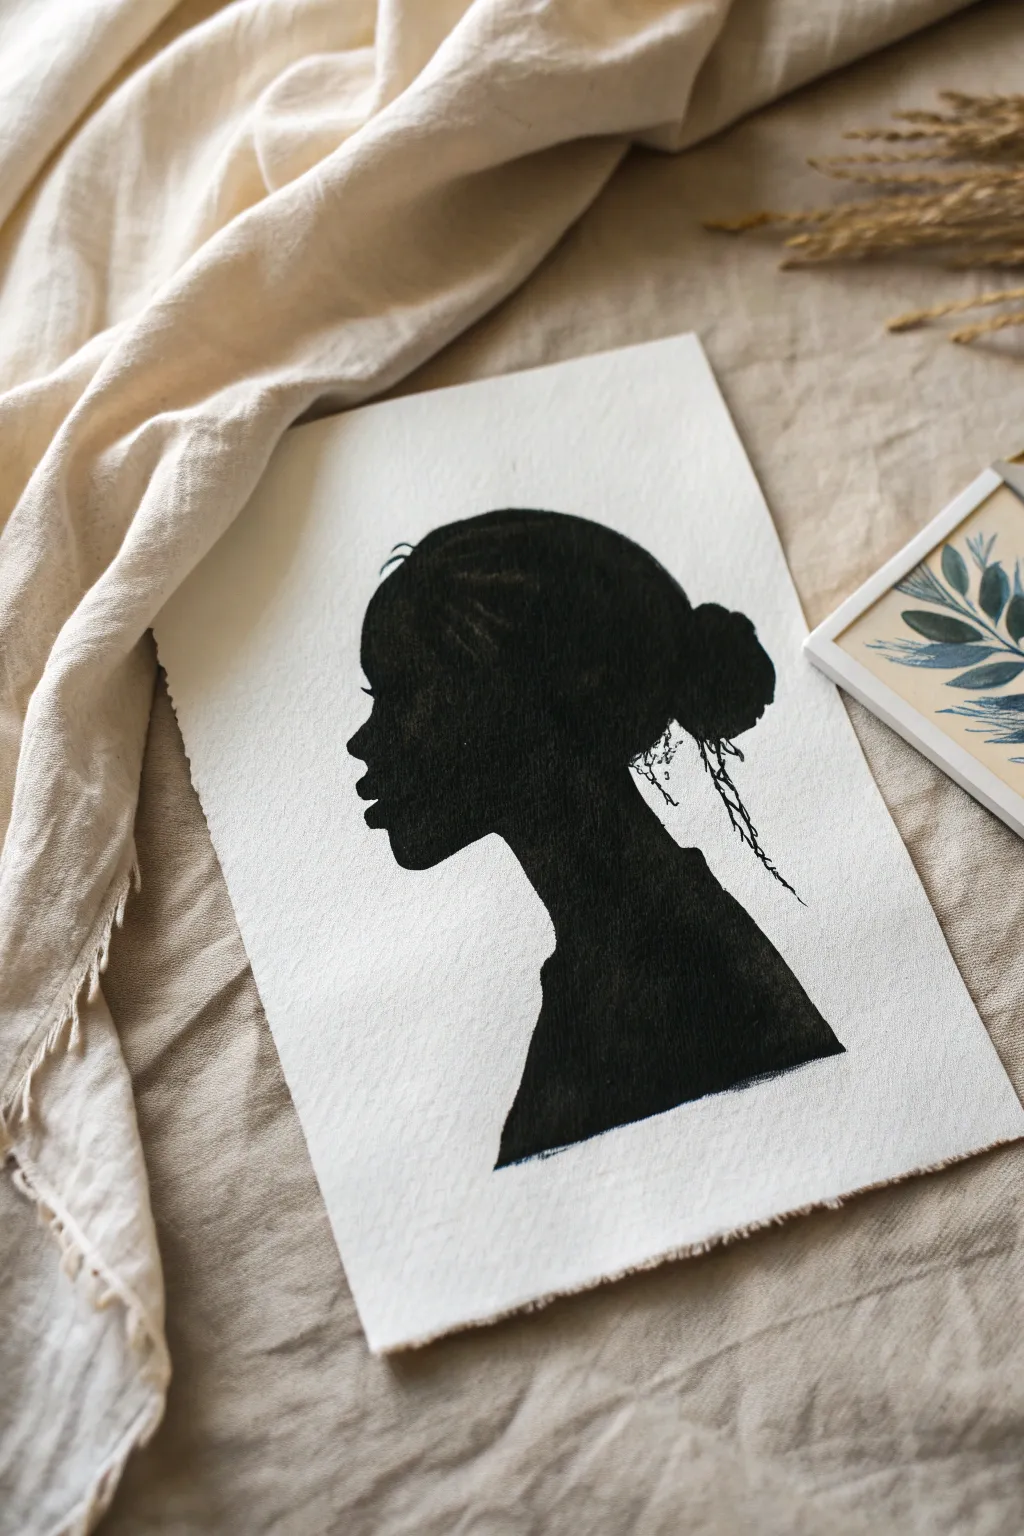
Faceless Black Girl Silhouette Portrait
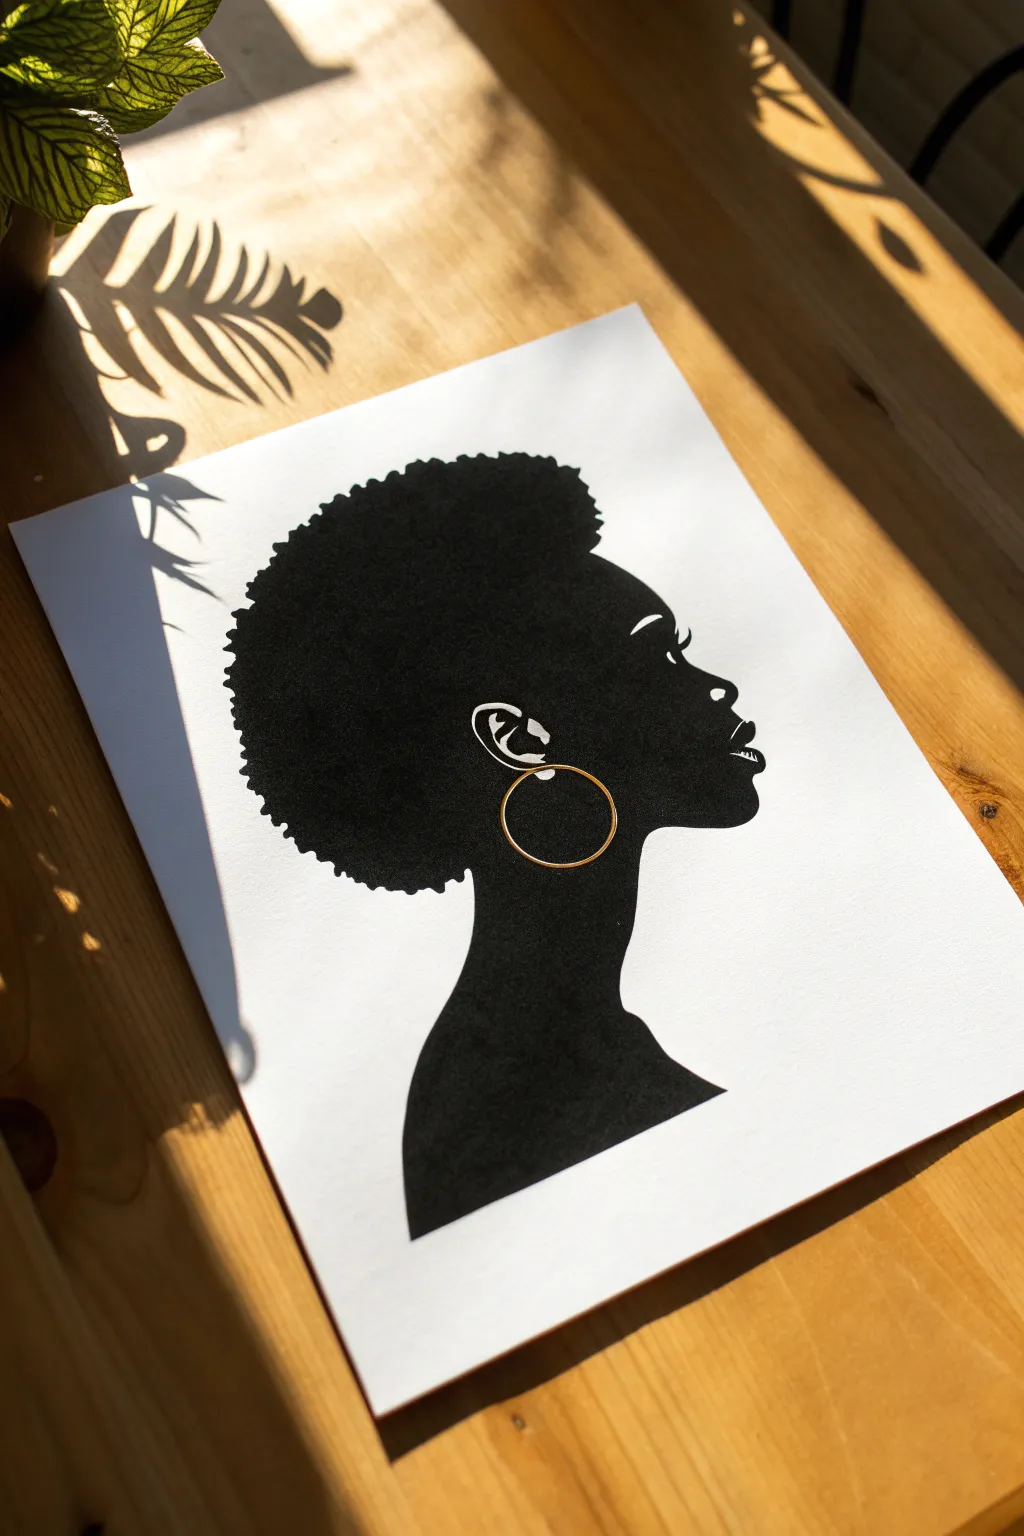
This striking black and white silhouette portrait captures the beauty of a profile view with a touch of elegant minimalism. The bold contrast of black ink against crisp white paper, highlighted by a single metallic gold earring, creates a sophisticated piece of art that looks far more complex than it actually is.
How-To Guide
Materials
- High-quality white cardstock or watercolor paper (heavyweight prevents buckling)
- Pencil (HB or lighter)
- Eraser
- Black India ink or high-pigment black acrylic paint
- Fine liner pen (black, 0.3mm or 0.5mm)
- Small round paintbrush (size 2 or 4)
- Details paintbrush (size 00 or 0)
- Gold paint pen or metallic gold acrylic paint
- Masking tape (optional)
Step 1: Drafting the Silhouette
-
Prepare your workspace:
Ideally, tape down the corners of your paper to a flat surface. This keeps the paper from shifting while you sketch and prevents it from curling once you add wet media. -
Sketch the forehead and nose:
Start your pencil sketch lightly on the right side of the paper. Begin with the curve of the forehead, dipping in slightly for the bridge of the nose, and then extending out for the nose tip. -
Define the lips and chin:
Continue the profile line downward. Sketch the lips with subtle curves—the top lip slightly protruding—and follow with the curve of the chin and jawline. Keep these lines very faint so they are easy to correct. -
Outline the neck and shoulder:
Draw a long, graceful curve for the neck extending from the jawline. Widen this line at the base to suggest the slope of the shoulder, creating a solid foundation for the bust. -
Shape the hair:
Sketch the outline of the natural hair. Instead of a perfect circle, use small, bumpy curves to mimic the texture of an afro puff or natural shape. Make this shape large and voluminous, framing the face beautifully. -
Detail the ear:
Position the ear relatively low on the head, roughly in line with the nose. Draw the basic C-shape and add the internal curves of the ear cartilage carefully, as these small white spaces will be crucial for definition later. -
Mark the earring:
Draw a perfect circle hanging from the earlobe to represent the hoop earring. You can trace a small coin or bottle cap if you struggle with freehand circles.
Uneven Black Coverage?
If your black marker or paint looks streaky, don’t overwork it while wet. Let it dry completely, then apply a second layer in the opposite direction (cross-hatching) for a solid finish.
Step 2: Filling with Ink
-
Outline the profile:
Switch to your fine liner pen. Carefully trace the pencil line of the face profile (forehead, nose, lips, chin). Be very steady here, as this edge defines the likeness. -
Protect the negative space:
Using the fine liner or your smallest brush, carefully outline the inner details of the ear. You need to preserve the white paper inside the ear folds and the eye highlight if you included one. -
Outline the hair texture:
Go over the outer bumpy line of the hair with your pen or small brush. I like to make these bumps slightly irregular to keep the texture looking organic rather than manufactured. -
Fill the large areas:
Load your larger round brush with black India ink or acrylic paint. Start filling in the center of the hair and the neck area. Use smooth strokes to ensure an even, solid black coverage without streak marks. -
Refine the edges:
As you get closer to the detailed profile edges and the ear, switch back to a smaller brush. Carefully paint up to your pen lines, ensuring the transition between the outline and the fill is seamless. -
Define the earring space:
Paint carefully around the circle you drew for the earring. Do not paint inside the circle; leave this paper white for now. -
Double-check for gaps:
Hold your paper up to the light or view it from an angle to check for any translucent spots in the black ink. Apply a second coat to any patchy areas to achieve a true, deep blackout effect. -
Let it dry completely:
Allow the black ink or paint to dry fully. This is crucial before adding the metallic accent to prevent the colors from bleeding into each other.
Step 3: The Golden Touch
-
Erase stray marks:
Once the black ink is 100% dry, gently run your eraser over the exposed white paper to remove any visible pencil sketch lines. -
Paint the hoop:
Take your gold paint pen or a small brush with metallic acrylics. Carefully fill in the ring of the earring. If using a brush, you may need two coats for maximum shine. -
Add final highlights (optional):
If you want extra dimension, you can use a white gel pen to add a tiny sparkle to the earring or a thin line along the top of the lip, though the silhouette works beautifully without it.
Crisp Edges Pro-Tip
For the sharpest profile lines, use a micron pen for the very edge of the face, and only use the brush to fill the middle. Paint brushes can splay and ruin the delicate nose shape.
Frame this simple yet powerful portrait in a natural wood frame to complement the organic feel of the silhouette


Two Puff Buns With Hoop Earrings

This striking yet simple painting features a beautiful profile silhouette set against a soft blush background. With its bold shapes and minimal details, it’s a perfect project for mastering clean lines and skin tones without getting overwhelmed by complex shading.
Step-by-Step Tutorial
Materials
- Thick watercolor paper or mixed media paper (at least 140lb)
- Acrylic paints (Dark Umber/Burnt Sienna, Black, Titanium White, Portrait Pink/Blush)
- Flat shader brush (size 6 or 8)
- Detail round brush (size 0 or 1)
- Pencil and eraser
- Painter’s tape or masking tape
- Palette for mixing paint
- Jar of water and paper towels
Step 1: Setting the Scene
-
Prepare your canvas:
Tape down all four edges of your paper to your work surface. This creates that crisp, clean white border you see in the final piece and keeps the paper from buckling when wet. -
Mix the background color:
Create a soft, dusty pink shade. I like to mix a glob of Titanium White with a very small touch of red or portrait pink, and perhaps a tiny dot of brown to mute it so it isn’t too bubblegum bright. -
Paint the background block:
Using your flat shader brush, paint a large rectangle in the center of the paper, leaving plenty of white space around the edges. You don’t need to paint the whole sheet, just the area where the portrait will live. Focus on getting an even, opaque layer. -
Let it dry completely:
This step is crucial. The pink layer must be bone dry before you sketch over it, or your pencil will dig into the paint and create ridges.
Clean Lines Hack
Struggling with the profile edge? Lightly draw your sketch, then go over the pencil line with a thin permanent marker before painting to help guide your brush.
Step 2: Sketching the Silhouette
-
Outline the profile:
Lightly sketch the profile of the face starting from the forehead, dipping in for the eye socket, out for the nose, and creating full lips and a strong chin. Keep your pencil pressure very light. -
Add the neck and shoulders:
Extend the line down to form a graceful neck that curves outward into broad shoulders. The shoulders should extend almost to the bottom edge of your pink background. -
Define the hair shape:
Draw the hairline curving around the ear area. Then, sketch two large circles for the puff buns—one sitting lower near the back of the head, and one perched higher up on the crown.
Make It Glossy
Once the painting is fully dry, paint a layer of high-gloss varnish over just the hoop earring to make it shine like real metal or acrylic jewelry.
Step 3: Painting the Figure
-
Mix the skin tone:
Combine Dark Umber or Burnt Sienna with a touch of Black to create a rich, deep brown. You want warmth, so don’t let it go completely gray. -
Paint the face and body:
Using a smaller flat brush or a large round brush, fill in the face, neck, and shoulders. Be very careful around the profile edge—smooth, confident strokes work best here to keep the nose and lips sharp. -
Fill in the hair base:
Switch to pure Black paint for the hair. Fill in the scalp area and the two bun circles you sketched earlier. At the hairline, you can use small dabbing motions to suggest texture. -
Refine the edges:
Go back with your detail brush to sharpen the tip of the nose, the curve of the lips, and the eyelashes. A tiny flick of black paint at the eye can serve as luscious lashes.
Step 4: Adding Details & Texture
-
Create hair texture:
Once the black base is dry, mix a tiny bit of white or gray into your black paint. Use an old, scruffy brush to ‘stipple’ or dab texture onto the puffs and the scalp area to mimic natural hair coils. -
Paint the lips:
Mix a muted mauve or purple tone. Carefully paint the lips within the profile silhouette. Add a tiny highlight of white on the lower lip to give it volume. -
Add the earring:
Using pure Titanium White and your finest detail brush, paint a bold circle overlapping the jawline and neck. To make it look like a hoop, the line needs to be consistent in thickness. -
Earring hardware details:
Paint a small white dot or stud where the hoop connects to the ear lobe to anchor the jewelry visually. -
Final touch-ups:
Check your edges. If the pink background looks a bit uneven near the profile, you can carefully tidy it up with your background color mix. -
Remove the tape:
Wait until every layer is completely dry to the touch. Peel your tape away slowly at a 45-degree angle to reveal those crisp white borders.
Step back and admire the elegance of your modern portrait.

Crown On Natural Hair
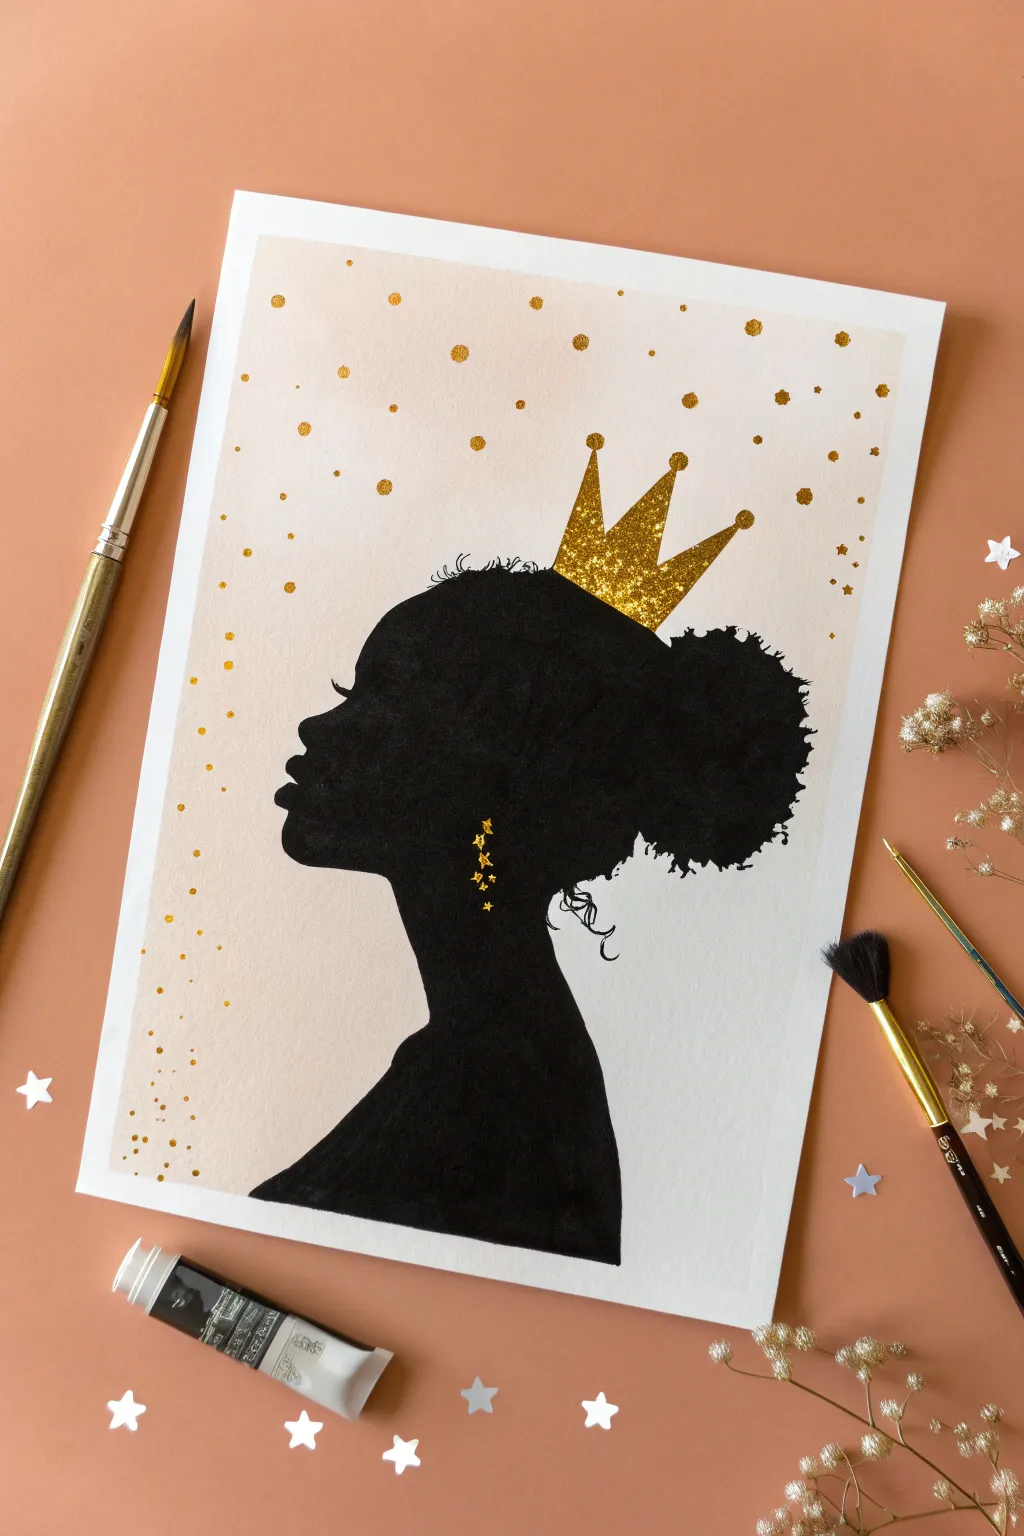
Celebrate natural beauty with this striking silhouette portrait featuring a shimmering gold crown and star accents. This project combines smooth acrylic painting with a touch of glitter for a regal, elegant finish that pops against a soft pastel background.
Detailed Instructions
Materials
- Heavyweight watercolor paper or mixed media paper
- Black acrylic paint
- Gold glitter glue or gold acrylic paint mixed with loose glitter
- Flesh-tone or peach acrylic paint (for background)
- Pencil and eraser
- Fine liner brush (size 0 or 00)
- Flat shader brush
- Round brush (size 4 or 6)
- Painter’s tape
- Palette or mixing plate
Step 1: Setting the Scene
-
Prepare the paper:
Begin by taping down the edges of your paper to a flat surface. This creates a clean white border and prevents the paper from buckling when you add the background wash. -
Sketch the outline:
Lightly sketch the profile of the face using a pencil. Start with the forehead, curving in for the eye socket, out for the nose and lips, and down the chin into the neck. Don’t worry about perfect features; the silhouette simplifies everything. -
Define the hair:
Draw the outline of the hair as a large, round puff at the back of the head. Keep the line slightly jagged or bumpy to mimic texture rather than making a perfect circle. -
Add the accessories:
Sketch a simple three-point crown resting on top of the head, slightly overlapping the hair line. Add small dangling shapes near the ear area to mark where the starry earrings will go later.
Step 2: Painting the Background
-
Mix a soft wash:
Dilute your peach or flesh-tone acrylic paint with a fair amount of water to create a semi-transparent wash. You want a soft, watercolor-like effect rather than an opaque layer. -
Apply the background color:
Using your larger round brush, paint the background area around your pencil sketch. I like to focus the color more heavily on the left side and let it fade out slightly towards the right for an airy feel. -
Let it dry completely:
Allow the background wash to dry fully before moving on. If the paper feels cool to the touch, it’s still damp.
Clean Edges Problem?
If black paint bleeds into the background, wait for it to dry fully. Then, use a tiny brush with the background peach color to touch up and reshape the silhouette edge.
Step 3: Creating the Silhouette
-
Paint the face profile:
Using opaque black acrylic paint and a round brush, carefully fill in the face and neck. Use a smaller brush near the lips and nose to keep those edges sharp and distinct. -
Fill the hair shape:
Switch to a larger brush to fill in the main mass of the hair with solid black paint. Ensure the coverage is even without streaky brushstrokes. -
Texture the edges:
Take a small detail brush or a nearly dry round brush and dab tiny, irregular marks along the outer edge of the hair puff. This creates the look of natural curls and creates a realistic transition into the background. -
Add wispy details:
With your finest liner brush, paint delicate little curls escaping at the nape of the neck and slight baby hairs near the forehead line. These tiny details make the silhouette feel alive. -
Dry the black layer:
Let the black paint dry completely. This is crucial so that you don’t accidentally smudge black into your gold sections later.
Sparkle Like a Pro
For maximum shine, mix two different textures of glitter—fine dust and chunky hexagons—into your gold paint. This catches light from multiple angles.
Step 4: Adding the Royal Touch
-
Paint the crown base:
Fill in the crown sketched earlier using a solid gold paint. This acts as a base layer so no white paper or black paint shows through the glitter. -
Apply glitter to the crown:
Once the base gold is dry, apply a generous layer of gold glitter glue over the crown. Alternatively, paint a layer of clear glue and sprinkle loose gold glitter over it, tapping off the excess. -
Create the earrings:
Using your fine liner brush and gold paint, essentially ‘draw’ the earring. Paint a vertical line of small stars or dots hanging from the ear area. -
Paint the confetti stars:
Scatter small gold dots and tiny star shapes around the background using the tip of your small brush. Concentrate them near the head and sparse them out towards the edges. -
Remove the tape:
Once everything is fully dry, slowly peel off the painter’s tape at a 45-degree angle to reveal your crisp white border.
Frame your masterpiece to highlight the contrast between the deep silhouette and the shimmering gold details


Headwrap With Bold Pattern Blocks
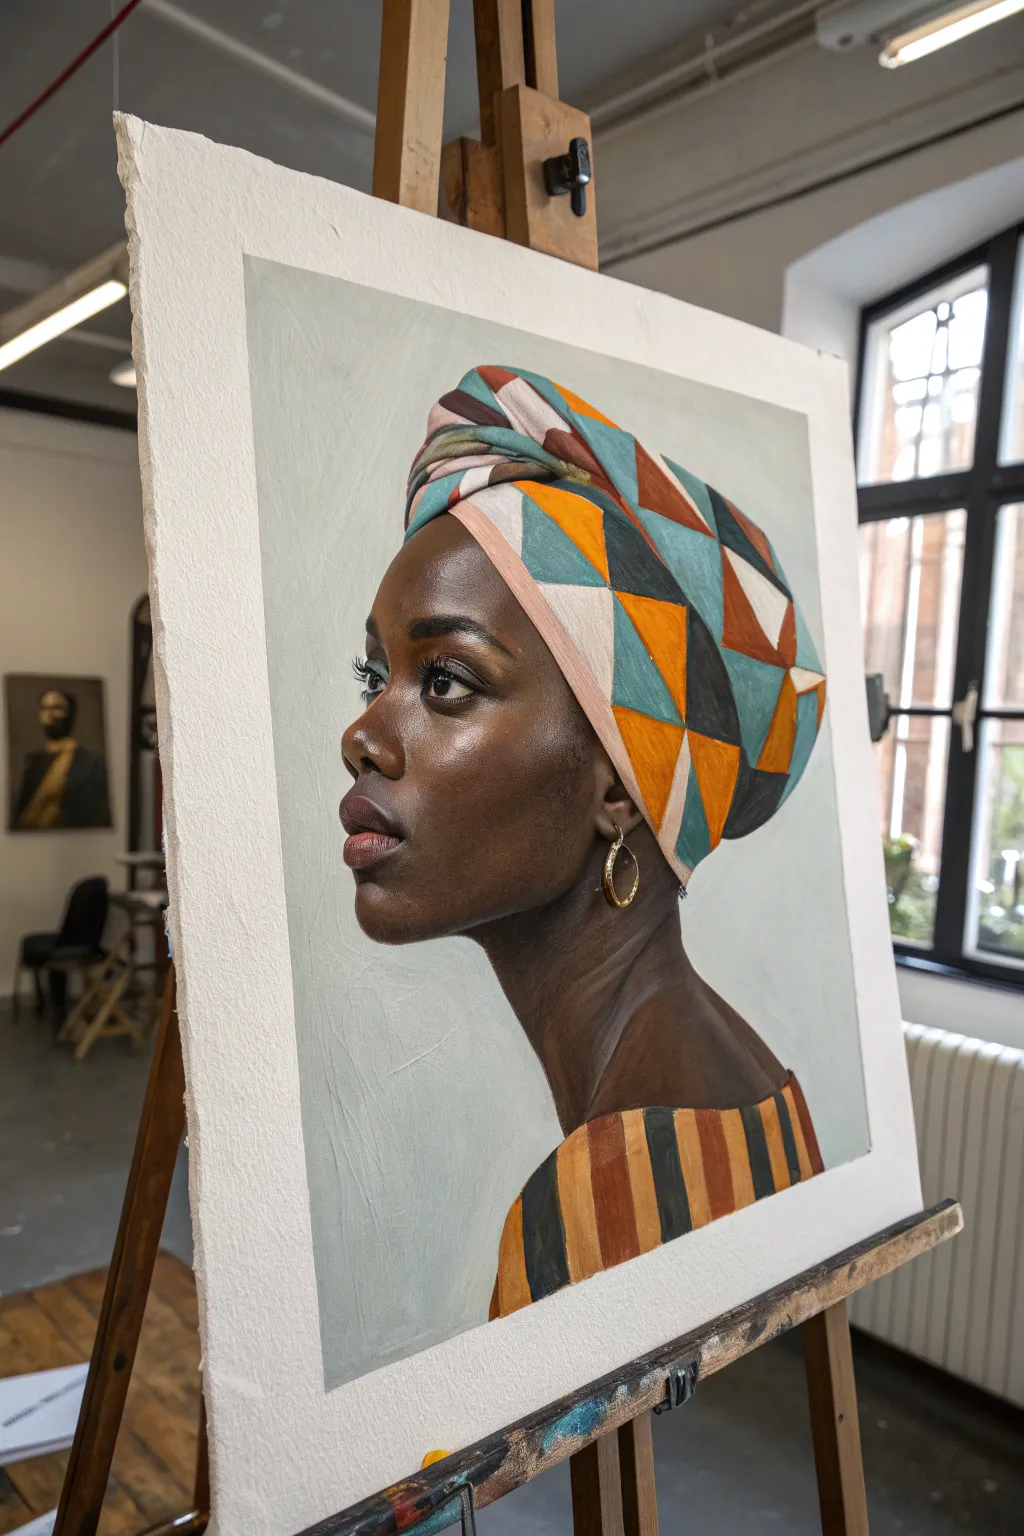
Capture the striking elegance of a profile portrait featuring a vibrant, geometrically patterned headwrap. This painting balances realistic skin tones with bold graphic elements, creating a piece that feels both modern and timeless.
How-To Guide
Materials
- Canvas board or heavy mixed-media paper (approx. 16×20 inches)
- Acrylic or oil paints (burnt umber, raw sienna, ultramarine blue, alizarin crimson, titanium white, ochre, teal, orange)
- Set of synthetic brushes (flat shaders for blocking, small rounds for details)
- Palette knife for mixing
- Graphite pencil (HB or 2B) and eraser
- Slow-drying medium (if using acrylics)
- Easel or flat working surface
- Water cup and paper towels
Step 1: Sketching the Composition
-
Establish the Profile:
Begin by lightly sketching the outline of the head in profile. Pay close attention to the slope of the forehead, the curve of the nose, and the fullness of the lips. -
Map the Headwrap:
Draw the large, rounded shape of the headwrap sitting high on the head. Keep the lines loose initially, focusing on the volume it adds to the silhouette. -
Mark Geometric Sections:
Inside the headwrap outline, sketch the triangular and diamond shapes that make up the pattern. Don’t worry about perfect symmetry; the folds of the fabric will naturally distort the shapes. -
Define Neck and Shoulders:
Extend a graceful line down for the neck, ensuring it feels strong yet elegant, and sketch the curve of the shoulder and the neckline of the garment.
Muddy Skin Tones?
If skin looks dull or grey, you likely used too much white or black to lighten/darken. Use yellows or oranges to lighten, and blues or purples to darken for richer tones.
Step 2: Blocking in Base Colors
-
Background Wash:
Mix a muted, pale grey-green using titanium white, a touch of teal, and a tiny bit of burnt umber. Apply this to the entire background area to establish a neutral field. -
Base Skin Tone:
Create a rich, dark base for the skin using burnt umber and ultramarine blue with a hint of alizarin crimson. Paint the face and neck flatly, ignoring highlights for now. -
Block the Headwrap Colors:
Using a flat brush, fill in the geometric shapes on the headwrap. Use teal, orange, ochre, and brown, keeping the colors flat and distinct for this layer. -
Clothing Base:
Paint the garment with vertical stripes of ochre, burnt sienna, and dark grey. Follow the curve of the body slightly to suggest form.
Step 3: Developing Form and Realism
-
Shadows on the Face:
Deepen the shadows around the eye socket, under the nose, and along the jawline using a mix of burnt umber and purple. This starts to build the three-dimensional structure of the face. -
Mid-tones and Warmth:
Mix a slightly lighter brown using raw sienna and burnt umber. Apply this to the cheek, forehead, and neck where the light naturally hits, blending edges gently into the shadow areas. -
Skin Highlights:
I like to add the highlights carefully here. Use a small amount of white mixed with burnt sienna and ochre to softly brush highlights onto the cheekbone, the bridge of the nose, the tip of the nose, and the forehead. -
Eye Detail:
Switch to a small round brush. Paint the eye carefully, adding the dark pupil, the brown iris, and the sharp lash line. Add a tiny dot of pure white for the catchlight to bring the eye to life. -
Lip Texture:
Paint the lips using alizarin crimson mixed with brown. Keep the upper lip slightly darker and add a soft highlight to the fullness of the lower lip.
Texture Play
For a mixed-media twist, glue actual pieces of patterned fabric onto the canvas for the headwrap instead of painting it, then seal with matte medium.
Step 4: Refining Details
-
Headwrap Fabric Folds:
Add dimension to the headwrap by painting shadows within the geometric shapes. Use a darker version of each color to show where the fabric folds or overlaps. -
Highlighting the Fabric:
Mix lighter versions of the teal, orange, and white patches. Apply these to the high points of the fabric folds to make the material look wrapped and taut. -
Refining the Earring:
Paint the hoop earring with a mix of ochre and white. Add a sharp white highlight to mimic the shine of gold metal against the dark skin. -
Softening Edges:
Check the transition between the skin and the background. Use a clean, dry brush to slightly soften this edge so the portrait sits naturally in the space. -
Final Glazing:
If using acrylics, you can add a very thin glaze of burnt umber over the shadow side of the neck to deepen the contrast one last time.
Step back and admire how the bold geometry perfectly frames the serene expression of your portrait subject
BRUSH GUIDE
The Right Brush for Every Stroke
From clean lines to bold texture — master brush choice, stroke control, and essential techniques.
Explore the Full Guide
Box Braids With Ombre Tips
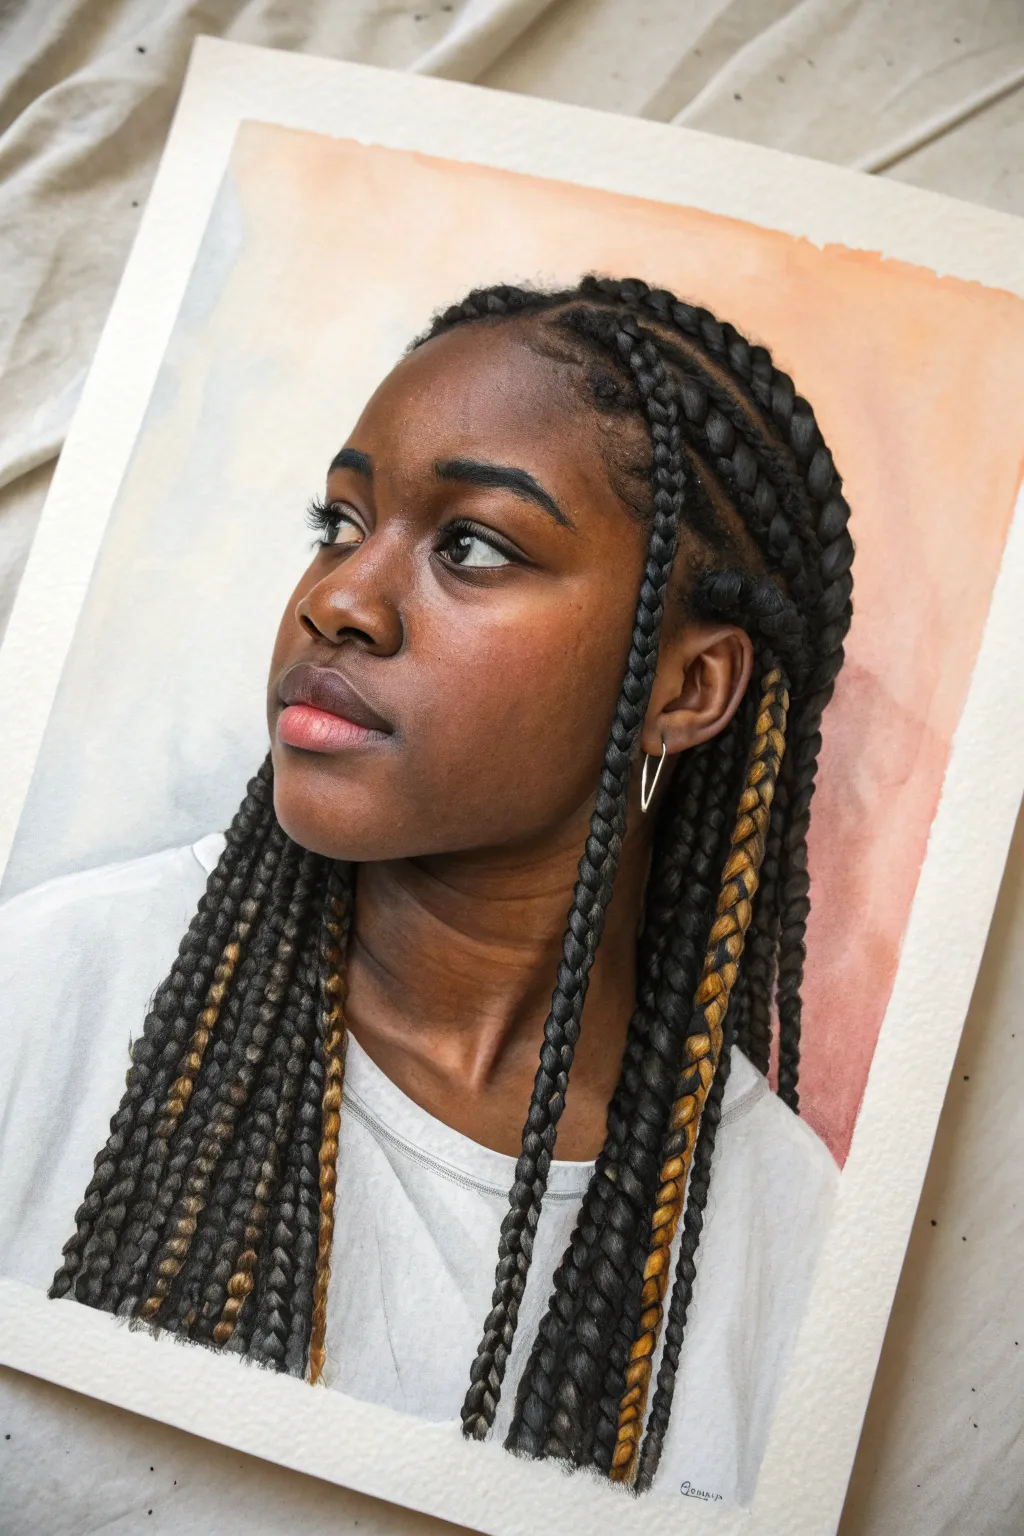
Capture the stunning detail of box braids and glowing skin tones in this realistic watercolor portrait. The soft, washed background contrasts beautifully with the sharp, intricate twisting of the hair, making it a perfect study in texture and light.
Step-by-Step
Materials
- Cold press watercolor paper (300 gsm)
- Watercolor paints (Burnt Umber, Yellow ochre, Alizarin Crimson, Ultramarine Blue, Lamp Black)
- Gouache (White, for highlights)
- Round brushes (sizes 2, 6, and 10)
- Fine liner brush (size 0 or 00)
- Pencil (HB) and kneadable eraser
- Masking tape
- Palette for mixing
- Two jars of water
Step 1: Sketching and Background
-
Prepare the surface:
Tape down your watercolor paper to a board on all four sides. This prevents buckling when we add water and creates that clean white border shown in the reference. -
Initial sketch:
Lightly sketch the outline of the face, neck, and the general flow of the braids. Focus on the placement of eyes and the jawline. Don’t draw every single braid strand yet, just the main shapes and direction. -
Background wash:
Mix a very watery wash of Ultramarine Blue and a touch of Burnt Umber for a grey-blue tone. Wet the background area on the left side of the paper and drop in the color. Repeat on the right side using a watery mix of Alizarin Crimson and Yellow Ochre for a peach tone. -
Soft transitions:
While the background paint is still wet, let the blue and peach sections touch slightly behind the head to create a soft, blurred effect. Avoid hard edges near the face.
Step 2: Skin Tones and Base Layers
-
Base skin layer:
Mix Burnt Umber with a tiny bit of Alizarin Crimson. Apply a thin, even wash over the face and neck, avoiding the eyes and teeth. Let this layer dry completely. -
Building shadows:
Deepen your skin mix by adding a touch of Ultramarine Blue. Apply this to the shadow areas: under the chin, the side of the nose, and the hollow of the cheek. Soften the edges with a clean, damp brush. -
Warmth and highlights:
Glaze a thin layer of Yellow Ochre over the forehead and cheeks to bring warmth to the skin. Lift out pigment with a damp brush on the tip of the nose and cheekbones to create soft highlights. -
Facial features:
Paint the lips with a mix of Alizarin Crimson and a touch of brown, keeping the lower lip lighter. Fill in the eyebrows with short, hair-like strokes using a dark brown mix. -
Painting the eyes:
Use a fine brush to paint the iris and pupil. Remember to leave a tiny speck of white paper for the catchlight, or add it later with white gouache.
Muddy Skin Tones?
If skin looks dull, you likely overmixed your colors on the paper. Let layers dry totally before glazing new ones, and keep your water jars clean—one for rinsing, one for clean water.
Step 3: Detailed Box Braids
-
Hair base color:
Mix a strong black-brown using Burnt Umber and Lamp Black. Paint the main shape of the hair, following the direction of the braids but leaving gaps where the blonde highlights will go. -
Adding the ombre:
For the gold tips and interspersed strands, mix Yellow Ochre with a bit of Burnt Sienna. Paint these strands specifically where you left gaps in the previous step. -
Defining the braid pattern:
Once the base hair layers are dry, mix a dark, opaque black. Using your smallest brush, paint the ‘V’ shapes or heart shapes that form the woven pattern of the braids. -
Layering the texture:
I find it helpful to paint the shadows between the braid bumps first. This makes the braids look three-dimensional before you even add highlights. -
Highlighting the hair:
Mix a light grey (white gouache plus a speck of black) and paint thin, curved lines on the top of each braid bump to simulate shine. -
Parting details:
Use a diluted brown to paint the scalp visible between the braids at the parting. Use the fine liner to add tiny baby hairs along the hairline for realism.
Add Texture
Once the watercolor is dry, use colored pencils to deepen the darkest crevices in the braids or add texture to the eyebrows. It adds a mixed-media sharpness that paint sometimes misses.
Step 4: Clothing and Finishes
-
Shirt shadows:
The shirt is white, so we are painting shadows, not the cloth itself. Use a very watery grey-blue mix to paint the folds and creases of the fabric. -
Neckline detail:
Use a slightly darker grey to define the stitching on the collar of the t-shirt. -
Earring accent:
Paint the silver hoop earring using a medium grey, leaving a crisp white line for the reflection. -
Final touches:
Assess the whole image. If the skin needs more contrast, add a final glaze of dark brown to the deepest shadows. Use pure white gouache to pop the highlights in the eyes and on the tip of the nose.
Step back and admire the beautiful depth and lighting you have captured in this portrait
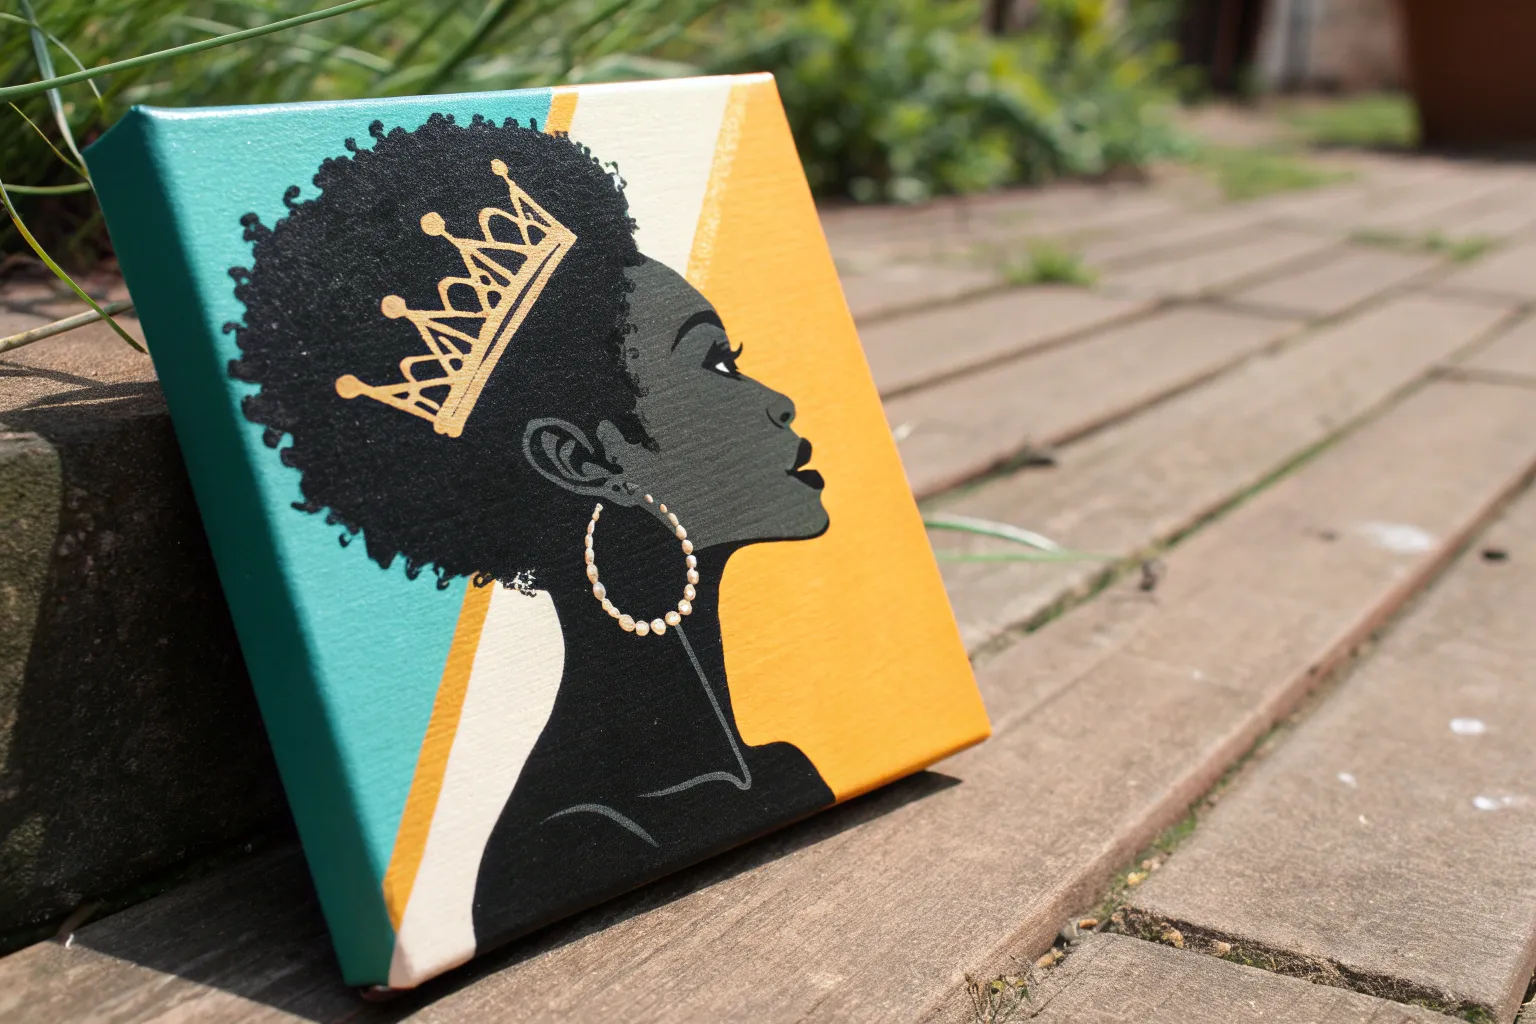
Afro Puff With Flower Accent
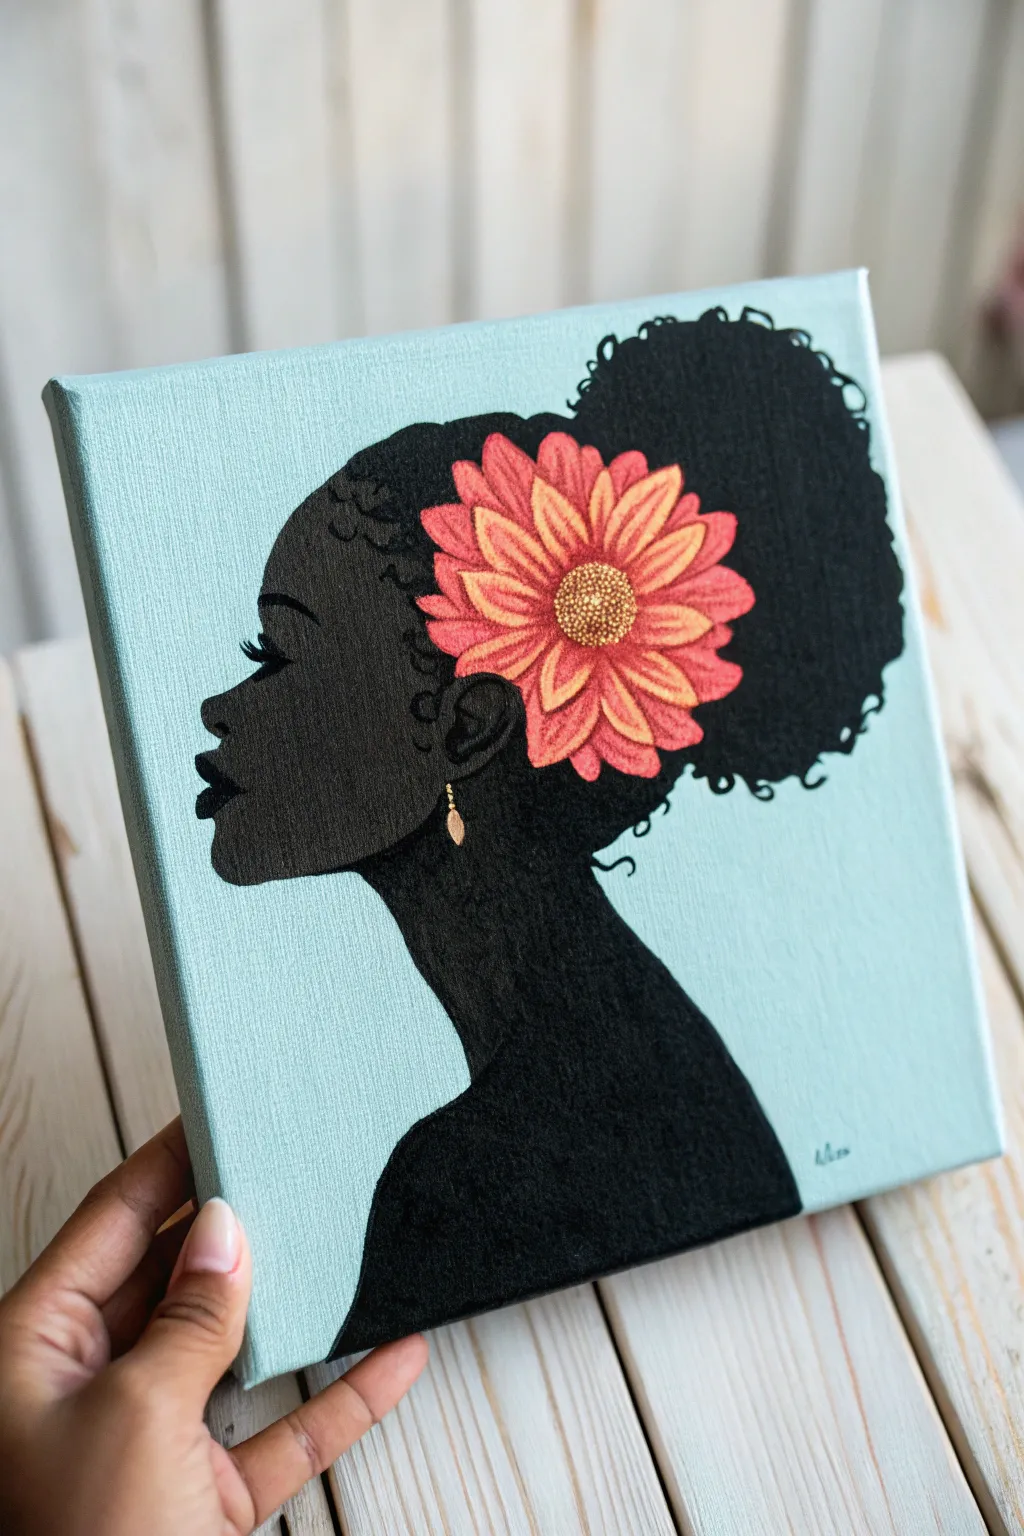
This elegant acrylic painting features a striking side profile silhouette of a Black woman, highlighted by a vibrant, multi-layered flower accessory in her hair. The clean lines against a soothing teal background make for a stunningly bold yet simple piece of art.
How-To Guide
Materials
- Square stretched canvas (e.g., 8×8 or 10×10 inches)
- Acrylic paints: Mars Black, Teal or Turquoise, White, Orange, Bright Pink, Yellow ochre, Metallic Gold
- Flat brush (1-inch) for background
- Round brushes (small and medium sizes)
- Pencil for sketching
- Palette or paper plate
- Cup of water and paper towels
Step 1: Preparing the Canvas
-
Mix the background color:
Start by mixing a light, calming teal shade. Combine a generous amount of White with a small dollop of Teal or Turquoise paint. Adjust until you get a soft, pastel blue-green hue. -
Apply the base coat:
Using a wide flat brush, paint the entire front and sides of the canvas with your mixed teal color. Use long, horizontal strokes to ensure a smooth, even finish without visible brush marks. -
Let it dry completely:
Allow the background to dry fully. Since acrylics dry fast, this should take 15-20 minutes. If the coverage looks streaky, apply a second coat for opacity.
Step 2: Sketching the Silhouette
-
Outline the profile:
Lightly sketch the side profile of the face using a pencil. Focus on the forehead, the curve of the nose, full lips, and chin. Dont press too hard; you just need a faint guide. -
Define the neck and shoulders:
Extend a curved line down from the chin to form the neck, leading onto the shoulders. The base should naturally fade off the bottom edge of the canvas. -
Sketch the hair shape:
Draw the outline of the hair. Create a large, rounded shape at the back of the head for the ‘puff,’ making the edges slightly bumpy or wavy to suggest natural texture. -
Mark the flower placement:
Draw a rough circle or oval near the temple area where the flower will sit. This reserves the space so you don’t paint it black.
Clean Lines Hack
If you struggle with steady hands for the profile, try using a black paint pen or ultra-fine marker to outline the face first before filling it in with paint.
Step 3: Painting the Silhouette
-
Fill in the face:
Load a medium round brush with Mars Black acrylic. Carefully paint along the pencil lines of the profile first to get a sharp edge, then fill in the rest of the face. -
Paint the neck and shoulders:
Continue painting black down the neck and shoulder area. Ensure the paint is opaque; you may need two coats of black for a solid, deep finish. -
Fill the hair area:
Fill in the Afro puff shape with black paint. For the outer edges, use the tip of a smaller brush to create tiny curls or bumps that mimic hair texture, rather than a perfectly smooth line. -
Create the hairline details:
Switch to a very small detail brush. Gently paint wispy baby hairs along the forehead and temple area to add realism and softness to the silhouette.
Level Up: Texture
Mix a pinch of baking soda into the black paint used for the hair. Dab it on to create real, raised texture that mimics the volume of natural curls.
Step 4: Creating the Flower Accent
-
Base coat the flower:
Paint the reserved flower area with a base coat of Bright Pink. It’s okay if this layer is flat; we will add dimension next. -
Define the petals:
Using a small round brush and Orange paint, outline individual petals radiating from the center. Add some streaks of Orange inside the pink petals to create texture. -
Add highlights:
Mix a tiny bit of White with Yellow Ochre or lighter Orange. Paint thin lines along the tips and centers of the petals to catch the ‘light’ and simulate the veins of the flower. -
Paint the flower center:
Dab a circle of Yellow Ochre or Brown in the very center of the flower. Use a stippling motion (dotting) to create a pollen-like texture. -
Gold detailing:
Once the center is dry, dot a little Metallic Gold paint right in the middle for a subtle shimmer that catches the eye.
Step 5: Final Touches
-
Add the earring:
Using your small detail brush and Metallic Gold or bright Copper paint, draw a small teardrop shape hanging from the earlobe area to create a jewelry accent. -
Refine the edges:
Check the edges of your silhouette. If any teal background accidentally covered a black line, touch it up with black. Smooth out any shaky lines on the profile.
Hang your beautiful portrait on the wall and enjoy the calm confidence it brings to the room

PENCIL GUIDE
Understanding Pencil Grades from H to B
From first sketch to finished drawing — learn pencil grades, line control, and shading techniques.
Explore the Full Guide
Sunglasses And Glossy Lips Shortcut
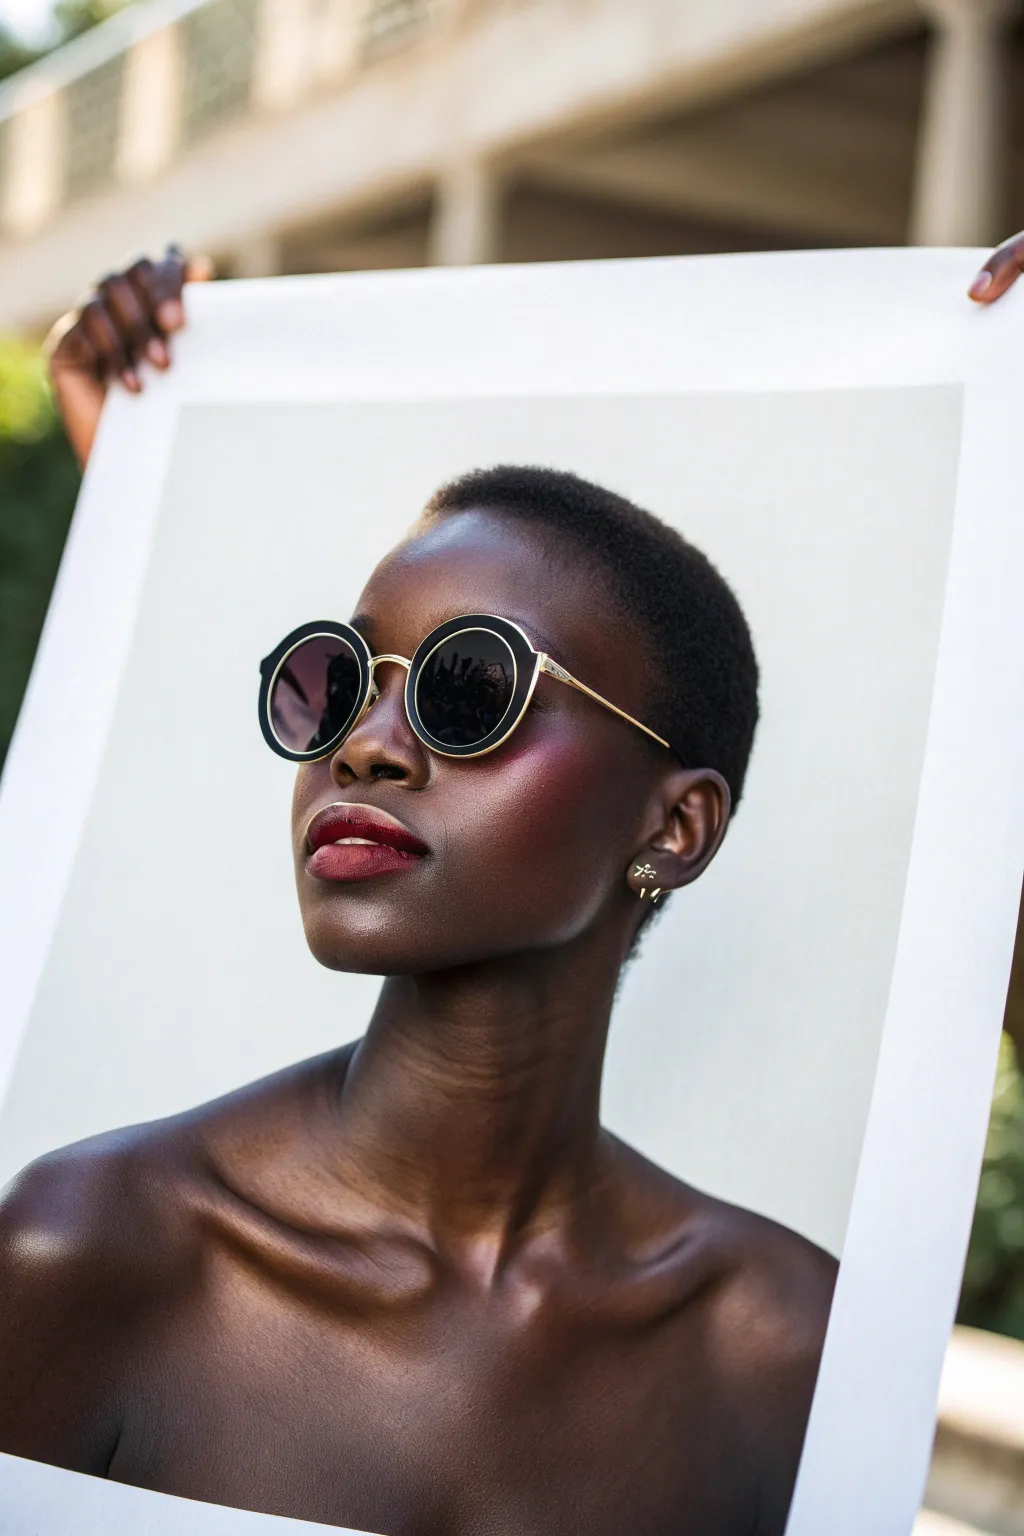
Capture the essence of glowing skin and chic style with this vibrant acrylic portrait. This project focuses on mastering highlights and rich skin tones to create a piece that feels both modern and deeply reflective.
Detailed Instructions
Materials
- Canvas board or stretched canvas (16×20 inches recommended)
- Acrylic paints (Burnt Umber, Mars Black, Titan Buff, Ultramarine Blue, Alizarin Crimson, Cadmium Red, Gold, Titanium White)
- Synthetic paint brushes (Flat wash brush, Filbert brushes #4 and #8, Round detail brush #1)
- Palette knife or mixing plate
- Water cup and paper towels
- Pencil for sketching
- Reference photo
Step 1: Laying the Foundation
-
Sketch the composition:
Begin by lightly sketching the outline of the woman’s head, the neck, and the shoulders directly onto your canvas. Pay close attention to the angle of the chin, which is tilted upward slightly to catch the light. -
Position the features:
Map out the placement of the sunglasses first, as they dominate the upper face. Two perfect circles for the lenses will serve as your anchor points. Then, sketch the nose and the full lips below. -
Mix the base skin tone:
On your palette, combine Burnt Umber with a touch of Ultramarine Blue and a tiny amount of Alizarin Crimson. This creates a deep, rich brown base rather than a flat brown. Add a drop of water to improve flow. -
Apply the first layer:
Using your large flat brush, block in the entire face, neck, and shoulders with your dark skin mixture. Don’t worry about shadows or highlights yet; just aim for solid, opaque coverage. -
Paint the background:
While the skin base dries, paint the background area inside the frame shape a flat, pale grey or off-white (Titan Buff works well here) to mimic the negative space in the photo.
Wet-on-Dry Blending
For smooth skin without visible brushstrokes, wait for layers to dry completely before glazing the next color. This builds depth without muddying your tones.
Step 2: Developing Form and Shadow
-
Darken the shadows:
Mix Mars Black into your original skin tone. Apply this darker shade under the jawline, in the hollows of the throat, against the collarbone, and on the side of the face away from the light source. -
Add warmth to the cheeks:
Create a warmer mid-tone by mixing Burnt Umber with Alizarin Crimson and a tiny bit of Cadmium Red. Glaze this over the cheekbones and directly under the sunglasses to simulate a flushed, radiant look. -
Paint the sunglasses frames:
Switch to a smaller round brush and careful fill in the frames of the glasses. Use pure Mars Black for the outer rim and the lenses. Leave the metal bridge and arms for later. -
Refine the lips:
Mix Alizarin Crimson with a little Burnt Umber for the lips. Paint the upper lip slightly darker than the lower lip to indicate the shadow cast by the nose.
Metallic Pop
Mix a tiny amount of iridescent medium or pearl white into your highlight colors. This gives the skin a literal shimmer when viewed from different angles.
Step 3: The Glossy Details
-
Create the skin highlights:
This is crucial for the glossy look. Mix Burnt Umber with Titan Buff and a touch of Gold paint. Apply this highlighting mixture to the high points: the forehead, the tip of the nose, the chin, and along the collarbones. -
Blend the transition:
While the paint is still slightly tacky, use a dry, soft filbert brush to gently blend the edges of your highlights into the base skin tone. You want a smooth, gradient transition, not a harsh line. -
Add brilliant white reflections:
Using your smallest detail brush and pure Titanium White, add tiny, sharp dots of light. Place these on the highest point of the cheekbone, the center of the lip, and the tip of the nose to mimic sweat or oil sheen. -
Detail the sunglasses:
Paint the bridge and arms of the glasses with Gold paint. For the lenses, add abstract reflections using watered-down grey and white to suggest the world reflecting back. -
Paint the white frame:
Using a wide flat brush, paint the large white board she is holding. Keep the edges crisp and straight. You might need two coats of Titanium White to ensure it is fully opaque. -
Paint the hands:
If you are including the hands holding the frame, use your dark skin base, but keep the details minimal to ensure the focus stays on the face. -
Final touches:
Check your contrast. If the glossy areas don’t pop enough, darken the shadows right next to them slightly. This pushes the brights forward visually.
Step back and admire how contrast creates that stunning, lifelike glow on the canvas
Melanin Glow Color Palette Practice
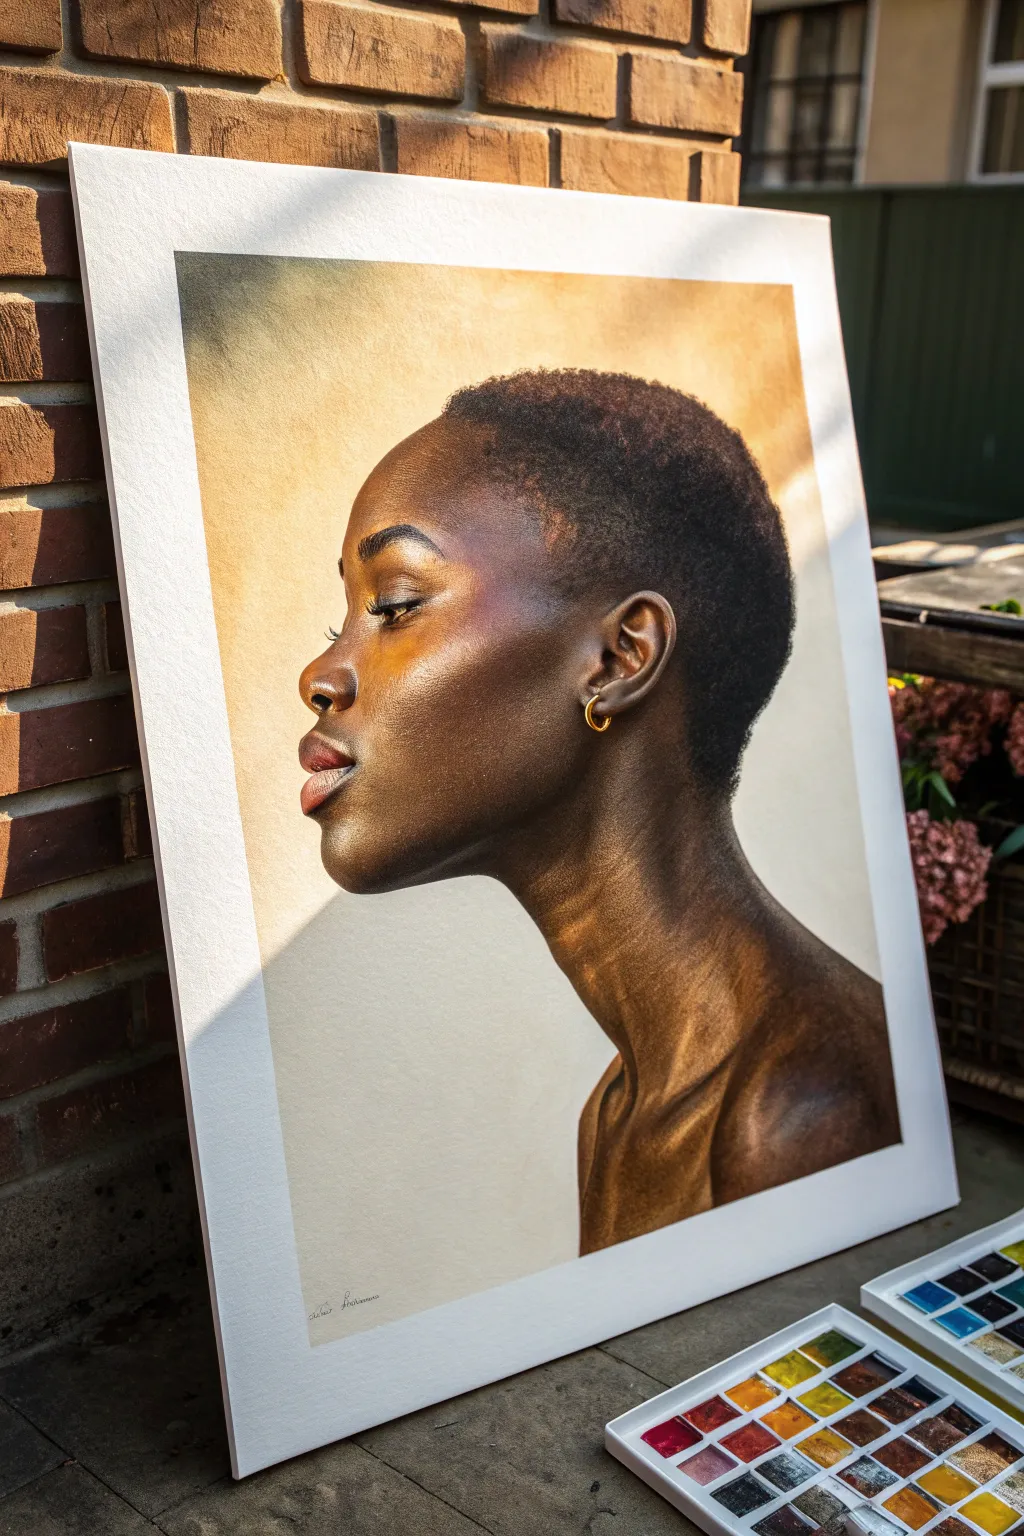
This project focuses on rendering a stunningly realistic profile using watercolor to achieve a luminous, sun-kissed effect on deep skin tones. By carefully layering warm ochres, burnt siennas, and touches of purple, you will build a dimensional portrait that seems to glow from within.
Step-by-Step Tutorial
Materials
- High-quality cold press watercolor paper (300 gsm or heavier)
- Watercolor paints (Burnt Umber, Burnt Sienna, Yellow Ochre, Alizarin Crimson, Ultramarine Blue, Lamp Black)
- White gouache for highlights
- Round watercolor brushes (sizes 2, 6, and 10)
- Detail liner brush (size 0 or 00)
- Pencil (HB) and kneaded eraser
- Masking fluid (optional)
- Palette for mixing
- Two jars of water
- Paper towels
Step 1: Preparation and Sketching
-
Paper Setup:
Begin by taping down your watercolor paper to a board using artist tape. This prevents the paper from buckling when wet and creates that crisp, clean white border seen in the reference image. -
Outline the Profile:
Lightly sketch the profile of the subject. Focus on the accurate placement of the ear, the curve of the jawline, and the shape of the nose and lips. Keep your pencil lines faint so they don’t show through the transparent watercolor layers later. -
Masking Highlights:
If you want to preserve the brightest white on the hoop earring, apply a tiny dot of masking fluid there. This is optional, but it helps keep that crisp metallic highlight perfectly clean.
Muddy Shadows?
Avoid mixing more than three pigments for shadows. If it looks dull, let it dry completely and glaze a pure, transparent layer of Burnt Sienna or Purple over it to unify the tone.
Step 2: Base Layers and Background
-
Background Wash:
Mix a very dilute wash of Yellow Ochre with a touch of Burnt Sienna. Apply this loosely to the background area behind the face, fading it out as you move toward the edges of the paper to create a soft, sunlit atmosphere. -
First Skin Glaze:
Mix a watery tea-consistency wash of Yellow Ochre and Burnt Sienna. Apply this over the entire face and neck area to establish a warm undertone. Avoid the eye area and the earring. -
Mapping Shadows:
While the first layer is dry to the touch, mix Burnt Umber with a hint of Alizarin Crimson. Using a size 6 brush, gently paint in the major shadow shapes: under the chin, the back of the neck, and the hollow of the cheek.
Pro Tip: Soft Transitions
Use a clean, damp brush to soften the edges of your shadows while the paint is still wet. This prevents harsh lines and makes the skin look smooth and organic.
Step 3: Building Depth and Form
-
Deepening Values:
Strengthen your shadow mix by adding a little Ultramarine Blue to your Burnt Umber. This cools the shadow down. Apply this to the darkest areas of the neck and behind the ear to create volume. -
Warm Mid-Tones:
I like to reintroduce warmth here by glazing pure Burnt Sienna over the cheekbone, forehead, and bridge of the nose. This mimics the ‘melanin glow’ where the sun hits the skin directly. -
Refining Facial Features:
Switch to a size 2 brush. Carefully paint the lips using a mix of Alizarin Crimson and Burnt Umber. Ensure the top lip is slightly darker than the bottom lip to show dimension. -
Defining the Eye:
Use a dark mix of Burnt Umber and Lamp Black for the eyelashes and the pupil. Paint the iris with a dark brown, leaving a tiny speck of white paper for the catchlight to bring the eye to life.
Step 4: Texture and Details
-
Hair Texture Base:
Paint the hair shape with a solid dark wash of Burnt Umber and Ultramarine Blue. Let the edges be slightly soft where the hair meets the forehead skin. -
Stippling Hair Details:
Once the hair base is dry, take a nearly dry brush with thick black paint. Use a stippling motion (tapping the brush tip) along the hairline and the top of the head to create the texture of short, coiled hair. -
Earring Gold tone:
Remove the masking fluid if you used it. Paint the hoop earring with Yellow Ochre, adding a tiny line of Burnt Umber for the shadow side to make it look cylindrical. -
Enhancing Skin Texture:
To create the realistic pore texture seen on the cheek, take a damp brush and gently lift small spots of pigment, or stipple tiny dots of a slightly darker skin tone over the cheek area. -
Final Contrast Check:
Step back and look at your painting. Deepen the darkest shadows under the chin and at the nape of the neck with your darkest brown-black mix to ensure the profile pops against the background. -
Highlights:
Using a liner brush and white gouache, add sharp, tiny bright spots to the tip of the nose, the highest point of the cheekbone, the brow bone, and the bottom lip. This simulates sweating or oily skin reflecting light.
Peel off the tape carefully to reveal your crisp border and admire the warm, lifelike portrait you have created


Neon Background Pop Portrait
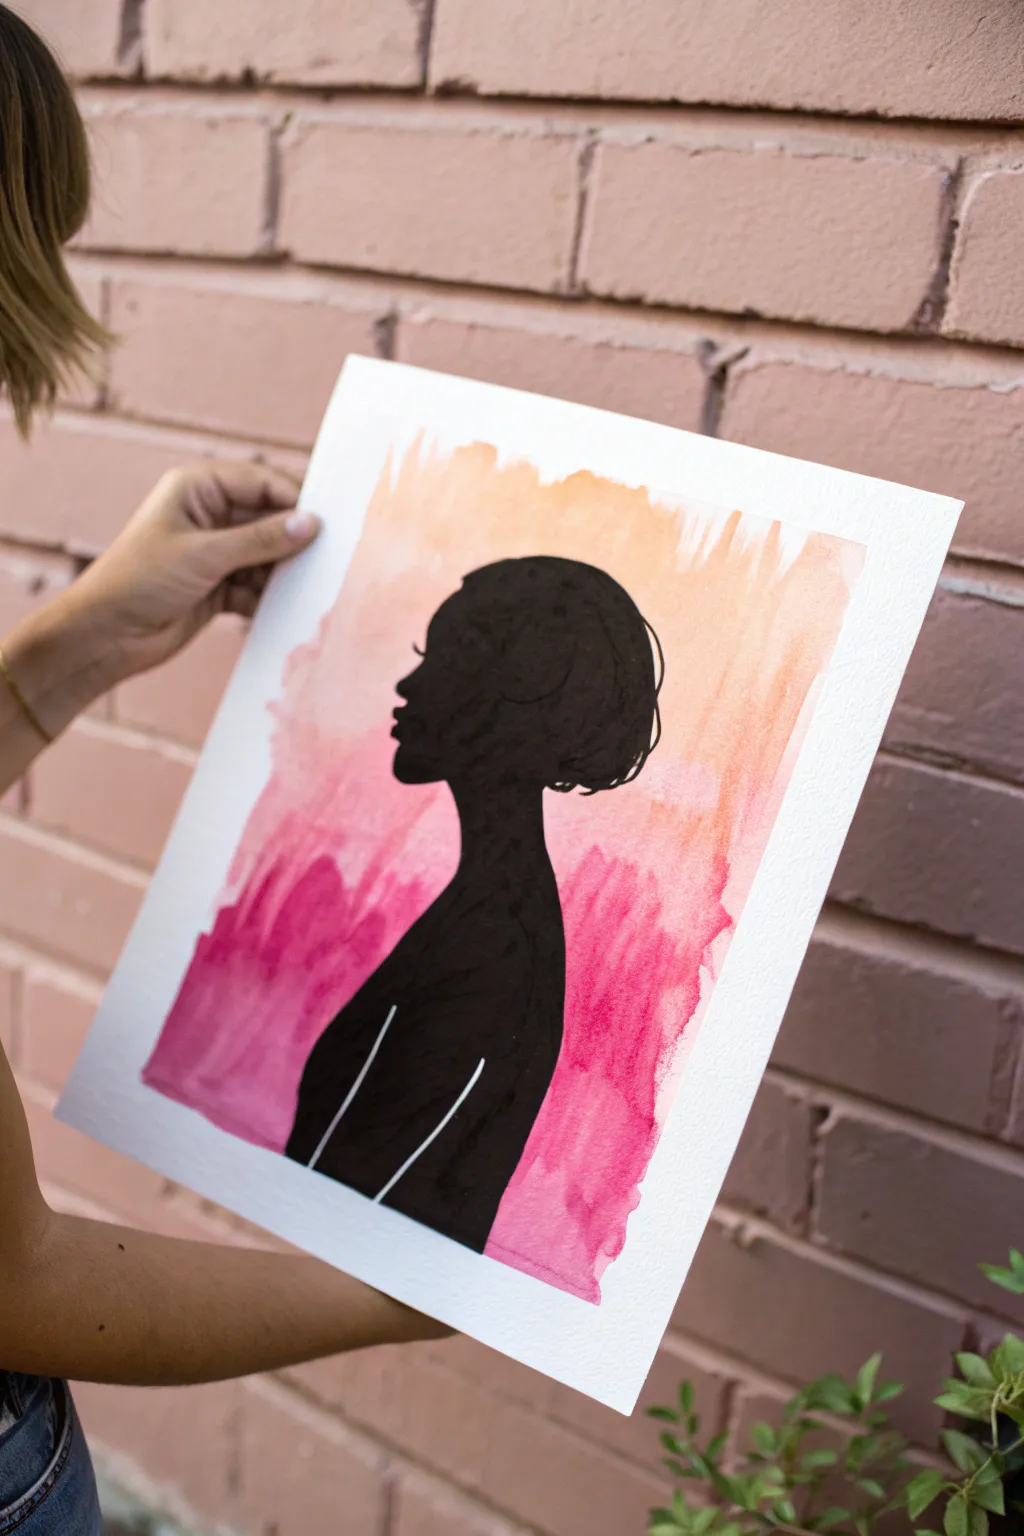
This striking portrait combines the soft, fluid beauty of a watercolor wash with the bold, graphic impact of a black silhouette. It creates a modern, stylish piece of art that looks impressive but is surprisingly simple to achieve, making it perfect for beginners.
Detailed Instructions
Materials
- High-quality watercolor paper (cold press, at least 140lb/300gsm)
- Watercolor paints (magenta/pink and orange/peach shades)
- Large flat brush or wash brush
- Pencil and eraser
- Black acrylic paint or black India ink
- Fine liner brush or rigger brush
- Medium round brush
- White gel pen or white acrylic marker
- Paper towels and water cup
Step 1: Creating the Sunset Wash
-
Prepare the paper:
Tape down your watercolor paper to a board or table on all four sides. This prevents the paper from buckling when it gets wet and creates a nice clean white border around your finished piece. -
Mix your colors:
Prepare two puddles of watercolor paint on your palette: a vibrant magenta or deep pink, and a warm peach or light orange. Make sure they are juicy and watery, not too thick. -
Apply the bottom wash:
Using your large flat brush, load up the magenta paint. Start at the bottom third of your paper and brush upwards with loose, vertical strokes. Let the edges be rough and uneven for an artistic look. -
Blend in the top color:
While the pink is still slightly damp but not soaking, clean your brush and load the peach/orange color. Start painting from the top downward. -
Create the gradient:
Where the orange meets the pink in the middle, gently brush them together. Let the colors bleed into each other naturally to form a seamless transition. Don’t overwork it; let the water do the work. -
Add texture:
If you want a bit more texture, you can dab a clean paper towel lightly in a few spots to lift a tiny bit of color, or add a second layer of pink at the very bottom for depth. -
Let it dry completely:
Walk away and let the background dry 100%. If you try to paint the silhouette while the paper is damp, the black ink will bleed into the background and ruin the crisp lines. I usually give this at least an hour.
Bleeding Edges?
If your black paint bleeds into the background, the paper wasn’t dry enough. Let it dry fully, then use white acrylic to cover the bleed, and repaint the black line over it.
Step 2: Painting the Silhouette
-
Sketch the outline:
Lightly sketch the profile of the woman using a pencil. Focus on the shape of the forehead, nose, lips, and chin. Draw the hair shape loosely, perhaps a short bob or pixie cut style. -
Refine the shoulders:
Draw the curve of the neck down to the shoulders. Since this is a silhouette, you only need the outside contour line; don’t worry about internal details like eyes or ears. -
Outline in black:
Using your fine liner brush and black acrylic paint (or ink), carefully trace over your pencil lines. Keep your hand steady to get a smooth, crisp edge. -
Fill in the shape:
Switch to a medium round brush to fill in the large areas of the head, neck, and shoulders with solid black. Ensure the coverage is opaque; you may need a second coat if the watercolor shows through. -
Detail the hair:
Use the fine liner brush again to add small, wispy flyaway hairs along the hairline and the back of the head. This makes the silhouette look natural rather than like a cutout. -
Add definition:
Check the profile edges. If the nose or lips need sharpening, use the very tip of your smallest brush to refine those shapes.
Step 3: Finishing Touches
-
Add white highlights:
Once the black paint is completely dry, use a white gel pen or a white acrylic marker to draw simple contour lines on the shoulder and back. Just two or three curved lines suggest the form of the body. -
Clean up:
If you have any pencil marks still visible around the edges of the silhouette, gently erase them. -
Reveal the border:
Carefully peel off the painter’s tape. Pull it away from the painting at a 45-degree angle to ensure a crisp, clean white frame.
Gold Leaf Glam
Instead of white pen lines for the body highlights, apply thin lines of gold leaf adhesive and foil. The metallic shine against the matte black silhouette looks incredibly chic.
Hang your new artwork in a spot that needs a pop of color and enjoy the elegant simplicity you’ve created
Galaxy Afro With Splatter Stars
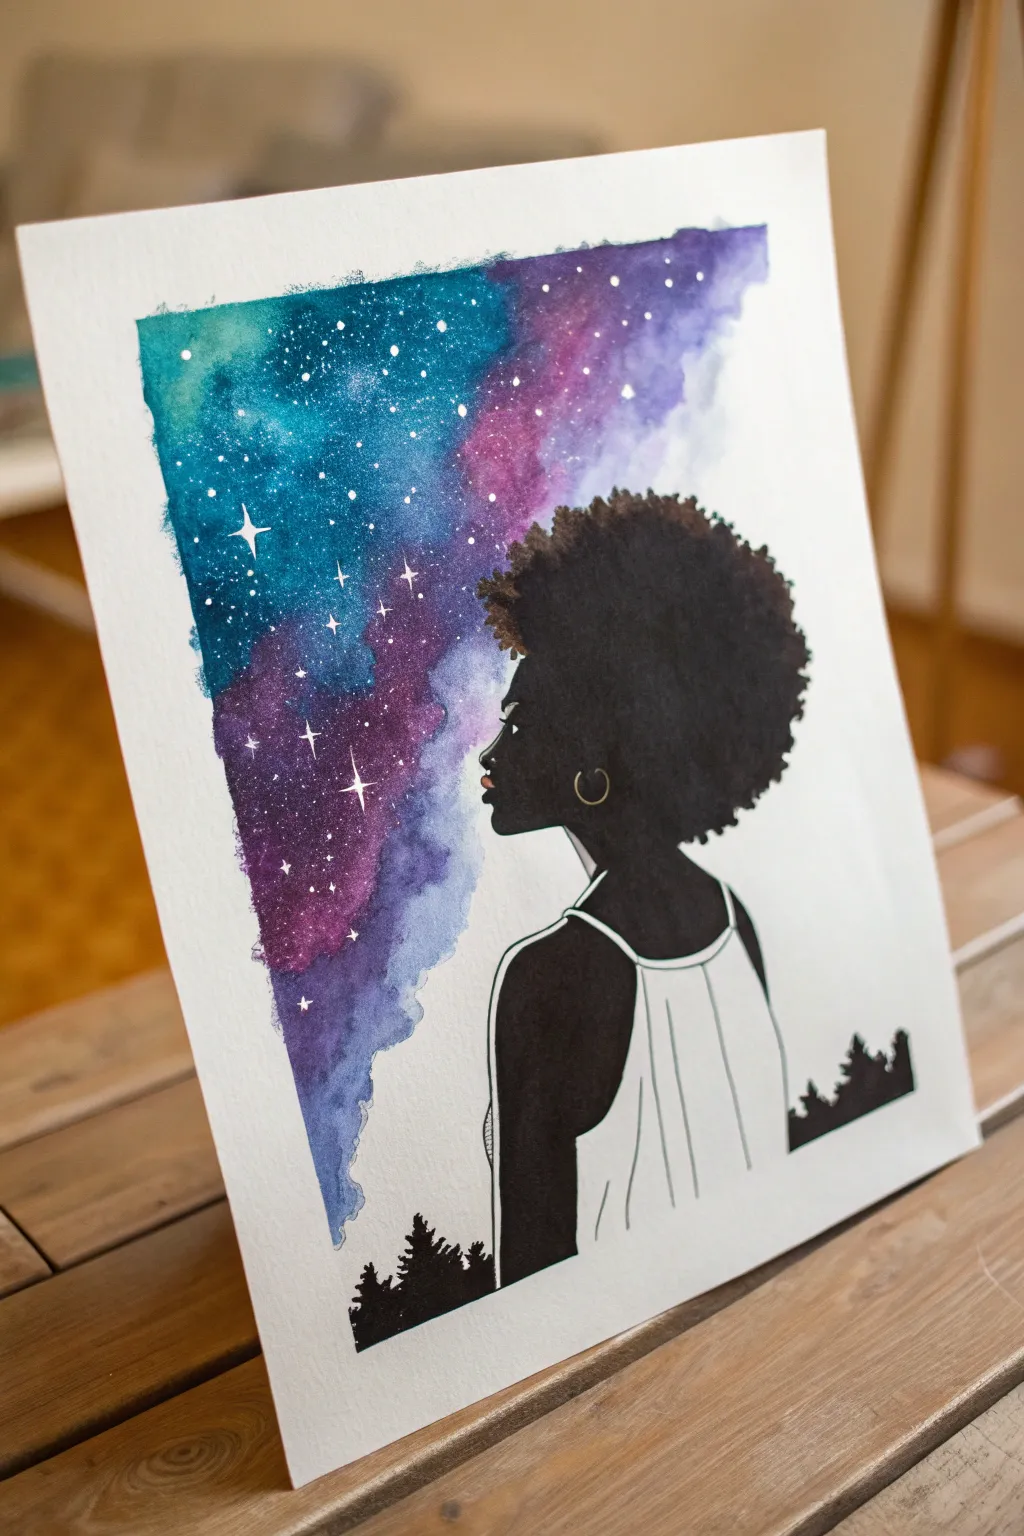
Blend the infinite beauty of the galaxy with a striking, peaceful portrait in this mixed-media watercolor project. By combining wet-on-wet techniques with bold silhouette work, you’ll create a stunning piece where the stars seem to emanate from the subject’s gaze.
Step-by-Step Guide
Materials
- Cold press watercolor paper (300 gsm)
- Watercolor paints (Indanthrone Blue, Turquoise, Violet, Magenta)
- Black ink or black gouache
- White gel pen or white gouache
- Graphite pencil (HB or H)
- Round watercolor brushes (size 6 and 10)
- Fine liner brush or size 0 round brush
- Painters tape or masking tape
- Mixing palette
- Paper towels
- Two jars of water
Step 1: Preparation and Sketching
-
Secure the paper:
Begin by taping your watercolor paper down to a hard board or your table surface. This prevents the paper from buckling when we apply the wet washes later. -
Outline the silhouette:
Using a light pencil, sketch the outline of the woman’s profile on the right side of the paper. Focus on the shape of the afro, the curve of the neck, and the shoulders. -
Define the clothing:
Draw the thin straps and the gentle drape of her top. Keep the lines clean, as the inside of the shirt will remain white paper. -
Mark the galaxy zone:
Lightly sketch a jagged, abstract boundary line starting from the top left corner down towards the center left. This doesn’t need to be perfect; it just guides where your paint will stop. -
Add landscape details:
Sketch a simplified tree line along the bottom edge of the paper, ensuring trees silhouette against the white background on the right and extend under the galaxy on the left.
Step 2: Painting the Galaxy
-
Wet the sky area:
Using clean water and your larger brush, wet the area defined for the galaxy background. Be careful to paint around the silhouette of the woman’s face and hair—don’t get water inside the profile. -
Drop in cool colors:
While the paper is wet, load your brush with turquoise and teal. Drop these colors into the upper left and middle sections, letting them bloom naturally. -
Deepen with blues:
Add concentrated Indanthrone Blue or dark navy to the edges and corners of the wet area to create depth and the feeling of deep space. -
Add violet accents:
Introduce magenta and violet hues near the woman’s face and into the center of the galaxy cloud. Let these mix slightly with the blues on the paper to create soft transitions. -
Create texture:
If I want more texture, I sometimes sprinkle a tiny pinch of salt or spatter clear water droplets onto the drying paint to create star-like blooms. -
Dry completely:
This is crucial: allow the galaxy layer to dry 100%. If the paper is cool to the touch, it’s still damp. Wait until it is fully dry.
Fixing “Cauliflowers”
If your galaxy dries with unwanted hard edges (blooms/cauliflowers), gently scrub the edge with a damp stiff brush to soften it, or simply paint a darker layer of stars over it to disguise the texture.
Step 3: Inking the Silhouette
-
Fill the skin tone:
Using black ink or opaque black gouache, carefully paint the woman’s skin. Use a fine brush for the profile details—nose, lips, and chin—to ensure sharp edges. -
Shape the hair:
Fill in the hair area with the same black. Use the tip of your brush to create tiny, bumpy textures along the outer edge of the afro to simulate curls rather than a smooth line. -
Define the earring:
Leave a small circle of negative space (white paper) for the hoop earring, or paint over it and add it later with a metallic or white pen. -
Paint the landscape:
Fill in the tree line at the bottom with solid black. Use stippling motions (tapping the brush tip) to create the suggestion of pine needle textures on the tree peaks. -
Outline the top:
Using a very fine liner brush or a black pen, carefully ink the straps and fold lines of the white top. Do not color it in; leave it the white of the paper for high contrast.
Add Metallic Magic
Swap the white paint for iridescent or metallic silver watercolor when flicking the stars. It catches the light beautifully and adds a magical shimmer that changes as you walk past the artwork.
Step 4: Stars and Details
-
Spatter the stars:
Cover the woman’s silhouette with a scrap piece of paper to protect it. Load a stiff brush or toothbrush with opaque white gouache and flick the bristles to spray fine white dots over the galaxy area. -
Add major stars:
Use a white gel pen or fine brush with white gouache to manually draw a few larger, four-pointed sparkle stars in the darker blue areas. -
Refine the earring:
If you painted over the ear area, use a gold metallic pen or yellow paint to draw a crisp hoop earring standing out against the black skin. -
Define the lips:
Add a tiny, subtle touch of terracotta or lighter brown to the lips to give the profile dimension. -
Remove tape:
Once all ink and paint is bone dry, slowly peel off the masking tape at an angle, pulling away from the painting to reveal a crisp white border.
Now you have a breathtaking piece where the universe meets the individual, ready to frame or gift.
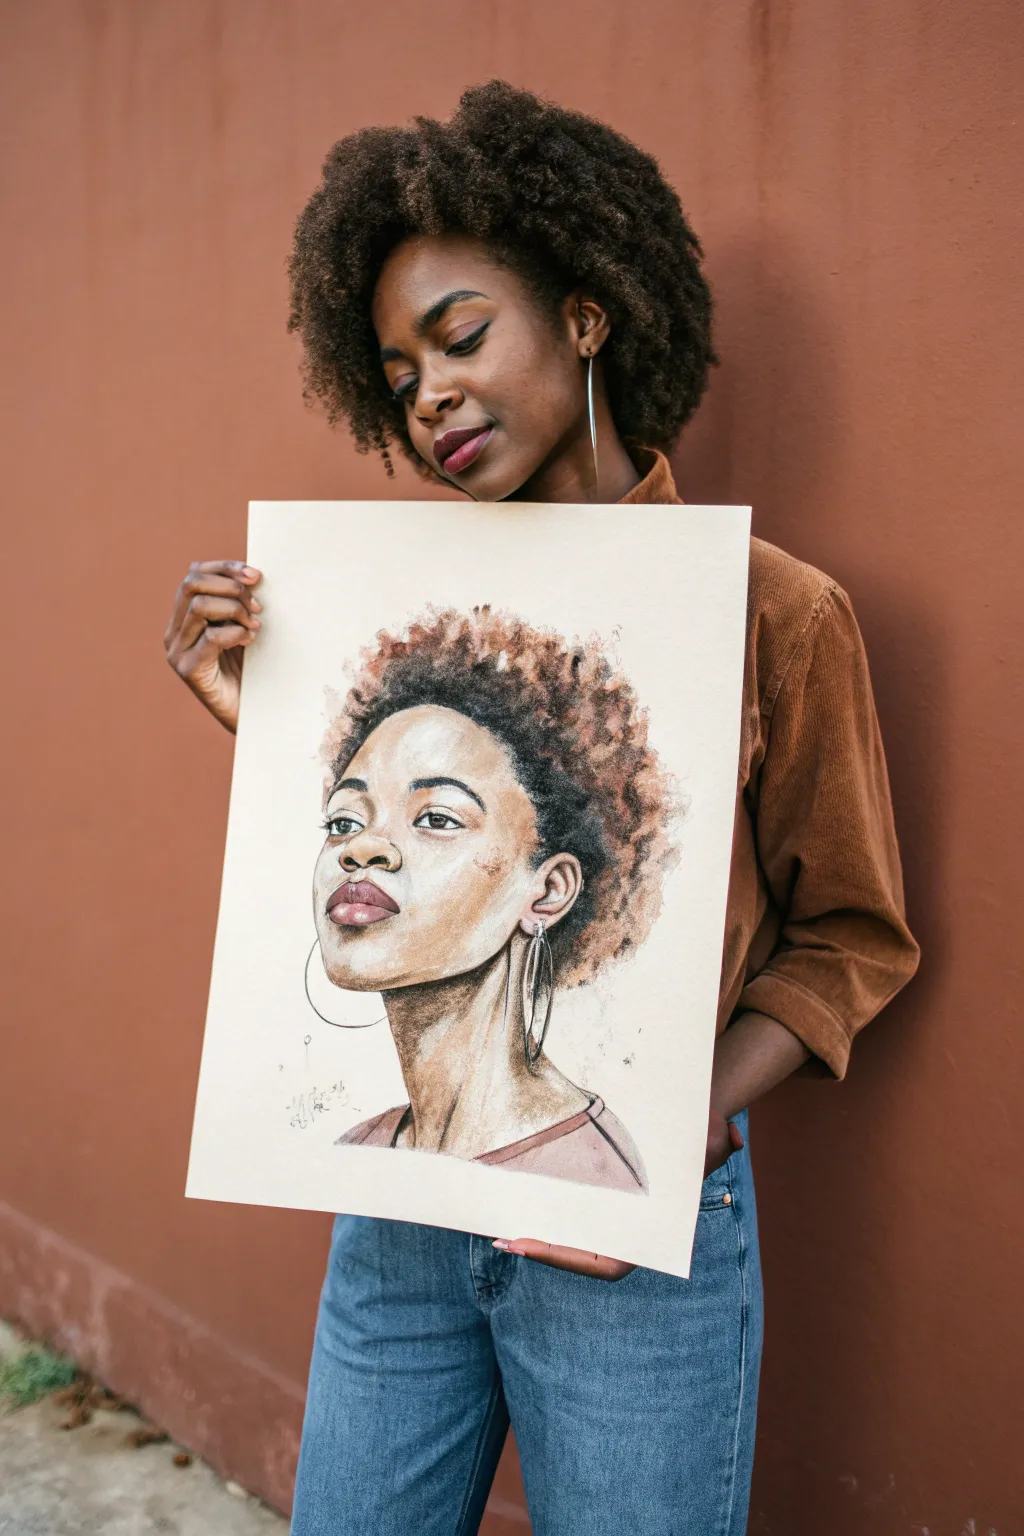
Monochrome Brown Study Portrait
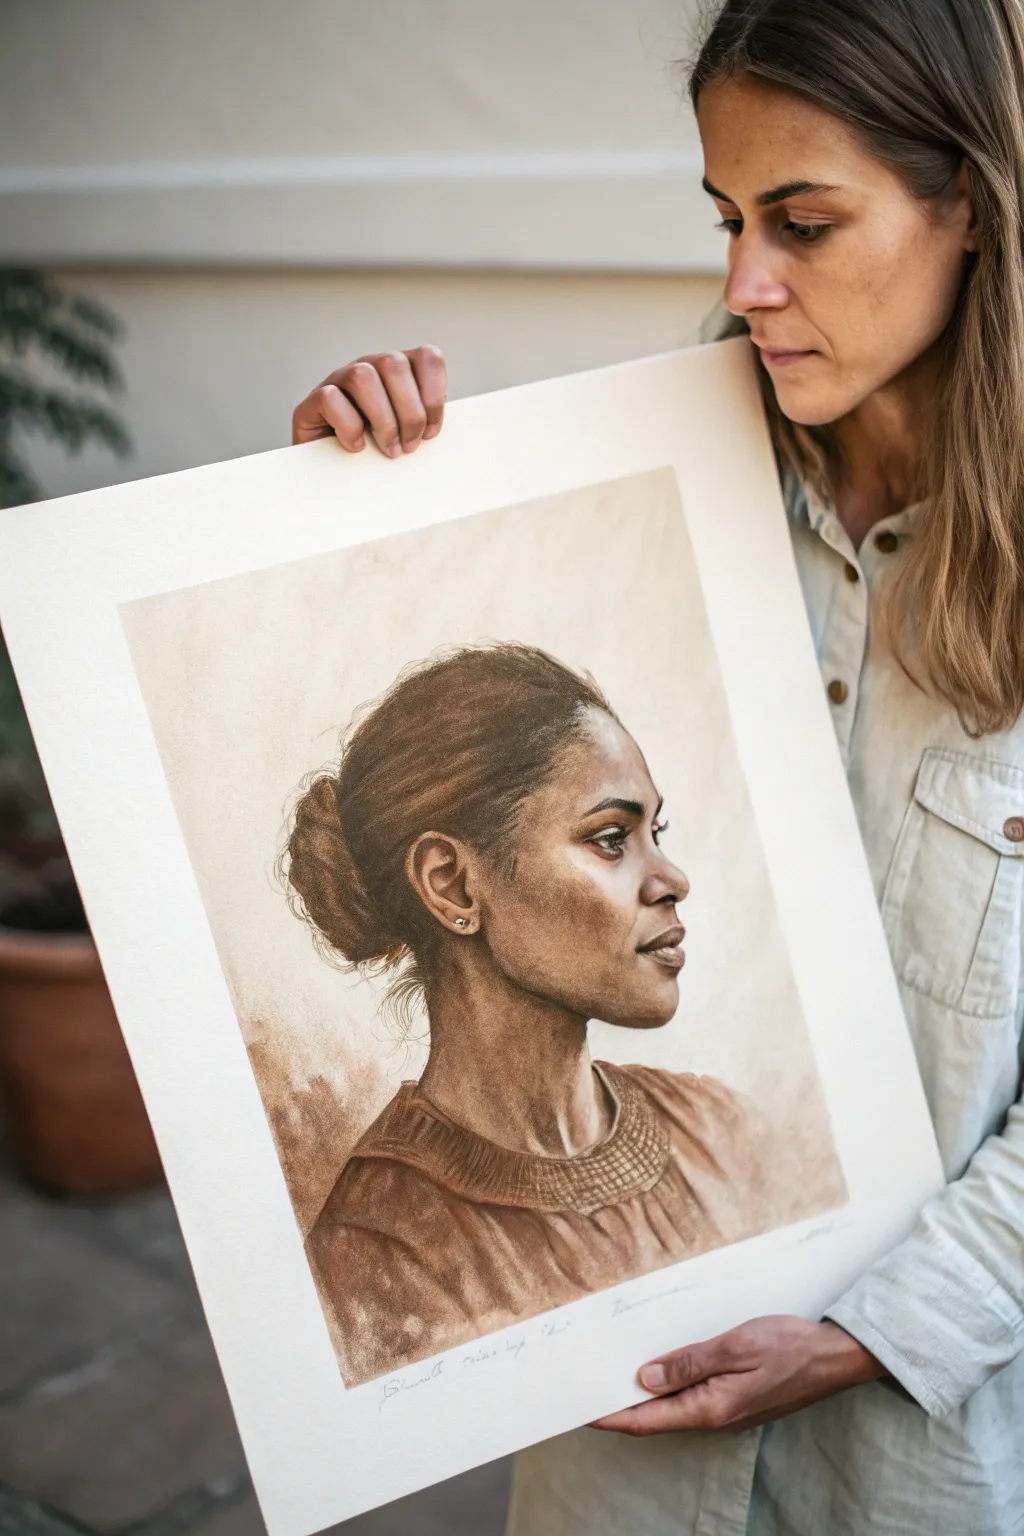
Capture the quiet elegance of a profile portrait using a monochrome palette of warm browns and deep umbers. This study focuses on soft lighting and realistic skin textures, creating a timeless piece that looks like a vintage photograph brought to life.
How-To Guide
Materials
- Heavyweight textured drawing paper (cream or off-white, at least 18×24 inches)
- Sepia and Burnt Umber pastel pencils
- Compressed charcoal (brown/sanguine)
- White pastel pencil (for highlights)
- Soft blending stumps (tortillons)
- Kneadable eraser
- Fixative spray
- Artist tape
Step 1: Planning and Structure
-
Surface Preparation:
Begin by taping your large sheet of cream paper to a rigid board or wall surface. The cream tone provides a warm mid-tone base, meaning you won’t have to color in every inch of skin later. -
Light Sketching:
Using a very light touch with a hard sepia pencil, map out the profile. Focus on the angle of the jawline, the slope of the nose, and the placement of the ear. Keep these lines faint so they can be easily adjusted or erased. -
Establishing the Eye:
Draw the eye first to anchor the expression. Since this is a profile, remember the eye sits somewhat recessed; define the upper lid and the lash line with a sharper point.
Muddy Shadows?
If shadows look dirty, you may be over-blending. Lift the murky area with a kneadable eraser until the paper shows through, then re-apply fresh pigment without rubbing it.
Step 2: Building Tone and Form
-
First Shadow Pass:
Identify the darkest areas: the hair bun, the nape of the neck, and the shadow under the chin. Lightly hatch these areas with a medium brown pastel pencil. -
Blending the Base:
Rub the hatched areas gently with a blending stump or a soft cloth. This creates a hazy, soft underlayer known as ‘sfumato’ which is perfect for realistic skin transitions. -
Sculpting the Cheek:
Add subtle shading underneath the cheekbone to create depth. Transition this shadow slowly into the light of the cheek; sudden lines here will make the face look gaunt rather than sculpted. -
Defining the Ear:
Pay close attention to the ear’s anatomy. Use darker umber values to deepen the inner folds of the ear, contrasting them against the lighter rim. A tiny touch of white pastel on the lobe adds realism. -
Layering the Hair:
Switch to your compressed charcoal or darker pastel for the hair. Instead of drawing individual strands immediately, block in the mass of the bun and the hair swept back from the forehead. -
Hair Texture:
once the dark mass is established, use a sharp pencil to flick in loose strands escaping the bun and along the hairline to soften the look.
Step 3: Refining Details
-
Deepening Values:
Go back over the darkest shadows—specifically the nostril, the corner of the mouth, and the deepest folds of the hair—with your darkest brown or black-brown pencil to increase contrast. -
The Mouth:
Render the lips carefully. The upper lip usually casts a shadow and appears darker, while the lower lip catches more light. Use vertical strokes to mimic lip texture. -
Clothing Texture:
Roughly sketch the collar and shoulders. I prefer to keep the clothing looser and more impressionistic than the face, using broad side-strokes of the pastel to suggest fabric folds without rigorous detail. -
Collar Detailing:
Add the cross-hatching pattern to the collar area with a sharp point, suggesting a woven or knit texture.
Pro Tip: Hand Guard
Place a clean sheet of scrap paper under your drawing hand. This prevents natural oils from your skin transferring to the paper and stops your palm from smudging your work.
Step 4: Highlights and Finishing
-
Lifting Highlights:
Use your kneadable eraser to lift pigment off the bridge of the nose, the forehead, and the top of the cheekbone. This ‘erasing out’ technique creates a natural, soft highlight. -
Adding White:
Use the white pastel pencil very sparingly. Apply it only to the most intense light points: the reflection in the eye, the tip of the nose, and the earring. -
Background Wash:
Lightly smudge some leftover pigment from your blending stump into the background area behind the head. This vague shadowing helps pop the portrait forward. -
Final Fix:
Once you are satisfied, spray the artwork with a workable fixative in a well-ventilated area to prevent smudging.
Step back and admire the soulful depth of your new monochrome portrait
Line Art Face With Painted Hair
This stunning mixed-media portrait captures the beauty of natural hair by combining precise facial shading with loose, expressive textures for the afro. The finished piece balances detailed charcoal or pencil work on the face with soft, earthy washes of watercolor or pastel to create a soulful and artistic composition.
Step-by-Step Guide
Materials
- Large sheet of heavyweight mixed-media or watercolor paper (cream or tan toned is ideal)
- Graphite pencils (HB, 2B, 4B)
- Charcoal pencils (soft and medium)
- Willow charcoal sticks
- Watercolor paints (Burnt Sienna, Raw Umber, Yellow Ochre, Lamp Black)
- Round watercolor brushes (sizes 6 and 10)
- White gel pen or white gouache
- Kneaded eraser
- Blending stumps (tortillons)
- Fixative spray
Step 1: Sketching the Foundation
-
Establish facial proportions:
Start with a light HB pencil sketch to map out the facial structure. Draw a vertical line for symmetry and horizontal guidelines for the eyes, nose, and mouth. Position the head at a slight ¾ angle, looking upward and to the left. -
Refine the features:
Lightly outline the almond shape of the eyes, the curve of the nose, and the fullness of the lips. Keep your lines faint so they can be easily adjusted or erased later. Mark the jawline and the long, elegant curve of the neck. -
Map the hair boundary:
Sketch a very faint, irregular outline where the afro will sit. Do not draw individual strands yet; just establish the overall volume and shape, ensuring it frames the face nicely.
Uneven Blotches?
If your watercolor hair wash dries with hard, unwanted edges (blooms), soften them by scrubbing gently with a clean, damp stiff brush, then layer charcoal over the top to hide the transition.
Step 2: Shading the Face
-
Apply base shading:
Using a 2B pencil, begin shading the shadow areas of the face: under the eyebrows, the side of the nose, beneath the lip, and along the jawline. Use gentle hatching strokes. -
Deepen contrast with charcoal:
Switch to a medium charcoal pencil for the darker areas. Darken the pupils, the lash line, and the nostrils. Use the charcoal to define the sharp line of the jaw and the shadow on the neck. -
Blend for smoothness:
Take a blending stump and gently smudge the graphite and charcoal shading on the skin. This creates a smooth, semi-realistic skin texture. Leave the highlighted areas (cheekbones, nose bridge, forehead) bare paper for now. -
Add skin tone nuances:
I like to wash a very diluted layer of Yellow Ochre and Burnt Sienna watercolor over the shaded areas of the skin. Keep it extremely watery so the pencil work shows through. Let this dry completely. -
Detail the lips and eyes:
Add a touch of diluted red or pink watercolor to the lips. Once dry, redefine the lip lines with sharp charcoal. Add the catchlights in the eyes using a tiny dot of white gouache or a gel pen to bring the subject to life.
Step 3: Creating the Hair Texture
-
First watercolor wash:
Mix a watery wash of Burnt Sienna and Raw Umber. Apply this loosely within the hair boundary you sketched earlier. Let the edges be rough and organic to mimic natural hair texture. -
Dabbing technique:
While the first layer is still slightly damp, dab in darker concentrations of brown and black paint using a sponge or a scruffy brush. Focus the darkest darks near the scalp and roots to create depth. -
Dry brush texture:
Once the paint is dry, take a willow charcoal stick or a dry brush with black paint. Scumble (rub loosely) over the painted area to create a fuzzy, frizzy texture that mimics the surface of an afro. -
Define the edges:
Use a charcoal pencil to draw tight, tiny coils and squiggles along the outer edge of the hair. This breaks up the solid shape and makes the hair look realistic and soft.
Make It Pop
Add metallic gold paint to the hoop earrings or as subtle flecks in the eyes to give the portrait a luxurious, gallery-ready finish that catches the light.
Step 4: Final Touches
-
Add earrings:
Draw the large hoop earrings. Use a sharp charcoal pencil for the outlines and ensure the earring on the far side passes ‘through’ the negative space of the neck area correctly. -
Clothing sketch:
Sketch the neckline of the top loosely with charcoal and add a wash of muted mauve or brown watercolor. Keep the clothing less detailed than the face to maintain focus on the portrait. -
Artist signature:
Add your signature near the shoulder area. Review the contrast one last time—if the skin looks too pale, add another layer of light graphite shading. -
Seal the artwork:
Because you used charcoal and graphite, spray the entire piece with a fixative in a well-ventilated area to prevent smudging.
Hang your beautiful portrait in a simple frame to let the textures speak for themselves
Butterfly Locs As Repeating Shapes
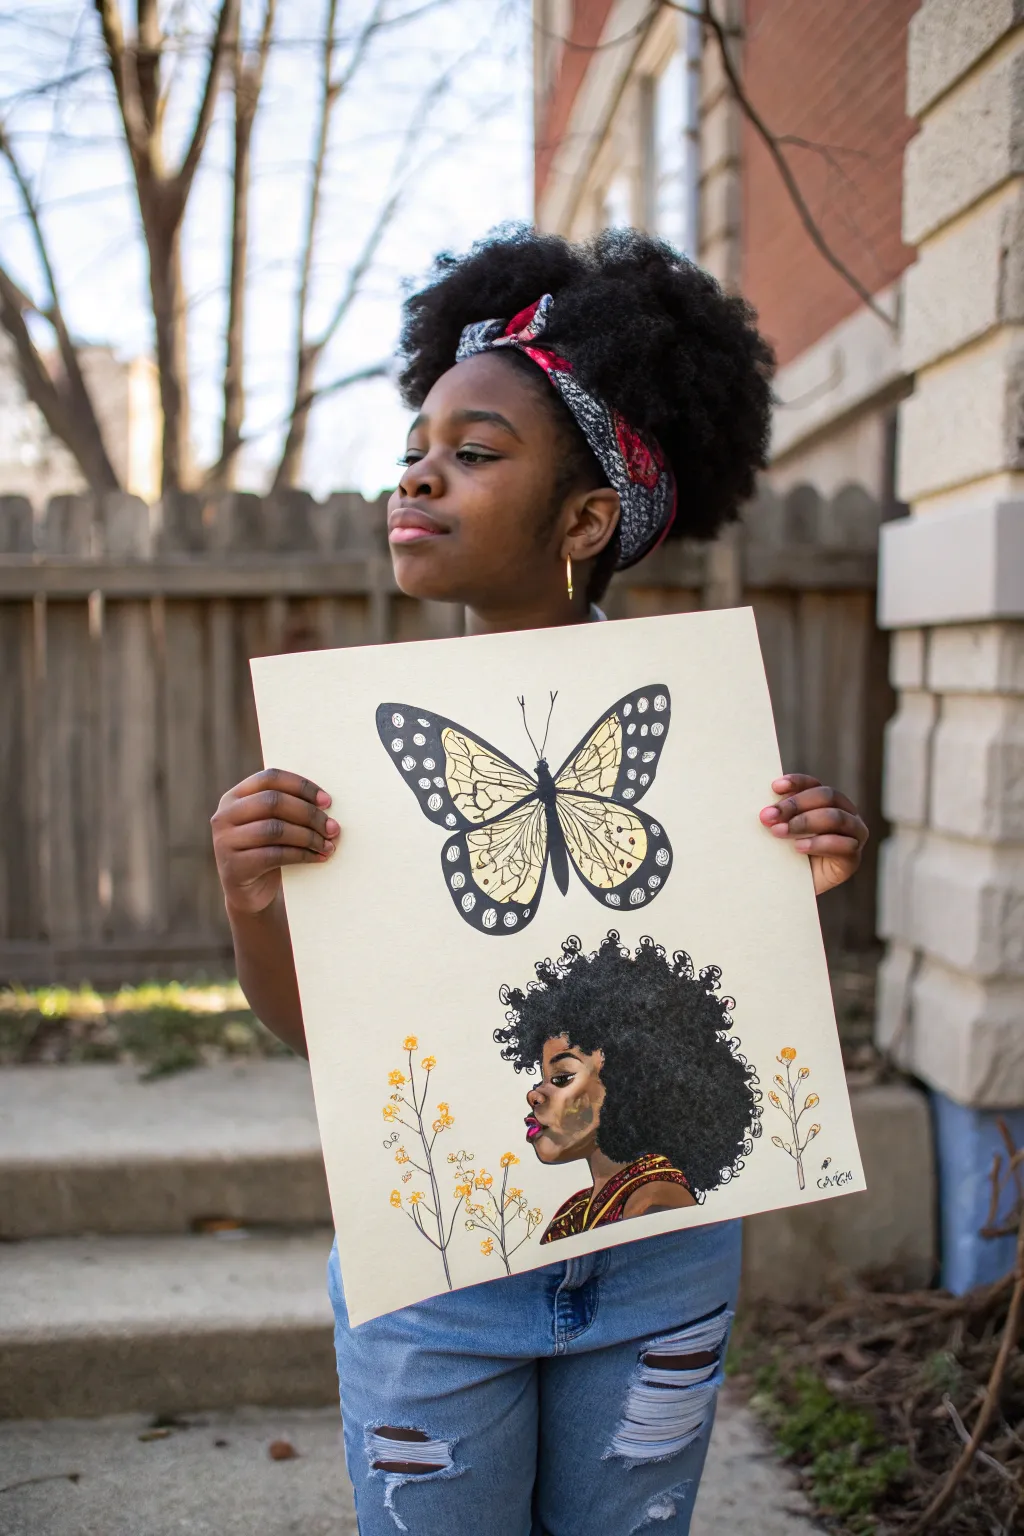
This striking mixed-media style piece combines a delicate, large-scale butterfly with a bold profile portrait, celebrating the beauty of natural hair and nature’s patterns. The simple color palette of black, cream, and mustard yellow creates a sophisticated, illustrated look that jumps off the page.
Step-by-Step
Materials
- Heavyweight cream or off-white mixed media paper (11×14 or larger)
- Graphite pencil (HB) and eraser
- Fine liner pens (Black, varying sizes 0.1mm – 0.8mm)
- Black acrylic paint or India ink
- Yellow/Gold watercolor or acrylic wash
- Small round brushes (size 2 and 4)
- White gel pen (optional for highlights)
- Ruler (for symmetry)
Step 1: Drafting the Composition
-
Space planning:
Begin by lightly dividing your paper into two main sections. The top two-thirds will be dedicated to the butterfly, and the bottom third will house the profile portrait. -
Butterfly structure:
Draw a vertical centerline for the butterfly’s body. Sketch a long, thin oval for the body, then lightly block out the large wing shapes. The top wings should be elongated triangles, and the bottom wings should be rounded lobes. -
Sketching the profile:
In the bottom section, sketch the side profile of a face looking left. Focus on the curve of the forehead, nose, and lips. Don’t worry about the hair yet; just get the facial features proportioned. -
Adding the hair volume:
Draw a large, cloud-like shape surrounding the head to represent the Afro-textured hair. Keep the edges playful and irregular to mimic natural curls. -
Botanical accents:
To the left and right of the profile, lightly sketch slender, vertical stems with small, circular flower buds. These should frame the portrait without overwhelming it.
Clean Lines Pro-Tip
For the butterfly’s wing spots, use a white gel pen over the dried black paint instead of trying to paint around tiny white circles. It’s much faster and cleaner.
Step 2: Inking the Butterfly
-
Outlining the wings:
Using a thicker black marker or a brush with India ink, trace the main outline of the butterfly wings. Make the outer edges thick and bold. -
Creating the segments:
Inside the wings, draw the vein structure. Create large, enclosed cells within the wings, leaving thick black borders between them, similar to stained glass lead lines. -
Adding patterns:
Along the outer black margins of the wings, draw small circles and ovals. These will remain unpainted to create the classic Monarch-style polka dot pattern. -
Filling the black:
Fill in the negative space of the wings with solid black ink or paint. Be careful to work around your inner cells and the outer edge dots.
Step 3: Painting the Portrait
-
Skin tone base:
Mix a warm brown acrylic or watercolor. Paint the face profile, carefully avoiding the eye area if you want it lighter. Let this layer dry completely. -
Hair texture:
Using black paint and a stippling motion (dabbing the brush up and down), fill in the hair shape. Use swirling motions at the edges to create tight coils and loose curls. -
Defining features:
Once the skin paint is dry, use a fine liner to outline the profile, draw the eye, eyebrow, and define the lips. A touch of pink paint on the lips adds a nice pop. -
Patterned clothing:
Sketch a simple garment neckline. Fill it with geometric patterns—stripes or triangles—using red and yellow to complement the butterfly.
Level It Up
Use metallic gold paint for the butterfly wings and clothing details. It will catch the light and make the artwork feel regal and expensive.
Step 4: Color and Final Details
-
Gilding the wings:
Take your yellow or gold wash and carefully paint inside the large ‘window’ cells of the butterfly wings. The transparency of watercolor works beautifully here to keep things delicate. -
Floral touches:
Paint the small flower buds on the stems with the same yellow/gold used in the wings to tie the piece together. Trace the stems with a very fine black pen. -
Hair detailing:
I like to use a fine liner to add tiny spirals and squiggles protruding from the main black hair shape, giving it an airy, realistic texture. -
Cleanup:
Erase any remaining pencil lines once all ink and paint are fully dry. If you want extra contrast, use a white gel pen to add a highlight to the cheek or lip.
Step back and admire how the bold black elements balance perfectly with the delicate color washes
Negative Space Hair Silhouette Trick
This elegant project uses the power of high contrast to create a striking portrait that looks professional but is surprisingly beginner-friendly. By focusing on the silhouette shape rather than facial details, you capture a beautiful essence with just black ink or paint on textured paper.
Step-by-Step Tutorial
Materials
- Heavyweight watercolor or mixed-media paper (cold press texture recommended)
- Black India ink or high-flow black acrylic paint
- Pencil (HB or H for light lines)
- Fine liner pen (black, 0.3mm or 0.5mm)
- Round brush (size 4 or 6 for filling)
- Small detail brush (size 0 or 00 for edges)
- Printer and plain paper (optional, for reference template)
- Masking tape
Step 1: Preparation & Sketching
-
Secure the paper:
Begin by tearing the edges of your paper if you want that rustic, deckled look shown in the image. Tape the paper down to your work surface or a drawing board using masking tape to prevent it from buckling when wet. -
Establish the outline:
You can freehand the profile if you feel confident, focusing on the curve of the forehead, the dip of the nose, and the fullness of the lips. Keep your pencil lines extremely light so they are easy to erase later. -
Use a template (optional):
If drawing faces is tricky, print a side-profile photo you like in high contrast. Trace the outline onto your watercolor paper using a light box or by shading the back of the printout and tracing over the top. -
Refine the hairstyle:
Sketch the bun shape at the back of the head. Don’t worry about individual strands yet; just focus on the solid mass of the hair and the connection to the neck. -
Mark the neck and shoulders:
Draw the slope of the neck down to the shoulder. I usually let the bottom edge of the silhouette curb naturally or fade out rather than drawing a hard horizontal line.
Bleeding Lines?
If ink bleeds beyond your lines, the paper might be too damp or absorbent. Let it dry, then use a white gel pen or white gouache to tidy up the edges and sharpen the profile.
Step 2: Inking the Silhouette
-
Outline with precision:
Using your fine liner pen or the very tip of your detail brush, carefully trace over your pencil lines. Pay close attention to the lips and eyelashes, as these small bumps define the profile. -
Fill the large areas:
Switch to your larger round brush loaded with black India ink or fluid acrylic. Start filling in the center of the head and neck, working your way outward toward your outline. -
Work the wet edge:
Try to keep a ‘wet edge’ as you paint to avoid streak marks. If the ink dries too fast, you might see layering lines, so work steadily from top to bottom. -
Refine the profile features:
As you bring the black fill up to the face outline, switch back to the smaller brush for ultimate control. The ink should be solid and opaque—apply a second coat if it looks patchy after drying.
Step 3: Adding Delicate Details
-
Create hair texture:
To make the hair look realistic, use your fine liner or a semi-dry detail brush to flick tiny lines outward from the top of the hairline and the bun. These shouldn’t be uniform; random directions look more natural. -
Add wispy strands:
Draw a few longer, stray hairs escaping from the bun and falling down the back of the neck. Use a quick, light hand motion for these lines so they taper off thinly at the ends. -
Detail the hairline:
Add very subtle, small strokes along the forehead hairline. This softens the transition between the black paint and the white paper, preventing it from looking like a cutout helmet. -
Final inspection:
Step back and look at the overall shape. Fill in any tiny white pinholes in the ink and let the artwork dry completely before carefully erasing any visible pencil marks.
Add a Golden Touch
For a luxurious twist, paint the jewelry (like an earring or necklace) using metallic gold watercolor or gold leaf. It pops beautifully against the matte black ink.
Now you have a timeless piece of art that celebrates simple beauty through bold contrast
Mini Series Of Four Hairstyles
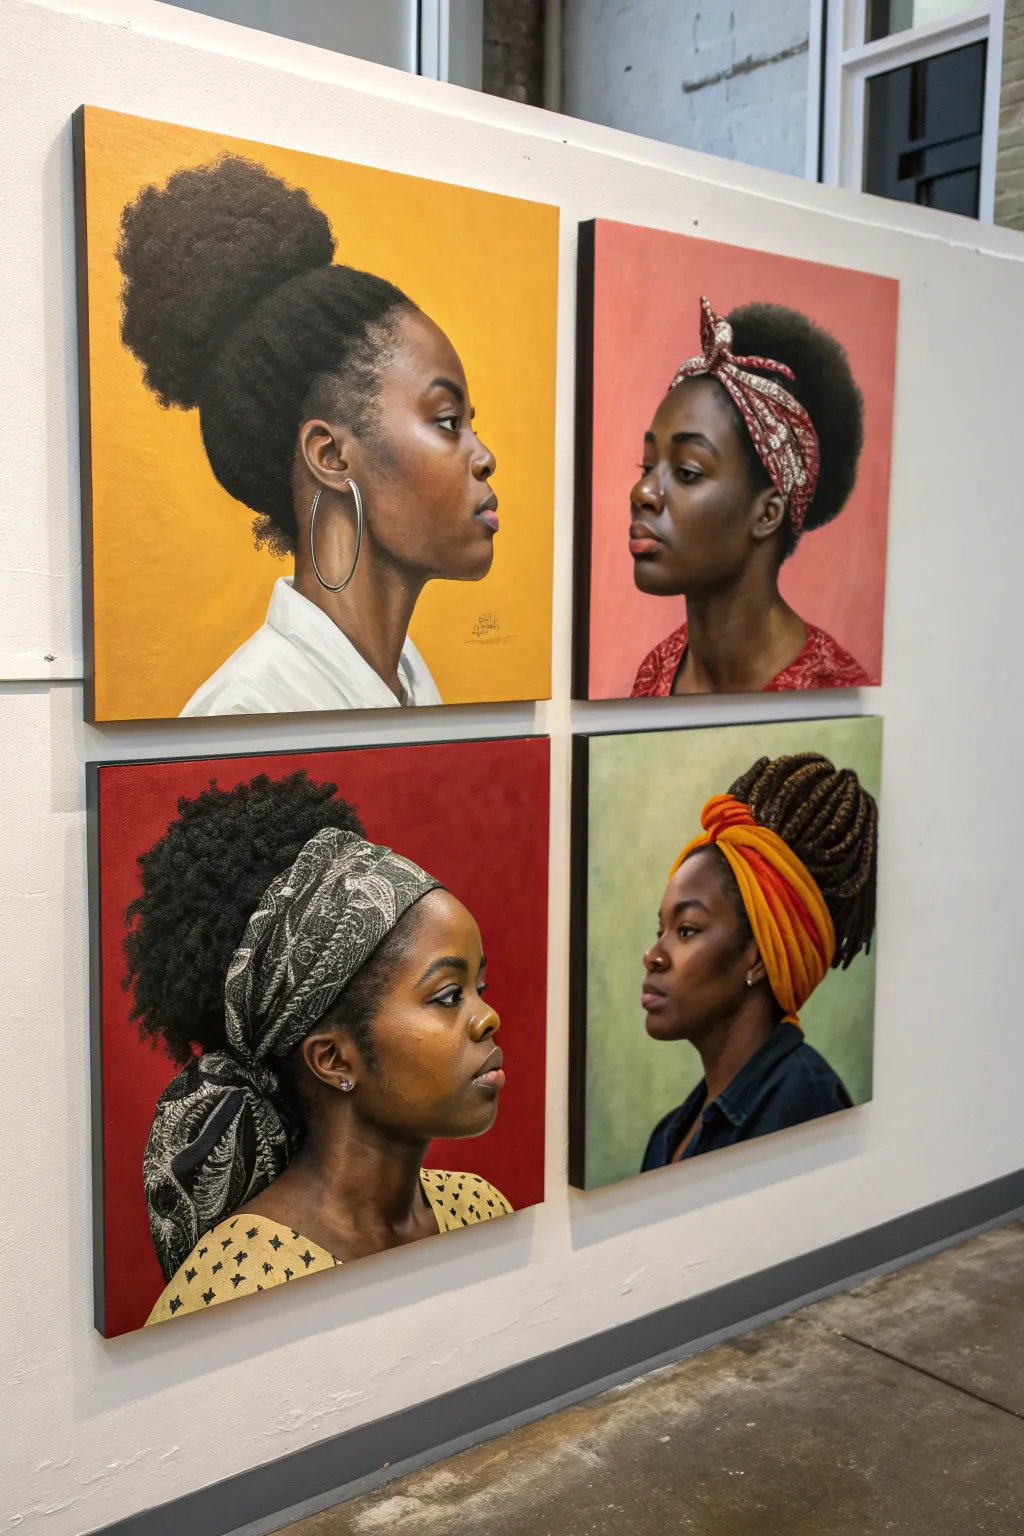
This stunning mini-series captures the beauty and diversity of hairstyles through four cohesive portraits, each set against a bold, solid-colored background. By using a profile view for every subject, you create a unified gallery wall effect that celebrates individuality within a consistent theme.
Step-by-Step
Materials
- 4 Square canvases (12×12 or 16×16 inches)
- Acrylic paints (Heavy body recommended)
- Gesso (optional, for priming)
- Pencil (HB or 2B)
- Graphite transfer paper (optional)
- Various brushes: large flat brush (backgrounds), Filbert brushes (skin blending), small round brushes (details)
- Mixing palette
- Water cup and paper towels
- Spray fixative or varnish
Step 1: Planning and Sketching
-
Select your references:
Choose four reference photos of Black women in profile view. Aim for variety in hairstyles—like an afro puff, a patterned headwrap, braided updo with a scarf, and natural curls with accessories—to create visual interest across the series. -
Map out the composition:
Lightly sketch the profile of each woman onto your four canvases. Ensure the heads are roughly the same size and gazing in the same direction (or pairs looking at each other) for visual harmony. If drawing freehand is tricky, use graphite transfer paper to trace your reference outlines. -
Check proportions:
Before picking up a brush, double-check key landmarks like the ear placement, jawline angles, and the volume of the hair. Correcting these now is much easier than fixing them after painting has started.
Fixing Muddy Colors
If skin tones look grey or ‘muddy,’ you likely mixed too many colors or used black to darken. Use burnt umber or dark purple to deepen browns instead.
Step 2: Color Blocking
-
Paint the backgrounds:
Choose four distinct, saturated colors: mustard yellow, coral pink, deep red, and sage green. Use a large flat brush to apply an even, opaque coat to the negative space around each figure. You may need two coats for full coverage. -
Base coat the skin:
Mix a mid-tone brown for the skin base. Don’t worry about highlights or shadows yet; just fill in the face and neck areas with a flat, solid color to establish the silhouette. -
Block in hair and clothing:
Fill in the hair shapes with a dark brown or black base. For the headwraps and clothing, apply the main base color (like olive green for the patterned wrap or yellow for the shirt) to separate these elements from the skin and background.
Step 3: Developing the Portraits
-
Establish shadows:
Mix a darker version of your skin tone using burnt umber and a touch of purple or deep blue. Apply this to the shadowed areas: under the chin, the nape of the neck, and the side of the face away from the light source. -
Add warm mid-tones:
Using a filbert brush, blend in warmer, reddish-brown tones on the cheeks and forehead to give the skin life and dimension. Work while the paint is slightly tacky to soften the transition between shadow and base. -
Place the highlights:
Mix a lighter skin tone using yellow ochre and a tiny bit of white. Dab this onto the high points: cheekbones, bridge of the nose, forehead, and shoulder. Keep edges soft for a realistic glow. -
Detail the features:
Switch to a small round brush. Carefully define the eyes, eyebrows, and lips. Pay close attention to the subtle curves of the lips and the highlight in the eye, as these bring the expression to life.
Level Up: Gold Leaf
Apply gold leaf to the hoop earrings or specific patterns in the headwraps. This adds a physical shine that catches the light beautifully.
Step 4: Hair and Accessories
-
Texturize natural hair:
For the afro puff and natural textures, use a scruffy or dry brush. Stipple dark grey or lighter black paint over the black base to create the illusion of coils and volume without drawing every strand. -
Detail the headwraps:
Paint the intricate patterns on the scarves. For the dark wrap, use a fine liner brush to add the white paisley details. For the orange and red wraps, paint the folds and creases using darker shades of the base color to show depth. -
Refine the braids:
If painting braids, use a repetition of small, interlocking ‘V’ or oval shapes. Highlight the top curve of each braid segment to show texture and shine. -
Add jewelry:
Paint the prominent hoop earrings. Start with a dark grey line for the hoop, then add a stark white highlight on the metal to make it look reflective and shiny.
Step 5: Finishing Touches
-
Refine the edges:
Go back with your background color and clean up the silhouette edges where the profile meets the colored backdrop. This makes the figure ‘pop’ and look crisp. -
Deepen contrast:
I like to take a step back here and evaluate the values. If the portrait feels flat, glaze a thin layer of transparent dark brown over the deepest shadows to push the contrast further. -
Pattern clothing:
Add the final patterns to the clothing, such as the small stars on the yellow shirt or the paisley texture on the red top, keeping the strokes loose but deliberate. -
Seal the work:
Once all four paintings are completely dry (give it at least 24 hours), apply a satin or gloss varnish to protect the paint and unify the sheen across the series.
Hang your quartet in a precise grid to instantly transform any wall into a gallery of vibrant, celebrating beauty.
Abstract Color-Block Black Girl Portrait
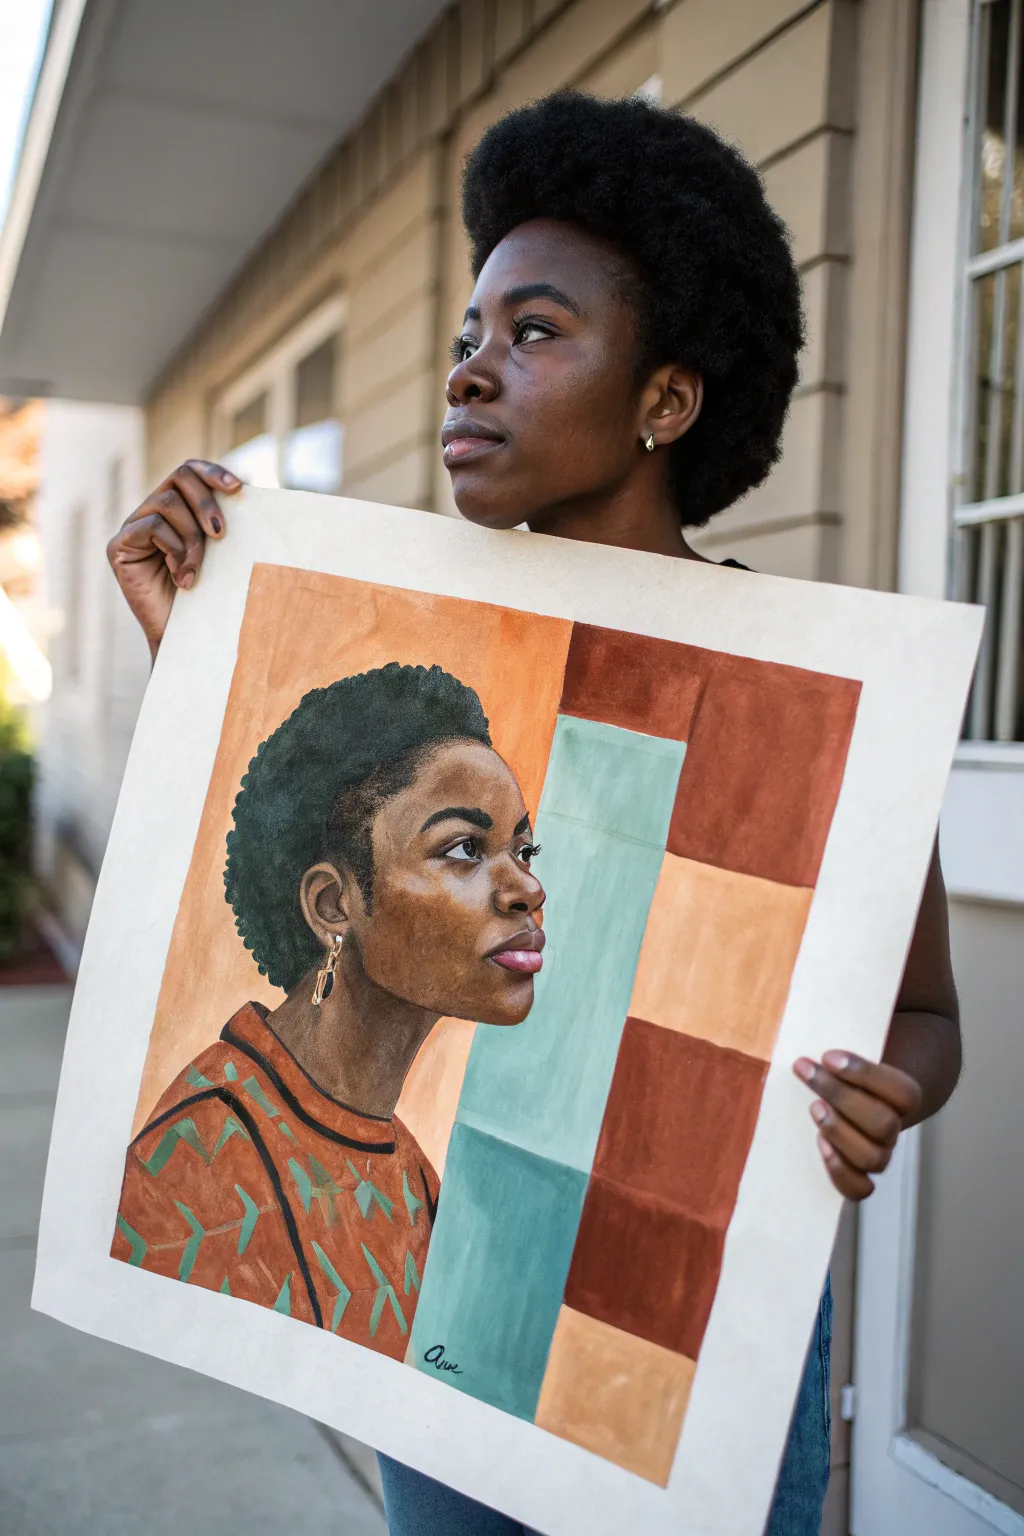
This stunning intermediate-level project combines realistic portraiture with geometric abstraction, creating a modern and vibrant piece of wall art. By dividing the background into bold color blocks, you frame the subject in a way that feels both structured and deeply expressive.
Step-by-Step Guide
Materials
- Large heavy-weight watercolor paper or mixed media board (approx. 18×24 inches)
- Acrylic paints (Burnt Sienna, Raw Umber, Yellow Ochre, Ultramarine Blue, Titanium White, Teal, Terracotta/Burnt Orange, Deep Red-Brown)
- Pencil (HB or H) for sketching
- Kneaded eraser
- Flat synthetic brushes (1-inch and 1/2-inch for background)
- Round synthetic brushes (sizes 2, 4, and 0 for details)
- Ruler or T-square
- Painter’s tape or masking tape
- Palette for mixing
- Water cup and paper towels
Step 1: Planning and Sketching
-
Grid the Layout:
Begin by lightly planning your composition. Using a ruler, mark out the rectangular zones for the background. You’ll want a large vertical block on the left (warm orange), a central vertical column that’s split horizontally (teal and dark blue-green), and a segmented column on the right with varying brown tones. -
Sketch the Portrait Outline:
In the left-center area, lightly sketch the profile of the subject. Focus on the angle of the jawline, the curve of the afro texture hair, and the gaze looking toward the right. Keep your pencil pressure light so lines don’t show through the paint later. -
Refine Facial Features:
Add detail to the facial features. Pay close attention to the almond shape of the eye, the structure of the nose, and the fullness of the lips. Sketch the shirt collar and shoulders to ground the figure.
Uneven Coverage?
If your background colors look streaky, apply a second coat. Let the first layer dry fully, then paint the second layer perpendicular to the first for an opaque finish.
Step 2: The Abstract Background
-
Tape the Edges:
To get those crisp, clean lines between the color blocks, apply painter’s tape along your pencil lines. I usually tape and paint one section at a time to prevent wet edges from blurring. -
Paint the Warm Orange Zone:
Mix a terracotta shade using Burnt Orange and a touch of White to soften it. Paint the large section behind the head, using a flat brush for smooth, even strokes. Let the paint overlap slightly into the hair area—you’ll paint over it later. -
Block in Cool Tones:
Once the orange is dry and re-taped, mix a muted teal using Teal, White, and a tiny dot of Burnt Sienna to desaturate it. Fill the upper central rectangle. For the lower block, add a bit more blue or green to create a subtle variation. -
Complete the Right Column:
Fill the remaining rectangles on the right side. Use a deep reddish-brown for the larger blocks and a lighter, peachy-tan (White mixed with Yellow Ochre and Burnt Sienna) for the smaller accent square. Let the entire background dry completely before removing any remaining tape.
Step 3: Painting the Portrait
-
Base Skin Tone:
Mix a mid-tone brown using Burnt Sienna, Raw Umber, and a little Yellow Ochre. Apply this base layer to the entire face and neck, avoiding the eyes and lips. -
Establish Shadows:
While the base is still slightly tacky or just dry, mix a darker shadow tone (add a touch of Blue or Purple to your brown mix). Paint the shadows under the jawline, the hollow of the cheek, the eye socket, and the side of the nose. -
Add Highlights:
Mix a lighter tint of your base color. Carefully brush this onto the forehead, the bridge of the nose, the cheekbone, and the chin to create dimension and form. -
Paint the Features:
Using a size 2 round brush, paint the lips using a mix of red-brown and a touch of violet. Paint the eye, remembering to leave the white of the eye clean or painted with off-white, and define the pupil with dark brown or black. -
Detailing the Hair:
Mix a very dark grey-black (Raw Umber + Ultramarine Blue). Use a scumbling technique or a worn bristle brush to tap in the texture of the hair, ensuring the edges feel soft and natural against the orange background. -
Patterned Clothing:
Paint the shirt with a rust-orange base. Once dry, use a small liner brush and green paint to add the geometric arrow pattern seen in the reference. Keep the pattern loose to suggest fabric movement.
Add Metallic Foil
Instead of painting the earring with ochre, use a small amount of gold leaf adhesive and apply real gold leaf to the jewelry area for a luxurious, mixed-media 3D effect.
Step 4: Refining and Finishing
-
Deepen Contrast:
Step back and assess your values. If the face looks flat, glaze a thin layer of dark transparent brown over the deepest shadow areas to increase the contrast. -
The Gold Earring:
Using a small detail brush, paint the earring shape. Start with a ochre base, then add a pop of pure white highlight and a dark brown shadow to make it look metallic and shiny. -
Clean Up Lines:
Check the edges where the portrait meets the background. If any background paint overlapped too much, carefully touch up the profile edge with your skin tone mix for a sharp silhouette. -
Final Varnish:
Once the painting is fully cured (usually 24 hours for acrylics), apply a matte or satin varnish to protect the surface and unify the sheen of the different colors.
Hang your finished masterpiece in a well-lit area to let those rich earth tones truly warm up the room


Have a question or want to share your own experience? I'd love to hear from you in the comments below!