Blacklight wall paint is one of my favorite ways to flip a room from “normal” to pure magic with the lights off. If you’ve been craving a space that feels immersive, glowy, and a little surreal, these blacklight wall paint ideas will get you there fast.
Classic Neon Geometric Wall
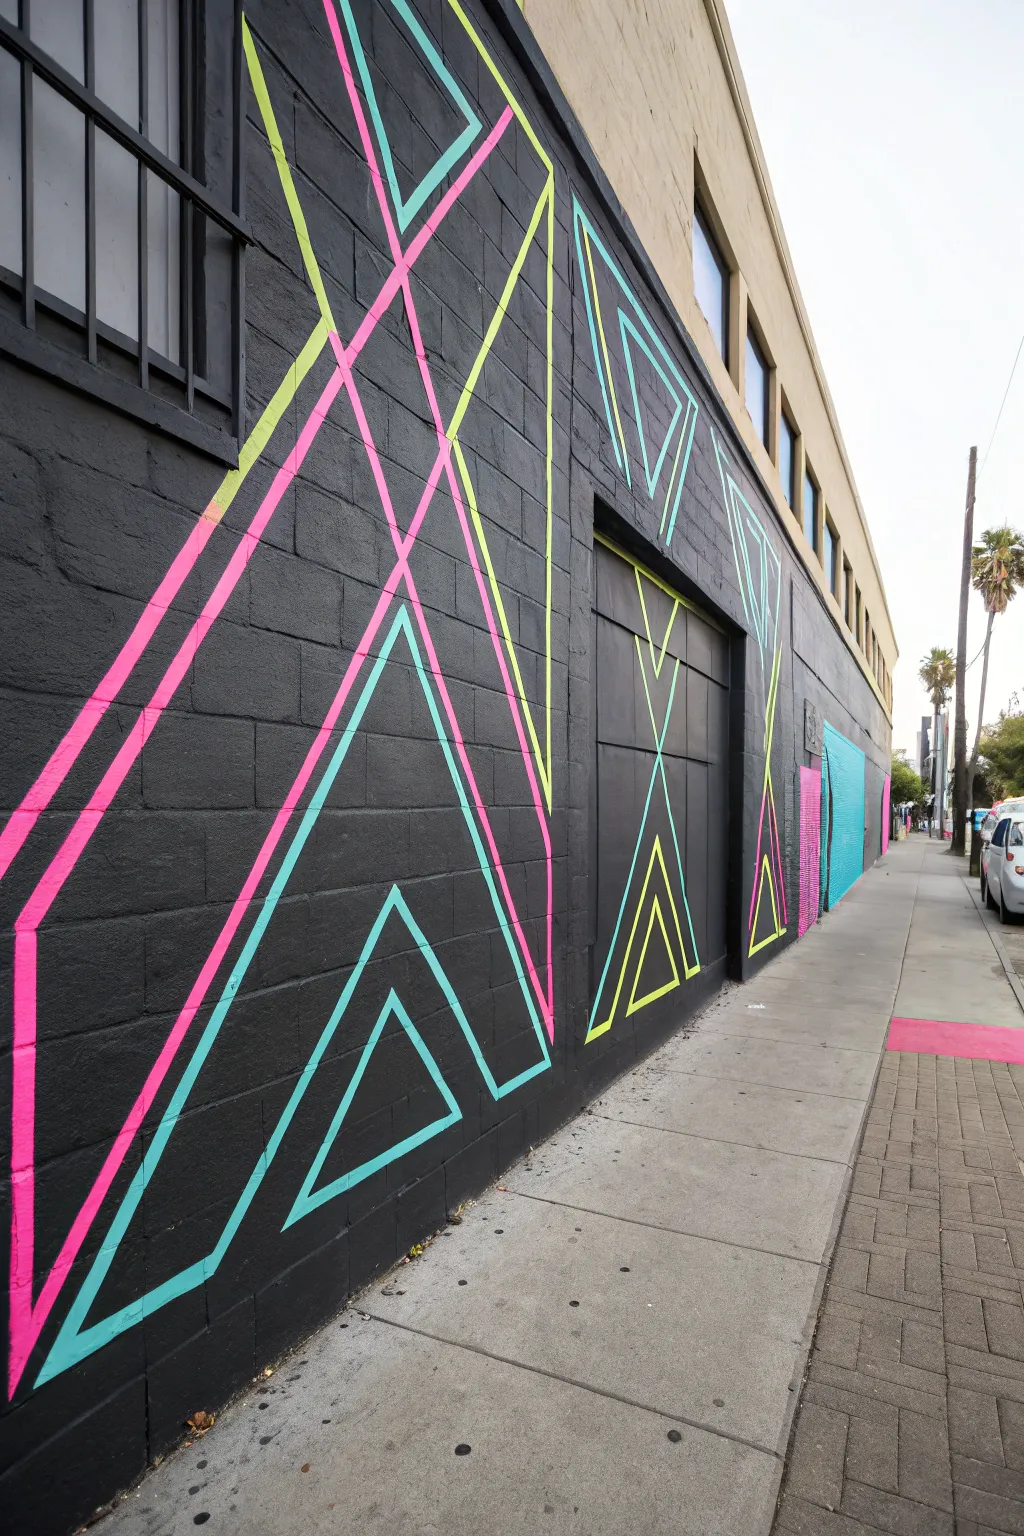
Transform a plain exterior or interior wall into a striking visual statement using high-contrast neon lines against a matte black background. This design mimics the crisp vectors of 80s arcade cabinets, using simple triangles and diamonds to create a sense of depth and movement.
How-To Guide
Materials
- Matte black exterior latex paint (base coat)
- Neon/fluorescent latex paint (Pink, Cyan, Yellow, Lime Green)
- Painter’s tape (multiple widths: 1-inch and 2-inch)
- Chalk line tool
- Measuring tape
- Long level or laser level
- Paint rollers and tray
- Small angled sash brush
- Pencil or white chalk
- Drop cloths
Step 1: Preparation and Base Coat
-
Clean surface:
Begin by thoroughly cleaning the wall surface. If you are working on exterior brick or cinder block like the example, use a stiff bristle brush or pressure washer to remove dirt and debris so the paint adheres properly. -
Protect area:
Lay down heavy-duty drop cloths along the base of the wall to catch drips, since you’ll be working with highly pigmented black paint. -
Apply base coat:
Roll on the matte black latex paint. You want a solid, uniform void as your canvas. I find that two coats are usually necessary to get that deep, light-absorbing finish, especially on textured masonry. -
Full cure:
Let the black paint dry completely and cure for at least 24 hours. If the base is tacky, your tape lines will damage it later.
Bleed-Proofing Blocks
On cinder blocks, tape alone fails. Always ‘seal’ the tape edge with your base color first. It creates a dam so the next color sits perfectly on top without seeping into the grooves.
Step 2: Drafting the Geometry
-
Establish center lines:
Measure the total width of your wall section. Use a chalk line or laser level to mark vertical reference lines where the peaks of your large triangles will sit. -
Mark heights:
Decide on the height of your main shapes. Mark the top and bottom points of the large interlocking triangles using white chalk so they show up against the black. -
Snap diagonal lines:
Using the chalk line, connect your top and bottom reference points to create the large ‘X’ shapes and triangles. Don’t worry about the smaller internal shapes yet; just get the main skeleton layout done. -
Draft internal shapes:
Measure designated distances (e.g., 6 inches) inside your main lines to create the nested, concentric triangles and diamonds. Mark these parallel lines lightly with chalk.
Step 3: Taping and Painting
-
Tape the design:
Apply painter’s tape along the *outside* of your chalk lines for the shapes you want to paint. To achieve the specific look in the photo, vary your line widths—use wider tape spacing for the pink perimeter lines and slightly narrower spacing for the internal cyan shapes. -
Seal the tape edges:
This is a crucial step for clean lines on textured walls: brush a very thin layer of your *black base paint* along the edges of the tape. This fills any gaps in the texture and prevents the neon paint from bleeding underneath. -
Paint the pink vectors:
Load a small roller or brush with the neon pink paint. Fill in the taped areas designated for the large outer triangles. Apply thin, even coats to build up opacity without dripping. -
Paint the cyan vectors:
Move on to the cyan/teal paint for the inner nested triangles. Be careful not to cross-contaminate your colors. -
Add accent colors:
If your design includes the yellow or lime green accents shown on the side panels or smaller sections, paint those now. I like to double-check my color placement plan before opening the next can. -
Apply second coats:
Neon paints are often translucent. Wait for the first coat to dry to the touch, then apply a second (and potentially third) coat to make the colors pop vividly against the black. -
Remove tape:
While the final coat of paint is still slightly tacky (not fully dry), carefully peel back the painter’s tape at a 45-degree angle. Pulling while slightly wet helps prevent pulling up dried chips of paint.
Pro Tip: White Primer
For maximum neon brightness, paint a thin layer of white primer inside your taped lines before applying the neon color. It makes the fluorescent pigment pop way more than on black.
Step 4: Touch-ups
-
Correct bleed:
Inspect your lines. If any neon paint bled onto the black, use a small artist’s brush and the matte black paint to carefully ‘erase’ the mistake. -
Clean chalk lines:
Once the paint is fully cured (give it another day), use a damp cloth to gently wipe away any remaining visible white chalk marks.
Step back and admire how the bold geometry transforms the entire architectural feel of the space


Galaxy Night Sky Mural
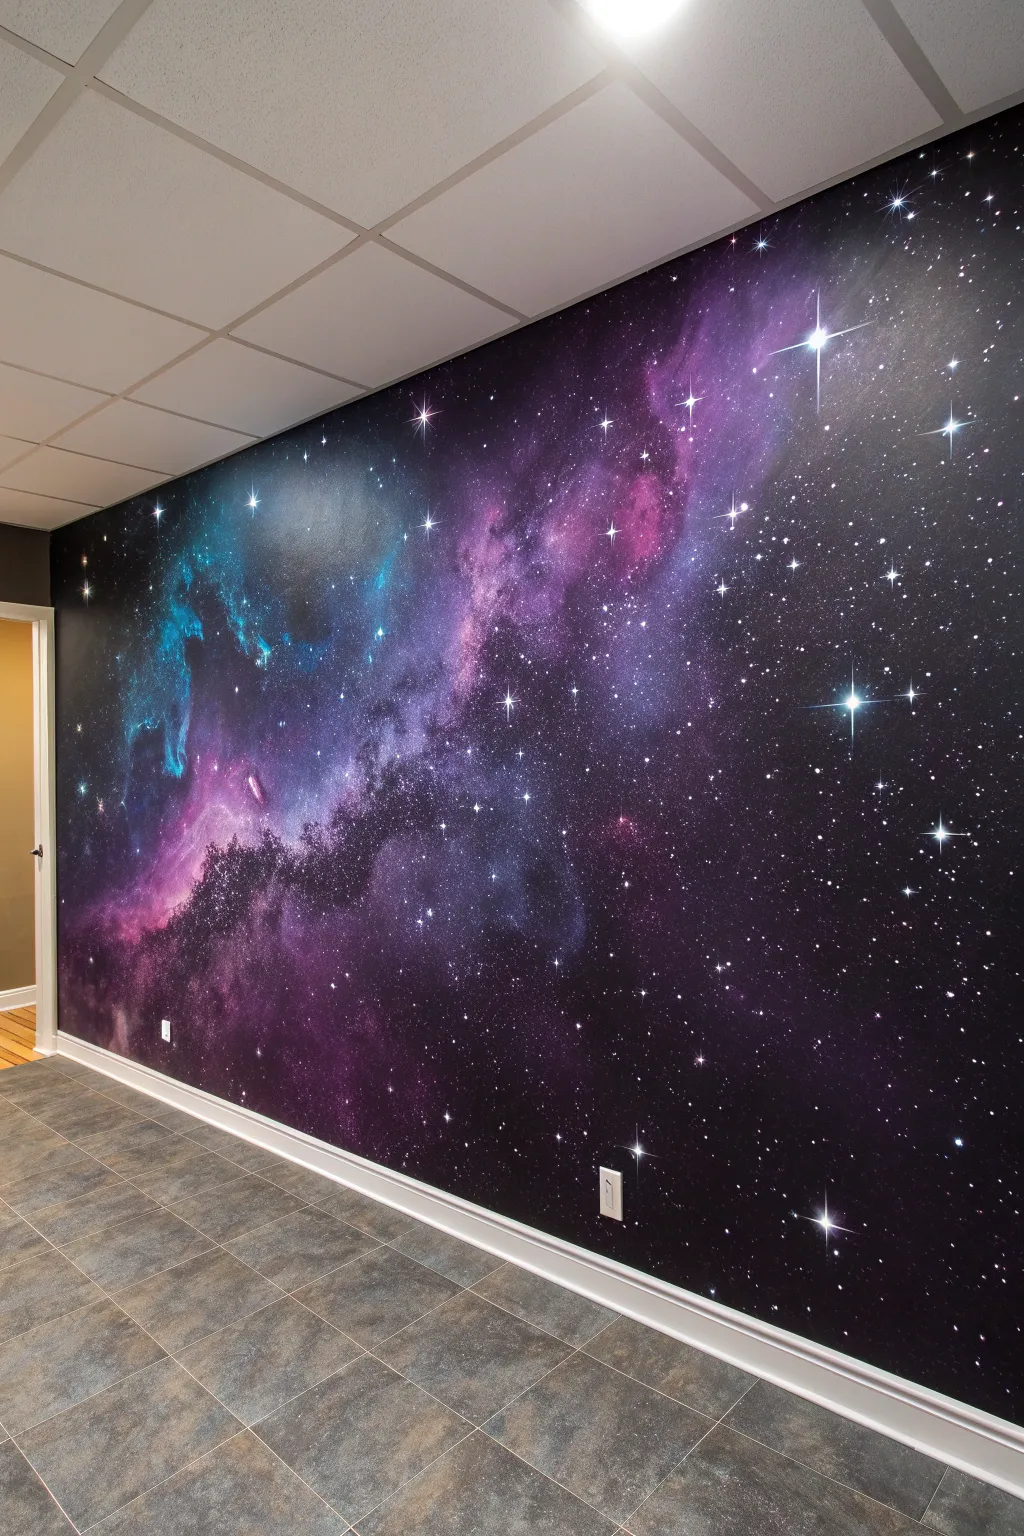
Transform an ordinary room into a breathtaking portal to deep space with this expansive galaxy mural. By layering deep purples, teals, and blacks, you will create a sense of infinite depth that glows magnificently under blacklight conditions.
Detailed Instructions
Materials
- Interior latex paint (Black, Deep Purple, Navy Blue)
- Fluorescent or UV-reactive acrylic paints (Pink, Cyan, White, Neon Purple)
- Glaze medium
- Large paint rollers and tray
- Assortment of sea sponges
- Chip brushes (various sizes)
- Old toothbrush
- Painter’s tape and drop cloths
- Detail brush (fine tip)
Step 1: Preparation and Base Layer
-
Prep the room:
Clear the area and lay down drop cloths to protect your flooring, as the splattering later on can get messy. Mask off your baseboards, electrical outlets, and door frames with painter’s tape. -
Mix the base color:
Combine your jet black latex paint with a small amount of deep purple. You want a color that reads as black but has a subtle warmth to it rather than a flat, dead gray-black. -
Roll the wall:
Apply this dark base coat over the entire wall using a standard roller. Aim for solid, opaque coverage; if your wall was light before, you will likely need two coats to achieve the necessary depth. -
Establish the darkness:
Allow the base coat to dry completely for at least 4-6 hours. A dry surface is crucial for the sponges to create texture rather than muddying the base layer.
Starry Depth Trick
Mix a tiny drop of pure white into your light blue nebula paint. Use this for the faintest background stars. They will look much further away than the pure white foreground stars.
Step 2: Building the Nebula
-
Map the cloud shapes:
Pour patches of deep purple and navy blue onto a paper plate. Dampen a large sea sponge, dip it into the paint, and offload most of the excess. -
Sponge the first layer:
Lightly dab the sponge in diagonal, drifting patterns across the wall to create the ‘backbone’ of the nebula clouds. Keep the edges soft and irregular, avoiding hard shapes or recognizable patterns. -
Intensify with UV colors:
Mix your glaze medium with the fluorescent pink and neon purple paints. I find a 1:1 ratio helps the paint stay translucent, allowing the dark background to show through slightly. -
Layering the glow:
Using a clean, damp sponge, apply these glazes over the darkest purple areas. Focus on the centers of the clouds to make them look like they are illuminated from within. -
Adding the teal rift:
Identify a focal point, like the bright blue nebula section on the left. Sponge on cyan fluorescent paint mixed with glaze, blending it gently into the surrounding purple areas while the paint is still tacky. -
Blend the transitions:
Take a dry chip brush and very lightly feather the edges where the teal meets the purple to create a seamless transition. The goal is a smoky, ethereal look. -
Deepen the shadows:
Go back in with pure black paint on a small piece of sponge. Dab it into the ‘valleys’ of your nebula clouds to create high contrast and reinforce the illusion of three-dimensional space.
Step 3: Creating the Stars
-
Prepare the star paint:
Thicken your fluorescent white acrylic paint slightly with a drop of water until it has the consistency of heavy cream. -
The toothbrush method:
Dip an old toothbrush into the white paint. Stand back about two feet from the wall and run your thumb across the bristles to flick a fine mist of ‘distant stars’ across the entire mural. -
Adding medium stars:
Use a round brush to manually dot larger stars specifically around the densest parts of the nebula clouds, where star formation would theoretically be happening. -
Painting the hero stars:
Select 5-7 spots for major ‘hero’ stars. Paint a small solid white circle, then drag a fine liner brush out from the center to create a cross shape, mimicking the diffraction spikes seen in telescope photos. -
Highlight the bursts:
Add a tiny dot of pure cyan or pink to the absolute center of your largest white stars to give them a glowing, hot core.
Sponge Trouble?
If your sponge marks look too stamped or repetitive, tear the sponge in half to create a rough, raw edge. Rotate your wrist constantly while dabbing to avoid creating identical patterns.
Step 4: Final Touches
-
Softening harsh stars:
If any stars look too stark or like paint splatters, lightly tap them with your fingertip to smudge the edges just a tiny bit, making them recede into the distance. -
Checking under blacklight:
Turn off the main lights and switch on a blacklight source. This is the moment to see if any areas need more fluorescent glaze to truly pop in the dark. -
Clean up:
Carefully peel away the painter’s tape while the final touches are still slightly damp to ensure a crisp edge along the ceiling and baseboards.
Step back and enjoy the view as your room expands into the infinite cosmos


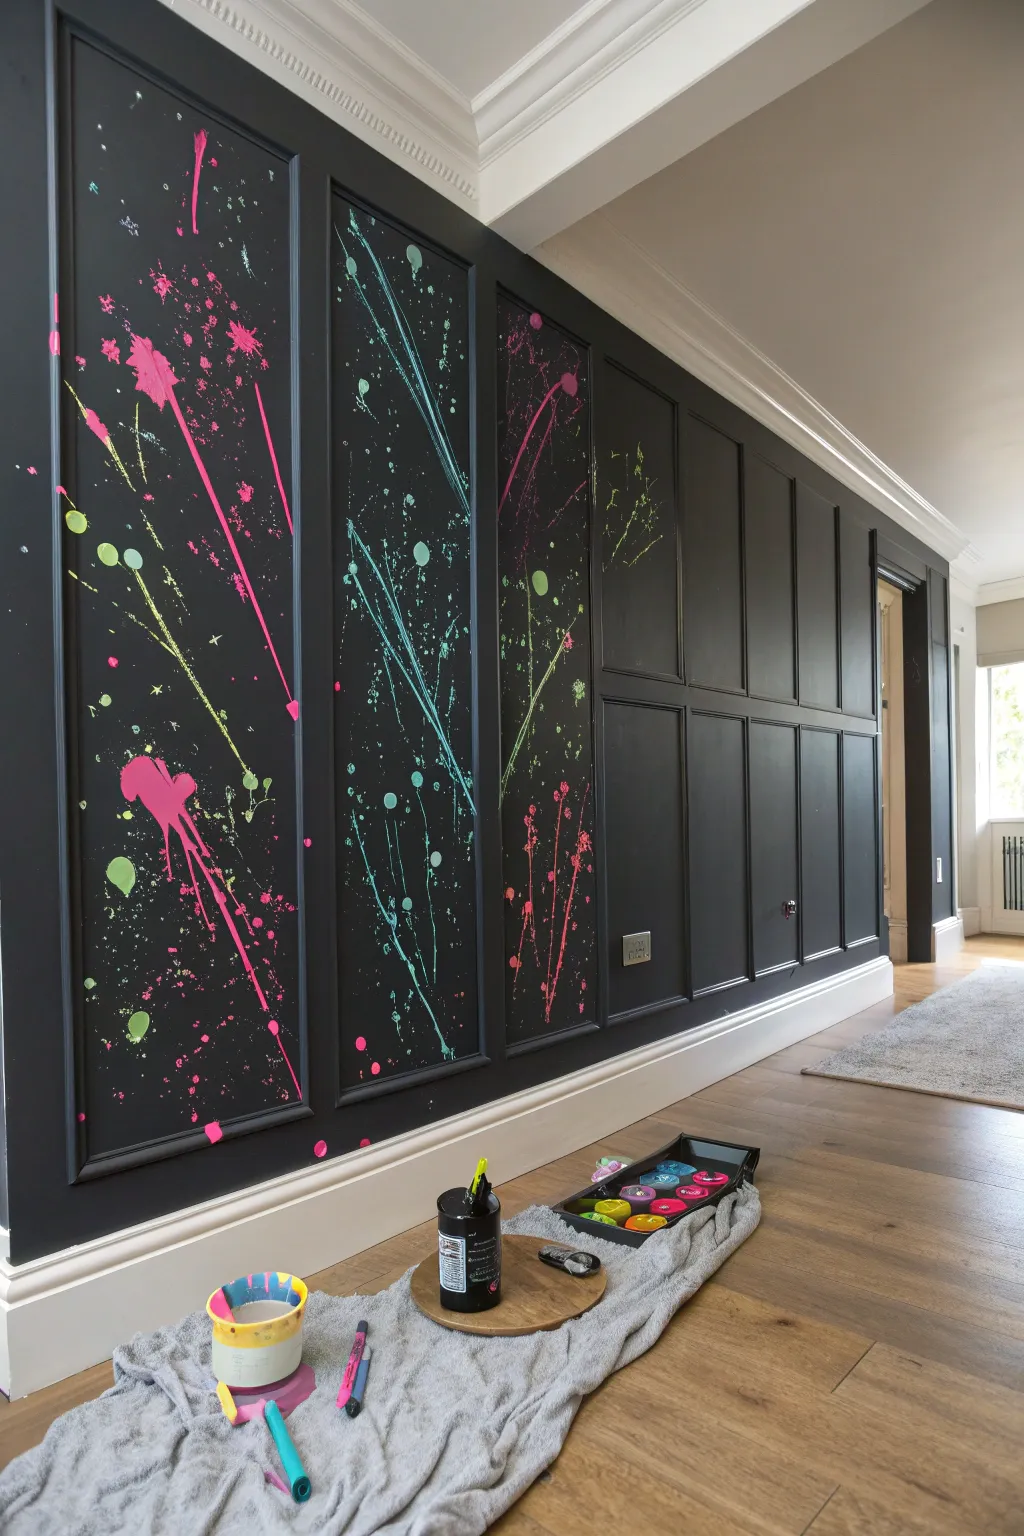
Neon Drip Accent Wall
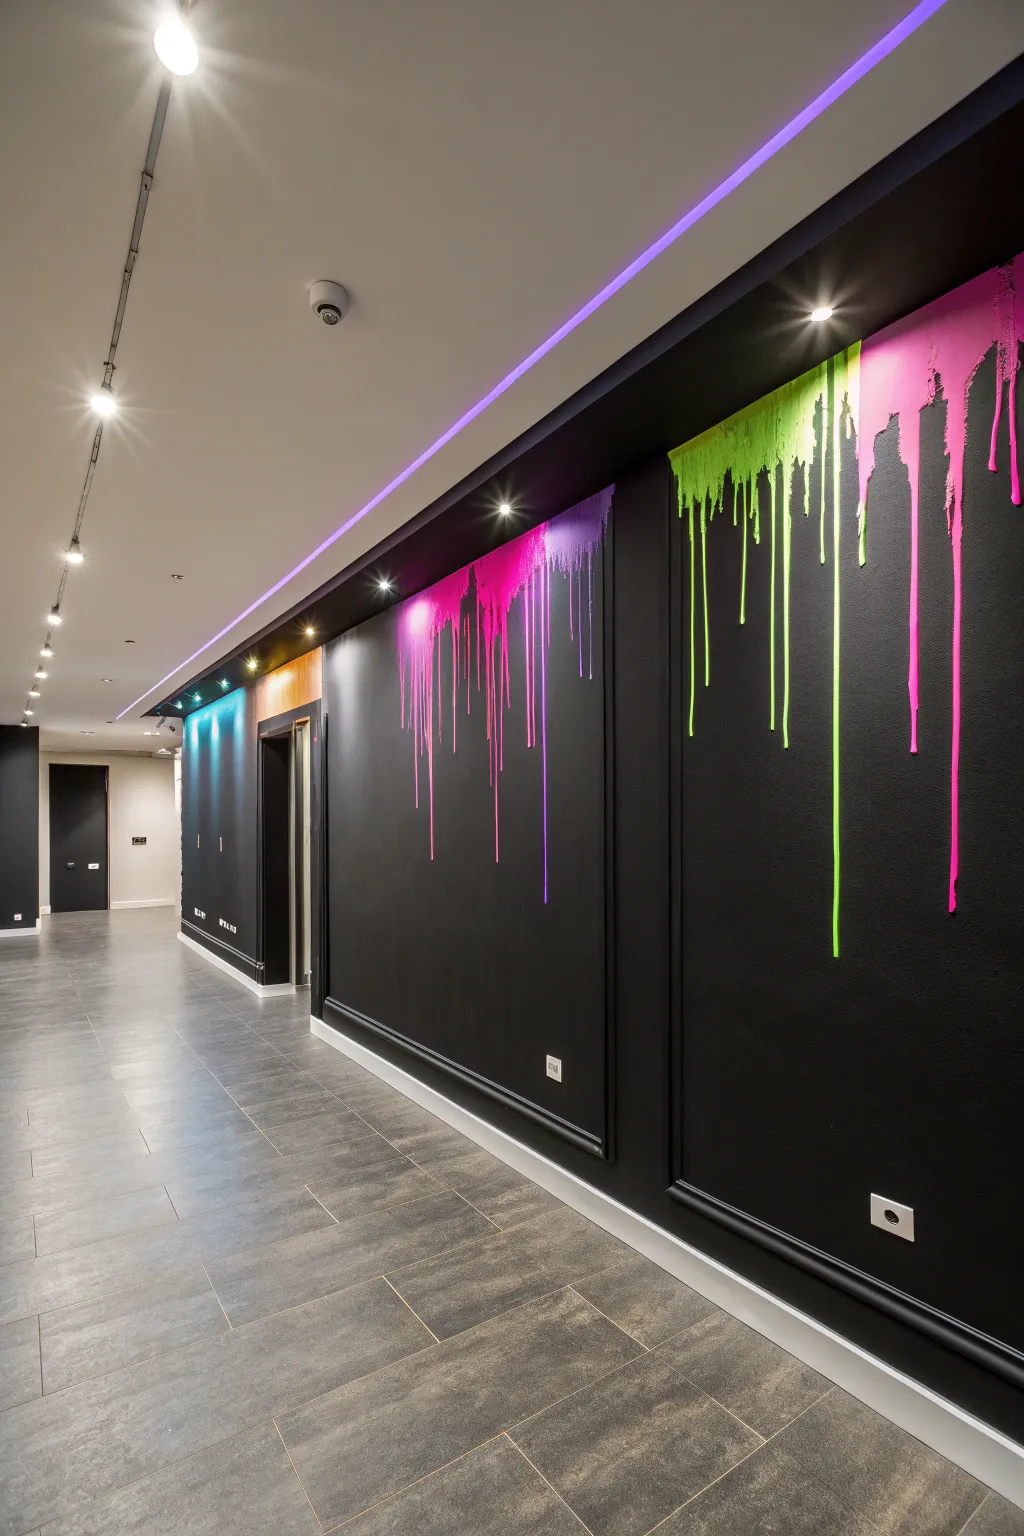
Transform a plain hallway into an electrifying art installation with this bold, graffiti-inspired accent wall. By combining matte black backgrounds with vibrant, dripping neon paints, you create a high-contrast look that feels modern and edgy.
Step-by-Step Tutorial
Materials
- Matte black interior latex paint
- Neon pink acrylic or latex paint
- Neon green acrylic or latex paint
- Neon purple acrylic or latex paint
- Wall molding trim (pre-primed)
- Miter saw or hand saw with miter box
- Construction adhesive (e.g., Liquid Nails)
- Painter’s tape
- Drop cloths
- Squeeze bottles or large syringes
- Small foam roller and tray
- Angled sash brush
- Wall filler/spackle
- Sandpaper (medium grit)
- Level and measuring tape
- Caulk gun and paintable caulk
Step 1: Preparation & Base Coat
-
Clear and clean:
Remove any outlet covers or wall hangings from the designated wall area. Wipe the wall down with a damp cloth to remove dust and let it dry completely. -
Protect the area:
Lay down drop cloths along the entire length of the hallway floor to catch drips later. Use painter’s tape to mask off the ceiling line, baseboards, and any adjacent walls you don’t want painted. -
Apply the black base:
Roll the entire wall with matte black interior paint. I find that matte finishes absorb light better than satin, making the neon colors pop more intensely. Use an angled brush to cut in around edges before rolling. -
Apply a second coat:
Once the first coat is dry to the touch (usually 2-4 hours), apply a second coat of black to ensure full, opaque coverage without streaks.
Step 2: Creating the Panels
-
Measure and mark:
Determine the size of your framed panels. Use a level and measuring tape to lightly mark the rectangular outlines on the black wall where your molding will go. Ensure equal spacing between panels. -
Cut the molding:
Using a miter saw, cut your molding strips to length with 45-degree angles at the corners so they fit together perfectly to form rectangles. -
Paint the molding:
Before attaching them, paint the molding strips with the same matte black paint used on the wall. It’s easier to get good coverage now than when they are on the wall. -
Install the frames:
Apply construction adhesive to the back of the molding strips and press them into place along your marked lines. Use a level to double-check alignment before the glue sets. -
Caulk and touch up:
Fill any gaps at the mitered corners or along the wall edge with paintable caulk. Once dry, touch up with black paint for a seamless, built-in look.
Uneven Drips?
If paint is pooling too much at the bottom, use a sponge brush to gently catch excess drips before they hit the baseboard, or tape plastic over the bottom molding.
Step 3: The Drip Effect
-
Prepare the neon paint:
Pour your neon paints (pink, green, purple) into separate squeeze bottles. If the paint is very thick, dilute it slightly with water or a pouring medium so it flows easily but isn’t watery. -
Test the flow:
Test your squeeze bottle technique on a piece of cardboard first. You want to be able to control how much paint comes out to vary the drip length. -
Mask the top edge (Optional):
If you want a very clean top line for the drips, place a strip of painter’s tape horizontally where you want the drip pattern to start. Alternatively, you can freehand it right against the upper molding edge for a wilder look. -
Start the drips:
Starting at the very top of each panel (inside the molding frame), squeeze a generous amount of paint directly against the wall. Let gravity do the work. -
Vary the pressure:
To create varied drip lengths, squeeze more paint for long drips that reach the floor and less paint for shorter drips that stop midway. Move horizontally across the top of the panel. -
Layering colors:
For panels with multiple colors, let the first color dry slightly (about 10-15 minutes) before adding a second neon shade adjacent to or slightly overlapping it. -
Detailed control:
If a drip is straying too far sideways, gently guide it with a small brush or a toothpick while it’s still wet. Clean up any unwanted splatters on the molding immediately with a damp rag. -
Dry and seal:
Allow the drip artwork to dry for at least 24 hours. Because the paint is applied thickly, it takes longer than a standard coat to cure.
Level Up: UV Magic
Install a blacklight LED strip along the ceiling cove or inside the top molding edge. This will make your neon paint glow intensely in the dark.
Now you have a dynamic, gallery-worthy hallway that brings a splash of street-style energy to your interior space


Bioluminescent Underwater Scene
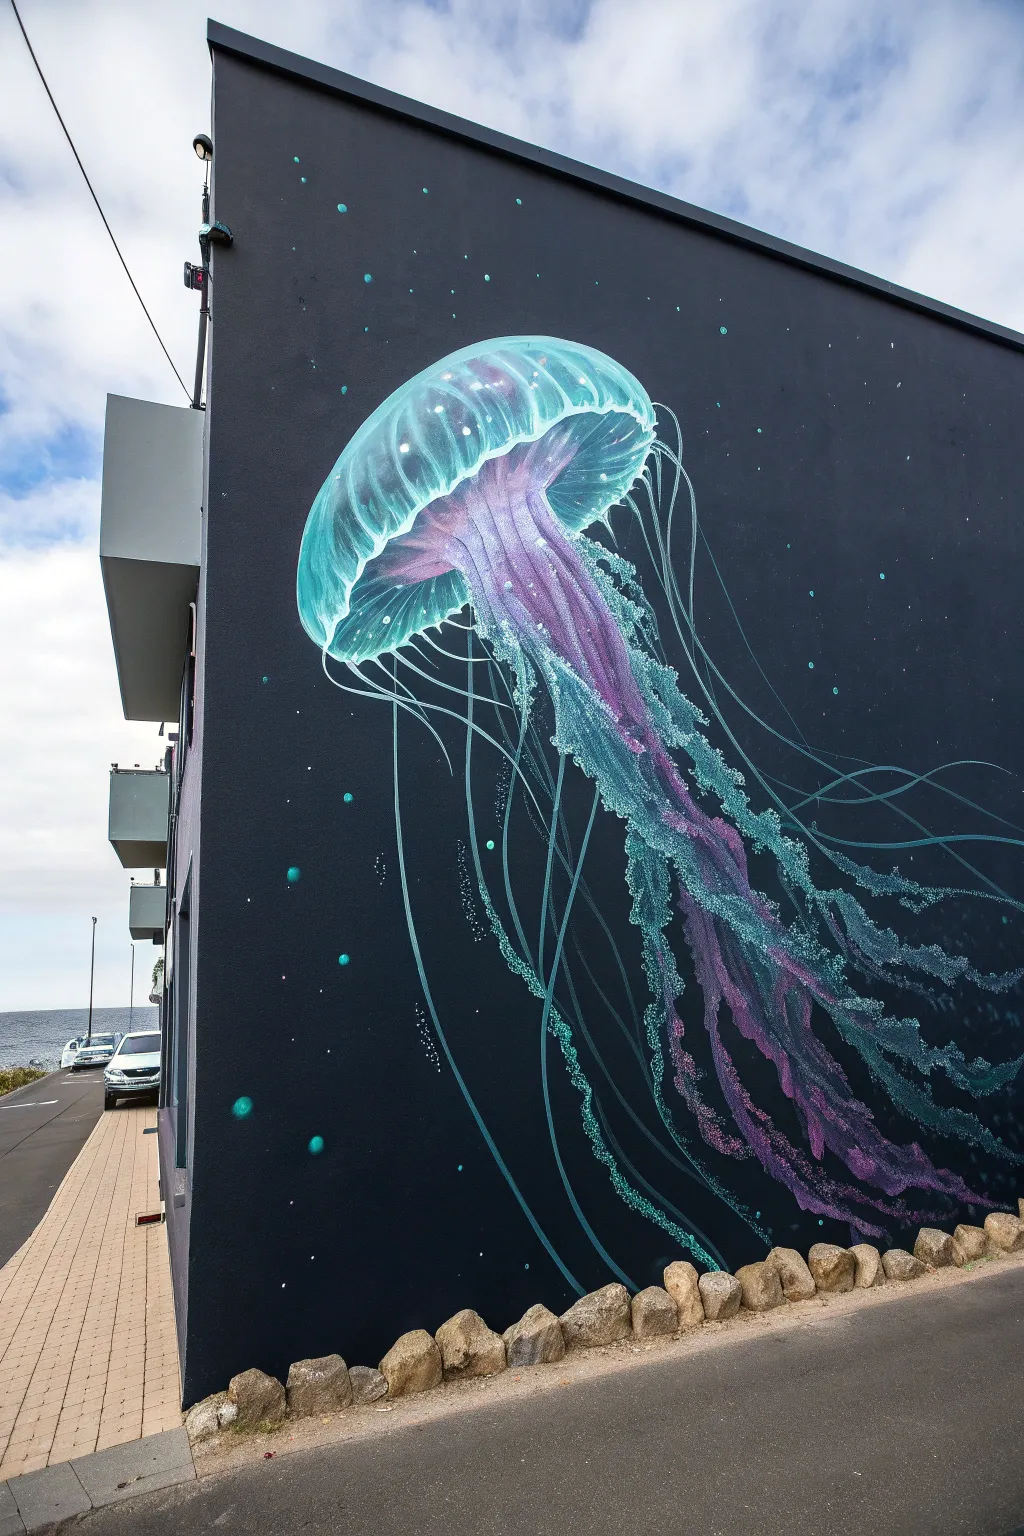
Transform a plain exterior or interior wall into a deep-sea spectacle with this glowing jellyfish mural. By utilizing high-contrast neon paints against a deep matte background, you’ll achieve a stunning bioluminescent effect that pops even in daylight.
Step-by-Step Tutorial
Materials
- Matte black exterior masonry paint (or interior latex)
- High-quality spray paints (teal, purple, white)
- Fluorescent acrylic paints (cyan, magenta, electric blue)
- Assorted paintbrushes (large flats, liners, and fan brushes)
- Chalk or pastel pencil (for sketching)
- Painting tape and drop cloths
- Clear UV-resistant sealant (optional for outdoors)
- Ladder or scaffolding (depending on wall height)
Step 1: Setting the Stage
-
Prepping the Surface:
Begin by cleaning the wall surface thoroughly to remove any dirt or loose debris. Use a pressure washer for exterior walls or a specialized cleaner for interiors to ensure the paint adheres perfectly. -
Applying the Base Coat:
Roll on two coats of high-quality matte black paint. Using a matte finish is crucial here because it absorbs light, making the neon colors of the jellyfish appear much brighter by comparison. -
Reference Grid:
If you are scaling this up significantly, lightly sketch a grid with white chalk. This helps keep the jellyfish proportions correct, especially given the complex flow of the tentacles. -
Sketching the Outline:
Using a light-colored pastel pencil or chalk, sketch the mushroom-shaped bell of the jellyfish near the top left. Draw rough, flowing guidelines for where the main oral arms and thinner tentacles will descend toward the bottom right.
Neon Pop Secret
To make colors truly vibrate, paint a layer of pure white primer exactly where the neon paint will go first. Neon pigments are transparent and need a white base to reflect light properly.
Step 2: Constructing the Bell
-
Blocking the Shape:
Mix a diluted wash of white and light teal acrylic. Roughly fill in the bell shape, keeping the edges soft. This creates the translucent ‘body’ of the jellyfish. -
Adding Ribbing Details:
Using a medium round brush and a darker teal spray paint or fluid acrylic, paint curved lines radiating from the center of the bell to the outer rim. These define the jellyfish’s structure. -
Highlighting the Dome:
Apply pure white paint to the very top edge of the bell and along the ridges. I like to dry-brush this part slightly to give it that shimmering, gelatinous texture. -
Inner Glow:
Glaze a thin layer of fluorescent purple inside the bottom curve of the bell. This suggests the internal organs and adds depth to the transparent form.
Blacklight Magic
Use invisible UV-reactive paint for the white highlights. In daylight, it looks normal, but under a blacklight at night, the jellyfish will actually glow in the dark.
Step 3: Flowing Tentacles
-
Core Tentacle Structure:
For the thick, central oral arms, lay down a base of purple and magenta mixed with white. Use long, wavy strokes that follow your chalk guidelines. -
Texturing the Arms:
Stipple or dab lighter teal and white paint over the purple base of the central arms. This creates a frilled, coral-like texture. -
Creating the Wisps:
Load a liner brush or rigger brush with thinned electric blue or cyan paint. Using your whole arm to guide the stroke, pull long, continuous lines for the thinner tentacles that trail behind. -
Building Layers:
Repeat the liner brush process with slightly different shades of teal and very pale blue. Overlapping these fine lines creates volume and movement. -
Adding Bioluminescence:
Dip a toothbrush or stiff bristle brush in watered-down white paint. Flick the bristles to spatter tiny dots primarily along the tentacles and the bell’s rim to simulate sparkling light.
Step 4: Atmosphere and Final Touches
-
Background Particles:
Paint scattered dots of varying sizes in teal and cyan around the jellyfish. These ‘marine snow’ particles add depth to the black water. -
Enhancing Contrast:
Step back and look for areas that need more pop. Add pure white highlights to the brightest parts of the tentacles and the very edge of the bell. -
Softening Edges:
If any lines look too harsh, use a dry, clean brush to gently smudge the paint while it’s still tacky, creating a glow that bleeds into the black background. -
Sealing the Work:
Once fully dry (give it at least 24 hours), apply a clear UV-resistant topcoat if the mural is outdoors to protect those vibrant neons from fading in the sun.
Now step back and admire how your dark wall has become a window into the deep ocean
BRUSH GUIDE
The Right Brush for Every Stroke
From clean lines to bold texture — master brush choice, stroke control, and essential techniques.
Explore the Full Guide
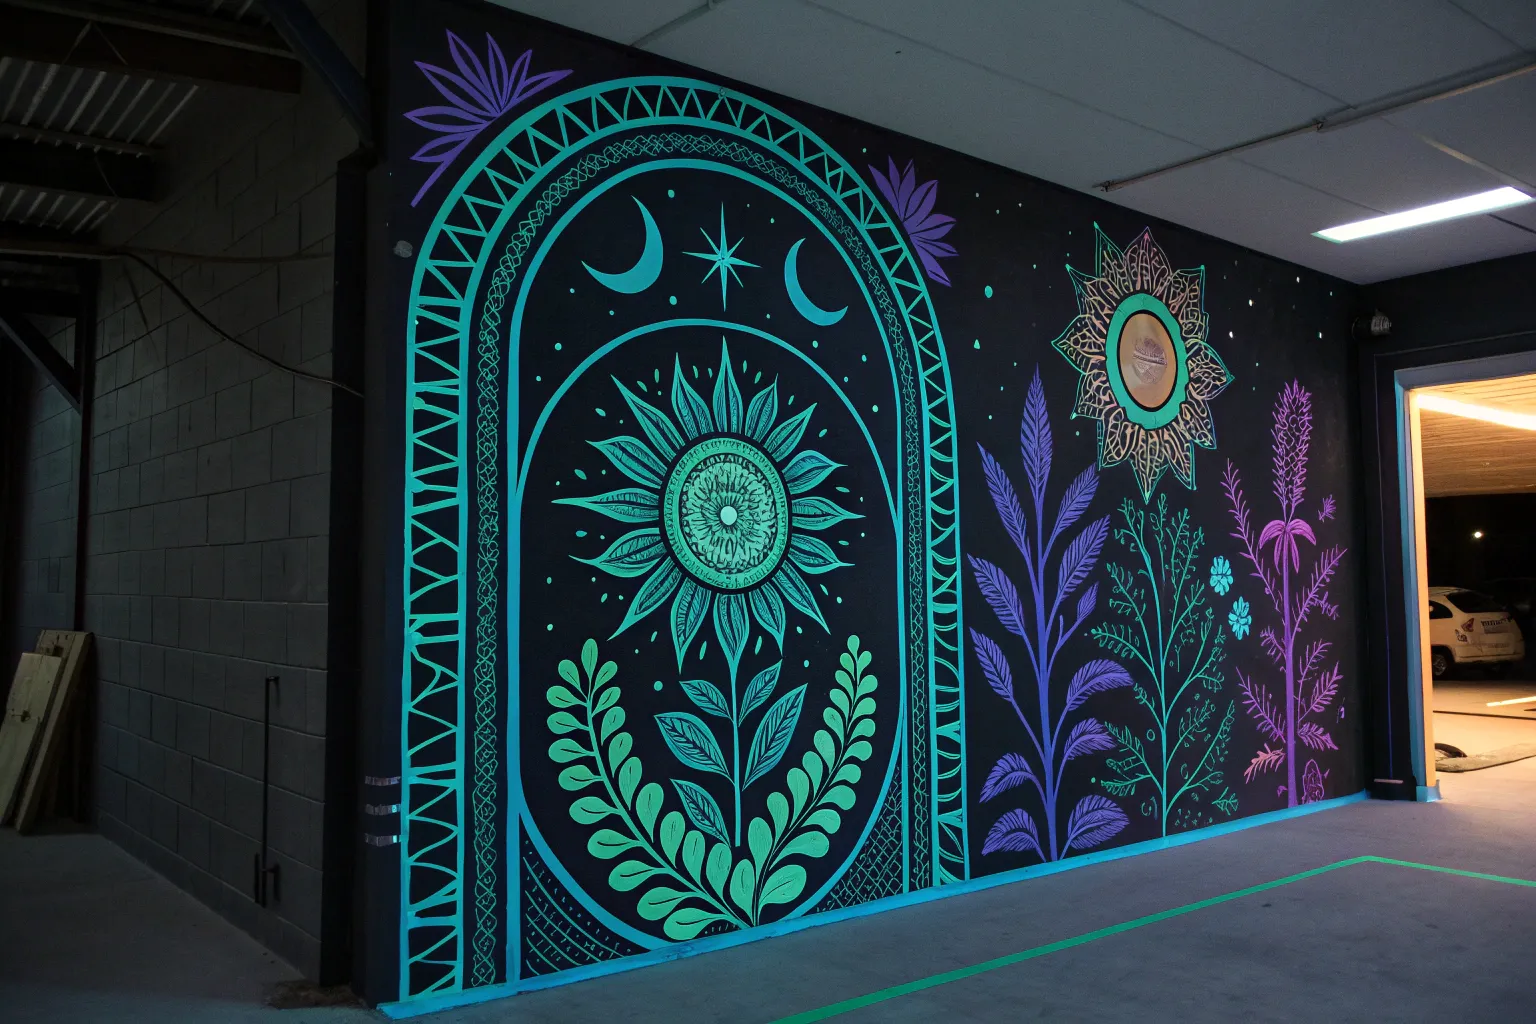
Cosmic Portal Doorway Illusion
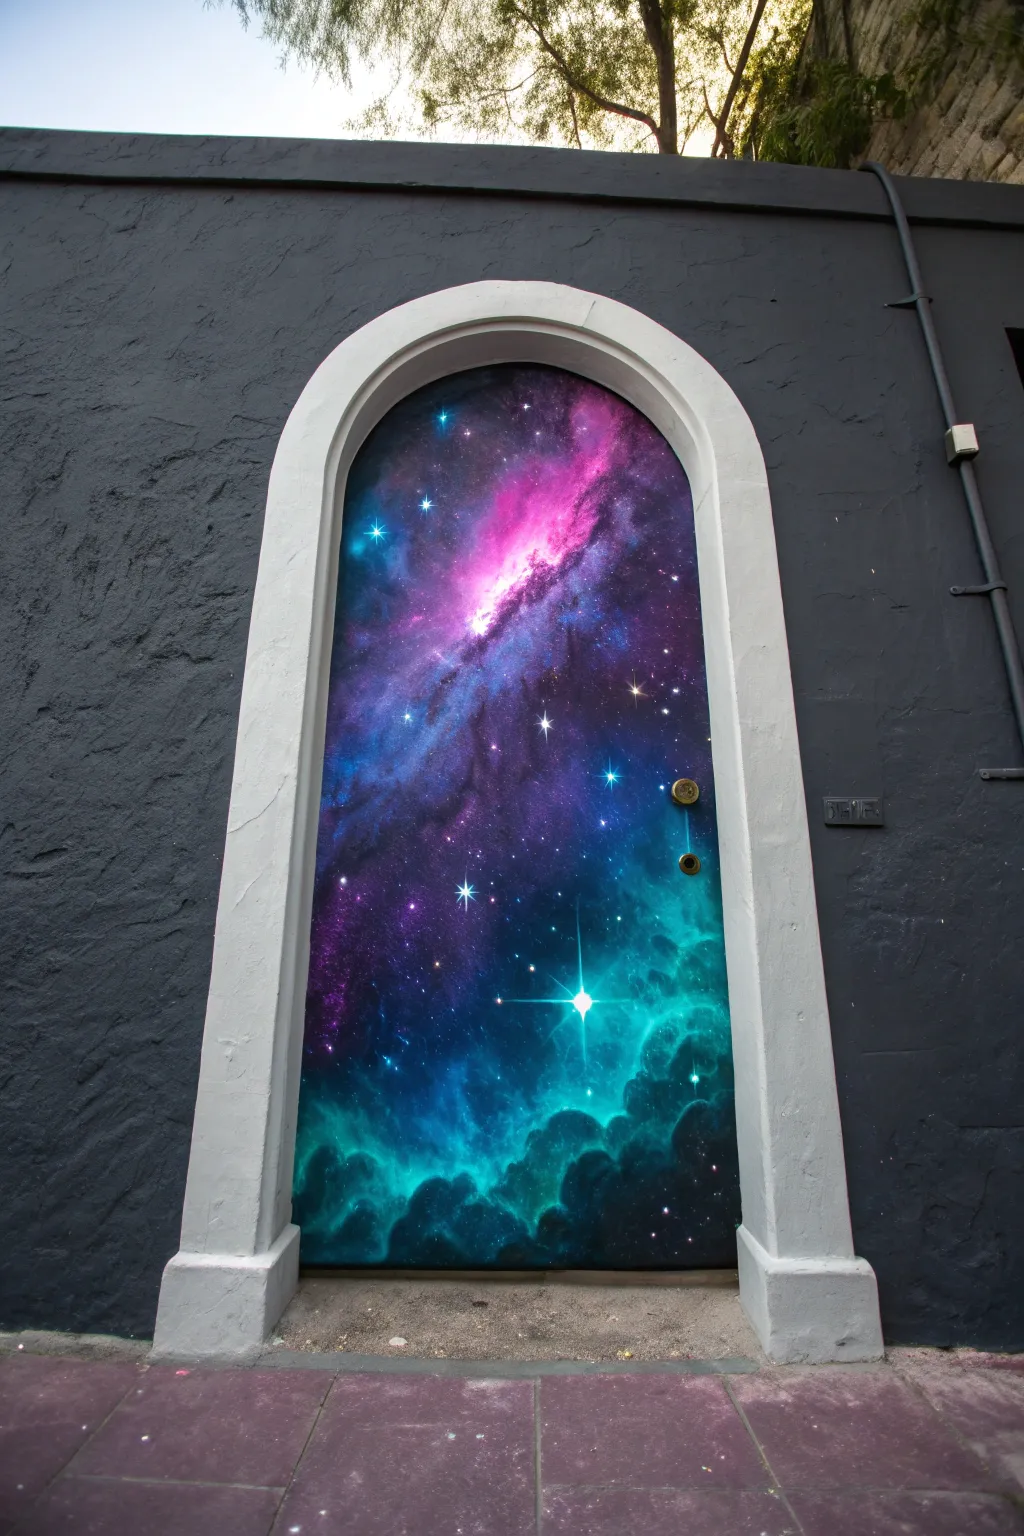
Transform a standard arched doorway into a mesmerizing gateway to the universe using fluorescent paints that glow under blacklight. This project turns a flat door surface into a vibrant deep-space nebula, creating an immediate sense of wonder and depth in any room.
Step-by-Step
Materials
- Arched door (or standard door with painted arch)
- Black primer (indoor acrylic latex)
- Fluorescent acrylic paints (Neon Pink, Electric Blue, Cyan, Purple, White)
- Glow-in-the-dark medium (optional)
- Assorted brushes: 2-inch flat brush, medium round brush, fine liner brush
- Natural sea sponges
- Painter’s tape
- Drop cloth
- Old toothbrush (for stars)
- Clear sealant (matte or satin finish)
- Mixing palette or paper plates
Step 1: Preparation & Base Coat
-
Masking the edges:
Begin by protecting your door frame. Apply painter’s tape carefully around the inner edge of the white archway and cover the door handle and lock with tape or plastic wrap to keep them paint-free. -
Surface prep:
Lightly sand the door surface to ensure the new paint adheres well. Wipe away any dust with a damp cloth and let it dry completely. -
The void:
Apply a solid coat of black primer to the entire door surface. I find a small roller works best for speed, but use a brush for the edges. Let this dry fully; a second coat may be needed to achieve a true, deep void.
Fix Color Mud
If blending pink and green creates brown mud, let the first layer dry completely before adding the second. Acrylics are opaque; layering dry colors keeps them vibrant.
Step 2: Painting the Nebula
-
Establishing the core:
Mix a bright neon pink with a touch of white. Using a wet sea sponge, dab this mixture diagonally across the upper center of the door to create the bright ‘heart’ of the galaxy. -
Adding purple transitions:
While the pink is still slightly tacky, sponge in deep purple around the pink edges. Blur the line where they meet to create a soft, gaseous transition. -
Building the blue expanse:
Load a clean sponge with electric blue. Dab this into the corners and lower sections, leaving patches of black visible for contrast. Don’t overwork it; texture is key here. -
Cyan highlights:
Using cyan or teal paint, sponge highlights into the lower ‘clouds’ of the nebula. Focus on the bottom third of the door to create those billowing cosmic dust formations. -
Blending layers:
Take a dry, soft brush and very gently whisk over the sponge marks in the direction of the galaxy’s flow. This softens the sponge texture into wispy gas clouds.
3D Effect Mode
Add UV-reactive fluorescent tape along the inner jamb of the door frame. When the door opens, the glowing edge enhances the feeling of stepping ‘through’ a portal.
Step 3: Stars & Details
-
Creating the starfield:
Dip an old toothbrush into thinned white paint (or white glow paint). Hold it near the door and flick the bristles with your thumb to spray a fine mist of tiny stars across the black and dark blue areas. -
Painting hero stars:
Switch to your fine liner brush. Select 5-7 spots for major stars. Paint a small white dot, then carefully drag four thin lines outward in a cross shape to create a diamond flaring effect. -
Adding the focal glint:
Locate the brightest cyan area near the bottom. Paint a larger, distinct four-point star here with a solid white center to act as a foreground light source. -
Enhancing depth:
Mix a very thin glaze of black paint and water. Lightly brush this over areas that became too bright or flat, pushing them back into the shadows.
Step 4: Finishing Touches
-
Cleaning up:
Once the artwork is fully dry, carefully peel away the painter’s tape from the frame and hardware. Use a small brush to touch up any white frame areas if black paint bled through. -
Sealing the portal:
Apply a coat of clear matte or satin sealant over the entire painted surface. This protects the acrylic detail from scratches and hand oils during daily use.
Step back, turn on the blacklight, and admire your own personal gateway to the cosmos
Glowing City Skyline Silhouette
Capture the electric energy of a city at dusk with this striking silhouette art piece that comes alive under blacklight. By combining gradient backgrounds with sharp, opaque foregrounds, you’ll create a mesmerizing illusion of depth and urban glow.
Detailed Instructions
Materials
- Large canvas or primed wooden panel (24×36 inches or larger)
- Black gesso or flat black acrylic paint
- Fluorescent acrylic paints (Neon Magenta, Electric Purple, Hot Pink)
- Bright white acrylic paint
- Painter’s tape or masking tape
- Wide flat brush or sponge roller
- Fine liner brush (size 0 or 00)
- Medium flat brush
- Graphite transfer paper
- Reference photo of a city skyline
- Mixing palette
- UV/Blacklight flashlight (for testing)
Step 1: Setting the Scene
-
Prepare the canvas:
Ensure your canvas is clean and dry. If you are using a raw wooden panel, apply a coat of white gesso first to help the neon colors pop. -
Mix your gradient:
On your palette, prepare your fluorescent magenta, purple, and a touch of white. I like to keep a misting bottle of water nearby to keep the acrylics workable for blending. -
Apply the base color:
Start at the top of the canvas with a mix of purple and a tiny bit of black or dark blue (non-fluorescent) to create the deep twilight sky. -
Create the fade:
As you move down the canvas, gradually introduce the fluorescent purple, blending it seamlessly into the darker top section using long, horizontal strokes. -
Intensify the glow:
Transition into the neon magenta and hot pink as you reach the middle and lower-middle sections where the ‘horizon’ light would be strongest. -
Final blend check:
Use a clean, dry brush to feather out any harsh lines between the color bands. Use your blacklight flashlight to check that the gradient glows smoothly before it dries.
Pro Tip: Masking
Use strips of painter’s tape to block out the straight vertical edges of the main skyscrapers before painting black. This guarantees perfect, architectural lines.
Step 2: Designing the Skyline
-
Draft the horizon:
Once the background is completely dry, decide where your skyline will sit. Usually, the bottom third of the canvas works best for composition. -
Transfer the outline:
Place your transfer paper and reference photo over the canvas. Trace the outline of the buildings, focusing on the recognizable shapes like the Empire State Building spire. -
Block in the black:
Using black gesso or flat black paint and a medium flat brush, fill in the main bulk of the buildings. Ensure the black is completely opaque to create a true silhouette. -
Define the edges:
Switch to a smaller round brush to crisp up the edges of the skyscrapers. Sharp, straight lines are crucial here for a realistic architectural look. -
Add the spire details:
Use your fine liner brush to paint the delicate antenna and needle details on the tallest buildings. This requires a steady hand, so brace your pinky against a dry part of the canvas.
Step 3: Adding the City Lights
-
Plan the windows:
Visualize where lights would represent occupied floors. You don’t need to paint every window; random clusters look more natural. -
Paint the glow:
Mix a tiny amount of fluorescent pink or white. Using the very tip of your fine brush, dot in tiny squares or lines within the black silhouette. -
Create distant lights:
For buildings further back in the ‘distance’, use slightly dimmer or smaller dots to push them into the background perspective. -
Add street level glow:
At the very bottom edge of the buildings, use a dry brush with a tiny bit of neon paint to suggest the ambient light rising from the streets. -
Final cure:
Allow the entire piece to cure for at least 24 hours. While varnishing isn’t strictly necessary, a matte varnish can protect the black paint from scuffing.
Troubleshooting: Streaky Sky
If the gradient dries with streaks, apply a second thin layer of the neon colors mixed with glazing medium. This smooths transitions without hiding the glow.
Hang your masterpiece, flip on the blacklight, and enjoy the view of your personal glowing metropolis.

PENCIL GUIDE
Understanding Pencil Grades from H to B
From first sketch to finished drawing — learn pencil grades, line control, and shading techniques.
Explore the Full Guide
UV Paint Splatter Studio Wall
Transform a traditional paneled feature wall into an energetic explosion of color with this bold UV-reactive art project. The contrast between the sophisticated charcoal background and the electric neon splatters creates a modern, edgy studio vibe that comes alive under blacklight.
Step-by-Step Tutorial
Materials
- Dark charcoal or matte black interior wall paint
- UV-reactive neon acrylic paints (pink, green, teal)
- Painter’s tape
- Drop cloths or old towels
- Paint roller and tray
- Angled sash brush
- Assorted paintbrushes (stiff bristled)
- Small plastic cups or palette
- Water for thinning paint
- Mixing sticks
Step 1: Preparation & Base Coat
-
Protect the area:
Before opening any paint, lay down extensive drop cloths along the base of the wall. Splatter painting is inherently messy, so cover more floor space than you think you need. -
Tape the trim:
Apply painter’s tape carefully along the baseboards and any adjacent walls or ceiling lines you want to keep pristine. Press the tape edges down firmly to prevent bleed-through. -
Cut in the edges:
Using your angled sash brush, paint the interior edges of the panel molding and the corners of the wall with your dark charcoal paint. This ensures the tricky recessed areas get full coverage. -
Roll the panels:
Use a roller to apply the base color to the flat surfaces of the wall. Work in smooth, vertical strokes to achieve an even, matte finish. -
Apply a second coat:
Once the first coat is dry to the touch, apply a second coat of the dark paint. A solid, opaque background is crucial for making the neon colors pop later. -
Let it cure:
Allow the dark base coat to dry completely, ideally overnight. If the surface is tacky, the neon splatters might mix with the base rather than sitting on top.
Flick Consistency
Test your flicking technique on a piece of cardboard first. This helps you gauge exactly how much water to add for the perfect splatter consistency.
Step 2: The Splatter Technique
-
Prepare neon paints:
Pour small amounts of your UV-reactive paints—hot pink, lime green, and teal—into separate cups or a palette tray. -
Adjust consistency:
Add a few drops of water to each neon color. You want a consistency somewhere between heavy cream and milk—thin enough to fly off the brush, but thick enough to hold its color. -
Start with the primary color:
Dip a stiff-bristled brush into your first color (like the hot pink). Stand back about two feet from the wall. -
Flick the wrist:
Using a sharp flicking motion of your wrist, launch the paint at the wall. Aim for the center of the panels to create dynamic diagonals. -
Create variety:
Vary your distance and the force of your flick. Hard flicks create long streaks, while gentle taps against the brush handle create clusters of smaller dots. -
Layer the second color:
Switch to your next color, perhaps the teal. I like to aim these splatters to cross over the first set, creating visual depth and intersection points. -
Add accent splatters:
Use the lime green sparingly as a highlight. Focus these splatters on the outer edges of the main clusters to break up the pattern. -
Target specific panels:
Notice in the reference image that not every panel is fully covered. Leave some panels (like the far right ones) completely plain to let the eye rest and maintain a sophisticated look. -
Address drips:
If a drip becomes too long or goes somewhere you don’t want, quickly dab it with a damp cloth, or embrace the chaos if it fits the vibe. -
Clean up immediately:
Carefully fold up your drop cloths inward to trap the paint droplets. Peel off the painter’s tape slowly while the neon paint is still slightly tacky to avoid peeling.
UV Reveal
Install a permanent UV blacklight fixture in the ceiling or a track light pointed at the wall to make the neon colors glow intensely at night.
Now you have a dynamic accent wall that looks sleek by day and becomes an electric art installation by night
Blacklight Paint Checkerboard Twist
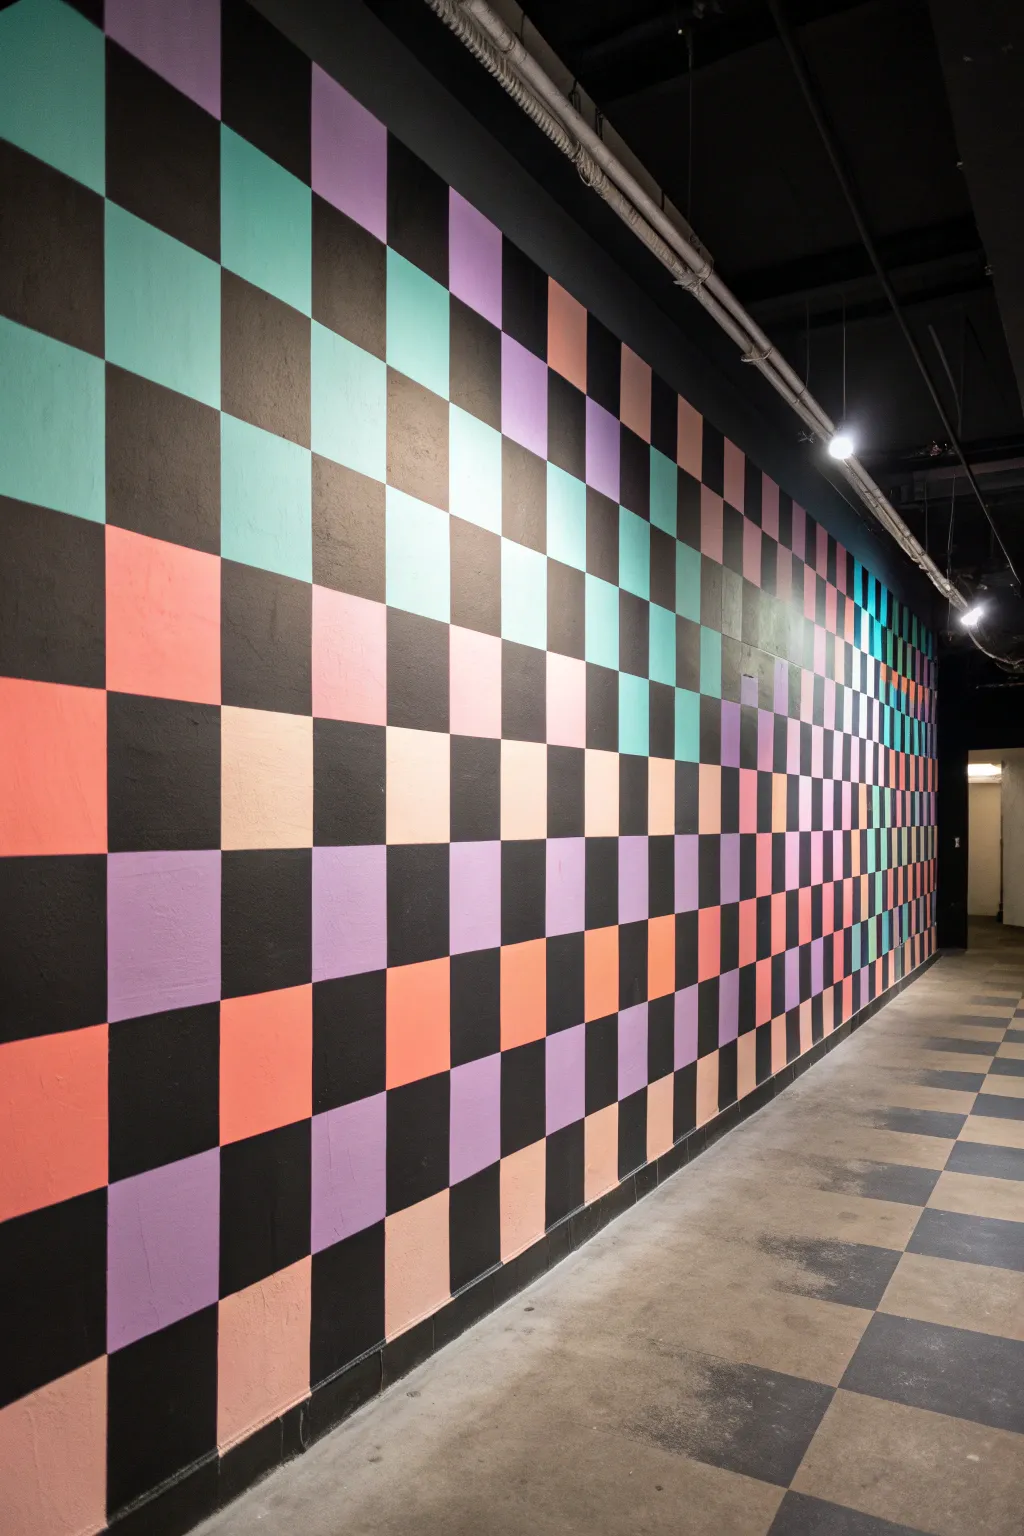
Transform a plain wall into a retro-futuristic focal point with this vibrant checkerboard mural. By swapping traditional white squares for alternating pops of neon pastels against deep black, you create a mesmerizing visual rhythm that truly glows under blacklight.
Step-by-Step
Materials
- Matte black interior latex paint
- Assorted neon/fluorescent acrylic paints (pink, teal, lavender, peach)
- Painter’s tape (1.5 inch or 2 inch width)
- Laser level (highly recommended) or passing level
- Chalk line or pencil
- Tape measure
- Small foam roller (4-inch) with tray
- Angled sash brush (2-inch)
- Drop cloths
- Damp rag for clean up
Step 1: Preparation & Base Coat
-
Prep the surface:
Clear the area and lay down drop cloths to protect your flooring. If the wall has any holes or bumps, patch and sand them smooth now, as the geometric pattern will highlight imperfections. -
Apply the black base:
Roll the entire wall with your matte black latex paint. This serves as the ‘negative space’ for your checkerboard. I prefer doing two coats to ensure a rich, solid depth without streaks. Let this dry completely—ideally overnight—before applying any tape.
Bleed-Through Blues?
If neon paint bleeds under the tape, wait for it to dry fully. Then, create a ‘frame’ of tape around the error and dab matte black paint over the blemish to erase it seamlessly.
Step 2: Mapping the Grid
-
Determine square size:
Decide on the size of your squares. For a wall of this scale, 12-inch or 18-inch squares work best. Calculate the math to ensure you don’t end up with tiny slivers of squares at the edges. -
Mark the vertical lines:
Using a tape measure, mark your vertical intervals along the top and bottom of the wall. -
Mark the horizontal lines:
Repeat the process for the horizontal lines along the left and right sides. -
Create the grid:
Use a laser level to project your lines based on the marks, or snap a chalk line to create a physical grid on the wall. A laser level is a game-changer here for keeping things perfectly straight.
Step 3: Taping & Painting
-
Tape the vertical lines first:
Apply painter’s tape along the OUTSIDE of the vertical lines for the columns you intend to paint. This is tricky; you need to visualize which squares will be colored. -
Tape horizontal lines:
Apply tape along the horizontal lines. You are essentially masking off the ‘black’ squares so you can paint the colored ones. -
Seal the tape edges:
To prevent neon paint from bleeding onto the black, run a credit card or putty knife firmly over all tape edges. For crisp lines, I like to lightly brush a tiny bit of black paint over the tape edges first to seal them. -
Plan your color palette:
Look at the pattern in the reference image. The colors shift in a diagonal gradient or random scatter (e.g., a block of teals, then a block of peaches). Mark each square lightly with a pencil code (e.g., ‘P’ for pink) so you don’t get confused while painting. -
Paint the first set of squares:
Using your foam roller or angled brush, fill in the exposed squares with your neon colors. Use smooth, even strokes. -
Apply second coats:
Neon and fluorescent paints often have lower opacity. Apply a second or even third coat to make the colors pop against the dark surroundings. -
Remove tape while damp:
Carefully peel off the painter’s tape while the final coat is still slightly tacky. Pull at a 45-degree angle away from the painted area to ensure a sharp line.
Pro Tip: The Diagonal Flow
To replicate the flow in the image, don’t place colors randomly. Group them diagonally! Paint 3-4 squares of the same color in a diagonal line to create that sweeping, cohesive look.
Step 4: Finishing the Second Set
-
Let dry completely:
Allow the painted squares to cure fully. This is crucial because you will need to tape over them for any adjacent squares if you didn’t finish the pattern in one go. -
Tape remaining grid (if necessary):
If your taping strategy required doing every other column first, re-tape to expose the remaining squares of the checkerboard pattern. -
Paint remaining squares:
Fill in the remaining squares with their designated colors, repeating the sealing and multi-coat process. -
Touch ups:
Once all tape is removed, use a small artist’s brush and a bit of the black base paint to fix any small bleeds or uneven corners.
Turn on the blacklights and enjoy the glow of your crisp, geometric masterpiece


Interactive UV Doodle Wall Zone
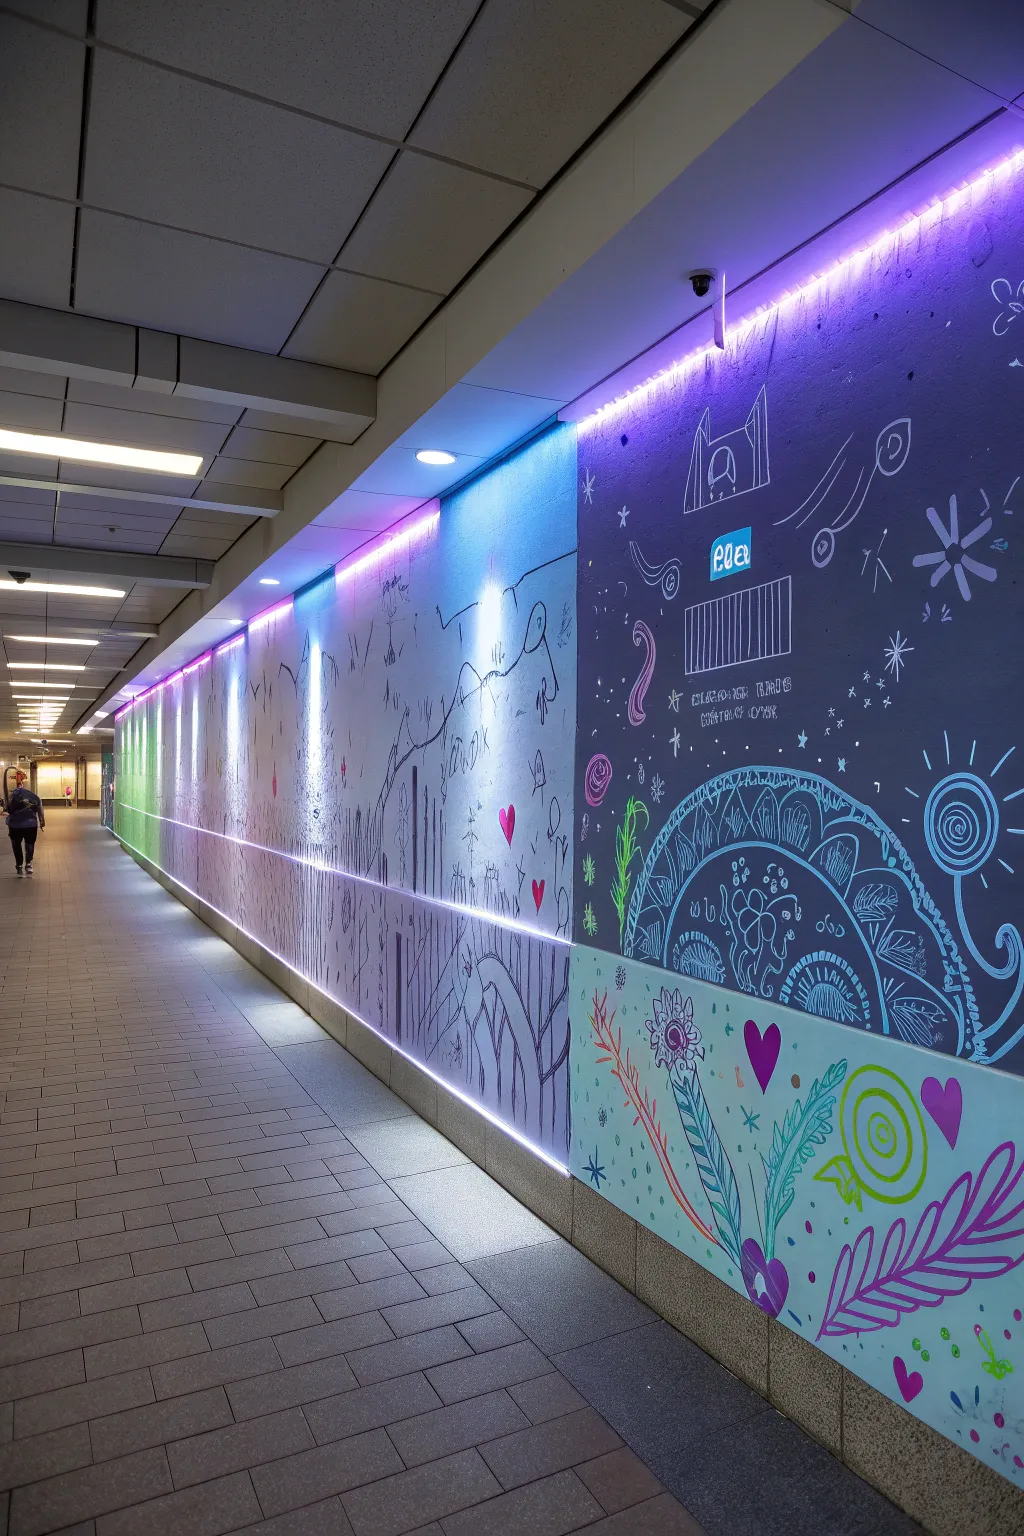
Transform a plain corridor into an immersive art experience with this large-scale mural project that combines chalkboard-style line art with vibrant splashes of color. Using a dark base and reactive lighting, you can create a whimsical, ever-changing environment that feels like stepping into a sketchbook.
Step-by-Step Tutorial
Materials
- Dark grey or blackboard paint (matte finish)
- White acrylic paint markers (chisel and bullet tips)
- Neon/fluorescent acrylic paints (pink, blue, green, yellow)
- RGB LED strip lights with remote or app control
- Aluminum LED channel diffusers (optional but recommended)
- Painter’s tape
- Drop cloths
- Pencil and eraser
- Step ladder
- Clear matte sealer (optional)
Step 1: Setting the Stage
-
Prep the surface:
Begin by cleaning the entire wall surface thoroughly to remove dust and grease. Apply painter’s tape to the ceiling line, floor trim, and any adjacent walls you want to keep clean. Lay down drop cloths to protect the flooring. -
Apply the base coat:
Paint the entire wall with a dark grey or matte black paint. Using a roller will give you the most even coverage. You’ll likely need two coats to ensure a solid, opaque background that will make the white lines pop. -
Install the lighting track:
While the paint dries, measure the top length of the wall for your LED strips. If you want a polished look like the photo, mount aluminum LED channels just below the ceiling line. -
Mount the LEDs:
Peel the backing off your RGB LED strips and press them firmly into the channels or directly onto the wall. Turn them on to a cool blue or purple setting—seeing the light wash down the wall helps visualize where the art will be most visible.
Step 2: Creating the Line Art
-
Rough out the design:
Using a pencil, lightly sketch large, whimsical shapes across the wall. Think abstract landscapes, rolling hills, and simple geometric structures. Keep the composition loose and free-flowing. -
Start the main outlines:
Grab a wide chisel-tip white acrylic paint marker. Trace over your major pencil lines—the ‘ground’ layers, larger arches, and main dividing lines. Shake the marker frequently to keep the ink opaque. -
Add detail doodles:
Switch to a finer bullet-tip marker. Inside the larger shapes, start filling in patterns. Draw simple flowers, stick figures, stars, and abstract swirls. The charm of this style comes from the hand-drawn, imperfect quality. -
Incorporate text elements:
If desired, add small blocks of text or playful symbols. Drawing boxes with vertical lines can mimic buildings or fences, adding structure to the organic doodles. -
Layer the depth:
Create a sense of depth by drawing some elements ‘behind’ others. For instance, draw a smaller mountain range peaking out from behind the main foreground lines.
Light Angle Matters
Position LED strips facing downward (grazing light) rather than outward. This highlights the texture of the wall and makes the paint markers glow more intensely.
Step 3: Adding Color and Finishing Touches
-
Select neon accents:
Choose a few key spots for color bursts. In the reference image, notice the solid colored sections at the bottom and specific icons like hearts. Use your neon acrylic paints here. -
Paint color blocks:
Paint large, rectangular or organic zones at the bottom of the wall in pastel or neon shades (like light blue or mint green). This grounds the mural and offers a new background for darker doodles. -
Overlay doodles on color:
Once the colored blocks are dry, use a dark marker or different colored paint pens to doodle on top of them. Draw leaves, large flowers, or spirals to contrast with the solid color. -
Add floating icons:
Scatter small colored icons throughout the white line work. A bright pink heart here or a yellow sun there breaks up the monotony of the white lines. -
Check the lighting:
I like to dim the room lights and cycle the LED hues at this stage. Check if any white lines look too faint under the colored light and re-trace them if necessary for better visibility. -
Seal the work:
If this is a high-traffic hallway, apply a clear matte sealer over the bottom half of the wall to protect your artwork from scuffs and handprints.
Interactive Layer
Use chalkboard paint for the bottom section and leave out the sealer. Provide neon chalk so guests can add their own temporary doodles to the masterpiece.
Enjoy the magical atmosphere of your new illuminated art corridor as the colors shift and change
Neon Shadow Portrait Mural
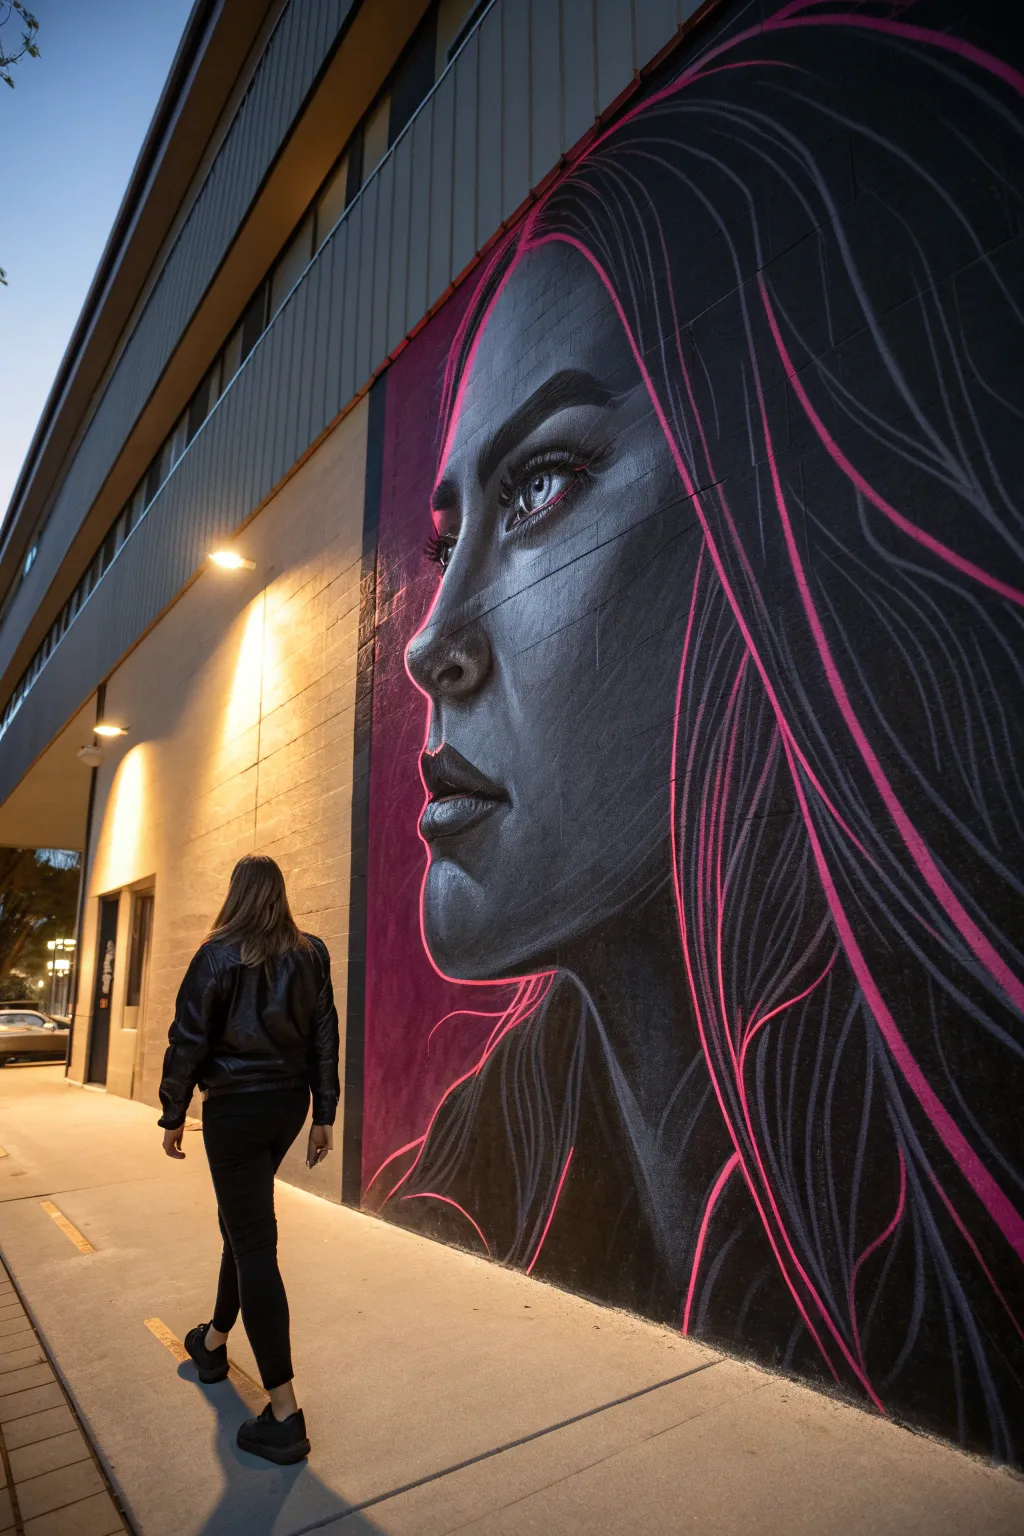
Transform a plain exterior wall into a striking gallery piece with this high-contrast portrait mural. By combining deep monochromatic shading with electrifying neon outlines, you’ll create a dramatic visual that looks stunning by day and virtually pops off the wall under evening lights.
Detailed Instructions
Materials
- Exterior masonry primer (grey or white)
- Black outdoor latex paint (matte or eggshell)
- White outdoor latex paint
- Neon pink exterior paint (UV reactive/fluorescent recommended)
- Digital projector
- Laptop or tablet with reference image
- Chalk or pastel pencil (white)
- Assorted paint rollers and trays
- Large and medium synthetic bristle brushes
- Fine liner brushes (for neon details)
- Painter’s tape
- Extension ladder or scaffolding (if needed based on wall height)
Step 1: Preparation and Mapping
-
Surface Prep:
Begin by thoroughly cleaning the wall surface to remove dust and grime. Once dry, check for any large cracks; fill them if necessary for a smooth canvas. -
Prime the Surface:
Roll on a coat of grey-tinted masonry primer. Using a mid-tone grey primer instead of stark white helps significantly with judging values later on. -
Project the Image:
Wait until dusk or set up a darkened enclosure to use your digital projector. Cast your chosen profile portrait reference image onto the wall at the desired scale. -
Trace the Outline:
Using a white chalk or pastel pencil, lightly trace the major landmarks of the face—the eyes, nose profile, lips, and flow of the hair. Don’t worry about shading yet; just get the geography right.
Smooth Operator
For smoother gradients on rough brick, slightly dilute your grey paints with water or a flow improver. This helps the pigment settle into the texture.
Step 2: Monochromatic Base Painting
-
Establish the Darks:
Mix a large batch of your black outdoor paint. Using a medium brush or small roller, block in the darkest areas first: the background, the clothing, and the deepest shadows of the hair and jawline. -
Mid-tone Mixing:
Create a dark grey and a medium grey by mixing your black and white paints. I prefer to mix these in large separate buckets so the color remains consistent across the whole wall. -
Painting the Skin Gradient:
Start applying the dark grey to the shadowed side of the face. While the paint is still wet, blend into the medium grey as you move toward the cheekbones and forehead. -
Refining Features:
Switch to smaller synthetic brushes for the facial features. Paint the iris, nostrils, and lips with careful attention to the original black-and-white reference, ensuring the transitions are soft and smoky. -
Adding Highlights:
Use your lightest grey (nearly white) to hit the high points: the tip of the nose, the brow bone, the catchlight in the eye, and the lower lip. This brings the 3D form to life. -
Hair Texture:
Paint the hair mass in dark grey/black. Use a dry-brush technique with a lighter grey to suggest the direction and flow of strands without drawing every single hair.
Step 3: The Neon Glow Effect
-
Dry Time:
Ensure the monochromatic base layer is completely dry to the touch before opening the neon paint. This prevents muddying the vibrant color. -
Select Flow Lines:
Identify the primary ‘flow’ lines of the hair and profile. You aren’t outlining everything; you want to choose dynamic curves that accentuate movement. -
Painting the Neon Strokes:
Load a round brush or liner brush with the neon pink paint. Paint long, confident strokes following the hair strands you previously mapped out. -
Profile Emphasis:
Run a thin neon line along the very edge of the forehead, nose, and lips. This creates the ‘backlit’ effect that separates the figure from the background. -
Double Loading for Glow:
To make the neon look like it’s glowing, paint a slightly wider, semi-transparent line of pink first, let it dry, and then paint a solid, thin line of opaque pink right down the center. -
Background Accents:
Add a few abstract neon lines swirling behind the head or fading into the dark background to integrate the figure into the wall space. -
Final Inspection:
Step back about 20 feet to view the whole composition. Touch up any black areas where the neon might have dripped or gone astray.
Uneven Glow?
If your neon paint looks patchy (common with fluorescents), apply a base coat of pure white along your lines first, then layer the neon pink on top.
Step back and admire how your fusion of classic portraiture and modern street art creates a stunning focal point for the neighborhood
Spooky UV Wall With Glowing Bones
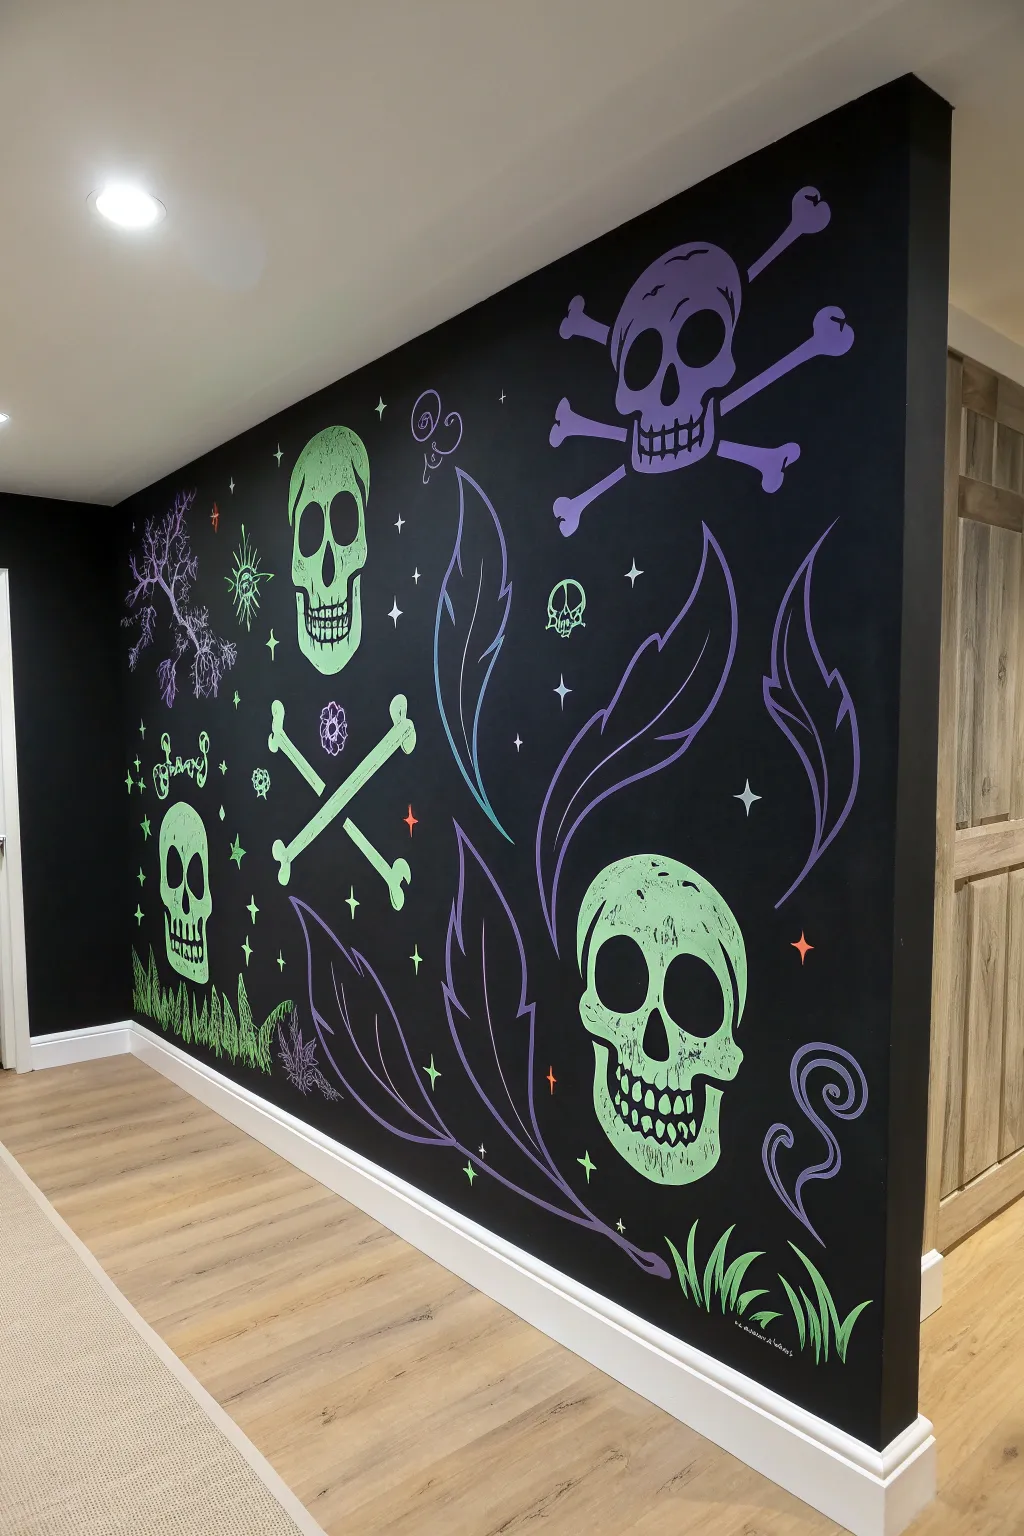
Transform a plain wall into a haunting pirate’s cove with this large-scale mural that pops under blacklight. Featuring grinning skulls, crossbones, and swirling feathers, this design uses neon pastels against a stark black background for maximum spooky impact.
How-To Guide
Materials
- Matte black interior wall paint
- Paint roller and tray
- Painter’s tape
- White or light grey chalk
- UV-reactive acrylic paints (neon green, purple, blue, orange)
- Assorted paintbrushes (1-inch flat, medium round, fine liner)
- Pencil and large eraser
- Reference image of skulls and feathers
- Ladder or step stool
- Blacklight (for testing while painting)
Step 1: Preparing the Canvas
-
Prime the wall:
Start by clearing the wall area and taping off the baseboards and ceiling edges. Apply a coat of high-quality matte black interior paint over the entire surface. A matte finish is crucial here because it absorbs light, making the neon colors pop more intensely than they would on satin or gloss. -
Check coverage:
Allow the first coat to dry completely, then check for any patchy spots. Apply a second coat if necessary to ensure a deep, solid void for your background. -
Sketch the layout:
Using a stick of white chalk, lightly sketch the large shapes onto the black wall. Start with the main skulls to establish your focal points, placing one large green skull centrally near the bottom and another purple skull with crossbones near the top right. -
Add floating elements:
Fill in the negative space by sketching the large, sweeping feather shapes and the smaller crossed bones. Keep your chalk lines loose and faint so they are easy to wipe away later.
Chalk It Up
Use a projector to cast the skull images onto the wall before you start. Trace the projected lines with chalk for perfect proportions without the guesswork.
Step 2: Painting the Skulls
-
Base coat the green skull:
Load a medium round brush with neon green UV paint. Fill in the shape of the large lower skull, carefully working around the eye sockets and nose cavity so they remain black. -
Create texture:
While the green paint is still slightly wet, I find dry-brushing a little extra pigment on the forehead and cheekbones adds a nice weathered bone texture. -
Detail the teeth:
Switch to a smaller brush to paint the individual teeth of the green skull. Leave thin black lines between each tooth to define them clearly. -
Paint the purple skull:
Move to the top right section and fill in the Jolly Roger skull using neon purple paint. Paint the crossbones extending from behind it in the same shade. -
Add the third skull:
Paint the third skull on the left side using a lighter green or mixing your neon green with a touch of white to create variety. -
Define the cracks:
Once the base coats are dry, use a fine liner brush with black paint (or just leave negative space) to add jagged cracks and fissures to the skulls for an aged look.
Step 3: Foliage and Flourishes
-
Outline the feathers:
Using neon purple and blue paints, outline the large, sweeping feather shapes you sketched earlier. Instead of filling them in solid, use long, confident strokes to create the central spine and the barbs of the feathers. -
Paint the crossbones:
Create the independent crossbones symbol on the left using a pale neon green or off-white UV paint. Keep lines sharp and edges crisp. -
Add grassy details:
Along the very bottom of the wall, paint jagged tufts of grass using swift upward strokes of green paint. Mix in some purple blades for visual interest. -
Insert magical vines:
On the far left, create the glowing tree or vine structure using purple paint, dabbing the brush to create the appearance of small leaves or magical spores.
Invisible Ink
Add hidden messages or extra spooky details using clear UV paint. They will remain completely invisible in daylight but appear magically when the blacklight is on.
Step 4: Final Glowing Details
-
Sprinkle stars:
Using a small detail brush, paint four-pointed stars and small dots scattered throughout the empty black spaces. Use white or pale yellow UV paint for these to simulate distant glimmers. -
Add accent colors:
Incorporate small pops of neon orange for tiny details like flowers or specific stars to break up the cool color palette. -
Review under blacklight:
Turn off the main lights and switch on your blacklight source. This will reveal any areas where the paint might be too thin or uneven. -
Touch up:
Apply a second coat to any glowing areas that look streaky under the UV light. This ensures the glow is solid and bright. -
Clean up:
Use a damp cloth to wipe away any remaining visible chalk guide lines from the initial sketch phase. Remove the painter’s tape carefully.
Now turn off the lights and watch your spooky creation glow with eerie brilliance
Blacklight Paint Optical Tunnel Illusion
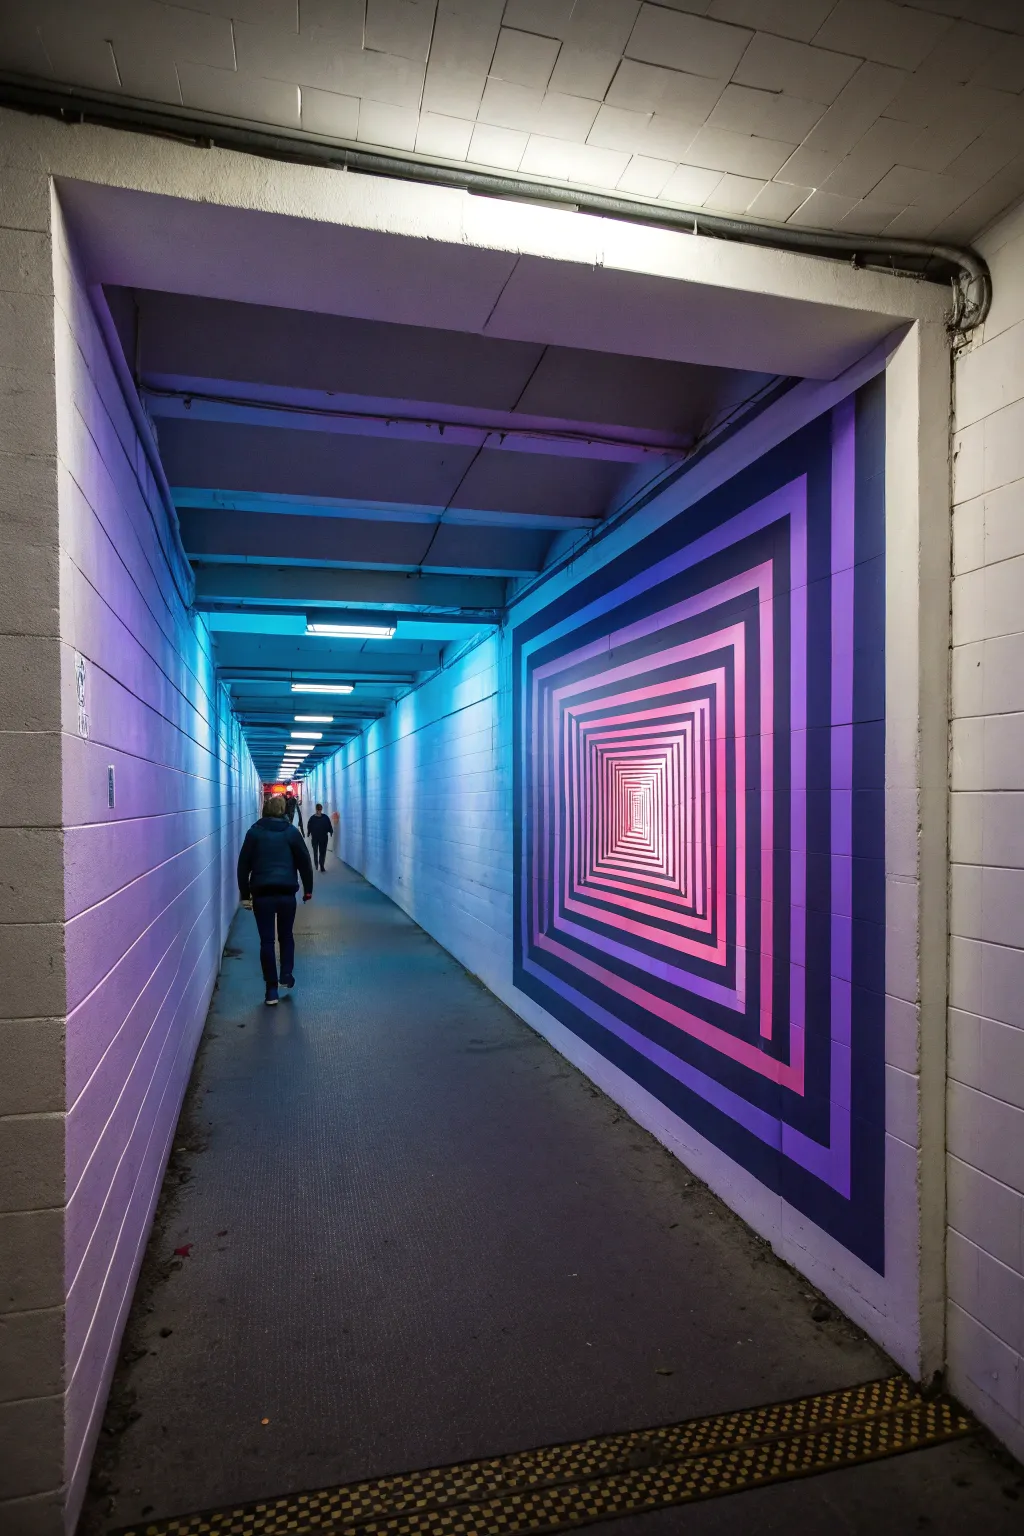
Transform a flat wall into a mesmerizing portal of infinite depth using clever geometry and vibrant, UV-reactive hues. This project creates a stunning optical illusion of a never-ending corridor that glows intensely under blacklight, perfect for game rooms or hallways.
Step-by-Step Guide
Materials
- UV-reactive/neon acrylic paints (Dark Purple, Violet, Magenta, Neon Pink, White)
- Black latex primer or flat black wall paint
- Painter’s tape (various widths: 1-inch and 2-inch)
- Laser level or long spirit level
- Chalk line or straight edge ruler
- Pencil and eraser
- Assorted paintbrushes (angled sash brush, flat brushes, fine detail brush)
- Paint rollers and tray
- Drop cloth
- Step ladder
Step 1: Setting the Stage
-
Prepare the surface:
Begin by cleaning your wall surface thoroughly to remove any dust or grease. Lay down your drop cloth to protect the floor. -
Create the void:
Paint the entire designated wall section with flat black latex paint. Apply two coats to ensure a rich, deep background, allowing full drying time between coats. This dark base is crucial for making the neon colors pop later. -
Map the center point:
Decide where you want the ‘end’ of your tunnel to be. It doesn’t have to be dead center; slightly off-center creates a more dynamic perspective. Mark this vanishing point lightly with a pencil.
Sharp Line Secret
Before painting your neon colors, seal the tape edges with a thin layer of the black base paint. This prevents neon bleed-under and guarantees razor-sharp edges.
Step 2: Drafting the Geometry
-
Establish the outer boundary:
Use your laser level or straight edge to draw the largest, outermost square or rectangle of your tunnel. This defines the frame of your artwork. -
Draw the ‘X’:
Lightly snap a chalk line or draw pencil lines connecting the four corners of your outer rectangle to your central vanishing point. These diagonal guidelines will help you keep all subsequent squares aligned properly. -
Draft the inner squares:
Starting from the outside and working inward, draw a series of concentric squares. Uses the diagonal ‘X’ lines as guides for where the corners should land. Space the lines closer together as you get nearer to the center point to exaggerate the feeling of depth. -
Tape the negative space:
Apply painter’s tape over the lines that represent the spaces *between* your painted bands. You want to mask off the black background so you only paint the glowing frames.
Shift the Perspective
Don’t center the smallest square perfectly. Place the vanishing point at eye level or off to one side. This tricks the brain into seeing the tunnel turn a corner.
Step 3: Applying the Gradient
-
Plan your palette:
Arrange your UV paints in order of brightness. The outermost rings should be the darkest purple, transitioning through violet, magenta, and pink, ending with pure white in the center. -
Paint the outer rings:
Start with the largest, outermost rectangle using your darkest purple UV paint. Apply smooth, even strokes, ensuring solid coverage. I find two thin coats cover better than one thick one. -
Transitioning colors:
Move to the next inner ring with your violet shade. If you want a smooth gradient, slightly blend the edges while the paint is wet, or just paint distinct, sharp bands for a retro-digital look. -
Intensify the brightness:
As you move inward to the middle rings, switch to neon magenta. The colors should be get significantly brighter now. -
Approaching the center:
Paint the next few small rings with hot neon pink. Use a smaller flat brush here to stay within the lines, as the squares are getting quite tight. -
The blinding light:
Paint the tiny, innermost rectangles and the central vanishing point with pure white paint. White often fluoresces blue-ish bright under UV light, creating the illusion of a light source at the end of the tunnel.
Step 4: Finishing Touches
-
Remove the tape:
Once the paint is tacky but not fully dry, carefully peel off the painter’s tape at a 45-degree angle. This ensures crisp, sharp lines. -
Touch up edges:
Inspect your lines for any bleed-through. Use a small detail brush and your black background paint to carefully clean up any messy edges. -
Create the bevel effect (Optional):
To add 3D volume like in the reference, paint the top and right sides of each square slightly lighter, and the bottom and left sides slightly darker within the same hue family. This simulates light hitting the tunnel walls. -
Final inspection:
Turn off the main lights and switch on your blacklight source. Check for any patchy areas that might need a second coat of neon paint to glow evenly.
Step back and enjoy the incredible depth you’ve added to your room with just paint and perspective


Have a question or want to share your own experience? I'd love to hear from you in the comments below!