Blue acrylics are pure magic when you want a painting to feel calm, moody, or a little bit mysterious. Here are my favorite blue acrylic painting ideas—starting with the classic scenes everyone loves and ending with a few playful twists.
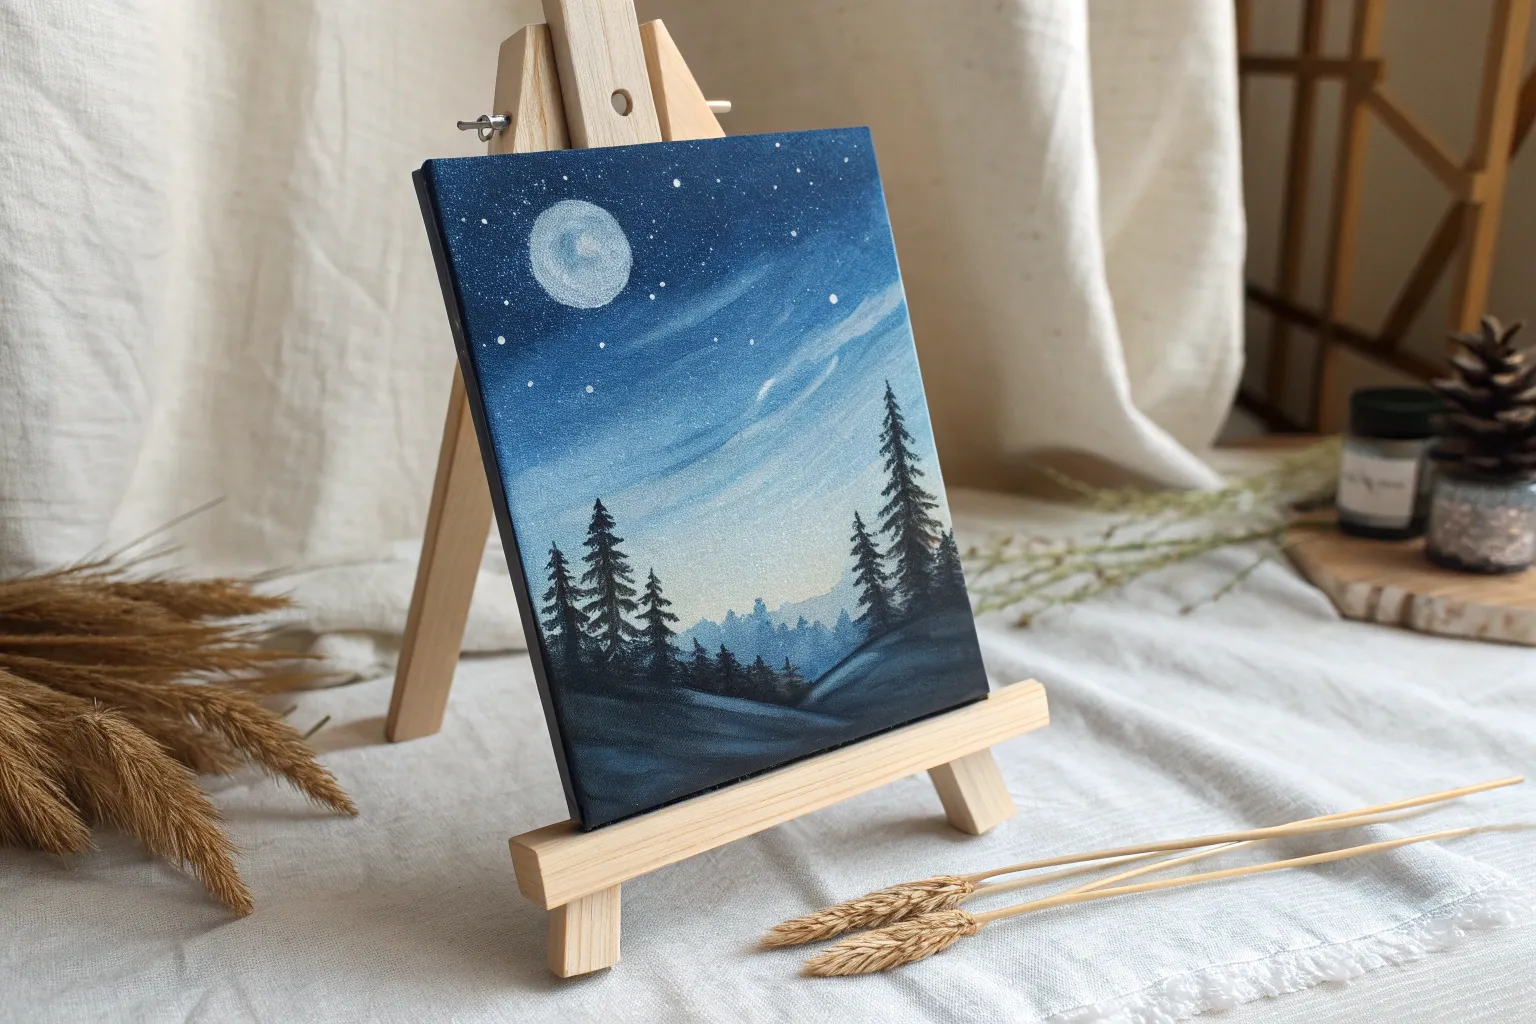
Night Sky Ombre With Stars
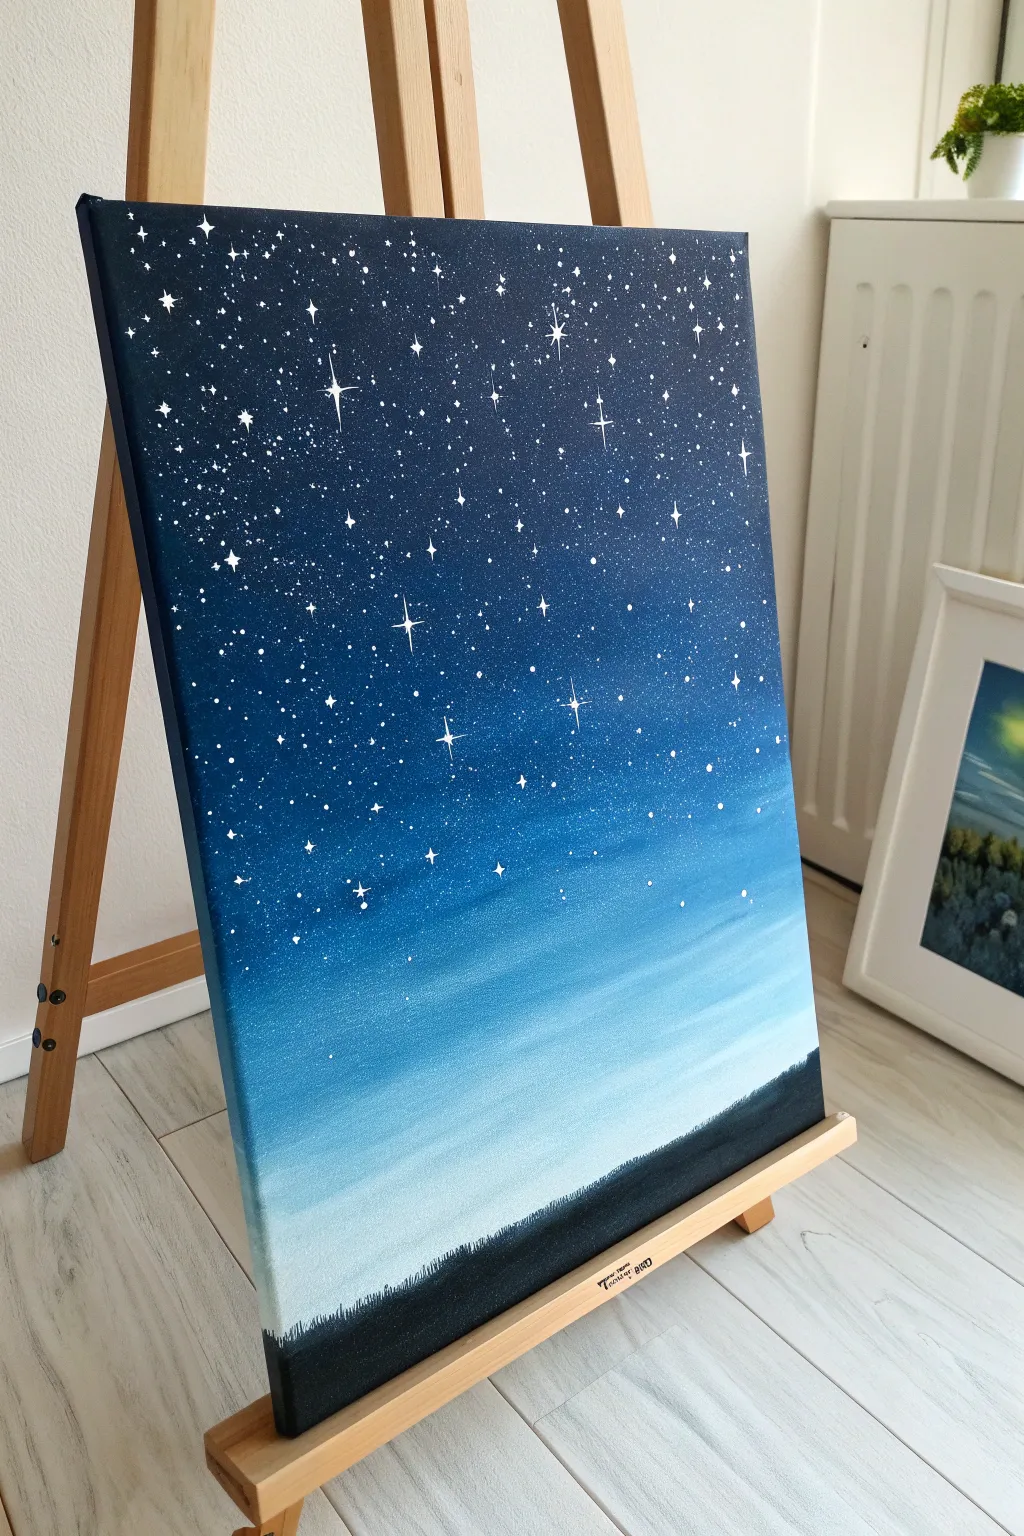
This project captures the mesmerizing transition of twilight into deep space using smooth acrylic blending techniques. You’ll create a seamless gradient from navy to pale blue, dusted with a constellation of twinkling stars over a silent horizon.
Step-by-Step Guide
Materials
- Stretched canvas (e.g., 11×14 or 16×20)
- Acrylic paints: Carbon Black, Prussian Blue (or Navy), Ultramarine Blue, Titanium White
- Large flat wash brush (2-inch width)
- Medium flat brush (1-inch width)
- Small round detail brush (size 0 or 00)
- Old toothbrush (for splattering)
- Palette or paper plate
- Jar of water
- Paper towels
Step 1: Creating the Ombré Gradient
-
Prepare your palette:
Squeeze out generous amounts of Prussian Blue, Ultramarine, and Titanium White. You’ll need plenty of paint to keep the canvas wet for blending. -
Start with the darkest sky:
Using your large flat brush, mix Prussian Blue with a tiny touch of Black. Paint the top third of the canvas using long, horizontal strokes. Ensure you paint the sides of the canvas too for a finished look. -
Introduce the mid-tones:
Without washing your brush completely, pick up pure Prussian Blue. Blend this into the bottom edge of your dark section, working your way down. -
Transition to lighter blue:
Mix Ultramarine Blue with a little White. Apply this below the Prussian Blue section, using horizontal sweeping motions to blur the line where the colors meet. I like to work quickly here so the paint doesn’t tack up. -
Blend the lightest horizon:
Clean your large brush thoroughly. Mix a large amount of White with a tiny speck of Ultramarine Blue. Paint the bottom section of the sky, blending upward into the medium blue until the transition looks smooth and seamless. -
Smooth the entire sky:
Take a very slightly damp, clean large brush and run it horizontally across the entire canvas from top to bottom one last time to soften any harsh brushstrokes. -
Let it dry:
Allow the gradient background to dry completely before moving on to the stars. This usually takes about 15-20 minutes.
Paint drying too fast?
If your acrylics are drying before you can blend the gradient, keep a spray bottle of water nearby. A very light mist over the canvas keeps the paint workable for longer.
Step 2: Adding the Stars
-
Mix the star paint:
On your palette, mix Titanium White with a few drops of water. You want an inky, fluid consistency, like heavy cream. -
Splatter the galaxy:
Dip an old toothbrush into the watered-down white paint. Hold it facing the canvas (about 6 inches away) and use your thumb to flick the bristles, spraying fine mist over the darker top section. -
Control the density:
Focus the splatters mostly on the dark navy top section, letting them fade out as you move lower down the canvas. -
Paint distinct stars:
Switch to your smallest round detail brush. Dip it in pure Titanium White (not watered down) and dot individual stars randomly among the splatters to create variety in size. -
Create the glimmering stars:
Select a few larger dots to turn into twinkling stars. Paint a thin vertical line through the dot, followed by a intersecting horizontal line. Make the center slightly thicker and taper the points. -
Add diagonal glints:
For the largest ‘hero’ stars, add tiny diagonal lines between the main four points to give them extra sparkle.
Step 3: Painting the Horizon Silhouette
-
Mix the silhouette color:
Combine Carbon Black with a small amount of your dark blue mix. Pure black can look flat, so adding blue gives it depth. -
Paint the base:
Using the medium flat brush, paint a solid strip along the very bottom edge of the canvas, covering about an inch or two of the light blue sky. -
Add texture:
Switch to a small brush. Instead of a straight line, use specific dabbing motions along the top edge of the black strip to simulate distant trees, grass, or uneven terrain. -
Refine the details:
Make some ‘trees’ slightly taller than others to create a natural, organic silhouette line against the pale horizon. -
Final check:
Step back and look at your composition. Add a few more tiny star dots near the horizon if the sky feels too empty, but keep the lower area relatively clear.
Make it cosmic
Add a hint of purple or magenta into the transition zone between the navy and medium blue to give your night sky a subtle, galaxy-inspired nebula effect.
Hang your new masterpiece in a well-lit spot to let those bright white stars really shine


Full Moon Glow Study in Blues
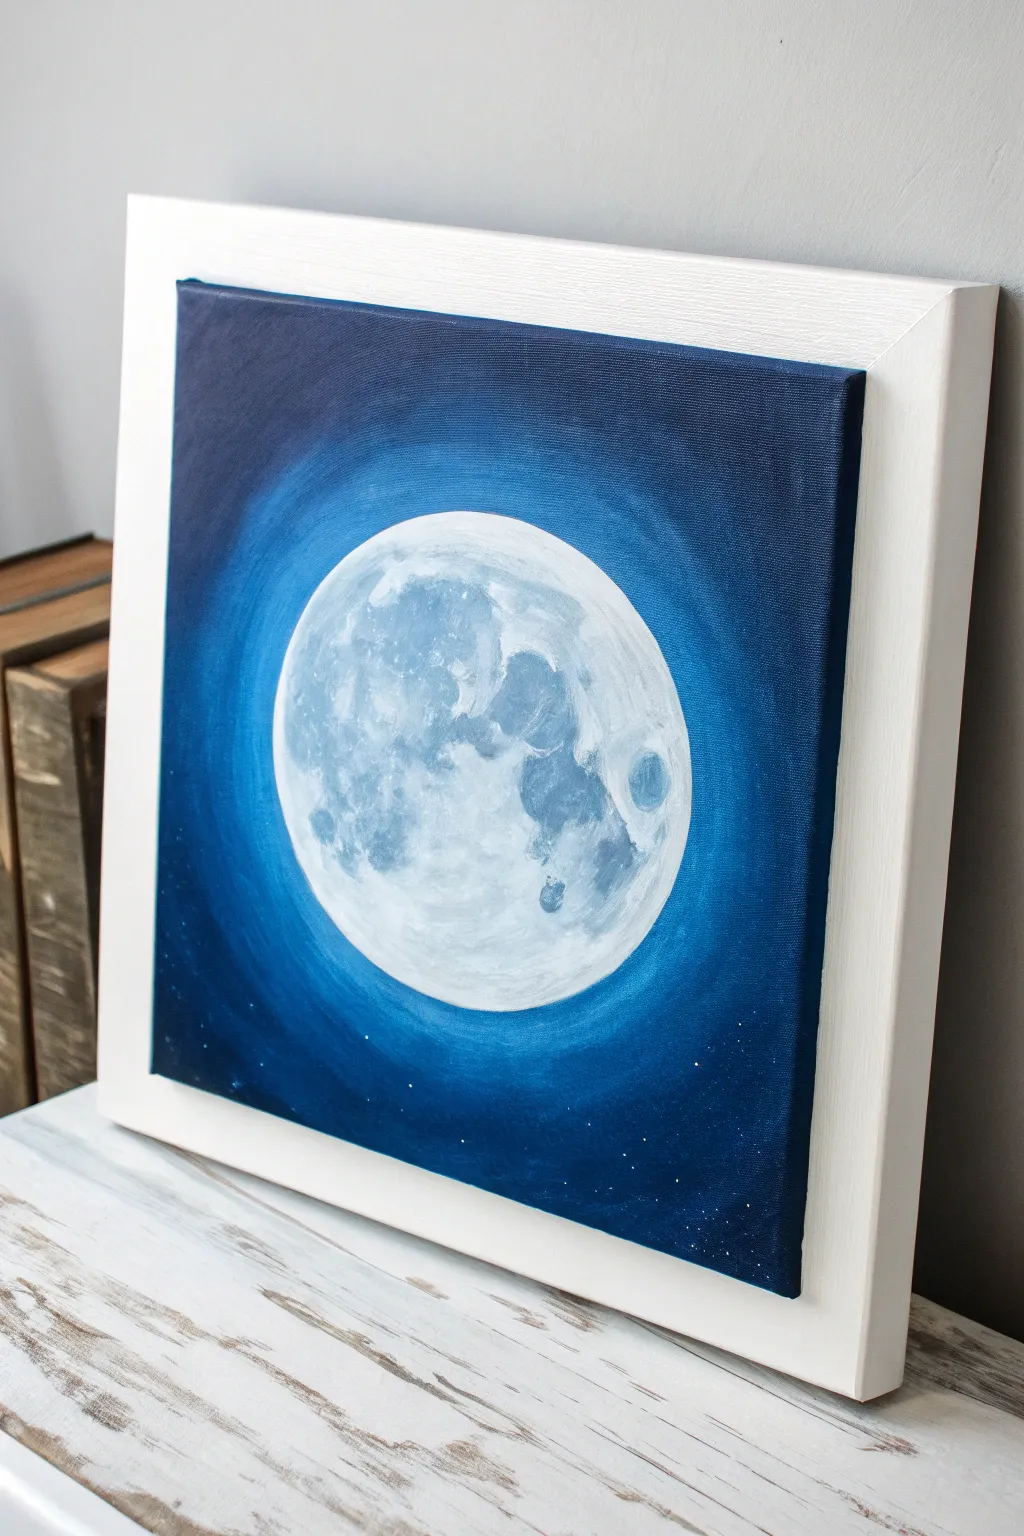
Capture the serene luminescence of a full moon with this monochromatic study in blue. By layering acrylics from deep indigo to bright titanium white, you’ll create a glowing focal point that radiates calmness and nocturnal mystery.
Detailed Instructions
Materials
- Square stretched canvas (e.g., 10×10 or 12×12 inches)
- Acrylic paints: Phthalo Blue, Ultramarine Blue, Prussian Blue (or Indigo), Titanium White, Black
- Large flat brush (1-inch width)
- Medium filbert brush
- Small round detail brush
- Medium round bristle brush (for stippling)
- Circular object for tracing (plate or bowl)
- Pencil
- Palette for mixing
- Cup of water and paper towels
- Splatter brush or stiff toothbrush (optional for stars)
Step 1: Preparation and Base
-
Establish the Moon Shape:
Begin by placing your circular object in the exact center of the square canvas. Lightly trace the outline with a pencil to define your moon’s perimeter. -
Paint the Deep Background:
Mix Prussian Blue (or Indigo) with a touch of Black to create a very dark, midnight blue. Using your large flat brush, paint the corners and outer edges of the canvas, ensuring you cover the sides of the canvas as well for a finished look. -
Begin the Gradient:
While the outer edges are still slightly wet or freshly dry, mix a pure Phthalo Blue. Paint a ring just inside the dark corners, blending outward slightly to soften the transition. -
Create the Glow Ring:
Mix Phthalo Blue with a small amount of Titanium White to create a medium electric blue. Apply this color around the pencil circle, extending outward about an inch or two into the Phthalo Blue area to create the radiant halo effect. -
Smooth the Transitions:
Using a clean, slightly damp brush, gently feather the edges where the different blues meet. The goal is a seamless, circular gradient from the bright ring around the moon fading into the deep darkness of the corners.
Edge Blending Secret
To get a buttery smooth gradient in the background, use a generic “slow-drying medium” or a spray bottle to keep the acrylics wet longer while blending.
Step 2: Painting the Moon
-
Base Coat the Moon:
Fill in the entire pencil circle with a mix of Titanium White and the tinest speck of Phthalo Blue. It should be an extremely pale, cool off-white, not a stark pure white. -
Map the Maria (Dark Spots):
Mix a light grey-blue using White, a touch of Ultramarine, and a grey tone. Using a medium filbert brush, blot in the major ‘seas’ or dark patches of the moon. Reference the photo to place the large patch on the left and the smaller ones on the right. -
Build Texture:
Switch to a round bristle brush. Dip it into a slightly darker grey-blue mix and dab off most of the paint on a paper towel. Stipple (tap vertically) onto the darker patches to create a crater-like texture. -
Add Crater Definitions:
With a small round detail brush, mix a darker blue-grey shadow color. Paint small C-shapes and irregular curved lines within the textured areas to suggest specific impact craters, like the distinctive Tycho crater near the bottom. -
Highlight the Surface:
Reload your brush with pure Titanium White. Stipple and dry-brush highlights on the top-left edges of your craters and the brightest parts of the moon’s surface to make the texture pop.
Level Up: Pearl
Mix a clear iridescent medium into your final white highlight layer. The moon will shimmer slightly when viewed from different angles.
Step 3: Final Details
-
Enhance the Glow:
If your background glow dried too dark, create a very watery glaze of white and light blue. Gently brush this over the blue background immediately surrounding the moon to intensify the radiance. -
Add Distant Stars:
Dilute a small amount of white paint with water until it is inky. Dip a stiff brush or toothbrush into it and flick the bristles to spray tiny, subtle stars primarily into the dark outer corners. -
Paint Larger Stars:
Use your smallest detail brush to manually dot a few slightly brighter, more distinct stars near the bottom edge of the painting. -
Final Check:
Step back and assess your contrast. Ensure the moon looks significantly brighter than the background. Add a final touch of pure white to the brightest area of the moon if needed. -
Framing:
Once fully dry, mount the canvas into a white floating frame to mimic the clean, modern look of the reference image.
Hang your finished piece in a bedroom or reading nook to enjoy its peaceful, celestial atmosphere.


Blue Ocean Waves With White Foam
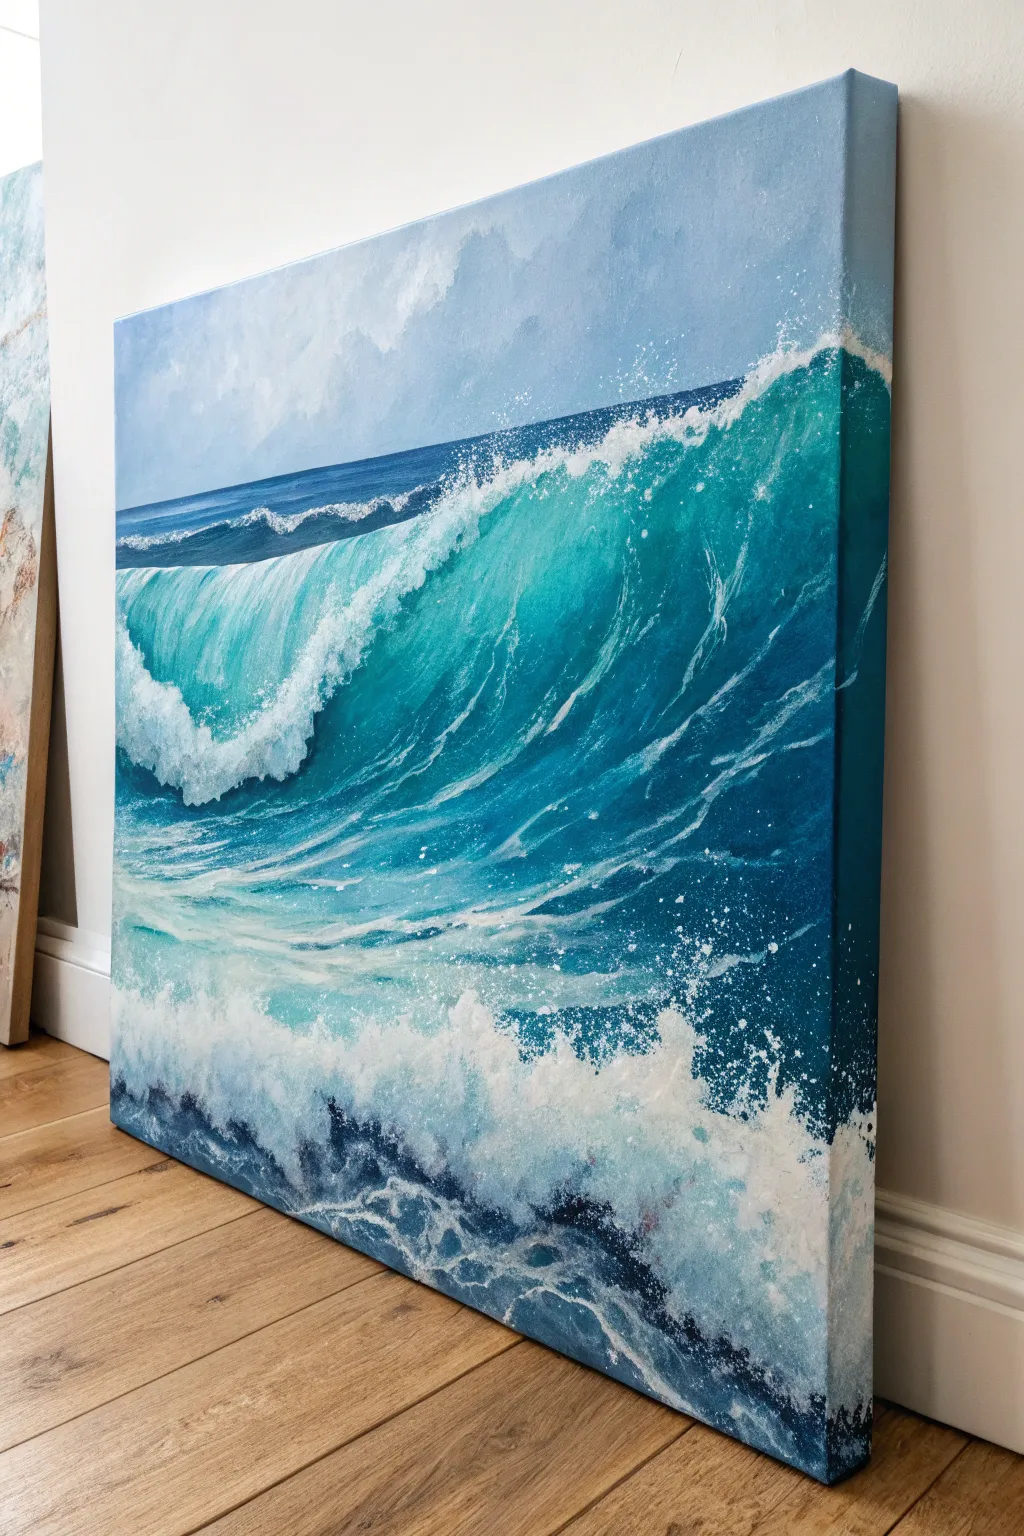
Capture the raw power of the ocean with this dynamic, large-scale acrylic seascape featuring a translucent curling wave. The painting emphasizes the interplay of deep turquoise water and energetic white foam, creating a striking sense of movement.
Step-by-Step
Materials
- Large stretched canvas (square or portrait orientation recommended)
- Acrylic paints: Phthalo Blue, Ultramarine Blue, Turquoise, Phthalo Green, Titanium White, Raw Umber, Sky Blue
- Large flat brush (2-inch)
- Medium filbert brush
- Small round detail brush
- Palette knife
- Fan brush (optional)
- Water container and paper towels
- Gesso (optional)
Step 1: Setting the Scene
-
Prepare the canvas:
Start with a clean canvas. If you want a smoother surface for water details, apply a coat of gesso and sand it lightly once dry. -
Map the horizon:
Paint the sky area in the upper third using a mix of Titanium White and a touch of Sky Blue. Use horizontal strokes to create a calm, distant atmosphere. -
Add distant clouds:
While the sky is still slightly wet, blend in subtle cloud shapes using a bit of grey (mix White with a tiny dot of Raw Umber and Blue). Keep these soft and undefined. -
Define the horizon line:
Use painter’s tape or a steady hand to paint a straight, dark blue line (Ultramarine + Phthalo Blue) for the distant ocean horizon.
Foam Looks Flat?
Real foam has volume. Don’t just use white; mix a specifically cool grey-blue for the shadows underneath the foam clumps to make the white highlights pop.
Step 2: Building the Wave Form
-
Block in the deep water:
Mix a dark, rich teal using Phthalo Blue and Phthalo Green. Paint the bottom right section and the area under the curling lip, where the water is thickest and darkest. -
Create the translucent curl:
For the sunlight hitting the thinner part of the wave, mix Turquoise with Titanium White. Apply this lighter teal color to the upper face of the curling wave, blending it downwards into the darker teal. -
Shape the lip:
Use your medium filbert brush to define the sharp, curling edge of the wave. The transition from the dark shadow underneath to the translucent top needs to be smooth to show volume. -
Wrap the canvas edges:
Don’t forget to extend your deep blues and teals onto the sides of the canvas like in the reference image. This gives the finished piece a polished, gallery-ready look without a frame.
Level Up: Glazing
Once dry, apply a very thin glaze of Gloss Medium mixed with Phthalo Turquoise over the translucent part of the wave to make the water look wet and glowing.
Step 3: Creating Movement
-
Paint surface ripples:
Using a smaller brush and a lighter tint of your turquoise mix, paint thin, curved lines following the shape of the wave. These lines should curve upward toward the lip to indicate the water is being pulled up. -
Establish the crash zone:
At the bottom left where the wave has already broken, block in irregular shapes of pure Titanium White. Don’t worry about detail yet; just get the opaque white paint down. -
Add shadow to the foam:
Mix a light grey-blue (White + trace of Ultramarine + tiny bit of Raw Umber). Paint this into the lower sections of the white foam to give it 3D structure and weight.
Step 4: Adding the Splash and Spray
-
Detail the crest:
Use a small round brush or the edge of a palette knife to stipple thick Titanium White along the very top edge of the wave, letting it break up as it starts to crash. -
Create fine spray:
Load a stiff brush (like an old toothbrush or stiff bristle brush) with watered-down white paint. Use your thumb to flick fine mist patterns over the crest and the bottom crash zone. -
Texture the foreground foam:
I like to use a sea sponge or a scrunched-up paper towel here. Dip it in thick white paint and dab it vigorously at the bottom of the canvas to create chaotic, churning sea foam. -
Refine the water veins:
Go back into the translucent teal area with a very fine script liner brush. Paint delicate, lightning-bolt-like veins of white foam that are stretching as the wave curls. -
Highlight the splash:
Look for the brightest points where the light hits the crashing water. Apply pure, unthinned Titanium White to these spots for maximum contrast. -
Final adjustments:
Step back and check your values. If the shadow under the lip isn’t dark enough, glaze a thin layer of dark Phthalo Blue over it to deepen the contrast.
Hang your seascape in a well-lit spot where the turquoise tones can really shine


Waterfall in a Blue Mist Palette
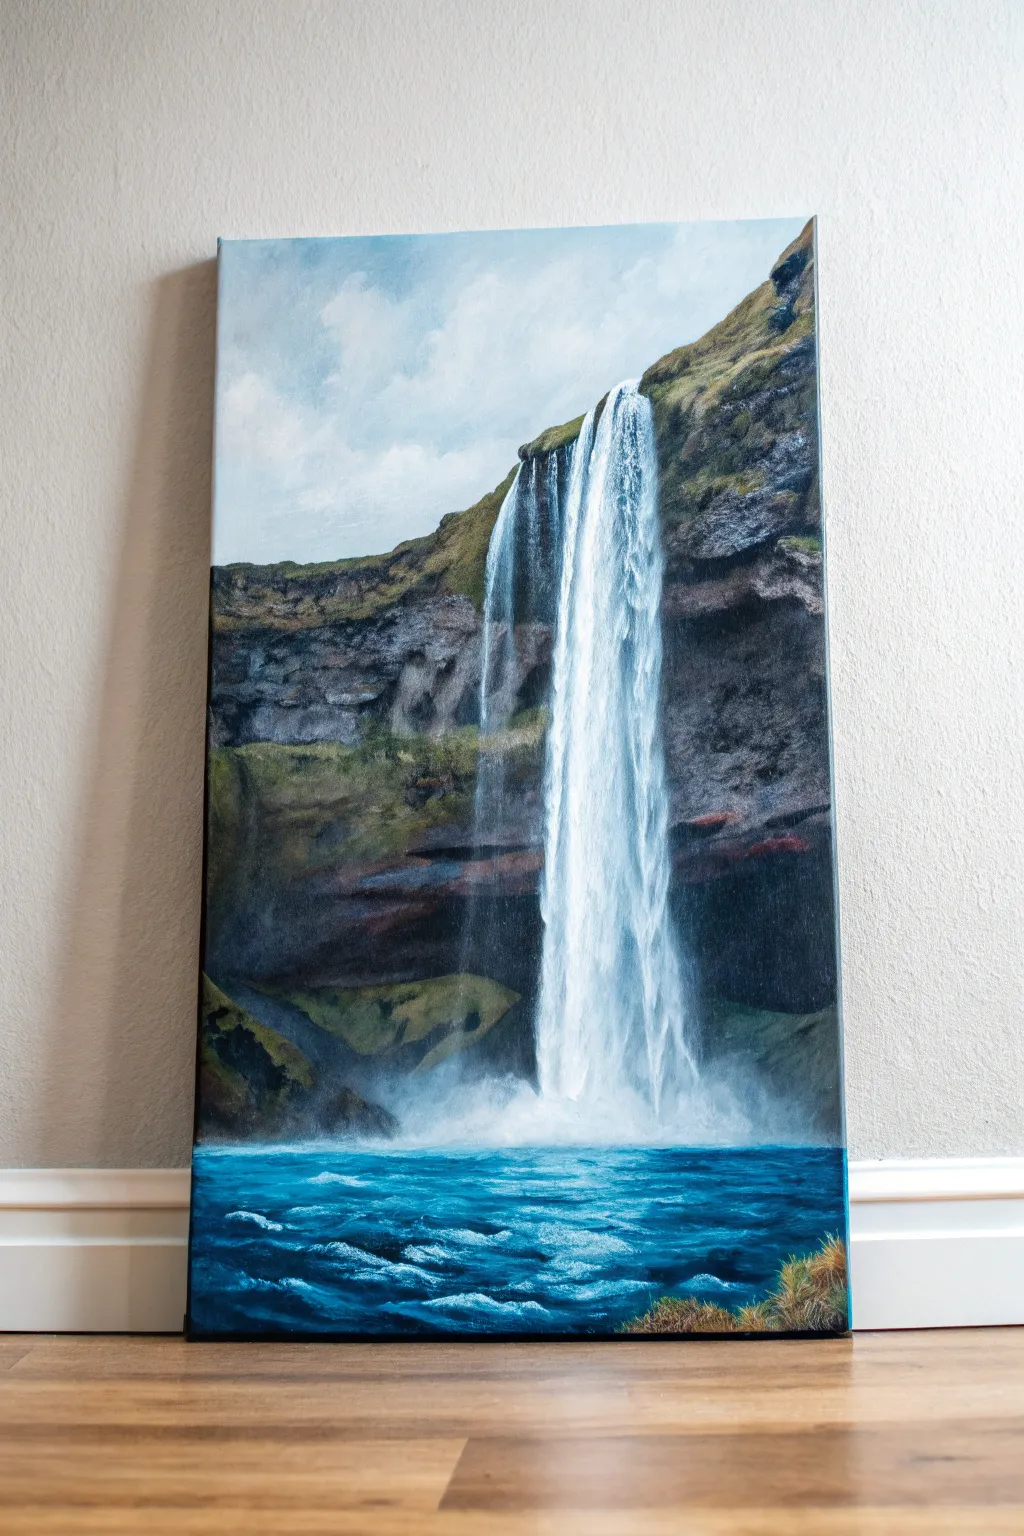
Capture the raw power and serene beauty of a towering waterfall with this landscape painting tutorial. Using cool blues and earthy tones, you will create a vertical masterpiece that balances textured rock faces with the ethereal softness of falling water.
Detailed Instructions
Materials
- Tall stretched canvas (e.g., 12×24 inch)
- Acrylic paints: Phthalo Blue, Ultramarine Blue, Burnt Umber, Burnt Sienna, Yellow Orche, Titanium White, Mars Black, Sap Green
- Large flat brush (1-inch)
- Medium filbert brush
- Small round detail brush
- Fan brush (optional)
- Palette knife
- Water cup and paper towels
- Spray bottle with water
Step 1: Sky and Base Sketching
-
Prime and gradient:
Begin by painting the upper third of the canvas with a soft gradient for the sky. Mix Titanium White with a tiny touch of Phthalo Blue and apply it near the top, fading into pure white as you move down towards the horizon line. -
Cloud softness:
While the sky paint is still wet, scumble in subtle cloud shapes using pure white and a dry brush. Keep the edges soft and indistinct to push the sky into the background. -
Rough composition:
Using a watered-down mix of Burnt Umber, lightly sketch the cliff line. It should start high on the right side and slope diagonally downwards to the left, carving out a vertical space for the waterfall.
Dry Brushing Trick
For realistic falling water, wipe most of the paint off your brush first. The bristles will split, creating multiple tiny lines that look just like water droplets.
Step 2: Cliff Face and Texture
-
Base rock layer:
Block in the dark areas of the cliff using a mix of Mars Black, Burnt Umber, and a touch of Ultramarine Blue. Focus on the shadowed cavern behind where the water will fall. -
Mid-tone rocks:
Mix Burnt Sienna with a little White and grey to create mid-tone rocky colors. Apply this to the cliff faces that are catching light, using choppy strokes to mimic jagged stone. -
Adding vegetation:
Mix Sap Green with Yellow Ochre and a bit of Burnt Umber. Stipple this mossy green mixture onto the top plateau of the cliff and in patches along the rock face to suggest hanging grass and moss. -
Deepening shadows:
Go back into the cavern behind the falls with your darkest darks. This contrast is crucial; the darker the cave, the brighter your white water will appear later. -
Rock highlighting:
Use a palette knife or a small flat brush to drag a light grey-brown mix across the protruding rocks. I prefer to keep the knife flat to catch the texture of the canvas, creating natural-looking stone textures.
Level Up: Glazing
Once the rock face is 100% dry, apply a very thin watery wash of purple or dark blue over the deepest shadows. This transparent glaze adds incredible depth.
Step 3: The Waterfall
-
Mapping the flow:
With a diluted mixture of White and a tiny drop of Blue, paint the vertical path of the water. Start narrow at the top lip and let it widen slightly as it falls. -
The main plunge:
Load a filbert brush with thick Titanium White. Starting from the top edge of the cliff, pull the paint straight down in long, confident strokes. Let the brush execute a ‘dry brush’ effect towards the bottom to suggest spray. -
Secondary streams:
Paint thinner, delicate streams of water breaking away from the main column using a small round brush. These should look like wispy veils rather than solid blocks. -
Creating mist:
Where the water hits the bottom, use a dry brush or your finger to smudge the white paint outward, creating a soft, misty cloud that obscures the base of the cliffs.
Step 4: Foreground Water
-
Deep water base:
For the pool at the bottom, mix Phthalo Blue with a touch of Black and Emerald Green. Paint the entire bottom section with this deep, rich hue. -
Turbulence layers:
Mix Titanium White with Phthalo Blue to get a bright turquoise. Using a horizontal scrubbing motion, paint the churning water near the base of the falls. -
Ripples and waves:
Switch to a smaller brush and pure White. diverse horizontal squiggles and dashes in the foreground water to represent foam and waves moving away from the impact zone. -
Final foam details:
Add bright white highlights to the crests of the waves in the very foreground. This helps create depth and draws the eye into the painting. -
Foreground grass:
In the bottom right corner, use a fan brush or liner brush to flick up some strands of grass using Yellow Ochre and Burnt Sienna, grounding the viewer on the bank.
Step back and admire the powerful movement and stillness captured in your landscape painting
BRUSH GUIDE
The Right Brush for Every Stroke
From clean lines to bold texture — master brush choice, stroke control, and essential techniques.
Explore the Full Guide
Cloudy Day Sky in Cool Blues
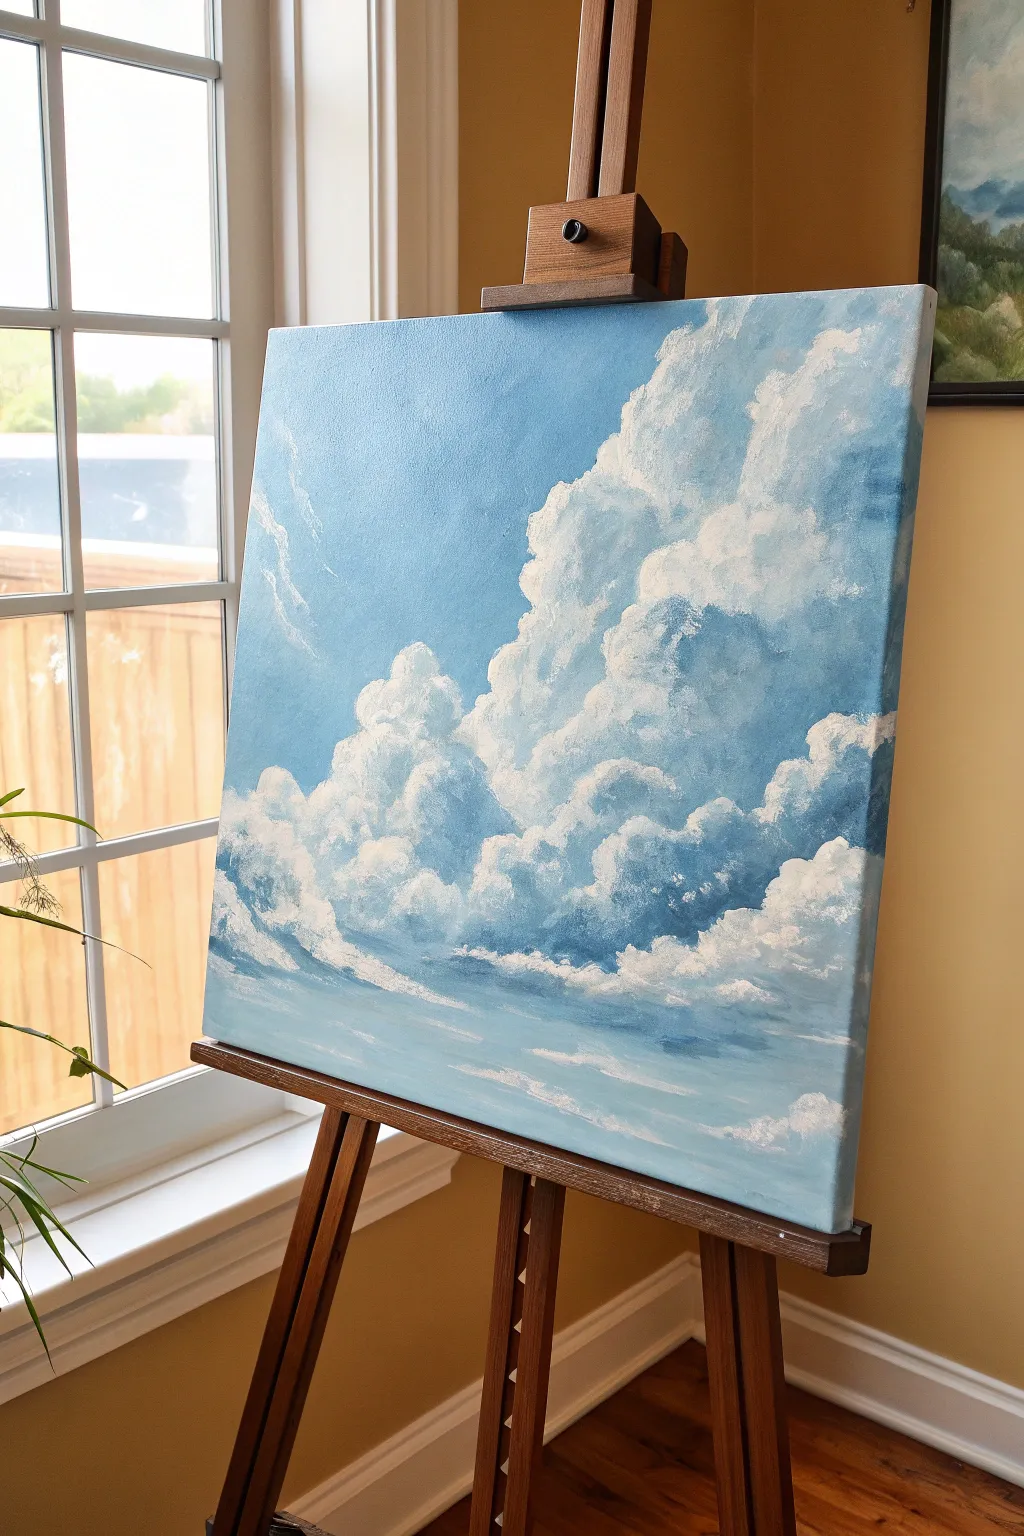
Capture the ephemeral beauty of a summer afternoon with this soft, atmospheric acrylic painting. By focusing on a limited palette of cool blues and clean whites, you will learn to build voluminous, fluffy clouds that feel like they’re floating right off the canvas.
Step-by-Step
Materials
- Square stretched canvas (approx. 16×16 or 20×20 inches)
- Acrylic paints: Titanium White, Ultramarine Blue, Cerulean Blue, Payne’s Grey
- Large flat brush (1-inch width)
- Medium filbert brush (size 6 or 8)
- Small round brush (size 2)
- Sea sponge (optional, for texture)
- Palette knife
- Water cup and paper towels
- Acrylic glazing medium
Step 1: Setting the Atmosphere
-
Mix the sky gradient:
Begin by creating two shades of blue on your palette. For the upper sky, mix Ultramarine Blue with a touch of Titanium White and a tiny dot of Payne’s Grey for depth. For the lower horizon sky, mix Cerulean Blue with a generous amount of Titanium White to create a pale, airy cyan. -
Apply the background base:
Using your large flat brush, paint the top third of the canvas with your darker Ultramarine mixture. While the paint is still wet, switch to the lighter Cerulean mixture for the bottom two-thirds. -
Blend the transition:
Where the two blue zones meet, use horizontal strokes to blend them seamlessly. You want a gradient that fades from deep blue at the top to a hazy light blue at the bottom, mimicking atmospheric perspective. -
Add faint wisps:
While the background is still slightly tacky, take a clean, dry brush with a tiny amount of white paint. Lightly scumble a few faint, diagonal streaks in the upper left corner to suggest high-altitude cirrus clouds. Let the entire background dry completely.
Step 2: Building the Cloud Formations
-
Map the main shapes:
Mix a light grey-blue shade using White, a touch of Ultramarine, and a tiny bit of Payne’s Grey. With your filbert brush, roughly block in the main silhouette of the large cumulus cloud structure, focusing on the right side of the canvas. -
Establish the shadows:
Establish the shadowed underbellies of the clouds. Use a slightly darker mix of Payne’s Grey and Blue to paint the bottom edges and the deep crevices within the cloud mass. Keep your edges soft and irregular. -
Create mid-tones:
Mix a lighter mid-tone grey (mostly white with a hint of blue). Apply this broadly over the grey base you initially painted, leaving the darkest shadow areas exposed. Use a circular, scrubbing motion with your brush to create a fluffy texture. -
Define the smaller clusters:
On the left side of the canvas, paint a secondary, smaller cluster of clouds rising up. Repeat the process of laying down a dark grey base followed by the lighter mid-tones, ensuring these clouds look connected to the main formation. -
Soften the edges:
Use a clean, slightly damp filbert brush to gently blur the transition between the cloud shadows and the blue sky background. I like to keep the top edges of the clouds distinct but soften the bottom edges where they fade into the atmosphere.
Cloud Control
Clouds looking too heavy? Don’t overwork the paint. If edges get too hard, use a dry, clean brush to gently feather them out while wet. Remember, clouds are water vapor, not solid objects.
Step 3: Highlighting and Refining
-
Mix the highlight white:
Prepare a pile of pure Titanium White. If your paint is very thick, add a drop of glazing medium to improve flow, but keep it relatively opaque for the brightest spots. -
Apply initial highlights:
Identify where the light source is coming from (top left in this scene). Dab pure white paint onto the top, rounded domes of the clouds using a loaded filbert brush. -
Scumble for texture:
Use a ‘scumbling’ technique—rubbing a brush with very little paint on it in circular motions—to blend the bright white highlights downward into the grey mid-tones. This creates the illusion of volume and fluffiness. -
Detail the edges:
Switch to your small round brush. Add crisp, bright white defining lines along the very top ridges of the cloud formation. Breaking up the edge with small bumps makes the cloud look more organic and less like a cotton ball. -
Layering the mass:
Build up the large cloud mass on the right by adding layers of smaller cloud puffs in front of the larger ones. Paint the top edges white and let them fade into the grey shadow of the cloud behind them to create depth. -
Enhance the shadows:
If your shadows have disappeared under all the white, re-mix a sheer glaze of Payne’s Grey and glazing medium. lightly glaze the underside of the clouds to deepen the contrast without losing the texture underneath. -
Final atmospheric touches:
Paint thin, horizontal streaks of white and pale blue near the bottom of the canvas. These represent distant cloud layers near the horizon, grounding your composition. -
Review and refine:
Step back from your easel. Look for areas that need more contrast. If a cloud looks too flat, add a brighter highlight on top and a deeper shadow underneath.
Violet Vibes
To add realistic warmth to your cool painting, try mixing a tiny speck of Alizarin Crimson into your grey shadow mix. This subtle purple tint makes the clouds pop against the yellow sunlight.
Hang your finished piece near a window to let natural light enhance those airy textures
Blue Desert Night With a Big Moon

Capture the stillness of a moonlit desert with this striking vertical acrylic painting. Using a monochromatic palette of blues, you’ll learn to blend a gradient sky and sculpt dimensional sand dunes that glow under the moonlight.
Detailed Instructions
Materials
- Tall vertical canvas (e.g., 12×24 inches or similar ratio)
- Acrylic paints: Titanium White, Phthalo Blue, Ultramarine Blue, Prussian Blue (or Indigo), Lamp Black
- Large flat brush (1-2 inch) for blending
- Medium filbert brush
- Small round detail brush
- Palette knife or round object (like a jar lid) for the moon stencil
- Water cup and paper towels
- Pencil or chalk for sketching
Step 1: Painting the Gradient Sky
-
Prepare the gradient:
Start by mixing three distinct values for your sky: a deep Prussian blue mix for the top corners, a standard Phthalo blue mid-tone, and a very light blue mixed with plenty of white for the horizon area. -
Apply the darkest blue:
Using your large flat brush, apply the darkest blue mixture at the very top of the canvas. Use horizontal strokes to cover the top quarter. -
Transition to mid-tones:
Without cleaning the brush fully, pick up your mid-tone Phthalo blue. Paint the section just below the dark blue, allowing the wet edges to touch and blend naturally. -
Blend the horizon:
Blend in your lightest blue mixture as you move down the canvas. The sky should be lightest right where the top of the highest dune will eventually sit, about two-thirds of the way down. -
Smooth the transition:
Take a clean, slightly damp large brush and run it horizontally back and forth across the entire sky to smooth out brushstrokes and create a seamless ombre effect. -
Add wispy clouds:
While the blue is still tacky or just dry, use a dry brush with a tiny amount of Titanium White to gently scumble in some faint, horizontal cloud streaks across the middle section.
Uneven Sky Blending?
If your gradient looks streak, let it dry completely. Then, mix a glazing medium with your blue paints and apply a thin, translucent layer over the top to smooth transitions.
Step 2: Creating the Glowing Moon
-
Position the moon:
Once the sky is fully dry, trace a circle in the upper third of the canvas using a jar lid or compass. Position it slightly off-center to the left for better composition. -
Base coat the moon:
Fill in the circle with pure Titanium White. You may need two coats to ensure it’s fully opaque against the dark blue background. -
Add craters and texture:
Mix a very light grey-blue using a speck of Ultramarine and White. Dab this gently onto the white moon with a sponge or old stiff brush to create crater textures. -
Create the glow:
Mix a transparent glaze of water and Titanium White (or use glazing medium). With a clean brush, paint a thin, transparent ring around the moon on the blue sky to make it look like it’s glowing.
Add Sparkle
Mix a tiny amount of iridescent or silver glitter medium into the white paint used for the final dune highlights. The sand will subtly sparkle as you walk past the art.
Step 3: Sculpting the Dunes
-
Sketch the dune lines:
Use a piece of chalk to lightly sketch the sweeping curves of the sand dunes. Draw a main large dune peak in the middle ground and sweeping curves coming forward. -
Block in the darkest shadows:
Mix Prussian Blue with a touch of Black to create a deep midnight indigo. Paint the shadowed side of the dunes—usually the side facing away from the moon or the deep valleys between ridges. -
Paint the illuminated slopes:
Mix a mid-tone blue (Ultramarine + White). Paint the tops and moon-facing slopes of the dunes. I like to keep my strokes distinct here to mimic the texture of shifting sand. -
Refine the ridge lines:
Use a smaller filbert brush to sharpen the edge where the light slope meets the dark shadow. This sharp contrast creates the ‘crest’ of the dune. -
Add foreground details:
In the immediate foreground at the bottom, use your darkest blue mix to paint ripples or small depressions in the sand. Lightly highlight the top edges of these ripples with a lighter blue. -
Final highlights:
With your smallest brush and nearly pure white paint, add thin, crisp lines along the very sharpest peaks of the dunes to show where the moonlight hits most intensely. -
Add stars:
Load a toothbrush or stiff brush with watered-down white paint. Cover the bottom part of your painting with paper, then flick the bristles to spray tiny stars into the dark upper sky.
Step back and admire the cool, tranquil atmosphere of your desert night landscape

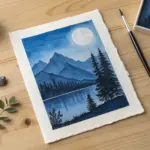
PENCIL GUIDE
Understanding Pencil Grades from H to B
From first sketch to finished drawing — learn pencil grades, line control, and shading techniques.
Explore the Full Guide
Winter Pines in Icy Blue Shadows

Capture the serene chill of a winter forest with this striking study of snow-laden evergreens. Using a limited palette of cool blues and crisp whites, you’ll learn to build realistic texture and depth, transforming a blank canvas into a frosty masterpiece.
Step-by-Step
Materials
- Stretched canvas (vertical orientation, e.g., 16×20 inches)
- Acrylic paints: Titanium White, Phthalo Blue (or Primary Blue), Ultramarine Blue, Mars Black, Burnt Umber
- Flat brushes (Large 1-inch, Medium 1/2-inch)
- Angle brush (Medium)
- Fan brush (optional but helpful)
- Small round or liner brush for details
- Palette knife (for mixing)
- Water container and paper towels
Step 1: Setting the Scene
-
Prepare the Gradient Sky:
Begin by creating a soft gradient for the sky. Mix a large amount of Titanium White with a tiny touch of Phthalo Blue. Start painting at the bottom third of the canvas and work your way up. -
Deepen the Blue:
As you move upward, gradually add more blue to your mix. The top corners should be the darkest, though still a relatively light, airy blue. Blend the transition while the paint is wet using horizontal strokes. -
Establish the Ground:
For the snowy foreground, use a mix of Titanium White with the slightest hint of Ultramarine Blue for shadow areas. Paint the bottom of the canvas, creating implied slopes by curving your brushstrokes diagonally downward from left to right. -
Background Trees:
Mix a very pale, grayish-blue using White, a touch of Blue, and a dot of Black. Using a flat brush turned sideways, tap in faint, vertical ghost shapes on the right and left edges to suggest distant trees. Keep these blurry and low-contrast.
Muddy Snow Fix
If your white snow is turning gray or green as you apply it, your dark underlayer isn’t dry enough. Stop, let it dry fully (or use a hairdryer), and re-apply fresh white.
Step 2: Painting the Main Pines
-
Mix the Dark Underlayer:
Create a deep forest green-black mixture. Combine Phthalo Blue, Mars Black, and a little Burnt Umber. This dark base will provide the necessary contrast for the bright snow later. -
Structure the First Tree:
Start with the smaller pine on the left. Draw a faint vertical guide line. Using a medium flat or angle brush, tap in the branches starting from the top, getting wider as you move down. Leave gaps between branches; don’t paint a solid triangle. -
Build the Second Tree:
Repeat this process for the taller, dominant pine on the right. Ensure its top is higher and the base extends slightly lower than the first tree to create perspective. Keep the edges ragged and natural. -
Add Depth to the Base:
Darken the paint mix slightly and reinforce the bottom branches where the shadows would be deepest. Let this dark layer dry completely—this is crucial so the white snow doesn’t turn gray.
Step 3: Adding the Snow
-
Mix Shadowed Snow:
Before adding pure white, mix a ‘shadow white’ using Titanium White and a very small amount of Ultramarine Blue. This will be the underside of the heavy snow clumps. -
Apply Snow Shadows:
Using a filbert or small flat brush, dab this cool white onto the tops of the dark branches. Focus on the right side of the trees if you want the light source coming from the left. -
Highlight with Pure White:
Load your brush with thick, pure Titanium White. Gently lay this over the shadowed snow layer, focusing on the very tops and tips of the branches. I prefer to use a heavy loading technique here so the paint creates literal texture. -
Shape the Foliage:
As you apply the white, mimic the downward drape of heavy snow. The branches should look weighed down. Leave bits of the dark underlayer peeking through for form.
Pro Tip: Texture
Don’t thin your white paint for the final snow highlights. Use heavy body acrylics straight from the tube to build actual physical ridges that catch the light.
Step 4: Foreground and Details
-
Refine the Foreground:
Using your large flat brush, sweep pure white across the ground, blending it into the base of the trees. Add diagonal blue-tinted shadows cast by the trees stretching towards the bottom right. -
Paint the Side Brush:
On the far right, use a liner brush and a mix of watery Burnt Umber and White to paint delicate, bare branches reaching up. This balances the composition. -
Frost the Bare Branches:
Take your liner brush with pure white (slightly thinned with water) and carefully outline one side of these bare branches to create a frost effect. -
Final Atmosphere:
If needed, dry brush a tiny amount of white mist at the very base of the trees to settle them into the snow so they don’t look like they are floating.
Step back and admire the crisp, chilly atmosphere you’ve created on canvas
Galaxy Swirl With Blue Nebula Clouds
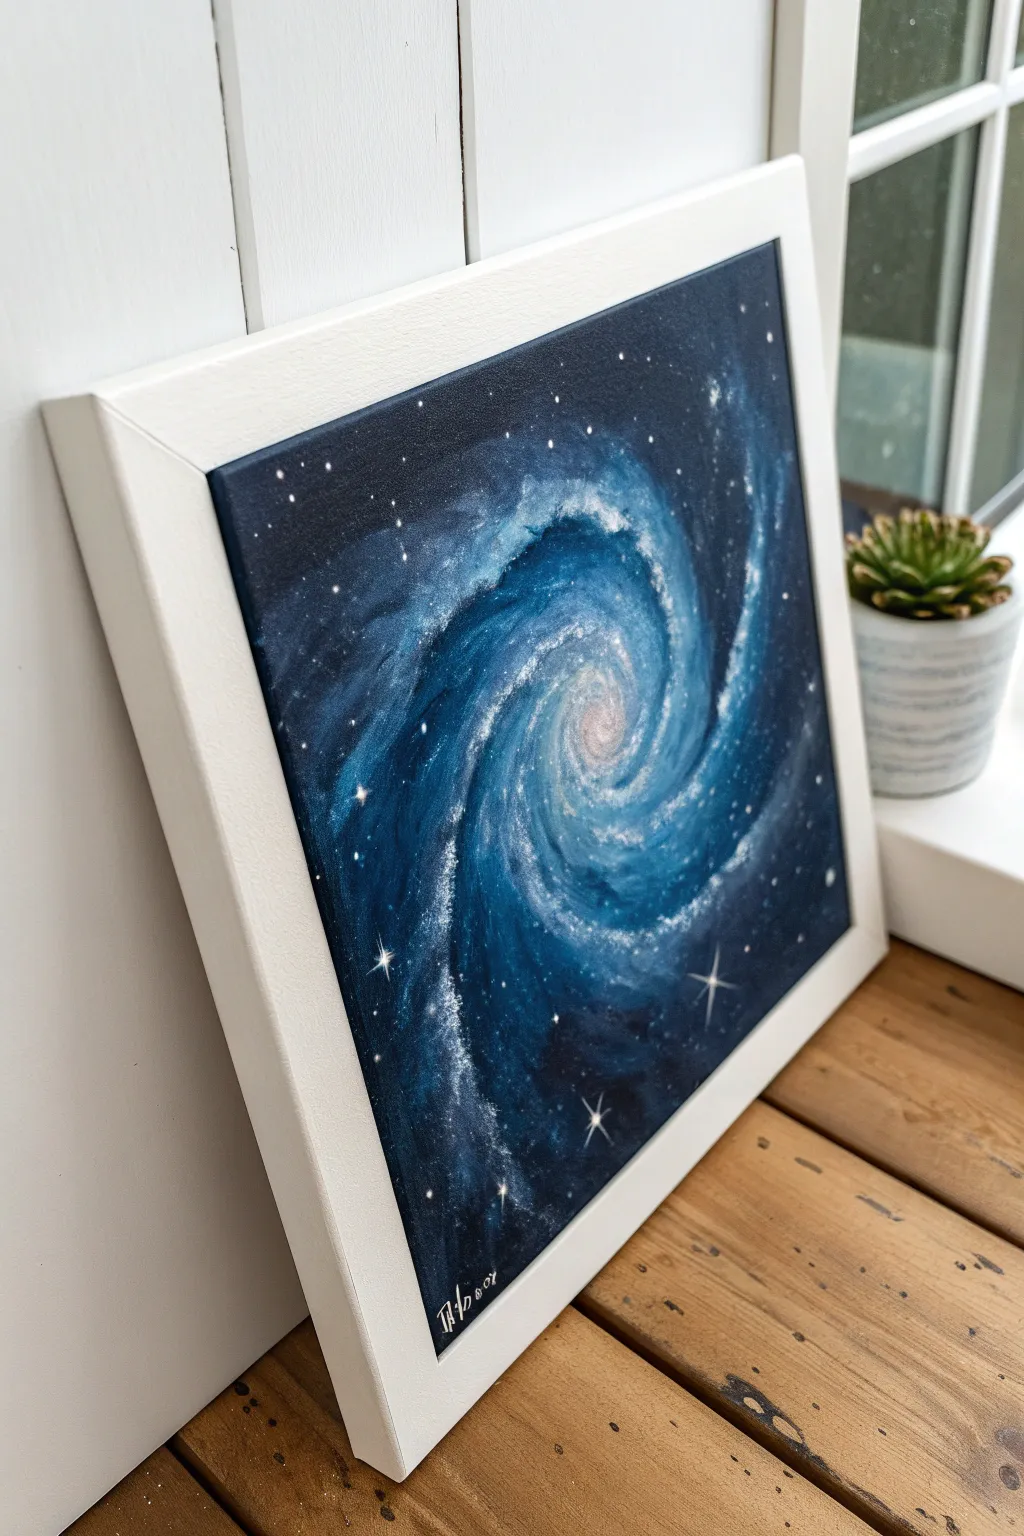
Capture the infinite depth of space with this swirling galaxy painting, featuring rich layers of indigo and electric blue nebula clouds. This project uses blending techniques on a square canvas to create a dynamic, glowing spiral that seems to spin right before your eyes.
Step-by-Step Guide
Materials
- Square stretched canvas (e.g., 10×10 or 12×12 inches)
- Acrylic paints: Black, Phthalo Blue, Ultramarine Blue, Teal, Magenta, Titanium White
- Medium flat brush (3/4 inch)
- Small round brush (size 4)
- Fine liner brush (size 0 or 00)
- Old toothbrush (optional for stars)
- Palette for mixing
- Water cup and paper towels
Step 1: Setting the Stage
-
Prime the background:
Start by mixing a deep, dark base color. Combine black with a generous amount of Phthalo Blue to create a rich midnight shade. Cover the entire canvas with this mixture, ensuring you paint the sides for a finished look. -
Map the spiral:
While the base is still slightly tacky or just dry, sketch the basic spiral shape. Use a very watered-down white paint or a piece of white chalk to lightly draw a swirl starting from the center and expanding outward to the edges.
Cosmic Depth Trick
Don’t just use white for stars! Mix very faint blue or pink tints for some larger stars. This subtle color variation adds incredible realism.
Step 2: Layering the Nebula
-
Lay the mid-tones:
Mix Ultramarine Blue with a touch of White to create a medium royal blue. Using your medium flat brush, follow the path of your chalk sketch with broad, sweeping strokes, keeping the edges soft and feathery. -
Deepen the shadows:
Return to your dark Phthalo Blue and Black mix. Paint into the negative spaces between the spiral arms to increase contrast, blending gently where the dark space meets the lighter nebula arms. -
Brighten the arms:
Create a lighter teal by mixing Teal with White. Apply this color more centrally along the spiral arms, letting the darker blue show through on the edges to create volume and roundness. -
Create the glowing core:
The center of the galaxy needs heat. Mix White with a tiny dot of Magenta and plenty of water to glaze the very center point. Blend outwards slightly into the surrounding blue to create a diffuse glow.
Muddiness Rescue
If your spiral starts looking muddy or gray, stop immediately. Let the canvas dry completely, then re-apply your bright blues on top of the dry layer.
Step 3: Adding Texture and Starlight
-
Stipple the clouds:
Use a dry, scruffy brush or a sponge with almost dry white paint. Lightly tap or ‘stipple’ over the brightest parts of the spiral arms to simulate gas clouds and clusters of distant stars. -
Enhance the flow:
Take a clean, slightly damp brush and gently soften the transitions of your stippling. You want the ‘clouds’ to feel like they are moving, so drag the brush slightly in the direction of the spiral’s rotation. -
Intensify the highlights:
Mix pure White with a tiny touch of water. With a small round brush, add definitive bright streaks along the upper ridges of the spiral arms to suggest the highest concentration of light. -
Splatter distant stars:
Dilute white paint with water until it’s inky. Load an old toothbrush or stiff brush, and flick the bristles to spray a fine mist of tiny stars over the dark background areas.
Step 4: Final Details
-
Paint major stars:
Switch to your fine liner brush. Dip it into pure Titanium White and place larger, deliberate dots randomly throughout the galaxy, varying their sizes for depth. -
Add distinctive flares:
Choose 3-5 of your largest stars to turn into ‘flares.’ Paint a thin vertical line and a thin horizontal line crossing through the star center to create a cross shape. -
Refine the center:
If the center lost some brightness, add a final solid dot of pure white right in the middle. I like to glaze a tiny bit of watery pink around it once dry to make it pulsate. -
Sign and seal:
Add your signature in the bottom corner with a liner brush. Once completely fully dry (give it 24 hours), apply a gloss varnish to make the dark blues really pop and protect the finish.
Hang your new masterpiece near a window to see the light catch the texture of the stars


Blue City Skyline at Dusk
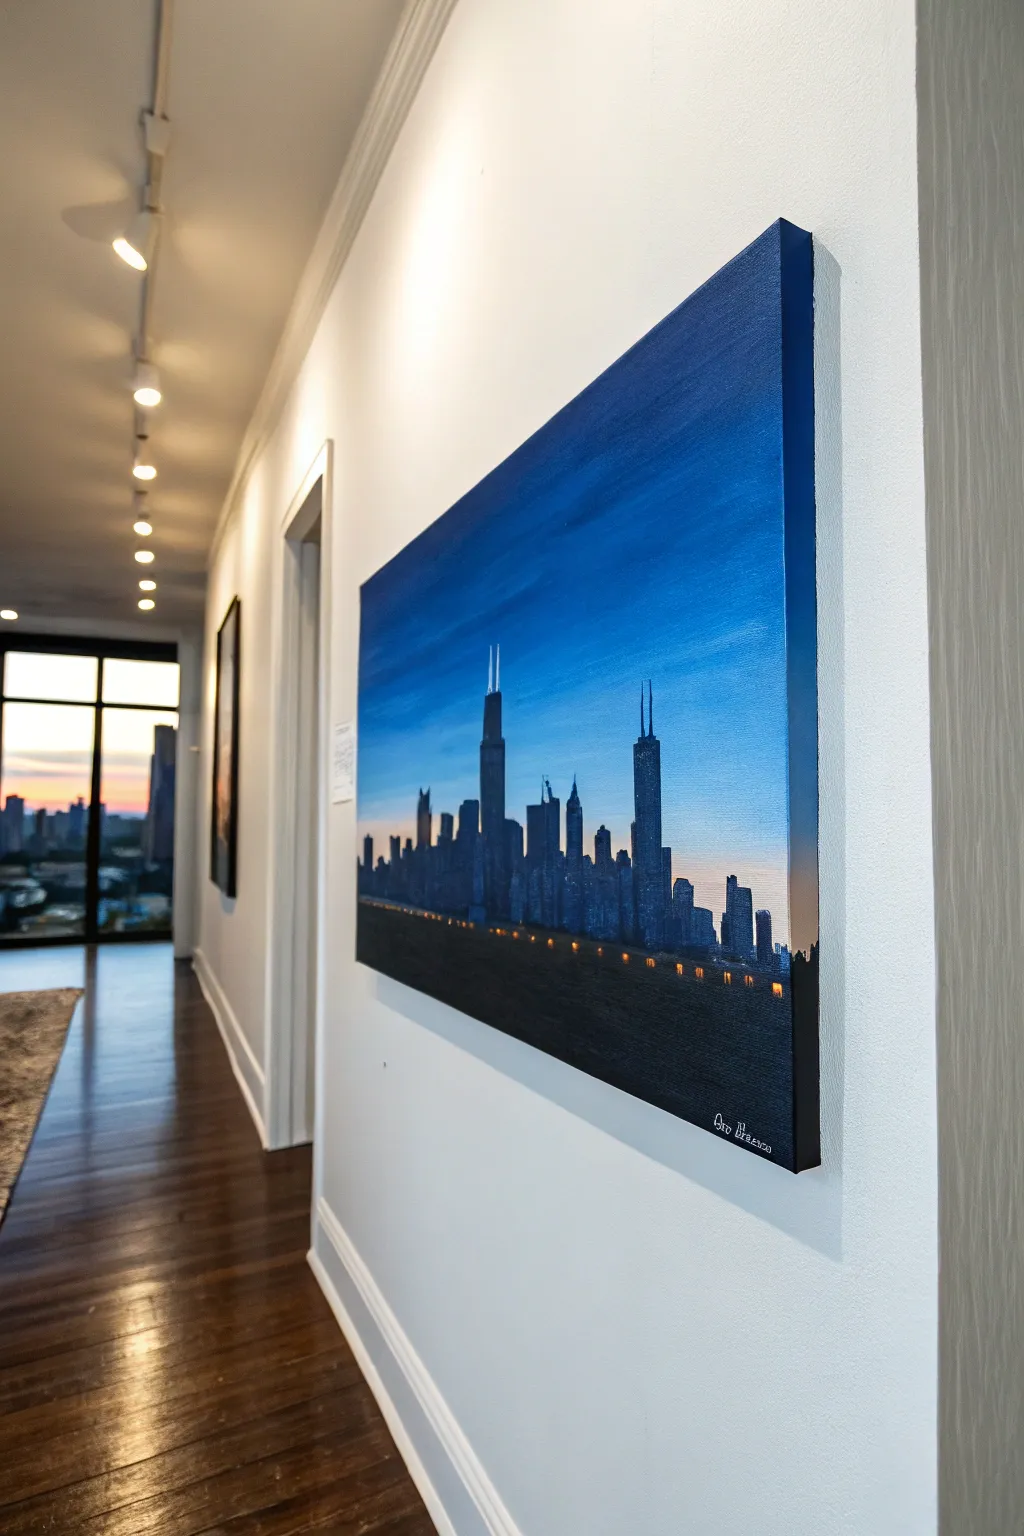
Capture the magic of the Windy City at dusk with this moody acrylic painting featuring distinct architectural silhouettes against a deep blue gradient sky. The high-contrast composition uses simple shapes to create a sophisticated, modern look perfect for hallway decor.
Step-by-Step Tutorial
Materials
- Stretched canvas (e.g., 18×24 or similar expansive ratio)
- Acrylic paints: Phthalo Blue, Ultramarine Blue, Titanium White, Mars Black, Burnt Umber, Cadmium Yellow or Orange (for lights)
- Large flat brush (2-inch) for the sky blending
- Medium flat brush for blocking buildings
- Small round or liner brush for details and lights
- Ruler or straight edge
- Painter’s tape (optional)
- Palette for mixing
- Cup of water and paper towels
Step 1: Painting the Gradient Sky
-
Prime the canvas:
Ensure your canvas is clean. If it’s raw, apply a coat of gesso. If pre-primed, you can start directly. Begin by dampening your large flat brush slightly to help the paint flow smoothly. -
Mix the deepest blue:
On your palette, mix a generous amount of Phthalo Blue with a touch of Mars Black. This will be the dark, moody color for the very top of the sky. -
Apply the top layer:
Using long, horizontal strokes, paint the top third of the canvas with your dark blue mix. Ensure you paint the edges of the canvas too for a finished gallery wrap look. -
Transition to mid-tone:
mix pure Ultramarine Blue with a little Titanium White. While the top layer is still wet, blend this new color into the section below it, working your way down to the middle of the canvas. -
Create the horizon glow:
Clean your brush thoroughly. Mix plenty of Titanium White with a tiny speck of orange or pink for a sunset hint, then extensive white to make a very pale blue. Paint the bottom third, blending upward into the mid-tone blue to create a seamless gradient. -
Smooth the transition:
With a clean, dry brush, lightly sweep back and forth across the boundaries where colors meet to soften distinct lines. Let the entire sky background dry completely before proceeding.
Uneven Gradients?
If your sky looks streaky, the paint likely dried too fast. Use a retarder medium to keep acrylics wet longer, or lightly mist the canvas with water while blending layers.
Step 2: Constructing the Cityscape
-
Establish the horizon line:
Decide how tall your tallest building will be. The skyline in the reference sits relatively low, taking up the bottom 40% of the canvas. You can use a ruler to lightly mark a baseline if you wish, though buildings vary in distance. -
Mix the silhouette color:
Combine Mars Black with a small amount of Phthalo Blue. I prefer not using straight black because the blue undertone makes the shadows look richer and more atmospheric. -
Outline the major landmarks:
Using a small round brush, outline the iconic shapes. For this Chicago-inspired scene, focus on the Willis Tower (tall with antennae) and the John Hancock Center (tapered with antennae). Position them off-center for better composition. -
Fill in the building blocks:
Switch to a medium flat brush to block in the main bodies of the buildings. Use the flat edge of the brush to create crisp, sharp corners and vertical lines. -
Add varied heights:
Paint the smaller, non-descript buildings between the landmarks. Vary their heights and widths to create a realistic urban rhythm, ensuring no two adjacent buildings are exactly the same height. -
Create depth with shading:
To suggest depth, mix a slightly lighter grey-blue tone. Paint faint vertical rectangular sections on the ‘front’ or ‘side’ of some buildings to suggest dimension, rather than leaving them as flat cutouts.
Step 3: Final Details
-
Paint the foreground connection:
Connect all building bases with a solid dark strip at the very bottom. This represents the shoreline or foreground roads and grounds the composition. -
Add the antennae:
Using your finest liner brush and slightly thinned white or light grey paint, carefully drag the brush upward from the tops of the main skyscrapers to create delicate antennae needles. -
Dot the city lights:
Mix a warm Cadmium Yellow or Orange with white. Using the tip of a small brush or a toothpick, dot tiny windows randomly across the skyline. -
Create the shoreline glow:
Apply slightly larger, distinct warm yellow dots in a horizontal row near the base of the buildings. This mimics distinct streetlights running along a highway or lakeshore drive. -
Sign and seal:
Once fully dry, sign your name in the corner with a contrasting color like white or silver. If desired, apply a satin varnish to protect the painting and unify the sheen.
Level Up: Reflection
Extend the canvas length downward and mirror the skyline with wavy, distorted strokes in the bottom third to create a stunning waterfront reflection effect.
Now you have a stunning piece of urban art ready to bring sophisticated city vibes to any room in your home
Blue Florals With White Highlight Petals
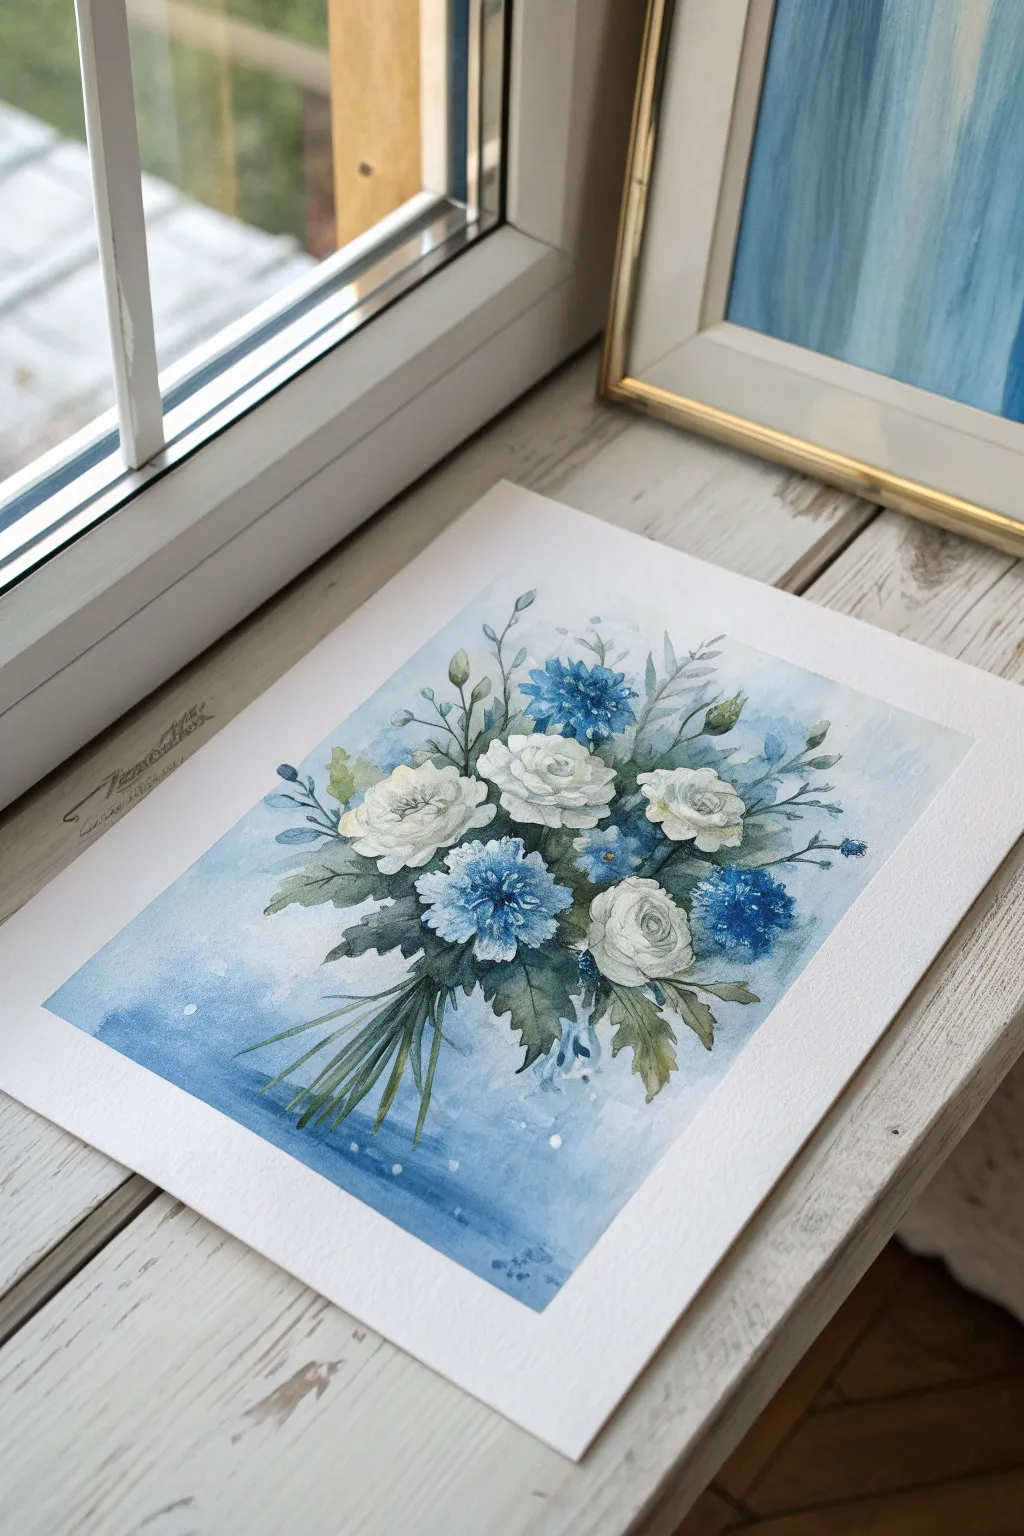
Capture the delicate beauty of a frosty garden with this soft, atmospheric floral painting. By using acrylics in thin, watery layers, you can achieve a translucent watercolor effect that makes the white roses and blue cornflowers seem to float on the paper.
Step-by-Step Guide
Materials
- Heavyweight watercolor paper (300gsm cold press recommended)
- Acrylic paints: Titanium White, Phthalo Blue, Ultramarine Blue, Hooker’s Green, Burnt Umber
- Soft synthetic brushes: round brushes (sizes 4, 8, and a fine liner)
- Palette for mixing washes
- Two cups of water
- Paper towels
- Painter’s tape or masking tape
- Pencil (HB or lighter)
Step 1: Preparation and Sketching
-
Secure your surface:
Begin by taping down all four edges of your watercolor paper to a board or table. This prevents buckling when we add watery layers of paint and creates that crisp white border seen in the reference. -
Lightly sketch the bouquet:
Use your pencil to lightly map out the composition. Draw three main circles for the white roses—one central, two flanking it—and mark smaller circles for the blue flowers. Add faint lines for the stems gathering at the bottom.
Step 2: Creating the Atmospheric Background
-
Mix a watery blue wash:
Dilute Phthalo Blue and a touch of Ultramarine with plenty of water until it’s the consistency of tea. You want transparency here, not opaque coverage. -
Apply the wet-on-wet background:
Brush clean water around the flower shapes, avoiding the petals themselves. While the paper is damp, drop in your blue wash, concentrating the color near the bottom and fading it out near the top for an ombré effect. -
Soften the edges:
Use a clean, damp brush to feather the edges of your blue wash outward, letting the color bleed softly into the white paper. Let this layer dry completely before moving on.
Acrylic Gouache Trick
For that matte, velvety finish seen in the photo, try using acrylic gouache or mixing a tiny bit of cornstarch into your regular acrylics to reduce the plastic sheen.
Step 3: Painting the White Roses
-
Define the rose centers:
Mix a very pale grey-blue using White, a tiny dot of Ultramarine, and Burnt Umber. Paint C-shaped strokes in the center of your rose sketches to suggest unfolding petals. -
Build outward petals:
Continue with larger, sweeping C-curves moving outward. Leave plenty of pure white paper between strokes; these negative spaces act as the highlighted edges of the petals. -
Deepen the shadows:
Once the first layer is dry, mix a slightly darker, cooler grey. Carefully paint into the deepest crevices between petals to give the roses dimension and form.
Muddy Colors?
If your blues and greens are turning brown where they touch, let each layer dry fully before applying the next. Use a hair dryer on low heat to speed this up.
Step 4: Painting the Blue Flowers
-
Paint the first cornflower layer:
Mix a medium-strength Ultramarine Blue. Using the tip of your round brush, dab small, radiating strokes to form the fluffy heads of the blue cornflowers. -
Add detail and variation:
While the blue paint is still wet, drop in tiny touches of Phthalo Blue or even purple to create visual interest. Leave some white gaps for airiness. -
Create smaller buds:
Around the main bouquet, paint small blue teardrop shapes on thin stems to represent unopened buds or forget-me-nots.
Step 5: Greenery and Final Details
-
Mix varied greens:
Combine Hooker’s Green with a bit of Burnt Umber for a natural, earthy olive tone. Mix a second puddle with more blue for the cooler leaves. -
Paint the leaves:
Tuck leaves in and around the flower heads. I like to vary the pressure on the brush—press down for the belly of the leaf and lift up for a sharp tip. -
Add the stems:
Using your fine liner brush and thinned green paint, draw the stems gathering at the bottom. Make sure they cross over each other naturally. -
Enhance with deep shadows:
Mix a dark green-blue color. Carefully paint into the negative spaces between the stems and leaves deep inside the bouquet to push those areas back. -
Add white highlights:
Use opaque Titanium White (undiluted) to add tiny dots to the centers of the blue flowers and a few crisp highlights on the tips of the leaves. -
Splatter for texture:
Load a toothbrush or stiff brush with watery white paint and flick a gentle mist over the blue background and bottom stems for a magical, dewy look. -
Remove tape:
Wait until the painting is 100% bone dry. Peel the tape away slowly at a low angle to reveal your crisp, clean border.
Frame your delicate masterpiece in a simple silver or wood frame to complement the cool tones
Negative-Space Blue Shapes With Bold Silhouettes
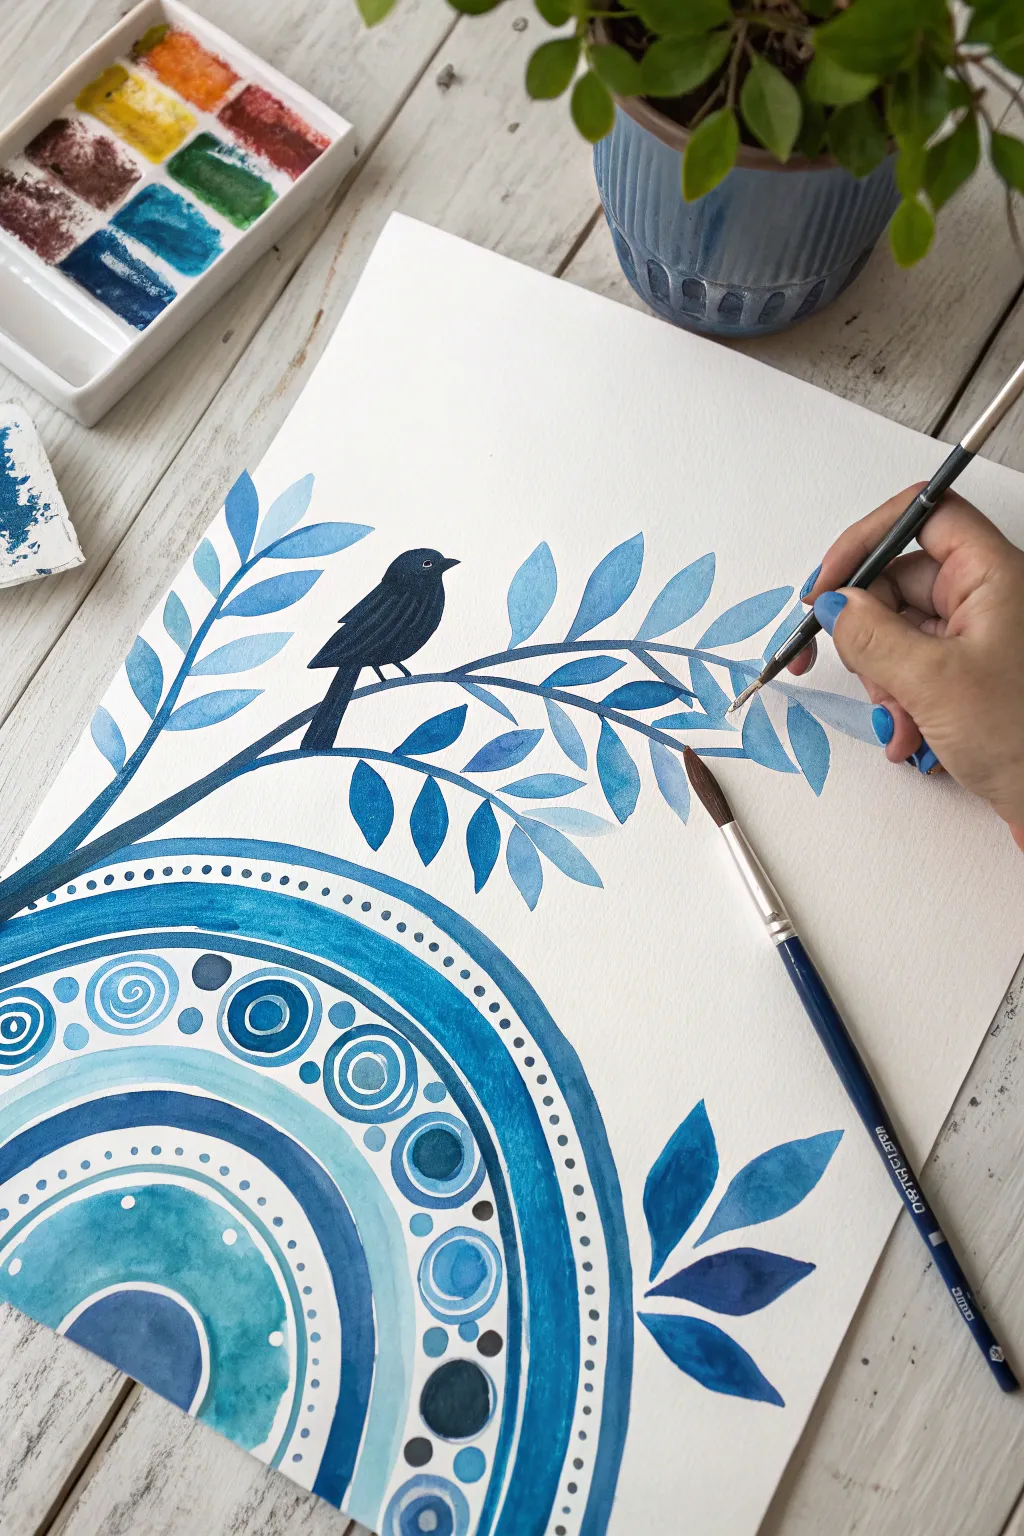
Capture the serene beauty of a monochromatic palette with this charming artwork featuring a bold bird silhouette perched above decorative patterns. By blending traditional botanical painting with playful mandala elements, you’ll create a balanced composition that feels both organic and structured.
How-To Guide
Materials
- Watercolor paper (140lb/300gsm cold press recommended)
- Watercolor paints (shades of Prussian Blue, Cerulean, Navy, and Ultramarine)
- Black watercolor or gouache for the bird
- Synthetic round brushes (sizes 2, 4, and 8)
- Fine liner brush (size 00 or 0)
- Palette for mixing
- Pencil and eraser
- Compass or round objects to trace
- Clean water and paper towels
Step 1: Drafting the Design
-
Map out the circles:
Begin at the bottom left corner of your paper. Using a compass or by tracing round household objects (like bowls or lids), draw a series of concentric semi-circles radiating outward. Leave varying gaps between the lines to create thick and thin bands for patterns. -
Sketch the branch and bird:
Lightly sketch a curved branch extending from the left side of the paper, arching over the circle patterns. Draw simple almond shapes for leaves along the branch. Add a small silhouette of a bird sitting on the main branch, positioned slightly off-center for visual balance.
Fixing Bleeds
If blue paint bleeds into a white area, clean your brush, dampen it with clean water, and gently ‘scrub’ the mistake. Blot immediately with a paper towel to lift the color.
Step 2: Painting the Mandala Base
-
Fill the primary bands:
Mix a deep ocean blue. With your size 8 brush, fill in the widest semi-circular band within your mandala sketch. Keep the edges crisp and the wash even. -
Add lighter accents:
Dilute your blue with more water to create a soft sky blue. Paint the inner semi-circle shapes, such as the large central dome at the very bottom corner. -
Create detailed patterns:
Once the base layers are dry, use a size 4 brush to paint the decorative circles inside the bands. Use alternating shades of medium and dark blue to paint concentric rings and spiral motifs. -
Add dotwork details:
Using the tip of a smaller brush or a dotting tool, add rows of small dots along the arched lines. Ensure the spacing is consistent to maintain that structured mandala look.
Step 3: Illustrating the Botanical Elements
-
Paint the main stem:
Using a dark navy mix, paint the main curve of the branch. Let your brush pressure vary slightly to give the wood a natural, organic thickness. -
Layer the leaves:
Mix three different concentrations of blue: a pale wash, a medium tone, and a saturated dark blue. Paint the leaves using these different values. I find it helpful to paint the light leaves first, let them dry, and then overlap darker leaves to create depth without muddiness. -
Add floating leaves:
Paint a few detached, floating leaf clusters in the bottom right corner of the paper to balance the composition and fill the negative space.
Metallic Magic
Add gold ink or metallic watercolor accents to the dots in the mandala or the veins of the leaves for a stunning shimmer that catches the light.
Step 4: The Bold Silhouette
-
Outline the bird:
Switch to your black paint (gouache works best here for opacity). Carefully outline the bird shape you sketched earlier, paying attention to the beak and tail feathers. -
Fill in the shape:
Fill the bird silhouette with solid black. Ensure the paint is thick enough so no paper shows through, creating a stark contrast against the white background. -
Add fine details:
Once the black is completely dry, use a very heavy white mix or a gel pen to add a tiny dot for the eye and a thin line for the wing definition.
Step 5: Final Touches
-
Refine the edges:
Look over the mandala section. Use your fine liner brush to sharpen any blurry edges on the circles or spirals. -
Add texture marks:
If desired, add very faint veins to some of the larger leaves using a slightly darker shade of blue and your thinnest brush.
Step back and admire the calm atmosphere your monochrome masterpiece brings to the room


Have a question or want to share your own experience? I'd love to hear from you in the comments below!