
Creating your own page markers is one of the most satisfying ways to use up scraps of high-quality cardstock while testing out new color palettes without the pressure of a large canvas. These miniature vertical compositions are perfect for experimenting with drawing ideas that blend functionality with your unique artistic style.
Climbing Floral Vines
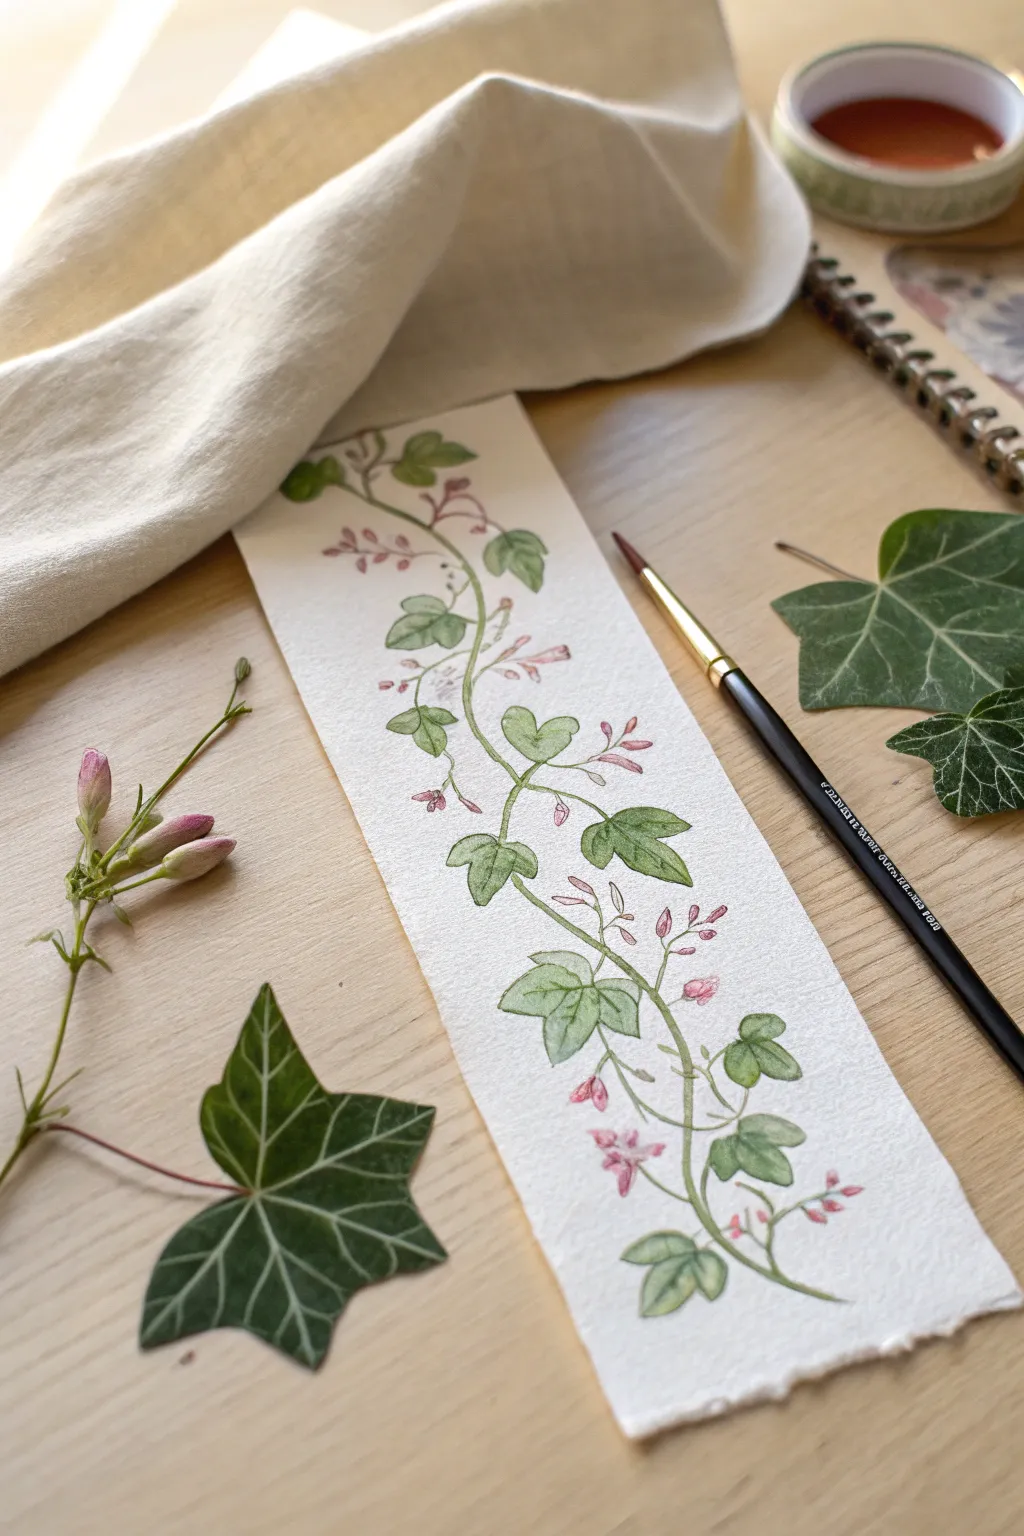
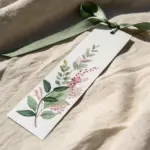
Create a delicate, botanical bookmark featuring a twisting vine of ivy leaves and soft pink buds. This project uses transparent watercolors on textured paper to achieve an organic, elegant look perfect for saving your page.
Step-by-Step
Materials
- Cold press watercolor paper (300gsm)
- Watercolor paints (Sap Green, Olive Green, Rose or Alizarin Crimson, Burnt Sienna)
- Round brush (size 2 or 4)
- Liner or Rigger brush (size 0 or 00)
- HB Pencil
- Kneaded eraser
- Water jar and palette
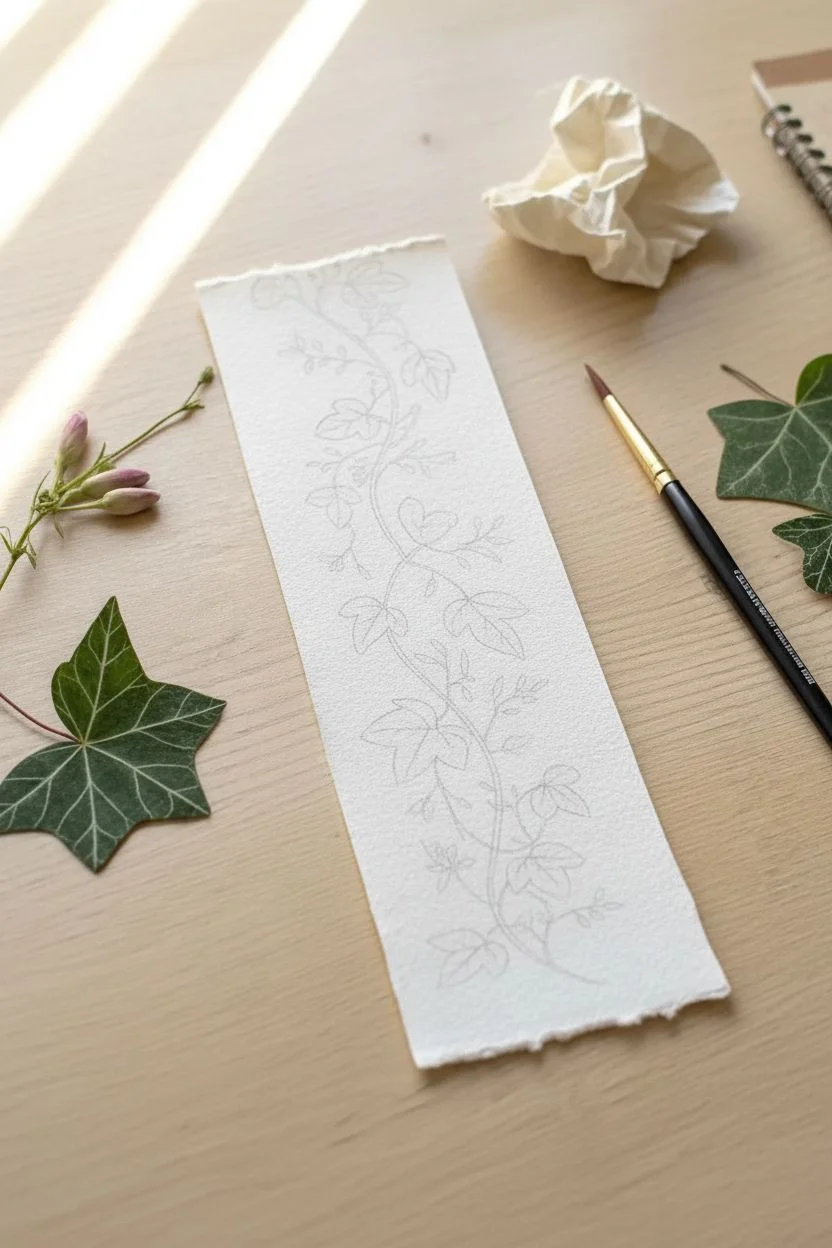
Step 1: Sketching the Composition
-
Prepare paper strip:
Cut your watercolor paper into a bookmark strip, approximately 2 inches by 7 inches. For the rustic look shown in the image, you can carefully tear the paper edges against a ruler instead of cutting. -
Draw the vine guide:
Using your HB pencil, lightly sketch a sinuous, curving ‘S’ line running from the top to the bottom of the paper. This serves as the backbone of your vine. -
Outline leaves:
Sketch small, three-lobed ivy leaves alternating along the sides of the curved line. In nature, randomness looks best, so vary the sizes slightly. -
Place flower clusters:
Draw small groupings of teardrop shapes in the negative spaces between the leaves to represent the bud clusters. -
Lighten lines:
Roll your kneaded eraser over the entire sketch to lift up excess graphite. The lines should be barely visible so they don’t show through the paint.
Stabilize Your Hand
Shaky lines on the long vine? Exhale slowly as you pull the brush for the long stem, or rest your pinky finger on a dry area of the paper for stability.
Step 2: Painting the Greenery
-
Mix leaf color:
On your palette, mix a fresh, light green using Sap Green and a touch of yellow. Keep it quite watery for transparency. -
Base coat leaves:
Using your round brush (size 2 or 4), fill in the leaf shapes with the light green mix. -
Add wet-on-wet depth:
While the green paint is still wet on the paper, touch the tip of your brush (loaded with slightly darker Olive Green) to the base of each leaf near the stem. Watch it bleed naturally. -
Mix stem color:
Create a darker vine color by mixing Olive Green with a tiny bit of Burnt Sienna to brown it down. -
Paint the main vine:
Switch to your liner brush. Loading it with the stem color, carefully trace over your main ‘S’ curve. I find it helps to do this in smooth, confident strokes rather than short dashes. -
Connect the leaves:
Use the liner brush to paint thin stems connecting the base of each leaf to the main vine. -
Drying time:
Let the greenery dry completely before moving on to the flowers to prevent colors from bleeding into each other.
Step 3: Blooms and Details
-
Mix floral pink:
Dilute a Rose or Crimson paint with plenty of water to get a soft, pastel pink. -
Paint buds:
Using the tip of your round brush, dab small, elongated shapes where you sketched the flowers. Use just the very tip for tiny buds. -
Add floral definition:
While the pink is damp, drop a tiny speck of concentrated pink pigment at the bottom of the petals to give them volume. -
Connect flowers:
Once the pink shapes are dry, use the liner brush and your stem green mix to paint hairline stems attaching the flowers to the main vine. -
Paint leaf veins:
Mix a dark, cool green. Ensure your leaves are bone dry, then use your finest brush to paint a central vein and two side veins on each ivy leaf. -
Final assessment:
Look for any gaps. You can add tiny extra tendrils or singular leaves to fill empty spaces if the composition feels unbalanced.
Gilded Edges
For a magical finish, once the paint is dry, use a metallic gold watercolor or gel pen to trace the leaf veins or add tiny dots along the vine.
Allow your bookmark to dry flat overnight, and you’ll have a beautiful piece of art to track your reading progress.


Geometric Line Art Patterns
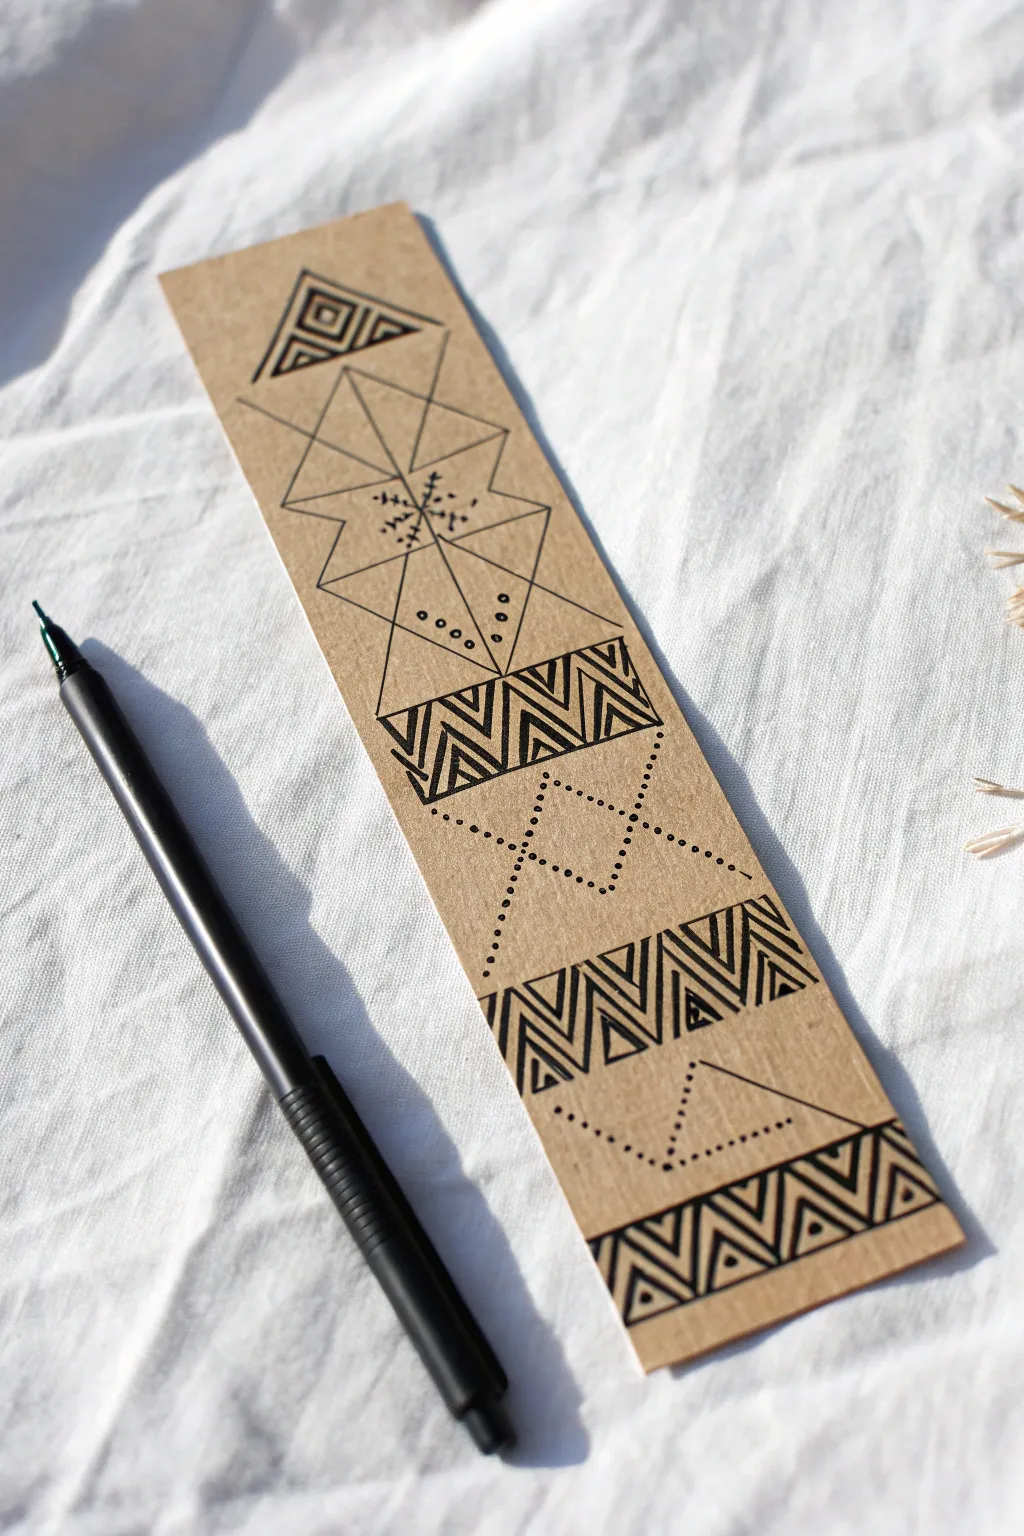
Combine the warmth of kraft paper with the sharpness of precision geometry in this stylish bookmark project. You will use simple repetitive lines and dots to build a complex-looking totem design that feels both modern and tribal.
Detailed Instructions
Materials
- Kraft cardstock or heavy brown paper
- Fine liner pen (Black, size 0.5mm or 0.3mm)
- Ruler (clear plastic recommended)
- Pencil (HB)
- Quality eraser
- Scissors
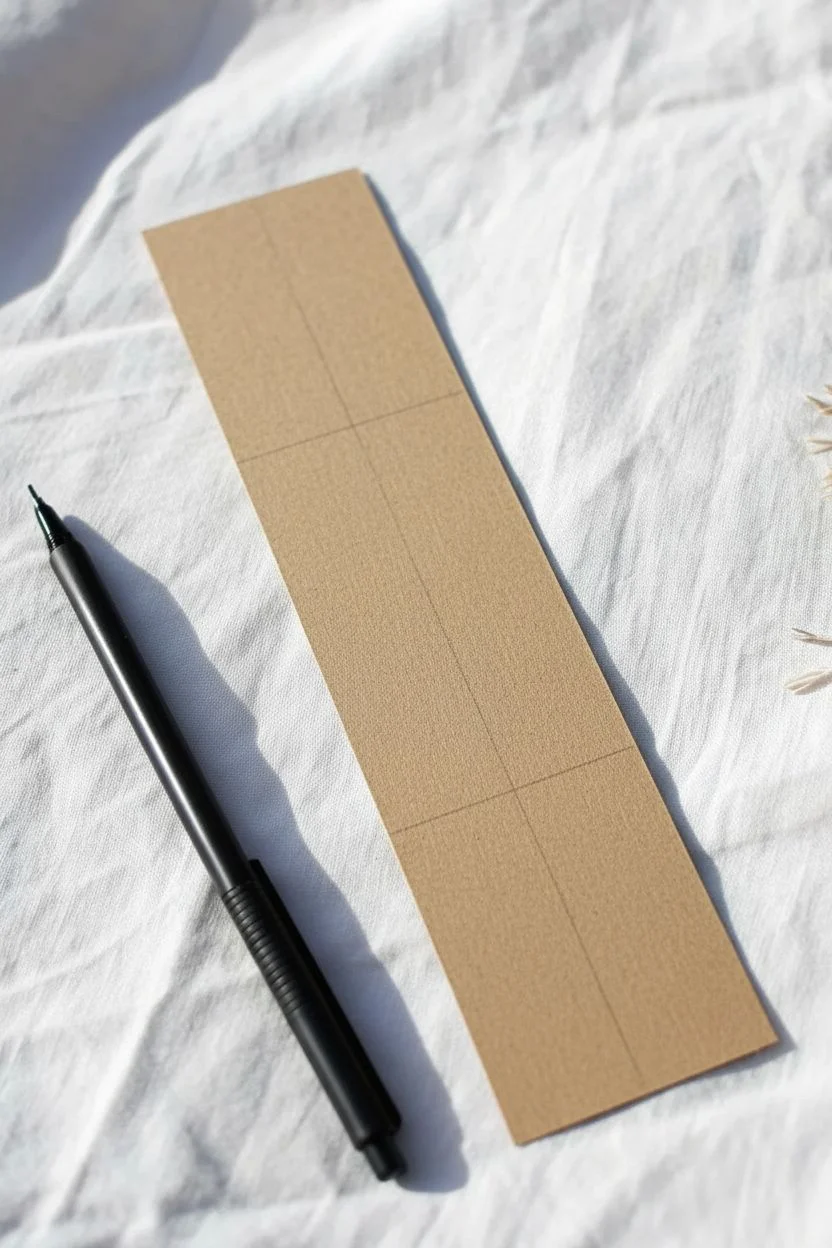
Step 1: Base Structure
-
Cut the canvas:
Cut your kraft cardstock into a standard bookmark strip, approximately 2 inches wide by 7 inches tall. -
Center guide:
Using your ruler and pencil, very lightly draw a vertical line straight down the exact center of the bookmark. This will help keep your geometry symmetrical. -
Sectioning:
Lightly mark horizontal lines with your pencil to divide the bookmark into four roughly equal visual zones, leaving a little breathing room at the very top and bottom.
Smudge Patrol
Wipe the edge of your ruler with a tissue after every few lines. Ink tends to gather on the ruler’s edge and can drag across your paper, ruining the crisp look.
Step 2: Upper Totem Details
-
Top triangle:
At the top, draw a broad triangle with your black pen. Inside it, draw a smaller triangle suspended from the top point. -
Triangle fill:
Fill the inner triangle with a square spiral pattern or concentric geometric lines as shown in the reference. -
The diamond structure:
Below the top triangle, draw a large diamond shape that spans the width of the bookmark. Use the center pencil line to align the top and bottom points. -
Intersecting lines:
Draw an ‘X’ through the diamond, connecting the corners to create four internal triangular sections. -
Center snowflake:
Where the lines cross in the center, add tiny dashes on the lines and a few dots to create a small snowflake or starburst effect. -
Descending dots:
In the bottom triangular section of this diamond, draw a row of four small circles that decrease in size as they go down.
Line Variance
If your lines look too thin, restart your strokes or use a slightly thicker pen (0.8mm) for the main outlines to make the geometric shapes pop.
Step 3: Patterned Bands
-
First chevron band:
Draw two horizontal parallel lines across the bookmark to create a rectangle band about 3/4 inch thick below the diamond section. -
Zig zag division:
Draw a sharp zig-zag line through the middle of this band to create a series of triangles pointing up and down. -
Hatching lines:
Fill these triangles with varying diagonal lines. I prefer to alternate the angle of the lines for each neighboring triangle to create a herringbone texture. -
Dotted diamond:
Below the band, visualize a diamond shape. Instead of drawing lines, dab the tip of your pen to create the shape using only stippled dots. -
Second chevron band:
Create a second horizontal pattern band below the dotted diamond. Repeat the same process: borders, zig-zags, and diagonal hatching.
Step 4: Final Flourishes
-
Dotted V:
Under the second band, create a large ‘V’ shape using only dots, mirroring the bottom half of the diamond shape above. -
Bottom border:
At the very bottom edge, draw a final zig-zag pattern. This time, ink the bottom triangles fully or hatch them heavily to ground the design. -
Drying time:
Wait at least 5 minutes to ensure the ink is completely dry on the textured paper. -
Clean up:
Gently erase your central pencil guide line and any horizontal section markers.
Slip this into your current read and enjoy the satisfaction of marking your page with your own art


The Classic Book Stack

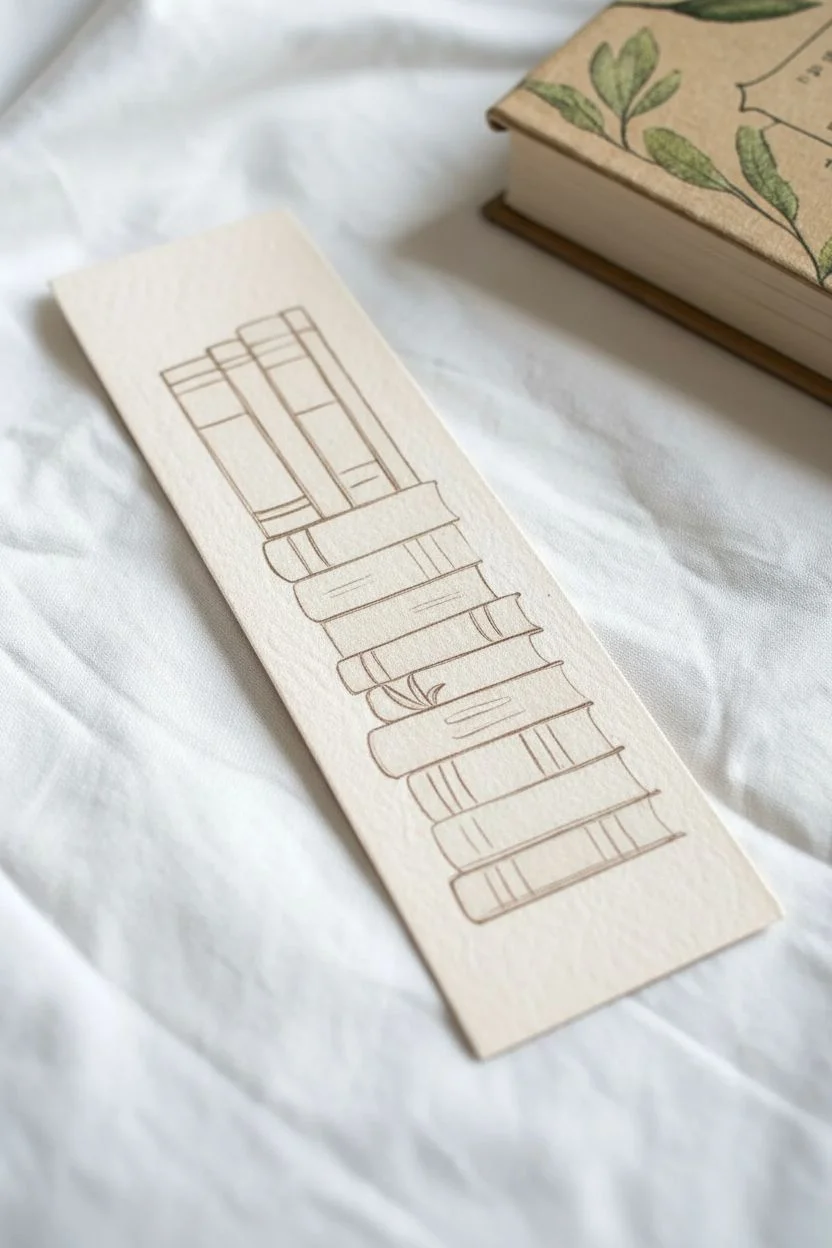
Capture the charm of a personal library with this whimsical, hand-painted bookmark featuring a teetering tower of books. This project uses cold-press paper to achieve a lovely textured, vintage aesthetic perfect for holding your place in your next read.
Step-by-Step Guide
Materials
- Cold press watercolor paper (300gsm/140lb)
- Waterproof fine-liner pen (0.1 or 0.3, Sepia or Dark Grey)
- Watercolor paints (or watercolor pencils)
- Small round brush (size 2 or 4)
- HB Pencil and kneaded eraser
- Ruler
- Scissors or craft knife
- Water jar and paper towel
Step 1: Planning and Sketching
-
Cut the base:
Begin by cutting your watercolor paper into a strip measuring approximately 2.5 inches by 7 inches, leaving the edges straight for now. -
Sketch the vertical books:
Using your pencil lightly, draw a cluster of three tall, thin rectangles standing vertically at the top of where your stack will be. Angle one slightly to make the stack look natural and less rigid. -
Build the horizontal stack:
Directly underneath the vertical trio, sketch a column of books lying flat on their sides. Vary the thickness of the spines—make some chunky and others slender. -
Add spine details:
Draw small rectangles or horizontal bands across the spines to mimic title blocks or binding ridges. -
Refine the lines:
Go over your stack and wobble your lines ever so slightly; straight ruler lines can look too architectural, while hand-drawn lines add coziness. -
Ink the drawing:
Trace over your pencil lines with the waterproof fine-liner. I personally prefer a sepia tone ink here as it looks softer and more uniform with the earth tones than harsh black. -
Erase guidelines:
Wait a moment for the ink to set fully to avoid smearing, then gently lift all graphite marks with your kneaded eraser.
Step 2: Coloring and Texture
-
Prepare the palette:
Mix watery puddles of earthy colors: olive green, mustard yellow, terracotta red, and a soft dusty pink. Keep the pigment transparent. -
Paint the greens:
Select three or four books scattered throughout the stack (not touching each other) and fill them with the olive green wash. -
Add the reds:
While the green dries, paint a few other spines with your terracotta red. Dispersing the colors creates a balanced composition. -
Fill the yellows:
Paint the mustard tones on the remaining thick spines. I like to leave tiny slivers of white paper showing along the edges of the ink lines to simulate highlights. -
Soft pink accents:
Use the dusty pink for any remaining thin books to break up the darker earthy tones. -
Layering shadows:
Once the first layer is bone dry, mix a slightly darker version of each color and paint a thin strip along the left or right side of each spine to create a cylindrical form. -
Paint the details:
Use a very fine tip brush to fill in the little title blocks or binding ridges with a contrasting or darker shade.
Bleeding Control
To prevent colors from bleeding into each other, treat this like a paint-by-number where you never paint two adjacent shapes at the same time. Let one book dry before painting its neighbor.
Step 3: Finishing Touches
-
Add texture marks:
If the paper texture isn’t enough, use your fine-liner to add tiny tick marks or hatching on the spines for an aged cloth-bound look. -
Cut the top notch:
Find the center point at the very top of the bookmark and use scissors to cut a small, shallow ‘V’ shape downwards. -
Flattening:
If the heavy watercolor wash caused the paper to buckle, place the finished (dry) bookmark under a heavy book overnight to crisp it up.
Pro Tip: Vintage Feel
For an even cozier vintage look, lightly brush a very diluted wash of tea or watered-down yellow ochre over the entire white background of the paper before you start painting the books.
Slip this charming handmade creation between the pages of your current read and enjoy the cozy vibe everytime you open your book


Watercolor Galaxy Blends

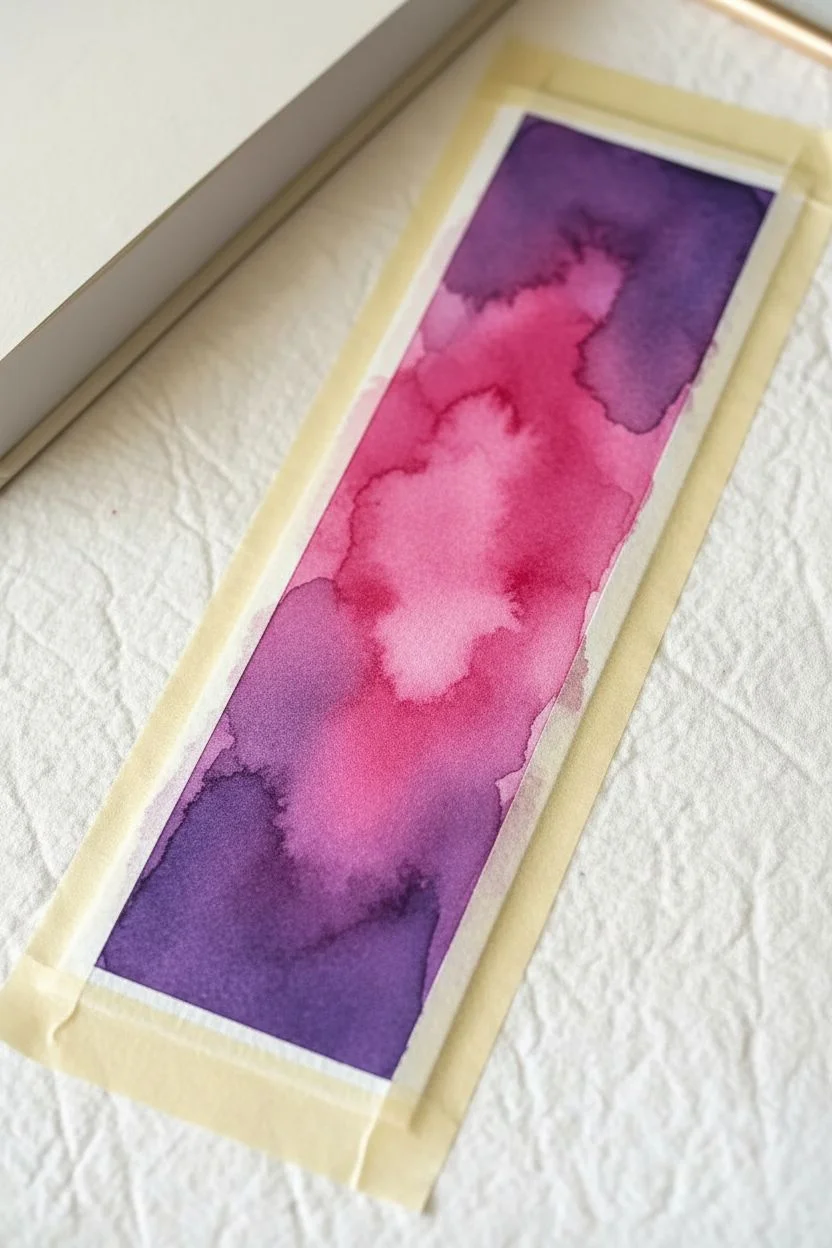
Capture the infinite beauty of space on a simple strip of paper. This project uses wet-on-wet blending to create a seamless transition from deep void blacks to vibrant nebulae pinks, finished with a dusting of starlight.
Step-by-Step Tutorial
Materials
- Cold press watercolor paper (300gsm suggested)
- Masking tape, washi tape, or painter’s tape
- Watercolors: Indigo/Black, Purple/Violet, Magenta/Rose
- Round watercolor brushes (size 6 for wash, size 0 for fine details)
- White gouache, white acrylic ink, or a white gel pen
- Jar of clean water
- Paper towels
- Drawing board or hard flat surface
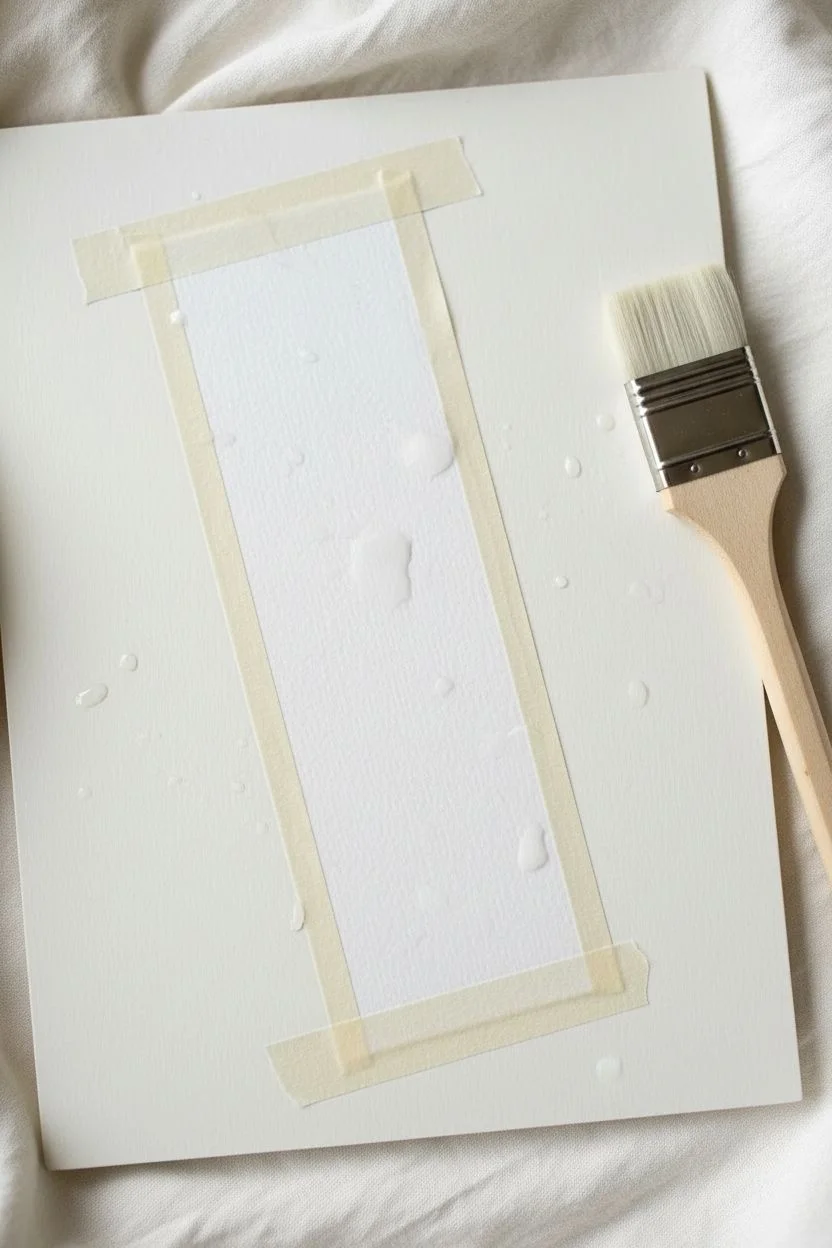
Step 1: Preparation & Base Gradient
-
Cut the paper:
Cut your watercolor paper into a rectangular strip, approximately 2 inches wide by 6 or 7 inches long. -
Secure the edges:
Place the paper on a hard board and tape down all four sides with masking tape. Overlap the paper by about 1/4 inch to create the clean white border seen in the final image. -
Press the tape:
Run your fingernail firmly along the inner edge of the tape to ensure a tight seal, which prevents paint from bleeding underneath. -
Wet the surface:
Using your larger clean brush, apply a thin, even layer of clean water to the entire paper surface inside the tape. The paper should glisten but not have puddles. -
Apply the core color:
While the paper is wet, load your brush with magenta or bright rose paint. Dab this color down the center of the bookmark in an irregular, cloudy shape. -
Add the mid-tones:
Clean your brush slightly and pick up your violet or purple paint. Drop this color heavily around the edges of the pink center. -
Blend the transition:
Allow the purple to touch the pink; since the paper is wet, they will diffuse naturally. You can gently nudge the colors together with the brush tip for a softer blend.
Tape Removal Pro-Tip
To ensure a perfect white border, peel the tape slowly at an angle away from the painting. If the tape feels stuck, blast it warm with a hair dryer for a few seconds to soften the adhesive.
Step 2: Deepening the Space
-
Paint the void:
Load your brush with the darkest color—indigo or black mixed with blue. Paint the outer edges and corners of the bookmark, closest to the tape. -
Create the gradient:
Work the dark paint inward toward the purple, letting it fade out before it reaches the bright pink center. The goal is a vignette effect. -
Intensify contrast:
If the colors look too pale, dab more concentrated pigment into the wet areas. The black should be very opaque at the edges. -
Let it dry:
This is crucial. Allow the painting to dry completely until the paper is flat and cool to the touch. I usually wait at least 15 minutes here to ensure the next step stays crisp.
Step 3: Stars & Finishing Touches
-
Prepare white paint:
Dilute a small amount of white gouache or acrylic with a drop of water until it has the consistency of heavy cream. -
Splatter stars:
Dip a brush in the white mix. Hold it over the bookmark and tap the handle against another brush or your finger to spray fine mist droplets (stars) across the galaxy. -
Draw major stars:
Using the size 0 fine brush or a white gel pen, manually draw a few larger four-pointed stars (cross shapes) in the open spaces. -
Add focus stars:
Dot a few distinct, rounder stars manually with the gel pen to create variety in star sizes. -
Final dry:
Let the white paint dry completely to avoid smearing during the reveal. -
Reveal the border:
Slowly peel away the masking tape. Pull the tape away from the paper at a 45-degree angle to keep the edges sharp and prevent tearing.
Troubleshooting: Bloom
If you see water stains or ‘cauliflowers’ forming, you added water to a drying wash. Embrace it! In galaxy art, these textures look like distant gas clouds and add organic realism.
Now your cosmic bookmark is ready to hold your place in your next adventure.
BRUSH GUIDE
The Right Brush for Every Stroke
From clean lines to bold texture — master brush choice, stroke control, and essential techniques.
Explore the Full Guide
Juicy Citrus Repeats

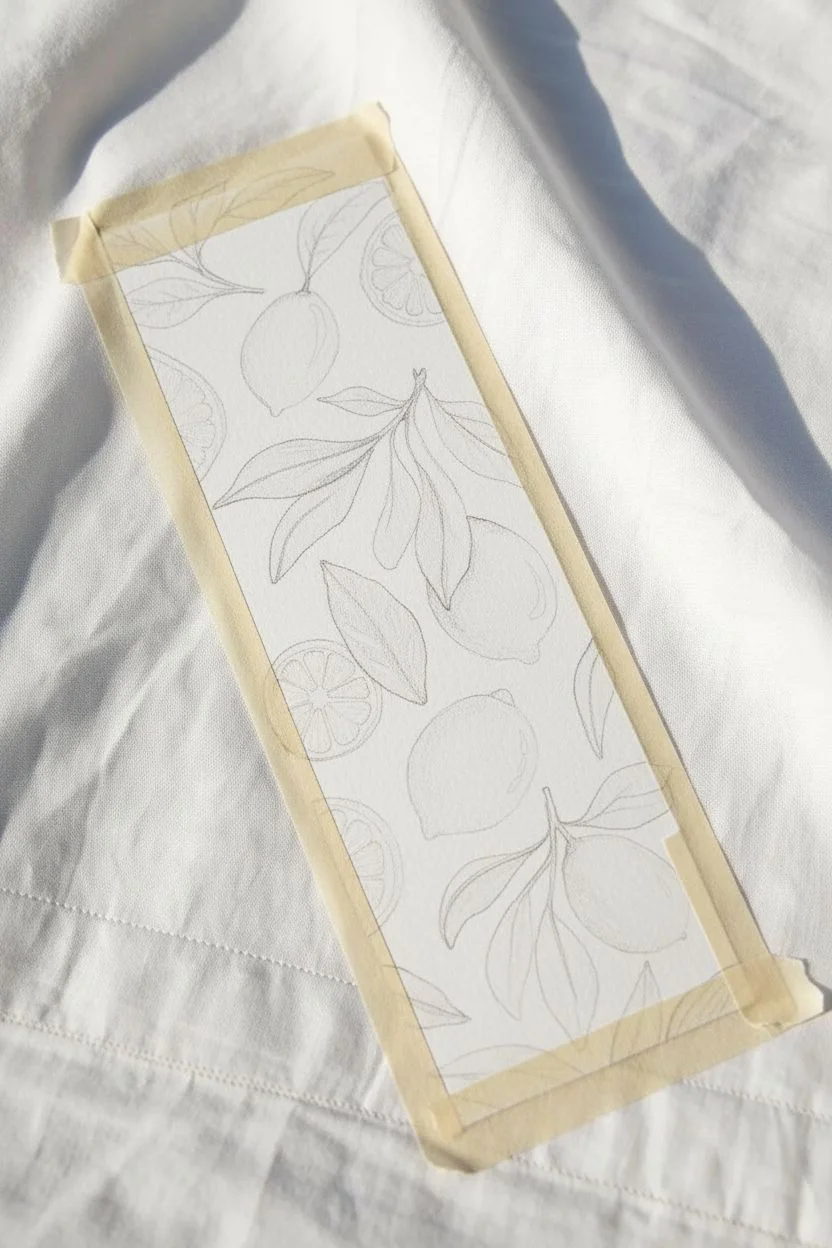
Capture the refreshing essence of summer with this vibrant citrus watercolor project. You will learn to use negative painting techniques to create a crisp blue background that makes the yellow graphic patterning pop off the page.
How-To Guide
Materials
- Cold press watercolor paper (300 gsm)
- Watercolor paints (Lemon Yellow, Cadmium Yellow, Sap Green, Hooker’s Green, Cerulean Blue)
- White gouache or white gel pen
- Round brushes (size 2 and 4)
- Pencil (HB) and kneaded eraser
- Masking tape
- Water jar and paper towels
Step 1: Preparation and Sketching
-
Cut and secure:
Cut your watercolor paper to a standard bookmark size, roughly 2.5 by 7 inches. Tape the edges down to a hard board to prevent buckling. -
Plan the composition:
Lightly sketch your design with an HB pencil. Arrange whole lemons at different angles and fill gaps with cut lemon wedges and round slices. -
Add foliage:
Draw clusters of leaves emerging from the lemons. Ensure the leaves curve naturally and overlap slightly to create depth. -
Lighten the lines:
Roll a kneaded eraser over the sketch to lift up excess graphite. You want the lines faint enough to guide you but disappear under the paint.
Step 2: Painting the Fruit and Leaves
-
Base lemon layer:
Using your size 4 brush, paint the whole lemons with a diluted Lemon Yellow. Leave a tiny sliver of dry white paper near the top curve for a natural highlight. -
Painting slices:
For the cross-section slices, paint small triangles for the pulp segments, leaving narrow white gaps between them to represent the pith. -
Adding volume:
While the yellow is still damp, drop a touch of Cadmium Yellow or a golden ochre to the bottom of each lemon to create a rounded shadow. -
First green wash:
Mix a light Sap Green and fill in the leaf shapes. I like to vary the water ratio here so some leaves look lighter than others. -
Leaf detailing:
Once the base green is dry, use the size 2 brush and Hooker’s Green creates veins. Paint one half of a leaf slightly darker to suggest folding. -
Developing the slices:
Return to the lemon slices. Use a slightly darker yellow to paint small details or seeds within the pulp segments for texture.
Bleeding Colors?
If the blue background bleeds into your yellow lemons, the fruit wasn’t dry enough. Ensure the fruit layer is warm to the touch (bone dry) before starting the background.
Step 3: Background and Highlights
-
Mix the background color:
Prepare a generous puddle of diluted Cerulean Blue. The consistency should be milky to ensure an even wash. -
Negative painting:
Carefully paint the blue background around your yellow and green shapes. Use the tip of the size 2 brush to get into the tight corners between leaves. -
Smooth the wash:
Work reasonably quickly to keep a wet edge on the blue paint, preventing harsh streak lines from forming in the background. -
Review edges:
Check for any white gaps between the background and the objects. Touch up these areas carefully so the fruit looks fully immersed in the color. -
Pop the highlights:
Using white gouache or a gel pen, add crisp white curved lines to the upper left of the whole lemons to make them look shiny and waxy. -
Rind texture:
Add tiny white stippled dots on the darker, shadowed parts of the lemon peel to simulate the porous texture of citrus skin. -
The reveal:
Wait until the paper is completely bone dry, then peel away the masking tape at a 45-degree angle to reveal clean, sharp edges.
Make it Durable
Since bookmarks handle a lot of wear, consider laminating your finished piece or spraying it with a fixative to protect the watercolor from moisture and smudging.
Now you have a squeeze of sunshine to keep your place in your favorite book
Minimalist One-Line Faces
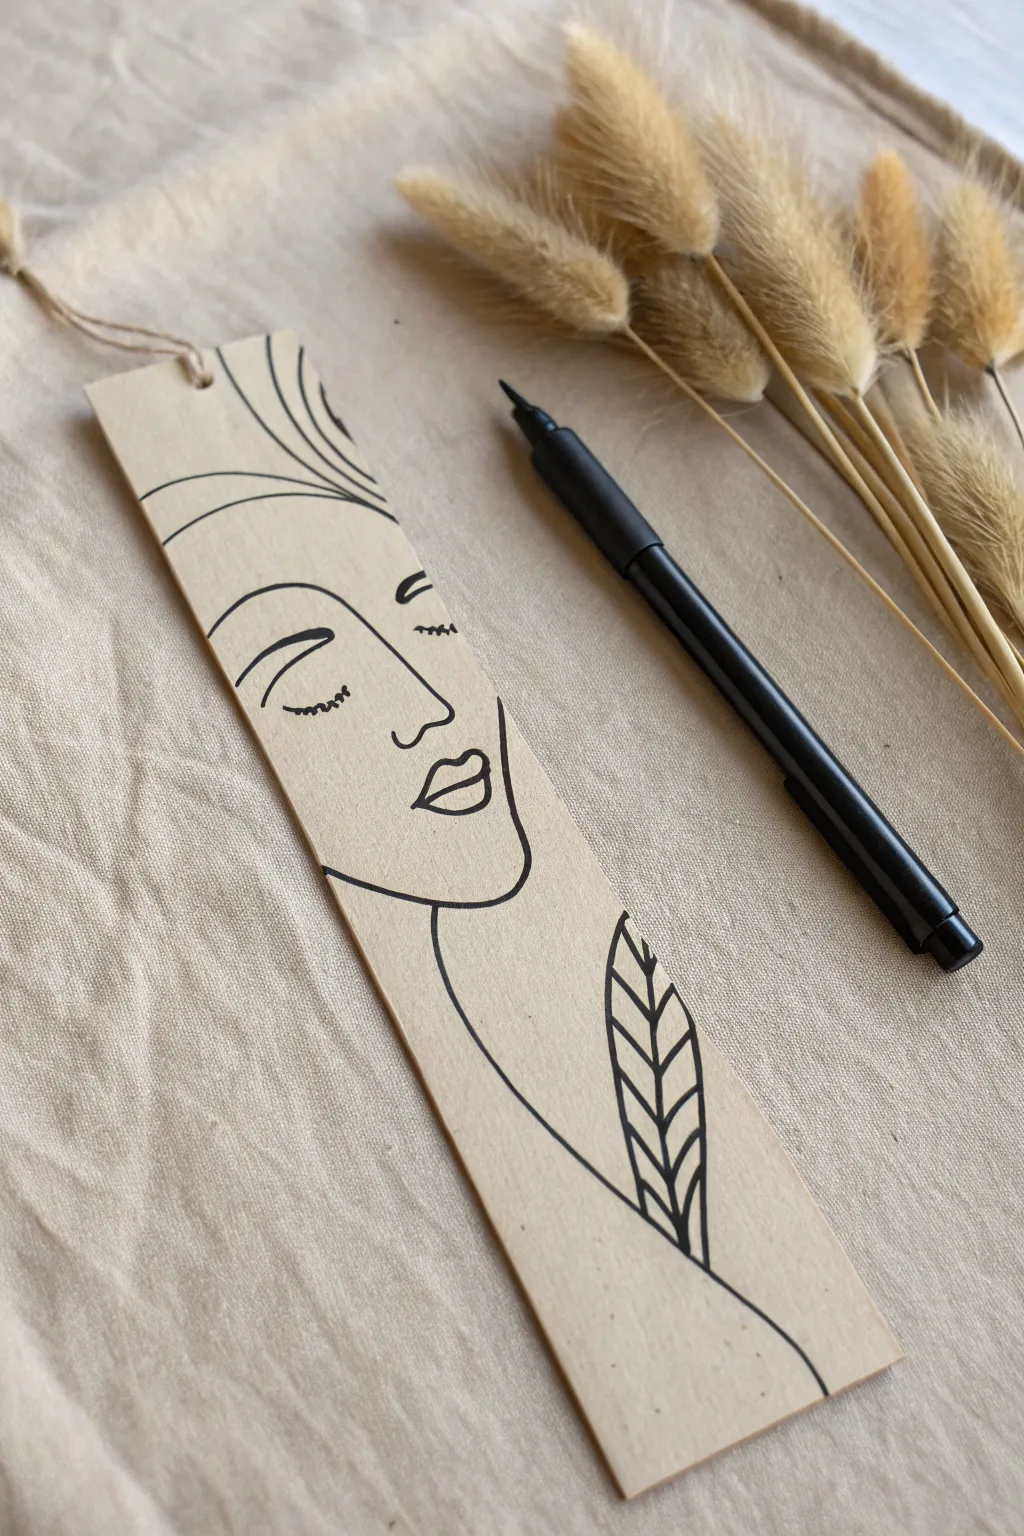
Embrace the “less is more” aesthetic with this elegant line art project on natural wood. Using simple materials, you will transform a plain bookmark blank into a sophisticated piece of functional art featuring a stylized portrait.
Step-by-Step Guide
Materials
- Unfinished wooden bookmark blank (approx. 2×6 inches)
- Fine-grit sandpaper (220 grit)
- Pencil (HB or lighter)
- Soft white eraser
- Black fine-point permanent marker or archival ink pen (0.5mm)
- Clear matte spray sealer (optional)
- Natural jute twine
Step 1: Preparing and Sketching
-
Sand the surface:
Lightly sand the face of the wooden bookmark to remove any rough texture or loose splinters, ensuring a smooth canvas. -
Clean the wood:
Wipe the surface thoroughly with a clean, dry cloth to remove all wood dust so it doesn’t clog your pen tip later. -
Sketch the hair:
Using your pencil lightly, draw three to four sweeping curves starting from the top left edge and flowing downward to suggest hair strands. -
Outline the profile:
Extend the lowest hair line downward to form the forehead and the bridge of the nose. -
Draw the nose and lips:
Sketch a simple curve for the nose tip and outline the lips just below it, keeping the shapes abstract and fluid. -
Add the eye details:
Place a curved line for the closed eyelid to the right of the nose bridge, adding three small dashes for lashes and an arched eyebrow above. -
Define the face shape:
Sketch the jawline starting from the side of the face, curving down to form a soft chin under the lips. -
Add the neck line:
Draw a long, elegant line flowing from the chin area down toward the bottom right corner of the bookmark. -
Incorporate the botanical element:
Sketch a vertical leaf or feather shape intersecting the neck line at the bottom, adding a central stem and simple V-shaped veins.
Ink Bleeding Control
If your test mark shows the ink feathering into the wood grain, paint a thin layer of clear matte medium or decoupage glue over the sketch area and let it dry before doing your final inking.
Step 2: Inking and Finishing
-
Test your pen:
Make a small mark on the back of the bookmark to ensure your ink doesn’t bleed into the wood grain. -
Trace the hair:
Begin inking with your black marker at the top, tracing the hair strands with confident, fluid strokes. -
Ink the profile:
Carefully trace the forehead and nose lines. I find that pulling the pen toward me creates smoother curves than pushing it away. -
Detail the features:
Go over the eye, lashes, and lips with a steady hand, applying slightly lighter pressure for these delicate details. -
Complete the outline:
Trace the jawline and the long neck curve, connecting the facial features to the lower section of the design. -
Finalize the leaf:
Ink the outline of the leaf pattern and fill in the internal veins, keeping the lines crisp. -
Let it dry:
Allow the ink to sit for at least 15 minutes to ensure it is completely set. -
Erase pencil marks:
Gently erase the underlying pencil sketches, holding the wood steady so it doesn’t bend or snap. -
Seal the wood:
Optionally, mist the bookmark with a clear matte spray sealer to protect the drawing from smudging over time. -
Attach the twine:
Cut a 6-inch length of jute twine, thread it through the hole at the top, and secure it with a simple loop knot.
Level Up: Gold Accents
Elevate the design by painting the leaf motif with metallic gold acrylic paint, or start the project by painting a solid pastel shape behind where the face will go for a pop of color.
You now have a beautiful, hand-drawn accessory to mark your place in your favorite story

PENCIL GUIDE
Understanding Pencil Grades from H to B
From first sketch to finished drawing — learn pencil grades, line control, and shading techniques.
Explore the Full Guide
Mountain Range Silhouettes
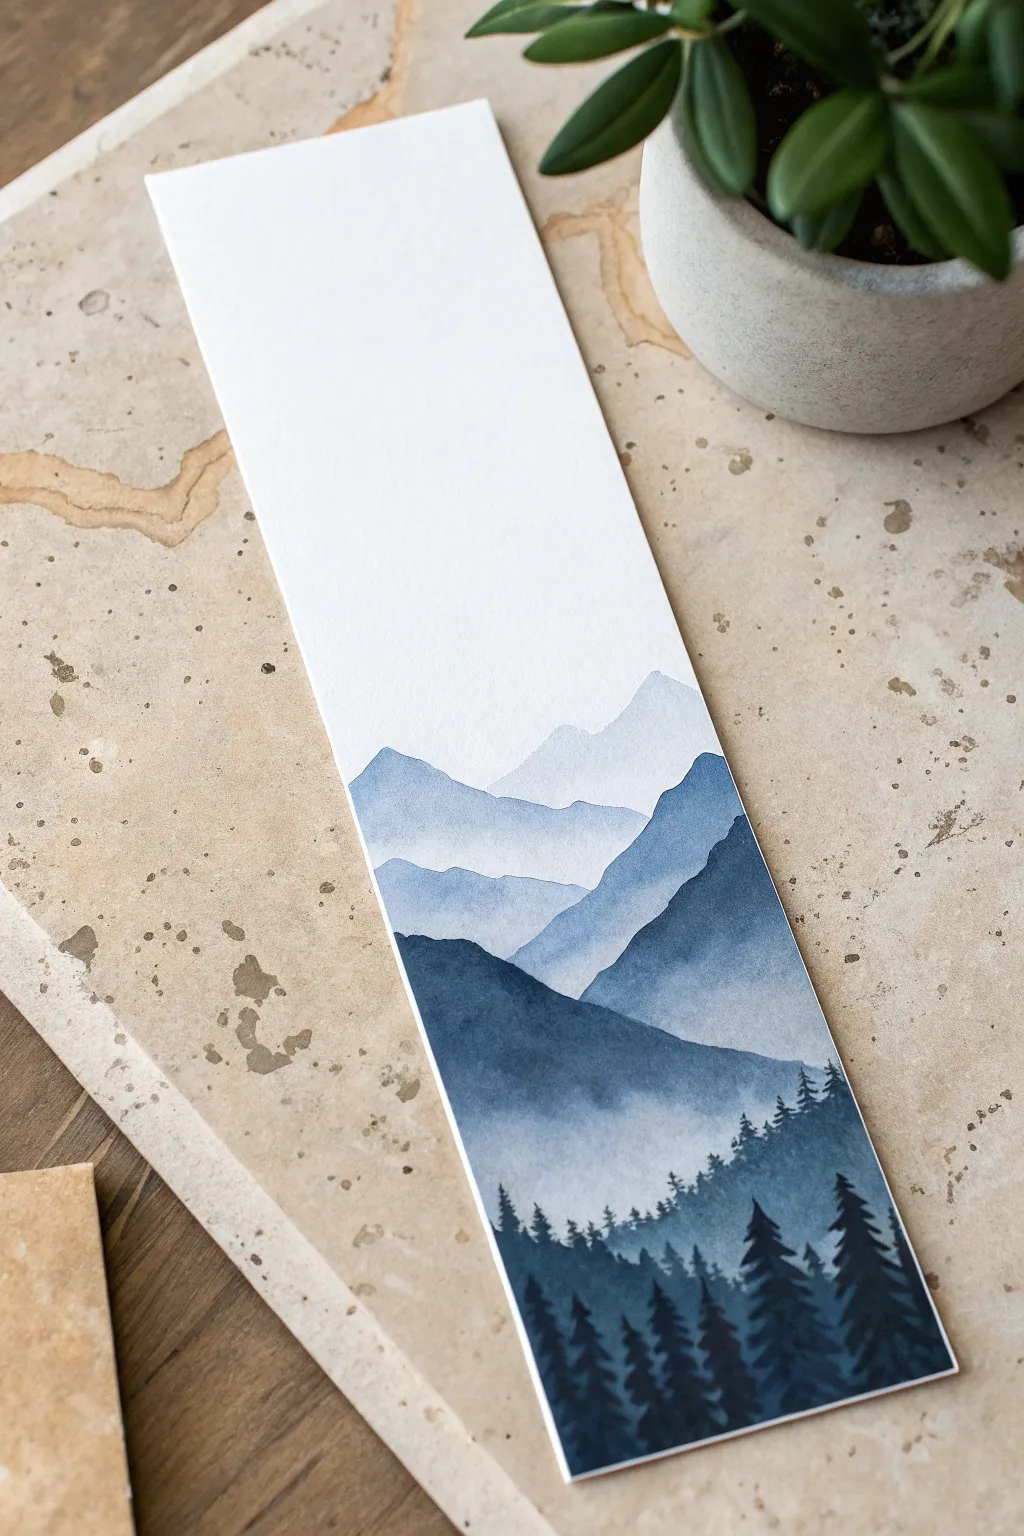
Capture the serene beauty of a mountain range fading into the distance with this monochromatic watercolor project. Using just one color and varying water ratios, you’ll create atmospheric depth and a striking pine forest silhouette.
How-To Guide
Materials
- 300gsm cold press watercolor paper (cut to 2.5 x 8 inches)
- Watercolor paint (Indigo, Payne’s Gray, or Prussian Blue)
- Round brush (size 6 or 8)
- Detail brush (size 0 or 1)
- Masking tape and hardboard
- Mixing palette
- Two jars of water
- Paper towels
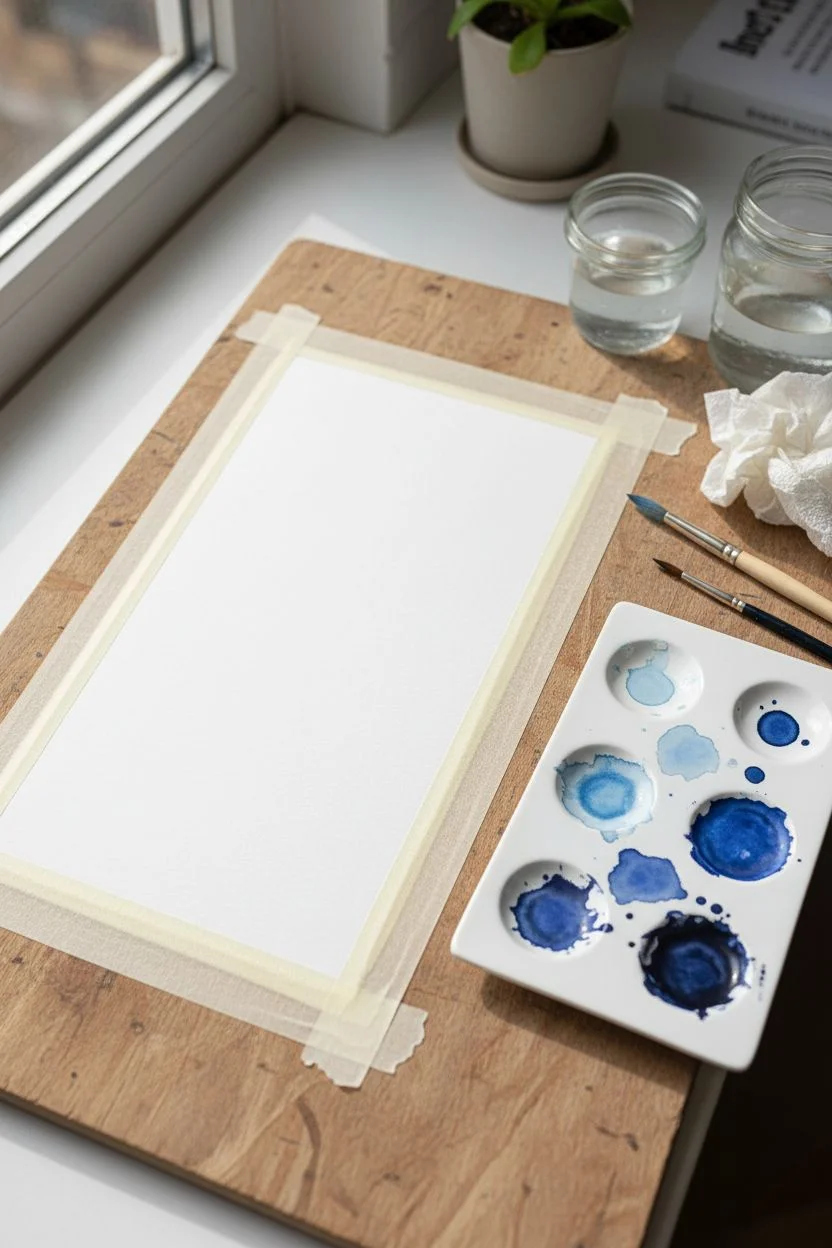
Step 1: Preparation
-
Cut and Secure:
Cut your watercolor paper to your desired bookmark size. Tape it securely to a hardboard or table using masking tape on all four sides to prevent buckling. -
Mix Master Puddles:
On your palette, create four distinct puddles of your chosen blue paint mixed with water: very pale, light, medium, and dark (cream consistency).
Fixing Hard Edges
If your gradient dries with a hard line at the bottom instead of fading, reactivate the edge immediately with a clean, damp brush and smooth it out before continuing.
Step 2: Painting the Atmospheric Layers
-
First Mountain Range:
Load your round brush with the palest wash. Starting about halfway down the paper, paint a jagged, organic line to represent the furthest mountain peaks. -
Create the Mist:
Immediately rinse your brush and leave it slightly damp. Drag clean water along the bottom edge of your painted shape to fade the color out into white paper. -
Dry Completely:
Allow this layer to dry fully. If the paper is cool to the touch, it is still wet. Patience here ensures crisp overlapping lines later. -
Second Layer:
Using the light wash (step up from pale), paint a second mountain range slightly below the first. Overlap the fainter mountains to build depth. -
Fade Again:
Repeat the fading technique, pulling the color down into a transparent wash so the bottom edge disappears. -
Third Layer:
Once the previous layer is bone dry, switch to your medium-strength mix. clear distinction in value is key for the 3D effect. -
Adding Texture:
Paint the third ridge line. I like to make this one a bit steeper or more rugged than the distant ones. -
Pre-Tree Mist:
Fade the bottom of this third layer out, but leave the bottom section slightly tinted rather than pure white to act as a backdrop for the trees. -
Fourth Layer Base:
Use your dark mixture to paint a solid, sloping hill shape at the very bottom of the bookmark. This will be the ground for your forest.
Step 3: Forest Details
-
Switch Brushes:
Change to your fine detail brush (size 0 or 1). Ensure your paint is thick and opaque, like heavy cream. -
Paint Tree Trunks:
Draw thin vertical lines rising from the dark base hill. Vary the heights to make the forest look natural. -
Needle Technique:
Starting at the top of a trunk line, use tiny horizontal dabbing motions to create pine needles. Keep the top narrow and widen the shape as you move down. -
Building Density:
Continue adding trees across the foreground. Let some overlap others to create a dense, lush forest feel. -
Fill the Gaps:
If I see gaps between the trees at the bottom, I darken the area between trunks to connect everything into a solid silhouette. -
Final Dry:
Wait for the thick paint of the trees to dry completely, as it takes longer than the watery washes. -
Reveal:
Carefully peel away the masking tape at a 45-degree angle to reveal the crisp white border.
Level Up: Starry Night
Once fully dry, cover the mountains with a scrap paper and flick white gouache from a toothbrush onto the sky area to create a beautiful snowy or starry effect.
You have successfully captured a breath of mountain air on paper, ready to mark your place in your next adventure.
Dainty Feather Sketches
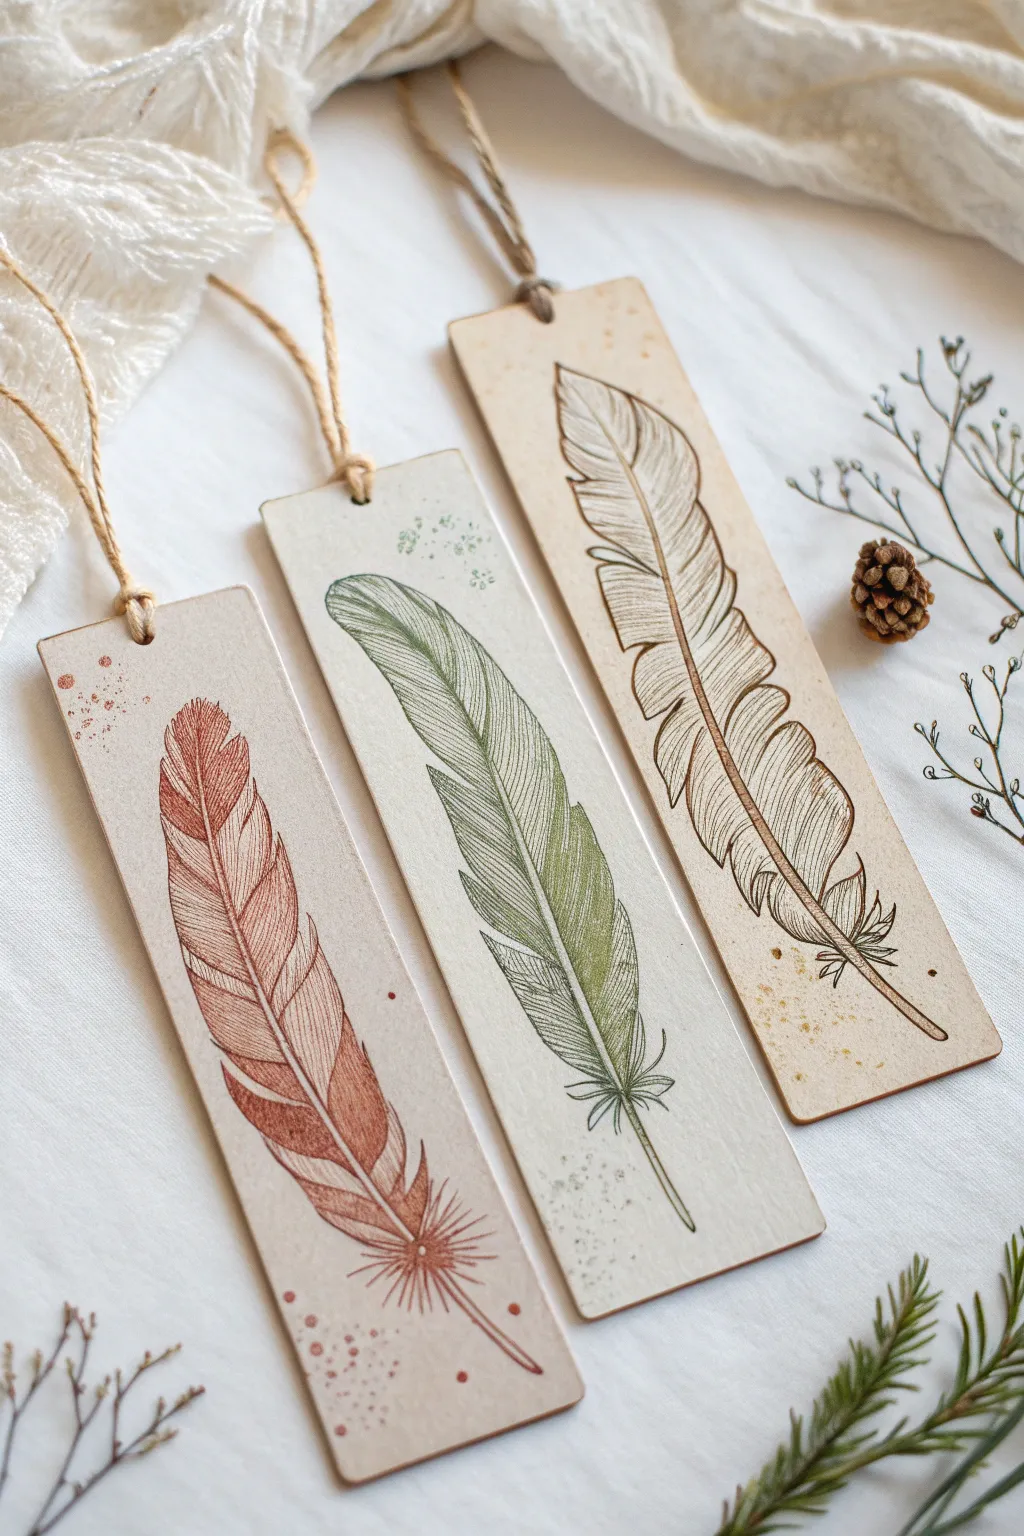

These ethereal bookmarks combine earthy tones with delicate line work for a vintage botanical aesthetic. They are perfect for marking your place in a favorite novel or giving as a thoughtful handmade gift.
Detailed Instructions
Materials
- Heavyweight cream cardstock or watercolor paper
- Fine liner pens (0.1mm and 0.3mm) in terracotta, sage, and sepia
- HB Pencil
- Kneaded eraser
- Ruler
- Corner rounder punch (or scissors)
- Hole punch
- Jute twine
Step 1: Preparing the Canvases
-
Cut the base:
Measure and cut your cardstock into three strips, each measuring roughly 2 inches wide by 6 inches tall. -
Shape the corners:
Use a corner rounder tool or scissors to carefully trim the sharp corners into smooth, uniform curves. -
Add hardware space:
Punch a single hole centered about half an inch down from the top edge of each bookmark.
Stroke Direction
Always pull your pen strokes outward from the center shaft, quickly lifting at the end for a tapered line.
Step 2: Sketching the Guides
-
Map the quill:
Using a sharp pencil, draw a central curved line on each strip to represent the rachis (quill shaft). -
Outline the shape:
Lightly sketch the outer silhouette of the feathers around the quill, varying the shapes so each one is unique. -
Plan the imperfections:
Mark small triangular notches along the edges where you want natural splits in the feather vanes to appear.
Step 3: Inking the Terracotta Plume
-
Define the shaft:
Pick up your terracotta fine liner and trace the central quill, slightly thickening the base and tapering to a hairline at the tip. -
Draw the barbs:
Begin inking the individual feather segments using quick, flicking strokes that start at the quill and move outward. -
Keep it loose:
I like to keep my wrist relaxed here to ensure the lines look organic and wispy rather than stiff. -
Create separation:
Deliberately leave gap spaces where you marked the notches to create the look of a weathered, realistic feather. -
Add texture:
Stipple small dots randomly around the feather with the pen tip to create an artistic, speckled effect.
Vintage Vibes
Distressing the paper edges with a brown ink pad or coffee stain adds an antique feel to the set.
Step 4: Green and Sepia Variations
-
Sage version:
Switch to the sage green pen for the second bookmark, focusing on a longer, sleeker feather shape with tighter parallel lines. -
Sepia version:
For the third bookmark, use the sepia pen to draw a feather with a dramatically curved tip and ruffled edges. -
add depth:
Layer your strokes near the central shaft on all feathers to build up shadow, making the center appear denser. -
Draw the down:
Add a cluster of messy, loose scribbles at the very base of each quill to mimic soft downy feathers.
Step 5: Finishing Touches
-
Clean up:
Allow the ink to dry completely, then gently dab with a kneaded eraser to lift away all visible pencil marks. -
Prepare the tassel:
Cut three strands of jute twine, each about 8 inches long. -
Secure the twine:
Fold a piece of twine in half, thread the loop through the hole, and pull the tails through the loop to create a lark’s head knot.
Place your new bookmarks inside your current read and enjoy the natural charm they bring to your library.


Starry Night Pine Trees
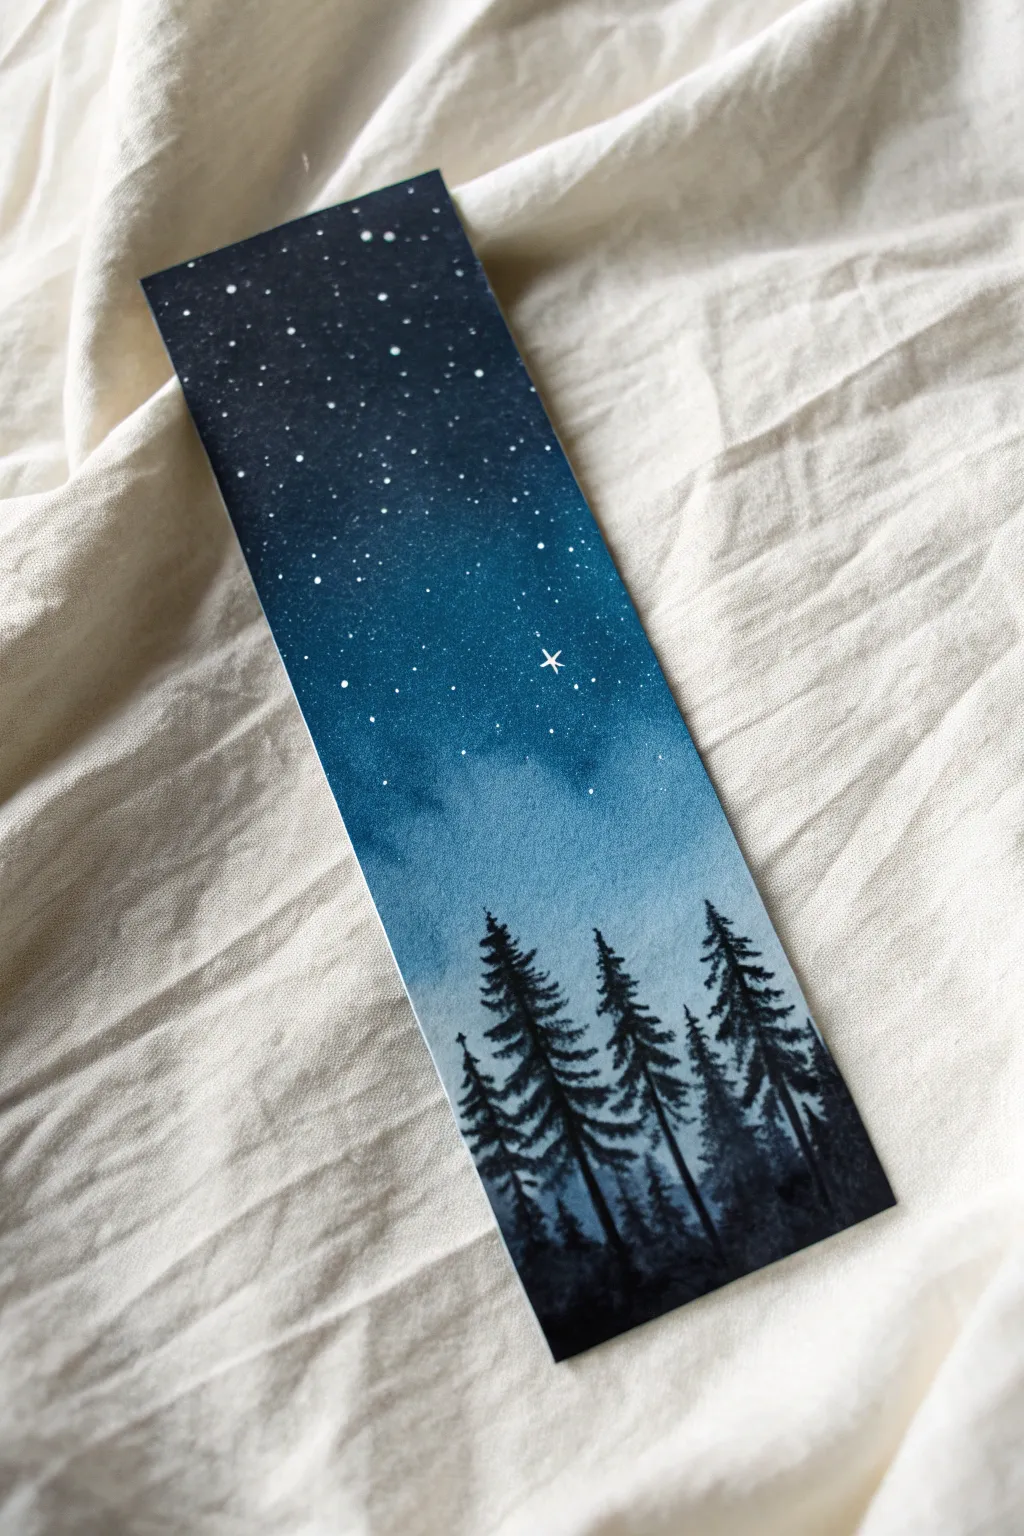
Capture the serene beauty of a silent winter night with this atmospheric watercolor bookmark. You will learn to create a seamless glowing gradient and crisp silhouettes to bring this starry scene to life.
Detailed Instructions
Materials
- Cold press watercolor paper (300 gsm)
- Watercolor paints (Indigo, Prussian Blue, Black)
- White opacity product (White Gouache, Acrylic, or Gel Pen)
- Flat wash brush (approx. size 1/2 inch)
- Fine detail brush (size 0 or 00 round)
- Masking tape
- Paper towels
- Two jars of water
Step 1: Setting the Scene
-
Prepare the canvas:
Cut your watercolor paper to your desired bookmark dimensions, typically around 2 inches by 6 inches. -
Secure the edges:
Tape the paper down to a rigid board using masking tape along all four sides. This prevents the paper from buckling when wet and creates a clean white border. -
Pre-wet the paper:
Using your clean flat wash brush, apply a generous even layer of clean water over the entire surface of the bookmark until it glistens.
Mist Effect
To increase depth, make the water really clean as you reach the bottom of the sky wash. This leaves the paper nearly white behind the trees, mimicking mist or a horizon glow.
Step 2: The Night Sky Gradient
-
Apply the darkest tone:
Load your flat brush with concentrated Indigo or a dark Navy mix. Apply this to the top third of the paper, using horizontal strokes. -
Transition to blue:
Clean your brush slightly and pick up Prussian Blue. Blend this into the bottom of the indigo section, pulling the color down to the two-thirds mark. -
Create the glow:
Rinse your brush thoroughly so it holds only clean water. Drag the blue paint downward from the middle section, letting it fade out to almost clear water near the bottom. -
Smooth the blend:
If harsh lines appear, gently run a damp brush horizontally across the transition areas to soften the gradient. I prefer to tilt the board slightly to help gravity blend the colors naturally. -
Allow to dry:
Let the paper dry completely. It must be bone dry and room temperature to the touch before proceeding to the stars.
Step 3: Starlight and Silhouettes
-
Mix the stars:
Dilute a small amount of white gouache or acrylic paint with water until it reaches the consistency of heavy cream. -
Splatter texture:
Load a brush with the white mixture. Hold it over the bookmark and tap the handle against another brush or your finger to spray fine speckles across the blue sky. -
Add the North Star:
Using your finest detail brush or a white gel pen, carefully draw a small four-pointed star in the middle-right area to serve as a focal point. -
Mix the tree color:
Create a thick, saturated mix of black watercolor. It should be barely diluted to ensure the trees are opaque and dark. -
Anchor the trees:
With the fine detail brush, paint a thin, straight vertical line starting from the bottom tape edge upward. This acts as the trunk for your first tree. -
Form the canopy:
Starting at the top of the trunk line, use short, horizontal dabbing motions that get slightly wider as you move down the trunk to create jagged pine branches. -
Build the forest:
Repeat the tree process, varying the heights. Place some taller trees in the foreground and shorter ones slightly behind or to the side. -
Fill the undergrowth:
Fill in the very bottom of the bookmark with solid black paint to connect the tree bases and ground the composition. -
Final dry and reveal:
Wait for the dense black paint to dry completely. Gently peel away the masking tape at a 45-degree angle to reveal your crisp edges.
Blobby Stars?
If your paint splatters are landing as large blobs rather than mist, your brush is too wet. Blot the loaded brush once on a paper towel before tapping it over the artwork.
Place this bookmark in your current read to add a touch of wilderness magic to your daily pause
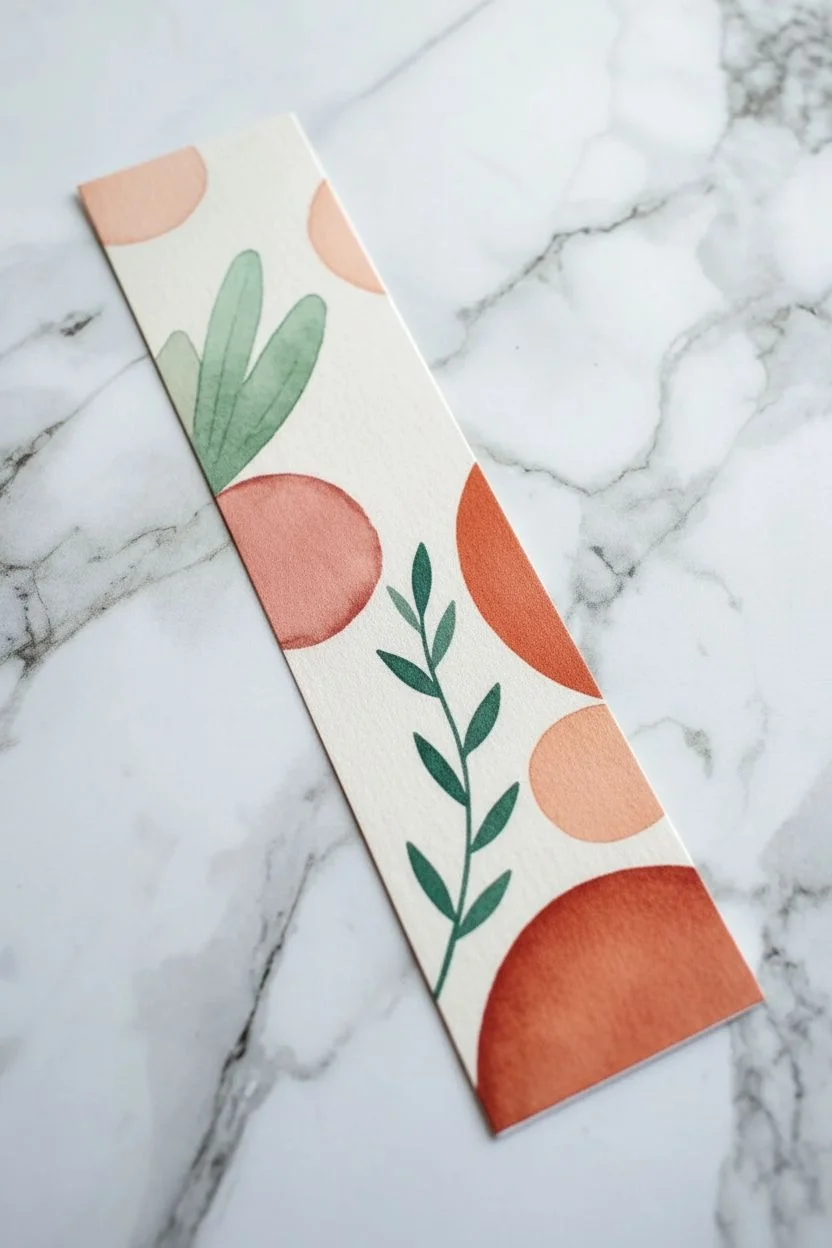
Abstract Organic Shapes
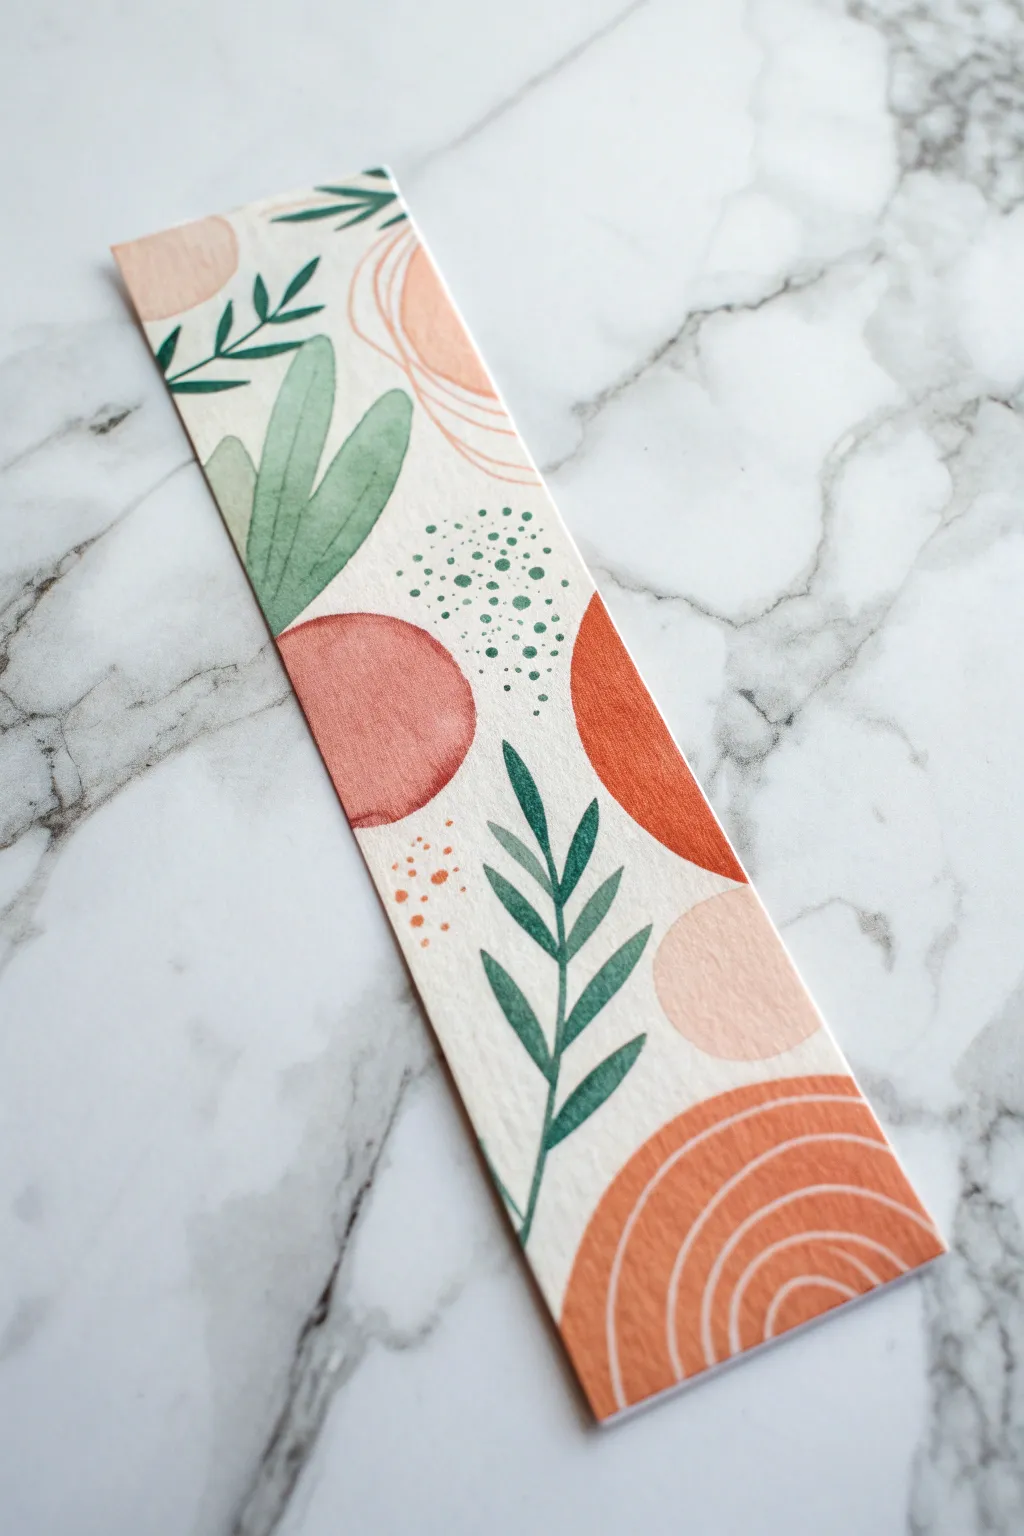
Capture the calming vibe of modern abstract art with this earthy, nature-inspired bookmark project. Using simple organic forms and watercolor textures, you will create a piece that feels grounded and artistic.
How-To Guide
Materials
- Cold-press watercolor paper (300gsm)
- Watercolors (Burnt Sienna, Sap Green, Vermillion)
- White Gouache or White Gel Pen
- Round brushes (size 6 and size 2)
- Scissors and ruler
- Water cups and paper towel
- Mixing palette
Step 1: Base Composition
-
Prepare the canvas:
Measure and cut a strip of watercolor paper to your desired bookmark size, typically around 2 inches wide by 7 inches tall. -
Mix the rust tone:
Combine burnt sienna with a touch of red on your palette to create a warm, rich terracotta or rust color. -
Paint the anchor shape:
Using the size 6 brush, paint a quarter-circle shape in the bottom right corner, letting the curved edge face inward. -
Add balancing rust shapes:
Paint a semi-circle on the right edge, about halfway up the paper, and a full circle on the left side, roughly one-third of the way from the top. -
Mix the blush tone:
Clean your brush and mix a very diluted wash of vermillion or orange to create a soft peach or blush shade. -
Paint soft accents:
Add a small organic circle tucking into the space above the bottom rust shape, and paint a freeform blob at the very top of the bookmark. -
Let it dry:
Allow these base layers to dry completely. I like to wait until the paper feels cool but dry to the touch to prevent bleeding.
Step 2: Botanical Elements
-
Mix sage green:
Create a muted sage green by mixing sap green with a tiny drop of your rust color or grey. -
Paint broad leaves:
Paint two wide, elongated leaves overlapping the large rust circle on the left, curving them slightly upward. -
Mix forest green:
Load your smaller size 2 brush with a deeper, saturated forest green pigment. -
Add the central vine:
Paint a thin, delicate stem rising through the center of the bookmark. -
Detail the leaves:
Add small, pointed leaves to the central stem using the tip of the brush, varying the angle for a natural look. -
Top foliage:
Add a few loose sprigs of dark greenery coming in from the top left corner.
Troubleshooting
Colors bleeding together? Ensure the first layer is bone dry before painting adjacent shapes. A hair dryer on low heat speeds this up perfectly.
Step 3: Texture and Details
-
Stipple green dots:
Using the very tip of your small brush, dab a cluster of forest green dots in the white space between the central shapes. -
Stipple orange dots:
Add a smaller, looser cluster of rust-colored dots near the bottom left area for balance. -
Draw white arches:
Once the bottom rust shape is fully dry, use a white gel pen or fine brush with white gouache to draw concentric curved lines over it. -
Add final line work:
Use a fine brush with your rust paint to add thin, scratchy arched lines over the top peach shape.
Pro Tip
For the specific texture seen in the photo, cold-press watercolor paper is essential. The rough surface grabs the pigment to create that grainy distinct look.
Place this beautiful handmade marker in your current read and enjoy a piece of art every time you turn the page
Cute Cat Paws Peeking
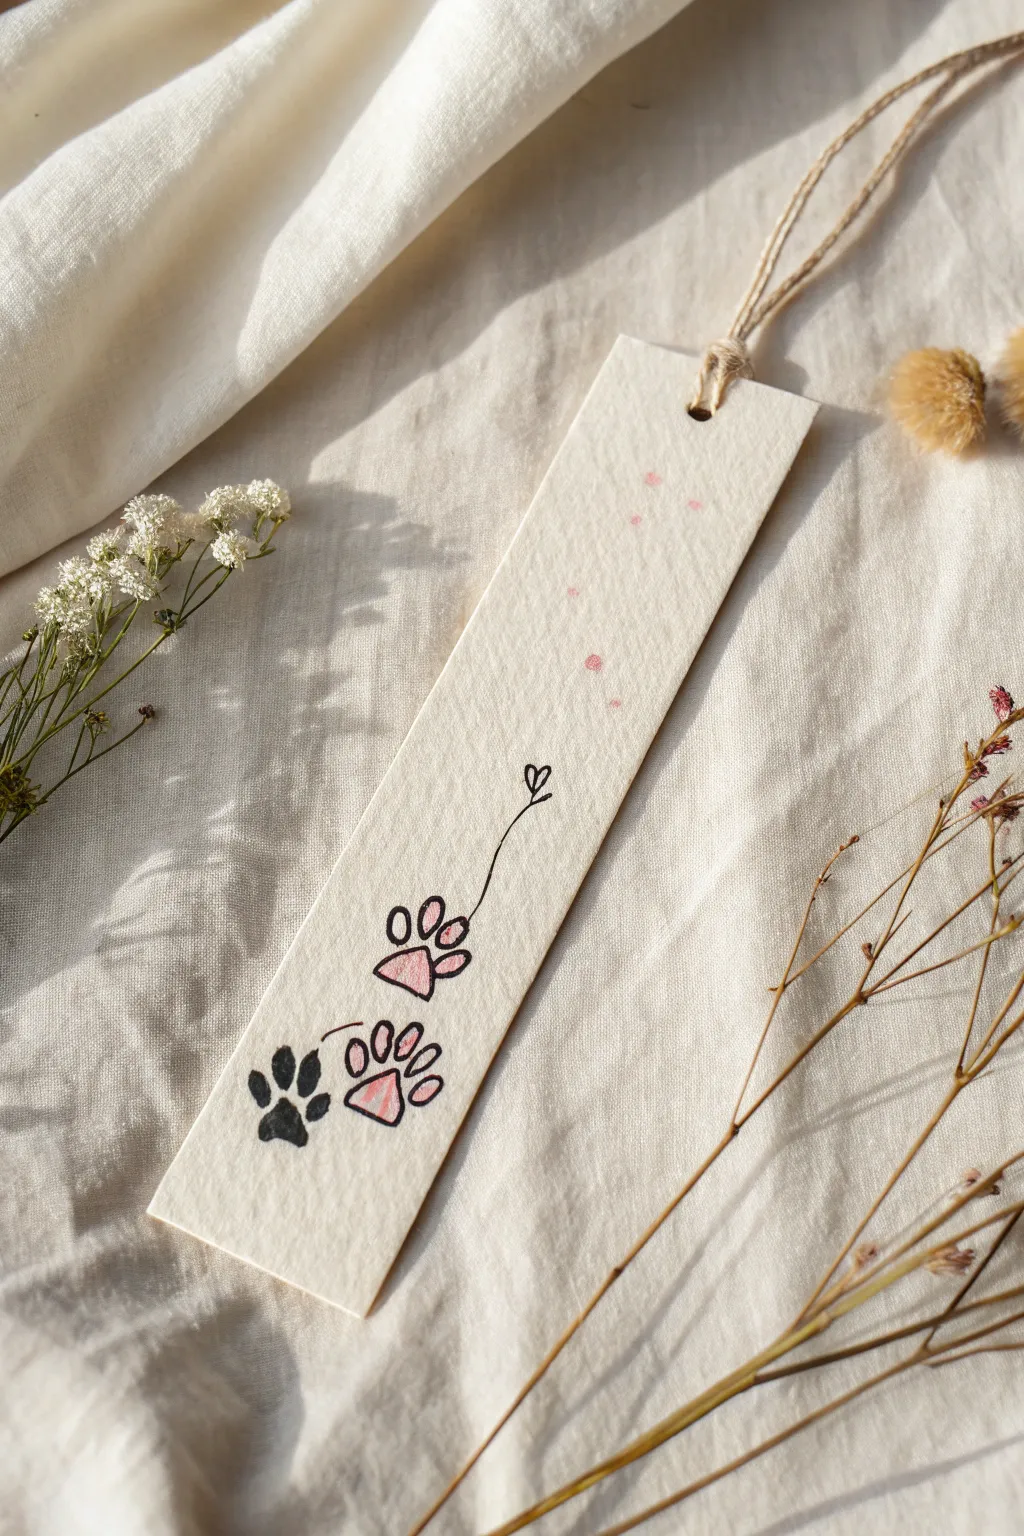
This charming project combines minimalist line art with soft watercolor touches to create a sweet tribute to furry friends. The textured paper and jute tassel give it a lovely rustic feel perfect for cozy reading sessions.
Step-by-Step
Materials
- Cold press watercolor paper (300gsm)
- Black waterproof fine liner pen (0.3 or 0.5mm)
- Pink watercolor paint or brush pen
- Pencil and kneadable eraser
- Natural jute twine
- Hole punch
- Ruler
- Scissors
Step 1: Preparing the Canvas
-
Measure and cut:
Using your ruler, measure a rectangle approximately 2 inches wide by 6 inches long on your watercolor paper. -
Create the strip:
Cut along your measured lines to create the bookmark base. Using textured watercolor paper really adds to the aesthetic shown here. -
Punch the hole:
Use a standard single-hole punch to create a clean hole centered about half an inch from the very top edge.
Step 2: Sketching the Design
-
Position the first paw:
Lightly sketch a paw print near the bottom left corner using your pencil. Draw one large pad and four smaller toe beans above it. -
Add the walking paws:
Sketch two more paw prints moving diagonally upward toward the right. Leave a small gap between each print to suggest movement. -
Add the whimsical detail:
From the top-most paw, draw a thin, wavy line floating upward that terminates in a tiny, open heart shape.
Ink Smearing?
Ensure your fine liner is labeled ‘waterproof’ or ‘archival.’ If not, do the painting steps first, let it dry completely, and then draw the black outlines over the paint.
Step 3: Inking the Outline
-
Fill the bottom paw:
Using your black waterproof fine liner, trace the bottom-left paw and fill it in completely so it is solid black. -
Outline the upper paws:
For the middle and top paws, carefully trace only the outer edges of the pads and toes. Do not fill them in. -
Trace the creative accent:
Go over your pencil line for the string and the small heart with the fine liner, keeping the hand steady for a smooth curve. -
Erase guidelines:
Once you are certain the ink is completely dry, gently remove all visible pencil marks with your kneadable eraser.
Personalize It
Make this extra special by writing a pet’s name in small cursive script along the curved line that connects the paw to the heart.
Step 4: Adding Color
-
Paint the pads:
Dip a small round brush into watery pink paint (or use a brush pen). Fill in the ‘open’ paw prints, staying loosely within the black lines. -
Create the texture:
I like to leave the color slightly uneven within the pads to mimic the organic look of the reference image. -
Prepare for splatters:
Load a paintbrush with diluted pink paint—the same shade used for the paws but with more water added. -
Add the speckles:
Hold the brush over the top half of the bookmark and gently tap the handle against your finger to create tiny, faint pink droplets on the paper. -
Dry thoroughly:
Set the bookmark aside on a flat surface until the paint is bone dry to prevent warping.
Step 5: The Finishing Touch
-
Prepare the tassel:
Cut a piece of natural jute twine approximately 8 inches long. -
Thread the twine:
Fold the twine in half, push the looped end through the punched hole from front to back. -
Secure the loop:
Pull the loose tail ends through the loop and tug gently to tighten the knot against the top of the paper.
Now you have a sweet, handmade marker to keep your place in your next adventure
Hanging Potted Plants

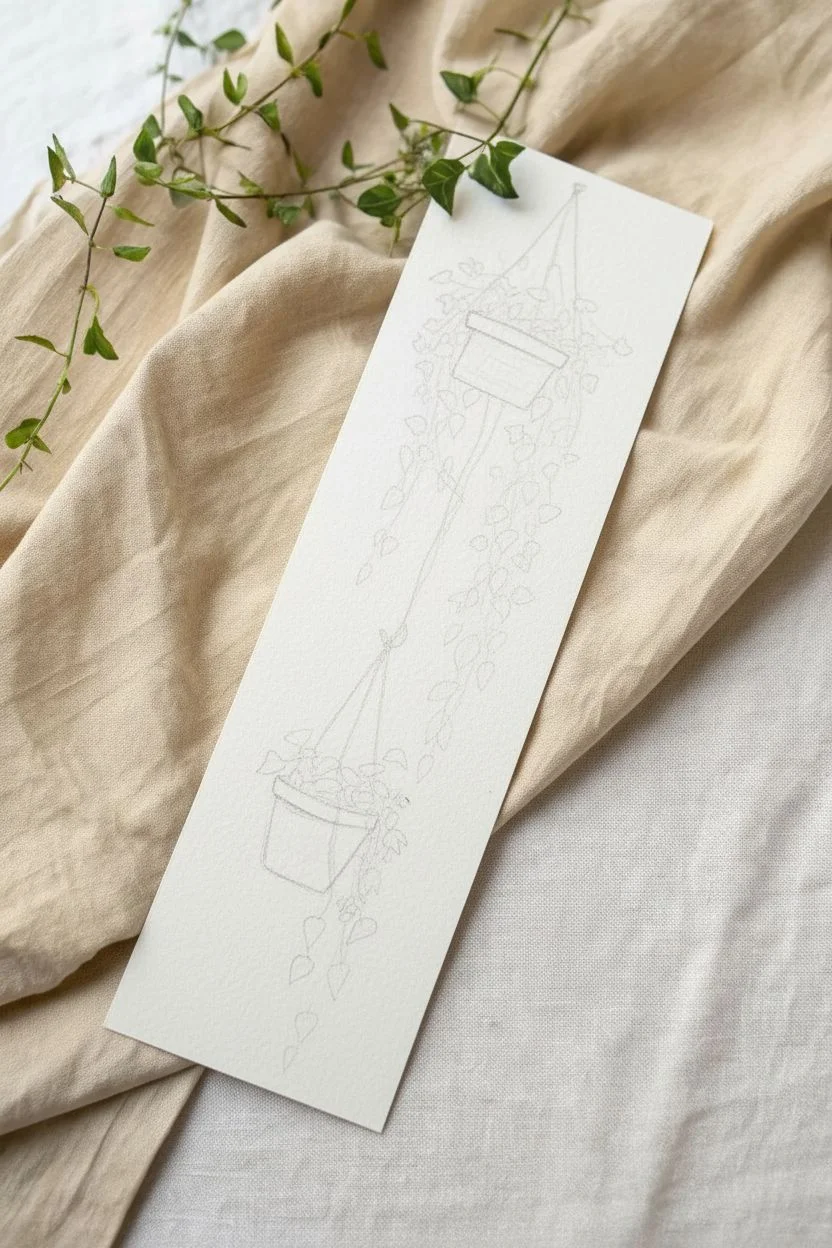
Bring a touch of indoor gardening to your reading time with this serene watercolor bookmark featuring trailing potted plants. The vertical composition perfectly captures the elegance of hanging vines cascading down the page.
How-To Guide
Materials
- Cold press watercolor paper (300 gsm)
- Watercolor paints (Burnt Sienna, Sap Green, Viridian, Yellow Ochre, Burnt Umber)
- Round watercolor brushes (size 4 for washes, size 0 or 00 for details)
- Pencil (HB or H)
- Kneaded eraser
- Jar of water and paper towel
- Ruler
Step 1: Sketching the Layout
-
Cut and measure:
Begin by cutting your watercolor paper to a standard bookmark size, approximately 2.5 by 7 inches, to ensure plenty of vertical space for the vines. -
Outline the top pot:
Lightly sketch a trapezoid shape near the top third of the paper for the first pot, adding a thin rectangle on top for the rim. -
Position the lower pot:
Sketch a second, slightly smaller pot in the bottom third of the paper, angled slightly to the left to create a dynamic composition. -
Draft the ropes:
Draw faint lines connecting the pots to the top edge of the paper, mimicking a macramé hanger structure. -
Map the vines:
Loose, flowing lines are key here; sketch the main stems of the plants cascading down from both pots, letting them overlap the pots slightly.
Step 2: Painting the Terracotta
-
Mix the clay color:
Create a warm terracotta hue by mixing Burnt Sienna with a tiny touch of Red or Burnt Umber. -
Base wash:
Using your size 4 brush, fill in the main body of both pots with a translucent wash of your terracotta mix. -
Add dimension:
While the paint is still damp, dab a slightly darker, more concentrated version of the color along the right side and bottom edge to suggest a curved shadow. -
Paint the rims:
Once the body is mostly dry, paint the rectangular rims, leaving a hairline gap of white paper between the rim and the pot body to define the shape.
Water Control
Vary your water-to-paint ratio on the leaves. Use more water for pale, translucent new growth and less water with more pigment for older, shadowed leaves to create instant depth.
Step 3: Adding the Greenery
-
Prepare green variations:
Mix a ‘fresh’ green (Sap Green and Yellow) and a ‘cool’ green (Viridian and a touch of Blue) on your palette. -
Stem work:
Switch to your size 00 brush and paint the fine, trailing stems using the darker green mix, following your pencil guides. -
Top foliage:
Paint small, heart-shaped leaves on the top plant; I like to vary the pressure, pressing down for the leaf belly and lifting for the tip. -
Bottom foliage:
Repeat the leaf painting for the lower pot, perhaps making these leaves slightly smaller or pointier to suggest a different plant variety. -
Layering depth:
Once the first layer of leaves is dry, add a few darker leaves behind the lighter ones to create a sense of volume and fullness.
Gilded Edges
Once the artwork is sealed and dry, use a metallic gold gel pen to trace the rope lines or add tiny dots to the center of the leaves for a premium, shimmering finish.
Step 4: Fine Details
-
Rope texture:
Mix Yellow Ochre with a dot of brown for a rope color; paint over the pencil lines with short, tiny dash strokes to mimic the twisted texture of twine. -
Knots and loops:
Add small blobs of the rope color where the lines meet to represent knots holding the pots in place. -
Erase guidelines:
Wait until the painting is bone dry—touch it with the back of your hand to check—then gently erase any visible pencil marks.
Place this lovely bookmark in your favorite novel and enjoy the calming vibes of nature every time you open the page.
Detailed Mandala Half-Circles
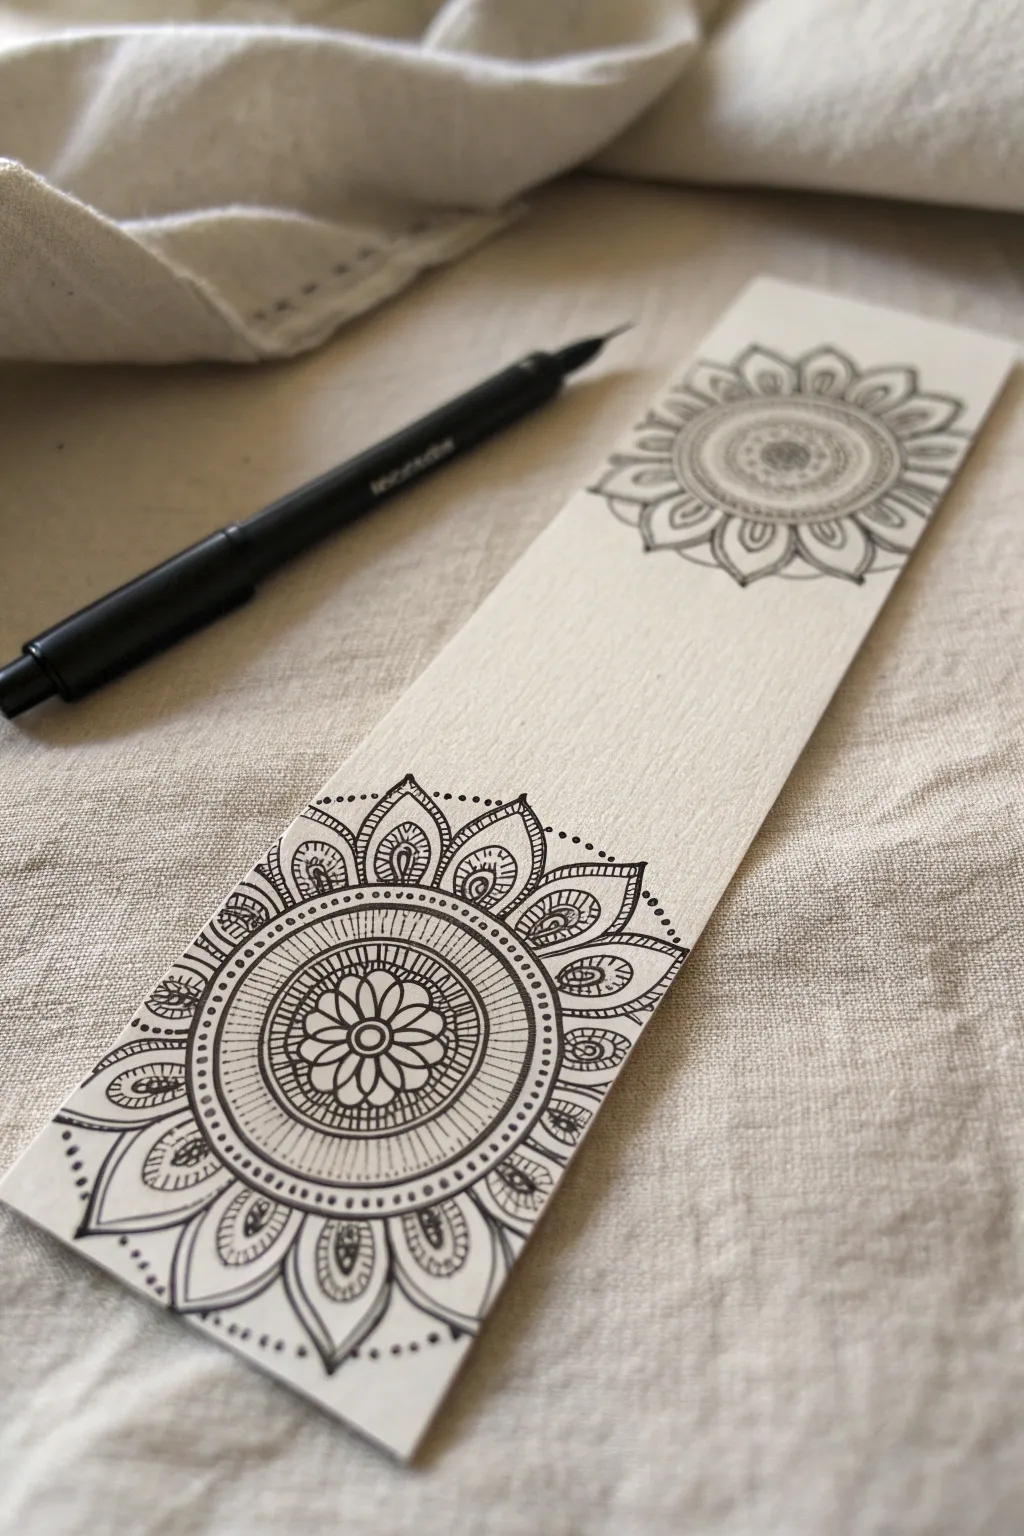
This calming project features two intricate mandala semi-circles inked onto sturdy textured paper, creating a balanced and elegant composition. Using fine lines and repetitive patterns, you’ll create a bookmark that is as relaxing to make as it is to look at.
Step-by-Step Guide
Materials
- Teal or cream cardstock or cold-press watercolor paper
- Black finely tipped pens (sizes 0.1mm and 0.5mm)
- Pencil (HB or lighter)
- Eraser
- Ruler
- Compass
Step 1: Setting the Structure
-
Cut and measure:
Cut your paper into a standard bookmark rectangle, roughly 2.5 by 7 inches. Lightly mark a vertical centerline down the middle of the strip with your pencil to help keep the designs symmetrical. -
Placement guides:
Decide where your two mandalas will sit. For the bottom design, mark a center point about two inches up from the bottom edge. For the top design, mark a point about two inches down from the top edge. -
Pencil framework:
Using a compass centered on your bottom mark, draw three concentric circles lightly in pencil: a small one for the center, a medium one for the mid-pattern, and a large one that nearly touches the paper’s edges. -
Top framework:
Repeat the compass process for the top mark, but make the outermost circle slightly smaller than the bottom one to create visual variety.
Wobbly Lines?
If a curved line goes astray, don’t panic. Simply retrace the line to make it slightly thicker intentionally. This adds line weight variety and hides small shakes instantly.
Step 2: The Bottom Mandala
-
Center flower:
Switch to your 0.5mm pen. Starting at the bottom center point, draw a small eight-petaled flower rosette. Let the petals touch the innermost pencil circle guidelines. -
Textured bands:
Draw a ring around your flower petals. Create a second ring about 3mm further out. Fill the space between these two rings with tightly packed, straight radial lines using the finer 0.1mm pen. -
Rounded petals:
Along the outer edge of your textured band, draw a row of U-shaped petals. Try to keep them uniform in size, rotating your paper as you work to maintain a comfortable hand angle. -
Inner details:
Inside each U-shaped petal, draw a slightly smaller upside-down teardrop shape using the fine pen. This creates a detailed, lacy look. -
Outer band:
Draw two more concentric circles outside the petal layer, creating a thin open border. I like to leave this space empty of hatching to let the design breathe. -
Pointed leaves:
For the outermost layer, draw large, pointed leaf shapes radiating outward. Since the bookmark is narrow, the leaves on the far left and right will be cut off by the edge of the paper—draw them as if they are continuing off the page. -
Leaf filling:
Inside each large pointed leaf, draw a smaller matching shape and add perpendicular hatch marks at the base for shading.
Step 3: The Top Mandala
-
Core design:
Move to the top framework. Draw a small circle in the center, and surround it with two rings filled with small dots or stippling instead of lines. -
Petal variation:
Draw a layer of rounded petals similar to the bottom mandala, but keep them slightly shorter and wider. Add a small dot inside the base of each petal. -
Outer contour:
Outline the entire shape with a slightly thicker line using the 0.5mm pen to give the top mandala a bold definition against the cream paper.
Add a Splash
Once the ink is fully dry, paint a translucent watercolor wash over the petals in soft pastels, or use a metallic gold gel pen to fill the center teardrops for subtle luxury.
Step 4: Final Touches
-
Dotted halo:
Using the 0.5mm pen, place a series of evenly spaced dots floating just above the pointed tips of the bottom mandala’s outer leaves. Continue this dotted line off the edge of the paper. -
Erase guidelines:
Wait at least 15 minutes to shape sure the ink is completely bone dry. Gently erase all pencil lines, being careful not to buckle the paper. -
Contrast check:
Review your drawing. If any main outlines look too thin, go over them once more with the 0.5mm pen to make the structure pop against the delicate inner details.
Place this beautiful creation in your current read and enjoy the serenity it brings.
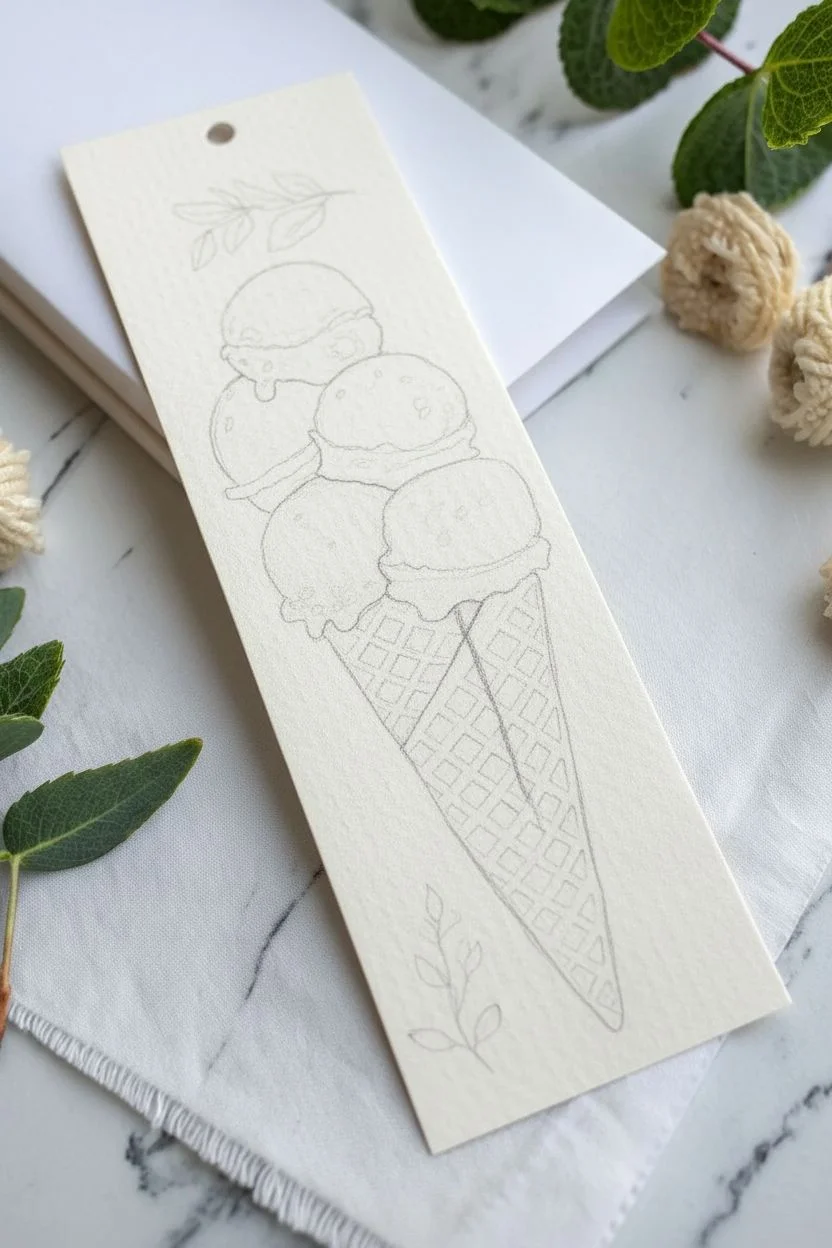
Towering Ice Cream Scoops
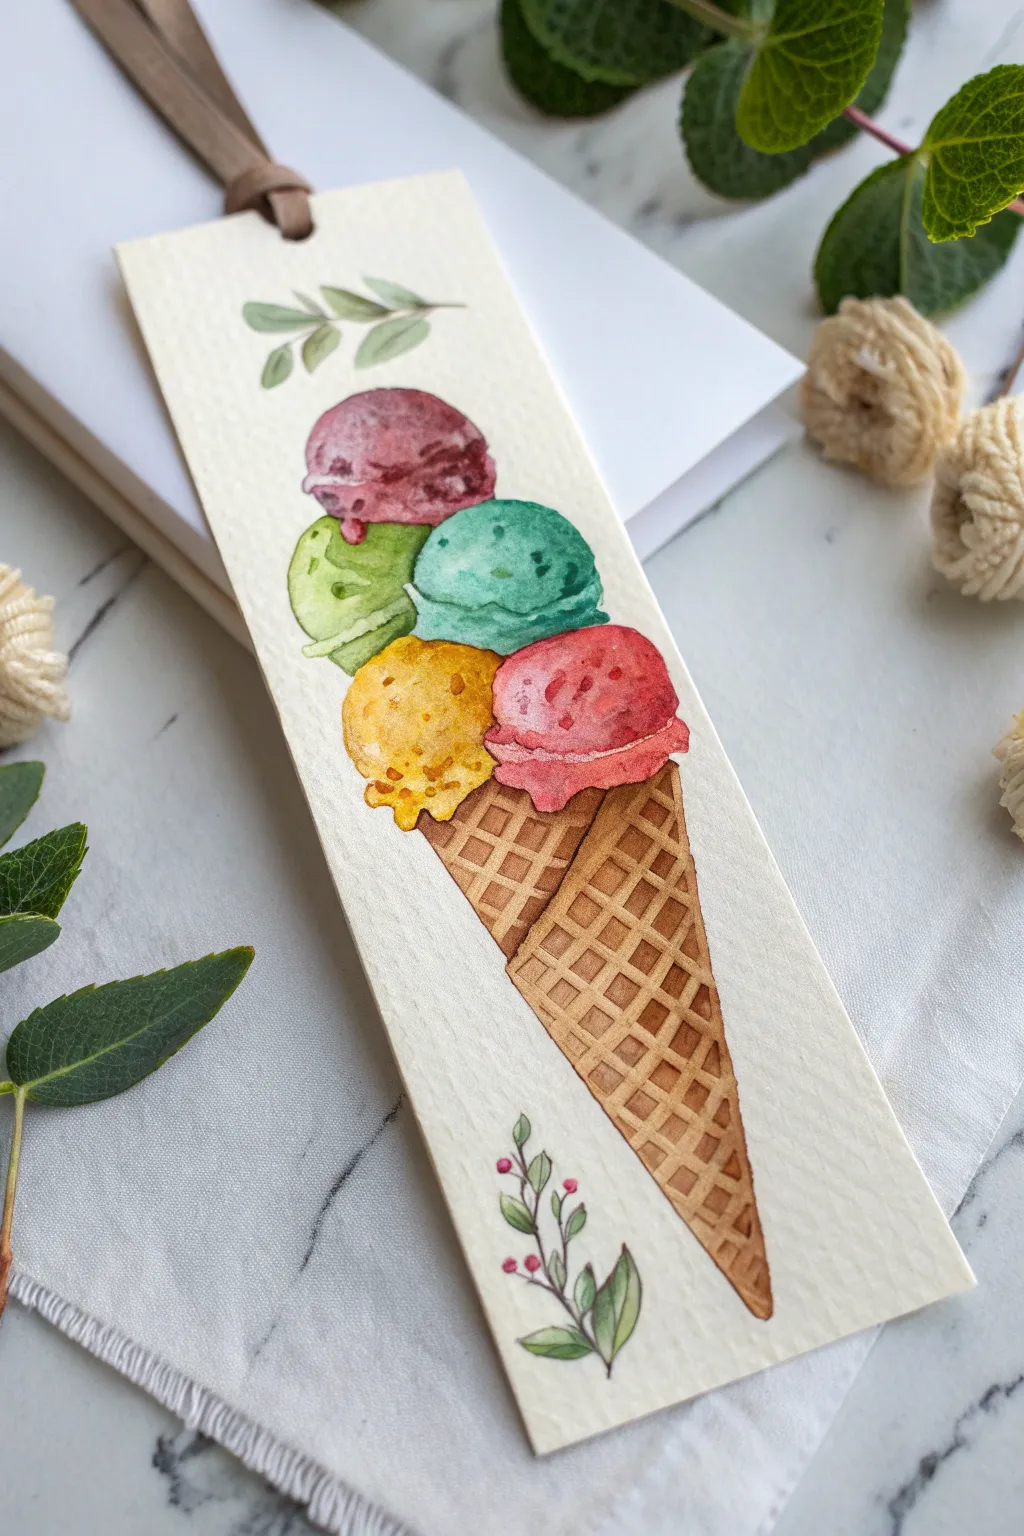
Capture the joy of summer reading with this refreshing watercolor bookmark featuring a whimsical stack of five ice cream scoops. The combination of textured paper and soft translucent washes creates a delightful, dimensional treat that looks good enough to eat.
How-To Guide
Materials
- Cold press watercolor paper (300 gsm)
- Watercolor paints (Plum, Lime Green, Teal, Ochre, Pink, Brown)
- Round watercolor brushes (Size 2 and 4)
- HB Pencil and kneaded eraser
- Paper trimmer or scissors
- Hole punch
- Brown ribbon or leather cord
Step 1: Sketching the Sweets
-
Cut and measure:
Begin by trimming your watercolor paper into a standard bookmark strip, approximately 2 inches wide by 6-7 inches tall. -
Outline the scoops:
Using an HB pencil with a very light hand, sketch five overlapping circles and ovals in the upper center of the paper to represent the ice cream scoops. -
Draw the cone:
Sketch a triangular cone shape at the bottom. Notice the cone in the example has a unique folded look, resembling two sections side-by-side, so draw a vertical dividing line down the center. -
Add nature elements:
Lightly trace a small sprig of leaves at the very top of the bookmark and a tiny floral stem near the bottom point of the cone.
Muddy colors?
If your scoops are bleeding into each other, you’re working too fast! Ensure one shape is bone-dry before painting an adjacent color to keep edges crisp.
Step 2: Painting the Scoops
-
The berry scoop:
For the top scoop, load your size 4 brush with distinct plum or berry-colored paint. Apply the color, leaving a tiny sliver of white paper unpainted on the upper left for a glossy highlight. -
Painting the middle layers:
Skip the second scoop to prevent bleeding and move to the third (teal) scoop. Paint it solid, letting the water pool slightly at the bottom edge for a natural shadow. -
The lime scoop:
Once the top and teal scoops are touch-dry, paint the second scoop in a fresh lime green. Carefully paint around the bottom curve of the purple scoop above it. -
Textured yellow scoop:
For the fourth scoop, use an ochre or golden yellow. I like to dab the tip of my brush specifically on the left side to create a ‘crumbly’ texture, rather than a smooth wash. -
The base scoop:
Paint the final scoop in a strawberry pink. Add a slightly wavy, ruffled edge at the bottom where it meets the cone to simulate the ‘skirt’ of the ice cream melting. -
Deepening shadows:
Once the base layers are dry, glaze a thin line of darker pigment along the bottom curve of each scoop to separate them visually.
Step 3: The Waffle Cone
-
Cone base wash:
Mix a light tan or biscuit color and paint the entire cone shape. Keep this wash very watery and transparent. -
Drawing the grid:
Switch to your size 2 brush and a darker brown mix. Carefully paint diagonal lines to create the classic waffle pattern on the cone. -
Adding volume:
Paint a second layer of the grid pattern on the right side of the cone and slightly darker along the central vertical line to create a 3D folded effect.
Level Up: Tasty Texture
Once the paint is dry, use a white gel pen or opaque white gouache to add tiny highlight dots or ‘sprinkles’ on the colored scoops for extra pop.
Step 4: Final Details
-
Top foliage:
Using a sage green, paint simple, loose leaves on the sprig you sketched at the top. Vary the pressure on your brush to get tapered leaf shapes. -
Bottom floral accent:
Paint the tiny stem at the bottom with delicate green strokes. Add tiny dots of pink or red for berries or buds. -
Finishing:
Allow the artwork to dry completely. Erase any visible pencil marks gently with a kneaded eraser. -
Ribbon tie:
Punch a hole in the top center of the bookmark and thread a brown leather cord or ribbon through carefully.
Slide your new creation into your favorite book for a sweet reading companion.
Enchanted Mushroom Forest
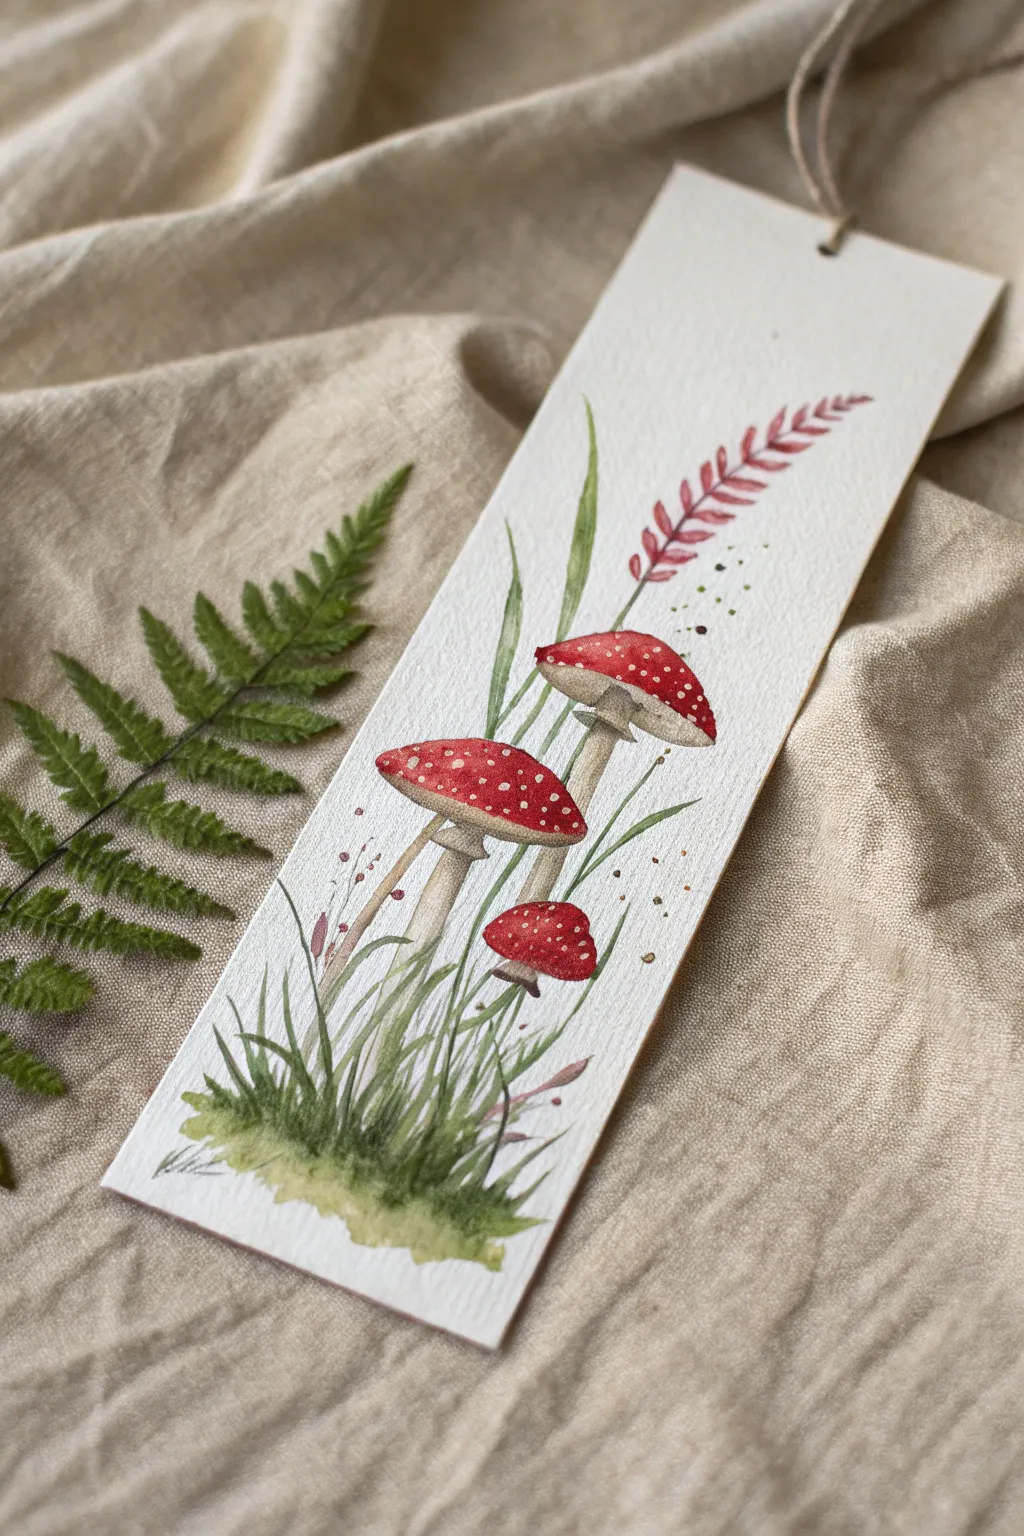
Capture the magic of a forest floor with this charming watercolor bookmark featuring bright Amanita mushrooms and delicate botanical details. The texture of cold-press paper adds a lovely rustic feel perfect for marking your place in a fairytale.
Detailed Instructions
Materials
- 140lb (300gsm) cold press watercolor paper
- Watercolor paints (Cadmium Red, Sap Green, Burnt Umber, Yellow Ochre, Alizarin Crimson)
- Round brushes (size 4 for washes, size 0 or fine liner for details)
- Opaque white gouache or white gel pen
- HB pencil and kneaded eraser
- Hole punch
- Jute twine or rustic string
Step 1: Sketching the Composition
-
Cut and Size:
Cut your watercolor paper into a strip approximately 2.5 by 7 inches. -
Outline the Stems:
Lightly sketch the three mushroom stems: a medium one leaning slightly left, a tall central one, and a small stout one on the bottom right. -
Add Caps and Grass:
Draw the domed caps on top of the stems and sketch loose, varying heights of grass blades rising from the bottom. -
Background Details:
faintly outline the curving fern-like frond at the top right to guide your painting later.
Brushwork Tip
For the realistic grass blades, press down firmly at the root and gradually lift the brush as you move upward, ending the stroke with just the very tip of the bristles for a sharp point.
Step 2: Painting the Mushrooms
-
Stem Base Layer:
Mix Yellow Ochre with a tiny dot of Burnt Umber/Brown. Paint the stems with this wash, keeping the color sheer and watery. -
Shading:
While the stems are still damp, drop a slightly darker brown mix just under the cap area and at the base to create volume. -
The Red Caps:
Paint the three caps with vibrant Cadmium Red. I like to apply two thin layers here to achieve that really rich, punchy saturation. -
Softening Edges:
Before the red dries completely, use a clean, slightly damp brush to soften the bottom curve of the caps so they look round rather than flat.
Step 3: Foliage and Atmosphere
-
Grass Foundation:
Mix Sap Green with a touch of brown for a natural hue. Paint the base tuft of grass using short, upward flicking strokes. -
Depth in the Grass:
Switch to a darker, more saturated green mix. Add contrast to the very bottom of the grass clump while the previous layer is still slightly wet. -
Tall Blades:
Using your fine liner brush and the lighter green mix, paint the tall grass blades behind the mushrooms with long, confident sweeping motions. -
The Pink Fern:
Dilute Alizarin Crimson with plenty of water for a soft pinkish-red. Paint the delicate fern frond at the top, pressing down gently for each leaf segment. -
Atmospheric Splatter:
Load a small brush with watery green or brown paint and tap it against your finger to create tiny, subtle splatter dots near the red fern.
Level Up: Magic Dust
Swap the subtle green background splatter for metallic gold watercolor paint. This adds a whimsical, magical shimmer that catches the light whenever you open your book.
Step 4: Finishing Touches
-
The White Spots:
Once the red caps are bone dry, use opaque white gouache or a white gel pen to dot on the signature Amanita spots. -
Stem Details:
Add a few tiny white or pale brown lines on the stems to suggest the texture of the mushroom’s ring or “skirt”. -
Clean Up:
Wait for the artwork to be completely dry, then gently erase any visible pencil marks with your kneaded eraser. -
Hardware:
Punch a hole in the top center of the bookmark and thread a loop of jute twine through it to finish.
Now you have a small piece of enchanted forest to keep your page
Gradient Cloud Scapes
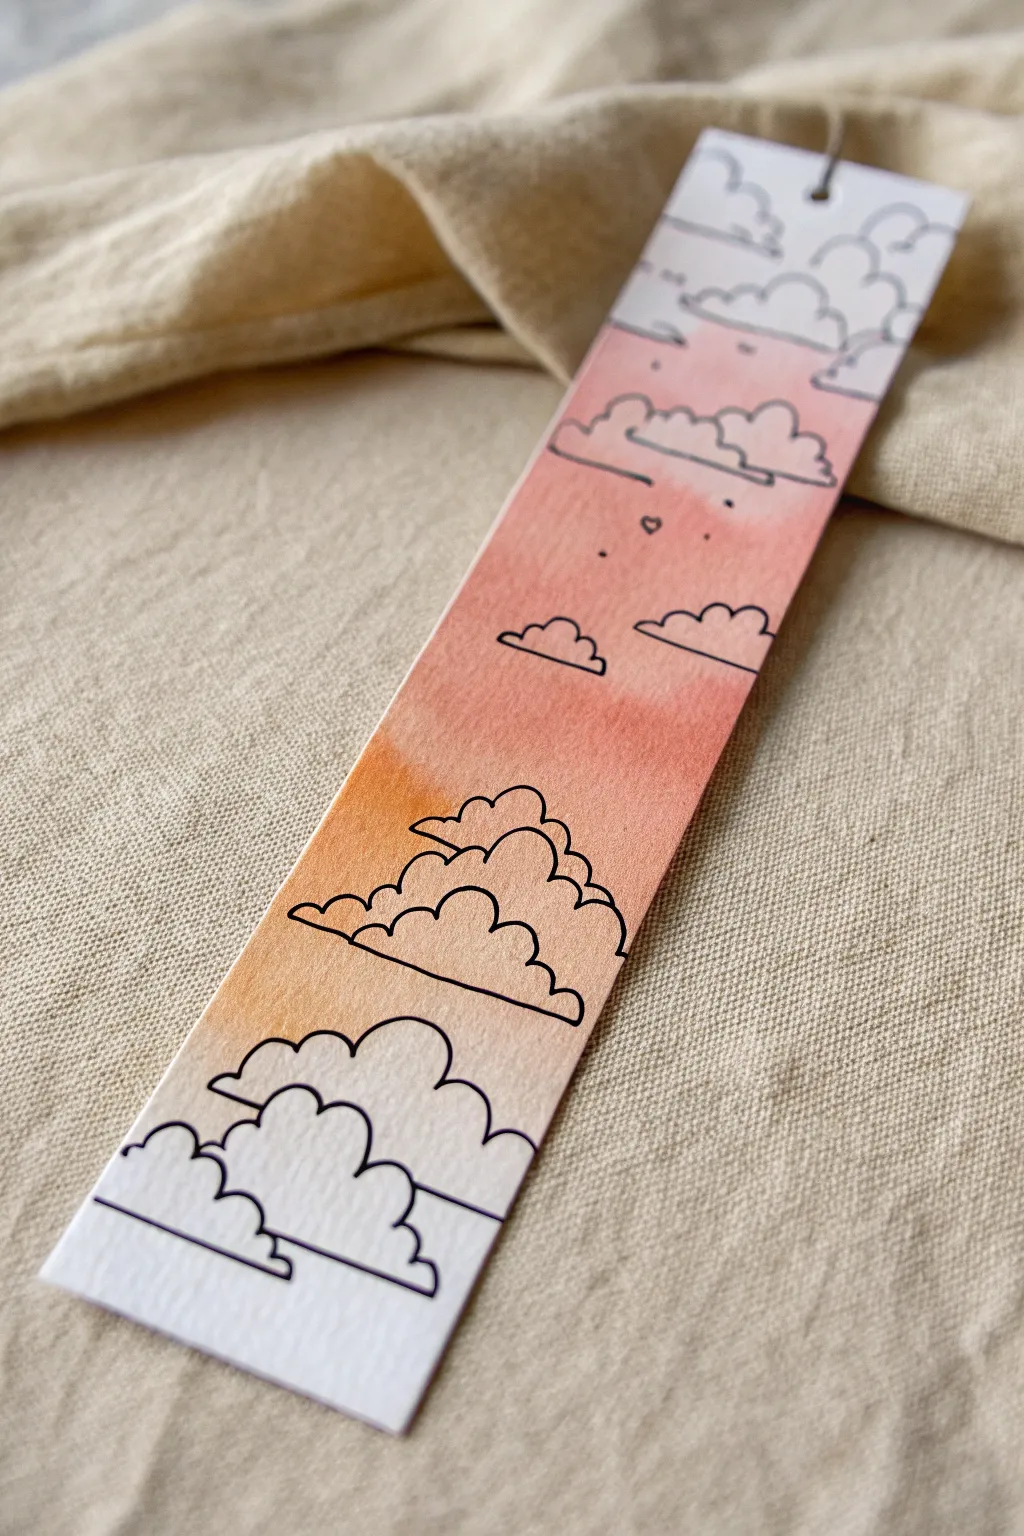

Capture the serenity of a sunset with this beautiful watercolor and ink project. By combining a wet-on-wet gradient background with crisp fineliner doodles, you will create a professional-looking bookmark that feels light and airy.
Step-by-Step
Materials
- Cold press watercolor paper (300 gsm)
- Watercolor paints (Pink and Orange/Peach)
- Round watercolor brush (size 6 or 8)
- Waterproof black fineliner pen (0.3mm or 0.5mm)
- Masking tape or washi tape
- Jar of clean water
- Paper towels
- Hole punch
- String or thin twine
Step 1: Setting the Stage
-
Prepare the paper:
Cut your watercolor paper into a rectangular strip, approximately 2 inches wide by 6 inches tall. -
Secure the workspace:
Tape the edges of your paper down to a hard board or table using masking tape to prevent the paper from buckling when wet. -
Mix your colors:
Prepare two puddles of paint on your palette: a diluted soft pink and a slightly vibrant peach or pale orange.
Gradient Success
Work quickly while the paper is wet. If the paper dries before you finish blending, the colors won’t mix smoothly, leading to hard water lines.
Step 2: Painting the Gradient
-
Wet the surface:
Using your clean brush, apply a layer of clear water over the middle 80% of the bookmark, leaving the very top and bottom dry for now. -
Apply the pink:
Load your brush with the pink wash and gently touch it to the upper wet area, allowing the pigment to bloom naturally. -
Add warmth:
While the pink is still wet, drop the peach color into the center section below the pink, letting them blend where they meet. -
Fade the edges:
Clean your brush, leave it slightly damp, and gently drag the color downwards and upwards to fade it into the white paper at the ends. -
Dry completely:
Allow the paint to dry fully. I like to wait until the paper feels room temperature to the touch to ensure no moisture remains.
Step 3: Doodling the Clouds
-
Start the line art:
Using your black fineliner, begin drawing clouds near the top of the pink section. -
Shape the clouds:
Draw flat bottoms for the clouds and use bumpy, scalloped lines for the fluffy tops. -
Create variation:
Don’t close every shape perfectly; leave some lines open or disconnected to give the clouds a stylized, sketchy look. -
Build the middle:
Draw larger, more clustered cloud formations in the center peach section where the color is most vibrant. -
Add the horizon:
Near the bottom, draw a straight horizontal line to represent a distant horizon using a ruler or a steady hand. -
Anchor the bottom:
Place large, puffy clouds resting on this horizon line, overlapping them slightly for depth. -
Add sky details:
Fill the empty sky spaces with tiny dots, small circles, and a miniature heart to add whimsy.
Fixing Mistakes
If you accidentally make a cloud shape you don’t like, simply draw another cloud slightly overlapping it to hide the line naturally.
Step 4: Final Assembly
-
Remove tape:
Carefully peel away the masking tape at a 45-degree angle to avoid tearing the paper. -
Add the tassel:
Punch a hole in the top center of the bookmark and tie a loop of natural twine through it.
Enjoy using your custom bookmark for your next reading session
Celestial Phases of the Moon

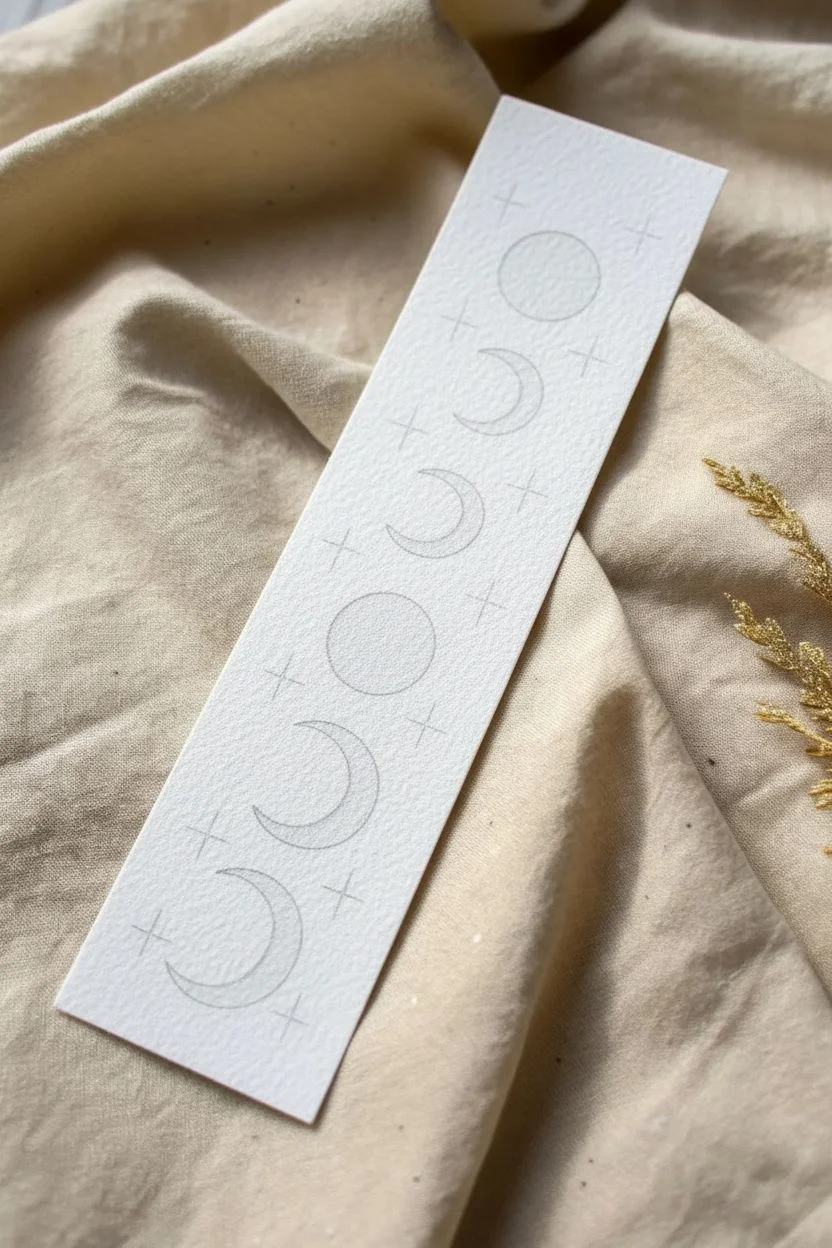
Capture the magic of the night sky with this elegant watercolor bookmark. Using metallic gold paint on textured cold-press paper creates a luxurious, crater-like finish that catches the light beautifully as you read.
Step-by-Step Guide
Materials
- Cold press watercolor paper (140lb/300gsm)
- Metallic gold watercolor pan or gouache
- Round detail brush (size 1 or 2)
- Ruler
- Pencil (HB)
- Kneaded eraser
- Small circular stencil or drawing compass
- Standard hole punch
- Gold eyelet and setting tool
- Jar of water
Step 1: Drafting the Design
-
Cut the base:
Cut a strip of cold press watercolor paper to clear dimensions, approximately 2 inches wide by 7 inches tall. -
Mark the centerline:
Using your ruler, lightly draw a vertical line down the exact center of the strip to help keep your phases aligned. -
Space the phases:
Mark five evenly spaced dots along the centerline where the middle of each moon phase will sit. -
Draw the full moon:
Use a stencil or compass to draw a perfect circle centered on the middle dot. -
Sketch inner crescents:
Sketch the crescent shapes above and below the full moon; I find it easiest to draw a light full circle first and then mark the inner curve. -
Sketch outer crescents:
Draw the top and bottom thinning crescents, ensuring the curves face inward toward the full moon. -
Mark star placement:
Lightly sketch small cross signs scattered symmetrically around the moons to indicate where the stars will go. -
lift the graphite:
Roll your kneaded eraser gently over the entire sketch to lift up the dark graphite, leaving only faint guidelines visible.
Creating Texture
To get the mottled moon surface, drop clear water onto the semi-dry gold paint. The water pushes the pigment to the edges, creating natural-looking craters.
Step 2: Painting the Gold
-
Prepare the paint:
Add a few drops of water to your metallic gold pan and let it sit for a minute to soften into a creamy, opaque consistency. -
Outline the full moon:
Load your brush and carefully outline the central full moon circle using the tip of the bristles. -
Fill and texture:
Fill in the circle with gold; while wet, dab in slightly thicker blobs of pigment to create a ‘crater’ texture as it dries. -
Paint inner crescents:
Paint the two crescent shapes closest to the full moon, being careful to keep the points sharp. -
Paint outer crescents:
Fill in the top and bottom crescents, rotating the paper if needed to get the best angle for the curves. -
Add the stars:
Using just the very tip of your brush with less water, paint the thin cross-stars over your guidelines.
Troubleshooting Edges
If your gold paint bleeds outside the lines, the paper was likely too wet. Use a damp, clean brush to gently ‘lift’ the excess paint while it is still wet.
Step 3: Finishing Touches
-
Dry completely:
Allow the bookmark to dry flat for at least an hour; metallic pigments often take longer to set than standard watercolors. -
Final erase:
Once fully dry, use a clean eraser to remove any remaining visible pencil lines around the gold. -
Punch the hole:
Use a standard hole punch to create a hole centered about half an inch from the top edge. -
Insert eyelet:
Place a gold eyelet through the front of the hole. -
Set the eyelet:
Use an eyelet setter or setting pliers to crimp the back of the eyelet, securing it tightly to the paper.
Slip this shimmering handmade piece into your favorite novel to track your reading progress
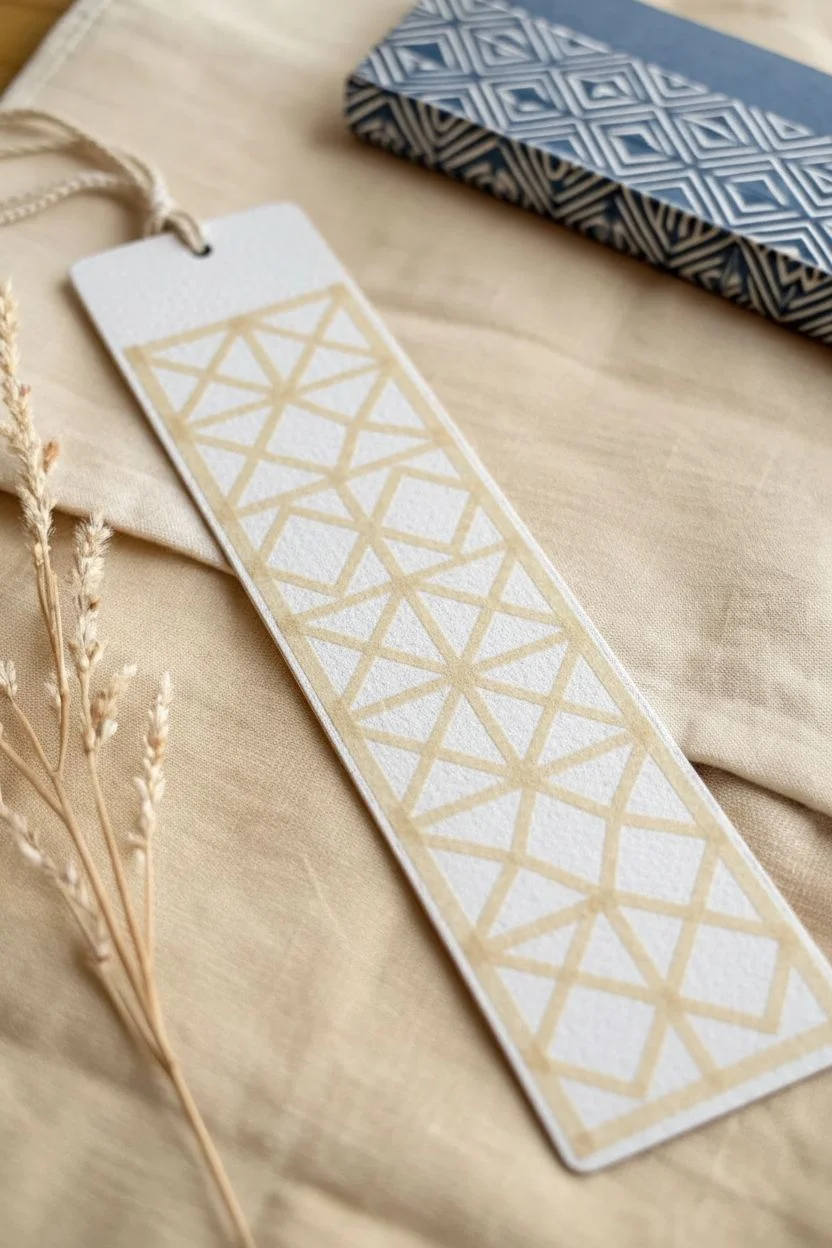
Geometric Tape Resist
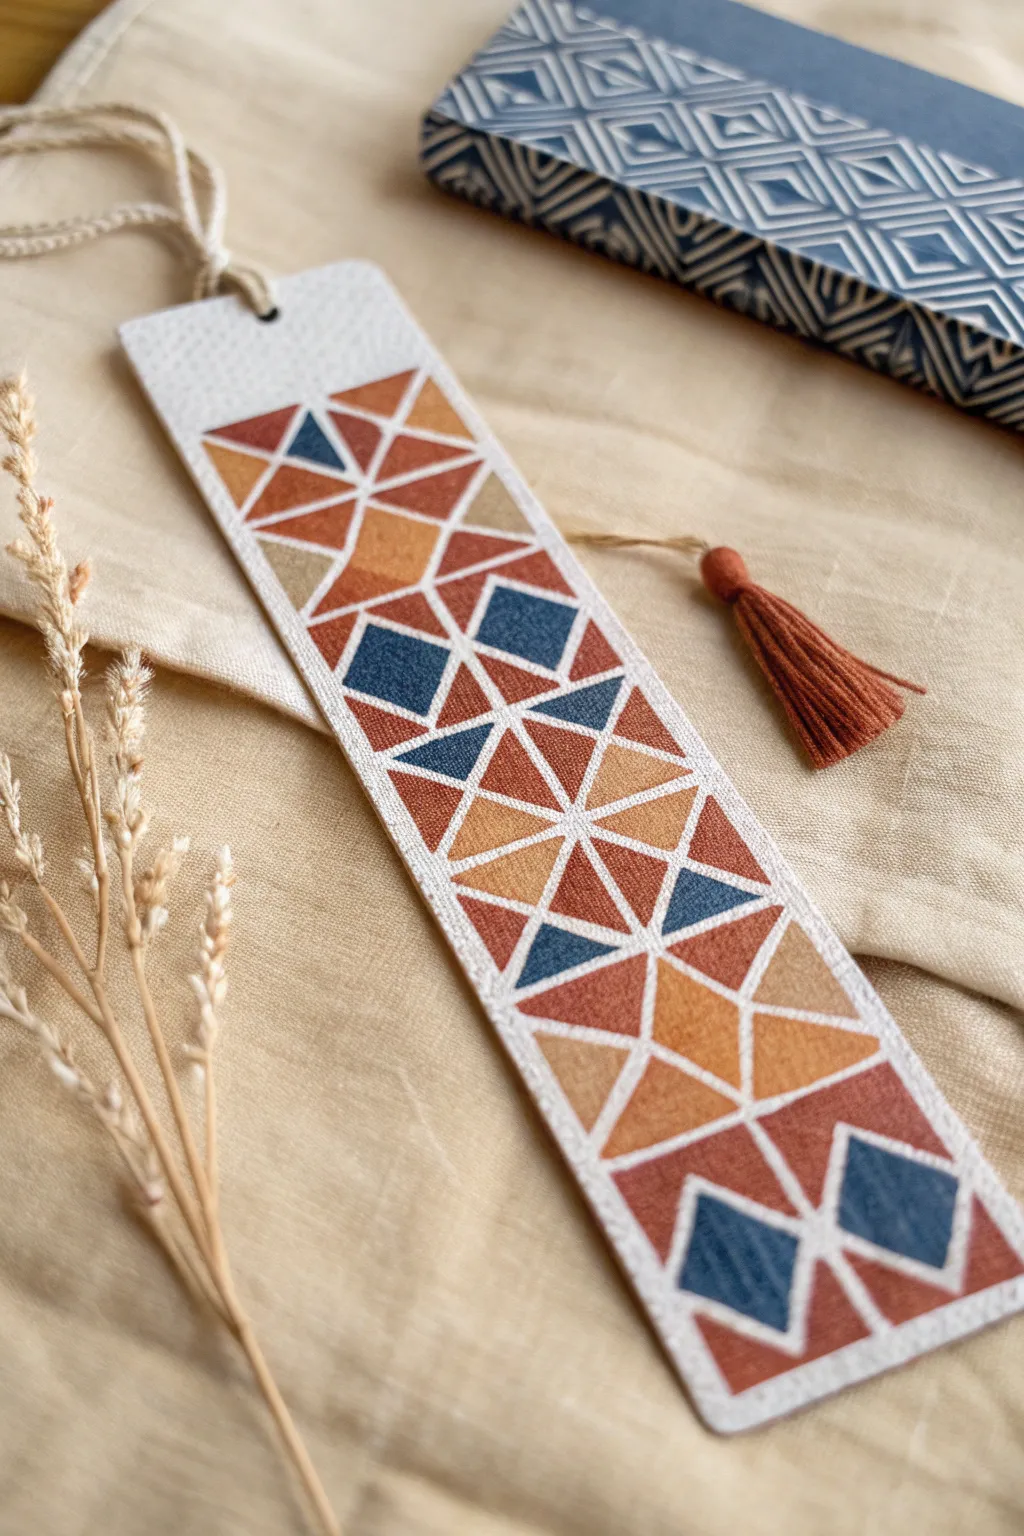
This project harnesses the simple magic of masking tape to create intricate, mosaic-like patterns with crisp white boundaries. Using a warm, bohemian color palette, you’ll transform a simple strip of paper into a stunning geometric artwork that looks far more complex than it actually is.
Step-by-Step
Materials
- Heavy watercolor paper (140lb/300gsm)
- Thin masking tape (3mm/0.12 inch) or graphic art tape
- Watercolor or gouache paints (Rust, Mustard, Navy, Terra-cotta)
- Small round paintbrush (size 2 or 4)
- Hole punch
- Embroidery floss (rust color) or pre-made tassel
- Scissors and ruler
- Cutting mat (optional)
Step 1: Setting the Foundation
-
Size the paper:
Cut your watercolor paper into a standard bookmark rectangle, approximately 2 inches wide by 7 inches tall. -
Create the hanging point:
Use a hole punch to create a neat circle centered about half an inch from the top edge of the paper. -
Prepare the tape:
If you don’t have specialized graphic tape, stick wide masking tape to a clean cutting mat and slice it into thin strips (about 3mm wide) using a ruler and craft knife.
Clean Lines Hack
If your tape lines aren’t crisp, try painting a thin layer of clear acrylic medium or white gouache over the tape edges first to seal them before adding color.
Step 2: Designing the Grid
-
Start the lattice:
Apply your first strip of tape diagonally across the paper, starting from one side and angling downward. -
Mirror the line:
Place a second strip crossing the first one in the opposite direction, creating a large ‘X’ or diamond shape. -
Build the pattern:
Continue adding diagonal strips parallel to your first lines, spacing them irregularly to create diamonds and triangles of various sizes. -
Subdivide shapes:
Place smaller, shorter pieces of tape inside the larger diamond shapes to break them down into smaller triangles, adding complexity to the design. -
Seal the deal:
Run your fingernail or a bone folder firmly over every piece of tape. This step is crucial to prevent paint from sneaking underneath.
Step 3: Painting the Mosaic
-
Mix your palette:
Prepare your paints on a palette. You want a creamy consistency—not too watery—to keep the colors vibrant. -
Apply the first color:
Start with your yellow or mustard tone. Paint scattered triangles throughout the design, leaving plenty of empty shapes in between. -
Add warmth:
Switch to the rust and terra-cotta shades. Fill in adjacent shapes, being careful not to place two identical colors right next to each other. -
Deepen the contrast:
Use the navy blue paint to fill in the remaining empty shapes. I like to confirm all white spaces are filled before washing my brush. -
Let it dry completely:
Set the bookmark aside until the paper feels cool and dry to the touch. Patience here prevents smudging.
Level Up: Metallic Pop
Swap one of the earth tones for metallic gold watercolor. Paint just three or four scattered triangles with it to catch the light as you turn the page.
Step 4: The Big Reveal
-
Peel the tape:
Slowly peel back the tape strips at a sharp 45-degree angle. This technique helps ensure the paper doesn’t tear. -
Tidy the edges:
If the tape extended past the bookmark edges, use scissors to trim any excess paint or rough paper fuzz from the sides. -
Prepare the tassel:
Cut a bundle of embroidery floss about 4 inches long, fold it in half, and tie a knot near the top to create a tassel head. -
Attach the hardware:
Thread the loop of your tassel through the punched hole, then pull the tassel tail through the loop to secure it tightly.
Slide your new textured masterpiece into your favorite novel and enjoy the pop of color every time you read.
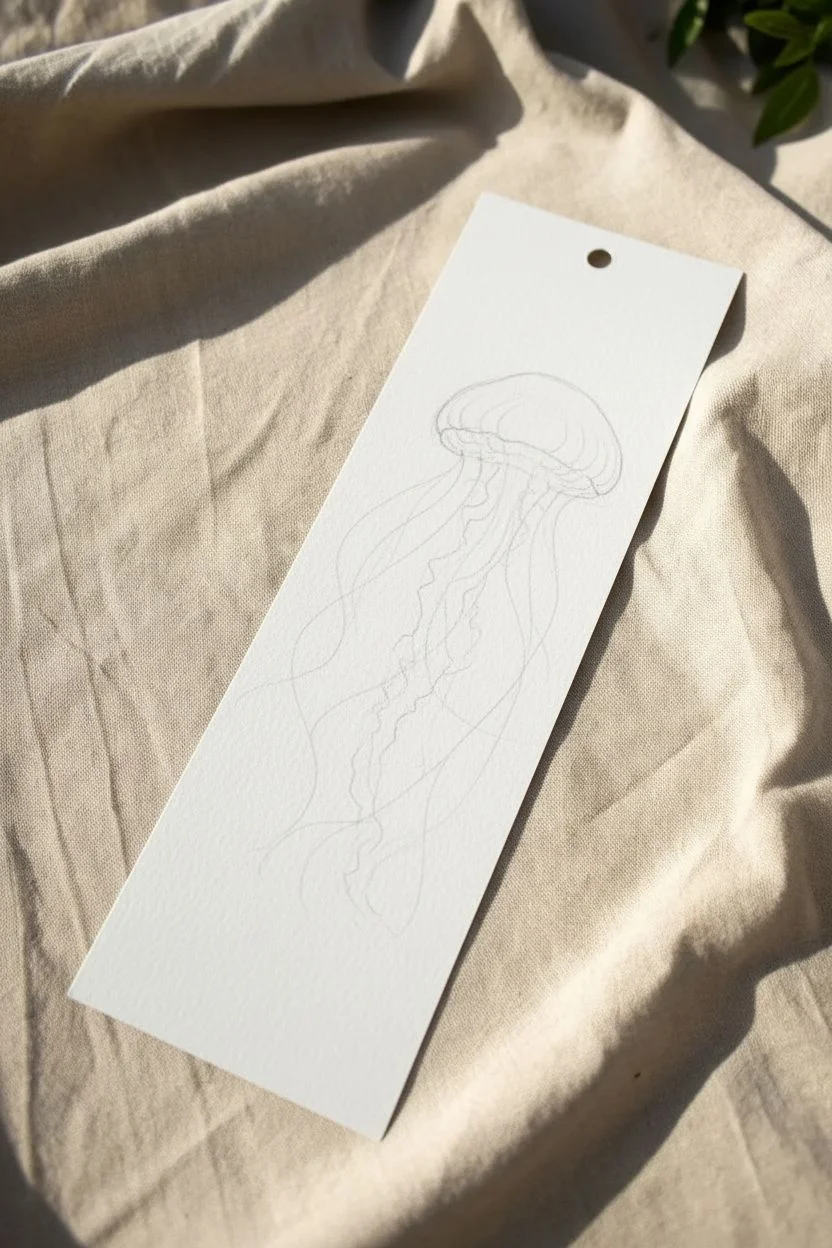
Floating Jellyfish Streamers
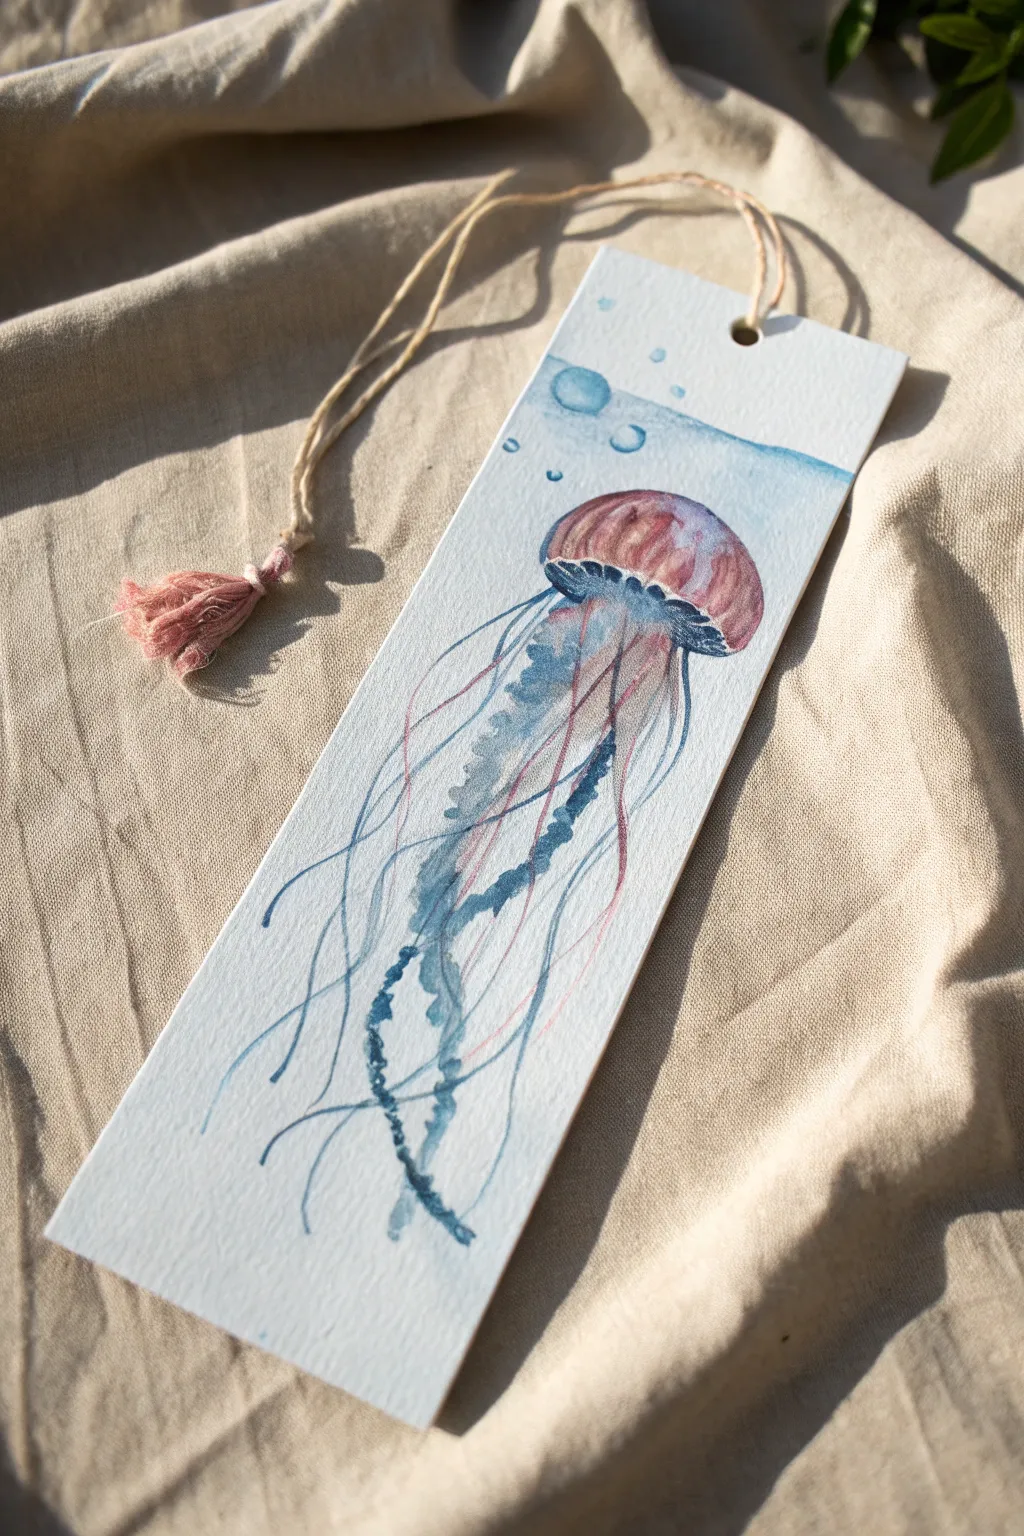
Capture the graceful movement of the ocean with this delicate watercolor bookmark project. You will learn to control wet-on-wet blending to create a translucent jellyfish bell and practice fine brushwork for the flowing tentacles.
Step-by-Step Guide
Materials
- Cold-pressed watercolor paper (300gsm)
- Watercolors (Dusty Rose, Indigo, Ultramarine, Burnt Sienna)
- Round brushes (size 4 for washes, size 0 or 00 for details)
- Pencil (HB) and kneaded eraser
- Hole punch
- Hemp cord or embroidery floss for tassel
- Paper towel
- Jars of water
Step 1: Preparation & Sketching
-
Cut the paper:
Cut your watercolor paper into a standard bookmark rectangle, approximately 2.5 by 7 inches. -
Punch the hole:
Use a hole punch to create the opening for the tassel at the top center. Doing this now ensures you don’t paint important details where the hole will be. -
Sketch the outline:
Lightly sketch a mushroom-cap shape for the jellyfish bell in the upper third of the paper. Keep your pencil pressure very light so the graphite doesn’t show through the transparent paint later. -
Indicate flow:
Draw faint directional lines to guide where the tentacles will flow, curving them slightly to the left to suggest movement.
Bubble Pro Tip
To get perfectly round, ghostly bubbles, wait for the background wash to settle for 30 seconds, then firmly press a clean Q-tip onto the paper to lift the paint.
Step 2: Painting the Background & Bell
-
Paint the water line:
Dilute a small amount of Indigo or light blue with plenty of water. Paint a horizontal, slightly uneven wash across the top area of the bookmark to represent the water surface. -
Create bubbles:
While the background wash is still damp, paint a few small circles with clean water or lift pigment out with a dry brush to create soft, translucent bubbles. -
Wet the bell:
Clean your brush and apply a glaze of clean water inside the jellyfish bell sketch. The paper should be glistening but not forming a puddle. -
Apply the base color:
Load your size 4 brush with a watery mix of Dusty Rose or diluted Burnt Sienna. Touch the tip to the top of the wet bell and let the color bloom downward naturally. -
Add volume:
While the pink is still wet, drop a small amount of diluted Indigo or purple to the sides of the bell to create a 3D rounded effect. -
Lift the highlight:
I like to use a thirsty (clean and dry) brush to lift a little pigment from the top center of the dome, creating a highlight that makes the jellyfish look shiny.
Step 3: Detailing the Tentacles
-
Define the rim:
Once the bell is damp-dry (not soaking), use a stronger mix of Indigo to paint the ruffled bottom edge of the bell with short, jagged strokes. -
Paint the oral arms:
Using a creamy mix of Indigo and Prussian Blue, paint the thick, central tentacles (oral arms). Use a stippling or squiggly motion to give them a frilly, textured appearance. -
Switch brushes:
Change to your smallest brush (size 0 or a liner brush) for the fine tentacles. -
Draw the fine lines:
Mix a watery purple-grey using your pink and blue paints. Paint long, sweeping lines extending from the bell to the bottom of the paper. -
Add color variation:
Paint a second layer of fine hairline tentacles using pink or red oxide to add depth and interest among the blue lines. -
Entangle the lines:
Allow some lines to cross over each other and vary the pressure on your brush—press down for thickness and lift up for whisper-thin ends.
Level Up: Bioluminescence
Mix a tiny amount of metallic silver or pearlescent watercolor into your blue paint for the final tentacles to give the jellyfish a subtle, glowing effect.
Step 4: Finishing Touches
-
Dry completely:
Let the artwork dry completely. Watercolor paper must be bone-dry before you touch it with an eraser. -
Clean up sketch:
Gently erase any visible pencil marks, specifically around the water bubbles and the outer edges of the jellyfish. -
Prepare the tassel:
Cut three strands of embroidery floss or thin hemp cord, roughly 10 inches long. Match the color to the pink of the jellyfish for harmony. -
Attach the tassel:
Fold the strands in half, push the loop through the punched hole, and pull the loose ends through the loop to secure it with a lark’s head knot.
Slide your beautiful new artwork into your current read and enjoy the peaceful vibe it brings to your library.


Have a question or want to share your own experience? I'd love to hear from you in the comments below!