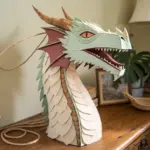
A bowling pin is basically the perfect little 3D canvas—curvy, classic, and begging for color. Here are my favorite bowling pin painting ideas that play up that iconic silhouette, from timeless designs to the kind of “wait, that’s a bowling pin?!” transformations.
Classic Floral Wraparound

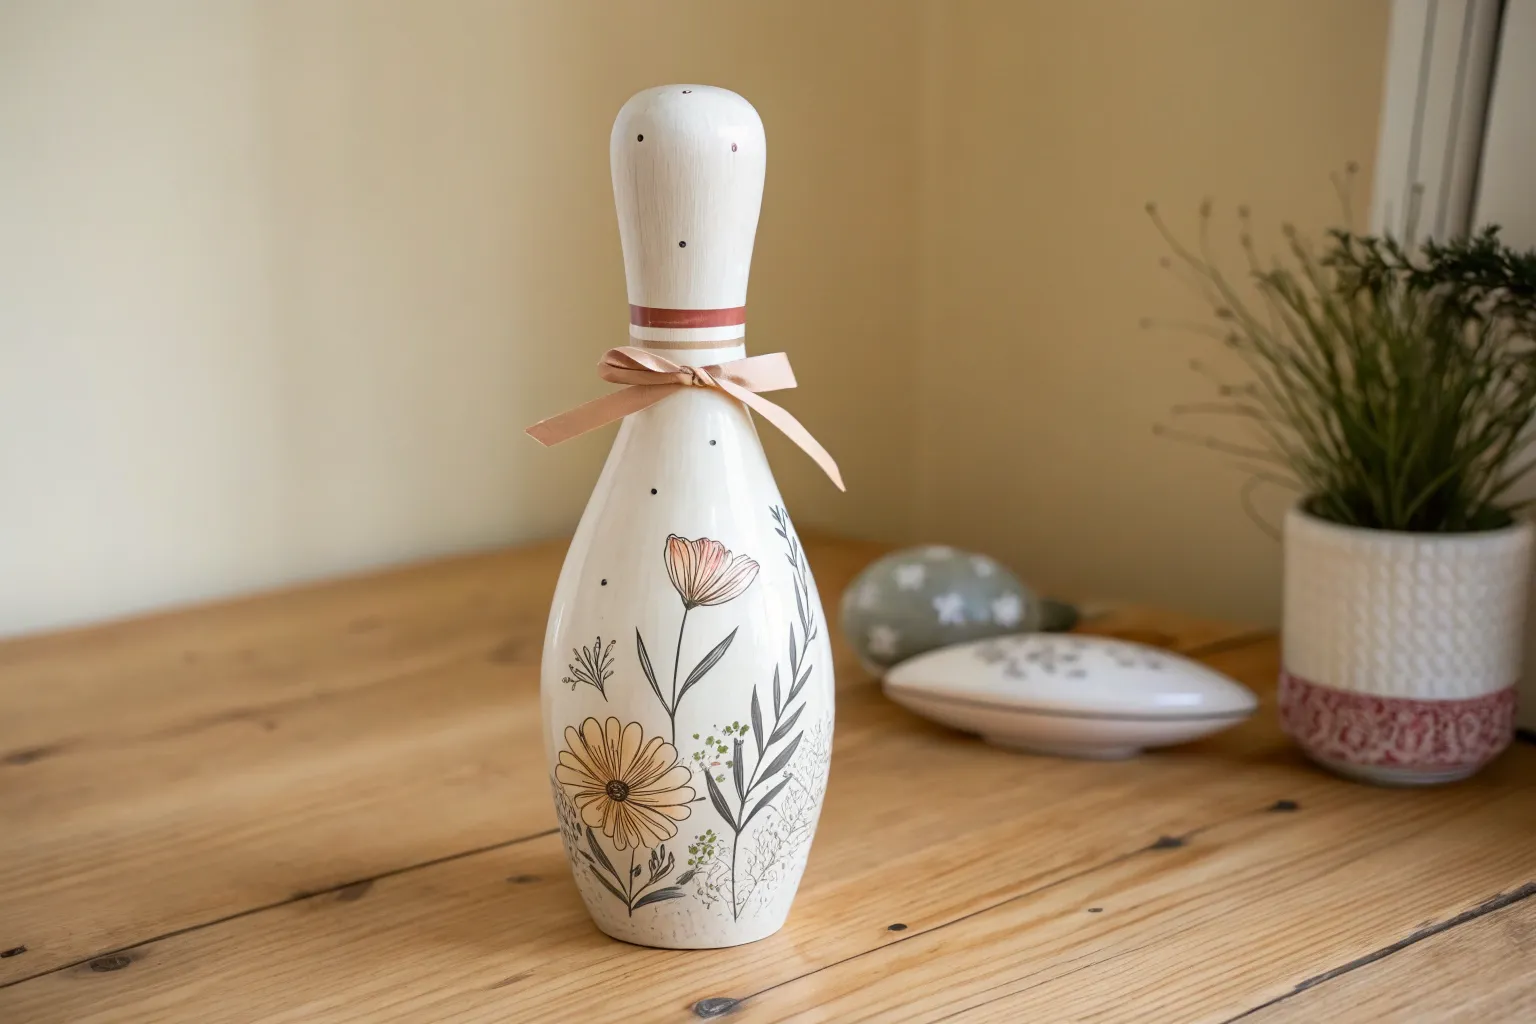
Transform a standard bowling pin into a piece of romantic cottagecore decor with this elegant floral makeover. By combining crisp white paint with detailed botanical imagery, you’ll create a sophisticated vase-like accent perfect for a mantelpiece display.
Detailed Instructions
Materials
- Used bowling pin (cleaned and sanded)
- White acrylic chalk paint
- Red acrylic paint
- Floral rub-on transfers or decoupage paper (pink/red roses)
- Flat synthetic brush (1 inch)
- Small detail brush or liner brush
- Painter’s tape or masking tape
- Sanding sponge (fine grit)
- Matte clear topcoat or varnish
- Soft cloth
Step 1: Preparation & Base Coat
-
Clean the surface:
Begin by thoroughly cleaning the bowling pin with soapy water to remove any lane oil or grime. Dry it completely with a clean towel. -
Scuff sand:
Lightly sand the entire plastic coating of the pin using a fine-grit sanding sponge. This creates a ‘tooth’ for the paint to grip onto, preventing peeling later. -
First coat of white:
Apply the first layer of white chalk paint using a flat synthetic brush. Don’t worry if it looks streaky; thin, even coats are key. -
Dry and repeat:
Allow the first coat to dry for about 30 minutes. Apply a second and possibly third coat until you have a solid, opaque white finish. -
Smooth the finish:
Once fully cured, use your fine sanding sponge to very lightly buff the white paint. This knocks down brush strokes and mimics the texture of ceramic.
Step 2: Adding the Decorative Bands
-
Tape the first line:
Position a strip of painter’s tape horizontally around the neck of the pin. Place a second strip parallel to it, leaving about a 1/4 inch gap for the stripe. -
Paint the red stripe:
Fill in the gap between the tape strips with red acrylic paint. Use a fairly dry brush to prevent paint from bleeding under the tape edges. -
Create the second stripe:
Once the first stripe is dry to the touch, repeat the taping process slightly higher up the neck to create the second, thinner red band. -
Add the dots:
Using a small detail brush or the handle end of a paintbrush, carefully add small white dots inside the red bands for a charming vintage detail.
Curve Control
When applying large floral transfers to the rounded belly, cut small slits in the clear carrier film around the design edges. This allows the flat image to mold over the curve without wrinkling.
Step 3: Applying the Floral Design
-
Plan the composition:
Cut out your rose clusters from the transfer sheet or decoupage paper. Hold them against the pin’s belly to visualize the placement before committing. -
Start with the focal point:
Apply the largest rose cluster to the widest part of the pin. If using a rub-on transfer, press firmly with the provided stick tool; if decoupaging, use a thin layer of medium underneath. -
Working smoothly:
I find it helpful to start rubbing from the center of the image outward to eliminate air bubbles, especially on the curved surface of the pin. -
Build the vine:
Add smaller buds and leaf stems extending upward toward the neck. The design should naturally thin out as it reaches the red stripes. -
Add lower details:
Place a few small leaves or a drooping bud near the bottom to balance the visual weight and ground the design. -
Connect the elements:
If your transfers don’t connect perfectly, use a fine liner brush and green paint mixed to match the leaves to hand-paint thin stems, joining the separate flowers into one cohesive vine. -
Burnish the edges:
Gently rub over the applied designs with a soft cloth to ensure all edges are fully adhered and flush with the painted surface.
Aged Patina
Mix a tiny drop of brown paint with glazing medium and lightly brush it over your finished flowers, wiping off the excess immediately. This settles into crevices for an antique ceramic look.
Step 4: Protection
-
Seal the artwork:
Apply a coat of matte clear varnish over the entire pin. This protects the transfers from scratching and unifies the sheen of the paint and the decals. -
Final cure:
Let the piece dry undisturbed in a dust-free area for at least 24 hours before handling or displaying.
Place your newly decorated pin on a shelf or sideboard to enjoy a touch of vintage floral charm every day

Bold Candy-Stripe Pin
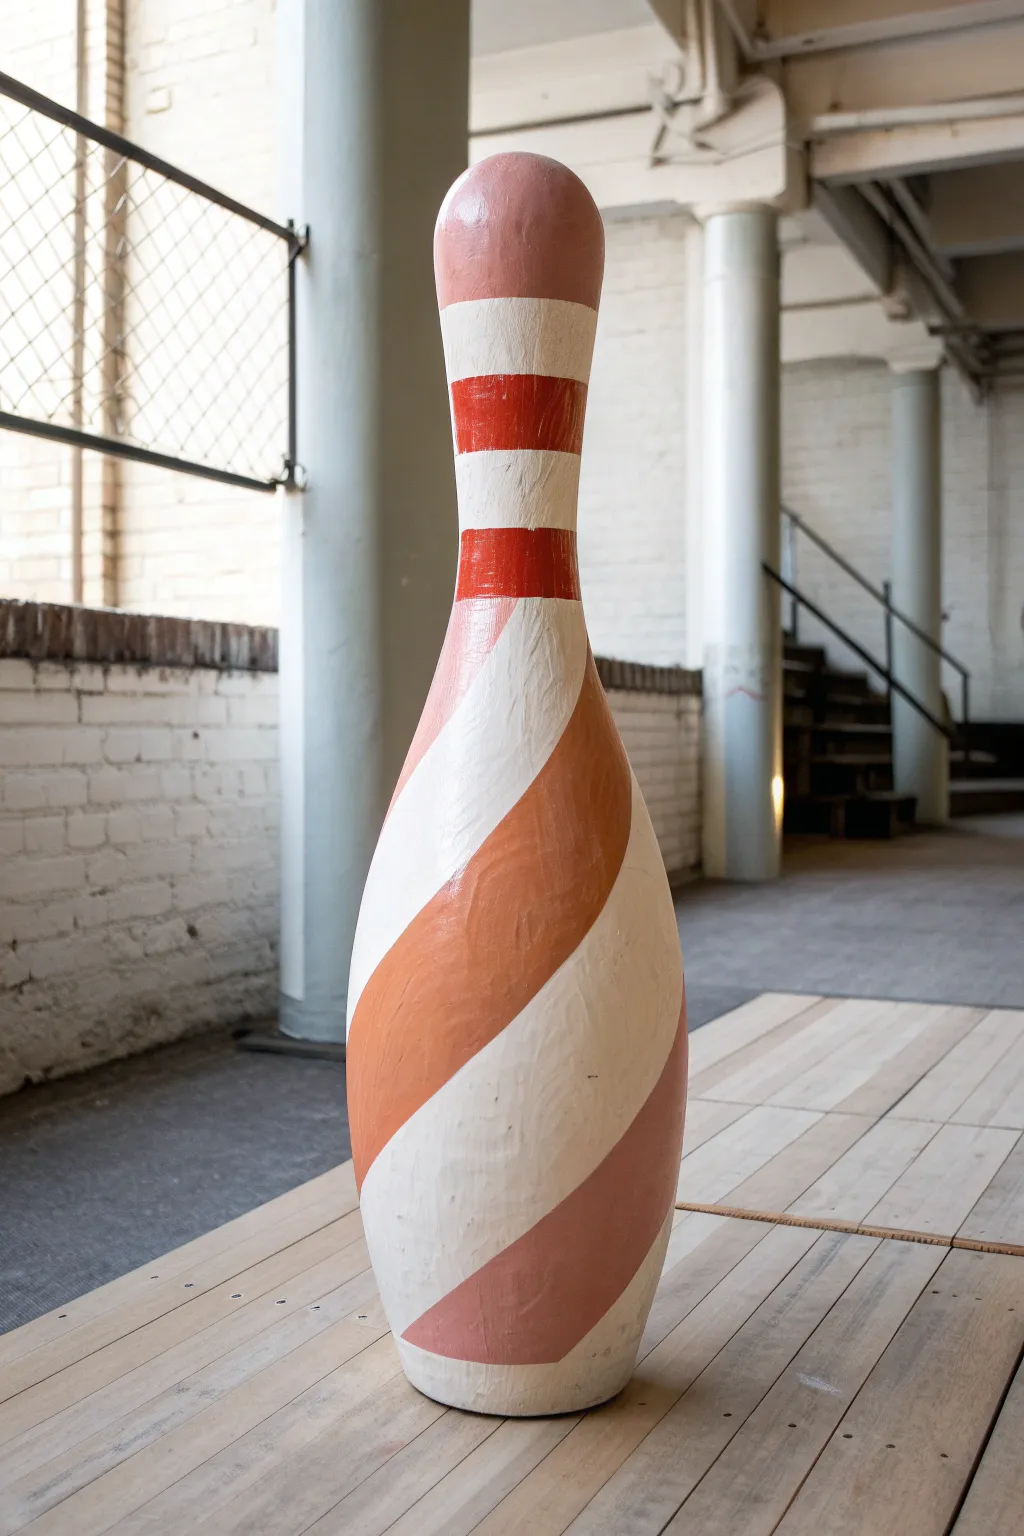
Transform a standard bowling pin into a oversized confection with this delightful candy-striped design. Mixing horizontal bands with sweeping diagonal swirls creates a playful, circus-like aesthetic that serves as a perfect conversation piece.
How-To Guide
Materials
- Regulation or oversized bowling pin (wood or plastic)
- Sandpaper (medium and fine grit)
- Primer (spray or brush-on)
- Acrylic craft paints: Creamy White, Terracotta Orange, Candy Apple Red, Dusty Pink
- Painter’s tape (various widths: 1/2 inch and 1 inch)
- Flexible masking tape (for curves)
- Flat paintbrushes (medium and large)
- Small detail brush
- Matte clear sealer
- Pencil
Step 1: Preparation
-
Clean surface:
Thoroughly clean the bowling pin with soapy water to remove any oils, wax, or lane grime. Let it dry completely. -
Sand the pin:
Scuff the entire surface with medium-grit sandpaper to help the primer adhere. If your pin has a heavy plastic coating, really work to dull that shine. -
Prime:
Apply an even coat of primer over the entire pin. I prefer using a spray primer for this step to ensure a smooth, dripless base. -
Base coat:
Paint the entire pin with two coats of Creamy White acrylic paint, allowing full drying time between layers. This serves as your lightest stripe color.
Clean Lines on Curves
For the cleanest lines on the tricky curved belly, seal your tape edges with a thin layer of the *base* color (white) first. This fills gaps so the orange won’t bleed under.
Step 2: Painting the Neck
-
Paint the knob:
Using the Dusty Pink paint, carefully coat the very top rounded knob of the pin. Use a medium flat brush to get a smooth curve right where the neck starts to widen. -
Mask neck stripes:
Once the base white is 100% dry, apply two rings of painter’s tape around the neck. You want to create two gaps where the red stripes will go. -
Seal tape edges:
Run a fingernail or credit card firmly over the tape edges to prevent paint bleed. -
Paint red bands:
Fill in the exposed neck areas with Candy Apple Red. Apply thin layers to avoid ridges at the tape line. -
Remove tape:
Peel off the tape while the red paint is still slightly tacky to get the cleanest line.
Wrinkled Tape Issues
Standard blue tape wrinkles on the spherical belly. Use dedicated ‘automotive vinyl tape’ or ‘flexible masking tape’ designed for curves to get that perfect spiral.
Step 3: Creating the Swirls
-
Map the spiral:
Lightly sketch your spiral pattern on the fat part of the pin with a pencil. Start from the bottom of the neck and curve downwards and around to the base. -
Tape the curves:
Use flexible masking tape (or cut narrow strips of regular tape) to follow your pencil lines. Mask off the areas that should remain white. -
Apply orange paint:
Paint the exposed spiral sections with the Terracotta Orange. The texture in the photo suggests a slightly thicker, hand-painted look, so don’t worry about being perfectly smooth. -
Second coat:
Add a second coat of orange if the coverage looks streaky. -
Reveal the pattern:
Carefully remove the tape. Check for any ragged edges or bleed-through. -
Touch up:
Use a small detail brush and the Creamy White paint to fix any areas where the orange might have crept under the tape.
Step 4: Finishing and Distressing
-
Light sanding (Optional):
To mimic the slightly weathered look in the original image, very lightly run fine-grit sandpaper over the painted pin once dry. Focus on the transition lines between colors. -
Create texture:
If you want that hand-carved look, you can dab a dry brush with a tiny amount of off-white paint over the colored sections to mute them slightly. -
Seal:
Apply a coat of matte clear sealer to protect your work and unify the finish, eliminating any difference in sheen between paint colors.
Now you have a striking, circus-style decorative piece ready for display on a shelf or floor


Cheerful Polka Dot Pop
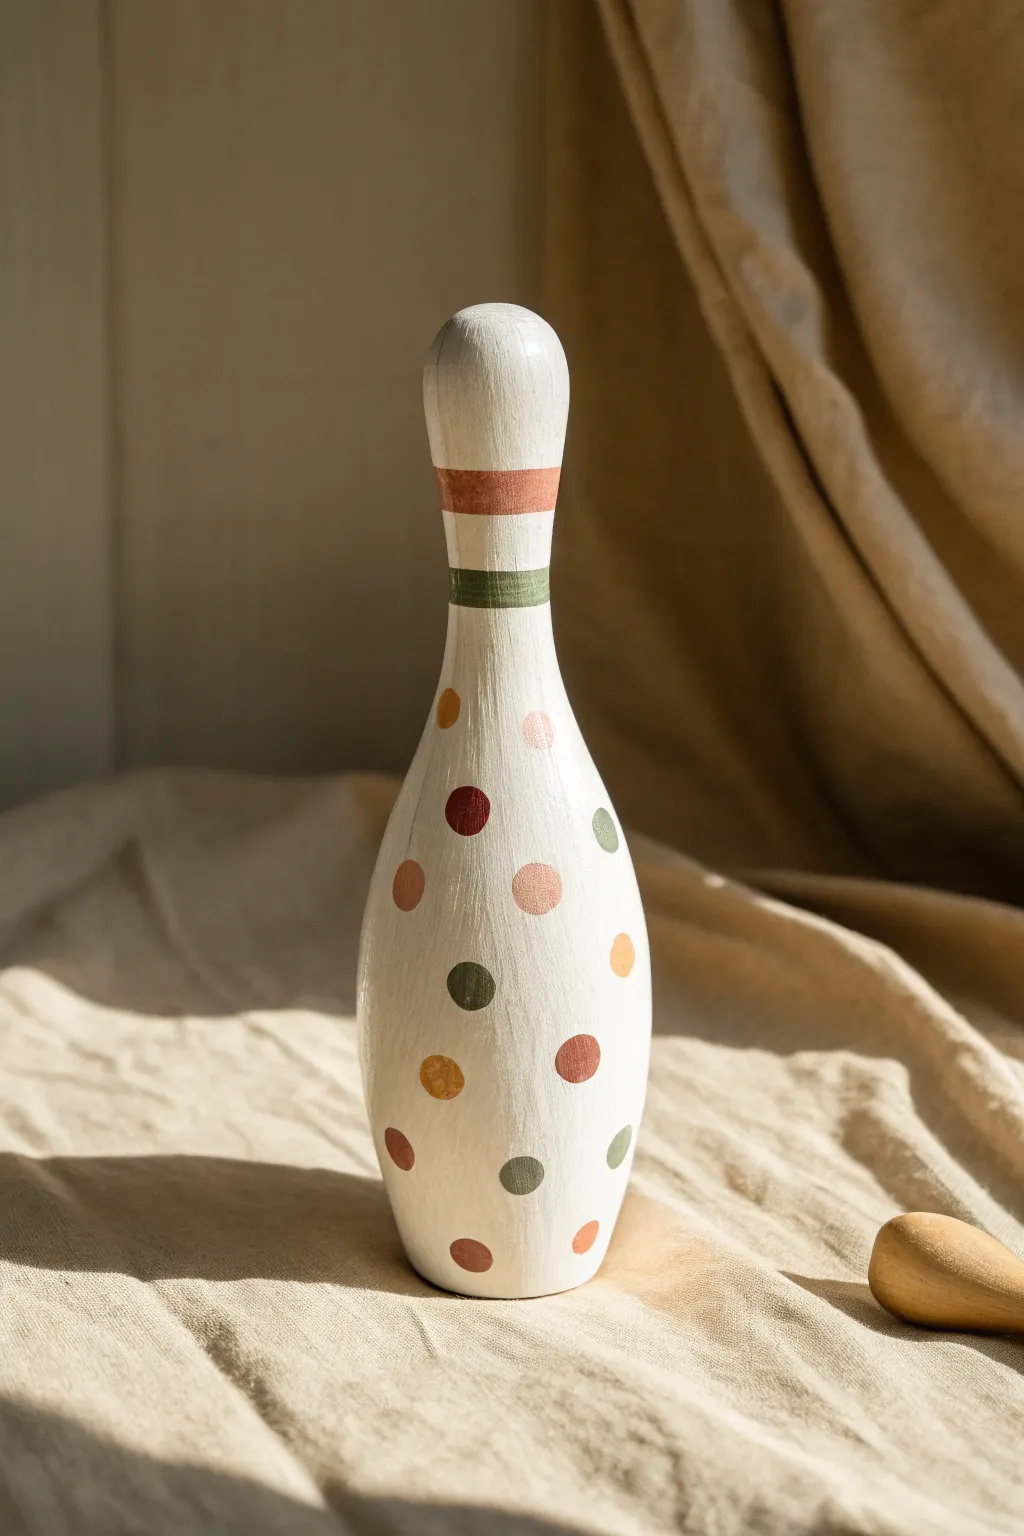
Transform a plain wooden bowling pin into a whimsical decor piece with a playful array of polka dots and earthy stripes. This vintage-inspired look uses a muted color palette to create a charming, subtle pop that fits perfectly on a shelf or as part of a homemade toy set.
Step-by-Step
Materials
- Unfinished wooden bowling pin (approx. 8-10 inches tall)
- Medium-grit sanding sponge
- Microfiber tack cloth
- Off-white or cream matte acrylic paint
- Flat paintbrush (1-inch width)
- Round detail brush (size 4 or 6)
- Fine liner brush (size 1)
- Acrylic paints in muted earth tones: terracotta, sage green, mustard yellow, dusty rose, and burnt sienna
- Small circular foam pouncer (optional, for dots)
- Matte clear sealant spray
Step 1: Preparation & Base Coat
-
Smooth the Surface:
Begin by gently sanding the entire surface of the wooden bowling pin with your medium-grit sanding sponge to remove any rough patches or splinters. -
Clean the Dust:
Wipe away all sawdust using a microfiber tack cloth to ensure your paint adheres smoothly. -
Apply First Base Layer:
Using the 1-inch flat brush, apply a coat of off-white or cream acrylic paint. Paint in long vertical strokes from the neck down to the base for a uniform look. -
Let it Dry:
Allow the first coat to dry completely for about 20 minutes before assessing coverage. -
Add Texture (Optional):
Apply a second coat if needed, but I like to leave it slightly semi-opaque to let a hint of the wood grain show through for a vintage feel.
Clean Circle Trick
If you struggle painting perfect circles, dip the flat end of a pencil or a dedicated dotting tool into the paint and press straight down for instant, crisp polka dots.
Step 2: Painting the Neck Stripes
-
Mix the Stripe Colors:
Prepare your palette with a warm terracotta orange and a muted sage green. -
Paint the Upper Ring:
About an inch below the very top of the pin, paint a horizontal band using the terracotta paint. Aim for a width of roughly half an inch. -
Refine the Edges:
Use your fine liner brush to clean up the edges of the Terracotta ring, keeping the line as straight as possible as you rotate the pin. -
Paint the Lower Ring:
Leave a small gap of white space (about 1/4 inch) below the terracotta ring, then paint a slightly thinner band using the sage green paint. -
Dry the Stripes:
Allow these neck stripes to dry fully to prevent smudging while you handle the body of the pin.
Step 3: Adding the Polka Dots
-
Plan Your Palette:
Dispense small amounts of mustard yellow, burnt sienna, dusty rose, sage green, and dark maroon onto your palette. -
Start the First Color:
Dip your round detail brush (or foam pouncer) into the dark maroon paint. Place random dots around the widest part of the pin’s belly. -
Create Variety:
Switch to dusty rose and add more dots, spacing them out so no two potential colors are clumped together. -
Fill the Gaps:
Continue adding dots with mustard yellow and sage green, working your way up the neck and down to the base. -
Address lower areas:
Be sure to add a few dots near the very bottom edge so the pattern feels continuous. -
Check Balance:
Step back and look at the pin from all angles. If there are large white voids, add a small dot of burnt sienna to balance the composition. -
Let Dots Set:
Let the polka dots dry completely, usually about 30 minutes, handling carefully to avoid smearing wet paint.
Make it a Set
Paint 5 more pins, swapping the main stripe colors (e.g., blue and yellow) but keeping the polka dot palette the same for a cohesive but varied bowling set.
Step 4: Finishing Touches
-
Protect the Art:
In a well-ventilated area, spray a light, even coat of matte clear sealant over the entire pin. -
Final Cure:
Allow the sealant to cure according to the manufacturer’s instructions before displaying or playing.
Once dry, your hand-painted pin is ready to bring a touch of playful charm to your home decor


Soft Ombre Fade
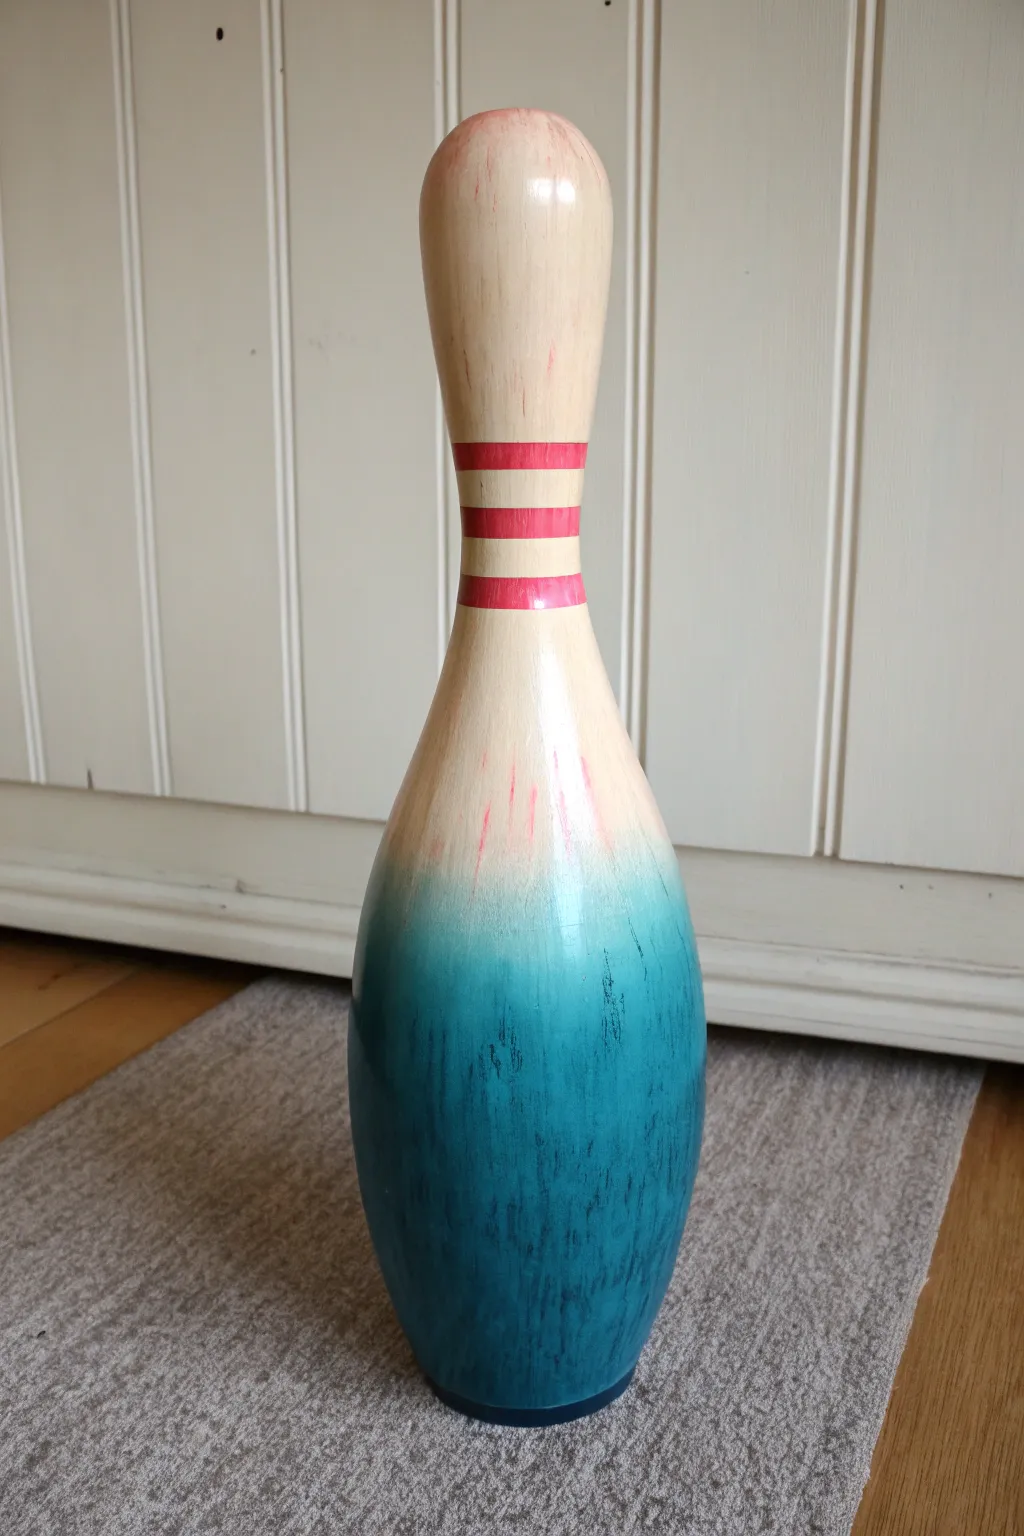
Transform an old wooden bowling pin into a chic piece of decor with this soft ombre effect. By blending deep teal acrylics into the natural wood tone and adding classic red stripes, you’ll create a vintage-inspired accent piece perfect for any shelf.
Step-by-Step Guide
Materials
- Wooden bowling pin (clean and dry)
- Deep teal acrylic paint
- Bright red acrylic paint
- Cream or off-white acrylic paint (optional, for blending)
- Medium flat paintbrush
- Small fine-point paintbrush
- Painter’s tape or washi tape
- Dry rag or paper towels
- Fine-grit sandpaper (optional)
- Matte clear sealant spray
Step 1: Preparation & Base
-
Clean surface:
Begin by wiping down your bowling pin with a damp cloth to remove any dust, oils, or grime. If the pin has a very glossy existing finish, you might want to scuff it lightly with fine-grit sandpaper to help the new paint adhere better. -
Assess natural tone:
Look at the natural color of the wood. Since the top half remains unpainted (or very lightly washed), decide if you want to keep the raw wood look or apply a very sheer wash of cream paint to even out the tone before starting the color.
Step 2: Creating the Ombre Fade
-
Apply base teal:
Dip your medium flat brush into the deep teal paint. Start painting from the very bottom of the pin, applying a solid coat up to about the widest part of the belly. -
Start the transition:
Once the bottom creates a solid base, do not reload your brush. Instead, use the remaining paint on the bristles to drag the color upward. -
Dry brushing technique:
As you move higher up the pin’s belly, use lighter pressure. You want the brush strokes to look ‘scratchy’ here, allowing the wood grain or base color to peek through the teal. -
Feathering the edge:
When you reach the midway point where you want the color to fade out completely, use a very dry brush. Rapid, light upward flicks work best here to create that uneven, distressed edge seen in the photo. -
Optional softening:
If the line looks too harsh, I like to take a tiny bit of cream paint (or water) on a rag and gently dab the transition line to smudge the teal into the wood tone. -
Layering for depth:
Let the first layer dry for about 10 minutes. Go back to the very bottom and add a second coat of teal just at the base to ensure it looks richest and darkest there, reinforcing the gradient effect.
Struggling with the fade?
If your gradient looks too blocky, dampen a sponge slightly and dab the border where paint meets wood to soften the transition.
Step 3: Adding the Stripes
-
Position tape:
Once the bottom is fully dry, move to the neck. Apply three rings of painter’s tape around the neck. Space them evenly to create gaps where the red stripes will go. -
Check spacing:
Step back and look at the tape. The gaps between the tape should be consistent in width. Adjust as needed before painting. -
Seal tape edges:
Press the edges of the tape down firmly with your fingernail to prevent the red paint from bleeding underneath. -
Paint stripes:
Using your small brush and bright red paint, fill in the exposed wood between the tape rings. Use a minimal amount of paint to keep the look slightly vintage and not too glossy. -
Remove tape:
Carefully peel off the tape while the red paint is still slightly wet. This helps prevent the paint from chipping or peeling off with the adhesive. -
Touch ups:
If any red paint bled, use a damp Q-tip immediately to wipe it away, or gently scrape it off with a craft knife once dry.
Use rubber bands
For the neck stripes, use rubber bands instead of tape. They naturally grip the curve and create distinct, straight lines easily.
Step 4: Finishing Touches
-
Distress (Optional):
For a more weathered look, lightly sand the red stripes or the thickest part of the teal paint with fine-grit sandpaper to reveal a bit more wood. -
Seal the project:
Take the pin to a well-ventilated area. Spray the entire piece with a matte clear sealant. This protects the ombre effect and keeps the paint from chipping over time. -
Final dry:
Allow the sealant to cure for at least 24 hours before placing the pin on a shelf or using it for display.
Place your newly painted pin on a mantle or bookshelf for a pop of personalized color
BRUSH GUIDE
The Right Brush for Every Stroke
From clean lines to bold texture — master brush choice, stroke control, and essential techniques.
Explore the Full Guide
Modern Color-Block Minimal
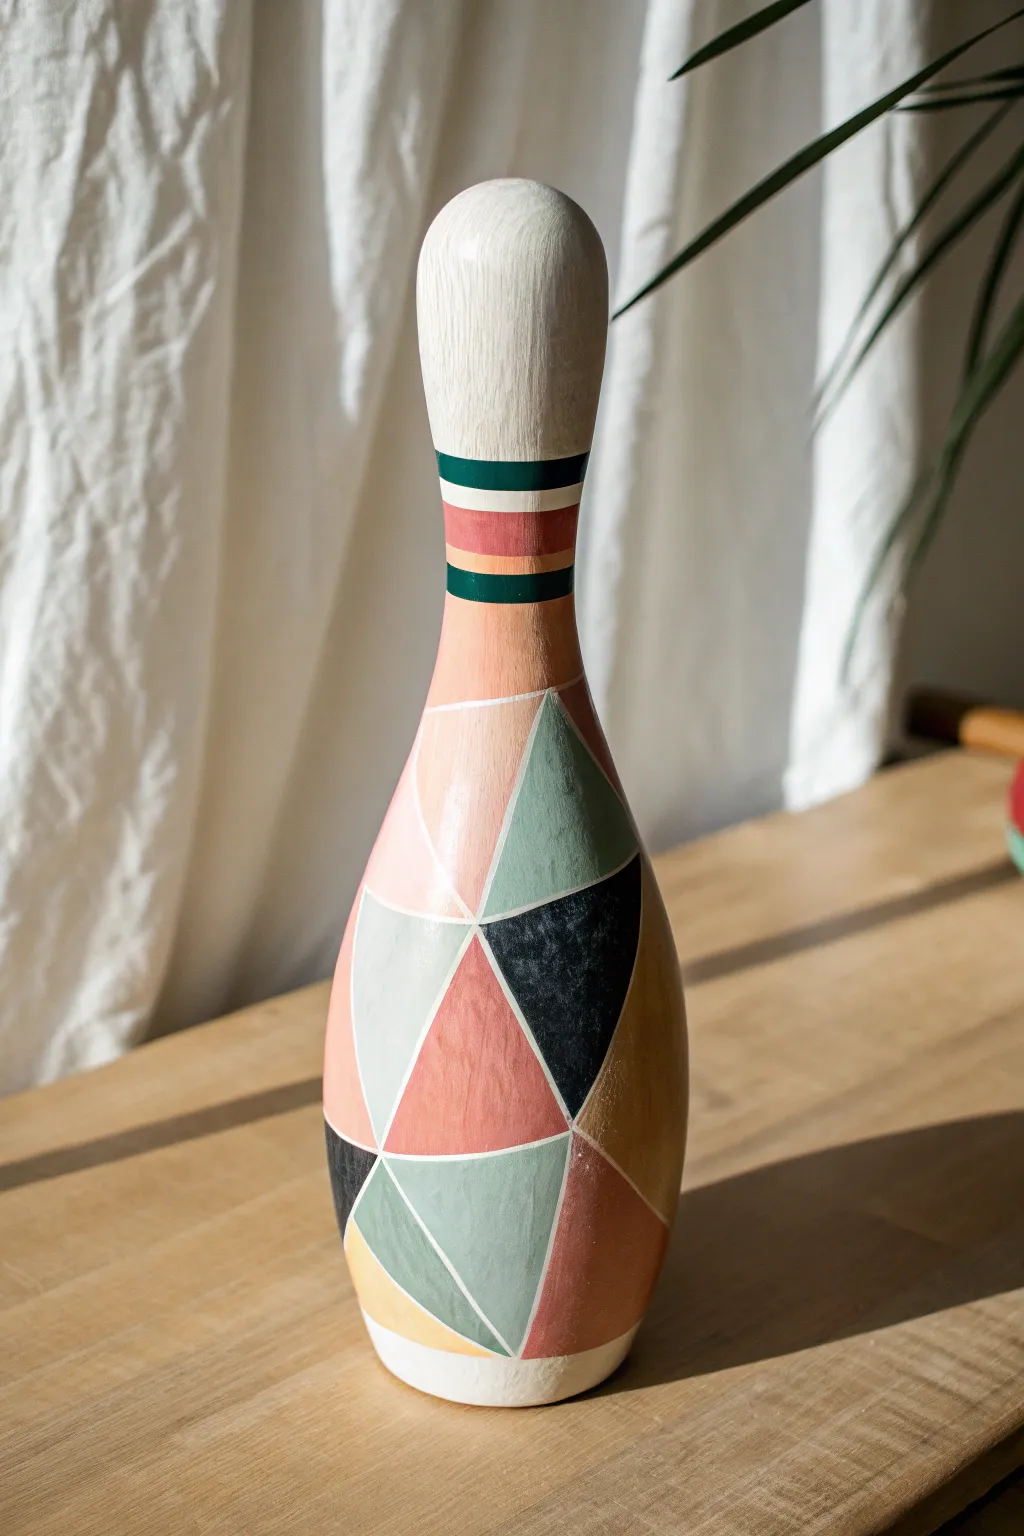
Transform a retired bowling pin into a piece of modern art with this sophisticated geometric design. Featuring a palette of sage green, terra cotta, blush pink, and bold black triangles, the look is balanced by crisp white lines and a minimalist striped neck.
Detailed Instructions
Materials
- Used or new wooden bowling pin
- Sandpaper (120 and 220 grit)
- White acrylic craft paint (base coat and lines)
- Acrylic paints: Sage green, Terra cotta/rust, Blush pink, Black, Mustard yellow
- High-quality painter’s tape (various widths if available)
- Detail liner brush (size 0 or 00)
- Flat shader brush (size 4 or 6)
- Pencil
- Ruler or flexible measuring tape
- Matte spray sealant
Step 1: Preparation & Base Coat
-
Clean the surface:
Start by thoroughly cleaning your bowling pin with warm soapy water to remove any lane oil or grime. Dry it completely with a lint-free cloth. -
Sand the finish:
Using 120-grit sandpaper, scuff the entire surface of the pin to remove the original glossy coating. Follow up with 220-grit to smooth it out, creating a perfect tooth for the paint to grab. -
Wipe away dust:
Use a slightly damp cloth or tack cloth to remove every speck of sanding dust before you open your paint. -
Apply the white base:
Paint the entire pin with white acrylic paint. You will likely need two to three thin coats to get solid, opaque coverage. Let each coat dry fully before adding the next.
Step 2: Designing the Geometry
-
Sketch the neck stripes:
Lightly mark the neck area where the stripes will go. Position the main stripe block at the narrowest part of the neck. -
Draw the triangles:
Using a pencil and a flexible ruler, sketch your geometric pattern on the body. Start with a large central intersection point and radiate lines outward to form various sized triangles. -
Plan your colors:
Mark each triangle lightly with a letter (e.g., ‘G’ for green, ‘B’ for black) so you don’t lose track of your color balance while painting.
Use Tape for Lines
For the straight white lines between triangles, apply thin graphic art tape (1/8 inch) BEFORE painting colors. Peel it off at the end to reveal the white base underneath.
Step 3: Painting the Colors
-
Paint the sage sections:
Starting with your sage green, fill in the designated triangles. Use a flat shader brush for the centers and careful strokes near the edges. Don’t worry about perfect lines yet; the white outlines come later. -
Add terra cotta tones:
Next, paint the terra cotta or rust-colored sections. I find applying two thin coats gives a much richer finish than one thick gloop. -
Apply blush pink:
Fill in the large connecting shapes with blush pink. This soft color acts as a great bridge between the darker earth grid tones. -
Insert black accents:
Paint the sharp black triangles. Be extra steady here, as black is unforgiving if it drips. These dark shapes anchor the design visually. -
Finish small details:
Add the small mustard yellow accents near the bottom or wherever your pattern calls for a pop of brightness. -
Paint the neck stripes:
Carefully paint the neck bands. Use a dark teal or green for the top and bottom stripes, and a terra cotta band in the middle. You can use tape here for crispness, or freehand it for an organic look.
Metallic Upgrade
Swap the white separation lines for gold leaf paint or a metallic copper pen. The metallic sheen adds a luxe, high-end feel against the matte pastel colors.
Step 4: Refining & Sealing
-
Create the white lines:
Once all color blocks are dry, use your fine liner brush and white paint to go over the lines between the shapes. This separates the colors and creates the ‘stained glass’ effect. -
Touch up edges:
Check the very bottom edge and the top of the pin head to ensure the white base coat is still clean and bright. Touch up if necessary. -
Let it cure:
Allow the pin to dry overnight. Acrylics dry to the touch quickly but take longer to fully harden. -
Seal the project:
Finish by shielding your work with a clear matte spray sealant. Hold the can 10-12 inches away and apply light, even mists to avoid drips.
Place your finished geometric sculpture on a bookshelf or side table to enjoy its modern flair
Rustic Whitewash and Greenery

Transform an old bowling pin into a charming piece of farmhouse decor with this rustic whitewash technique. The distressed finish and delicate hand-painted greenery create a soft, welcoming accent perfect for a mantel or dining table centerpiece.
Step-by-Step
Materials
- Used bowling pin (wooden or synthetic)
- Sandpaper (120 and 220 grit)
- White or cream chalk paint
- Dark brown acrylic paint (for base/stripes)
- Deep green acrylic paint (for stripes/leaves)
- Sage or olive green acrylic paint (for leaves)
- Assorted brushes: 2-inch flat brush, fine liner brush, small flat brush
- Painter’s tape (optional)
- Clean rag or paper towels
- Matte clear sealant spray
Step 1: Preparation & Base Coat
-
Clean the surface:
Start by thoroughly cleaning your bowling pin to remove any old wax, oil, or lane debris. Warm soapy water usually does the trick, but let it dry completely before moving on. -
Sand for texture:
Scuff sand the entire surface with 120-grit sandpaper. This is crucial for adhesion, especially if the pin has a glossy factory finish. Wipe away the dust with a damp cloth. -
Apply the dark undercoat:
Instead of priming white, paint a thin, patchy layer of dark brown acrylic paint over the wood. This doesn’t need to be perfect; it will peek through later to mimic aged wood underneath the white paint. -
Dry completely:
Let this dark layer dry fully. If you rush this step, the brown will mix with your white topcoat and create a muddy gray, which we want to avoid.
Paint Slipping?
If paint beads up on plastic pins, wipe the surface with rubbing alcohol before priming to remove invisible oily residues.
Step 2: Creating the Whitewash Finish
-
Apply chalk paint:
Using a 2-inch flat brush, apply a coat of white or cream chalk paint. Use long, vertical strokes from the top of the neck down to the base. -
Distress while wet:
Before the paint dries completely, take a slightly damp rag and gently wipe away small sections of the white paint, revealing the dark brown undercoat or wood grain. -
Dry brush texture:
Dip your dry brush lightly into the white paint, dab most of it off on a paper towel, and drag it over the wiped areas to create a scratchy, worn texture. -
Sand for aging:
Once the white coat is bone dry, use 220-grit sandpaper to sand the edges and curves. Focus on the ‘shoulders’ of the pin where natural wear would occur.
Make it Ancient
Mix a tiny amount of water and brown paint, then flick it off a toothbrush onto the pin for a speckled, fly-speck antique effect.
Step 3: Adding Decorative Details
-
Paint the neck stripes:
Locate the neck area where the pin naturally narrows. Paint two horizontal bands: the top one in a rusty red or maroon, and slightly below it, a band of deep green. -
Distress the stripes:
I like to let these stripes dry for just a few minutes, then lightly scuff them with sandpaper to ensure they match the weathered look of the body. -
Sketch the greenery:
Lightly sketch your botanical design with a pencil. Plan for three distinct stems rising from the base, crossing slightly for a natural arrangement. -
Paint the stems:
Using a fine liner brush and thinned dark green paint, create very thin, wispy lines for the main stems. Keep your hand loose to avoid stiff, straight lines. -
Add dark leaves:
Paint small, elongated oat-shaped leaves along the first stem using the dark green. Vary the pressure on your brush to make the leaves taper at the ends. -
Layer lighter leaves:
Switch to your sage or olive green paint for the other stems. This color variation adds depth and prevents the artwork from looking flat. -
Add final details:
For a bit of visual interest, add tiny dots or feather-like strokes to the tips of the greenery to suggest buds or fern textures. -
Seal the project:
Finish by spray-painting the entire pin with a matte clear sealant. This protects your handiwork and preserves that chalky, rustic texture without adding unwanted shine.
This simple botanical update gives new life to an old game piece and adds a lovely vintage touch to your home

PENCIL GUIDE
Understanding Pencil Grades from H to B
From first sketch to finished drawing — learn pencil grades, line control, and shading techniques.
Explore the Full Guide
Ladybug Pin Character
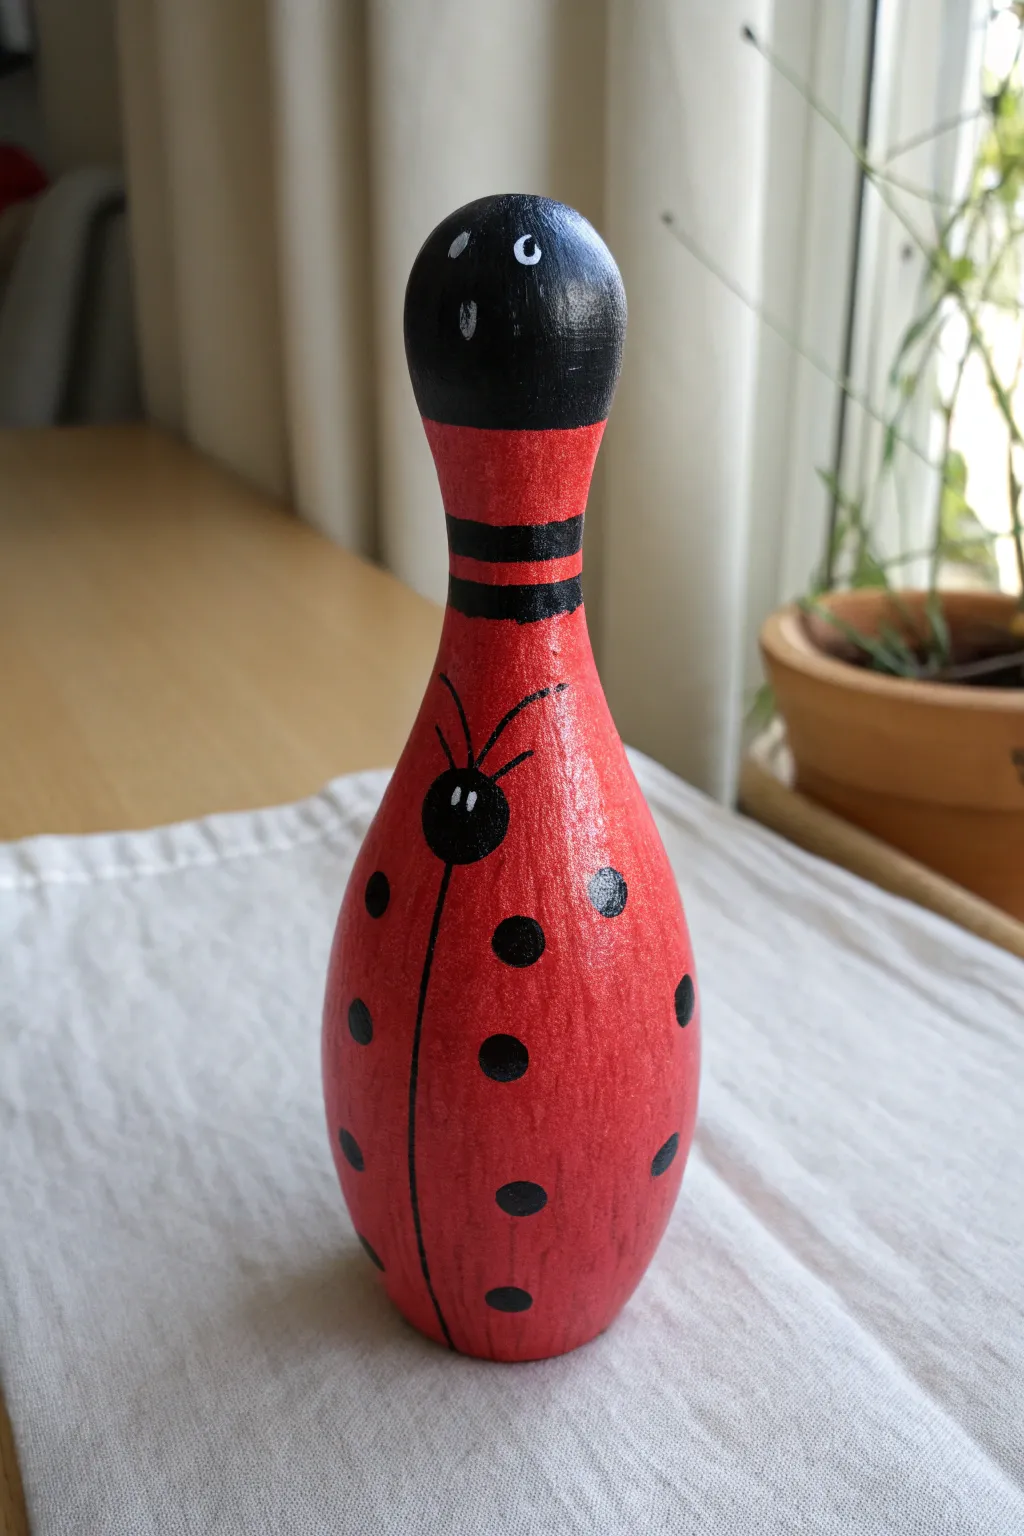
Transform a plain wooden bowling pin into a charming garden friend with this vibrant ladybug design. This simple yet striking project uses bold reds and blacks to create a character that looks great on a shelf or as part of a homemade lawn bowling set.
How-To Guide
Materials
- Wooden bowling pin (standard or mini size)
- Sandpaper (medium grit)
- Red acrylic paint (bright scarlet or primary red)
- Black acrylic paint
- White acrylic paint
- Medium flat brush
- Small round brush or detail brush
- Pencil
- Sealer or varnish (optional but recommended)
Step 1: Base Preparation
-
Clean and sand:
Begin by ensuring your bowling pin is clean and free of old dirt or grease. Give the entire surface a light sanding with medium-grit sandpaper to help the paint adhere better, then wipe away the dust with a damp cloth. -
Prime the surface:
If your pin is raw wood or dark-colored, apply a coat of white primer or white acrylic paint to create a neutral base. This ensures your red will pop later.
Pro Tip: Perfect Circles
Struggling to paint perfect spots? Use the flat end of a pencil eraser or a foam pouncer dipped in paint. Press straight down and lift up for a crisp, round dot every time.
Step 2: Applying the Main Colors
-
Define the head:
Visualize a line around the neck of the pin, just below the rounded top knob. Using your medium flat brush, paint everything above this line with solid black paint to create the ladybug’s main head shape. -
Paint the body red:
Paint the rest of the pin—from the neck line down to the bottom—with your bright red acrylic paint. Apply the paint in long, smooth vertical strokes to minimize brush marks. -
Apply a second coat:
Red paint can sometimes be translucent. Once the first layer is dry to the touch, apply a second coat of red to get a rich, opaque finish. Let this dry completely before moving on. -
Mock up the design:
Using a pencil very lightly, sketch the placement of the neck stripes, the central wing line, and the smaller ladybug face on the body.
Step 3: Adding the Details
-
Paint the neck stripes:
Switch to a smaller brush. Paint two thick black horizontal bands around the neck of the pin, directly over the red paint. These act as a decorative collar for your character. -
Create the mini ladybug face:
About a third of the way down the wide part of the body, paint a solid black circle about the size of a quarter. This will be the head of the painted ladybug illustration. -
Draw the antennae:
Using your finest detail brush and black paint (or a black paint marker for easier control), draw two thin, curved lines extending upward from that black circle. -
Paint the dividing line:
Starting from the bottom of the black circle you just painted, draw a single black line curving down the center of the pin’s belly all the way to the base. This represents the separation of the wings. -
Add the spots:
Dip a round brush or a cotton swab into black paint to create the classic polka dots. Place 6-8 spots randomly on either side of the central dividing line. -
Detail the main eyes:
Return to the very top (the large black head). Using a small brush or a dotting tool, add two crooked white ovals for eyes, giving the pin a goofy expression. I like to make one pupil slightly larger than the other for character. -
Detail the mini eyes:
Now add two tiny white dots inside the black circle on the body (the mini ladybug’s head) to give it eyes as well. -
Add pupils:
Once the white eye spots are dry, add tiny black dots for pupils on the top head. Then add vertical black slits to the mini ladybug’s eyes for a cute cartoon effect. -
Final touches:
Check for any uneven edges, especially where the red meets the black neck stripes, and touch them up with the appropriate color. -
Seal the project:
Once all paint is completely dry (wait at least an hour), apply a clear coat of acrylic sealer or varnish to protect your artwork from chipping.
Level Up: 3D Elements
Glue on plastic googly eyes instead of painting them for a fun shaker effect, or attach pipe cleaners to the top of the pin with strong glue to create wiggly 3D antennae.
Set up your finished pin with nine others for a themed game, or let it stand alone as a cheerful doorstop
Penguin in a Scarf
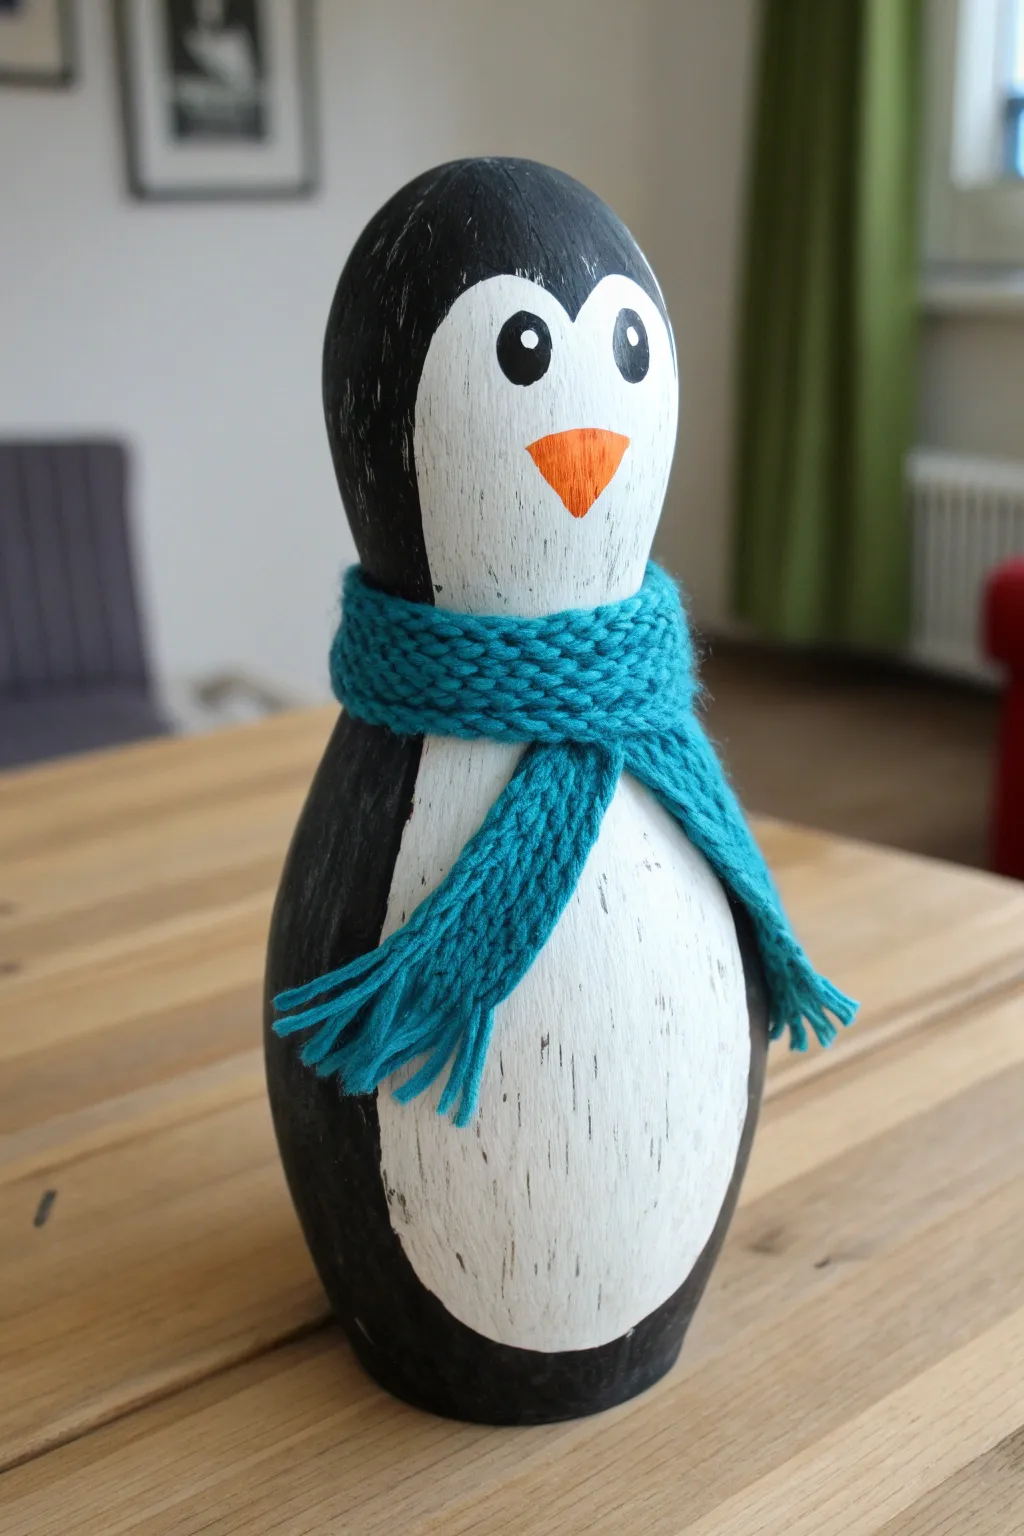
Transform a retired bowling pin into a chilly weather companion with this adorable penguin project. With a distressed finish and a cozy, miniature knitted scarf, this craft adds a touch of whimsical winter charm to any shelf.
Step-by-Step Tutorial
Materials
- Used wooden or plastic bowling pin
- Sandpaper (medium to fine grit)
- White acrylic paint (priming and top coat)
- Black acrylic paint
- Orange acrylic paint
- Medium flat paintbrush
- Small round detail brush
- Pencil
- Blue yarn (worsted weight)
- Knitting needles (appropriate size for yarn) or a small strip of blue felt
- Clear matte sealer spray
Step 1: Preparation and Base Coat
-
Clean and prep:
Start by thoroughly cleaning your bowling pin to remove any oil or lane wax. If the pin has a glossy plastic coating, scuff it all over with sandpaper so the paint adheres properly. -
Prime the surface:
Apply a base coat of white acrylic paint over the entire pin. Allow this layer to dry completely. -
Sketch the design:
Using a pencil, lightly draw the outline of the penguin’s white belly and face area. The shape should look like a large oval on the bottom connected to a heart-shaped face mask at the top. -
Define the beak:
In the center of the face area, sketch a small, inverted triangle for the beak.
Paint won’t stick?
Bowling pins have a tough coating. If paint peels, use a coarse 60-grit sandpaper to really roughen the surface, then apply a specific bonding primer before painting.
Step 2: Painting the Body
-
Apply the black coat:
Using your medium flat brush, paint the entire area outside of your pencil lines black. I find it helpful to outline the white shape carefully first, then fill in the rest of the back and sides. -
Create texture:
Let the black paint dry slightly but not fully. Then, drag a dry brush lightly over the edges where black meets white to create a feathery, rustic texture rather than a sharp, hard line. -
Second white coat:
Paint the belly and face area inside your lines with a second coat of white paint. Use vertical strokes to mimic the look of feathers or fur. -
Add distressing (optional):
For that rustic look seen in the photo, allow some of the underlying wood or brush strokes to show through, or lightly sand the painted surface once it is dry.
Winter Texture
Mix a tiny pinch of baking soda into your white paint for the belly. This creates a fluffy, snow-like texture that makes the penguin look even more realistic and tactile.
Step 3: Facial Details
-
Paint the eyes:
Using the small round brush and black paint, create two solid black circles near the top of the white face area. -
Add the beak:
Fill in the triangle beak shape with bright orange acrylic paint. You may need two coats here to cover the white background completely. -
Add the catchlights:
Once the black eye paint is totally dry, use the tip of a small brush or a toothpick to place a tiny white dot in the upper corner of each eye. This brings the character to life. -
Seal the paint:
After all paint is fully cured, spray the entire pin with a clear matte sealer to protect the finish.
Step 4: The Scarf Accessory
-
Knit the scarf:
Cast on about 6 to 8 stitches with your blue yarn and knit a simple garter stitch strip until it is long enough to wrap around the pin’s neck with some overhang. -
Alternative: The cheat method:
If you don’t knit, you can cut a long strip of blue felt or cut a section from an old sweater sleeve to achieve a similar look. -
Make the fringe:
Cut short lengths of yarn and loop them through the ends of your knitted rectangle to create a fringe. -
Dress the penguin:
Wrap the scarf snugly around the neck of the pin (the narrowest part). Tie it in a simple overhand knot so one end drapes over the belly. -
Secure the fabric:
Adjust the scarf so it sits nicely. If needed, you can use a small dab of hot glue behind the knot to keep it from slipping down the slope of the pin.
Now you have a charming winter friend ready to waddle onto your mantle


Snowman With Cozy Details
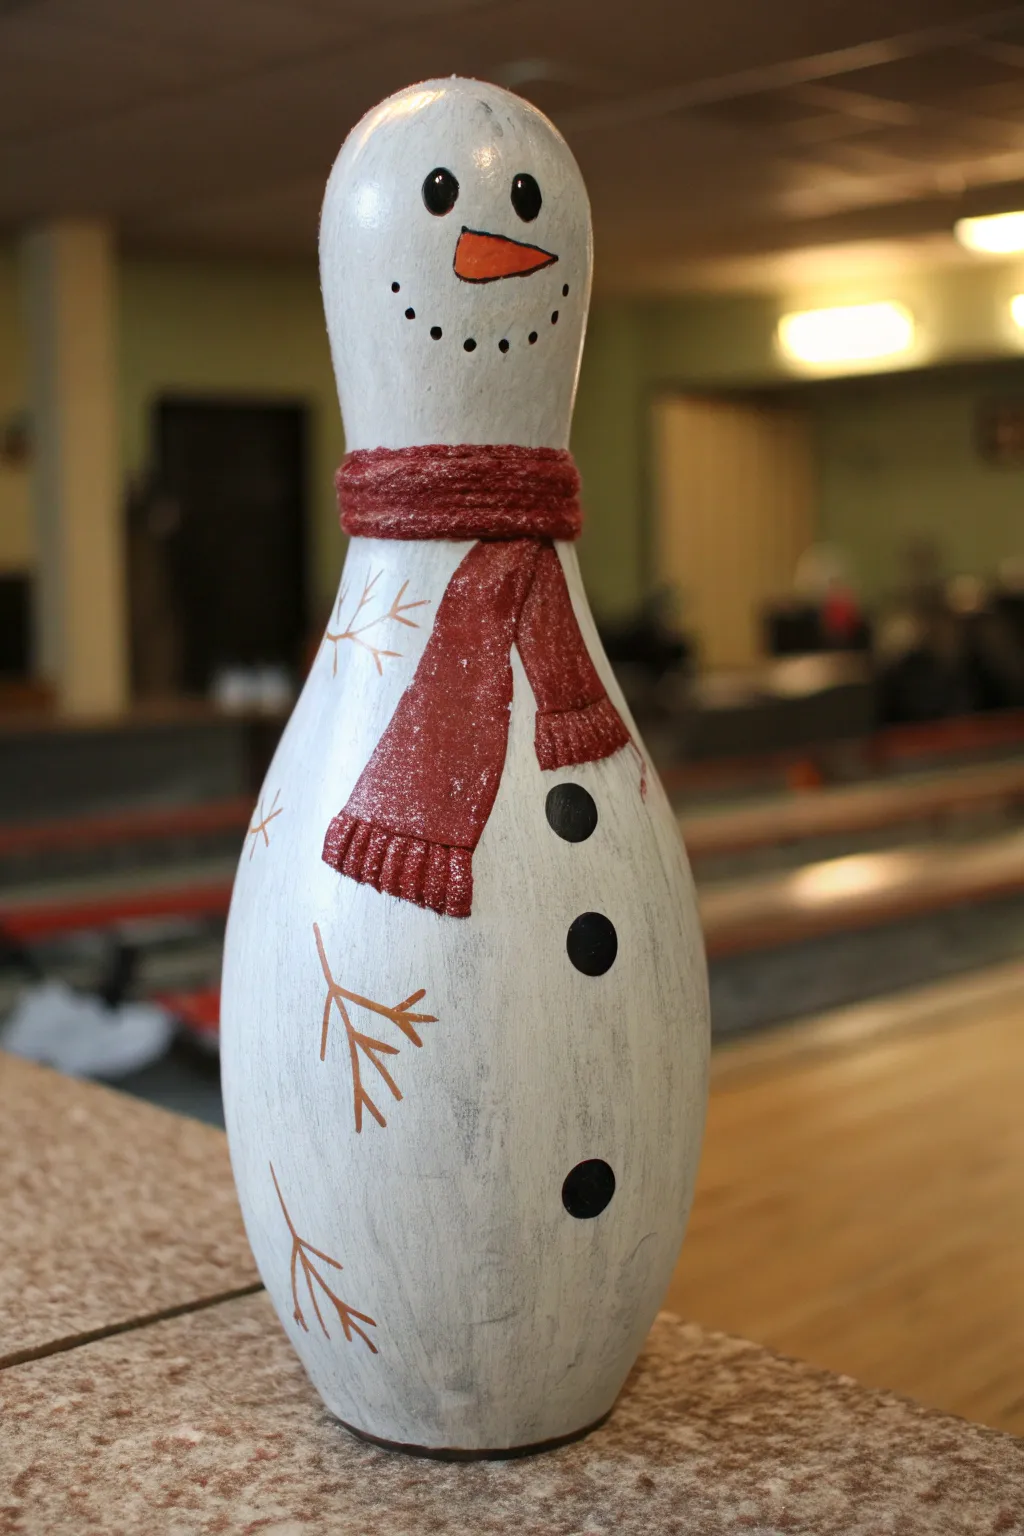
Transform an old, retired bowling pin into a charming winter decoration with a weathered finish and cozy hand-painted details. This friendly snowman features a textured red scarf and delicate stick arms, bringing warmth to your holiday displays.
How-To Guide
Materials
- Used bowling pin (cleaned and prepped)
- Sandpaper (medium grit)
- White acrylic paint
- Burnt umber or dark brown acrylic paint
- Orange acrylic paint
- Black acrylic paint
- Christmas red acrylic paint
- Glitter glue or fine iridescent glitter
- Foam brushes
- Small detail brushes (liner brush)
- Medium flat brush
- Matte spray sealer
- Pencil
Step 1: Prepping and Base Coating
-
Clean and sand:
Begin by thoroughly cleaning the bowling pin to remove any oil or lane wax. Once dry, scuff the entire surface with medium-grit sandpaper to help the paint adhere. -
Apply the white base:
Using a foam brush, paint the entire bowling pin with white acrylic paint. You will likely need two to three coats for full, opaque coverage, letting each layer dry completely in between. -
Create a weathered look:
Once the white base is bone dry, lightly dry-brush some grey or diluted wash of black paint vertically over the pin to give it that grainy, wooden texture visible in the photo. -
Distress the surface:
Take a piece of sandpaper and gently distress the white paint in random areas to reveal hints of the underlying surface, enhancing the rustic feel.
Paint Slashing?
If the plastic coating on the pin is too slick even after sanding, apply a coat of specialized bonding primer or gesso before your white acrylic layer.
Step 2: Painting the Accessories
-
Sketch the design:
Use a pencil to lightly sketch out the placement of the scarf around the neck, the facial features, the buttons down the belly, and the twig arms. -
Paint the scarf base:
Fill in the scarf outline with Christmas red paint. Paint the band around the neck first, then add the hanging tails. I find doing two thin coats is better than one thick one to avoid drips. -
Add scarf texture:
To mimic the look of wool, use a slightly darker red or brown to paint small vertical lines on the scarf fringe. Lightly stipple or dab the main scarf body to give it a woven appearance. -
Apply glitter accent:
While the red paint is tacky, or using a layer of clear glue/glitter glue over top, brush on some fine iridescent glitter over the scarf. This makes it look frosty and cozy. -
Paint the buttons:
Using black paint and a round brush, paint three solid black circles down the front of the snowman’s body for his coal buttons.
Texture Tip
For a chunky knit scarf look, mix baking soda into your red paint before applying. It creates a thick, fluffy texture that looks like real fabric once dry.
Step 3: Facial Features and Arms
-
Paint the eyes:
Using the handle end of a paintbrush dip into black paint and dot two eyes onto the head. -
Add the eye sparkle:
Once the black eyes are dry, use a toothpick or a very fine brush to add a tiny white dot in the upper corner of each eye for a lifelike glint. -
Create the nose:
Paint a long, triangular carrot nose using bright orange paint. Outline it very faintly with a thin line of brown to give it dimension. -
Paint the smile:
Create the coal mouth by painting small, uneven black dots in a U-shape under the nose. -
Paint the twig arms:
Mix a brown paint (burnt umber works well). Using a liner brush, paint thin, branching lines on the sides of the body to resemble stick arms. -
Add snowflakes (optional):
If you have empty space, paint faint, simple snowflake stars near the scarf using a diluted grey or metallic silver. -
Seal the project:
Wait 24 hours for all paint to cure fully. Take the pin outside and spray it with a matte clear sealer to protect your artwork from chipping.
Set your finished snowman on the mantle or front porch to greet guests with a rustic winter welcome
Chicken Pin Barnyard Style
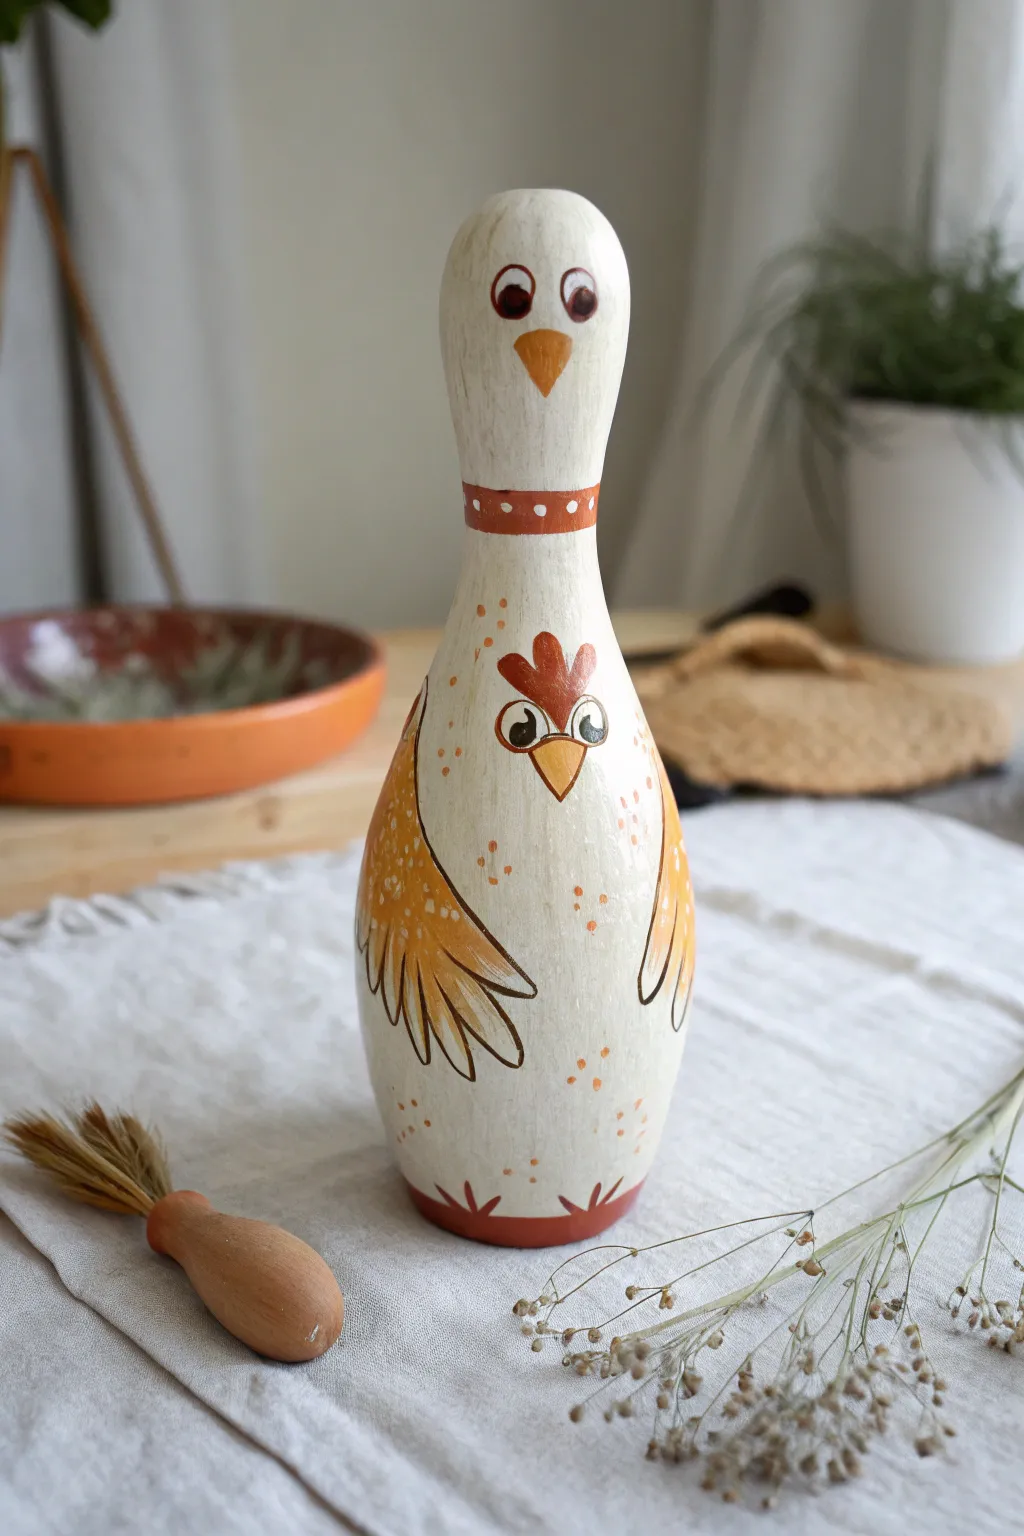
Transform an old bowling pin into a rustic barnyard friend with this charming chicken painting project. Using simple shapes and distressed finishes, you’ll create a folk-art style decoration perfect for a farmhouse kitchen or shelf.
Step-by-Step
Materials
- Wooden or plastic bowling pin
- Sandpaper (medium and fine grit)
- White acrylic paint (matte or satin)
- Acrylic paints: Burnt Orange, Terracotta, Dark Brown
- Paintbrushes: 1-inch flat brush, medium round brush, fine liner brush
- Pencil
- Clear matte sealer spray
- Soft cloth or paper towel
Step 1: Preparation & Base Coat
-
Prep the surface:
Begin by thoroughly cleaning your bowling pin to remove any grease or wax. If it has a glossy finish, scuff sand the entire surface with medium-grit sandpaper to help the paint adhere. -
Apply the white base:
Paint the entire bowling pin with white acrylic paint. You will likely need 2-3 coats for solid coverage, allowing each coat to dry completely before adding the next. -
Create a distressed texture:
Once the white paint is fully dry, lightly sand the pin with fine-grit sandpaper. Focus on creating vertical scratch marks to simulate old, white-washed wood rather than a perfect factory finish. -
Add vintage aging:
Mix a tiny amount of brown paint with water to create a wash. Lightly brush this over the white paint and immediately wipe most of it back with a cloth. This settles into your sanding marks, giving that aged ivory look shown in the photo.
Paint Slipping?
If acrylic paint beads up on plastic pins, mix your paint with a little multi-surface medium or PVA glue to tackle slick surfaces better.
Step 2: Sketching & Blocking Colors
-
Sketch the features:
Using a pencil, lightly draw the chicken’s features. Sketch two main wings on the fat part of the pin, a band around the neck, the facial features near the top, and a smaller, second face with a comb in the center of the ‘chest’ area. -
Paint the neck band:
Fill in the neck band area with the terracotta or burnt orange paint. This separates the ‘head’ of the pin from the body. -
Block in the wings:
Paint the wing shapes in a golden-orange or mustard yellow color. Don’t worry about the feather details yet; just get the solid shape filled in. -
Paint the base:
Add a strip of terracotta paint around the very bottom edge of the pin to ground the design. -
Add the beaks and combs:
Paint a triangular beak on the top head and the chest face using orange paint. Use a darker red-orange for the rooster comb on the chest.
Make it a Pair
Paint a second pin black with white speckles to create a contrasting ‘Plymouth Rock’ hen style for a complete farmhouse duo.
Step 3: Detailing & Line Work
-
Outline the wings:
Using your fine liner brush and dark brown paint (thinned slightly with water for better flow), outline the wing shapes. -
Detail the wing feathers:
Paint individual feather lines inside the wing shapes. These are simple long U-shapes or V-shapes pointing downward. -
Create the chest face:
Outline the small beak and comb on the chest. Paint two large white circles for eyes, let them dry, then add brown outlines and pupils. I find adding a tiny white dot in the pupil brings the character to life. -
Paint the top face:
Repeat the process for the top of the pin: paint two eyes, outlines, and the beak details. This creates the primary personality of the chicken. -
Decorate the neck band:
Using the handle end of a paintbrush dipped in white paint, dot a row of small circles around the terracotta neck band. -
Add speckles:
Dip a stiff brush or an old toothbrush into watered-down orange paint. Flick the bristles to spatter tiny dots across the white body of the chicken for a speckled egg effect. -
Paint the feet:
At the bottom red band, paint simple three-pronged ‘V’ shapes in dark brown to represent the chicken feet peeking out. -
Final clear coat:
Allow the paint to cure for at least 24 hours, then spray the entire pin with a matte clear sealer to protect your barnyard masterpiece.
Place your finished chicken pin on a shelf with some dried wheat or straw to complete the rustic look
Woodland Fox Pin
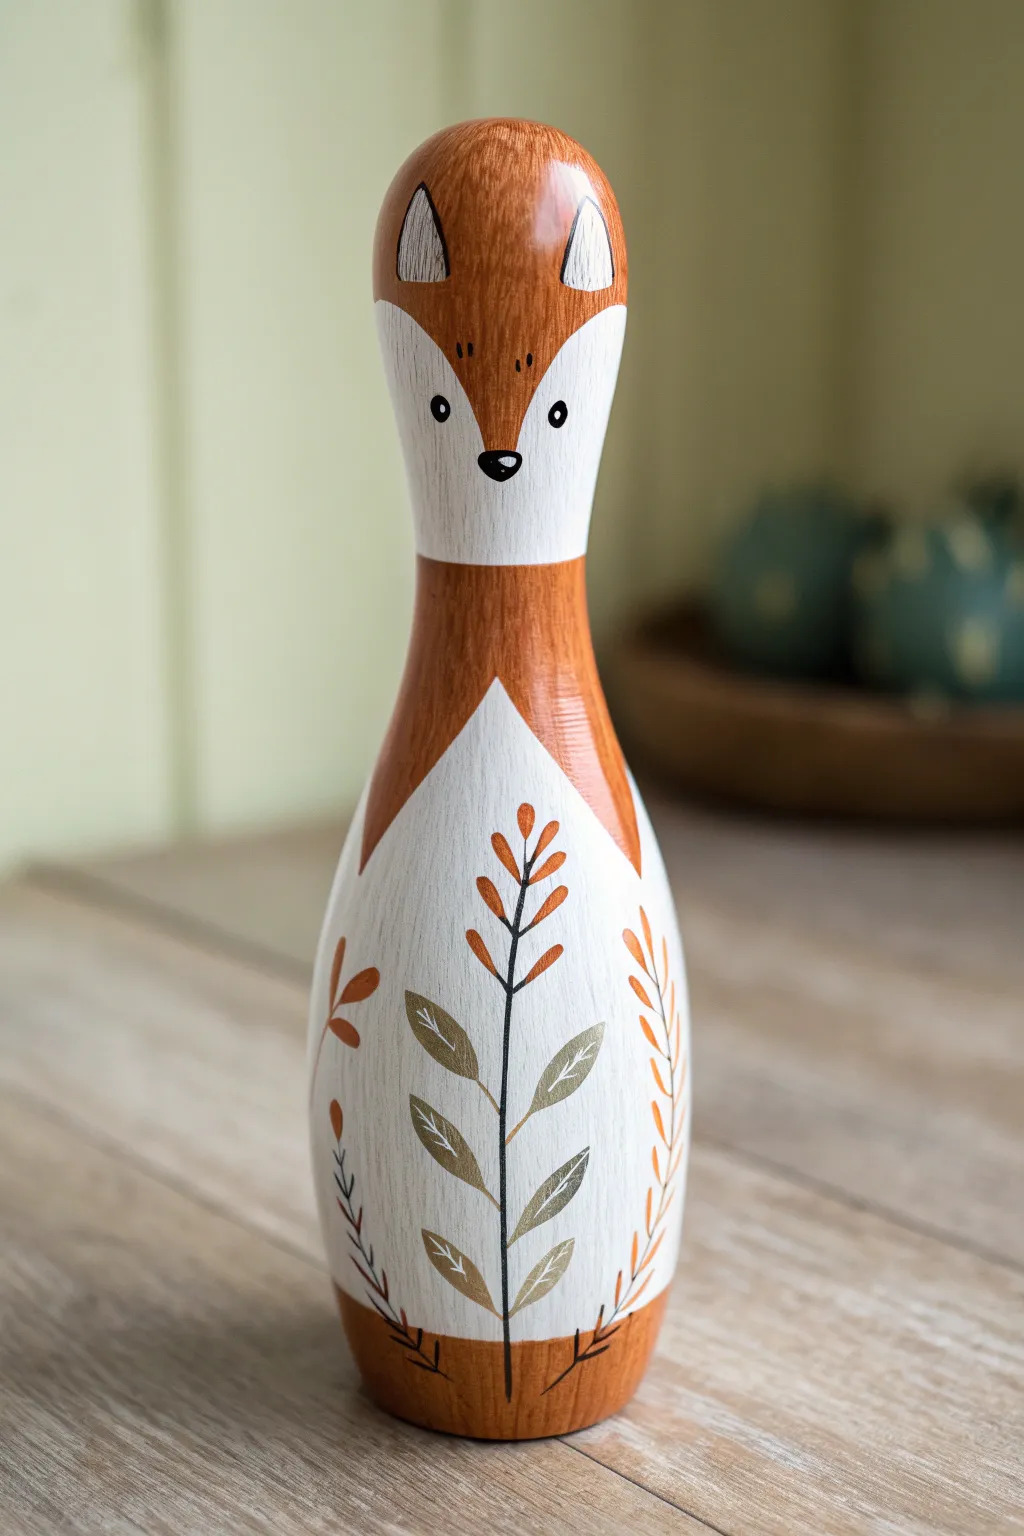
Transform a simple wooden bowling pin into a charming forest friend with this fox painting project. The design uses warm, natural tones and delicate floral patterns to create a piece that looks lovely on a shelf or as part of a woodland-themed bowling set.
Step-by-Step Guide
Materials
- Wooden bowling pin (standard toy size, ~6-8 inches)
- Fine-grit sandpaper (220 grit)
- Acrylic paints: Burnt Sienna (red-brown), Warm White, Black, Olive Green, Metallic Gold (optional)
- Flat shader brush (size 6 or 8)
- Fine liner brush (size 0 or 00)
- Pencil and eraser
- Matte or satin acrylic varnish
Step 1: Preparation and Base Blocking
-
Prep the surface:
Begin by lightly sanding your wooden pin to remove any rough spots or factory finish. Wipe away the dust with a damp cloth to ensure smooth paint adhesion. -
Sketch the face guidelines:
Using a pencil very lightly, draw a curved ‘V’ shape starting from the top sides of the pin’s head down to the center of the ‘neck’ area. This defines the white face mask. -
Map out the body:
Continuing from the neck, sketch a large inverted ‘V’ shape on the front of the body. The area inside this V will be white (the chest/belly), and the outside will be the brown fur. -
Paint the white sections:
Using your flat shader brush, fill in the face mask area and the large belly triangle with Warm White paint. Apply two thin coats rather than one thick one for the smoothest finish, letting the first dry completely. -
Paint the fox fur:
Paint the rest of the pin—the top of the head (ears), the back, and the sides of the body—with Burnt Sienna. Carefully cut in along the pencil lines where the brown meets the white. -
Create the ears:
At the very top of the head, inside the brown area, paint two small white triangles for the inner ears. If the brown paint is still wet, wait for it to dry so the white stays crisp. -
Add the bottom detail:
Paint a band of Burnt Sienna at the very base of the pin, creating a grounded look that frames the white belly section.
Keeping Lines Sharp
For the crispest lines between the brown fur and white belly, apply a strip of flexible masking tape or washi tape before painting the brown sections.
Step 2: Face and Fur Details
-
Outline the ears:
Switch to your fine liner brush. Mix a tiny bit of black with your brown paint to create a darker outline. Use this to outline the white triangles of the ears. -
Add fur texture:
Using the same fine brush and the dark brown mix, add tiny, vertical tick marks or strokes on the brown paint, especially near the white boundaries, to simulate fur texture. -
Paint the eyes:
Dip the handle end of a paintbrush into black paint and dot two eyes onto the white face mask area. They should be wide-set and positioned roughly halfway down the face section. -
Paint the nose:
paint a small, inverted black triangle or soft rounded shape at the very bottom point of the white face mask for the nose. Add a tiny white highlight dot to the nose once dry. -
Refine the eyes:
Once the black eye dots are dry, use a toothpick or the very tip of your liner brush to add a tiny white catchlight to each pupil. -
Add forehead details:
Paint three tiny vertical dashes or dots in black between the eyes on the brown forehead area for a bit of character.
Step 3: Floral Body details
-
Draw the central stem:
Lightly sketch a vertical line straight up the center of the white belly section. This will be the main stem for your botanical design. -
Paint the main stem:
Trace over your pencil line with the liner brush and black paint. Keep the line as thin and steady as possible. -
Leaf placement:
Paint pairs of leaves branching off the main stem. Use Olive Green (or a mix of green and gold) for the lower and middle leaves. I like to gently press the brush down and lift up to create the leaf shape naturally. -
Top floral accents:
Near the top of the stem, switch to Burnt Sienna (orange-brown) to paint small, tear-drop shaped buds or leaves branching out. -
Side embellishments:
On the left and right sides of the white belly (flanking the main stem), paint simple curved vines in contrasting colors like orange or brown to fill the negative space. -
Leaf detailing:
Once the green leaves are dry, use your white paint and liner brush to add very fine veins or outlines to the leaves for a decorative, folk-art touch. -
Protective finish:
Allow the entire project to cure for at least 24 hours. Finally, brush on a coat of matte or satin varnish to protect the paint from chipping during handling.
Make It a Set
Paint the other pins as different woodland creatures like a raccoon, owl, and deer, using the same floral belly motif to tie the whole bowling set together visually.
Now you have a beautifully painted woodland fox that captures the spirit of the forest
Mandala Bands Around the Belly
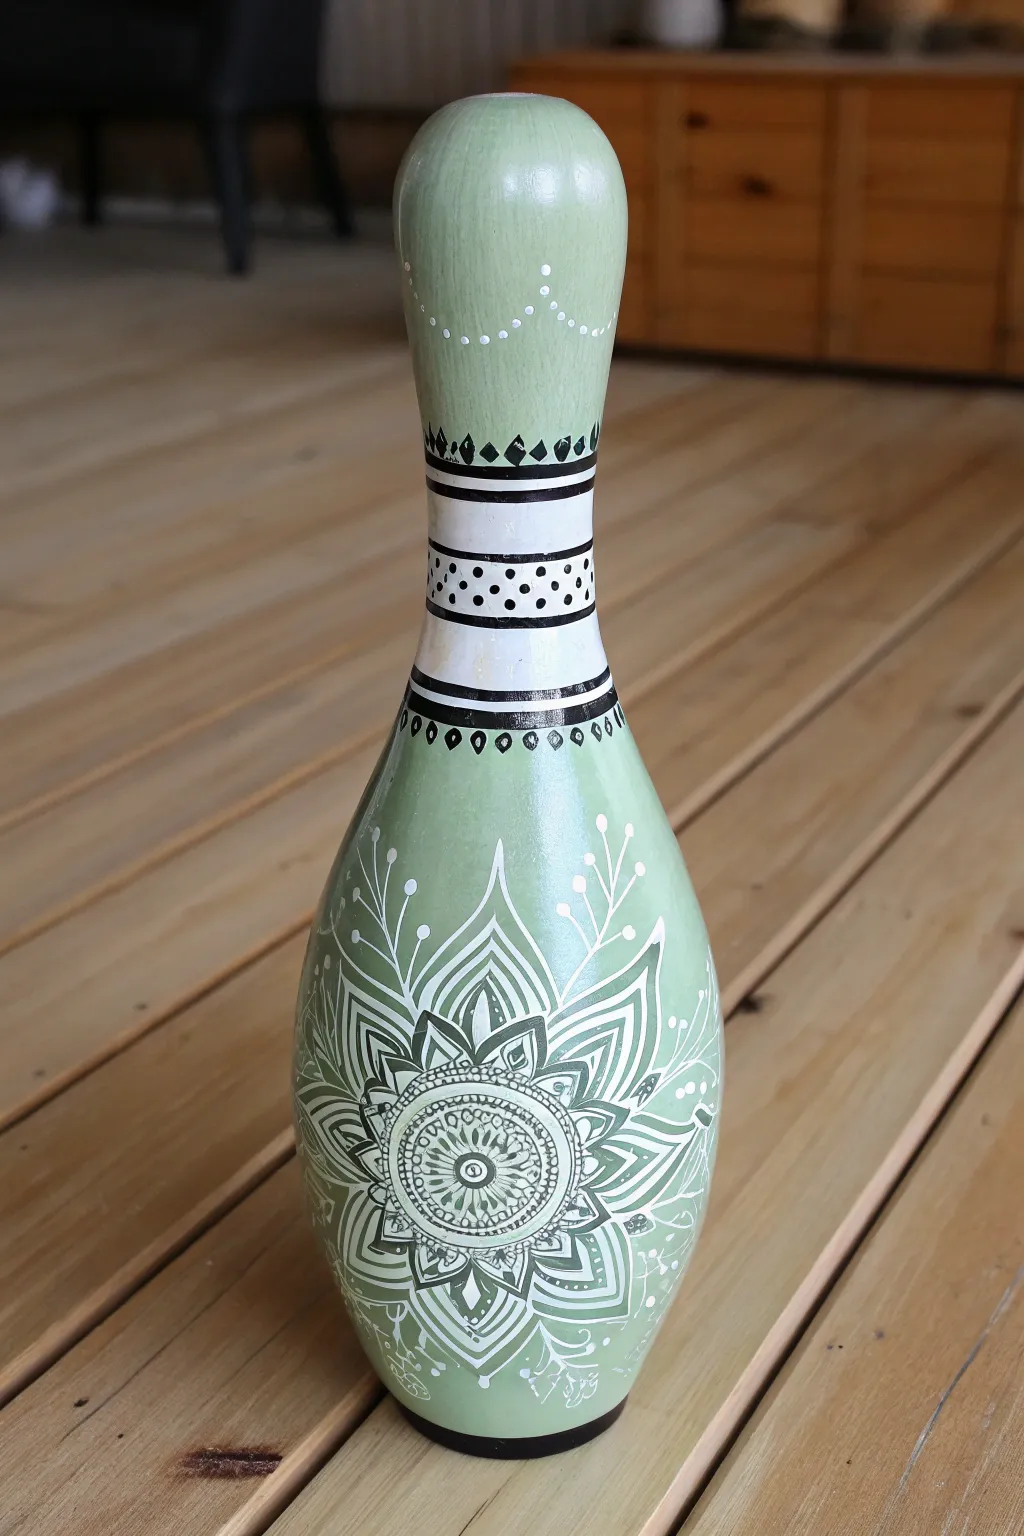
Transform a retired bowling pin into a bohemian work of art featuring soothing sage green tones and intricate line work. This project combines bold geometric banding on the neck with a delicate, freehand white mandala that blooms across the base.
Detailed Instructions
Materials
- Used wooden bowling pin (cleaned and sanded)
- Sage green acrylic craft paint (matte finish)
- White acrylic craft paint
- Black acrylic craft paint (or black paint marker)
- White paint marker (fine tip, 0.7mm or 1mm)
- Black paint marker (fine tip)
- Wide flat brush for base coating
- Medium round brush
- Pencil and eraser
- Compass or round objects for tracing circles
- Clear matte sealer spray
Step 1: Preparation and Base Coat
-
Clean the surface:
Thoroughly clean your bowling pin to remove any lane oil or grime. Lightly sand the entire surface to help the new paint adhere, then wipe away the dust with a damp cloth. -
Apply the green base:
Using a wide flat brush, paint the entire pin with sage green acrylic paint. This might take 2-3 coats to get a solid, opaque finish. Let each coat dry completely before adding the next. -
Block out the neck bands:
Once the green is fully dry, identify the neck area where the white bands will go. Paint a wide section of the neck white, covering enough space for your patterned bands. Don’t worry about perfect edges yet; we will cover them with black lines later.
Wobbly Lines?
If you struggle painting straight bands around the neck, place a thick rubber band around the pin. Use it as a physical guide to trace your black lines perfectly straight.
Step 2: Painting the Neck Patterns
-
Define the borders:
Use a black paint marker or a steady hand with a fine brush to draw horizontal rings defining the top and bottom of your white neck section. Create a few internal rings to divide the white space into smaller bands. -
Add the diamond band:
Just above the white section on the green paint, draw a series of small black diamonds connected by a thin line. Fill the diamonds in with solid black. -
Create the dotwork band:
In the middle of your white section, use a black marker to create a stippled band. Place larger dots in the center line and smaller dots radiating outward for a textured look. -
Paint the decorative border:
Below the white section, paint a final black band. Underneath this line, add a series of small, open teardrop or petal shapes in black ink. -
Top decoration:
Near the very top of the pin, use your white paint marker to create a simple draped garland effect with tiny dots.
Add Some Dimension
Use a metallic silver or gold paint pen to trace over select lines in the central mandala. This adds a subtle shimmer that catches the light beautifully.
Step 3: The Belly Mandala
-
Sketch the center:
Lightly sketch a circle in the center of the pin’s widest part (the belly) using a pencil. This will be the anchor for your mandala. -
Draw the central rosette:
Using the black paint marker, draw a small central circle and surround it with a ring of petals. Fill the center with fine lines or a spiral pattern. -
Build the outer rings:
Draw concentric circles around your rosette. Fill one ring with tiny scallops and another with distinct straight lines radiating outward like spokes on a wheel. -
Add first layer of white petals:
Switch to your white paint marker. Draw large, pointed lotus petals extending from your black center design. Outline these petals twice to give them visual weight. -
Detail the white petals:
Inside the large white petals, add smaller drawn details like teardrops or lines. I find that keeping these interior lines thin makes the design look more delicate. -
Expand with leaf flourishes:
Between the points of your main white petals, draw long, flowing sprigs that curve outward and upward. Add small dots to the ends of the lines to mimic berries or buds. -
Fill the lower section:
Continue the mandala design downward towards the base of the pin using white ink. Repeat the petal shapes and leafy flourishes so the design wraps slightly around the curvature of the pin. -
Add final highlights:
Look over your design and add tiny white dots in any large empty green spaces to balance the composition.
Step 4: Finishing Touches
-
Paint a black base:
Paint a solid black ring around the very bottom edge of the pin to ground the design. -
Erase guidelines:
Once you are absolutely certain the ink is dry (give it at least an hour), use a clean eraser to gently remove any visible pencil marks. -
Seal the artwork:
Take the pin to a well-ventilated area and spray it with a clear matte sealer. This protects the delicate paint pen work from chipping.
Place your finished piece on a bookshelf or mantle where the detailed line work can be admired up close
Black-and-White Doodle Patterns
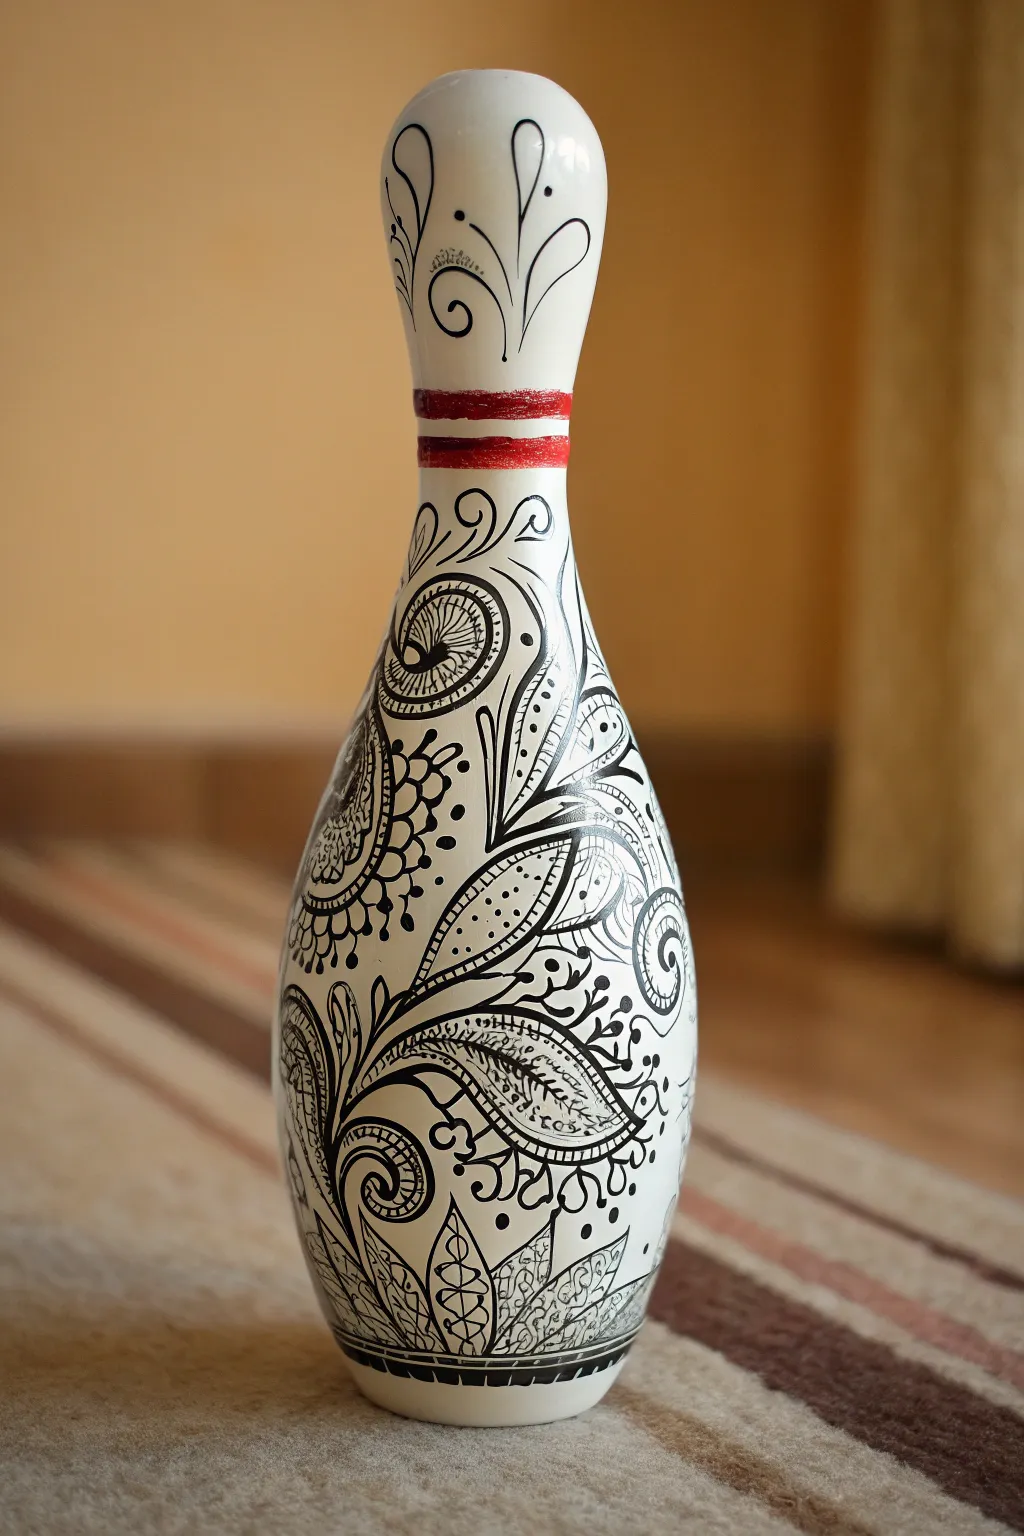
Transform a retired bowling pin into a stunning piece of modern decor with this intricate black-and-white doodle design. This project combines strict geometric planning with free-flowing organic shapes, resulting in a striking contrast that looks impressive on any shelf.
Step-by-Step Guide
Materials
- Used wooden or plastic bowling pin
- Sandpaper (medium and fine grit)
- White acrylic paint or gesso
- Wide flat paintbrush
- Red acrylic paint
- Painter’s tape or masking tape
- Black permanent markers (fine and ultra-fine tips)
- Pencil and eraser
- Clear spray sealant (matte or gloss)
Step 1: Preparation and Base Coat
-
Clean and Sand:
Begin by thoroughly cleaning your bowling pin to remove any lane oil or grime. Sand the surface scrupulously, starting with medium grit to remove the old finish and finishing with fine grit to create a smooth, paint-ready texture. -
Apply Primer:
Paint a layer of gesso or white primer over the entire pin. This helps the topcoat adhere better and prevents the wood grain from showing through. -
Paint the Base White:
Using a wide flat brush, apply two to three coats of white acrylic paint. Allow each coat to dry completely before applying the next to ensure a solid, opaque finish. -
Tape the Neck:
Once the white base is fully cured, use painter’s tape to mark off two parallel rings around the neck of the pin. Press the tape edges down firmly to prevent paint bleed. -
Add the Red Accent:
Paint the space between your tape lines with red acrylic paint. You may need two coats for a vibrant pop of color. Carefully peel off the tape while the paint is still slightly tacky for a crisp edge.
Step 2: Drafting the Design
-
Map Out Major Shapes:
Lightly sketch the main structural lines of the design with a pencil. Focus on large, swooping curves that follow the contours of the pin’s belly. -
Block in Focal Points:
Identify where you want your largest mandalas or floral elements to sit. Draw simple circles or teardrop shapes as placeholders for these detailed areas. -
Connect the Flow:
Draw connecting vines or stems between your major focal points. The design should feel continuous, wrapping naturally around the curves of the pin.
Smudge Control
Work from the top down or rotate the pin constantly so your hand never rests on wet ink. If you’re right-handed, work left to right to keep your palm clear.
Step 3: Inking the Patterns
-
Outline Main Lines:
Switch to a fine-tip permanent marker. Carefully trace over your pencil lines for the major shapes, vines, and leaf outlines. Keep your hand steady and confident. -
Thicken Key Curves:
Go back over specific curves—particularly the main stems and the outer edges of large petals—to add line weight. Thickening these lines creates visual depth. -
Fill the Spirals:
Inside your large circular shapes, draw intricate spirals or concentric patterns. Use an ultra-fine tip marker here for delicate detailing. -
Add Patterned Texture:
Select specific leaves or petals to fill with texture. I like to use stippling (tiny dots), varied hatching, or small circles to differentiate these areas from the solid white spaces. -
Create Paisley Elements:
Draw paisley-style tear drops within the larger negative spaces. Fill these with internal scallops or mesh patterns to add complexity. -
Detail the Neck:
Move up to the top of the pin, above the red bands. Add lighter, airier swirls and simple leafy flourishes so the design doesn’t feel top-heavy. -
Balance the Bottom:
Ensure the design extends fully to the base. Add a dark, solid band or a row of heavy pattern work near the very bottom to ‘ground’ the visual weight of the artwork. -
Refine and Correct:
Look over the entire piece. Fill in any small gaps with tiny dots or small floating circles to make the composition feel unified. -
Erase Guide Lines:
Wait for the ink to be 100% dry to avoid smudging. Gently run a clean eraser over the design to remove any remaining visible pencil marks.
Add Metallic Flair
Instead of plain black ink for the accents, use a gold or silver leafing pen for specific details like the center of flowers to add a touch of luxury
Step 4: Finishing Touches
-
Seal the Artwork:
In a well-ventilated area, spray the entire pin with a clear sealant. Apply in light, even mists to prevent the ink from running or the finish from dripping.
Place your finished pin on a mantle or bookshelf to enjoy your handmade modern art
Marble Swirl Pour Finish
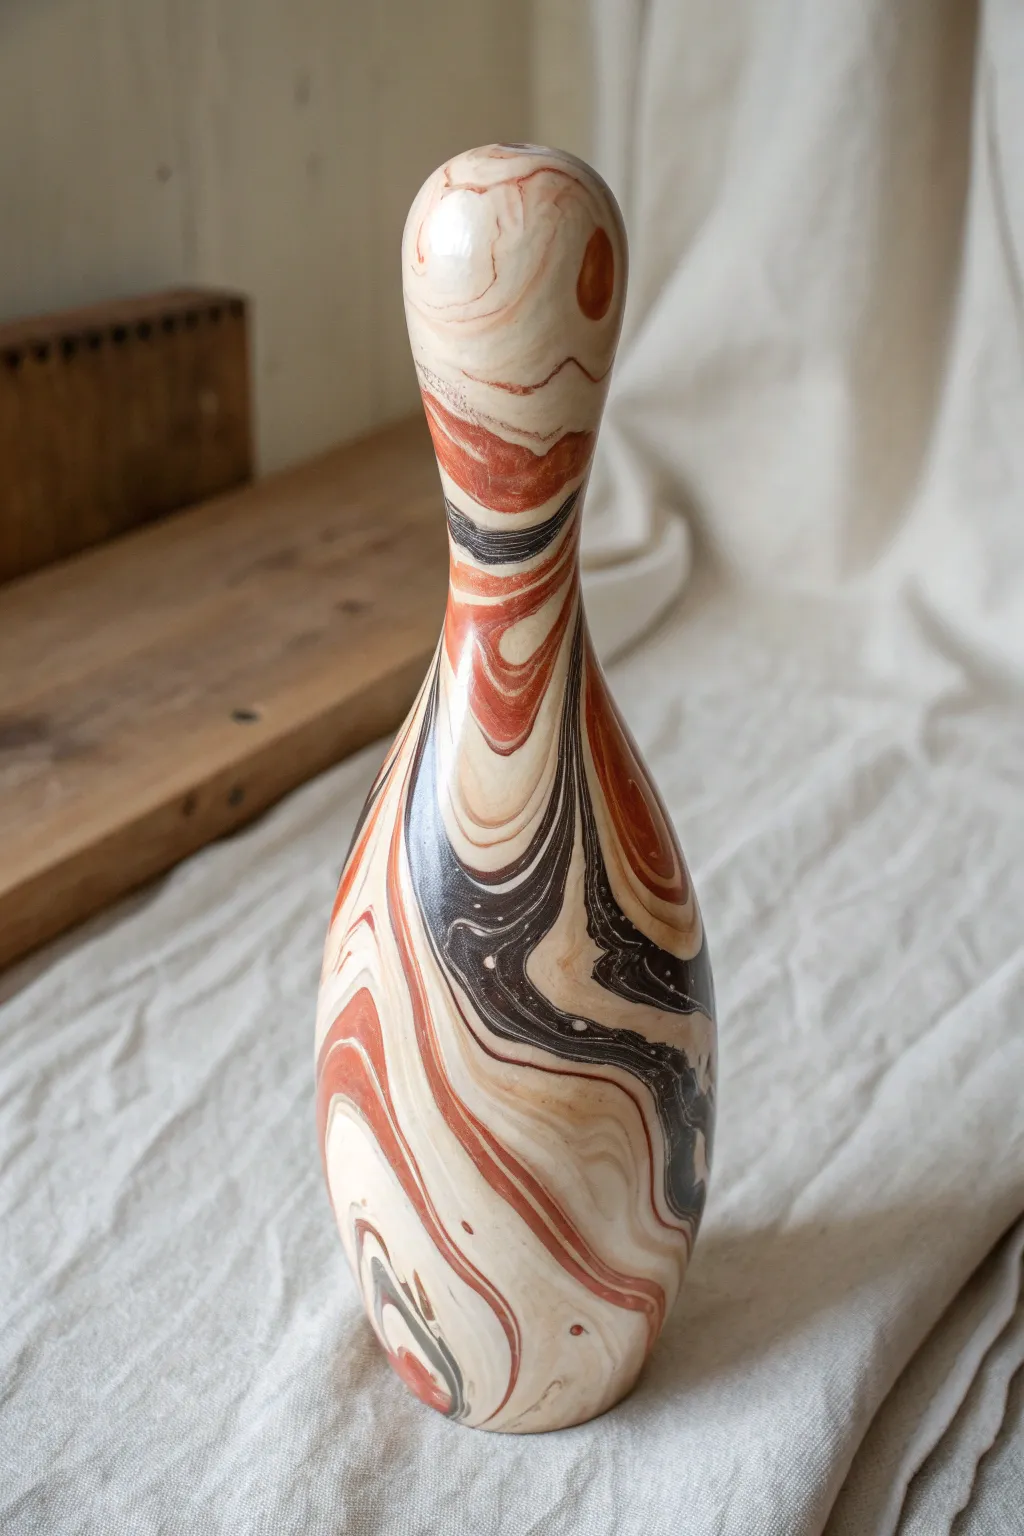
Transform a standard bowling pin into a sophisticated piece of decor using a classic hydro-dipping or paint pouring technique. The result is a stunning, organic pattern featuring warm creams, deep rusts, and striking black veins that looks like polished agate.
Step-by-Step Tutorial
Materials
- Plastic or wooden bowling pin (primed)
- Sandpaper (medium and fine grit)
- White spray primer (matte)
- Acrylic pouring paints (Cream, Terracotta/Rust, Carbon Black, Warm Beige)
- Pouring medium
- Large plastic bin or bucket (deep enough to dip the pin)
- Water
- Painter’s tape
- Dowel or stiff wire (for suspension)
- High-gloss spray varnish
- Gloves
- Stir sticks
Step 1: Preparation
-
Clean and sand:
Begin by thoroughly cleaning the bowling pin to remove any grease or old clear coats. Sand the entire surface lightly with medium-grit sandpaper to create a ‘tooth’ for the paint to grab onto. -
Prime the surface:
Wipe away any dust with a damp cloth. Apply two even coats of matte white spray primer, allowing sufficient drying time between layers. This ensures your earth tones will pop. -
Create a handle:
Since you need to dip the entire pin, you can’t hold it with your hands. Insert a dowel or stiff wire securely into the hole at the bottom of the pin, securing it with tape if necessary so it won’t wiggle.
Paint Sinking?
If paint sinks to the bottom instead of floating, your water tension is broken or the paint is too heavy. Use a lighter ‘soft body’ acrylic or let the tap water sit for an hour before starting.
Step 2: Mixing the Paints
-
Prepare the palette:
For this earth-tone look, you need four distinct cups. Pour your acrylic paints into separate cups: Cream, Terracotta/Rust, Carbon Black, and Warm Beige. -
Add pouring medium:
Mix each paint color with pouring medium according to the manufacturer’s ratio (often 1:1). The consistency should resemble warm honey—flowing smoothly but not watery. -
Check consistency:
Lift your stir stick; the paint should run off in a continuous stream without breaking. If it’s too thick, add a few drops of water.
Add Metallic Veins
For a luxe upgrade, mix a small amount of metallic gold or copper paint into the rotation. When dipped, these will create shimmering veins that catch the light elegantly.
Step 3: The Dip Technique
-
Prepare the water bath:
Fill your large plastic bin with room-temperature water. The water needs to be deep enough to submerge nearly the entire pin. -
Drop the colors:
Gently drip your paint mixtures onto the surface of the water one by one. I like to alternate contrast, dropping black into cream, then adding the rust tones. -
Swirl the pattern:
Use a skewer or the end of a paintbrush to very gently swirl the floating paint. Don’t overmix; you want distinct ribbons of color like the reference photo to mimic natural stone. -
The immersion:
Holding the pin by your improvised dowel handle, slowly dip it into the water at a 45-degree angle. Rotate the pin slowly as you push it down to wrap the paint around the curves. -
Submerge and clear:
Once fully submerged, disperse the remaining surface paint by blowing on it or sweeping it away with a piece of cardboard before pulling the pin back up. This prevents a double-layer of paint.
Step 4: Finishing Touches
-
Drip drying:
Hang the pin upside down by its handle to dry. Place a drop cloth underneath to catch drips. Let it sit indisturbed for at least 24 to 48 hours to ensure the thick paint cures. -
Inspect and refine:
Once dry, check for any rough bumps from dried drips at the very top (formerly the bottom). Lightly sand these smooth with fine-grit paper. -
Seal the deal:
Spray the entire pin with a high-gloss varnish. This mirrors the polished look of marble and protects your artwork from scratches. -
Second coat:
Apply a second coat of varnish for extra depth and shine, making those black veins look suspended in glass.
Place your newly marbled pin on a shelf or mantelpiece to enjoy its timeless, stony elegance
Night-Sky Galaxy Pin
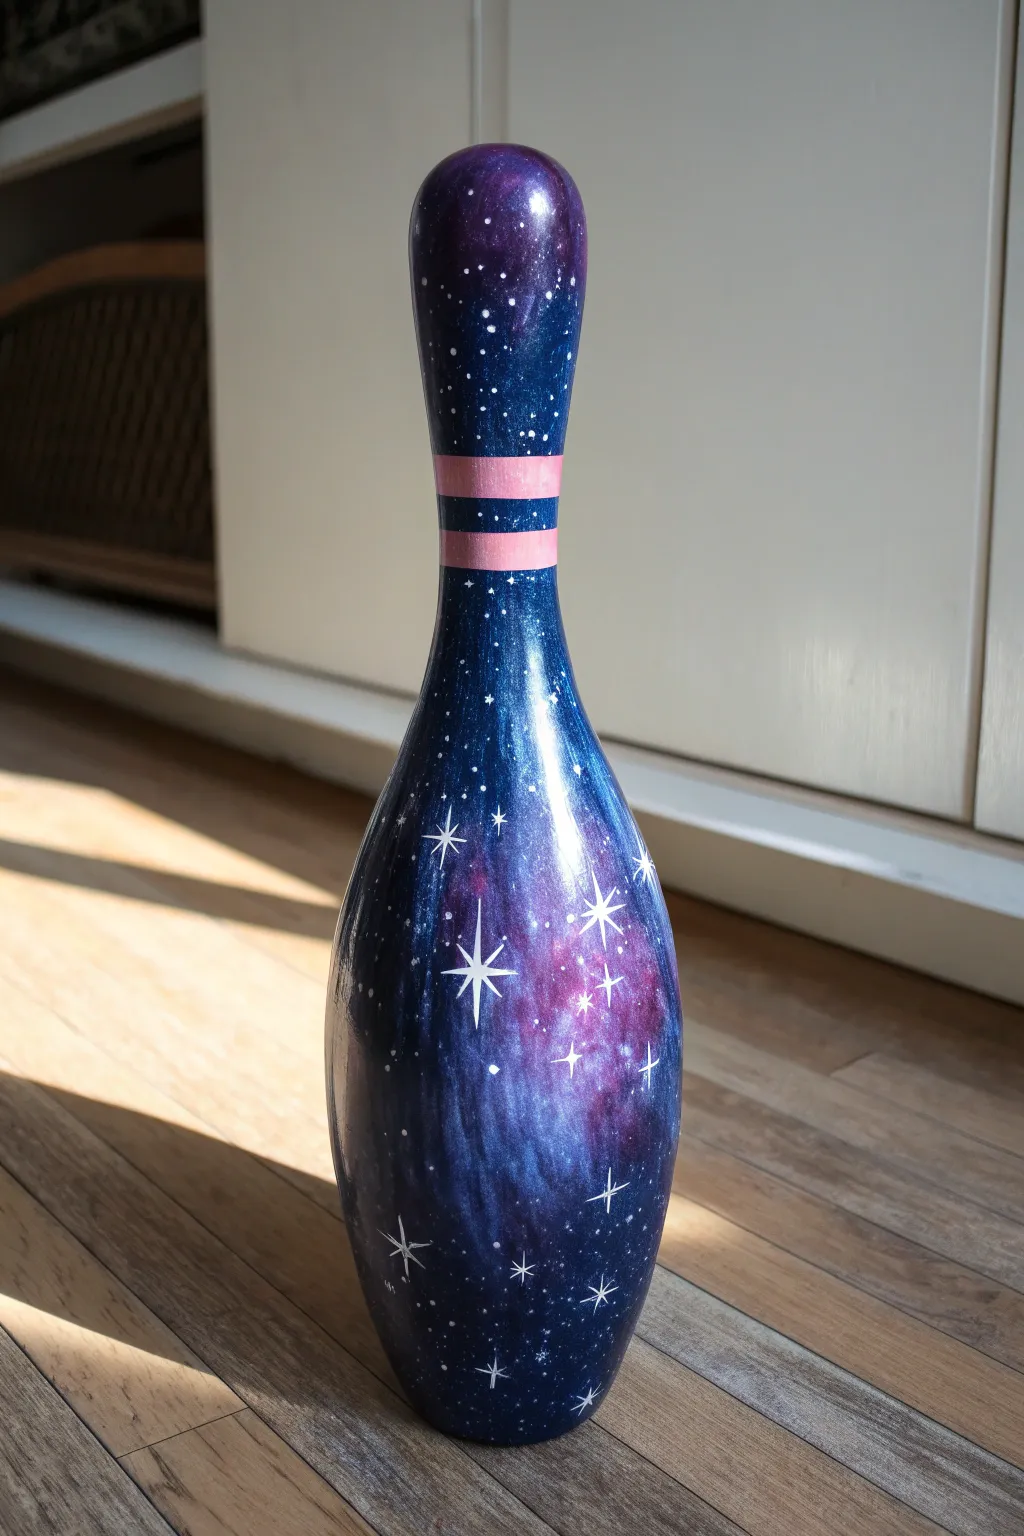
Transform a standard bowling pin into a stunning celestial artwork featuring swirling nebulas and sparkling stars. This project uses blending techniques and simple splatter effects to create a deep, dimensional night sky that looks impressive on display.
Step-by-Step
Materials
- Used wooden or plastic bowling pin
- Fine-grit sandpaper (220 grit)
- White primer spray paint
- Acrylic paints (dark blue, black, purple, magenta, teal, white)
- Painter’s tape (1/4 inch width)
- Sponges (makeup wedges or sea sponge)
- Assorted paintbrushes (medium flat, small round, fine liner)
- Old toothbrush
- Clear high-gloss sealant spray
Step 1: Preparation and Base
-
Prep the surface:
Clean the bowling pin thoroughly with soapy water to remove oils and dirt, then dry completely. Lightly sand the surface with 220-grit sandpaper to help the paint adhere, wiping away any dust with a damp cloth. -
Prime the pin:
Apply an even coat of white primer spray paint over the entire pin. Let this dry fully according to the can’s instructions; a solid base is crucial for the dark colors to look vibrant. -
Base coat application:
Paint the entire pin with a solid coat of dark midnight blue acrylic paint. You may need two coats to ensure full, opaque coverage where no white primer shows through.
Pro Tip: Better Splatters
Test your toothbrush splatter technique on a piece of cardboard first. The consistency of the paint determines if you get misty stars or large globs.
Step 2: Creating the Galaxy
-
Sponge on depth:
Dip a slightly damp sponge into black paint and lightly dab it around the very top and bottom of the pin, as well as random patches in the middle, to create deep space shadows. -
Layering nebula colors:
Using a clean section of the sponge, dab varied patches of purple and magenta over the dark blue areas. Keep the pressure light to create a cloudy texture rather than distinct shapes. -
Adding highlights:
While the purple layer is still slightly tacky, sponge small amounts of teal or lighter blue into the center of the purple clusters. This creates a glowing, dimensional nebula effect. -
Blending the transition:
If the edges of your colored clouds look too harsh, take a sponge with a tiny bit of the original dark blue base color and dab over the edges to soften them back into the background. -
Dry time:
Allow these sponge layers to dry completely before moving on to the next step, so your colors don’t mud together.
Step 3: Stars and Details
-
Splatter stars:
Dilute a small mount of white acrylic paint with water until it has an inky consistency. Dip an old toothbrush into it and flick the bristles with your thumb to spray tiny white specks across the pin. -
Masking stripes:
Once the galaxy background is fully dry, apply two strips of painter’s tape around the neck of the pin. The space between the tape lines will become your pink stripes. -
Painting stripes:
Paint the designated stripe areas with a pale pink acrylic paint. I usually apply two or three thin layers here to get a crisp, opaque finish. -
Adding large stars:
Remove the tape carefully. Using your finest liner brush and undiluted white paint, create several four-pointed or eight-pointed ‘hero’ stars scattered around the widest part of the pin. -
Reinforcing bright spots:
Add a tiny dot of white paint to the center of your largest stars to make them pop. You can also add a few larger individual dots among the splattered stars for variety. -
Final clear coat:
Take the project to a well-ventilated area and seal your artwork with a clear high-gloss spray sealant. This protects the paint and gives the galaxy a wet, shiny finish.
Level Up: Glow in the Dark
Mix glow-in-the-dark medium into your white paint for the stars. During the day it looks normal, but with the lights out, your galaxy will actually shine.
Place your finished galaxy pin on a shelf or mantle where the light can catch those bright white stars
Spooky Monster Face Pin
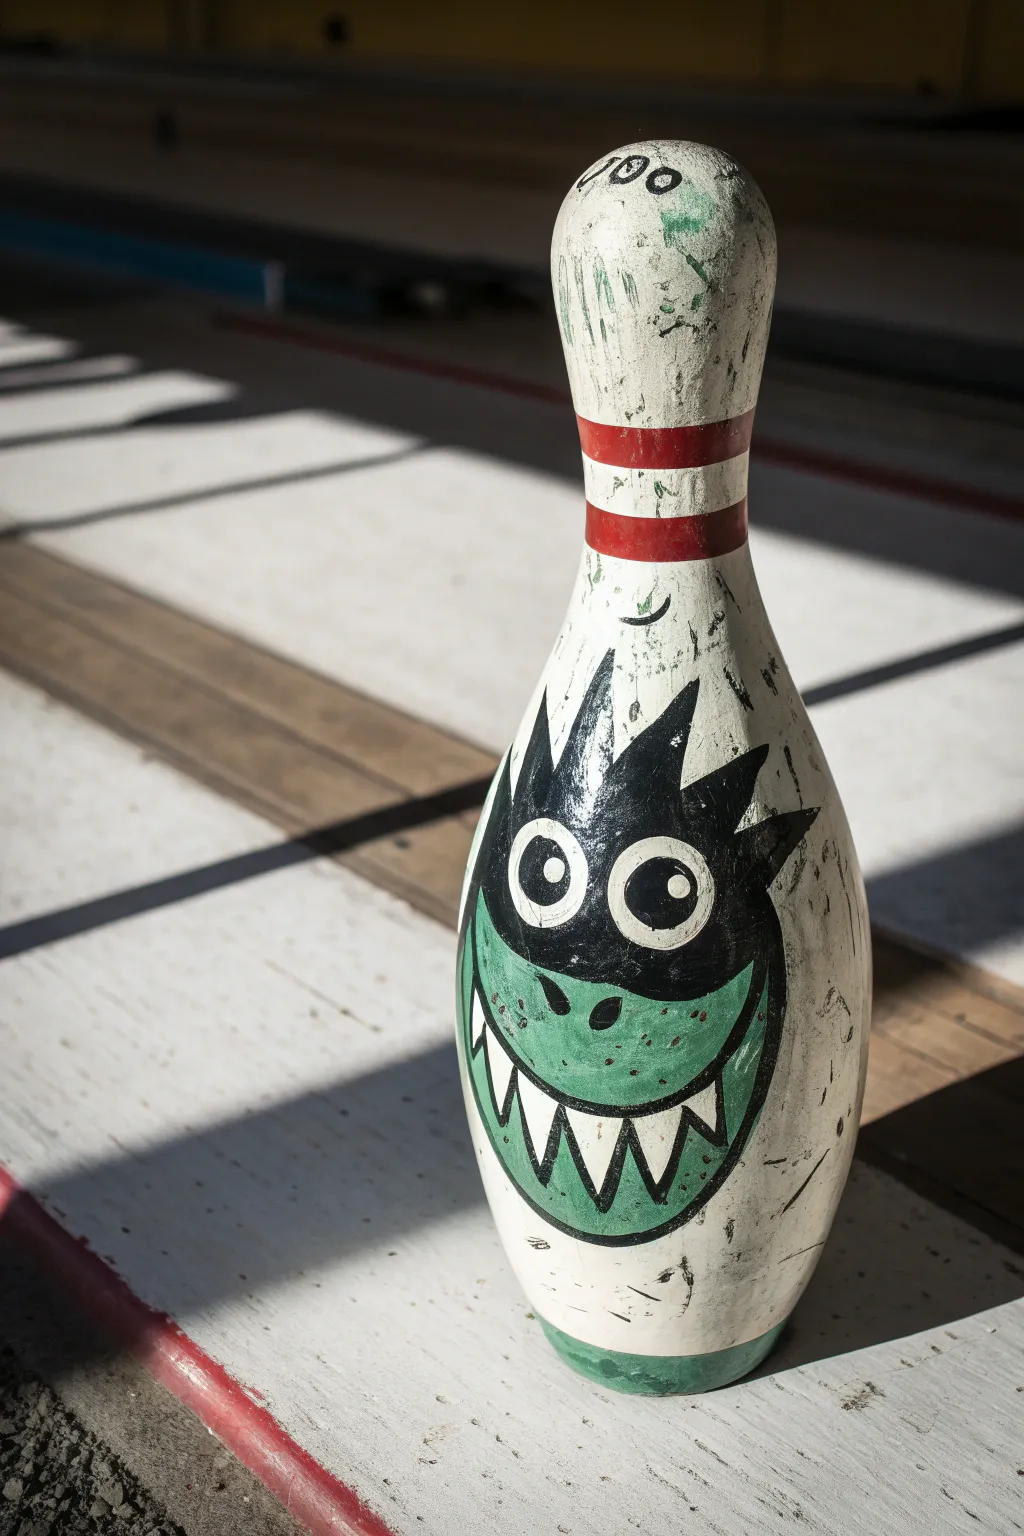
Transform a retired bowling pin into a mischievous monster with a cartoonish grin and spiky hair. This project features bold black outlines, a classic red-striped neck, and a wonderfully expressive green jaw that is perfect for Halloween decor or a fun game room addition.
Step-by-Step Tutorial
Materials
- Used wooden or plastic bowling pin
- Sandpaper (medium grit, 120-150)
- White matte acrylic paint or spray paint
- Cardinal red acrylic paint
- Black acrylic paint
- Kelly green acrylic paint
- Painter’s tape or masking tape
- Pencil for sketching
- Medium flat brush
- Small round detail brush
- Clear matte sealer spray (optional)
- Rags or paper towels
Step 1: Preparation and Base Coat
-
Clean the surface:
Start by thoroughly cleaning your bowling pin with warm soapy water to remove any lane oil, grime, or old wax. Dry it completely with a rag before moving on. -
Sand for adhesion:
Scuff the entire surface of the pin with medium grit sandpaper. This helps break the glossy finish so your new paint will stick properly, rather than peeling off later. -
Apply the white base:
Paint the entire pin with white acrylic paint. You may need two to three coats to get a solid, opaque coverage, especially if the pin has old markings. Let each coat dry fully before adding the next. -
Distress the finish (optional):
If you want the vintage, worn look seen in the photo, you can lightly sand areas of the white paint once dry, or simply don’t aim for a perfectly smooth finish—let the brushstrokes show.
Tape Trick
To stop paint bleeding under the tape on the neck stripes, paint a thin layer of the *base white* over the tape edge first to seal it.
Step 2: Adding the Classic Stripes
-
Tape the neck:
Using painter’s tape, mask off two parallel rings around the neck of the pin. The space between the tape lines will become your red stripes, so press the edges down firmly to prevent bleeding. -
Paint the red bands:
Fill in the masked areas with cardinal red acrylic paint. Apply light layers to avoid ridges. -
Remove tape carefully:
While the red paint is still slightly tacky (not fully hard), peel off the tape slowly. This ensures a crisp line without pulling up dried chunks of paint.
Step 3: Painting the Monster Face
-
Sketch the outline:
Switch to a pencil and lightly sketch the monster’s face on the main body (belly) of the pin. Draw a spiky ‘crown’ shape for the hair/head and a large, wide U-shape for the jaw. -
Block in the green jaw:
Paint the large U-shape area at the bottom of the face with kelly green paint. This will be the monster’s chin and mouth area. -
Paint the black head:
Fill in the spiky upper section with black acrylic paint. Extend the black halfway down the sides of the face to meet the green jaw area, creating a mask-like effect. -
Add white eyes:
Once the black section is dry, paint two large white circles in the center for the eyes. You might need a second coat of white here to make them really pop against the black background. -
Create the mouth opening:
Inside the green jaw area, paint a wide, curved black shape for the mouth. Make sure to leave a thick green border around the bottom and sides. -
Paint the teeth:
Using your small detail brush and white paint, create sharp, triangular teeth along the bottom edge of the black mouth shape. Let the points reach upward. -
Detail the eyes:
Add small black pupils inside the white eye circles. I like to place them slightly off-center or mismatched to give the monster a goofy, crazed expression. -
Add the nostrils:
Paint two small, dark tear-drop shapes in the green area, just below the eyes, to form the nose. -
Apply texture spots:
Thicken your black paint slightly or use a very dry brush to dab tiny specks and dots onto the green chin area for a scaly, textured monster skin look. -
Line the jaw:
Use the fine detail brush to outline the green jaw area with a thin black line, separating it from the white body of the pin. -
Weathering detail:
Dip a dry brush into a tiny amount of black paint, wipe most of it off, and lightly scuff areas around the pin’s body and the top white section to mimic scuffs and age markings. -
Seal the creature:
Once all paint is completely cured (wait at least a few hours), spray the entire pin with a clear matte sealer to protect your artwork from chipping.
Glow Up
Use glow-in-the-dark acrylic paint for the white teeth and eyes. When the lights go down for cosmic bowling, your monster will stare back.
Place your finished monster pin on a shelf or group it with other characters for a spooky display
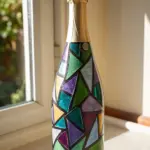
Faux Ceramic Tile Mosaic Look
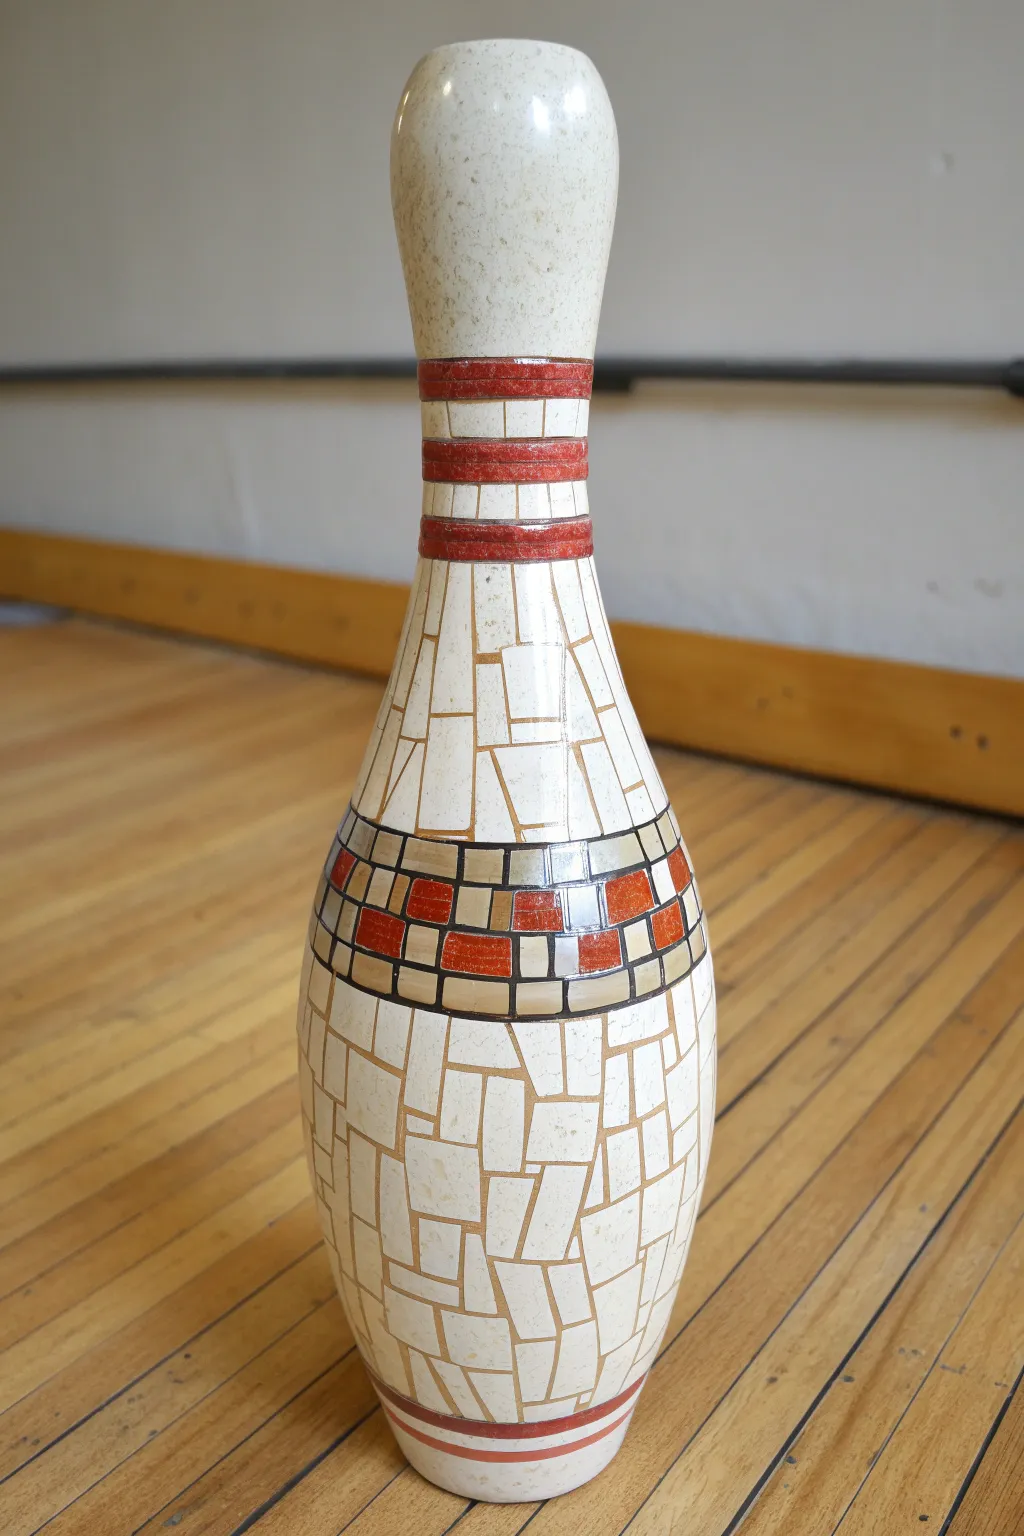
Transform an old bowling pin into a stunning piece of faux pottery that mimics the intricate look of a hand-laid mosaic. This clever technique uses simple painting methods to create the illusion of individual ceramic tiles and textured grout lines without any actual tiling involved.
How-To Guide
Materials
- Used wooden or plastic bowling pin
- Sandpaper (medium and fine grit)
- Primer (white or cream)
- Acrylic paints: Cream/Off-White, Terra Cotta Red, Warm Grey, Dark Brown (for grout lines)
- Pencil
- Fine liner brush (size 0 or 00)
- Small flat brush
- Sea sponge or stiff bristle brush
- Clear high-gloss varnish or spray sealer
- Painter’s tape (optional)
Step 1: Preparation and Base Coat
-
Prep the surface:
Clean your bowling pin thoroughly to remove any lane oil or dirt. Scuff the entire surface with medium-grit sandpaper to help the paint adhere, then smooth it out with fine-grit sandpaper. -
Prime the pin:
Apply a coat of white or cream primer to the entire pin. Allow this to dry completely according to the manufacturer’s instructions before moving on. -
Create the stone texture:
Mix a small amount of warm grey into your cream acrylic paint. Using a sea sponge or an old stiff brush, dab this mixture lightly over the top third of the pin (the head) to create a speckled, stone-like texture. Let this layer dry.
Shiny Tiles
For extra realism, apply a drop of dimensional glaze (like Mod Podge Dimensional Magic) onto each individual painted ’tile’ to make them physically raised and glossy.
Step 2: Drawing the Layout
-
Sketch the neck bands:
Using a pencil, lightly draw three horizontal rings around the narrowest part of the neck. These will become the red “grouted” bands. -
Draft the decorative belt:
Move down to the widest part of the pin’s belly. Draw two horizontal parallel lines about an inch apart to create a belt. Inside this belt, sketch a grid of small squares or rectangles. -
Map out the mosaic shards:
For the rest of the body (between the neck and the belt, and below the belt), draw random geometric shapes. Think of trapezoids, triangles, and irregular quadrilaterals that fit together like a puzzle, leaving small uniform gaps between them for the ‘grout’ lines.
Step 3: Painting the Tiles
-
Paint the neck rings:
Fill in the three neck rings with Terra Cotta Red paint. Don’t worry about being perfectly smooth; a little texture adds to the ceramic feel. -
Detail the main shards:
Using a small flat brush and your Cream paint, fill in the large geometric shapes you drew on the body. You may need two coats here to make the ’tiles’ look opaque and solid against the primer. -
Fill the decorative belt:
Paint the small squares inside the belly belt. Alternate between Terra Cotta Red, Warm Grey, and Cream in a random pattern to create visual interest. -
Add the base stripes:
At the very bottom of the pin, paint two thin horizontal stripes in red to mirror the neck design.
Colored Grout
Don’t feel limited to brown grout! Try a dark charcoal or even a deep navy blue for the lines to dramatically change the contrast and mood of the piece.
Step 4: Grouting and Finishing
-
Mix the grout color:
Create a ‘grout’ color by mixing Dark Brown paint with a tiny drop of gold or grey. You want a color that contrasts with the cream tiles but looks like aged mortar. -
Line the mosaic:
I find this step the most meditative: take your fine liner brush and carefully paint the gaps between all your shapes with the dark grout color. Keep your hand steady and try to maintain a consistent line thickness. -
Define the neck detail:
Paint thin vertical lines through the red neck rings to make them look like rows of small, vertical red bricks rather than solid bands. -
Add faux highlights:
Once the grout is dry, mix a very watered-down white glaze. Lightly dab the center of a few random tiles to simulate how light hits uneven ceramic surfaces. -
Seal the masterpiece:
Protect your work with a high-gloss varnish or spray sealer. This is crucial as it gives the ’tiles’ that authentic, shiny fired-ceramic look.
Display your faux mosaic pin on a shelf where the light can catch those glossy finishes


Have a question or want to share your own experience? I'd love to hear from you in the comments below!