If you’re planning a bridal shower and want an activity that feels meaningful (but still super relaxed), a painting moment is such a sweet way to celebrate. Here are my favorite bridal shower painting ideas that keep things beginner-friendly, photo-ready, and totally focused on the bride-to-be.
Wedding Bouquet Watercolor
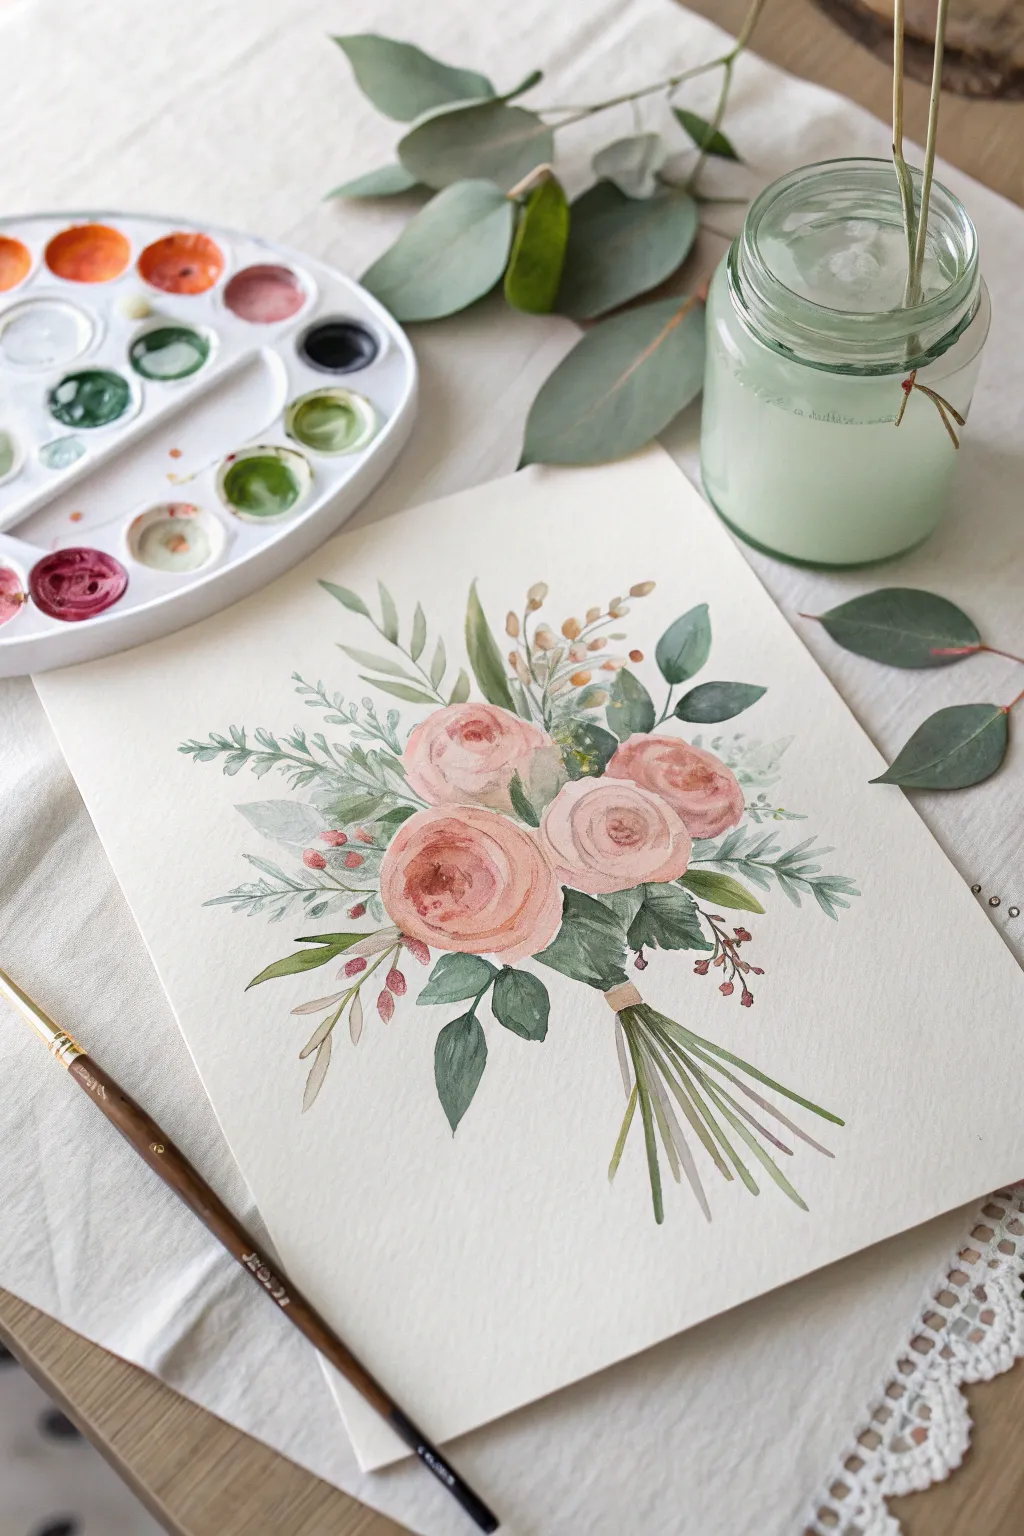
Capture the delicate beauty of a wedding bouquet with this soft and romantic watercolor project. Featuring blushing pink blooms nestled among sage green foliage, this painting makes for a thoughtful bridal shower activity or a cherished keepsake.
Detailed Instructions
Materials
- Cold-press watercolor paper (300 gsm)
- Round watercolor brushes (sizes 2, 6, and 8)
- Watercolor paints (Alizarin Crimson, Yellow Ochre, Sap Green, Viridian, Burnt Umber, Payne’s Gray)
- Pencil (HB or H) and kneaded eraser
- Jar of clean water
- Paper towel or rag
- Mixing palette
Step 1: Sketching the Composition
-
Outline the focal blooms:
Begin by lightly sketching three circular shapes in the center of your paper to represent the main roses. Place one slightly higher than the others to create a natural, triangular grouping. -
Add the stem structure:
Draw faint lines extending downward from the flower heads, gathering at a single point to form the tied bouquet handle. Don’t worry about perfect straightness; organic lines look more realistic. -
Sketch foliage placement:
Lightly map out the surrounding greenery. Draw elongated oval shapes for eucalyptus leaves extending outward and small sprigs for filler flowers, ensuring the composition feels balanced but not perfectly symmetrical.
Step 2: Painting the Roses
-
Mix the blush tone:
Create a watery mix of Alizarin Crimson with a tiny touch of Yellow Ochre to get a soft, warm pink. Test the color on a scrap piece of paper first to ensure it’s delicate enough. -
Paint the rose centers:
Using your size 6 brush, paint tight C-shaped strokes in the center of the first rose outline. Keep the pigment slightly more concentrated here. -
Expand the petals:
Dip your brush in water to dilute the paint on your brush. Paint larger, looser C-shapes around the center strokes, leaving small white gaps between them to represent the petal edges catching light. -
Complete the blooms:
Repeat this process for the other two roses. Vary the pink intensity slightly between them—perhaps making the bottom rose a bit deeper in color—to add visual depth to the bouquet.
Muddy Waters?
If your greens look dull or brown, your water jar is likely dirty. Change your water frequently, or use two jars: one for rinsing dirty brushes and one for picking up clean clear water.
Step 3: Adding Greenery and Filler
-
Mix varied greens:
Prepare two green mixtures: a lighter, warmer sage green (Sap Green + lots of water) and a cooler, deeper green (Viridian + a touch of Payne’s Gray). -
Paint the main leaves:
Using the size 8 brush, paint the larger leaves tucked immediately around the roses. Use the ‘press and lift’ technique: touch the tip to the paper, press down to widen the belly of the brush, and lift up to taper the point. -
Add eucalyptus sprigs:
Switch to a size 6 brush and your cooler green mix. Paint rounder, coin-shaped leaves specifically on the upper right and left sides, connecting them with thin stems. -
Create fern-like textures:
With the size 2 brush and a watery green mix, paint delicate, feathery fronds extending out to the sides. These should look light and airy compared to the solid leaves. -
Insert filler accents:
Mix a muted red-brown using Burnt Umber and a touch of Crimson. Dab small dots or tiny ovals on fine stems to create the berries or buds peeking out between the leaves.
Pro Tip: Soft Edges
For dreamier roses, touch a clean, damp brush to the outer edge of a wet petal. The pigment will bleed slightly into the clear water, creating a soft, fading gradient.
Step 4: Final Details
-
Paint the stems:
Use a mix of Sap Green and Burnt Umber for the stems at the bottom. Start from the ‘binding point’ and paint quick, straight strokes downward. Leave gaps to keep them distinct rather than painting a solid block. -
Add the binding ribbon:
Paint a small horizontal band where the stems gather using a diluted Yellow Ochre or light brown to suggest a ribbon or twine holding the bouquet together. -
Deepen shadows:
Once the first layers are completely dry, mix a slightly darker version of your pink and green. Carefully add small strokes in the deepest crevices of the roses and under overlapping leaves to increase contrast. -
Review and refine:
Step back and look at the whole piece. If any areas look too empty, add a faint, watery leaf or a few extra berry dots to balance the composition.
Allow your painting to dry flat completely before framing or gifting this lovely floral tribute


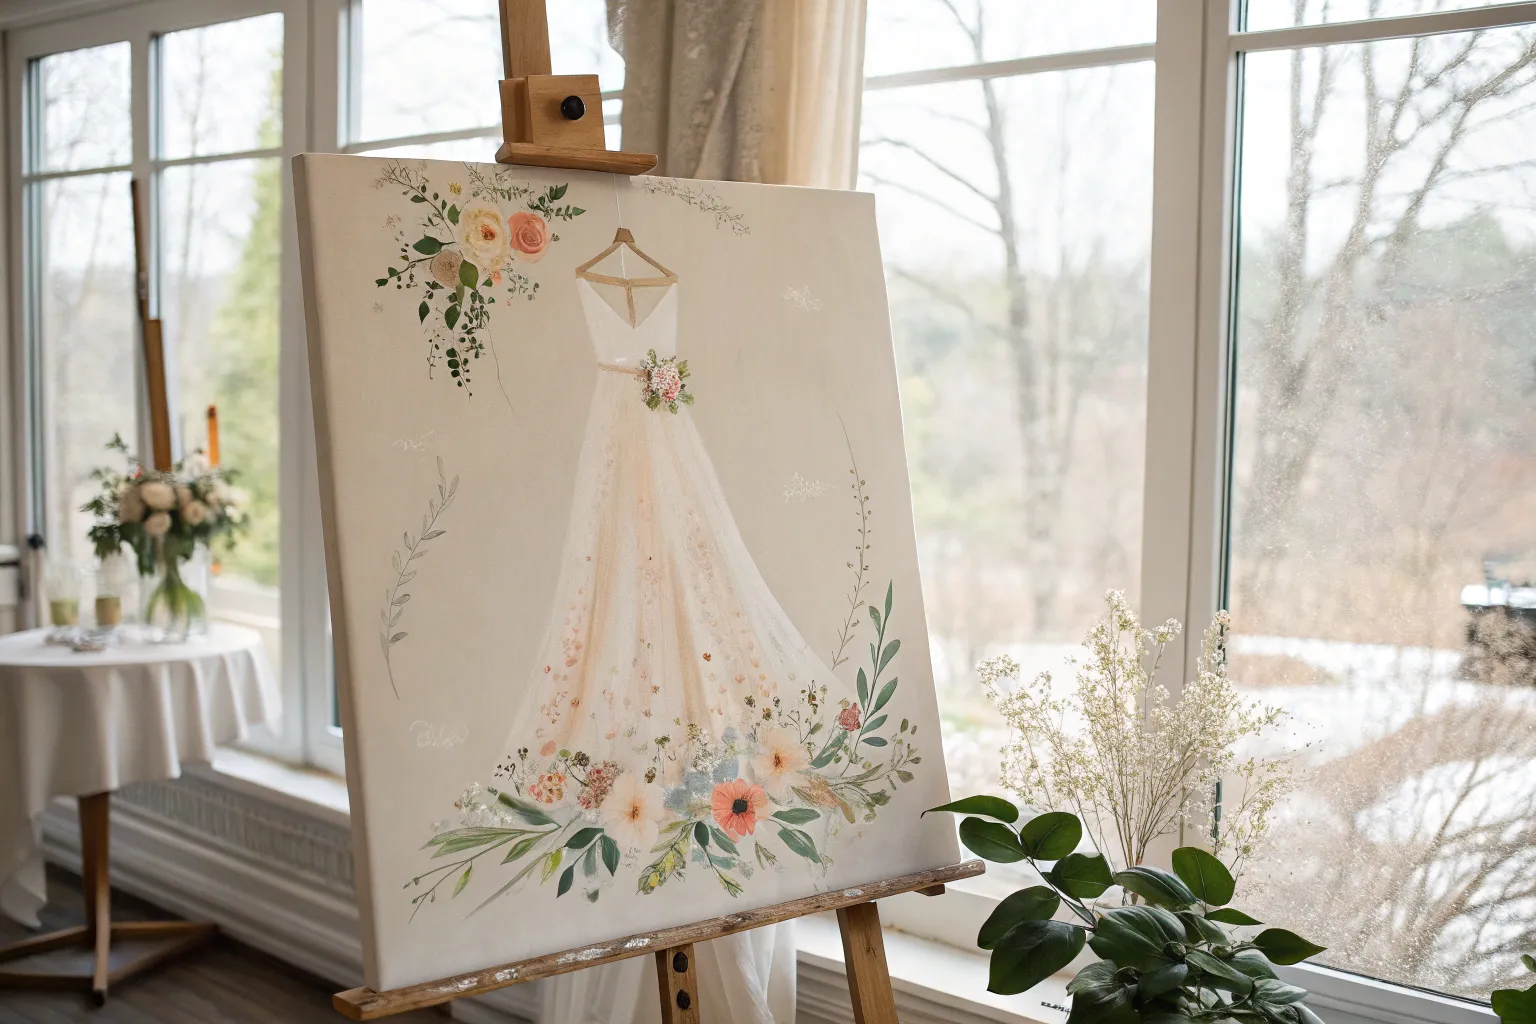
Bride Dress Silhouette on Canvas
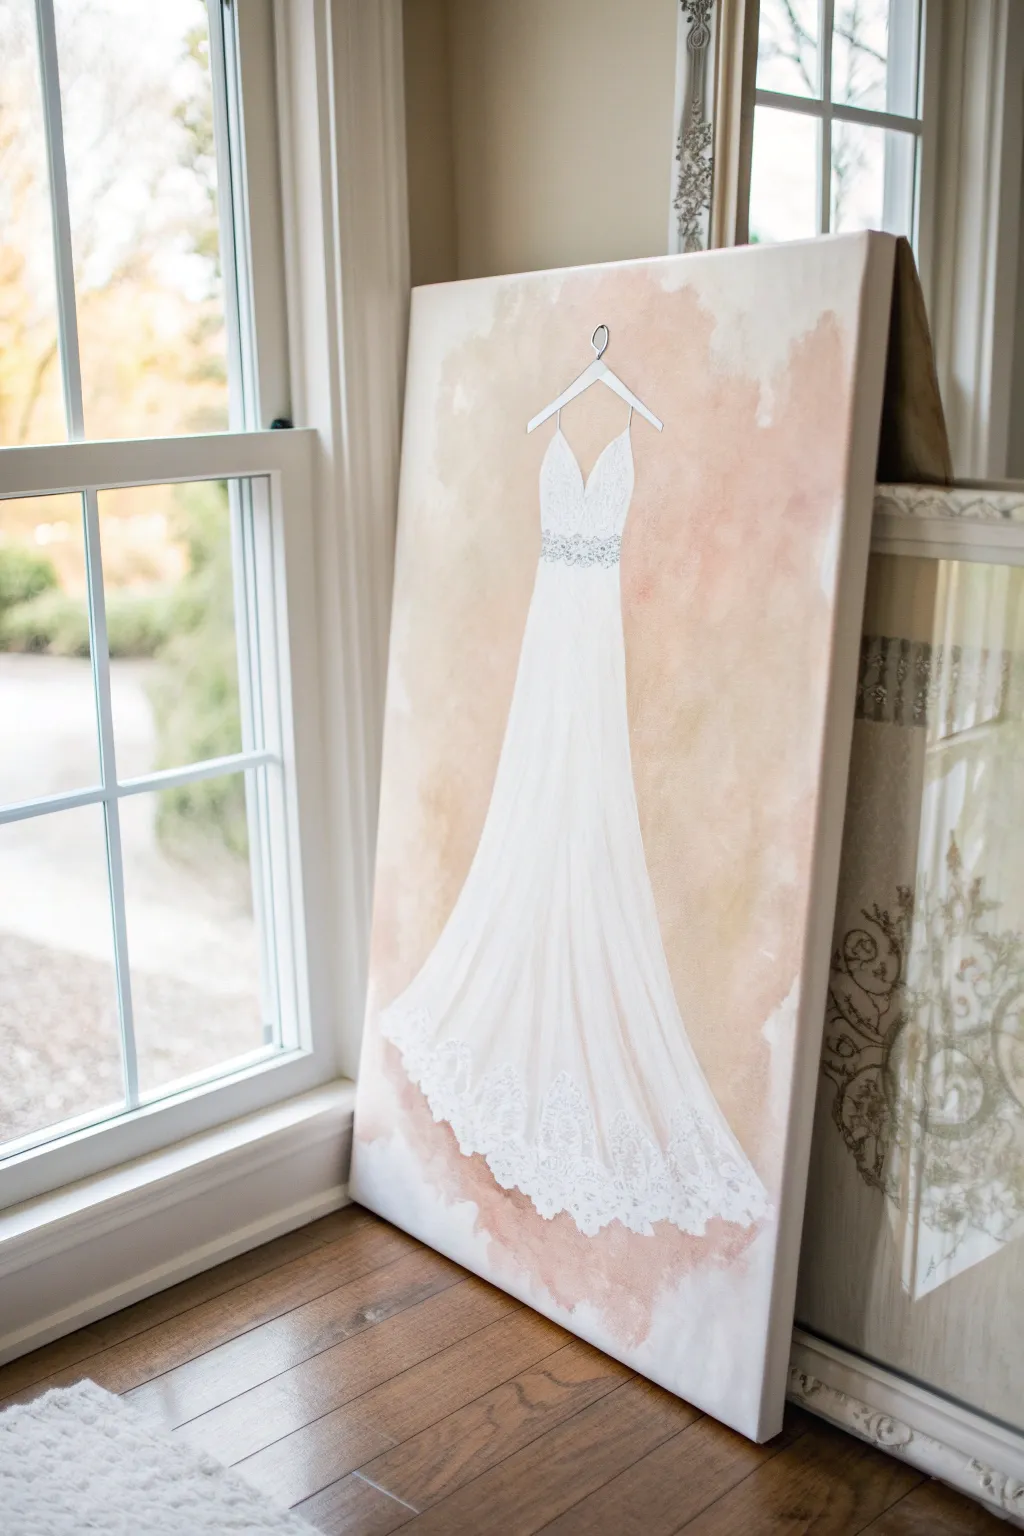
Capture the elegance of the bride’s gown forever with this dreamy, watercolor-style acrylic painting. Using soft washes of blush and peach behind a detailed white silhouette creates a stunning keepsake that doubles as sophisticated bridal shower décor.
Step-by-Step Tutorial
Materials
- Large rectangular canvas (approx. 24×36 inches)
- Acrylic paints: Titanium White, Burnt Sienna, Yellow Ochre, Alizarin Crimson, Raw Umber
- Glazing medium or water for thinning paint
- Sketching pencil (HB or 2H)
- Eraser
- Large flat brush (1-2 inch) for background
- Medium filbert brush for dress form
- Fine detail brush (0 or 00) for lace and hanger
- Palette or mixing plate
- Reference photo of the bride’s dress
- Paper towels
Step 1: Creating the Background Wash
-
Prepare your palette:
Mix a small amount of Alizarin Crimson with Yellow Ochre and plenty of Titanium White to create a soft peach tone. Make a second puddle that leans more towards beige using Burnt Sienna and White. -
Thin the paint:
Dilute your paint mixtures significantly with water or glazing medium. You want a consistency similar to watercolor paint or ink, translucent rather than opaque. -
Apply the first wash:
Using your large flat brush, apply the peach mixture loosely around the center of the canvas where the dress will hang. Use irregular, cloud-like strokes and leave the edges of the wash uneven for an organic look. -
Add depth with beige:
While the first layer is still slightly damp, introduce the beige mixture in patches, blending it softly into the peach areas. Let the colors bleed into each other naturally. -
Soften the edges:
Clean your brush and use plain water to feather out the harsh edges of your painted areas, fading the color into the white of the canvas. -
Allow to dry:
Let this background layer dry completely. It should look like a soft, mottled cloud of blush and tan tones.
Gown Glazing Tip
For a satin look, mix a pearlizing medium into your white topcoat. This adds a subtle shimmer that mimics real bridal fabric under light.
Step 2: Sketching the Silhouette
-
Mark the placement:
Lightly mark the center vertical line of your canvas to ensure the dress hangs straight. Decide where the hanger will sit, leaving enough room at the top for visual breathing space. -
Outline the hanger:
Sketch a simple, elegant wire hanger shape. Draw the hook and the sloping shoulders, keeping lines clean and symmetrical. -
Draft the bodice:
Following the bride’s dress design, sketch the bodice shape—whether it’s sweetheart, V-neck, or strapless. Pay attention to the waistline placement. -
Flow the skirt:
Draw the long, flowing lines of the skirt extending down from the waist. Flare the skirt out gently towards the bottom to mimic the weight and drape of fabric.
Too Much Color?
If your background wash dries too dark, wash over it with a distinct layer of heavily watered-down white acrylic (a white glaze) to push it back.
Step 3: Painting the Gown
-
Block in the white:
Using your filbert brush and undiluted Titanium White, fill in the entire shape of the dress. You may need two coats to fully cover the background wash. -
Define the shadows:
Mix a very tiny amount of Raw Umber or Burnt Sienna into your white to create a light warm grey. Use this to paint vertical folds in the skirt, suggesting movement and drapery. -
Highlight the form:
Apply pure white highlights on the tops of the folds and the center of the bodice to make the dress form pop forward. -
Paint the hanger:
Carefully trace your hanger sketch with white paint or a very pale grey, using your fine detail brush to keep the lines sharp.
Step 4: Adding Lace Details
-
Detail the waist:
If the dress has a belt or intricate waist detail, use your fine brush to stipple small dots of grey and white, mimicking beading or lace texture. -
Create the lace hem:
At the bottom of the skirt, use the tip of your smallest brush to paint delicate, scallop-like patterns. Keep the paint slightly translucent here so it looks like sheer fabric. -
Refine the bodice:
Add similar lace details to the bodice if applicable, using small loops and dots to suggest texture rather than painting every thread. -
Final touches:
Step back and assess your values. If the dress looks too flat, deepen the darkest shadows in the folds slightly with a more concentrated grey wash. -
Clean up:
Use white paint to tidy up any edges around the dress silhouette where the background wash might look messy against the crisp white gown.
Hang this beautiful tribute prominently at the shower and watch the bride-to-be light up seeing her gown immortalized as art


Lovebirds and Vines Scene
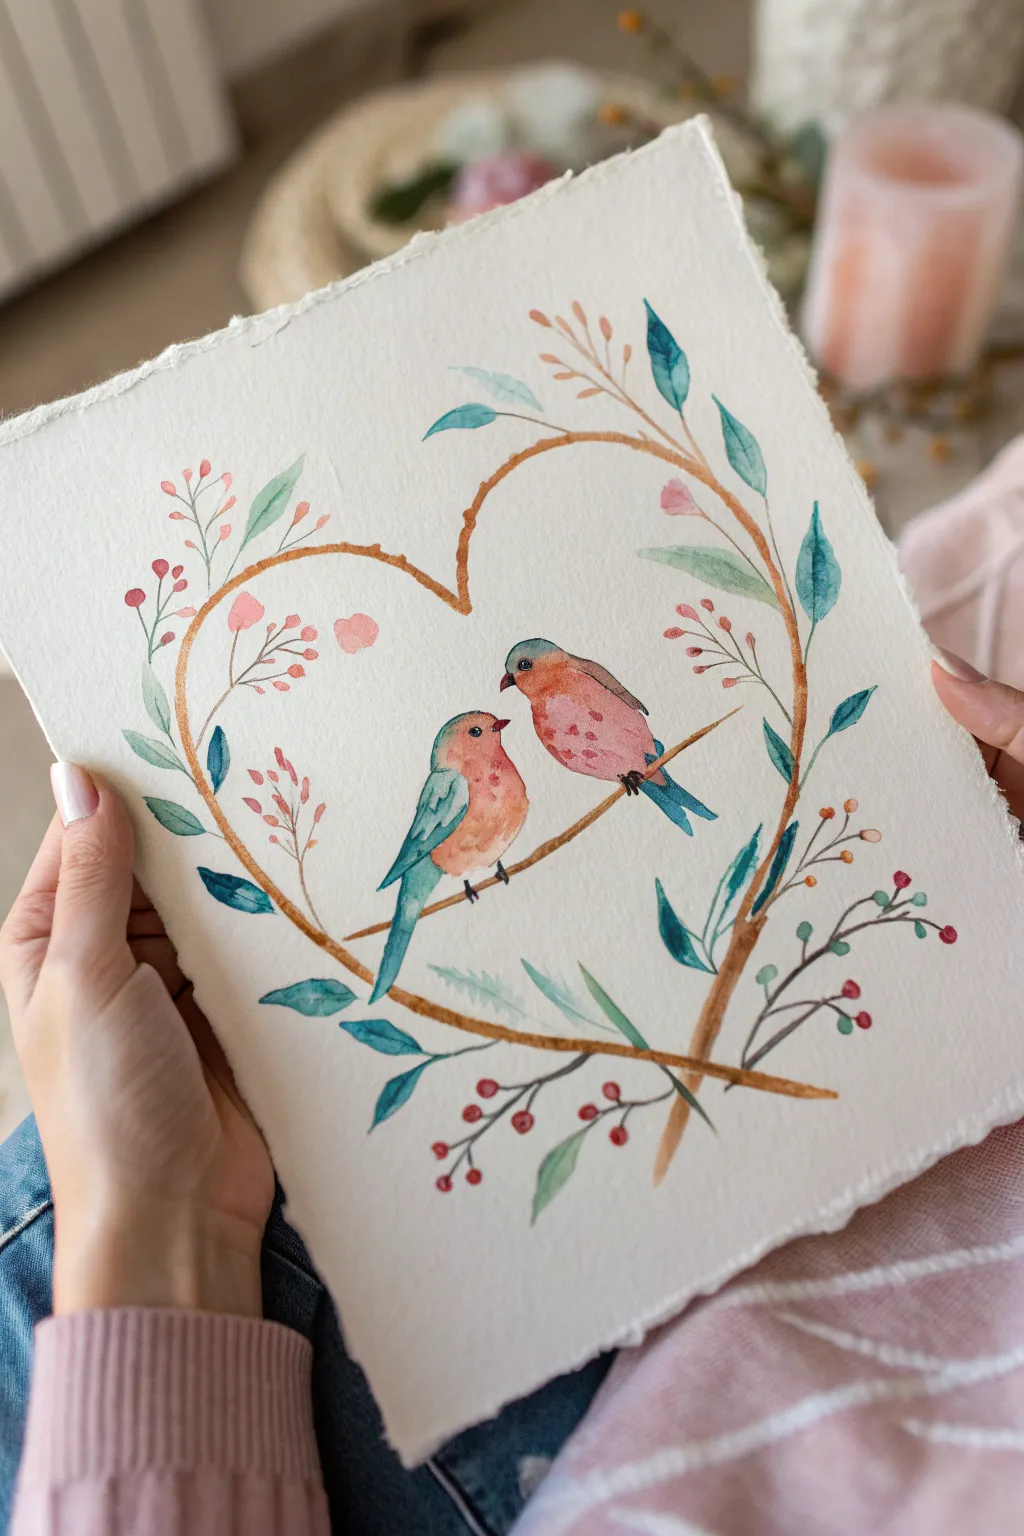
Celebrate the happy couple with this delicate watercolor painting featuring two sweet birds perched inside a heart formed by twisting vines. The soft color palette and botanical details make this piece a romantic and timeless addition to any newlywed home.
Detailed Instructions
Materials
- Cold press watercolor paper (deckled edge optional)
- Watercolor paints (coral pink, teal/turquoise, sap green, burnt sienna, crimson)
- Round watercolor brushes (size 2, 4, and 6)
- Pencil (HB or H)
- Kneaded eraser
- Clean water jar
- Paper towels
- Painter’s tape or a board for mounting
Step 1: Sketching the Composition
-
Outline the heart:
Begin by lightly sketching a large heart shape in the center of your paper. Don’t worry about perfect symmetry; a slightly organic, rustic shape works best for the vine texture. -
Draw the main branches:
Turn your single line into a branch by thickening it slightly. Draw a diagonal branch cutting across the lower third of the heart for the birds to sit on, extending slightly outside the heart frame. -
Sketch the birds:
Place two oval shapes side-by-side on the diagonal branch. Add smaller circles for heads. The bird on the left should look slightly up and to the right, while the bird on the right faces left, creating a connection between them. -
Refine bird details:
Add small triangular beaks, tail feathers extending downwards, and wings tucked against their sides. Keep your pencil marks very faint so they won’t show through the transparency of the watercolor later. -
Map out the foliage:
Lightly sketch stems branching off the main heart vine. Add small clusters of berries and a few key leaves, but leave plenty of negative space so the design doesn’t feel cluttered.
Clean Edges Pro Tip
For the rough, vintage look shown in the photo, tear your watercolor paper against a ruler instead of cutting it. This creates a soft ‘deckled’ edge that elevates the finish.
Step 2: Painting the Lovebirds
-
First wash on the bodies:
Mix a watery coral pink. Paint the chest and belly of the right bird. For the left bird, paint the chest pink but transition into a soft teal blue on the wing and back while the paint is still wet to create a soft blend. -
Adding wing definitions:
Once the first layer is damp (not soaking), use a size 2 brush and a slightly more saturated teal to paint the wing feathers on the left bird. Use a deeper pink mixed with a touch of purple for the right bird’s wing. -
Heads and beaks:
Paint the top of the left bird’s head with a light teal wash. For the right bird, use a soft grey-blue on the crown. Carefully fill in the beaks with a dark grey or black, leaving a tiny speck of white paper for a highlight. -
Body textures:
I like to add tiny dots of darker pink on the chests of both birds while the paper is bone dry. This stippling effect mimics the texture of fluffy down feathers. -
The eyes:
Using your smallest brush and concentrated black paint, create the eye on each bird. Add a tiny white reflected light dot (or use white gouache later) to bring them to life.
Step 3: Creating the Botanical Heart
-
Painting the main vine:
Load a size 4 brush with burnt sienna/brown. Paint the heart outline and the perch branch. Vary your pressure as you drag the brush to create thick and thin sections, simulating natural wood. -
painting the teal leaves:
Mix a cool teal-green. Paint the larger leaves scattered around the heart frame. Experiment with painting a few leaves with just water first, then dropping pigment into them for a soft, dreamy look. -
Adding green foliage:
Switch to a sap green or olive tone. Paint slender, elongated leaves in the gaps between the teal ones. Ensure some leaves overlap the vine while others tuck behind it for depth. -
Berry clusters:
Using a crimson or deep red, dab small circles onto the ends of the finer sketched stems. vary the saturation—some should be bold red, others remarkably watery and pale. -
Fine details:
Use your size 2 brush and a diluted brown to connect the berries to the main vine with hair-thin stems. -
Final touches:
Look for empty spots that feel unbalanced. Add faint, watery splashes of pink or blue, or simplified floating petals to fill the space without adding visual weight.
Fixing Water Blooms
If you get a ‘cauliflower’ bloom where water pushed pigment away, wait for it to dry completely. Then, gently scrub the area with a damp stiff brush and dab with a tissue to soften the hard edge.
Allow the painting to dry flat completely before framing or gifting this sweet symbol of affection


Couple Silhouette at Sunset
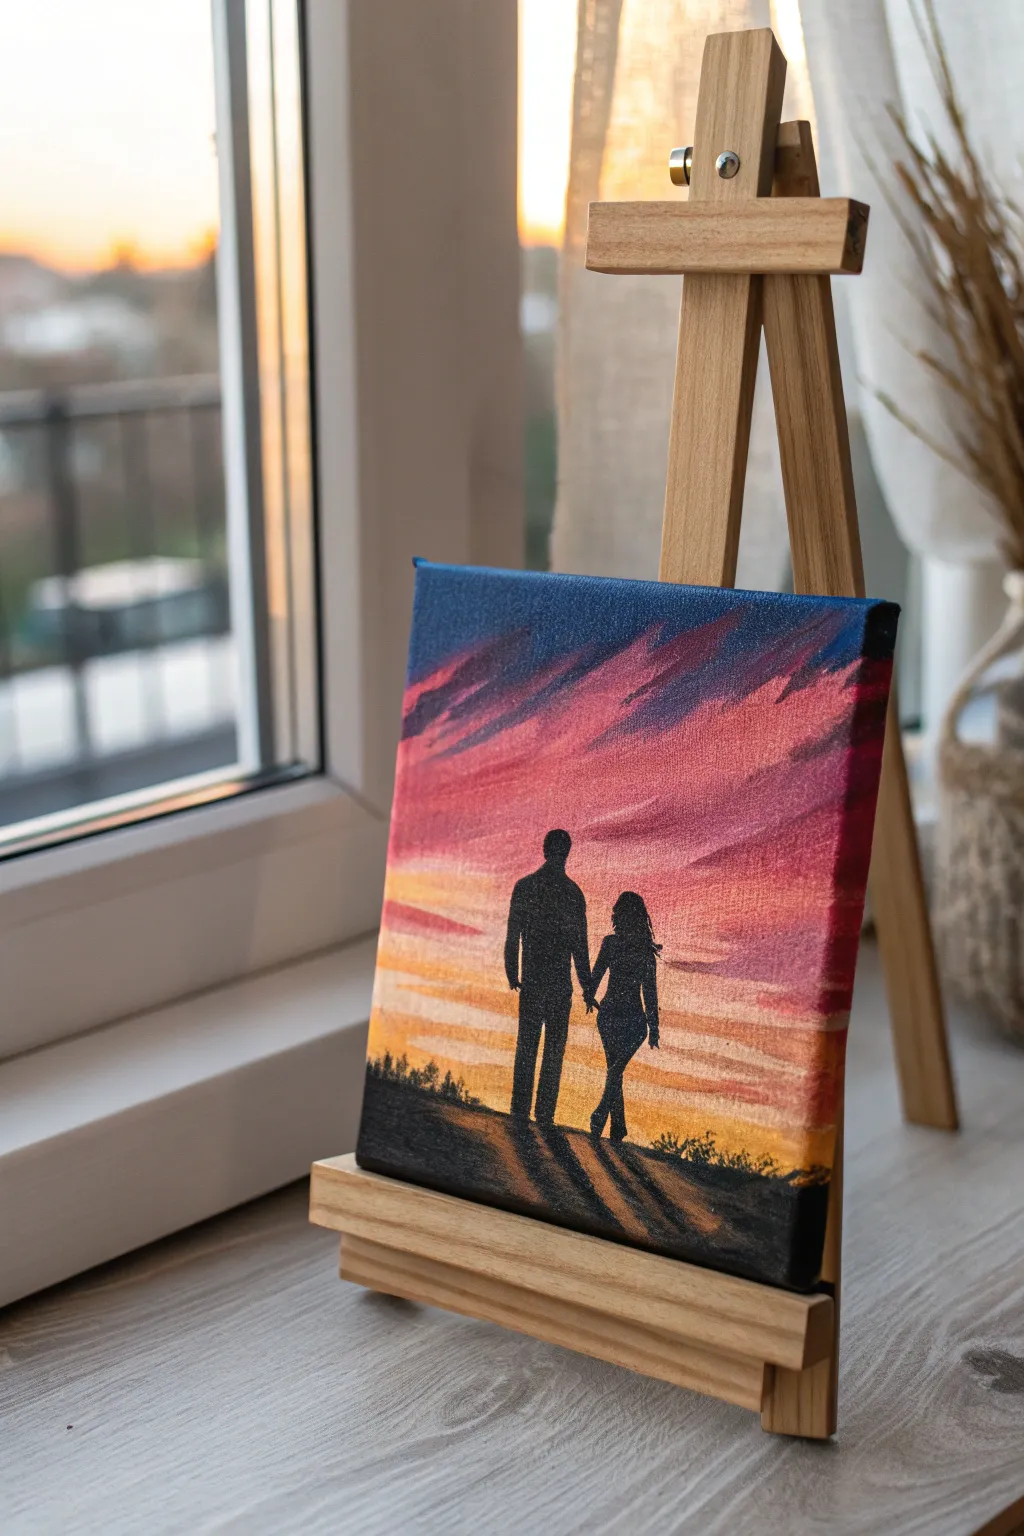
Capture the romance of a couple walking into a vibrant dusk with this striking acrylic painting. The bold black silhouette contrasts beautifully against the blended gradient of a dramatic sunset sky, making it a perfect, personalized gift for a bridal shower.
Detailed Instructions
Materials
- Small square canvas (e.g., 6×6 or 8×8 inches)
- Acrylic paints: Titanium White, Cadmium Yellow, Orange, Magenta (or Crimson), Deep Violet, Phthalo Blue (or Ultramarine), Mars Black
- Flat shader brushes (medium and small)
- Small round detail brush (size 0 or 1)
- Palette or paper plate
- Cup of water and paper towels
- Pencil (optional)
- Mini wooden easel for display
Step 1: Painting the Sky Gradient
-
Establish the horizon line:
Visualize where you want the ground to be. Usually, the bottom quarter of the canvas works best. You can lightly mark this with a pencil if you wish, but keep it faint. -
Start with the brightest light:
Load a medium flat brush with Titanium White and a touch of Cadmium Yellow. Paint horizontal strokes just above your imagined horizon line to create the glowing sun effect. -
Introduce the orange hues:
Without cleaning your brush completely, pick up some Orange. Blend this into the yellow area while moving upward, ensuring a smooth transition where the colors meet. -
Transition to pinks and purples:
Clean your brush. Mix Magenta with a tiny bit of White to make it creamy. Apply this above the orange band, using slightly angled strokes to mimic cloud movement. -
Deepen the upper canvas:
Move higher up the canvas using Deep Violet. Blend the bottom edge of the violet into the pink layer while the paint is still wet to avoid hard lines. -
Add the twilight blue:
For the very top corners and upper edge, use Phthalo Blue mixed with a touch of Violet. This creates the darkest part of the evening sky, framing the sunset.
Silhouette Smudges
If you smudge black paint onto the sky, let it dry completely rather than wiping it while wet. Once dry, paint over the mistake with the original sky color to cover it up.
Step 2: Adding Texture and Clouds
-
Create sweeping clouds:
Use a smaller flat brush with pure Magenta or a mix of Magenta and Violet. Apply quick, sweeping diagonal strokes across the upper sky to give the impression of wind-swept clouds. -
Highlight the cloud edges:
Dip the corner of your brush in a pale peachy-pink mix. Gently tap the bottom edges of your purple clouds to catch the light from the setting sun below. -
Refine the horizon glow:
Return to the area just above the ground. Add faint, horizontal streaks of White and Yellow to intensify the brightness right where the couple will be walking. -
Allow to dry:
Let the background dry completely. Since the silhouette needs crisp edges, a wet background will smudge the black paint and ruin the effect.
Step 3: Painting the Silhouette
-
Sketch the figures:
Using a pencil, very lightly outline the shape of the couple. Focus on their posture—holding hands and walking away. Simple shapes allow the viewer to project their own likeness onto the painting. -
Paint the ground:
Using Mars Black and a flat brush, fill in the bottom ground area. Use choppy, uneven strokes at the top edge of the ground to suggest grass or uneven terrain. -
Fill in the figures:
Switch to your small round detail brush and Mars Black paint. Carefully fill in the shapes of the couple. I like to stabilize my hand on a dry part of the canvas or the table edge for steadier lines. -
Refine the connection:
Pay close attention to where their hands meet. A tiny gap or a gentle connection point is all you need to show they are holding hands. -
Add long shadows:
Mix a tiny amount of water into your black paint to make it translucent (a wash). Paint long, diagonal shadows extending from the couple’s feet toward the bottom right corner. -
Texture the foreground:
Using the tip of a small brush, dab tiny black dots and short lines along the horizon line near the couple’s feet to simulate distant grass or wildflowers. -
Final touches:
If the black looks patchy once dry, add a second coat to the figures to make them completely opaque and bold against the bright sky.
Pro Tip: Custom Profiles
Take a profile photo of the actual couple and trace their outline onto the canvas using transfer paper for a truly personalized and recognizable silhouette.
Place your masterpiece on the mini easel and enjoy the warm, romantic glow it brings to the room.
BRUSH GUIDE
The Right Brush for Every Stroke
From clean lines to bold texture — master brush choice, stroke control, and essential techniques.
Explore the Full Guide
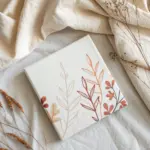
Mini Canvases as Shower Favors
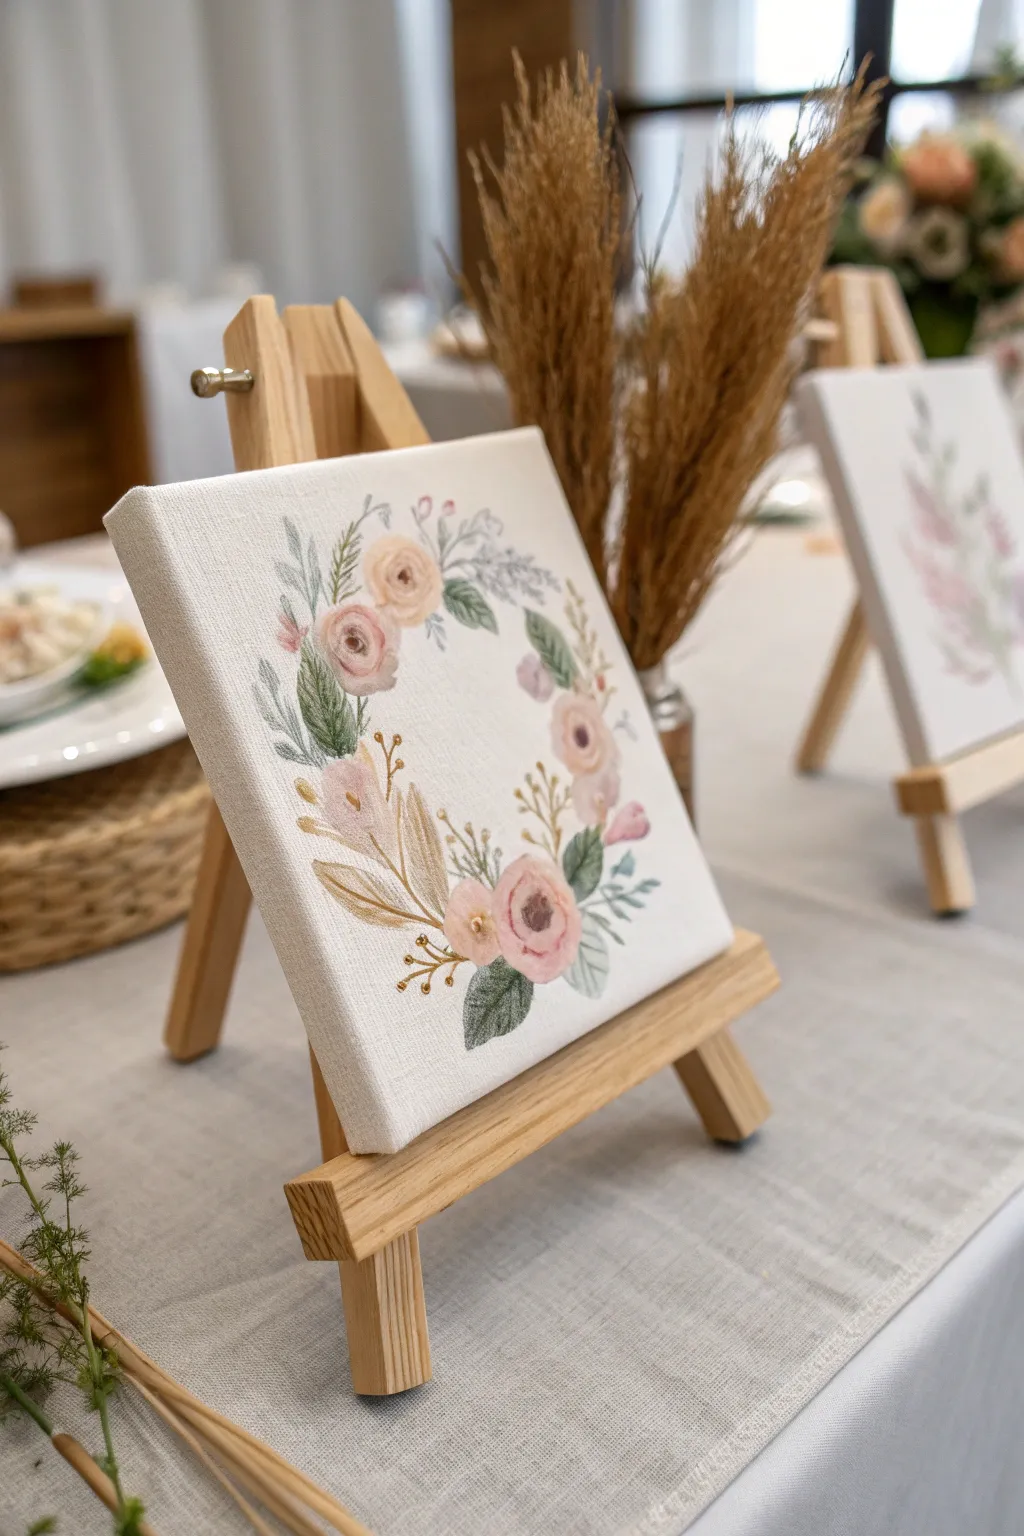
These charming mini canvases feature a delicate watercolor-style floral wreath that serves as both a relaxing activity and a beautiful take-home favor. The soft pinks, dusty greens, and touches of gold create an elegant, timeless design perfect for a bridal shower setting.
Step-by-Step Tutorial
Materials
- 4×4 inch mini stretched canvas
- Small wooden easel (tabletop size)
- Acrylic paints: Titanium White, Blush Pink, Dusty Rose, Sage Green, Olive Green, Metallic Gold
- Matte medium or flow improver (to create watercolor effects with acrylics)
- Small round brushes (sizes 0, 2, and 4)
- Pencil (HB or H)
- Paper plate or palette
- Water cup
- Paper towels
Step 1: Preparation & Sketching
-
Prime the surface:
Even though most canvases come primed, applying a fresh, thin coat of Titanium White ensures a smooth, bright base for your delicate florals. -
Establish the shape:
Lightly trace a circle in the center of the canvas using a pencil. You can trace the bottom of a cup or a roll of masking tape to get a perfect round shape. -
Plan the composition:
Very faintly sketch the placement of your main flowers. Focus on three main clusters: one lower left, one upper left, and a smaller one on the right side to balance the wreath.
Paint Too Opaque?
If your acrylics look too heavy or ‘plastic-like,’ mix in more water or glaze medium. You are aiming for a watercolor look, so translucency is key.
Step 2: Painting the Blooms
-
Mix your base pink:
On your palette, mix a small amount of Blush Pink with a drop of matte medium or water. You want the paint to be thin and slightly translucent, similar to watercolor. -
Paint the first roses:
Using a size 4 brush, paint loose, irregular circles for the main rose shapes. Keep the edges soft and wavy rather than perfectly round. -
Add depth to the centers:
While the base pink is still tacky, mix a tiny bit of Dusty Rose into your brush. Dab this darker color into the center of your flowers in a ‘C’ or spiral motion to imply petals. -
Highlight the petals:
load a clean size 2 brush with watered-down White. Gently blend the outer edges of the roses into the canvas background to create a dreamy, soft focus look. -
Create smaller buds:
Using the Dusty Rose shade, paint small, teardrop-shaped buds scattered near the main flower clusters. I like to group these in twos or threes.
Display Pro Tip
Write the guest’s name in calligraphy in the center of the wreath. This transforms the favor into a personalized place card for the table setting.
Step 3: Adding Greenery
-
Mix the foliage colors:
Prepare two shades of green: a pale Sage Green for the larger leaves and a deeper Olive Green for contrast. Thin both with your flow medium. -
Paint structural leaves:
With the size 2 brush and Sage Green, paint elongated leaves tucking out from underneath the main roses. Use a ‘press and lift’ motion—press down for the belly of the leaf, then lift for the tip. -
Add darker contrast:
Switch to Olive Green and paint smaller, darker leaves overlapping the sage ones. This layering creates visual depth without adding bulk. -
Paint fern accents:
Using the size 0 brush, paint very thin stems radiating outward. Add tiny, quick dashes along the stems to create delicate fern-like sprigs in a greyish-green tone.
Step 4: Metallic Accents & Finishing
-
Prepare the gold:
Shake your Metallic Gold paint well. You want this opaque, so don’t dilute it too much. -
Add gold sprigs:
Using your finest brush (size 0), paint thin, branching stems curving out from the floral clusters. Add tiny dots at the ends of these branches to mimic berries or buds. -
Detail the leaves:
Add very subtle gold veins to one or two of the larger green leaves for a cohesive shimmer. -
Refine the centers:
Place three tiny dots of gold or dark brown in the very center of the open roses to define the stigma. -
Review and balance:
Step back and look at the wreath. If there are large gaps, fill them with faint washes of green or tiny pink petals. -
Final dry:
Allow the canvas to dry completely for at least an hour before placing it on the mini easel.
Your guests will love taking home this tiny piece of handmade art that captures the romance of the day
Venue or Ceremony Arch Illustration
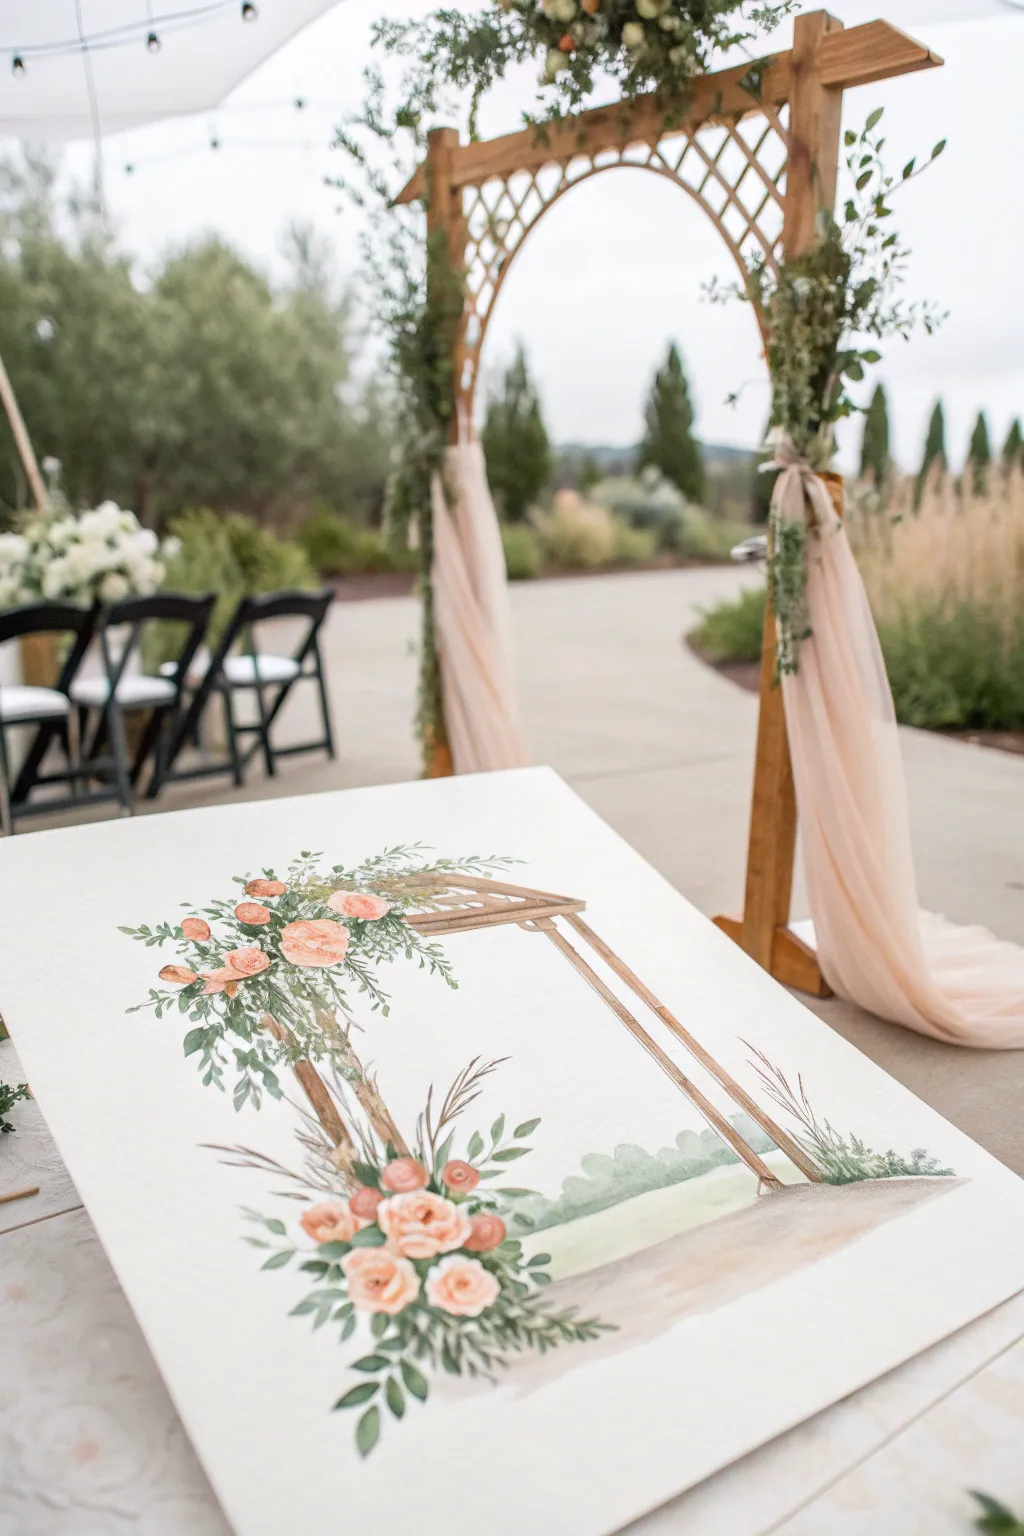
Immortalize the wedding venue’s most iconic feature with this delicate mixed-media illustration. By combining architectural lines with soft floral accents, you’ll create a sentimental keepsake that beautifully mirrors the actual ceremony backdrop.
Detailed Instructions
Materials
- High-quality watercolor paper or illustration board (at least 11×14 inches)
- Watercolor paints (shades of brown, sage green, deep forest green, blush pink, coral)
- Fine liner pens (brown or sepia, waterproof)
- Pencil (HB or H)
- Ruler
- Round watercolor brushes (sizes 2, 6, and 10)
- Clean water jar and paper towels
- Reference photo of the venue’s arch
Step 1: Drafting the Structure
-
Establish the horizon:
Begin by lightly penciling a horizontal line across the lower third of your paper to represent the ground level where the arch will stand. -
Outline the main posts:
Using a ruler, draw the two vertical posts of the arbor. Keep the perspective slightly angled if you want to match the 3D look of the reference, with the front post appearing slightly taller and larger than the rear one. -
Connect the crossbeams:
Sketch the horizontal beams across the top. Pay attention to any lattice work or decorative curves found in your specific venue’s arch design. -
Detail the wood grain:
Lightly sketch uneven, shaky vertical lines inside the posts to mimic the texture of wood, adding small knots or imperfections for realism. -
Map out floral placement:
Draw loose, circular shapes where the floral arrangements will go—typically one large cluster at the bottom left and a draping cluster at the top left.
Step 2: Painting the Wood & Landscape
-
First wash for wood:
Mix a watery light brown or ochre. Paint the wooden beams, letting the color pool slightly at the joints to create natural shadows. -
Defining the edges:
While the first layer is still damp, drop in a darker sepia tone along the right edges of the posts to establish dimension and form. -
Adding texture:
Once the wood layers are dry, take a size 2 brush with concentrated dark brown paint and trace over your pencil wood-grain lines to sharpen the texture. -
Painting the lawn:
For the grass, use a wide wash of pale lime green. Keep the strokes horizontal and sweep them towards the horizon line. -
Creating the background foliage:
Mix a muted, cool green. Paint soft, irregular humps along the horizon line to suggest distant bushes or trees, keeping the edges soft to maintain depth. -
Grounding the structure:
Add a wash of sandy beige or soft grey directly under the arch posts to create a pathway or dirt patch, blending it gently into the grass area.
Loose is best
Don’t overwork the flowers. The beauty of this style is in the ‘suggestion’ of blooms rather than botanical accuracy. Leave white space for highlights.
Step 3: Adding the Floral Details
-
Base layer for roses:
Mix a very watery blush pink. Fill in your circular floral sketches loosely; don’t worry about perfect petal shapes yet. -
Deepening the blooms:
While the pink is wet, drop concentrated coral or darker pink into the centers of the circles. Let the color bleed outward naturally. -
Painting the leaves:
Using a size 6 brush, paint tear-drop shapes in sage and forest green radiating out from the flowers. Vary the green shades to visualize different types of foliage. -
Adding hanging vines:
Switch to your smallest brush. Paint thin, trailing vines drooping down from the top arrangement, adding tiny leaves along the stems. -
Overlaying wispy grasses:
Near the bottom floral cluster, use quick, upward flicking strokes with a brownish-green mix for pampas grass or wheat textures. -
Refining petals:
Once the flowers are fully dry, use a mix of crimson and brown to paint small “C” curves inside the blooms to define individual petals. -
Final ink touches:
If desired, go over key structural lines of the wood and the centers of the flowers with a fine sepia liner pen to make the illustration pop.
Muddy colors?
If your greens and pinks are turning brown where they touch, let the flower layer dry completely before painting adjacent leaves.
Now you have a charming, personalized piece of art that freezes the ceremony setting in time


Have a question or want to share your own experience? I'd love to hear from you in the comments below!