
If you’ve ever stared at a bumpy pumpkin and thought, “How am I supposed to paint on this?”—you’re in the right place. Those warts and ridges are actually built-in texture that can turn simple paint into something seriously eye-catching.
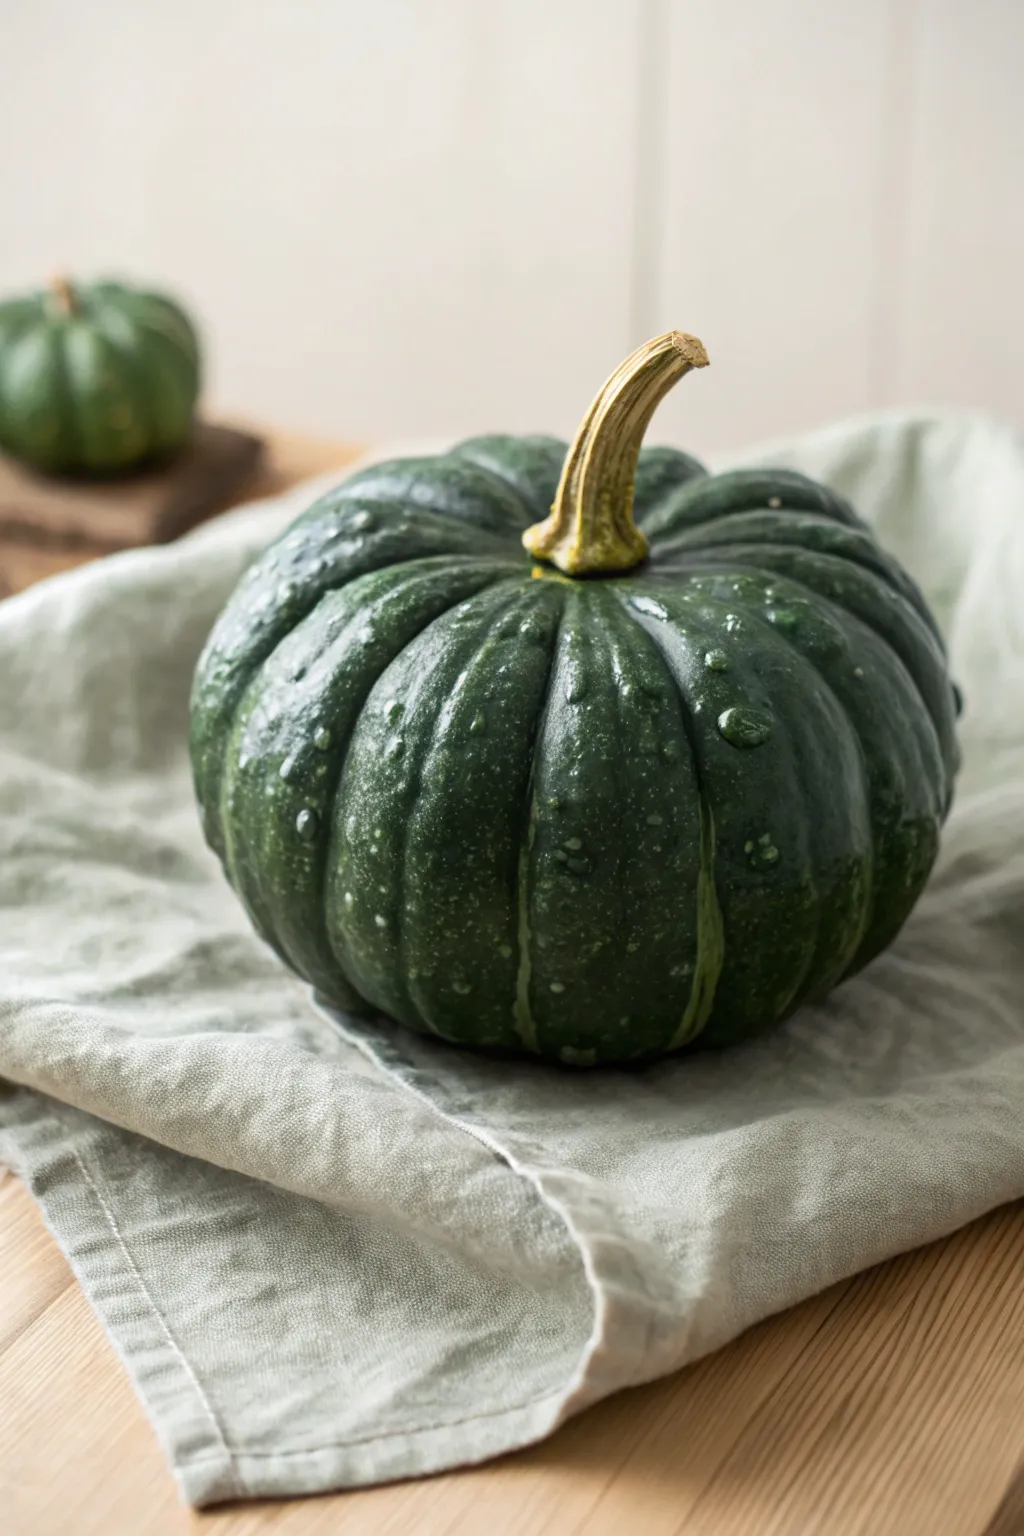
Cauldron Bubbles on a Bumpy Pumpkin
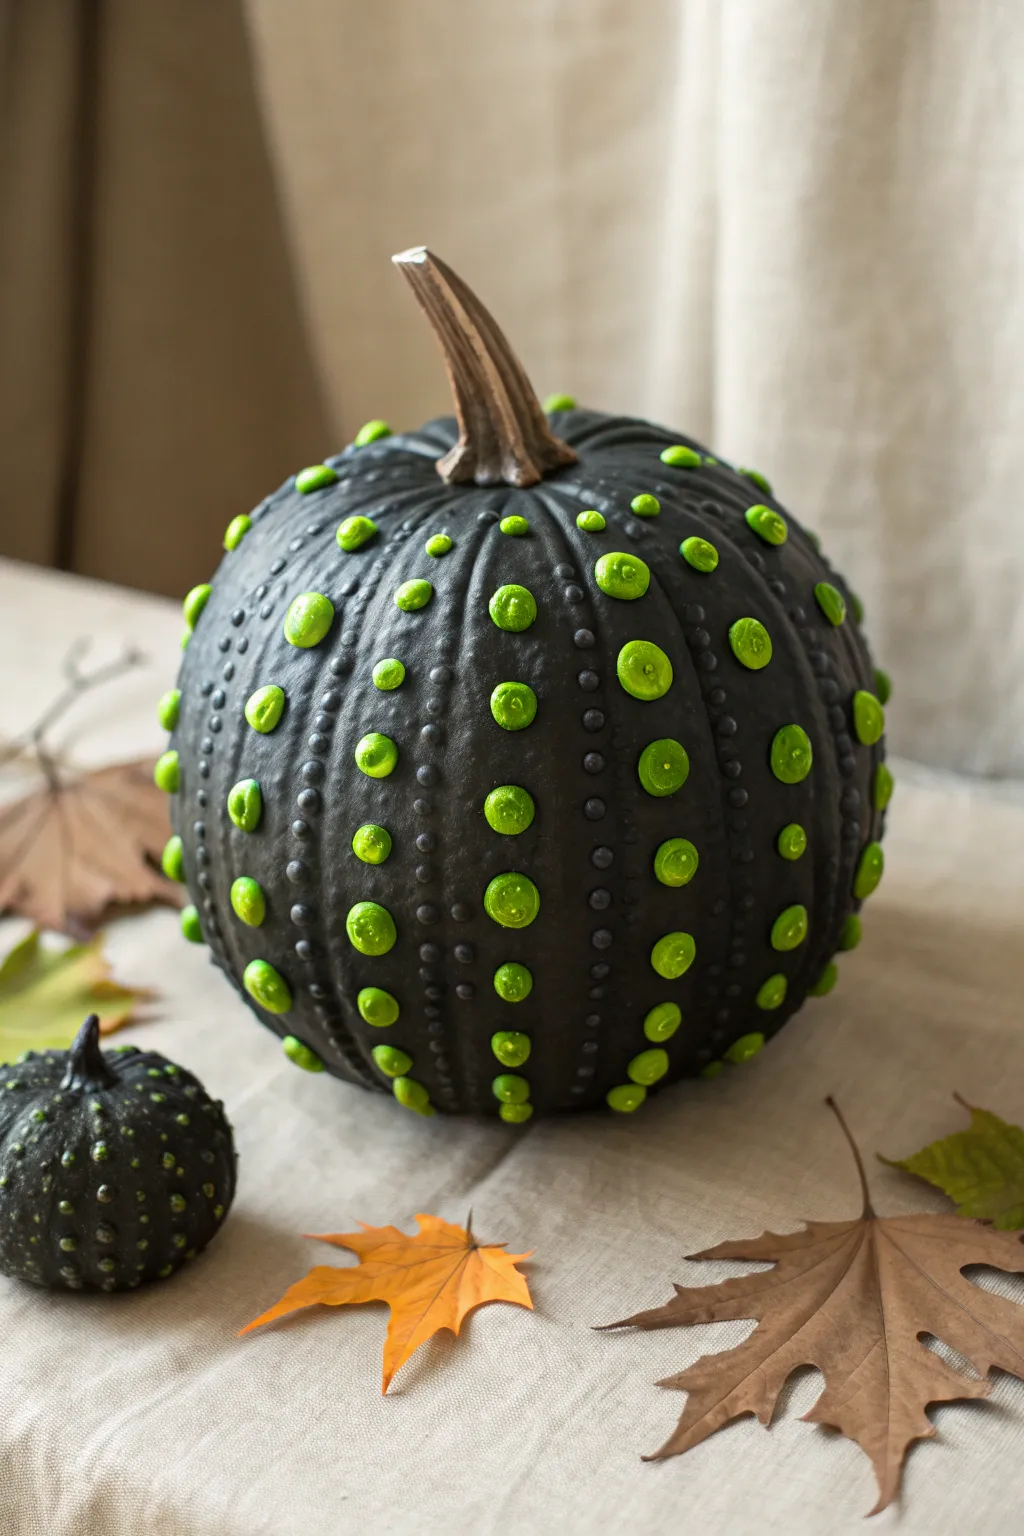
Transform a textured pumpkin into a witch’s brew with this strikingly simple high-contrast design. By highlighting the natural warts with neon green, you create an eerie, glowing illusion of bubbling potion against a matte black base.
Step-by-Step Tutorial
Materials
- Faux or real ‘knucklehead’ or warty pumpkin
- Matte black acrylic paint
- Neon lime green textured puff paint (or heavy body acrylic)
- Wide flat paintbrush
- Small round paintbrush (if not using puff paint bottle)
- Damp cloth for cleaning
- Newspaper or drop cloth
Step 1: Base Preparation
-
Clean the surface:
Begin by wiping down your pumpkin with a damp cloth to remove any dust or dirt, especially in the crevices around the bumps. -
Dry completely:
Ensure the pumpkin is totally dry before applying any paint, as moisture will prevent the base coat from adhering properly. -
Protect the stem:
If you want to keep the natural brown stem as shown in the photo, wrap it carefully with painter’s tape. -
Apply base coat:
Using a wide flat brush, coat the entire pumpkin with matte black acrylic paint. -
Check coverage:
Work the bristles into the grooves and around the base of each wart to ensure no orange skin shows through. -
Apply second coat:
Allow the first layer to dry for about 20 minutes; apply a second coat if the color looks streaky or translucent. -
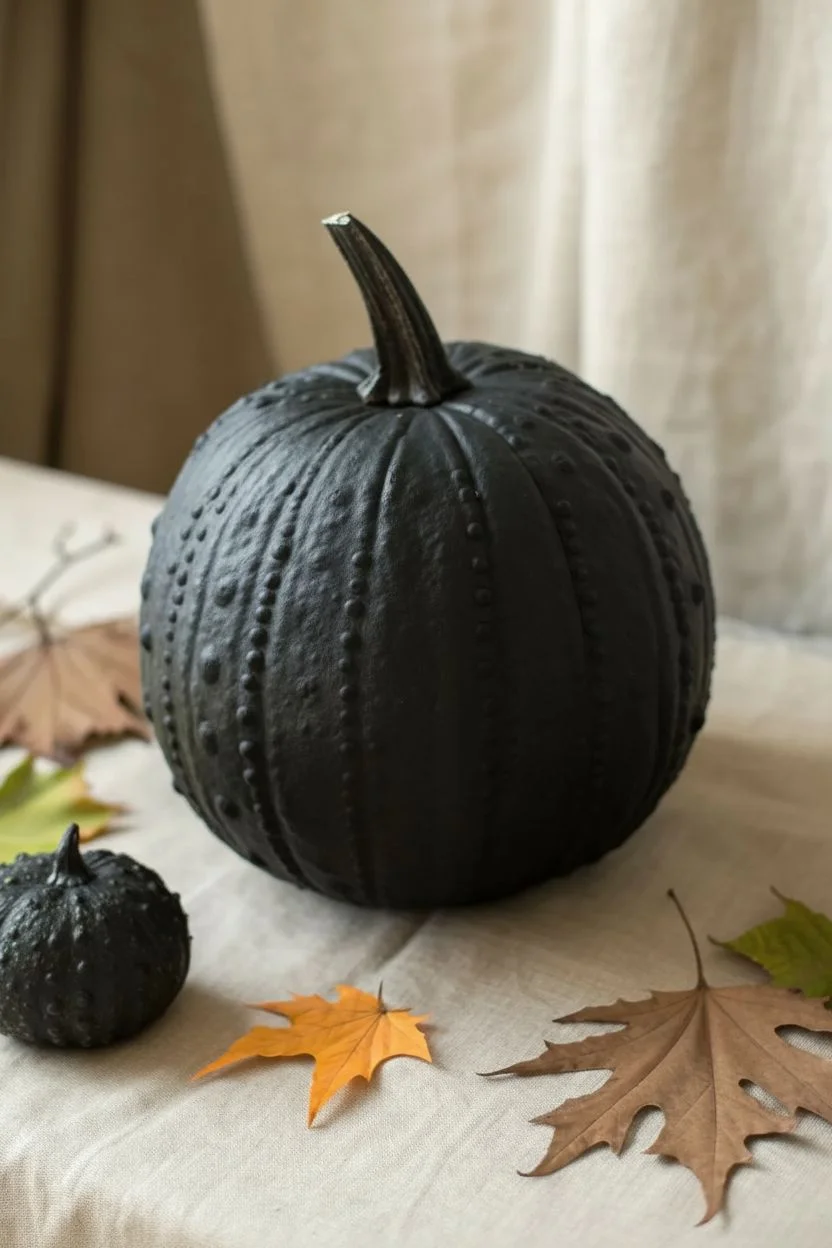
Wait for curing:
Let the black base coat dry completely for at least an hour. The surface needs to be sturdy before adding the detail work.
Paint Slipping Off?
If the green paint slides off the bumps, the black base might be too slick. Lightly sand the tops of the black-painted warts with fine grit sandpaper to give the green paint better grip.
Step 2: Adding the Bubbles
-
Select your warts:
Identify the most prominent raised bumps on your pumpkin surface; these will become your glowing bubbles. -
Prepare the green:
Shake your neon green puff paint bottle vigorously to remove air bubbles, or load a small round brush with heavy body acrylic. -
Start at the top:
Begin applying paint to the warts near the top of the pumpkin and work your way down to avoid smudging your work with your hand. -
Create dimension:
Apply the paint thickly. If using puff paint, squeeze gently directly onto the bump. I find swirling the nozzle slightly helps cover the whole bump evenly. -
Vary the sizes:
Follow the natural sizes of the pumpkin’s warts, making some dots large and bulbous while leaving others smaller for organic variety. -
Coat the sides:
Make sure the green paint covers the sides of the wart, not just the very tip, to make them pop against the black background. -
Add tiny details:
If your pumpkin has smooth patches, you can add tiny artificial dots of green paint between the large warts to simulate smaller fizzing bubbles. -
Second pass for brightness:
Neon paints can sometimes be sheer. Once the first green layer is dry to the touch, add a second dollop on top for maximum vibrancy.
Make It Glow
Swap the standard neon acrylic for glow-in-the-dark paint. Charge it under a bright lamp before turning off the lights to make your bubbling cauldron effect truly spooky at night.
Step 3: Finishing Touches
-
Refine the stem:
Remove the painter’s tape from the stem. If any black paint seeped through, wipe it away quickly or touch it up with a little brown paint. -
Create a companion:
Use a smaller gourd or mini-pumpkin to create a matching ‘baby’ bubble pumpkin using the remaining paint. -
Final dry time:
Allow the thick green paint or puff paint to dry overnight. Thick embellishments take much longer to cure than standard flat paint.
Place your bubbling creation on your porch or table for a delightfully toxic look that screams Halloween style


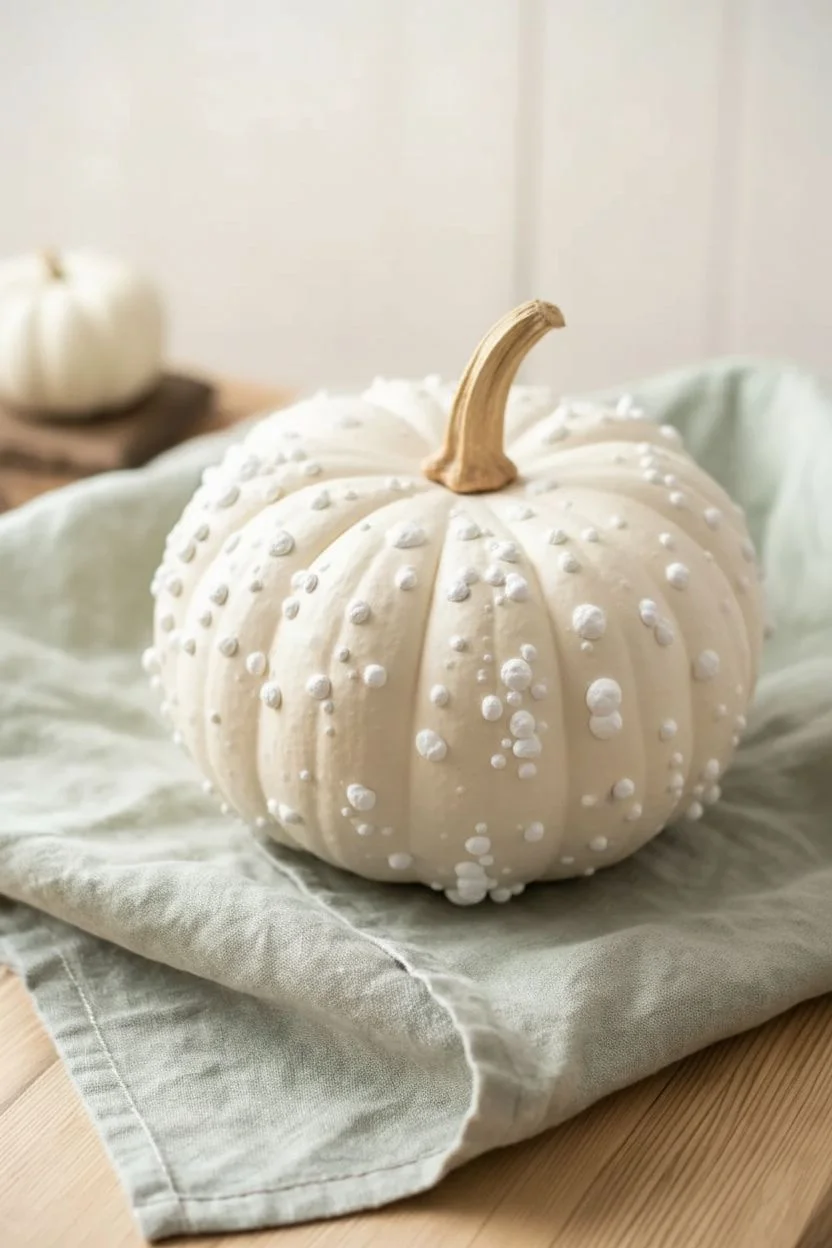
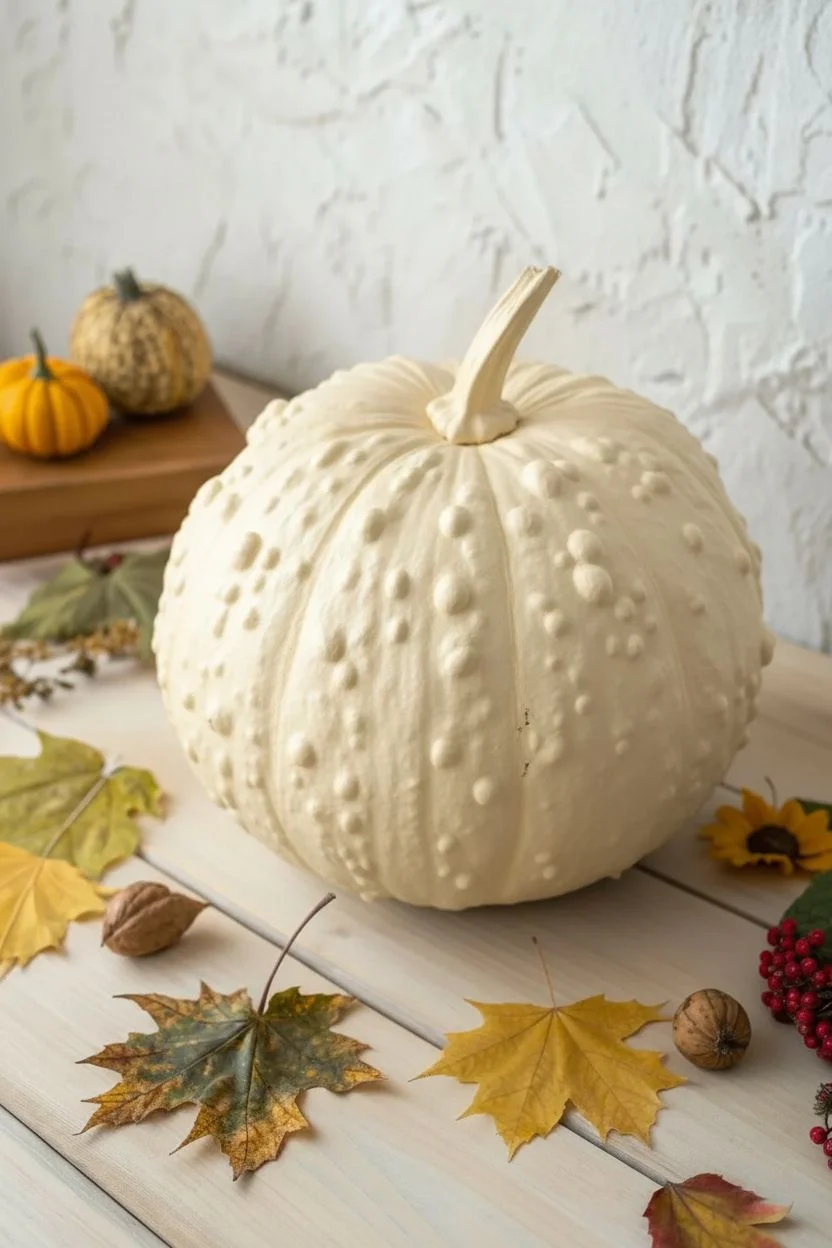
Rustic Whitewashed Bumpy Pumpkin
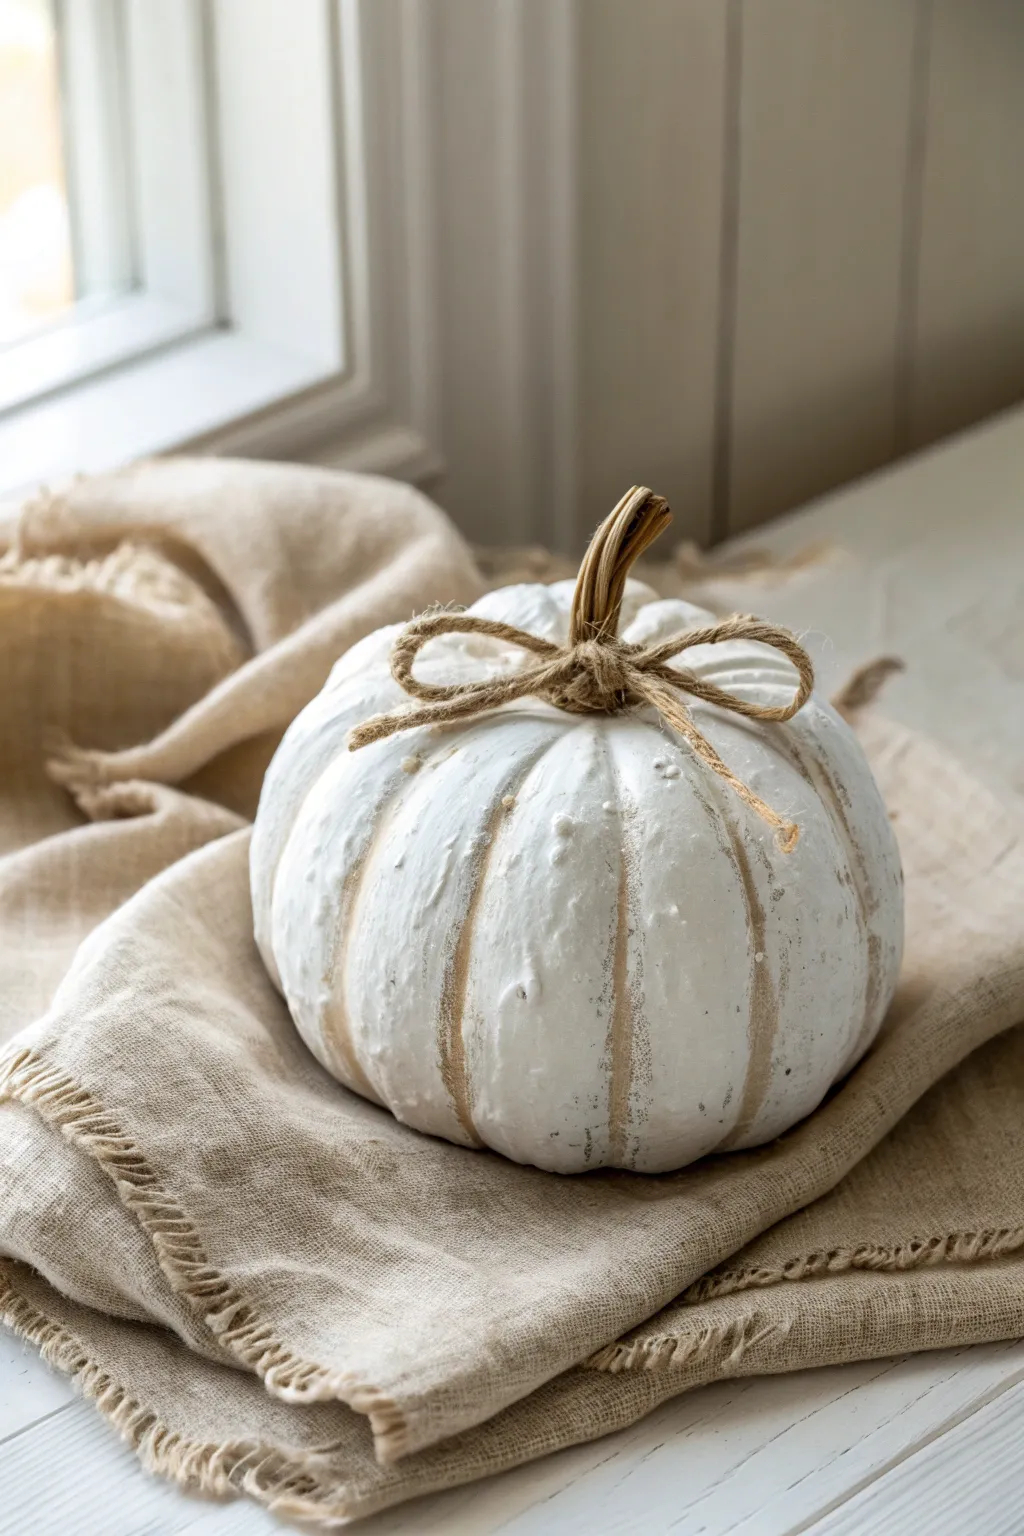
Transform a standard faux pumpkin into a rustic masterpiece with this simple whitewashing technique. The subtle distressing highlights every bump and groove, giving it that perfectly aged, timeworn farmhouse charm.
Step-by-Step Guide
Materials
- Faux pumpkin (preferably with some existing texture/bumps)
- White chalk paint or matte acrylic paint
- Brown antique wax or dark glaze
- Chip brush (bristle brush)
- Small round detail brush
- Paper towels or clean rag
- Jute twine
- Scissors
- Protective workspace covering
Step 1: Base Preparation
-
Clean surface:
Begin by wiping down your faux pumpkin with a damp cloth to remove any dust or manufacturing residue. Let it dry completely. -
Initial inspection:
Look at the natural grooves and bumps on your pumpkin. These are the areas we will accentuate later, so plan your painting strategy to not fill them in too heavily at first.
Pro Tip: Texture
Add baking soda to your white paint before applying. This creates a gritty, stone-like texture that makes a plastic pumpkin look like heavy ceramic.
Step 2: Whitewashing
-
Load the brush:
Dip your chip brush into the white chalk paint. Chalk paint is ideal here because its matte finish creates a realistic organic texture. -
Apply first coat:
Apply the paint vertically, following the natural ribs of the pumpkin from stem to base. Use long, sweeping strokes. -
Dry brushing technique:
Don’t aim for perfect, opaque coverage. Allow some of the underlying color (especially if it’s an orange or tan pumpkin) to peek through slightly for depth. -
Stipple the bumps:
For the bumpy ‘warty’ areas, use a stippling motion (dabbing the brush straight up and down) to ensure the paint clings to the texture without pooling. -
Dry thoroughly:
Let this white base coat dry completely. This usually takes about 20-30 minutes for chalk paint.
Level Up: Stem Realism
Paint the plastic stem with a dark brown base, then dry brush with metallic gold or bronze for an elegant, high-end finish that contrasts the rustic white.
Step 3: Distressing & Aging
-
Prepare the wax:
Get your brown antique wax or glaze ready. If using a heavy wax, I like to warm it slightly on the palette to make it more spreadable. -
Apply wax to grooves:
Using a small round brush, paint the brown wax specifically into the deep vertical grooves (ribs) of the pumpkin. -
Feather outward:
Immediately use a clean, dry chip brush or a rag to feather that dark wax outward from the grooves onto the raised sections. -
Wipe back:
Gently wipe the surface with a paper towel. This removes the dark wax from the high points (the white areas) while leaving it settled in the crevices and around the bumps. -
Highlight the bumps:
Dip a fingertip or a tiny brush into the brown wax and very lightly touch the tops of a few random bumps to make them pop against the white background. -
Evaluate the look:
Step back and look at the contrast. If it looks too stark, you can dry brush a wispy layer of white back over the top to soften the brown lines.
Step 4: Finishing Touches
-
Dry completely:
Allow the wax or glaze layer to cure fully according to the package instructions. -
Measure twine:
Cut a length of jute twine approximately 18 inches long, though this depends on the thickness of your pumpkin stem. -
Create the bow:
Tie the twine around the base of the stem. Create a simple shoelace bow, pulling the loops tight. -
Adjust the loops:
Fluff open the loops of the bow so they stand up slightly, adding a bit of volume near the stem. -
Styling:
Trim the tails of the twine if they are too long, aiming for them to drape naturally down the side of the pumpkin.
Place your newly finished pumpkin on a soft linen cloth to complete this cozy autumn vignette


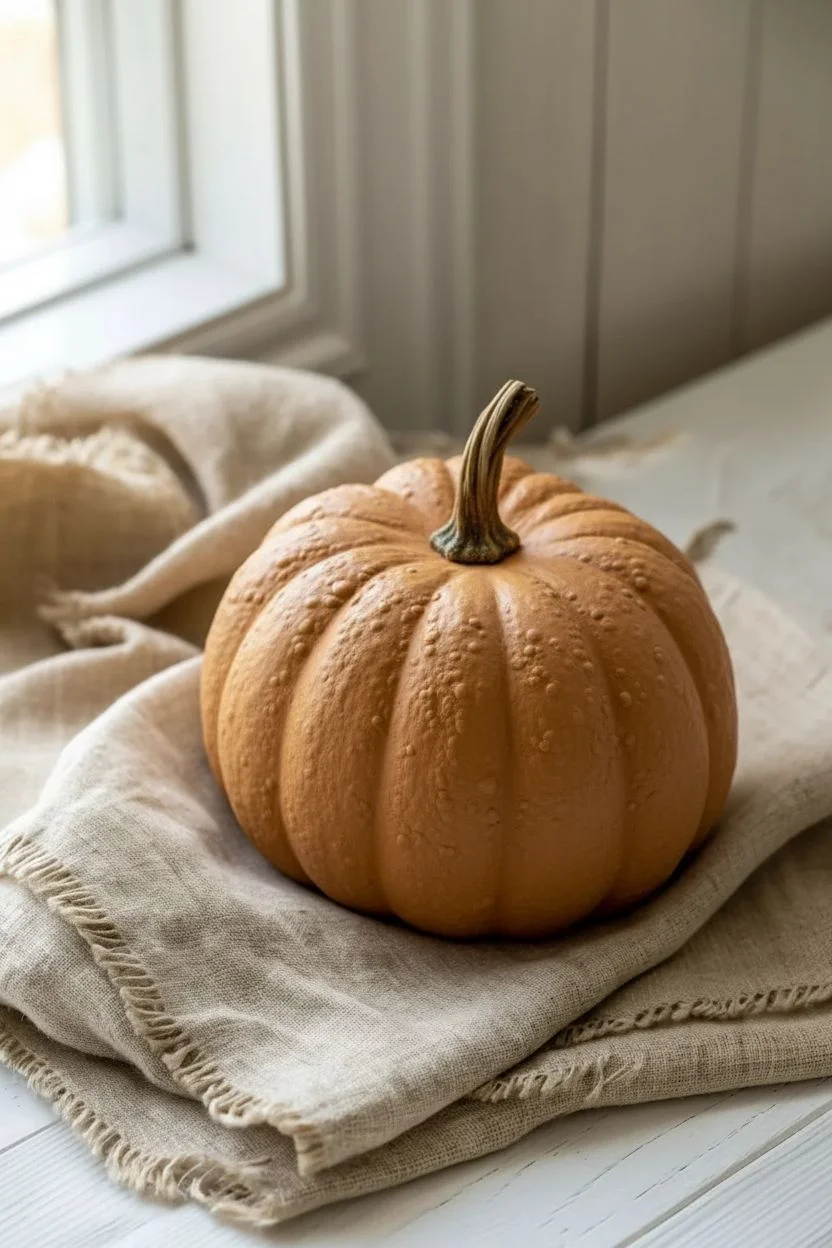
Matte Base With Glossy Bumpy Pumpkin Bumps
Transform a standard craft pumpkin into a striking heirloom squash with this textured painting technique. By layering deep forest greens with lighter speckling and using dimensional paint for bumps, you’ll achieve that authentic, garden-fresh Kabocha look.
Step-by-Step Tutorial
Materials
- Faux craft pumpkin (white or cream base)
- Dimensional fabric paint (puffy paint) in any color
- Acrylic paints: Forest Green, Sap Green, Burnt Umber, White, Pale Yellow
- Matte finish spray sealant
- Glossy finish spray sealant or brush-on gloss varnish
- Medium flat brush
- Small round detail brush
- Sea sponge or stippling brush
- Paper plate or palette
- Water cup and paper towels
Step 1: Texturing the Surface
-
Prep the pumpkin:
Wipe down your faux pumpkin with a damp cloth to remove any dust or manufacturing residue. If the existing stem is removable, take it off now to keep it clean; otherwise, tape it off with masking tape. -
Map out the bumps:
Study the natural ridges of your pumpkin. Authentic heirloom pumpkins often have bumpy textures concentrated on the upper ridges. Using your dimensional puffy paint, add erratic dots of varying sizes along these high points. -
Vary the size:
Don’t be too uniform. Squeeze gently for tiny, pin-prick bumps and a bit harder for larger warts. Cluster a few together for a natural, organic appearance. -
Smoothen sharp peaks:
If your puffy paint leaves sharp ‘Hershey’s Kiss’ peaks, wait about five minutes for the skin to set slightly, then gently tap them down with a wet finger to round them out. -
Let it cure completely:
This is crucial. Allow the dimensional paint to dry fully—usually several hours or overnight—before you attempt to paint over it.
Step 2: Base Coat and Color
-
Mix the base green:
On your palette, mix a large amount of Forest Green with a touch of Burnt Umber. You want a very dark, deep green that almost looks black in dim light. -
Apply the first layer:
Using your medium flat brush, coat the entire pumpkin, painting right over your dry 3D bumps. Don’t worry about perfect coverage yet; just get the color on. -
Add depth to grooves:
While the paint is still wet, dip your brush into pure Burnt Umber and run it deep into the vertical crevices of the pumpkin to create natural shadowing. -
Dry and repeat:
Let the first coat dry. Apply a second coat of your dark green mixture to ensure none of the original pumpkin color shows through.
Creating Dew Drops
Use clear UV resin instead of glue for the water droplets. It cures instantly with a UV light and stays perfectly clear and glassy without yellowing.
Step 3: Adding Detail and Finish
-
Create the lighter green:
Mix Sap Green with a little White and a drop of Pale Yellow. This should be a few shades lighter than your base, resembling the variegation seen on Kabocha squash. -
Dry brush highlights:
Load a tiny amount of this lighter green onto a dry brush or sea sponge. Dab off the excess on a paper towel until almost nothing remains. -
Focus on the ridges:
Lightly drag the dry brush or sponge vertically down the centers of the ridges (the bumpy parts). I like to keep the paint very faint here to mimic the subtle streaking of real rind. -
Highlight the warts:
Take a small detail brush with the lighter green mix and carefully tap the tops of your dimensional bumps. This makes the texture pop visually against the dark background. -
Splatter for realism:
Thin down a bit of Pale Yellow paint with water until it’s inky. Dip an old toothbrush or stiff brush into it and flick tiny speckles onto the pumpkin surface for extra texture. -
Paint the stem:
If you removed the stem, attach it now. Paint it with a mix of Pale Yellow and Burnt Umber, drying brushing the ridges for a woody look. -
Seal heavily:
Apply a coat of gloss varnish or spray sealant over the entire pumpkin. Real squash have a waxy sheen, and this will tie all your layers together. -
Add ‘dew’ drops (optional):
For the finishing touch shown in the photo, create permanent water droplets by carefully applying clear gloss gel medium or clear hot glue dots in random spots, letting them dry clear and shiny.
Paint Peeling Off?
If acrylics slide off the faux pumpkin surface, prime it first with a spray primer or lightly sand the surface with fine-grit sandpaper for better grip.
Now you have a stunningly realistic heirloom pumpkin that will look fresh all season long


Ombre Fade on a Bumpy Pumpkin
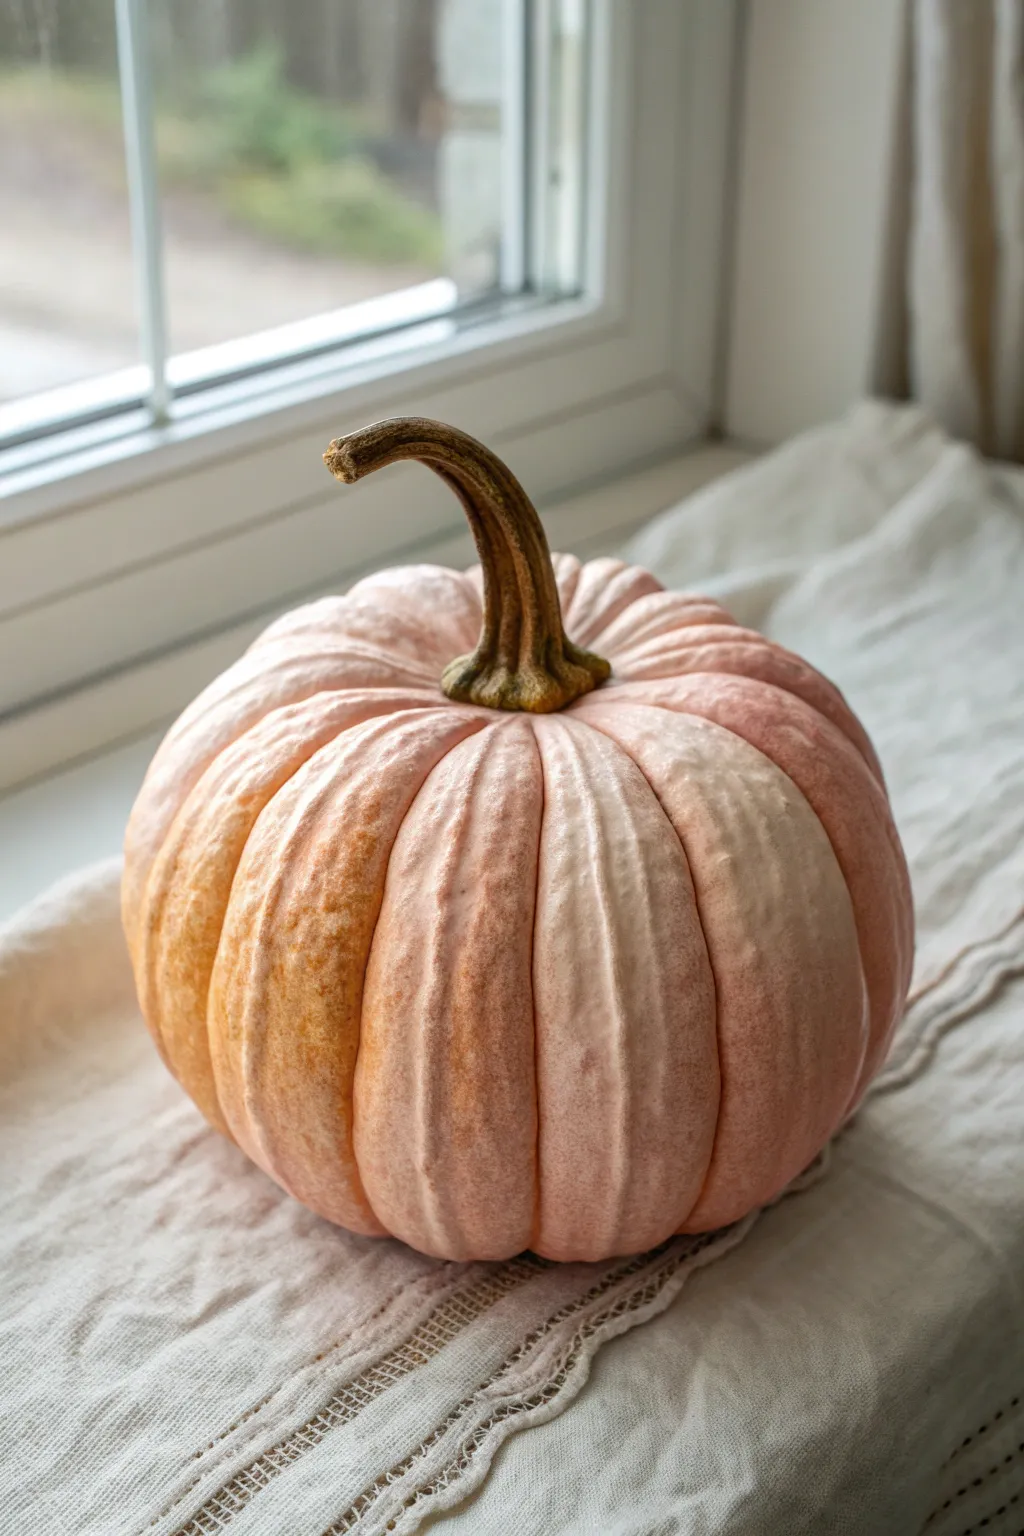
Embrace the natural texture of a ribbed pumpkin by highlighting its curves with a sophisticated ombre fade. This technique transitions softly from warm, classic orange tones into a modern, dusty rose pink for a uniquely chic autumn centerpiece.
Step-by-Step Guide
Materials
- Medium-sized pumpkin with deep ribbing (heirloom varieties work best)
- Acrylic craft paints: Cream/Off-white, Burnt Orange, Dusty Pink/Mauve
- Sponge daubers or cosmetic wedges
- Small soft-bristle brush (for tight crevices)
- Glazing medium or water (for blending)
- Paper plate or palette
- Paper towels
- Matte spray sealer
Step 1: Preparation & Base Coat
-
Clean the canvas:
Before painting, wipe your pumpkin down thoroughly with a damp cloth to remove any dirt or field debris. Let it dry completely so the paint adheres properly. -
Protect the stem:
If you want to keep the stem’s natural brown look, wrap it carefully with painter’s tape. Alternatively, you can just paint carefully around the base of the stem later. -
Apply the primer coat:
To ensure true colors, especially on an orange pumpkin, paint the entire surface with a coat of cream or off-white acrylic paint. This acts as a neutral primer. -
Dry time:
Allow this base coat to dry fully. It doesn’t need to be opaque, but it should mute the underlying pumpkin color significantly.
Step 2: Creating the Warm Side
-
Mix the warm hue:
On your palette, mix a small amount of Burnt Orange with plenty of Cream paint to create a soft, peachy-orange shade. -
Start the left side:
Using a sponge dauber, dab this warm mixture onto the left side of the pumpkin. Focus on getting paint into the deep ribs. -
Fade the edge:
As you move toward the center of the pumpkin, use less paint on your sponge and dab lighter to start creating a faded edge. -
Layering depth:
Go back over the far left side with a slightly darker version of your orange mix to add dimension to the curve.
Uneven Blending?
If the transition looks muddy, let it dry completely. Then, dry-brush a thin layer of the lighter central color over the muddy area to reset the gradient.
Step 3: Applying the Cool Side
-
Prepare the pink shade:
Clean your brush or grab a fresh sponge. Mix your Dusty Pink paint with a touch of Cream to soften it slightly. -
Paint the right side:
Start applying the pink mixture on the far right side of the pumpkin, ensuring full coverage on the outer ribs. -
Work inward:
Just like with the orange side, dab lighter and lighter as you approach the center where the two colors will meet. -
Sponge texture:
I find that using a tapping motion with the sponge creates a nice texture that mimics the pumpkin’s skin better than brush strokes.
Pro Tip: Glazing Medium
Mix a drop of glazing liquid into your paints. This extends the drying time, giving you a longer window to blend the ombre fade perfectly.
Step 4: The Blending Zone
-
Mix the transition color:
Create a bridge color by mixing a little of your peach-orange mix with your dusty pink mix. -
Apply the blend:
Dab this transition color right down the center vertical ribs where the orange and pink sections meet. -
Softening lines:
Take a slightly damp, clean sponge and gently tap over the transition area to blur any harsh lines between the three color zones. -
Refining the ribs:
Use a small brush to ensure the crevices between the ribs have received enough color; sometimes sponges bridge over deep gaps.
Step 5: Finishing Touches
-
Highlighting:
Dip a dry sponge into pure Cream paint. Very lightly graze the very tops of the vertical ridges across the whole pumpkin to highlight the texture. -
Check the stem base:
Remove the tape from the stem. Use a small brush to touch up the paint right up to where the stem meets the fruit for a seamless look. -
Seal the work:
Once fully dry, spray the pumpkin with a matte sealer to protect the paint from chipping and to give it a unified, velvety finish.
Place your beautifully blended pumpkin near a window to let natural light show off the soft color transition
BRUSH GUIDE
The Right Brush for Every Stroke
From clean lines to bold texture — master brush choice, stroke control, and essential techniques.
Explore the Full Guide
Sunflower Crown Bumpy Pumpkin
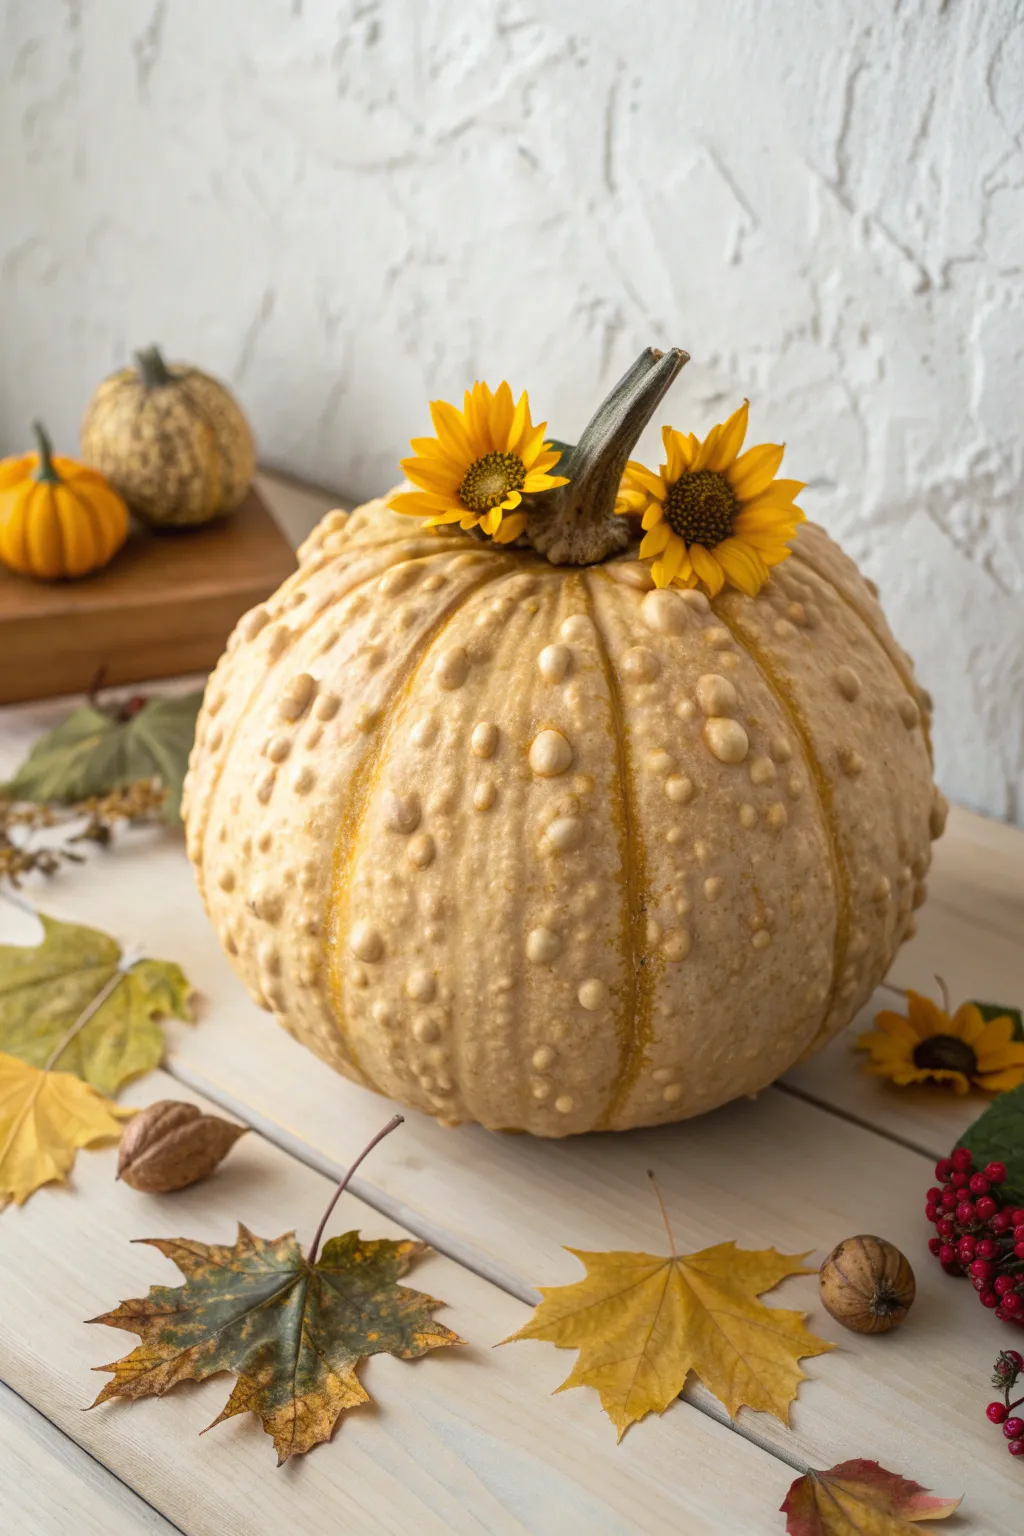
Transform a textured, warty pumpkin into an elegant autumn centerpiece with a soft, creamy paint job and a simple floral accent. This project celebrates the unique bumps and ridges of the gourd by highlighting them with a warm, neutral palette that contrasts beautifully with bright yellow blooms.
Detailed Instructions
Materials
- Large warty pumpkin (Knucklehead or similar variety)
- Cream or pale beige acrylic craft paint
- Warm yellow or ochre acrylic paint (for highlights)
- Wide flat paintbrush
- Small detail paintbrush
- Paper towels or soft rag
- Two fresh or faux small sunflowers
- Hot glue gun and glue sticks (optional, if attaching faux flowers)
- Matte finish clear sealant spray
Step 1: Base Coat Application
-
Clean and Dry:
Begin by thoroughly washing your pumpkin to remove any dirt or garden debris, paying special attention to the crevices around the bumps. Dry it completely with a towel. -
First Coat:
Using a wide flat brush, apply a generous layer of cream or pale beige acrylic paint over the entire surface of the pumpkin, avoiding the stem. -
Work into Texture:
Ensure you push the bristles into all the nooks, crannies, and deep ridges characteristic of warty pumpkins so no orange skin shows through. -
Dry Time:
Allow this first coat to dry completely for about 20-30 minutes. The thick texture of the pumpkin might require a bit more drying time in the deep grooves. -
Second Coat:
Apply a second coat of the cream paint to achieve an opaque, solid finish. I find this creates a much smoother canvas for the next steps.
Paint Flaking Off?
Warty pumpkins can be slick. If paint isn’t sticking, lightly sand the surface with fine-grit sandpaper first to give the paint some ‘tooth’ to grab onto.
Step 2: Highlighting and Depth
-
Mix Highlight Color:
Mix a small amount of warm yellow or ochre paint with your base cream color to create a subtle, sun-kissed shade. -
Dry Brushing:
Dip your wide brush lightly into this mixture and wipe most of the paint off onto a paper towel until the brush is almost dry. -
Highlighting Bumps:
Gently sweep the dry brush over the tops of the bumps and the raised ridges. This technique catches the high points and adds dimension without coloring the deep grooves. -
Accentuate Grooves:
Take a small detail brush with a slightly darker beige or diluted ochre and carefully trace the deepest vertical grooves to enhance the segmented look of the pumpkin. -
Soft Blending:
Use a clean, damp rag to softly dab any areas where the paint looks too stark, blending the highlights into the base coat for a natural, organic feel. -
Seal the Paint:
Once you are happy with the finish and it is fully dry, take the pumpkin to a ventilated area and spray a light coat of matte clear sealant to protect the paint.
Add Autumn Sparkle
Before the sealant dries, sprinkle a tiny pinch of extra-fine gold glitter over the tops of the bumps for a magical, morning-dew effect.
Step 3: Floral Installation
-
Trim Flowers:
Trim the stems of your two sunflowers down to about one inch in length. -
Positioning:
Place the sunflowers near the base of the pumpkin stem, tucking them close together so their petals overlap slightly. -
Attaching:
If using faux flowers, apply a dab of hot glue to the back of the flower head and press firmly onto the pumpkin shoulder. For fresh flowers, you can carefully pin them in place or simply rest them if the pumpkin is purely decorative. -
Final Adjustments:
Fluff the sunflower petals to ensure they look perky and full, creating a cheerful crown for your textured masterpiece.
Place your finished pumpkin on a bed of dry maple leaves to complete the cozy autumn vignette
Mushroom Patch Bumpy Pumpkin
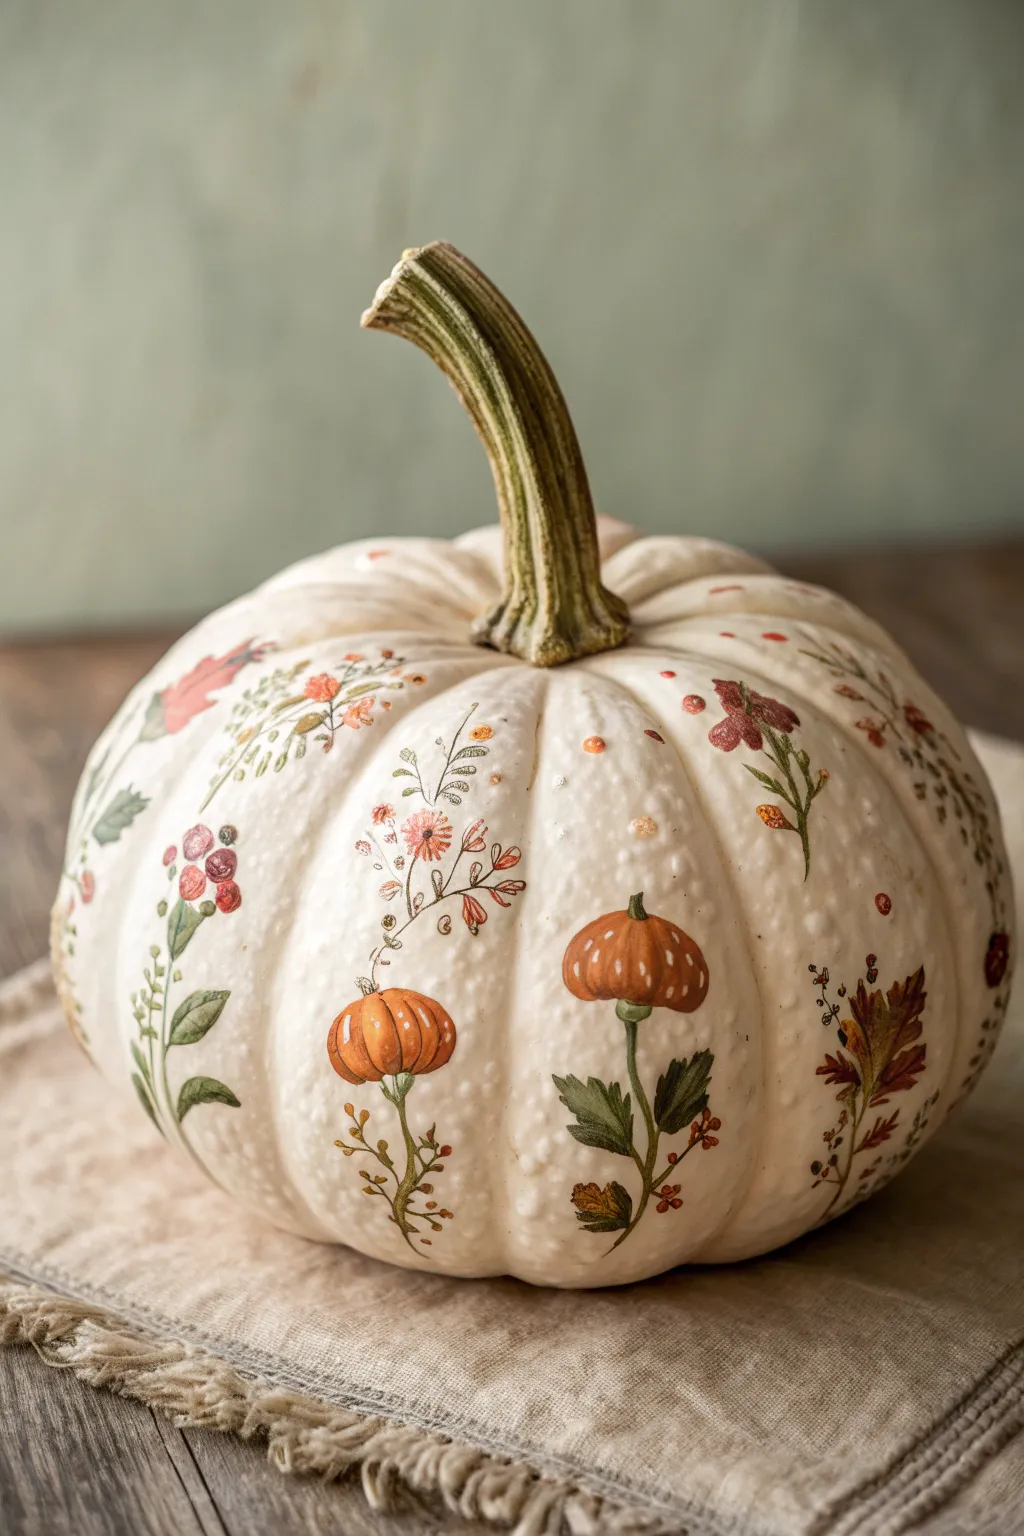
Transform a textured white pumpkin into a storybook garden scene by painting delicate mushrooms and wildflowers directly onto its surface. This project replicates the charm of vintage botanical illustrations, using the pumpkin’s natural bumps to enhance the 3D effect of the painted fungi.
Step-by-Step Tutorial
Materials
- White pumpkin (textured/bumpy variety like Casper or Lumina)
- Acrylic craft paints (burnt orange, terracotta, cream, moss green, deep olive, burgundy, yellow ochre)
- Fine detail brushes (sizes 0, 00, and 1)
- Small flat brush (size 2 or 4)
- Matte finish sealer/spray varnish
- Pencil (H or HB, light lead)
- Paper plate or palette
- Cup of water and paper towels
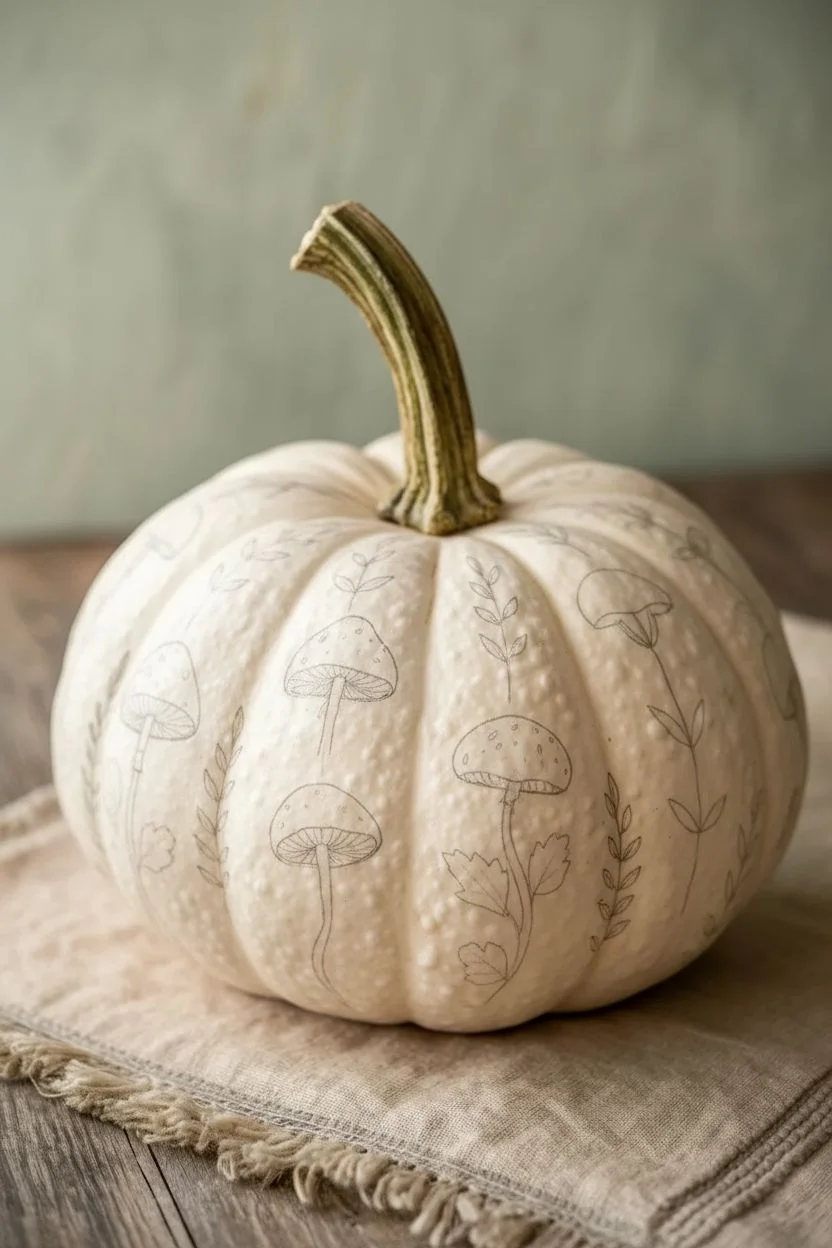
Step 1: Preparation & Layout
-
Clean the surface:
Wipe down your white pumpkin with a damp cloth to remove any dirt or oils. Dry it thoroughly before starting, as acrylics adhere best to a completely dry shell. -
Study the texture:
Rotate the pumpkin and identify natural ‘bumps’ or raised warts on the surface. These are perfect spots to place your mushrooms, as the raised texture will give the painted caps a realistic, rounded feel. -
Sketch the main elements:
Lightly sketch the outlines of your mushroom caps directly over the chosen bumps using a light pencil. Draw vertical stems extending downward from these caps. -
Add floral variety:
In the spaces between the mushrooms, lightly sketch vertical lines for wildflowers and leaf sprigs to create a balanced, garden-like pattern around the pumpkin.
Step 2: Painting the Mushrooms
-
Base coat the caps:
Load a small flat brush with burnt orange paint mixed with a touch of terracotta. Fill in the mushroom cap shapes you sketched over the bumps. -
Add cap dimension:
While the orange is still slightly wet, I like to blend in a tiny amount of cream or darker rust near the edges to create a rounder, 3D appearance. -
Paint the stems:
Switch to a size 1 round brush and mix a moss green color. Paint slender, slightly curved stems descending from the center of each mushroom cap. -
Connect the base:
Paint small leaves at the base of the stems using deep olive green, grounding the mushrooms so they look like they are growing. -
Detail the caps:
Once the orange caps are dry, use a 00 brush and cream paint to add tiny vertical tick marks or dots on the mushroom tops to mimic texture and highlights.
Use Nature’s Texture
Don’t fight the bumps! If your brush skips over a wart, let it be. Organic imperfections make the painted mushrooms look more like natural specimens.
Step 3: Botanical Details
-
Adding wildflowers:
Use the size 0 brush to paint thin, wispy stems for the accompanying flowers. Use varying shades of green to keep the foliage looking natural. -
Painting small blooms:
Dip the tip of a small brush into burgundy or rust paint and dab small clusters to create berries or flower buds along the wild stems. -
Creating detailed leaves:
Paint larger, fern-like leaves or maple-shaped leaves in empty spaces using yellow ochre and deep brownish-reds to evoke an autumn feel. -
Layering fine lines:
Go back over your floral stems with the thinnest brush (00) and a dark olive green to add very fine branches or veins to the leaves. -
Adding shadow:
Dilute a tiny bit of brown paint with water to make a glaze. Carefully apply a shadow under the mushroom caps where they meet the stem for added depth.
Vintage Look
Mix a tiny drop of brown into all your colors to “antique” them. This mutes the brightness and gives the artwork that classic scientific illustration vibe.
Step 4: Finishing Touches
-
Refining the stem:
Don’t forget the main pumpkin stem. Paint it with strokes of olive, brown, and cream to highlight its natural ridges and integrate it into the color palette. -
Final highlights:
Add tiny dots of white or cream on the berries and the tops of the painted leaves to make them look dewy and dimensional. -
Protect the art:
Allow the paint to cure for at least 24 hours. Once fully dry, mist the entire pumpkin with a matte clear sealer to protect the botanical illustrations from moisture.
Display your botanical masterpiece on a linen runner to complete the rustic autumn aesthetic


Have a question or want to share your own experience? I'd love to hear from you in the comments below!