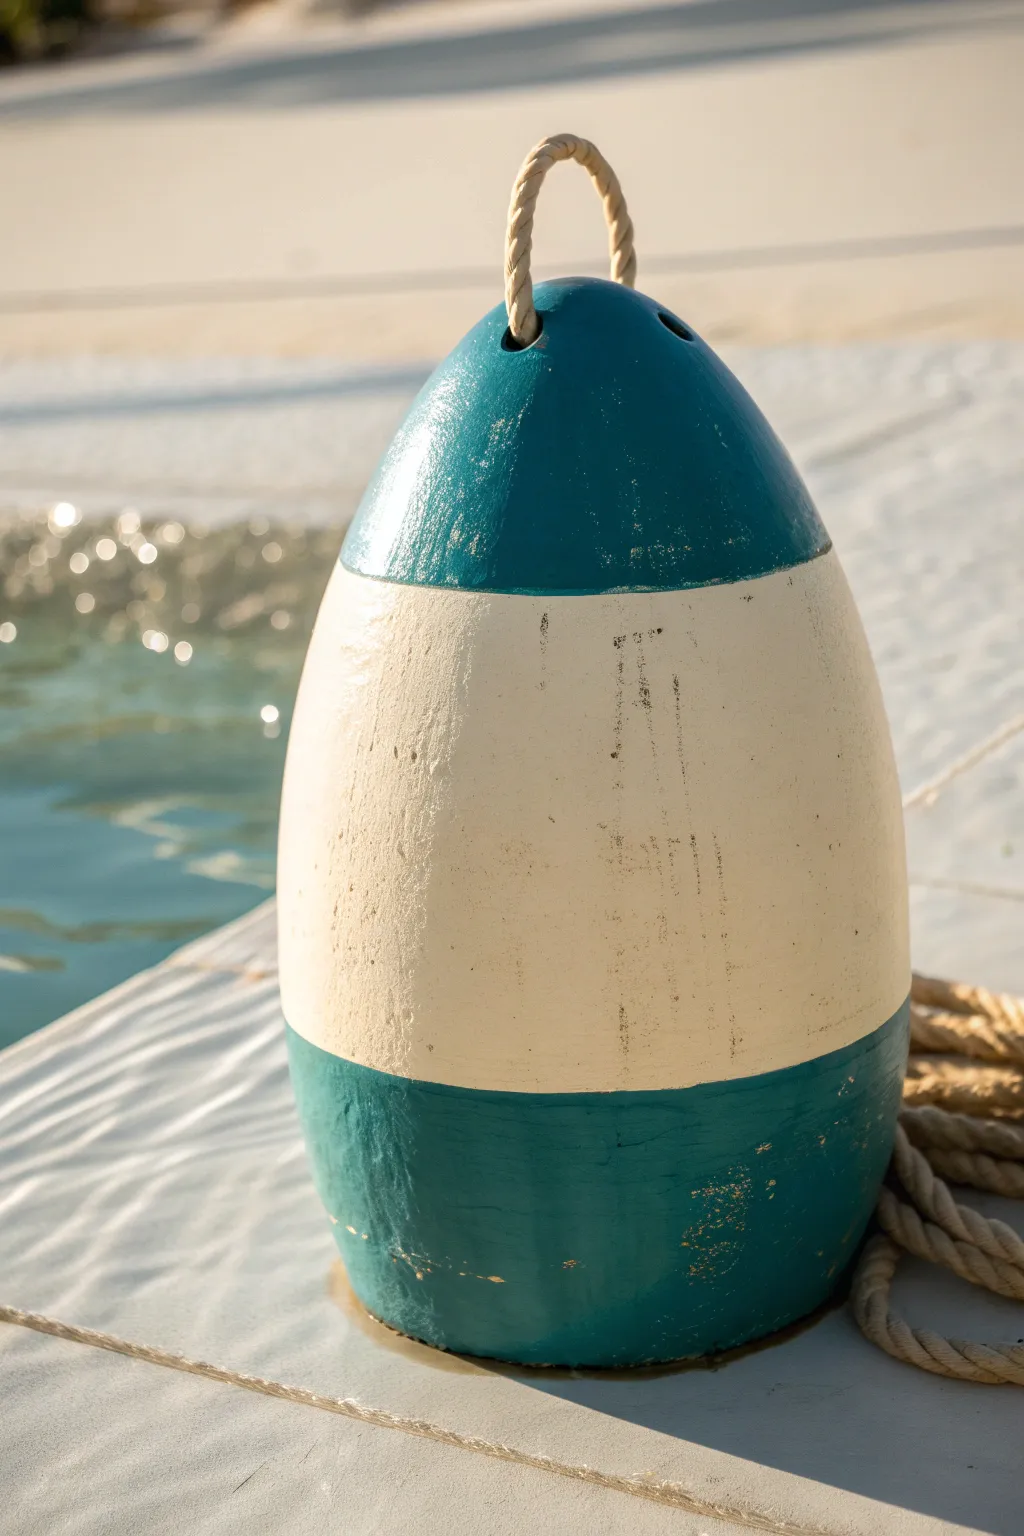
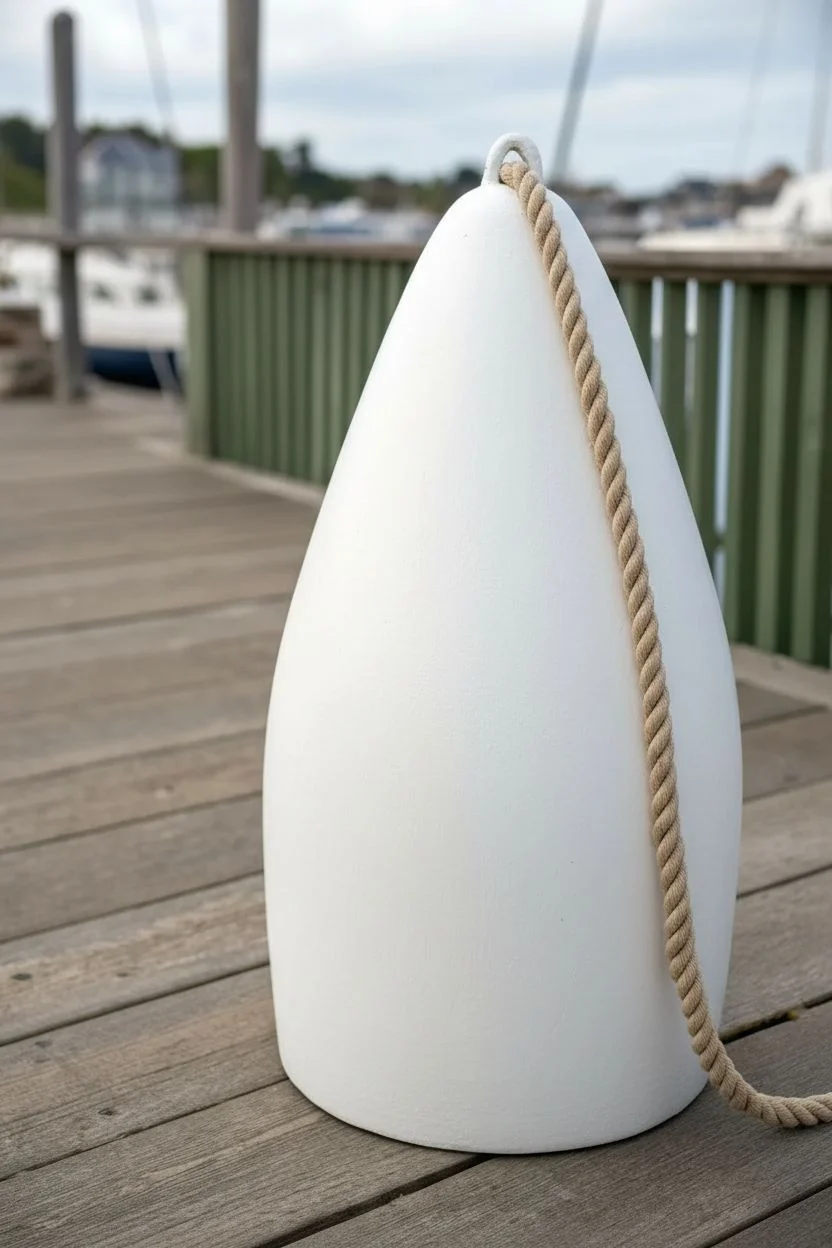
Painting buoys is one of my favorite ways to turn a simple, hardworking object into instant coastal decor. Whether you’re working on a real float or painting a picture of one, these buoy painting ideas will give you tons of direction without overthinking it.
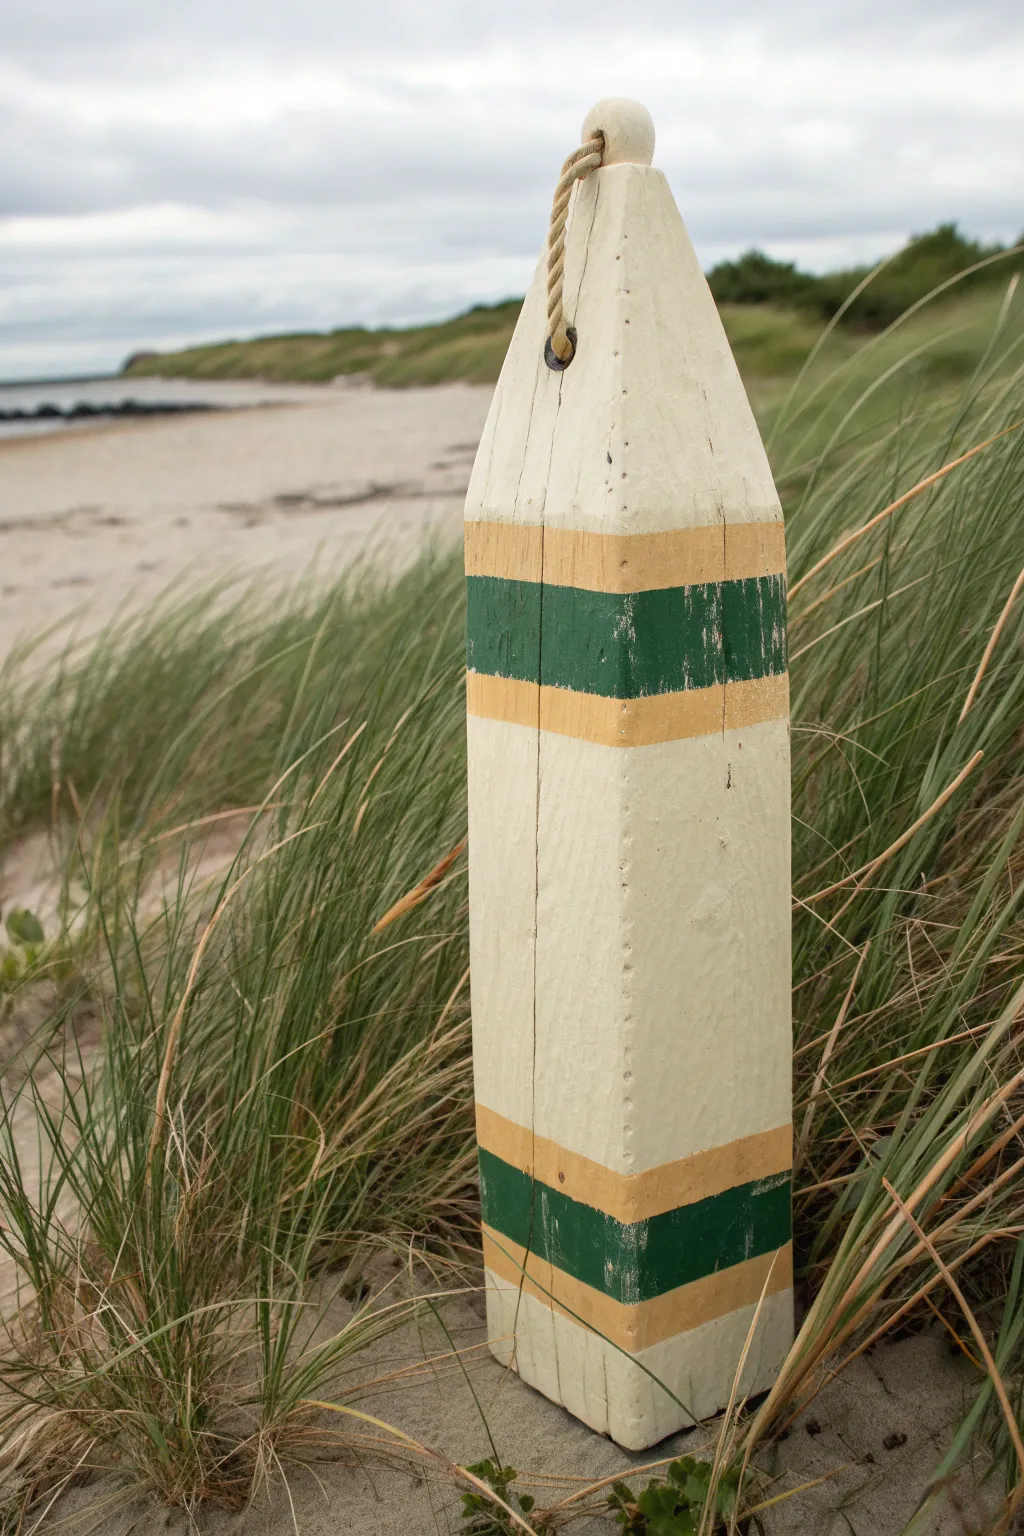
Classic Coastal Stripes
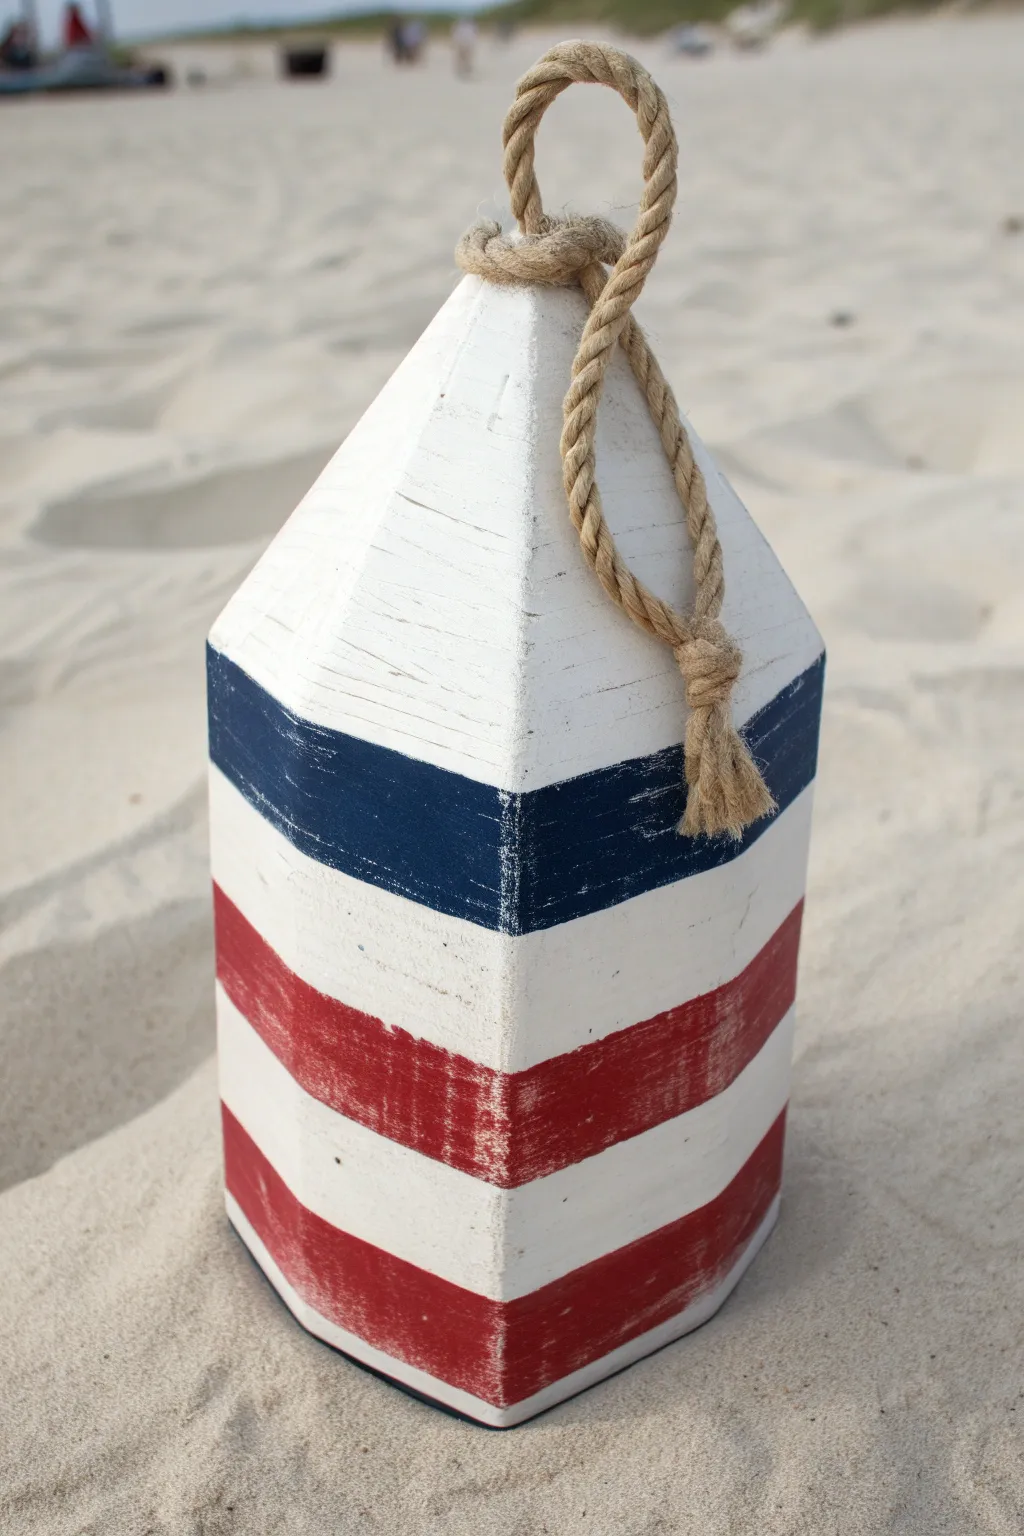

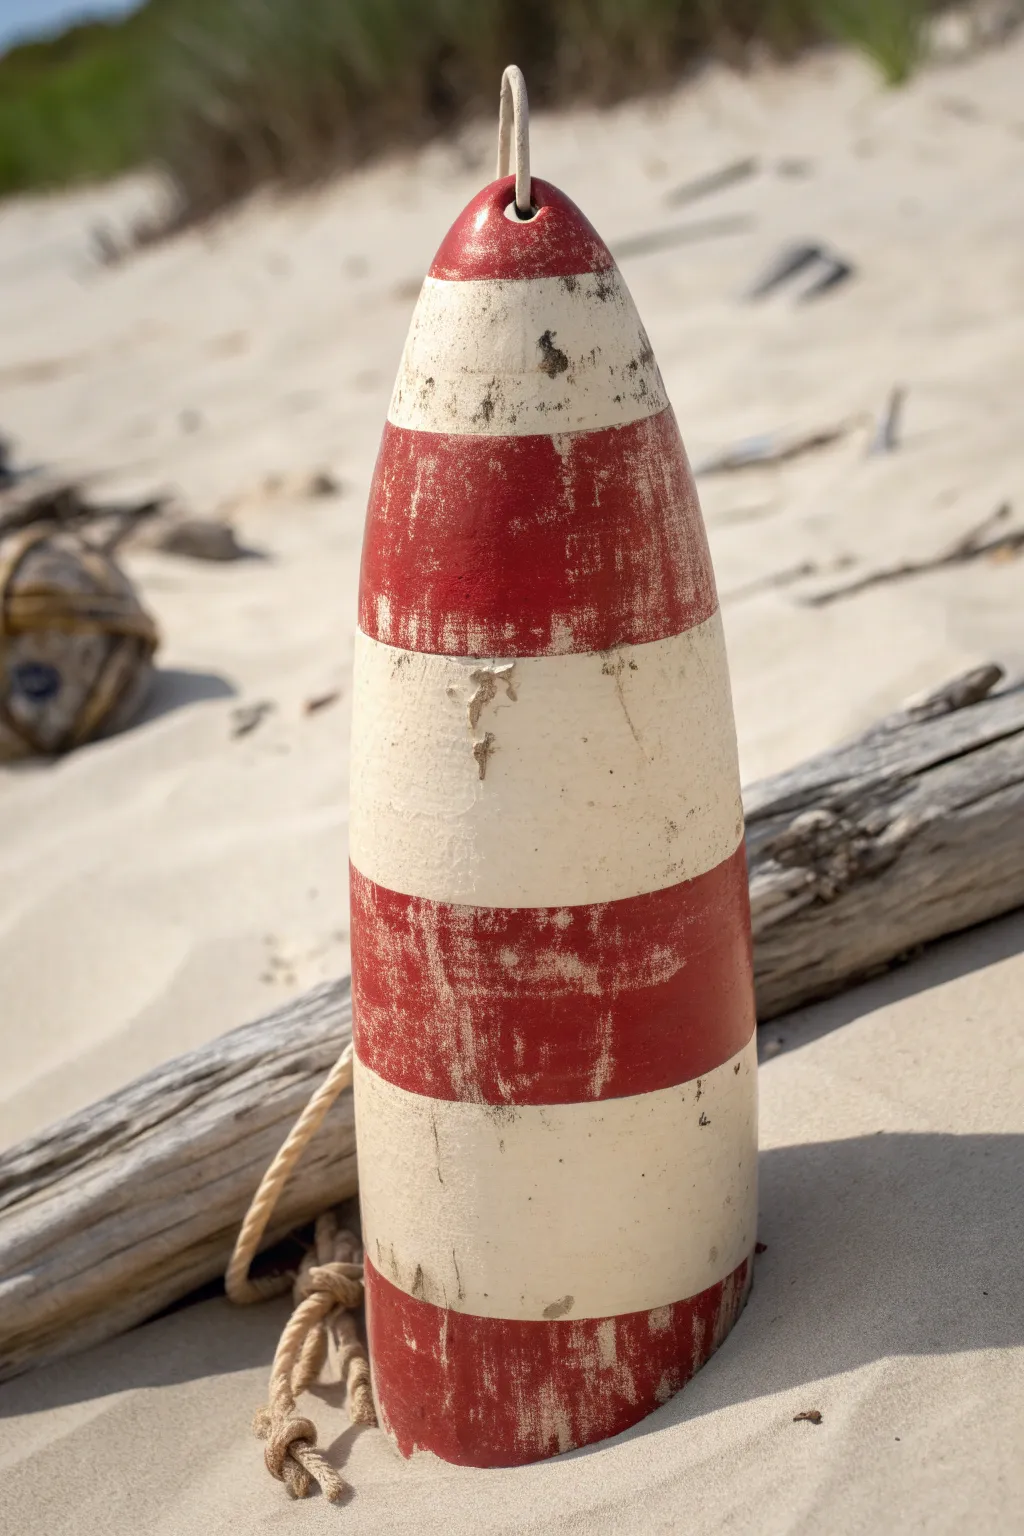
Bring the seaside charm right to your doorstep with this classic wooden buoy project. Featuring a timeless palette of red, white, and navy, its distressed finish gives it that authentic, weather-worn look perfect for coastal decor.
How-To Guide
Materials
- 4×4 wooden post (cut to 12-14 inches)
- Saw (miter saw or hand saw)
- Sandpaper (80 and 120 grit)
- White acrylic or chalk paint
- Navy blue acrylic paint
- Red acrylic paint
- Painter’s tape (1-inch width)
- Foam brushes or flat synthetic brushes
- Drill with large bit (approx. 1/2 inch)
- Thick jute rope (approx. 2 feet)
- Scissors
- Hot glue gun or heavy-duty craft glue
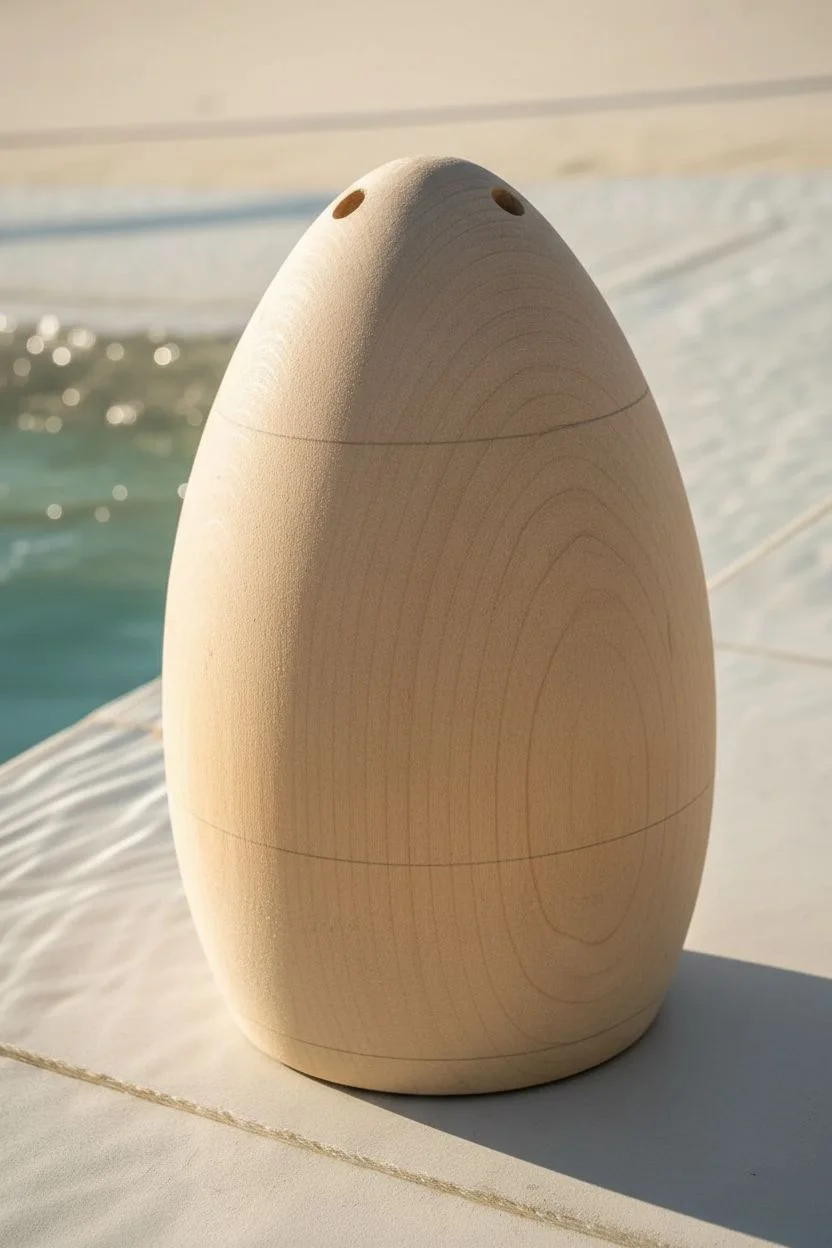
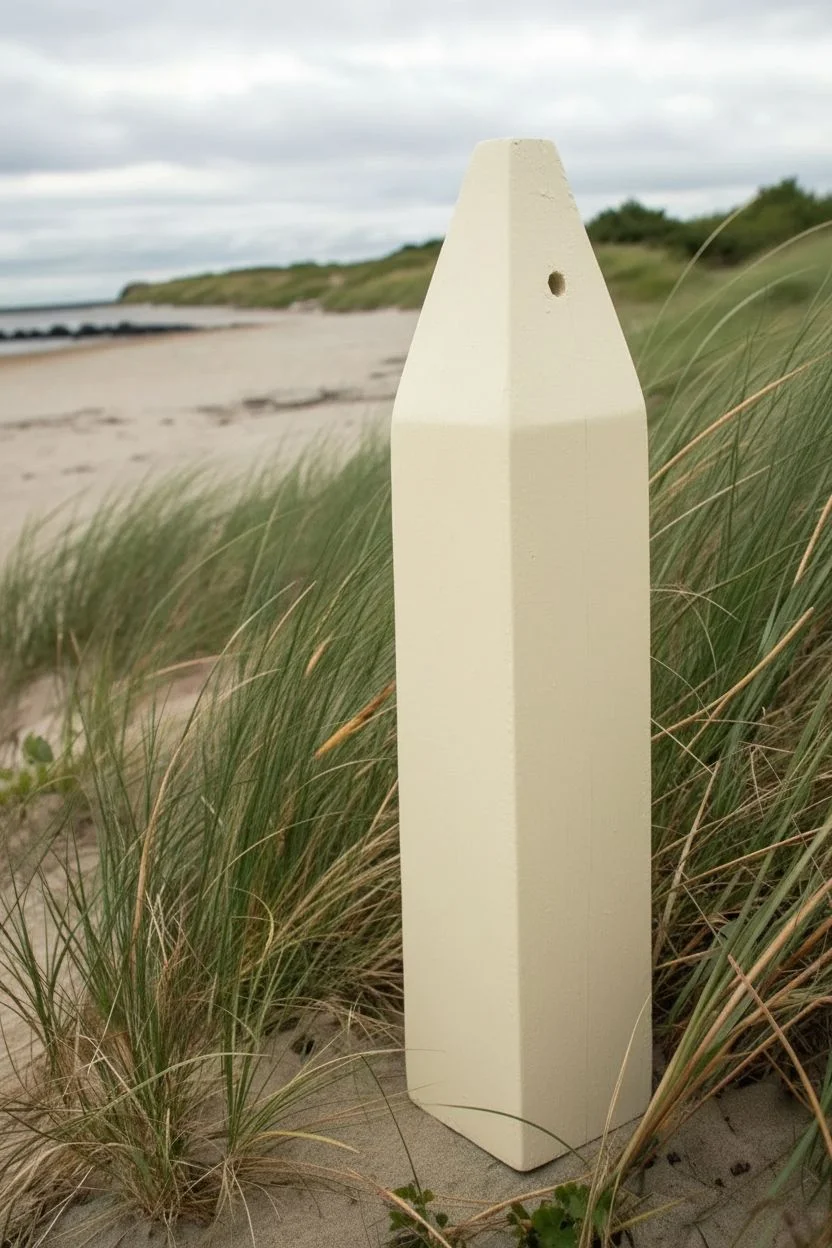
Step 1: Shaping the Base
-
Cut the Post:
Start by cutting your 4×4 wooden post to your desired length, typically between 12 and 14 inches. A standard untreated pine post works perfectly for this. -
Mark the Angles:
Measure about 3 inches down from the top of the post on all four sides. Mark the center point on the top face of the wood. -
Create the Point:
Using your saw, make 45-degree angle cuts from your side marks up to the center top point. This creates the classic tapered buoy shape. -
Drill the Rope Hole:
Drill a hole horizontally through the tapered top section, about 1.5 inches from the peak. Make sure the bit is large enough for your jute rope to pass through. -
Initial Sanding:
Use 80-grit sandpaper to smooth out the cut edges and remove any large splinters. Round over the sharp corners of the post slightly to soften the look.
Bleeding Stripes?
If paint bleeds under the tape, wait for it to dry, then use a small artist’s brush and your base white paint to touch up the edges for a clean line.
Step 2: Painting the Design
-
Base Coat:
Apply a generous coat of white paint to the entire buoy, including the bottom. I find that chalk paint works best here because it absorbs well and distressing easily later. -
Coverage Check:
Let the first coat dry completely. Depending on the wood’s absorbency, apply a second coat of white to ensure solid coverage. -
Tape the Navy Stripe:
Once the white base is bone dry, place a strip of painter’s tape horizontally about 4 inches down from the flat part of the buoy body. -
Paint the Navy:
Paint the area above the tape line with navy blue paint up to where the taper begins. Peel the tape off while the paint is still slightly wet for a crisp edge. -
Mark the Red Stripes:
Allow the blue paint to dry. Measure and tape off two sections for the red stripes near the bottom. Leave about an inch of white space between them. -
Apply Red Paint:
Fill in the taped areas with bright red acrylic paint. Two thin coats are better than one thick one to prevent bleeding under the tape. -
Dry and Peel:
Remove the tape carefully and let the entire project dry overnight or for several hours until completely cured.
Step 3: Finishing Touches
-
Distress the Surface:
Take your 120-grit sandpaper and lightly sand over the painted stripes and edges. Focus on corners and high spots to reveal some of the wood and white base beneath. -
Clean Up:
Wipe the buoy down with a tack cloth or slightly damp rag to remove all the sanding dust. -
Insert Rope:
Thread one end of your jute rope through the drilled hole at the top. -
Tie the Knot:
Pull the rope through until you have a loop of your desired handle size. Bring the two loose ends together. -
Secure the Handle:
Tie the two ends together in a simple overhand knot or wrap a smaller piece of twine around them to bind them, securing it with a dab of hot glue. -
Fray the Ends:
Trim the excess rope below the knot/bind and unravel the strands slightly to create a tassel effect.
Weatherproofing
Using this outside? Apply a clear matte polyurethane sealer after the sanding step to protect the wood from moisture and fading.
Place your finished buoy on a shelf or front porch to instantly add a breezy, nautical vibe to your home


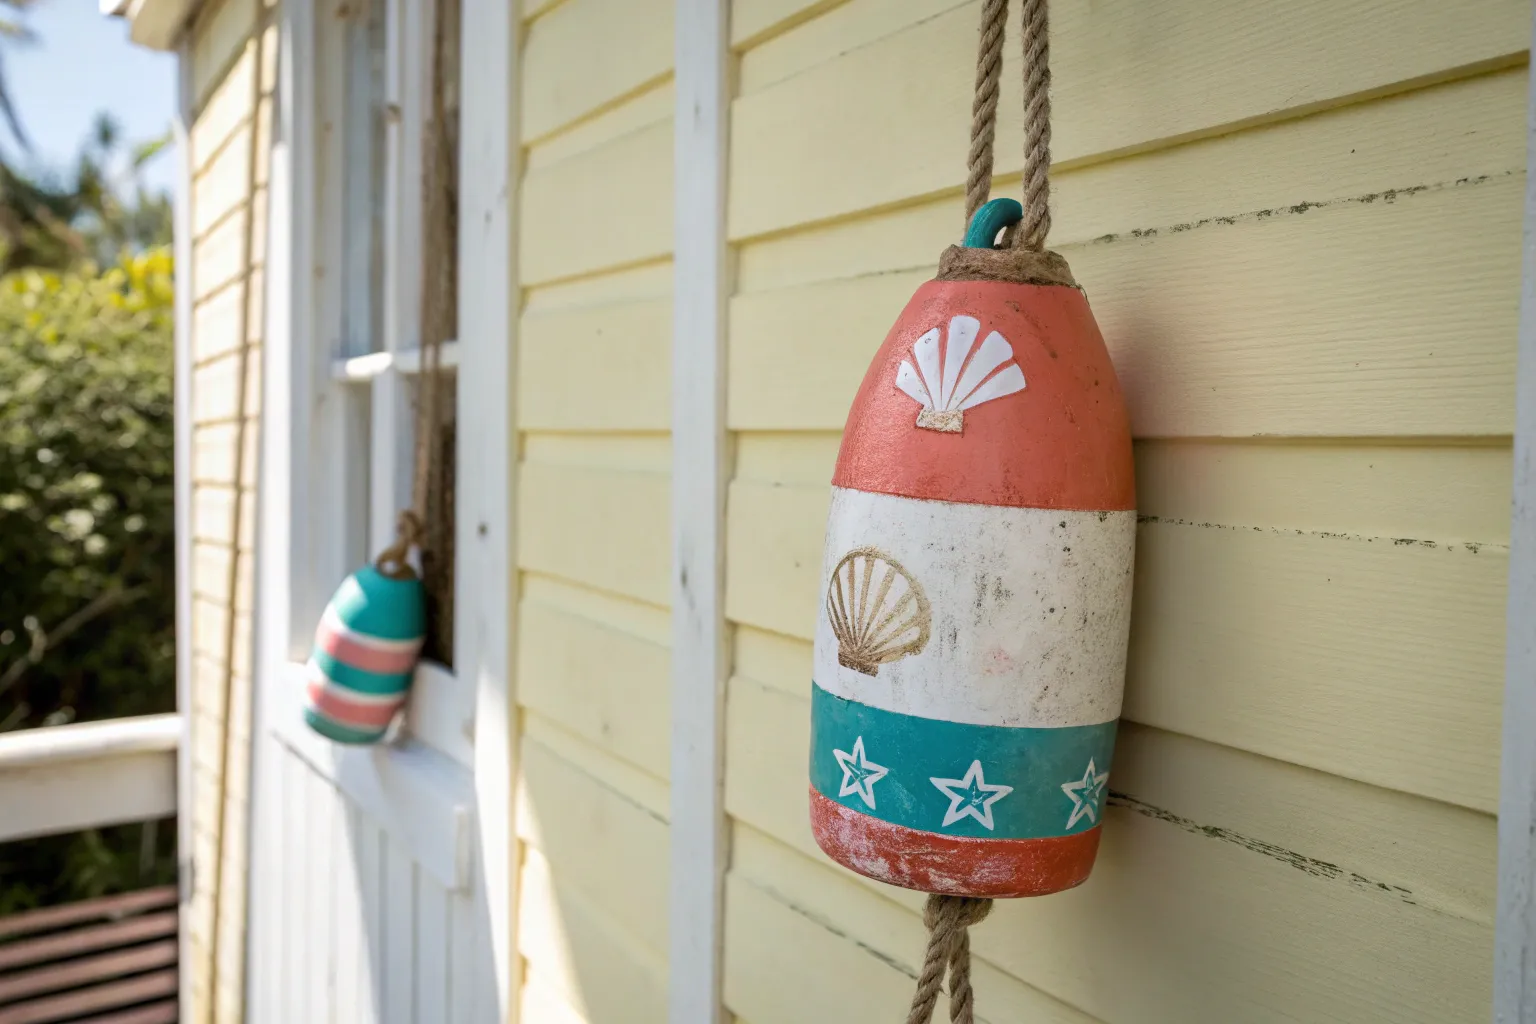
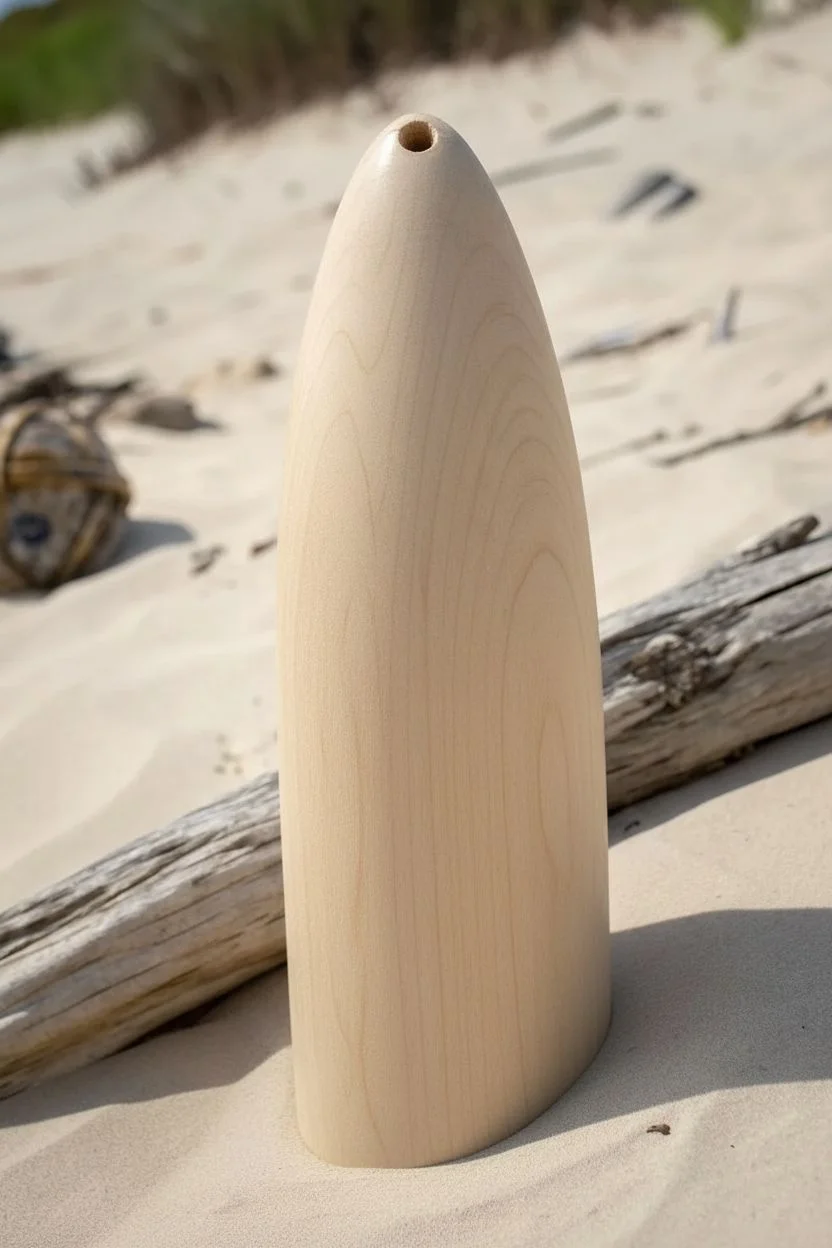
Lobster Buoy Numbers and Initials

Bring a touch of New England charm to your outdoor space with this authentically styled wooden buoy. Featuring a classic color block design and serif lettering, this project perfectly mimics the weathered look of genuine maritime gear.
Detailed Instructions
Materials
- Solid wood turning blank (approx. 4″ x 12″) or pre-made wood buoy shape
- Sandpaper (120 and 220 grit)
- Acrylic craft exterior paints: Muted Teal, Warm White, Coral/Salmon, Dark Green
- Painter’s tape (1-inch width)
- Small stencil set (serif font) or transfer paper
- Stencil brush or small flat brush
- 1/2-inch natural hemp or sisal rope
- Drill with 5/8-inch spade bit
- Matte clear coat sealer (exterior grade)
- Pencil
- Ruler
Step 1: Preparation & Base Coats
-
Prepare the wood shape:
If you aren’t starting with a pre-made buoy, sand your wood blank until smooth. The shape should be cylindrical with a tapered, rounded top and a flat bottom. -
Drill the rope hole:
Mark the center of the bottom of the buoy. Using your 5/8-inch spade bit, drill a hole about 1.5 inches deep to accommodate the bottom rope tassel later. -
Drill the top loop:
Drill a horizontal hole through the very top neck of the buoy, passing all the way through from one side to the other, for the hanging loop. -
Sand the surface:
Give the entire piece a final sanding with 220-grit sandpaper to ensure a smooth painting surface, then wipe away all dust with a tack cloth. -
Paint the middle section:
Paint the entire middle section of the buoy with Warm White interior/exterior acrylic. Don’t worry about perfect edges yet; simply cover the central area thoroughly. -
Apply second coat:
Let the white paint dry completely, then add a second coat to ensure opacity, especially since white can sometimes be translucent on raw wood.
Step 2: Color Blocking
-
Tape the top boundary:
Once the white paint is fully cured, wrap a strip of painter’s tape around the buoy where you want the white section to end and the top teal section to begin. -
Tape the stripe boundary:
Place another strip of tape lower down to define the top edge of the coral stripe. Measure carefully to keep the line level. -
Paint the top section:
Paint the top tapered section with Muted Teal. I find it helpful to brush away from the tape edge initially to prevent paint bleed. -
Paint the bottom section:
Use the same Muted Teal to paint the very bottom section of the buoy, leaving a gap for the coral stripe. -
Create the coral stripe:
Apply the Coral/Salmon paint in the band between the white and bottom teal sections. You may need two thin coats for vibrant color. -
Remove tape:
Carefully peel off the painter’s tape while the paint is still slightly tacky to achieve crisp, clean lines.
Bleed-Proof Lines
Before painting your colored sections, brush a tiny amount of the base white paint over the tape edge first. This seals the gap so your teal line is perfect.
Step 3: Lettering & Finishing
-
Position the text:
Using a pencil and ruler, lightly mark the center of the white section. Arrange your stencils to spell ‘LOBSTER BUOY’ centered on the face. -
Apply the lettering:
Using Dark Green paint and a dry stencil brush, tap paint gently over the stencil letters. Keep the brush vertically upright to prevent paint from sneaking under the plastic. -
Hand-paint corrections:
Once dry, remove the stencils. Use a very fine liner brush to fill in the ‘bridges’ of the stencil letters so they look like solid, printed text. -
Distress the finish:
When completely dry, lightly sand the edges and raised areas with 220-grit sandpaper to scuff the paint and reveal small peek-throughs of wood. -
Seal the artwork:
Apply a coat of exterior matte clear sealer to protect the paint from the elements without adding a glossy shine. -
Add the top rope:
Thread a length of hemp rope through the top horizontal hole. Tie a sturdy knot at the top to create a hanging loop. -
Attach the bottom tassel:
Cut a short piece of rope, fold it in half, and glue the folded end into the bottom hole using strong wood glue or epoxy, letting the ends fray naturally.
Oops! Uneven Text?
If your stenciled letters look crooked, wet a cotton swab with rubbing alcohol to gently erase the mistake before the acrylic cures, then try again.
Hang your buoy on a fence post or entryway to welcome guests with a classic seaside vibe


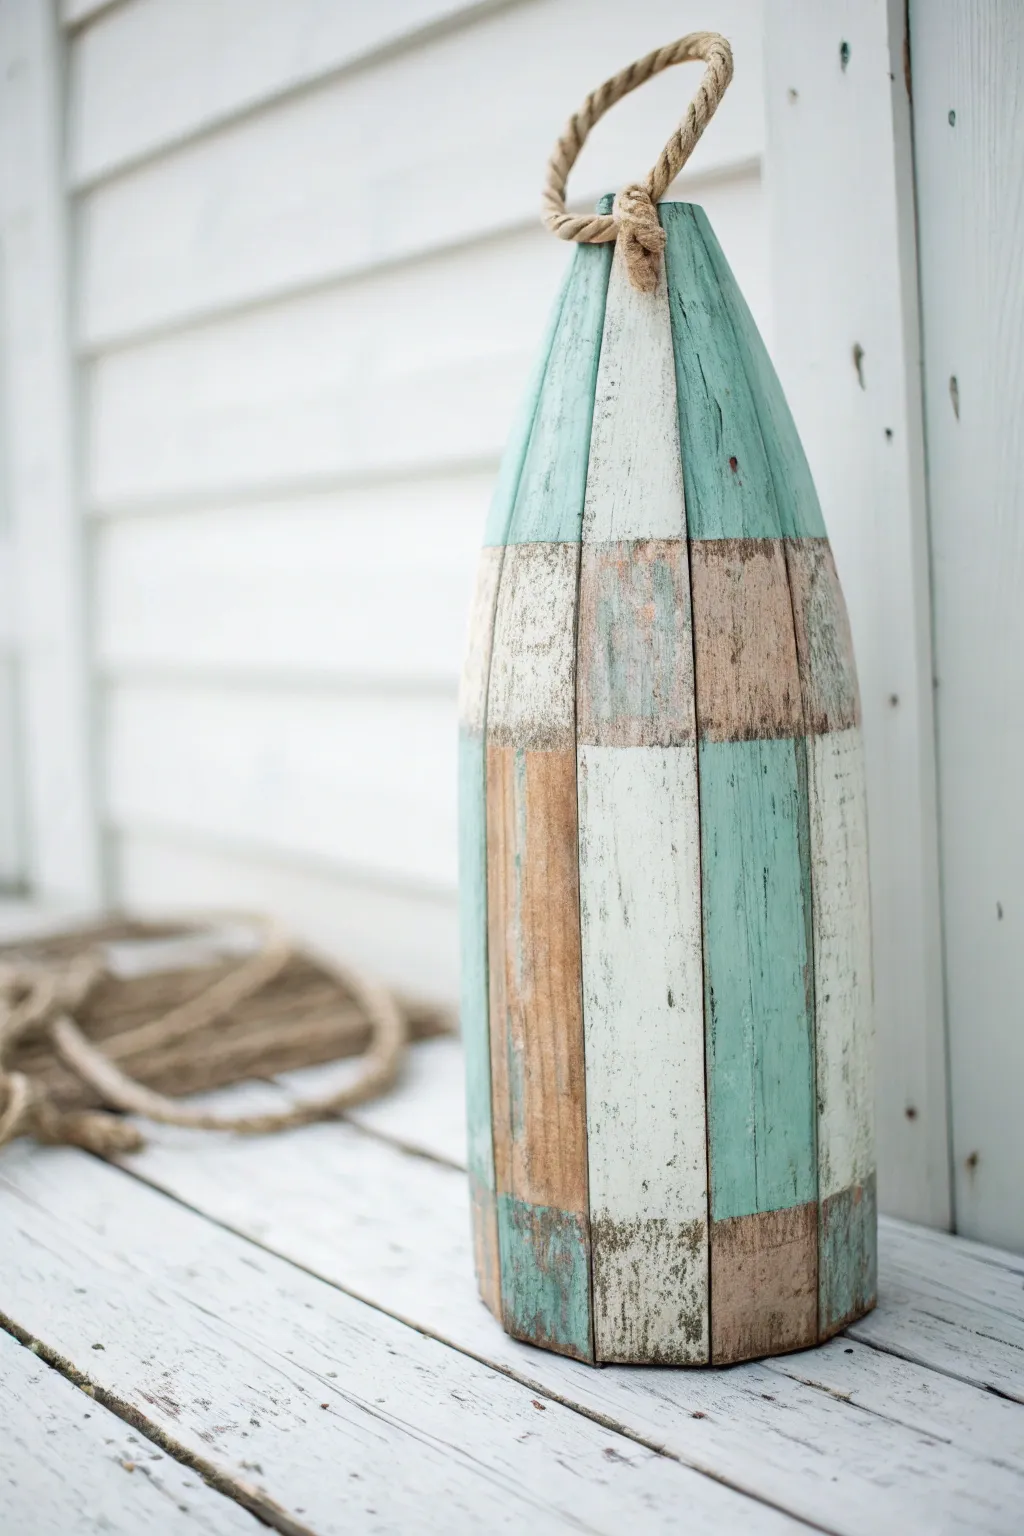
Bold Two-Tone Color Blocking
Capture the classic nautical spirit with this timeless three-stripe design featuring deep teal ends and a soft cream center. The weathered finish adds an authentic, sea-worn charm perfect for coastal decor.
Step-by-Step Guide
Materials
- Wooden lobster buoy blank (11-12 inches tall)
- Sandpaper (120 and 220 grit)
- Painter’s tape (1-inch width)
- Teal or dark turquoise exterior acrylic paint
- Cream or antique white exterior acrylic paint
- Medium flat paintbrush (1 inch)
- Small detail brush
- Pencil
- Ruler or measuring tape
- Natural jute rope (1/2 inch thick)
- Clear matte exterior sealer spray
- Clean rag or tack cloth
Step 1: Preparation
-
Sand the surface:
Begin by sanding the entire wooden buoy with 120-grit sandpaper to remove any rough splinters or existing finish. Follow up with 220-grit for a smooth painting surface. -
Clean the wood:
Wipe down the buoy thoroughly with a tack cloth or a slightly damp rag to remove all sawdust. Any dust left behind will cause bumps in your paint job. -
Mark the sections:
Using your ruler, measure the total height of the buoy main body (excluding the tapered top). Divide this roughly into three equal sections. -
Draw guide lines:
Lightly mark these divisions with a pencil around the circumference of the buoy. Don’t worry if they aren’t perfectly straight; a little variation adds character.
Bleeding Lines?
If paint bled under the tape, don’t panic. Wait for it to dry, then use a small angled brush and the cream paint to carefully touch up the line
Step 2: Base Painting
-
Paint the center band:
Start by painting the middle section with your cream or antique white paint. Extend the paint slightly past your pencil lines into the top and bottom zones to ensure full coverage later. -
Apply a second coat:
Let the first coat dry for about 20 minutes, then apply a second layer of cream paint to ensure the wood grain is mostly covered but still subtly visible for texture. -
Dry completely:
Allow the cream section to dry fully, preferably for at least an hour. If the paint is tacky, the tape in the next step will ruin the finish.
Step 3: Applying the Teal
-
Tape the boundaries:
Apply painter’s tape horizontally over the dry cream paint. Align the edge of the tape with your original pencil marks (or where you want the stripes to start). -
Seal the tape edge:
Press the edge of the tape down firmly with your fingernail or a credit card to prevent the darker paint from bleeding underneath. -
Paint the bottom section:
Using the 1-inch flat brush, paint the bottom third of the buoy with the teal color. Brush horizontally to match the direction of the stripes. -
Paint the top section:
Paint the top tapered section with the same teal color. Be careful around the hole at the very top where the rope will go; use the small detail brush to get inside the rim if needed. -
Layer the teal:
Apply a second coat of teal to both the top and bottom sections once the first coat is dry to the touch, ensuring a rich, opaque color. -
Remove the tape:
While the second coat of teal is still slightly damp, carefully peel back the painter’s tape at a 45-degree angle to reveal crisp lines.
Make It Numbered
Use a stencil to paint a large, dark number on the center cream band for an authentic marina registration look
Step 4: Finishing Touches
-
Distress the finish:
Once all paint is perfectly dry (wait overnight if possible), take your 220-grit sandpaper and lightly scuff the painted surface. Focus on the edges and anywhere the buoy would naturally bump against a dock. -
Seal the project:
Take the buoy to a well-ventilated area and spray it with a clear matte exterior sealer. I like to do two light coats rather than one heavy one to avoid drips. -
Prepare the rope:
Cut a length of jute rope approximately 12 inches long. Wrap the ends with a small piece of tape to keep them from fraying while you work. -
Thread the handle:
Feed one end of the rope through the hole at the top of the buoy. Tie a simple overhand knot on the inside (if the buoy is hollow) or create a loop knot if threading through horizontally. -
Secure and style:
If your buoy has a horizontal hole, feed the rope through and knot both ends securely against the wood. Allow the natural twist of the rope to form a graceful arch.
Now you have a charming piece of nautical decor ready to brighten up your patio or entryway


Rope-Trim Borders and Bands
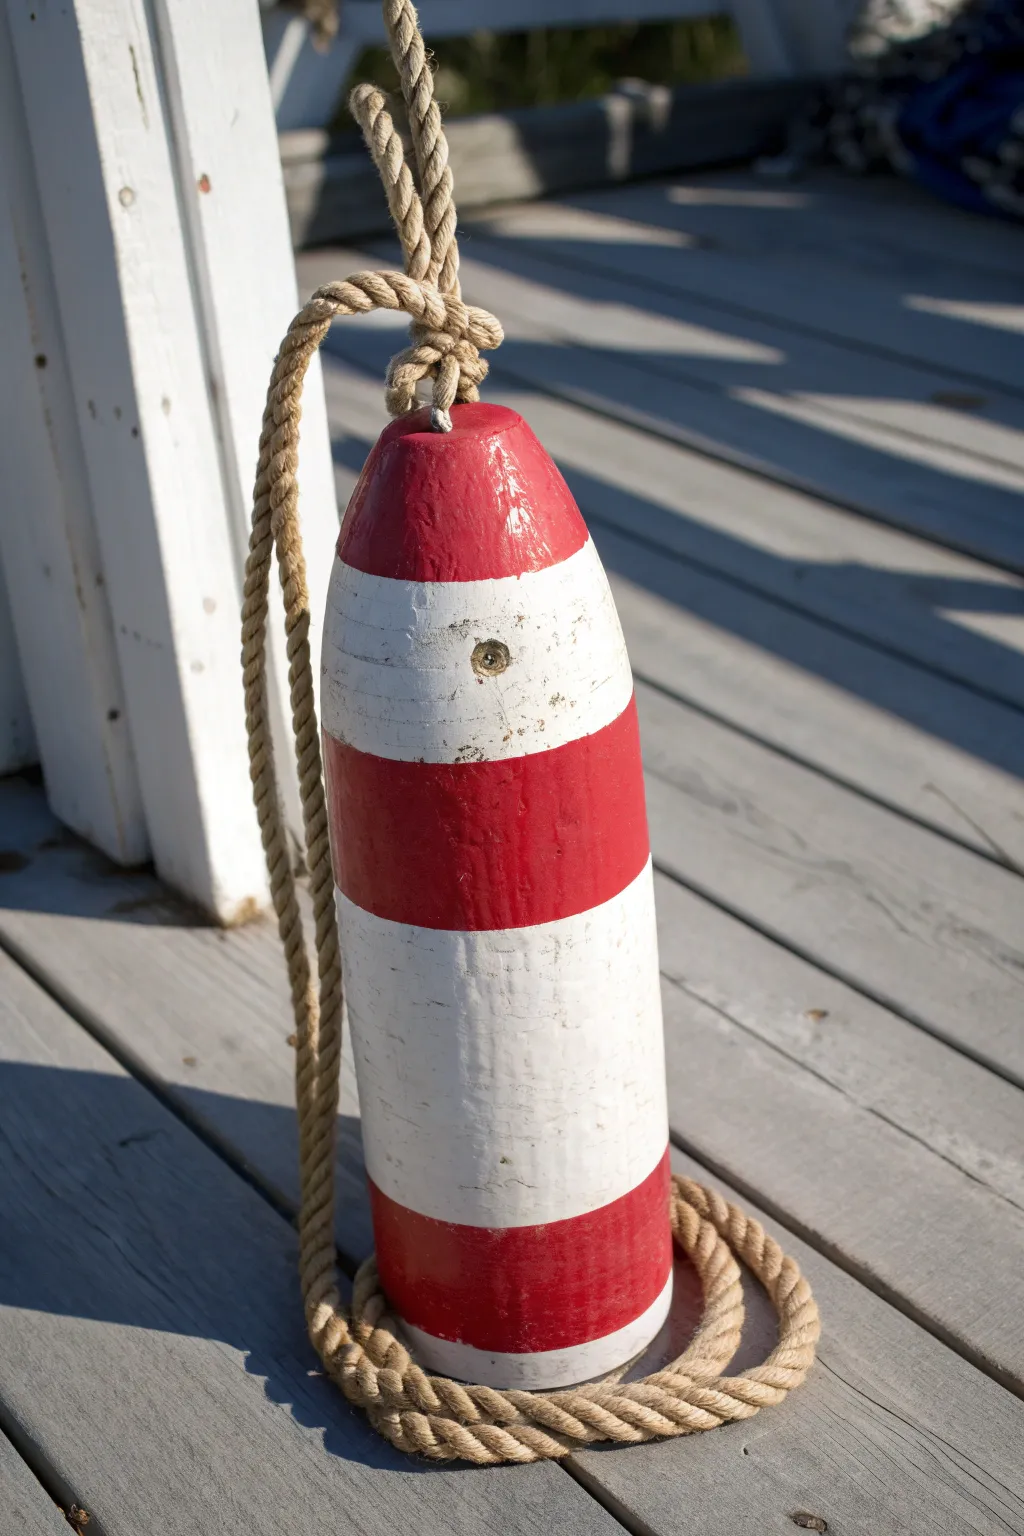
Capture the essence of classic maritime style with this beautifully weathered lobster buoy project. Featuring bold red and white stripes and authentic rope detailing, this piece brings a touch of the seaside to any porch or shelf.
Step-by-Step Tutorial
Materials
- Wooden lobster buoy blank (solid wood or foam core)
- Red exterior acrylic or enamel paint
- White exterior acrylic or enamel paint
- Painter’s tape (1-inch width)
- Medium-grit sandpaper
- Fine-grit sandpaper
- Paintbrushes (flat brush and detail brush)
- Natural fiber rope (manila or hemp, approx. 1/2 inch thick)
- Drill with bit matching rope diameter (if buoy isn’t pre-drilled)
- Clear matte sealer (marine grade optional)
- Pencil
- Ruler or measuring tape
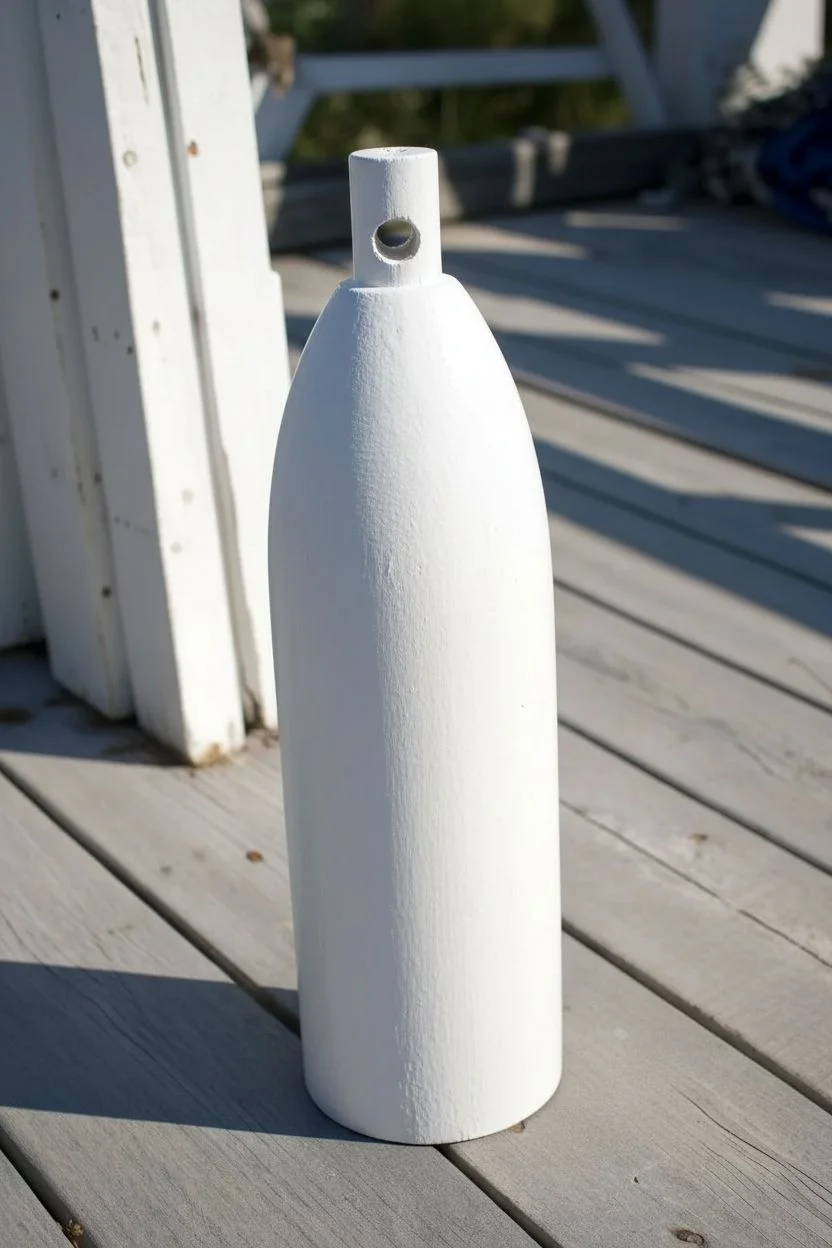
Step 1: Preparation & Base Coat
-
Sand the Wood:
Begin by giving your wooden buoy blank a good sanding with medium-grit sandpaper. You want to smooth out any major splinters but leave some texture for that authentic, rustic feel. -
Clean surface:
Wipe the buoy down with a damp cloth to remove all sawdust. Let it dry completely before applying any paint. -
Drill the Hole:
If your buoy doesn’t already have one, drill a hole through the narrow top handle section. This will be essential for threading your rope later. -
Apply White Base:
Paint the entire buoy with a solid coat of white paint. I like to use long, even strokes to mimic the grain of the wood. -
Second Coat:
Once the first coat is dry to the touch, apply a second coat of white to ensure full coverage and a bright, crisp background.
Weathering Tip
For a truly aged look, dilute a tiny drop of brown paint in water and lightly specific ‘dirty’ spots before sealing.
Step 2: Creating the Stripes
-
Measure Sections:
Decide on the pattern. For this look, measure and lightly mark horizontal lines with a pencil to divide the buoy into five roughly equal sections. -
Apply Tape:
Wrap painter’s tape carefully around the buoy. Apply the tape effectively to mask off the areas you want to remain white (the second and fourth bands, counting from the top). -
Seal the Edges:
Press the edges of the tape down firmly with your thumbnail or a credit card. This prevents the red paint from bleeding underneath. -
Paint Red Bands:
Paint the exposed sections (top, middle, and bottom) with your vibrant red paint. Use a flat brush for the main areas and a smaller brush near the tape edges. -
Layer Red:
Allow the red paint to dry, then apply a second coat for a deep, rich color that stands out against the white. -
Remove Tape:
Carefully peel off the painter’s tape while the paint is still slightly tacky to achieve the sharpest lines.
Make it Functional
Add house numbers using stencils on the white stripe to turn this art piece into a functional address marker.
Step 3: Detailing & Finishing
-
Distress the Paint:
Once completely dry, take fine-grit sandpaper and lightly scuff the painted surface. Focus on the edges and widely handled areas to replicate years of salt spray and use. -
Paint the Eyelet:
If your buoy has a small indentation or ‘eye’ on the side like the example, use a detail brush to darken the inside with a mix of grey or brown wash to make it look recessed. -
Thread the Rope:
Cut a long length of natural fiber rope. Thread one end through the top hole you drilled earlier. -
Create the Knot:
Tie a sturdy knot at the top to secure the rope, leaving a loop for hanging if desired. A bowline or figure-eight knot works well aesthetically. -
Coil the Excess:
Wrap the excess rope around the base of the buoy loosely or create a decorative coil to sit beneath it as part of the display. -
Seal the Project:
Finish by applying a clear matte sealer over the entire painted surface to protect your work from the elements and lock in that weathered finish.
Now you have a charming piece of nautical decor that looks like it has countless stories from the sea to tell
BRUSH GUIDE
The Right Brush for Every Stroke
From clean lines to bold texture — master brush choice, stroke control, and essential techniques.
Explore the Full Guide
Distressed Salt-Worn Finish
Capture the essence of a seaside cottage with this authentically distressed wooden buoy project. By layering paint and strategically scuffing the surface, you’ll create a convincingly salt-worn finish that looks like it washed ashore after years at sea.
Step-by-Step
Materials
- Solid wood buoy blank (balsa or cedar)
- White chalk paint or matte acrylic
- Barn red acrylic paint
- Painter’s tape (1-inch width)
- Medium-grit sandpaper (100-150 grit)
- Coarse-grit sandpaper (60-80 grit)
- Dark antique wax or brown glazing medium
- Lint-free rags
- Small twist drill bit
- Natural jute rope
- Candle wax or petroleum jelly (resist medium)
- Flat paintbrush (1-inch)
Step 1: Base Preparation
-
Drill the rope hole:
Before painting, carefully drill a hole straight through the tapered top of your wooden buoy blank. This will be essential for the rope handle later. -
Sand the raw wood:
give the entire wooden surface a quick sanding with medium-grit paper to remove any factory finish or rough splinters, ensuring the paint adheres well. -
Wipe clean:
Thoroughly wipe down the wood with a damp cloth to remove all sawdust. Let it dry completely.
Pro Tip: The Sandpaper Trick
For realistic weathering, hold your sandpaper flat against the buoy and wrap your hand around it, twisting the buoy rather than scrubbing back and forth.
Step 2: Layering the White Base
-
Apply the first white coat:
Paint the entire buoy with a layer of white chalk paint. Chalk paint works beautifully here because it sands easily for that distressed look. -
Let it dry:
Allow this base coat to dry fully, usually about 30-45 minutes depending on humidity. -
Apply the wax resist:
Rub a candle or a tiny amount of petroleum jelly on areas where you want natural wood to show through later—focus on edges, the very top, and random spots around the middle. -
Second white coat:
Apply a second coat of white paint over everything, including the wax spots. This adds depth and texture.
Level Up: Barnacle Details
Mix baking soda into a bit of grey paint to create a chunky paste. Dab small textural spots near the bottom to mimic dried barnacles.
Step 3: Creating the Stripes
-
Tape off the pattern:
Once the white paint is bone dry, use painter’s tape to mark off your stripes. Press the edges of the tape down firmly to prevent major bleeding, though minor bleeding adds to the rustic look. -
Add more resist:
I like to dab a little more wax or jelly specifically in the areas that will be painted red to ensure the white shows through the red later. -
Paint the red stripes:
Fill in the exposed sections with Barn Red acrylic paint. Don’t worry about perfect coverage; a slightly streaky application looks more authentic. -
Remove tape immediately:
While the red paint is still slightly tacky, carefully peel back the painter’s tape at a 45-degree angle.
Step 4: The Distressing Process
-
Dry completely:
Wait for the buoy to be completely dry to the touch, perhaps letting it sit overnight to be safe. -
Heavy sanding:
Take your coarse-grit sandpaper and attack the areas where you applied the wax resist. The paint will peel away easily in those spots. -
General distressing:
Switch to medium-grit paper and sand the entire body vertically. Scuff through the red stripes to reveal the white beneath, and through the white to reveal the raw wood. -
Add deep scratches:
Use the edge of a screwdriver or the coarse sandpaper to create intentional gouges or deep scratches for that ‘battered by rocks’ effect.
Step 5: Aging and Finishing
-
Apply antique glaze:
Mix a tiny drop of brown paint with water or use an antique wax. Brush it over the whole buoy, working it into the scratches and raw wood areas. -
Wipe back:
Immediately wipe off the excess glaze with a lint-free rag. This leaves grime in the crevices and tones down the bright white paint. -
Attach the rope:
Thread a length of heavy jute rope through the top hole. Tie a simple overhand knot or splice the ends together to create a rugged loop handle. -
Fray the ends:
Finally, tease apart the ends of the rope slightly to give it a worn, used appearance.
Place your finished buoy on a shelf or mantel to bring a touch of genuine seascape character to your home
Weathered Wood Grain Highlighting

Embrace the charm of coastal living with this project that turns a wooden blank into a beautifully weathered maritime artifact. By using distressing techniques on alternating paint colors, you’ll create a piece that looks like it’s bobbed in the ocean for decades.
Detailed Instructions
Materials
- Solid wood buoy blank (conical top)
- Medium-grit sandpaper (120-150 grit)
- Coarse-grit sandpaper (80 grit)
- Chalk or matte acrylic paint (Teal/Seafoam Green)
- Chalk or matte acrylic paint (Antique White)
- Dark walnut wood stain
- Lint-free rags
- Painters tape (1-inch width)
- Foam brushes or synthetic bristle brushes
- Jute or sisal rope (thick)
- Drill with large bit (if hole is not pre-drilled)
- Matte clear finishing spray
Step 1: Preparation & Staining
-
Sand the surface:
Begin by sanding your raw wood buoy blank with medium-grit sandpaper. You want to smooth out any rough manufacturing cuts but leave enough texture for the stain to grab onto. -
Establish the base tone:
Apply a coat of dark walnut wood stain to the entire buoy using a lint-free rag. Work the stain deep into the wood grain. -
Wipe away excess:
Immediately wipe off the excess stain. You aren’t looking for a solid dark color, but rather a base layer that will peek through later to create that aged effect. -
Let it cure:
Allow the stain to dry completely according to the manufacturer’s instructions. If you rush this, the paint layers might not adhere properly or could bleed.
Wax Resist Method
Before painting, rub a candle on edges and random spots. Paint won’t stick there, so when you sand later, the paint flakes off easily for an authentic chipped look.
Step 2: Creating the Grid Pattern
-
Define vertical sections:
If your buoy isn’t constructed of actual staves, you can fake the look. Use a pencil and a ruler to draw vertical lines from the darker base up to the start of the cone taper, dividing the cylinder into even vertical stripes. -
Tape the verticals:
Apply painter’s tape along every other vertical section. Press the edges down firmly to prevent significant bleed-under, though a little imperfection adds to the charm. -
Mark horizontal divisions:
On the exposed wood sections, lightly mark horizontal lines to divide the stripes into blocks. Looking at the example, there is a distinct middle band section.
Paint Looking Too New?
If the colors are too bright after sanding, mix water with a tiny drop of brown paint and wash it over the whole buoy, then wipe off immediately to dirty it up.
Step 3: Painting & Distressing
-
Paint the first color:
Load your brush with the Antique White paint. Paint alternating blocks on your exposed vertical stripes. Keep the application somewhat uneven; don’t aim for perfect opacity. -
Apply the second color:
Clean your brush or grab a fresh one, and apply the Seafoam Teal paint to the remaining designated blocks on these exposed stripes. Extend this teal color up into the cone section for two of the stripes. -
Remove tape and dry:
Carefully peel back the tape while the paint is tacky to avoid peeling. Let these painted sections dry completely. -
Tape the alternate sections:
Now, tape over the painted vertical stripes so you can work on the raw wood sections you skipped previously. -
Paint the second set:
Repeat the block painting process with your White and Teal paints. Vary the placement so you get that checkerboard feel, leaving some sections as bare stained wood if desired for contrast. -
Dry and reveal:
Remove the final tape strips and allow the entire buoy to dry overnight or until fully cured.
Step 4: The Weathering Process
-
Heavy distressing:
Take your coarse 80-grit sandpaper and aggressively sand over the painted areas. Focus on the edges of the ‘blocks’ and the vertical seams where the wood would naturally rub. -
Expose the grain:
Sand until you see the dark walnut stain and raw wood peeking through the white and teal paint. I like to really scuff up the bottom edge where a buoy would bang against a boat. -
Dust off leftovers:
Wipe the buoy down with a dry cloth or tack cloth to remove all sanding dust. -
Add the rope handle:
Loop a length of thick jute rope through the hole at the top of the buoy. Tie a simple overhand knot or splice the ends together for a secure handle. -
Seal the finish:
Spray the entire piece with a matte clear coat. This protects the finish without adding a glossy sheen that would ruin the vintage aesthetic.
Now you have a charmingly weathered accent piece that brings the dockside atmosphere right into your home

PENCIL GUIDE
Understanding Pencil Grades from H to B
From first sketch to finished drawing — learn pencil grades, line control, and shading techniques.
Explore the Full Guide
Lighthouse Wraparound Scene
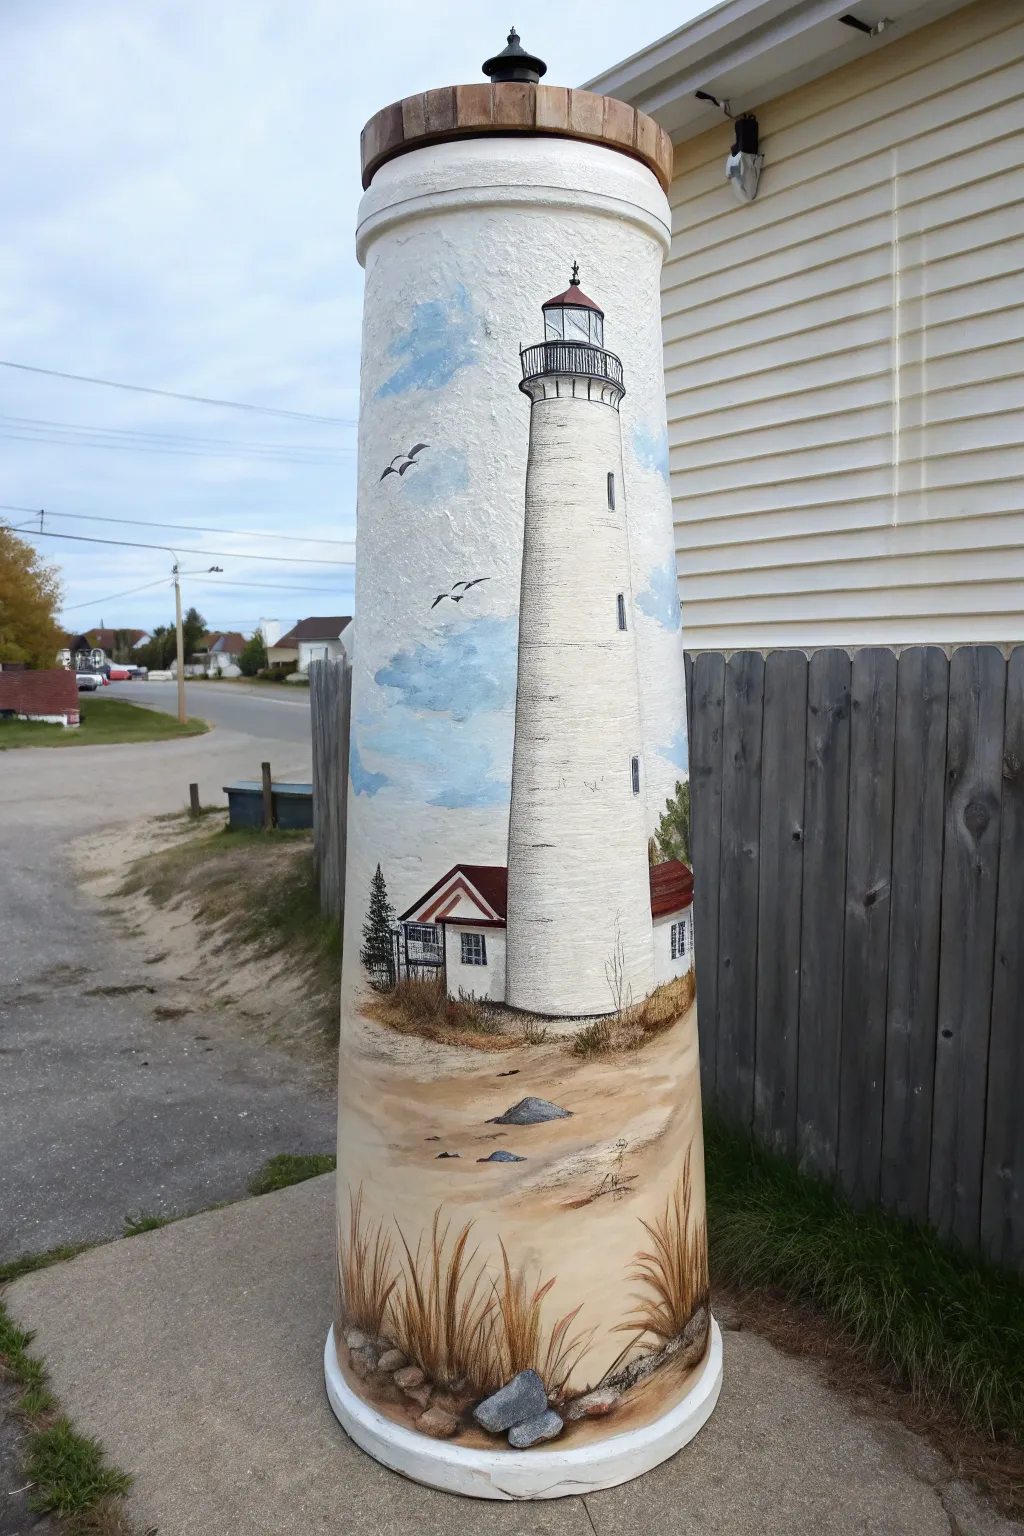
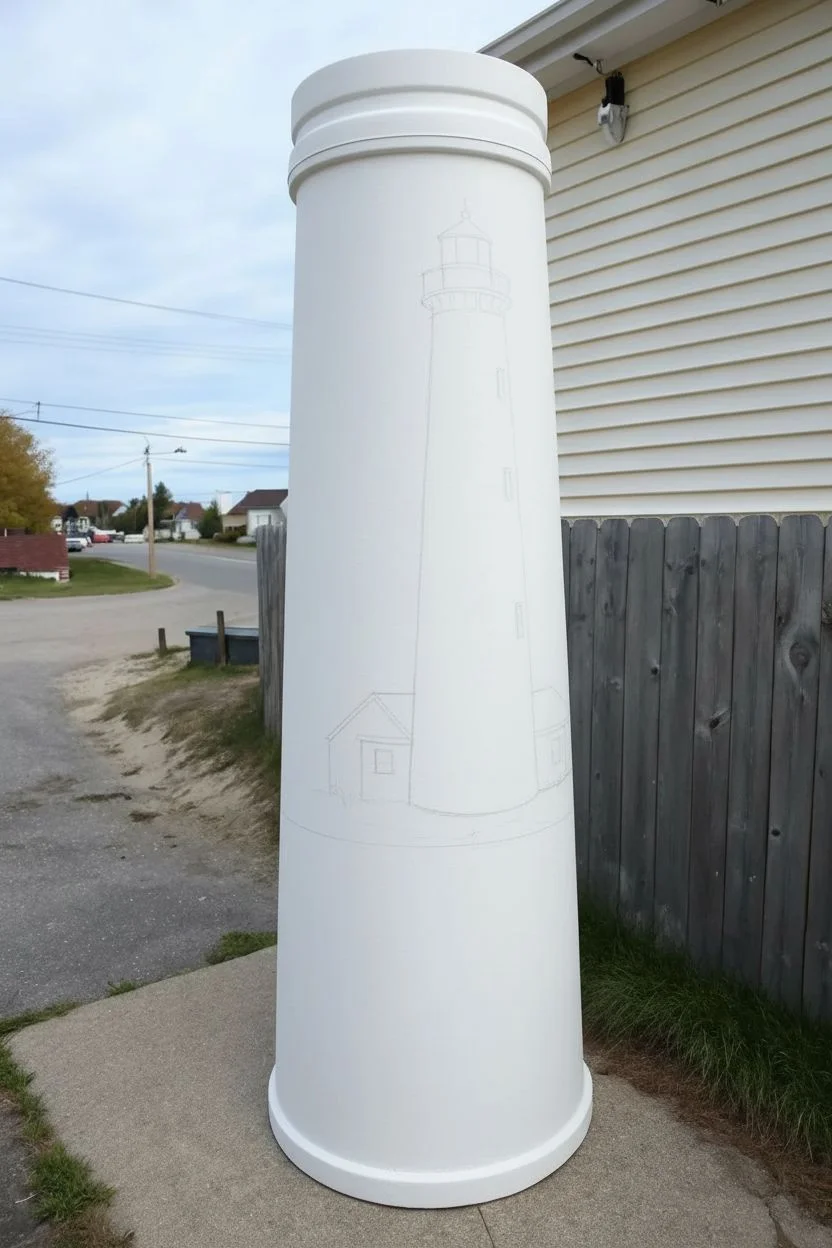
Transform a plain cylindrical buoy or pillar into a stunning seaside vista featuring a towering white lighthouse and dune grass. This wraparound mural technique creates a continuous 360-degree scene that captures the peaceful atmosphere of the coast.
Step-by-Step Guide
Materials
- Large cylindrical buoy or PVC pillar (primed white)
- Exterior acrylic craft paints (white, navy blue, light blue, sandy beige, ochre, brick red, charcoal grey, black, green)
- Set of brushes: 2-inch flat brush, 1-inch angled shader, #4 round brush, fine liner brush
- Pencil and large eraser
- Painter’s tape
- Clear outdoor sealant (UV resistant)
- Palette or mixing plate
- Paper towels and water cup
Step 1: Preparation and Sketching
-
Clean and Prime:
Ensure your buoy or cylinder is completely clean and dry. Apply a coat of high-quality exterior primer if the surface isn’t already prepped, creating a smooth, white canvas that will help your colors pop. -
Draft the Horizon:
Using a pencil, lightly sketch a horizon line about one-third of the way up from the bottom. This separates your sandy beach foreground from the sky background. -
Outline the Structures:
Sketch the main lighthouse tower vertically, tapering slightly as it goes up. At the base, draw the outlines of the keeper’s house, including the rooflines and windows. Keep your lines light so they are easily covered by paint.
Reference Trick
Tape a photo of a real lighthouse next to your painting area. It helps you get the proportions of the lantern room and windows correct without guessing.
Step 2: Sky and Background
-
Paint the Sky Base:
Mix a soft sky blue using white and a touch of light blue. Using your 2-inch flat brush, paint the entire upper section around the lighthouse sketch. I like to keep the blue slightly darker near the top and fade it to almost white near the horizon for atmospheric perspective. -
Add Clouds:
While the sky is still slightly tacky, use a dry brush with pure white paint to scumble in soft, fluffy clouds. Blend the edges gently so they aren’t too harsh against the blue. -
Paint Distant Birds:
Once the sky is dry, use your fine liner brush and black paint to add a few V-shaped silhouettes of seagulls flying in the distance.
Solar Topper
Glue a solar path light to the flat top of the buoy. At night, it will illuminate the painted beacon, making your lighthouse actually glow.
Step 3: The Lighthouse and Buildings
-
Block in the Tower:
Paint the lighthouse tower a creamy white. Since the primer is white, this step adds texture and coverage to hide your pencil lines. Let this layer dry completely. -
Add Shadow and Form:
To make the tower look cylindrical, mix a very diluted watery grey. Glaze the left side of the tower vertically to create a shadow side, giving the structure 3D volume. -
Detail the Lantern Room:
Use charcoal grey and black to paint the railing, the lantern glass grid, and the roof cap at the very top of the lighthouse. A steady hand with the liner brush is key here. -
Paint the House:
Fill in the keeper’s house walls with white. Paint the roof with brick red, adding slightly darker red strokes for shingles. Use the fine brush to outline windows in black and add grey shadowing under the eaves.
Step 4: Foreground and Finishing
-
Create the Sand Base:
Mix sandy beige with a touch of white. Paint the bottom third of the cylinder, using horizontal strokes. Blend in some ochre in patches to simulate uneven sand dunes. -
Detail the Rocks:
Paint small rock shapes near the bottom using grey. Add highlights on top with light grey and shadows underneath with black to ground them in the sand. -
Paint Dune Grass:
Using your round brush or a fan brush, flick upward strokes of brown, burnt umber, and ochre from the bottom edge. Vary the lengths and directions of the strokes to mimic wild sea grass blowing in the wind. -
Add Real Rocks (Optional):
For a trompe l’oeil effect, paint realistic shadows under the faux rocks, or you can even glue small, lightweight pebbles around the very base if the buoy material allows. -
Seal the Artwork:
Once all paint is thoroughly dry (give it 24 hours), apply two coats of clear, UV-resistant outdoor sealant to protect your masterpiece from the elements.
Place your finished lighthouse buoy in the garden or by the driveway to welcome visitors with a nautical touch
Sailboat Silhouette on the Taper
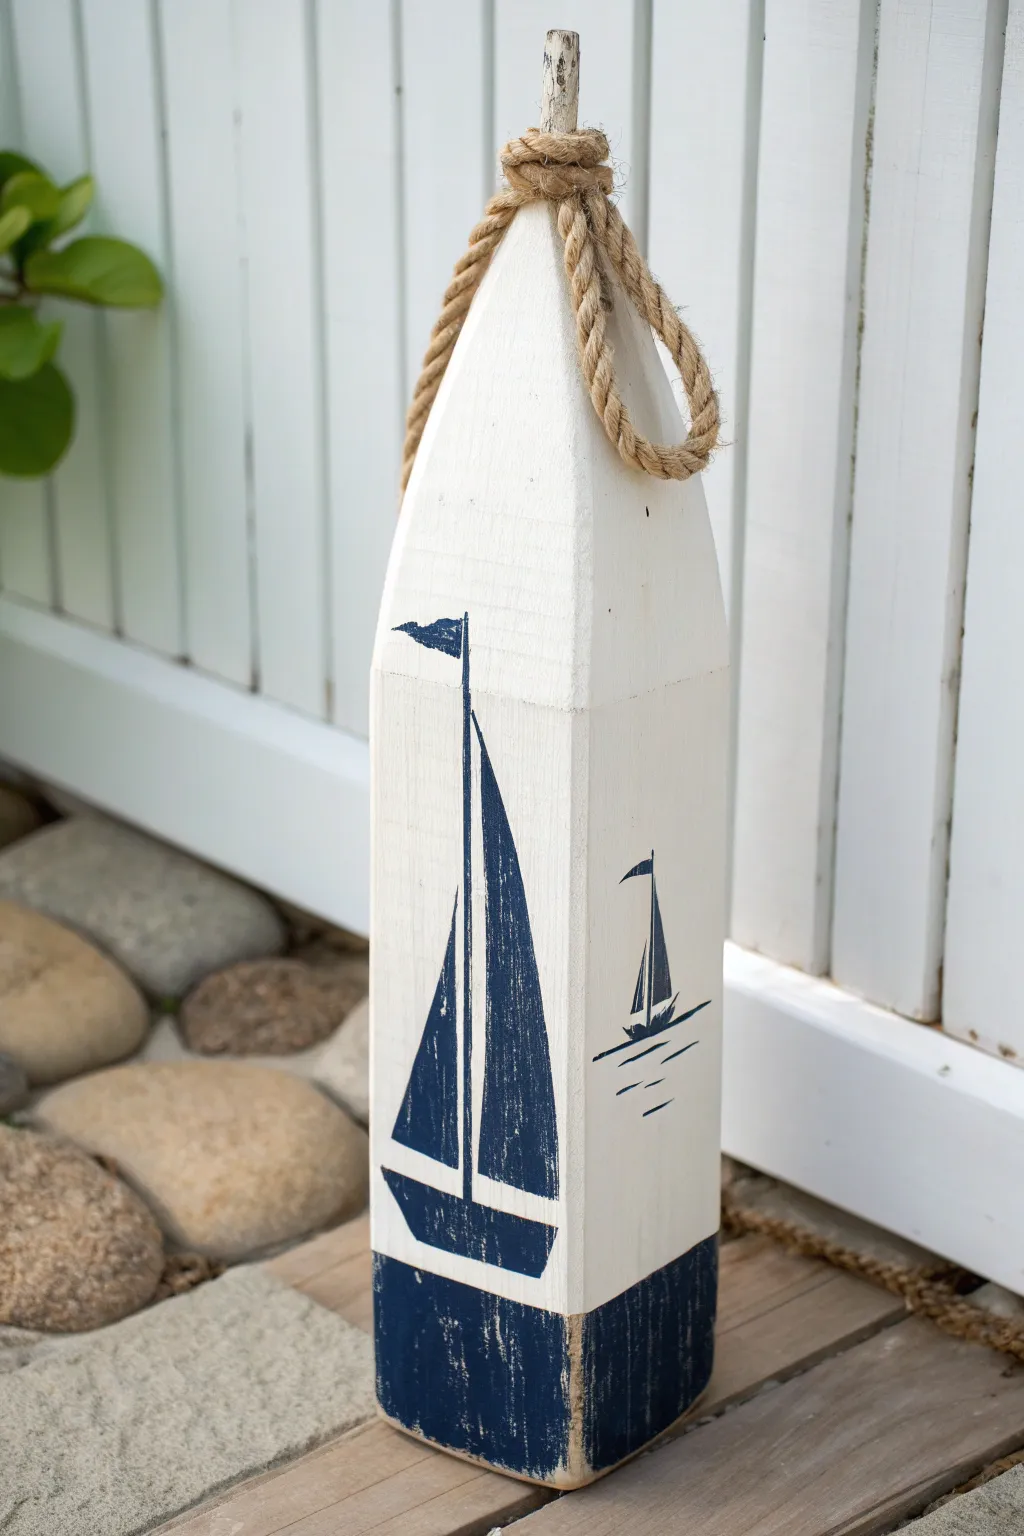
Create a charming seaside accent with this rustic wooden buoy featuring silhouetted sailboats. The distressed white finish and classic navy blue details give it an authentic, weathered look perfect for any coastal home.
Step-by-Step Tutorial
Materials
- 4×4 wooden post (cut to roughly 18-24 inches)
- Small wooden dowel (1/2 inch diameter)
- White acrylic or chalk paint
- Navy blue acrylic paint
- Jute rope (approx. 1/2 inch thick)
- Sandpaper (medium and fine grit)
- Detail paintbrushes
- Pencil
- Masking tape or painter’s tape
- Drill with 1/2 inch bit
- Wood glue
- Saw (miter saw or hand saw)
Step 1: Shaping the Buoy
-
Cut the Base:
Start with your 4×4 wooden post. Cut it to your desired height, typically between 18 and 24 inches is suitable for a decorative piece like this. -
Mark the Taper:
Measure about 4 to 5 inches down from the top of your post. Mark a center point on the top face of the wood using a ruler and pencil. -
Cut the Angle:
Using a miter saw or hand saw, cut angles from your 4-inch mark up to the center point to create a pyramid-like top. You want four triangular faces converging at the peak. -
Drill the Pinnacle:
Drill a shallow hole into the very center top of your pyramid using a 1/2 inch drill bit. This will hold the decorative dowel. -
Add the Spindle:
Cut a short piece of wooden dowel, about 2 inches long. Apply a dab of wood glue to your drilled hole and insert the dowel so it sticks up like a spindle.
Uneven Lines?
If your hand-painted boat lines look shaky, use a fine-tip dark blue paint marker instead of a brush for better control over the straight edges.
Step 2: Base Painting
-
Initial Sanding:
Give the entire piece a thorough sanding with medium-grit sandpaper to remove rough splinters, but leave some texture for character. -
Base Coat:
Apply a coat of white acrylic or chalk paint to the entire buoy, including the raw wood dowel on top. Don’t worry about perfect coverage; a little transparency adds to the aged look. -
Second Coat:
Once dry, apply a second coat of white if necessary. I prefer chalk paint here because it sands off beautifully for that distressed vibe later. -
Distress the Edges:
After the paint is fully dry, take fine-grit sandpaper and gently rub along the corners and edges, revealing the raw wood underneath to simulate weathering.
Level Up: House Number
Add practical flair by stenciling your house number vertically down one side of the buoy in the same navy blue paint.
Step 3: Adding the Design
-
Draft the Sailboat:
Lightly sketch a tall, slender sailboat silhouette on the front face using a pencil. Draw a simple triangular sail and a boat hull. -
Draft the Side Boat:
On the adjacent side, sketch a smaller, distant sailboat to create visual interest from different angles. Add simple horizontal lines below it to represent water ripples. -
Tape the Bottom:
Apply a strip of masking tape horizontally around the base of the buoy, about 3 inches from the bottom, to create a crisp line for the dipped effect. -
Paint the Base:
Paint the bottom section below the tape with navy blue paint. Use vertical brush strokes to ensure the paint gets into the wood grain. -
Paint the Silhouettes:
Using a fine detail brush and the same navy blue paint, carefully fill in your pencil sketches of the sailboats. Keep the lines clean but slightly imperfect for a hand-painted feel. -
Add Texture to Paint:
Once the blue paint is tacky but almost dry, lightly drag a dry, stiff brush or sandpaper over the blue areas to distress them slightly, matching the white base.
Step 4: Final Touches
-
Seal the piece:
If this will live outside, apply a clear matte sealer. For indoor use, leave it unsealed for a more powdery, authentic finish. -
Prepare the Rope:
Cut a length of thick jute rope, roughly 20 inches long. Wrap it loosely around the ‘neck’ of the buoy where the taper begins. -
Secure the Loop:
Tie a simple overhand knot or wrap the rope ends under themselves to form a loop. Use a dab of hot glue or wood glue hidden under the rope to keep it permanently in place. -
Fray the Top:
Optional: lightly sand or distress the paint on the top dowel one last time to make it look like driftwood.
Place your finished buoy on a porch or mantel to bring a breath of fresh sea air into your space


Seagulls and Horizon Line
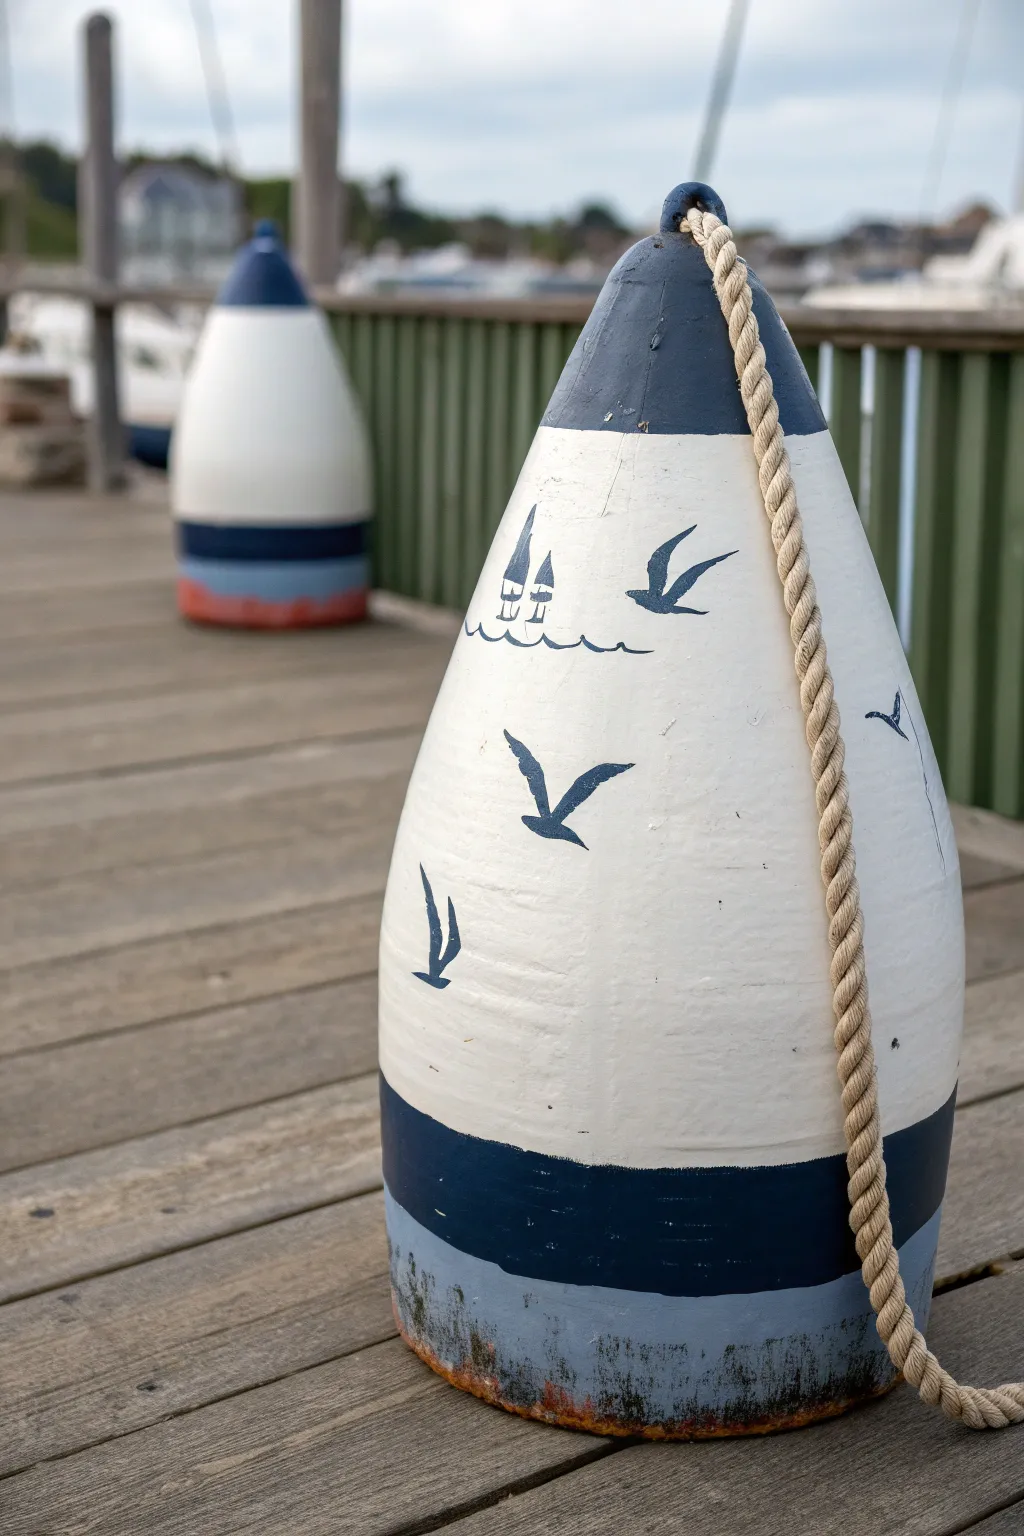
Transform a weathered buoy into a charming piece of nautical decor with this simple yet evocative design. Featuring a distinct horizon line and silhouetted seagulls, this project captures the peaceful rhythm of the ocean in classic maritime colors.
How-To Guide
Materials
- Large wooden or foam lobster buoy (cone-shaped)
- Sandpaper (medium and fine grit)
- Painter’s tape (1-inch width)
- Acrylic or outdoor craft paint: White
- Acrylic or outdoor craft paint: Navy Blue
- Acrylic or outdoor craft paint: Slate Blue/Grey
- Fine detail paintbrush (liner or round size 2)
- Medium flat paintbrush (1-inch)
- Large flat paintbrush (2-inch)
- Pencil
- Clear outdoor sealant spray (matte finish)
- Thick jute rope or twisted sisal rope
Step 1: Base Preparation
-
Clean and Sand:
Begin by thoroughly cleaning your buoy to remove any algae, dirt, or loose paint. Once dry, sand the entire surface, starting with medium grit to smooth out rough patches and finishing with fine grit for a painting-ready texture. -
Base Coat:
Using your large flat brush, apply a solid coat of white paint over the entire body of the buoy. This acts as your primer and the main background color. Let it dry completely. -
Add a Second Coat:
Apply a second layer of white paint to ensure opaque coverage, hiding any underlying wood grain or previous markings. Allow this to cure fully before taping.
Pro Tip: Steady Hands
For the tiny seagulls, rest your painting hand’s pinky finger on the dry surface of the buoy. It acts as an anchor, stopping your hand from shaking while painting fine lines.
Step 2: Blocking the Colors
-
Tape the Top Cone:
Measure about 3-4 inches down from the very top loop hole. Apply painter’s tape horizontally around the circumference of the buoy to mark off the top cone section. -
Tape the Bottom Stripes:
Create the bottom bands by applying a line of tape about 4 inches up from the bottom edge. Then, apply a second line of tape about 2 inches above that one. This defines the space for the navy stripe. -
Paint the Navy Sections:
Paint the top cone section and the defined middle stripe band with Navy Blue paint. Use the medium flat brush for control near the tape edges. -
Paint the Base:
While the navy paint is wet or just after drying, paint the very bottom section (below the navy stripe) with the Slate Blue/Grey paint. -
Remove Tape:
Carefully peel off the painter’s tape while the paint is still slightly tacky to achieve crisp, clean lines. Let all bands dry completely.
Step 3: Painting the Details
-
Sketch the Horizon:
Use a pencil to lightly sketch a small, wavy horizon line roughly in the upper third of the white section. Draw two simple triangular sailboat shapes resting on this line. -
Sketch the Birds:
Lightly sketch several seagull silhouettes scattered across the white space. Vary their sizes and angles to create a sense of movement and depth. -
Paint the Sailboats:
Using your fine detail brush and Navy Blue paint, carefully fill in the two sailboat shapes. They are stylized, so simple triangles with a line for a mast work perfectly here. -
Detail the Waves:
With the same fine brush, trace over your pencil wave line beneath the boats. Keep the line thin and slightly broken to suggest distant water texture. -
Fill in Seagulls:
Switch back to the Navy Blue paint. Fill in your seagull sketches. I find it helps to start at the center of the bird’s body and pull the brush outward toward the wingtips for a natural tapered create. -
Add Wing Details:
For the larger birds, ensure the wings have a distinct ‘elbow’ bend. A slightly heavier pressure on the brush in the middle of the wing creates a nice varied line width. -
Clean Up Edges:
Inspect your white background. If any navy paint smudged, use a small brush with white paint to touch up and conceal errors once the blue is dry.
Level Up: Personalized Port
Add custom stenciled numbers or initials to the lower blue band to mimic real registration numbers, representing a house number or family anniversary date.
Step 4: Finishing Touches
-
Distress (Optional):
For a rustic look matching the photo, lightly sand the navy blue bands and the bottom grey section to reveal tiny bits of white or wood underneath. -
Seal the Project:
Take the buoy outdoors or to a well-ventilated area. Spray the entire piece with a clear matte outdoor sealant to protect it from sun and moisture. -
Attach the Rope:
Thread a thick length of jute or sisal rope through the top loop of the buoy. Create a secure knot or splice it back into itself. -
Create the Drop Line:
Let the rope hang down alongside the buoy, similar to how it would look in the water. You can secure it with a small dab of hot glue if you want it to stay permanently draped.
Hang your nautical masterpiece by the dock or on a porch post to enjoy a permanent view of the coast
Seaweed and Dune Grass Stripes
Capture the muted, natural tones of the coastline with this classic striped buoy design. The combination of creamy white, deep hunter green, and mustard yellow perfectly mimics the colors found in swaying dune grass and washed-up kelp.
Step-by-Step Tutorial
Materials
- Wooden lobster buoy (square tapered style)
- Sandpaper (medium and fine grit)
- White primer
- Cream or off-white exterior acrylic paint
- Mustard yellow exterior acrylic paint
- Hunter green exterior acrylic paint
- Painter’s tape (1-inch width)
- Flat paintbrush (1-inch)
- Small round brush for touch-ups
- Rope or twine for the handle
- Clear matte sealant spray
Step 1: Preparation and Base Coat
-
Sand the surface:
Begin by sanding the entire wooden buoy. Start with medium grit to remove any rough splinters, especially around the tapered top, then finish with fine grit for a smooth painting surface. -
Wipe it clean:
Use a tack cloth or a slightly damp rag to remove all sawdust. Any dust left behind will result in a bumpy finish. -
Prime the wood:
Apply a coat of white primer to the entire buoy. This seals the wood and ensures your top colors will look true and vibrant. -
Let it dry completely:
Allow the primer to dry according to the manufacturer’s instructions, usually about an hour. -
Apply the base color:
Paint the entire buoy with your cream or off-white acrylic paint. Use long, vertical strokes that follow the grain of the wood. -
Add a second coat:
Once the first coat is dry, apply a second coat of cream paint to ensure solid, opaque coverage without streaks.
Clean Lines Pro-Tip
Before applying your stripe color, paint a thin layer of the *base* cream color over the tape edge. This seals the gap, so any bleed is invisible.
Step 2: Creating the Striped Pattern
-
Mark the stripe locations:
Decide where you want your two striped sections. The design features a thicker band of green sandwiched between two thin bands of yellow. Lightly mark these positions with a pencil. -
Tape the yellow bands:
Apply painter’s tape to mask off the areas *outside* where the yellow stripes will go. You are essentially creating a stencil for the two yellow bands first. -
Seal the tape edges:
Run your fingernail or a credit card firmly along the edge of the tape to prevent paint bleed. -
Paint the yellow stripes:
Fill in the exposed areas with the mustard yellow paint. I prefer to do two thin coats rather than one thick one to avoid drips. -
Remove tape and dry:
Peel off the tape while the paint is still slightly tacky to get a clean line, then let the yellow paint dry completely. -
Mask for the green stripe:
Once the yellow is fully cured, place fresh painter’s tape directly over the yellow stripes you just painted. This protects them while you paint the green center. -
Apply the green paint:
Paint the area between the masked yellow lines with your hunter green paint. Ensure you cover all four sides of the buoy evenly.
Step 3: Finishing Touches
-
Reveal the design:
carefully remove all tape. You should now see a perfect stack: yellow, green, yellow, against the cream background. -
Distress the finish (optional):
To match the weathered look in the photo, take a piece of sandpaper and lightly scuff the edges and corners of the buoy, revealing a bit of wood beneath the paint. -
Add the handle:
Thread a piece of thick rope or twine through the hole in the handle spindle. Create a loop and secure it with a sturdy knot. -
Seal the project:
Spray the entire buoy with a clear matte sealant. This protects it from the elements if you plan to display it outside or in a garden.
Paint Bleeding?
If paint seeped under the tape, wait for it to dry fully. Then, use a small angled brush and the base cream color to carefully touch up the fuzzy edge.
Place your finished buoy in the garden or on a porch to bring a subtle touch of the seaside to your home
Starfish and Shell Medallions
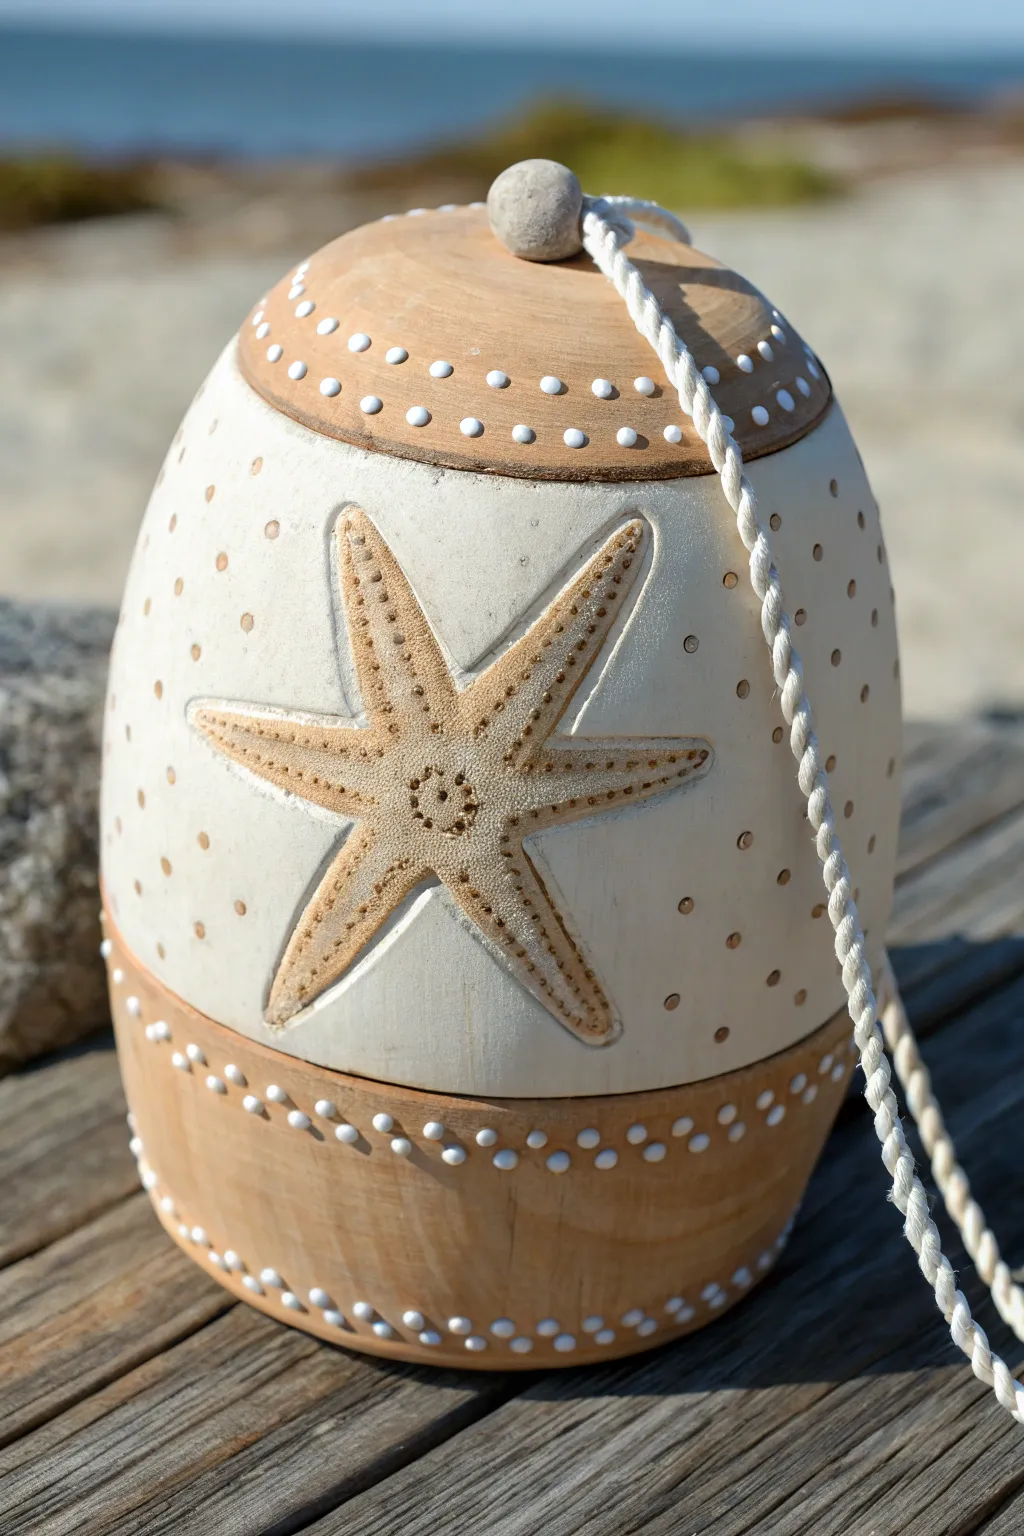
Transform a simple wooden buoy into a refined piece of coastal decor with this elegant relief-style project. The combination of natural wood tones, creamy whites, and textured dot work creates a sophisticated look that mimics washed-up sea treasures.
Detailed Instructions
Materials
- Wooden buoy (unfinished)
- Pencil
- Carving tools (V-gouge and shallow U-gouge)
- Sandpaper (fine and medium grit)
- Cream or off-white acrylic paint
- Small round paintbrushes (sizes 0 and 2)
- Flat paintbrush (size 1/2 inch)
- White puff paint (dimensional fabric paint) or small dotting tool
- Cotton rope or jute twine
- Small wooden bead or stone (for top knot)
- Matte clear sealant spray
Step 1: Preparation and Design
-
Sand the surface:
Start by smoothing your wooden buoy with medium-grit sandpaper, then follow up with fine-grit to create a perfect canvas, wiping away all dust with a tack cloth. -
Mark the bands:
Using a pencil, lightly mark horizontal lines to divide the buoy into three sections: a top cap, a large central band for the design, and a bottom base. -
Sketch the starfish:
In the center of the middle band, lightly sketch a five-legged starfish. Aim for slightly curved, organic arms rather than perfectly straight geometric points to make it look natural.
Textural trick
If you aren’t comfortable with wood carving tools, you can use a wood burning tool (pyrography pen) to outline the starfish. It creates a similar depth and adds a lovely dark edge.
Step 2: Carving the Relief
-
Outline with a V-gouge:
Carefully trace the outline of your starfish sketch using a V-gouge carving tool. Apply steady, moderate pressure to create a defined trench around the shape. -
Define the interior details:
Use the same tool to create the central spine running down each starfish arm, mimicking the texture of a real sea star. -
Clear background material (optional):
If you want the starfish to stand out more, you can use a shallow U-gouge to slightly lower the wood level immediately surrounding the starfish, though a simple outline works beautifully too. -
Sand the carving:
Fold a small piece of fine sandpaper to smooth any rough edges created inside the carved grooves.
Step 3: Painting
-
Paint the middle band:
Using your flat brush and cream acrylic paint, carefully fill in the large central band surrounding the starfish. Leave the starfish itself unpainted to show the natural wood tone. -
Detail the edges:
Switch to a smaller brush to paint right up to the carved outline of the starfish. I find it helpful to rotate the buoy frequently to get the best angle for these tight spots. -
Preserve the wood sections:
Leave the top dome and the bottom base completely unpainted. The contrast between the raw wood and the cream paint is essential for this aesthetic. -
Add textural dots to the Starfish:
Dip the handle end of a paintbrush or a dotting tool into the cream paint. Apply tiny dots along the spine of each starfish arm to simulate its bumpy texture. -
Create the polka dot pattern:
Using the same dotting technique but with slightly more paint (or a darker beige color for subtle contrast), add scattered dots across the painted cream background.
Uneven dots?
If your puff paint dots look peaky like meringues, tap the bottom of the buoy firmly on the table immediately after application. This helps the paint settle into a smooth dome.
Step 4: Finishing Details
-
Apply the raised white dots:
For the decorative borders, use white puff paint directly from the bottle nozzle to create uniform, raised dots along the upper and lower edges of the colored band. -
Accent the wood grain:
Add another row of puff paint dots along the very bottom edge of the buoy and within the top natural wood section for cohesive detailing. -
Let it cure:
Allow the puff paint to dry completely—this often takes several hours to harden fully. -
Seal the piece:
Spray the entire buoy with a matte clear sealant to protect both the wood and the paint from moisture and handling. -
Attach the rope:
Thread a length of white cotton rope through the hole at the top of the buoy. -
Secure with a stone knot:
Thread both ends of the rope through a large bead or a drilled stone, then tie a sturdy overhand knot above it to secure the loop.
Hang your finished buoy in a prominent spot to bring a breath of fresh sea air to your home
Crab or Lobster Illustration
Transform a plain wooden lobster buoy into a charming piece of coastal decor with this lively crab illustration. The finished piece features a distressed white background, a bold red crustacean, and whimsical teal stars, perfect for hanging by the dock or on a porch.
How-To Guide
Materials
- Wooden lobster buoy (primed or raw wood)
- Sandpaper (medium and fine grit)
- White acrylic paint (matte finish)
- Red acrylic paint (bright scarlet)
- Dark teal or navy blue acrylic paint
- Light teal or turquoise acrylic paint
- Paintbrushes (1-inch flat, medium round, and fine liner)
- Pencil
- Painters tape
- Clear outdoor sealant spray (matte or satin)
- Rope for hanging
Step 1: Preparation & Base Coat
-
Prepare the surface:
Begin by sanding the entire wooden buoy to remove any rough splinters or old finish. Wipe away the dust with a damp cloth or tack rag to ensure a clean painting surface. -
Apply the base coat:
Paint the entire buoy with the white matte acrylic paint using a 1-inch flat brush. You may need two to three coats to get a solid, opaque finish. Let each coat dry completely before adding the next. -
Distress the finish (optional):
If you want the slightly weathered look seen in the photo, lightly sand the dried white paint in a few spots, especially around the edges, to let a bit of wood texture show through.
Paint Bleeding?
If your wave lines look messy, wait for the paint to dry fully. Then, go back with your white base color and a small flat brush to ‘cut in’ and tidy up the edges.
Step 2: Designing the Borders
-
Mark the bottom section:
Using a pencil, lightly mark a horizontal line about 2-3 inches up from the bottom of the buoy. This will be the top edge of your wave pattern. -
Sketch the waves:
Draw three wavy lines below your initial mark to create bands. The bottom band will be dark teal, the middle red, and the top band dark teal again. -
Paint the wave outlines:
Use a medium round brush and the dark teal/navy paint to fill in the top and bottom wavy bands. Take your time on the curves to keep them smooth. -
Fill the center wave:
Once the dark bands are dry to the touch, fill the middle wave section with the bright red paint. This creates a bold contrast against the white and blue. -
Add the bottom stripe:
Paint a solid straight band of the dark teal around the very bottom edge of the buoy to anchor the design visually.
Step 3: Painting the Crab
-
Sketch the crab:
Lightly sketch the crab outline in the center of the buoy using your pencil. Start with a wide oval for the body, then add the two large front claws and four smaller legs on each side. -
Paint the crab body:
Using the red paint and a medium round brush, fill in the main oval body shape. Apply paint somewhat thickly for good coverage, but watch for drips on the vertical surface. -
Detail the claws:
Paint the large pincers red. Notice how the claws in the image have a segmented look; paint the ‘arm’ sections first, then the large pincer shapes. -
Add the legs:
Switch to a smaller brush to carefully paint the walking legs. They should curve downward and taper to points. -
Add the eyes:
Dip the handle end of a paintbrush into the dark teal paint and dot two eyes onto the crab’s head area. Use a fine liner brush to draw thin stalks connecting the eyes to the body. -
Highlight the shell:
I like to add a tiny bit of white to my red paint to create a lighter shade, then add subtle curved highlights on the top of the shell and claws to give them dimension.
Pro Design Tip
Don’t aim for perfect symmetry on the crab. Making one claw slightly larger or differently shaped adds whimsical character often found in folk art styles.
Step 4: Finishing Touches
-
Add the stars:
Using the light teal or turquoise paint, sketch five-pointed stars around the crab using a fine brush. Place one or two above the crab and one near the bottom for balance. -
Weather the design:
Once all paint is bonedry, you can take a piece of fine-grit sandpaper and very gently scuff the red crab and the wave borders. This mimics sea-worn wear and tear. -
Seal the artwork:
Spray the entire buoy with a clear outdoor sealant. This is crucial to protect your work from moisture and sun fading if it will hang outside. -
Attach the rope:
Thread a sturdy length of rope through the handle hole at the top. Knot it securely so the buoy hangs straight.
Hang your nautical masterpiece with pride and enjoy the seaside charm it brings to your space
Whale Design That Follows the Curve
Transform a classic wooden lobster buoy into a piece of coastal decor with this serene whale design. The artwork features a leaping humpback whale that curves naturally with the cylindrical shape, framed by sea-inspired colors.
Step-by-Step Guide
Materials
- Wooden lobster buoy (approx. 18-20 inches tall)
- Sandpaper (120 and 220 grit)
- Painter’s tape (1-inch width)
- Acrylic craft paints: Cream/Off-white, Teal/Seafoam Green, Navy Blue, White, Black
- Paintbrushes: 1-inch flat brush, small round brush, fine liner brush
- Old toothbrush or stiff bristle brush
- Pencil and eraser
- Clear matte or satin sealant spray
- Jute or twisted sisal rope (approx. 15 inches)
- Drill with bit matching rope thickness (if buoy isn’t pre-drilled)
Step 1: Preparation and Base Coats
-
Sand the surface:
Begin by sanding your wooden buoy thoroughly. Start with 120 grit to remove rough patches, then switch to 220 grit for a smooth painting surface. Wipe away all dust with a damp cloth. -
Map out zone lines:
Using a pencil, lightly mark where your color blocks will go. You’ll need a line about 4 inches from the bottom and another at the ‘shoulder’ where the buoy begins to taper inward. -
Tape off the sections:
Apply painter’s tape just inside the top taper line and the bottom line. This helps create crisp edges for the large middle section. -
Paint the middle section:
Load your flat brush with cream or off-white paint. Apply two to three coats to the large middle cylinder, allowing about 20 minutes of drying time between each coat for solid coverage. -
Paint the top taper:
Once the cream paint is dry, move the tape to protect the cream edge. Paint the top tapered section with your teal or seafoam green shade. Use vertical strokes that follow the wood grain toward the tip.
Step 2: Adding the Whale and Details
-
Spatter the background:
To create the sandy texture, dilute a tiny bit of teal paint with water. Dip an old toothbrush in it and run your thumb across the bristles to flick tiny speckles onto the cream section. Let this dry completely. -
Sketch the whale:
Using your pencil, lightly draw the outline of the whale. Position the head pointing upward near the left side and curve the body diagonally down so the tail lands near the bottom right. The curve should mimic the roundness of the buoy. -
Block in the whale body:
Fills the main body shape with navy blue paint using a small round brush. Leave the belly area unpainted for now. -
Paint the whale belly:
Mix a little white into your navy blue to create a very light blue-grey. Paint the ribbed belly area of the whale with this lighter shade. -
Add definition lines:
Switch to your fine liner brush. Using the original navy color or black, paint the thin lines running along the length of the whale’s belly. -
Detail the eye and fins:
Paint the side pectoral fin in navy. Add a tiny white circle for the eye with a minuscule black dot in the center. I find using the handle end of a paintbrush makes perfect dots.
Uneven Lines?
If paint bleeds under your tape, wait for it to dry fully. Then, dampen a stiff angled brush with water and gently scrub the error away, or touch it up with the base color.
Step 3: Finishing the Bottom and Assembly
-
Paint the bottom band:
Remove any remaining tape. Paint the bottom 4-inch section with a deep teal or dark blue that complements the top color. Apply two coats. -
Add wave details:
Using a small round brush and white paint, create stylized wave lines over the dark bottom band. Paint simple, horizontal undulating curves. -
Add the rope handle:
Thread your jute or sisal rope through the hole at the top of the buoy. Tie a simple overhand knot on the two ends together or splice them if you know how. -
Create a distressed look (optional):
If you want a weather-beaten look, lightly sand the edges of the paint, especially on the waves and the whale, to reveal a bit of wood underneath. -
Seal the artwork:
Take the buoy to a well-ventilated area and spray the entire piece with a clear matte or satin sealant to protect the paint from moisture and fading.
Add Dimension
Mix a drop of water into white paint to create a translucent ‘glaze.’ lightly brush this over the top teal section to give it a sun-bleached, salty look.
Hang your new nautical masterpiece on a porch post or set it by the fireplace for instant seaside charm.
Sunset-to-Night Ocean Gradient
Capture the serene transition of a coastal evening with this graduated color block design. This wooden buoy project features warm coral tones shifting into cool teal and deep navy for a rustic, nautical piece perfect for seaside décor.
Step-by-Step
Materials
- Wooden buoy blank (square prism shape)
- Sandpaper (medium and fine grit)
- Painter’s tape (optional, for crisp lines)
- Acrylic paints: Coral/Salmon, Teal/Turquoise, Navy Blue, White
- Flat paintbrushes (1-inch and small detail brush)
- Paper plate or palette
- Rope (sisal or cotton)
- Clear matte sealant spray
- Pencil
Step 1: Preparation
-
Smooth the Surface:
Begin by sanding your wooden buoy blank. Use medium grit sandpaper to remove any rough splinters, then follow up with fine grit for a smooth painting surface. Wipe away all dust with a tack cloth or damp rag. -
Mark Color Zones:
Visualize the buoy in roughly three equal vertical sections. Use a pencil to lightly mark where you want your color transitions to be. The top third will be coral, the middle teal, and the bottom navy.
Step 2: Painting the Gradient
-
Applied the Top Coat:
Start with the coral or salmon paint. Cover the entire top tapered section and extend down to your first pencil mark. Don’t worry about a perfect bottom edge yet; a slightly uneven line adds rustic charm. -
Paint the Middle Section:
Using a clean brush, apply the teal paint to the middle section. Bring the color right up to meet the coral. For a hard line, let the coral dry and use tape; for the look in the photo, freehand the line so it looks a bit organic. -
Add the Base Layer:
Finally, paint the bottom section with the dark navy blue. Ensure full coverage on the base to ground the piece visually. Allow this base coat to dry completely before moving on. -
Create Texture (Dry Brushing):
To achieve the weathered look seen in the reference, use a dry brush technique. Dip a dry brush very lightly into the navy paint, dab most of it off on a paper towel, and lightly drag it upwards over the transition line into the teal area. -
Blend the Upper Transition:
Repeat the dry brushing process with the teal paint, dragging it slightly upwards into the coral section. This creates that lovely, worn gradient effect rather than harsh stripes.
Paint Lifting?
If your dry brushing pulls up the layer beneath, the base layer wasn’t fully dry. Let it cure longer, or lightly sand the surface before attempting the texture again.
Step 3: Adding Details
-
Draft the Moon:
On the dark navy section, lightly sketch a crescent moon shape with your pencil. Place it near the bottom corner for a balanced composition. -
Paint the Moon:
Use a small detail brush and white paint to fill in the crescent moon. You may need two coats to ensure the white pops against the dark navy background. -
Distress the Moon:
Once the white paint is dry, lightly sand over the moon with fine sandpaper. This reveals a bit of the navy underneath, giving it a cratered, aged texture. -
Overall Distressing:
If I want an extra vintage nautical feel, I take the sandpaper to the edges and corners of the buoy, scuffing away paint to reveal the raw wood underneath.
Starry Night
Flick a stiff toothbrush dipped in watered-down white paint over the navy section. This creates a spray of tiny stars to accompany your crescent moon.
Step 4: Finishing and Assembly
-
Seal the Wood:
Protect your artwork with a clear matte sealant spray. This will keep the colors vibrant and protect the wood from moisture if displayed outdoors. -
Prepare the Rope:
Cut a length of rope approximately 2-3 feet long, depending on how low you want the buoy to hang. -
Attach the Rope:
Thread one end of the rope through the hole at the top of the buoy. If the hole is tight, wrap a piece of tape around the rope end to stiffen it. -
Secure the Knot:
Instead of a simple knot at the top, pull the rope through until the ends meet. Create a decorative loop or splice the ends if you are handy with knots. -
Create the Bottom Tassel:
Looking at the reference, the rope is tied off loosely near the bottom. You can simply let the extra length hang and fray slightly for a relaxed, beachy vibe.
Now you have a stunning piece of coastal art that brings the colors of the horizon right into your home
Nautical Map Lines and Compass Rose
Transform a plain wooden buoy into an antique navigational tool with this vintage map design. Featuring the Americas and a prominent compass rose, this piece captures the romance of early exploration with aged sepia tones and precise detailing.
Step-by-Step Guide
Materials
- Wooden buoy (approx. 12-15 inches)
- Sandpaper (medium and fine grit)
- Matte cream or light beige acrylic paint
- Raw sienna or antiquing glaze
- Black acrylic paint
- Fine tip black permanent marker or liner brush
- Carbon transfer paper
- Printed map and compass rose template
- Painter’s tape
- Ruler or flexible measuring tape
- Dark wood stain (walnut or dark oak)
- Small dotting tool or toothpick
- Matte clear sealant spray
- Jute rope
Step 1: Preparation and Base Coat
-
Surface Prep:
Begin by sanding the entire wooden buoy, paying special attention to the curved areas to ensure they are smooth. Wipe away all dust with a tack cloth or damp rag. -
Taping Off:
Using painter’s tape, mask off the very top conical section and the bottom inch of the buoy. These areas will remain stained wood, so cover them securely. -
Base Painting:
Apply a coat of matte cream or light beige acrylic paint to the central exposed area of the buoy. Let it dry completely, then apply a second coat for solid, opaque coverage. -
Staining Accents:
Once the cream paint is fully cured, remove the tape. Carefully apply the dark wood stain to the top cone and the bottom rim. I find specifically using a foam brush helps keep the edge clean near the paint line. -
Creating the Bands:
Paint a thick black band (about 1/4 inch) separating the cream center from the stained top, and another band separating it from the stained bottom. Use a steady hand or re-tape for crisp lines.
Aged Parchment Hack
For an even more authentic old-map look, dab a used, damp tea bag over the cream paint before drawing. The tea stains simulate water damage and age spots perfectly.
Step 2: Mapping the World
-
Sizing the Map:
Find a vintage line-drawing map of the Americas and resize it on your computer to fit the height of your buoy’s cream section. Print it out on standard paper. -
Transfer Method:
Tape carbon transfer paper behind your printed map, then tape the map onto the buoy. Trace the coastlines of North and South America firmly with a pencil. -
Inking the Coastlines:
Remove the template. Go over the faint carbon lines with a very fine-tip black permanent marker or a liner brush with thinned black paint. Use a slightly jagged motion to mimic an old etched map style. -
Adding Grid Lines:
Using a flexible measuring tape and a pencil, lightly draw longitude and latitude lines across the surface. Trace over these with your fine-tip marker. -
Adding Text:
Carefully letter in location names like ‘North America’ or ocean names if desired, using a classic serif font style to match the vintage aesthetic.
Use Decoupage
Can’t draw? Print a vintage map on tissue paper. Use Mod Podge to adhere it directly to the buoy, blending the edges into the background paint for a seamless look.
Step 3: The Compass Rose
-
Positioning:
Choose an empty spot on the ‘ocean’ area of your map, preferably centrally located. Transfer a compass rose design using the same carbon paper method used for the continents. -
Outlining the Compass:
Trace the primary circle and the eight points of the star with your fine black marker. Ensure the points align vertically with your N and S markers. -
Filling Details:
Fill in alternating sections of the compass points with black paint to create the traditional 3D navigational look. Add the elaborate ‘N’ and ‘S’ letters above and below.
Step 4: Antiquing and Finishing
-
Aging the Surface:
Dilute raw sienna paint or use a dedicated antiquing glaze. Brush it lightly over the cream map area, then immediately wipe most of it back with a rag. This leaves color in the crevices and gives it a parchment look. -
Dotting the Bands:
Dip a small dotting tool or the tip of a toothpick into white or cream paint. Carefully press small, evenly spaced dots along the center of the black bands at the top and bottom. -
Sealing:
Protect your cartography work with a coat of matte clear sealant spray. This prevents the ink from smudging and seals the wood. -
Attaching the Rope:
Thread a length of thick jute rope through the hole at the top of the buoy. Tie a sturdy knot or create a loop splice to finish the authentic nautical appearance.
Display your navigational masterpiece on a mantel or shelf to add a timeless maritime touch to your decor
Hand-Lettered Coastal Words
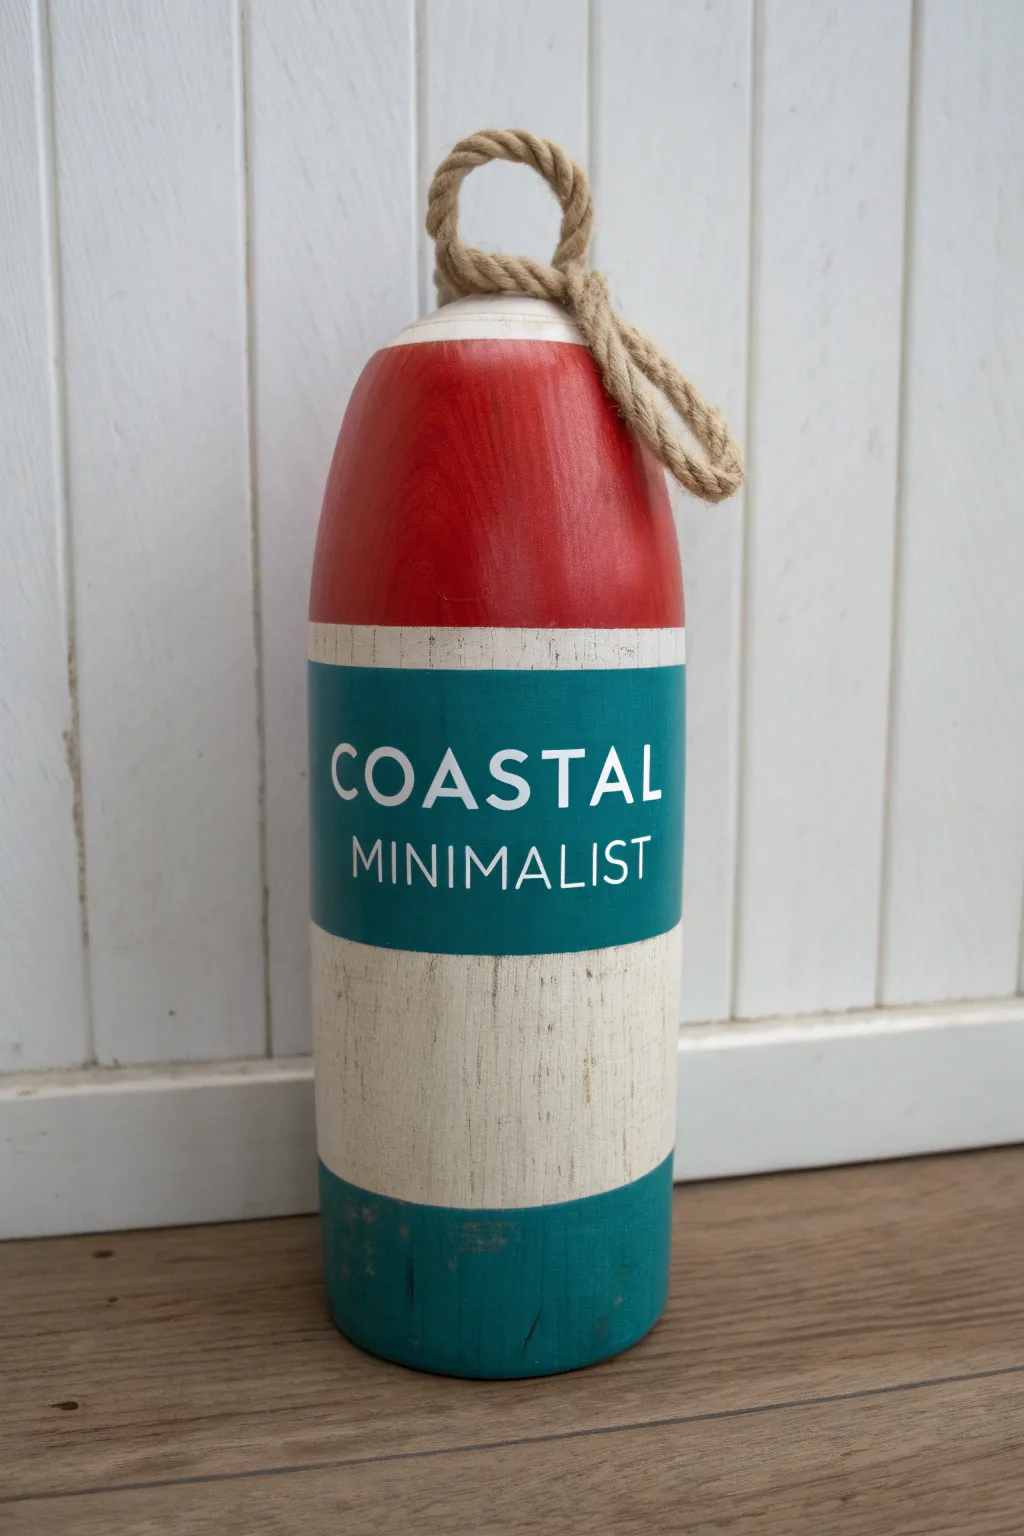
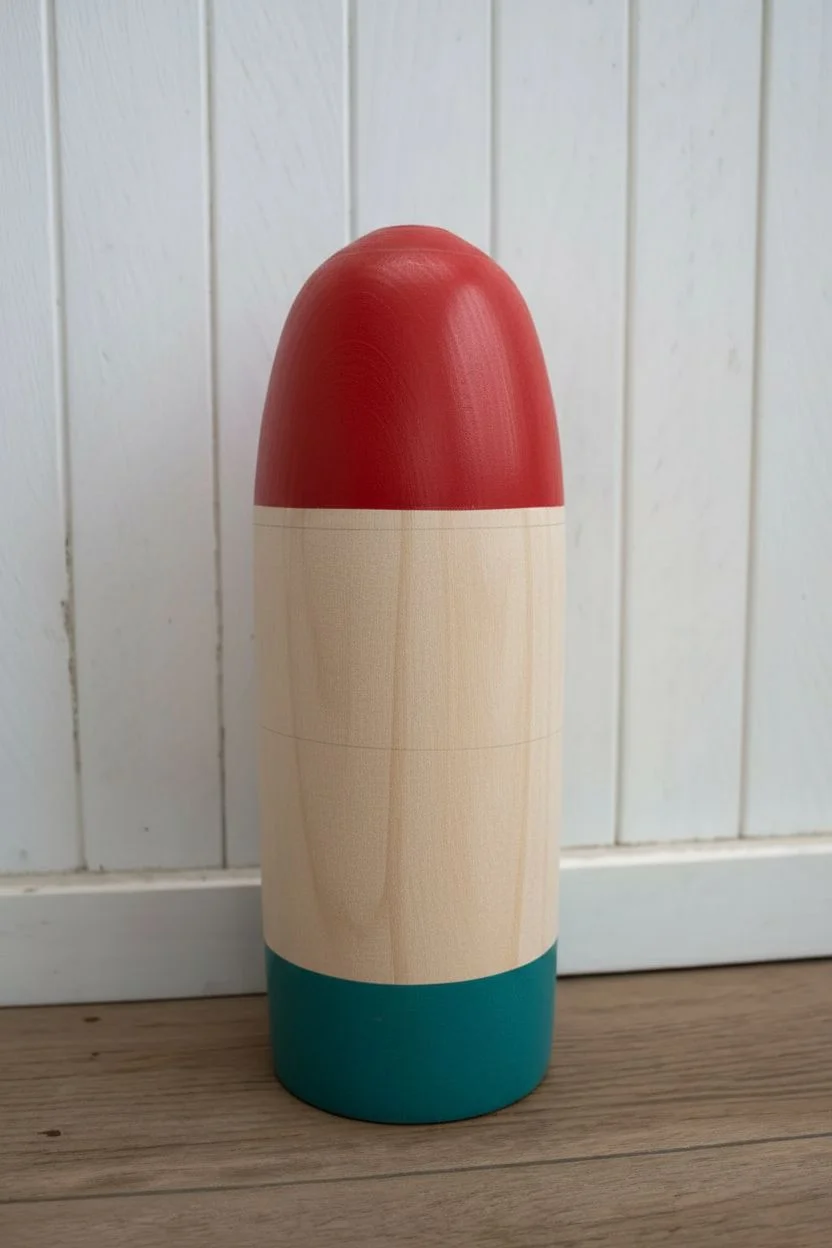
Bring the charm of seaside living into your home with this elegantly rustic wooden buoy project. Featuring a classic nautical palette of deep red, teal, and weathered white, this piece combines bold color blocking with crisp, modern typography.
Step-by-Step
Materials
- Wooden lobster buoy blank (approx. 12-15 inches)
- Acrylic craft paints (Deep Barn Red, Teal/Turquoise, Warm White)
- Painter’s tape (1-inch width)
- Foam brushes or flat synthetic brushes
- Medium-grit sanding sponge or sandpaper (120-150 grit)
- Small round detail brush (size 1 or 2)
- White paint marker (fine tip) or stencil set
- Thick jute rope (approx. 12 inches)
- Drill with large bit (if buoy isn’t pre-drilled)
- Pencil and ruler
- Matte clear sealant spray
Step 1: Preparation and Base Coating
-
Sand the Wood:
Begin by giving your wooden buoy blank a thorough sanding. You want to remove any rough splinters while keeping some of the natural wood texture. Wipe away all dust with a tack cloth or damp rag. -
Map Out the Sections:
Using a pencil and ruler, lightly mark horizontal lines around the circumference of the buoy to define your color blocks. Looking at the reference, markings should be roughly at the neck, about 2 inches below that, then a large 5-inch section for white, and finally the bottom inch. -
Paint the Top Section:
Apply the Deep Barn Red paint to the domed top section of the buoy. Use a foam brush for smooth coverage, working your way down to your first pencil mark. This may need two coats for full opacity. -
Paint the Bottom Band:
Skip the middle sections for a moment and paint the very bottom band (about 1.5 inches high) with your teal paint. Flip the buoy upside down to make this easier without smudging the red top.
Clean Lines Hack
To prevent paint bleeding under your tape, brush a tiny amount of the *base* color (or matte medium) over the tape edge first to seal it before applying the new color.
Step 2: Color Blocking the Center
-
Tape the Upper Middle:
Once the red and bottom teal sections are completely dry (I like to give it at least 30 minutes), apply painter’s tape along the bottom edge of the red section to protect it. -
Paint the First White Stripe:
Paint a narrow band of Warm White directly below the red section. This stripe should be about 0.5 to 1 inch wide. -
Create the Main Teal Block:
Below the narrow white stripe, paint a wide band of teal. This will be the background for your lettering, so make it roughly 3 to 4 inches tall. Apply 2-3 thin coats to ensure the color is solid and rich. -
Paint the Lower White Section:
Fill the remaining large section between the main teal block and the bottom teal band with Warm White. Don’t worry if the edges where colors meet aren’t perfectly straight; we’ll distress them later. -
Dry Thoroughly:
Allow the entire buoy to dry completely, preferably overnight or for several hours. The paint must be hard before we start the lettering process.
Make it Yours
Instead of general words, customize the text with your family surname, a specific house number, or the coordinates of your favorite beach spot.
Step 3: Lettering and Finishing
-
Draft the Text:
Lightly sketch the words ‘COASTAL’ and ‘MINIMALIST’ onto the wide teal band using a pencil. Center ‘COASTAL’ in a larger sans-serif font, and place ‘MINIMALIST’ below it in a smaller, thinner font. -
Paint the Primary Letters:
Using a fine-tip white paint marker or a very small detail brush with thinned white paint, carefully trace over your ‘COASTAL’ lettering. Keep the strokes relatively thick and bold. -
Paint the Secondary Letters:
Fill in the ‘MINIMALIST’ text with finer lines. A paint marker offers excellent control here for maintaining consistent line width on the curved surface. -
Distress the Surface:
Once all paint is bone dry, take your sanding sponge and gently sand over the entire buoy. Focus on the edges where colors meet and lightly go over the lettering to make it look weathered and time-worn. -
Seal the Project:
Spray the entire buoy with a matte clear coat. This protects the paint and enhances the dusty, vintage maritime look without adding unwanted shine. -
Install the Handle:
Thread the thick jute rope through the hole at the top of the handle. Tie a simple overhand knot or splice the ends together to form a sturdy loop, completing the authentic look.
Hang your finished buoy by the door or prop it on a shelf for an instant touch of nautical history
Seasonal Buoy Themes
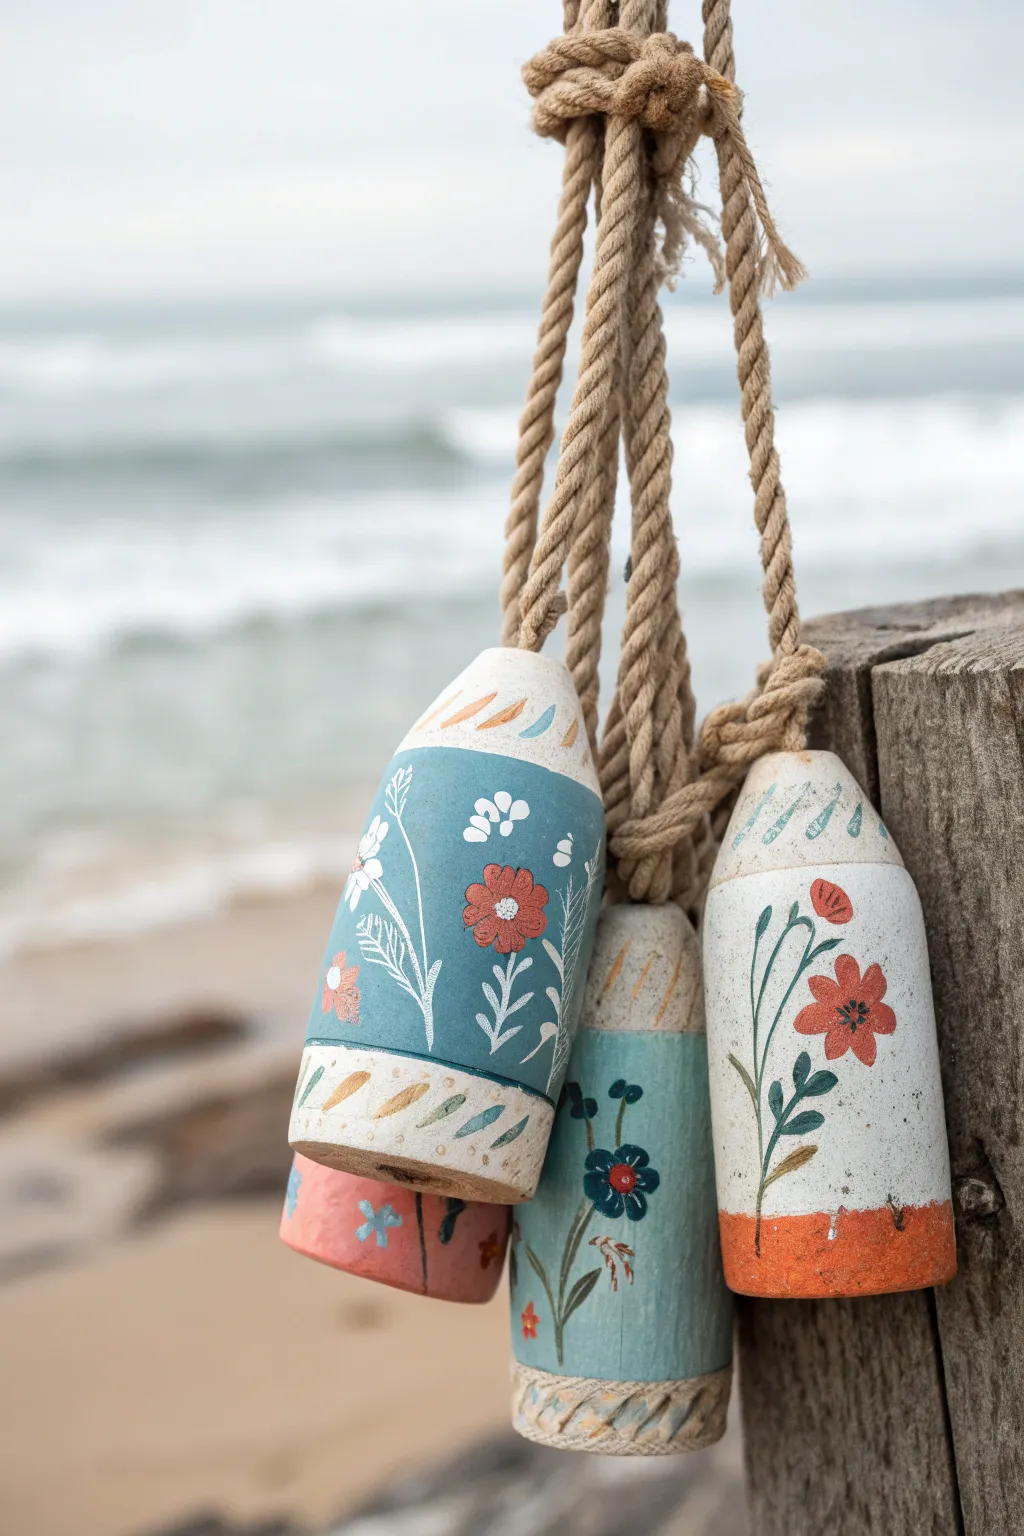
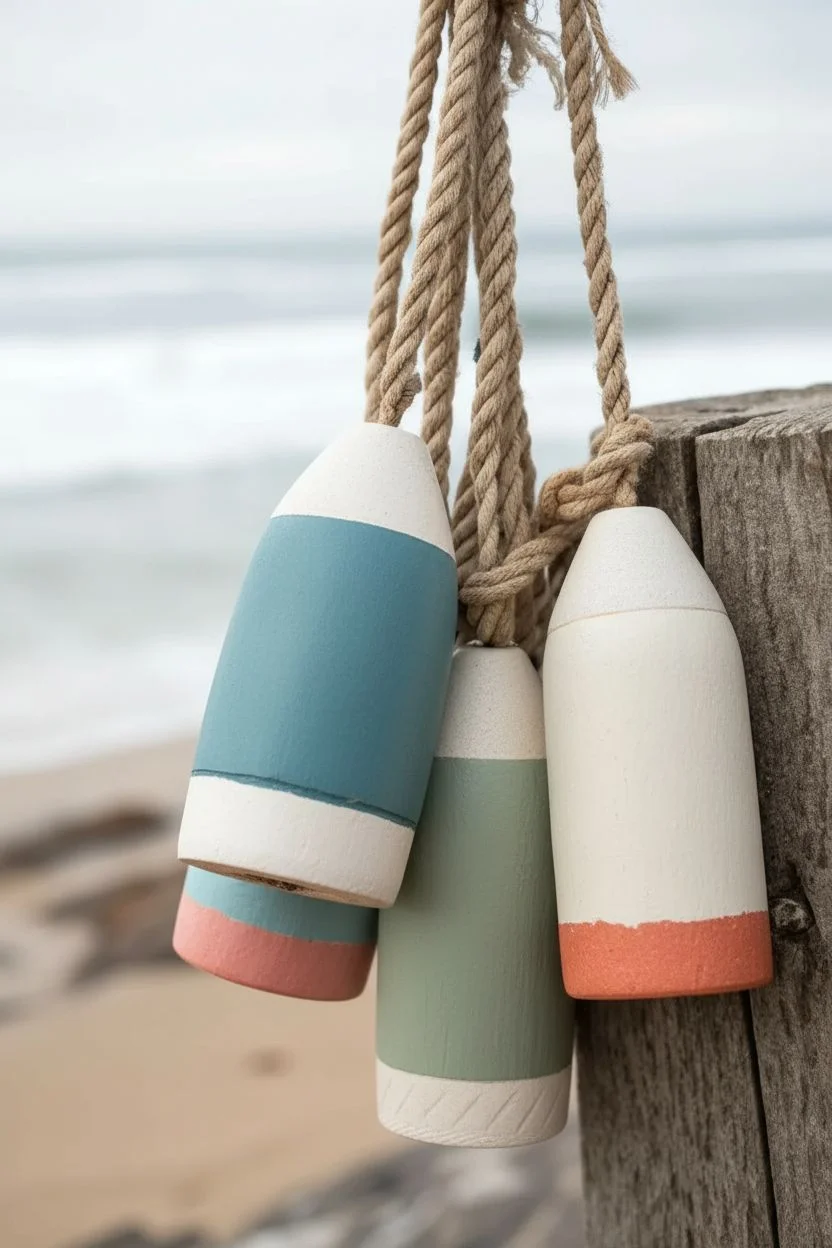
Bring the soft beauty of coastal meadows to your decor with these hand-painted wooden buoys featuring delicate wildflower motifs. The matte finish and muted palette of teal, coral, and cream give them a perfectly weathered, nostalgic charm.
Detailed Instructions
Materials
- Unfinished wooden lobster buoys (various sizes)
- Sandpaper (medium and fine grit)
- Matte acrylic craft paints (Cream/Off-White, Muted Teal, Coral/Terracotta, Sage Green, Dark Blue)
- Thick jute rope
- Painter’s tape
- Small round paintbrushes (sizes 0, 2, and 4)
- Flat paintbrush (1 inch)
- Pencil for sketching
- Matte clear sealant spray
- Drill with large bit (if buoys aren’t pre-drilled)
Step 1: Preparation & Base Coats
-
Prepare the surface:
Begin by sanding your wooden buoys smooth. Start with medium grit to remove any rough splinters, then finish with fine grit for a painting-ready surface. Wipe away all dust with a damp cloth. -
Block off sections:
Decide on your color blocking. For the main buoy shown prominently, apply painter’s tape horizontally to create a large central band, leaving the top and bottom sections exposed for the cream color. -
Apply the cream base:
Paint the top cone area and the bottom band with your cream or off-white acrylic paint. You may need two coats for solid coverage. Let this dry completely before moving on. -
Paint the center band:
Once the cream paint is dry, move your tape to protect those fresh edges. Paint the large middle section with a muted teal or sage green, depending on which buoy variation you are creating. -
Create the accent stripe:
For the buoy on the right, paint the very bottom edge with a rusty coral color to create a dipped look. Keep the lines relatively clean, but don’t worry about perfection; a little hand-painted wobble adds character.
Step 2: Painting the Florals
-
Sketch the design:
Lightly sketch your floral designs onto the dry base coat using a pencil. Focus on simple shapes: long sweeping stems, small oval leaves, and basic daisy-like flower heads. -
Paint main stems:
Using a size 2 round brush and sage green paint mixed with a tiny drop of teal, paint the long, curving stems. Use a light hand to keep the lines fluid and organic. -
Add leaves:
Add small leaves along the stems. For the teal buoy, I like to use white paint for some of the foliage to create high contrast against the dark background. -
Paint flower petals:
Switch to your coral or terracotta paint. Create flowers by making simple teardrop strokes radiating from a center point. Vary the sizes; make some large blooms and some small buds. -
Add floral details:
Once the petals dry, add centers to the flowers using a dark blue or black dot. You can also add tiny white decorative dots around the petals or on the leaves for extra texture. -
Paint the geometric accents:
On the cream-colored top and bottom bands, paint small, angled dashes using contrasting colors (teal on the cream, or coral strokes) to frame the main floral section.
Chalk Paint Texture
Swap standard acrylics for chalk paint to get an ultra-matte, powdery finish that distresses much easier and looks more authentically vintage.
Step 3: Finishing Touches
-
Distress for age:
Once all paint is thoroughly dry, take a piece of fine-grit sandpaper and very lightly scuff the edges and the painted surface. This reveals a bit of wood grain and gives that authentic ‘weathered by the sea’ look. -
Seal the artwork:
Spray the entire buoy with a matte clear sealant. This protects your handiwork from moisture and UV light without adding an unwanted glossy shine. -
Attach the rope:
Cut a length of thick jute rope (about 2-3 feet). Thread it through the hole in the handle of the buoy. -
Secure the loop:
Tie a sturdy overhand knot or a fisherman’s knot to secure the rope, leaving a long loop for hanging. Fray the ends of the knot slightly for a rustic finish.
Add 3D Elements
Glue small seashells or pieces of sea glass onto the buoy’s unpainted wood sections or around the knot for extra coastal texture.
Now you have a charming cluster of coastal art ready to hang on a porch post or entryway wall
Mixed-Media Buoys in Sandy Texture
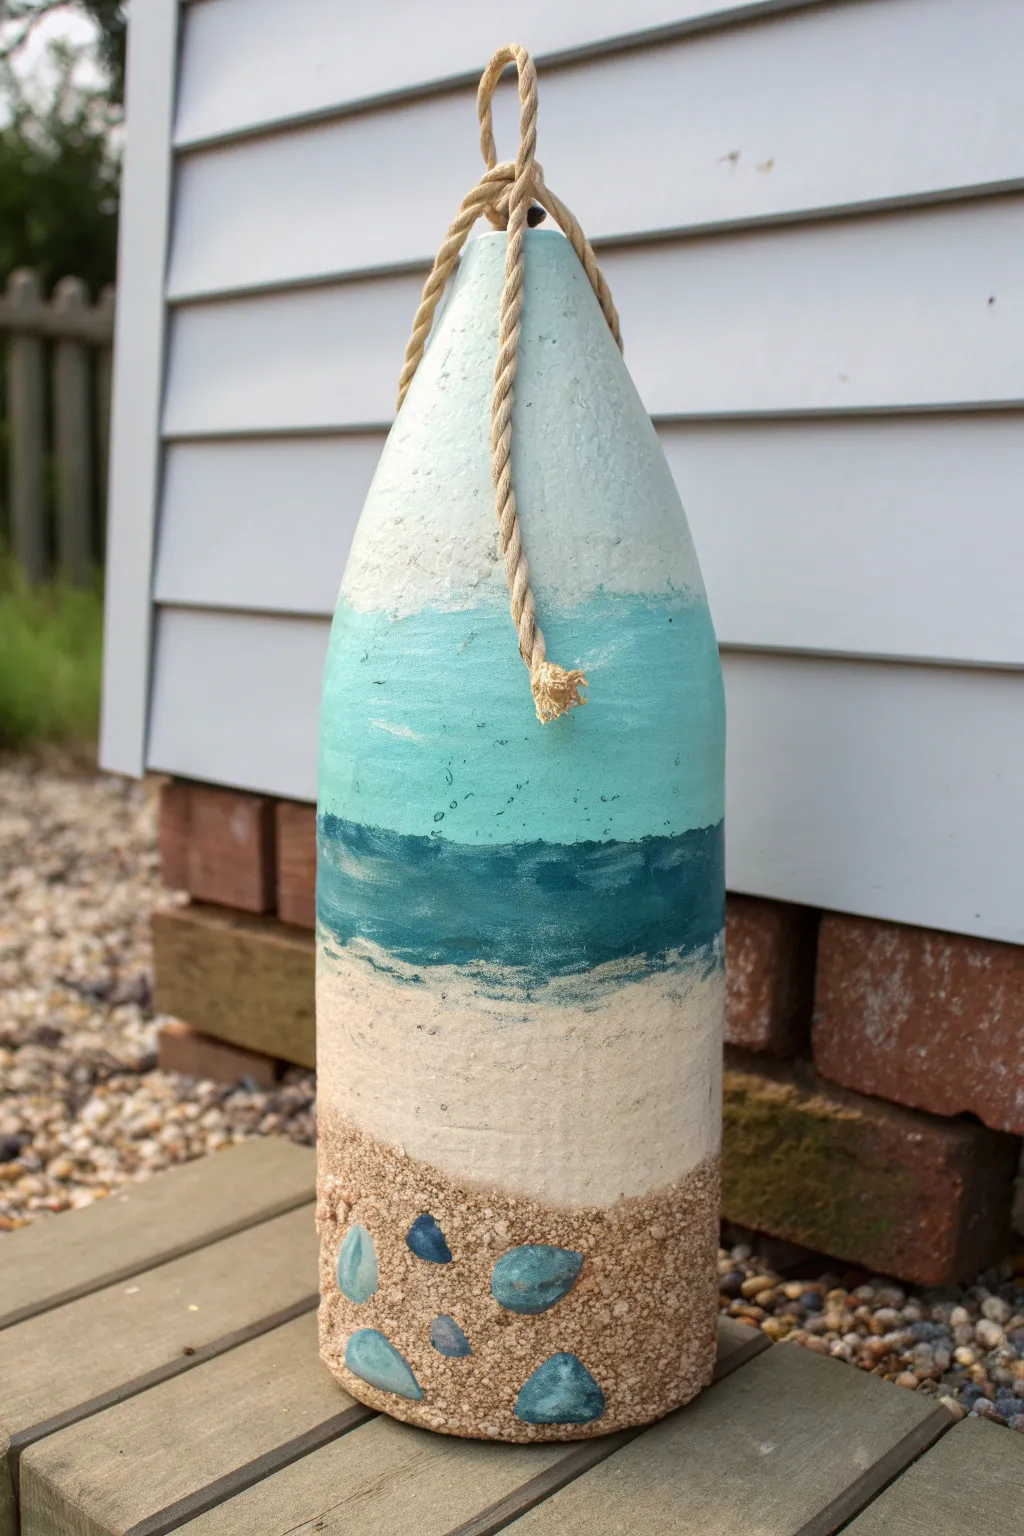

Capture the essence of a tranquil shoreline with this mixed-media buoy project that transitions from calm waters to sandy beaches. By layering acrylics with real sand and glass accents, you’ll create a tactile piece of decor perfect for any seaside cottage.
Step-by-Step
Materials
- Wooden or foam lobster buoy (primed)
- Acrylic paints: Aqua, Teal, Deep Blue, White, Cream/Beige
- Sponge brushes (various sizes)
- Sea salt or texture medium (optional for upper texture)
- Craft sand or collected beach sand
- Mod Podge or heavy gel medium
- Flat glass gems/stones (blue and teal)
- Jute or sisal rope
- Hot glue gun and glue sticks
- Matte clear sealer spray
- Painters tape (optional)
Step 1: Preparation and Sky Layer
-
Surface Prep:
Ensure your buoy is clean and dry. If it’s a raw wood or foam buoy, apply a coat of white primer to help the colors pop and seal the porous surface. Let this dry completely before starting. -
Top Coat Application:
Mix a very light aqua with a touch of white. Sponge this color onto the top third of the buoy, dabbing gently to create a slightly mottled, cloud-like texture rather than sweeping brushstrokes. -
Adding Texture:
While the top paint is still wet, you can sprinkle a tiny pinch of sea salt or dab with a textured sponge to mimic the airy feel of sea spray or clouds. Let this top section dry for about 20 minutes.
Loose Sand?
If sand keeps shedding after drying, mix white glue with water (50/50 ratio) and dab it gently over the sand layer to lock it in place.
Step 2: Painting the Seascape Gradient
-
The Horizon Line:
Below the sky section, sponge on a band of pure aqua or turquoise paint. Blend the upper edge slightly into the sky color while the paint is fresh to soften the transition. -
Deep Ocean Water:
Beneath the aqua band, apply a darker teal or deep blue shade. This represents the deeper ocean water. Use a horizontal sweeping motion here to suggest waves. -
Creating Waves:
Dip a dry sponge into white paint and dab it heavily where the deep blue meets the area below it. Create a jagged, uneven line that resembles breaking waves and sea foam. -
Transitional Sand:
Paint the section below the dark water with a cream or beige color. I like to bring this color up slightly into the blue while the blue is tacky, mixing them on the buoy to create that transparent, shallow water look. -
Lower Base Coat:
Paint the remaining bottom portion of the buoy with a solid coat of tan or sand-colored paint. This will act as the background for your textured sand layer.
Add Sparkle
Mix a tiny amount of ultra-fine iridescent glitter into the white paint used for the sea foam to make the water glisten in the sunlight.
Step 3: Adding Texture and Embellishments
-
Applying Adhesive:
Generously brush Mod Podge or a heavy gel medium onto the bottom 3-4 inches of the buoy, covering the tan paint completely. Work fairly quickly so it doesn’t dry out. -
Applying Sand:
While the adhesive is wet, press handfuls of craft sand onto the buoy or roll the bottom of the buoy in a tray of sand. Pat it down firmly to ensure good contact and shake off any excess. -
Placing Sea Glass:
Before the sand adhesive fully sets, identify spots for your glass gems. Apply a dab of hot glue or heavy construction adhesive to the back of each blue glass stone and press them firmly into the sand layer. -
Securing the Stones:
Once the stones are placed, brush a little more Mod Podge mixed with sand around the edges of the stones to make them look like they are partially buried in the beach.
Step 4: Finishing Touches
-
Sealing the Work:
Allow the entire buoy to dry overnight. Once cured, spray the painted and sanded areas with a matte clear sealer to protect the finish and keep the sand from shedding. -
Rope Attachment:
Cut a length of jute rope, approximately 24 inches long. Thread it through the hole in the handle of the buoy. -
Knotting the Rope:
Tie a simple overhand knot at the top to create a loop for hanging. For extra flair, you can wrap the loose ends around the base of the handle and secure them with a dab of hot glue. -
Final Inspection:
Check for any loose sand or bare patches in the paint. Touch up as needed, and your coastal buoy is ready for display.
Hang your finished buoy near a sunny window or on a porch to enjoy the calming beach vibes every day


Have a question or want to share your own experience? I'd love to hear from you in the comments below!