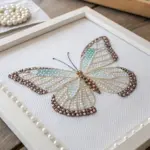
Butterflies are my go-to subject when I want something instantly graceful but still fun to experiment with. These butterfly drawing ideas go from classic, beginner-friendly sketches to creative twists that’ll make your wings feel totally your own.
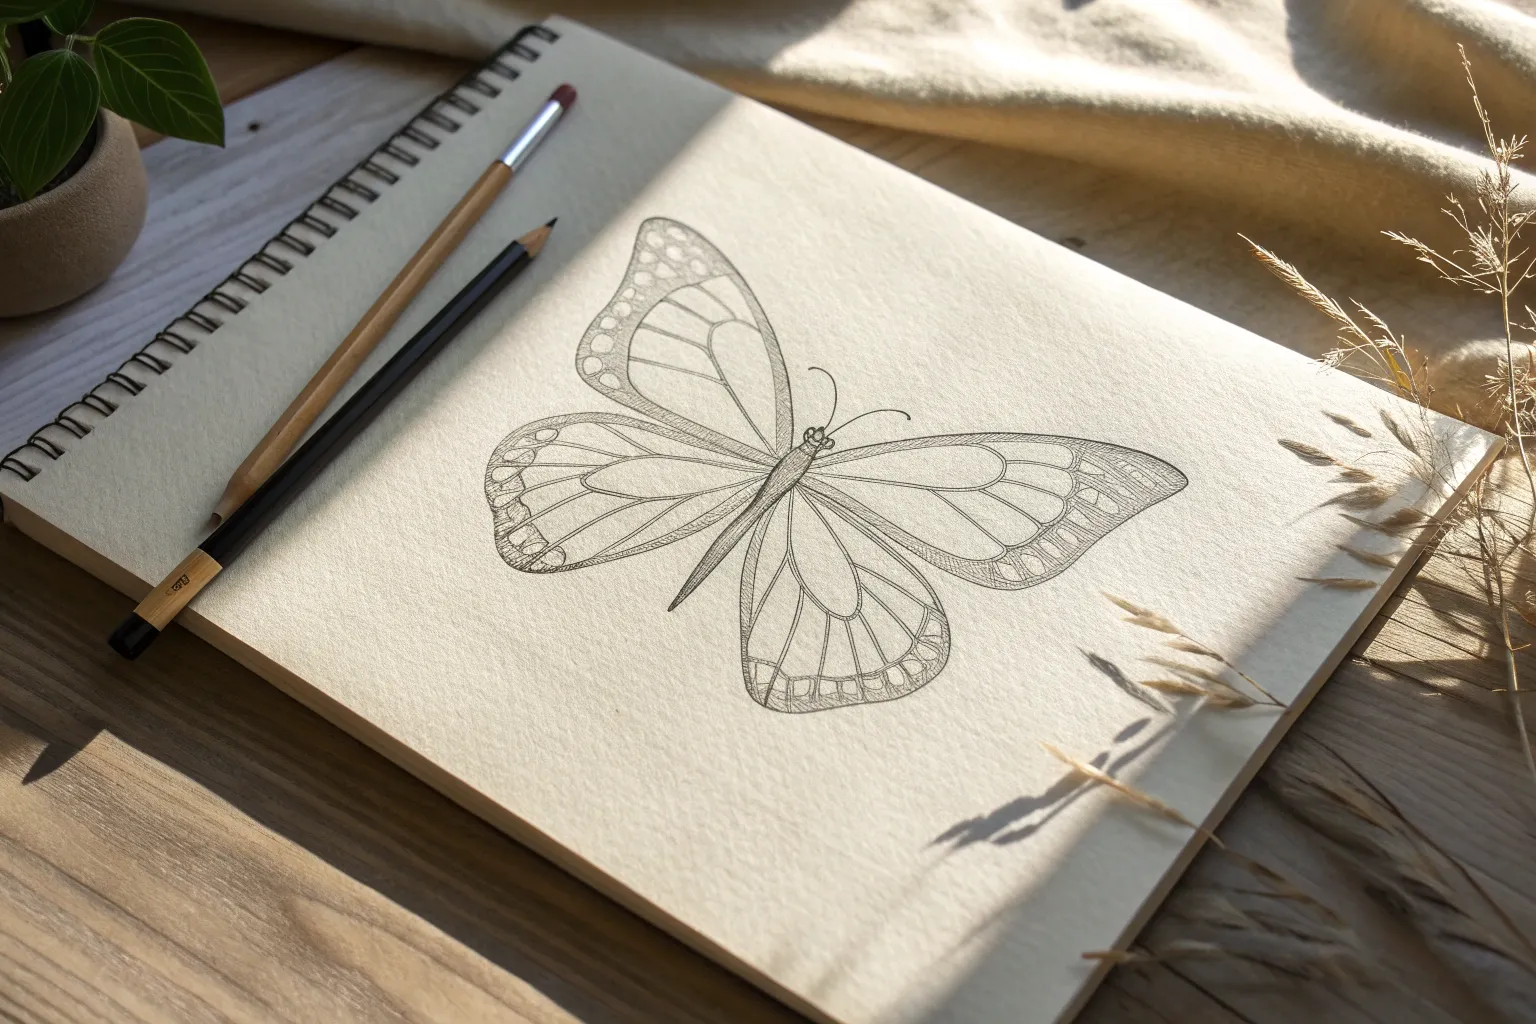
Classic Symmetrical Butterfly Outline
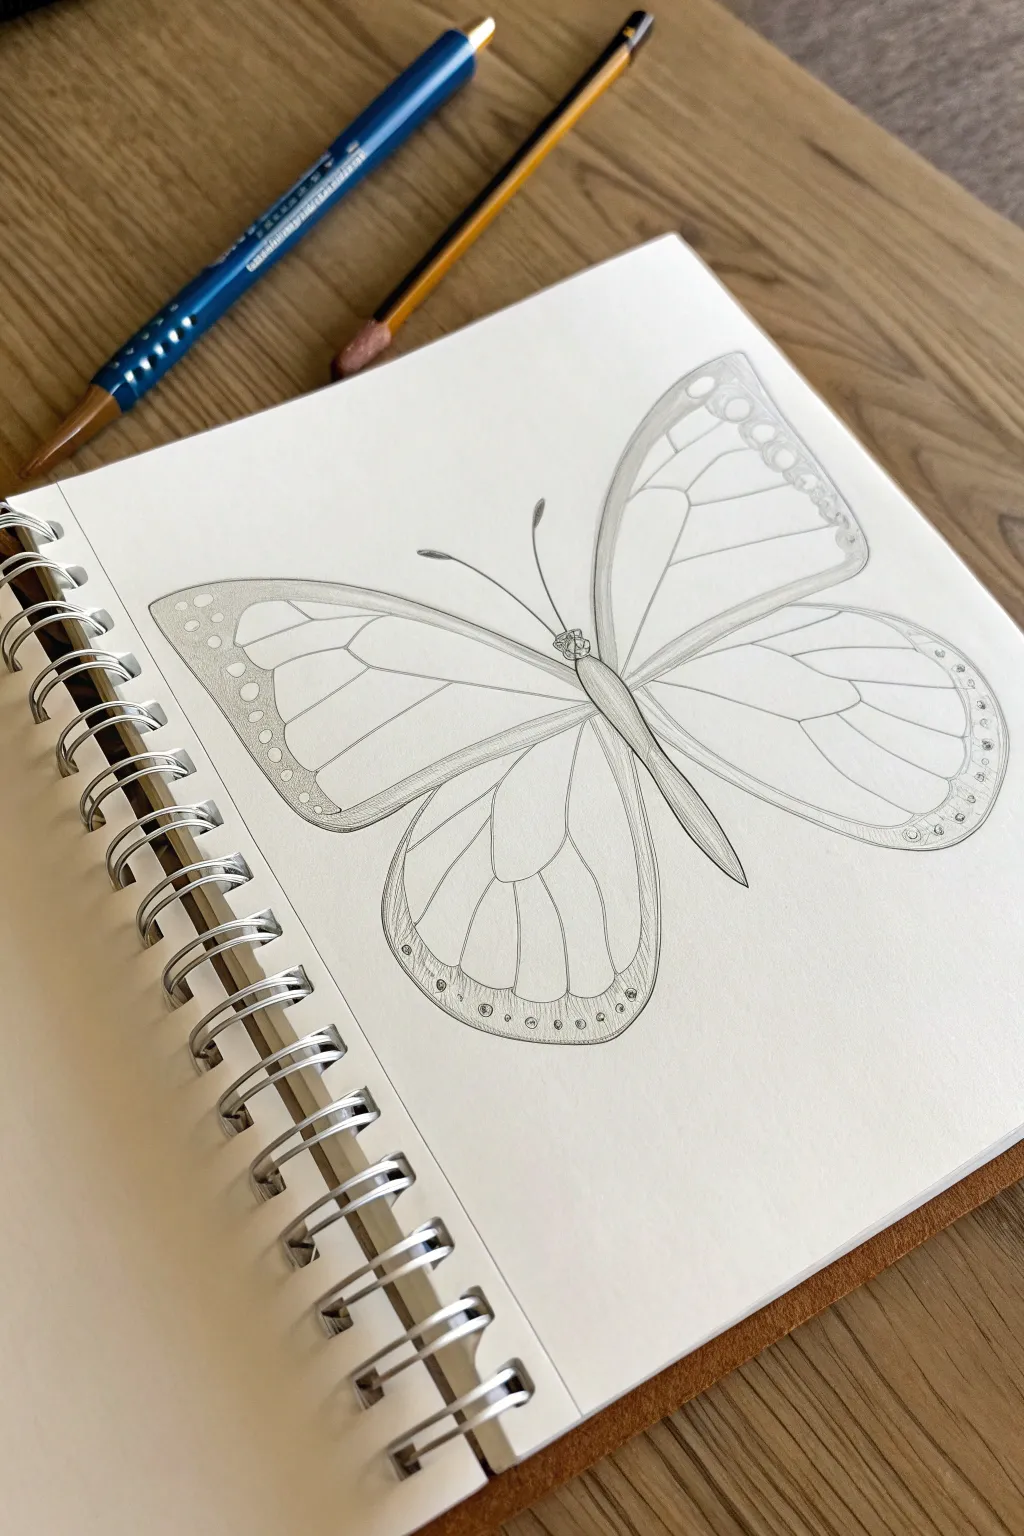
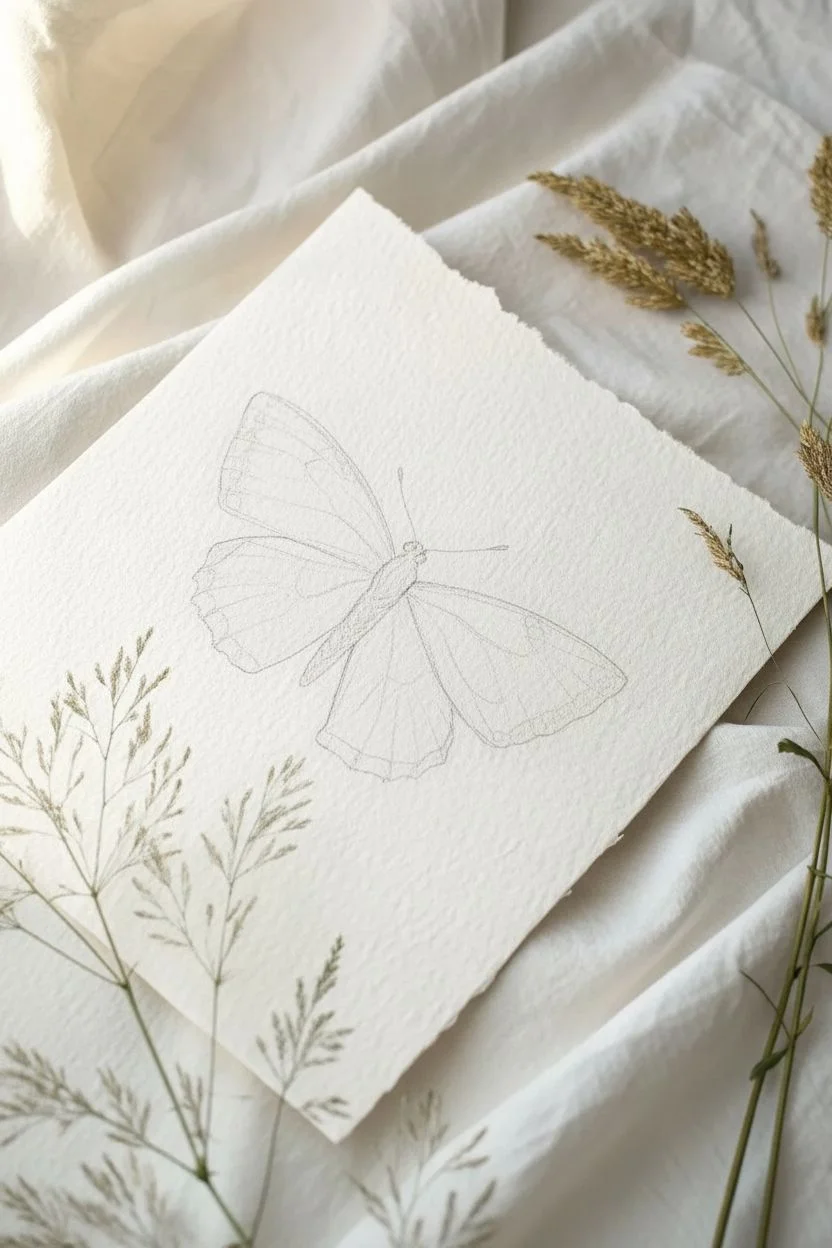
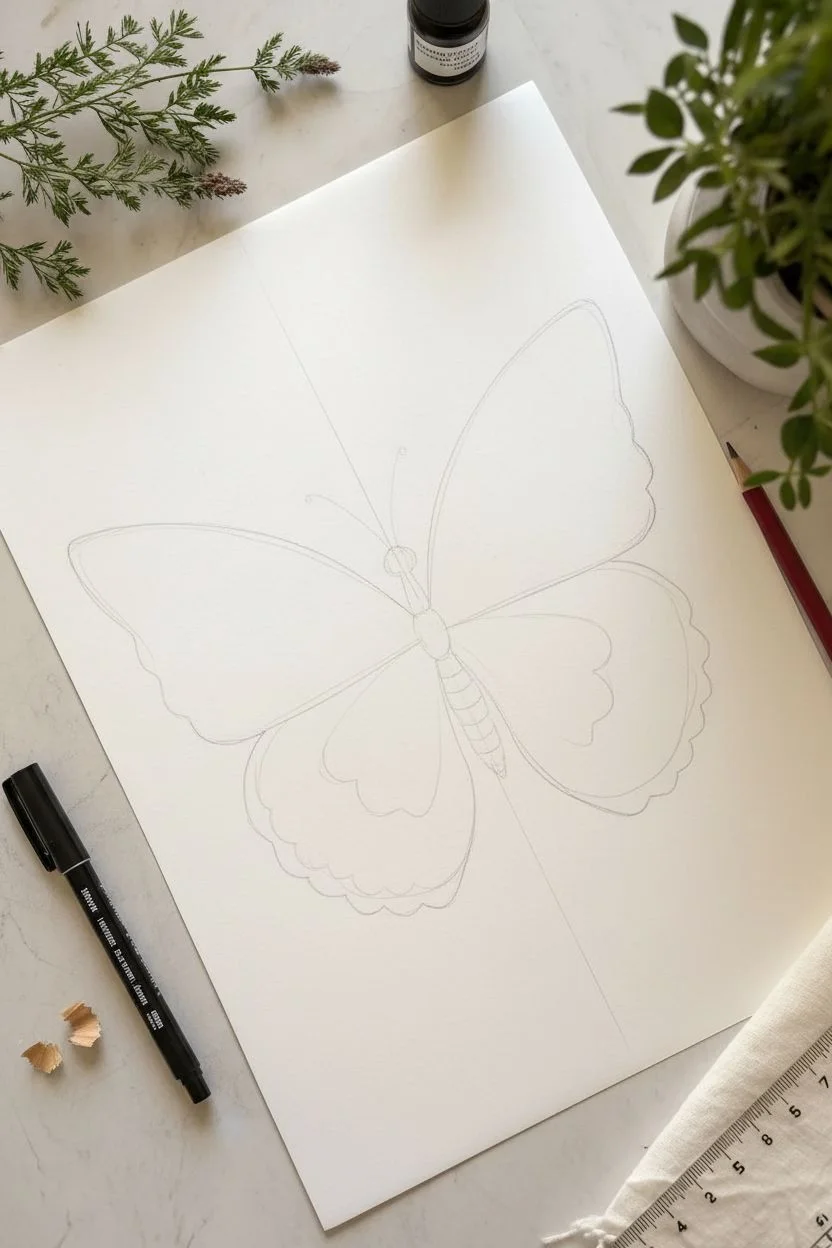
This classic project focuses on capturing the natural elegance of a butterfly through precise line work and perfect symmetry. The resulting illustration offers a clean, calming aesthetic that sits beautifully on the page of a simple sketchbook.
How-To Guide
Materials
- High-quality sketchbook or drawing paper
- HB or 2H graphite pencil for sketching
- Fine liner pen (0.1mm or 0.3mm, black)
- Ruler
- Eraser (kneaded preferred)
Step 1: Setting the Foundation
-
Establish the axis:
Begin by opening your sketchbook to a fresh page. Using your ruler and a light pencil touch, draw a faint vertical line straight down the center of the page. This axis is crucial for maintaining perfect symmetry later on. -
Mark the segments:
Along this central line, lightly mark three distinct sections to guide the body proportions: a small segment at the top for the head, a medium segment for the thorax, and a longer segment below for the abdomen. -
Sketch the body:
Around your markings, softly sketch the butterfly’s body shapes. Draw a small circle for the head, an oval for the thorax, and a long, tapered shape for the abdomen. Keep these lines very light so they can be easily adjusted. -
Define wing span:
Extend light diagonal lines outward from the thorax to determine the general width and angle of the upper wings. Do the same for the lower wings, ensuring the left and right sides mirror each other.
Symmetry Hack
Draw one wing perfectly first. Trace it onto tracing paper, flip the paper over, and rub the back with graphite to transfer the exact mirror image to the other side.
Step 2: Drafting the Wings
-
Outline the forewings:
Sketch the large upper wings (forewings). Start from the thorax, curve upward and outward to a rounded tip, then sweep back down toward the lower body. Repeat on the other side, constantly checking your central axis for balance. -
Outline the hindwings:
Draw the lower wings (hindwings) starting just beneath the forewings. These should be more rounded and tear-drop shaped, curving downward and tucking in near the bottom of the abdomen. -
Add the inner contour:
Inside each wing shape, draw a second, slightly smaller outline parallel to the main edge. This creates a border or margin which adds a nice graphical quality to the drawing. -
Place veins:
Lightly sketch the main veins radiating from the body outward to the distinct sections of the wings. Think of these like the spokes of a wheel, creating the framework for the decorative panels.
Make It Pop
Use a thicker pen (0.5mm) for the absolute outer edges and a thinner pen (0.1mm) for the interior veins. This line weight variation adds instant professional depth.
Step 3: Refining and Inking
-
Detail the antenna:
Draw two delicate, curving lines extending from the head for the antennae. Try to keep the curve smooth and consistent on both sides. -
Begin inking the body:
Switch to your fine liner pen. Carefully trace over your pencil lines for the head, thorax, and abdomen. I like to add horizontal segmentation lines across the abdomen for a realistic texture. -
Ink the wing perimeters:
Trace the outer edges of the wings with steady, confident strokes. If your hand feels shaky, try pivoting from your elbow rather than your wrist for smoother long lines. -
Stipple the borders:
This is the signature detail of this piece. In the ‘margin’ space you created between the double wing outlines, fill the area with tiny stippled dots. Keep them denser near the lines and looser in the center for depth. -
Define the wing panels:
Ink the vein lines inside the wings. For a more styled look, double up these lines slightly to create thin shapes rather than single strokes. -
Clean up:
Once the ink is completely dry—give it a few minutes to be safe—gently erase all the underlying graphite sketch lines and the central guide axis. -
Optional dashed line:
To recreate exact aesthetic from the photo, you can use your ruler and a fine pen to draw a dashed vertical line through the center, extending above and below the butterfly, nodding to the symmetry guide.
Now you have a beautifully balanced butterfly illustration ready to remain an elegant outline or to be filled with color


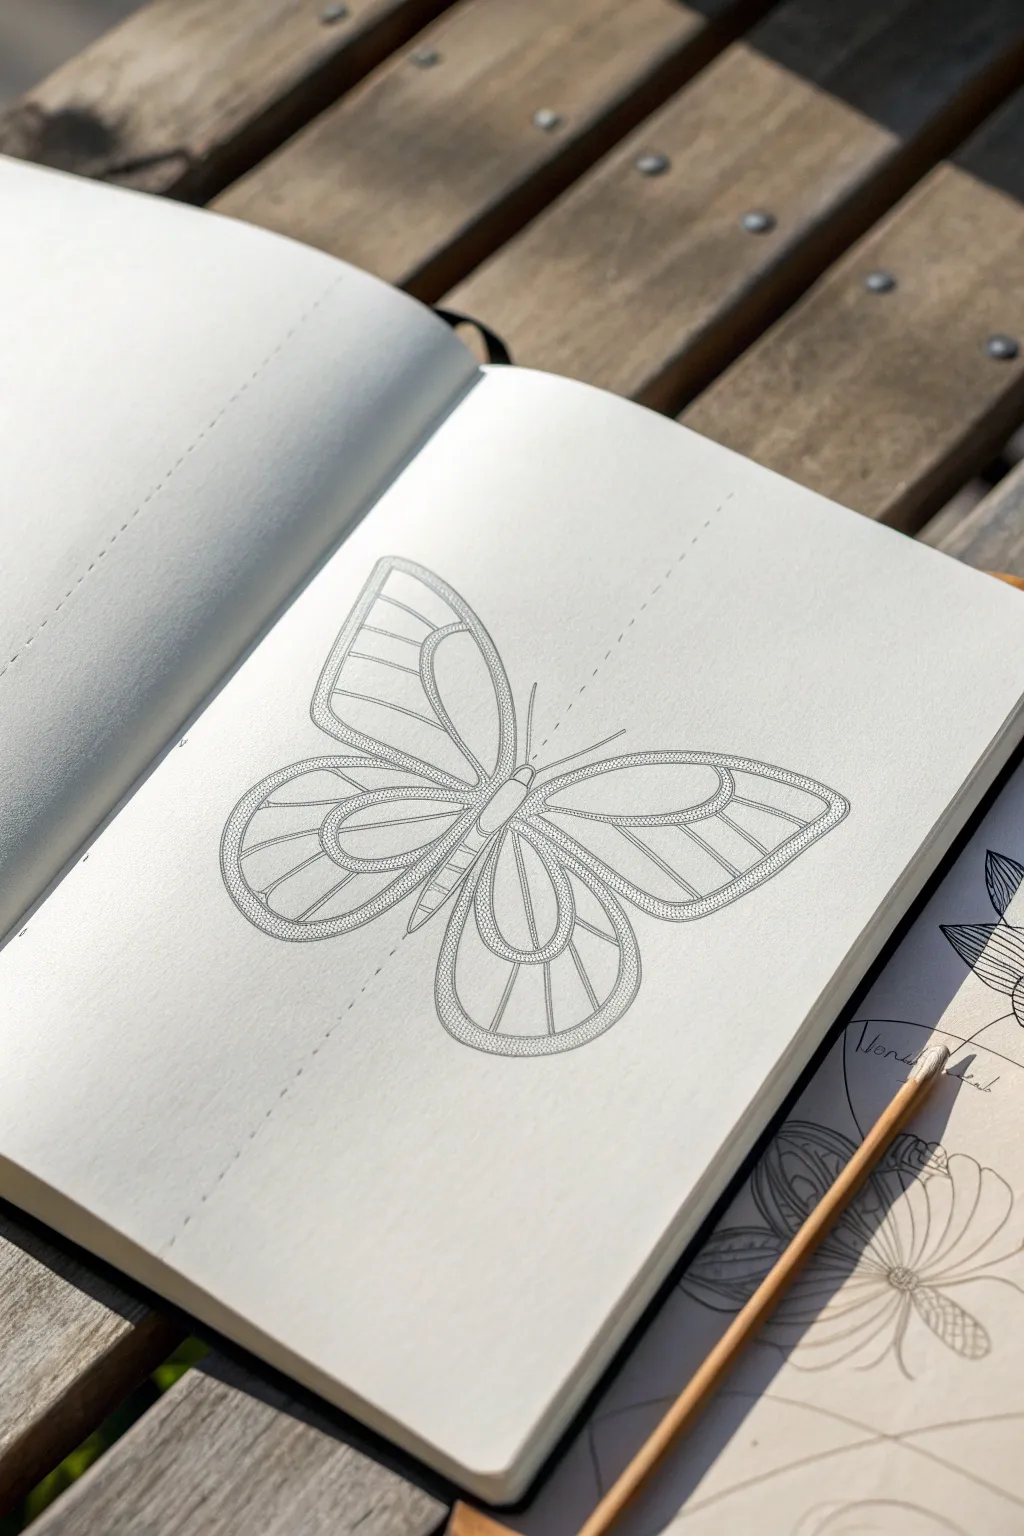
Step-by-Step Butterfly Built from Simple Shapes
This project creates a beautifully detailed butterfly by starting with basic geometry and refining it into an elegant final piece. The result is a clean, realistic line drawing that captures the delicate veins and symmetry of insect wings.
Detailed Instructions
Materials
- Sketchbook or quality drawing paper
- HB graphite pencil (for initial lines)
- 2B or 4B graphite pencil (for shading/darkening)
- Mechanical pencil (optional, for fine details)
- Kneaded eraser
- Reference photo of a Monarch or similar butterfly (optional)
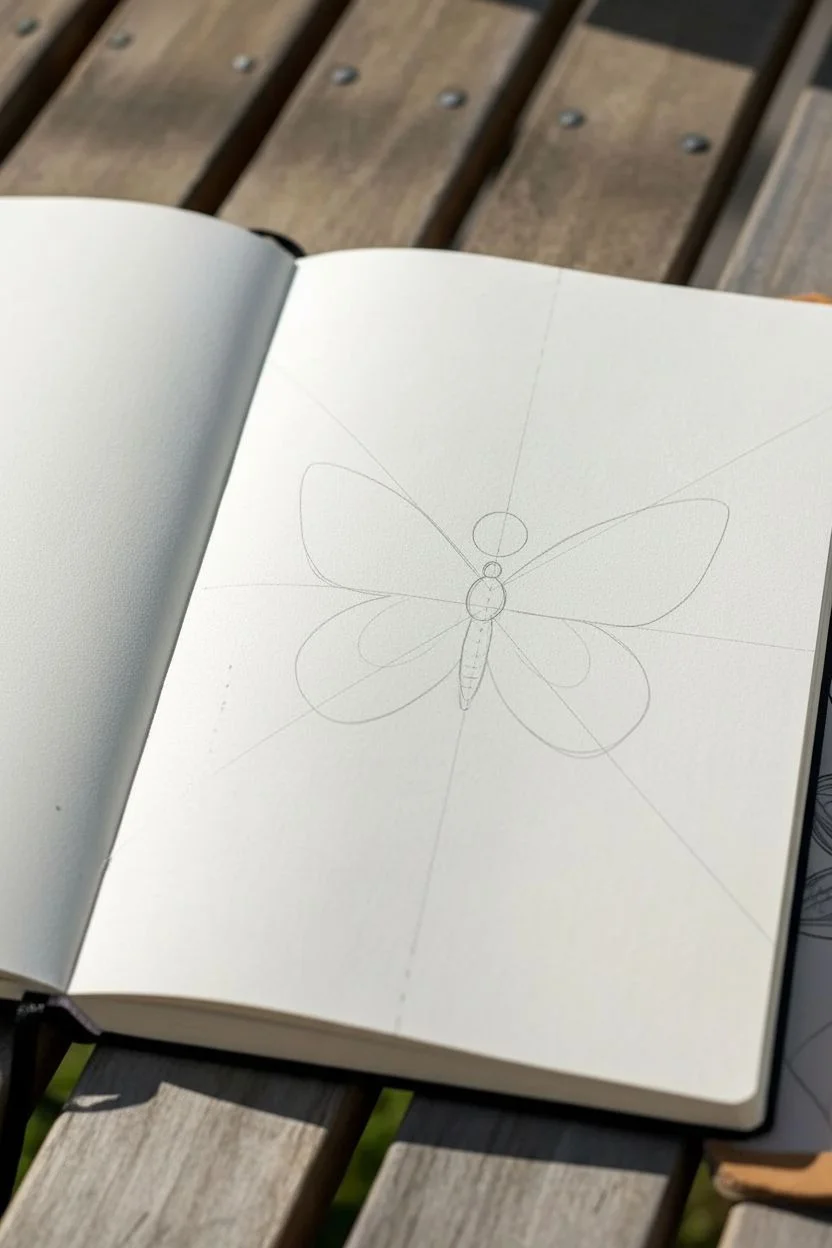
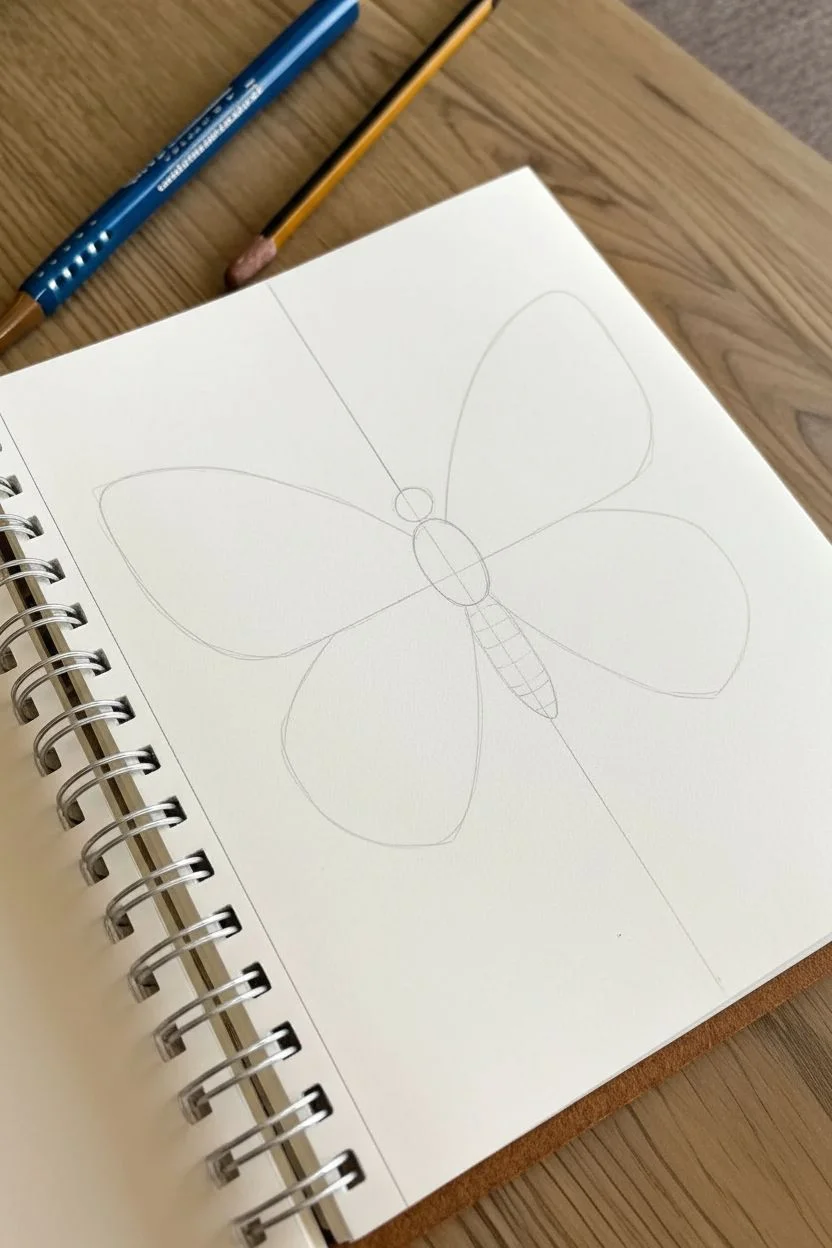
Step 1: Constructing the Core Shapes
-
Draw the central axis:
Begin by lightly sketching a slanted vertical line in the center of your page. This will serve as the body’s spine and help maintain symmetry for the wings. -
Outline the body segments:
Along your axis line, draw three distinct shapes: a small circle for the head, a slightly larger oval for the thorax (chest), and a long, tapered cylinder for the abdomen. -
Sketch the upper wing scaffold:
From the thorax, extend two large, triangular shapes upward and outward. Think of these as rounded triangles with the longest curved side facing away from the body. -
Add the lower wing scaffold:
Below the upper wings, sketch two rounded teardrop shapes that extend downward from the lower thorax. These should be slightly smaller than the top wings.
Symmetry Check
Struggling to match the left and right wings? Look at your drawing in a mirror. The reverse view instantly reveals any lopsided angles.
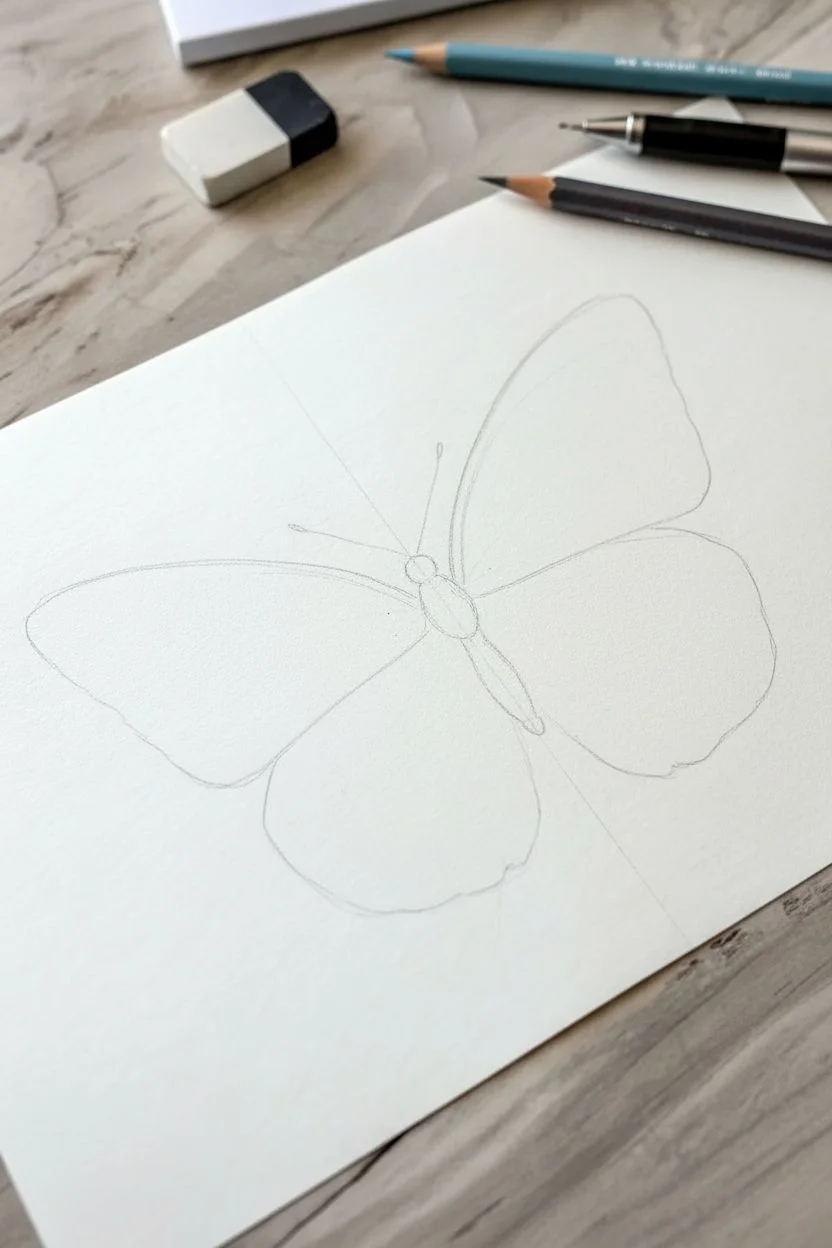
Step 2: Refining the Outline
-
Define the upper wing curve:
Go over your scaffolding lines to create the final silhouette. Smooth out the top edge of the upper wing, giving it a gentle, sweeping curve that dips slightly before the tip. -
Shape the wing margins:
Draw the inner border of the wings. This is a thin band that runs parallel to the outer edge of all four wings, creating a ‘frame’ where the spot patterns will eventually go. -
Refine the body details:
Darken the outline of the body. I find it helpful to add small, segments to the abdomen to give it a segmented insect look, and ensure the head has two tiny distinct eyes. -
Add antennae:
Draw two long, slender lines extending from the head. Curve them gently outward and add a tiny thickened bulb at the very tip of each antenna. -
Clean up guidelines:
Using your kneaded eraser, gently lift away the initial axis line and geometric scaffolding shapes, leaving only your refined butterfly outline.
Step 3: Detailing the Veins and Pattern
-
Map the central cell:
On the upper wing, draw a long, enclosed loop shape near the top edge, close to the body. This is the ‘discal cell’ from which other veins will radiate. -
Draw radiating veins:
Sketch lines extending from that central cell outward toward the wing margins. Keep your pencil pressure light and try to curve the lines slightly to show the wing’s tension. -
Create the lower wing cells:
Similar to the top, draw a large central cell on the lower wing, then extend veins downward like the ribs of an umbrella, reaching toward the bottom edge. -
Add circular spots:
Inside the border margins you drew earlier, sketch a series of small circles and ovals. Vary their sizes, placing larger ones near the wing tips and smaller dots along the bottom edge. -
Thicken the vein lines:
Go back over your vein lines with a slightly heavier hand or a softer pencil (like a 2B). Make them thicker near the body and let them taper to fine points as they reach the edges.
Add Some Color
While beautiful in graphite, you can scan this line art and use it as a custom coloring page, or use watercolors to fill the cells with orange and yellow.
Step 4: Shading and Finishing
-
Shade the body:
Add graphite shading to the sides of the abdomen and thorax to create a 3D cylindrical effect. Leave a thin strip of white down the center for a highlight. -
Fill the darker zones:
Lightly shade inside the outer margins of the wings, working around the small circles you drew so they remain bright white. -
Add wing texture:
Use very light, short pencil strokes or hatching near the base of the wings (where they attach to the body) to suggest fuzziness or depth. -
Final contrast check:
Deepen the darkest areas—specifically the thorax and the very edges of the wings—to make the white spots pop. Ensure your outline is crisp and clean.
Take a moment to admire the delicate symmetry you have created on the page


Realistic Butterfly Wing Veins and Segmented Body
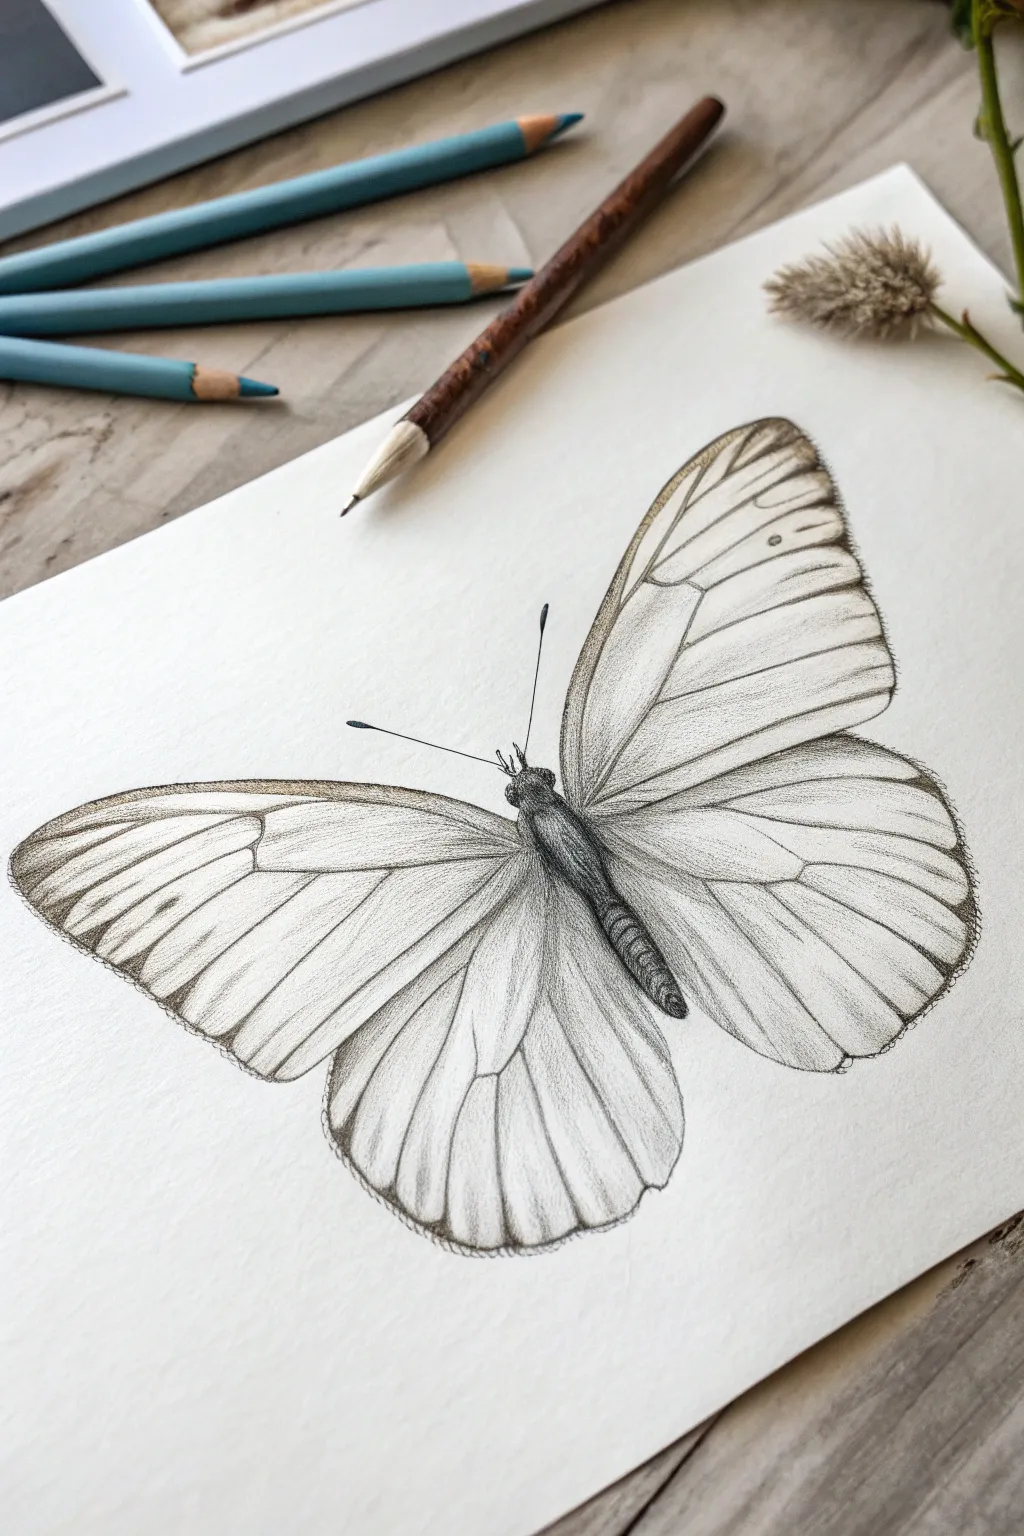
Master the art of delicate textures with this realistic graphite study of a butterfly, focusing on intricate wing venation and a segmented body. The monochromatic palette emphasizes form and shadow, creating a classic, scientific illustration feel.
Step-by-Step Tutorial
Materials
- High-quality drawing paper (smooth or light texture, like Bristol board or hot press watercolor paper)
- Graphite pencils (HB for outlines, 2B and 4B for shading)
- Mechanical pencil (0.5mm HB) for fine veins
- Kneaded eraser
- Precision eraser (rendering stick style)
- Blending stump or tortillon (optional)
Step 1: Drafting the Structure
-
Establish the Axis:
Begin by lightly sketching a diagonal central line to act as the butterfly’s spine. Mark a small oval for the head, a slightly longer segment for the thorax, and a tapered, elongated oval for the abdomen along this axis. -
Map the Wing Span:
Visualize a gentle curve extending from the thorax to define the top edge of the forewings. Sketch large, rounded triangular shapes for the forewings and softer, rounded shapes underneath for the hindwings. Keep your pressure extremely light so lines can be erased later. -
Refine the Silhouette:
Go over your rough shapes to create the definitive outline. Note the subtle dips and curves along the wing edges; butterflies rarely have perfectly straight lines. Ensure the wings mirror each other in size and perspective.
Step 2: Detailing the Body
-
Segment the Abdomen:
Using an HB pencil, draw small curved lines across the abdomen to create segments. These lines should curve slightly downward to suggest the roundness of the body. -
Shade the Thorax and Head:
Switch to a 2B pencil to darken the thorax. Use short, fuzzy strokes to simulate the tiny hairs found on a moth or butterfly body. Keep the eyes dark and distinct. -
Add Antennae and Legs:
Draw the antennae extending from the head, finishing them with tiny club-like tips. If visible from your angle, sketch the faint lines of the legs tucked near the head. -
Deepen Body Shadows:
Use a 4B pencil to add deep contrast to the underside of the body and the crevices between segments. This makes the body pop off the page.
Smudge Alert
Graphite loves to smear. Place a clean sheet of scrap paper under your drawing hand to protect your work from oils and accidental rubbing while you detail the wings.
Step 3: Drawing the Wing Veins
-
Establish Main Veins:
With a mechanical pencil or a sharp HB, draw the primary veins radiating from the thorax outward toward the wing edges. These should be thicker near the body and taper off as they reach the tips. -
Add Branching Veins:
Sketch the secondary veins that branch off the main ones. Observe how they form cells or elongated shapes on the wing surface. Keep these lines consistent but faint. -
Soften the Lines:
If your vein lines look too harsh, gently tap them with a kneaded eraser. You want them to look like structures beneath the wing membrane, not wires sitting on top.
Vein Variation
Don’t draw the wing veins as solid, unbroken lines. Varying the pressure—making lines skip or fade slightly—makes the organic structure look much more realistic.
Step 4: Shading and Texture
-
Apply Base Shading:
Using an HB pencil held at a shallow angle, lightly shade the areas between the veins. Focus on the areas closest to the body and the outer edges of the wings. -
Define the Edges:
Darken the outer rims of the wings with a 2B pencil. I like to use short, hatching strokes here to suggest the microscopic scales that make up the wing’s edge. -
Create Depth Between Veins:
Darken the space immediately adjacent to the veins slightly, leaving the center of each ‘cell’ (the space between veins) lighter. This pillowing effect makes the wings look stretched and taut. -
Highlighting:
Use your precision eraser to lift out thin highlights right in the center of the widest spaces between veins. This enhances the translucent, papery quality of the wings. -
Final Contrast Check:
Step back and assess your values. Use the 4B pencil to punch up the darkest blacks in the body and the very tips of the wings, ensuring a full range of values from white paper to deep graphite.
Now you have a stunning, scientifically inspired butterfly specimen preserved on paper, ready to be framed


Monarch-Inspired Orange-and-Black Pattern Study
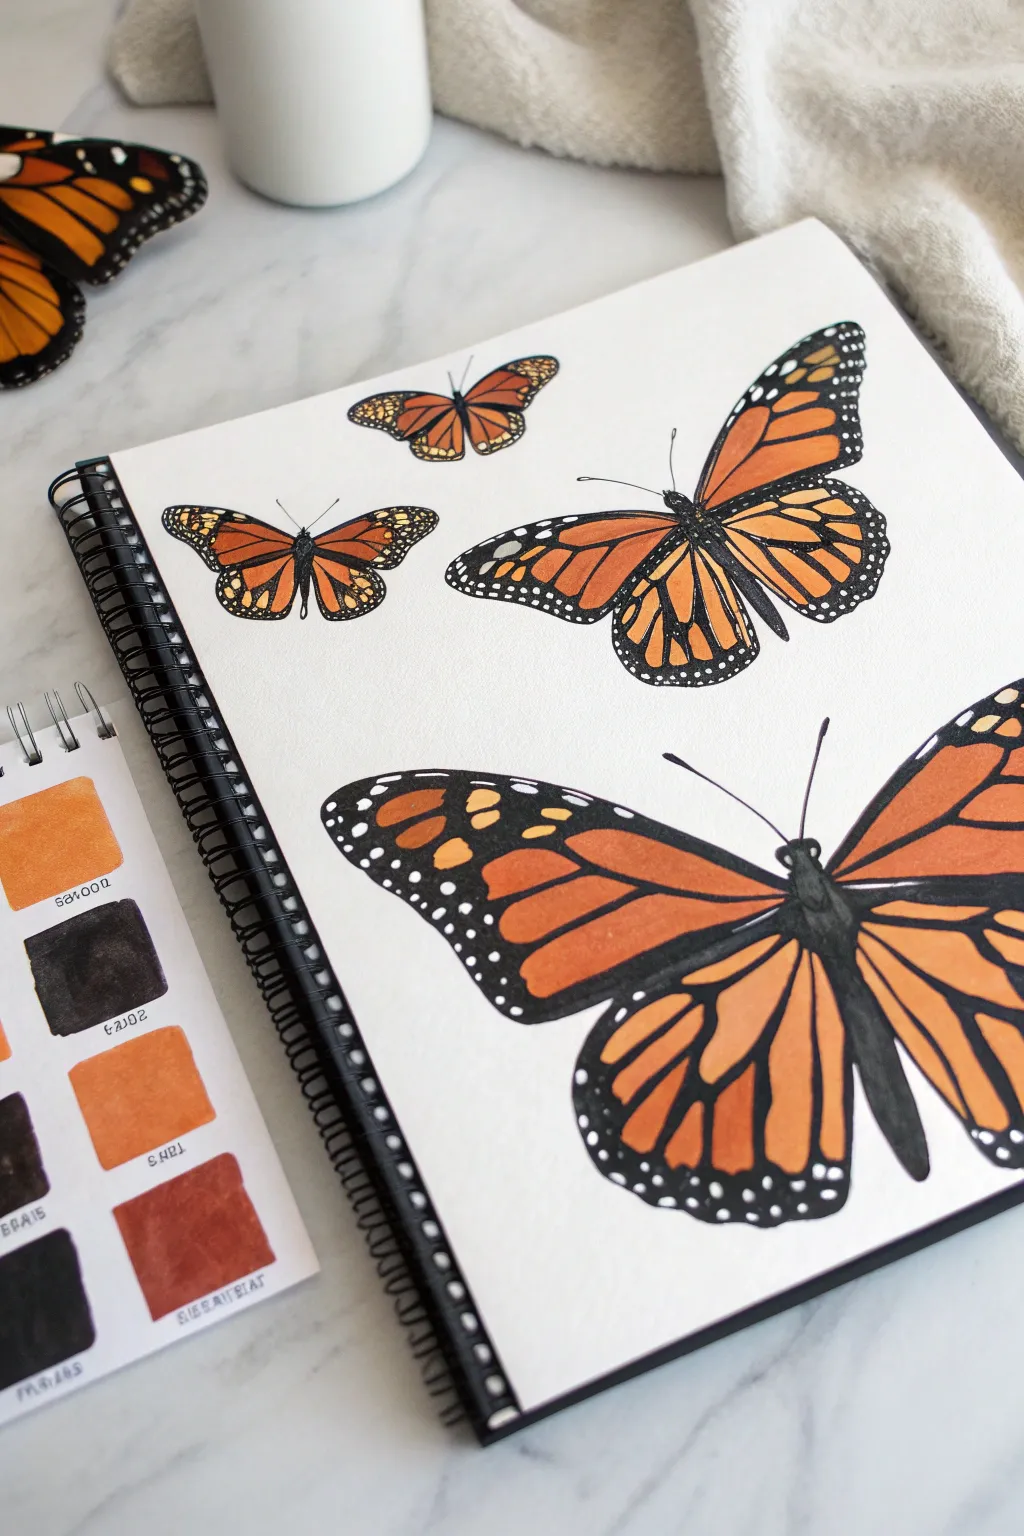
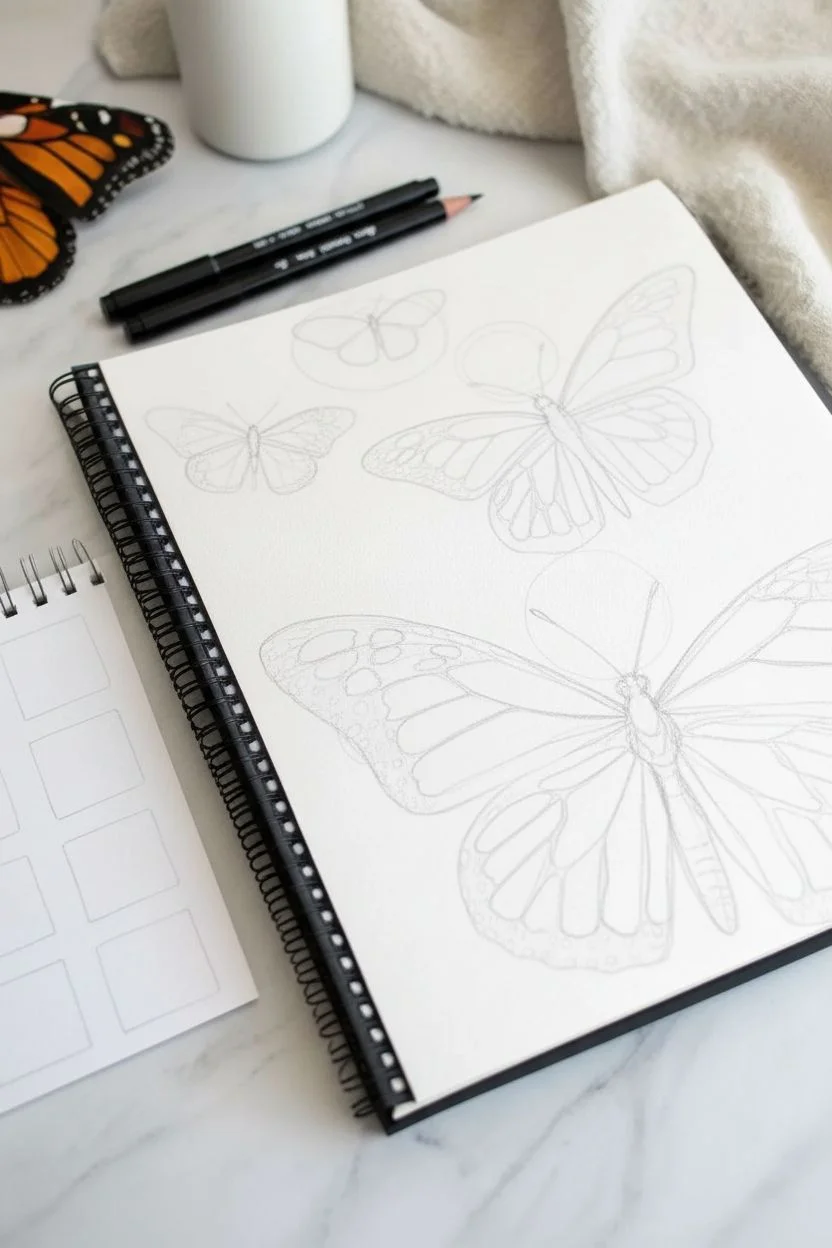
Capture the graceful flight of monarch butterflies with this illustrative sketchbook study, focusing on their iconic orange wings and intricate black veining. By varying the size and angle of each butterfly, you’ll create a dynamic composition that feels alive and full of movement.
Step-by-Step Guide
Materials
- Mixed-media sketchbook (heavyweight paper)
- Alcohol markers (light orange, dark orange, burnt sienna)
- Black fineliner pens (0.1, 0.3, and 0.5 sizes)
- Black brush pen or broad marker
- Pencil (HB or H)
- White gel pen (for highlights)
- Eraser
Step 1: Planning the Composition
-
Map out positions:
Begin by lightly sketching loose circles or ovals to mark where each butterfly will go on the page. Aim for variety: place a tiny one near the top, a medium one in the center, and let a large butterfly dominate the bottom corner, perhaps even flying off the page for interest. -
Sketch the bodies:
Draw the central thorax and abdomen for each butterfly. They essentially look like thin, segmented elongated ovals. -
Draft the wing shapes:
Add the forewings (top) and hindwings (bottom). Monarch wings are somewhat triangular but with rounded edges. Ensure the wings connect centrally to the thorax. -
Refine the outlines:
Go over your loose shapes to define the final wing contours. Don’t worry about perfect symmetry; natural variations make the drawing look more organic.
Step 2: Color Blocking
-
Base orange layer:
Using your lightest orange alcohol marker, fill in the main sections of the wings. Leave a small gap near the edges where the black borders will eventually go. -
Add depth with shading:
While the base layer is still slightly wet, take a darker orange or burnt sienna marker and add shading near the body and the wing tips. Blend this inward to create a gradient effect. -
Create a color swatch:
I find it helpful to create a small test strip on a separate piece of paper (or the side of the page) to ensure your oranges blend smoothly before applying them to the main drawing.
Ink Bleeding?
If your black marker bleeds into the orange, wait longer for the base color to dry. Alcohol markers reactivate each other, so layer darks last.
Step 3: Inking and Details
-
Outline the wings:
Use a 0.5 black fineliner to trace the exterior outline of the wings. Make the lines slightly thicker on the outer edges. -
Fill the borders:
Switch to a black brush pen or broad marker to fill in the thick black margins around the wing edges and the butterfly body. -
Draw the veins:
With a 0.3 fineliner, carefully draw the veins radiating from the body to the outer black borders. These lines should be confident but thin. -
Thicken select veins:
Go back over the main structural veins to thicken them slightly near the body, tapering them as they reach the outer edge. -
Add the white spots:
Wait for the black ink to be completely dry. Then, use a white gel pen to tap small rows of dots along the black outer margins of the wings and on the body itself. -
Final antennae touches:
Use your finest 0.1 pen to draw delicates antennae curving out from the head. -
Clean up:
Once all ink is totally dry, gently erase any remaining pencil sketch lines to leave the drawing crisp and clean.
Metallic Magic
Trace over the main black veins with a deeply colored glitter pen or metallic gel pen to give the wings a subtle shimmer when the page turns.
Now you have a vibrant page of butterflies ready to fly off the paper
BRUSH GUIDE
The Right Brush for Every Stroke
From clean lines to bold texture — master brush choice, stroke control, and essential techniques.
Explore the Full Guide
Blue Morpho-Inspired Iridescent Wing Shading
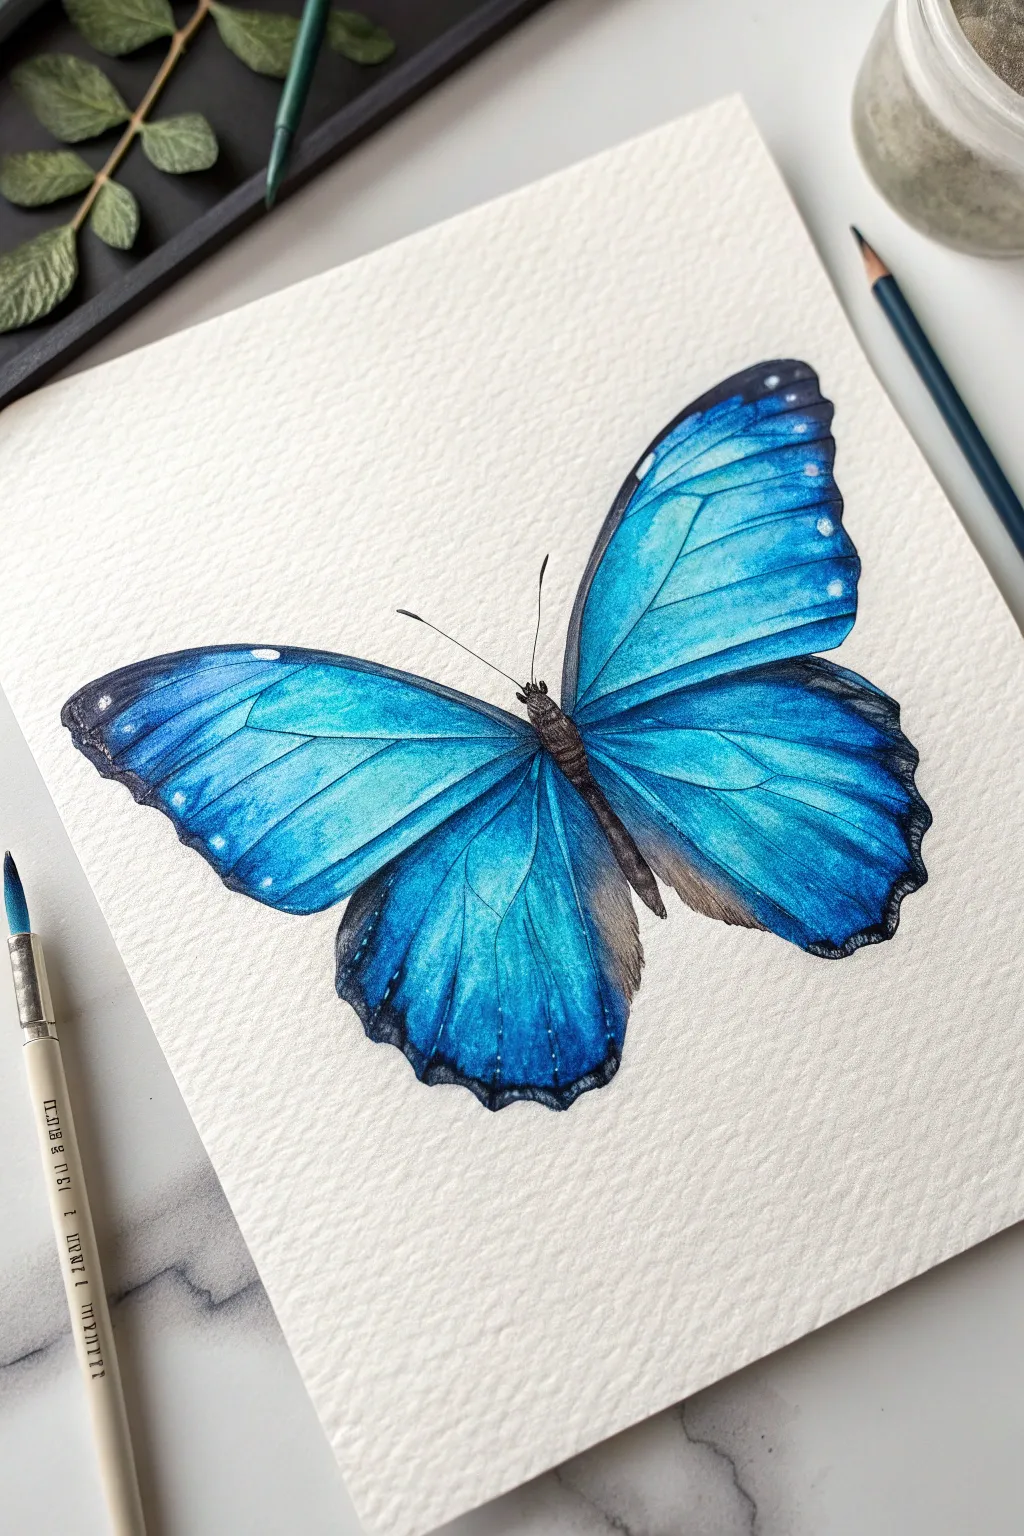

Capture the brilliant iridescence of a Blue Morpho butterfly by layering vibrant watercolor washes under detailed colored pencil work. This technique allows for deep, saturated blues that fade softly into the black margins, creating a lifelike and stunning focal point.
How-To Guide
Materials
- Cold press watercolor paper (300gsm for texture)
- H or HB graphite pencil
- Kneadable eraser
- Watercolor paints (Cerulean Blue, Prussian Blue, Turquoise, Lamp Black)
- Round watercolor brushes (Size 2 and 4)
- Colored pencils (Black, Dark Indigo, White)
- White gel pen or gouache
Step 1: Sketching the Framework
-
Draw the central axis:
Begin by lightly sketching a diagonal line to guide the angle of the butterfly’s body, ensuring it sits naturally on the page. -
Outline the body:
Sketch a slender, segmented abdomen and thorax along your axis line. Keep the head small and mark the positions for the antennae. -
Map the forewings:
Extend large, triangular shapes upward from the thorax for the forewings. Give the outer edges a gentle curve rather than a straight line to mimic organic growth. -
Add the hindwings:
Draw rounded, scallop-shaped hindwings extending downwards, slightly overlapping with the forewings near the body attachment. -
Detail the veins:
Lightly pencil in the major veins radiating from the body outward to the wing edges. These will serve as crucial guides for your shading later. -
Refine the edges:
Go back over the outer contours and add slight unevenness or tiny scallops to the wing edges to make them look realistic rather than perfectly smooth.
Step 2: Watercolor Washes
-
Base blue wash:
Using a size 4 brush, apply a very diluted, watery wash of Cerulean Blue across the entire wing surface, carefully avoiding the veins you sketched if possible, or lifting pigment from them while wet. -
Deepen the mid-tones:
While the first layer is damp (not soaking), drop in Prussian Blue near the butterfly’s body and distinct turquoise tones in the center of the wings to create a gradient. -
Darken the margins:
Blend a small amount of Lamp Black with Prussian Blue. Carefully paint the outer rims of the wings, letting the dark color bleed slightly inward toward the blue. -
Dry completely:
Let the paper dry fully. If the veins became too blue, now is a good time to gently lift color with a damp, clean brush or verify your pencil lines are still visible.
Uneven Gradients?
If your watercolor dries with harsh watermarks, lightly shade over the transition area with a colored pencil in a matching hue. The wax will smooth out the visual texture.
Step 3: Pencil Detailing & Contrast
-
Define the veins:
Sharpen your black colored pencil to a fine point. Trace the vein lines, pressing harder near the body and lightening your touch as you reach the wing edges. -
Shadowing the inner wings:
Use an Indigo pencil to shade the sections between veins near the body. I find that flicking the pencil outward creates a nice feathery texture that mimics scales. -
Solidify the black edges:
Use the black pencil to color over the watercolor borders, pressing firmly to get a rich, opaque black. Create a jagged, tooth-like transition where the black meets the blue. -
Color the body:
Fill in the abdomen and thorax with dark grey and black pencil, using small circular strokes to suggest a fuzzy texture. -
Draw antennae and legs:
Add the delicate antennae and legs with thin, confident black strokes.
Add Metallic Life
Mix a tiny amount of iridescent medium or pearlescent watercolor into your blue top coat. It creates a subtle shimmer that mimics actual butterfly scales.
Step 4: Final Highlights
-
Add white wing spots:
Using a white gel pen or a fine brush with white gouache, place tiny dots along the black outer margins of the forewings and hindwings. -
Enhance the veins:
Run a very sharp white colored pencil lightly alongside the black vein lines to make them pop against the blue background. -
Final texture check:
step back and look at the overall contrast. If the blues look flat, gently layer a little more blue pencil over the dry watercolor to boost saturation.
Your vibrant blue morpho is now ready to fly off the page
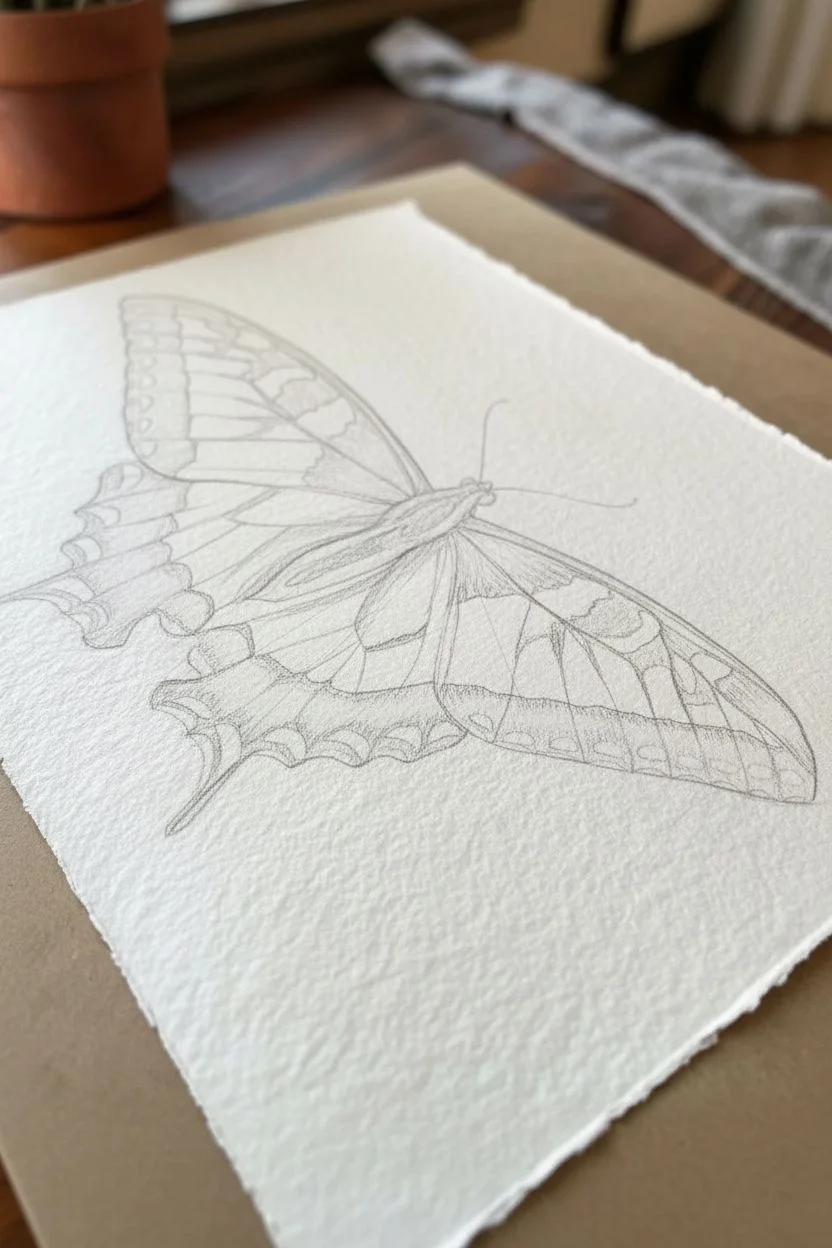
Swallowtail with Long Tails and Bold Edges
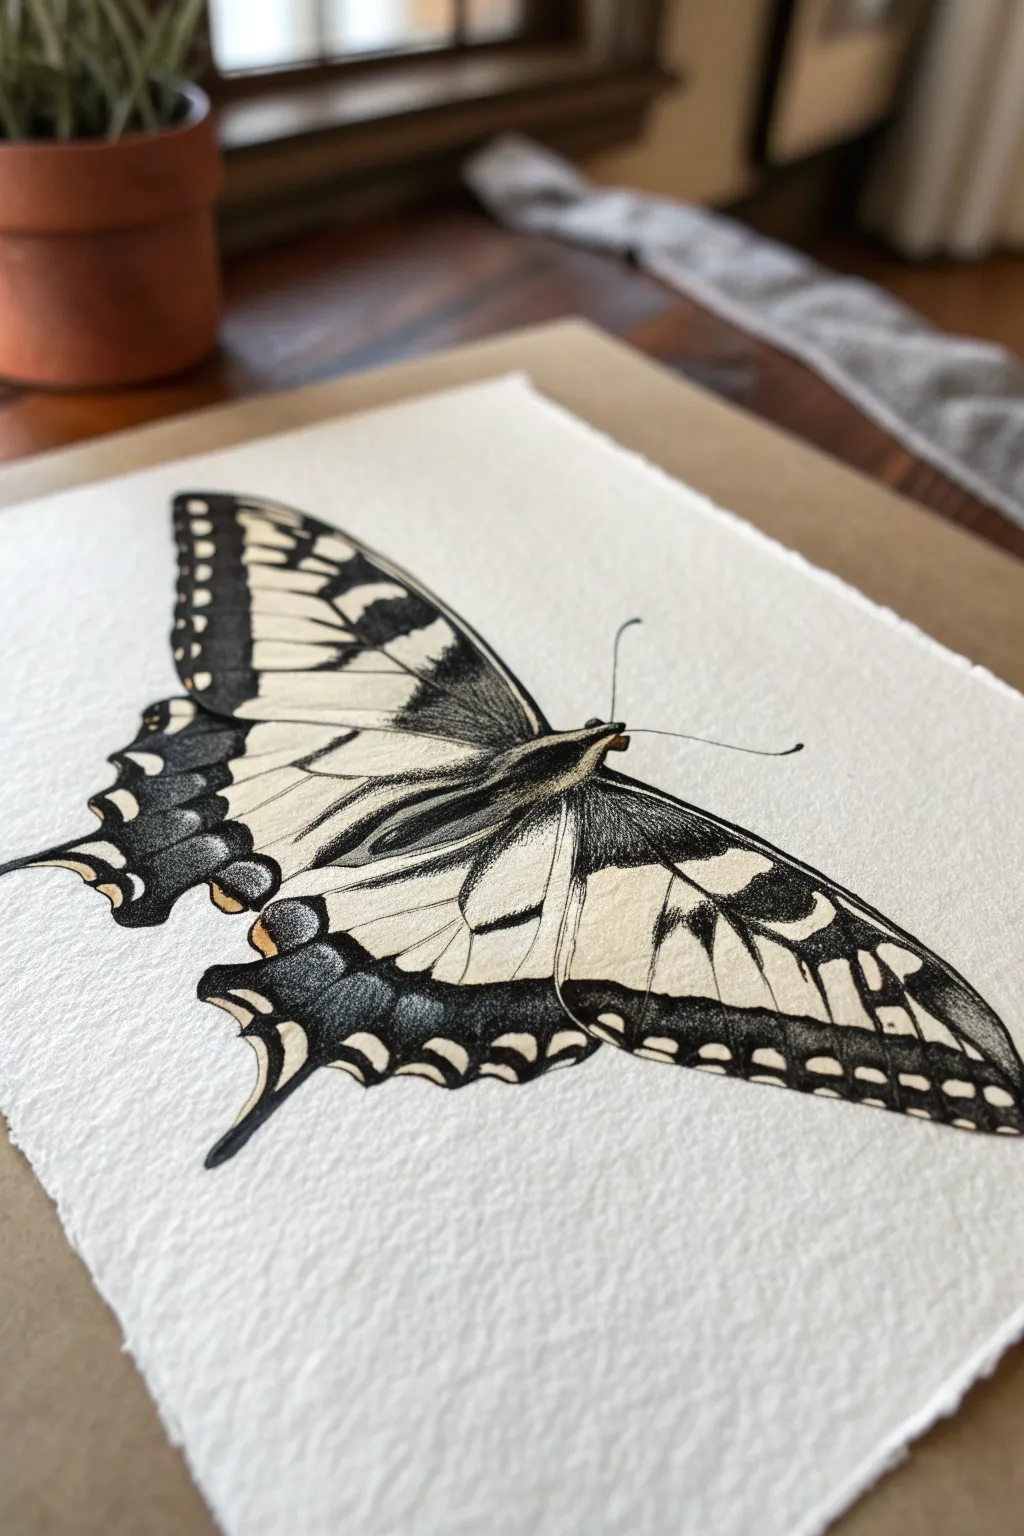
Capture the delicate elegance of a swallowtail butterfly with this detailed drawing project that emphasizes bold contrast and subtle textures. Using fine liners and shading techniques on textured paper creates a piece that feels both scientific and artistic.
Step-by-Step Guide
Materials
- Cold press watercolor paper (heavy texture)
- H or HB graphite pencil
- Kneadable eraser
- Fine liner pens (0.05mm, 0.1mm, 0.3mm, 0.5mm)
- Black brush pen or marker (for large fills)
- Warm grey colored pencil
- Pale yellow or cream colored pencil
- Burnt orange colored pencil
Step 1: Drafting the Structure
-
Establish the axis:
Begin by lightly sketching a diagonal central line to represent the butterfly’s body angle. This helps create that dynamic, resting pose seen in the reference. -
Map the wings:
Using simple geometric shapes, outline the two large upper forewings and the two lower hindwings. Ensure the hindwings extend downwards into the characteristic ‘tails’ of the swallowtail. -
Refine the outline:
Switch to a slightly more confident pencil line to carve out the scalloped edges of the wings. Swallowtails have distinctive wavy edges, so avoid straight lines. -
Detail the veins:
Lightly sketch the vein structure radiating from the body outward. These veins act as the skeleton for the patterns we will add later. -
Add pattern blocks:
Map out where the heavy black bands will go. There is a thick band along the top edge, ‘tiger stripes’ near the body, and a distinctive border of crescents along the bottom edges.
Paper Texture Matters
Using cold press or ‘rough’ watercolor paper adds instant character. The heavy grain catches the pencil pigment, creating natural shading without extra effort.
Step 2: Inking the Details
-
Outline the body:
Start inking with a 0.1mm pen. Carefully trace the fuzzy texture of the body and the antenna, keeping your hand light for delicate features. -
Define the veins:
Use a 0.05mm or 0.1mm pen to trace over your pencil vein lines. Make these lines smooth but not perfectly uniform—nature has slight variations. -
Fill the heavy blacks:
Switch to a 0.5mm pen or a black brush marker to fill in the dark patterned areas. This applies to the bold stripes on the forewings and the thick border on the hindwings. -
Preserve the crescents:
While filling the black border on the lower wings, be extremely careful to leave the negative space for the crescent moon shapes and the blue/orange eye-spots. -
Stipple the transition:
Where the black markings fade into the lighter wing areas, use stippling (tiny dots) rather than a hard line. This creates a soft, velvety texture.
Shaky Lines?
If your inking hand shakes, rest your wrist on a clean sheet of scrap paper. It reduces friction and prevents oils from your hand smudging the drawing.
Step 3: Shading and Color
-
Erase pencil guides:
Once the ink is completely dry, gently gently lift off the graphite lines with a kneadable eraser to clean the paper surface. -
Base tone application:
Take your pale yellow or cream pencil and lightly shade the ‘white’ areas of the wing. We don’t want stark white; we want an organic, aged ivory look. -
Deepen the shadows:
Using a warm grey pencil, shade right next to the black veins and close to the body. This mimics the microscopic overlapping of scales and adds depth. -
Add color accents:
Locate the small eye-spots on the lower hindwings. Fill them carefully with the burnt orange pencil, blending slightly into the surrounding black for integration. -
Texture the body:
I like to go back over the thorax (body) with fine, short strokes of the grey pencil to simulate fur or fuzz. -
Final contrast check:
Look at the darkest areas. If the texture of the paper has left white speckles in your black ink, do a second pass with the black marker to make those voids solid.
Frame your delicate illustration in a simple wood frame to let the high-contrast patterns take center stage

PENCIL GUIDE
Understanding Pencil Grades from H to B
From first sketch to finished drawing — learn pencil grades, line control, and shading techniques.
Explore the Full Guide
Butterfly in Flight with Motion Lines and Wing Blur
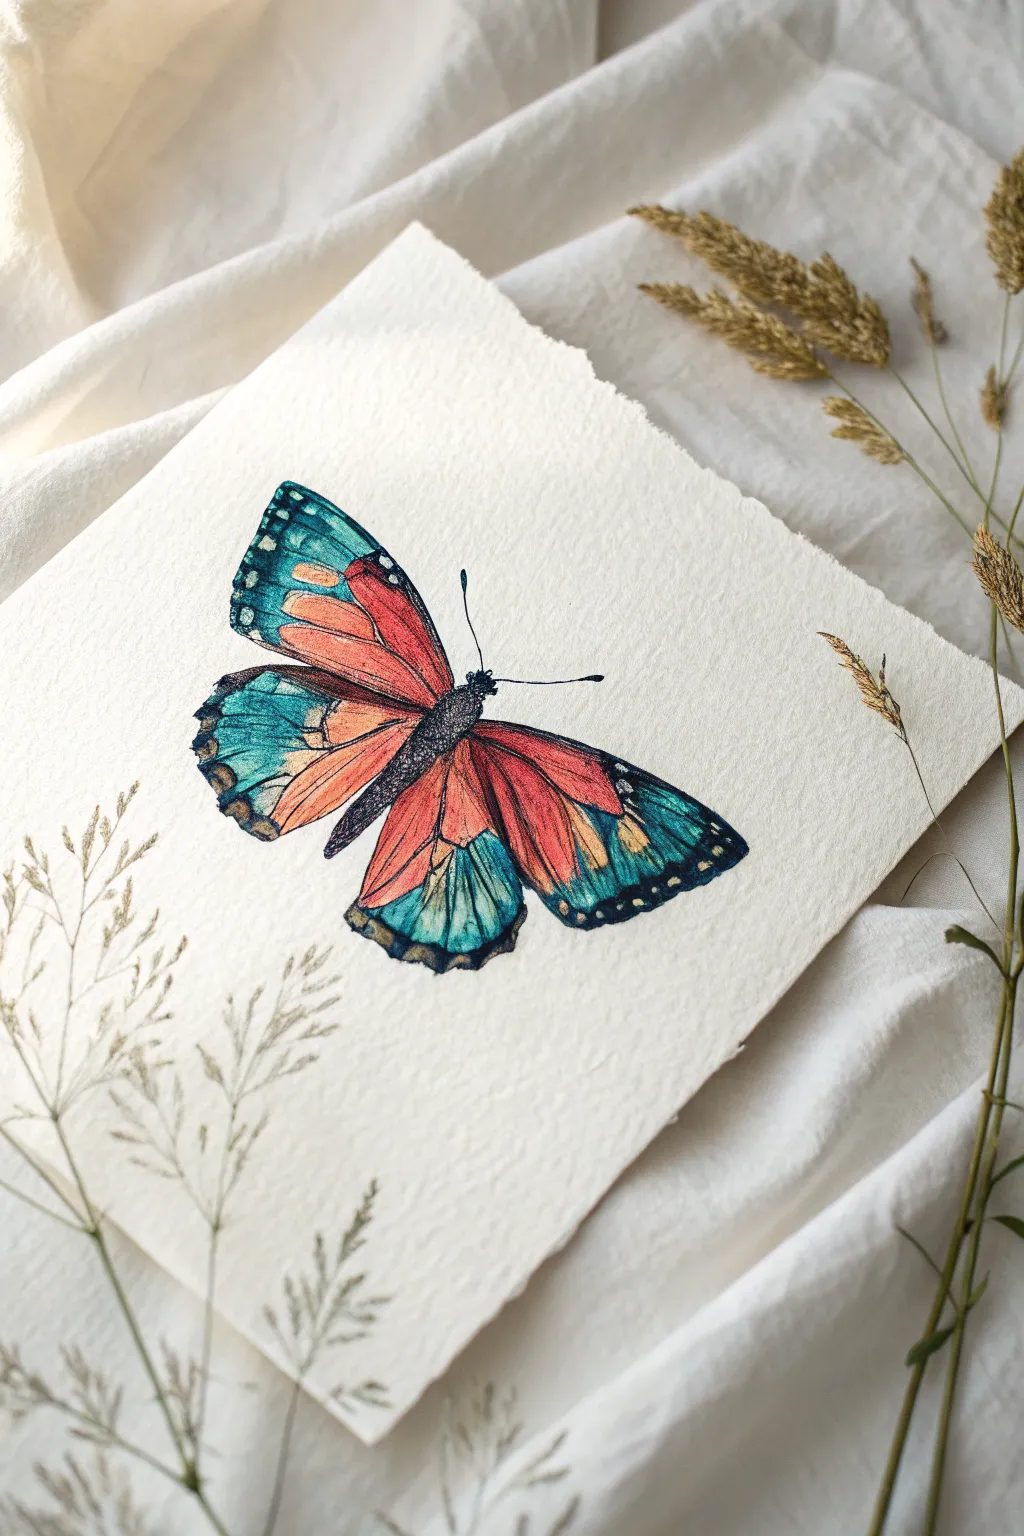
Capture the delicate beauty of a butterfly with this detailed mixed media illustration. Combining the fluidity of watercolor with the precision of fine liner pens creates a striking contrast that brings the wings to life on textured paper.
Detailed Instructions
Materials
- Cold-pressed watercolor paper (300gsm, rough texture)
- Watercolor paints (Turquoise/Teal, Coral/Salmon, Black)
- Round watercolor brushes (size 2 and 4)
- Fine liner pens (Black, 0.1mm and 0.3mm)
- HB pencil
- Kneadable eraser
- White gel pen (optional for highlights)
Step 1: Sketching the Form
-
Pencil Outline:
Begin by lightly sketching the butterfly’s central body (thorax and abdomen) at a slight diagonal angle to suggest movement. -
Upper Wings:
Draw the two large upper forewings extending outward. Keep the top edges slightly curved and the tips somewhat angular. -
Lower Wings:
Add the two lower hindwings, making them rounded and slightly smaller than the forewings, overlapping just beneath them. -
Wing Veins:
Very faintly sketch the main vein lines radiating from the body to the wing edges. These will guide your painting later. -
Refine and Erase:
Gently roll a kneadable eraser over your sketch to lift up excess graphite, leaving only faint ghost lines.
Bleeding Colors?
If your teal and coral are turning grey where they touch, your paper is too wet. Let the first color dry almost completely before adding the second for a sharper line.
Step 2: Watercolor Application
-
Inner Wing Wash:
Mix a vibrant coral or salmon color. Apply this to the inner sections of the wings closest to the body, keeping the paint wet. -
Outer Wing Wash:
While the coral is still slightly damp (but not puddling), load your brush with turquoise or teal. Paint the outer edges of the wings. -
Blending Transition:
Where the coral and teal meet, use a clean, damp brush to gently soften the transition, allowing the colors to bleed into each other without turning muddy. -
Body Color:
Paint the butterfly’s body with a diluted black or dark grey watercolor wash. Let it bleed slightly into the wing roots for a natural look. -
Drying Time:
Allow the watercolor layer to dry completely. The paper should feel room temperature to the touch, not cool.
Add Metallic Flair
Mix a tiny amount of gold iridescent medium into your coral paint or use a gold gel pen for the wing veins to make the artwork shimmer in the light.
Step 3: Inking and Details
-
Defining the Body:
Using a 0.3mm fine liner, stipple (dot) the body to create a fuzzy texture, concentrating the dots on the shadowed side. -
Heavy Outline:
Outline the outer edges of the wings with the 0.3mm pen. Makes the lines thicker at the wing tips and thinner along the bottom curves. -
Primary Veins:
Switch to a 0.1mm pen. Draw the main veins extending from the body to the edges, following your original pencil guides. -
Detailed Patterning:
Add the intricate cell patterns within the teal sections. Use small, looping strokes to create the scale-like texture found on butterfly wings. -
Darkening Edges:
Fill in the very outer rim of the wings with black ink or heavy watercolor, leaving small circles of the underlying teal paint visible as ‘spots’. -
Antennae:
Draw two slender antennae curving outward from the head with a single confident stroke for each. -
Final Contrast:
Revisit the coral sections and add very fine, sparse scribbles or dots to suggest texture without overwhelming the color. -
Highlights:
If desired, use a white gel pen to add tiny dots to the black edges of the wings or the body for extra sparkle.
Tear the edges of your paper for a rustic, organic finish to complete your butterfly study
Tiny Butterfly Doodles with Sparkles and Stars
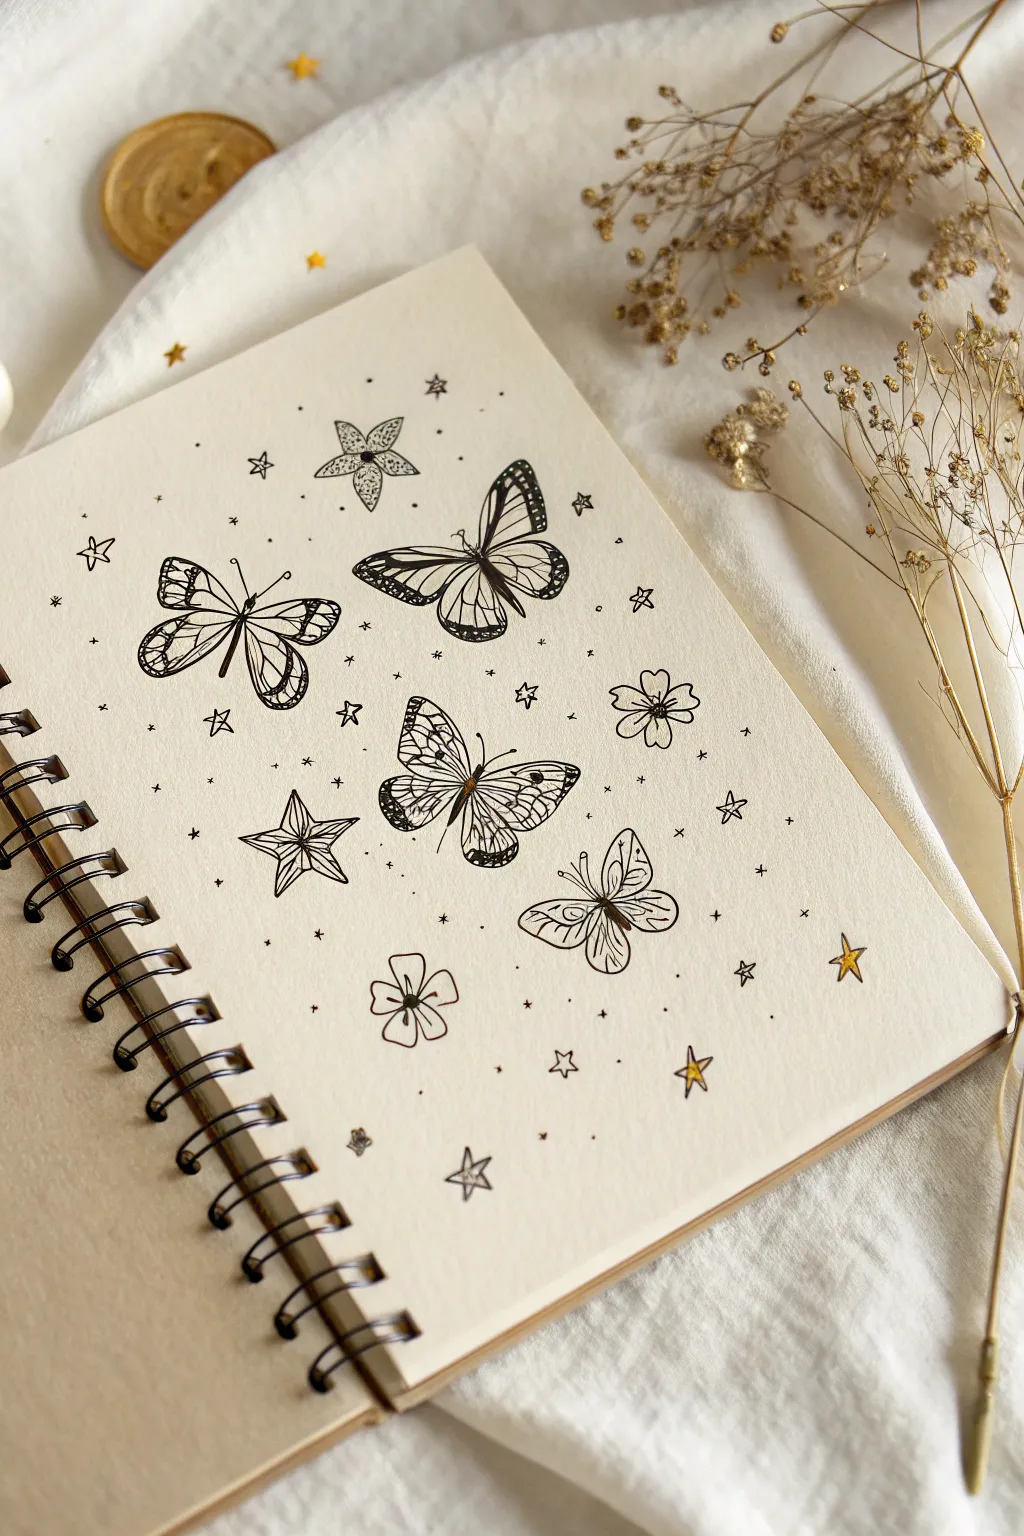
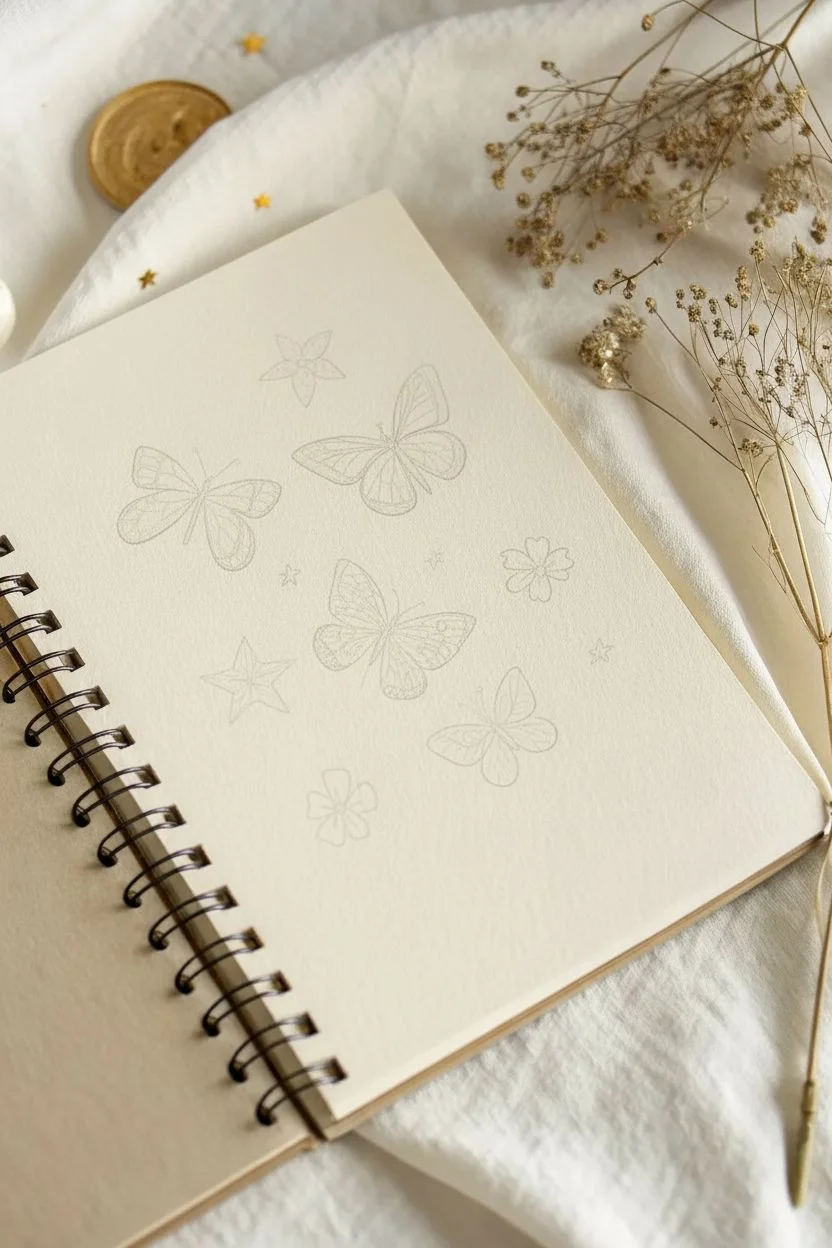
Create a magical sketchbook page filled with delicate line-art butterflies, twinkling stars, and tiny sparkles. This project celebrates the beauty of simplicity by using fine black ink on cream-colored paper to create a dreamy, monochromatic aesthetic with just a hint of gold.
Step-by-Step Guide
Materials
- Spiral-bound sketchbook with cream/off-white paper
- Fine liner pen (Black, 0.1mm)
- Fine liner pen (Black, 0.3mm or 0.5mm)
- Gold gel pen or metallic marker
- Pencil (HB or H)
- Eraser
- Ruler (optional)
Step 1: Planning and Sketching
-
Map out the composition:
Visualize where your four main butterflies will go. They are arranged somewhat loosely in a zigzag or diamond pattern—one top right, one middle left, one middle center, and one lower right. -
Sketch butterfly shapes:
Using your pencil very lightly, draw rough outlines for the butterflies. Start with simple lines for the bodies and basic triangular or rounded shapes for the wings to get the proportions right. -
Add floral elements and stars:
Lightly sketch in the positions of the larger stars—mostly five-pointed shapes—and the few simple flower outlines scattered between the butterflies.
Step 2: Inking the Butterflies
-
Outline the top-right butterfly:
Switch to your 0.3mm pen. Draw the monarch-style butterfly in profile. Create the body first, then the upper wing with a smooth curve, and the lower wing slightly smaller. Ink the veins inside the wings. -
Detail the first butterfly:
With the 0.1mm pen, fill in the delicate patterns on the wing edges. Use tiny dots or small circles near the edges to mimic the spotted pattern of a monarch. -
Ink the left-side butterfly:
Draw this butterfly with open wings. Start with a slender body. Draw the top wings slightly pointed and the bottom wings rounded. Add vein lines radiating from the body. -
Add texture to the left butterfly:
Use the finer pen to add stippling (tiny dots) along the bottom edges of the wings to give it a shadowed, textured look. -
Draw the center butterfly:
This butterfly faces forward. Draw a slightly thicker body. Create detailed, almost lace-like patterns inside the wings using looping lines and small enclosed shapes. -
Ink the bottom-right butterfly:
Draw the smallest butterfly near the bottom. Keep the lines simple here; smooth loops for the wings and just a few central veins, making it look lighter and airier than the others. -
Add antennae:
Go back to every butterfly and add long, slender antennae. Curve the tips slightly for a graceful, natural appearance.
Shaky Lines?
If your lines aren’t perfectly straight, embrace it! A slightly wavering line adds to the organic, hand-drawn charm of a doodle style. It doesn’t need to look printed.
Step 3: Drawing Celestial & Floral Details
-
Ink the star doodles:
Draw the scattered stars. Vary their styles: some are classic five-pointed stars with internal lines connecting closer to the center, others are simple outlines. -
Create star clusters:
Draw tiny four-pointed stars (just crossing lines) and simple hollow star shapes in the empty spaces to act as filler. -
Draw the flowers:
Ink the simple five-petal flowers you sketched earlier. Keep the petals rounded and open, adding a small circle or star shape in the very center of each bloom. -
Erase pencil marks:
Wait until the ink is completely dry—I usually give it at least five minutes to be safe—then gently erase all your underlying pencil sketches.
Pro Tip: Wing Symmetry
Draw the upper left wing, then immediately move to the upper right wing while the motion is fresh in your muscle memory. This helps keep shapes symmetrical.
Step 4: Finishing Touches
-
Add the ‘magic dust’:
Using your 0.1mm pen, dot the paper randomly between the larger elements. These tiny stipples create a sense of movement and fill the negative space without cluttering it. -
Draw tiny plus signs:
Scatter small ‘plus’ signs (+) and tiny distinct dots among the stippling to vary the texture of the background sparkles. -
Apply gold accents:
Take your gold gel pen and carefully color inside just two or three select stars. Don’t color them all; the sparing use of gold makes it pop more against the cream paper. -
Highlight the butterflies:
Add a tiny touch of gold to the center body of the middle butterfly to tie the color scheme together.
Now you have a whimsical page of butterflies that captures the delicate feeling of a summer sketchbook


Heart-Shaped Butterfly Wings for Cute Sketches
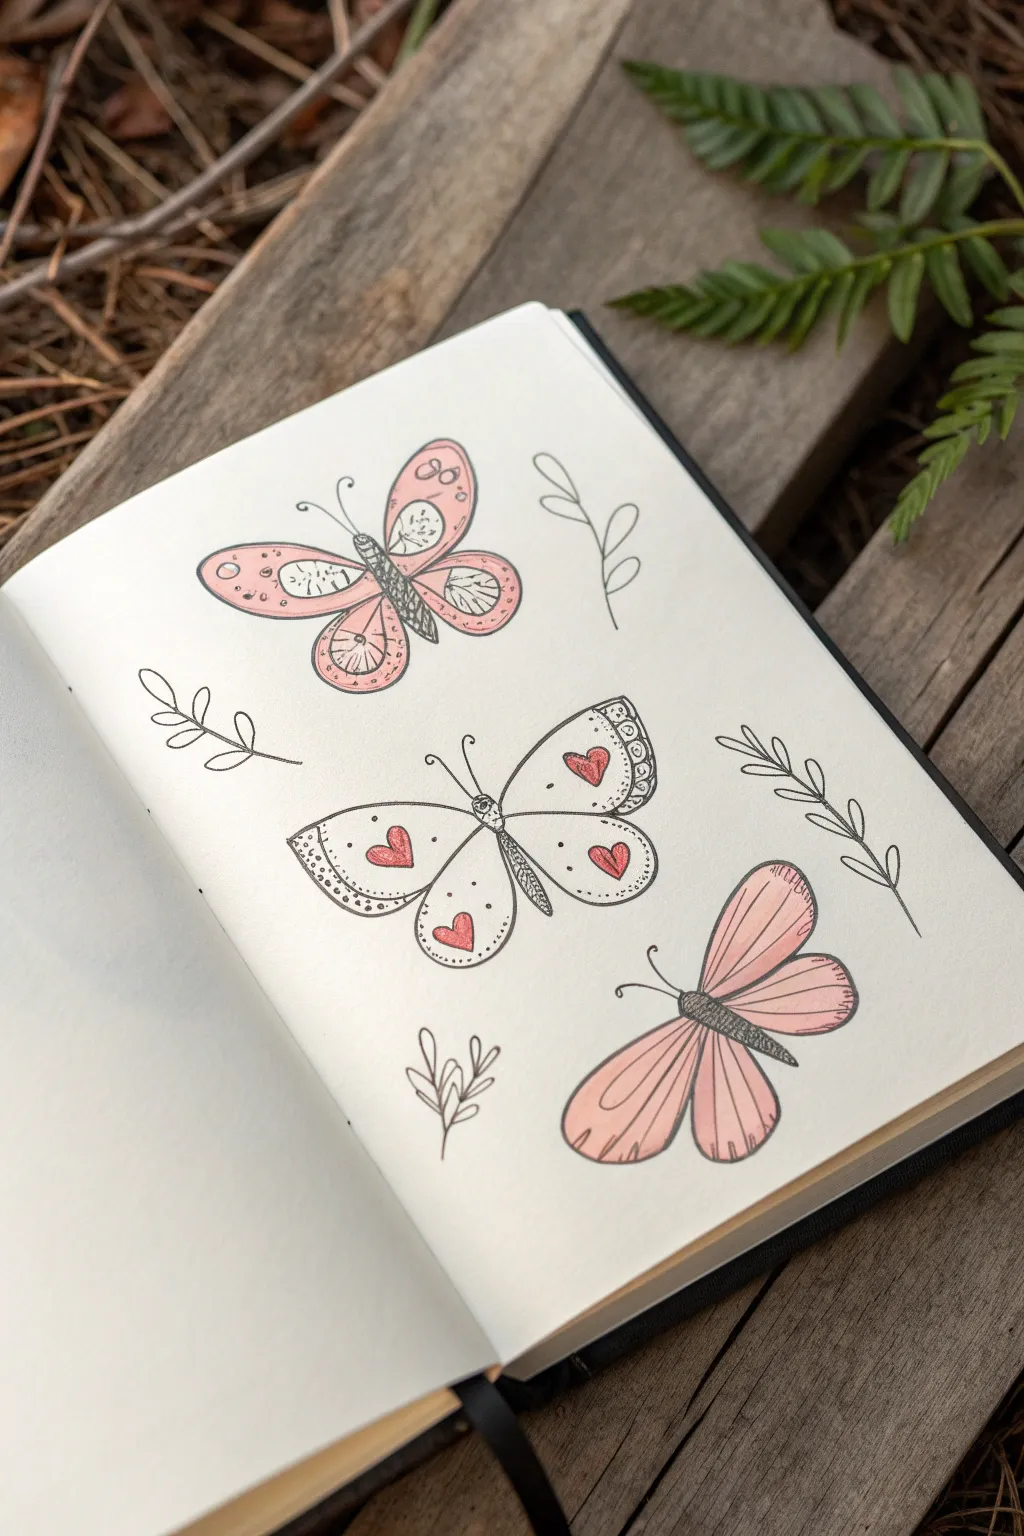
This charming sketchbook spread features three distinct butterflies, each incorporating heart motifs and soft pink hues for a romantic, doodle-style aesthetic. The combination of crisp ink lines and gentle colored pencil shading creates a lovely balance between structured illustration and freehand sketching.
Detailed Instructions
Materials
- Sketchbook with smooth, off-white paper
- HB graphite pencil
- Fine liner pens (sizes 0.1mm and 0.3mm, black)
- Colored pencils (light pink, dusty rose, salmon pink)
- Eraser
- Pencil sharpener
Step 1: Planning and Sketching
-
Lay out the composition:
Begin by lightly marking the positions for three butterflies with your graphite pencil. Place one near the top left, one in the center, and one toward the bottom right to create a balanced, cascading diagonal flow. -
Sketch the central bodies:
Draw the central axis for each butterfly first. Sketch simple, elongated oval shapes for the bodies. The top and bottom butterflies should be angled diagonally, while the middle one can be more horizontal. -
Draft the top butterfly wings:
For the top butterfly, sketch rounded upper wings and slightly smaller lower wings. Incorporate circular patterns near the body on the upper wings. -
Draft the middle butterfly wings:
This is the ‘heart-winged’ star. Use a wider wingspan here. Inside the large wing sections, lightly sketch the placement for four small hearts—one on each wing section. -
Draft the bottom butterfly wings:
Give the bottom butterfly a simpler, more streamlined shape. The wings should look like elongated teardrops or petals extending from the body. -
Add floral accents:
Sketch simple leafy sprigs in the empty spaces around the butterflies. Draw curved lines with small, oval leaves attached to fill the negative space.
Smudge Alert
Fine liner ink can smear easily under colored pencil if not fully dry. Let your ink sit for at least 5 minutes before coloring, or test a small spot on scrap paper first.
Step 2: Inking the Outlines
-
Ink the central bodies:
Switch to a 0.3mm fine liner. Trace over the pencil sketches of the butterfly bodies. For the thorax (the middle part), use short, dense strokes or stippling to suggest a fuzzy texture. -
Outline the top butterfly:
Carefully ink the wings of the top butterfly. Add the distinct circular ‘eyes’ on the wings and the radiating lines near the body. Don’t forget the curled antennae. -
Ink the heart butterfly:
Outline the middle butterfly’s wings. Draw the small hearts inside the wings clearly. Add a decorative border on the outer edges of the wings with small dots or scallops for extra detail. -
Outline the bottom butterfly:
Ink the petal-shaped wings of the final butterfly. Draw the long veins running from the body to the wing create distinct segments. -
Trace the foliage:
Go over your leaf sprigs with the 0.1mm pen to keep them delicate and slightly thinner than the main subjects. -
Erase pencil marks:
Wait a moment for the ink to set completely, then gently erase all graphite guidelines to reveal a clean black-and-white drawing.
Step 3: Adding Color and Texture
-
Color the top butterfly:
Take a dusty rose colored pencil and fill in the outer edges of the upper wings. Press lighter as you move inward to create a gradient. Leave the small circles white for contrast. -
Shade the middle butterfly:
Use a salmon pink or reddish pencil to color the four small hearts solidly. Leave the rest of the wing white or extremely pale cream. -
Detail the middle wings:
With a very sharp black pen (0.05mm or 0.1mm), add tiny stippling dots around the hearts and along the wing edges to give shading without adding more color. -
Color the bottom butterfly:
Use a light pink pencil for the bottom butterfly. Fill the wings entirely but keep the pressure even and soft so the texture appears smooth. -
Final shading touches:
Go back to the top butterfly and darken the very tips of the wings with a second layer of pink to add depth. -
Enhance the bodies:
I like to add a tiny bit of dark charcoal or black pencil over the inked bodies to make them look matte and deep black.
Metallic Magic
Trace the hearts or wing veins with a gold or silver gel pen. This adds a subtle shimmer that catches the light when you turn the page.
Close your sketchbook knowing you’ve captured a delicate trio of nature’s beauty
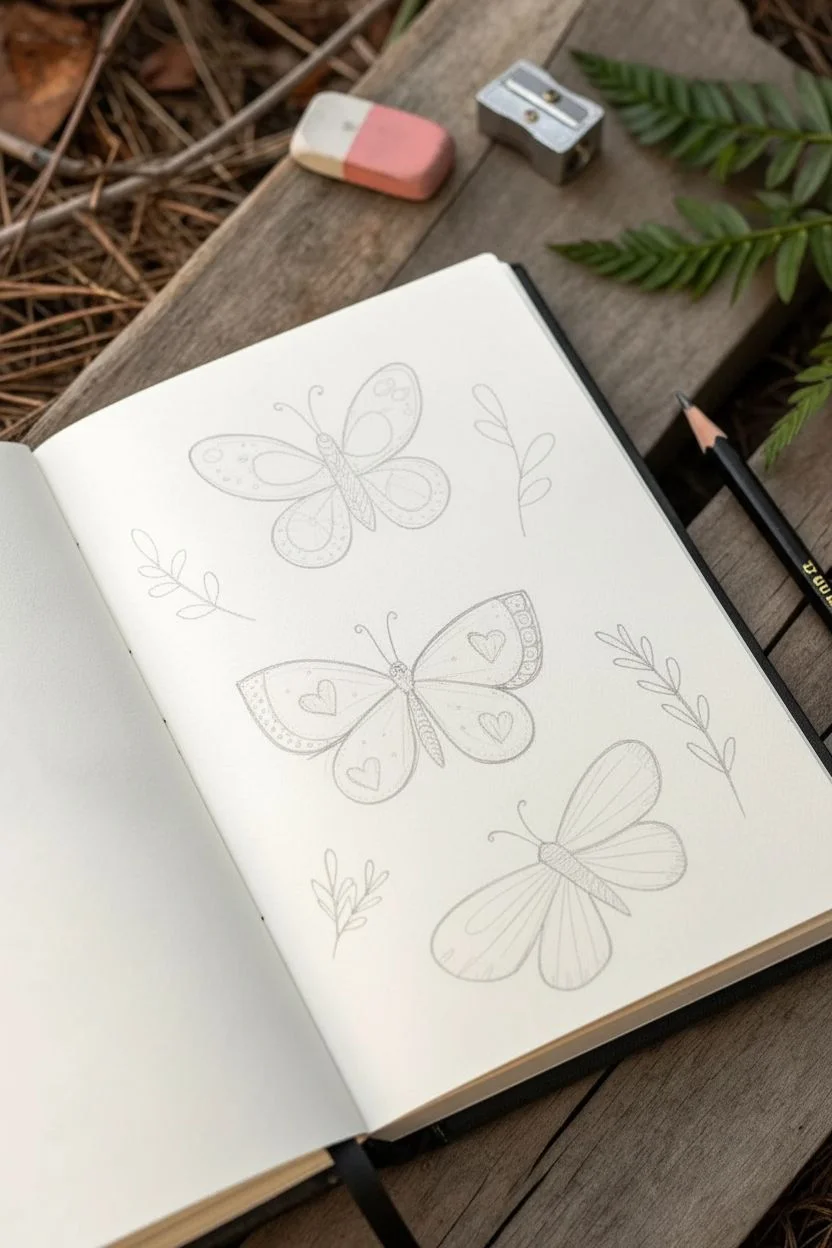
Butterfly Made from Numbers and Letters
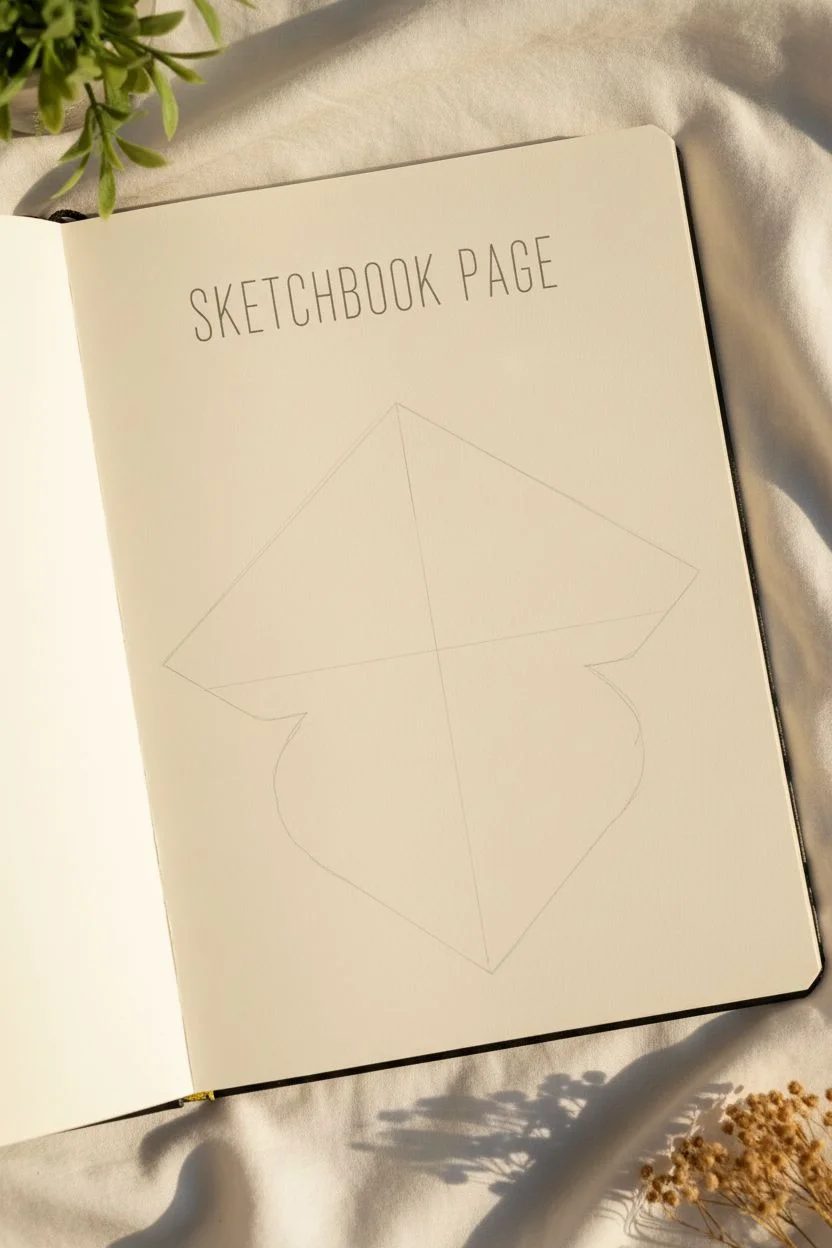
This charming sketchbook project transforms simple curves and circles into a clean, stylized butterfly illustration. It is a perfect exercise for practicing steady linework and symmetry without needing complex shading.
Step-by-Step Tutorial
Materials
- Sketchbook or drawing paper
- Pencil (HB or H)
- Eraser
- Fine liner pen (0.3mm or 0.5mm, black)
- Ruler
Step 1: Setting the Layout
-
Page Title:
Start by lettering the title ‘SKETCHBOOK PAGE’ in thin, tall sans-serif capital letters near the top center of your paper. If you aren’t confident in your freehand lettering, lightly draw top and bottom guidelines with a ruler first. -
Central Axis:
Below your text, use your ruler to draw a very light vertical line down the center of the remaining space. This will serve as the anchor for the butterfly’s body and ensure your wings stay symmetrical. -
Blocking the Wings:
Visualize the overall shape. Sketch a kite-like diamond shape lightly in pencil to define the outer limits of where the wings will go.
Clean Lines Tip
Rotate your sketchbook as you draw the curves. It’s much easier to push your hand in a natural arc than to contort your wrist.
Step 2: Drawing the Body
-
Head and Thorax:
Draw a small circle at the top of your central axis for the head. Below it, sketch a slightly elongated oval for the thorax (the middle section). -
Abdomen:
Extend a long, thin shape downward from the thorax for the abdomen. It should taper slightly at the end, resembling a stretched teardrop. -
Segment Details:
Add small horizontal lines across the abdomen to indicate segments, and draw two large, simple eyes on the head circle. -
Antennae:
Draw two thin lines curving outward from the top of the head. Add tiny circles at the very tips of these lines.
Level Up Ideas
Use colored pencils to gently shade the wing segments, or redraw the butterfly using only numbers 3 and 8 for a hidden code challenge.
Step 3: Constructing the Wings
-
Upper Wing Arches:
Start the top wings by drawing a large curve extending from the thorax up and out, rounding down to form a soft point. -
Lower Wing Curves:
For the bottom wings, draw a curve starting from the lower thorax, swooping down and out, distinct from the upper wing but touching it slightly. -
Wing Veins – Main:
Draw a central vein line through each wing section, radiating from the body outward toward the wing tips. -
Wing Veins – Segments:
Connect the central veins to the outer edges of the wings with curved lines, creating sections that look like stained glass panels.
Step 4: Adding Patterns
-
Upper Wing Eyespots:
In the large upper section of each top wing, draw a distinct circle. Inside that circle, draw a smaller concentric circle to create an eyespot pattern. -
Swirl Detail:
Inside the innermost circle of the upper wing eyespot, draw a small spiral or swirl for a whimsical touch. -
Lower Wing Eyespots:
Repeat the circle process on the lower wings, placing them centrally in the largest segment. These can be slightly smaller than the top ones. -
Lower Swirls:
Add the matching spiral detail inside the lower wing circles to maintain the pattern theme.
Step 5: Inking and Finishing
-
Refining Lines:
Take a moment to look at your pencil sketch. Adjust the symmetry if one wing looks significantly different from the other. -
Inking the Outline:
Using your fine liner pen, carefully trace over your pencil lines. I find it easiest to pull the pen toward me for smoother curves. -
Inking the Details:
Trace the internal patterns, eyespots, and lettering carefully. Keep your hand steady on the spirals. -
Erase Sketches:
Wait at least 5 minutes for the ink to fully dry to prevent smudging. Once dry, gently erase all underlying pencil marks.
You now have a crisp, elegant butterfly illustration ready to serve as a calming page in your sketchbook
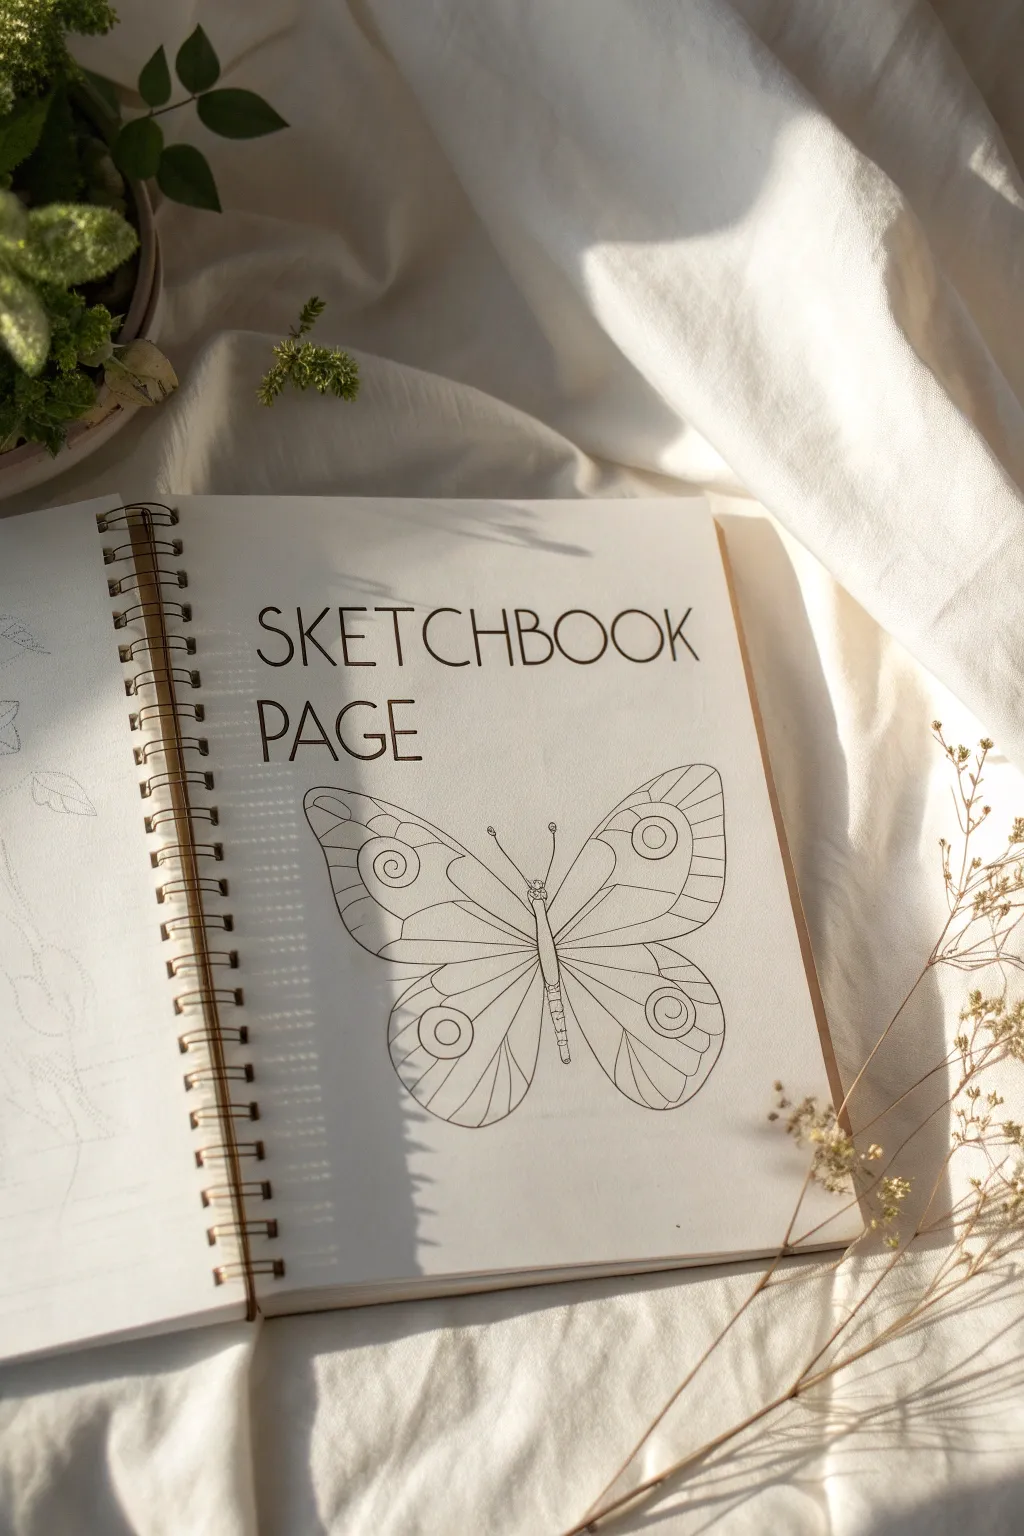
Mandala Butterfly Wings with Repeating Patterns
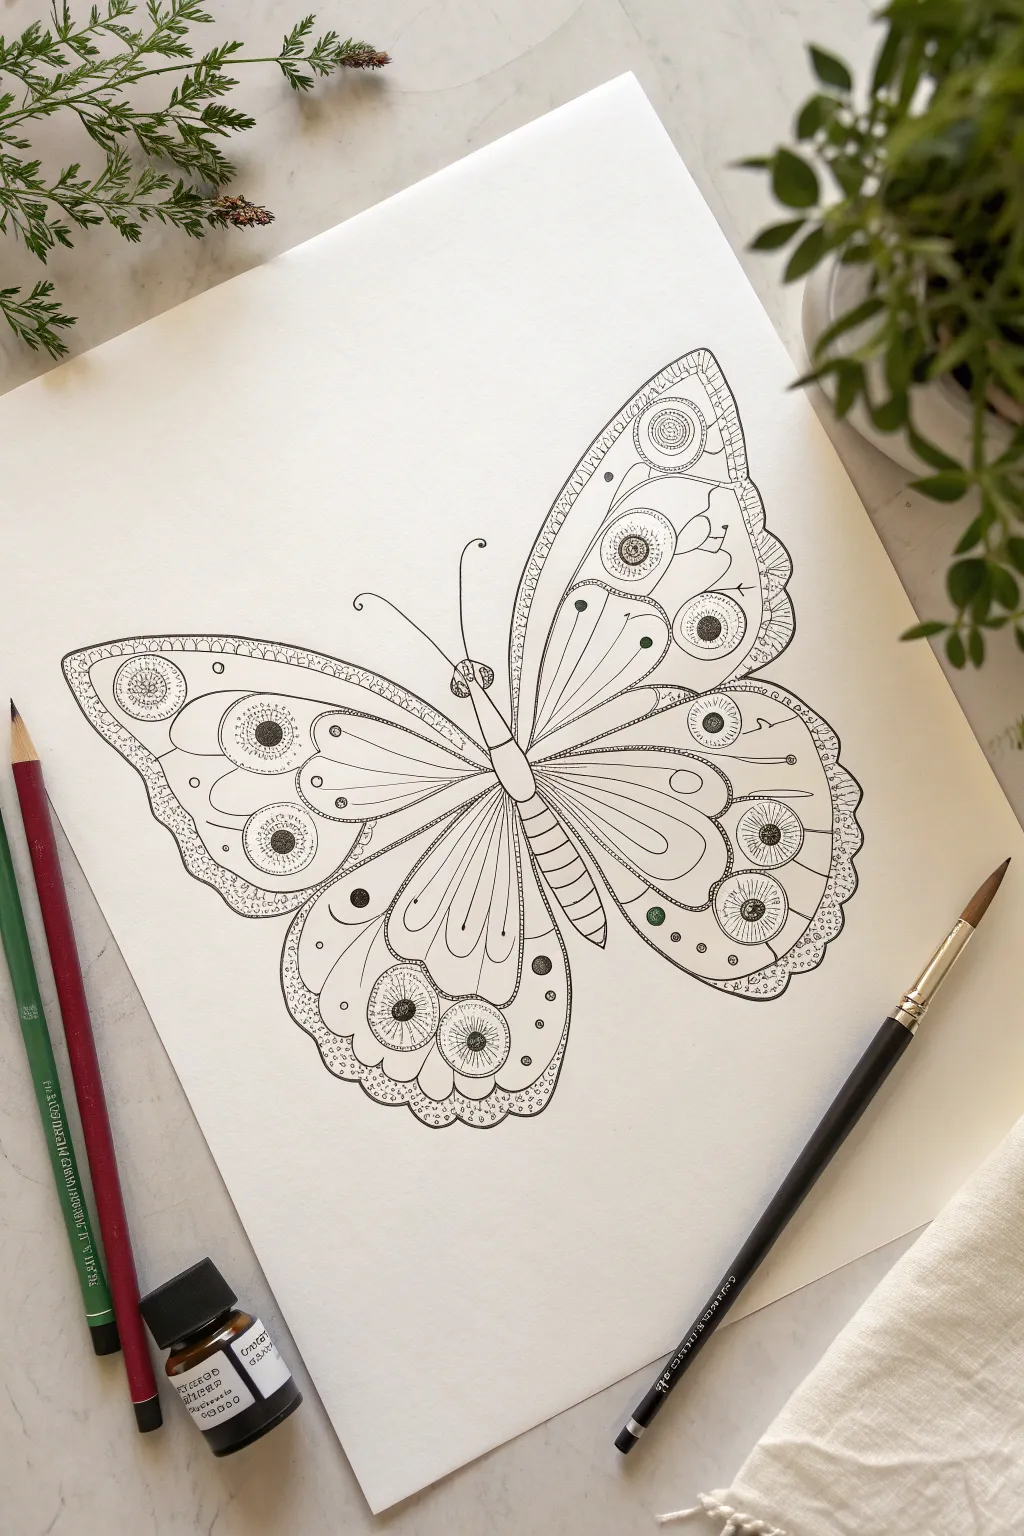
Create a stunningly detailed butterfly illustration featuring intricate mandala-inspired wing patterns. This project combines precise line work with repetitive floral and geometric motifs for a relaxing and meditative drawing experience.
Detailed Instructions
Materials
- High-quality white drawing paper or cardstock (A4 size)
- Fine liner pens (sizes 0.1, 0.3, and 0.5mm) in black
- Pencil (HB or H)
- Eraser
- Ruler (optional for symmetry)
- Circle template or compass (optional)
Step 1: Basic Structure Sketching
-
Establish the central axis:
Start by lightly drawing a diagonal line across your paper to guide the butterfly’s orientation. This helps position the insect as if it’s fluttering upwards rather than sitting stiffly. -
Sketch the body segments:
Draw the butterfly’s body along your guide line. Create a small oval for the head, a slightly longer thorax, and a long, segmented abdomen that tapers at the end. -
Outline the upper wings:
Sketch two large, triangular shapes for the forewings. The top edge should curve gently outward, and the outer tip should be somewhat pointed before sweeping back in towards the body. -
Outline the lower wings:
Draw the hindwings as rounded shapes extending from beneath the forewings. Make these slightly wider and rounder at the bottom to give the butterfly a balanced, classic silhouette. -
Refine the wing shapes:
Go over your rough outlines to create smoother, more organic curves. Add a slight scalloped edge to the bottom of the hindwings for a delicate texture.
Step 2: Detailed Ink Lining
-
Inking the body:
Switch to a 0.5mm pen to ink the main outline of the body. Add horizontal lines across the abdomen to show segmentation, and draw two large eyes on the head. -
Adding antennae:
Draw two long, slender antennae curving outward from the head. Finish each with a tiny spiral or loop at the very tip for a whimsical touch. -
Main wing veins:
Use a 0.3mm pen to draw the primary veins. These should radiate from the thorax (chest area) outward to the edges of the wings, dividing the wings into large sections like a stained glass window. -
Creating the eye-spots:
Inside the larger wing sections, draw several circles. Place prominent ones near the outer edges of both upper and lower wings. These will become the focal points of your mandala patterns.
Pro Tip: Line Weight
Varying your pen pressure is key. Use heavy pressure for the outer wing shapes and whisper-light pressure for the internal mandala details to create instant visual depth.
Step 3: Mandala Pattern Filling
-
Detailing the eye-spots:
Using a 0.1mm pen, fill the circles you just drew. Create concentric rings, shading the center dark (stippling works well here) and adding tiny radiating lines or petals around the center to mimic a flower or eye. -
Adding secondary circles:
Draw smaller circles scattered in the remaining open spaces of the wings. Add a simple dot in the center of each specific small circle to create depth. -
Filling the vein sections:
In the elongated sections created by the veins, add internal lines that echo the shape of the section, leaving a small border. This creates a ‘double line’ effect that adds sophistication. -
Decorating the wing margins:
Along the outer edges of the wings, draw a border strip. Fill this strip with a repetitive pattern, such as tiny fish scales, overlapping arches, or small stippled dots. -
Stippling for texture:
I find that adding texture makes the drawing pop, so use your finest pen to add stippling (tiny dots) at the base of the wings near the body. This gradient of dots adds a shadowed, velvety effect. -
Adding decorative lines:
Draw very fine, curved lines connecting the eye-spots to the veins or other pattern elements. Think of these as thin threads connecting the mandala designs.
Troubleshooting: Smudges
Work from the center outwards if you’re right-handed (or right to left) to avoid dragging your hand through wet ink. Place a scrap piece of paper under your drawing hand as a shield.
Step 4: Final Touches
-
Checking for balance:
Step back and look at the overall symmetry. While nature isn’t perfect, you want the density of the patterns on the left and right wings to feel roughly equal. -
Thickening key lines:
Use the 0.5mm pen to selectively thicken the outer perimeter of the wings and the main structural veins. This line weight variation prevents the drawing from looking flat. -
Erase pencil marks:
Wait until the ink is completely dry—give it a few extra minutes to be safe. Gently erase all underlying pencil sketches to reveal the crisp black and white artwork. -
Optional accent color:
If desired, add very subtle touches of color. A tiny bit of green or gold in the center of the eye-spots can look like jewels, but keeping it black and white is equally striking.
Now you have a beautiful, intricate butterfly illustration ready to be framed or used as a coloring page
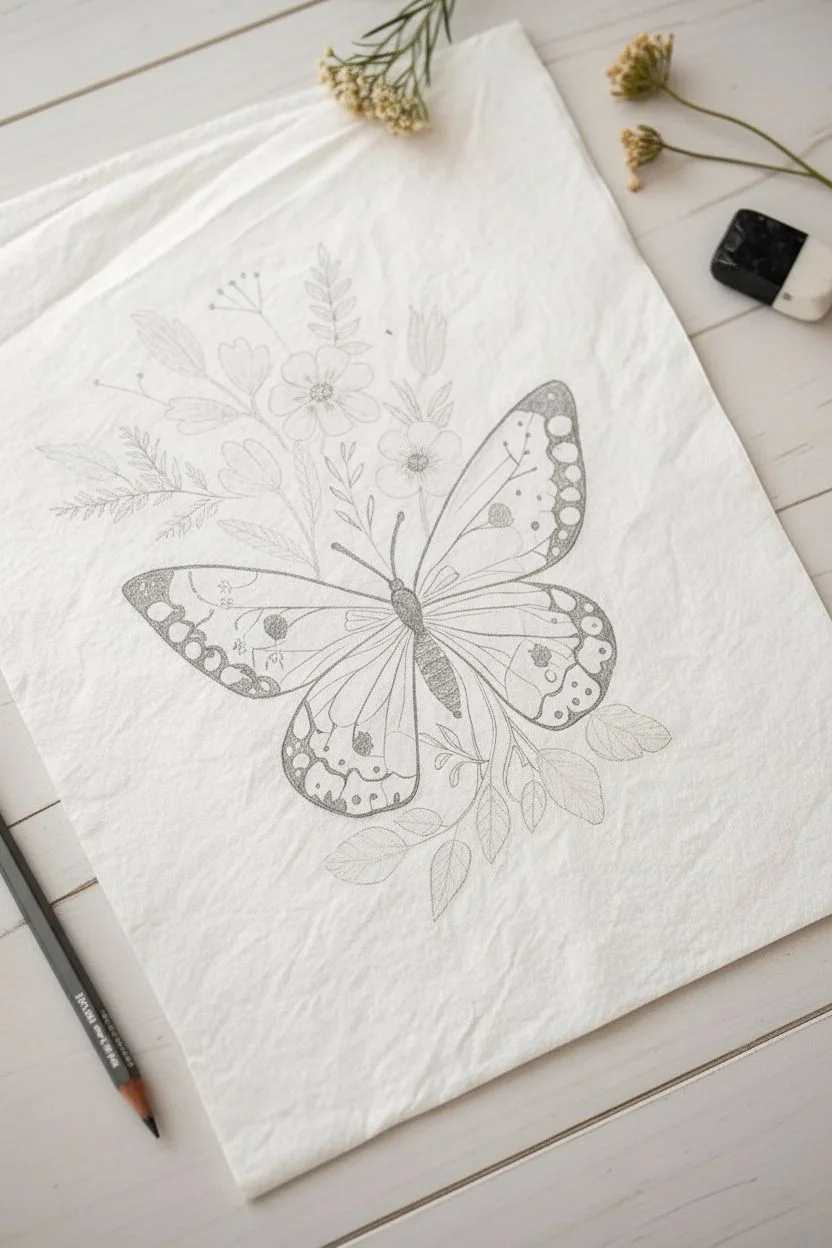
Floral Butterfly Mashup: Wings Filled with Botanicals
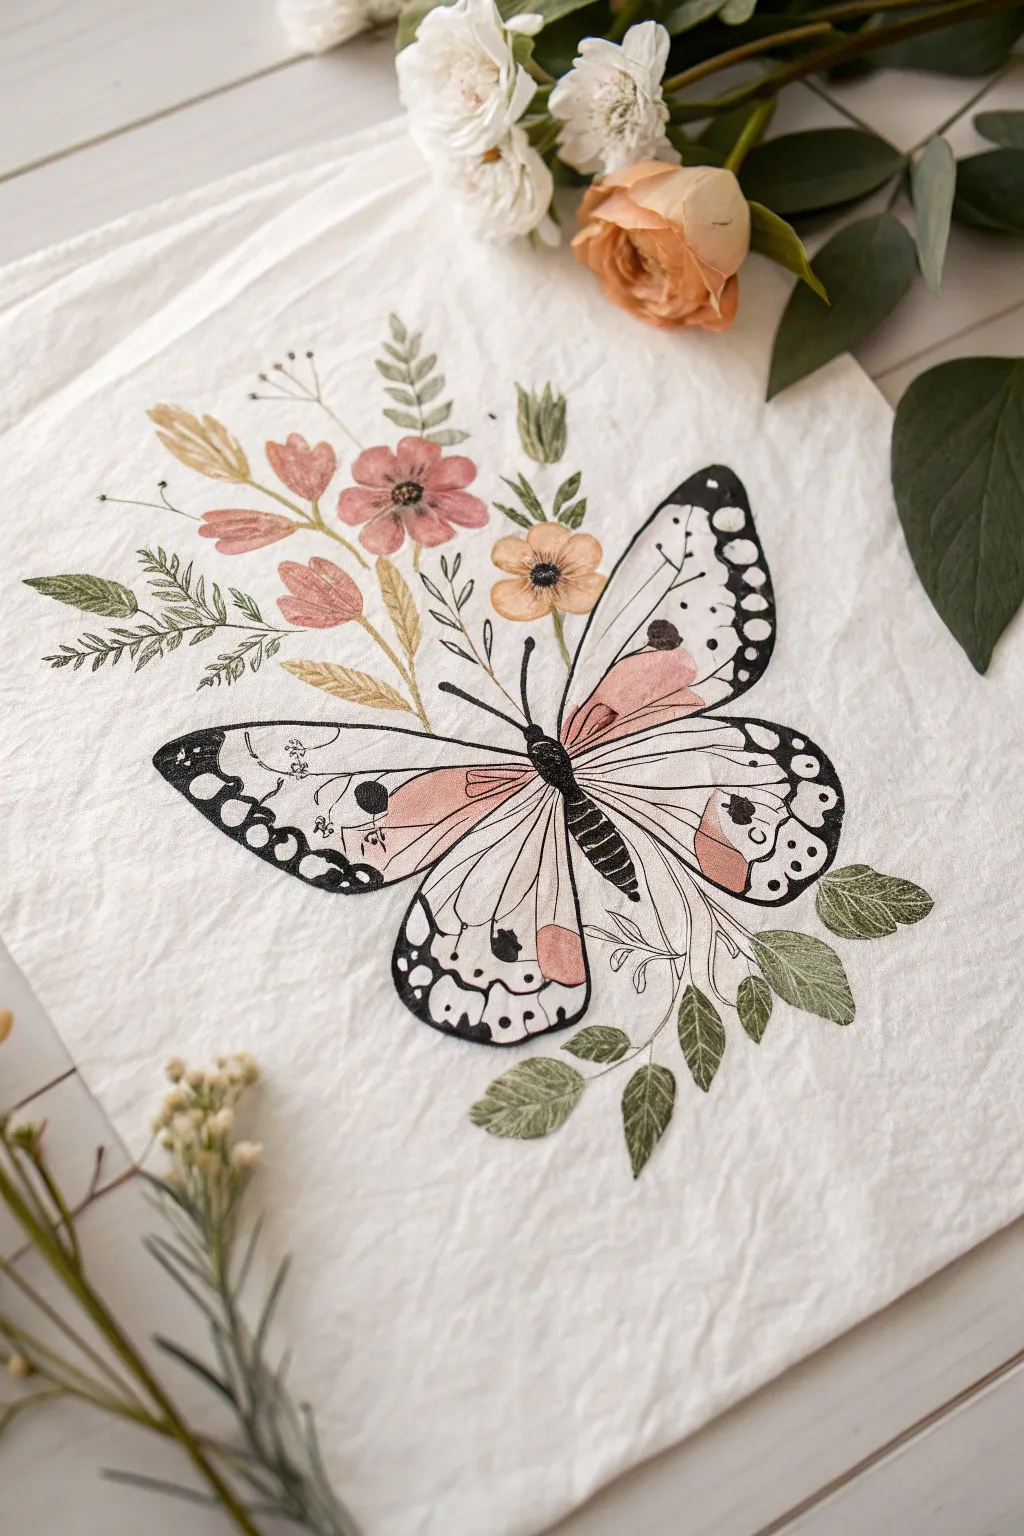
This project combines the delicate line work of ink with soft watercolor washes to create a vintage-inspired butterfly surrounded by wildflowers. The textured paper background adds a rustic charm, making the botanical elements feel like a pressed flower arrangement brought to life.
How-To Guide
Materials
- Cold-press watercolor paper or textured handmade paper (heavyweight)
- Black waterproof fine liner pens (0.1mm, 0.3mm, 0.5mm)
- Watercolor paint set (focus on dusty pink, warm beige, sap green, olive green, ochre)
- Small round brushes (size 0, 2, and 4)
- Graphite pencil (HB or 2H)
- Kneadable eraser
- Paper towels
- Clean water jar
Step 1: Sketching the Composition
-
Outline the butterfly shape:
Start by drawing a faint central line to help with symmetry. Sketch the butterfly’s body in the center, tilting it slightly to the right for a more natural look. Draw the upper wings as triangular shapes with rounded tips, and the lower wings as teardrop shapes. -
Add floral placement:
Lightly sketch the stems and flowers. Position a cluster of blooms emerging from the top left of the butterfly, and trailing leaves coming from the bottom right. Avoid heavy details for now; just mark the positioning. -
Refine the wing patterns:
Inside the wings, sketch the major veins radiating from the body toward the edges. Mark out the scalloped patterns along the wing margins and the circular spots near the tips. -
Detail the botanicals:
Flesh out your floral sketches. Draw simple five-petal flowers for the pink blooms, fan-shaped leaves for the ferns, and teardrop shapes for the larger leaves at the bottom.
Ink Bleed Prevention
Make absolutely sure your pen is labeled ‘waterproof’ or ‘archival.’ Test it on a scrap paper with water before starting your main project.
Step 2: Inking the Framework
-
Ink the main outlines:
Using a 0.3mm waterproof pen, carefully trace over your butterfly outline. Use confident, smooth strokes. Ink the stems and main outlines of the flowers and leaves. -
Add weight to the wings:
Switch to a 0.5mm pen to darken the butterfly’s body and the thick outer edges of the wings. Fill in the black sections along the wing margins, leaving the white spots empty. -
Create fine details:
With your finest 0.1mm pen, draw the delicate veins inside the wings. Use broken or lighter lines near the center to suggest transparency. Add tiny stippling dots on the floral stamens and near the butterfly’s body for texture. -
Erase pencil lines:
Wait at least 10 minutes to ensure the ink is completely dry. Gently use a kneadable eraser to lift off all visible graphite sketches.
Step 3: Applying Watercolor Washes
-
Paint the pink blooms:
Mix a watery, dusty pink color. Using a size 2 brush, fill in the petals of the top flowers and the patches on the butterfly’s wings. Keep the wash transparent so the textures show through. -
Add yellow and ochre accents:
Load your brush with a warm ochre or pale yellow. Paint the center flower near the wing and add touches of this gold tone to the fern-like leaves on the left. -
Greenery base layer:
Mix a light olive green. Paint the leaves at the bottom right and the tiny leaves around the floral cluster. I like to keep this layer quite pale initially. -
Deepen the greens:
Once the first layer is dry, mix a slightly darker sap green. Add a second layer to parts of the leaves to create shadows and vein definition. -
Shade the butterfly body:
Use a very diluted black or grey watercolor wash to add a slight shadow to the right side of the butterfly’s white wing sections, giving them a bit of volume. -
Enhance floral centers:
Dip a size 0 brush into concentrated brown or dark red paint. Dot the centers of the flowers to make them pop against the pale petals.
Fabric Texture Trick
Paint on actual unprimed cotton or linen fabric scraps mounted on cardstock to perfectly replicate the rustic textile look in the photo.
Step 4: Final Touches
-
Reinforce black areas:
Check your inked black areas. If the watercolor has made them look dull, go over the darkest blacks again with your 0.5mm pen. -
Add white highlights (optional):
If you have a white gel pen or white gouache, add tiny highlights to the black body segments or the center of the dark flower eyes for sparkle. -
Flatten the paper:
Since watercolor can buckle paper, once the piece is 100% dry, place it under a heavy book overnight to crisp up the final presentation.
Now you have a stunning piece of botanical art ready to be framed or gifted to a nature lover
Abstract Splash Butterfly: Wet Ink Blow-Out Effect
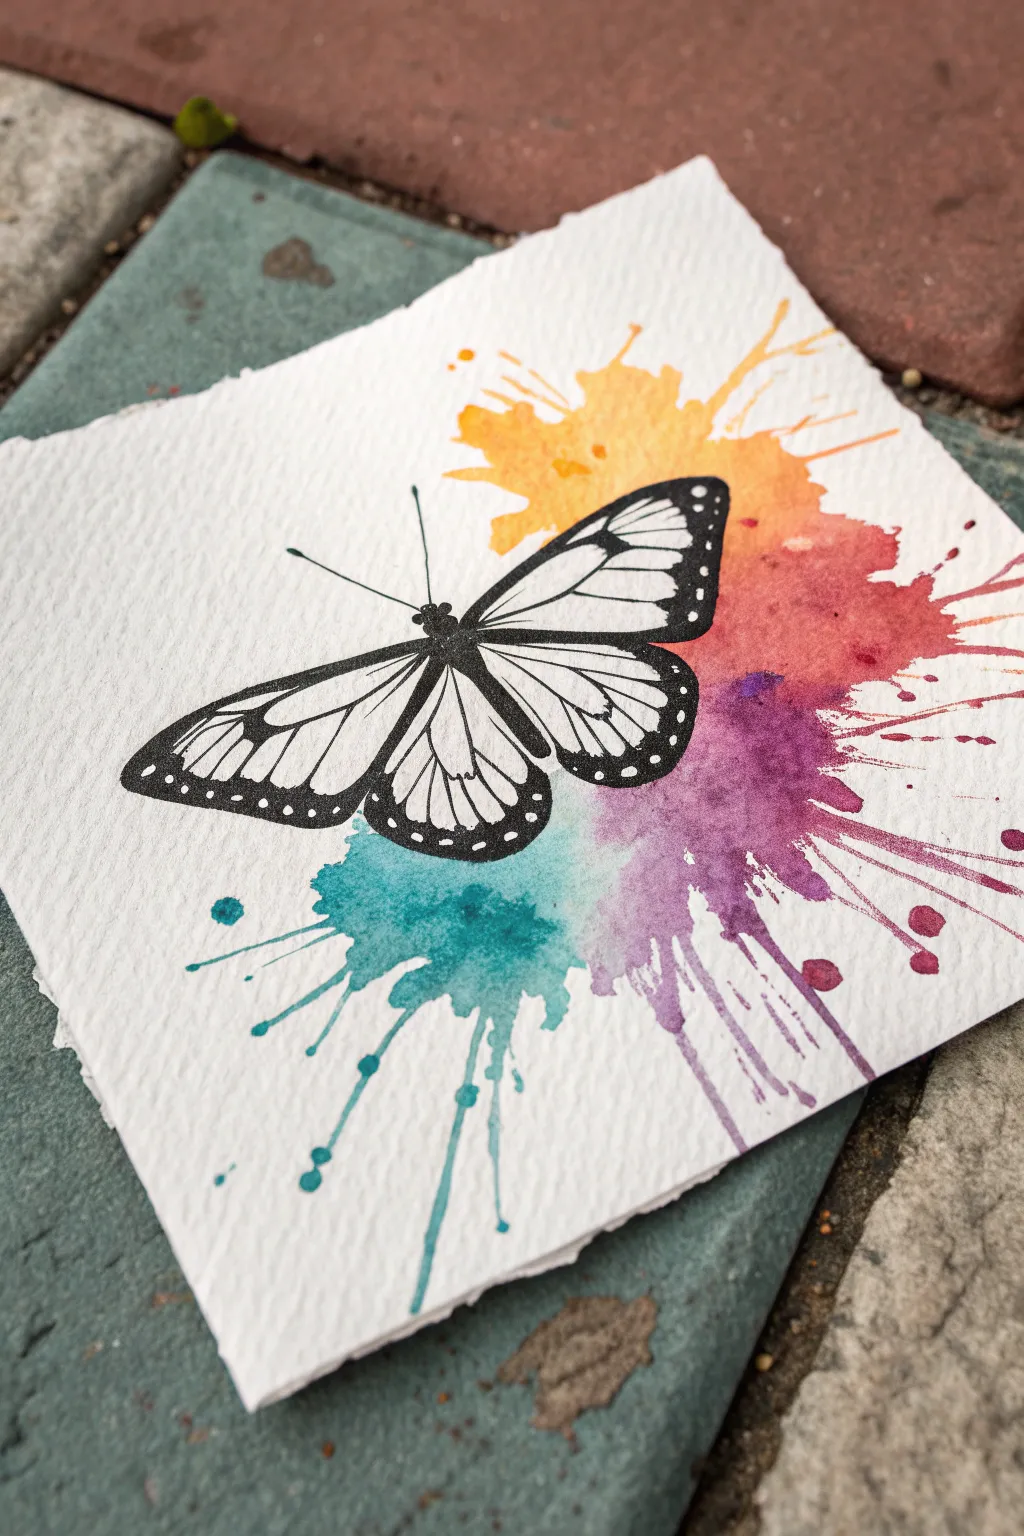
This vibrant project combines the controlled elegance of a line drawing with the spontaneous energy of watercolor splashes. The result is a striking contrast between the crisp black insect and a messy, joyful rainbow explosion.
Step-by-Step Guide
Materials
- Cold press watercolor paper (300 gsm)
- Watercolor paints (Yellow, Orange, Red, Purple, Teal)
- Black waterproof archival ink pen (0.3mm or 0.5mm)
- OR: Black waterproof stamping ink and a butterfly stamp
- Soft round brush (size 6 or 8)
- Drinking straw
- Pencil and eraser
- Paper towels
- Ruler (for tearing paper edges)
Step 1: Preparing the Paper
-
Create the rough edges:
To achieve the rustic, deckled look seen in the photo, you’ll want to tear your paper rather than cut it. Lay a ruler firmly on your watercolor paper sheet to act as a straight guide. -
Tear carefully:
Pull the paper upward against the ruler’s edge slowly. This breaks the fibers unevenly, giving you that lovely textured border. -
Size the canvas:
Repeat this on all four sides until you have a square piece, approximately 5×5 or 6×6 inches.
Pro Tip: Straw Control
For finer splatter lines, hold the straw closer to the paper and blow harder. For softer pools of color, hold the straw higher up and blow gently.
Step 2: Creating the Splash Background
-
Mix your first color:
Load your brush heavily with water and pick up some bright yellow pigment. You want a consistent, puddle-like consistency. -
Drop the puddle:
Place a generous drop of the yellow paint onto the paper where the top right wing will eventually sit. -
Blow the ink:
Use a drinking straw to blow sharply onto the wets puddle, forcing the paint outward to create splatter lines. Aim away from the center of the paper. -
Add orange tones:
While the yellow is still damp, mix up an orange shade. Drop it right next to or slightly overlapping the yellow, then use the straw technique again to blast it outward. -
Transition to red:
Move clockwise around your imaginary center point. Drop a wet puddle of red paint and blow it towards the right edge of the paper. -
Continue the spectrum:
Mix a deep purple watercolor. Place this spot below the red area, ensuring the wet edges touch slightly so the colors bleed together naturally. -
Finish with teal:
Complete the color arc by adding a teal or turquoise puddle at the bottom. Blow this downwards to create the final set of drip lines. -
Add splatters:
Load your brush with clean water or light pigment and tap it against your finger over the painting to add tiny, uncontrolled droplets around the main splashes. -
Let it dry completely:
This is crucial. The paper must be bone dry before you add the black ink, or the lines will feather and ruin the crisp effect. Use a hairdryer if you’re impatient.
Level Up: Metallic Pop
Once the painting is dry, trace over the black wing veins with a clear glitter pen or add touches of gold ink to the splash edges for shimmer.
Step 3: Drawing the Butterfly
-
Outline the body:
Using your waterproof black pen, draw a small, segmented body in the center of the color explosion. It should angle slightly diagonally, leaning left. -
Sketch the upper wing:
Draw the outline of the large top wing. The shape is roughly triangular with rounded corners. I usually anchor this line directly to the thorax. -
Sketch the lower wing:
Draw the bottom wing, which should be slightly more rounded and tear-drop shaped than the top one. -
Mirror the left side:
Repeat lines for the left wings. Since the butterfly is angled, the left wings will appear slightly foreshortened compared to the right. -
Add wing veins:
Draw thin lines radiating from the body outward toward the wing edges to create the vein structure. -
Fill the margins:
Thicken the outer edges of the wings with black ink. Most monarchs or similar butterflies have heavy black borders. -
Add white spots:
If you filled the borders solid black, you can go back later with a white gel pen. Alternatively, carefully draw around tiny circles in the black margins to leave the white paper showing. -
Draw antennae:
Finish the piece with two fine, curved lines extending from the head for the antennae.
Frame your vibrant creation in a floating frame to show off those beautiful torn edges


Have a question or want to share your own experience? I'd love to hear from you in the comments below!