If you’re craving butterfly face paint that feels magical but still doable, you’re in the right place. I pulled together a mix of classic wing layouts and artsy twists so you can pick a look that matches your time, comfort level, and vibe.
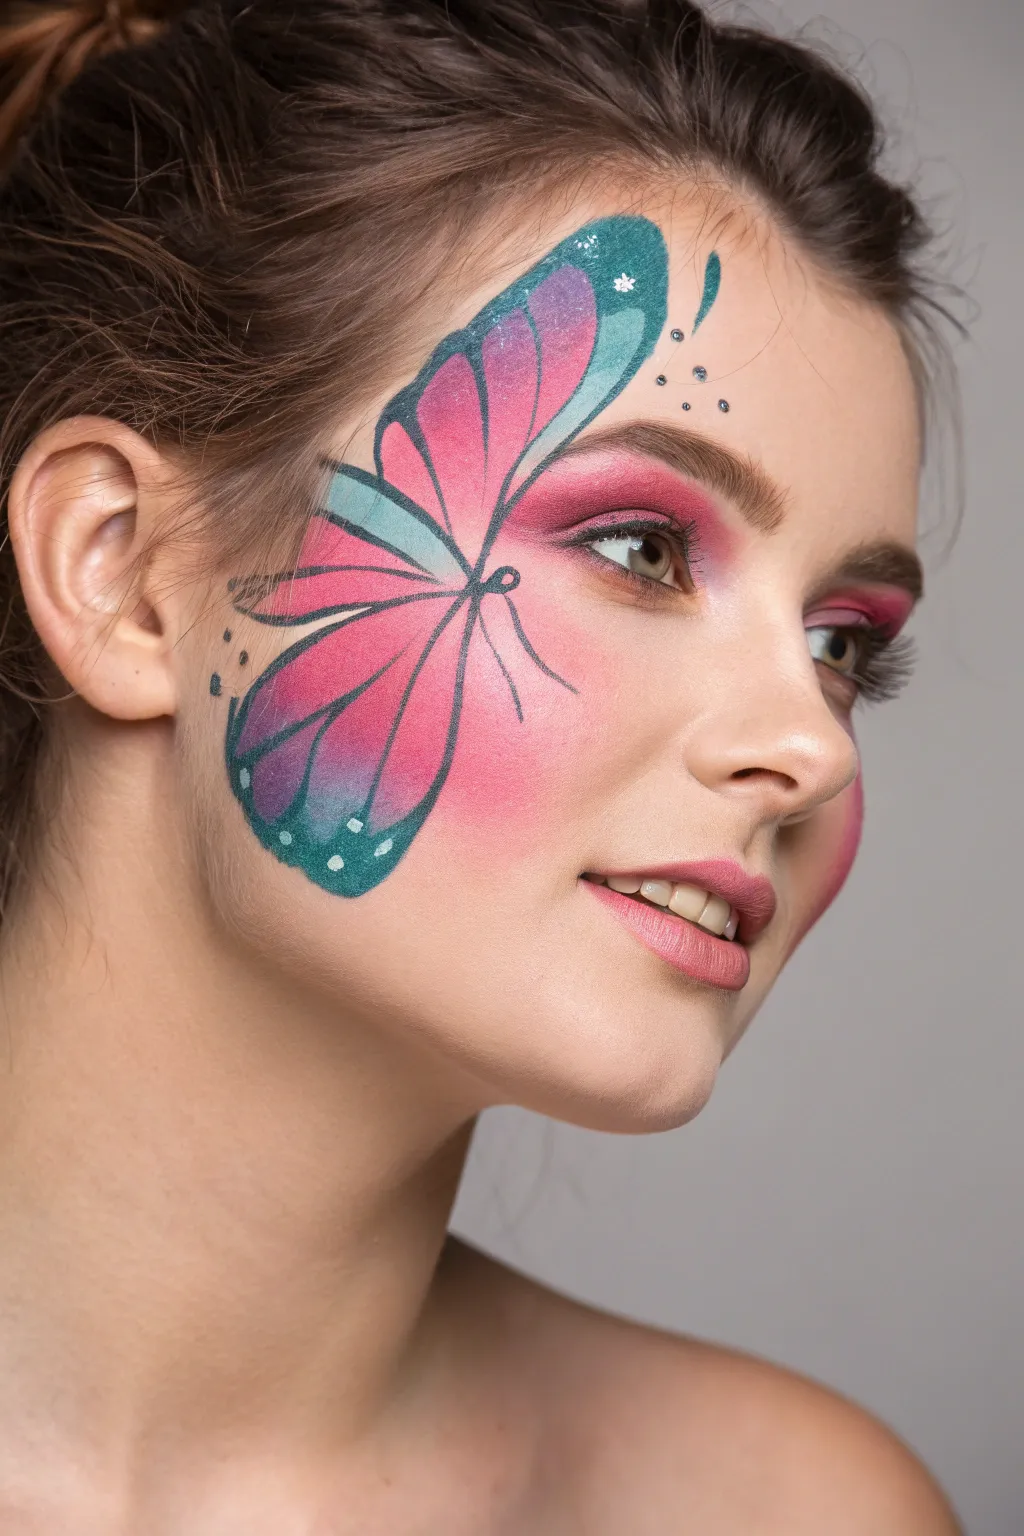
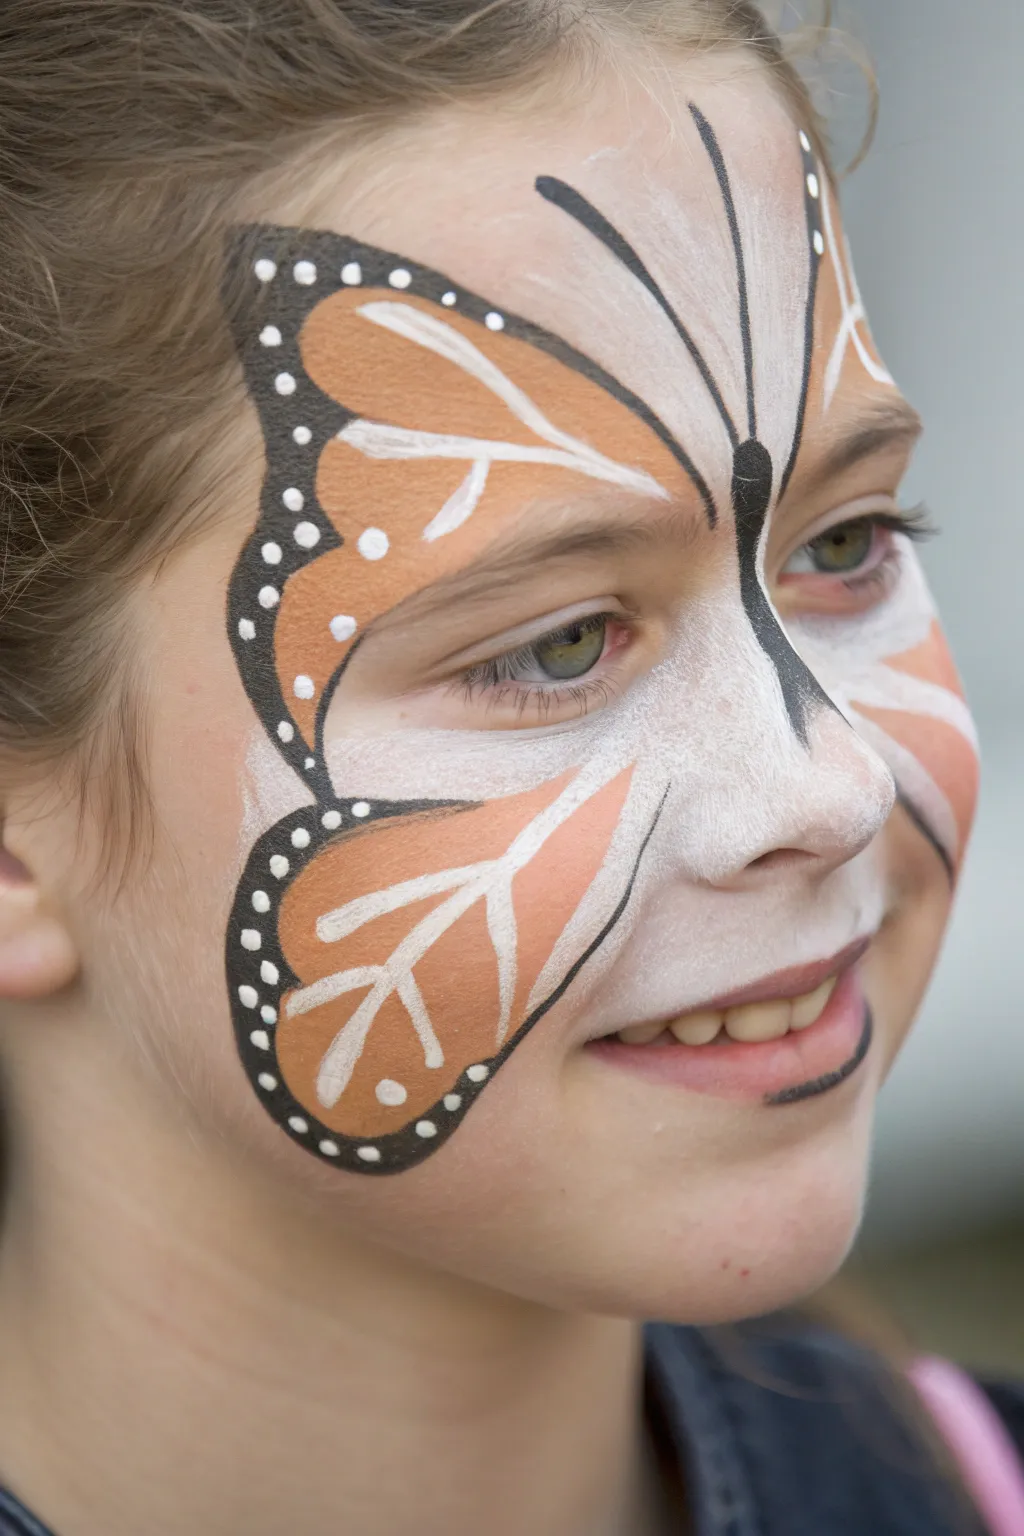
Classic Full-Face Butterfly Mask
This elegant face painting design creates a stunning butterfly mask effect using soft gradients of pink, purple, and blue. It frames the eyes beautifully while adding a touch of magic with delicate white dots and sweeping black lines.
Step-by-Step Guide
Materials
- High-quality face paint palette (specifically: pink, purple, light blue, black, and white)
- Face painting sponges (petal-shaped or wedges)
- Round brush (size 2 or 3) for outlining
- Fine liner brush (size 0 or 1) for details
- Cup of water
- Paper towels
- Cosmetic glitter gel (optional)
Step 1: Creating the Base Wings
-
Sponge the Upper Wings:
Start with your sponge loaded with a gradient of pink (on the wider end) and light purple (on the tip). Press the sponge diagonally above one eyebrow, angling it outward toward the temple to create the top wing shape. -
Add the Lower Wings:
Reload the sponge with pink and purple. Dab a smaller, rounded wing shape on the cheekbone, directly below the outer corner of the eye. Ensure the pink constitutes the main body color. -
Apply the Blue Accent:
Using a clean sponge edge or a small finger dauber, pick up light blue paint. Gently press this over the eyelid and blend it upward into the inner corner of the eyebrow, creating a soft transition where the wing meets the nose. -
Repeat for Symmetry:
Mirror these steps on the other side of the face. Try to keep the wing heights and angles as symmetrical as possible, though perfection isn’t strictly necessary for a natural look.
Step 2: Defining structure
-
Paint the Butterfly Body:
Load a round brush with black paint. Paint the body of the butterfly right down the center of the nose, starting between the eyebrows and ending midway down the bridge. -
Draw the Antennae:
From the top of the body, sweep two long, thin lines curving upward and outward onto the forehead. Add a tiny dot at the end of each antenna for a finished look. -
Outline the Upper Wing:
With the black paint and the round brush, carefully outline the pink/purple shape above the eye. Use varying pressure—press down for thick lines on the curves, lift up for thin tapered ends. -
Outline the Lower Wing:
Continue the outline around the lower wing shape on the cheek. Join this outline to the upper wing at the outer corner of the eye.
Clean Lines Only
If your black lines look shaky or dry, your paint is too thick. Mix a drop more water into the black to get an inky, flowing consistency like liquid eyeliner.
Step 3: Adding texture and details
-
Create Inner Wing Veins:
Switch to a finer brush if needed. Inside the upper wing, paint thin, curved black lines radiating from the corner of the eye outward, mimics the veins of a real butterfly wing. -
Detail the Lower Wing:
Add corresponding vein lines to the lower wing section on the cheek. Keep these lines delicate so they don’t overpower the colorful base. -
Add Decorative Swirls:
Extend the design slightly by painting two small, elegant curved tails coming off the bottom of the lower wing outline. -
Highlight with White Dots:
The magic is in the details. Load a small round brush with white paint. Add a series of dots along the black outer edges of both wings. Vary the sizes—some large, some tiny. -
Paint Floating Accents:
Add a few scattered blue and pink dots floating near the temple and cheek area to soften the edges of the design.
Fairy Dust Finish
Add cosmetic-grade biodegradable glitter to the wet paint on the eyelids for a shimmering effect that catches the light whenever the subject blinks.
Step 4: Final Touches
-
Apply Lipstick:
Finish the look with a coordinating berry or dark pink lipstick that matches the wing colors. -
Optional Glitter:
If you want extra sparkle, dab a tiny amount of glitter gel on the center of the eyelids or the tips of the wings.
Now step back and admire the lovely, symmetrical mask you have created


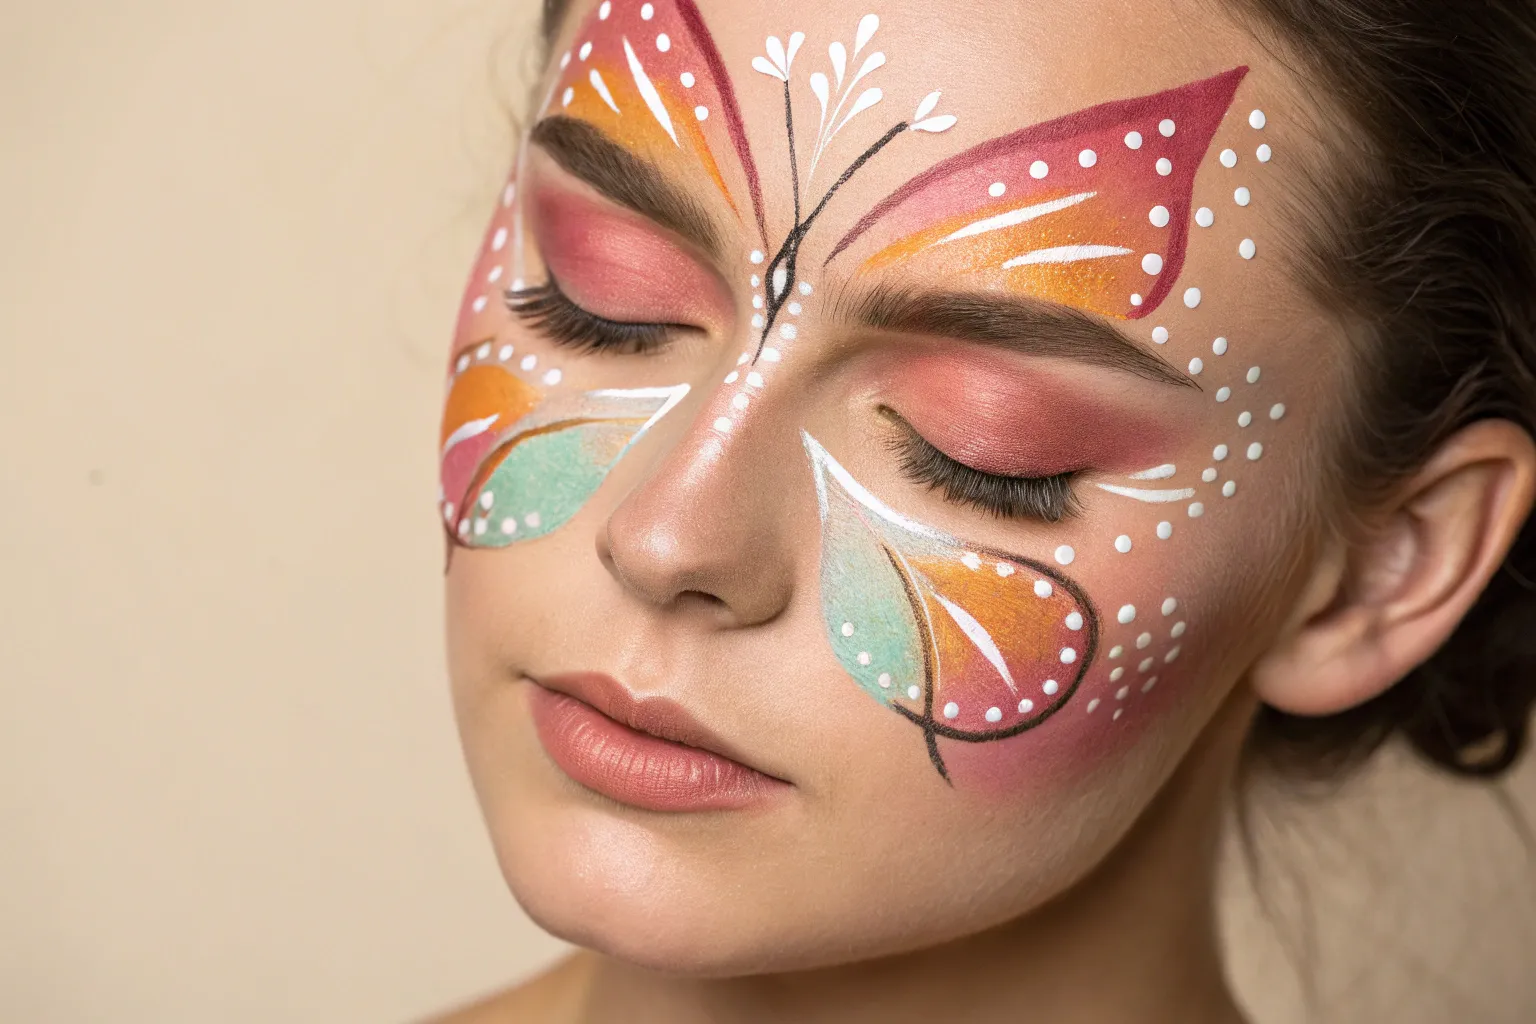
Soft Pastel Fairy Butterfly
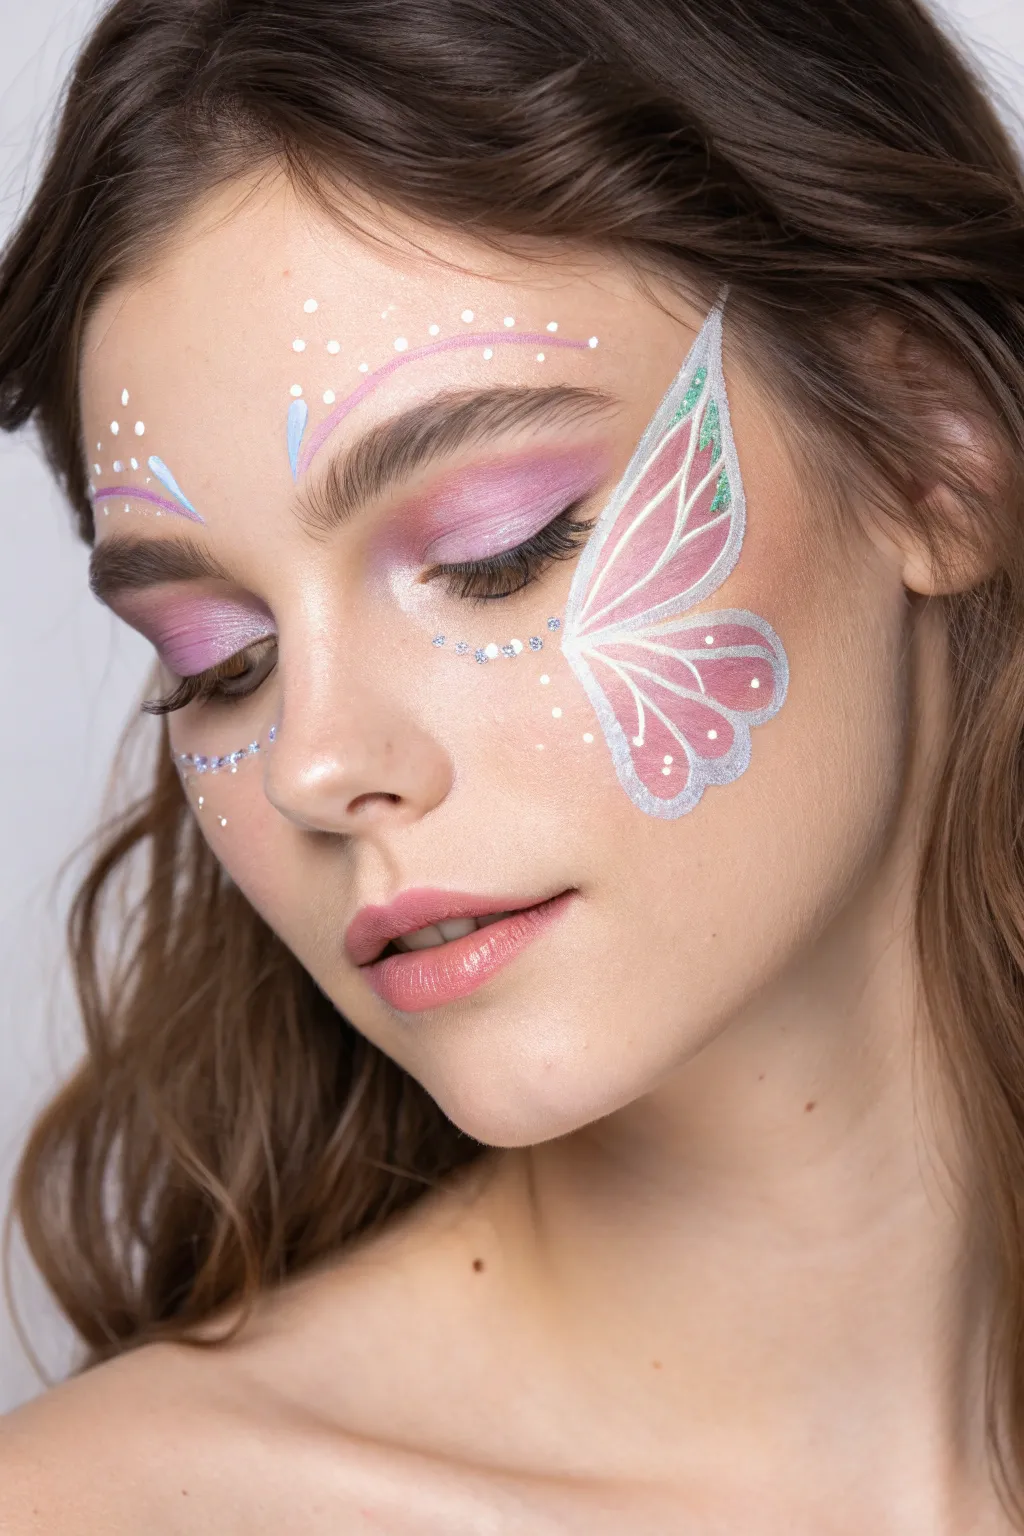
This delicate face paint design captures the whimsy of a fairy garden with a single, sweeping butterfly wing in soft pinks and whites. The look is completed with dreamy eyeshadow and scattered dots that mimic morning dew, perfect for an elegant costume or festival style.
Detailed Instructions
Materials
- Face primer
- Matte foundation or concealer
- Eyeshadow palette (soft pink, mauve, shimmer white)
- Fluffy blending brush
- Flat shader brush
- White face paint (water-activated)
- Light blue face paint (water-activated)
- Fine liner brush (size 0 or 1)
- Medium round brush (size 4)
- Cosmetic glitter gel (silver or iridescent)
- Setting spray
Step 1: Base and Eyeshadow
-
Prep the canvas:
Begin with a clean, moisturized face. Apply your standard primer and a light layer of foundation or concealer to even out the skin tone, creating a flawless base for the artwork. -
Apply base color:
Using a fluffy blending brush, sweep a soft matte pink eyeshadow across the entire eyelid. Blend it upwards past the crease, diffusing the edges softly towards the brow bone. -
Deepen the crease:
Dip into a slightly deeper mauve or berry shade. Concentrate this color on the outer corner of the eye and the crease to add dimension, blending seamlessly into the lighter pink. -
Highlight the inner corner:
Apply a shimmering white or pale pearl eyeshadow to the inner corner of the eye (the tear duct area) to open up the gaze and add a touch of brightness. -
Soft lower lash line:
Run a small amount of the pink shadow along the lower lash line using a smaller brush, keeping it smoky and soft rather than a harsh line.
Smooth Linework Pro-Tip
For the crispest white lines, ensure your paint has an ‘inky’ consistency—like melted ice cream. If the paint is too dry, lines will crack; too wet, and they will drip.
Step 2: Painting the Butterfly Wing
-
Outline the upper wing shape:
Load a fine liner brush with white face paint. Starting at the outer corner of the eye, draw a curved line extending upwards and outwards towards the temple, creating the top edge of the wing. -
Define the lower wing shape:
From the same starting point near the eye, draw a second curved line sweeping down onto the cheekbone. Connect these lines with a scalloped edge on the outside to form the basic wing silhouette. -
Fill with color:
Clean your brush or switch to a slightly larger round brush. Mix a drop of water with pink face paint (or use a wet brush with pink eyeshadow) to create a sheer wash. Fill inside the white outline, leaving a small gap near the white lines. -
Draw the veins:
Reload the fine liner brush with creamy white paint. Draw thin, delicate veins radiating from the inner point (near the eye) outward toward the scalloped edges of the wing. -
Thicken the outline:
Go over the main outer perimeter of the wing again with the white paint. I like to make the line slightly thicker at the curves to give it a more organic, illustrative feel. -
Add wing details:
Inside the pink sections, add tiny white teardrop shapes near the scalloped edge to mimic the patterns found on real butterfly wings.
Step 3: Decorative Accents
-
Forehead accents:
Above the opposite eyebrow (the one without the wing), paint a few gentle, curved strokes in pale pink and white to balance the design. -
Add pastel blue touches:
Using a very pale blue face paint, add small teardrop shapes near the forehead strokes and subtly at the tip of the butterfly wing for a cool-toned contrast. -
Create dotted trails:
Using the back of your brush handle or a dotting tool dipped in white, create a trail of dots arching over the eyebrows. Vary the size from large to microscopic for a magical effect. -
Under-eye decoration:
Under the eye opposite the wing, paint a small curved chain of blue and white dots mimics a piece of delicate jewelry draping down the cheek. -
Apply glitter accents:
Dab a tiny amount of cosmetic glitter gel on the tips of the butterfly wing and along the dotted trails. Focus on the high points where light would naturally hit. -
Final touches:
Check for symmetry and balance. Add a coat of mascara to the lashes to frame the eyes without overpowering the delicate paint work.
Level Up: 3D Effect
Use a tiny bit of darker pink eyeshadow to shade *underneath* the white wing outline on the skin. This creates a drop shadow that makes the wing look like it’s hovering.
Mist your face lightly with setting spray to lock in your beautiful new fairy persona for hours of wear


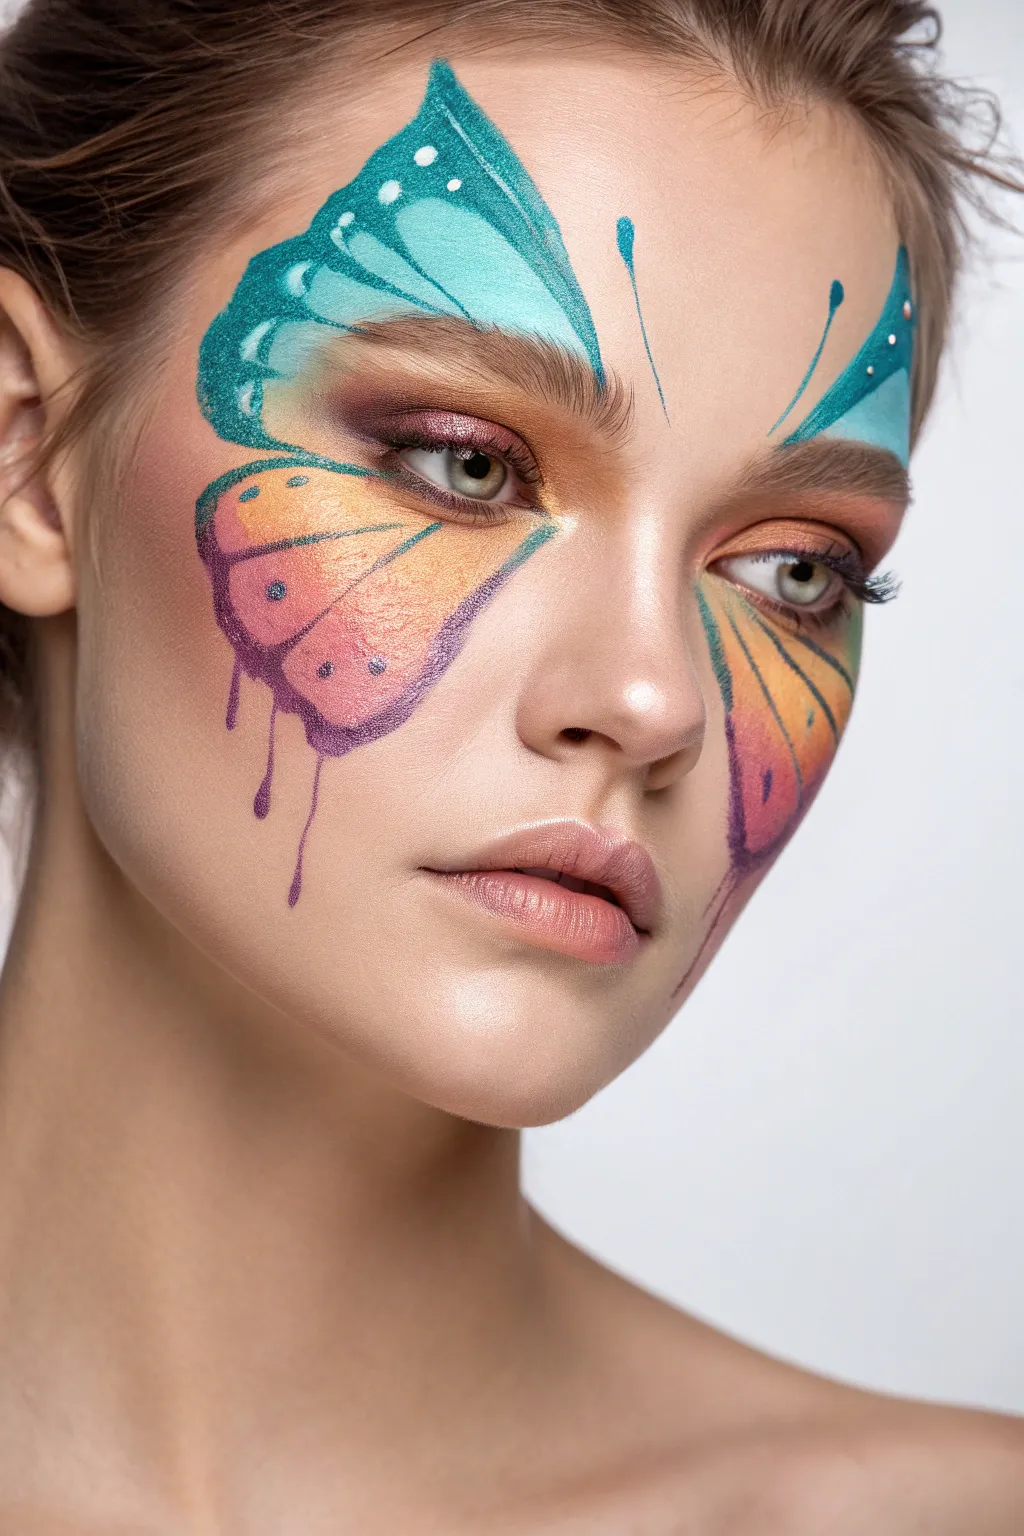
Rainbow Ombre Butterfly Wings
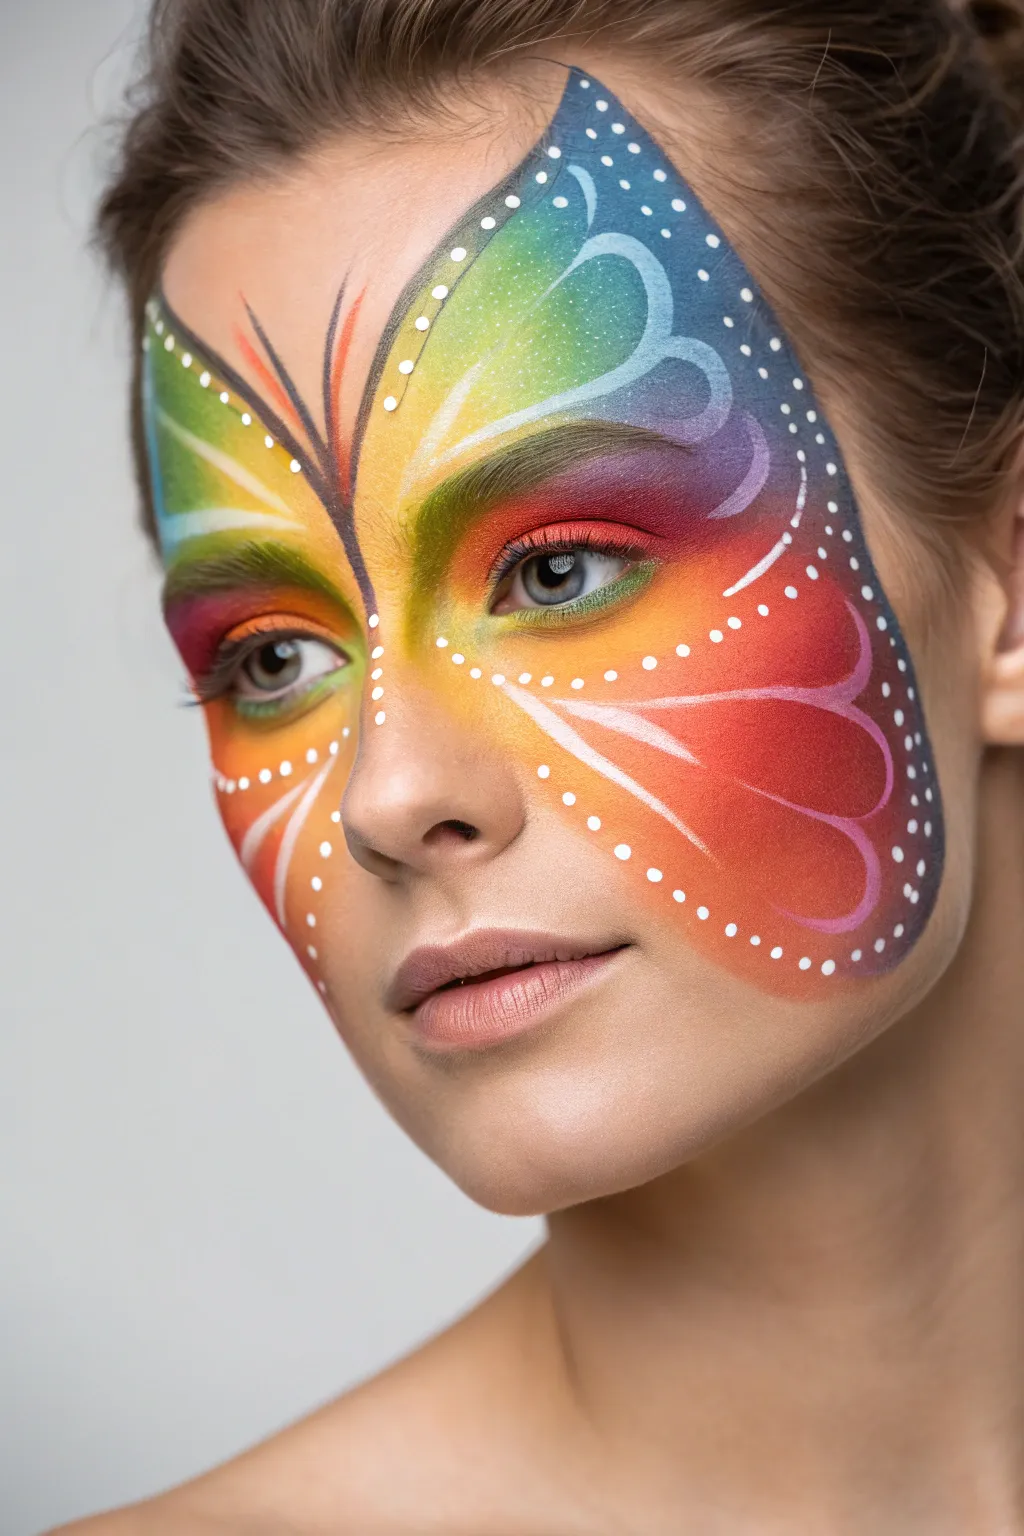

Transform a face into a stunning work of art with this vibrant butterfly design that seamlessly blends the entire spectrum of the rainbow. Featuring bold, sweeping wing shapes and delicate white detailing, this look captures the ethereal beauty of fluttering wings with professional flair.
Step-by-Step
Materials
- High-density face paint palette (neon or standard rainbow colors: green, yellow, orange, red, purple, dark blue)
- White face paint (highly opaque)
- Black or very dark grey face paint for outlining
- Flat brush (3/4 inch or 1 inch for base gradients)
- Small round brush (#2 or #3 for details)
- High-density sponge or blending sponge
- Setting spray (optional)
- Cosmetic glitter gel (optional)
- Bowl of water
- Paper towels
Step 1: Creating the Ombre Base
-
Prime the Eyelids:
Start by loading a sponge or small flat brush with bright yellow face paint. Pat this color onto the inner corner of the eye and the bridge of the nose, acting as the bright center of the butterfly body. -
Blend the Upper Wing Gradient:
Using a wide flat brush, load a gradient of yellow, green, and blue. Paint a large, sweeping curve starting from the inner eyebrow, arching high over the forehead, and curving down towards the temple. Ensure the yellow side faces the nose and the blue faces the hairline. -
Apply the Lower Wing Gradient:
Switch colors on your flat brush to a warm spectrum: yellow, orange, and red. Paint a second sweeping teardrop shape starting under the eye, curving down the cheek, and flicking slightly upward towards the ear. -
Connect the Colors:
Use a clean, slightly damp sponge to gently tap the area where the upper and lower wings meet at the outer corner of the eye. You want the transition from the green/blue section to the red/orange section to feel seamless, creating a full spectrum effect. -
Deepen the Inner Eye:
For added depth, blend a small amount of reddish-purple paint into the crease of the eyelid and the outer corner of the eye, smoothing it into the orange paint on the cheekbone.
Muddy Colors?
If your rainbow gradient turns brown where colors meet, wait for the first color to dry completely before applying the next one nearby, or wash your brush more frequently between color swaps.
Step 2: Defining the Shape
-
Outline the Central Body:
Load a #2 round brush with dark grey or black paint. Draw the butterfly’s body right down the center of the nose bridge. Keep lines thin at the bottom and slightly thicker as they move up between the eyebrows. -
Create Antennae:
From the top of the central body, flick two long, sweeping lines upward onto the forehead. These should curve outward gracefully to mimic antennae. -
Border the Wings:
Using the same dark paint and round brush, outline the outer edges of your colorful gradient shapes. Vary your pressure to create a line that goes from thick to thin, giving the wings an organic feel. -
Add Inner Veins:
Draw teardrop or scallop shapes inside the main wings. Start these lines from the dark outer border and curve them inward toward the eye, dividing the gradient into distinct wing sections. -
Soften the Edges:
If the dark outlines look too harsh, you can use a barely damp brush to feather the inner edge of the black line slightly into the color, creating a smoky, shadowed effect.
Step 3: Adding Highlights and Magic
-
Outline Inner Sections:
Clean your round brush thoroughly and load it with opaque white paint. Draw thin, crisp lines right next to your black inner vein lines to make the sections pop. -
Create Reflection Points:
Paint small white accent curves inside the top of the upper wing and the curve of the lower wing. These mimic light reflecting off the wing’s surface. -
Dot the Perimeter:
This is my favorite step for bringing the look together. Using the tip of your brush or a dotting tool, apply a series of white dots along the dark outer border of the wings. Vary the size—larger dots near the top, getting smaller as you go down. -
Add Bridge Detail:
Place a few tiny white dots vertically down the center of the nose, right on top of the butterfly body, to add dimension. -
Final Eye Accents:
Add a few delicate white dots under the eye area, following the curve of the lower wing, to brighten the expression. -
Set the Look:
Once the paint is fully dry, lightly mist with a setting spray if you need the design to last all day.
Glitter Glam
Before the paint dries completely, tap cosmetic-grade holographic glitter onto the wettest parts of the gradient (like the eyelids) for a shimmering, magical finish.
Now you have a vibrant, show-stopping butterfly design ready for any festival or costume party


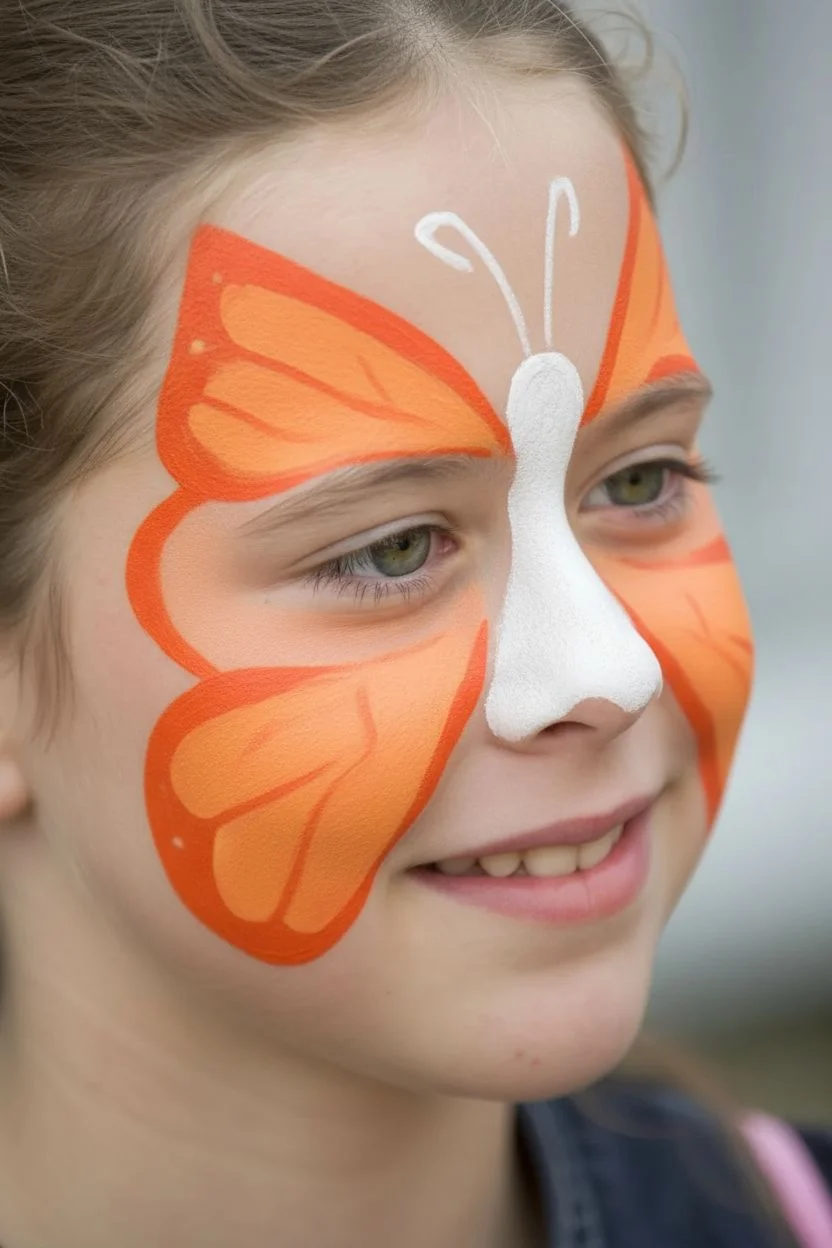
Quick Cheek Butterfly for Little Wigglers
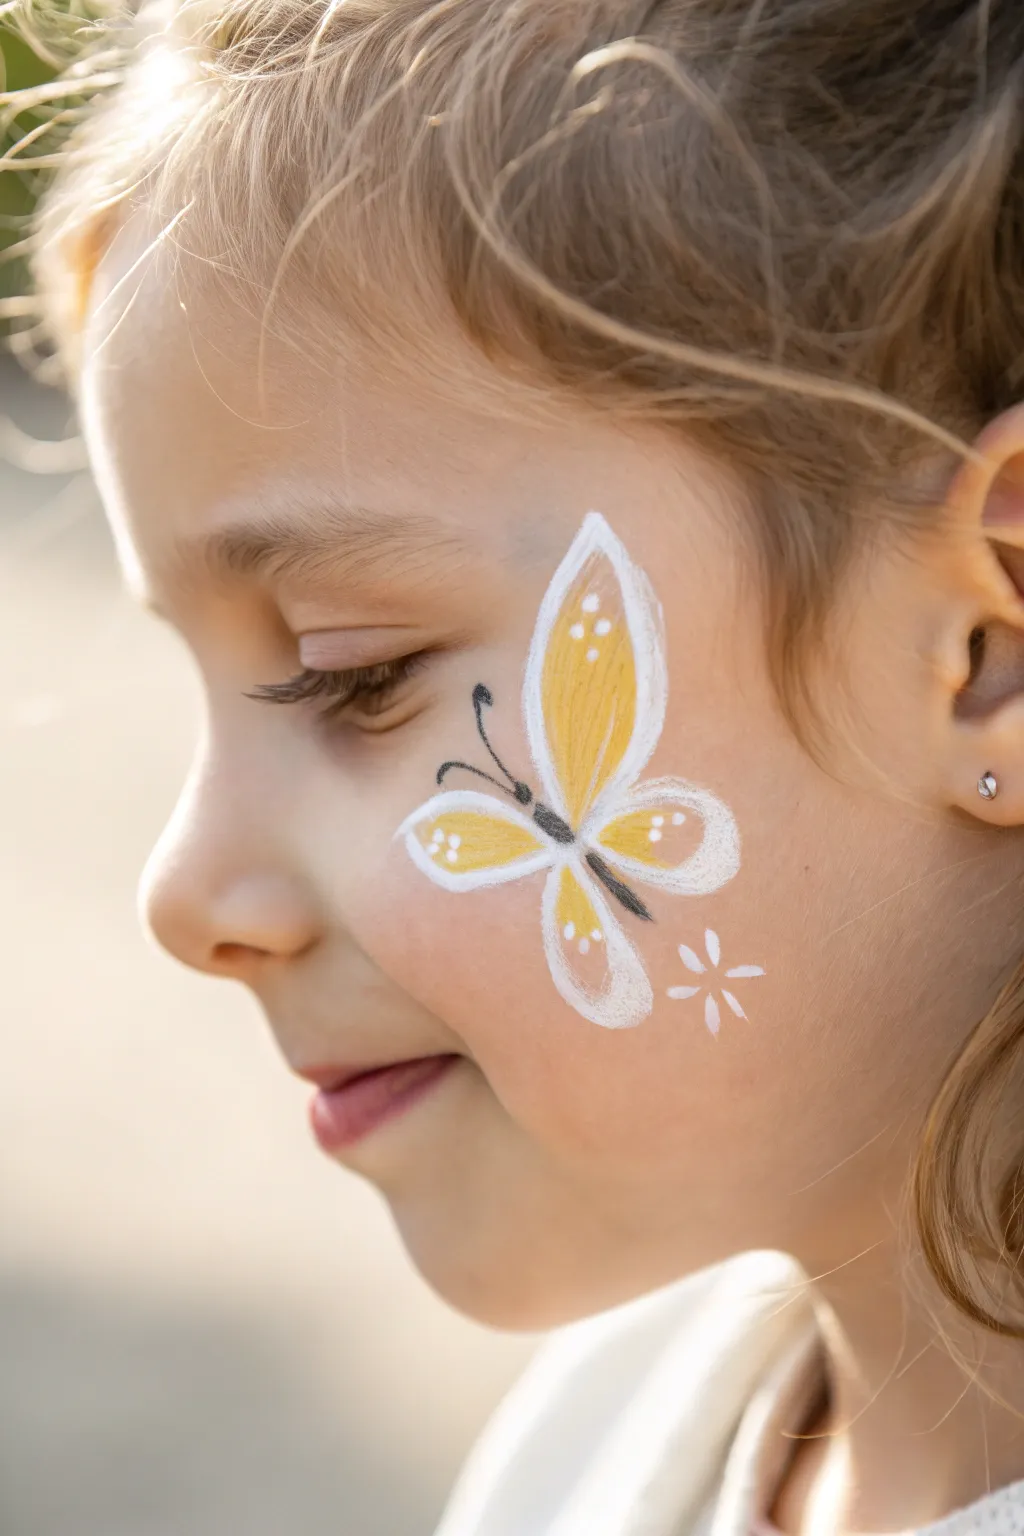
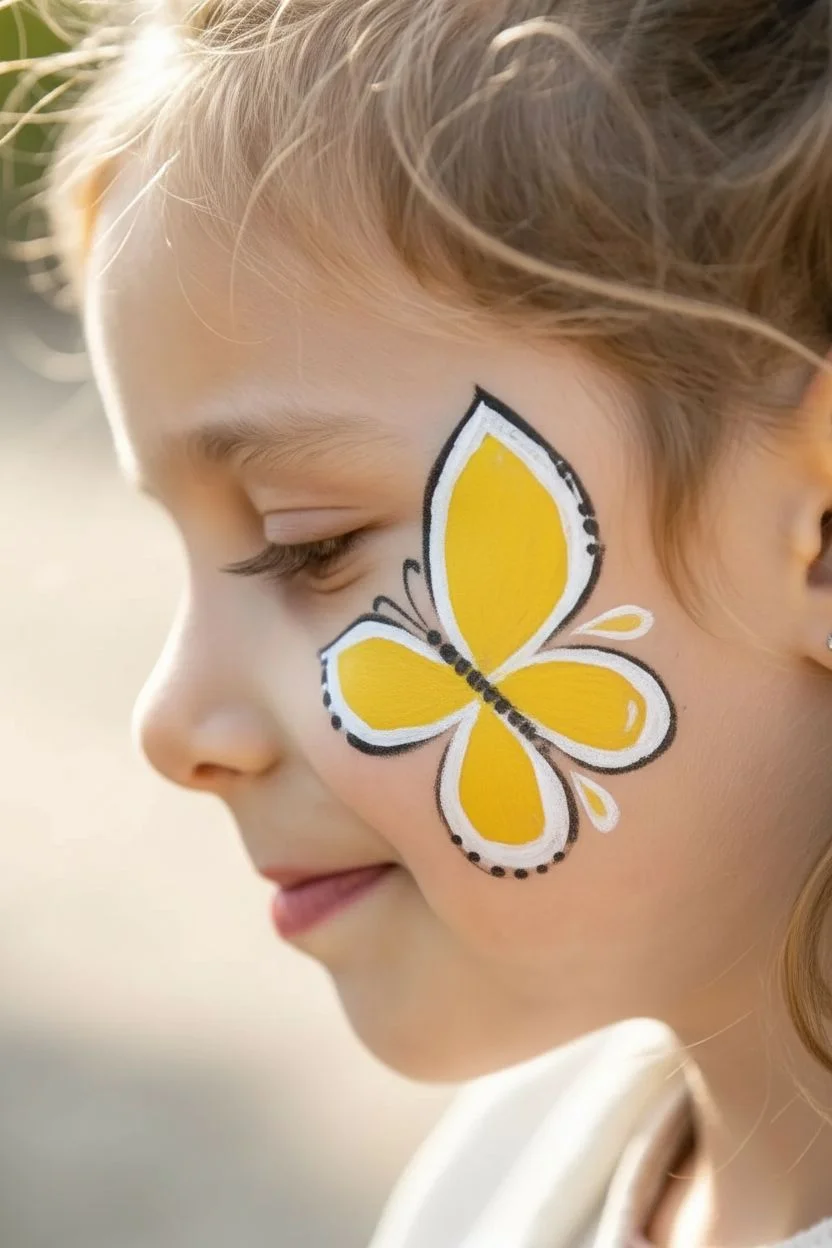
Perfect for energetic little ones who can’t sit still for long, this simple yet elegant cheek design captures the essence of a butterfly without needing a full-face mask. Its soft yellow hues and delicate white highlights create a sunny, cheerful look that pairs beautifully with any summer outfit.
Step-by-Step Tutorial
Materials
- Face paint (yellow, white, black)
- Small round brush (size 2 or 3)
- Fine liner brush (size 0 or 1)
- Cup of water
- Paper towel or sponge
- Cosmetic glitter (optional)
Step 1: Painting the Wings
-
Load your brush:
Start by wetting your small round brush and loading it generously with bright yellow face paint. You want a creamy consistency, not too watery. -
Create the upper wing:
Visualize a teardrop shape on the upper cheekbone, angled towards the outer eye. Press the brush down to create the wide top of the wing, then drag and lift it towards the nose to form the point. -
Add the lower wing:
Using the same yellow paint, create a smaller, slightly rounder teardrop shape directly below the first one. -
Form the back wings:
Repeat the process to make two smaller, thinner teardrop shapes behind the first two, creating the butterfly’s rear wings. -
Outline with white:
Clean your brush thoroughly and load it with white paint. Carefully outline the outer curves of all four yellow wing sections. -
Soft blending:
While the paint is still damp, I like to gently feather the white outline inward slightly to blend it with the yellow, creating a softer transition.
Wobbly Lines?
If your child moves and a line goes astray, don’t wipe it! Wait for it to dry completely, then use a damp Q-tip to gently erase just the mistake.
Step 2: Adding Details
-
Switch brushes:
Pick up your fine liner brush for the delicate work. Load it with black paint, ensuring the bristles form a sharp point. -
Paint the body:
In the center where the wings meet, paint a small, elongated oval for the butterfly’s body. -
Add the head:
Place a tiny dot of black paint at the top of the body for the head. -
Draw antennae:
With a very light hand, sweep two thin, curved lines extending from the head. finish them with tiny curls or dots. -
Detail the wings:
Using the white paint again on the fine liner brush, add small sets of three dots inside the upper and lower wing sections for texture. -
Add a flower accent:
Paint a simple white asterisk shape or starburst below the butterfly to act as a stylized flower or sparkle. -
Final highlights:
Add a few more tiny white dots around the flower shape to fill in empty space and add whimsy. -
Optional sparkle:
If desired, dab a tiny bit of cosmetic glitter onto the wet yellow paint or the center of the flower for extra shine.
Color Pop
Swap the yellow for an ombré effect! Load your brush with pink and tip it in purple before painting the petals for a multi-colored wing.
This quick and charming design is sure to bring a smile to their face without taking up their whole afternoon
BRUSH GUIDE
The Right Brush for Every Stroke
From clean lines to bold texture — master brush choice, stroke control, and essential techniques.
Explore the Full Guide
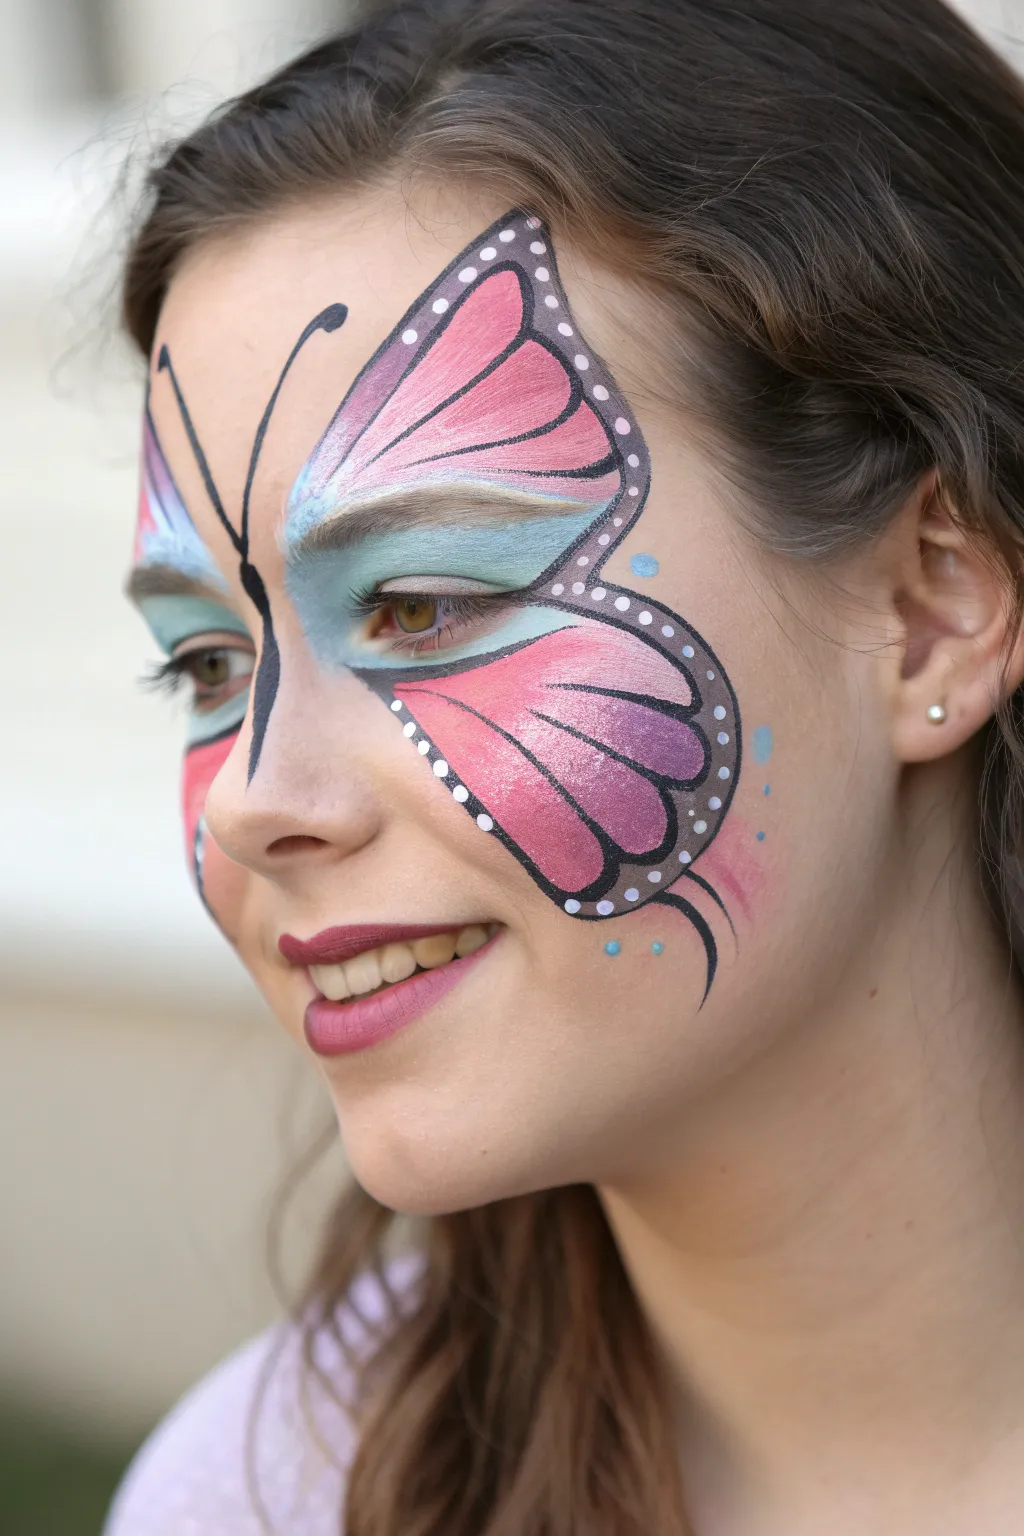
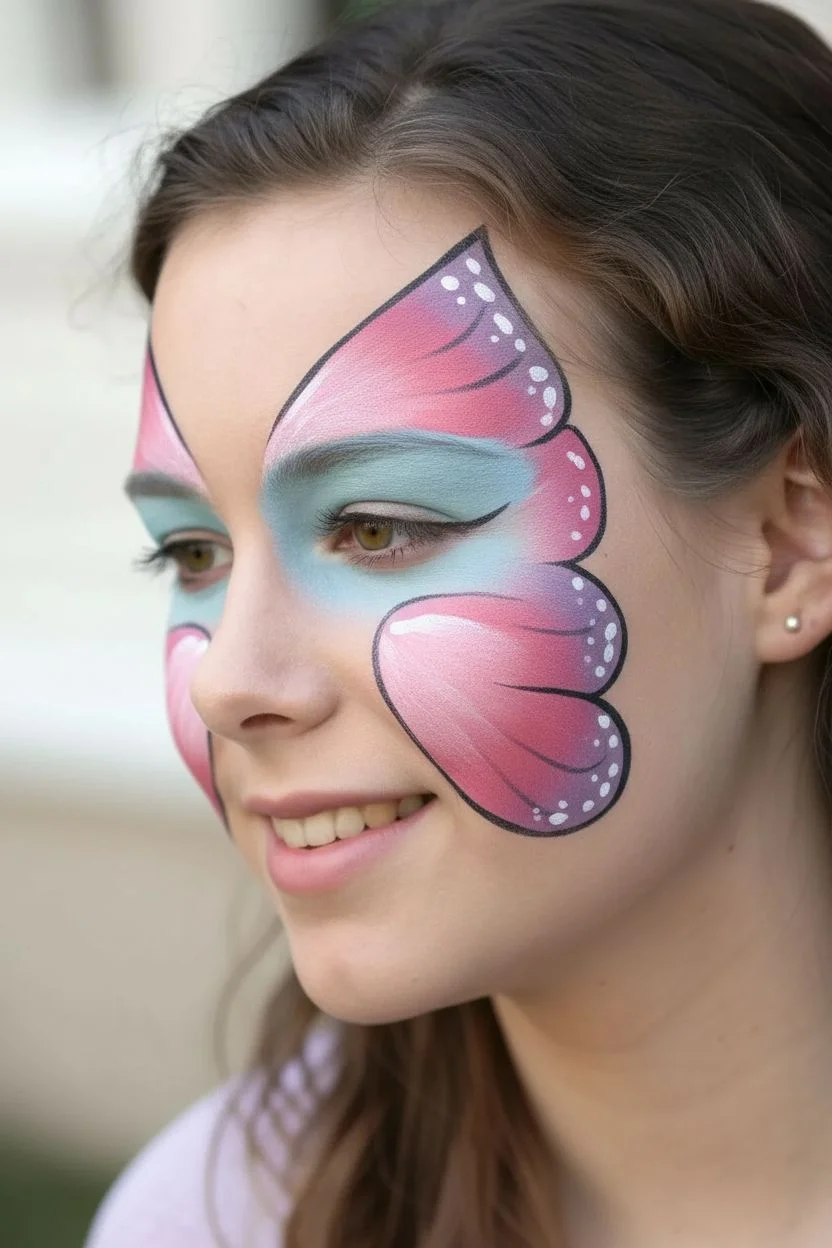
Half-Face Side Butterfly Sweep
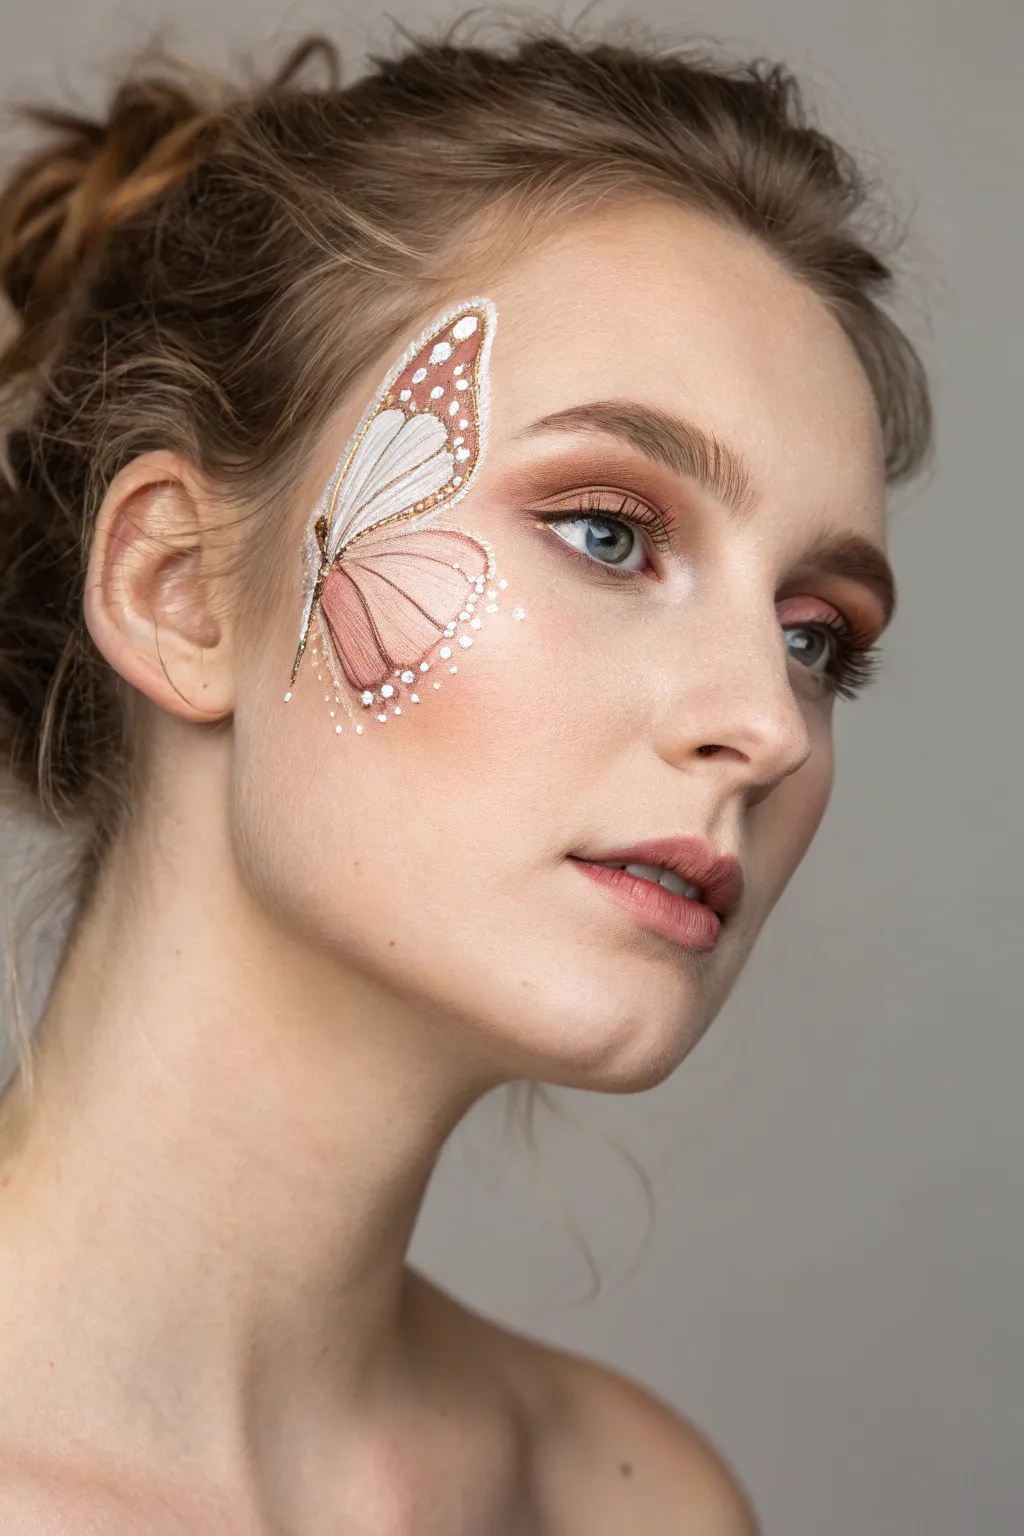
This sophisticated face paint design mimics the texture of fine embroidery, transforming a simple butterfly wing into a work that looks stitched directly onto the skin. With soft blush tones and precise highlighting, you’ll create a dimensional, angelic effect perfect for high-fashion photoshoots or ethereal costumes.
Detailed Instructions
Materials
- Matte face can foundation (pale base)
- Contour powder or cream
- Blush palette (dusty rose, peach)
- White liquid eyeliner or high-pigment face paint
- Fine round brush (size 0 or 1)
- Small flat angled brush
- Warm brown liquid liner or face paint
- Translucent setting powder
- Bronze or gold shimmer pigment
Step 1: Base and Prep
-
Skin Perfection:
Begin with a flawless matte canvas. Apply a comprehensive layer of foundation to even out the skin tone, ensuring the area around the temple and cheekbone is particularly smooth. -
Contour the Hollows:
Using a contour powder, gently define the hollow of the cheekbone and the temple area. This shadowing will help the butterfly wing pop forward visually. -
Eye Base:
Apply a soft wash of terracotta or peach eyeshadow to the eyelids, blending slightly outward toward the temple where the wing design will sit. This integrates the makeup with the art.
Step 2: Drafting the Wing
-
Outline the Shape:
Load a fine round brush with diluted warm brown paint or use a brown liner. Sketch the outline of the upper and lower butterfly wings, starting from the outer corner of the eye and sweeping up the forehead and down the cheek. -
Color blocking the Upper Wing:
Fill the top section of the upper wing with a solid white base. This doesn’t need to be perfectly opaque yet, but it maps out the ‘stitched’ area. -
Painting the Lower Wing:
For the lower wing section on the cheek, fill the shape with a dusty rose or muted peach face paint. I like to keep this layer slightly sheer so skin texture shows through. -
Adding the Border:
Thicken the outer edge of the upper wing using a burnt orange or rust-colored paint. Create a thick border that will house the decorative white spots later.
Textural Depth
To make the ’embroidery’ look raised, add a drop of convex clear gloss or 3D fabric paint (skin safe) over the main white sections for physical texture.
Step 3: Creating Texture
-
Drawing the Veins:
Using your finest brush and the warm brown tone, carefully paint the veins radiating from the center of the wing outwards. Keep lines extremely thin to mimic thread. -
Embroidered Hatching:
Inside the white sections of the upper wing, paint tiny, diagonal strokes using a slightly dirty white or very pale grey. This hatching technique creates the illusion of thread direction. -
Shadowing the Thread:
Add tiny lines of darker brown right next to your vein lines on the shadowed side. This creates the illusion that the ‘threads’ are raised above the skin. -
Highlighting the Lower Wing:
On the pink lower wing, add dry-brushed strokes of white sweeping from the center outward. This softens the pink and adds a silky texture.
Shaky Lines?
If your vein lines are shaky, purposely turn them into ‘stitch’ marks by breaking the line into tiny dashes. It looks intentional and adds charm.
Step 4: Detailed Embellishment
-
The Dotted Border:
Dip a dotting tool or the back of your brush into high-density white paint. Place distinct dots of varying sizes along the rust-colored border of the top wing. -
Scattered Stardust:
Create a ‘spray’ of tiny white dots floating off the bottom edge of the lower wing, drifting down onto the cheek area to soften the boundary between art and skin. -
Micro-Stitching:
For the most realistic effect, add tiny white tick marks perpendicular to the main brown vein lines. These look like the gathering stitches holding the design together. -
Metallic Accents:
Mix a small amount of bronze shimmer with mixing medium. Carefully trace over the thickest parts of the main wing veins to give them a subtle, gilded glow. -
Lash Definition:
Finish the eye look with defining mascara on the upper lashes. Keep lower lashes bare or very minimal to maintain the airy feel.
Step back and admire the delicate, stitched beauty you have created
Eye-Centered Wings With Bold Lids


Transform a standard eye look into something magical with this delicate, eye-centered butterfly wing design. This look combines soft, blended eyeshadows with precision face painting for a whimsical effect that flutter’s right off the skin.
How-To Guide
Materials
- Rose gold or soft pink shimmer eyeshadow
- Matte terracotta or brown eyeshadow
- Pearly white or champagne inner corner highlight
- Black liquid eyeliner (fine tip)
- White liquid eyeliner or water-activated face paint
- Face paint cake: Metallic Silver/White
- Face paint cake: Hot Pink
- Fine detail brush (liner brush)
- Small blending brush
- Mascara
- Makeup setting spray
Step 1: The Eye Shadow Base
-
Prime the lid:
Begin with a clean, prepped eyelid. Apply a layer of eyeshadow primer to ensure the colors pop and stay vibrant throughout the day. -
Apply crease transition:
Using a fluffy blending brush, sweep a matte terracotta or warm brown shade through the crease. Blend it upwards toward the eyebrow for a seamless fade. -
Add lid shimmer:
Pack a rose gold or soft pink shimmer shadow onto the center of the mobile lid. Use a flat brush or your fingertip for maximum pigment payoff. -
Deepen the outer corner:
Take the matte terracotta shade again and darken the outer corner of the eye, connecting it to the lower lash line to create a cohesive shape. -
Highlight the inner corner:
Apply a bright pearl or champagne highlighter to the inner corner of the eye. Blend this slightly inwards to open up the gaze. -
Create the eyeliner wing:
Using black liquid eyeliner, draw a sharp, thin wing extending from the outer corner. Keep the line close to the lashes for refinement.
Uneven Gradients?
If the pink and white paints look streak rather than blended, use a damp Q-tip to gently tap the border where the two colors meet while they are still wet.
Step 2: Painting the Butterfly Wing
-
Draft the wing shape:
Switch to your face paints. With a fine brush dipped in diluted white paint or a white liner pencil, faintly sketch the outline of the top and bottom wing sections starting from the eye’s outer corner. -
Fill the white base:
Load a small brush with metallic silver or pearlescent white face paint. Fill in the upper interior section of the top wing, closest to the hairline. -
Add the pink gradient:
While the white is still slightly tacky, apply hot pink face paint to the outer edges of the wing sections. Blend it inwards into the white to create a soft ombre effect. -
Outline the structure:
I like to steady my hand on my cheek for this part. Using a very fine liner brush and black face paint (or liquid liner), trace the main outline of the butterfly wing. -
Draw internal veins:
With the same black liner, draw thin, curved lines extending from the center of the wing outward to the edges, mimicking the delicate veins of a real butterfly. -
Add the thick border:
Thicken the black outline on the outer edge of the wing sections. This creates the dark border characteristic of monarch butterflies. -
Detail with dots:
Using a dotting tool or the back end of a brush dipped in white paint, place small, distinct dots along the thick black outer border. -
Add gentle stippling:
For extra texture, add a few tiny black dots floating just above the top wing near the eyebrow, fading out like dust. -
Finish with lashes:
Apply a generous coat of black mascara to both top and bottom lashes. If desired, add false lashes to the outer corner to match the wing’s angle.
Level Up: 3D Sparkle
Apply small rhinestones over the white dots on the wing edges using lash glue. The crystal reflection adds a stunning 3D texture to the face paint.
Now you have a delicate and enchanting look perfect for festivals or costume parties

PENCIL GUIDE
Understanding Pencil Grades from H to B
From first sketch to finished drawing — learn pencil grades, line control, and shading techniques.
Explore the Full Guide
Thin-Line Outline Butterfly Over a Color Wash
This delicate face paint design combines the softness of a watercolor wash with crisp, graphical linework to create an ethereal butterfly wing. It’s a stunning asymmetrical look that frames the eye beautifully without feeling heavy or mask-like.
Detailed Instructions
Materials
- High-density face paint sponge (wedge shaped)
- Round synthetic brush (size 2 or 3 for outlines)
- Small blending brush or fluffy eyeshadow brush
- Water-activated face paints in brilliant pink, magenta, and teal
- Black face paint (liner consistency)
- White liquid face paint
- Cosmetic glitter gel or loose cosmetic glitter (optional)
- Cup of clean water
- Paper towels
Step 1: Creating the Color Wash
-
Prep the canvas:
Begin with a clean, dry face. If the skin is oily, a quick wipe with a toner can help the paint adhere better and last longer. -
Load the sponge with pink:
Dampen your wedge sponge slightly and load it generously with the brilliant pink face paint. You want a creamy consistency, not too watery. -
Apply the base shape:
Gently sponge the pink over the left eyelid, extending it out towards the temple and down onto the upper cheekbone. Create a soft, diffused cloud shape rather than hard edges. -
Intensify the crease:
Using the corner of the sponge or a small fluffy brush, tap a deeper magenta shade into the crease of the eye and the outer corner to add dimension. -
Add the teal accents:
Clean your sponge or use a fresh side. Load it with teal paint. Dab this color at the top of the design on the forehead and at the very bottom edge on the cheek. -
Blend the transition:
Where the pink meets the teal, gently pat the sponge to blend the two colors. I find that lightly tapping back and forth creates a beautiful purple transition tone.
Clean Lines Secret
Make sure your black paint is the consistency of liquid eyeliner. If it’s too thick, lines will drag; too thin, they’ll drip. Test on your hand first.
Step 2: Defining the Butterfly
-
Prepare the liner brush:
Load a round size 2 or 3 brush with black face paint. Roll the brush tip on your palette to create a sharp point and ensure the paint is an inky consistency. -
Draw the main vein:
Starting from the outer corner of the eye, draw a diagonal line extending upward toward the hairline to establish the top wing’s angle. -
Outline the top wing:
Create a curved line from the top of your diagonal line, sweeping it down towards the nose bridge, following the natural curve of the brow bone. -
Form the bottom wing:
Draw a large, sweeping curve starting from the outer eye corner, looping down the cheek and curving back up towards the ear. -
Fill in the segments:
Using light pressure, draw thinner veins branching out from the center (near the eye) to the outer edges of the wings within your wash area. -
Vary line thickness:
Go back over the outer perimeter lines to thicken them slightly, making the interior veins look delicate by comparison. -
Add the body:
Painting carefully near the eye, draw a small, elongated loop for the butterfly’s body right at the temple area where the wings converge. -
Create antennae:
Flick two very fine, curved lines extending from the body shape towards the nose.
Level Up The Look
Mirror the eye makeup on the other side! Even without the butterfly wings, apply the pink and magenta wash to the other eye for a balanced, high-fashion result.
Step 3: Highlights and Details
-
Add white dots:
Dip the handle end of a brush or a detail tool into white paint. Place small dots along the thicker black edges of the wings, particularly at the tips. -
Highlight the body:
Add a tiny streak of white to the black body segment to give it a glossy, 3D appearance. -
Extend the magic:
Paint a few free-floating dots or teardrop shapes above and outside the wing on the forehead to add movement to the design. -
Sparkle finish:
Identify the teal areas of the design. Tap a small amount of cosmetic glitter gel over these spots while the paint is dry to catch the light.
Step back and admire how the bold lines contrast with the soft base to create immediate artistic impact
Realistic Wing Veins and Segments
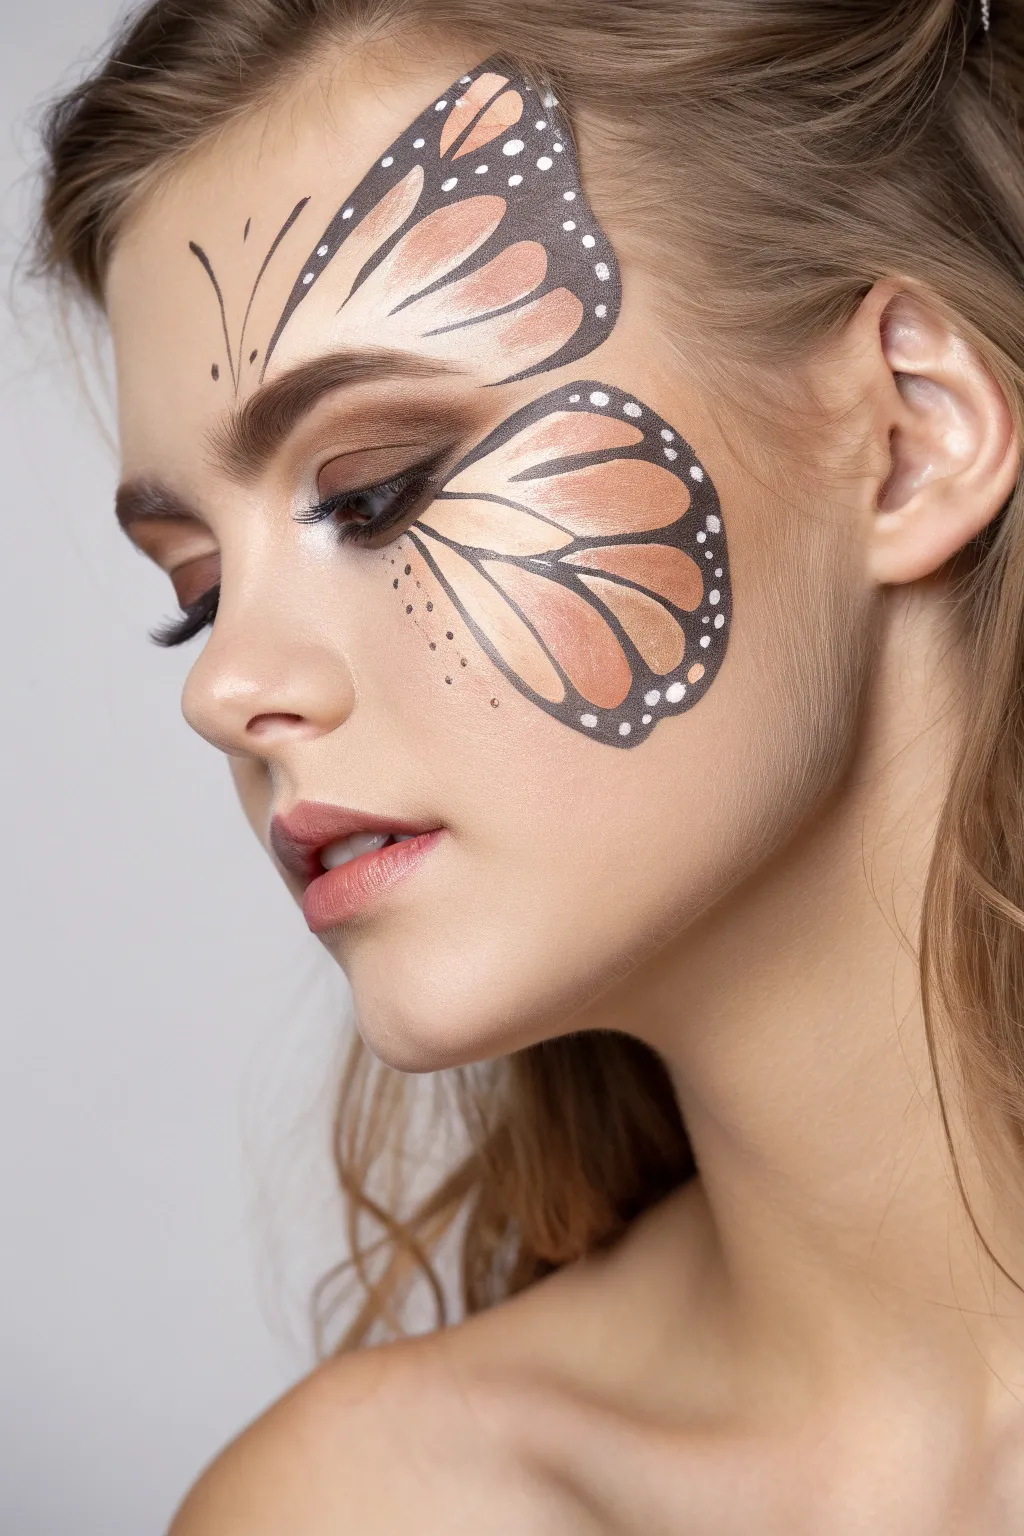
Transform your face into a delicate work of art with this hyper-realistic monarch butterfly design. This look focuses on capturing the intricate vein structures and soft gradients of the wings for a truly elegant finish.
Step-by-Step Guide
Materials
- Matte foundation and concealer (matching skin tone)
- Setting powder
- Face paint palette (black, white, orange, peach/light brown)
- Fine liner brush (size 0 or 00)
- Flat angled shader brush
- Small fluffy blending brush
- Makeup sponge
- Eyeshadow palette (browns, warm neutrals)
- Black eyeliner pencil or gel
- False eyelashes (optional)
- Setting spray
Step 1: Base Preparation and Eye Definition
-
Apply base makeup:
Start with a clean, moisturized face. Apply your regular foundation and concealer to create an even canvas, but keep the coverage natural. Lightly dust with setting powder to ensure the face paint adheres well without slipping. -
Create a soft smokey eye:
Using a small blending brush, sweep a medium brown eyeshadow into your crease and outer corner. This adds depth that complements the earthy tones of the butterfly wing without overpowering it. -
Line the eyes:
Apply a thin line of black liner along the upper lash line. I like to slightly smudge this out for a softer look before applying mascara or false lashes.
Clean Lines Only
If your black lines look shaky or bleed, your paint is too watery. Let the black dry, then clean up edges with a stiff angled brush dipped in a tiny bit of concealer.
Step 2: Drafting the Upper Wing
-
Outline the upper shape:
With a fine liner brush and black face paint, lightly sketch the outline of the top wing. Start just above the brow, curving up towards the hairline and then sweeping back down towards the temple. -
Draw the main veins:
From the inner corner of the drawn wing (near the brow), draw three or four radiating lines outward to the wing’s edge. These will serve as the main structural veins of your butterfly. -
Fill the segments:
Load a flat angled brush with orange and peach face paint. Fill in the spaces between your black vein lines. Keep the color most intense near the center of the segment and lighter near the vein edges. -
Blend for dimension:
While the paint is slightly damp, use a clean, dry brush to feather the orange color gently. You want a gradient effect, perhaps keeping the area near the hairline slightly darker for volume. -
Thicken the veins:
Go back over your black vein lines with the liner brush. Vary the pressure: press harder at the base of the wing for a thicker line and lift off creating a whisper-thin line as you reach the outer edge. -
Add the antenna:
In the center of the forehead, draw two delicate, curved antennae using the very tip of your liner brush. Add two small dots at the base for balance.
Shimmer Upgrade
Before the orange paint fully dries, tap a sheer gold shimmer eyeshadow over the center of the wing segments. It catches the light beautifully when you turn your head.
Step 3: Creating the Lower Wing
-
Outline the cheek section:
Start plotting the lower wing on your cheekbone. Draw a curved line starting from the outer corner of the eye, swooping down the cheek and curving back up towards the ear. -
Establish the lower veins:
Similar to the forehead, draw radiating black lines from the inner point (near the eye) outward to the bottom edge of the wing shape. Fan them out evenly across the cheek area. -
Apply gradient color:
Fill these new segments with your orange and peach mixture. To make it look realistic, I often mix a tiny bit of white into the center of these panels to make the wing look slightly translucent. -
Refine the border:
Thicken the outer black border of the lower wing significantly. This thick black edge is characteristic of monarch butterflies and will house the white dots later. -
Detail the inner eye corner:
Add a few tiny dots or faint lines extending from the lower lash line into the wing pattern to seamlessly connect the makeup to your eye.
Step 4: Details and Highlights
-
Add white marginal spots:
Dip a small dotting tool or the back of a brush handle into white face paint. Place distinct white dots along the thick black outer borders of both the upper and lower wings. -
Vary dot sizes:
Use larger dots on the wider parts of the black border and tiny, pin-prick dots as the border narrows. This variation helps sell the realism. -
Highlight the veins:
Using a very clean, thin brush and white paint, add extremely subtle highlights along the top edge of some of the black veins to give them a 3D, raised appearance. -
Add freestanding dots:
Place a small cluster of tiny black dots floating near the nose bridge and unpainted cheek area to create an artistic transition between skin and design. -
Set the look:
Once all paint is fully dry, mist your face with a setting spray. Hold the bottle at arm’s length to avoid droplets running the water-based paint.
Now you have a stunning, nature-inspired face paint design ready for any costume party or photoshoot


White Dot Accents for Wing Scales
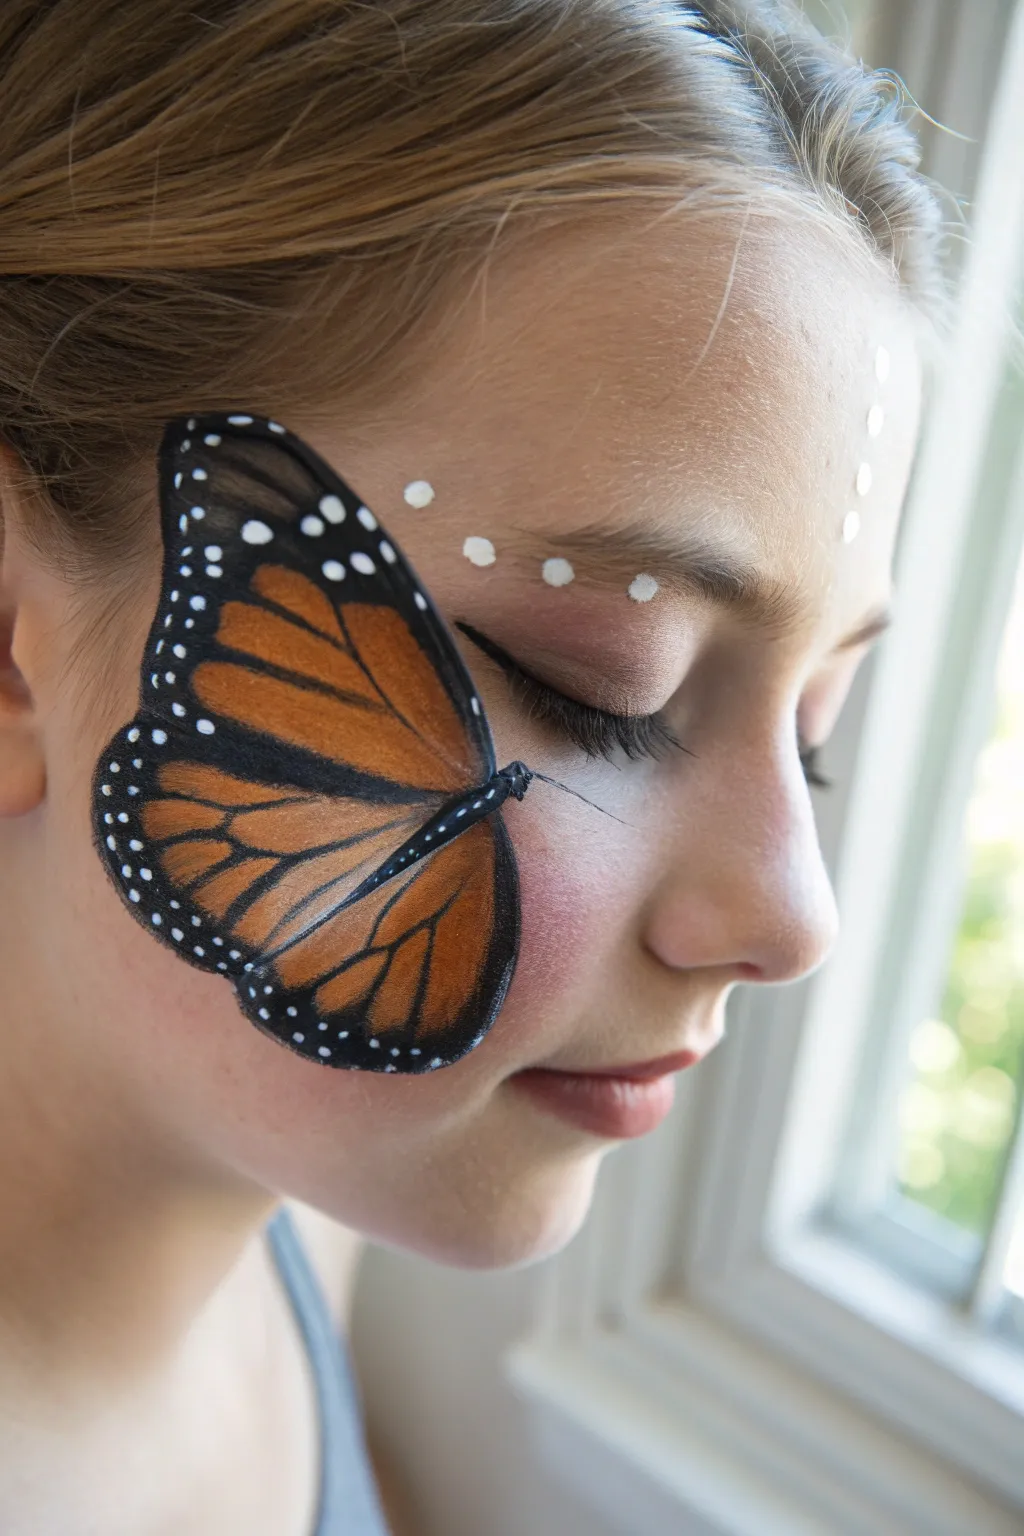
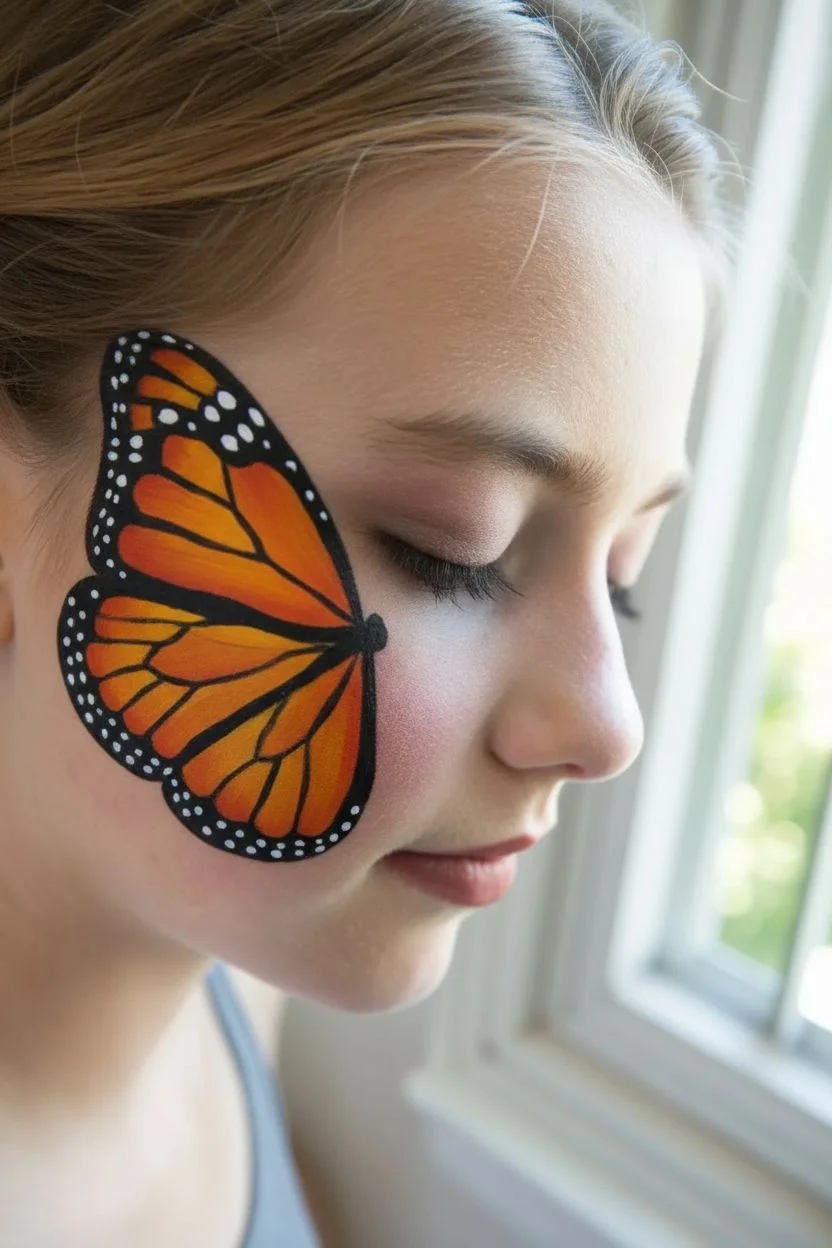
This elegant face paint design transforms a simple butterfly wing into something ethereal with delicate white dot accents that mimic soft light or magical dust. The realistic monarch wing paired with these minimalist dots creates a sophisticated look perfect for older children or teens who want something beyond the basic carnival designs.
How-To Guide
Materials
- Orange face paint (creamy consistency)
- Black face paint (strong pigment)
- White face paint (high opacity)
- Flat brush (medium width)
- Round brush (size 2 or 3)
- Fine liner brush (size 0 or 00)
- Cosmetic sponge
- Blush (soft pink or peach)
- Setting spray (optional)
Step 1: Base and Wing Structure
-
Prep the canvas:
Begin with a clean, dry face. Apply a very light dusting of translucent powder if the skin is naturally oily to help the paint grip better. -
Apply blush:
Before starting the paint, sweep a soft pink or peach blush onto the cheekbone area where the wing won’t be covering. This adds a natural warmth that integrates the design beautifully. -
Outline the wing shape:
Using your round brush and black paint, lightly sketch the outline of the monarch wing. Start near the corner of the eye and extend down the cheek in a gentle curve, creating the characteristic upper and lower wing sections. -
Fill the orange panels:
Load a flat brush or sponge with bright orange paint. Carefully fill in the wing sections, leaving space for the black veins and borders. Keep the orange vibrant and solid. -
Add dimension:
While the orange is still damp, I like to mix in a tiny bit of yellow near the center of the panels or red near the edges to create a subtle gradient effect.
Dotting Tool Hack
Don’t have a perfectly round brush? The back end of a paintbrush handle dipped in white paint makes perfect, uniform dots every single time.
Step 2: Detailing the Butterfly
-
Thicken the borders:
Switch back to black paint. Using a round brush, thicken the outer borders of the wing, ensuring the black line is bold and opaque. -
Paint the veins:
Draw the thin black veins running through the orange sections. Start from the body area near the eye and pull your strokes outward for the most natural, tapered lines. -
Create the body:
Paint the butterfly’s body along the line where the wing meets the face, near the temple and outer eye corner. Use small, segmented strokes to give it texture. -
Add the antenna:
With your finest liner brush and black paint, sweep a very delicate, thin line extending directly from the head across the cheek towards the nose.
Uneven Lines?
If your black veins look shaky, thicken the line slightly to smooth it out. Resting your pinky finger on the chin while painting stabilizes your hand.
Step 3: The White Accents
-
Wing spots preparation:
Clean your fine liner brush thoroughly or grab a new one. Load it with opaque white face paint. The consistency should be creamy, not watery. -
Dot the wing edges:
Place small white dots inside the thick black border of the wing. Vary the sizes slightly—some tiny, some a bit larger—to mimic real monarch patterns. -
Begin the facial accents:
Now for the signature detail of this look: the floating dots. Start above the eyebrow arch. -
Create the eyebrow arch:
Paint a row of white dots following the curve above the eyebrow. Space them out evenly, starting larger near the center of the forehead and getting smaller as you move toward the temple. -
Paint cheek accents:
Add a few scattered white dots near the inner corner of the eye or trailing down from the brow design to balance the composition. -
Sharpen the edges:
Use a cotton swab with a little makeup remover to clean up any smudges around the wing’s outer edge for a crisp finish. -
Final touches:
If desired, add a light coat of mascara to the eyelashes to frame the eye and complement the black in the butterfly wing.
Step back and admire how those simple white dots bring the whole butterfly to life
Sparkly Wing Edges for Extra Shine

For a look that feels more like high-fashion artistry than simple face paint, this design combines delicate structural lines with soft pink shading and strategically placed gems. The result is a luminous, pearl-like butterfly mask that transforms the face with elegance and light.
Detailed Instructions
Materials
- High-quality white face paint (water-activated)
- Rose gold or soft pink cream face paint or highly pigmented eyeshadow
- Fine liner brush (size 0 or 00)
- Small flat shader brush or eyeshadow blending brush
- Flat, ¼-inch face painting brush
- Adhesive-backed rhinestones (2mm and 3mm size, silver or clear)
- Cosmetic grade adhesive (if using loose gems)
- Black liquid eyeliner
- Mascara
- Setting spray (optional)
Step 1: Base Prep and Eye Definition
-
Prime the canvas:
Begin with a clean, moisturized face. Apply a light, sheer foundation or tinted moisturizer to evne out the skin tone without creating a heavy mask, as the butterfly wings rely on skin visibility for their delicate effect. -
Apply the winged shadow:
Using your flat shader brush, load rose gold or soft pink eyeshadow. Sweep this across the entire eyelid, extending the color outward past the outer corner of the eye in a soft, diffused wing shape. -
Define the lash line:
With a steady hand, apply black liquid eyeliner along the upper lash line. Create a sharp, thin cat-eye flick that follows the upward curve of your eyeshadow. -
Finish the lashes:
Apply two coats of black mascara to give the eyes definition that won’t get lost behind the artwork. Ensure the lashes are separated and lifted.
Stay Steady
Rest your pinky finger on the model’s cheek or chin while painting fine lines. This anchors your hand and prevents shakes when drawing the delicate wing veins.
Step 2: Constructing the Wings
-
Outline the upper wing shape:
Load your fine liner brush with creamy white face paint. Starting from the center of the forehead above the brow, draw a large, sweeping curve up toward the hairline and then down toward the temple to form the top edge of the upper wing. -
Define the lower wing:
Below the eye, draw a shorter, rounded scallop shape that cups the cheekbone. This line should start near the inner corner of the eye and curve outward to meet the temple area, though the wings don’t need to connect perfectly yet. -
Create the nose bridge body:
Paint a slender, elongated teardrop shape centered on the bridge of the nose using white. This acts as the body of the butterfly, connecting the two sides of the face. -
Add the inner wing details:
Inside the large upper wing outline, use your fine brush to paint three or four elongated teardrop or petal shapes. These represent the ‘cells’ of the butterfly wing. -
Structure the lower wing:
Repeat the process on the lower cheek wing, drawing three smaller petal shapes radiating outward from the nose area toward the ear. -
Shade the wing cells:
Using a dry flat brush or eyeshadow brush, gently pat your rose gold or pink pigment inside the ‘cells’ you just outlined. Keep the color concentrated near the center of each cell and fade it out before it touches the white outline. -
Solidify the negative space:
Use your ¼-inch flat brush loaded with opaque white paint to fill in the spaces *between* the pink cells. This creates the solid white structure of the wing veins. -
Extend the tail:
From the lowest point of the cheek wing, drag your brush downward to create a wispy, tapered tail that follows the jawline slightly. Feather the edges so it looks soft.
Pearl Finish
Dust a sheer white iridescent highlighter powder over the white painted areas. It creates a stunning pearlized sheen that glows when the light hits the wings.
Step 3: Embellishment and Refinement
-
Refine the outlines:
Go back over your main white outlines with the fine liner brush to ensure they are crisp and opaque. Clean edges are crucial for this high-fashion look. -
Add the antennae:
Paint two very delicate, curved lines extending from the top of the nose bridge body upward onto the forehead. These should be thin and graceful. -
Highlight the body:
Add a tiny touch of black or dark brown paint to the very center of the nose bridge shape to give the butterfly body dimension, effectively contouring it. -
Place rim gems on the upper wing:
Using cosmetic adhesive or self-stick gems, carefully place a row of small silver rhinestones along the outermost top edge of the upper wing. Space them evenly for a professional look. -
Detail the lower wing:
Continue the line of gems along the outer curve of the lower wing on the cheek. I find that using slightly smaller gems here keeps the design from looking too heavy. -
Accent the inner eye:
Place a few tiny dots of white paint or very small crystals near the inner corner of the eye and along the bridge of the nose to bring light to the center of the face. -
Final touch-ups:
Check for symmetry. If one wing looks slightly different, add a little extra white shading or extend a line to balance them out.
Now you have a breathtaking, jewelry-like butterfly design that is perfect for editorial photoshoots or elegant costume events
Jeweled Butterfly Body Down the Nose Bridge

Transform a simple face paint design into a stunning masquerade piece with this elegant, jewel-encrusted butterfly look. The striking combination of soft orange wings, teal borders, and a vertical gemstone body creates a sophisticated fantasy style perfect for festivals or costume parties.
How-To Guide
Materials
- Orange face paint (creamy consistency)
- Teal or dark turquoise face paint
- Black face paint (fine liner)
- White face paint
- Self-adhesive rhinestones (red/ruby, various sizes)
- Self-adhesive pearls or crystals (white/clear, various sizes)
- Flat shader brush (medium)
- Fine liner brush (size 0 or 00)
- Dotting tool or back of a paintbrush
- Warm brown eyeshadow
- Fluffy blending brush
- Tweezers (for gem application)
- Setting spray (optional)
Step 1: Base and Eye Prep
-
Prepping the Canvas:
Start with clean, moisturized skin. Apply a light base of foundation and concealer if desired to create an even tone that makes the colors pop. -
Warm Shadow Base:
Using a fluffy blending brush, sweep a warm brown eyeshadow across the eyelids and blend it softly into the crease and slightly outward. This warmth complements the orange paint beautifully.
Step 2: Painting the Wings
-
Mapping the Upper Wings:
Load a flat shader brush with orange face paint. Start above the eyebrows, painting large, petal-shaped wings that extend toward the temples. -
Filling the Upper Wings:
Fill in these shapes completely with the orange paint, ensuring opacity. The shape should angle upwards slightly for a lifting effect. -
Creating Lower Wings:
Paint smaller, curved triangular shapes on the upper cheekbones, under the outer corner of the eye. These are the bottom wings of the butterfly. -
Adding Teal Borders:
Using the teal or dark turquoise paint and a steady hand, outline the top edge of the upper wings. Make this border thick enough to accommodate decorative dots later. -
Lower Wing Borders:
Repeat the thick teal outline on the outer edge of the lower cheek wings. Taper the line as it moves inward toward the nose. -
Defining the Veins:
With a fine liner brush and black paint (or a very dark mixture of the teal and black), carefully paint the veins inside the orange sections. Draw thin lines radiating from the center bridge area outward toward the teal borders.
Symmetry Check
Step back from the mirror frequently. If wings look uneven, use a slightly damp Q-tip with makeup remover to essentially erase and reshape the edges before the paint dries completely.
Step 3: The Central Body
-
Painting the Nose Bridge:
Paint a slender, tapered line down the center of the nose using the teal paint. This acts as an abstract body for the butterfly and connects the two upper wings. -
Applying the Center Gem:
Place a large, teardrop or oval-shaped ruby rhinestone right between the eyebrows, anchoring the design. -
Vertical Gem Alignment:
Using tweezers for precision, apply a vertical line of smaller red rhinestones extending upward from the main gem onto the forehead. I like to graduate the sizes from large to small as they go up.
Glitter Upgrade
For a magical night-time look, lightly dust a translucent iridescent glitter over the orange sections of the wings while the paint is still slightly tacky to make them shimmer.
Step 4: Detailed Embellishment
-
Dotting the Borders:
Dip a dotting tool or the handle end of a brush into white face paint. Carefully stamp a row of even dots along the center of the thick teal borders on the forehead. -
Pearl Accents:
Intersperse small stick-on pearls or white crystals along the brow bone area within the teal paint for added texture and dimension. -
Cheek Details:
Add corresponding white dots or tiny crystals along the edge of the lower cheek wings. Follow the curve of the teal outline. -
Inner Corner Highlights:
Place a few tiny dots of teal or silver glitter paint near the inner corner of the eye to bridge the gap between the nose painting and the eye makeup. -
Final Lashes:
Apply black mascara or a pair of natural-looking false lashes to define the eyes without overpowering the paint work. -
Setting the Look:
If you plan to wear this for hours, lightly mist the face with a setting spray to lock the pigments in place.
Now you are ready to flutter into any event with this exquisite and artistic design
Negative Space Butterfly With Clean Skin Gaps
Create a stunning butterfly design that uses the natural skin tone to highlight the vibrant orange wings and crisp black detailing. This look features bold white highlights and defined segments, perfect for a cheerful and classic face painting style.
Detailed Instructions
Materials
- High-density face paint sponge (halved)
- Round brush (size 2 or 3 for outlining)
- Round brush (size 4 or 5 for filling)
- Face paint: Bright Orange
- Face paint: Peach or Light Apricot
- Face paint: White
- Face paint: Black
- Water container
- Spray bottle with water
Step 1: Laying the Base
-
Prepare the sponge:
Mist your sponge lightly with water. Rub it into the white face paint until you have a creamy consistency, not too drippy. -
Apply the white center:
Dab the white paint onto the bridge of the nose and fan it out slightly onto the inner corner of the eyes and the upper cheeks. This acts as the bright body and highlight area. -
Create the upper wings:
Load a clean sponge or a large brush with bright orange paint. Press it onto the forehead above the eyebrow, angling it diagonally towards the temple to form the wide top wing shape. -
Shape the lower wings:
Using the same orange, fill in the cheek area, tapering the shape downward towards the jawline to create the bottom wing curve. -
Blend the transition:
Take a slightly damp sponge with a touch of peach or light apricot paint. Gently dab where the orange meets the white near the inner eye to create a soft, gradient fade rather than a harsh line.
Step 2: Defining the Structure
-
Paint the body:
Load a size 4 round brush with black paint. Draw a long, thin teardrop shape specifically on the nose bridge for the butterfly’s body, ending with a small head between the eyes. -
Draw the antennae:
Using the very tip of your brush, sweep two long, curved lines upward from the head onto the center of the forehead. Keep your hand light so the lines taper off beautifully. -
Outline the top wing:
Switch to a finer size 2 or 3 brush loaded with black. Outline the top edge of the orange shape on the forehead, curving it down toward the outer corner of the eye. -
Outline the bottom wing:
Continue the black line to outline the bottom wing on the cheek, curving it back up toward the ear and then down to the jawline. -
Add inner details:
Draw delicate black veins inside the orange sections. Start from the corner of the eye and pull outward, like branches of a tree, dividing the wing into segments.
Clean Lines?
If your black lines look shaky or transparent, your paint is too watery. Mix the black until it has an inky, cohesive consistency before reloading your brush.
Step 3: Highlights and Details
-
Thicken the borders:
Go back over the outer edges of the wings with your black brush. Make the line thicker in certain spots, specifically at the wing tips, to create distinct bold areas. -
Add the dots:
Load a small round brush with thick white paint. Carefully place small, round dots inside the thick black borders you just created. This mimics the classic Monarch butterfly pattern. -
Highlight the veins:
Using the white paint again, add thin, sweeping lines right next to or on top of the orange sections inside the wings to add dimension and brightness. -
Accent the eyes:
Add a small white swoosh or highlight under the eye area where the paint transitions from white to orange to make the eyes pop. -
Finish with lips:
Optionally, apply a soft pink or peach color to the lips, and outline the bottom lip with a very thin black line to tie the whole look together.
Make It Sparkle
While the paint is still slightly damp on the cheeks, tap a finger dipped in cosmetic-grade chunky glitter over the white areas for a magical finish.
Now you have a vibrant butterfly ready to flutter away at any party
Watercolor-Style Butterfly With Soft Drips
This stunning design moves away from sharp graphic lines, embracing a soft, blended watercolor aesthetic with delicate drip details. The combination of shimmering teal upper wings and a warm, sunset-hued lower wing creates a captivating asymmetry that feels both organic and high-fashion.
How-To Guide
Materials
- Face primer or moisturizer
- Water-activated face paints (Teal, Cyan, White, Orange, Pink, Purple)
- Medium round brush
- Small liner brush
- Fluffy blending brush (eyeshadow brush works well)
- Loose cosmetic glitter (iridescent or silver)
- Gold or bronze metallic face paint (optional for inner eye)
- Setting spray
Step 1: Base Preparation
-
Prep the skin:
Begin with a clean canvas. Apply a light layer of moisturizer or primer to help the face paint glide on smoothly and last longer without cracking. -
Map the shape:
Using a very pale color or a nude pencil, lightly sketch the outline of the butterfly wings around the left eye. The top wing should extend up toward the temple, and the bottom wing should curve down onto the cheek.
Step 2: Upper Wing Creation
-
Lay down the teal:
Load a medium round brush with a vibrant teal face paint. Start at the inner corner of the eyebrow and sweep upwards and outwards to form the top edge of the upper wing. -
Fill the shape:
Fill in the upper wing shape with the teal paint. While the paint is still slightly damp, mix in a bit of cyan or lighter blue towards the center to create depth. -
Add texture:
Using a dry brush technique or a sponge, gently dab over the teal to give it a slightly porous, organic texture rather than a solid block of color. -
Highlight the veins:
With a thin liner brush and white paint, carefully draw the delicate veins inside the wing. Keep these lines very thin and slightly translucent. -
Apply glitter:
Before the paint fully dries, tap loose iridescent glitter onto the wettest parts of the teal wing, focusing on the outer edges and the veins for a magical shimmer.
Water Control is Key
For the drip effect, mix more water into your paint than usual. Test the consistency on your hand first; it should run slowly but still hold its color opacity.
Step 3: Sunset Lower Wing
-
Start the gradient:
Clean your brush and load it with a warm orange. Apply this to the top section of the lower wing, right under the eye area. -
Blend into pink:
While the orange is wet, introduce a soft pink shade below it. Use a fluffy brush to buff the seam between the orange and pink, creating a seamless ombre effect. -
Finish with purple:
At the very bottom edge of the wing, blend a soft purple into the pink. This completes the sunset gradient. -
Outline and define:
Take a liner brush with a deep purple or dark magenta. Outline the segments of the lower wing, imitating the stained-glass look of a butterfly wing. -
Add dots:
Place tiny dots of the dark purple inside the segments for added detail. -
Create the drips:
This is the signature step. Load your brush with watery purple paint. press the brush gently at the bottom edge of the wing and let the paint pool slightly, then drag it down in a squiggly, organic line to create the ‘drip’ effect.
Add Dimension with Jewels
Take this look to festival level by adhering small rhinestones along the vein lines of the upper wing or at the end of the purple drips using eyelash glue.
Step 4: Right Eye & Final Details
-
Partial wing accent:
On the other side of the face (the right eye), create a partial wing. Paint just the tips of the upper teal wing extending from the temple, and a hint of the orange/yellow lower wing on the cheekbone. -
Draw the antennae:
Using the teal paint and a liner brush, paint two long, curved antennae lines extending from the center of the forehead upwards. -
Detail the accents:
Add a few white dots to the partial teal wing on the right side to mirror the texture of the main design. -
Inner corner highlight:
Apply a touch of gold or bronze metallic paint to the inner corners of both eyes to brighten the gaze and tie the warm and cool tones together. -
Soften edges:
I like to take a clean, damp fluffy brush and very gently soften the outer edges of the paint where it meets the skin, enhancing that watercolor feel. -
Set the look:
Close the eyes and mist the entire face with a setting spray to lock the design in place and prevent smudging.
Now you have a breathtaking, artistic butterfly design that looks like a living watercolor painting.


Have a question or want to share your own experience? I'd love to hear from you in the comments below!