Butterfly rocks are one of those projects that instantly feel joyful—bold color, delicate details, and a little bit of nature all on one tiny canvas. I’m sharing a mix of classic, super-doable butterfly rock painting ideas and a few more creative twists so you can pick what fits your mood today.
Classic Monarch-Inspired Butterfly
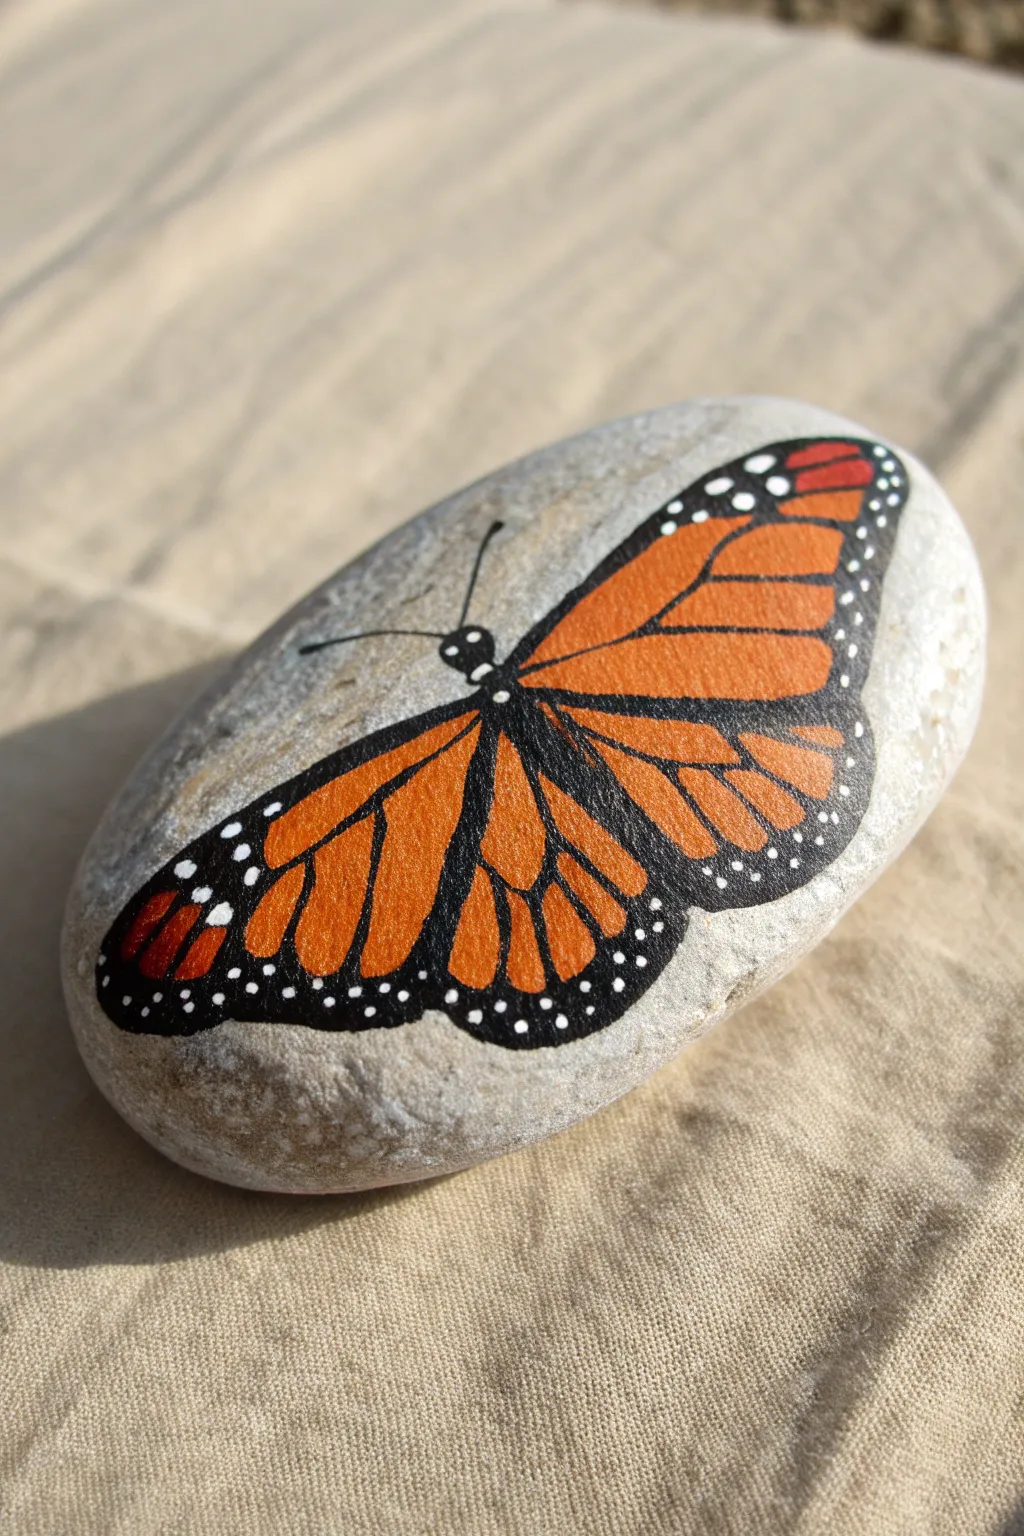
This project captures the classic beauty of a Monarch butterfly on a natural stone canvas, focusing on clean lines and vibrant orange hues. The result is a stunningly realistic piece of rock art that looks as though a butterfly has just landed to rest.
How-To Guide
Materials
- Smooth, oval river rock (light grey or beige)
- Acrylic paints (bright orange, black, white)
- Pencil for sketching
- Fine liner brush (size 00 or 0)
- Small round brush (size 1 or 2)
- Dotting tool or toothpick
- Sealer (spray or brush-on varnish)
Step 1: Planning and Sketching
-
Select your stone:
Choose a smooth, oval-shaped rock. A lighter background color like grey or beige works best so you don’t have to paint a base coat, allowing the natural texture to shine through. -
Clean surface:
Wash the rock with soap and water to remove any dirt or oils, then let it dry drastically. Paint adheres much better to a clean surface. -
Sketch the center body:
Use a pencil to lightly sketch a thin, segmented body diagonally across the center of the rock. Add a small circle for the head at the top end. -
Outline the wings:
Draw the outline of the upper and lower wings. The upper wings should be elongated triangles, while the lower wings are more rounded. Ensure they fan out symmetrically from the body.
Shaky Hands?
If painting thin veins is difficult, use a black ultra-fine tip acrylic paint pen instead of a brush. It gives you drawing-like control over the delicate lines.
Step 2: Blocking in Color
-
Fill the orange sections:
Using your small round brush and bright orange paint, fill in the main wing shapes. Leave a small gap between the orange sections and your pencil lines where the black veins will go later. -
Second coat:
Orange acrylic often needs a second layer to be truly opaque. Let the first coat dry completely, then apply a second coat for vibrant, solid color. -
Add red accents (optional):
For extra realism, you can blend a tiny bit of red or darker orange near the tips of the upper wings while the paint is still slightly wet.
Step 3: Detailing the Veins
-
Paint the body:
Switch to your fine liner brush and black paint. Carefully fill in the body and head that you sketched earlier. -
Outline the wings:
Paint a thick black border around the entire perimeter of the orange wings. The tips of the upper wings should have a thicker black area. -
Thick main veins:
Paint the main structural veins radiating from the body outward. These should be slightly thicker near the body and taper as they reach the black border. -
Thin connecting veins:
I find it helpful to steady my hand against the table for this part. Paint the thinner, cross-hatching veins inside the orange sections to create the stained-glass effect. -
Antennae:
Using the very tip of your liner brush, paint two delicate, thin antennae curving out from the head.
Add a Shadow
Paint a faint, translucent grey shadow underneath one side of the wings on the bare rock. It creates a 3D illusion, making the butterfly look lifted.
Step 4: Finishing Touches
-
Wing edge dots:
Dip a dotting tool or a toothpick into white paint. Add rows of small dots along the thick black outer borders of the wings. Vary the sizes slightly for a natural look. -
Body details:
Add two tiny white dots to the head for eyes and a few micro-dots along the thorax (the upper body) to give it dimension. -
Cleanup:
If your black lines looked a bit shaky, you can use a tiny bit of orange to touch up the edges once the black is fully dry. -
Seal the art:
Allow the rock to cure for at least 24 hours. Apply a clear sealer to protect your butterfly from weathering and to make the colors pop.
Place your finished rock in the garden to surprise visitors with this everlasting butterfly


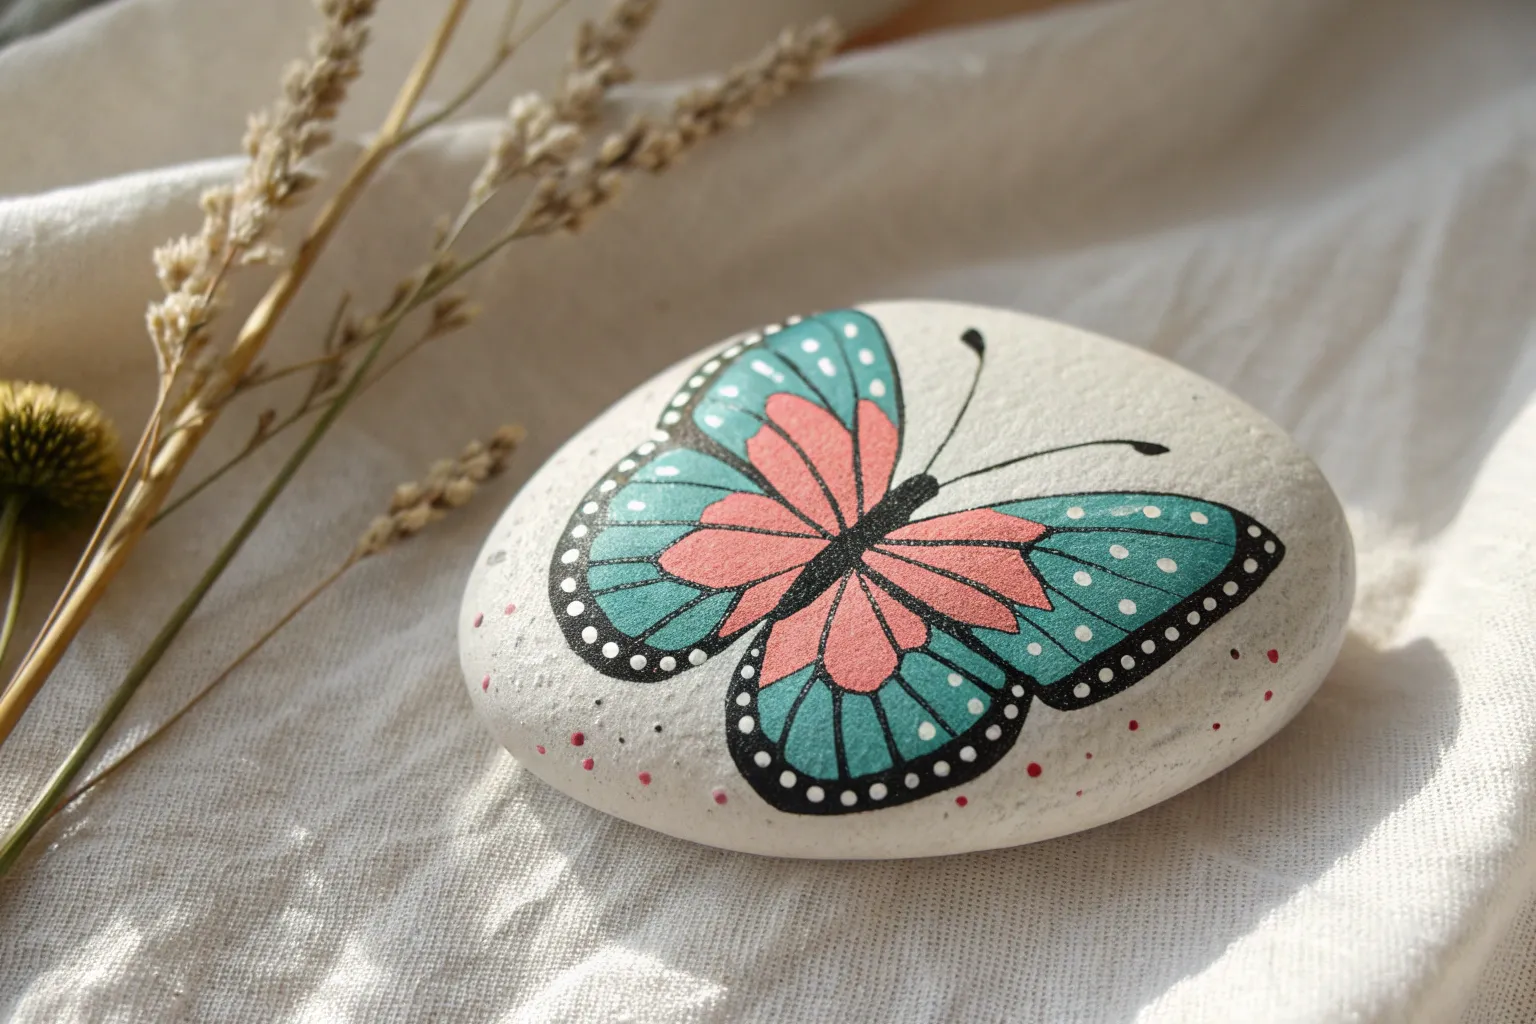
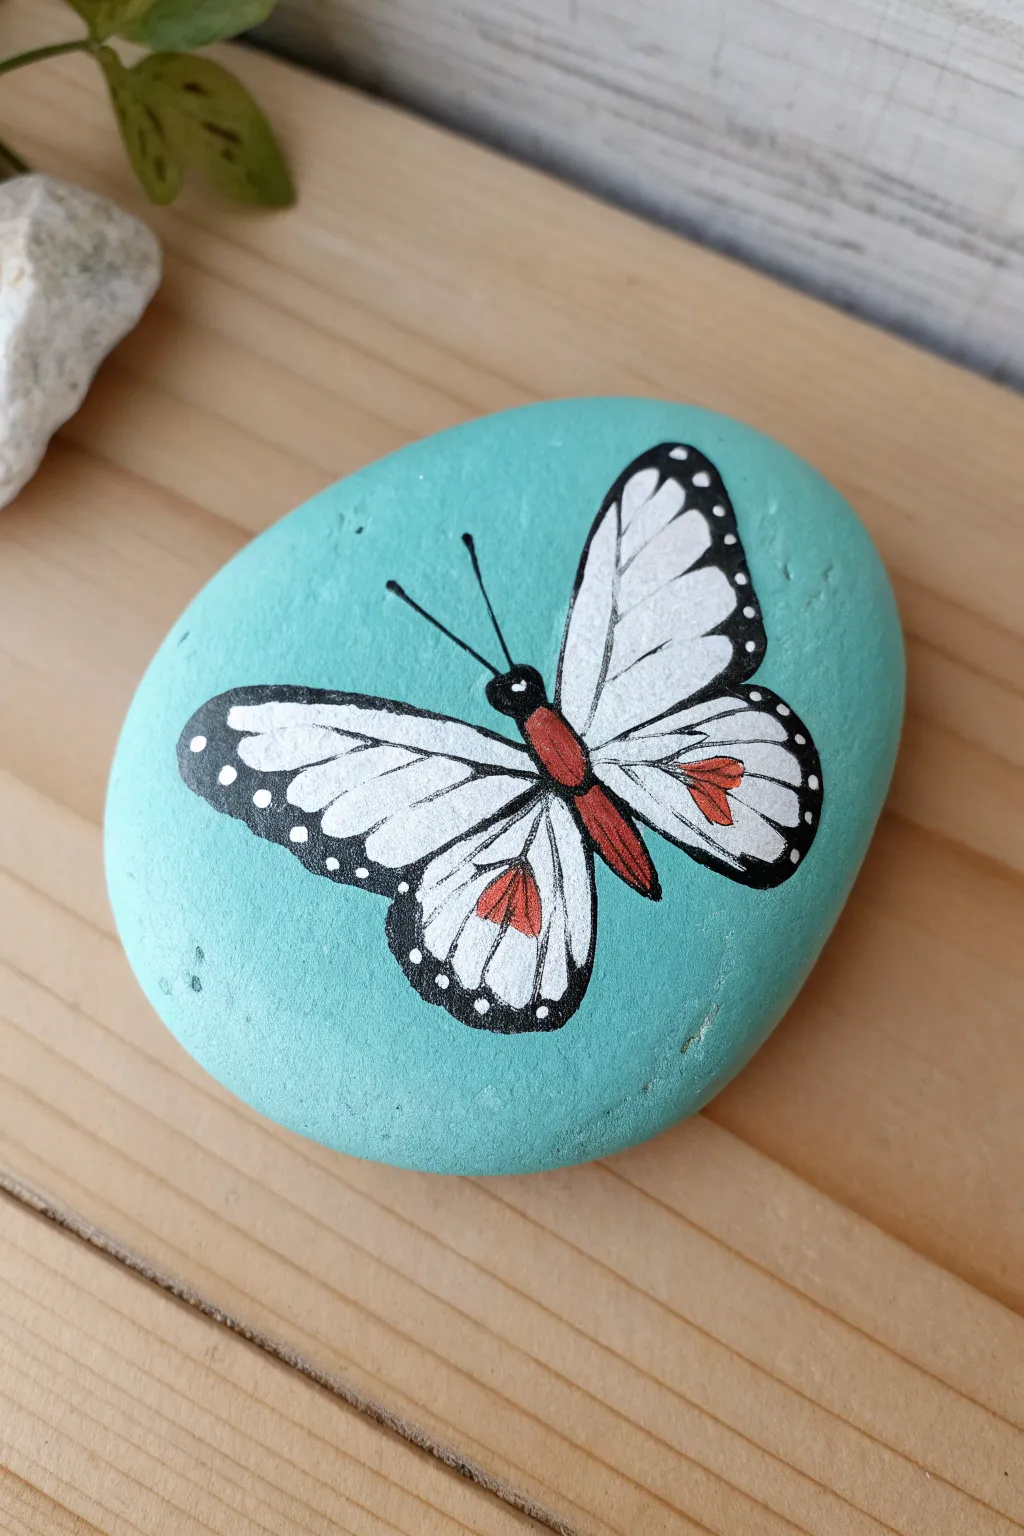
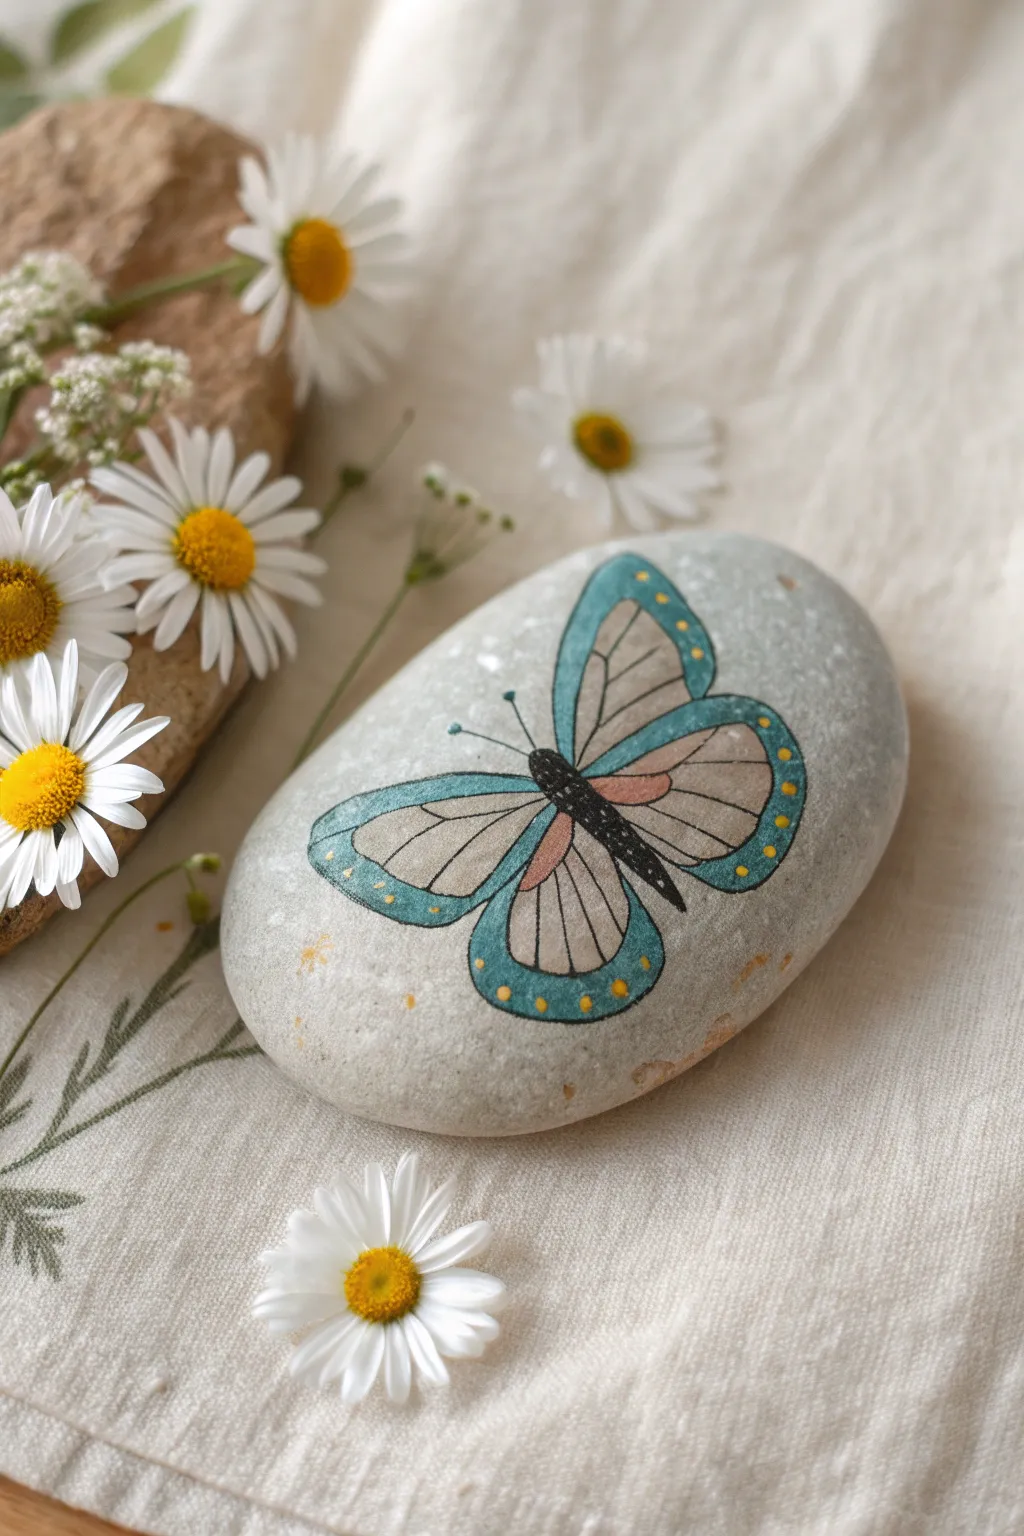
Simple Bold Outline Butterfly
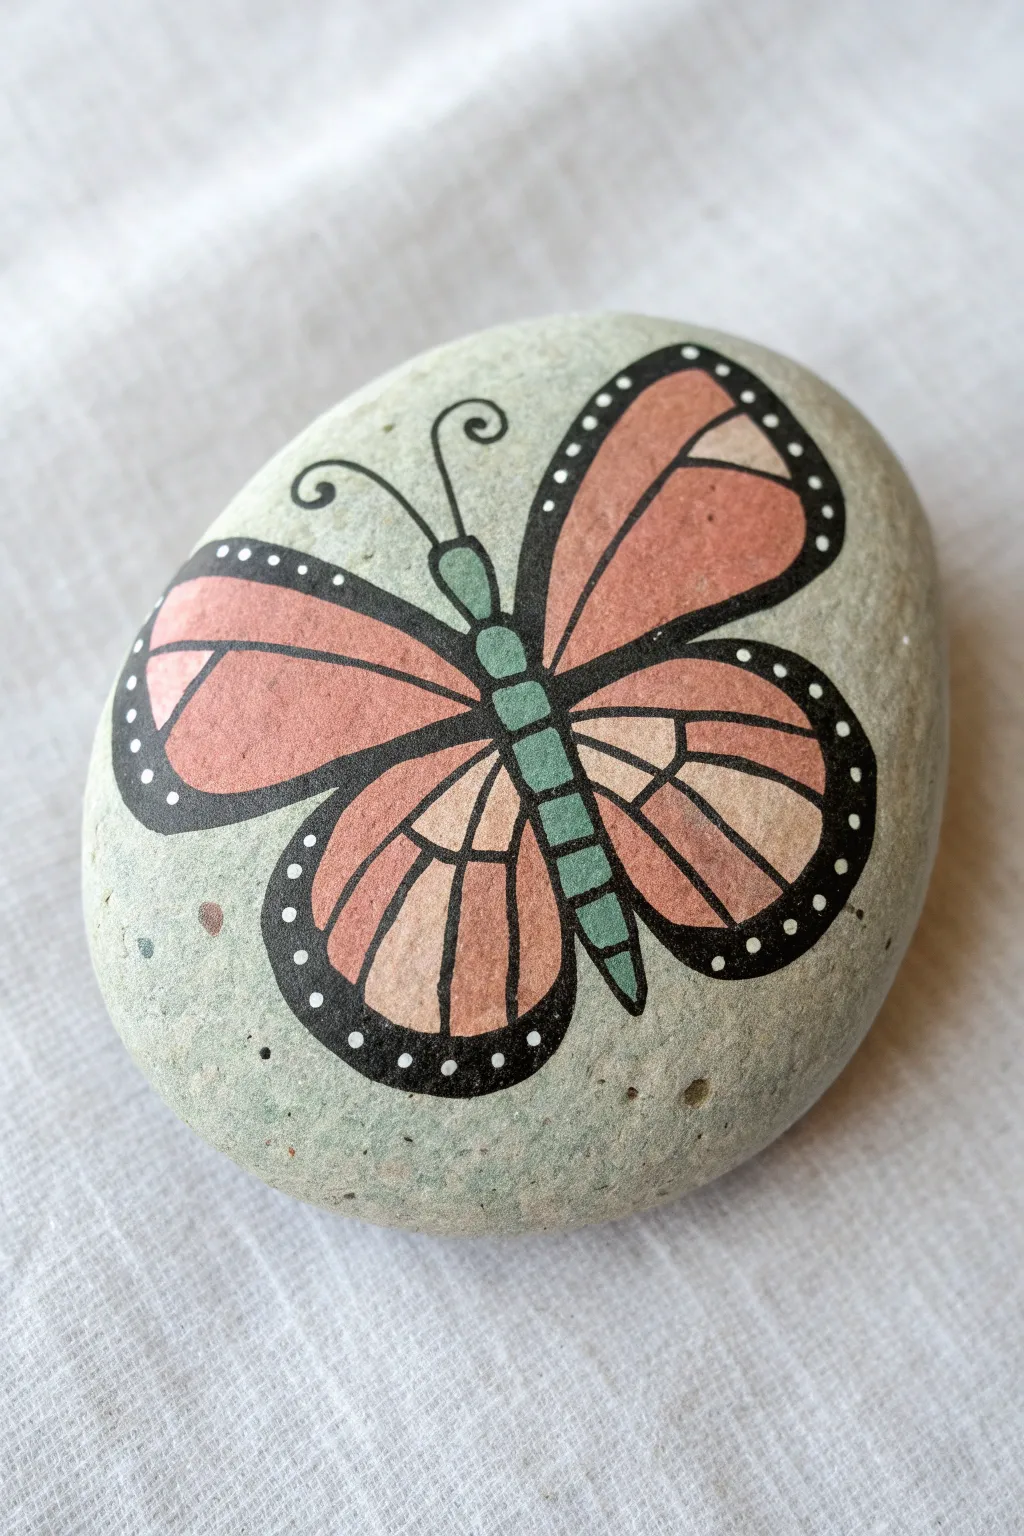
This elegant butterfly design mimics the look of stained glass with its bold black outlines and segmented wings. The teal body contrasts beautifully against coral wings, creating a peaceful, nature-inspired piece that fits perfectly in the palm of your hand.
Detailed Instructions
Materials
- Smooth, flat river stone (light grey is ideal)
- Pencil and eraser
- Acrylic paint pens (extra fine tip: black, white)
- Acrylic paint pens (medium or fine tip: coral/salmon, light pale orange, teal/seafoam green)
- Matte or satin varnish/sealant
- Damp cloth (for mistakes)
Step 1: Sketching the Design
-
Prepare your canvas:
Begin by washing your stone with warm soapy water and letting it dry completely. A clean surface ensures your paint pens won’t snag on grit. -
Draw the central axis:
Using a pencil, lightly draw a diagonal line across the center of the stone. This will act as the spine for your butterfly, giving the drawing a dynamic, tilted orientation. -
Sketch the body segments:
Along that central line, sketch a small oval for the head, followed by a longer thorax and a segmented abdomen. Keep the shapes rounded and organic. -
Outline the upper wings:
Draw two large, rounded triangular shapes extending from the upper thorax. The left wing should look slightly flatter due to the angle, while the right wing stretches upward toward the edge of the stone. -
Outline the lower wings:
Sketch two rounded tear-drop shapes below the upper wings. These should curve inward toward the tail of the butterfly. -
Detail the wing patterns:
Inside each wing, lightly draw the internal framework. Create ‘window panes’ by sketching lines that radiate from the body outward, separating the wing into smaller segments.
Step 2: Adding Color
-
Fill the body:
Take your teal or seafoam green paint pen and color in the body segments. I find it helpful to leave the tiny connecting lines unpainted for now to make the black outlining easier later. -
Paint the main wing panels:
Using the coral/salmon marker, fill in the largest segments of the wings. Apply the ink smoothly, aiming for solid coverage without distinct stroke marks. -
Add the lighter accents:
Color the smaller inner segments near the body (and a few outer accent panels) with the pale orange marker. This subtle color shift gives the wings depth and dimension. -
Let the colors set:
Allow the colored ink to dry completely. Acrylic markers dry fast, but give it at least 10 minutes to prevent the black outline from bleeding into the wet color.
Bleeding Lines?
If your black ink bleeds into the color, the base layer wasn’t dry enough. Let it sit longer, or try ‘dotting’ the black line on slowly rather than dragging the pen nib.
Step 3: Outlining and Details
-
Outline the body:
Switch to your extra-fine black paint pen. carefully trace the perimeter of the head and body segments. Draw horizontal lines to separate the abdomen segments clearly. -
Define the wing structure:
Trace the main outlines of the wings. Go slowly here—smooth, confident curves look better than sketchy, feathery lines. -
Thicken the outer borders:
Go back over the outermost edges of the wings to create a thick, bold black border. Make this band wide enough to eventually hold small white dots. -
Draw the veins:
Trace the internal lines separating your coral and pale orange sections. These lines should remain thinner than the outer border to maintain delicacy. -
Add the antennae:
From the head, draw two delicate, curving antennae that swirl outward. Add a tiny spiral at the very tip of each for a whimsical touch. -
Apply the white dots:
Once the thick black border is fully dry, use your white extra-fine pen to place small, evenly spaced dots along the dark rim of the wings. This high-contrast detail makes the design pop. -
Seal the artwork:
Finish by applying a coat of matte or satin varnish to protect your stone from the elements and scratching.
Steady Hand Trick
Rest your painting hand’s wrist on the table or even on the stone itself (if dry) to anchor your movement. This pivot point creates must smoother curves.
Now you have a permanent piece of nature art to brighten up your garden or desk


Side-Profile Butterfly on a Curve
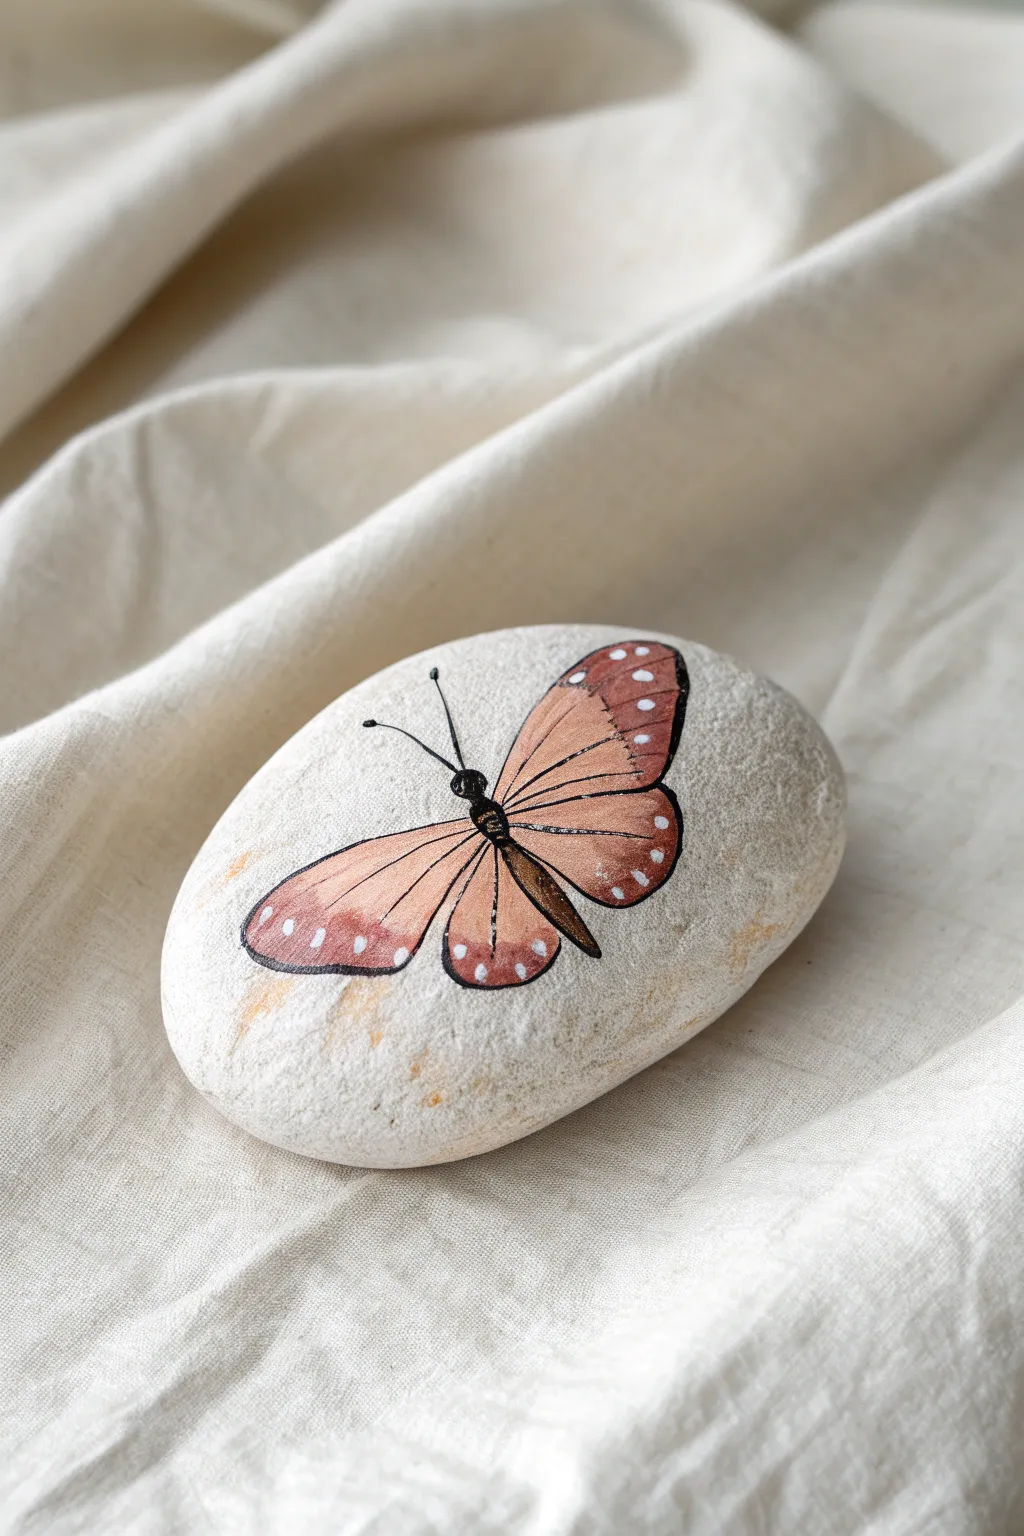
Capture the delicate beauty of a butterfly resting on a sun-drenched surface with this elegant rock painting project. The design uses the natural curvature of the stone to give the insect a lively, dimensional feel against a clean, untouched background.
Step-by-Step Guide
Materials
- Smooth, oval-shaped river rock (cleaned and dried)
- White gesso or acrylic primer (optional)
- Acrylic paints: warm white, burnt orange, yellow ochre, burnt sienna, dark brown, and black
- Fine liner brush (size 0 or 00)
- Small round brush (size 1)
- Micron pen or ultra-fine black paint marker
- Pencil and eraser
- Matte or satin varnish
Step 1: Preparation and Sketching
-
Clean Your Canvas:
Begin by thoroughly washing your rock with soapy water to remove any dirt or oils. Let it dry completely in the sun or use a hairdryer to speed things up. -
Prime the Surface:
If your rock is dark or porous, apply a thin layer of white gesso to the area where you’ll paint the butterfly. If you have a lovely pale stone like the one shown, feel free to skip this step to keep the natural texture. -
Outline the Body:
Using a light pencil grip, sketch a small, segmented body diagonally across the center of the rock. It should look like three small connected ovals, with the head at the top left. -
Draft the Wings:
Draw the forewing extending upward and the hindwing sweeping downward. Focus on getting the lovely tear-drop shape of the bottom wing correctly positioned against the curve of the stone.
Step 2: Base Colors
-
Mix the Wing Tone:
Create a soft, peachy-orange hue by mixing burnt orange with a touch of warm white and a tiny dot of brown. I find this muted tone looks more natural on rock than bright neon orange. -
Fill the Wings:
Using your small round brush, fill in the main sections of both wings with your mixed color. Keep the paint thin and even. -
Add Subtle Gradients:
While the base coat is still slightly damp, blend a tiny amount of yellow ochre near the body area of the wings to create a warm inner glow. -
Darken the Edges:
Mix a little burnt sienna into your base orange. Gently brush this darker shade toward the outer edges of the wings to imply depth and curvature. -
Let it Dry:
Allow the wing sections to dry completely. If you move on too soon, the black details will bleed into the orange.
Clean Lines?
If your brush keeps splaying, switch to a technical drawing pen (like a Micron) for the black veins. Just ensure the paint underneath is 100% dry first.
Step 3: Detailed Line Work
-
Paint the Body:
Use a fine liner brush and black paint to fill in the body segments you sketched earlier. Make the thorax (middle section) slightly fuzzy by stippling the edges. -
Outline the Wings:
Carefully trace the perimeter of the wings with black paint or a fine paint pen. Vary your pressure to make the lines thicker at the tips and thinner near the body. -
Create Wing Veins:
Draw delicate, sweeping veins radiating from the body outward. Imagine them like branches of a tree; keep them incredibly thin for realism. -
Add the Border Detail:
Thicken the black border at the outer edges of the wings, creating small semi-circular scallops where the wing edge meets the vein lines. -
Paint Antennae and Legs:
With a steady hand, draw two very fine antennae extending from the head. Add stick-thin legs gripping the ‘invisible’ surface beneath the body.
Go Metallic
Swap the white dots on the wings for metallic gold or silver paint. When the rock catches the light, your butterfly will look like a precious jewel.
Step 4: Highlights and Shadows
-
Add White Spots:
Dip the very tip of a toothpick or a dotting tool into white paint. Place tiny, distinct dots along the thick black borders of the wings. -
Highlight the Body:
Add a microscopic dash of grey or white to the top of the head and thorax to show where the light hits the insect’s body. -
Create a Shadow:
Mix a very watery wash of brown and black. Paint a faint, translucent shadow on the rock just underneath the bottom wing and legs to ground the butterfly. -
Enhance the Stone:
If you like the rustic look, dilute some gold or ochre paint until it’s like watercolor and dab it randomly around the butterfly for an aged, artistic effect. -
Seal the Artwork:
once fully dry (give it at least 24 hours), apply a coat of matte varnish. This protects the paint without adding an unnatural glossy shine.
Enjoy displaying your grounded little butterfly on a desk or tucked into a potted plant.


Bright Base Coat for Maximum Pop
This project transforms an ordinary oval river rock into a stunning piece of art featuring a white and red butterfly against a vivid teal backdrop. The high contrast of the bright base coat makes the delicate wing details pop beautifully, creating a perfect decorative accent for your garden or desk.
Detailed Instructions
Materials
- Smooth, oval river rock (palm-sized)
- Acrylic paint: Bright Teal/Turquoise
- Acrylic paint: Titanium White
- Acrylic paint: Mars Black or Carbon Black
- Acrylic paint: Bright Red or Red-Orange
- Wide flat brush for base coating
- Fine liner brush (size 0 or 00)
- Small round brush (size 1 or 2)
- Dotting tool or toothpick
- Water cup and paper towels
- Matte or glossy spray varnish (optional)
Step 1: Setting the Stage
-
Clean the canvas:
Begin by washing your stone with warm water and a little dish soap to remove any dirt or oils that might repel the paint. Let it dry completely in the sun or use a hairdryer to speed things up. -
Apply the base coat:
Using your wide flat brush, load up a generous amount of bright teal acrylic paint. Cover the entire top surface of the rock. -
Build opacity:
Allow the first coat to dry until it’s no longer tacky. Apply a second coat of teal to ensure a solid, opaque background with no rock surface showing through. -
Dry thoroughly:
This is crucial: let the teal base cure completely before starting the butterfly. If the base is wet, your white paint will turn pastel blue.
Paint Consistency
For the crispest black lines, thin your black acrylic slightly with water until it flows like ink. This prevents the brush from skipping.
Step 2: Blocking the Shape
-
Sketch the outline:
Lightly sketch the butterfly shape using a very faint pencil line or thin, watered-down white paint. Draw a central body line, two large upper wings, and two smaller lower wings. -
fill the wings in white:
Use your small round brush to fill in the four wing sections with titanium white paint. Don’t worry about the black borders yet; just get a solid white shape. -
Layer the white:
The white needs to be very bright to stand out against the teal. You will likely need two or three thin layers of white paint to get full coverage without brushstrokes. -
Paint the body:
Once the white wings are dry, use black paint and a small brush to paint the thorax and abdomen down the center. Make the top part (thorax) slightly wider and rounder. -
Add red details:
Switch to your red paint. carefully adding vivid red-orange patches to the lower body section and subtle little crescents or triangles on the lower wings near the body.
Step 3: Defining Details
-
Outline the upper wings:
Load your fine liner brush with inky consistency black paint. Trace the outer edge of the top wings, thickening the line towards the tips. -
Outline the lower wings:
Continue the black outline around the bottom wings. I find it helpful to rotate the rock as I pull the brush to keep my hand steady. -
Create the veins:
Using the very tip of your liner brush, draw thin, delicate veins radiating from the body outward across the white wings. Keep these lines extremely light. -
Add shading:
Mix a tiny drop of black into your white to make a very light grey. Gently glaze this grey near the body and under the veins to give the wings a slight curvature. -
Paint the antennae:
With your thinnest brush, pull two long, slender black lines extending from the head. Add a tiny dot at the very end of each antenna. -
Add the wing spots:
Dip a dotting tool or the tip of a toothpick into white paint. Place small dots along the thick black borders of the upper wings and the outer edges of the lower wings. -
Refine the edges:
Go back with your teal base color if you need to tidy up any wobbly black lines on the outside edge of the butterfly. -
Seal the artwork:
Once the painting is bone dry (give it a few hours), spray it with a varnish to protect the paint from chipping and to enhance the colors.
Metallic Magic
Swap the plain red paint for a metallic copper or gold to give the butterfly’s body a shimmering, jewel-like quality in the sunlight.
Now you have a vibrant, everlasting butterfly that captures the beauty of nature on stone
BRUSH GUIDE
The Right Brush for Every Stroke
From clean lines to bold texture — master brush choice, stroke control, and essential techniques.
Explore the Full Guide
Natural Stone Background Butterfly
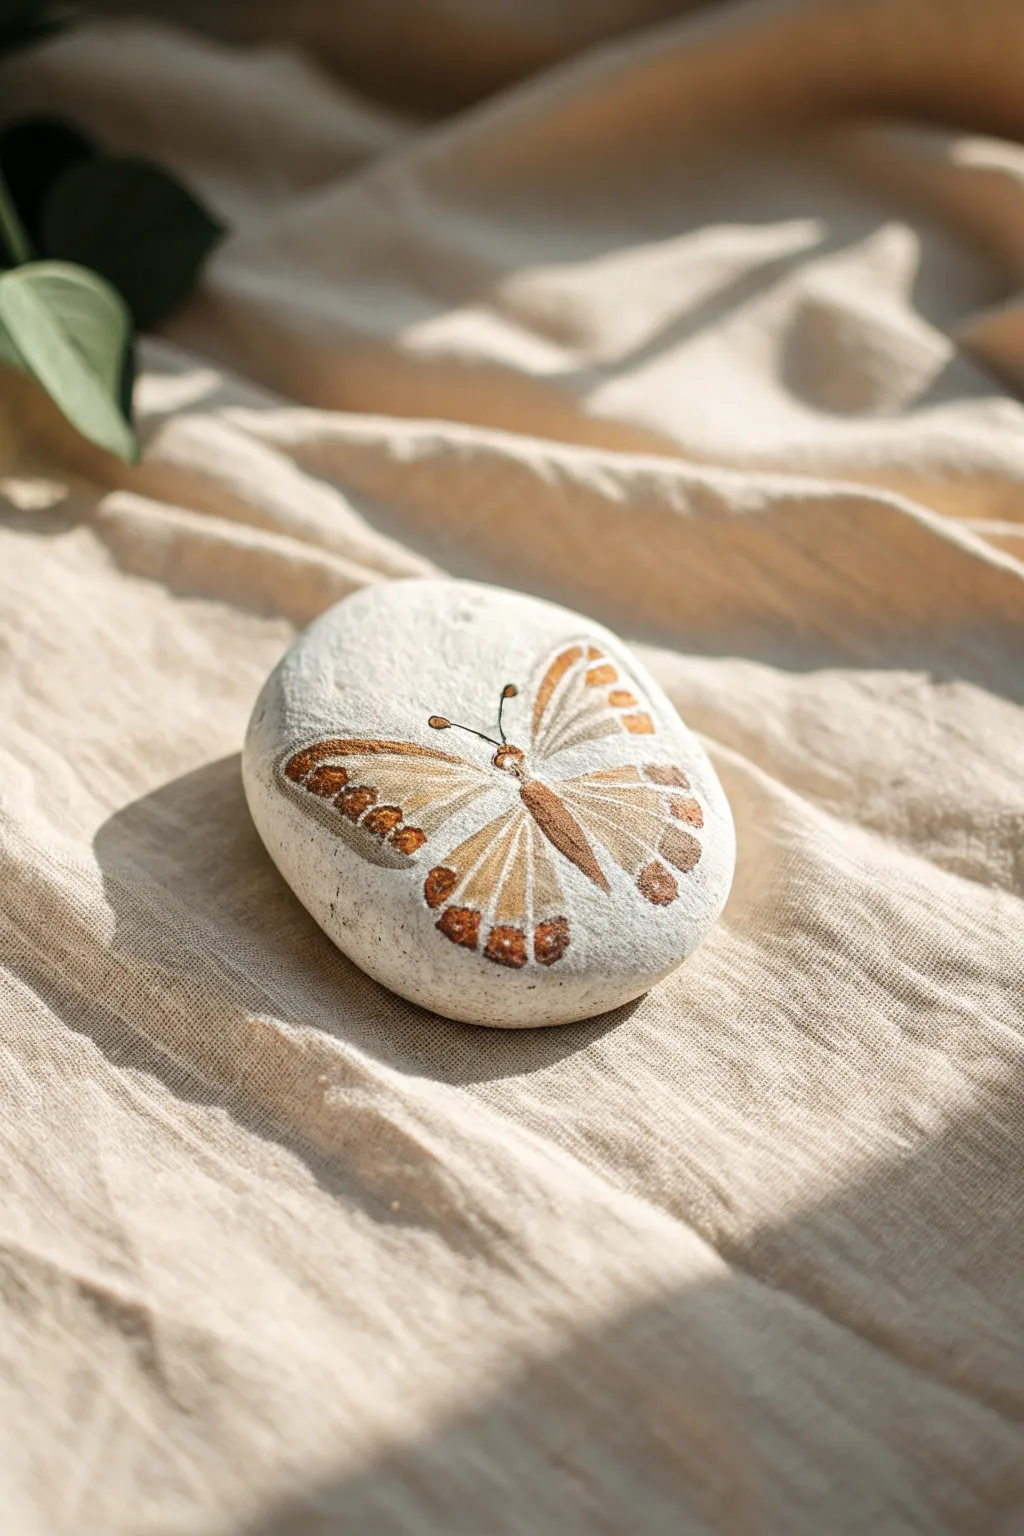
Embrace the organic beauty of nature by painting a delicate, moth-like butterfly directly onto a raw, pale stone. This project uses translucent layers and earthy tones to make the insect look like a fossilized treasure resting on the smooth surface.
Step-by-Step Guide
Materials
- Smooth, pale river rock (white or cream)
- Acrylic paints: Burnt Sienna, Raw Umber, Cream/Unbleached Titanium, White, Gold Metallic
- Fine detail brushes (size 000, 0, and 1)
- Pencil for sketching
- Matte varnish or sealant
- Palette for mixing
- Water cup and paper towel
Step 1: Preparation & Sketching
-
Clean the canvas:
Begin by scrubbing your stone with soapy water to remove any dirt or oils. Let it dry completely. The natural texture is key here, so we won’t be applying a base coat. -
Sketch the symmetry:
Lightly draw a central vertical line down the middle of the stone with a pencil to act as the butterfly’s body axis. -
Outline the wings:
Sketch the wing shapes on either side. Aim for a slightly triangular forewing and a rounded hindwing. Keep your pencil pressure very light so graphite doesn’t smudge into the paint later. -
Mark the body:
Draw the elongated oval for the body along the center line, separating the thorax (top) and abdomen (bottom).
Step 2: Base Layers & Wing Structure
-
Mix a sheer wash:
Dilute a bit of Unbleached Titanium or Cream paint with water. We want a semi-transparent glaze, not opaque coverage. -
Fill the wings:
Apply this glaze to the entire wing area. This helps the stone’s natural texture show through while providing a light background for the details. -
Paint the veins:
Using a size 0 brush and thinned Raw Umber, paint the skeletal veins of the wings radiating outward from the body. These should be very thin, spidery lines. -
Define the edges:
Use Burnt Sienna to gently outline the outer edges of the wings, creating a warm border that fades inward.
Keeping Lines Crisp
To get razor-sharp veins, turn your brush while pulling the stroke. If the paint drags, add a drop of water to improve flow.
Step 3: Adding Details & Color
-
Create the spots:
Mix Burnt Sienna with a tiny touch of Gold Metallic. Paint the decorative rectangular spots along the outer edges of the wings. -
Darken the tips:
Add small dabs of Raw Umber to the very tips of the wing spots to give them dimension and depth. -
Highlight the inner wings:
Using a dry-brush technique with opaque White paint, add gentle streaks between the veins near the center of the wings. This simulates light hitting the translucent membrane. -
Paint the body:
Fill in the body with solid Burnt Sienna. While wet, stipple in some darker Raw Umber on the sides to make it look round and fuzzy. -
Add the head:
Paint a small circle for the head at the top of the thorax using the dark brown mix.
Metallic Magic
Mix a tiny amount of gold mica powder into your final varnish layer over just the wings for a subtle, iridescent shimmer.
Step 4: Final Touches
-
Draw antennae:
With your finest 000 brush and thinned black or dark brown paint, pull two delicate, curved lines extending from the head for the antennae. -
Refine the spots:
Go back over the orange wing spots. If they look too flat, add a tiny dot of cream paint to the center of each to act as a highlight. -
Clean up edges:
I like to take a damp cotton swab or a clean, wet brush to wipe away any stray graphite lines that are still visible around the painting. -
Seal the stone:
Once fully dry (give it at least an hour), apply a layer of matte varnish. A glossy finish might look unnatural, so matte is best to preserve that raw stone aesthetic.
Now you have a timeless piece of nature art that looks beautiful on a desk or tucked into a garden planter
Ombré Gradient Wings
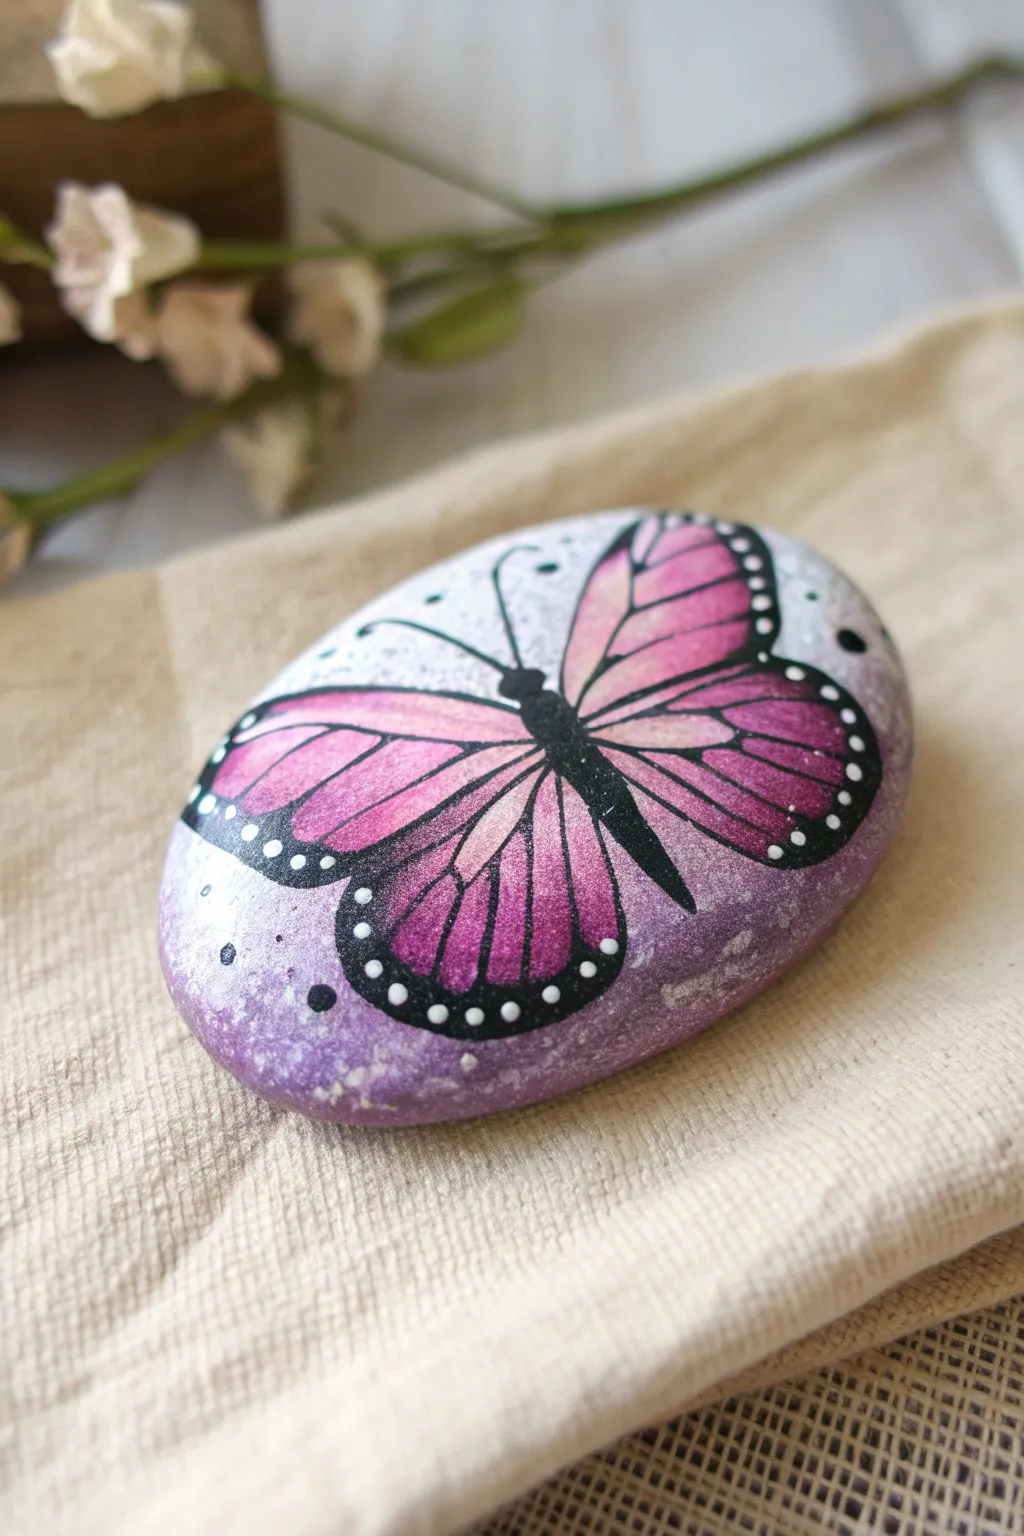
Capture the delicate beauty of a monarch-style butterfly with this stunning rock painting project. By blending soft pinks into deep magentas against a misty purple background, you’ll create a dimensional piece that looks like it’s ready to take flight.
Step-by-Step Guide
Materials
- Smooth, oval river rock (cleaned and dried)
- White acrylic paint or gesso
- Acrylic paints: Magenta, baby pink, violet/lilac, black
- Fine liner brush (size 0 or 00)
- Small flat shader brush
- Small round brush
- Dotting tool or toothpick
- Sponge or foam pouncer (optional)
- Clear acrylic sealer (spray or brush-on)
Step 1: Base and Background
-
Prime the surface:
Start by coating the entire top surface of your rock with white acrylic paint. This primer layer ensures your bright pinks and purples will pop rather than sinking into the stone’s natural gray tones. -
Create the vignette:
Once the white is dry, mix a soft lilac or violet paint. Using a sponge or a dry brush, gently stipple color around the outer edges of the rock, fading it inward to leave a lighter, almost white center where the butterfly will rest. -
Splatter texture:
For that magical, speckled look seen in the background, load a brush with watered-down white paint and flick the bristles to create tiny, subtle specks over the purple gradient.
Fixing Wobbly Lines
If your black veins get too thick or shaky, wait for them to dry completely. Then, use the pink wing color to carefully paint along the edge of the mistake to ‘erase’ and thin the line back down.
Step 2: Painting the Wings
-
Sketch the outline:
Lightly sketch the butterfly shape with a pencil. Draw a central body line, followed by the two large upper wings and two smaller lower wings, making sure they stretch almost to the rock’s edge. -
Base coat the wings:
Use your lightest baby pink to fill in the entire shape of the wings. Do not worry about the veins or black edges yet; just get a solid, opaque layer of pink down. -
Apply the darker gradient:
While the pink base is still slightly tacky or freshly dry, apply magenta paint to the outer third of the wings. Use a clean, slightly damp flat brush to gently pull this dark color inward, blending it seamlessly into the lighter pink center. -
Add wing details:
Once the gradient is fully dry, use tiny strokes of white or very pale pink near the body to add brightness to the inner wings, enhancing the glowing effect.
Step 3: Linework and Details
-
Paint the body:
Using a small round brush and black paint, fill in the central body section. It should be slightly thicker at the thorax (top) and taper down to a point at the abdomen. -
Outline the wings:
Switch to your fine liner brush. Carefully paint a bold black outline around the entire perimeter of the wings. Make the line thicker at the outer edges and thinner near the body. -
Create the veins:
Draw thin, sweeping black lines radiating from the body outward to the black edges. Try to keep your hand steady and use only the very tip of the liner brush for these delicate veins. -
Thicken the borders:
Go back to the outer edges of the wings and thicken the black border significantly, creating patches of solid black where the white dots will eventually go. -
Add the antennae:
Paint two thin, curved lines extending from the top of the head for antennae. Keep the movement loose and natural.
Try Metallic Accents
For an extra magical touch, replace the white dots on the wing edges with metallic silver or gold paint. It catches the light beautiful when displayed outdoors.
Step 4: Final Touches
-
Dot the borders:
Dip a small dotting tool or a toothpick into white paint. Carefully place a row of small dots inside the thick black borders you painted earlier. -
Highlight the background:
add a few larger black dots floating in the background space for balance, if desired, mirroring the photo’s style. -
Seal the artwork:
Wait at least 24 hours for the paint to cure completely. Finish by applying a clear acrylic sealer to protect your detailed work from scratches and weather.
Now you have a serene little painted stone perfect for brightening up a desk or garden path

PENCIL GUIDE
Understanding Pencil Grades from H to B
From first sketch to finished drawing — learn pencil grades, line control, and shading techniques.
Explore the Full Guide
Soft Pastel Butterfly Wings
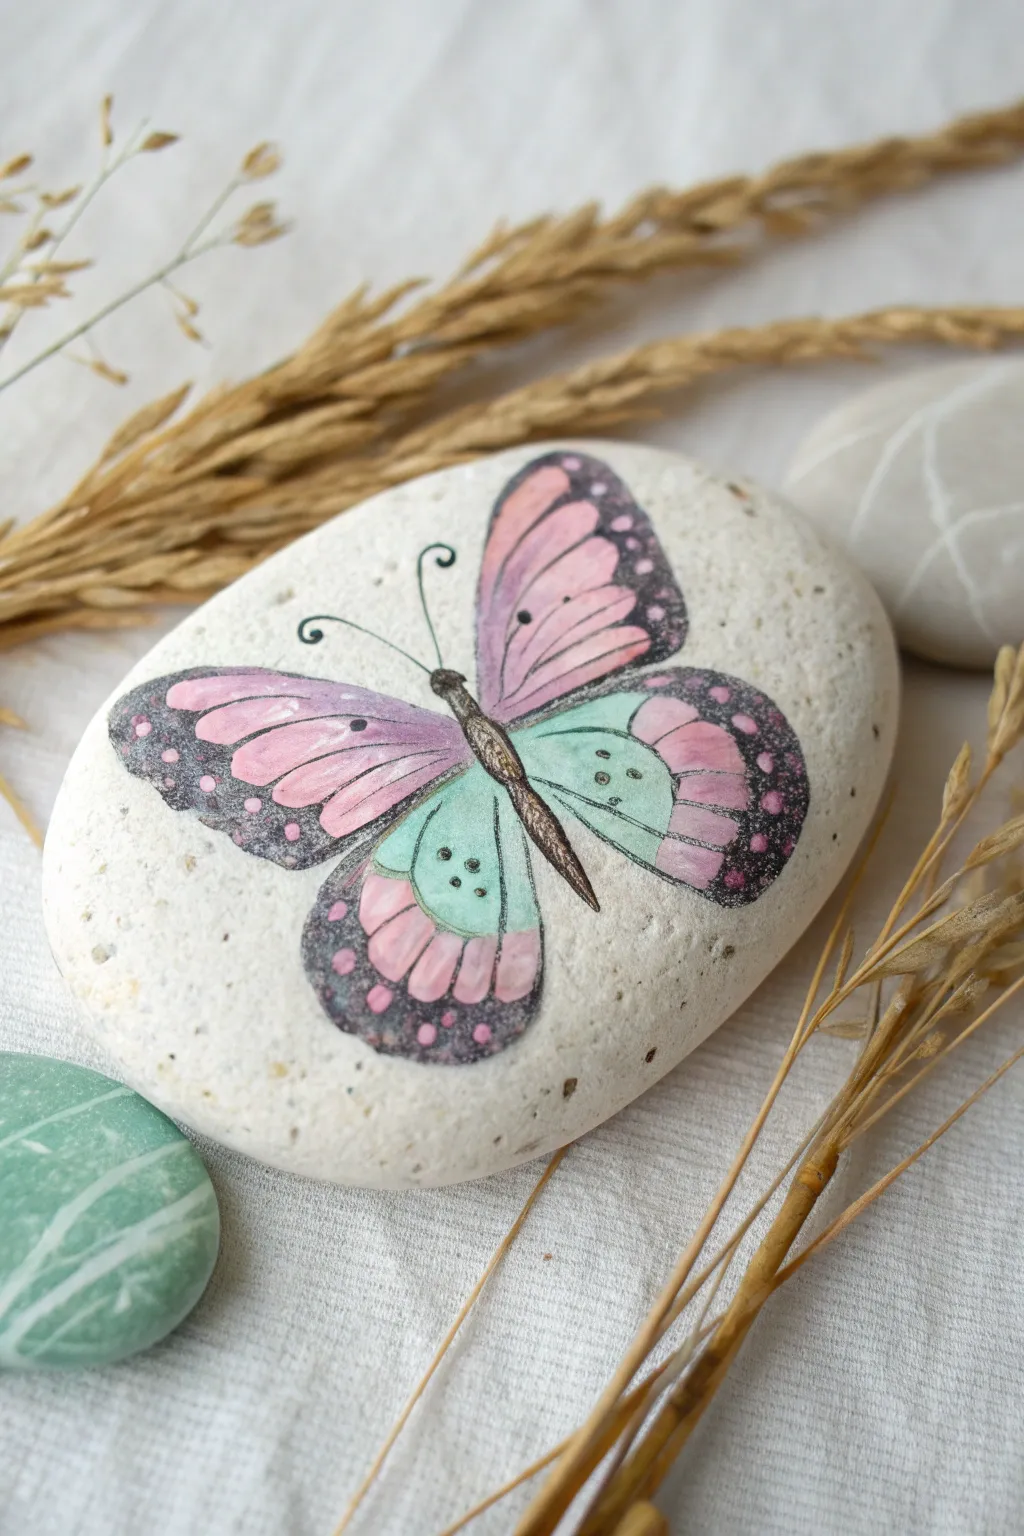
Capture the delicate beauty of butterfly wings on a smooth river stone with this soft, pastel-toned project. The combination of muted pinks, mint greens, and crisp black detailing creates an elegant, almost watercolor-effect finish perfect for garden decor or paperweights.
Detailed Instructions
Materials
- Smooth, flat white or light-colored river rock
- Pencil and eraser
- Acrylic paints (Soft Pink, Mint/Teal Green, White, Black)
- Fine liner brush (size 0 or 00)
- Small flat or filbert brush
- Black acrylic paint pen (extra fine tip) or permanent marker
- Matte varnish or sealant
- Water cup and paper towels
- Palette for mixing
Step 1: Preparation and Sketching
-
Clean the canvas:
Begin by washing your stone thoroughly with warm soapy water to remove any dirt or oils. Let it dry completely before starting, as moisture trapped in the stone can ruin the paint later. -
Base coat (optional):
If your stone isn’t naturally white or light-colored, paint a layer of white acrylic over the surface to make the pastel colors pop. Let this dry fully. -
Sketch the symmetry:
Using a pencil, lightly draw a vertical line down the center of the rock to act as the body’s guide. This helps ensure your wings stay symmetrical. -
Outline the wings:
Sketch the upper wings, which are larger and more rounded at the top. Follow with the lower wings, which should be slightly smaller and tear-drop shaped. Don’t press too hard with the pencil.
Water It Down
Dilute your acrylics slightly with water to get a translucent, watercolor-like finish. This makes overlapping the pink and teal colors much smoother and softer.
Step 2: Painting the Base Colors
-
Mix soft pastels:
On your palette, mix a touch of white into your pink and mint green paints to soften them. You want a milky, gentle hue rather than a vibrant neon. -
Upper wing creation:
Fill the majority of the upper wings with the soft pink mix. Leave the very outer edges blank for now. -
Lower wing transition:
Paint the inner section of the lower wings with the mint green color. I find using a small filbert brush helps get into the curves smoothly. -
Adding the secondary color:
While the green is still slightly tacky or just dry, paint the outer tips of the lower wings with the soft pink to create a beautiful two-tone effect. -
Create the border zone:
Using diluted black or a dark grey, paint a thick border around the outer edges of all four wings. It doesn’t need to be perfect yet, as we will refine it later.
Step 3: Detailing and Definition
-
Draw the veins:
Using your fine liner brush or a black paint pen, carefully draw thin lines radiating from the body outward through the pink and green sections. These are the veins of the wings. -
Refine the edges:
Go over the outer black borders again to make them solid and opaque. While doing this, add small white or light pink dots inside the black border for that classic butterfly pattern. -
Paint the body:
Paint the central body of the butterfly in a dark brown or black. Make the thorax (upper part) slightly thicker than the abdomen (lower part). -
Add texture:
Use a dry-brush technique with a tiny amount of white paint to add subtle highlights to the body, giving it a fuzzy appearance. -
Antennae work:
With your thinnest brush or pen, draw two delicate antennae curving outward from the head. Adding a tiny curl at the end gives it a whimsical touch.
Add Some sparkle
Mix a tiny pinch of fine iridescent glitter into your final varnish coat, or use metallic gold paint for the veins to make the wings shimmer in the sunlight.
Step 4: Finishing Touches
-
Clean up:
If you made any mistakes or smudges on the white stone background, use a small brush with white acrylic to paint over them, acting like an eraser. -
Seal the artwork:
Once the paint is absolutely dry (give it at least an hour), apply a layer of matte varnish. This protects the delicate pastel colors without adding a distracting glossy shine.
Place your lovely new stone in a sunny spot or gift it to a friend who loves nature
Stained-Glass Wing Segments
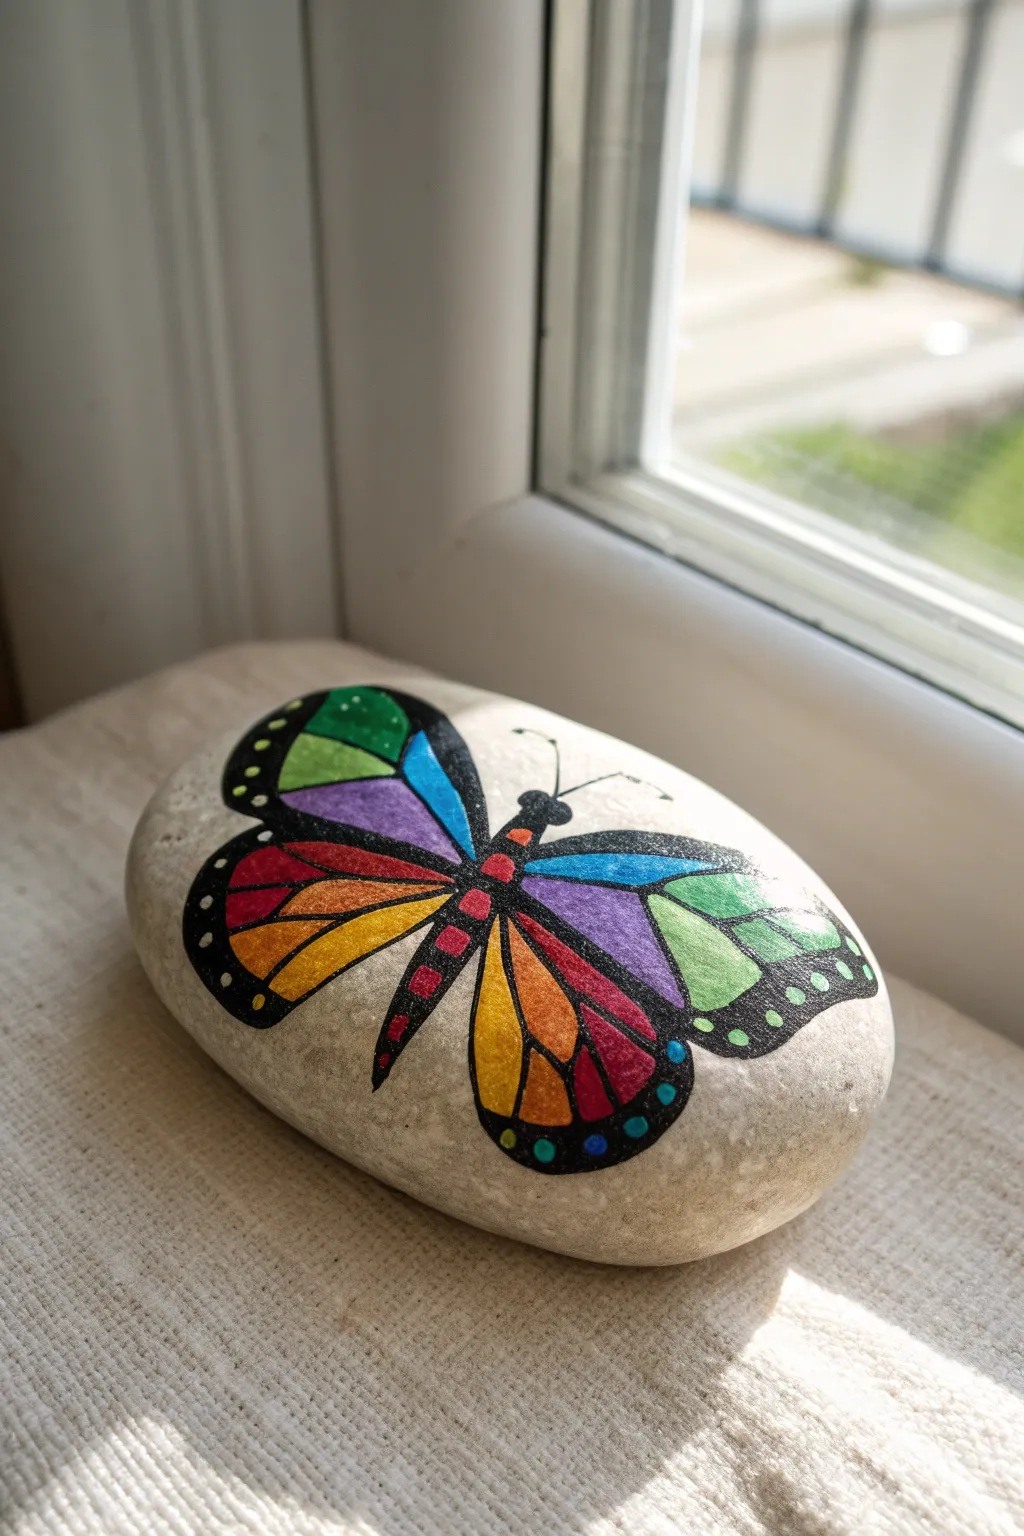
Transform a simple river rock into a luminous piece of art by mimicking the look of stained glass. The vibrant, segmented wings create a beautiful rainbow effect that shines against the pale stone background.
How-To Guide
Materials
- Smooth oval river rock (light colored)
- Pencil and eraser
- Fine-point black paint pen or liner marker
- Acrylic paints (Red, Orange, Yellow, Green, Cyan, Purple, Magenta)
- Small fine-detail paintbrushes (Sizes 0 and 00)
- White paint pen or small dotting tool
- Clear varnish or sealant
Step 1: Sketching the Outline
-
Prepare your canvas:
Begin by washing your rock thoroughly with soapy water and letting it dry completely. A clean surface ensures your paint adheres properly and lasts longer. -
Map the center:
Using a pencil, lightly draw a thin, vertical elongated oval in the center of the rock for the butterfly’s body. Add a small circle at the top for the head. -
Draft the upper wings:
Sketch two large, triangular shapes extending from the upper thorax. Curve the top edges gently to soften the look, making them symmetrical. -
Draft the lower wings:
Draw two smaller, rounded teardrop shapes extending from the lower body. These should tuck slightly under the upper wings.
Step 2: Creating the Grid
-
Main outlines:
Trace over your pencil exterior lines with a fine-point black paint pen. Create a confident, steady line to define the butterfly shape. -
Segmenting the wings:
In the upper wings, draw two long diagonal lines fanning out from the body to the wing tip. Then, add a curved horizontal line intersecting them, creating diverse geometric panes. -
Lower wing details:
For the lower wings, draw three vertical lines radiating downward. Connect them with a gentle arc near the bottom edge to create distinct sections. -
Add the antennae:
Draw two thin, curved lines extending from the head, finishing each with a tiny dot.
Clean Lines Tip
If your hand is shaky, rest your pinky finger on a dry part of the rock while outlining. This acts as an anchor and gives you much greater control over fine lines.
Step 3: Applying Vibrant Colors
-
Start with warm tones:
Using your detail brush, fill the lower left wing segments with a gradient of yellow, orange, and red. Keep the colors distinct but adjacent to mimic glass pieces. -
Cool tones for contrast:
Paint the upper right wing segments with cool colors like teal, cyan, and deep blue. This asymmetry creates visually interesting movement. -
Mixing the spectrum:
Fill the remaining upper left wing with green, purple, and magenta gradients. The goal is a rainbow patchwork effect. -
Right lower wing:
Mirroring the opposite side loosely, paint the lower right wing with strips of rainbow colors: purple, blue, green, and a touch of red. -
Body accents:
Paint the main body black, but leave small rectangular segments open and fill them with bright red or magenta for a unique robotic or jewel-like spine.
Level Up: Metallic Hues
For a magical touch, use metallic gold or silver paint instead of white for the reflective dots. It makes the ‘stained glass’ effect shimmer beautifully in sunlight.
Step 4: Refining and Sealing
-
Re-lining boundaries:
Once the color layers are fully dry, go back over all the black outlines with your paint pen. This cleans up any messy edges where color might have spilled over. -
Thicken the borders:
Make the outer perimeter lines of the wings slightly thicker than the interior lines. This adds weight and mimics the lead came used in real stained glass. -
Edge details:
Paint small, colored circles along the outer black rim of the wings—cyan dots on the bottom right and orange/yellow dots on the bottom left. -
White highlights:
Using a white paint pen or dotting tool, add tiny white dots along the upper wing borders and a few specks on the colored segments to suggest light reflection. -
Final varnish:
Allow the entire stone to dry for at least 24 hours. Apply a coat of clear, glossy varnish to protect the artwork and give it a true glass-like sheen.
Now you have a permanent splash of color that will brighten up any windowsill or garden corner


White-Dot Wing Border Detail
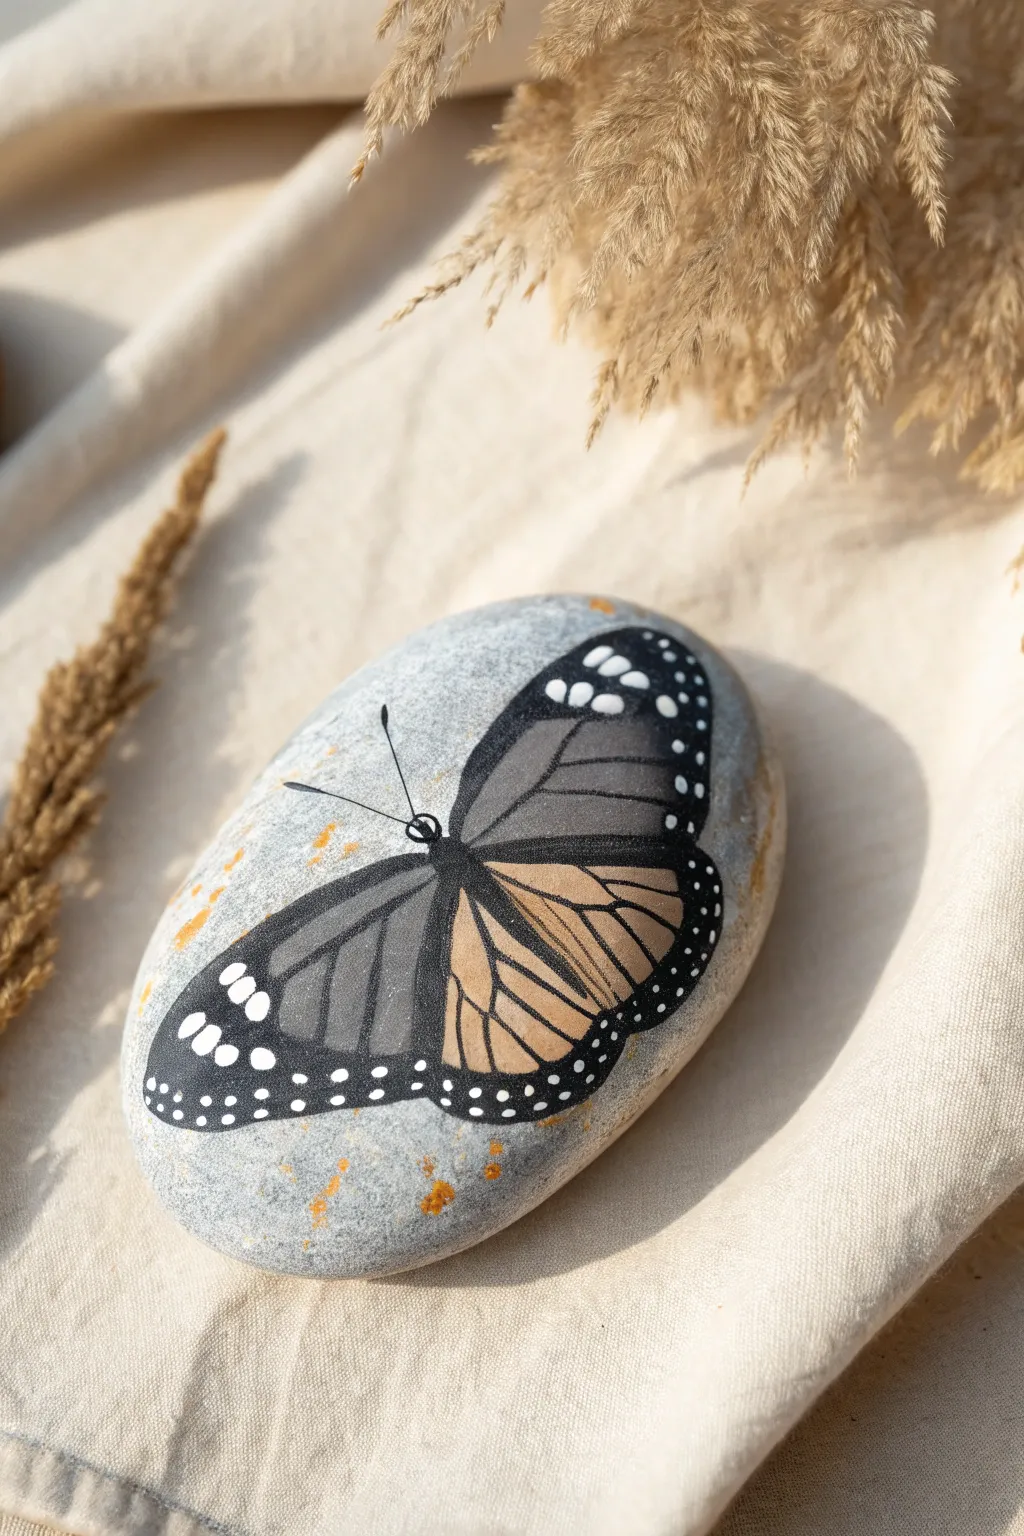
Transform a simple grey stone into a stunning piece of nature art with this sophisticated butterfly design. The muted palette of greys and earthy golds creates a realistic yet artistic look that stands out beautifully against the natural stone background.
Step-by-Step Guide
Materials
- Smooth oval river rock (flat surface is best)
- Acrylic paints: black, white, charcoal grey, tan/ochre, metallic gold
- Fine detail brushes (size 0 and 00)
- Small flat brush (size 2 or 4)
- Pencil for sketching
- Palette for mixing
- Sealer (gloss or matte varnish)
- Clean water and paper towels
Step 1: Base and Texture
-
Prepare the Canvas:
Begin with a clean, dry rock. If your rock has a rough texture, you might want to sand it lightly, but a natural smooth river stone works best for this detailed work. -
Add Golden Speckles:
Before painting the butterfly, add the subtle background texture. Dip a stiff brush or an old toothbrush into metallic gold or watered-down ochre paint. -
Create the Splatter:
Flick the bristles to create tiny, random speckles across the surface. Let this dry completely so it doesn’t smear when you paint the main subject. -
Sketch the Outline:
Using a pencil, lightly draw the outline of the butterfly. Start with a central vertical line for the body, then arc the upper wings high and wide, and the lower wings more rounded and smaller.
Pro Tip: Dotting Tools
Don’t struggle with a brush for the dots especially if you are shaky. Use the head of a pin, a toothpick, or a specialized nail-art dotting tool for perfectly round circles.
Step 2: Blocking in Color
-
Paint the Body:
Use deep black paint to fill in the central body section. It should be a slender, segmented shape tapering at the bottom. -
Map the Upper Wings:
The upper wings are divided into two main color zones. Paint the inner section (closest to the body) with a dark charcoal grey. -
Map the Lower Wings:
For the lower wings, paint the inner sections with your tan or ochre color. I like to mix a tiny bit of white into the ochre here to make it opaque enough to cover the grey stone. -
Define the Borders:
Using black paint and a steady hand, outline the entire perimeter of all four wings to create the thick, dark border characteristic of monarchs.
Troubleshooting: Opacity Issues
If the tan or ochre paint looks transparent against the grey rock, don’t just pile on thick paint. Paint a layer of white first, let it dry, and then paint the tan over it.
Step 3: Veining and Details
-
Draw the Veins:
Switch to your finest liner brush. connect the black wing borders to the butterfly body with thin, sweeping black lines. These ‘veins’ should radiate outward like a fan. -
Refine the Grey Zone:
On the upper grey wings, ensure the black veins are sharp. You can gently dry-brush a lighter grey in the center of the panels to add a slight curve or sheen to the wing surface. -
Texture the Tan Zone:
On the lower ochre wings, add very faint streaks of a darker brown or watered-down black along the veins to give the wing depth and texture. -
Add Antennae:
With the very tip of your detail brush, paint two fine, curved lines extending from the head. Add tiny bulbs at the ends.
Step 4: The White Dot Finish
-
Mix the White:
Ensure your white paint is fluid but not watery; it needs to hold a round shape. Place a small puddle on your palette. -
Dot the Upper Border:
Along the thick black border of the upper wings, carefully place pairs of small white dots. Use larger dots near the wing tips and tinier ones as you move inward. -
Dot the Lower Border:
Continue this pattern on the lower wings. Space them evenly inside the black margin to create that classic spotted edge. -
Final Cleanup:
Look over your work. If any black lines look shaky, use the appropriate background color (grey or tan) to tidy up the edges. -
Seal the Artwork:
Once the paint is aggressively dry (give it at least an hour), apply a coat of clear varnish to protect your art and make the colors pop.
Place your beautiful stone in a garden pot or on a sunny windowsill to enjoy your handiwork
Fantasy Butterfly With Eye Spots
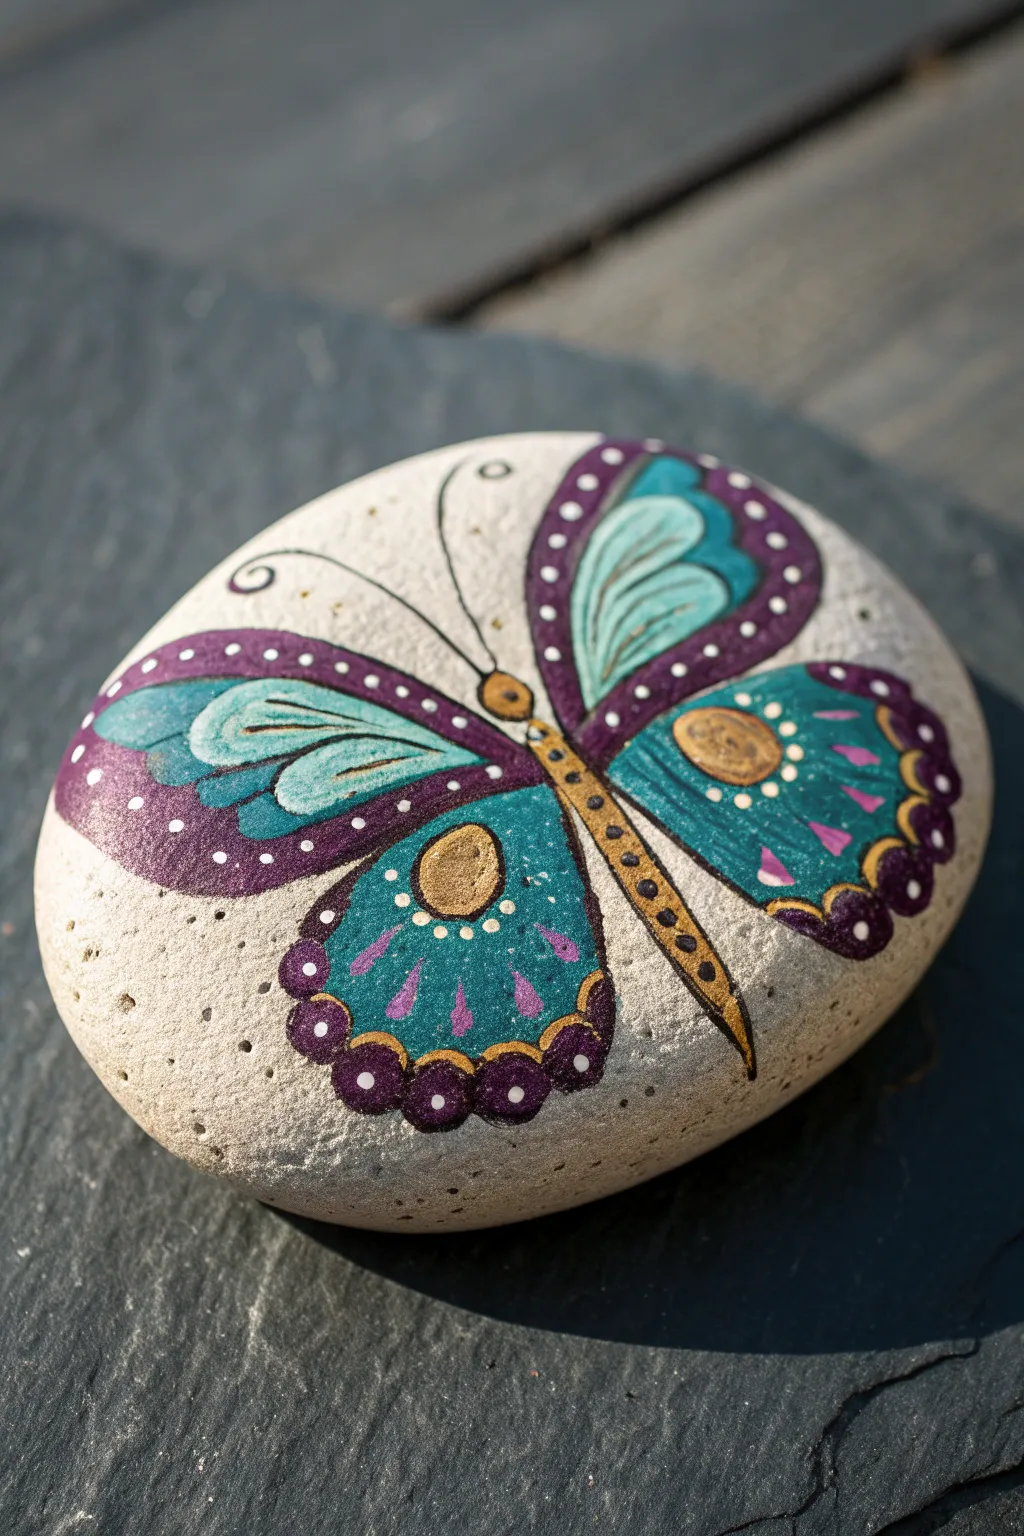
Transform a smooth, pale stone into a work of art with this fantasy-inspired butterfly design featuring elegant teal wings and shimmering gold accents. The unique eye-spot details on the lower wings add a touch of mystery and depth to this colorful garden decoration.
Detailed Instructions
Materials
- Smooth, light-colored river rock (flat is best)
- Pencil for sketching
- Acrylic paints: Gold, Teal/Turquoise, Dark Purple, White, Light Pink/Lilac
- Fine liner brush (size 0 or 00)
- Small round brush (size 2)
- Dotting tools (various sizes)
- Varnish or clear sealant
Step 1: Preparation & Sketching
-
Clean the stone:
Before you begin, wash your rock thoroughly with soap and water to remove any dirt or oils, then let it dry completely so the paint adheres properly. -
Lightly sketch the outline:
Using a pencil, draw the central body as a long, slender line down the middle of the rock. Then, sketch the upper wings (larger and more triangular) and the lower wings (rounded teardrop shapes). -
Mark the eye spots:
Inside each of the lower wings, draw a circle to mark where the large gold eye spots will go later.
Pro Tip: Symmetry Hack
Work symmetrically as you go—paint one stroke on the left wing, then immediately do the corresponding stroke on the right. It’s easier than finishing one full side first.
Step 2: Base Colors
-
Paint the golden body:
Use your gold metallic paint to fill in the long, segmented body of the butterfly. Make the head slightly rounder at the top. -
Fill the lower wings:
Paint the entirety of the lower wing shapes with a rich teal or turquoise color, carefully painting around the circular eye spots you sketched. -
Paint the upper wing centers:
For the upper wings, paint a teal teardrop shape in the center, leaving a wide border around the edges for the purple trim. -
Add the purple borders:
Fill in the wide border around the upper wings with dark purple paint. Also, paint a scalloped edge along the bottom of the teal lower wings using the same purple. -
Fill the gold eye spots:
Now, paint the reserved circular spots heavily with gold paint to create the focal point of the lower wings.
Step 3: Detailing & Linework
-
Define the veins:
Once the teal paint is dry, use a very fine liner brush and black or dark grey paint to draw delicate veins inside the upper teal wing sections. -
Highlight the upper wings:
Add subtle white swoop lines inside the upper teal sections to give the wings a sense of volume and shine. -
Create the scalloped separates:
On the lower wings, paint thin, curving purple lines that radiate from the gold eye spot down to the purple scalloped edge. -
Add pink accents:
Paint small, triangular pink or lilac shapes inside the purple radiating sections on the lower wings for a pop of contrast. -
Outline the body:
Use a fine liner brush with black paint to carefully outline the gold body segments and draw thin, curving antennae coming from the head. -
Outline the wings:
Outline the entire butterfly shape with a steady, thin black line to separate the wings from the bare stone.
Troubleshooting: Shaky Lines?
If your outlining hand is shaky, rest your pinky finger on the dry part of the stone for stability. You can also thin your black paint slightly with water for smoother flow.
Step 4: Decorative Dotted Accents
-
Dot the purple borders:
Dip a small dotting tool into white paint and create a row of evenly spaced dots along the dark purple border of the upper wings. -
Decorate the lower scallops:
Add a white dot in the center of each purple scallop at the bottom of the lower wings. -
Embellish the eye spots:
Using a very small dotting tool, place tiny white dots around the perimeter of the gold eye circles on the lower wings. -
Add body details:
Place tiny black dots down the center of the gold body to define the segments clearly. -
Seal the artwork:
Allow all paint to dry for at least 24 hours, then apply a coat of clear varnish or sealant to protect your design from weather or scratches.
Place this fantastical creature in a potted plant or on a windowsill to enjoy its colors year-round
Dotted Flight Trail Butterfly
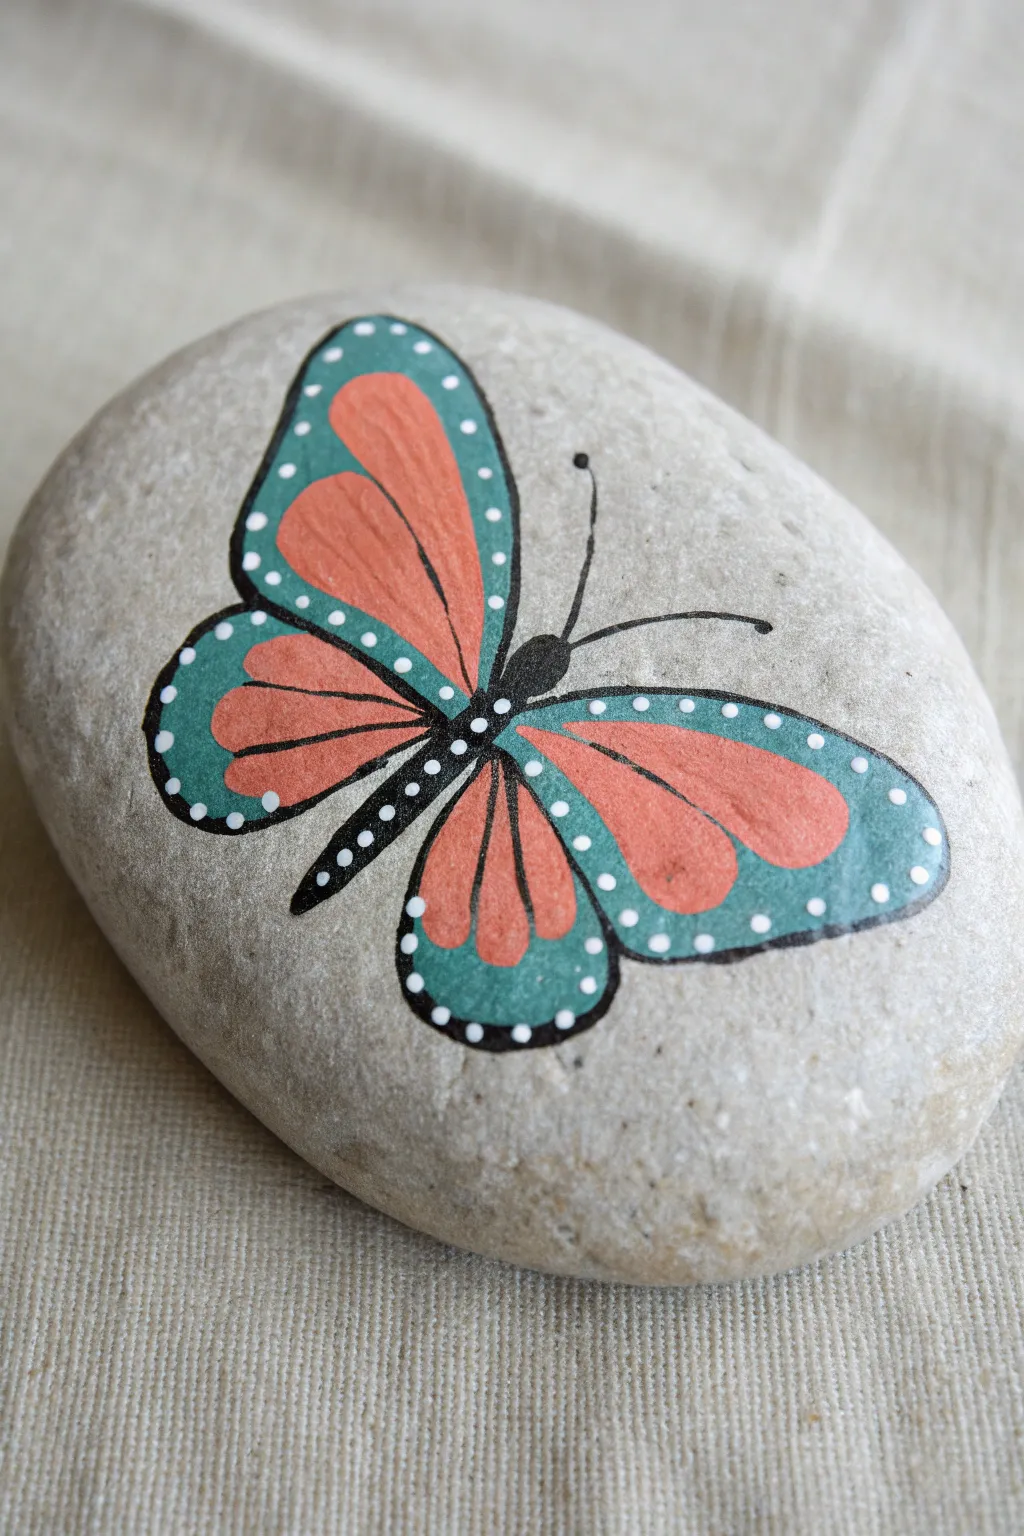
This elegant rock painting features a striking butterfly design that combines cool teal borders with warm coral inner wings. The crisp black outlining and delicate white dotwork create a finished look that feels both folk-art inspired and modern.
Step-by-Step
Materials
- Smooth, flat river stone (grey or beige)
- Acrylic paints: Teal/Turquoise, Coral/Salmon, Carbon Black, Titanium White
- Fine liner brush (size 0 or 00)
- Small round brush (size 2)
- Dotting tool or toothpick
- Pencil and eraser
- Spray sealer or varnish
Step 1: Sketching the Shape
-
Clean your canvas:
Begin by washing your stone with soap and water to remove any dirt or oils. Let it dry completely before starting. -
Find the center:
visualizing a vertical line down the center of your rock to help with symmetry. Lightly sketch a small, elongated body shape at a diagonal tilt in the center using a pencil. -
Outline the top wings:
Sketch the two large upper wings. They should be roughly triangular but with rounded corners, extending upwards and outwards from the top of the body. -
Add lower wings:
Draw the two bottom wings, which are slightly smaller and more rounded than the top pair, tucking in below the upper wings. -
Define the inner panels:
Inside each wing shape, lightly draw the inner panels where the color will change. Leave about a quarter-inch gap between this line and the outer edge of the wing.
Pro Tip: Consistency
Thin your black acrylic paint with a drop of water until it has an ink-like consistency. This helps the liner brush glide smoothly without dragging.
Step 2: Blocking in Color
-
Paint the inner wings:
Using your small round brush, fill in the four inner panels with your coral or salmon paint. You may need two coats for smooth, opaque coverage. -
Apply the border:
Next, paint the thick border around the coral sections using your teal paint. Carefully follow the contours of your pencil sketch. -
Fill the body:
Paint the butterfly’s body in solid black. Ensure the head is distinct from the thorax. -
Dry time:
Allow these base colors to dry completely. If the paint is even slightly wet, the black lining in the next phase might bleed.
Troubleshooting: Shaky Hands
If you struggle with fine lines, rest your wrist on the table or even on the rock itself (if dry) to stabilize your hand while painting the veins.
Step 3: Detailing and Lining
-
Outline the wings:
Switch to your fine liner brush and black paint to outline the entire perimeter of the butterfly wings. -
Define the color separation:
Paint a clean black line separating the teal border from the coral inner section on all four wings. -
Add wing veins:
Paint thin, delicate lines extending from the body into the coral sections of the wings to represent veins. Keep your touch very light here. -
Draw antennae:
Using the very tip of your liner brush, pull two thin, curved lines out from the head for antennae, adding a tiny dot at the end of each.
Step 4: The Dotted Finish
-
Start the border dots:
Dip a dotting tool or the back of a paintbrush into white paint. Place evenly spaced dots along the teal border of the wings. -
Dot the body:
Using a smaller tool, like a toothpick, add tiny white dots down the center of the black body for extra detail. -
Clean up edges:
If any lines look shaky, you can carefully touch them up with the background rock color or re-apply the black line once dry. -
Seal the work:
Once the paint has cured for at least 24 hours, apply a clear spray sealer to protect your artwork from the elements.
Place your finished butterfly in the garden or on a desk where its bright wings can bring a daily smile to your face
Butterfly With Tiny Daisies
Transform a smooth, grey river stone into a delicate piece of art featuring a folk-art inspired butterfly with teal wings. This project combines simple linework with soft color blocking for a charming, hand-painted look that sits perfectly alongside fresh blooms.
How-To Guide
Materials
- Smooth, oval-shaped river stone (light grey)
- Acrylic paints (teal/turquoise, pale pink, black, white, yellow)
- Fine point detail brushes (sizes 0 and 00)
- Flat shader brush (small)
- Graphite paper or soft pencil for transfer
- Matte varnish or sealant
- Painter’s palette or small dish
- Water cup and paper towels
Step 1: Preparation and Sketching
-
Clean the surface:
Begin by washing your stone thoroughly with warm soapy water to remove any dirt or oils. Let it dry completely before starting. -
Outline the wings:
Using a very light pencil sketch, draw the basic butterfly shape on the center of the stone. Start with a thin body line, then add two large upper wings and two slightly smaller lower wings. -
Define the sections:
Inside the wings, lightly sketch the inner sections where colors will change. Draw a line parallel to the outer edge to create a border, and add the teardrop shapes inside the wings for the pink sections.
Fixing Wobbly Lines
If your black outlines get too thick or shaky, wait for them to dry completely. Then, use the base color (teal or white) to paint over the mistake and reshape the line.
Step 2: Adding Color
-
Paint the wing borders:
Mix a muted teal or turquoise acrylic paint. Using your small flat brush or larger round brush, fill in the thick outer border of all four wings. You may need two thin coats for full opacity. -
Fill the inner wings:
For the main inner section of the wings, use a very watered-down white or light cream paint to create a semi-transparent, washed look, allowing a hint of the stone’s texture to remain visible. -
Add the pink accents:
Paint the small teardrop shapes near the body of the butterfly with a soft, dusty pink color. Keep these shapes distinct and separate from the teal borders. -
Dry time:
Allow these base colors to dry completely. Since we will be drawing fine lines over them, the paint must be hard to the touch.
Daisy Chain
Extend the theme by painting tiny white daisies around the edges of the stone or on the back to match the photo’s styling.
Step 3: Detailing and Linework
-
Outline the body:
Load a fine liner brush with black acrylic paint. Carefully paint the central body section, making it slightly thicker at the thorax and tapered at the abdomen. -
Outline the wings:
Using the very tip of your detail brush, trace over your pencil lines to create the black outlines of the wings. Keep your hand steady and your pressure light. -
Add vein details:
Draw thin, delicate lines radiating from the body outward through the white sections of the wings to mimic veins. I find it helps to look at reference photos of stained glass for this step. -
Paint the antennae:
Add two thin, curved lines extending from the head for antennae, finishing each with a tiny black dot.
Step 4: Finishing Touches
-
Apply yellow dots:
Dip the non-brush end of a paintbrush or a dotting tool into yellow paint. Carefully place small dots along the center of the teal wing borders. -
Highlight the body:
Add a few microscopic dashes of white or light grey across the black body to give it volume and texture. -
Add stone splatter:
To integrate the painting with the rock, flick a tiny bit of watered-down white or grey paint around the butterfly for a subtle speckled effect. -
Erase guidelines:
Once the paint is absolutely bone dry, gently erase any visible pencil marks that weren’t covered by paint. -
Seal the artwork:
Finish by applying a coat of matte varnish. A matte finish preserves the natural look of the stone better than a high gloss.
Now you have a serene little stone creature ready to decorate your garden table or desk
Butterfly on a Leafy Vine Frame
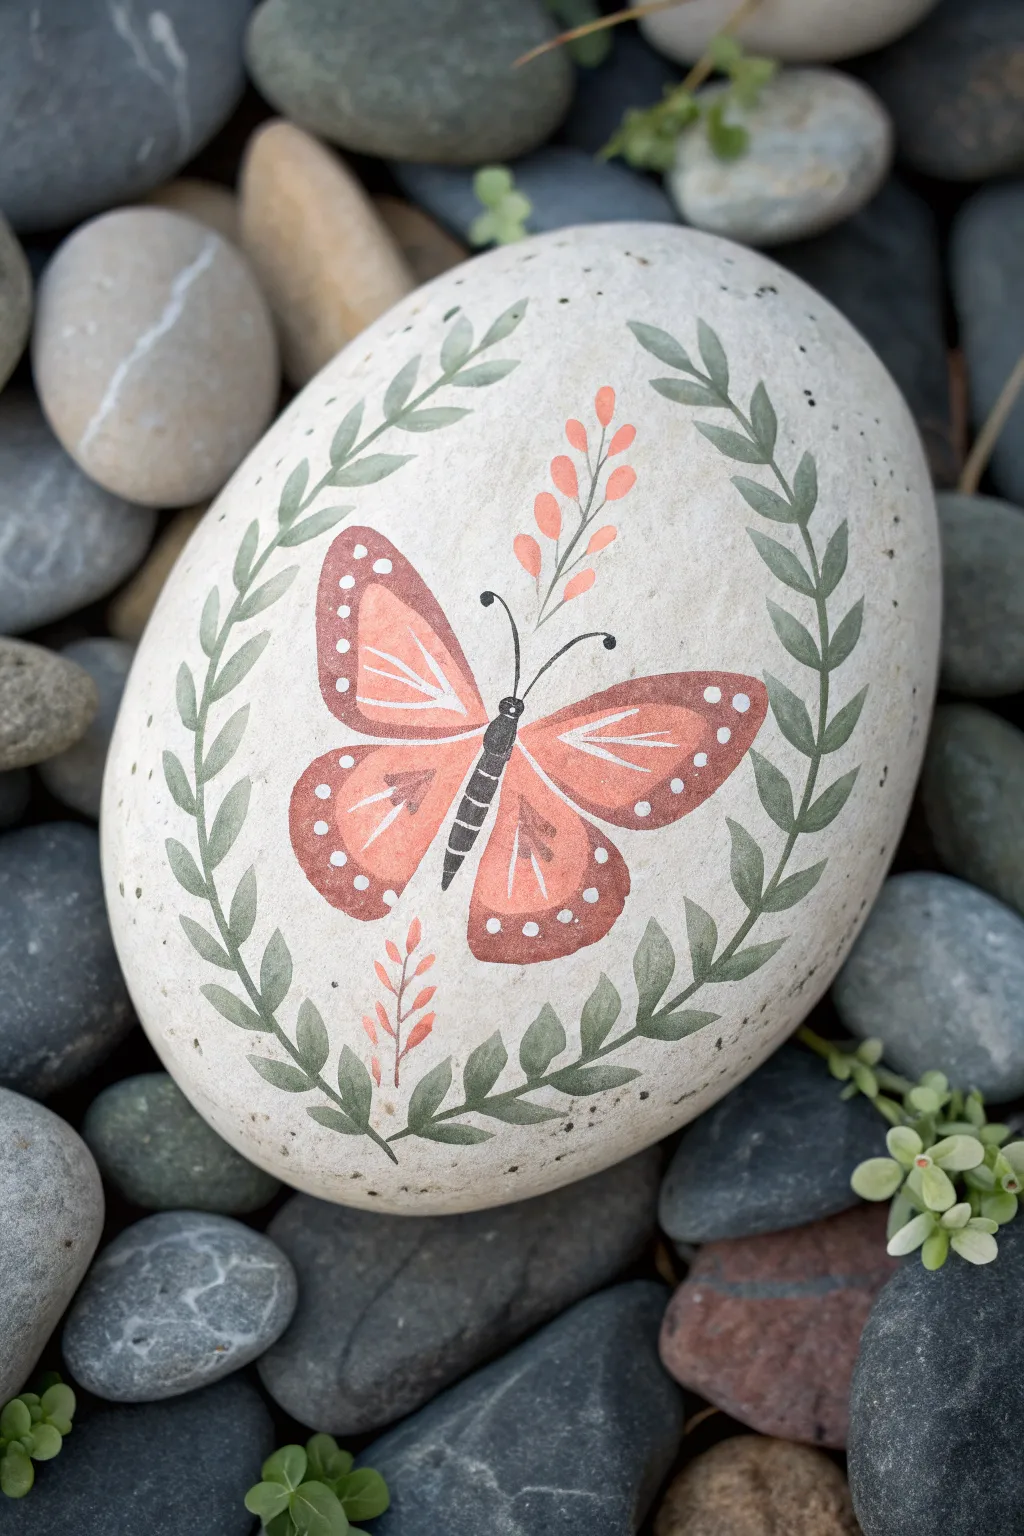
Capture the delicate beauty of a garden visitor with this elegant rock painting project featuring a stylized Monarch butterfly encircled by simple leafy vines. The design utilizes the stone’s natural surface as a background for a clean, organic look.
Step-by-Step Guide
Materials
- Smooth, oval river rock (light grey or beige)
- Acrylic paints: Coral/Salmon, Burnt Sienna, Dark Green, Sage Green, Black, White
- Fine detail brushes (size 0 and 00)
- Small round brush (size 2)
- Pencil for sketching
- Palette or paper plate
- Matte spray sealant
Step 1: Preparation and Sketching
-
Clean the surface:
Before you begin, scrub your rock with soap and warm water to remove any dirt or oils. Let it dry completely in the sun or with a hairdryer to ensure the paint adheres properly. -
Mark the center:
Using a pencil, lightly mark the center point of the rock. This will be where the butterfly’s body rests. -
Sketch the butterfly wings:
Draw the upper wings first, angling them upwards like rounded triangles. Then, sketch the lower wings below them, making them slightly smaller and more rounded. Don’t press too hard with the pencil. -
Outline the wreath:
Sketch two long, curving lines that start at the bottom center and curve up around the butterfly to meet near the top, leaving a small gap. These will become your vine stems.
Steady Hand Pro Tip
Rest your pinky finger on a dry part of the rock while painting fine lines like antennae. This anchors your hand and significantly reduces shaking.
Step 2: Painting the Butterfly
-
Base coat the wings:
Mix coral paint with a tiny dot of burnt sienna to create a warm, earthy orange. Fill in all four wing sections with this color. -
Add a second coat:
Once the first layer is dry, apply a second coat of the coral mix to ensure the color is opaque and vibrant against the stone. -
Paint the body:
Using black paint and a fine detail brush, paint the butterfly’s body in the center. It should be a segmented line, slightly thicker at the top (thorax) and tapering at the bottom. -
Add wing details:
With a very fine brush and thinned white paint, draw delicate lines inside the coral wings. Create a radiating pattern from the body outward. -
Add wing spots:
Use the tip of your smallest brush or a dotting tool to add tiny white dots along the outer edges of the wings. -
Adding the antennae:
With black paint and a very steady hand, paint two thin, curved lines extending from the head, curling slightly at the ends.
Make it Metallic
Swap the white wing veins for gold metallic paint, or add tiny gold dots to the center of the green leaves for a magical, enchanted garden vibe.
Step 3: Painting the Leafy Wreath
-
Paint the main stems:
Load your size 0 brush with dark green paint. Carefully trace over your pencil lines for the two main curved stems framing the butterfly. -
Add the leaves:
Starting from the bottom and working up, paint small, pointed oval leaves along the stems. Use sage green for a softer look, or mix green with a little white. -
Vary leaf direction:
Make sure the leaves point generally upwards and outwards, following the curve of the stem. A quick press-and-lift motion with a round brush creates a nice leaf shape effortlessly. -
Paint the accent sprigs:
Using the same coral color from the butterfly, paint two vertical sprigs—one rising from the top of the butterfly and a smaller one at the bottom. These look like tiny buds on a stick. -
Add bud details:
Paint small oval dots along these coral stems to represent flower buds.
Step 4: Final Touches
-
Clean up:
Check for any stray pencil marks. If the paint is fully dry, you may be able to gently erase visible sketch lines, or simply touch them up with a bit of watered-down beige paint to blend them into the stone. -
Seal the artwork:
Once completely dry (wait at least 24 hours to be safe), spray the rock with a matte sealant. This protects the design from chipping without adding an unnatural glossy shine.
Place your finished stone in a garden pot or on a windowsill to enjoy a touch of nature indoors
Sunset Sky Butterfly Silhouette
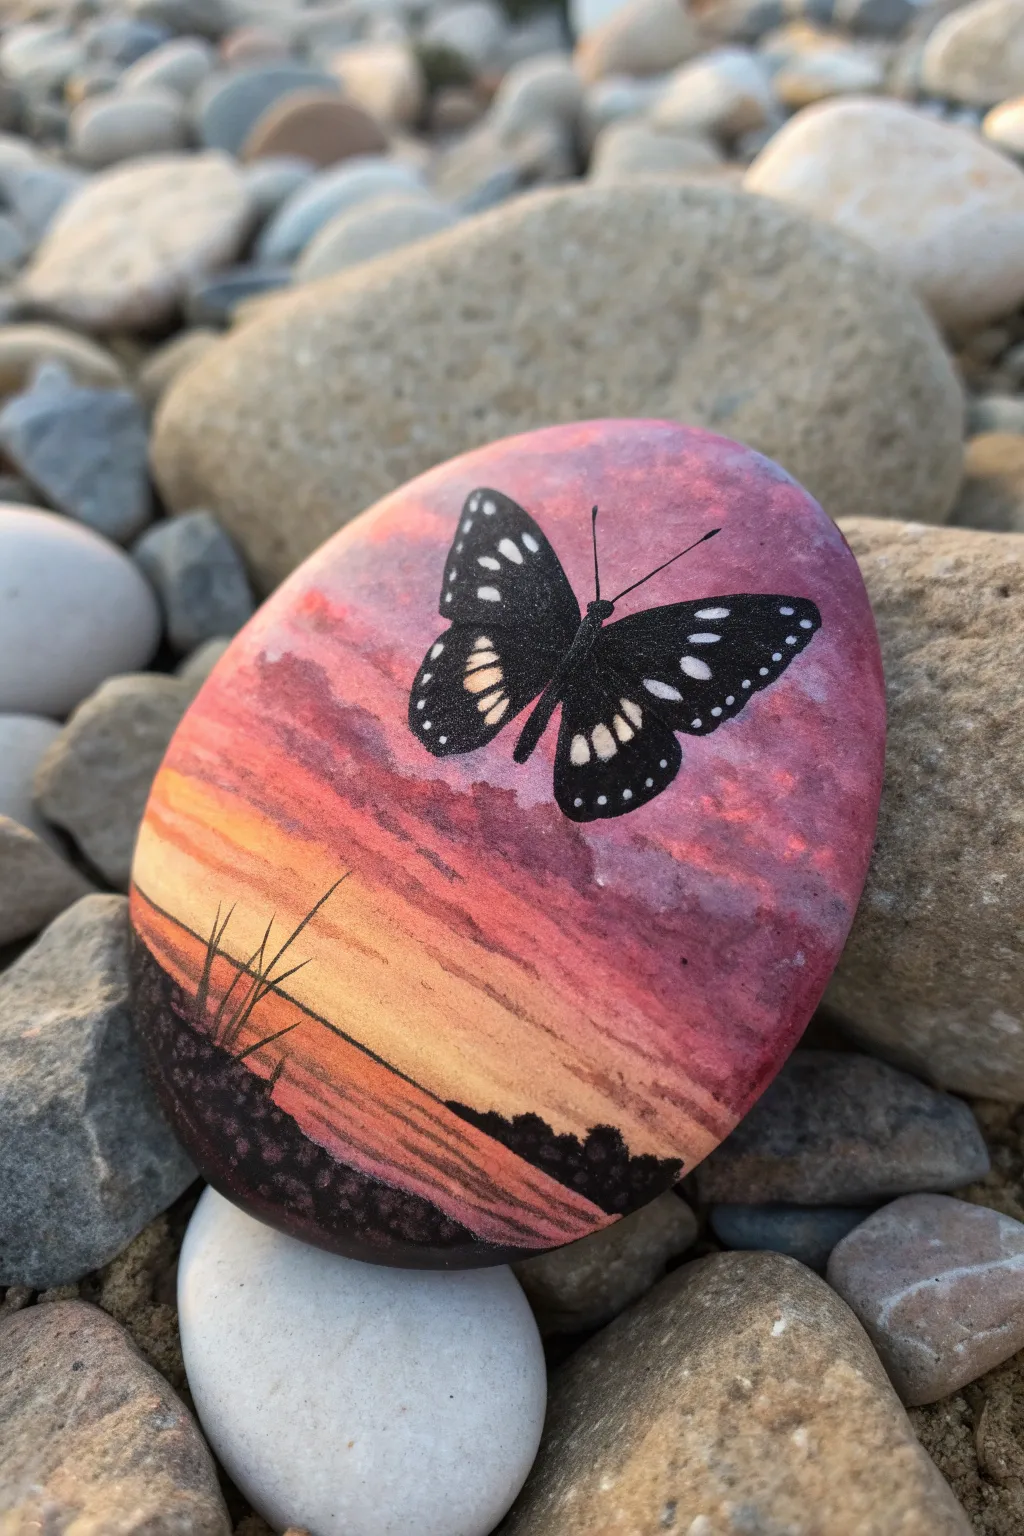
Capture the fleeting beauty of dusk with this vibrant painted rock design, featuring a classic black butterfly silhouette against a fiery sky. The seamless blend of purples, pinks, and oranges creates a dramatic backdrop that makes the butterfly pop.
Detailed Instructions
Materials
- Smooth, oval-shaped river rock (medium size)
- White acrylic paint or gesso (for priming)
- Acrylic paints: Dark purple, magenta/rose, orange, golden yellow, black, white
- Flat brush (intermediate size used for blending)
- Detail liner brush (size 0 or 00)
- Small round brush
- Water cup and paper towels
- Palette or mixing plate
- Gloss varnish or sealant spray
Step 1: Preparing the Canvas
-
Clean the surface:
Begin by washing your stone with warm soapy water to remove any dirt or oils. Scrub it gently, rinse well, and let it dry completely in the sun or with a hairdryer. -
Prime the rock:
Apply a base coat of white acrylic paint or gesso over the top surface. This step is crucial because it ensures the sunset colors applied later will be bright and true rather than muddy against the gray stone. Let this dry fully.
Step 2: Painting the Sunset Sky
-
Lay down the yellow:
Start with your golden yellow paint. Using a flat brush, paint a horizontal band across the lower third of the rock, leaving a small space at the very bottom for the ground. -
Add the orange layer:
While the yellow is still slightly wet, paint a band of orange directly above it. Gently stroke the brush back and forth where the colors meet to blend them, creating a soft transition. -
Introduce the pinks:
Above the orange, apply your magenta or rose color. Again, work the wet edge into the orange below it to blur the line. If the paint dries too fast, I find adding a tiny drop of water or glazing medium helps keep it workable. -
Cap with purple:
Finish the top of the sky with dark purple. Blend it down into the pink layer. The goal is a smooth gradient from dark sky to bright horizon. -
Create cloud textures:
Dip a clean, damp brush into a mix of purple and magenta. Lightly dab and streak this color horizontally across the pink and orange sections to create wispy, low-hanging clouds. Don’t overthink this; random placement looks more natural. -
Let the background set:
Allow the entire gradient background to dry completely before moving on to the silhouette. This prevents the black paint from bleeding into the sky.
Smooth Blends
Keep a damp sponge handy while blending the sky. If the gradient looks streaky, lightly dab the transition line with the sponge to soften the edges instantly.
Step 3: Adding the Silhouettes
-
Paint the ground:
Using black acrylic paint and a small round brush, fill in the bottom curve of the rock to establish the ground. Create an uneven, bumpy horizon line just above the yellow section to simulate terrain. -
Add vegetation:
Switch to your fine liner brush. With thinned black paint (ink consistency), flick upward quickly from the ground into the yellow sky to create thin, tapering blades of grass on the left side. -
Outline the butterfly:
In the center of the purple/pink sky area, lightly sketch the butterfly shape with a pencil or very thinned white paint if you aren’t confident freehanding. Draw two large upper wings and two smaller lower wings meeting at a central body. -
Fill the butterfly shape:
Use the liner brush and black paint to fill in the butterfly outline. Ensure the paint is opaque; you may need a second coat after the first dries to completely block out the background color. -
Add the antennae:
Paint two very delicate, curved lines extending from the head of the butterfly. Keep your hand light to ensure these lines are whisper-thin.
Starry Night
Before painting the butterfly, flick a toothbrush loaded with thinned white paint over the purple section to add distant stars to the upper sky.
Step 4: White Details & Finishing
-
Detail the upper wings:
Once the black butterfly is totally dry, mix a tiny bit of white paint. On the upper wings, paint small, elongated teardrop shapes near the edges, pointing inward toward the body. -
Detail the lower wings:
Add a row of small dots along the bottom edge of the lower wings. Then, paint slightly larger oval spots in the center of the lower wings. -
Highlight the wing texture:
Use extremely fine lines or tiny dots of white to suggest veins or separation between the wing sections, but keep this minimal to maintain the silhouette effect. -
Seal the artwork:
Wait at least 24 hours for all paint layers to cure. Finish by applying a coat of gloss varnish or spray sealant to protect the rock from scratches and weather, giving it a professional shine.
Place your finished stone in a garden pot or on a sunny windowsill where the vibrant colors can catch the light
Night Sky Galaxy Butterfly
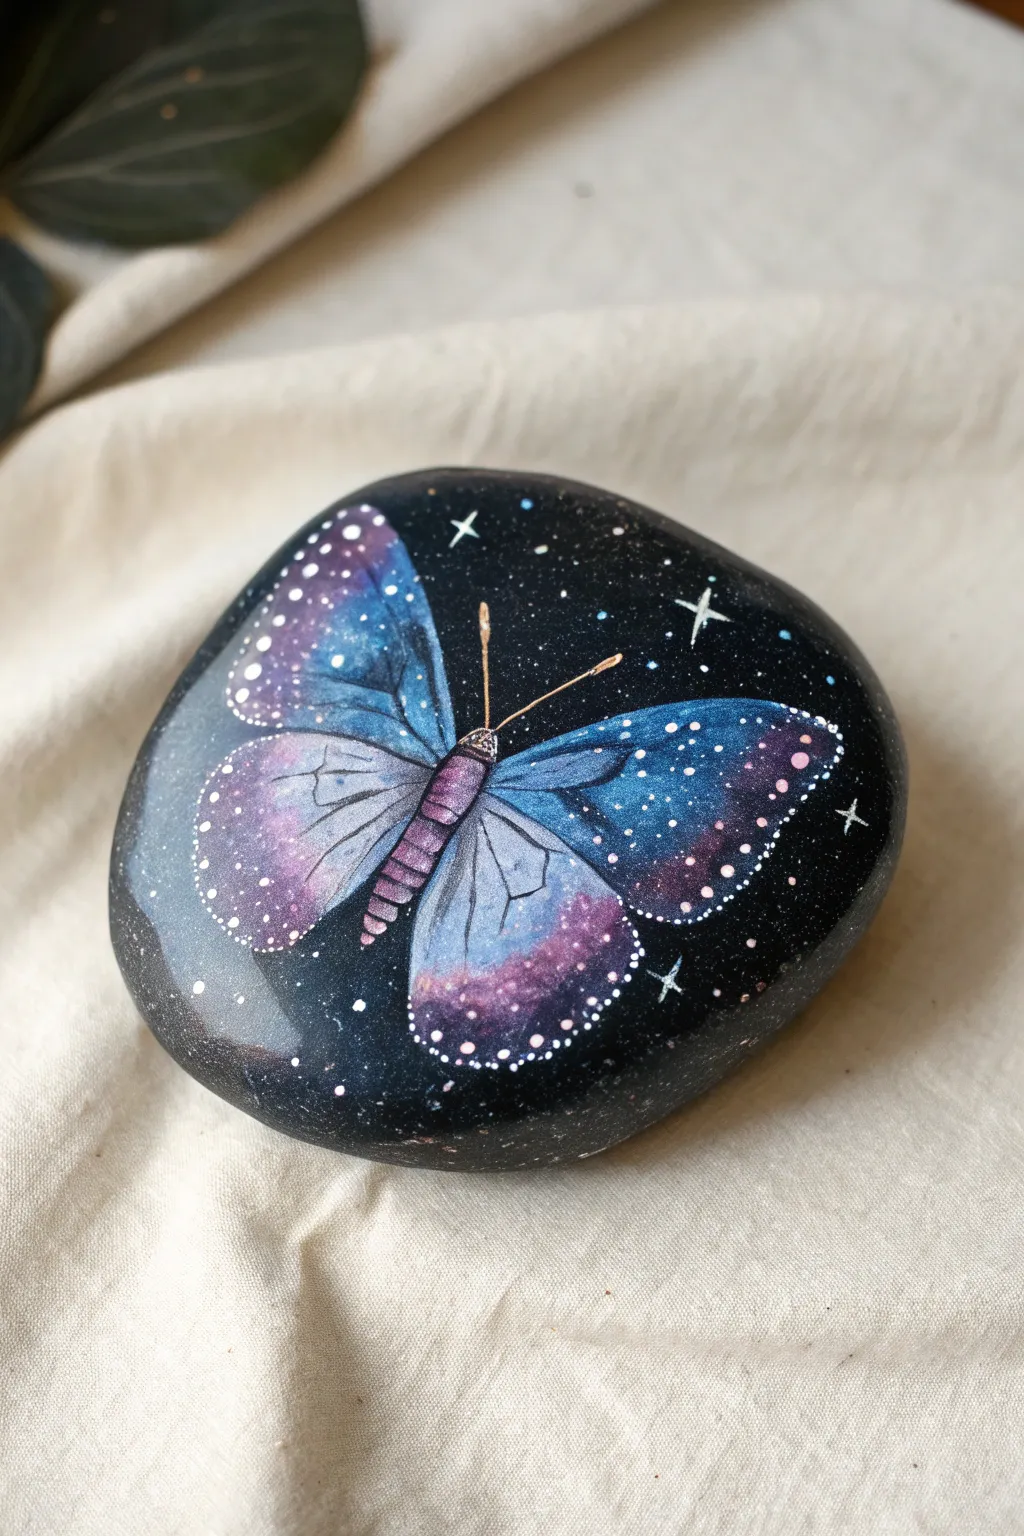
Transform a simple stone into a celestial masterpiece with this galaxy-themed butterfly project. The deep blue and violet hues of the wings blend seamlessly into a starry night background, creating a magical, dreamy effect.
Step-by-Step
Materials
- Smooth, rounded river rock (medium size)
- Black acrylic paint (or gesso)
- Acrylic paints: Titanium White, Ultramarine Blue, Phthalo Blue, Dioxazine Purple, Magenta
- Flat shader brush (size 6 or 8)
- Fine liner brush (size 0 or 00)
- Small round brush (size 2)
- White paint pen (extra fine tip)
- Gloss varnish or sealer
- Pencil (white or regular)
- Mixing palette
- Water cup and paper towels
Step 1: Preparation & Base Coat
-
Clean the Stone:
Begin by scrubbing your rock with warm, soapy water to remove any dirt or oils that might repel the paint. Let it dry completely in the sun or use a hairdryer to speed things up. -
Apply the Base:
Paint the entire top surface of the rock with black acrylic paint. You may need two coats to ensure an opaque, solid dark background. Allow the black paint to dry thoroughly before proceeding. -
Sketch the Outline:
Using a white charcoal pencil or a very lightly applied regular pencil, sketch the outline of the butterfly. Draw an elongated oval for the body in the center, tilting slightly, and four large wing shapes extending outward.
Oops! Uneven blending?
If your gradient looks choppy, use a slightly damp brush (no paint) to gently rub the border between the two wet colors. This softens the transition without adding more pigment.
Step 2: Painting the Galaxy Wings
-
Layering Blues:
Start with Phthalo Blue. Paint the inner sections of the wings closest to the body, but don’t fill the whole wing. Keep the paint somewhat translucent or mix it with a tiny bit of water to let the black show through slightly. -
Adding Purples:
While the blue is still slightly tacky, introduce Dioxazine Purple to the outer edges of the wings. Blend the purple into the blue where they meet to create a seamless gradient. -
Creating Highlights:
Mix a little Titanium White with your Magenta to make a light pink-purple. Gently stipple this color onto the tips of the lower wings and the upper corners of the top wings to create a glowing nebulae effect. -
Interpreting the Veins:
Using your fine liner brush and thinned black paint, carefully draw the delicate veins over the dried galaxy colors. Start thick near the body and let the lines taper off as they reach the edges of the wings. -
Painting the Body:
Fill in the body shape using a mix of purple and black. Add horizontal segmentation lines with a lighter purple mix to give the abdomen volume and texture. -
Adding Antennae:
With a steady hand and your finest brush, pull two thin lines extending from the head. I like to add varied pressure to make them look natural, painting the tips slightly lighter for visibility.
Step 3: Starry Details & Finish
-
Wing Stars:
Dip a toothpick or very fine dotting tool into white paint. Add tiny constellations inside the wings themselves, focusing on the dark areas to make them pop. -
Wing Edges:
Use a white paint pen or fine brush to dot a border of white spots along the very outer edges of all four wings. Vary the size of the dots—some tiny, some slightly larger—to mimic natural butterfly markings. -
Background Stars:
Moving to the black background, flick a toothbrush loaded with watered-down white paint for a fine mist of distant stars, or manually dot them for more control. -
Twinkling Highlights:
Select a few larger stars in the background and paint small ‘cross’ shapes to make them twinkle. This adds depth to the space theme. -
Sealing the Magic:
Once the artwork is 100% dry (give it a few hours just to be safe), apply a coat of gloss varnish. The gloss finish deepens the black background and makes the galaxy colors vibrate.
Level Up: Metallic Touch
Mix a tiny amount of iridescent or metallic medium into your blue and purple paints. In direct sunlight, the wings will shimmer just like real butterfly scales.
Place this cosmic stone on your desk or in a planter for a daily reminder of the universe’s beauty
Mandala-Pattern Butterfly Wings
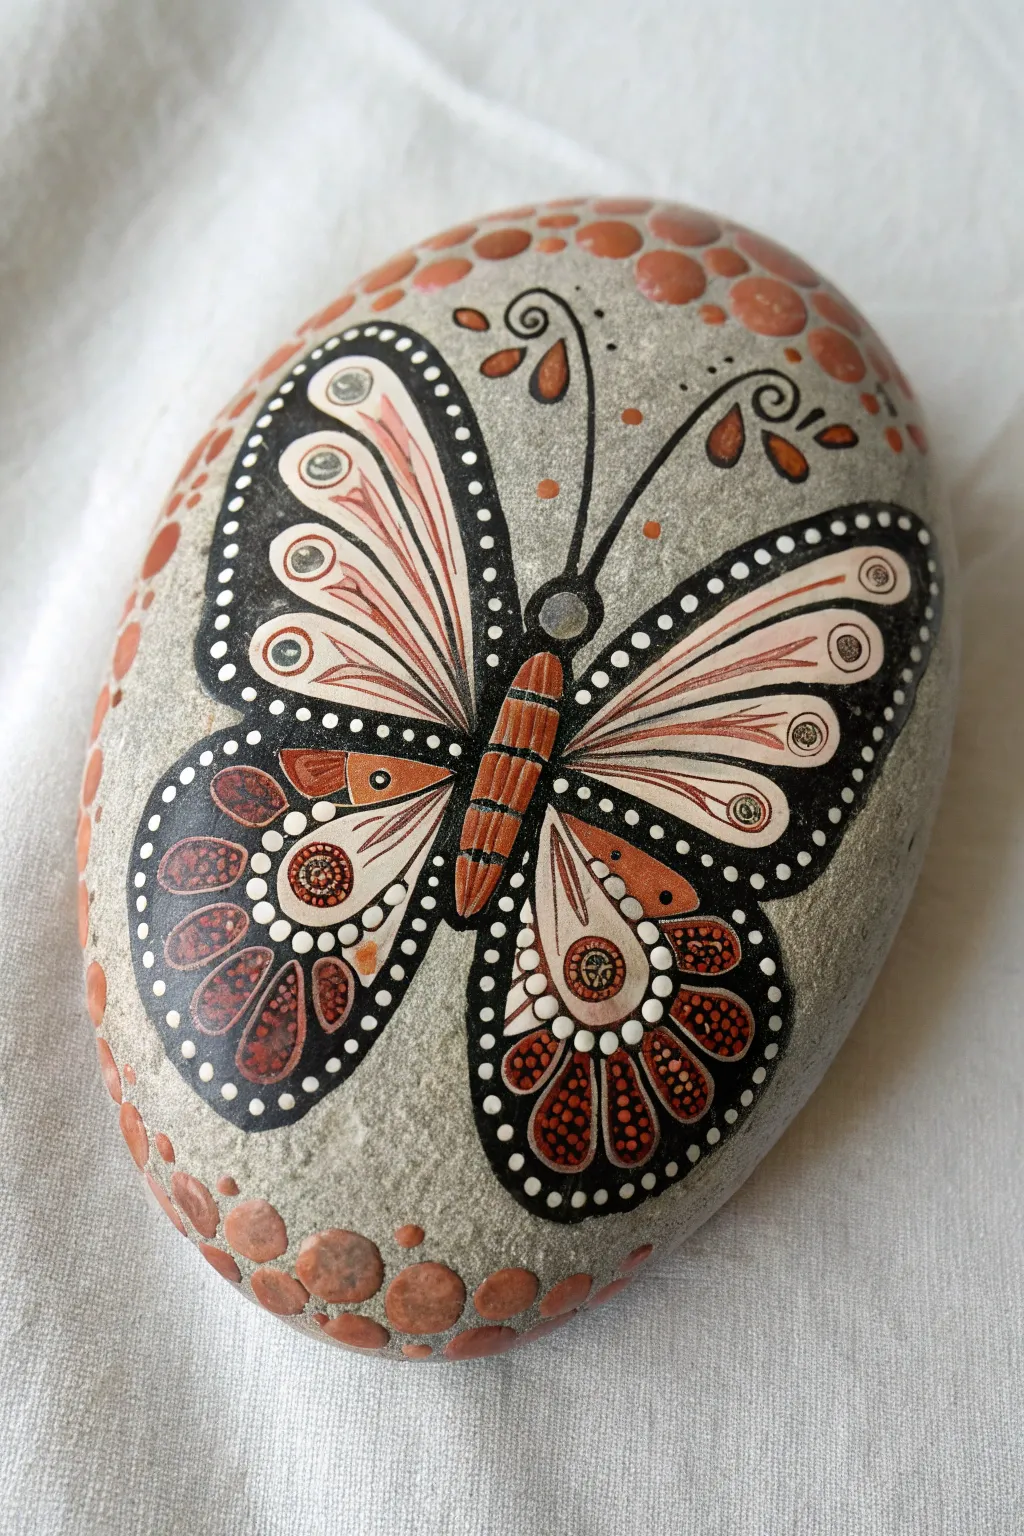
Transform a simple river rock into a work of art featuring a stylized butterfly with intricate, mandala-inspired wing patterns. This project combines earthy terra cotta tones with crisp black and white detailing for a striking, folk-art finish.
How-To Guide
Materials
- Smooth, oval river rock (medium to large size)
- Acrylic paints (black, white, terra cotta/burnt orange, grey)
- Fine detail paintbrushes (sizes 0/0 and 000)
- Dotting tools or toothpicks
- Pencil for sketching
- Sealer (spray varnish or Mod Podge)
Step 1: Base and Outline
-
Clean surface:
Begin with a clean, dry rock. If your stone is too dark, you can paint a very thin wash of light grey acrylic over the surface to make the colors pop, but the natural stone texture is lovely if left visible. -
Sketch the silhouette:
Using a pencil, lightly draw the butterfly outline. Start with a slender central body, then draw two large upper wings that sweep upward and two smaller, rounded lower wings. -
Outline in black:
Load a fine liner brush with black acrylic paint. Carefully trace your pencil lines to create the bold outer shape of the butterfly wings and the segmented body. -
Fill the body:
Paint the central body sections with your terra cotta paint, leaving thin black lines between the segments for definition.
Step 2: Upper Wing Details
-
Create the framework:
Inside the upper wings, paint long, teardrop-shaped sections using white paint. These should radiate outward from the body like sun rays. -
Add vein details:
Once the white is dry, use your finest brush and diluted terra cotta paint to add very thin lines inside the white teardrops. These mimic delicate veins. -
Wing tips:
Near the outer edge of the white sections, paint small circles. I like to outline these circles in black and add a tiny dot in the center for an eye-like effect. -
Outer borders:
Thicken the black outer border of the upper wings. Use a dotting tool dipped in white paint to create a row of evenly spaced dots along this black edge.
Steady Hand Tip
Rest your pinky finger on a dry part of the rock while painting fine lines. This anchors your hand and significantly reduces shaking for straighter lines.
Step 3: Lower Wing Complexities
-
Block color sections:
Divide the lower wings into sections. Paint the inner areas near the body with white, and create rounded sections near the bottom edge. -
Terra cotta fills:
Fill the bottom rounded sections with terra cotta paint. This creates a visually heavy base for the wings. -
Mandala dotting:
Using your smallest dotting tool, add stippled dots of black or dark orange over the terra cotta sections to create texture. -
decorative dividers:
Paint thick black lines to separate the wing sections. Add rows of tiny white dots along these dividing lines to brighten the design.
Metallic Magic
Swap the terra cotta paint for a metallic copper or bronze. The shimmer adds a luxurious, jewelry-like quality to the mandala wing patterns.
Step 4: Final Flourishes
-
Antennae:
Paint two long, curving antennae extending from the head. Make them graceful and curly at the ends. -
Floral accents:
Add small, simple leaf shapes or teardrops floating near the antennae using the terra cotta color outlined in black. -
Perimeter dots:
Create a border effect on the stone itself by painting large, irregular terra cotta dots around the edges of the rock, fading them out as they move away from the butterfly. -
Highlight the body:
Add tiny white highlights to the butterfly’s body segments to give them a rounded, 3D appearance. -
Seal the work:
Allow the paint to cure fully for at least 24 hours. Apply a spray sealer or brush-on varnish to protect your intricate work from chipping.
Place your finished stone in a garden pot or on a sunny windowsill where the patterns can be admired
Geometric Faceted Butterfly
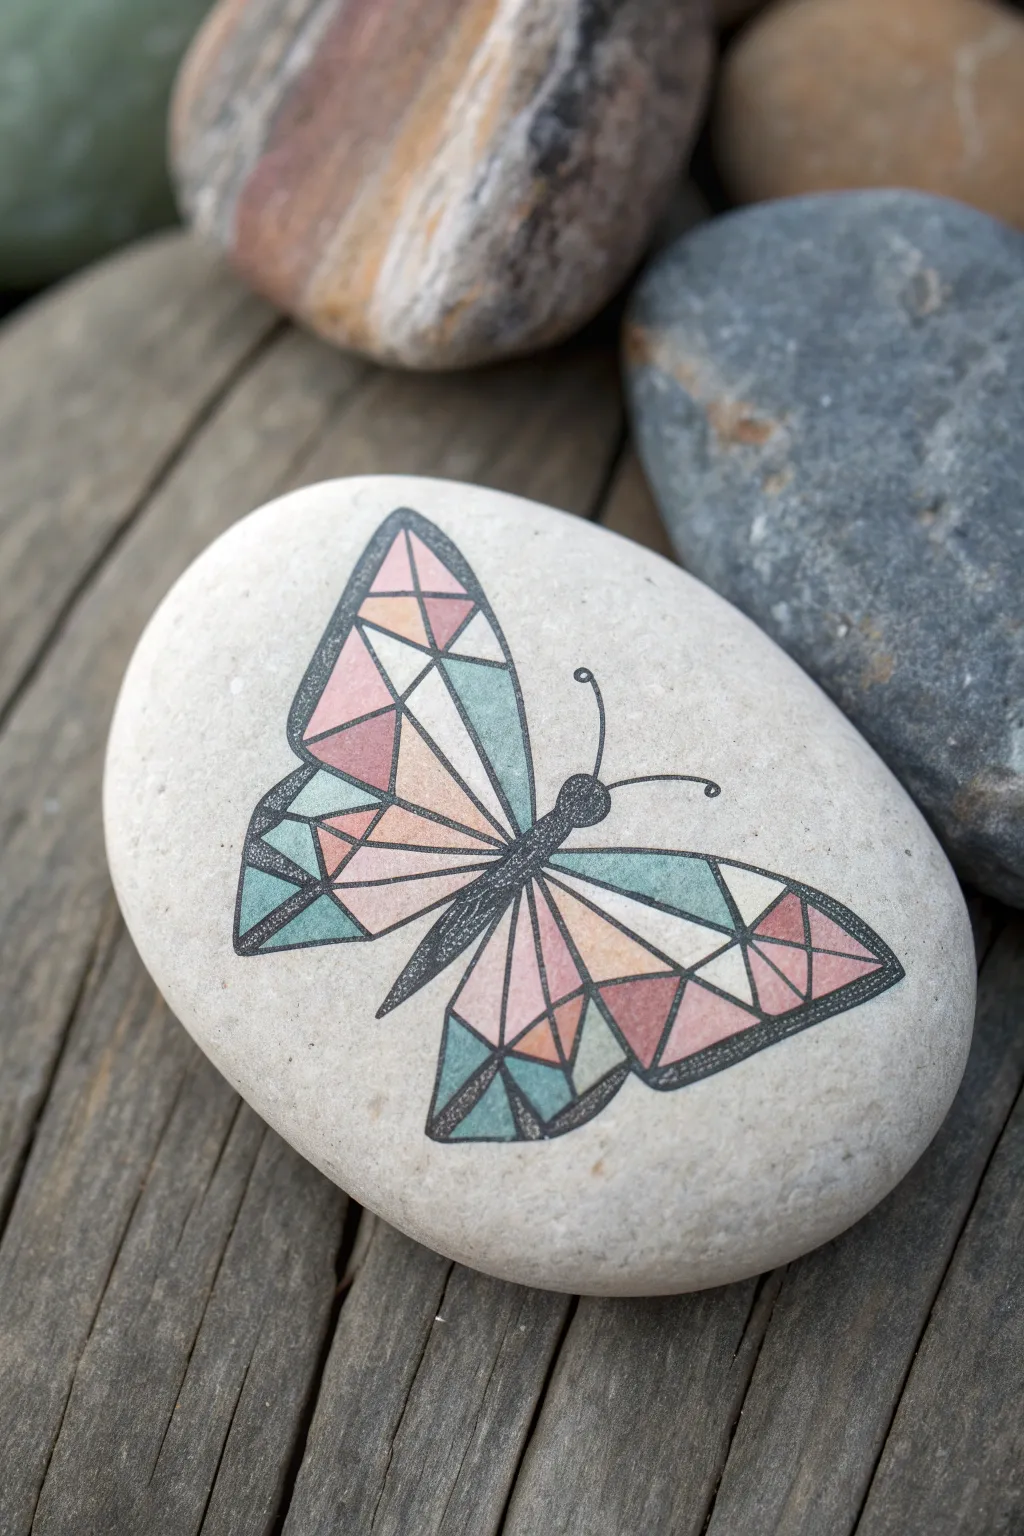
Transform a smooth river rock into a modern piece of art with this geometric faceted butterfly design. The low-poly style mimics stained glass, using soft pastel washes and crisp black lines to create a delicate, structured beauty.
Step-by-Step Tutorial
Materials
- Smooth, light-colored river rock (flattened oval shape works best)
- Pencil (HB or similar)
- Eraser
- Fine-point black paint pen (0.5mm or 0.7mm)
- Ultra-fine black pigment liner (optional, for very crisp details)
- Acrylic paints (muted teal, dusty rose, pale peach, white)
- Small detail paintbrush (size 0 or 00)
- Palette or mixing surface
- Matte spray sealant
Step 1: Preparation & Sketching
-
Clean the Canvas:
Begin by washing your stone with warm soapy water to remove any dirt or oils. Let it dry completely in the sun or with a cloth; moisture inside the rock can ruin the paint later. -
Estalish Symmetry:
Using your pencil very lightly, draw a faint vertical line down the center of the rock to act as the body axis. This helps ensure your wings stay balanced. -
Sketch the Outline:
Draw the basic silhouette of the butterfly wings. Start with two large, triangular shapes for the top wings and two smaller, rounded shapes for the bottom wings. -
Add the Body:
Sketch a slender, elongated oval for the body along your center axis, adding a small circle for the head and two curving lines for antennae. -
Create the Grid:
Inside the wing outlines, start drawing straight lines that intersect to form a network of triangles and irregular polygons. I find it easiest to start from a central point near the body and radiate lines outward. -
Refine the Chaos:
Review your geometric grid. Aim for a mix of larger and smaller shapes to create visual interest, ensuring no single section looks too empty.
Steady Hands
Rest your painting hand on a heavy book or block that is the same height as your rock. This stabilizes your wrist for perfectly straight geometric lines.
Step 2: Adding Color
-
Mix Custom Pastels:
In your palette, mix a tiny drop of your teal, rose, and peach paints with plenty of white. You want soft, muted tones rather than bright or neon colors. -
Water Down the Paint:
Add a very small amount of water to your acrylics. You want the consistency to be fluid, almost like a watercolor wash, so the texture of the stone still peeks through slightly. -
Fill the Facets:
Using your size 00 brush, begin filling in the geometric shapes. Paint random sections with the muted teal first, scattering them across all four wings so the color is balanced. -
Apply the Rose Tones:
Clean your brush and switch to the dusty rose mixture. Fill in adjacent shapes, trying not to put two pink sections directly next to each other if possible. -
Finish with Peach:
Fill the remaining empty facets with the pale peach color. Leave a few tiny shapes unpainted or painted pure white to act as highlights. -
Dry Check:
Allow the paint to dry fully. Acrylic washes dry fast, but give it 10-15 minutes to be safe. If the colors look too transparent, you can add a second thin layer.
Metallic Pop
Replace one of the pastel colors with a metallic gold or copper paint. Fill just a few random facets with this metallic hue to catch the light.
Step 3: Inking & Final Touches
-
Outline the Wings:
Take your fine-point black paint pen and carefully trace the main outer silhouette of the butterfly. Keep your hand steady and rest your wrist on the table for stability. -
Define the interior:
Trace over all the internal pencil lines that separate your colored shapes. Go slowly to ensure the corners of the triangles meet neatly. -
Fill the Body:
Color in the central body, head, and antennae with solid black ink. I usually create a slight stippled texture on the body to differentiate it from the sleek wings. -
Clean Up:
Once the ink is 100% dry, gently erase any visible pencil marks that strayed outside the design. -
Seal the Art:
Finish by spraying the rock with a matte sealant. This protects the delicate paint washes and prevents the ink from scratching off over time.
Now you have a serene, modern stone art piece perfect for a desk weight or garden accent
Negative Space Butterfly Wings
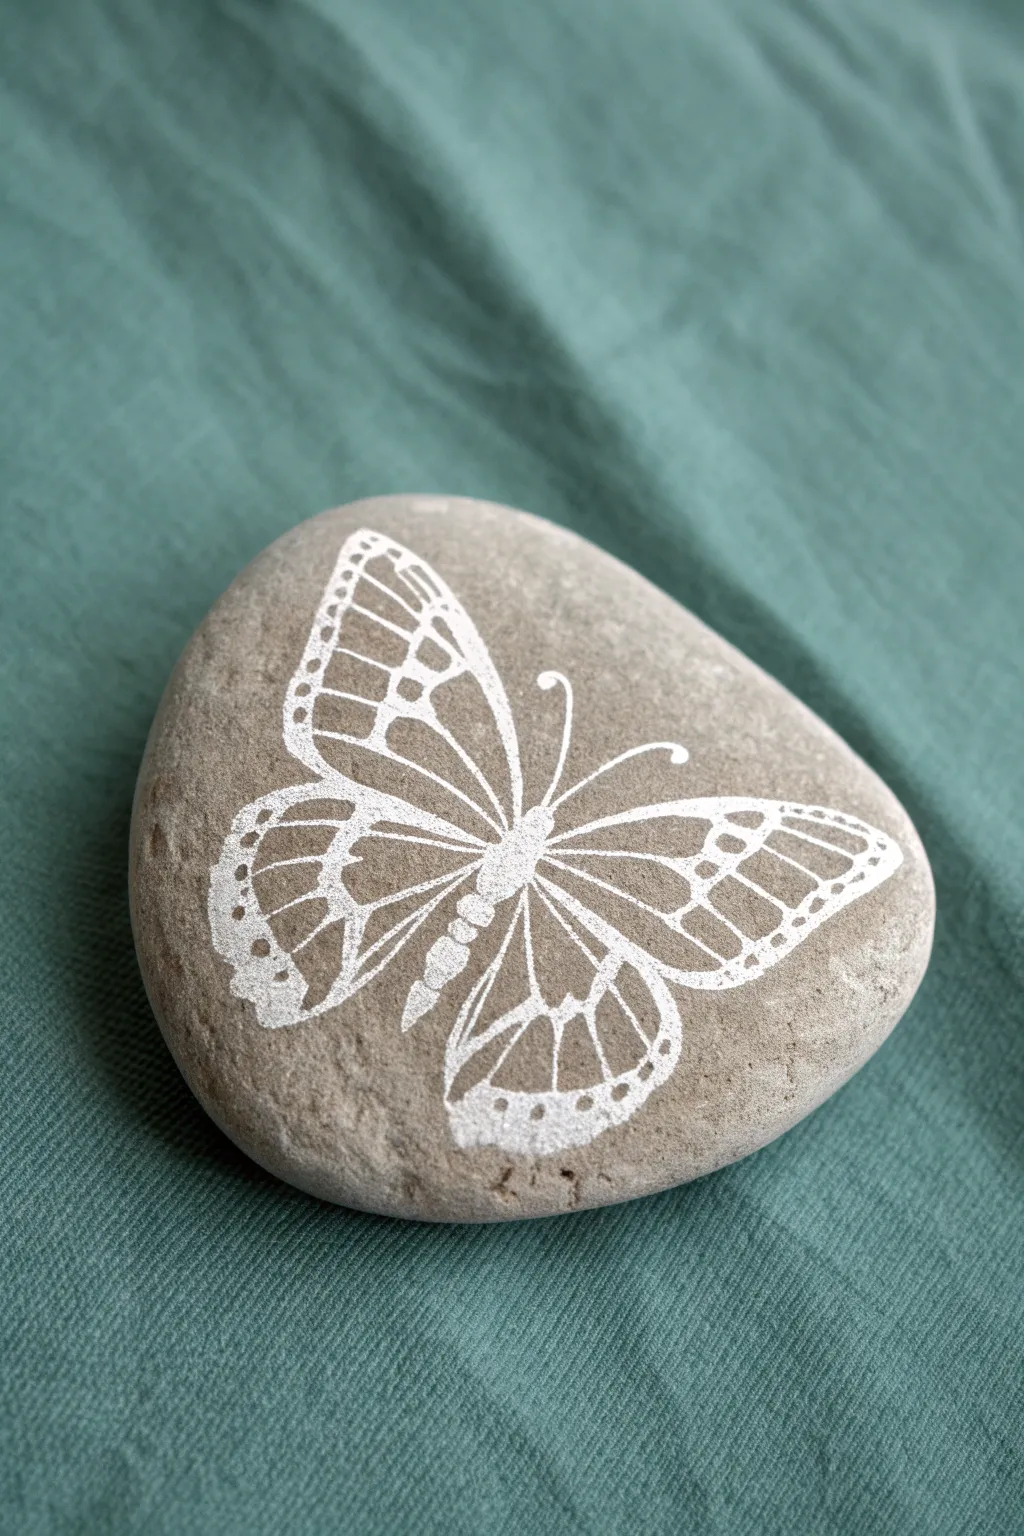
Embrace simplicity with this delicate white-on-grey design that transforms a humble river stone into a piece of lacy art. Using fine lines and careful negative space, you’ll create an intricate butterfly that feels organic and grounding.
Detailed Instructions
Materials
- Smooth, flat grey river stone (clean and dry)
- Extra-fine white paint pen (0.7mm or 0.5mm tip)
- White acrylic paint (optional, for touch-ups)
- Small fine-detail paintbrush (size 0 or 00)
- Pencil (HB or lighter)
- Soft eraser
- Clear matte varnish or spray sealant
Step 1: Preparation and Sketching
-
Stone Selection:
Choose a stone with a naturally smooth, matte grey surface. This background color is crucial as it forms the ‘color’ of the butterfly’s inner wings. -
Cleaning:
Wash your stone thoroughly with warm soapy water and scrub away any grit. Let it dry completely for several hours to ensure the ink adheres properly. -
Mapping the Center:
Using your pencil very lightly, draw a gentle curve for the butterfly’s body in the center of the stone. Angle it slightly diagonally to create a dynamic look. -
Wing Outline:
Sketch the large, teardrop-like upper wings first, extending towards the top corners of the stone. -
Lower Wings:
Add the lower wings, making them slightly smaller and rounder than the top set. Ensure all four wings meet near the central body.
Ink Flow Tip
If your pen tip drags or feels scratchy on the rock, press it onto scrap paper a few times to re-wet the nib. Don’t press hard directly on the stone to avoid splatters.
Step 2: Inking the Foundation
-
Prime the Pen:
Shake your white paint pen vigorously and test the flow on a scrap piece of paper. You want a consistent, thin line without blobs. -
Body Details:
Starting with the actual painting, draw the body. Create small, connected segments for the abdomen and a slightly larger oval for the thorax. -
Main Outlines:
Trace over your pencil lines for the main wing perimeter. Keep your hand steady and use your wrist as a pivot point on the table for stability. -
Antennae:
Draw two thin, curving lines extending from the head. I like to add tiny curls at the very tips for a whimsical touch. -
Erase Guidelines:
Wait 15 minutes for the main outline to cure completely. Then, gently erase any visible pencil marks so they don’t get trapped under the detail work.
Fixing Smudges
Made a mistake? Don’t panic. Use a damp Q-tip immediately to wipe away the wet paint. If it has dried, gently scrape the error off with a toothpick or craft knife.
Step 3: Detailed Fill Work
-
Sectioning the Wings:
Inside the upper wings, draw long, sweeping veins that radiate from the body outward to the edges, dividing the wing into 3-4 main sections. -
Adding the Cells:
Within those sections, draw smaller loops or ‘cells’ near the outer edges. This mimics the stained-glass look of real butterfly wings. -
Thickening Lines:
Go back over the places where veins connect to the main outline. Thicken these intersections slightly to create smoother, more organic transitions. -
Lower Wing Details:
Repeat the vein process on the lower wings, keeping the lines fluid. The pattern doesn’t need to be perfectly symmetrical; nature rarely is. -
The Dotted Border:
Along the outer perimeter of the wings, add a row of very small, classic dots or dashes. This frames the design beautifully. -
Filling the Edge:
Carefully color in the very outer rim of the wing tips with solid white, leaving small circular ‘windows’ of grey stone showing through as spots. -
Final Touches:
Check for any uneven lines. If needed, use a tiny brush with white acrylic paint to crisp up edges that the pen might have missed.
Step 4: Sealing
-
Drying Time:
Allow the stone to sit untouched for at least an hour. White paint pens can smear easily if moisture is trapped underneath a sealer. -
Varnishing:
Apply a thin coat of matte spray varnish. Avoid brush-on sealers for the first coat to prevent dragging the delicate line work.
Place your finished stone on a desk or in the garden to add a moment of natural calm to your day
Textured Raised-Detail Butterfly

This project transforms a simple smooth river rock into a stunning piece of folk art featuring an intricate butterfly design. The rich, earthy tones combined with raised dot details give the finished piece a beautiful texture and a touch of whimsy.
Step-by-Step Guide
Materials
- Smooth, oval river rock (cleaned and dried)
- Pencil and eraser
- Acrylic paints: warm beige, burnt sienna (red-brown), dark teal blue, deep orange, black, and white
- Fine-tipped liner brush (size 0 or 00)
- Small round brush (size 2)
- Dotting tools or toothpicks
- Matte or satin varnish (spray or brush-on)
- Palette for mixing
Step 1: Preparation and Sketching
-
Prepare the Surface:
Begin by scrubbing your rock with warm soapy water to remove any dirt or oils. Let it dry completely. The stone’s natural color serves as the background, so no base coat is needed. -
Mark Center and Body:
Lightly sketch a central diagonal line with your pencil to guide the butterfly’s orientation. Draw a long, slender body along this line, tapering at the tail end. -
Outline the Wings:
Sketch the upper wing shapes first, making them larger and more curved. Follow with the lower wings, which should be slightly smaller and rounder. Ensure symmetry on both sides of the body. -
Draft the Patterns:
Inside the wings, lightly draw the internal vein lines that separate the colored sections. Map out the thick border areas where the teal color will go.
Step 2: Color Blocking
-
Paint the Inner Panels:
Using the small round brush and warm beige paint, fill in the long, teardrop-shaped panels closest to the butterfly’s body. -
Add Secondary Colors:
In the outer sections of the wings (specifically the tips of the upper wings and the middle of the lower wings), apply the burnt sienna or deep orange paint. Blending slightly where it meets the beige can create a nice transition, though distinct blocks of color work well for this folk style. -
Paint the Borders:
Carefully paint the thick outer borders of all four wings using the dark teal blue. Use your liner brush near the edges to keep the lines crisp. -
Fill the Butterfly Body:
Paint the main body, head, and tail using a mix of burnt sienna and a tiny touch of black to darken it. Let all paint layers dry completely before moving on.
Pro Tip: Consistency
Make sure your white paint for the dots is the consistency of heavy cream. Too thin, and the dots will flatten out; too thick, and they will form sharp peaks.
Step 3: Detailing and Linework
-
Outline Everything:
Load your fine liner brush with thinned black paint or ink. Outline every section color you just painted. Go slowly to ensure steady, dark lines. -
Create Veins:
Draw the black vein lines that radiate from the body through the beige sections. These should connect to the teal border. -
Add Body Details:
On the darker brown body, add small horizontal lines in a slightly lighter brown or grey to suggest segmentation. -
Draw Antennae:
With a very light touch, sweep two thin black lines extending from the head for antennae. I find resting my pinky finger on the table helps stabilize my hand for these delicate curves.
Troubleshooting: Shaky Lines
If your outlines are wobbly, thin your black paint slightly with water or flow medium. Thinner paint flows off the liner brush much smoother than thick paint.
Step 4: Adding Texture and Highlights
-
Dot the Borders:
Dip a small dotting tool or toothpick into white paint. Apply a row of evenly spaced dots along the dark teal outer border of the wings. This creates that signature ‘raised’ look. -
Add Decorative Spots:
Using the deep orange or burnt sienna paint, add small accent spots within the teal border on the lower wings for extra visual interest. -
Floating Dots:
Create a whimsical trail of dots ‘floating’ off the butterfly’s upper left wing. Use pink or light red paint, graduating the size from large to small as they move away from the wing. -
Wait for Full Cure:
Allow the stone to sit undisturbed until the thickest dots of paint are fully hard to the touch. -
Seal the Artwork:
Finish by applying a coat of matte or satin varnish. This protects the acrylic design from scratching and deepens the natural color of the stone.
Place your finished stone in a garden pot or on a sunny windowsill to enjoy your detailed handiwork.
Metallic Accent Butterfly Highlights
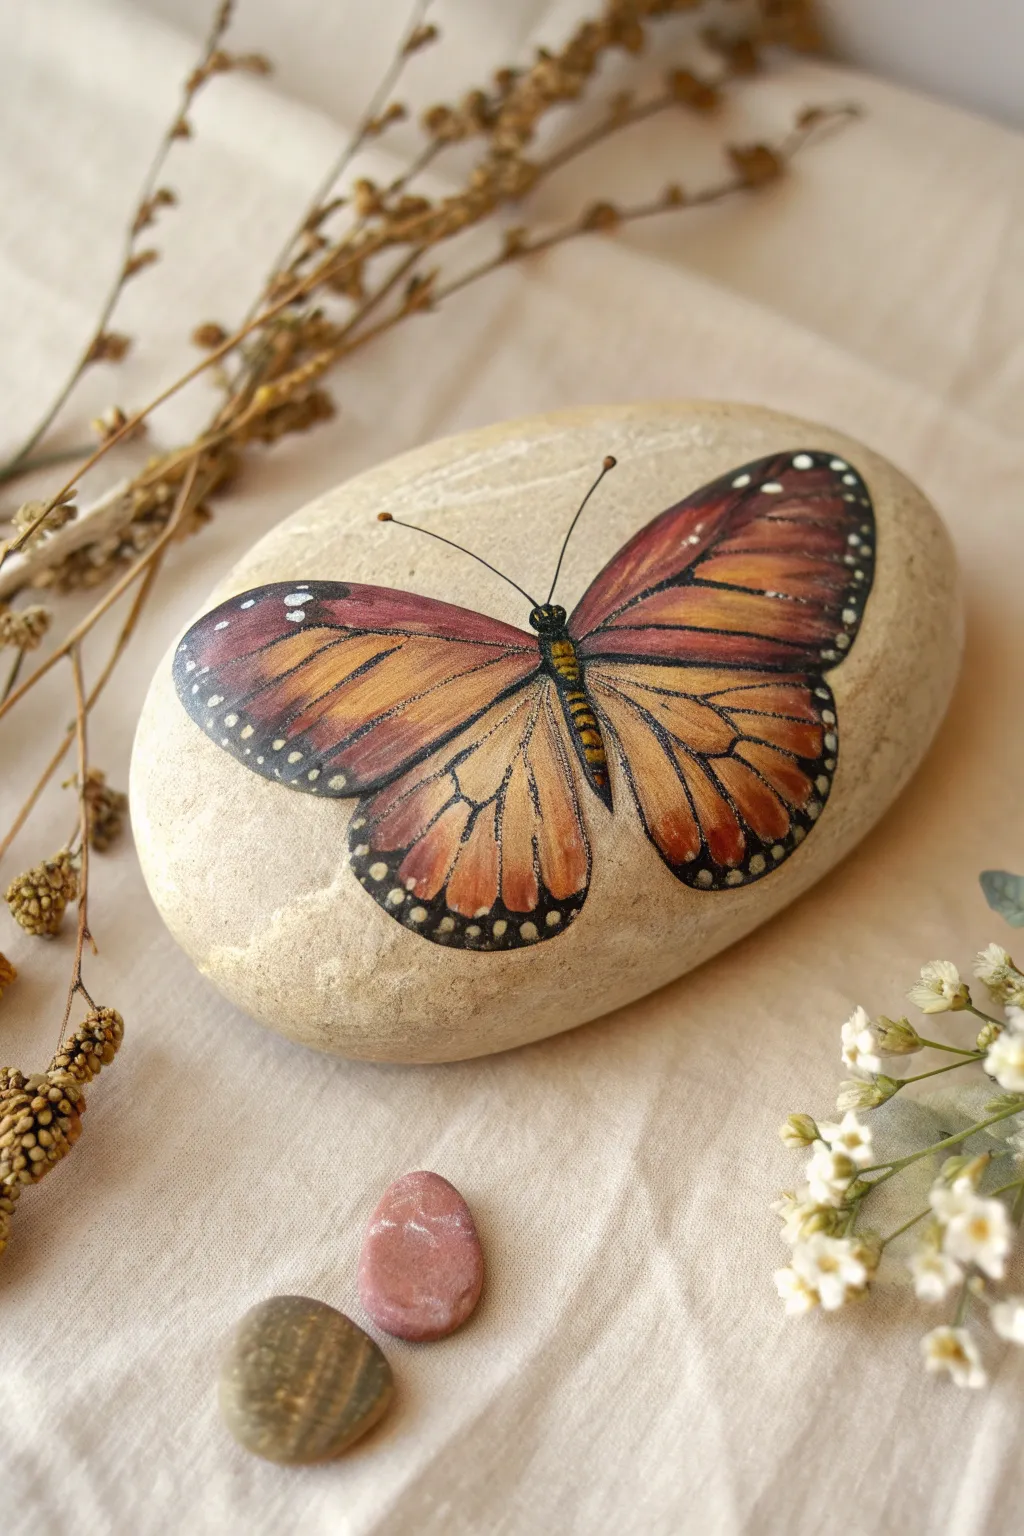
Transform an ordinary river rock into a delicate work of art by painting a stunningly detailed monarch butterfly. This technique focuses on soft gradient shading and bold black contouring to make the wings seem to flutter right off the stone’s surface.
How-To Guide
Materials
- Smooth, oval river rock (beige or light grey)
- Acrylic paints (rust orange, burnt sienna, deep burgundy, black, white, pale yellow)
- Fine liner brushes (sizes 00 and 000)
- Small flat shader brush
- Pencil for sketching
- Palette or small dish for mixing
- Matte or satin varnish sealer
Step 1: Sketching and Base Layers
-
Clean surface:
Begin by thoroughly cleaning and drying your rock to ensure the paint adheres properly. Select the smoothest side for your canvas. -
Initial sketch:
Lightly sketch the outline of the butterfly with a pencil. Draw a diagonal central body line first, then map out the four wing sections, ensuring the top wings are larger and more elongated than the bottom ones. -
Map the veins:
Still using your pencil, gently trace the internal vein structures. These lines will guide your color placement, creating the segments or ‘cells’ inside the wings. -
Base coat – upper wings:
Mix a rust orange with a tiny touch of white to create a soft, opaque base. Fill in the center areas of the large upper wings, leaving the outer edges raw rock for now. -
Base coat – lower wings:
Using the same rust orange mix, fill in the central cells of the lower wings. Keep your paint thin and fluid to avoid thick brush texturing.
Step 2: Gradient Shading
-
Deepen the tips:
While the base is still slightly tacky or freshly dry, blend burnt sienna into the tips of the upper wings, pulling the color inward toward the body. -
Add dramatic shadows:
Switch to deep burgundy or a reddish-brown. Apply this darker shade to the very outer edges of the colored sections and near the body connection points to create depth. -
Highlighting center cells:
Mix a pale yellow wash and glaze the very center of the largest wing cells. This creates a domed, dimensional look to the wing sections. -
Color washing:
Use a damp, clean brush to feather the edges where colors meet. You want a smooth transition from the dark burgundy edges to the bright orange centers.
Shaky Hands?
Rest your painting hand on the table or against the rock itself. Using your pinky finger as a stabilizer ‘kickstand’ helps maximize control for thin lines.
Step 3: Black Detailing
-
Painting the body:
Using your smallest liner brush and black paint, fill in the central body section. Add tiny horizontal stripes in pale yellow or white along the abdomen for realism. -
Thick outer borders:
Paint the thick black margins around the entire butterfly perimeter. The top wing tips should have the thickest black areas. -
Vein detailing:
Carefully paint the internal black veins over your initial pencil lines. Keep these lines much thinner than the outer borders; I find adding a drop of water to black paint helps the ink flow smoother for these long strokes. -
Antennae:
With a steady hand and a barely-loaded brush, sweep two thin, curved lines upward from the head for antennae, adding tiny dots at the very tips.
Pro Tip: Vein Flow
For the crispest black veins, dilute your black paint slightly with water to an ink-like consistency. It will drag smoothly without skipping or clumping.
Step 4: Final Accents
-
White border spots:
Dip the very tip of a brush handle or a fine tool into white paint. Dot small white circles into the thick black borders along the wing edges. -
Body highlights:
Add extremely tiny white speckles to the black head and thorax area to simulate texture and reflection. -
cleanup:
If any paint strayed onto the raw stone background, use a damp cotton swab or a stiff brush with water to scrub it away while fresh. -
Sealing:
Once completely dry (wait at least 24 hours), apply a clear matte or satin varnish over the painted area to protect your work from scratches and fading.
Display your beautiful painted stone on a desk or shelf to bring a permanent touch of nature indoors

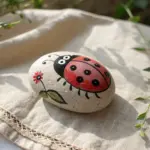


Have a question or want to share your own experience? I'd love to hear from you in the comments below!