If you’re craving that cozy road-trip feeling, painting tiny campers on rocks is such a satisfying little project. I love how a simple stone can turn into a whole camping scene—from retro trailers to starry nights—without needing a ton of space or time.
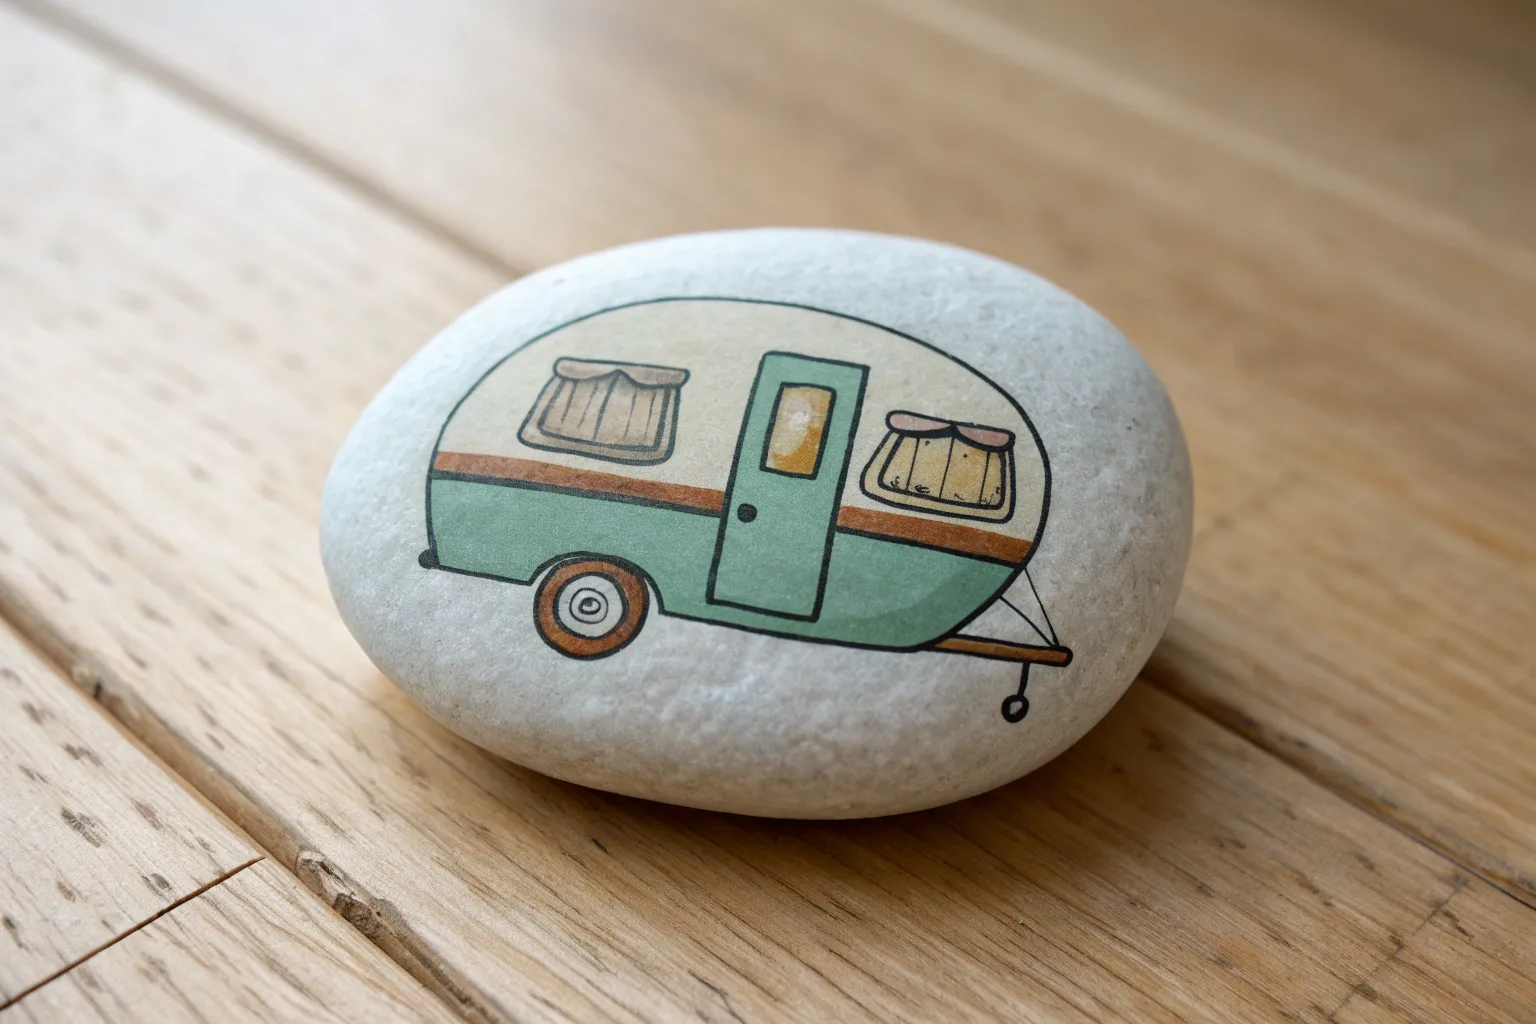
Classic Two-Tone Vintage Camper
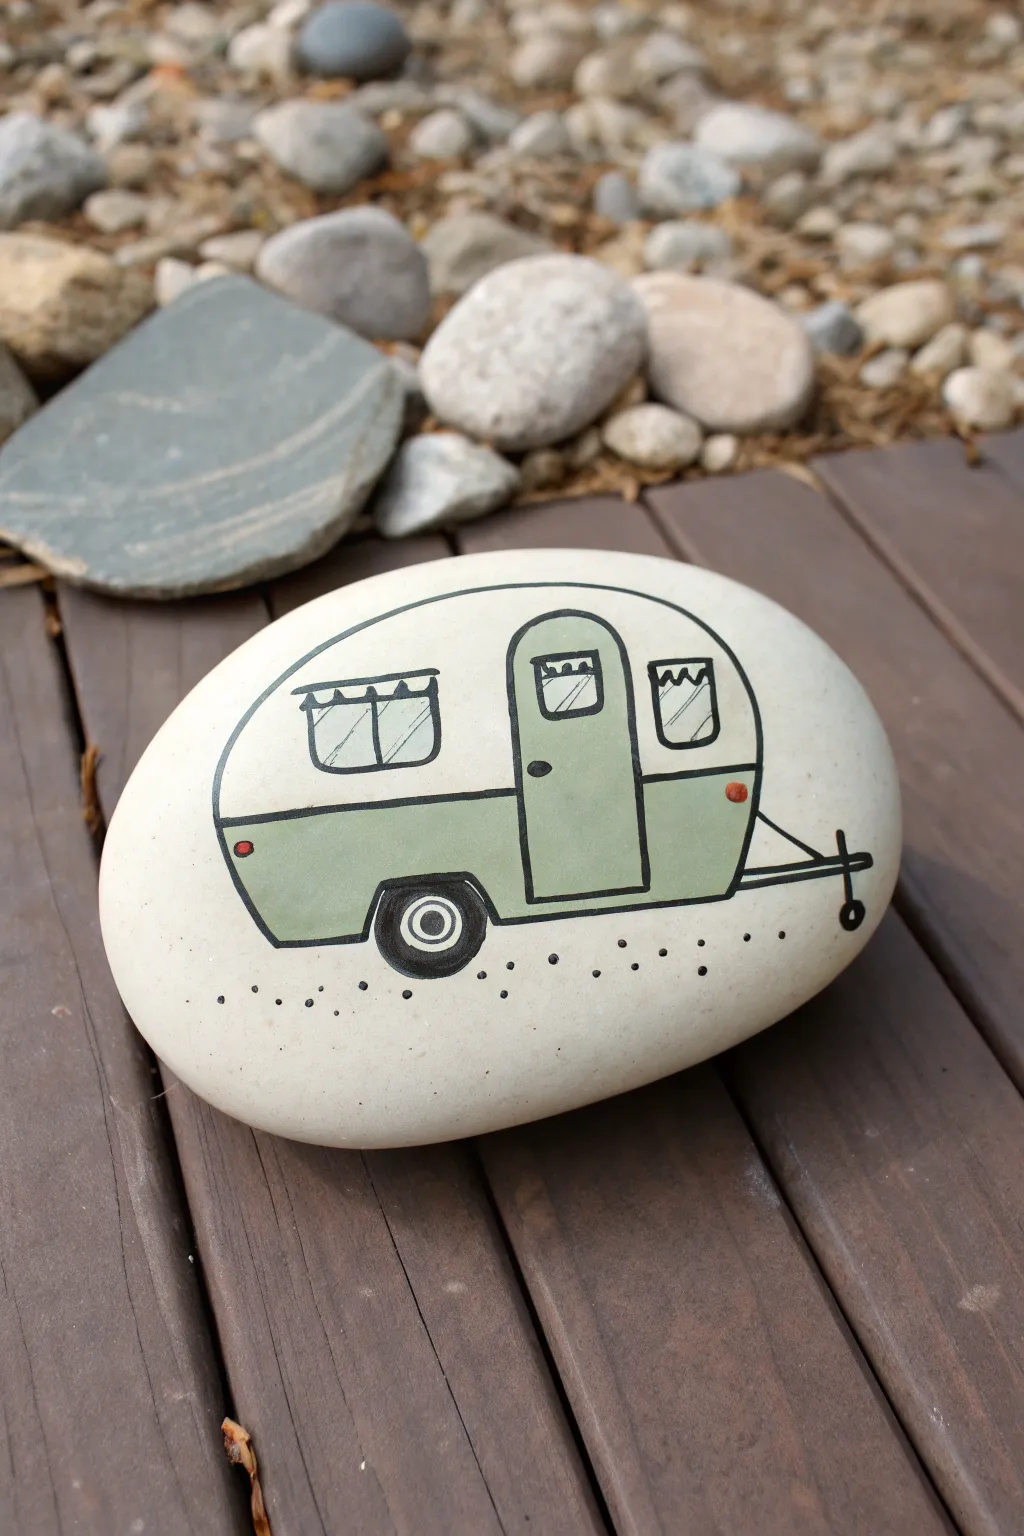
Capture the nostalgia of the open road with this charming painted rock project featuring a classic tear-drop style camper. The finished piece combines clean, bold lines with a soothing sage green palette for a minimal yet striking design.
Step-by-Step Guide
Materials
- Smooth, oval-shaped river rock (cleaned and dried)
- Acrylic paint (Sage Green, White, Black, Red)
- Fine liner detail brush (size 0 or 00)
- Pencil and eraser
- Black paint pen (extra fine tip) or waterproof micro-pen
- Matte sealer or varnish
Step 1: Base Coat & Sketching
-
Prep the canvas:
Begin by washing your rock with soap and water to remove any dirt or oils. Let it dry completely before starting. -
Apply the background:
Paint the entire surface of the rock with a solid coat of white acrylic paint. Since rocks are porous, you might need two or three coats to get a smooth, opaque finish. Let each layer dry fully. -
Sketch the outline:
Lightly use a pencil to draw the main camper shape. It’s essentially a rounded rectangle or ‘loaf’ shape that mimics the curve of the rock itself. -
Divide the colors:
Draw a horizontal line slightly below the middle of the camper body. This will separate your top white section from the bottom colored section. -
Add key features:
Sketch in the large rectangular door, the two side windows, the wheel arch, and the hitch sticking out from the front.
Step 2: Color Blocking
-
Paint the lower body:
Using your sage green paint and a small brush, carefully fill in the bottom section of the camper below your pencil line. I find it helpful to outline the area with paint first, then fill in the middle. -
Fill the door:
Paint the bottom half of the door with the same sage green so it matches the body stripe perfectly. -
Second coat:
Once the green is dry to the touch, apply a second coat if the white background is showing through. You want a solid, flat color. -
Paint the wheel:
Use black paint to fill in the tire circle inside the wheel arch. Leave a tiny white dot in the center for the hubcap, or paint it solid black and add a white dot later.
Steady Hands
Rest your pinky finger on the dry part of the rock while outlining. This acts as an anchor to keep your hand steady for crisp lines.
Step 3: Details & Outlining
-
Outline the body:
Once all paint is completely dry, take your black paint pen or fine brush and carefully trace the main outer shape of the camper. -
Define the sections:
Draw the horizontal line separating the white top from the green bottom. Continue this line across the door as well. -
Detail the door:
Outline the door frame. Add a small rounded window at the top of the door and a tiny black dot for the handle. -
Window treatment:
Outline the two side windows. Draw small zigzag lines or scallops at the top of each window to represent cute little curtains. -
Add reflection lines:
Draw two diagonal hatching lines on the glass area of the windows to suggest a reflection. -
Hitch and lights:
Draw the trailer hitch on the right side using simple straight lines and a small circle for the connector. Add a small red dot for the brake light on the back and a small orange dot for the side reflector near the front. -
Grounding dots:
To place the camper in a scene without painting grass, simply add a series of small black dots along the bottom edge underneath the camper.
Seasonal Camping
Customize the camper for holidays by adding a tiny wreath to the door for Christmas or painting tiny bunting flags across the top for a birthday.
Step 4: Finishing
-
Clean up sketch lines:
If any pencil marks are still visible outside your paint, gently erase them now. -
Seal the artwork:
Protect your work with a spray sealer or a brush-on varnish. A matte finish looks best for this vintage illustration style.
Now you have a pint-sized adventure ready to be displayed in your garden or on a desk


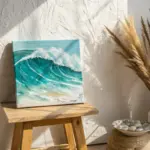

Striped Camper With Bold Lines
Capture the nostalgic vibe of a vintage teardrop trailer with this clean and colorful rock painting design. Using warm, alternating stripes of burnt orange and soft peach against a smooth white stone creates a look that is both graphic and charming.
Step-by-Step
Materials
- Smooth, oval-shaped river rock (white or light grey preferred)
- Pencil for sketching
- Acrylic paints: Burnt Orange, Peach/Light Flesh Tone, White, Grey, Light Blue
- Black paint pen (extra fine tip) or liner brush with black acrylic
- Small flat brush
- Detail round brush
- Clear sealant (spray or brush-on)
- Clean water and paper towels
Step 1: Sketching the Shape
-
Prepare the surface:
Ensure your rock is clean and dry. Since this design relies on the natural rock color for the background, you won’t need a base coat unless your rock is very dark. -
Draw the main outline:
Using a pencil, lightly sketch a large, rounded rectangle shape for the body of the camper in the center of the rock. Curve the corners significantly to give it that retro aerodynamic look. -
Sketch the hitch:
On the left side, draw a triangle pointing outwards for the hitch. Draw a tiny heart shape at the very tip of the triangle. -
Add functional details:
Draw a tall, narrow rectangle for the door on the right side of the camper body. Add a small window rectangle on the upper door. Sketch a larger, rectangular window on the left side of the camper body. -
Position the wheel:
Draw that classic wheel well by creating a semi-circle at the bottom center of the camper, overlapping slightly with the bottom edge line. -
Map the stripes:
Lightly draw horizontal lines across the camper body to create the striped pattern. Based on the reference, you’ll want about five or six distinct bands.
Step 2: Painting the Design
-
Fill the darker stripes:
Using your small flat brush and the Burnt Orange paint, carefully fill in alternating stripes. Start with the top stripe, skip one, paint the next, and continue down. Avoid painting over the door or window areas. -
Fill the lighter stripes:
Once the orange is dry, use the Peach or Light Flesh Tone paint to fill in the remaining horizontal stripes. This alternating pattern gives the camper its sunset-like aesthetic. -
Let colors dry:
Allow the stripes to dry completely before moving on to avoid smudging the colors into the white sections. -
Paint the door:
Fill the main door rectangle with opaque White paint. You may need two thin coats to ensure the stripes or rock color don’t show through. -
Detail the hitch and wheel:
Paint the triangular hitch area white. Fill the main circle of the wheel with black, leaving a small white dot in the direct center for the hubcap. -
Window glass:
Paint the glass inside the side window and the small door window using a soft Light Blue or grey mixture. -
Window frame:
Paint the frame around the side window using a dark grey or a muddy brown to distinguish it from the stripes. -
Tiny heart detail:
Use a tiny dot of orange or yellow paint to fill in the small heart at the tip of the hitch.
Steady Hand Trick
To get those horizontal stripe lines perfectly straight, try using a strip of masking tape or washi tape as a guide while painting the initial color blocks.
Step 3: The Bold Outline
-
Prepare your liner:
This step makes the design pop. Shake your black extra-fine paint pen well, or load a liner brush with thinned black acrylic paint. -
Outline the body:
Trace the entire outer perimeter of the camper body with a steady, bold black line. I find it helpful to brace my hand against the table for stability here. -
Define the sections:
Draw black lines horizontally to separate every single color stripe. Go over your pencil marks carefully. -
Outline features:
Outline the door, the windows, and the darker window frame. Add a small black dot for the doorknob. -
Outline the hitch:
Trace the triangle of the hitch and outline the tiny heart at the tip. -
Finish the wheel:
Draw a circle around the inner white hubcap to define it sharply against the black tire. -
Seal it up:
Once the black ink is 100% dry (give it extra time just to be safe), apply a clear sealant to protect your miniature travel trailer from the elements.
Paint Pen Troubleshooting
If your black paint pen starts dragging or skipping over the painted surface, scribble on a scrap piece of paper to get the ink flowing again before returning to the rock.
Now you have a groovy little camper that looks ready for a tiny road trip adventure


Polka-Dot Camper Cutie
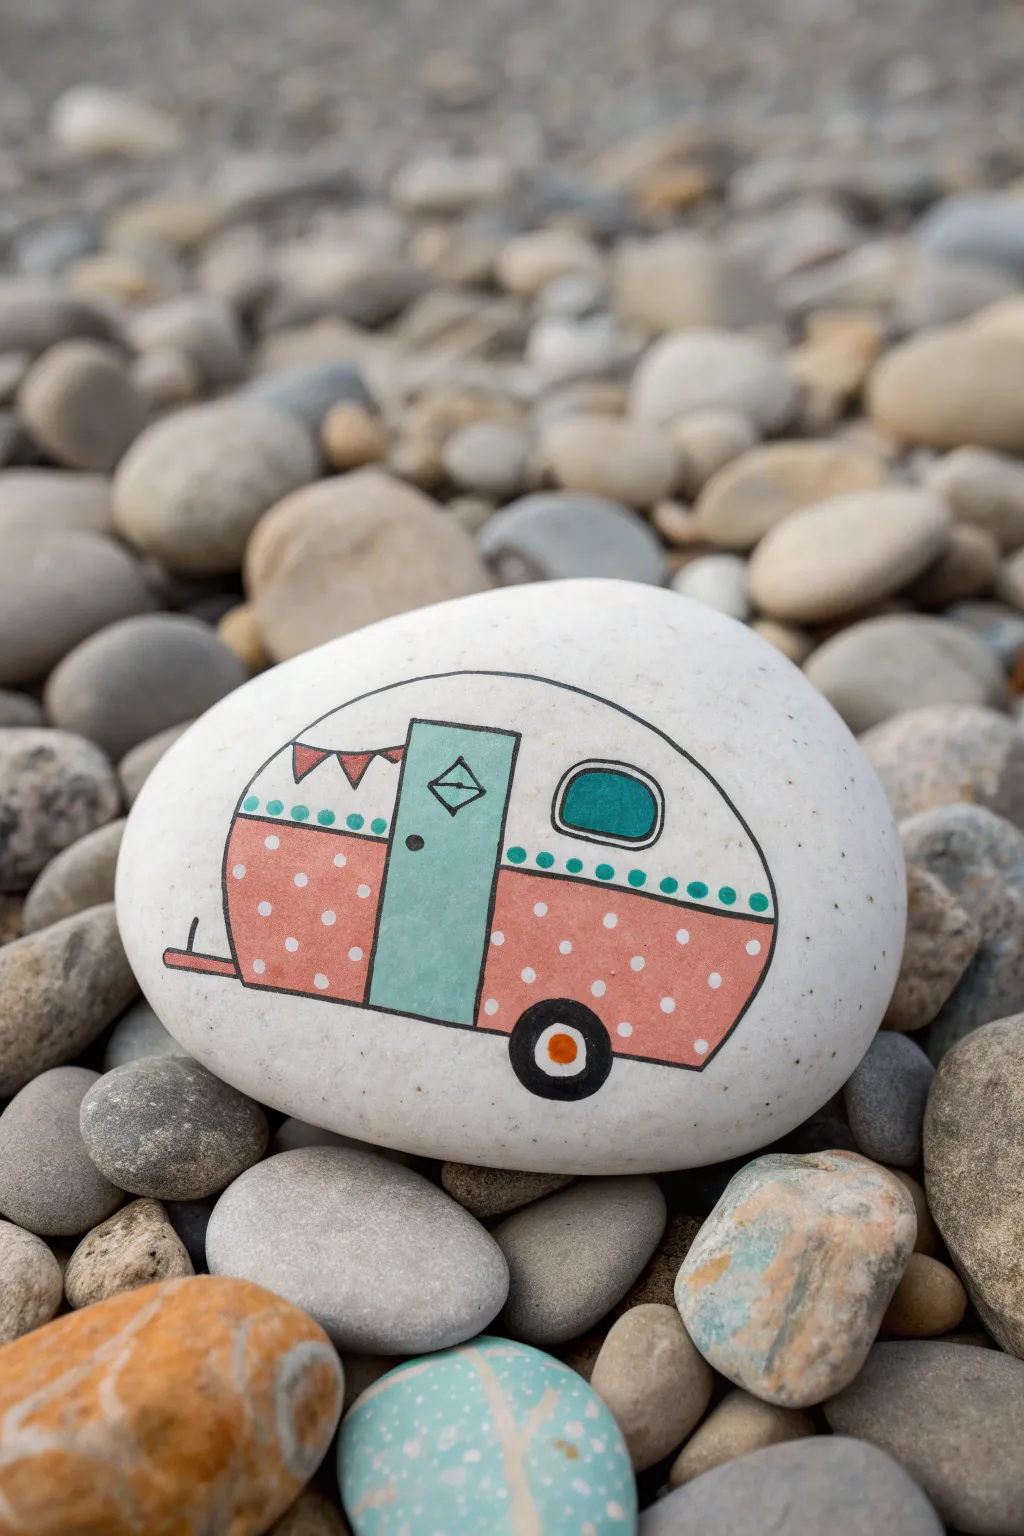
Hit the road with this adorable retro-style camper painted on a smooth white stone. Its cheerful pink polka dots and teal accents make it a perfect little keepsake for camping lovers or a cute garden decoration.
Step-by-Step Tutorial
Materials
- Smooth, rounded river rock (approx. 3-4 inches wide)
- White acrylic paint or gesso
- Acrylic paints (salmon pink, teal/turquoise, black, orange)
- Fine point black paint pen or liner brush (00 size)
- Dotting tool or toothpick
- Small flat brush
- Pencil and eraser
- Matte or glossy spray sealant
Step 1: Preparing the Canvas
-
Clean and Dry:
Begin by washing your rock with warm soapy water to remove any dirt or oils. Let it dry completely in the sun or use a hairdryer to speed things up. -
Base Coat:
Even if your rock is naturally light, apply 1-2 coats of white acrylic paint to create a bright, solid background. This ensures your colors will really pop. Allow full drying time between coats.
Uneven Dots?
If your polka dots look messy, let them dry fully, touch them up with the base pink color, and try again using the round end of a paintbrush handle.
Step 2: Sketching the Design
-
Outline the Shape:
Use a pencil to lightly sketch the main outline of the teardrop camper. It should look like a rounded loaf of bread, slightly taller on the right side. -
Add Key Features:
Sketch a vertical rectangle in the center for the door. Draw a curved line horizontally across the camper, separating the top roof section from the bottom body. Add a wheel arch at the bottom. -
Refine Details:
Draw the side window on the right (a rounded rectangle), a diamond window on the door, and the trailer hitch sticking out to the left. Don’t worry about the dots yet.
Clean Lines Secret
For super crisp straight lines on the door frame, use small pieces of washi tape or painter’s tape to mask off the area before painting the teal.
Step 3: Block Painting
-
Paint the Body:
Using a small flat brush, fill in the bottom section of the camper (to the left and right of the door) with salmon pink paint. You might need two layers for opaque coverage. -
Paint the Door:
Fill the rectangular door shape with your teal or turquoise paint. Be careful to keep the edges crisp against the pink sections. -
Window Detail:
Paint the inside of the main side window with a darker teal shade or mix a tiny bit of black into your teal paint to create contrast. -
The Wheel:
Paint the tire circle solid black. Once dry, add a smaller white circle in the center, and finally a tiny orange dot for the hubcap. -
Trailer Hitch:
Use a liner brush and pink paint to create the small trailer hitch lines extending from the front of the camper.
Step 4: Adding the Details
-
Polka Dots:
Dip a dotting tool or the end of a toothpick into white paint. carefully place small dots evenly across the pink sections of the camper. -
Decorative Stripe:
Just above the pink section, paint a row of tiny teal dots following the curve of the roofline. This acts as a cute trim detail. -
Bunting Flags:
In the upper left white section, paint three tiny triangles in pink to look like hanging bunting flags. -
Outline Work:
Once all paint is bone dry, use a fine point black paint pen to outline the entire camper, the door, the windows, and the bunting. Keep your hand steady and rest your pinky on the table for support. -
Final Touches:
Add a tiny black dot for the doorknob and outline the diamond window on the door. I like to re-trace the outer perimeter line once more to make it bold.
Step 5: Sealing
-
Protect Your Work:
Take your rock outside or to a well-ventilated area. Apply a light coat of spray sealant to protect the paint from chipping and weathering.
Let your finished rock cure for 24 hours before placing it in the garden to brighten up a flower pot


Pastel Camper With Tiny Curtains
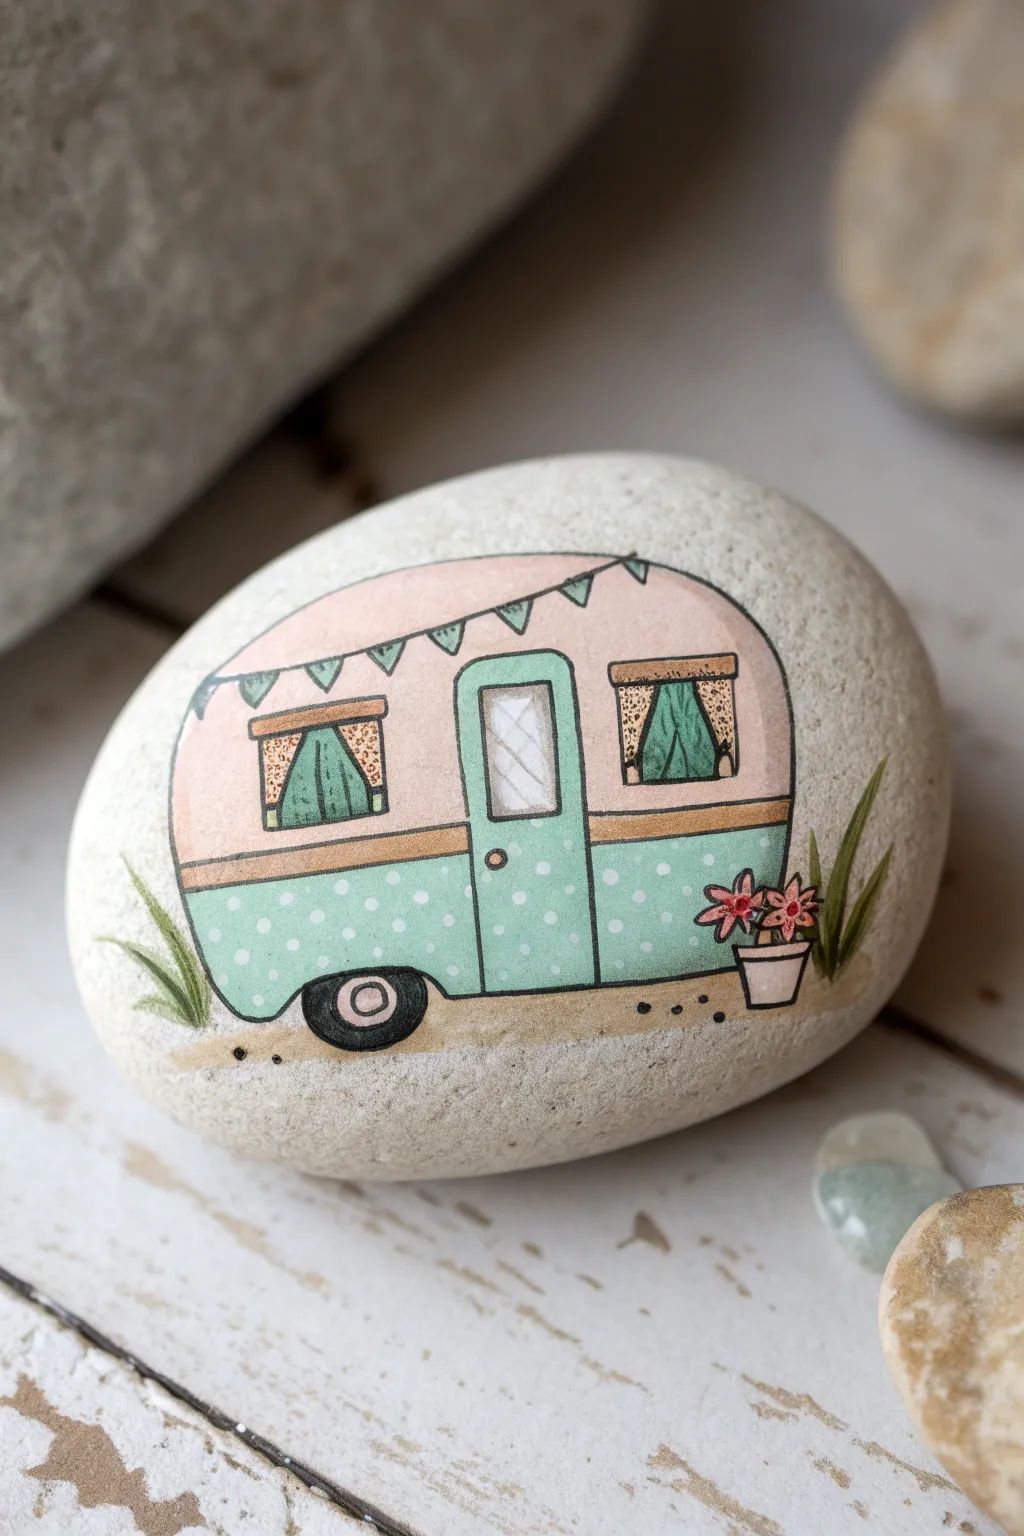
Capture the nostalgia of the open road with this adorable vintage camper painted on a smooth river rock. Featuring soft pastel hues, polka dots, and charming little curtains, this design fits perfectly in the palm of your hand.
How-To Guide
Materials
- Smooth, oval-shaped river rock (cleaned and dried)
- Acrylic paints (pale pink/peach, teal/aqua, white, black, brown, grey)
- Fine liner pens (black, sizes 01 and 03)
- Small round paintbrushes (sizes 0/3) and a liner brush
- Pencil and eraser
- Matte spray sealer or varnish
- Palette or small dish for mixing
- Water cup and paper towels
Step 1: Sketching and Base Layers
-
Prepare the Surface:
Begin with a completely clean and dry stone. If your rock is very dark, you may want to prime the area where you’ll be painting with a thin coat of white acrylic paint to help the pastels pop later. -
Outline the Shape:
Using a light pencil, sketch a rounded rectangle shape that curves with the natural contour of the rock. This will be the main body of the caravan. -
Add Details:
Lightly sketch the internal details: a horizontal line dividing the camper in half, a tall rectangle for the door, two smaller windows, the wheel well, and a triangular hitch at the front. -
Paint the Top Half:
Mix a soft pale pink or peach color. Carefully fill in the upper section of the camper, painting around the windows and the door frame. You might need two thin coats for opaque coverage. -
Paint the Bottom Half:
Use a teal or aqua acrylic paint for the lower section of the camper body and the door itself. Keep the strokes smooth and even. -
Ground the Camper:
Mix a sandy beige or light brown. Paint a horizontal strip underneath the camper to represent the ground, extending slightly past the edges of the vehicle.
Ink Control Pro Tip
Only use pens once the paint is bone dry! If the paint is even slightly tacky, it will clog the nib of your fine liner pen instantly. I always touch the rock to my cheek to check for coolness/dampness.
Step 2: Adding Character and Detail
-
Window Treatments:
Inside the window rectangles, paint contrasting teal triangles to look like drawn curtains. Fill the rest of the window space with white. -
The Polka Dots:
Dip the very tip of a fine brush, or a toothpick, into white paint. Add tiny, intentional dots across the teal bottom section of the camper for that retro texture. -
Door and Wheels:
Paint the window on the door white with a thin crisscross pattern later. Fill in the wheel shape with black, adding a smaller grey or pink circle in the center for the hubcap. -
Bunting Banner:
Using the teal paint, create a string of small triangles across the top curve of the pink section to look like festive bunting flags. -
Flower Pot Accent:
To the right of the door, paint a small trapezoid for a flower pot. Add simple star-shaped flowers in dark pink or red above it.
Step 3: Line work and Finishing Touches
-
Black Outlining:
Allow all paint to dry completely—this is crucial. Use your fine liner pens to outline every element. Go over the camper body, the windows, the bunting, and the door frame. -
Curtain Details:
With the finest pen, add tiny dots or patterns to the curtains to suggest fabric texture, and draw the curtain rods. -
Grass and Plants:
Using an olive green paint and a liner brush, flick upwards from the ground line to create simple blades of grass on either side of the camper. -
Final Highlights:
Add a tiny white highlight to the black tire and the flower petals to make them look dimensional. -
Seal the Rock:
Once the ink is fully set (give it at least an hour), spray the rock with a matte sealer to protect your miniature artwork from the elements.
Clean Lines Hack
Make a mistake with the black liner? Don’t panic. Wait for the ink to dry, then use a tiny brush with the original paint color to ‘erase’ the mistake by painting over the line.
Place your finished camper rock on a sunny windowsill or in a potted plant for a touch of travel-inspired whimsy
BRUSH GUIDE
The Right Brush for Every Stroke
From clean lines to bold texture — master brush choice, stroke control, and essential techniques.
Explore the Full Guide
Happy Camper Lettering Rock

This charming project combines bold, rustic typography with a sweet miniature illustration to celebrate the joy of the open road. The design sits perfectly on a smooth white stone, creating a clean but homespun look that makes a wonderful keepsake for camping enthusiasts.
How-To Guide
Materials
- Smooth white or light grey river rock (flat surface is best)
- Pencil and eraser
- Posca pens or fine tip acrylic paint markers (Black, Orange/Rust, Brown)
- Small detail paintbrush (optional, if not using markers)
- Matte spray sealant or brush-on varnish
Step 1: Preparation & Lettering
-
Clean your canvas:
Begin by washing your stone thoroughly with soap and water to remove any dirt or oils that might prevent the paint from sticking. Let it dry completely. -
Draft the text layout:
Using a pencil, lightly sketch two curved guidelines to help shape your text. The top line should curve upward slightly, and the bottom downward, creating an oval shape for your words. -
Sketch the letters:
Pencil in the words ‘HAPPY’ and ‘CAMPER’ using the faint guidelines. Aim for a slightly rustic, uneven sans-serif style where the letters aren’t perfectly uniform. -
Ink the outlines:
Take your black fine-tip paint marker and carefully trace over your pencil letters. Keep your hand steady and move slowly on the textured surface. -
Thicken the strokes:
Go back over each letter to thicken the lines slightly. I like to add a tiny bit more weight to the downstrokes to give the font that hand-lettered feel.
Step 2: Drawing the Mini Camper
-
Outline the camper shape:
Centered below the text, use your black pen to draw a small rounded rectangle for the camper body. Add a small wheel well bump at the bottom. -
Add the door and window:
Draw a tall, narrow rectangle for the door on the right side of the camper body. Add a small square window on the upper left side. -
Detail the wheels and hitch:
Draw two small circles for wheels at the bottom. Add a tiny line protruding from the front (right side) for the trailer hitch. -
Color blocking the camper:
Using an orange or rust-colored marker, fill in the bottom half of the camper body. Leave the top half the natural color of the stone. -
Roof detail:
Use a brown marker to color a thin strip along the very top edge of the camper to represent the roof.
Priming Pro Tip
If your rock is too dark, paint a white oval where the design will go first. Let it dry, then draw on top. This makes the colors pop just like on a white stone.
Step 3: Florals & Accessories
-
Sketch the branches:
Draw two curved lines extending outward from the sides of the camper using the black marker. These will be the stems for your leaves. -
Add the leaves:
Switch to your brown or rust marker. Draw small, simple teardrop shapes along the black stems to create rustic foliage. -
Draw the flowers:
On the left and right sides of the word ‘CAMPER’, draw a simple six-petaled flower shape using the orange marker. -
Detail the flowers:
Once the orange paint is dry, add a tiny white or unpainted dot in the center of each flower. -
Add decorative dots:
Using the black fine tip, add three or four tiny dots around the top curve of ‘HAPPY’ and near the flowers to balance the composition.
Fixing Wobbly Lines
If your black outlines look shaky, wait for them to dry fully. Then, use the edge of a toothpick to gently scrape away excess paint to straighten the edges.
Step 4: Finishing Touches
-
Erase guidelines:
Wait until the paint is entirely dry—give it at least 15 minutes—then gently erase any visible pencil marks. -
Seal the rock:
Apply a coat of matte spray sealant or brush-on varnish to protect your design from chipping and weather.
Now you have a travel-ready piece of art to decorate your campsite or garden
Camper Silhouette at Sunset
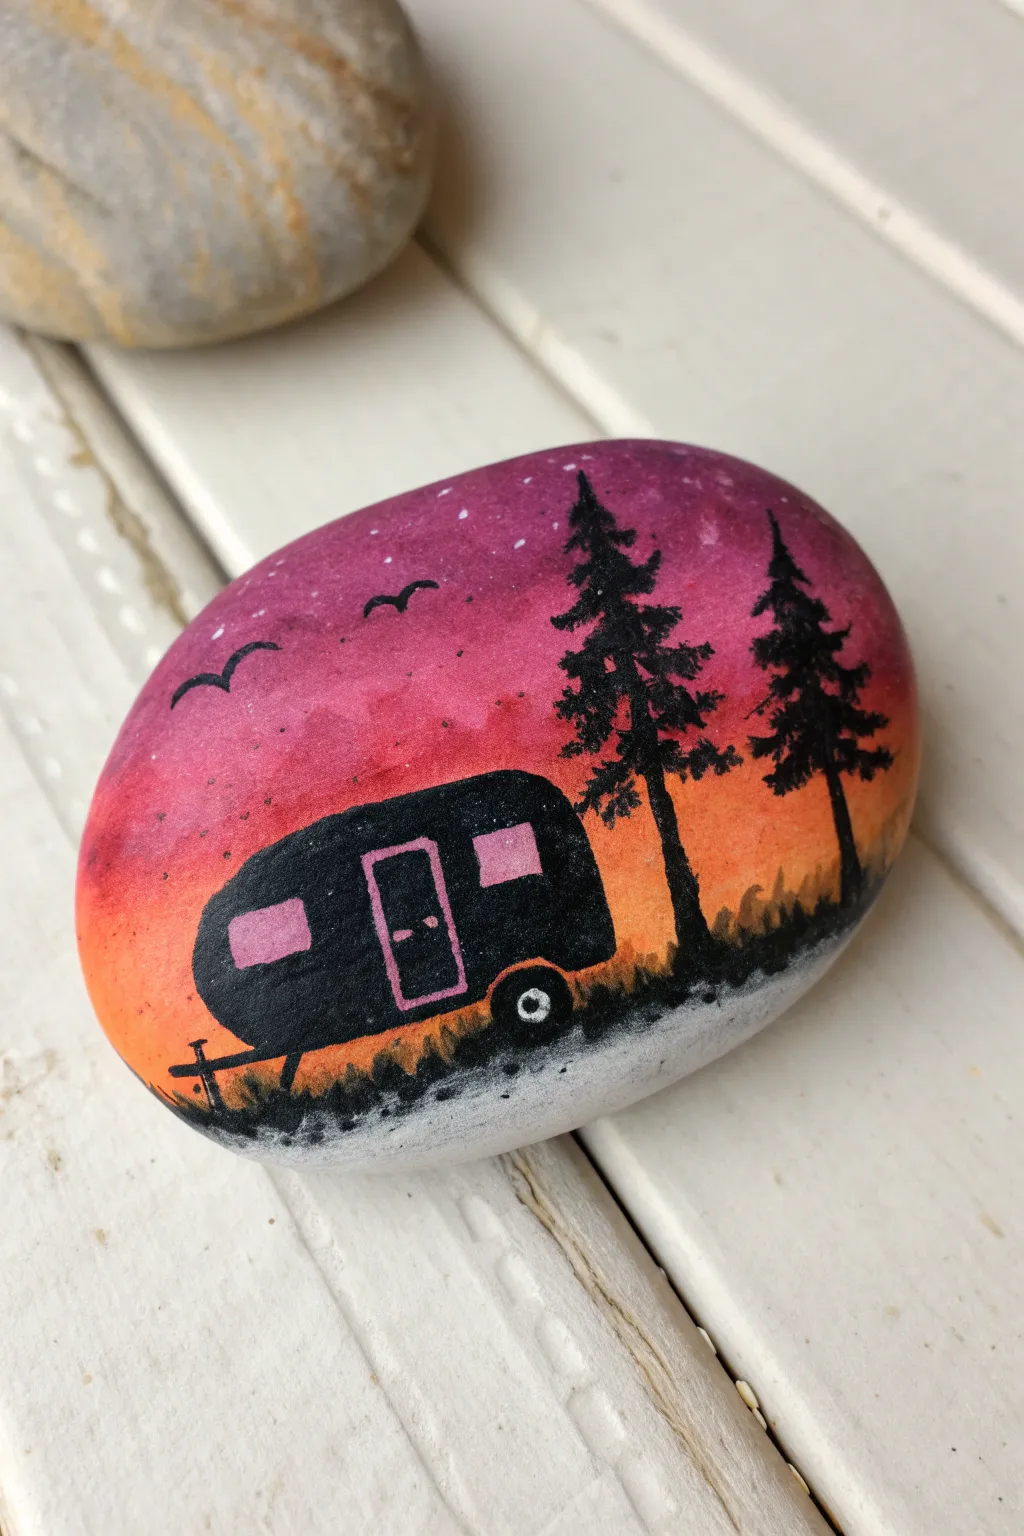
Capture the wanderlust of camping with this vibrant sunset rock painting, featuring a bold silhouette against a glowing sky. The smooth gradient background sets the perfect mood for the tiny camper and pine trees nestled in the foreground.
Step-by-Step Tutorial
Materials
- Smooth, rounded river rock (cleaned and dried)
- White acrylic paint or gesso (for base coat)
- Acrylic paints: Purple, Magenta/Dark Pink, Orange, Yellow
- Black acrylic paint or fine-tip black paint pen/marker
- Light pink or white paint (for window details)
- Makeup sponge or foam wedge
- Small flat paint brush
- Detail liner brush (size 0 or 00)
- Small dotting tool or toothpick
- Sealer (spray or brush-on varnish)
Step 1: Creating the Sunset Gradient
-
Base Coat Application:
Begin by painting your clean rock with a layer or two of white acrylic paint or gesso. This crucial step ensures your sunset colors will pop vividly rather than sinking into the grey stone. -
Prepare Your Palette:
Squeeze out small amounts of purple, magenta, orange, and yellow paint onto your palette or a paper plate. Keep them close together so you can grab colors quickly. -
Starting the Sky:
Using a slightly damp makeup sponge, dab into the purple paint. Sponge this color onto the top third of the rock, tapping lightly to create a texture-free coverage. -
Blending Downward:
While the purple is still wet, pick up the magenta paint with the same sponge. Blend it into the bottom edge of the purple and continue sponging downward into the middle section of the rock. -
Adding Warmth:
Before the magenta dries completely, pick up the orange paint. Sponge this below the pink, letting the colors overlap slightly to create a smooth transition. -
The Lower Horizon:
Finish the gradient by sponging yellow paint at the very bottom third of the rock, blending it up into the orange. If the transition looks harsh, just re-dab the area between colors to soften it. -
Drying Time:
Allow the gradient background to dry completely. I prefer to let this sit for at least 20 minutes because we need a bone-dry surface for the sharp black details coming next.
Muddy Sunset?
If your gradient colors are blending into brown mud, let each layer dry slightly more before adding the next, or wash your sponge out between contrasting colors like purple and orange.
Step 2: Painting the Silhouettes
-
Planning the Horizon:
Using black paint and a small brush, paint a slightly uneven horizon line near the bottom of the rock where the yellow meets the white unpainted bottom or just over the yellow. -
Camper Outline:
With a fine detail brush or a black paint pen, draw the rounded rectangle shape of the retro camper. It should be positioned on the left side, resting on your horizon line. -
Filling the Shape:
Fill in the entire camper body with solid black paint. Paint a small wheel well at the bottom and a simple A-frame hitch sticking out the front left. -
Tree Trunks:
To the right of the camper, paint two vertical lines for the tree trunks using your liner brush. Make the one closest to the camper slightly taller. -
Adding Pine Branches:
Starting at the top of a tree trunk, use quick, short dabbing motions to create branches. Flare them out wider as you move down the trunk to create that classic Christmas tree shape. -
Ground Texture:
Use the very tip of your brush to flick tiny upward strokes along the horizon line, creating the look of grass and weeds silhouetted against the sunset.
Glamping Glow
Add a tiny touch of yellow paint inside the pink camper windows to make it look like the lights are on inside for a cozy evening vibe.
Step 3: Final Details
-
Camper Windows:
Once the black camper silhouette is completely dry, mix a tiny bit of white with pink (or use light pink paint). Paint two small rectangles inside the camper for windows and outline a door shape. -
Window Details:
Carefully outline the pink windows and door with your finest black pen or brush to clean up the edges. Add a tiny dot for the doorknob. -
Wheel Detail:
Paint a very small white circle inside the wheel well area, then add a black dot in the center to create the tire and hubcap. -
Flying Birds:
Using your finest brush or pen, draw two or three simple ‘V’ shapes in the upper left purple sky to represent birds flying in the distance. -
Starry Sky:
Dip a toothpick or dotting tool into white paint. Gently tap a few tiny stars into the upper purple section of the sky for a magical evening touch. -
Sealing the Artwork:
Let everything cure overnight. Apply a clear spray sealer or brush-on varnish to protect your painting from the elements and give it a nice shine.
Place this little piece of art on your desk or in a planter to remind you of peaceful evenings in nature

PENCIL GUIDE
Understanding Pencil Grades from H to B
From first sketch to finished drawing — learn pencil grades, line control, and shading techniques.
Explore the Full Guide
Cozy Campsite Camper and Pines
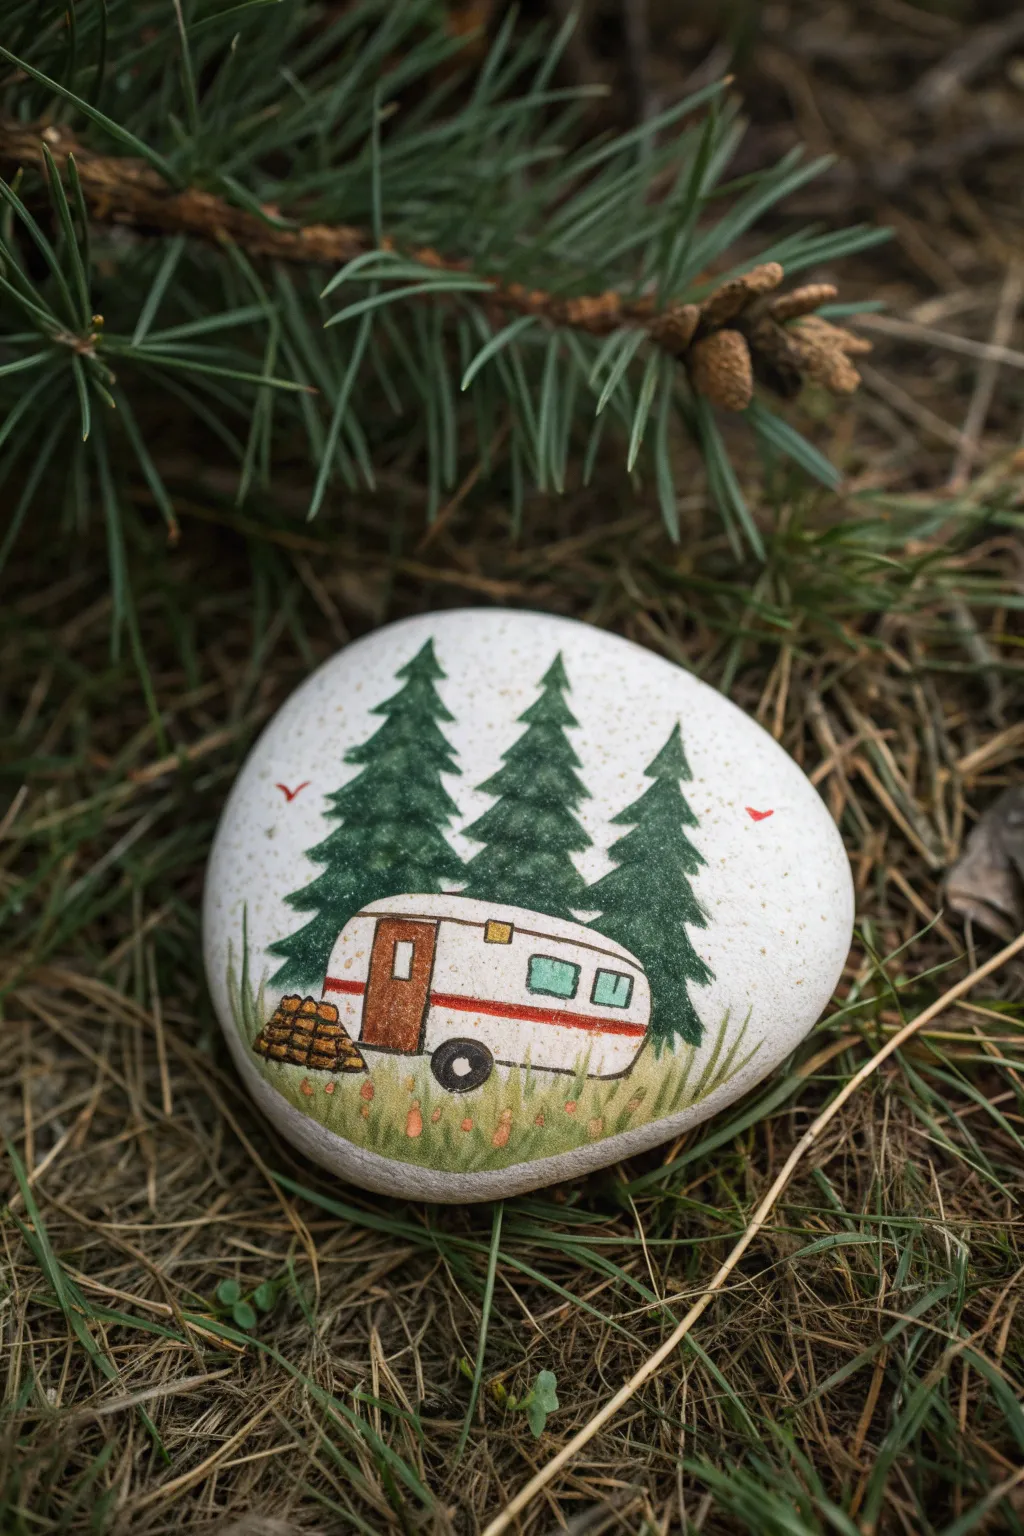
Capture the magic of a secluded weekend getaway with this charming rock painting featuring a retro trailer nestled among tall pines. The design uses natural tones and crisp lines on a smooth white stone to create a miniature camping scene that fits in the palm of your hand.
Step-by-Step Guide
Materials
- Smooth, round or oval river rock
- Acrylic paints (White, Dark Green, Tan/Beige, Brown, Black, Red, Light Blue, Light Green)
- Fine point detail brushes (Sizes 000 and 0)
- Small flat brush
- Posca paint pens (optional, for fine lines)
- Clear acrylic sealer (spray or brush-on)
- Pencil for sketching
- Palette or paper plate
- Water cup
Step 1: Preparation and Base
-
Clean the stone:
Begin by thoroughly washing your rock with soap and water to remove any dirt or oils. Let it dry completely before starting. -
Prime the surface:
Paint the entire face of the rock with 2-3 coats of white acrylic paint. This creates a bright, neutral canvas that helps the other colors pop. Allow each coat to dry fully. -
Sketch the layout:
Use a pencil to lightly sketch your design. Start by drawing the oval shape of the camper near the bottom third of the rock. Then, sketch three triangular outlines for the trees behind it, making sure the middle tree is slightly higher.
Uneven Tree Texture?
If your pine trees look too flat, wait for the green to dry, then dry-brush a lighter sage green on just the tips of the branches to add instant dimension.
Step 2: Painting the Backdrop
-
Block in the trees:
Using a small brush and dark forest green paint, fill in the tree shapes. Don’t worry about texture yet; just get a solid base color down. -
Texture the pines:
Once the green base is dry, use a fine detail brush to flick small, downward strokes along the edges and interior of the trees. This mimics the look of pine needles. I like to mix a tiny bit of black into the green for the deeper shadowed areas. -
Add the grass base:
Paint a wash of light green mixed with a touch of tan along the very bottom of the rock, overlapping the bottom edge of the camper sketch slightly. Keep this layer semi-transparent and uneven.
Step 3: Creating the Camper
-
Fill the camper body:
Paint the main body of the camper with white paint. You may need two coats to ensure it looks solid against the background trees. -
Paint the details:
Using a light brown or tan color, paint the rectangular door. Use a very light blue for the two side windows, and add a small yellow square near the roof for a vent. -
Add the stripe:
Carefully paint a thin horizontal red stripe running across the middle of the camper. Using a paint pen here can give you a steadier line than a brush. -
Outline and define:
With your finest brush (000) and black paint (or a black extra-fine paint pen), outline the entire camper, the door, and the windows. Draw the wheel circle at the bottom with a silver or grey hubcap center.
Straight Line Trick
For the crisp red stripe on the camper, lay down two strips of washi tape or painter’s tape as a stencil. Peel it off while the paint is still wet.
Step 4: Final Touches
-
Paint the woodpile:
To the left of the camper, paint small stacked circles and ovals in brown to represent chopped logs. Outline them in black and add tiny wood grain swirls. -
Detail the grass:
Use a fan brush or a detail brush to flick upward strokes of various greens and dull yellows at the base. Ensure grass blades overlap the bottom of the camper and the firewood to ground them in the scene. -
Add the birds:
Paint two tiny, red ‘v’ shapes in the white sky area on either side of the trees to represent distant birds. -
Create speckles:
For a rustic, textured look, dilute some brown paint with water and gently flick it from a stiff brush over the entire rock. This gives it a speckled, eggshell-like finish. -
Seal the artwork:
Once absolutely everything is dry, apply a coat of clear acrylic sealer to protect your miniature painting from scratches and weather.
Place your finished camper rock on a desk or in a planter for a daily dose of adventure
Lakeside Camper With Canoe Detail
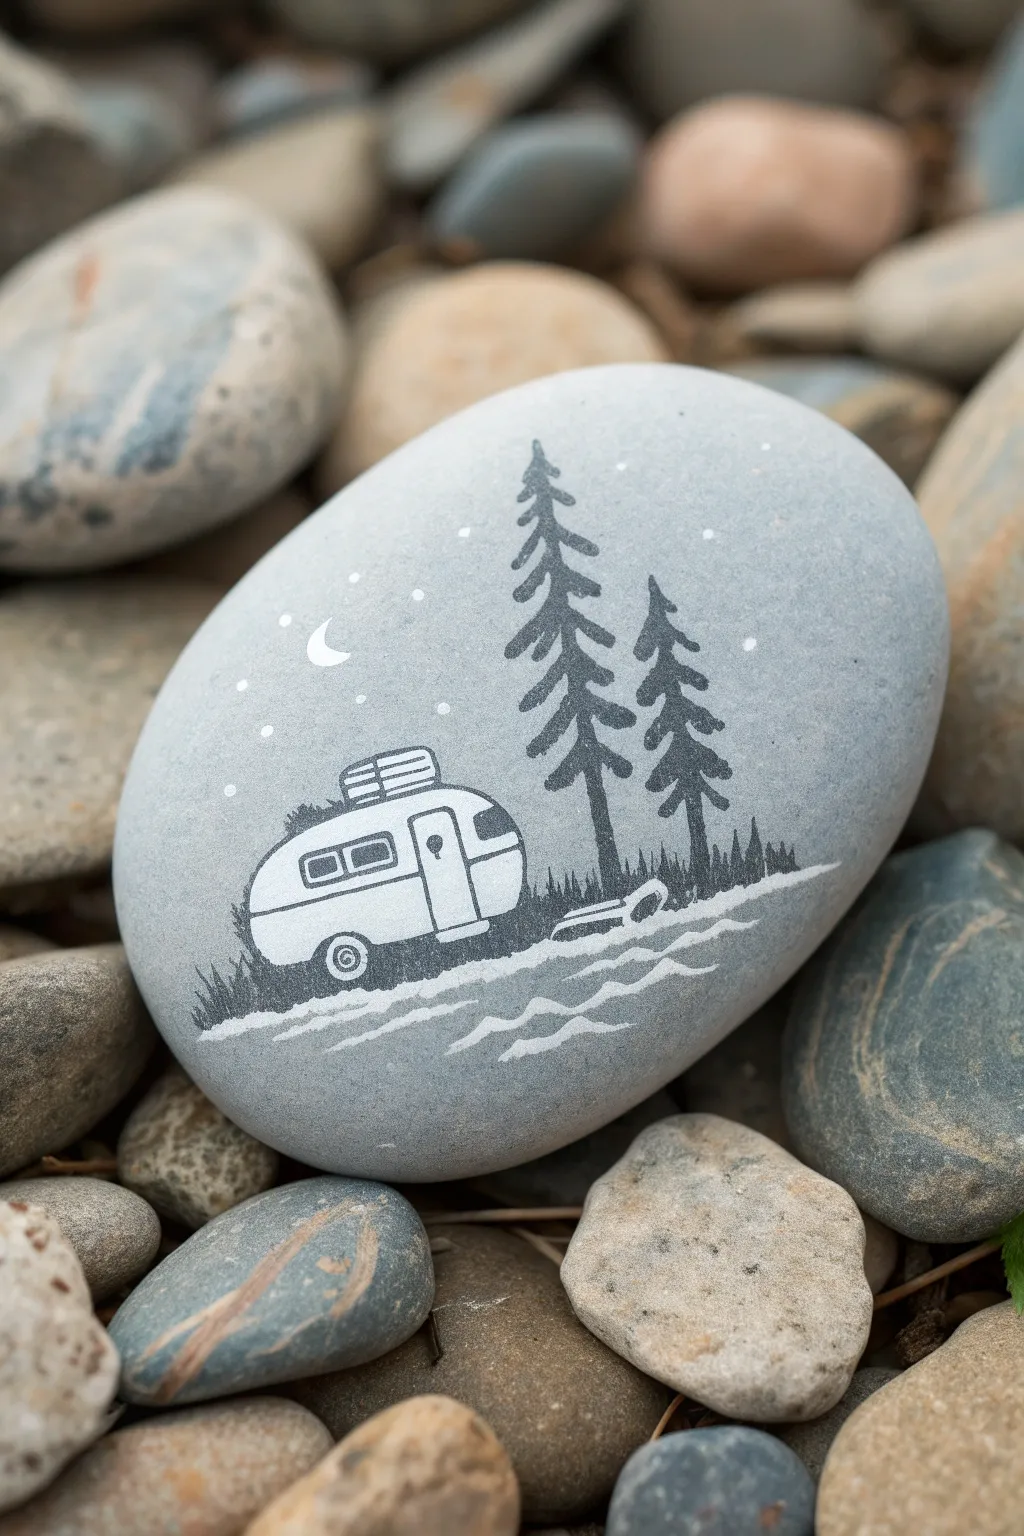
Capture the serenity of a quiet camping night with this elegant silhouette design. Using the natural cool grey of a smooth river stone as your backdrop, this project combines crisp black lines with stark white highlights for a striking monochromatic finish.
Detailed Instructions
Materials
- Smooth, flat grey river rock (palm-sized)
- Black acrylic paint or black paint pen (extra fine tip)
- White acrylic paint or white paint pen (extra fine tip)
- Fine detail paintbrush (size 0 or 00)
- Pencil for sketching
- Matte spray sealer or varnish
- Paper towel
- Water cup
Step 1: Setting the Scene
-
Surface Prep:
Begin by washing your stone thoroughly with soap and water to remove any dirt or oils. Let it dry completely before starting your design. -
Drafting the Horizon:
Using a light pencil, sketch a gentle, uneven line across the lower third of the rock to establish the ground where your camper and trees will sit. -
Sketching the Elements:
Lightly outline the rounded shape of the retro camper on the left side. To the right, sketch the vertical lines for two tall pine trees and a small canoe shape resting on the ground line.
Steady Hand Trick
Rest your painting hand on a stable surface and use your pinky finger as a pivot point on the table or the rock itself. This helps immensely when drawing tiny details like the stars.
Step 2: Painting the Silhouette
-
Blocking the Trees:
Load your fine brush or black paint pen. Start at the top of your sketched tree trunks and use short, downward jagged strokes to create the pine branches. Keep the tops narrow and widen the branches as you move down. -
Adding the Grass Line:
Along the horizon line you sketched earlier, paint small, upward flicking strokes to simulate grass blades. Extend this texture slightly behind where the camper will sit. -
Detailing the Canoe:
Outline the small canoe shape on the ground. Fill in the interior with black, leaving a tiny sliver of the grey rock visible to suggest the rim of the boat. -
Camper Outline:
Carefully trace the main body of the camper with your black medium. Focus on the rounded retro shape, the wheel well, and the door frame. -
Camper Details:
Add the specific camper details in black: the wheel, the hitch at the front, and the roof rack storage area. Do not fill the main body with black; we want the stone color to remain the primary camper color.
Add a Glow
Mix a tiny drop of yellow with white paint and glaze the inside of the camper windows. It creates a cozy illusion of a light being turned on inside the trailer.
Step 3: Bringing in the Light
-
White Blocking:
Switch to your white paint pen or clean brush. Fill in the main body of the camper with white paint. This makes it pop against the grey stone. You may need two thin coats for opacity. -
Defining Windows:
Once the white body is dry, use your black pen to draw the rectangular windows and the door outline back over the white paint. -
Water ripples:
Below the grass line, use the white paint to create wavy, horizontal lines. These represent the water’s edge and gentle ripples reflecting the moonlight. -
Moon and Stars:
In the upper left sky area, paint a small, crisp white crescent moon. Dot the surrounding sky with tiny white specks for stars, varying their size slightly for a natural look. -
Ground Highlights:
Add a few thin white lines along the grassy bank, specifically under the canoe and camper, to show where the moonlight is hitting the ground.
Step 4: Final Touches
-
Cleanup:
Check your edges. If the black silhouette looks shaky anywhere, use the black pen to crisp up the lines of the trees or grass. -
Drying Time:
Allow the paint to cure fully. If you used thick white acrylic, give it at least an hour to ensure the moisture has evaporated. -
Sealing:
Take the rock outside and apply a light coat of matte spray sealer. I find matte works best here to keep the natural stone look without unwanted glare.
Place this charming stone on a bookshelf or gift it to your favorite camping buddy as a keepsake


Desert Camper Under a Hot Sun
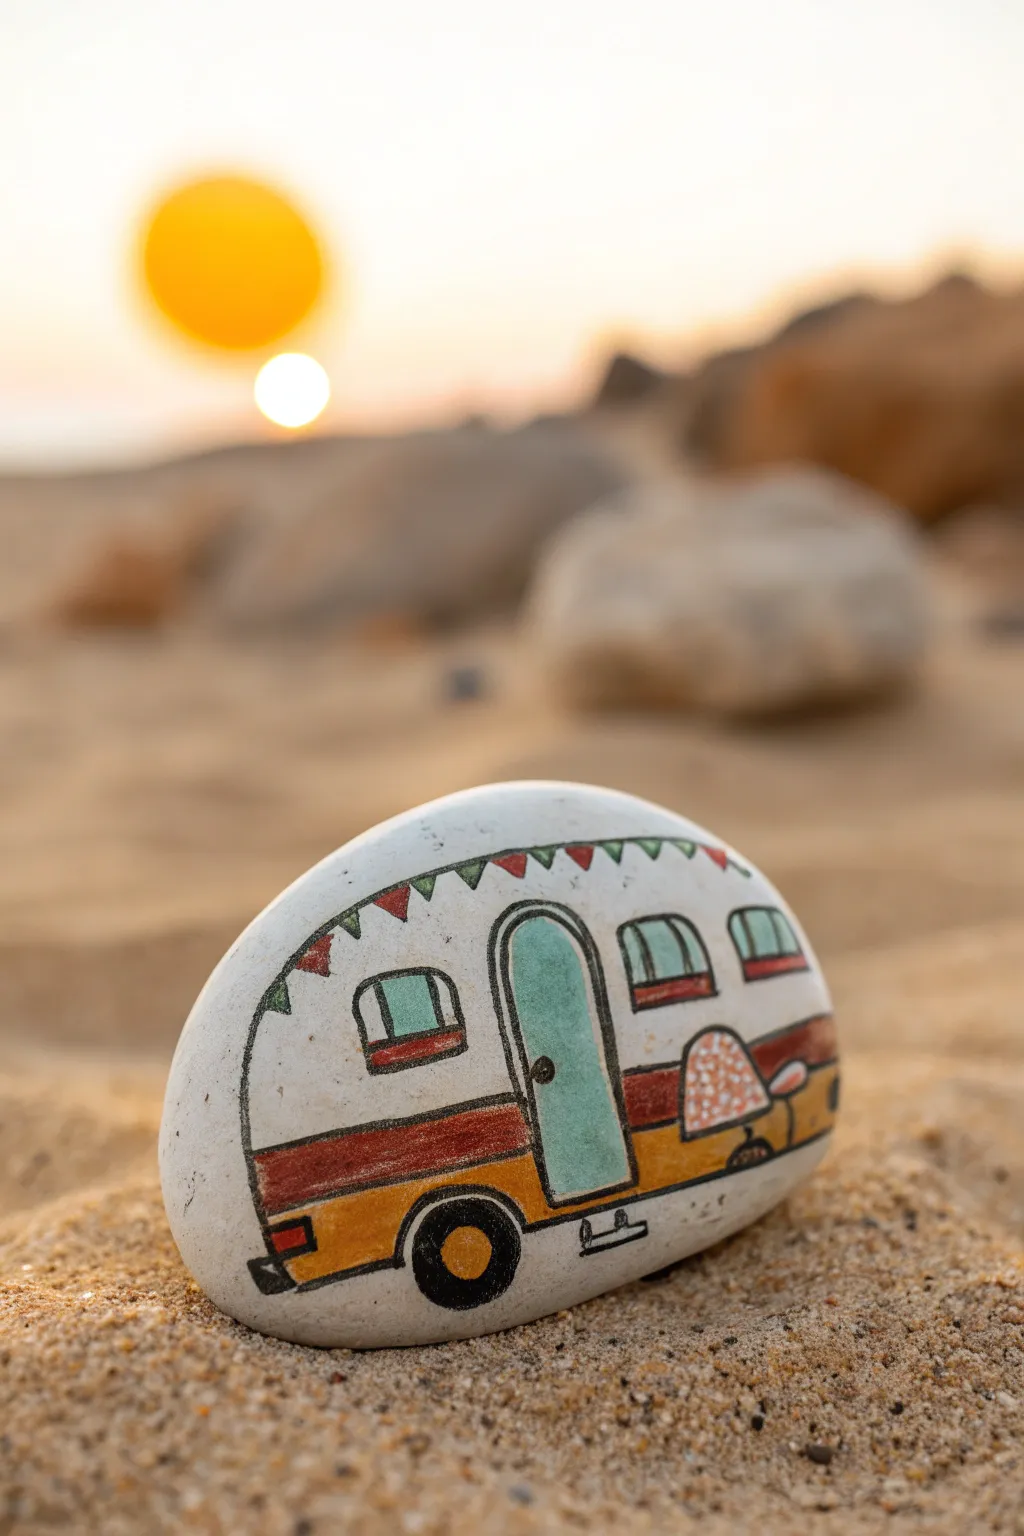
Capture the spirit of desert camping with this simple yet charming painted stone featuring a classic teardrop trailer. The clean white background helps the retro teal and warm yellow colors pop, making it a perfect pocket-sized souvenir of summer travels.
Step-by-Step Guide
Materials
- Smooth, oval-shaped river rock (cleaned and dried)
- White acrylic paint or gesso
- Acrylic paints: Teal/aqua, mustard yellow, burnt orange/rust, light grey
- Black fine-point paint pen (0.5mm or 0.7mm) or fineliner marker
- Small flat brush and detail round brush
- Pencil and eraser
- Clear spray sealant (matte or satin finish)
Step 1: Preparing the Base
-
Surface Prep:
Begin by washing your stone with warm soapy water to remove any dirt or oils. Let it dry completely before starting, as moisture can ruin your base coat. -
The Base Coat:
Apply a layer of white acrylic paint over the entire top surface of the rock. You want the stone to be an opaque, clean canvas. -
Second Layer:
Once the first coat is dry to the touch, apply a second coat of white. This ensures no grey stone color peeks through later. -
Rough Sketching:
Using a pencil very lightly, sketch the large rounded rectangle shape of the camper body. Add the wheel arch at the bottom and the door placement.
Steady Hands
If your hand shakes while outlining with the pen, try resting your wrist on a heavy book that is the same height as your rock.
Step 2: Blocking in Color
-
Painting the Door:
Mix a soft teal or aqua color. Carefully paint the door shape, filling it in solidly with your small brush. -
Adding Windows:
With the same teal shade, paint two small rectangular shapes for the windows—one to the left of the door and one to the right. -
The Lower Stripe:
Switch to your mustard yellow paint. Paint a horizontal band along the bottom edge of the camper body, carefully going around the wheel well space. -
The Middle Stripe:
Above the yellow strip, paint a thinner band of burnt orange or rust color. This creates that classic vintage two-tone look. -
Decorative Bunting:
Using the tip of your smallest brush or a toothpick, dab tiny triangles along the top curve of the camper roof. Alternate between green and red for a festive bunting effect. -
Wheel Detail:
Paint a solid black circle inside the wheel well area. Once dry, add a smaller yellow dot in the exact center for the hubcap.
Pen Won’t Flow?
If the paint pen stops working over the acrylic, the surface might be too rough. scribble on a piece of smooth paper to get the ink flowing again.
Step 3: Outlining and Details
-
Main Outlines:
Wait until all paint is totally dry. Taking your black paint pen, carefully trace the main outer shape of the camper. -
Defining Features:
Outline the door, the windows, and the horizontal stripes. Keep your hand steady and rest your pinky on the table for stability. -
Curtains and Frames:
Draw simple curtain lines inside the windows. Add small rectangles beneath the windows to suggest frames or ledges. -
Door Hardware:
Place a small black dot on the door for the handle. Add a tiny vertical line near the bottom of the door for the step. -
The Hitch & Lights:
Draw a small rectangle at the rear for a taillight and fill it with red. At the front, sketch a small triangle or line to represent the towing hitch. -
Wheel Arch:
Outline the wheel arch curve carefully, ensuring it frames the tire without touching it. -
Final Polish:
Check for any pencil marks that are still visible and gently erase them if the paint is cured. I usually wait an extra hour before sealing to prevent smearing.
Step 4: Sealing
-
Protecting the Art:
Take the rock outside or to a ventilated area. Spray a light coat of clear sealant over the surface to protect the paint from chipping and UV light.
Now your little camper is ready for its own miniature adventure on your desk or garden shelf
Snowy Camper With Winter Lights
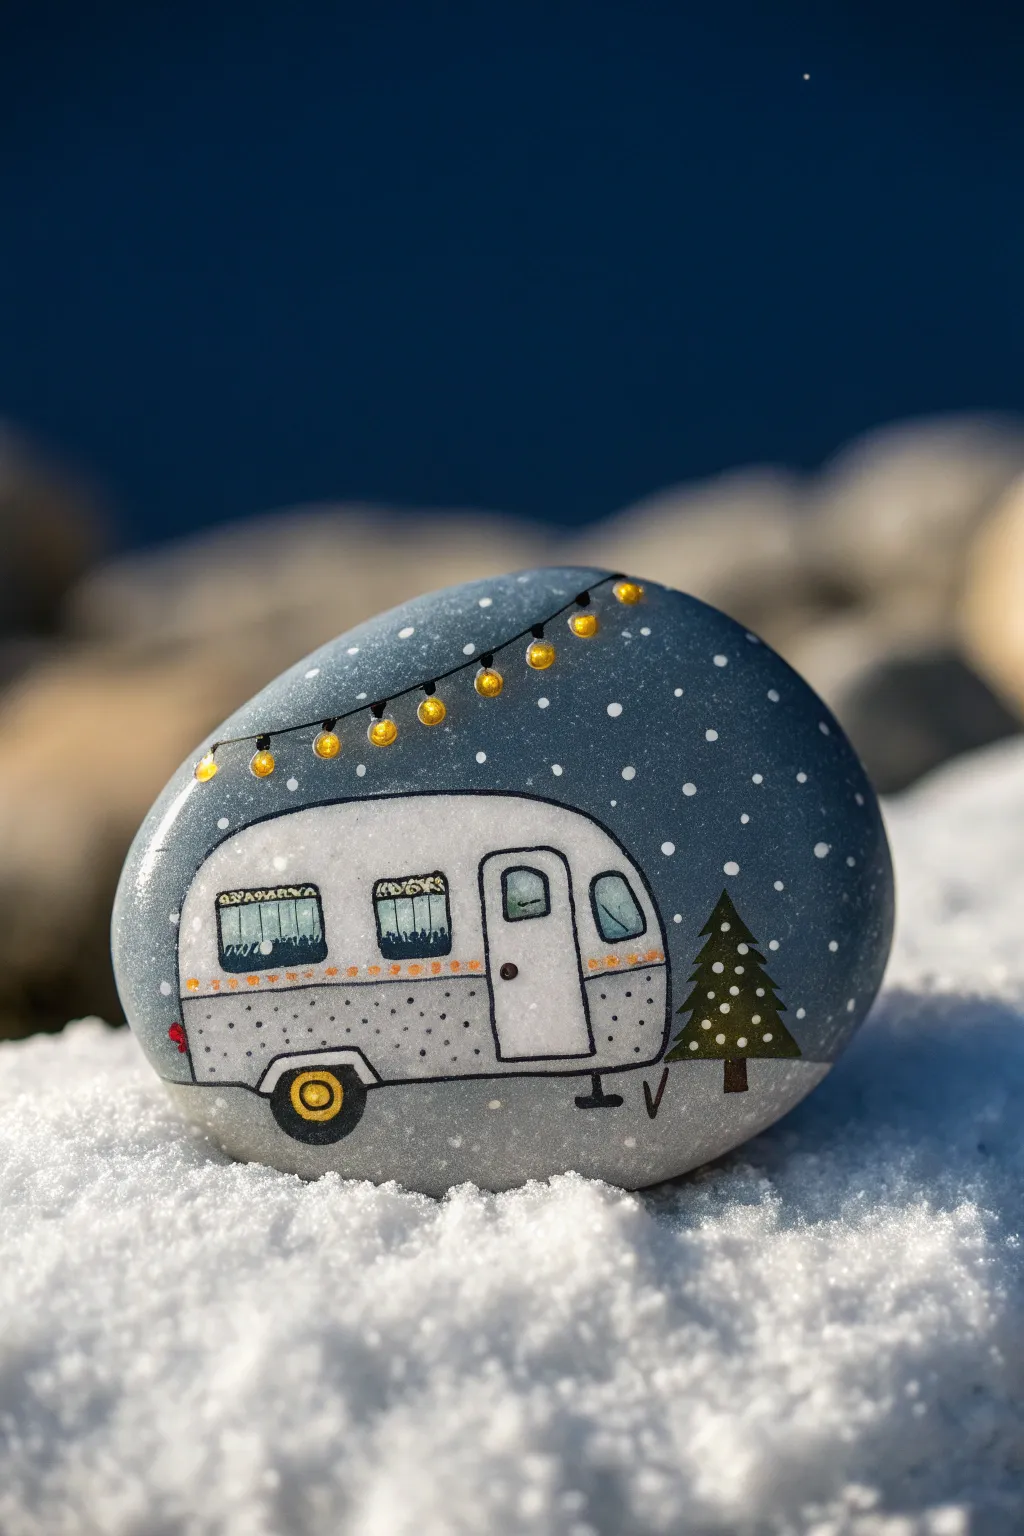
Capture the cozy magic of winter camping with this adorable painted rock. It features a vintage-style camper beneath a string of glowing festive lights and a gentle snowfall.
Detailed Instructions
Materials
- Smooth, rounded rock (medium size)
- Acrylic paints: dark slate blue, white, silver/grey, black, golden yellow, forest green, brown, red
- Paint brushes: medium flat brush, fine detail liner brush
- Dotting tool or toothpick
- Clear acrylic sealer (spray or brush-on)
- Pencil for sketching
Step 1: Setting the Scene
-
Prepare the stone:
Begin by washing your stone with soap and water to remove any dirt or oils. Let it dry completely before starting. -
Paint the background:
Mix a dark slate blue with a tiny touch of black to create a deep night sky color. Paint the upper three-quarters of the rock with this shade. You may need two coats for full opacity. -
Create the snowy ground:
For the bottom quarter of the rock, paint a curved horizon line using pure white paint to represent the snow-covered ground.
Step 2: Drafting the Camper
-
Sketch the outline:
Once the background is fully dry, lightly sketch the shape of a vintage camper with a pencil. Aim for a rounded, bean-like shape sitting on the snow line. -
Paint the camper body:
Fill in the entire camper shape with white paint first to act as a primer. This ensures your silver and other colors will pop against the dark background. -
Add metallic details:
Paint the bottom half of the camper with metallic silver or light grey paint, leaving the top half white. Add a thin stripe of golden yellow or orange separating the two sections. -
Refine the camper texture:
Using the very tip of a fine brush, add tiny grey dots to the silver section to give it a textured, vintage metal appearance.
Snowy Texture Tip
For realistic snow on the ground, dab a small piece of sponge with white paint instead of brushing it on. The texture mimics fluffy, fresh powder.
Step 3: Camp Details & Atmosphere
-
Outline and define:
Using your finest liner brush and black paint mixed with a drop of water for flow, outline the camper body. Draw a rectangular door with a rounded top and small square windows. -
Paint the windows:
Fill the window panes with a very light blue. Once dry, sketch tiny curtains or cross-hatching to make it look cozy inside. -
Add the wheel and hitch:
Paint a black wheel well near the back and a yellow hubcap inside it. Don’t forget the small hitch and stand at the front and a tiny red tail light at the back. -
Plant a tree:
To the right of the camper, paint a simple pine tree using forest green. Start with a small brown trunk, then layer small triangles of green upwards.
Make It Sparkle
Before the snow dots dry, sprinkle a pinch of iridescent fine glitter over the white paint for a magical, frosty shimmer in the sunlight.
Step 4: Lights and Snow
-
String the lights:
Paint a thin, swoping black line arching across the sky above the camper. I find it easiest to anchor my pinky on the table for stability here. -
Add glowing bulbs:
Use a dotting tool dipped in golden yellow to place bulbs along the black string. Add a tiny white dot in the center of each yellow bulb to simulate a glowing reflection. -
Let it snow:
Dip the handle end of a brush or a toothpick into white paint. Dot ‘snow’ randomly all over the background sky and lightly over the tree. -
Seal your work:
Allow the paint to cure for at least 24 hours. Finish with a coat of clear acrylic sealer to protect your winter scene from the elements.
Place your finished rock in a garden pot or on a windowsill to enjoy a little winter cheer all season long
Spring Wildflowers Framing a Camper
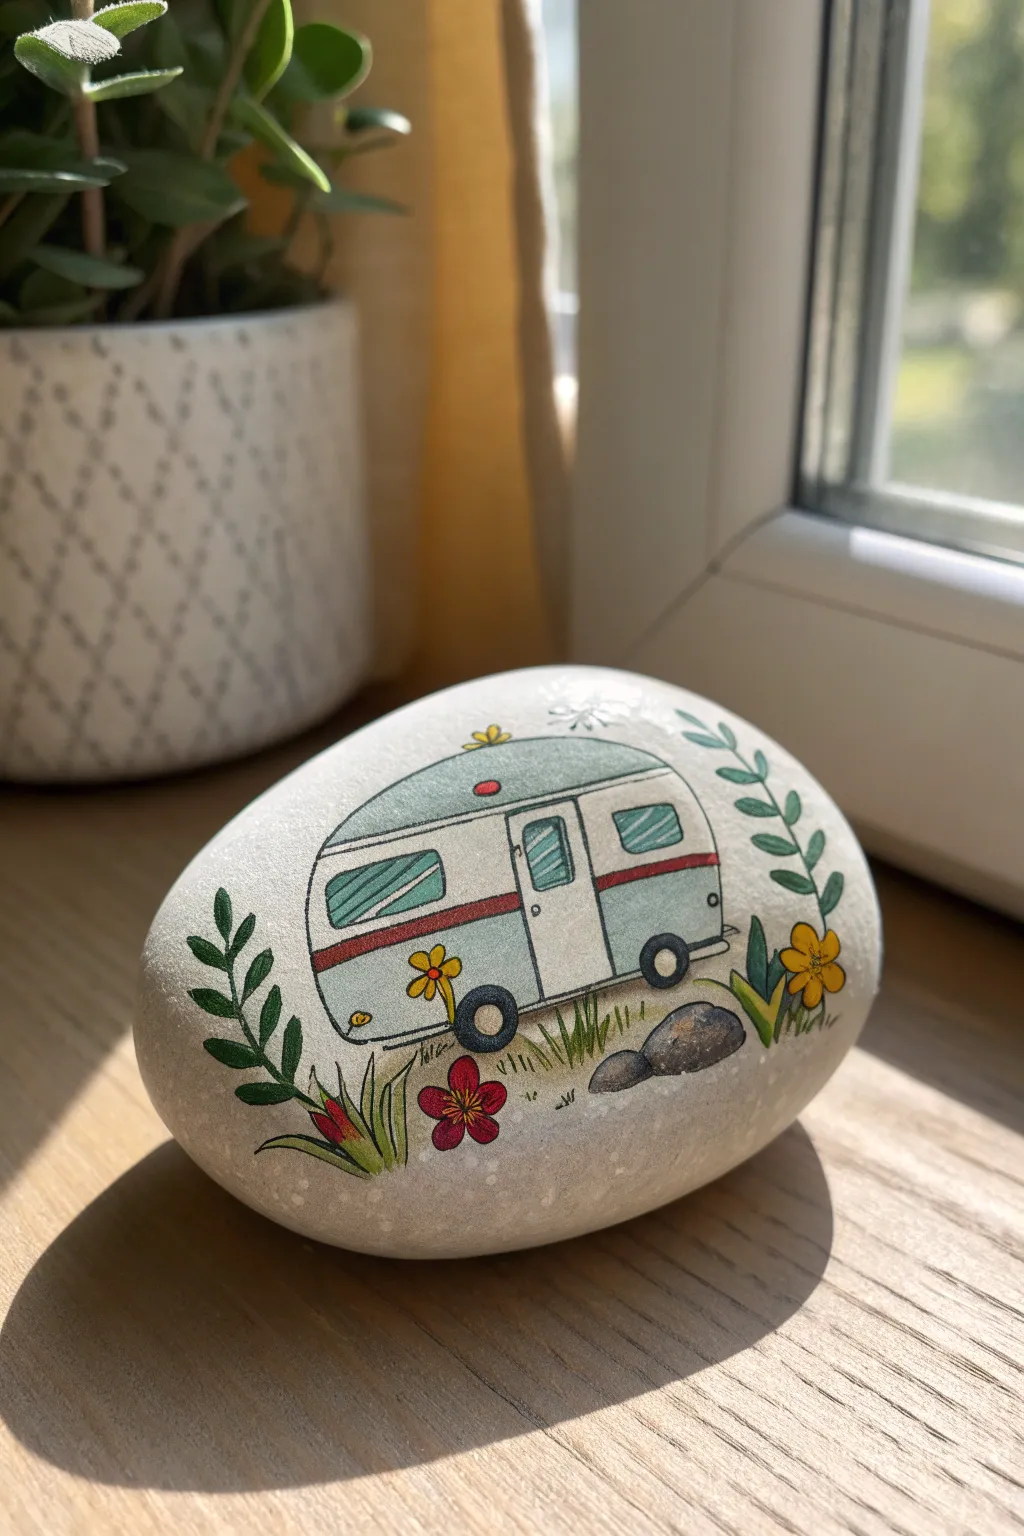
Capture the spirit of the open road with this charming painted rock featuring a retro tear-drop camper nestled among spring blooms. The clean lines and soft colors give this project a lovely illustrative quality that looks great on a smooth, river-washed stone.
Step-by-Step Tutorial
Materials
- Smooth, oval-shaped river rock (cleaned and dried)
- Acrylic paints (white, light teal/sage green, red, yellow, dark grey)
- Fine tip black permanent marker or acrylic paint pen (0.5mm or 0.7mm)
- Small round paintbrush (size 0 or 1)
- Pencil and eraser
- Matte finish spray sealant or Mod Podge
Step 1: Sketching the Scene
-
Prepare the surface:
Ensure your rock is clean and completely dry. If the natural color of your stone is dark or uneven, apply a base coat of white acrylic paint and let it dry fully to create a bright canvas. -
Outline the camper shape:
Using a pencil lightly, draw a rounded loaf-shape for the camper body in the center of the rock. Keep the bottom flat and the top curved. -
Add camper details:
Sketch in a vertical rectangle for the door in the middle. Add two rectangular windows with rounded corners—one to the left of the door, one to the right. -
Draw the border and wheel:
From the middle of the camper’s height, draw a horizontal stripe running across the body. Sketch a wheel arch and circular tire at the bottom, just slightly off-center to the right. -
Position the flora:
Lightly sketch placement for the surrounding flowers. Add a vine climbing up the left side, a sprig of leaves on the right, and a few small blooms tucked near the bottom ground line.
Ink Smearing?
If your black marker smears when you apply varnish, switch to a water-based sealant first, or ensure you are using a true acrylic paint pen rather than a Sharpie.
Step 2: Blocking in Color
-
Paint the camper top:
Using your light teal or sage green paint, fill in the top half of the camper and the bottom half below the stripe. Leave the windows and door white for now. -
Detail the stripe:
Carefully paint the horizontal stripe across the camper body with red acrylic paint. Use a very small brush to keep the edges straight. -
Fill the windows:
Paint the inside of the windows with a very diluted wash of the teal color to suggest glass, or simply use light blue strokes. -
Color the nature elements:
Paint the leaves with a rich green. Use yellow for the taller flowers and red for the small flower near the bottom left. Don’t worry about outlines yet. -
Ground the scene:
Paint two small grey oval shapes at the bottom right to represent rocks. Add a dark grey circle for the tire.
Make it Personal
Turn this into a keepsake by painting the camper to match a real-life trailer you own, or write a family name and the year in tiny letters on the camper door.
Step 3: Fine Lines & Finishing
-
Outline the camper:
Once the paint is 100% dry, use your fine black marker or paint pen to trace the outer shape of the camper. -
Define the door and windows:
Outline the door and window frames. Draw diagonal hatch marks inside the door window and the main windows to create a stylized glass reflection effect. -
Add structural details:
Draw the wheel rim, the door handle, and the small hitch at the front. I like to add a tiny vent on the roof for extra realism. -
Ink the plants:
Trace your painted leaves and flowers. Add a central line to the leaves and definition to the flower petals. -
Create texture:
Use short, quick vertical strokes with the pen along the bottom edge of the camper to simulate grass growing around the tires and rocks. -
Final touches:
Add tiny dot details to the camper lights and perhaps a few small stippled dots in the background for texture. -
Seal the work:
Allow the ink to cure for at least an hour to prevent smearing. Spray with a matte sealant to protect your miniature masterpiece.
Now you have a tiny piece of nostalgic art ready to brighten up a windowsill or garden path
Woodland Friends Visiting the Camper
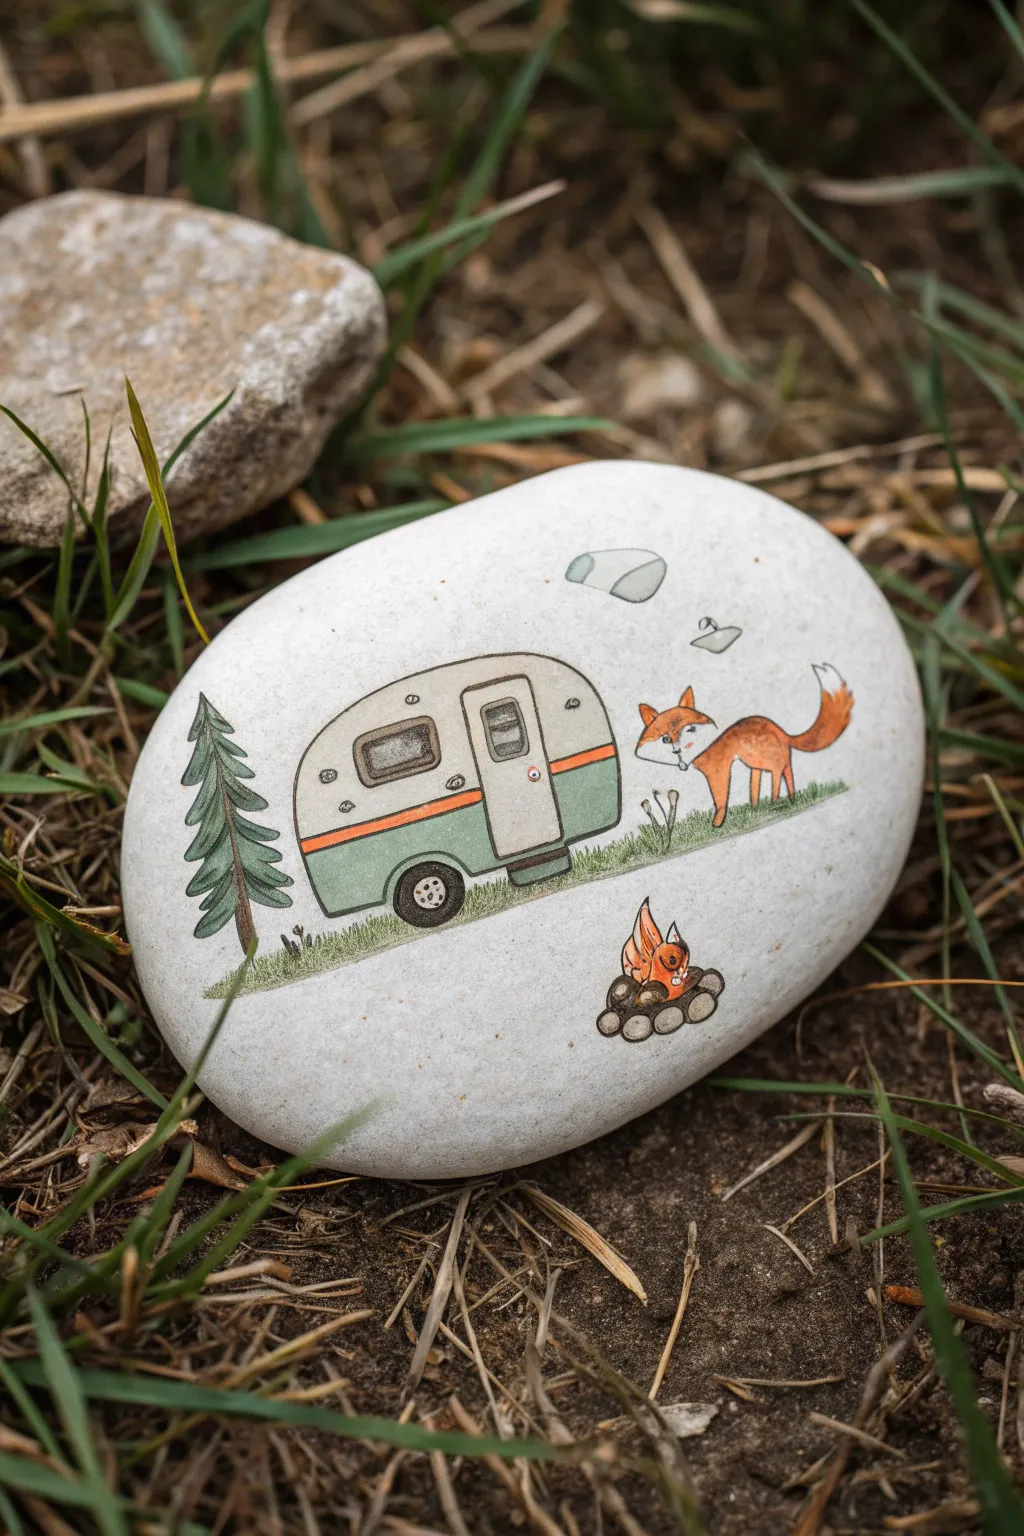
Transform a smooth garden stone into a charming miniature scene featuring a retro camper and a curious woodland fox. This project uses delicate line work and soft colors to create a storybook illustration style right in the palm of your hand.
Step-by-Step
Materials
- Smooth, flat river rock (palm-sized or larger)
- White acrylic paint or gesso (matte finish)
- Fine-grit sandpaper
- Pencil (HB or lighter)
- Micron pens or ultra-fine black paint markers (005 and 01 sizes)
- Acrylic paints (Vintage Green, Cream/Off-White, Burnt Orange, Grey, Brown, Yellow)
- Detail brushes (sizes 0, 00, and a small flat brush)
- Matte spray varnish
Step 1: Preparing the Canvas
-
Clean and Sand:
Wash your rock thoroughly with soap and water to remove any dirt or oils. Once dry, lightly sand the surface if there are any rough bumps, aiming for the smoothest possible texture for your fine lines. -
Base Coat Application:
Apply a layer of white acrylic paint or gesso over the entire top surface of the rock. Let it dry completely, then apply a second or third coat until you have an opaque, solid white background. -
Smooth the Surface:
Should you notice brush strokes in your dried base coat, give it a very gentle sanding with fine-grit sandpaper to create a paper-like surface for drawing.
Ink Smearing?
If your pen smears when sealing, ensure the ink dried for at least 24 hours. Alternatively, spray the first coat of varnish very lightly in a fine mist rather than a heavy soaking layer.
Step 2: Sketching the Scene
-
Outline the Camper:
Using a light pencil, sketch a rounded, bean-like shape for the vintage camper in the center-left. Add a rectangular door and a rounded rectangular window towards the front. -
Add Camper Details:
Draw the wheel well and tire at the bottom. Sketch horizontal guidelines across the middle of the camper for the two-tone paint job. -
Position the Elements:
To the right of the camper, lightly sketch a fox standing on all fours, looking back toward the camper. Add a pine tree on the far left and a small campfire near the bottom right. -
Refine the Sketch:
Double-check your proportions. Ensure the fox’s tail is fluffy and upright, and add two small cloud shapes floating above the scene.
Step 3: Painting the Details
-
Coloring the Camper:
Mix a soft vintage green and carefully paint the bottom half of the camper body. Use a cream or off-white shade for the top half. -
Adding Stripes:
Paint a thin strip of burnt orange between the green and cream sections to create that classic retro stripe. Let the paint dry fully between touching colors. -
Fox Basics:
Fill in the fox’s body with a vibrant burnt orange paint. Leave the tip of the tail, the chest, and the lower face white. -
Tree and Grass:
Using a dark green, paint the pine tree branches. Switch to a watered-down green to wash in a subtle grassy area beneath the camper and fox, keeping it loose and textured. -
Campfire and Smoke:
Dab small spots of orange and yellow for the flames. Paint the stones around the fire grey. For the smoke clouds above, use a very diluted grey wash so they appear transparent.
Smoother Lines
For the crispest outlines, I prefer using technical drawing pens (like Microns) over paint brushes. They offer steadier control on the uneven rock surface.
Step 4: Inking and Finishing
-
Outline Main Shapes:
Once all paint is 100% dry, take your fine black pen (01 size). Carefully outline the camper body, the window, the door, and the tire. -
Detailing the Fox:
Switch to a finer pen (005) for the fox. Draw the face details, ears, and add little fur texture lines on the tail and legs. -
Tree Texture:
Ink the pine tree with jagged lines to mimic needles. Draw a thin trunk line down the center. -
Grounding Elements:
Add small vertical ticks for grass blades along the green wash. Outline the campfire stones and flames. -
Final Touches:
Add tiny details like the camper door handle, wheel spokes, and a few small flower buds in the grass. Erase any visible pencil marks gently. -
Sealing:
Finish by spraying the rock with a matte varnish. This protects the delicate ink work without smearing it, which can happen with brush-on sealers.
Place your finished rock in a flower pot or give it to a camping friend as a tiny keepsake
Galaxy Camper With Metallic Highlights
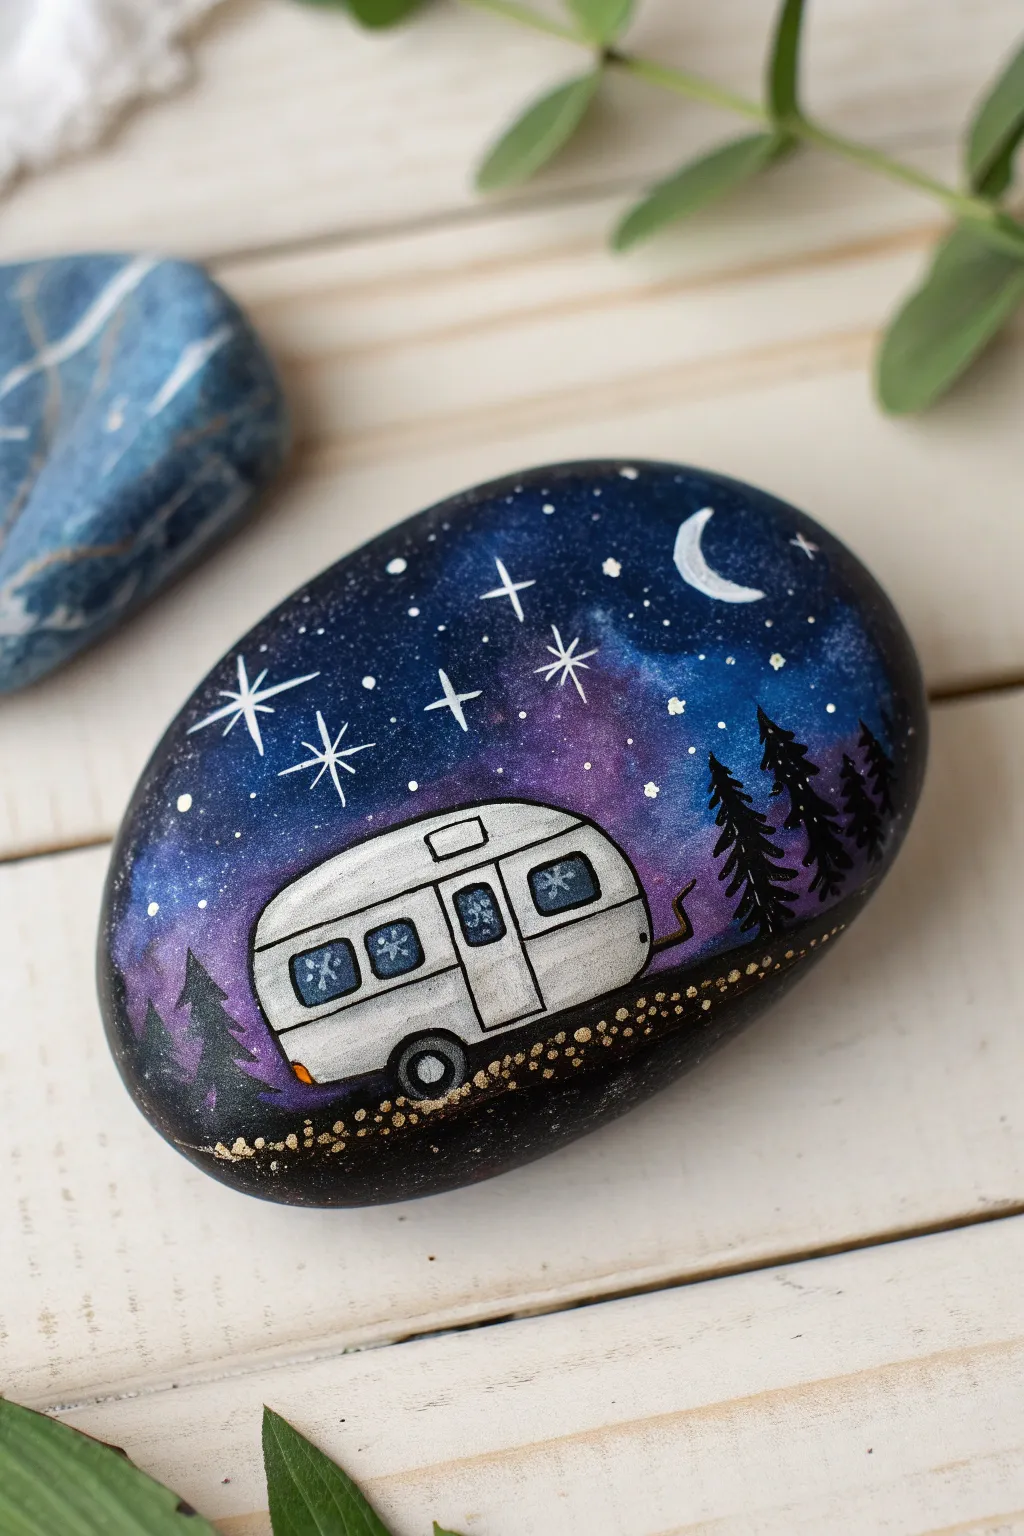
Transport a vintage travel trailer into a dreamy cosmic landscape with this detailed rock painting project. The contrast between the stark white camper and the swirling purple and blue galaxy sky creates a magical atmosphere perfect for any camping lover.
Step-by-Step Tutorial
Materials
- Smooth, oval river rock
- Gesso or white acrylic primer
- Acrylic paints: Black, Midnight Blue, Violet/Purple, White
- Metallic gold acrylic paint
- Sponges or makeup wedges
- Fine liner brush (size 00 or 000)
- Small flat brush
- Pencil for sketching
- Spray sealer or varnish (glossy)
Step 1: Setting the Scene
-
Prime the Surface:
Begin by scrubbing your rock clean and letting it dry completely. Apply a smooth coat of gesso or white primer to the top surface to ensure your colors pop. -
Base Sponging:
Using a sponge or makeup wedge, dab black acrylic paint around the outer edges of the rock, leaving the center area somewhat lighter. -
Creating the Galaxy:
While the black is still tacky or just dry, sponge midnight blue into the center, blending it outwardly into the black. Add dabs of violet or purple in the middle to create that nebula effect. -
Highlights and Depth:
Lightly sponge a tiny amount of white mixed with blue into the very center of the purple area to create a glowing focal point in the sky. Let the background dry completely.
Oops! Paint too thick?
If your camper white looks lumpy, sand it very lightly with fine-grit sandpaper once dry, then apply a final thinned coat for a smooth finish.
Step 2: The Camper Profile
-
Initial Sketch:
Once the sky is dry, use a pencil to lightly sketch the outline of a rounded, retro-style camper in the lower center of the rock. -
Blocking the Camper:
Fill in the camper shape with white acrylic paint. You will likely need two or three thin coats to get solid coverage over the dark background. -
Defining the Shape:
Using your fine liner brush and black paint, carefully outline the entire camper body. Draw a vertical line for the door and outline the wheel well at the bottom. -
Adding Windows:
Paint three rectangles with rounded corners for the windows—two on the main body and one on the door. Fill them with a light blue-grey color. -
Window Details:
Outline the windows in black. Inside the glass panes, paint tiny white snowflakes or stars to reflect the starry night outside. -
Camper Accents:
Add a small square roof vent on top. Don’t forget the hitch on the right side and a small orange or yellow reflector light on the rear bumper area. -
The Wheel:
Paint a black circle for the tire inside the wheel well, adding a small grey or silver dot in the center for the hubcap.
Step 3: Atmosphere and Finish
-
Silhouetted Trees:
With black paint and your finest brush, paint jagged pine trees on the right and left sides of the camper. Use quick, downward strokes for the branches. -
Starry Night:
Dip a toothbrush or stiff brush in thinned white paint and flick it over the sky area for distant stars, masking the camper with a piece of paper first. Hand-paint a few larger, four-point stars and a crescent moon with the fine brush. -
Grounding the Scene:
Paint the ground beneath the camper black, blending it into the shadowed edges of the rock. -
Metallic Magic:
Dip the end of a paintbrush or a dotting tool into metallic gold paint. Create a dotted uneven line along the ‘ground’ to simulate gravel or magical dust. -
Sealing:
Allow the entire piece to cure for 24 hours. Finish with a glossy spray sealer to protect the artwork and make the galaxy colors vibrant.
Make it Shine
Mix a tiny pinch of white glitter into your glossy varnish before sealing the rock to give the entire galaxy sky a real sparkle effect.
Your miniature cosmic camping trip is now preserved forever on stone


Have a question or want to share your own experience? I'd love to hear from you in the comments below!