There’s something instantly nostalgic about painting pumpkins in candy corn colors—that crisp white, orange, and yellow combo just screams spooky-season fun. Here are my favorite candy corn pumpkin painting ideas, starting with the classic looks and drifting into more playful, artsy twists.
Classic Candy Corn Stripe Pumpkin
Transform a simple gourd into a giant version of Halloween’s most iconic treat with this bold, color-blocked design. This project captures the nostalgic tri-color look of candy corn using clean lines and opaque craft paints for a result that looks good enough to eat.
Step-by-Step
Materials
- Medium-sized pumpkin (white or orange base)
- Acrylic craft paint (Bright White)
- Acrylic craft paint (Pumpkin Orange)
- Acrylic craft paint (Lemon Yellow or Deep Yellow)
- 1-inch flat synthetic paintbrush
- Medium round brush for touch-ups
- Painter’s tape or masking tape (optional but helpful)
- Damp cloth or paper towels
- Clear acrylic sealer spray (gloss or matte)
Step 1: Preparation and Planning
-
Clean surface:
Begin by thoroughly wiping down your pumpkin with a damp cloth to remove any field dirt or dust. A clean surface ensures the acrylic paint adheres properly without peeling later. -
Dry completely:
Allow the pumpkin to air dry completely. If there is any moisture trapped under the paint, it can cause the skin to rot faster or the paint to bubble. -
Visualize the thirds:
Look at your pumpkin and visually divide it horizontally into three roughly equal sections. Candy corn has a distinct hierarchy: a smaller white tip, a large orange center, and a yellow base.
Wobbly Lines?
If freehand painting is difficult, lightly sketch your horizontal dividing lines with a pencil first. You can also use painter’s tape, but press firmly into the grooves to prevent bleeding.
Step 2: Painting the Base Layer
-
Start with white:
Using your 1-inch flat brush, paint the top section of the pumpkin Bright White. I like to start here because it prevents dragging dark colors into the pristine white area. -
Paint around the stem:
Carefully work the white paint up to the base of the stem, but try to keep the stem itself natural for a rustic contrast. Use a smaller round brush if you need more control in the crevices. -
Establish the first line:
Bring the white paint down to your visualize ‘top third’ line. Don’t worry about making it perfectly straight; a slightly organic line follows the pumpkin’s ribs nicely. -
Apply the bottom yellow:
Rinse your brush thoroughly. Move to the bottom third of the pumpkin and apply the Yellow paint. Paint all the way to the underside so no original pumpkin color shows when it sits. -
Create the yellow border:
Bring the yellow paint up to meet the bottom of where your middle section will be. Leave a gap of unpainted pumpkin in the middle for now to act as a buffer. -
First drying phase:
Let these top and bottom sections dry to the touch, usually about 15-20 minutes. This prevents the wet colors from blending into mud when you add the orange.
Pro Tip: Better Coverage
To make the yellow and orange pop instantly, paint the entire pumpkin white first as a primer. This is essential if you are using an orange pumpkin rather than a white one.
Step 3: Filling the Center and Refining
-
Fill the middle:
Load your flat brush with Pumpkin Orange paint. Fill in the center band, carefully meeting the edge of the white paint above and the yellow paint below. -
Clean up edges:
As you paint the orange meeting points, use the side of your flat brush to create a crisp line. If you overlap the white or yellow slightly, it often creates a cleaner look than leaving a gap. -
Check for coverage:
Assess the opacity. Orange and yellow pigments are often translucent, so you might see the pumpkin skin through the first coat. -
Apply second coats:
Once the base layer is dry, apply a second coat to each color band. This increases the vibrancy and gives that plastic-like candy corn appearance. -
Follow the ribs:
When applying the second coat, brush vertically along the ribs of the pumpkin rather than horizontally. This emphasizes the pumpkin’s natural shape.
Step 4: Finishing Touches
-
Inspect the stem:
Check the stem for any accidental stray paint marks. If you find any, wipe them off with a damp paper towel or paint over them with a brown that matches the stem. -
Touch up transitions:
Look closely at where the colors meet. If the lines look too messy, use a small brush to straighten them out with fresh paint. -
Final dry:
Allow the entire pumpkin to dry for at least an hour in a well-ventilated area. -
Seal the deal:
Take the pumpkin outside or to a ventilated space and apply a light coat of clear acrylic sealer. A gloss finish makes it look more like real candy, while matte looks more modern.
Place your finished candy corn pumpkin on your porch or table for a sweet pop of seasonal color


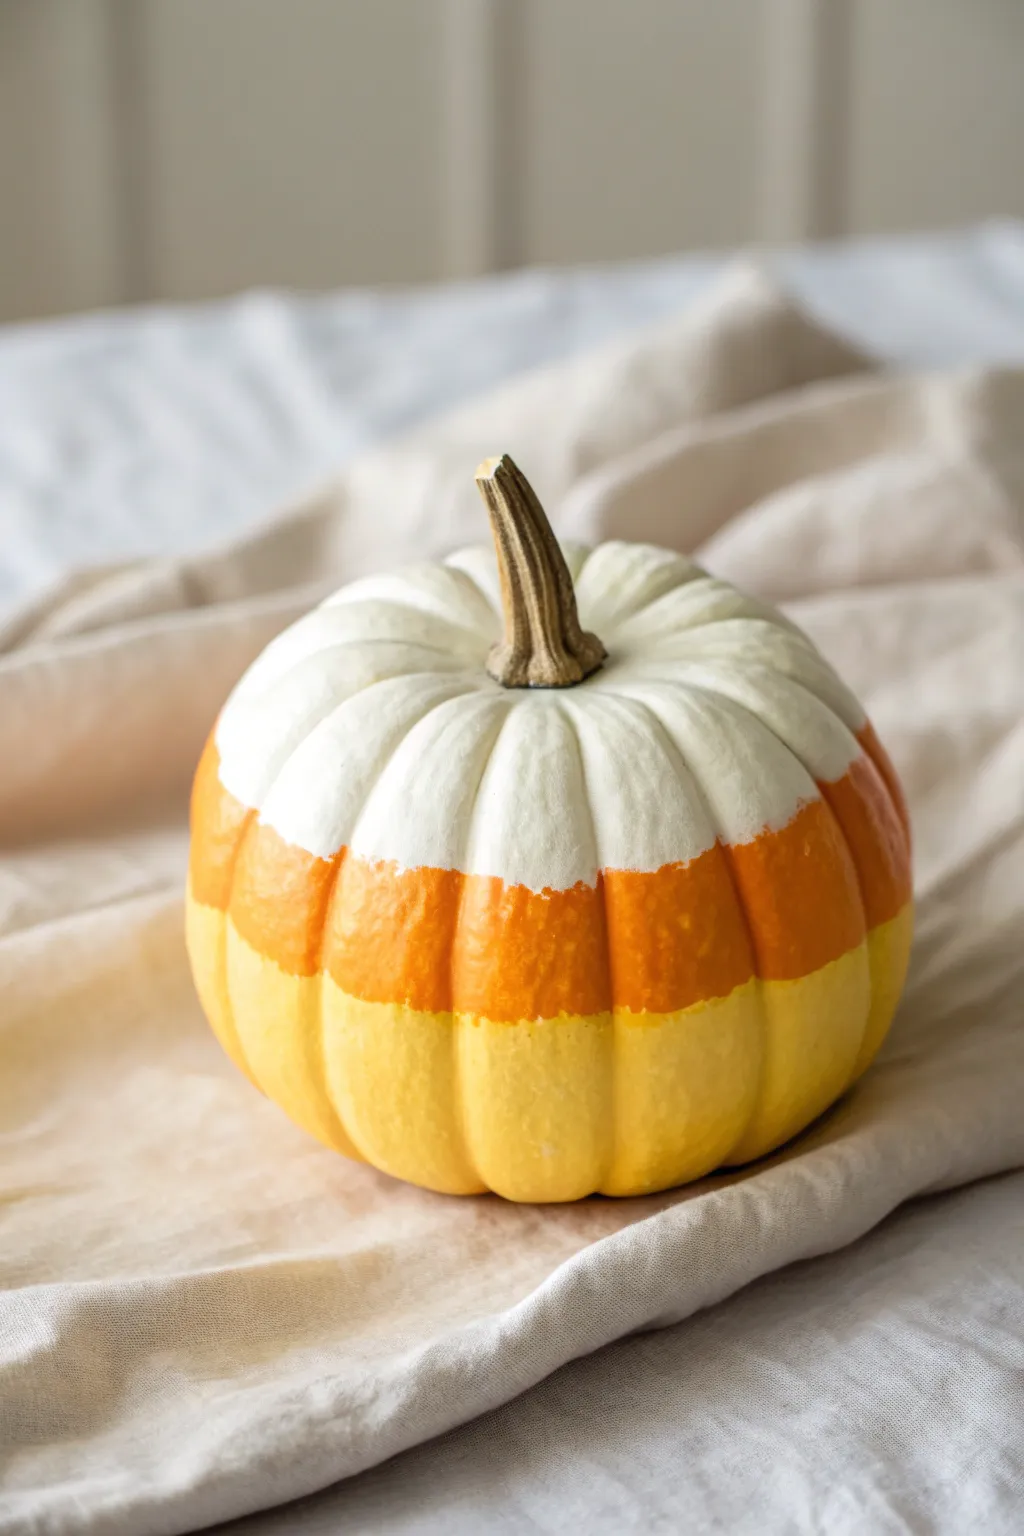
Vertical Candy Corn Stripes
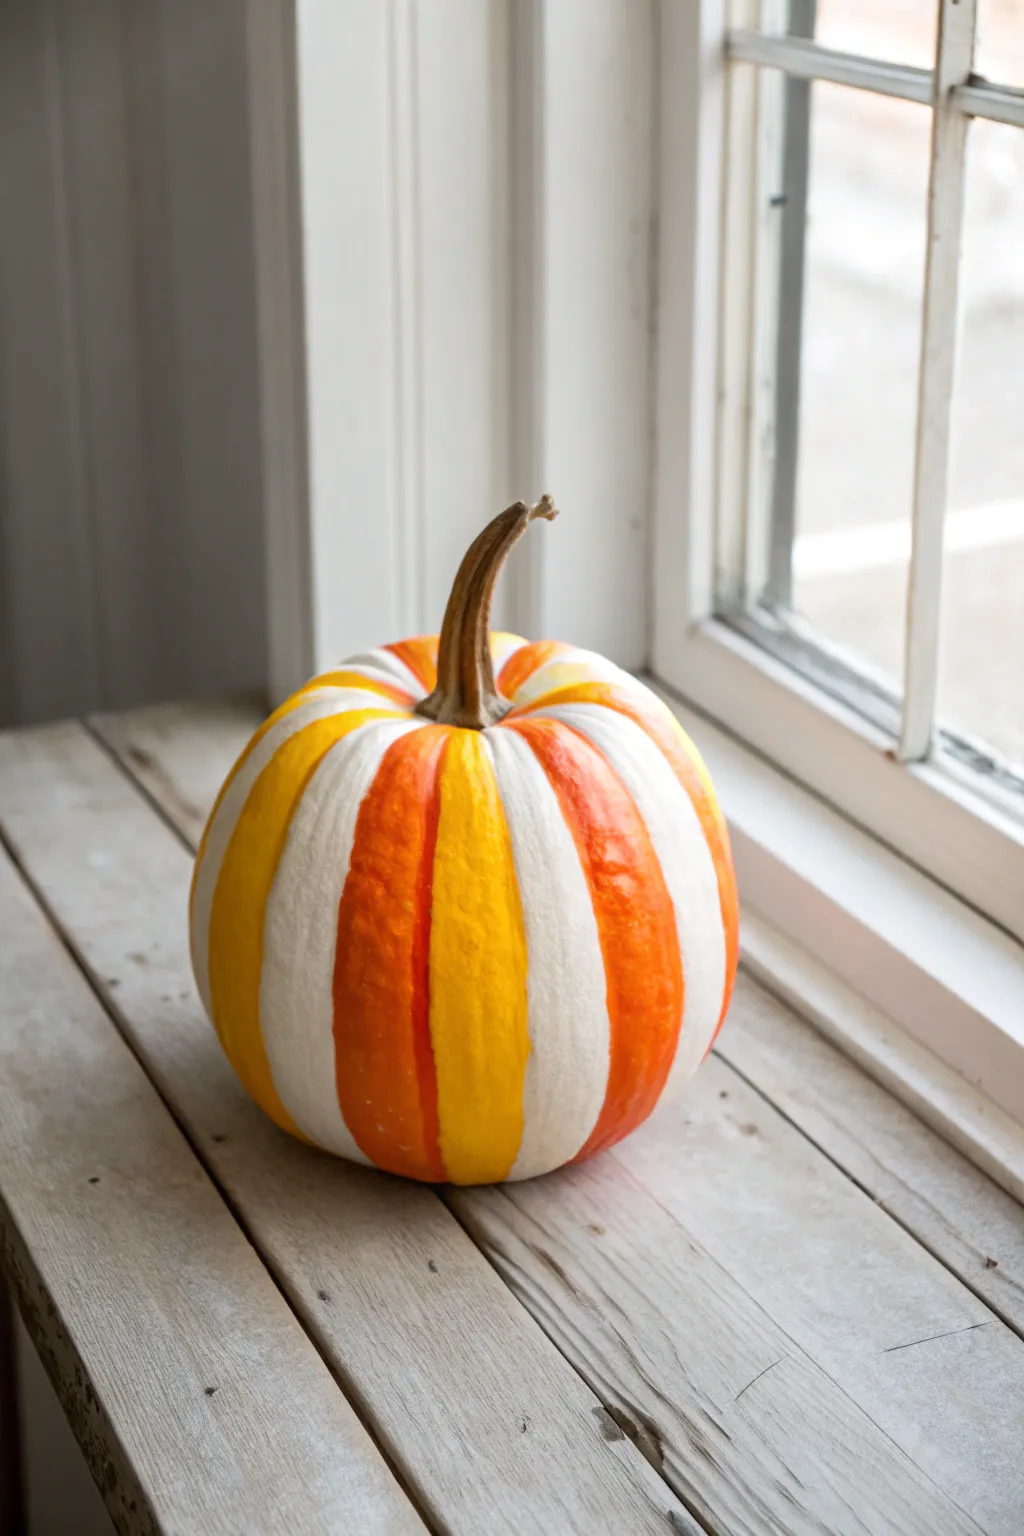
Transform a simple white pumpkin into a festive treat without using a single carving tool by following the pumpkin’s natural shape. This project uses the classic yellow, orange, and white palette of candy corn to create distinctive, clean vertical stripes that look chic on any windowsill.
How-To Guide
Materials
- Small white pumpkin (real or faux)
- Acrylic craft paint (bright orange)
- Acrylic craft paint (bright sunny yellow)
- Acrylic craft paint (titanium white)
- Medium flat paintbrush (about 1/2 inch)
- Small detail paintbrush
- Paper towel or rag
- Glass of water
- Palette or paper plate
- Painter’s tape (optional, for unsteady hands)
- Matte or satin sealer spray (optional)
Step 1: Preparation & Planning
-
Clean surface:
Begin by wiping the pumpkin with a slightly damp cloth to remove any dirt or oils that might prevent the paint from adhering properly. Dry it thoroughly with a paper towel. -
Stem protection:
If you want to keep the stem natural, you can wrap a small piece of painter’s tape around the very base of the stem where it meets the pumpkin skin. -
Identify sections:
Examine the natural vertical grooves (ribs) of your pumpkin. These indentations naturally divide the pumpkin into segments, which will serve as your painting guides. -
Map the pattern:
Mentally map out your pattern: one white section, one yellow section, one orange section. I like to make a tiny dot of paint in each section just to keep track before committing to full strokes.
Step 2: Painting the Stripes
-
Start with white:
Using your medium flat brush, fill in every third section with titanium white paint. Even if the pumpkin is already white, painting it ensures the texture and sheen match the other colors. -
Stroke direction:
Paint in long, vertical strokes from the top near the stem down to the base. This mimics the direction of the pumpkin’s growth and keeps brushstrokes neat. -
Refine edges:
Use the edge of your flat brush or switch to the detail brush to get a crisp line right inside the grooves where the segments meet. -
Dry the white:
Let the white sections dry completely to the touch. This prevents accidental smudging when you work on neighboring colors. -
Apply yellow:
Load your brush with bright yellow paint. Fill in the segments directly to the right (or left, depending on your direction) of the white stripes. -
Watch the coverage:
Yellow pigment is often translucent. Apply a thin coat first, let it dry briefly, and apply a second coat if the pumpkin skin is showing through. -
Clean brushes:
Thoroughly rinse your brush and blot it dry. Any residual yellow will muddy your orange paint. -
Apply orange:
Fill the remaining unpainted segments with bright orange paint. Be careful near the edges where the orange meets the yellow and white. -
Manage the grooves:
The deepest part of the groove is the tricky part. Try to let the color meet strictly in the center of the indentation for the cleanest look. -
Base cleanup:
Flip the pumpkin carefully or lift it to paint the very bottom of the segments so the color wraps underneath slightly.
Uneven Stripes?
If your pumpkin has odd-sized ribs, don’t worry about perfect spacing. Just follow the natural grooves; the organic variety adds charm and looks more authentic on a real vegetable.
Step 3: Finishing Touches
-
Inspect coverage:
Once the first full layer is dry, rotate the pumpkin and look for any streaky areas. Touch up with extra paint where needed. -
Tidy lines:
If any paint crossed over a line, use a small detail brush with the correct color to ‘erase’ the mistake by painting over it. -
Remove tape:
If you taped the stem, gently peel it away now. If you didn’t, inspect the stem base and clean up any accidental paint smudges with a damp Q-tip. -
Seal:
For a long-lasting finish, especially if placing outdoors, give the pumpkin a light misting with a matte or satin sealer spray.
Crisper Lines
For ultra-sharp lines between colors, use a small angled shader brush. It fits perfectly into the pumpkin’s vertical grooves, giving you better control than a standard round brush.
Place your finished pumpkin in a sunny spot to let those candy corn colors brighten up the room


Candy Corn Ombre Fade
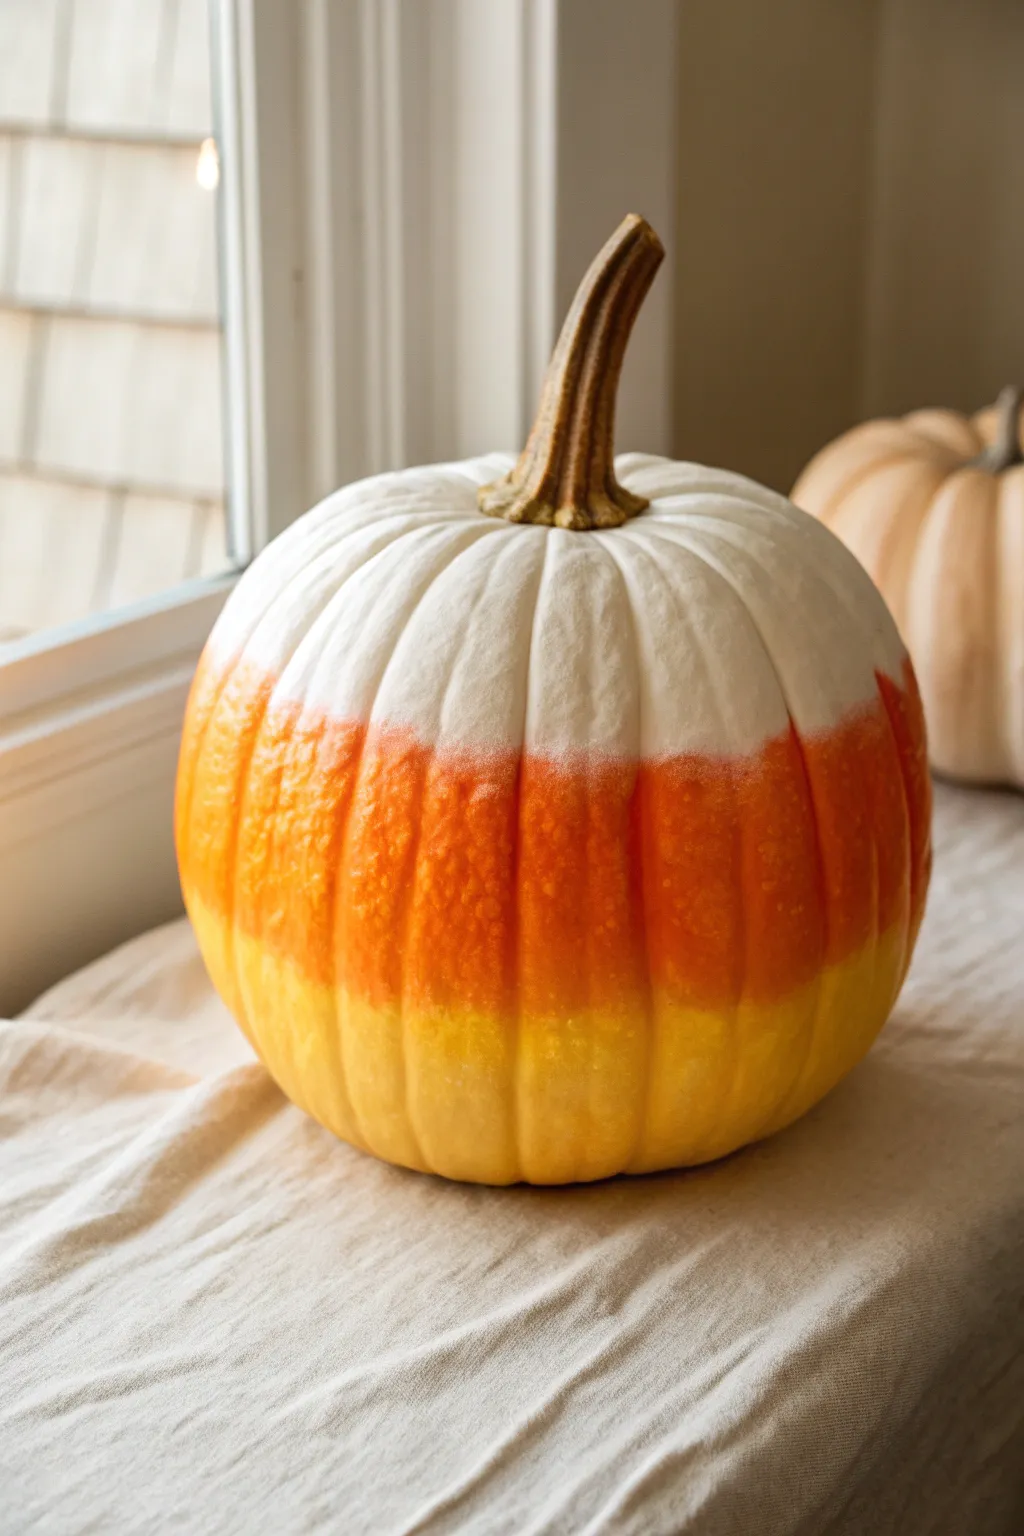
Recreate the iconic look of a candy corn treat on a grand scale with this soft, blended pumpkin design. The seamless fade from white to orange to yellow gives this autumn gourd a sophisticated, almost sugar-dusted appearance.
Step-by-Step Tutorial
Materials
- Medium-sized pumpkin (real or faux)
- White acrylic craft paint (matte)
- Bright orange acrylic craft paint
- Sunshine yellow acrylic craft paint
- Gesso or white primer spray paint
- Makeup sponges or sea sponge
- Wide flat paintbrush
- Paint palette or paper plate
- Painter’s tape (optional)
- Clear matte sealant spray (optional)
Step 1: Preparation and Base Coat
-
Clean surface:
Begin by thoroughly wiping down your pumpkin with a damp cloth to remove any dirt or oils. If you are using a real pumpkin, ensure the skin is completely dry before proceeding. -
Protect stem:
If you want to keep the natural brown stem color shown in the image, wrap it carefully with painter’s tape to shield it from stray brushstrokes. -
Prime the pumpkin:
Apply a coat of white gesso or spray primer over the entire pumpkin. This ensures your yellow and orange colors will pop vibrantly rather than getting muddied by the pumpkin’s natural orange skin. -
Dry primer:
Allow the primer layer to dry completely according to the manufacturer’s instructions. A smooth, dry base is crucial for the ombre blending later.
Fixing Muddy Colors
If your orange and yellow mix into a dirty brown, let the layer dry completely. Re-apply fresh, pure color on top, then blend gently with a clean sponge.
Step 2: Color Block Application
-
Paint the top third:
Using a wide flat brush, paint the top section of the pumpkin with the matte white acrylic. Extend this color slightly past the shoulder of the pumpkin, covering roughly the top third. -
Paint the bottom third:
Clean your brush and paint the bottom third of the pumpkin with the bright yellow paint. Bring this color up just below the pumpkin’s equator. -
Paint the middle band:
Fill the remaining middle section with the bright orange paint. Don’t worry about perfect edges yet; simply ensure you have substantial coverage in the center ring. -
Second coat:
Let the first layer dry to the touch, then apply a second coat to each color block to ensure opacity. The colors should look solid and bright.
Add Sugary Texture
While the final coat of paint is still wet, lightly sprinkle ultra-fine white or crystal glitter over the pumpkin to mimic real sugar coating.
Step 3: Creating the Ombre Fade
-
Prepare blending tools:
Dampen a makeup sponge or sea sponge slightly and wring it out so it is moist but not dripping. Squeeze a fresh blob of white and orange paint onto your palette. -
Blend top transition:
Dip the sponge into the white paint and dab it gently where the white meets the orange. Use a stippling motion (up and down dabs) to pull the white slightly down into the orange. -
Mix transition tone:
Without cleaning the sponge fully, pick up a tiny bit of orange. Dab along the transition line again to soften the boundary, creating a creamy peach blur between the two colors. -
Refresh sponge:
Switch to a clean side of the sponge or grab a fresh one for the lower section. -
Blend bottom transition:
Load your sponge with orange paint and stipple along the line where the orange meets the yellow. Slowly work the orange downward into the yellow section. -
Soften yellow edge:
Pick up a small amount of yellow paint on the same sponge and dab back over the blended area. I find that working back and forth between the two colors creates the smoothest gradient. -
Check texture:
Continue stippling heavily to build up a slight texture. This dabbing motion mimics the sugary, porous surface of real candy corn.
Step 4: Finishing Touches
-
Dry thoroughly:
Step back and inspect your fade. If you see harsh lines, dab them out. Once satisfied, let the pumpkin dry completely. -
Remove tape:
Carefully peel away the painter’s tape from the stem. -
Seal (optional):
For longevity, especially if displaying outdoors, spray the pumpkin with a clear matte sealant to lock in the paint and protect the finish.
Place your sweet creation near a window or fireplace to enjoy the warm autumn glow it brings to the room


Glossy Candy-Coated Candy Corn Finish

Transform a simple faux pumpkin into a sweet seasonal centerpiece with this high-gloss candy corn design. The layered white, orange, and yellow paint job, finished with a thick glossy coating, perfectly mimics the shiny texture of the classic Halloween treat.
How-To Guide
Materials
- White faux pumpkin (smooth surface works best)
- Wide painter’s tape or masking tape
- Yellow acrylic craft paint
- Bright orange acrylic craft paint
- Metallic gold craft paint
- High-gloss spray sealant or Mod Podge Super Gloss
- Medium flat paint brush
- Small detail paint brush
- Paper plate or palette
- Drop cloth or newspapers
Step 1: Preparation & Base Planning
-
Clean surface:
Begin by wiping down your faux pumpkin with a slightly damp cloth to remove any dust or oils. Let it dry completely to ensure the paint adheres smoothly. -
Visualize thirds:
Mentally divide your pumpkin horizontally into three roughly equal sections. Since organic shapes aren’t perfect, you don’t need to measure exactly, but aim for a balanced look: top third, middle third, bottom third.
Wet Look Trick
For an ultra-thick, resin-like shine, use ‘Thick Gloss’ glaze poured over the top instead of spray sealant. It drips naturally!
Step 2: Painting the Layers
-
Start at the bottom:
Flip the pumpkin upside down or rest it on its side. Load your medium flat brush with bright yellow acrylic paint. -
Apply yellow layer:
Paint the bottom third of the pumpkin yellow. Follow the vertical grooves of the pumpkin, working the paint into the crevices. -
Feather the edge:
As you reach the top of the yellow section, don’t worry about a perfectly straight line. A slightly uneven, hand-painted edge actually looks more like real candy corn. -
Let yellow dry:
Allow the yellow paint to dry to the touch. This usually takes about 15–20 minutes, depending on how thick your coat is. -
Paint the middle:
Once the yellow is stable, load a clean brush with bright orange paint. Paint the middle band of the pumpkin, letting it overlap slightly with the top edge of the yellow to avoid any white gaps. -
Fill the grooves:
Make sure to push the orange paint deep into the vertical ribs. The spherical shape can sometimes hide white spots in the crevices. -
Leave the top:
Stop painting just before you reach the top curve of the pumpkin. The natural white color of the faux pumpkin will serve as the white tip of the candy corn, so leave this area bare for now. -
Refine the white:
If your faux pumpkin wasn’t white to begin with, or is looking a bit dingy, paint the top third with white acrylic paint now, blending it gently where it meets the orange. -
Apply second coats:
Yellow and orange pigments can sometimes be translucent. I usually apply a second coat to both colored sections to get that rich, opaque candy saturation.
Glam It Up
Sprinkle ultra-fine iridescent glitter onto the wet paint of the white section for a sugar-dipped effect.
Step 3: Detailing the Stem
-
Base coat stem:
Using your small detail brush, carefully paint the stem. A solid base coat of brown or dark metallic gold works well here. -
Add metallic highlight:
Once the base is dry, brush on a layer of metallic gold paint to the stem. This adds an elegant, festive touch that elevates the project. -
Clean up edges:
Check the base of the stem where it meets the white pumpkin top. Use a tiny brush to ensure a clean line, perhaps adding a tiny touch of green if you want a realistic vine look.
Step 4: The High-Gloss Finish
-
Prepare for sealing:
Ensure all paint layers are 100% dry. This is critical; trapping moisture under the gloss can cause bubbling. -
Apply first gloss coat:
Take your high-gloss spray sealant (or brush-on Super Gloss). Apply a steady, even coat over the entire pumpkin. If spraying, keep the can 10-12 inches away to prevent drips. -
Wait and repeat:
Let the first clear coat dry completely. This creates a tack-free surface for the next layer. -
Build the shine:
Apply a second or even third coat of gloss. The goal is a wet, glass-like look that mimics the sugary coating of real candy corn. -
Final cure:
Let the pumpkin cure overnight in a dust-free area to ensure the finish hardens into a durable, shiny shell.
Place your shiny new creation on a mantel or dining table for a vibrant pop of autumn sweetness
BRUSH GUIDE
The Right Brush for Every Stroke
From clean lines to bold texture — master brush choice, stroke control, and essential techniques.
Explore the Full Guide
Candy Corn Chevron Pattern
Give your Halloween decor a modern twist with this eye-catching chevron pumpkin that reimagines classic candy corn colors. The sharp zig-zag pattern creates dynamic movement while maintaining that cozy autumn palette we all love.
Step-by-Step Tutorial
Materials
- Large white faux pumpkin (smooth surface works best)
- Pencil
- Flexible measuring tape
- Painters tape (narrow width, 0.5 to 1 inch)
- Acrylic paints: Bright yellow, Burnt orange, Deep red/Maroon, Titanium white
- Flat paintbrushes (medium and small)
- Palette or paper plate
- Paper towels
- Clear matte sealer spray (optional)
Step 1: Prep and Prime
-
Clean surface:
Wipe down your faux pumpkin with a slightly damp cloth to remove any dust or manufacturing residue. Let it dry completely. -
Base coat:
Even if your pumpkin is already white, applying a thin coat of Titanium white acrylic paint creates a uniform texture for the other colors to grip onto. -
Dry thoroughly:
Allow this base coat to dry fully before moving on to avoid peeling later.
Step 2: Mapping the Pattern
-
Mark vertical guides:
Using your flexible measuring tape, lightly mark vertical lines evenly spaced around the pumpkin with a pencil. These will help keep your chevrons aligned. -
Mark horizontal bands:
Decide on the width of your chevron stripes. Measure and mark horizontal reference dots every 2-3 inches down the vertical lines to guide your peaks and valleys. -
Sketch the zig-zags:
Connect your reference dots lightly with a pencil. Draw a continuous zig-zag line around the circumference for each colored band level. Don’t worry if it’s not machine-perfect; handmade charm is part of the appeal. -
Tape guides:
Carefully apply painter’s tape along your pencil lines. Press the edges down firmly with your fingernail to prevent paint bleed. I find it easier to tape one color section at a time rather than the whole pumpkin at once.
Tape Hack
Cut your painters tape into small, 2-inch strips. It’s much easier to create the sharp ‘V’ angles with short pieces than trying to bend one long piece of tape.
Step 3: Painting the Bands
-
Start with yellow:
Starting near the top, identifying the first band. Load your medium flat brush with bright yellow paint and fill in the chevron stripe. -
Apply second coat:
Acrylics often need two coats for full opacity, especially yellows. Apply a second thin layer once the first is dry to the touch. -
Move to orange:
Once the top yellow section is dry, move down to the next band. Paint this section with your burnt orange color, carefully following your penciled or taped guidelines. -
Deep red accents:
For the bottom-most colored band, use the deep red or maroon shade. Use a smaller flat brush here to get clean points on the chevron peaks. -
Touch up white spaces:
If you are leaving gaps of white between the colors as shown in the photo, go back with a small brush and fresh white paint to clean up any accidental smudges.
Wobbly Lines?
If your hand shakes, rest your pinky finger on the dried part of the pumpkin for stability as you paint detail lines.
Step 4: Finishing Touches
-
Remove tape:
If you used tape, peel it off slowly at a 45-degree angle while the paint is still slightly tacky to avoid pulling up dried chunks. -
Refine edges:
Use a small detail brush to sharpen the points of your chevrons manually. A crisp peak makes the whole pattern look more professional. -
Clean up pencil marks:
Gently erase any visible pencil lines. If the eraser smudges the paint, simply paint over the lines with the appropriate color. -
Paint the stem:
Give the stem a realistic look by painting it dark brown or black, perhaps with a touch of tan dry-brushing for texture. -
Seal the work:
Take the pumpkin to a well-ventilated area and apply a light coat of clear matte sealer spray to protect your design from chipping.
Place your stylish pumpkin on a neutral tablecloth to let those bold colors really pop
Candy Corn Checkerboard Blocks

Give your classic white pumpkin a geometric makeover with this playful checkerboard pattern inspired by everyone’s favorite Halloween treat. The blocks of sunny yellow and festive orange create a modern, graphic look that still feels perfectly traditional.
How-To Guide
Materials
- White craft pumpkin (or real white pumpkin)
- Acrylic paint (Bright Yellow)
- Acrylic paint (Orange)
- Flat shader paintbrush (medium width, approx. 1/2 inch)
- Pencil (optional)
- Small cup of water
- Paper towels
- Palette or paper plate
Step 1: Planning the Pattern
-
Clean surface:
Before you begin, ensure your pumpkin is clean and dry. If using a real pumpkin, wipe it down with a damp cloth to remove any dirt or residue. For craft pumpkins, a quick dusting works perfectly. -
Visualize the grid:
Hold your pumpkin and identify the natural vertical ribs. These ridges make excellent guides for your checkerboard columns. -
Mark vertical guides:
Using a pencil very lightly, mark which vertical sections (between the ribs) you want to paint. You can skip every other section if the ribs are very close together, but following each rib groove is usually best. -
Mark horizontal lines:
Decide on the height of your checkerboard band. Lightly sketch a top horizontal line and a bottom horizontal line around the pumpkin’s equator to create a restricted painting zone. -
Define the rows:
Divide that horizontal band into three equal rows. This 3-row grid is crucial for the candy corn gradient effect.
Step 2: Painting the Yellow Squares
-
Load the brush:
Squeeze a dollop of bright yellow acrylic paint onto your palette. Load your flat brush generously but wipe off excess drips. -
Paint the top row:
Starting on the top imaginary row you sketched, paint a square of yellow in one vertical column. -
Skip a space:
Move horizontally to the next-but-one column. Leave the column between them blank (white). Continue this skip-one pattern all the way around the pumpkin’s top row. -
Paint the bottom row:
Repeat this process on the bottom row, painting yellow squares directly underneath the top ones. The middle row should remain completely unpainted for now. -
Refine edges:
Go back over your yellow squares to square off the corners. Don’t worry about perfection; the hand-painted look adds charm.
Wobbly Lines?
If freehand painting is too daunting, use thin washi tape or painter’s tape to block out your grid before painting. Peel it off while the paint is still slightly wet.
Step 3: Painting the Orange Squares
-
Switch colors:
Rinse your brush thoroughly and dry it well, or grab a fresh brush. Load it up with the orange acrylic paint. -
Locate the gaps:
Look for the vertical columns that you left blank in the previous phase. These are where your orange squares will live. -
Paint the middle row:
In these blank columns, paint an orange square exactly in the middle row. This creates the alternating checkerboard effect. -
Fill the alternating pattern:
Continue around the pumpkin. You should now see a pattern: yellow on top/bottom columns alternating with orange in the middle columns. -
Add connecting squares:
Depending on how dense you want the pattern, you can also add orange squares in the middle row directly between the yellow top/bottom squares, creating a solid band. However, leaving white space creates that airy, floating look shown in the photo.
Distress It
Once the paint is fully dry, lightly sand the squares with fine-grit sandpaper. This creates a rustic, farmhouse aesthetic perfect for fall decor.
Step 4: Finishing Touches
-
Check opacity:
Acrylics can be translucent. If the pumpkin skin is showing through too much, apply a second coat of paint to the squares once the first layer is dry to the touch. -
Tidy up:
If you have any pencil marks still visible outside your painted areas, gently erase them. -
Dry time:
Let the pumpkin sit undisturbed for at least an hour to ensure the paint cures completely before moving it.
Now you have a sweet, geometric centerpiece ready for the windowsill

PENCIL GUIDE
Understanding Pencil Grades from H to B
From first sketch to finished drawing — learn pencil grades, line control, and shading techniques.
Explore the Full Guide
Candy Corn Scallop-Edge Layers
Recreate the iconic look of everyone’s favorite (or most controversial) Halloween treat with this simple painting project. By layering horizontal bands of white, orange, and yellow paint, you can transform a plain pumpkin into a sweet, festive accent piece.
Step-by-Step Tutorial
Materials
- Small to medium white pumpkin (or orange pumpkin + white primer)
- Acrylic craft paint: Bright White
- Acrylic craft paint: Bright Orange
- Acrylic craft paint: Warm Yellow
- Medium flat synthetic paintbrush
- Small round detail brush (optional)
- Painter’s tape or Washi tape
- Paper plate or palette
- Cup of water and paper towels
- Clear matte sealer spray (optional)
Step 1: Preparation & Planning
-
Clean surface:
Begin by wiping down your pumpkin with a damp cloth to remove any dirt or oils from the pumpkin patch. Dry it completely with a paper towel; paint adheres much better to a bone-dry surface. -
Protect the stem:
Using small pieces of painter’s tape, carefully wrap the stem to keep it free of accidental paint splatters. Press the tape edges down firmly against the pumpkin skin. -
Visualize the thirds:
Look at your pumpkin and mentally divide it horizontally into three equal sections. The top third will be white, the middle orange, and the bottom yellow.
Uneven Lines?
Don’t stress about wiggly lines. Real candy corn is layered imperfectly! If you want sharpness, use Washi tape to mask sections, but ensure base layers are 100% dry first so paint doesn’t peel.
Step 2: The White Layer (Top)
-
Prime the top:
Even if you are using a white pumpkin, applying a coat of Bright White paint to the top third creates a consistent, opaque finish. Start near the stem and stroke downwards, following the natural ribs of the gourd. -
Feather the edge:
When you reach the bottom of the top third, don’t worry about a perfect straight line yet. Just feather the paint out slightly so it can blend or be covered later. -
Let it dry:
Allow this white layer to dry for about 15-20 minutes. If the pumpkin’s natural color is showing through, apply a second coat for solid coverage.
Step 3: The Yellow Layer (Bottom)
-
Flip and paint:
I find it easiest to carefully turn the pumpkin upside down (resting on its stem if stable, or holding it) to paint the bottom. Apply the Warm Yellow paint to the bottom third of the pumpkin. -
Cover the base:
Make sure to paint all the way to the center of the bottom so it looks finished from every angle. Bring the yellow paint up towards the middle section. -
Create the lower line:
Define the top edge of your yellow section. Again, you don’t need a ruler-straight line; following the soft, curved nature of the pumpkin actually looks more like real candy corn. -
Dry thoroughly:
Let the yellow paint dry completely before handling the pumpkin again to prevent smudging.
Level Up: Glitter Dipped
While the paint is still wet on the bottom yellow section, sprinkle fine iridescent glitter over it. This adds a sugary texture that mimics real candy sheen and catches the light beautifully.
Step 4: The Orange Layer (Middle)
-
Fill the middle:
With the top and bottom dry, load your medium flat brush with Bright Orange paint. Fill in the remaining middle band. -
Meeting the white:
Carefully paint the upper edge of the orange band where it meets the white. You can use the flat edge of your brush to push the paint right up to the line for a crisp look, or use a smaller detail brush if you feel shaky. -
Meeting the yellow:
Repeat the process for the lower edge where the orange meets the yellow. Try to keep the band width relatively consistent all the way around the circumference. -
Touch up density:
Orange pigment can sometimes be translucent. If you see brushstrokes, let the first coat dry and apply a second coat to get that bold, saturated candy corn hue.
Step 5: Finishing Touches
-
Remove tape:
Once the paint is dry to the touch, gently peel the painter’s tape off the stem. If any white paint seeped under, scratch it off gently with a fingernail while the paint is fresh. -
Clean up lines:
Inspect your horizontal lines. If one color wobbled too much into another, use a small brush with the correcting color to straighten it out. -
Seal the deal:
For longevity, especially if displaying outdoors on a porch, lightly mist the entire pumpkin with a clear matte sealer spray.
Enjoy displaying this sweet, zero-calorie treat on your autumn table or porch
Distressed Farmhouse Candy Corn Stripes
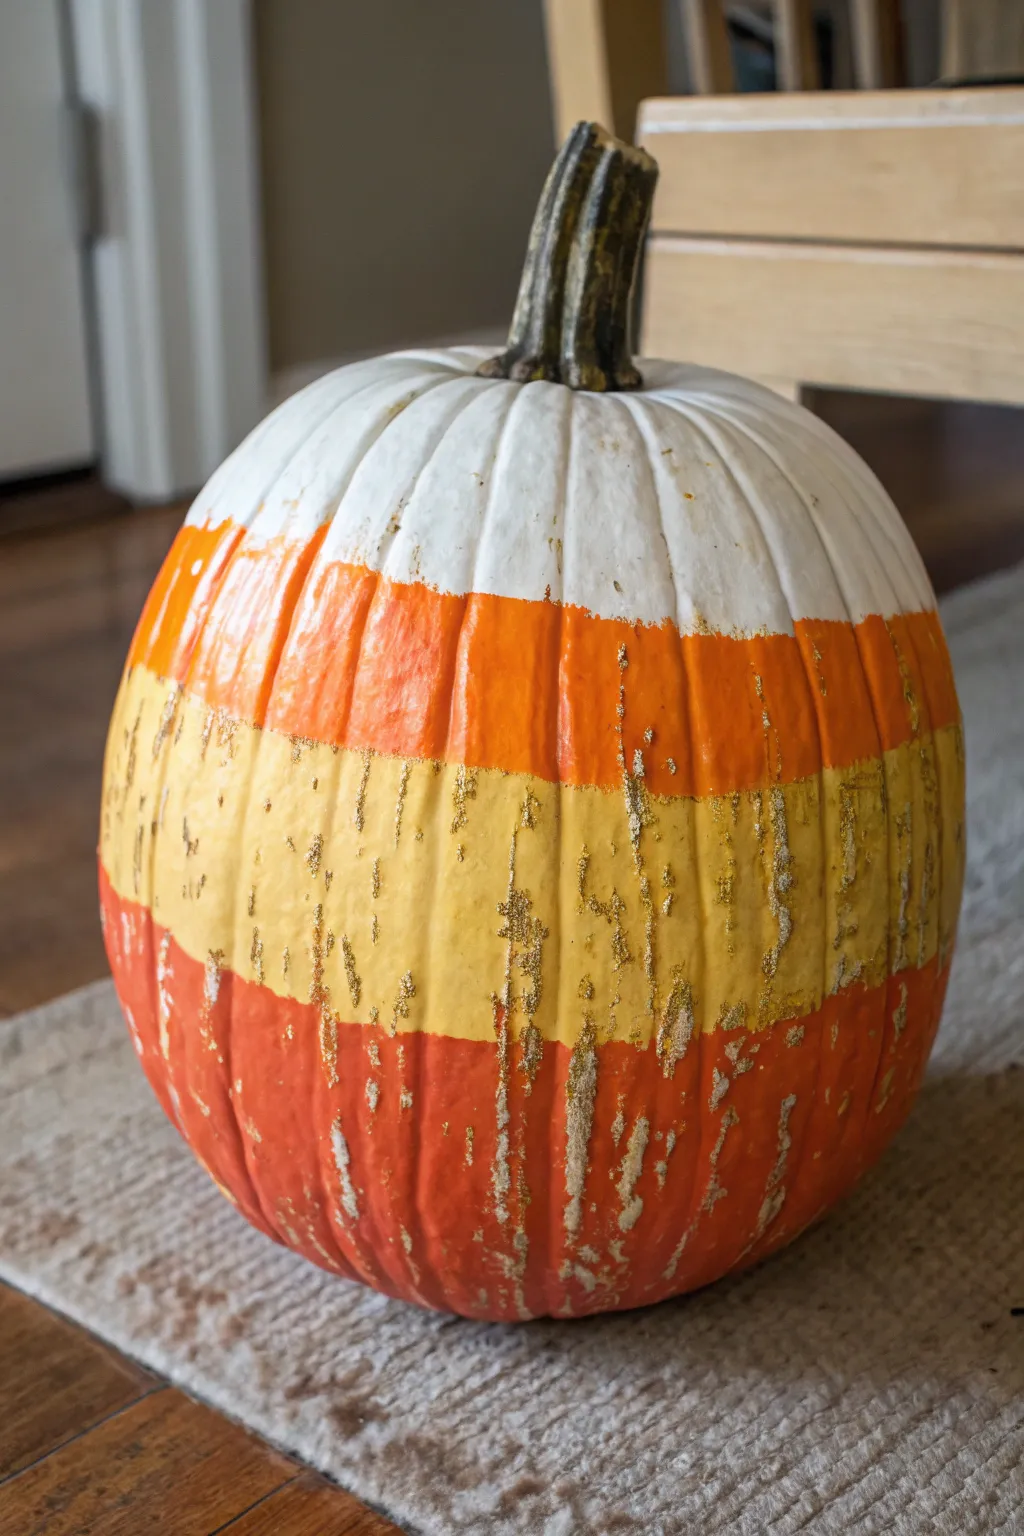
Transform a standard orange pumpkin into a sweet farmhouse centerpiece with this easy layered painting technique. The distressed finish adds charming texture, making the colors pop without looking too perfect or manufactured.
Detailed Instructions
Materials
- Medium-sized pumpkin (real or faux)
- White acrylic or chalk paint
- Yellow acrylic or chalk paint
- Orange acrylic or chalk paint
- Painter’s tape or masking tape
- Medium foam brush or synthetic bristle brush
- Coarse sandpaper or sanding block (80-100 grit)
- Antiquing wax or brown glaze (optional)
- Clean rag or paper towels
- Drop cloth or newspapers
Step 1: Preparation & Base Coat
-
Clean surface:
Begin by thoroughly washing your pumpkin to remove any dirt or oils. Dry it completely with a clean towel to ensure the paint adheres properly. -
Protect the stem:
Wrap the stem carefully with painter’s tape to keep it natural and free of paint splatters during the process. -
Initial white coat:
Paint the entire top third of the pumpkin with white paint. Don’t worry about perfect lines at the bottom edge yet, just ensure solid coverage around the top near the stem. -
Extend the white:
Drag the white paint down slightly past where you want your white stripe to end. This overlap ensures no unpainted gaps appear later. -
Dry time:
Let this white layer dry completely. Chalk paint usually dries quickly, but give it at least 20-30 minutes so your tape doesn’t pull it up.
Step 2: Creating the Stripes
-
Marking the zones:
Visualize your pumpkin in four horizontal sections. The pattern for candy corn is typically white top, orange, then yellow, but this variation uses a repeating stripe pattern for more visual interest. -
Taping the first line:
Apply a ring of painter’s tape horizontally around the pumpkin, just below where the white section should end. Press the edges of the tape firmly into the pumpkin’s vertical grooves to prevent bleeding. -
Painting the orange band:
Paint the section immediately below the tape with your orange paint. Apply a second coat if needed for opacity, covering the middle-upper section of the gourd. -
Adding the yellow band:
Move down to the next section. You can freehand this transition for a more organic look, or use tape once the orange is dry. Paint a broad yellow stripe encircling the pumpkin nicely. -
Bottom orange layer:
Finally, paint the bottom-most section of the pumpkin with the same orange used earlier to ground the design. -
Remove tape:
Carefully peel off any tape while the paint is still slightly tacky to avoid peeling up creating jagged chunks of dried paint. -
Touch ups:
Use a small brush to fix any major bleeds, but remember that since we are distressing this later, imperfections are actually helpful. -
Full cure:
Allow the entire pumpkin to dry for several hours or overnight. The paint needs to be hard before the distressing phase.
Tape Sealing Trick
To get cleaner lines on uneven surfaces, paint a thin layer of the *base* color over the tape edge first to seal gaps before adding the new color.
Step 3: Distressing & Finishing
-
Major sanding:
Take your coarse sanding block and rigorously sand the painted surface. Focus your energy on the vertical ridges of the pumpkin where wear would naturally occur. -
Cross-sanding:
Sand horizontally across the color transitions to blend the hard lines slightly, giving it that worn, vintage candy look. -
Reveal the orange:
Don’t be afraid to sand completely through the paint in spots to reveal the original orange pumpkin skin underneath. This contrast is key to the rustic style. -
Dusting off:
Wipe down the pumpkin with a dry cloth to remove all the paint dust created by the sanding process. -
Optional aging:
If you want an even grungier farmhouse look, lightly brush a small amount of antiquing wax or darker glaze over the sanded areas and wipe it back immediately with a rag. -
Stem reveal:
Remove the tape from the stem. If the stem looks too new, you can dry brush a tiny bit of white or brown paint onto the ridges of the stem to tie it in.
Sparkle Finish
Mix a teaspoon of coarse glitter into a clear matte sealer and brush it over the dried bands for a ‘sugared’ candy corn texture.
Place your distressed pumpkin on a bed of hay or a rustic woven runner to complete your seasonal display.


Bold Brushstroke Candy Corn Bands
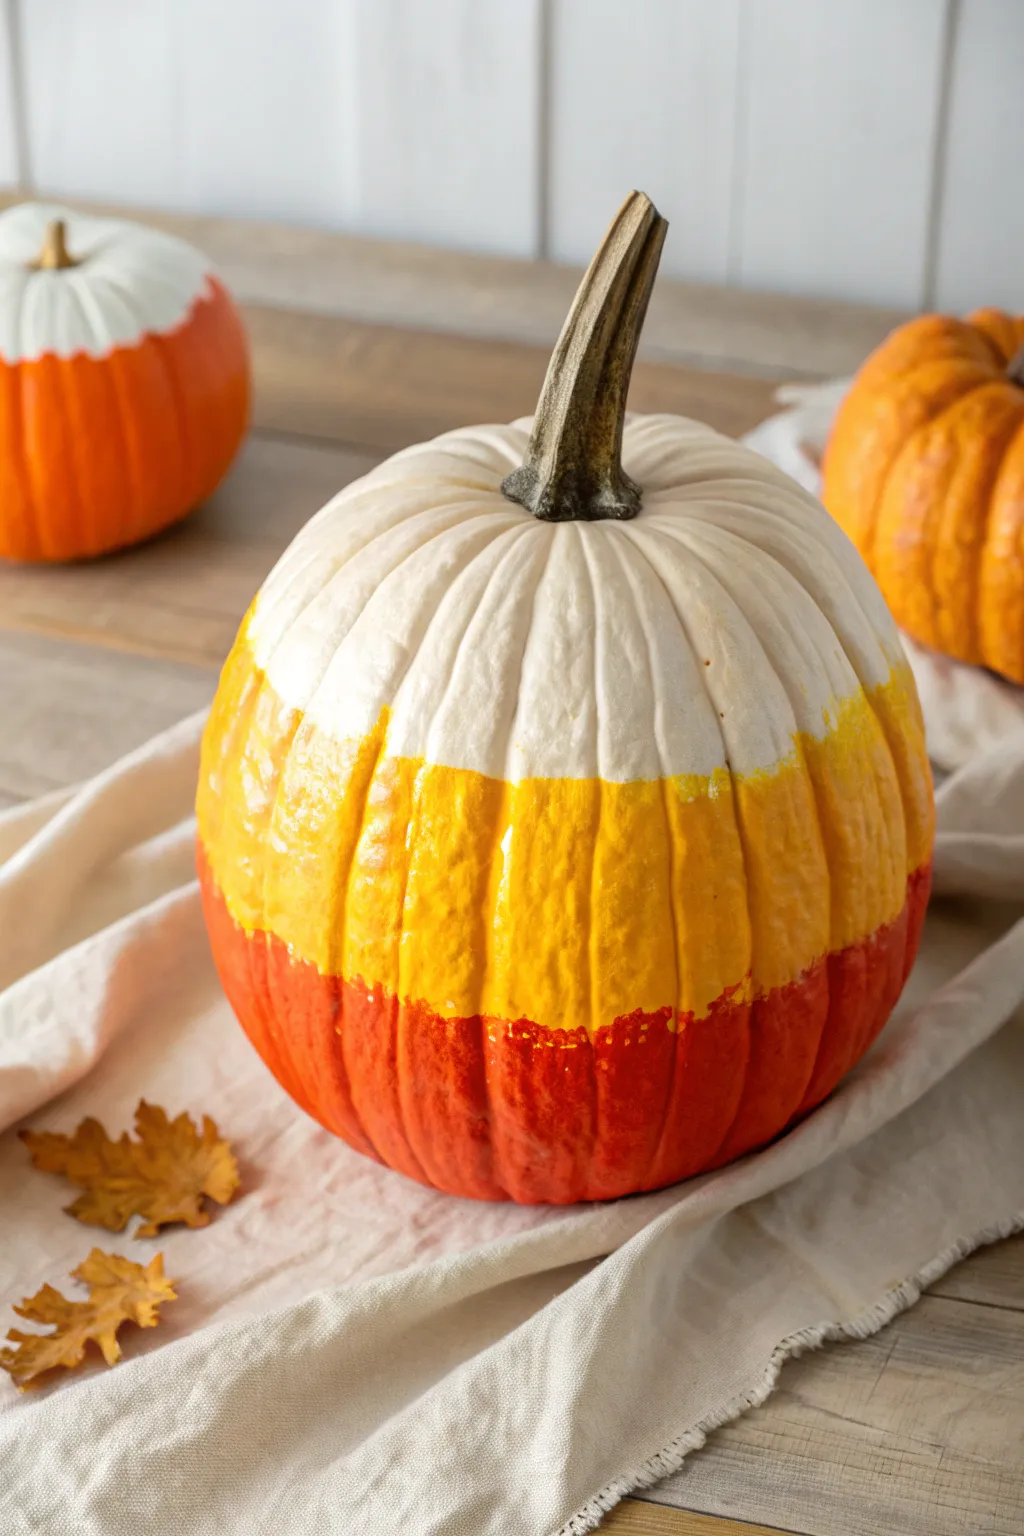
Transform a classic autumn gourd into a giant piece of candy corn with this delightfully rustic painting project. By layering thick, visible brushstrokes in those iconic white, yellow, and orange hues, you create a decoration that feels fresh yet nostalgic.
Step-by-Step Tutorial
Materials
- Medium-sized round pumpkin (real or faux)
- White acrylic paint (matte finish)
- Yellow acrylic paint (sunflower or bright yellow)
- Orange acrylic paint (pumpkin or bright orange)
- 1-inch flat synthetic paintbrush
- Paper towels or rag
- Palette or paper plate
- Surface protection (newspaper or drop cloth)
- Clear matte sealer spray (optional)
Step 1: Preparation and Base
-
Clean and Dry:
Begin by thoroughly wiping down your pumpkin with a damp cloth to remove any field dirt or dust. If you are using a real pumpkin, ensure the skin is completely dry before applying any paint, as moisture will prevent adhesion. -
Set Up Your Workspace:
Lay down your surface protection. Pour a generous amount of white paint onto your palette. Since we are aiming for a textured look, don’t worry about thinning the paint with water; thicker paint works better here. -
Paint the Top Band:
Start painting the top third of the pumpkin with the white acrylic. Brush directly over the stem base and down into the crevices. Don’t aim for a perfect straight line at the bottom of this section; a jagged, painterly edge looks much more organic. -
Check for Coverage:
Inspect the white section. If the orange skin of a real pumpkin is showing through too strongly, let the first coat dry for about 10 minutes and apply a second coat for a solid, creamy white top.
Paint Slipping?
If acrylic paint slides off a waxy real pumpkin skin, lightly sand the surface with fine-grit sandpaper first to give the paint some ‘tooth’ to grip onto.
Step 2: Adding the Color Bands
-
Start the Middle Band:
Load your brush with bright yellow paint. You don’t need to wash the brush perfectly after the white; a little blending is actually desirable. Apply the yellow to the middle section of the pumpkin. -
Blend the Transition:
Where the yellow meets the white, gently feather your brush upward. I like to let the bristles flick slightly so the colors overlap in a rough, textured way rather than a hard line. -
Fill the Ridges:
Make sure you push the yellow paint deep into the vertical ribs of the pumpkin. The brushstrokes should follow the curve of the pumpkin, moving vertically or slightly diagonally to mimic the texture in the photo. -
Lower Band Prep:
Wipe off excess yellow paint from your brush using a paper towel, but again, don’t rinse it completely clean. Pour your orange paint onto the palette. -
Paint the Base:
Apply the orange paint to the bottom third of the pumpkin. This is naturally the darkest section, so use generous amounts of paint to get rich, bold color saturation. -
Feather the Orange:
Work the orange paint upward into the yellow band. Use quick, upward strokes to gently disjoint the line, creating that signature ‘bold brushstroke’ look where the colors seem to vibrate against each other. -
Touch Up the Bottom:
Carefully lift the pumpkin or tilt it to paint the very bottom curve that sits near the table. Ensure there are no gaps of unpainted skin visible at the base.
Step 3: Finishing Touches
-
Assess the Transitions:
Step back and look at your three bands. If the transition lines look too straight or artificial, go back in with a slightly dry brush and scuff the edges to roughen them up. -
Enhance the Texture:
To match the reference image’s textured appearance, dab a little extra paint (impasto style) onto the most prominent ridges of the pumpkin. This catches the light and emphasizes the crafted look. -
Clean the Stem:
This style looks best with a natural stem. If you accidentally got paint on the stem, use a damp paper towel or a baby wipe to gently clean it off while the paint is still tacky. -
Dry Completely:
Allow the pumpkin to sit undisturbed for at least an hour. Thick acrylic applications take longer to dry than thin coats. -
Seal (Optional):
If you plan to display this pumpkin outdoors on a porch, spray it lightly with a clear matte sealer to protect the paint from moisture and peeling.
Add Subtle Sparkle
While the paint is still wet, sprinkle a tiny amount of iridescent white glitter over the white top section to mimic the sugary texture of real candy corn.
Now you have a striking centerpiece that captures the sweet spirit of the season without any of the sticky mess
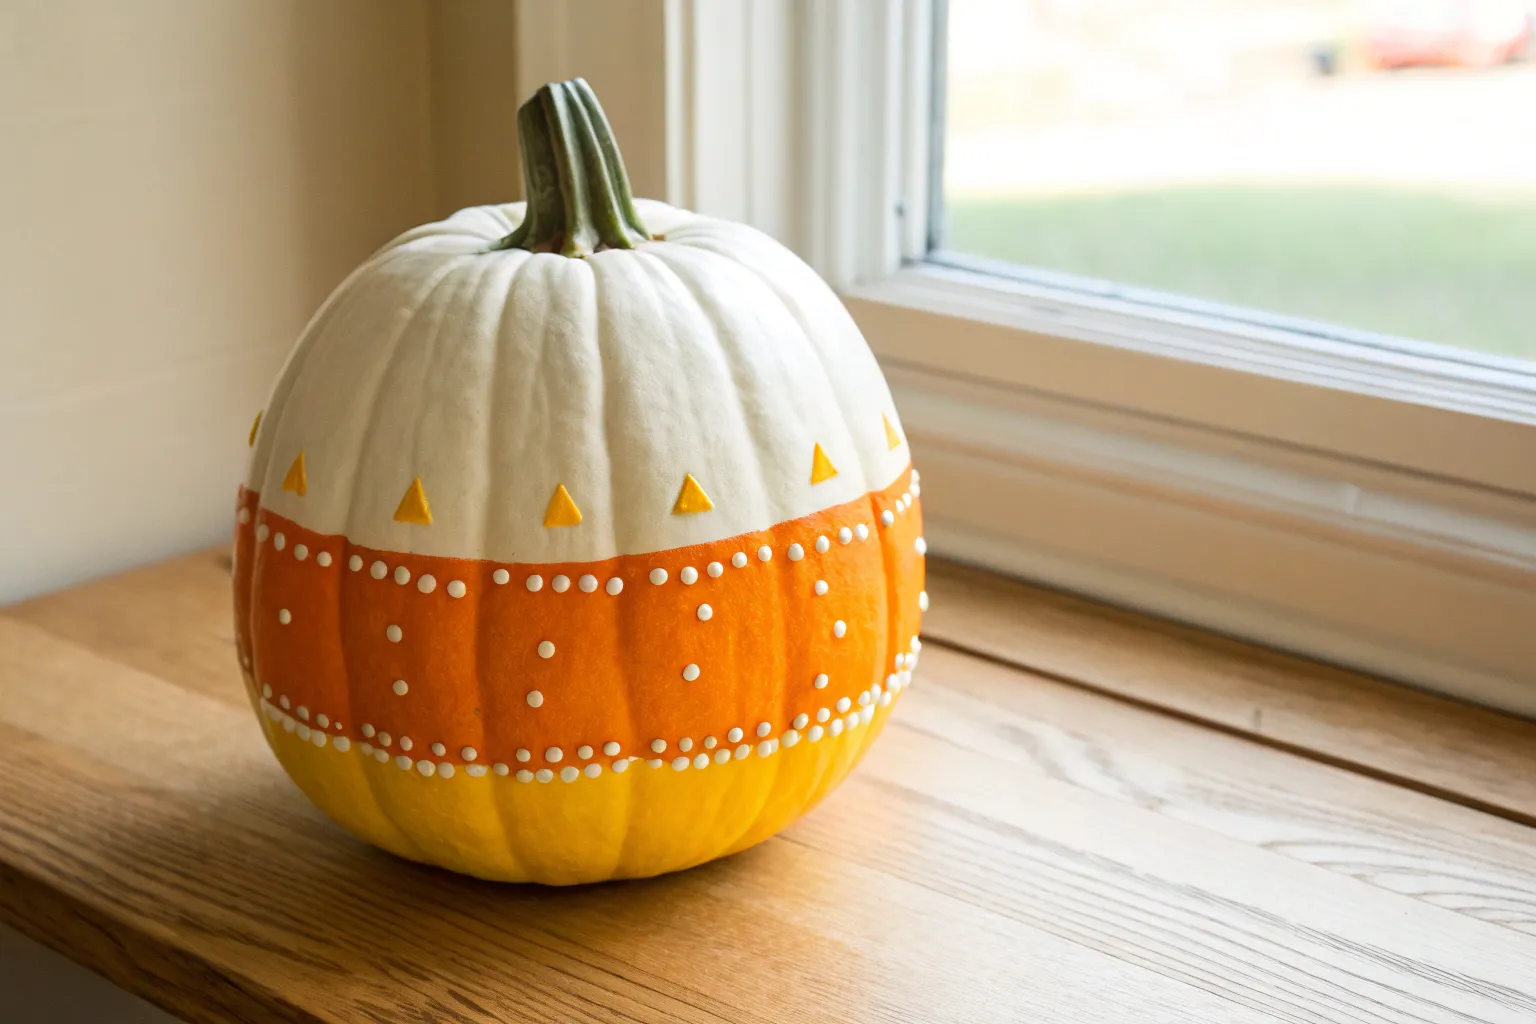
Candy Corn Dots on Stripes
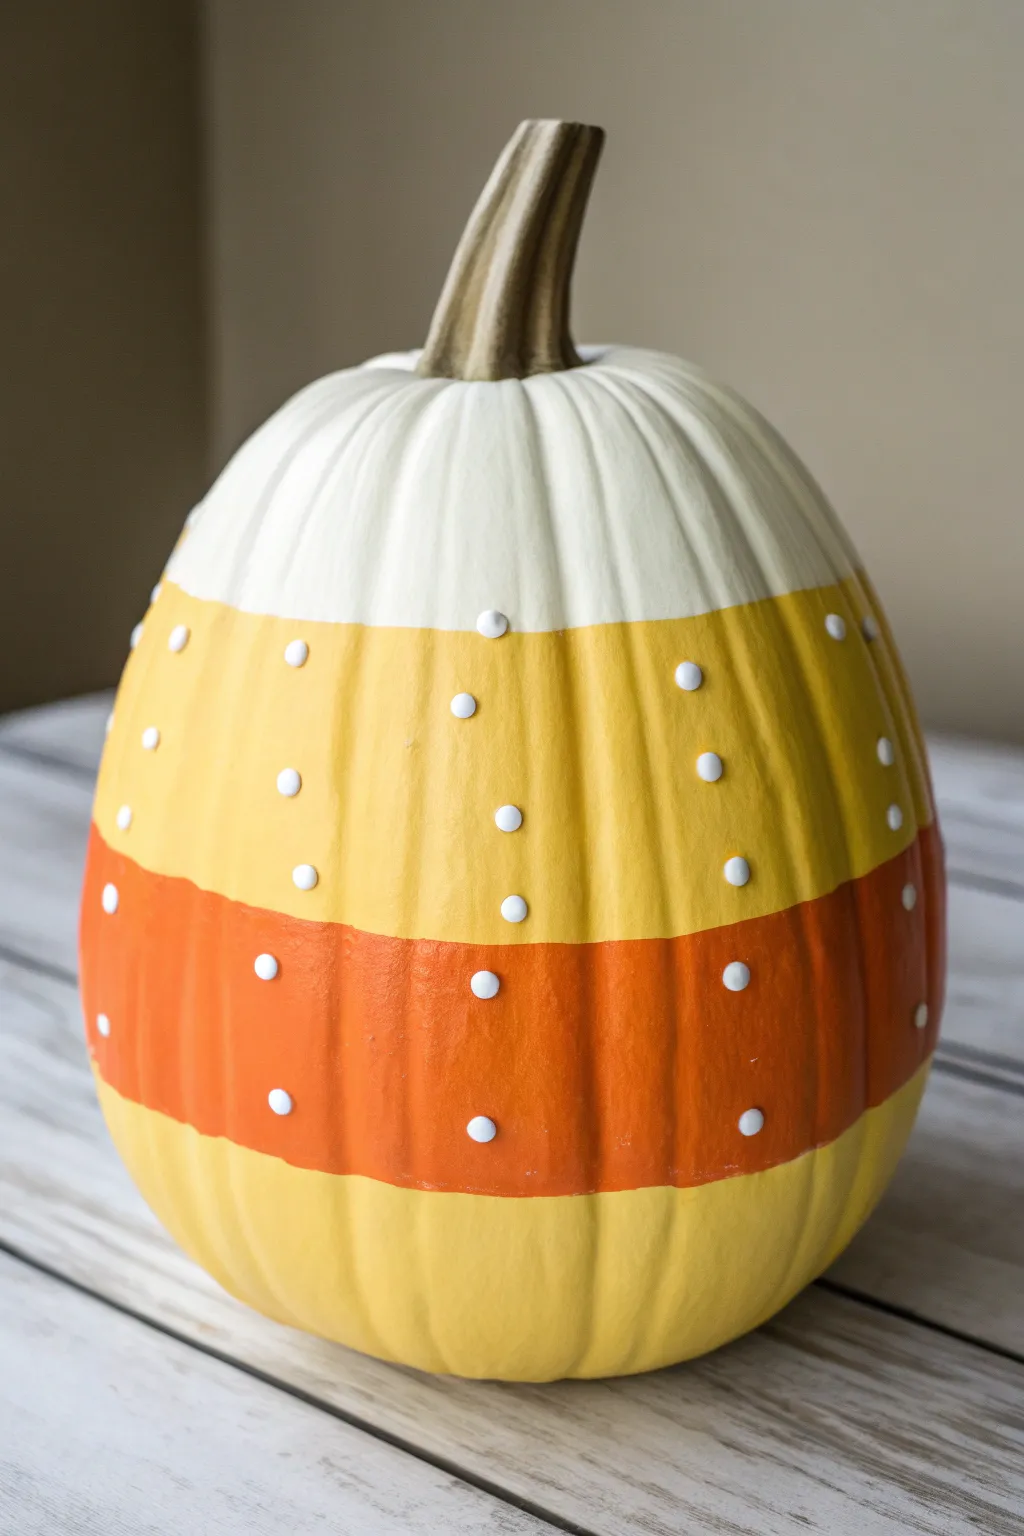
Give your porch a cheerful, nostalgic touch with this candy corn-inspired pumpkin featuring crisp stripes and playful dimensional dots. The bright bands of color mimic the classic Halloween treat, while the raised white accents add a delightful texture that pops.
How-To Guide
Materials
- Tall craft pumpkin (white or cream preferred)
- Painter’s tape or masking tape (1 inch width)
- Acrylic paint (Bright White, Golden Yellow, Pumpkin Orange)
- Medium flat paintbrush
- Small flat paintbrush
- Puffy paint or dimensional fabric paint (White)
- Pencil (light)
- Paper plate or palette
- Damp cloth for clean up
Step 1: Preparation and Planning
-
Clean surface:
Begin by wiping down your pumpkin with a damp cloth to remove any dust or oils, ensuring a clean surface for painting. -
Plan your stripes:
Visualize striping the pumpkin into four horizontal sections. It helps to lightly mark these sections with a pencil to keep your proportions even. -
Tape the top boundary:
Apply a ring of painter’s tape around the pumpkin where the top white section will end and the first yellow section begins. Press the edges down firmly to prevent bleed-through.
Clean Lines Secret
To stop paint bleed, seal the tape edge with a thin layer of the *base* color first before applying the new stripe color.
Step 2: Painting the Base Stripes
-
Paint the top white:
Using your medium flat brush, paint the top section bright white. Even if your pumpkin is already white, a fresh coat gives it a cleaner, more finished look. -
Allow to dry:
Let the white paint dry completely to the touch before moving on. -
Tape the next section:
Once dry, move your tape or add a new line of tape to define the bottom edge of the upper yellow stripe. -
Paint the upper yellow band:
Fill in the second section with golden yellow acrylic paint. You may need two coats here to get a solid, opaque color. -
Create the orange band:
Tape off the area below the yellow stripe. Paint this third section with your pumpkin orange acrylic, ensuring the color gets deep into the varied texture of the pumpkin skin. -
Paint the bottom yellow band:
Finally, paint the bottom-most section yellow to match the upper band. I find painting the bottom can be tricky, so you might want to rest the pumpkin on its side or use a cup to elevate it. -
Remove tape carefully:
Peel off all painter’s tape while the paint is still slightly tacky to achieve the crispest lines. If you waited until it was fully dry, score the edge lightly with a craft knife first. -
Touch up lines:
Use a small flat brush to fix any areas where the paint might have bled or where the lines aren’t perfectly straight.
Add Some Sparkle
While the dimensional paint dots are still wet, sprinkle ultra-fine iridescent glitter over them for a sugary, crystallized candy look.
Step 3: Adding the Dots
-
Test your puffy paint:
Before applying directly to the pumpkin, squeeze a few test dots onto a paper plate to get a feel for the flow and remove any air bubbles. -
Start on the yellow bands:
Begin applying small dots of white puffy paint on the upper yellow stripe. Place them randomly but keep the spacing relatively open so it doesn’t look cluttered. -
Dot the orange band:
Continue the pattern onto the orange stripe. Try to stagger the placement relative to the dots above to create a balanced, confetti-like effect. -
Add dots to the bottom:
Finish by adding dots to the bottom yellow section, maintaining the same density and randomness. -
Check for drips:
Look over your work immediately. If gravity pulls a dot down, quickly wipe it away with a damp Q-tip and re-apply. -
Final cure:
Dimensional paint takes much longer to dry than acrylics. Set the pumpkin in a safe, dust-free spot and let it cure overnight to ensure the dots harden completely without smudging.
Once fully dry, display your cheerful pumpkin on a mantel or covered porch to welcome the season
Mini Candy Corn Motifs on Black
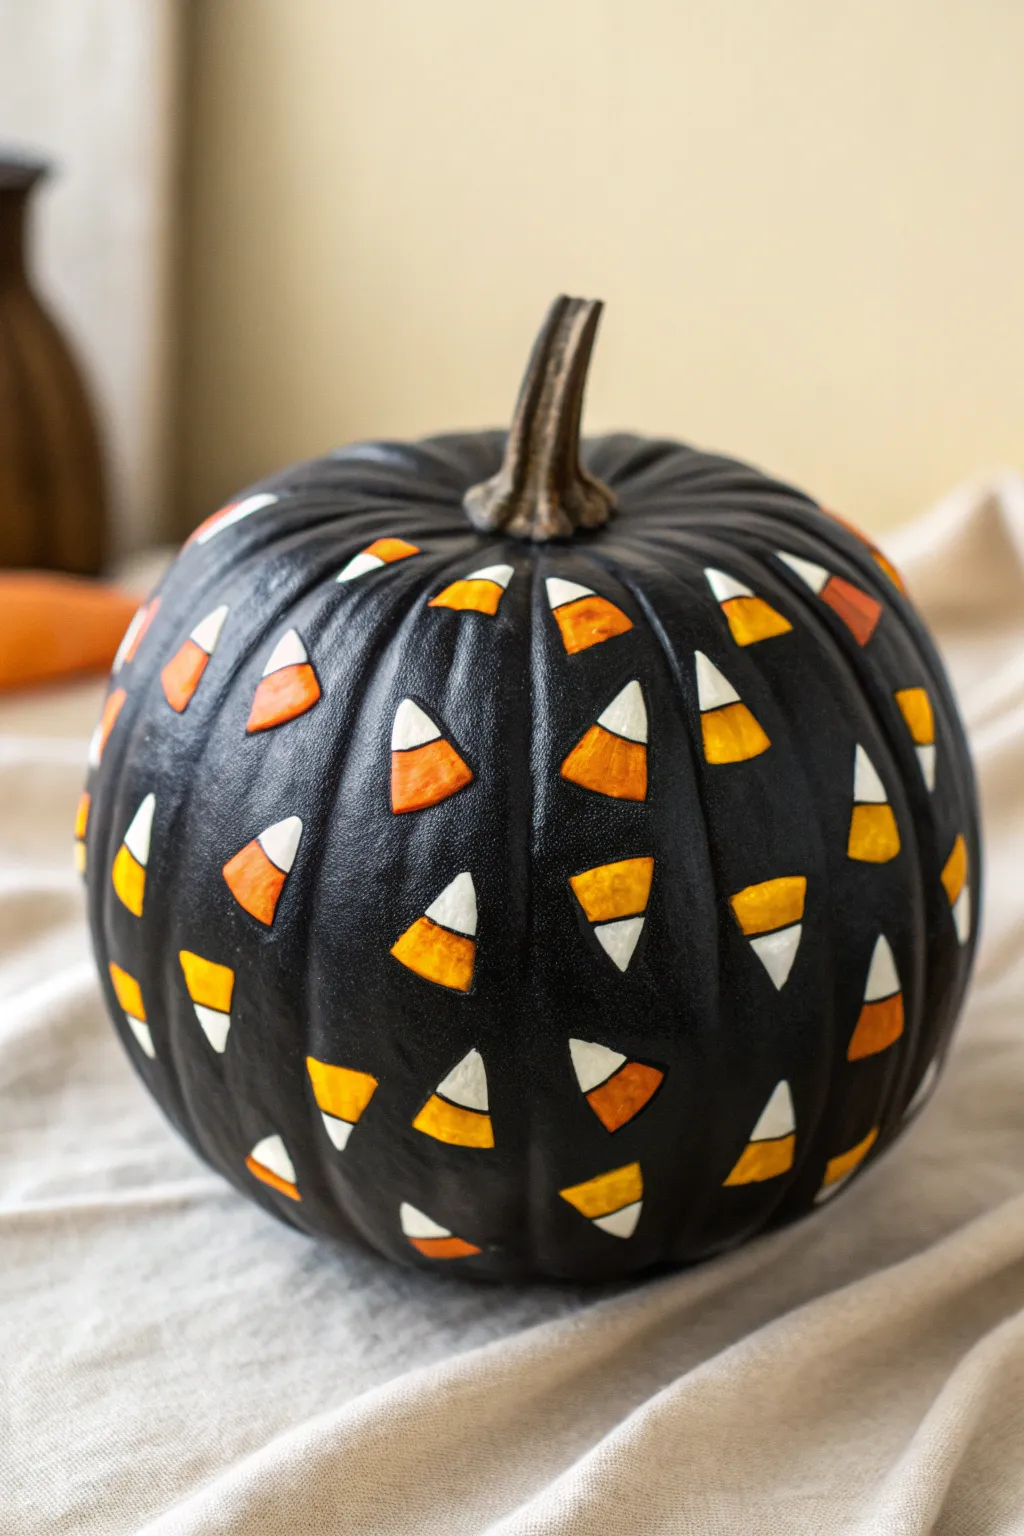
Transform a classic autumn gourd into a sleek, modern decoration with this high-contrast design. The matte black background makes the vibrant pops of yellow, orange, and white candy corn pieces truly shine.
Step-by-Step Tutorial
Materials
- Medium-sized pumpkin (real or faux)
- Matte black acrylic paint
- Titanium white acrylic paint
- Bright orange acrylic paint
- Golden yellow acrylic paint
- Wide flat paintbrush (approx. 1 inch)
- Small flat shader brush (approx. 1/4 inch or size 4)
- Fine detail liner brush (size 0 or 1)
- Paper towels
- Clean water cup
- Matte sealant spray (optional)
Step 1: Setting the Stage
-
Prep the surface:
Clean your pumpkin thoroughly with a damp cloth to remove any dirt or oils that might prevent the paint from sticking. If you are using a real pumpkin, ensure it is completely dry before proceeding. -
Apply the base coat:
Using your wide flat brush, cover the entire pumpkin with matte black acrylic paint. Work in smooth, vertical strokes following the natural ribs of the pumpkin. -
Let it dry completely:
Wait for the first coat to dry. If the orange of the pumpkin is still peeking through, apply a second coat for a solid, opaque finish. I like to let this dry for about an hour to ensure a stable canvas. -
Clean the stem:
If you accidentally got black paint on the stem, wipe it off with a damp paper towel now, or paint it carefully with a brown or natural tone later to define it.
Priming for Pop
Yellow paint is notoriously see-through. Always paint the entire triangle shape in white first. This acts as a primer, ensuring your yellow and orange layers remain vibrant against the dark base.
Step 2: Painting White Foundations
-
Plan placement:
Visualize a scattered pattern for your candy corn. They should be randomly oriented—some upright, some upside down, some tilted—to create a fun, confetti-like effect. -
Paint the triangle shapes:
Using the small flat shader brush and titanium white paint, paint small, solid white triangles all over the pumpkin. This white base layer is crucial because yellow and orange paints are often translucent and won’t show up well directly on black. -
Add variety:
Space the triangles about 1.5 to 2 inches apart. Rotate your brush or the pumpkin frequently to ensure the angles of the triangles vary. -
Refine the edges:
Use the edge of your brush to tidy up the sides of the triangles. They don’t need to be mathematically perfect, but straight edges look cleaner. -
Allow to cure:
Let this white ‘primer’ layer on the motifs dry completely. The subsequent colors will mix with the white and look pastel if you rush this step.
Step 3: Adding the Candy Colors
-
Start with yellow:
Load your small flat brush with golden yellow paint. Paint the bottom third (the widest part) of select triangles. -
Mix up the orientation:
Remember that on a real candy corn, the wide end is yellow. Since your triangles are rotated, ensure you are painting the ‘base’ yellow, regardless of which way the triangle is pointing. -
Apply the orange band:
Rinse your brush thoroughly. Pick up the bright orange paint and fill in the middle section of each triangle. -
Create clean lines:
Carefully touch the orange paint against the yellow section and the remaining white tip. Try to keep the lines between colors relatively straight, though a slight organic wobble is fine. -
Refresh the white tips:
If your white tips got smudged or look dull compared to the fresh paint, use your fine detail brush to add a fresh dab of white to the pointed ends.
Level Up: Texture
For a sugary look, sprinkle clear iridescent glitter onto the wet paint of the candy corn motifs. This creates a crystallized texture that mimics real candy.
Step 4: Finishing Touches
-
Second coats:
Inspect your motifs. If the black background is dimming the brightness of the yellow or orange, carefully dab on a second coat of color once the first is dry. -
Touch up the background:
If you slipped outside the lines of the triangles, use the fine liner brush and black paint to ‘erase’ the mistake by painting over the stray mark. -
Seal the work:
For longevity, especially if displaying outdoors, spray the entire pumpkin with a matte sealant once the paint is fully cured (usually 24 hours).
Place your stylish new pumpkin creation on a mantle or porch to welcome the spookiest season with charm
Candy Corn Starry Night Stripes
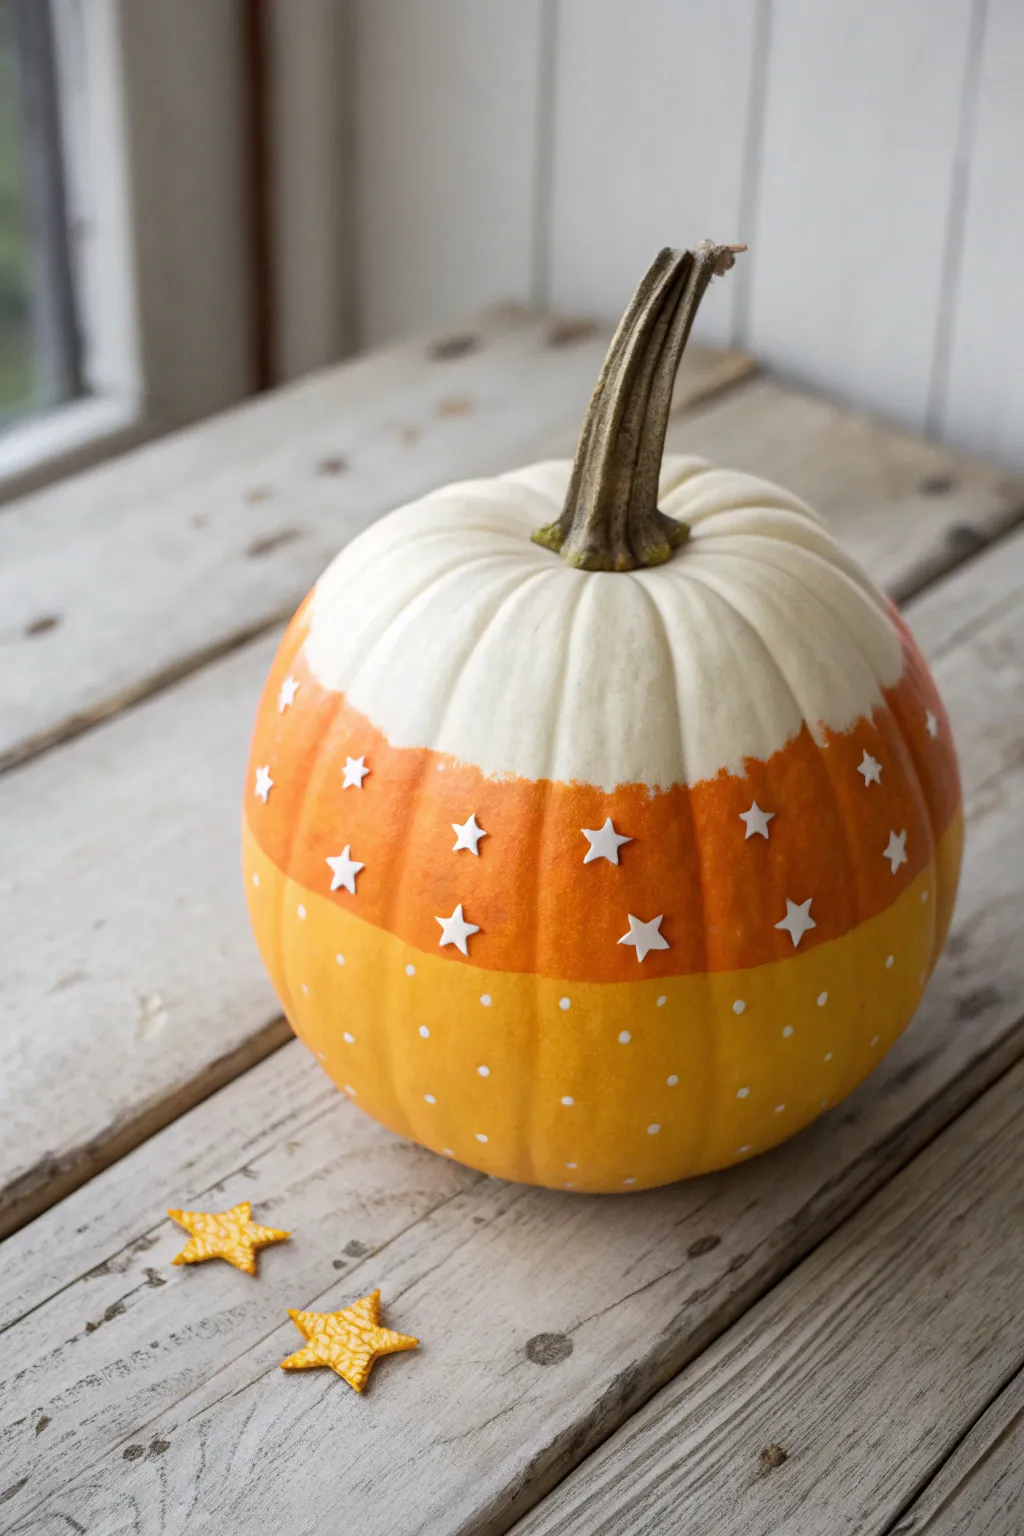
Transform a simple white pumpkin into a festive fall centerpiece with this sweet candy corn-inspired design. Featuring crisp stripes of white, orange, and yellow adorned with playful stars and dots, this project brings a whimsical touch to your autumn décor.
Detailed Instructions
Materials
- White craft pumpkin (or a real white pumpkin)
- Acrylic craft paint: Bright Orange
- Acrylic craft paint: Golden Yellow
- Paintbrushes: 1-inch flat brush, fine detail brush
- Masking tape or painter’s tape (optional)
- Small white star stickers or white dimensional paint
- White paint pen (fine tip) or small dotting tool
- Palette or paper plate
- Paper towels
- Cup of water
Step 1: Painting the Base Stripes
-
Prep your pumpkin:
Start with a clean, dry white pumpkin. If you are using a real pumpkin, wash it gently with mild soap and dry it thoroughly. If using a craft pumpkin, just give it a quick wipe to remove any dust. -
Plan your zones:
Visualize the pumpkin divided horizontally into three equal sections. The top section near the stem will remain the natural white of the pumpkin. -
Paint the middle band:
Dip your flat brush into the Bright Orange acrylic paint. Paint a wide horizontal band around the middle third of the pumpkin. Don’t worry about keeping the top edge perfectly straight; a slightly organic, hand-painted line looks charming here. -
Refine the orange layer:
Apply a second coat of orange paint if the coverage looks thin. Let the first coat dry for about 10-15 minutes before adding the second to prevent lifting the paint. -
Paint the bottom band:
Clean your brush thoroughly. Load it with Golden Yellow paint and fill in the bottom third of the pumpkin. Carefully paint up to meet the orange line, blending them slightly if you prefer a softer transition, or keeping them distinct for a bolder look. -
Check the bottom edge:
Be sure to paint all the way down to the base so no white shows when the pumpkin is sitting on a table. Let this yellow layer dry completely. -
Touch up transitions:
Inspect the point where the orange meets the yellow. If there are gaps, use a small amount of paint to bridge them. Allow the entire pumpkin to dry for at least one hour before moving to decorations.
Sticky Situation?
If stickers aren’t adhering to the curves, use white craft glue on the back or switch to painting the stars with a stencil for a seamless look.
Step 2: Adding the Starry Details
-
Apply star accents:
Once the paint is fully dry to the touch, peel off small white star stickers and press them firmly onto the orange band. Space them somewhat randomly around the circumference. -
Alternative star method:
If you don’t have stickers, I recommend painting small stars using a fine detail brush and white acrylic paint, or piping them on with white dimensional puffy paint for texture. -
Start the polka dots:
Using a white paint pen or the handle end of a paintbrush dipped in white paint, create small dots on the yellow section. -
Complete the pattern:
Distribute the dots evenly around the yellow base. Keep the dots relatively small to balance the size of the stars above. -
Clean the stem:
If any orange or yellow paint accidentally got on the stem, gently wipe it away with a damp paper towel or paint over it with a dark brown or green to define the stem. -
Final drying time:
Let all the decorative dots and stars set completely. If you used puffy paint or thick acrylics for the details, give it extra time to cure.
Make It Sparkle
Brush a thin layer of glitter glue over the white top section or sprinkle fine translucent glitter on the wet paint for a sugar-coated effect.
Place your sweet creation on a rustic wood board or festive table runner to enjoy the autumn vibes
Candy Corn Plaid Pumpkin
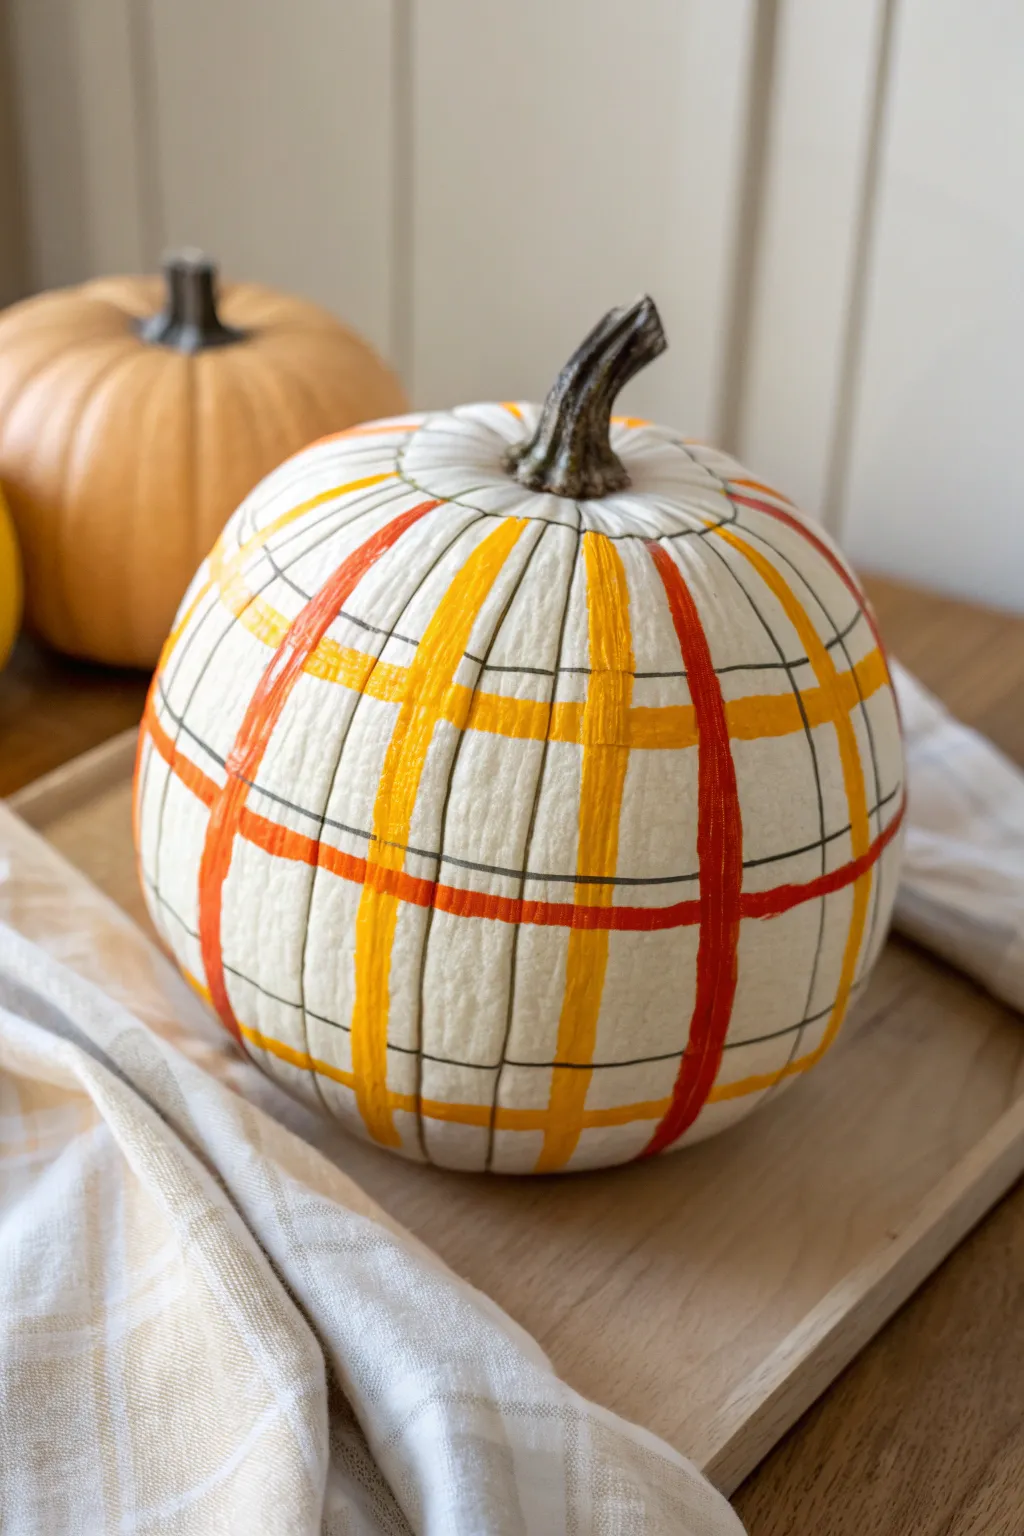
Transform a simple white pumpkin into a cozy autumn statement piece with this clever plaid design. By layering classic candy corn colors—yellow, orange, and white—with crisp black lines, you create a sophisticated pattern that celebrates the season without feeling cliché.
Step-by-Step Tutorial
Materials
- Faux white pumpkin (or a real white pumpkin, cleaned and dried)
- Acrylic craft paint: Bright Orange
- Acrylic craft paint: Golden Yellow
- Acrylic craft paint: Black
- Flat shader brush (approx. 1/2 inch wide)
- Thin liner brush or fine-point paint pen (black)
- Pencil
- Palette or paper plate
- Paper towels
- Cup of water
Step 1: Painting the Vertical Stripes
-
Prep your surface:
Ensure your white pumpkin is clean and free of dust. If you are using a real pumpkin, wash it with a mild soap and water solution and dry it thoroughly. If your faux pumpkin isn’t a bright enough white, give it a quick base coat of white acrylic paint first. -
Plan the spacing:
Visualize the vertical ribs of the pumpkin as your guide. You will be painting stripes following these natural indentations. It helps to lightly mark with a pencil which sections will be orange and which will be yellow to keep the pattern consistent. -
Start the orange stripes:
Load your flat shader brush with bright orange paint. Starting from the very top near the stem, paint a vertical stripe down the pumpkin following a natural rib. Don’t worry about making it perfectly straight; the pumpkin’s curve adds character. -
Space out the color:
Leave a wide gap of white space (roughly 2-3 inches depending on pumpkin size) and paint your next vertical orange stripe. Continue this spacing all around the pumpkin. -
Add yellow verticals:
Clean your brush thoroughly. Now, paint vertical yellow stripes in the center of the white gaps you left between the orange stripes. You should now have alternating vertical lines of orange and yellow with white space in between them. -
Dry completely:
Allow these vertical stripes to dry fully before moving on. Acrylics dry fast, but give it about 20 minutes to prevent smearing.
Pro Tip: Steady Hands
Rest your pinky finger on a dry part of the pumpkin while painting the thin black lines. This acts as an anchor and stabilizes your hand for straighter detailed strokes.
Step 2: Adding Horizontal Bands
-
Paint the horizontal orange band:
Using the same flat brush and orange paint, paint a horizontal band that encircles the pumpkin’s ‘equator’ or lower middle section. This will intersect all your vertical lines. -
Create the plaid effect:
Where any orange line crosses another orange line, dab a tiny bit of extra paint to make that intersection slightly darker or more opaque, mimicking the weave of fabric. -
Paint the horizontal yellow bands:
Clean your brush again. Paint two horizontal yellow bands: one above the orange center line (closer to the top) and one below it (closer to the bottom). This creates the grid structure. -
Touch up edges:
Use the edge of your flat brush to neaten up any intersections where the perpendicular lines meet. The goal is a rough, hand-painted fabric look, so perfection isn’t necessary.
Level Up: Textile Texture
Before the paint is fully dry, lightly drag a dry, stiff-bristled brush horizontally and vertically across the wet stripes. This creates a linen-like texture.
Step 3: Detailing the Plaid
-
Prepare the black paint:
Squeeze out a small amount of black paint. You want this paint slightly fluid so it glides easily, so I prefer to mix in a tiny drop of water if it feels too thick. -
Draw vertical grid lines:
Using a thin liner brush (or a black paint pen for easier control), draw thin vertical black lines in the white spaces between your colored stripes. Reference the image to place two thin lines between the main colored bars. -
Add horizontal grid lines:
Draw corresponding thin horizontal black lines. Place a pair of thin black lines bracketing the central orange band, and another pair bracketing the yellow bands. -
Create the heavy grid:
To really sell the plaid look, paint a single, slightly bolder black line directly through the center of selected white vertical sections. This variation in line weight makes the pattern look like woven textile. -
Check for gaps:
Rotate the pumpkin and check the underside and the area near the stem. Extend your lines as far as possible so the pattern doesn’t abruptly stop. -
Final cure:
Let the entire pumpkin dry overnight. This ensures the thick layers of paint where stripes intersect harden completely.
Display this charming plaid pumpkin on a wooden tray or your mantel to bring a touch of warm, patterned flair to your fall decor
Candy Corn Marble Swirl Pumpkin
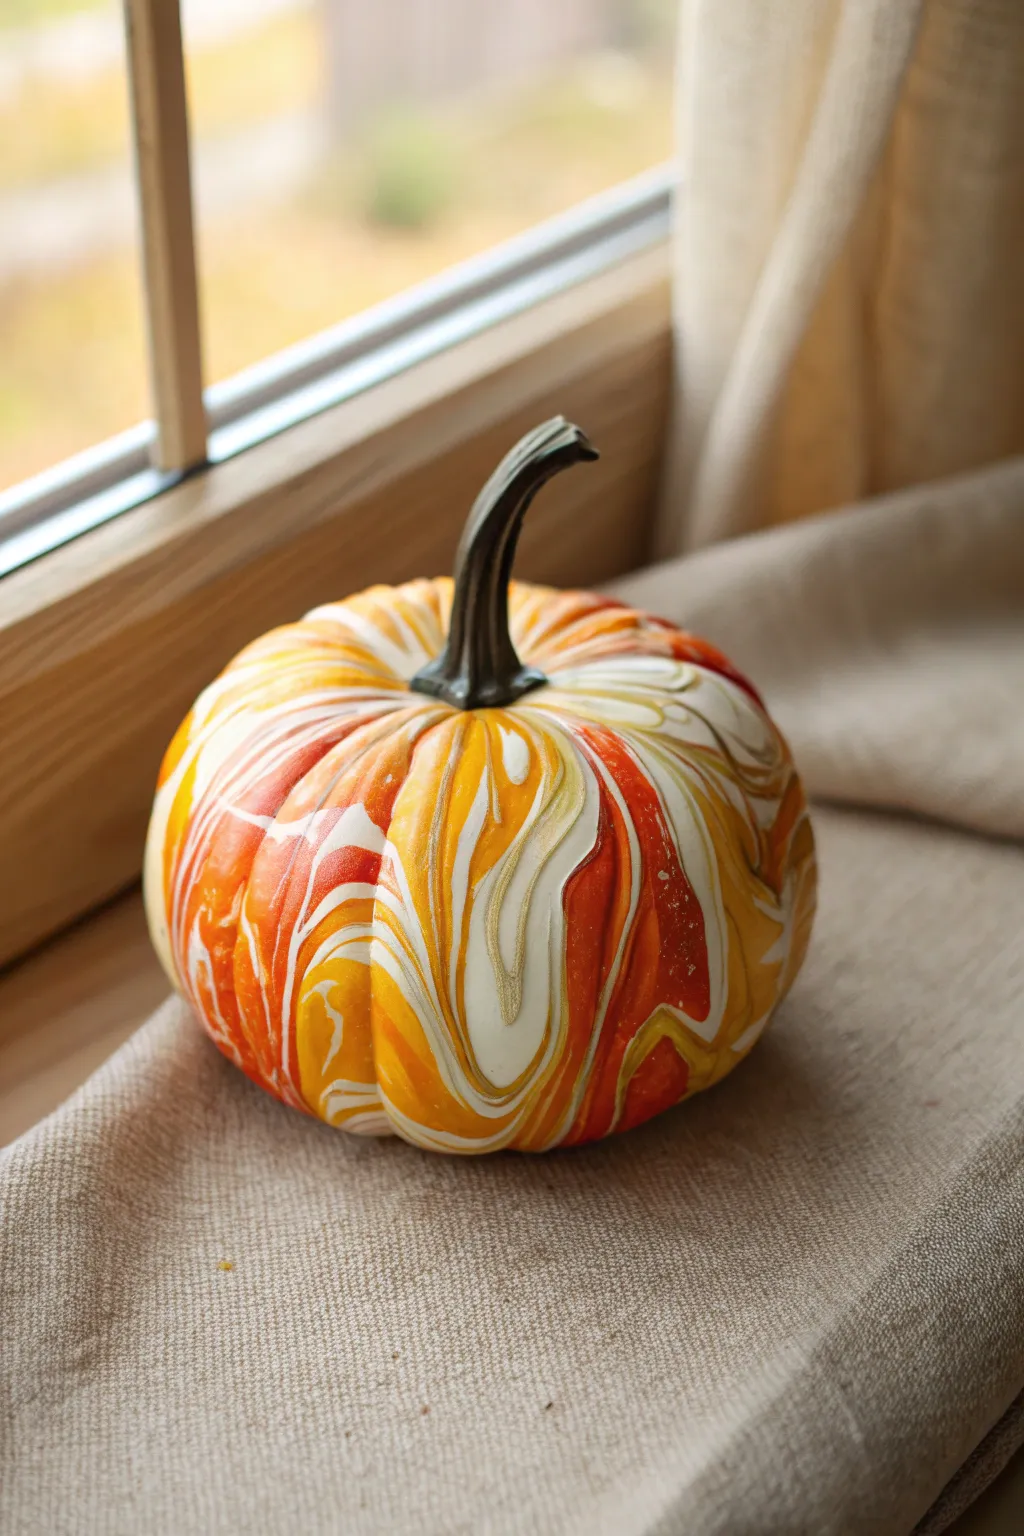
Transform a plain pumpkin into a mesmerizing piece of seasonal decor with this elegant take on the hydro-dipping trend. Using the classic candy corn palette, you’ll create fluid, organic swirls of white, orange, and yellow that wrap beautifully around the pumpkin’s curves.
Step-by-Step Guide
Materials
- Faux craft pumpkin (white is best)
- Spray paint or acrylic craft paint (white, orange, yellow)
- Large plastic tub or bucket (deep enough to submerge the pumpkin)
- Water
- Stirring stick or skewer
- Painter’s tape
- Gloves
- Drop cloth or cardboard
- Clear gloss sealant spray
Step 1: Preparation
-
Prepare your workspace:
Set up your crafting area in a well-ventilated space, preferably outdoors or in a garage. Lay down a drop cloth or cardboard to catch any drips, as both spray paint and marbling can get messy. -
Clean the pumpkin:
Wipe down your faux pumpkin with a damp cloth to remove any dust or oils. A clean surface ensures the paint adheres properly and prevents peeling later on. -
Protect the stem:
Carefully wrap the pumpkin stem completely with painter’s tape. Since the stem on the reference image is a distinct dark brown, we want to keep it paint-free during the dipping process. -
Base coat application:
If your pumpkin isn’t already white, apply a solid base coat of white spray paint. Do this in light, even bursts to avoid drips. Let it dry completely before moving to the next phase.
Paint globs?
If the paint clumps on the water surface instead of spreading, your water might be too cold. Try using slightly warmer tap water to help the spray paint expand fully.
Step 2: Creating the Marble Effect
-
Prepare the water bath:
Fill your large plastic tub with cool to lukewarm water. The container needs to be deep enough for the pumpkin to be mostly submerged but not so full that it overflows when you dip. -
Add the first color:
Shake your orange spray paint can vigorously. Hold it about 8 inches from the water surface and spray a generous amount into the center of the tub. You’ll see the paint float on top of the water. -
Layer the colors:
Immediately follow with the yellow spray paint, spraying it into the center of the orange ring. Then add a burst of white into the center of the yellow. Alternate colors quickly to create a ‘bullseye’ pattern on the water’s surface. -
Swirl the paint:
I like to use a skewer or stirring stick to gently drag through the paint rings. Move slowly to create marbled swirls, but don’t over-mix or the colors will become muddy. -
The dip technique:
Put on your gloves. Hold the pumpkin securely by the taped stem (or the bottom if you can grip it). Slowly and steadily lower the pumpkin into the swirling paint water. -
Submerge and spin:
As you push the pumpkin down, rotate it slightly to catch different parts of the swirl pattern. Submerge it as much as possible to cover the sides. -
Clear the surface:
Before pulling the pumpkin out, use your free hand (or a piece of cardboard) to sweep away the remaining paint on the water’s surface. This prevents a double-layer of paint from ruining the pattern as you lift it out. -
Lift and inspect:
Lift the pumpkin out of the water and shake off excess water droplets gently. Set it on a protected surface—I usually prop it up on an inverted cup or can to let the bottom drip dry without sticking.
Use a handle
Insert a long screw or dowel securely into the bottom of the pumpkin before dipping. This gives you a handle to hold so you can submerge the entire pumpkin without getting fingerprints on the paint.
Step 3: Finishing Touches
-
Allow to dry:
Let the pumpkin dry completely. This can take several hours depending on humidity. Don’t touch the surface while it’s tacky, as the paint film is fragile. -
Remove the tape:
Once the paint is fully cured and hard to the touch, carefully peel away the painter’s tape from the stem. -
Touch up the stem:
If any paint seeped onto the stem, or if you want it darker like the photo, use a small brush and dark brown or black acrylic paint to cover the stem area specifically. -
Seal the artwork:
To achieve that high-gloss finish seen in the image and protect your design, apply a clear gloss sealant spray. Two light coats are better than one heavy coat.
Now you have a stunning, glossy centerpiece that perfectly captures the spirit of the season with a sophisticated twist
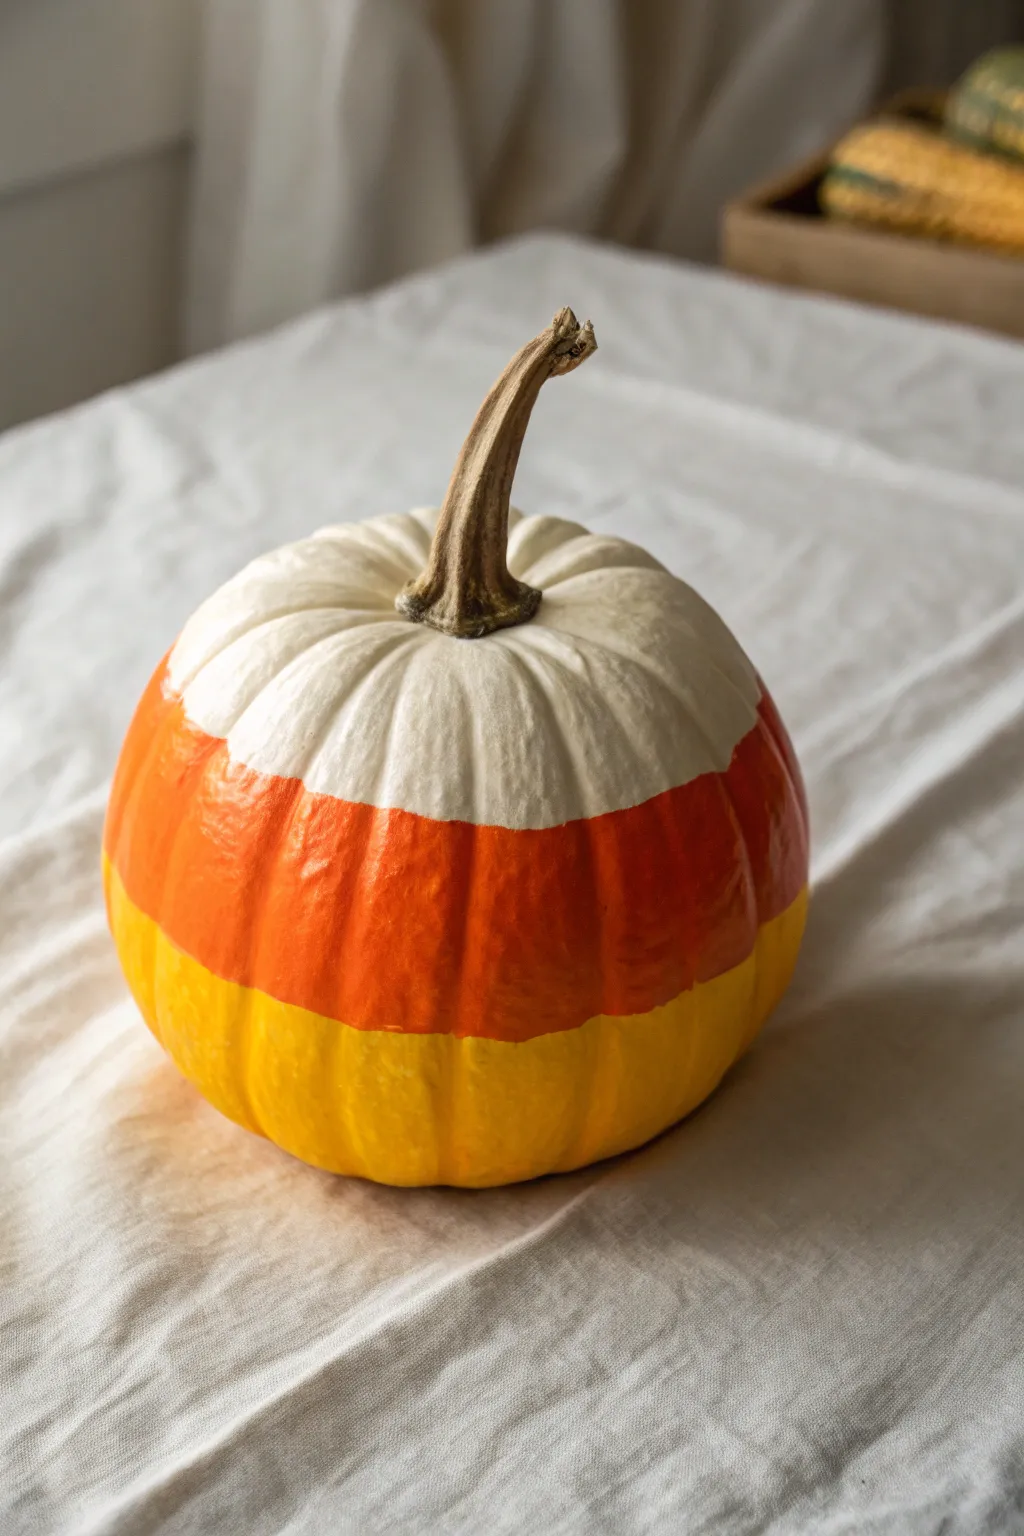
Candy Corn Color Blocks With Curved Edges
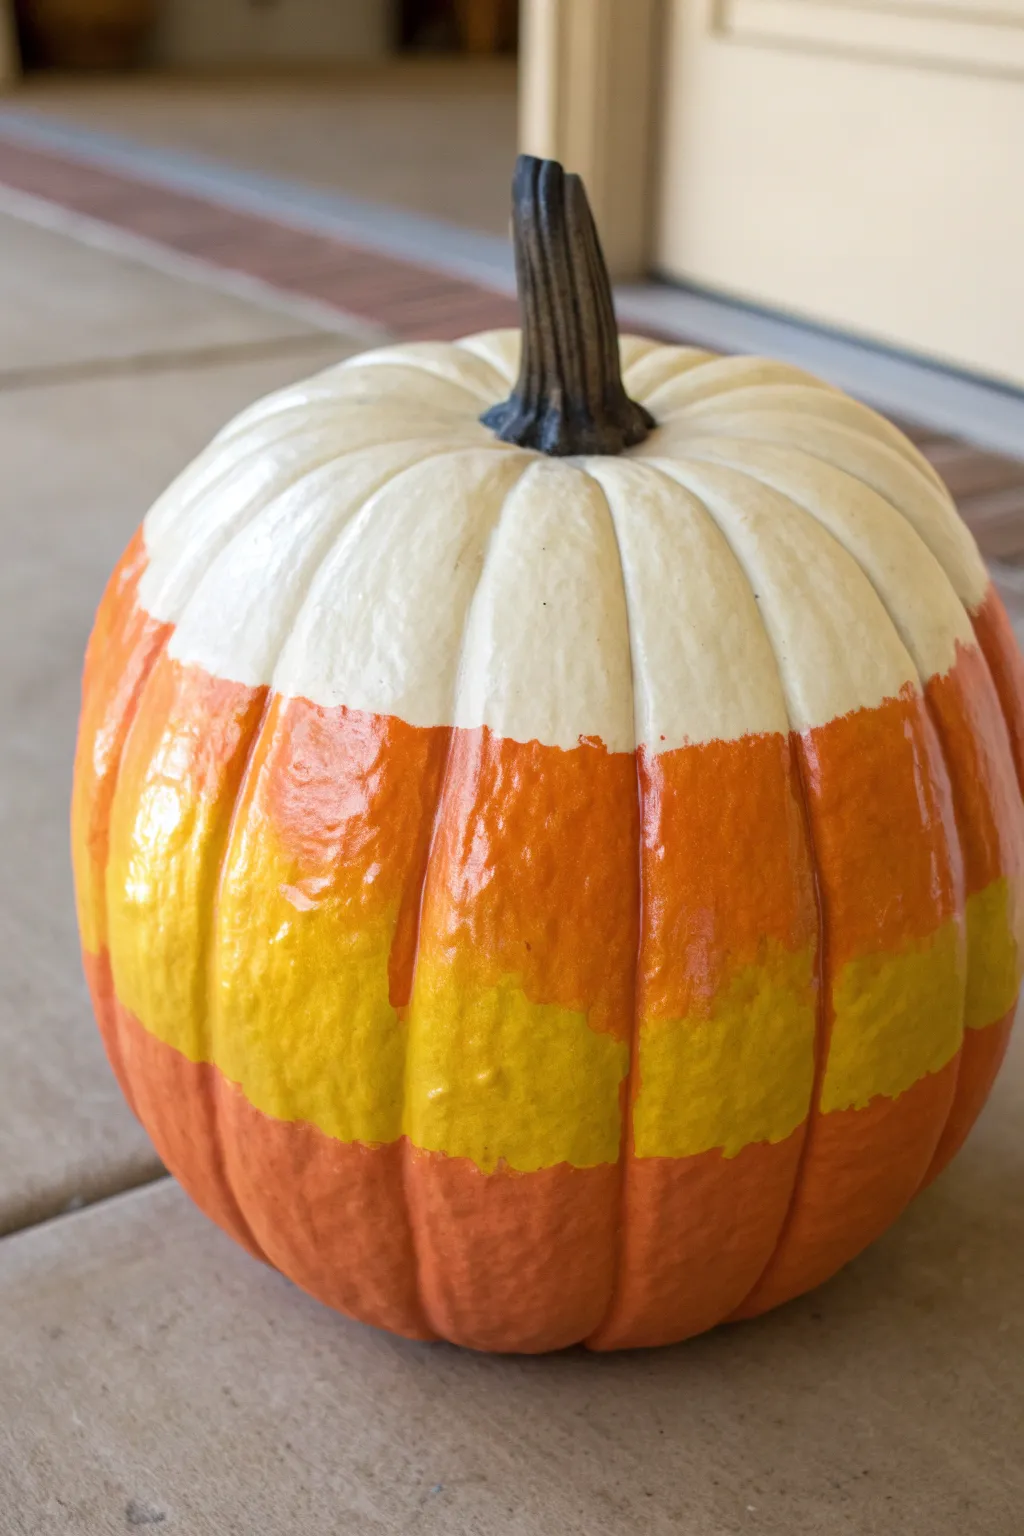
Transform a simple gourd into a giant piece of nostalgic candy with this vibrant color-blocking technique. The horizontal stripes create a bold, graphic look that instantly recognizes the classic Halloween treat while maintaining the pumpkin’s natural charm.
Step-by-Step
Materials
- Medium-sized pumpkin (real or faux)
- White acrylic craft paint
- Orange acrylic craft paint
- Yellow acrylic craft paint
- Painter’s tape or masking tape
- Medium flat paintbrush (1-inch width)
- Small round paintbrush (for touch-ups)
- Paper towels or rag
- Newspaper or drop cloth
- Gloss sealer spray (optional)
Step 1: Cleaning and Prep
-
Clean the surface:
Before dipping into any paint, ensure your pumpkin is completely free of dirt and oils. Wipe it down thoroughly with a damp cloth or a mixture of water and mild dish soap. -
Dry completely:
Use a dry cloth or paper towel to remove all moisture. If using a real pumpkin, make sure the stem area is perfectly dry to prevent rot under the paint. -
Protect the stem:
If you want to keep the stem natural, wrap it carefully with painter’s tape. This ensures you can paint freely near the top without accidentally coloring the stem.
Uneven Coverage?
If the dark pumpkin skin shows through the yellow paint, apply a coat of white first as a primer layer. Once dry, paint the yellow over the white for a much brighter, true-to-color result.
Step 2: Planning the Stripes
-
Visualize the zones:
Look at your pumpkin and mentally divide it into four roughly equal horizontal sections. Candy corn typically follows a white-orange-yellow pattern, but for a pumpkin, we often repeat the orange at the base for balance. -
Mark the lines:
Using a pencil or a very light touch of paint, mark the boundaries of your sections. They don’t need to be perfectly straight; following the pumpkin’s natural curve actually looks better.
Pro Tip: Glossy Finish
For a super-shiny, wet look without spray sealer, mix a little glossy Mod Podge directly into your acrylic paints before applying them. It acts as a built-in finish and hardener.
Step 3: Painting the Layers
-
Start with white:
Using your medium flat brush, paint the top section surrounding the stem in bright white. Extend this section down past the shoulder of the pumpkin. -
Apply a second white coat:
White paint can be translucent. Let the first coat dry to the touch, then apply a second layer to ensure opaque, solid coverage. -
Paint the top orange band:
Clean your brush thoroughly. Paint a wide band of orange directly beneath the white section. Don’t worry about a crisp line yet; just get the color on the surface. -
Paint the yellow band:
Below the orange, paint your yellow stripe. This should sit around the ‘belly’ or widest part of the pumpkin. -
Add the bottom orange:
Finally, paint the base of the pumpkin orange again to frame the yellow stripe. This creates a cohesive look and hides any dirt near the bottom. -
Check for coverage:
Inspect the orange and yellow sections. I find that yellow often needs an extra coat to really pop, so don’t hesitate to layer it up once dry.
Step 4: Refining the Edges
-
Clean up the transitions:
Once the main blocks are dry, use your smaller brush to neatly refine the lines where colors meet. You want them to touch but not blend into a muddy mess. -
Follow the ribs:
When refining your horizontal lines, let the brush dip slightly into the pumpkin’s vertical ribs. This emphasizes the pumpkin’s natural shape rather than fighting against it. -
Let it cure:
Allow the entire pumpkin to dry for several hours. Acrylic paint dries fast on the surface but takes longer to fully cure.
Step 5: Finishing Touches
-
Remove tape:
Carefully peel the tape off the stem. If any paint seeped under, scratch it off gently with a fingernail or use a damp Q-tip. -
Seal the deal:
To get that shiny, candy-like finish seen in the photo, take the pumpkin outside and spray it with a clear gloss sealer. This also helps protect the paint from chipping.
Place your sweet new creation on the porch or entryway to greet guests with a festive pop of color
Pastel Candy Corn Pumpkin
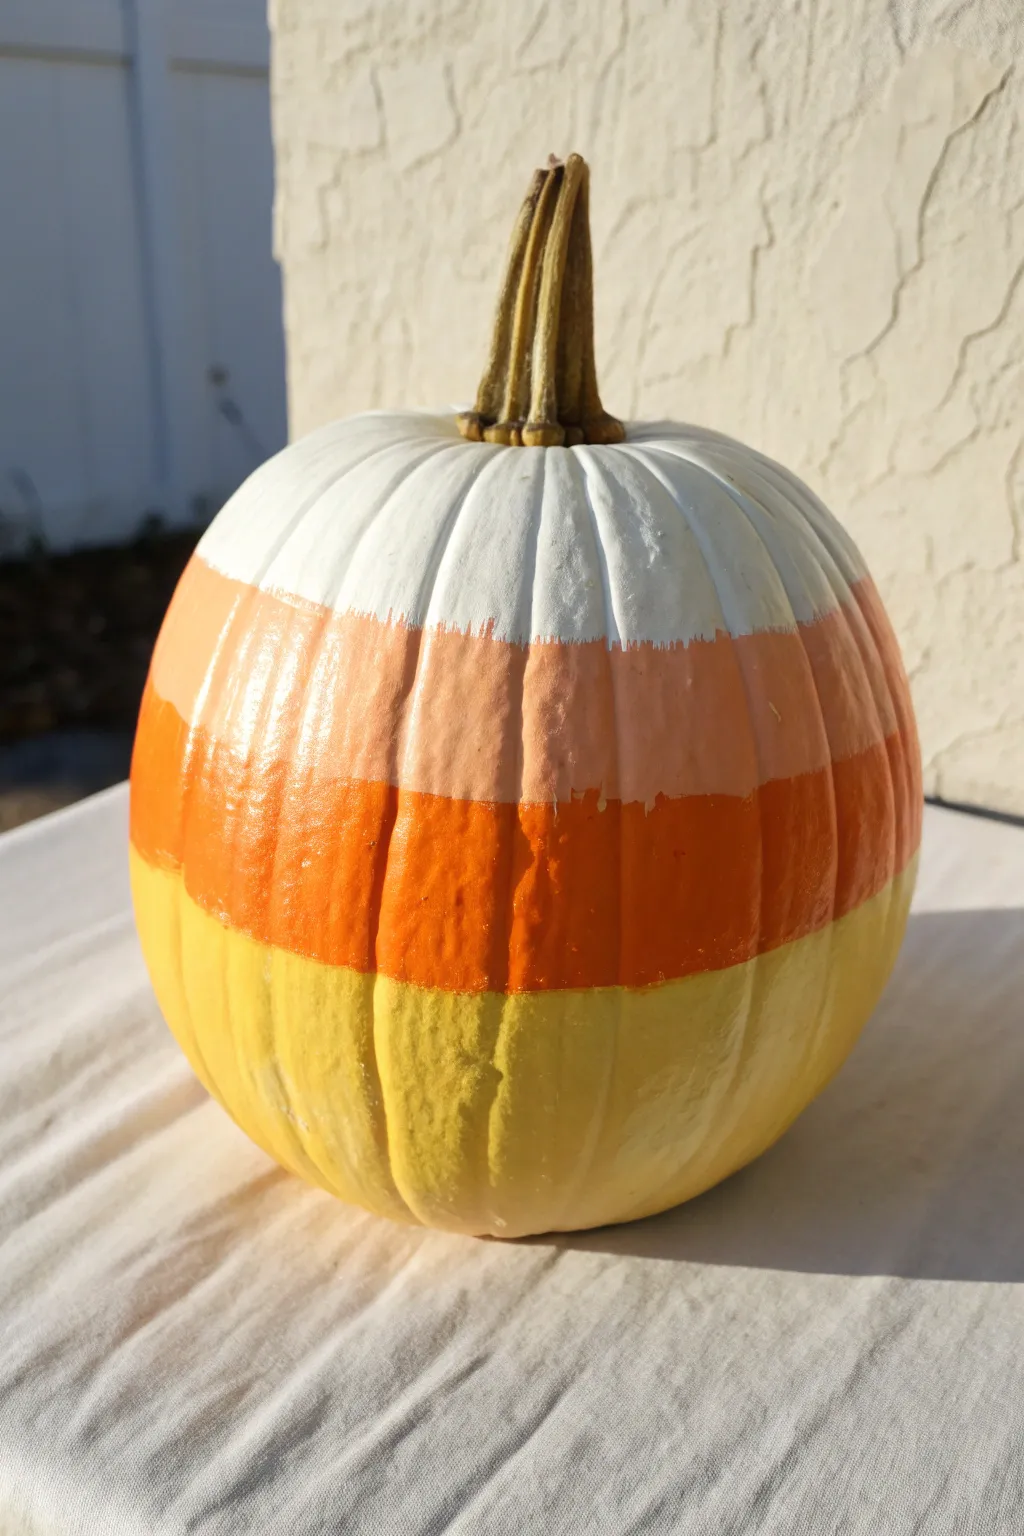
Give your Halloween decor a softer, sweeter touch with this candy corn-inspired pumpkin design. Instead of stark, aggressive lines, this project uses blended, painterly stripes in classic white, orange, and yellow hues to create a charming handcrafted look.
Step-by-Step Guide
Materials
- Medium-sized pumpkin (real or faux)
- White acrylic craft paint
- Pastel orange acrylic craft paint
- Bright orange acrylic craft paint
- Light yellow acrylic craft paint
- Medium flat paintbrush (1-inch width)
- Small blending brush or sponge
- Painter’s tape (optional)
- Paper plate or palette
- Damp cloth for cleanup
Step 1: Preparation & Base Coat
-
Clean the surface:
Begin by wiping down your pumpkin with a damp cloth to remove any dirt or dust. If you are using a real pumpkin, ensure it is completely dry before applying any paint so the layers adhere properly. -
Protect the stem:
Wrap the pumpkin stem carefully with painter’s tape to keep it free of paint splatters. If you feel confident with your brush control, you can skip this, but I find it saves cleanup time later. -
Plan your sections:
Mentally divide the pumpkin horizontally into three main sections: the top third for white, the middle for orange, and the bottom third for yellow. No need to measure perfectly; an organic look is part of the charm.
Uneven Coverage?
If the orange paint looks streaky or transparent, let the first coat dry completely before adding a second. Don’t overwork wet paint, or it will lift off the pumpkin skin.
Step 2: Applying the Colors
-
Start with white:
Using your flat brush, apply the white acrylic paint to the top section, surrounding the stem. Bring the paint down just past the curve where the top meets the side. -
Keep edges loose:
As you paint the bottom edge of the white section, don’t try to make a straight line. Use short, downward brushstrokes to create a feathered edge that will make blending easier later. -
Paint the yellow base:
Clean your brush thoroughly and dip into the light yellow paint. Paint the bottom third of the pumpkin, including the underside curve so it looks finished from all angles. -
Feather the yellow top:
Similar to the white section, feather the top edge of the yellow paint upward with uneven strokes. Allow both the white and yellow sections to dry to the touch, which usually takes about 10-15 minutes.
Add Some Sparkle
For a ‘sugar-coated’ candy corn effect, sprinkle fine iridescent glitter over the wet paint immediately after blending the stripe transitions.
Step 3: The Orange Middle
-
Apply the pastel orange:
Load your brush with the pastel orange shade. Apply this directly below the white section, overlapping slightly with the feathered white edges. -
Transition to bright orange:
While the pastel orange is still wet, introduce the brighter orange paint immediately below it. Let these two orange tones meet in the middle of the pumpkin to create depth. -
Overlap the yellow:
Continue painting the bright orange downward until it overlaps the feathered edge of the dry yellow base. You should now have stripes of white, two tones of orange, and yellow.
Step 4: blending & Finishing
-
Blend the white junction:
With a clean, slightly damp brush, gently softly brush over the line where the white meets the pastel orange. Use light vertical strokes to blur the hard line, pulling a tiny bit of white down. -
Blend the yellow junction:
Repeat the blending process where the bright orange meets the yellow bottom. The goal is a slightly rustic, ‘painterly’ transition rather than a perfect gradient. -
Add texture:
If the colors look too flat, dry brush a tiny amount of the lighter color over the top of the darker color at each transition point. This mimics the texture seen in the reference image. -
Check for gaps:
Pumpkins have deep ribs that can be hard to fill. Rotate the pumpkin and dab extra paint into any crevices that might have been missed during the initial striping. -
Remove tape:
Once you are happy with the coverage and the paint is tacky but not fully dry, carefully peel off the painter’s tape from the stem. -
Final drying:
Let the pumpkin sit undisturbed for at least an hour to cure completely before moving it to your display area.
Now you have a sweet centerpiece that captures the essence of fall without all the sugar
Candy Corn Smiley Face Character Pumpkin
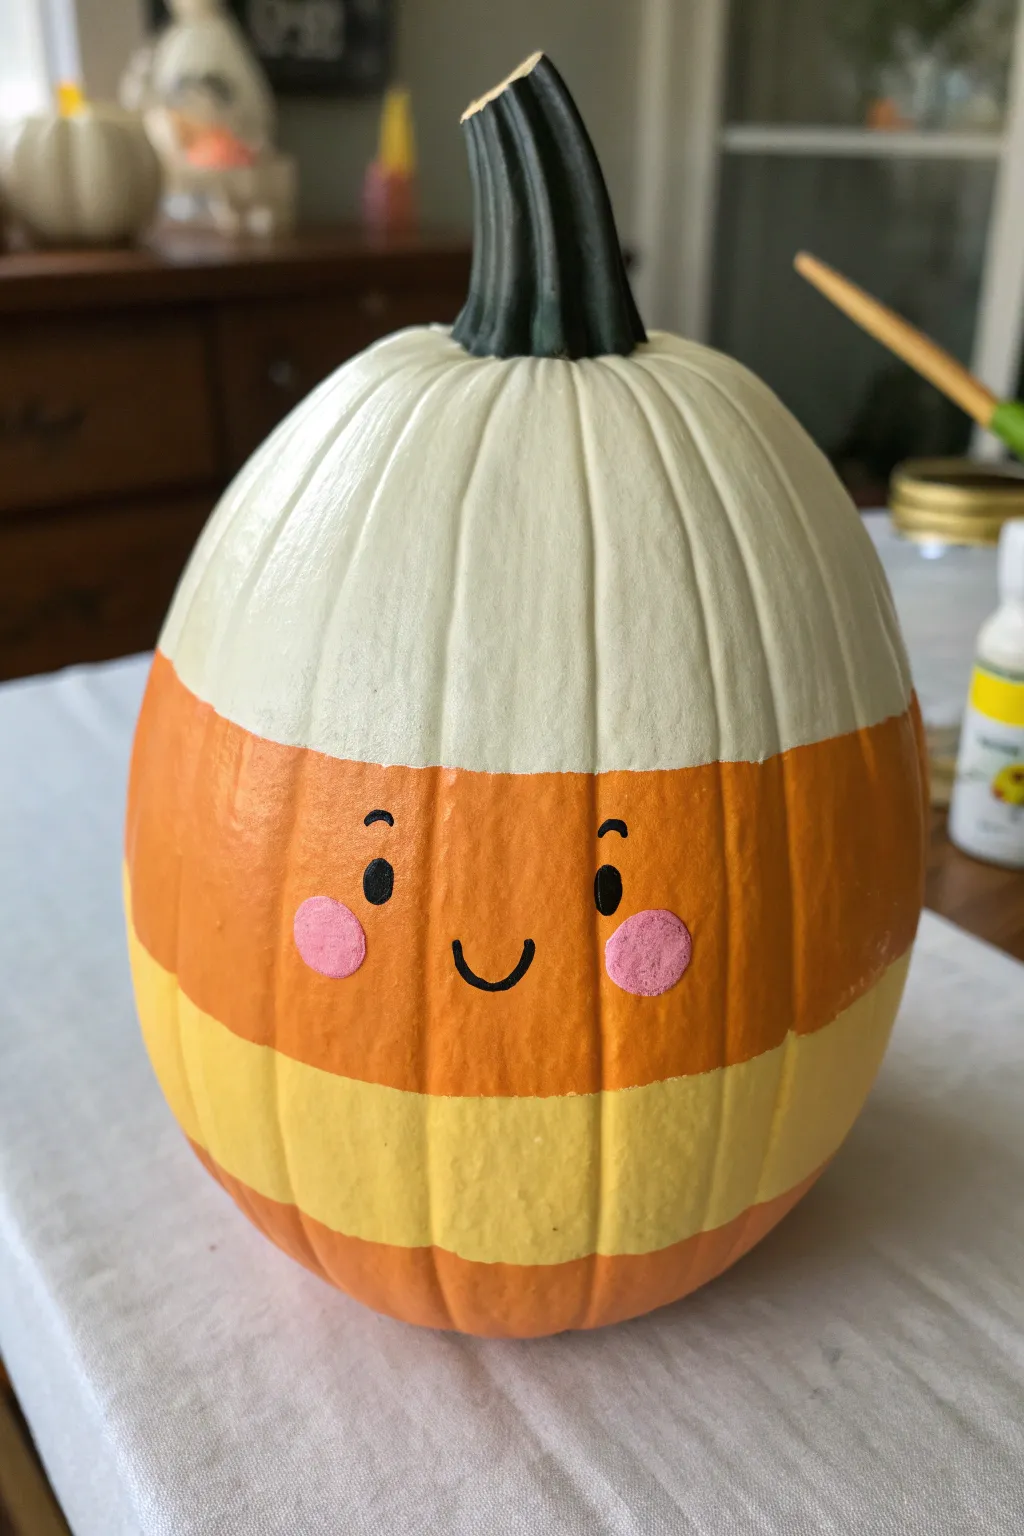
Transform a tall pumpkin into a beloved Halloween treat with this adorable candy corn character tutorial. Featuring the classic tri-color stripes and a simple, beaming face, this project combines traditional fall colors with a playful, kawaii-inspired personality.
Step-by-Step
Materials
- Tall, oblong faux or real pumpkin (white is easiest to start with)
- Acrylic craft paint (White, Bright Orange, Daffodil Yellow, Black, Pink)
- Wide flat paintbrush (1-inch width)
- Small round detail brush
- Medium round brush or foam pouncer
- Painter’s tape or masking tape (optional)
- Pencil
- Palette or paper plate
- Water cup and paper towels
- Clear matte sealer spray (optional)
Step 1: Base Blocking
-
Clean surface:
Begin by wiping down your pumpkin with a slightly damp cloth to remove any dust or oils, ensuring the paint adheres properly. Let it dry completely. -
Map out zones:
Visually divide your pumpkin horizontally. You want a white top section (about 1/3), a large orange middle section, a yellow stripe below that, and a final orange section at the very bottom. -
Paint the top white:
Using your wide flat brush, paint the top third of the pumpkin white. Even if the pumpkin is already white, a coat of paint gives it a uniform texture. Brush in the direction of the pumpkin’s vertical ridges. -
Apply the orange band:
Load your brush with bright orange paint. Paint a wide band directly below the white section. This should be the largest section, as it will house the face. -
Blend the transition:
While the paint is still slightly wet where the white meets the orange, lightly feather the brush strokes so the line isn’t perfectly straight, mimicking the soft edge of real candy corn. -
Add the yellow stripe:
Clean your brush thoroughly. Paint a band of daffodil yellow directly below the orange section. This stripe should be slightly narrower than the orange band above it. -
Finish the bottom:
Paint the very base of the pumpkin with the same orange used in the middle. This creates that classic candy corn layering effect. -
Let it dry:
Allow the base coats to dry completely to the touch. I usually wait about 20-30 minutes to ensure the colors don’t muddy when we add the second coat. -
Second coat:
Apply a second layer of paint to each color block to make the colors opaque and vibrant, covering any streaks from the first pass.
Clean Lines
For sharper lines between colors, use painter’s tape. Press it firmly into the pumpkin’s valleys to prevent bleed-through.
Step 2: Face & Details
-
Paint the stem:
While the body dries, carefully paint the pumpkin stem using black or a very dark forest green. Get into all the nooks and crannies of the stem texture. -
Sketch the face:
Once the orange middle section is totally dry, lightly sketch the face placement with a pencil. You want wide-set eyes and a small mouth centered in the lower half of the orange band. -
Paint the eyes:
Using the small round detail brush and black paint, fill in two vertical ovals for the eyes. Add small, curved eyebrow lines just above them. -
Create the smile:
With the very tip of your detail brush, paint a simple ‘U’ shape for the smile between the eyes. -
Add rosy cheeks:
Mix a little white with pink paint to get a soft pastel shade. Using a medium round brush or a foam pouncer, dab two circles just outside and slightly below the eyes. -
Seal the work:
After the face details have dried for at least an hour, take the pumpkin outside and spray it with a clear matte sealer to protect the finish.
Make it Sparkle
While the white paint on top is wet, sprinkle on chunky iridescent glitter to make the pumpkin look sugar-coated.
Now you have a cheerful candy corn character ready to sweeten up your autumn porch display


Have a question or want to share your own experience? I'd love to hear from you in the comments below!